Loading ...
Loading ...
Loading ...
18
2. Remove all the residues with a vacuum cleaner (g. 34).
11.6 Cleaning the water tank
1.
Clean the water tank (A16) regularly (about once a month)
and whenever you replace the water softener lter (C4) (if
provided) with a damp cloth and a little mild washing up
liquid.
2. Remove the lter (if present) and rinse with running water.
3. Replace the lter (if provided), ll the tank with fresh
water and replace the tank.
4. (Models with water softener lter only) Deliver about 3,38
.oz/100 ml of water.
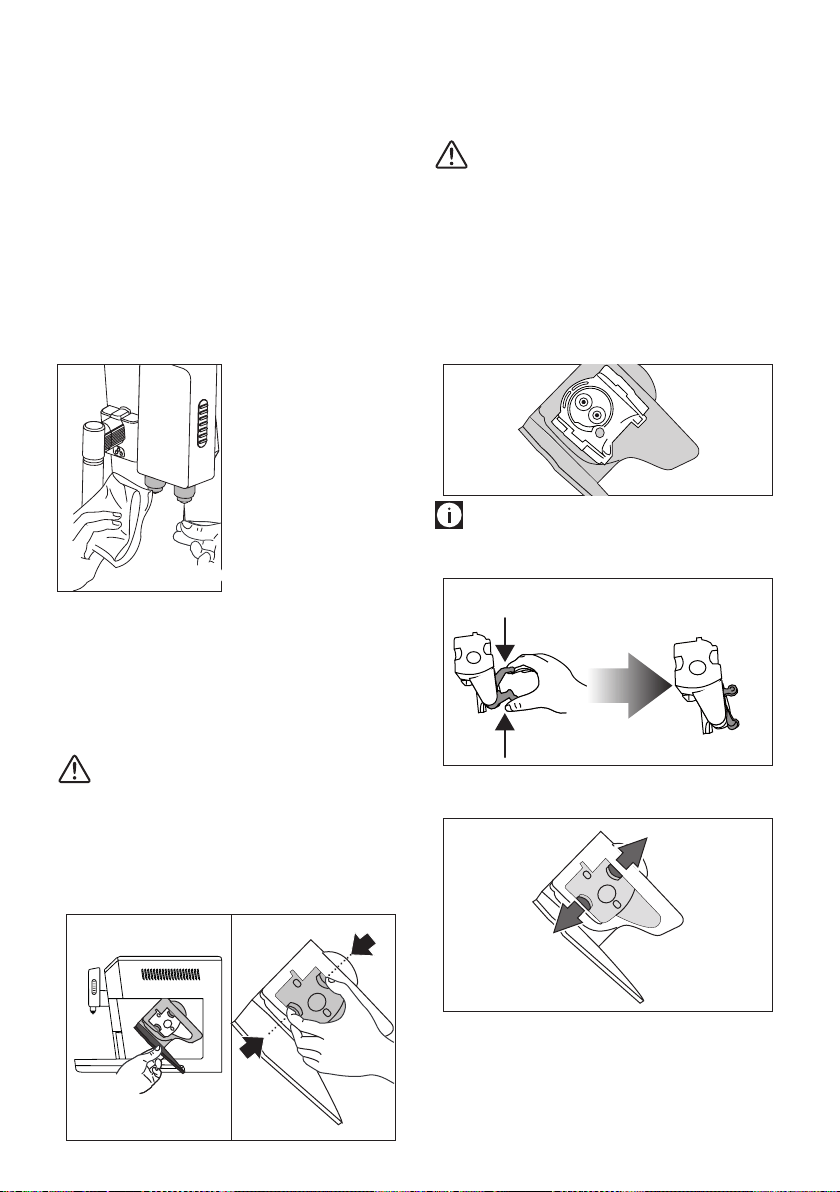
11.7 Cleaning the coee spouts
35
1. Clean the coee spouts (A7)
regularly with a sponge or
cloth (g. 35).
2. Check that the holes in
the coee spouts are not
blocked.
If necessary, remove coee de-
posits with a toothpick (g. 35).
11.8 Cleaning the pre-ground coee funnel
Check regularly (about once a month) that the pre-ground
coee funnel (A4) is not blocked. If necessary, remove coee
deposits with the brush (C5) supplied.
11.9 Cleaning the infuser
The infuser (A15) must be cleaned at least once a month.
Important!
The infuser may not be extracted when the machine is on.
1. Make sure the machine is correctly turned o (see section
“6. TURNING THE APPLIANCE OFF”).
2. Remove the water tank (A16- g. 3).
3. Open the infuser door (A14- g. 36) on the right side of the
appliance.
36
37
PUSH
PUSH
4. Press the two coloured release buttons inwards and at the
same time pull the infuser outwards (g. 37);
5. Soak the infuser in water for about 5 minutes, then rinse
under the tap.
Important!
RINSE WITH WATER ONLY
NO WASHING UP LIQUID NO DISH WASHER
Clean the infuser without using washing up liquid as it
could be damaged.
6. Use the brush (C5) to remove any coee residues left in the
infuser housing, visible through the infuser door.
7. After cleaning, replace the infuser by sliding it onto the
internal support (g. 38), then push the PUSH symbol fully
in until it clicks into place.
38
Please note!
If the infuser is dicult to insert, before insertion, adapt it to the
right size by pressing the two levers shown in g. 39.
39
8. Once inserted, make sure the two coloured buttons have
snapped out (g. 40).
40
PUSH
9. Close the infuser door.
10. Put the water tank back.
Loading ...
Loading ...
Loading ...