Documents: Go to download!
User Manual
- User Manual - (English, French, Spanish)
- Quick Specs - (English)
- Installation Instructions - (English)
- Kitchen Safety Tips - (English)
- USING THE RANGE
- Cookware for Radiant Glass Cooktop
- CARE AND CLEANING
- TROUBLESHOOTING TIPS
Table of contents
User Manual
USING THE RANGE
Cooktop Features
Throughout this manual, features and appearance may vary from your model.
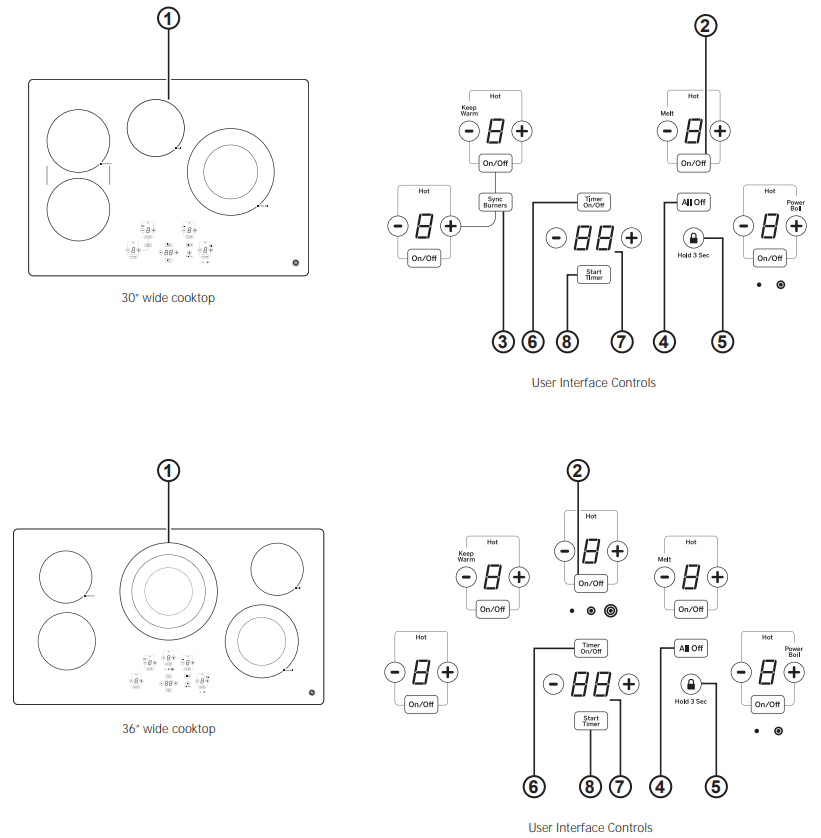
1. Cooking Element(s): See page 8.
2. Element On/Off: See page 8.
3. Sync Burners: See page 10.
4. All Off: See page 8.
5. Lock: See page 10.
6. Timer On/Off: See page 10.
7. Display: See page 10.
8. Start Timer: See page 10.
Radiant Glass Cooktop
The radiant cooktop features heating units beneath a smooth glass surface.
NOTE: A slight odor is normal when a new cooktop is used for the first time. It is caused by the heating of new parts and insulating materials and will disappear in a short time.
NOTE: This cooktop has Rapid Response surface units. The cooktop will automatically heat up or cool down to the desired power level setting in the quickest time possible. While the surface units are on, you may not see them glow red during certain heat up or cool down conditions.
Cooktop temperatures increase with the number of surface units that are on. With 3 or 4 units turned on, surface temperatures are high. Always use caution when touching the cooktop.

Home Canning Tips
Be sure the canner is centered over the surface unit.
Make sure the canner is flat on the bottom.
To prevent burns from steam or heat, use caution when canning.
Use recipes and procedures from reputable sources. These are available from manufacturers such as Ball® and Kerr® and the Department of Agriculture Extension Service.
Flat-bottomed canners are recommended. Use of water bath canners with rippled bottoms may extend the time required to bring the water to a boil.
Cookware for Radiant Glass Cooktop
The following information will help you choose cookware which will give good performance on glass cooktops.
NOTE: Follow all cookware manufacturer's recommendations when using any type of cookware on the ceramic cooktop.
Recommended
Stainless Steel
Aluminum: heavy weight recommended
Good conductivity. Aluminum residues sometimes appear as scratches on the cooktop but can be removed if cleaned immediately. Because of its low melting point, thin weight aluminum should not be used.
Copper Bottom:
Copper may leave residues which can appear as scratches. The residues can be removed, as long as the cooktop is cleaned immediately. However, do not let these pots boil dry. Overheated metal can bond to glass cooktops. An overheated copper bottom pot will leave a residue that will permanently stain the cooktop if not removed immediately.
Enamel (painted) on Cast Iron:
recommended if bottom of pan is coated
Avoid/Not Recommended
Enamel (painted) on Steel:
Heating empty pans can cause permanent damage to cooktop glass.
The enamel can melt and bond to the ceramic cooktop.
Glass-ceramic:
Poor performance. Will scratch the surface.
Stoneware:
Poor performance. May scratch the surface.
Cast Iron:
not recommended-unless designed specifically for glass cooktops
Poor conductivity and slow to absorb heat. Will scratch the cooktop surface.

For Best Results
- Place only dry pans on the surface elements. Do not place lids on the surface elements, particularly wet lids. Wet pans and lids may stick to the surface when cool.
- Do not use woks that have support rings. This type of wok will not heat on glass surface elements.
- We recommend that you use only a flat-bottomed wok. They are available at your local retail store. The bottom of the wok should have the same diameter as the surface element to ensure proper contact.
- Some special cooking procedures require specific cookware such as pressure cookers or deep-fat fryers. All cookware must have flat bottoms and be the correct size.

Element Cycling
Surface elements will cycle on and off to maintain the temperature you have selected. All radiant surface elements have a temperature limiter that protects the glass cooktop from getting too hot, this is normal. The temperature limiter may cycle the elements off more frequently if:
The pan boils dry.
The pan bottom is not flat.
The pan is off-center.
There is no pan on the element.
Operating The Cooking Elements
Turn Burner(s) On: Touch and hold On/Off pad about half a second. A chime can be heard with each touch to any pad.
Power level can be selected in the following ways:
1. Touch + or - pads to adjust power level, or;
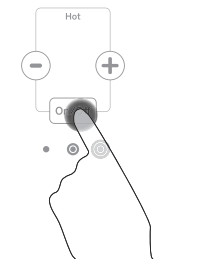
2. Shortcut to Hi: Immediately after turning unit on, touch the + pad, or;
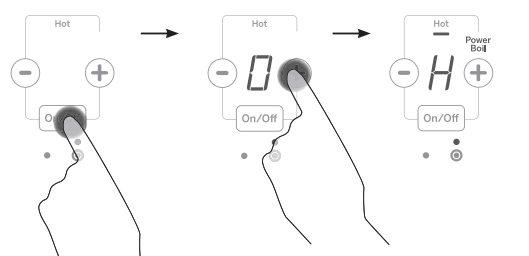
3. Shortcut to Low: Immediately after turning unit on, touch the - pad.
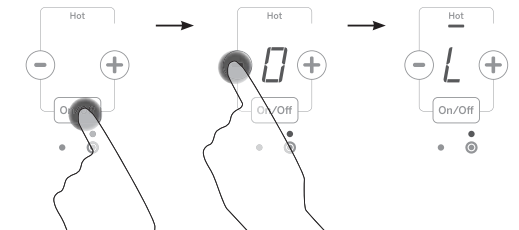
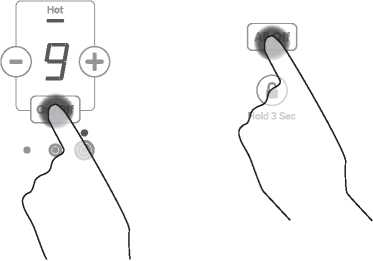
Turn Burner(s) Off
Touch On/Off pad for an individual burner or touch the All Off pad.
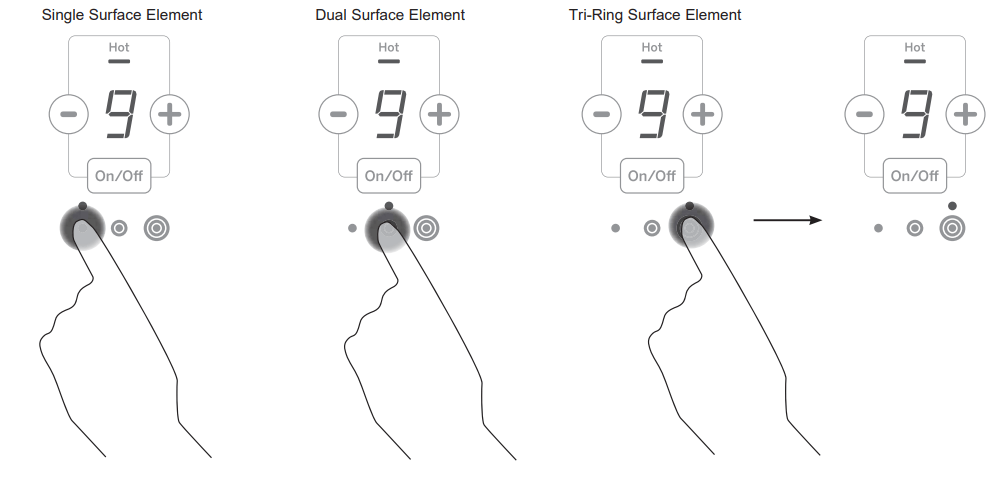
Adjust Burner Size
The burner ring size is adjustable on some elements. The ring size can be selected by pressing the burner ring graphic.
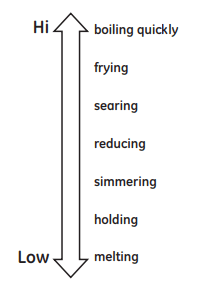
Selecting Cooktop Settings
Choose the element/burner that is best fit to the cookware size. Each element/burner on your new cooktop has its own power levels ranging from low to high. Power level settings necessary for cooking will vary depending on the cookware being used, the type and quantity of food, and the desired outcome. In general use lower settings for melting, holding and simmering and use higher settings for heating quickly, searing and frying. When keeping foods warm confirm selected setting is sufficient to maintain food temperature above 140°F. Larger elements and elements marked “Keep Warm” are not recommended for melting.
Hi is the highest power level, designed for large quantity rapid cooking and boiling. Hi will operate for a maximum of 10 minutes. Hi may be repeated after the initial 10 minute cycle by pressing the + pad.
CAUTION: Do not place any cookware, leave excess water spills on control key pads. result in unresponsive touch pads and turning cooktop if present for several seconds.
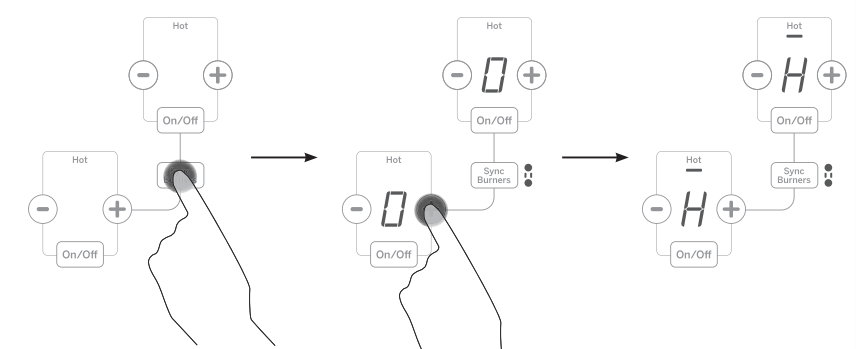
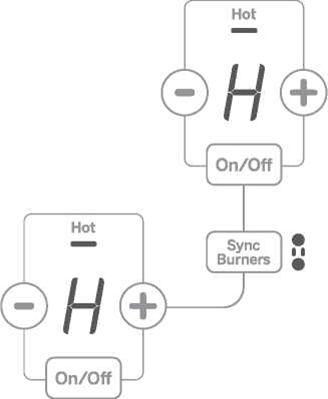
How To Synchronize Left Elements
To Turn On
Hold the Sync Burners pad for about half a second to connect the two burners. Operate either element as described on page 8 to adjust power level.
To Turn Off
1. Touch the On/Off pad on either burner to turn off the Sync Burners.
or
2. Touch the Sync Burners to turn both burners off.
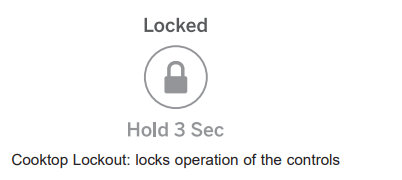
Cooktop Lockout
Lock
Hold control lock pad for 3 seconds.
Unlock
Hold control lock pad.
Timer
To Turn On
Touch the Timer On/Off pad. Touch the + or - pads to choose the desired number of minutes. Press the Start Timer pad to start timer.
To Turn Off
Hold Timer On/Off pad to cancel timer.
NOTE: Use the kitchen timer to measure cooking time or as a reminder. The kitchen timer does not control the cooking elements. Timer turns off if there is no activity for 30 seconds.

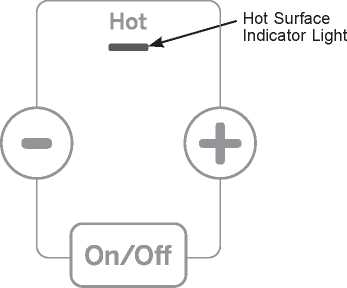
Hot Light Indicator
A hot surface indicator light (one for each cooking element) will glow when the glass surface is hot and will remain on until the surface has cooled to a temperature that is safe to touch.
Griddle (optional accessory)
Using the Griddle
Before using this cookware for the first time, wash it to make sure it is clean. Then season it lightly, rubbing cooking oil onto the cooking surface.
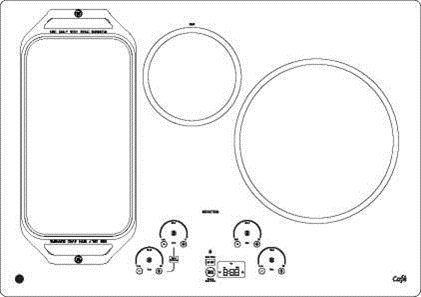
How To Place The Griddle
IMPORTANT: Always place and use your griddle at the designated location on the cooktop.
IMPORTANT NOTES:
- Clean the griddle with a sponge and mild detergent in warm water. DO NOT use blue or green scrubbing pads or steel wool.
- Avoid cooking extremely greasy foods and be careful of grease spillover while cooking.
- Never place or store any items on the griddle, even when it is not in use. The griddle can become heated when using the surrounding surface units.
- Avoid using metal utensils with sharp points or rough edges, which might damage the griddle. Do not cut foods on the griddle.
- Do not use cookware as a storage container for food or oil. Permanent staining and/or craze lines could result.
- Your griddle will discolor over time with use.
- Do not clean the griddle in a self-cleaning oven.
- Always allow the cookware to cool before immersing in water.
- Do not overheat the griddle.
Type of Food | Cook Setting |
Warming Tortillas | Med-Lo |
Pancakes | Med-Lo |
Hamburgers | Med |
Fried Eggs | Med-Lo |
Breakfast Sausage Links | Med |
Hot Sandwiches (such as Grilled Cheese) | Med-Lo |
Griddle Operation
To turn on the surface units for the entire griddle, use the Sync Burner control feature. Touch the Sync Burner pad and then adjust power level to desired setting as described on page 10.
CARE AND CLEANING
Cleaning the Glass Cooktop
Normal Daily Use Cleaning
ONLY use CERAMA BRYTEⓇ Ceramic Cooktop
Cleaner on the glass cooktop. Other creams may not be as effective.
To maintain and protect the surface of your glass cooktop, follow these steps:
- Before using the cooktop for the first time, clean it with CERAMA BRYTE® Ceramic Cooktop Cleaner. This helps protect the top and makes cleanup easier.
- Dally use of CERAMA BRYTEⓇ Ceramic Cooktop Cleaner will help keep the cooktop looking new.
- Shake the cleaning cream well. Apply a few drops of CERAMA BRYTE® Ceramic Cooktop Cleaner directly to the cooktop.
- Use a paper towel or CERAMA BRYTEⓇ Cleaning Pad for Ceramic Cooktops to clean the entire cooktop surface.
- Use a dry cloth or paper towel to remove all cleaning residue. No need to rinse.
- Do not use CERAMA BRYTE® on any metal parts located next to the glass.

NOTE: It is very important that you DO NOT heat the cooktop until it has been cleaned thoroughly.
Burned-On Residue
NOTE: DAMAGE to your glass surface may occur if you use scrub pads other than those recommended.
- Allow the cooktop to cool.
- Spread a few drops of CERAMA BRYTE Ceramic Cooktop Cleaner on the entire burned residue area.
- Using a CERAMA BRYTE® Cleaning Pad for Ceramic Cooktops, rub the residue area, applying pressure as needed.
- If any residue remains, repeat the steps listed above as needed.
- For additional protection, after all residue has been removed, polish the entire surface with CERAMA BRYTE® Ceramic Cooktop Cleaner and a paper towel.

Heavy, Burned-On Residue
- Allow the cooktop to cool.
- Use a single-edge razor blade scraper at approximately a 45° angle against the glass surface and scrape the soil. It will be necessary to apply pressure to the razor scraper in order to remove the residue.
- After scraping with the razor scraper, spread a few drops of CERAMA BRYTE® Ceramic Cooktop Cleaner on the entire burned residue area Use a CFRAMA BRYTEⓇ Cleaning Pad to remove any remaining residue.
- For additional protection, after all residue has been removed, polish the entire surface with CERAMA BRYTE® Ceramic Cooktop Cleaner and a paper towel.

Metal Marks and Scratches
1. Be careful not to slide pots and pans across your cooktop. It will leave metal markings on the cooktop surface.
These marks are removable using the CERAMA BRYTE® Ceramic Cooktop Cleaner with a CERAMA BRYTEⓇ Cleaning Pad for Ceramic Cooktops.
2. If pots with a thin overlay of aluminum or copper are allowed to boil dry, the overlay may leave black discoloration on the cooktop.
This should be removed immediately before heating again or the discoloration may be permanent.
NOTE: Carefully check the bottom of pans for roughness that would scratch the cooktop.
Damage from Sugary Spills and Melted Plastic
Special care should be taken when removing hot substances to avoid permanent damage of the glass surface. Sugary spillovers (such as jellies, fudge, candy, syrups) or melted plastics can cause pitting of the surface of your cooktop (not covered by the warranty) unless the spill is removed while still hot. Special care should be taken when removing hot substances.
Be sure to use a new, sharp razor scraper.
Do not use a dull or nicked blade.
1 Turn off all surface units. Remove hot pans.
2 Wearing an oven mitt:
a. Use a single-edge razor blade scraper to move the spill to a cool area on the cooktop.
b. Remove the spill with paper towels.
3. Any remaining spillover should be left until the surface of the cooktop has cooled.
4. Don't use the surface units again until all of the residue has been completely removed.
NOTE: If pitting or indentation in the glass surface has already occurred, the cooktop glass will have to be replaced. In this case, service will be necessary.
TROUBLESHOOTING TIPS
Troubleshooting Tips ... Before you call for service
Save time and money! Review the charts on the following pages first and you may not need to call for service. If an error occurs in the control operation, a fault code will flash in the display. Record the error code and call for service.
Problem | Possible Cause | What To Do |
Surface elements will not maintain a rolling boil or cooking is slow | Improper cookware being used. | Use pans that are absolutely flat and match the diameter of the surface unit selected. |
Surface elements do not work properly | Cooktop controls improperly set. | Check to be sure the correct control is set for the surface element you are using. |
Power arc ON indicator blinking | +, or control lock pads have been touched before an element is turned on. | See the Operating the Cooking Elements section. |
Scratches on cooktop glass surface | Incorrect cleaning methods being used. | Use recommended cleaning procedures. See the Cleaning the glass cooktop section. |
Cookware with rough bottoms being used or coarse particles (salt or sand) were between the cookware and the surface of the cooktop. Cookware has been slid across the cooktop surface. | To avoid scratches, use the recommended cleaning procedures. Make sure bottoms of cookware are clean before use, and use cookware with smooth bottoms. | |
Areas of discoloration on the cooktop | Food spillovers not cleaned before next use. | See the Cleaning the glass cooktop section. |
Hot surface on a model with a light-colored glass cooktop. | This is normal. The surface may appear discolored when it is hot. This is temporary and will disappear as the glass cools. | |
Plastic melted to the surface | Hot cooktop came into contact with plastic placed on the hot cooktop. | See the Glass surface - potential for permanent damage section in the Cleaning the glass cooktop section. |
Pitting (or indentation) of the cooktop | Hot sugar mixture spilled on the cooktop. | Call a qualified technician for replacement. |
Unresponsive keypad | Keypad is dirty. | Clean the keypad. |
A fuse in your home may be blown or the circuit breaker tripped. | Replace the fuse or reset the circuit breaker. |
See other models: JB860FJ5DS PDP715SYNFS GFP1528PNDG JVX3300SJSS GTE17DTNRWW
