Owner’s
Manual
30″ Convection
Wall Oven
ZET1P – Single Wall Oven
ZET1S – Single Wall Oven
ZET2P – Double Wall Oven
ZET2S – Double Wall Oven
ge.com
49-80434
Printed in the United States
1-07 JR
Four mural à convection de
76 cm (30 po)
Manuel du propriétaire
ZET1P – Four mural simple
ZET1S – Four mural simple
ZET2P – Four mural double
ZET2P – Four mural double
La section française commence à la page 45
Horno de convección
de pared de 30″
Manual del propietario
ZET1P – Horno de pared simple
ZET1S – Horno de pared simple
ZET2P – Horno de pared doble
ZET2P – Horno de pared doble
La sección en español empieza en la página 91

2
Consumer Information
Wall Oven
Introduction
Your new Monogram wall oven makes an eloquent statement of style, convenience and kitchen
planning flexibility. Whether you chose it for its purity of design, assiduous attention to detail— or
for both of these reasons—you’ll find that your Monogram wall oven’s superior blend of form
and function will delight you for years to come.
Your Monogram wall oven was designed to provide the flexibility to blend in with your kitchen
cabinetry. Its sleek design can be beautifully integrated into the kitchen.
The information on the following pages will help you operate and maintain your wall oven
properly.
Contents
Care and Cleaning
Broiler Pan and Grid . . . . . . . . . . . . . . . . . . 33
Oven Door . . . . . . . . . . . . . . . . . . . . . . . 35, 37
Oven Lights . . . . . . . . . . . . . . . . . . . . . . . . 36
Probe . . . . . . . . . . . . . . . . . . . . . . . . . . . . . 35
Racks . . . . . . . . . . . . . . . . . . . . . . . . . . . . . . 34
Consumer Services
Important Phone Numbers . . . . . . . . . . . . 43
Model and Serial Number . . . . . . . . . . . . . . . 3
Problem Solver . . . . . . . . . . . . . . . . . . . 38, 39
Product Registration . . . . . . . . . . . . . 3, 41, 42
Safety Instructions . . . . . . . . . . . . . . . . . . . 4–6
Warranty . . . . . . . . . . . . . . . . . . . . . . . . . . . 44
Oven
Aluminum Foil . . . . . . . . . . . . . . . . . 10, 13, 22
Baking . . . . . . . . . . . . . . . . . . . . . . . . . . . . . 12
Broiling . . . . . . . . . . . . . . . . . . . . . . . . . 13, 14
Clock . . . . . . . . . . . . . . . . . . . . . . . . . . . . . . 28
Controls . . . . . . . . . . . . . .8, 9, 12, 14, 16, 18, 19,
20, 22, 25, 26, 27
Control Lockout . . . . . . . . . . . . . . . . . . . . . . .28
Convection Cooking . . . . . . . . . . . . . . . 17–22
Features . . . . . . . . . . . . . . . . . . . . . . . . . . . . . 7
Probe . . . . . . . . . . . . . . . . . . . 9, 15, 16, 20, 35
Proofing . . . . . . . . . . . . . . . . . . . . . . . . . . . . 25
Racks . . . . . . . . . . . . . . . . . . . . . . . . . . . . . . 11
Sabbath Feature . . . . . . . . . . . . . . . . . . . . . .32
Self-Cleaning Instructions . . . . . . . . . . . 26, 27
Special Features . . . . . . . . . . . . . . . . . . . 30–32
Thermostat Adjustment . . . . . . . . . . . . . . . .30
Timed Cooking . . . . . . . . . . . . . . . . . . . 23, 24
Timer . . . . . . . . . . . . . . . . . . . . . . . . . . . . . . 29
Remove
packaging
tape
Carefully grasp a corner of the protective
shipping film with your fingers and slowly peel
it from the appliance surface. Do not use any
sharp items to remove the film. Remove all
of the film before using the appliance for
the first time.
To assure no damage is done to the finish
of the product, the safest way to remove
the adhesive from packaging tape on new
appliances is an application of a household
liquid dishwashing detergent. Apply with a
soft cloth and allow to soak.
NOTE: The adhesive must be removed from all parts.
It cannot be removed if it is baked on.

3
Before
using your
wall oven
Read this manual carefully. It is intended to
help you operate and maintain your new wall
oven properly.
Keep it handy for answers to your questions.
If you don’t understand something or need
more help, there is a list of toll-free consumer
service numbers included in the back section of
this manual.
OR
Visit our Website at: ge.com
Write
down the
model &
serial
numbers
You’ll find them on a label on the front left
trim behind the oven door.
Fill out and return the Consumer Product
Registration Card that is packed with this
product.
Before sending in this card, please write these
numbers here:
Model Number
Serial Number
Use these numbers in any correspondence or
service calls concerning your wall oven.
If you
received a
damaged
wall oven
Immediately contact the dealer (or builder)
that sold you the wall oven.
Save time
& money
Before you request service, check the
Problem Solver in the back of this manual.
It lists causes of minor operating problems that
you can correct yourself.
If you
need
service
To obtain service, see the Consumer Services
page in the back of this manual.
We’re proud of our service and want you to be
pleased. If for some reason you are not happy
with the service you receive, here are two steps
to follow for further help.
FIRST, contact the people who serviced your
appliance. Explain why you are not pleased.
In most cases, this will solve the problem.
NEXT, if you are still not pleased, write all the
details—including your phone number—to:
Manager, Customer Relations
GE Appliances
Appliance Park
Louisville, KY 40225
Consumer Information
Wall Oven

4
IMPORTANT SAFETY INSTRUCTIONS
IMPORTANT SAFETY NOTICE
• The California Safe Drinking Water
and Toxic Enforcement Act requires the
Governor of California to publish a list
of substances known to the state to cause
cancer, birth defects or other reproductive
harm, and requires businesses to warn
customers of potential exposure to such
substances.
• The fiberglass insulation in self-clean ovens
gives off a very small amount of carbon
monoxide during the cleaning cycle. Exposure
can be minimized by venting with an open
window or using a ventilation fan or hood.
• IMPORTANT: The health of
some birds is extremely sensitive to the fumes
given off during the self-cleaning cycle of any
oven. Move birds to another well-ventilated
room.
SAFETY PRECAUTIONS
When using your electrical appliances, basic
safety precautions should be followed,
including the following:
• Be sure all packing materials are removed
from the oven before operating it to prevent
fire or smoke damage should the packing
material ignite.
• Use this appliance only for its intended use as
described in this Owner’s Manual.
• Be sure your appliance is properly installed
and grounded by a qualified technician in
accordance with the provided installation
instructions.
• Be sure the oven is securely installed in a
cabinet that is firmly attached to the house
structure. Never allow anyone to climb, sit,
stand or hang on the oven door.
• Have the installer show you the location of the
circuit breaker or fuse. Mark it for easy
reference.
• Do not attempt to repair or replace any part
of your wall oven unless it is specifically
recommended in this manual. All other
servicing should be referred to a qualified
technician.
• Teach children not to play with the controls or
any other part of the oven.
• Never leave the oven door open when you are
not watching the oven.
• Always keep dish towels, dish cloths, pot
holders and other linens a safe distance from
your oven.
• For your safety, never use your appliance
for warming or heating the room.
• Do not store flammable materials in the oven.
• Always keep wooden and plastic utensils
and canned food a safe distance away from
your oven.
• Always keep combustible wall coverings,
curtains or drapes a safe distance from
your oven.
• DO NOT STORE OR USE COMBUSTIBLE
MATERIALS, GASOLINE OR OTHER
FLAMMABLE VAPORS AND LIQUIDS IN
THE VICINITY OF THIS OR ANY OTHER
APPLIANCE.
• Do not let cooking grease or other flammable
materials accumulate in or near the wall oven.
• Do not use water on grease fires. Never pick
up a flaming pan. Turn the controls off.
Flame in the oven can be smothered
completely by closing the oven door and
turning the oven off or by using a multi-
purpose dry chemical or foam-type fire
extinguisher.

5
SAFETY PRECAUTIONS
• Do not use aluminum foil to line oven
bottoms, except as suggested in this manual.
Improper installation of aluminum foil may
result in a risk of electric shock or fire.
• Cook meat and poultry thoroughly—meat to
at least an INTERNAL temperature of 160°F
and poultry to at least an INTERNAL
temperature of 180°F. Cooking to these
temperatures usually protects against
foodborne illness.
• Before performing any service, DISCONNECT
THE OVEN POWER SUPPLY AT THE
HOUSEHOLD DISTRIBUTION PANEL BY
REMOVING THE FUSE OR SWITCHING
OFF THE CIRCUIT BREAKER.
• Do not leave children alone—children should
not be left alone or unattended in an area
where an appliance is in use. They should
never be allowed to sit or stand on any part
of the appliance.
• Do not touch the heating elements or the
interior surface of the oven. These surfaces
may be hot enough to burn even though they
are dark in color. During and after use, do
not touch, or let clothing or other flammable
materials contact, any interior area of the
oven; allow sufficient time for cooling first.
Potentially hot surfaces include the oven vent
openings and surfaces near the openings,
crevices around the oven door, the edges of
the door window and metal trim parts above
the door.
Remember: The inside surface of the oven
may be hot when the door is opened.
•
CAUTION: ITEMS OF INTEREST
TO CHILDREN SHOULD NOT BE STORED
IN CABINETS ABOVE AN OVEN—
CHILDREN CLIMBING ON THE OVEN TO
REACH ITEMS COULD BE SERIOUSLY
INJURED.
• Never wear loose-fitting or hanging garments
while using the appliance. Be careful when
reaching for items stored over the oven.
Flammable material could be ignited if
brought in contact with oven heating
elements and may cause severe burns.
• Use only dry pot holders—moist or damp
pot holders on hot surfaces may result in
burns from steam. Do not let pot holders
touch hot heating elements. Do not use a
towel or other bulky cloth.
• Keep the oven vent unobstructed.
• Keep the oven free from grease buildup.
• Stand away from the oven when opening the
oven door. Hot air or steam which escapes can
cause burns to hands, face and/or eyes.
• After broiling, always take the broiler pan out
of the oven and clean it. Leftover grease in the
broiler pan can catch fire the next time you use
the pan.
• Large scratches or impacts to glass doors can
lead to broken or shattered glass.
• Never leave jars or cans of fat drippings in or
near your oven.
IMPORTANT SAFETY INSTRUCTIONS

6
IMPORTANT SAFETY INSTRUCTIONS
SAVE THESE INSTRUCTIONS
SAFETY PRECAUTIONS
• Children in walkers, or children crawling, can
be attracted to the round oven door handle and
may grab and open the oven door. This can
result in injury from the door being pulled
open on a child, or severe burns if the oven
is in use and hot.
• Do not heat unopened food containers.
Pressure could build up and the container
could burst, causing an injury.
• Place the oven rack in the desired position
while the oven is cool. If racks must be handled
when hot, do not let pot holder contact the
heating elements.
• Extending the rack to its fully open position is a
convenience in lifting heavy foods. It is also
a precaution against burns from touching
hot surfaces of the door or oven walls.
• When using cooking or roasting bags in the
oven, follow the manufacturer’s directions.
• Do not use your oven to dry newspapers.
If overheated, they can catch on fire.
• Do not use oven for a storage area. Items stored
in an oven can ignite.
• Do not leave paper products, cooking utensils
or food in the oven when not in use.
• Do not allow anyone to climb, stand or hang
on the door. They could damage the oven or
cause severe personal injury.
SELF-CLEANING OVEN
• Do not clean the door gasket. The door gasket
is essential for a good seal. Care should be
taken not to rub, damage or move the gasket.
• Do not use oven cleaners. No commercial oven
cleaner or oven liner protective coating of any
kind should be used in or around any part of
the oven. Residue from oven cleaners will
damage the inside of the oven when the self-
clean cycle is used.
• Clean only parts listed in this Owner’s Manual.
• Before self-cleaning the oven, remove the
broiler pan, grid and other cookware.
• Be sure to wipe up excess spillage before
starting the self-cleaning operation.
• If the self-cleaning mode malfunctions, turn the
oven off and disconnect the power supply. Have
it serviced by a qualified technician.
• The oven racks may be cleaned in the oven
during the self-cleaning cycle.

Feature Index Page
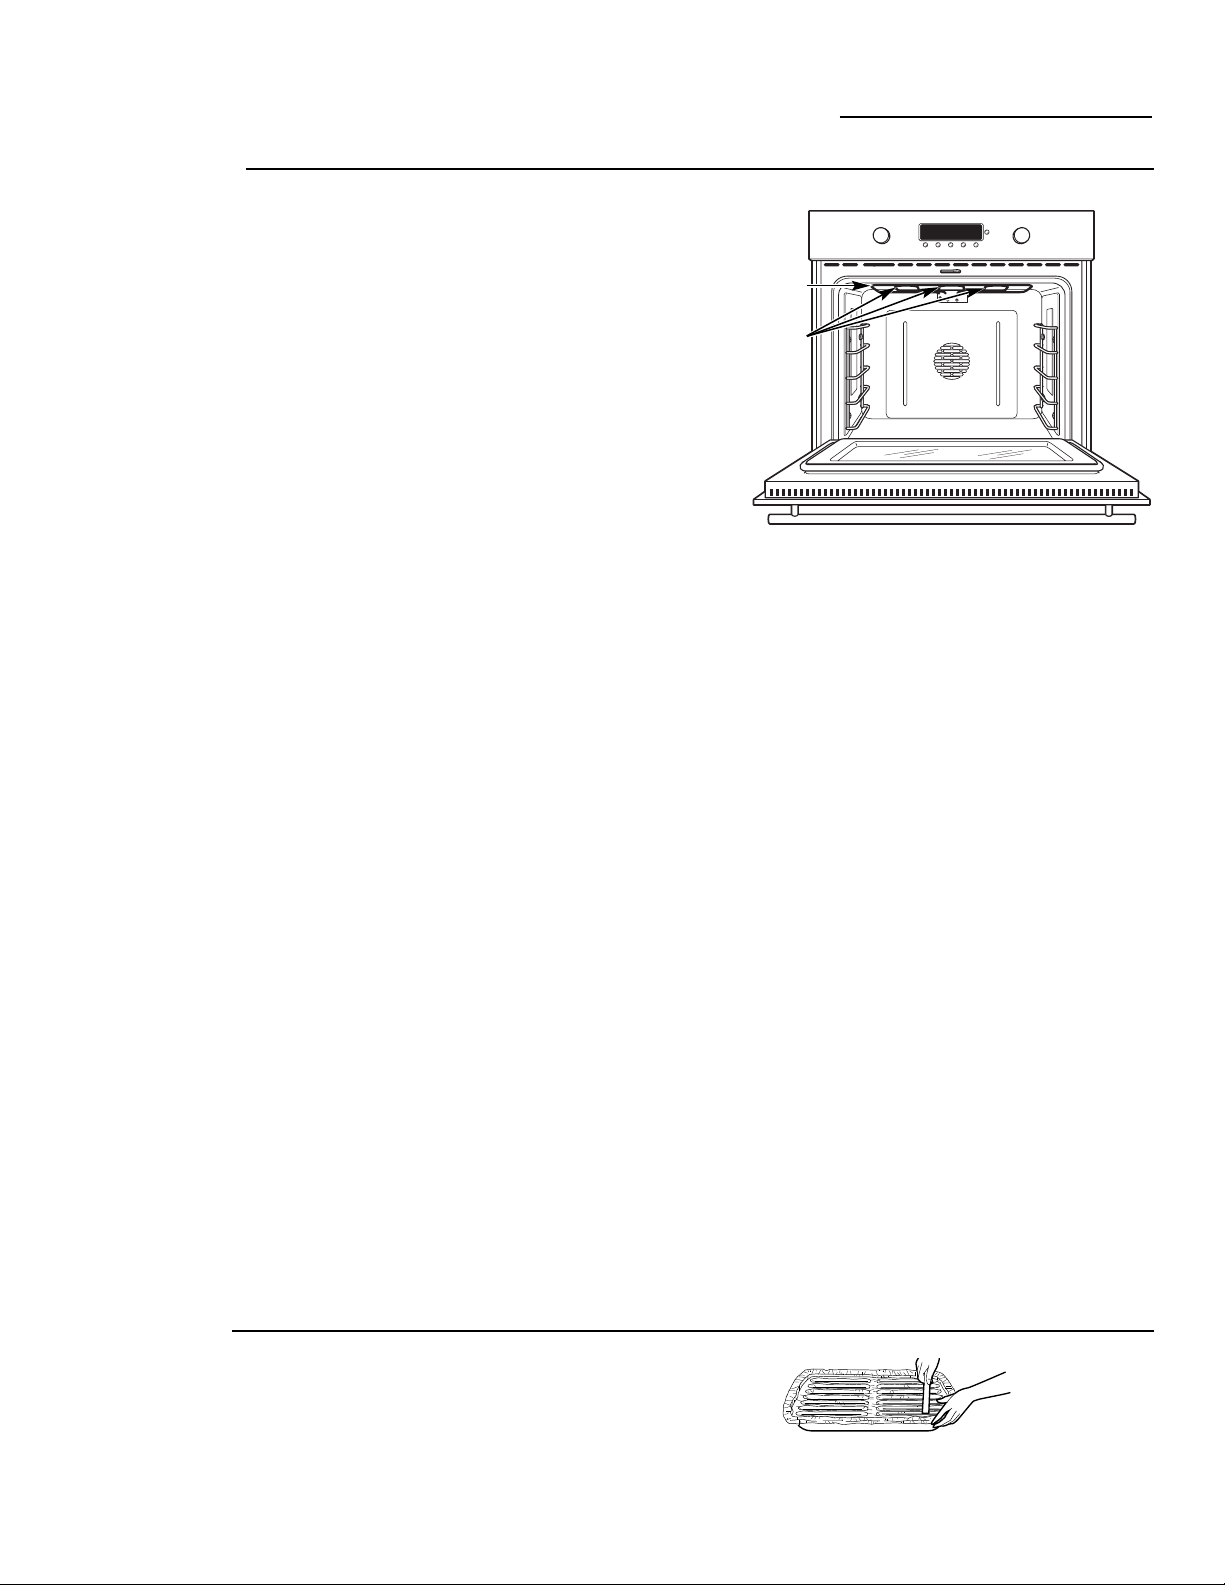
1 Full Extension Oven Racks (3 in each oven) 10, 11, 12, 13, 14, 17,
18, 19, 20, 22, 23, 25, 34
2 Broiler Pan and Grid 19, 33
3 Probe 9, 15, 16, 20, 35
4 Oven Mode knob 9, 12, 14, 16, 18,
19, 20, 22, 25, 26, 27
5 Display 9
6 Mini-Knob – Turn to set and push to enter PROBE, 9, 16, 20, 23, 24, 26,
TIMER, CLOCK, COOK TIME and DELAY START 27, 28, 29, 30, 31, 32
settings.
7 Temperature knob 9, 12, 14, 16, 18,
19, 20, 22, 26, 27
8 Probe, Timer, Clock, Cook Time and Delay Start 9, 16, 20, 23, 24, 26,
buttons. Push to select feature, turn the Mini-Knob 27, 28, 29, 30, 31, 32
to set and push it to enter.
9 Sub-Displays – Upper and lower oven temperatures —
shown in their dedicated displays (on models so
equipped).
10 Probe Outlet 15, 16, 20, 22, 26, 38, 39
11 Halogen Oven Lights 36, 38
12 Oven Rack Supports (5 positions) 11, 36
13 Convection Fan (operates during convection cooking 12, 13, 16, 17, 18, 19,
and while preheating) 20, 22, 23, 26, 27, 39
14 Removable Oven Door 35
15 Oven Door Gasket 37
16 Bake Element (under the oven floor) 4, 18, 33
17 Broil Element 17, 33, 38
18 Automatic Oven Door Latch 26, 27
19 Oven Vent 5, 39
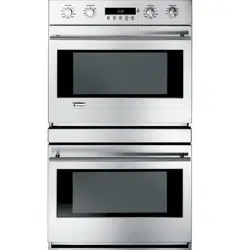
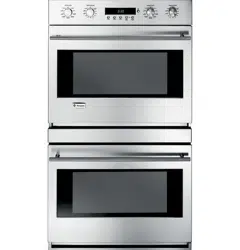
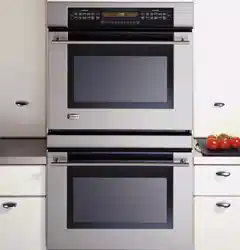
Features of Your Wall Oven
Wall Oven
Design
information
(Not all features
are on all models.
Appearance may vary.)
ZET1—shown with Integrated style knobs
11
12
10
4 7
ZET2—shown with Pro style knobs
12
16
11
12
10
9
18
15
11
17
12
13
10
11
13
12
18
16
1
2
3
8
5
6
13
15
14
17
15
16
18
17
11
12
4 5 6 94
8
77
19
19
14
14
11
7
8
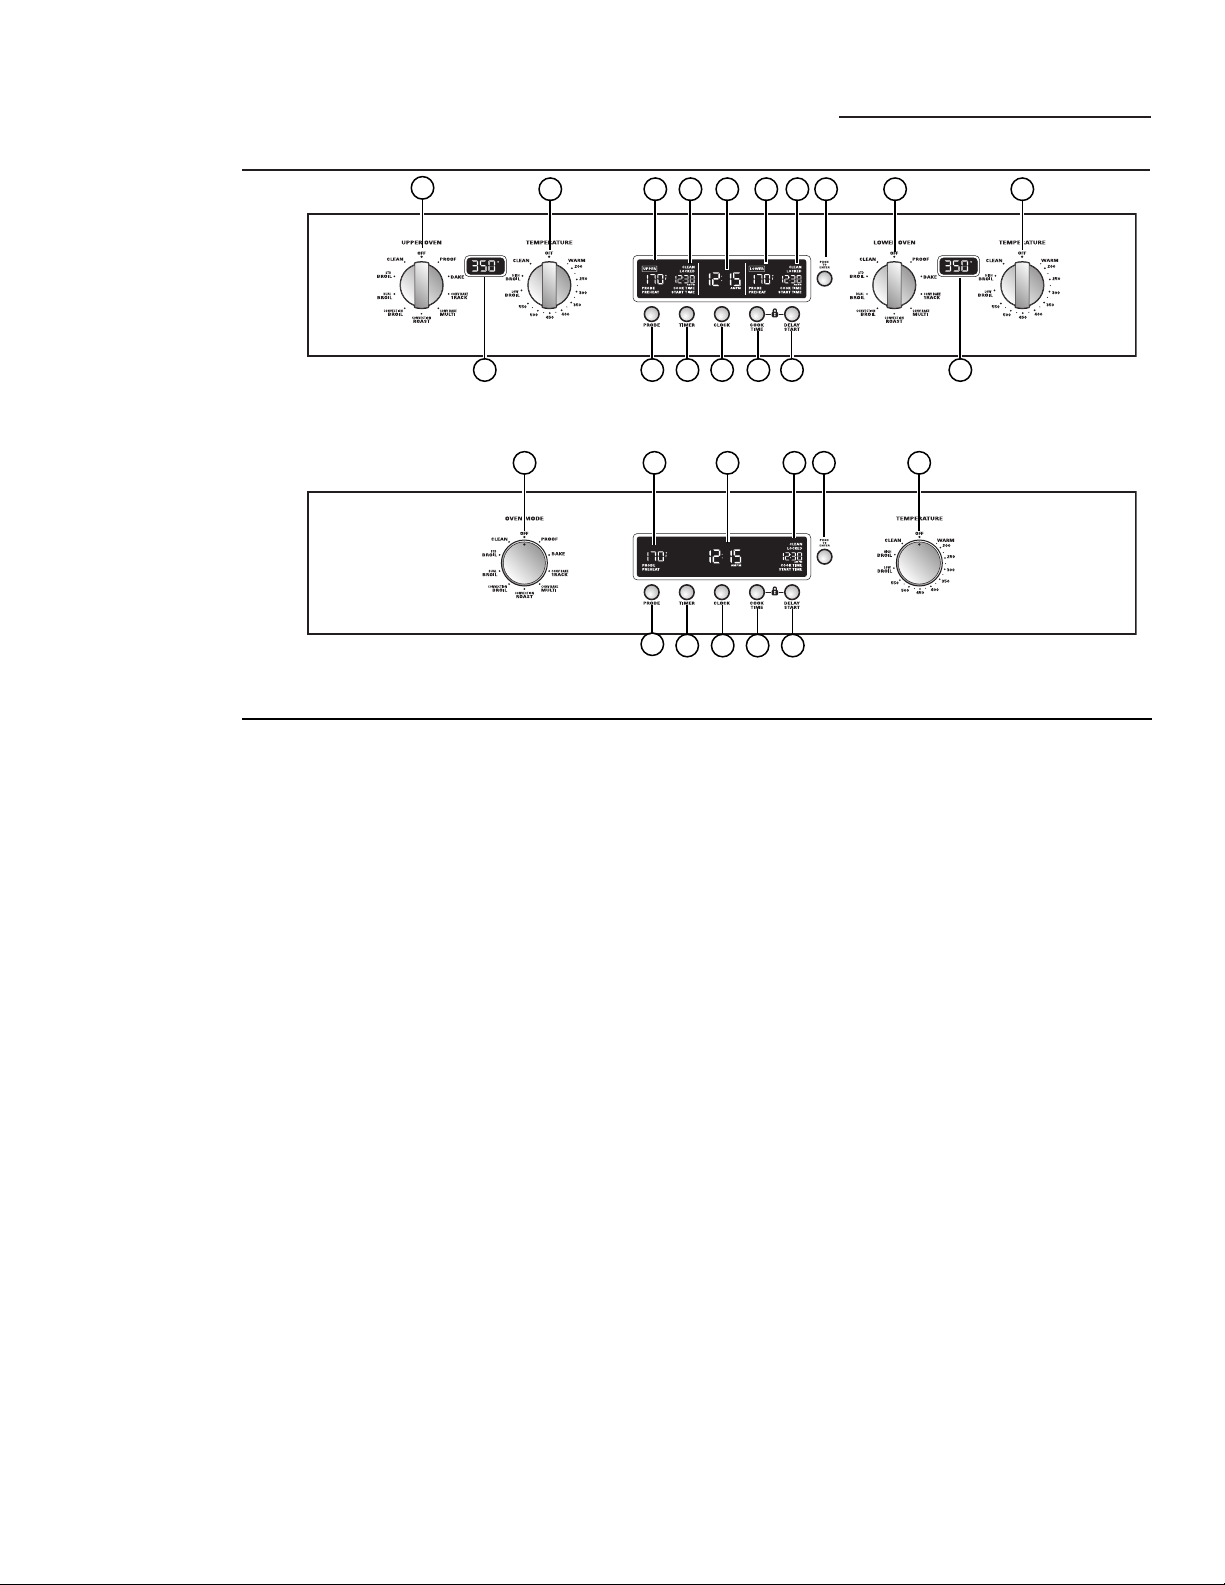
Oven Control, Clock and Timer
Wall Oven
FF
Double oven control – Pro style shown (Appearance may vary)
Single Oven control – Integrated style shown (Appearance may vary)
Features of
your oven
control,
clock and
timer
(Not all
features
are on all
models.
Appearance
may vary.)
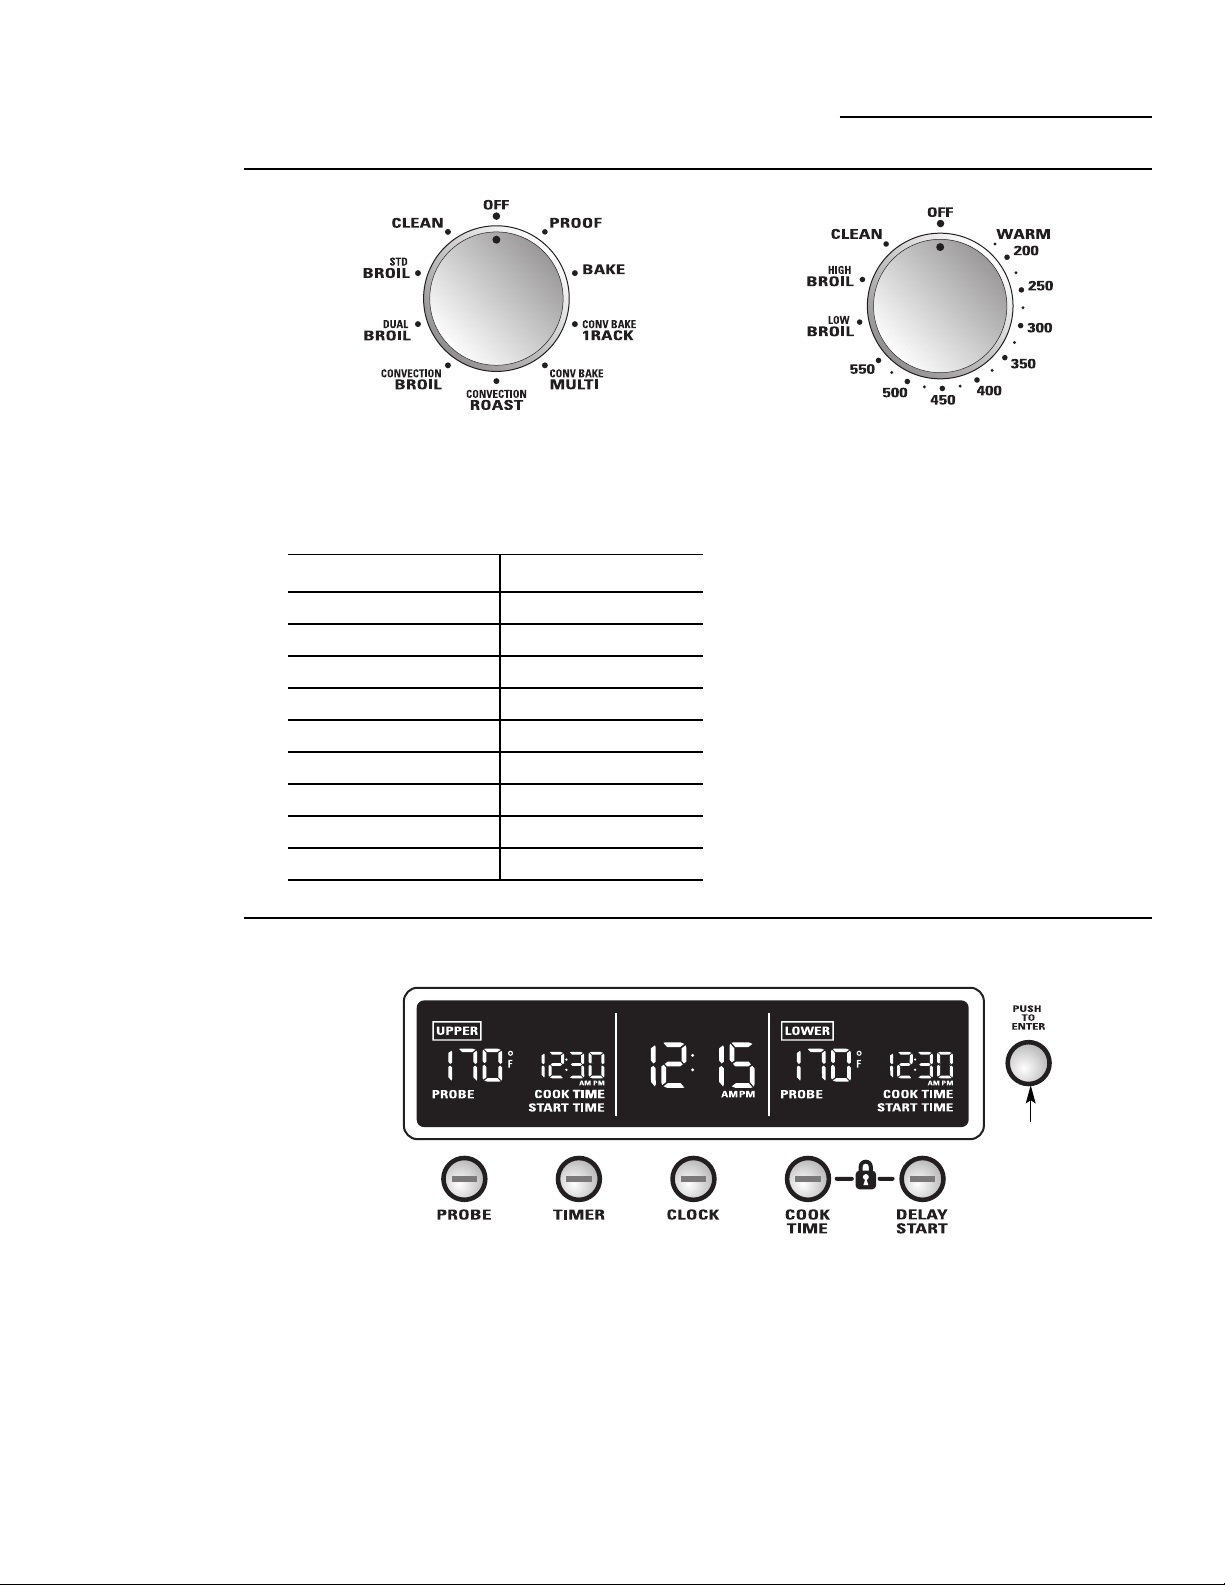
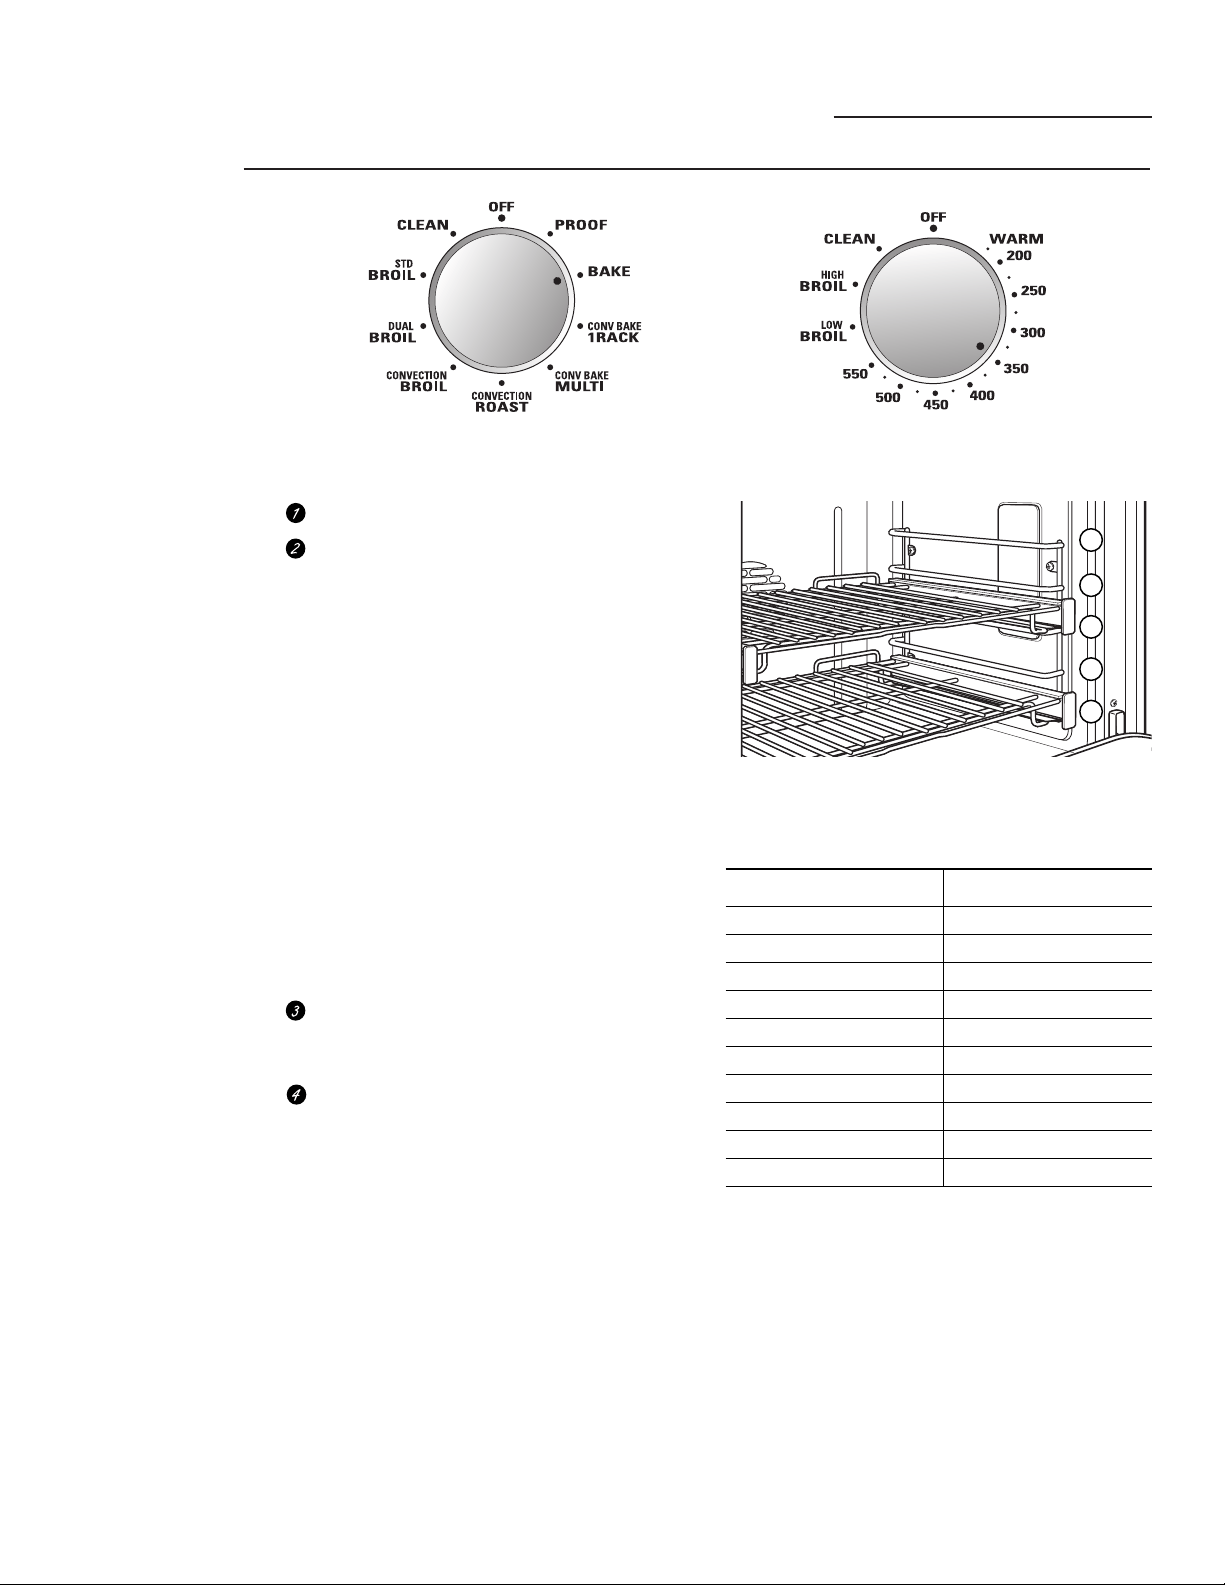
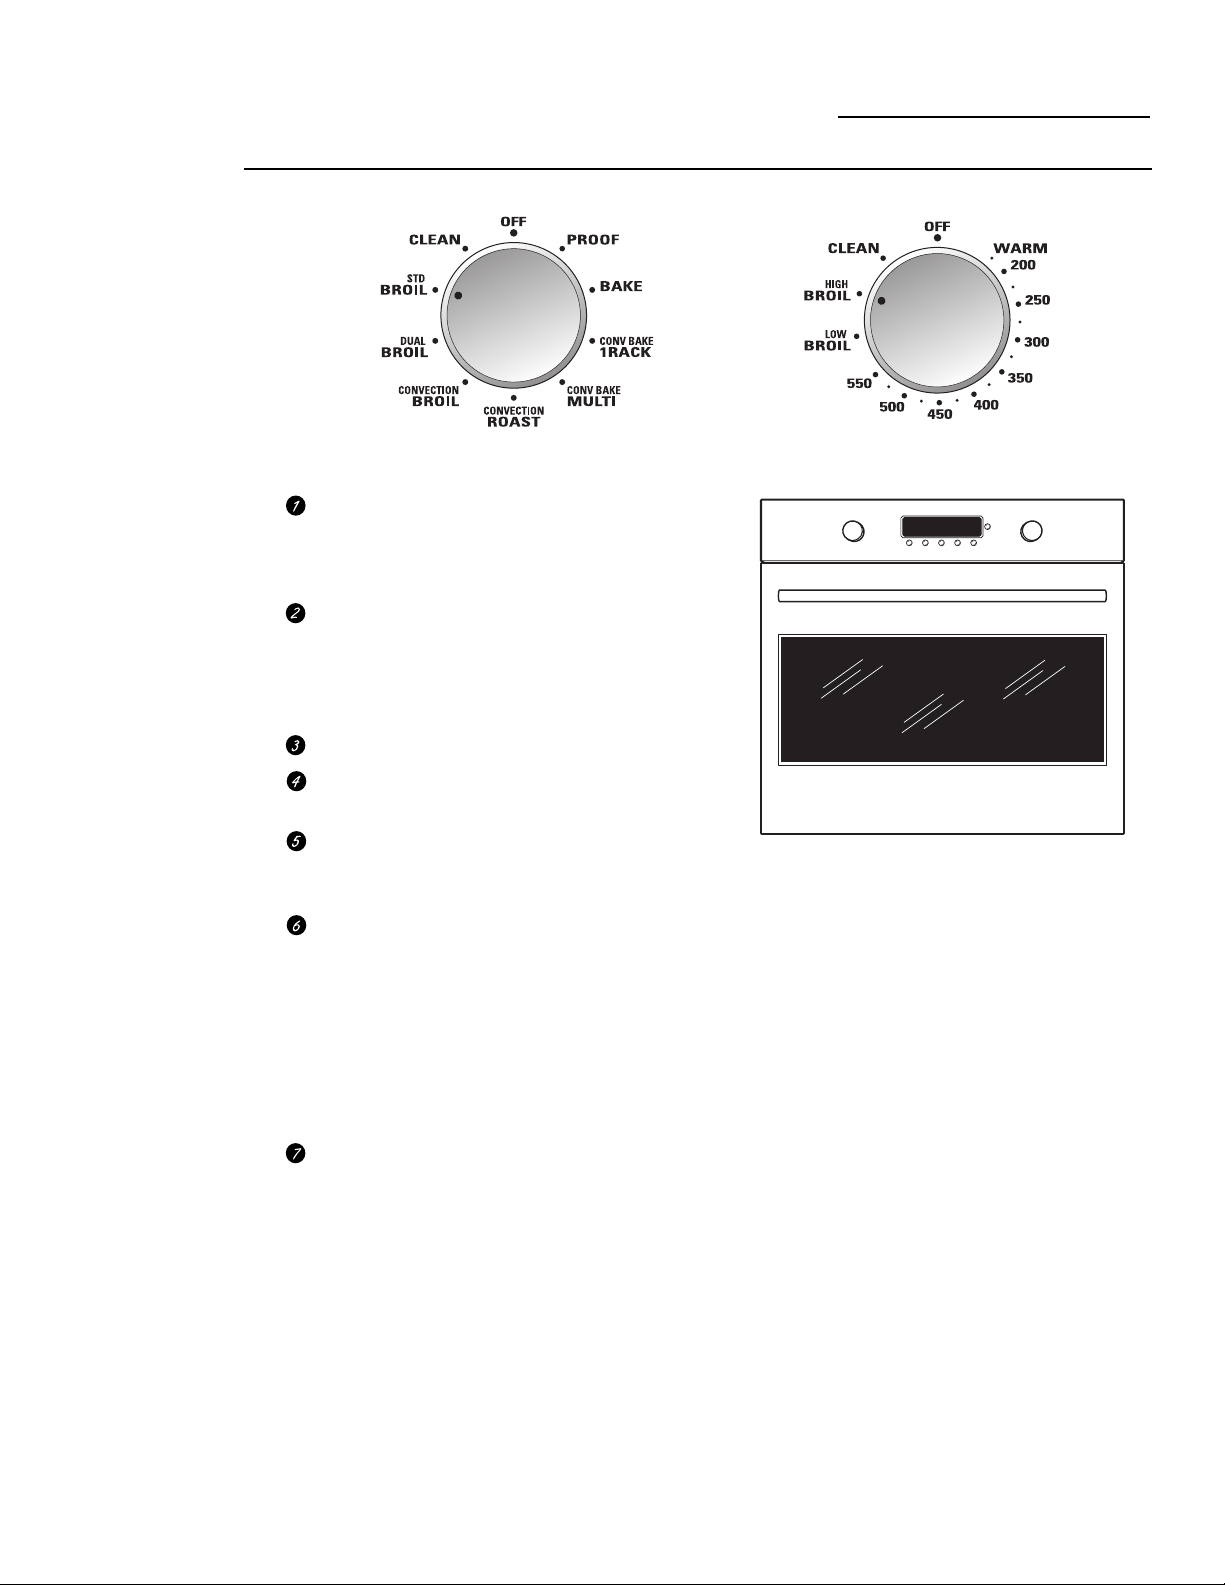
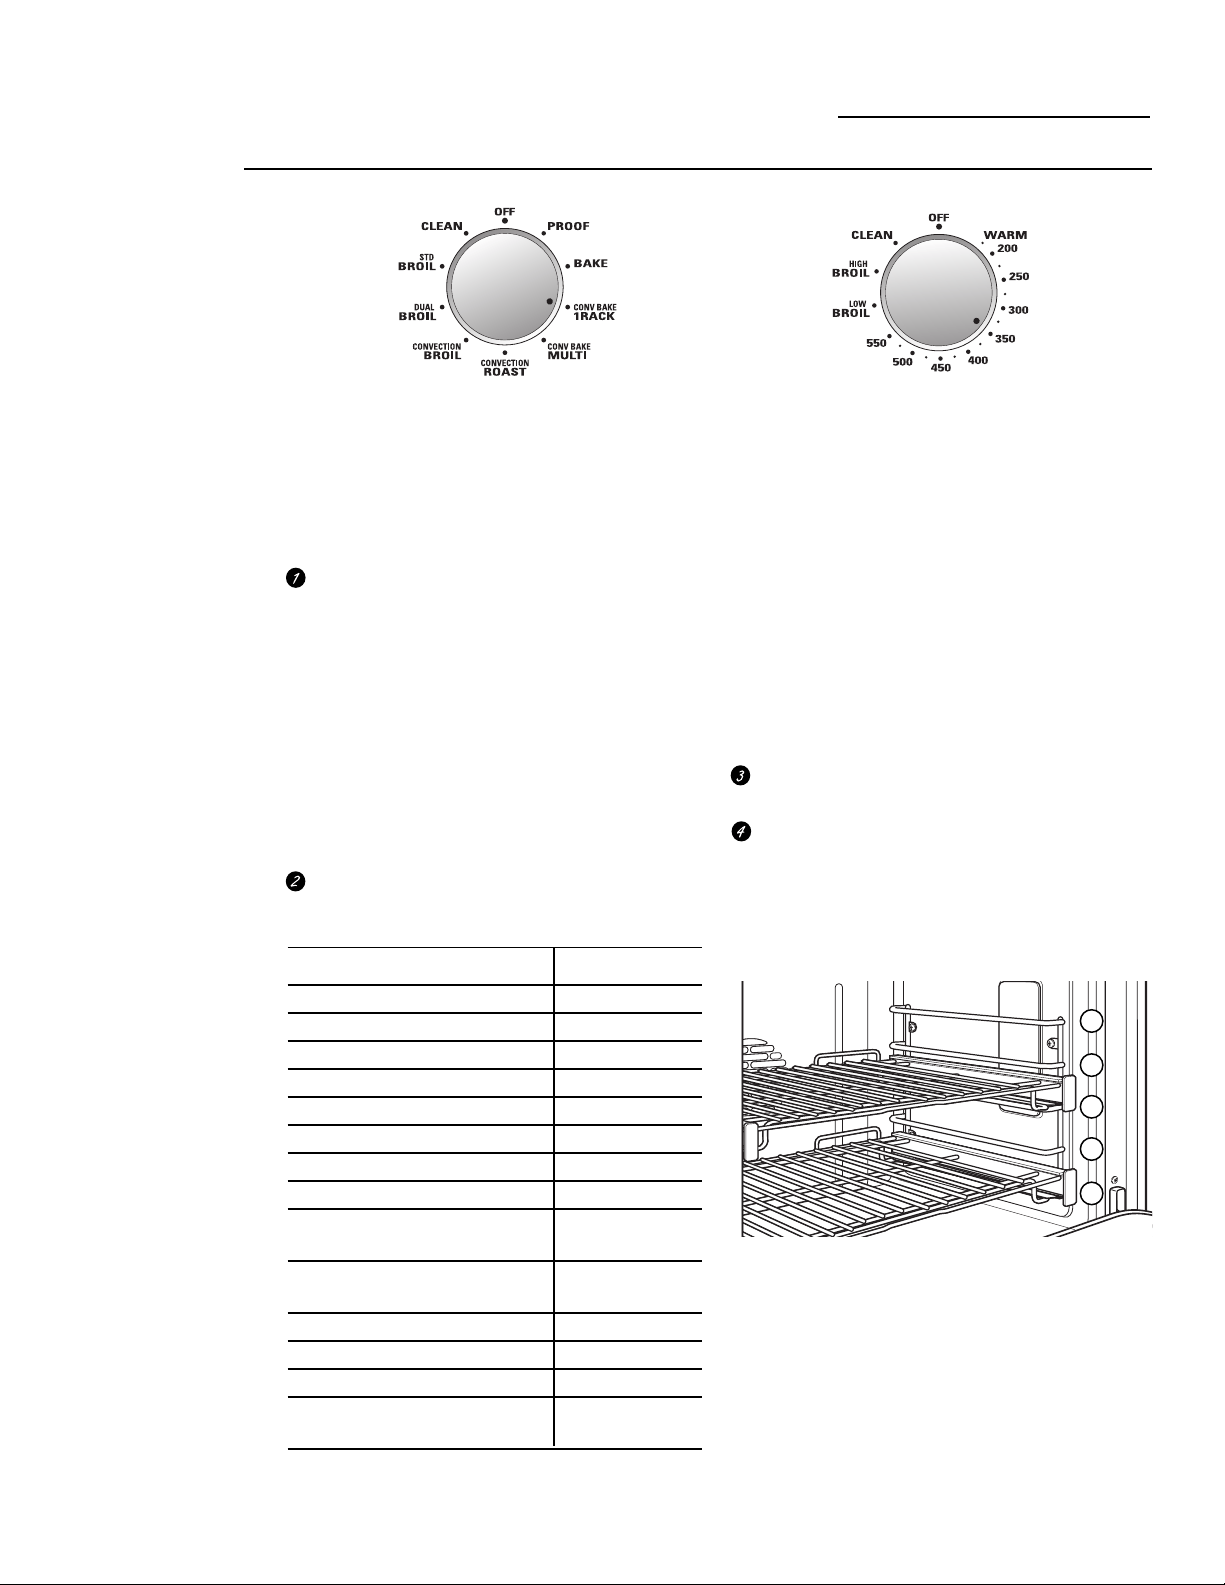
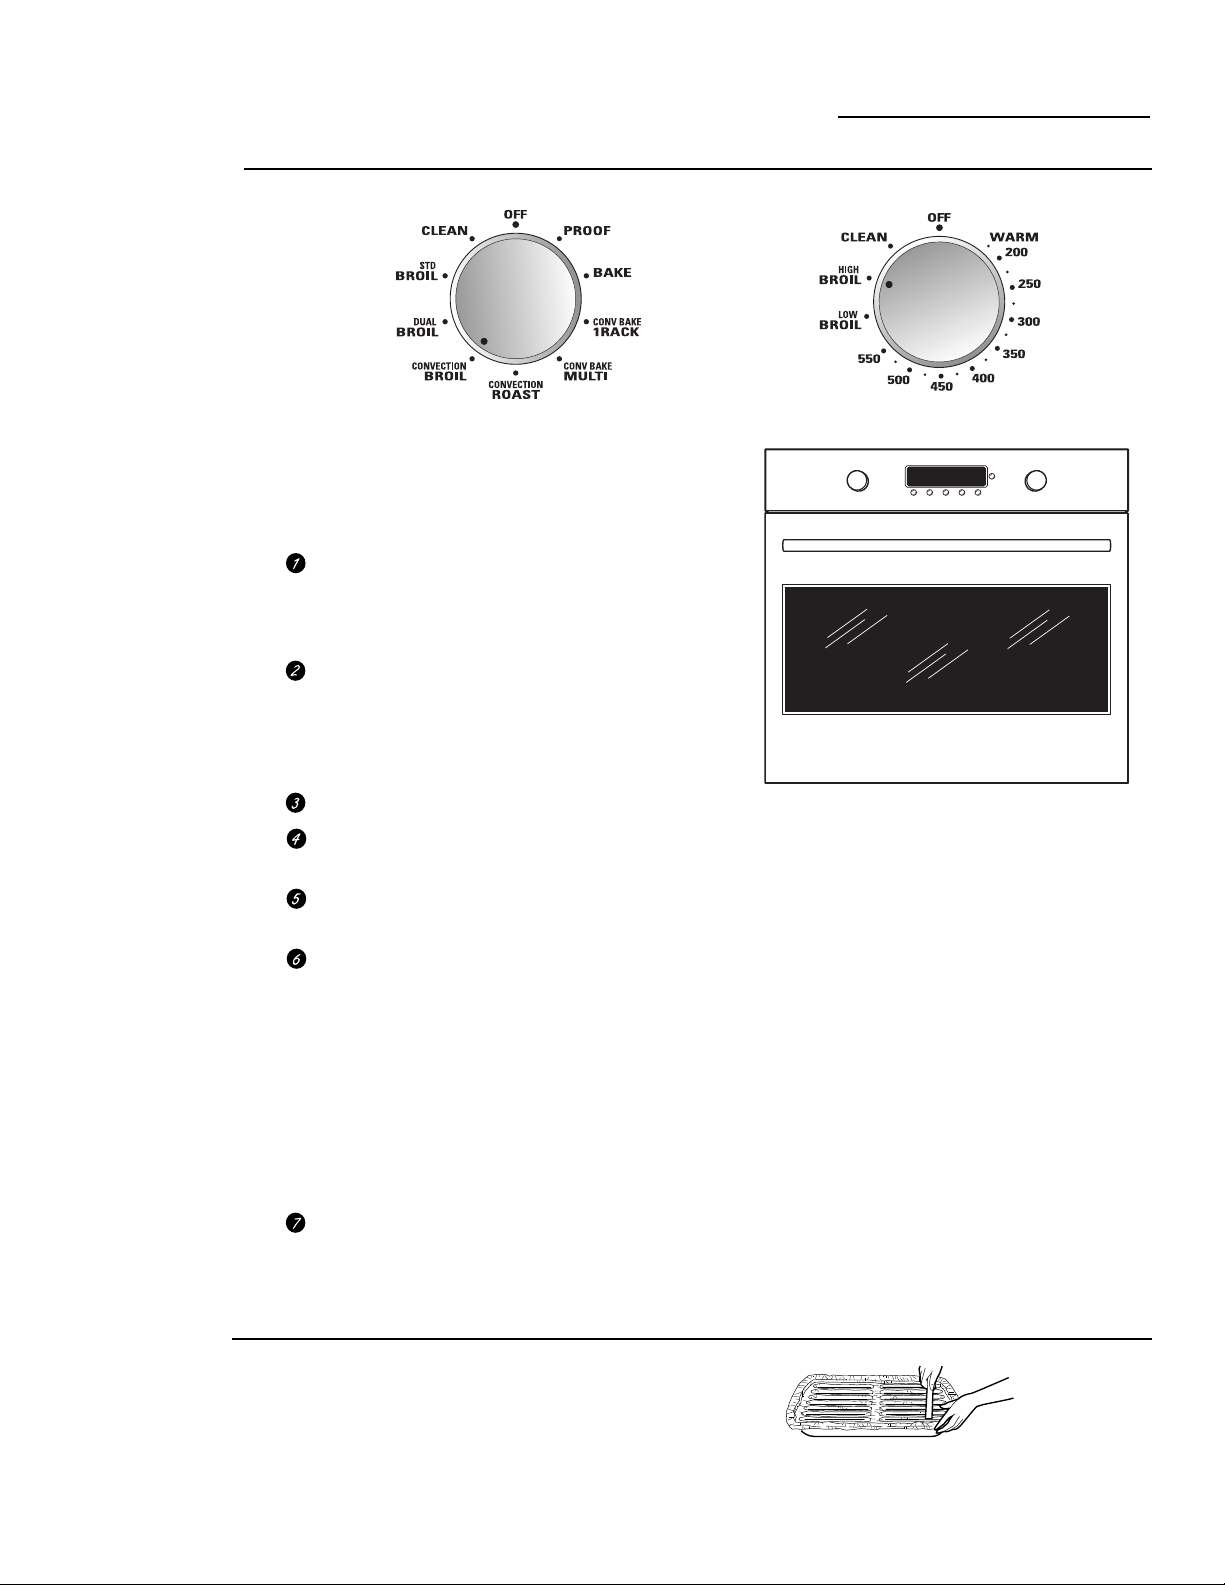
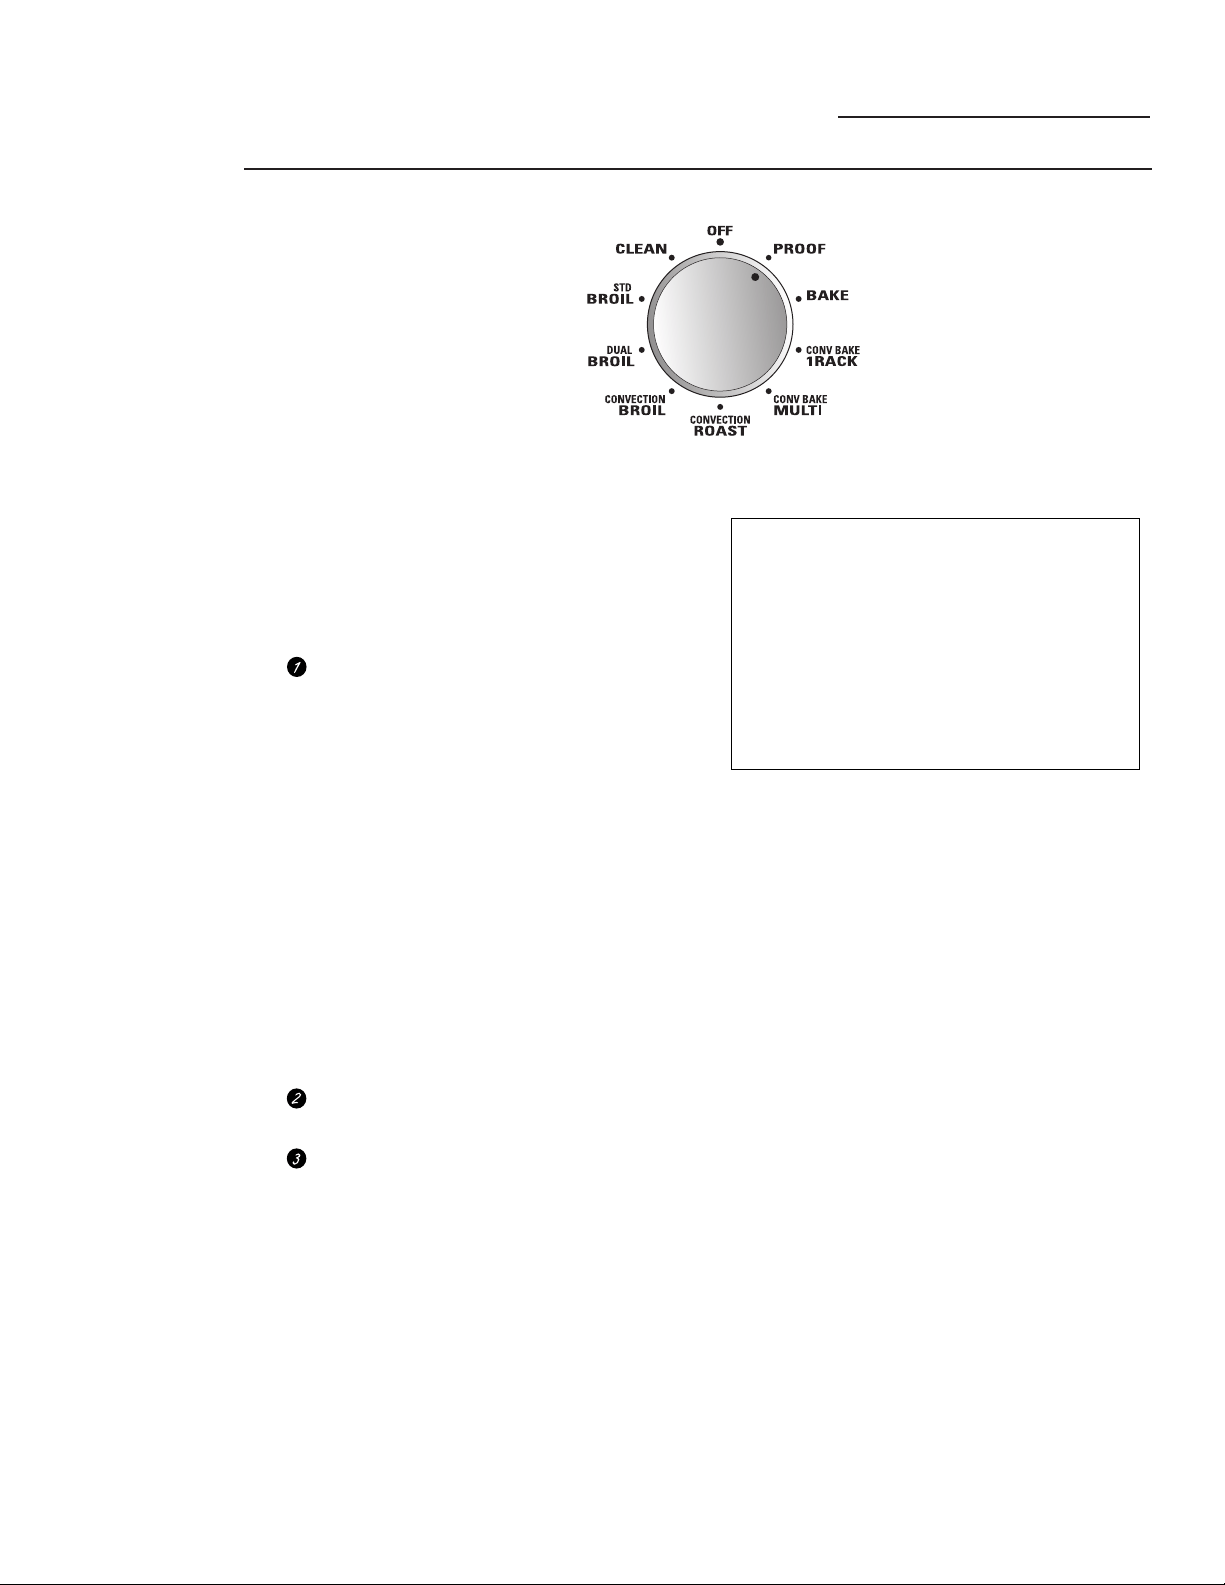
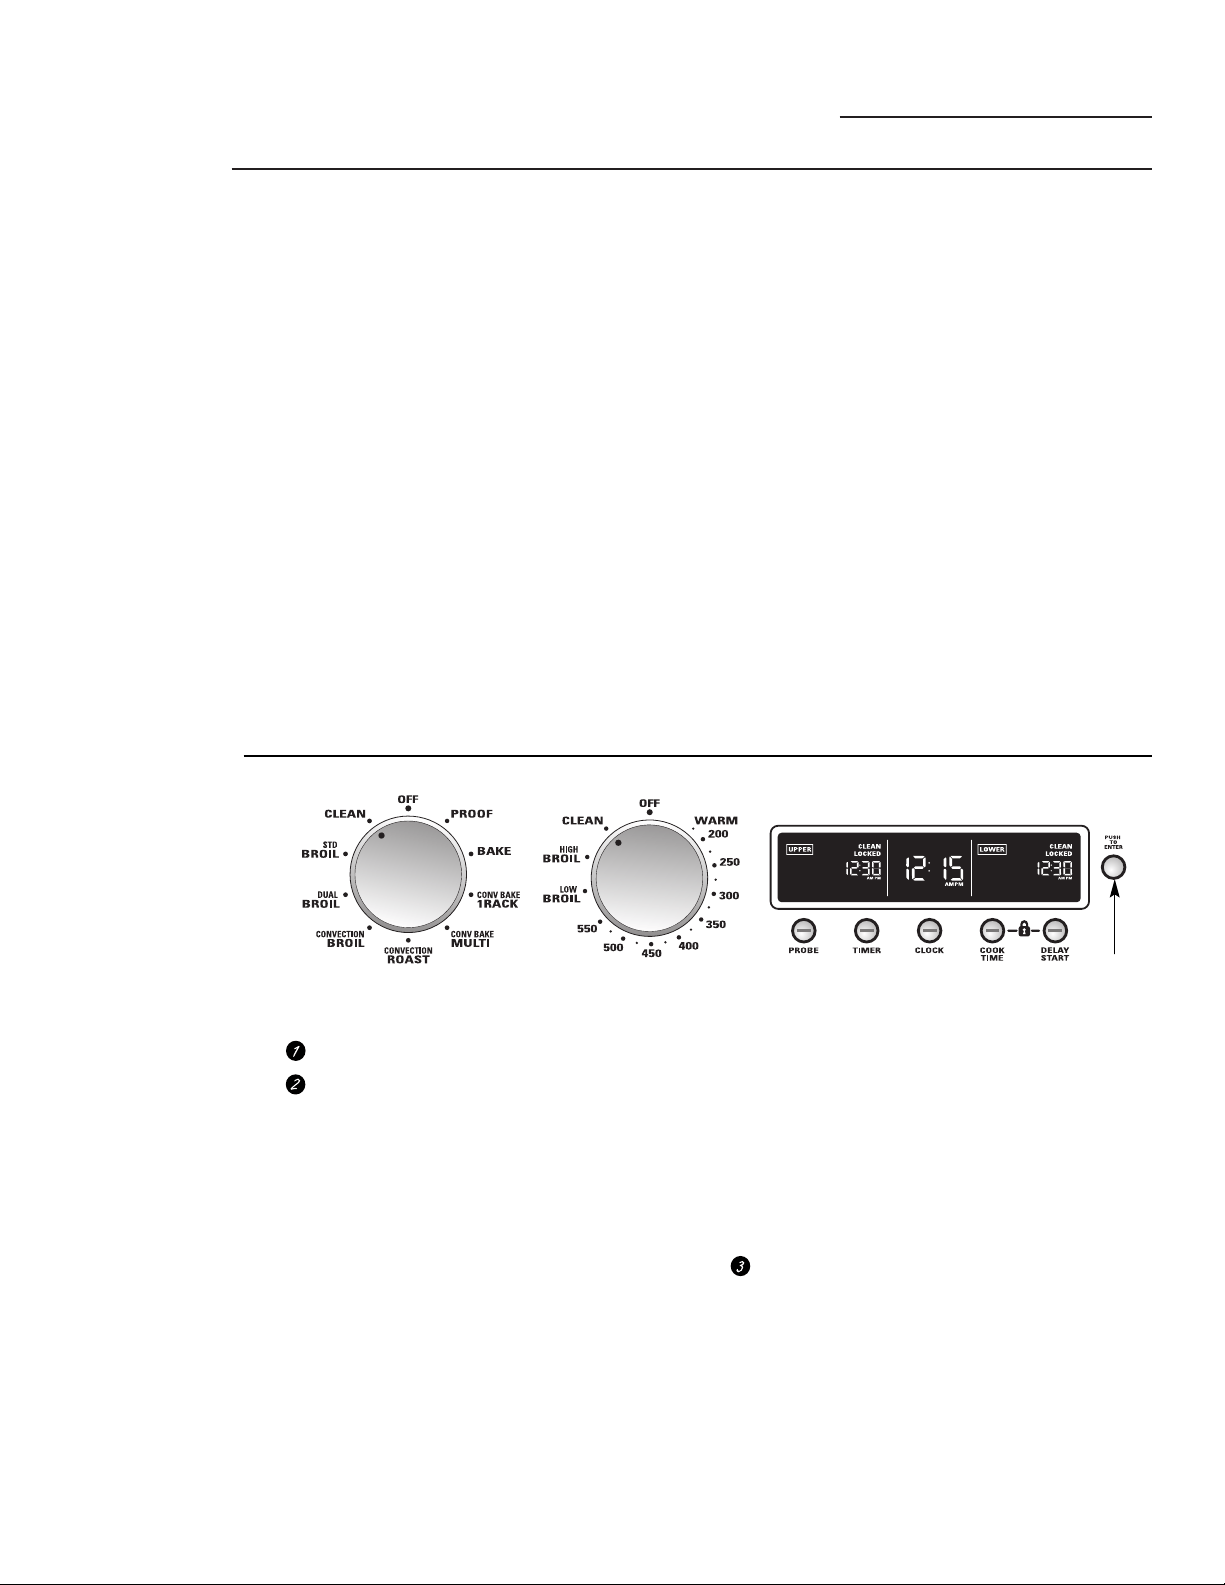
1 Oven Mode knob – Turn to select:
PROOF – Maintains a warm environment
useful for rising yeast-leavened products.
BAKE – Select for traditional baking.
CONV BAKE 1 RACK – Use for convection
baking on one rack.
CONV BAKE MULTI – Use for convection
baking on multiple racks.
CONV ROAST – Use for convection roasting.
CONV BROIL – Use for convection broiling.
DUAL BROIL – Select to provide traditional
broiling for a larger food quantity.
STD BROIL – Select to provide traditional
broiling for a smaller food quantity.
CLEAN – Select for the self-cleaning
function. See the Self-Cleaning Oven section.
2 Temperature knob – Turn to select:
Use to set baking temperatures from 200°F
to 550°F.
WARM – Keeps already cooked foods warm
for up to 2 hours after the cooking function
is finished.
LOW BROIL – A lower broiling temperature
is automatically set.
HIGH BROIL – A higher broiling
temperature is automatically set.
CLEAN – The self-clean temperature is
automatically set.
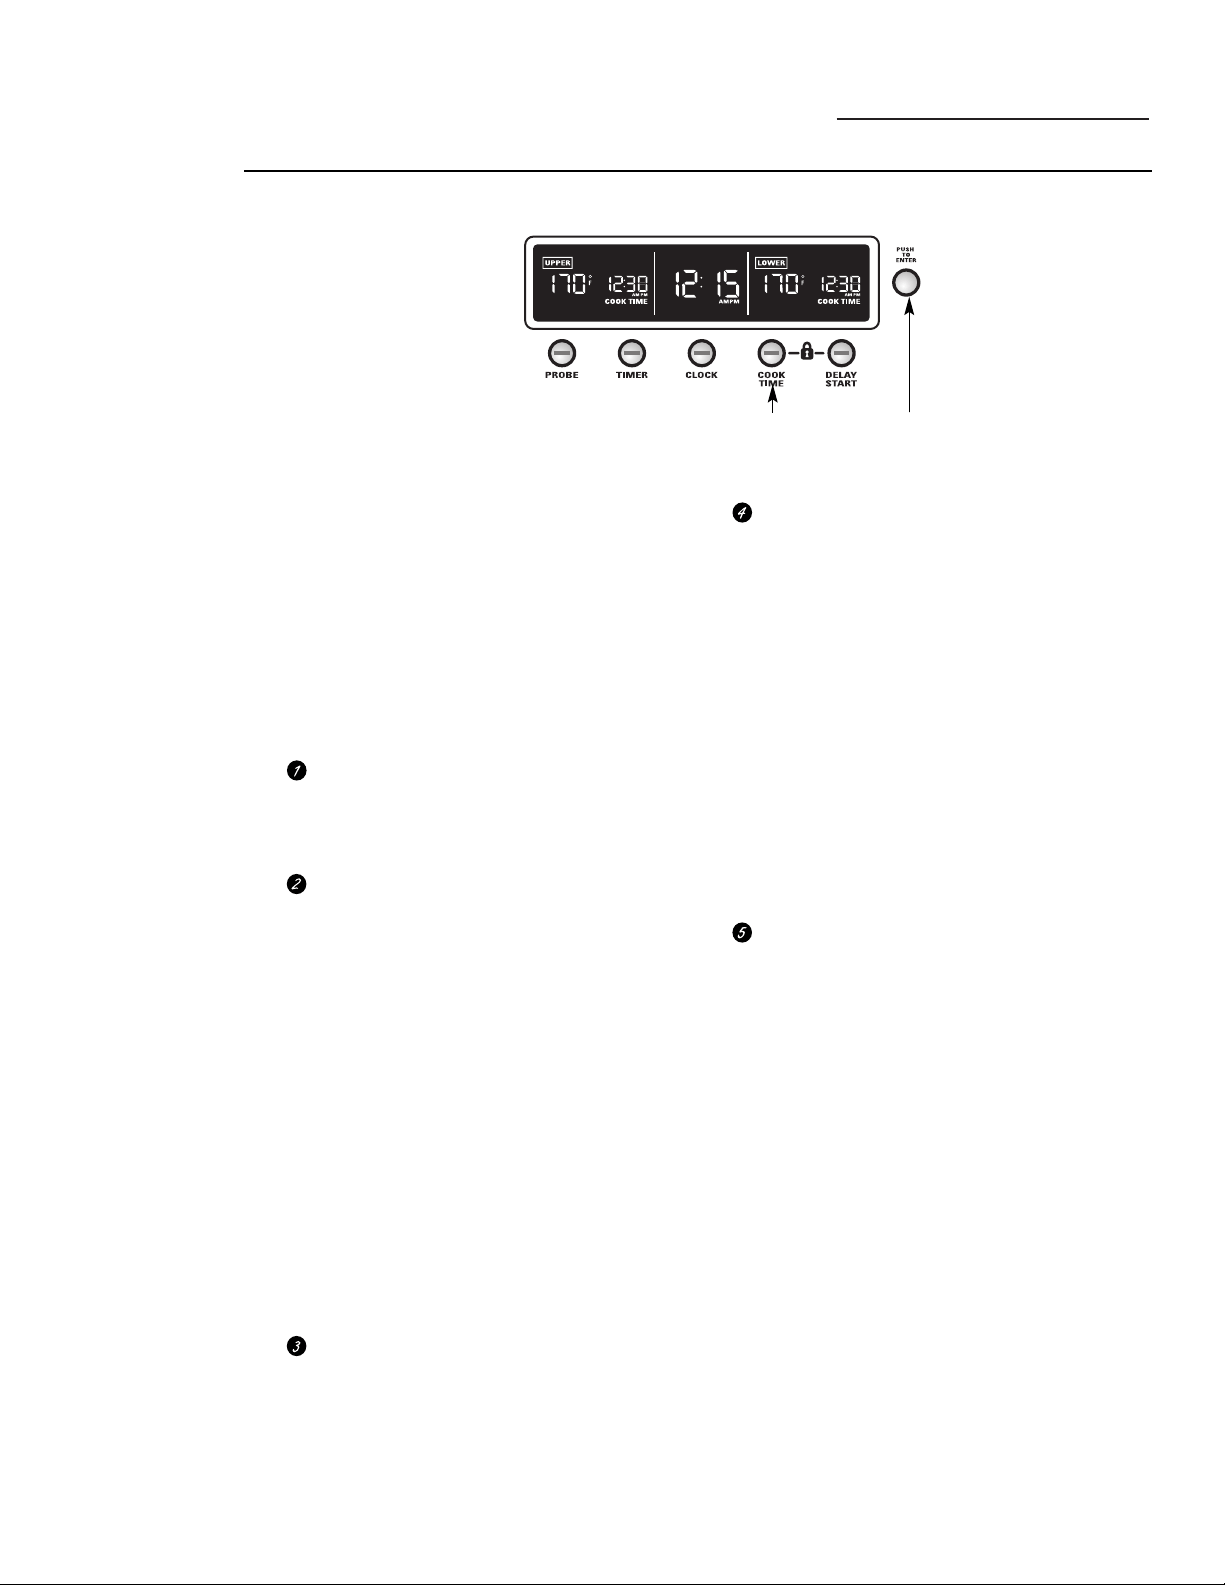
3 Mini-Knob
Turn to select and push to enter PROBE,
TIMER, CLOCK, COOK TIME and DELAY
START settings.
4 PROBE – Push to select the probe to cook
food to a set internal temperature. Turn and
push the Mini-Knob to set.
5 TIMER – Push to select the timer function.
The timer does not control oven operations.
The timer can time up to 11 hours and 59
minutes. Turn and push the Mini-Knob
to set.
6 CLOCK – Push to enter the time of day. Turn
and push the Mini-Knob to set.
7 COOK TIME – Push to enter the desired
length of cooking time for baking (or
roasting), convection baking and convection
roasting. Turn and push the Mini-Knob
to set.
8 DELAY START – Push to delay the start
of cooking or the self-clean cycle. Turn and
push the Mini-Knob to set the time you want
the oven to start.
9 Temperature Display – Shows the oven set
temperature or probe set temperature and if
the oven is preheating. (On some double
wall oven models, UPPER and LOWER are
displayed above their respective settings.)
NOTE: On some wall oven models, the set
temperature shows in displays between their
respective control knobs.
10 Timing and Cleaning Status Display – If set,
shows the remaining COOK TIME and the
DELAY START time. Lights indicate the
status of the self-clean cycle.
11 Time of Day Display – Shows set time of day.
1
2 10119 10 3 1 2
9
4
5 6 7
8
9
1 9 11 10 3 2
4
5 6 7 8
9
9
Push the PROBE, TIMER, CLOCK, COOK
TIME or DELAY START buttons and set them
by turning and pushing the Mini-Knob. See
each respective section for details.
The Mini-Knob will select in increments of 1, 5
or 10 depending on how fast it is turned. Turn it
clockwise to increase probe set temperatures
and time or counterclockwise to reduce them.
Push to set.
See the Control lockout section for how to lock
and unlock the controls.
Introduction
to the probe
temperature
set and time
controls
Controls Overview
Wall Oven
For all modes except Proof, the oven will not
operate unless both the Oven Mode and the
Temperature knobs are set. See table.
Introduction
to the oven
controls
To cancel a feature, turn either the Oven Mode
knob or the Temperature knob to OFF.
To cancel PROOF, turn the Oven Mode knob
to OFF.
Mini-Knob
Turn to select
Push to enter
Double oven display shown
Mode Knob Temperature Knob
PROOF OFF
BAKE WARM to 550°F
CONV BAKE/1 RACK WARM to 550°F
CONV BAKE/MULTI WARM to 550°F
CONVECTION/ROAST WARM to 550°F
CONVECTION/BROIL HIGH or LOW BROIL
DUAL BROIL HIGH or LOW BROIL
STD BROIL HIGH or LOW BROIL
CLEAN CLEAN
Oven Mode knob Temperature knob
Baking Tips
Wall Oven
Pan
placement
For even cooking and proper browning, there
must be enough room for air circulation in the
oven. Baking results will be better if baking pans
are centered as much as possible rather than
being placed to the front or to the back of
the oven.
Pans should not touch each other or the walls of
the oven. Allow 1- to 1
1
⁄2″ space between pans as
well as from the back of the oven, the door and
the sides.
If you need to use two racks, use rack positions
A and C, B and D or A and D and stagger the
pans so that one is not directly above the other.
Preheating
Allow the oven to preheat before placing food in
the oven. Preheating is necessary for good results
when baking cakes, cookies, pastry and breads.
To preheat, set the oven at the correct temperature. The
PREHEAT light will turn on and 100°F will appear in
the display. (The temperature display will start to change
once the oven temperature reaches 100°F.) The convection
fan will also turn on during preheating. The control
will beep when the oven is preheated—this will take
approximately 10 to 15 minutes. The PREHEAT light will
turn off and the display will show the set temperature.
When the PREHEAT light goes off, foods should be
placed in the oven.
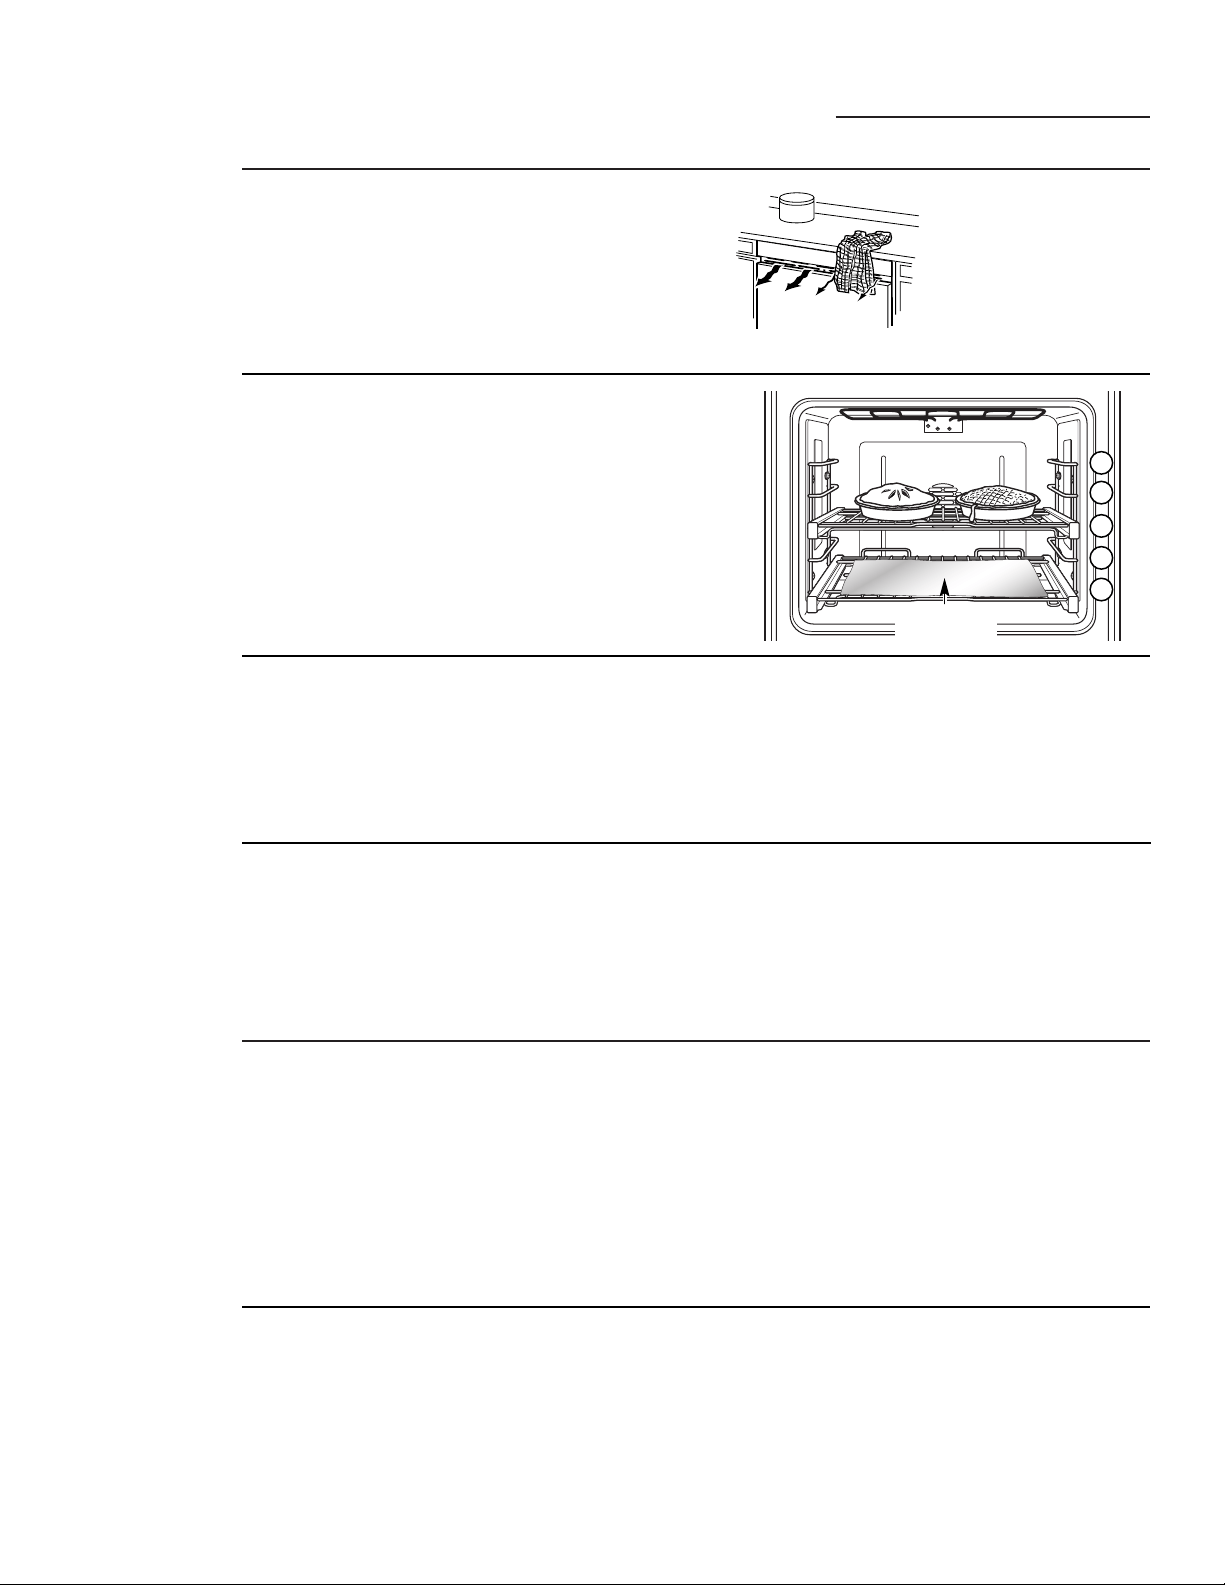
Aluminum
foil
Never entirely cover a rack with aluminum foil. This
will disturb the heat circulation and result in poor
baking. A smaller sheet of foil may be used to catch
a spillover by placing it on a lower rack several
inches below the food.
NOTE: For general baking, only one or two racks
will be used. Three racks will be used only when
multi-rack baking. Remove the third rack from the
oven when it is not is use.
S
E
L
F
C
L
E
A
N
5
0
0
4
5
0
4
0
0
O
F
F
O
°
W
A
R
M
3
5
0
30
0
2
5
0
2
0
0
B
R
O
I
L
B
A
K
E
P
R
O
O
F
C
O
N
V
.
B
A
K
E
C
O
N
V
.
R
O
A
S
T
C
O
N
V
.
B
R
O
I
L
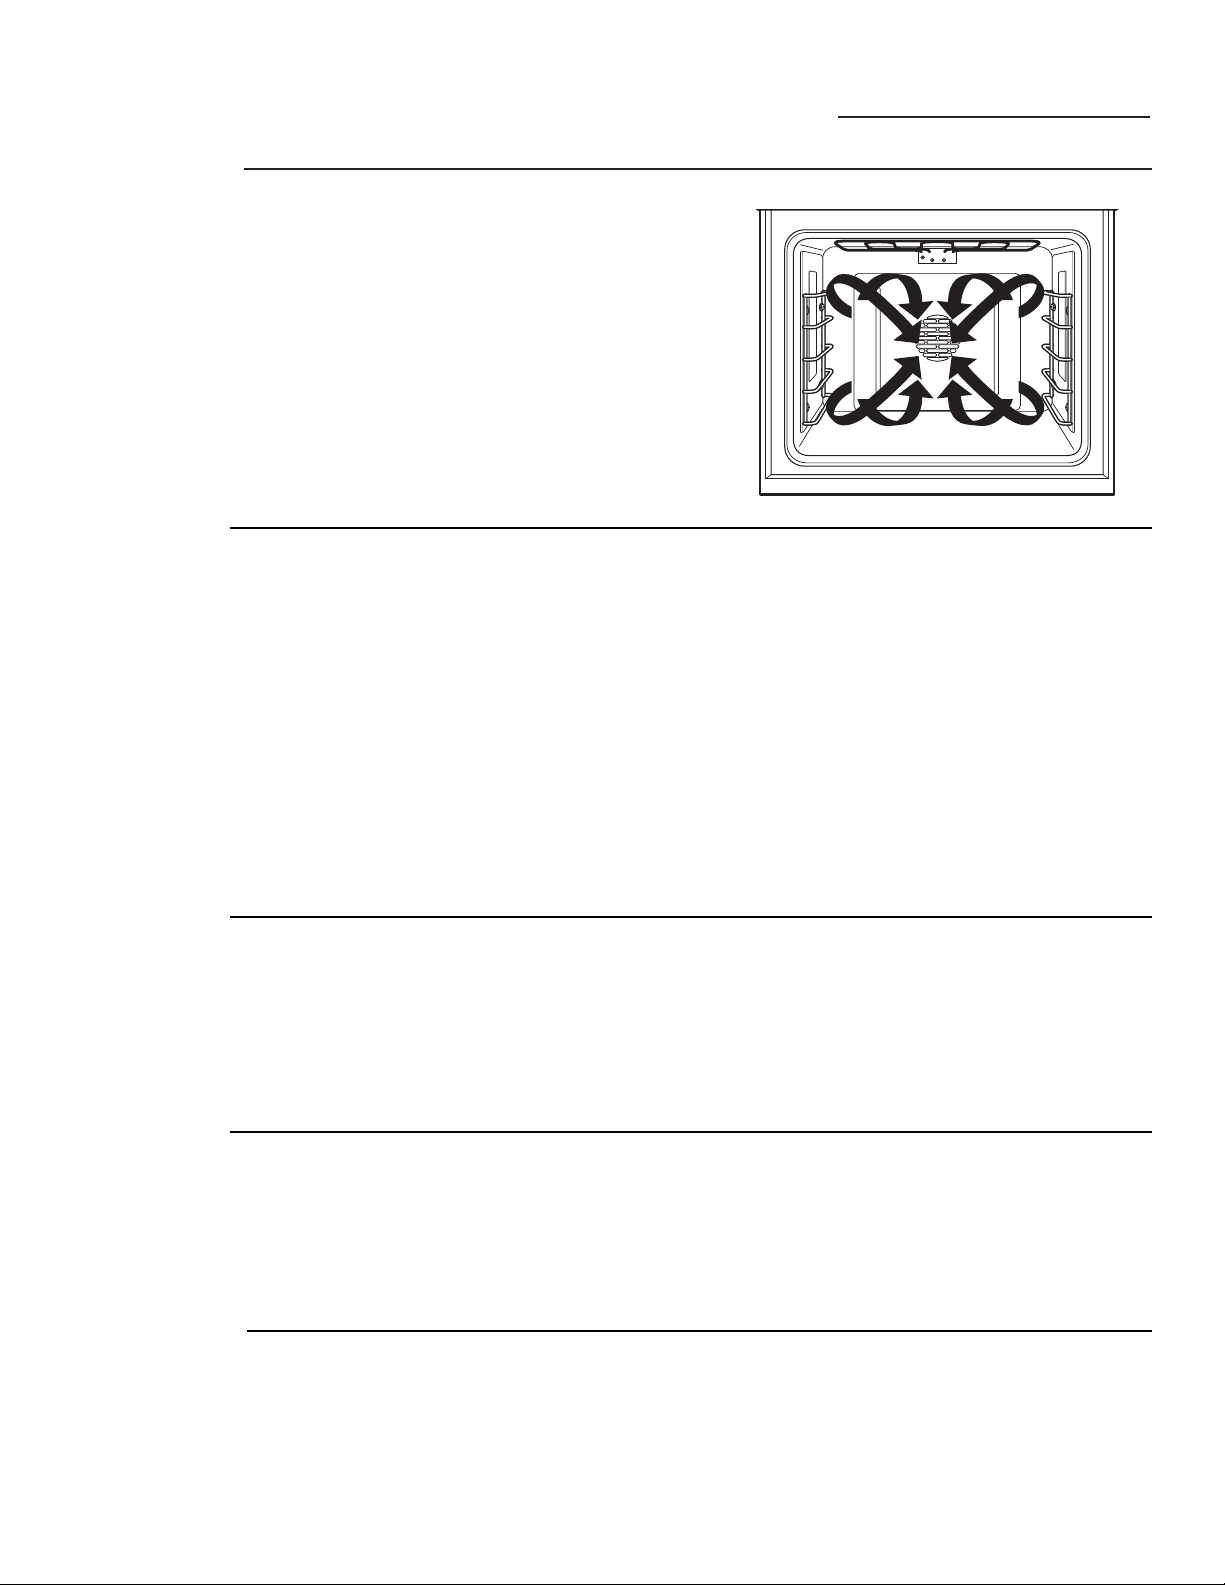
Oven air flow
An internal cooling fan operates during all oven
modes. The warm air from inside the oven will be
exhausted out through vents located between the
door and control panel.
Do not allow this air flow to be obstructed by
draping kitchen towels over the front of the oven in
undercounter applications.
Baking
pans/sheets
Use the proper baking pan. The type of finish on
the pan determines the amount of browning that
will occur.
• Dark, rough or dull pans absorb heat resulting in
a browner, crisper crust. Use this type for pies.
• Shiny, bright and smooth pans reflect heat,
resulting in a lighter, more delicate browning.
Cakes and cookies require this type of pan
or sheet.
• Glass baking dishes also absorb heat. When
baking in glass baking dishes, the temperature
may need to be reduced by 25°F.
The type of
margarine
will affect
baking
performance!
Most recipes for baking have been developed
using high-fat products such as butter or
margarine (80% fat). If you decrease the fat,
the recipe may not give the same results as
with a higher-fat product.
Recipe failure can result if cakes, pies, pastries,
cookies or candies are made with low-fat spreads.
The lower the fat content of a spread product, the
more noticeable these differences become.
Federal standards require products labeled
“margarine” to contain at least 80% fat by weight.
Low-fat spreads, on the other hand, contain less
fat and more water. The high moisture content
of these spreads affect the texture and flavor of
baked goods. For best results with your old
favorite recipes, use margarine, butter or stick
spreads containing at least 70% vegetable oil.
Aluminum foil to
catch spillovers
C
D
B
A
E
10
Before You Begin
Wall Oven
To avoid possible burns, place the racks in the
correct position before turning on the oven.
The correct rack position depends on the
kind of food and the browning desired.
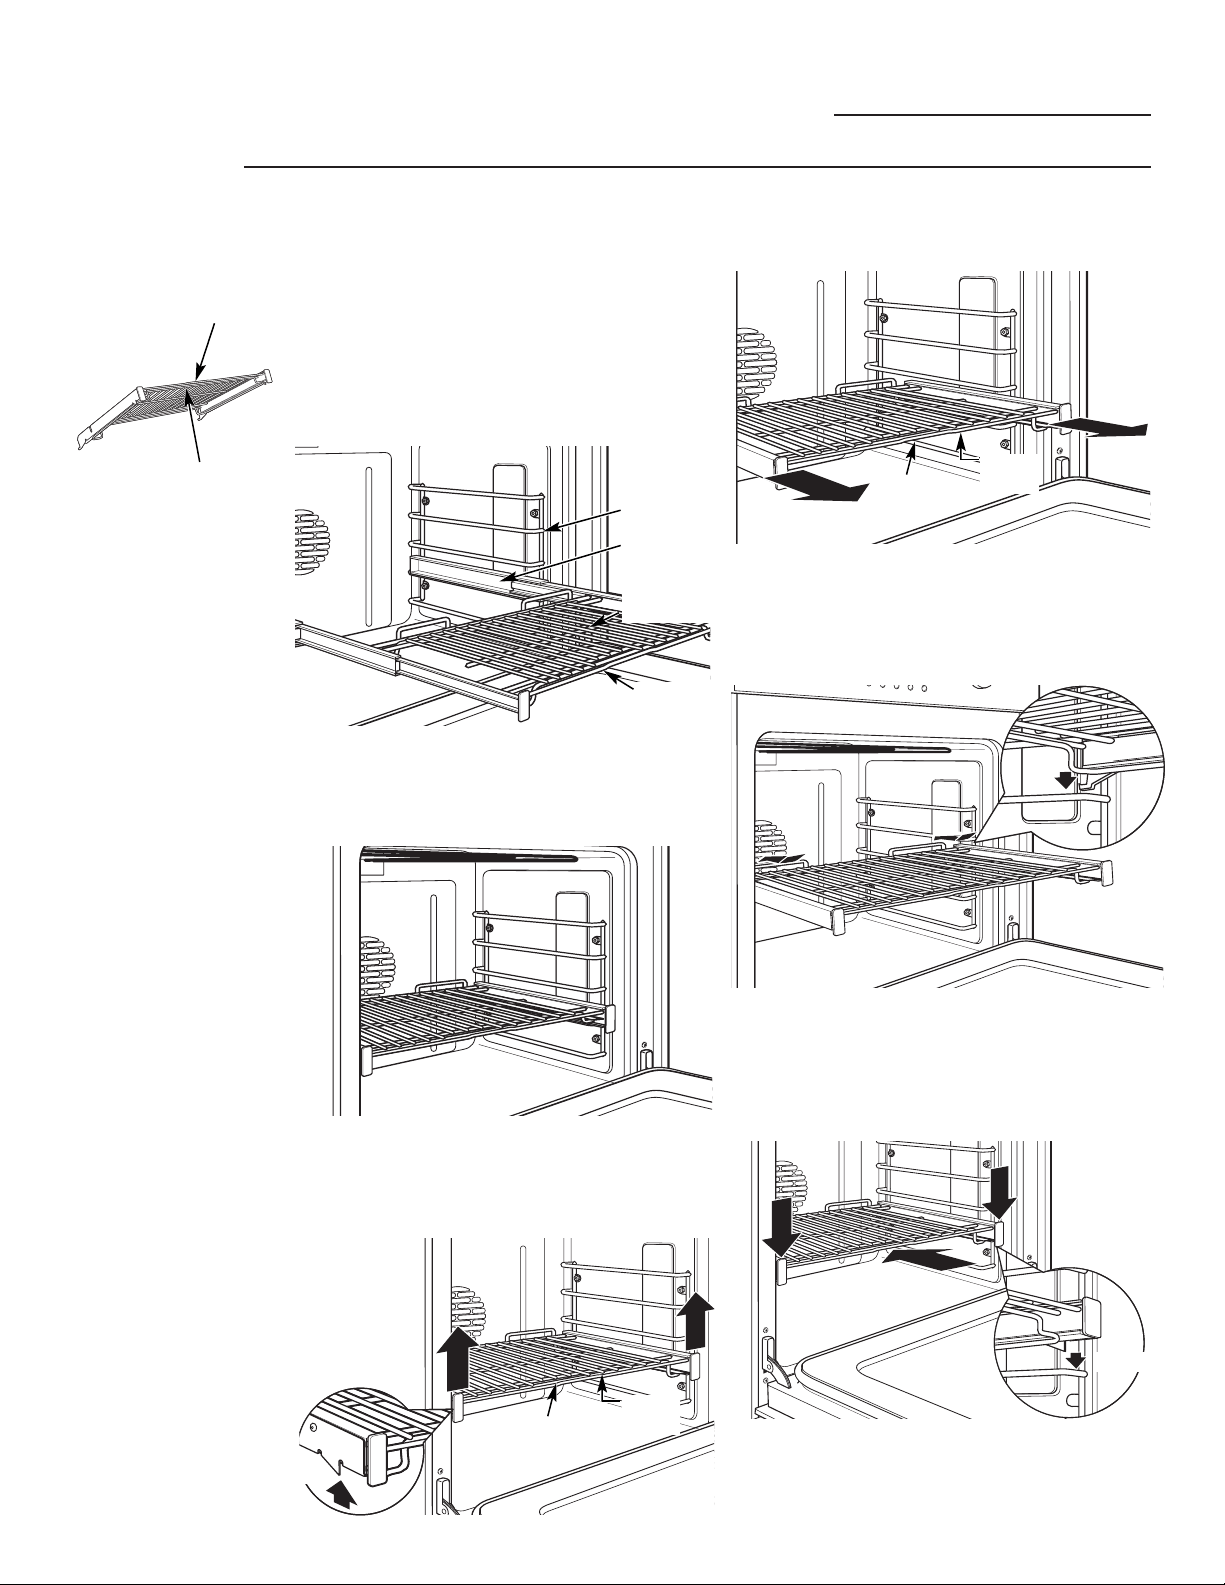
The racks have a frame that locks into the
rack supports on both sides. Once the frame is
locked into place, always pull the rack out, by
its upper front rail, to its full extension stop
position, when placing or removing cookware.
To remove a rack:
1. Make sure the rack is pushed all the way into
the oven.
2. Grasp the rack by both its upper front rail
and its lower front rail and lift straight up
to unlock the front rack locks from the
rack supports.
3. Firmly holding onto both the upper and
lower front rack rails, pull the rack forward
and remove it from the oven.
To replace a rack:
1. Place the rear rack locks over and onto
the rack supports (five rack positions are
available including the top position).
2. Slide the rack all the way in until the
rear rack locks are secure on the rear rack
supports and press the front rack locks onto
the front rack supports.
Full
extension
oven racks
The oven
has 5 rack
positions
Rack frame
Rack extended
to its full stop
position
Upper front
rack rail
Slide the rack all the way in
and push down to lock the
front rack locks onto the
front rack supports
Lift to unlock
front rack
locks from
the rack
support
Upper
front rail
Lower
front rail
Upper
front rail
Lower
front rail
Front rack lock
Front rack lock
Lower
front rail
Upper
front rail
11
12
Baking
Wall Oven
Turn the Oven Mode knob to BAKE.
Using the Temperature knob,
set the desired temperature, in 25°F
increments, from 200°F to 550°F.
The oven and the oven interior lights will
turn on immediately and stay on until the
oven is turned off.
The convection fan will turn on (after a
short delay), the PREHEAT light will turn
on and 100°F will appear in the display.
(The temperature display will start to
change once the oven temperature reaches
100°F.) The control will beep when the oven
is preheated—this will take approximately
10 to 15 minutes. The PREHEAT light will
turn off and the
display will show the set temperature.
When the PREHEAT light goes off, place
food in the oven.
Check the food for doneness at the
minimum time on the recipe. Cook
longer if necessary.
Turn the Oven Mode knob and the
Temperature knob to OFF when baking
is finished.
NOTE: A cooling fan will turn on to cool
internal parts. This is normal, and the fan
may continue to run even after the oven is
turned off.
How to set
the oven for
baking
Oven Mode knob Temperature knob
C
D
B
A
E
The oven has 5 rack positions. See the Full extension oven racks
section for how to use, remove and replace the racks.
Type of Food Rack Position
Angel food cake A
Biscuits or muffins B or C
Cookies or cupcakes B or C
Brownies B or C
Layer cakes B or C
Bundt or pound cakes A or B
Pies or pie shells B or C
Single pie B or C
Frozen pies B or C (on cookie sheet)
Casseroles B or C
13
Aluminum
foil
You can use aluminum foil to line the broiler
pan and broiler grid. However, you must mold
the foil tightly to the grid and cut slits in it just
like the grid.
Broiling
Wall Oven
Introduction
to broiling
Different broil elements are used in each
broil mode as described below. There are
3 different broil modes, each providing a HI
and a LO setting.
• The HI setting can be used to seal in
juices or provide intense browning or
charring when needed (a higher rack
is generally used).
• The LO setting can be used when foods
need adequate browning and also need to
be thoroughly cooked through (a lower
rack is used for large food items such as
pork tenderloin or London Broil).
Dual Broil – Both the inside and outside
broil elements are used in this broil mode.
Use this mode for full broiler pan food loads.
See the How to set the oven for broiling section.
HI – Full broiler pan – hamburgers; roast
vegetables such as whole peppers, eggplant,
corn, assorted cut vegetables, kabobs and very
thin meats such as smoked pork chops
LO – Full broiler pan – fish fillets
Std Broil – Uses the inner element only – use
for smaller food loads. See the How to set the
oven for broiling section.
HI – Small food quantity – (2–4) hamburgers
or 1/2″–1″ pork chops or steaks
LO – Small food quantity – (2–4) chicken
breasts or fish fillets
Convection Broil – Uses both the inside and
outside broil elements and the convection fan.
See the How to set the oven for convection broiling
section.
HI – 1
1
⁄
2
″–2″ thick steaks, London Broil
and chicken breasts (seals in juices without
overbrowning)
LO – Large pork tenderloin or beef roast
(provides adequate browning along with
thorough cooking)
Outer broil
element
Inner broil
element
14
If the meat has fat or gristle around the
edge, cut vertical slashes through both about
2″ apart. If desired, the fat may be trimmed,
leaving a layer about 1/8″ thick.
Place the meat or fish on the broiler pan
and grid. Always use the grid so that any
fat will drip into the broiler pan; otherwise
the juices may become hot enough to catch
on fire.
Position rack in oven.
Close the door. Always broil with the door
closed.
Turn the Oven Mode knob to DUAL BROIL
(for larger food quantities) or STD BROIL
(for smaller food quantities).
Turn the Temperature knob to LOW BROIL
or HIGH Broil. The broiling temperature
will be automatically set.
LO or HI will appear in the display
depending on the automatic broil
temperature selected.
The oven and the oven interior lights will
turn on immediately and stay on until the
oven is turned off.
When broiling is finished, turn the
Oven Mode knob and the Temperature
knob to OFF.
NOTE: A cooling fan will turn on to cool
internal parts. This is normal, and the fan
may continue to run even after the oven is
turned off.
The broiler does not need to be preheated
for most broiling. However, foods that cook
quickly, such as thin strips of meat or fish
may require a short preheating period of
2 to 3 minutes to allow the food surface to
brown in the same time the food takes to
be cooked throughout.
Turn the food only once during broiling.
NOTE: Broil will not work if the temperature
probe is plugged in. Never leave your probe
inside the oven during a broil cycle.
Broiling
Wall Oven
How to set
the oven
for broiling
Close the door. Always broil with the door closed.
Oven Mode knob Temperature knob
15
Using the Probe for Roasting
Wall Oven
Temperature
probe
For many foods, especially roasts and poultry,
internal food temperature is the best test for
doneness. The temperature probe takes the
guesswork out of roasting by cooking foods to
the exact doneness you want.
Use of probes other than the one provided
with this product may result in damage to the
probe.
Use the handles of the probe and plug when
inserting and removing them from the meat
and oven outlet.
• To avoid damaging the probe, do not use
tongs to pull on the cable when removing it.
• To avoid breaking the probe, make sure food
is completely defrosted before inserting.
• To prevent possible burns, do not unplug
the probe from the outlet until the oven
has cooled.
• Never leave the probe inside the oven
during a broil or self-cleaning cycle.
• Do not store the probe in the oven.
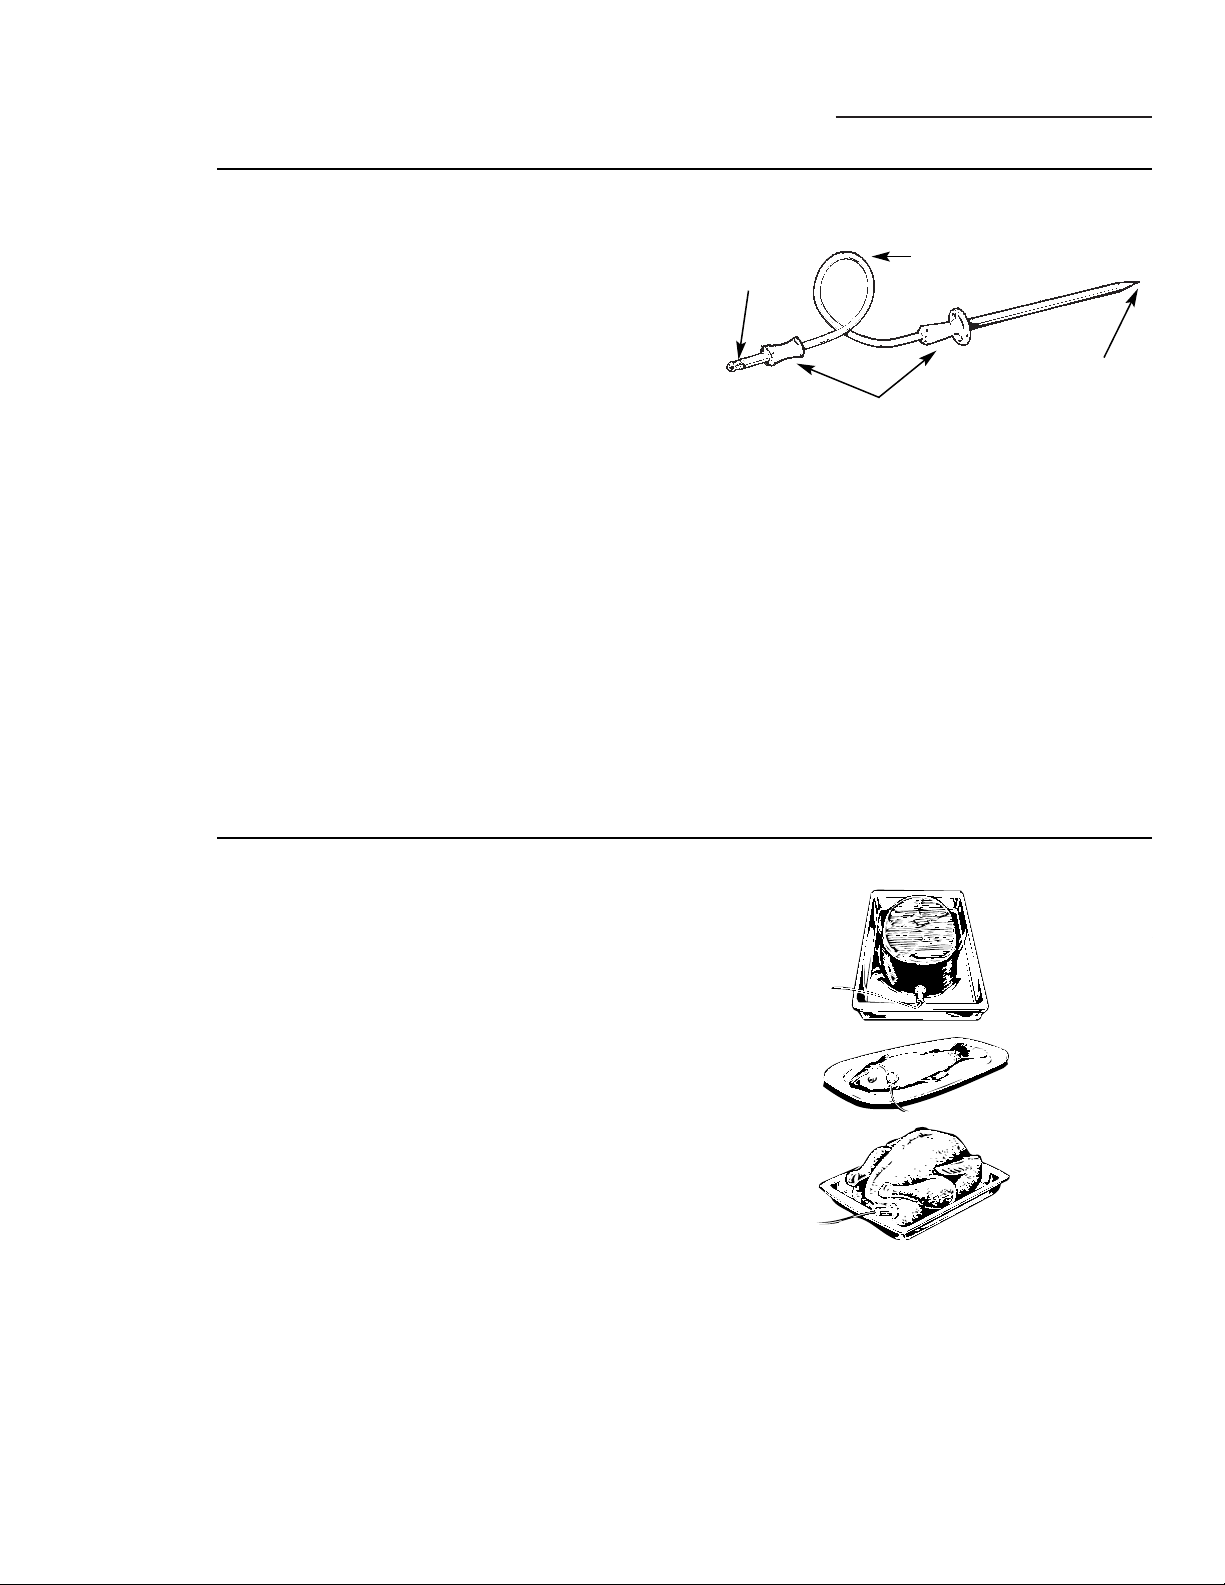
Cable
Probe
Handles
Plug
The temperature probe has a skewer-like probe at one end and a plug
at the other end that goes into the outlet in the oven.
Proper
placement
of the probe
After preparing the meat and placing it on
the broiler pan grid, follow these directions for
proper probe placement.
• The tip of the probe should rest in the center
of the thickest meaty part of the roast.
• The probe must be inserted completely into
the meat, up to the handle, in order for it to
read the temperature properly. It should not
touch the bone, fat or gristle.
For roasts with no bone, insert the probe into
the meatiest part of the roast. For bone-in ham
or lamb, insert the probe into the center of the
lowest large muscle or joint.
Insert the probe into the center of dishes such
as meat loaf or casseroles. When cooking fish,
insert the probe from just above the gill into
the meatiest area, parallel to the backbone.
Insert the probe into the meatiest part of the
inner thigh from below and parallel to the leg
of a whole turkey.
16
How to set
the oven for
roasting
when using
the probe
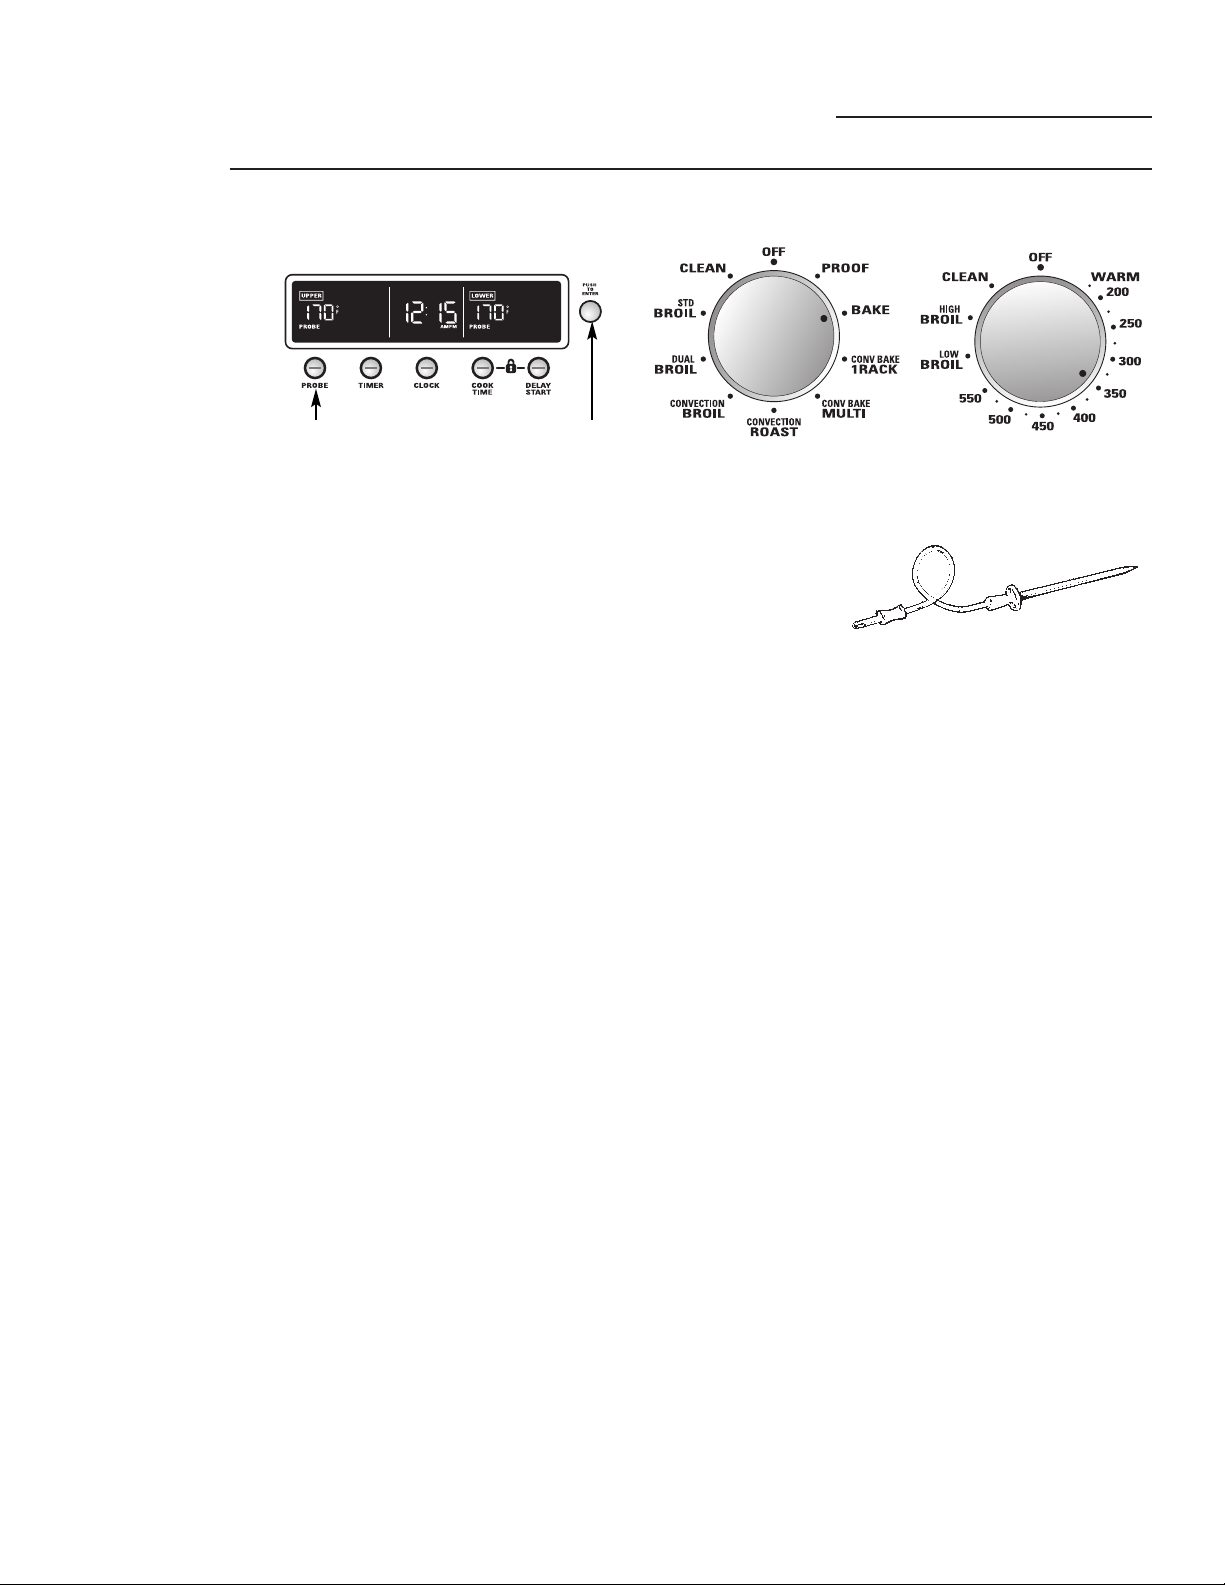
1 Insert the probe into the meat.
2 Plug the probe into the outlet in the oven.
Make sure it is pushed all the way in.
Close the oven door.
3 Push the PROBE button.
NOTE: On double wall oven models, the oven
control will automatically set the oven that has the
probe plugged into it.
4 Turn the Mini-Knob to select and push it
to enter the desired internal food or meat
temperature. The minimum and maximum
internal temperatures for the food that you
can enter are 100°F to 200°F.
“PROBE” will flash in the display if the probe is
inserted into the outlet and you have not entered a
probe temperature.
5 Turn the Oven Mode knob to BAKE. For
convection roasting with the probe, see the
How to set the oven for convection roasting with
the probe section.
6 Using the Temperature knob, set the desired
oven temperature, in 25°F increments, from
200°F to 550°F.
The oven and the oven interior lights will
turn on immediately and stay on until the
oven is turned off.
The convection fan will turn on (after a
short delay), the PROBE light will turn on
and 100°F will appear in the display. (The
temperature display will start to change once
the internal temperature of the meat reaches
100°F.)
Using the Probe for Roasting
Wall Oven
Temperature knob
Mini-Knob
Turn to select
Push to enter
Push to select
Double oven display shown.
CAUTION: To prevent possible burns, do not unplug
the probe from the oven outlet until the oven has
cooled. Do not store the probe in the oven.
7 When the internal temperature of the
meat reaches the number you have set,
the probe and the oven turn off, END will
show in the display and the oven control will
beep. (PROBE will remain lit along with the
probe temperature.) To stop the reminder
beep, turn the Oven Mode knob and the
Temperature knob to OFF or push the
Mini-Knob. Use hot pads to remove the
probe from the food. Do not use tongs
to pull on it—they might damage it.
“PROBE” will flash in the display until the probe
is removed from the oven receptacle.
To change the set internal food or meat
(probe) temperature during the Roast cycle,
push the PROBE button, turn the Mini-Knob
to select the new temperature and push to
enter it.
• You can use the timer even though you
cannot use timed oven operations.
Oven Mode knob
17
Using the Convection Oven
Wall Oven
Convection
fan
In a convection oven, a fan circulates hot air
over, under and around the food.
This circulating hot air is evenly distributed
throughout the oven cavity. As a result, foods
are evenly cooked and browned—often in less
time with convection heat.
NOTE: The convection fan will cycle on and off
while cooking to best distribute hot air in the oven.
The convection fan shuts off when the oven door is
opened. DO NOT leave the door open for long periods
of time while using convection cooking or you may
shorten the life of the convection heating element.
Cookware for
convection
cooking
Before using your convection oven, check
to see if your cookware leaves room for air
circulation in the oven. If you are baking with
several pans, leave space between them. Also,
be sure the pans do not touch each other or
the walls of the oven.
Paper and Plastic
Heat-resistant paper and plastic containers that
are recommended for use in regular ovens can
be used in convection ovens. Plastic cookware
that is heat-resistant to temperatures of 400°F
can also be used.
NOTE: Do not allow any paper or plastic to come
into contact with the upper broil element.
Metal and Glass
Any type of cookware will work in your
convection oven. However, metal pans heat the
fastest and are recommended for convection
baking.
Darkened or matte-finished pans will bake
faster than shiny pans.
Glass or ceramic pans cook more slowly.
When baking cookies, you will get the best
results if you use a flat cookie sheet instead
of a pan with low sides.
For recipes like oven-baked chicken, use a pan
with low sides. Hot air cannot circulate well
around food in a pan with high sides.
Adapting
recipes
You can use your favorite recipes in the
convection oven.
When convection baking, reduce baking
temperature by 25°F. No temperature
adjustment is necessary when convection
roasting.
Use pan size recommended.
Some package instructions for frozen
casseroles or main dishes have been developed
using commercial convection ovens. For best
results in this oven, preheat the oven and use
the temperature on the package.
1-Rack
convection
baking
When convection baking with only 1 rack,
use CONV BAKE 1 RACK and for best results
place the rack on rack position B or C at the
center of the oven. Cook times may decrease,
so food should be checked earlier than
package directions to make sure that it
does not overcook.
Ideal for cooking large casseroles and lasagna
with good results.
Multi-rack
convection
baking
Because heated air is circulated evenly
throughout the oven, foods can be baked
with excellent results using multiple racks.
The amount of time required for multi-rack
baking may increase slightly for some foods,
but overall time is saved because two to three
times as much food is cooked at once.
Cookies, muffins, biscuits and other quick
breads give good results with multi-rack baking.
Convection Baking is ideal for evenly browned
baked foods cooked on single or multiple racks.
When set on Convection Bake, the rear bake
element and the fan operate whenever the oven is
heating.
Turn the Oven Mode knob to CONV BAKE/
1 RACK (Convection Bake 1-Rack mode) for 1-
rack convection baking. This mode is used for
cooking food items on only 1 rack in
convection bake.
Turn the Oven Mode knob to CONV
BAKE/MULTI (Convection Bake Multi
mode) for multi-rack convection baking.
This mode is used for cooking food items on
more than one rack (i.e. 2, 3 or more racks)
at the same time in Convection Bake. See the
Multi-rack convection baking section for more
information.
Using the Temperature knob, set the desired
temperature, in 25°F increments, from 200°F
to 550°F.
The oven and the oven interior lights will turn
on immediately and stay on until the oven is
turned off.
The convection fan will turn on (after a
short delay), the PREHEAT light will turn
on and 100°F will appear in the display.
(The temperature display will start to change
once the oven temperature reaches 100°F.)
The control will beep when the oven is
preheated—this will take approximately 10 to
15 minutes. The PREHEAT light will turn off
and the display will show the set temperature.
When the PREHEAT light goes off, place food
in the oven.
Check the food for doneness at the minimum
time on the recipe. Cook longer if necessary.
Turn the Oven Mode knob and the
Temperature knob to OFF when convection
cooking is finished.
NOTE: A cooling fan will turn on to cool internal
parts. This is normal, and the fan may continue to
run even after the oven is turned off.
Type of Food Rack Position
Biscuits (1 rack) B or C
Biscuits (2 racks) A & C or B & D
Muffins and Cupcakes (1 rack) B or C
Muffins and Cupcakes (2 racks) A & C or B & D
Cookies (1 rack) B or C
Cookies (3 racks) A, C & E
2-Layer Cakes (1 rack) B or C
4-Layer Cakes (2 racks) A & C or B & D
1 Frozen Pie (1 rack) B or C
(on cookie sheet)
2 Frozen Pies (2 racks) A & C or B & D
(on cookie sheet)
Casseroles (1 rack) B or C
12″ Frozen Pizza (1 rack) B or C
2–12″ Frozen Pizzas (2 racks) A & C or B & D
Roasting (large cuts of meat, A, B or C
turkeys, etc.)
18
How to set
the oven for
convection
baking
Oven Mode knob Temperature knob
Convection Baking
Wall Oven
The oven has 5 rack positions. See the Full extension oven racks
section for how to use, remove and replace the racks.
C
D
B
A
E
NOTE: These rack positions are suggestions—use
racks which give best results. Racks A and D are
another suggestion.

19
Convection Roasting
Wall Oven
Convection Roasting is good for roasting large
tender cuts of meat, uncovered.
Turn the Oven Mode knob to
CONVECTION ROAST.
Using the Temperature knob, set the desired
temperature, in 25°F increments, from
200°F to 550°F.
The oven and the oven interior lights will
turn on immediately and stay on until and
the oven is turned off.
The convection fan will turn on (after a
short delay), the PREHEAT light will turn
on and 100°F will appear in the display.
(The temperature display will start to
change once the oven temperature
reaches 100°F.) The control will beep
when the oven is preheated—this will
take approximately 10 to 15 minutes.
The PREHEAT light will turn off and
the display will show the set temperature.
Check the food for doneness at the
minimum time on the recipe. Cook longer
if necessary.
Turn the Oven Mode knob and
the Temperature knob to OFF when
convection cooking is finished.
NOTE: A cooling fan will turn on to cool
internal parts. This is normal, and the fan
may continue to run even after the oven is
turned off.
How to set
the oven for
convection
roasting
Oven Mode knob Temperature knob
Convection
roasting
tips
Using the broiler pan and grid provided, heated
air will be circulated over, under and around the
food being roasted. The heated air seals in juices
quickly for a moist and tender interior while, at the
same time, creating a rich golden brown exterior.
When you are convection roasting, it is important
that you use the broiler pan and grid. The pan is
used to catch grease spills and the grid is used to
prevent grease spatters and allow heated air to
circulate under the meat and increase browning
on the underside of the meat or poultry.
• Place the grid on the broiler pan.
Grid
Broiler pan

20
How to set
the oven for
convection
roasting
with the
probe
See the Convection roasting tips section.
1 Place the rack in the desired rack position
and insert the probe into the meat.
2 Plug the probe into the outlet in the oven.
Make sure it is pushed all the way in.
Close the oven door.
3 Push the PROBE button.
NOTE: On double wall oven models, the oven
control will automatically set the oven that has
the probe plugged into it.
4 Turn the Mini-Knob to select and push it
to enter the desired internal food or meat
temperature. The minimum and maximum
internal temperatures for the food that you
can enter are 100°F to 200°F.
“PROBE” will flash in the display if the probe is
inserted into the outlet and you have not entered
a probe temperature.
5 Turn the Oven Mode knob to
CONVECTION ROAST.
6 Using the Temperature knob, set the desired
oven temperature, in 25°F increments, from
200°F to 550°F.
The oven and the oven interior lights will
turn on immediately and stay on until the
oven is turned off.
The convection fan will turn on (after a
short delay), the PROBE light will turn on
and 100°F will appear in the display. (The
temperature display will start to change once
the internal temperature of the meat reaches
100°F.)
Convection Roasting with the Probe
Wall Oven
Temperature knob
Mini-Knob
Turn to select
Push to enter
Push to select
Double oven display shown.
CAUTION: To prevent possible burns, do not unplug
the probe from the oven outlet until the oven has
cooled. Do not store the probe in the oven.
7 When the internal temperature of the
meat reaches the number you have set,
the probe and the oven turn off, END will
show in the display and the oven control will
beep. (PROBE will remain lit along with the
probe temperature.) To stop the reminder
beep, turn the Oven Mode knob and the
Temperature knob to OFF or push the
Mini-Knob. Use hot pads to remove the
probe from the food. Do not use tongs
to pull on it—they might damage it.
“PROBE” will flash in the display until the probe
is removed from the oven receptacle.
To change the set internal food or meat
(probe) temperature during the Roast cycle,
push the PROBE button, turn the Mini-Knob
to select the new temperature and push to
enter it.
• If the probe is removed from the food before
the final temperature is reached, a tone will
sound and the display will flash until the
probe is removed from the oven.
• You can use the timer even though you
cannot use timed oven operations.
Oven Mode knob
21
Convection
roasting
guide
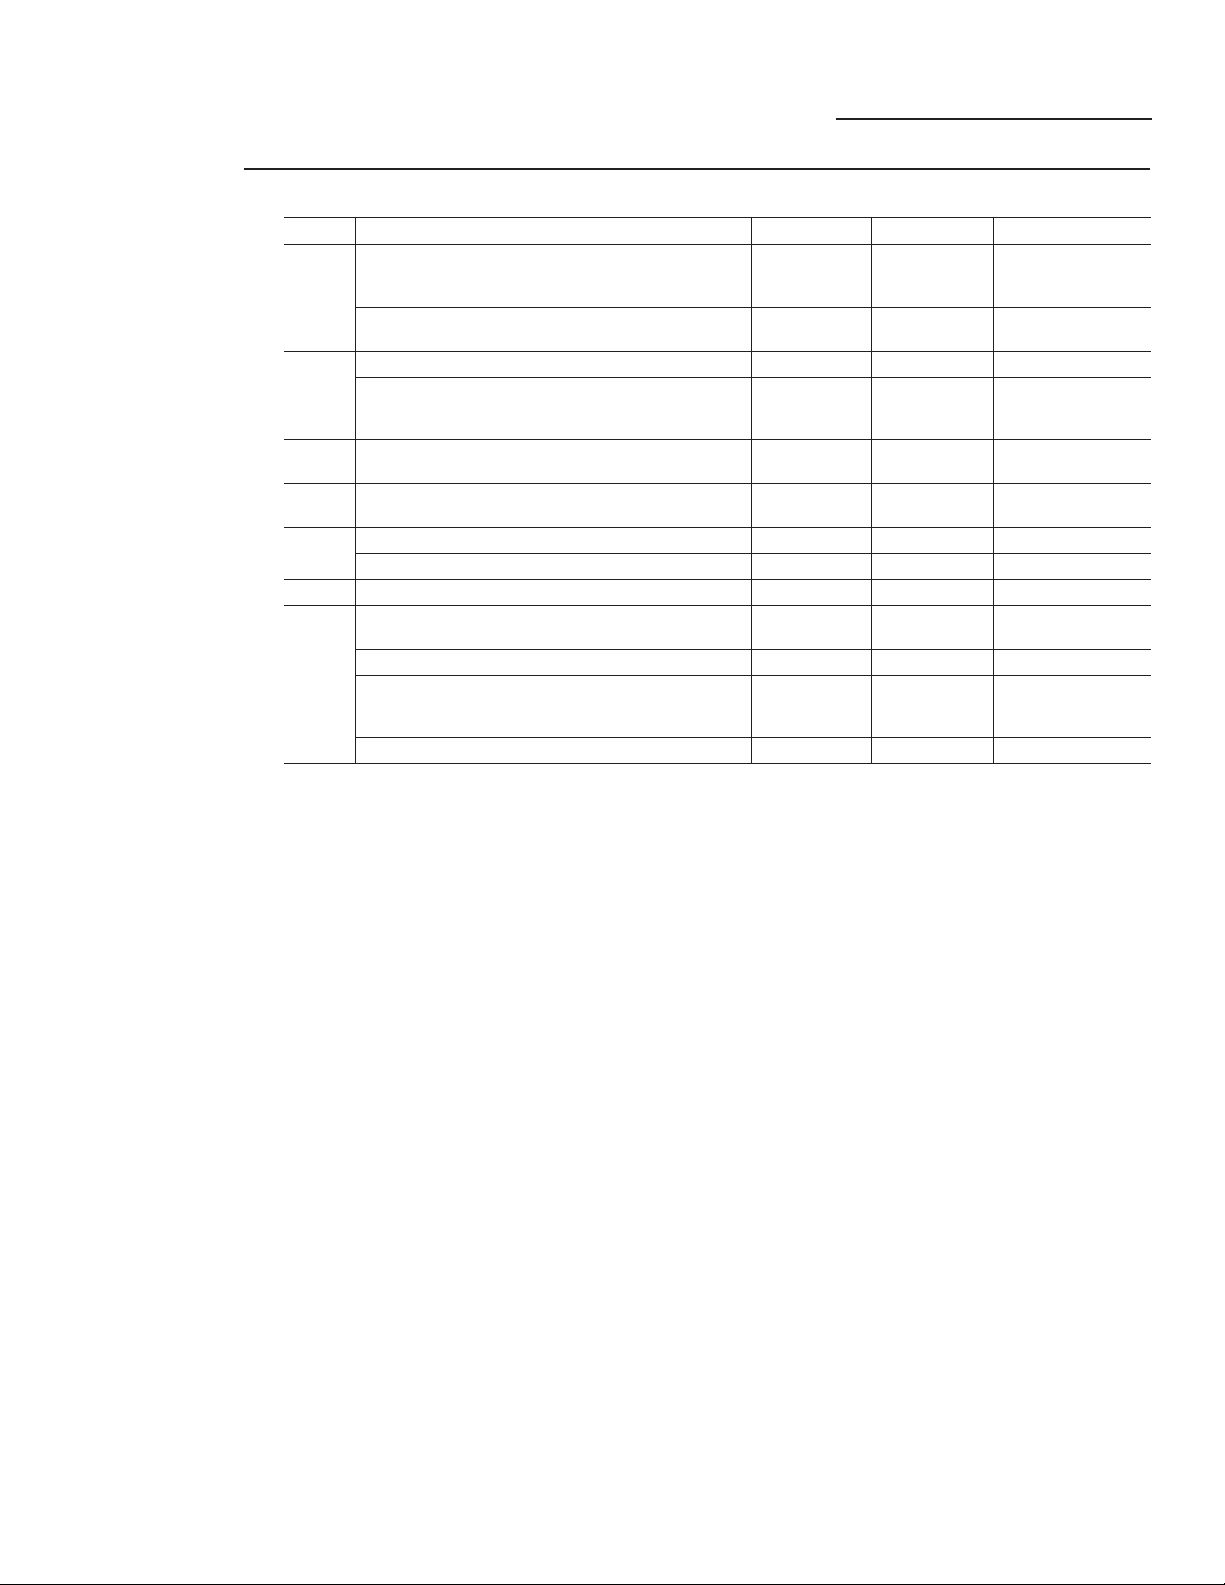
Meats Minutes/Lb. Oven Temp. Internal Temp.
Beef Rib, Boneless Rib, Rare 20–24 325°F 140°F†
Top Sirloin Medium 24–28 325°F 160°F
(3 to 5 lbs.) Well 28–32 325°F 170°F
Beef Tenderloin Rare 10–14 325°F 140°F†
Medium 14–18 325°F 160°F
Pork Bone-in, Boneless (3 to 5 lbs.) 23–27 325°F 170°F
Chops (1/2 to 1″ thick) 2 chops 30–35 total 325°F 170°F
4 chops 35–40 total 325°F 170°F
6 chops 40–45 total 325°F 170°F
Ham Canned, Butt, Shank (3 to 5 lbs.) 14–18 325°F 140°F
(fully cooked)
Lamb Bone-in, Boneless (3 to 5 lbs.) Medium 17–20 325°F 160°F
Well 20–24 325°F 170°F
Seafood Fish, whole (3 to 5 lbs.) 30–40 total 400°F
Lobster Tails (6 to 8 oz. each) 20–25 total 350°F
Poultry Whole Chicken (2
1
⁄2 to 3
1
⁄2 lbs.) 24–26 350°F 180°–185°F
Cornish Hens Unstuffed (1 to 1
1
⁄2
lbs.) 50–55 total 350°F 180°–185°F
Stuffed (1 to 1
1
⁄2
lbs.) 55–60 total 350°F 180°–185°F
Duckling (4 to 5 lbs.) 24–26 325°F 180°–185°F
Turkey, whole*
Unstuffed (10 to 16 lbs.) 8–11 325°F 180°–185°F
Unstuffed (18 to 24 lbs.) 7–10 325°F 180°–185°F
Turkey Breast (4 to 6 lbs.) 16–19 325°F 170°F
* Stuffed birds generally require 30–45 minutes additional roasting time. Shield legs and breast with foil to prevent over-browning and
drying of skin.
† The U.S. Department of Agriculture says “Rare beef is popular, but you should know that cooking it to only 140°F means some food
poisoning organisms may survive.” (Source: Safe Food Book. Your Kitchen Guide. USDA Rev. June 1985.)
Convection Roasting
Wall Oven
22
Convection Broil is good for broiling fish or
smaller cuts of meat. When set at Convection
Broil, both top elements operate whenever
heating.
If the meat has fat or gristle around the
edge, cut vertical slashes through both about
2″ apart. If desired, the fat may be trimmed,
leaving a layer about 1/8″ thick.
Place the meat or fish on the broiler pan
and grid. Always use the grid so that any
fat will drip into the broiler pan; otherwise
the juices may become hot enough to catch
on fire.
Position rack in oven.
Close the door. Always broil with the door
closed.
Turn the Oven Mode knob to
CONVECTION BROIL.
Turn the Temperature knob to LOW BROIL
or HIGH Broil. The broiling temperature
will be automatically set. LO or HI will
appear in the display depending on the
automatic broil temperature selected.
The oven and the oven interior lights will
turn on immediately and stay on until the
oven is turned off.
The convection fan will turn on (after a
short delay).
When broiling is finished, turn the
Oven Mode knob and the Temperature
knob to OFF.
NOTE: A cooling fan will turn on to cool
internal parts. This is normal, and the fan
may continue to run even after the oven is
turned off.
The broiler does not need to be preheated
for most broiling. However, foods that cook
quickly, such as thin strips of meat or fish,
may require a short preheating period of
2 to 3 minutes to allow the food surface to
brown in the same time the food takes to
be cooked throughout.
Turn the food only once during broiling.
NOTE: Convection broil will not work if
the temperature probe is plugged in. Never
leave your probe inside the oven during a
broil cycle.
Convection Broiling
Wall Oven
How to set
the oven for
convection
broiling
Close the door. Always broil with the door closed.
Aluminum
foil
You can use aluminum foil to line the broiler
pan and broiler grid. However, you must mold
the foil tightly to the grid and cut slits in it just
like the grid.
Oven Mode knob
Temperature knob
23
Timed Cooking
Wall Oven
Timed cooking allows you to set the oven
to turn on immediately, cook for a selected
length of time and turn off automatically.
To set the oven to turn on immediately and
turn off automatically:
NOTE: Before beginning, make sure the clock
shows the correct time of day.
To avoid possible burns, place the racks in the
correct position before turning on the oven.
Turn the Oven Mode knob to the desired
cooking function.
NOTE: Timed cooking cannot be set for the
Broil or Proof features.
Using the Temperature knob,
set the desired temperature, in 25°F
increments, from 200°F to 550°F.
The oven and the oven interior lights will
turn on immediately and stay on until the
oven turns off.
The convection fan will turn on (after a
short delay), the PREHEAT light will turn
on and 100°F will appear in the display.
(The temperature display will start to
change once the oven temperature reaches
100°F.) The control will beep when the oven
is preheated—this will take approximately
10 to 15 minutes. The PREHEAT light will
turn off and the display will show the set
temperature.
When the PREHEAT light goes off, place
food in the oven.
Push the COOK TIME button.
NOTE: If your recipe requires preheating,
you may need to add additional time to the
length of cooking time (approximately 10
to 15 minutes).
Turn the Mini-Knob to select and push it
to enter the desired length of cooking time.
(The maximum cooking time is 9 hours and
59 minutes. The minimum cooking time is
1 minute.)
The display will show COOK TIME and the
cooking time countdown.
NOTE: The cook time coundown will start
immediately.
The oven will continue to cook for the
programmed amount of time, then turn off
automatically.
To recall the cook time, push the COOK TIME
button. To change it, turn and push the Mini-
Knob.
At the end of timed cooking, the oven
will turn off, 0:00 will flash quickly, END will
show in the display and the oven control will
beep. To stop the reminder beep, turn the
Oven Mode knob and the Temperature
knob to OFF.
NOTE:
• The WARM (175° shows in the display)
temperature setting of this oven is available to
keep hot cooked foods warm. Food kept in
the oven longer than two hours at these low
temperatures may not be safe to eat.
• Foods that spoil easily, such as milk, eggs, fish,
stuffings, poultry and pork, should not be
allowed to sit for more than one hour before
or after cooking. Room temperature
promotes the growth of harmful bacteria.
Timed
cooking
(immediate
start and
automatic
stop)
Mini-Knob
Turn to select
Push to enter
Push to select
Double oven display shown.

24
Timed
cooking
(delayed
start and
automatic
stop)
Timed cooking with DELAY START allows
you to set the oven to turn on at the time of day
you set, cook for a selected length of time and
turn off automatically. DELAY START cannot
be used with the Sabbath feature.
To delay the start of cooking:
NOTE: Before beginning, make sure the clock
shows the correct time of day.
To avoid possible burns, place the racks in the
correct position before turning on the oven.
NOTE: Timed cooking cannot be set for the Broil
or Proof features.
Push the DELAY START button. The current
time of day will flash in the display.
On double oven models, push the DELAY START
button once to set the upper oven and twice to set the
lower oven.
Turn the Mini-Knob to select and push it to
enter the time of day you want the oven to turn
on and start cooking.
Push the COOK TIME button.
NOTE: If your recipe requires preheating, you
may need to add additional time to the length of
cooking time (approximately 10 to 15 minutes).
Turn the Mini-Knob to select and push it
to enter the desired length of cooking time.
(The maximum cooking time is 9 hours and
59 minutes. The minimum cooking time
is 1 minute.)
Turn the Oven Mode knob to the desired
cooking function.
Using the Temperature knob,
set the desired temperature, in 25°F
increments, from 200°F to 550°F.
To recall the start time, push the DELAY START
button. To change it, turn and push the Mini-
Knob. To recall the cook time, push the COOK
TIME button. To change it, turn and push the
Mini-Knob.
The display will return to the time of day and
show START TIME indicating the oven is set.
When the start time is reached the oven and
the oven interior lights will turn on.
NOTE: The cook time countdown will start
when the delay start time is reached. The display
will show COOK TIME and the cooking time
countdown.
The oven will continue to cook for the
programmed amount of time, then turn off
automatically.
At the end of timed cooking, the oven will turn
off, 0:00 will flash quickly, END will show in the
display and the oven control will beep. To stop
the reminder beep, turn the Oven Mode knob
and the Temperature knob to OFF.
On double oven models, you can use timed baking in
both ovens at the same time. Turn the Oven Mode knob
and the Temperature knob of the second oven to the
desired settings. Push the COOK TIME button and turn
and push the Mini-Knob to enter. Push the DELAY
START button and turn and push the Mini-Knob
to enter.
NOTE:
• The WARM (175° shows in the display)
temperature setting of this oven is available to
keep hot cooked foods warm. Food kept in the
oven longer than two hours at these low
temperatures may not be safe to eat.
• Foods that spoil easily, such as milk, eggs, fish,
stuffings, poultry and pork, should not be
allowed to sit for more than one hour before or
after cooking. Room temperature promotes the
growth of harmful bacteria.
Timed Cooking
Wall Oven
Mini-Knob
Turn to select
Push to enter
Push to
select
Double oven display shown.
Push to
select
25
Proofing
Wall Oven
How to set
the oven for
proofing
The proofing feature maintains a warm
environment useful for rising yeast-leavened
products.
Place the covered dough in a dish in the
oven on rack A.
Turn the Oven Mode knob to PROOF. The
display will show PrF (proof). Proofing will
not operate when oven is above 125°F. The
display will show “too hot”. Allow the oven
time to cool.
NOTE: For best results, cover the dough with
a cloth or with greased plastic wrap (the plastic
may need to be anchored underneath the
front of the container so the oven fan will
not blow it off).
The proofing feature automatically provides the
optimum temperature for the proofing process;
therefore the Temperature knob does not
affect the proof temperature.
The oven interior lights cycle on and off until
the Oven Mode knob has been turned to OFF.
Set the TIMER for the minimum proof time,
as a reminder to check food.
When proofing is finished, turn the Oven
Mode knob to OFF.
• To avoid lowering the oven temperature and
lengthening proofing time, do not open the
oven door unnecessarily.
• Check bread products early to avoid
over-proofing.
NOTE: Do not use the proofing mode
for warming food or keeping food hot.
The proofing oven temperature is not hot
enough to hold foods at safe temperatures.
The WARM temperature setting of this
oven is available to keep hot cooked foods
warm. Food kept in the oven longer than
two hours at these low temperatures may
not be safe to eat.
Oven Mode knob
26
Self-Cleaning Oven
Wall Oven
Before a
clean cycle
The oven door must be closed and all controls
must be set correctly for the self-clean cycle to
work properly.
We recommend venting your kitchen with
an open window or using a ventilation fan
or hood during the first self-clean cycle.
• Clean soil from the frame around the oven
door and outside the door gasket. These
areas must be cleaned by hand.
• Do not clean the door gasket by hand as this
could damage it.
• Wipe up excess grease and other food spills
with a damp cloth. This will minimize the
amount of smoke created during self-
cleaning.
• Remove all cookware, broiler pan, grid, probe
and any aluminum foil from the oven.
• The oven racks may be left in the oven during
the self-clean cycle.
• Make sure the oven light lens and lens frame
are in place.
• Do not use commercial oven cleaners,
abrasives or oven protectors in or near the
self-cleaning oven.
IMPORTANT: The health of some birds is
extremely sensitive to the fumes given off
during the self-cleaning cycle of any oven.
Move birds to another well-ventilated room.
NOTE: Self-Clean will not work if the
temperature probe is plugged in or if the
Sabbath feature is set.
On double oven models, you can set a clean cycle
in both ovens at the same time. The last oven set will
automatically delay its start until the end of the first
oven’s clean cycle.
On double oven models, you can use timed baking in
one oven and self-clean in the other at the same time.
Turn the Oven Mode knob to CLEAN.
Turn the Temperature knob to CLEAN.
The oven is set to clean for its normal clean
time of 5 hours. (If a clean time less than
5 hours is needed, turn the Mini-Knob to
the clean time desired.) Push to enter it.
You can change the clean time to any
time between 3 and 5 hours, in 15 minute
increments, depending on the amount of soil
in your oven.
NOTE: The Mini-Knob must be pushed for the
self-clean cycle to start.
If your oven is connected to a 208V electrical
supply, we recommend that you set your clean
time for 5 hours.
If LOCKED flashes in the display, the self-clean
cycle has been selected but the door is not
closed. Close the oven door.
The display will show CLEAN and the clean
time remaining.
As the oven heats to the clean temperature,
the door will lock automatically. The LOCKED
light will turn on. The display will show the
clean time remaining. It will not be possible
to open the oven door until the temperature
drops below the lock temperature and the
LOCKED light goes off.
After the clean cycle is complete and
the oven has cooled, END will show in the
display and the LOCKED light will turn
off. Turn the Oven Mode knob and the
Temperature knob to OFF.
To stop a clean cycle, turn the Oven
Mode knob and the Temperature knob
to OFF. When the LOCKED light goes off,
indicating the oven has cooled below the
locking temperature, you will be able
to open the door.
How to set
the oven for
cleaning
Oven Mode knob Temperature knob
Mini-Knob
Turn to select
Push to enter
Double oven display shown.

27
After a
clean cycle
You may notice some white ash in the oven. Wipe it up
with a damp cloth after the oven cools.
If white spots remain, remove them with warm sudsy
water and rinse thoroughly with a vinegar and water
mixture. These deposits are usually a salt residue that
cannot be removed by the clean cycle.
If the oven is not clean after one clean cycle, repeat
the cycle.
You cannot set the oven for cooking until the oven is
cool enough for the door to unlock.
How to
delay the
start of
cleaning
You can set the oven to delay the start of cleaning, clean
for a selected length of time and turn off automatically.
NOTE: Before beginning, make sure the clock shows
the correct time of day.
Turn the Oven Mode knob to CLEAN.
Turn the Oven Temperature knob to CLEAN.
The oven will be set to clean for its normal clean
time of 5 hours. (If a clean time less than 5 hours
is needed, turn the Mini-Knob to the clean time
desired.) Push to enter it.
You can change the clean time to any time between
3 and 5 hours, in 15 minute increments, depending
on the amount of soil in your oven.
NOTE: The Mini-Knob must be pushed for the
self-clean cycle to be set.
Push the DELAY START button. The current time
of day will flash in the display.
On double oven models, push the DELAY START
button once to set the upper oven and twice to set
the lower oven.
Turn the Mini-Knob to select and push it to enter
the time of day you want the oven to turn on and
start cleaning.
NOTE: The Mini-Knob must be pushed for the
self-clean cycle to be set to start at the time of day
entered.
The oven is now set to turn on at the time of day you set
and clean for the set amount of clean time.
If your oven is connected to a 208V electrical supply, we
recommend that you set your clean time for 5 hours.
If LOCKED flashes in the display, the self-clean cycle has
been selected but the door is not closed. Close the oven
door.
To check the start time, push the DELAY START button.
To change it, turn and push the Mini-Knob.
The display will show START TIME. When the start time
is reached, the oven will turn on automatically.
The display will show CLEAN and the clean time
remaining.
As the oven heats to the clean temperature, the door
will lock automatically. The LOCKED light will turn on.
The display will show the clean time remaining.
It will not be possible to open the oven door until the
temperature drops below the lock temperature and the
LOCKED light goes off.
After the clean cycle is complete and the oven
has cooled, END will show in the display and
the LOCKED light will turn off. Turn the Mode
Selector and the Temperature knobs to OFF.
To stop a clean cycle, turn the Mode Selector and
the Temperature knobs to OFF. When the LOCKED
light goes off, indicating the oven has cooled below the
locking temperature, you will be able to open the door.
NOTE: On double oven models, you can set a delay clean
in both ovens at the same time. Turn the Oven Mode knob
and the Temperature knob of the second oven to CLEAN.
The second oven set will automatically delay the start of
cleaning until the end of the first oven’s clean cycle.
Self-Cleaning Oven
Wall Oven
Temperature knob
Mini-Knob
Turn to select
Push to enter
Push to
select
Double oven display shown.
Oven Mode knob
28
Clock and Control Lockout Features
Wall Oven
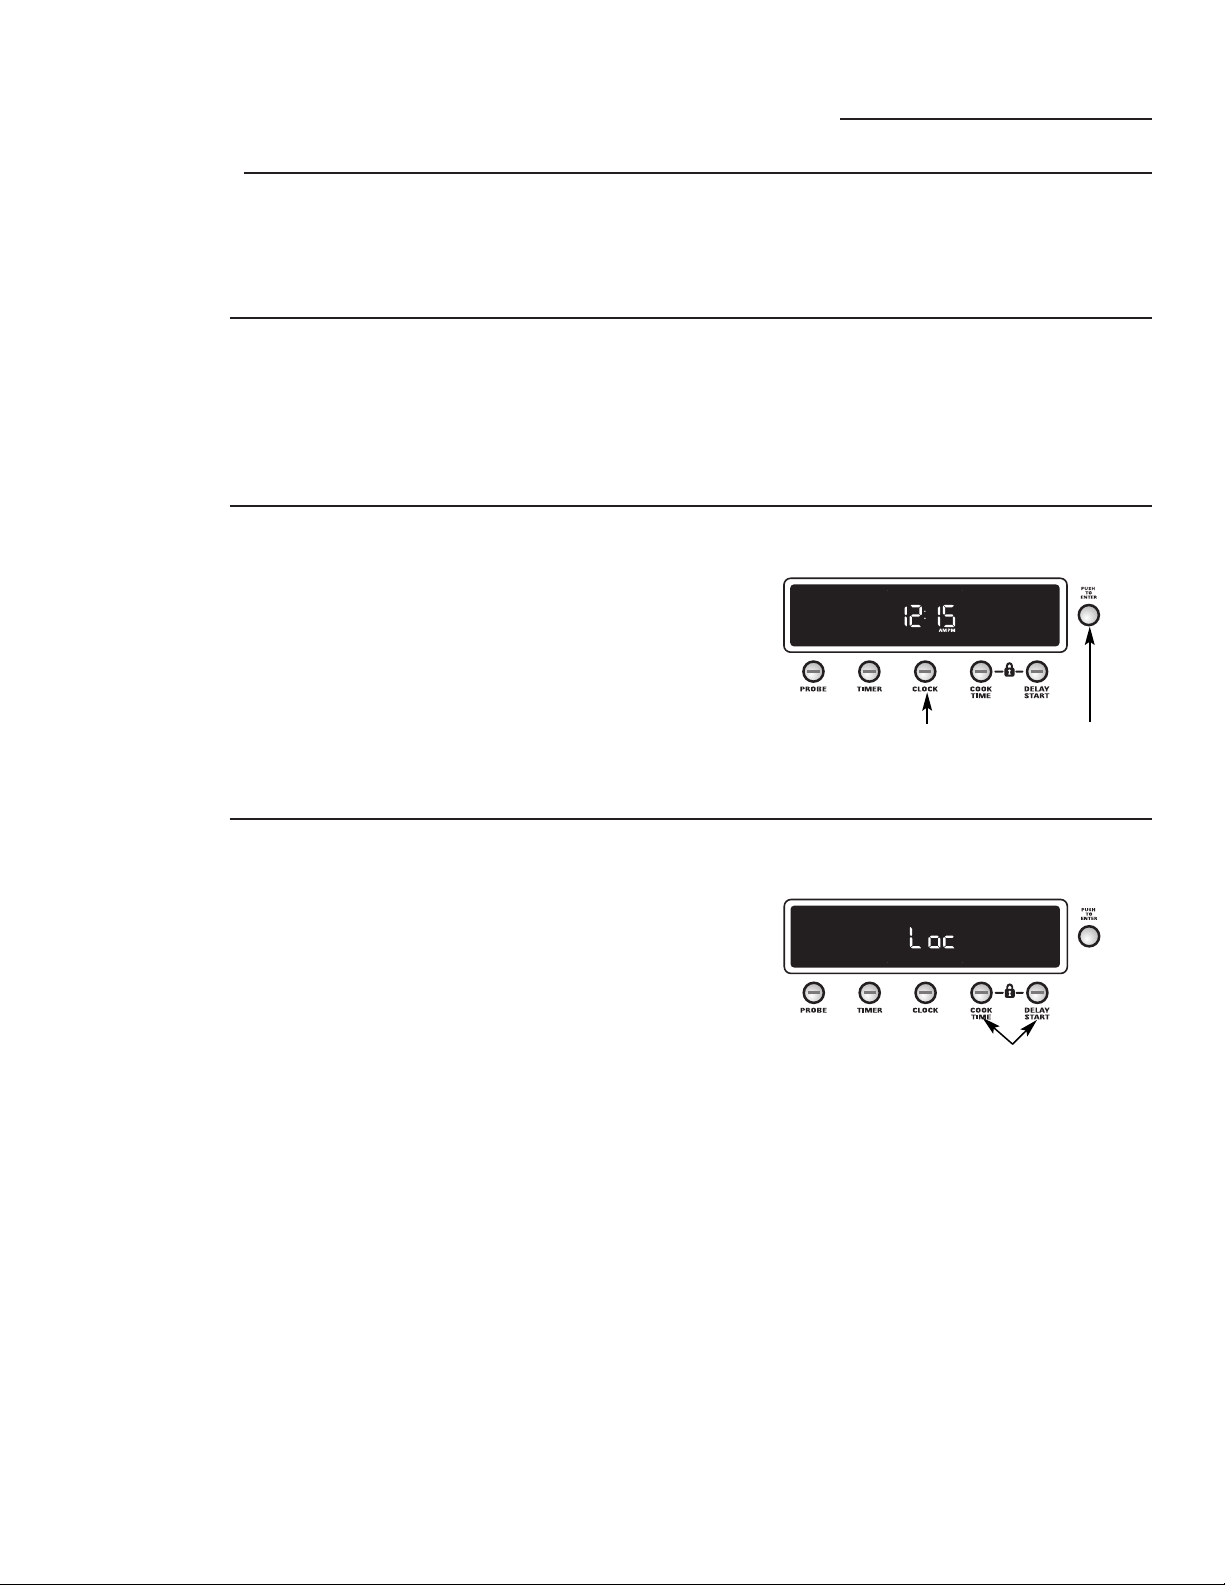
To set
the clock
1 Push the CLOCK button.
2 Turn the Mini-Knob to select the time of day
and push it to enter.
NOTE: While setting, the time will roll
around from AM to PM.
Clock
The clock must be set for the automatic oven timing
functions to work properly.
The time of day clock cannot be changed
during Delay Start. (It can be changed during
a regular bake or broil operation.)
Power
failure
If a flashing time of day is in the display,
you have experienced a power failure.
Reset the clock.
Control
lockout
Allows you to lock out all controls so that
the Oven Mode knob, Temperature knob and
the control panel buttons cannot be activated
when set.
NOTE: On double oven models, this activates this
feature for both ovens.
To lock/unlock the controls:
1 Push and hold the COOK TIME and
DELAY START buttons at the same time
for 3 seconds until the control beeps and
the display shows “Loc.” After locking the
controls, the time of day will appear in the
display.
2 To unlock, push and hold the COOK TIME
and DELAY START buttons at the same time.
(“Loc” will appear in the display). Hold for
3 seconds until the control beeps and “Loc”
disappears from the display.
When this feature is on and the controls are
attempted to be set, the display will show “Loc.”
NOTES:
• If locked while a cooking, cleaning or timed function
are in operation, they will be cancelled.
• The adjustment will be retained in memory after a
power failure.
Double oven display shown.
Double oven display shown.
Mini-Knob
Turn to select
Push to enter
Push to
select
Push and hold at
the same time to
lock/unlock
29
Timer
NOTE: The timer is independent of all the other
functions and it does not control the oven.
You may program the timer to time cooking
or other household activities for up to 11 hours
and 59 minutes.
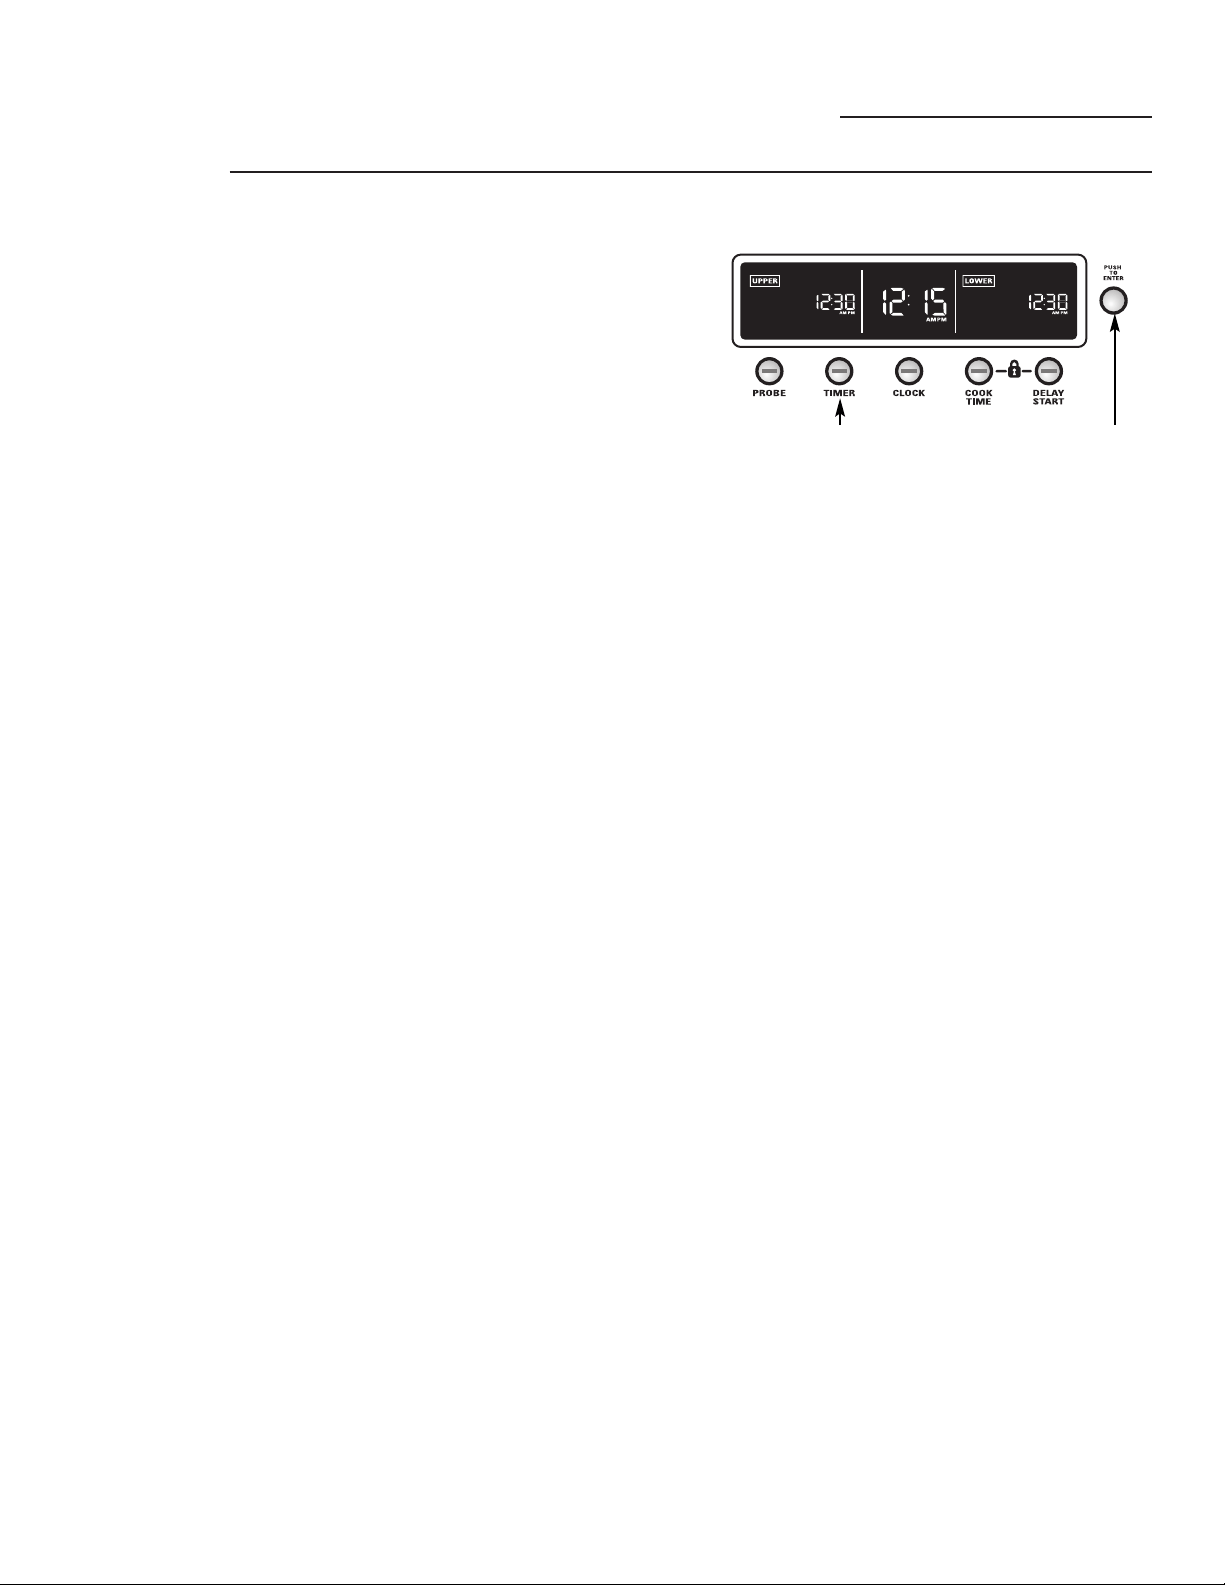
To set the timer:
1 Push the TIMER button.
2 Turn the Mini-Knob to select the length of
time for the timer up to 11 hours and 59
minutes and push to enter it.
On double oven models, a second timer may be set by
pressing the TIMER button twice.
The timer display will show hours and minutes
counting down 1 minute at a time from 24
hours to 1 hour. It will then change to show
minutes and seconds counting down until the
last minute is reached. The control will beep
and the display will show seconds until the
timer counts down to :00.
When the timer reaches :00, the control
will beep 3 times followed by one beep every
6 seconds until the TIMER button is pushed.
The 6-second tone can be cancelled by
following the steps in Tones at the end of a
timed cycle in the Special Features section.
To cancel the timer:
1 Push the TIMER button.
2 Turn the Mini-Knob to :00 and push to enter.
Timer Feature
Wall Oven
Mini-Knob
Turn to select
Push to enter
Push to select
Double oven display shown.
30
Special Features
Wall Oven
Special
features of
your oven
control
Your oven has additional Special Features that you
may choose to use.
They remain in the control’s memory until
the steps are repeated. The Special Features
will remain in memory after a power failure.
Either the Oven Mode knob and/or the
Temperature knob must be turned
to OFF.
On double oven models, either the Oven Mode knob or
the Temperature knob will have to be turned to OFF for
each oven.
NOTE: While in the Special Features mode, if the
Mini-Knob is not pushed to enter a choice after 60
seconds, the mode will be cancelled (without changes)
and the time of day will return to the display.
The following are the features and how you
may activate them.
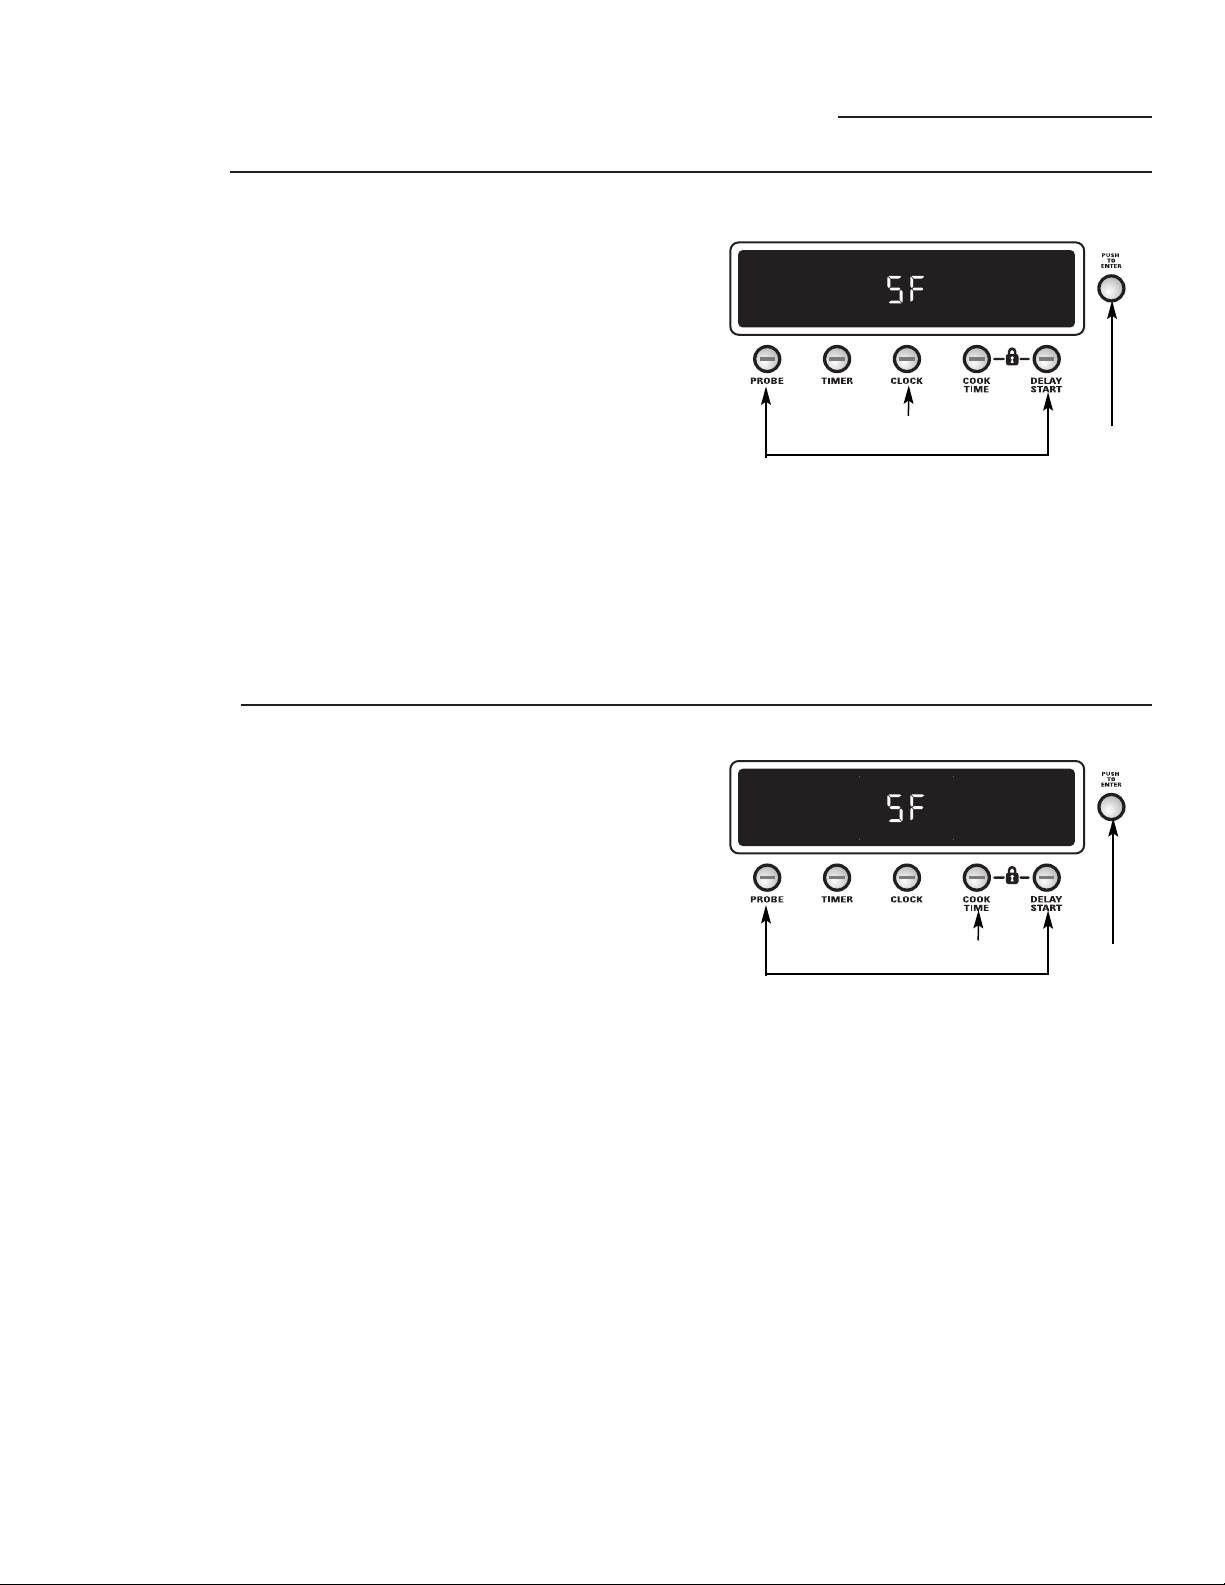
Tones at
the end of a
timed cycle
At the end of a timed cycle, 3 short beeps will sound
followed by one beep every 6 seconds until the TIMER
button is pushed. This continuous 6-second beep may be
cancelled. To cancel the 6-second beep:
1 Push and hold the PROBE and DELAY START
buttons at the same time for 4 seconds until the
display shows SF (Special Features).
2 Push the TIMER button to choose between:
con SF bEEP – Continuous Beeps – Reminder
beeps will sound after a timed cycle has ended
until the TIMER button is pushed.
SF bEEP – No beeps – The reminder beeps
after a timed cycle is cancelled.
3 Push the Mini-Knob to enter your choice.
4 Push and hold the Mini-Knob for 5 seconds
to exit SF (Special Features) and return to the
time of day clock.
Oven
thermostat
adjustment
You may find that your new oven cooks differently than
the one it replaced. Use your new oven for a few weeks to
become more familiar with it. If you still think your new
oven is too hot or too cold, you can adjust the thermostat
yourself.
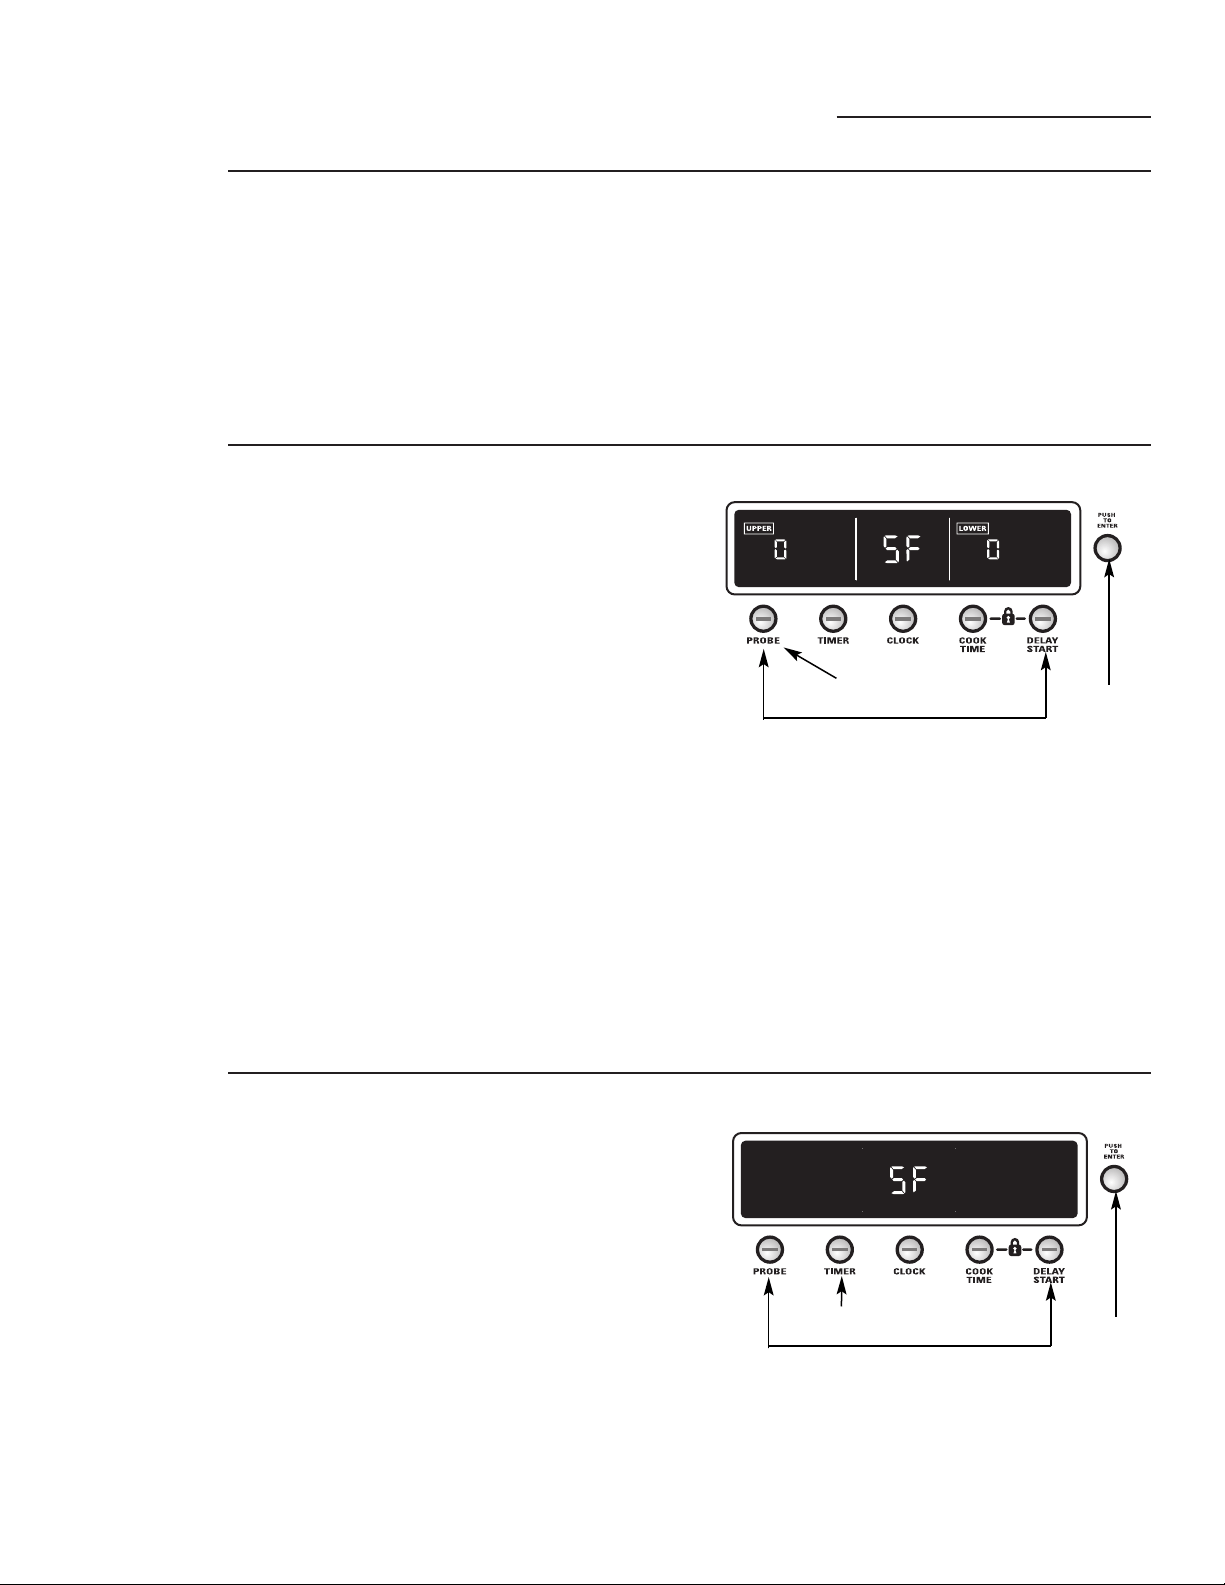
To adjust the oven thermostat:
1 Push and hold the PROBE and DELAY START
buttons at the same time for 4 seconds until the
display shows SF (Special Features).
2 Push the PROBE button. A “0” will show in the
display.
On double wall oven models, a “0” will show in
both the upper and lower oven displays. Push the
PROBE button a 2nd time (“UPPER” will show in
the display) to set the upper oven, and push PROBE
a 3rd time (“LOWER” will show in the display) to
set the lower oven.
3 Turn the Mini-Knob to adjust the oven
thermostat up to 35°F hotter or (-) 35°F cooler
in 1°F increments.
4 Push the Mini-Knob to enter your choice.
3. Mini-
Knob
Push to
enter choice
2. Push to choose.
Double oven display shown.
1. Push and hold at the same time to enter/exit SF.
Double oven display shown.
5 Push and hold the Mini-Knob for 5 seconds
to exit SF (Special Features) and return to the
time of day clock.
Do not use thermometers, such as those found in
grocery stores, to check the temperature setting of
your oven. These thermometers may vary 20–40
degrees.
NOTE: This adjustment will only affect baking
temperatures; it does not affect broiling, convection
or self-cleaning temperatures. The adjustment will
be retained in memory after a power failure.
3. Mini-
Knob
Push to
enter choice
2. Push to choose.
1. Push and hold at the same time to enter/exit SF.
NOTE: On double oven models, this cancels the
end-of-cycle tone for both ovens.
31
Tone
volume
This feature allows you to adjust the tone volumes to a
more acceptable volume. There are three possible volume
levels.
1 Push and hold the PROBE and DELAY
START buttons at the same time for
4 seconds until the display shows SF
(Special Features).
2 Push the COOK TIME button to choose
between:
1 SF bEEP – Quietest Beep Volume.
2 SF bEEP – Middle Beep Volume.
3 SF bEEP – Loudest Beep Volume.
3 Push the Mini-Knob to enter your choice.
4 Push and hold the Mini-Knob for 5 seconds to
exit SF (Special Features) and return to the
time of day clock.
NOTE: On double oven models, this activates this
special feature for both ovens.
Special Features
Wall Oven
12-hour,
24-hour
or clock
blackout
Your control is set to use a 12-hour clock. If you
would prefer to have a 24-hour military time clock or
black out the clock display, follow the steps below.
1 Push and hold the PROBE and DELAY
START buttons at the same time for
4 seconds until the display shows SF
(Special Features).
2 Push the CLOCK button to choose between:
12 hr – 12 hour clock with AM and PM.
24 hr – 24 hour clock – military time.
OFF – blacks out the clock from the disp1ay.
3 Push the Mini-Knob to enter your choice.
4 Push and hold the Mini-Knob for 5 seconds
to exit SF (Special Features).
NOTE: If the clock is in the black-out mode, you will
not be able to use the Delay Start function.
Double oven display shown.
Double oven display shown.
3. Mini-
Knob
Push to
enter choice
2. Push to choose.
1. Push and hold at the same time to enter/exit SF.
3. Mini-
Knob
Push to
enter choice
2. Push to choose.
1. Push and hold at the same time to enter/exit SF.

32
Tone
volume
This feature allows you to adjust the tone volumes to a
more acceptable volume. There are three possible volume
levels.
1 Push and hold the PROBE and DELAY
START buttons at the same time for
4 seconds until the display shows SF
(Special Features).
2 Push the COOK TIME button to choose
between:
1 SF bEEP – Quietest Beep Volume.
2 SF bEEP – Middle Beep Volume.
3 SF bEEP – Loudest Beep Volume.
3 Push the Mini-Knob to enter your choice.
4 Push and hold the Mini-Knob for 5 seconds
to exit SF (Special Features) and return to
the time of day clock.
NOTE: On double oven models, this activates this
special feature for both ovens.
Special Features
Wall Oven
12-hour,
24-hour
or clock
blackout
Your control is set to use a 12-hour clock. If you
would prefer to have a 24-hour military time clock or
black out the clock display, follow the steps below.
1 Push and hold the PROBE and DELAY
START buttons at the same time for
4 seconds until the display shows SF
(Special Features).
2 Push the CLOCK button to choose between:
12 hr – 12 hour clock with AM and PM.
24 hr – 24 hour clock – military time.
OFF – blacks out the clock from the disp1ay.
3 Push the Mini-Knob to enter your choice.
4 Push and hold the Mini-Knob for 5 seconds
to exit SF (Special Features).
NOTE: If the clock is in the black-out mode, you will
not be able to use the Delay Start function.
Double oven display shown.
Double oven display shown.
3. Mini-
Knob
Push to
enter choice
2. Push to choose.
1. Push and hold at the same time to enter/exit SF.
3. Mini-
Knob
Push to
enter choice
2. Push to choose.
1. Push and hold at the same time to enter/exit SF.

33
Control
panel and
knobs
Clean up spatters with a damp cloth. Remove
heavier soil with warm, soapy water.
Do not use abrasives of any kind on the control
panel or knobs.
The control knobs may be removed for easier
cleaning. To remove a knob, pull it straight off
the stem. Wash the knobs in soap and water but
do not soak.
Oven
heating
elements
Do not clean the broil element. Any soil will
burn off when the element is heated.
The bake element is not exposed and is
under the oven floor. If spillovers, residue
or ash accumulate on the oven floor, wipe
up before self-cleaning.
Broiler pan
and grid
After broiling, remove the broiler pan and grid
from the oven. Remove the grid from the pan.
Carefully pour out the grease from the pan into a
proper container. Wash and rinse the broiler pan
and grid in hot water with a soap-filled or plastic
scouring pad.
If food has burned on, sprinkle the grid with
detergent while hot and cover with wet paper
towels or a dishcloth. Soaking the pan will
remove burned-on foods.
The broiler pan and grid may be cleaned
with a commercial oven cleaner.
The broiler pan and grid can also be cleaned
in the dishwasher.
Do not store a soiled broiler pan or grid
anywhere in the oven.
CAUTION: Do not clean the broiler pan or grid
in a self-cleaning oven.
Grid
Broiler pan
BE SURE ELECTRICAL POWER IS OFF AND ALL SURFACES ARE COOL BEFORE CLEANING ANY
PART OF THE OVEN.
Care and Cleaning
Wall Oven
NOTE: The Mini-Knob is not removable.
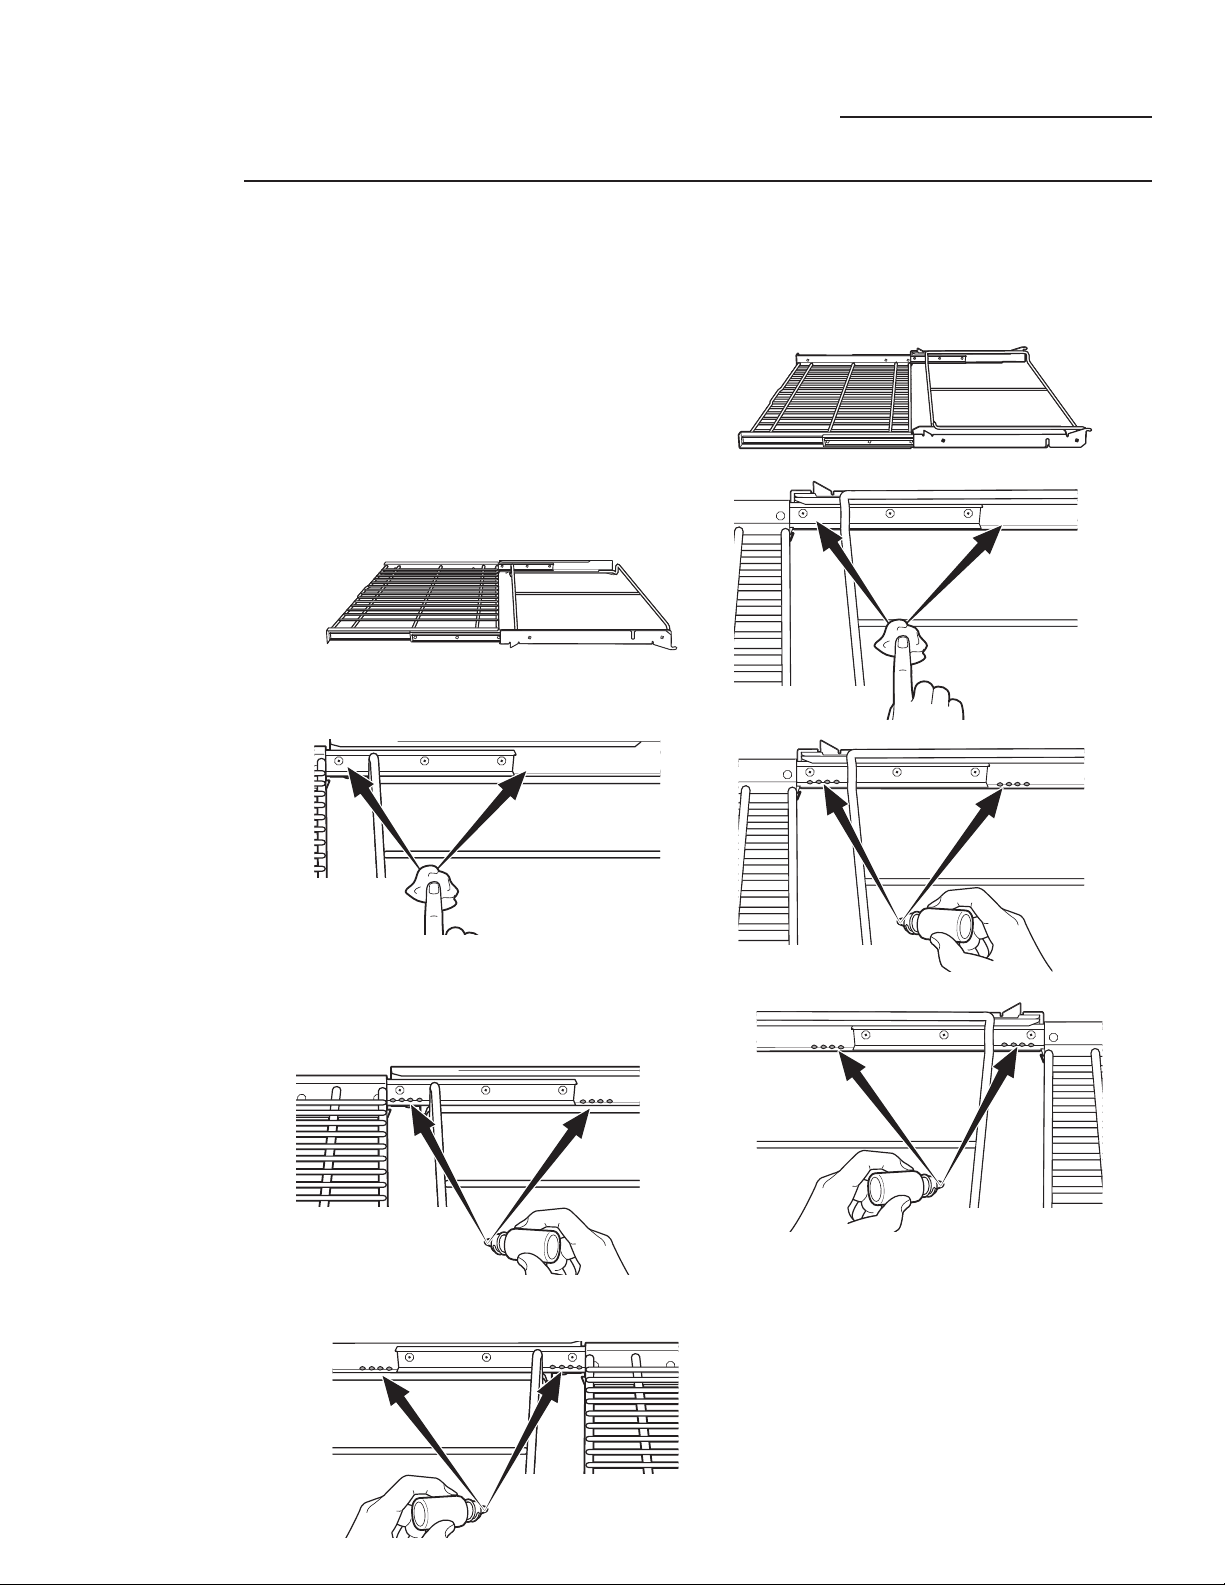
34
Care and Cleaning
Wall Oven
Oven racks
The racks may remain in the oven during the
self-cleaning cycle without being damaged.
Periodically, after several self-clean cycles, the
oven racks may need to be lubricated using
the Graphite Lubrication shipped with your
wall oven. To order additional Graphite
Lubrication, call our National Parts Center
800.626.2002 and reference WB02T10303.
1 Remove rack from the oven. See the Full
extension oven racks section.
2 Fully extend the rack on a table or
countertop. Newspaper may be placed
underneath the rack for easy clean up.
3 If there is debris in the slide tracks, wipe
it away using a paper towel. NOTE: Any
graphite lubricant wiped away must be replaced.
4 Shake the graphite lubricant before opening
it. Starting with left slide mechanism of the
rack, place four (4) small drops of lubricant
on the two (2) bottom tracks of the slide
close to the bearing carriers.
5 Repeat for the right slide mechanism of
the rack.
6 Open and close the rack several times to
distribute the lubricant.
7 Replace the cap on the lubricant and shake
it again. Turn the rack over and repeat steps
3, 4, 5 and 6.
8 Close the rack, turn rack right-side-up and
place in the oven. See the Full extension oven
racks section.
9 Repeat above steps for each rack.
NOTE: Do not spray with Pam
®
or other lubricant
sprays.
Left side
Left side
Right side
Right side
Rack right-side-up
Rack right-side-up
Rack up-side-down
Rack up-side-down
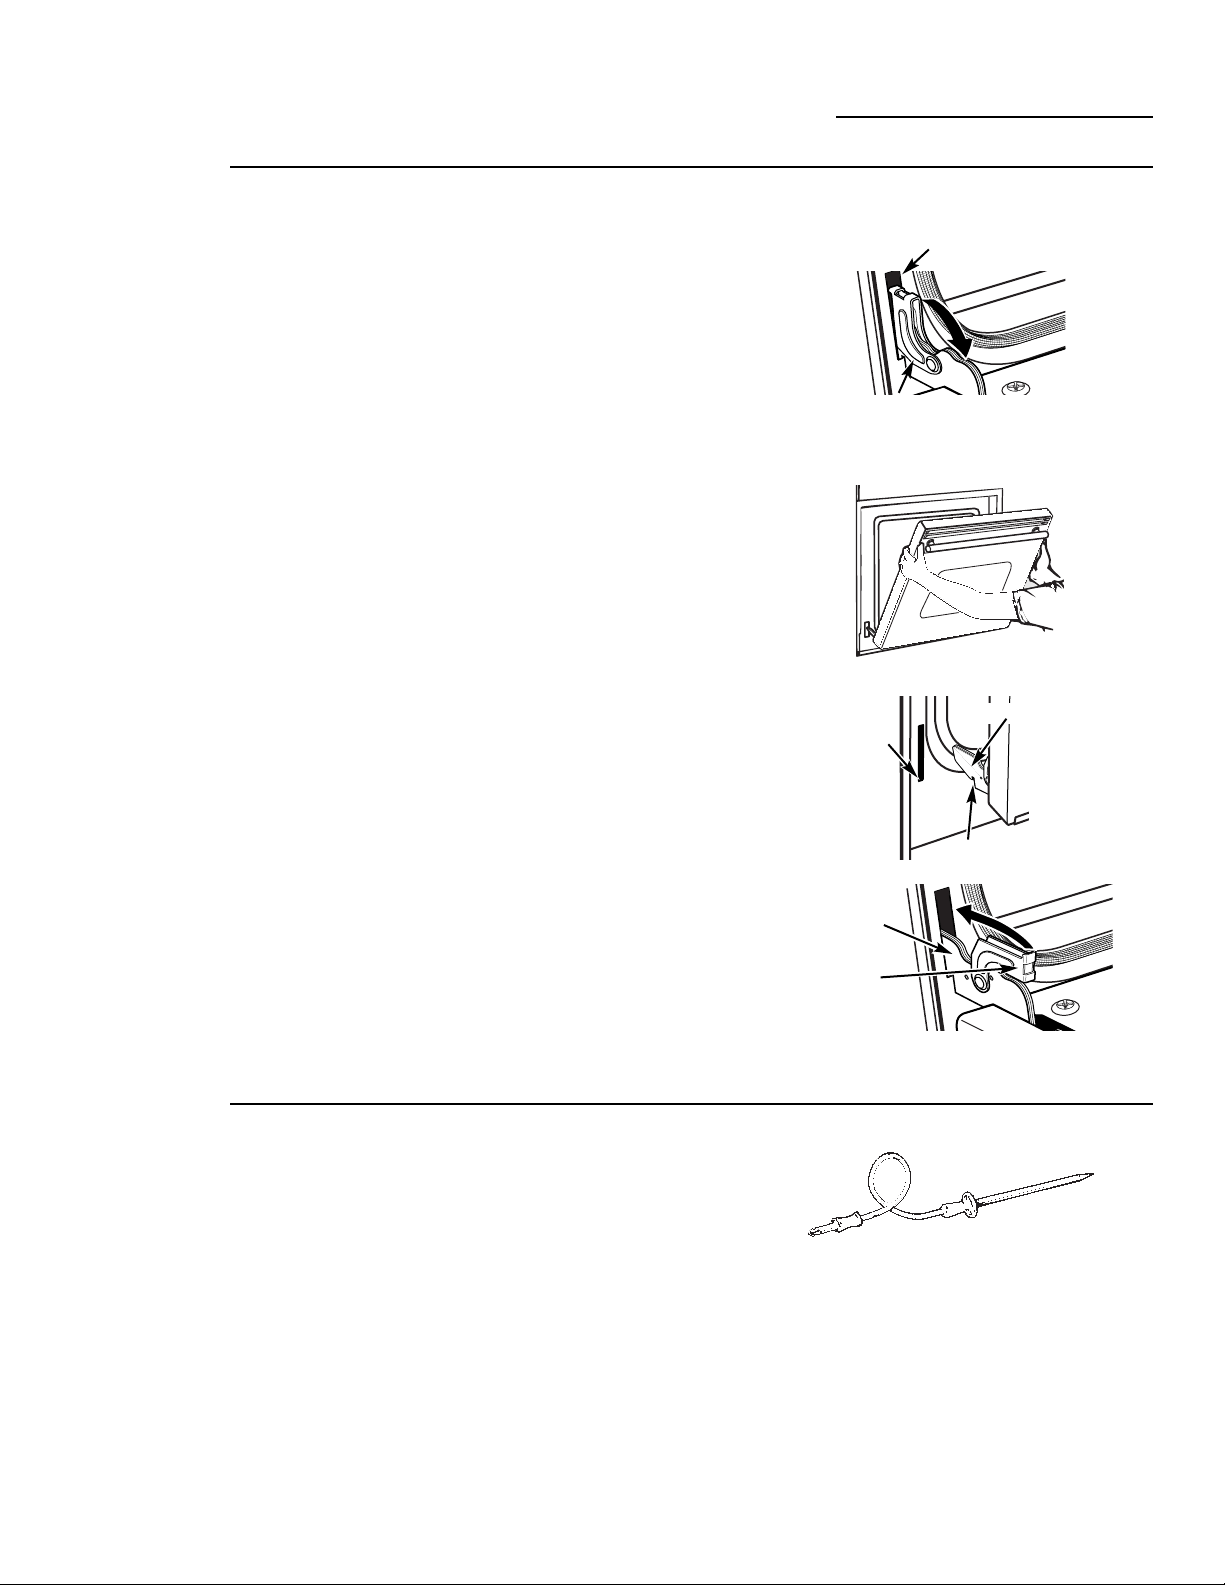
35
Care and Cleaning
Wall Oven
The door is very heavy. Be careful when removing
and lifting the door.
Do not lift the door by the handle.
To remove the door:
1 Fully open the door.
2 Pull the hinge locks down toward the door
frame, to the unlocked position. A tool, such
as a small flat-blade screwdriver, may be
required.
3 Firmly grasp both sides of the door at the top.
4 Close door to the door removal position,
which is most of the way and lift it up and out
until the hinge arm is clear of the slot.
To replace the door:
1 Firmly grasp both sides of the door at the top.
2 With the door at the same angle as the
removal position, seat the indentation of the
hinge arm into the bottom edge of the hinge
slot. The notch in the hinge arm must be
fully seated into the bottom of the slot.
3 Fully open the door. If the door will not fully
open, the indentation is not seated correctly in
the bottom edge of the slot.
4 Push the hinge locks up against the front
frame of the oven cavity, to the locked
position.
5 Close the oven door.
Lift-off
oven
door—
removal
Hinge arm
Indentation
Bottom
edge of
slot
Removal position
Hinge lock
Slot
Pull hinge locks down to unlock
Hinge
lock
Hinge
arm
Push hinge locks up to lock
Probe
The temperature probe may be cleaned with
soap and water or a soap-filled scouring pad.
Cool the temperature probe before cleaning.
Scour stubborn spots with a soap-filled scouring
pad, rinse and dry.
Do not immerse the temperature probe in water.
Do not store the temperature probe in the oven.
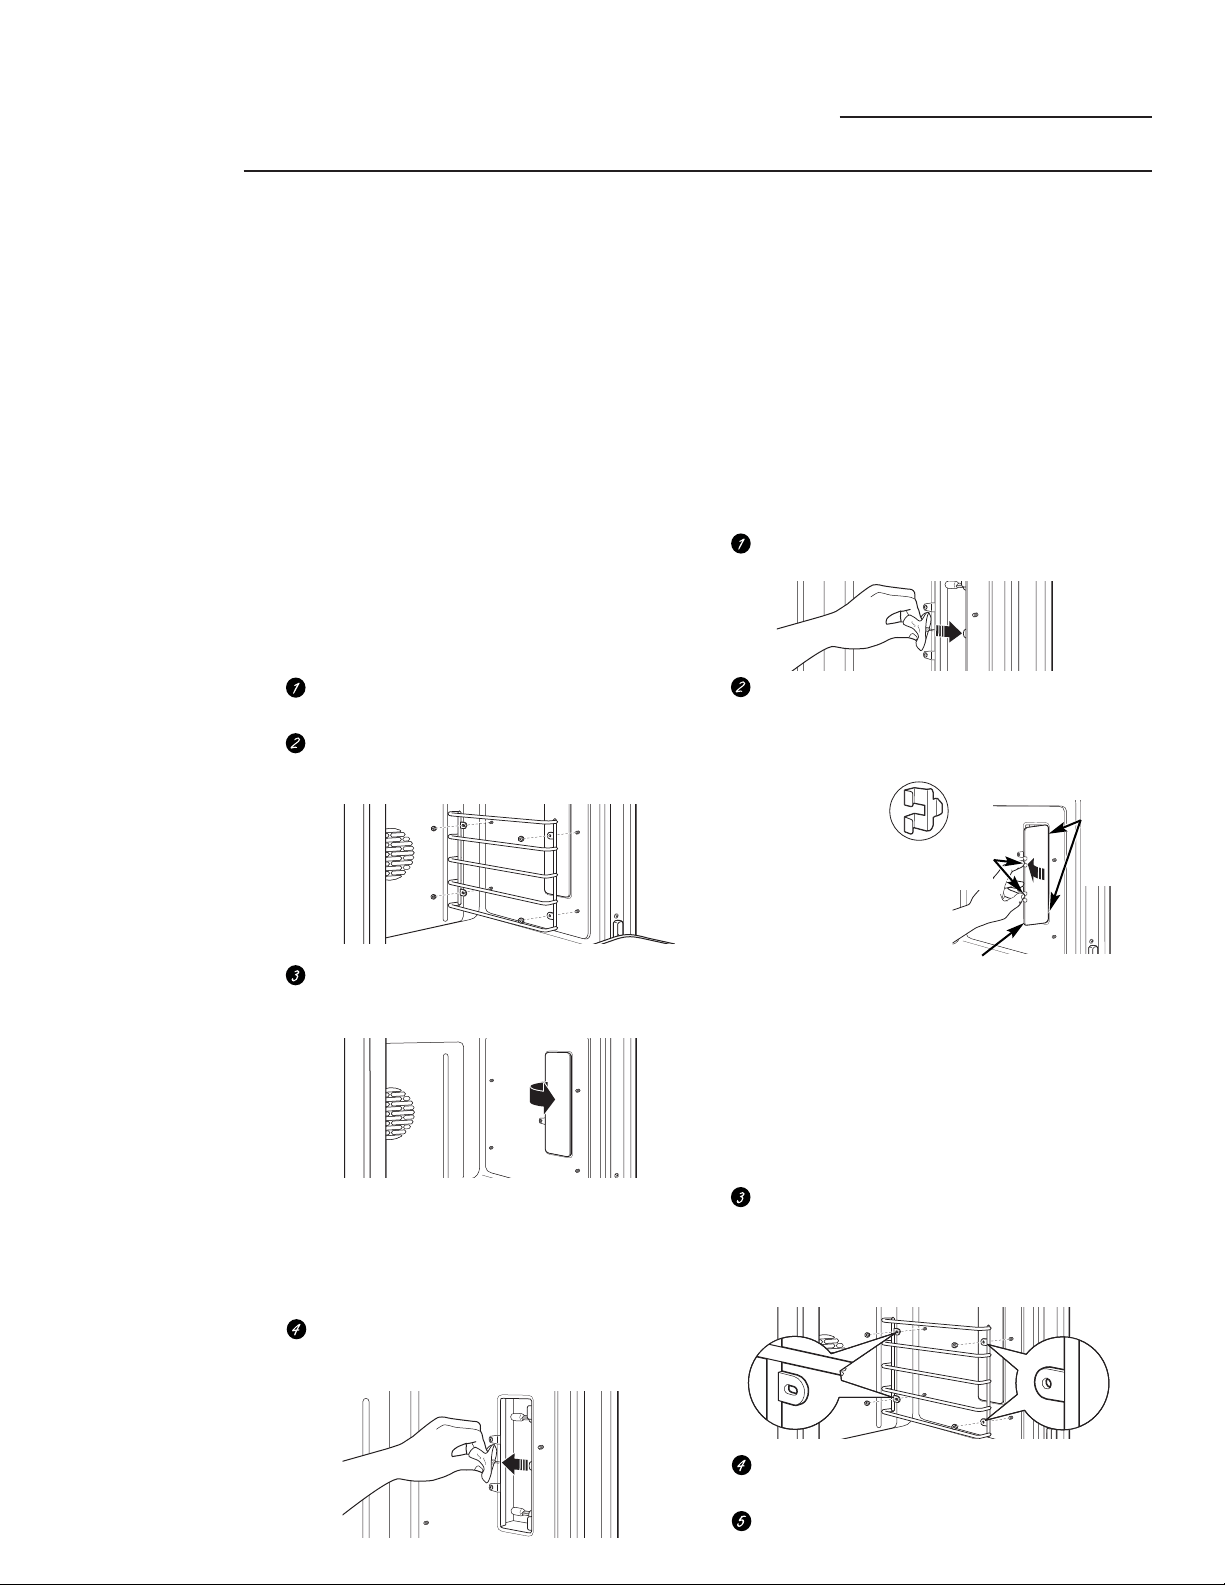
36
Care and Cleaning
Wall Oven
Oven lights
Each oven is equipped with two halogen light
assemblies located on the side walls of the oven.
The lights come on when the door is opened or
when the oven is in a cooking cycle. The oven
lights do not come on during self-cleaning or
if the Sabbath Feature is set.
Each light assembly consists of a removable light
cover with two locking clips, a light compartment
with three light bulb sockets and three halogen
light bulbs.
CAUTION: Before replacing the bulb, disconnect
electrical power to the oven at the main fuse or
circuit breaker panel.
Be sure to let the light cover and bulb cool
completely.
For your safety, do not touch a hot bulb with bare
hands or a damp cloth.
To remove:
Remove the racks from the oven. See the Full
extension oven racks section.
Using an adjustable wrench, remove the four
nuts holding the rack support over the light
assembly.
Remove the glass light cover by pulling its back
edge out and rolling it toward you.
Do not remove any screws.
NOTE: The two locking clips may fall from the
glass light cover. Upon replacement, they will
need to be placed in the correct position on
the light cover and pressed back into the light
compartment until seated.
Using gloves or a dry cloth, remove
the burned-out light bulb by pulling
it straight out.
To replace:
Use a new 120-volt Halogen bulb, with G8 pins,
not to exceed 25 watts.
Replacement bulbs may be purchased by calling
800.626.2002. Order Part Number WB25T10064.
NOTE: Higher wattage bulbs will damage your oven.
Using gloves or a dry cloth, remove the bulb
from its packaging. Do not touch the bulb with
bare fingers. Oil from bare fingers may cause hot
spots on the glass surface and lead to premature
failure of the bulb. If you do touch the glass, clean
it with alcohol prior to installation.
Push the bulb straight into the receptacle all
the way.
Replace the light cover, by placing its
front edge under the front two tabs in the light
compartment. Roll the back edge into place,
making sure that it is firmly seated.
NOTE: If
the locking
clips fell
from the
glass lens cover,
hold them on the
cover, in the correct
position, while
replacing the cover on
the light compartment.
The light cover must be in place when using
the oven.
For improved lighting inside the oven,
clean the glass cover frequently using a wet
cloth. This should be done when the oven is
off, disconnected from the power supply, and
completely cool.
Replace the rack support with the slotted holes
over the rear bolts and the round holes over
the front bolts. Lightly secure with the four
nuts removed earlier, but do not over-tighten
or the enamel could be chipped.
Replace the racks. See the Full extension oven
racks section.
Reconnect electrical power to the oven.
Hold
locking
clips in
place on
lens cover
back edge
Press the light cover
into place
Place front
edge of
lens cover
under
front two
tabs
Round
holes
over
front
bolts
Slotted
holes
over
rear
bolts
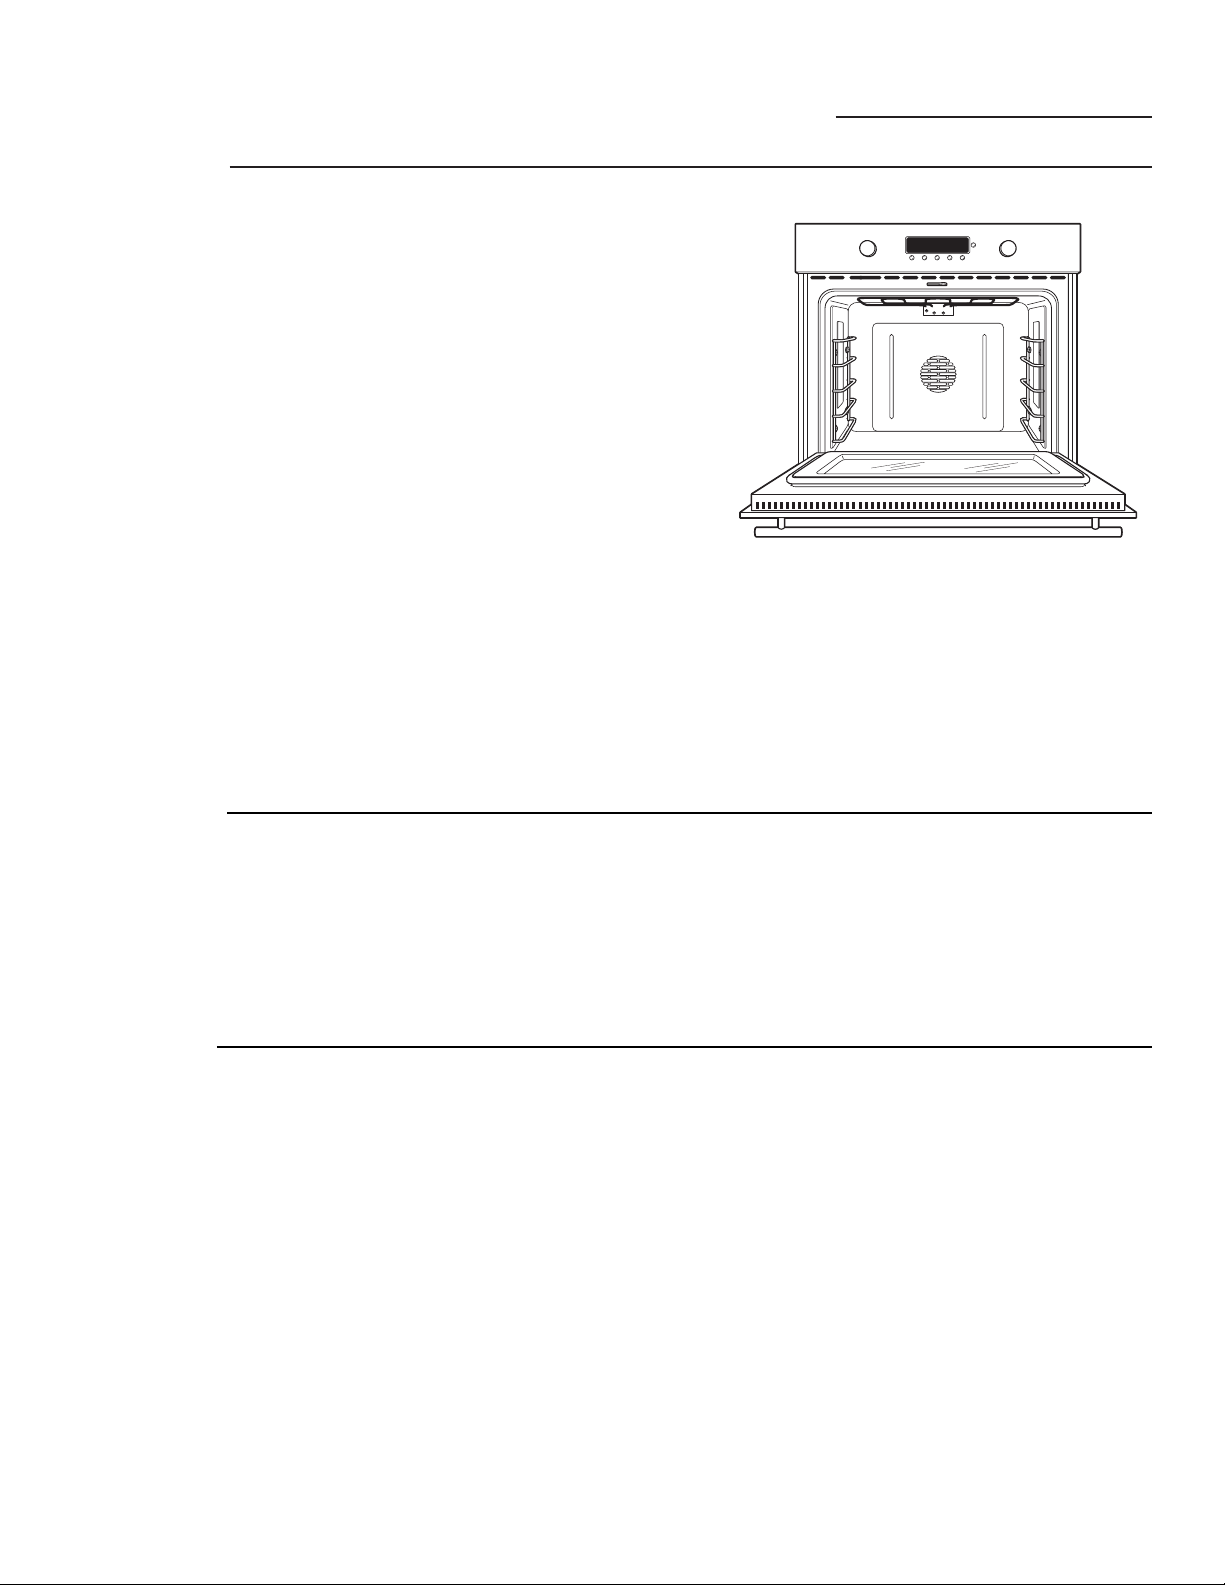
37
To clean
the door
Inside of the door:
• Because the area inside the gasket is cleaned
during the self-clean cycle, you do not need to
clean this by hand. Any soap left on the liner
causes additional stains when the oven is
heated, so be sure to rinse thoroughly.
• The area outside the gasket can be cleaned
with a soap-filled scouring pad.
• Do not rub or clean the door gasket—
the fiberglass material of the gasket has an
extremely low resistance to abrasion. An intact
and well-fitting oven door gasket is essential
for energy-efficient oven operation and good
baking results. If you notice the gasket
becoming worn, frayed or damaged in
any way or if it has become displaced on
the oven, you should have it replaced.
Outside of the door:
• Depending on your model, see the Stainless
steel surfaces section or the Painted surfaces
section.
Care and Cleaning
Wall Oven
Painted surfaces include the door, top
of the control panel and the drawer front.
Clean these with soap and water or a vinegar
and water solution.
Do not use commercial oven cleaners, cleaning
powders, steel wool or harsh abrasives on any
painted surface.
Painted
surfaces (on
some
models)
Do not use a steel-wool pad; it will scratch the
surface.
To clean the stainless steel surface, use
warm sudsy water or a stainless steel cleaner or
polish. Always wipe the surface in the direction
of the grain. Follow the cleaner instructions for
cleaning the stainless steel surface.
To inquire about purchasing stainless steel
appliance cleaner or polish, or to find the
location of a dealer nearest you, please call our
toll-free number, 800.626.2002 or visit ge.com.
Stainless steel
surfaces (on
some models)
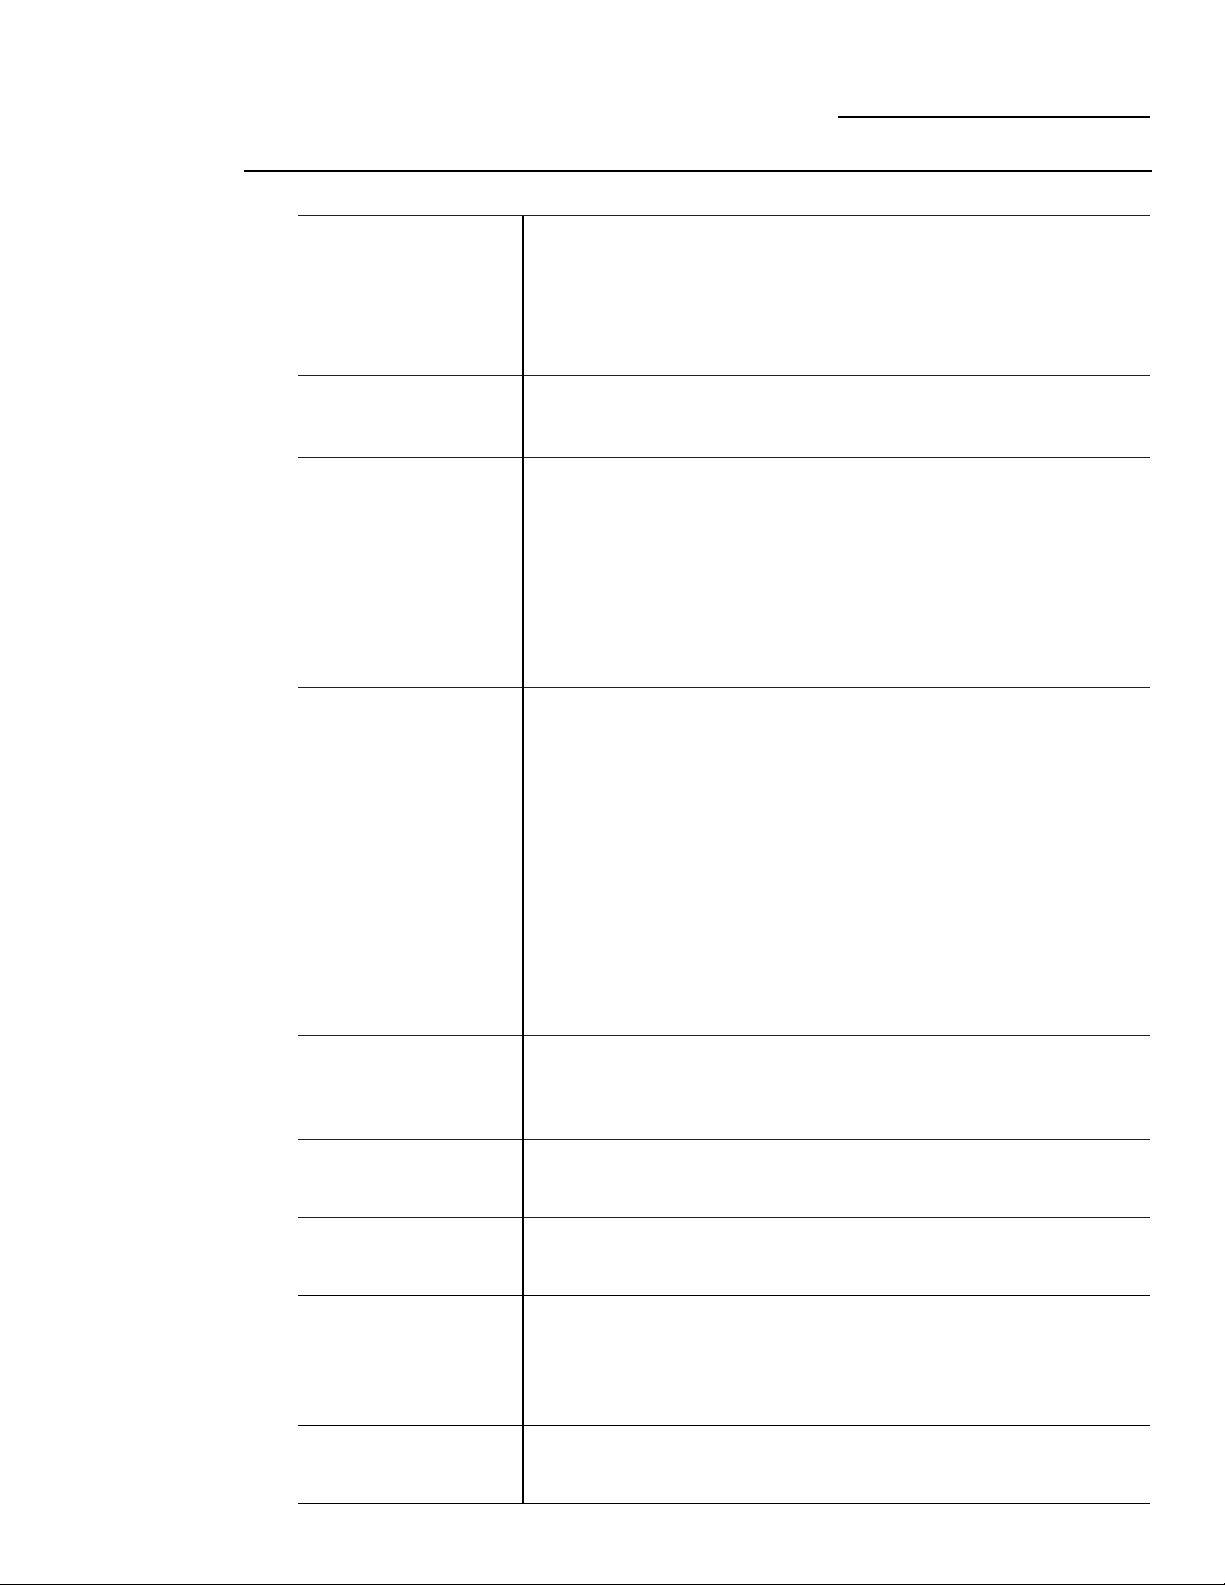
38
PROBLEM POSSIBLE CAUSE
OVEN WILL NOT
•
A fuse in your home may be blown or the circuit breaker tripped.
WORK
•
The oven controls are not properly set.
•
The oven controls are set for cleaning. If necessary, allow the oven to cool;
then open the door.
•
Make sure the Oven Mode knob is set to BAKE and the Temperature knob
is set to a temperature.
OVEN LIGHT(S)
•
The light bulb is defective. Replace the bulb.
DO NOT WORK
•
The oven is self-cleaning or the Sabbath feature is set. The oven lights do
not come on during self-cleaning or if the Sabbath feature is set.
FOOD DOES NOT
•
The oven controls are improperly set. See the Baking or Roasting section.
BAKE OR ROAST
•
Oven not preheated for a long enough time (use approximately 10 to 15
PROPERLY
minutes).
•
Incorrect cookware or cookware of improper size being used. See the Pan
placement section.
•
Racks in the wrong position. See the Baking or Roasting section.
•
Use a foil tent to slow down browning during roasting.
•
Oven thermostat needs adjustment. See the Oven thermostat adjustment
section.
FOOD DOES NOT
•
This model is designed for closed door broiling only. Close the door. Always
BROIL PROPERLY broil with the door closed.
•
The oven controls are not set at BROIL. See the Broiling section.
•
The probe is plugged into the outlet in the oven. Remove the probe from
the oven.
•
Improper rack position being used.
•
Food is being cooked in a hot pan. Use the broiling pan and grid that came
with your oven.
•
Cookware is not suited for broiling. Use the broiling pan and grid that came
with your oven.
•
Aluminum foil used on the broiling pan and grid has not been fitted
properly and slit as recommended.
•
In some areas the power (voltage) may be low. Preheat the broil element
for approximately 10 to 15 minutes.
OVEN WILL NOT
•
The oven temperature is too high to set a self-clean operation.
SELF CLEAN Allow the oven to cool below the locking temperature and reset the
controls.
•
The controls are not properly set. See the Self-Cleaning Oven section.
“CRACKING” OR
•
This is normal. This is the sound of the metal heating and cooling
“POPPING” SOUND during both the cooking and cleaning functions.
DURING CLEANING
EXCESSIVE SMOKING
•
Excessive soil. Turn the Oven Mode and the Temperature knobs
OCCURS DURING
•
to OFF. Open the windows to rid the room of smoke. Wait until the locked
CLEANING
•
door indicator light goes off. Wipe up excess soil and reset the clean cycle.
OVEN NOT CLEAN
•
The oven was heavily soiled. Clean up heavy spillovers before starting
AFTER A CLEAN the clean cycle. Heavily soiled ovens may need to self-clean again.
CYCLE
•
Oven is connected to a 208V electrical supply. Set your cleaning
time for 5 hours.
•
The oven controls are not properly set. See the Self-Cleaning Oven section.
OVEN RACKS ARE
•
The racks were cleaned in the self-clean cycle and now need periodic
DIFFICULT TO SLIDE lubrication. Do not spray with Pam
®
or other lubricant sprays. See Full
extension oven racks in the Care and Cleaning section.
The Problem Solver
Wall Oven
Save time
& money!
Review the
troubleshooting
tips on the
following pages
first and you may
not need to call
for service.
39
Save time
& money!
PROBLEM POSSIBLE CAUSE
CLOCK AND TIMER • A fuse in your home may be blown or the circuit breaker tripped.
DO NOT WORK Replace the fuse or reset the circuit breaker.
• Oven controls improperly set. See the Clock and Timer sections.
OVEN • Oven thermostat needs adjustment. See the Oven thermostat
TEMPERATURE adjustment section.
TOO HOT OR
TOO COLD
OVEN DOOR WILL • The oven is too hot. Allow the oven to cool below locking temperature.
NOT OPEN AFTER
A CLEAN CYCLE
LOCKED • The self-clean cycle has been selected but the door is not closed.
FLASHES IN Close the oven door.
THE DISPLAY
LOCKED LIGHT • The oven door is locked because the temperature inside the oven has
IS ON WHEN YOU not dropped below the locking temperature. Turn the Oven Mode
WANT TO COOK and the Temperature knobs to OFF. Allow the oven to cool.
F9 FLASHES • The oven has a function error code. Turn the Oven Mode and the
IN THE DISPLAY Temperature knobs to OFF. Allow the oven to cool for one hour. Put the
oven back into operation.
• Disconnect all power to the oven for 30 seconds and then reconnect
power. If the function error code repeats, call for service.
DISPLAY GOES • A fuse in your home may be blown or the circuit breaker tripped.
BLANK Replace the fuse or reset the circuit breaker.
• The clock is in the black-out mode. See the Special Features section.
DISPLAY FLASHES • Power failure. Reset the clock.
UNABLE TO GET • The PROBE and the DELAY START buttons must be pushed at the
THE DISPLAY TO same time and held for 4 seconds.
SHOW SF
“PROBE” APPEARS • This is reminding you to enter a probe temperature after plugging in
IN THE DISPLAY the probe. Enter a probe temperature.
POWER OUTAGE, • Power outage or surge. Reset the clock. If the oven was in use, you
CLOCK FLASHES must reset it by pushing the CLOCK button, turning and pushing the
Mini-Knob to enter.
STEAM FROM • When using the convection feature, it is normal to see steam coming
THE VENT out of the oven vent. As the number of racks or amount of food being
cooked increases, the amount of visible steam will increase.
“BURNING” OR • This is normal in a new oven and will disappear in time.
“OILY” ODOR
EMITTING FROM
THE VENT
STRONG ODOR • This is temporary. An odor from the insulation around the inside of the
oven is normal for the first few times the oven is used.
FAN NOISE • A cooling fan or a convection fan (depending on the function you are
using) may turn on. This is normal. The cooling fan will turn on to cool
internal parts. It may run after the oven is turned off. The convection fan
may cycle on and off until the function is over or the door is opened.
The Problem Solver
Wall Oven

40
Notes
Wall Oven

41
General Electric Company
Warranty Registration Department
P.O. Box 32150
Louisville, KY 40232-2150
Place
1st Class
Letter
Stamp
Here
GE Appliances
Consumer Product
Ownership Registration
Important Mail Today
42
Consumer Product Ownership Registration
Dear Customer:
Thank you for purchasing our product and thank you for placing your confidence in us. We are proud to
have you as a customer!
Follow these three steps to protect your new appliance investment:
1
Complete and mail
your Consumer
Product Ownership
Registration today.
Have the peace of mind
of knowing we can
contact you in the
unlikely event of a
safety modification.
2
After completing this
registration, write your
model and serial numbers
in this manual. You will
need this information
should you require service.
The service number in the
USA: 800.444.1845. In
Canada: 1.888.880.3030.
3
Read your Owner’s
Manual carefully. It will
help you operate your
new appliance properly.
Important: To ensure that your product is registered, mail the separate product registration card.
If the separate product registration card is missing, fold and mail the form below. No envelope is needed.
Consumer Product Ownership Registration
Product Model Serial
Wall Oven
Important
M
ail
T
o
d
ay!
First
Name
Apt. #
Street
Address
City
Last
Name
Zip
CodeState
Date Placed
In Use
Month Day Year
Phone
Number
TAPE CLOSED
FOLD HERE
Mr. Ms. Mrs.
Miss
General Electric Company
Louisville, KY 40225
Monogram®
✄
✄
✄
ge.com
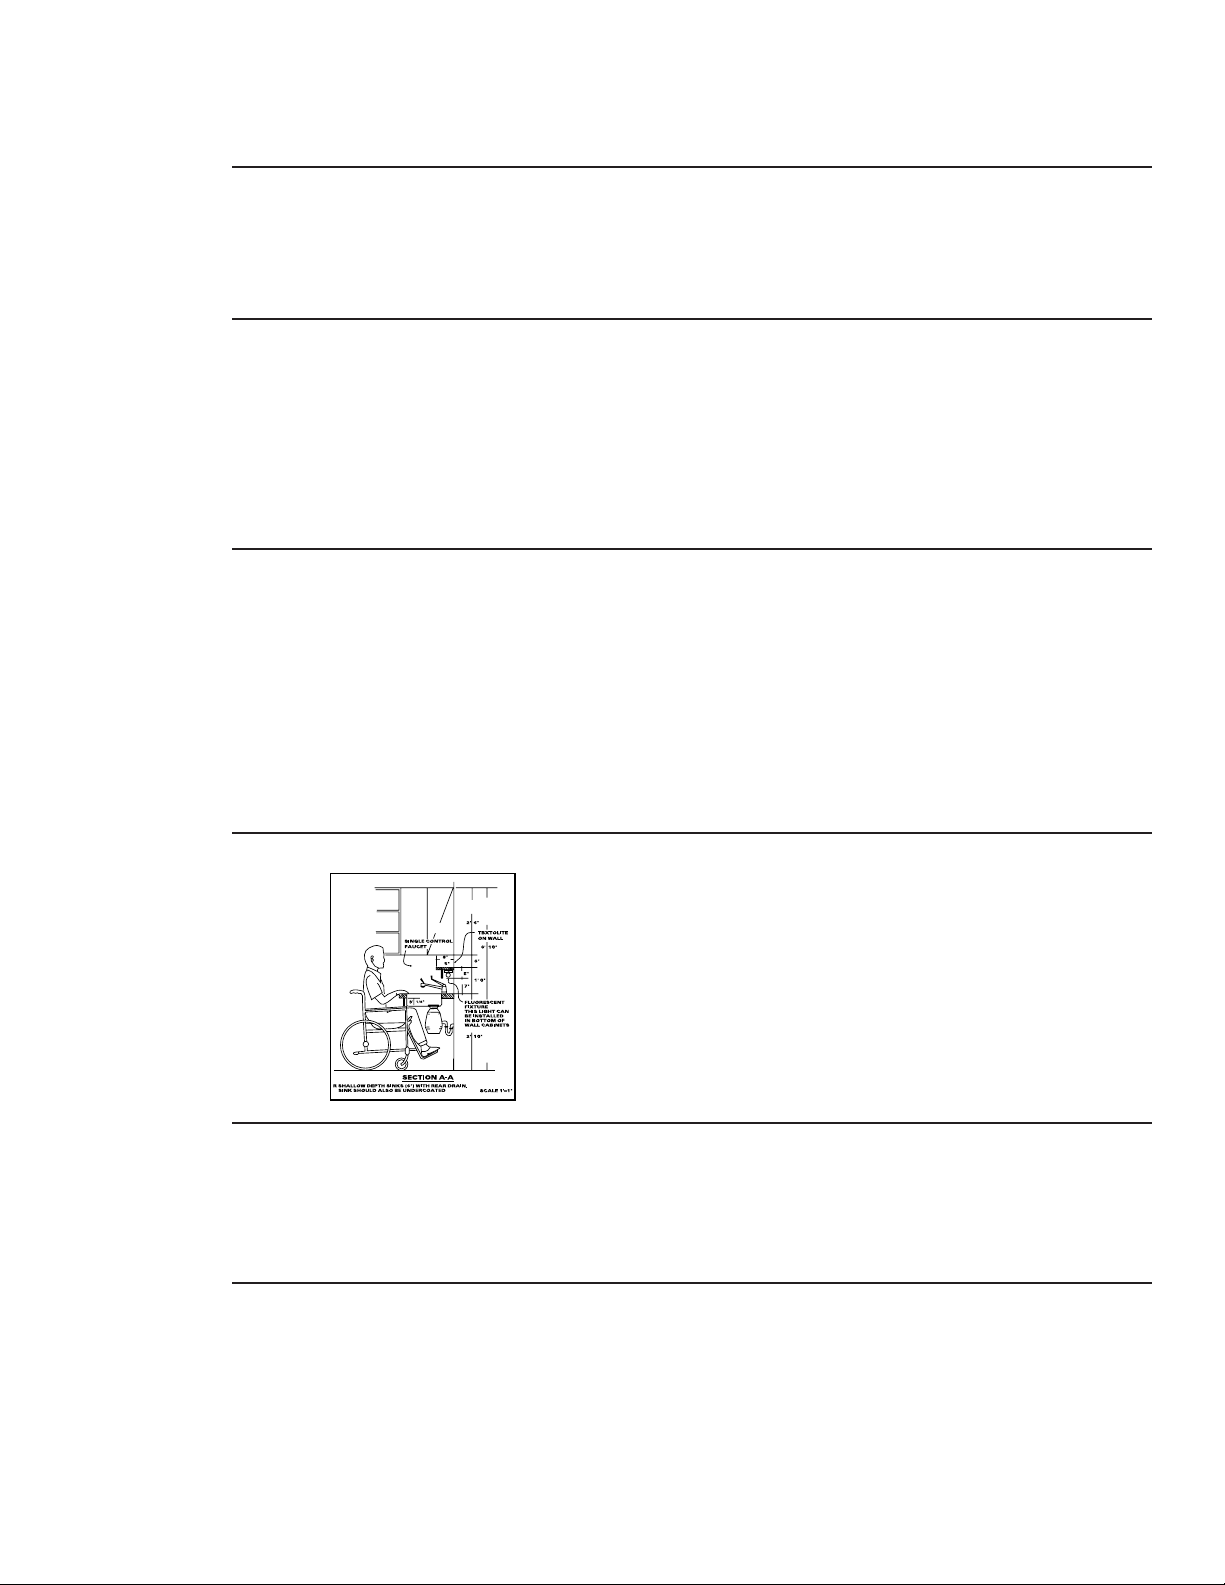
Consumer Services
With the purchase of your new Monogram appliance, receive the
assurance that if you ever need information or assistance from GE,
we’ll be there. All you have to do is call—toll- free!
GE Answer
Center
®
800.626.2000
Whatever your question about any Monogram major appliance, GE Answer Center
®
information service is available to help. Your call—and your question—will be answered
promptly and courteously. And you can call any time. GE Answer Center
®
service is open
24 hours a day, 7 days a week.
OR
Visit our Website at: ge.com
In-Home Repair
Service
800.444.1845
A GE consumer service professional will provide expert repair service, scheduled at a time
that’s convenient for you. Many GE Consumer Service company-operated locations offer
you service today or tomorrow, or at your convenience (7:00 a.m. to 7:00 p.m. weekdays,
9:00 a.m. to 2:00 p.m. Saturdays). Our factory-trained technicians know your appliance
inside and out—so most repairs can be handled in just one visit.
Service Contracts
800.626.2224
You can have the secure feeling that GE Consumer Service will still be there after your
warranty expires. Purchase a GE contract while your warranty is still in effect and you’ll
receive a substantial discount. With a multiple-year contract, you’re assured of future
service at today’s prices.
Parts and
Accessories
800.626.2002
Individuals qualified to service their own appliances can have parts or accessories sent directly
to their home. The GE parts system provides access to over 47,000 parts…and all GE Genuine
Renewal Parts are fully warranted. VISA, MasterCard and Discover cards are accepted.
User maintenance instructions contained in this manual cover procedures intended to be
performed by any user. Other servicing generally should be referred to qualified service
personnel. Caution must be exercised, since improper servicing may cause unsafe operation.
For Customers
With Special
Needs…
800.626.2000
GE offers, free of charge, a brochure to assist in planning
a barrier-free kitchen for persons with limited mobility.
Consumers with impaired hearing or speech who have access to
a TDD or a conventional teletypewriter may call 800.TDD.GEAC
(800.833.4322) to request information or service.
43
44
Warranty
Wall Oven
YOUR MONOGRAM WALL OVEN WARRANTY
Staple sales slip or cancelled check here. Proof of original purchase
date is needed to obtain service under warranty. Please have serial
number and model number available when calling for service.
WHAT IS
COVERED
From the Date
of the Original
Purchase
LIMITED ONE-YEAR WARRANTY
For one year from date of original purchase, we will provide, free of charge, parts and
service labor in your home to repair or replace any part of the oven that fails because of
a manufacturing defect.
This warranty is extended to the original purchaser and any succeeding owner for products
purchased for ordinary home use in the 48 mainland states, Hawaii or Washington, D.C.
If the product is located in an area where service by our Authorized Servicer is not available, you
may be responsible for a trip charge or you may be required to bring the product to an Authorized
Service location for service. In Alaska the warranty is the same except that you must pay to ship the
product to the service shop or for the service technician’s travel costs to your home.
All warranty service will be provided by our Factory Service Centers or by our authorized Customer
Care
®
servicers during normal working hours.
Should your appliance need service, during warranty period or beyond, call 800.444.1845.
Some states do not allow the exclusion or limitation of incidental or consequential damages, so the
above limitation or exclusion may not apply to you. This warranty gives you specific legal rights, and
you may also have other rights which vary from state to state. To know what your legal rights are in
your state, consult your local or state consumer affairs office or your state’s Attorney General.
Warrantor: General Electric Company,
Louisville, KY 40225
WHAT IS NOT
COVERED
• Service trips to your home to teach you how
to use the product.
• Replacement of house fuses or resetting of
circuit breakers.
• Damage to the product caused by accident,
fire, floods or acts of God.
• Damage after delivery.
• Failure of the product if it is used for
other than its intended purpose or used
commercially.
• Improper installation, delivery or
maintenance.
If you have an installation problem, contact
your dealer or installer. You are responsible
for providing adequate electrical, gas,
exhausting and other connecting facilities
as described in the Installation Instructions
provided with the product.
• Incidental or consequential damage caused by
possible defects with this appliance.
• Product not accessible to provide required
service.
GE Consumer & Industrial
Appliances
General Electric Company
Louisville, KY 40225
ge.com
EXCLUSION OF IMPLIED WARRANTIES—Your sole and exclusive remedy is product
repair as provided in this Limited Warranty. Any implied warranties, including the
implied warranties of merchantability or fitness for a particular purpose, are
limited to one year or the shortest period allowed by law.

45
Information pour le client
Four mural
Introduction
Votre nouveau four mural Monogram offre un style éloquent, une grande commodité et de la
souplesse dans l’agencement de votre cuisine. Que vous le choisissiez pour la pureté de ses lignes,
l’attention assidue pour le détail ou ces deux raisons, vous constaterez que le mariage exceptionnel
de la forme et de la fonctionnalité de votre four mural Monogram vous apportera satisfaction
pendant de nombreuses années.
Vote four mural Monogram a été conçu pour vous offrir la flexibilité voulue permettant de
l’agencer à vos armoires. Son style élégant permet de l’intégrer en toute beauté à votre cuisine.
L’information des pages suivantes vous aidera à faire fonctionner et à entretenir correctement
votre four mural.
Contenu
Entretien et nettoyage
Ampoules du four . . . . . . . . . . . . . . . . . . . 79
Grilles . . . . . . . . . . . . . . . . . . . . . . . . . . . . . 77
Lèchefrite et grille . . . . . . . . . . . . . . . . . . . 76
Porte du four . . . . . . . . . . . . . . . . . . . . 78, 80
Sonde . . . . . . . . . . . . . . . . . . . . . . . . . . . . . 78
Service à la clientèle
Carte d’enregistrement du produit . . . . . . 46
Consignes de sécurité . . . . . . . . . . . . . . 47–49
Garantie . . . . . . . . . . . . . . . . . . . . . . . . . . . . 86
Numéros de modèle et de série . . . . . . . . . 46
Numéros de téléphone importants . . . . . . 85
Solutions de problèmes . . . . . . . . . . . . 81, 82
Four
Caractéristiques . . . . . . . . . . . . . . . . . . . . . . 50
Commandes . . . . . . . . . . . .51, 52, 55, 57, 59, 61,
62, 63, 65, 68, 69, 70
Cuisson à minuterie . . . . . . . . . . . . . . . 66, 67
Cuisson au grilloir . . . . . . . . . . . . . . . . 56, 57
Cuisson par convection . . . . . . . . . . . . 60–65
Cuisson . . . . . . . . . . . . . . . . . . . . . . . . . . . . 55
Directives pour l’autonettoyage . . . . . . 69, 70
Fermentation . . . . . . . . . . . . . . . . . . . . . . . 68
Fonction Sabbath . . . . . . . . . . . . . . . . . . . .75
Fonctions spéciales . . . . . . . . . . . . . . . . 73–75
Grilles du four . . . . . . . . . . . . . . . . . . . . . . 54
Horloge . . . . . . . . . . . . . . . . . . . . . . . . . . . 71
Minuterie . . . . . . . . . . . . . . . . . . . . . . . . . . . 72
Papier d’aluminium . . . . . . . . . . . . 53, 56, 65
Réglage du thermostat . . . . . . . . . . . . . . . .73
Sonde . . . . . . . . . . . . . . . . . . 52, 58, 59, 63, 78
Verrouillage des commandes . . . . . . . . . . . . .71
Retirez le
ruban
d’emballage
Pincez avec soin entre vos doigts un coin
de la pellicule de protection pour l’expédition
et détachez-la lentement de la surface de
l’appareil. N’utilisez pas d’objets tranchants
pour retirer la pellicule. Retirez toute la
pellicule avant d’utiliser l’appareil pour la
première fois.
Pour s’assurer de ne pas endommager le fini
du produit, le meilleur moyen pour décoller du
nouvel appareil l’adhésif du ruban d’emballage
est d’appliquer du détergent liquide pour laver
la vaisselle. Appliquez avec un chiffon doux et
laissez tremper.
REMARQUE : l’adhésif doit être retiré de toutes les
pièces. Il ne pourra l’être s’il a été cuit en place.
46
Avant
d’utiliser
votre four
mural
Lisez attentivement ce manuel. L’information
contenue dans ses pages vous aidera à faire
fonctionner et à entretenir correctement votre
four mural.
Gardez-le à portée de la main pour répondre à
vos questions.
Si vous ne comprenez pas certains points ou si
vous avez besoin d’aide, vous trouverez une
liste de numéros de service à la clientèle sans
frais à la section arrière de ce manuel.
OU
Visitez notre site Web à l’adresse suivante :
ge.com
Inscrivez
les
numéros
de modèle
et de série
Vous les trouverez sur une étiquette située sur
la partie avant gauche de la garniture derrière
la porte du four.
Remplissez et faites-nous parvenir la carte
d’enregistrement du produit qui accompagne
ce produit.
Avant d’envoyer la carte, veuillez inscrire les
numéros ci-dessous :
Numéro de modèle
Numéro de série
Utilisez ces numéros pour toute
correspondance ou tout appel de service au
sujet de votre four mural.
Si vous avez
reçu un four
mural
endommagé
Contactez immédiatement le détaillant (ou le
fabricant) qui vous a vendu le four mural.
Gagnez du
temps et
économisez
Avant toute demande de service, consultez la
section Solution de problèmes à l’arrière de
ce manuel.
Vous y trouverez une liste des causes de
problèmes de fonctionnement mineurs que
vous pouvez corriger vous-même.
Si vous
avez besoin
de service
d’entretien
ou de
réparation
Pour obtenir du service, reportez-vous aux
pages du service à la clientèle à l’arrière de
ce manuel.
Nous sommes fiers de notre service et nous
tenons à votre satisfaction. Si pour quelque
raison que ce soit vous n’êtes pas satisfait du
service reçu, voici deux étapes à suivre pour
obtenir de l’aide supplémentaire.
D’ABORD, contactez les personnes qui ont
réparé votre appareil. Expliquez votre
insatisfaction. Dans la plupart des cas, cette
démarche résoudra le problème.
ENSUITE, si vous n’êtes toujours pas satisfait,
écrivez tous les détails (sans oublier d’inscrire
votre numéro de téléphone) au :
Manager, Customer Relations
GE Appliances
Appliance Park
Louisville, KY 40225
Information pour le client
Four mural

47
MESURES DE SÉCURITÉ IMPORTANTES
AVIS IMPORTANT EN MATIÈRE DE SÉCURITÉ
• Le California Safe Drinking Water and Toxic
Enforcement Act exige que le gouverneur de
Californie publie une liste de substances que
l’on sait occasionner le cancer, des anomalies
congénitales ou d’autres anomalies de
reproduction, et exige que les entreprises
avertissent leurs clients des dangers que leur
font courir une exposition à ces substances.
• L’isolement en fibre de verre dans les fours
auto-nettoyants émet un très petit montant
de gaz carbonique pendant le cycle de
nettoyage. Vous pouvez réduire votre
exposition à ce gaz en aérant, en ouvrant
la fenêtre ou en utilisant un ventilateur
ou une hotte d’aération.
• IMPORTANT : Certains oiseaux
sont extrêmement sensibles à la fumée produite
pendant le programme d’autonettoyage de
n’importe quel four. Placez les oiseaux
dans une autre pièce bien aérée.
MESURES DE SÉCURITÉ
Pour utiliser des appareils électroménagers,
vous devez suivre des précautions élémentaires
de sécurité, en particulier :
• Assurez-vous d’enlever tous les matériaux
d’emballage du four avant de le mettre en
marche, pour éviter tout danger d’incendie
ou de dommage dû à la fumée si ces
matériaux d’emballage prennent feu.
• N’utilisez cet appareil que pour l’usage auquel
il est destiné, comme expliqué dans le présent
Manuel du propriétaire.
• Assurez-vous que votre appareil est bien installé
et mis à la terre par un installateur qualifié,
conformément aux directives d’installation
fournies.
• Assurez-vous que le four est bien installé dans
une armoire solidement fixée à la charpente
de la résidence. Ne laissez personne grimper,
s’asseoir ou monter sur la porte du four,
ou s’y agripper.
• Demandez à l’installateur de vous montrer
l’emplacement du disjoncteur ou du fusible.
Identifiez-le pour pouvoir le trouver facilement.
• Ne tentez pas de réparer ni de remplacer aucune
pièce du four, à moins que cela ne soit
recommandé dans le présent manuel. Tout autre
service d’entretien doit être assuré
par un réparateur qualifié.
• Apprenez aux enfants à ne pas jouer avec les
commandes ou toute autre pièce du four.
• Ne laissez jamais la porte du four ouverte
lorsque vous ne surveillez pas l’appareil.
• Gardez toujours les linges à vaisselle, les mitaines
de four et autres articles en tissu à une distance
sécuritaire de votre four.
• Pour votre sécurité, n’utilisez pas cet appareil
pour réchauffer la pièce.
• Ne rangez pas de matériaux inflammables dans
le four.
• Gardez toujours les ustensiles en plastique et en
bois, de même que les aliments en conserve, à
une distance sécuritaire de votre four.
• Gardez toujours les revêtements muraux
combustibles, les rideaux et les tentures à une
distance sécuritaire de votre four.
• NE PAS EMMAGASINEZ OU UTILISEZ DES
MATÉRIELS COMBUSTIBLES, L’ESSENCE
OU LES AUTRES VAPEURS ET LES
LIQUIDES INFLAMMABLES À PROXIMITÉ
DE CECI OU AUCUN AUTRE APPAREIL.
• Ne laissez pas de graisse ou autres matières
inflammables s’accumuler dans le four ou à
proximité de ce dernier.
• Ne tentez pas d’éteindre des feux de graisse avec
de l’eau. Ne soulevez jamais une casserole en
flammes. Mettez tous les réglages en position off
(arrêt).
Vous pouvez éteindre complètement les flammes
en fermant la porte du four et en éteignant
l’appareil, ou en utilisant un extincteur chimique
à poudre ou à mousse.

48
MESURES DE SÉCURITÉ
• N’utilisez pas de papier d’aluminium pour
couvrir la sole du four, sauf de la façon indiquée
dans le présent manuel. Une utilisation
inadéquate du papier d’aluminium peut
présenter des risques de chocs électriques ou
d’incendie.
• Faites cuire la viande et la volaille à fond—la
température INTERNE de la viande doit être
d’au moins 160 °F, et celle de la volaille d’au
moins 180 °F. La cuisson à ces températures
internes assure généralement une bonne
protection contre les intoxications alimentaires.
• Avant d’effectuer une réparation, COUPEZ
TOUJOURS L’ALIMENTATION DU FOUR AU
PANNEAU DE DISTRIBUTION EN
ENLEVANT LE FUSIBLE OU EN
DÉCLENCHANT LE DISJONCTEUR.
• Ne laissez pas les enfants sans surveillance—
Il ne faut jamais laisser les enfants seuls ou sans
surveillance près de l’appareil, lorsque celui-ci
fonctionne. On doit également leur interdire de
grimper ou de s’asseoir sur l’appareil.
• Ne touchez pas aux éléments chauffants, ni
aux parois du four. Ces surfaces peuvent être
suffisamment chaudes pour causer des brûlures,
même si elles ne sont pas rouges. Pendant et
après l’utilisation, faites en sorte que vos
vêtements et autres matériaux inflammables ne
viennent pas en contact avec les parois du four.
Laissez-les d’abord refroidir.
Les surfaces susceptibles de devenir chaudes
comprennent notamment l’évent du four et les
surfaces qui l’entourent, les aspérités autour de
la porte du four, la surface périphérique du
hublot et les moulures métalliques au-dessus
de la porte.
N’oubliez pas : Les parois du four peuvent être
chaudes lorsque vous ouvrez la porte.
•
ATTENTION : NE RANGEZ PAS
DES ARTICLES QUI PRÉSENTENT UN
INTÉRÊT POUR LES ENFANTS, DANS LES
ARMOIRES SE TROUVANT AU-DESSUS D’UN
FOUR CAR CEUX-CI POURRAIENT
GRIMPER SUR L’APPAREIL POUR LES
ATTEINDRE ET RISQUERAIENT DE SE
BLESSER.
• Ne portez jamais de vêtements amples
lorsque vous utilisez cet appareil. Faites attention
lorsque vous prenez des articles rangés dans les
armoires au-dessus du four. Les tissus
inflammables peuvent prendre feu au contact
des surfaces chaudes et causer de graves
brûlures.
• N’utilisez que des poignées ou des mitaines de
four sèches—les poignées ou mitaines de four
humides ou mouillées peuvent causer des
brûlures de vapeur. Ne laissez pas les poignées
venir en contact avec les éléments chauds.
N’utilisez pas de serviette ou autre objet
encombrant en tissu au lieu de mitaines de four.
• Assurez-vous que l’évent du four n’est jamais
obstrué.
• Ne laissez pas s’accumuler de dépôts graisseux
dans le four.
• Ne vous tenez pas trop près du four lorsque vous
ouvrez la porte. L’air chaud et la vapeur qui s’en
échappent peuvent vous brûler les mains, le
visage et les yeux.
• Après le grillage, sortez toujours la lèchefrite
du four et nettoyez-la. La graisse qui s’est
accumulée dans la lèchefrite pourrait prendre
feu la prochaine fois que vous utiliserez le four.
• De grandes égratignures ou des impacts sur la
surface vitrée des portes peuvent entraîner le
bris du verre.
• Ne laissez jamais de pots à graisse ou de boîtes
de conserve contenant des matières grasses à
proximité de votre four.
MESURES DE SÉCURITÉ IMPORTANTES

49
CONSERVEZ CES DIRECTIVES
MESURES DE SÉCURITÉ
• Les enfants en marchette ou les enfants qui
rampent peuvent être attirés par la poignée
ronde de porte du four et peuvent la saisir, et
ainsi ouvrir la porte. Cela peut occasionner une
ouverture de la porte sur l’enfant ou
des brûlures sérieuses si le four est en
fonctionnement et chaud.
• Ne faites pas chauffer de récipient fermé.
L’accumulation de pression dans le récipient
peut le faire éclater, causant ainsi des blessures.
• Placez les clayettes à la hauteur désirée lorsque
le four est froid. Si vous devez les manipuler
lorsque le four est chaud, évitez que vos mitaines
de four entrent en contact avec
les éléments du four.
• Il est plus pratique de soulever des plats
lourds lorsque la grille est entièrement ouverte.
Vous éviterez ainsi de vous brûler en touchant
aux parois de la porte ou du four.
• Lorsque vous utilisez des sachets pour la cuisson
ou le rôtissage, suivez les directives du fabricant.
• Ne faites pas sécher de journaux dans le four.
S’ils surchauffent, ils risquent de prendre feu.
• N’entreposez pas d’articles dans votre four.
Ils pourraient prendre feu.
• Ne laissez pas de produits en papier, d’ustensiles
de cuisson ou d’aliments dans le four lorsqu’il
n’est pas utilisé.
• Ne laissez personne grimper ou monter
sur la porte du four, ou s’y agripper. Cela
pourrait endommager l’appareil ou causer
de graves blessures.
FOUR AUTONETTOYANT
• Ne nettoyez pas le joint de la porte. Ce joint
est essentiel à une bonne étanchéité. Il faut éviter
de le récurer, de l’endommager ou
de le déplacer.
• N’utilisez pas de produits nettoyants
commerciaux pour le four. Il ne faut jamais
utiliser des produits nettoyants commerciaux ou
des enduits protecteurs dans le four ou près des
pièces du four. Les résidus de ces produits
nettoyants endommageront l’intérieur du four
lorsque vous effectuerez un autonettoyage.
• Ne nettoyez que les pièces indiquées dans le
présent manuel d’utilisation.
• Avant de commencer l’autonettoyage, enlevez la
lèchefrite, la grille et autres ustensiles de cuisine.
• Avant de commencer l’autonettoyage, essuyez les
aliments renversés.
• Si le programme d’autonettoyage fonctionne mal,
éteignez le four et coupez l’alimentation
électrique. Faites réparer l’appareil par un
technicien qualifié.
• Vous pouvez nettoyer les clayettes du four
pendant le cycle d’auto-nettoyage.
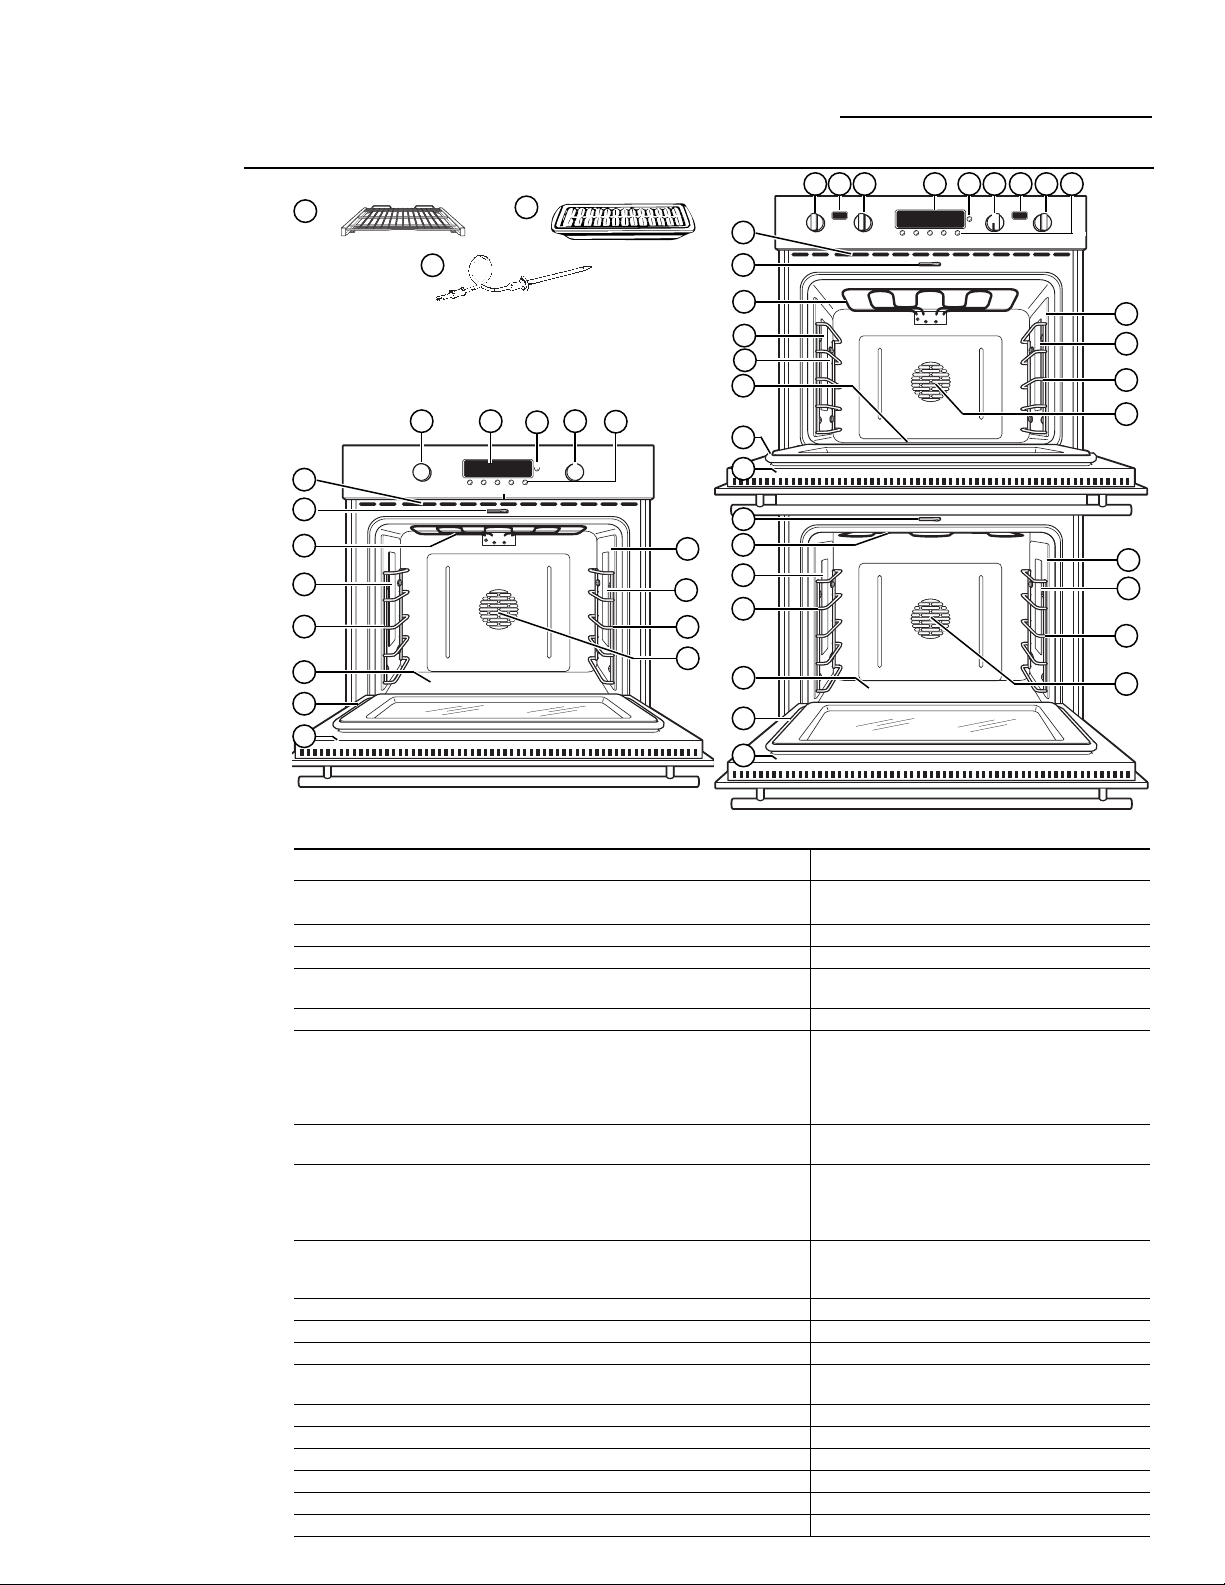
50
Index des caractéristiques Page
1 Grilles de four à extension complète (3 par four) 53, 54, 55, 56, 57, 60,
61, 62, 63, 65, 66, 68, 77
2 Lèchefrite et grille 62, 76
3 Sonde 52, 58, 59, 63, 78
4 Bouton de sélection du mode de cuisson 52, 55, 57, 59, 61,
62, 63, 65, 68, 69, 70
5 Afficheur 52
6 Bouton de sélection miniature : Tournez pour 52, 59, 63, 66, 67, 69,
sélectionner et enfoncez pour saisir les réglages des 70, 71, 72, 73, 74, 75
fonctions PROBE (sonde), TIMER (minuterie),
CLOCK (horloge), COOK TIME (temps de cuisson)
et DELAY START (démarrage différé).
7 Bouton de sélection de la température 52, 55, 57, 59, 61,
62, 63, 65, 69, 76
8 Boutons sonde, minuterie, horloge, temps de cuisson 52, 59, 63, 66, 67, 29,
et démarrage différé. Sélection d’une caractéristique 70, 71, 72, 73, 74, 75
par enfoncement : tournez le bouton de sélection
miniature pour sélectionner et enfoncez pour saisir.
9 Sous-affichages : Les températures supérieure et —
inférieure apparaissent dans leurs afficheurs respectifs
(sur certains modèles).
10 Sortie de la sonde 58, 59, 63, 65, 69, 81, 82
11 Ampoules de four à halogène 79, 81
12 Supports à grille de four (5 positions) 54, 79
13 Ventilateur de convection (fonctionne durant la cuisson 55, 56, 59, 60, 61, 62,
à convection et le préchauffage) 63, 65, 66, 69, 70, 82
14 Porte de four amovible 78
15 Joint de porte de four 80
16 Élément de cuisson (sous le plancher du four) 47, 61, 76
17 Élément chauffant pour griller 60, 76, 81
18 Loquet de porte du four automatique 69, 70
19 Évent du four 48, 82
Caractéristiques de votre four mural
Four mural
Renseignements
descriptifs
(les caractéristiques
n’apparaissent pas sur
tous les modèles. L’aspect
peut varier.)
ZET1 : illustré avec ses boutons stylisés intégrés
11
12
10
4 7
ZET2 : illustré avec ses boutons stylisés Pro
12
16
11
12
10
9
18
15
11
17
12
13
10
11
13
12
18
16
1
2
3
8
5
6
13
15
14
17
15
16
18
17
11
12
4 5 6 94
8
77
19
19
14
14
11
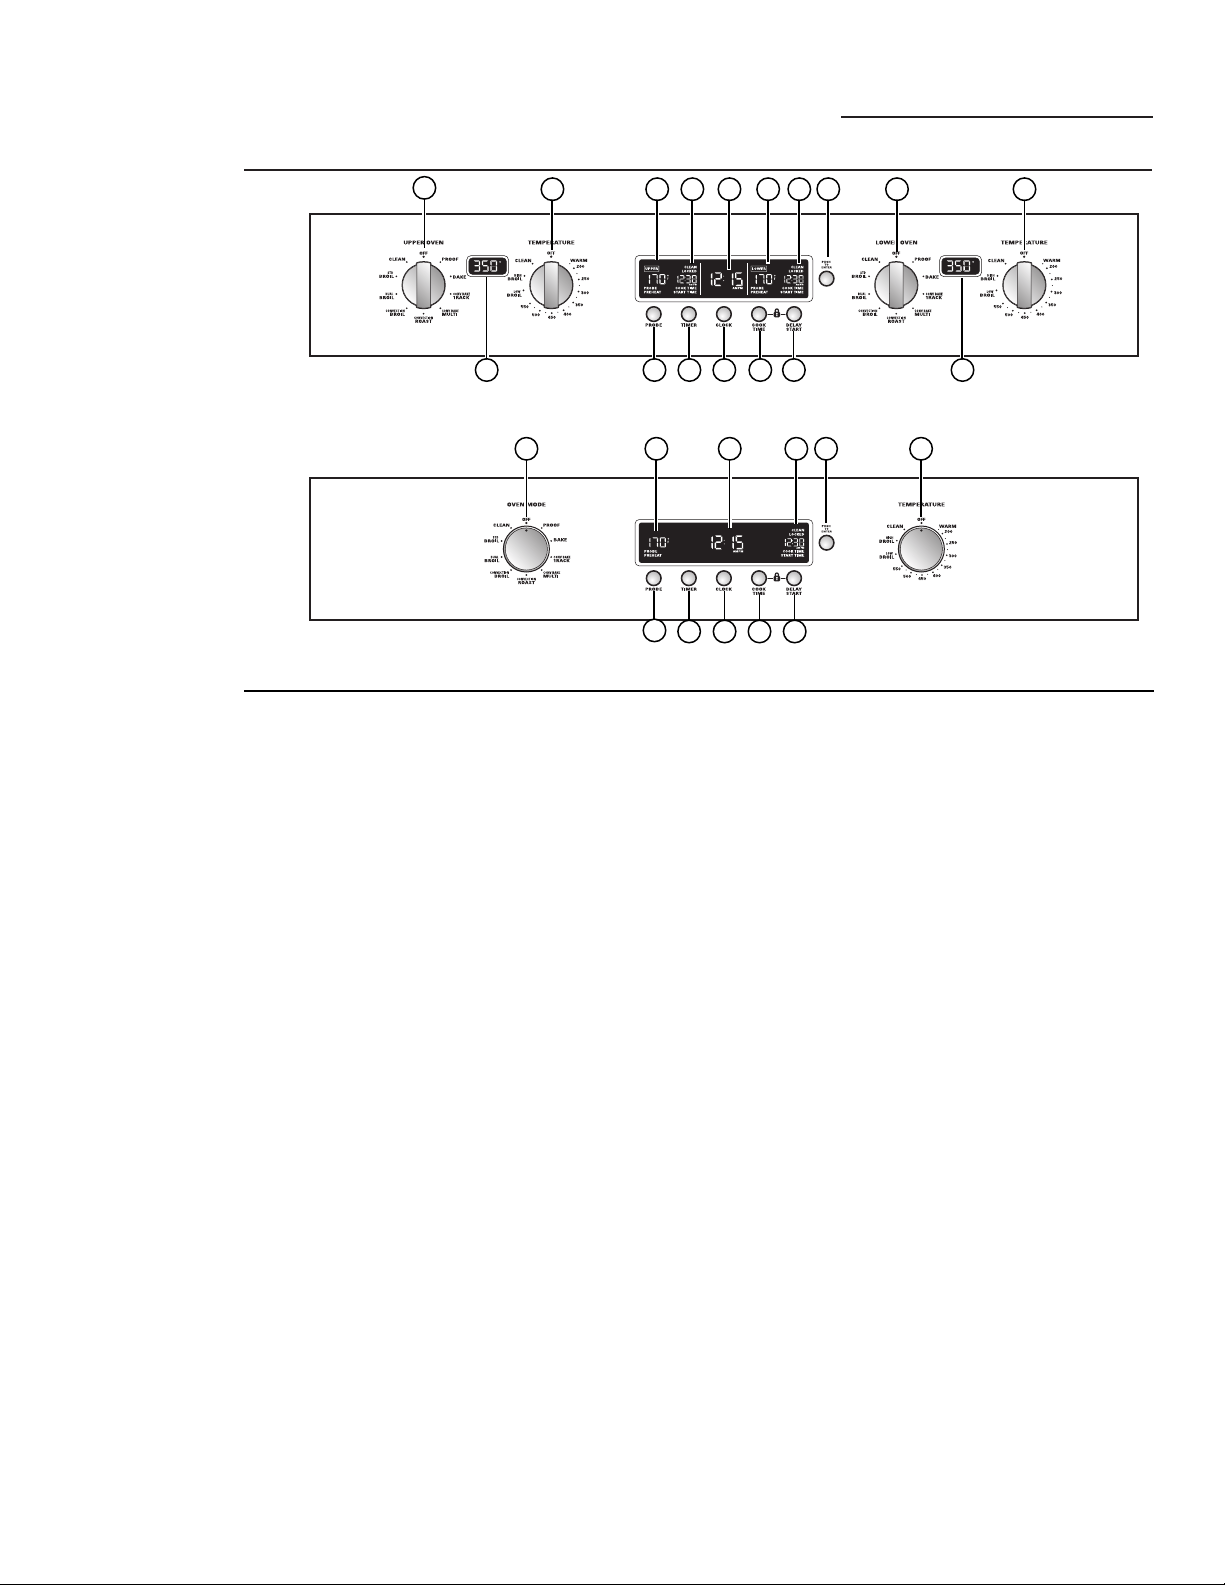
Commandes, l’horloge et la minuterie
Four mural
FF
Commandes du four double : Modèle Pro illustré (l’aspect peut varier.)
Commandes du four simple : Modèle intégré illustré (l’aspect peut varier.)
Caractéristiques
des commandes,
de l’horloge
et de la
minuterie de
votre four (les
caractéristiques
n’apparaissent
pas sur tous
les modèles.
L’aspect peut
varier.)
1 Bouton de sélection du mode de cuisson : Tournez
pour sélectionner :
PROOF (levage) : Pour maintenir un
environnement chaud, utile pour faire lever les
produits contenant de la levure.
BAKE (cuisson) : Pour la cuisson conventionnelle.
CONV BAKE 1 RACK (cuisson par convection à une
grille) : Pour la cuisson par convection sur une
grille.
CONV BAKE MULTI (cuisson par convection à
plusieurs grilles) : Pour la cuisson par convection
sur plusieurs grilles.
CONV ROAST (rôtissage par convection) : Pour le
rôtissage par convection.
CONV BROIL (grillage par convection) : Pour la
cuisson au grilloir par convection.
DUAL BROIL (grillage par convection à 2 éléments) :
Pour la cuisson conventionnelle au grilloir pour
une grande quantité de nourriture.
STD BROIL (grillage à 1 élément) : Pour la cuisson
conventionnelle au grilloir pour une petite
quantité de nourriture.
CLEAN (nettoyage) : Pour la fonction
d’autonettoyage. Reportez-vous à la section Four
autonettoyant.
2 Bouton de sélection de la température : Tournez
pour sélectionner :
Pour le réglage de la température entre
200 °F et 550 °F (93 °C et 288 °C).
WARM (réchauffer) : Pour garder les aliments
chauds jusqu’à 2 heures après l’arrêt de la
fonction cuisson.
LOW BROIL (grillage faible) : Pour le réglage
automatique d’une température basse de cuisson
au grilloir.
HIGH BROIL (grillage élevé) : Pour le réglage
automatique d’une température élevée de cuisson
au grilloir.
CLEAN (nettoyage) : Pour le réglage automatique
de la fonction d’autonettoyage.
3 Bouton de sélection miniature
Tournez pour sélectionner et enfoncez pour saisir
les réglages PROBE (sonde), TIMER (minuterie),
CLOCK (horloge), COOK TIME (temps de
cuisson) et DELAY START (démarrage différé).
4 PROBE (sonde) : Enfoncez pour sélectionner la
sonde et cuire les aliments à une température
interne. Tournez et enfoncez le bouton de
sélection miniature pour valider ce réglage.
5 TIMER (minuterie) : Enfoncez pour sélectionner
la fonction minuterie. Elle ne contrôle pas les
opérations du four. La minuterie permet un
réglage allant jusqu’à 11 heures et 59 minutes.
6 CLOCK (horloge) : Enfoncez pour saisir l’heure
de la journée. Tournez et enfoncez le bouton
de sélection miniature pour valider ce réglage.
7 COOK TIME (temps de cuisson) : Enfoncez pour
saisir le temps désiré pour la cuisson (ou le
rôtissage), la cuisson par convection ou le
rôtissage par convection. Tournez et enfoncez le
bouton de sélection miniature pour valider ce
réglage.
8 DELAY START (démarrage différé) : Enfoncez pour
différer le démarrage de la cuisson ou du cycle
d’autonettoyage. Tournez et enfoncez le bouton
de sélection miniature pour régler l’heure désirée
du démarrage de la cuisson.
9 Afficheur de température :
Indique la température
de réglage du four ou de la sonde et si le four est
en préchauffage. (Sur certains modèles de four
mural double, UPPER et LOWER (haut et bas)
apparaissent au-dessus de leurs réglages respectifs.)
REMARQUE : sur certains modèles de four mural,
la température de réglage apparaît dans les afficheurs
entre leurs boutons de commande respectifs.
10 Afficheur d’avancement de temps de cuisson et
d’autonettoyage : Lorsque sélectionné, indique le
temps de cuisson (COOK TIME) restant et le
temps de démarrage différé (DELAY START). Les
indicateurs lumineux indiquent l’avancement du
cycle d’autonettoyage.
11 Afficheur de l’heure de la journée : Indique l’heure
de la journée.
1
2 10119 10 3 1 2
9
4
5 6 7
8
9
1 9 11 10 3 2
4
5 6 7 8
9
51
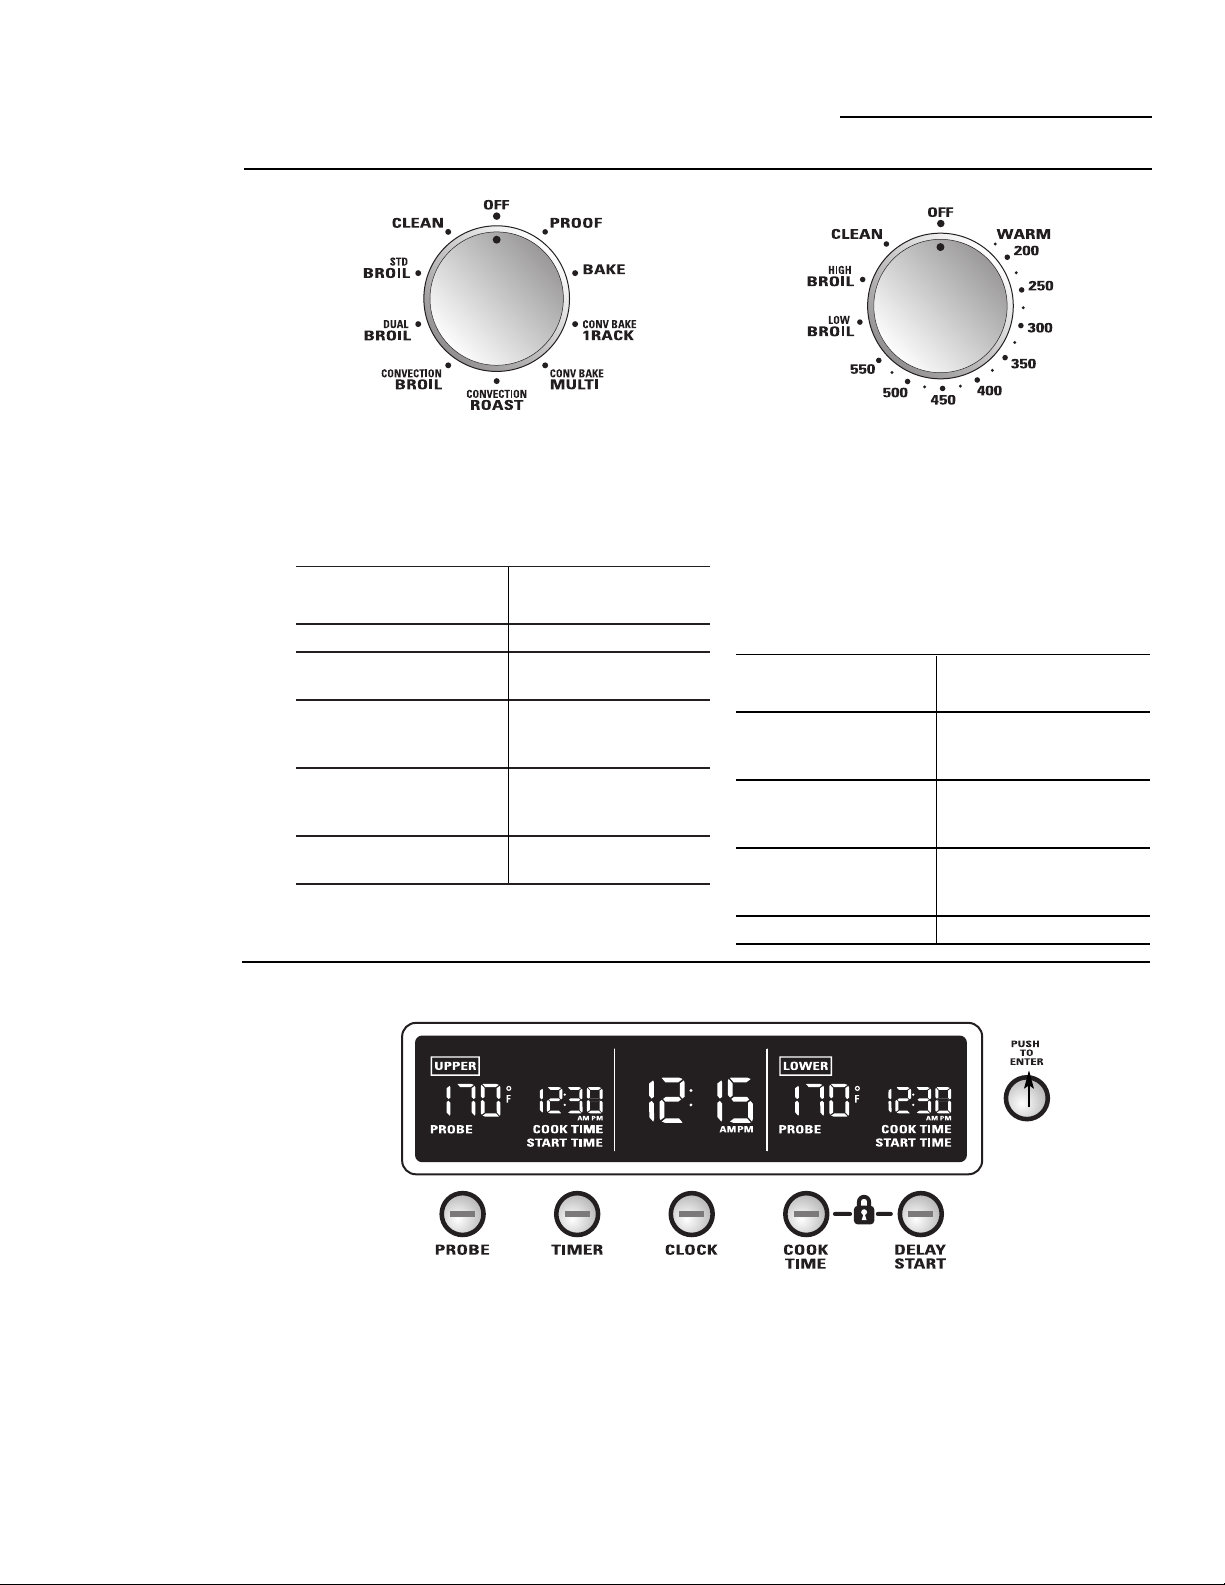
52
Bouton de sélection Bouton de sélection
du mode de cuisson de la température
PROOF (levage) OFF (arrêt)
BAKE (cuisson) De WARM (chaud)
à 550 °F (288 °C )
CONV BAKE/1 RACK De WARM (chaud)
(cuisson par convection à 550 °F (288 °C )
sur une grille)
CONV BAKE/MULTI De WARM (chaud)
(cuisson par convection à 550 °F (288 °C )
sur plusieurs grilles)
CONVECTION/ROAST De WARM (chaud)
(rôtissage par convection) à 550 °F (288 °C )
Présentation
des
commandes
de réglage de
la sonde de
température
et de temps
Aperçu général des commandes
Four mural
Pour tous les modes sauf Proof (levage), le four
ne fonctionnera que si le mode du four et la
température ont tous deux été sélectionnés à
l’aide des boutons. Voir le tableau.
Présentation
des
commandes
du four
Pour annuler cette fonction, tournez à OFF
(arrêt) soit le bouton de sélection du mode
de cuisson ou le bouton de sélection de la
température.
Pour annuler PROOF (levage), tournez le
bouton de sélection du mode cuisson à OFF
(arrêt).
Bouton de sélection
miniature
Tournez pour sélectionner
Enfoncez pour saisir
Illustration de l’afficheur du four double
Bouton de sélection du mode de cuisson Bouton de sélection de la température
Enfoncez les boutons PROBE (sonde), TIMER
(minuterie), CLOCK (horloge), COOK TIME
(temps de cuisson) ou DELAY START
(démarrage différé) et validez la sélection
en tournant et en enfonçant le bouton de
sélection miniature. Reportez-vous à chaque
section respective pour les détails.
Le bouton de sélection miniature affiche une
sélection en incréments de 1, 5 ou 10 selon la-
vitesse à laquelle le bouton est tourné. Tournez
le dans le sens horaire pour augmenter la
température de réglage de la sonde et du
temps et dans le sens antihoraire pour la
réduire. Enfoncez pour valider le réglage.
Consultez la section Verrouillage des commandes
pour savoir comment verrouiller et
déverrouiller les commandes.
Bouton de sélection Bouton de sélection
du mode de cuisson de la température
CONVECTION/BROIL HIGH ou LOW BROIL
(cuisson au grilloir (cuisson au grilloir
par convection) haute ou basse)
DUAL BROIL HIGH ou LOW BROIL
(cuisson au grilloir (cuisson au grilloir
à 2 éléments) haute ou basse)
STD BROIL HIGH ou LOW BROIL
(cuisson au grilloir (cuisson au grilloir
à 1élément) haute ou basse)
CLEAN (nettoyage) CLEAN (nettoyage)
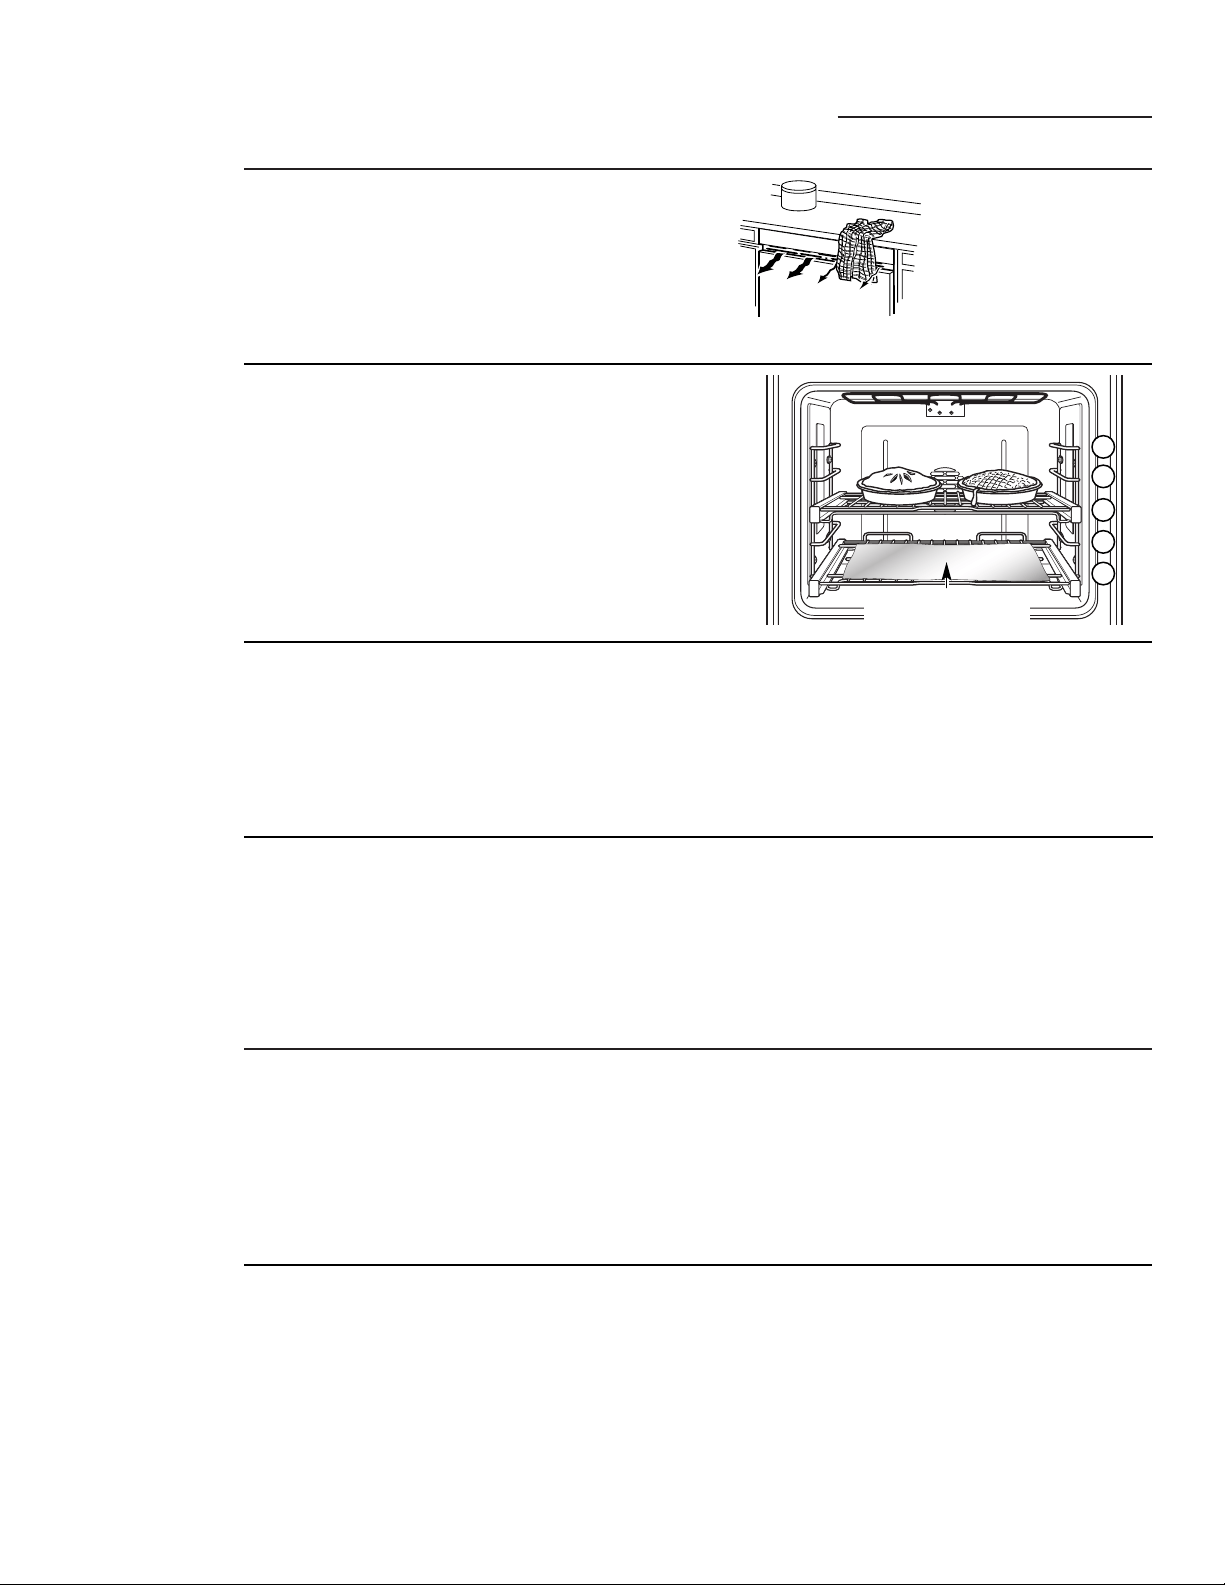
Conseils de cuisson
Four mural
Positionnement
des casseroles
Pour une cuisson uniforme et un brunissage
correct, il doit y avoir suffisamment d’espace pour
la circulation d’air dans le four. Les résultats de
cuisson seront meilleurs si les plats sont centrés
autant que possible dans le four plutôt que d’être
placés à l’avant ou à l’arrière du four.
Les plats ne doivent ni se toucher, ni toucher aux
parois du four. Prévoyez un espacement de 2,5 à
3,75 cm (1 à 1,5 po) entre les plats ainsi qu’avec
l’arrière, la porte et les côtés du four.
Si vous devez utiliser deux grilles, utilisez les
positions A et C, B et D ou A et D et décalez les
plats de manière à ce qu’ils ne soient pas
directement l’un au-dessus de l’autre.
Préchauffage
Le papier
d’aluminium
Ne déposez jamais une feuille de papier d’aluminium
sur toute la surface d’une grille, car cela affectera la
circulation de l’air chaud et donnera une cuisson
inadéquate. Vous pouvez placer une petite feuille
de papier d’aluminium sur une grille placée à
quelques pouces au-dessous de l’aliment que vous
faites cuire afin de recueillir les débordements.
REMARQUE :
vous n’utiliserez généralement
qu’une ou deux grilles pour la cuisson générale.
Vous utiliserez trois grilles uniquement lorsque vous
faites la cuisson sur plusieurs grilles. Retirez la
troisième grille du four lorsqu’elle n’est pas utilisée.
S
E
L
F
C
L
E
A
N
5
0
0
4
5
0
4
0
0
O
F
F
O
°
W
A
R
M
3
5
0
30
0
2
5
0
2
0
0
B
R
O
I
L
B
A
K
E
P
R
O
O
F
C
O
N
V
.
B
A
K
E
C
O
N
V
.
R
O
A
S
T
C
O
N
V
.
B
R
O
I
L
Écoulement
d’air du four
Un ventilateur de refroidissement interne fonctionne
durant tous les modes de cuisson du four. L’air
chaud à l’intérieur du four est évacué par les évents
situés entre la porte et le tableau de commande.
Dans le cas des installations sous le comptoir,
ne placez pas de serviettes sur le devant du four,
car cela viendrait obstruer l’écoulement d’air
des évents.
Moules de
cuisson/
plaques à
pâtisserie
Le type de
margarine
utilisée affecte
la cuisson!
La plupart des recettes nécessitant une cuisson
exige l’utilisation de produits à forte teneur en
matières grasses, comme du beurre ou de la
margarine (80 % de matières grasses). Si vous
diminuez la quantité de gras, vous pourriez ne
pas obtenir les mêmes résultats qu’avec un
produit à plus forte teneur en matières grasses.
Vous pouvez rater votre recette de gâteau, de tarte, de
pâtisseries, de biscuits ou de friandises lorsque vous
utilisez de la graisse tartinable à faible teneur en matières
grasses. Plus la teneur en matières grasses d’une graisse
tartinable est faible, plus la différence est appréciable.
En vertu des normes fédérales, les produits
étiquetés comme étant de la «margarine» doivent
contenir au moins 80 % de matières grasses. Par
contre, les graisses tartinables à faible teneur en
matières grasses contiennent moins de gras et
plus d’eau. La forte teneur en eau de ces graisses
tartinables affecte la texture et la saveur des
produits de boulangerie. Pour obtenir de bons
résultats avec vos anciennes recettes préférées,
utilisez de la margarine, du beurre ou de la
graisse à tartiner contenant au moins 70 %
d’huile végétale.
Le papier d’aluminium pour
recueillir les débordements
C
D
B
A
E
Laissez le four préchauffer avant d’y placer les
aliments. Pour de meilleurs résultats, il est nécessaire
de préchauffer le four lors de la préparation de
gâteaux, de biscuits, de pâtisseries et de pain.
Pour préchauffer, réglez le four à la bonne température.
L’indicateur lumineux PREHEAT (préchauffage)
s’allume et l’afficheur de température indique 100 °F
(38 °C). (La température affichée commence à changer
une fois que la température du four atteint 100 °F
[38 °C.].) Le ventilateur à convection se met aussi en
marche lors du préchauffage. La commande émet un
signal sonore (bip) une fois que le four est préchauffé, ce
qui prend environ 10 à 15 minutes. L’indicateur
lumineux PREHEAT (préchauffage) s’éteint et
l’afficheur indique la température de réglage.
Les aliments peuvent être placés dans le four une fois
que le voyant lumineux PREHEAT (préchauffage) s’est
éteint.
Utilisez les moules de cuisson appropriés. Le type
de fini du moule détermine la quantité de
brunissage qui aura lieu.
• Les moules de couleur foncée, rugueux ou
ternis absorbent la chaleur et il en résultera une
croûte plus brunie et croustillante. Utilisez ce
type de moule pour les tartes.
• Les moules brillants, de couleur claire et lisses
reflètent la chaleur et il en résultera un
brunissage plus clair et plus délicat. C’est le type
de moule ou de plaque à pâtisserie qu’il faut
utiliser pour les gâteaux et les biscuits.
• Les plats de cuisson en verre absorbent aussi la
chaleur. Pour les plats de cuisson en verre, il
peut être nécessaire de réduire la température
de cuisson de 25 °F (14 °C).
53
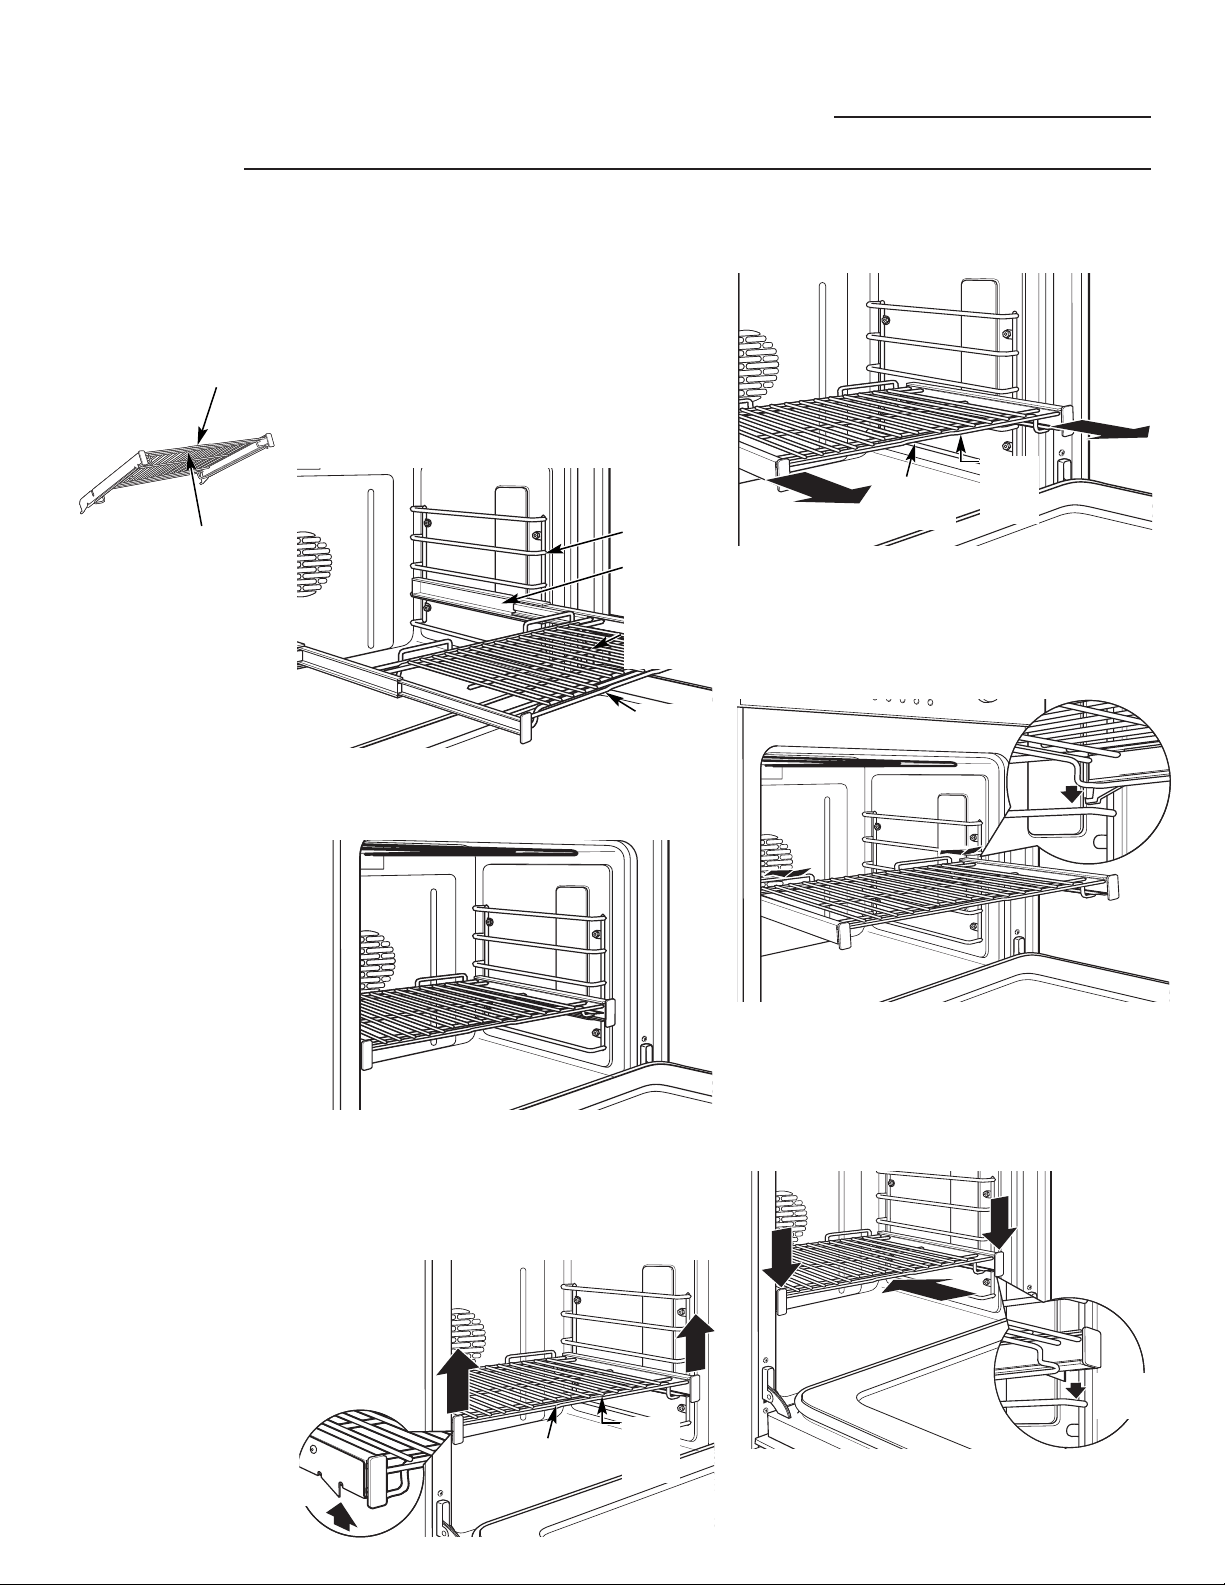
54
Avant d’utiliser votre four
Four mural
Afin d’éviter de vous brûler, placez les grilles à
la bonne position avant de mettre le four en
marche.
La position de rail correcte dépend du type
d’aliment et du brunissage désiré.
Le cadre des grilles s’adapte aux supports à
grille des deux côtés. Une fois le cadre de grille
en place, utilisez le rail avant supérieur de la
grille pour tirer celle-ci en position d’extension
complète, lorsque vous placez ou retirez un plat
de cuisson.
Pour enlever une grille :
1. Assurez-vous que la grille est bien au fond
du four.
2. Saisissez la grille à la fois par son rail avant
supérieur et son rail avant inférieur et
soulevez-la vers le haut de manière à
désenclencher les mécanismes de
verrouillage avant de la grille des supports
à grille.
3. Alors que vous tenez fermement les rails
avant supérieur et inférieur, tirez la grille vers
l’avant et retirez-la du four.
Pour remettre une grille en place :
1. Placez les mécanismes de verrouillage arrière
par dessus et sur les supports à grille (cinq
positions de grille sont possibles y compris la
position supérieure).
2.
Glissez la grille complètement en place
jusqu’à ce que les mécanismes de verrouillage
arrière de la grille soient bien fixés sur les
supports arrière de grille et poussez les
mécanismes de verrouillage avant de la grille
sur les supports avant de grille.
Grilles de
four à
extension
complète
Glissez la grille complètement vers
l’intérieur et poussez vers le bas de
manière à enclencher les
mécanismes de verrouillage avant
sur les supports avant de la grille
Soulevez pour
désenclencher les
mécanismes de
verrouillage avant
de la grille des
supports à grille
Rail avant
supérieur
Rail
avant
inférieur
Rail avant
supérieur
Rail
avant
inférieur
Verrouillage avant de la grille
Verrouillage
avant de la grille
Rail avant
inférieur
Rail avant
supérieur
Grille en
position
d’extension
complète
Rail avant
supérieur de
la grille
Le four
comporte 5
positions de
grilles
Cadre de grille

55
Cuisson
Four mural
Tournez le bouton de sélection du mode
cuisson à BAKE (cuisson).
À l’aide du bouton de sélection de la
température, réglez la température désirée,
par incrément de 25 °F, de 200 °F à 550 °F
(93 °C à 288 °C).
Le four et les ampoules intérieures du four
s’allument immédiatement et demeurent
allumés jusqu’à ce que le four soit éteint.
Le ventilateur à convection se met en
marche (après un court délai), l’indicateur
lumineux PREHEAT (préchauffage)
s’allume et l’afficheur indique 100 °F (38
°C). (La température affichée commence à
changer une fois que la température du four
atteint 100 °F [38 °C.]) La commande émet
un signal sonore (bip) une fois que le four
est préchauffé, ce qui prend environ de 10 à
15 minutes. L’indicateur lumineux
PREHEAT (préchauffage) s’éteint et
l’afficheur indique la température de
réglage.
Les aliments peuvent être placés dans le
four une fois que le voyant lumineux
PREHEAT (préchauffage) s’est éteint.
Vérifiez si les aliments sont prêts au temps
minimum indiqué dans la recette. Faites
cuire plus longtemps au besoin.
Tournez le bouton de sélection du mode
cuisson et le bouton de sélection de la
température à OFF (arrêt) une fois la
cuisson terminée.
REMARQUE : un ventilateur de
refroidissement se met en marche pour
refroidir les pièces internes. Cela est normal
et il se peut que le ventilateur continue à
fonctionner même après que le four soit éteint.
Comment
régler une
cuisson
Bouton de sélection du mode de cuisson Bouton de sélection de la température
C
D
B
A
E
Le four possède 5 positions de grille. Reportez-vous à la section
Grilles de four à extension complète pour les instructions sur
l’utilisation, l’enlèvement et la remise en place des grilles.
Type d’aliment Position de la grille
Gâteau des anges A
Biscuits ou muffins B ou C
Biscuits ou petits gâteaux B ou C
Carrés au chocolat B ou C
Gâteaux à étages B ou C
Gâteaux moulés et A ou B
quatre-quarts
Tartes et fonds de tarte B ou C
Une seule tarte B ou C
Tartes congelées B ou C (sur plaque à
pâtisserie)
Casseroles B ou C

56
Différents éléments de grillage sont utilisés
pour chaque mode de cuisson au grilloir, tel
que décrit ci-dessous. Il y a 3 modes de cuisson
au grilloir, et pour chacun, un réglage HI et LO
(haut et bas).
• Le réglage HI (haut) peut être utilisé pour
enfermer les jus à l’intérieur et fournir un
brunissage intense ou un grillage lorsque
nécessaire (une grille en position supérieure
sera alors utilisée).
• Le réglage LO (bas) peut être utilisé lorsque
les aliments requièrent un brunissage adéquat
et nécessitent aussi d’être cuits de part en part
(une grille en position basse sera utilisée pour
les pièces plus grosses telles que le filet de
porc ou le bifteck de flanc roulé).
Dual Broil (cuisson au grilloir à 2 éléments) :
les éléments de grillage intérieur et extérieur
sont tous deux utilisés pour ce mode de cuisson
au grilloir. Utilisez ce mode lorsque la
lèchefrite est entièrement chargée d’aliments.
Reportez-vous à la section Comment régler le four
pour la cuisson au grilloir.
HI (haut) (lèchefrite entièrement chargée) :
hamburgers; légumes grillés tels que poivrons
entiers, aubergines, maïs, légumes coupés
assortis, kebabs et viandes tranchées très minces
telles que les côtelettes de porc fumées
LO (bas) (lèchefrite entièrement chargée) :
filets de poisson
Std Broil (cuisson au grilloir à 1 élément) :
utilise l’élément intérieur seulement (pour les
plus petites quantités de nourriture). Reportez-
vous à la section Comment régler le four pour la
cuisson au grilloir.
HI (haut) (petite quantité de nourriture) :
2 à 4 hamburgers ou côtelettes de porc ou
tranches de bœuf de 1,25 à 2,5 cm (0,5 à 1 po)
LO (bas) (petite quantité de nourriture) :
2 à 4 poitrines de poulet ou filets de poisson
Convection Broil Cuisson au grilloir par
convection : les éléments de grillage intérieur
et extérieur sont tous deux utilisés ainsi que le
ventilateur à convection. Reportez-vous à la
section Comment régler le four pour la cuisson au
grilloir par convection.
HI (haut) : tranches de bœuf de 3,75 à 5 cm
(1,5 à 2 po), bifteck de flanc roulé et poitrines
de poulet (enferme les jus sans brunissage
excessif)
LO (bas) : gros filets de porc ou rôtis de bœuf
(permet le brunissage adéquat et une cuisson
complète)
Papier
d’aluminium
Vous pouvez utiliser du papier d’aluminium
comme doublure pour la lèchefrite et sa grille.
Par contre, vous devez placer le papier bien
ajusté sur la grille et découper des fentes
semblables à celles de la grille.
Grillage
Four mural
Présentation
de la cuisson
au grilloir
Élément
de grillage
extérieur
Élément
de grillage
intérieur
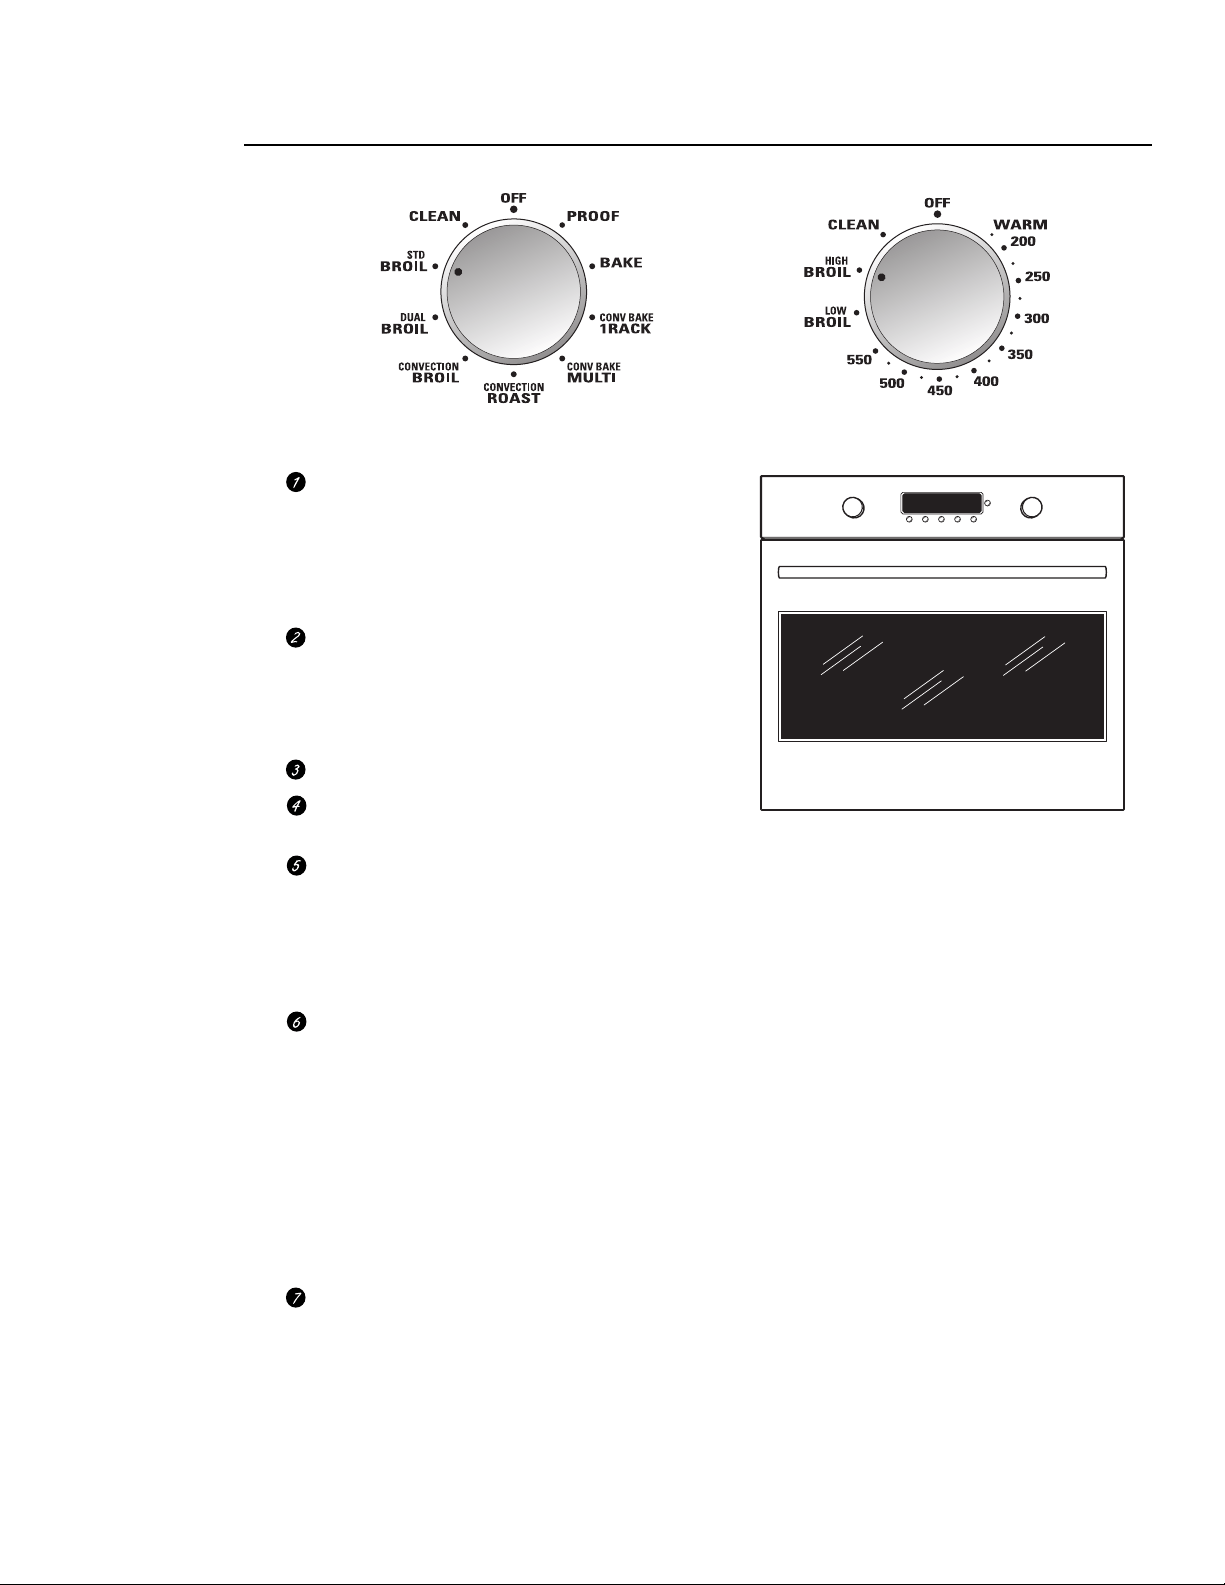
57
Si la pièce de viande comporte du gras ou
du cartilage sur le pourtour, faites des
entailles verticales dans les deux à environ 5
cm (2 po) d’intervalle. Si désiré, le gras peut
être enlevé, pour ne laisser qu’une couche
de 0,3 cm (1/8 po).
Placez la viande ou le poisson sur la
lèchefrite et sa grille. Utilisez toujours la
grille pour que tout le gras tombe dans la
lèchefrite; sinon, les jus pourraient devenir
suffisamment chauds pour s’enflammer.
Placez la grille dans le four.
Fermez la porte. Fermez toujours la porte
lorsque vous cuisinez au grilloir.
Tournez le bouton de sélection du mode
cuisson à DUAL BROIL (cuisson au grilloir
à 2 éléments) (pour les grandes quantités de
nourriture) ou STD BROIL (cuisson au
grilloir à 1 élément) (pour les plus petites
quantités de nourriture).
Tournez le bouton de sélection de la
température à LOW BROIL (cuisson basse
au grilloir) ou HIGH BROIL (cuisson haute
au grilloir). La température de cuisson au
grilloir est alors réglée automatiquement.
LO ou HI (bas ou haut) apparaît sur
l’afficheur selon la température de cuisson
au grilloir sélectionnée.
Le four et les ampoules intérieures du four
s’allument immédiatement et demeurent
allumés jusqu’à ce que le four soit éteint.
Lorsque la cuisson au grilloir est terminée,
tournez à OFF (arrêt) le bouton de sélection
du mode cuisson et le bouton de sélection
de la température.
REMARQUE : un ventilateur de
refroidissement se met en marche pour
refroidir les pièces internes. Cela est normal
et il se peut que le ventilateur continue de
fonctionner même après que le four soit éteint.
Le préchauffage n’est pas nécessaire pour la
plupart des cuissons au grilloir. Cependant,
les aliments qui cuisent rapidement, les
languettes de viande ou de poisson fines par
exemple, peuvent nécessiter une courte
période de préchauffage de 2 à 3 minutes pour
permettre à la surface des aliments de brunir
tout en cuisant entièrement.
Ne retournez les aliments qu’une seule fois
pendant la cuisson au grilloir.
REMARQUE : il n’est pas possible de griller
si la sonde de température est branchée. Ne
laissez jamais votre sonde à l’intérieur du four
lors d’un cycle de cuisson au grilloir.
Comment
régler un
grillage dans
votre four
Fermez la porte. Fermez toujours la porte lorsque vous
cuisinez au grilloir.
Bouton de sélection du mode de cuisson Bouton de sélection de la température
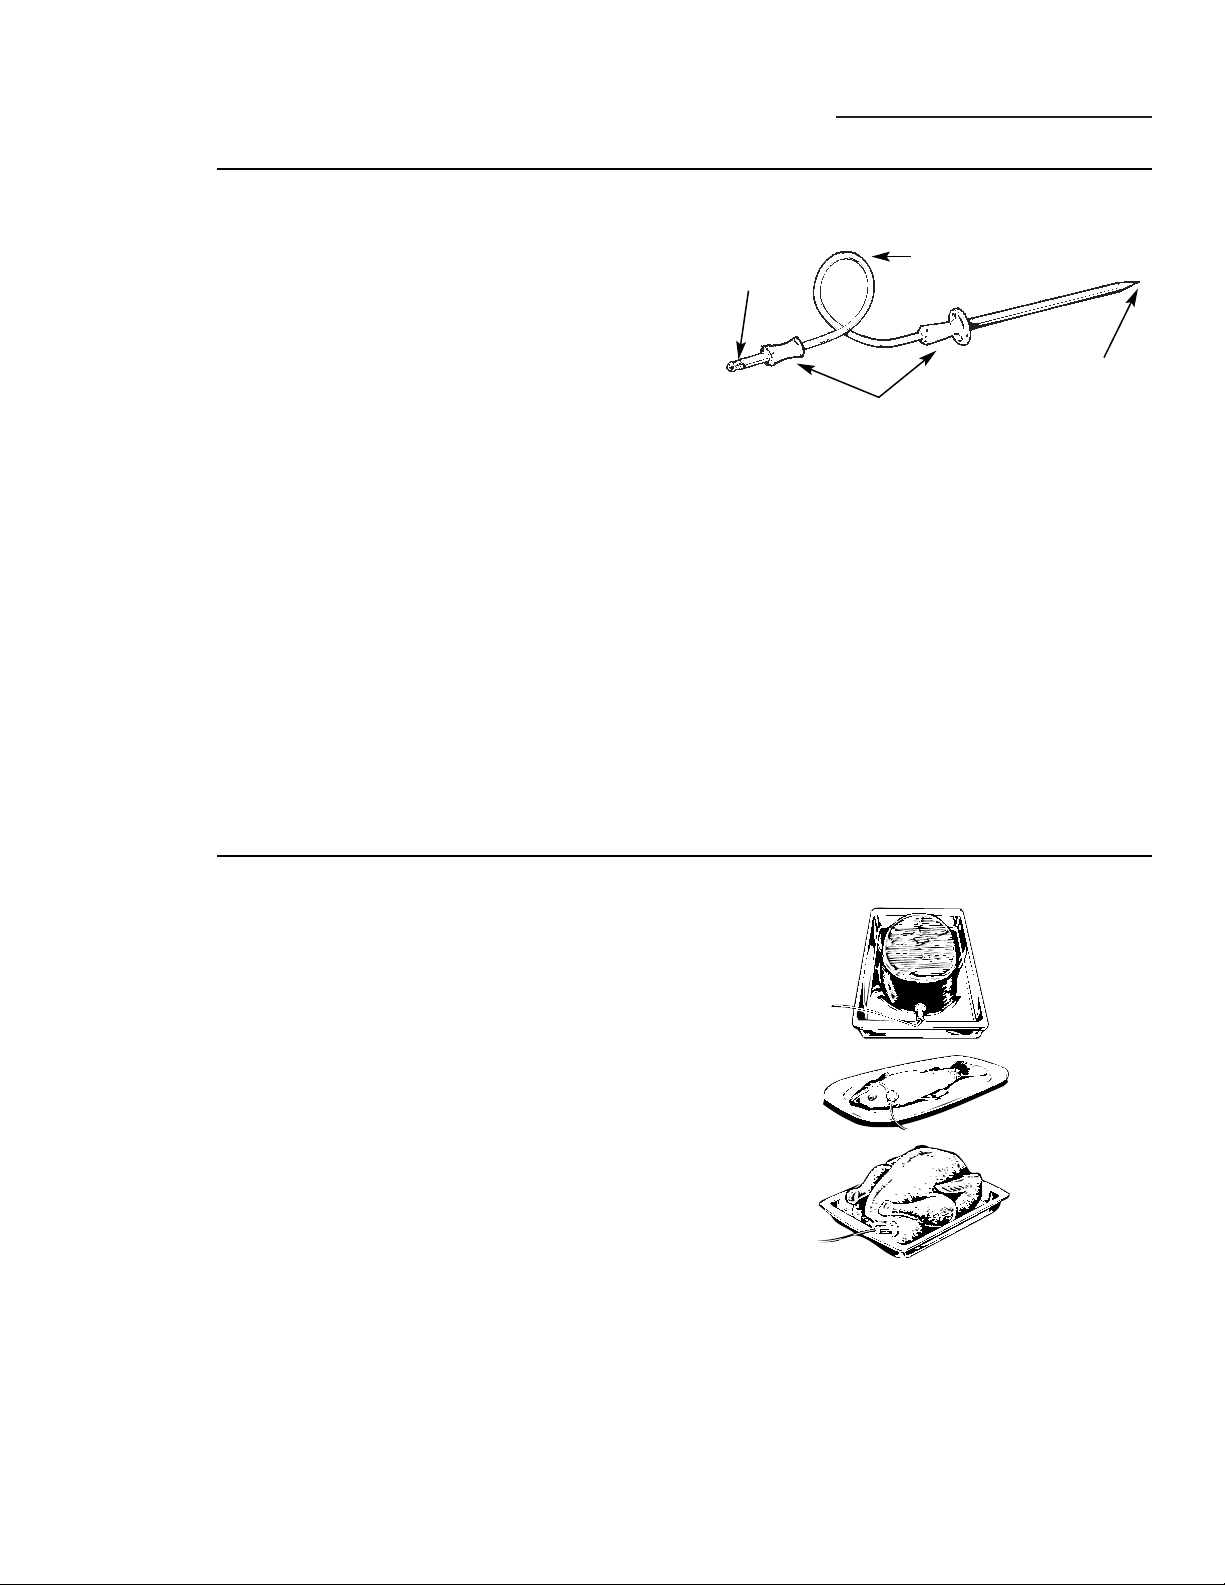
58
Utilisation de la sonde pour la cuisson
Four mural
Sonde
thermique
Dans le cas de nombreux aliments, plus
particulièrement dans celui des rôtis et de la
volaille, la température interne de l’aliment
constitue le meilleur moyen d’en évaluer la
cuisson. Grâce à la sonde thermique, plus
besoin de deviner la durée du rôtissage.
Si vous utilisez une autre sonde que celle
fournie avec votre four, cela pourrait
l’endommager.
Saisissez la sonde par la poignée lorsque vous
l’insérez dans la viande et la voûte du four et
lorsque vous l’en retirez.
• Pour ne pas endommager votre sonde,
n’utilisez pas de pinces pour tirer sur le câble
lorsque vous l’enlevez.
• Assurez-vous que l’aliment est complètement
dé congelé avant d’insérer la sonde, afin
d’éviter de la casser.
• Pour éviter tout risque de brûlures, ne
débranchez la sonde de la prise que lorsque
le four a refroidi.
• Ne laissez jamais votre sonde à l’intérieur du
four lors d’un cycle de cuisson au grilloir ou
d’autonettoyage.
• Ne laissez pas la sonde dans le four.
Câble
Sonde
Poignées
Fiche
La sonde thermique ressemble à une broche pourvue à une extrémité
d’une fiche que vous devez brancher dans la prise aménagée dans la
voûte du four.
Positionnement
correct de la
sonde
Après avoir préparé la viande et l’avoir placée
sur une grille dans une lèchefrite, suivez les
étapes ci-dessous pour bien positionner la
sonde.
• La pointe de la sonde doit être placée au
centre de la partie la plus épaisse de la viande
du rôti.
• La sonde doit être insérée complètement dans
la viande, jusqu’à la poignée, pour qu’elle
puisse indiquer la température correctement.
Elle ne devrait pas toucher l’os, le gras ou le
cartilage.
Dans le cas d’un rôti désossé, insérez la sonde
dans la partie coupée, dans la région la plus
charnue. Dans le cas d’un jambon ou d’un gigot
avec os, insérez la sonde jusqu’au centre du
muscle inférieur le plus gros ou de
l’articulation.
Insérez la sonde au centre du plat, par exemple
un pain de viande ou une casserole. Pour la
cuisson du poisson, insérez la sonde juste au-
dessus des branchies, dans la partie la plus
charnue, parallèlement à l’arête.
Insérez la sonde dans la partie la plus charnue
de l’intérieur de la cuisse, par le dessous et
parallèlement au pilon de la dinde.
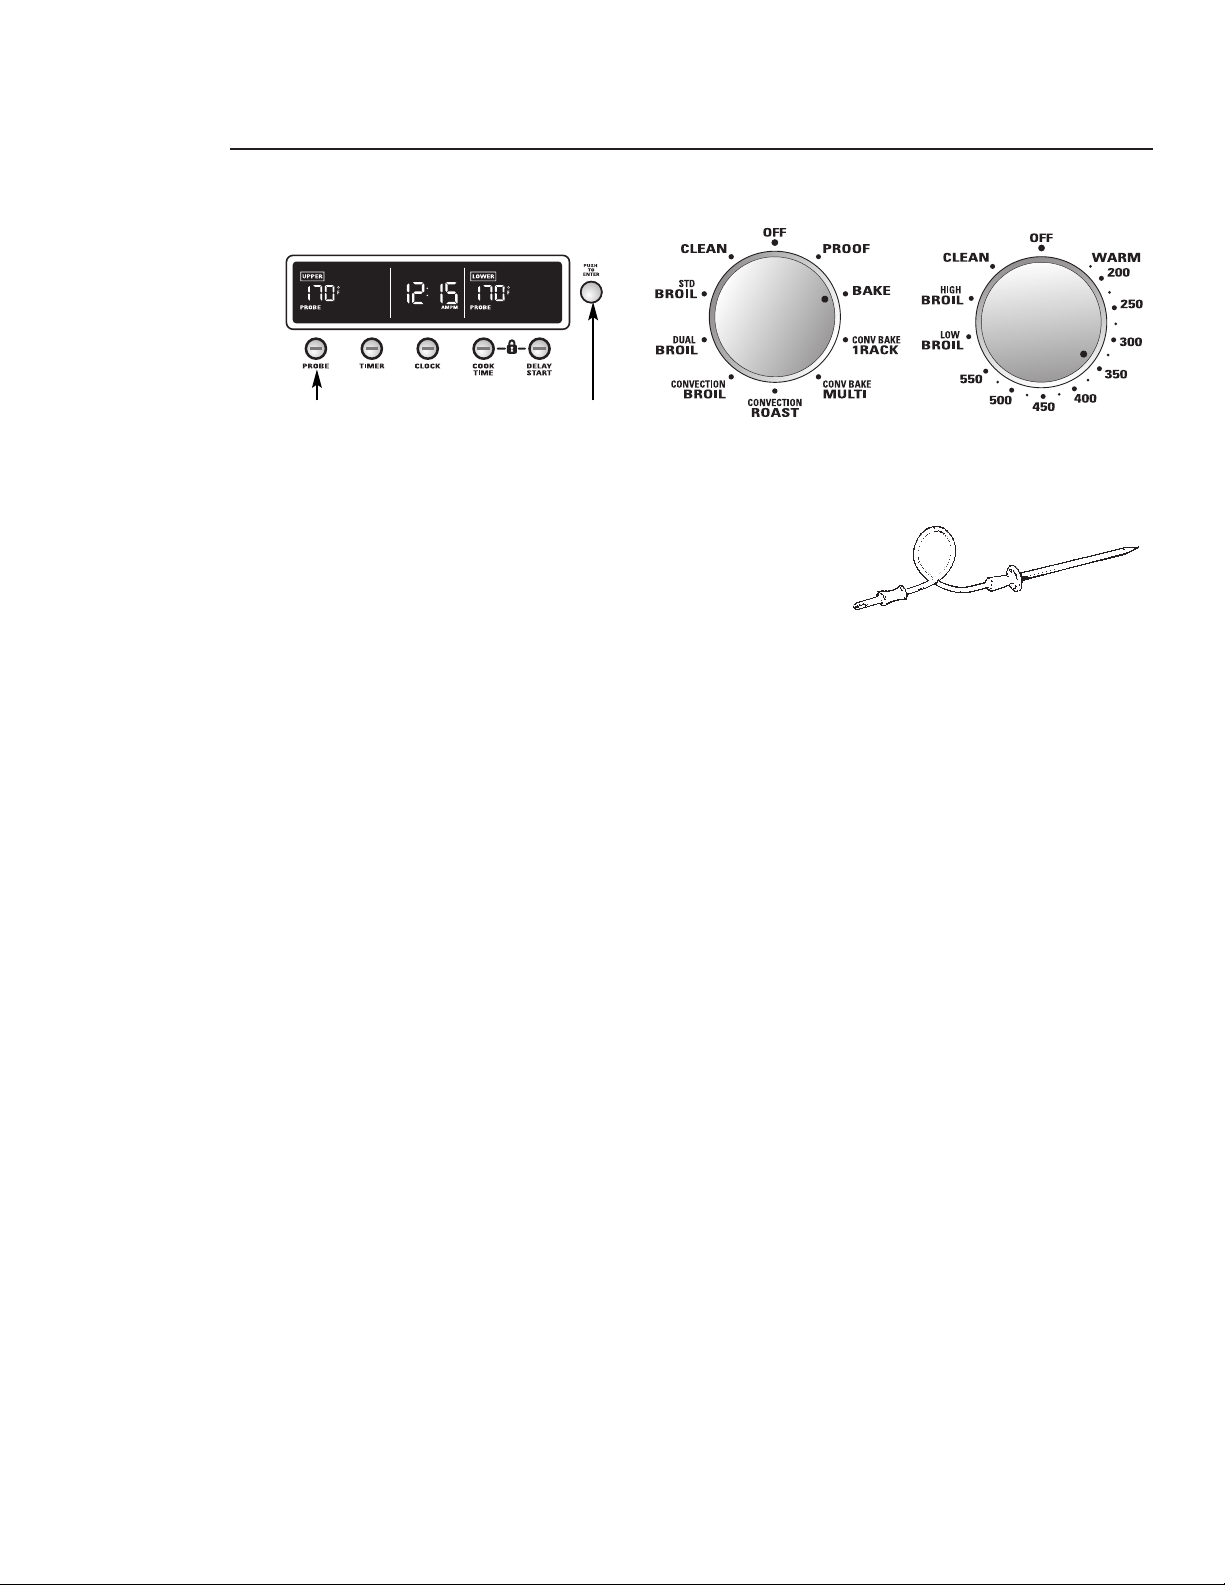
59
Comment
régler un
rôtissage avec
la sonde
thermique
1 Insérez la sonde dans la viande.
2 Branchez la sonde dans la prise aménagée
dans le four. Assurez-vous qu’elle est bien
branchée. Refermez la porte du four.
3 Enfoncez le bouton PROBE (sonde).
REMARQUE : sur les modèles de four mural
double, la commande du four sélectionne
automatiquement le four sur lequel la sonde
est branchée.
4 Tournez le bouton de sélection miniature
pour sélectionner et enfoncez pour saisir
la température interne désirée pour les
aliments ou la viande. Les températures
internes minimum et maximum pour la
nourriture que vous pouvez saisir sont
100 °F à 200 °F (38 °C à 93 °C ).
L’indicateur lumineux PROBE (sonde) clignote
sur l’afficheur si la sonde est insérée dans la prise
mais que vous n’avez pas saisi une température
pour celle-ci.
5 Tournez le bouton de sélection du mode
cuisson à BAKE (cuisson). Pour le rôtissage
par convection avec la sonde, reportez-vous à
la section Comment régler un rôtissage par
convection avec la sonde thermique.
6 À l’aide du bouton de sélection de la
température, réglez la température désirée,
par incrément de 25 °F, de 200 °F à 550 °F
(93 °C à 288 °C).
Le four et les ampoules intérieures du four
s’allument immédiatement et demeurent
allumés jusqu’à ce que le four soit éteint.
Le ventilateur à convection se met en marche
(après un court délai), l’indicateur lumineux
PROBE (sonde) s’allume et l’afficheur
indique 100 °F (38 °C). (La température
affichée commence à changer une fois que la
température intérieure de la viande atteint
100 °F [38 °C].)
Bouton de sélection de
la température
Bouton de sélection
miniature
Tournez pour
sélectionner
Enfoncez pour saisir
Enfoncez pour sélectionner
Illustration de l’afficheur du four double
MISE EN GARDE :
Pour éviter tout risque de brûlures, ne
débranchez la sonde de la prise que lorsque le four a refroidi.
Ne laissez pas la sonde dans le four.
7 Une fois que la température intérieure de la
viande a atteint la température désirée, la
sonde et le four s’éteignent, le mot END
(fin) apparaît sur l’afficheur et le four émet
un signal sonore (bip). (L’indicateur
lumineux PROBE [sonde] demeure allumé
ainsi que la sonde de température.) Pour
arrêter le signal sonore (bip), tournez à OFF
(arrêt) le bouton de sélection du mode
cuisson et le bouton de sélection de la
température ou enfoncez le bouton de
sélection miniature. Utilisez des poignées
chaudes pour retirer la sonde des aliments.
N’utilisez pas de pinces pour la retirer—vous
risquez de l’endommager.
L’indicateur lumineux PROBE (sonde) clignote sur
l’afficheur jusqu’à ce que la sonde soit retirée du
réceptacle du four.
Pour changer le réglage de la température
interne des aliments ou de la viande (sonde) au
cours du cycle de rôtissage, enfoncez le bouton
PROBE (sonde), tournez le bouton de
sélection miniature pour sélectionner la
nouvelle température et enfoncez pour la saisir.
• Vous pouvez utiliser la minuterie même si
vous ne pouvez effectuer une cuisson
minutée.
Bouton de sélection du mode
de cuisson

Utilisation du four à convection
Four mural
Ventilateur
de
convection
Casseroles
pour la
cuisson par
convection
Pour
adapter vos
recettes
Cuisson par
convection
sur 1 grille
Pour la cuisson par convection sur 1 seule
grille, utilisez CONV BAKE 1 RACK et pour de
meilleurs résultats, placez la grille à la position
B ou C au centre du four. Les temps de cuisson
peuvent être inférieurs à ceux prévus; il faut
donc vérifier les aliments plus tôt que ce qui est
indiqué sur le paquet afin de s’assurer de ne
pas trop cuire.
Idéal pour préparer avec succès de larges
casseroles et des lasagnes.
Cuisson à
convection
avec plusieurs
grilles
Parce que l’air chaud circule uniformément
dans le four, la cuisson des aliments sur
plusieurs grilles à la fois donne d’excellents
résultats.
Le temps requis pour la cuisson sur plusieurs
grilles pourrait augmenter un peu pour certains
aliments, mais le temps d’ensemble est
conservé puisque deux à trois fois plus
d’aliments peuvent être préparés en même
temps.
Vous obtiendrez d’excellents résultats en
cuisant à convection avec plusieurs grilles les
biscuits, les muffins, les petits gâteaux et les
petits pains.
Avant d’utiliser votre four à convection, vérifiez
s’il y a suffisamment d’espace autour de votre
plat de cuisson pour assurer une bonne
circulation de l’air dans le four. Si vous utilisez
plusieurs plats, laissez de l’espace entre eux.
Assurez-vous également qu’ils n’entrent pas en
contact avec d’autres casseroles ou avec les
parois du four.
Papier et plastique
Vous pouvez utiliser dans le four à convection
les contenants de plastique ou de papier
résistant à la chaleur, recommandés par leur
fabricant pour utilisation dans un four
ordinaire. Les plats de cuisson en plastique
résistant à une température de 400 °F (200 °C)
conviennent également.
REMARQUE : ne laissez aucun papier ou
plastique en contact avec l’élément de grillage
supérieur.
Métal et verre
Vous pouvez utiliser n’importe quel type de
plats de cuisson dans votre four à convection.
Toutefois, ce sont les plats en métal qui
chauffent le plus rapidement. Ils sont d’ailleurs
recommandés pour la cuisson par convection.
Les plats de couleur foncée ou au fini mat
assurent une cuisson plus rapide que les plats
luisants.
Les plats en verre ou en céramique assurent
une cuisson plus lente.
Lorsque vous préparez des biscuits, vous
obtiendrez de meilleurs résultats si vous utilisez
une plaque à biscuit plate plutôt qu’un moule à
bords bas.
Dans le cas de certaines recettes, comme le
poulet au four, utilisez un plat dont les parois
sont peu élevées. L’air chaud ne peut circuler
adéquatement autour de l’aliment lorsque
celui-ci est placé dans un plat à parois élevées.
Vous pouvez vous servir de vos recettes préférées
dans le four à convection.
Pour cuire à convection, réduisez la température
de cuisson de 25 °F (14 °C). Aucun ajustement de
température n’est requis pour le rôtissage par
convection.
Utilisez le format de casserole recommandé
dans la recette.
L’emballage de certains plats principaux ou plats
surgelés comportent des directives conçues pour les
fours à convection commerciaux. Pour obtenir de
bons résultats dans votre four, faites réchauffer le four
et réglez la température indiquée sur l’emballage.
Dans un four à convection, l’air chaud circule
au-dessus, au-dessous et autour des aliments
grâce à un ventilateur.
L’air est ainsi distribué uniformément dans
toute la cavité du four. Par conséquent, les
aliments sont cuits uniformément et dorés à
point—et la durée de cuisson est souvent plus
courte que dans un four ordinaire.
REMARQUE : Le ventilateur de convection se met
en marche et s’arrête pendant la cuisson pour mieux
distribuer l’air chaud dans le four.
Le ventilateur du four à convection s’éteint lorsque
vous ouvrez la porte du four. Ne laissez PAS la porte
ouverte pendant de longues périodes lorsque vous avez
programmé une cuisson par convection sinon, vous
risquez d’écourter la durée de l’élément chauffant du
système à convection.
60

La cuisson par convection est idéale pour le
brunissage uniforme d’aliments cuits sur une
ou plusieurs grilles.
Lorsque réglé pour la cuisson par convection,
l’élément de cuisson arrière et le ventilateur
fonctionnent dès que le four commence à
chauffer.
Tournez le bouton de sélection du mode
cuisson à CONV BAKE/1 RACK pour la
cuisson par convection sur 1 grille. Ce mode
est utilisé pour faire cuire les aliments sur une
seule grille dans le four à convection.
Tournez le bouton de sélection du mode
cuisson à CONV BAKE/MULTI (Convection
Bake Multi mode) pour la cuisson par
convection sur plusieurs grilles. Ce mode sert
à préparer les aliments sur plus d’une grille
(soit 2, 3 ou plus) en même temps pour la
cuisson par convection. Reportez-vous à la
section Cuisson par convection sur plusieurs
grilles pour plus d’information.
À l’aide du bouton de sélection de la
température, réglez la température désirée, par
incrément de 25 °F, de 200 °F à 550 °F
(93 °C à 288 °C).
Le four et les ampoules intérieures du four
s’allument immédiatement et demeurent
allumés jusqu’à ce que le four soit éteint.
Le ventilateur à convection se met en marche
(après un court délai), l’indicateur lumineux
PREHEAT (préchauffage) s’allume et
l’afficheur indique 100 °F (38 °C). (La
température affichée commence à changer
une fois que la température du four a atteint
100 °F [38 °C.].) La commande émet un
signal sonore (bip) une fois que le four est
préchauffé, ce qui prend environ de 10 à 15
minutes. L’indicateur lumineux PREHEAT
(préchauffage) s’éteint et l’afficheur indique la
température de réglage.
Les aliments peuvent être placés dans le four
une fois que le voyant lumineux PREHEAT
(préchauffage) s’est éteint.
Vérifiez si les aliments sont prêts au temps
minimum prévu dans la recette. Faites cuire
plus longtemps au besoin.
Tournez à OFF (arrêt) le bouton de sélection
du mode cuisson et le bouton de sélection de
la température une fois la cuisson par
convection terminée.
REMARQUE : un ventilateur de refroidissement
se met en marche pour refroidir les pièces
internes. Cela est normal et il se peut que le
ventilateur continue de fonctionner même après
que le four soit éteint.
Comment
régler une
cuisson par
convection
Bouton de sélection du mode de cuisson Bouton de sélection de la température
Cuisson par convection
Four mural
Le four possède 5 positions de grille. Reportez-vous à la section
Grilles de four à extension complète pour les instructions sur
l’utilisation, l’enlèvement et la remise en place des grilles.
C
D
B
A
E
REMARQUE :
ces positions de grilles sont
suggérées; utilisez celles qui donnent les meilleurs
résultats. Les grilles A et D sont une autre suggestion.
61
Type d’aliment Position de la
grille
Biscuits (1 grille) B ou C
Biscuits (2 grilles) A & C ou B & D
Muffins et petits gâteaux (1 grille)
B ou C
Muffins et petits gâteaux (2 grilles)
A & C ou B & D
Biscuits (1 grille) B ou C
Biscuits (3 grilles) A, C & E
2 gâteaux à étages (1 grille) B ou C
4 gâteaux à étages (2 grilles) A & C ou B & D
1 tarte congelée (1 grille) B ou C
(sur plaque à
pâtisserie)
2 tartes congelées (2 grilles) A & C ou B & D
(sur plaque à
pâtisserie)
Casseroles (1 grille) B ou C
Pizza congelée de 30 cm
B ou C
(12 po) (1 grille)
2 Pizzas congelées de 30 cm A & C ou B & D
(12 po) (2 grilles)
Rôtissage (tranches de viande A, B ou C
épaisses, dindons, etc.)
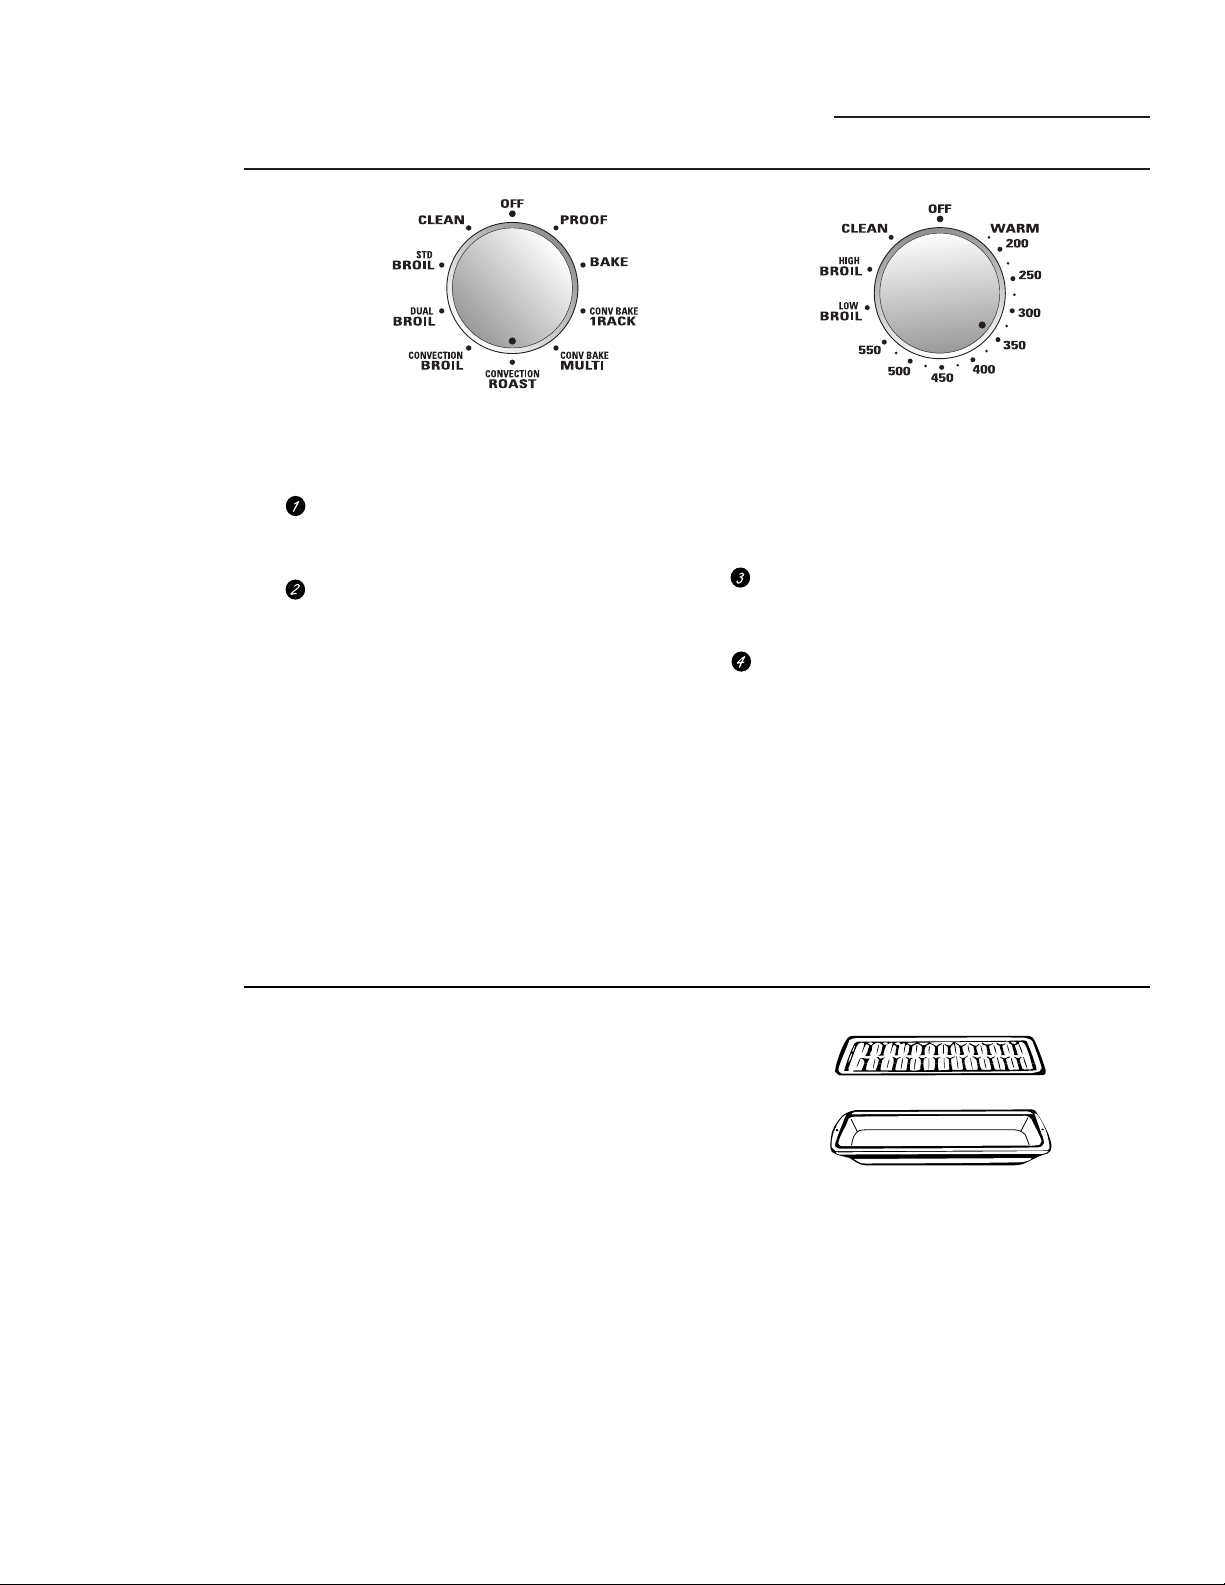
62
Rôtissage par convection
Four mural
Le rôtissage par convection convient pour les
grosses pièces de viande tendre, à découvert.
Tournez le bouton de sélection du mode
cuisson à CONVECTION ROAST (rôtissage
par convection).
À l’aide du bouton de sélection de la
température, réglez la température désirée,
par incrément de 25 °F, de 200 °F à 550 °F
(93 °C à 288 °C).
Le four et les ampoules intérieures du four
s’allument immédiatement et demeurent
allumés jusqu’à ce que le four soit éteint.
Le ventilateur à convection se met en
marche (après un court délai), l’indicateur
lumineux PREHEAT (préchauffage)
s’allume et l’afficheur indique 100 °F
(38 °C). (La température affichée
commence à changer une fois que la
température du four a atteint 100 °F
[38 °C.].) La commande émet un signal
sonore (bip) une fois que le four est
préchauffé, ce qui prend environ de 10 à 15
minutes. L’indicateur lumineux PREHEAT
(préchauffage) s’éteint et l’afficheur indique
la température de réglage.
Vérifiez si les aliments sont prêts au temps
minimum indiqué dans la recette. Faites
cuire plus longtemps au besoin.
Tournez le bouton de sélection du mode
cuisson et le bouton de sélection de la
température à OFF (arrêt) une fois la
cuisson terminée.
REMARQUE : un ventilateur de
refroidissement se met en marche pour
refroidir les pièces internes. Cela est normal
et il se peut que le ventilateur continue à
fonctionner même après que le four soit éteint.
Comment
régler un
rôtissage par
convection
Bouton de sélection du mode de cuisson Bouton de sélection de la température
Conseils
pour le
rôtissage par
convection
En utilisant la lèchefrite et sa grille pour rôtir, l’air
réchauffé circule au-dessus, au-dessous et autour
des aliments pendant le rôtissage. L’air réchauffé
enferme les jus rapidement, ce qui donne un
intérieur tendre et juteux tout en créant un
extérieur d’un brun doré.
Lorsque vous faites rôtir par convection, il est
important d’utiliser la lèchefrite et sa grille. La
lèchefrite sert à recueillir les écoulements de gras
et la grille sert à empêcher les éclaboussures de
gras et à permettre à l’air réchauffé de circuler
sous la viande et d’ainsi augmenter le brunissage
sur le dessous de la viande ou de la volaille.
• Placez la grille sur la lèchefrite.
Grille
Lèchefrite
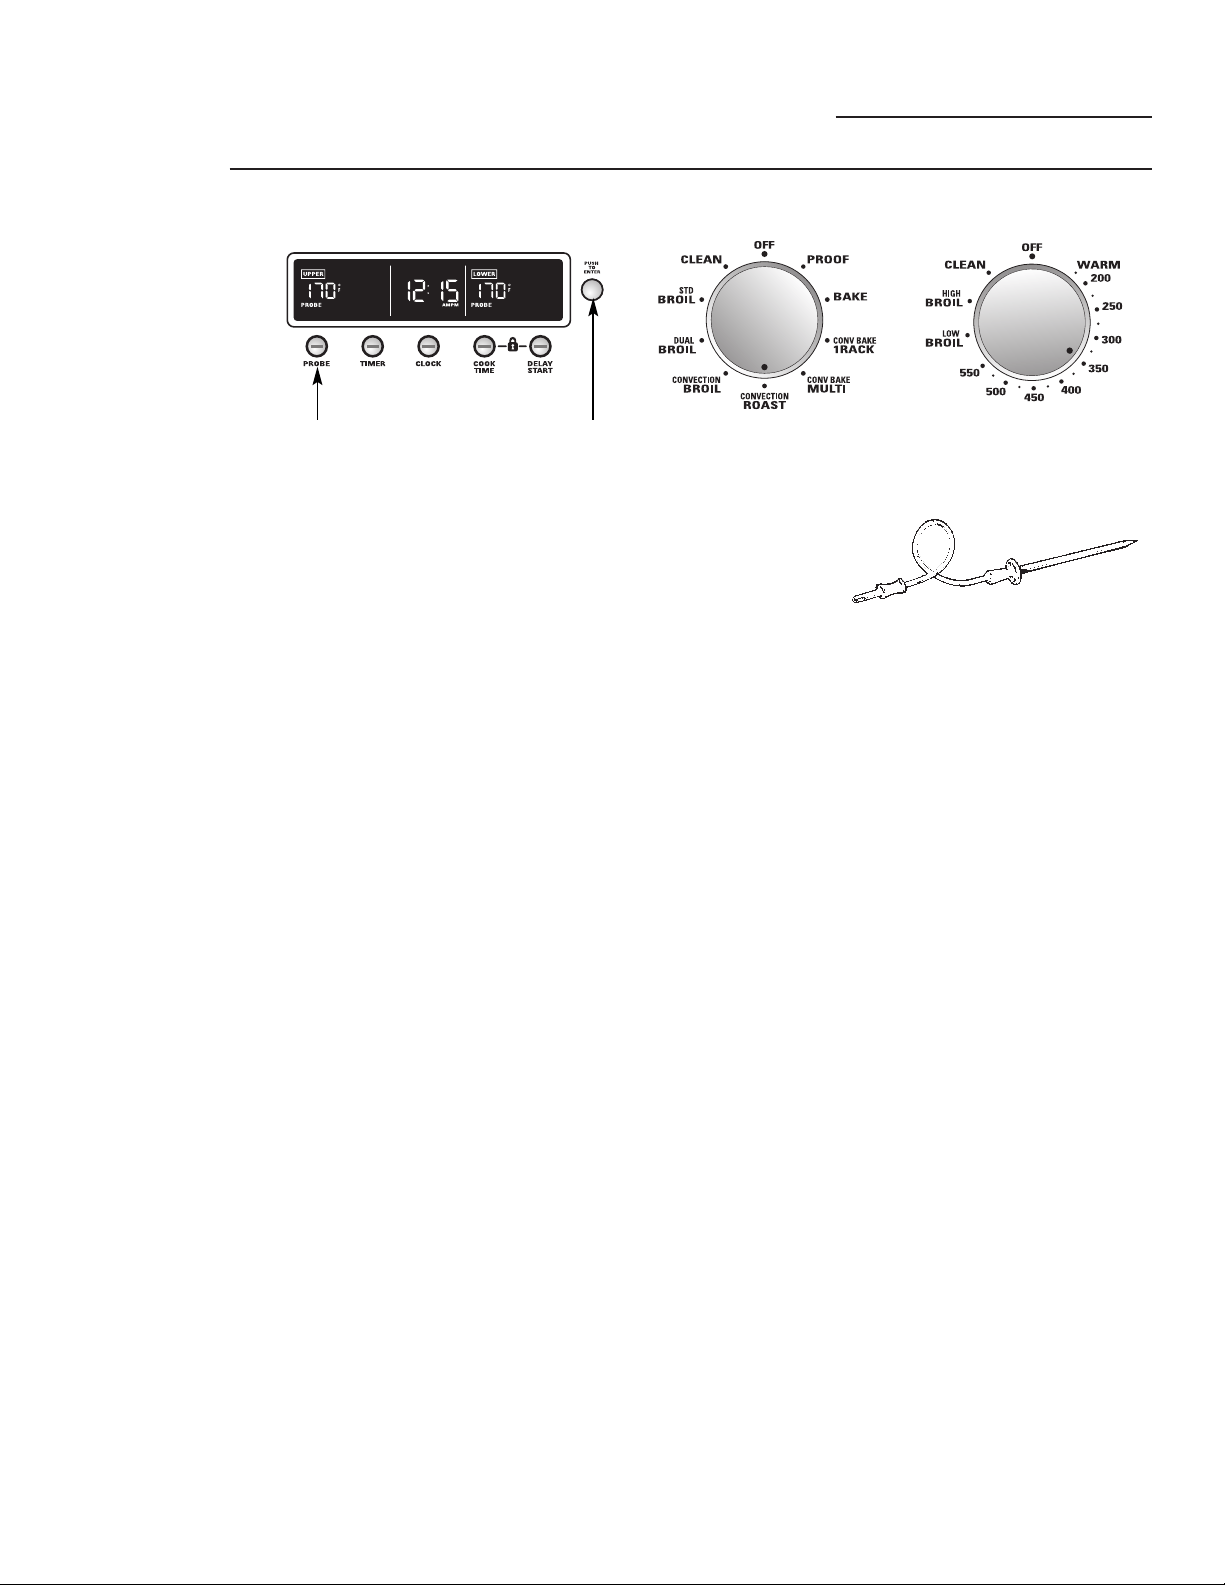
63
Comment
régler un
rôtissage par
convection
avec la sonde
thermique
Reportez-vous à la section Conseils pour le
rôtissage par convection.
1 Placez la grille à la position désirée et insérez
la sonde dans la viande.
2 Branchez la sonde dans la prise aménagée
dans le four. Assurez-vous qu’elle est bien
enfoncée dans la prise. Fermez la porte
du four.
3 Enfoncez le bouton PROBE (sonde).
REMARQUE : sur les modèles de four mural
double, la commande du four sélectionne
automatiquement le four sur lequel la sonde
est branchée.
4 Tournez le bouton de sélection miniature
pour sélectionner et enfoncez pour saisir
la température interne désirée pour les
aliments ou la viande. Les températures
internes minimum et maximum pour la
nourriture que vous pouvez saisir sont
100 °F à 200 °F (38 °C à 93 °C).
L’indicateur lumineux PROBE (sonde) clignote
sur l’afficheur si la sonde est insérée dans la prise
mais que vous n’avez pas saisi une température
pour celle-ci.
5 Tournez le bouton de sélection du mode
cuisson à CONVECTION ROAST (rôtissage
par convection).
6 À l’aide du bouton de sélection de la
température, réglez la température désirée,
par incrément de 25 °F, de 200 °F à 550 °F
(93 °C à 288 °C).
Le four et les ampoules intérieures du four
s’allument immédiatement et demeurent
allumés jusqu’à ce que le four soit éteint.
Le ventilateur à convection se met en marche
(après un court délai), l’indicateur lumineux
PROBE (sonde) s’allume et l’afficheur
indique 100 °F (38 °C). (La température
affichée commence à changer une fois que la
température intérieure de la viande atteint
100 °F [38 °C].)
Rôtissage par convection avec la sonde thermique
Four mural
Bouton de sélection de
la température
Bouton de sélection
miniature
Tournez pour sélectionner
Enfoncez pour saisir
Enfoncez pour sélectionner
Illustration de l’afficheur du four double.
MISE EN GARDE :
Pour éviter tout risque de brûlures, ne
débranchez la sonde de la prise que lorsque le four a refroidi.
Ne laissez pas la sonde dans le four.
7 Une fois que la température intérieure de la
viande a atteint la température désirée, la
sonde et le four s’éteignent, le mot END
(fin) apparaît sur l’afficheur et le four émet
un signal sonore (bip). (L’indicateur
lumineux PROBE [sonde] demeure allumé
ainsi que la sonde de température.) Pour
arrêter le signal sonore (bip), tournez à OFF
(arrêt) le bouton de sélection du mode
cuisson et le bouton de sélection de la
température ou enfoncez le bouton de
sélection miniature. Utilisez des poignées
chaudes pour retirer la sonde des aliments.
N’utilisez pas de pinces pour la retirer—vous
risquez de l’endommager.
L’indicateur lumineux PROBE (sonde) clignote sur
l’afficheur jusqu’à ce que la sonde soit retirée du
réceptacle du four.
Pour changer le réglage de la température
interne des aliments ou de la viande (sonde)
au cours du cycle de rôtissage, enfoncez le
bouton PROBE (sonde), tournez le bouton
de sélection miniature pour sélectionner la
nouvelle température et enfoncez pour la saisir.
• Si vous retirez la sonde de l’aliment avant que
la température finale ait été atteinte, une
tonalité se fait entendre et l’écran d’affichage
clignote jusqu’à ce que vous enleviez la sonde
du four.
• Vous pouvez utiliser la minuterie même si
vous ne pouvez effectuer une cuisson
minutée.
Bouton de sélection du mode
de cuisson

64
Guide de
rôtissage par
convection
Viande Minutes/lb Temp. du four Temp. interne
Boeuf Côtes, entrecôte, Saignant 20–24 325 °F (163 °C) 140 °F (60 °C)†
haut de surlonge À point 24–28 325 °F (163 °C) 160 °F (71 °C)
(3 à 5 lb [1,4 à 2,3 kg]) Bien cuit 28–32 325 °F (163 °C) 170 °F (82 °C)
Filet Saignant 10–14 325 °F (163 °C) 140 °F (60 °C)†
À point 14–18 325 °F (163 °C) 160 °F (71 °C)
Porc Désossé ou non (3 à 5 lb [1,4 à 2,3 kg]) 23–27 325 °F (163 °C) 170 °F (82 °C)
Côtelettes (1/2 à 1 po 2 côtelettes 30–35 au total 325 °F (163 °C) 170 °F (82 °C)
[1,3 à 2,5 cm] d’épaisseur) 4 côtelettes 35–40 au total 325 °F (163 °C) 170 °F (82 °C)
6 côtelettes 40–45 au total 325 °F (163 °C) 170 °F (82 °C)
Jambon En conserve, soc, jarret (3 à 5 lb [1,4 à 2,3 kg], cuit) 14–18 325 °F (163 °C) 140 °F (60 °C)
Agneau Désossé ou non (3 à 5 lb [1,4 à 2,3 kg]) À point 17–20 325 °F (163 °C) 160 °F (71 °C)
Bien cuit 20–24 325 °F (163 °C) 170 °F (82 °C)
Fruits Poisson, entier (3 à 5 lb [1,4 à 2,3 kg]) 30–40 au total 400 °F (204 °C)
de mer
Queues de homard (6 à 8 oz [0,17 à 0,22 kg] ch.) 20–25 au total 350 °F (177 °C)
Volaille Poulet entier (2
1
⁄2 à 3
1
⁄2 lb [1,1 à 1,6 kg]) 24–26 350 °F (177 °C)
180°–185 °F (82°–85 °C)
Poulets de Cornouailles non farcis (1 à 1
1
⁄2
lb [0,45 à 0,7 kg]) 50–55 au total 350 °F (177 °C)
180°–185 °F (82°–85 °C)
Farcis (1 à 1
1
⁄2
lb [0,45 à 0,7 kg]) 55–60 au total 350 °F (177 °C)
180°–185 °F (82°–85 °C)
Canard (4 à 5 lb [1,8 à 2,3 kg]) 24–26 325 °F (163 °C)
180°–185 °F (82°–85 °C)
Dinde, entière*
Non farcie (10 à 16 lb [4,5 à 7,3 kg]) 8–11 325 °F (163 °C)
180°–185 °F (82°–85 °C)
Non farcie (18 à 24 lb [8,2 à 10,9 kg]) 7–10 325 °F (163 °C)
180°–185 °F (82°–85 °C)
Poitrine de dinde (4 à 6 lb [1,8 à 2,7 kg]) 16–19 325 °F (163 °C) 170 °F (82 °C)
*
Il faut généralement allonger la durée de rôtissage de 30 à 45 minutes pour la volaille farcie. Protégez les pilons et la poitrine avec du papier
d’aluminium pour éviter un brunissage excessif et le dessèchement de la peau.
†
Le ministère de l’Agriculture des États-Unis fait la mise en garde suivante : «Même si la consommation du boeuf saignant est très répandue, il faut
savoir que lorsque la température interne de la viande atteint seulement 140 °F (60 °C), certains micro-organismes nuisibles pour la santé ne sont pas
détruits.» (Source : Safe Food Book, Y
our Kitchen Guide
, USDA, rév. juin 1985.)
Rôtissage par convection
Four mural
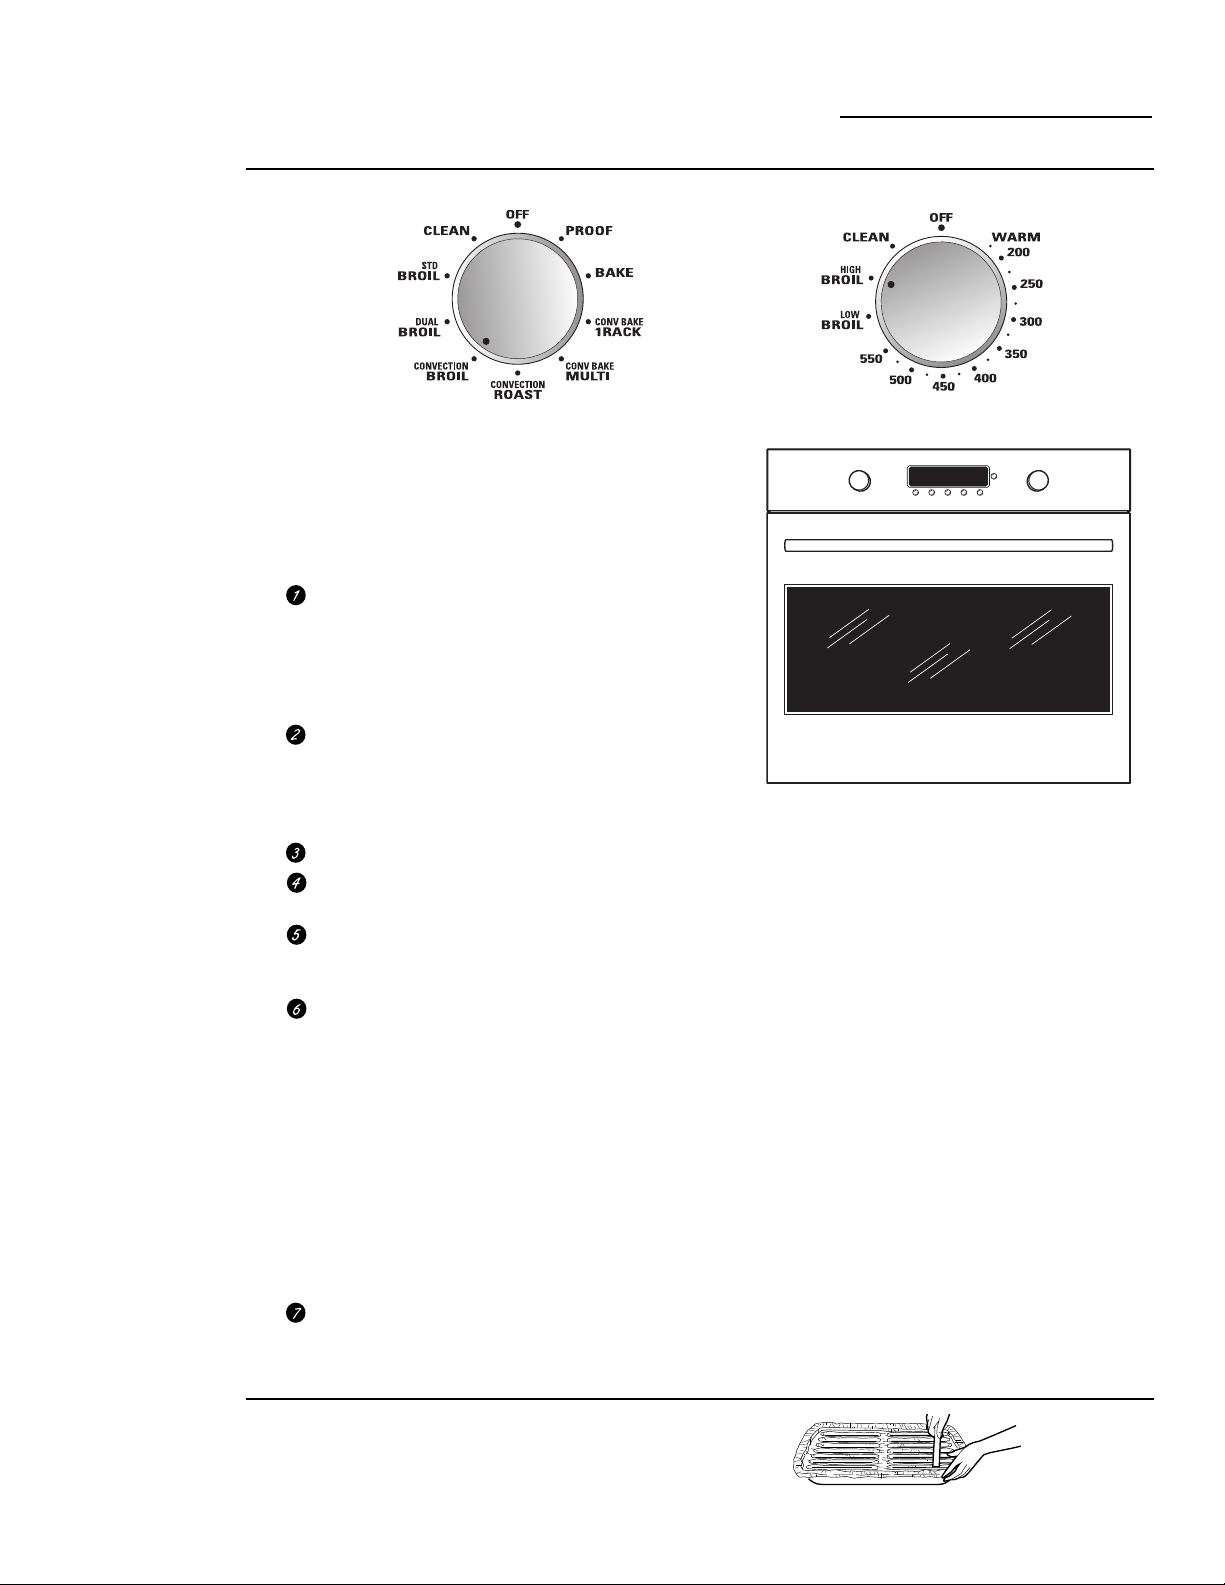
65
La cuisson au grilloir par convection convient
pour la cuisson au grilloir du poisson et des
coupes de viande plus petites. Lorsque le four est
réglé pour la cuisson au grilloir par convection,
les deux éléments du haut se mettent en marche
lorsque la cuisson est lancée.
Si la pièce de viande comporte du gras ou
du cartilage sur le pourtour, faites des
entailles verticales dans les deux à environ
5 cm (2 po) d’intervalle. Si désiré, le gras
peut être enlevé, pour ne laisser qu’une
couche de 0,3 cm (1/8 po).
Placez la viande ou le poisson sur la
lèchefrite et sa grille. Utilisez toujours la
grille pour que tout le gras tombe dans la
lèchefrite; sinon, les jus pourraient devenir
suffisamment chauds pour s’enflammer.
Placez la grille dans le four.
Fermez la porte. Fermez toujours la porte
lorsque vous cuisinez au grilloir.
Tournez le bouton de sélection du mode
cuisson à CONVECTION BROIL (cuisson
au grilloir par convection).
Tournez le bouton de sélection de la
température à LOW BROIL (cuisson basse au
grilloir) ou HIGH BROIL (cuisson haute au
grilloir). La température de cuisson au
grilloir est alors réglée automatiquement. LO
ou HI (bas ou haut) apparaît sur l’afficheur
selon la température de cuisson au grilloir
sélectionnée.
Le four et les ampoules intérieures du four
s’allument immédiatement et demeurent
allumés jusqu’à ce que le four soit éteint.
Le ventilateur à convection se met en
marche (après un court délai).
Lorsque la cuisson au grilloir est terminée,
tournez à OFF (arrêt) le bouton de sélection
du mode cuisson et le bouton de sélection
de la température.
REMARQUE :
un ventilateur de refroidissement
se met en marche pour refroidir les pièces
internes. Cela est normal
et il se peut que le ventilateur continue de
fonctionner même après que le four soit éteint.
Le préchauffage n’est pas nécessaire pour la
plupart des cuissons au grilloir. Cependant, les
aliments qui cuisent rapidement, les languettes
de viande ou de poisson fines par exemple,
peuvent nécessiter une courte période de
préchauffage de 2 à 3 minutes pour permettre
à la surface des aliments de brunir tout en
cuisant entièrement.
Ne retournez les aliments qu’une seule fois
pendant la cuisson au grilloir.
REMARQUE : Il est impossible d’utiliser le
mode de cuisson au grilloir par convection si la
sonde de température est branchée. Ne laissez
jamais votre sonde à l’intérieur du four lors
d’un cycle de cuisson au grilloir.
Grilloir par convection
Four mural
Comment
régler le four
pour la
cuisson au
grilloir par
convection
Fermez la porte. Fermez toujours la porte lorsque vous
cuisinez au grilloir.
Papier
d’aluminium
Vous pouvez utiliser du papier d’aluminium
comme doublure pour la lèchefrite et sa grille.
Par contre, vous devez placer le papier bien
ajusté sur la grille et découper des fentes
semblables à celles de la grille.
Bouton de sélection du mode de cuisson
Bouton de sélection de la température

66
Cuisson à l’aide de la minuterie
Four mural
La cuisson à minuterie vous permet de mettre
le four en marche immédiatement, de faire
cuire pendant la période de temps
sélectionnée et de programmer l’arrêt
automatique.
Afin de programmer la mise en marche
immédiate et l’arrêt automatique du four :
REMARQUE : avant de commencer, assurez-
vous que l’horloge affiche la bonne heure.
Afin d’éviter de vous brûler, placez les grilles à
la bonne position avant de mettre le four en
marche.
Tournez le bouton de sélection du mode
cuisson à la fonction de cuisson désirée.
REMARQUE : la cuisson à minuterie ne
peut être utilisée pour les modes Broil
(cuisson au grilloir) et Proof (levage).
À l’aide du bouton de sélection de la
température, réglez la température désirée,
par incrément de 25 °F, de 200 °F à 550 °F
(93 °C à 288 °C).
Le four et les ampoules intérieures du four
s’allument immédiatement et demeurent
allumés jusqu’à ce que le four soit éteint.
Le ventilateur à convection se met en
marche (après un court délai), l’indicateur
lumineux PREHEAT (préchauffage)
s’allume et l’afficheur indique 100 °F
(38 °C). (La température affichée
commence à changer une fois que la
température du four a atteint 100 °F
[38 °C.].) La commande émet un signal
sonore (bip) une fois que le four est
préchauffé, ce qui prend environ de 10 à 15
minutes. L’indicateur lumineux PREHEAT
(préchauffage) s’éteint et l’afficheur
indique la température de réglage.
Les aliments peuvent être placés dans le
four une fois que le voyant lumineux
PREHEAT (préchauffage) s’est éteint.
Enfoncez le bouton COOK TIME (temps
de cuisson).
REMARQUE : si votre recette exige que vous
préchauffiez le four, vous devrez peut-être
augmenter le temps de cuisson (environ
10 à 15 minutes).
Tournez le bouton de sélection miniature
pour faire une sélection et enfoncez pour
saisir le temps de cuisson désiré. (Le temps
de cuisson maximal est de 9 heures et
59 minutes. Le temps de cuisson minimal
est de 1 minute.)
L’afficheur indique COOK TIME (temps de
cuisson) et le décompte du temps de cuisson.
REMARQUE : le décompte du temps de
cuisson commence immédiatement.
Le four continue à cuire pour la période
de temps programmée, puis s’éteint
automatiquement.
Pour rappeler le temps de cuisson, enfoncez le
bouton COOK TIME (temps de cuisson). Pour
le changer, tournez et enfoncez le bouton de
sélection miniature.
Lorsque la cuisson à minuterie a pris fin,
le four s’éteint, 0:00 s’affiche en succession
rapide, le mot END (fin) apparaît sur
l’afficheur et la commande du four émet
un signal sonore (bip). Pour arrêter le
signal sonore (bip) de rappel, tournez à
OFF (arrêt) le bouton de sélection du
mode cuisson et le bouton de sélection
de la température.
REMARQUE :
• Le réglage de température WARM (chaud)
(l’afficheur indiquera 175 °F), offert sur ce
four, permet de garder les aliments chauds.
Les aliments gardés plus de deux heures au
four à ces basses températures pourraient ne
plus être propres à la consommation.
• Ne laissez jamais des aliments comme des
produits laitiers, du poisson, de la farce, de la
volaille et du porc reposer pendant plus d’une
heure avant ou après la cuisson. Lorsque ces
aliments sont laissés à la température de la
pièce, cela favorise la prolifération de bactéries
nocives.
Cuisson à
minuterie
(mise en
marche
immédiate
et arrêt
automatique)
Bouton de sélection
miniature
Tournez pour sélectionner
Enfoncez pour saisir
Enfoncez pour
sélectionner
Illustration de l’afficheur du four double.

Cuisson à
minuterie
(mise en
marche
différée
et
arrêt
automatique)
La cuisson à minuterie avec DELAY START
(démarrage différé) vous permet de mettre le
four en marche à l’heure que vous avez choisie,
de faire cuire durant la période sélectionnée et
de programmer l’arrêt automatique. La fonction
DELAY START (démarrage différé) ne peut être
utilisée avec la fonction Sabbath.
Pour différer le début de la cuisson :
REMARQUE : avant de commencer, assurez-
vous que l’horloge affiche la bonne heure.
Afin d’éviter de vous brûler, placez les grilles à la
bonne position avant de mettre le four en marche.
REMARQUE : la cuisson à minuterie ne peut
être utilisée pour les modes Broil (cuisson au
grilloir) et Proof (levage).
Enfoncez le bouton DELAY START
(démarrage différé). L’heure de la journée
apparaît en succession rapide sur l’afficheur.
Pour les modèles de four double, enfoncez le bouton
DELAY START (démarrage différé) une fois pour régler
le four supérieur et deux fois pour régler le four inférieur.
Tournez le bouton de sélection miniature pour
faire une sélection et enfoncez pour saisir
l’heure de la journée à laquelle vous désirez
que débute la cuisson.
Enfoncez le bouton COOK TIME (temps
de cuisson).
REMARQUE : si votre recette exige que vous
préchauffiez le four, vous devrez peut-être
augmenter le temps de cuisson (environ 10 à
15 minutes).
Tournez le bouton de sélection miniature pour
faire une sélection et enfoncez pour saisir le
temps de cuisson désiré. (Le temps de cuisson
maximal est de 9 heures et 59 minutes. Le
temps de cuisson minimal est de 1 minute.)
Tournez le bouton de sélection du mode
cuisson à la fonction de cuisson désirée.
À l’aide du bouton de sélection de la
température, réglez la température désirée,
par incrément de 25 °F, de 200 °F à 550 °F
(93 °C à 288 °C).
Pour rappeler l’heure de démarrage, enfoncez le
bouton DELAY START (démarrage différé). Pour
le changer, tournez et enfoncez le bouton de
sélection miniature. Pour rappeler le temps de
cuisson, enfoncez le bouton COOK TIME (temps
de cuisson). Pour le changer, tournez et enfoncez
le bouton de sélection miniature.
L’afficheur affiche à nouveau l’heure de la
journée et START TIME (heure de démarrage)
pour indiquer que le four est réglé. Une fois
l’heure de démarrage atteinte, le four et les
ampoules de four intérieures s’allument.
REMARQUE :
le décompte du temps de cuisson
commence lorsque l’heure de démarrage différé est
atteinte. L’afficheur indique COOK TIME (temps de
cuisson) et le décompte du temps de cuisson.
Le four continue à cuire pour la période
de temps programmée, puis s’éteint
automatiquement.
Lorsque la cuisson à minuterie a pris fin,
le four s’éteint, 0:00 s’affiche en succession
rapide, le mot END (fin) apparaît sur
l’afficheur et la commande du four émet un
signal sonore (bip). Pour arrêter le signal
sonore (bip) de rappel, tournez à OFF (arrêt)
le bouton de sélection du mode cuisson et le
bouton de sélection de la température.
Pour les modèles de four double, vous pouvez utiliser la
cuisson à minuterie dans les deux fours en même temps.
Tournez le bouton de sélection du mode cuisson et le bouton
de sélection de la température du deuxième four aux réglages
désirés. Enfoncez le bouton COOK TIME (temps
de cuisson), tournez et enfoncez le bouton de sélection
miniature pour saisir la durée de cuisson. Enfoncez le
bouton DELAY START (démarrage différé), tournez et
enfoncez le bouton de sélection miniature pour saisir l’heure.
REMARQUE :
• Le réglage de température WARM (chaud)
(l’afficheur indiquera 175 °F), offert sur ce
four, permet de garder les aliments chauds.
Les aliments gardés plus de deux heures au
four à ces basses températures pourraient ne
plus être propres à la consommation.
•
Ne laissez jamais des aliments comme des produits
laitiers, du poisson, de la farce, de la volaille et du
porc reposer pendant plus d’une heure avant ou
après la cuisson. Lorsque ces aliments sont laissés
à la température de la pièce, cela favorise la
prolifération de bactéries nocives.
Cuisson à l’aide de la minuterie
Four mural
Bouton de sélection
miniature
Tournez pour sélectionner
Enfoncez pour saisir
Enfoncez pour
sélectionner
Illustration de l’afficheur du four double.
Enfoncez pour
sélectionner
67

68
La fonction de fermentation maintient une
chaleur suffisante pour faire lever les produits à
la levure.
Placez la pâte dans un plat couvert au four sur
la grille A.
Tournez le bouton de sélection du mode
cuisson à PROOF (levage). L’afficheur
indique PrF (levage). Le levage de la pâte
ne fonctionne pas lorsque la température
du four dépasse 125 °F (52 °C). L’afficheur
indique alors « too hot » (trop chaud).
Laissez le four refroidir.
REMARQUE : Pour de meilleurs résultats,
recouvrez la pâte d’un linge ou d’une pellicule
plastique enduite d’une matière graisseuse
(il peut être nécessaire de fixer la pellicule
plastique sous le contenant afin que le
ventilateur du four ne la souffle pas).
La fonction de fermentation procure
automatiquement la température optimale
demandée par le processus de fermentation;
c’est pourquoi le bouton de sélection de la
température n’affecte pas la température de
levage de la pâte.
Les ampoules intérieures du four s’allument et
s’éteignent en fonction du cycle jusqu’à ce que
le bouton de sélection du mode cuisson du
four ait été tourné à OFF (arrêt).
Vous pouvez régler la fonction TIMER
(minuterie) pour le temps de levage
minimal, afin de vous rappeler de vérifier
la pâte.
Une fois le levage terminé, tournez le
bouton de sélection du mode de cuisson à
OFF (arrêt).
• Pour éviter d’abaisser la température du four
et ainsi augmenter la durée de la
fermentation, n’ouvrez pas la porte du four
inutilement.
• Vérifiez le pain sans trop tarder pour éviter
une fermentation excessive.
REMARQUE : N’utilisez pas le mode de
fermentation pour réchauffer les aliments
ou les garder au chaud. La température
de fermentation du four n’est pas
suffisamment élevée pour garder les
aliments à des températures sécuritaires.
Le réglage de température WARM (chaud)
de ce four permet de garder chaud les
aliments cuits. Les aliments gardés plus de
deux heures dans le four à ces basses
températures pourraient ne plus être
propres à la consommation.
Fermentation
Four mural
Comment
régler le four
pour le
fermentation
Bouton de sélection du mode de cuisson
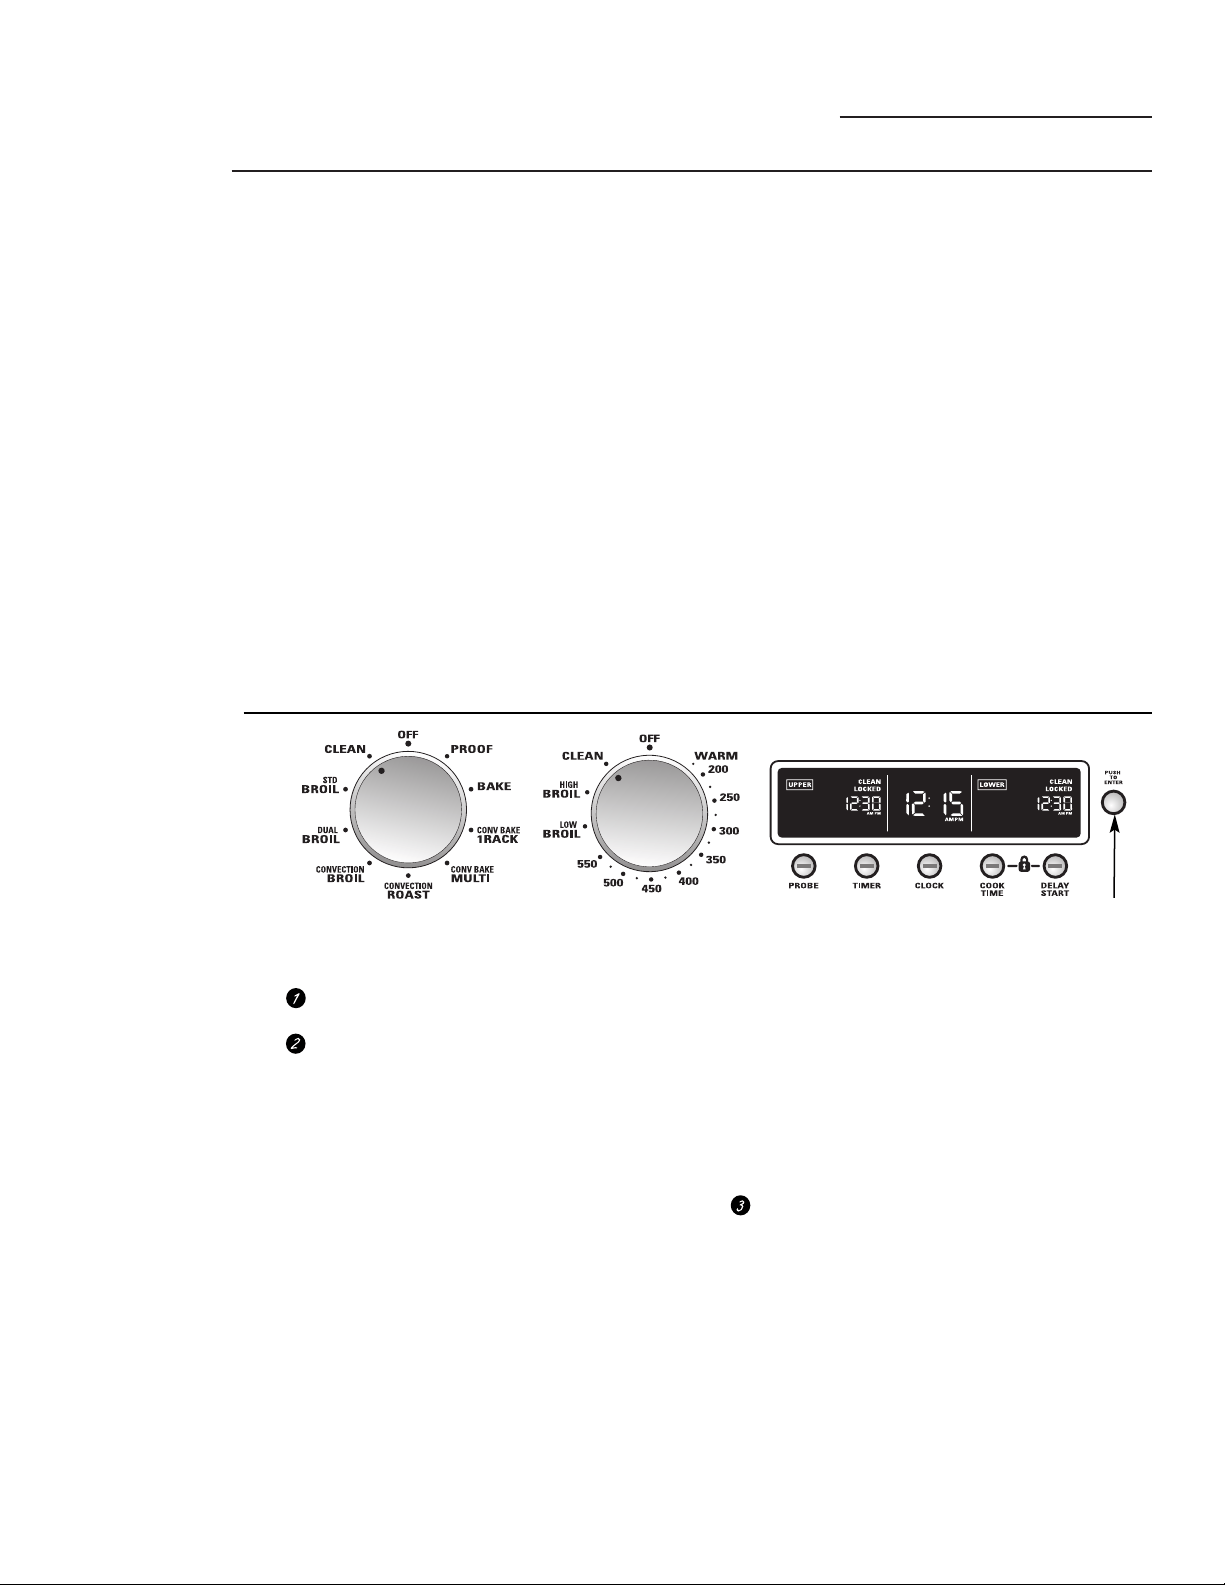
69
Four autonettoyant
Four mural
Avant
l’autonettoyage
Tournez le bouton de sélection du mode
de cuisson à CLEAN (nettoyage).
Tournez le bouton de sélection de la
température à CLEAN (nettoyage).
Le four est préréglé pour effectuer l’autonettoyage
normal sur 5 heures. (Si un temps d’autonettoyage
de moins de 5 heures est requis, tournez le bouton
de sélection miniature au temps d’autonettoyage
désiré.) Enfoncez pour saisir le temps.
Vous pouvez changer le temps d’autonettoyage
pour une durée allant de 3 à 5 heures, par
incrément de 15 minutes, en fonction de la
quantité de saleté dans le four.
REMARQUE : le bouton de sélection miniature
doit être enfoncé pour que le cycle
d’autonettoyage commence.
Si votre four est branché à une source d’alimentation
électrique de 208 V, nous recommandons que le
temps d’autonettoyage soit réglé à 5 heures.
Si le mot LOCKED (verrouillé) apparaît en
succession rapide sur l’afficheur, le cycle
d’autonettoyage a été sélectionné mais la porte
n’est pas fermée. Fermez la porte du four.
L’afficheur indique CLEAN (nettoyage) et le
temps d’autonettoyage restant.
Une fois que le four commence à chauffer pour
atteindre la température d’autonettoyage, la
porte se verrouille automatiquement. Le voyant
lumineux LOCKED (verrouillé) s’allume.
L’afficheur indique le temps d’autonettoyage
restant. Il n’est pas possible d’ouvrir la porte du
four avant que la température ne tombe sous la
température de verrouillage et avant que le
voyant lumineux LOCKED (verrouillé) ne
s’éteigne.
Une fois le cycle d’autonettoyage terminé et
le four refroidi, l’afficheur indique END
(fin) et le voyant lumineux LOCKED
(verrouillé) s’éteint. Tournez à OFF (arrêt)
le bouton de sélection du mode de cuisson
et le bouton de sélection de la température.
Pour arrêter un cycle d’autonettoyage,
tournez à OFF (arrêt) le bouton de
sélection du mode de cuisson et le bouton
de sélection de la température. Quand le
voyant lumineux LOCKED (verrouillé) s’éteint
pour indiquer que la température du four est
descendue sous la température de verrouillage,
vous pouvez ouvrir la porte.
Comment
régler le
four pour
le nettoyage
Bouton de sélection du mode
de cuisson
Bouton de sélection de
la température
Bouton de sélection
miniature
Tournez pour sélectionner
Enfoncez pour saisir
Illustration de l’afficheur du four double.
Pour que le programme d’autonettoyage
fonctionne adéquatement, il faut que la porte
du four soit fermée et que toutes les
commandes soient réglées correctement.
Nous vous recommandons d’assurer une
ventilation adéquate en ouvrant une fenêtre
ou en utilisant un ventilateur ou une hotte de
cuisine au cours du premier autonettoyage.
• Enlevez la saleté du cadre autour de la porte
de four et à l’extérieur du joint de porte. Ces
parties doivent être nettoyées à la main.
• Ne nettoyez pas le joint de porte à la main car
cela pourrait l’endommager.
• Ramassez tout excès de graisse et autre
déversement de nourriture à l’aide d’un
chiffon humide. Cela permet de réduire au
minimum la quantité de fumée produite lors
du cycle d’autonettoyage.
•
Retirez toutes les casseroles, la lèchefrite et sa
grille, la sonde et tout papier aluminium du four.
• Vous pouvez laisser les grilles dans le four au
cours du cycle d’autonettoyage.
•
Assurez-vous que la lentille de l’ampoule de
four et le cadre de la lentille sont bien en place.
• N’utilisez pas de produits nettoyants,
d’abrasifs ou de protecteurs de four
commerciaux à l’intérieur ou à proximité
du four autonettoyant.
IMPORTANT : certains oiseaux sont
extrêmement sensibles à la fumée produite
pendant le programme d’autonettoyage de
n’importe quel four. Placez les oiseaux dans
une autre pièce bien aérée.
REMARQUE : le cycle d’autonettoyage ne
fonctionne pas si la sonde de température
est branchée ou si la fonction Sabbath est
programmée.
Sur les modèles de four mural double, il vous est
possible de régler un cycle de nettoyage pour les deux
fours en même temps. Le dernier four à être réglé
retardera automatiquement le début de son cycle
jusqu’à la fin du cycle de nettoyage du premier four.
Sur les modèles de four mural double, il vous est
possible d’utiliser la cuisson à minuterie pour un
four et l’autonettoyage pour l’autre en même temps.
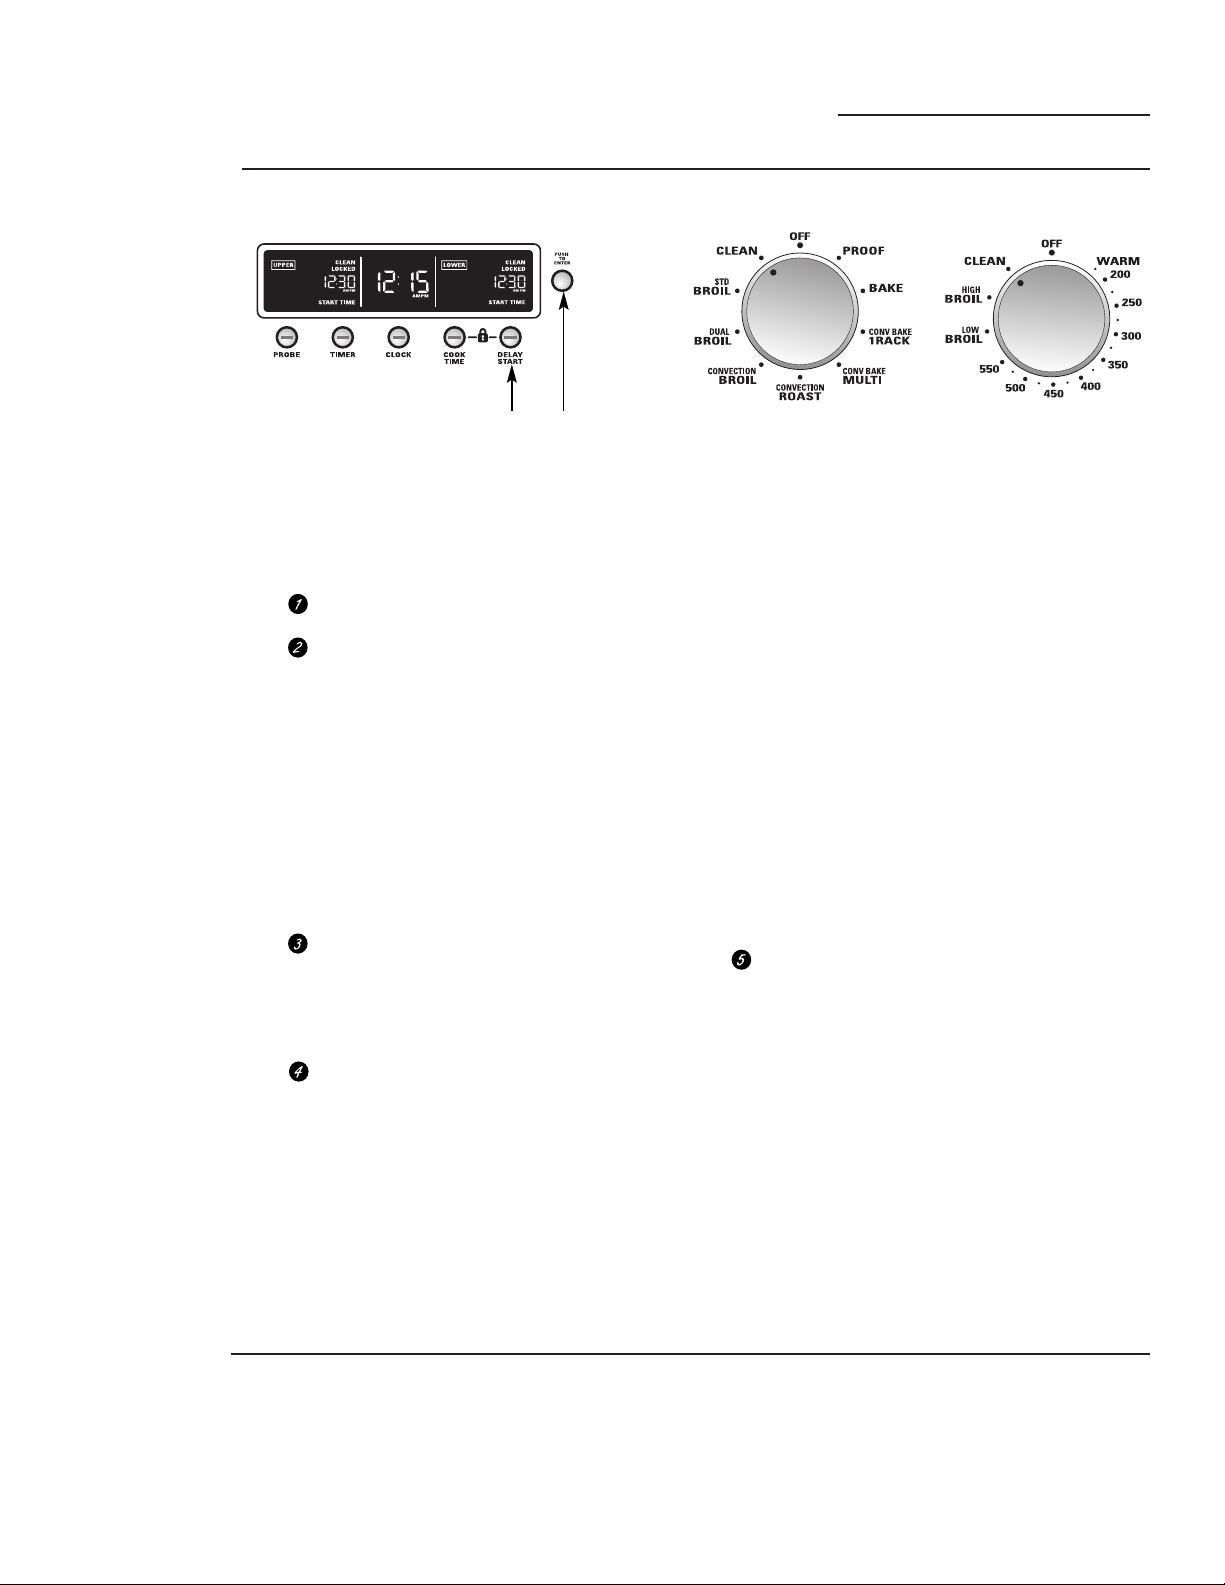
70
Après
l’autonettoyage
Vous remarquerez un peu de cendre blanche dans
le four. Essuyez-la avec un linge humide lorsque
le four a refroidi.
Si des taches blanches persistent, enlevez-les à
l’eau tiède savonneuse, puis rincez comme il faut
avec un mélange d’eau et de vinaigre. Il s’agit
généralement de résidus de sel qui ne
disparaissent pas lors de l’autonettoyage.
Si le four n’est pas propre après un premier
nettoyage, programmez à nouveau un
autonettoyage.
Vous ne pouvez programmer aucune fonction de
cuisson tant que le four n’a pas suffisamment
refroidi pour que vous puissiez déverrouiller la
porte.
Pour différer
le début de
l’autonettoyage
Four autonettoyant
Four mural
Bouton de sélection de
la température
Enfoncez pour
sélectionner
Illustration de l’afficheur du four double.
Bouton de sélection du mode
de cuisson
Vous pouvez régler le démarrage différé de l’autonettoyage
du four, la durée d’autonettoyage et l’arrêt automatique.
REMARQUE :
avant de commencer, assurez-vous
que l’horloge affiche la bonne heure.
Tournez le bouton de sélection du mode
de cuisson à CLEAN (nettoyage).
Tournez le bouton de sélection de la
température à CLEAN (nettoyage).
Le four est préréglé pour effectuer l’autonettoyage
normal sur 5 heures. (Si un temps d’autonettoyage
de moins de 5 heures est requis, tournez le bouton
de sélection miniature au temps d’autonettoyage
désiré.) Enfoncez pour saisir le temps.
Vous pouvez changer le temps d’autonettoyage
pour une durée allant de 3 à 5 heures, par
incrément de 15 minutes, en fonction de la
quantité de saleté dans le four.
REMARQUE :
le bouton de sélection
miniature doit être enfoncé pour que
le cycle d’autonettoyage commence.
Enfoncez le bouton DELAY START
(démarrage différé). L’heure courante
apparaît en succession rapide sur l’afficheur.
Pour les modèles de four double, enfoncez le bouton
DELAY START (démarrage différé) une fois pour régler
le four supérieur et deux fois pour régler le four inférieur.
Tournez le bouton de sélection miniature pour faire
une sélection et enfoncez pour saisir l’heure à laquelle
vous désirez que l’autonettoyage du four soit mis en
marche.
REMARQUE : le bouton de sélection miniature doit
être enfoncé pour que le cycle d’autonettoyage soit
réglé afin de commencer à l’heure de la journée saisie.
Le four est maintenant prêt à démarrer à l’heure de la
journée à laquelle vous l’avez réglé et à s’autonettoyer
pour la période de temps choisie.
Si votre four est branché à une source d’alimentation
électrique de 208 V, nous recommandons que le temps
d’autonettoyage soit réglé à 5 heures.
Si
le mot LOCKED (verrouillé) apparaît en
succession rapide sur l’afficheur, le cycle
d’autonettoyage a été sélectionné mais la porte
n’est pas fermée. Fermez la porte du four.
Pour rappeler l'heure de démarrage, enfoncez le
bouton DELAY START. Pour le changer, tournez et
enfoncez le bouton de sélection miniature.
L’afficheur indique START TIME (heure de
démarrage). Une fois que l’heure de démarrage est
atteinte, le four se met en marche automatiquement.
L’afficheur indique CLEAN (nettoyage) et le temps
d’autonettoyage.
Une fois que le four commence à chauffer pour
atteindre la température d’autonettoyage, la porte se
verrouille automatiquement. Le voyant lumineux
LOCKED (verrouillé) s’allume.
L’afficheur indique le temps d’autonettoyage restant.
Il n’est pas possible d’ouvrir la porte du four avant
que la température ne tombe sous la température de
verrouillage et avant que le voyant lumineux
LOCKED (verrouillé) ne s’éteigne.
Une fois le cycle d’autonettoyage terminé et
le four refroidi, l’afficheur indique END (fin)
et le voyant lumineux LOCKED (verrouillé)
s’éteint. Tournez à OFF (arrêt) le bouton
de sélection du mode de cuisson et le bouton
de sélection de la température.
Pour arrêter un cycle d’autonettoyage, tournez à OFF
(arrêt) le bouton de sélection du mode de cuisson et le
bouton de sélection de la température. Quand le voyant
lumineux LOCKED (verrouillé) s’éteint pour indiquer
que la température du four est descendue sous la
température de verrouillage, vous pouvez ouvrir la porte.
REMARQUE : sur les modèles de four mural double, il vous
est possible de régler le démarrage différé du nettoyage pour les
deux fours en même temps. Tournez à CLEAN (nettoyage) le
bouton de sélection du mode de cuisson et le bouton de
sélection de la température sur le deuxième four. Le deuxième
four à être réglé retardera automatiquement le début de son
cycle jusqu’à la fin du cycle de nettoyage du premier four.
Bouton de sélection
miniature
Tournez pour sélectionner
Enfoncez pour saisir
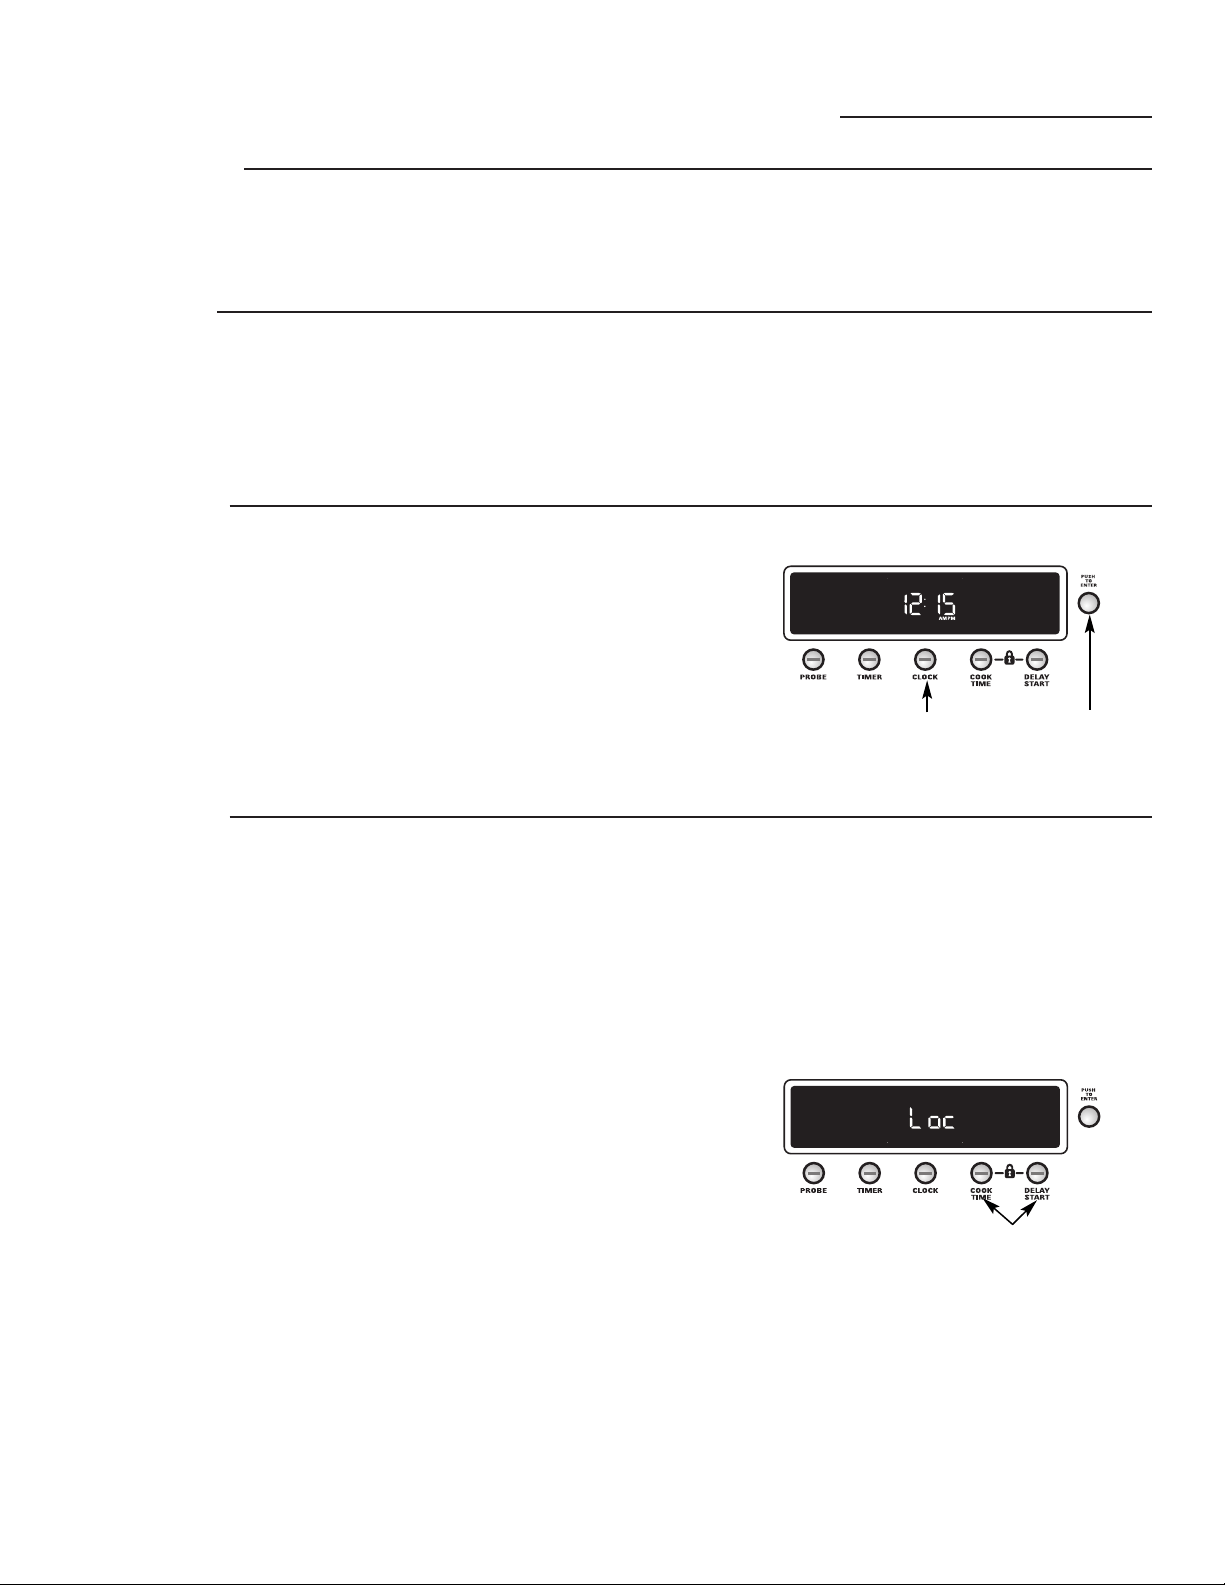
71
Fonctions horloge et verrouillage des commandes
Four mural
Pour régler
l’horloge
1 Enfoncez le bouton CLOCK (horloge).
2 Tournez le bouton de sélection miniature
pour sélectionner l’heure et enfoncez pour
saisir.
REMARQUE : pendant le réglage, le temps
basculera de AM à PM.
Horloge
Pour que les dispositifs de chronométrage automatiques du
four fonctionnent correctement, vous devez régler l’horloge
à la bonne heure.
L’heure de l’horloge ne peut être changée
pendant que la fonction Delay Start
(démarrage différé) est programmée. (Elle
peut être changée que pendant la cuisson
conventionnelle ou la cuisson au grilloir.)
Panne de
courant
Si l’heure de la journée apparaît en succession
rapide sur l’afficheur, c’est qu’il y a eu panne
de courant. Remettez l’horloge à l’heure.
Verrouillage
des
commandes
Cette commande vous permet de bloquer
toutes les autres commandes de manière à ce
que le bouton de sélection du mode de cuisson,
le bouton de sélection de la température et les
boutons du tableau de commande ne puissent
être activés une fois qu’il a été réglé.
REMARQUE : sur les modèles de four mural
double, cette commande active cette fonction pour les
deux fours.
Pour verrouiller/déverrouiller les commandes :
1 Enfoncez et maintenez enfoncés les boutons
COOK TIME (temps de cuisson) et DELAY
START (démarrage différé) simultanément
pendant 3 secondes jusqu’à ce que la
commande émette un signal sonore (bip) et
que l’afficheur indique « Loc ». Une fois les
commandes verrouillées, l’heure de la
journée apparaît sur l’afficheur.
2 Pour déverrouiller, enfoncez et maintenez
enfoncés les boutons COOK TIME (temps
de cuisson) et DELAY START (démarrage
différé) simultanément. (L’afficheur indique
« Loc »). Maintenez les boutons enfoncés
pendant 3 secondes jusqu’à ce que la
commande émette un signal sonore (bip) et
que le mot « Loc » disparaisse de l’afficheur.
Une fois cette fonction activée, l’afficheur
indique « Loc » lorsqu’on tente d’effectuer un
réglage des commandes.
Illustration de l’afficheur du four double.
Illustration de l’afficheur du four double.
Bouton de sélection
miniature
Tournez pour sélectionner
Enfoncez pour saisir
Enfoncez pour
sélectionner
Enfoncez et
maintenez enfoncés
simultanément pour
verrouiller ou
déverrouiller
REMARQUES :
• Si une fonction de cuisson, d’autonettoyage ou de
minuterie est programmée, elle sera annulée.
• L’ajustement reste en mémoire après huit pannes
de courant.

72
Minuterie
REMARQUE : la minuterie est indépendante de
toutes les autres fonctions et ne permet pas de
contrôler le four.
Vous pouvez programmer la minuterie pour
la cuisson à minuterie ou toute autre activité
domestique pour une période allant jusqu’à
11 heures et 59 minutes.
Pour régler la minuterie :
1 Enfoncez le bouton TIMER (minuterie).
2 Tournez le bouton de sélection miniature
pour sélectionner la période de temps sur la
minuterie jusqu’à 11 heures et 59 minutes et
enfoncez pour saisir.
Pour les modèles de four double, une deuxième
minuterie peut être réglée en enfonçant le bouton
TIMER (minuterie) deux fois.
L’afficheur de la minuterie indique le
décompte des heures et des minutes, une
minute à la fois, de 24 heures à 1 heure. Il
changera alors pour indiquer le décompte des
minutes et des secondes jusqu’à ce que la
dernière minute soit atteinte. La commande
émet un signal sonore (bip) et l’afficheur
indique les secondes jusqu’à ce que la
minuterie atteigne :00.
Lorsque la minuterie atteint :00, la commande
fait entendre 3 signaux sonores (bips) suivis
d’un signal sonore (bip) toutes les 6 secondes
jusqu’à ce que le bouton TIMER (minuterie)
soit enfoncé.
La tonalité de 6 secondes peut être arrêtée en
suivant les étapes indiquées à Tonalités à la fin
d’un cycle à minuterie de la section Fonctions
spéciales.
Pour annuler la minuterie :
1 Enfoncez le bouton TIMER (minuterie).
2 Tournez le bouton de sélection miniature
à :00 et enfoncez pour saisir.
La fonction minuterie
Four mural
Bouton de sélection
miniature
Tournez pour sélectionner
Enfoncez pour saisir
Enfoncez pour
sélectionner
Illustration de l’afficheur du four double.

73
4 Enfoncez et maintenez enfoncé le bouton de
sélection miniature pendant 5 secondes pour
quitter SF (Fonctions spéciales) et revenir à
l’affichage de l’horloge.
REMARQUE:
sur les modèles de four mural double, cette
commande annule la tonalité de fin de cycle pour les deux fours.
À la fin d’une fonction minutée, trois signaux sonores courts se
font entendre, suivis d’un signal sonore toutes les 6 secondes,
jusqu’à ce que vous appuyiez sur TIMER (minuterie). Cette
tonalité toutes les 6 secondes peut être annulée.
Pour annuler
la tonalité toutes les 6 secondes :
1 Enfoncez et maintenez enfoncés simultanément
les boutons PROBE (sonde) et DELAY START
(démarrage différé) pendant 4 secondes jusqu’à ce
que l’afficheur indique SF (fonctions spéciales).
2 Enfoncez le bouton TIMER (minuterie) pour
choisir entre :
con SF bEEP (signaux sonores (bips) continus) :
Les rappels sonores (bip) sont émis après la fin
d’un cycle de minuterie jusqu’à ce que le bouton
TIMER (minuterie) soit enfoncé.
SF bEEP (aucun signal sonore) : Aucun rappel
sonore (bip) après la fin d’un cycle de minuterie.
3 Enfoncez le bouton de sélection miniature pour
saisir votre choix.
Caractéristiques spéciales
Four mural
Caractéristiques
spéciales des
commandes
du four
Tonalités à
la fin du
cycle de
minuterie
Réglage du
thermostat
du four
Il est possible que vous trouviez que dans votre nouveau four
la cuisson est différente que dans votre ancien four. Utilisez
votre nouveau four pendant quelques semaines afin de vous
familiariser avec son fonctionnement. Si vous trouvez que la
température dans votre nouveau four est trop élevée ou trop
basse, vous pouvez régler la commande de température vous-
même.
Pour ajuster le thermostat du four :
1 Enfoncez et maintenez enfoncés simultanément
les boutons PROBE (sonde) et DELAY START
(démarrage différé) pendant 4 secondes jusqu’à ce
que l’afficheur indique SF (fonctions spéciales).
2 Enfoncez le bouton PROBE (sonde). Un « 0 »
apparaît sur l’afficheur.
Sur les modèles de four mural double, un « 0 » apparaît
sur les afficheurs des deux fours. Enfoncez le bouton
PROBE (sonde) une 2e fois (l’afficheur indiquera «
UPPER ») pour permettre le réglage du four supérieur,
et enfoncez le bouton PROBE (sonde) une 3e fois
(l’afficheur indiquera « LOWER ») pour permettre le
réglage du four inférieur.
3 Tournez le bouton de sélection miniature pour
ajuster le thermostat du four jusqu’à 35 °F de plus
ou de moins par incrément de 1 °F.
4 Enfoncez le bouton de sélection miniature pour
saisir votre choix.
5 Enfoncez et maintenez enfoncé le bouton de
sélection miniature pendant 5 secondes pour
3. Bouton de
sélection
miniature
Enfoncez pour
saisir votre choix
2. Enfoncez pour choisir.
Illustration de l’afficheur du four double.
1. Enfoncez et maintenez enfoncés simultanément
les deux boutons pour entrer ou quitter SF.
Illustration de l’afficheur du four double.
3. Bouton de
sélection
miniature
Enfoncez pour
saisir votre choix
2. Enfoncez pour choisir.
1. Enfoncez et maintenez enfoncés simultanément
les deux boutons pour entrer ou quitter SF.
quitter SF (Fonctions spéciales) et revenir à
l’affichage de l’horloge.
Nous vous recommandons de ne pas utiliser un
thermomètre bon marché, comme ceux vendus dans
les épiceries, pour vérifier le réglage de température
de votre nouveau four. Ces thermomètres peuvent
présenter des écarts de 20 à 40 degrés.
REMARQUE : ce réglage affectera seulement les
températures de cuisson et de rôtissage. Ce réglage n’affectera
nullement les températures de grillage, de convection ou
d’autonettoyage. De plus, il sera conservé en mémoire si
jamais une panne de courant survient.
Votre four comporte d’autres fonctions spéciales que
vous pouvez utiliser.
Elles sont conservées dans la mémoire de la
commande jusqu’à ce que vous suiviez à nouveau
les étapes indiquées. Ces caractéristiques spéciales
sont conservées en mémoire, même après une
panne de courant.
Soit le bouton de sélection du mode de cuisson,
soit le bouton de sélection de la température doit
être tourné à OFF (arrêt).
Pour les modèles de four double, soit le bouton de
sélection du mode de cuisson, soit le bouton de sélection
de la température doit être tourné à OFF (arrêt) sur
chacun des fours.
REMARQUE : alors que vous êtes en mode Fonctions
spéciales, si le bouton de sélection miniature n’est pas
enfoncé pour saisir un choix dans les 60 secondes, le
mode sera annulé (sans changement) et l’heure de la
journée réapparaîtra sur l’afficheur.
Voici les fonctions et comment les activer.

74
Volume
du son
Cette caractéristique vous permet de régler le volume du
son à un volume plus acceptable. Il y a trois niveaux de
volume possibles.
1 Enfoncez et maintenez enfoncés simultanément
les boutons PROBE (sonde) et DELAY START
(démarrage différé) pendant 4 secondes jusqu’à
ce que l’afficheur indique SF (fonctions
spéciales).
2 Enfoncez le bouton COOK TIME (temps de
cuisson) pour choisir entre :
1 SF bEEP : Signal sonore (bip) de faible
intensité.
2 SF bEEP : Signal sonore (bip) d’intensité
moyenne.
3 SF bEEP : Signal sonore (bip) de grande
intensité.
3 Enfoncez le bouton de sélection miniature pour
saisir votre choix.
4 Enfoncez et maintenez enfoncé le bouton de
sélection miniature pendant 5 secondes pour
quitter SF (Fonctions spéciales) et revenir à
l’affichage de l’horloge.
REMARQUE : sur les modèles de four mural double,
cette commande active la fonction spéciale pour les
deux fours.
Caractéristiques spéciales
Four mural
12 heures,
24 heures
ou
extinction
de l’heure
Illustration de l’afficheur du four double.
Illustration de l’afficheur du four double.
3. Bouton de
sélection
miniature
Enfoncez pour
saisir votre
choix
2. Enfoncez pour choisir.
1. Enfoncez et maintenez enfoncés simultanément
les deux boutons pour entrer ou quitter SF.
3. Bouton de
sélection
miniature
Enfoncez pour
saisir votre
choix
2. Enfoncez pour choisir.
1. Enfoncez et maintenez enfoncés simultanément
les deux boutons pour entrer ou quitter SF.
Votre commande est réglée pour fonctionner avec le système
horaire de 12 heures. Si vous désirez utiliser le système
horaire de 24 heures ou préférez ne pas afficher l’heure,
suivez les étapes ci-dessous.
1 Enfoncez et maintenez enfoncés simultanément
les boutons PROBE (sonde) et DELAY START
(démarrage différé) pendant 4 secondes jusqu’à
ce que l’afficheur indique SF (fonctions
spéciales).
2 Enfoncez le bouton CLOCK (horloge) pour
choisir entre :
12 hr : affichage sur 12 heures avec AM et
PM.
24 hr : affichage sur 24 heures.
OFF : aucun affichage.
3 Enfoncez le bouton de sélection miniature pour
saisir votre choix.
4 Enfoncez et maintenez enfoncé le bouton de
sélection miniature pendant 5 secondes pour
quitter SF (Fonctions spéciales).
REMARQUE : lorsque l’horloge est réglée au mode
«extinction», vous ne pouvez utiliser la fonction de mise
en marche différée.

75
Fonction
Sabbath, arrêt
après 12
heures, ou
pas d'arrêt
après 12
heures
Avec cette fonction, la commande éteindra le four
automatiquement après 12 heures de fonctions de
cuisson, s’il vous arrive de le laisser allumé par oubli.
Si vous désirez désactiver cette fonction, suivez les
étapes ci-dessous.
1 Enfoncez et maintenez enfoncés simultanément
les boutons PROBE (sonde) et DELAY START
(démarrage différé) pendant 4 secondes jusqu’à
ce que l’afficheur indique SF (fonctions
spéciales).
2 Enfoncez le bouton DELAY START
(démarrage différé) pour choisir entre :
12 SF Shdn : Le four s’éteint
automatiquement après 12 heures.
no SF Shdn : Le four ne s’éteint pas
automatiquement après 12 heures.
SAbbAth : Fonction conçue pour servir au
sabbat juif et aux fêtes.
La fonction du sabbat peut servir seulement
en mode cuire/rôtir. Elle ne peut servir pour
la cuisson par convection, par grillage, pour
l’autonettoyage ou le démarrage différé.
Lorsque la fonction Sabbath est réglée, la
lampe du four et tous les signaux sonores
(bip) sonores sont annulés. La fonction
prévoit aussi une période de différé aléatoire
allant de 30 secondes à 1 minute, avant que le
four ne démarre une fois qu’il est réglé à
BAKE (cuisson).
3 Enfoncez le bouton de sélection miniature pour
saisir votre choix.
4 Enfoncez et maintenez enfoncé le bouton de
sélection miniature pendant 5 secondes pour
quitter SF (Fonctions spéciales) et revenir à
l’affichage de l’horloge.
REMARQUE : sur les modèles de four mural double,
cette commande active cette fonction pour les deux
fours.
Illustration de l’afficheur du four double.
3. Bouton de
sélection
miniature
Enfoncez pour
saisir votre
choix
2. Enfoncez pour choisir.
1. Enfoncez et maintenez enfoncés simultanément
les deux boutons pour entrer ou quitter SF.

76
Tableau de
commande
et boutons
de sélection
Essuyez les éclaboussures avec un chiffon
humide. Retirez les saletés les plus grosses avec
de l’eau tiède savonneuse.
N’utilisez aucun abrasif sur le tableau de
commande et les boutons de sélection.
Les boutons de sélection se retirent pour
faciliter l’autonettoyage. Pour retirer un bouton
de sélection, retirez-le directement de sur la
tige. Lavez les boutons de sélection au savon et à
l’eau, mais ne les laissez pas tremper.
Éléments
chauffants
du four
Ne nettoyez pas l’élément du gril. Toute saleté
brûlera lorsque l’élément sera chauffé.
L’élément de cuisson n’est pas exposé et se
trouve sous le fond du four. S’il y a des
déversements ou de la cendre accumulée sur le
fond du four, essuyez le tout avant
l’autonettoyage.
Lèchefrite
et grille
Après avoir grillé, retirez la lèchefrite et sa grille
du four. Retirez la grille de la lèchefrite. Versez
délicatement la graisse de la lèchefrite dans un
contenant approprié. Lavez et rincez la
lèchefrite et sa grille dans l’eau chaude avec un
tampon à récurer de plastique ou imbibé de
savon.
Si des aliments brûlés se trouvent sur la grille,
saupoudrez-la de détergent tandis qu’elle est
chaude et couvrez-la d’essuie-tout ou d’un linge
à vaisselle. Faire tremper la lèchefrite éliminera
les aliments cuits.
La lèchefrite et sa grille se lavent avec un
détergent commercial pour four.
La lèchefrite et sa grille se lavent aussi au lave-
vaisselle.
Ne rangez pas la lèchefrite et sa grille dans le
four alors qu’elles sont sales.
MISE EN GARDE : ne nettoyez pas la lèchefrite
et sa grille dans un four autonettoyant.
Grille
Lèchefrite
AVANT DE NETTOYER UNE PIÈCE QUELCONQUE DU FOUR, ASSUREZ-VOUS QUE
L’ALIMENTATION
É
LECTRIQUE A
É
T
É
COUP
É
E ET QUE TOUTES LES SURFACES DE
L’APPAREIL ONT REFROIDI.
Entretien et nettoyage
Four mural
REMARQUE : le bouton de sélection miniature n’est pas amovible.
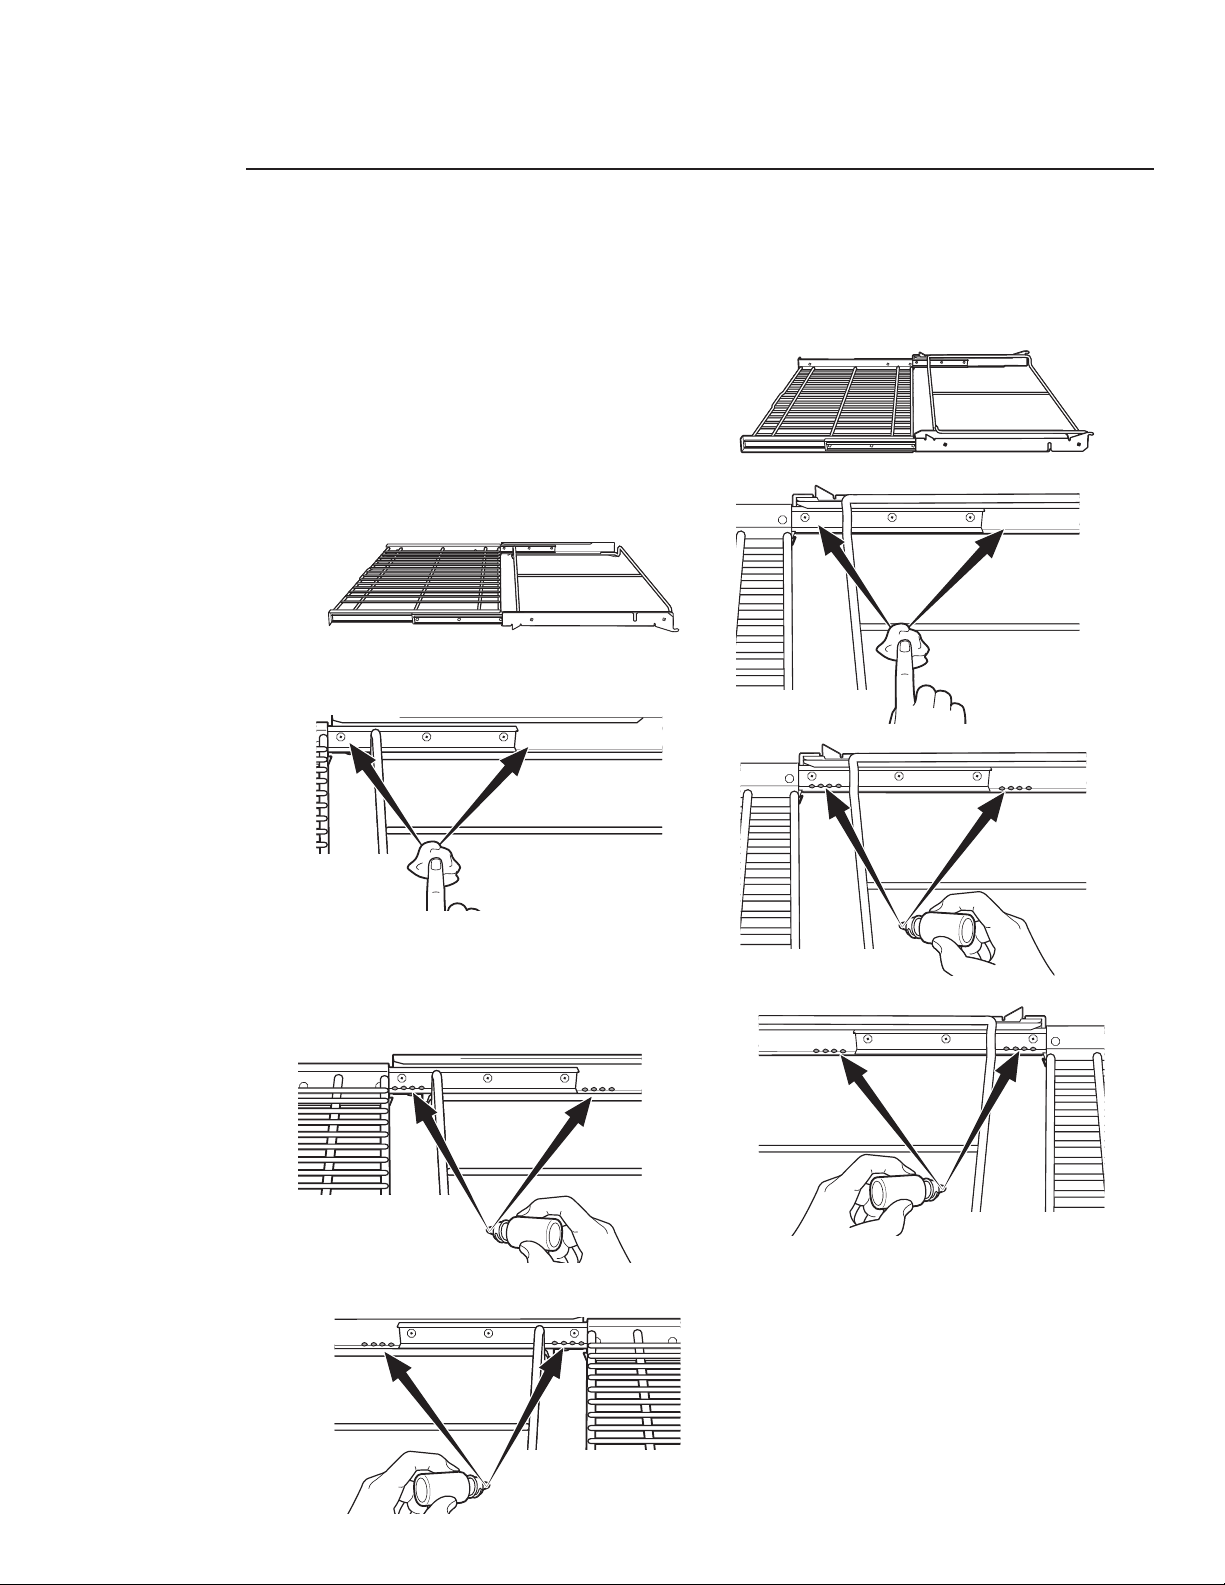
77
Grilles
du four
Les grilles peuvent être laissées dans le four pendant
le cycle d’autonettoyage sans être endommagées.
Périodiquement, après plusieurs cycles
d’autonettoyage, il peut être nécessaire de lubrifier
les grilles du four à l’aide du lubrifiant au graphite
accompagnant votre four mural. Pour commander
du lubrifiant au graphite additionnel, appelez le
Centre national des pièces au 1.800.626.2002 et
mentionnez le numéro de référence WB02T10303.
1 Retirez la grille du four. Reportez-vous à la
section Grilles de four à extension complète.
2
Ouvrez la grille entièrement et posez-la sur une
table ou un comptoir. Du papier journal peut être
placé sous la grille pour faciliter le nettoyage.
3
S’il y a des débris dans les glissières, essuyez-les à
l’aide d’un essuie-tout. REMARQUE : tout lubrifiant
au graphite que vous enlevez doit être remplacé.
4
Secouez le contenant de lubrifiant au graphite
avant de l’ouvrir. En commençant par le côté
gauche du mécanisme de glissement de la grille,
placez quatre (4) petites gouttes de lubrifiant sur
les deux (2) glissières du bas près des boîtiers de
roulement.
5 Répétez pour le mécanisme de glissement
droit de la grille.
6 Ouvrez et refermez la grille plusieurs fois
afin de répartir le lubrifiant.
7 Replacez le capuchon sur le contenant de
lubrifiant et secouez-le encore une fois.
Retournez la grille et répétez les étapes 3, 4,
5 et 6.
8 Fermez la grille, retournez la grille vers le
haut et replacez-la dans le four. Reportez-
vous à la section Grilles de four à extension
complète.
9 Répétez les étapes ci-dessus pour chaque
grille.
REMARQUE : ne vaporisez pas de Pam
®
ou tout
autre lubrifiant à vaporiser.
Côté gauche
Côté gauche
Côté droit
Côté droit
Grille tournée vers le haut
Grille tournée vers le haut
Grille tournée vers le bas
Grille tournée vers le bas

78
La porte est très lourde. Faites attention quand
vous l’enlevez ou vous la soulevez.
Ne soulevez jamais la porte par sa poignée.
Enlèvement de la porte :
1 Ouvrez complètement la porte.
2 Tirez les verrous de charnières vers
l’armature de la porte, en position
déverrouillée. Un outil, comme un tournevis
à lame plate, peut être nécessaire.
3 Tenez fermement les deux côtés du haut de
la porte.
4 Refermez la porte à la position d’enlèvement
de la porte, ce qui veut dire presque
complètement et soulevez-la vers le haut puis
vers l’extérieur jusqu’à ce que le bras
d’articulation soit entièrement sorti de la
rainure.
Remise en place de la porte :
1 Tenez fermement les deux côtés du haut de
la porte.
2 Avec la porte au même angle que pour
l’enlever, mettez le renfoncement du bras de
charnière dans l’arête du bas de la fente de
charnière. Le renfoncement du bras de
charnière doit être bien installé dans le bas
de la fente.
3 Ouvrez complètement la porte.
Si la porte n’est pas complètement ouverte,
l’indentation ne repose pas bien à l’extrémité
inférieure de la fente.
4 Poussez les verrous de charnière contre
l’armature de devant du trou du four, en
position verrouillée.
5 Fermez la porte du four.
Entretien et nettoyage
Four mural
Enlèvement de
la porte du
four en la
soulevant
—
enlèvement
Bras de charnière
Renforcement
Extrémité
de la
fente
Position d’enlèvement
Verrous de charnière
Fente
Tirez en bas les verrous des charnières
pour déverrouiller.
Verrous de
charnière
Bras de
charnière
Poussez vers le haut les verrous des charnières
pour verrouiller.
Sonde
Lavez la sonde thermique avec de l’eau
savonneuse ou un tampon à récurer
savonneux. Laissez refroidir la sonde avant de
la laver. Faites disparaître les taches tenaces
avec un tampon à récurer savonneux, puis
rincez et séchez.
Ne plongez pas la sonde thermique dans l’eau.
Ne rangez pas la sonde thermique dans le four.
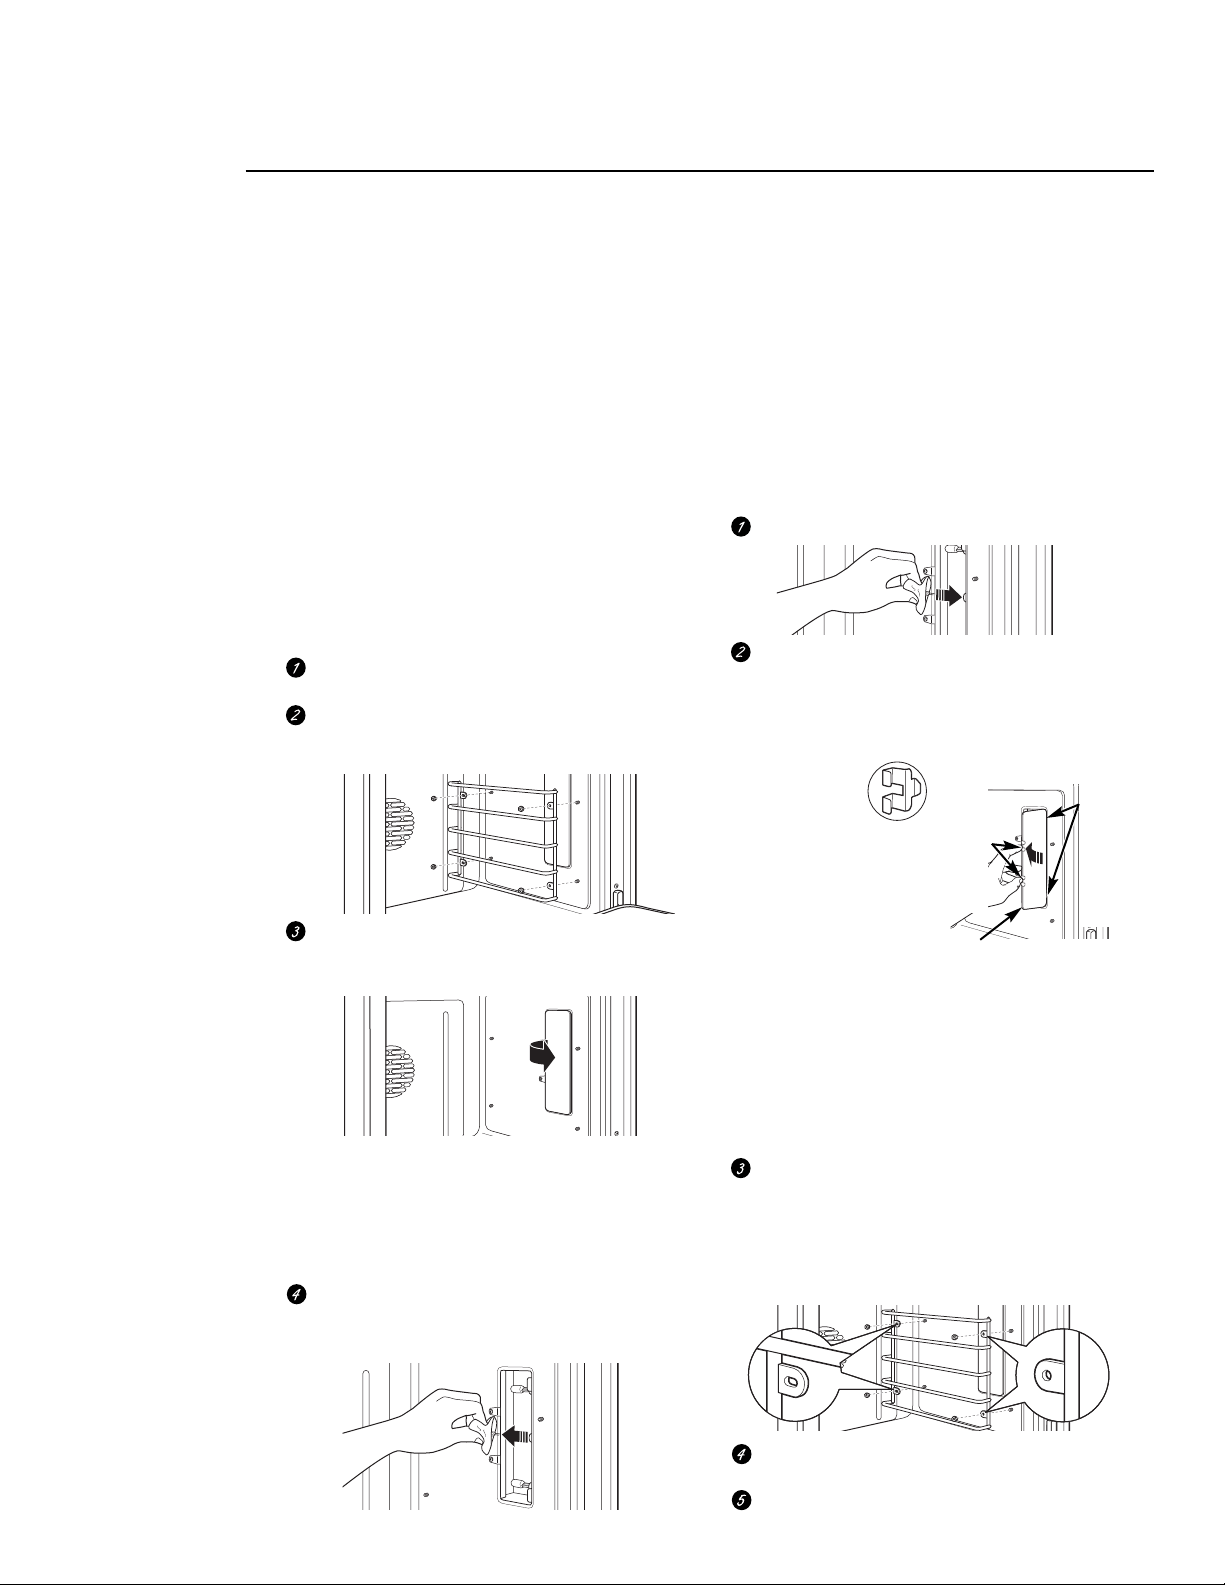
Chaque four est muni de deux unités d’ampoule
à halogène situées sur les parois latérales du four.
Les ampoules s’allument lorsque la porte est
ouverte ou lorsque le four exécute un cycle de
cuisson. Les ampoules du four ne s’allument pas
pour le cycle d’autonettoyage ou si le four est
réglé à la fonction du sabbat.
Chaque unité d’ampoule comprend un couvercle
de lampe amovible sur lequel se trouvent deux
mécanismes de verrouillage, un compartiment de
lampe dans lequel se trouvent trois culots et trois
ampoules à halogène.
MISE EN GARDE :
avant de remplacer une ampoule,
débranchez l’alimentation électrique au four à même le
panneau de fusibles ou de disjoncteurs
.
Assurez-vous de laisser le couvercle et l’ampoule
refroidir complètement.
Pour votre sécurité, ne manipulez pas d’ampoule
chaude à mains nues ou avec un chiffon humide.
Pour retirer :
Retirez les grilles du four. Reportez-vous à la
section Grilles de four à extension complète.
À l’aide d’une clé à molette, retirez les quatre
écrous qui maintiennent le support à grille par-
dessus l’unité de la lampe.
Retirez le couvercle de lampe en verre en tirant
vers l’extérieur son rebord arrière et en le
faisant rouler vers vous. Ne retirez aucune vis.
REMARQUE :
les pinces de fixation pourraient
tomber du couvercle de verre. Après le
remplacement, elles devront être placées dans la
bonne position sur le couvercle de la lampe et
réinsérées dans le compartiment de la lampe en
les enfonçant bien en place.
Portez des gants ou utilisez un chiffon propre
et retirez l’ampoule grillée en tirant pour la
faire sortir.
Pour remplacer :
Utilisez une nouvelle ampoule à halogène de 120
volts, à broches G8, sans dépasser 25 watts.
Les ampoules de remplacement peuvent être achetées en
appelant le 800.626.2002. Numéro de pièce : WB25T10064.
REMARQUE : les ampoules d’intensité supérieure
endommageront votre four.
Portez des gants ou utilisez un chiffon propre et
retirez l’ampoule de son emballage. Ne touchez pas
l’ampoule à doigts nus. L’huile de vos doigts peut
causer des points chauds sur la surface de verre et
causer le grillage prématuré de l’ampoule. Si vous
touchez le verre, nettoyez-le avec de l’alcool avant
l’installation.
Enfoncez l’ampoule dans le culot jusqu’au fond.
Replacez le couvercle de la lampe, en plaçant son
bord avant sous les deux languettes dans le
compartiment de la lampe. Roulez le rebord
arrière en place, en prenant soin de vous assurer
qu’il appuie bien en place.
REMARQUE :
si les pinces
de fixation
sont tombées
du couvercle
de la lentille,
maintenez-les
sur le couvercle,
dans la bonne
position, pendant
que vous replacez
le couvercle sur le
compartiment de la lampe.
Le couvercle de la lampe doit être en place
lorsque le four est mis en marche.
Pour un meilleur éclairage à l’intérieur du four,
nettoyez fréquemment le couvercle vitré à l’aide
d’un chiffon humide. Cela devrait être fait
lorsque le four est éteint, débranché de
l’alimentation et complètement refroidi.
Replacez le support à grille de manière à ce que
les trous ovales se retrouvent par-dessus les
boulons arrière et les trous ronds par-dessus les
boulons avant. Fixez légèrement à l’aide des
quatre écrous que vous avez retirés
précédemment, mais ne serrez pas trop car cela
pourrait endommager l’émail.
Replacez les grilles. Reportez-vous à la section
Grilles de four à extension complète.
Rebranchez le courant électrique au four.
Tenez les
pinces de
fixation en
place sur le
rebord arrière
du couvercle
de la lentille
Appuyez sur le couvercle de la
lentille pour le fixer en place
Placez le
rebord
avant du
couvercle
de la
lentille sous
les deux
languettes
avant
79
Ampoules
du four
Trous
ronds par
dessus
les
boulons
avant
Trous
ovales
par
dessus
les
boulons
arrière
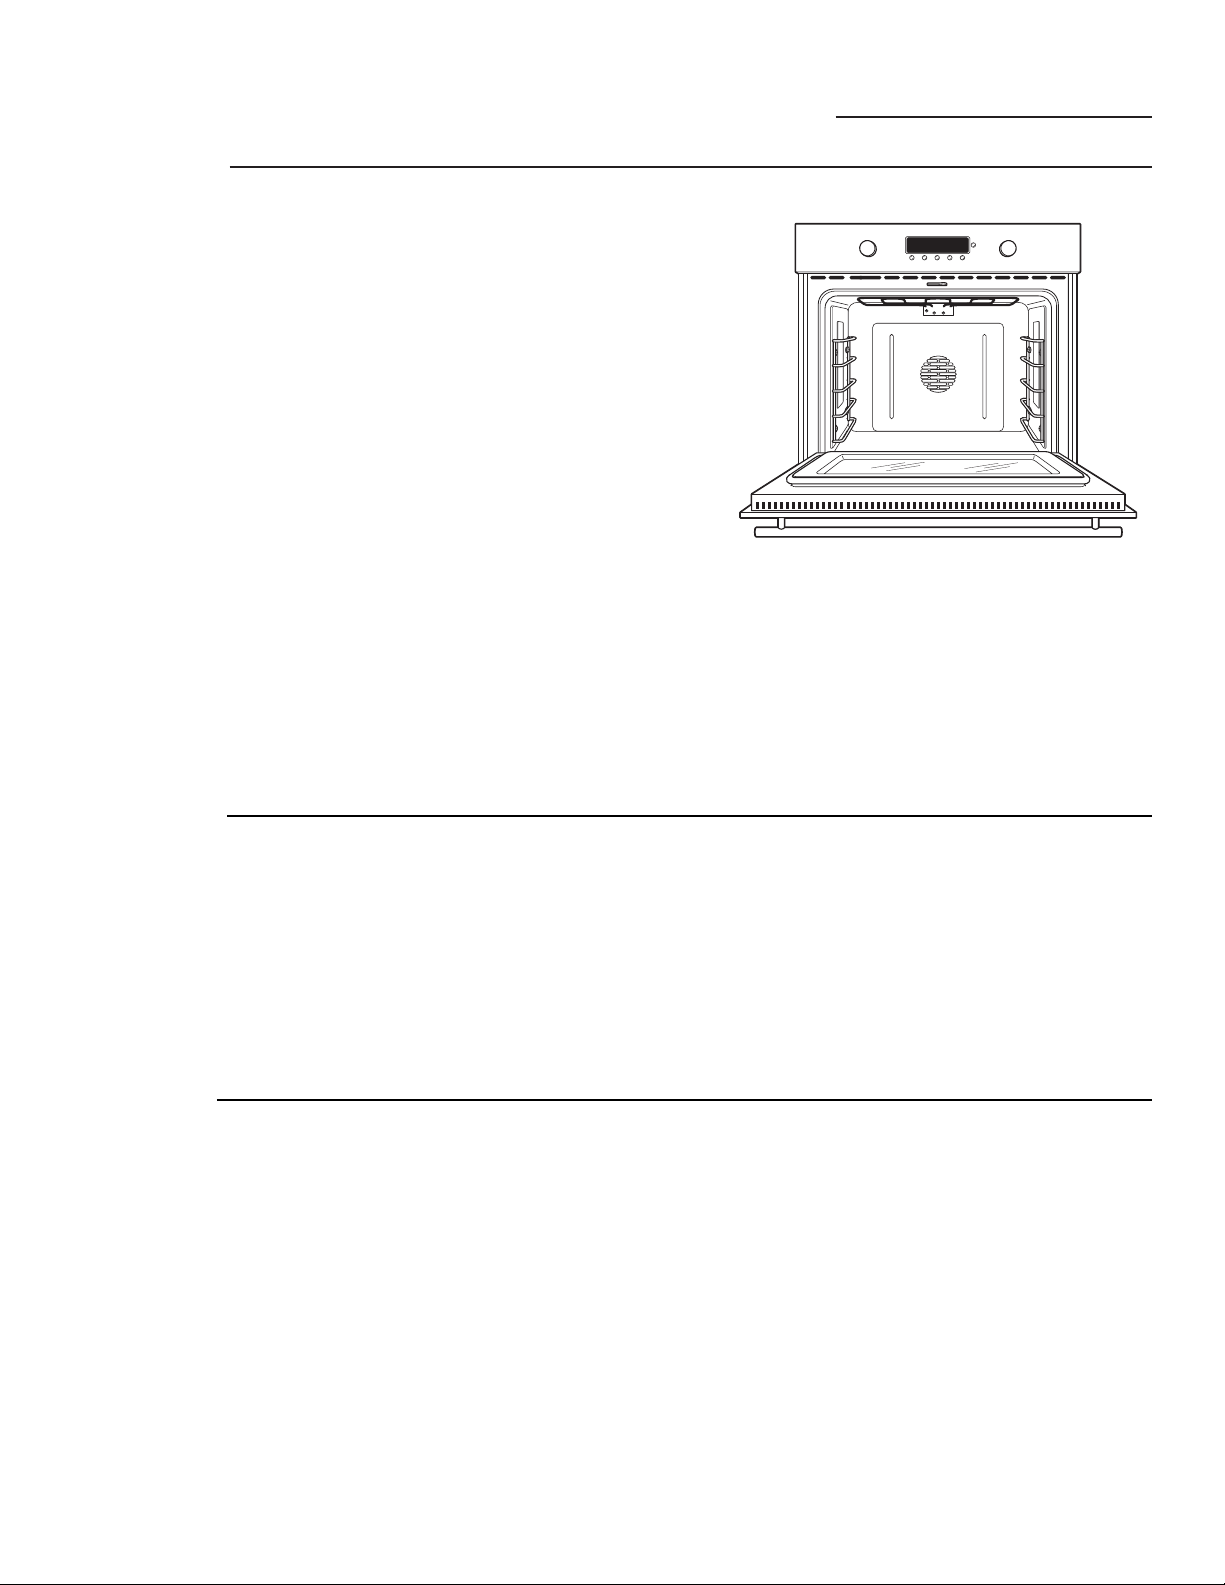
80
Pour
nettoyer
la porte
L’intérieur de la porte :
• Puisque la section à l’intérieur du joint se
nettoie durant le cycle d’autonettoyage, aucun
besoin de le nettoyer à la main. Tout savon
laissé sur la doublure pourra causer des taches
additionnelles lorsque le four est chauffé, alors
assurez-vous de bien la rincer.
• La section à l’extérieur du joint se nettoient
avec un tampon à récurer de rempli de savon.
• Vous ne devez ni frottez ni nettoyez le joint de
porte; le matériau de fibre de verre du joint a
une très faible résistance à l’abrasion. Un joint
de porte intact et bien ajusté est essentiel pour
obtenir un bon rendement énergétique et de
bons résultats de cuisson Si vous remarquez
qu’il devient usé, s’effiloche, est endommagé
de quelque façon ou a été déplacé sur la
porte, vous devriez le remplacer.
L’extérieur de la porte :
• En fonction de votre modèle, reportez-vous
à la section Surfaces en acier inoxydable ou
Surfaces peintes.
Entretien et nettoyage
Four mural
Les surfaces peintes incluent la porte, le dessus
du tableau de commande et l’avant du tiroir.
Nettoyez-les avec du savon et de l’eau ou une
solution de vinaigre et d’eau.
N’utilisez pas de nettoyant commercial pour le
four, de poudres de nettoyage, de laine d’acier
ou d’abrasifs forts sur quelque surface peinte
que ce soit.
Surfaces
peintes
(sur certains
modèles)
N’utilisez pas de tampons de laine d’acier; ils
pourraient rayer la surface.
Pour nettoyer la surface en acier inoxydable,
utilisez de l’eau chaude savonneux ou un
produit nettoyant ou cire à acier inoxydable.
Essuyez toujours la surface dans le sens du
grain. Suivez les instructions du produit
nettoyant pour nettoyer la surface en acier
inoxydable.
Pour savoir comment acheter le produit nettoyant
ou le cire pour appareils électroménagers en acier
inoxydable, ou pour connaître les coordonnées
du détaillant le plus près de chez vous, veuillez
appeler notre numéro sans frais :
1.800.626.2002 ou visitez notre site Web ge.com.
Surfaces
en acier
inoxydable
(sur certains
modèles)
81
PROBLÈME CAUSE PROBABLE
LE FOUR NE
•
Un fusible peut être grillé ou un disjoncteur peut être déclenché dans le
FONCTIONNE PAS panneau de votre résidence.
•
Les commandes du four ne sont pas réglées correctement.
•
Les commandes du four sont réglées pour l’autonettoyage. Si besoin est, laissez le
four refroidir; ouvrez ensuite la porte.
•
Assurez-vous que le bouton de sélection du mode de cuisson est réglé à BAKE
(cuisson) et que le bouton de sélection de la température est réglé à une température.
LA LAMPE DU FOUR NE •
La lampe est défectueuse. Remplacez l’ampoule.
S’ALLUME PAS
•
Le four effectue un cycle d’autonettoyage ou il est réglé sur la fonction Sabbath. Les
lampes du four ne s’allument pas pendant l’autonettoyage ou si le four est réglé à la
fonction Sabbath.
CUISSON OU RÔTISSAGE
•
Les commandes du four ne sont pas réglées correctement. Reportez-vous à la section
INAD
É
QUATS DES
Cuisson ou Rôtissage.
ALIMENTS DANS
•
Le four n’a pas préchauffé suffisamment longtemps (laisser environ 10 à 15 minutes).
LE FOUR
•
Des plats de cuisson ne convenant pas ou des plats de cuisson de mauvaise taille sont
utilisés. Reportez-vous à la section Positionnement des plats.
•
Les grilles sont dans la mauvaise position. Reportez-vous à la section Cuisson ou
Rôtissage.
•
Recouvrez les aliments de papier d’aluminium pour ralentir le brunissage lors du
rôtissage.
•
Le thermostat du four doit être ajusté. Reportez-vous à la section Réglage du thermostat
du four.
GRILLAGE
INAD
É
QUATS
•
Ce modèle est conçu pour une porte fermée. Fermez la porte. Grillez
DES ALIMENTS DANS toujours avec la porte fermée.
LE FOUR
•
Les commandes du four ne sont pas réglées à BROIL. Reportez-vous à la section
Cuisson au grilloir.
•
La sonde est branchée dans le four. Enlevez la sonde du four.
•
Grille placée à une hauteur inadéquate.
•
Aliments cuits dans un plat de cuisson chaud.
Utilisez la lèchefrite et sa grille
comprises avec votre four.
•
Plat de cuisson qui ne convient pas au grillage
. Utilisez la lèchefrite et sa grille
comprises avec votre four.
•
Le papier d’aluminium utilisé sur la lèchefrite et sa grille n’a pas été ajusté
correctement et n’a pas été fendu tel que recommandé.
•
Dans certaines régions, la tension de l’alimentation peut être basse. Faites
préchauffer l’élément chauffant
environ 10 à 15 minutes.
LE PROGRAMME
•
La température du four est trop élevée pour pouvoir régler un autonettoyage.
D’AUTONETTOYAGE NE Laissez la température du four descendre sous la température de
FONTIONNE PAS verrouillage et refaites le réglage des commandes.
•
Commandes mal réglées. Voir la section Four autonettoyant.
SONS DE « CRÉPITEMENT »
•
Ce phénomène est normal. Ces bruits sont produits par le métal sous l’effet
OU « D’ÉCLATEMENT »
de la chaleur et du refroidissement pendant les fonctions de cuisson
AU COURS DE
et d’autonettoyage.
L’AUTONETTOYAGE
FUMÉES EXCESSIVES
•
Quantité excessive de saleté.
Tournez le bouton de sélection du mode de
AU COURS DE
•
cuisson et le bouton de sélection de la température à OFF (arrêt).
Ouvrez
L’AUTONETTOYAGE
•
les fenêtres pour dissiper la fumée.
Attendez que le voyant lumineux du
•
verrouillage de la porte s’éteigne.
Essuyez l’excès de saleté, et programmez
à nouveau l’autonettoyage.
LE FOUR N’EST PAS
•
Le four était très sale. Essuyez le surplus de saleté avant
PROPRE APRÈS
de programmer l’autonettoyage. Lorsque le four est très sale, il peut
L’AUTONETTOYAGE
être nécessaire de programmer un autre autonettoyage.
•
Le four est branché à une source d’alimentation électrique de 208 V. Réglez le temps
d’autonettoyage à 5 heures.
•
Les commandes du four ne sont pas réglées correctement.
Voir la section Four
autonettoyant.
LES GRILLES
•
Les grilles ont été nettoyées à l’aide du cycle d’autonettoyage et il est maintenant
DU GLISSENT temps d’effectuer une lubrification périodique. Ne les vaporisez pas de Pam
®
ou
DIFFICILEMENT d’un autre lubrifiant à vaporiser. Reportez-vous à la section Grilles de four à extension
complète de la section Entretien et autonettoyage.
Solutions de problèmes
Four mural
Économisez
du temps et
de l’argent!
Consultez d’abord
les conseils de
dépannage des pages
qui suivent. Vous
pourriez vous éviter
d’appeler un
réparateur.

PROBLÈME CAUSE PROBABLE
L’HORLOGE ET LA •
Un fusible peut être grillé ou un disjoncteur peut être déclenché dans le panneau
MINUTERIE NE
de votre résidence. Remplacez le fusible ou réenclenchez le disjoncteur
.
FONCTIONNEMENT •
Les commandes du four ne sont pas réglées correctement. Voir les sectiones
PAS
Horloge et Minuterie.
TEMPÉRATURE •
La commande de température du four doit être réglée. Voir la section
TROP ELÉVÉE OU
Réglage du thermostat du four.
TROP BASSE DANS
LE FOUR
LA PORTE NE S’OUVRE •
Le four est trop chaud. Laissez la température du four descendre sous la
PAS APRÈS
température de verrouillage.
L’AUTONETTOYAGE
LE MESSAGE •
Vous avez programmé l’autonettoyage mais n’avez pas fermé la porte.
“LOCKED” CLIGNOTE
Fermez la porte du four.
À L’ÉCRAN
LE MESSAGE •
La porte du four est verrouillée parce que la température dans le four
“LOCKED” S’ALLUME
n’est pas descendue sous la température de verrouillage. Tournez le bouton
LORSQUE VOUS
de sélection du mode de cuisson et le bouton de sélection de la température
DÉSIREZ EFFECTUER
à OFF (arrêt). Laissez le four refroidir.
UNE CUISSON
CLIGNOTEMENTS F9 • Le four utilise un code d’erreur de fonctionnement. Tournez le bouton
EST AFFICHÉ de sélection du mode de cuisson et le bouton de sélection de la
À L’ÉCRAN température à OFF (arrêt). Laissez le four refroidir pendant une heure.
Remettez le four en marche.
• Débranchez l’alimentation électrique du four pendant 30 secondes,
puis remettez le four sous tension. Si le code d’erreur de
fonctionnement réapparaît, faites appel à un service d’entretien.
L’ÉCRAN D’AFFICHAGE •
Un fusible peut être grillé ou un disjoncteur peut être déclenché dans le panneau
N’EST PAS ALLUMÉ
de votre résidence.
Remplacez le fusible ou réenclenchez le disjoncteur.
• L’horloge est réglée au mode d’extinction. Voir la section
Caractéristiques spéciales.
L’ÉCRAN D’AFFICHAGE • Panne de courant. Réglez à nouveau l’horloge.
CLIGNOTE
IMPOSSIBILITÉ • Les boutons PROBE (sonde) et DELAY START (démarrage différé) doivent
D’AFFICHER LE être enfoncés simultanément et maintenus enfoncés pendant 4 secondes.
MESSAGE «SF»
LE MESSAGE «PROBE» •
Ce message vous rappelle d’entrer une température interne
EST AFFICHÉ
après avoir branché la sonde.
Entrez une température interne.
À L’ÉCRAN
PANNE DE COURANT, • Panne de courant ou surtension. Réglez à nouveau l’horloge. Si le
L’HORLOGE four était en fonctionnement, vous devez le régler de nouveau en
CLIGNOTE enfonçant le bouton CLOCK (horloge), et en tournant et enfonçant
le bouton de sélection miniature pour saisir les réglages.
DE LA VAPEUR • À la cuisson par convection, il est normal que de la vapeur s’échappe par
S’ÉCHAPPE PAR l’évent du four. Plus le nombre de grilles utilisées ou la quantité d’aliments
L’ÉVENT dans le four augmente, plus il y a de vapeur visible qui s’échappe.
ODEUR DE «BRÛLÉ»OU • Ce phénomène est normal lorsque le four est neuf et disparaîtra avec
D’HUILE» PROVENANT le temps.
DE L’ÉVENT
FORTES ODEURS • Ce phénomène est temporaire. Les premières fois que vous utilisez le four,
il est normal de sentir une odeur provenant de l’isolant qui se trouve à
l’intérieur du four.
BRUIT DE • C’est normal. Le ventilateur de refroidissement se mettra en marche pour
VENTILATEUR refroidir les pièces internes. Il peut fonctionner après le four éteint. Le
ventilateur de convection se mettra en marche et s’arrêtera jusqu’à ce que
la fonction de cuisson par convection soit terminée ou que la porte
soit ouverte.
82
Économisez
du temps et de
l’argent!
Solutions de problèmes
Four mural

83
Notes
Four mural

84
Notes
Four mural

85
Avec l’achat de votre nouvel appareil Monogram, vous recevez
aussi l’assurance que si vous avez besoin d’information ou d’aide de
notre part, nous serons là pour vous. Vous n’avez qu’à appeler le
numéro sans-frais!
GE Answer
Center
®
Aux États-Unis :
800.626.2000
Peu importe votre question au sujet des appareils électroménagers Monogram, le GE Answer
Center
®
est là pour vous aider. Vous aurez les réponses à vos questions rapidement et de
manière courtoise. Vous pouvez appeler en tout temps. Le GE Answer Center
®
est ouvert 24
heures par jour, 7 jours par semaine.
OU
Visitez notre site Web au : ge.com
Le service de
réparation In-
Home
Aux États-Unis :
800.444.1845
Un professionnel du service à la clientèle GE vous fournira un service de réparation expert à
un moment qui vous convient. De nombreux endroits gérés par GE Consumer Service
(service à la clientèle) vous offrent un service le jour même ou le lendemain ou selon ce qui
vous convient (de 7 h 00 à 19 h 00 en semaine, de 9 h 00 à 14 h 00 le samedi). Nos
techniciens formés en usine connaissent votre appareil de fond en comble et la plupart des
réparations peuvent donc être réglées en une seule visite.
Contrats de
service
Aux États-Unis :
800.626.2224
Ne vous inquiétez pas non plus pour le service après la fin de votre garantie, GE Consumer
Service (service à la clientèle) sera encore là pour vous. Achetez un contrat de GE avant la fin
de votre garantie et profitez d’un rabais important. Avec un contrat de plusieurs années, vous
êtes assuré d’avoir les prix actuels pour le service à l’avenir.
Pièces et
accessoires
Aux États-Unis :
800.626.2002
Les personnes qualifiées pour la réparation de leurs propres appareils peuvent faire envoyer
directement les pièces ou les accessoires à leur résidence. Le système de pièces GE offre un
accès à plus de 47 000 pièces et toutes les pièces de rechange authentiques de GE sont
entièrement garanties. Nous acceptons les cartes de crédit Visa, Mastercard et Discover.
Les instructions de maintenance de l’utilisateur dans ce manuel couvrent les procédures à
effectuer par tout utilisateur. Tout autre entretien ou toute réparation doivent être confiés à
du personnel qualifié. Il faut être prudent puisqu’un mauvais entretien ou une mauvaise
réparation pourraient rendre dangereux le fonctionnement de l’appareil.
Pour les clients
aux besoins
spéciaux…
Aux États-Unis :
800.626.2000
GE met à votre disposition une brochure pour vous aider dans
l’aménagement d’une cuisine adaptée aux personnes à mobilité
réduite.
Les clients malentendants ou ayant des difficultés d’élocution et qui ont
accès à un ATME ou à un téléimprimeur traditionnel peuvent appeler le
1.800.TDD.GEAC (1.800.833.4322) pour demander de l’information ou
des services.
Service à la clientèle
Four mural

86
Garantie
Four mural
LA GARANTIE DE VOTRE FOUR MURAL MONOGRAM
Agrafez votre reçu ou votre chèque encaissé ici. La preuve de date
d’achat original est nécessaire pour obtenir le service sous garantie.
Veuillez avoir le numéro de série et de modèle sous la main lorsque
vous appelez notre service de réparations.
CE QUI EST
COUVERT
À partir de la
date d’achat
original
GARANTIE LIMITÉE D’UN AN
Pour une durée d’un an à partir de la date d’achat originale, nous fournirons, sans frais, les
pièces et la main-d’œuvre à votre domicile pour la réparation et le remplacement de toute
pièce du four défectueuse en raison d’un défaut de fabrication.
Cette garantie est offerte à l’acheteur original et à tout autre propriétaire pour les produits achetés
pour une utilisation résidentielle dans les 48 États continentaux, Hawaii et Washington (D.C.). Si
l’appareil se trouve dans une zone où le service de réparations autorisé n’est pas disponible, des frais
de déplacement pourraient s’ajouter ou vous pourriez devoir apporter l’appareil à un réparateur
autorisé. En Alaska, la garantie est la même sauf que vous devez payer l’expédition du produit à
l’atelier de service ou le coût du voyage d’un technicien de service chez vous.
Tout le service sous garantie est fourni par nos Centres de service en usine ou par un technicien de
Customer Care
®
autorisé durant les heures normales de travail.
S’il devient nécessaire de réparer votre appareil, au cours de la période de garantie ou après,
appelez le 1.800.444.1845 aux États-Unis.
Certains États n’acceptent pas d’exclusion ou de limites aux dommages indirects et consécutifs, il se
peut donc que l’exclusion précédente ne s’applique pas dans votre cas. Cette garantie vous donne
des droits juridiques précis et vous pourriez aussi avoir d’autres droits qui varient d’une juridiction
à l’autre. Pour connaître vos droits juridiques dans votre État, consultez votre bureau des affaires
aux consommateurs local ou d’État ou l’avocat général de votre État.
Garant aux É.-U. : General Electric Company,
Louisville, KY 40225
CE QUI N’EST
PAS COUVERT
• Les déplacements du service pour vous
enseigner comment utiliser le produit.
• Remplacement des fusibles résidentiels ou
réinitialisation des disjoncteurs.
• Tout dommage au produit à la suite d’un
accident, incendie, inondation ou force
majeure.
• Tout dommage après livraison.
• Défaillance du produit à la suite d’un abus,
d’une mauvaise utilisation, d’une utilisation à
des fins autres que celles prévues ou à une
utilisation commerciale.
• Mauvaise installation, livraison ou
maintenance.
Si vous éprouvez des problèmes avec
l’installation, communiquez avec votre vendeur
ou avec l’installateur. Il vous incombe de
fournir les prises adéquates pour l’électricité,
le gaz, l’évacuation et les autres raccords, telles
que décrites dans les Instructions d’installation
fournies avec ce produit.
• Dommages indirects ou consécutifs causés par
des défauts possibles de l’appareil.
• Produit non accessible pour faire les
réparations nécessaires.
GE Consumer & Industrial
Appliances
General Electric Company
Louisville, KY 40225
ge.com
EXCLUSION DES GARANTIES TACITES : Votre seule et unique voie de droit est la
réparation du produit aux termes de la présente garantie limitée. Toutes les garanties
tacites, y compris les garanties de valeur marchande ou d’adéquation à un usage
particulier, sont limitées à une durée d’un an, ou à la durée la plus courte autorisée par
la loi en vigueur.

87
Información para los clientes
Horno de pared
Introducción
Su nuevo horno de pared Monogram brinda una impresión elocuente de estilo, conveniencia
y flexibilidad para el diseño de su cocina. Ya sea que lo elija por su pureza de diseño, atención
minuciosa a los detalles, o por ambas razones, descubrirá que la combinación superior de formas
y funciones de su horno de pared Monogram lo deleitará por años.
Este horno fue diseñado para brindar flexibilidad ya que se ajusta al modelo del gabinete de
su cocina. Su elegante diseño puede integrarse maravillosamente en su cocina.
La información en las siguientes páginas lo ayudará a manejar y mantener adecuadamente
su horno de pared.
Contents
Cuidados y limpieza
Asadera y rejilla . . . . . . . . . . . . . . . . . . . . . 118
Luces del horno . . . . . . . . . . . . . . . . . . . . 121
Parrillas . . . . . . . . . . . . . . . . . . . . . . . . . . . 119
Puerta del horno . . . . . . . . . . . . . . . . 120, 122
Sonda . . . . . . . . . . . . . . . . . . . . . . . . . . . . 120
Servicio al cliente
Garantía . . . . . . . . . . . . . . . . . . . . . . . . . . . 128
Instrucciones de seguridad . . . . . . . . . . 89–91
Modelo y número de serie . . . . . . . . . . . . . 88
Números de teléfono importantes . . . . . . 127
Registro del producto . . . . . . . . . 88, 125, 126
Solución de problemas . . . . . . . . . . . 123, 124
Horno
Ajuste del termostato . . . . . . . . . . . . . . . . .115
Asar a la parilla . . . . . . . . . . . . . . . . . . . 98, 99
Bloqueo del control . . . . . . . . . . . . . . . . . . . .113
Cocción por convección . . . . . . . . . . 102–107
Cocción programada . . . . . . . . . . . . . 108, 109
Controles . . . . . . . .93, 94, 97, 99, 101, 103, 104,
105, 107, 110, 111, 112
Fermentación . . . . . . . . . . . . . . . . . . . . . . 110
Funciones . . . . . . . . . . . . . . . . . . . . . . . . . . 92
Funciones especiales . . . . . . . . . . . . . 115–117
Función Sabbath . . . . . . . . . . . . . . . . . . . .117
Hornear . . . . . . . . . . . . . . . . . . . . . . . . . . . . 97
Instrucciones para
la limpieza automática . . . . . . . . . . . . 111, 112
Papel de aluminio . . . . . . . . . . . . . 95, 98, 107
Parrillas . . . . . . . . . . . . . . . . . . . . . . . . . . . . 96
Reloj . . . . . . . . . . . . . . . . . . . . . . . . . . . . . 113
Sonda . . . . . . . . . . . . . . 94, 100, 101, 105, 120
Temporizador . . . . . . . . . . . . . . . . . . . . . . 114
Retire la
cinta de
empaque
Tome cuidadosamente una esquina de
la película protectora y despéguela lentamente
de la superficie del aparato. No use ningún
objeto puntiagudo para retirar la película.
Retire toda la película antes de usar el aparato
por primera vez.
Para asegurarse de no dañar el acabado
del producto, la manera más segura de retirar
el adhesivo de la cinta de empaque sobre
aparatos nuevos es la aplicación de
un detergente doméstico líquido para lavar
platos. Aplique con un paño suave y moje.
NOTA: debe retirar el adhesivo de todas las partes.
No puede retirarse si se quema.
88
Antes de
utilizar su
horno de
pared
Lea detenidamente este manual, ya que
lo ayudará a operar y mantener en buenas
condiciones su nuevo horno de pared.
Téngalo a mano para consultar cualquier duda.
Si no entiende algún punto o necesita más
ayuda, hay una lista de números gratuitos
de atención al cliente en la última sección
del manual.
O
Visite nuestro sitio web en: ge.com
Anote los
números
de modelo
y serie
Los encontrará en una etiqueta sobre la banda
izquierda frontal de la puerta del horno.
Complete los datos y envíe la Tarjeta de registro
del producto del cliente que viene con el
producto.
Antes de enviar esta tarjeta, anote estos
números aquí:
Número de modelo
Número de serie
Utilice estos números en cualquier
correspondencia o llamada de servicio
relacionada con su horno de pared.
Si recibe
un horno
de pared
dañado
Comuníquese inmediatamente con
el distribuidor (o fabricante) que le vendió
el producto.
Ahorre
tiempo y
dinero
Antes de solicitar servicio técnico, consulte
la sección Solución de problemas al final de este
manual.
Se enumeran causas de problemas menores
de funcionamiento que puede corregir usted
mismo.
Si necesita
servicio
técnico
Para obtener servicio técnico, consulte
la página de “Servicios al cliente” al final
de este manual.
Estamos orgullosos de nuestro servicio y
queremos que se sienta satisfecho. Si por
alguna razón no está conforme con el servicio
que recibe, puede seguir los dos pasos
siguientes para obtener ayuda adicional.
EN PRIMER LUGAR, comuníquese con
la gente que revisó su aparato. Explique
la razón de su disconformidad. En la mayoría
de los casos, esto solucionará el problema.
LUEGO, si aún no está conforme, escriba
todos los detalles, incluyendo su número de
teléfono, a:
Manager, Customer Relations
GE Appliances
Appliance Park
Louisville, KY 40225
Información para los clientes
Horno de pared

Cuando utilice electrodomésticos, debe tomar
precauciones básicas de seguridad, incluyendo
las siguientes:
• Asegúrese de retirar todo el material de
embalaje del horno antes de ponerlo en
funcionamiento a fin de evitar incendios o
daños causados por el humo en caso de que
el material de embalaje coja fuego.
• Use este aparato únicamente para los fines
descritos en este Manual del propietario.
• Cerciórese de que su aparato esté
correctamente instalado y conectado por
un técnico calificado de acuerdo con
las instrucciones de instalación provistas.
• Asegúrese que el horno esté instalado
como es debido, es decir, en un gabinete que
esté firmemente amurado a la estructura de
la casa. Nunca permita que alguien se trepe,
se siente, se pare o se cuelgue de la puerta
del horno.
• Pida al instalador que le muestre la ubicación
del cortacircuitos o fusible. Márquelo para
una referencia fácil.
• No intente reparar ni reemplazar ninguna
pieza de su horno a menos que en este
manual se recomiende tal acción de manera
específica. Todos los demás servicios deben
referirse a un técnico calificado.
• Indique a los niños que no jueguen con
los controles ni ninguna otra pieza del horno.
• Nunca deje la puerta del horno abierta
cuando no lo esté mirando.
• Siempre mantenga las toallas para platos,
guantes para cacerolas y otros objetos de tela
a una distancia segura de su horno.
• Para su seguridad, nunca use su aparato para
calentar la habitación.
• No almacene materiales inflamables en
el horno.
• Siempre mantenga los utensilios de madera
y plástico, así como los alimentos enlatados,
a una distancia segura de su horno.
• Siempre mantenga los tapices, las cortinas o
los paños combustibles a una distancia segura
de su horno.
• NO ALMACENE NI UTILICE MATERIALES
COMBUSTIBLES, GASOLINA NI OTROS
VAPORES Y LÍQUIDOS INFLAMABLES
CERCA DE ÉSTE O DE CUALQUIER OTRO
APARATO.
• No deje que se acumule grasa de la cocción
ni otro material inflamable dentro o cerca
del horno de pared.
• No use agua para extinguir los incendios
ocasionados por la grasa. Nunca tome
una cacerola que se esté quemando. Apague
los controles.
Las llamas del horno pueden eliminarse
por completo si cierra la puerta del horno y
lo apaga, o bien si utiliza un extintor de polvo
químico seco o de espuma.
89
INSTRUCCIONES IMPORTANTE DE SEGURIDAD
AVISO IMPORTANTE DE SEGURIDAD
• La Ley de Aplicación de la Legislación
sobre Tóxicos y Agua Potable Segura exige
al Gobernador de California publicar una lista
de las sustancias que el Estado sabe que
causan cáncer, defectos congénitos u otros
daños reproductivos; además, exhorta a
las empresas a que adviertan a los clientes
sobre la potencial exposición a dichas
sustancias.
• El aislamiento de fibra de vidrio de los hornos
autolimpiantes despide una pequeña cantidad
de monóxido de carbono durante el ciclo de
limpieza. La exposición a esta sustancia puede
minimizarse si se deja una ventana abierta o
se utiliza un ventilador o campana de
ventilación.
• IMPORTANTE: la salud de
algunos pájaros es extremadamente sensible
a los gases despedidos durante el ciclo de
autolimpieza de cualquier horno. Traslade
los pájaros a otra habitación bien ventilada.
PRECAUCIONES DE SEGURIDAD

90
PRECAUCIONES DE SEGURIDAD
• No use papel de aluminio para cubrir
el fondo del horno, excepto que así se sugiera
en el manual. La colocación incorrecta
del papel de aluminio puede provocar
una descarga eléctrica o incendio.
• Cocine los diferentes tipos de carne en
su totalidad. La carne debe alcanzar,
al menos, una temperatura INTERNA de
160 °F, mientras que la de aves debe registrar
una temperatura INTERNA de 180 °F
aproximadamente. La cocción a estas
temperaturas ofrece protección contra
enfermedades de transmisión en
los alimentos.
• Antes de realizar cualquier tarea,
DESCONECTE EL SUMINISTRO DE
ENERGÍA DEL HORNO DESDE EL PANEL
DE DISTRIBUCIÓN DE LA CASA. PARA
ELLO, RETIRE LOS FUSIBLES O APAGUE
EL INTERRUPTOR DE ENERGÍA.
• No deje solos a los niños; siempre deben estar
acompañados por un adulto si se encuentran
en un área donde un aparato está en uso.
No se les debe permitir sentarse o pararse
sobre ninguna de las partes del aparato.
• No toque las piezas de calentamiento
ni la superficie interna del horno. Estas
superficies podrían estar lo suficientemente
calientes como para quemar aún si están
oscuras. Durante y luego del uso, no toque
el interior del horno ni permita que telas u
otro material inflamable entre en contacto
con esta parte; primero espere hasta que
se enfríe lo suficiente.
Las superficies potencialmente calientes
incluyen las aberturas de ventilación
del horno y las superficies cercanas a
las aberturas, hendiduras alrededor de
la puerta del horno, los extremos de
la ventana de la puerta y las piezas de
metal sobre la puerta.
Recuerde: la superficie interna del horno
puede estar caliente cuando la puerta está
abierta.
•
PRECAUCIÓN: LOS OBJETOS
DE INTERÉS DE LOS NIÑOS NO DEBEN
ALMACENARSE EN GABINETES ENCIMA
DE UN HORNO YA QUE PUEDE SER MUY
PELIGROSO QUE LOS NIÑOS SE TREPEN
HASTA ALLÍ PARA BUSCARLOS.
• Nunca use vestimenta floja o que cuelgue
mientras usa el aparato. Tenga cuidado
al tomar los objetos que estén almacenados
sobre el horno. El material inflamable podría
prenderse si entra en contacto con las piezas
de calentamiento del horno y podría provocar
quemaduras graves.
• Use únicamente guantes para cacerolas que
estén secos; los guantes húmedos o mojados
sobre superficies calientes podrían causar
quemaduras debido al vapor. No permita que
los guantes entren en contacto con las piezas
de calentamiento. No use una toalla u otro
tipo de tela voluminosa.
• No obstruya la ventilación del horno.
• Mantenga el horno libre de acumulación
de grasa.
• Manténgase alejado del horno cuando abra su
puerta. El aire caliente o el vapor que se escapa
puede provocar quemaduras en las manos,
la cara y los ojos.
• Luego de asar a la parrilla, siempre saque
la asadera del horno y lávela. La grasa que
queda en la asadera puede incendiarse
la próxima vez que la utilice.
• Los rayones o impactos severos sobre
las puertas de vidrio podrían romper o astillar
el vidrio.
• Nunca deje frascos ni latas con grasa
derramada dentro o cerca de su horno.
INSTRUCCIONES IMPORTANTE DE SEGURIDAD

91
INSTRUCCIONES IMPORTANTE DE SEGURIDAD
GUARDE ESTAS INSTRUCCIONES
PRECAUCIONES DE SEGURIDAD
• Los niños en caminadores o los bebés que
gatean pueden verse atraídos por la manija
redonda de la puerta del horno, y pueden
alcanzarla y abrirla. Esto puede causar lesiones
si la puerta del horno se abre de golpe sobre
un niño, o quemaduras graves si el horno está
encendido y caliente.
• No caliente envases de alimentos sin abrir,
ya que esto podría aumentar su presión y,
como consecuencia, reventar y causar heridas.
• Coloque la parrilla del horno en la posición
deseada mientras el horno está frío. Si debe
tocar las parrillas cuando están calientes,
no permita que la asadera entre en contacto
con las piezas de calentamiento.
• Es conveniente extender la parilla
completamente cuando se levanten alimentos
pesados. Asimismo, sirve como una precaución
para evitar posibles quemaduras, ya que podría
tocar superficies calientes de la puerta o
las paredes del horno.
• Cuando utilice bolsas para cocinar o asar, siga
las instrucciones del fabricante.
• No utilice su horno para secar periódicos.
Ya que si se calientan demasiado podrían llegar
a incendiarse.
• No utilice el horno como área de
almacenamiento. Los elementos almacenados
en un horno pueden incendiarse.
• No deje objetos de papel, utensilios de cocina
o alimentos sobre el horno mientras no está en
uso.
• No deje que nadie se suba, se pare o
se cuelgue de la puerta. Podrían dañar
el horno o provocar heridas personales graves.
AUTOLIMPIEZA DEL HORNO
• No limpie la junta de la puerta. Ésta constituye
una parte importante del buen sellado. Debe
tener cuidado de no refregar, dañar ni mover
la junta.
• No use limpiadores de horno. No deben usarse
limpiadores de horno comerciales ni ningún
tipo de recubrimiento protectivo para hornos
dentro o alrededor de ninguna parte del horno.
Los residuos de los limpiadores de horno
dañarán su interior cuando se utilice el ciclo
de limpieza automática.
• Limpie únicamente las partes enumeradas en
este Manual del propietario.
• Antes de activar la limpieza automática
del horno, retire la asadera, la rejilla y los demás
utensilios de cocina.
• Asegúrese de limpiar el exceso de derrames
antes de iniciar la función de autolimpieza.
• Si este modo no funciona adecuadamente,
apague el horno y desconecte el suministro
de energía. Hágalo revisar por un técnico
calificado.
• Las parrillas del horno pueden limpiarse en
su interior durante el ciclo de autolimpieza.
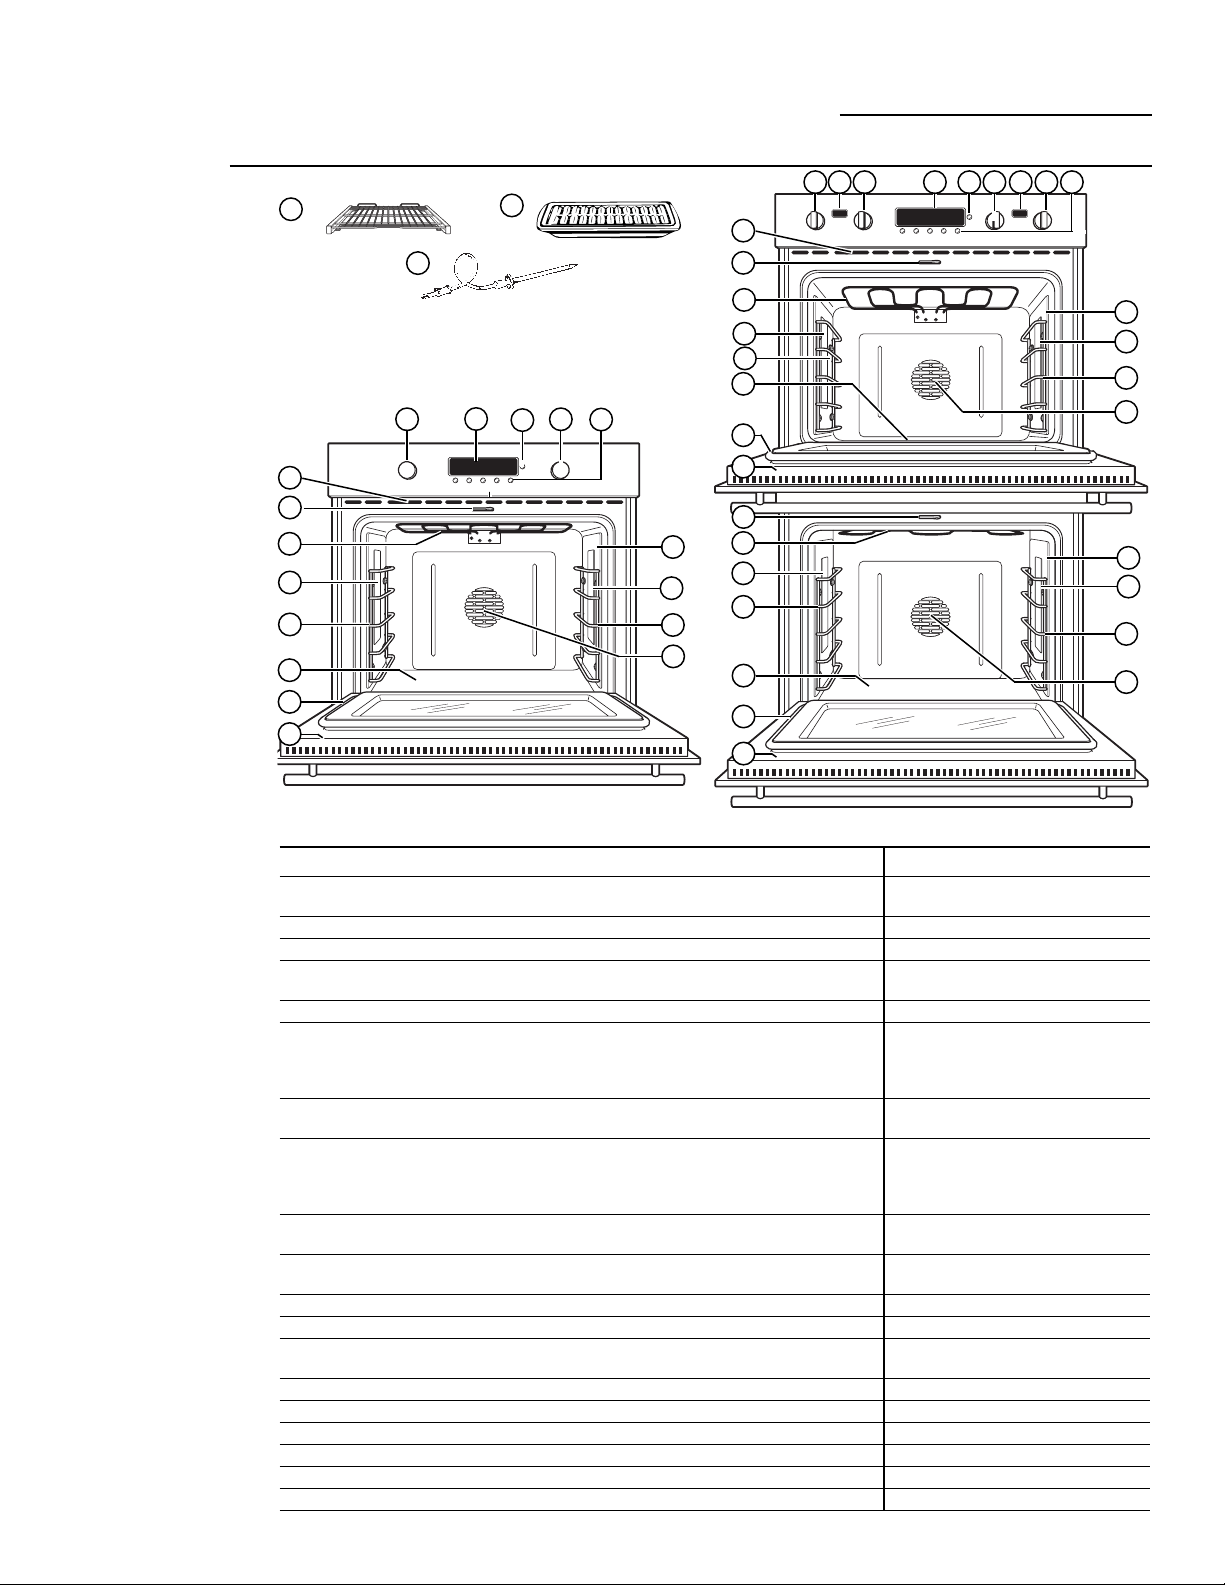
92
Índice de funciones Página
1 Parrillas de horno con extensión completa 95, 96, 97, 98, 99, 102, 103,
(3 en cada horno) 104, 105, 107, 108, 110, 119
2 Asadera y rejilla 104, 118
3 Sonda 94, 100, 101, 105, 120
4 Perilla de modo del horno 94, 97, 99, 101, 103,
104, 105, 107, 110, 111, 112
5 Pantalla 94
6 Perilla pequeña: se gira para programar y se presiona para ingresar 94, 101, 105, 108, 109, 111,
las configuraciones de PROBE (SONDA), TIMER 112, 113, 114, 115, 116, 117
(TEMPORIZADOR), CLOCK (RELOJ), COOK TIME (TIEMPO
DE COCCIÓN) y DELAY START (INICIO TARDÍO).
7 Perilla de temperatura 94, 97, 99, 101, 103,
104, 105, 107–112, 115, 118
8 Botones Probe (Sonda), Timer (Temporizador), Clock (Reloj), Cook 94, 101, 105, 108, 109, 111,
Time (Tiempo de cocción) y Delay Start (Inicio tardío). Presione 112, 113, 114, 115, 116, 117
alguno de ellos para seleccionar la función, gire la perilla pequeña
para proceder con la configuración y presiónela para aceptar.
9
Subpantallas: las temperaturas altas y bajas del horno aparecen en —
sus pantallas correspondientes (en modelos equipados de esta manera).
10 Tomacorriente de la sonda 100, 101, 105,
107, 111, 123, 124
11 Luces halógenas del horno 121, 123
12 Soportes de la parrilla del horno (5 posiciones) 96, 121
13 Ventilador de convección (funciona durante la cocción de convección 97, 98, 101, 102, 103, 104,
y durante el precalentamiento) 105, 107, 108, 111, 112, 124
14 Puerta removible del horno 120
15 Junta de la puerta del horno 122
16 Pieza para hornear (debajo del piso del horno) 89, 103, 118
17 Pieza para asar 102, 118, 123
18 Seguro automático de la puerta del horno 111, 112
19 Ventilación del horno 90, 124
Funciones de su horno de pared
Horno de pared
Información
del diseño
(No todas las funciones
corresponden a todos
los modelos.
La apariencia
puede variar.)
ZET1—Se muestra con perillas de estilo integradas
11
12
10
4 7
ZET2—Se muestra con perillas de estilo profesional
12
16
11
12
10
9
18
15
11
17
12
13
10
11
13
12
18
16
1
2
3
8
5
6
13
15
14
17
15
16
18
17
11
12
4 5 6 94
8
77
19
19
14
14
11
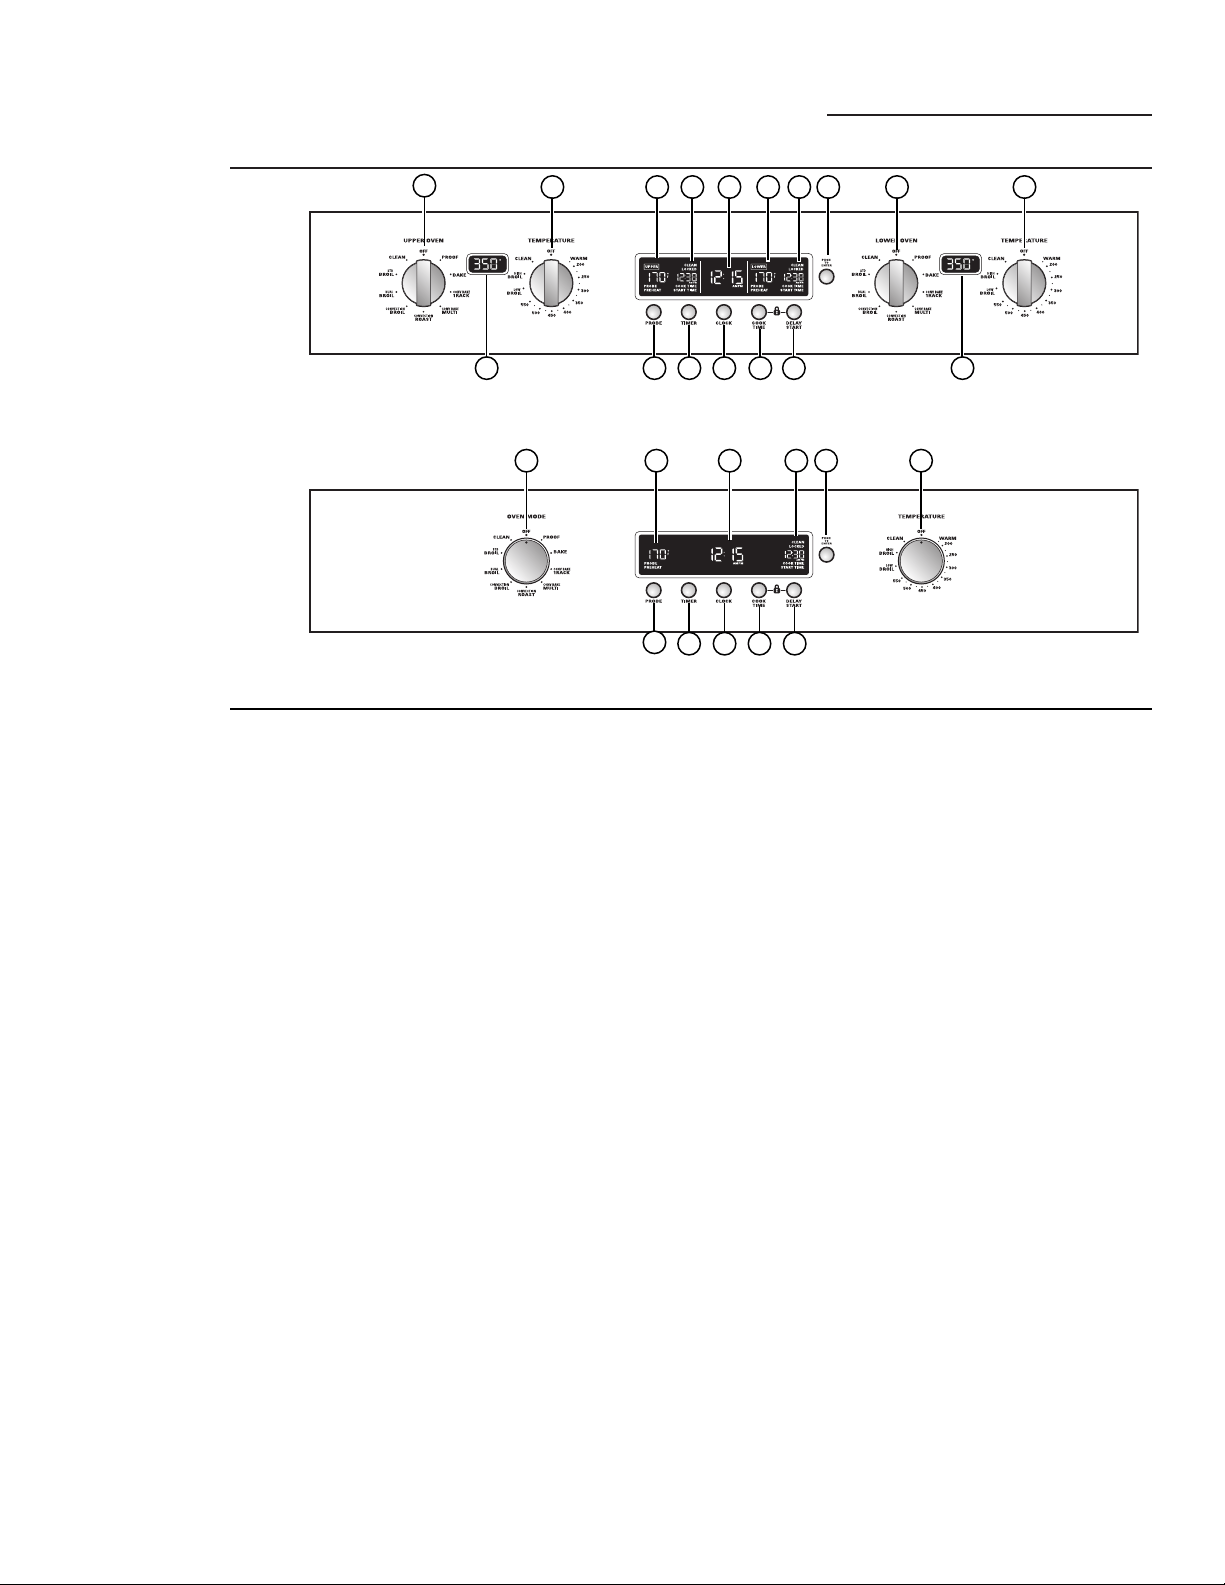
Control del horno, reloj y temporizador
Horno de pared
FF
Control de horno doble: se muestra el estilo profesional (La apariencia puede variar)
Control de horno simple: se muestra el estilo integrado (La apariencia puede variar)
Funciones
del control
de su horno,
reloj y
temporizador
(No todos los
modelos
presentan
todas las
funciones.
La
apariencia
puede
variar.)
1 Perilla de modo del horno: gírela para hacer la selección
correspondiente:
PROOF (Fermentar): mantiene un ambiente
templado útil para levar alimentos.
BAKE (Hornear): seleccione esta función para
el horneado tradicional.
CONV BAKE 1 RACK (Hornear por convección en
1 parrilla): se utiliza para hornear por convección
en una parrilla.
CONV BAKE MULTI (Hornear por convección en varias
parrillas): se utiliza para hornear por convección
en múltiples parrillas.
CONV ROAST (Asar por convección): se utiliza para
asar por convección.
CONV BROIL (Asar a la parrilla por convección):
se utiliza para el asado a la parrilla por convección.
DUAL BROIL (Asar a la parrilla en dos posiciones):
seleccione esta función para un asado tradicional a
la parrilla en grandes cantidades.
STD BROIL (Asar a la parrilla estándar): seleccione
esta función para un asado tradicional a la parrilla
en pequeñas cantidades.
CLEAN (Limpiar): seleccione esta función
para realizar la autolimpieza. Consulte la sección
Autolimpieza del horno.
2 Perilla de temperatura: gírela para hacer la selección
correspondiente:
Utilícela para configurar temperaturas de horneado
desde 200 °F hasta 550 °F.
WARM (Calentar): esta función mantiene calientes
los alimentos cocidos hasta 2 horas después de
haberse completado la función de cocción.
LOW BROIL (Asar a la parrilla a temperatura baja):
se configura automáticamente una temperatura más
baja para asar a la parrilla.
HIGH BROIL (Asar a la parrilla a temperatura alta):
se configura automáticamente una temperatura más
alta para asar a la parrilla.
CLEAN (Limpiar): la temperatura de autolimpieza
se configura automáticamente.
3 Perilla pequeña
Gírela para seleccionar alguna de las funciones
y presiónela para aceptar las configuraciones de
PROBE (Sonda), TIMER (Temporizador), CLOCK
(Reloj), COOK TIME (Tiempo de cocción) y
DELAY START (Inicio tardío).
4 PROBE (Sonda): seleccione la sonda para cocinar
alimentos a una temperatura interna configurada.
Gire y presione la perilla pequeña para configurar.
5 TIMER (Temporizador): presione este botón
para seleccionar la función temporizador.
El temporizador no controla las funciones del horno.
Éste puede cronometrar hasta 11 horas y 59 minutos.
Gire y presione la perilla pequeña para configurar.
6 CLOCK (Reloj): presione este botón para ingresar
la hora. Gire y presione la perilla pequeña para
configurar.
7 COOK TIME (Tiempo de cocción): presione este
botón para ingresar el tiempo de cocción deseado
para el horneado (o asado), horneado por
convección y asado por convección. Gire y
presione la perilla pequeña para configurar.
8 DELAY START (Inicio tardío): presione este botón
para demorar el inicio de la cocción o el ciclo de
autolimpieza. Gire y presione la perilla pequeña
para configurar la hora en que desea que el horno
se encienda.
9 Pantalla de temperatura: muestra la temperatura
configurada para el horno o la temperatura
configurada para la sonda; además, indica si
el horno está precalentando. (En algunos modelos
de hornos de pared doble, SUPERIOR e INFERIOR
aparecen sobre sus respectivas configuraciones).
NOTA: en algunos modelos de hornos de pared,
la temperatura configurada aparece en pantallas ubicadas
entre sus respectivas perillas de control.
10 Pantalla de estado de limpieza y temporización: si está
configurada, muestra el TIEMPO DE COCCIÓN
restante y la hora del INICIO TARDÍO. La luz indica
el estado del ciclo de autolimpieza.
11 Pantalla de la hora del día: muestra la hora del día
configurada.
1
2 10119 10 3 1 2
9
4
5 6 7
8
9
1 9 11 10 3 2
4
5 6 7 8
9
93
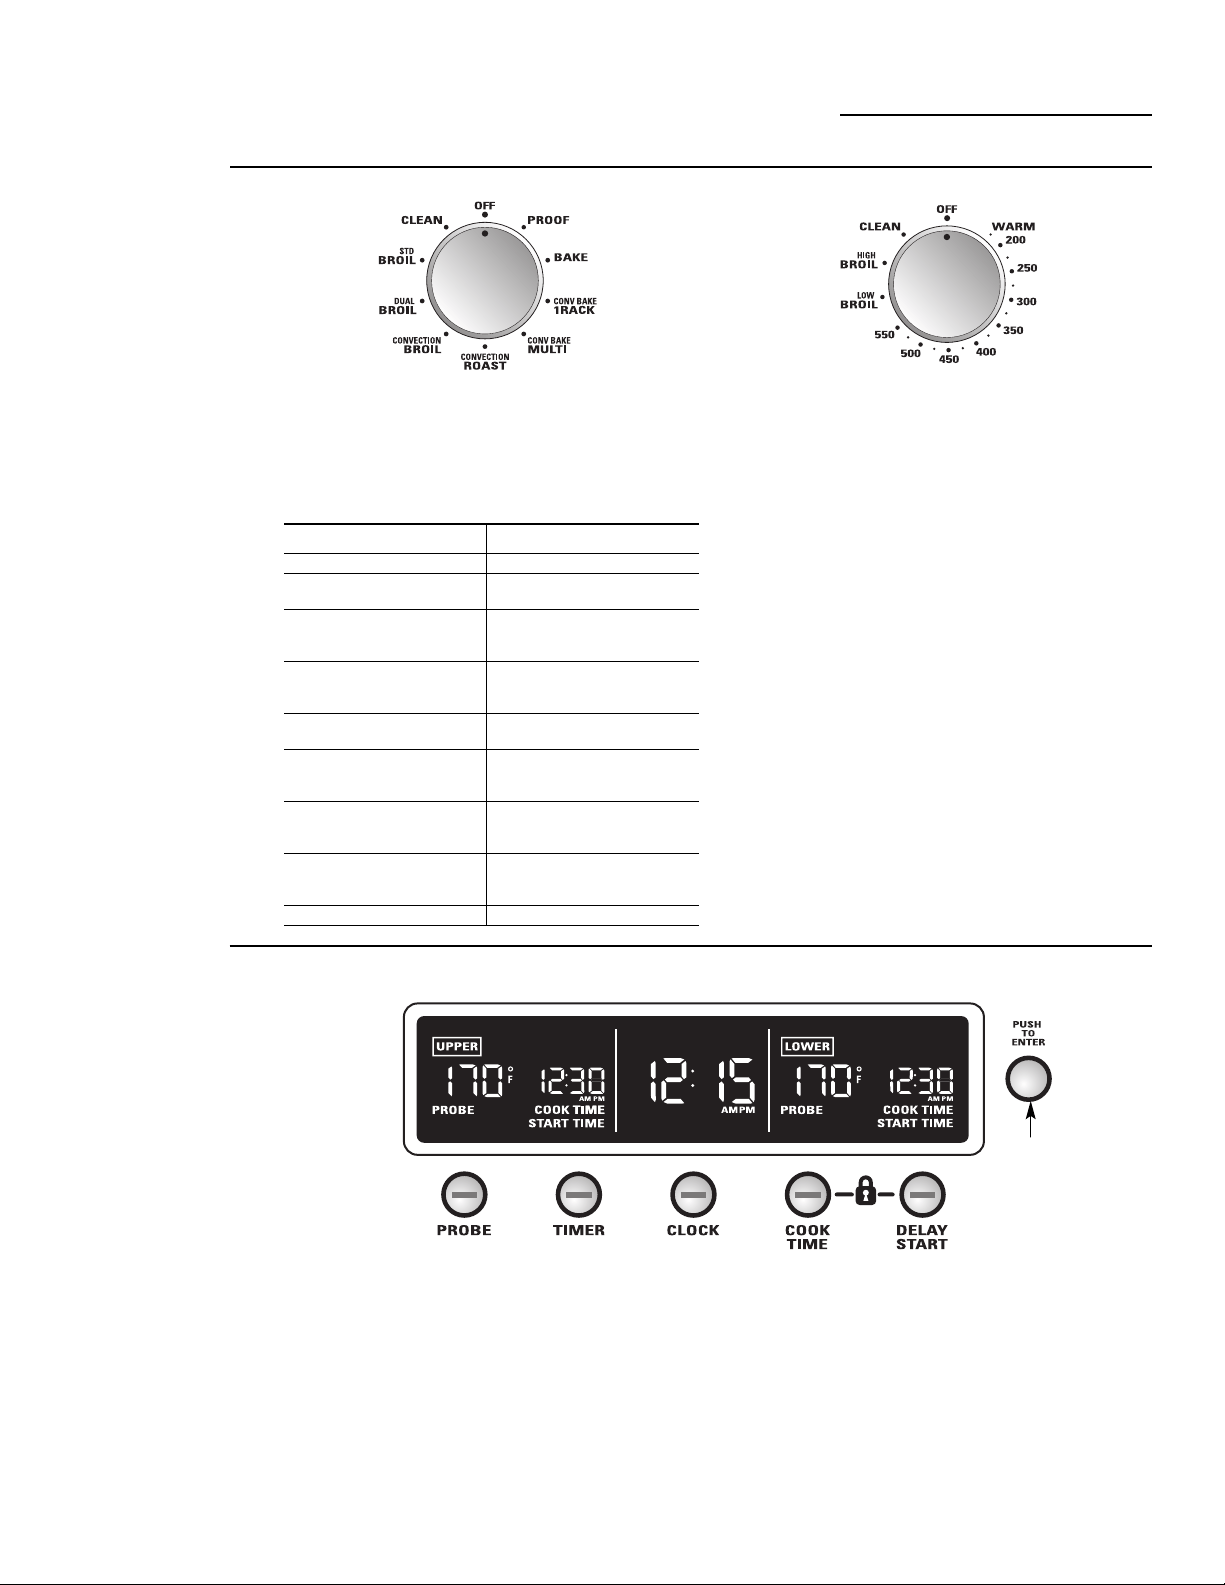
94
Presione los botones botones PROBE (Sonda),
TIMER (Temporizador), CLOCK (Reloj),
COOK TIME (Tiempo de cocción) o DELAY
START (Inicio tardío) y configúrelos girando y
presionado la perilla pequeña. Consulte cada
sección respectiva para obtener detalles.
La perilla pequeña seleccionará en incrementos
de 1, 5 o 10, según la velocidad a la que se
la gire. Gírela en el sentido de las agujas del
reloj para aumentar las temperaturas y el
tiempo configurados para la sonda o en sentido
contrario a las agujas del reloj para reducirlos.
Presione para configurar.
Consulte la sección Bloqueo del control
para saber cómo bloquear y desbloquear
los controles.
Introducción
a la configuración
de la temperatura
de la sonda y los
controles del tiempo
Información general de los controles
Horno de pared
Para todos los modos excepto para Fermentar,
el horno no funcionará a menos que tanto
la perilla de modo del horno como la de
temperatura estén configuradas. Ver tabla.
Introducción
a los controles
del horno
Para cancelar una función, gire la perilla
de modo o la de temperatura a la posición
OFF (Apagado).
Para cancelar PROOF (Fermentación),
gire la perilla de modo a la posición OFF
(Apagado).
Perilla pequeña
Gire para seleccionar
Presione para aceptar
Se muestra la pantalla de un horno doble
Perilla de modo Perilla de temperatura
PROOF (Fermentar) OFF (Apagado)
BAKE (Hornear) WARM to 550°F
(Calentar hasta 550 °F)
CONV BAKE/1 RACK WARM to 550°F
(Hornear por convección (Calentar hasta 550 °F)
en 1 parrilla)
CONV BAKE/MULTI WARM to 550°F
(Hornear por convección (Calentar hasta 550 °F)
en varias parrillas)
CONVECTION/ROAST WARM to 550°F
(Asar por convección) (Calentar hasta 550 °F)
CONVECTION/BROIL HIGH or LOW BROIL
(Asar a la parrilla (Asar a la parrilla a
por convección) temperatura alta o baja)
DUAL BROIL HIGH or LOW BROIL
(Asar a la parrilla en (Asar a la parrilla a
dos posiciones) temperatura alta o baja)
STD BROIL HIGH or LOW BROIL
(Asar a la parrilla (Asar a la parrilla a
estándar) temperatura alta o baja)
CLEAN (Limpiar) CLEAN (Limpiar)
Perilla de modo del horno Perilla de temperatura

La mayoría de las recetas para hornear se han desarrollado
usando productos de alto contenido en grasa como
mantequilla o margarina (80% de grasa). Si disminuye
la grasa, es posible que la receta no tenga los mismos
resultados que con un producto de mayor contenido
de grasa.
Las recetas pueden fallar si las tortas, pasteles, galletas o dulces
se preparan con productos bajos en grasa. Mientras menos sea
el contenido de grasa de un producto tipo mantequilla, más se
notarán estas diferencias.
Los estándares federales exigen que los productos
marcados como margarinas, contengan por lo menos
un 80% de grasa por peso. Por otra parte, los productos tipo
mantequilla bajos en grasa contienen menos grasa y más agua.
El alto contenido de humedad de estos productos afecta
la textura y el sabor de los alimentos horneados.
Para mejores resultados con sus viejas recetas favoritas,
use margarina, mantequilla u otros productos que contengan
por lo menos un 70% de aceite vegetal.
95
Consejos para el horneado
Horno de pared
Ubicación de
la cacerola
Para una cocción uniforme y un dorado adecuado,
debe haber suficiente espacio para la circulación de aire
en el horno. Los resultados del horneado serán mejores si
las placas para hornear se centran lo mejor posible en lugar
de colocarse en la parte delantera o trasera del horno.
Las placas no deben tocarse ni tocar las paredes del horno.
Deje un espacio de 1 a 1
1
⁄2″ entre las placas, así como en
la parte trasera del horno, la puerta y los laterales.
Si necesita usar dos parrillas, use las posiciones A y C, B y D o
A y D, y alterne las placas de manera que no quede una sobre
la otra.
Precalentamiento
Papel de
aluminio
Nunca cubra por completo una parrilla con papel aluminio.
Esto obstruirá la circulación del calor y obtendrá un asado
deficiente. Puede utilizarse una pequeña hoja de papel
aluminio para atrapar derrames colocándola en uno de las
parrillas inferiores varias pulgadas por debajo del alimento.
NOTA: para el horneado general, sólo se utilizarán una o dos
parrillas. Se utilizarán tres parrillas sólo para el horneado con
varias parrillas. Retire la tercera parrilla del horno cuando no
la utilice.
S
E
L
F
C
L
E
A
N
5
0
0
4
5
0
4
0
0
O
F
F
O
°
W
A
R
M
3
5
0
300
2
5
0
2
0
0
B
R
O
I
L
B
A
K
E
P
R
O
O
F
C
O
N
V
.
B
A
K
E
C
O
N
V
.
R
O
A
S
T
C
O
N
V
.
B
R
O
I
L
Flujo de aire
del horno
Durante todos los modos del horno funciona un ventilador
de refrigeración interno. El aire caliente del interior del horno
será despedido a través de ventilaciones ubicadas entre la
puerta y el panel de control.
No permita que este flujo de aire se obstruya colocando toallas
de cocina en el frente del horno en aparatos de bajo mesada.
Placas/
planchas
para hornear
Use la placa para hornear adecuada. El tipo de acabado
de la placa determina lo mucho o poco que se dorarán los
alimentos.
• Las placas oscuras, ásperas u opacas absorben el calor,
resultando en una costra más dorada y crujiente. Use este
tipo para pasteles.
• Para obtener un dorado más suave y delicado, utilice
las placas brillosas y lisas, ya que éstas reflejan el calor.
Las tortas y las galletitas requieren este tipo de placas
o planchas.
• Las fuentes para hornear de vidrio también absorben
el calor. Cuando hornee en fuentes de vidrio,
la temperatura no necesita reducirse a menos de 25 °F.
¡El tipo de
margarina
afectará el
desempeño del
horneado!
Papel de aluminio para
juntar los excedentes
C
D
B
A
E
Deje que el horno se caliente antes de colocar los alimentos.
El calentamiento previo del horno es necesario para obtener
buenos resultados al hornear tortas, galletitas, masas y panes.
Para precalentar, configure el horno a la temperatura correcta.
Se encenderá la luz PREHEAT (Precalentamiento) y aparecerá 100 °F
en la pantalla. (La pantalla de la temperatura comenzará a cambiar
una vez que la temperatura del horno alcance los 100 °F).
El ventilador de convección también se encenderá durante
el precalentamiento. El control sonará cuando el horno esté
precalentado, lo cual tomará aproximadamente de 10 a 15 minutos.
La luz PREHEAT (Precalentamiento) se apagará y la pantalla
mostrará la temperatura configurada.
Una vez que se apague la luz PREHEAT (Precalentamiento),
deberá colocar los alimentos en el horno.

96
Antes de comenzar
Horno de pared
Para evitar posibles quemaduras, coloque
las parrillas en la posición correcta antes de
encender el horno.
La posición correcta de la parrilla depende
del tipo de alimentos y del dorado deseado.
Las parrillas tienen un marco que encaja
en los soportes de ambos lados de la parrilla.
Una vez que el marco esté ubicado en el lugar
correcto, siempre tire de la parrilla hacia fuera,
por su riel superior frontal y hasta su posición
de extensión completa, cuando coloque o
retire utensilios de cocina.
Para retirar una parrilla:
1. Asegúrese que la parrilla esté extendida
completamente dentro del horno.
2. Tome la parrilla por ambos rieles, el frontal
superior y el frontal inferior, y levante en
forma derecha para destrabar las trabas
frontales de la parrilla de los respectivos
soportes.
3. Sostenga la parilla firmemente sobre ambos
rieles, superior e inferior, tire de ella hacia
adelante y retírela del horno.
Para volver a colocar una parrilla:
1. Coloque las trabas posteriores de
la parrilla por encima y sobre los soportes de
la parrilla (la parrilla tiene cinco posiciones,
incluida la posición superior).
2. Deslice la parrilla hasta el fondo, es decir,
hasta que las trabas posteriores de la parrilla
estén bien enganchadas en los soportes
posteriores, y empuje las trabas frontales
de la parrilla contra los soportes frontales.
Parrillas
para horno
de
extensión
completa
El horno
posee 5
posiciones de
parrilla
Marco de
la parrilla
Parrilla extendida
hasta su posición
de extensión
completa
Riel superior
frontal de
la parrilla
Deslice la parrilla hasta
el fondo y empuje para trabar
las trabas frontales en
los soportes frontales
de la parrilla.
Levante para
destrabar las
trabas frontales
de la parrilla
del soporte
correspondiente
Riel
frontal
superior
Riel
frontal
inferior
Riel frontal
superior
Riel frontal
inferior
Traba frontal
de la parrilla
Traba frontal
de la parrilla
Riel inferior
frontal
Riel superior
frontal
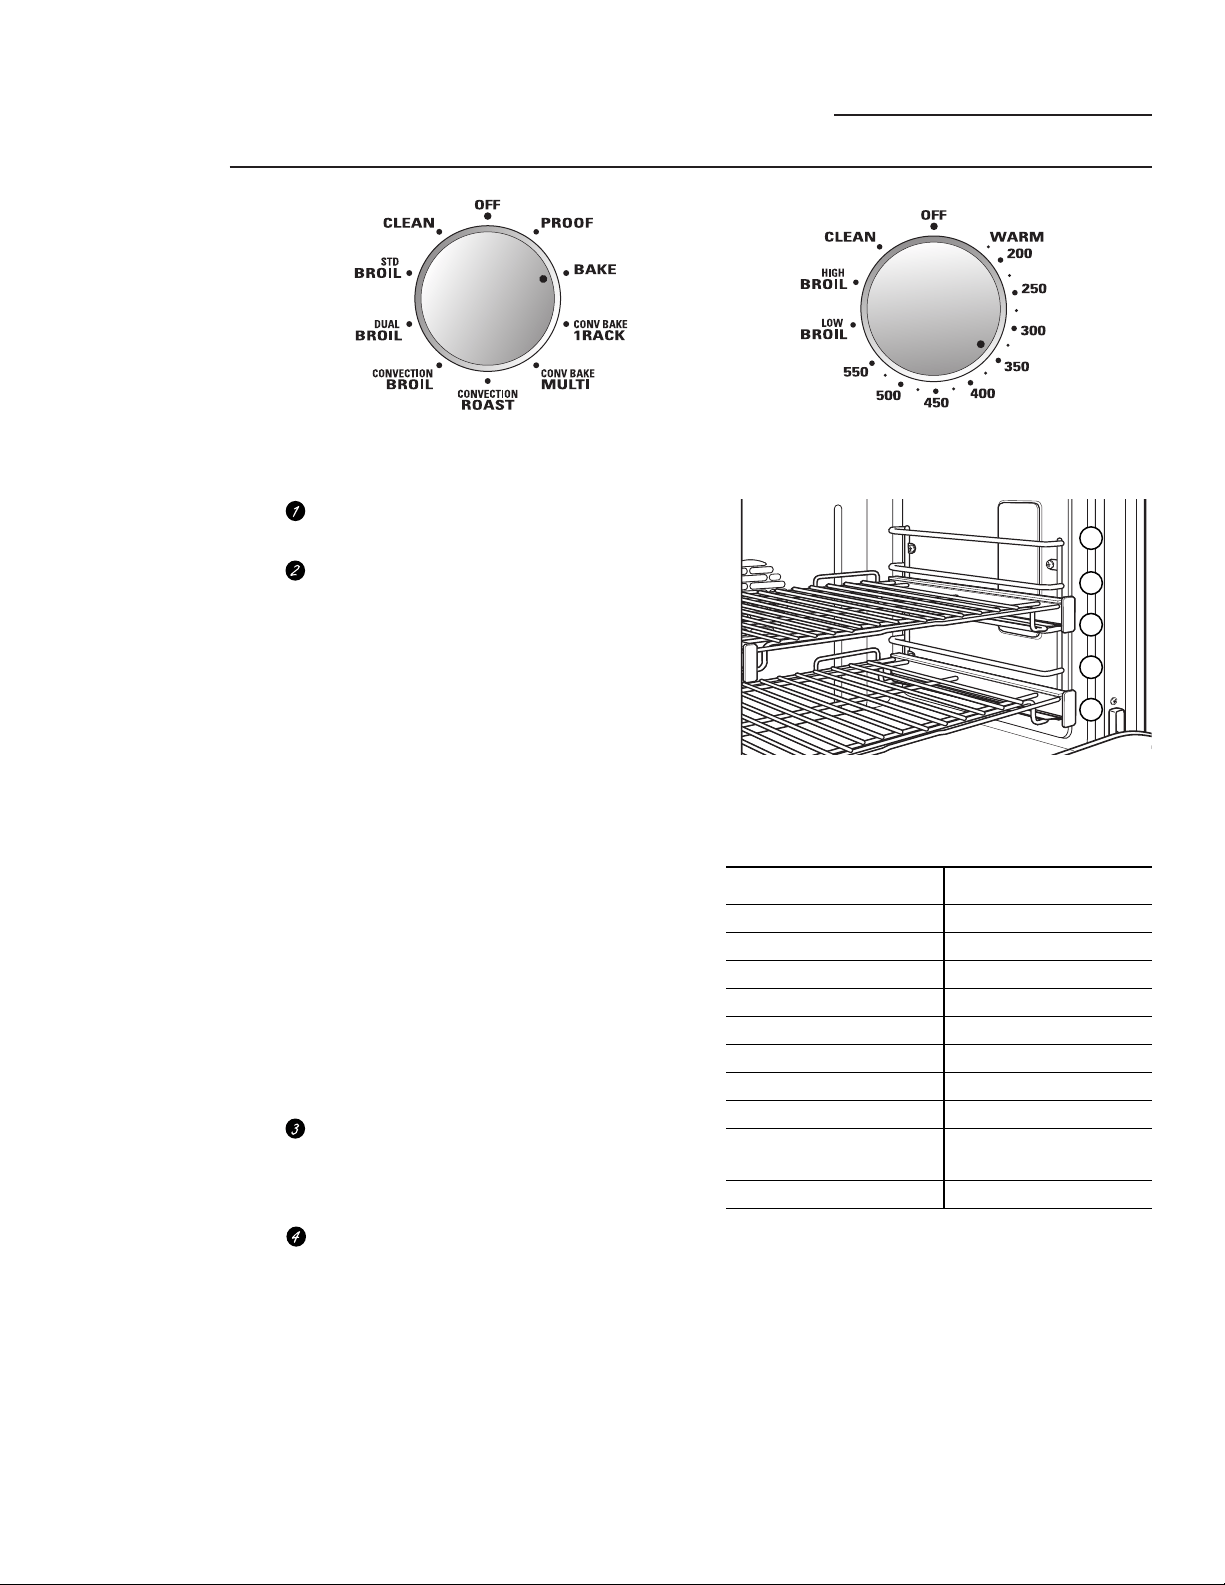
Hornear
Horno de pared
Gire la perilla de modo del horno a BAKE
(Hornear).
Usando la perilla de temperatura, configure
la temperatura deseada, en incrementos de
25 °F, de 200 °F a 550 °F.
El horno y las luces interiores del
mismo se encenderán de inmediato y
permanecerán encendidas hasta que
se apague el horno.
El ventilador de convección se encenderá
(luego de un breve intervalo), la luz
PREHEAT (Precalentamiento) se encenderá
y aparecerá 100 °F en la pantalla.
(La pantalla de la temperatura comenzará
a cambiar una vez que la temperatura del
horno alcance los 100 °F). El control sonará
cuando el horno esté precalentado; esto
tomará aproximadamente de 10 a 15
minutos. Se apagará la luz PREHEAT
(Precalentamiento) y la pantalla mostrará
la temperatura configurada.
Cuando la luz PREHEAT
(Precalentamiento) se apague, coloque
los alimentos en el horno.
Verifique en la receta el grado de
consistencia de los alimentos en el tiempo
mínimo. Cocine durante más tiempo
si es necesario.
Gire la perilla de modo y la perilla de
temperatura a la posición OFF (Apagado)
cuando haya finalizado el horneado.
NOTA: se encenderá un ventilador de
refrigeración para enfriar las partes internas.
Esto es normal, y el ventilador puede continuar
funcionando incluso luego de que se apague
el horno.
Cómo
configurar
el horno
para
hornear
Perilla de modo del horno Perilla de temperatura
C
D
B
A
E
El horno tiene 5 posiciones de parrilla. Consulte la sección Parrillas
de horno de extensión completa para saber cómo usar, retirar y volver
a colocar las parrillas.
Tipo de alimentos Posición de la parrilla
Pastel de ángel A
Bizcochos o molletes B o C
Galletitas o magdalenas B o C
Brownies B o C
Pasteles de capas B o C
Pastel Bundt o panqués A o B
Pasteles o base de pasteles B o C
Pastel simple B o C
Pasteles helados B o C (en plancha para
hornear)
Guisos B o C
97

98
Papel de
aluminio
Puede usar papel de aluminio para cubrir
la asadera y la rejilla. Sin embargo, deberá
moldear firmemente el papel a la rejilla y
hacer cortes con la forma de la rejilla.
Asar a la parrilla
Horno de pared
Introducción
para asar a
la parrilla
Se utilizan diferentes elementos en cada
modo de asar a la parrilla, según se describe
a continuación. Hay 3 modos diferentes
para asar a la parrilla, y cada uno proporciona
una configuración HI (Alto) y un LO (Bajo).
• La configuración HI (Alto) puede utilizarse
para sellar en jugos o proporcionar
un dorado o carbonizado intenso cuando
sea necesario (generalmente se usa una
parrilla más alta).
• La configuración LO (Bajo) puede usarse
cuando los alimentos necesitan un dorado
adecuado y además necesitan estar cocidos en
forma pareja (se usa una parrilla más baja
para alimentos grandes como lomo de cerdo
o London Broil [bife de vacío]).
Dual Broil (Asado a la parrilla de
dos posiciones): se utilizan los elementos
para asar a la parrilla tanto internos como
externos en este modo para asar. Use este
modo para asaderas llenas de alimentos.
Consulte la sección Cómo configurar el horno para
asar a la parrilla.
HI (Alto): asadera llena; hamburguesas,
verduras asadas como pepinos enteros,
berenjenas, choclo, verduras cortadas surtidas,
brochetas y carnes muy finas como costillas
de cerdo ahumado
LO (Bajo): asadera llena; filetes de pescado
Std Broil (Asado a la parrilla estándar):
sólo usa el elemento interno; se usa para
alimentos más pequeños. Consulte la sección
Cómo configurar el horno para asar a la parrilla.
HI (Alto): pequeñas cantidades de alimentos;
(2 a 4) hamburguesas o costillas de cerdo o
bifes de 1/2″–1″
LO (Bajo): pequeñas cantidades de alimentos;
(2 a 4) pechugas de pollo o filetes de pescado
Convection Broil (Asar a la parrilla por
convección): usa los elementos para asar
a la parrilla tanto internos como externos
y el ventilador de convección. Consulte
la sección Cómo configurar el horno para asar
a la parrilla.
HI (Alto): bifes anchos de 1
1
⁄2″–2,″ London
Broil (bife de vacío) y pechugas de pollo (sella
en jugos sin dorar de más)
LO (Bajo): lomo de cerdo o roast beef
(proporciona un dorado adecuado además de
una cocción uniforme)
Elemento
externo
para asar
a la
parrilla
Elemento
interno
para asar
a la
parrilla

Si la carne tiene grasa o cartílago en
los bordes, corte tajadas verticales con 2″
de diferencia. Si lo desea, la grasa puede
reducirse, dejando una capa de
aproximadamente 1/8″ de espesor.
Coloque la carne o el pescado en la asadera
y la rejilla. Siempre use la rejilla para que
la grasa caiga dentro de la asadera, de lo
contrario, los jugos pueden calentarse
demasiado y prenderse fuego.
Coloque la parrilla en el horno.
Cierre la puerta. Siempre ase con la puerta
cerrada.
Gire la perilla de modo del horno a
DUAL BROIL (Asar a la parrilla con dos
posicoines) (para grandes cantidades de
alimentos) o a STD BROIL (Asar a
la parrilla estándar) (para pequeñas
cantidades de alimentos).
Gire la perilla de temperatura a LOW
BROIL (Asar a la parrilla a temperatura
baja) o HIGH BROIL (Asar a la parrilla
a temperatura alta). La temperatura
para asar a la parrilla se configurará
automáticamente. Aparecerá LO (Bajo)
o HI (Alto) en la pantalla dependiendo
de la temperatura automática para asar
seleccionada.
El horno y las luces interiores
del mismo se encenderán de inmediato
y permanecerán encendidas hasta que
se apague el horno.
Cuando termine de asar a la parrilla,
gire la perilla de modo y la perilla de
temperatura a la posición OFF (Apagado).
NOTA: se encenderá un ventilador de
refrigeración para enfriar las partes internas.
Esto es normal. Además, es posible que
el ventilador siga funcionando, incluso, luego
de que se apague el horno.
La asadera no necesita ser precalentada
en la mayoría de los casos. Sin embargo,
los alimentos que se cocinan rápido, como
tiras finas de carne, pueden requerir
un período corto de precalentamiento
de 2 a 3 minutos para permitir que
la superficie de los alimentos se dore
en la misma cantidad de tiempo que
los alimentos necesitan para cocinarse
por completo.
Gire los alimentos una sola vez durante el asado
a la parrilla.
NOTA: el asado a la parrilla no funcionará
si la sonda de temperatura está enchufada.
Nunca deje la sonda dentro del horno
durante un ciclo de asado a la parrilla.
99
Asar a la parrilla
Horno de pared
Cómo configurar
el horno para
asar a la
parrilla
Cierre la puerta. Siempre ase a la parrilla con la puerta
cerrada.
Perilla de modo del horno Perilla de temperatura

Ubicación
apropiada de
la sonda
Después de preparar la carne, colocarla sobre
un posafuentes o sobre una parrilla para asados, siga
estas instrucciones para la ubicación apropiada de la
sonda.
• La punta de la sonda debe permanecer en
el centro de la parte más gruesa del bife.
• La sonda debe insertarse por completo dentro
de la carne, hasta la manija, de manera que
pueda leer adecuadamente la temperatura.
No debe tocar el hueso, la grasa o el cartílago.
Para bistecs sin hueso, inserte la sonda dentro de
la parte carnosa del bistec. Para jamón o cordero con
hueso, inserte la sonda dentro del centro del músculo
grande más interno o la articulación.
Inserte la sonda dentro del centro de platos como rollos
de carne o cacerolas. Cuando cocine pescado, inserte
la sonda justo por encima de la agalla en el área más
carnosa, paralelo a la columna vertebral.
Inserte la sonda en la parte más carnosa de la parte
interna del muslo desde abajo y en paralelo a la pierna
de un pavo completo.
100
Utilización de la sonda para asar
Horno de pared
Sonda de
temperatura
Para muchos alimentos, especialmente la carne asada
y las aves, la temperatura interna del alimento es la mejor
prueba para el punto de cocción. La sonda de
temperatura elimina las conjeturas acerca de
los asados al cocinar los alimentos en el punto
de cocción exacto que usted desea.
El uso de sondas distintas a la suministrada con este
producto puede resultar en el daño la sonda.
Utilice las agarraderas de la sonda y el enchufe cuando
la inserte y la remueva de la carne y del enchufe
del horno.
•
Para evitar daños a la sonda, no utilice tenazas para
tirar del cable cuando la remueva.
•
Para evitar rupturas de la sonda, asegúrese de que
los alimentos estén completamente descongelados
antes de insertarla.
•
Para prevenir posibles quemaduras, no desenchufe
la sonda del enchufe hasta que el horno se haya
enfriado.
• Nunca deje la sonda dentro del horno durante un ciclo
de asado a la parrilla o autolimpieza.
•
No almacene la sonda en el horno.
Cable
Sonda
Agarraderas
Enchufe
La sonda de temperatura tiene un detector en forma de pincho en
un extremo y un enchufe en el otro extremo; dicho enchufe va dentro
del enchufe en el horno.
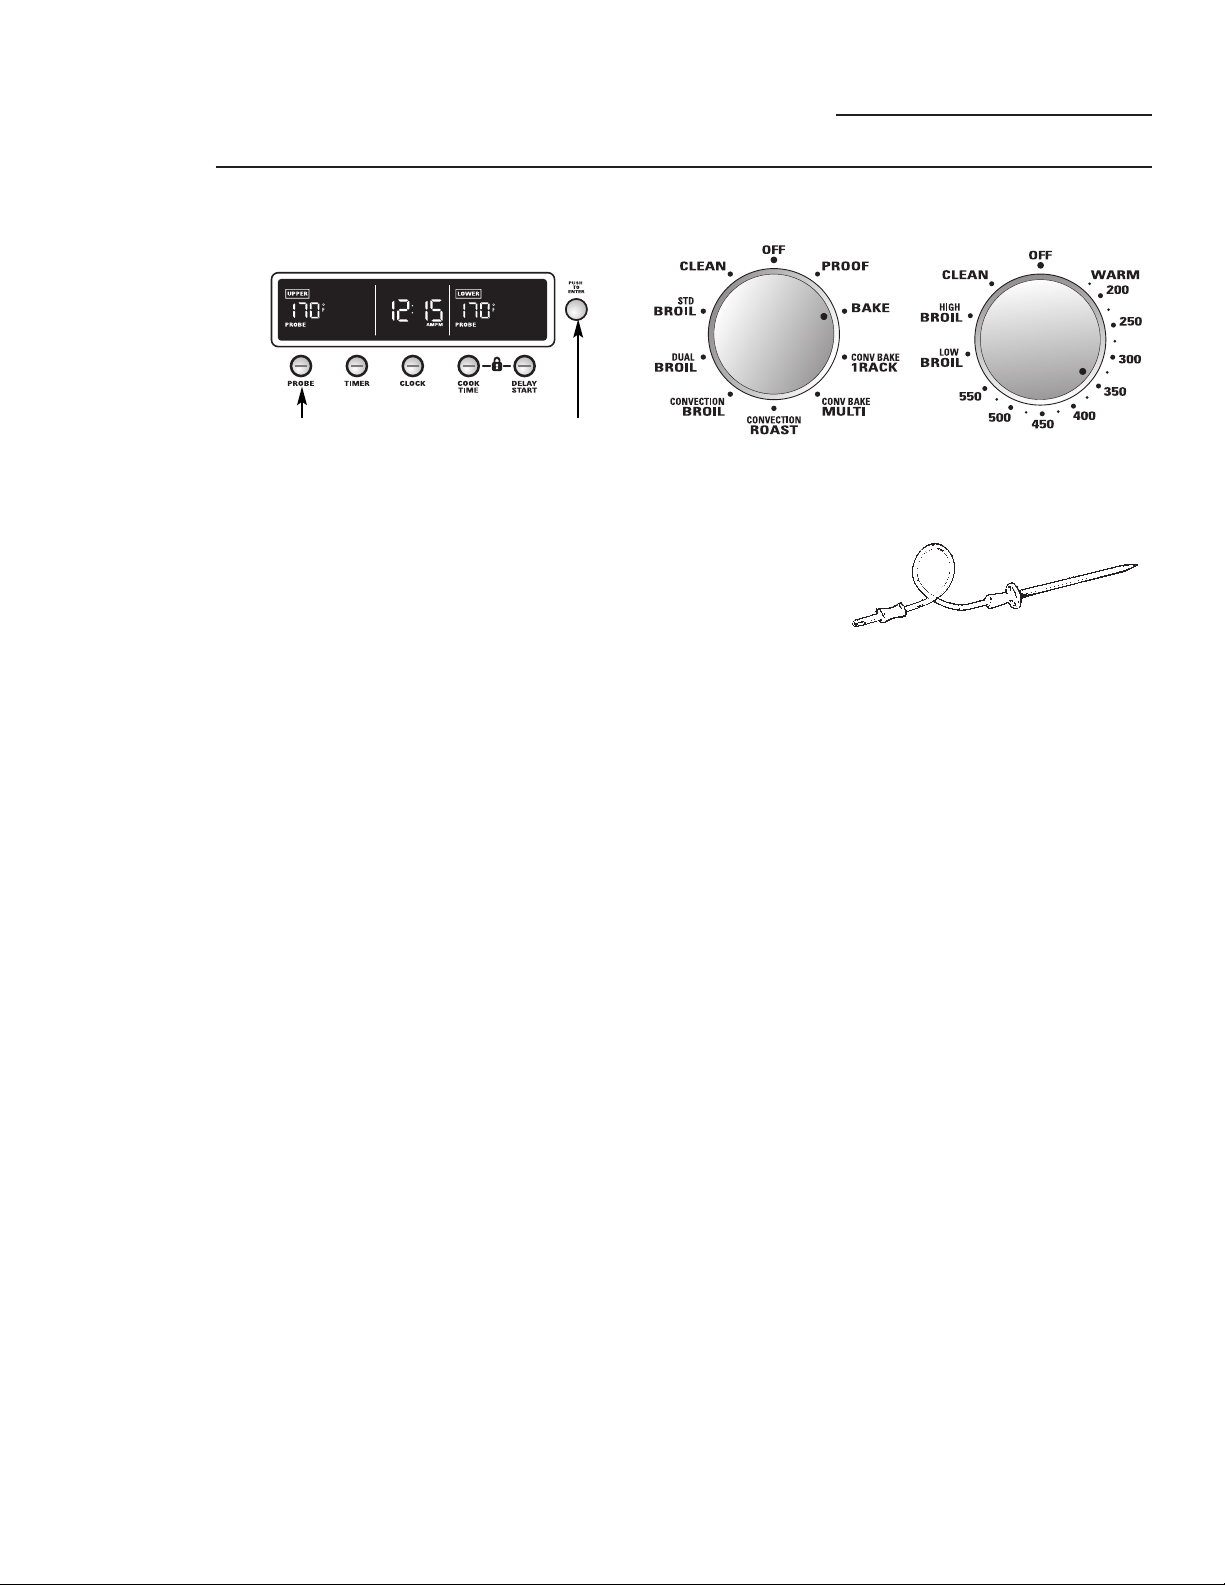
101
Cómo
configurar
el horno
para asar
cuando se
utiliza la
sonda
1
Inserte la sonda dentro de la carne.
2
Conecte la sonda en la toma dentro
del horno. Asegúrese de que quede bien conectada
en la toma. Cierre la puerta del horno.
3 Presione el botón PROBE (Sonda).
NOTA: en modelos de horno de pared doble,
el control del horno configurará automáticamente
el horno que posee la sonda enchufada en el
mismo.
4 Gire la perilla pequeña para seleccionar
y presiónela para ingresar la temperatura
deseada de la carne o los alimentos.
Las temperaturas internas mínimas y
máximas que puede ingresar para
los alimentos son de 100 °F a 200 °F.
“PROBE” (“Sonda”) titilará en la pantalla
si la sonda está insertada dentro del tomacorriente
y usted no ha ingresado una temperatura para
la misma.
5 Gire la perilla de modo del horno a BAKE
(Hornear). Para asar por convección con
la sonda, consulte la sección Cómo configurar
el horno para asar por convección al utilizar
la sonda.
6 Utilice la perilla de temperatura para
configurar la temperatura deseada, en
incrementos de 25 °F, de 200 °F a 550 °F.
El horno y las luces interiores del mismo
se encenderán de inmediato y permanecerán
encendidas hasta que se apague el horno.
El ventilador de convección se encenderá
(luego de un breve intervalo), la luz PROBE
(Sonda) se encenderá y aparecerá 100 °F en
la pantalla. (La pantalla de la temperatura
comenzará a cambiar una vez que
la temperatura interna de la carne alcance
los 100 °F).
Utilización de la sonda para asar
Horno de pared
Perilla de temperatura
Perilla pequeña
Gire para
seleccionar
Presione para
aceptar
Presione para
seleccionar
Se muestra la pantalla de un horno doble.
7 Cuando la temperatura interna de la carne
alcance el número que usted ha configurado,
la sonda y el horno se apagarán, aparecerá
END (Fin) en la pantalla y sonará el control
del horno. (PROBE [Sonda] permanecerá
encendido junto con la temperatura
de la sonda). Para detener el sonido de
recordatorio, gire la perilla de modo y
la perilla de temperatura a la posición OFF
(Apgado) o presione la perilla pequeña.
Use agarraderas para retirar la sonda
de los alimentos. No utilice tenazas para
extraerla: las tenazas pueden dañarla.
“PROBE” (“Sonda”) titilará en la pantalla hasta
que se retire la sonda del receptáculo del horno.
Para cambiar la temperatura interna
configurada de los alimentos o la carne
(sonda) durante el ciclo Asar, presione el botón
PROBE (Sonda), gire la perilla pequeña para
seleccionar la temperatura nueva y presione
para ingresarla.
• Usted puede utilizar el temporizador pero no
puede utilizar las operaciones cronometradas
del horno.
Perilla de modo del horno
PRECAUCIÓN: para prevenir posibles quemaduras, no
desenchufe la sonda del enchufe del horno hasta que el horno
se haya enfriado. No almacene la sonda en el centro de cocina.

Uso del horno de convección
Horno de pared
Ventilador
de
convección
Utensilios de
cocina para
la cocción por
convección
Cómo
adaptar
recetas
Usted puede utilizar sus recetas favoritas en el horno por
convección.
Cuando hornee por convección, reduzca la temperatura
de horneado en 25 °F. No se necesitan ajustes de
temperatura durante el asado por convección.
Utilice los tamaños de cacerola recomendados.
Algunas instrucciones del paquete para cacerolas
congeladas o platos principales han sido desarrolladas
utilizando hornos comerciales por convección. Para
mejores resultados en este horno, precaliente el horno
y utilice la temperatura indicada en el paquete.
Horneado
por
convección
en 1
parrilla
Cuando hornee por convección con 1 sola parilla, use
CONV BAKE 1 RACK y para obtener mejores resultados
coloque la parrilla en la posición B o C en el centro del
horno. Los tiempos de cocción pueden disminuir, así
que debe revisar los alimentos un poco antes de las
instrucciones del paquete para asegurarse de que
no se cocinen de más.
Ideal para cocinar guisos grandes y lasaña con buenos
resultados.
Horneado
por
convección
en varias
parrillas
Ya que se circula aire caliente uniformemente a
lo largo del horno, los alimentos pueden hornearse
con excelentes resultados utilizando múltiples parrillas.
El tiempo necesario para el horneado con varias parrillas
puede aumentar levemente para algunos alimentos,
pero el tiempo total disminuye de dos a tres veces,
ya que se cocinan muchos alimentos a la vez.
Galletas, muffins, bizcochos y otros panecillos rápidos
dan buenos resultados con el horneado de múltiples
parrillas.
Antes de utilizar su horno por convección, verifique
si sus utensilios de cocina permiten que el aire circule
dentro del horno. Si está horneando con varias bandejas,
deje espacio entre ellas. También, asegúrese de que las
bandejas no entren en contacto unas con otras ni con
las paredes del horno.
Papel y plástico
En los hornos por convección pueden utilizarse
los recipientes de papel y plástico resistentes al calor
recomendados para el uso en hornos regulares. También
pueden utilizarse los utensilios de cocina plásticos
resistentes al calor hasta temperaturas de 400 °F.
NOTA: no permita que ningún papel o plástico entre en
contacto con el elemento superior para asar a la parrilla.
Metal y vidrio
Cualquier tipo de utensilio de cocina funcionará
en su horno por convección. Sin embargo, las bandejas
metálicas se calientan más rápido y están recomendadas
para el horneado por convección.
Las bandejas oscurecidas o con acabado mate hornearán
más rápido que las bandejas brillantes.
Las bandejas de vidrio o cerámica cocinarán más
lentamente.
Cuando hornee galletas, obtendrá mejores resultados
si usa una plancha plana para galletas en vez de
una placa de lados bajos.
Para recetas como el pollo al horno, utilice
una bandeja con lados bajos. El aire caliente no puede
circular bien alrededor de los alimentos en una bandeja
con lados altos.
En una horno a convección, un ventilador hace circular
aire caliente sobre, debajo y alrededor de los alimentos.
Este aire caliente en circulación se distribuye de manera
uniforme por la cavidad del horno. Como resultado, los
alimentos se cocinan y se doran de manera uniforme; a
menudo, en menor tiempo con calor de convección.
NOTA: El ventilador de convección se encenderá y se apagará
en ciclos durante la cocción para distribuir mejor el aire caliente
en el horno.
El ventilador de convección del horno se apaga cuando se abre
la puerta del horno. NO deje la puerta abierta durante períodos
largos mientras utiliza la cocción por convección o podrá
reducir la vida útil del elemento calefactor por convección.
102
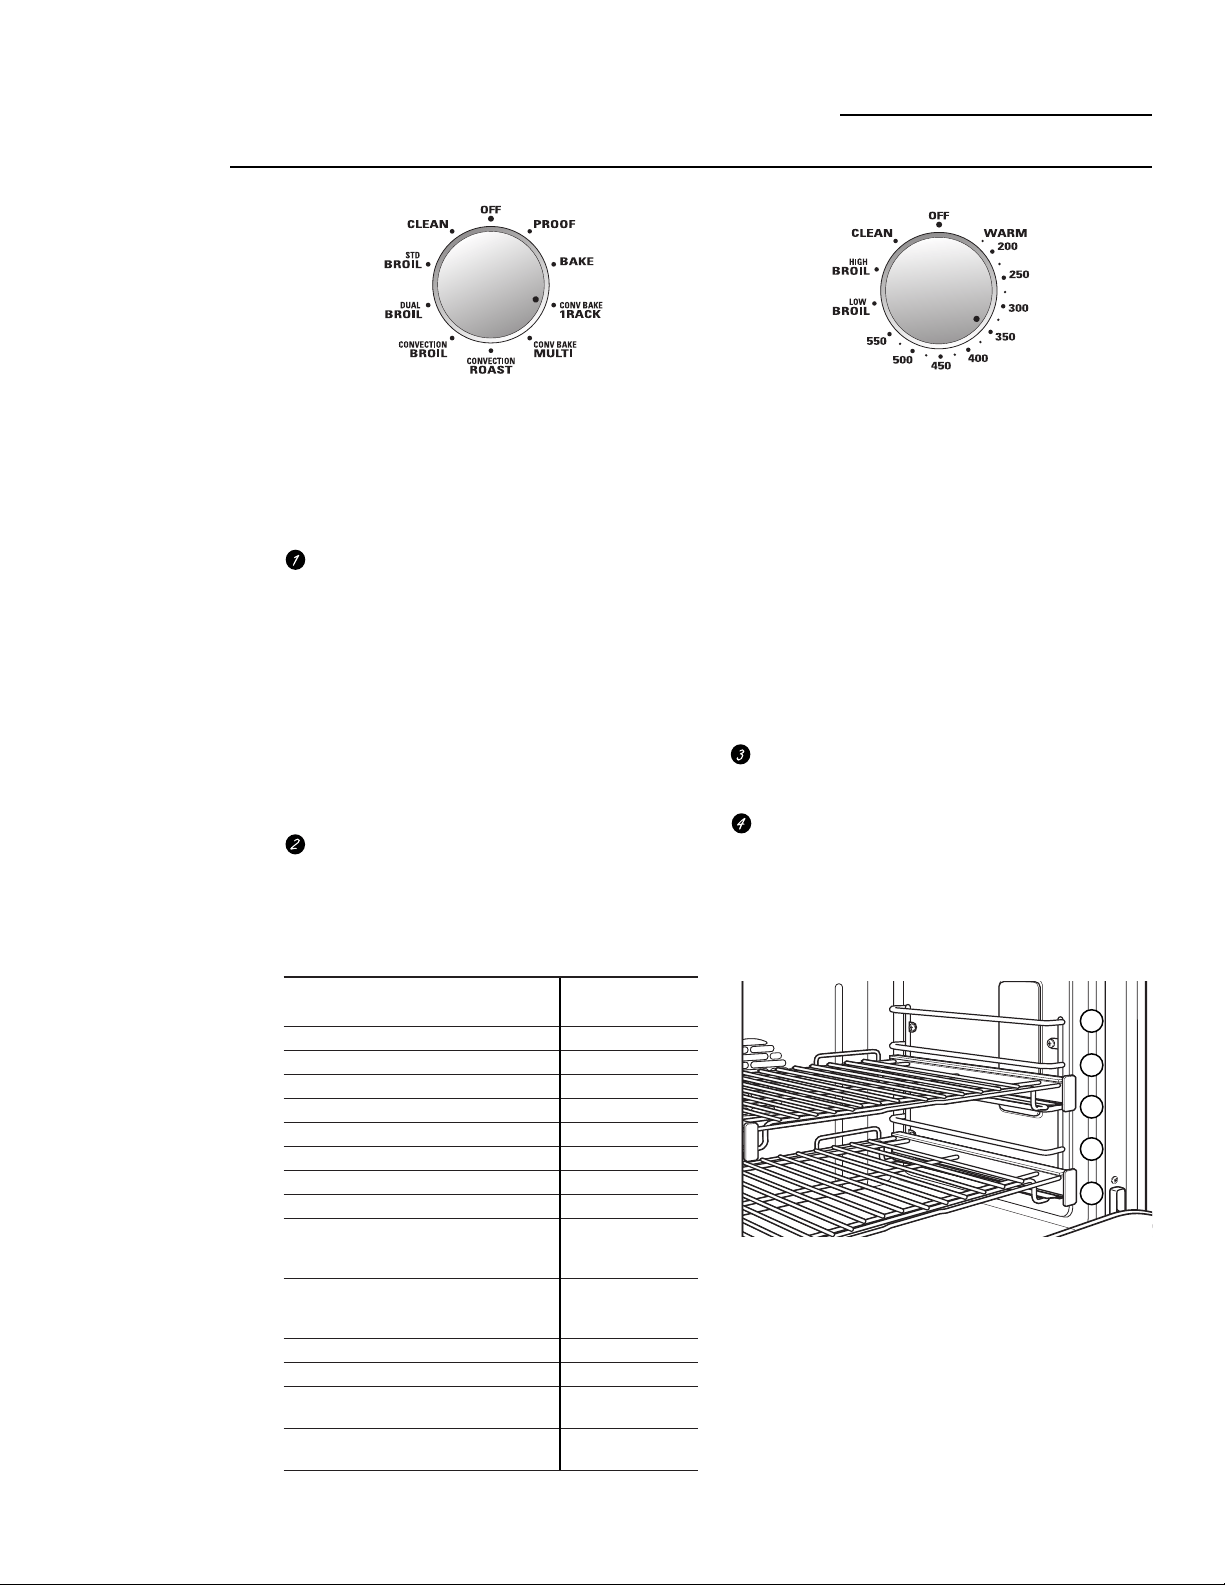
103
Tipo de alimento Posición de la
parrilla
Bizcochos (1 parrilla) B o C
Bizcochos (2 parrillas) A & C o B & D
Molletes y magdalenas (1 parrilla) B o C
Molletes y magdalenas (2 parrillas) A & C o B & D
Galletas (1 parrilla) B o C
Galletas (3 parrillas) A, C & E
Pasteles de 2 capas (1 parrilla) B o C
Pasteles de 4 capas (2 parrillas) A & C o B & D
1 Pastel helado (1 parrilla) B o C
(en plancha para
hornear)
2 Pasteles helados (2 parrillas) A & C o B & D
(en plancha para
hornear)
Guisos (1 parrilla) B o C
Pizza congelada de 12″ (1 parrilla) B o C
2 pizzas congeladas de 12″ A & C o B & D
(2 parrillas)
Asado (cortes grandes de carne, A, B o C
pavos, etc.)
Cómo
configurar
el horno
para
hornear por
convección
Perilla de modo del horno Perilla de temperatura
Hornear por convección
Horno de pared
El horno tiene 5 posiciones de parrilla. Consulte la sección Parrillas de
horno de extensión completa para saber cómo usar, retirar y cambiar
las parrillas.
C
D
B
A
E
NOTA: estas posiciones de parrilla son sugerencias; use las
parrillas que den el mejor resultado. Las parrillas A y D son
otra sugerencia.
El Horneado por convección es ideal para alimentos
horneados uniformemente dorados cocinados en una o
varias parrillas.
Cuando se configura el Horneado por convección,
el elemento para hornear trasero y el ventilador
funcionan siempre que el horno esté calentando.
Gire la perilla de modo a CONV BAKE/ 1 RACK
(Hornear por convección en 1 parrilla) para
hornear por convección en 1 parrilla. Este modo
se usa para cocinar alimentos sólo en 1 parrilla
en el modo hornear por convección.
Gire la perilla modo del horno a CONV
BAKE/MULTI (Hornear por convección con varias
parrillas) para hornear por convección con varias
parrillas. Este modo se utiliza para cocinar alimentos
en más de una parrilla (es decir, 2, 3 o más parrillas)
al mismo tiempo en modo Hornear por convección.
Consulte la sección Hornear por convección con varias
parrillas para obtener más información.
Utilice la perilla de temperatura para configurar
la temperatura deseada, en incrementos de 25 °F,
de 200 °F a 550 °F.
El horno y las luces interiores del mismo se
encenderán de inmediato y permanecerán
encendidas hasta que se apague el horno.
El ventilador por convección se encenderá
(luego de un breve intervalo), la luz PREHEAT
(Precalentamiento) se encenderá y aparecerá 100 °F
en la pantalla. (La pantalla de la temperatura
comenzará a cambiar una vez que la temperatura
del horno alcance los 100 °F). El control sonará
cuando el horno esté precalentado; esto tomará
aproximadamente de 10 a 15 minutos. La luz
PREHEAT (Precalentamiento) se apagará y la
pantalla mostrará la temperatura configurada.
Cuando la luz PREHEAT (Precalentamiento)
se apague, coloque los alimentos en el horno.
Verifique el grado de consistencia de los alimentos
al cumplirse el tiempo mínimo especificado en
la receta. Cocine durante más tiempo si es necesario.
Gire la perilla de modo y la perilla de temperatura a
la posición OFF (Apagado) cuando haya finalizado
la cocción por convección.
NOTA: se encenderá un ventilador de refrigeración
para enfriar las partes internas. Esto es normal,
y el ventilador puede continuar funcionando
incluso luego de que se apague el horno.
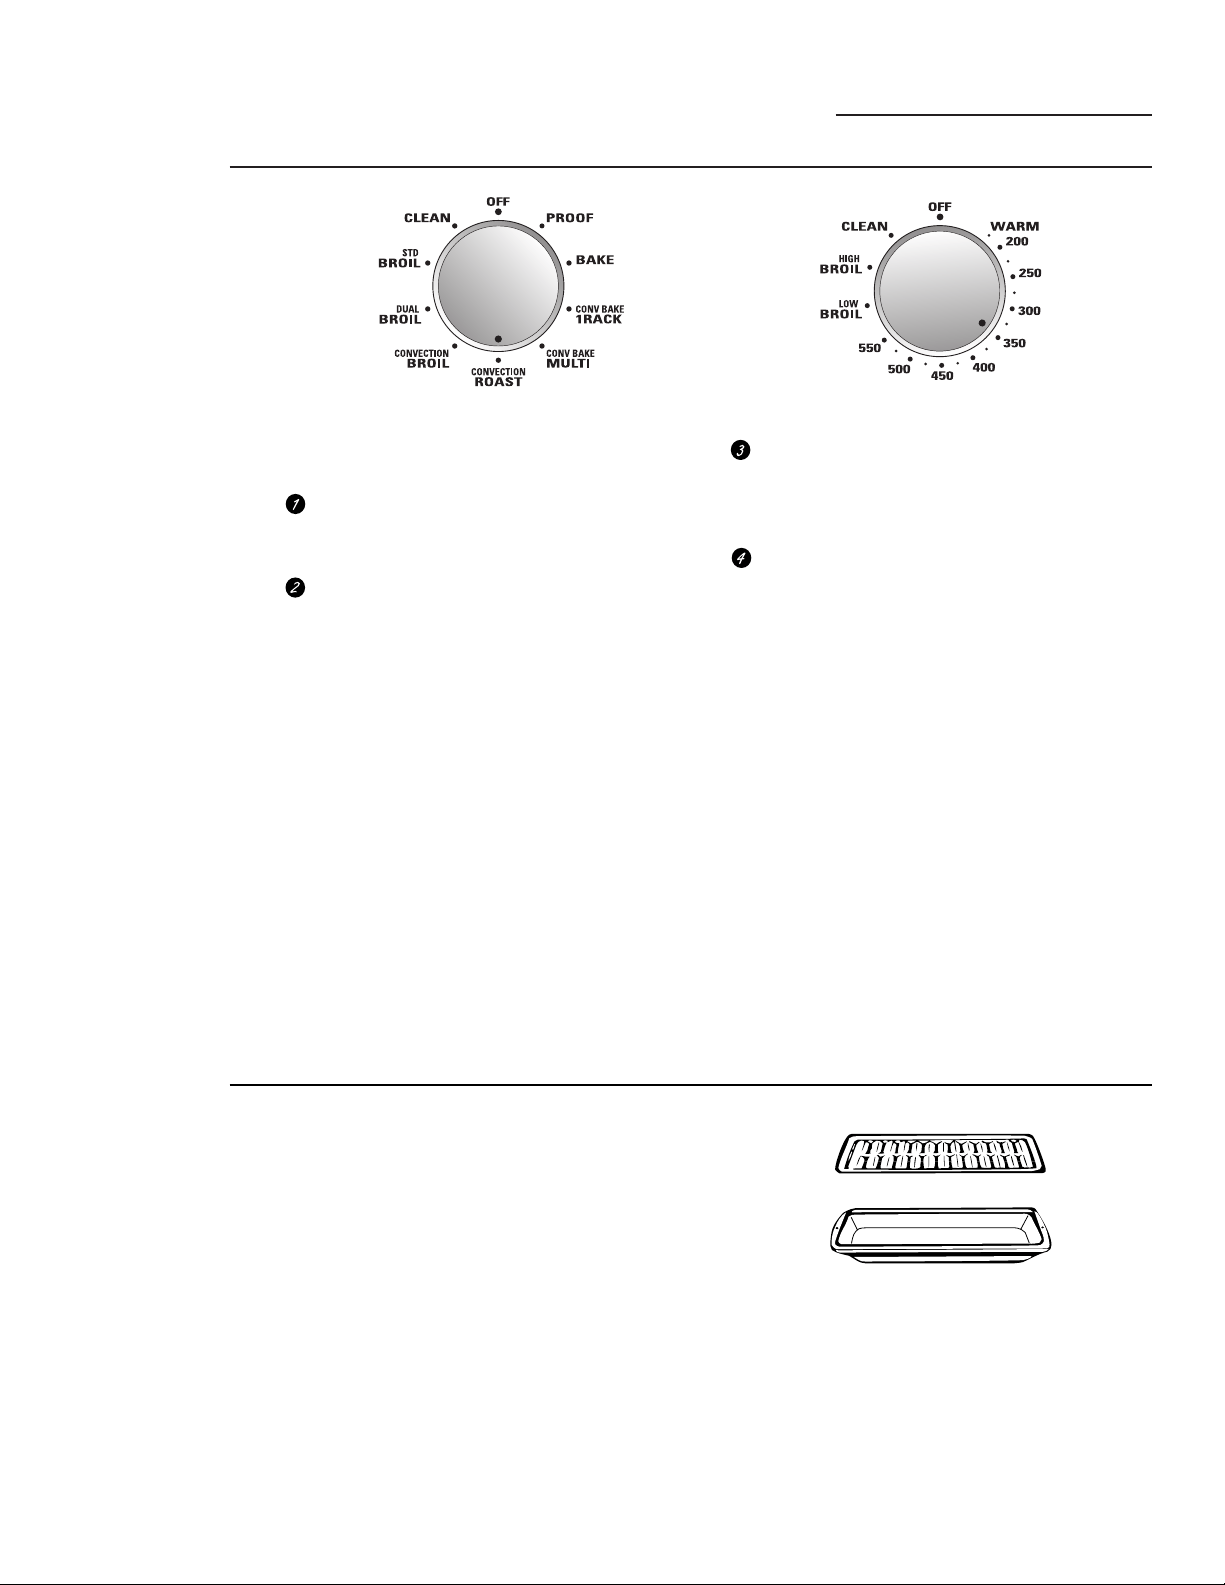
104
Asado por convección
Horno de pared
El Asado por convección es bueno para asar
grandes cortes de carne tiernos, sin cubrir.
Gire la perilla de modo del horno a
CONVECTION ROAST (Asar por
convección).
Utilice la perilla de temperatura para
configurar la temperatura deseada, en
incrementos de 25 °F, de 200 °F a 550 °F.
El horno y sus luces interiores
se encenderán de inmediato y
permanecerán encendidas hasta
que se apague el horno.
El ventilador de convección se encenderá
(luego de un breve intervalo), la luz
PREHEAT (Precalentamiento) se encenderá
y aparecerá 100 °F en la pantalla.
(La pantalla de la temperatura comenzará
a cambiar una vez que la temperatura del
horno alcance los 100 °F.) El control sonará
cuando el horno esté precalentado; esto
tomará aproximadamente de 10 a 15
minutos. La luz de PREHEAT
(Precalentamiento) se apagará y la pantalla
mostrará la temperatura configurada.
Verifique el grado de consistencia de
los alimentos al cumplirse el tiempo mínimo
especificado en la receta. Cocine durante más
tiempo si es necesario.
Gire la perilla de modo y la perilla de
temperatura a la posición OFF (Apagado)
cuando haya finalizado la cocción por
convección.
NOTA: se encenderá un ventilador de
refrigeración para enfriar las partes internas.
Esto es normal, y el ventilador puede continuar
funcionando incluso luego de que se apague
el horno.
Cómo
configurar
el horno
para asar
por convección
Perilla de modo del horno Perilla de temperatura
Consejos
para el
asado por
convección
Utilizando la asadera y la rejilla provistas,
circulará aire caliente sobre, debajo y alrededor
de los alimentos que se están asando. El aire
caliente sella rápidamente en jugos para lograr
un interior más húmedo y tierno mientras forma
una capa dorada en el exterior.
Cuando use asar por convección, es importante
que use la asadera y la rejilla. La asadera se usa
para juntar los derrames de grasa y la rejilla se
usa para evitar salpicaduras de grasa y permite
que el aire caliente circule por debajo de la carne
y aumente el dorado en la parte de abajo de
la carne o el ave.
• Coloque la rejilla sobre la asadera.
Rejilla
Asadera

Cómo
configurar
el horno
para asar
por convección
con la sonda
Consulte la sección Consejos para asar por
convección.
1 Coloque la parrilla en la posición deseada
e inserte la sonda dentro de la carne.
2
Conecte la sonda en la toma dentro del horno.
Asegúrese de que quede bien conectada en la toma.
Cierre la puerta del horno.
3 Presione el botón PROBE (Sonda).
NOTA: en modelos de horno de pared doble,
el control del horno configurará automáticamente
el horno que posee la sonda enchufada en
el mismo.
4 Gire la perilla pequeña para seleccionar
y presiónela para ingresar la temperatura
deseada de la carne o los alimentos.
Las temperaturas internas mínimas y
máximas que puede ingresar para
los alimentos son de 100 °F a 200 °F.
“PROBE” (“Sonda”) titilará en la pantalla si
la sonda está insertada dentro del tomacorriente
y usted no ha ingresado una temperatura para
la misma.
5 Gire la perilla de modo del horno
a CONVECTION ROAST (Asar por
convección).
6 Utilice la perilla de temperatura para
configurar la temperatura deseada, en
incrementos de 25 °F, de 200 °F a 550 °F.
El horno y las luces interiores del mismo
se encenderán de inmediato y permanecerán
encendidas hasta que se apague el horno.
El ventilador de convección se encenderá
(luego de un breve intervalo), la luz PROBE
(Sonda) se encenderá y aparecerá 100 °F
en la pantalla. (La pantalla de la temperatura
comenzará a cambiar una vez que la
temperatura interna de la carne alcance
los 100 °F).
Asado por convección con la sonda
Horno de pared
Perilla de temperatura
Perilla pequeña
Gire para seleccionar
Presione para aceptar
Presione para
seleccionar
Se muestra la pantalla de un horno doble.
PRECAUCIÓN: para prevenir posibles quemaduras,
no desenchufe la sonda del enchufe del horno hasta
que el horno se haya enfriado. No almacene la sonda
en el centro de cocina.
7 Cuando la temperatura interna de la carne
alcance el número que usted ha configurado,
la sonda y el horno se apagarán, aparecerá
END (Fin) en la pantalla y sonará el control
del horno. (PROBE (Sonda) permanecerá
encendido junto con la temperatura de
la sonda). Para detener el sonido de
recordatorio, gire la perilla de modo y
la perilla de temperatura a la posición OFF
(Apagado) o presione la perilla pequeña.
Use agarraderas para retirar la sonda
de los alimentos. No utilice tenazas para
extraerla: las tenazas pueden dañarla.
“PROBE” (“Sonda”) titilará en la pantalla hasta
que se retire la sonda del receptáculo del horno.
Para cambiar la temperatura interna
configurada de los alimentos o la carne (sonda)
durante el ciclo Asar, presione el botón PROBE
(Sonda), gire la perilla pequeña para
seleccionar la temperatura nueva y
presione para ingresarla.
• Si se quita la sonda de la comida antes de
que se alcance la temperatura final, sonará
un tono y la pantalla parpadeará hasta que
la sonda sea removida del horno.
• Usted puede utilizar el temporizador
pero no puede utilizar las operaciones
cronometradas del horno.
Perilla de modo del horno
105

106
Guía para
asar por
convección
Temperatura Temperatura
Carnes Minutos/Lb del horno interna
Carne
Costillas, Costillas deshuesadas, Poco cocido 20 a 24 325°F 140°F†
Top Sirloin Medio 24 a 28 325°F 160°F
(3 a 5 lb) Bien asado 28 a 32 325°F 170°F
Lomo de res Poco cocido 10 a 14 325°F 140°F†
Medio 14 a 18 325°F 160°F
Cerdo Con hueso, Deshuesado (3 a 5 lb) 23 a 27 325°F 170°F
Chuletas (1/2 a 1 pulg. de espesor) 2 chuletas 30 a 35 total 325°F 170°F
4 chuletas 35 a 40 total 325°F 170°F
6 chuletas 40 a 45 total 325°F 170°F
Jamón Enlatado, Butt, Shank (3 a 5 lb totalmente cocinado) 14 a 18 325°F 140°F
Cordero Con hueso, Deshuesado (3 a 5 lb) Medio 17 a 20 325°F 160°F
Bien asado 20 a 24 325°F 170°F
Mariscos Pescado, entero (3 a 5 lb) 30 a 40 total 400°F
Colas de langosta (6 a 8 onzas cada una) 20 a 25 total 350°F
Aves Pollo completo (2
1
⁄2 a 3
1
⁄2 lb) 24 a 26 350°F 180° a 185°F
Gallina Cornish, no rellena (1 a 1
1
⁄2 lb) 50 a 55 total 350°F 180° a 185°F
Rellena (1 a 1
1
⁄2 lb) 55 a 60 total 350°F 180° a 185°F
Pato (4 a 5 lb) 24 a 26 325°F 180° a 185°F
Pavo, completo*
No relleno (10 a 16 lb) 8 a 11 325°F 180° a 185°F
No relleno (18 a 24 lb) 7 a 10 325°F 180° a 185°F
Pechuga de pavo (4 a 6 lb) 16 a 19 325°F 170°F
*Las aves rellenas requieren generalmente 30 a 45 minutos de tiempo adicional de cocción.Cubra las patas y la pechuga con papel aluminio para
evitar un sobredorado y la desecación de la piel.
† El Departamento de Agricultura de los EE.UU. indica que: "la carne a poco cocida es popular, pero usted debe saber que cocinarla a solamente
140 °F significa que algunos organismos venenosos podrían sobrevivir". (Fuente: Safe Food Book.Your Kitchen Guide. USDA Rev. Junio 1985.)
Asado por convección
Horno de pared
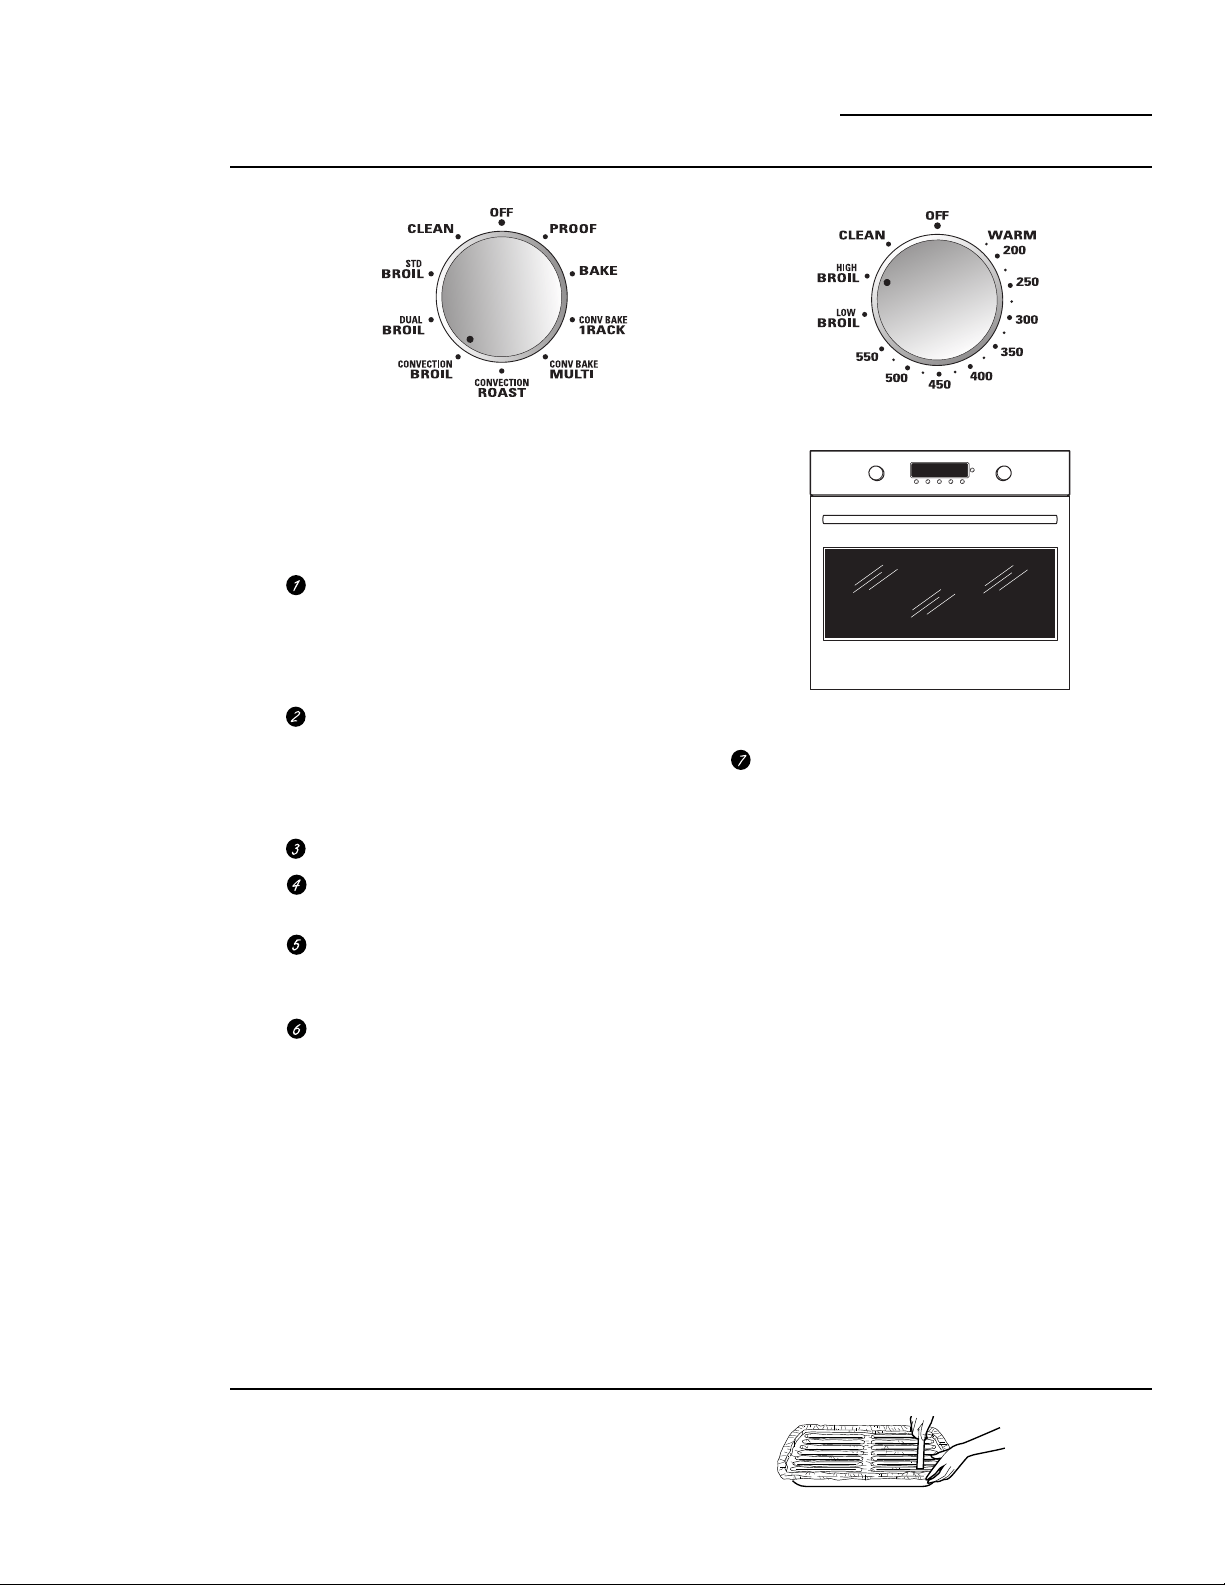
107
Asar a la parrilla por convección es bueno para
asar pescado o cortes de carnes más pequeños.
Cuando se configura asar a la parrilla por
convección, ambos elementos superiores
funcionan siempre que el horno calienta.
Si la carne tiene grasa o cartílago en
los bordes, corte tajadas verticales con 2″
de diferencia. Si lo desea, la grasa
puede reducirse, dejando una capa de
aproximadamente 1/8″ de espesor.
Coloque la carne o el pescado en la asadera
y la rejilla. Siempre use la rejilla para que
la grasa caiga dentro de la asadera, de
lo contrario, los jugos pueden calentarse
demasiado y prenderse fuego.
Coloque la parrilla en el horno.
Cierre la puerta. Siempre ase a la parrilla
con la puerta cerrada.
Gire la perilla de modo del horno a
CONVECTION BROIL (Asar a la parrilla
convección).
Gire la perilla de temperatura a LOW
BROIL (Asar a la parrilla a temperatura
baja) o HIGH BROIL (Asar a la parrilla
a temperatura alta). La temperatura para
asar a la parrilla se configurará
automáticamente. Aparecerá LO (Bajo)
o HI (Alto) en la pantalla dependiendo
de la temperatura automática para asar
a la parrilla seleccionada.
El horno y las luces interiores del mismo se
encenderán de inmediato y permanecerán
encendidas hasta que se apague el horno.
Se encenderá el ventilador de convección
(luego de un breve intervalo).
Cuando termine de asar a la parrilla,
gire la perilla de modo y la perilla de
temperatura a la posición OFF (Apagado).
NOTA: se encenderá un ventilador
de refrigeración para enfriar las partes internas.
Esto es normal. Además, es posible que
el ventilador siga funcionando, incluso,
luego de que se apague el horno.
La asadera no necesita ser precalentada
en la mayoría de los casos. Sin embargo,
los alimentos que se cocinan rápido, como
tiras finas de carne, pueden requerir un
período corto de precalentamiento de 2 a 3
minutos para permitir que la superficie de
los alimentos se dore en la misma cantidad
de tiempo que los alimentos necesitan para
cocinarse por completo.
Gire los alimentos una sola vez durante el asado
a la parrilla.
NOTA: El asado a la parrilla por convección
no funcionará si la sonda de temperatura está
enchufada. Nunca deje la sonda dentro del
horno durante un ciclo de asado a la parrilla.
Asar a la parrilla por convección
Horno de pared
Cómo
configurar
el horno
para
asar a la
parrilla por
convección
Cierre la puerta. Siempre ase con la puerta cerrada.
Papel de
aluminio
Puede usar papel de aluminio para cubrir
la asadera y la rejilla. Sin embargo, deberá
moldear firmemente el papel a la rejilla y
hacer cortes con la forma de la rejilla.
Perilla de modo del horno
Perilla de temperatura
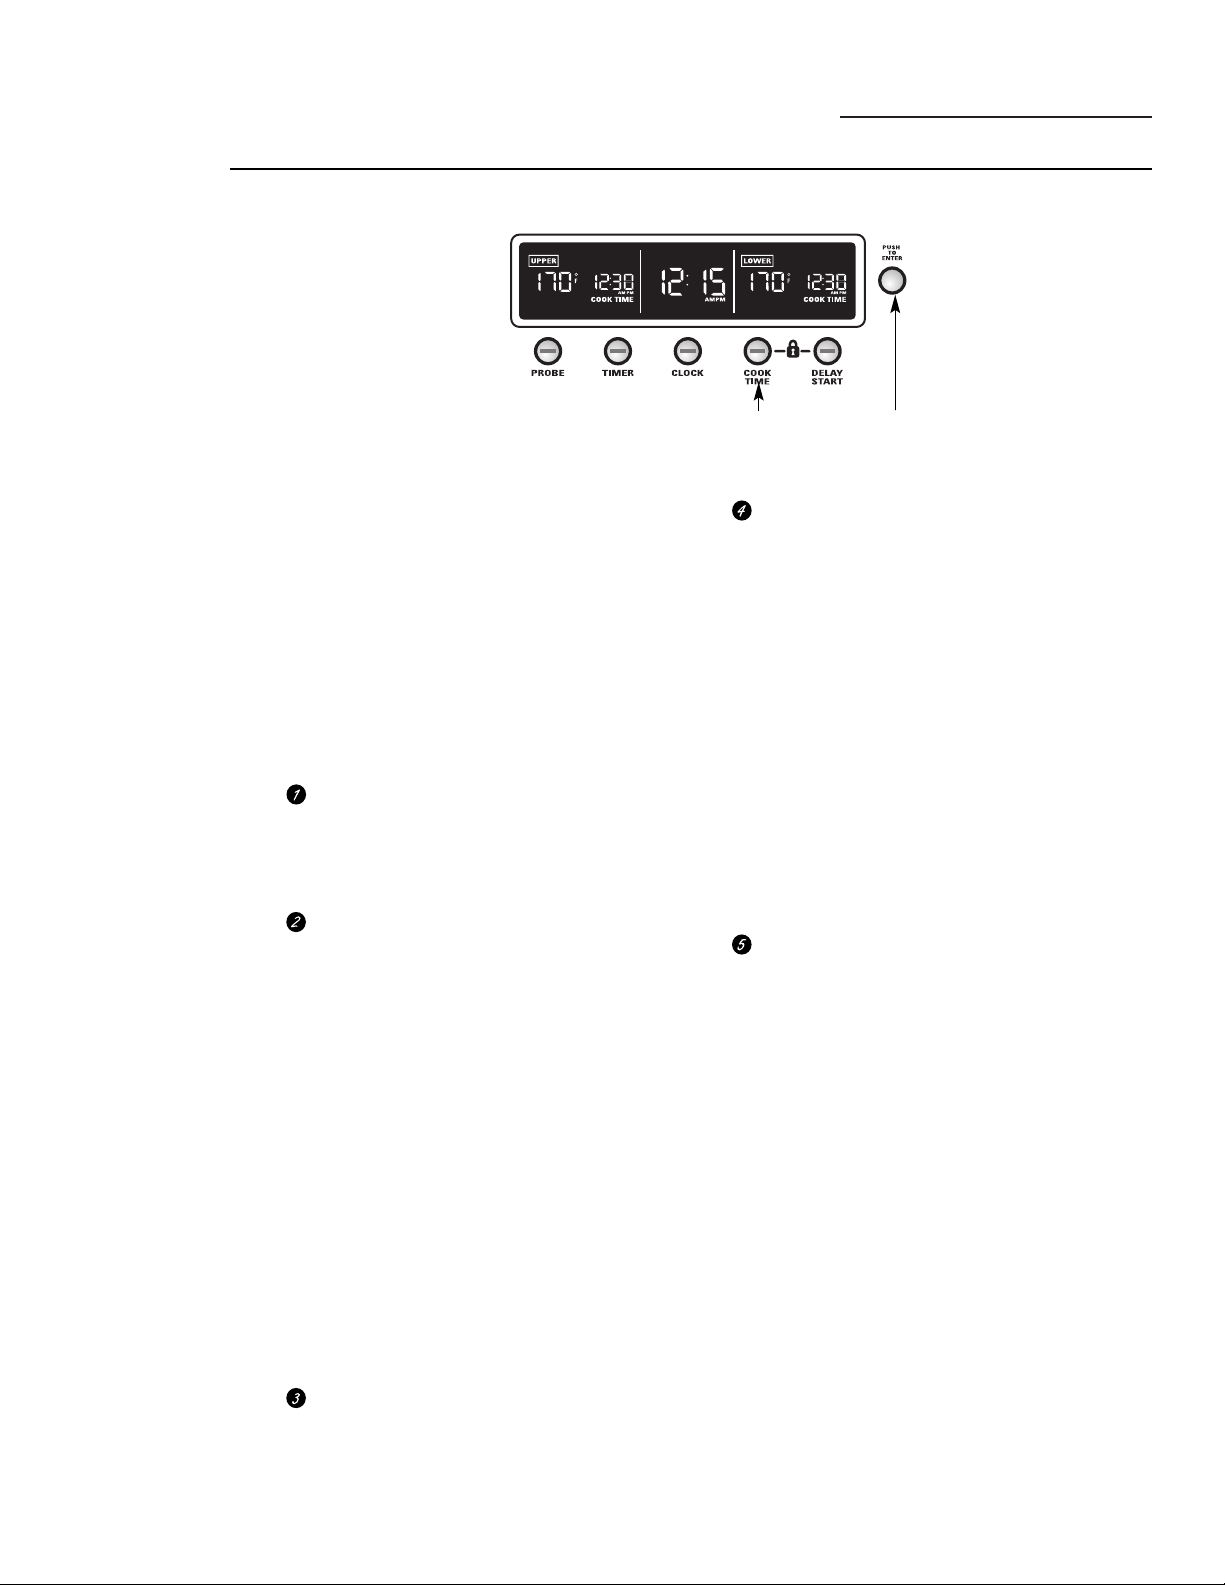
108
Cocción programada
Horno de pared
La cocción programada le permite configurar
el horno para que se encienda de inmediato,
cocine durante una determinada cantidad de
tiempo y se apague automáticamente.
Para configurar el horno para que se encienda
de inmediato y se apague automáticamente:
NOTA: antes de comenzar, asegúrese de que
el reloj muestre la hora correcta del día.
Para evitar posibles quemaduras, coloque
las parrillas en la posición correcta antes de
encender el horno.
Gire la perilla de modo a la función de
cocción deseada.
NOTA: la cocción programada no puede
configurarse para las funciones Asar a
la parrilla o Fermentar.
Utilice la perilla de temperatura para
configurar la temperatura deseada, en
incrementos de 25 °F, de 200 °F a 550 °F.
El horno y sus luces interiores se
encenderán de inmediato y permanecerán
encendidas hasta que se apague el horno.
El ventilador de convección se encenderá
(luego de un breve intervalo), la luz
PREHEAT (Precalentamiento) se encenderá
y aparecerá 100 °F en la pantalla.
(La pantalla de la temperatura comenzará
a cambiar una vez que la temperatura del
horno alcance los 100 °F.) El control sonará
cuando el horno esté precalentado; esto
tomará aproximadamente de 10 a 15
minutos. La luz de PREHEAT
(Precalentamiento) se apagará y la pantalla
mostrará la temperatura configurada.
Cuando la luz PREHEAT (Precalentamiento)
se apague, coloque los alimentos en el horno.
Presione el botón COOK TIME (Tiempo de
cocción).
NOTA: si su receta requiere precalentamiento,
deberá agregar tiempo adicional al tiempo de
cocción (aproximadamente de 10 a 15
minutos).
Gire la perilla pequeña para seleccionar
y presiónela para ingresar el tiempo de
cocción deseado. (El tiempo de cocción
máximo es de 9 horas y 59 minutos. El
tiempo de cocción mínimo es de 1 minuto).
La pantalla mostrará COOK TIME (Tiempo de
cocción) y el conteo regresivo del tiempo de
cocción.
NOTA: el conteo regresivo del tiempo de
cocción comenzará de inmediato.
El horno continuará cocinando durante
la cantidad de tiempo programada, luego
se apagará automáticamente.
Para recordar el tiempo de cocción, presione
el botón COOK TIME (Tiempo de cocción).
Para cambiarlo, gire y presione la perilla
pequeña.
Al finalizar el tiempo de cocción,
el horno se apagará, 0:00 titilará
rápidamente, aparecerá END (Fin) en
la pantalla y el control del horno sonará.
Para detener el sonido de recordatorio,
gire la perilla de modo y la de temperatura
a la posición OFF (Apagado).
NOTA:
• La configuración de temperatura WARM
(Calentar) (aparece 175° en la pantalla)
de este horno puede usarse para mantener
calientes alimentos cocidos. Quizás no sea
seguro ingerir los alimentos que se mantienen
en el horno por más de dos horas a estas
bajas temperaturas.
• No debe permitirse que los alimentos que
se echan a perder fácilmente—como leche,
huevos, pescado, rellenos, aves y cerdo—
reposen por más de 1 hora antes o después
de la cocción. La temperatura ambiente
promueve el crecimiento de bacterias
peligrosas.
Cocción
programada
(inicio
inmediato y
detención
automática)
Perilla pequeña
Gire para seleccionar
Presione para aceptar
Presione para
seleccionar
Se muestra la pantalla de un horno doble.

Cocción
programada
(inicio
postergado
y
detención
automática)
La cocción programada con DELAY START
(Inicio tardío) le permite configurar el horno
para que se encienda a la hora del día que
configuró, cocine durante un período de tiempo
seleccionado y se apague automáticamente.
DELAY START (Inicio tardío) no puede utilizarse
con la función Sabbath.
Para postergar el inicio de la cocción:
NOTA: antes de comenzar, asegúrese de que
el reloj muestre la hora correcta del día.
Para evitar posibles quemaduras, coloque
las parrillas en la posición correcta antes de
encender el horno.
NOTA: la cocción programada no puede
configurarse para las funciones Asar a la parrilla
o Fermentar.
Presione el botón DELAY START (Inicio
tardío). La hora actual del día titilará en
la pantalla.
En modelos de hornos dobles, presione el botón
DELAY START (Inicio tardío) una vez para
configurar el horno superior y dos veces para
configurar el inferior.
Gire la perilla pequeña para seleccionar y
presiónela para ingresar la hora del día en
la cual desea que el horno se encienda y
comience a cocinar.
Presione el botón COOK TIME (Tiempo
de cocción).
NOTA: si su receta requiere precalentamiento,
deberá agregar tiempo adicional al tiempo
de cocción (aproximadamente de 10 a 15
minutos).
Gire la perilla pequeña para seleccionar y
presiónela para ingresar el tiempo de cocción
deseado. (El tiempo de cocción máximo es
de 9 horas y 59 minutos. El tiempo de cocción
mínimo es de 1 minuto).
Gire la perilla de modo a la función de cocción
deseada.
Utilice la perilla de temperatura para
configurar la temperatura deseada, en
incrementos de 25 °F, de 200 °F a 550 °F.
Para recordar la hora de inicio, presione el botón
DELAY START (Inicio tardío). Para cambiarlo,
gire y presione la perilla pequeña. Para recordar
el tiempo de cocción, presione el botón COOK
TIME (Tiempo de cocción). Para cambiarlo, gire
y presione la perilla pequeña.
La pantalla volverá a mostrar la hora del día
y aparecerá START TIME (Hora de inicio)
indicando que el horno está configurado.
Cuando sea la hora de inicio, el horno y
sus luces interiores se encenderán.
NOTA: el conteo regresivo del tiempo de
cocción comenzará cuando sea la hora de inicio.
La pantalla mostrará COOK TIME (Tiempo de
cocción) y el conteo regresivo del tiempo de
cocción.
El horno continuará cocinando durante
la cantidad de tiempo programada, luego
se apagará automáticamente.
Al finalizar el tiempo de cocción, el horno
se apagará, 0:00 titilará rápidamente, aparecerá
END (Fin) en la pantalla y el control del horno
sonará. Para detener el sonido de recordatorio,
gire la perilla de modo y la de temperatura a
la posición OFF (Apagado).
En modelos de hornos dobles, puede usar el horneado
programado en ambos hornos al mismo tiempo. Gire
la perilla de modo y la de temperatura del segundo horno
a la configuración deseada. Presione el botón COOK
TIME (Tiempo de cocción) y gire y presione la perilla
pequeña para aceptar. Presione el botón DELAY START
(Inicio tardío) y gire y presione la perilla pequeña para
aceptar.
NOTA:
• La configuración de temperatura WARM
(Calentar) (aparece 175° en la pantalla)
de este horno puede usarse para mantener
calientes alimentos cocidos. Quizás no sea seguro
ingerir los alimentos que se mantienen en
el horno por más de dos horas a estas bajas
temperaturas.
• No debe permitirse que los alimentos que
se echan a perder fácilmente—como leche,
huevos, pescado, rellenos, aves y cerdo—reposen
por más de 1 hora antes o después de la cocción.
La temperatura ambiente promueve
el crecimiento de bacterias peligrosas.
Cocción programada
Horno de pared
Perilla pequeña
Gire para seleccionar
Presione para aceptar
Presione
para
seleccionar
Se muestra la pantalla de un horno doble.
Presione
para
seleccionar
109
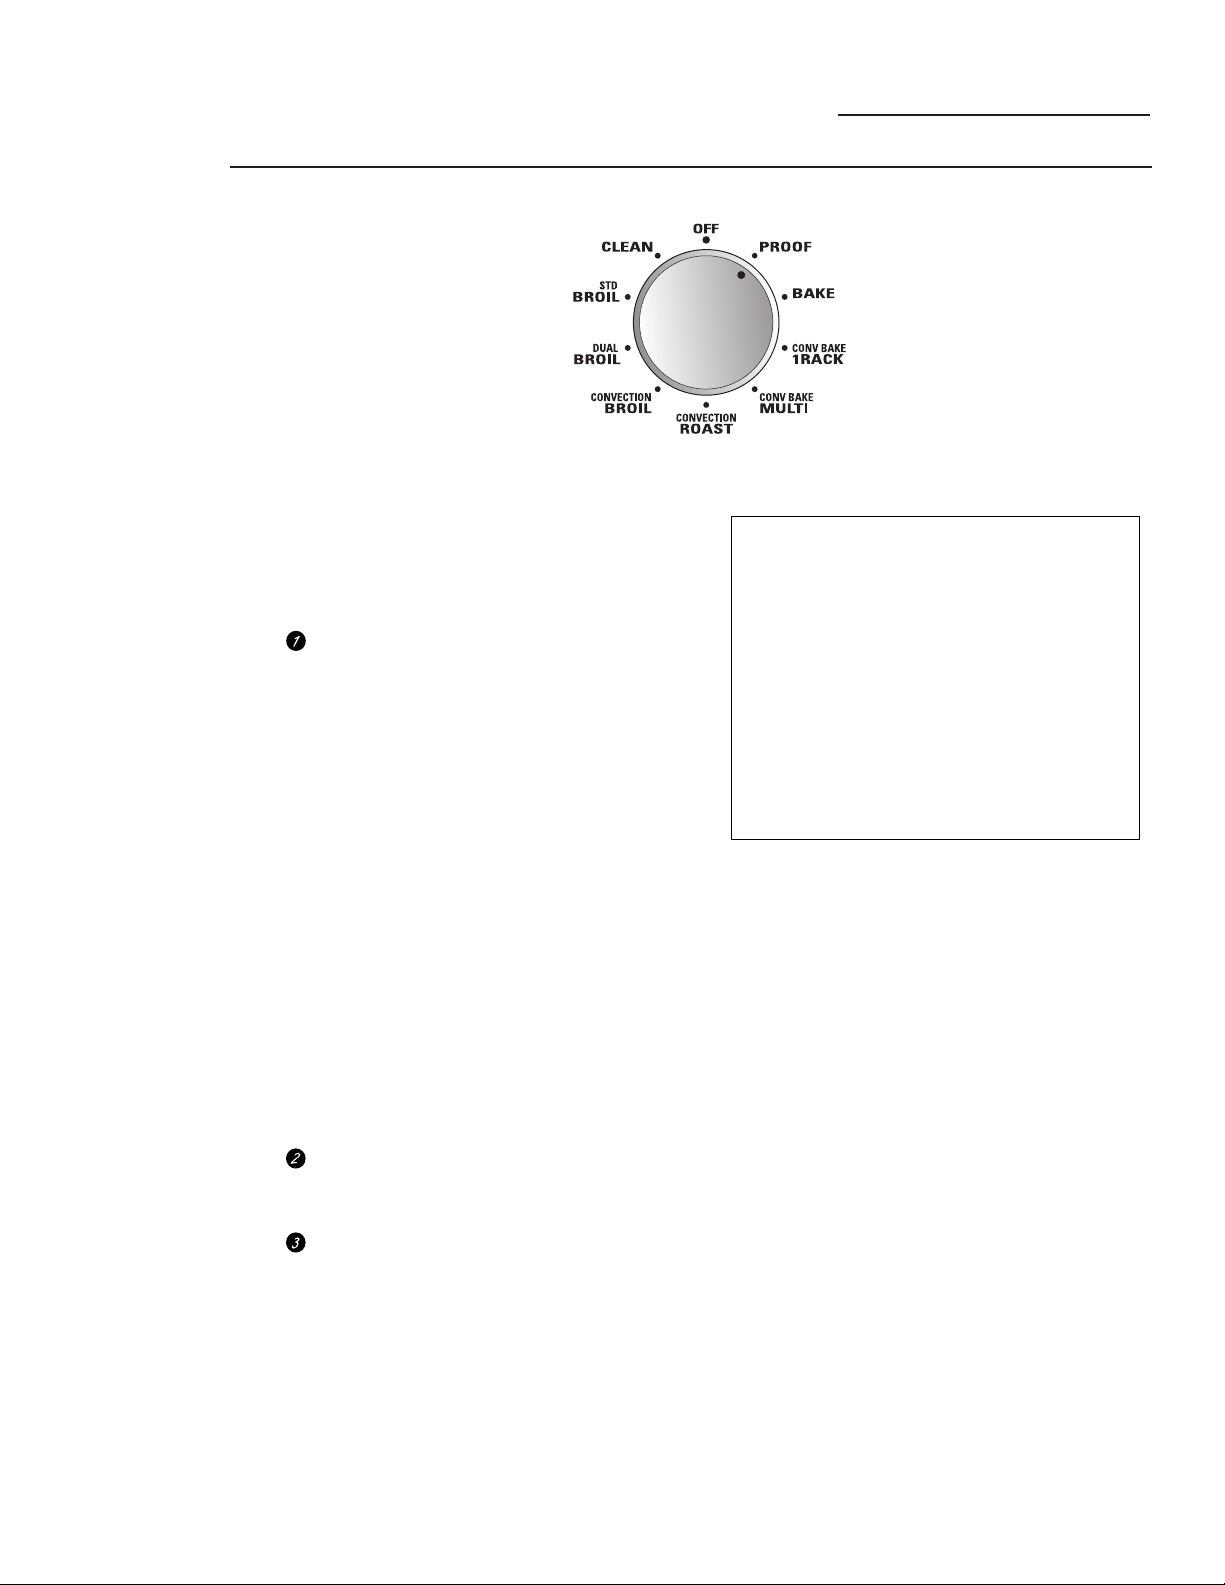
110
Fermentación
Horno de pared
Cómo
configurar
el horno
para la
fermentación
La función de leudado mantiene un ambiente
tibio útil para levar los productos con levadura.
Coloque la masa cubierta en un plato sobre
la parrilla A del horno.
Gire la perilla de modo del horno a
PROOF (Fermentar). La pantalla mostrará
PrF (fermentar). La fermentación no
funcionará cuando el horno esté por encima
de los 125 °F. La pantalla mostrará “too hot”
(“demasiado caliente”). Deje que el horno
se enfríe.
NOTA: Para obtener mejores resultados, cubra
la masa con un paño o con película adherente
engrasada (el plástico deberá asegurarse debajo
del recipiente para que el ventilador de la estufa
no lo quite).
La función de leudado proporciona
automáticamente la temperatura óptima para
el proceso de leudado; por lo tanto, la perilla
de temperatura no afecta la temperatura
de fermentación.
Las luces interiores del horno se encienden
y se apagan hasta que la perilla de modo se gira
a la posición OFF (Apagado).
Configure el TIMER (Temporizador) para
el tiempo de fermentación mínimo, para
acordarse de revisar los alimentos.
Cuando la fermentación haya finalizado,
gire la perilla de modo a la posición OFF
(Apagado).
• Para evitar reducir la temperatura del horno
y extender el tiempo de leudado, no abra
la puerta del horno sin necesidad.
• Controle los productos de pan con anticipación
para evitar que leuden demasiado.
NOTA: No utilice el modo de leudado
para calentar alimentos o mantenerlos
calientes. La temperatura de leudado
del horno no es lo suficientemente alta
como para mantener los alimentos a
temperaturas seguras.
La configuración de temperatura
WARM (Calentar) de este horno permite
mantener alimentos cocidos calientes.
Quizás no sea seguro ingerir los alimentos
que se mantienen en el horno por más
de dos horas a estas bajas temperaturas.
Perilla de modo del horno
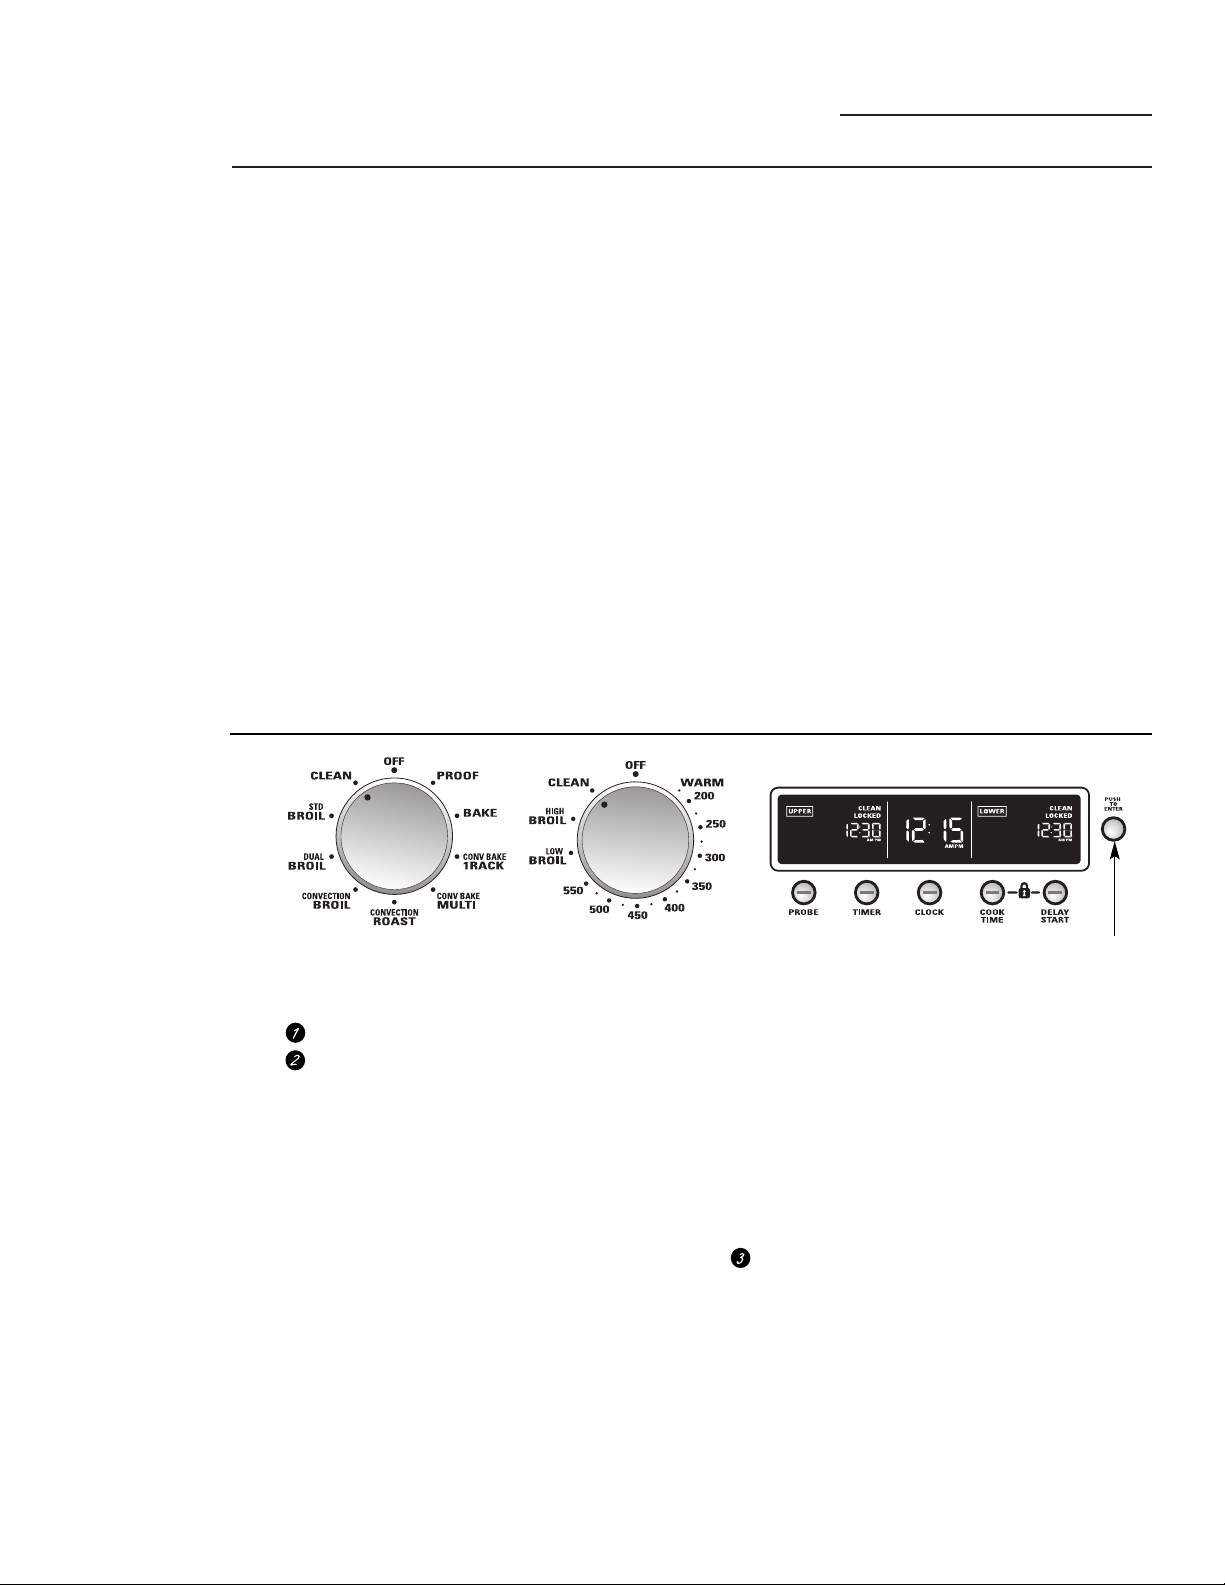
111
Horno autolimpieza
Horno de pared
Antes de un
ciclo de
limpieza
Gire la perilla de modo a CLEAN (Limpiar).
Gire la perilla de temperatura a CLEAN (Limpiar).
El horno está configurado para limpiar en su tiempo de
limpieza normal de 5 horas. (Si se necesita un tiempo
de limpieza menor a 5 horas, gire la perilla pequeña al
tiempo de limpieza deseado). Presione para aceptar.
Puede cambiar el tiempo de limpieza a la cantidad que
desee entre 3 y 5 horas, en incrementos de 15 minutos,
dependiendo de la suciedad de su horno.
NOTA: debe presionarse la perilla pequeña para que
comience el ciclo de autolimpieza.
Si su horno está conectado a un suministro eléctrico
de 208V, le recomendamos que configure el tiempo
de limpieza en 5 horas.
Si LOCKED (Bloqueado) titila en la pantalla, se ha
seleccionado el ciclo de autolimpieza pero la puerta
no está cerrada. Cierre la puerta del horno.
La pantalla mostrará CLEAN (Limpiar) y el tiempo
de limpieza restante.
A medida que el horno se calienta para alcanzar
la temperatura de limpieza, la puerta se trabará
automáticamente. La luz LOCKED (Bloqueado)
se encenderá. La pantalla mostrará el tiempo de
limpieza restante. No será posible abrir la puerta
del horno hasta que la temperatura descienda por
debajo de la temperatura de bloqueo y la luz LOCKED
(Bloqueado) se apague.
Una vez que el ciclo de limpieza esté completo y
el horno se haya enfriado, aparecerá END (Fin)
en la pantalla y la luz LOCKED (Bloqueado)
se apagará. Gire la perilla de modo y la de
temperatura a la posición OFF (Apagado).
Para detener un ciclo de limpieza, gire la perilla
de modo y la de temperatura a la posición OFF
(Apagado). Cuando se apague la luz LOCKED
indicando que el horno se ha enfriado a una
temperatura inferior a la de bloqueo, podrá
abrir la puerta del horno.
Cómo
ajustar el
horno para
limpieza
Perilla de modo del horno Perilla de temperatura
Perilla pequeña
Gire para seleccionar
Presione para aceptar
Se muestra la pantalla de un horno doble.
La puerta del horno debe estar cerrada y todos
los controles deben estar configurados correctamente
para que el ciclo de autolimpieza. funcione
apropiadamente.
Recomendamos ventilar su cocina dejando una ventana
abierta o utilizando un ventilador o campana extractora
durante el primer ciclo de autolimpieza.
• Limpie la suciedad del marco alrededor de la puerta
del horno y fuera de la junta de la puerta. Estas áreas
deben limpiarse a mano.
• No limpie la junta de la puerta a mano, ya que esto
podría dañarla.
• Limpie el exceso de grasa y otros derrames de
alimentos con un trapo húmedo. Esto minimizará
la cantidad de humo que se forma durante
la autolimpieza.
• Quite del horno todos los utensilios de cocina,
la parrilla, la plancha, la sonda de temperatura
y cualquier papel de aluminio.
• Durante el ciclo de autolimpieza las rejillas del horno
pueden permanecer dentro del horno.
• Asegúrese que el lente de las luces del horno
y el marco del lente estén en su lugar.
• No use limpiadores de horno comerciales, abrasivos
ni protectores de hornos dentro o cerca del horno
autolimpiante.
IMPORTANTE: la salud de algunas aves es
extremadamente sensible a las emanaciones nocivas
despedidas durante el ciclo de autolimpieza de
cualquier horno. Mueva las aves a otro cuarto
bien ventilado.
NOTA: la autolimpieza no funcionará si la sonda
de temperatura está enchufada o si está configurada
la función Sabbath.
En modelos de horno doble, puede configurar un ciclo de
limpieza en ambos hornos simultáneamente. El último horno
configurado retrasará automáticamente su inicio hasta que
finalice el ciclo de limpieza del primero.
En modelos de horno doble, puede usar el horneado
cronometrado en un horno y la limpieza automática en el otro
simultáneamente.
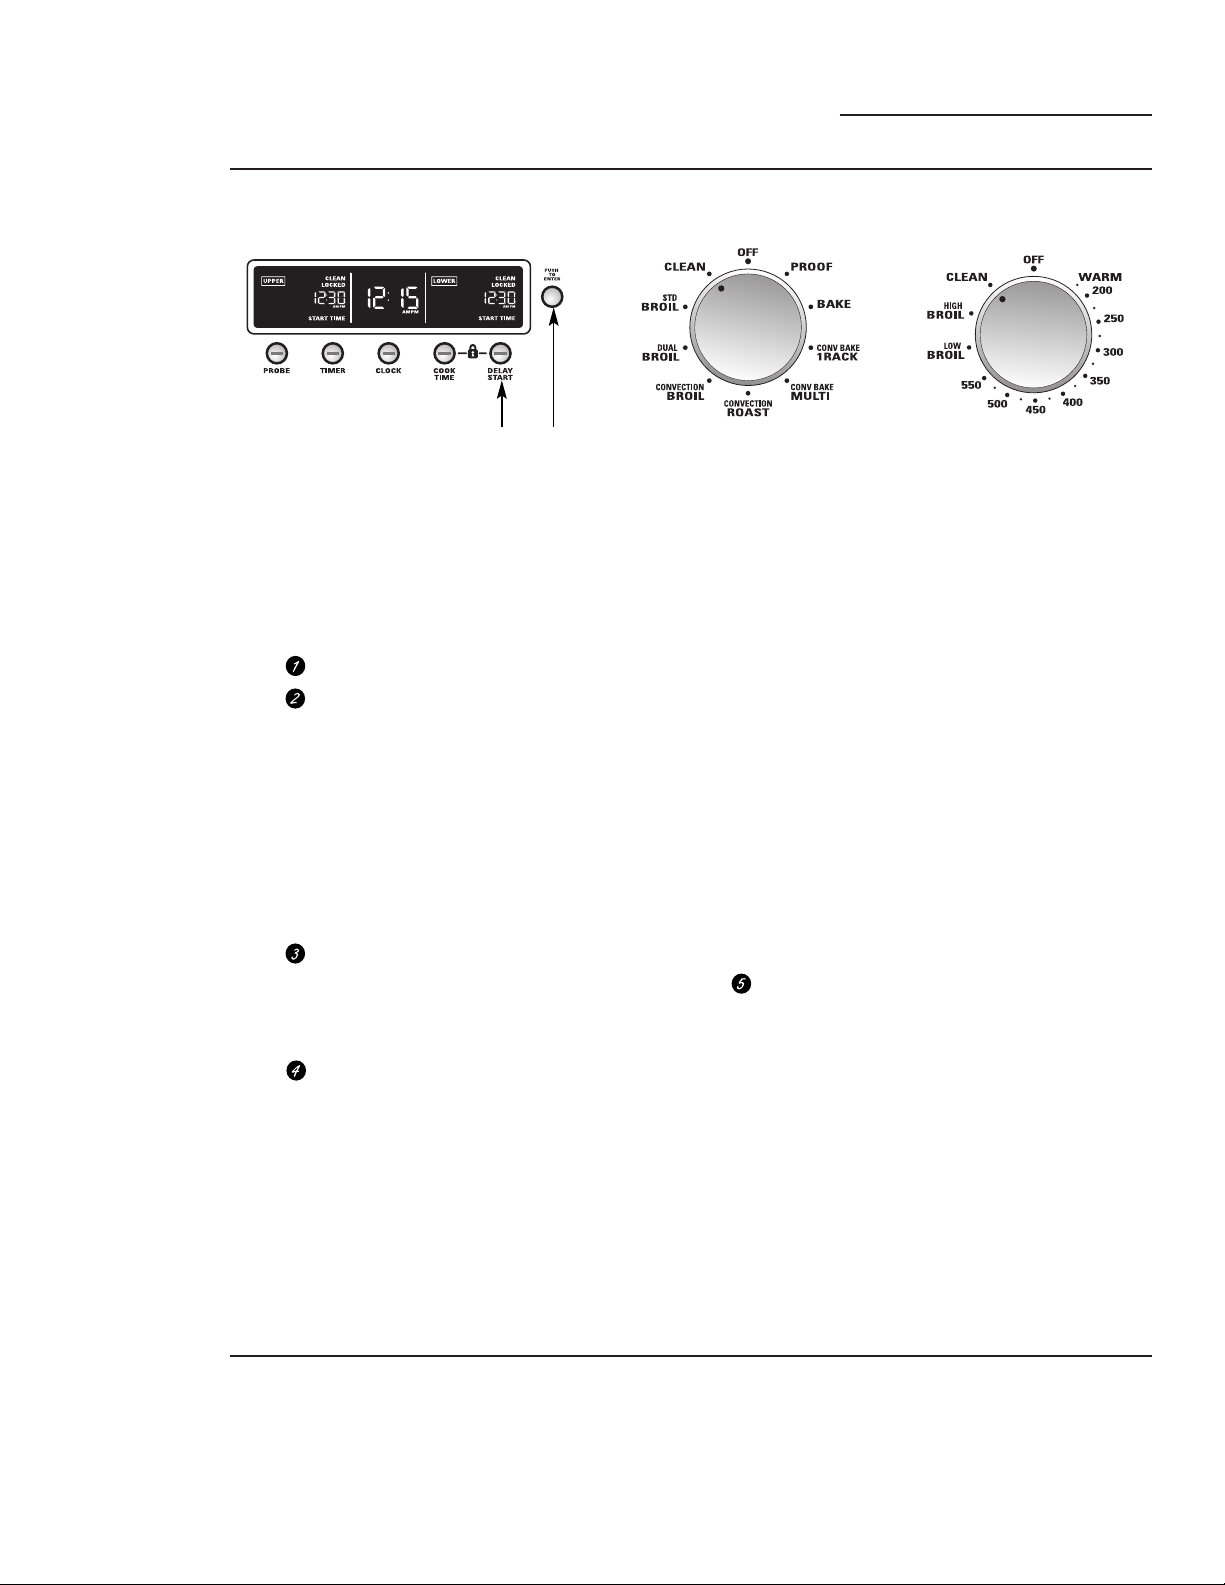
112
Después de
un ciclo de
limpieza
Es posible que observe algunas cenizas blancas en el
horno. Límpielas con un paño húmedo después de que
el horno se enfríe.
Si quedan manchas blancas, quítelas con agua tibia
con mucho jabón y enjuague bien con una mezcla de
vinagre y agua. Estos depósitos son usualmente residuos
de sal que el ciclo de limpieza no puede eliminar.
Si el horno no queda limpio después de un ciclo de
limpieza, repita el ciclo.
Usted no puede configurar el horno para cocción hasta
que el horno esté lo suficientemente frío como para
que la puerta se desbloquee.
Cómo
posponer el
inicio de la
limpieza
Horno autolimpieza
Horno de pared
Perilla de temperatura
Presione para
seleccionar
Se muestra la pantalla de un horno doble.
Perilla de modo del horno
Puede configurar el horno para que retrase el inicio
de limpieza, limpie durante un período de tiempo
seleccionado y se apague automáticamente.
NOTA: antes de comenzar, asegúrese de que el reloj
muestre la hora correcta del día.
Gire la perilla de modo a CLEAN (Limpiar).
Gire la perilla de temperatura a CLEAN (Limpiar).
El horno está configurado para limpiar en
su tiempo de limpieza normal de 5 horas.
(Si se necesita un tiempo de limpieza menor a
5 horas, gire la perilla pequeña al tiempo de
limpieza deseado). Presione para aceptar.
Puede cambiar el tiempo de limpieza a la cantidad
que desee entre 3 y 5 horas, en incrementos de 15
minutos, dependiendo de la suciedad de su horno.
NOTA: debe presionarse la perilla pequeña para
que comience el ciclo de autolimpieza.
Presione el botón DELAY START (Inicio tardío).
La hora actual del día titilará en la pantalla.
En modelos de hornos dobles, presione el botón DELAY
START (Inicio tardío) una vez para configurar el horno
superior y dos veces para configurar el inferior.
Gire la perilla pequeña para seleccionar y presiónela
para ingresar la hora del día en la cual desea que
el horno se encienda y comience a cocinar.
NOTA: debe presionarse la perilla pequeña para
configurar el ciclo de autolimpieza para que comience
a la hora del día ingresada.
Ahora el horno está configurado para encenderse
a la hora del día que usted configuró y limpiar durante
el tiempo configurado.
Si su horno está conectado a un suministro eléctrico
de 208V, le recomendamos que configure el tiempo
de limpieza en 5 horas.
Si LOCKED (Bloqueado) titila en la pantalla,
se ha seleccionado el ciclo de autolimpieza pero
la puerta no está cerrada. Cierre la puerta del horno.
Para controlar la hora de inicio, presione el botón
DELAY START. Para cambiarla, gire y presione la
perilla pequeña.
En la pantalla aparecerá START TIME (Hora
de inicio). Cuando llegue la hora de inicio,
el horno se encenderá automáticamente.
La pantalla mostrará CLEAN (Limpiar) y el tiempo
de limpieza restante.
A medida que el horno se calienta para alcanzar
la temperatura de limpieza, la puerta se trabará
automáticamente. La luz LOCKED (Bloqueado)
se encenderá.
La pantalla mostrará el tiempo restante de limpieza.
No será posible abrir la puerta del horno hasta que
la temperatura sea inferior a la temperatura de bloqueo
y se apague la luz LOCKED.
Una vez que el ciclo de limpieza esté completo
y el horno se haya enfriado, aparecerá END (Fin)
en la pantalla y la luz LOCKED (Bloqueado)
se apagará. Gire la perilla de modo y la de
temperatura a la posición OFF (Apagado).
Para detener un ciclo de limpieza, gire la perilla
de modo y la de temperatura a la posición OFF
(Apagado). Cuando se apague la luz LOCKED
indicando que el horno se ha enfriado a una
temperatura inferior a la de bloqueo, podrá abrir
la puerta del horno.
NOTA: En modelos de horno doble, puede configurar un ciclo
de limpieza retrasado en ambos hornos simultáneamente.
Gire la perilla de modo y la de temperatura del segundo horno
a CLEAN (Limpiar). El segundo horno configurado retrasará
automáticamente el inicio de la limpieza hasta que finalice
el ciclo de limpieza del primero.
Perilla pequeña
Gire para
seleccionar
Presione para
aceptar
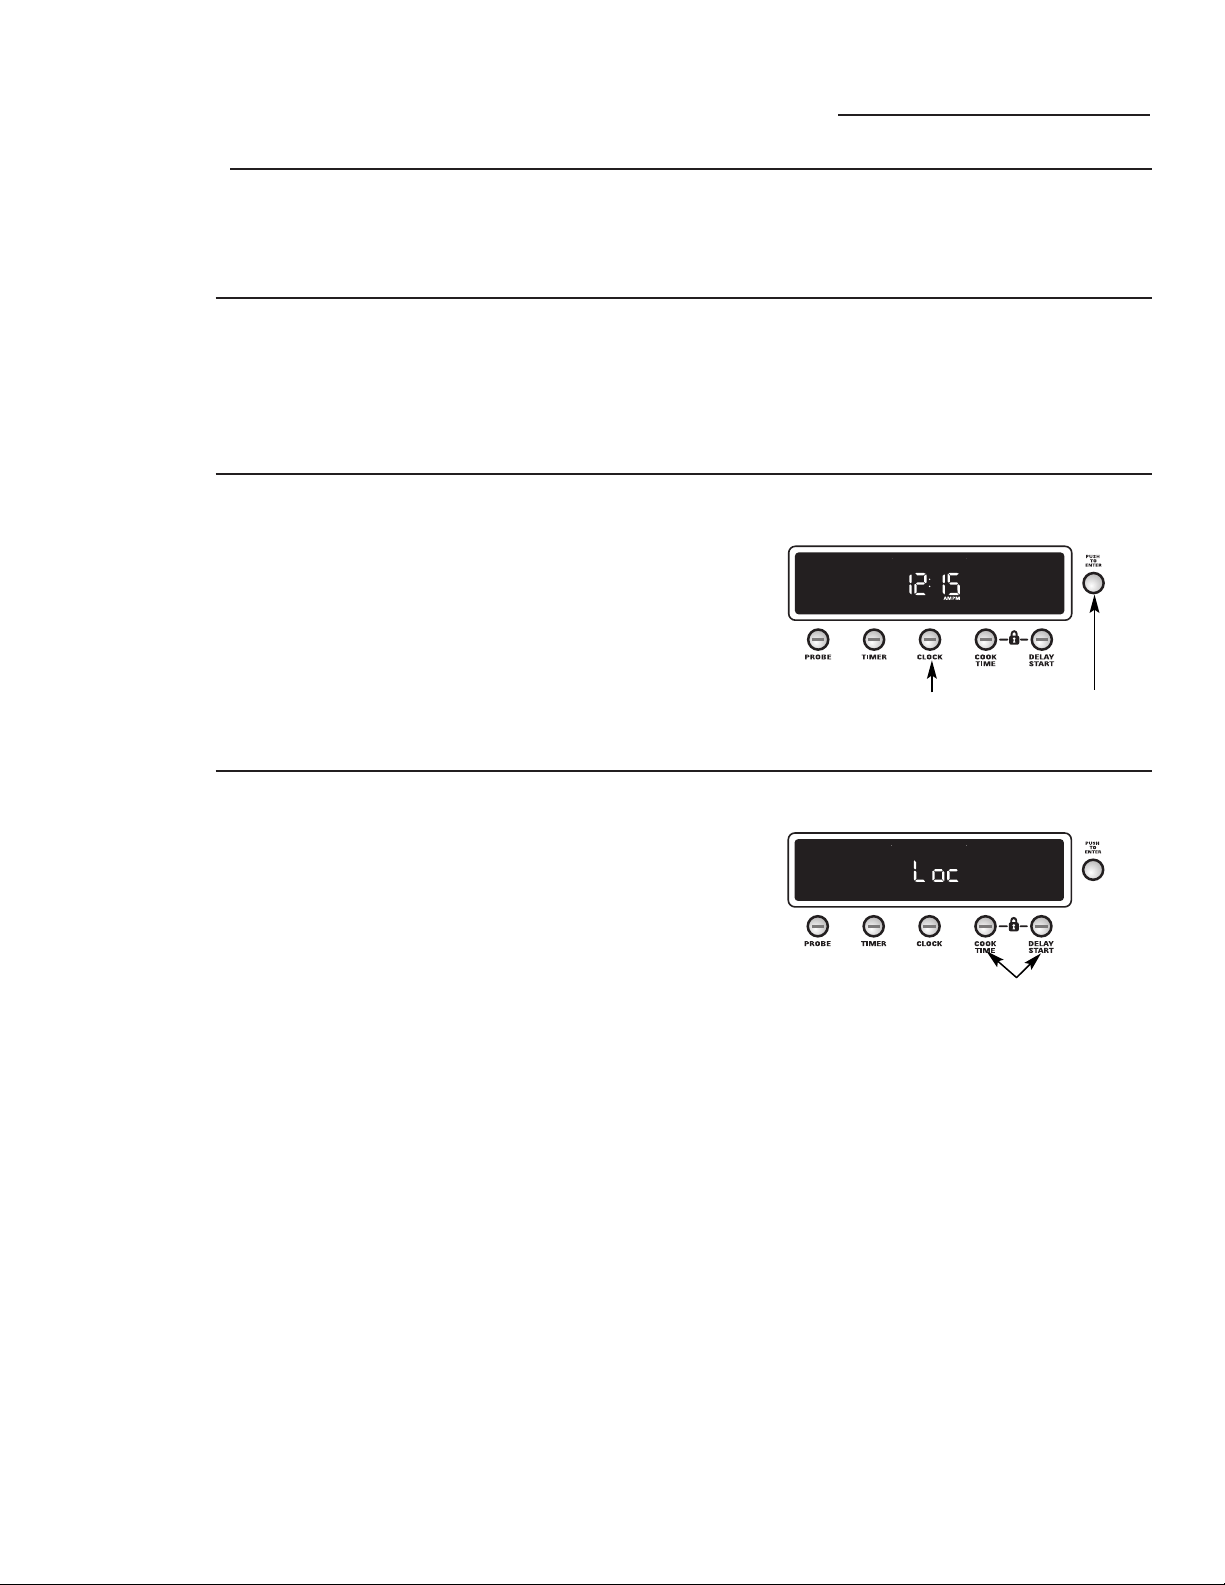
113
Funciones del reloj y del bloqueo del control
Horno de pared
Para
ajustar
el reloj
1 Presione el botón CLOCK (Reloj).
2 Gire la perilla pequeña para seleccionar
la hora del día y presione para aceptar.
NOTA: durante la configuración, la hora
pasará de AM a PM.
Reloj
El reloj debe ser ajustado para que las funciones
automáticas cronometradas del horno funcionen
apropiadamente.
El reloj con la hora del día no puede cambiarse
durante el Inicio tardío. (Puede cambiarse
durante un horneado regular o una función de
asado a la parrilla).
Corte de
energía
Si aparece la hora del día titilando
en la pantalla, ha sufrido un corte de energía.
Reinicie el reloj.
Bloqueo
del control
Le permite bloquear todos los controles
de manera que la perilla de modo, la de
temperatura y los botones del panel de control
no puedan activarse cuando se los configura.
NOTA:
En los modelos de horno doble, esto activa dicha
función en ambos hornos.
Para bloquear/desbloquear los controles:
1 Mantenga presionados los botones COOK
TIME (Tiempo de cocción) y DELAY START
(Inicio tardío) al mismo tiempo, durante
3 segundos, hasta que el control suene y
la pantalla muestre “Loc”. Luego de bloquear
los controles, aparecerá la hora del día en
la pantalla.
2 Para desbloquear, presione y mantenga
presionados los botones COOK TIME
(Tiempo de cocción) y DELAY START
(Inicio tardío) al mismo tiempo. (“Loc”
aparecerá en la pantalla). Manténgalos
presionados durante 3 segundos hasta
que suene el control y “Loc” desaparezca
de la pantalla.
Cuando esta función está activa y se intenta
configurar los controles, la pantalla mostrará
“Loc”.
NOTAS:
• Si se los bloquea mientras hay una función de cocción,
limpieza o programada activa, la misma se cancelará.
•
El ajuste permanecerá en la memoria luego de una
interrupción de la energía.
Se muestra la pantalla de un horno doble
Se muestra la pantalla de un horno doble
Perilla pequeña
Gire para seleccionar
Presione para aceptar
Presione
para
seleccionar
Presione y mantenga
presionado al mismo tiempo
para bloquear/desbloquear
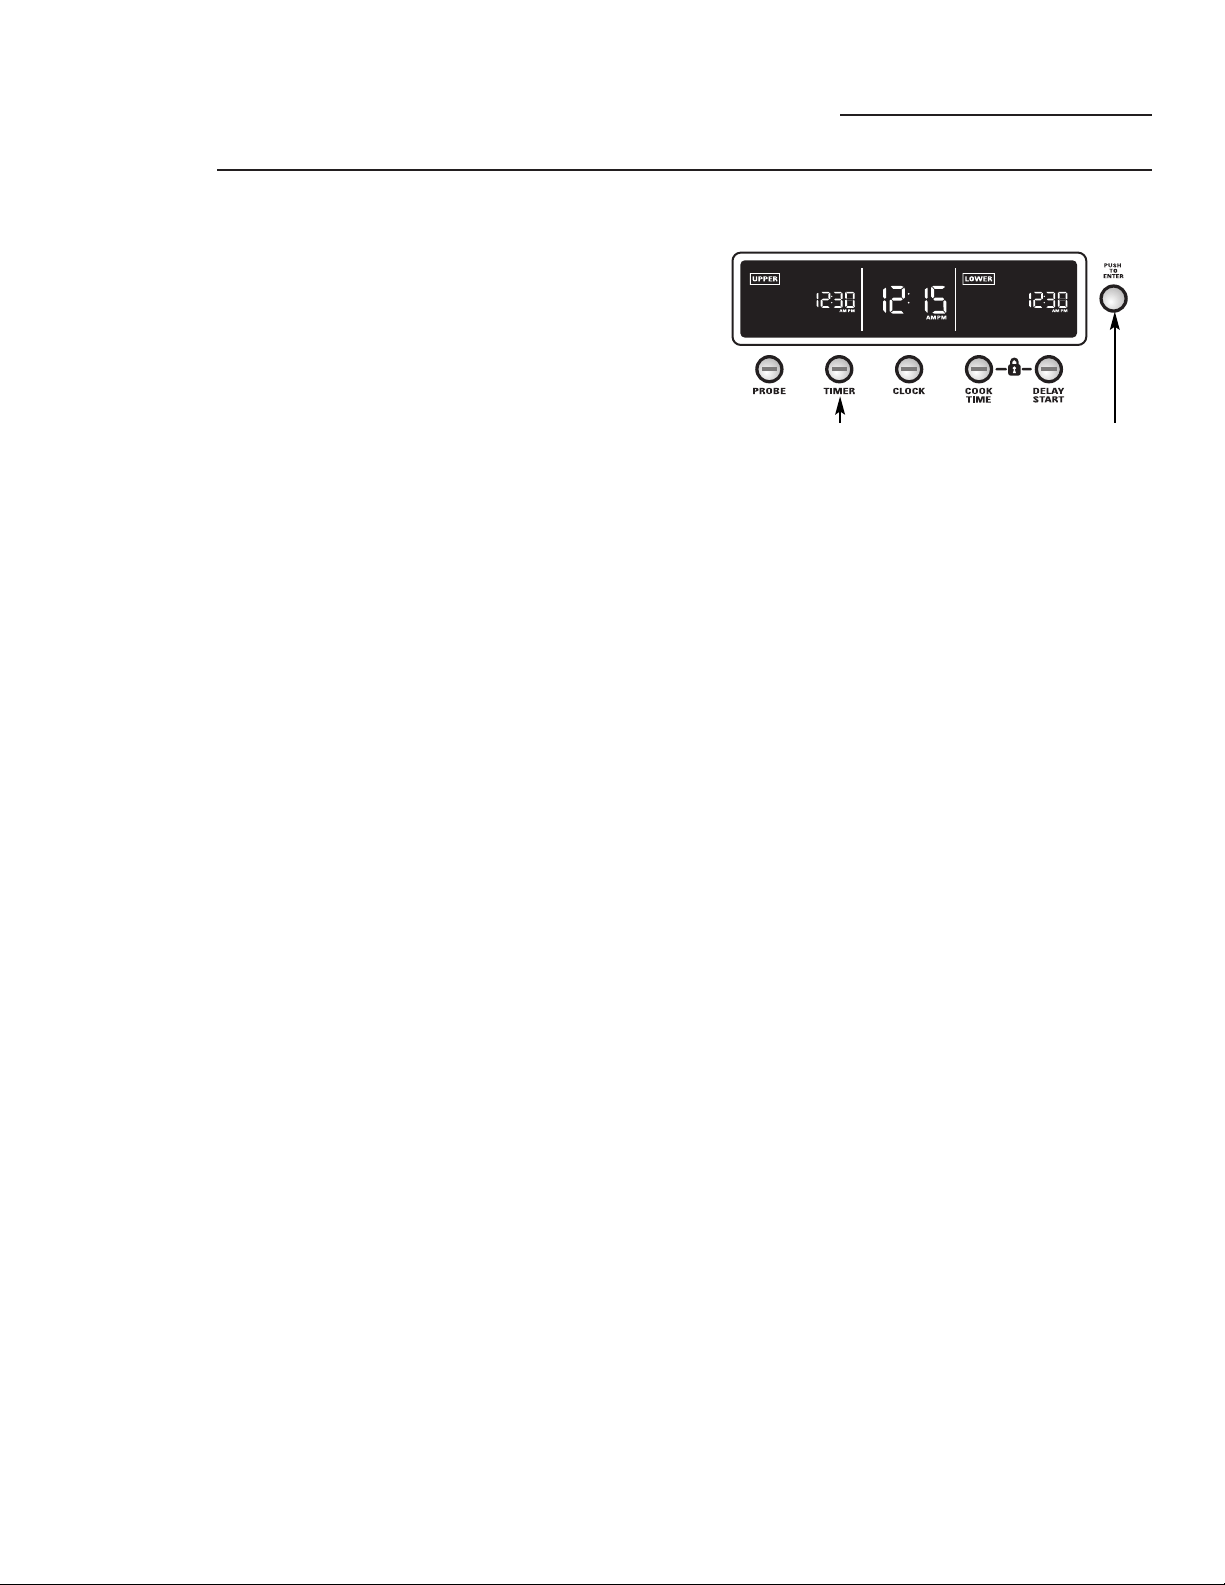
114
Temporizador
NOTA: el temporizador es independiente de todas
las demás funciones y no controla el horno.
Usted puede programar el temporizador para
el tiempo de cocción o para otras actividades
del hogar hasta 11 horas y 59 minutos.
Para configurar el temporizador:
1 Presione el botón TIMER (Temporizador).
2 Gire la perilla pequeña para seleccionar
la cantidad de tiempo para el temporizador
hasta 11 horas y 59 minutos y presione para
ingresarla.
En modelos de hornos dobles, puede configurarse
un segundo temporizador presionando dos veces
el botón TIMER (Temporizador).
La pantalla del temporizador mostrará
horas y minutos contando en forma regresiva
de a 1 minuto por vez de 24 horas a 1 hora.
Cambiará para mostrar los minutos y segundos
en cuenta regresiva hasta alcanzar el último
minuto. El control sonará y la pantalla mostrará
segundos hasta que el temporizador llegue
a :00.
Cuando el temporizador llegue a :00,
el control sonará 3 veces seguidas de un bip
cada 6 segundos hasta que se presione el botón
TIMER (Temporizador).
El tono de 6 segundos puede cancelarse
siguiendo los pasos de Tonos al final de un ciclo
programado en la sección Funciones especiales.
Para cancelar el temporizador:
1 Presione el botón TIMER (Temporizador).
2 Gire la perilla pequeña a :00 y presione para
ingresar.
Función temporizador
Horno de pared
Perilla
pequeña
Gire para
seleccionar
Presione
para aceptar
Presione para
seleccionar
Se muestra la pantalla de un horno doble.
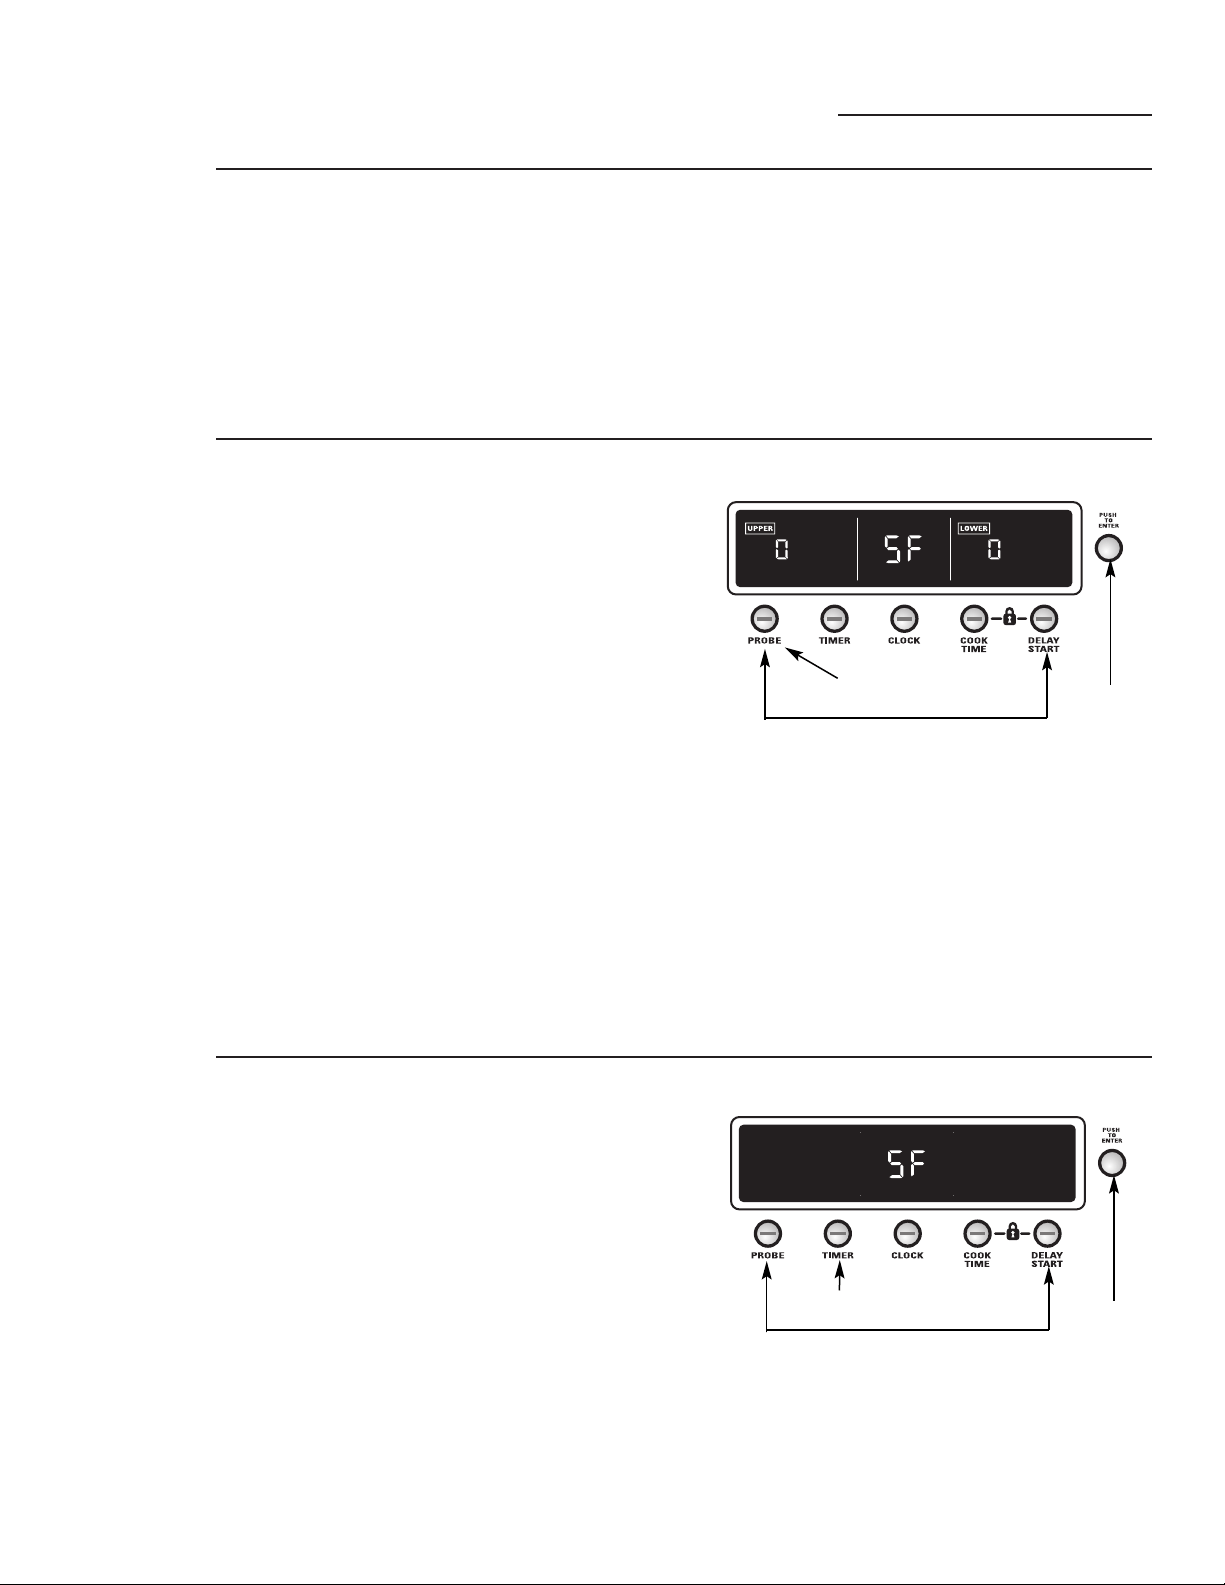
Funciones especiales
Horno de pared
Características
especiales
de control
de su horno
Su horno tiene Funciones especiales que puede escoger y utilizar.
Dichos modos permanecen en la memoria del control
hasta que los pasos sean repetidos. Las características
especiales permanecerán en la memoria después de
una falla en el suministro de electricidad.
Debe colocarse en OFF (Apagado) la perilla de modo
o la de temperatura.
En modelos de hornos dobles, deberá colocarse en OFF (Apagado)
la perilla de modo o la de temperatura para cada horno.
NOTA: en el modo Funciones especiales, si no se presiona
la perilla pequeña para ingresar una opción luego de 60
segundos, el modo se cancelará (sin cambios) y volverá
a aparecer la hora del día en la pantalla.
A continuación figuran las funciones y cómo puede
activarlas.
Tonos al
final de
un ciclo
cronometrado
Al final de un ciclo cronometrado, sonarán 3 pitidos cortos
seguidos por un pitido cada 6 segundos hasta que se presione
el botón TIMER (Temporizador). Este pitido continuo cada
6 segundos puede cancelarse. Para cancelar el pitido cada 6
segundos:
1 Presione y mantenga presionados los botones PROBE
(Sonda) y DELAY START (Inicio tardío) al mismo
tiempo durante 4 segundos hasta que la pantalla
muestre SF (Funciones especiales).
2 Presione el botón TIMER (Temporizador) para
escoger entre:
con SF bEEP: bips continuos; sonarán bips de
recordatorio luego de que haya finalizado un ciclo
programado hasta que se presione el botón TIMER
(Temporizador).
SF bEEP: sin bips; se cancelan los bips de
recordatorio luego de un ciclo programado.
3 Presione la perilla pequeña para aceptar su elección.
Ajuste del
termostato
del horno
Usted se puede percatar que su horno nuevo cocina distinto
al que reemplazó. Use su horno nuevo por varias semanas
para familiarizarse con él. Si aún piensa que su horno nuevo
es demasiado caliente o demasiado frío, usted puede ajustar
el termostato usted mismo.
Para ajustar el termostato del horno:
1 Presione y mantenga presionados los botones PROBE
(Sonda) y DELAY START (Inicio tardío) al mismo
tiempo durante 4 segundos hasta que la pantalla
muestre SF (Funciones especiales).
2 Presione el botón PROBE (Sonda). Aparecerá “0”
en la pantalla.
En los modelos de hornos de pared doble, aparecerá “0”
tanto en la pantalla del horno superior como inferior.
Presione el botón PROBE (Sonda) una segunda vez
(“UPPER” [“superior”] aparecerá en la pantalla) para
configurar el horno superior, y presione PROBE (Sonda)
una 3ra vez (aparecerá “LOWER” [“inferior”] en
la pantalla) para configurar el horno inferior.
3 Gire la perilla pequeña para ajustar el termostato
del horno hasta 35 °F más caliente o (-) 35 °F más frío
en incrementos de 1 °F.
4 Presione la perilla pequeña para aceptar su elección.
5 Presione y mantenga presionada la perilla pequeña
durante 5 segundos par salir de SF (Funciones
especiales) y regresar al reloj con la hora del día.
3. Perilla
pequeña
Presione para
aceptar su
elección
2. Presione para elegir.
Se muestra la pantalla de un horno doble.
1. Mantenga presionado al mismo tiempo para
ingresar/salir de SF (Funciones especiales).
Se muestra la pantalla de un horno doble.
No use termómetros, como los que se venden en tiendas
de aprovisionamiento para inspeccionar la temperatura
de su horno. Estos termómetros podrían variar de 20 a 40
grados.
NOTA: este ajuste sólo afectará la temperatura de horneado
y asado; no afecta las temperaturas de asado a la parrilla,
convección o autolimpieza. El ajuste se almacenará en
la memoria después de una falla eléctrica.
3. Perilla
pequeña
Presione para
aceptar su
elección
2. Presione para elegir.
1. Mantenga presionado al mismo tiempo para
ingresar/salir de SF (Funciones especiales).
4 Presione y mantenga presionada la perilla pequeña
durante 5 segundos par salir de SF (Funciones
especiales) y regresar al reloj con la hora del día.
NOTA: en modelos de horno doble, esto cancela el sonido
del final del ciclo para ambos hornos.
115
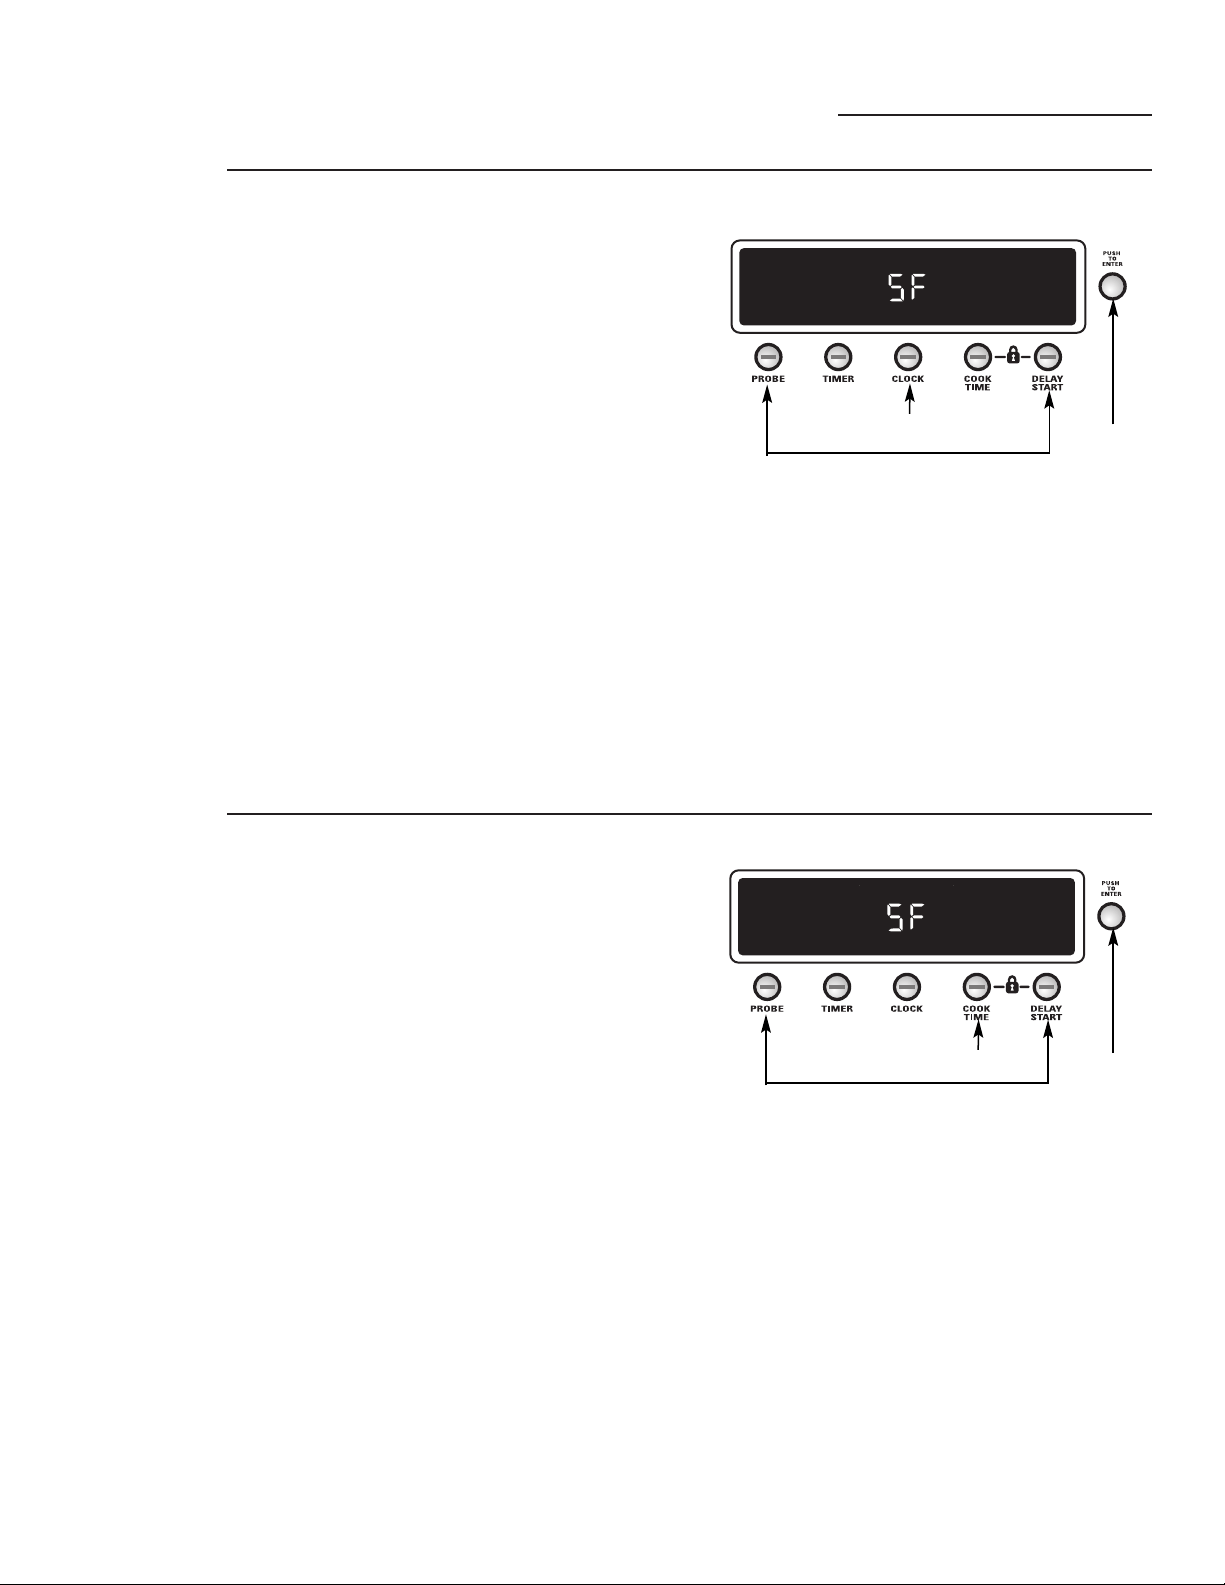
116
Volumen
del sonido
Esta función le permite ajustar los volúmenes del sonido a
valores más aceptables. Existen tres niveles posibles de volumen.
1 Presione y mantenga presionados los botones
PROBE (Sonda) y DELAY START (Inicio
tardío) al mismo tiempo durante 4 segundos
hasta que la pantalla muestre SF (Funciones
especiales).
2 Presione el botón COOK TIME (Tiempo
de cocción) para escoger entre:
1 SF bEEP: volumen de bip más bajo.
2 SF bEEP: volumen de bip medio.
3 SF bEEP: volumen de bip más alto.
3 Presione la perilla pequeña para aceptar
su elección.
4 Presione y mantenga presionada la perilla
pequeña durante 5 segundos par salir de
SF (Funciones especiales) y regresar al reloj
con la hora del día.
NOTA:
En los modelos de horno doble, esto activa dicha
función especial para ambos hornos.
Funciones especiales
Horno de pared
Reloj de
12 horas,
24 horas
o supresión
del reloj
Su control está configurado para utilizar un reloj de
12 horas. Si usted preferiría tener un reloj de 24 horas
o suprimir el reloj de la pantalla, siga los pasos a
continuación.
1 Presione y mantenga presionados los botones
PROBE (Sonda) y DELAY START (Inicio
tardío) al mismo tiempo durante 4 segundos
hasta que la pantalla muestre SF (Funciones
especiales).
2 Presione el botón CLOCK (Reloj) para
escoger entre:
12 hr: reloj de 12 horas con AM y PM.
24 hr: reloj de 24 horas; horario militar.
OFF (Apagado): apaga el reloj de
la pantalla.
3 Presione la perilla pequeña para aceptar
su elección.
4 Presione y mantenga presionada la perilla
pequeña durante 5 segundos par salir de SF
(Funciones especiales).
NOTA: si el reloj está en el modo suprimido, no podrá
utilizar la función Delay Start.
Se muestra la pantalla de un horno doble.
Se muestra la pantalla de un horno doble.
3. Perilla
pequeña
Presione
para aceptar
su elección
2. Presione para elegir.
1. Mantenga presionado al mismo tiempo para
ingresar/salir de SF (Funciones especiales).
3. Perilla
pequeña
Presione
para aceptar
su elección
2. Presione para elegir.
1. Mantenga presionado al mismo tiempo para
ingresar/salir de SF (Funciones especiales).

117
Función
Sabbath,
apagado
de 12 horas
o sin
apagado
Con esta función, si usted deja accidentalmente
el horno encendido, el control lo apagará en forma
automática después de 12 horas durante las
funciones de horneado. Si desea apagar esta
función, siga los pasos a continuación.
1 Presione y mantenga presionados los botones
PROBE (Sonda) y DELAY START (Inicio
tardío) al mismo tiempo durante 4 segundos
hasta que la pantalla muestre SF (Funciones
especiales).
2 Presione el botón DELAY START
(Inicio tardío) para escoger entre:
12 SF Shdn: el horno se apagará
automáticamente luego de 12 horas.
no SF Shdn: el horno no se apagará
automáticamente luego de 12 horas.
SAbbAth: diseñado para usar en el Sabbath
judío y en los feriados.
La función Sabbath puede usarse sólo
para hornear/asar. No puede usarse para
convección, asado a la parrilla, autolimpieza
o Inicio tardío de cocción.
Cuando esté configurada la función
Sabbath, la luz del horno y todos los bips
audibles ser deshabilitarán. La función
también proporcionará un período de
demora al azar, de aproximadamente
30 segundos a 1 minuto, antes de que
el horno se encienda una vez que
se configure para BAKE (Hornear).
3 Presione la perilla pequeña para aceptar
su elección.
4 Presione y mantenga presionada la perilla
pequeña durante 5 segundos par salir de SF
(Funciones especiales) y regresar al reloj
con la hora del día.
NOTA:
En los modelos de horno doble, esto activa dicha
función especial para ambos hornos.
Funciones especiales
Horno de pared
Se muestra la pantalla de un horno doble.
3. Perilla
pequeña
Presione
para aceptar
su elección
2. Presione para elegir.
1. Mantenga presionado al mismo tiempo para
ingresar/salir de SF (Funciones especiales).
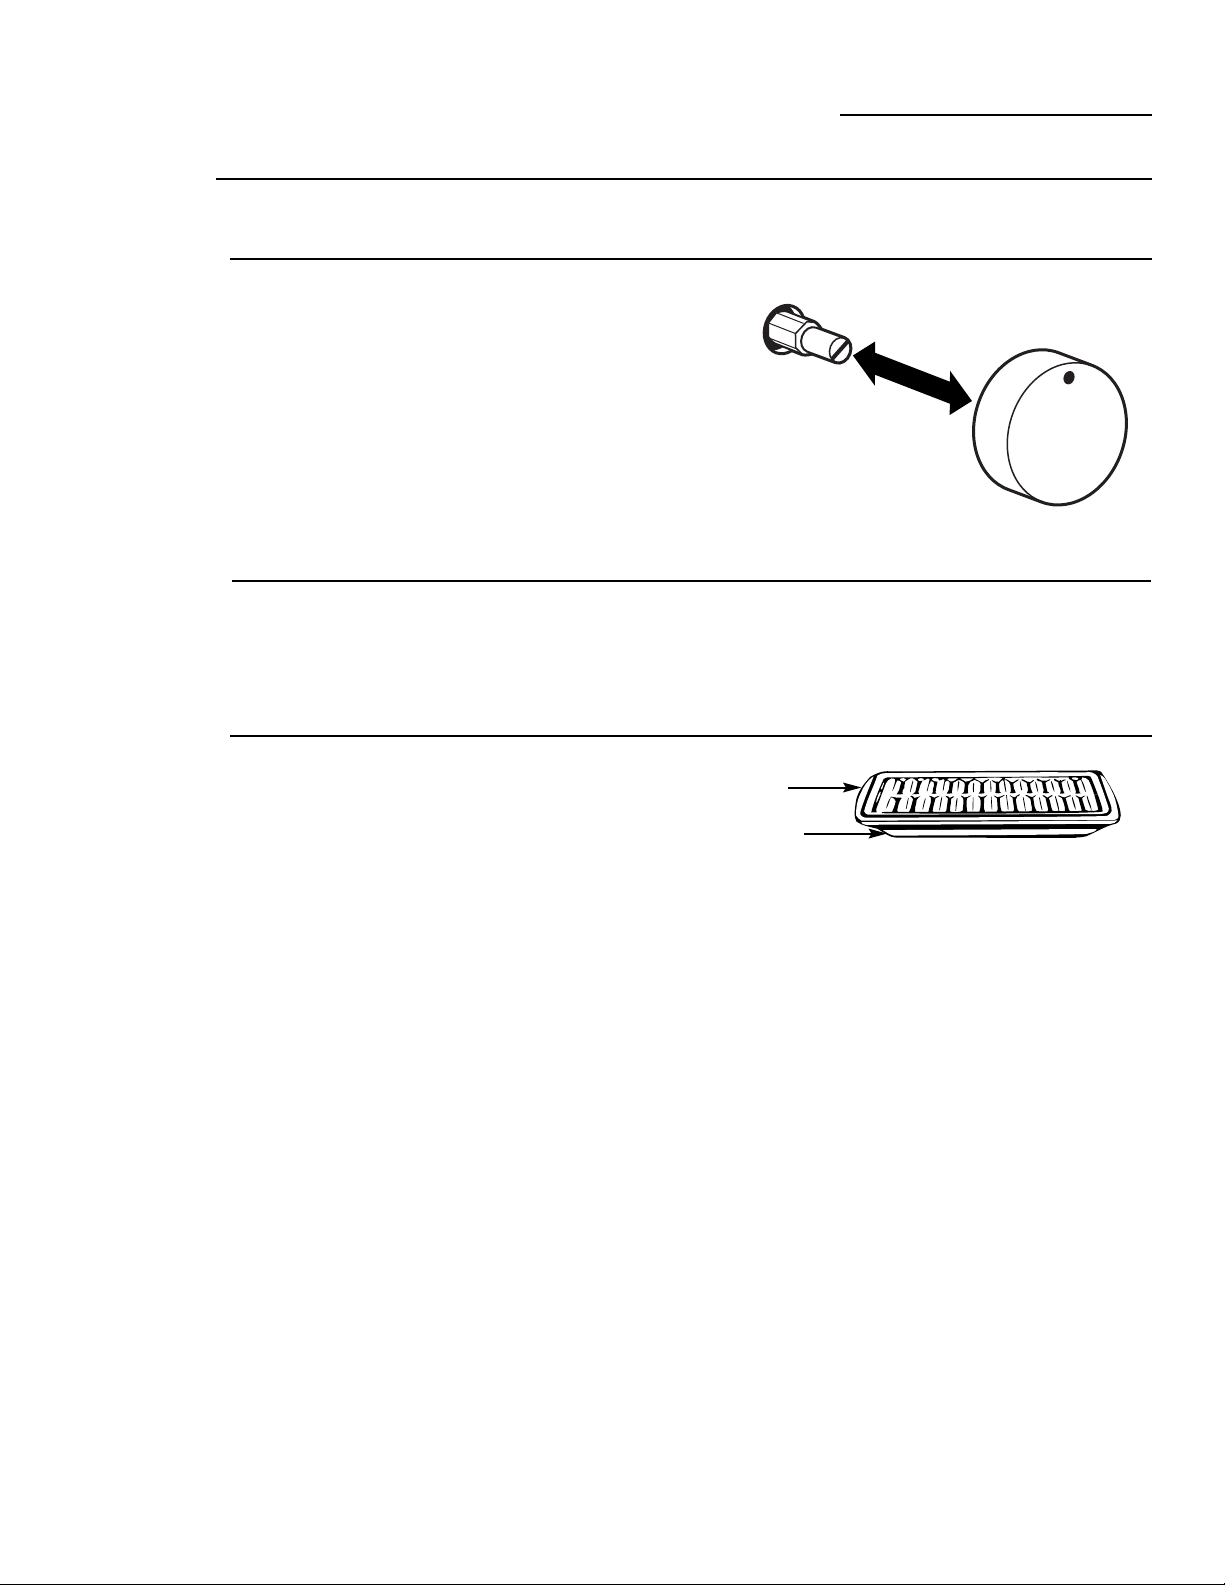
118
Panel de
control y
perillas
Limpie las salpicaduras con un trapo húmedo.
Quite la suciedad más difícil con agua tibia y
jabón.
No use abrasivos de ningún tipo en el panel de
control y las perillas.
Las perillas de control deben retirarse para
facilitar la limpieza. Para retirar una perilla,
tírela hacia afuera del vástago. Lave las perillas
con agua y jabón pero no las deje en remojo.
Elementos
calentadores
del horno
No limpie el elemento para asar a la parrilla.
Cualquier suciedad se quemará cuando
se caliente el elemento.
El elemento para hornear no está expuesto,
está debajo del piso del horno. Si se acumulan
excedentes, residuos o cenizas en el piso
del horno, limpie antes de la autolimpieza.
Asadera
y rejilla
Luego de asar a la parrilla, retire la asadera
y la rejilla del horno. Retire la rejilla de
la asadera. Vierta cuidadosamente la grasa de
la asadera en un contenedor adecuado. Lave
y enjuague la asadera y la parrilla con agua
caliente y una esponja con jabón o de plástico.
Si se han pegado alimentos, salpique la rejilla
con detergente mientras está caliente y cúbrala
con toallas de papel mojadas o un repasador.
Si remoja la asadera se removerán los alimentos
pegados.
La asadera y la rejilla pueden limpiarse con
un limpiador de hornos comercial.
La asadera y la rejilla también pueden limpiarse
en el lavaplatos.
No almacene una asadera o rejilla sucia en
ningún lugar del horno.
PRECAUCIÓN: no limpie la asadera
ni la rejilla en un horno autolimpiante.
Rejilla
Asadera
ANTES DE LIMPIAR CUALQUIER PARTE DEL HORNO, ASEGÚRESE DE QUE EL SUMINSTRO
ELÉCTRICO ESTÉ DESCONECTADO Y TODAS LAS SUPERFICIES ESTÉN FRÍAS.
Cuidados y Limpieza
Horno de pared
NOTA: la perilla pequeña no es removible.
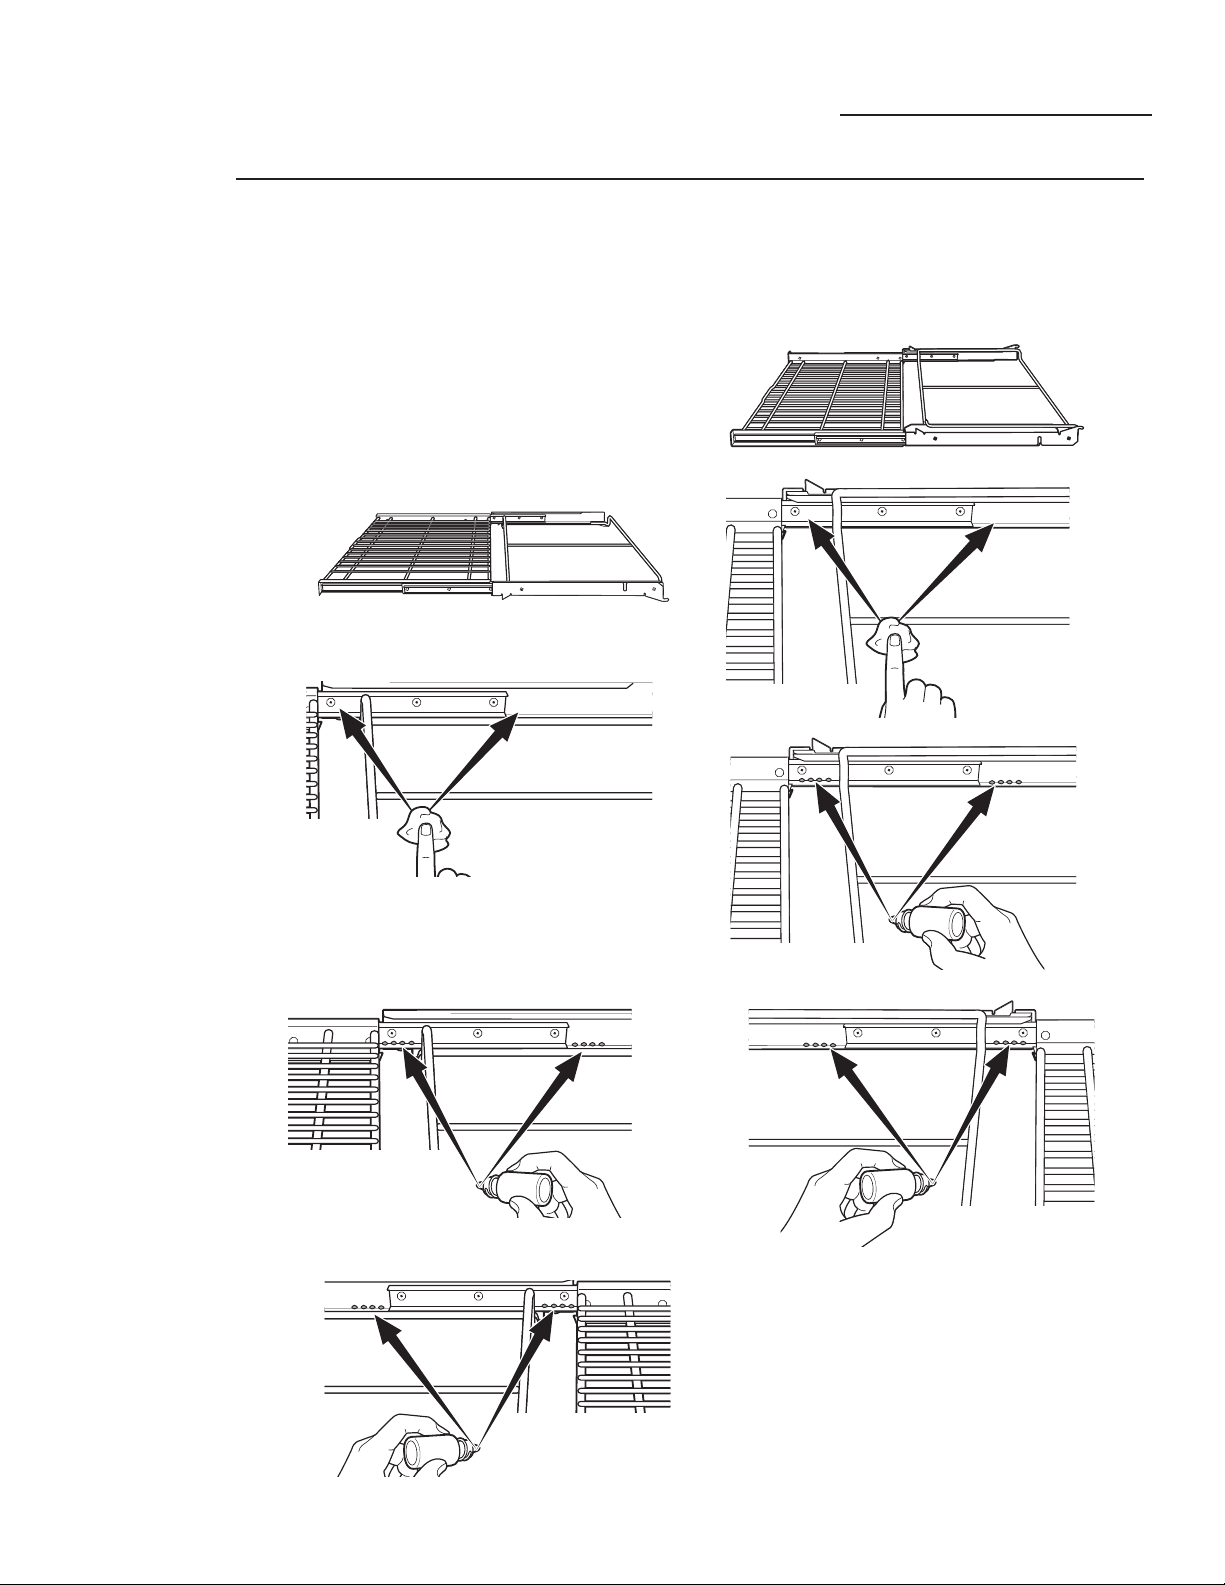
119
Cuidados y Limpieza
Horno de pared
Parrillas
para
hornos
Las parrillas pueden permanecer en el horno durante
el ciclo de autolimpieza sin dañarse.
Periódicamente, luego de varios ciclos de autolimpieza,
las parrillas del horno pueden necesitar ser lubricadas
usando la Lubricación de grafito que viene con su
horno de pared. Para pedir una Lubricación de grafito
adicional, comuníquese con nuestro Centro nacional
de piezas al 800.626.2002 y refiérase a WB02T10303.
1 Retire la parrilla del horno. Consulte la sección
Parrillas de horno de extensión completa.
2 Extienda la parrilla por completo en una mesa
o encimera. Debe colocarse periódico debajo de
la parrilla para facilitar la limpieza.
3 Si hay desechos en las vías de los rieles, límpielas
con una toalla de papel. NOTA: debe volver a colocarse
cualquier lubricante de grafito que se haya eliminado.
4 Agite el lubricante de grafito antes de abrirlo.
Comenzando con el mecanismo de deslizamiento
izquierdo de la parrilla, coloque (4) gotas pequeñas
de lubricante en las (2) vías inferiores del deslizador
cercano a los soportes.
5 Repita para el mecanismo deslizante derecho de
la parrilla.
6 Abra y cierre la parrilla varias veces para distribuir
el lubricante.
7 Vuelva a colocar la tapa en el lubricante y agítelo
nuevamente. Dé vuelta la parrilla y repita los pasos
3, 4, 5 y 6.
8 Cierre la parrilla, gírela y colóquela en el horno.
Consulte la sección Parrillas de horno de extensión
completa.
9 Repita los pasos anteriores para cada parrilla.
NOTA: no rocíe con Pam
®
ni otros sprays lubricantes.
Lado izquierdo
Lado izquierdo
Lado derecho
Lado derecho
Parrilla del lado derecho
Parrilla del lado derecho
Parrilla de reverso
Parrilla de reverso

120
Cuidados y Limpieza
Horno de pared
La puerta es muy pesada. Tenga cuidado al quitar
y levantar la puerta.
No levante la puerta de la manija.
Para quitar la puerta:
1
Abra la puerta por completo.
2
Tire hacia abajo los seguros de la bisagra hacia
el marco de la puerta, y colóquelos en la posición
de desbloqueo. Podrá ser necesario utilizar
una herramienta, como un destornillador
pequeño de hoja plana.
3
Sujete con firmeza ambos lados de la puerta
en la parte superior.
4
Cierre la puerta hasta la posición de remoción,
que es casi todo el recorrido y levántela hacia
arriba y hacia afuera hasta que la bisagra salga
de la ranura.
Para volver a colocar la puerta:
1
Sujete con firmeza ambos lados de la puerta
en la parte superior.
2
Con la puerta en el mismo ángulo que la posición
de extracción, coloque la muesca del brazo de
la bisagra en el borde inferior de la ranura de
la bisagra. La muesca en el brazo de la bisagra debe
estar bien asentada en la parte inferior de la ranura.
3
Abra la puerta por completo. Si la puerta no
se abre completamente, la muesca no está asentada
correctamente en el borde inferior de la ranura.
4
Empuje los seguros de la bisagra hacia arriba
contra el marco delantero de la cavidad del horno
y colóquelos en la posición de bloqueo.
5
Cierre la puerta del horno.
Puerta
extraíble
del
horno
—
extracción
Brazo de la bisagra
Muesca
Borde
inferior
de la
ranura
Posición de extracción
Seguro de la bisagra
Ranura
Tire los seguros de la bisagra hacia
abajo para desbloquearlos
Seguro de
la bisagra
Brazo de la
bisagra
Empuje los seguros de la bisagra
hacia arriba para bloquearlos
Sonda
La sonda de temperatura puede limpiarse con
agua y jabón o con una esponja limpiadora llena
con jabón. Enfríe la sonda de temperatura antes
de limpiarla. Quite las manchas rebeldes con
una esponja limpiadora llena con jabón,
enjuáguelas y séquelas.
No introduzca la sonda de temperatura en el agua.
No almacene la sonda de temperatura en el horno.
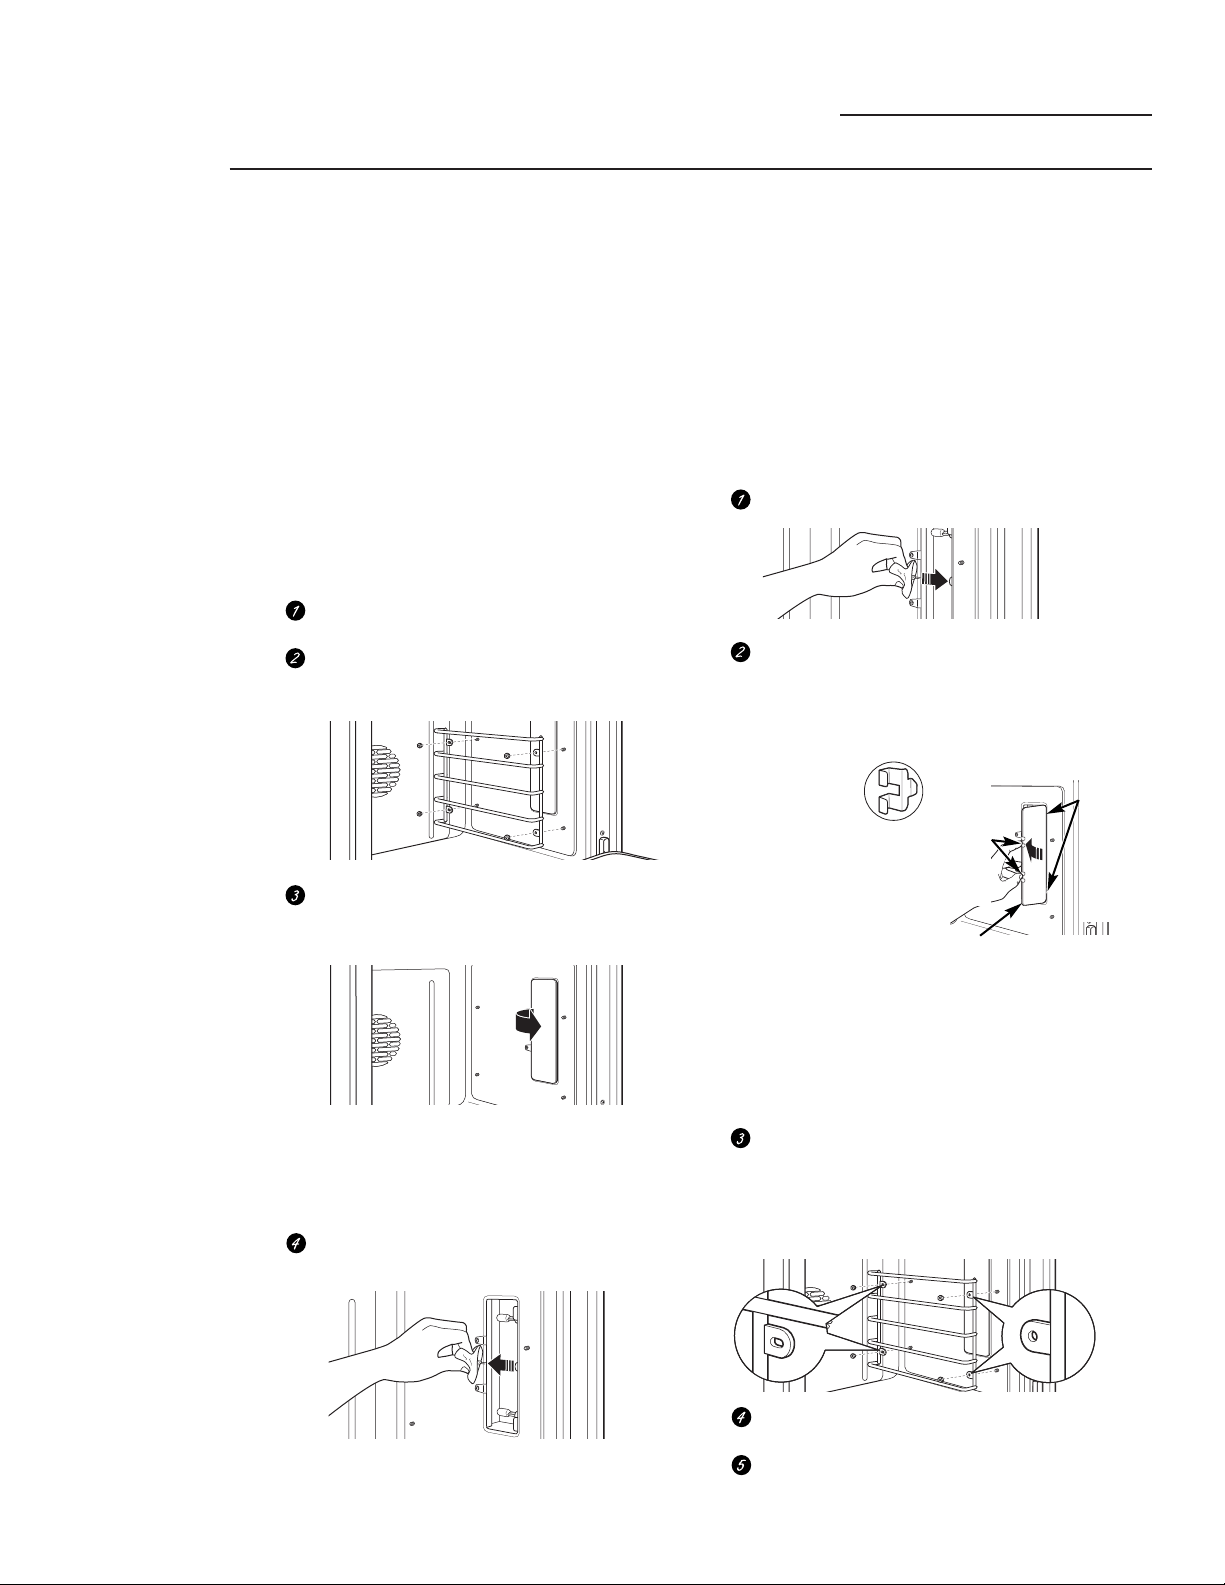
121
Cuidados y Limpieza
Horno de pared
Luces del
horno
Cada horno está equipado con dos unidades de luces
halógenas ubicados en las paredes laterales del mismo.
Las luces se encienden cuando la puerta se abre o
cuando el horno está en un ciclo de cocción. Las luces
del horno no se encienden durante la autolimpieza o
si está configurada la función Sabbath.
Cada unidad de luces consiste en una cubierta de luz
removible con dos trabas, un compartimiento de luz
con tres portalámparas y tres bombillas de luz halógena.
PRECAUCIÓN: antes de cambiar la bombilla,
desconecte la energía eléctrica en el fusil principal
o en el panel del disyuntor.
Asegúrese de dejar enfriar por completo la cubierta de
la luz y la bombilla.
Para su seguridad, no toque una bombilla caliente con
las manos ni con un trapo húmedo.
Para retirar:
Retire las parrillas del horno. Consulte la sección
Parrillas de horno de extensión completa.
Con una llave ajustable, retire las cuatro tuercas que
sostienen el soporte de la parrilla sobre la unidad
de luz.
Retire la cubierta de vidrio de la luz tirando de
su borde posterior hacia usted. No retire ningún
tornillo.
NOTA: las dos trabas pueden caerse de la cubierta
de vidrio de la luz. Luego del cambio, deberán ser
colocadas en la posición correcta sobre la cubierta
de la luz y presionadas hacia adentro de la unidad
hasta que calcen.
Usando guantes o un trapo seco, quite la bombilla
de luz quemada tirando hacia afuera.
Para volver a colocar:
Use una bombilla de halógeno de120 voltios nueva,
con clavijas G8, que no exceda los 25 vatios.
Las bombillas de repuesto pueden comprarse llamando al
800.626.2002. Pida el número de pieza WB25T10064.
NOTA: las bombillas con mayor voltaje dañarán su horno.
Usando guantes o un trapo seco, retire la bombilla
de su empaque. No toque la bombilla con los dedos.
La grasa de los dedos puede provocar manchas calientes
en la superficie del vidrio y hacer que la bombilla tenga
menor vida útil. Si toca el vidrio, límpielo con alcohol
antes de colocarlo.
Empuje la bombilla dentro del receptáculo.
Vuelva a poner la cubierta de la luz, colocando
su borde frontal debajo de las dos lengüetas
frontales de la unidad de luz. Coloque el borde
trasero en su lugar, asegurándose que encaje
firmemente.
NOTA: si las
trabas se caen
de la cubierta
del lente de vidrio,
sujételas sobre
la cubierta, en
la posición correcta,
mientras vuelve a
colocar la cubierta sobre
la unidad de luz.
La cubierta de la luz debe
estar en su lugar cuando utilice el horno.
Para mejorar la iluminación dentro del horno,
limpie frecuentemente la cubierta de vidrio
utilizando un trapo mojado. Esto puede realizarse
cuando el horno está apagado, desconectado de
la energía eléctrica y completamente frío.
Coloque el soporte de la parrilla con los orificios
ranurados sobre los pernos posteriores y los orificios
redondos sobre los pernos frontales. Asegure
levemente con las cuatro tuercas retiradas
anteriormente, pero no ajuste demasiado
para que no se salte el esmalte.
Vuelva a colocar las parrillas. Consulte la sección
Parrillas de horno de extensión completa.
Vuelva a conectar la energía eléctrica al horno.
Sujete
las trabas
en su lugar
sobre
el borde
trasero de
la cubierta
del lente
Presione la cubierta de
la luz en su lugar
Coloque el
borde
frontal de
la cubierta
del lente
debajo de
las dos
lengüetas
frontales
Orificios
redondos
sobre
pernos
frontales
Orificios
ranurados
sobre
pernos
posteriores
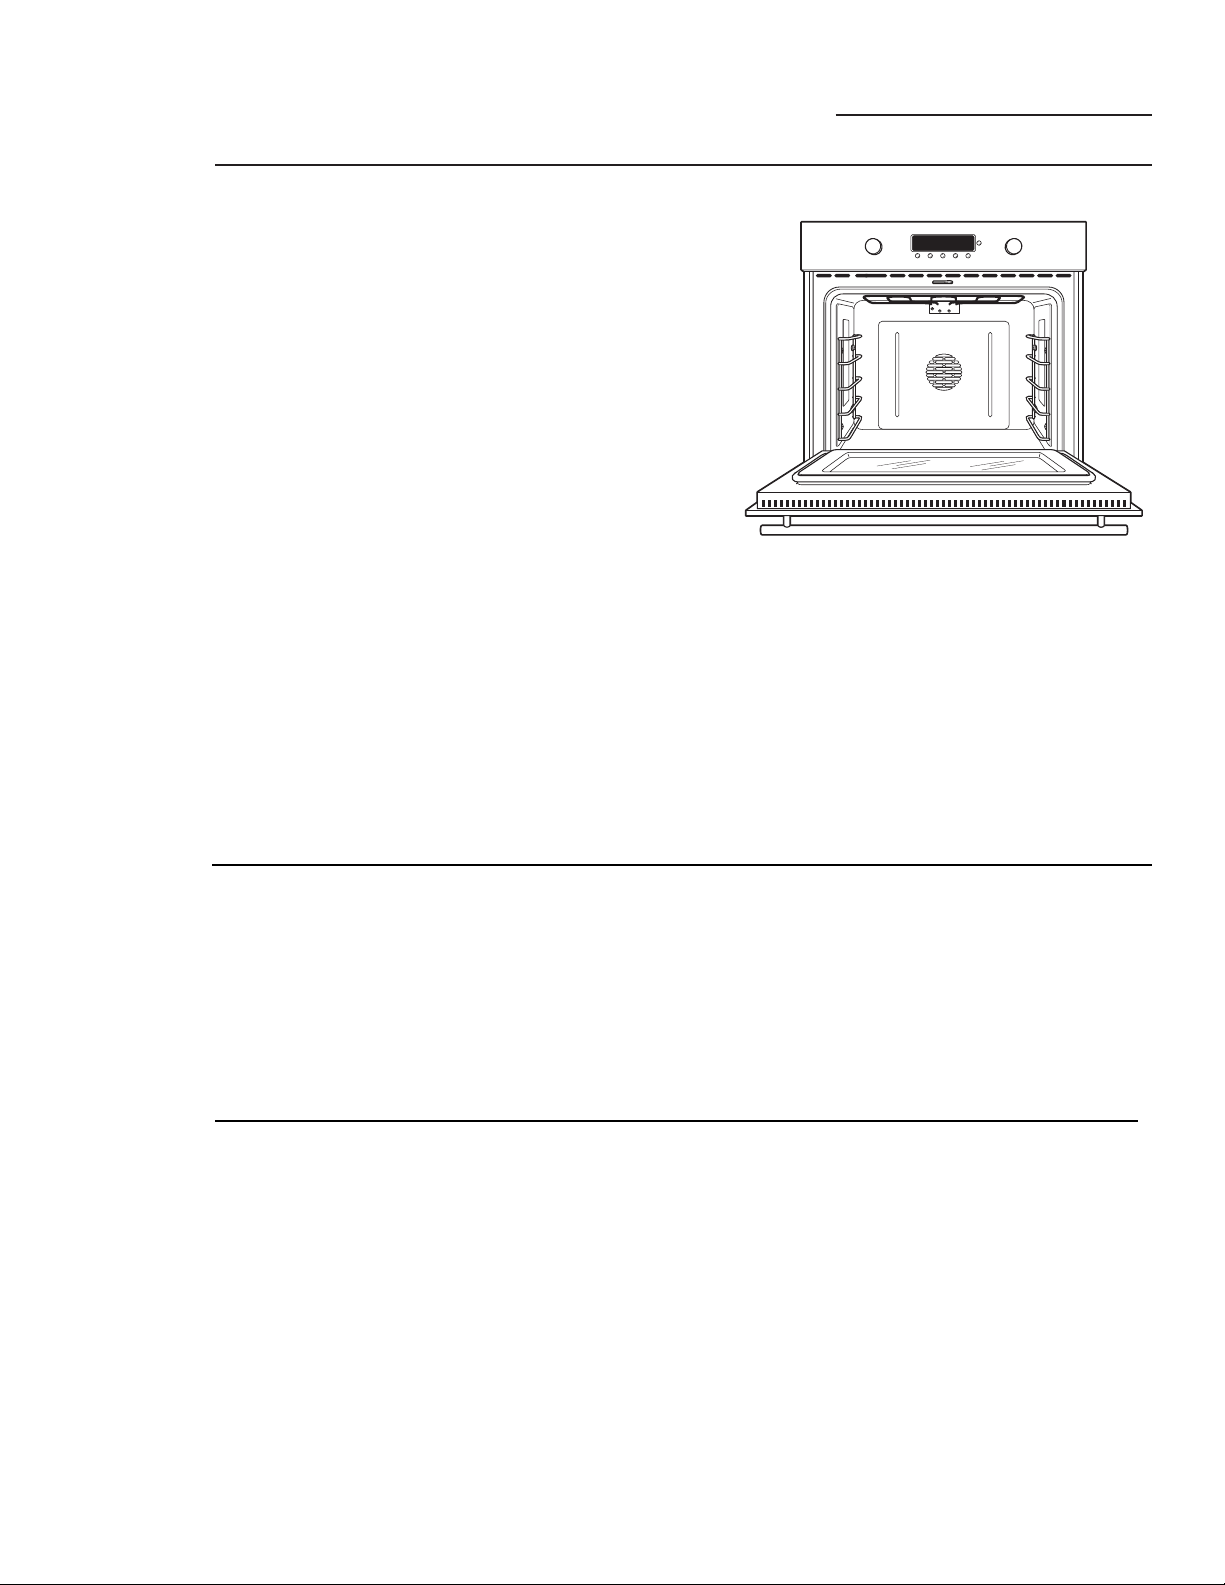
122
Para
limpiar la
puerta
Interior de la puerta:
• Debido a que el área dentro de la junta se limpia
durante el ciclo de limpieza automática, no es
necesario que la limpie de manera manual.
Cualquier resto de jabón en el revestimiento
causa manchas adicionales cuando el horno
se calienta, por lo tanto, asegúrese de
enjuagar bien.
• El área fuera de la junta pueden limpiarse
con una esponja limpiadora llena de jabón.
• No refriegue ni limpie la junta de la puerta,
el material de fibra de vidrio de la junta tiene
una resistencia extremadamente baja a los
abrasivos. Es esencial que la junta de la puerta
del horno esté intacta y bien mantenida para
un funcionamiento eficiente del horno y para
obtener buenos resultados al hornear.
Si observa que la junta se está desgastando o
dañando de alguna manera o si se ha movido
de lugar en el horno, hágala reparar.
Exterior de la puerta:
• Dependiendo de su modelo, consulte
la sección Superficies de acero inoxidable
o la sección Superficies pintadas.
Cuidados y Limpieza
Horno de pared
Las superficies pintadas incluyen la puerta,
la parte superior del panel de control y
la gaveta frontal. Límpielas con jabón y
agua o una solución de vinagre y agua.
No use limpiadores de horno comerciales,
limpiadores en polvo, lana de acero ni
abrasivos fuertes en ninguna superficie
pintada.
Superficies
pintadas
(en algunos
modelos)
No use una almohadilla de lana de acero;
rayará la superficie.
Para limpiar la superficie de acero inoxidable,
use agua jabonosa con poca espuma o bien
un limpiador o abrillantador para acero
inoxidable. Siempre limpie la superficie en
la dirección de las vetas. Siga las instrucciones
del limpiador para limpiar la superficie de
acero inoxidable.
Para averiguar acerca de la compra de un
limpiador o un lustrador de acero inoxidable,
o para encontrar la ubicación de su distribuidor
más cercano, por favor llame a nuestro número
gratuito, 800.626.2002 o visite ge.com.
Superficies
de acero
inoxidable
(en algunos
modelos)
PROBLEMA CAUSA POSIBLE
EL HORNO NO
•
Un fusible en su casa puede estar fundido o el disyuntor activado.
FUNCIONA
•
Los controles del horno no están adecuadamente configurados.
•
Los controles del horno están configurados para limpiar. Si es necesario, deje que
el horno se enfríe; luego abra la puerta.
•
Asegúrese que la perilla de modo esté colocada en BAKE (Hornear) y que
la perilla de temperatura esté configurada a una temperatura.
LA LUZ DEL HORNO
•
La bombilla de la luz no funciona. Cambie la bombilla.
NO FUNCIONA
•
El horno se está auto limpiando o está configurada la función Sabbath.
Las luces del horno no se encienden durante la autolimpieza o si está configurada
la función Sabbath.
LOS ALIMENTOS NO
•
Controles del horno no configurados apropiadamente. Consulte
SE HORNEAN O ASAN la sección Hornear o Asar.
APROPIADAMENTE
•
El horno no ha sido precalentado por un período de tiempo suficiente
(emplee aproximadamente de 10 a 15 minutos).
•
Se están utilizando utensilios de cocina inadecuados o de un tamaño incorrecto.
Consulte la sección Cambio de placa.
•
Parrillas en posición incorrecta. Consulte la sección Hornear o Asar.
•
Use una lámina de papel de aluminio para disminuir el dorado durante
el asado.
•
El termostato del horno necesita un ajuste. Consulte el Ajuste del termostato
del horno.
LOS ALIMENTOS
•
Este modelo está diseñado para un asado únicamente con la puerta
NO SE ASAN A LA cerrada. Cierre la puerta. Siempre ase a la parrilla con la puerta cerrada.
PARRILLA
•
Los controles del horno no están configurados en BROIL
APROPIADAMENTE (Asar a la parrilla). Consulte la sección Asar a la parrilla.
•
La sonda está conectada a la salida en el horno. Desconecte y retire la sonda
del horno.
•
Se está utilizando una posición inadecuada de la parrilla.
•
Los alimentos se están cocinando en una fuente caliente. Use la asadera y la rejilla
que vinieron con su horno.
•
Los utensilios de cocina no son adecuados para asar a la parrilla. Use la asadera y
la rejilla que vinieron con su horno.
•
El papel de aluminio usado sobre la asadera y la rejilla no se ha colocado
correctamente ni se ha cortado según lo recomendado.
•
En algunas áreas el voltaje puede ser bajo. Precaliente el elemento de asado
a la parrilla durante 10 minutos.
EL HORNO NO SE
•
La temperatura del horno es demasiado alta para establecer una operación
AUTO LIMPIARÁ de autolimpieza. Deje que el horno se enfríe por debajo de la temperatura de
bloqueo y reinicie los controles.
•
Los controles del horno no están adecuadamente configurados.
Consulte la sección Autolimpieza del horno.
SONIDO “CRUJIENTE”
•
Esto es normal. Este es el sonido del metal calentándose y
O DE “ESTALLIDO” enfriándose durante las funciones de cocción y limpieza.
DURANTE LA LIMPIEZA
HUMO EXCESIVO
•
Exceso de mugre. Gire la perilla de modo y la de temperatura a la posición
DURANTE LA LIMPIEZA
•
OFF (Apagado). Abra las ventanas para dejar salir el humo de la habitación.
Espere hasta que la luz indicadora de puerta bloqueada se apague. Limpie
el exceso de mugre y reinicie el ciclo de limpieza.
EL HORNO NO ESTÁ
•
El horno tiene mugre difícil de eliminar. Limpie las sobras pesadas antes de
LIMPIO DESPUÉS comenzar el ciclo de limpieza. Es posible que los hornos que tienen una mugre
DE UN CICLO DE muy pesada necesiten de autolimpieza nuevamente.
LIMPIEZA
•
El horno está conectado a un suministro eléctrico de 208V. Configure su tiempo
de limpieza en 5 horas.
•
Los controles del horno no están adecuadamente configurados. Consulte la
sección Autolimpieza del horno.
ES DIFÍCIL DESLIZAR
•
Las parrillas se limpiaron en el ciclo de autolimpieza y ahora necesitan una
LAS PARRILLAS DEL lubricación periódica. No rocíe con Pam
®
ni otros sprays lubricantes.
HORNO Consulte acerca de las Parrillas para horno de extensión completa
en la sección Cuidados y Limpieza.
Solución de problemas
Horno de pared
¡Ahorran
tiempo y
dinero!
Revise primero los
consejos para
resolución de
problemas en las
siguientes páginas y
es posible que no
tenga que llamar
para solicitar servicio
de mantenimiento.
123
124
¡Ahorran
tiempo y
dinero!
PROBLEMA CAUSA POSIBLE
EL RELOJ Y EL • Un fusible en su casa puede estar fundido o el disyuntor activado.
TEMPORIZADOR Reemplace el fusible o reinicie el disyuntor.
NO FUNCIONAN
• Controles del horno no configurados apropiadamente. Consulte
los secciónes Reloj y Temporizador.
LA TEMPERATURA • El termostato del horno necesita un ajuste. Consulte la sección
DEL HORNO ES Ajuste del termostato.
DEMASIADO ALTA O
DEMASIADO BAJA
LA PUERTA DEL • El horno está demasiado caliente. Permita que el horno se enfríe
HORNO NO SE ABRIRÁ por debajo de la temperatura de bloqueo.
DESPUÉS DE UN CICLO
DE LIMPIEZA
LOCKED PARPADEA • Se ha seleccionado el ciclo autolimpieza pero la puerta no está
EN LA PANTALLA cerrada. Cierre la puerta del horno.
LA LUZ LOCKED ESTÁ • La puerta del horno está bloqueada porque la temperatura dentro
ENCENDIDA CUANDO del horno no ha caído por debajo de la temperatura de bloqueo.
DESEA COCINAR Gire las perillas de modo y temperatura a la posición OFF (Apagado).
Deje que el horno se enfríe.
F9 TITILA • El horno tiene un código de error de funcionamiento. Gire las perillas
DE LA PANTALLA de modo y temperatura a la posición OFF (Apagado). Deje que el horno
se enfríe durante una hora. Vuelva a hacer funcionar el horno.
•
Desconecte toda la energía del horno durante 30 segundos y luego vuelva a
conectarlo. Si el código de error de funcionamiento se repite, llame al
servicio técnico.
LA PANTALLA SE • Un fusible en su casa puede estar fundido o el disyuntor activado.
PONE EN BLANCO Reemplace el fusible o reinicie el disyuntor.
• El reloj está en el modo de apagado. Consulte la sección Funciones
especiales.
LA PANTALLA PARPADEA
• Falla en el suministro de electricidad. Reinicie el reloj.
IMPOSIBLE LOGRAR • Los botones PROBE (Sonda) y DELAY START (Inicio tardío) deben
LA PANTALLA presionarse al mismo tiempo y mantenerse presionados durante
MUESTRE SF 4 segundos.
APARECE “PROBE” • Esto le recuerda ingresar una temperatura de sonda después de enchufar
EN LA PANTALLA la sonda. Ingrese una temperatura de sonda.
CORTE EN EL • Pico o corte del suministro eléctrico. Reinicie el reloj. Si el horno e
SUMINISTRO staba funcionando, debe reiniciarlo presionando el botón CLOCK
ELÉCTRICO, EL (Reloj), girando y presionando la perilla pequeña para aceptar.
RELOJ PARPADEA
SALE VAPOR DEL • Cuando se utiliza la característica por convección es normal ver vapor
RESPIRADERO saliendo del respiradero del horno. Conforme aumenta el número de
CUANDO SE UTILIZA parrillas o a cantidad de alimentos que están siendo cocinados, así
mismo aumentará la cantidad de vapor visible.
OLOR A “QUEMADO” • Esto es normal en un horno nuevo y desaparecerá con el tiempo.
O “ACEITOSO”
SALIENDO DEL
RESPIRADERO
OLOR FUERTE • Esto es temporal. Un olor del aislamiento al rededor del interior del
horno es normal las primeras veces que se utiliza el horno.
SUENA UN • Un ventilador de enfriamiento o un ventilador de convección
VENTILADOR (dependiendo de la función que esté utilizando) puede encenderse.
Esto es normal. El ventilador de enfriamiento se encenderá para
refrigerar las partes internas. Puede funcionar después que el horno
esté apagado. El ventilador de convección funcionará y se apagará
hasta que la función termine o la puerta sea abierta.
Solución de problemas
Horno de pared

125
General Electric Company
Warranty Registration Department
P.O. Box 32150
Louisville, KY 40232-2150
Coloque
Aquí
Estampilla
de Primera
Clase
GE Appliances
Inscripción del
consumidor de
propiedad de producto
Importante Envíe hoy

Inscripción del consumidor de propiedad de producto
Estimado cliente:
Gracias por comprar nuestro producto y por depositar su confianza en nosotros. ¡Estamos orgullosos de tenerlo como
cliente!
Siga estos tres pasos para proteger la inversión de su nuevo artefacto:
1
Complete y envíe su
Inscripción del consumidor
de propiedad de producto
hoy mismo.
Tenga la tranquilidad
de saber que lo podemos
contactar en caso de que
haya una modificación
de seguridad.
2
Después de completar
esta inscripción, escriba
los números de modelo y
de serie en este manual.
Necesitará esta
información en caso de
requerir servicio técnico.
El número de servicio
técnico en los EE.UU.:
800.444.1845. En Canadá: 1.888.880.3030.
3
Lea su Manual
del Usuario
cuidadosamente.
Le ayudará a operar
su nuevo artefacto
de manera correcta.
Importante: Para garantizar que su producto se encuentre registrado, envíe por correo la tarjeta individual
de inscripción de producto. Si la tarjeta individual de inscripción de producto se hubiera extraviado, doble y envíe
el formulario incluido a continuación. No se necesita un sobre.
Inscripción del consumidor de propiedad de producto
Producto Número de modelo Número de serie
Horno de pared
Nombre
N°
Departamento #
Dirección
Ciudad
Apellido
Código
postalEsta
do
Fecha de inicio
de uso
Mes Día Año
Número de
teléfono
CIERRE CON CINTA ADHESIVA
DOBLE AQUÍ
Sr. Sra.
Srta.
General Electric Company
Louisville, KY 40225
Monogram®
✄ ✄
✄
ge.com
126
¡Im
portante
Envíe hoy!
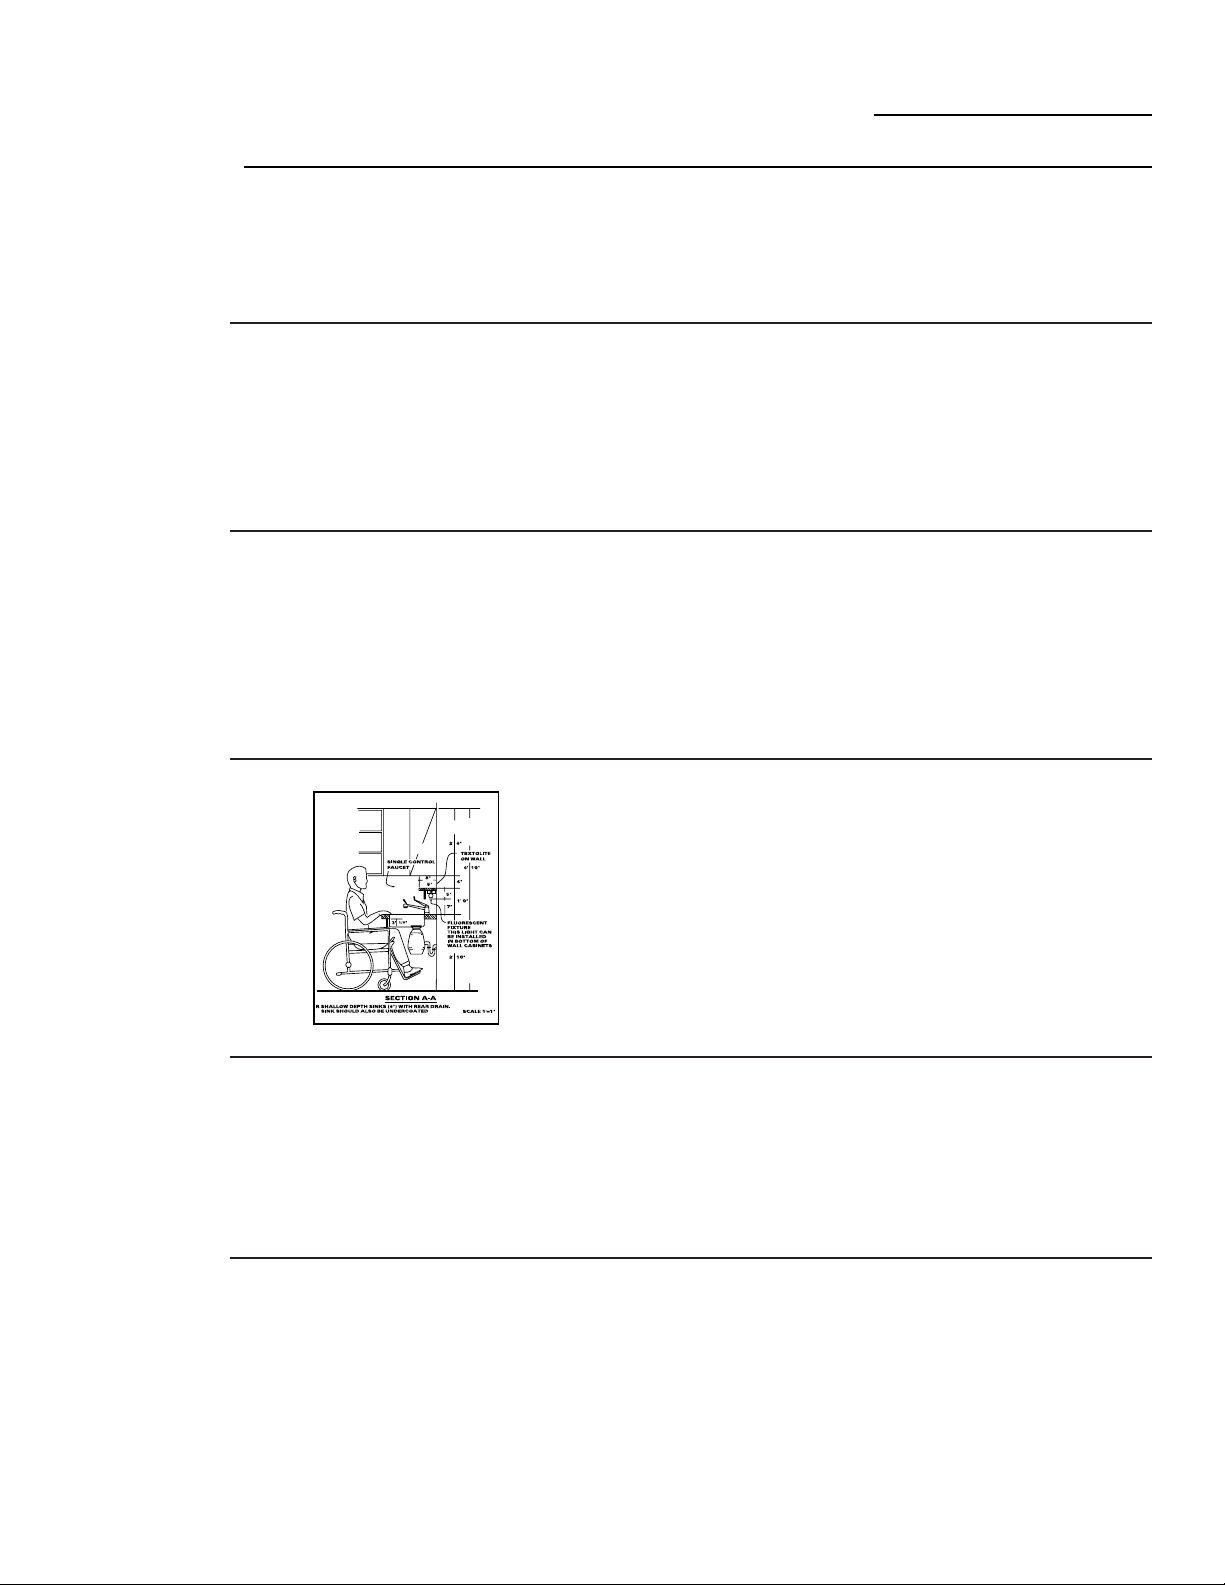
127
Con la compra de su nuevo aparato Monogram, tiene la seguridad
de que si alguna vez necesita información o ayuda de GE, allí
estaremos. ¡Todo lo que tiene que hacer es llamar gratis!
Centro de
atención GE
®
800.626.2000
Cualquiera sea su pregunta acerca de cualquier aparato Monogram, el servicio de información
del Centro de atención de GE
®
está disponible para ayudarlo. Su llamada, y su consulta, serán
atendidas a la brevedad y con cortesía. Y puede llamar en cualquier momento. El servicio del
Centro de atención GE
®
está abierto las 24 horas del día, 7 días a la semana.
O
Visite nuestro sitio web en: ge.com
Servicio de
reparación a
domicilio
800.444.1845
Un profesional del servicio al cliente de GE le brindará servicio de reparación de calidad,
programado a un horario conveniente para usted. Muchas localidades en las cuales funciona
el Servicio al cliente de GE le ofrecen servicio hoy o mañana, o cuando le sea conveniente
(7:00 a.m. a 7:00 p.m. días de semana, 9:00 a.m. a 2:00 p.m. sábados). Nuestros técnicos
entrenados en la fábrica conocen su aparato por dentro y por fuera, así que la mayoría
de las reparaciones pueden atenderse en una sola visita.
Contratos de
servicio
800.626.2224
Puede tener la certeza de que el Servicio al cliente de GE aún estará disponible luego
de que su garantía caduque. Compre un contrato con GE mientras su garantía está vigente
y recibirá un gran descuento. Con un contrato de varios años, se asegura los servicios futuros
a los precios actuales.
Refacciones y
accesorios
800.626.2002
Las personas calificadas para reparar sus propios aparatos pueden recibir piezas o accesorios
directamente en sus hogares. El sistema de piezas de GE le brinda acceso a 47.000 piezas… y
todas las Piezas de renovación genuinas de GE están completamente garantizadas. Se aceptan
tarjetas VISA, MasterCard y Discover.
Las instrucciones de mantenimiento que contiene este manual abarcan procedimientos que
pueden ser realizados por cualquier usuario. Otro tipo de servicio puede ser derivado a
personal de servicio calificado. Debe tomar sus precauciones, ya que una reparación
inadecuada puede provocar un funcionamiento inseguro.
Para clientes
con necesidades
especiales…
800.626.2000
GE le ofrece un folleto de ayuda para diseñar cocinas sin impedimentos
para personas con movilidad limitada.
Los clientes con dificultades en el habla o la audición que tienen acceso a
un TDD o a un teleimpresor convencional pueden llamar al
800.TDD.GEAC (800.833.4322) para solicitar información o servicio.
Servicios al cliente
Horno de pared
Garantía
Horno de pared
GARANTÍA DE SU HORNO DE PARED MONOGRAM
Adjunte la factura de compra o el cheque cancelado aquí. Se requiere
un comprobante de la fecha de compra original para obtener servicio
bajo la garantía. Cuando llame, tenga a la mano el número de serie
y el número de modelo.
COBERTURA
A partir de la
fecha de la
compra original
GARANTÍA POR UN AÑO
Durante un año a partir de la fecha de compra original le brindaremos, sin cargo, piezas de
repuesto y servicio de reparación en su hogar para reparar o cambiar cualquier pieza del horno
que no funcione debido a un defecto de fabricación.
Esta garantía se extiende al comprador original y a cualquier propietario que lo suceda para
el caso de productos comprados para uso doméstico en los Estados Unidos, Hawai o Washington,
D.C. Si el producto está ubicado en una zona donde nuestro Proveedor de servicios autorizado no
está disponible, usted será responsable de los gastos del flete o se le solicitará que lleve el producto
a una localidad con Servicio autorizado. En Alaska la garantía es la misma, excepto que usted debe
pagar el flete del producto al centro de servicio o el costo del viaje del técnico hasta su hogar.
Todos los servicios de la garantía serán provistos por nuestros Centros de servicios de fábrica o por
nuestros proveedores de servicios Care
®
durante el horario normal de trabajo.
Si su aparato necesitara servicio durante el período de garantía o más adelante, llame
al 800.444.1845.
Algunos estados no permiten la exclusión o limitación de daños incidentales o consiguientes, de
modo que esta limitación o exclusión quizás no le corresponda. Esta garantía le otorga derechos
jurídicos específicos y es posible que usted tenga también otros derechos que puedan variar de un
estado a otro estado. Para conocer los derechos jurídicos de su estado, consulte con su oficina local
o estatal de asuntos del consumidor o al procurador general de su estado.
Garante : General Electric Company,
Louisville, KY 40225
QUÉ NO ESTÁ
CUBIERTO
• Visitas de servicio técnico a su hogar para
enseñarle a usar el producto.
• Reemplazo de fusibles de su hogar o reajuste
de cortocircuitos.
• Daños al producto causados por accidente,
incendio, inundación o causas de fuerza mayor.
• Daños luego de la entrega.
• Falla del producto si se lo utiliza con fines
distintos a los propuestos o con fines
comerciales.
• Instalación, entrega o mantenimiento
inadecuados.
Si tiene un problema de instalación,
comuníquese con su distribuidor o instalador.
Usted es responsable de proporcionar las
instalaciones eléctricas, de gas, de desagote
y otras instalaciones de conexión según se
describe en las Instrucciones de instalación
provistas con el producto.
• Daños incidentales o consiguientes provocados
por posibles defectos en este aparato.
• Producto no accesible para brindar el servicio
requerido.
GE Consumer & Industrial
Appliances
General Electric Company
Louisville, KY 40225
ge.com
EXCLUSIÓN DE GARANTÍAS IMPLÍCITAS: su recurso único y exclusivo es la reparación
del producto según se estipula en esta Garantía limitada. Cualquier garantía implícita,
incluyendo las garantías implícitas de comerciabilidad o capacidad para un propósito
particular, están limitadas a un año o al período más corto permitido por la ley.