Loading ...
Loading ...
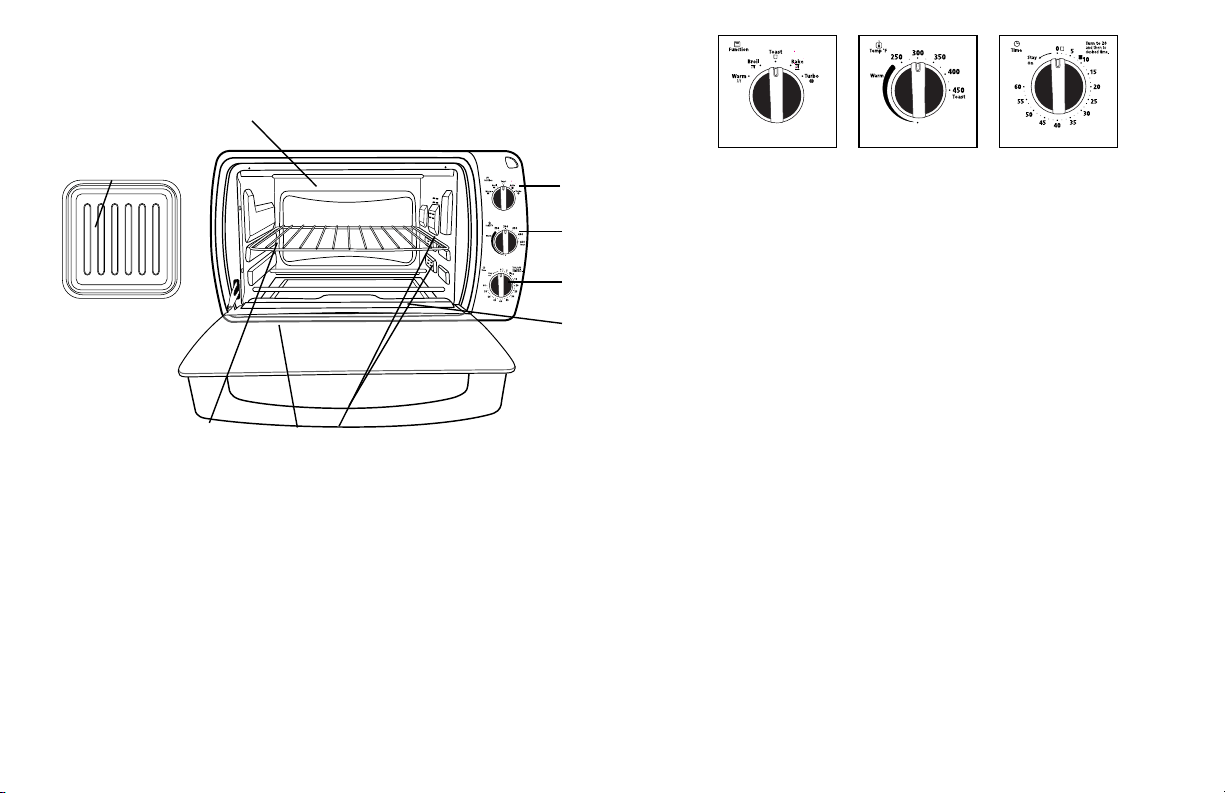
Figure 1 Figure 2 Figure 3
English-4
Learning about Your Countertop oven
1. Function Selector Knob – Select cooking function by turning knob to desired
setting. (See Figure 1)
2. Temperature Control Knob – Adjust the dial thermostat to the desired
temperature. (See Figure 2)
3. Timer Control Knob with Bell Signal – Set cooking time up to 60 minutes.
Will automatically turn the oven OFF at the end of the cooking time. (See
Figure 3)
4. Removable Crumb Tray – For crumb or fallen food particles collection. Pulls
out for easy cleaning.
5. Removable Wire/Broil Rack – Use for all your broiling and grilling needs. See
“Positioning Rack” and “Positioning Pan” sections.
6. Tempered Glass Door – For front viewing of food.
7. Two Rack Positions
1
7
8
2
3
4
5
6
9
English-5
8. Baking Pan & Cookie sheet in one – Use for all your baking needs.
See “Positioning Pan” section.
9. Easy Clean Interior Walls – Allows fast clean up.
preparing to use Your Countertop oven for the first time
NOTE: During initial start up you may detect a slight smell and/or smoke.
Turn the temperature to max and let run for approximately 5 minutes.
If you are using your Countertop oven for the first time, please be sure to:
• Remove any stickers from the surface of the oven.
• Open oven door and remove all printed documents and paper from
inside the Countertop Oven.
• Clean the rack and pan with hot water, a small amount of dishwashing
liquid and a non-abrasive cleaning pad.
• DO NOT IMMERSE THE BODY OF THE UNIT IN WATER.
• Dry the unit thoroughly before using.
• Select a location for the Countertop Oven. The location should be in
an open area on a flat counter where the plug will reach an outlet.
• Plug the Countertop Oven into a 120 Volt AC electrical outlet.
WARNING: When Countertop Oven is in use or cooling down, please be
sure there is a 6-inch clearance between the Countertop Oven and any other
surface including cords. Be sure the cord is not resting against the back of the
Countertop Oven.
Loading ...
Loading ...
Loading ...