Gather the required tools and parts before starting installation. Read and follow the instructions provided with any tools listed here.
Tools needed
Phillips screwdriver
Scissors
Pencil
Cordless drill and ¹⁄₈" bit
Parts supplied
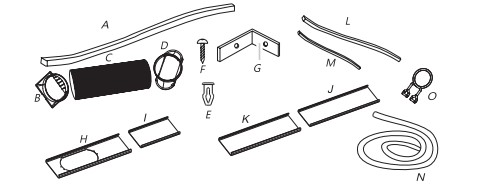
Check that all parts are included in parts package.
A.Foam seal
B.Coupling
C.Flexible exhaust hose
D.Window exhaust adapter
E.Rivets(4)
F.Screws(4)
G.Window-lock bracket(2)
H.Outer slider section with vent
I. Inner slider section-short
J.Inner slider section
K.Outer slider section
L.Foam seal-long(2)
M.Foam seal-short(2)
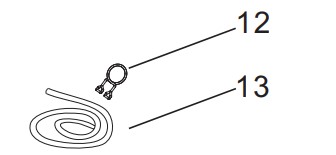
N.Drain hose (Heat pump models)
O.Drain hose clip(Heat pump models)
Electrical Requirements
Recommended Grounding Method
This portable air conditioner is equipped with a power supply cord with a three-prong grounding plug. The cord must be plugged into a mating, grounded three-prong outlet, grounded in accordance with all local codes and ordinances. If a mating outlet is not available, it is the customer's responsibility to have a properly grounded three-prong outlet installed by a qualified electrical installer.
Wiring requirement
115 V (103.5 min. to 126.5 max.)
15 A time-delay fuse or circuit breaker
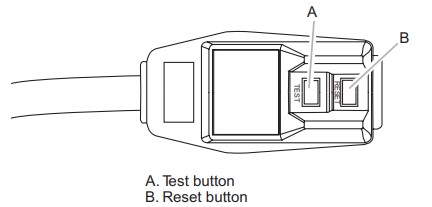
Power Supply Cord
NOTE: Your air conditioner’s device may differ from the one shown. This room air conditioner is equipped with a power supply cord required by UL. This power supply cord contains state-of-the-art electronics that sense leakage current. If the cord is crushed, the electronics detect leakage current and power will be disconnected in a fraction of a second.
To test your power supply cord:
Plug power supply cord into a grounded 3 prong outlet.
Press RESET (on some devices, a green light will turn on).
Press TEST (listen for click; Reset button will trip, and on some devices, a green light will turn off).
Press and release RESET (listen for click; Reset button will latch, and on some devices, a green light will turn on). The power supply cord is ready for operation.
NOTE:
The Reset button must be pushed in for proper operation.
The power supply cord must be replaced if it fails to trip when the test button is pressed or fails to reset.
Do not use the power supply cord as an off/on switch. The power supply cord is designed as a protective device.
A damaged power supply cord must be replaced with a new power supply cord obtained from the product manufacturer and must not be repaired.
The power supply cord contains no user serviceable parts. Opening the tamper-resistant case voids all warranty and performance claims.
Location Requirements
NOTE:
The flexible exhaust hose allows placement of the air conditioner at least 20" from window or door.
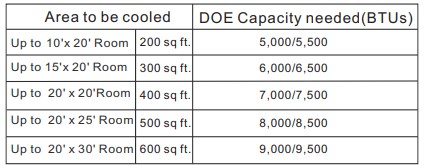
Confirm you are using the correct size air conditioner for the space to be cooled, per sizing recommendations, below:
NOTE: Match BTUs to room use and location:
Shaded room reduce to next smaller size
Sunny room increase to next larger size
For kitchens, increase to next larger size
INSTALLATION INSTRUCTIONS
Unpack the Air Conditioner
Remove packaging materials
Remove and recycle packaging materials. Remove tape and glue residue from surfaces before turning on the air conditioner. Rub a small amount of liquid dish soap over the adhesive with your fingers. Wipe with warm water and dry.
Caution: Installation accessories are stored in the top of the carton, and are required for proper cooling performance. Please remove all accessories from packing materials before use
Install The Portable Air Conditioner
Install Exhaust Hose and Adapter
Roll the air conditioner to selected location. see “Location Requirements”
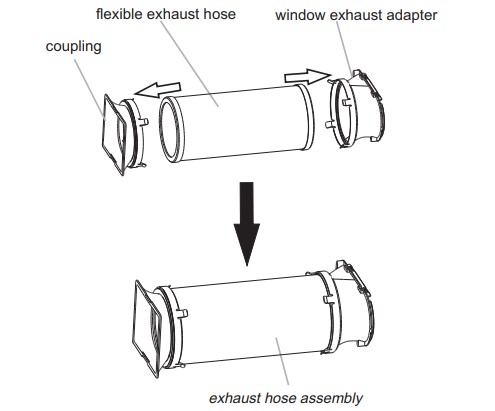
Preparing the exhaust hose assembly: Press the flexible exhaust hose into the coupling and the window exhaust adapter, Both the coupling and window exhaust adapter have integral clips that snap onto the hose.
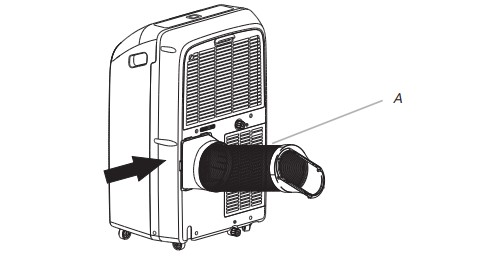
Insert the coupling into the slot on the back of the air conditioner.
Slide down to lock the hose into place.
Confirm the hose is locked in place before operating.
Window Installation
Your window installation kit has been designed to fit most standard vertical and horizontal window applications. Roll the air conditioner to selected location. see “Location Requirements”
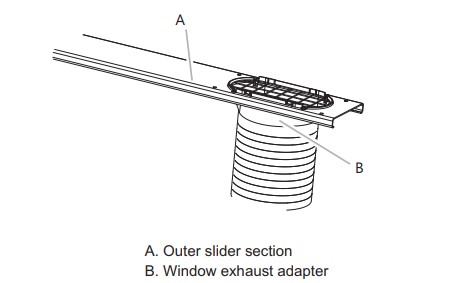
Attach the window exhaust adapter to the outer slider section (the piece with the large exhaust hole).
NOTE: Product must be used with included Duct Window installation kit for effective cooling.
Installation In Vertical Sliding Windows
NOTE:The window installation kit can be used with vertical sliding windows between 18'' and 50'' wide.
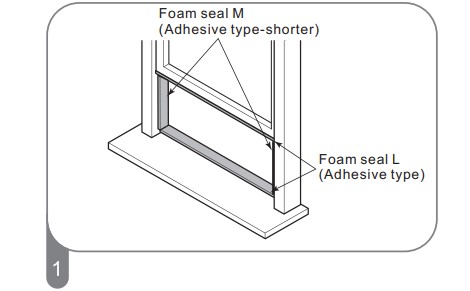
Cut the foam seal L(adhesive type) & M (adhesive type-shorter)to the proper length,and attcah it to the window sash and frame.
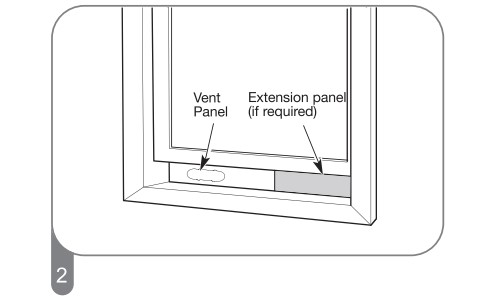
Insert the vent panel assembly, including extension panels, if needed, into the window opening. Extend the extension panels to the window width.
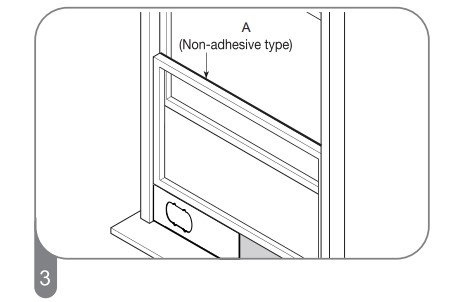
Cut the foam seal A(Non-adhesive type) to the window width. Stuff the foam seal A between the glass and the window to prevent air and foreign objects from getting into the room.
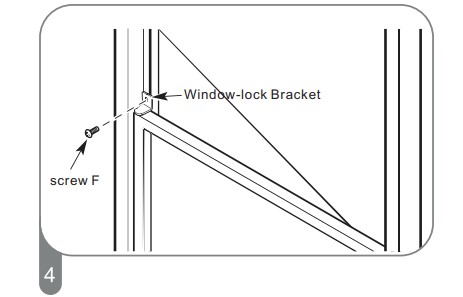
Install the Window-lock bracket with a type F screw as shown if you need.
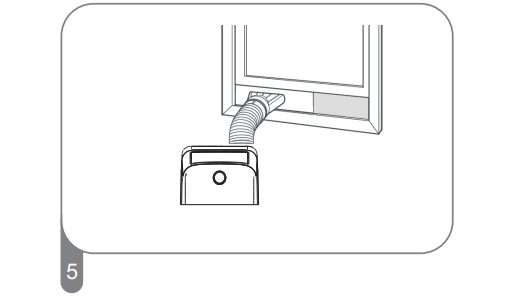
Insert the window exhaust adapter into the opening in the vent panel.
PORTABLE AIR CONDITIONER USE
Operating your portable air conditioner properly helps you to obtain the best possible results. This section explains proper air conditioner operation.
IMPORTANT:
Do not stay in direct airflow from the air conditioner for extended periods of time.
Never use in tightly enclosed spaces. Always ensure there is sufficient airflow of outside air entering the household especially when used in conjunction with combustible devices such as gas stoves, fireplaces, furnaces, hot water heaters etc. Do not place the power cord or air conditioner near a heater, radiator, stoves or other apparatus(including amplifiers) that produce heat.
This air conditioner is intended for household use as a residential appliance. Do not use it as a precision climate control for commercial use, or for precision equipment, food, pets, plants, artwork, etc.
Do not block or obstruct the exhaust vent hose as it may severely affect performance, or cause failure of the air conditioner.
The air conditioner display shows the current room temperature.
When changing modes while the air conditioner is in operation, the compressor will stop for 3 to 5 minutes before restarting. If a button is pressed during this time, the compressor will not restart for another 3 to 5 minutes.
In Cooling or Dry mode, the compressor and condenser fan will stop when the room temperature reaches the set temperature
On Dry mode, the humidity level is automatically set, but is not able to be displayed.
NOTE: In the event of a power failure, your air conditioner will operate at the previous settings when the power is restored.
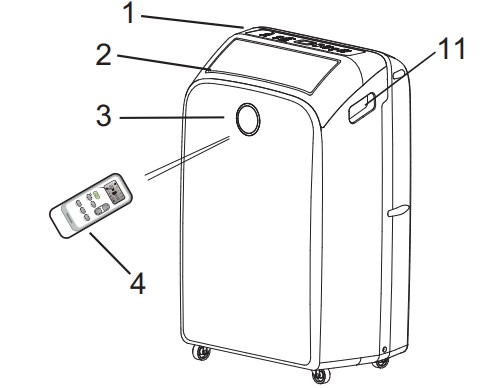
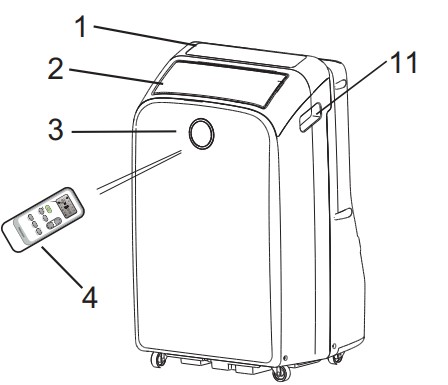
Using The Remote Control
Insert the Batteries
Remove the battery cover along the arrowed direction.
Insert new batteries making sure that the (+) and (-) of battery are matched correctly.
Re-attach the cover by sliding it back into position.
NOTE:
Use 2 standard AAA(1.5volt) batteries. Do not use rechargeable batteries
Replace batteries with new ones of the same type when the display becomes dim, or after 6 months.
When replacing batteries, always replace both batteries with new batteries. Do not mix old and new batteries. Do not mix alkaline, standard( carbon-zinc), or rechargeable (ni-cd, ni-mh, etc) batteries.
If the air conditioner will not be used for an extended period of time, remove the batteries from the remote.
How to Use
To operate the room air conditioner, aim the remote control at the signal receptor. The remote control will operate the air conditioner at a distance of up to 23'(7m) when pointing at signal receptor of the air conditioner.
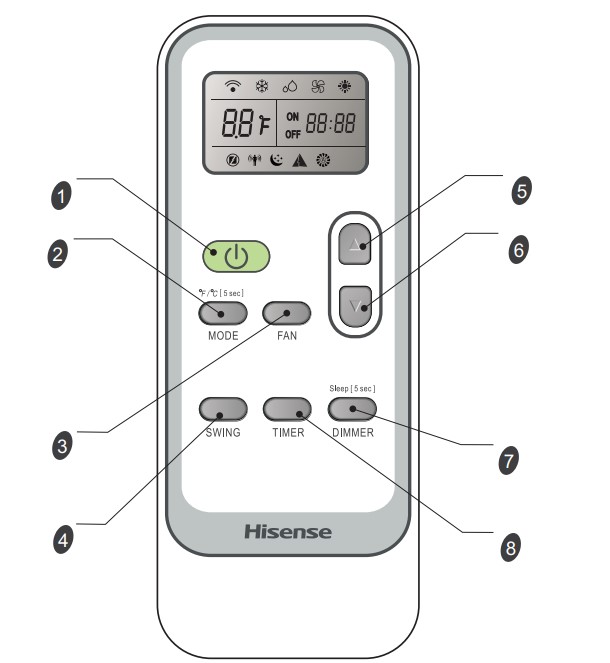
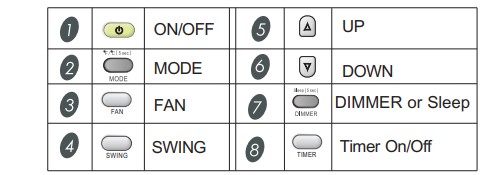
Remote control
NOTE: Remote control may differ in appearance.
Button and Function
NOTE: Press and hold the MODE button on the remote for 5 seconds to switch the temperature display from degrees Fahrenheit(°F) to degrees Celsius(°C).
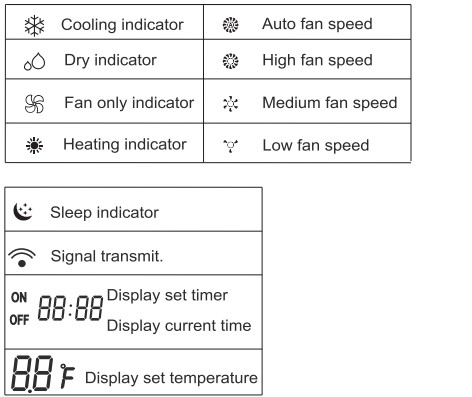
Indication symbols
Indication symbols on LCD
Sleep mode
SLEEP mode can only be set in Cooling, Heating or Drying modes. When in sleep mode the unit will utilize lower, quieter fanspeeds and automatic temperature adjustments offering 8 hours of optimal sleeping conditions before shutting off.
NOTE:
The appliance will stop operation automatically after operating for 8 hours.
Fan speed is automatically set at low speed.
In the Cooling mode, if the current room temperature is below 79°F(26°C), the temperature will automatically increase 1°F(1°C) during the first hour after Sleep control is activated, and continue running at that temperature. If the room temperature is 79°F(26°C) or above, set temperature will not change.
In Heating mode, the set temperature will decrease by 6°F(3°C) at most, during 3 hours, and continues running at that temperature until auto shut off.
Press MODE to select COOL, Heating or DRY.
Press the UP or DOWN button to set the temperature.
Press and hold the DIMMER button on the remote for 5 seconds to switch the DIMMER mode to the Sleep mode.
After 5 seconds, the lights on the control panel display will dim.
To turn off Sleep control, press MODE, FAN, Sleep or wait 8 hours for Sleep control to turn off automatically.
TIMER
Use the TIMER function to turn the air conditioner ON/OFF automatically.
Setting the Air Conditioner to Turn On:
Plug in the air conditioner and use the remote to power it ON.
Use the remote to set the desired mode, temperature, fan speed, etc.
Use the remote to power OFF the air conditioner.
Press TIMER on the remote and use the UP, DOWN buttons to set the desired delay time until the air conditioner turns ON. The delay time can be set from 0 to 24 hours in one-hour increments.
Press TIMER again to confirm the delay time. The TIMER light on the unit will be on.
Setting the Air Conditioner to Turn OFF:
Plug in the air conditioner and use the remote to power it ON.
Use the remote to set the desired mode, temperature, fan speed, etc.
Press TIMER on the remote and use the UP, DOWN buttons to set the desired delay time until the air conditioner turns OFF. The delay time can be set from 0 to 24 hours in one-hour increments.
Press TIMER again to confirm the delay time. The TIMER light on the unit will be on.
To cancel TIMER :
Press the TIMER button again. Once a “beep” is heard and the indicator disappears, the TIMER mode has been canceled.
Normal Sounds
When your air conditioner is operating normally, you may hear sounds such as:
Air movement from the fan.
Clicks from the thermostat cycling.
Vibration or noise due to poor wall or window construction.
A high-pitched hum or pulsating noise caused by the high-efficiency compressor cycling on and off.
PORTABLE AIR CONDITIONER CARE
Draining the Air Conditioner(non-Heating models)
1. Unplug the air conditioner or disconnect power.
2. Move the air conditioner to a drain location or outside.
NOTE: To avoid leaking water from the unit, move the air conditioner slowly and keep it level.
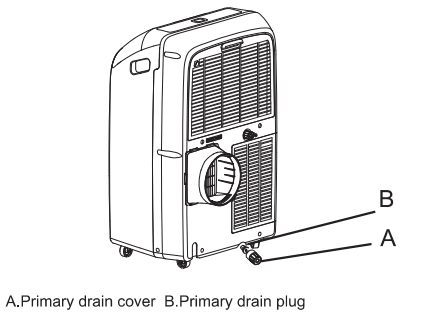
3. Remove the primary drain cover and plug.
4. Drain water completely through the drain hole.
NOTE: If the air conditioner will be stored after use, see "Storing After Use".
5. Reinstall the drain plug to the primary drain hole.
6. Reinstall the primary drain cover to the drain hole.
7. Reposition the air conditioner.
8. Plug in the air conditioner or reconnect power.
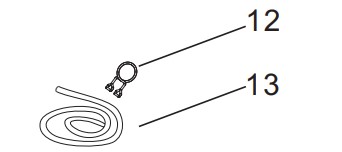
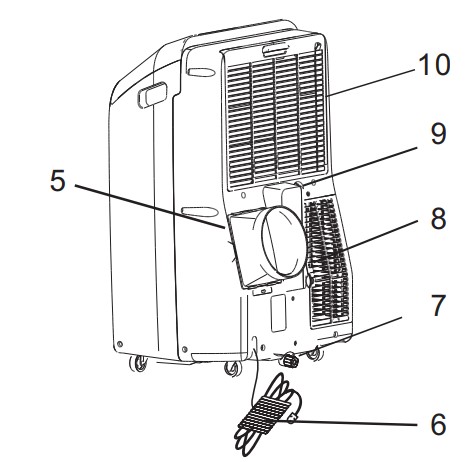
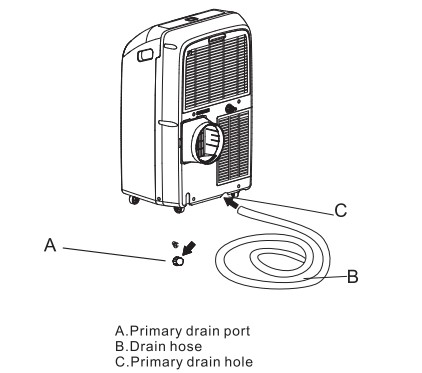
Draining the Air Conditioner(Heating models)
WARNING: Please connect the drain hose on heating mode, or the unit will stop running after the water the water reaches warning level.
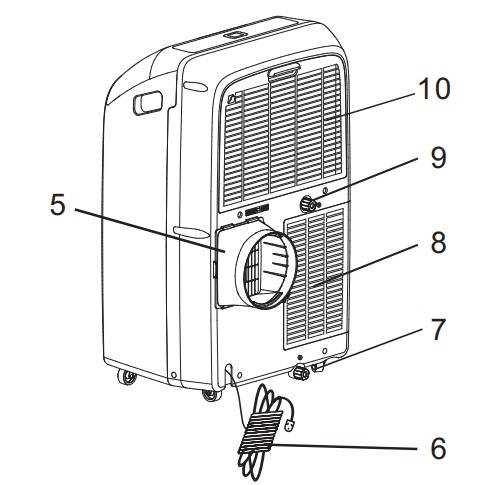
Uncover the primary drain port.
Attach the drain hose to the primary drain hose. Make sure the connector has no water leak.
Place the other end of drain hose into a outfall. Check to see that the hose lies flat and is in the drain. Make sure the hose end that goes to the drain is on a lower level than the hose end that connects to the unit. The hose should not be kinked or pinched.
Cleaning the Outside
Press ON/OFF to turn off the air conditioner.
Unplug the air conditioner or disconnect power.
Remove the air filter and clean separately.
Wipe the outside of the air conditioner with a soft, damp cloth.
Plug in the air conditioner or reconnect power.
Press ON/OFF to start the air conditioner.
Cleaning the Air Filter
1. Press ON/OFF to turn off the air conditioner.
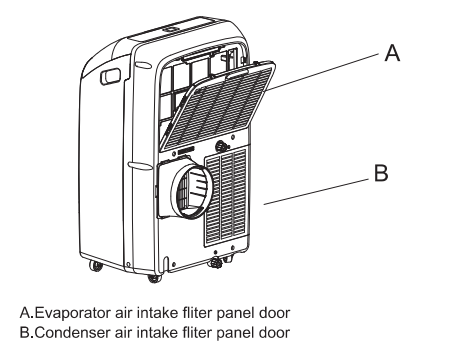
2. Open the filter panel door on the back of the air conditioner and remove.
3. Remove the tapping screw from the condenser air intake filter panel door and remove.
4. Use a vacuum cleaner to clean the filter. If the filter is very dirty, wash the filter in warm water with a mild detergent. NOTE: Do not wash the filter in the dishwasher or use any chemical cleaners.
5. Air dry the filter completely before replacing to ensure maximum efficiency.
6. Reattach the air filter to the filter panel door.
7. Reinstall the filter panel door and tapping screw.
8. Press ON/OFF to start the air conditioner._
Storing After Use
If the air conditioner will not be used for an extended period of time:
1. Drain the water completely. See "draining the Air Conditioner".
2. Run the air conditioner set to Fan Only for approximately 12 hours to dry the air conditioner.
3. Unplug the air conditioner.
4. Remove the flexible exhaust hose and store with the air conditioner in a clean, dry area. See " installation Instructions
5. Remove the window kit and store with the air conditioner in a clean, dry area. See " Installation Instructions
6. Remove the filter and clean. See Cleaning the Air Filter.
7. Clean the outside of the air conditioner. See "Cleaning the Outside".
8. Reinstall the filter.
9. Remove the batteries and store the remote control with the air conditioner in a clean, dry area.
Before using the air conditioner again:
1. Make sure the filter and drain cap are in place.
2. Check the power cord to make sure it is in good condition, with no cracks or damage.
3. Place new batteries in the remote.
4. Install the air conditioner. See "Installation Instructions".
TROUBLESHOOTING
Air Conditioner will not operate
The power supply cord is unplugged.
Plug into a grounded 3 prong outlet. See " electrical Requirements.”
Time-delay fuse or circuit breaker of the wrong capacity is being used.
Replace with a time-delay fuse or circuit breaker of the correct capacity. See " electrical Requirements”.
The power supply cord has tripped (Reset button has popped out).
Press and release RESET (listen for click; Reset button will latch and remain in) to resume operation.
A household fuse has blown. or a circuit breaker has tripped.
Replace the fuse. or reset the circuit breaker. See. “Electrical Requirements’.
The On/Off button has not been pressed.
Press ON/OFF.
The local power has failed.
Wait for power to be restored.
Air conditioner blows fuses or trips circuit breakers
Too many appliances are being used on the same circuit.
Unplug or relocate appliances that share the same circuit
You are trying to restart the air conditioner too soon after turning off air conditioner.
Wait at least 3 minutes after turning off air conditioner before trying to restart the air conditioner.
Air conditioner power supply cord trips (Reset button pops out)
Disturbances in your electrical current can trip (Reset button will pop out) the power supply cord.
Press and release RESET (listen for click; Reset button will latch and remain in) to resume operation.
Electrical overloading. overheating. cord pinching or aging can trip (Reset button will pop out) the power supply cord.
After correcting the problem. press and release RESET (listen for click; Reset button will latch and remain in) to to resume operation. If the power cord fails to reset. contact a service technician.
NOTE: A damaged power supply cord must be replaced with a new power supply cord obtained from the product manufacturer and must not be repaired.
Air conditioner seems to run too much
Is there a door or window open?
Keep doors and windows closed.
The current air conditioner replaced an older model.
The use of more efficient components may cause the air conditioner to run longer than an older model. but the total energy consumption will be less. Newer air conditioners do not emit the “ blast” of cold air you may be accustomed to from older units. but this is not an indication of lesser cooling capacity or efficiency. Refer to the efficiency rating (EER) and capacity rating (in Blu/h) marked on the air conditioner.
The air conditioner is in a heavily occupied room. or heat producing appliances are in use in the room.
Use exhaust vent fans while cooking or bathing and try not to use heat-producing appliances during the hottest part of the day. Portable air conditioners are designed as supplemental cooling to local areas within a room. A higher capacity air conditioner may be required. depending on the size of the room being cooled.
Air conditioner runs for a short time only, but room is not cool
Set temperature is close to room temperature.
Lower set temperature. See " portable Air Conditioner Use "
Display error code
If the unit displays error code E5. the water container is full.
Drain the water. see “Draining the air conditioner”. After draining. the unit can be operated again.
If the unit display error code E1/E2/ES/E4/E6/ETIEA.
please contact customer service.
Air conditioner runs. but does not cool
The filter is dirty or obstructed by debris.
Clean the filter
Air outlet is blocked.
Clear air outlet.
Set temperature is too high.
Lower set temperature.
Air conditioner cycles on and off too much
The air conditioner is not properly sized for your room.
Check the cooling capabilities of your portable air conditioner. Portable air conditioners are designed as. supplemental cooling to local areas within a room.
The filter is dirty or obstructed by debris
Clean the filter.
There is excessive heat or moisture. open container cooking. showers. etc. in the room.
Use a fan to exhaust heat or moisture from the room. Try not to use heat-producing appliances during the hottest part of the day.
The louvers are blocked.
Install the air conditioner in a location where the louvers are free from curtains. blinds. furniture. etc.