Camera User Guide
• Makesureyoureadthisguide,includingthe“Safety
Precautions”section,beforeusingthecamera.
• Readingthisguidewillhelpyoulearntousethecamera
properly.
• Storethisguidesafelysothatyoucanuseitinthefuture.
ENGLISH
COPY
2
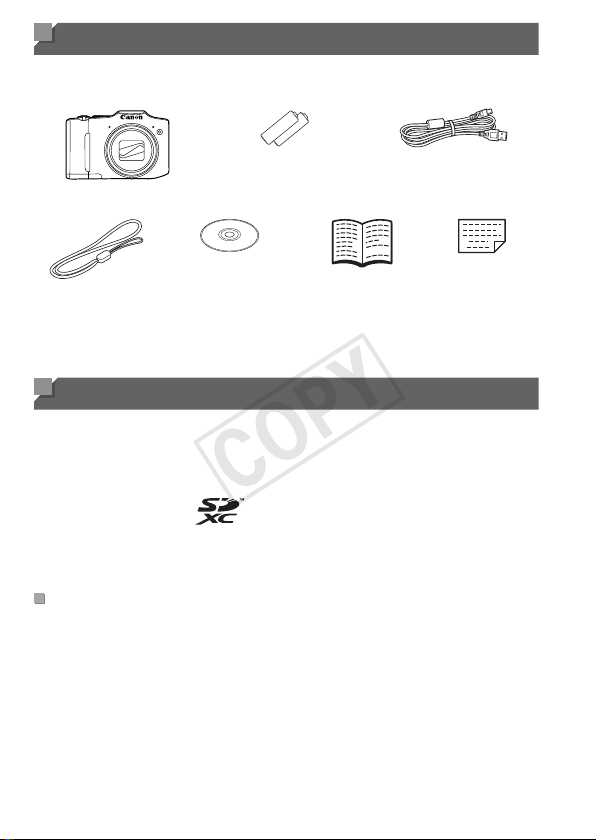
Package Contents
Beforeuse,makesurethefollowingitemsareincludedinthepackage.
Ifanythingismissing,contactyourcameradealer.
Camera
AAAlkalineBatteries(x2)
InterfaceCable
IFC-400PCU
WristStrap
WS-800
DIGITALCAMERA
SolutionDisk
*
(CD-ROM)
GettingStarted
WarrantyCard
*ContainssoftwareandPDFmanuals(=
25).
• Amemorycardisnotincluded(seebelow).
Compatible Memory Cards
Thefollowingmemorycards(soldseparately)canbeused,regardlessof
capacity.
• SDmemorycards
*
• SDHCmemorycards
*
• SDXCmemorycards
*
• Eye-Ficards
*ConformstoSDspecications.However,notallmemorycardshavebeenveriedto
workwiththecamera.
AboutEye-FiCards
ThisproductisnotguaranteedtosupportEye-Ficardfunctions(including
wirelesstransfer).IncaseofanissuewithanEye-Ficard,pleasecheck
withthecardmanufacturer.
AlsonotethatanapprovalisrequiredtouseEye-Ficardsinmanycountries
orregions.Withoutapproval,useofthecardisnotpermitted.Ifitisunclear
whetherthecardhasbeenapprovedforuseinthearea,pleasecheckwith
thecardmanufacturer.
COPY

3
Preliminary Notes and Legal Information
• Takeandreviewsometestshotsinitiallytomakesuretheimageswere
recordedcorrectly.PleasenotethatCanonInc.,itssubsidiariesand
afliates,anditsdistributorsarenotliableforanyconsequentialdamages
arisingfromanymalfunctionofacameraoraccessory,includingmemory
cards,thatresultsinthefailureofanimagetoberecordedortobe
recordedinawaythatismachinereadable.
• Imagesrecordedbythecameraareintendedforpersonaluse.Refrain
fromunauthorizedrecordingthatinfringesoncopyrightlaw,andnotethat
evenforpersonaluse,photographymaycontravenecopyrightorother
legalrightsatsomeperformancesorexhibitions,orinsomecommercial
settings.
• Thecamerawarrantyisvalidonlyintheareaofpurchase.Incaseof
cameraproblemswhileabroad,returntotheareaofpurchasebefore
contactingaCanonCustomerSupportHelpDesk.
• AlthoughtheLCDmonitorisproducedunderextremelyhigh-precision
manufacturingconditionsandmorethan99.99%ofthepixelsmeet
designspecications,inrarecasessomepixelsmaybedefectiveormay
appearasredorblackdots.Thisdoesnotindicatecameradamageor
affectrecordedimages.
• TheLCDmonitormaybecoveredwithathinplasticlmforprotection
againstscratchesduringshipment.Ifcovered,removethelmbefore
usingthecamera.
• Whenthecameraisusedoveranextendedperiod,itmaybecomewarm.
Thisdoesnotindicatedamage.
Organization of Camera User Guide
Thefollowingguidesareincluded,eachusedfordifferentpurposes.
BasicGuide(=
13)
• Givesbasicinstructions,frominitialpreparationstoshooting,playback,
andsavingonacomputer
AdvancedGuide(=
33)
• Practicalguidethatintroducesothercamerabasicsanddescribes
shootingandplaybackoptions
COPY
4
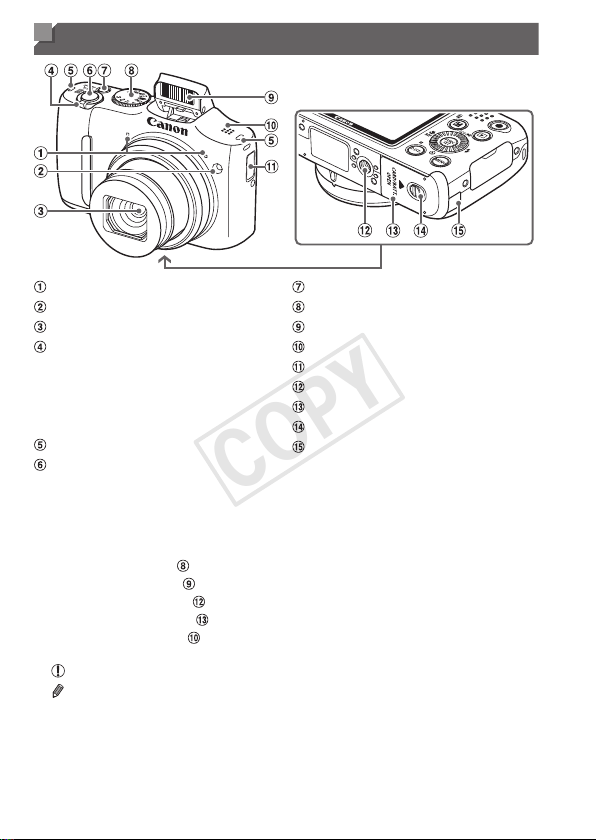
Part Names and Conventions in This Guide
Microphone
Lamp
Lens
Zoomlever
Shooting:<i(telephoto)>/
<j(wideangle)>
Playback:<k(magnify)>/
<g(index)>
Strapmount
Shutterbutton
Powerbutton
Modedial
Flash
Speaker
Date/timebatteryholder
Tripodsocket
Memorycard/batterycover
Lockreleaseswitch
DCcouplercableport
• Inthisguide,iconsareusedtorepresentthecorrespondingcamera
buttonsanddialsonwhichtheyappearorwhichtheyresemble.
• Thefollowingcamerabuttonsandcontrolsarerepresentedbyicons.
<o> Upbutton
onback
<q> Leftbutton onback
<r> Rightbutton onback
<p> Downbutton onback
<5> Controldial onback
• Shootingmodesandon-screeniconsandtextareindicatedinbrackets.
•
:Importantinformationyoushouldknow
•
:Notesandtipsforexpertcamerause
• =xx:Pageswithrelatedinformation(inthisexample,“xx”representsa
pagenumber)
• Instructionsinthisguideapplytothecameraunderdefaultsettings.
COPY
5
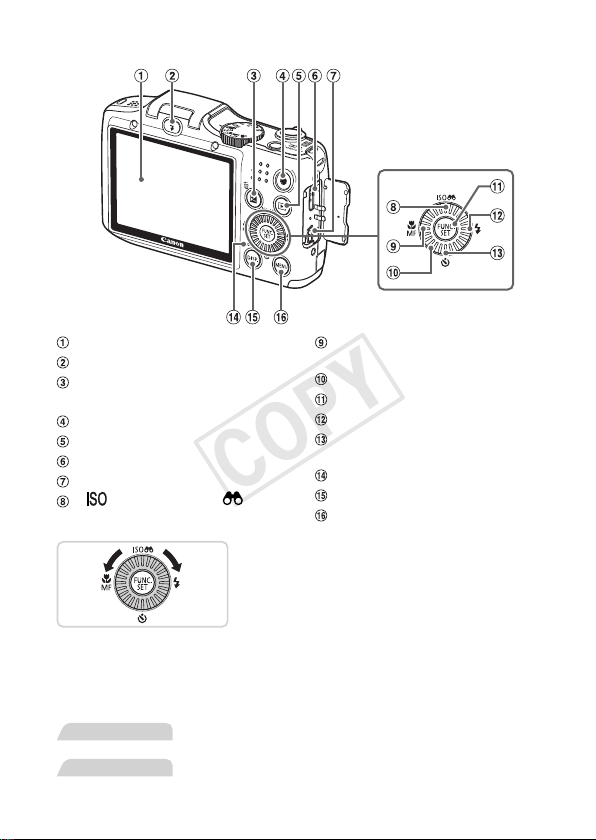
PartNamesandConventionsinThisGuide
Screen(LCDmonitor)
<h(Flashup)>button
<b(Exposurecompensation)>/
<a(Singleimageerase)>button
Moviebutton
<1(Playback)>button
HDMI
TM
terminal
DIGITALterminal
< (ISOspeed)>/< (Filter
imagedisplay)>/Upbutton
<e(Macro)>/<f(Manual
focus)>/Leftbutton
Controldial
FUNC./SETbutton
<h(Flash)>/Rightbutton
<Q(Self-timer)>/
Downbutton
Indicator
<l(Display)>button
<n>button
Turningthecontroldialisonewayto
choosesettingitems,switchimages,and
performotheroperations.Mostofthese
operationsarealsopossiblewiththe
<o><p><q><r>buttons.
• Forconvenience,allsupportedmemorycardsaresimplyreferredtoas
“thememorycard”.
• Thetabsshownabovetitlesindicatewhetherthefunctionisusedforstill
images,movies,orboth.
StillImages
: Indicatesthatthefunctionisusedwhenshootingor
viewingstillimages.
Movies
: Indicatesthatthefunctionisusedwhenshootingor
viewingmovies.
COPY

6
Table of Contents
PackageContents.........................2
CompatibleMemoryCards............2
PreliminaryNotesandLegal
Information.....................................3
OrganizationofCameraUser
Guide.............................................3
PartNamesandConventionsin
ThisGuide......................................4
TableofContents...........................6
Contents:BasicOperations...........8
SafetyPrecautions.......................10
Basic Guide .................... 13
InitialPreparations.......................14
TryingtheCameraOut................20
IncludedSoftware,PDF
Manuals.......................................25
Accessories..................................32
Advanced Guide ............. 33
1 CameraBasics.....................33
On/Off..........................................34
ShutterButton..............................35
ShootingModes...........................36
ShootingDisplayOptions............36
FUNC.Menu................................37
MENUMenu................................38
IndicatorDisplay..........................40
Clock............................................40
2 SmartAutoMode.................41
Shooting(SmartAuto).................42
Common,ConvenientFeatures...49
ImageCustomizationFeatures....54
HelpfulShootingFeatures...........59
CustomizingCamera
Operation.....................................62
3 OtherShootingModes........65
Brightness/ColorCustomization
(LiveViewControl).......................66
SpecicScenes...........................67
SpecialModesforOther
Purposes......................................69
ImageEffects(CreativeFilters)...71
DiscreetMode..............................76
ShootingVariousMovies.............77
4 PMode..................................79
ShootinginProgramAEMode
(<P>Mode)..................................80
ImageBrightness(Exposure
Compensation)............................81
ColorandContinuousShooting...84
ShootingRangeandFocusing....90
Flash............................................98
OtherSettings............................101
5 Tv,Av,andMMode............103
SpecicShutterSpeeds(<Tv>
Mode).........................................104
SpecicApertureValues(<Av>
Mode).........................................105
SpecicShutterSpeedsand
ApertureValues(<M>Mode).....106
6 PlaybackMode..................109
Viewing...................................... 110
BrowsingandFiltering
Images....................................... 114
ImageViewingOptions.............. 117
COPY

7
TableofContents
ProtectingImages......................120
ErasingImages..........................124
RotatingImages.........................127
ImageCategories......................129
EditingStillImages....................133
EditingMovies............................139
7 SettingMenu......................141
AdjustingBasicCamera
Functions...................................142
8 Accessories.......................155
ReplacingtheDate/Time
Battery........................................156
OptionalAccessories.................157
UsingOptionalAccessories.......159
PrintingImages..........................166
UsinganEye-FiCard.................179
9 Appendix............................181
Troubleshooting.........................182
On-ScreenMessages................186
On-ScreenInformation..............188
FunctionsandMenuTables.......192
HandlingPrecautions.................202
Specications.............................203
Index..........................................207
COPY

8
Contents: Basic Operations
4 Shoot
Usecamera-determinedsettings(AutoMode).................................... 42
Shootingpeoplewell
I
Portraits
(=
67)
P
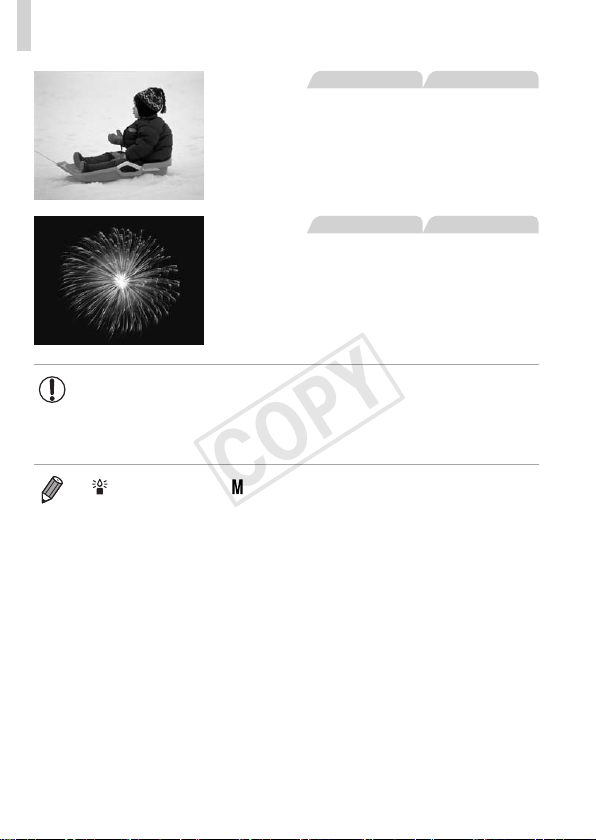
AgainstSnow
(=
68)
Matchingspecicscenes
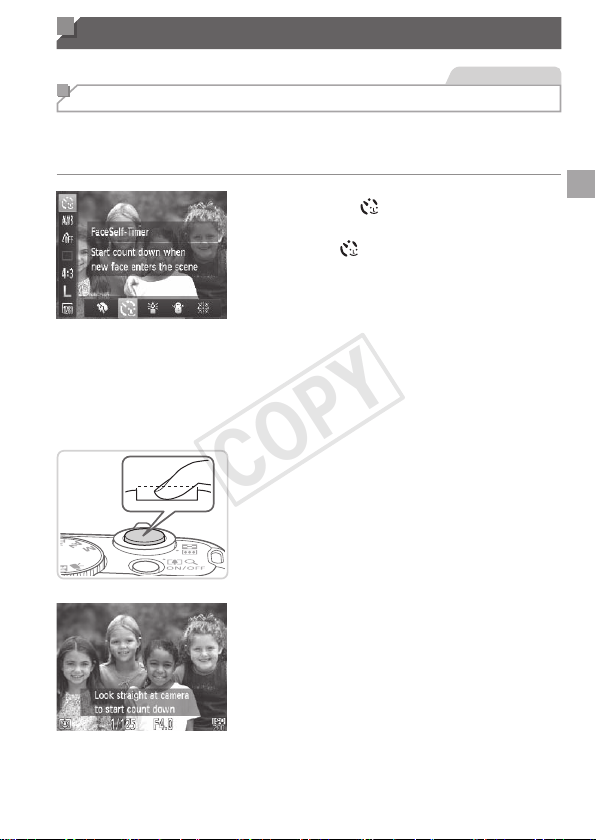
LowLight
(=
67)
t
Fireworks
(=
68)
Applyingspecialeffects
VividColors
(=
71)
PosterEffect
(=
71)
Fish-EyeEffect
(=
72)
MiniatureEffect
(=
72)
ToyCameraEffect
(=
74)
Monochrome
(=
75)
Wheresoundandasharenotallowed(DiscreetMode).................... 76
Whileadjustingimagesettings(LiveViewControl)............................. 66
Focusonfaces......................................................................... 42,67,93
Withmyselfintheshot(Self-Timer)............................................... 50,69
Adddatestamps.................................................................................. 52
COPY

9
Contents:BasicOperations
1 View
Viewimages(PlaybackMode)............................................................110
Automaticplayback(Slideshow).........................................................118
OnaTV.............................................................................................. 159
Onacomputer..................................................................................... 26
Browsethroughimagesquickly..........................................................114
Eraseimages..................................................................................... 124
E Shoot/ViewMovies
Shootmovies................................................................................. 42,77
Viewmovies(PlaybackMode)............................................................110
c Print
Printpictures...................................................................................... 166
Save
Saveimagestoacomputer................................................................. 26
COPY

10
Safety Precautions
• Beforeusingtheproduct,pleaseensurethatyoureadthesafetyprecautions
describedbelow.Alwaysensurethattheproductisusedcorrectly.
• Thesafetyprecautionsnotedonthefollowingpagesareintendedtoprevent
injuriestoyourselfandotherpersons,ordamagetotheequipment.
• Besuretoalsochecktheguidesincludedwithanyseparatelysold
accessoriesyouuse.
Warning
Denotesthepossibilityofseriousinjuryordeath.
• Donottriggertheashincloseproximitytopeople’seyes.
Exposuretotheintenselightproducedbytheashcoulddamageeyesight.
Inparticular,remainatleast1meter(39inches)awayfrominfantswhen
usingtheash.
• Storethisequipmentoutofthereachofchildrenandinfants.
Strap:Puttingthestraparoundachild’sneckcouldresultinasphyxiation.
Date/timebattery:Dangerousifswallowed.Ifthisoccurs,contactadoctor
immediately.
• Useonlyrecommendedpowersources.
• Donotattempttodisassemble,alterorapplyheattotheproduct.
• Avoiddroppingorsubjectingtheproducttosevereimpacts.
• Toavoidtheriskofinjury,donottouchtheinterioroftheproductif
ithasbeendroppedorotherwisedamaged.
• Stopusingtheproductimmediatelyifitemitssmoke,astrange
smell,orotherwisebehavesabnormally.
• Donotuseorganicsolventssuchasalcohol,benzine,orthinnerto
cleantheproduct.
• Donotlettheproductcomeintocontactwithwater(e.g.seawater)
orotherliquids.
• Donotallowliquidsorforeignobjectstoenterthecamera.
Thiscouldresultinelectricalshockorre.
Ifliquidsorforeignobjectscomeintocontactwiththecamerainterior,
immediatelyturnthecameraoffandremovethebatteries.
• Useonlytherecommendedbatteries.
• Donotplacethebatteriesnearorindirectame.
Thebatteriesmayexplodeorleak,resultinginelectricalshockorre.This
couldcauseinjuryanddamagethesurroundings.Intheeventthatbatteries
leakandthebatteryelectrolytecontactseyes,mouth,skinorclothing,
immediatelyushwithwater.
COPY

11
SafetyPrecautions
• Turnthecameraoffinplaceswherecamerauseisprohibited.
Theelectromagneticwavesemittedbythecameramayinterferewiththe
operationofelectronicinstrumentsandotherdevices.Exerciseadequate
cautionwhenusingthecamerainplaceswhereuseofelectronicdevicesis
restricted,suchasinsideairplanesandmedicalfacilities.
• DonotplaythesuppliedCD-ROM(s)inanyCDplayerthatdoesnot
supportdataCD-ROMs.
Itispossibletosufferhearinglossfromlisteningwithheadphonestothe
loudsoundsofaCD-ROMplayedonanaudioCDplayer(musicplayer).
Additionally,thiscoulddamagethespeakers.
Caution
Denotesthepossibilityofinjury.
• Whenholdingthecamerabythestrap,becarefulnottobangit,
subjectittostrongimpactsorshocks,orletitgetcaughtonother
objects.
• Becarefulnottobumporpushstronglyonthelens.
Thiscouldleadtoinjuryordamagethecamera.
• Becarefulnottosubjectthescreentostrongimpacts.
Ifthescreencracks,injurymayresultfromthebrokenfragments.
• Whenusingtheash,becarefulnottocoveritwithyourngersor
clothing.
Thiscouldresultinburnsordamagetotheash.
• Avoidusing,placingorstoringtheproductinthefollowingplaces:
-Placessubjecttostrongsunlight
-Placessubjecttotemperaturesabove40°C(104°F)
-Humidordustyareas
Thesecouldcauseleakage,overheatingoranexplosionofthebatteries,
resultinginelectricalshock,re,burnsorotherinjuries.
• Theslideshowtransitioneffectsmaycausediscomfortwhenviewed
forprolongedperiods.
COPY

12
SafetyPrecautions
Caution
Denotesthepossibilityofdamagetotheequipment.
• Donotaimthecameraatbrightlightsources(suchasthesunona
clearday).
Doingsomaydamagetheimagesensor.
• Whenusingthecameraonabeachoratawindylocation,becareful
nottoallowdustorsandtoenterthecamera.
Thismaycausetheproducttomalfunction.
• Inregularuse,smallamountsofsmokemaybeemittedfromthe
ash.
Thisisduetothehighintensityoftheashburningdustandforeign
materialsstucktothefrontoftheunit.Pleaseuseacottonswabtoremove
dirt,dustorotherforeignmatterfromtheashtopreventheatbuild-upand
damagetotheunit.
• Removeandstorethebatterieswhenyouarenotusingthecamera.
Ifthebatteriesareleftinsidethecamera,damagecausedbyleakagemay
occur.
• Beforeyoudiscardthebatteries,covertheterminalswithtapeor
otherinsulators.
Contactingothermetalmaterialsmayleadtoreorexplosions.
• Donotchargebatteriesofdifferenttypesatthesametime,oruse
olderbatteriestogetherwithnewerbatteries.
• Donotinsertthebatterieswiththe+and–terminalsreversed.
Thismaycausetheproducttomalfunction.
• Whenputtingthecamerainyourbag,ensurethathardobjectsdo
notcomeintocontactwiththescreen.
• Donotattachanyhardobjectstothecamera.
Doingsomaycausemalfunctionsordamagethescreen.
COPY

13
Basic Guide
Givesbasicinstructions,frominitial
preparationstoshooting,playback,and
savingonacomputer
COPY
14
Initial Preparations
Prepareforshootingasfollows.
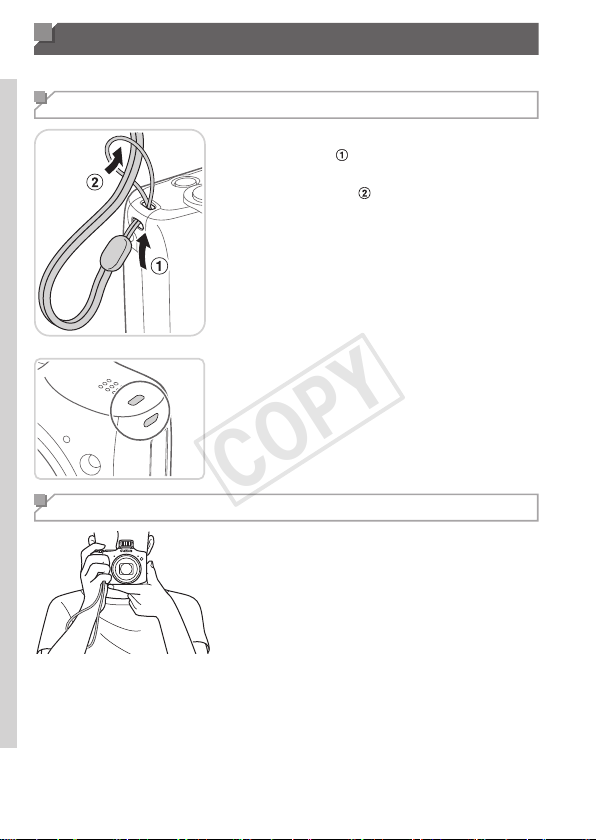
Attaching the Strap
Threadtheendofthestrapthroughthe
straphole(
),andthenpulltheother
endofthestrapthroughthelooponthe
threadedend(
).
Thestrapcanalsobeattachedtotheleft
sideofthecamera.
Holding the Camera
Placethestraparoundyourwrist.
Whenshooting,keepyourarmscloseto
yourbodyandholdthecamerasecurely
topreventitfrommoving.Ifyouhave
raisedtheash,donotrestyourngers
onit.
COPY
15
InitialPreparations
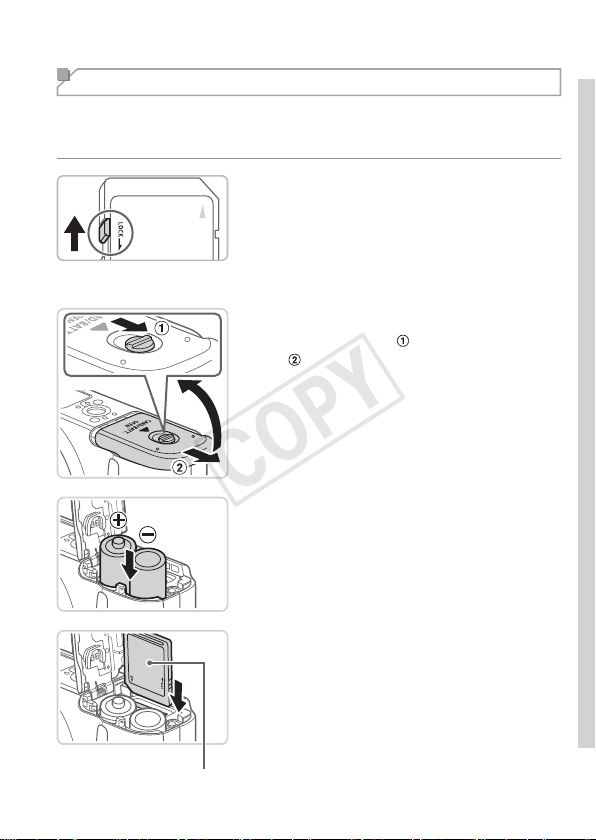
Inserting the Batteries and Memory Card
Inserttheincludedbatteriesandamemorycard(soldseparately).
Notethatbeforeusinganewmemorycard(oramemorycardformattedin
anotherdevice),youshouldformatthememorycardwiththiscamera(=146).
1 Checkthecard’swrite-protect
tab.
Recordingisnotpossibleonmemorycards
withawrite-protecttabwhenthetabisinthe
locked(downward)position.Slidethetabup
untilitclicksintotheunlockedposition.
2 Openthecover.
Slidetheswitch( )andopenthecover
(
).
3 Insertthebatteries.
Insertthebatteriesasshown.
Label
4 Insertthememorycard.
Insertthememorycardfacingasshown
untilitclicksintothelockedposition.
Makesurethememorycardisfacingthe
rightwaywhenyouinsertit.Inserting
memorycardsfacingthewrongwaymay
damagethecamera.
COPY
16
InitialPreparations
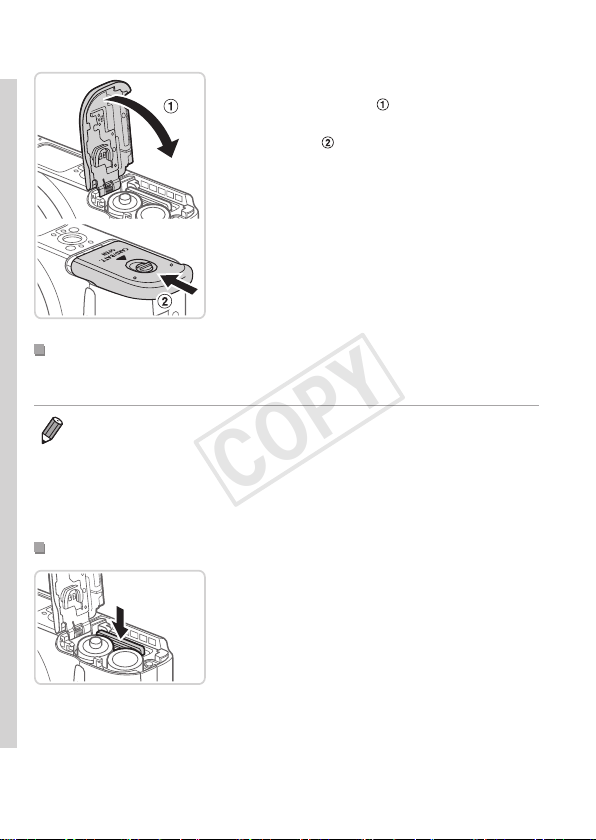
5 Closethecover.
Lowerthecover( )andholditdownas
youslideit,untilitclicksintotheclosed
position(
).
CompatibleBatteries
UseAAalkalinebatteriesorCanonAANiMHbatteries(soldseparately,
=
157).
• Duetotheinconsistentperformanceofotherbatteries,useofspecied
batteriesonlyisrecommended.
• NiMHbatterieslastlongerincamerasthanalkalinebatteriesdo,especially
incoldweather.
• Forguidelinesonhowmanyshotsorhoursofrecordingarepossiblewith
variousbatteries,see“Specications”(=
203).
RemovingtheMemoryCard
Openthecoverandpushthememory
cardinuntilitclicks,andthenslowly
releasethememorycard.
Thememorycardwillpopup.
COPY
17
InitialPreparations
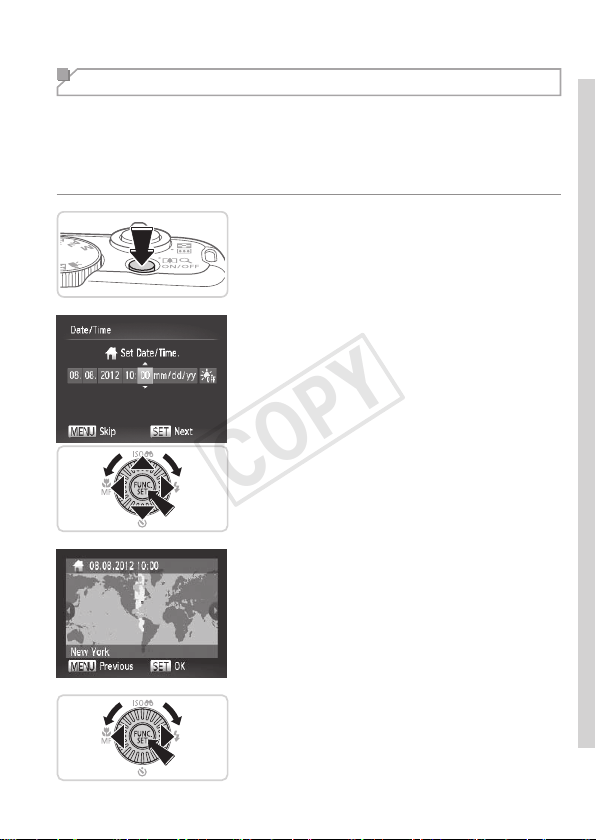
Setting the Date and Time
Setthecurrentdateandtimecorrectlyasfollowsifthe[Date/Time]screen
isdisplayedwhenyouturnthecameraon.Informationyouspecifythisway
isrecordedinimagepropertieswhenyoushoot,anditisusedwhenyou
manageimagesbyshootingdateorprintimagesshowingthedate.
Youcanalsoaddadatestamptoshots,ifyouwish(=
52).
1 Turnthecameraon.
Pressthepowerbutton.
The[Date/Time]screenisdisplayed.
2 Setthedateandtime.
Pressthe<q><r>buttonstochoosean
option.
Pressthe<o><p>buttonsorturnthe
<5>dialtospecifythedateandtime.
Whennished,pressthe<m>button.
3 Setthehometimezone.
Pressthe<q><r>buttonsorturnthe
<5>dialtochooseyourhometime
zone.
4 Finishthesetupprocess.
Pressthe<m>buttonwhennished.
Afteraconrmationmessage,thesetting
screenisnolongerdisplayed.
Toturnoffthecamera,pressthepowerbutton.
COPY
18
InitialPreparations
• Unlessyousetthedate,time,andhometimezone,the[Date/
Time]screenwillbedisplayedeachtimeyouturnthecameraon.
Specifythecorrectinformation.
• Tosetdaylightsavingtime(1hourahead),choose[ ]instep2andthen
choose[
]bypressingthe<o><p>buttonsorturningthe<5>dial.
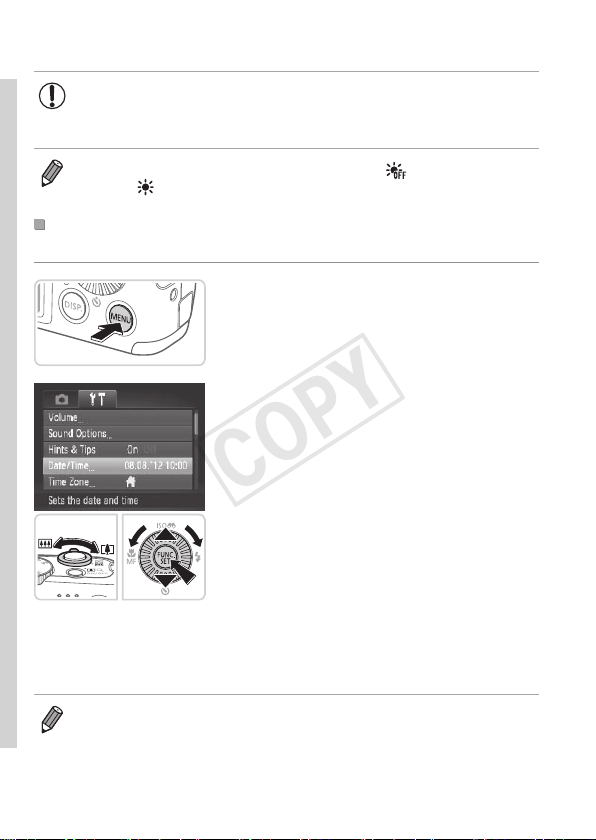
ChangingtheDateandTime
Adjustthedateandtimeasfollows.
1 Accessthecameramenu.
Pressthe<n>button.
2 Choose[Date/Time].
Movethezoomlevertochoosethe[3]
tab.
Pressthe<o><p>buttonsorturnthe
<5>dialtochoose[Date/Time],and
thenpressthe<m>button.
3 Changethedateandtime.
Followstep2on=17toadjustthesettings.
Pressthe<n>buttontoclosethemenu.
• Oncethedate/timebatteryisdepleted,the[Date/Time]screenwillbedisplayedwhen
youturnthecameraon.Followthestepson=17tosetthedateandtime.
• Ifthe[Date/Time]screenisdisplayedeachtimeyouturnthecameraon,
evenafteryouhavesetthedateandtimecorrectly,replacethedate/time
batterywithanewone(=
156).
COPY
19
InitialPreparations
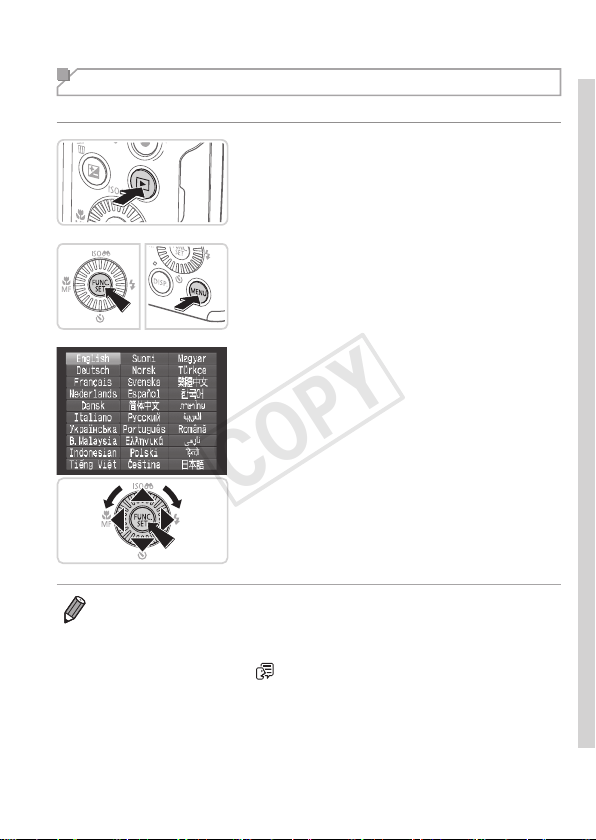
Display Language
Thedisplaylanguagecanbechangedasneeded.
1 EnterPlaybackmode.
Pressthe<1>button.
2 Accessthesettingscreen.
Pressandholdthe<m>button,and
thenimmediatelypressthe<n>
button.
3 Setthedisplaylanguage.
Pressthe<o><p><q><r>buttonsor
turnthe<5>dialtochoosealanguage,
andthenpressthe<m>button.
Oncethedisplaylanguagehasbeenset,
thesettingscreenisnolongerdisplayed.
• Thecurrenttimeisdisplayedifyouwaittoolonginstep2afterpressing
the<m>buttonbeforeyoupressthe<n>button.Inthiscase,
pressthe<m>buttontodismissthetimedisplayandrepeatstep2.
• Youcanalsochangethedisplaylanguagebypressingthe<n>button
andchoosing[Language
]onthe[3]tab.
COPY
20
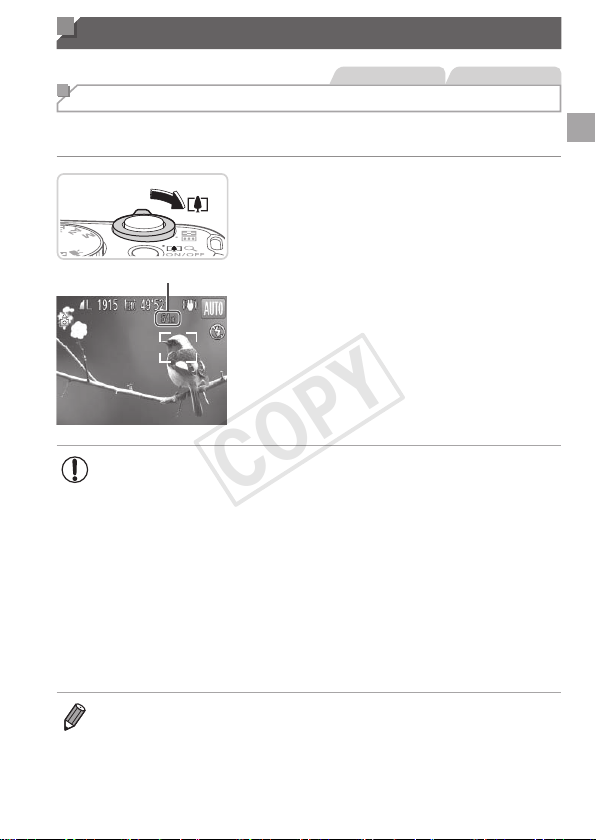
StillImages Movies
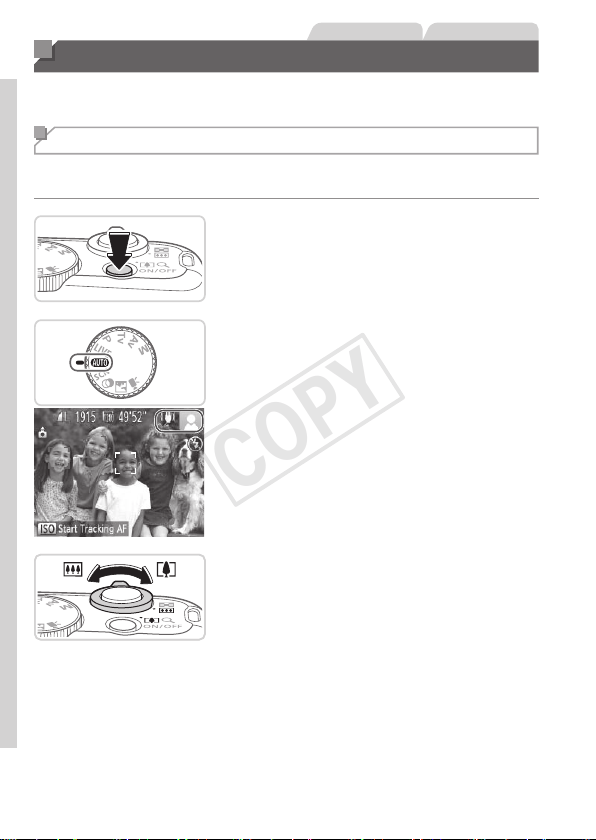
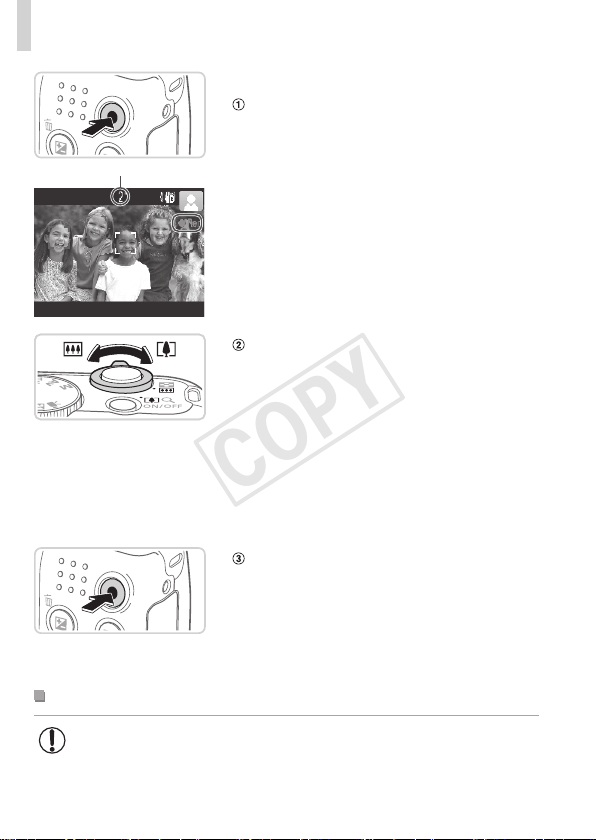
Trying the Camera Out
Followtheseinstructionstoturnthecameraon,shootstillimagesor
movies,andthenviewthem.
Shooting (Smart Auto)
Forfullyautomaticselectionoftheoptimalsettingsforspecicscenes,
simplyletthecameradeterminethesubjectandshootingconditions.
1 Turnthecameraon.
Pressthepowerbutton.
Thestartupscreenisdisplayed.
2 Enter<A>mode.
Setthemodedialto<A>.
Aimthecameraatthesubject.The
camerawillmakeaslightclickingnoise
asitdeterminesthescene.
Iconsrepresentingthesceneandimage
stabilizationmodearedisplayedinthe
upperrightofthescreen.
Framesdisplayedaroundanydetected
subjectsindicatethattheyareinfocus.
3 Composetheshot.
Tozoominandenlargethesubject,move
thezoomlevertoward<i>(telephoto),
andtozoomawayfromthesubject,move
ittoward<j>(wideangle).
COPY
21
TryingtheCameraOut
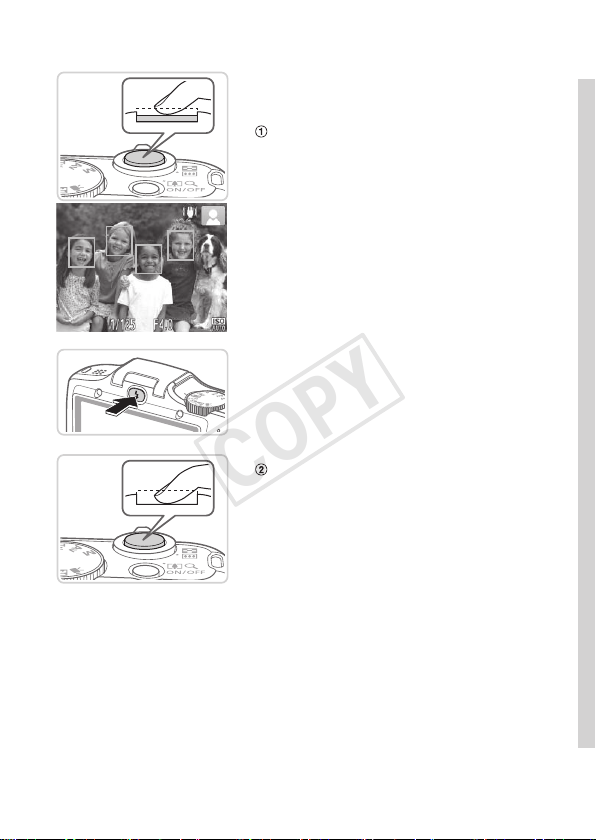
4 Shoot.
ShootingStillImages
Focus.
Presstheshutterbuttonlightly,halfway
down.Thecamerabeepstwiceafter
focusing,andgreenframesaredisplayed
toindicateimageareasinfocus.
If[Raisetheash]appearsonthescreen,
pressthe<h>buttontoraisetheash.It
willrewhenshooting.Ifyouprefernot
tousetheash,pushitdownwithyour
nger,intothecamera.
Shoot.
Presstheshutterbuttonalltheway
down.
Asthecamerashoots,ashuttersound
isplayed,andinlow-lightconditions,the
ashresautomatically.
Keepthecamerastilluntiltheshutter
soundends.
Yourshotremainsdisplayedonthe
screenforabouttwoseconds.
Evenwhiletheshotisdisplayed,youcan
takeanothershotbypressingtheshutter
buttonagain.
COPY
22
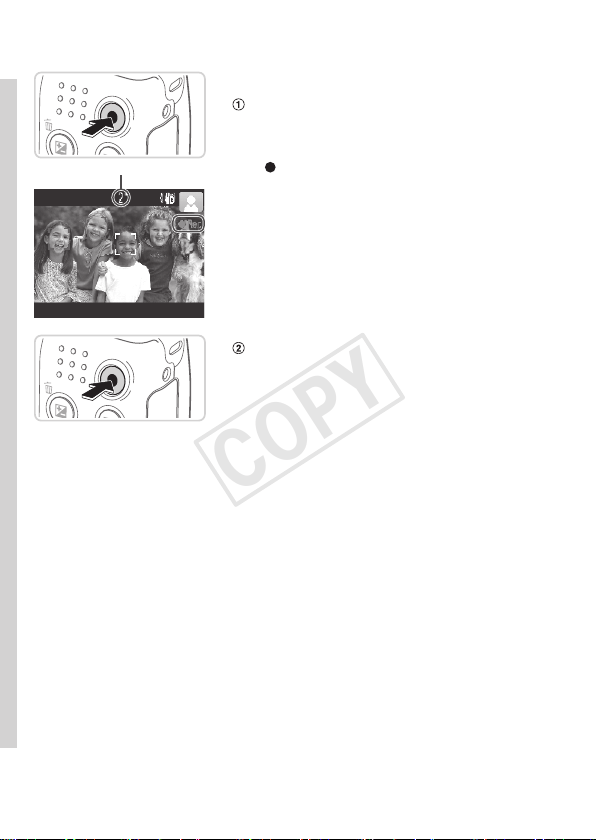
TryingtheCameraOut
ElapsedTime
ShootingMovies
Startshooting.
Pressthemoviebutton.Thecamera
beepsonceasrecordingbegins,and
[
Rec]isdisplayedwiththeelapsedtime.
Blackbarsdisplayedonthetopand
bottomedgesofthescreenindicate
imageareasnotrecorded.
Framesdisplayedaroundanydetected
facesindicatethattheyareinfocus.
Oncerecordingbegins,youcantakeyour
ngeroffthemoviebutton.
Finishshooting.
Pressthemoviebuttonagaintostop
shooting.Thecamerabeepstwiceas
recordingstops.
COPY
23
TryingtheCameraOut
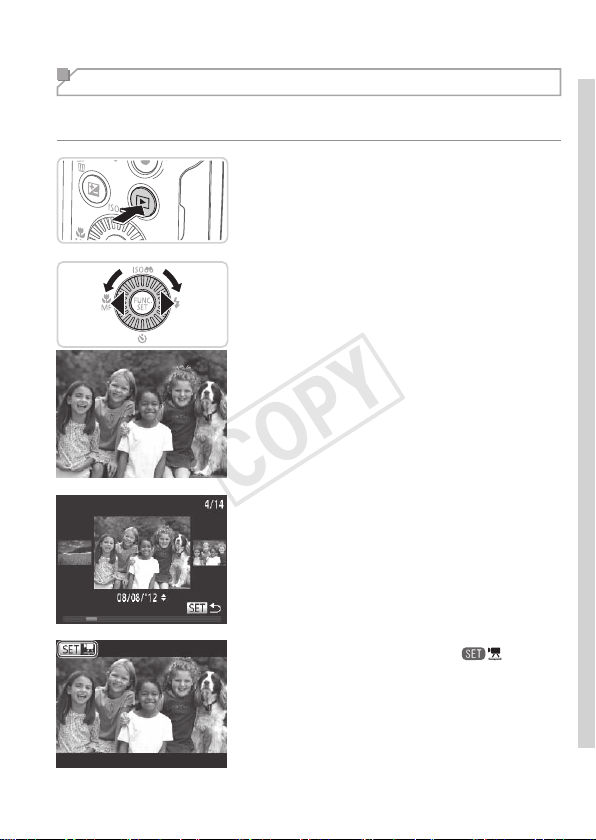
Viewing
Aftershootingimagesormovies,youcanviewthemonthescreenas
follows.
1 EnterPlaybackmode.
Pressthe<1>button.
Yourlastshotisdisplayed.
2 Browsethroughyourimages.
Toviewthepreviousimage,press
the<q>buttonorturnthe<5>dial
counterclockwise.Toviewthenext
image,pressthe<r>buttonorturnthe
<5>dialclockwise.
Pressandholdthe<q><r>buttonsto
browsethroughimagesquickly.Images
appeargrainyatthistime.
ToaccessScrollDisplaymode,turn
the<5>dialrapidly.Inthismode,
turnthe<5>dialtobrowsethrough
images.
Toreturntosingle-imagedisplay,press
the<m>button.
Moviesareidentiedbya[ ]icon.To
playmovies,gotostep3.
COPY
24
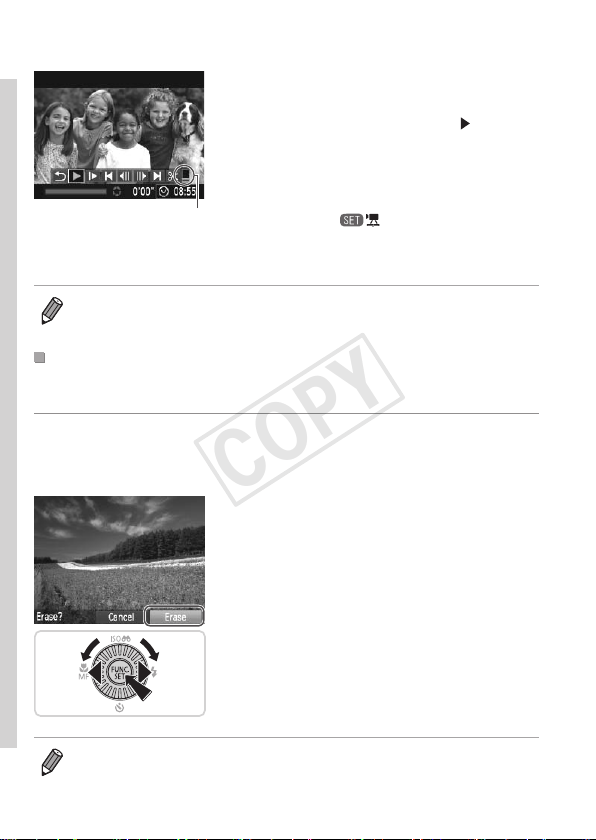
TryingtheCameraOut
Volume
3 Playmovies.
Pressthe<m>buttontoaccessthe
moviecontrolpanel,choose[
](either
pressthe<q><r>buttonsorturnthe
<5>dial),andthenpressthe<m>
buttonagain.
Playbacknowbegins,andafterthemovie
isnished,[
]isdisplayed.
Toadjustthevolume,pressthe<o><p>
buttons.
• ToswitchtoShootingmodefromPlaybackmode,presstheshutterbutton
halfway.
ErasingtheImages
Youcanchooseanderaseunneededimagesonebyone.Becarefulwhen
erasingimages,becausetheycannotberecovered.
1 Chooseanimagetoerase.
Pressthe<q><r>buttonsorturnthe
<5>dialtochooseanimage.
2 Erasetheimage.
Pressthe<a>button.
After[Erase?]isdisplayed,pressthe
<q><r>buttonsorturnthe<5>dialto
choose[Erase],andthenpressthe<m>
button.
Thecurrentimageisnowerased.
Tocancelerasure,pressthe<q><r>
buttonsorturnthe<5>dialtochoose
[Cancel],andthenpressthe<m>
button.
• Youcanalsoeraseallimagesatonce(=
124).
COPY

25
Included Software, PDF Manuals
ThesoftwareandPDFmanualsontheincludedDIGITALCAMERASolution
Disk(CD-ROM)(=
2)areintroducedbelow,withinstructionsfor
installation,andsavingimagestoacomputer.
Software
AfterinstallingthesoftwareontheCD-ROM,youcandothefollowing
thingsonyourcomputer.
CameraWindow
Importimagesandchangecamerasettings
ImageBrowserEX
Manageimages:view,search,andorganize
Printandeditimages
AutoUpdateFunction
Usingtheincludedsoftware,youcanupdatetothelatestversion,and
downloadnewfunctionsviatheInternet(somesoftwareexcluded).Besure
toinstallthesoftwareonacomputerwithanInternetconnectionsoyoucan
usethisfunction.
• Internetaccessisrequiredtousethisfunction,andanyISP
accountchargesandaccessfeesmustbepaidseparately.
PDF Manuals
CameraUserGuide
Refertothisguideforamorein-depthunderstandingofcamera
operation.
SoftwareGuide
Refertothisguidewhenusingtheincludedsoftware.Theguidecanbe
accessedfromthehelpsystemofincludedsoftware(somesoftware
excluded).
COPY

26
IncludedSoftware,PDFManuals
System Requirements
Theincludedsoftwarecanbeusedonthefollowingcomputers.Adobe
ReaderisrequiredtoviewthePDFmanuals.
Operating
System
Windows Macintosh
Windows7SP1
WindowsVistaSP2
WindowsXPSP3
MacOSX10.6–10.7
Computer
Computersrunningoneoftheaboveoperatingsystems
(preinstalled),withanincludedUSBportandInternetconnection
*
Processor
Stillimages:
1.6GHzorhigher
Movies:
Core2Duo1.66GHzorhigher
MacOSX10.7:
Core2Duoorhigher
MacOSX10.6:
CoreDuo1.83GHzorhigher
RAM
Stillimages
Windows7(64bit):2GBor
more
Windows7(32bit),Vista:1GB
ormore
WindowsXP:512MBormore
Movies
1GBormore
MacOSX10.7:2GBormore
MacOSX10.6:1GBormore
Interfaces USB
FreeHardDisk
Space
440MBormore
*
550MBormore
Display 1024x768resolutionorhigher
*Silverlight4orlater(max.100MB)mustbeinstalled,andinWindowsXP,Microsoft
.NETFramework3.0orlater(max.500MB)mustbeinstalled.Installationmaytake
sometime,dependingoncomputerperformance.
• ChecktheCanonwebsiteforthelatestsystemrequirements,including
supportedOSversions.
COPY
27
IncludedSoftware,PDFManuals
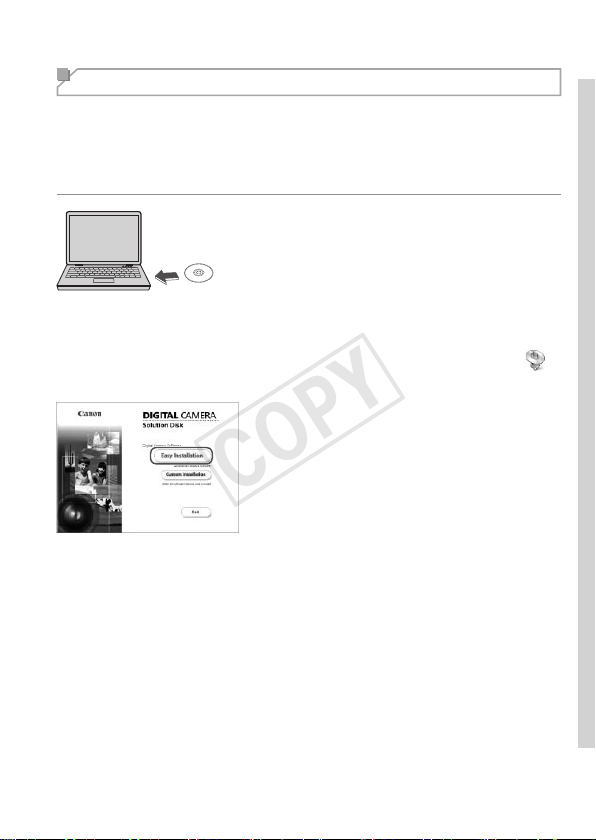
Installing the Software
Windows7andMacOSX10.6areusedhereforthesakeofillustration.
Usingthesoftwareautoupdatefunction,youcanupdatetothelatest
versionanddownloadnewfunctionsviatheInternet(somesoftware
excluded),sobesuretoinstallthesoftwareonacomputerwithanInternet
connection.
1 InserttheCD-ROMinthe
computer’sCD-ROMdrive.
InserttheincludedCD-ROM(DIGITAL
CAMERASolutionDisk)(=
2)inthe
computer’sCD-ROMdrive.
OnaMacintoshcomputer,afterinserting
thedisc,double-clickthedesktopdiscicon
toopenit,andthendouble-clickthe[
]
icondisplayed.
2 Begintheinstallation.
Click[EasyInstallation]andfollowthe
on-screeninstructionstocompletethe
installationprocess.
COPY

28
IncludedSoftware,PDFManuals
3 Whenamessageisdisplayed
promptingyoutoconnect
thecamera,connectittoa
computer.
Withthecameraturnedoff,openthe
cover(
).Withthesmallerplugofthe
includedinterfacecable(=
2)inthe
orientationshown,inserttheplugfully
intothecameraterminal(
).
Insertthelargerplugoftheinterface
cableinthecomputer’sUSBport.For
detailsaboutUSBconnectionsonthe
computer,refertothecomputeruser
manual.
4 Installtheles.
Turnthecameraon,andfollowthe
on-screeninstructionstocompletethe
installationprocess.
ThesoftwarewillconnecttotheInternet
toupdatetothelatestversionand
downloadnewfunctions.Installationmay
takesometime,dependingoncomputer
performanceandtheInternetconnection.
Click[Finish]or[Restart]onthescreen
afterinstallationandremovetheCD-
ROMwhenthedesktopisdisplayed.
Turnthecameraoffanddisconnectthe
cable.
COPY
29
IncludedSoftware,PDFManuals
• WhennotconnectedtotheInternet,therearethefollowinglimitations.
-Thescreeninstep3willnotbedisplayed.
-Somefunctionsmaynotbeinstalled.
• Thersttimeyouconnectthecameratothecomputer,driverswillbe
installed,soitmaytakeafewminutesuntilcameraimagesareaccessible.
• IfyouhaveseveralcamerasthatwerebundledwithImageBrowserEXon
theincludedCD-ROMs,besuretouseeachcamerawiththeirincludedCD-
ROMandfollowtheon-screeninstallationinstructionsforeach.Doingsowill
ensurethateachcamerawillreceivethecorrectupdatesandnewfunctions
viatheautoupdatefunction.
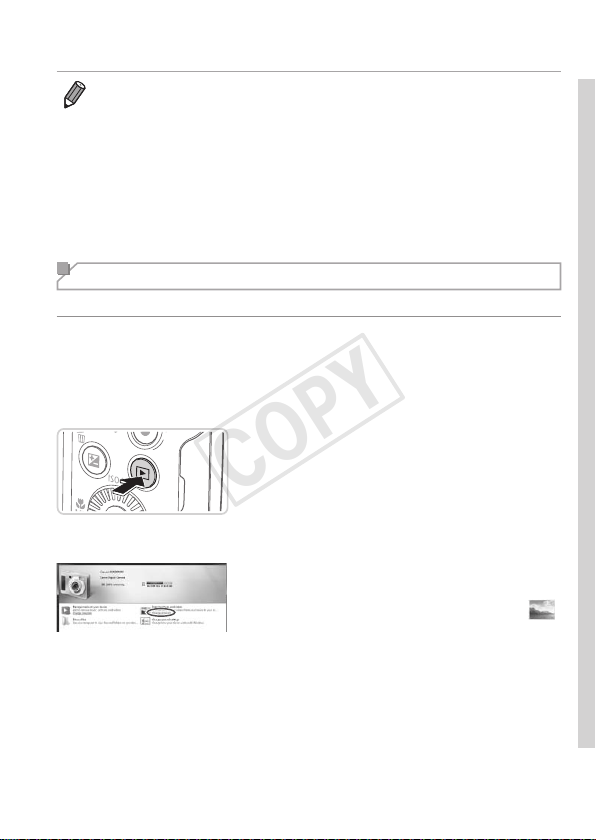
Saving Images to a Computer
Windows7andMacOSX10.6areusedhereforthesakeofillustration.
1 Connectthecameratothe
computer.
Followstep3on=
28toconnectthe
cameratoacomputer.
2 Turnthecameraontoaccess
CameraWindow.
Pressthe
<1>
buttontoturnthecameraon.
OnaMacintoshcomputer,CameraWindow
isdisplayedwhenaconnectionisestablished
betweenthecameraandcomputer.
ForWindows,followthestepsintroduced
below.
Inthescreenthatdisplays,clickthe[ ]
linktomodifytheprogram.
COPY
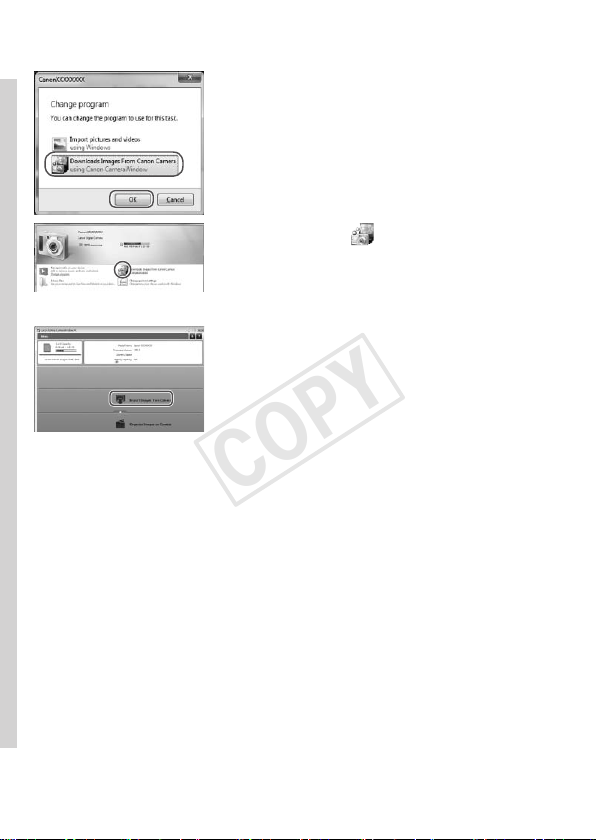
30
IncludedSoftware,PDFManuals
Choose[DownloadsImagesFromCanon
CamerausingCanonCameraWindow]
andthenclick[OK].
Doubleclick[ ].
CameraWindow
3 Savetheimagestothe
computer.
Click[ImportImagesfromCamera],and
thenclick[ImportUntransferredImages].
ImagesarenowsavedtothePictures
folderonthecomputer,inseparate
foldersnamedbydate.
Afterimagesaresaved,close
CameraWindow,pressthe<1>button
toturnthecameraoff,andunplugthe
cable.
Forinstructionsonviewingimageson
acomputer,refertothe
SoftwareGuide
(=
25).
COPY

31
IncludedSoftware,PDFManuals
• InWindows7,ifthescreeninstep2isnotdisplayed,clickthe[ ]iconin
thetaskbar.
• TostartCameraWindowinWindowsVistaorXP,click[DownloadsImages
FromCanonCamerausingCanonCameraWindow]onthescreendisplayed
whenyouturnthecameraoninstep2.IfCameraWindowisnotdisplayed,
clickthe[Start]menuandchoose[AllPrograms]
►
[CanonUtilities]
►
[CameraWindow]
►
[CameraWindow].
• OnaMacintoshcomputer,ifCameraWindowisnotdisplayedafterstep2,
clickthe[CameraWindow]iconintheDock(thebaratthebottomofthe
desktop).
• Althoughyoucansaveimagestoacomputersimplybyconnectingyour
cameratothecomputerwithoutusingtheincludedsoftware,thefollowing
limitationsapply.
-Itmaytakeafewminutesafteryouconnectthecameratothecomputer
untilcameraimagesareaccessible.
-Imagesshotinverticalorientationmaybesavedinhorizontalorientation.
-Imageprotectionsettingsmaybeclearedfromimagessavedtoa
computer.
-Someproblemsmayoccurwhensavingimagesorimageinformation,
dependingontheoperatingsystemversion,thesoftwareinuse,orimage
lesizes.
-Somefunctionsprovidedbytheincludedsoftwaremaynotbeavailable,
suchaseditingmoviesorreturningimagestothecamera.
Using the PDF Manuals
CameraUserGuide
Accessthisguidebydouble-clickingthedesktopshortcuticon.
SoftwareGuide
Theguidecanbeaccessedfromthehelpsystemofincludedsoftware
(somesoftwareexcluded).
• ItmaynotbepossibletoinstallthePDFmanualsoncomputersthatdo
notmeetthesystemrequirements(=
26).However,youcanviewthe
manualsonacomputerthatsupportsAdobeReaderbycopyingthePDF
lesintheReadmefolderontheCD-ROMdirectlytoaconvenientlocation
onthecomputer.
COPY
32
Accessories
WristStrap
WS-800
AAAlkaline
Batteries(x2)
DIGITAL
CAMERA
SolutionDisk
InterfaceCableIFC-400PCU
*1
MemoryCard CardReader Windows/
Macintosh
Computer
TV/
VideoSystem
ACAdapterKit
ACK800
*3
Batteryand
ChargerKit
CBK4-300
Included
Accessories
Power
Cable
HDMICableHTC-100
StereoAVCableAVC-DC400ST
FlashUnit
CanonPictBridge-
CompatiblePrinters
High-Power
Flash
HF-DC2
*2
*1Alsoavailableforpurchaseseparately.
*2High-PowerFlashHF-DC1alsosupported.
*3DCCouplerDR-DC10isrequired.
UseofgenuineCanonaccessoriesisrecommended.
Thisproductisdesignedtoachieveexcellentperformancewhenusedwithgenuine
Canonaccessories.
Canonshallnotbeliableforanydamagetothisproductand/oraccidentssuchasre,
etc.,causedbythemalfunctionofnon-genuineCanonaccessories(e.g.,aleakage
and/orexplosionofabatterypack).Pleasenotethatthiswarrantydoesnotapplyto
repairsarisingoutofthemalfunctionofnon-genuineCanonaccessories,althoughyou
mayrequestsuchrepairsonachargeablebasis.
COPY

33
Camera Basics
Practicalguidethatintroducesothercamerabasicsand
describesshootingandplaybackoptions
1
Advanced Guide
COPY
34
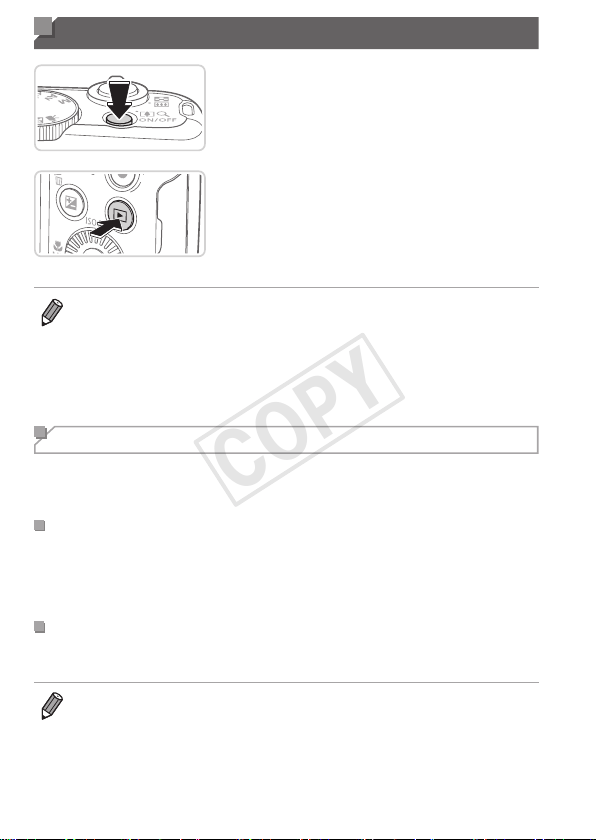
On/Off
ShootingMode
Pressthepowerbuttontoturnthe
cameraonandprepareforshooting.
Toturnthecameraoff,pressthepower
buttonagain.
PlaybackMode
Pressthe<1>buttontoturnthecamera
onandviewyourshots.
Toturnthecameraoff,pressthe<1>
buttonagain.
• ToswitchtoPlaybackmodefromShootingmode,pressthe<1>button.
• ToswitchtoShootingmodefromPlaybackmode,presstheshutterbutton
halfway(=
35).
• Thelenswillberetractedafteraboutoneminuteoncethecameraisin
Playbackmode.Youcanturnthecameraoffwhenthelensisretractedby
pressingthe<1>button.
Power-Saving Features (Auto Power Down)
Asawaytoconservebatterypower,thecameraautomaticallydeactivates
thescreen(DisplayOff)andthenturnsitselfoffafteraspecicperiodof
inactivity.
PowerSavinginShootingMode
Thescreenisautomaticallydeactivatedafteraboutoneminuteofinactivity.
Inabouttwomoreminutes,thelensisretractedandthecameraturnsitself
off.Toactivatethescreenandprepareforshootingwhenthescreenisoff
butthelensisstillout,presstheshutterbuttonhalfway(=
35).
PowerSavinginPlaybackMode
Thecameraturnsitselfoffautomaticallyafteraboutveminutesof
inactivity.
• Adjustthetimingofautomaticcameraandscreendeactivationasneeded
(=
149).
• Powersavingisnotactivewhilethecameraisconnectedtoacomputer
(=
28).
COPY

35
Shutter Button
Toensureyourshotsareinfocus,alwayspresstheshutterbuttonlightly
(halfway)initially.Oncethesubjectisinfocus,pressthebuttonalltheway
downtoshoot.
Inthismanual,shutterbuttonoperationsaredescribedaspressingthe
buttonhalfwayorall the way down.
1 Presshalfway.(Presslightlyto
focus.)
Presstheshutterbuttonhalfway.The
camerabeepstwice,andAFframesare
displayedaroundimageareasinfocus.
2 Pressallthewaydown.(From
thehalfwayposition,pressfully
toshoot.)
Thecamerashoots,asashuttersound
isplayed.
Keepthecamerastilluntiltheshutter
soundends.
• Imagesmaybeoutoffocusifyoushootwithoutinitiallypressing
theshutterbuttonhalfway.
• Lengthofshuttersoundplaybackvariesdependingonthetime
requiredfortheshot.Itmaytakelongerinsomeshootingscenes,
andimageswillbeblurryifyoumovethecamera(orthesubject
moves)beforetheshuttersoundends.
COPY

36
Shooting Modes
Usethemodedialtoaccesseachshootingmode.
P,Tv,Av,andMModes
Takeavarietyofshots
usingyourpreferred
settings(=
79,103).
MovieMode
Forshootingmovies
(=
77).
Youcanalsoshoot
movieswhenthemode
dialisnotsettoMovie
mode,simplybypressing
themoviebutton.
AutoMode
Fullyautomaticshooting,with
camera-determinedsettings
(=
20,42).
SpecialSceneMode
Shootwithoptimalsettingsfor
specicscenes(=
67).
DiscreetMode
Shootwithouttheashorcamera
sounds(
=
76).
CreativeFiltersMode
Addavarietyofeffectstoimages
whenshooting(=
71).
LiveViewControlMode
Customizeimagebrightnessor
colorswhenshooting(=
66).
• YoucanturnthemodedialtoswitchtoShootingmodefromPlaybackmode.
Shooting Display Options
Pressthe<l>buttontoviewotherinformationonthescreen,ortohide
theinformation.Fordetailsontheinformationdisplayed,see=
188.
Informationis
displayed
Noinformationis
displayed
• Screenbrightnessisautomaticallyincreasedbythenightdisplayfunction
whenyouareshootingunderlowlight,makingiteasiertocheckhowshots
arecomposed.However,on-screenimagebrightnessmaynotmatchthe
brightnessofyourshots.Notethatanyon-screenimagedistortionorjerky
subjectmotionwillnotaffectrecordedimages.
• Forplaybackdisplayoptions,see=
112.
COPY
37
FUNC. Menu
CongurecommonlyusedfunctionsthroughtheFUNC.menuasfollows.
Notethatmenuitemsandoptionsvarydependingontheshootingmode
(=
194–195).
1 AccesstheFUNC.menu.
Pressthe<m>button.
MenuItems
Options
2 Chooseamenuitem.
Pressthe<o><p>buttonstochoosea
menuitem.
Availableoptionsareshownatthebottom
ofthescreen.
3 Chooseanoption.
Pressthe<q><r>buttonsorturnthe
<5>dialtochooseanoption.
Optionslabeledwitha[ ]iconcan
beconguredbypressingthe<l>
button.
Toreturntothemenuitems,pressthe
<l>button.
4 Finishthesetupprocess.
Pressthe<m>button.
Thescreenbeforeyoupressedthe
<m>buttoninstep1isdisplayedagain,
showingtheoptionyoucongured.
• Toundoanyaccidentalsettingchanges,youcanrestorethecamera’s
defaultsettings(=
152).
COPY
38
MENU Menu
Congureavarietyofcamerafunctionsthroughothermenusasfollows.
Menuitemsaregroupedbypurposeontabs,suchasshooting[4],
playback[1],andsoon.Notethatavailablesettingsvarydependingon
theselectedshootingorplaybackmode(=
196–200).
1 Accessthemenu.
Pressthe<n>button.
2 Chooseatab.
Movethezoomlevertochooseatab.
Afteryouhavepressedthe<o><p>
buttonstochooseatabinitially,youcan
switchbetweentabsbypressingthe
<q><r>buttons.
3 Chooseasetting.
Pressthe<o><p>buttonsorturnthe
<5>dialtochooseasetting.
Tochoosesettingswithoptionsnot
shown,rstpressthe<m>or<r>
buttontoswitchscreens,andtheneither
pressthe<o><p>buttonsorturnthe
<5>dialtoselectthesetting.
Toreturntothepreviousscreen,press
the<n>button.
COPY
39
MENUMenu
4 Chooseanoption.
Pressthe<q><r>buttonstochoosean
option.
5 Finishthesetupprocess.
Pressthe<n>buttontoreturntothe
screendisplayedbeforeyoupressedthe
<n>buttoninstep1.
• Toundoanyaccidentalsettingchanges,youcanrestorethecamera’s
defaultsettings(=
152).
COPY
40
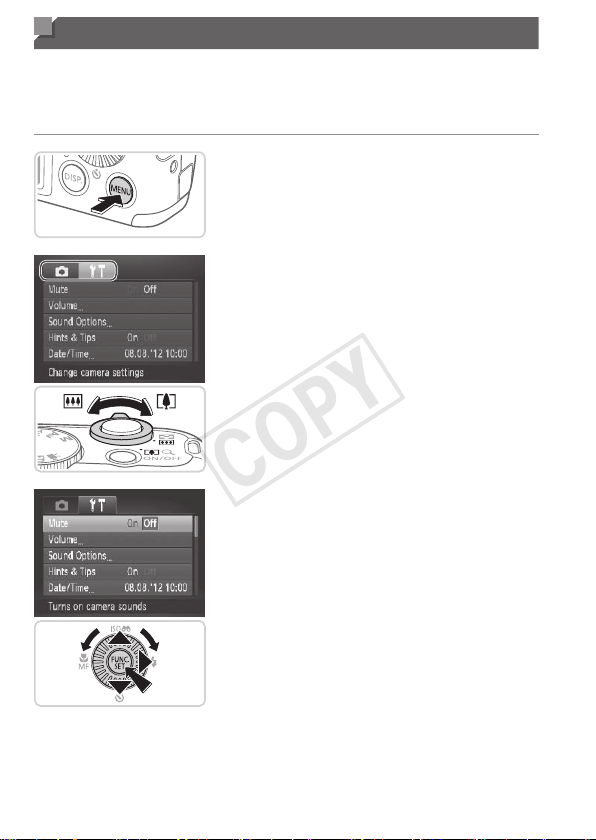
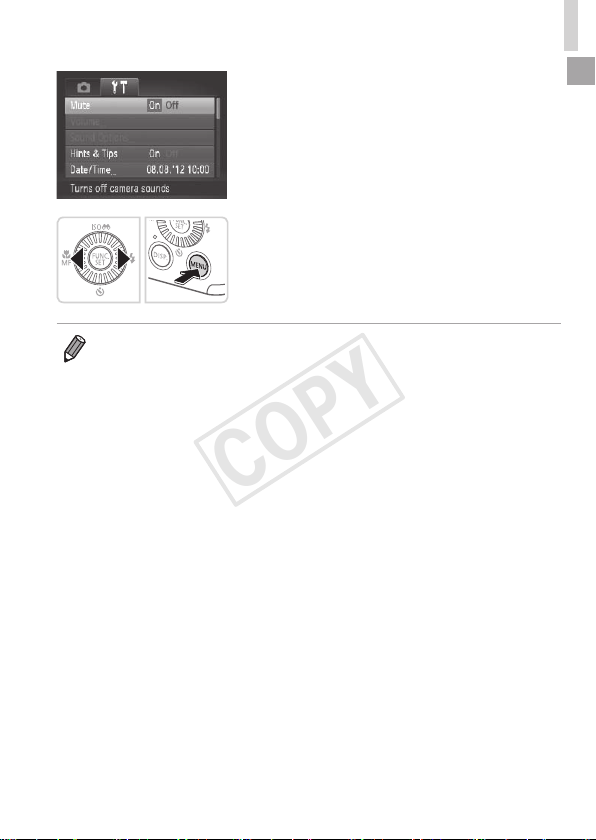
Indicator Display
Theindicatoronthebackofthecamera(=
5)lightsuporblinks
dependingonthecamerastatus.
Color
Indicator
Status
CameraStatus
Green
On
Connectedtoacomputer(=
29),ordisplayoff
(=
34,149)
Blinking Startingup,recording/reading/transmittingimages
• Whentheindicatorblinksgreen,neverturnthecameraoff,open
thememorycard/batterycover,orshakeorjoltthecamera,which
maycorruptimagesordamagethecameraormemorycard.
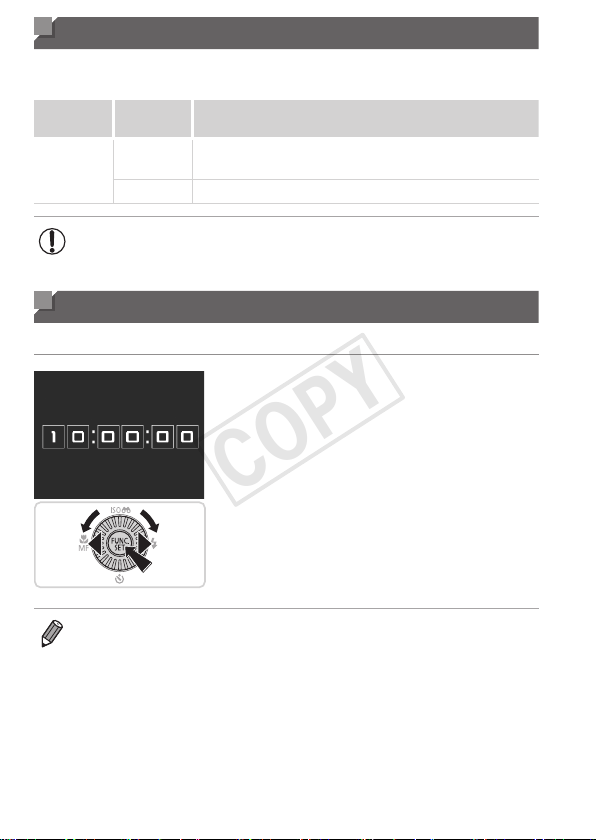
Clock
Youcancheckthecurrenttime.
Pressandholdthe<m>button.
Thecurrenttimeappears.
Ifyouholdthecameraverticallywhile
usingtheclockfunction,itwillswitch
toverticaldisplay.Pressthe<q><r>
buttonsorturnthe<5>dialtochange
thedisplaycolor.
Pressthe<m>buttonagaintocancel
theclockdisplay.
• Whenthecameraisoff,pressandholdthe<m>button,thenpressthe
powerbuttontodisplaytheclock.
COPY

41
Smart Auto Mode
Convenientmodeforeasyshotswithgreatercontrol
overshooting
2
COPY
42
StillImages Movies
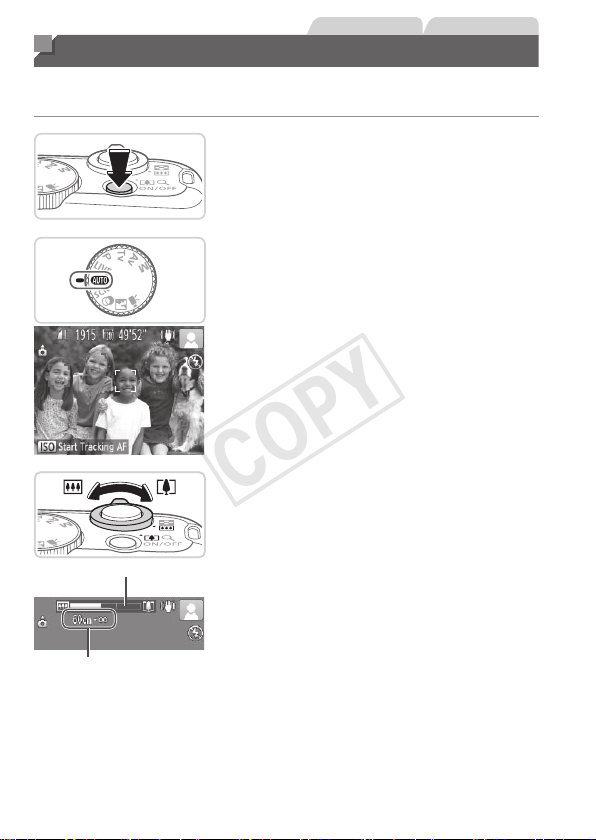
Shooting (Smart Auto)
Forfullyautomaticselectionatoptimalsettingsforspecicscenes,simply
letthecameradeterminethesubjectandshootingconditions.
1 Turnthecameraon.
Pressthepowerbutton.
Thestartupscreenisdisplayed.
2 Enter<A>mode.
Setthemodedialto<A>.
Aimthecameraatthesubject.The
camerawillmakeaslightclickingnoise
asitdeterminesthescene.
Iconsrepresentingthesceneandimage
stabilizationmodearedisplayedinthe
upperrightofthescreen(=
46,47).
Framesdisplayedaroundanydetected
subjectsindicatethattheyareinfocus.
ZoomBar
FocusRange(approx.)
3 Composetheshot.
Tozoominandenlargethesubject,move
thezoomlevertoward<i>(telephoto),
andtozoomawayfromthesubject,move
ittoward<j>(wideangle).(Azoombar
showingthezoompositionisdisplayed.)
COPY

43
Shooting(SmartAuto)
4 Shoot.
ShootingStillImages
Focus.
Presstheshutterbuttonhalfway.The
camerabeepstwiceafterfocusing,and
greenframesaredisplayedtoindicate
imageareasinfocus.
Severalgreenframesaredisplayedwhen
multipleareasareinfocus.
If[Raisetheash]appearsonthescreen,
pressthe<h>buttontoraisetheash.It
willrewhenshooting.Ifyouprefernot
tousetheash,pushitdownwithyour
nger,intothecamera.
Shoot.
Presstheshutterbuttonalltheway
down.
Asthecamerashoots,ashuttersound
isplayed,andinlow-lightconditions
whenyouhaveraisedtheash,itres
automatically.
Keepthecamerastilluntiltheshutter
soundends.
Yourshotremainsdisplayedonthe
screenforabouttwoseconds.
Evenwhiletheshotisdisplayed,youcan
takeanothershotbypressingtheshutter
buttonagain.
COPY
44
Shooting(SmartAuto)
ElapsedTime
ShootingMovies
Startshooting.
Pressthemoviebutton.Thecamera
beepsonceasrecordingbegins,and
[●Rec]isdisplayedwiththeelapsedtime.
Blackbarsdisplayedonthetopand
bottomedgesofthescreenindicate
imageareasnotrecorded.
Framesdisplayedaroundanydetected
facesindicatethattheyareinfocus.
Oncerecordingbegins,youcantakeyour
ngeroffthemoviebutton.
Resizethesubjectand
recomposetheshotasneeded.
Toresizethesubject,dothesamething
asinstep3on=
42.However,note
thatthesoundofcameraoperationswill
berecorded,andmoviesshotatzoom
factorsshowninbluewilllookgrainy.
Whenyourecomposeshots,the
focus,brightness,andcolorswillbe
automaticallyadjusted.
Finishshooting.
Pressthemoviebuttonagaintostop
shooting.Thecamerabeepstwiceas
recordingstops.
Recordingwillstopautomaticallywhen
thememorycardbecomesfull.
StillImages/Movies
• Torestorecamerasoundifyouhaveaccidentallydeactivatedit
(byholdingthe<l>buttondownwhileturningthecameraon),
pressthe<n>buttonandchoose[Mute]onthe[3]tab,and
thenpressthe<q><r>buttonstochoose[Off].
COPY
45
Shooting(SmartAuto)
StillImages
• Aashing[ ]iconwarnsthatimagesaremorelikelytobeblurred
bycamerashake.Inthiscase,mountthecameraonatripodor
takeothermeasurestokeepitstill.
• Ifyourshotsaredarkdespitetheashring,movecloserto
thesubject.Fordetailsontheashrange,see“Specications”
(=
203).
• Thesubjectmaybetoocloseifthecameraonlybeepsoncewhen
youpresstheshutterbuttonhalfway.Fordetailsonthefocusing
range(shootingrange),see“Specications”(=
203).
• Toreducered-eyeandtoassistinfocusing,thelampmaybe
activatedwhenshootinginlow-lightconditions.
• Ablinking[h]icondisplayedwiththemessage[Chargingtheash]
whenyouattempttoshootindicatesthatshootingisnotpossible
untiltheashhasnishedrecharging.Shootingcanresumeas
soonastheashisready,soeitherpresstheshutterbuttonallthe
waydownandwait,orreleaseitandpressitagain.
Movies
Microphone
• Keepyourngersawayfromthe
microphonewhileshootingmovies.
Blockingthemicrophonemayprevent
audiofrombeingrecordedormay
causetherecordingtosoundmufed.
• Avoidtouchingcameracontrolsotherthanthemoviebuttonwhen
shootingmovies,becausesoundsmadebythecamerawillbe
recorded.
• Audioisrecordedinstereo.
COPY
46
Shooting(SmartAuto)
StillImages Movies
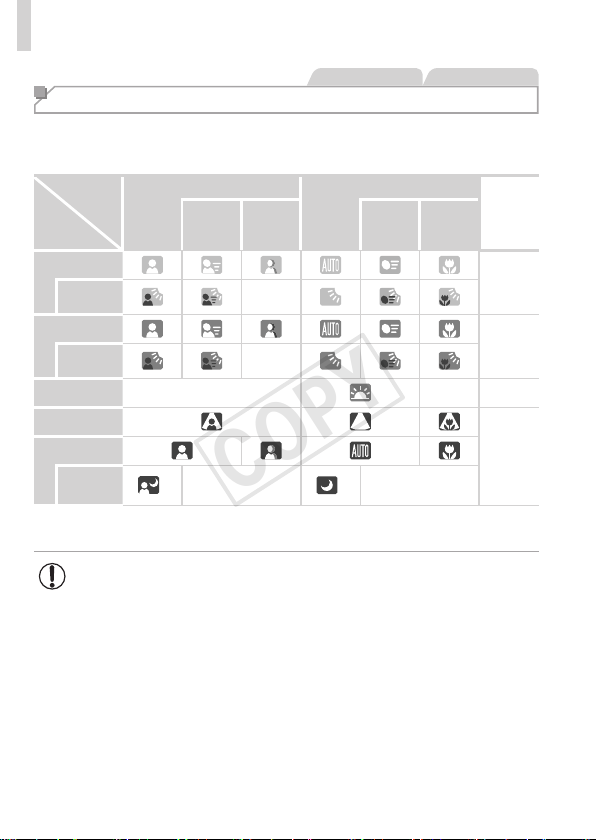
Scene Icons
In<A>mode,shootingscenesdeterminedbythecameraareindicated
bytheicondisplayed,andcorrespondingsettingsareautomatically
selectedforoptimalfocusing,subjectbrightness,andcolor.
Subject
Background
People OtherSubjects
Icon
Background
Color
In
Motion
*1
Shadows
onFace
*1
In
Motion
*1
AtClose
Range
Bright
Gray
Backlit
—
WithBlueSky
Light
Blue
Backlit
—
Sunsets —
— Orange
Spotlights
Dark
Blue
Dark
Tripod
Used
*2
—
*2
—
*1Notdisplayedformovies.
*2Displayedindarksceneswhenthecameraisheldstill,aswhenmountedonatripod.
• Tryshootingin<G>mode(=
79)ifthesceneicondoesnot
matchactualshootingconditions,orifitisnotpossibletoshoot
withyourexpectedeffect,color,orbrightness.
COPY
47
Shooting(SmartAuto)
StillImages Movies
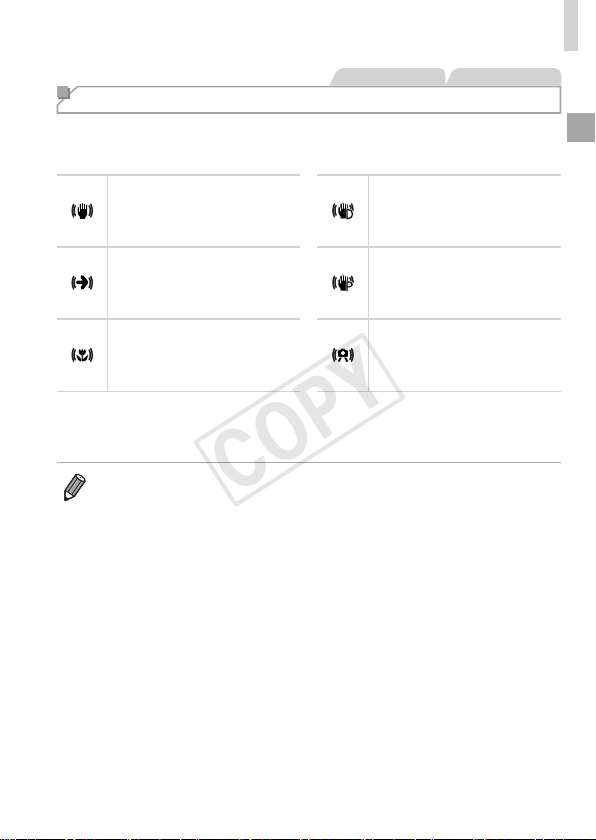
Image Stabilization Icons
Optimalimagestabilizationfortheshootingconditionsisautomatically
applied(IntelligentIS).Additionally,thefollowingiconsaredisplayedin
<A>mode.
Imagestabilizationforstill
images
Imagestabilizationformovies,
reducingstrongcamerashake,
aswhenshootingwhilewalking
(DynamicIS)
Imagestabilizationforstill
images,whenpanning
*
Imagestabilizationforslow
camerashake,suchaswhen
shootingmoviesattelephoto
(PoweredIS)
Imagestabilizationformacro
shots(HybridIS)
Noimagestabilization,because
thecameraismountedon
atripodorheldstillbyother
means
*Displayedwhenyoupan,followingmovingsubjectswiththecamera.Whenyoufollow
subjectsmovinghorizontally,imagestabilizationonlycounteractsverticalcamera
shake,andhorizontalstabilizationstops.Similarly,whenyoufollowsubjectsmoving
vertically,imagestabilizationonlycounteractshorizontalcamerashake.
• Tocancelimagestabilization,set[ISMode]to[Off](=
101).Inthiscase,
anISiconisnotdisplayed.
COPY

48
Shooting(SmartAuto)
StillImages Movies
On-Screen Frames
Avarietyofframesaredisplayedoncethecameradetectssubjectsyouare
aimingthecameraat.
• Awhiteframeisdisplayedaroundthesubject(orperson’sface)
determinedbythecameratobethemainsubject,andgrayframesare
displayedaroundotherdetectedfaces.Framesfollowmovingsubjects
withinacertainrangetokeeptheminfocus.
However,ifthecameradetectssubjectmovement,onlythewhiteframe
willremainonthescreen.
• Whenyouarepressingtheshutterbuttonhalfwayandthecamera
detectssubjectmovement,ablueframeisdisplayed,andthefocusand
imagebrightnessareconstantlyadjusted(ServoAF).
• Tryshootingin<G>mode(=
79)ifnoframesaredisplayed,if
framesarenotdisplayedarounddesiredsubjects,orifframesare
displayedonthebackgroundorsimilarareas.
COPY
49
Common, Convenient Features
StillImages Movies
Zooming In Closer on Subjects (Digital Zoom)
Whendistantsubjectsaretoofarawaytoenlargeusingtheopticalzoom,
usedigitalzoomforuptoabout64xenlargement.
ZoomFactor
1 Movethezoomlevertoward
<i>.
Holdtheleveruntilzoomingstops.
Zoomingstopsatthelargestpossiblezoom
factor(beforetheimagebecomesnoticeably
grainy),whichisthenindicatedonthescreen.
2 Movethezoomlevertoward
<i>again.
Tocontinuemagnifyingthesubject,keep
zooming.
• Movingthezoomleverwilldisplaythezoombar(whichindicates
thezoomposition).Thecolorofthezoombarwillchange
dependingonthezoomrange.
-Whiterange:opticalzoomrangewheretheimagewillnotappeargrainy.
-Yellowrange:digitalzoomrangewheretheimageisnot
noticeablygrainy(ZoomPlus).
-Bluerange:digitalzoomrangewheretheimagewillappeargrainy.
Becausethebluerangewillnotbeavailableatsomeresolution
settings(=
55)themaximumzoomfactorcanbeachievedby
followingstep1.
• Zoomedimagesmaylookgrainy,undersomeresolutionsettings
(=
55)
andzoomfactors.Inthiscase,thezoomfactorisshowninblue.
• Focallengthwhenopticalanddigitalzoomarecombinedisasfollows
(35mmlmequivalent).
28–1792mm(28–448mmwithopticalzoomalone)
• Todeactivatedigitalzoom,pressthe<n>button,choose[DigitalZoom]
onthe[4]tab,andthenchoose[Off].
COPY
50
Common,ConvenientFeatures
StillImages Movies
Using the Self-Timer
Withtheself-timer,youcanincludeyourselfingroupphotosorothertimed
shots.Thecamerawillshootabout10secondsafteryoupresstheshutter
button.
1 Congurethesetting.
Pressthe<p>button,choose[]](either
pressthe<o><p>buttonsorturnthe
<5>dial),andthenpressthe<m>
button.
Oncethesettingiscomplete,[]]is
displayed.
2 Shoot.
ForStillImages:Presstheshutterbutton
halfwaytofocusonthesubject,andthen
pressitallthewaydown.
ForMovies:Pressthemoviebutton.
Onceyoustarttheself-timer,thelamp
willblinkandthecamerawillplayaself-
timersound.
Twosecondsbeforetheshot,theblinking
andsoundwillspeedup.(Thelampwill
remainlitincasetheashres.)
Tocancelshootingafteryouhave
triggeredtheself-timer,pressthe
<n>button.
Torestoretheoriginalsetting,choose
[
]instep1.
COPY
51
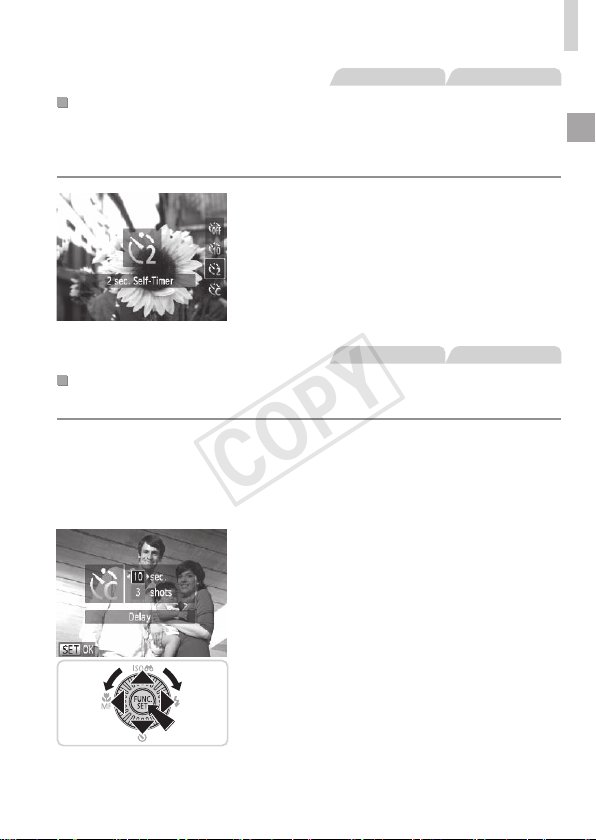
Common,ConvenientFeatures
StillImages Movies
UsingtheSelf-TimertoAvoidCameraShake
Thisoptiondelaysshutterreleaseuntilabouttwosecondsafteryouhave
pressedtheshutterbutton.Ifthecameraisunsteadywhileyouarepressing
theshutterbutton,itwillnotaffectyourshot.
Congurethesetting.
Followstep1on=
50andchoose
[[].
Oncethesettingiscomplete,[[]is
displayed.
Followstep2on=
50toshoot.
StillImages Movies
CustomizingtheSelf-Timer
Youcanspecifythedelay(0–30seconds)andnumberofshots(1–10).
1 Choose[$].
Followingstep1on=
50,choose
[$]andpressthe<n>button
immediately.
2 Congurethesetting.
Pressthe<o><p>buttonstochoose
[Delay]or[Shots].
Pressthe<q><r>buttonsorturnthe
<5>dialtochooseavalue,andthen
pressthe<m>button.
Oncethesettingiscomplete,[$]is
displayed.
Followstep2on=
50toshoot.
COPY

52
Common,ConvenientFeatures
• Formoviesshotusingtheself-timer,[Delay]representsthedelay
beforerecordingbegins,butthe[Shots]settinghasnoeffect.
• Whenyouspecifymultipleshots,imagebrightnessandwhitebalanceare
determinedbytherstshot.Moretimeisrequiredbetweenshotswhenthe
ashresorwhenyouhavespeciedtotakemanyshots.Shootingwillstop
automaticallywhenthememorycardbecomesfull.
• Whenadelaylongerthantwosecondsisspecied,twosecondsbeforethe
shot,thelampblinkingandself-timersoundwillspeedup.(Thelampwill
remainlitincasetheashres.)
StillImages
Adding a Date Stamp
Thecameracanaddtheshootingdatetoimages,inthelower-rightcorner.
However,notethatdatestampscannotbeeditedorremoved,soconrm
beforehandthatthedateandtimearecorrect(=
17).
1 Congurethesetting.
Pressthe<n>button,choose[Date
Stamp]onthe[4]tab,andthenchoose
thedesiredoption(=
38).
Oncethesettingiscomplete,[DATE]is
displayed.
2 Shoot.
Asyoutakeshots,thecameraaddsthe
shootingdateortimetothelower-right
cornerofimages.
Torestoretheoriginalsetting,choose
[Off]instep1.
COPY
53
Common,ConvenientFeatures
• Datestampscannotbeeditedorremoved.
• Shotstakenwithoutaddingadatestampcanbeprintedwithoneasfollows.
However,addingadatestampthiswaytoimagesthatalreadyhaveonemay
causeittobeprintedtwice.
-Usetheincludedsoftwaretoprint
Fordetails,refertotheSoftware Guide(=
25).
-Printusingprinterfunctions(=
166)
-UsecameraDPOFprintsettings(=
173)toprint
StillImages
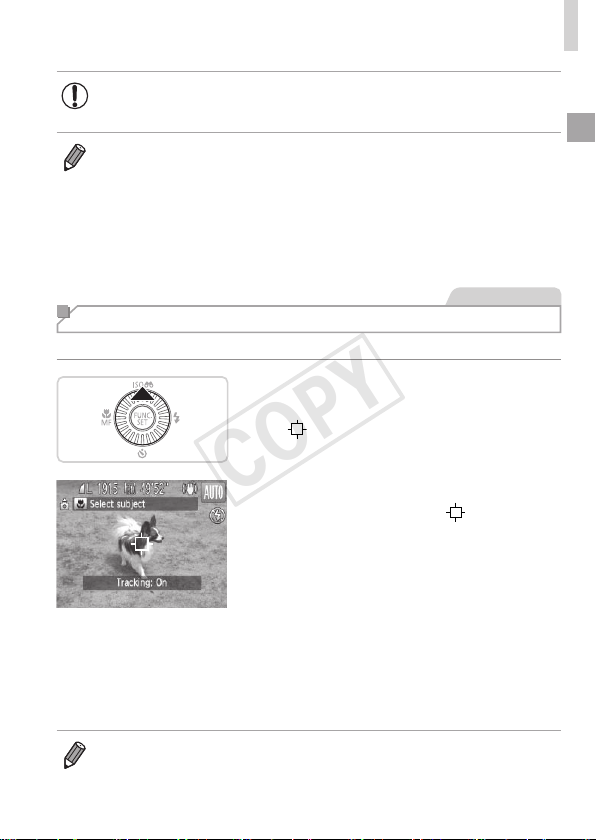
Choosing Subjects to Focus On (Tracking AF)
Shootafterchoosingasubjecttofocusonasfollows.
1 SpecifyTrackingAF.
Pressthe<o>button.
[ ]isdisplayedinthecenterofthe
screen.
2 Chooseasubjecttofocuson.
Aimthecamerasothat[ ]isonthe
desiredsubject,andthenpressthe
shutterbuttonhalfway.
Ablueframeisdisplayed,andthe
camerawillkeepthesubjectinfocusand
imagebrightnessadjusted(ServoAF).
3 Shoot.
Presstheshutterbuttonallthewaydown
toshoot.
Pressthe<o>buttontocancelTrackingAF.
• Trackingmaynotbepossiblewhensubjectsaretoosmallormovetoo
rapidly,orwhensubjectcolororbrightnessmatchesthatofthebackground
tooclosely.
COPY
54
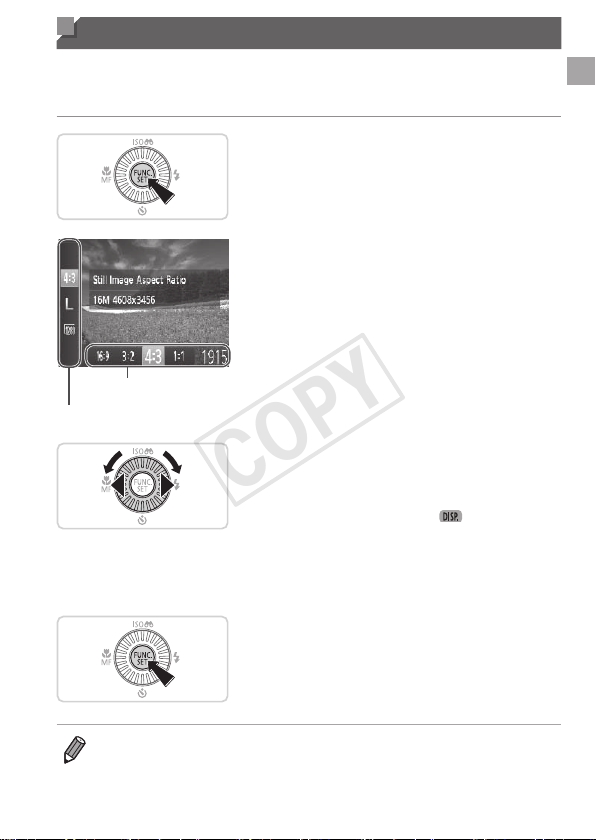
Image Customization Features
StillImages
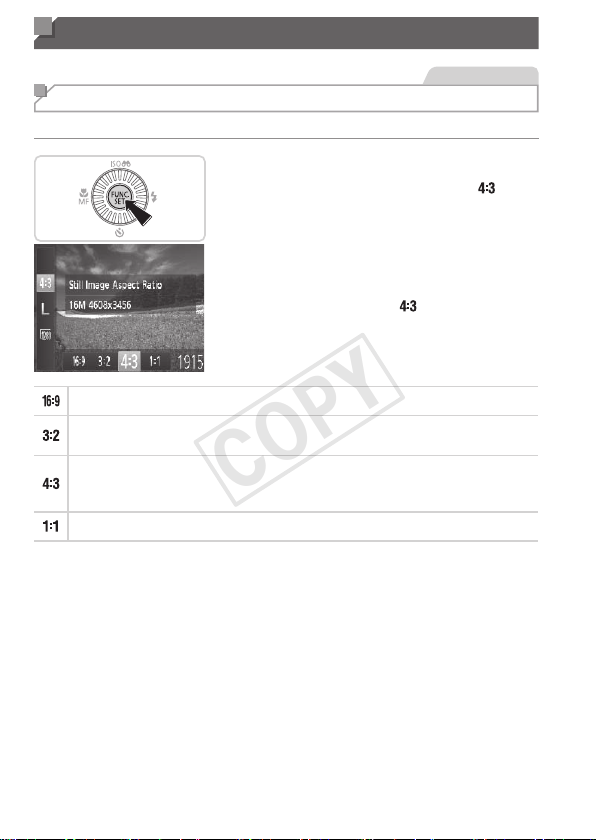
Changing the Aspect Ratio
Changetheimageaspectratio(ratioofwidthtoheight)asfollows.
Congurethesetting.
Pressthe<m>button,choose[ ]in
themenu,andchoosethedesiredoption
(=
37).
Oncethesettingiscomplete,thescreen
aspectratiowillbeupdated.
Torestoretheoriginalsetting,repeatthis
processbutchoose[
].
UsedfordisplayonwidescreenHDTVsorsimilardisplaydevices.
Sameaspectratioas35mmlm,usedforprintingimagesat5x7-inchor
postcardsizes.
Nativeaspectratioofthecamerascreen,alsousedfordisplayonstandard-
denitiontelevisionsorsimilardisplaydevices,orforprintingimagesat3.5x
5-inchorA-seriessizes.
Squareaspectratio.
COPY
55
ImageCustomizationFeatures
StillImages
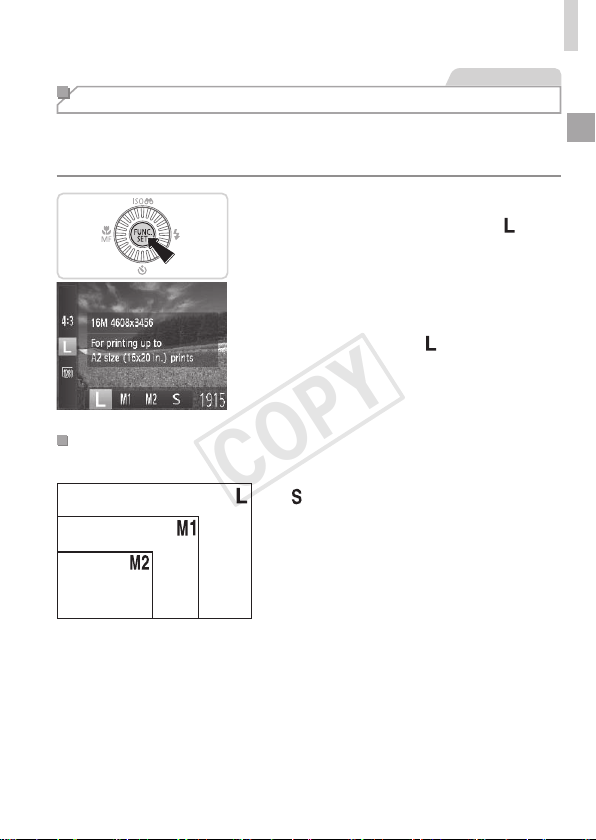
Changing Image Resolution (Size)
Choosefrom4levelsofimageresolution,asfollows.Forguidelineson
howmanyshotsateachresolutionsettingcantonamemorycard,see
“Specications”(=
203).
Congurethesetting.
Pressthe<m>button,choose[ ]in
themenu,andchoosethedesiredoption
(=
37).
Theoptionyouconguredisnow
displayed.
Torestoretheoriginalsetting,repeatthis
processbutchoose[
].
GuidelinesforChoosingResolutionBasedonPaper
Size(for4:3Images)
A2(16.5x23.4in.)
A3–A5(11.7x
16.5–5.8x8.3in.)
5x7in.
Postcard
3.5x5in.
[ ]:Fore-mailingimages.
COPY
56
ImageCustomizationFeatures
StillImages
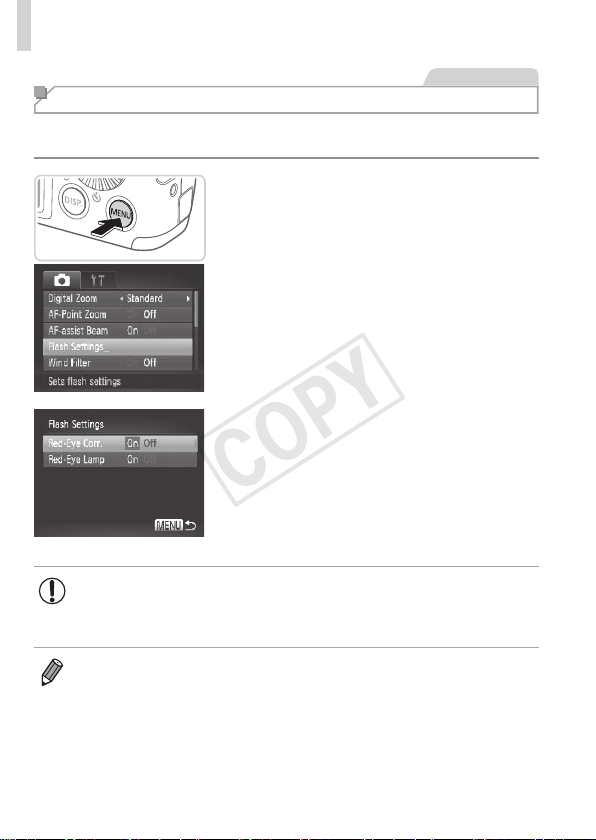
Red-Eye Correction
Red-eyethatoccursintheashphotographycanbeautomatically
correctedasfollows.
1 Accessthe[FlashSettings]
screen.
Pressthe<n>button,choose[Flash
Settings]onthe[4]tab,andthenpress
the<m>button(=
38).
2 Congurethesetting.
Choose[Red-EyeCorr.],andthen
choose[On](=
38).
Oncethesettingiscomplete,[R]is
displayed.
Torestoretheoriginalsetting,repeatthis
processbutchoose[Off].
• Red-eyecorrectionmaybeappliedtoimageareasotherthan
eyes(ifthecameramisinterpretsredeyemakeupasredpupils,
forexample).
• Youcanalsocorrectexistingimages(=
138).
• Youcanalsoaccessthescreeninstep2whentheashisupbypressing
the<r>buttonandimmediatelypressingthe<n>button.
COPY
57
ImageCustomizationFeatures
Movies
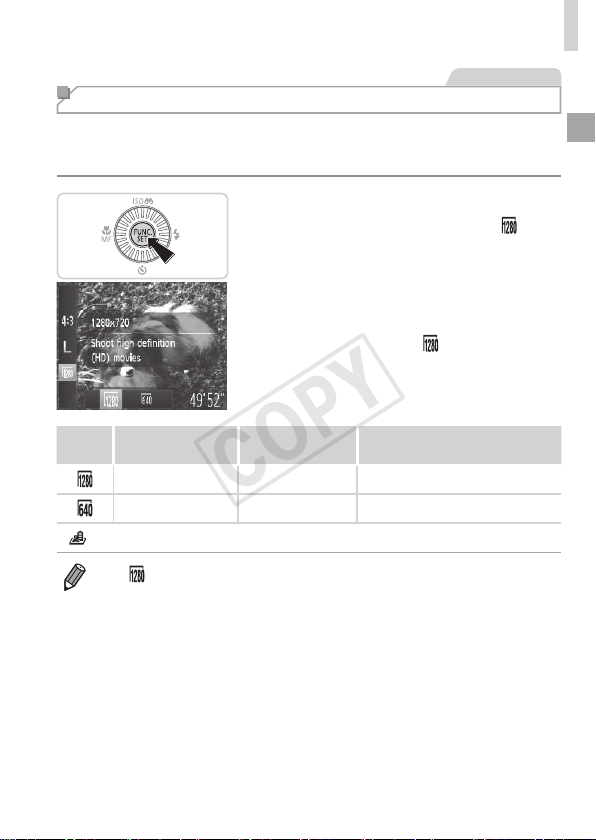
Changing Movie Image Quality
2imagequalitysettingsareavailable.Forguidelinesonthemaximum
movielengthateachlevelofimagequalitythatwilltonamemorycard,
see“Specications”(=
203).
Congurethesetting.
Pressthe<m>button,choose[ ]in
themenu,andchoosethedesiredoption
(=
37).
Theoptionyouconguredisnow
displayed.
Torestoretheoriginalsetting,repeatthis
processbutchoose[
].
Image
Quality
Resolution FrameRate Details
1280x720 25fps* ForshootinginHD
640x480 30fps Forshootinginstandarddenition
*[
]moviesareplayedbackat30fps.
• In[ ]mode,blackbarsdisplayedonthetopandbottomedgesofthe
screenindicateimageareasnotrecorded.
COPY
58
ImageCustomizationFeatures
Movies
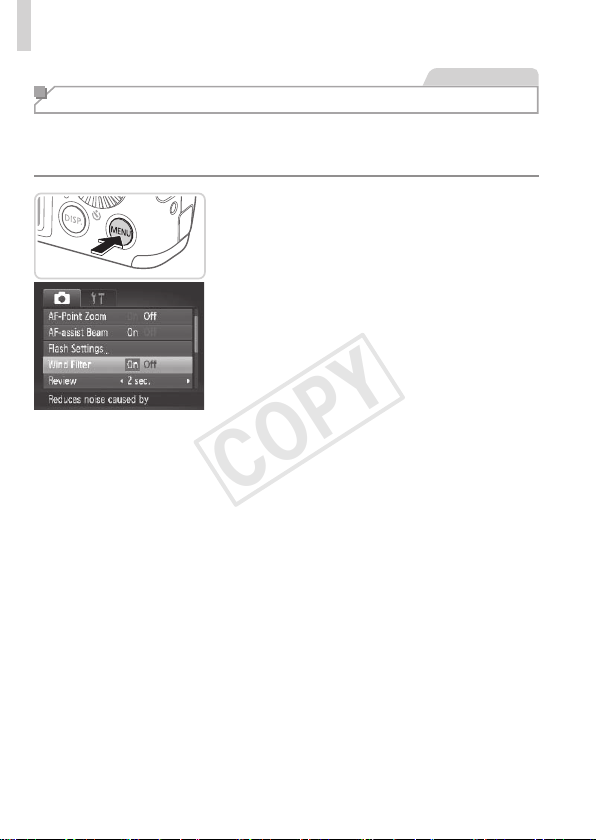
Using the Wind Filter
Distortedaudiocausedbyrecordingwhenthewindisstrongcanbe
reduced.However,therecordingmaysoundunnaturalwhenthisoptionis
usedwhenthereisnowind.
Congurethesetting.
Pressthe<n>button,choose
[WindFilter]onthe[4]tab,andthen
choose[On](=
38).
Torestoretheoriginalsetting,repeatthis
processbutchoose[Off].
COPY
59
Helpful Shooting Features
StillImages Movies
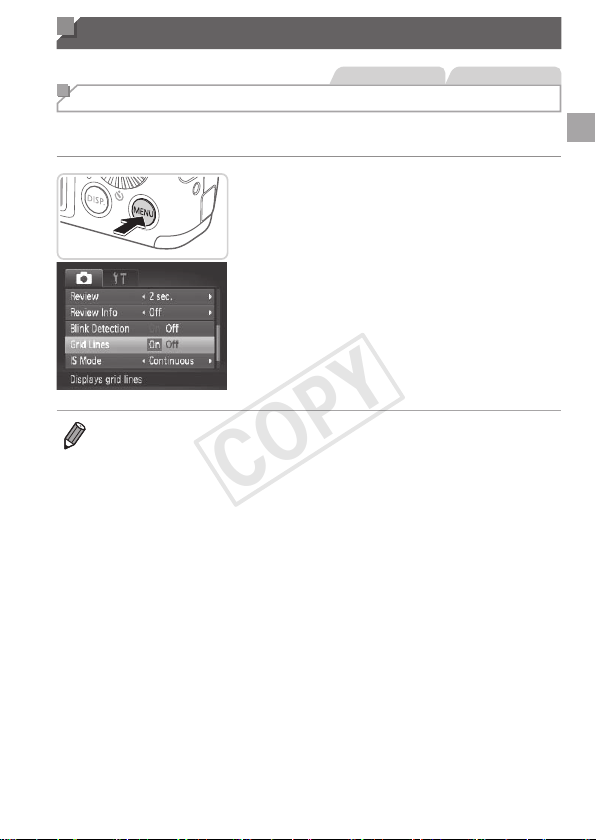
Displaying Grid Lines
Gridlinescanbedisplayedonthescreenforverticalandhorizontal
referencewhileshooting.
Congurethesetting.
Pressthe<n>button,choose
[GridLines]onthe[4]tab,andthen
choose[On](=
38).
Oncethesettingiscomplete,gridlines
aredisplayedonthescreen.
Torestoretheoriginalsetting,repeatthis
processbutchoose[Off].
• Gridlinesarenotrecordedinyourshots.
COPY

60
HelpfulShootingFeatures
StillImages
Magnifying the Area in Focus
Youcancheckthefocusbypressingtheshutterbuttonhalfway,whichwill
enlargetheportionoftheimageinfocusintheAFframe.
1 Congurethesetting.
Pressthe<n>button,choose
[AF-PointZoom]onthe[4]tab,and
thenchoose[On](=
38).
2 Checkthefocus.
Presstheshutterbuttonhalfway.The
facedetectedasthemainsubjectisnow
magnied.
Torestoretheoriginalsetting,choose
[Off]instep1.
• Theareainfocuswillnotbemagniedwhenyoupresstheshutter
buttonhalfwayifafacewasnotdetected,ifthepersonistooclose
tothecameraandtheirfaceistoolargeforthescreen,orifthe
cameradetectssubjectmovement.
• Thedisplaywillnotmagnifywhenusingthedigitalzoom(=
49)or
TrackingAF(=
94).
COPY
61
HelpfulShootingFeatures
StillImages
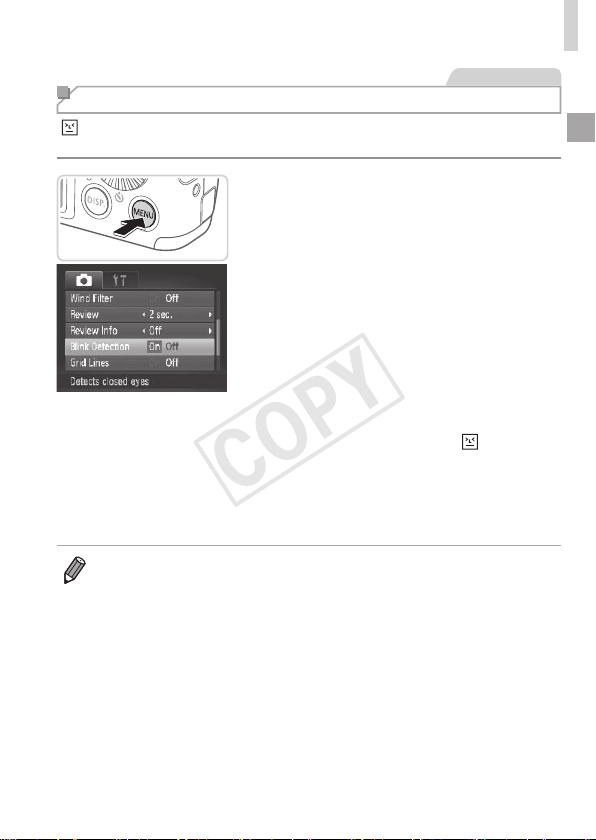
Checking for Closed Eyes
[ ]isdisplayedwhenthecameradetectsthatpeoplemayhaveclosed
theireyes.
1 Congurethesetting.
Pressthe<n>button,choose
[BlinkDetection]onthe[4]tab,andthen
choose[On](=
38).
2 Shoot.
Aframe,accompaniedby[ ],is
displayedwhenthecameradetectsa
personwhoseeyesareclosed.
Torestoretheoriginalsetting,choose
[Off]instep1.
• Whenyouhavespeciedmultipleshotsin[$]mode,thisfunctionisonly
availableforthenalshot.
• Theframeisnotdisplayedwhen[Review]issetto[Quick](=
63).
COPY
62
Customizing Camera Operation
Customizeshootingfunctionsonthe[4]tabofthemenuasfollows.
Forinstructionsonmenufunctions,see“MENUMenu”(=
38).
StillImages
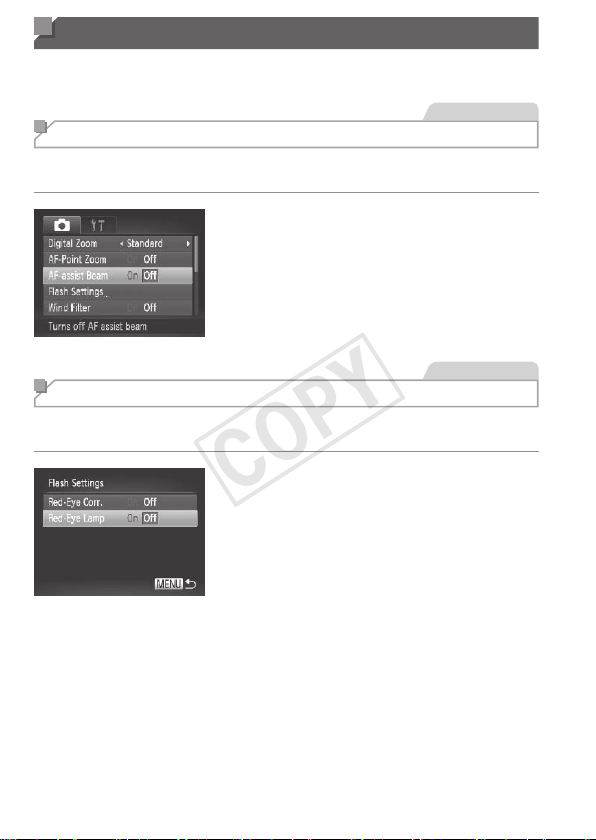
Deactivating the AF Assist Beam
Youcandeactivatethelampthatnormallylightsuptohelpyoufocuswhen
youpresstheshutterbuttonhalfwayinlow-lightconditions.
Congurethesetting.
Pressthe<n>button,choose
[AF-assistBeam]onthe[4]tab,and
thenchoose[Off](=
38).
Torestoretheoriginalsetting,repeatthis
processbutchoose[On].
StillImages
Deactivating the Red-Eye Reduction Lamp
Youcandeactivatethered-eyereductionlampthatlightsuptoreducered-
eyewhentheashisusedinlow-lightshots.
1 Accessthe[FlashSettings]
screen.
Pressthe<n>button,choose
[FlashSettings]onthe[4]tab,andthen
pressthe<m>button(=
38).
2 Congurethesetting.
Choose[Red-EyeLamp],andthen
choose[Off](=
38).
Torestoretheoriginalsetting,repeatthis
processbutchoose[On].
COPY
63
CustomizingCameraOperation
StillImages
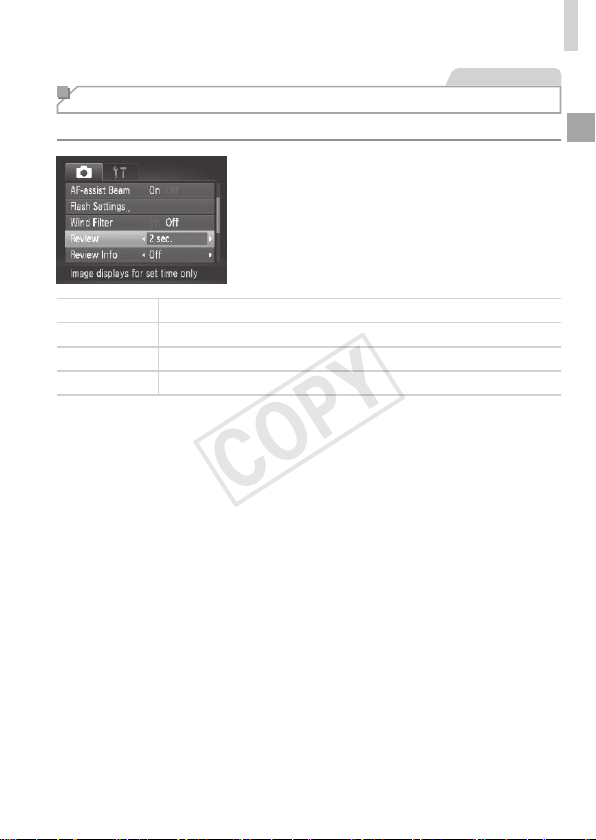
Changing the Image Display Period After Shots
Changehowlongimagesaredisplayedaftershotsasfollows.
Congurethesetting.
Pressthe<n>button,choose
[Review]onthe[4]tab,andthen
choosethedesiredoption(=
38).
Torestoretheoriginalsetting,repeatthis
processbutchoose[2sec.].
Quick Displaysimagesonlyuntilyoucanshootagain.
2–10sec. Displaysimagesforthespeciedtime.
Hold Displaysimagesuntilyoupresstheshutterbuttonhalfway.
Off Noimagedisplayaftershots.
COPY
64
CustomizingCameraOperation
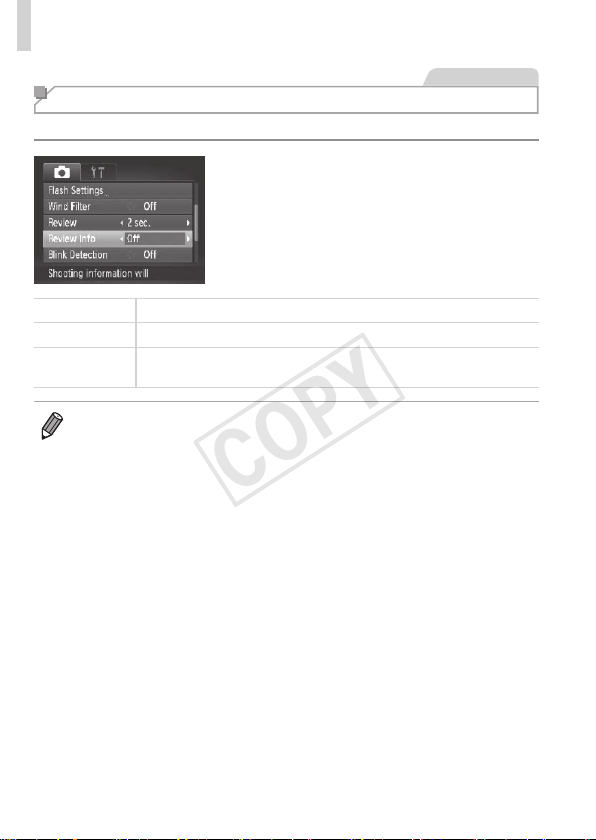
StillImages
Changing the Image Display Style After Shots
Changethewayimagesaredisplayedaftershotsasfollows.
Congurethesetting.
Pressthe<n>button,choose
[ReviewInfo]onthe[4]tab,andthen
choosethedesiredoption(=
38).
Torestoretheoriginalsetting,repeatthis
processbutchoose[Off].
Off Displaysonlytheimage.
Detailed
Displaysshootingdetails(=
190).
FocusCheck
ShowstheareaintheAFframemagnied,enablingyoutocheckthe
focus.Followthestepsin“CheckingtheFocus”(=
113).
• Thissettingissetto[Off]andcannotbechangedwhen[Review](=
63)is
setto[Quick]or[Off].
COPY

65
Other Shooting Modes
Shootmoreeffectivelyinvariousscenes,andtakeshots
enhancedwithuniqueimageeffectsorcapturedusing
specialfunctions
3
COPY
66
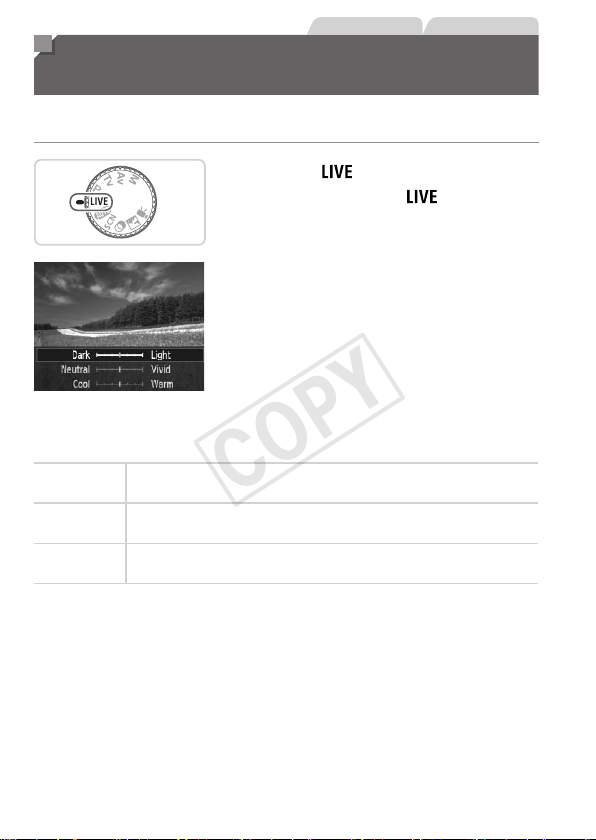
StillImages Movies
Brightness/Color Customization
(Live View Control)
Imagebrightnessorcolorswhenshootingcanbeeasilycustomizedas
follows.
1 Enter< >mode.
Setthemodedialto< >.
2 Congurethesetting.
Pressthe<m>buttontoaccessthe
settingscreen.Pressthe<o><p>
buttonstochooseasettingitem,and
thenpressthe<q><r>buttonsorturn
the<5>dialtoadjustthevalueasyou
watchthescreen.
Pressthe<m>button.
3 Shoot.
Brightness
Forbrighterimages,adjusttheleveltotheright,andfordarker
images,adjustittotheleft.
Color
Formorevividimages,adjusttheleveltotheright,andformore
subduedimages,adjustittotheleft.
Tone
Forawarm,reddishtone,adjusttheleveltotheright,andforacool,
bluishtone,adjustittotheleft.
COPY
67
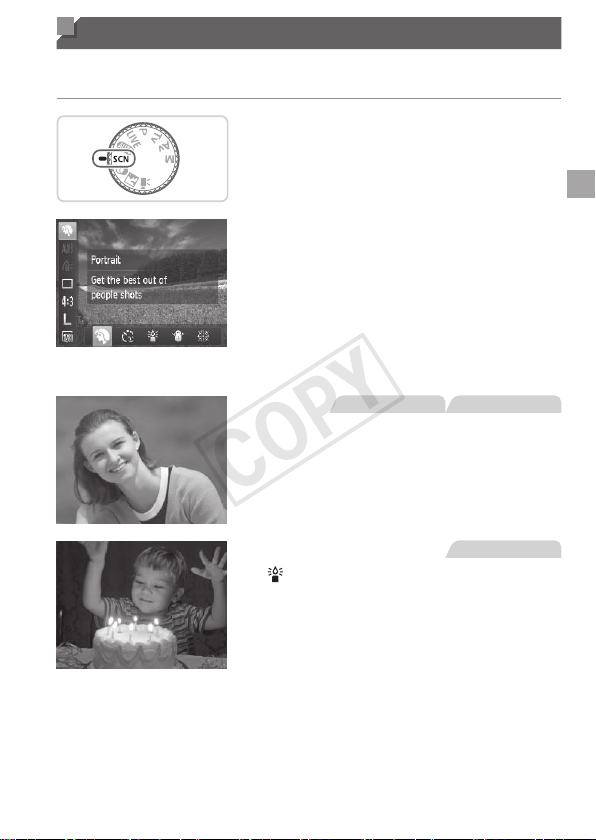
Specic Scenes
Chooseamodematchingtheshootingscene,andthecamerawill
automaticallycongurethesettingsforoptimalshots.
1 Enter<K>mode.
Setthemodedialto<K>.
2 Chooseashootingmode.
Pressthe<m>button,choose[I]inthe
menu,andthenchooseashootingmode
(=
37).
3 Shoot.
StillImages Movies
IShootportraits(Portrait)
Takeshotsofpeoplewithasoftening
effect.
StillImages
Shootunderlowlight
(LowLight)
Shootwithminimalcamerashakeand
subjectblureveninlow-lightconditions.
COPY
68
SpecicScenes
StillImages Movies
PShootwithsnowybackgrounds
(Snow)
Bright,natural-coloredshotsofpeople
againstsnowybackgrounds.
StillImages Movies
tShootreworks(Fireworks)
Vividshotsofreworks.
• In[t]mode,mountthecameraonatripodortakeother
measurestokeepitstillandpreventcamerashake.Additionally,
youshouldset[ISMode]to[Off]whenusingatripodorother
meanstoholdthecamerastill(=
101).
• [ ]moderesolutionis[ ](2304x1728)andcannotbechanged.
COPY
69
Special Modes for Other Purposes
StillImages
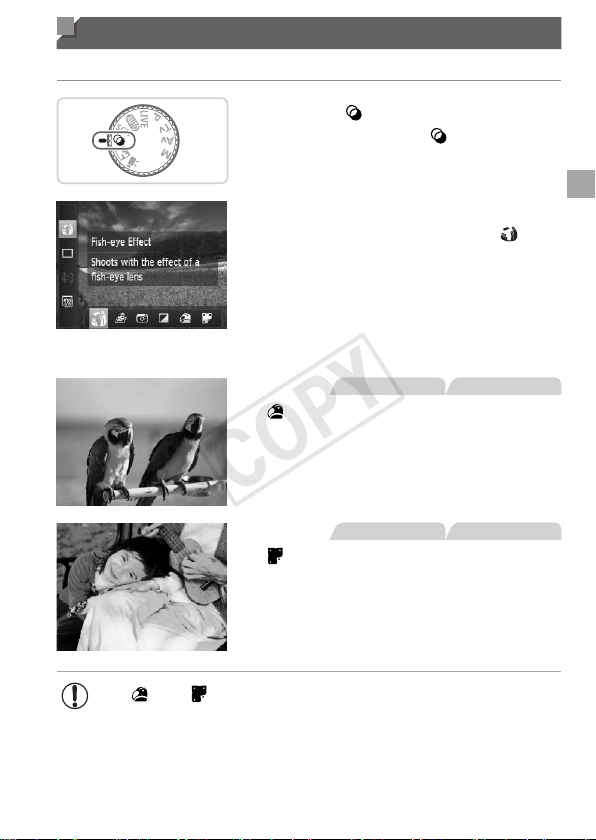
Using the Face Self-Timer
Thecamerawillshootabouttwosecondsafterdetectingthatthefaceofanother
person(suchasthephotographer)hasenteredtheshootingarea(
=
93).This
isusefulwhenincludingyourselfingroupphotosorsimilarshots.
1 Choose[ ].
Followsteps1–2on=
67and
choose[
].
2 Composetheshotandpress
theshutterbuttonhalfway.
Makesureagreenframeisdisplayed
aroundthefaceyoufocusonandwhite
framesaroundotherfaces.
3 Presstheshutterbuttonallthe
waydown.
Thecameranowentersshootingstandby
mode,and[Lookstraightatcamerato
startcountdown]isdisplayed.
Thelampblinksandtheself-timersound
isplayed.
4
Jointhesubjectsintheshooting
areaandlookatthecamera.
Afterthecameradetectsanewface,the
lampblinkingandself-timersoundwill
speedup.(Whentheashres,thelamp
willremainlit.)Abouttwosecondslater,
thecamerawillshoot.
Tocancelshootingafteryouhavetriggered
theself-timer,pressthe<
n
>button.
COPY

70
SpecialModesforOtherPurposes
• Evenifyourfaceisnotdetectedafteryoujointheothersintheshooting
area,thecamerawillshootabout15secondslater.
• Tochangethenumberofshots,afterchoosing[
]insteps1–2on
=
69,pressthe<l>button,andtheneitherpressthe<q><r>
buttonsorturnthe<5>dialtochooseavalue,andthenpressthe<l>
buttonagain.
COPY
71
Image Effects (Creative Filters)
Addavarietyofeffectstoimageswhenshooting.
1 Enter< >mode.
Setthemodedialto< >.
2 Chooseashootingmode.
Pressthe<m>button,choose[ ]in
themenu,andthenchooseashooting
mode(=
37).
3 Shoot.
StillImages Movies
Shootinvividcolors
(SuperVivid)
Shotsinrich,vividcolors.
StillImages Movies
Posterizedshots(PosterEffect)
Shotsthatresembleanoldposteror
illustration.
• In[ ]and[ ]modes,trytakingsometestshotsrst,tomake
sureyouobtainthedesiredresults.
COPY
72
ImageEffects(CreativeFilters)
StillImages
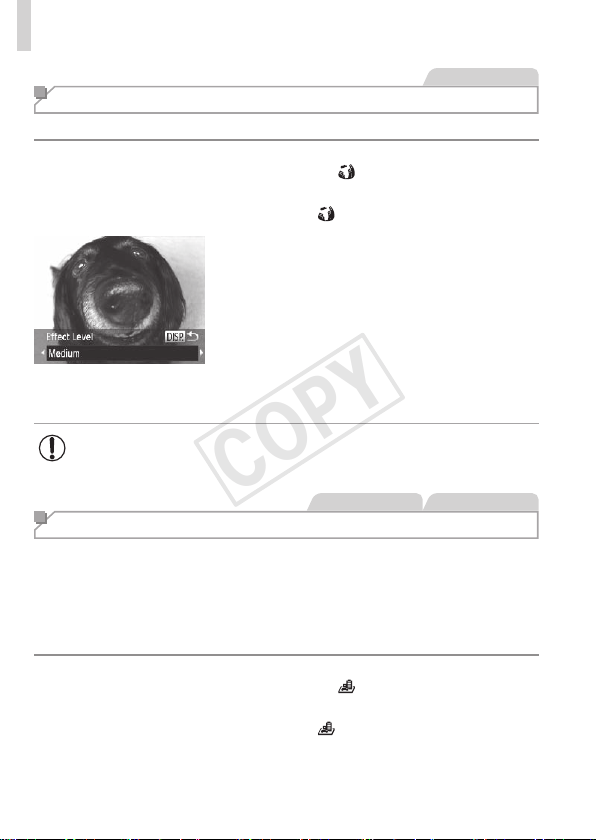
Shooting with a Fish-Eye Lens Effect (Fish-eye Effect)
Shootwiththedistortingeffectofash-eyelens.
1 Choose[ ].
Followsteps1–2on=
71and
choose[
].
2 Chooseaneffectlevel.
Pressthe<l>button,choosean
effectlevel(eitherpressthe<q><r>
buttonsorturnthe<5>dial),andthen
pressthe<l>buttonagain.
Apreviewisshownofhowyourshotwill
lookwiththeeffectapplied.
3 Shoot.
• Trytakingsometestshotsrst,tomakesureyouobtainthe
desiredresults.
StillImages Movies
Shots Resembling Miniature Models (Miniature Effect)
Createstheeffectofaminiaturemodel,byblurringimageareasaboveand
belowyourselectedarea.
Youcanalsomakemoviesthatlooklikescenesinminiaturemodelsby
choosingtheplaybackspeedbeforethemovieisrecorded.Peopleand
objectsinthescenewillmovequicklyduringplayback.Notethatsoundis
notrecorded.
1 Choose[ ].
Followsteps1–2on=
71and
choose[
].
Awhiteframeisdisplayed,indicatingthe
imageareathatwillnotbeblurred.
COPY
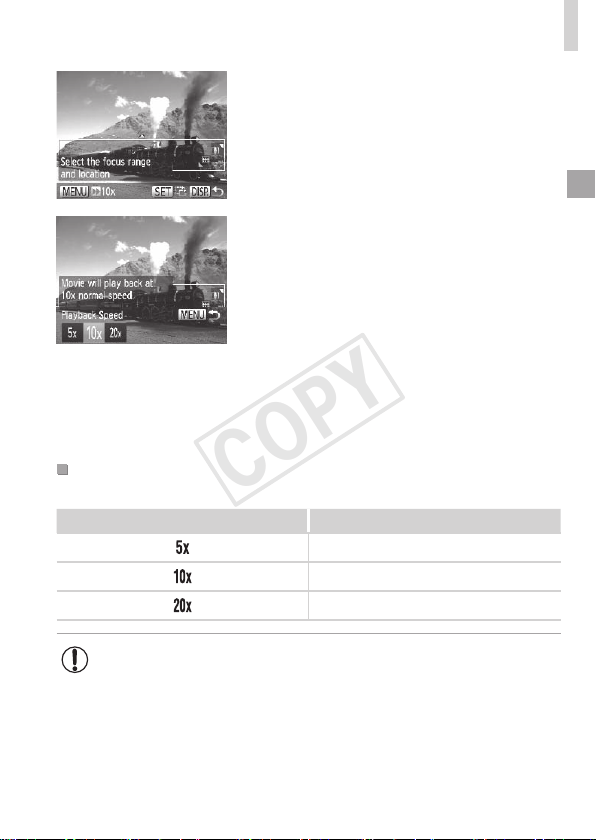
73
ImageEffects(CreativeFilters)
2 Choosetheareatokeepin
focus.
Pressthe<l>button.
Movethezoomlevertoresizetheframe,
andpressthe<o><p>buttonstomove
it.
3 Formovies,choosethemovie
playbackspeed.
Pressthe<n>button,andthen
choosethespeedbypressingthe
<q><r>buttonsorturningthe<5>
dial.
4 Returntotheshootingscreen
andshoot.
Pressthe<n>buttontoreturntothe
shootingscreen,andthenshoot.
PlaybackSpeedandEstimatedPlaybackTime(forOne-
MinuteClips)
Speed PlaybackTime
Approx.12sec.
Approx.6sec.
Approx.3sec.
• Thezoomisnotavailablewhenshootingmovies.Besuretoset
thezoombeforeshooting.
• Trytakingsometestshotsrst,tomakesureyouobtainthe
desiredresults.
COPY
74
ImageEffects(CreativeFilters)
• Toswitchtheorientationoftheframe(fromhorizontaltoverticalorvice-
versa),pressthe<m>buttoninstep2.Youcanmovetheframeinvertical
orientationbypressingthe<q><r>buttons.
• Holdingthecameraverticallywillchangetheorientationoftheframe.
• Movieimagequalityis[
]atanaspectratioof[ ]and[ ]atanaspect
ratioof[
](=
54).Thesequalitysettingscannotbechanged.
StillImages
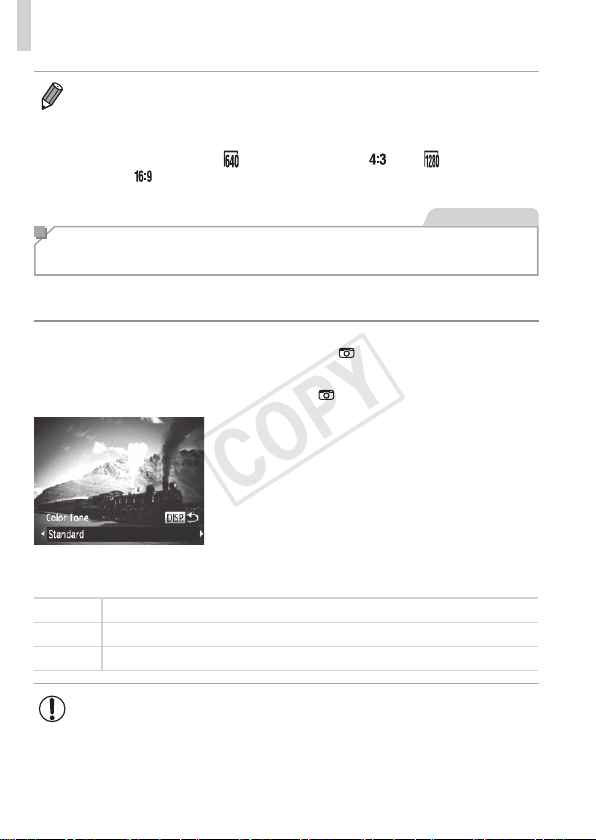
Shooting with a Toy Camera Effect
(Toy Camera Effect)
Thiseffectmakesimagesresembleshotsfromatoycamerabyvignetting
(darker,blurredimagecorners)andchangingtheoverallcolor.
1 Choose[ ].
Followsteps1–2on=
71and
choose[
].
2 Chooseacolortone.
Pressthe<l>button,chooseacolor
tone(eitherpressthe<q><r>buttonsor
turnthe<5>dial),andthenpressthe
<l>buttonagain.
Apreviewisshownofhowyourshotwill
lookwiththeeffectapplied.
3 Shoot.
Standard Shotsresembletoycameraimages.
Warm Imageshaveawarmertonethanwith[Standard].
Cool Imageshaveacoolertonethanwith[Standard].
• Trytakingsometestshotsrst,tomakesureyouobtainthe
desiredresults.
COPY
75
ImageEffects(CreativeFilters)
StillImages Movies
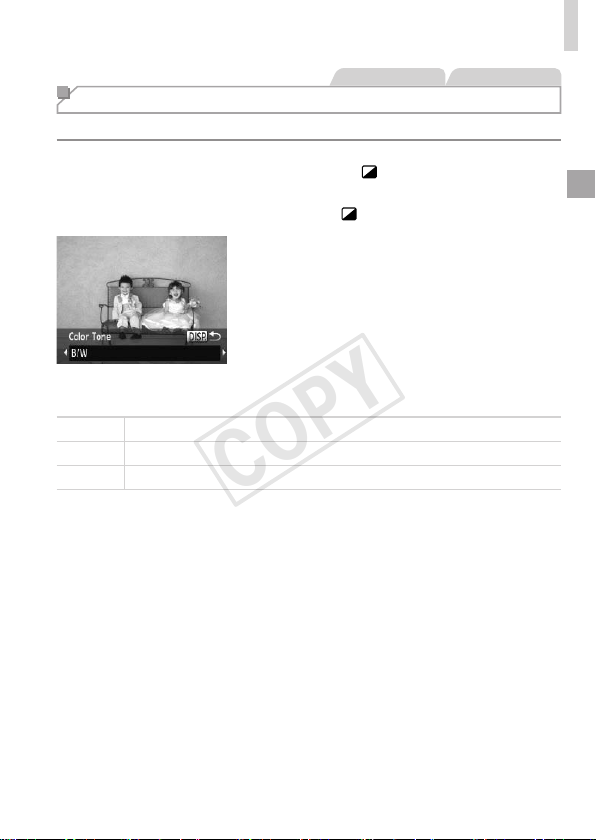
Shooting in Monochrome
Shootimagesinblackandwhite,sepia,orblueandwhite.
1 Choose[ ].
Followsteps1–2on=
71and
choose[
].
2 Chooseacolortone.
Pressthe<l>button,chooseacolor
tone(eitherpressthe<q><r>buttonsor
turnthe<5>dial),andthenpressthe
<l>buttonagain.
Apreviewisshownofhowyourshotwill
lookwiththeeffectapplied.
3 Shoot.
B/W Blackandwhiteshots.
Sepia Sepiatoneshots.
Blue Blueandwhiteshots.
COPY

76
StillImages Movies
Discreet Mode
Shootwithoutactivatingcamerasounds,theash,orlampasfollows.Use
thismodewherecamerasounds,theash,andlightsareprohibited.
1 Enter< >mode.
Setthemodedialto< >.
2 Shoot.
• In< >mode,evenplaybacksoundsaremuted.Soundsofcamera
operationsaremuted,andmovieaudioisalsomuted.
COPY
77
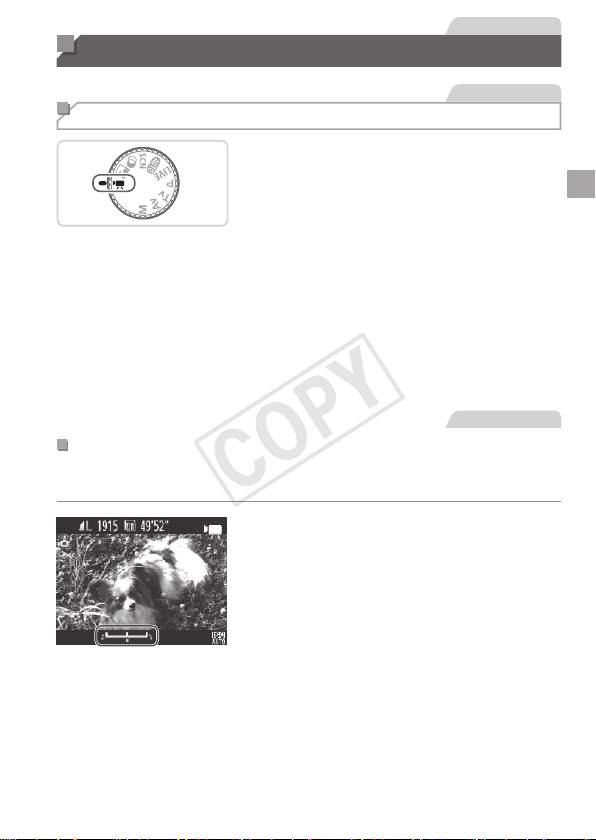
Movies
Shooting Various Movies
Movies
Shooting Movies in <E> Mode
1 Enter<E>mode.
Setthemodedialto<E>.
Blackbarsdisplayedonthetopand
bottomedgesofthescreenindicate
imageareasnotrecorded.
2 Congurethesettingstosuit
themovie(=
192–199).
3 Shoot.
Pressthemoviebutton.
Tostopmovierecording,pressthemovie
buttonagain.
Movies
LockingorChangingImageBrightnessBeforeShooting
Beforeshooting,youcanlocktheexposureorchangeitin1/3-stop
incrementswithinarangeof–2to+2.
1 Locktheexposure.
Afterreleasingtheshutterbutton,press
the<o>buttontolocktheexposure.The
exposureshiftbarisdisplayed.
Tounlocktheexposure,pressthe<o>
buttonagain.
2 Adjusttheexposure.
Turnthe<5>dialtoadjustthe
exposure,asyouwatchthescreen.
3 Shoot.
COPY
78
ShootingVariousMovies
Movies
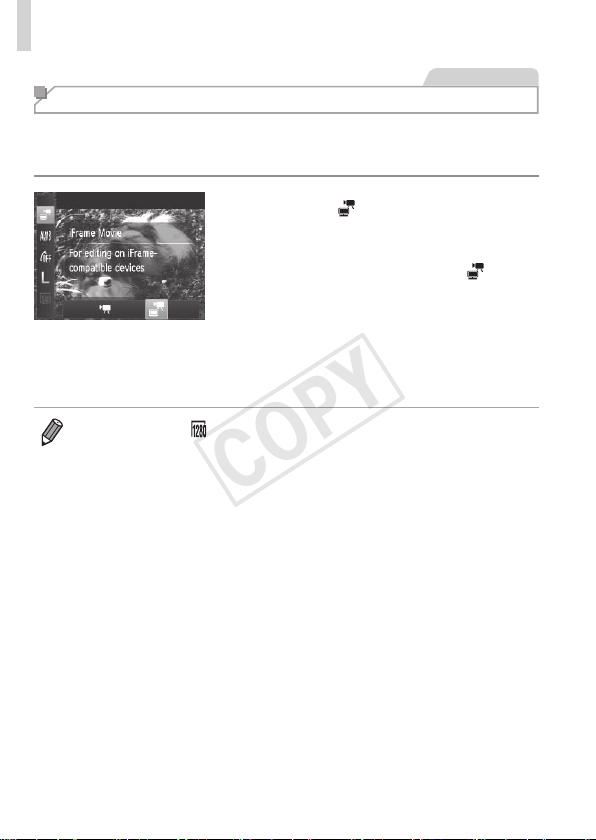
Shooting iFrame Movies
ShootmoviesthatcanbeeditedwithiFrame-compatiblesoftwareor
devices.Youcanquicklyedit,save,andmanageiFramemoviesusingthe
includedsoftware(=
25).
1 Choose[ ].
Setthemodedialto<E>.
Pressthe<m>button,choose[E]
inthemenu,andthenchoose[
]
(=
37).
Blackbarsdisplayedonthetopand
bottomedgesofthescreenindicate
imageareasnotrecorded.
2 Shoot(=
77).
• Theresolutionis[ ](=
57)andcannotbechanged.
• iFrameisavideoformatdevelopedbyApple.
COPY

79
P Mode
Morediscerningshots,inyourpreferredshootingstyle
• Instructionsinthischapterapplytothecamerawiththemodedialsetto
<G>mode.
• <G>:ProgramAE;AE:AutoExposure
• Beforeusingafunctionintroducedinthischapterinmodesotherthan
<G>,makesurethefunctionisavailableinthatmode(=
192–199).
4
COPY

80
StillImages Movies
Shooting in Program AE Mode
(<P> Mode)
Youcancustomizemanyfunctionsettingstosuityourpreferredshooting
style.
1 Enter<G>mode.
Setthemodedialto<G>.
2 Customizethesettingsas
desired(=
81–101),and
thenshoot.
• Ifadequateexposurecannotbeobtainedwhenyoupresstheshutterbutton
halfway,shutterspeedsandaperturevaluesaredisplayedinorange.To
obtainadequateexposure,tryadjustingthefollowingsettings.
-Activatetheash(=
98)
-ChangetheISOspeed(=
82)
• Moviescanberecordedin<G>modeaswell,bypressingthemoviebutton.
However,some<H>and<n>settingsmaybeautomatically
adjustedformovierecording.
• Fordetailsontheshootingrangein<G>mode,see“Specications”
(=
203).
COPY
81
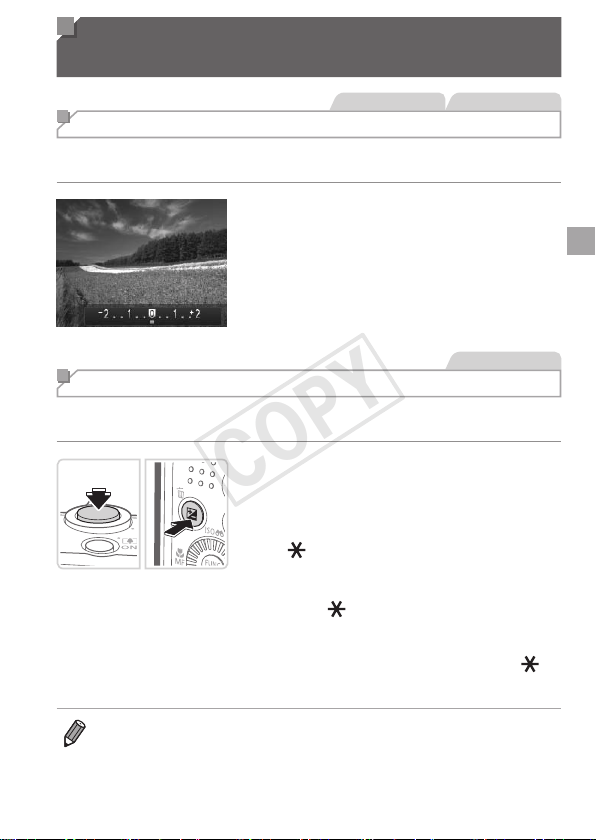
Image Brightness (Exposure
Compensation)
StillImages Movies
Adjusting Image Brightness (Exposure Compensation)
Thestandardexposuresetbythecameracanbeadjustedin1/3-stop
increments,inarangeof–2to+2.
Pressthe<
b
>button.Asyouwatchthe
screen,pressthe<
q
><
r
>buttonsorturn
the<
5
>dialtoadjustbrightness,andthen
pressthe<
b
>buttonagainwhennished.
Thecorrectionlevelyouspeciedisnow
displayed.
StillImages
Locking Image Brightness/Exposure (AE Lock)
Beforeshooting,youcanlocktheexposure,oryoucanspecifyfocusand
exposureseparately.
1 Locktheexposure.
Aimthecameraatthesubjecttoshootwith
theexposurelocked.Withtheshutterbutton
pressedhalfway,pressthe<
b
>button.
[ ]
isdisplayed,andtheexposureislocked.
TounlockAE,releasetheshutterbutton
andpressthe<b>buttonagain.Inthis
case,[
]isnolongerdisplayed.
2 Composetheshotandshoot.
Afteroneshot,AEisunlockedand[ ]is
nolongerdisplayed.
• AE:AutoExposure
• Aftertheexposureislocked,youcanadjustthecombinationofshutter
speedandaperturevaluebyturningthe<5>dial(ProgramShift).
COPY
82
ImageBrightness(ExposureCompensation)
StillImages
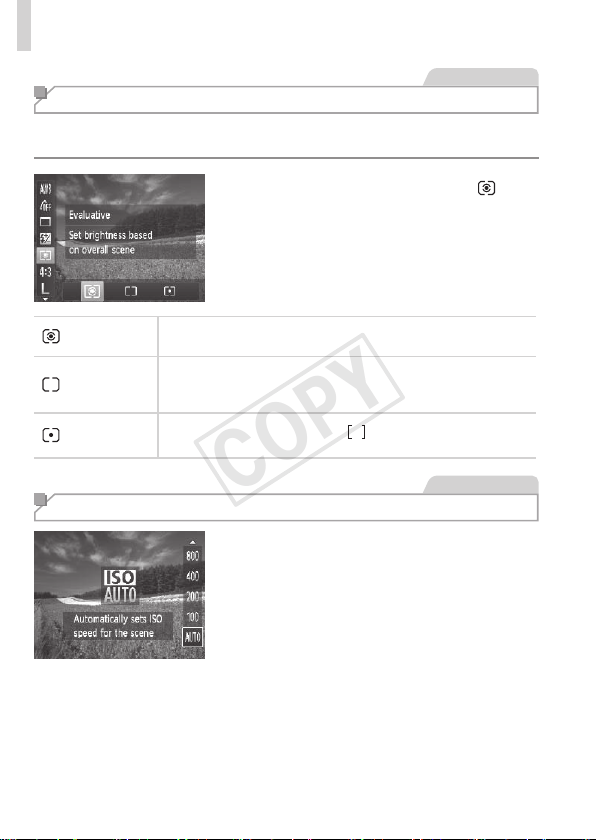
Changing the Metering Method
Adjustthemeteringmethod(howbrightnessismeasured)tosuitshooting
conditionsasfollows.
Pressthe<m>button,choose[ ]in
themenu,andchoosethedesiredoption
(=
37).
Theoptionyouconguredisnow
displayed.
Evaluative
Fortypicalshootingconditions,includingbacklitshots.
Automaticallyadjustsexposuretomatchtheshootingconditions.
Center
WeightedAvg.
Determinestheaveragebrightnessoflightacrosstheentire
imagearea,calculatedbytreatingbrightnessinthecentralarea
asmoreimportant.
Spot
Meteringrestrictedtowithinthe[
](SpotAEPointframe),
displayedinthecenterofthescreen.
StillImages
Changing the ISO Speed
Pressthe<o>button,chooseanoption
(eitherpressthe<o><p>buttonsor
turnthe<5>dial),andthenpressthe
<m>button.
Theoptionyouconguredisnow
displayed.
COPY
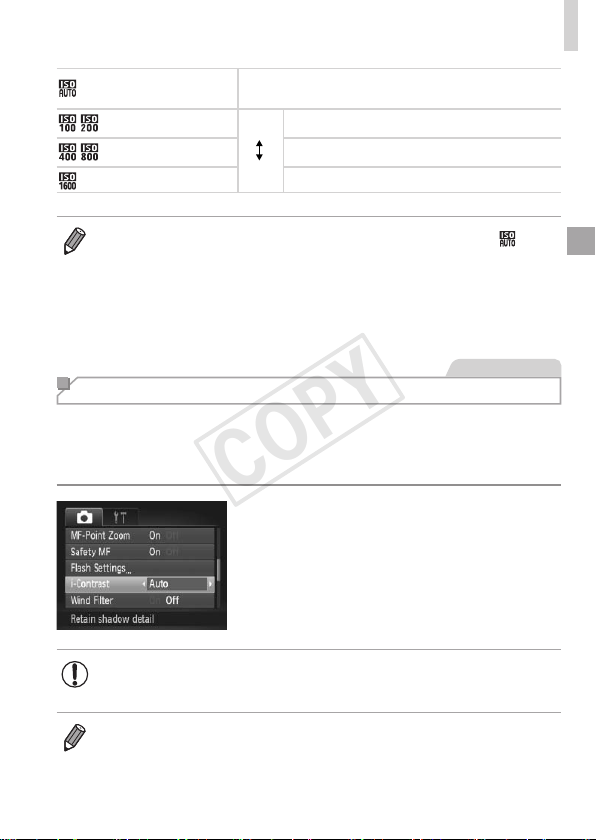
83
ImageBrightness(ExposureCompensation)
AutomaticallyadjuststheISOspeedtosuitthe
shootingmodeandconditions.
Low
High
Forshootingoutdoorsinfairweather.
Forshootingincloudyconditions,orattwilight.
Forshootingnightscenes,orindarkrooms.
• ToviewtheautomaticallysetISOspeedwhenthecameraissetto[ ],
presstheshutterbuttonhalfway.
• AlthoughchoosingalowerISOspeedmayreduceimagegraininess,there
maybeagreaterriskofsubjectblurrinessinsomeshootingconditions.
• ChoosingahigherISOspeedwillincreaseshutterspeed,whichmayreduce
subjectblurrinessandincreasetheashrange.However,shotsmaylookgrainy.
StillImages
Correcting Image Brightness (i-Contrast)
Beforeshooting,excessivelybrightordarkimageareas(suchasfacesor
backgrounds)canbedetectedandautomaticallyadjustedtotheoptimal
brightness.Insufcientoverallimagecontrastcanalsobeautomatically
correctedbeforeshootingtomakesubjectsstandoutbetter.
Pressthe<n>button,choose
[i-Contrast]onthe[4]tab,andthen
choose[Auto](=
38).
Oncethesettingiscomplete,[@]is
displayed.
• Undersomeshootingconditions,correctionmaybeinaccurateor
maycauseimagestoappeargrainy.
• Youcanalsocorrectexistingimages(=
137).
COPY
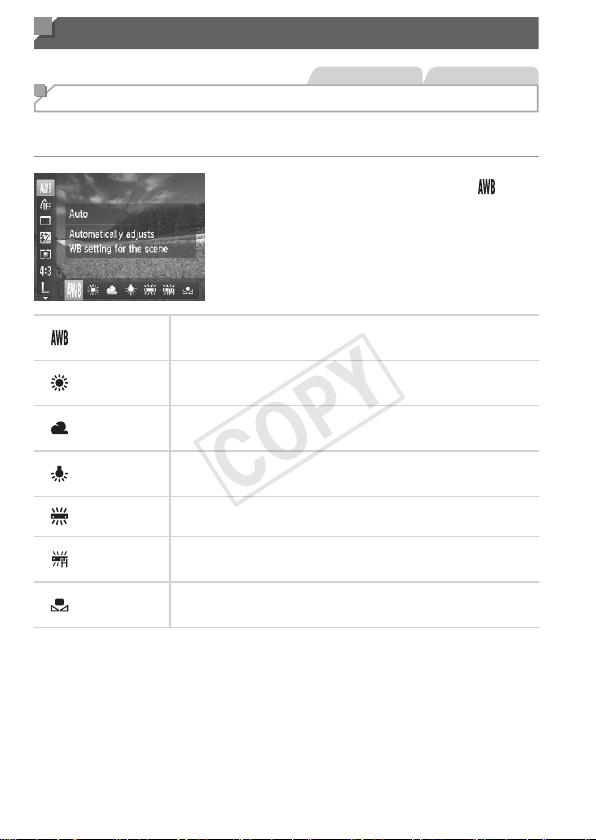
84
Color and Continuous Shooting
StillImages Movies
Adjusting White Balance
Byadjustingwhitebalance(WB),youcanmakeimagecolorslookmore
naturalforthesceneyouareshooting.
Pressthe<m>button,choose[ ]in
themenu,andchoosethedesiredoption
(=
37).
Theoptionyouconguredisnow
displayed.
Auto
Automaticallysetstheoptimalwhitebalancefortheshooting
conditions.
DayLight Forshootingoutdoorsinfairweather.
Cloudy Forshootingincloudyconditions,intheshade,orattwilight.
Tungsten
Forshootingunderordinaryincandescent(tungsten)lighting
andsimilarlycoloreduorescentlighting.
Fluorescent
Forshootingunderwarm-white(orsimilarlycolored)orcool-
whiteuorescentlighting.
FluorescentH
Forshootingunderdaylightuorescentandsimilarlycolored
uorescentlighting.
Custom
Formanuallysettingacustomwhitebalance(=
85).
COPY
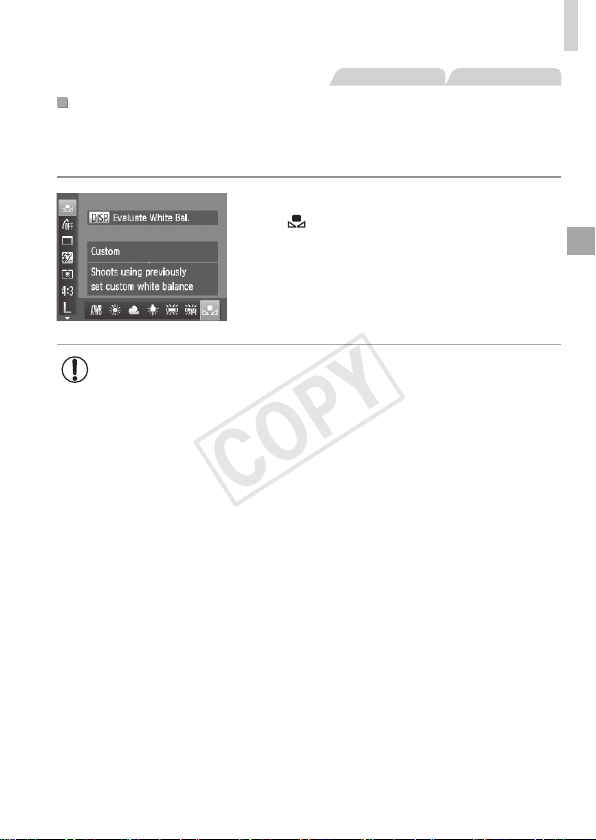
85
ColorandContinuousShooting
StillImages Movies
CustomWhiteBalance
Forimagecolorsthatlooknaturalunderthelightinyourshot,adjustwhite
balancetosuitthelightsourcewhereyouareshooting.Setthewhite
balanceunderthesamelightsourcethatwillilluminateyourshot.
Followthestepson=
84tochoose
[
].
Aimthecameraataplainwhitesubject,
sothattheentirescreeniswhite.Press
the<l>button.
Thetintofthescreenchangesoncethe
whitebalancedatahasbeenrecorded.
• Colorsmaylookunnaturalifyouchangecamerasettingsafter
recordingwhitebalancedata.
COPY
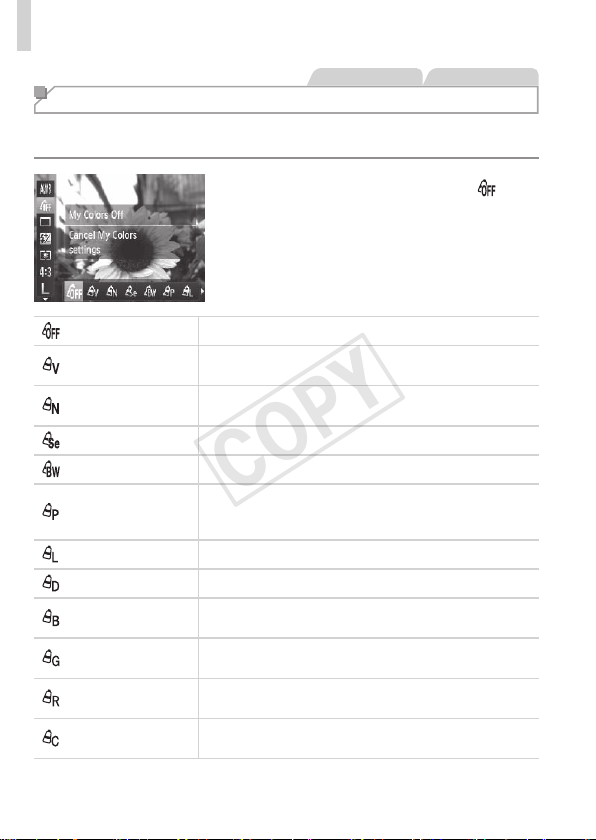
86
ColorandContinuousShooting
StillImages Movies
Changing Image Color Tones (My Colors)
Changeimagecolortonesasdesired,suchasconvertingimagestosepia
orblackandwhite.
Pressthe<m>button,choose[ ]in
themenu,andchoosethedesiredoption
(=
37).
Theoptionyouconguredisnow
displayed.
MyColorsOff ―
Vivid
Emphasizescontrastandcolorsaturation,makingimages
sharper.
Neutral
Tonesdowncontrastandcolorsaturationforsubdued
images.
Sepia Createssepiatoneimages.
B/W Createsblackandwhiteimages.
PositiveFilm
CombinestheeffectsofVividBlue,VividGreen,and
VividRedtoproduceintenseyetnatural-lookingcolors
resemblingimagesonpositivelm.
LighterSkinTone Lightensskintones.
DarkerSkinTone Darkensskintones.
VividBlue
Emphasizesbluesinimages.Makesthesky,ocean,and
otherbluesubjectsmorevivid.
VividGreen
Emphasizesgreensinimages.Makesmountains,foliage,
andothergreensubjectsmorevivid.
VividRed
Emphasizesredsinimages.Makesredsubjectsmore
vivid.
CustomColor
Adjustcontrast,sharpness,colorsaturation,andother
qualitiesasdesired(=
87).
COPY
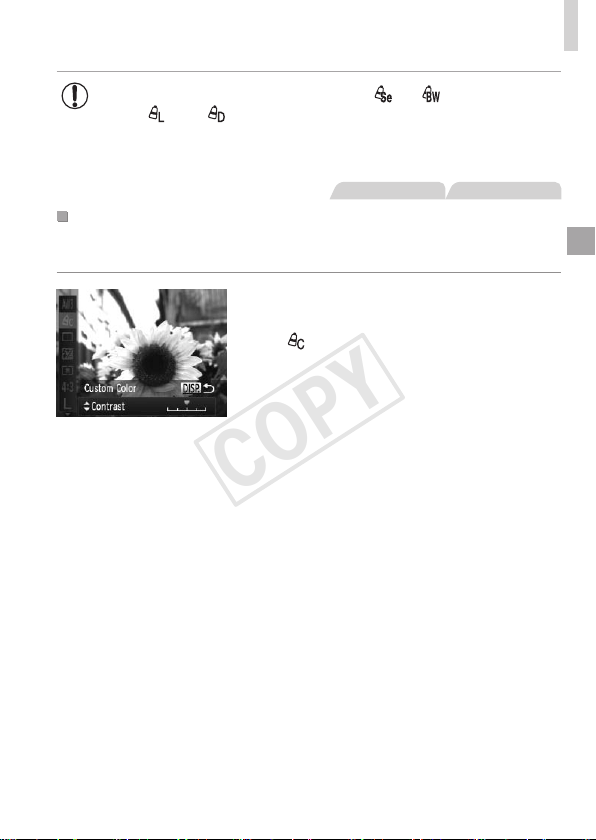
87
ColorandContinuousShooting
• Whitebalance(=
84)cannotbesetin[ ]or[ ]modes.
• With[
]and[ ]modes,colorsotherthanpeople’sskintone
maybemodied.Thesesettingsmaynotproducetheexpected
resultswithsomeskintones.
StillImages Movies
CustomColor
Choosethedesiredlevelofimagecontrast,sharpness,colorsaturation,
red,green,blue,andskintonesinarangeof1–5.
1 Accessthesettingscreen.
Followthestepson=
86tochoose
[
],andthenpressthe<l>button.
2 Congurethesetting.
Pressthe<o><p>buttonstochoose
anoption,andthenspecifythevalueby
pressingthe<q><r>buttonsorturning
the<5>dial.
Forstronger/moreintenseeffects(or
darkerskintones),adjustthevalueto
theright,andforweaker/lightereffects
(orlighterskintones),adjustthevalueto
theleft.
Pressthe<l>buttontocompletethe
setting.
COPY
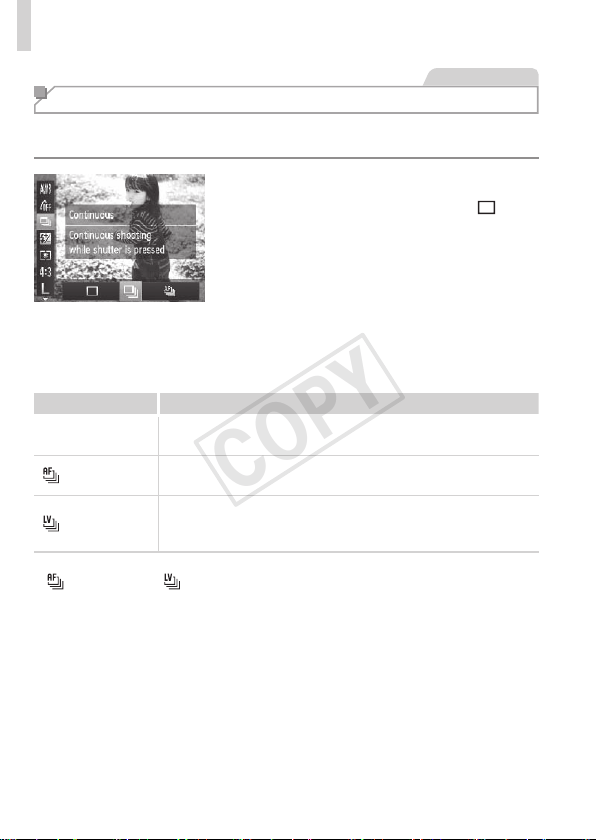
88
ColorandContinuousShooting
StillImages
Continuous Shooting
Holdtheshutterbuttonallthewaydowntoshootcontinuously.
Fordetailsonthecontinuousshootingspeed,see“Specications”
(=
203).
1 Congurethesetting.
Pressthe<m>button,choose[ ]in
themenu,andchoosethedesiredoption
(=
37).
Theoptionyouconguredisnow
displayed.
2 Shoot.
Holdtheshutterbuttonallthewaydown
toshootcontinuously.
Mode Description
W
Continuous
Continuousshooting,withthefocusandexposuredetermined
whenyoupresstheshutterbuttonhalfway.
Continuous
ShootingAF
Continuousshootingandfocusing.
[AFFrame]issetto[Center]andcannotbechanged.
Continuous
ShootingLV
*
Continuousshooting,withthefocusxedattheposition
determinedinmanualfocusing.In[t]mode,focusisdetermined
bytherstshot.
*In[t]mode(=
68),AFlock(=
97),ormanualfocusmode(=
90),
[
]ischangedto[ ].
*Fordetailsonthecontinuousshootingspeedineachmode,see“Specications”
(=
203).
COPY

89
ColorandContinuousShooting
• Cannotbeusedwiththeself-timer(=
50)or[BlinkDetection]
(=
61).
• Shootingmaystopmomentarilyorcontinuousshootingmayslow
downdependingonshootingconditions,camerasettings,andthe
zoomposition.
• Asmoreshotsaretaken,shootingmayslowdown.
• Shootingmayslowdowniftheashres.
• Continuousshootingisfasterin[ ]mode(=
67).
COPY
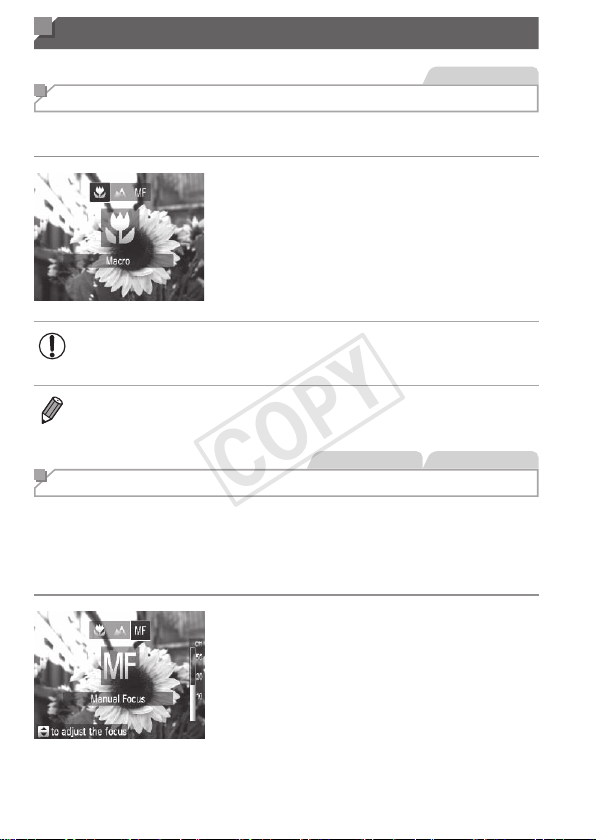
90
Shooting Range and Focusing
StillImages
Shooting Close-ups (Macro)
Torestrictthefocustosubjectsatcloserange,setthecamerato[e].For
detailsonthefocusingrange,see“Specications”(=
203).
Pressthe<q>button,choose[e](either
pressthe<q><r>buttonsorturnthe
<5>dial),andthenpressthe<m>
button.
Oncethesettingiscomplete,[e]is
displayed.
• Intheyellowbardisplayareabelowthezoombar,[e]willturn
grayandthecamerawillnotfocus.
• Topreventcamerashake,trymountingthecameraonatripodandshooting
withthecamerasetto[[](=
51).
StillImages Movies
Shooting in Manual Focus Mode
WhenfocusingisnotpossibleinAFmode,usemanualfocus.Youcan
specifythegeneralfocalpositionandthenpresstheshutterbuttonhalfway
tohavethecameradeterminetheoptimalfocalpositionneartheposition
youspecied.Fordetailsonthefocusingrange,see“Specications”
(=
203).
1 Choose[f].
Pressthe<q>button,choose[f]
(eitherpressthe<q><r>buttonsorturn
the<5>dial),andthenpressthe<m>
button.
[f]andtheMFindicatoraredisplayed.
COPY

91
ShootingRangeandFocusing
MFIndicator
2 Specifythegeneralfocal
position.
Referringtotheon-screenMFindicator
bar(whichshowsthedistanceandfocal
position)andthemagnieddisplayarea,
pressthe<o><p>buttonsorturnthe
<5>dialtospecifythegeneralfocal
position,andthenpressthe<m>button.
3 Fine-tunethefocus.
Presstheshutterbuttonhalfwaytohave
thecamerane-tunethefocalposition
(SafetyMF).
• AFframemodeorsizecannotbechangedwhilefocusing
manually(=
92).IfyouwanttochangetheAFframemodeor
size,cancelmanualfocusmoderst.
• Focusingispossiblewhenusingthedigitalzoom(=
49)or
digitaltele-converter(=
92),orwhenusingaTVasadisplay
(=
163),butthemagnieddisplaywillnotappear.
• Tofocusmoreaccurately,tryattachingthecameratoatripodtostabilizeit.
• Tohidethemagnieddisplayarea,pressthe<n>buttonandset[MF-
PointZoom]onthe[4]tabto[Off](=
38).
• Todeactivateautomaticfocusne-tuningwhentheshutterbuttonispressed
halfway,pressthe<n>buttonandset[SafetyMF]onthe[4]tabto
[Off](=
38).
COPY
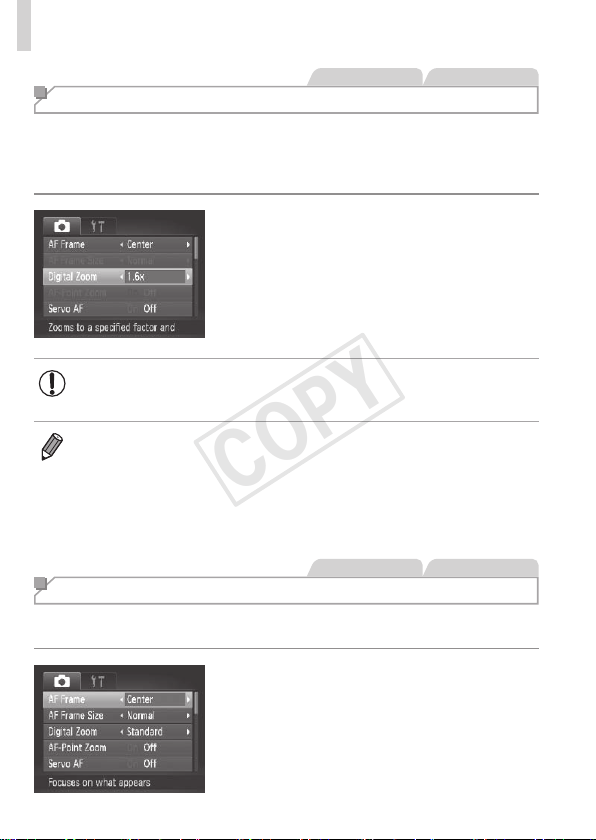
92
ShootingRangeandFocusing
StillImages Movies
Digital Tele-Converter
Thefocallengthofthelenscanbeincreasedbyapproximately1.6xor2.0x.
Thiscanreducecamerashakebecausetheshutterspeedisfasterthanit
wouldbeifyouzoomed(includingusingdigitalzoom)intothesamezoom
factor.
Pressthe<n>button,choose
[DigitalZoom]onthe[4]tab,andthen
choosethedesiredoption(=
38).
Theviewisenlargedandthezoomfactor
isdisplayedonthescreen.
• Thedigitaltele-convertercannotbeusedwithdigitalzoom
(=
49)andAF-pointzoom(=
60).
• Therespectivefocallengthswhenusing[1.6x]and[2.0x]are44.8–
716.8mmand56.0–896.0mm(35mmlmequivalent).
• Theshutterspeedmaybeequivalentwhenyoumovethezoomleverallthe
waytoward<i>formaximumtelephoto,andwhenyouzoomintoenlarge
thesubjecttothesamesizefollowingstep2on=
49.
StillImages Movies
Changing the AF Frame Mode
ChangetheAF(autofocus)framemodetosuittheshootingconditionsas
follows.
Pressthe<n>button,choose
[AFFrame]onthe[4]tab,andthen
choosethedesiredoption(=
38).
COPY

93
ShootingRangeandFocusing
StillImages Movies
Center
OneAFframeisdisplayedinthecenter.Effectiveforreliablefocusing.
• AyellowAFframeisdisplayedwith[ ]ifthecameracannot
focuswhenyoupresstheshutterbuttonhalfway.NotethatAF-
pointzooming(=
60)isnotpossible.
• ToreducetheAFframesize,pressthe<n>buttonandset[AFFrame
Size]onthe[4]tabto[Small](=
38).
• TheAFframesizeissetto[Normal]whenyouusethedigitalzoom(=
49)
ordigitaltele-converter(=
92),andinmanualfocusmode(=
90).
• Tocomposeshotssothatsubjectsarepositionedattheedgeorinacorner,
rstaimthecameratocapturethesubjectinanAFframe,andthenhold
theshutterbuttonhalfwaydown.Asyoucontinuetoholdtheshutterbutton
halfway,recomposetheshotasdesired,andthenpresstheshutterbuttonall
thewaydown(FocusLock).
StillImages Movies
FaceAiAF
• Detectspeople’sfaces,andthensetsthefocus,exposure(evaluative
meteringonly),andwhitebalance([ ]only).
• Afteryouaimthecameraatthesubject,awhiteframeisdisplayed
aroundtheperson’sfacedeterminedbythecameratobethemain
subject,anduptotwograyframesaredisplayedaroundotherdetected
faces.
• Whenthecameradetectsmovement,frameswillfollowmovingsubjects,
withinacertainrange.
• Afteryoupresstheshutterbuttonhalfway,uptoninegreenframesare
displayedaroundfacesinfocus.
COPY
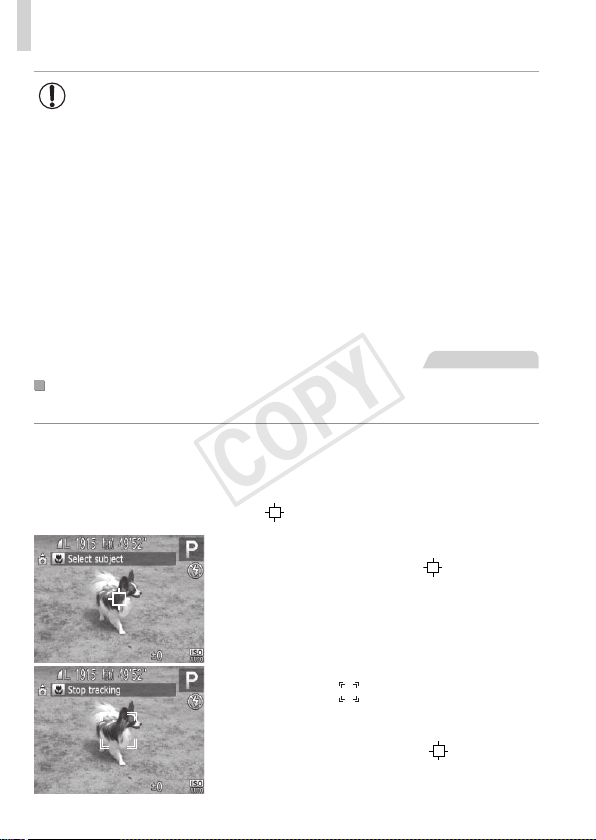
94
ShootingRangeandFocusing
• Iffacesarenotdetected,orwhenonlygrayframesaredisplayed
(withoutawhiteframe),uptoninegreenframesaredisplayedin
theareasinfocuswhenyoupresstheshutterbuttonhalfway.
• IffacesarenotdetectedwhenServoAF(=
95)issetto[On],
theAFframeisdisplayedinthecenterofthescreenwhenyou
presstheshutterbuttonhalfway.
• Examplesoffacesthatcannotbedetected:
-Subjectsthataredistantorextremelyclose
-Subjectsthataredarkorlight
-Facesinprole,atanangle,orpartlyhidden
• Thecameramaymisinterpretnon-humansubjectsasfaces.
• NoAFframesaredisplayedifthecameracannotfocuswhenyou
presstheshutterbuttonhalfway.
StillImages
ChoosingSubjectstoFocusOn(TrackingAF)
Shootafterchoosingasubjecttofocusonasfollows.
1 Choose[TrackingAF].
Followthestepson=
92tochoose
[TrackingAF].
[ ]
isdisplayedinthecenterofthescreen.
2 Chooseasubjecttofocuson.
Aimthecamerasothat[ ]isonthe
desiredsubject,andthenpressthe<q>
button.
Whenthesubjectisdetected,thecamera
beepsand[
]isdisplayed.Evenifthe
subjectmoves,thecamerawillcontinue
totrackthesubjectwithinacertainrange.
Ifnosubjectisdetected,[ ]isdisplayed.
Tocanceltracking,pressthe<q>button
again.
COPY

95
ShootingRangeandFocusing
3 Shoot.
Presstheshutterbuttonhalfway.[ ]changes
toablue[
],whichfollowsthesubjectas
thecameracontinuestoadjustthefocusand
exposure(ServoAF)
(
seebelow
).
Presstheshutterbuttonallthewaydown
toshoot.
Evenafteryourshot,[ ]isstilldisplayed
andthecameracontinuestotrackthesubject.
• [ServoAF](seebelow)issetto[On]andcannotbechanged.
• Trackingmaynotbepossiblewhensubjectsaretoosmallormove
toorapidly,orwhensubjectcolororbrightnessmatchesthatofthe
backgroundtooclosely.
• [AF-PointZoom]onthe[4]tabisnotavailable.
• [e]isnotavailable.
• Thecameracandetectsubjectsevenifyoupresstheshutterbuttonhalfway
withoutpressingthe<q>button.Afteryourshot,[
]isdisplayedinthe
centerofthescreen.
• Whenshootingin[f]mode(=
90),pressandholdthe<q>buttonforat
leastonesecond.
StillImages
ShootingwithServoAF
Thismodehelpsavoidmissingshotsofsubjectsinmotion,becausethe
cameracontinuestofocusonthesubjectandadjusttheexposureaslong
asyoupresstheshutterbuttonhalfway.
1 Congurethesetting.
Pressthe<n>button,choose
[ServoAF]onthe[4]tab,andthen
choose[On](=
38).
COPY
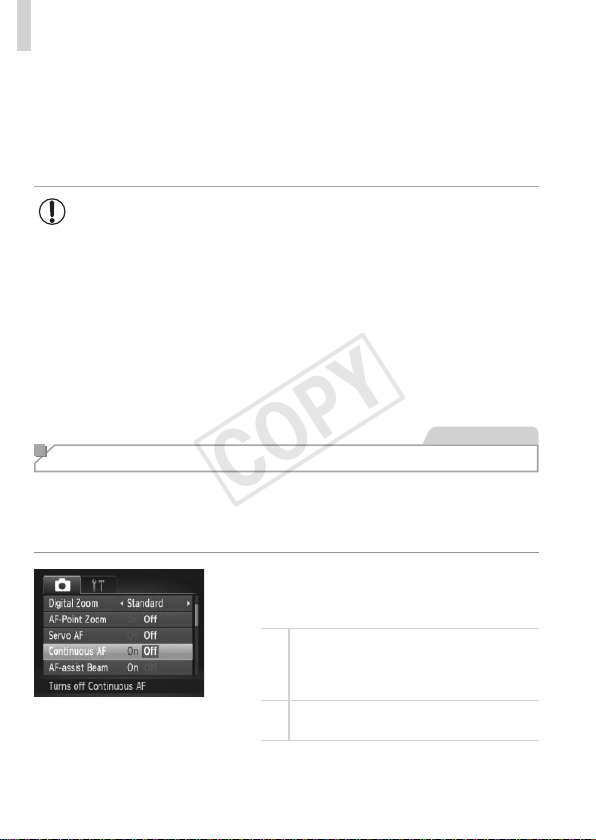
96
ShootingRangeandFocusing
2 Focus.
Thefocusandexposurearemaintained
wheretheblueAFframeisdisplayed
whileyouarepressingtheshutterbutton
halfway.
• Focusingmaynotbepossibleinsomeshootingconditions.
• Inlow-lightconditions,ServoAFmaynotbeactivated(AFframes
maynotturnblue)whenyoupresstheshutterbuttonhalfway.
Inthiscase,thefocusandexposurearesetaccordingtothe
speciedAFframemode.
• Ifadequateexposurecannotbeobtained,shutterspeedsand
aperturevaluesaredisplayedinorange.Releasetheshutter
button,andthenpressithalfwayagain.
• AFlockshootingisnotavailable.
• [AF-PointZoom]onthe[4]tabisnotavailable.
• Notavailablewhenusingtheself-timer(=
50).
StillImages
Changing the Focus Setting
Youcanchangedefaultcameraoperationofconstantlyfocusingon
subjectsitisaimedat,evenwhentheshutterbuttonisnotpressed.Instead,
youcanlimitcamerafocusingtothemomentyoupresstheshutterbutton
halfway.
Pressthe<n>button,choose
[ContinuousAF]onthe[4]tab,andthen
choose[Off](=
38).
On
Helpsavoidmissingsuddenphoto
opportunities,becausethecamera
constantlyfocusesonsubjectsuntilyou
presstheshutterbuttonhalfway.
Off
Conservesbatterypower,becausethe
cameradoesnotfocusconstantly.
COPY

97
ShootingRangeandFocusing
StillImages Movies
Shooting with the AF Lock
Thefocuscanbelocked.Afteryoulockthefocus,thefocalpositionwillnot
changeevenwhenyoureleaseyourngerfromtheshutterbutton.
1 Lockthefocus.
Withtheshutterbuttonpressedhalfway,
pressthe<q>button.
Thefocusisnowlocked,and[f]and
theMFindicatoraredisplayed.
TocancelAFlock,releasetheshutter
button,holdtheshutterbuttonhalfway
downagain,andpressthe<q>button.
2 Composetheshotandshoot.
COPY
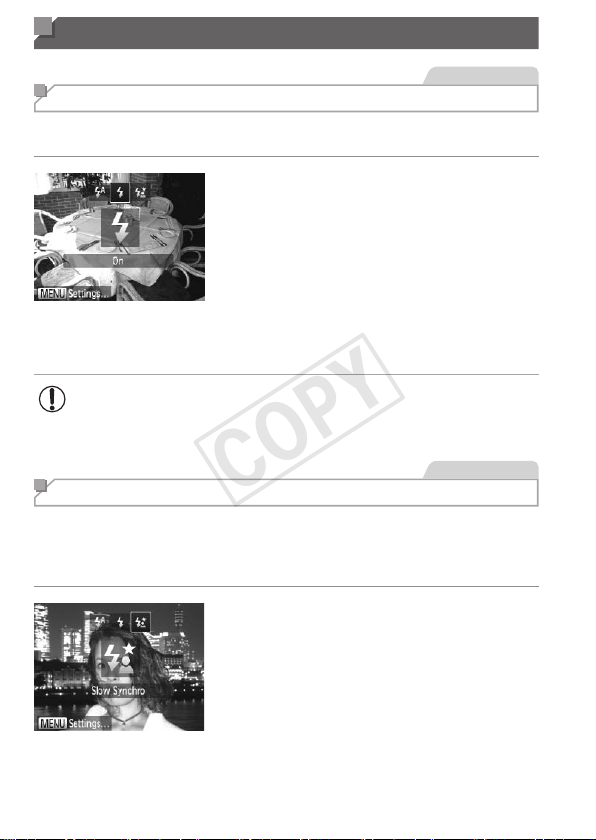
98
Flash
StillImages
Activating Flash
Youcanhavetheashreforeachshot.Fordetailsontheashrange,see
“Specications”(=
203).
1 Raisetheash.
Pressthe<h>button.
2 Congurethesetting.
Pressthe<r>button,choose[h](either
pressthe<q><r>buttonsorturnthe
<5>dial),andthenpressthe<m>
button.
Oncethesettingiscomplete,[h]is
displayed.
• Thesettingscreencannotbeaccessedbypressingthe<r>
buttonwhentheashislowered.Pressthe<h>buttontoraise
theash,thencongurethesetting.
StillImages
Shooting with Slow Synchro
Withthisoption,theashrestoincreasethebrightnessofthemain
subject(suchaspeople)whilethecamerashootsataslowshutterspeedto
increasethebrightnessofthebackgroundthatisoutoftheashrange.
Fordetailsontheashrange,see“Specications”(=
203).
1 Raisetheash.
Pressthe<h>button.
2 Congurethesetting.
Pressthe<r>button,choose[Z](either
pressthe<q><r>buttonsorturnthe
<5>dial),andthenpressthe<m>
button.
Oncethesettingiscomplete,[Z]is
displayed.
COPY

99
Flash
3 Shoot.
Evenaftertheashres,ensurethat
themainsubjectdoesnotmoveuntilthe
shuttersoundisnishedplaying.
• Mountthecameraonatripodortakeothermeasurestokeepit
stillandpreventcamerashake.Additionally,youshouldset[IS
Mode]to[Off]whenusingatripodorothermeanstoholdthe
camerastill(=
101).
• Thesettingscreencannotbeaccessedbypressingthe<r>
buttonwhentheashislowered.Pressthe<h>buttontoraise
theash,thencongurethesetting.
StillImages
Adjusting the Flash Exposure Compensation
Justaswithregularexposurecompensation(=
81),youcanadjustthe
ashexposurefrom–2to+2stops,in1/3-stopincrements.
Pressthe<m>button,choose[X]in
themenu,andadjustthesettingbyeither
pressingthe<q><r>buttonsorturning
the<5>dial(=
37).
Oncethesettingiscomplete,[X]is
displayed.
• Whenthereisariskofoverexposure,thecameraautomaticallyadjuststhe
shutterspeedoraperturevalueduringtheashshotstoreducewashed-out
highlightsandshootatoptimalexposure.However,youcandeactivateautomatic
adjustmentoftheshutterspeedandaperturevaluebyaccessing<
n
>
(=
38)andsetting[SafetyFE]in[FlashSettings]onthe[
4
]tabto[Off].
• Youcanalsoconguretheashexposurecompensationbyaccessing
<n>(=
38)andchoosing[FlashExp.Comp]in[FlashSettings]on
the[4]tab.
• Youcanalsoaccessthe[FlashSettings]<n>screenwhentheash
isupbypressingthe<r>buttonandimmediatelypressingthe<n>
button.
COPY
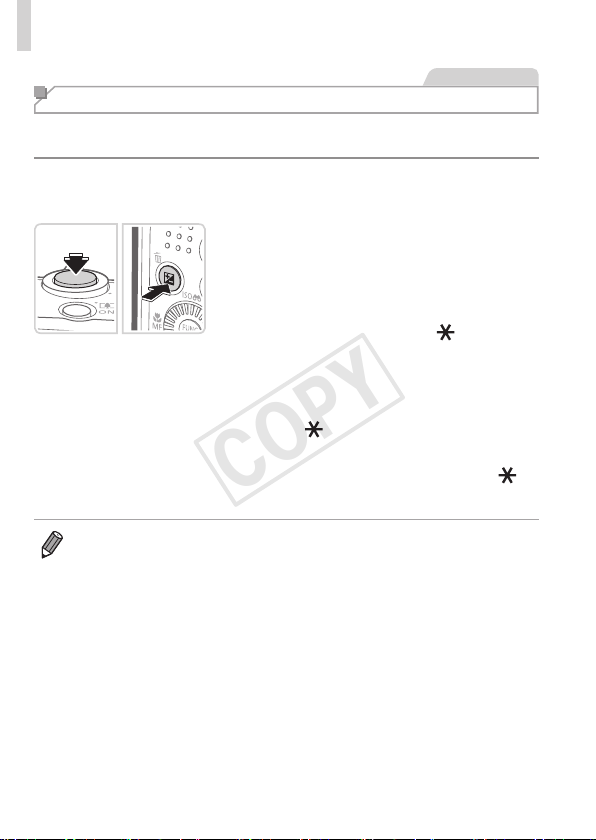
100
Flash
StillImages
Shooting with the FE Lock
JustaswiththeAElock(=
81),youcanlocktheexposurefortheash
shots.
1 Raisetheashandsetitto[h]
(=
98).
2 Locktheashexposure.
Aimthecameraatthesubjecttoshoot
withtheexposurelocked.Withthe
shutterbuttonpressedhalfway,pressthe
<b>button.
Theashres,andwhen[ ]is
displayed,theashoutputlevelis
retained.
TounlockFE,releasetheshutterbutton
andpressthe<b>buttonagain.Inthis
case,[
]isnolongerdisplayed.
3 Composetheshotandshoot.
Afteroneshot,FEisunlockedand[ ]is
nolongerdisplayed.
• FE:FlashExposure
COPY
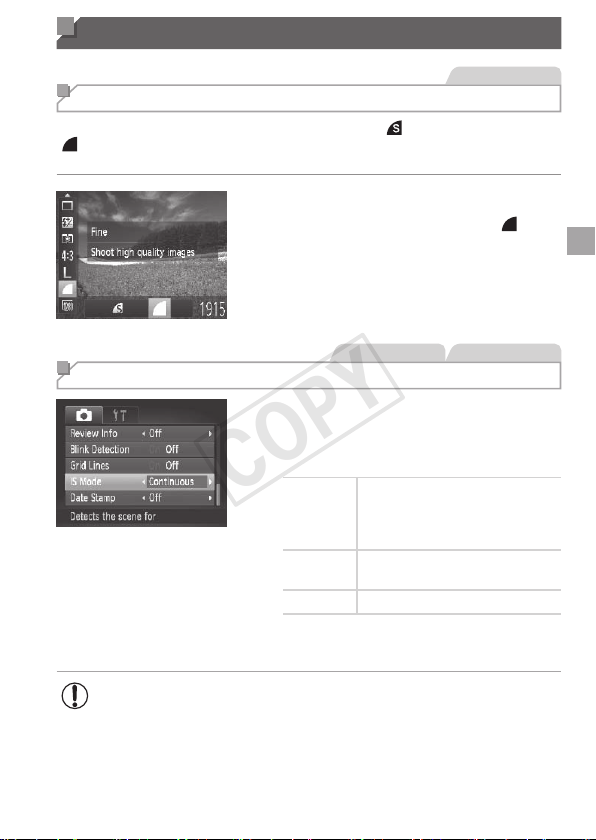
101
Other Settings
StillImages
Changing the Compression Ratio (Image Quality)
Choosefromtwocompressionratios,asfollows:[ ](SuperFine),
[ ](Fine).Forguidelinesonhowmanyshotsateachcompressionratio
cantonamemorycard,see“Specications”(=
203).
Congurethesetting.
Pressthe<m>button,choose[ ]in
themenu,andchoosethedesiredoption
(=
37).
StillImages Movies
Changing the IS Mode Settings
Pressthe<n>button,choose[IS
Mode]onthe[4]tab,andthenpressthe
<q><r>buttonstochoosethedesired
option(=
38).
Continuous
Optimalimagestabilization
fortheshootingconditionsis
automaticallyapplied(Intelligent
IS)(=
47).
ShootOnly
*
Imagestabilizationisactiveonlyat
themomentofshooting.
Off Deactivatesimagestabilization.
*Thesettingischangedto[Continuous]formovie
recording.
• Ifimagestabilizationcannotpreventcamerashake,mountthe
cameraonatripodortakeothermeasurestoholditstill.Inthis
case,set[ISMode]to[Off].
COPY

102
COPY

103
Tv, Av, and M Mode
Takesmarter,moresophisticatedshots
• Instructionsinthischapterapplytothecameraassettotherespective
mode.
5
COPY

104
StillImages
Specic Shutter Speeds (<Tv> Mode)
Setyourpreferredshutterspeedbeforeshootingasfollows.Thecamera
automaticallyadjuststheaperturevaluetosuityourshutterspeed.
Fordetailsonavailableshutterspeeds,see“Specications”(=
203).
1 Enter<M>mode.
Setthemodedialto<M>.
2 Settheshutterspeed.
Turnthe<5>dialtosettheshutter
speed.
• Withshutterspeedsof1.3secondsorslower,therewillbeadelay
beforeyoucanshootagain,asimagesareprocessedtoremove
noise.
• Whenshootingatlowshutterspeedsonatripod,youshouldset
[ISMode]to[Off](=
101).
• Maximumshutterspeedwiththeashis1/2000second.Ifyou
specifyafasterspeed,thecamerawillautomaticallyresetthe
speedto1/2000secondbeforeshooting.
• Orangedisplayofaperturevalueswhenyoupresstheshutter
buttonhalfwayindicatesthatthesettingsdeviatefromstandard
exposure.Adjusttheshutterspeeduntiltheaperturevalueis
displayedinwhite,orusesafetyshift(=
105).
• <M>:Timevalue
COPY
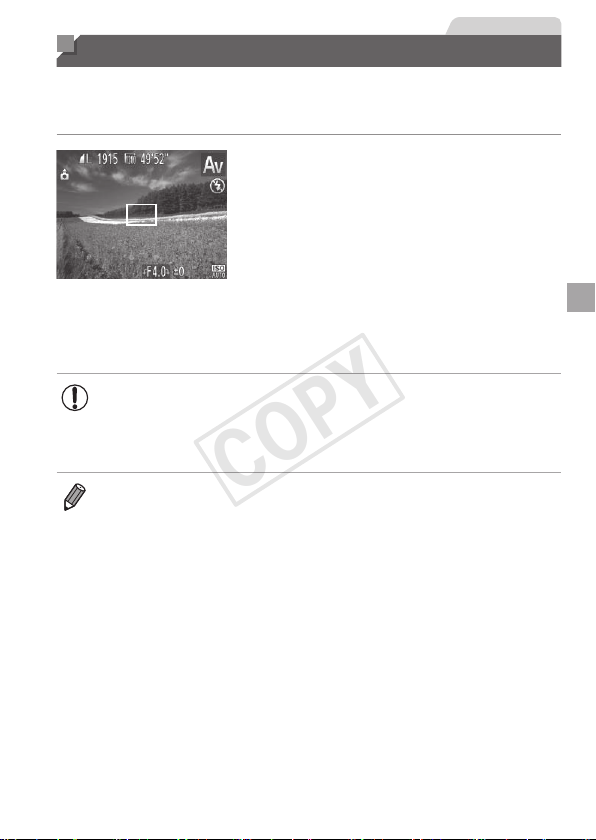
105
StillImages
Specic Aperture Values (<Av> Mode)
Setyourpreferredaperturevaluebeforeshootingasfollows.Thecamera
automaticallyadjuststheshutterspeedtosuityouraperturevalue.
Fordetailsonavailableaperturevalues,see“Specications”(=
203).
1 Enter<B>mode.
Setthemodedialto<B>.
2 Settheaperturevalue.
Turnthe<5>dialtosettheaperture
value.
• Orangedisplayofshutterspeedswhenyoupresstheshutter
buttonhalfwayindicatesthatthesettingsdeviatefromstandard
exposure.Adjusttheaperturevalueuntiltheshutterspeedis
displayedinwhite,orusesafetyshift(seebelow).
• <B>:Aperturevalue(sizeoftheopeningmadebytheirisinthelens)
• Toavoidexposureproblemsin<M>and<B>modes,youcanhavethe
cameraautomaticallyadjusttheshutterspeedoraperturevalue,evenwhen
standardexposurecannototherwisebeobtained.Pressthe<n>button
andset[SafetyShift]onthe[4]tabto[On](=
38).However,safetyshift
isdisabledwhentheashres.
COPY
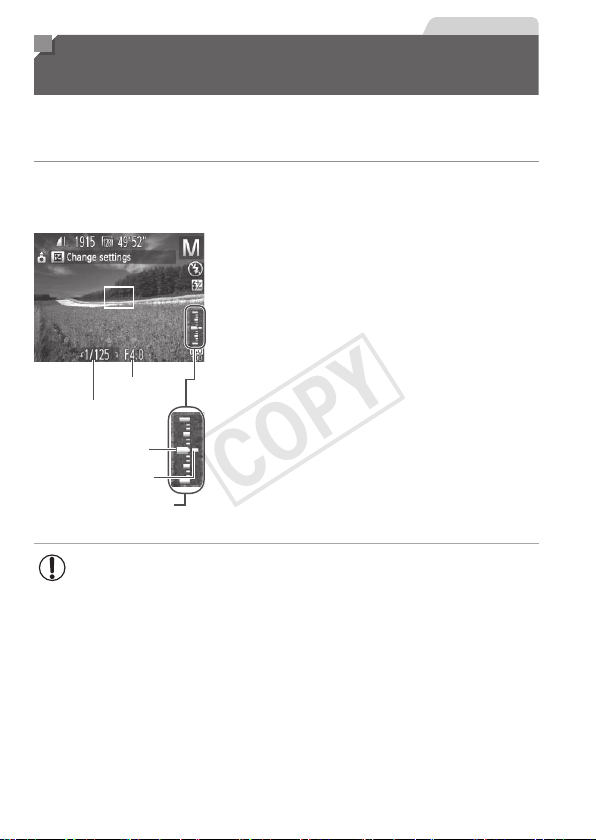
106
StillImages
Specic Shutter Speeds and Aperture
Values (<M> Mode)
Followthesestepsbeforeshootingtosetyourpreferredshutterspeed
andaperturevaluetoobtainthedesiredexposure.Fordetailsonavailable
shutterspeedsandaperturevalues,see“Specications”(=
203).
1 Enter<D>mode.
Setthemodedialto<D>.
ApertureValue
ShutterSpeed
StandardExposure
Level
ExposureLevelMark
ExposureLevelIndicator
2 Congurethesetting.
Pressthe<b>button,choose
adjustmentofshutterspeedoraperture
value,andturnthe<5>dialtospecify
avalue.
Anexposurelevelmarkbasedonyour
speciedvalueisshownontheexposure
levelindicatorforcomparisontothe
standardexposurelevel.
Theexposurelevelmarkisshown
inorangewhenthedifferencefrom
standardexposureexceeds2stops.“–2”
or“+2”isdisplayedinorangeinthelower
rightwhenyoupresstheshutterbutton
halfway.
• Afteryousettheshutterspeedoraperturevalue,theexposure
levelmaychangeifyouadjustthezoomorrecomposetheshot.
• Screenbrightnessmaychangedependingonyourspecied
shutterspeedoraperturevalue.However,screenbrightness
remainsthesamewhentheashisupandthemodeissetto[h].
• Tohavethesettingyoudidnotcongureinstep2(whethershutter
speedoraperturevalue)automaticallyadjustedtoobtainstandard
exposure,holdtheshutterbuttonhalfwayandpressthe<b>
button.Notethatstandardexposuremaynotbepossiblewith
somesettings.
COPY

107
SpecicShutterSpeedsandApertureValues(<M>Mode)
• <D>:Manual
• Calculationofstandardexposureisbasedonthespeciedmeteringmethod
(=
82).
StillImages
Adjusting the Flash Output
Choosefromthethreeashlevelsin<D>mode.
1 Enter<D>mode.
Setthemodedialto<D>.
2 Congurethesetting.
Pressthe<m>button,choose[X]in
themenu,andadjustthesettingbyeither
pressingthe<q><r>buttonsorturning
the<
5
>dial(=
37).
Oncethesettingiscomplete,[X]is
displayed.
• Youcanalsosettheashlevelbyaccessing<n>(=
38)and
choosing[FlashOutput]in[FlashSettings]onthe[4]tab.
• Youcansettheashlevelin<M>or<B>modebyaccessing<n>
(=
38),choosing[FlashSettings]onthe[4]tab,andthensetting[Flash
Mode]to[Manual].
• Youcanalsoaccessthe[FlashSettings]<n>screenasfollows.
-Whentheashisup,pressthe<r>buttonandimmediatelypressthe
<n>button.
COPY

108
COPY

109
Playback Mode
Havefunreviewingyourshots,andbrowseoreditthem
inmanyways
• Topreparethecamerafortheseoperations,pressthe<1>buttonto
enterPlaybackmode.
• Itmaynotbepossibletoplaybackoreditimagesthatwere
renamedoralreadyeditedonacomputer,orimagesfromother
cameras.
6
COPY

110
StillImages Movies
Viewing
Aftershootingimagesormovies,youcanviewthemonthescreenas
follows.
1 EnterPlaybackmode.
Pressthe<1>button.
Yourlastshotisdisplayed.
2 Browsethroughyourimages.
Toviewthepreviousimage,press
the<q>buttonorturnthe<5>dial
counterclockwise.Toviewthenext
image,pressthe<r>buttonorturnthe
<5>dialclockwise.
Pressandholdthe<q><r>buttonsto
browsethroughimagesquickly.Images
appeargrainyatthistime.
ToaccessScrollDisplaymode,turn
the<5>dialrapidly.Inthismode,
turnthe<5>dialtobrowsethrough
images.
Toreturntosingle-imagedisplay,press
the<m>button.
Tobrowseimagesgroupedbyshooting
date,pressthe<o><p>buttonsin
ScrollDisplaymode.
Moviesareidentiedbya[ ]icon.To
playmovies,gotostep3.
COPY

111
Viewing
Volume
3 Playmovies.
Tostartplayback,pressthe<m>button
toaccessthemoviecontrolpanel,press
the<q><r>buttonstochoose[
],and
thenpressthe<m>buttonagain.
4 Adjustthevolume.
Pressthe<o><p>buttonstoadjustthe
volume.
5 Pauseplayback.
Topauseorresumeplayback,pressthe
<m>button.
Afterthemovieisnished,[ ]is
displayed.
• ToswitchtoShootingmodefromPlaybackmode,presstheshutterbutton
halfway.
• TodeactivateScrollDisplay,pressthe<n>button,choose[Scroll
Display]onthe[1]tab,andthenchoose[Off].
• Ifyouprefertohavethemostrecentshotdisplayedwhenyouenterplayback
mode,pressthe<n>button,andonthe[1]tab,choose[Resume]and
then[Lastshot].
• Tochangethetransitionshownbetweenimages,pressthe<n>button,
choose[Transition]onthe[1]tab,andthenpressthe<q><r>buttonsto
choosetheeffect.
COPY
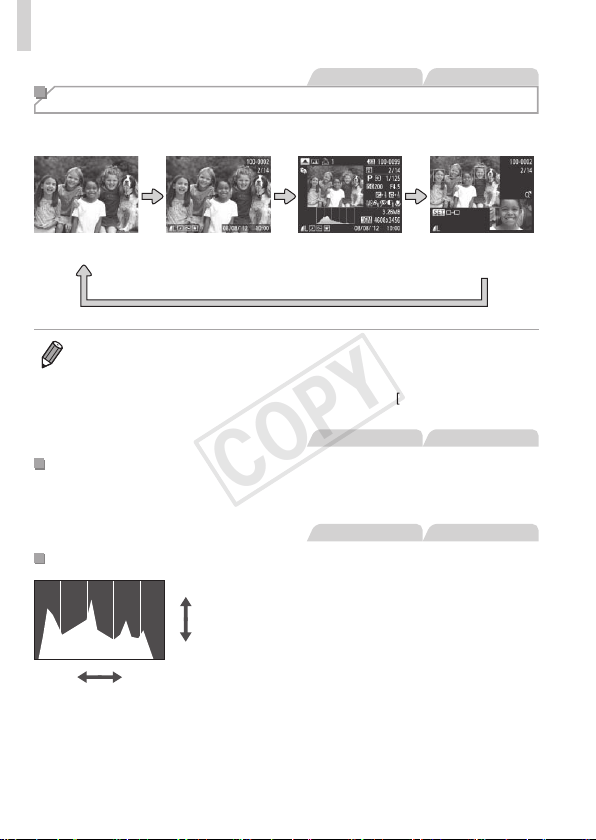
112
Viewing
StillImages Movies
Switching Display Modes
Pressthe<l>buttontoviewotherinformationonthescreen,ortohide
theinformation.Fordetailsontheinformationdisplayed,see=
190.
NoInformation
Display
Simple
Information
Display
Detailed
Information
Display
Enablesyouto
checkthefocus
(=113)*
*Notshownformovies.
• Switchingdisplaymodesbypressingthe<l>buttonisalsopossible
immediatelyafteryoushoot,whileyourshotisdisplayed.However,simple
informationdisplayisnotavailable.Tochangetheinitialdisplaymode,press
the<n>buttonandchoose[ReviewInfo]onthe[4]tab(=
64).
StillImages Movies
OverexposureWarning(forImageHighlights)
Washed-outhighlightsintheimageashonthescreenindetailed
informationdisplay.
StillImages Movies
Histogram
High
Dark
Low
Bright
Thegraphindetailedinformationdisplay
isahistogramshowingthedistributionof
brightnessintheimage.Thehorizontal
axisrepresentsthedegreeofbrightness,
andtheverticalaxis,howmuchofthe
imageisateachlevelofbrightness.
Viewingthehistogramisawaytocheck
exposure.
COPY

113
Viewing
StillImages
Checking the Focus
Tocheckthefocusofyourshots,youcanmagnifytheareaoftheimage
thatwasintheAFframeatthetimeofshooting.
1 AccessFocusCheck.
Pressthe<l>button(=
112).
AwhiteframeisdisplayedwheretheAF
framewaswhenthefocuswasset.
Grayframesaredisplayedoverfaces
detectedlater,inPlaybackmode.
Theportionoftheimageintheorange
frameismagnied.
2 Switchframes.
Movethezoomlevertoward<k>once.
Thescreenatleftisdisplayed.
Toswitchtoadifferentframewhenthere
aremultipleframes,pressthe<m>
button.
3 Zoominorout,orviewother
imageareas.
Asyouexaminethefocus,usethe
zoomlevertozoominorout.Pressthe
<o><p><q><r>buttonstoadjustthe
displayposition.
Pressthe<n>buttontorestorethe
originaldisplayinstep1.
COPY
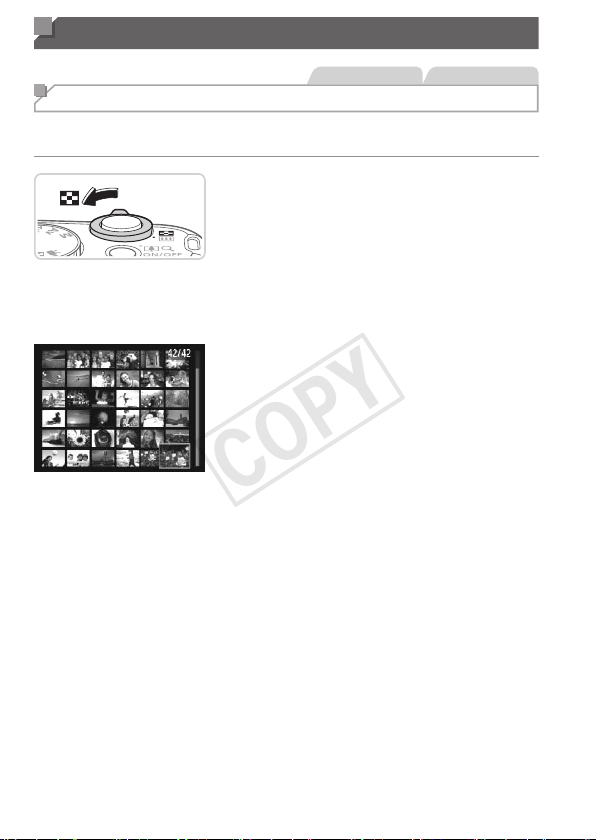
114
Browsing and Filtering Images
StillImages Movies
Navigating Through Images in an Index
Bydisplayingmultipleimagesinanindex,youcanquicklyndtheimages
youarelookingfor.
1 Displayimagesinanindex.
Movethezoomlevertoward<g>to
displayimagesinanindex.Movingthe
leveragainwillincreasethenumberof
imagesshown.
Todisplayfewerimages,movethezoom
levertoward<k>.Fewerimagesare
showneachtimeyoumovethelever.
2 Chooseanimage.
Turnthe<5>dialtoscrollthroughthe
images.
Pressthe<o><p><q><r>buttonsto
chooseanimage.
Anorangeframeisdisplayedaroundthe
selectedimage.
Pressthe<m>buttontoviewthe
selectedimageinsingle-imagedisplay.
COPY
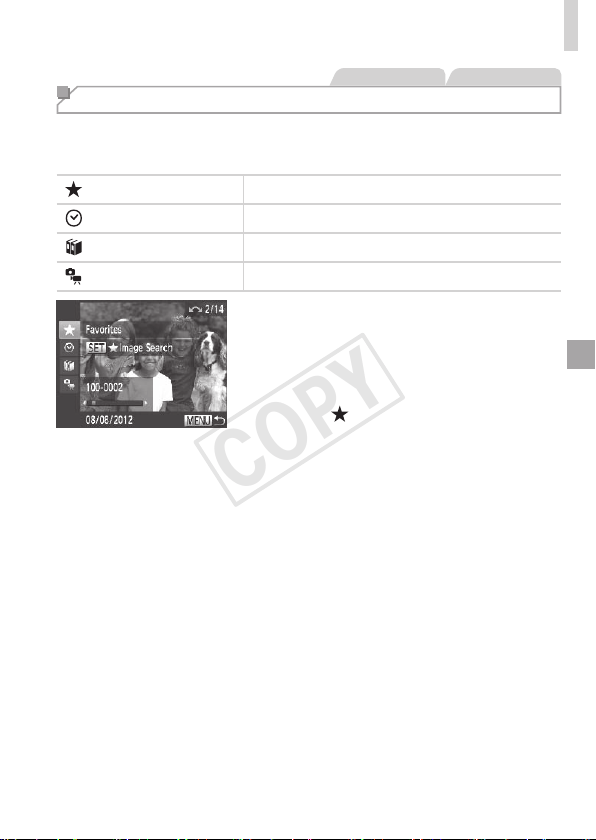
115
BrowsingandFilteringImages
StillImages Movies
Finding Images Matching Specied Conditions
Finddesiredimagesquicklyonamemorycardfullofimagesbyltering
imagedisplayaccordingtoyourspeciedconditions.Youcanalsoprotect
(=
120)ordelete(=
124)theseimagesallatonce.
Favorites
Displaysimagestaggedasfavorites(=
129).
ShotDate Displaystheimagesshotonaspecicdate.
MyCategory
Displaystheimagesofaspeciccategory(=
130).
Stillimage/Movie Displaysonlystillimagesormovies.
1 Choosetherstconditionfor
imagedisplayornavigation.
Insingle-imagedisplay,pressthe<o>
button,andthenpressthe<o><p>
buttonstochooseadisplaylter.
When[ ]isselected,youcanview
onlyimagesmatchingthisconditionby
pressingthe<q><r>buttons.Toperform
anactionforalloftheseimagestogether,
pressthe<m>buttonandgotostep3.
2 Choosethesecondcondition
andchecktheimagesfound.
Pressthe<q><r>buttonstochoose
anothercondition.Onceyouturnthe
<5>dial,youcanviewtheimages
narroweddownbyyourconditions.
Tocancelthismode,pressthe<n>
button.
Toswitchtolteredimagedisplay,press
the<m>buttonandgotostep3.
COPY

116
BrowsingandFilteringImages
3 Viewthelteredimages.
Imagesmatchingyourconditionsare
displayedinyellowframes.Toview
onlytheseimages,pressthe<q><r>
buttons,orturnthe<5>dial.
Toexitlteredimagedisplay,pressthe
<o>button,andafter[Imagesearch
canceled]isdisplayed,pressthe<m>
button.
• Whenthecamerahasfoundnocorrespondingimagesforsome
conditions,thoseconditionswillnotbeavailable.
• Toshoworhideinformation,pressthe<l>buttoninstep2.
• Optionsforviewingtheimagesfound(instep3)include“Navigating
ThroughImagesinanIndex”(=
114),“ViewingSlideshows”(=
118),
and“MagnifyingImages”(=
117).Youcanprotect,erase,orprintall
imagesfoundoraddthemtoaphotobookbychoosing[SelectAllImages
inSearch]in“ProtectingImages”(=
120),“ErasingAllImages”(=
124),
“AddingImagestothePrintList(DPOF)”(=
173),or“AddingImagestoa
Photobook”(=
177).
• However,ifyourecategorizeimages(=
130)oreditthemandsavethem
asnewimages(=
133–138),amessageisdisplayedandlteredimage
displayends.
COPY
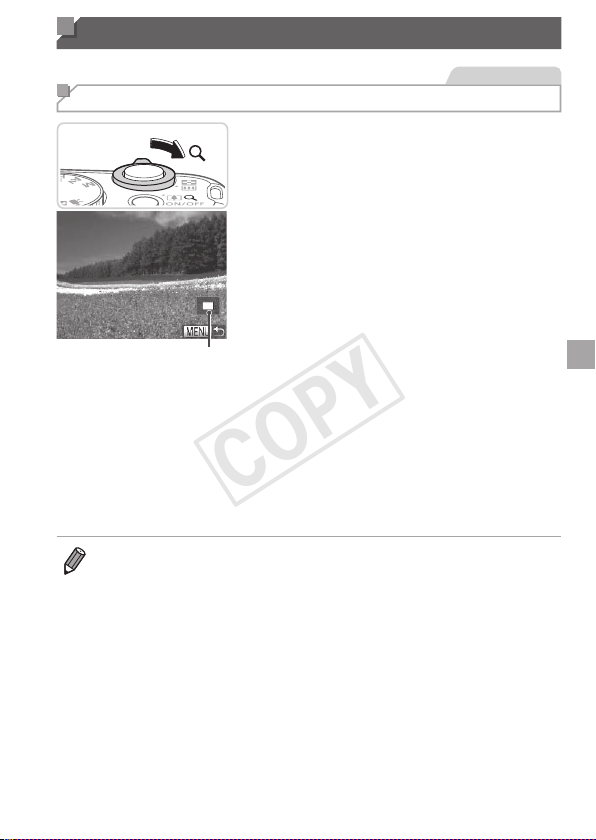
117
Image Viewing Options
StillImages
Magnifying Images
ApproximatePositionof
DisplayedArea
1 Magnifyanimage.
Movingthezoomlevertoward<k>will
zoominandmagnifytheimage.You
canmagnifyimagesuptoabout10xby
continuingtoholdthezoomlever.
Tozoomout,movethezoomlever
toward<g>.Youcanreturntosingle-
imagedisplaybycontinuingtoholdit.
2 Movethedisplaypositionand
switchimagesasneeded.
Tomovethedisplayposition,pressthe
<o><p><q><r>buttons.
Toswitchtootherimageswhilezoomed,
turnthe<5>dial.
• Youcanreturntosingle-imagedisplayfrommagnieddisplaybypressing
the<n>button.
COPY
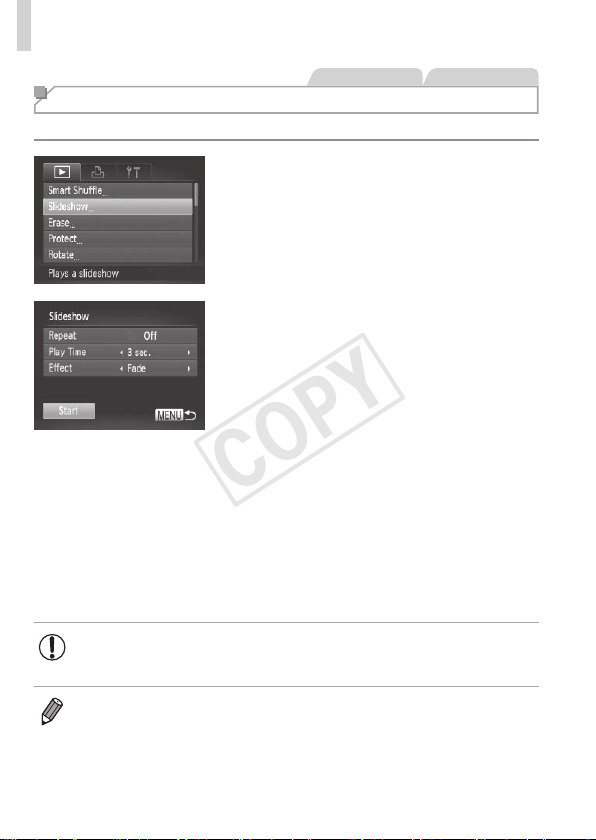
118
ImageViewingOptions
StillImages Movies
Viewing Slideshows
Automaticallyplaybackimagesfromamemorycardasfollows.
1 Accessthesettingscreen.
Pressthe<n>button,andthen
choose[Slideshow]onthe[1]tab
(=
38).
2 Congurethesetting.
Chooseamenuitemtocongure,and
thenchoosethedesiredoption(=
38).
3 Startautomaticplayback.
Pressthe<o><p>buttonsorturnthe
<5>dialtochoose[Start],andthen
pressthe<m>button.
Theslideshowwillstartafewseconds
after[Loadingimage...]isdisplayed.
Pressthe<n>buttontostopthe
slideshow.
• Thecamera’spower-savingfunctions(=
34)aredeactivated
duringslideshows.
• Topauseorresumeslideshows,pressthe<m>button.
• Youcanswitchtootherimagesduringplaybackbypressingthe<q><r>
buttonsorturningthe<5>dial.Forfast-forwardorfast-rewind,holdthe
<q><r>buttonsdown.
• [PlayTime]cannotbemodiedwhen[Bubble]ischosenin[Effect].
COPY
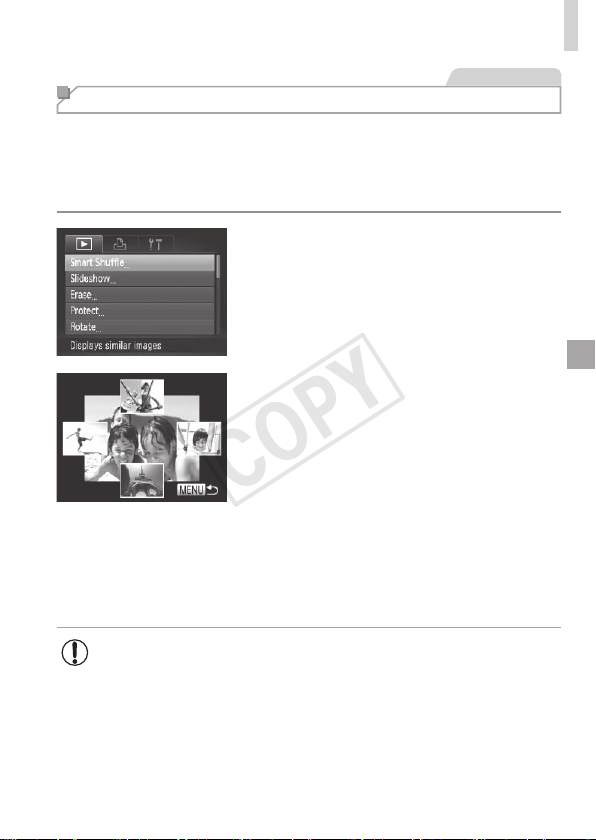
119
ImageViewingOptions
StillImages
Auto Playback of Similar Images (Smart Shufe)
Basedonthecurrentimage,thecameraoffersfourimagessimilartoit
thatyoumaywishtoview.Afteryouchoosetoviewoneofthoseimages,
thecameraoffersfourmoreimages.Thisisanenjoyablewaytoplayback
imagesinanunexpectedorder.Trythisfeatureafteryouhavetakenmany
shots,inmanykindsofscenes.
1 ChooseSmartShufe.
Pressthe<n>button,choose
[SmartShufe]onthe[1]tab,andthen
pressthe<m>button(=
38).
Fourcandidateimagesaredisplayed.
2 Chooseanimage.
Pressthe<o><p><q><r>buttonsto
choosetheimageyouwanttoviewnext.
Yourchosenimageisdisplayedinthe
center,surroundedbythenextfour
candidateimages.
Forfull-screendisplayofthecenter
image,pressthe<m>button.Torestore
theoriginaldisplay,pressthe<m>
buttonagain.
Pressthe<n>buttontorestore
single-imagedisplay.
• Onlystillimagesshotwiththiscameraareplayedbackusing
SmartShufe.
• SmartShufeisnotavailableinthefollowingcases:
-Therearelessthan50shotstakenwiththiscamera
-Anunsupportedimageiscurrentlydisplayed
-Imagesareshowninltereddisplay(=
115)
COPY
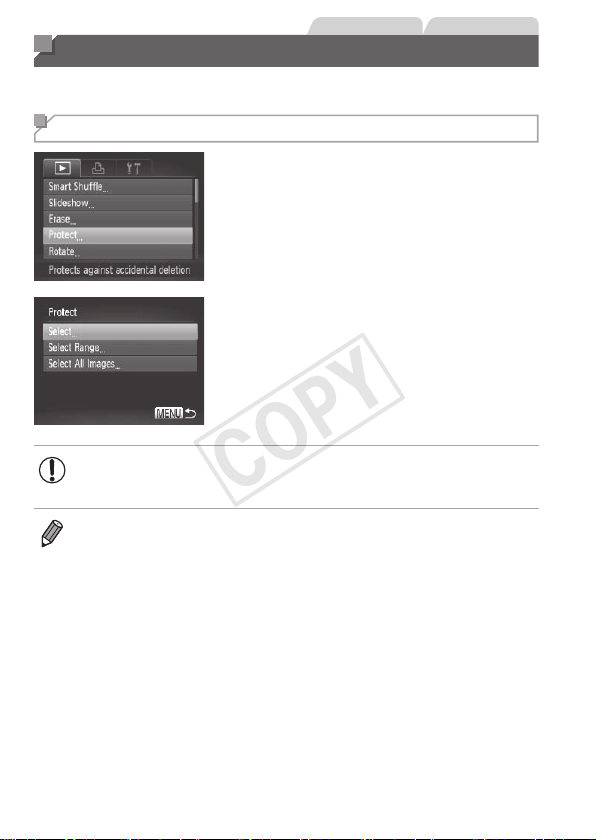
120
StillImages Movies
Protecting Images
Protectimportantimagestopreventaccidentalerasurebythecamera
(=
124).
Choosing a Selection Method
1 Accessthesettingscreen.
Pressthe<n>buttonandchoose
[Protect]onthe[1]tab(=
38).
2 Chooseaselectionmethod.
Chooseamenuitemandasettingas
desired(=
38).
Toreturntothemenuscreen,pressthe
<n>button.
• Protectedimagesonamemorycardwillbeerasedifyouformat
thecard(=
146,147).
• Protectedimagescannotbeerasedusingthecamera’serasurefunction.To
erasethemthisway,rstcancelprotection.
COPY
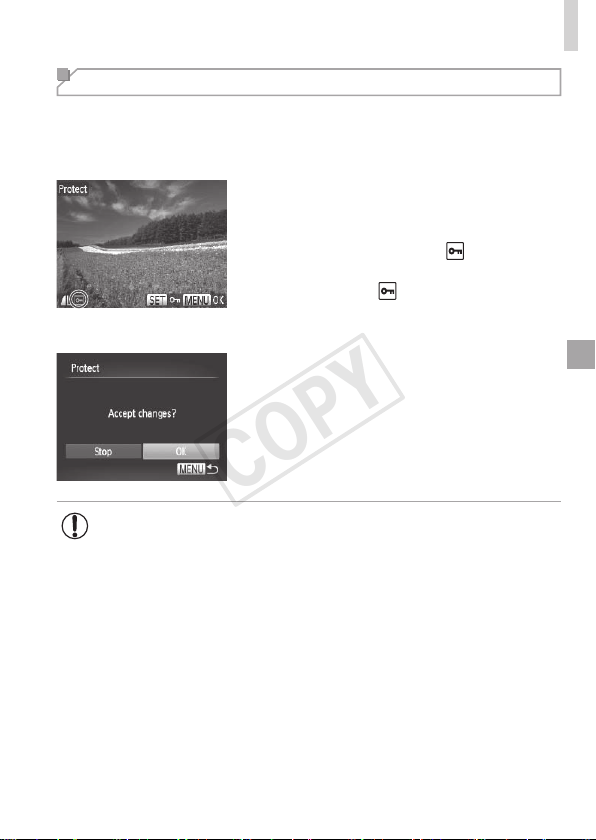
121
ProtectingImages
Choosing Images Individually
1 Choose[Select].
Followingstep2on=
120,choose
[Select]andpressthe<m>button.
2 Chooseanimage.
Pressthe<q><r>buttonsorturnthe
<5>dialtochooseanimage,andthen
pressthe<m>button.[
]isdisplayed.
Tocancelselection,pressthe<m>
buttonagain.[
]isnolongerdisplayed.
Repeatthisprocesstospecifyother
images.
3 Protecttheimage.
Pressthe<n>button.
Aconrmationmessageisdisplayed.
Pressthe<q><r>buttonsorturnthe
<5>dialtochoose[OK],andthenpress
the<m>button.
• ImageswillnotbeprotectedifyouswitchtoShootingmodeorturn
thecameraoffbeforenishingthesetupprocessinstep3.
COPY
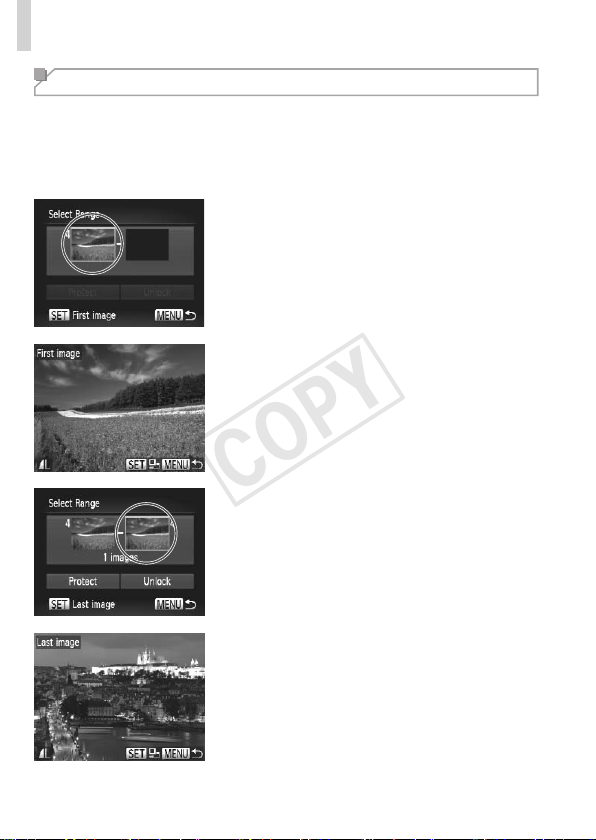
122
ProtectingImages
Selecting a Range
1 Choose[SelectRange].
Followingstep2on=
120,choose
[SelectRange]andpressthe<m>
button.
2 Chooseastartingimage.
Pressthe<m>button.
Pressthe<q><r>buttonsorturnthe
<5>dialtochooseanimage,andthen
pressthe<m>button.
3 Chooseanendingimage.
Pressthe<r>buttontochoose[Last
image],andthenpressthe<m>button.
Pressthe<q><r>buttonsorturnthe
<5>dialtochooseanimage,andthen
pressthe<m>button.
Imagesbeforetherstimagecannotbe
selectedasthelastimage.
COPY
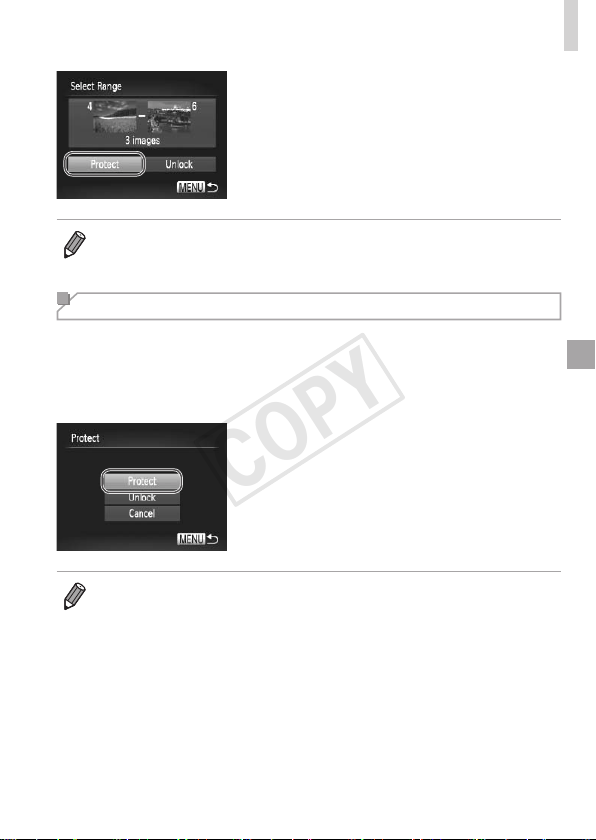
123
ProtectingImages
4 Protecttheimages.
Pressthe<p>buttontochoose
[Protect],andthenpressthe<m>
button.
• Youcanalsochoosetherstorlastimagebyturningthe<5>dialwhenthe
topscreeninsteps2and3isdisplayed.
Specifying All Images at Once
1 Choose[SelectAllImages].
Followingstep2on=
120,choose
[SelectAllImages]andpressthe<m>
button.
2 Protecttheimages.
Pressthe<o><p>buttonsorturnthe
<5>dialtochoose[Protect],andthen
pressthe<m>button.
• Tocancelprotectionforgroupsofimages,choose[Unlock]instep4of
“SelectingaRange”orinstep2of“SpecifyingAllImagesatOnce”.
COPY
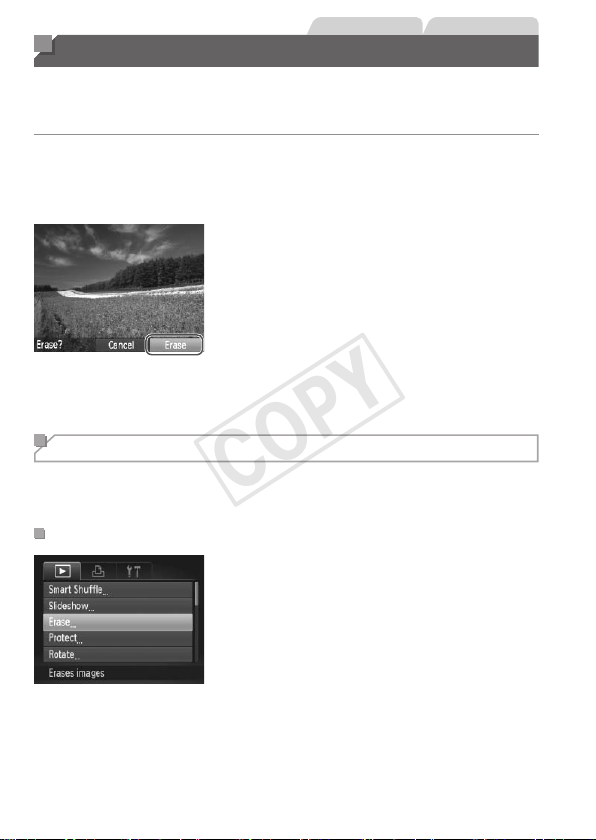
124
StillImages Movies
Erasing Images
Youcanchooseanderaseunneededimagesonebyone.Becarefulwhen
erasingimages,becausetheycannotberecovered.However,protected
images(=
120)cannotbeerased.
1 Chooseanimagetoerase.
Pressthe<q><r>buttonsorturnthe
<5>dialtochooseanimage.
2 Erasetheimage.
Pressthe<a>button.
After[Erase?]isdisplayed,pressthe
<q><r>buttonstochoose[Erase],and
thenpressthe<m>button.
Thecurrentimageisnowerased.
Tocancelerasure,pressthe<q><r>
buttonsorturnthe<5>dialtochoose
[Cancel],andthenpressthe<m>
button.
Erasing All Images
Youcaneraseallimagesatonce.Becarefulwhenerasingimages,
becausetheycannotberecovered.However,protectedimages(=
120)
cannotbeerased.
ChoosingaSelectionMethod
1 Accessthesettingscreen.
Pressthe<n>button,andthen
choose[Erase]onthe[1]tab(=
38).
COPY
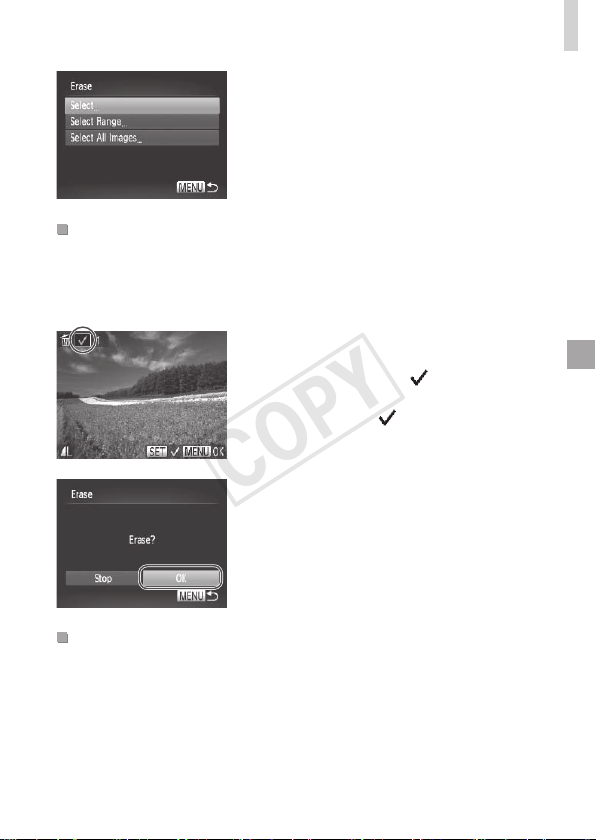
125
ErasingImages
2 Chooseaselectionmethod.
Chooseamenuitemandasettingas
desired(=
38).
Toreturntothemenuscreen,pressthe
<n>button.
ChoosingImagesIndividually
1 Choose[Select].
Followingstep2above,choose[Select]
andpressthe<m>button.
2 Chooseanimage.
Onceyoufollowstep2on=
121to
chooseanimage,[
]isdisplayed.
Tocancelselection,pressthe<m>
buttonagain.[
]isnolongerdisplayed.
Repeatthisprocesstospecifyother
images.
3 Erasetheimage.
Pressthe<n>button.A
conrmationmessageisdisplayed.
Pressthe<q><r>buttonsorturnthe
<5>dialtochoose[OK],andthenpress
the<m>button.
SelectingaRange
1 Choose[SelectRange].
Followingstep2in“ChoosingaSelection
Method”(seeabove),choose[Select
Range]andpressthe<m>button.
COPY

126
ErasingImages
2 Chooseimages.
Followsteps2–3on=
122tospecify
images.
3 Erasetheimages.
Pressthe<p>buttontochoose[Erase],
andthenpressthe<m>button.
SpecifyingAllImagesatOnce
1 Choose[SelectAllImages].
Followingstep2in“ChoosingaSelection
Method”(=
125),choose[SelectAll
Images]andpressthe<m>button.
2 Erasetheimages.
Pressthe<q><r>buttonsorturnthe
<5>dialtochoose[OK],andthenpress
the<m>button.
COPY
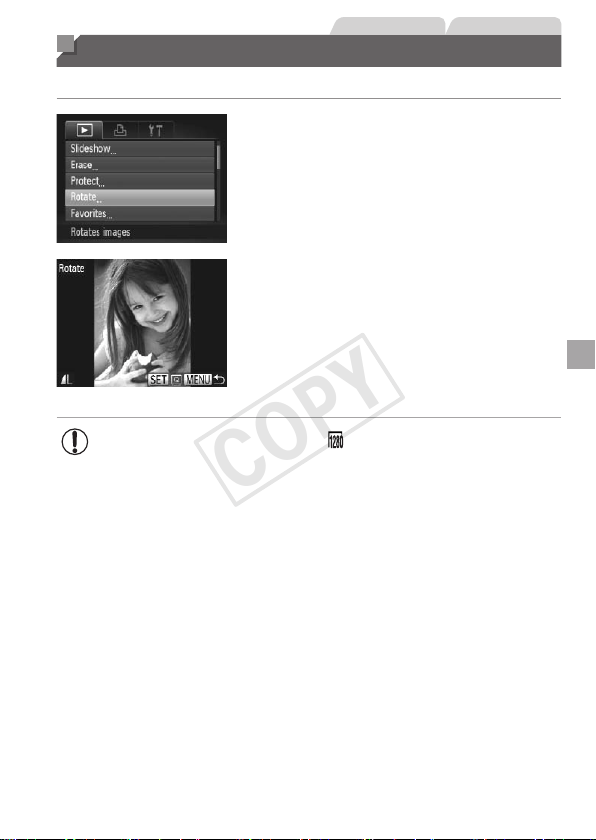
127
StillImages Movies
Rotating Images
Changetheorientationofimagesandsavethemasfollows.
1 Choose[Rotate].
Pressthe<n>buttonandchoose
[Rotate]onthe[1]tab(=
38).
2 Rotatetheimage.
Pressthe<q><r>buttonsorturnthe
<5>dialtochooseanimage.
Theimageisrotated90°eachtimeyou
pressthe<m>button.
Toreturntothemenuscreen,pressthe
<n>button.
• Movieswithanimagequalityof[ ]cannotberotated.
• Rotationisnotpossiblewhen[AutoRotate]issetto[Off]
(=
128).
COPY
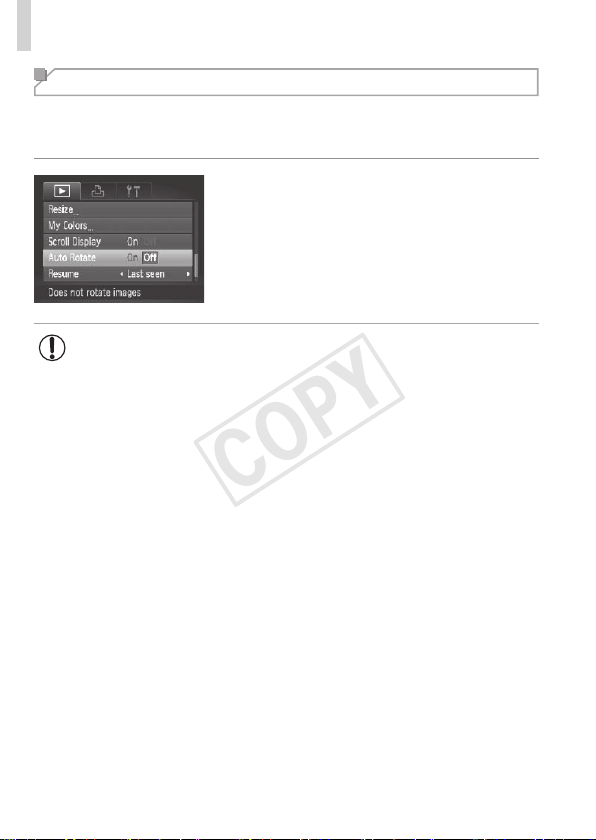
128
RotatingImages
Deactivating Auto Rotation
Followthesestepstodeactivateautomaticrotationbythecamera,which
rotatesimagesshotinverticalorientationsotheyaredisplayedverticallyon
thecamera.
Pressthe<n>button,choose[Auto
Rotate]onthe[1]tab,andthenchoose
[Off](=
38).
• Imagescannotberotated(=
127)whenyouset[AutoRotate]to
[Off].Additionally,imagesalreadyrotatedwillbedisplayedinthe
originalorientation.
• InSmartShufe(=
119)mode,evenif[AutoRotate]issetto
[Off],imagesshotverticallywillbedisplayedvertically,androtated
imageswillbedisplayedintherotatedorientation.
COPY

129
Image Categories
YoucantagimagesasfavoritesorassignthemtoMyCategory(=
130)
groups.Bychoosingacategoryinlteredplayback,youcanrestrictthe
followingoperationstoallofthoseimages.
• Viewing(=
110),ViewingSlideshows(=
118),ProtectingImages
(=
120),ErasingImages(=
124),AddingImagestothePrintList
(DPOF)(=
173),AddingImagestoaPhotobook(=
177)
StillImages Movies
Tagging Images as Favorites
1 Choose[Favorites].
Pressthe<n>buttonandchoose
[Favorites]onthe[1]tab(=
38).
2 Chooseanimage.
Pressthe<q><r>buttonsorturnthe
<5>dialtochooseanimage,andthen
pressthe<m>button.[
]isdisplayed.
Tountagtheimage,pressthe<m>
buttonagain.[
]isnolongerdisplayed.
Repeatthisprocesstochooseadditional
images.
3 Finishthesetupprocess.
Pressthe<n>button.A
conrmationmessageisdisplayed.
Pressthe<q><r>buttonsorturnthe
<5>dialtochoose[OK],andthenpress
the<m>button.
• ImageswillnotbetaggedasfavoritesifyouswitchtoShooting
modeorturnthecameraoffbeforenishingthesetupprocessin
step3.
COPY
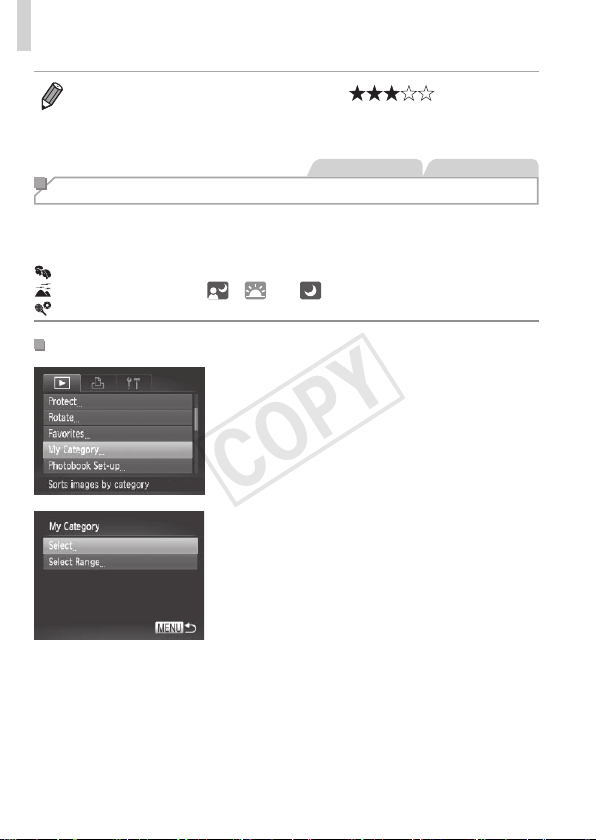
130
ImageCategories
• Favoriteimageswillhaveathree-starrating( )when
transferredtocomputersrunningWindows7orWindowsVista.(Doesnot
applytomovies.)
StillImages Movies
Organizing Images by Category (My Category)
Youcanorganizeimagesintocategories.Notethatimagesare
automaticallycategorizedatthetimeofshooting,accordingtoshooting
conditions.
: Imageswithdetectedfaces,orimagesshotin[I]mode.
: Imagesdetectedas[ ],[ ],or[ ]in<A>mode.
: Imagesshotin[P]or[t]mode.
ChoosingaSelectionMethod
1 Accessthesettingscreen.
Pressthe<n>button,andthen
choose[MyCategory]onthe[1]tab
(=
38).
2 Chooseaselectionmethod.
Chooseamenuitemandasettingas
desired(=
38).
Toreturntothemenuscreen,pressthe
<n>button.
COPY
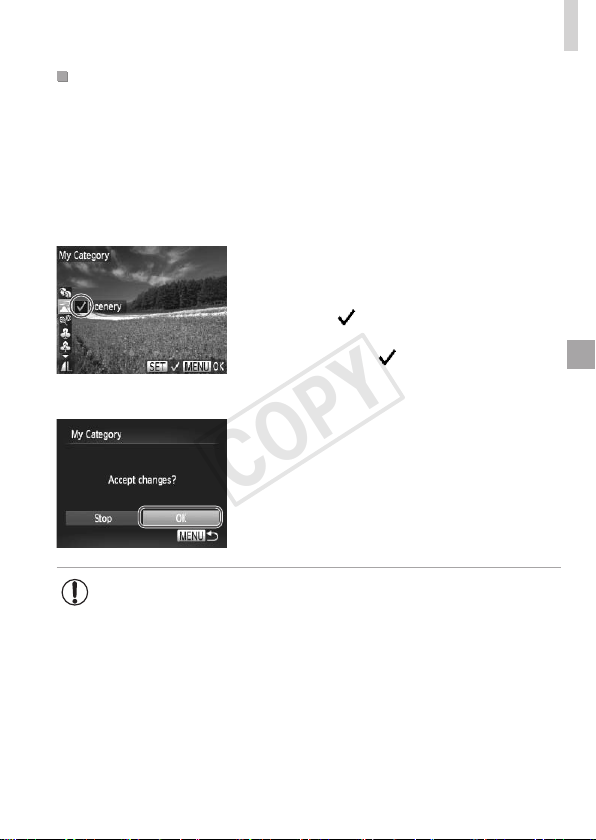
131
ImageCategories
ChoosingImagesIndividually
1 Choose[Select].
Followingstep2on=
130,choose
[Select]andpressthe<m>button.
2 Chooseanimage.
Pressthe<q><r>buttonsorturnthe
<5>dialtochooseanimage.
3 Chooseacategory.
Pressthe<o><p>buttonstochoose
acategoryandthenpressthe<m>
button.[
]isdisplayed.
Tocancelselection,pressthe<m>
buttonagain.[
]isnolongerdisplayed.
Repeatthisprocesstochooseadditional
images.
4 Finishthesetupprocess.
Pressthe<n>button.A
conrmationmessageisdisplayed.Press
the<q><r>buttonsorturnthe<5>
dialtochoose[OK],andthenpressthe
<m>button.
• ImageswillnotbeassignedtoacategoryifyouswitchtoShooting
modeorturnthecameraoffbeforenishingthesetupprocessin
step4.
COPY

132
ImageCategories
SelectingaRange
1 Choose[SelectRange].
Followingstep2on=
130,choose
[SelectRange]andpressthe<m>
button.
2 Chooseimages.
Followsteps2–3on=
122tospecify
images.
3 Chooseacategory.
Pressthe<p>buttontochoosethetype
ofimage,andthenpressthe<q><r>
buttonsorturnthe<5>dialtochoose
acategory.
4 Finishthesetupprocess.
Pressthe<p>buttontochoose[Select],
andthenpressthe<m>button.
• Youcancleartheselectionofallimagesinthe[SelectRange]categoryby
choosing[Deselect]instep4.
COPY
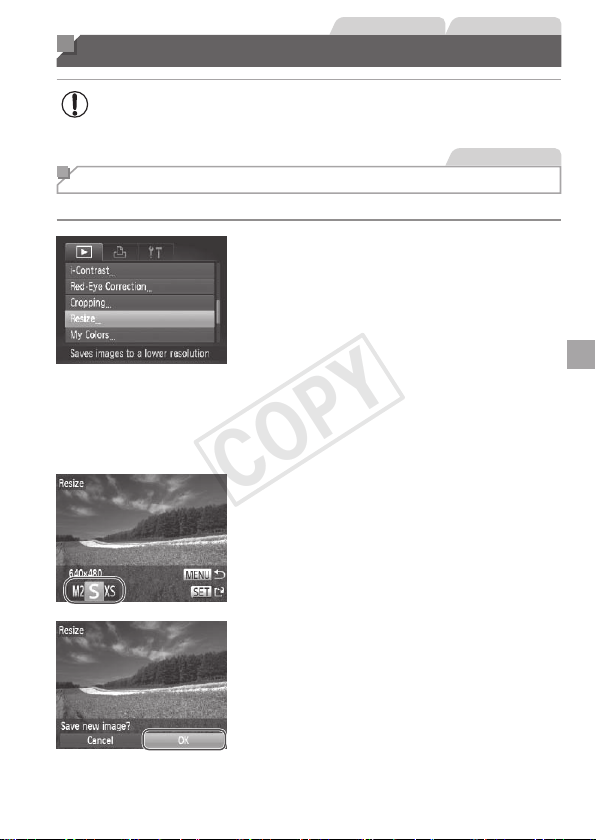
133
StillImages Movies
Editing Still Images
• Imageediting(=
133–138)isonlyavailablewhenthememory
cardhassufcientfreespace.
StillImages
Resizing Images
Saveacopyofimagesatalowerresolution.
1 Choose[Resize].
Pressthe<n>buttonandchoose
[Resize]onthe[1]tab(=
38).
2 Chooseanimage.
Pressthe<q><r>buttonsorturnthe
<5>dialtochooseanimage,andthen
pressthe<m>button.
3 Chooseanimagesize.
Pressthe<q><r>buttonsorturnthe
<5>dialtochoosethesize,andthen
pressthe<m>button.
[Savenewimage?]isdisplayed.
4 Savethenewimage.
Pressthe<q><r>buttonsorturnthe
<5>dialtochoose[OK],andthenpress
the<m>button.
Theimageisnowsavedasanewle.
COPY
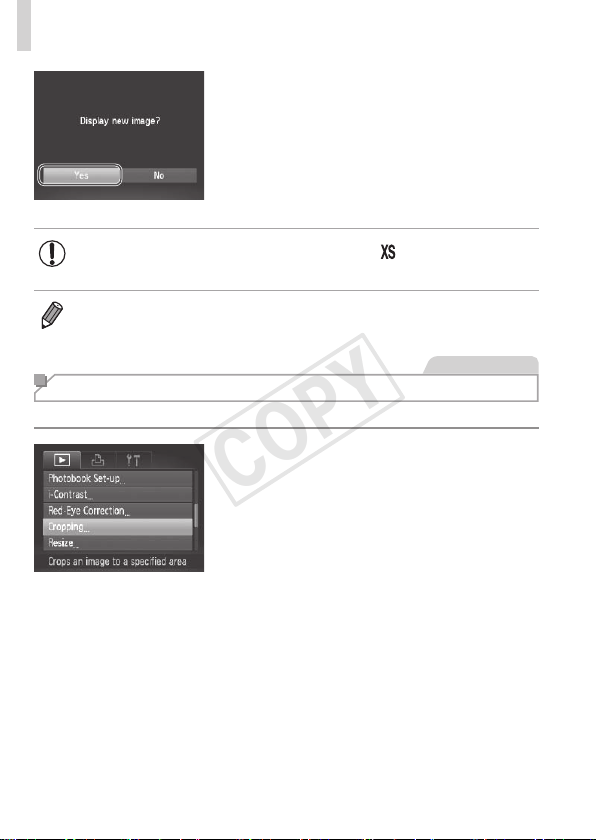
134
EditingStillImages
5 Reviewthenewimage.
Pressthe<n>button.[Displaynew
image?]isdisplayed.
Pressthe<q><r>buttonsorturnthe
<5>dialtochoose[Yes],andthen
pressthe<m>button.
Thesavedimageisnowdisplayed.
• Editingisnotpossibleforimagessavedas[ ]instep3.
• Imagescannotberesizedtoahigherresolution.
StillImages
Cropping
Youcanspecifyaportionofanimagetosaveasaseparateimagele.
1 Choose[Cropping].
Pressthe<n>button,andthen
choose[Cropping]onthe[1]tab
(=
38).
2 Chooseanimage.
Pressthe<q><r>buttonsorturnthe
<5>dialtochooseanimage,andthen
pressthe<m>button.
COPY
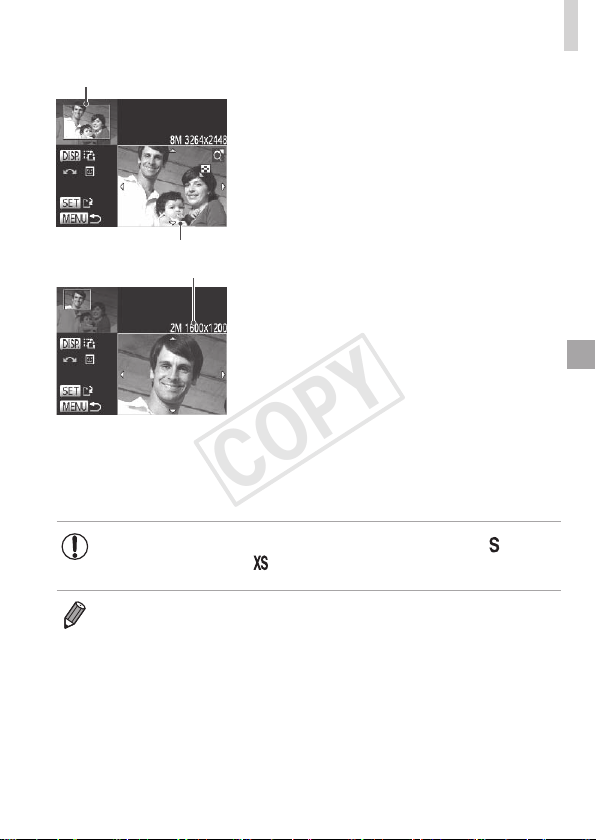
135
EditingStillImages
PreviewofImageAfterCropping
CroppingArea
ResolutionAfterCropping
3 Adjustthecroppingarea.
Aframeisdisplayedaroundtheportionof
theimagetobecropped.
Theoriginalimageisshownintheupper
left,andapreviewoftheimageas
croppedisshowninthelowerright.
Toresizetheframe,movethezoom
lever.
Tomovetheframe,pressthe
<o><p><q><r>buttons.
Tochangetheframeorientation,press
the<l>button.
Facesdetectedintheimageare
enclosedingrayframesintheupper-left
image.Tocroptheimagebasedonthis
frame,turnthe<5>dialtoswitchtothe
otherframe.
Pressthe<m>button.
4 Saveasanewimageand
review.
Followsteps4–5on=
133–134.
• Editingisnotpossibleforimagesshotataresolutionof[ ]
(=
55)orresizedto[ ](=
133).
• Imagessupportedforcroppingwillhavethesameaspectratioafter
cropping.
• Croppedimageswillhaveasmallerresolutionthanuncroppedimages.
COPY
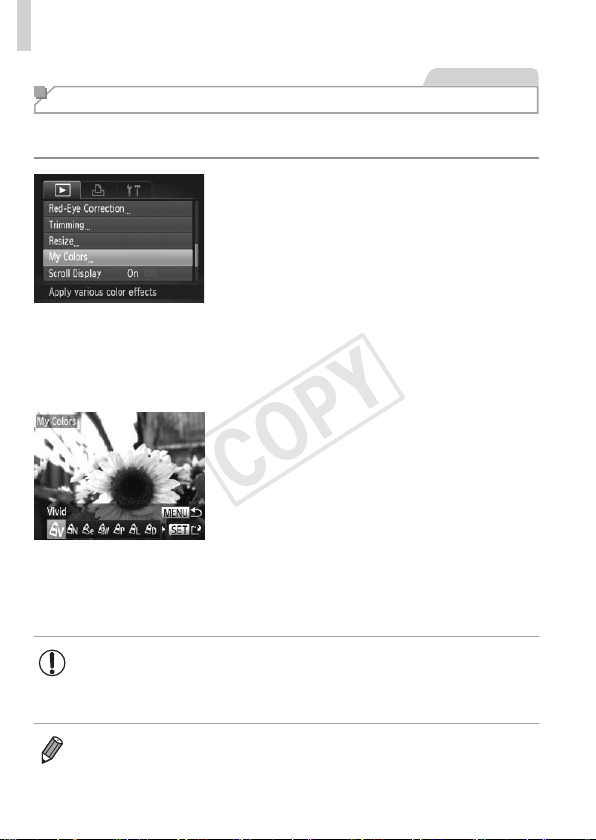
136
EditingStillImages
StillImages
Changing Image Color Tones (My Colors)
Youcanadjustimagecolorsandthensavetheeditedimageasaseparate
le.Fordetailsoneachoption,see=
86.
1 Choose[MyColors].
Pressthe<n>button,andthen
choose[MyColors]onthe[1]tab
(=
38).
2 Chooseanimage.
Pressthe<q><r>buttonsorturnthe
<5>dialtochooseanimage,andthen
pressthe<m>button.
3 Chooseanoption.
Pressthe<q><r>buttonsorturnthe
<5>dialtochooseanoption,andthen
pressthe<m>button.
4 Saveasanewimageand
review.
Followsteps4–5on=
133–134.
• Imagequalityofpicturesyourepeatedlyeditthiswaywillbealittle
lowereachtime,andyoumaynotbeabletoobtainthedesired
color.
• Thecolorofimageseditedusingthisfunctionmayvaryslightlyfromthe
colorofimagesshotusingMyColors(=
86).
COPY
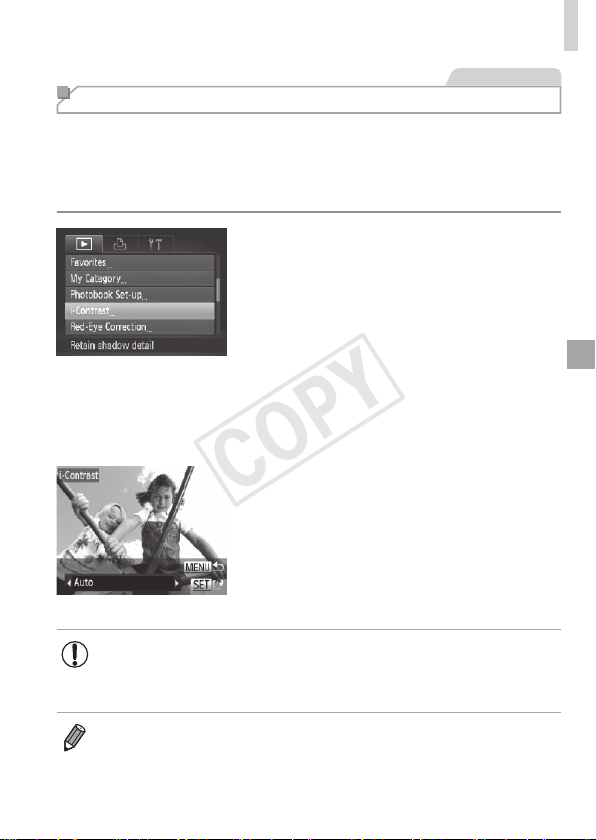
137
EditingStillImages
StillImages
Correcting Image Brightness (i-Contrast)
Excessivelydarkimageareas(suchasfacesorbackgrounds)canbe
detectedandautomaticallyadjustedtotheoptimalbrightness.Insufcient
overallimagecontrastisalsoautomaticallycorrected,tomakesubjects
standoutbetter.Choosefromfourcorrectionlevels,andthensavethe
imageasaseparatele.
1 Choose[i-Contrast].
Pressthe<n>button,andthen
choose[i-Contrast]onthe[1]tab
(=
38).
2 Chooseanimage.
Pressthe<q><r>buttonsorturnthe
<5>dialtochooseanimage,andthen
pressthe<m>button.
3 Chooseanoption.
Pressthe<q><r>buttonsorturnthe
<5>dialtochooseanoption,andthen
pressthe<m>button.
4 Saveasanewimageand
review.
Followsteps4–5on=
133–134.
• Forsomeimages,correctionmaybeinaccurateormaycause
imagestoappeargrainy.
• Imagesmaylookgrainyafterrepeatededitingusingthisfunction.
• If[Auto]doesnotproducetheexpectedresults,trycorrectingimagesusing
[Low],[Medium],or[High].
COPY
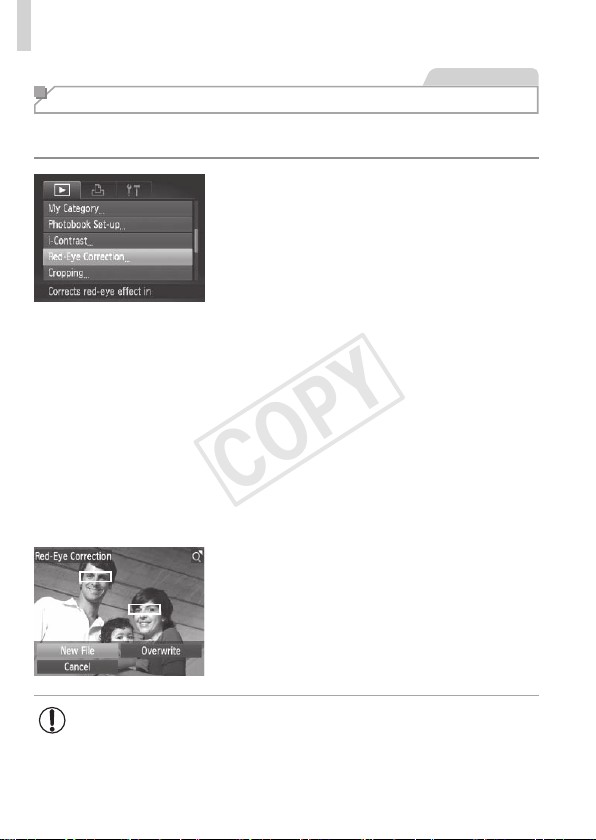
138
EditingStillImages
StillImages
Correcting Red-Eye
Automaticallycorrectsimagesaffectedbyred-eye.Youcansavethe
correctedimageasaseparatele.
1 Choose[Red-EyeCorrection].
Pressthe<n>button,andthen
choose[Red-EyeCorrection]onthe[1]
tab(=
38).
2 Chooseanimage.
Pressthe<q><r>buttonsorturnthe
<5>dialtochooseanimage.
3 Correcttheimage.
Pressthe<m>button.
Red-eyedetectedbythecameraisnow
corrected,andframesaredisplayed
aroundcorrectedimageareas.
Enlargeorreduceimagesasneeded.
Followthestepsin=
117.
4
Saveasanewimageandreview.
Pressthe<o><p><q><r>buttonsor
turnthe<5>dialtochoose[NewFile],
andthenpressthe<m>button.
Theimageisnowsavedasanewle.
Followstep5on=
134.
• Someimagesmaynotbecorrectedaccurately.
• Tooverwritetheoriginalimagewiththecorrectedimage,choose
[Overwrite]instep4.Inthiscase,theoriginalimagewillbeerased.
• Protectedimagescannotbeoverwritten.
COPY
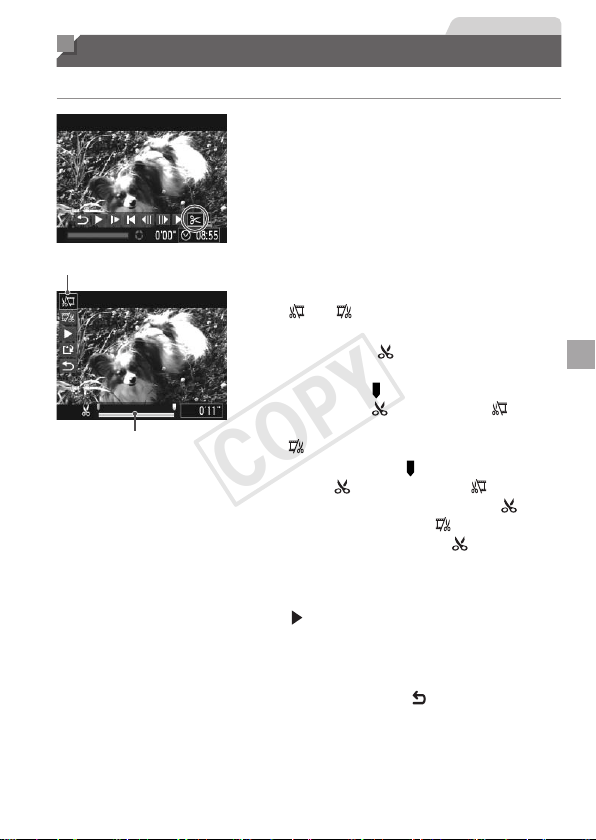
139
Movies
Editing Movies
Youcancutmoviestoremoveunneededportionsatthebeginningorend.
1 Choose[*].
Followingsteps1–5on=
110–111,
choose[*]andpressthe<m>button.
Themovieeditingpanelandeditingbar
arenowdisplayed.
MovieEditingPanel
MovieEditingBar
2 Specifyportionstocut.
Pressthe<o><p>buttonstochoose
[
]or[ ].
Toviewtheportionsyoucancut
(identiedby[
]onthescreen),press
the<q><r>buttonsorturnthe<5>
dialtomove[
].Cutthebeginningofthe
movie(from[
])bychoosing[ ],and
cuttheendofthemoviebychoosing
[
].
Evenifyoumove[ ]toapositionother
thana[
]mark,choosing[ ]willonly
cuttheportionfromthenearest[
]to
theleft,andchoosing[
]willcutthe
portionfromthenearest[
]totheright.
3 Reviewtheeditedmovie.
Pressthe<o><p>buttonstochoose
[
],andthenpressthe<m>button.
Theeditedmovieisnowplayed.
Toeditthemovieagain,repeatstep2.
Tocancelediting,pressthe<o><p>
buttonstochoose[
].Pressthe<m>
button,choose[OK](eitherpressthe
<q><r>buttonsorturnthe<5>dial),
andthenpressthe<m>buttonagain.
COPY

140
EditingMovies
4 Savetheeditedmovie.
Pressthe<o><p>buttonstochoose
[
],andthenpressthe<m>button.
Pressthe<o><p><q><r>buttonsor
turnthe<5>dialtochoose[NewFile],
andthenpressthe<m>button.
Themovieisnowsavedasanewle.
• Tooverwritetheoriginalmoviewiththecutone,choose
[Overwrite]instep4.Inthiscase,theoriginalmoviewillbeerased.
• [Overwrite]isonlyavailablewhenmemorycardslacksufcient
freespace.
• Moviesmaynotbesavedifthebatteriesrunoutwhilesavingisin
progress.
• Wheneditingmovies,youshouldusebatterieswithsufcient
chargeorfullychargedNiMHAAbatteries(=
157),oranAC
adapterkitandDCcoupler(=
157,bothsoldseparately).
COPY

141
Setting Menu
Customizeoradjustbasiccamerafunctionsforgreater
convenience
7
COPY
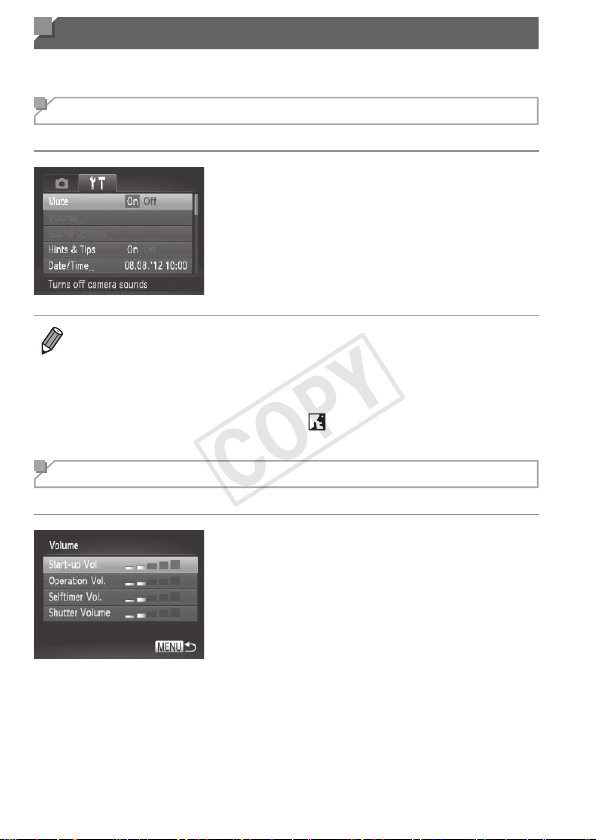
142
Adjusting Basic Camera Functions
Functionscanbeconguredonthe[3]tab.Customizecommonlyused
functionsasdesired,forgreaterconvenience(=
38).
Silencing Camera Operations
Silencecamerasoundsandmoviesasfollows.
Choose[Mute],andthenchoose[On].
• Operationcanalsobesilencedbyholdingdownthe<l>buttonasyou
turnthecameraon.
• Soundisnotplayedduringmoviesifyoumutecamerasounds(=
110).To
restoresoundduringmovies,pressthe<o>button.Adjustvolumewiththe
<o><p>buttons,asneeded.
• Soundsettingscannotbechangedin[
]mode(=
76).
Adjusting the Volume
Adjustthevolumeofindividualcamerasoundsasfollows.
Choose[Volume],andthenpressthe
<m>button.
Chooseanitem,andthenpressthe
<q><r>buttonstoadjustthevolume.
COPY
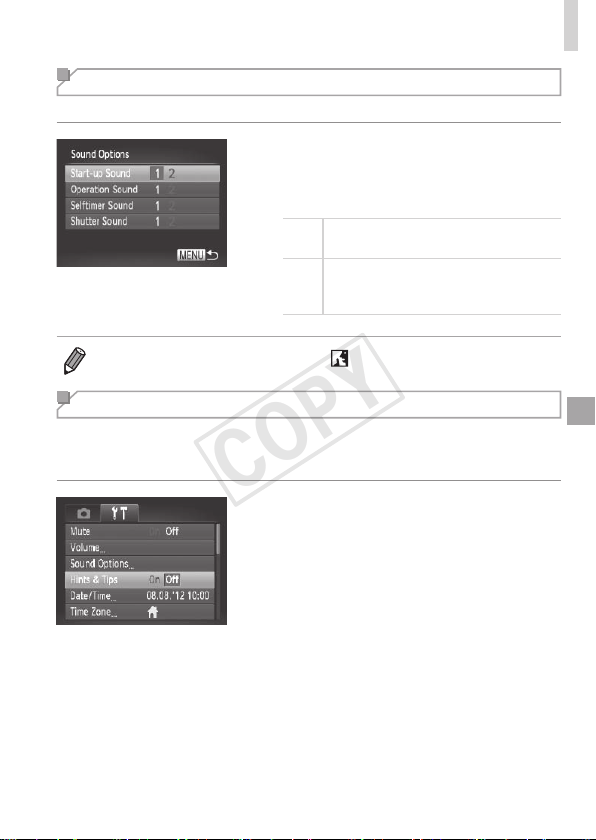
143
AdjustingBasicCameraFunctions
Customizing Sounds
Customizecameraoperatingsoundsasfollows.
Choose[SoundOptions],andthenpress
the<m>button.
Chooseanitem,andthenpressthe
<q><r>buttonstochooseanoption.
1
Presetsounds
(cannotbemodied)
2
Presetsounds
Canbechangedbyusingtheincluded
software.
• Soundsettingscannotbechangedin[ ]mode(=
76).
Hiding Hints and Tips
HintsandtipsarenormallyshownwhenyouchooseFUNC.menu
(=
37)orMenu(=
38)items.Ifyouprefer,youcandeactivatethis
information.
Choose[Hints&Tips],andthenchoose
[Off].
COPY
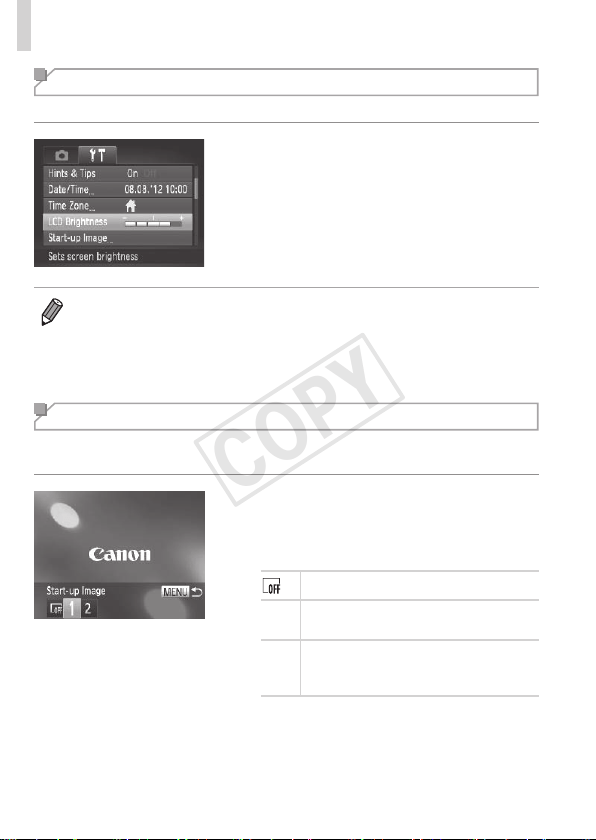
144
AdjustingBasicCameraFunctions
Screen Brightness
Adjustscreenbrightnessasfollows.
Choose[LCDBrightness],andthen
pressthe<q><r>buttonstoadjustthe
brightness.
• Formaximumbrightness,pressandholdthe<l>buttonforatleast
onesecondwhentheshootingscreenisdisplayedorwheninsingle-image
display.(Thiswilloverridethe[LCDBrightness]settingonthe[3]tab.)To
restoretheoriginalbrightness,pressandholdthe<l>buttonagainfor
atleastonesecondorrestartthecamera.
Start-up Screen
Customizethestart-upscreenshownafteryouturnthecameraonas
follows.
Choose[Start-upImage],andthenpress
the<m>button.
Pressthe<q><r>buttonsorturnthe
<5>dialtochooseanoption.
Nostart-upimage
1
Presetimage
(cannotbemodied)
2
Presetimage
Assignadesiredshot,orusethe
includedsoftwaretochangetheimage.
COPY
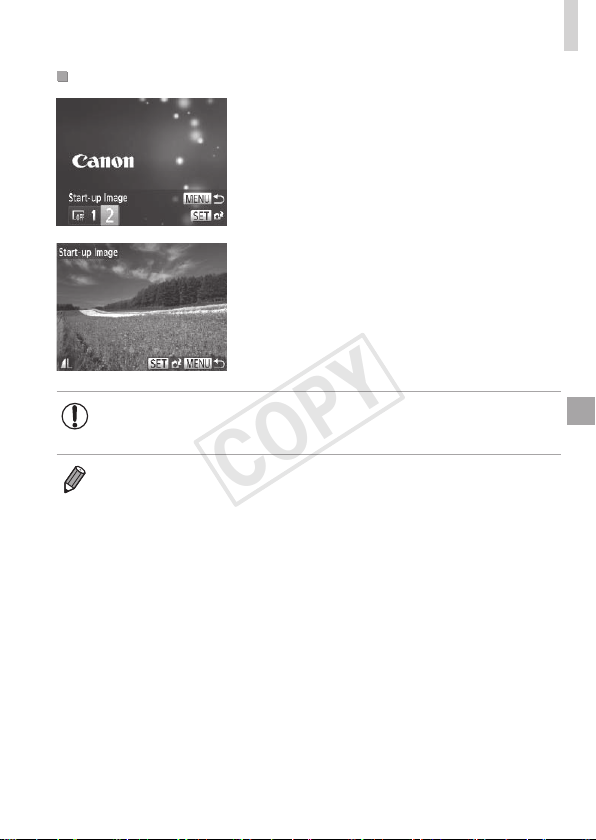
145
AdjustingBasicCameraFunctions
CustomizingtheStart-upScreen
1 Accessthe[Start-upImage]
screeninPlaybackmode.
Pressthe<1>button.
Followingthepreviousprocedure,choose
[2]andpressthe<m>button.
2 Chooseoneofyourshots.
Chooseanimageandpressthe<m>
button.After[Register?]isdisplayed,
choose[OK](eitherpressthe<q><r>
buttonsorturnthe<5>dial),andthen
pressthe<m>button.
• Thepreviousstart-upsettingisoverwrittenwhenyouassignanew
start-upimage.
• Youcanassigntheoperatingsoundsandstart-upimageforyourcamera
fromtheincludedsoftware.RefertotheSoftware Guide(=
25)fordetails.
COPY
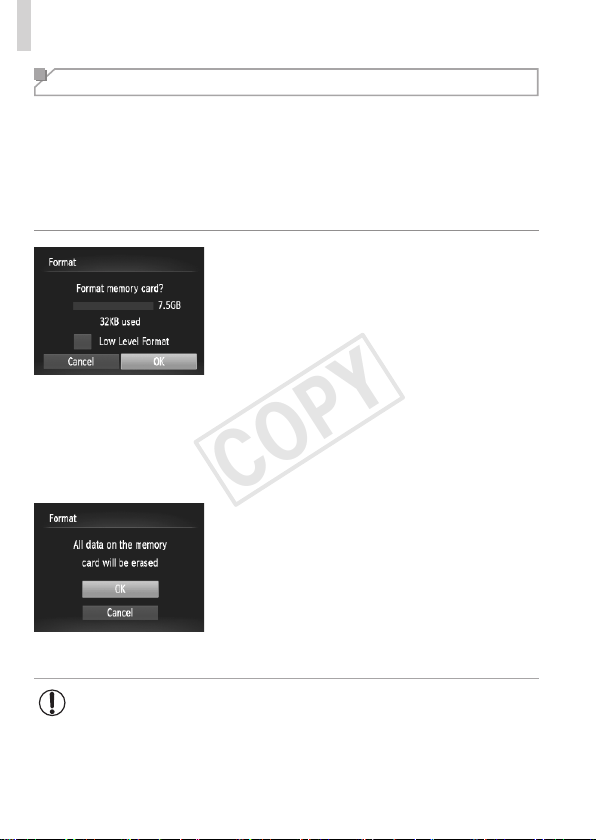
146
AdjustingBasicCameraFunctions
Formatting Memory Cards
Beforeusinganewmemorycardoracardformattedinanotherdevice,you
shouldformatthecardwiththiscamera.
Formattingerasesalldataonamemorycard.Beforeformatting,copy
imagesonthememorycardtoacomputer,ortakeotherstepstobackthem
up.
AnEye-Ficard(=
179)containssoftwareonthecarditself.Before
formattinganEye-Ficard,installthesoftwareonacomputer.
1 Accessthe[Format]screen.
Choose[Format],andthenpressthe
<m>button.
2 Choose[OK].
Pressthe<o><p>buttonstochoose
[Cancel],choose[OK](eitherpressthe
<q><r>buttonsorturnthe<5>dial),
andthenpressthe<m>button.
3 Formatthememorycard.
Tobegintheformattingprocess,press
the<o><p>buttonsorturnthe<5>
dialtochoose[OK],andthenpressthe
<m>button.
Whenformattingisnished,[Memory
cardformattingcomplete]isdisplayed.
Pressthe<m>button.
• Formattingorerasingdataonamemorycardonlychangesle
managementinformationonthecardanddoesnoterasethedata
completely.Whentransferringordisposingofmemorycards,take
stepstoprotectpersonalinformationifnecessary,asbyphysically
destroyingcards.
COPY
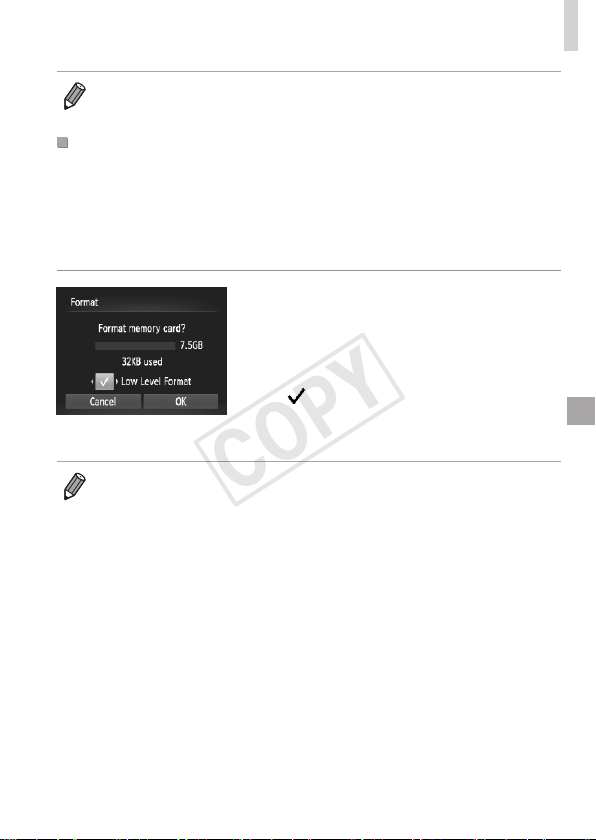
147
AdjustingBasicCameraFunctions
• Thetotalcardcapacityindicatedontheformattingscreenmaybelessthan
theadvertisedcapacity.
Low-LevelFormatting
Performlow-levelformattinginthesecases:[Memorycarderror]is
displayed,thecameraisnotworkingcorrectly,cardimagereading/writingis
slower,continuousshootingisslower,ormovierecordingsuddenlystops.
Low-levelformattingerasesalldataonamemorycard.Beforelow-level
formatting,copyimagesonthememorycardtoacomputer,ortakeother
stepstobackthemup.
Performlow-levelformatting.
Onthescreeninstep2on=
146,
pressthe<o><p>buttonsorturnthe
<5>dialtochoose[LowLevelFormat],
andthenselectthisoption(markwitha
[
])bypressingthe<q><r>buttons.
Followsteps2–3on=
146tocontinue
withtheformattingprocess.
• Low-levelformattingtakeslongerthan“FormattingMemoryCards”
(=
146),becausedataiserasedfromallstorageregionsofthememory
card.
• Youcancancellow-levelformattinginprogressbychoosing[Stop].Inthis
case,alldatawillbeerased,butthememorycardcanbeusednormally.
COPY
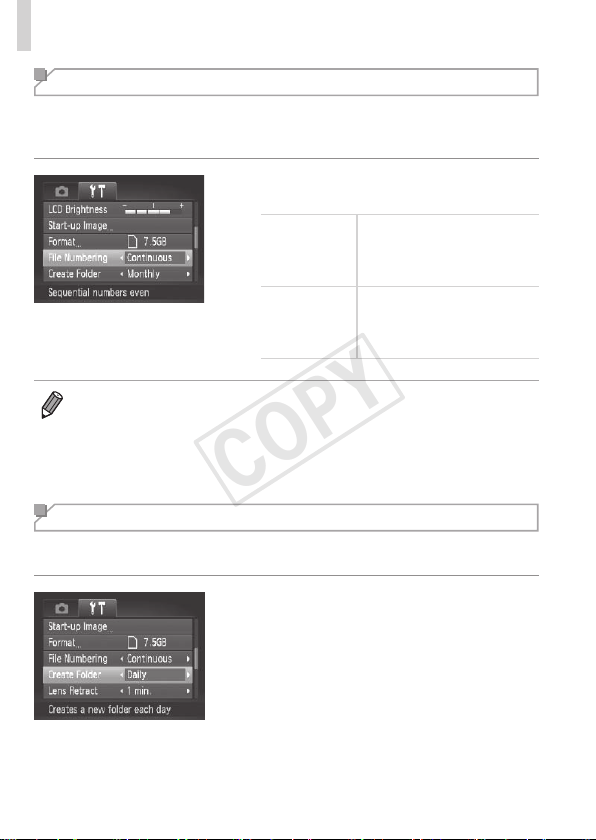
148
AdjustingBasicCameraFunctions
File Numbering
Yourshotsareautomaticallynumberedinsequentialorder(0001–9999)
andsavedinfoldersthatstoreupto2,000imageseach.Youcanchange
howthecameraassignslenumbers.
Choose[FileNumbering],andthen
chooseanoption.
Continuous
Imagesarenumbered
consecutively(untilthe9999th
shotistaken/saved)evenif
youswitchmemorycards.
AutoReset
Imagenumberingisresetto
0001ifyouswitchmemory
cards,orwhenanewfolderis
created.
• Regardlessoftheoptionselectedinthissetting,shotsmaybenumbered
consecutivelyafterthelastnumberofexistingimagesonnewlyinserted
memorycards.Tostartsavingshotsfrom0001,useanempty(orformatted
(=
146))memorycard.
• RefertotheSoftware Guide(=
25)forinformationonthecardfolder
structureandimageformats.
Date-Based Image Storage
Insteadofsavingimagesinfolderscreatedeachmonth,youcanhavethe
cameracreatefolderseachdayyoushoottostoreshotstakenthatday.
Choose[CreateFolder],andthenchoose
[Daily].
Imageswillnowbesavedinfolders
createdontheshootingdate.
COPY
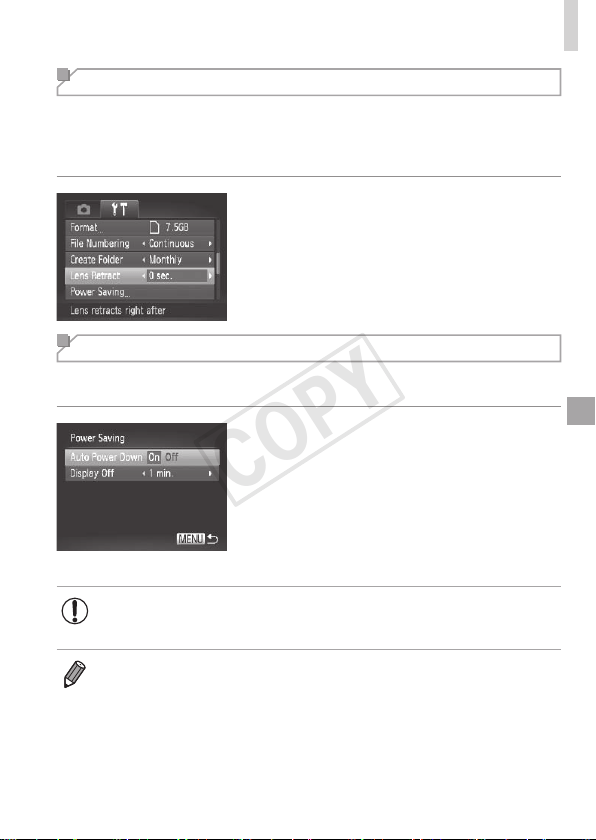
149
AdjustingBasicCameraFunctions
Lens Retraction Timing
Thelensisnormallyretractedforsafetyaboutoneminuteafteryoupress
the<1>buttoninShootingmode(=
34).Tohavethelensretracted
immediatelyafteryoupressthe<1>button,settheretractiontimingto
[0sec.].
Choose[LensRetract],andthenchoose
[0sec.].
Power-Saving Adjustment
Adjustthetimingofautomaticcameraandscreendeactivation(AutoPower
DownandDisplayOff,respectively)asneeded(=
34).
1 Accessthe[PowerSaving]
screen.
Choose[PowerSaving],andthenpress
the<m>button.
2 Congurethesettings.
Afterchoosinganitem,pressthe
<q><r>buttonstoadjustitasneeded.
• Toconservebatterypower,youshouldnormallychoose[On]for
[AutoPowerDown]and[1min.]orlessfor[DisplayOff].
• The[DisplayOff]settingisappliedevenifyouset[AutoPowerDown]to
[Off].
COPY

150
AdjustingBasicCameraFunctions
World Clock
Toensurethatyourshotswillhavethecorrectlocaldateandtimewhenyou
travelabroad,simplyregisterthedestinationinadvanceandswitchtothat
timezone.ThisconvenientfeatureeliminatestheneedtochangetheDate/
Timesettingmanually.
Beforeusingtheworldclock,besuretosetthedateandtimein“Settingthe
DateandTime”(=
17)andyourhometimezone.
1 Specifyyourdestination.
Choose[TimeZone],andthenpressthe
<m>button.
Pressthe<o><p>buttonsorturnthe
<5>dialtochoose[
World],andthen
pressthe<m>button.
Pressthe<q><r>buttonsorturnthe
<5>dialtochoosethedestination.
Tosetdaylightsavingtime(1hour
ahead),pressthe<o><p>buttonsto
choose[
].
Pressthe<m>button.
2 Switchtothedestinationtime
zone.
Pressthe<o><p>buttonsorturnthe
<5>dialtochoose[
World],andthen
pressthe<n>button.
[ ]isnowshownontheshootingscreen
(“On-ScreenInformation”(=
188)).
• Adjustingthedateortimewhilein[ ]mode(=
17)willautomatically
updateyour[
Home]timeanddate.
COPY
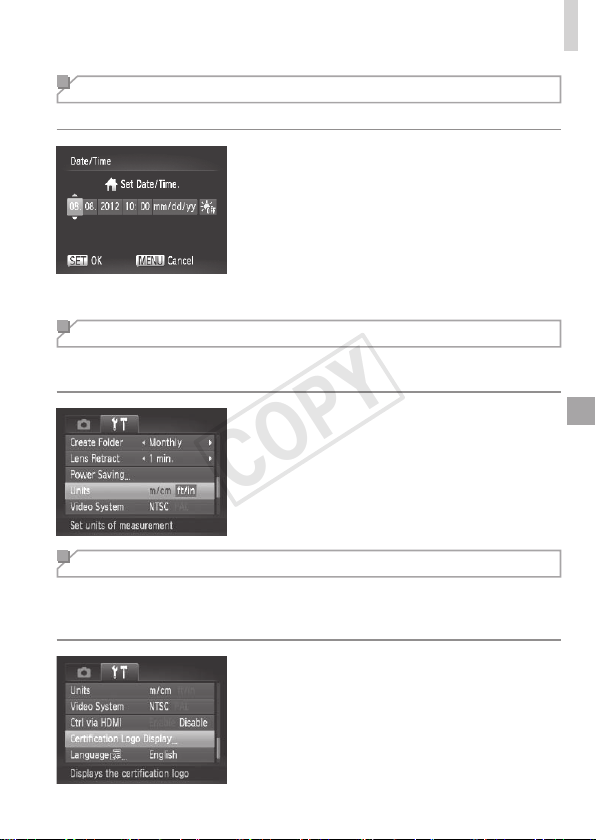
151
AdjustingBasicCameraFunctions
Changing the Date and Time
Adjustthedateandtimeasfollows.
1 Accessthe[Date/Time]screen.
Choose[Date/Time],andthenpressthe
<m>button.
2 Congurethesetting.
Pressthe<q><r>buttonstochoosean
item,andthenadjustthesetting,either
bypressingthe<o><p>buttonsor
turningthe<5>dial.
Metric/Non-Metric Display
ChangetheunitofmeasurementshownintheMFindicator(=
91)and
zoombar(=
42)fromm/cmtoft/inasneeded.
Choose[Units],andthenchoose[ft/in].
Checking Certication Logos
Somelogosforcerticationrequirementsmetbythecameracanbeviewed
onthescreen.Othercerticationlogosareprintedinthisguide,onthe
camerapackaging,oronthecamerabody.
Choose[CerticationLogoDisplay],and
thenpressthe<m>button.
COPY
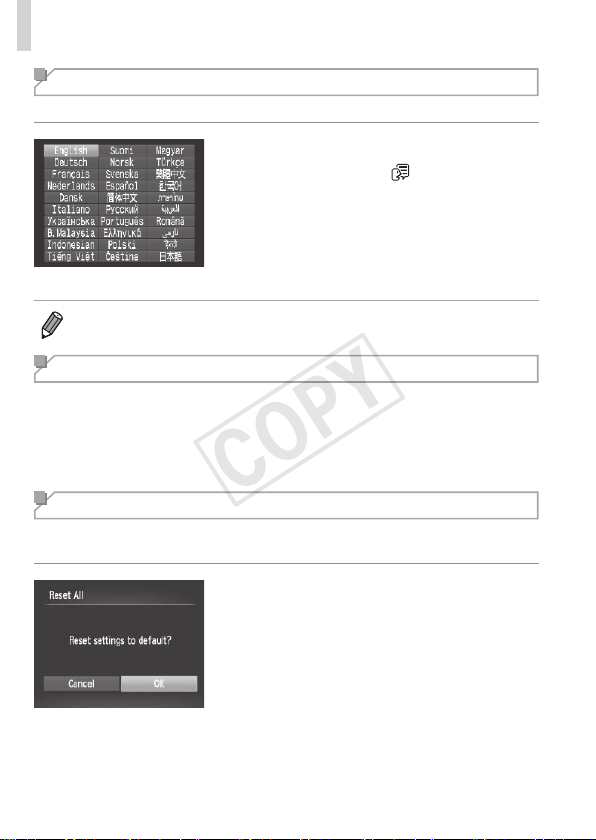
152
AdjustingBasicCameraFunctions
Display Language
Changethedisplaylanguageasneeded.
1 Accessthe[Language]screen.
Choose[Language ],andthenpress
the<m>button.
2 Congurethesetting.
Pressthe<o><p><q><r>buttonsor
turnthe<5>dialtochoosealanguage,
andthenpressthe<m>button.
• Youcanalsoaccessthe[Language]screeninPlaybackmodebypressing
andholdingthe<m>buttonandimmediatelypressingthe<n>button.
Adjusting Other Settings
Thefollowingsettingscanalsobeadjustedonthe[3]tab.
• [VideoSystem](=
163)
• [CtrlviaHDMI](=
161)
• [Eye-FiSettings](=
179)
Restoring Defaults
Ifyouaccidentallychangeasetting,youcanrestoredefaultcamera
settings.
1 Accessthe[ResetAll]screen.
Choose[ResetAll],andthenpressthe
<m>button.
2 Restoredefaultsettings.
Pressthe<q><r>buttonsorturnthe
<5>dialtochoose[OK],andthenpress
the<m>button.
Defaultsettingsarenowrestored.
COPY

153
AdjustingBasicCameraFunctions
• Thefollowingfunctionsarenotrestoredtodefaultsettings.
-[3]tabsettings[Date/Time](=
17),[Language ](=
19),
[TimeZone](=
150),[VideoSystem](=
163),andtheimageassigned
to[Start-upImage](=
144)
-Customwhitebalancedatayouhaverecorded(=
85)
-Shootingmodechosenin<K>(=
67)or< >(=
71)mode
-Themoviemode(=
77)
COPY

154
COPY

155
Accessories
Useincludedaccessorieseffectivelyandenjoythe
camerainmorewayswithoptionalCanonaccessories
andothercompatibleaccessoriessoldseparately
8
COPY
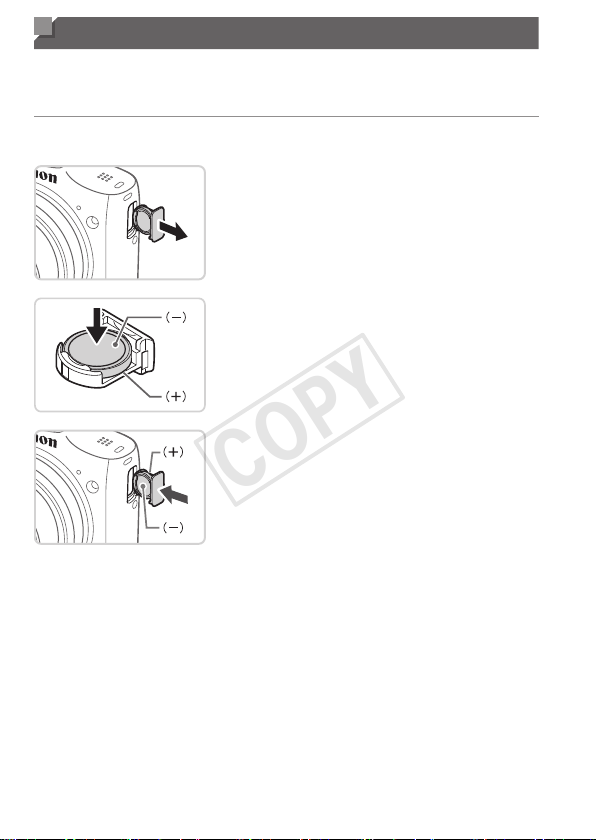
156
Replacing the Date/Time Battery
Thedate/timebattery(back-upbattery)willlastaboutthreeyears.Ifthe
Date/Timescreenisdisplayedeverytimeyouturnthecameraon,replace
thedate/timebatterywithanewone(CR1220).
1 Makesurethecameraisoff.
2 Removethedate/timebattery
holder.
3 Replacethebattery.
Insertthebatterywiththe(+)and(–)
sidesfacingthecorrectway.
4 Insertthebatteryholder.
5 Insertthebatteryandclosethe
cover.
6 Turnthecameraonandsetthe
dateandtime(=
17).
COPY
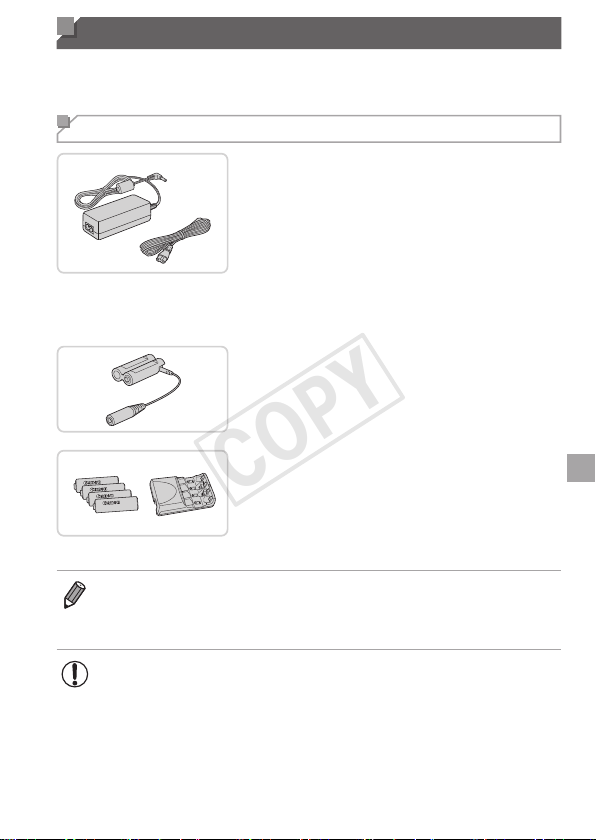
157
Optional Accessories
Thefollowingcameraaccessoriesaresoldseparately.Notethatavailability
variesbyarea,andsomeaccessoriesmaynolongerbeavailable.
Power Supplies
ACAdapterKitACK800
Forpoweringthecamerausing
householdpower.Recommendedwhen
usingthecameraoverextendedperiods,
orwhenconnectingthecameratoa
printerorcomputer.Cannotbeusedto
chargethecamerabatteries.DCCoupler
DR-DC10isrequiredtoconnectthe
adaptertothecamera.
DCCouplerDR-DC10
UsedwiththeACadapterkit
BatteryandChargerKitCBK4-300
IncludesfourrechargeableAANiMH
batteries(NB-3AH)andabatterycharger
(CB-5AH).Recommendedwhenusing
thecameraoverextendedperiods.
• AsetoffourrechargeableAANiMHbatteries(NiMHBatteryNB4-300)isalso
availablewithoutthecharger.
• BatteryandChargerKitCBK4-200canalsobeused.
• ThebatteryandchargerkitandACadapterkitcanbeusedin
areaswith100–240VACpower(50/60Hz).
• Forpoweroutletsinadifferentformat,useacommercially
availableadapterfortheplug.Neveruseanelectricaltransformer
designedfortraveling,whichmaydamagethebattery.
COPY
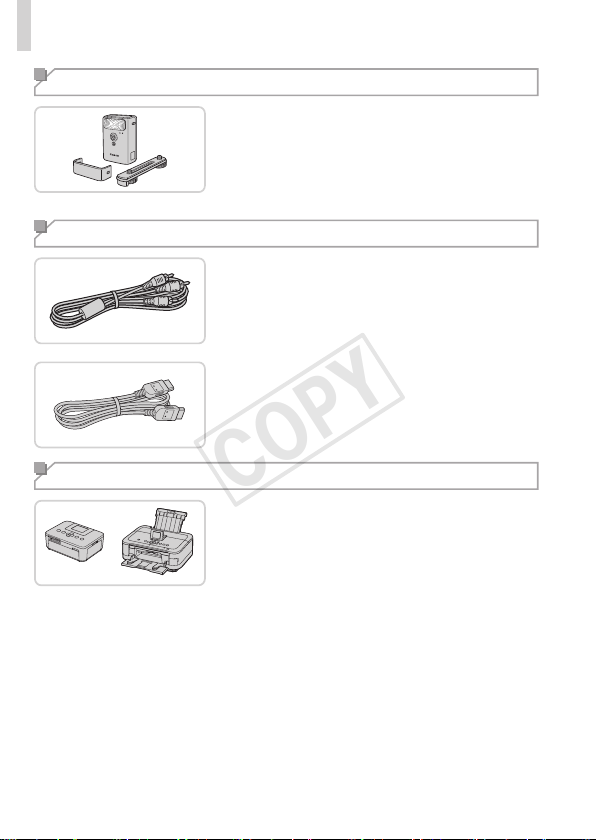
158
OptionalAccessories
Flash Unit
High-PowerFlashHF-DC2
Externalashforilluminatingsubjects
thatareoutofrangeofthebuilt-inash.
High-PowerFlashHF-DC1canalsobe
used.
Other Accessories
StereoAVCableAVC-DC400ST
ConnectthecameratoaTVtoenjoy
playbackonthelargerTVscreen.
HDMICableHTC-100
ForconnectingthecameratoanHDMI
inputofahigh-denitionTV.
Printers
CanonPictBridge-Compatible
Printers
Printingimageswithoutacomputeris
possiblebyconnectingthecameratoa
CanonPictBridge-compatibleprinter.For
details,visityournearestCanondealer.
COPY
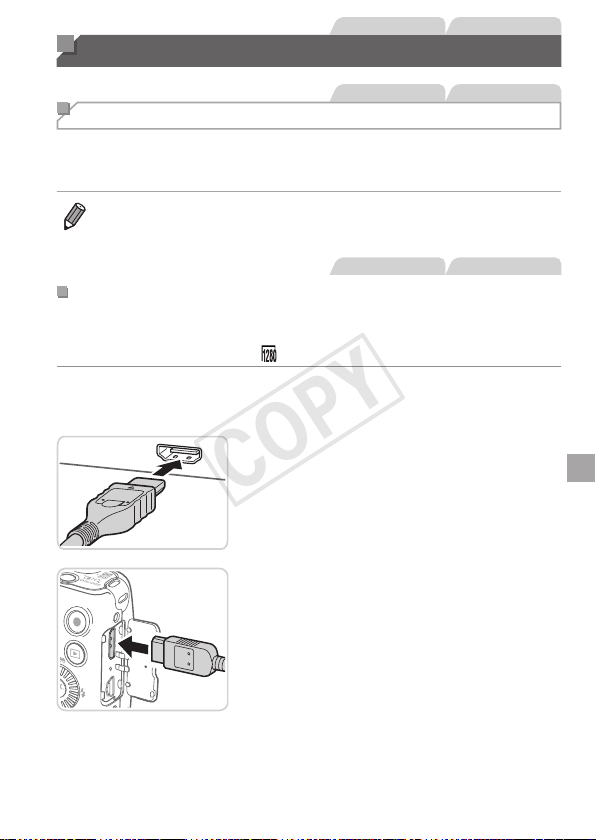
159
StillImages Movies
Using Optional Accessories
StillImages Movies
Playback on a TV
ByconnectingthecameratoaTV,youcanviewyourshotsonthelarger
screenoftheTV.
Fordetailsonconnectionorhowtoswitchinputs,refertotheTVmanual.
• SomeinformationmaynotbedisplayedontheTV(=
190).
StillImages Movies
PlaybackonaHigh-DenitionTV
ConnectingthecameratoanHDTVwiththeHDMICableHTC-100(sold
separately)enablesyoutoviewyourshotsonthelargerscreenoftheTV.
Moviesshotataresolutionof[ ]canbeviewedinhigh-denition.
1 MakesurethecameraandTV
areoff.
2 ConnectthecameratotheTV.
OntheTV,insertthecableplugfullyinto
theHDMIinputasshown.
Onthecamera,opentheterminalcover
andinsertthecableplugfullyintothe
cameraterminal.
COPY
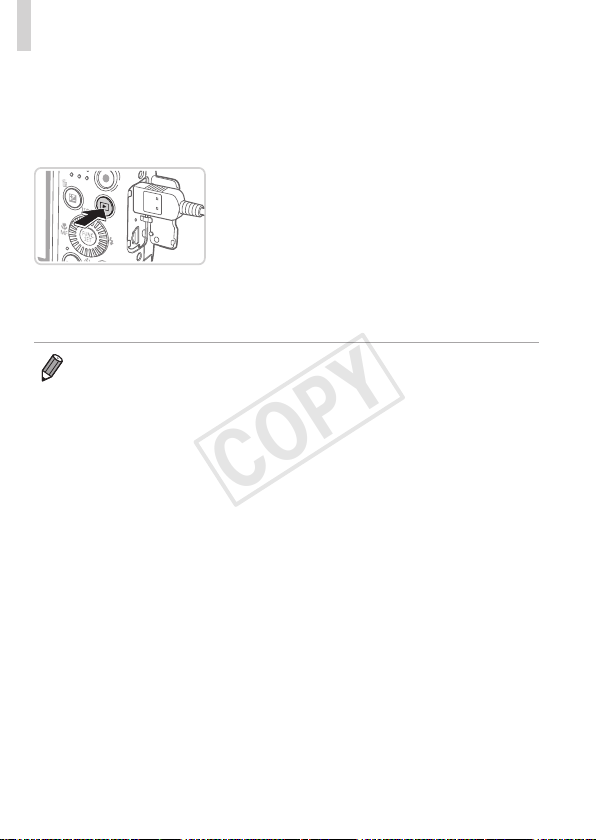
160
UsingOptionalAccessories
3 TurntheTVonandswitchto
videoinput.
SwitchtheTVinputtothevideoinputyou
connectedthecabletoinstep2.
4 Turnthecameraon.
Pressthe<1>buttontoturnthecamera
on.
Imagesfromthecameraarenow
displayedontheTV.(Nothingis
displayedonthecamerascreen.)
Whennished,turnoffthecameraand
TVbeforedisconnectingthecable.
• Cameraoperatingsoundsarenotplayedwhilethecameraisconnectedto
anHDTV.
COPY

161
UsingOptionalAccessories
StillImages Movies
ControllingtheCamerawithaTVRemote
ConnectingthecameratoanHDMICEC-compatibleTVenablesplayback
(includingslideshowplayback)usingtheTVremotecontrol.
Inthiscase,youwillneedtoadjustsomeTVsettings.Fordetails,referto
theTVusermanual.
1 Congurethesetting.
Pressthe<n>button,choose
[CtrlviaHDMI]onthe[3]tab,andthen
choose[Enable](=
38).
2 ConnectthecameratotheTV.
Followsteps1–2on=
159toconnect
thecameratotheTV.
3 Displayimages.
TurnontheTV.Onthecamera,pressthe
<1>button.
Imagesfromthecameraarenow
displayedontheTV.(Nothingis
displayedonthecamerascreen.)
4 ControlthecamerawiththeTV
remote.
Pressthe<q><r>buttonsontheremote
tobrowseimages.
Todisplaythecameracontrolpanel,
presstheOK/Selectbutton.Select
controlpanelitemsbypressingthe
<q><r>buttonstochooseanitem,and
thenpressingtheOK/Selectbuttonagain.
COPY

162
UsingOptionalAccessories
CameraControlPanelOptionsShownontheTV
Return Closesthemenu.
PlayMovie
Startsmovieplayback.(Onlydisplayedwhenamovie
isselected.)
.
Slideshow
Startsslideshowplayback.Toswitchimagesduring
playback,pressthe<q><r>buttonsontheremote
control.
IndexPlayback Displaysmultipleimagesinanindex.
l
ChangeDisplay
Switchesdisplaymodes(=
36).
• Pressingthe<n>buttononthecamerawillswitchcontroltothe
cameraitself,whichwillpreventremotecontroluntilyoureturntosingle-
imagedisplay.
• Movingthezoomleveronthecamerawillswitchcontroltothecameraitself,
whichwillpreventremotecontroluntilyoureturntosingle-imagedisplay.
• Thecameramaynotalwaysrespondcorrectlyeveniftheremoteisforan
HDMICEC-compatibleTV.
StillImages Movies
PlaybackonaStandard-DenitionTV
ConnectingthecameratoaTVwiththeStereoAVCableAVC-DC400ST
(soldseparately)enablesyoutoviewyourshotsonthelargerscreenofthe
TVasyoucontrolthecamera.
1 MakesurethecameraandTV
areoff.
Red
Red
White
Yellow
Yellow
White
2 ConnectthecameratotheTV.
OntheTV,insertthecableplugsfullyinto
thevideoinputsasshown.
COPY
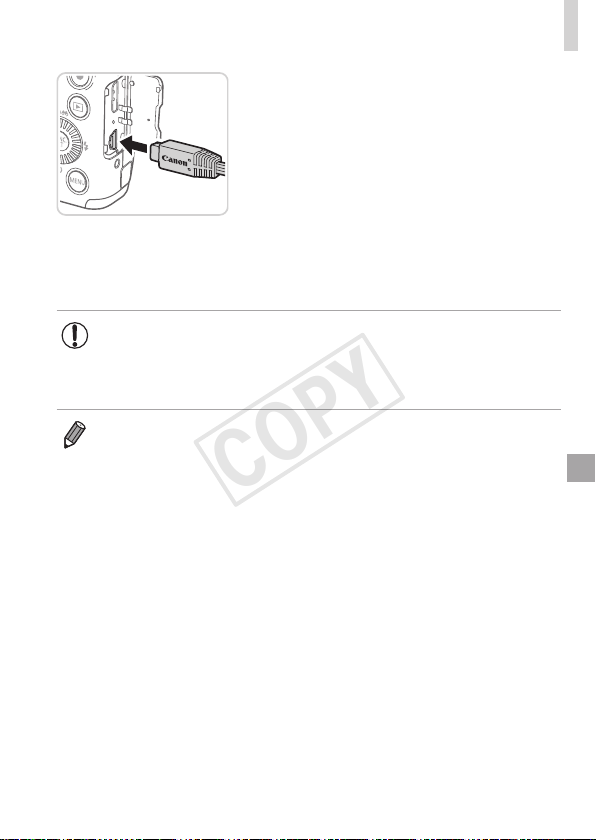
163
UsingOptionalAccessories
Onthecamera,opentheterminalcover
andinsertthecableplugfullyintothe
cameraterminal.
3 Displayimages.
Followsteps3–4on=
160todisplay
images.
• Correctdisplayisnotpossibleunlessthecameravideooutput
format(NTSCorPAL)matchestheTVformat.Tochangethe
videooutputformat,pressthe<n>buttonandchoose[Video
System]onthe[3]tab.
• WhenthecameraandTVareconnected,youcanalsoshootwhile
previewingshotsonthelargerscreenoftheTV.Toshoot,followthesame
stepsaswhenusingthecamerascreen.However,AF-PointZoom(=
60)
andMF-PointZoom(=
90)arenotavailable.
COPY
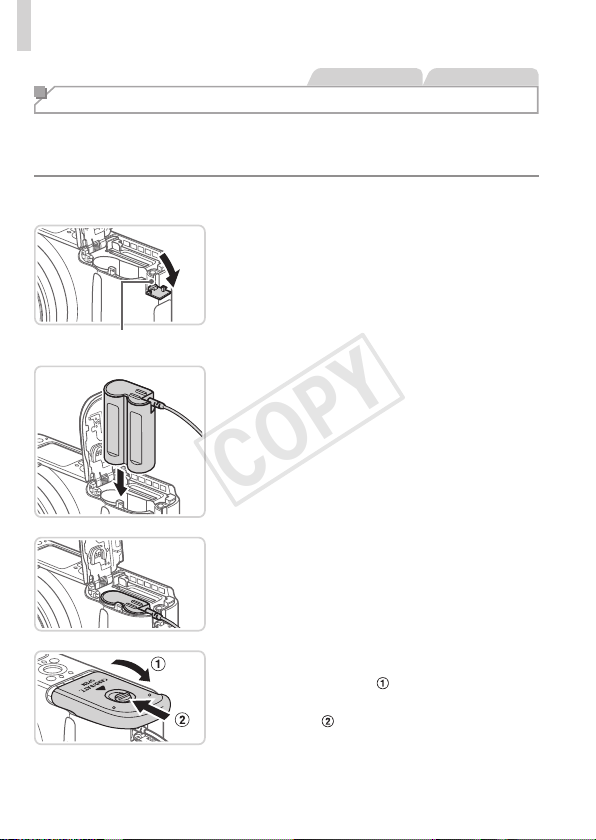
164
UsingOptionalAccessories
StillImages Movies
Powering the Camera with Household Power
PoweringthecamerawithACAdapterKitACK800andDCCouplerDR-
DC10(bothsoldseparately)eliminatestheneedtomonitortheremaining
batterylevel.
1 Makesurethecameraisoff.
CouplerCablePort
2 Openthecover.
Followstep2on=
15toopenthe
memorycard/batterycover.
Openthecouplercableportasshown.
3 Insertthecoupler.
Insertthecouplerasshown.
Makesurethecouplercablepasses
throughtheport.
4 Closethecover.
Lowerthecover( )andholditdownas
youslideit,untilitclicksintotheclosed
position(
).
COPY
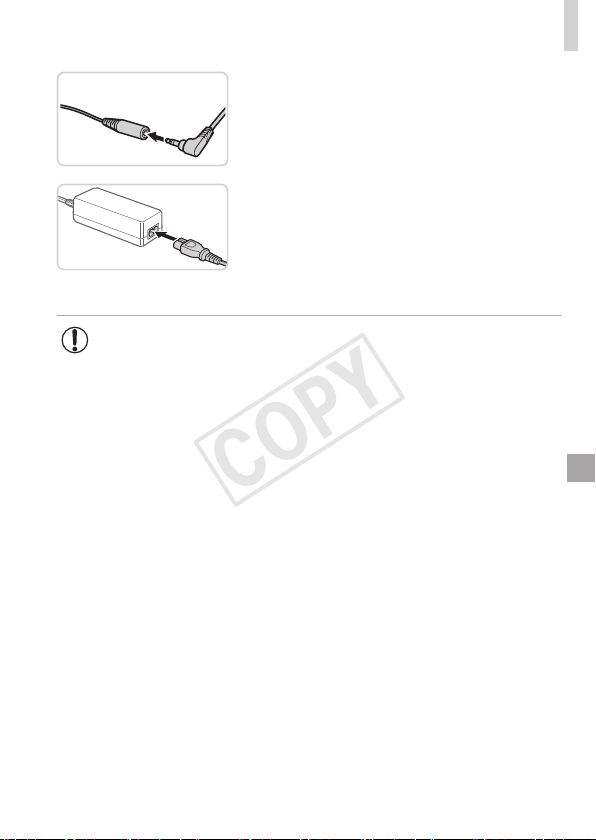
165
UsingOptionalAccessories
5 Connectthepowercord.
Inserttheadapterplugintotheendofthe
couplercable.
Insertoneendofthepowercordintothe
compactpoweradapter,andthenplug
theotherendintoapoweroutlet.
Turnthecameraonanduseitasdesired.
Whennished,turnthecameraoffand
unplugthepowercordfromtheoutlet.
• Donotdisconnecttheadapterorunplugthepowercordwhile
thecameraisstillon.Thismayeraseyourshotsordamagethe
camera.
• Donotattachtheadapteroradaptercordtootherobjects.Doing
socouldresultinmalfunctionordamagetotheproduct.
COPY

166
StillImages Movies
Printing Images
Yourshotscaneasilybeprintedbyconnectingthecameratoaprinter.On
thecamera,youcanspecifyimagestosetupbatchprinting,prepareorders
forphotodevelopmentservices,andprepareordersorprintimagesfor
photobooks.
ACanonSELPHYCPseriescompactphotoprinterisusedhereforthe
sakeofillustration.Screensdisplayedandavailablefunctionsvaryby
printer.Alsorefertotheprintermanualforadditionalinformation.
StillImages
Easy Print
EasilyprintyourshotsbyconnectingthecameratoaPictBridge-compatible
printer(soldseparately)withtheincludedinterfacecable(=
2).
1 Makesurethecameraand
printerareoff.
2 Connectthecameratothe
printer.
Openthecover.Holdingthesmaller
cableplugintheorientationshown,insert
theplugfullyintothecameraterminal.
Connectthelargercableplugtothe
printer.Forotherconnectiondetails,refer
totheprintermanual.
3 Turntheprinteron.
4 Turnthecameraon.
Pressthe<1>buttontoturnthecamera
on.
COPY
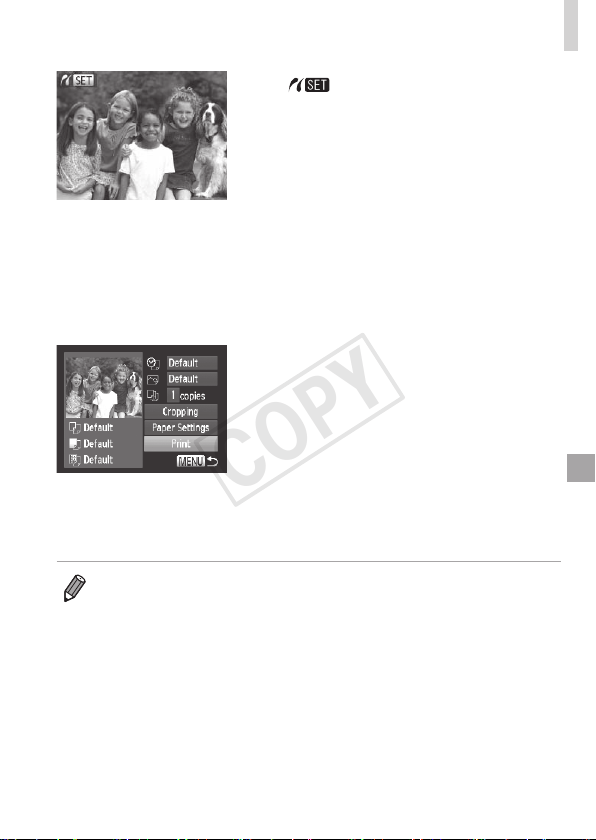
167
PrintingImages
[ ]isdisplayed.
5 Chooseanimage.
Pressthe<q><r>buttonsorturnthe
<5>dialtochooseanimage.
6 Accesstheprintingscreen.
Pressthe<m>button.
7 Printtheimage.
Pressthe<o><p>buttonsorturnthe
<5>dialtochoose[Print],andthen
pressthe<m>button.
Printingnowbegins.
Toprintotherimages,repeatsteps5–6
afterprintingisnished.
Whenyouarenishedprinting,turnthe
cameraandprinteroffanddisconnectthe
interfacecable.
• ForCanonPictBridge-compatibleprinters(soldseparately),see=
158.
COPY
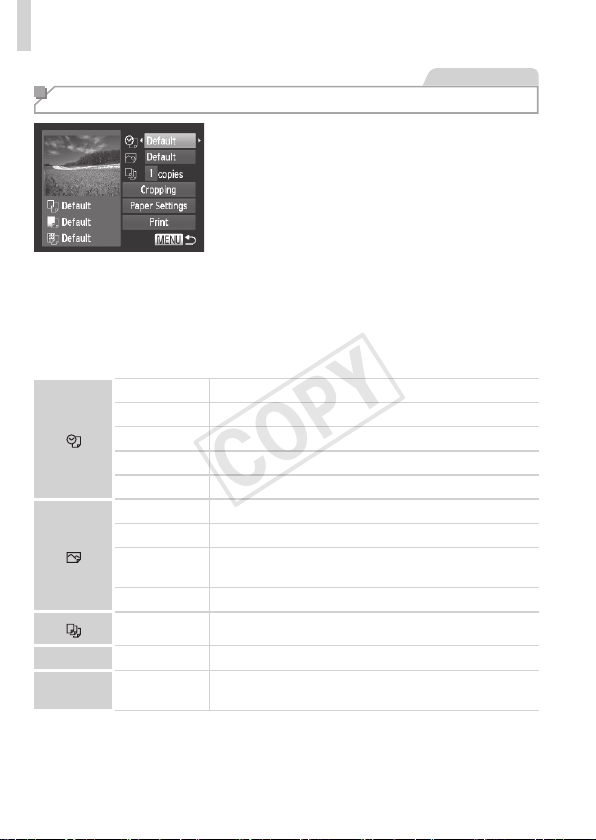
168
PrintingImages
StillImages
Conguring Print Settings
1 Accesstheprintingscreen.
Followsteps1–6on=
166–167to
accessthescreenatleft.
2 Congurethesettings.
Pressthe<o><p>buttonsorturn
the<5>dialtochooseanitem,and
thenchooseanoptionbypressingthe
<q><r>buttons.
Default Matchescurrentprintersettings.
Date Printsimageswiththedateadded.
FileNo. Printsimageswiththelenumberadded.
Both Printsimageswithboththedateandlenumberadded.
Off
–
Default Matchescurrentprintersettings.
Off
–
On
Usesinformationfromthetimeofshootingtoprintunder
optimalsettings.
Red-Eye1 Correctsred-eye.
No.ofCopies Choosethenumberofcopiestoprint.
Cropping
–
Specifyadesiredimageareatoprint(=
169).
Paper
Settings
–
Specifythepapersize,layout,andotherdetails
(=
170).
COPY
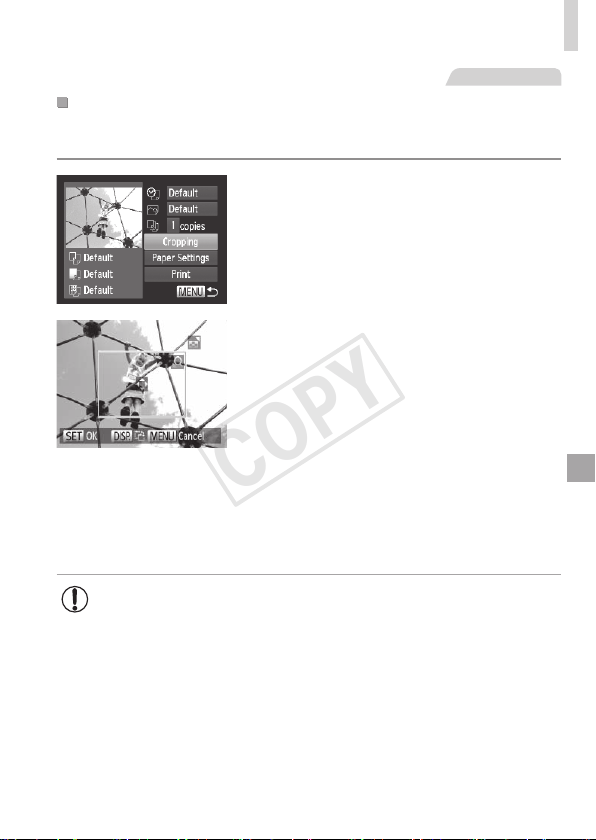
169
PrintingImages
StillImages
CroppingImagesBeforePrinting(Cropping)
Bycroppingimagesbeforeprinting,youcanprintadesiredimagearea
insteadoftheentireimage.
1 Choose[Cropping].
Afterfollowingstep1on=
168to
accesstheprintingscreen,choose
[Cropping]andpressthe<m>button.
Acroppingframeisnowdisplayed,
indicatingtheimageareatoprint.
2 Adjustthecroppingframeas
needed.
Toresizetheframe,movethezoomlever
orturnthe<5>dial.
Tomovetheframe,pressthe
<o><p><q><r>buttons.
Torotatetheframe,pressthe<l>
button.
Whennished,pressthe<m>button.
3 Printtheimage.
Followstep7on=
167toprint.
• Croppingmaynotbepossibleatsmallimagesizes,oratsome
aspectratios.
• Datesmaynotbeprintedcorrectlyifyoucropimagesshotwith
[DateStamp]selected.
COPY
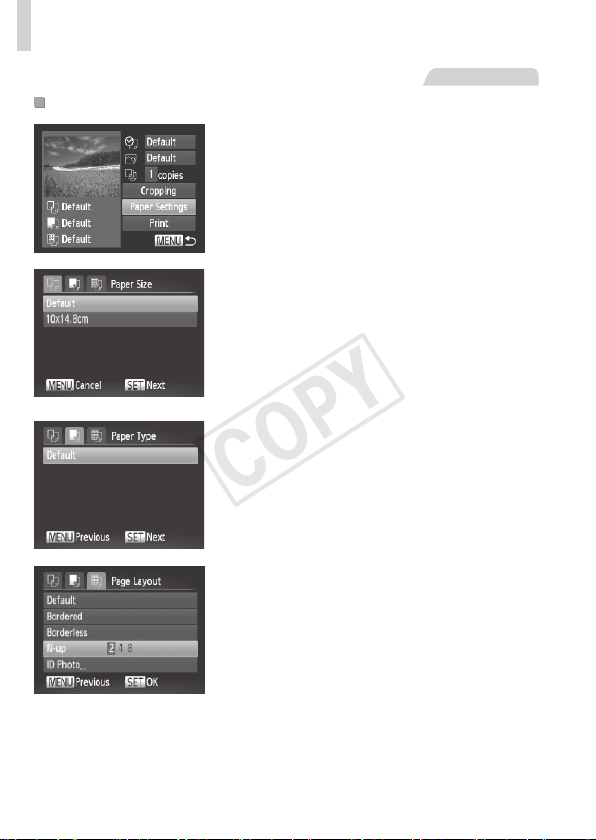
170
PrintingImages
StillImages
ChoosingPaperSizeandLayoutBeforePrinting
1 Choose[PaperSettings].
Afterfollowingstep1on=
168to
accesstheprintingscreen,choose
[PaperSettings]andpressthe<m>
button.
2 Chooseapapersize.
Pressthe<o><p>buttonsorturnthe
<5>dialtochooseanoption,andthen
pressthe<m>button.
3 Chooseatypeofpaper.
Pressthe<o><p>buttonsorturnthe
<5>dialtochooseanoption,andthen
pressthe<m>button.
4 Choosealayout.
Pressthe<o><p>buttonsorturnthe
<5>dialtochooseanoption.
Whenchoosing[N-up],pressthe
<q><r>buttonstospecifythenumberof
imagespersheet.
Pressthe<m>button.
5 Printtheimage.
COPY
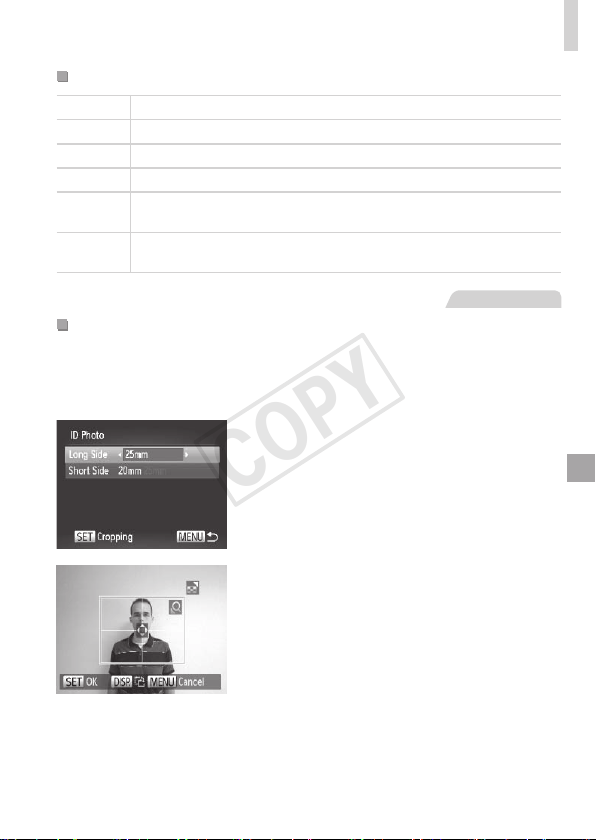
171
PrintingImages
AvailableLayoutOptions
Default Matchescurrentprintersettings.
Bordered Printswithblankspacearoundtheimage.
Borderless Borderless,edge-to-edgeprinting.
N-up Choosehowmanyimagestoprintpersheet.
IDPhoto
Printsimagesforidenticationpurposes.
OnlyavailableforimageswitharesolutionofLandanaspectratioof4:3.
FixedSize
Choosetheprintsize.
Choosefrom3.5x5in.,postcard,orwide-formatprints.
StillImages
PrintingIDPhotos
1 Choose[IDPhoto].
Followingsteps1–4on=
170,choose
[IDPhoto]andpressthe<m>button.
2 Choosethelongandshortside
length.
Pressthe<o><p>buttonsorturnthe
<5>dialtochooseanitem.Choosethe
lengthbypressingthe<q><r>buttons,
andthenpressthe<m>button.
3 Choosetheprintingarea.
Followstep2on=
169tochoosethe
printingarea.
4 Printtheimage.
COPY
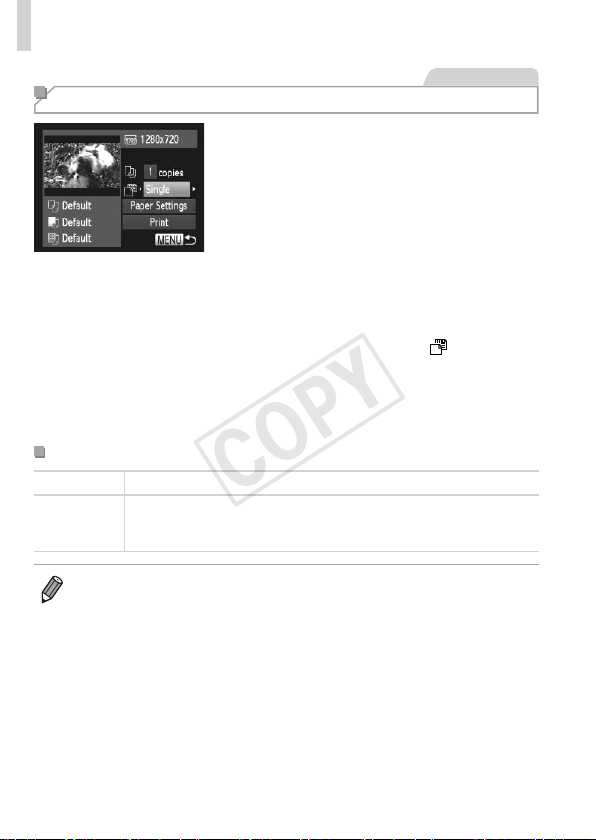
172
PrintingImages
Movies
Printing Movie Scenes
1 Accesstheprintingscreen.
Followsteps1–5on=
166–167
tochooseamovie,andthenpressthe
<m>button.
Pressthe<q><r>buttonsorturnthe
<5>dialtochoose[c],andthenpress
the<m>button.Thescreenatleftis
displayed.
2 Chooseaprintingmethod.
Pressthe<o><p>buttonsorturn
the<5>dialtochoose[
],andthen
pressthe<q><r>buttonstochoosethe
printingmethod.
3 Printtheimage.
MoviePrintingOptions
Single Printsthecurrentsceneasastillimage.
Sequence
Printsaseriesofscenes,acertainintervalapart,onasinglesheetof
paper.Youcanalsoprintthefoldernumber,lenumber,andelapsed
timefortheframebysetting[Caption]to[On].
• Tocancelprintinginprogress,pressthe<m>button.
• [IDPhoto]and[Sequence]cannotbechosenonCanonPictBridge-
compatibleprintersfromCP720/CP730andearliermodels.
COPY

173
PrintingImages
StillImages
Adding Images to the Print List (DPOF)
Batchprinting(=
176)andorderingprintsfromaphotodevelopment
servicecanbesetuponthecamera.Chooseupto998imagesona
memorycardandcongurerelevantsettings,suchasthenumberofcopies,
asfollows.TheprintinginformationyoupreparethiswaywillconformDPOF
(DigitalPrintOrderFormat)standards.
StillImages
ConguringPrintSettings
Specifytheprintingformat,whethertoaddthedateorlenumber,and
othersettingsasfollows.Thesesettingsapplytoallimagesintheprintlist.
Pressthe<n>button,andthen
choose[PrintSettings]onthe[2]tab.
Chooseandconguresettingsasdesired
(=
38).
PrintType
Standard Oneimageisprintedpersheet.
Index
Smallerversionsofmultipleimagesareprinted
persheet.
Both Bothstandardandindexformatsareprinted.
Date
On Imagesareprintedwiththeshootingdate.
Off
–
FileNo.
On Imagesareprintedwiththelenumber.
Off
–
ClearDPOF
data
On
Allimageprintlistsettingsareclearedafter
printing.
Off
–
COPY
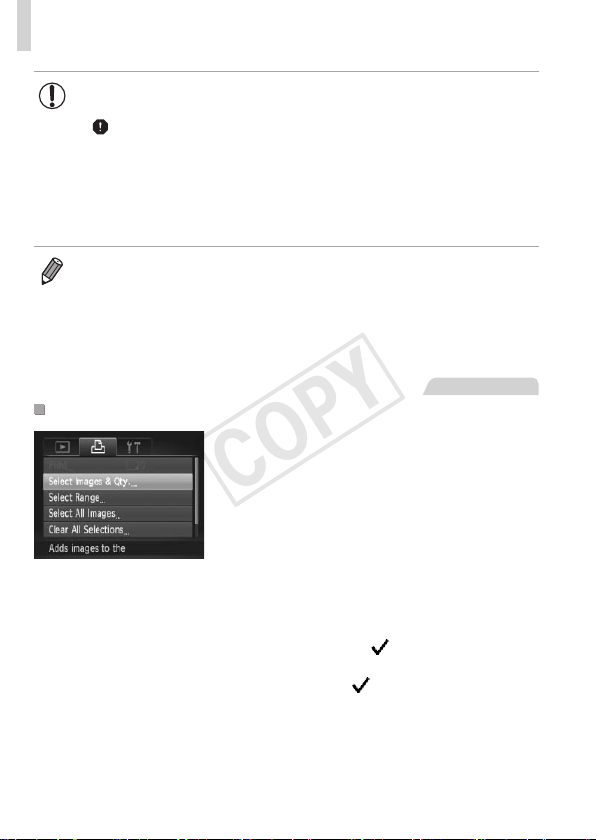
174
PrintingImages
• NotallofyourDPOFsettingsmaybeappliedinprintingbythe
printerorphotodevelopmentservice,insomecases.
• [
]maybedisplayedonthecameratowarnyouthatthememory
cardhasprintsettingsthatwereconguredonanothercamera.
Changingtheprintsettingsusingthiscameramayoverwriteall
previoussettings.
• Setting[Date]to[On]maycausesomeprinterstoprintthedate
twice.
• Specifying[Index]willpreventyoufromchoosing[On]forboth[Date]and
[FileNo.]atthesametime.
• Thedateisprintedinaformatmatchingsettingdetailsin[Date/Time]onthe
[3]tab,accessiblebypressingthe<n>button(=
17).
• IndexprintingisnotavailableonsomeCanonPictBridge-compatibleprinters
(soldseparately).
StillImages
SettingUpPrintingforIndividualImages
1 Choose[SelectImages&Qty.].
Pressthe<n>button,choose
[SelectImages&Qty.]onthe[2]tab,
andthenpressthe<m>button.
2 Chooseanimage.
Pressthe<q><r>buttonsorturnthe
<5>dialtochooseanimage,andthen
pressthe<m>button.
Youcannowspecifythenumberofcopies.
Ifyouspecifyindexprintingfortheimage,it
islabeledwitha[
]icon.Tocancelindex
printingfortheimage,pressthe<
m
>
buttonagain.[
]isnolongerdisplayed.
COPY

175
PrintingImages
3 Specifythenumberofprints.
Pressthe<
o
><
p
>buttonsorturnthe<
5
>
dialtospecifythenumberofprints(upto99).
Tosetupprintingforotherimagesandspecify
thenumberofprints,repeatsteps2–3.
Printingquantitycannotbespeciedfor
indexprints.Youcanonlychoosewhich
imagestoprint,byfollowingstep2.
Whennished,pressthe<n>button
toreturntothemenuscreen.
StillImages
SettingUpPrintingforaRangeofImages
1 Choose[SelectRange].
Followingstep1on=
174,choose
[SelectRange]andpressthe<m>
button.
2 Chooseimages.
Followsteps2–3on=
122tospecify
images.
3 Conguretheprintsettings.
Pressthe<o><p>buttonstochoose
[Order],andthenpressthe<m>button.
COPY
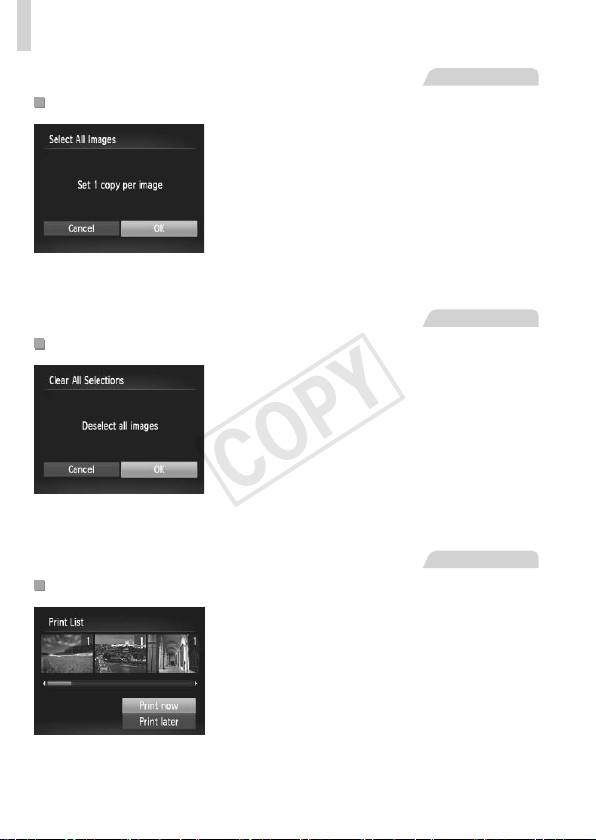
176
PrintingImages
StillImages
SettingUpPrintingforAllImages
1 Choose[SelectAllImages].
Followingstep1on=
174,choose
[SelectAllImages]andpressthe<m>
button.
2 Conguretheprintsettings.
Pressthe<q><r>buttonsorturnthe
<5>dialtochoose[OK],andthenpress
the<m>button.
StillImages
ClearingAllImagesfromthePrintList
1 Choose[ClearAllSelections].
Followingstep1on=
174,choose
[ClearAllSelections]andpressthe<m>
button.
2 Conrmclearingtheprintlist.
Pressthe<q><r>buttonsorturnthe
<5>dialtochoose[OK],andthenpress
the<m>button.
StillImages
PrintingImagesAddedtothePrintList(DPOF)
Whenimageshavebeenaddedtothe
printlist(=
173–176),thescreen
atleftisdisplayedafteryouconnect
thecameratoaPictBridge-compatible
printer.Pressthe<o><p>buttonsto
choose[Printnow],andthensimplypress
the<m>buttontoprinttheimagesinthe
printlist.
AnyDPOFprintjobthatyoutemporarily
stopwillberesumedfromthenextimage.
COPY
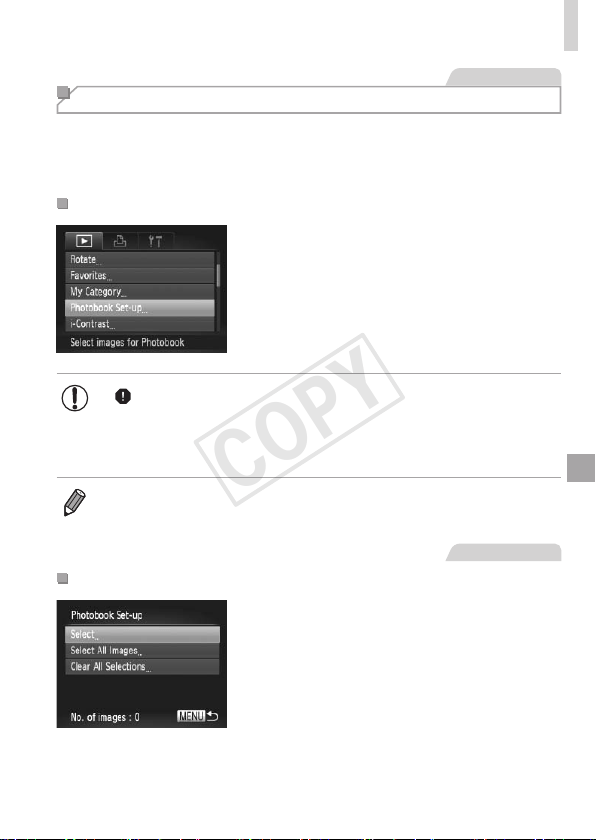
177
PrintingImages
StillImages
Adding Images to a Photobook
Photobookscanbesetuponthecamerabychoosingupto998imagesona
memorycardandimportingthemintotheincludedsoftwareonyourcomputer,
wheretheyarestoredintheirownfolder.Thisisconvenientwhenordering
printedphotobooksonlineorprintingphotobookswithyourownprinter.
ChoosingaSelectionMethod
Pressthe<n>button,choose
[PhotobookSet-up]onthe[1]tab,and
thenchoosehowyouwillselectimages.
• [ ]maybedisplayedonthecameratowarnyouthatthememory
cardhasprintsettingsthatwereconguredonanothercamera.
Changingtheprintsettingsusingthiscameramayoverwriteall
previoussettings.
• Afterimportingimagestoyourcomputer,alsorefertotheSoftware Guide
(=
25)andtheprintermanualforfurtherinformation.
StillImages
AddingImagesIndividually
1 Choose[Select].
Followingthepreviousprocedure,choose
[Select]andpressthe<m>button.
COPY
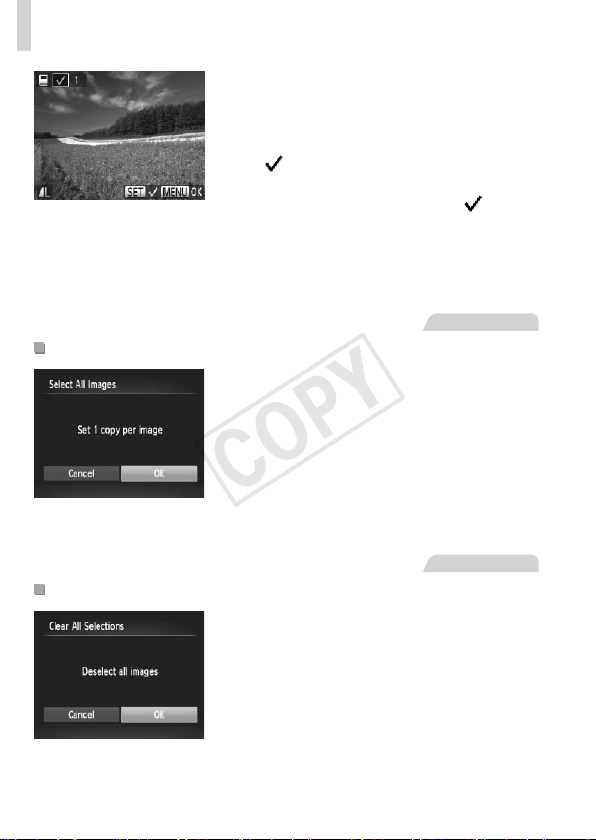
178
PrintingImages
2 Chooseanimage.
Pressthe<q><r>buttonsorturnthe
<5>dialtochooseanimage,andthen
pressthe<m>button.
[ ]isdisplayed.
Toremovetheimagefromthephotobook,
pressthe<m>buttonagain.[
]isno
longerdisplayed.
Repeatthisprocesstospecifyotherimages.
Whennished,pressthe<n>button
toreturntothemenuscreen.
StillImages
AddingAllImagestoaPhotobook
1 Choose[SelectAllImages].
Followingtheprocedureon=
177,
choose[SelectAllImages]andpressthe
<m>button.
2 Conguretheprintsettings.
Pressthe<q><r>buttonsorturnthe
<5>dialtochoose[OK],andthenpress
the<m>button.
StillImages
RemovingAllImagesfromaPhotobook
1 Choose[ClearAllSelections].
Followingtheprocedureon=
177,
choose[ClearAllSelections]andpress
the<m>button.
2 Conrmclearingthephotobook.
Pressthe<q><r>buttonsorturnthe
<5>dialtochoose[OK],andthenpress
the<m>button.
COPY
179
StillImages Movies
Using an Eye-Fi Card
BeforeusinganEye-Ficard,alwaysconrmthatlocaluseispermitted
(=
2).
InsertingapreparedEye-Ficardenablesautomaticwirelesstransferof
imagestoacomputeroruploadingtoaphoto-sharingwebsite.
ImagesaretransferredbytheEye-Ficard.Refertothecard’susermanual
orcontactthemanufacturerforinstructionsonpreparingandusingcardsor
resolvingtransferproblems.
• WhenusinganEye-Ficard,keepthefollowingpointsinmind.
-Cardsmaycontinuetotransmitradiowavesevenwhen[Eye-
Fitrans.]issetto[Disable](=
180).RemovetheEye-Fi
cardbeforeenteringhospitals,aircraft,orotherareaswhere
transmissionisprohibited.
-Whentroubleshootingimagetransferissues,checkthecardand
computersettings.Fordetails,refertothecard’susermanual.
-PoorEye-Ficonnectionsmaycauseimagetransfertotakealong
time,andtransfermaybeinterruptedinsomecases.
-Eye-Ficardsmaybecomehot,duetotheirtransferfunctions.
-Batterypowerwillbeconsumedfasterthaninnormaluse.
-Cameraoperationmaybecomesluggish.Toresolvethis,try
setting[Eye-Fitrans.]to[Disable].
ConnectionstatusofEye-Ficardsinthecameracanbecheckedonthe
shootingscreen(inregularinformationdisplaymode)orplaybackscreen(in
simpleinformationdisplaymode).
(Gray) Notconnected
Interrupted
(Blinkingwhite) Connecting
Notcommunicating
(White) Connected
ErroracquiringEye-Ficard
information
*2
(Animated) Transferinprogress
*1
*1Powersaving(=
34)onthecameraistemporarilydisabledduringimagetransfer.
*2Restartthecamera.Repeateddisplayofthisiconmayindicateaproblemwiththe
card.
Imageslabeledwitha[ ]iconhavebeentransferred.
COPY
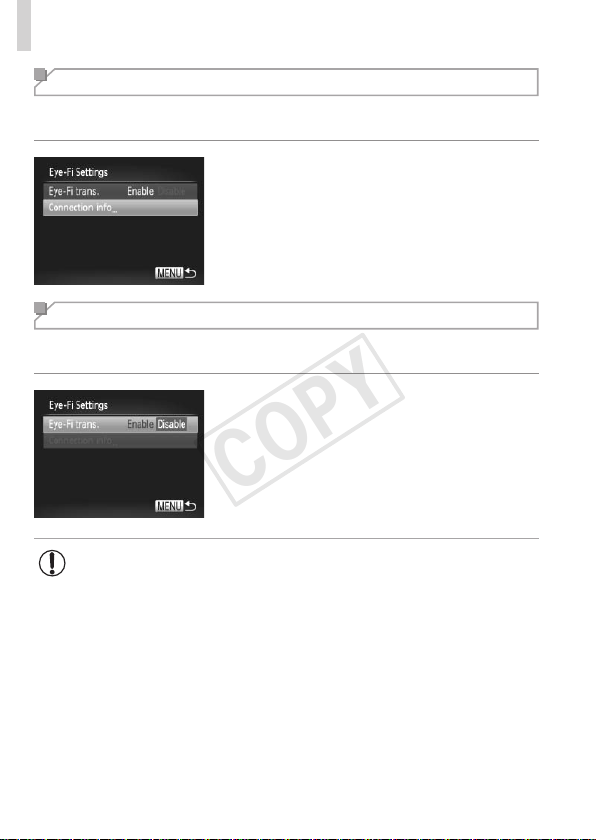
180
UsinganEye-FiCard
Checking Connection Information
ChecktheaccesspointSSIDusedbytheEye-Ficardortheconnection
status,asneeded.
Pressthe<n>button,choose
[Eye-FiSettings]onthe[3]tab,andthen
pressthe<m>button.
Choose[Connectioninfo],andthenpress
the<m>button.
Theconnectioninformationscreenis
displayed.
Disabling Eye-Fi Transfer
CongurethesettingasfollowstodisableEye-Fitransferbythecard,if
necessary.
Choose[Disable]in[Eye-Fitrans.].
Pressthe<n>button,choose
[Eye-FiSettings]onthe[3]tab,andthen
pressthe<m>button.
Choose[Eye-Fitrans.],andthenchoose
[Disable].
• [Eye-FiSettings]isnotshownunlessanEye-Ficardisinthe
camerawithitswrite-protecttabintheunlockedposition.Forthis
reason,youcannotchangesettingsforaninsertedEye-Ficardif
thewrite-protecttabisinthelockedposition.
COPY

181
Appendix
Helpfulinformationwhenusingthecamera
9
COPY

182
Troubleshooting
Ifyouthinkthereisaproblemwiththecamera,rstcheckthefollowing.
Iftheitemsbelowdonotsolveyourproblem,contactaCanonCustomer
SupportHelpDesk.
Power
Nothinghappenswhenthepowerbuttonispressed.
• Conrmthatnewbatteriesofthecorrecttypeareinserted(=
15,16).
• Conrmthatthebatteriesareinsertedfacingthecorrectway(=
15).
• Conrmthatthememorycard/batterycoverisfullyclosed(=
16).
• Dirtybatteryterminalsreducebatteryperformance.Trycleaningtheterminalswitha
cottonswabandreinsertingthebatteriesafewtimes.
Batteriesaredepletedquickly.
• Batteryperformancedecreasesatlowtemperatures.Trywarmingthebatteriesalittle
byputtingtheminyourpocket,forexample,ensuringthattheterminalsdonottouch
anymetalobjects.
Thelensisnotretracted.
• Donotopenthememorycard/batterycoverwhilethecameraison.Closethecover,
turnthecameraon,andthenturnitoffagain(=
16).
Display on a TV
CameraimageslookdistortedornotdisplayedonaTV(=
163).
Shooting
Cannotshoot.
• InPlaybackmode(=
19),presstheshutterbuttonhalfway(=
35).
Strangedisplayonthescreenunderlowlight(=
36).
Strangedisplayonthescreenwhenshooting.
Notethatthefollowingdisplayproblemsarenotrecordedinstillimagesbutare
recordedinmovies.
• Thescreenmaydarkenunderbrightlight.
• ThescreenmayickerunderuorescentorLEDlighting.
• Purplishbandingmayappearonthescreenifyoucomposeashotthatincludesa
brightlightsource.
Nodatestampisaddedtoimages.
• Congurethe[DateStamp]setting(
=
52
).Notethatdatestampsarenotaddedtoimages
automatically,merelybecauseyouhaveconguredthe[Date/Time]setting(
=
17
).
• Datestampsarenotaddedinshootingmodes(=
198–199)inwhichthissetting
cannotbecongured(=
52).
COPY

183
Troubleshooting
[Chargingtheash]isdisplayedwhentheshutterbuttonispressed,
andshootingisnotpossible(=
45).
[
]isdisplayedwhentheshutterbuttonispressedhalfway(=
45).
• Set[ISMode]to[Continuous](=
101).
• Raisetheashandsettheashmodeto[h](=
98).
• IncreasetheISOspeed(=
82).
• Mountthecameraonatripodortakeothermeasurestokeepitstill.Inthiscase,you
shouldset[ISMode]to[Off](=
101).
Shotsareoutoffocus.
• Presstheshutterbuttonhalfwaytofocusonsubjectsbeforepressingitalltheway
downtoshoot(=
35).
• Makesuresubjectsarewithinfocusingrange(=
205).
• Set[AF-assistBeam]to[On](=
62).
• Conrmthatunneededfunctionssuchasmacroaredeactivated.
• TryshootingwithfocuslockorAFlock(=
93,97).
NoAFframesaredisplayedandthecameradoesnotfocuswhenthe
shutterbuttonispressedhalfway.
• TohaveAFframesdisplayedandthecamerafocuscorrectly,trycomposingthe
shotwithhigher-contrastsubjectareascenteredbeforeyoupresstheshutterbutton
halfway.Otherwise,trypressingtheshutterbuttonhalfwayrepeatedly.
Subjectsinshotslooktoodark.
• Raisetheashandsettheashmodeto[h](=
98).
• Adjustbrightnessbyusingexposurecompensation(=
81).
• Adjustcontrastbyusingi-Contrast(=
83,137).
• UseAElockorspotmetering(=
81,82).
Subjectslooktoobright,highlightsarewashed-out.
• Lowertheashandsettheashmodeto[!](=
43).
• Adjustbrightnessbyusingexposurecompensation(=
81).
• UseAElockorspotmetering(=
81,82).
• Reducethelightingonsubjects.
Shotslooktoodarkdespitetheashring(=
45).
• Shootwithinashrange(=
205).
• Adjustbrightnessbyusingashexposurecompensationorchangingtheashoutput
level(=
99,107).
• IncreasetheISOspeed(=
82).
COPY

184
Troubleshooting
Subjectsinashshotslooktoobright,highlightsarewashed-out.
• Shootwithinashrange(=
205).
• Lowertheashandsettheashmodeto[!](=
43).
• Adjustbrightnessbyusingashexposurecompensationorchangingtheashoutput
level(=
99,107).
Whitedotsorsimilarimageartifactsappearinashshots.
• Thisiscausedbylightfromtheashreectingoffdustorairborneparticles.
Shotslookgrainy.
• LowertheISOspeed(=
82).
Subjectsareaffectedbyred-eye(=
56).
• Set[Red-EyeLamp]to[On](=
62)toactivatethered-eyereductionlamp
(=
4)inashshots.Notethatwhilethered-eyereductionlampison(forabout
onesecond),itisnotpossibletoshoot,becausethelampiscounteractingred-eye.
Forbestresults,havesubjectslookatthered-eyereductionlamp.Alsotryincreasing
thelightinginindoorscenesandshootingatcloserrange.
• Editimagesusingred-eyecorrection(=
138).
Recordingtothememorycardtakestoolong,orcontinuousshooting
isslower.
• Usethecameratoperformlow-levelformattingofthememorycard(=
147).
ShootingsettingsorFUNC.menusettingsarenotavailable.
• Availablesettingitemsvarybyshootingmode.Referto“FunctionsAvailableinEach
ShootingMode”,“FUNC.Menu”,and“ShootingMenu”(=
192–196).
Shooting Movies
Theelapsedtimeshownisincorrect,orrecordingisinterrupted.
• Usethecameratoformatthememorycard,orswitchtoacardthatsupportshigh-
speedrecording.Notethateveniftheelapsedtimedisplayisincorrect,thelength
ofmoviesonthememorycardcorrespondstotheactualrecordingtime(=
146,
204).
[ ]isdisplayedandshootingstopsautomatically.
Thecamera’sinternalmemorybufferlledupasthecameracouldnotrecordtothe
memorycardquicklyenough.Tryoneofthefollowingmeasures.
• Usethecameratoperformlow-levelformattingofthememorycard(=
147).
• Lowertheimagequality(=
57).
• Switchtoamemorycardthatsupportshigh-speedrecording(=
204).
Zoomingisnotpossible.
• Zoomingisnotpossiblewhenshootingmoviesin[ ]mode.
COPY

185
Troubleshooting
Playback
Playbackisnotpossible.
• Imageormovieplaybackmaynotbepossibleifacomputerisusedtorenamelesor
alterthefolderstructure.RefertotheSoftware Guide(=
25)fordetailsonfolder
structureandlenames.
Playbackstops,oraudioskips.
• Switchtoamemorycardthatyouhaveperformedlow-levelformattingonwiththe
camera(=
147).
• Theremaybebriefinterruptionswhenplayingmoviescopiedtomemorycardsthat
haveslowreadspeeds.
• Whenmoviesareplayedonacomputer,framesmaybedroppedandaudiomayskip
ifcomputerperformanceisinadequate.
Soundisnotplayedduringmovies.
• Adjustthevolume(=
24,111)ifyouhaveactivated[Mute](=
142)orthe
soundinthemovieisfaint.
• Nosoundisplayedformoviesshotin[
]mode(=
72)becauseaudioisnot
recordedinthismode.
Computer
Cannottransferimagestoacomputer.
Whenattemptingtotransferimagestothecomputerviaacable,tryreducingthe
transferspeedasfollows.
• Pressthe<1>buttontoenterPlaybackmode.Holdthe<n>buttondownas
youpressthe<o>and<m>buttonsatthesametime.Onthenextscreen,press
the<q><r>buttonstochoose[B],andthenpressthe<m>button.
Eye-Fi Cards
Cannottransferimages(=
179).
COPY

186
On-Screen Messages
Ifanerrormessageisdisplayed,respondasfollows.
Nomemorycard
• Thememorycardmaybeinsertedfacingthewrongway.Reinsertthememorycard
facingthecorrectway(=
15).
Memorycardlocked
• Thewrite-protecttabofthememorycardissettothelockedposition.Switchthe
write-protecttabtotheunlockedposition(=
15,180).
Cannotrecord!
• Shootingwasattemptedwithoutamemorycardinthecamera.Toshoot,inserta
memorycardfacingthecorrectway(=
15).
Memorycarderror(=
147)
• Ifthesameerrormessageisdisplayedevenwhenyouhaveinsertedaformattedmemory
cardfacingthecorrectway,contactaCanonCustomerSupportHelpDesk
(=15).
Insufcientspaceoncard
• Thereisnotenoughfreespaceonthememorycardtoshoot(=
41,65,79,
103)oreditimages(=
133–138).Eithereraseunneededimages(=
124)or
insertamemorycardwithenoughfreespace(=
15).
Changethebatteries(=
15)
NoImage.
• Thememorycarddoesnotcontainanyimagesthatcanbedisplayed.
Protected!(=
120)
UnidentiedImage/IncompatibleJPEG/Imagetoolarge./Cannotplay
backAVI/RAW
• Unsupportedorcorruptimagescannotbedisplayed.
• Itmaynotbepossibletodisplayimagesthatwereeditedorrenamedonacomputer,
orimagesshotwithanothercamera.
Cannotmagnify!/CannotplaybackthiscontentinSmartShufe/
Cannotrotate/Cannotmodifyimage/Cannotregisterthisimage!/
Cannotmodify/Cannotassigntocategory/Unselectableimage.
• Thefollowingfunctionsmaybeunavailableforimagesthatwererenamedoralready
editedonacomputer,orimagesshotwithanothercamera.Notethatstarred(*)
functionsarenotavailableformovies.Magnify*(=
117),SmartShufe*(=
119),
Categorize(=
130),Rotate(=
127),Edit*(=
133–138),AssignasStart-up
Image*(=
144),PrintList*(=
173),andPhotobookSet-up*(=
177).
Invalidselectionrange
• Whenspecifyingarangeforimageselection(=
122,125,132,175),you
attemptedtochooseaninitialimagethatwasafterthenalimage,orvice-versa.
COPY

187
On-ScreenMessages
Exceededselectionlimit
• Morethan998imageswereselectedforPrintList(=
173)orPhotobookSet-up
(=
177).Choose998imagesorless.
• PrintList(=
173)orPhotobookSet-up(=
177)settingscouldnotbesaved
correctly.Reducethenumberofselectedimagesandtryagain.
• Youattemptedtochoosemorethan500imagesinProtect(=
120),Erase
(=
124),Favorites(=
129),MyCategory(=
130),PrintList(=
173),or
PhotobookSet-up(=
177).
Communicationerror
• Anexcessiveamountofimages(approx.1,000)onthememorycardpreventedprinting
orimagetransfertoacomputer.Totransfertheimages,useacommerciallyavailable
USBcardreader.Toprint,insertthememorycarddirectlyintotheprintercardslot.
Namingerror!
• Thefoldercouldnotbecreatedorimagescouldnotberecorded,becausethehighest
supportedfoldernumber(999)forstoringimagesonthecardhasbeenreachedand
thehighestsupportedimagenumber(9999)forimagesinfoldershasbeenreached.
Inthe[3]menu,change[FileNumbering]to[AutoReset](=
148),orformatthe
memorycard(=
146).
LensError
• Thiserrormayoccurifthelensisheldwhileitismoving,orwhenthecameraisused
industyorsandylocations.
• Frequentdisplayofthiserrormessagemayindicatecameradamage.Inthiscase,
contactaCanonCustomerSupportHelpDesk.
Acameraerrorwasdetected(
errornumber
)
• Ifthiserrormessageisdisplayedimmediatelyafterashot,theimagemaynothave
beensaved.SwitchtoPlaybackmodetocheckfortheimage.
• Frequentdisplayofthiserrormessagemayindicatecameradamage.Inthiscase,
writedowntheerrornumber(Exx)andcontactaCanonCustomerSupportHelpDesk.
FileError
• Correctprinting(=
166)maynotbepossibleforphotosfromothercamerasor
imagesthathavebeenalteredusingcomputersoftware,evenifthecamerais
connectedtotheprinter.
Printerror
• Checkthepapersizesetting(=
170).Ifthiserrormessageisdisplayedwhenthe
settingiscorrect,restarttheprinterandcompletethesettingonthecameraagain.
Inkabsorberfull
• ContactaCanonCustomerSupportHelpDesktorequestassistancewithink
absorberreplacement.
COPY
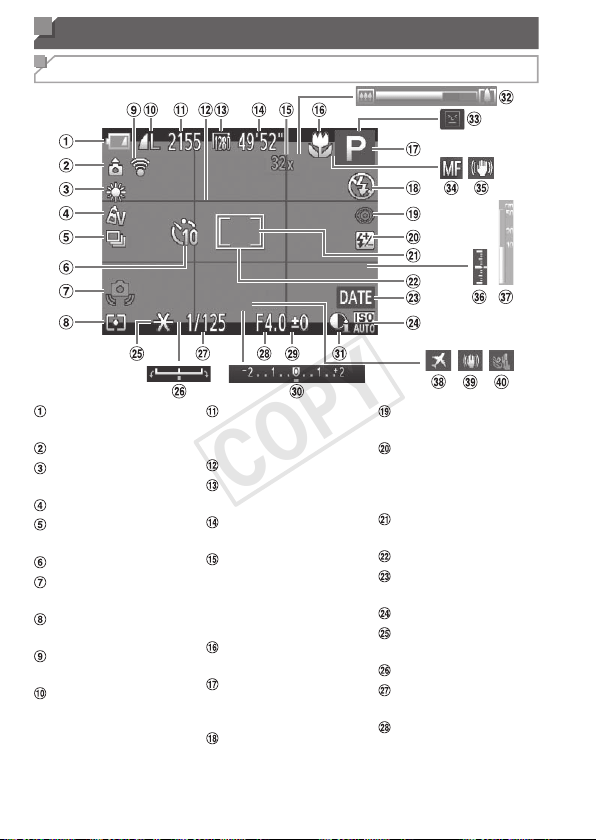
188
On-Screen Information
Shooting (Information Display)
Batterylevel
(=
189)
Cameraorientation
*
Whitebalance
(=
84)
MyColors(=
86)
Drivemode
(=
88)
Self-timer(=
50)
Camerashake
warning(=
45)
Meteringmethod
(=
82)
Eye-Ficonnection
status(=
179)
Stillimage
compression
(=
101),
Resolution(=
55)
Stillimages:
Recordableshots
(=
204)
Gridlines(=
59)
Movieresolution
(=
57)
Movies:Remaining
time(=
204)
Digitalzoom
magnication
(=
49),Digital
tele-converter
(=
92)
Focusingrange
(=
90)
Shootingmode
(=
192),Scene
icon(=
46)
Flashmode
(=
98)
Red-eyecorrection
(=
56)
Flashexposure
compensation/
Flashoutputlevel
(=
99,107)
SpotAEpointframe
(=
82)
AFframe(=
92)
Datestamp
(=
52)
ISOspeed(=
82)
AElock(=
81),
FElock(=
100)
Exposureshiftbar
Shutterspeed
(=
104,106)
Aperturevalue
(=
105,106)
COPY

189
On-ScreenInformation
Exposure
compensationlevel
(=
81)
Exposure
compensationbar
(=
81)
i-Contrast(=
83)
Zoombar(=
42)
Blinkdetection
(=
61)
AFlock(=
97),
Manualfocus
(=
90)
ISmodeicon
(=
47)
Exposurelevel
(=
106)
MFindicator
(=
91)
Timezone(=
150)
Imagestabilization
(=
101)
Windlter(=
58)
* :Regularorientation, :Heldvertically
Thecameradetectstheshootingorientationandadjustssettingsforoptimalshots.
Orientationisalsodetectedduringplayback,andineitherorientation,thecamera
automaticallyrotatesimagesasneeded.
However,theorientationmaynotbedetectedcorrectlywhenthecameraispointed
straightupordown.
BatteryLevel
Anon-screeniconormessagewarnsyouwhenthereislittlebatterypower
left.Noiconormessageisshownunlessthebatteriesarerunningoutof
power.
Display Details
Nearlydepleted—preparereplacement
batteries
Changethebatteries Depleted—replacethebatteries
COPY
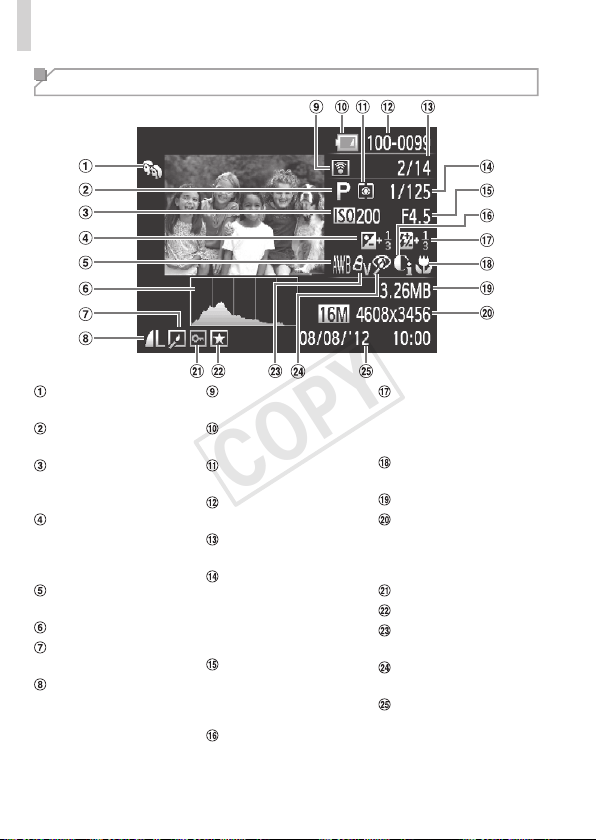
190
On-ScreenInformation
Playback (Detailed Information Display)
MyCategory
(=
130)
Shootingmode
(=
192)
ISOspeed
(=
82),Playback
speed(=
73)
Exposure
compensationlevel
(=
81),Exposure
shiftlevel(=
77)
Whitebalance
(=
84)
Histogram(=
112)
Imageediting
(=
133–138)
Compression(image
quality)(=
101)/
Resolution(=
55,
57),MOV
(movies)
Transferredvia
Eye-Fi(=
179)
Batterylevel
(=
189)
Meteringmethod
(=
82)
Foldernumber-File
number(=
148)
Currentimageno./
Totalno.ofimages
Shutterspeed(still
images)(=
104),
Imagequality/
Framerate(movies)
(=
57)
Aperturevalue
(=
105,106),
Imagequality
(movies)(=
57)
i-Contrast(=
83,
137)
Flash(=
98),
Flashexposure
compensation
(=
99)
Focusingrange
(=
90)
Filesize
Stillimages:
Resolution(=
204)
Movies:Playback
time(=
204)
Protection(=
120)
Favorites(=
129)
MyColors(=
86,
136)
Red-eyecorrection
(=
56,138)
Shootingdate/time
(=
17)
COPY
191
On-ScreenInformation
• SomeinformationmaynotbedisplayedwhenviewingimagesonaTV
(=
159).
SummaryofMovieControlPanelin“Viewing”(=
110)
Exit
Play
SlowMotion(Toadjusttheplaybackspeed,pressthe<q><r>buttonsorturn
the<5>dial.Nosoundisplayed.)
SkipBackward
*
(Tocontinueskippingbackward,keepholdingdownthe<m>
button.)
PreviousFrame(Forfast-rewind,keepholdingdownthe<m>button.)
NextFrame(Forfast-forward,keepholdingdownthe<m>button.)
SkipForward
*
(Tocontinueskippingforward,keepholdingdownthe<m>
button.)
*
Edit(=
139)
c
ShownwhenthecameraisconnectedtoaPictBridge-compatibleprinter
(=
166).
*Displaystheframeapprox.4sec.beforeorafterthecurrentframe.
• Toskipforwardorbackduringmovieplayback,pressthe<q><r>buttons.
COPY
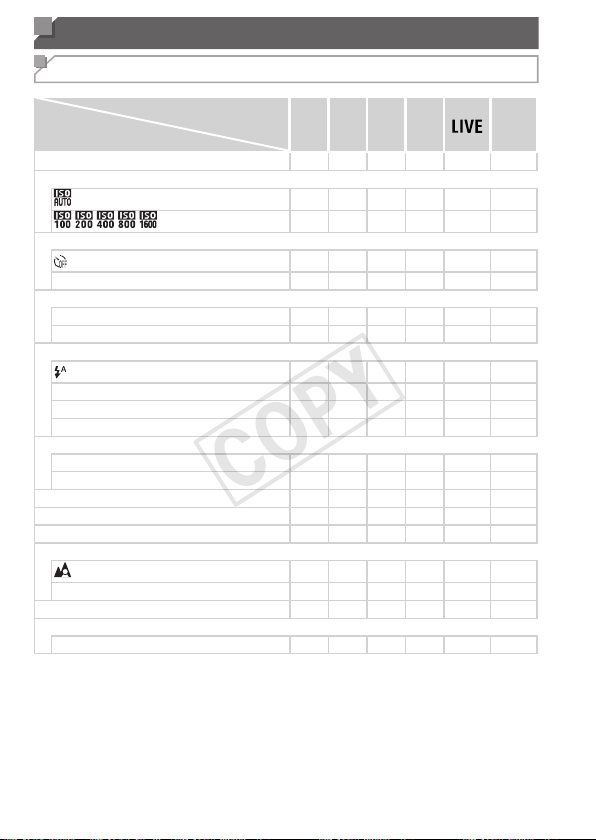
192
Functions and Menu Tables
Functions Available in Each Shooting Mode
ShootingMode
Function
D B M G
A
K E
I
P t E
ExposureCompensation(=
81)
– O
O
O
*1
– O O O O O O O O O O – O – –
ISOSpeed(=
82)
– O
O
O O O O O O O O O O O O O O O O O
O O
O
O – – – – – – – – – – – – – – – –
Self-Timer(=
50)
O O
O
O O O O O O O O O O O O O O O O O
][$
O O
O
O O O O – O O O O O O O O O – O O
Self-TimerSettings(=
51)
Delay
*2
O O
O
O O O O – O O O O O O O O O – O O
Shots
*3
O O
O
O O O O – O O O O O O O O O – – –
Flash(=
98)
– –
–
O O O O O O O – O O O O O O – – –
h
O O
O
O O – O O – O – O O O O O O – – –
Z
– O
–
O O
*4
– – – – – – – – – – – – – –
!
– –
–
– – – – – – – O – – – – – – O O O
Av/TvSettings(=
104,105)
ApertureValue
O O
–
– – – – – – – – – – – – – – – – –
ShutterSpeed
O –
O
– – – – – – – – – – – – – – – – –
ProgramShift(=
81)
– O
O
O – – – – – – – – – – – – – – – –
AELock/FELock(=
81,100)
*5
– O
O
O – – – – – – – – – – – – – – – –
AELock(Movie)/ExposureShift(=
77)
– –
–
– – – – – – – – – – – – – – – O O
FocusingRange(=
90)
O O
O
O O O O O O O O O O O O O O O O O
ef(=
90)
O O
O
O O – O – O O – O O O O O O O O O
TrackingAF(=
53)
O O
O
O O O O – O O – – – – O O O O – –
ScreenDisplay(=
36)
InformationDisplay/NoInformationDisplay
O O
O
O O O O – O O O – – – – O O O O O
O
Availableorsetautomatically.
–
Notavailable.
*1Setin[Dark]and[Light].
*2Cannotbesetto0secondsinmodeswithoutselectionofthenumberofshots.
*3Oneshot(cannotbemodied)inmodeswithoutselectionofthenumberofshots.
*4Notavailable,butswitchesto[Z]insomecases.
*5FElocknotavailablein[!]ashmode.
COPY

193
FunctionsandMenuTables
ShootingMode
Function
D B M G
A
K E
I
P t E
ExposureCompensation(=
81)
– O
O
O
*1
– O O O O O O O O O O – O – –
ISOSpeed(=
82)
– O
O
O O O O O O O O O O O O O O O O O
O O
O
O – – – – – – – – – – – – – – – –
Self-Timer(=
50)
O O
O
O O O O O O O O O O O O O O O O O
][$
O O
O
O O O O – O O O O O O O O O – O O
Self-TimerSettings(=
51)
Delay
*2
O O
O
O O O O – O O O O O O O O O – O O
Shots
*3
O O
O
O O O O – O O O O O O O O O – – –
Flash(=
98)
– –
–
O O O O O O O – O O O O O O – – –
h
O O
O
O O – O O – O – O O O O O O – – –
Z
– O
–
O O
*4
– – – – – – – – – – – – – –
!
– –
–
– – – – – – – O – – – – – – O O O
Av/TvSettings(=
104,105)
ApertureValue
O O
–
– – – – – – – – – – – – – – – – –
ShutterSpeed
O –
O
– – – – – – – – – – – – – – – – –
ProgramShift(=
81)
– O
O
O – – – – – – – – – – – – – – – –
AELock/FELock(=
81,100)
*5
– O
O
O – – – – – – – – – – – – – – – –
AELock(Movie)/ExposureShift(=
77)
– –
–
– – – – – – – – – – – – – – – O O
FocusingRange(=
90)
O O
O
O O O O O O O O O O O O O O O O O
ef(=
90)
O O
O
O O – O – O O – O O O O O O O O O
TrackingAF(=
53)
O O
O
O O O O – O O – – – – O O O O – –
ScreenDisplay(=
36)
InformationDisplay/NoInformationDisplay
O O
O
O O O O – O O O – – – – O O O O O
O
Availableorsetautomatically.
–
Notavailable.
*1Setin[Dark]and[Light].
*2Cannotbesetto0secondsinmodeswithoutselectionofthenumberofshots.
*3Oneshot(cannotbemodied)inmodeswithoutselectionofthenumberofshots.
*4Notavailable,butswitchesto[Z]insomecases.
*5FElocknotavailablein[!]ashmode.
COPY
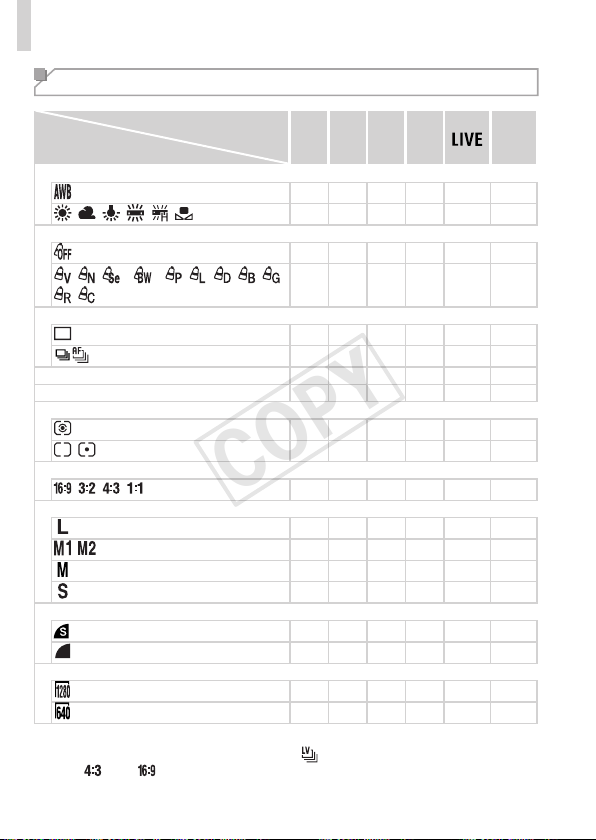
194
FunctionsandMenuTables
FUNC. Menu
ShootingMode
Function
D B M G
A
K E
I
P t E
WhiteBalance(=
84)
O O O O O O O O O O O O O O O O O O O O
O O O O – – – O O – – – – – – – – O O O
MyColors(=
86)
O O O O O O O O O O O O O O O O O O O O
*1
*1
*2
O O O O – – – O – – – – – – – – – O O O
DriveMode(=
88)
O O O O O O O O O O O O O O O O O O O O
*3
O O O O – – O – O O O O O O O O O O – –
FlashExposureCompensation(=
99)
– O O O – – – – – – – – – – – – – – – –
FlashOutputLevel(=
107)
O O O – – – – – – – – – – – – – – – – –
MeteringMethod(=
82)
O O O O O O O O O O O O O O O O O O O O
O O O O – – – – – – – – – – – – – – – –
StillImageAspectRatio(=
54)
O O O O – O O O – O O –
*4
– O O O O – –
Resolution(=
55)
O O O O O O O O – O O O O O O O O O O O
O O O O – O O O – O O – – – – – – O O O
– – – – – – – – O – – – – – – – – – – –
O O O O – O O O – O O – – – – – – O O O
Compression(=
101)
O O O O – – – – – – – – – – – – – – – –
O O O O O O O O O O O O O O O O O O O O
MovieQuality(=
57)
O O O O O O O O O O O O
*5
O O O O O O O
O O O O – O O O O O O O
*5
O O O O O O –
O
Availableorsetautomatically.
–
Notavailable.
*1Whitebalanceisnotavailable.*2Setinarangeof1–5:contrast,sharpness,color
saturation,red,green,blue,andskintone.*3[
]issetwith[f],AFlock,or[t].
*4Only[
]and[ ]areavailable.*5Synchronizeswiththeaspectratiosettingand
isautomaticallyset(=
74).
COPY

195
FunctionsandMenuTables
ShootingMode
Function
D B M G
A
K E
I
P t E
WhiteBalance(=
84)
O O O O O O O O O O O O O O O O O O O O
O O O O – – – O O – – – – – – – – O O O
MyColors(=
86)
O O O O O O O O O O O O O O O O O O O O
*1
*1
*2
O O O O – – – O – – – – – – – – – O O O
DriveMode(=
88)
O O O O O O O O O O O O O O O O O O O O
*3
O O O O – – O – O O O O O O O O O O – –
FlashExposureCompensation(=
99)
– O O O – – – – – – – – – – – – – – – –
FlashOutputLevel(=
107)
O O O – – – – – – – – – – – – – – – – –
MeteringMethod(=
82)
O O O O O O O O O O O O O O O O O O O O
O O O O – – – – – – – – – – – – – – – –
StillImageAspectRatio(=
54)
O O O O – O O O – O O –
*4
– O O O O – –
Resolution(=
55)
O O O O O O O O – O O O O O O O O O O O
O O O O – O O O – O O – – – – – – O O O
– – – – – – – – O – – – – – – – – – – –
O O O O – O O O – O O – – – – – – O O O
Compression(=
101)
O O O O – – – – – – – – – – – – – – – –
O O O O O O O O O O O O O O O O O O O O
MovieQuality(=
57)
O O O O O O O O O O O O
*5
O O O O O O O
O O O O – O O O O O O O
*5
O O O O O O –
O
Availableorsetautomatically.
–
Notavailable.
*1Whitebalanceisnotavailable.*2Setinarangeof1–5:contrast,sharpness,color
saturation,red,green,blue,andskintone.*3[
]issetwith[f],AFlock,or[t].
*4Only[
]and[ ]areavailable.*5Synchronizeswiththeaspectratiosettingand
isautomaticallyset(=
74).
COPY

196
FunctionsandMenuTables
*1Operationwhennofacesaredetectedvariesbyshootingmode.*2Onlyavailableby
pressingthe<o>button(=
53).*3AvailablewhentheAFframeissetto[Center].
*4[On]whensubjectmovementisdetectedin<A>mode.
4 Shooting Menu
ShootingMode
Function
D B M G
A
K E
I
P t E
AFFrame(=
92)
Center
O O O O O – O – O O O O – O O O O O O O
FaceAiAF
*1
O O O O O O O O O O – – – O O O O O O O
TrackingAF
O O O O O
*2
O – O O – – – – O O O O – –
AFFrameSize
*3
Normal
O O O O O – O – O O O O – O O O O O O O
Small
O O O O O – O – O O – – – O O O O O O O
DigitalZoom(=
49)
Standard
O O O O O O O O – O O – – – – – – O O O
Off
O O O O O O O O O O O O O O O O O O O O
DigitalTele-converter(1.6x/2.0x)
O O O O O – – – – – – – – – – – – – – –
AF-PointZoom(=
60)
On
O O O O O O O O O O – – – – O O O O – –
Off
O O O O O O O O O O O O O O O O O O O O
ServoAF(=
95)
On
O O O O O – O – O O – – – – O O O O – –
Off
*4
O O O O O O O O O O O O O O O O O O O O
ContinuousAF(=
96)
On
O O O O O O O O – O – O O O O O O O O O
Off
O O O O O – O – O O O O O O O O O O – –
AF-assistBeam(=
62)
On
O O O O O O O O O O – O O O O O O – O O
Off
O O O O O O O O O O O O O O O O O O O O
MF-PointZoom(=
90)
On
O O O O O – O – O O – – – – O O O O – –
Off
O O O O O O O O O O O O O O O O O O O O
SafetyMF(=
90)
On
O O O O O – O – O O – O O O O O O O O O
Off
O O O O O O O O O O O O O O O O O O O O
O
Availableorsetautomatically.
–
Notavailable.
COPY

197
FunctionsandMenuTables
ShootingMode
Function
D B M G
A
K E
I
P t E
AFFrame(=
92)
Center
O O O O O – O – O O O O – O O O O O O O
FaceAiAF
*1
O O O O O O O O O O – – – O O O O O O O
TrackingAF
O O O O O
*2
O – O O – – – – O O O O – –
AFFrameSize
*3
Normal
O O O O O – O – O O O O – O O O O O O O
Small
O O O O O – O – O O – – – O O O O O O O
DigitalZoom(=
49)
Standard
O O O O O O O O – O O – – – – – – O O O
Off
O O O O O O O O O O O O O O O O O O O O
DigitalTele-converter(1.6x/2.0x)
O O O O O – – – – – – – – – – – – – – –
AF-PointZoom(=
60)
On
O O O O O O O O O O – – – – O O O O – –
Off
O O O O O O O O O O O O O O O O O O O O
ServoAF(=
95)
On
O O O O O – O – O O – – – – O O O O – –
Off
*4
O O O O O O O O O O O O O O O O O O O O
ContinuousAF(=
96)
On
O O O O O O O O – O – O O O O O O O O O
Off
O O O O O – O – O O O O O O O O O O – –
AF-assistBeam(=
62)
On
O O O O O O O O O O – O O O O O O – O O
Off
O O O O O O O O O O O O O O O O O O O O
MF-PointZoom(=
90)
On
O O O O O – O – O O – – – – O O O O – –
Off
O O O O O O O O O O O O O O O O O O O O
SafetyMF(=
90)
On
O O O O O – O – O O – O O O O O O O O O
Off
O O O O O O O O O O O O O O O O O O O O
O
Availableorsetautomatically.
–
Notavailable.
COPY

198
FunctionsandMenuTables
ShootingMode
Function
D B M G
A
K E
I
P t E
FlashSettings(=
56,62,99,107)
FlashMode
Auto
–
O
O O O O O O O O – O O O O O O – – –
Manual
O
O
O – – – – – – – – – – – – – – – – –
FlashExp.Comp
–
O
O O – – – – – – – – – – – – – – – –
FlashOutput
O
O
O – – – – – – – – – – – – – – – – –
Red-EyeCorr.
On
O
O
O O – O O O O O – – – – – – – – – –
Off
O
O
O O O O O O O O – O O O O O O – – –
Red-EyeLamp On/Off
O
O
O O O O O O O O – O O O O O O – – –
SafetyFE
On
–
O
O O O O O O O O – O O O O O O – – –
Off
O
O
O O O – – – – – – – – – – – – – – –
i-Contrast(=
83)
Auto
O
O
O O – O – – O – – – – – – – – – – –
Off
O
O
O O O – O O – O O O O O O O O O O O
SafetyShift(=
105)
On
–
O
O – – – – – – – – – – – – – – – – –
Off
O
O
O O O O O O O O O O O O O O O O O O
WindFilter(=
58)
On/Off
O
O
O O O O O O O O O O – O O O O O O O
Review(=
63)
Off/Quick/2–10sec./Hold
O
O
O O O O O O O O O O O O O O O O – –
ReviewInfo(=
64)
Off/Detailed/FocusCheck
O
O
O O O O O O O O O O O O O O O O – –
BlinkDetection(=
61)
On
O
O
O O O O O O O O – – – – – O O O – –
Off
O
O
O O O O O O O O O O O O O O O O O O
GridLines(=
59)
On/Off
O
O
O O O O O O O O O O O O O O O O O O
ISMode(=
101)
Off/Continuous
O
O
O O O O O O O O O O O O O O O O O O
ShootOnly
O
O
O O O – O O O O O O O O O O O O – –
DateStamp(=
52)
Off
O
O
O O O O O O O O O O O O O O O O O O
Date/Date&Time
O
O
O O O O O O – O O – – – – – – O – –
O
Availableorsetautomatically.
–
Notavailable.
COPY

199
FunctionsandMenuTables
ShootingMode
Function
D B M G
A
K E
I
P t E
FlashSettings(=
56,62,99,107)
FlashMode
Auto
–
O
O O O O O O O O – O O O O O O – – –
Manual
O
O
O – – – – – – – – – – – – – – – – –
FlashExp.Comp
–
O
O O – – – – – – – – – – – – – – – –
FlashOutput
O
O
O – – – – – – – – – – – – – – – – –
Red-EyeCorr.
On
O
O
O O – O O O O O – – – – – – – – – –
Off
O
O
O O O O O O O O – O O O O O O – – –
Red-EyeLamp On/Off
O
O
O O O O O O O O – O O O O O O – – –
SafetyFE
On
–
O
O O O O O O O O – O O O O O O – – –
Off
O
O
O O O – – – – – – – – – – – – – – –
i-Contrast(=
83)
Auto
O
O
O O – O – – O – – – – – – – – – – –
Off
O
O
O O O – O O – O O O O O O O O O O O
SafetyShift(=
105)
On
–
O
O – – – – – – – – – – – – – – – – –
Off
O
O
O O O O O O O O O O O O O O O O O O
WindFilter(=
58)
On/Off
O
O
O O O O O O O O O O – O O O O O O O
Review(=
63)
Off/Quick/2–10sec./Hold
O
O
O O O O O O O O O O O O O O O O – –
ReviewInfo(=
64)
Off/Detailed/FocusCheck
O
O
O O O O O O O O O O O O O O O O – –
BlinkDetection(=
61)
On
O
O
O O O O O O O O – – – – – O O O – –
Off
O
O
O O O O O O O O O O O O O O O O O O
GridLines(=
59)
On/Off
O
O
O O O O O O O O O O O O O O O O O O
ISMode(=
101)
Off/Continuous
O
O
O O O O O O O O O O O O O O O O O O
ShootOnly
O
O
O O O – O O O O O O O O O O O O – –
DateStamp(=
52)
Off
O
O
O O O O O O O O O O O O O O O O O O
Date/Date&Time
O
O
O O O O O O – O O – – – – – – O – –
O
Availableorsetautomatically.
–
Notavailable.
COPY
200
FunctionsandMenuTables
3 Set up Menu
Item Ref.Page Item Ref.Page
Mute
=
142
CreateFolder
=
148
Volume
=
142
LensRetract
=
149
SoundOptions
=
143
PowerSaving
=
34,149
Hints&Tips
=
143
Units
=
151
Date/Time
=
17
VideoSystem
=
163
TimeZone
=
150
CtrlviaHDMI
=
161
LCDBrightness
=
144
Eye-FiSettings
=
179
Start-upImage
=
144,145
CerticationLogoDisplay
=
151
Format
=
146,147
Language
=
19
FileNumbering
=
148
ResetAll
=
152
1 Playback Menu
Item Ref.Page Item Ref.Page
SmartShufe
=
119
Red-EyeCorrection
=
138
Slideshow
=
118
Cropping
=
134
Erase
=
124
Resize
=
133
Protect
=
120
MyColors
=
136
Rotate
=
127
ScrollDisplay
=
111
Favorites
=
129
AutoRotate
=
128
MyCategory
=
130
Resume
=
111
PhotobookSet-up
=
177
Transition
=
111
i-Contrast
=
137
COPY


202
Handling Precautions
• Thecameraisahigh-precisionelectronicdevice.Avoiddroppingitor
subjectingittostrongimpact.
• Neverbringthecameranearmagnets,motors,orotherdevicesthat
generatestrongelectromagneticelds,whichmaycausemalfunctionor
eraseimagedata.
• Ifwaterdropletsordirtadherestothecameraorscreen,wipewithadry
softcloth,suchasaneyeglasscloth.Donotrubhardorapplyforce.
• Neverusecleanerscontainingorganicsolventstocleanthecameraor
screen.
• Useablowerbrushtoremovedustfromthelens.Ifcleaningisdifcult,
contactaCanonCustomerSupportHelpDesk.
• Topreventcondensationfromformingonthecameraaftersudden
temperaturechanges(whenthecameraistransferredfromcoldtowarm
environments),putthecamerainanairtight,resealableplasticbagand
letitgraduallyadjusttothetemperaturebeforeremovingitfromthebag.
• Ifcondensationdoesformonthecamera,stopusingitimmediately.
Continuingtousethecamerainthisstatemaydamageit.Removethe
batteriesandmemorycard,andwaituntilthemoisturehasevaporated
beforeresuminguse.
COPY

203
Specications
CameraEffective
Pixels(Max.)
Approx.16millionpixels
LensFocalLength
16xzoom:5.0(W)–80.0(T)mm
(35mmlmequivalent:28(W)–448(T)mm)
LCDMonitor
3.0typecolorTFTLCD
EffectivePixels:Approx.230,000dots
FileFormat
DesignruleforCameraFilesystem,DPOF(version1.1)compliant
DataType
StillImages:Exif2.3(JPEG)
Movies:MOV(Imagedata:H.264;Audiodata:LinearPCM(stereo))
Interface
Hi-speedUSB
HDMIoutput
Analogaudiooutput(stereo)
Analogvideooutput(NTSC/PAL)
PowerSource
AAalkalinebatteries(AANiMHbatteries(CanonNB-3AH))x2
ACAdapterKitACK800
• However,connectionrequiresDCCouplerDR-DC10,sold
separately
Dimensions(Based
onCIPAGuidelines)
111.0x72.5x44.1mm(4.37x2.85x1.74in.)
Weight(Basedon
CIPAGuidelines)
Approx.291g(approx.10.3oz.;includingbatteriesand
memorycard)
Approx.243g(approx.8.57oz.;camerabodyonly)
NumberofShots/RecordingTime,PlaybackTime
PowerSource
AlkalineBatteries(Supplied)
NiMHBatteries(Sold
Separately)
NumberofShots
Approx.140 Approx.380
MovieRecording
Time
*1
Approx.30minutes Approx.90minutes
Continuous
Shooting
*2
Approx.1hour,10minutes Approx.2hours,40minutes
PlaybackTime
Approx.7hours Approx.10hours
*1Timeunderdefaultcamerasettings,whennormaloperationsareperformed,suchas
shooting,pausing,turningthecameraonandoff,andzooming.
*2Timeavailablewhenshootingthemaximummovielength(untilrecordingstops
automatically)repeatedly.
•Thenumberofshotsthatcanbetakenisbasedonmeasurementguidelinesofthe
Camera&ImagingProductsAssociation(CIPA).
•Undersomeshootingconditions,thenumberofshotsandrecordingtimemaybeless
thanmentionedabove.
•Thenumberofshotsandrecordingtimethatcanbetakenmayvarywidelydepending
onthebrandofalkalinebatteriesused.
•Numberofshots/timewithfullychargedNiMHbatteries.
COPY
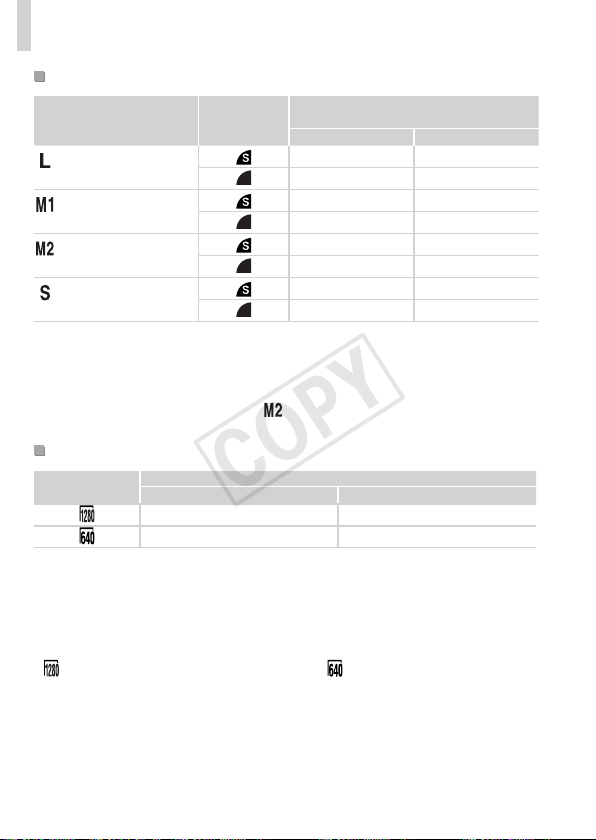
204
Specications
Numberof4:3ShotsperMemoryCard
RecordingPixels
Compression
Ratio
NumberofShotsperMemoryCard
(Approx.shots)
8GB 32GB
(Large)
16M/4608x3456
1131 4567
1903 7684
(Medium1)
8M/3264x2448
2252 9094
3721 15020
(Medium2)
2M/1600x1200
7442 30040
12927 52176
(Small)
0.3M/640x480
27291 110150
40937 165225
•ThevaluesinthetablearemeasuredaccordingtoCanonstandardsandmaychange
dependingonthesubject,memorycardandcamerasettings.
•Thevaluesinthetablearebasedon4:3aspectratio.Iftheaspectratioischanged
(=
54),moreimagescanbeshotbecausethedatasizeperimagewillbesmaller
thanwith4:3images.However,since[
]16:9imageshaveasettingof1920x1080
pixels,theirdatasizewillbelargerthan4:3images.
RecordingTimeperMemoryCard
ImageQuality
RecordingTimeperMemoryCard
8GB 32GB
49min.18sec.
*1
3hr.19min.03sec.
*2
1hr.28min.59sec. 5hr.59min.10sec.
*127min.28sec.foriFramemovies(=
78).
*21hr.50min.52sec.foriFramemovies(=
78).
•ThevaluesinthetablearemeasuredaccordingtoCanonstandardsandmaychange
dependingonthesubject,memorycardandcamerasettings.
•Recordingwillautomaticallystopwhenthecliplesizereaches4GB,orwhenthe
recordingtimereachesapproximately29minutesand59secondswhenshootingin[
],andapproximately1hourwhenshootingin[ ].
•Recordingmaystopevenifthemaximumcliplengthhasnotbeenreachedonsome
memorycards.SDSpeedClass6orhighermemorycardsarerecommended.
COPY
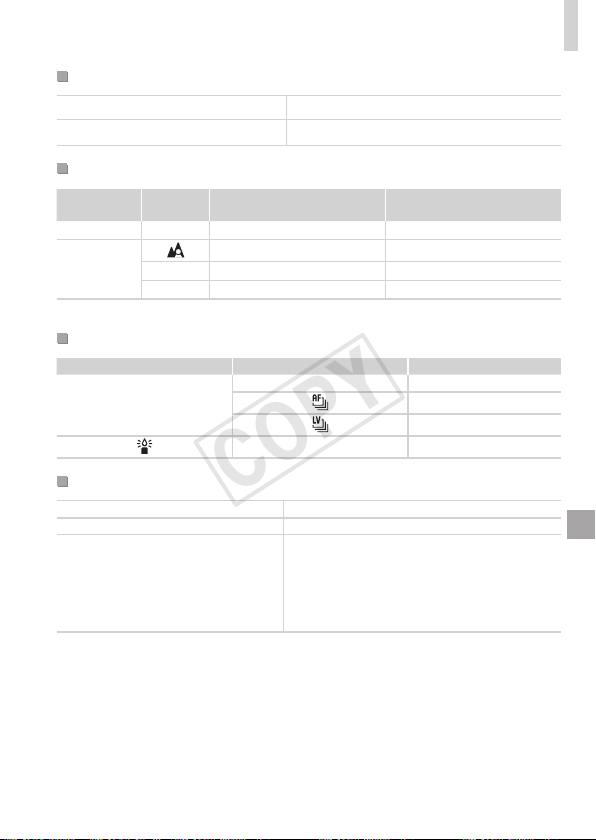
205
Specications
FlashRange
Maximumwideangle(j)
50cm–3.0m(1.6–9.8ft.)
Maximumtelephoto(i)
60cm–2.0m(2.0–6.6ft.)
ShootingRange
Shooting
Mode
Focusing
Range
MaximumWideAngle(j) MaximumTelephoto(i)
A
–
1cm(0.4in.)–innity 60cm(2.0ft.)–innity
Othermodes
5cm(2.0in.)–innity 60cm(2.0ft.)–innity
e
*
1cm(0.4in.)–50cm(1.6ft.)
–
f
*
1cm(0.4in.)–innity 60cm(2.0ft.)–innity
*Notavailableinsomeshootingmodes.
ContinuousShootingSpeed
ShootingMode ContinuousShootingMode Speed
G
W
Approx.0.8shots/sec.
Approx.0.5shots/sec.
Approx.0.6shots/sec.
– Approx.2.8shots/sec.
ShutterSpeed
<A>mode,automaticallysetrange
1–1/3200sec.
Rangeinallshootingmodes 15–1/3200sec.
<M>modeavailablevalues(sec.)
15,13,10,8,6,5,4,3.2,2.5,2,1.6,1.3,1,
0.8,0.6,0.5,0.4,0.3,1/4,1/5,1/6,1/8,1/10,
1/13,1/15,1/20,1/25,1/30,1/40,1/50,1/60,
1/80,1/100,1/125,1/160,1/200,1/250,1/320,
1/400,1/500,1/640,1/800,1/1000,1/1250,
1/1600,1/2000,1/2500,1/3200
COPY

206
Specications
Aperture
f/number f/3.5–f/8.0(W),f/5.9–f/8.0(T)
<B>modeavailablevalues
*
f/3.5,f/4.0,f/4.5,f/5.0,f/5.6,f/5.9,f/6.3,f/7.1,
f/8.0
*Dependingonthezoomposition,someaperturevaluesmaynotbeavailable.
• AlldataisbasedontestsbyCanon.
• Cameraspecicationsorappearancearesubjecttochangewithout
notice.
COPY

207
Index
A
AC adapter kit ............................ 157, 164
Accessories ....................................... 157
AE lock ................................................ 81
AF frames ............................................ 92
AF lock................................................. 97
Aspect ratio.......................................... 54
AUTO mode (shooting mode) .. 20, 36, 42
Av (shooting mode) ........................... 105
B
Batteries ...................................... 15, 157
" Date/time (date/time battery)
Battery and charger kit ................ 157
Level ............................................ 189
Power saving ................................. 34
Battery and charger kit ...................... 157
Black and white images ....................... 86
Blink detection ..................................... 61
C
Camera
Reset all ...................................... 152
Camera shake ................................... 101
Center (AF frame mode)...................... 93
Clock.................................................... 40
Color (white balance)........................... 84
Compression ratio (image quality) ..... 101
Continuous shooting ............................ 88
Creative lters (shooting mode)........... 71
Cropping ............................................ 134
Custom white balance ......................... 85
D
Date/time
Adding date stamps ...................... 52
Changing ....................................... 18
Date/time battery ......................... 156
Setting ........................................... 17
World clock .................................. 150
DC coupler......................................... 157
Defaults " Reset all
DIGITAL CAMERA Solution Disk ........... 2
Digital tele-converter............................ 92
Digital zoom ......................................... 49
Discreet mode (shooting mode) .......... 76
Display language ................................. 19
DPOF ................................................. 173
Drive mode .......................................... 88
E
Editing
Cropping ...................................... 134
i-Contrast ..................................... 137
My Colors .................................... 136
Red-eye correction ...................... 138
Resizing images .......................... 133
Erasing .............................................. 124
Error messages ................................. 186
Exposure
AE lock .......................................... 81
Compensation ............................... 81
FE lock ........................................ 100
Eye-Fi cards .................................. 2, 179
F
Face AiAF (AF frame mode) ................ 93
Face self-timer (shooting mode) .......... 69
Favorites ............................................ 129
FE lock............................................... 100
File numbering ................................... 148
Fireworks (shooting mode) .................. 68
Fish-eye effect (shooting mode) .......... 72
Flash
Flash exposure compensation ...... 99
On ................................................. 98
Slow synchro ................................. 98
COPY

208
Index
Focuscheck.......................................113
Focusing
AFframes...................................... 92
AFlock.......................................... 97
AF-pointzoom............................... 60
ServoAF....................................... 95
Focusingrange
Macro............................................ 90
Manualfocus................................. 90
Focuslock........................................... 93
FUNC.menu
Basicoperations............................ 37
Table............................................ 194
G
Gridlines............................................. 59
H
Householdpower............................... 164
I
i-Contrast..................................... 83,137
iFramemovies(moviemode).............. 78
ImagequalityCompressionratio
(imagequality)
Images
Displayperiod............................... 63
Erasing........................................ 124
PlaybackViewing
Protecting.................................... 120
Indicator............................................... 40
Interfacecable................................. 2,28
ISOspeed............................................ 82
L
Lamp.................................................... 62
LiveViewControl(shootingmode)...... 66
Low-light(shootingmode)................... 67
M
Macro(focusmode)............................. 90
Magnieddisplay................................117
Manualfocus(focusmode)................. 90
Memorycards........................................ 2
Recordingtime............................ 204
Menu
Basicoperations............................ 38
Table............................................ 192
Meteringmethod.................................. 82
Miniatureeffect(shootingmode)......... 72
Monochrome(shootingmode)............. 75
Movies
Editing......................................... 139
Imagequality
(resolution/framerate)................... 57
Recordingtime............................ 204
M(shootingmode)............................. 106
MyCategory...................................... 130
MyColors.................................... 86,136
P
Packagecontents.................................. 2
Photobookset-up.............................. 177
PictBridge.................................. 158,166
PlaybackViewing
Portrait(shootingmode)...................... 67
Postereffect(shootingmode)............. 71
PowerACadapterkit
Batteries
Batteryandchargerkit
Powersaving....................................... 34
Clock............................................. 40
Printing.............................................. 166
ProgramAE......................................... 80
Protecting.......................................... 120
P(shootingmode)............................... 80
COPY

209
Index
R
Red-eyecorrection...................... 56,138
Resetall............................................. 152
Resizingimages................................ 133
Resolution(imagesize)....................... 55
Rotating............................................. 127
S
Savingimagestoacomputer.............. 27
Screen
Displaylanguage........................... 19
Icons.................................... 188,190
MenuFUNC.menu,Menu
SD/SDHC/SDXCmemorycards
Memorycards
Searching...........................................115
Self-timer............................................. 50
2-secondself-timer........................ 51
Customizingtheself-timer............. 51
Faceself-timer(shootingmode)... 69
Sepiatoneimages............................... 86
ServoAF.............................................. 95
Shooting
Shootingdate/timeDate/time
Shootinginformation................... 188
Slideshow...........................................118
SmartShufe......................................119
Snow(shootingmode)......................... 68
Software
DIGITALCAMERASolutionDisk.... 2
Installation..................................... 27
Savingimagestoacomputer........ 29
Sounds.............................................. 142
StereoAVcable................................. 162
Strap................................................ 2,14
Supervivid(shootingmode)................ 71
T
Terminal..................... 159,163,165,166
Toycameraeffect(shootingmode)..... 74
TrackingAF................................... 53,94
Travelingwiththecamera................. 150
Troubleshooting................................. 182
TVdisplay.......................................... 159
Tv(shootingmode)............................ 104
V
Viewing................................................ 23
Imagesearch...............................115
Indexdisplay................................114
Magnieddisplay.........................117
Single-imagedisplay..................... 23
Slideshow.....................................118
SmartShufe...............................119
TVdisplay................................... 159
W
Whitebalance(color)........................... 84
Worldclock........................................ 150
WriststrapStrap
Z
Zoom....................................... 20,42,49
COPY

210
COPY

211
MEMO
COPY

212
USAandCanadaonly:
TheNickel-MetalHydridebatteryisrecyclable.
Pleasecall1-800-8-BATTERYforinformationonhowtorecyclethis
battery.
FCCNotice
(DigitalCamera,ModelPC1816systems)
ThisdevicecomplieswithPart15oftheFCCRules.Operationissubjecttothe
followingtwoconditions;
(1)thisdevicemaynotcauseharmfulinterference,and
(2)thisdevicemustacceptanyinterferencereceived,includinginterferencethatmay
causeundesiredoperation.
Note:ThisequipmenthasbeentestedandfoundtocomplywiththelimitsforClass
Bdigitaldevices,pursuanttoPart15oftheFCCrules.Theselimitsaredesigned
toprovidereasonableprotectionagainstharmfulinterferenceinaresidential
installation.
Thisequipmentgenerates,usesandcanradiateradiofrequencyenergyand,if
notinstalledandusedinaccordancewiththeinstructions,maycauseharmful
interferencetoradiocommunications.However,thereisnoguaranteethat
interferencewillnotoccurinaparticularinstallation.Ifthisequipmentdoescause
harmfulinterferencetoradioortelevisionreception,whichcanbedetermined
byturningtheequipmentoffandon,theuserisencouragedtotrytocorrectthe
interferencebyoneormoreofthefollowingmeasures:
•Reorientorrelocatethereceivingantenna.
•Increasetheseparationbetweentheequipmentandreceiver.
•Connecttheequipmentintoanoutletonacircuitdifferentfromthattowhichthe
receiverisconnected.
•Consultthedealeroranexperiencedradio/TVtechnicianforhelp.
Thecablewiththeferritecoreprovidedwiththedigitalcameramustbeusedwiththis
equipmentinordertocomplywithClassBlimitsinSubpartBofPart15oftheFCC
rules.
Donotmakeanychangesormodicationstotheequipmentunlessotherwise
speciedinthemanual.Ifsuchchangesormodicationsshouldbemade,youcould
berequiredtostopoperationoftheequipment.
CanonU.S.A.,Inc.
OneCanonPlaza,LakeSuccess,NY11042,U.S.A.
TelNo.(516)328-5600
COPY

213
CanadianRadioInterferenceRegulations
ThisClassBdigitalapparatuscomplieswithCanadianICES-003.
ForCA,USAonly
IncludedlithiumbatterycontainsPerchlorateMaterial-specialhandlingmayapply.
Seewww.dtsc.ca.gov/hazardouswaste/perchlorate/fordetails.
TrademarkAcknowledgments
• TheSDXClogoisatrademarkofSD-3C,LLC.
• ThisdeviceincorporatesexFATtechnologylicensedfromMicrosoft.
• HDMI,theHDMIlogoandHigh-DenitionMultimediaInterfaceare
trademarksorregisteredtrademarksofHDMILicensingLLC.
• TheiFramelogoandtheiFramesymbolaretrademarksofAppleInc.
AboutMPEG-4Licensing
ThisproductislicensedunderAT&TpatentsfortheMPEG-4standard
andmaybeusedforencodingMPEG-4compliantvideoand/ordecoding
MPEG-4compliantvideothatwasencodedonly(1)forapersonaland
non-commercialpurposeor(2)byavideoproviderlicensedundertheAT&T
patentstoprovideMPEG-4compliantvideo.
NolicenseisgrantedorimpliedforanyotheruseforMPEG-4standard.
*NoticedisplayedinEnglishasrequired.
Disclaimer
• Reprinting,transmitting,orstoringinaretrievalsystemanypartofthis
guidewithoutthepermissionofCanonisprohibited.
• Canonreservestherighttochangethecontentsofthisguideatanytime
withoutpriornotice.
• Illustrationsandscreenshotsinthisguidemaydifferslightlyfromthe
actualequipment.
• Theaboveitemsnotwithstanding,Canonacceptsnoliabilityfordamages
duetomistakenoperationoftheproducts.
COPY

CDD-E494-010 ©CANONINC.2012
COPY