Camera User Guide
• Makesureyoureadthisguide,includingthe“Safety
Precautions”section,beforeusingthecamera.
• Readingthisguidewillhelpyoulearntousethecamera
properly.
• Storethisguidesafelysothatyoucanuseitinthefuture.
ENGLISH
COPY
2
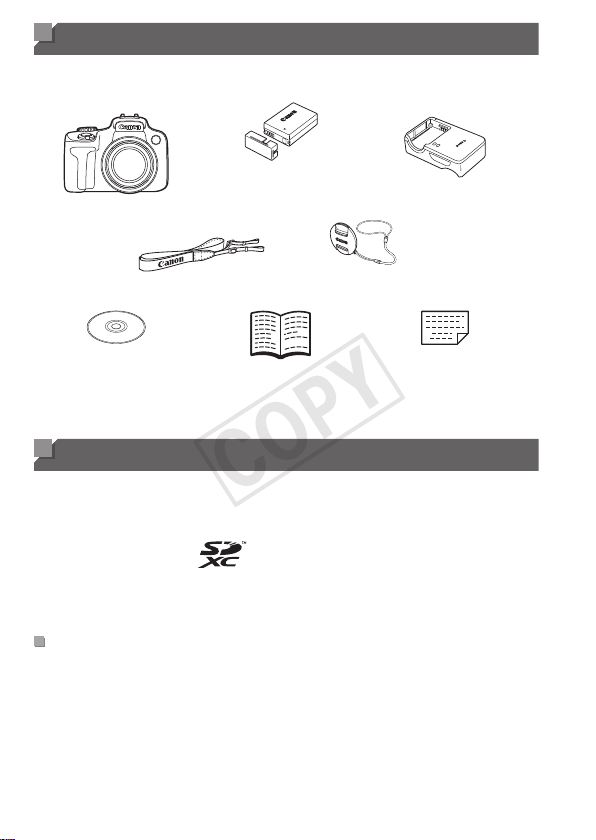
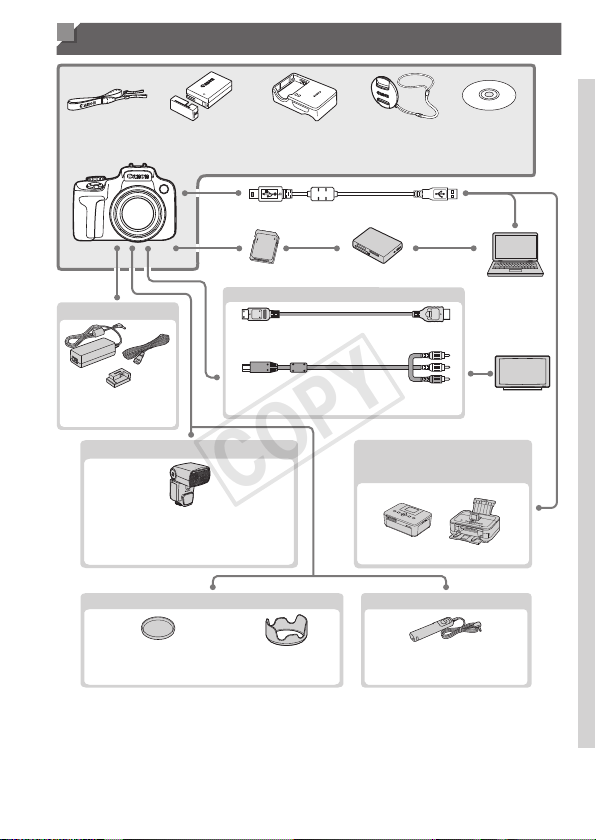
Package Contents
Beforeuse,makesurethefollowingitemsareincludedinthepackage.
Ifanythingismissing,contactyourcameradealer.
Camera
BatteryPack
NB-10L
(withterminalcover)
BatteryCharger
CB-2LC/CB-2LCE
NeckStrap
NS-DC11
LensCap
(withcord)
DIGITALCAMERA
SolutionDisk*
(CD-ROM)
GettingStarted
WarrantyCard
*ContainssoftwareandPDFmanuals(=
28).
• Amemorycardisnotincluded(seebelow).
Compatible Memory Cards
Thefollowingmemorycards(soldseparately)canbeused,regardlessofcapacity.
• SDmemorycards*
• SDHCmemorycards*
• SDXCmemorycards*
• Eye-Ficards
*ConformstoSDspecications.However,notallmemorycardshavebeenveriedto
workwiththecamera.
AboutEye-FiCards
ThisproductisnotguaranteedtosupportEye-Ficardfunctions(including
wirelesstransfer).IncaseofanissuewithanEye-Ficard,pleasecheck
withthecardmanufacturer.
AlsonotethatanapprovalisrequiredtouseEye-Ficardsinmanycountries
orregions.Withoutapproval,useofthecardisnotpermitted.Ifitisunclear
whetherthecardhasbeenapprovedforuseinthearea,pleasecheckwith
thecardmanufacturer.
COPY

3
Preliminary Notes and Legal Information
• Takeandreviewsometestshotsinitiallytomakesuretheimageswere
recordedcorrectly.PleasenotethatCanonInc.,itssubsidiariesand
afliates,anditsdistributorsarenotliableforanyconsequentialdamages
arisingfromanymalfunctionofacameraoraccessory,includingmemory
cards,thatresultsinthefailureofanimagetoberecordedortobe
recordedinawaythatismachinereadable.
• Imagesrecordedbythecameraareintendedforpersonaluse.Refrain
fromunauthorizedrecordingthatinfringesoncopyrightlaw,andnotethat
evenforpersonaluse,photographymaycontravenecopyrightorother
legalrightsatsomeperformancesorexhibitions,orinsomecommercial
settings.
• Thecamerawarrantyisvalidonlyintheareaofpurchase.Incaseof
cameraproblemswhileabroad,returntotheareaofpurchasebefore
contactingaCanonCustomerSupportHelpDesk.
• AlthoughtheLCDmonitorandviewnderareproducedunderextremely
high-precisionmanufacturingconditionsandmorethan99.99%ofthe
pixelsmeetdesignspecications,inrarecasessomepixelsmaybe
defectiveormayappearasredorblackdots.Thisdoesnotindicate
cameradamageoraffectrecordedimages.
• TheLCDmonitormaybecoveredwithathinplasticlmforprotection
againstscratchesduringshipment.Ifcovered,removethelmbefore
usingthecamera.
• Whenthecameraisusedoveranextendedperiod,itmaybecomewarm.
Thisdoesnotindicatedamage.
Organization of Camera User Guide
Thefollowingguidesareincluded,eachusedfordifferentpurposes.
BasicGuide(=
13)
• Givesbasicinstructions,frominitialpreparationstoshooting,playback,
andsavingonacomputer
AdvancedGuide(=
37)
• Practicalguidethatintroducesothercamerabasicsanddescribes
shootingandplaybackoptions
COPY
4
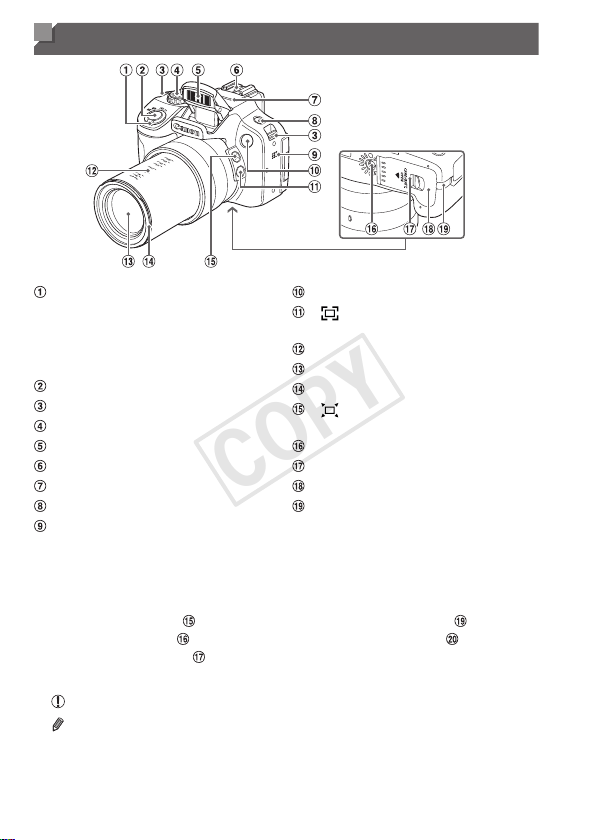
Part Names and Conventions in This Guide
Zoomlever
Shooting:<i(telephoto)>/
<j(wideangle)>
Playback:<k(magnify)>/
<g(index)>
Shutterbutton
Strapmount
Modedial
Flash
Hotshoe
Microphone
<h(Flash)>button
Speaker
Lamp
< (FramingAssist–Lock)>
button
Focallengthmarkings(approx.)
Lens
Lenshood/lteradaptermount
< (FramingAssist–Seek)>
button
Tripodsocket
Lockreleaseswitch
Memorycard/batterycover
DCcouplercableport
• Inthisguide,iconsareusedtorepresentthecorrespondingcamera
buttonsanddialsonwhichtheyappearorwhichtheyresemble.
• Thefollowingcamerabuttonsandcontrolsarerepresentedbyicons.
<q> Leftbutton onback
<o> Upbutton onback
<r> Rightbutton onback
< p> Downbutton onback
< 5> Controldial onback
• Shootingmodesandon-screeniconsandtextareindicatedinbrackets.
•
:Importantinformationyoushouldknow
•
:Notesandtipsforexpertcamerause
• =xx:Pageswithrelatedinformation(inthisexample,“xx”representsa
pagenumber)
• Instructionsinthisguideapplytothecameraunderdefaultsettings.
COPY
5
PartNamesandConventionsinThisGuide
Screen(LCDmonitor)
< (Shortcut)>/<c(Direct
print)>button
Diopteradjustmentdial
Viewnder
<1(Playback)>button
Indicator
Powerbutton
Moviebutton
Remoteterminal
< (AFFrameSelector)>/
<a(Singleimageerase)>button
AVOUT(Audio/videooutput)/
DIGITALterminal
HDMI
TM
terminal
<n>button
<l(Display)>button
<e(Macro)>/<f(Manual
focus)>/Leftbutton
<b(Exposurecompensation)>/
<
(Filterimagedisplay)>/Up
button
< (Self-timer)>/Rightbutton
FUNC./SETbutton
< >/Downbutton
Controldial
Turningthecontroldialisonewayto
choosesettingitems,switchimages,and
performotheroperations.Mostofthese
operationsarealsopossiblewiththe
<o><p><q><r>buttons.
• Forconvenience,allsupportedmemorycardsaresimplyreferredtoas
“thememorycard”.
• Thetabsshownabovetitlesindicatewhetherthefunctionisusedforstill
images,movies,orboth.
StillImages
: Indicatesthatthefunctionisusedwhenshootingor
viewingstillimages.
Movies
: Indicatesthatthefunctionisusedwhenshootingor
viewingmovies.
COPY

6
Table of Contents
PackageContents.........................2
CompatibleMemoryCards............2
PreliminaryNotesandLegal
Information.....................................3
OrganizationofCameraUser
Guide.............................................3
PartNamesandConventionsin
ThisGuide......................................4
TableofContents...........................6
Contents:BasicOperations...........8
SafetyPrecautions.......................10
Basic Guide .................... 13
InitialPreparations.......................14
TryingtheCameraOut................22
IncludedSoftware,PDF
Manuals.......................................28
Accessories..................................35
Advanced Guide ............. 37
1 CameraBasics.....................37
On/Off..........................................38
ShutterButton..............................39
Viewnder....................................40
ShootingModes...........................40
FUNC.Menu................................41
MENUMenu................................42
ShootingDisplayOptions............43
IndicatorDisplay..........................44
Clock............................................44
2 SmartAutoMode.................45
Shooting(SmartAuto).................46
Common,ConvenientFeatures...55
UsingFaceID..............................63
ImageCustomizationFeatures....73
HelpfulShootingFeatures...........79
CustomizingCamera
Operation.....................................82
3 OtherShootingModes........85
AutoClipRecording
(MovieDigest)..............................86
MovingSubjects(Sports).............87
SpecicScenes...........................89
ImageEffects(CreativeFilters)...92
SpecialModesforOther
Purposes....................................102
ShootingVariousMovies...........108
4 PMode................................113
ShootinginProgramAEMode
(<P>Mode)................................ 114
ImageBrightness
(ExposureCompensation)......... 115
ColorandContinuous
Shooting.....................................122
ShootingRangeand
Focusing....................................129
Flash..........................................142
ShootingRAWImages...............146
OtherSettings............................147
5 Tv,Av,M,C1,andC2
Mode...................................149
SpecicShutterSpeeds
(<Tv>Mode)..............................150
SpecicApertureValues
(<Av>Mode)..............................151
SpecicShutterSpeedsand
ApertureValues(<M>Mode).....152
COPY

7
TableofContents
CustomizationforShooting
Styles.........................................154
6 PlaybackMode..................159
Viewing......................................160
BrowsingandFiltering
Images.......................................166
EditingFaceIDInformation.......171
ImageViewingOptions..............172
ProtectingImages......................175
ErasingImages..........................179
RotatingImages.........................182
ImageCategories......................184
EditingStillImages....................188
EditingMovies............................194
7 SettingMenu......................197
AdjustingBasicCamera
Functions...................................198
8 Accessories.......................213
TipsonUsingIncluded
Accessories................................214
OptionalAccessories.................215
UsingOptionalAccessories.......218
PrintingImages..........................231
UsinganEye-FiCard.................245
9 Appendix............................247
Troubleshooting.........................248
On-ScreenMessages................252
On-ScreenInformation..............255
HandlingPrecautions.................259
FunctionsandMenuTables.......260
Specications.............................274
Index..........................................278
COPY

8
Contents: Basic Operations
4 Shoot
Usecamera-determinedsettings(AutoMode).................................... 46
Shootingpeoplewell
I
Portraits
(=
89)
P
AgainstSnow
(=
90)
SmoothSkin
(=
91)
Matchingspecicscenes
Sports
(=
87)
NightScenes
(=
89)
t
Fireworks
(=
90)
Applyingspecialeffects
VividColors
(=
92)
PosterEffect
(=
92)
Fish-EyeEffect
(=
94)
MiniatureEffect
(=
95)
ToyCameraEffect
(=
96)
SoftFocus
(=
97)
Monochrome
(=
98)
Focusonfaces............................................................... 46,89,133,139
Withoutusingtheash(FlashOff)....................................................... 47
Withmyselfintheshot(Self-Timer)............................................. 58,104
Addadatestamp................................................................................. 61
COPY

9
Contents:BasicOperations
UseFaceID................................................................................. 63,163
Movieclipsandphotostogether(MovieDigest).................................. 86
1 View
Viewimages(PlaybackMode)........................................................... 160
Automaticplayback(Slideshow)........................................................ 173
OnaTV.............................................................................................. 218
Onacomputer..................................................................................... 29
Browsethroughimagesquickly......................................................... 166
Eraseimages..................................................................................... 179
E Shoot/ViewMovies
Shootmovies............................................................................... 46,108
Viewmovies(PlaybackMode)........................................................... 160
Fast-movingsubjects,slow-motionplayback......................................111
c Print
Printpictures...................................................................................... 231
Save
Saveimagestoacomputer................................................................. 32
COPY

10
Safety Precautions
• Beforeusingtheproduct,pleaseensurethatyoureadthesafetyprecautions
describedbelow.Alwaysensurethattheproductisusedcorrectly.
• Thesafetyprecautionsnotedonthefollowingpagesareintendedto
preventinjuriestoyourselfandotherpersons,ordamagetotheequipment.
• Besuretoalsochecktheguidesincludedwithanyseparatelysold
accessoriesyouuse.
Warning
Denotesthepossibilityofseriousinjuryordeath.
• Donottriggertheashincloseproximitytopeople’seyes.
Exposuretotheintenselightproducedbytheashcoulddamageeyesight.In
particular,remainatleast1meter(39inches)awayfrominfantswhenusingtheash.
• Storethisequipmentoutofthereachofchildrenandinfants.
Strap:Puttingthestraparoundachild’sneckcouldresultinasphyxiation.
• Useonlyrecommendedpowersources.
• Donotattempttodisassemble,alterorapplyheattotheproduct.
• Avoiddroppingorsubjectingtheproducttosevereimpacts.
• Toavoidtheriskofinjury,donottouchtheinterioroftheproductif
ithasbeendroppedorotherwisedamaged.
• Stopusingtheproductimmediatelyifitemitssmoke,astrange
smell,orotherwisebehavesabnormally.
• Donotuseorganicsolventssuchasalcohol,benzine,orthinnerto
cleantheproduct.
• Donotlettheproductcomeintocontactwithwater(e.g.seawater)
orotherliquids.
• Donotallowliquidsorforeignobjectstoenterthecamera.
Thiscouldresultinelectricalshockorre.
Ifliquidsorforeignobjectscomeintocontactwiththecamerainterior,
immediatelyturnthecameraoffandremovethebattery.
Ifthebatterychargerbecomeswet,unplugitfromtheoutletandconsult
yourcameradistributororaCanonCustomerSupportHelpDesk.
• Donotlookthroughtheviewnderatbrightlightsources(suchas
thesunonaclearday).
Thiscoulddamageyoureyesight.
• Useonlytherecommendedbattery.
• Donotplacethebatterynearorindirectame.
• Unplugthepowercordperiodically,andusingadrycloth,wipeaway
anydustanddirtthathascollectedontheplug,theexteriorofthe
poweroutlet,andthesurroundingarea.
• Donothandlethepowercordwithwethands.
COPY

11
SafetyPrecautions
• Donotusetheequipmentinamannerthatexceedstheratedcapacity
oftheelectricaloutletorwiringaccessories.Donotuseifthepower
cordorplugaredamaged,ornotfullypluggedintotheoutlet.
• Donotallowdirtormetalobjects(suchaspinsorkeys)tocontact
theterminalsorplug.
Thebatterymayexplodeorleak,resultinginelectricalshockorre.Thiscouldcause
injuryanddamagethesurroundings.Intheeventthatabatteryleaksandthebattery
electrolytecontactseyes,mouth,skinorclothing,immediatelyushwithwater.
• Turnthecameraoffinplaceswherecamerauseisprohibited.
Theelectromagneticwavesemittedbythecameramayinterferewiththe
operationofelectronicinstrumentsandotherdevices.Exerciseadequate
cautionwhenusingthecamerainplaceswhereuseofelectronicdevicesis
restricted,suchasinsideairplanesandmedicalfacilities.
• DonotplaythesuppliedCD-ROM(s)inanyCDplayerthatdoesnot
supportdataCD-ROMs.
Itispossibletosufferhearinglossfromlisteningwithheadphonestothe
loudsoundsofaCD-ROMplayedonanaudioCDplayer(musicplayer).
Additionally,thiscoulddamagethespeakers.
Caution
Denotesthepossibilityofinjury.
• Whenholdingthecamerabythestrap,becarefulnottobangit,subject
ittostrongimpactsorshocks,orletitgetcaughtonotherobjects.
• Becarefulnottobumporpushstronglyonthelens.
Thiscouldleadtoinjuryordamagethecamera.
• Becarefulnottosubjectthescreentostrongimpacts.
Ifthescreencracks,injurymayresultfromthebrokenfragments.
• Whenusingtheash,becarefulnottocoveritwithyourngersorclothing.
Thiscouldresultinburnsordamagetotheash.
• Avoidusing,placingorstoringtheproductinthefollowingplaces:
-Placessubjecttostrongsunlight
-Placessubjecttotemperaturesabove40°C(104°F)
-Humidordustyareas
Thesecouldcauseleakage,overheatingoranexplosionofthebattery,
resultinginelectricalshock,re,burnsorotherinjuries.
Hightemperaturesmaycausedeformationofthecameraorbatterychargercasing.
• Theslideshowtransitioneffectsmaycausediscomfortwhenviewed
forprolongedperiods.
COPY

12
SafetyPrecautions
• Whenusingtheseparatelysoldlenslters,besuretoattachthemrmly.
Ifthelensbecomeslooseandfallsoff,itmaycrack,andtheshardsofglass
mayleadtocuts.
Caution
Denotesthepossibilityofdamagetotheequipment.
• Donotaimthecameraatbrightlightsources(suchasthesunonaclearday).
Doingsomaydamagetheimagesensor.
• Whenusingthecameraonabeachoratawindylocation,becareful
nottoallowdustorsandtoenterthecamera.
Thismaycausetheproducttomalfunction.
• Inregularuse,smallamountsofsmokemaybeemittedfromtheash.
Thisisduetothehighintensityoftheashburningdustandforeignmaterials
stucktothefrontoftheunit.Pleaseuseacottonswabtoremovedirt,dustorother
foreignmatterfromtheashtopreventheatbuild-upanddamagetotheunit.
• Removeandstorethebatterywhenyouarenotusingthecamera.
Ifthebatteryisleftinsidethecamera,damagecausedbyleakagemayoccur.
• Beforeyoudiscardthebattery,covertheterminalswithtapeorotherinsulators.
Contactingothermetalmaterialsmayleadtoreorexplosions.
• Unplugthebatterychargerfromthepoweroutletafterchargingis
complete,orwhenyouarenotusingit.
• Donotplaceanything,suchascloth,ontopofthebatterycharger
whileitischarging.
Leavingtheunitpluggedinforalongperiodoftimemaycauseitto
overheatanddistort,resultinginre.
• Donotplacethebatterynearpets.
Petsbitingthebatterycouldcauseleakage,overheatingorexplosion,
resultinginreordamage.
• Whenputtingthecamerainyourbag,closethescreentofaceinward
toensurethathardobjectsdonotcomeintocontactwiththescreen.
• Donotattachanyhardobjectstothecamera.
Doingsomaycausemalfunctionsordamagethescreen.
COPY

13
Basic Guide
Givesbasicinstructions,frominitial
preparationstoshooting,playback,and
savingonacomputer
COPY
14
Initial Preparations
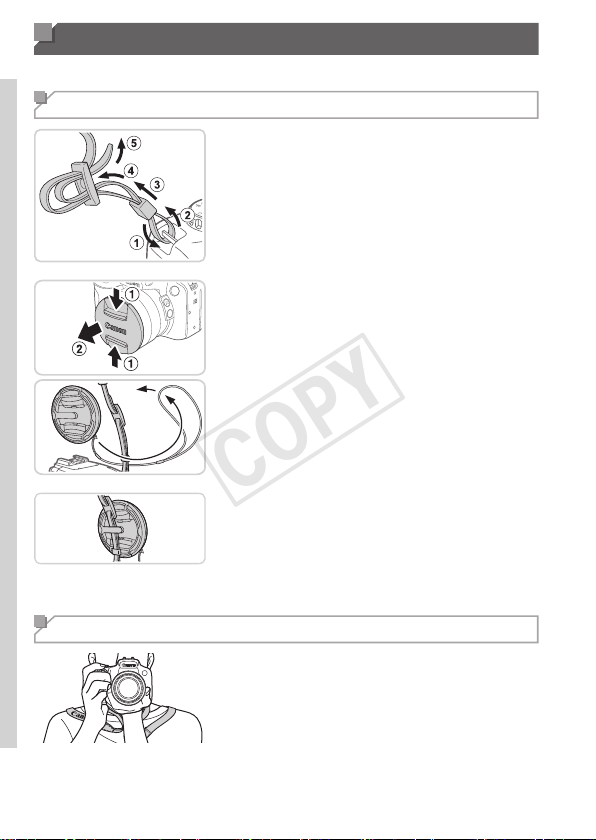
Prepareforshootingasfollows.
Attaching Accessories
1 Attachthestrap.
Attachtheincludedstraptothecamera
asshown.
Ontheothersideofthecamera,attach
thestrapthesameway.
2 Attachthelenscaptothestrap.
Removethelenscapfromthecamera
andattachthelenscapcordtothestrap.
Alwaysremovethelenscapbefore
turningthecameraon.Tryclippingthe
lenscaptotheneckstrapwhenthecap
isnotinuse.
Keepthelenscaponthelenswhenthe
cameraisnotinuse.
Holding the Camera
Placethestraparoundyourneck.
Whenshooting,keepyourarmscloseto
yourbodyandholdthecamerasecurely
topreventitfrommoving.Ifyouhave
raisedtheash,donotrestyourngers
onit.
COPY
15
InitialPreparations
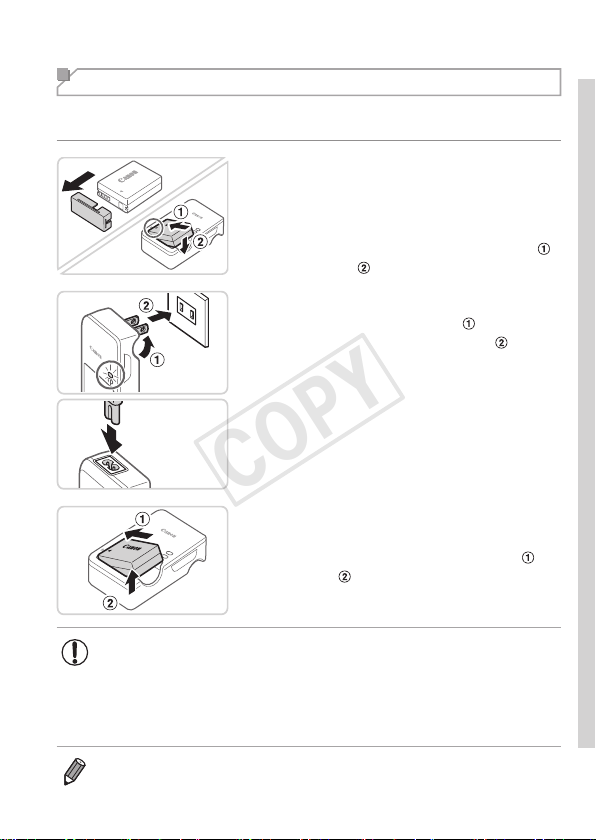
Charging the Battery
Beforeuse,chargethebatterywiththeincludedcharger.Besuretocharge
thebatteryinitially,becausethecameraisnotsoldwiththebatterycharged.
1 Removethebatterycoverand
insertthebatteryinthecharger.
Removethecoverfromthebattery,align
the▲marksonthebatteryandcharger,
andinsertthebatterybypushingitin(
)
anddown(
).
CB-2LC
CB-2LCE
2 Chargethebattery.
CB-2LC:Flipouttheplug( )andplug
thechargerintoapoweroutlet(
).
CB-2LCE:Plugthepowercordintothe
charger,thenplugtheotherendintoa
poweroutlet.
Thecharginglampturnsorangeand
chargingbegins.
Whenthechargingisnished,thelamp
turnsgreen.
3 Removethebattery.
Afterunpluggingthebatterycharger,
removethebatterybypushingitin(
)
andup(
).
• Toprotectthebatteryandkeepitinoptimalcondition,donot
chargeitcontinuouslyformorethan24hours.
• Forbatterychargersthatuseapowercord,donotattach
thechargerorcordtootherobjects.Doingsocouldresultin
malfunctionordamagetotheproduct.
• Fordetailsonchargingtimeandthenumberofshotsandrecordingtime
possiblewithafullychargedbattery,see“Specications”(=
274).
COPY
16
InitialPreparations
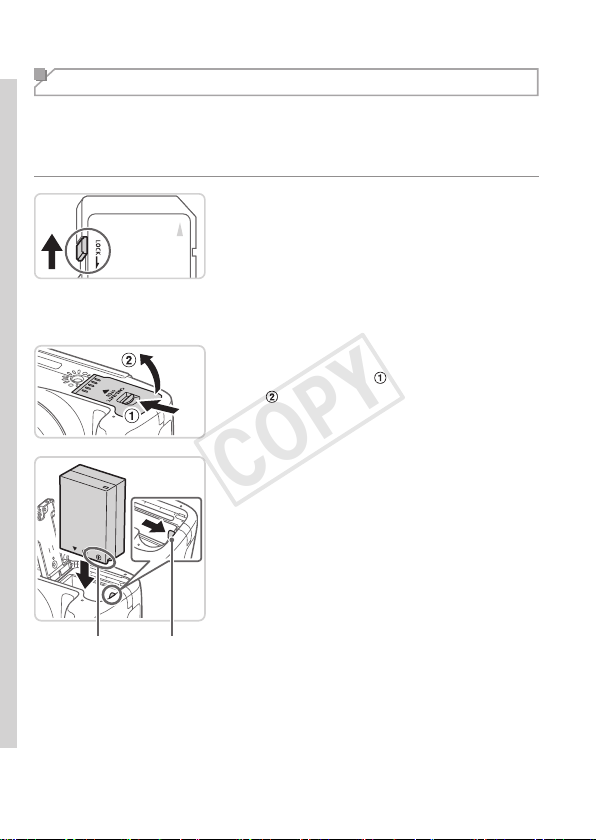
Inserting the Battery and Memory Card
Inserttheincludedbatteryandamemorycard(soldseparately).
Notethatbeforeusinganewmemorycard(oramemorycardformatted
inanotherdevice),youshouldformatthememorycardwiththiscamera
(=
203).
1 Checkthecard’swrite-protect
tab.
Recordingisnotpossibleonmemory
cardswithawrite-protecttabwhenthe
tabisinthelocked(downward)position.
Slidethetabupuntilitclicksintothe
unlockedposition.
2 Openthecover.
Slidetheswitch( )andopenthecover
(
).
Terminals Battery
Lock
3 Insertthebattery.
Whilepressingthebatterylockinthe
directionofthearrow,insertthebattery
asshownandpushitinuntilitclicksinto
thelockedposition.
Ifyouinsertthebatteryfacingthewrong
way,itcannotbelockedintothecorrect
position.Alwaysconrmthatthebattery
isfacingtherightwayandlockswhen
inserted.
COPY
17
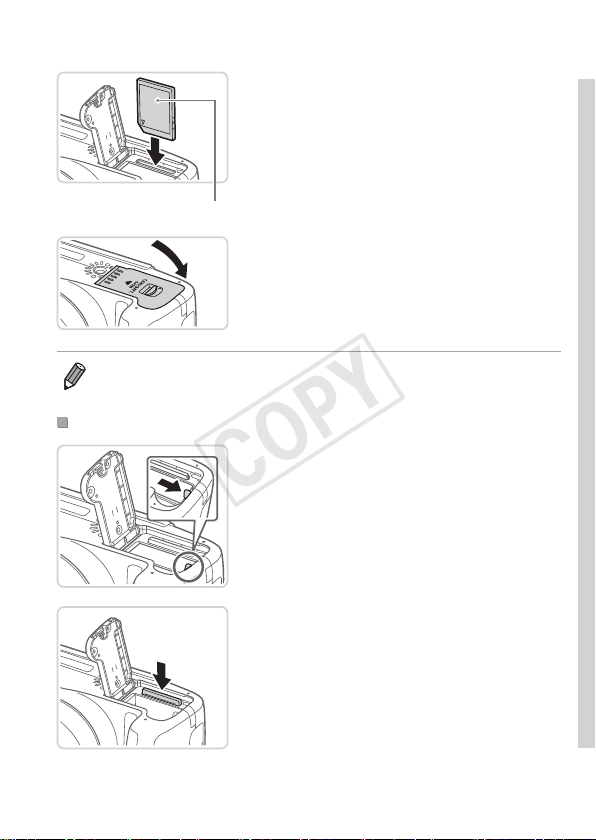
InitialPreparations
Label
4 Insertthememorycard.
Insertthememorycardfacingasshown
untilitclicksintothelockedposition.
Makesurethememorycardisfacingthe
rightwaywhenyouinsertit.Inserting
memorycardsfacingthewrongwaymay
damagethecamera.
5 Closethecover.
Lowerthecoverinthedirectionofthe
arrowandpressituntilitclicksintothe
closedposition.
• Forguidelinesonhowmanyshotsorhoursofrecordingcanbesavedon
onememorycard,see“Specications”(=
274).
RemovingtheBatteryandMemoryCard
Removethebattery.
Openthecoverandpressthebattery
lockinthedirectionofthearrow.
Thebatterywillpopup.
Removethememorycard.
Pushthememorycardinuntilitclicks,
andthenslowlyreleaseit.
Thememorycardwillpopup.
COPY
18
InitialPreparations
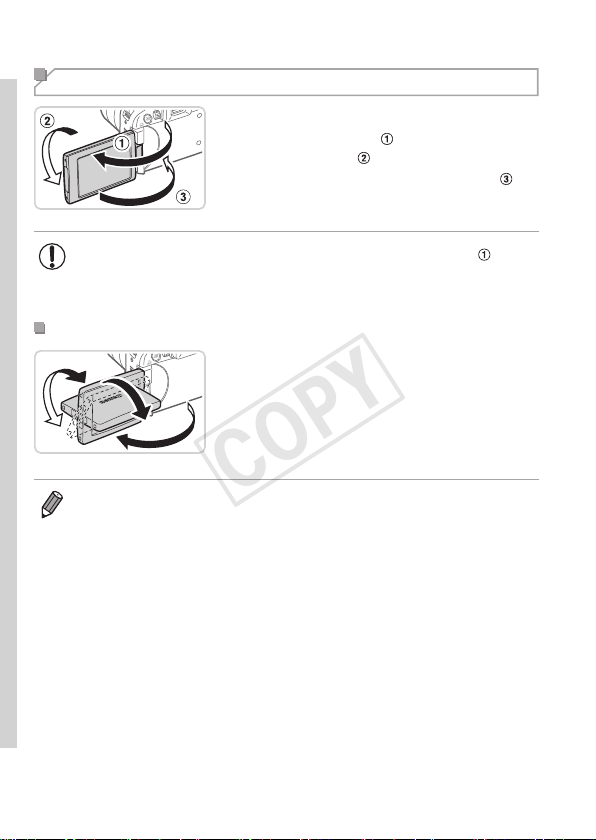
Using the Screen
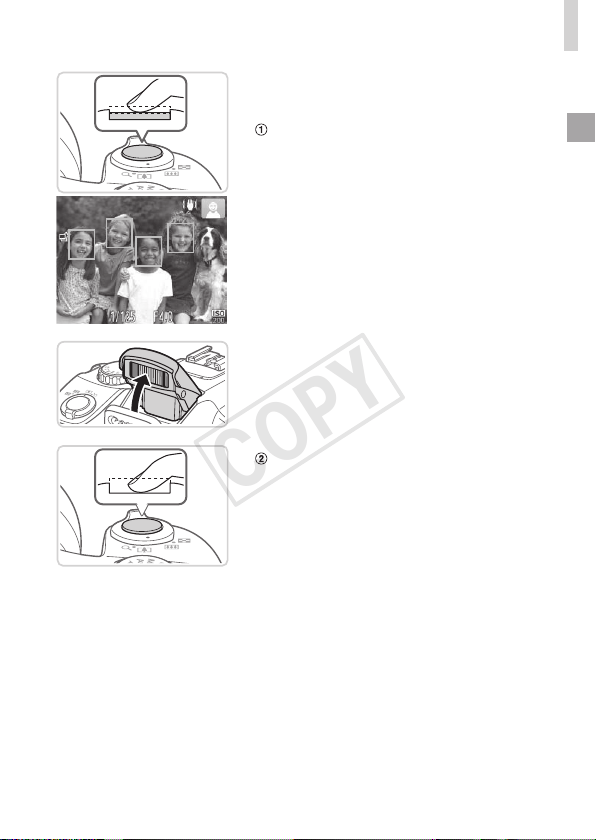
Preparethescreenforuse.
Openthescreen( )androtateittoward
thelens180°(
).
Closethescreeninthisorientation( ).
• Thescreencanonlyopentoapproximately175°indirection .Be
carefulnottoopenthescreenanyfurtherthanthis,asitwilldamage
thecamera.
AdjustingtheScreenAngleandOrientation
Youcanadjusttheangleandorientation
ofthescreenasneeded,tosuitshooting
conditions.
Toprotectthescreenwhenthecamera
isnotinuse,alwayskeepitclosedand
facingthecamerabody.
• Openthescreentoactivateitwhenthecameraison.Thiswilldeactivatethe
viewnder.Similarly,closethescreen(facingthecamerabody)todeactivate
itandactivatetheviewnder.
• Whenincludingyourselfinshots,youcanviewamirrorimageofyourselfby
rotatingthescreenaroundtowardthefrontofthecamera.Tocancelreverse
display,pressthe<n>button,choose[ReverseDisp.]onthe[4]tab,
andpressthe<q><r>buttonstochoose[Off].
COPY
19
InitialPreparations
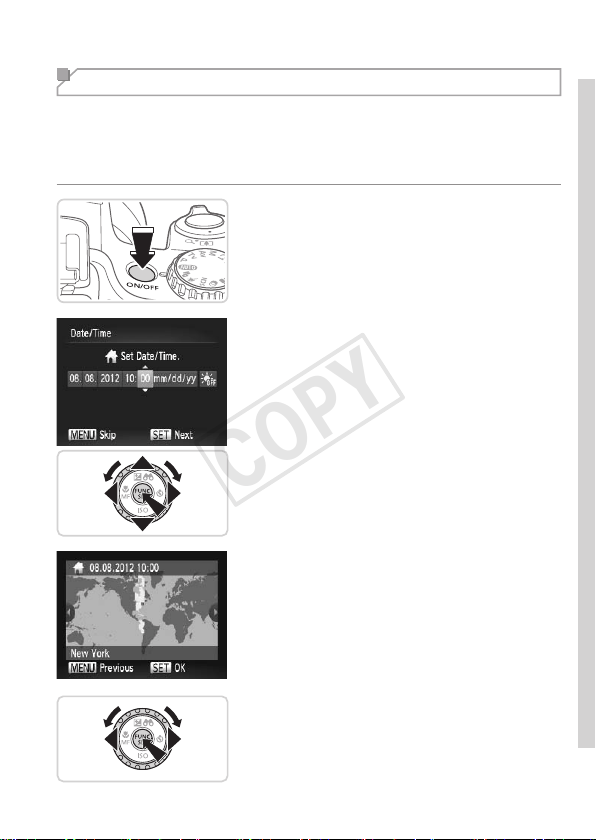
Setting the Date and Time
Setthecurrentdateandtimecorrectlyasfollowsifthe[Date/Time]screen
isdisplayedwhenyouturnthecameraon.Informationyouspecifythisway
isrecordedinimagepropertieswhenyoushoot,anditisusedwhenyou
manageimagesbyshootingdateorprintimagesshowingthedate.
Youcanalsoaddadatestamptoshots,ifyouwish(=
61).
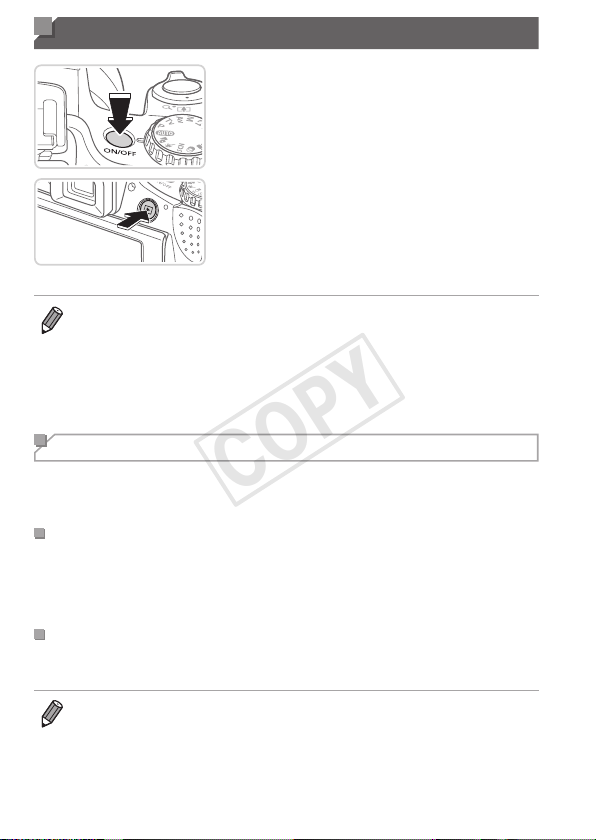
1 Turnthecameraon.
Pressthepowerbutton.
The[Date/Time]screenisdisplayed.
2 Setthedateandtime.
Pressthe<q><r>buttonstochoosean
option.
Pressthe<o><p>buttonsorturnthe
<5>dialtospecifythedateandtime.
Whennished,pressthe<m>button.
3 Setthehometimezone.
Pressthe<q><r>buttonsorturnthe
<5>dialtochooseyourhometime
zone.
4 Finishthesetupprocess.
Pressthe<m>buttonwhennished.
Afteraconrmationmessage,thesetting
screenisnolongerdisplayed.
Toturnoffthecamera,pressthepowerbutton.
COPY
20
InitialPreparations
• Unlessyousetthedate,time,andhometimezone,the[Date/
Time]screenwillbedisplayedeachtimeyouturnthecameraon.
Specifythecorrectinformation.
• Tosetdaylightsavingtime(1hourahead),choose[ ]instep2andthen
choose[
]bypressingthe<o><p>buttonsorturningthe<5>dial.
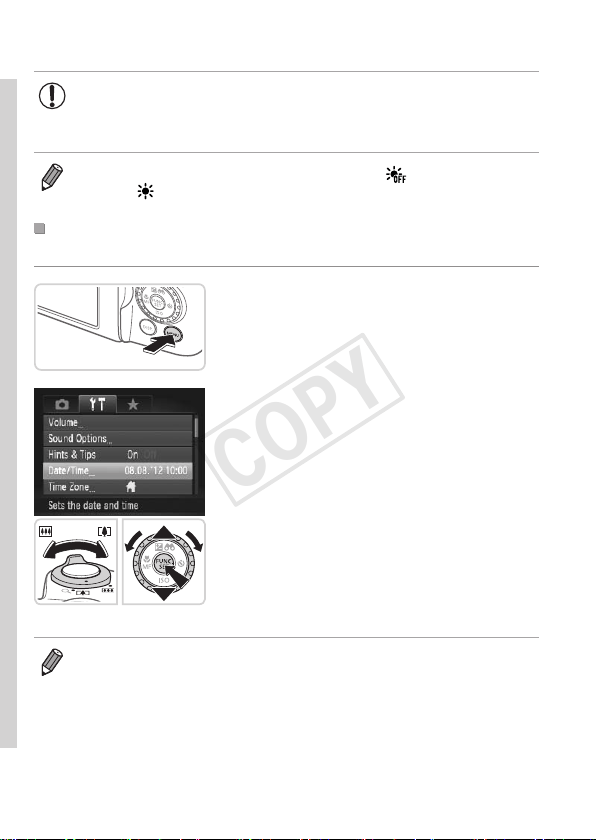
ChangingtheDateandTime
Adjustthedateandtimeasfollows.
1 Accessthecameramenu.
Pressthe<n>button.
2 Choose[Date/Time].
Movethezoomlevertochoosethe[3]
tab.
Pressthe<o><p>buttonsorturnthe
<5>dialtochoose[Date/Time],and
thenpressthe<m>button.
3 Changethedateandtime.
Followstep2on=
19toadjustthe
settings.
Pressthe<n>buttontoclosethe
menu.
• Date/timesettingscanberetainedforabout3weeksbythecamera’sbuilt-in
date/timebattery(backupbattery)afterthebatterypackisremoved.
• Thedate/timebatterywillbechargedinabout4hoursonceyouinserta
chargedbatteryorconnectthecameratoanACadapterkit(soldseparately,
=
215),evenifthecameraisleftoff.
• Oncethedate/timebatteryisdepleted,the[Date/Time]screenwillbe
displayedwhenyouturnthecameraon.Followthestepson=
19toset
thedateandtime.
COPY
21
InitialPreparations
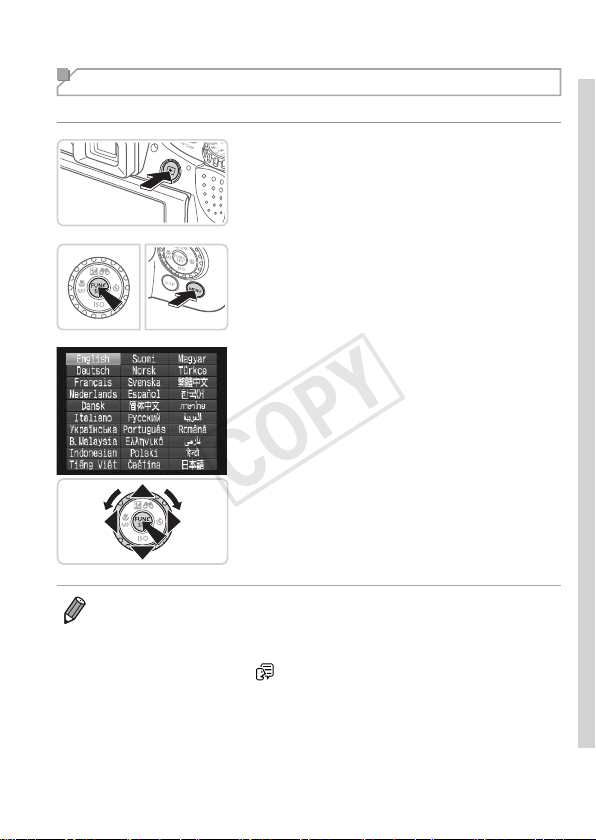
Display Language
Changethedisplaylanguageasneeded.
1 EnterPlaybackmode.
Pressthe<1>button.
2 Accessthesettingscreen.
Pressandholdthe<m>button,and
thenimmediatelypressthe<n>
button.
3 Setthedisplaylanguage.
Pressthe<o><p><q><r>buttonsor
turnthe<5>dialtochoosealanguage,
andthenpressthe<m>button.
Oncethedisplaylanguagehasbeenset,
thesettingscreenisnolongerdisplayed.
• Thecurrenttimeisdisplayedifyouwaittoolonginstep2afterpressingthe
<
m
>buttonbeforeyoupressthe<n>button.Inthiscase,pressthe
<
m
>buttontodismissthetimedisplayandrepeatstep2.
• Youcanalsochangethedisplaylanguagebypressingthe<n>button
andchoosing[Language
]onthe[3]tab.
COPY
22
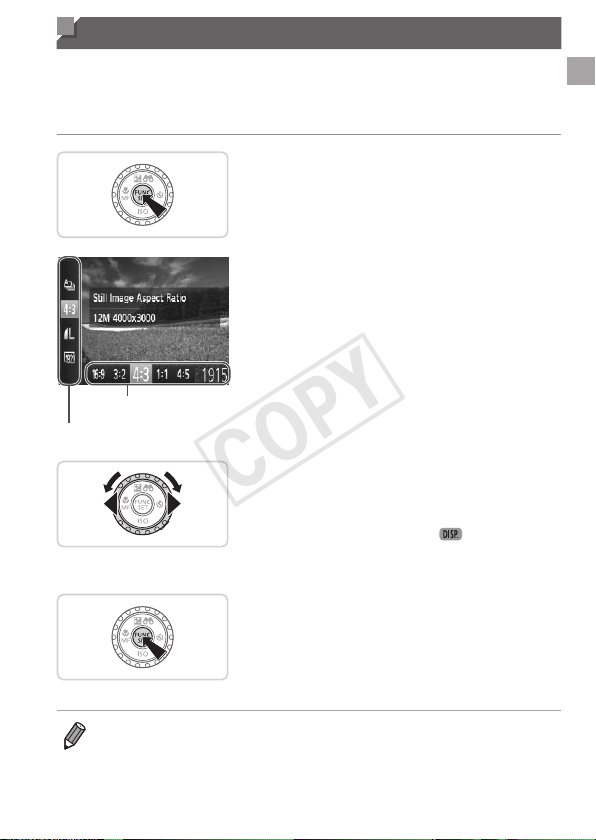
StillImages Movies
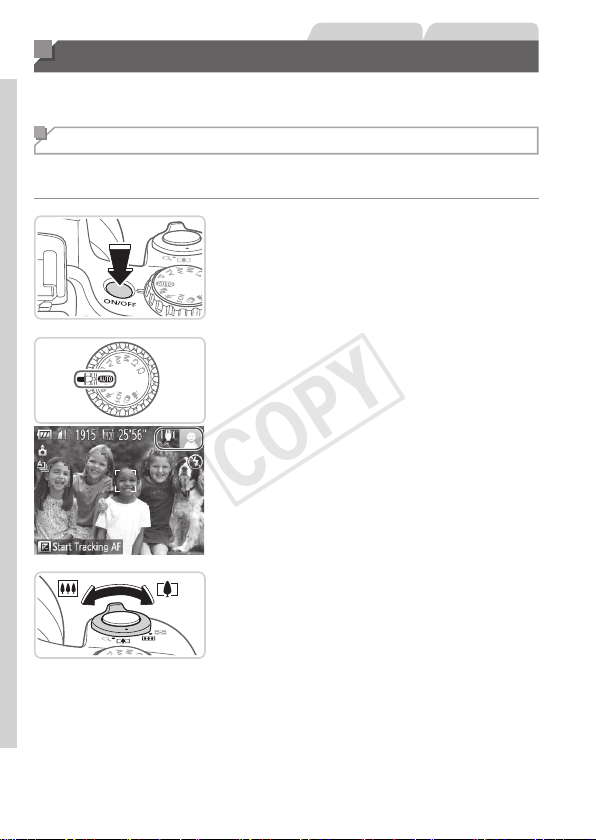
Trying the Camera Out
Followtheseinstructionstoturnthecameraon,shootstillimagesor
movies,andthenviewthem.
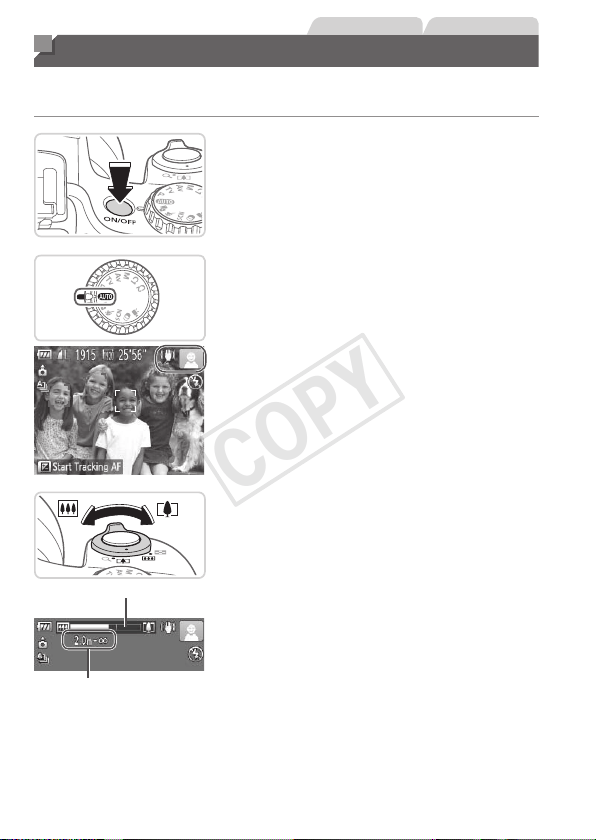
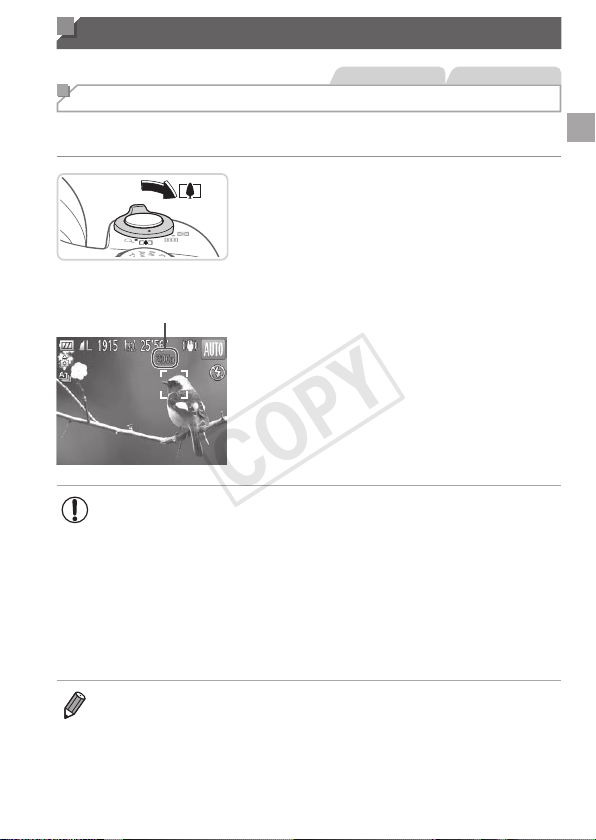
Shooting (Smart Auto)
Forfullyautomaticselectionoftheoptimalsettingsforspecicscenes,
simplyletthecameradeterminethesubjectandshootingconditions.
1 Turnthecameraon.
Pressthepowerbutton.
Thestartupscreenisdisplayed.
2 Enter<A>mode.
Setthemodedialto<A>.
Aimthecameraatthesubject.The
camerawillmakeaslightclickingnoise
asitdeterminesthescene.
Iconsrepresentingthesceneandimage
stabilizationmodearedisplayedinthe
upperrightofthescreen.
Framesdisplayedaroundanydetected
subjectsindicatethattheyareinfocus.
3 Composetheshot.
Tozoominandenlargethesubject,move
thezoomlevertoward<i>(telephoto),
andtozoomawayfromthesubject,move
ittoward<j>(wideangle).
COPY
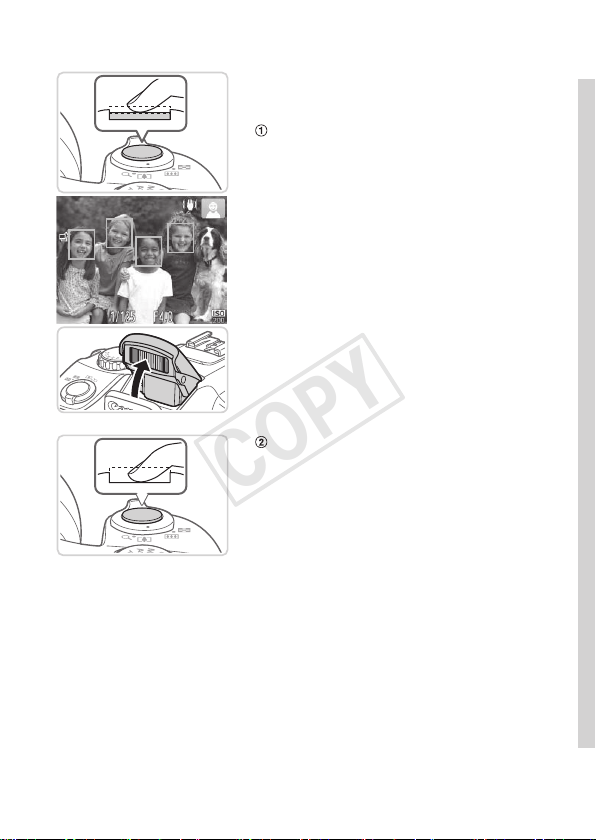
23
TryingtheCameraOut
4 Shoot.
ShootingStillImages
Focus.
Presstheshutterbuttonlightly,halfway
down.Thecamerabeepstwiceafter
focusing,andgreenframesaredisplayed
toindicateimageareasinfocus.
If[Raisetheash]isdisplayed,liftthe
ashwithyourngertoprepareitforuse.
Ifyouprefernottousetheash,pushit
downwithyournger,intothecamera.
Shoot.
Presstheshutterbuttonalltheway
down.
Asthecamerashoots,ashuttersound
isplayed,andinlow-lightconditions
whenyouhaveraisedtheash,itres
automatically.
Keepthecamerastilluntiltheshutter
soundends.
Yourshotisonlydisplayeduntilthe
cameraisreadytoshootagain.
COPY
24
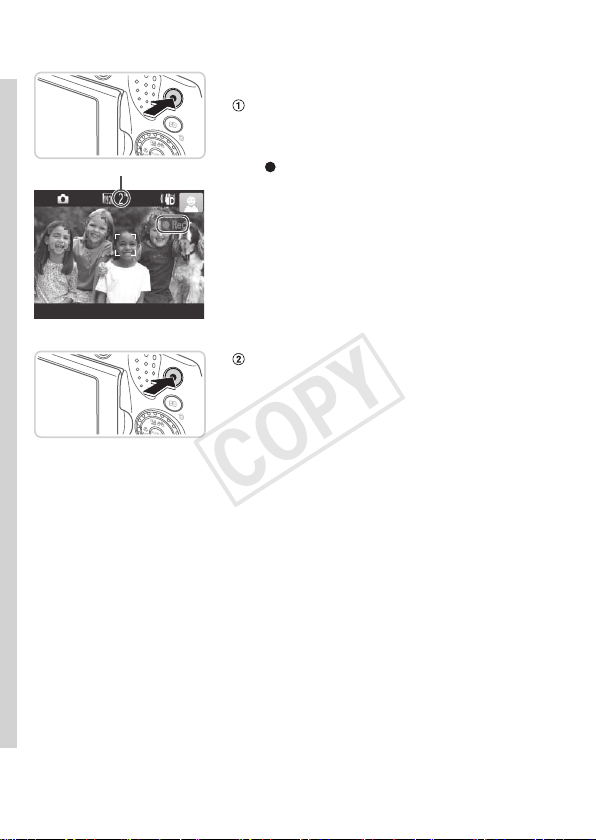
TryingtheCameraOut
ElapsedTime
ShootingMovies
Startshooting.
Pressthemoviebutton.Thecamera
beepsonceasrecordingbegins,and
[
Rec]isdisplayedwiththeelapsedtime.
Blackbarsaredisplayedonthetopand
bottomedgesofthescreen,andthe
subjectisslightlyenlarged.Theblack
barsindicateimageareasnotrecorded.
Framesdisplayedaroundanydetected
facesindicatethattheyareinfocus.
Oncerecordingbegins,youcantakeyour
ngeroffthemoviebutton.
Finishshooting.
Pressthemoviebuttonagaintostop
shooting.Thecamerabeepstwiceas
recordingstops.
COPY
25
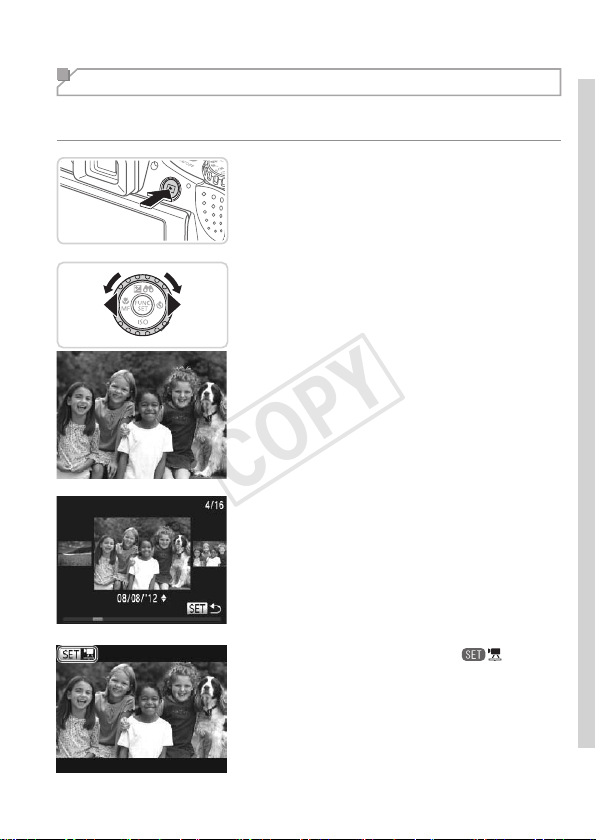
TryingtheCameraOut
Viewing
Aftershootingimagesormovies,youcanviewthemonthescreenas
follows.
1 EnterPlaybackmode.
Pressthe<1>button.
Yourlastshotisdisplayed.
2 Browsethroughyourimages.
Toviewthepreviousimage,press
the<q>buttonorturnthe<5>dial
counterclockwise.Toviewthenext
image,pressthe<r>buttonorturnthe
<5>dialclockwise.
Pressandholdthe<q><r>buttonsto
browsethroughimagesquickly.
ToaccessScrollDisplaymode,turnthe
<
5
>dialrapidly.Inthismode,turnthe
<
5
>dialtobrowsethroughimages.
Toreturntosingle-imagedisplay,press
the<m>button.
Moviesareidentiedbya[ ]icon.To
playmovies,gotostep3.
COPY

26
TryingtheCameraOut
Volume
3 Playmovies.
Pressthe<m>buttontoaccessthe
moviecontrolpanel,choose[
](either
pressthe<q><r>buttonsorturnthe
<5>dial),andthenpressthe<m>
buttonagain.
Playbacknowbegins,andafterthemovie
isnished,[
]isdisplayed.
Toadjustthevolume,pressthe<o><p>
buttons.
• ToswitchtoShootingmodefromPlaybackmode,presstheshutterbutton
halfway.
ErasingtheImages
Youcanchooseanderaseunneededimagesonebyone.Becarefulwhen
erasingimages,becausetheycannotberecovered.
1 Chooseanimagetoerase.
Pressthe<q><r>buttonsorturnthe
<5>dialtochooseanimage.
COPY
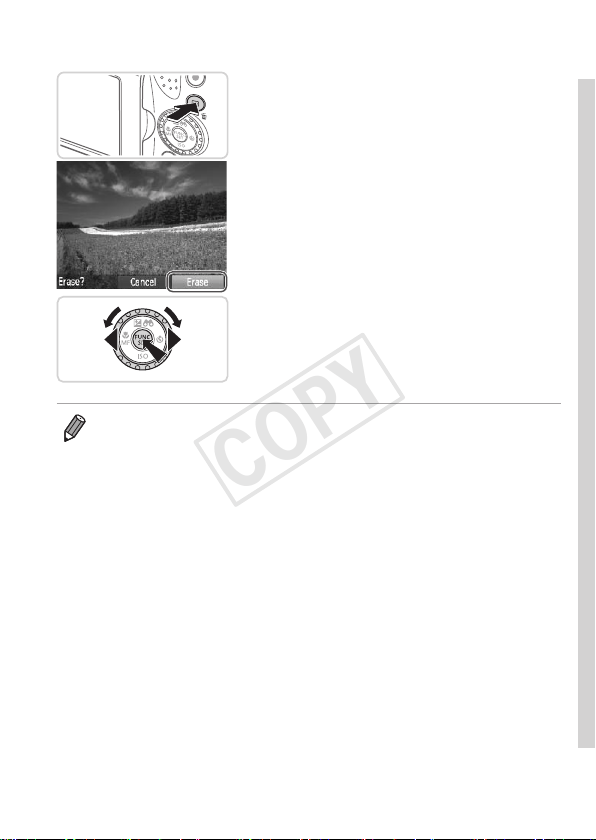
27
TryingtheCameraOut
2 Erasetheimage.
Pressthe<a>button.
After[Erase?]isdisplayed,pressthe
<q><r>buttonsorturnthe<5>dialto
choose[Erase],andthenpressthe<m>
button.
Thecurrentimageisnowerased.
Tocancelerasure,pressthe<q><r>
buttonsorturnthe<5>dialtochoose
[Cancel],andthenpressthe<m>
button.
• Youcanalsoeraseallimagesatonce(=
179).
COPY

28
Included Software, PDF Manuals
ThesoftwareandPDFmanualsontheincludedDIGITALCAMERASolution
Disk(CD-ROM)(=
2)areintroducedbelow,withinstructionsfor
installation,andsavingimagestoacomputer.
Software
AfterinstallingthesoftwareontheCD-ROM,youcandothefollowing
thingsonyourcomputer.
CameraWindow
Importimagesandchangecamerasettings
ImageBrowserEX
Manageimages:view,search,andorganize
Printandeditimages
DigitalPhotoProfessional
Browse,processandeditRAWimages
AutoUpdateFunction
Usingtheincludedsoftware,youcanupdatetothelatestversion,and
downloadnewfunctionsviatheInternet(somesoftwareexcluded).Besure
toinstallthesoftwareonacomputerwithanInternetconnectionsoyoucan
usethisfunction.
• Internetaccessisrequiredtousethisfunction,andanyISP
accountchargesandaccessfeesmustbepaidseparately.
PDF Manuals
CameraUserGuide
Refertothisguideforamorein-depthunderstandingofcamera
operation.
SoftwareGuide
Refertothisguidewhenusingtheincludedsoftware.Theguidecanbe
accessedfromthehelpsystemofincludedsoftware(somesoftware
excluded).
COPY

29
IncludedSoftware,PDFManuals
System Requirements
Theincludedsoftwarecanbeusedonthefollowingcomputers.Adobe
ReaderisrequiredtoviewthePDFmanuals.
Operating
System
Windows Macintosh
Windows7SP1
WindowsVistaSP2
WindowsXPSP3
MacOSX10.6–10.7
Computer
Computersrunningoneoftheaboveoperatingsystems
(preinstalled),withanincludedUSBportandInternetconnection*
Processor
Stillimages:1.6GHzorhigher,
Movies:Core2Duo2.6GHz
orhigher
Stillimages:MacOSX10.7:
Core2Duoorhigher,
MacOSX10.6:CoreDuo1.83
GHzorhigher,Movies:Core2
Duo2.6GHzorhigher
RAM
Windows7(64bit):2GBor
more
Windows7(32bit),
WindowsVista(64bit,32bit),
WindowsXP:
1GBormore(stillimages),2GB
ormore(movies)
MacOSX10.7:2GBormore
MacOSX10.6:1GBormore
(stillimages),2GBormore
(movies)
Interfaces USB
FreeHardDisk
Space
640MBormore* 750MBormore
Display 1024x768resolutionorhigher
*Silverlight4orlater(max.100MB)mustbeinstalled,andinWindowsXP,Microsoft
.NETFramework3.0orlater(max.500MB)mustbeinstalled.Installationmaytake
sometime,dependingoncomputerperformance.
• ChecktheCanonwebsiteforthelatestsystemrequirements,including
supportedOSversions.
COPY
30
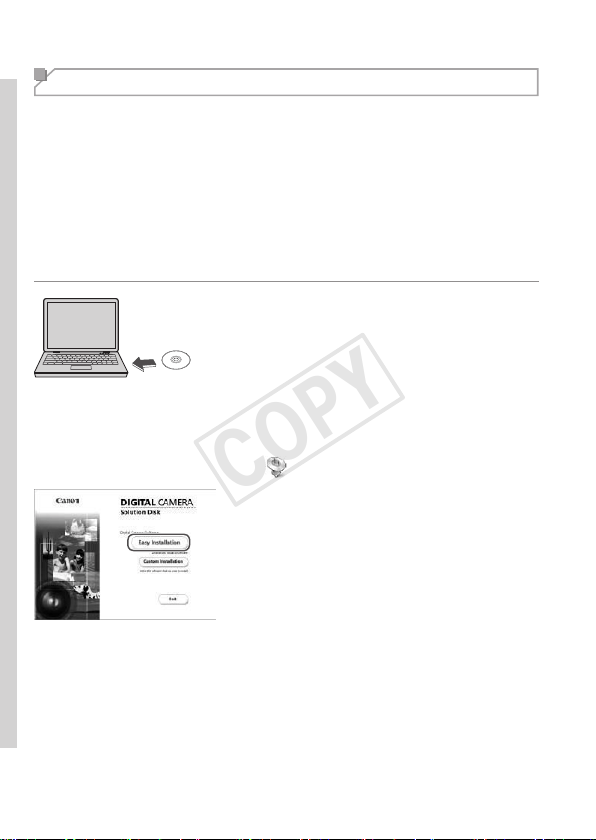
IncludedSoftware,PDFManuals
Installing the Software
Windows7andMacOSX10.6areusedhereforthesakeofillustration.
Usingthesoftwareautoupdatefunction,youcanupdatetothelatest
versionanddownloadnewfunctionsviatheInternet(somesoftware
excluded),sobesuretoinstallthesoftwareonacomputerwithanInternet
connection.
Whatyouwillneed:
Computer
USBcable(cameraend:Mini-B)
IncludedCD-ROM(DIGITALCAMERASolutionDisk)(=
2 )
1 InserttheCD-ROMinthe
computer’sCD-ROMdrive.
InserttheincludedCD-ROM(DIGITAL
CAMERASolutionDisk)(=
2)inthe
computer’sCD-ROMdrive.
OnaMacintoshcomputer,afterinserting
thedisc,double-clickthedesktopdisc
icontoopenit,andthendouble-clickthe
[
]icondisplayed.
2 Begintheinstallation.
Click[EasyInstallation]andfollowthe
on-screeninstructionstocompletethe
installationprocess.
COPY
31
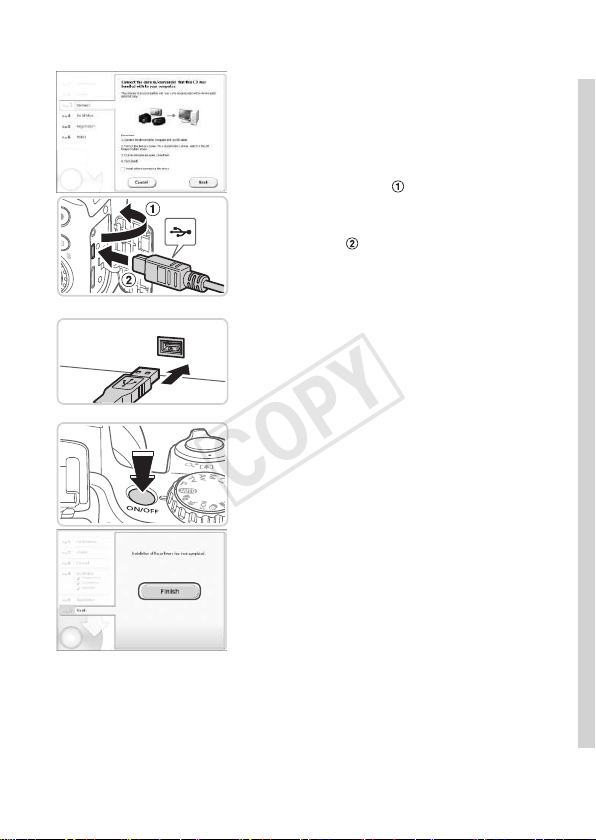
IncludedSoftware,PDFManuals
3 Whenamessageisdisplayed
promptingyoutoconnect
thecamera,connectittoa
computer.
Afterensuringthatthecameraisoff,
openthecover(
).Holdingthesmaller
plugoftheUSBcableintheorientation
shown,insertitfullyintothecamera
terminal(
).
InsertthelargerplugoftheUSBcable
inthecomputer’sUSBport.Fordetails
aboutUSBconnectionsonthecomputer,
refertothecomputerusermanual.
4 Installtheles.
Turnthecameraon,andfollowthe
on-screeninstructionstocompletethe
installationprocess.
ThesoftwarewillconnecttotheInternet
toupdatetothelatestversionand
downloadnewfunctions.Installationmay
takesometime,dependingoncomputer
performanceandtheInternetconnection.
Click[Finish]or[Restart]onthescreen
afterinstallationandremovetheCD-
ROMwhenthedesktopisdisplayed.
Turnthecameraoffanddisconnectthe
cable.
COPY
32
IncludedSoftware,PDFManuals
• WhennotconnectedtotheInternet,therearethefollowinglimitations.
-Thescreeninstep3willnotbedisplayed.
-Somefunctionsmaynotbeinstalled.
• Thersttimeyouconnectthecameratothecomputer,driverswillbe
installed,soitmaytakeafewminutesuntilcameraimagesareaccessible.
• IfyouhaveseveralcamerasthatwerebundledwithImageBrowserEXon
theincludedCD-ROMs,besuretouseeachcamerawiththeirincludedCD-
ROMandfollowtheon-screeninstallationinstructionsforeach.Doingsowill
ensurethateachcamerawillreceivethecorrectupdatesandnewfunctions
viatheautoupdatefunction.
Saving Images to a Computer
Windows7andMacOSX10.6areusedhereforthesakeofillustration.
1 Connectthecameratothe
computer.
Followstep3on=
31toconnectthe
cameratoacomputer.
2 Turnthecameraontoaccess
CameraWindow.
Pressthe<1>buttontoturnthecamera
on.
OnaMacintoshcomputer,
CameraWindowisdisplayedwhena
connectionisestablishedbetweenthe
cameraandcomputer.
ForWindows,followthestepsintroduced
below.
Inthescreenthatdisplays,clickthe[ ]
linktomodifytheprogram.
COPY
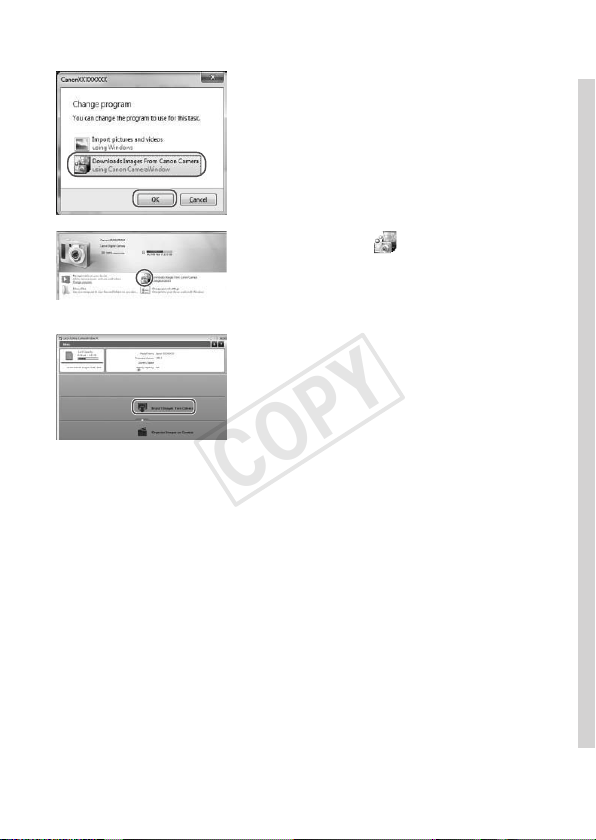
33
IncludedSoftware,PDFManuals
Choose[DownloadsImagesFromCanon
CamerausingCanonCameraWindow]
andthenclick[OK].
Doubleclick[ ].
CameraWindow
3 Savetheimagestothe
computer.
Click[ImportImagesfromCamera],and
thenclick[ImportUntransferredImages].
ImagesarenowsavedtothePictures
folderonthecomputer,inseparate
foldersnamedbydate.
Afterimagesaresaved,close
CameraWindow,pressthe<1>button
toturnthecameraoff,andunplugthe
cable.
Forinstructionsonviewingimageson
acomputer,refertothe
SoftwareGuide
(=
28).
COPY

34
IncludedSoftware,PDFManuals
• InWindows7,ifthescreeninstep2isnotdisplayed,clickthe[ ]iconin
thetaskbar.
• TostartCameraWindowinWindowsVistaorXP,click[DownloadsImages
FromCanonCamerausingCanonCameraWindow]onthescreendisplayed
whenyouturnthecameraoninstep2.IfCameraWindowisnotdisplayed,
clickthe[Start]menuandchoose[AllPrograms]
►
[CanonUtilities]
►
[CameraWindow]
►
[CameraWindow].
• OnaMacintoshcomputer,ifCameraWindowisnotdisplayedafterstep2,
clickthe[CameraWindow]iconintheDock(thebaratthebottomofthe
desktop).
• Althoughyoucansaveimagestoacomputersimplybyconnectingyour
cameratothecomputerwithoutusingtheincludedsoftware,thefollowing
limitationsapply.
-Itmaytakeafewminutesafteryouconnectthecameratothecomputer
untilcameraimagesareaccessible.
-Imagesshotinverticalorientationmaybesavedinhorizontalorientation.
-RAWimages(orJPEGimagesrecordedwithRAWimages)maynotbe
saved.
-Imageprotectionsettingsmaybeclearedfromimagessavedtoa
computer.
-Someproblemsmayoccurwhensavingimagesorimageinformation,
dependingontheoperatingsystemversion,thesoftwareinuse,orimage
lesizes.
-Somefunctionsprovidedbytheincludedsoftwaremaynotbeavailable,
suchaseditingmoviesorreturningimagestothecamera.
Using the PDF Manuals
CameraUserGuide
Accessthisguidebydouble-clickingthedesktopshortcuticon.
SoftwareGuide
Theguidecanbeaccessedfromthehelpsystemofincludedsoftware
(somesoftwareexcluded).
• ItmaynotbepossibletoinstallthePDFmanualsoncomputersthatdo
notmeetthesystemrequirements(=
29).However,youcanviewthe
manualsonacomputerthatsupportsAdobeReaderbycopyingthePDF
lesintheReadmefolderontheCD-ROMdirectlytoaconvenientlocation
onthecomputer.
COPY
35
Accessories
NeckStrap
NS-DC11
BatteryPack
NB-10L*
1
(withterminalcover)
Battery
Charger
CB-2LC/2LCE*
1
LensCap
(withcord)
DIGITAL
CAMERA
SolutionDisk
USBCable(cameraend:Mini-B)*
2
HDMICableHTC-100
StereoAVCable
AVC-DC400ST
MemoryCard CardReader
Windows/
Macintosh
Computer
TV/Video
System
ACAdapterKit
ACK-DC80
Speedlite*
3
600EX-RT,600EX,580EXII,
430EXII,320EX,270EXII
Canon-brandLensFilter
(67mmdia.)*
4
LensHood
LH-DC60
RemoteSwitch
RS-60E3
IncludedAccessories
Power
FlashUnits
LensAccessories OtherAccessories
CanonPictBridge-
CompatiblePrinters
Cables
*1Alsoavailableforpurchaseseparately.
*2AgenuineCanonaccessoryisalsoavailable(InterfaceCableIFC-400PCU).
*3Theseaccessoriesarealsosupported:Speedlite580EX,430EX,270EX,and
220EX,SpeedliteTransmitterST-E2,andSpeedliteBracketSB-E2.
*4RequiresFilterAdapterFA-DC67A.
COPY

36
Accessories
UseofgenuineCanonaccessoriesisrecommended.
Thisproductisdesignedtoachieveexcellentperformancewhenusedwithgenuine
Canonaccessories.
Canonshallnotbeliableforanydamagetothisproductand/oraccidentssuchasre,
etc.,causedbythemalfunctionofnon-genuineCanonaccessories(e.g.,aleakage
and/orexplosionofabatterypack).Pleasenotethatthiswarrantydoesnotapplyto
repairsarisingoutofthemalfunctionofnon-genuineCanonaccessories,althoughyou
mayrequestsuchrepairsonachargeablebasis.
COPY

37
Camera Basics
Practicalguidethatintroducesothercamerabasicsand
describesshootingandplaybackoptions
1
Advanced Guide
COPY
38
On/Off
ShootingMode
Pressthepowerbuttontoturnthe
cameraonandprepareforshooting.
Toturnthecameraoff,pressthepower
buttonagain.
PlaybackMode
Pressthe<1>buttontoturnthecamera
onandviewyourshots.
Toturnthecameraoff,pressthe<1>
buttonagain.
• ToswitchtoPlaybackmodefromShootingmode,pressthe<1>button.
• ToswitchtoShootingmodefromPlaybackmode,presstheshutterbutton
halfway(=
39).
• Thelenswillberetractedafteraboutoneminuteoncethecameraisin
Playbackmode.Youcanturnthecameraoffwhenthelensisretractedby
pressingthe<1>button.
Power-Saving Features (Auto Power Down)
Asawaytoconservebatterypower,thecameraautomaticallydeactivates
thescreen(DisplayOff)andthenturnsitselfoffafteraspecicperiodof
inactivity.
PowerSavinginShootingMode
Thescreenisautomaticallydeactivatedafteraboutoneminuteofinactivity.
Inabouttwomoreminutes,thelensisretractedandthecameraturnsitself
off.Toactivatethescreenandprepareforshootingwhenthescreenisoff
butthelensisstillout,presstheshutterbuttonhalfway(=
39).
PowerSavinginPlaybackMode
Thecameraturnsitselfoffautomaticallyafteraboutveminutesof
inactivity.
• Adjustthetimingofautomaticcameraandscreendeactivationasneeded
(=
206).
• Powersavingisnotactivewhilethecameraisconnectedtoacomputer
(=
32).
COPY
39
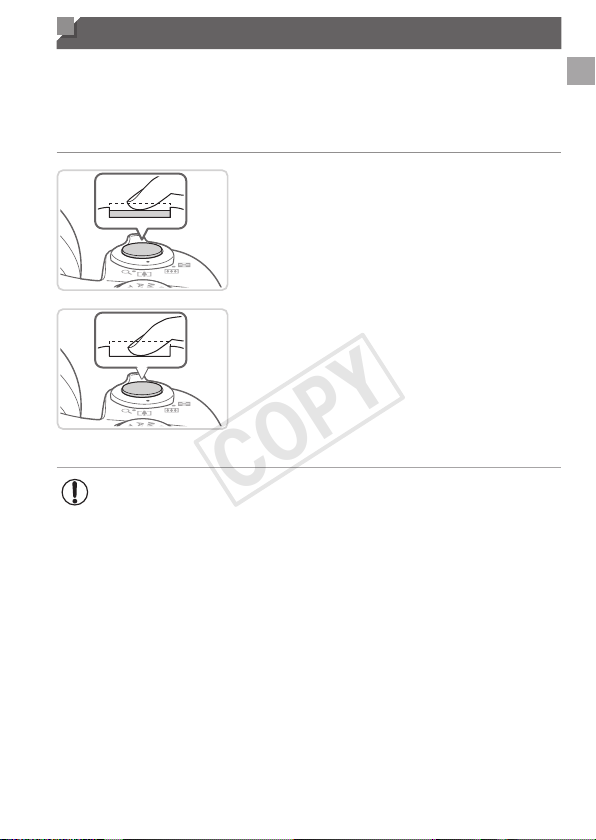
Shutter Button
Toensureyourshotsareinfocus,alwayspresstheshutterbuttonlightly
(halfway)initially.Oncethesubjectisinfocus,pressthebuttonalltheway
downtoshoot.
Inthismanual,shutterbuttonoperationsaredescribedaspressingthe
buttonhalfwayorall the way down.
1 Presshalfway.(Presslightlyto
focus.)
Presstheshutterbuttonhalfway.The
camerabeepstwice,andAFframesare
displayedaroundimageareasinfocus.
2 Pressallthewaydown.(From
thehalfwayposition,pressfully
toshoot.)
Thecamerashoots,asashuttersound
isplayed.
Keepthecamerastilluntiltheshutter
soundends.
• Imagesmaybeoutoffocusifyoushootwithoutinitiallypressing
theshutterbuttonhalfway.
• Lengthofshuttersoundplaybackvariesdependingonthetime
requiredfortheshot.Itmaytakelongerinsomeshootingscenes,
andimageswillbeblurryifyoumovethecamera(orthesubject
moves)beforetheshuttersoundends.
COPY
40
Viewnder
Adjusttheviewnderdisplayforsharperimagesbyadjustingthediopter,as
follows.
1 Activatetheviewnder.
Pressthe<l>buttonrepeatedlyuntil
theviewndergoeson(=
43).
2 Adjustthediopter.
Asyoulookthroughtheviewnder,turn
thedialonewayortheothersothat
imageslooksharp.
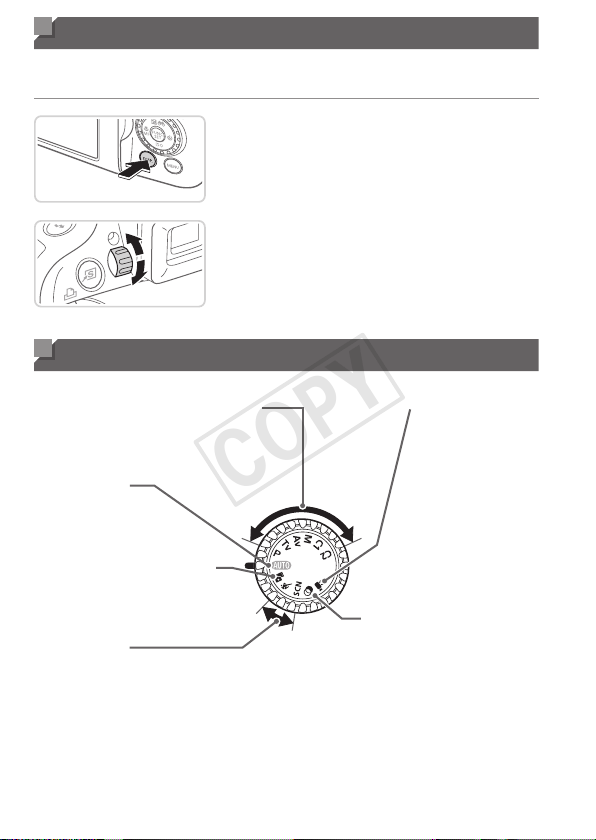
Shooting Modes
Usethemodedialtoaccesseachshootingmode.
MovieMode
Forshootingmovies
(=
108).
Youcanalsoshoot
movieswhenthe
modedialisnot
settoMoviemode,
simplybypressing
themoviebutton.
AutoMode
Fullyautomatic
shooting,withcamera-
determinedsettings
(=
22,46).
SceneMode
Shootwithoptimalsettingsfor
specicscenes(=
89).
CreativeFiltersMode
Addavarietyofeffects
toimageswhenshooting
(=
92).
MovieDigestMode
Youcanmakeashortmovieofa
dayjustbyshootingstillimages
(=
86).
P,Tv,Av,M,C1,andC2Modes
Takeavarietyofshotsusingyour
preferredsettings(=
113,149).
COPY
41
FUNC. Menu
CongurecommonlyusedshootingfunctionsthroughtheFUNC.menuas
follows.
Notethatmenuitemsandoptionsvarydependingontheshootingmode
(=
262–265).
1 AccesstheFUNC.menu.
Pressthe<m>button.
MenuItems
Options
2 Chooseamenuitem.
Pressthe<o><p>buttonstochoosea
menuitem.
Availableoptionsareshownatthebottom
ofthescreen.
3 Chooseanoption.
Pressthe<q><r>buttonsorturnthe
<5>dialtochooseanoption.
Optionslabeledwitha[ ]iconcan
beconguredbypressingthe<l>
button.
4 Finishthesetupprocess.
Pressthe<m>button.
Thescreenbeforeyoupressedthe
<m>buttoninstep1isdisplayedagain,
showingtheoptionyoucongured.
• Toundoanyaccidentalsettingchanges,youcanrestorethecamera’s
defaultsettings(=
211).
COPY
42
MENU Menu
Congureavarietyofcamerafunctionsthroughothermenusasfollows.
Menuitemsaregroupedbypurposeontabs,suchasshooting[4],
playback[1],andsoon.Notethatavailablesettingsvarydependingon
theselectedshootingorplaybackmode(=
266–273).
1 Accessthemenu.
Pressthe<n>button.
2 Chooseatab.
Movethezoomlevertochooseatab.
Afteryouhavepressedthe<o><p>
buttonstochooseatabinitially,youcan
switchbetweentabsbypressingthe
<q><r>buttons.
3 Chooseasetting.
Pressthe<o><p>buttonsorturnthe
<5>dialtochooseasetting.
Tochoosesettingswithoptionsnot
shown,rstpressthe<m>or<r>
buttontoswitchscreens,andtheneither
pressthe<o><p>buttonsorturnthe
<5>dialtoselectthesetting.
Toreturntothepreviousscreen,press
the<n>button.
4 Chooseanoption.
Pressthe<q><r>buttonstochoosean
option.
COPY
43
ShootingDisplayOptions
5 Finishthesetupprocess.
Pressthe<n>buttontoreturntothe
screendisplayedbeforeyoupressedthe
<n>buttoninstep1.
• Toundoanyaccidentalsettingchanges,youcanrestorethecamera’s
defaultsettings(=
211).
Shooting Display Options
Pressthe<l>buttontoviewotherinformationonthescreen,ortohide
theinformation.Fordetailsontheinformationdisplayed,see=
255.
Openthescreentoactivateitwhenthecameraison.Thiswilldeactivate
theviewnder.Similarly,closethescreen(facingthecamerabody)to
deactivateitandactivatetheviewnder(=
18).
Noinformationisdisplayed
LCDMonitor(Screen) Viewnder
Noinformationis
displayed
Informationisdisplayed
Informationis
displayed
• Screenbrightnessisautomaticallyincreasedbythenightdisplayfunction
whenyouareshootingunderlowlight,makingiteasiertocheckhowshots
arecomposed.However,on-screenimagebrightnessmaynotmatchthe
brightnessofyourshots.Notethatanyon-screenimagedistortionorjerky
subjectmotionwillnotaffectrecordedimages.
• Forplaybackdisplayoptions,see=
162.
COPY
44
Indicator Display
Theindicatoronthebackofthecamera(=
5)lightsuporblinks
dependingonthecamerastatus.
Color
Indicator
Status
CameraStatus
Green
On Cameraon
Blinking Recording/reading/transmittingimages
• Whentheindicatorblinksgreen,neverturnthecameraoff,open
thememorycard/batterycover,orshakeorjoltthecamera,which
maycorruptimagesordamagethecameraormemorycard.
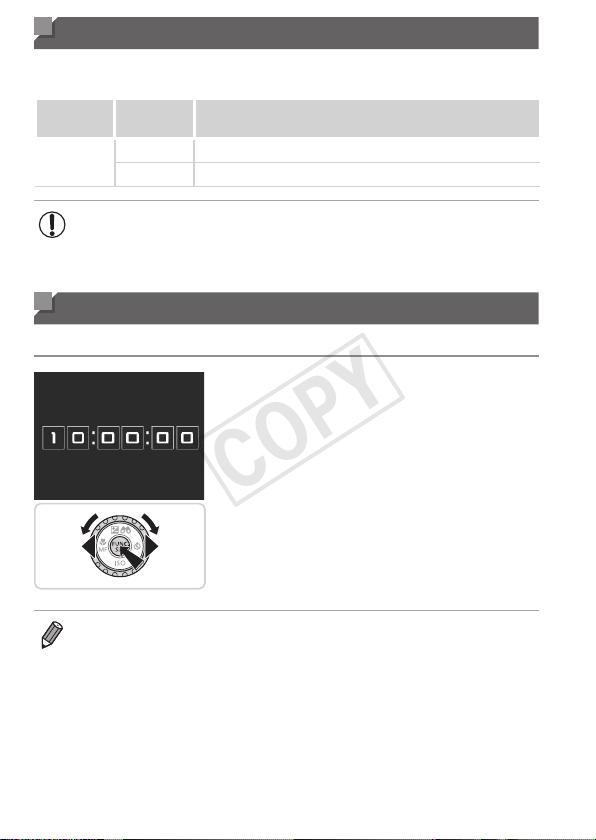
Clock
Youcancheckthecurrenttime.
Pressandholdthe<m>button.
Thecurrenttimeappears.
Ifyouholdthecameraverticallywhile
usingtheclockfunction,itwillswitch
toverticaldisplay.Pressthe<q><r>
buttonsorturnthe<5>dialtochange
thedisplaycolor.
Pressthe<m>buttonagaintocancel
theclockdisplay.
• Whenthecameraisoff,pressandholdthe<m>button,thenpressthe
powerbuttontodisplaytheclock.
COPY

45
Smart Auto Mode
Convenientmodeforeasyshotswithgreatercontrol
overshooting
2
COPY
46
StillImages Movies
Shooting (Smart Auto)
Forfullyautomaticselectionatoptimalsettingsforspecicscenes,simply
letthecameradeterminethesubjectandshootingconditions.
1 Turnthecameraon.
Pressthepowerbutton.
Thestartupscreenisdisplayed.
2 Enter<A>mode.
Setthemodedialto<A>.
Aimthecameraatthesubject.The
camerawillmakeaslightclickingnoise
asitdeterminesthescene.
Iconsrepresentingthesceneandimage
stabilizationmodearedisplayedinthe
upperrightofthescreen(=
51,53).
Framesdisplayedaroundanydetected
subjectsindicatethattheyareinfocus.
ZoomBar
FocusRange(approx.)
3 Composetheshot.
Tozoominandenlargethesubject,move
thezoomlevertoward<i>(telephoto),
andtozoomawayfromthesubject,move
ittoward<j>(wideangle).(Azoombar
showingthezoompositionisdisplayed.)
Tozoominoroutquickly,movethezoom
leverallthewaytoward<i>(telephoto)
or<j>(wideangle),andtozoomin
oroutslowly,moveitjustalittleinthe
desireddirection.
COPY
47
Shooting(SmartAuto)
4 Shoot.
ShootingStillImages
Focus.
Presstheshutterbuttonhalfway.The
camerabeepstwiceafterfocusing,and
greenframesaredisplayedtoindicate
imageareasinfocus.
Severalgreenframesaredisplayedwhen
multipleareasareinfocus.
If[Raisetheash]isdisplayed,liftthe
ashwithyourngertoprepareitforuse.
Ifyouprefernottousetheash,pushit
downwithyournger,intothecamera.
Shoot.
Presstheshutterbuttonalltheway
down.
Asthecamerashoots,ashuttersound
isplayed,andinlow-lightconditions
whenyouhaveraisedtheash,itres
automatically.
Keepthecamerastilluntiltheshutter
soundends.
Yourshotisonlydisplayeduntilthe
cameraisreadytoshootagain.
COPY

48
Shooting(SmartAuto)
ElapsedTime
ShootingMovies
Startshooting.
Pressthemoviebutton.Thecamera
beepsonceasrecordingbegins,and
[
Rec]isdisplayedwiththeelapsedtime.
Blackbarsaredisplayedonthetopand
bottomedgesofthescreen,andthe
subjectisslightlyenlarged.Theblack
barsindicateimageareasnotrecorded.
Framesdisplayedaroundanydetected
facesindicatethattheyareinfocus.
Oncerecordingbegins,youcantakeyour
ngeroffthemoviebutton.
Resizethesubjectand
recomposetheshotasneeded.
Toresizethesubject,dothesamething
asinstep3on=
46.
However,notethatthesoundofcamera
operationswillberecorded,andmovies
shotatzoomfactorsshowninbluewill
lookgrainy.
Whenyourecomposeshots,the
focus,brightness,andcolorswillbe
automaticallyadjusted.
Finishshooting.
Pressthemoviebuttonagaintostop
shooting.Thecamerabeepstwiceas
recordingstops.
Recordingwillstopautomaticallywhen
thememorycardbecomesfull.
COPY

49
Shooting(SmartAuto)
StillImages/Movies
• Toactivatethescreenwhenthecameraisonbutthescreenis
blank(whendisplayissettotheviewnder),pressthe<l>
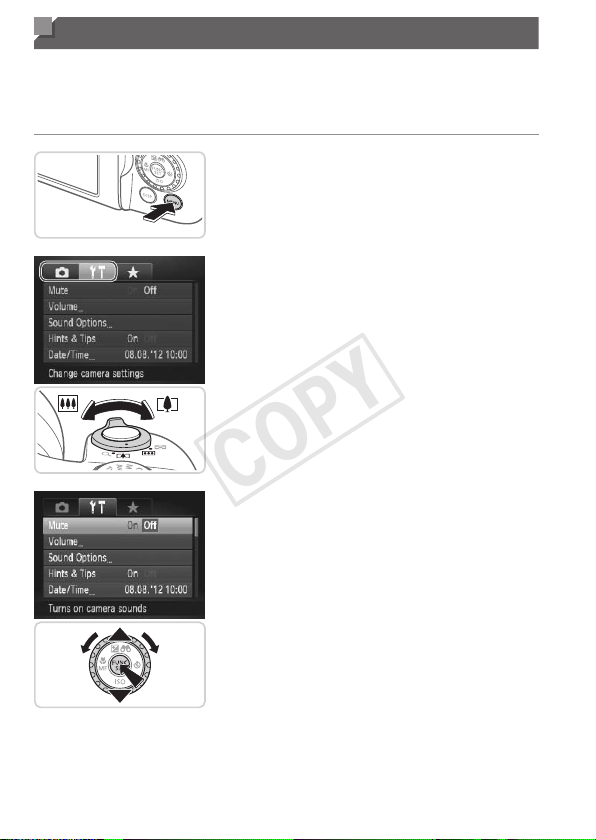
buttonrepeatedly.
• Torestorecamerasoundifyouhaveaccidentallydeactivatedit
(byholdingthe<l>buttondownwhileturningthecameraon),
pressthe<n>buttonandchoose[Mute]onthe[3]tab,and
thenpressthe<q><r>buttonstochoose[Off].
StillImages
• Aashing[ ]iconwarnsthatimagesaremorelikelytobeblurred
bycamerashake.Inthiscase,mountthecameraonatripodor
takeothermeasurestokeepitstill.
• Ifyourshotsaredarkdespitetheashring,movecloserto
thesubject.Fordetailsontheashrange,see“Specications”
(=
274).
• Thesubjectmaybetoocloseifthecameraonlybeepsoncewhen
youpresstheshutterbuttonhalfway.Fordetailsonthefocusing
range(shootingrange),see“Specications”(=
274).
• Toreducered-eyeandtoassistinfocusing,thelampmaybe
activatedwhenshootinginlow-lightconditions.
• Ablinking[h]icondisplayedwhenyouattempttoshootindicates
thatshootingisnotpossibleuntiltheashhasnishedrecharging.
Shootingcanresumeassoonastheashisready,soeitherpress
theshutterbuttonallthewaydownandwait,orreleaseitand
pressitagain.
• TheshuttersoundwillnotbeplayedwhentheSleepingand
Babies(Sleeping)icons(=
51)aredisplayed.
• Theashringduringshotsindicatesthatthecamerahasautomatically
attemptedtoensureoptimalcolorsinthemainsubjectandbackground
(Multi-areaWhiteBalance).
COPY

50
Shooting(SmartAuto)
Movies
Microphone
• Beforeshootingamovie,lowerthe
ashwithyournger.Becarefulnotto
touchthemicrophonewhenshooting
amovie.Leavingtheashraised,or
blockingthemicrophonemayprevent
audiofrombeingrecordedormay
causetherecordingtosoundmufed.
• Avoidtouchingcameracontrolsotherthanthemoviebuttonwhen
shootingmovies,becausesoundsmadebythecamerawillbe
recorded.
• Oncemovierecordingbegins,asmallerimagedisplayarea(eld
ofview)isshown,withthesubjectenlarged.Thischangeisdue
torotationalimagestabilization.Toshootsubjectsatthesame
sizeshownbeforeshooting,adjusttheimagestabilizationsetting
(=
148).
• Tocorrectsuboptimalimagecolorthatmayoccurin[
]movie
shooting(=
77)afteryourecomposeshots,pressthemovie
buttontostoprecording,andthenpressitagaintoresume
recording.
• Audioisrecordedinstereo.
COPY
51
Shooting(SmartAuto)
StillImages Movies
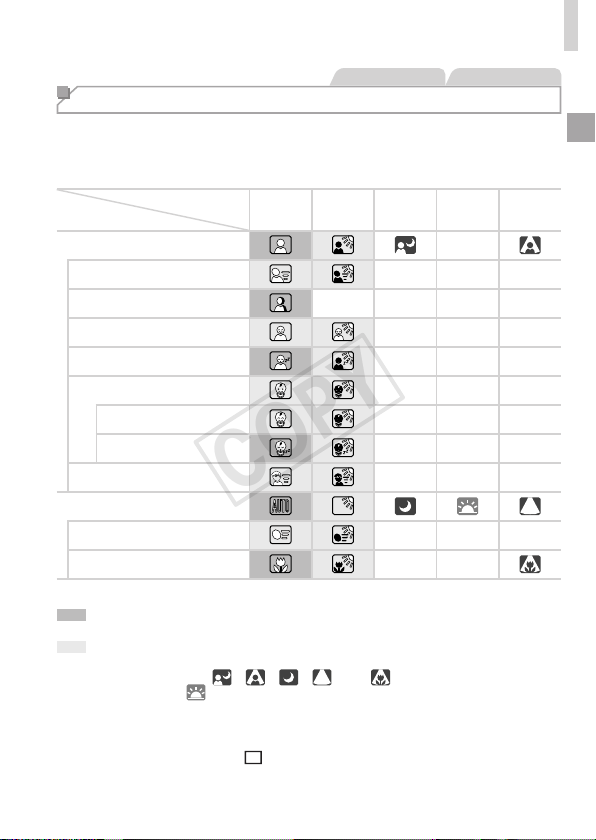
Scene Icons
In<A>mode,shootingscenesdeterminedbythecameraareindicated
bytheicondisplayed,andcorrespondingsettingsareautomatically
selectedforoptimalfocusing,subjectbrightness,andcolor.Dependingon
thescene,continuousimagesmaybeshot(=
52).
Background
Subject
Normal Backlit Dark* Sunsets
Spotlights
People
–
InMotion
– – –
ShadowsonFace
– – – –
Smiling
– – –
Sleeping
– – –
Babies
– – –
Smiling
– – –
Sleeping
– – –
Children(InMotion)
– – –
OtherSubjects
InMotion
– – –
AtCloseRange
– –
*TripodUsed
Thebackgroundcoloroficonsislightbluewhenthebackgroundisabluesky,
darkbluewhenthebackgroundisdark,andgrayforallotherbackgrounds.
Thebackgroundcoloroficonsislightbluewhenthebackgroundisabluesky,
andgrayforallotherbackgrounds.
•Thebackgroundcolorof[
],[ ],[ ],[ ],and[ ]isdarkblue,andthe
backgroundcolorof[
]isorange.
•Whenshootingmovies,onlyPeople,OtherSubjects,andAtCloseRangeiconswillbedisplayed.
•Whenshootingwiththeself-timer,People(InMotion),Smiling,Sleeping,Babies(Smiling),
Babies(Sleeping),Children,OtherSubjects(InMotion)iconswillnotbedisplayed.
•Whenthedrivemodeissetto[ ](=
127),andwhen[HgLampCorr.]issetto
[On]andscenesareautomaticallycorrected(=
76),Smiling,Sleeping,Babies
(Smiling),Babies(Sleeping),andChildreniconswillnotbedisplayed.
COPY
52
Shooting(SmartAuto)
•Iftheashissetto[ ],theBackliticonsforSmilingandChildrenwillnotbe
displayed.
•Babies,Babies(Smiling),Babies(Sleeping),andChildreniconswillbedisplayed
when[FaceID]issetto[On],andthefaceofaregisteredbaby(undertwoyearsold)
orchild(fromtwototwelveyearsold)isdetected(=
63).Conrmbeforehandthat
thedateandtimearecorrect(=
19).
• Tryshootingin<G>mode(=
113)ifthesceneicondoesnot
matchactualshootingconditions,orifitisnotpossibletoshoot
withyourexpectedeffect,color,orbrightness.
ContinuousShootingScenes
Ifyoushootastillimagewhenthefollowingsceneiconsaredisplayed,
thecamerawillshootcontinuously.Ifyoupresstheshutterbuttonhalfway
whenoneoftheiconsinthetablebelowisdisplayed,oneofthefollowing
iconswillbedisplayedtoinformyouthatthecamerawillshootcontinuous
images:[ ],[ ],or[W].
Smiling(includingBabies)
: Consecutiveimagesarecaptured,andthecamera
analyzesdetailssuchasfacialexpressionstosave
theimagedeterminedtobethebest.
Sleeping(includingBabies)
: Beautifulshotsofsleepingfaces,createdby
combiningconsecutiveshotstoreducecamera
shakeandimagenoise.TheAFassistbeamwillnot
lightup,theashwillnotre,andtheshuttersound
willnotbeplayed.
Children
W: Soyoudon’tmissaphotoopportunityofchildren
whomovearound,thecamerawillcapturethree
consecutiveimagesforeachshot.
• Insomescenes,expectedimagesmaynotbesaved,andimages
maynotlookasexpected.
• Focus,imagebrightness,andcoloraredeterminedbytherst
shot.
• Whenyouwanttoshootsingleimagesonly,pressthe<m>button,choose
[
]inthemenu,andthenchoose[ ].
COPY
53
Shooting(SmartAuto)
StillImages Movies
Image Stabilization Icons
Optimalimagestabilizationfortheshootingconditionsisautomatically
applied(IntelligentIS).Additionally,thefollowingiconsaredisplayedin
<A>mode.
Imagestabilizationforstill
images
Imagestabilizationformovies,
reducingstrongcamerashake,
aswhenshootingwhilewalking
(DynamicIS)
Imagestabilizationforstill
images,whenpanning*
Imagestabilizationforslow
camerashake,suchaswhen
shootingmoviesattelephoto
(PoweredIS)
Imagestabilizationformacro
shots(HybridIS)
Noimagestabilization,because
thecameraismountedon
atripodorheldstillbyother
means.However,someshooting
conditionswillactivateimage
stabilization.
*Displayedwhenyoupan,followingmovingsubjectswiththecamera.Whenyoufollow
subjectsmovinghorizontally,imagestabilizationonlycounteractsverticalcamera
shake,andhorizontalstabilizationstops.Similarly,whenyoufollowsubjectsmoving
vertically,imagestabilizationonlycounteractshorizontalcamerashake.
• Tocancelimagestabilization,set[ISMode]to[Off](=
147).Inthiscase,
anISiconisnotdisplayed.
COPY

54
Shooting(SmartAuto)
StillImages Movies
On-Screen Frames
Avarietyofframesaredisplayedoncethecameradetectssubjectsyouare
aimingthecameraat.
• Awhiteframeisdisplayedaroundthesubject(orperson’sface)
determinedbythecameratobethemainsubject,andgrayframesare
displayedaroundotherdetectedfaces.Framesfollowmovingsubjects
withinacertainrangetokeeptheminfocus.
However,ifthecameradetectssubjectmovement,onlythewhiteframe
willremainonthescreen.
• Whenyouarepressingtheshutterbuttonhalfwayandthecamera
detectssubjectmovement,ablueframeisdisplayed,andthefocusand
imagebrightnessareconstantlyadjusted(ServoAF).
• Tryshootingin<G>mode(=
113)ifnoframesaredisplayed,if
framesarenotdisplayedarounddesiredsubjects,orifframesare
displayedonthebackgroundorsimilarareas.
COPY
55
Common, Convenient Features
StillImages Movies
Zooming In Closer on Subjects (Digital Zoom)
Whendistantsubjectsaretoofarawaytoenlargeusingtheopticalzoom,
usedigitalzoomforuptoabout200xenlargement.
1
Movethezoomlevertoward<
i
>.
Holdtheleveruntilzoomingstops.
Zoomingstopsatthelargestpossible
zoomfactor(beforetheimagebecomes
noticeablygrainy),whichisthenindicated
onthescreen.
ZoomFactor
2 Movethezoomlevertoward
<i>again.
Thecamerazoomsinevencloseronthe
subject.
• Movingthezoomleverwilldisplaythezoombar(whichindicates
thezoomposition).Thecolorofthezoombarwillchange
dependingonthezoomrange.
-Whiterange:opticalzoomrangewheretheimagewillnotappeargrainy.
-Yellowrange:digitalzoomrangewheretheimageisnot
noticeablygrainy(ZoomPlus).
-Bluerange:digitalzoomrangewheretheimagewillappeargrainy.
Becausethebluerangewillnotbeavailableatsomeresolutionsettings
(
=
74)themaximumzoomfactorcanbeachievedbyfollowingstep1.
• Focallengthwhenopticalanddigitalzoomarecombinedisasfollows
(35mmlmequivalent).
24–4800mm(24–1200mmwithopticalzoomalone)
• Todeactivatedigitalzoom,pressthe<n>button,choose[DigitalZoom]
onthe[4]tab,andthenchoose[Off].
COPY

56
Common,ConvenientFeatures
StillImages Movies
Easier Telephoto Shooting
StillImages Movies
0
ReacquiringSubjectsLostAfterZooming(Framing
Assist–Seek)
Ifyoulosetrackofasubjectwhilezoomingin,youcannditmoreeasilyby
temporarilyzoomingout.
1 Lookforthelostsubject.
Pressandholdthe< >button.
Thecamerazoomsoutanddisplaysa
whiteframearoundtheareapreviously
shown(beforeyoupressedthe<
>
button).
2 Reacquirethesubject.
Aimthecamerasothatthesubjectinthe
whiteframe,andthenreleasethe
<
>button.
Thepreviousmagnicationisnow
restored,sothattheareaoutlinedin
whitellsthescreenagain.
• Someshootinginformationisnotdisplayedwhilethecamerais
zoomedout.
• Duringmovieshooting,thewhiteframeisnotdisplayedifyou
pressthe<
>button.Alsonotethatcameraoperatingsounds
suchaszoomingwillberecorded.
COPY
57
Common,ConvenientFeatures
• Ifyouprefertoshootatthezoomfactorofthescreeninstep1,pressthe
shutterbuttonallthewaydown.
• YoucanadjustthezoomfactorthatthecamerawillreverttoafterZoom
FramingAssist(whenyoureleasethe<
>button)bymovingthezoom
leverasyouholdthe<
>buttontoresizethewhiteframe.
• Toadjusthowmuchthecamerazoomsoutwhenthe<
>buttonis
pressed,pressthe<n>buttonandchooseoneofthethreelevelsin
[
DisplayArea]onthe[4]tab.
• Thezoomfactorcannotbechangedwiththe<
>buttonafteryoupress
theshutterbuttonallthewaydowninself-timermode(=
58).
StillImages
0
MinimizingCameraShakeWhileComposingShots
(FramingAssist–Lock)
Evenathighmagnication,youcanreducecamerashakewhilecomposing
shotsasfollows.
1 Pressthe< >button.
[ ]isdisplayed,andoptimalimage
stabilizationisappliedtothedisplayas
youcomposetheshot.
2 Shoot.
Whileholdingthe< >button,press
theshutterbuttonhalfwaytofocuson
thesubject,andthenpressitalltheway
down.
COPY
58
Common,ConvenientFeatures
• Thezoomfactorcannotbeadjustedbypressingthe< >button
(=
56)whileyouareholdingdownthe< >button.
• Changingthecompositionoftheshotsignicantlyormakingother
adjustmentsmayreducetheeffectivenessofimagestabilization.
Inthiscase,[
]willbeshowningray.Ifthisoccurs,releasethe
< >button,composetheshot,andthenpressitagain.
• Correctmovieshootingisnotpossibleifyoustartshootinga
moviewhileholdingdownthe<
>button,becausetheshot
compositionmaybechangedasthelevelofimagestabilization
changes.
• Althoughnoimagestabilizationiconisshownwhileyouareholdingdown
the<
>button,optimalimagestabilizationwillbeappliedwhenyoupress
theshutterbuttonhalfway.
• Tone-tunethesizeofsubjectsgradually,movethezoomleverwhile
holdingdownthe<
>button.
StillImages Movies
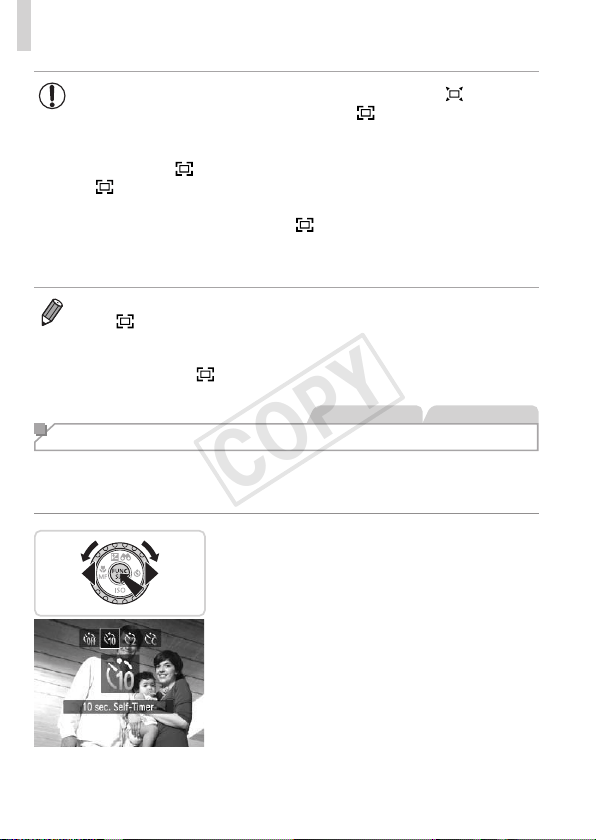
Using the Self-Timer
Withtheself-timer,youcanincludeyourselfingroupphotosorothertimed
shots.Thecamerawillshootabout10secondsafteryoupresstheshutter
button.
1 Congurethesetting.
Pressthe<r>button,choose[]](either
pressthe<q><r>buttonsorturnthe
<5>dial),andthenpressthe<m>
button.
Oncethesettingiscomplete,[]]is
displayed.
2 Shoot.
ForStillImages:Presstheshutterbutton
halfwaytofocusonthesubject,andthen
pressitallthewaydown.
ForMovies:Pressthemoviebutton.
COPY

59
Common,ConvenientFeatures
Onceyoustarttheself-timer,thelamp
willblinkandthecamerawillplayaself-
timersound.
Twosecondsbeforetheshot,theblinking
andsoundwillspeedup.(Thelampwill
remainlitincasetheashres.)
Tocancelshootingafteryouhave
triggeredtheself-timer,pressthe
<n>button.
Torestoretheoriginalsetting,choose
[
]instep1.
StillImages Movies
UsingtheSelf-TimertoAvoidCameraShake
Thisoptiondelaysshutterreleaseuntilabouttwosecondsafteryouhave
pressedtheshutterbutton.Ifthecameraisunsteadywhileyouarepressing
theshutterbutton,itwillnotaffectyourshot.
Congurethesetting.
Followstep1on=
58andchoose
[[].
Oncethesettingiscomplete,[[]is
displayed.
Followstep2on=
58toshoot.
StillImages Movies
CustomizingtheSelf-Timer
Youcanspecifythedelay(0–30seconds)andnumberofshots(1–10).
1 Choose[$].
Followingstep1on=
58,choose
[$]andpressthe<n>button
immediately.
COPY
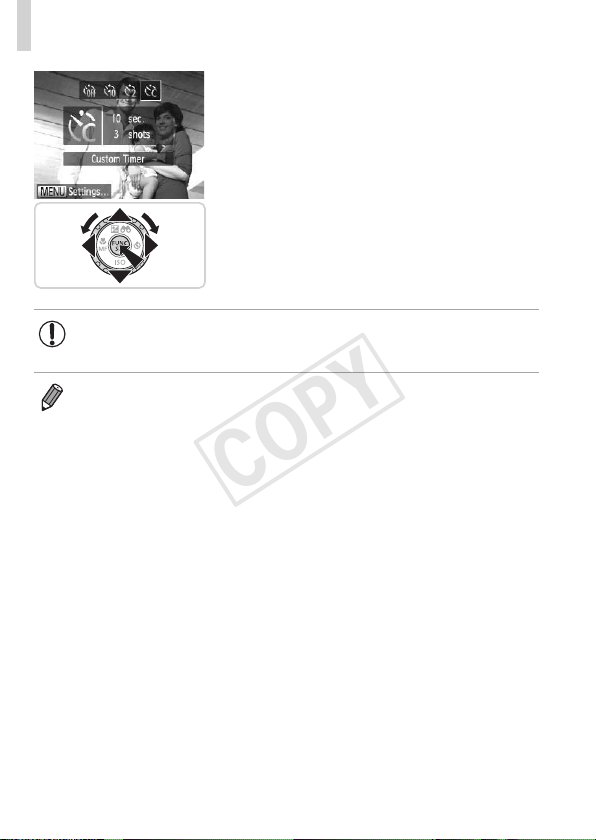
60
Common,ConvenientFeatures
2 Congurethesetting.
Pressthe<o><p>buttonstochoose
[Delay]or[Shots].
Pressthe<q><r>buttonsorturnthe
<5>dialtochooseavalue,andthen
pressthe<m>button.
Oncethesettingiscomplete,[$]is
displayed.
Followstep2on=
58toshoot.
• Formoviesshotusingtheself-timer,[Delay]representsthedelay
beforerecordingbegins,butthe[Shots]settinghasnoeffect.
• Whenyouspecifymultipleshots,imagebrightnessandwhitebalanceare
determinedbytherstshot.Moretimeisrequiredbetweenshotswhenthe
ashresorwhenyouhavespeciedtotakemanyshots.Shootingwillstop
automaticallywhenthememorycardbecomesfull.
• Whenadelaylongerthantwosecondsisspecied,twosecondsbeforethe
shot,thelampblinkingandself-timersoundwillspeedup.(Thelampwill
remainlitincasetheashres.)
COPY
61
Common,ConvenientFeatures
StillImages
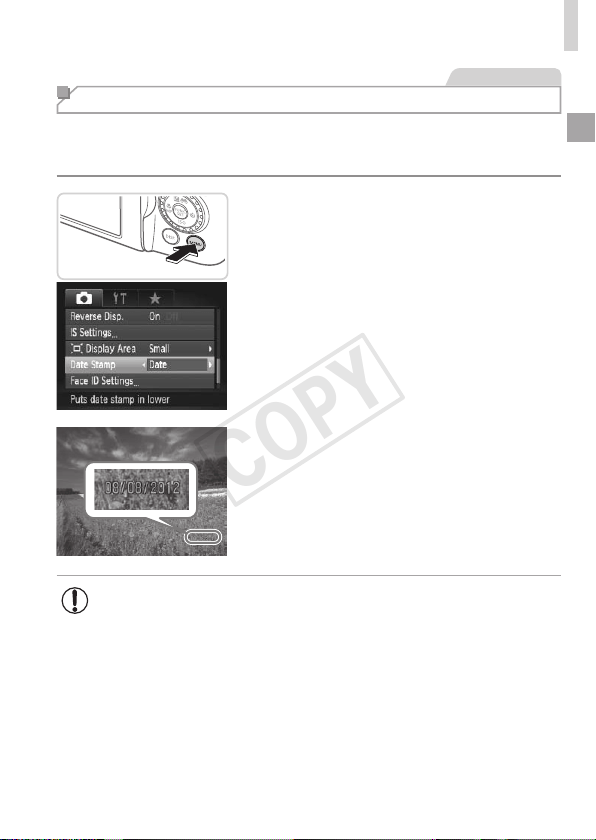
Adding a Date Stamp
Thecameracanaddtheshootingdatetoimages,inthelower-rightcorner.
However,notethatdatestampscannotbeeditedorremoved,soconrm
beforehandthatthedateandtimearecorrect(=
19).
1 Congurethesetting.
Pressthe<n>button,choose[Date
Stamp]onthe[4]tab,andthenchoose
thedesiredoption(=
42).
Oncethesettingiscomplete,[DATE]is
displayed.
2 Shoot.
Asyoutakeshots,thecameraaddsthe
shootingdateortimetothelower-right
cornerofimages.
Torestoretheoriginalsetting,choose
[Off]instep1.
• Datestampscannotbeeditedorremoved.
COPY
62
Common,ConvenientFeatures
• Imagesoriginallyrecordedwithouttheshootingdatecanbeprintedwiththis
informationasfollows.However,addingthedateandtimetoimagesthat
alreadyhavethisinformationmaycauseittobeprintedtwice.
-Usetheincludedsoftwaretoprint
Fordetails,refertotheSoftware Guide(=
28).
-Printusingprinterfunctions(=
231)
-UsecameraDPOFprintsettings(=
238)toprint
StillImages
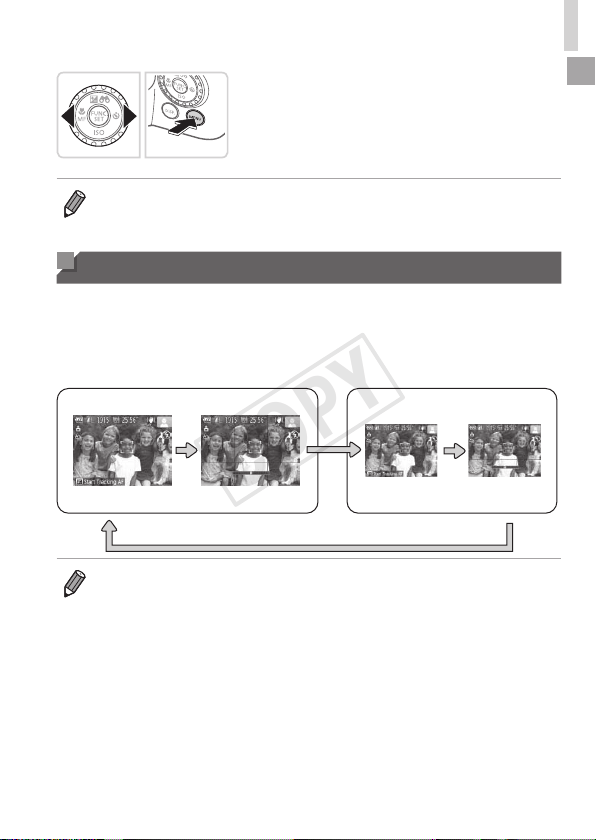
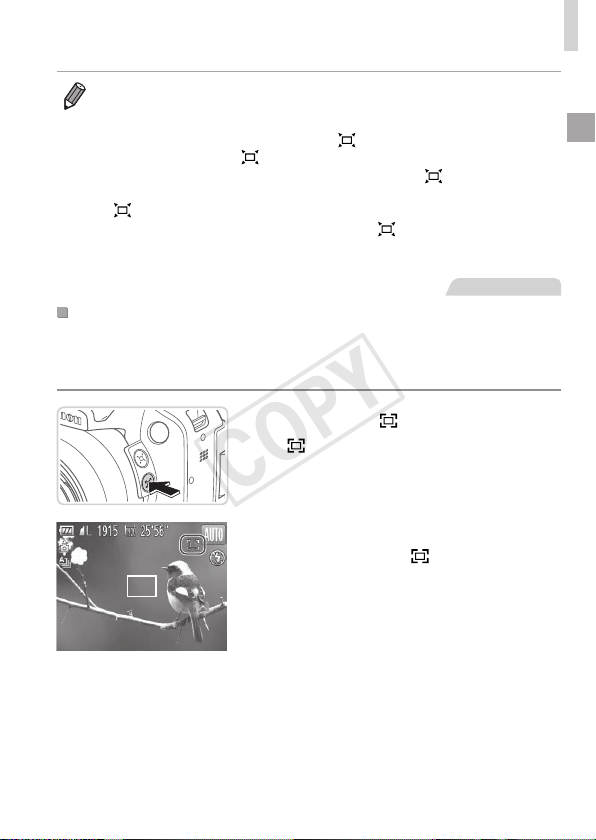
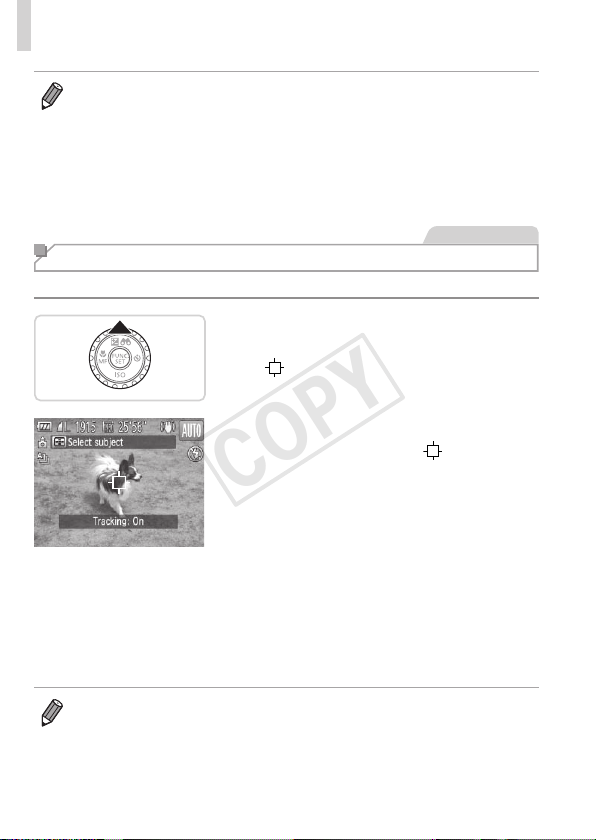
Choosing Subjects to Focus On (Tracking AF)
Shootafterchoosingasubjecttofocusonasfollows.
1 SpecifyTrackingAF.
Pressthe<o>button.
[ ]isdisplayedinthecenterofthe
screen.
2 Chooseasubjecttofocuson.
Aimthecamerasothat[ ]isonthe
desiredsubject,andthenpressthe
shutterbuttonhalfway.
Ablueframeisdisplayed,andthe
camerawillkeepthesubjectinfocusand
imagebrightnessadjusted(ServoAF).
3 Shoot.
Presstheshutterbuttonallthewaydown
toshoot.
Pressthe<o>buttontocancelTracking
AF.
• Trackingmaynotbepossiblewhensubjectsaretoosmallormovetoo
rapidly,orwhensubjectcolororbrightnessmatchesthatofthebackground
tooclosely.
COPY
63
Using Face ID
Ifyouregisterapersonaheadoftime,thecamerawilldetectthatperson’s
face,andprioritizefocus,brightness,andcolorforthatpersonwhen
shooting.In<A>mode,thecameracandetectbabiesandchildren
basedonregisteredbirthdaysandoptimizesettingsforthemwhen
shooting.
Thisfunctionisalsousefulwhensearchingforaspecicregisteredperson
amongalargenumberofimages(=
166).
PersonalInformation
• Informationsuchasimagesofaface(faceinfo)registeredwithFaceID,
andpersonalinformation(name,birthday)willbesavedonthecamera.
Additionally,whenregisteredpeoplearedetected,theirnameswillbe
recordedinstillimages.WhenusingtheFaceIDfunction,becareful
whensharingthecameraorimageswithothers,andwhenposting
imagesonlinewheremanyotherscanviewthem.
• Whendisposingofacameraortransferringittoanotherpersonafter
usingFaceID,besuretoeraseallinformation(registeredfaces,names,
andbirthdays)fromthecamera(=
71).
Registering Face ID Information
Youcanregisterinformation(faceinfo,name,birthday)forupto12people
tousewithFaceID.
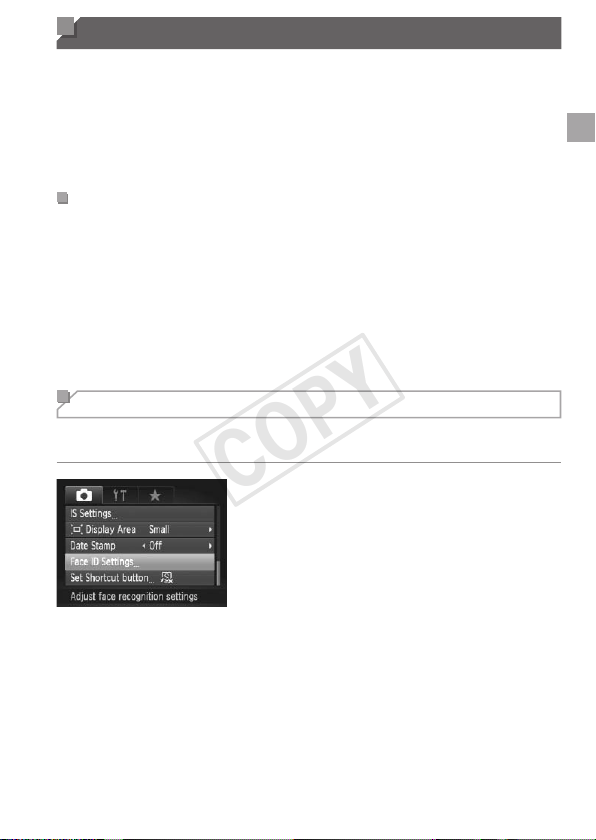
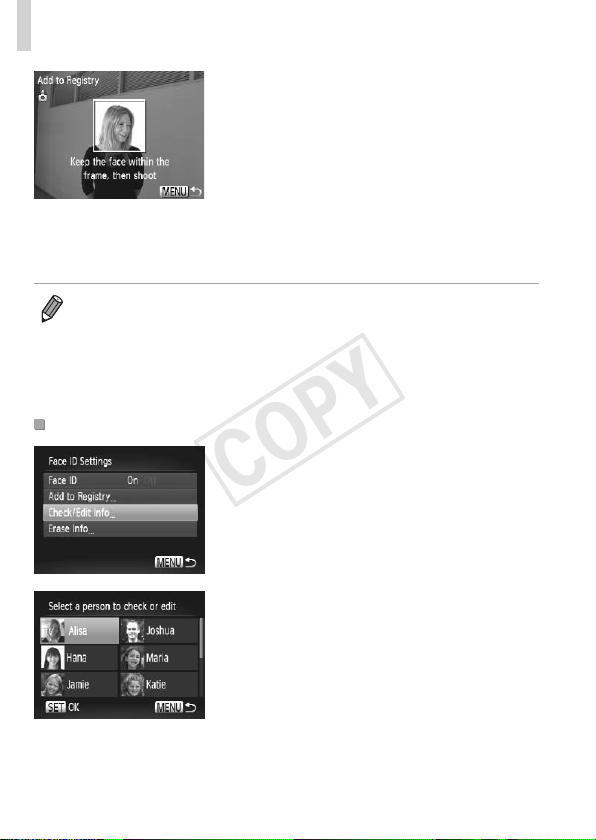
1 Accessthesettingscreen.
Pressthe<n>button,choose[Face
IDSettings]onthe[4]tab,andthen
pressthe<m>button(=
42).
COPY

64
UsingFaceID
Choose[AddtoRegistry],andthen
choose[AddaNewFace].
2 Registerfaceinformation.
Aimthecamerasothatthefaceofthe
personyouwanttoregisterisinsidethe
grayframeatthecenterofthescreen.
Awhiteframeontheperson’sface
indicatesthatthefaceisrecognized.
Makesureawhiteframeisdisplayedon
theface,andthenshoot.
Ifthefaceisnotrecognized,youcannot
registerfaceinformation.
3 Savethesettings.
After[Register?]isdisplayed,pressthe
<q><r>buttonsorturnthe<5>dialto
choose[OK],andthenpressthe<m>
button.
COPY
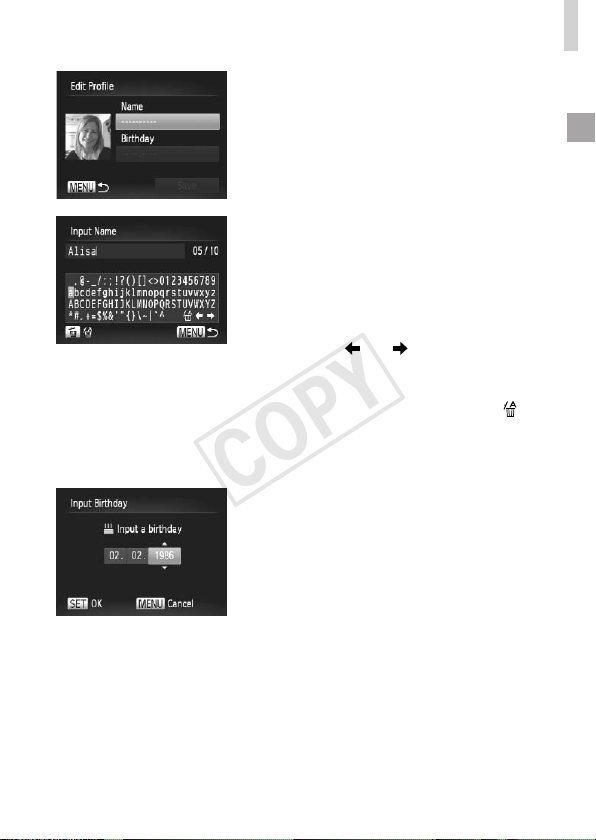
65
UsingFaceID
The[EditProle]screenisdisplayed.
4 Enteraname.
Pressthe<m>button.
Pressthe<o><p><q><r>buttonsor
turnthe<5>dialtochooseacharacter,
andthenpressthe<m>buttontoenter
it.
Choose[ ]or[ ]andpressthe<m>
buttontomovethecursor.
Todeletethepreviouscharacter,either
pressthe<a>buttonorchoose[
]and
pressthe<m>button.
Pressthe<n>buttontoreturntothe
editprolescreen.
5 Enterabirthday.
Pressthe<o><p>buttonsorturnthe
<5>dialtochoose[Birthday],andthen
pressthe<m>button.
Pressthe<q><r>buttonstochoosea
setting.
Pressthe<o><p>buttonsorturnthe
<5>dialtospecifythedate.
Whennished,pressthe<m>button.
COPY
66
UsingFaceID
6 Savethesettings.
Pressthe<o><p>buttonsorturnthe
<5>dialtochoose[Save],andthen
pressthe<m>button.
Afteramessageisdisplayed,pressthe
<q><r>buttonsorturnthe<5>dialto
choose[Yes],andthenpressthe<m>
button.
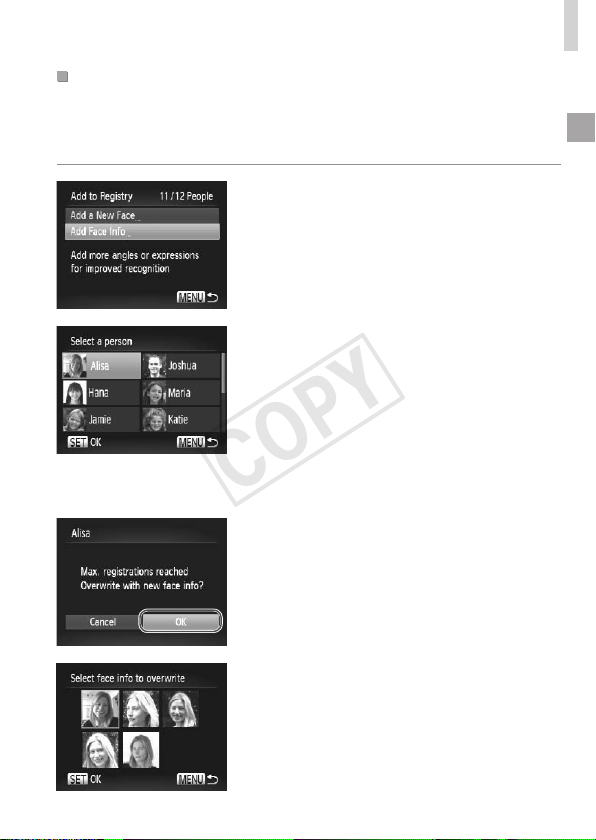
7
Continueregisteringfaceinformation.
Toregisterupto4morepointsoffaceinformation
(expressionsorangles),repeatsteps2–3.
Registeredfacesaremoreeasily
recognizedifyouaddavarietyofface
information.Inadditiontoahead-on
angle,addaslightsideangle,ashotwhen
smiling,andshotsinsideandoutside.
• Theashwillnotrewhenfollowingstep2.
• Ifyoudonotregisterabirthdayinstep5,BabiesorChildrenicons
(=
51)willnotdisplayin<A>mode.
• Youcanoverwriteregisteredfaceinfo,andaddfaceinfolaterifyouhavenot
lledall5faceinfoslots(=
69).
Shooting
Ifyouregisterapersonaheadoftime,thecamerawillprioritizethatpersonasthe
mainsubject,andoptimizefocus,brightness,andcolorforthatpersonwhenshooting.
Whenyoupointthecameratowardasubject,
thenamesofupto3registeredpeoplewill
bedisplayedwhentheyaredetected.
Shoot.
Displayednameswillberecordedinstill
images.Evenifpeoplearedetected,buttheir
namesarenotdisplayed,thenames(upto5
people)willberecordedintheimage.
COPY
67
UsingFaceID
• Peopleotherthanthoseregisteredmaybemistakenlydetectedas
theregisteredpersoniftheysharesimilarfacialfeatures.
• Registeredpeoplemaynotbecorrectlydetectedifthecapturedimageor
scenediffersdrasticallyfromtheregisteredfaceinformation.
• Ifaregisteredfaceisnotdetected,ornoteasilydetected,overwrite
registeredinformationwithnewfaceinfo.Registeringfaceinforightbefore
shootingwillallowforeasierdetectionofregisteredfaces.
• Ifapersonismistakenlydetectedasanotherpersonandyoucontinueshooting,
youcaneditorerasethenamerecordedintheimageduringplayback(
=
171).
• Becausefacesofbabiesandchildrenchangequicklyastheygrow,you
shouldupdatetheirfaceinforegularly(=
69).
• Nameswillstillberecordedinimagesevenifyouclearthe[ShootingInfo]
checkboxin[CustomDisplay](=
154)onthe[4]tabsothatthenames
arenotdisplayed.
• Ifyoudon’twantnamestoberecordedinstillimages,choose[FaceID
Settings]onthe[4]tab,choose[FaceID],andthenchoose[Off].
• Youcanchecknamesrecordedinimagesintheplaybackscreen(simple
informationdisplay)(=
160).
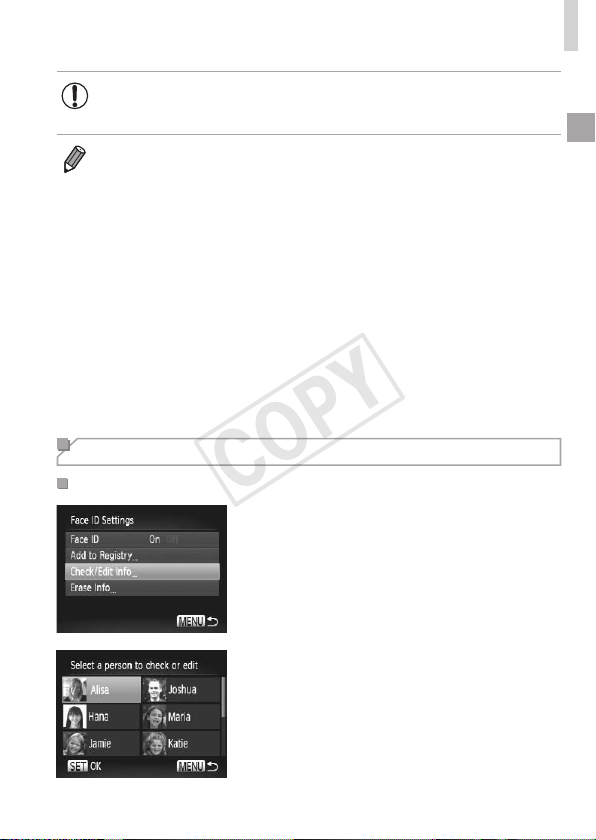
Checking and Editing Registered Information
CheckingRegisteredFaceIDInformation
1 Accessthe[Check/EditInfo]
screen.
Followingstep1on=
63,choose
[Check/EditInfo]andpressthe<m>
button.
2 Chooseapersontocheck.
Pressthe<o><p><q><r>buttonsor
turnthe<5>dialtochooseaperson,
andthenpressthe<m>button.
COPY
68
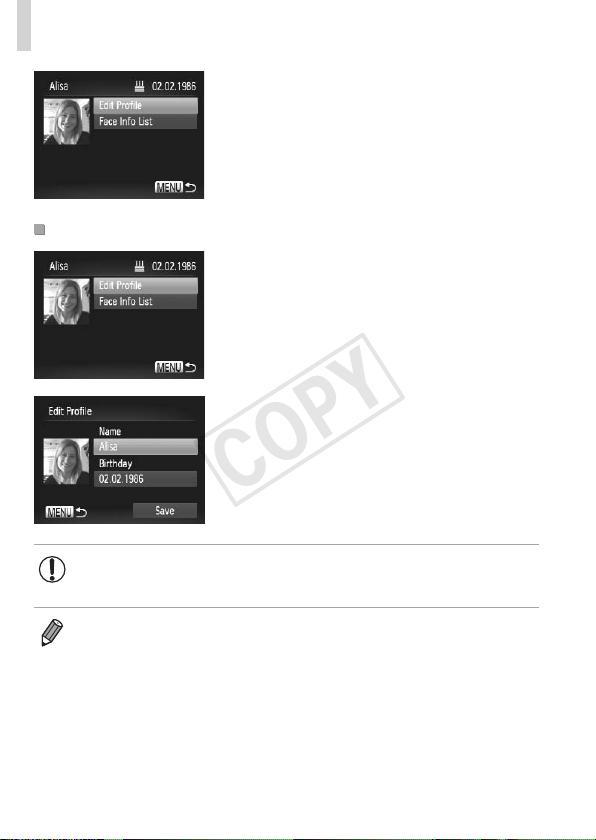
UsingFaceID
3 Checktheregistered
information.
Pressthe<o><p>buttonsorturnthe
<5>dialtochooseanitem,andthen
pressthe<m>button.
Checktheregisteredinformation.
ChangingtheNameorBirthday
1 Accessthe[EditProle]screen.
Followingsteps1–3on=
67–68,
choose[EditProle]andpressthe<m>
button.
2 Inputchanges.
Pressthe<o><p>buttonsorturnthe
<5>dialtochooseanitem,andfollow
steps4–5on=
65toinputchanges.
• Evenifyouchangenamesin[EditProle],thenamesrecordedin
previouslyshotimageswillremainthesame.
• Youcanusetheincludedsoftwaretoeditregisterednames.Some
charactersenteredwiththeincludedsoftwaremaynotdisplayonthe
camera,butwillbecorrectlyrecordedinimages.
COPY
69
UsingFaceID
OverwritingandAddingFaceInformation
Youcanoverwriteexistingfaceinformationwithnewfaceinfo.Youshould
updatefaceinformationregularly,especiallywithbabiesandchildren,as
theirfaceschangequicklyastheygrow.
Youcanalsoaddfaceinformationwhenall5faceinfoslotshavenotbeenlled.
1 Accessthe[AddFaceInfo]
screen.
Onthescreeninstep1on=
63,
choose[AddFaceInfo]andpressthe
<m>button.
2 Choosethenameoftheperson
tooverwrite.
Pressthe<o><p><q><r>buttonsor
turnthe<5>dialtochoosethenameof
apersontooverwrite,andthenpressthe
<m>button.
If4orlessfaceinformationslotsare
registered,followstep5on=
70to
addmorefaceinfo.
3 Accessthefaceinfoscreen.
Readthemessagethatdisplays,press
the<q><r>buttonsorturnthe<5>
dialtochoose[OK],andthenpressthe
<m>button.
Thefaceinfoscreenisdisplayed.
4 Choosethefaceinfoto
overwrite.
Pressthe<o><p><q><r>buttonsor
turnthe<5>dialtochoosethefaceinfo
tooverwrite,andthenpressthe<m>
button.
COPY
70
UsingFaceID
5 Registerfaceinformation.
Followsteps2–3on=
64to
shoot,andthenregisterthenewface
information.
Registeredfacesaremoreeasily
recognizedifyouaddavarietyofface
information.Inadditiontoahead-on
angle,addaslightsideangle,ashot
whensmiling,andshotsinsideand
outside.
• Youcannotaddfaceinformationifall5informationslotsarelled.Followthe
stepsabovetooverwritefaceinformation.
• Youcanfollowtheabovestepstoregisternewfaceinfowhenthereisat
leastoneslotopen,howeveryoucannotoverwriteanyfaceinformation.
Insteadofoverwritingfaceinfo,rsteraseunwantedexistinginfo(see
below),andthenregisternewfaceinformation(=
63)asneeded.
ErasingFaceInformation
1 Accessthe[Check/EditInfo]
screen.
Followingstep1on=
63,choose
[Check/EditInfo]andpressthe<m>
button.
2 Choosethenameoftheperson
whosefaceinfoyouwantto
erase.
Pressthe<o><p><q><r>buttonsor
turnthe<5>dialtochoosethenameof
thepersonwhosefaceinfoyouwantto
erase,andthenpressthe<m>button.
COPY
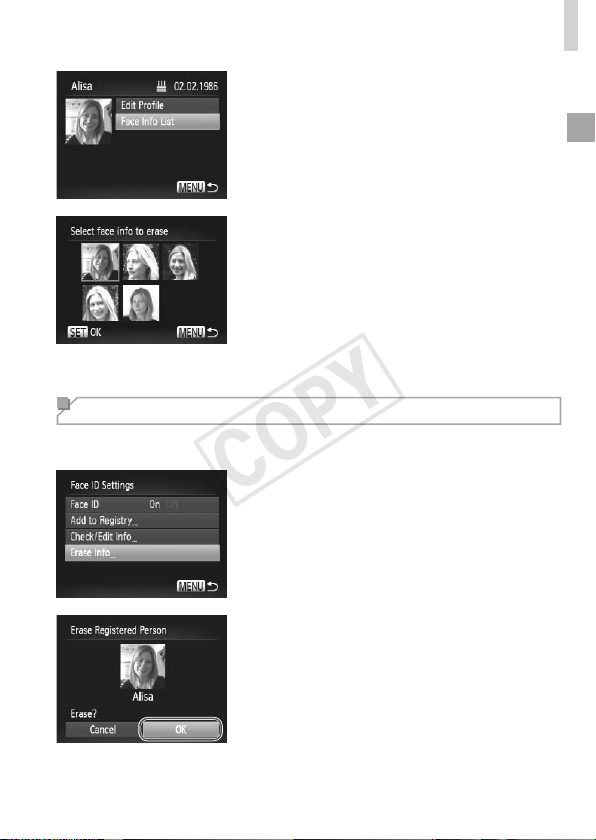
71
UsingFaceID
3 Accessthe[FaceInfoList]
screen.
Pressthe<o><p>buttonsorturnthe
<5>dialtochoose[FaceInfoList],and
thenpressthe<m>button.
4 Choosethefaceinfotoerase.
Pressthe<
m
>button,pressthe
<
o
><
p
><
q
><
r
>buttonsorturnthe<
5
>
dialtochoosethefaceinfoyouwanttoerase,
andthenpressthe<
m
>button.
After[Erase?]isdisplayed,pressthe<
q
><
r
>
buttonsorturnthe<
5
>dialtochoose
[OK],andthenpressthe<
m
>button.
Theselectedfaceinfowillbeerased.
Erasing Registered Information
Youcaneraseinformation(faceinfo,name,birthday)registeredtoFaceID.
However,namesrecordedinpreviouslyshotimageswillnotbeerased.
1 Accessthe[EraseInfo]screen.
Followstep1on=
63andchoose
[EraseInfo].
2 Choosethenameoftheperson
whoseinfoyouwanttoerase.
Pressthe<
o
><
p
><
q
><
r
>buttonsorturn
the<
5
>dialtochoosethenameofaperson
toerase,andthenpressthe<
m
>button.
After[Erase?]isdisplayed,pressthe
<q><r>buttonsorturnthe<5>dialto
choose[OK],andthenpressthe<m>
button.
COPY

73
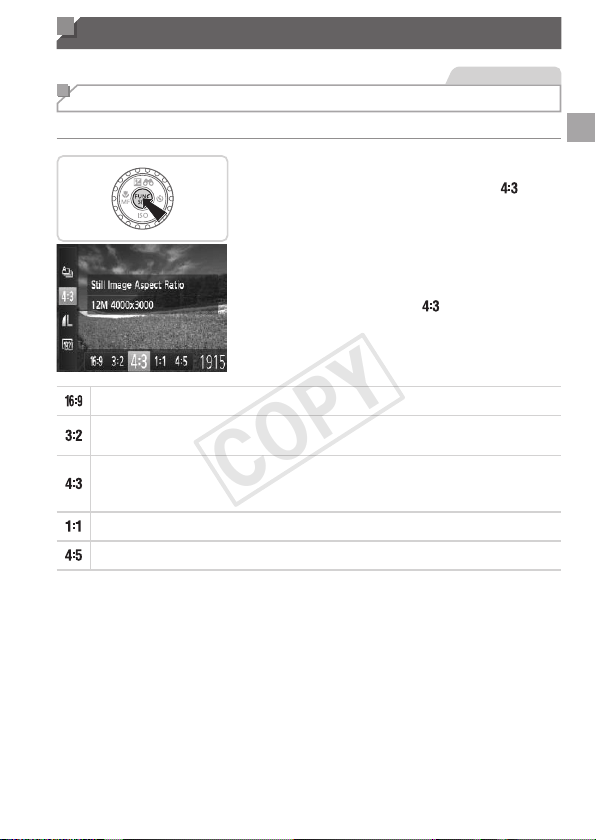
Image Customization Features
StillImages
Changing the Aspect Ratio
Changetheimageaspectratio(ratioofwidthtoheight)asfollows.
Congurethesetting.
Pressthe<m>button,choose[ ]in
themenu,andchoosethedesiredoption
(=
41).
Oncethesettingiscomplete,thescreen
aspectratiowillbeupdated.
Torestoretheoriginalsetting,repeatthis
processbutchoose[
].
UsedfordisplayonwidescreenHDTVsorsimilardisplaydevices.
Sameaspectratioas35mmlm,usedforprintingimagesat5x7-inchor
postcardsizes.
Nativeaspectratioofthecamerascreen,alsousedfordisplayonstandard-
denitiontelevisionsorsimilardisplaydevices,orforprintingimagesat3.5x
5-inchorA-seriessizes.
Squareaspectratio.
Aspectratiocommonlyusedforportraits.
COPY
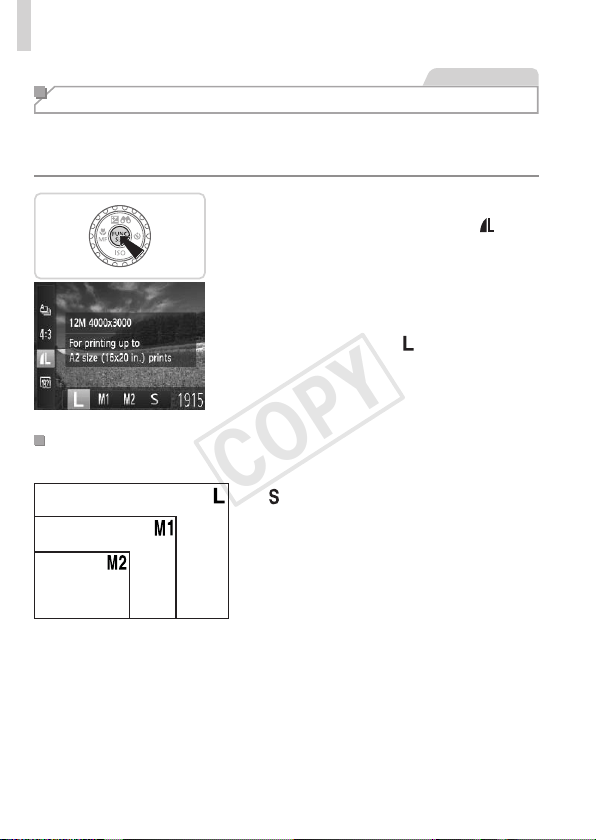
74
ImageCustomizationFeatures
StillImages
Changing Image Resolution (Size)
Choosefrom4levelsofimageresolution,asfollows.Forguidelineson
howmanyshotsateachresolutionsettingcantonamemorycard,see
“Specications”(=
274).
Congurethesetting.
Pressthe<m>button,choose[ ]in
themenu,andchoosethedesiredoption
(=
41).
Theoptionyouconguredisnow
displayed.
Torestoretheoriginalsetting,repeatthis
processbutchoose[
].
GuidelinesforChoosingResolutionBasedonPaper
Size(for4:3Images)
A2(16.5x23.4in.)
A3–A5(11.7x
16.5–5.8x8.3in.)
5x7in.
Postcard
3.5x5in.
[ ]:Fore-mailingimages.
COPY
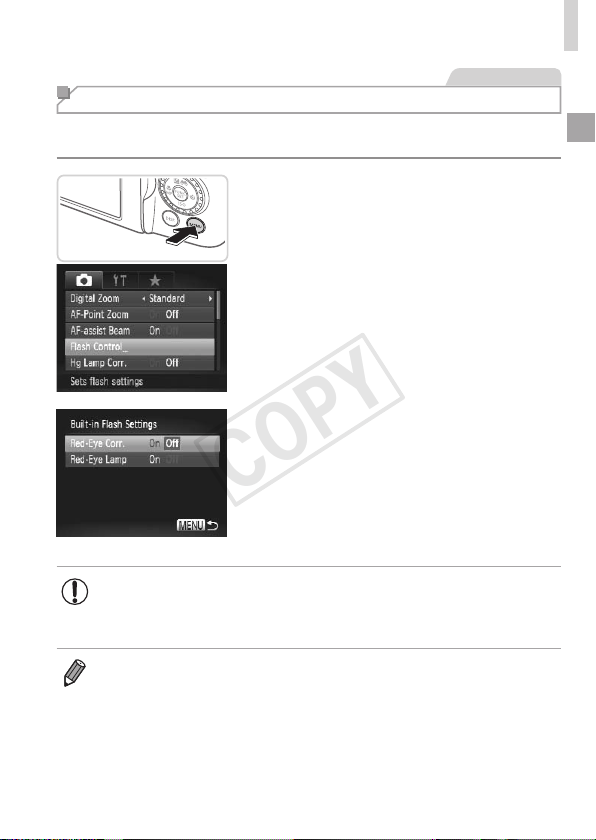
75
ImageCustomizationFeatures
StillImages
Red-Eye Correction
Red-eyethatoccursintheashphotographycanbeautomatically
correctedasfollows.
1 Accessthe[Built-inFlash
Settings]screen.
Pressthe<n>button,choose[Flash
Control]onthe[4]tab,andthenpress
the<m>button(=
42).
2 Congurethesetting.
Choose[Red-EyeCorr.],andthen
choose[On](=
42).
Oncethesettingiscomplete,[R]is
displayed.
Torestoretheoriginalsetting,repeatthis
processbutchoose[Off].
• Red-eyecorrectionmaybeappliedtoimageareasotherthan
eyes(ifthecameramisinterpretsredeyemakeupasredpupils,
forexample).
• Youcanalsocorrectexistingimages(=
193).
• Youcanalsoaccessthescreeninstep2byholdingdownthe<h>buttonfor
atleastonesecond.
• Youcanalsoaccessthescreeninstep2whentheashisupbypressing
the<h>buttonandimmediatelypressingthe<n>button.
COPY
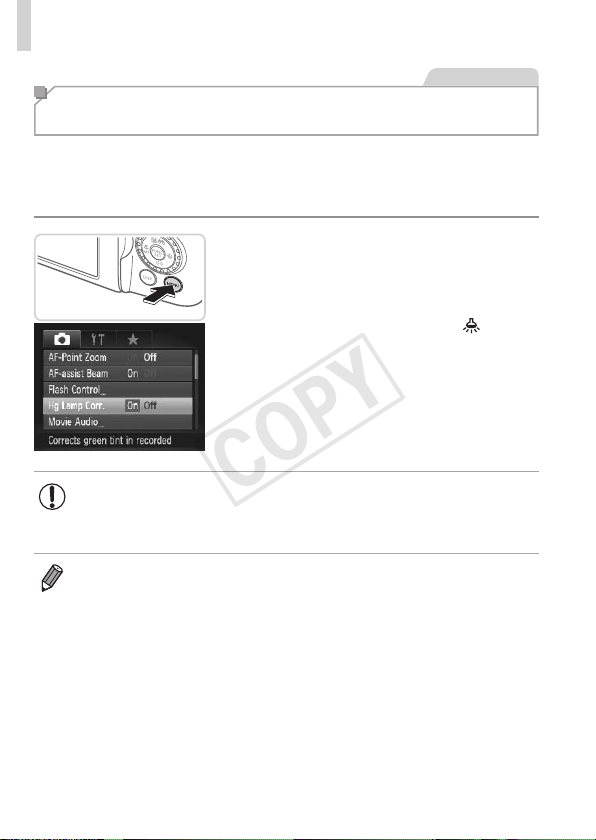
76
ImageCustomizationFeatures
StillImages
Correcting Greenish Image Areas from
Mercury Lamps
Inshotsofeveningsceneswithsubjectsilluminatedbymercurylamps,the
subjectsorbackgroundmayappeartohaveagreenishtinge.Thisgreenish
tingecanbecorrectedautomaticallywhenshooting,usingMulti-areaWhite
Balance.
Congurethesetting.
Pressthe<n>button,choose[Hg
LampCorr.]onthe[4]tab,andthen
choose[On](=
42).
Oncethesettingiscomplete,[ ]is
displayed.
Torestoretheoriginalsetting,repeatthis
processbutchoose[Off].
• Afteryouarenishedshootingundermercurylamps,youshould
set[HgLampCorr.]backto[Off].Otherwise,greenhuesnot
causedbymercurylampsmaybecorrectedbymistake.
• Trytakingsometestshotsrsttomakesureyouobtainthedesiredresults.
COPY
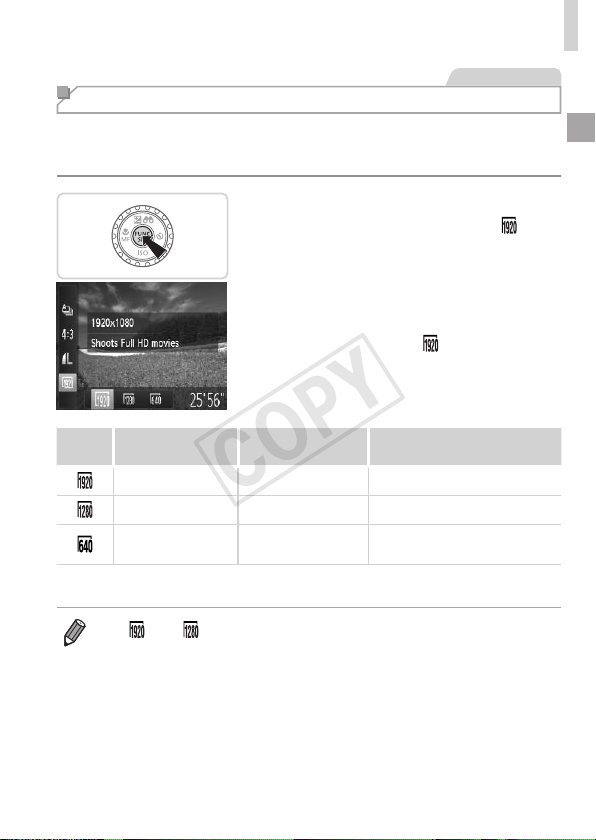
77
ImageCustomizationFeatures
Movies
Changing Movie Image Quality
3imagequalitysettingsareavailable.Forguidelinesonthemaximum
movielengthateachlevelofimagequalitythatwilltonamemorycard,
see“Specications”(=
274).
Congurethesetting.
Pressthe<m>button,choose[ ]in
themenu,andchoosethedesiredoption
(=
41).
Theoptionyouconguredisnow
displayed.
Torestoretheoriginalsetting,repeatthis
processbutchoose[
].
Image
Quality
Resolution FrameRate Details
1920x1080* 24fps ForshootinginFullHD
1280x720 30fps ForshootinginHD
640x480 30fps
Forshootinginstandard
denition
*FineDetailMovieProcessing(Thisfunctionquicklyprocessesalargeamountof
information,makingitpossibletorecorderevennerdetailsinmovies.)
• In[ ]and[ ]modes,blackbarsdisplayedonthetopandbottomedges
ofthescreenindicateimageareasnotrecorded.
COPY
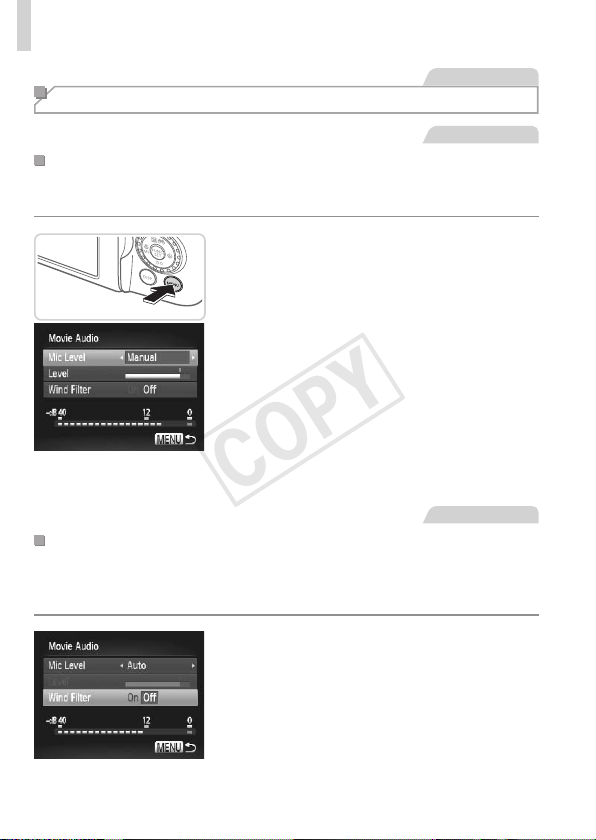
78
ImageCustomizationFeatures
Movies
Sound Settings
Movies
AdjustingtheRecordingVolume
Althoughtherecordinglevel(volume)isautomaticallyadjustedtoreduce
distortion,youcansetthelevelmanuallytosuittheshootingscene.
1
Accessthe[MovieAudio]screen.
Pressthe<n>button,choose
[MovieAudio]onthe[4]tab,andthen
pressthe<m>button(=
42).
2 Congurethesetting.
Choose[MicLevel],andthenchoose
[Manual](=
42).
Pressthe<p>button,andthenpress
the<q><r>buttonstocongurethe
[Level]setting.
Torestoretheoriginalsetting,repeatthis
processbutchoose[Auto].
Movies
UsingtheWindFilter
Distortedaudiocausedbyrecordingwhenthewindisstrongcanbe
reduced.However,therecordingmaysoundunnaturalwhenthisoptionis
usedwhenthereisnowind.
Congurethesetting.
Accessthe[MovieAudio]screenas
describedinstep1of“Adjustingthe
RecordingVolume”.
Choose[WindFilter],andthenchoose
[On](=
42).
Torestoretheoriginalsetting,repeatthis
processbutchoose[Off].
COPY

79
Helpful Shooting Features
StillImages Movies
Using the Electronic Level
Anelectroniclevelcanbedisplayedonthescreenwhenshootingasa
guidelinetodetermineifthecameraislevel.
1 Displaytheelectroniclevel.
Pressthe<l>buttonseveraltimes
todisplaytheelectroniclevel.
2 Levelthecameraasneeded.
Levelthecamerasothatthecenterofthe
electroniclevelisgreen.
• Iftheelectroniclevelisnotdisplayedinstep1,pressthe<n>button,
andonthe[4]tab,choose[CustomDisplay].Adda[
]tochoosethe
electroniclevel.
• Tiltingthecameratoofarforwardorbackwardwillpreventyoufromusing
theelectroniclevel,whichwillturngray.
• Theelectroniclevelisnotdisplayedduringmovierecording.
• Ifyouholdthecameravertically,theorientationoftheelectroniclevelwillbe
updatedautomaticallytomatchthecameraorientation.
• Ifyourshotsarenotlevelevenifyouusetheelectroniclevel,trycalibrating
theelectroniclevel(=
207).
COPY
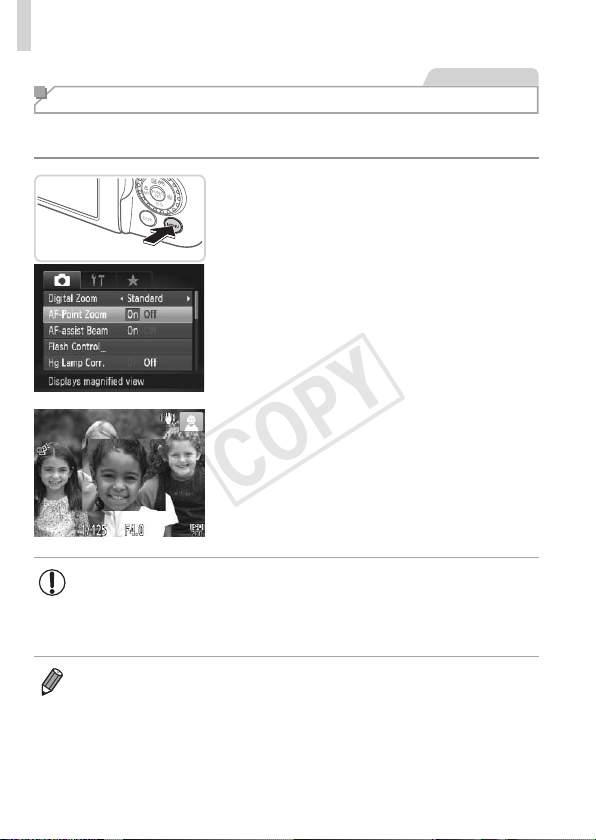
80
HelpfulShootingFeatures
StillImages
Magnifying the Area in Focus
Youcancheckthefocusbypressingtheshutterbuttonhalfway,whichwill
enlargetheportionoftheimageinfocusintheAFframe.
1 Congurethesetting.
Pressthe<n>button,choose[AF-
PointZoom]onthe[4]tab,andthen
choose[On](=
42).
2 Checkthefocus.
Presstheshutterbuttonhalfway.The
facedetectedasthemainsubjectisnow
magnied.
Torestoretheoriginalsetting,choose
[Off]instep1.
• Theareainfocuswillnotbemagniedwhenyoupresstheshutter
buttonhalfwayifafacewasnotdetected,ifthepersonistooclose
tothecameraandtheirfaceistoolargeforthescreen,orifthe
cameradetectssubjectmovement.
• Thedisplaywillnotmagnifywhenusingthedigitalzoom(=
55)or
TrackingAF(=
136).
COPY
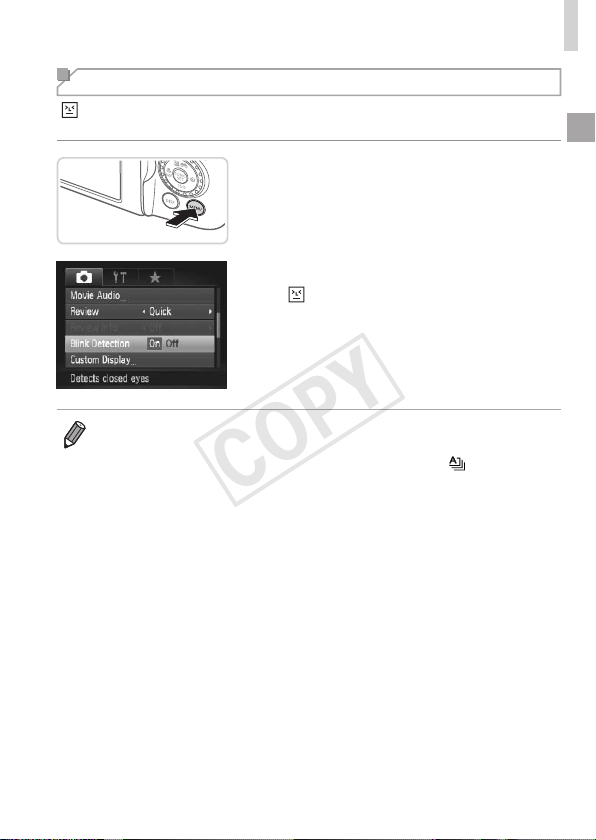
81
HelpfulShootingFeatures
Checking for Closed Eyes
[ ]isdisplayedwhenthecameradetectsthatpeoplemayhaveclosed
theireyes.
1 Congurethesetting.
Pressthe<n>button,choose[Blink
Detection]onthe[4]tab,andthen
choose[On](=
42).
2 Shoot.
[ ]isdisplayedwhenthecamera
detectsapersonwhoseeyesareclosed.
Torestoretheoriginalsetting,choose
[Off]instep1.
• Whenyouhavespeciedmultipleshotsin[$]mode,thisfunctionisonly
availableforthenalshot.
• Thisfeatureisnotavailableduringcontinuousshootingin[
]mode
(=
52).
• Aframeisdisplayedaroundpeoplewhoseeyesareclosedwhenyou
haveselected2–10secondsin[Review],orifyouhaveselected[Hold]
(=
83).
COPY
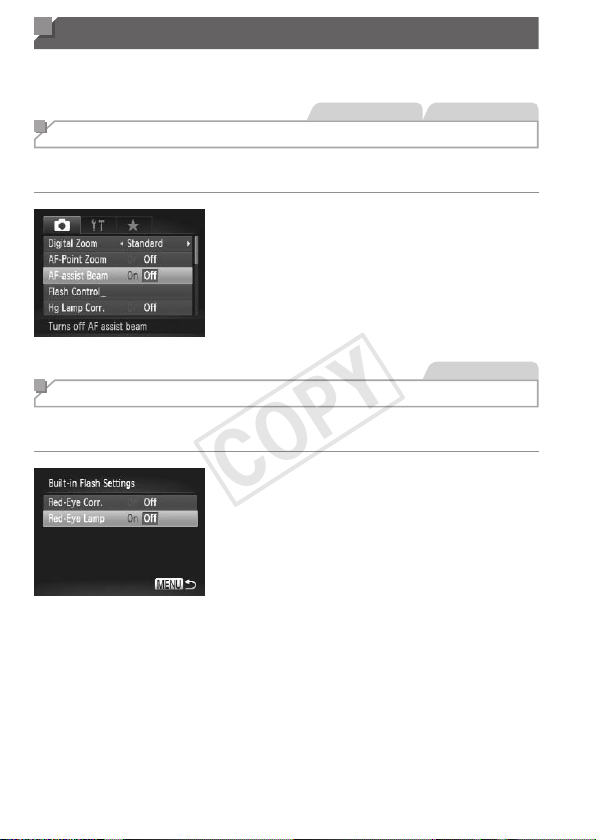
82
Customizing Camera Operation
Customizeshootingfunctionsonthe[4]tabofthemenuasfollows.
Forinstructionsonmenufunctions,see“MENUMenu”(=
42).
StillImages Movies
Deactivating the AF Assist Beam
Youcandeactivatethelampthatnormallylightsuptohelpyoufocuswhen
shootinginlow-lightconditions.
Congurethesetting.
Pressthe<n>button,choose[AF-
assistBeam]onthe[4]tab,andthen
choose[Off](=
42).
Torestoretheoriginalsetting,repeatthis
processbutchoose[On].
StillImages
Deactivating the Red-Eye Reduction Lamp
Youcandeactivatethered-eyereductionlampthatlightsuptoreducered-
eyewhentheashisusedinlow-lightshots.
1 Accessthe[Built-inFlash
Settings]screen.
Pressthe<n>button,choose[Flash
Control]onthe[4]tab,andthenpress
the<m>button(=
42).
2 Congurethesetting.
Choose[Red-EyeLamp],andthen
choose[Off](=
42).
Torestoretheoriginalsetting,repeatthis
processbutchoose[On].
COPY
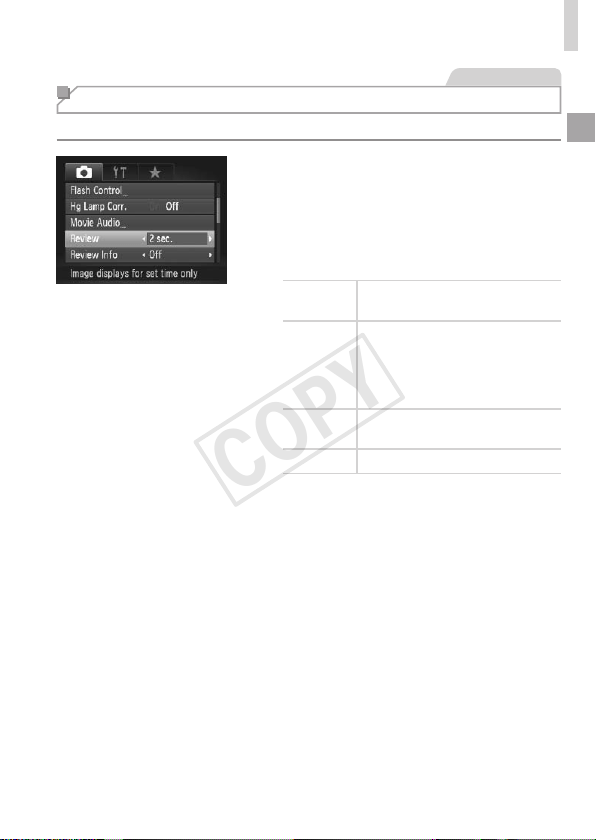
83
CustomizingCameraOperation
StillImages
Changing the Image Display Period After Shots
Changehowlongimagesaredisplayedaftershotsasfollows.
Congurethesetting.
Pressthe<n>button,choose
[Review]onthe[4]tab,andthen
choosethedesiredoption(=
42).
Torestoretheoriginalsetting,repeatthis
processbutchoose[Quick].
Quick
Displaysimagesonlyuntilyoucan
shootagain.
2–10sec.
Displaysimagesforthespecied
time.Evenwhiletheshotis
displayed,youcantakeanother
shotbypressingtheshutterbutton
halfwayagain.
Hold
Displaysimagesuntilyoupress
theshutterbuttonhalfway.
Off Noimagedisplayaftershots.
COPY
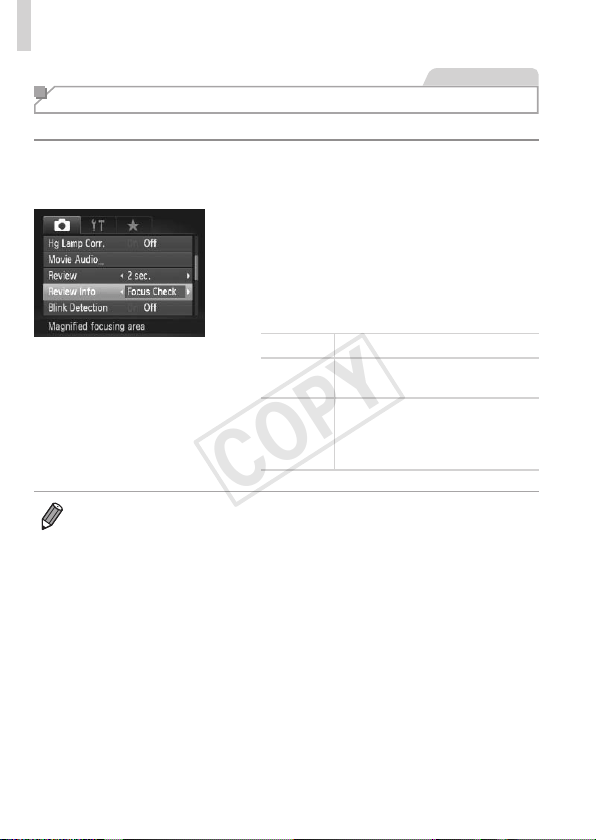
84
CustomizingCameraOperation
StillImages
Changing the Image Display Style After Shots
Changethewayimagesaredisplayedaftershotsasfollows.
1 In[Review],chooseeither2–10
secondsor[Hold](=
83).
2 Congurethesetting.
Pressthe<n>button,choose
[ReviewInfo]onthe[4]tab,andthen
choosethedesiredoption(=
42).
Torestoretheoriginalsetting,repeatthis
processbutchoose[Off].
Off Displaysonlytheimage.
Detailed
Displaysshootingdetails
(=
257).
Focus
Check
ShowstheareaintheAFframe
magnied,enablingyoutocheck
thefocus.Followthestepsin
“CheckingtheFocus”(=
165).
• Thissettingissetto[Off]andcannotbechangedwhen[Review](=
83)is
setto[Quick]or[Off].
COPY

85
Other Shooting Modes
Shootmoreeffectivelyinvariousscenes,andtakeshots
enhancedwithuniqueimageeffectsorcapturedusing
specialfunctions
3
COPY
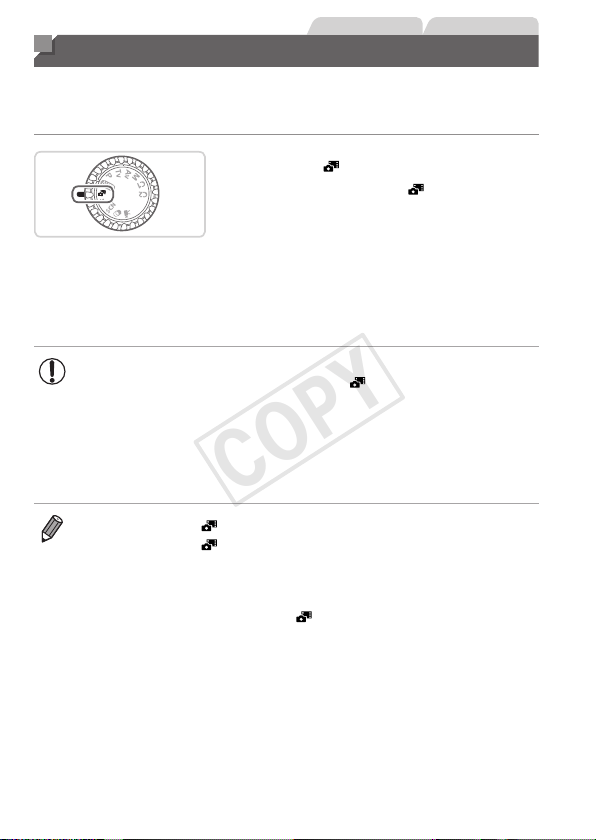
86
StillImages Movies
Auto Clip Recording (Movie Digest)
Youcanmakeashortmovieofadayjustbyshootingstillimages.
Beforeeachshot,thecamerawillautomaticallyrecordamovieclipofthe
scene.Eachcliprecordedthatdayiscombinedintoasinglele.
1 Enter< >mode.
Setthemodedialto< >.
2 Shoot.
Toshootastillimage,presstheshutter
buttonallthewaydown.
Beforeshooting,thecamerawill
automaticallyrecordaclipabout2–4
secondslong.
• Clipsmaynotberecordedifyoushootastillimageimmediately
afterturningthecameraon,choosing< >mode,oroperatingthe
camerainotherways.
• Batterylifeisshorterinthismodethanin<A>mode,because
clipsarerecordedforeachshot.
• Anysoundsfromcameraoperationsduringmovierecordingwill
beincludedinthemovie.
• Moviescreatedin< >modecanbeviewedbydate(=
169).
• Moviescreatedin<
>modearesavedasiFramemovies(=
110).
• Althoughtheclipsrecordedonaparticulardayarecombinedintoasingle
le,individualclips(chapters)canbeedited(=
196).
• Clipsaresavedasseparatemovielesinthefollowingcasesevenifthey
wererecordedonthesamedayin<
>mode.
-Ifthemovielesizereachesabout4GBorthetotalrecordingtimereaches
approx.29minutesand59seconds
-Ifamovieisprotected(=
175)
-Ifthedaylightsavingtime(=
20)ortimezone(=
200)settingshave
beenchanged
-Ifanewfolderiscreated(=
205)
• Somecamerasoundswillbemuted.Soundsarenotplayedwhenyoupress
theshutterbuttonhalfway,usecameracontrols,ortriggertheself-timer
(=
199).
COPY

87
StillImages
Moving Subjects (Sports)
Shootcontinuouslyasthecamerafocusesonmovingsubjects.
1 Enter< >mode.
Setthemodedialto< >.
2 Focus.
Whileyouarepressingtheshutterbutton
halfway,thecamerawillcontinueto
adjustfocusandimagebrightnesswhere
theblueframeisdisplayed.
3 Shoot.
Holdtheshutterbuttonallthewaydown
toshootcontinuously.
Shootingstopswhenyoureleasethe
shutterbuttonorreachthemaximum
numberofshots,afterwhich[Busy]is
displayedandtheshotsareshowninthe
orderyoutookthem.
• In< >mode,shotsmaylookgrainybecausetheISOspeed(=
117)is
increasedtosuittheshootingconditions.
• Fordetailsontheshootingrangein<
>mode,see“Specications”
(=
274).
• Theremaybeadelayaftercontinuousshootingbeforeyoucanshootagain.
Notethatsometypesofmemorycardsmaydelayyournextshoteven
longer.
• Shootingmayslowdowndependingonshootingconditions,camerasettings,
andthezoomposition.
COPY

88
MovingSubjects(Sports)
ImagesDisplayedDuringPlayback
Eachsetofimagesshotcontinuouslyismanagedasasinglegroup,and
onlytherstimageinthatgroupwillbedisplayed.Toindicatethatthe
imageispartofagroup,[ ]isdisplayedintheupperleftofthescreen.
• Ifyoueraseagroupedimage(=
179),allimagesinthegroup
arealsoerased.Becarefulwhenerasingimages.
• Groupedimagescanbeplayedbackindividually(=
170)andungrouped
(=
170).
• Protecting(=
175)agroupedimagewillprotectallimagesinthegroup.
• GroupedimagescanbeviewedindividuallywhenplayedbackusingImage
Search(=
166)orSmartShufe(=
174).Inthiscase,imagesare
temporarilyungrouped.
• Groupedimagescannotbetaggedasfavorites(=
184),edited(=
182–
193),categorized(=
185),printed(=
231),setforprintingindividually
(=
240),addedtoaPhotobook(=
243),FaceIDinformationcannot
beedited(=
171),andtheycannotbeassignedasastart-upimage
(=
202).Todothesethings,eitherviewgroupedimagesindividually
(=
170)orcancelgrouping(=
170)rst.
COPY
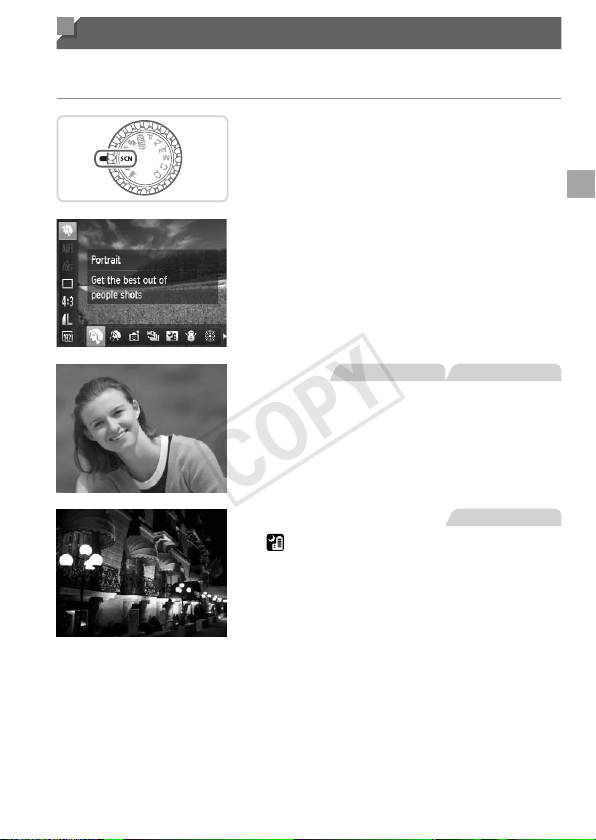
89
Specic Scenes
Chooseamodematchingtheshootingscene,andthecamerawill
automaticallycongurethesettingsforoptimalshots.
1 Enter<K>mode.
Setthemodedialto<K>.
2 Chooseashootingmode.
Pressthe<m>button,choose[I]inthe
menu,andthenchooseashootingmode
(=
41).
3 Shoot.
StillImages Movies
IShootportraits(Portrait)
Takeshotsofpeoplewithasoftening
effect.
StillImages
Shooteveningsceneswithout
usingatripod(Handheld
NightScene)
Beautifulshotsofeveningscenesor
portraitswitheveningsceneryinthe
background,withouttheneedtoholdthe
cameraverystill(aswithatripod).
Asingleimageiscreatedbycombining
consecutiveshots,reducingcamera
shakeandimagenoise.
COPY
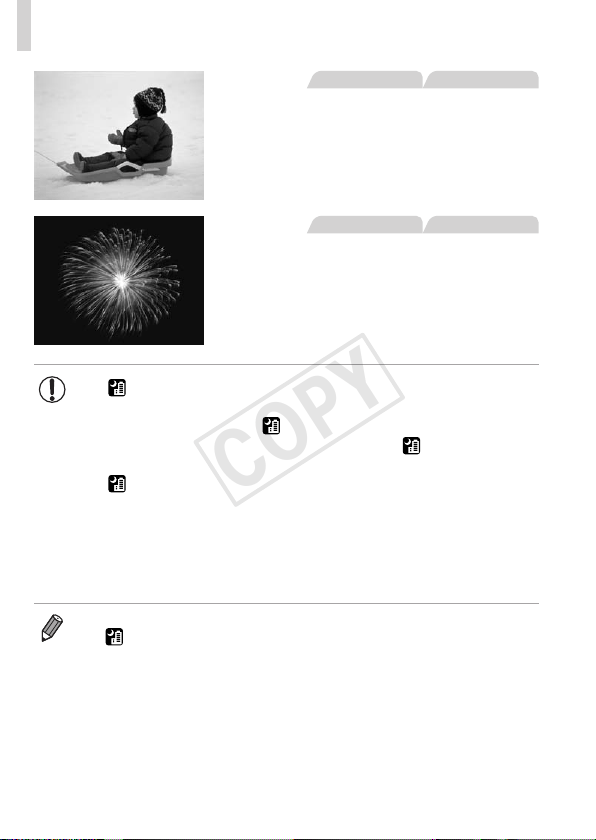
90
SpecicScenes
StillImages Movies
PShootwithsnowybackgrounds
(Snow)
Bright,natural-coloredshotsofpeople
againstsnowybackgrounds.
StillImages Movies
tShootreworks(Fireworks)
Vividshotsofreworks.
• In[ ]mode,shotsmaylookgrainybecausetheISOspeed
(=
117)isincreasedtosuittheshootingconditions.
• Subjectsappearlargerin[
]modecomparedtoothermodes.
• Becausethecamerawillshootcontinuouslyin[
]mode,holdit
steadywhileshooting.
• In[
]mode,excessivecamerashakeorcertainshooting
conditionsmaypreventyoufromobtainingthedesiredresults.
• In[t]mode,mountthecameraonatripodortakeother
measurestokeepitstillandpreventcamerashake.Additionally,
youshouldset[ISMode]to[Off]whenusingatripodorother
meanstoholdthecamerastill(=
147).
• Whenyouuseatripodforeveningscenes,shootingin[A]modeinstead
of[
]modewillgivebetterresults(=
46).
COPY
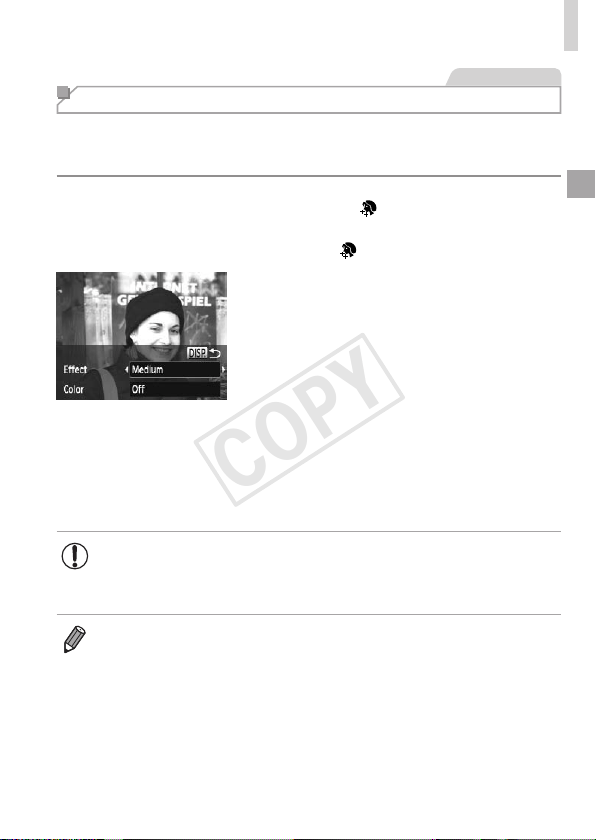
91
SpecicScenes
StillImages
Making Skin Look Smoother (Smooth Skin)
Youcanapplyasmootheningeffectwhenshootingimagesofpeople.
Theeffectlevelandcolor([LighterSkinTone],[DarkerSkinTone])canbe
chosenasfollows.
1 Choose[ ].
Followsteps1–2on=
89and
choose[
].
2 Accessthesettingscreen.
Pressthe<l>button.
3 Congurethesetting.
Pressthe<o><p>buttonstochoose
anoption.Chooseaneffectlevel(either
pressthe<q><r>buttonsorturnthe
<5>dial),andthenpressthe<l>
button.
Apreviewisshownofhowyourshotwill
lookwiththeeffectapplied.
4 Shoot.
• Areasotherthanpeople’sskinmaybemodied.
• Trytakingsometestshotsrsttomakesureyouobtainthe
desiredresults.
• Theeffectwillbestrongerforthefaceofthepersondetectedasthemain
subject.
COPY
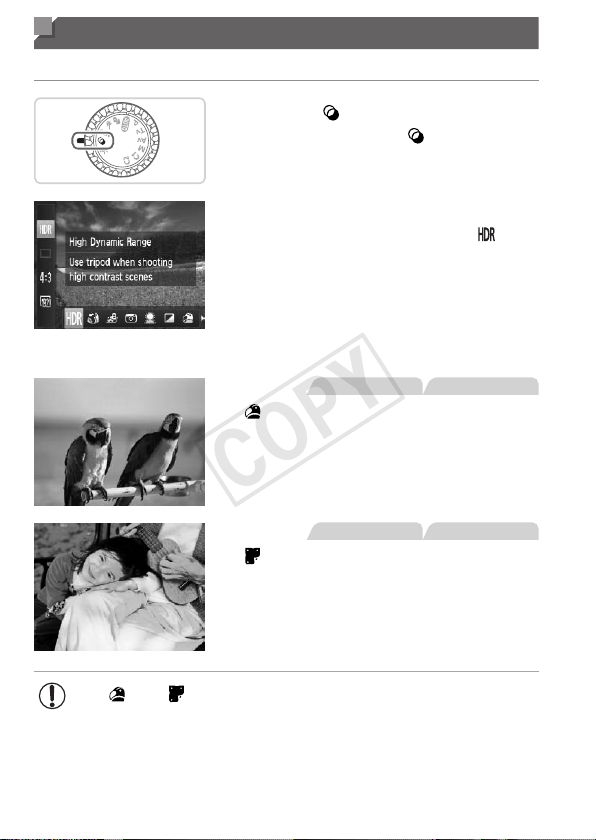
92
Image Effects (Creative Filters)
Addavarietyofeffectstoimageswhenshooting.
1 Enter< >mode.
Setthemodedialto< >.
2 Chooseashootingmode.
Pressthe<m>button,choose[ ]in
themenu,andthenchooseashooting
mode(=
41).
3 Shoot.
StillImages Movies
Shootinvividcolors(Super
Vivid)
Shotsinrich,vividcolors.
StillImages Movies
Posterizedshots(PosterEffect)
Shotsthatresembleanoldposteror
illustration.
• In[ ]and[ ]modes,trytakingsometestshotsrst,tomake
sureyouobtainthedesiredresults.
COPY
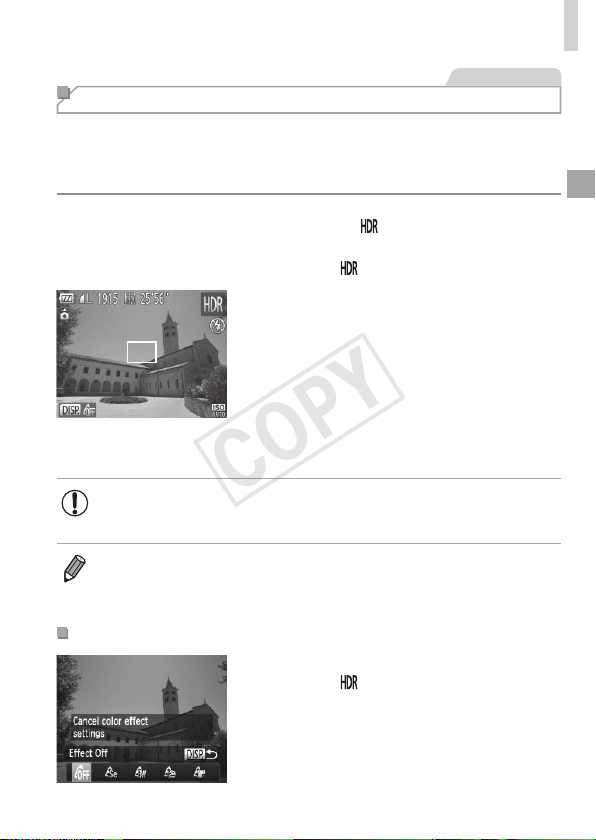
93
ImageEffects(CreativeFilters)
StillImages
Shooting High-Contrast Scenes (High Dynamic Range)
Threeconsecutiveimagesarecapturedatdifferentbrightnesslevelseachtime
youshoot,andthecameracombinesimageareaswithoptimalbrightnessto
createasingleimage.Thismodecanreducethewashed-outhighlightsand
lossofdetailinshadowsthattendstooccurinhigh-contrastshots.
1 Choose[ ].
Followsteps1–2on=
92and
choose[
].
2 Holdthecamerastill.
Mountthecameraonatripodortake
othermeasurestokeepitstilland
preventcamerashake.
3 Shoot.
Whenyoupresstheshutterbuttonall
thewaydown,thecamerawilltakethree
shotsandcombinethem.
• Set[ISMode]to[Off](=
147)inthismode.
• Anysubjectmovementwillcauseimagestolookblurry.
• Therewillbeadelaybeforeyoucanshootagain,asthecameraprocesses
andcombinestheimages.
AddingColorEffects
Followsteps1–2on=
92and
choose[
].
Pressthe<l>button,chooseacolor
effect(eitherpressthe<q><r>buttons
orturnthe<5>dial),andthenpressthe
<l>buttonagain.
COPY
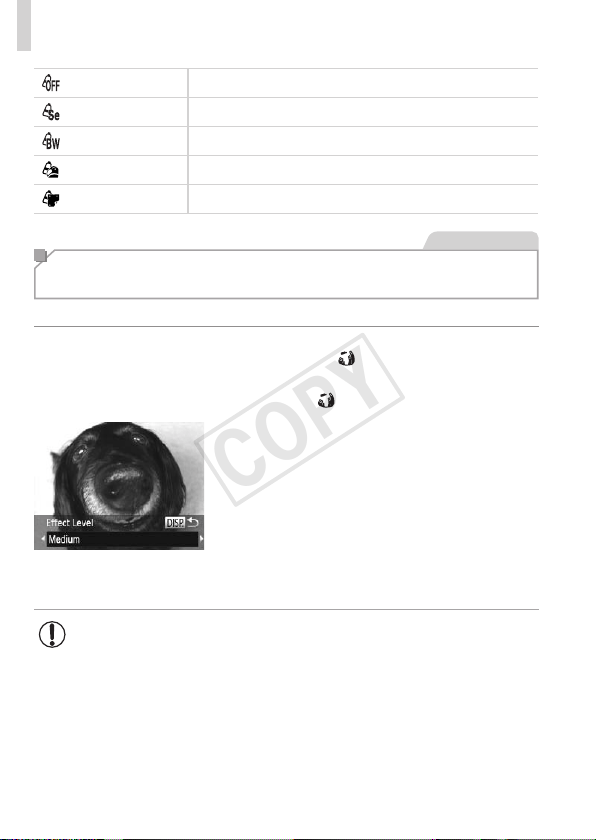
94
ImageEffects(CreativeFilters)
EffectOff ―
Sepia Sepiatoneshots.
B/W Blackandwhiteshots.
SuperVivid Shotsinrich,vividcolors.
PosterEffect Shotsthatresembleanoldposterorillustration.
StillImages
Shooting with a Fish-Eye Lens Effect
(Fish-eye Effect)
Shootwiththedistortingeffectofash-eyelens.
1 Choose[ ].
Followsteps1–2on=
92and
choose[
].
2 Chooseaneffectlevel.
Pressthe<l>button,choosean
effectlevel(eitherpressthe<q><r>
buttonsorturnthe<5>dial),andthen
pressthe<l>buttonagain.
Apreviewisshownofhowyourshotwill
lookwiththeeffectapplied.
3 Shoot.
• Trytakingsometestshotsrst,tomakesureyouobtainthe
desiredresults.
COPY
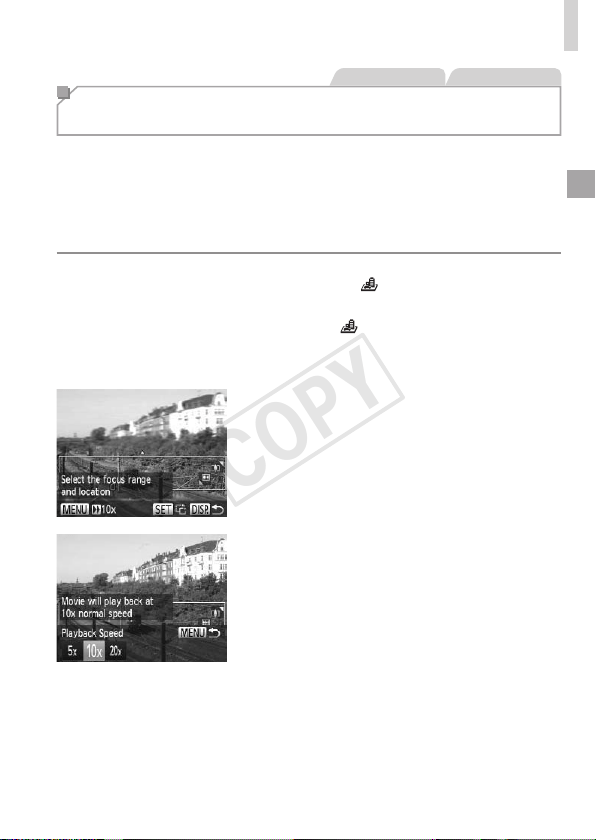
95
ImageEffects(CreativeFilters)
StillImages Movies
Shots Resembling Miniature Models
(Miniature Effect)
Createstheeffectofaminiaturemodel,byblurringimageareasaboveand
belowyourselectedarea.
Youcanalsomakemoviesthatlooklikescenesinminiaturemodelsby
choosingtheplaybackspeedbeforethemovieisrecorded.Peopleand
objectsinthescenewillmovequicklyduringplayback.Notethatsoundis
notrecorded.
1 Choose[ ].
Followsteps1–2on=
92and
choose[
].
Awhiteframeisdisplayed,indicatingthe
imageareathatwillnotbeblurred.
2 Choosetheareatokeepin
focus.
Pressthe<l>button.
Movethezoomlevertoresizetheframe,
andpressthe<o><p>buttonstomove
it.
3 Formovies,choosethemovie
playbackspeed.
Pressthe<n>button,andthen
choosethespeedbypressingthe
<q><r>buttonsorturningthe<5>
dial.
4 Returntotheshootingscreen
andshoot.
Pressthe<n>buttontoreturntothe
shootingscreen,andthenshoot.
COPY
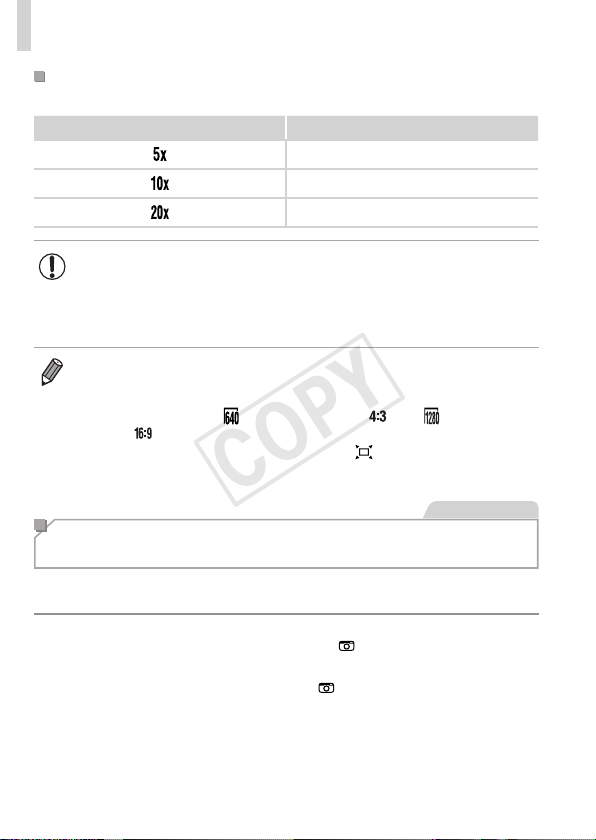
96
ImageEffects(CreativeFilters)
PlaybackSpeedandEstimatedPlaybackTime(forOne-
MinuteClips)
Speed PlaybackTime
Approx.12sec.
Approx.6sec.
Approx.3sec.
• Thezoomisnotavailablewhenshootingmovies.Besuretoset
thezoombeforeshooting.
• Trytakingsometestshotsrst,tomakesureyouobtainthe
desiredresults.
• Toswitchtheorientationoftheframe(fromhorizontaltoverticalorvice-
versa),pressthe<m>buttoninstep2.Youcanmovetheframeinvertical
orientationbypressingthe<q><r>buttons.
• Movieimagequalityis[
]atanaspectratioof[ ]and[ ]atanaspect
ratioof[
](=
73).Thesequalitysettingscannotbechanged.
• Thezoomfactorcannotbechangedwiththe<
>buttononthescreensin
steps2and3,orwhileshootingmovies.
StillImages
Shooting with a Toy Camera Effect
(Toy Camera Effect)
Thiseffectmakesimagesresembleshotsfromatoycamerabyvignetting
(darker,blurredimagecorners)andchangingtheoverallcolor.
1 Choose[ ].
Followsteps1–2on=
92and
choose[
].
COPY
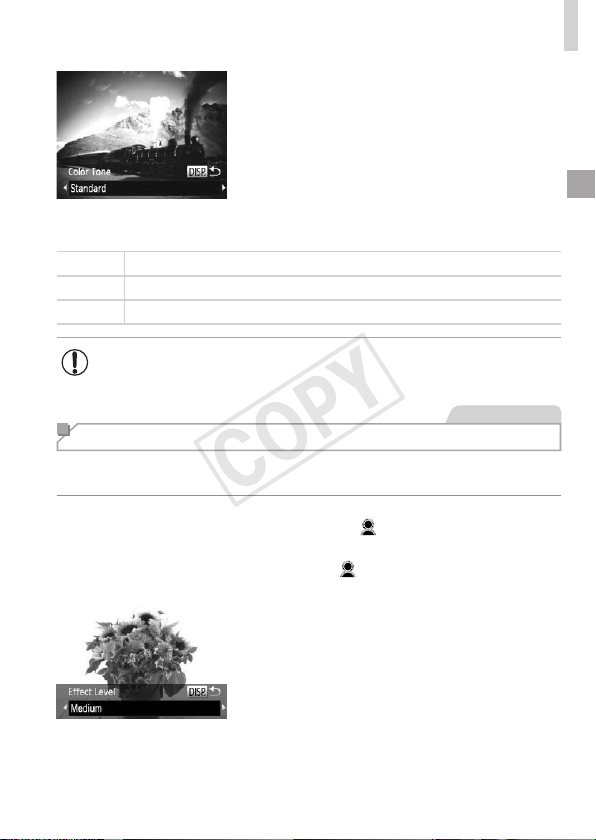
97
ImageEffects(CreativeFilters)
2 Chooseacolortone.
Pressthe<l>button,chooseacolor
tone(eitherpressthe<q><r>buttonsor
turnthe<5>dial),andthenpressthe
<l>buttonagain.
Apreviewisshownofhowyourshotwill
lookwiththeeffectapplied.
3 Shoot.
Standard Shotsresembletoycameraimages.
Warm Imageshaveawarmertonethanwith[Standard].
Cool Imageshaveacoolertonethanwith[Standard].
• Trytakingsometestshotsrst,tomakesureyouobtainthe
desiredresults.
StillImages
Shooting With a Soft Focus Effect
Thisfunctionallowsyoutoshootimagesasifasoftfocuslterisattached
tothecamera.Youcanadjusttheeffectlevelasdesired.
1 Choose[ ].
Followsteps1–2on=
92and
choose[
].
2 Chooseaneffectlevel.
Pressthe<l>button,choosean
effectlevel(eitherpressthe<q><r>
buttonsorturnthe<5>dial),andthen
pressthe<l>buttonagain.
Apreviewisshownofhowyourshotwill
lookwiththeeffectapplied.
3 Shoot.
COPY
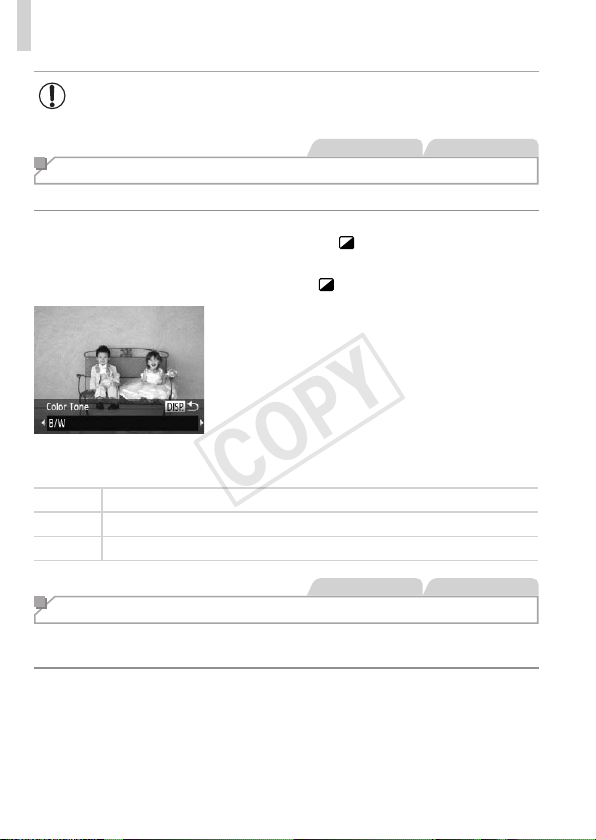
98
ImageEffects(CreativeFilters)
• Trytakingsometestshotsrst,tomakesureyouobtainthe
desiredresults.
StillImages Movies
Shooting in Monochrome
Shootimagesinblackandwhite,sepia,orblueandwhite.
1 Choose[ ].
Followsteps1–2on=
92and
choose[
].
2 Chooseacolortone.
Pressthe<l>button,chooseacolor
tone(eitherpressthe<q><r>buttonsor
turnthe<5>dial),andthenpressthe
<l>buttonagain.
Apreviewisshownofhowyourshotwill
lookwiththeeffectapplied.
3 Shoot.
B/W Blackandwhiteshots.
Sepia Sepiatoneshots.
Blue Blueandwhiteshots.
StillImages Movies
Shooting with Color Accent
Chooseasingleimagecolortokeepandchangeothercolorstoblackand
white.
1 Choose[T].
Followsteps1–2on=
92and
choose[T].
COPY
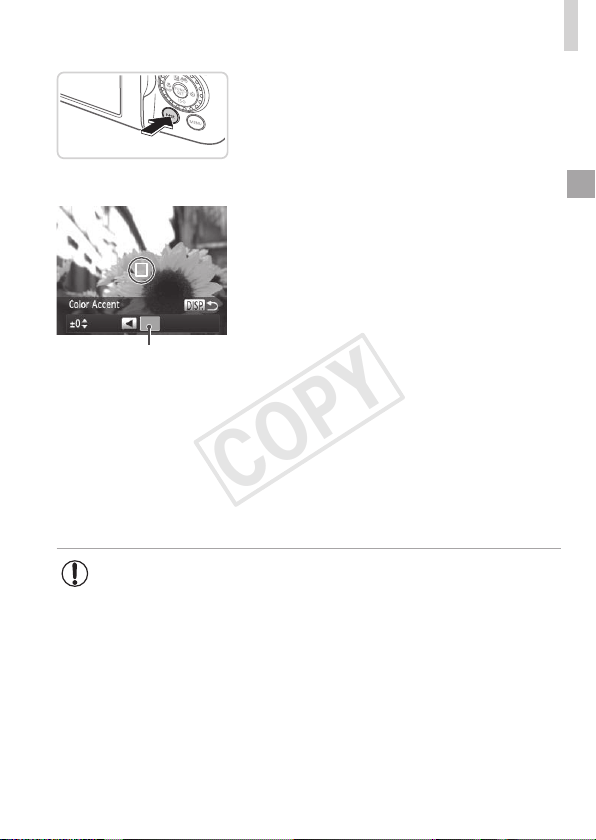
99
ImageEffects(CreativeFilters)
2 Accessthesettingscreen.
Pressthe<l>button.
TheoriginalimageandtheColorAccent
imagearedisplayedoneafteranother.
Bydefault,greenisthecolorthatwillbe
kept.
RecordedColor
3 Specifythecolor.
Positionthecenterframeoverthecolor
tokeep,andthenpressthe<q>button.
Thespeciedcolorisrecorded.
4 Specifytherangeofcolorsto
keep.
Pressthe<o><p>buttonsorturnthe
<5>dialtoadjusttherange.
Tokeeponlyyourspeciedcolor,choose
alargenegativevalue.Tokeepcolors
similartoyourspeciedcoloraswell,
choosealargepositivevalue.
Pressthe<l>buttontoreturntothe
shootingscreen.
5 Shoot.
• Usingtheashinthismodemaycauseunexpectedresults.
• Insomeshootingscenes,imagesmaylookgrainyandcolorsmay
notlookasexpected.
COPY
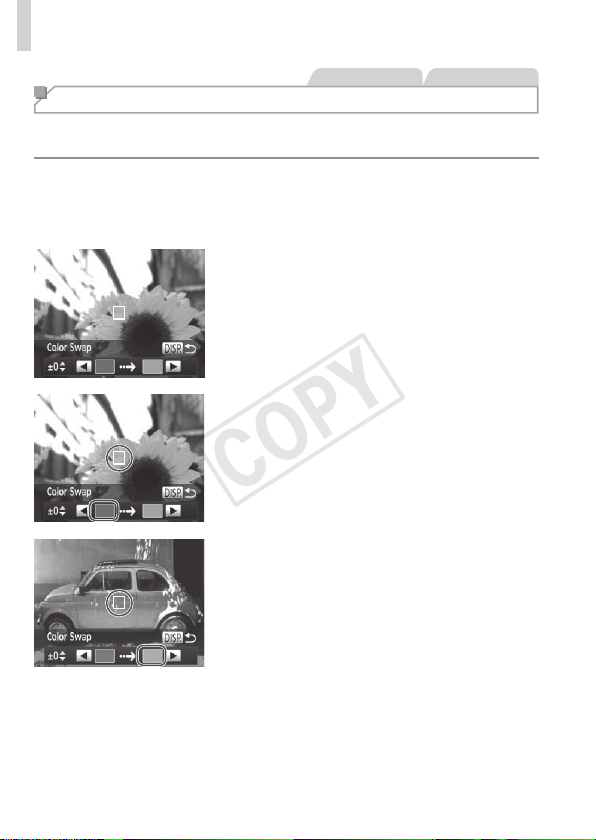
100
ImageEffects(CreativeFilters)
StillImages Movies
Shooting with Color Swap
Youcanreplaceoneimagecolorwithanotherbeforeshooting.Notethat
onlyonecolorcanbereplaced.
1 Choose[Y].
Followsteps1–2on=
92and
choose[Y].
2 Accessthesettingscreen.
Pressthe<l>button.
TheoriginalimageandtheColorSwap
imagearedisplayedoneafteranother.
Bydefault,greenwillbereplacedwith
gray.
3 Specifythecolortoreplace.
Positionthecenterframeoverthecolor
toreplace,andthenpressthe<q>
button.
Thespeciedcolorisrecorded.
4 Specifythenewcolor.
Positionthecenterframeoverthenew
color,andthenpressthe<r>button.
Thespeciedcolorisrecorded.
COPY

101
ImageEffects(CreativeFilters)
5 Specifytherangeofcolorsto
replace.
Pressthe<o><p>buttonsorturnthe
<5>dialtoadjusttherange.
Toreplaceonlyyourspeciedcolor,
choosealargenegativevalue.Toreplace
colorssimilartoyourspeciedcoloras
well,choosealargepositivevalue.
Pressthe<l>buttontoreturntothe
shootingscreen.
6 Shoot.
• Usingtheashinthismodemaycauseunexpectedresults.
• Insomeshootingscenes,imagesmaylookgrainyandcolorsmay
notlookasexpected.
COPY
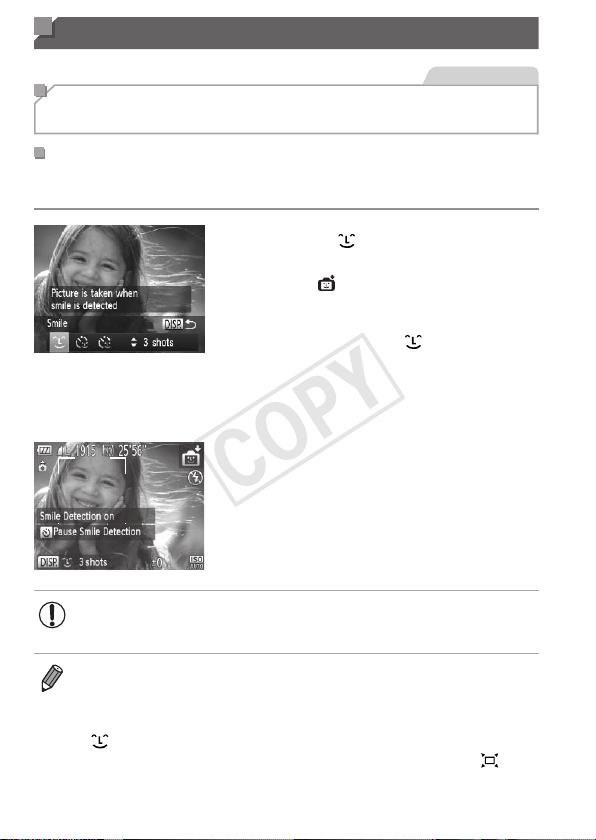
102
Special Modes for Other Purposes
StillImages
Auto Shooting After Face Detection
(Smart Shutter)
AutoShootingAfterSmileDetection
Thecamerashootsautomaticallyafterdetectingasmile,evenwithoutyou
pressingtheshutterbutton.
1 Choose[ ].
Followsteps1–2on=
89and
choose[
],andthenpressthe<l>
button.
Pressthe<q><r>buttonsorturnthe
<5>dialtochoose[
],andthenpress
the<l>button.
Thecameranowentersshootingstandby
mode,and[SmileDetectionon]is
displayed.
2 Aimthecameraataperson.
Eachtimethecameradetectsasmile,it
willshootafterthelamplightsup.
Topausesmiledetection,pressthe<r>
button.Pressthe<r>buttonagainto
resumedetection.
• Switchtoanothermodewhenyounishshooting,orthecamera
willcontinueshootingeachtimeasmileisdetected.
• Youcanalsoshootasusualbypressingtheshutterbutton.
• Thecameracandetectsmilesmoreeasilywhensubjectsfacethecamera
andopentheirmouthwideenoughsothatteetharevisible.
• Tochangethenumberofshots,pressthe<o><p>buttonsafterchoosing
[
]instep1.[BlinkDetection](=
81)isonlyavailableforthenalshot.
• Automaticshootingisnotavailablewhileyouareholdingdownthe<
>
button.
COPY

103
SpecialModesforOtherPurposes
StillImages
UsingtheWinkSelf-Timer
Aimthecameraatapersonandpresstheshutterbuttonallthewaydown.
Thecamerawillshootabouttwosecondsafterawinkisdetected.
1 Choose[ ].
Followsteps1–2on=
89and
choose[
],andthenpressthe<l>
button.
Pressthe<q><r>buttonsorturnthe
<5>dialtochoose[
],andthenpress
the<l>button.
2 Composetheshotandpress
theshutterbuttonhalfway.
Makesureagreenframeisdisplayed
aroundthefaceofthepersonwhowill
wink.
3 Presstheshutterbuttonallthe
waydown.
Thecameranowentersshootingstandby
mode,and[Winktotakepicture]is
displayed.
Thelampblinksandtheself-timersound
isplayed.
4 Facethecameraandwink.
Thecamerawillshootabouttwoseconds
afterdetectingawinkbytheperson
whosefaceisinsidetheframe.
Tocancelshootingafteryouhave
triggeredtheself-timer,pressthe
<n>button.
COPY
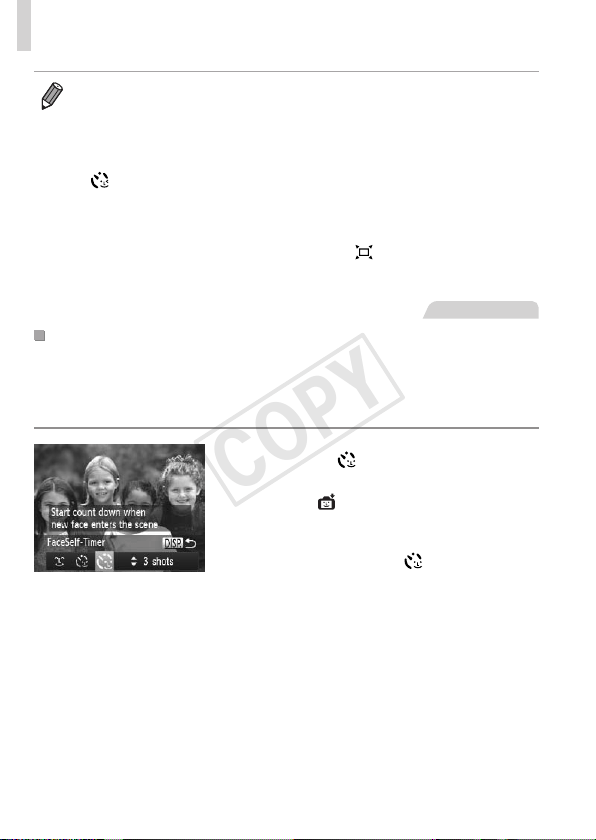
104
SpecialModesforOtherPurposes
• Ifthewinkisnotdetected,winkagainslowlyanddeliberately.
• Winkingmaynotbedetectedifeyesareobscuredbyhair,ahat,orglasses.
• Closingandopeningbotheyesatoncewillalsobedetectedasawink.
• Ifwinkingisnotdetected,thecamerawillshootabout15secondslater.
• Tochangethenumberofshots,pressthe<o><p>buttonsafterchoosing
[
]instep1.[BlinkDetection](=
81)isonlyavailableforthenalshot.
• Ifnooneisintheshootingareawhentheshutterbuttonispressedallthe
waydown,thecamerawillshootafterapersonenterstheshootingareaand
winks.
• Thezoomfactorcannotbechangedwiththe<
>buttonafteryoupress
theshutterbuttonallthewaydown.
StillImages
UsingtheFaceSelf-Timer
Thecamerawillshootabouttwosecondsafterdetectingthatthefaceof
anotherperson(suchasthephotographer)hasenteredtheshootingarea
(=
133).Thisisusefulwhenincludingyourselfingroupphotosorsimilar
shots.
1 Choose[ ].
Followsteps1–2on=
89and
choose[
],andthenpressthe<l>
button.
Pressthe<q><r>buttonsorturnthe
<5>dialtochoose[
],andthenpress
the<l>button.
2 Composetheshotandpress
theshutterbuttonhalfway.
Makesureagreenframeisdisplayed
aroundthefaceyoufocusonandwhite
framesaroundotherfaces.
COPY

105
SpecialModesforOtherPurposes
3 Presstheshutterbuttonallthe
waydown.
Thecameranowentersshootingstandby
mode,and[Lookstraightatcamerato
startcountdown]isdisplayed.
Thelampblinksandtheself-timersound
isplayed.
4 Jointhesubjectsinthe
shootingareaandlookatthe
camera.
Afterthecameradetectsanewface,the
lampblinkingandself-timersoundwill
speedup.(Whentheashres,thelamp
willremainlit.)Abouttwosecondslater,
thecamerawillshoot.
Tocancelshootingafteryouhave
triggeredtheself-timer,pressthe
<n>button.
• Evenifyourfaceisnotdetectedafteryoujointheothersintheshooting
area,thecamerawillshootabout15secondslater.
• Tochangethenumberofshots,pressthe<o><p>buttonsafterchoosing
[
]instep1.[BlinkDetection](=
81)isonlyavailableforthenalshot.
• Thezoomfactorcannotbechangedwiththe<
>buttonafteryoupress
theshutterbuttonallthewaydown.
COPY

106
SpecialModesforOtherPurposes
StillImages
High-Speed Continuous Shooting
(High-speed Burst HQ)
Youcanshootaseriesofshotsinrapidsuccessionbyholdingtheshutter
buttonallthewaydown.Fordetailsonthecontinuousshootingspeed,see
“Specications”(=
274).
HQ:HighQuality
1 Choose[ ].
Followsteps1–2on=
89and
choose[
].
2 Shoot.
Holdtheshutterbuttonallthewaydown
toshootcontinuously.
Shootingstopswhenyoureleasethe
shutterbuttonorreachthemaximum
numberofshots,afterwhich[Busy]is
displayedandtheshotsareshowninthe
orderyoutookthem.
Eachsetofimagesshotcontinuouslyis
managedasasinglegroup,andonlythe
rstimageinthatgroupwillbedisplayed
(=
88).
• Focus,imagebrightness,andcoloraredeterminedbytherstshot.
• Thescreenisblankwhileyouareshooting.
• Theremaybeadelayaftercontinuousshootingbeforeyoucanshootagain.
Notethatsometypesofmemorycardsmaydelayyournextshoteven
longer.
• Shootingmayslowdowndependingonshootingconditions,camerasettings,
andthezoomposition.
COPY
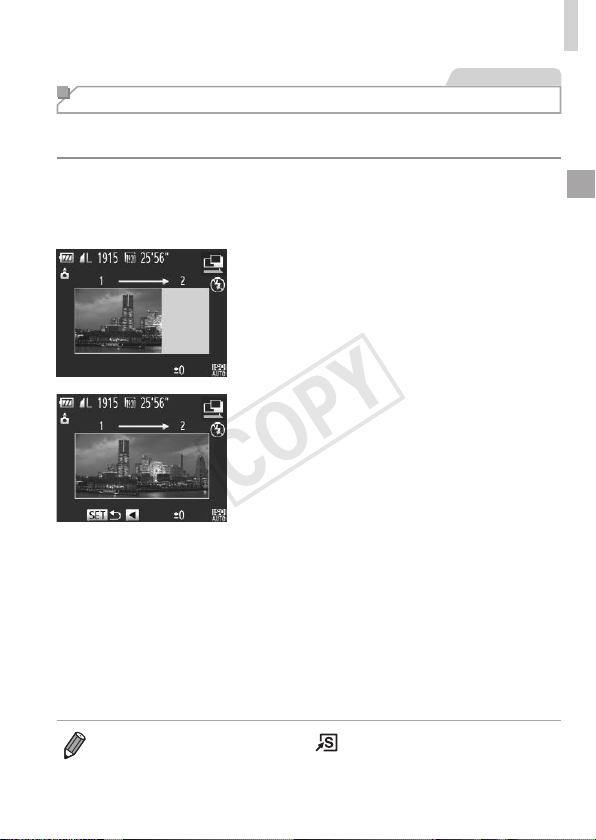
107
SpecialModesforOtherPurposes
StillImages
Shooting Stitch Assist Images
Shootalargesubjectbytakingmultipleshotsatvariouspositions,andthen
usetheincludedsoftware(=
28)tocombinethemintoapanorama.
1 Choose[x]or[v].
Followsteps1–2on=
89and
choose[x]or[v].
2 Taketherstshot.
Therstshotwilldeterminetheexposure
andwhitebalance.
3 Takeadditionalshots.
Composethesecondshotsothatitpartially
overlapstheimageareaoftherstshot.
Minormisalignmentofoverlapping
portionswillbecorrectedautomatically
whentheimagesarecombined.
Youcantakeupto26shots,thesame
wayyoutookthesecondshot.
4 Finishshooting.
Pressthe<m>button.
5 Usethesoftwaretocombinethe
images.
Forinstructionsonmergingimages,refer
totheSoftware Guide(=
28).
• TouseAFlock,assign[%]tothe< >button(=
155).
COPY

108
Movies
Shooting Various Movies
Movies
Shooting Movies in <E> Mode
1 Enter<E>mode.
Setthemodedialto<E>.
Blackbarsdisplayedonthetopand
bottomedgesofthescreenindicate
imageareasnotrecorded.
2 Congurethesettingstosuit
themovie(=
260–271).
3 Shoot.
Pressthemoviebutton.
Tostopmovierecording,pressthemovie
buttonagain.
StillImages Movies
ShootingStillImagesDuringMovieRecording
Shootstillimagesduringmovierecordingasfollows.
1 Whileshootingamovie,focus
onasubject.
Makesurethat[4]isdisplayed,and
thenpresstheshutterbuttonhalfway.
Focusandexposurearenowreadjusted.
(However,thecameradoesnotbeep.)
Movierecordingwillcontinue.
2 Shoot.
Presstheshutterbuttonalltheway
down.
Yourshotwillberecorded.
COPY
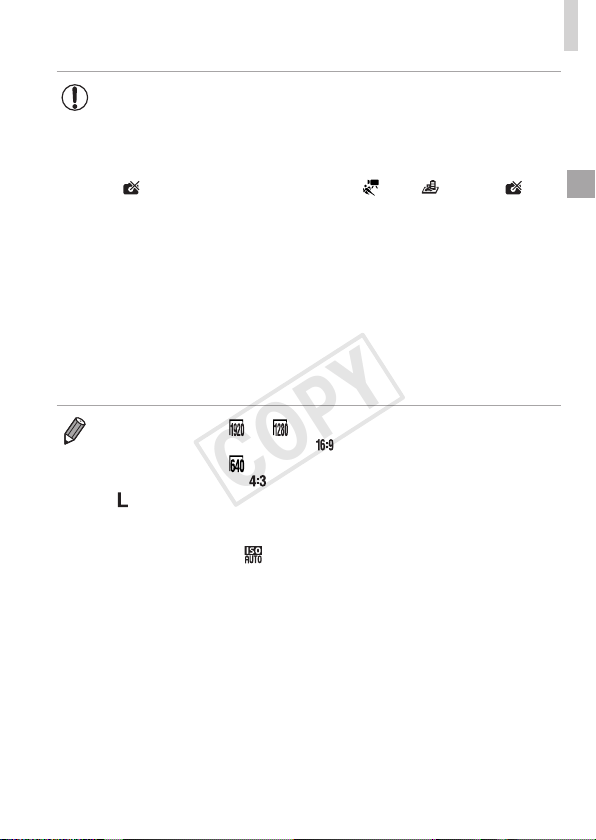
109
ShootingVariousMovies
• Shootingstillimagesduringmovierecordingmaynotbepossible
whenrecordingatslowspeedstomemorycards,orwhenthereis
notenoughfreeinternalmemory.
-[4](blinking):Imageprocessingforrecordingisinprogress.You
canshootwhentheiconstopsblinking.
-[ ]:Stillimagescannotbeshot.In[ ]and[ ]modes,[ ]
isdisplayedduringmovierecording,andstillimagescannotbe
shot.
• Whenstillimagesareshotduringmovierecording,ablackscreen
andshuttersoundwillbeincludedinthemovie.
• Theashdoesnotre.
• Theshootingdateandtime(=
61)willnotberecordedin
images.
• i-Contrast(=
120)isnotavailable.
• Movierecordingmaystopifshootingstillimagesllsupthe
internalmemory.
• Duringrecordingof[ ]or[ ]movies(withataspectratioof16:9),still
imageswillhaveanaspectratioof[
].
• Duringrecordingof[
]movies(withataspectratioof4:3),stillimageswill
haveanaspectratioof[
].
• [
]imagesareshotwhenmovieandstillimageaspectratiosdonotmatch.
• Duringmovierecording,anareawiderthantheareashownonthescreenis
recordedwhen[1]isselectedin[DynamicIS](=
148).
• TheISOspeedwillbe[
].
COPY
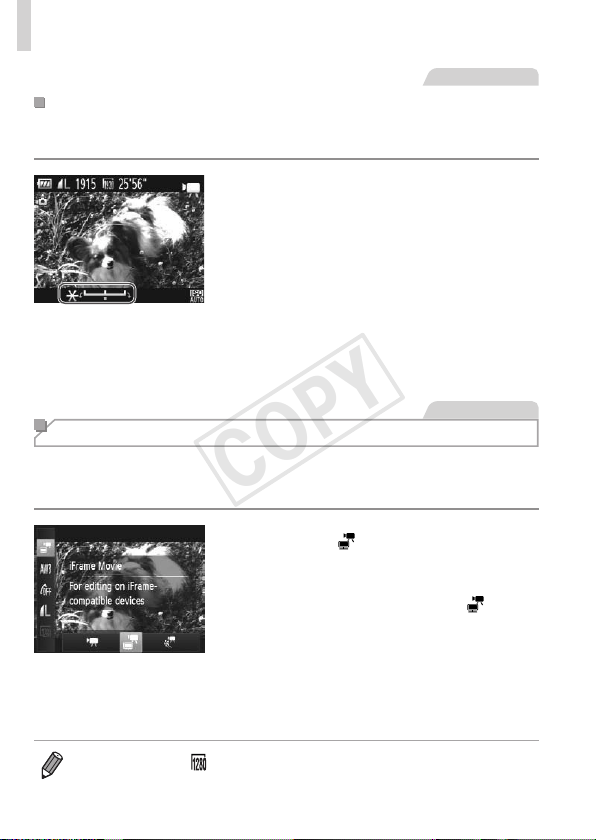
110
ShootingVariousMovies
Movies
LockingorChangingImageBrightnessBeforeShooting
Beforeshooting,youcanlocktheexposureorchangeitin1/3-stop
incrementswithinarangeof–3to+3.
1 Locktheexposure.
Pressthe<
o
>buttontolocktheexposure.
Theexposureshiftbarisdisplayed.
Tounlocktheexposure,pressthe<o>
buttonagain.
2 Adjusttheexposure.
Turnthe<5>dialtoadjustthe
exposure,asyouwatchthescreen.
3 Shoot(=
108).
Movies
Shooting iFrame Movies
ShootmoviesthatcanbeeditedwithiFrame-compatiblesoftwareor
devices.Youcanquicklyedit,save,andmanageiFramemoviesusingthe
includedsoftware(=
28).
1 Choose[ ].
Setthemodedialto<E>.
Pressthe<m>button,choose[E]
inthemenu,andthenchoose[
]
(=
41).
Blackbarsdisplayedonthetopand
bottomedgesofthescreenindicate
imageareasnotrecorded.
2 Shoot(=
108).
• Theresolutionis[ ](=
77)andcannotbechanged.
• iFrameisavideoformatdevelopedbyApple.
COPY
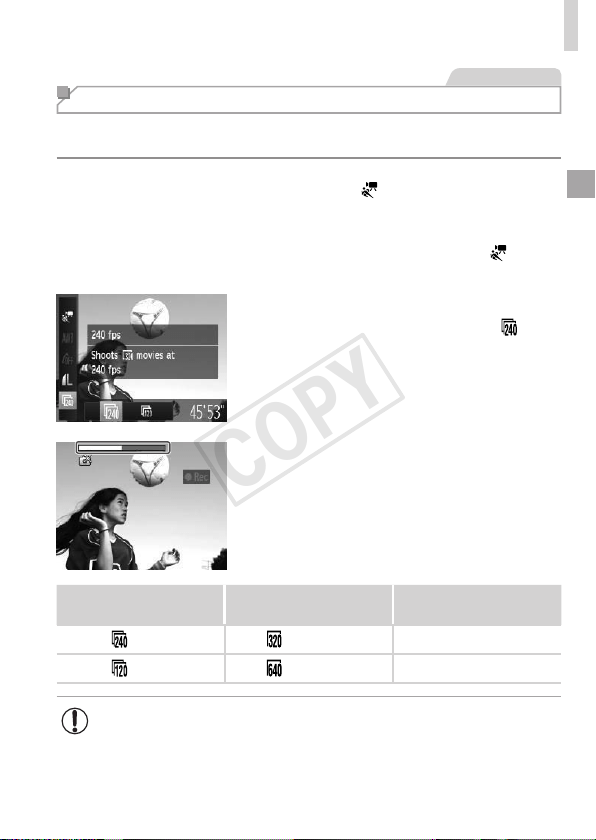
111
ShootingVariousMovies
Movies
Shooting Super Slow Motion Movies
Youcanshootfast-movingsubjectsforplaybacklaterinslowmotion.Note
thatsoundisnotrecorded.
1 Choose[ ].
Setthemodedialto<E>.
Pressthe<m>button,choose[E]
inthemenu,andthenchoose[
]
(=
41).
2 Chooseaframerate.
Pressthe<m>button,choose[ ]in
themenu,andchoosethedesiredframe
rate(=41).
Theoptionyouconguredisnow
displayed.
3 Shoot(=
108).
Abarshowingtheelapsedtimeis
displayed.Maximumcliplengthisapprox.
30sec.
FrameRate ImageQuality
PlaybackTime
(Fora30-sec.Clip)
240fps (320x240)
Approx.4min.
120fps (640x480)
Approx.2min.
• Zoomingisnotavailableduringrecording,evenifyoumovethe
zoomlever.
• Focus,exposure,andcoloraredeterminedwhenyoupressthe
moviebutton.
COPY


113
P Mode
Morediscerningshots,inyourpreferredshootingstyle
• Instructionsinthischapterapplytothecamerawiththemodedialsetto
<G>mode.
• <G>:ProgramAE;AE:AutoExposure
• Beforeusingafunctionintroducedinthischapterinmodesotherthan
<G>,makesurethefunctionisavailableinthatmode(=
260–271).
4
COPY

114
StillImages Movies
Shooting in Program AE Mode (<P> Mode)
Youcancustomizemanyfunctionsettingstosuityourpreferredshooting
style.
1 Enter<G>mode.
Setthemodedialto<G>.
2 Customizethesettingsas
desired(=
115–147),and
thenshoot.
• Ifadequateexposurecannotbeobtainedwhenyoupresstheshutterbutton
halfway,shutterspeedsandaperturevaluesaredisplayedinorange.To
obtainadequateexposure,tryadjustingthefollowingsettings.
-Activatetheash(=
142)
-ChangetheISOspeed(=
117)
• Moviescanberecordedin<G>modeaswell,bypressingthemoviebutton.
However,some<H>and<n>settingsmaybeautomatically
adjustedformovierecording.
• Fordetailsontheshootingrangein<G>mode,see“Specications”
(=
274).
COPY
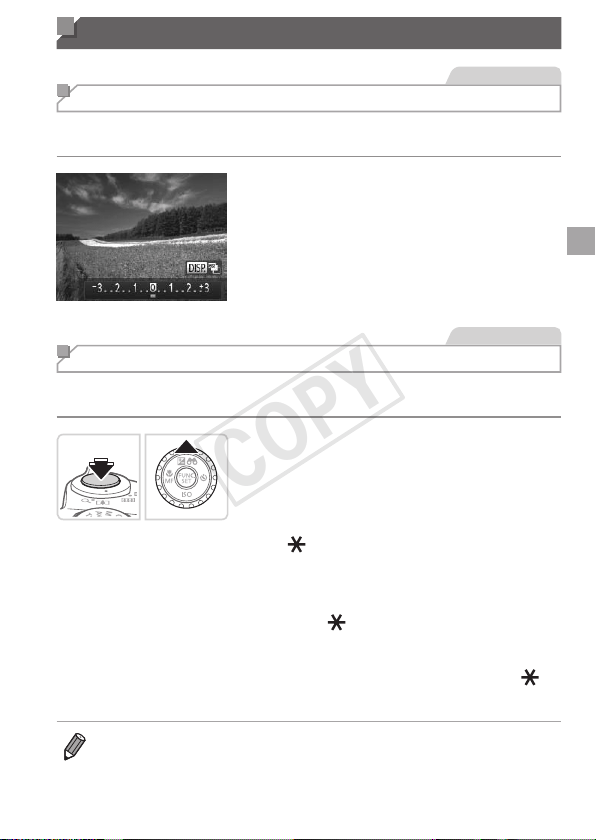
115
Image Brightness (Exposure Compensation)
StillImages
Adjusting Image Brightness (Exposure Compensation)
Thestandardexposuresetbythecameracanbeadjustedin1/3-stop
increments,inarangeof–3to+3.
Pressthe<o>button.Asyouwatchthe
screen,pressthe<q><r>buttonsor
turnthe<5>dialtoadjustbrightness,
andthenpressthe<o>buttonagain
whennished.
Thecorrectionlevelyouspeciedisnow
displayed.
StillImages
Locking Image Brightness/Exposure (AE Lock)
Beforeshooting,youcanlocktheexposure,oryoucanspecifyfocusand
exposureseparately.
1 Locktheexposure.
Aimthecameraatthesubjecttoshoot
withtheexposurelocked.Withthe
shutterbuttonpressedhalfway,pressthe
<o>button.
[ ]isdisplayed,andtheexposureis
locked.
TounlockAE,releasetheshutterbutton
andpressthe<o>buttonagain.Inthis
case,[
]isnolongerdisplayed.
2 Composetheshotandshoot.
Afteroneshot,AEisunlockedand[ ]is
nolongerdisplayed.
• AE:AutoExposure
• Aftertheexposureislocked,youcanadjustthecombinationofshutter
speedandaperturevaluebyturningthe<5>dial(ProgramShift).
COPY
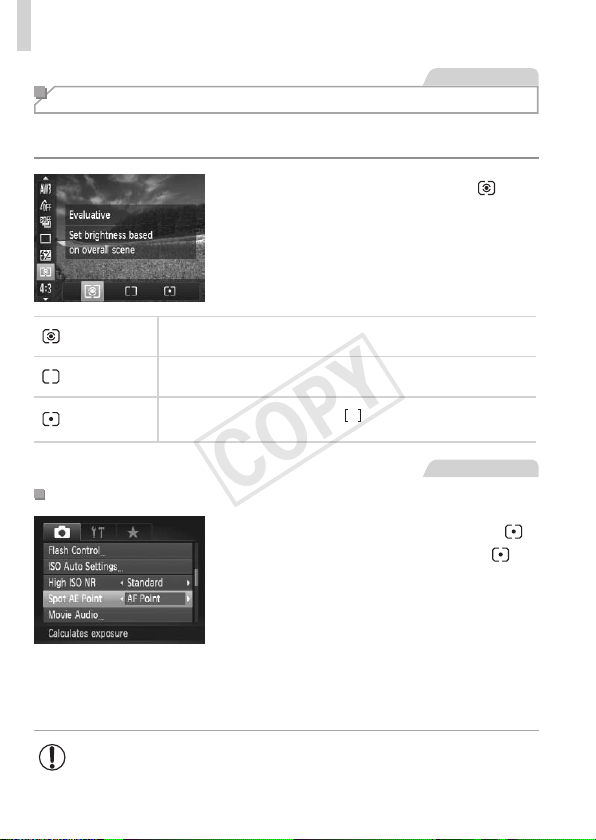
116
ImageBrightness(ExposureCompensation)
StillImages
Changing the Metering Method
Adjustthemeteringmethod(howbrightnessismeasured)tosuitshooting
conditionsasfollows.
Pressthe<m>button,choose[ ]in
themenu,andchoosethedesiredoption
(=
41).
Theoptionyouconguredisnow
displayed.
Evaluative
Fortypicalshootingconditions,includingbacklitshots.
Automaticallyadjustsexposuretomatchtheshootingconditions.
Center
WeightedAvg.
Determinestheaveragebrightnessoflightacrosstheentireimagearea,
calculatedbytreatingbrightnessinthecentralareaasmoreimportant.
Spot
Meteringrestrictedtowithinthe[ ](SpotAEPointframe).You
canalsolinktheSpotAEPointframetotheAFframe(seebelow).
StillImages
LinkingtheSpotAEPointFrametotheAFFrame
1 Setthemeteringmethodto[ ].
Followthestepsabovetochoose[ ].
2 Congurethesetting.
Pressthe<n>button,choose
[SpotAEPoint]onthe[4]tab,andthen
choose[AFPoint](=
42).
TheSpotAEPointframewillnowbe
linkedtothemovementoftheAFframe
(=
135).
• Notavailablewhen[AFFrame]issetto[FaceDetect](=
133)or
[TrackingAF](=
136).
COPY
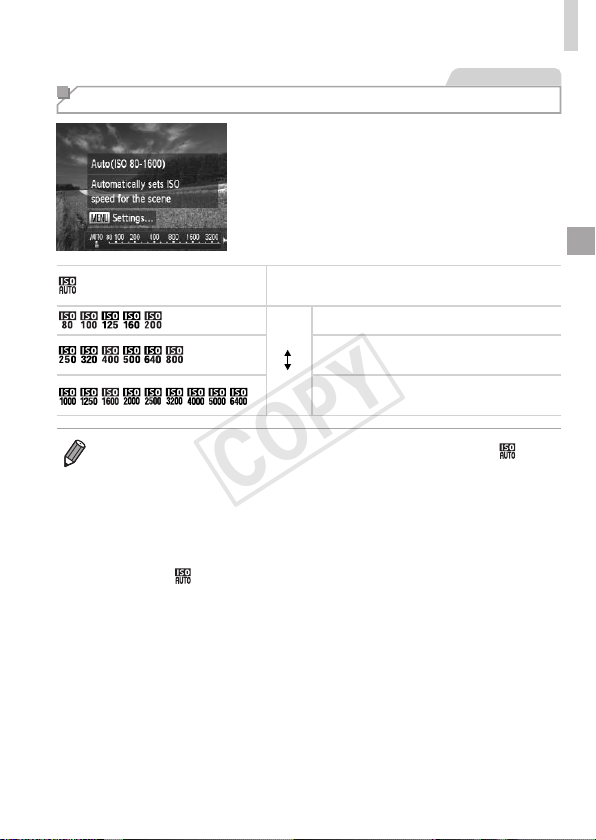
117
ImageBrightness(ExposureCompensation)
StillImages
Changing the ISO Speed
Pressthe<p>button,chooseanoption
(eitherpressthe<q><r>buttonsorturn
the<5>dial),andthenpressthe<m>
button.
Theoptionyouconguredisnow
displayed.
AutomaticallyadjuststheISOspeedtosuitthe
shootingmodeandconditions.
Low
High
Forshootingoutdoorsinfairweather.
Forshootingincloudyconditions,orat
twilight.
Forshootingnightscenes,orindark
rooms.
• ToviewtheautomaticallysetISOspeedwhenthecameraissetto[ ],
presstheshutterbuttonhalfway.
• AlthoughchoosingalowerISOspeedmayreduceimagegraininess,there
maybeagreaterriskofsubjectblurrinessinsomeshootingconditions.
• ChoosingahigherISOspeedwillincreaseshutterspeed,whichmayreduce
subjectblurrinessandincreasetheashrange.However,shotsmaylook
grainy.
• Tospecify[
],pressthe<l>buttononthesettingscreen.
COPY
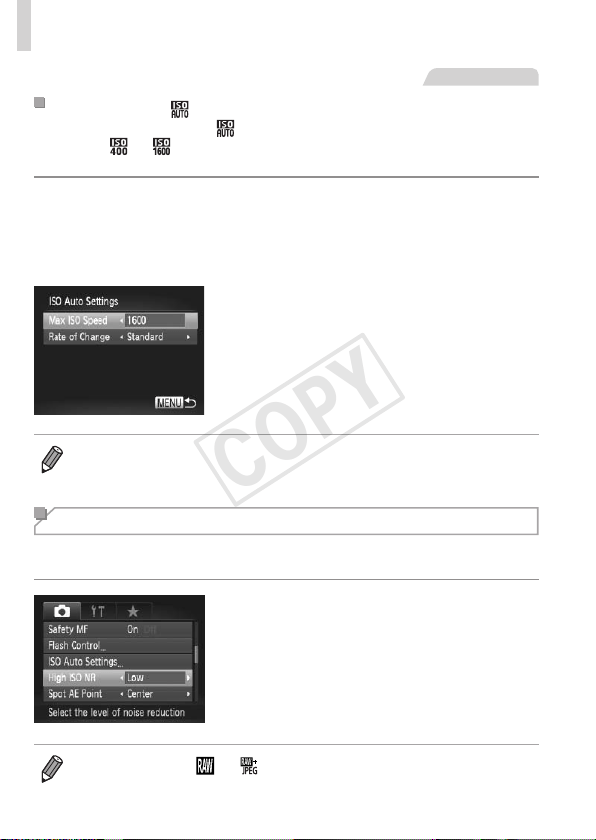
118
ImageBrightness(ExposureCompensation)
StillImages
Adjustingthe Setting
Whenthecameraissetto[ ],maximumISOspeedcanbespeciedin
arangeof[ ]–[ ],andsensitivitycanbespeciedinarangeofthree
levels.
1 Accessthesettingscreen.
Pressthe<n>button,choose[ISO
AutoSettings]onthe[4]tab,andthen
pressthe<m>button(=
42).
2 Congurethesetting.
Chooseamenuitemtocongure,and
thenchoosethedesiredoption(=
42).
• Youcanalsoaccessthe[ISOAutoSettings]screenwhentheISOspeed
settingscreen(=
117)isdisplayed,bypressingthe<n>button.
Changing the Noise Reduction Level (High ISO NR)
Youcanchoosefrom3levelsofnoisereduction:[Standard],[High],[Low].
ThisfunctionisespeciallyeffectivewhenshootingathighISOspeeds.
Chooseanoisereductionlevel.
Pressthe<n>button,choose[High
ISONR]onthe[4]tab,andthenchoose
thedesiredoption(=
42).
• Notavailablewith[ ]or[ ](=
146).
COPY

119
ImageBrightness(ExposureCompensation)
StillImages
Auto Exposure Bracketing (AEB Mode)
Threeconsecutiveimagesarecapturedatdifferentexposurelevels
(standardexposure,underexposure,andthenoverexposure)eachtime
youshoot.Youcanadjusttheamountofunderexposureandoverexposure
(relativetostandardexposure)from–2to+2stopsin1/3-stopincrements.
1 Choose[ ].
Pressthe<m>button,choose
[
]inthemenu,andthenchoose[ ]
(=
41).
2 Congurethesetting.
Pressthe<l>button,andthen
adjustthesettingbypressingthe
<q><r>buttonsorturningthe<5>
dial.
• AEBisonlyavailablein[!]mode(=
47).
• Continuousshooting(=
127)isnotavailableinthismode.
• Ifexposurecompensationisalreadyinuse(=
115),thevaluespeciedfor
thatfunctionistreatedasthestandardexposurelevelforthisfunction.
• Youcanalsoaccessthesettingscreenofstep2bypressingthe<l>
buttonwhentheexposurecompensationscreen(=
115)isdisplayed.
• Threeshotsaretaken,regardlessofanyquantityspeciedin[$](=
59).
• In[BlinkDetection]mode(=
81),thisfunctionisonlyavailableforthenal
shot.
COPY
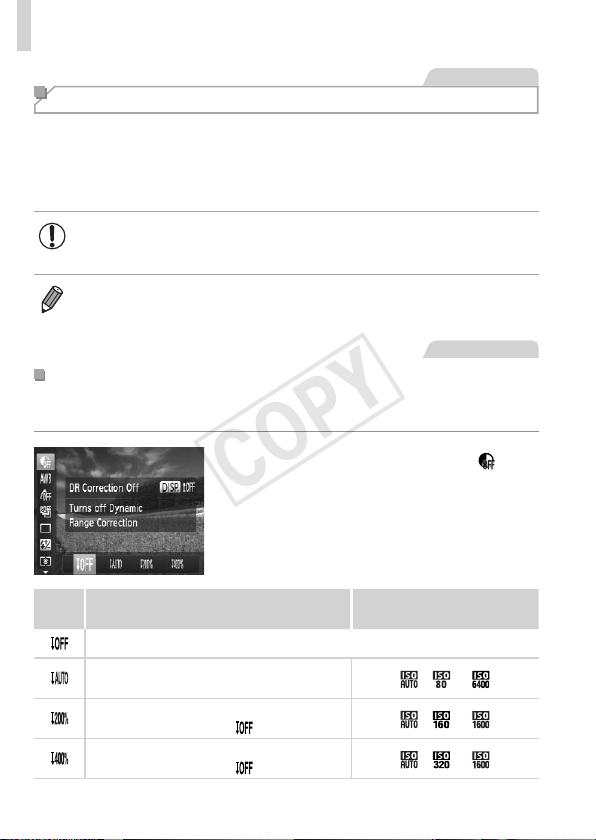
120
ImageBrightness(ExposureCompensation)
StillImages
Correcting Image Brightness (i-Contrast)
Beforeshooting,excessivelybrightordarkimageareas(suchasfacesor
backgrounds)canbedetectedandautomaticallyadjustedtotheoptimal
brightness.
Toavoidwashed-outhighlights,specifyDynamicRangeCorrection.To
preserveimagedetailinshadows,specifyShadowCorrect.
• Undersomeshootingconditions,correctionmaybeinaccurateor
maycauseimagestoappeargrainy.
• Youcanalsocorrectexistingimages(=
192).
StillImages
DynamicRangeCorrection(DRCorrection)
Tonedownbrightimageareas,whichmightotherwiselookwashedout,as
follows.
Pressthe<m>button,choose[ ]in
themenu,andchoosethedesiredoption
(
=41
).
Oncethesettingiscomplete,[@]is
displayed.
Item Details
AvailableISOSpeed
(=
117)
―
Automaticadjustmenttopreventwashed-out
highlights
[
],[ ]–[ ]
Tonedownhighlightsbyabout200%relative
tothebrightnesslevelof[
].
[
],[ ]–[ ]
Tonedownhighlightsbyabout400%relative
tothebrightnesslevelof[
].
[
],[ ]–[ ]
COPY
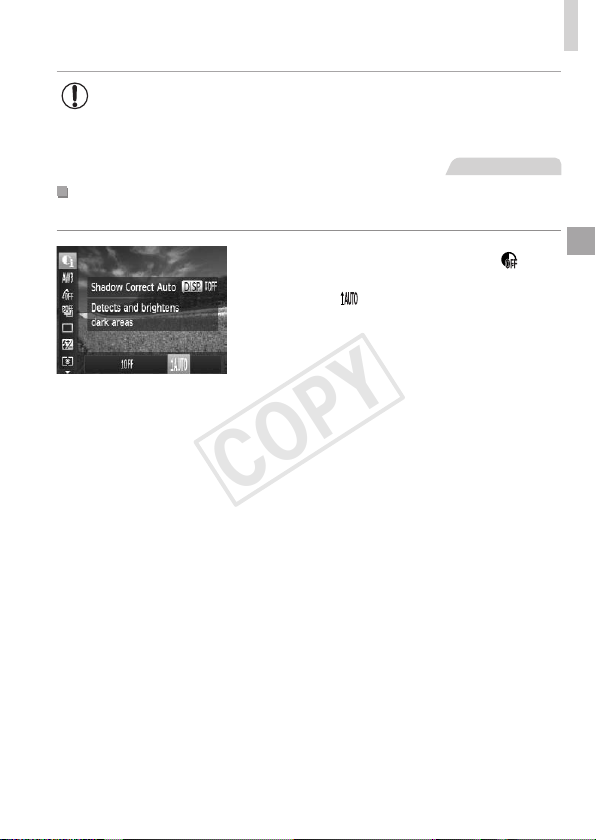
121
ImageBrightness(ExposureCompensation)
• ISOspeed(=
117)willbeadjustedtoaspeedwithinthe
supportedrangeifyouhavespeciedavalueoutsidethe
supportedrangeindicatedhere.
StillImages
ShadowCorrect
Automaticallypreserveimagedetailinshadowsasfollows.
Pressthe<m>button,choose[ ]in
themenu,pressthe<l>button,and
choose[
](=
41).
Oncethesettingiscomplete,[@]is
displayed.
COPY
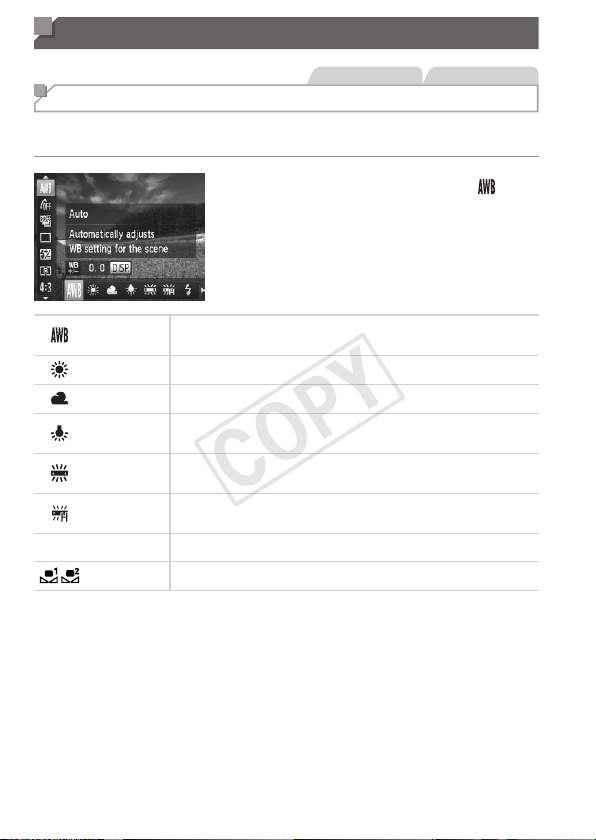
122
Color and Continuous Shooting
StillImages Movies
Adjusting White Balance
Byadjustingwhitebalance(WB),youcanmakeimagecolorslookmore
naturalforthesceneyouareshooting.
Pressthe<m>button,choose[ ]in
themenu,andchoosethedesiredoption
(=
41).
Theoptionyouconguredisnow
displayed.
Auto
Automaticallysetstheoptimalwhitebalancefortheshooting
conditions.
DayLight Forshootingoutdoorsinfairweather.
Cloudy Forshootingincloudyconditions,intheshade,orattwilight.
Tungsten
Forshootingunderordinaryincandescent(tungsten)lighting
andsimilarlycoloreduorescentlighting.
Fluorescent
Forshootingunderwarm-white(orsimilarlycolored)orcool-
whiteuorescentlighting.
FluorescentH
Forshootingunderdaylightuorescentandsimilarlycolored
uorescentlighting.
h
Flash Forshootingwiththeash.
Custom
Formanuallysettingacustomwhitebalance(=
123).
COPY
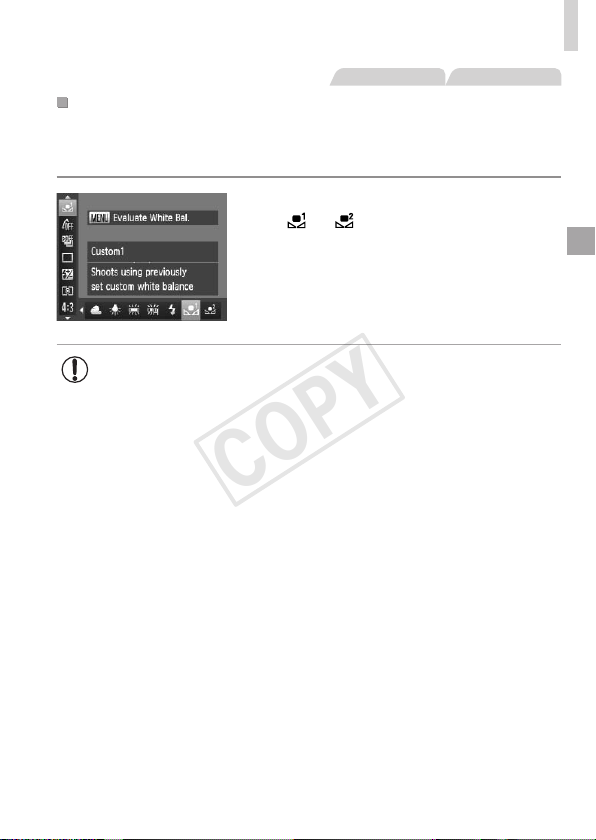
123
ColorandContinuousShooting
StillImages Movies
CustomWhiteBalance
Forimagecolorsthatlooknaturalunderthelightinyourshot,adjustwhite
balancetosuitthelightsourcewhereyouareshooting.Setthewhite
balanceunderthesamelightsourcethatwillilluminateyourshot.
Followthestepson=
122andchoose
[
]or[ ].
Aimthecameraataplainwhitesubject,
sothattheentirescreeniswhite.Press
the<n>button.
Thetintofthescreenchangesoncethe
whitebalancedatahasbeenrecorded.
• Colorsmaylookunnaturalifyouchangecamerasettingsafter
recordingwhitebalancedata.
COPY
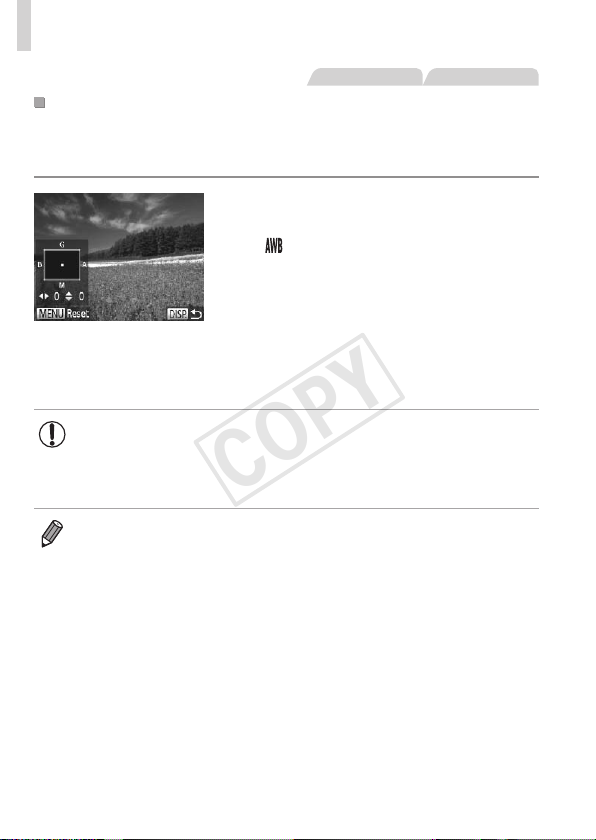
124
ColorandContinuousShooting
StillImages Movies
ManuallyCorrectingWhiteBalance
Youcancorrectwhitebalance.Thisadjustmentcanmatchtheeffectof
usingacommerciallyavailablecolortemperatureconversionlterorcolor-
compensatinglter.
Congurethesetting.
Followthestepson=
122tochoose
[
].
Pressthe<l>button,andthenpress
the<o><p><q><r>buttonstoadjust
thecorrectionlevel.
Toresetthecorrectionlevel,pressthe
<n>button.
Pressthe<l>buttontocompletethe
setting.
• Thecamerawillretainwhitebalancecorrectionlevelsevenif
youswitchtoanotherwhitebalanceoption(byfollowingstepson
=
122),butcorrectionlevelswillberesetifyourecordcustom
whitebalancedata.
• B:blue;A:amber;M:magenta;G:green
• Onelevelofblue/ambercorrectionisequivalenttoabout7miredsonacolor
temperatureconversionlter.(Mired:Colortemperatureunitrepresenting
colortemperatureconversionlterdensity)
COPY

125
ColorandContinuousShooting
StillImages Movies
Changing Image Color Tones (My Colors)
Changeimagecolortonesasdesired,suchasconvertingimagestosepia
orblackandwhite.
Pressthe<m>button,choose[ ]in
themenu,andchoosethedesiredoption
(=
41).
Theoptionyouconguredisnow
displayed.
MyColorsOff ―
Vivid
Emphasizescontrastandcolorsaturation,makingimages
sharper.
Neutral
Tonesdowncontrastandcolorsaturationforsubdued
images.
Sepia Createssepiatoneimages.
B/W Createsblackandwhiteimages.
PositiveFilm
CombinestheeffectsofVividBlue,VividGreen,and
VividRedtoproduceintenseyetnatural-lookingcolors
resemblingimagesonpositivelm.
LighterSkinTone Lightensskintones.
DarkerSkinTone Darkensskintones.
VividBlue
Emphasizesbluesinimages.Makesthesky,ocean,and
otherbluesubjectsmorevivid.
VividGreen
Emphasizesgreensinimages.Makesmountains,foliage,
andothergreensubjectsmorevivid.
VividRed
Emphasizesredsinimages.Makesredsubjectsmore
vivid.
CustomColor
Adjustcontrast,sharpness,colorsaturation,andother
qualitiesasdesired(=
126).
COPY

126
ColorandContinuousShooting
• Whitebalance(=
122)cannotbesetin[ ]or[ ]modes.
• With[
]and[ ]modes,colorsotherthanpeople’sskintone
maybemodied.Thesesettingsmaynotproducetheexpected
resultswithsomeskintones.
StillImages Movies
CustomColor
Choosethedesiredlevelofimagecontrast,sharpness,colorsaturation,
red,green,blue,andskintonesinarangeof1–5.
1 Accessthesettingscreen.
Followthestepson=
125tochoose
[
],andthenpressthe<l>button.
2 Congurethesetting.
Pressthe<o><p>buttonstochoose
anoption,andthenspecifythevalueby
pressingthe<q><r>buttonsorturning
the<5>dial.
Forstronger/moreintenseeffects(or
darkerskintones),adjustthevalueto
theright,andforweaker/lightereffects
(orlighterskintones),adjustthevalueto
theleft.
Pressthe<l>buttontocompletethe
setting.
COPY
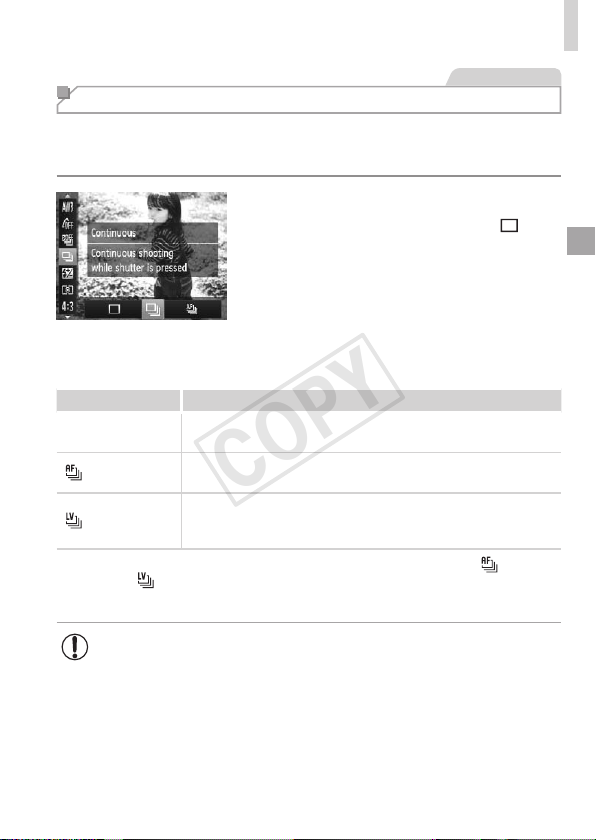
127
ColorandContinuousShooting
StillImages
Continuous Shooting
Holdtheshutterbuttonallthewaydowntoshootcontinuously.
Fordetailsonthecontinuousshootingspeed,see“Specications”
(=
274).
1 Congurethesetting.
Pressthe<m>button,choose[ ]in
themenu,andchoosethedesiredoption
(=
41).
Theoptionyouconguredisnow
displayed.
2 Shoot.
Holdtheshutterbuttonallthewaydown
toshootcontinuously.
Mode Description
W
Continuous
Continuousshooting,withthefocusandexposuredetermined
whenyoupresstheshutterbuttonhalfway.
Continuous
ShootingAF
Continuousshootingandfocusing.
[AFFrame]issetto[Center]andcannotbechanged.
Continuous
ShootingLV*
Continuousshooting,withthefocusxedattheposition
determinedinmanualfocusing.In[t]mode,focusisdetermined
bytherstshot.
*In[t]mode(=
90),AFlock(=
140),ormanualfocusmode(=
130),[ ]is
changedto[
].
*Fordetailsonthecontinuousshootingspeedineachmode,see“Specications”
(=
274).
• Cannotbeusedwiththeself-timer(=
58)or[BlinkDetection]
(=
81).
• Shootingmaystopmomentarilyorcontinuousshootingmayslow
downdependingonshootingconditions,camerasettings,andthe
zoomposition.
• Asmoreshotsaretaken,shootingmayslowdown.
• Shootingmayslowdowniftheashres.
COPY

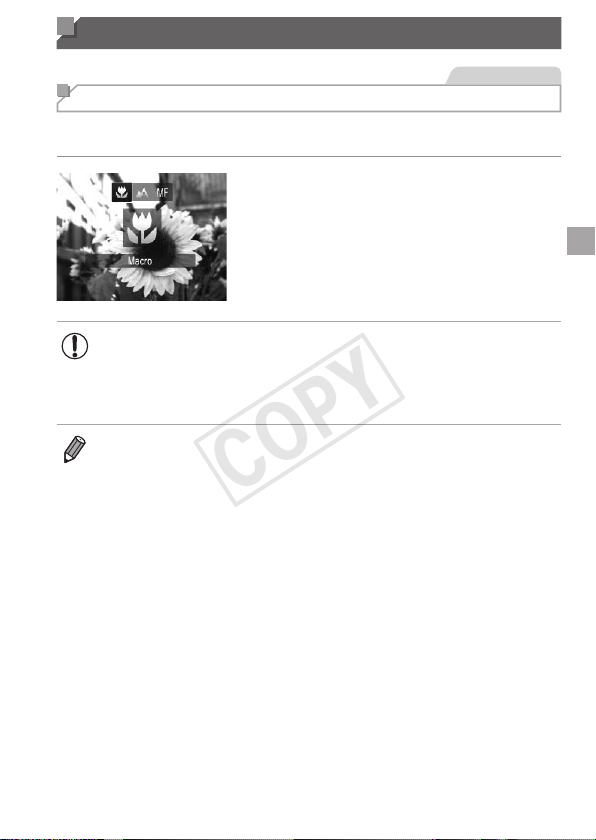
129
Shooting Range and Focusing
StillImages
Shooting Close-ups (Macro)
Torestrictthefocustosubjectsatcloserange,setthecamerato[e].For
detailsonthefocusingrange,see“Specications”(=
274).
Pressthe<q>button,choose[e](either
pressthe<q><r>buttonsorturnthe
<5>dial),andthenpressthe<m>
button.
Oncethesettingiscomplete,[e]is
displayed.
• Iftheashres,vignettingmayoccur.
• Becarefultoavoiddamagingthelens.
• Intheyellowbardisplayareabelowthezoombar,[e]willturn
grayandthecamerawillnotfocus.
• Topreventcamerashake,trymountingthecameraonatripodandshooting
withthecamerasetto[[](=
59).
COPY
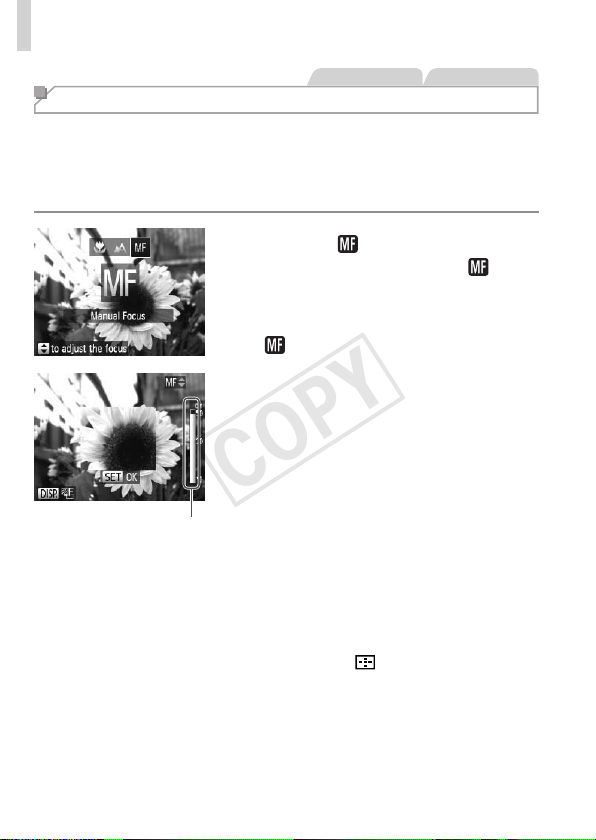
130
ShootingRangeandFocusing
StillImages Movies
Shooting in Manual Focus Mode
WhenfocusingisnotpossibleinAFmode,usemanualfocus.Youcan
specifythegeneralfocalpositionandthenpresstheshutterbuttonhalfway
tohavethecameradeterminetheoptimalfocalpositionneartheposition
youspecied.Fordetailsonthefocusingrange,see“Specications”
(=
274).
1 Choose[ ].
Pressthe<q>button,choose[ ]
(eitherpressthe<q><r>buttonsorturn
the<5>dial),andthenpressthe<m>
button.
[ ]andtheMFindicatoraredisplayed.
MFIndicator
2 Focus.
Referringtotheon-screenMFindicator
bar(whichshowsthedistanceandfocal
position)andthemagnieddisplayarea,
pressthe<o><p>buttonsorturnthe
<5>dialtospecifythegeneralfocal
position.
3 Fine-tunethefocus.
Presstheshutterbuttonhalfwaytohave
thecamerane-tunethefocalposition
(SafetyMF).
Youcanalsone-tunethefocusby
pressingthe<
>button.
COPY

131
ShootingRangeandFocusing
• AFframemodeorsizecannotbechangedwhilefocusing
manually(=
133).IfyouwanttochangetheAFframemodeor
size,cancelmanualfocusmoderst.
• Focusingispossiblewhenusingthedigitalzoom(=
55)or
digitaltele-converter(=
132),orwhenusingaTVasadisplay
(=
222),butthemagnieddisplaywillnotappear.
• Tofocusmoreaccurately,tryattachingthecameratoatripodtostabilizeit.
• Tohidethemagnieddisplayarea,pressthe<n>buttonandset[MF-
PointZoom]onthe[4]tabto[Off](=
42).
• Todeactivateautomaticfocusne-tuningwhentheshutterbuttonispressed
halfway,pressthe<n>buttonandset[SafetyMF]onthe[4]tabto
[Off](=
4 2 ).
COPY

132
ShootingRangeandFocusing
StillImages Movies
Digital Tele-Converter
Thefocallengthofthelenscanbeincreasedbyapproximately1.5xor2.0x.
Thiscanreducecamerashakebecausetheshutterspeedisfasterthanit
wouldbeifyouzoomed(includingusingdigitalzoom)intothesamezoom
factor.
Pressthe<n>button,choose
[DigitalZoom]onthe[4]tab,andthen
choosethedesiredoption(=
42).
Theviewisenlargedandthezoomfactor
isdisplayedonthescreen.
• Thedigitaltele-convertercannotbeusedwithdigitalzoom
(=
55)andAF-pointzoom(=
80).
• Therespectivefocallengthswhenusing[1.5x]and[2.0x]are36–1800mm
and48–2400mm(35mmlmequivalent).
• Theshutterspeedmaybeequivalentwhenyoumovethezoomleverallthe
waytoward<i>formaximumtelephoto,andwhenyouzoomintoenlarge
thesubjecttothesamesizefollowingstep2on=
55.
COPY
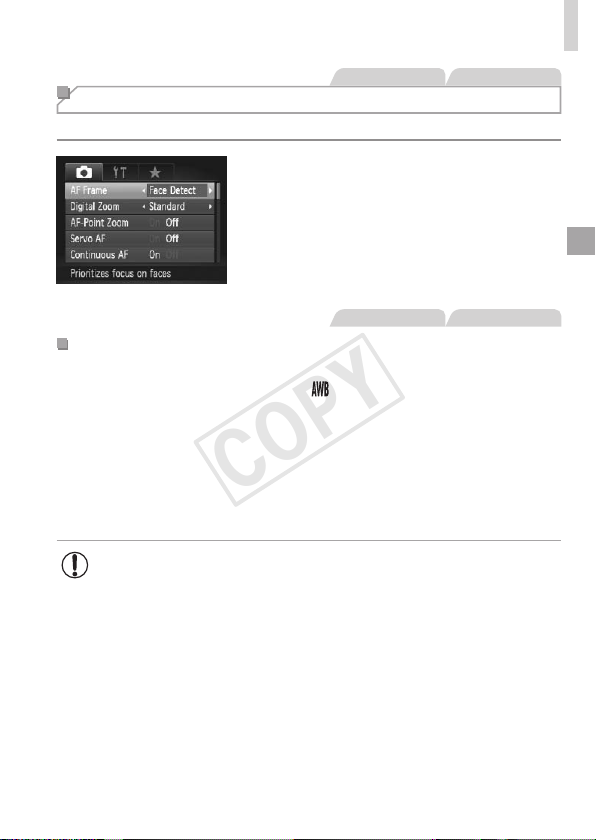
133
ShootingRangeandFocusing
StillImages Movies
Changing the AF Frame Mode
ChangetheAF(autofocus)framemodetosuittheshootingconditionsasfollows.
Pressthe<n>button,choose[AF
Frame]onthe[4]tab,andthenchoose
thedesiredoption(=
42).
StillImages Movies
FaceDetect
• Detectspeople’sfaces,andthensetsthefocus,exposure(evaluative
meteringonly),andwhitebalance([
]only).
• Afteryouaimthecameraatthesubject,awhiteframeisdisplayedaround
theperson’sfacedeterminedbythecameratobethemainsubject,and
uptotwograyframesaredisplayedaroundotherdetectedfaces.
• Whenthecameradetectsmovement,frameswillfollowmovingsubjects,
withinacertainrange.
• Afteryoupresstheshutterbuttonhalfway,uptoninegreenframesare
displayedaroundfacesinfocus.
• Iffacesarenotdetected,orwhenonlygrayframesaredisplayed
(withoutawhiteframe),anAFframeisdisplayedinthecenterof
thescreenwhenyoupresstheshutterbuttonhalfway.
• IffacesarenotdetectedwhenServoAF(=
137)issetto[On],
theAFframeisdisplayedinthecenterofthescreenwhenyou
presstheshutterbuttonhalfway.
• Examplesoffacesthatcannotbedetected:
-Subjectsthataredistantorextremelyclose
-Subjectsthataredarkorlight
-Facesinprole,atanangle,orpartlyhidden
• Thecameramaymisinterpretnon-humansubjectsasfaces.
• NoAFframesaredisplayedifthecameracannotfocuswhenyou
presstheshutterbuttonhalfway.
COPY

134
ShootingRangeandFocusing
StillImages
FlexiZone/Center
OneAFframeisdisplayed.Effectiveforreliablefocusing.
With[FlexiZone],youcanmoveandresizetheAFframe(=
135).
• AyellowAFframeisdisplayedwith[ ]ifthecameracannot
focuswhenyoupresstheshutterbuttonhalfway.NotethatAF-
pointzooming(=
80)isnotpossible.
• Tocomposeshotssothatsubjectsarepositionedattheedgeorinacorner,
rstaimthecameratocapturethesubjectinanAFframe,andthenhold
theshutterbuttonhalfwaydown.Asyoucontinuetoholdtheshutterbutton
halfway,recomposetheshotasdesired,andthenpresstheshutterbuttonall
thewaydown(FocusLock).
COPY
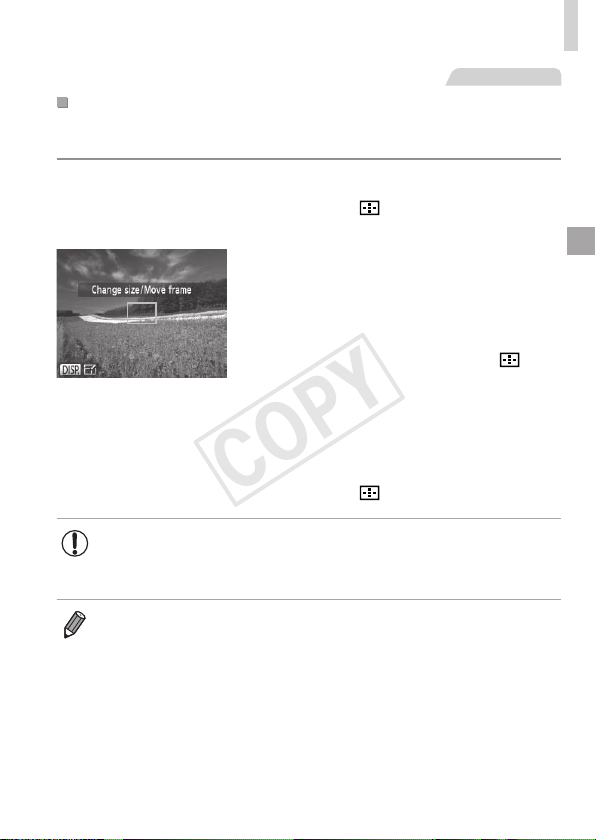
135
ShootingRangeandFocusing
StillImages
MovingandResizingAFFrames(FlexiZone)
WhenyouwanttochangethepositionorsizeoftheAFframe,settheAF
framemodeto[FlexiZone](=
134).
1 PreparetomovetheAFframe.
Pressthe< >button.TheAFframe
turnsorange.
2 MoveandresizetheAFframe.
Turnthe<5>dialtomovetheAFframe,
orpressthe<o><p><q><r>buttons
tomoveitbyasmalleramount.
ToreturntheAFframetotheoriginal
positioninthecenter,keepthe<
>
buttonhelddown.
ToreducetheAFframesize,pressthe
<l>button.Pressitagaintorestore
ittotheoriginalsize.
3 Finishthesetupprocess.
Pressthe< >button.
• AFframesaredisplayedatnormalsizewhenyouusethedigital
zoom(=
55)ordigitaltele-converter(=
132),andinmanual
focusmode(=
130).
• YoucanalsolinktheSpotAEPointframetotheAFframe(=
116).
COPY
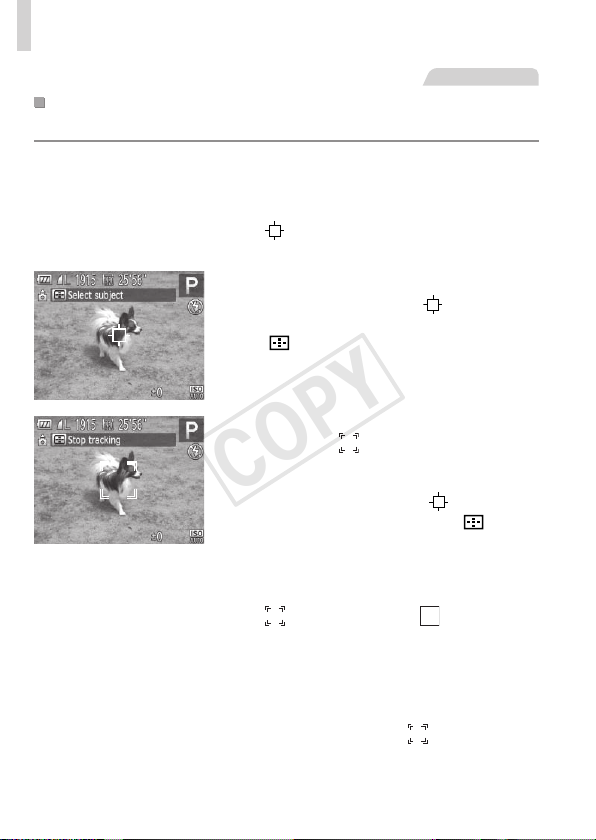
136
ShootingRangeandFocusing
StillImages
ChoosingSubjectstoFocusOn(TrackingAF)
Shootafterchoosingasubjecttofocusonasfollows.
1 Choose[TrackingAF].
Followthestepson=
133tochoose
[TrackingAF].
[ ]isdisplayedinthecenterofthe
screen.
2 Chooseasubjecttofocuson.
Aimthecamerasothat[ ]isonthe
desiredsubject,andthenpressthe
<
>button.
Whenthesubjectisdetected,thecamera
beepsand[
]isdisplayed.Evenifthe
subjectmoves,thecamerawillcontinue
totrackthesubjectwithinacertainrange.
Ifnosubjectisdetected,[ ]isdisplayed.
Tocanceltracking,pressthe< >button
again.
3 Shoot.
Presstheshutterbuttonhalfway.
[
]changestoablue[ ],which
followsthesubjectasthecamera
continuestoadjustthefocusand
exposure(ServoAF)(=
137).
Presstheshutterbuttonallthewaydown
toshoot.
Evenafteryourshot,[ ]isstill
displayedandthecameracontinuesto
trackthesubject.
COPY

137
ShootingRangeandFocusing
• [ServoAF](seebelow)issetto[On]andcannotbechanged.
• Trackingmaynotbepossiblewhensubjectsaretoosmallormove
toorapidly,orwhensubjectcolororbrightnessmatchesthatofthe
backgroundtooclosely.
• [AF-PointZoom]onthe[4]tabisnotavailable.
• [e]isnotavailable.
• Thecameracandetectsubjectsevenifyoupresstheshutterbuttonhalfway
withoutpressingthe<
>button.Afteryourshot,[ ]isdisplayedinthe
centerofthescreen.
StillImages
ShootingwithServoAF
Thismodehelpsavoidmissingshotsofsubjectsinmotion,becausethe
cameracontinuestofocusonthesubjectandadjusttheexposureaslong
asyoupresstheshutterbuttonhalfway.
1 Congurethesetting.
Pressthe<n>button,choose
[ServoAF]onthe[4]tab,andthen
choose[On](=
42).
2 Focus.
Thefocusandexposurearemaintained
wheretheblueAFframeisdisplayedwhile
youarepressingtheshutterbuttonhalfway.
• Focusingmaynotbepossibleinsomeshootingconditions.
• Inlow-lightconditions,ServoAFmaynotbeactivated(AFframesmay
notturnblue)whenyoupresstheshutterbuttonhalfway.Inthiscase,the
focusandexposurearesetaccordingtothespeciedAFframemode.
• Ifadequateexposurecannotbeobtained,shutterspeedsand
aperturevaluesaredisplayedinorange.Releasetheshutter
button,andthenpressithalfwayagain.
• AFlockshootingisnotavailable.
• [AF-PointZoom]onthe[4]tabisnotavailable.
• Notavailablewhenusingtheself-timer(=
58).
COPY

138
ShootingRangeandFocusing
StillImages
Changing the Focus Setting
Youcanchangedefaultcameraoperationofconstantlyfocusingon
subjectsitisaimedat,evenwhentheshutterbuttonisnotpressed.Instead,
youcanlimitcamerafocusingtothemomentyoupresstheshutterbutton
halfway.
Pressthe<n>button,choose
[ContinuousAF]onthe[4]tab,andthen
choose[Off](=
42).
On
Helpsavoidmissingsuddenphoto
opportunities,becausethecamera
constantlyfocusesonsubjectsuntilyou
presstheshutterbuttonhalfway.
Off
Conservesbatterypower,becausethe
cameradoesnotfocusconstantly.
COPY

139
ShootingRangeandFocusing
StillImages
Choosing a Person to Focus On (Face Select)
Youcanshootafterchoosingaspecicperson’sfacetofocuson.
1 SettheAFframeto[Face
Detect](=
133).
2 EnterFaceSelectmode.
Aimthecameraattheperson’sfaceand
pressthe<
>button.
After[FaceSelect:On]isdisplayed,a
faceframe[
]isdisplayedaroundthe
facedetectedasthemainsubject.
Evenifthesubjectmoves,thefaceframe
[
]followsthesubjectwithinacertain
range.
Ifafaceisnotdetected,[ ]isnot
displayed.
3 Choosethefacetofocuson.
Toswitchthefaceframe[ ]toanother
detectedface,pressthe<
>button.
Afteryouhaveswitchedthefaceframe
toalldetectedfaces,[FaceSelect:Off]
isdisplayed,andthespeciedAFframe
modescreenisdisplayedagain.
4 Shoot.
Presstheshutterbuttonhalfway.Afterthe
camerafocuses,[
]changesto[ ].
Presstheshutterbuttonallthewaydown
toshoot.
COPY

140
ShootingRangeandFocusing
StillImages Movies
Shooting with the AF Lock
Thefocuscanbelocked.Afteryoulockthefocus,thefocalpositionwillnot
changeevenwhenyoureleaseyourngerfromtheshutterbutton.
1 Lockthefocus.
Withtheshutterbuttonpressedhalfway,
pressthe<q>button.
Thefocusisnowlocked,and[ ]and
theMFindicatoraredisplayed.
Tounlockthefocus,onceagainholdthe
shutterbuttonhalfwaydownandpress
the<q>button.
2 Composetheshotandshoot.
COPY
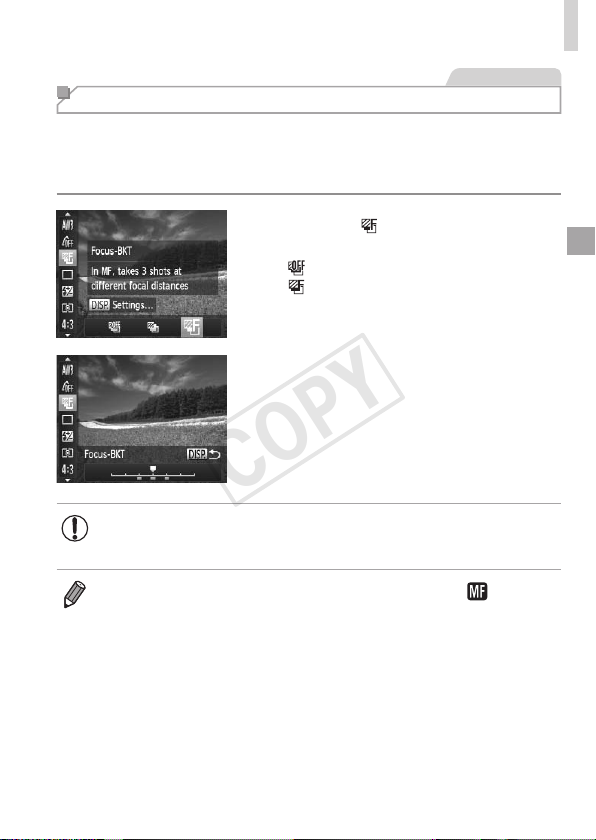
141
ShootingRangeandFocusing
StillImages
Focus Bracketing (Focus-BKT Mode)
Threeconsecutiveimagesarecapturedeachtimeyoushoot,withthe
rstoneatthefocaldistanceyousetmanuallyandtheothersatfarther
andnearerfocalpositionsdeterminedbypresets.Thedistancefromyour
speciedfocuscanbesetinthreelevels.
1 Choose[ ].
Pressthe<m>button,choose
[
]inthemenu,andthenchoose
[
](=
41).
2 Congurethesetting.
Pressthe<l>button,andthen
adjustthesettingbypressingthe
<q><r>buttonsorturningthe<5>
dial.
• Focusbracketingisonlyavailablein[!]mode(=
47).
• Continuousshooting(=
127)isnotavailableinthismode.
• Youcanalsoaccessthesettingscreeninstep2bychoosing[ ]instep1
on=
130andpressingthe<l>button.
• Threeshotsaretaken,regardlessofanyquantityspeciedin[$](=
59).
• In[BlinkDetection]mode(=
81),thisfunctionisonlyavailableforthenal
shot.
COPY
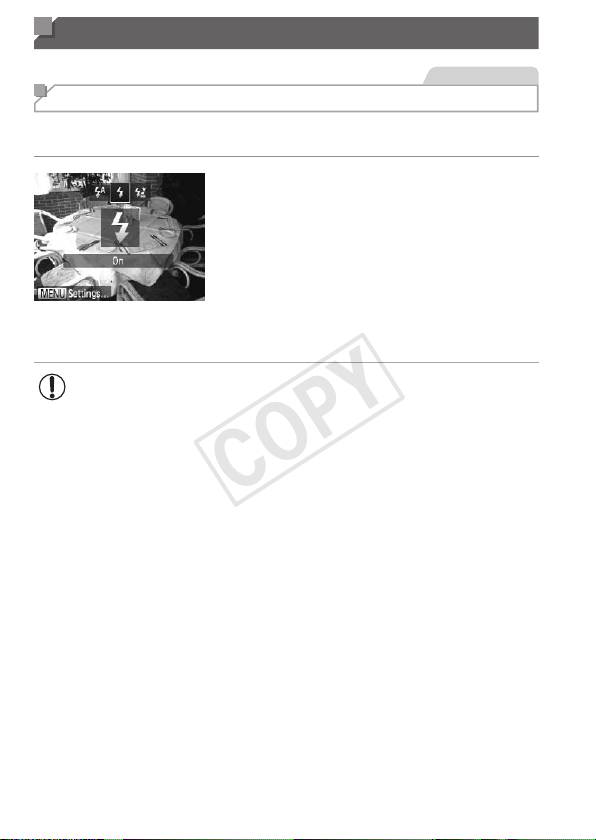
142
Flash
StillImages
Activating Flash
Youcanhavetheashreforeachshot.Fordetailsontheashrange,see
“Specications”(=
274).
1 Lifttheash(=
47).
2 Congurethesetting.
Pressthe<h>button,choose[h](either
pressthe<q><r>buttonsorturnthe
<5>dial),andthenpressthe<m>
button.
Oncethesettingiscomplete,[h]is
displayed.
• Thesettingscreencannotbeaccessedbypressingthe<h>
buttonwhentheashislowered.Lifttheashwithyourngerin
advance.
• Iftheashres,vignettingmayoccur.
COPY
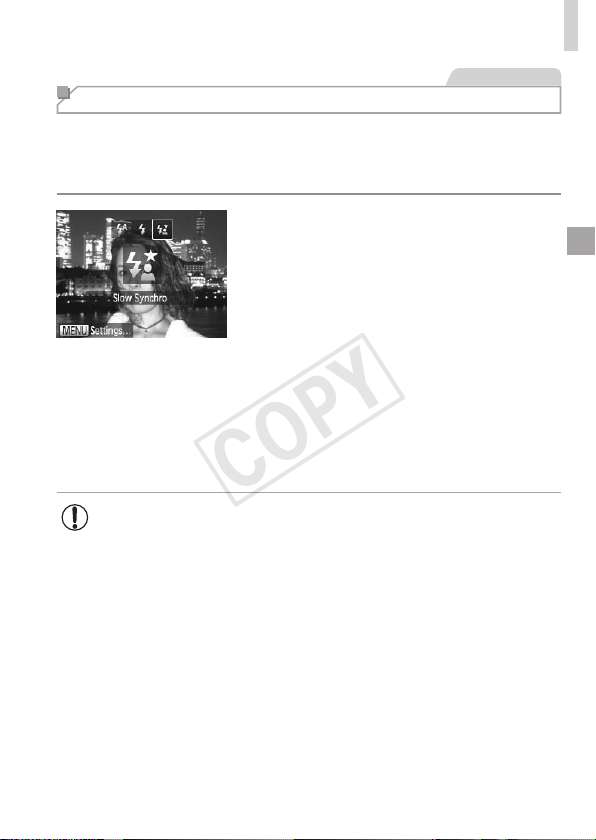
143
Flash
StillImages
Shooting with Slow Synchro
Withthisoption,theashrestoincreasethebrightnessofthemain
subject(suchaspeople)whilethecamerashootsataslowshutterspeedto
increasethebrightnessofthebackgroundthatisoutoftheashrange.
Fordetailsontheashrange,see“Specications”(=
274).
1 Lifttheash(=
47).
2 Congurethesetting.
Pressthe<h>button,choose[Z](either
pressthe<q><r>buttonsorturnthe
<5>dial),andthenpressthe<m>
button.
Oncethesettingiscomplete,[Z]is
displayed.
3 Shoot.
Evenaftertheashres,ensurethat
themainsubjectdoesnotmoveuntilthe
shuttersoundisnishedplaying.
• Mountthecameraonatripodortakeothermeasurestokeepit
stillandpreventcamerashake.Additionally,youshouldset[IS
Mode]to[Off]whenusingatripodorothermeanstoholdthe
camerastill(=
147).
• Thesettingscreencannotbeaccessedbypressingthe<h>
buttonwhentheashislowered.Lifttheashwithyourngerin
advance.
COPY
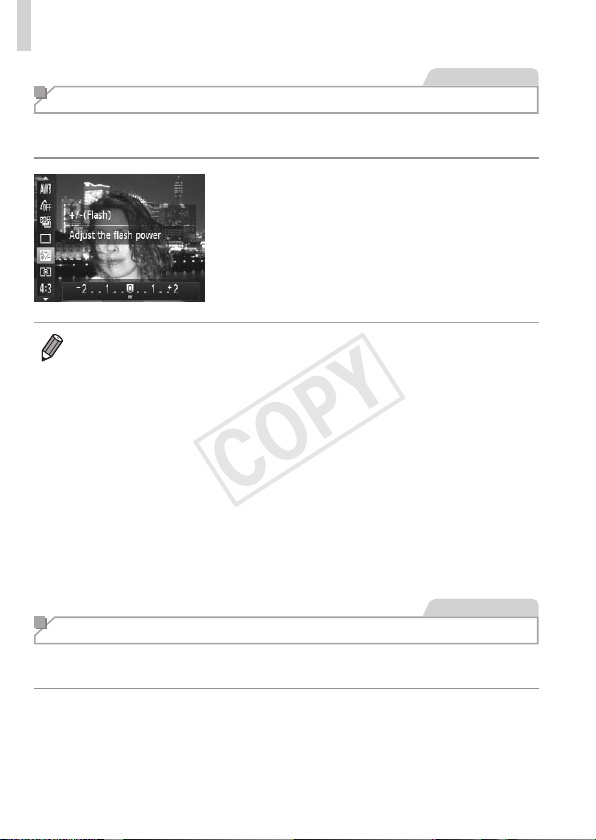
144
Flash
StillImages
Adjusting the Flash Exposure Compensation
Justaswithregularexposurecompensation(=
115),youcanadjustthe
ashexposurefrom–2to+2stops,in1/3-stopincrements.
Pressthe<m>button,choose[X]in
themenu,andadjustthesettingbyeither
pressingthe<q><r>buttonsorturning
the<5>dial(=
41).
Oncethesettingiscomplete,[X]is
displayed.
• Whenthereisariskofoverexposure,thecameraautomaticallyadjuststhe
shutterspeedoraperturevalueduringtheashshotstoreducewashed-
outhighlightsandshootatoptimalexposure.However,youcandeactivate
automaticadjustmentoftheshutterspeedandaperturevaluebyaccessing
<n>(=
42)andsetting[SafetyFE]in[FlashControl]onthe[4]tab
to[Off].
• Youcanalsoconguretheashexposurecompensationbyaccessing
<n>(=
42)andchoosing[FlashExp.Comp]in[FlashControl]on
the[4]tab.
• Youcanalsoaccessthe[Built-inFlashSettings]<n>screenasfollows
(exceptwhenanoptionalexternalashismounted).
-Pressandholdthe<h>buttonforatleastonesecond.
-Whentheashisup,pressthe<h>buttonandimmediatelypressthe
<n>button.
StillImages
Shooting with the FE Lock
JustaswiththeAElock(=
115),youcanlocktheexposurefortheash
shots.
1 Lifttheashandsettheashto
[h](=
142).
COPY
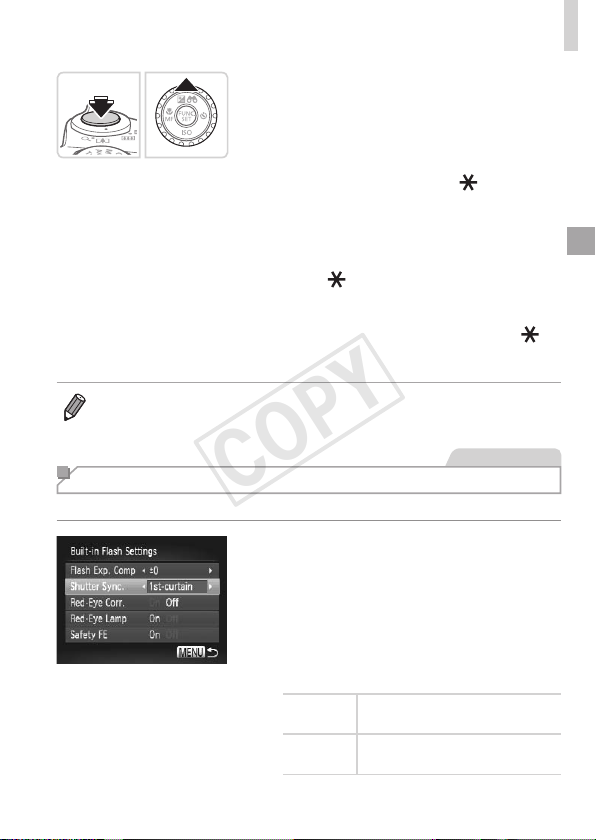
145
Flash
2 Locktheashexposure.
Aimthecameraatthesubjecttoshoot
withtheexposurelocked.Withthe
shutterbuttonpressedhalfway,pressthe
<o>button.
Theashres,andwhen[ ]is
displayed,theashoutputlevelis
retained.
TounlockFE,releasetheshutterbutton
andpressthe<o>buttonagain.Inthis
case,[
]isnolongerdisplayed.
3 Composetheshotandshoot.
Afteroneshot,FEisunlockedand[ ]is
nolongerdisplayed.
• FE:FlashExposure
StillImages
Changing the Flash Timing
Changethetimingoftheashandshutterreleaseasfollows.
1 Accessthesettingscreen.
Pressthe<n>button,choose[Flash
Control]onthe[4]tab,andthenpress
the<m>button(=
4 2 ).
2 Congurethesetting.
Choose[ShutterSync.],andthenchoose
thedesiredoption(=
42).
1st-curtain
Theashresimmediatelyafter
theshutteropens.
2nd-curtain
Theashresimmediatelybefore
theshuttercloses.
COPY
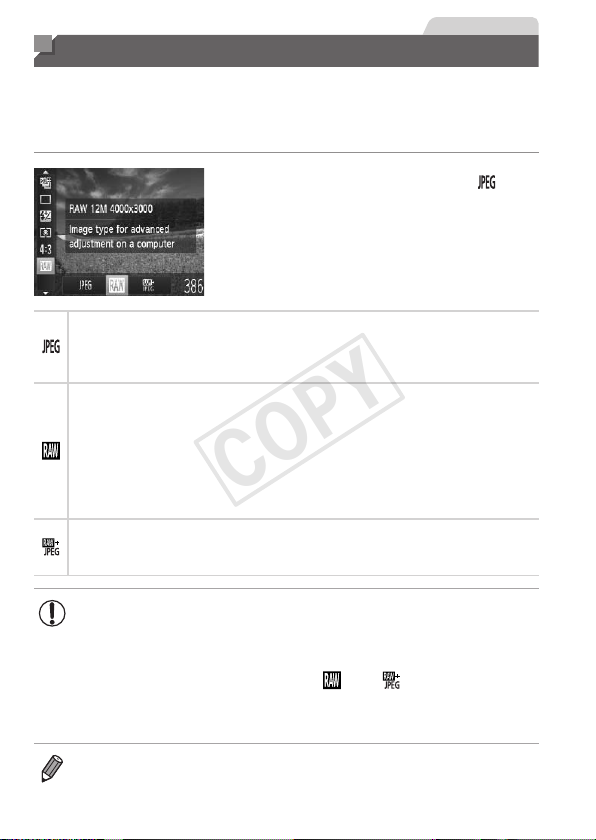
146
StillImages
Shooting RAW Images
RAWimagesare“raw”(unprocessed)data,recordedwithessentiallyno
lossofimagequalityfromthecamera’sinternalimageprocessing.Use
DigitalPhotoProfessional(=
28)toadjustRAWimagesasdesiredwith
minimallossofimagequality.
Pressthe<m>button,choose[ ]in
themenu,andchoosethedesiredoption
(=
41).
RecordsJPEGimages.JPEGimagesareprocessedinthecameraforoptimal
imagequalityandcompressedtoreducelesize.However,thecompression
processisirreversible,andimagescannotberestoredtotheiroriginal,
unprocessedstate.Imageprocessingmayalsocausesomelossofimagequality.
RecordsRAWimages.RAWimagesare“raw”(unprocessed)data,recordedwith
essentiallynolossofimagequalityfromthecamera’simageprocessing.The
datacannotbeusedinthisstateforviewingorprintingonacomputer.Youmust
rstusetheincludedsoftware(DigitalPhotoProfessional)toconvertimagesto
ordinaryJPEGorTIFFles.Imagescanbeadjustedwithminimallossofimage
quality.
Fordetailsonresolutionandthenumberofshotsthatwilltonacard,see
“Specications”(=
274).
Recordstwoimages,bothaRAWimageandaJPEGimage,foreachshot.
TheJPEGimagecanbeprintedorviewedonacomputerwithoutusingthe
includedsoftware.
• WhentransferringRAWimages(orRAWandJPEGimages
recordedtogether)toacomputer,alwaysusetheincluded
software(=
28).
• Digitalzoom(=
55),datestamps(=
61),andred-eye
reduction(=
75)aresetto[Off]in[ ]and[ ]modes.
Additionally,i-Contrast(=
120),MyColors(=
125)andnoise
reductionlevel(=
118)cannotbecongured.
• TheleextensionforJPEGimagesis.JPG,andtheextensionforRAW
imagesis.CR2.
COPY
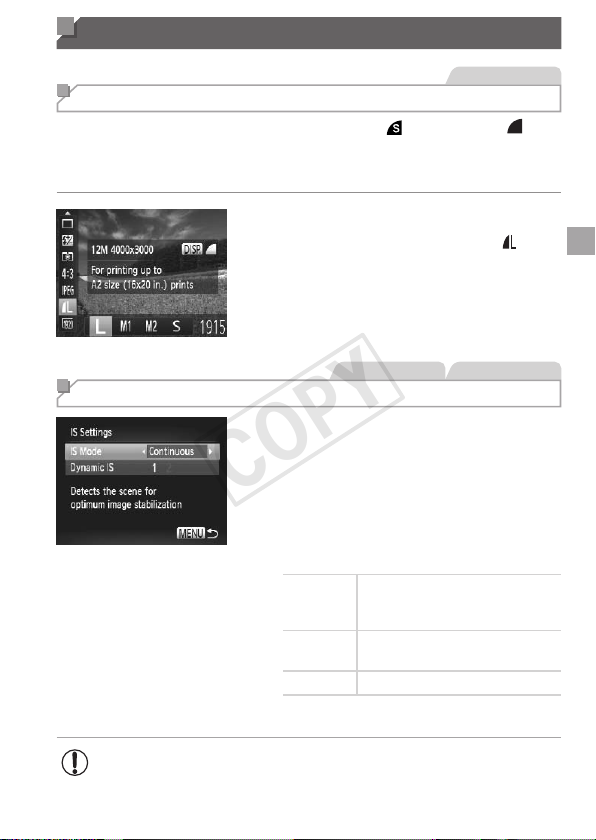
147
Other Settings
StillImages
Changing the Compression Ratio (Image Quality)
Choosefromtwocompressionratios,asfollows:[ ](SuperFine),[ ]
(Fine).
Forguidelinesonhowmanyshotsateachcompressionratiocantona
memorycard,see“Specications”(=
274).
Congurethesetting.
Pressthe<m>button,choose[ ]in
themenu,pressthe<l>button,and
choosethedesiredoption(=
41).
StillImages Movies
Changing the IS Mode Settings
1 Accessthesettingscreen.
Pressthe<n>button,choose[IS
Settings]onthe[4]tab,andthenpress
the<m>button(=
42).
2 Congurethesetting.
Choose[ISMode],andthenchoosethe
desiredoption(=
42).
Continuous
Optimalimagestabilizationforthe
shootingconditionsisautomatically
applied(IntelligentIS)(
=
53).
ShootOnly*
Imagestabilizationisactiveonlyat
themomentofshooting.
Off Deactivatesimagestabilization.
*Thesettingischangedto[Continuous]formovierecording.
• Ifimagestabilizationcannotpreventcamerashake,mountthe
cameraonatripodortakeothermeasurestoholditstill.Inthis
case,set[ISMode]to[Off].
COPY
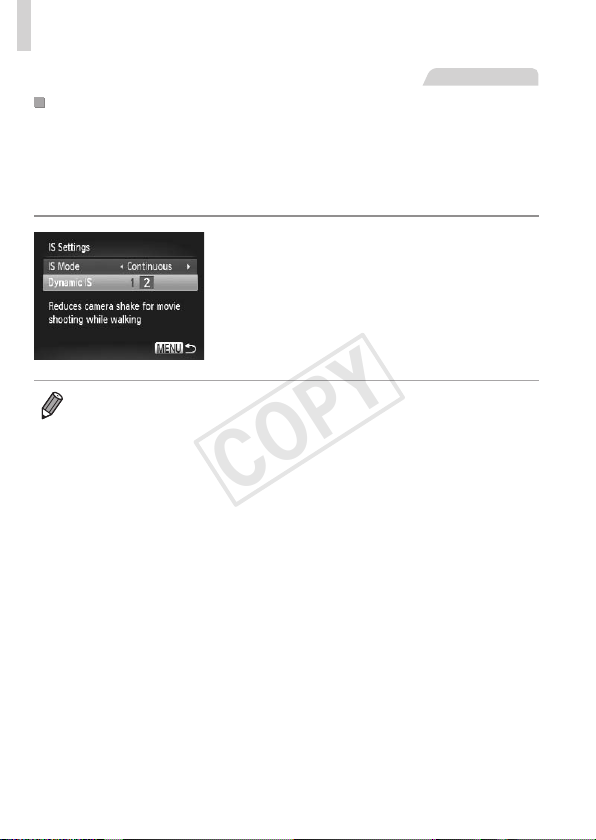
148
OtherSettings
Movies
0
ShootingMoviesWithSubjectsattheSameSizeShown
BeforeShooting
Normally,oncemovierecordingbegins,asmallerimagedisplayarea(eld
ofview)isshown,withthesubjectslightlyenlargedduetorotationalimage
stabilization.Toshootsubjectsatthesamesizeshownbeforeshooting,you
candisablethisimagestabilization.
Followthestepson=
147toaccess
the[ISSettings]screen.
Choose[DynamicIS],andthenchoose
[2](=
42).
• Youcanalsoset[ISMode]to[Off],sothatsubjectsarerecordedatthesame
sizeshownbeforeshooting.
COPY

149
Tv, Av, M, C1, and C2 Mode
Takesmarter,moresophisticatedshots,andcustomize
thecameraforyourshootingstyle
• Instructionsinthischapterapplytothecameraassettotherespective
mode.
5
COPY
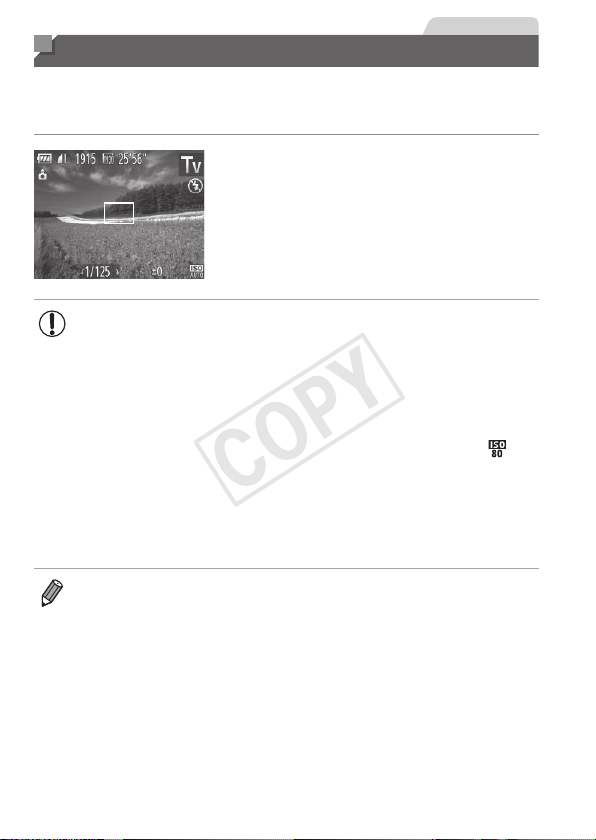
150
StillImages
Specic Shutter Speeds (<Tv> Mode)
Setyourpreferredshutterspeedbeforeshootingasfollows.Thecamera
automaticallyadjuststheaperturevaluetosuityourshutterspeed.
Fordetailsonavailableshutterspeeds,see“Specications”(=
274).
1 Enter<M>mode.
Setthemodedialto<M>.
2 Settheshutterspeed.
Turnthe<5>dialtosettheshutter
speed.
• Withshutterspeedsof1.3secondsorslower,therewillbeadelay
beforeyoucanshootagain,asimagesareprocessedtoremove
noise.
• Whenshootingatlowshutterspeedsonatripod,youshouldset
[ISMode]to[Off](=
147).
• Thespeedyousetmaybeloweredautomaticallyasneededifthe
ashres.
• Withshutterspeedsof1.3secondsorslower,ISOspeedis[
]
andcannotbechanged.
• Orangedisplayofaperturevalueswhenyoupresstheshutter
buttonhalfwayindicatesthatthesettingsdeviatefromstandard
exposure.Adjusttheshutterspeeduntiltheaperturevalueis
displayedinwhite,orusesafetyshift(=
151).
• <M>:Timevalue
COPY
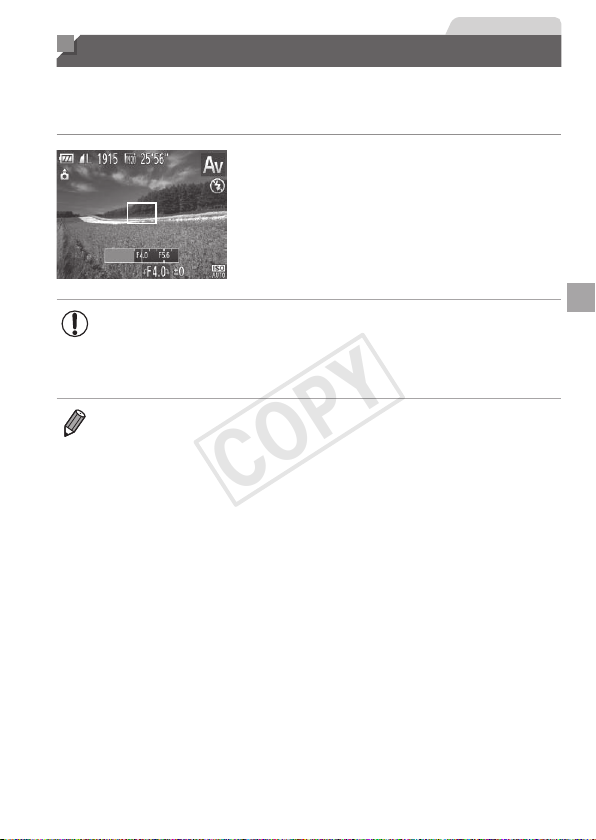
151
StillImages
Specic Aperture Values (<Av> Mode)
Setyourpreferredaperturevaluebeforeshootingasfollows.Thecamera
automaticallyadjuststheshutterspeedtosuityouraperturevalue.
Fordetailsonavailableaperturevalues,see“Specications”(=
274).
1 Enter<B>mode.
Setthemodedialto<B>.
2 Settheaperturevalue.
Turnthe<5>dialtosettheaperture
value.
• Orangedisplayofshutterspeedswhenyoupresstheshutter
buttonhalfwayindicatesthatthesettingsdeviatefromstandard
exposure.Adjusttheaperturevalueuntiltheshutterspeedis
displayedinwhite,orusesafetyshift(seebelow).
• <B>:Aperturevalue(sizeoftheopeningmadebytheirisinthelens)
• Toavoidexposureproblemsin<M>and<B>modes,youcanhavethe
cameraautomaticallyadjusttheshutterspeedoraperturevalue,evenwhen
standardexposurecannototherwisebeobtained.Pressthe<n>button
andset[SafetyShift]onthe[4]tabto[On](=
42).However,safetyshift
isdisabledwhentheashres.
COPY
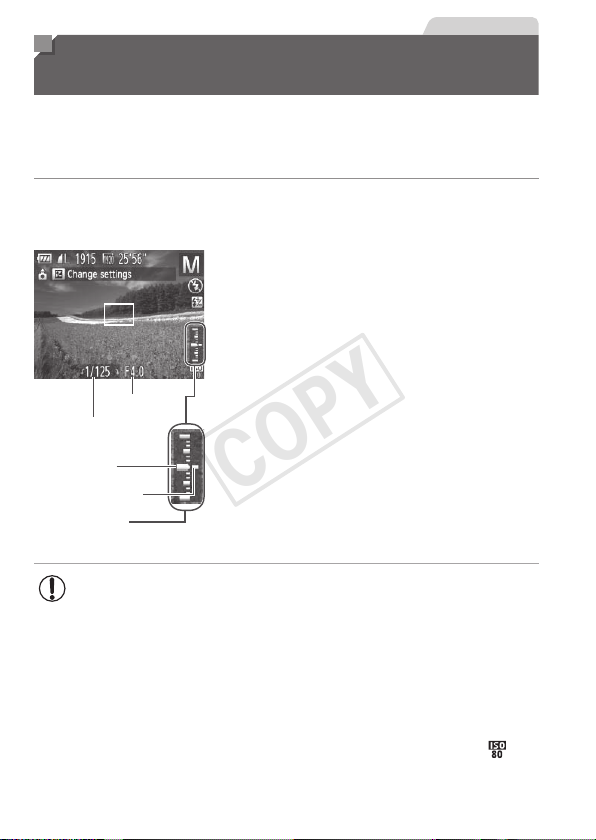
152
StillImages
Specic Shutter Speeds and Aperture
Values (<M> Mode)
Followthesestepsbeforeshootingtosetyourpreferredshutterspeedand
aperturevaluetoobtainthedesiredexposure.
Fordetailsonavailableshutterspeedsandaperturevalues,see
“Specications”(=
274).
1 Enter<D>mode.
Setthemodedialto<D>.
ApertureValue
ShutterSpeed
Standard
ExposureLevel
ExposureLevelMark
ExposureLevel
Indicator
2 Congurethesetting.
Pressthe<o>button,choose
adjustmentofshutterspeedoraperture
value,andturnthe<5>dialtospecify
avalue.
Anexposurelevelmarkbasedonyour
speciedvalueisshownontheexposure
levelindicatorforcomparisontothe
standardexposurelevel.
Theexposurelevelmarkisshown
inorangewhenthedifferencefrom
standardexposureexceeds2stops.“–2”
or“+2”isdisplayedinorangeinthelower
rightwhenyoupresstheshutterbutton
halfway.
• Afteryousettheshutterspeedoraperturevalue,theexposure
levelmaychangeifyouadjustthezoomorrecomposetheshot.
• Screenbrightnessmaychangedependingonyourspecied
shutterspeedoraperturevalue.However,screenbrightness
remainsthesamewhentheashisupandthemodeissetto[h].
• Tohavethesettingyoudidnotcongureinstep2(whethershutter
speedoraperturevalue)automaticallyadjustedtoobtainstandard
exposure,holdtheshutterbuttonhalfwayandpressthe<
o
>button.
Notethatstandardexposuremaynotbepossiblewithsomesettings.
• Withshutterspeedsof1.3secondsorslower,ISOspeedis[ ]
andcannotbechanged.
COPY

153
SpecicShutterSpeedsandApertureValues(<M>Mode)
• <D>:Manual
• Calculationofstandardexposureisbasedonthespeciedmeteringmethod
(=
116).
StillImages
Adjusting the Flash Output
Choosefromthethreeashlevelsin<D>mode.
1 Enter<D>mode.
Setthemodedialto<D>.
2 Congurethesetting.
Pressthe<m>button,choose[X]in
themenu,andadjustthesettingbyeither
pressingthe<q><r>buttonsorturning
the<
5
>dial(=
41).
Oncethesettingiscomplete,[X]is
displayed.
• Youcanalsosettheashlevelbyaccessing<n>(=
42)and
choosing[FlashOutput]in[FlashControl]onthe[4]tab.
• Youcansettheashlevelin<M>or<B>modebyaccessing<n>
(=
42),choosing[FlashControl]onthe[4]tab,andthensetting[Flash
Mode]to[Manual].
• Youcanalsoaccessthe[Built-inFlashSettings]<n>screenasfollows
(exceptwhenanexternalash(soldseparately)isattachedtothecamera).
-Pressandholdthe<h>buttonforatleastonesecond.
-Whentheashisup,pressthe<h>buttonandimmediatelypressthe
<n>button.
COPY
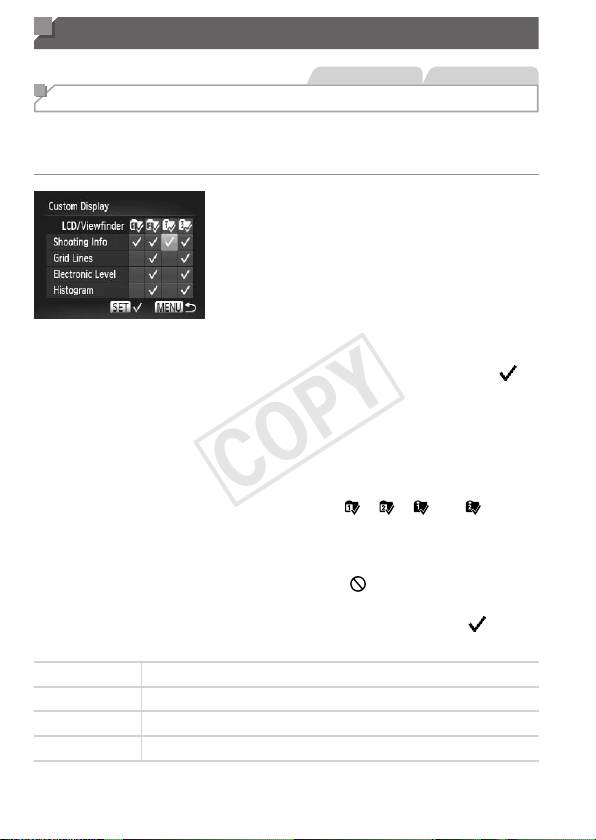
154
Customization for Shooting Styles
StillImages Movies
Customizing Display Information
Customizewhatinformationisshowninvariousdisplaymodes(switchedby
pressingthe<l>button),andwhetherornottheinformationisshown
ontheLCDmonitororviewnder.
1 Accessthesettingscreen.
Pressthe<n>button,choose
[CustomDisplay]onthe[4]tab,and
thenpressthe<m>button(=
42).
2 Congurethesetting.
Pressthe<o><p><q><r>buttonsor
turnthe<5>dialtochooseanitem,and
thenpressthe<m>button.Itemsyou
choosefordisplayarelabeledwith[
].
In[LCD/Viewnder],youcanspecifyto
showorhidethisinformationinLCD
monitororviewnderdisplaymodes
(switchedbypressingthe<l>
button).Pressthe<o><p><q><r>
buttonsorturnthe<5>dialtochoose
thescreen([
],[ ],[ ],or[ ]),and
thenpressthe<m>button.Tohide
thisinformationinthedisplaymode
(accessedbypressingthe<l>
button),add[
]totheicon.Notethatthe
currentdisplaymodecannotbemodied.
Selecteditems(labeledwitha[ ])will
beincludedindisplay.
ShootingInfo
Displaysshootinginformation(=
255).
GridLines Displaysareferencegrid.
ElectronicLevel
Displaystheelectroniclevel(=
79).
Histogram
Displaysahistogram(
=
162),in<
G
>,<
M
>,<
B
>,and<
D
>modes.
COPY
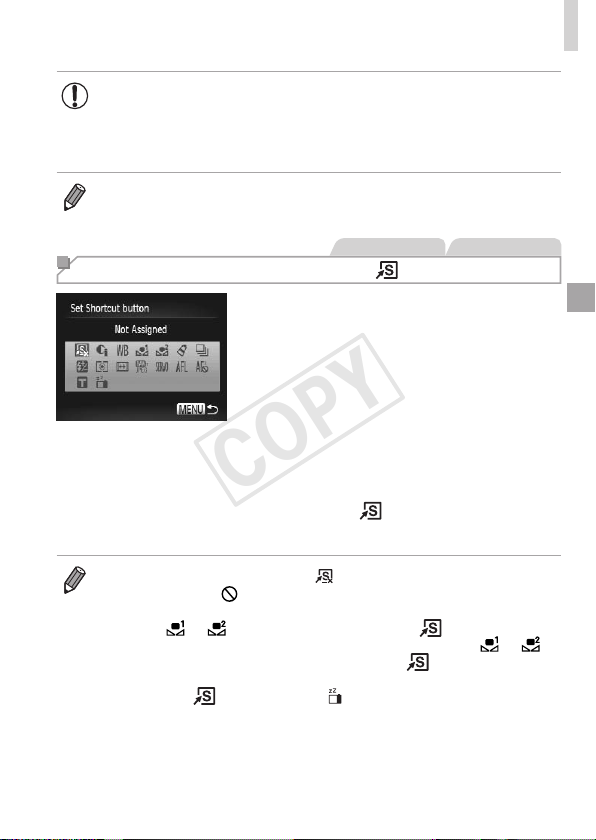
155
CustomizationforShootingStyles
• Settingswillnotbesavedifyoupresstheshutterbuttonhalfwayand
returntotheshootingscreenfromthecustomdisplaysettingsscreen.
• Grayed-outitemscanalsobespecied,buttheymaynotbe
displayedinsomeshootingmodes.
• Gridlinesarenotrecordedinyourshots.
StillImages Movies
Assigning Functions to the < > Button
1 Accessthesettingscreen.
Pressthe<n>button,choose[Set
Shortcutbutton]onthe[4]tab,andthen
pressthe<m>button(=
42).
2 Congurethesetting.
Pressthe<o><p><q><r>buttonsor
turnthe<5>dialtochooseafunctionto
assign,andthenpressthe<m>button.
3
Usetheassignedfunctionasneeded.
Pressthe< >buttontoactivatethe
assignedfunction.
• Torestoredefaultsettings,choose[ ].
• Iconslabeledwith[
]indicatethatthefunctionisnotavailableinthe
currentshootingmodeorundercurrentfunctionconditions.
• Whenthe[ ]or[ ]functionisused,eachpressofthe< >buttonrecords
whitebalancedata(
=
123),andthewhitebalancesettingschangeto[ ]or[ ].
• Whenthe[%]functionisused,eachpressofthe< >buttonadjustsand
locksthefocus,and[%]isdisplayedonthescreen.
• Pressingthe<
>buttonwhenthe[ ]functionisuseddeactivatesboth
screenandviewnderdisplay.Torestorethedisplay,doanyofthefollowing.
-Pressanybutton(otherthanthepowerbutton)
-Holdthecamerainanotherorientation
-Openandclosethescreen
-Raiseandlowertheash
COPY
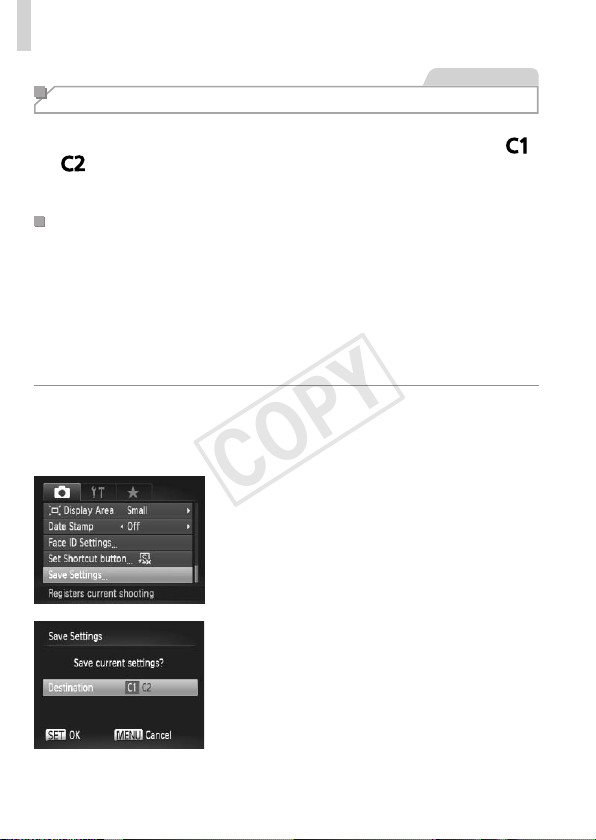
156
CustomizationforShootingStyles
StillImages
Saving Shooting Settings
Savecommonlyusedshootingmodesandyourconguredfunctionsettings
forreuse.Toaccesssavedsettingslater,simplyturnthemodedialto< >
or< >.Evensettingsthatareusuallyclearedwhenyouswitchshooting
modesorturnthecameraoff(suchasself-timersettings)canberetained
thisway.
Settingsthatcanbesaved
• Shootingmodes(<G>,<M>,<B>,and<D>)
• Itemssetin<G>,<M>,<B>,or<D>modes(=
115–152)
• Shootingmenusettings
• Zoompositions
• Manualfocuspositions(=
130)
• MyMenusettings(=
157)
1 Enterashootingmodewith
settingsyouwanttosave,and
changethesettingsasdesired.
2 Congurethesetting.
Pressthe<n>button,choose[Save
Settings]onthe[4]tab,andthenpress
the<m>button.
3 Savethesettings.
Pressthe<q><r>buttonsorturnthe
<5>dialtochoosethedestination,and
thenpressthe<m>button.
COPY
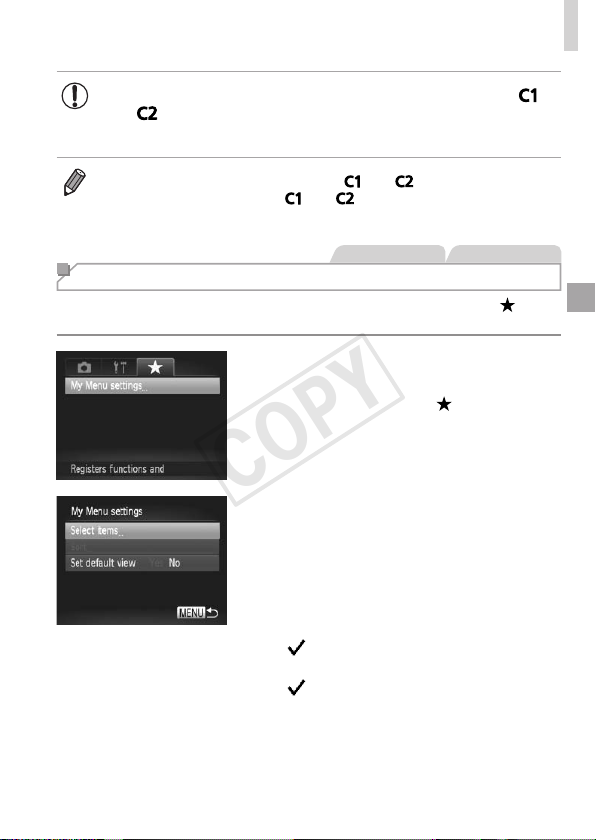
157
CustomizationforShootingStyles
• Toeditsavedsettings(excepttheirshootingmode),choose< >
or< >,changethesettings,andthenrepeatsteps2–3.These
settingdetailsarenotappliedinothershootingmodes.
• Toclearinformationyouhavesavedto< >or< >andrestoredefault
values,turnthemodedialto<
>or< >andchoose[ResetAll]
(=
211).
StillImages Movies
Saving Commonly Used Shooting Menus (My Menu)
Saveuptovecommonlyusedshootingmenusasmenusonthe[ ]tab,
forinstantaccesstoalloftheseitemsfromasinglescreen.
1 Accessthesettingscreen.
Pressthe<n>button,choose[My
Menusettings]onthe[
]tab,andthen
pressthe<m>button(=
42).
2 Congurethesetting.
Pressthe<o><p>buttonsorturnthe
<5>dialtochoose[Selectitems],and
thenpressthe<m>button.
Pressthe<o><p>buttonsorturnthe
<5>dialtochoosemenustosave(up
tove),andthenpressthe<m>button.
[ ]isdisplayed.
Tocancelsaving,pressthe<m>button.
[
]isnolongerdisplayed.
Pressthe<n>button.
COPY

158
CustomizationforShootingStyles
3 Rearrangethemenulistorder,
asneeded.
Pressthe<o><p>buttonsorturnthe
<5>dialtochoose[Sort],andthen
pressthe<m>button.
Pressthe<o><p>buttonsorturnthe
<5>dialtochooseamenutomove,
andthenpressthe<m>button.
Pressthe<o><p>buttonsorturnthe
<5>dialtochangetheorder,andthen
pressthe<m>button.
Pressthe<n>button.
• Grayed-outitemsinstep2canalsobespecied,buttheymaynot
beavailableinsomeshootingmodes.
• TomakeMyMenuimmediatelyaccessiblebypressingthe<n>button
inShootingmode,choose[Setdefaultview]andpressthe<q><r>buttons
tochoose[Yes].
COPY

159
Playback Mode
Havefunreviewingyourshots,andbrowseoreditthem
inmanyways
• Topreparethecamerafortheseoperations,pressthe<1>buttonto
enterPlaybackmode.
• Itmaynotbepossibletoplaybackoreditimagesthatwere
renamedoralreadyeditedonacomputer,orimagesfromother
cameras.
6
COPY
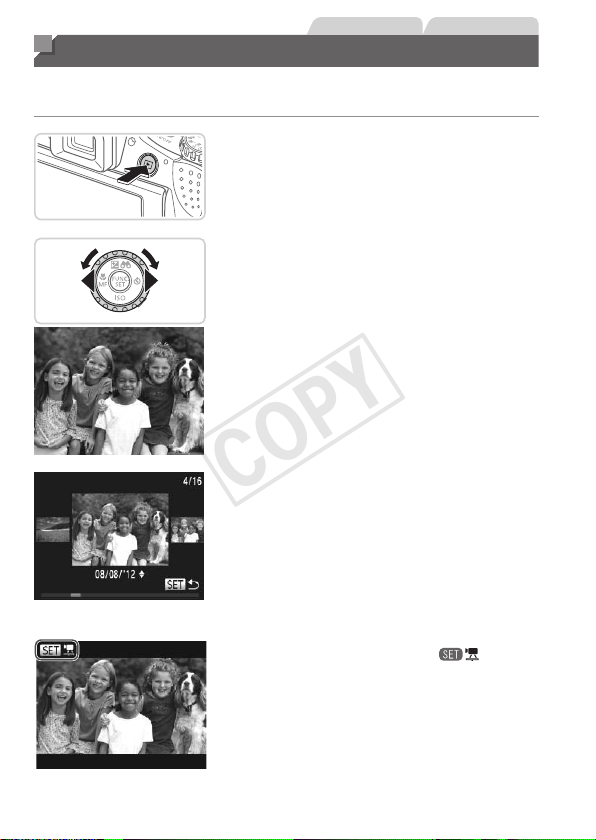
160
StillImages Movies
Viewing
Aftershootingimagesormovies,youcanviewthemonthescreenas
follows.
1 EnterPlaybackmode.
Pressthe<1>button.
Yourlastshotisdisplayed.
2 Browsethroughyourimages.
Toviewthepreviousimage,press
the<q>buttonorturnthe<5>dial
counterclockwise.Toviewthenext
image,pressthe<r>buttonorturnthe
<5>dialclockwise.
Pressandholdthe<q><r>buttonsto
browsethroughimagesquickly.
ToaccessScrollDisplaymode,turnthe
<
5
>dialrapidly.Inthismode,turnthe
<
5
>dialtobrowsethroughimages.
Toreturntosingle-imagedisplay,press
the<m>button.
Tobrowseimagesgroupedbyshooting
date,pressthe<o><p>buttonsin
ScrollDisplaymode.
Moviesareidentiedbya[ ]icon.To
playmovies,gotostep3.
COPY

161
Viewing
Volume
3 Playmovies.
Tostartplayback,pressthe<m>button
toaccessthemoviecontrolpanel,
choose[
](eitherpressthe<q><r>
buttonsorturnthe<5>dial),andthen
pressthe<m>buttonagain.
4 Adjustthevolume.
Pressthe<o><p>buttonstoadjustthe
volume.
5 Pauseplayback.
Topauseorresumeplayback,pressthe
<m>button.
Afterthemovieisnished,[ ]is
displayed.
• ToswitchtoShootingmodefromPlaybackmode,presstheshutterbutton
halfway.
• TodeactivateScrollDisplay,pressthe<n>button,choose[Scroll
Display]onthe[1]tab,andthenchoose[Off].
• Ifyouprefertohavethemostrecentshotdisplayedwhenyouenter
Playbackmode,pressthe<n>button,andonthe[1]tab,choose
[Resume]andthen[Lastshot].
• Tochangethetransitionshownbetweenimages,pressthe<n>button,
choose[Transition]onthe[1]tab,andthenpressthe<q><r>buttonsto
choosetheeffect.
COPY
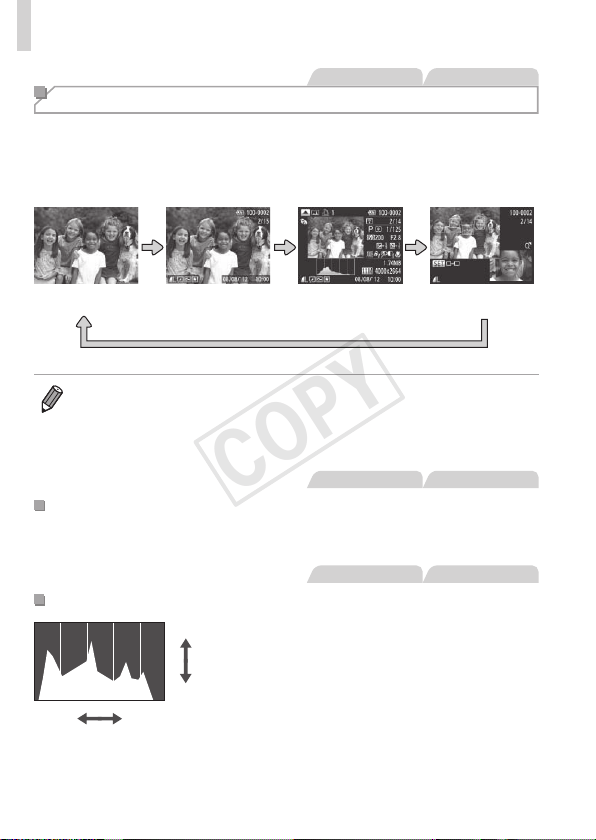
162
Viewing
StillImages Movies
Switching Display Modes
Pressthe<l>buttontoviewotherinformationonthescreen,ortohide
theinformation.Fordetailsontheinformationdisplayed,see=
255.
Openthescreentoactivateitwhenthecameraison.Thiswilldeactivate
theviewnder.Similarly,closethescreen(facingthecamerabody)to
deactivateitandactivatetheviewnder(=
18).
NoInformation
Display
Simple
Information
Display
Detailed
Information
Display
Enablesyoutocheck
thefocus(
=
165)*
*Notshownformovies.
• Switchingdisplaymodesbypressingthe<l>buttonisalsopossible
immediatelyafteryoushoot,whileyourshotisdisplayed.However,simple
informationdisplayisnotavailable.Tochangetheinitialdisplaymode,press
the<n>buttonandchoose[ReviewInfo]onthe[4]tab(=
84).
StillImages Movies
OverexposureWarning(forImageHighlights)
Washed-outhighlightsintheimageashonthescreenindetailed
informationdisplay(seeabove).
StillImages Movies
Histogram
High
Dark
Low
Bright
Thegraphindetailedinformationdisplay
(seeabove)isahistogramshowingthe
distributionofbrightnessintheimage.
Thehorizontalaxisrepresentsthedegree
ofbrightness,andtheverticalaxis,how
muchoftheimageisateachlevelof
brightness.Viewingthehistogramisa
waytocheckexposure.
Thehistogramcanalsobeaccessed
whileshooting(=
154,255).
COPY
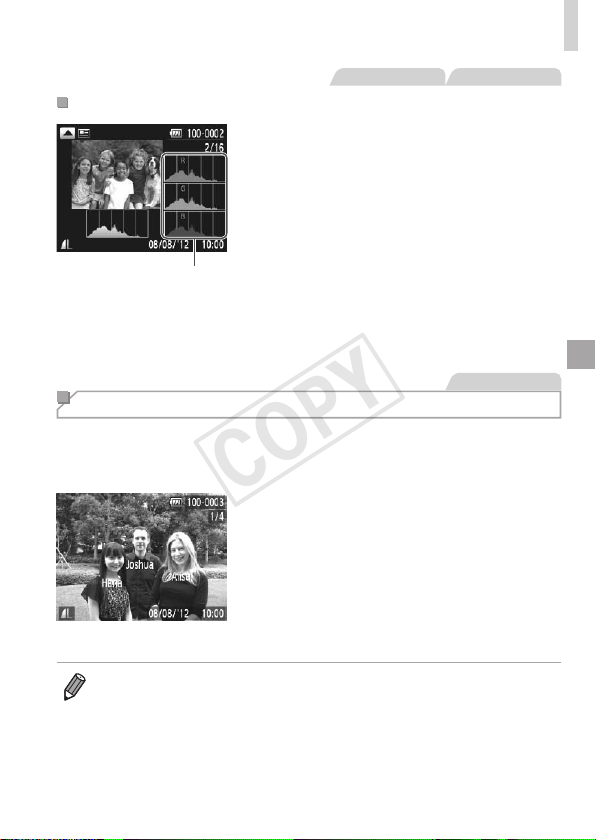
163
Viewing
StillImages Movies
RGBHistogram
RGBHistogram
ToviewanRGBhistogram,pressthe
<o>buttonindetailedinformation
display.TheRGBhistogramshowsthe
distributionofshadesofred,green,and
blueinanimage.Thehorizontalaxis
representsR,G,orBbrightness,andthe
verticalaxis,howmuchoftheimageis
atthatlevelofbrightness.Viewingthis
histogramenablesyoutocheckimage
colorcharacteristics.
Pressthe<o>buttonagaintoreturnto
detailedinformationdisplay.
StillImages
Checking People Detected in Face ID
Ifyouswitchthecameratosimpleinformationdisplaymode(=
162),the
namesofuptovedetectedpeopleregisteredinFaceID(=
63)willbe
displayed.
Switchtosimpleinformation
displaymodeandcheck.
Pressthe<l>buttonrepeatedlyuntil
simpleinformationdisplayisactivated,
andthenpressthe<q><r>buttonsto
chooseanimage.
Nameswillbedisplayedondetected
people.
• IfyoudonotwantnamestodisplayonimagesshotusingFaceID,pressthe
<n>button,choose[FaceIDInfo]onthe[1]tab,andthenset[Name
Display]to[Off].
COPY
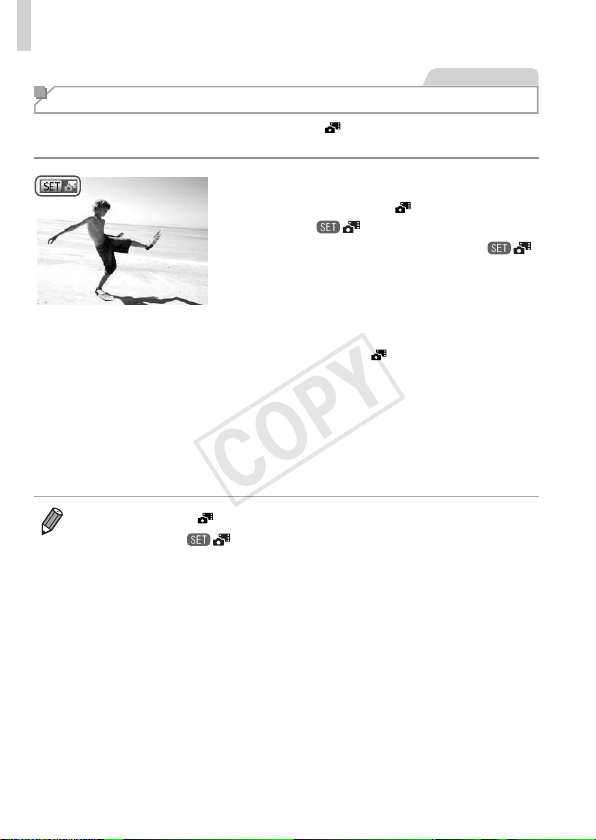
164
Viewing
Movies
Viewing Movie Digest Clips
Viewmovieclipsrecordedautomaticallyin[ ]mode(=
86)onadayof
stillimageshootingasfollows.
1 Chooseanimage.
Stillimagesshotin[ ]modearelabeled
withan[
]icon.
Chooseastillimagelabeledwith[ ]
andpressthe<m>button.
2 Playtheclip.
After[Playback movie?]isdisplayed,
pressthe<q><r>buttonsorturnthe
<5>dialtochoose[OK],andthenpress
the<m>button.
Themoviecliprecordedautomaticallyon
thedayofstillimageshootingisplayed
back,fromthebeginning.
• Moviescreatedin[ ]modecanalsobeviewedbydate(=
169).
• Afteramoment,[
]willnolongerbedisplayedwhenyouareusingthe
camerawithinformationdisplaydeactivated(=
162).
COPY

165
Viewing
StillImages
Checking the Focus
Tocheckthefocusofyourshots,youcanmagnifytheareaoftheimage
thatwasintheAFframeatthetimeofshooting.
1 AccessFocusCheck.
Pressthe<l>button(=
162).
AwhiteframeisdisplayedwheretheAF
framewaswhenthefocuswasset.
Grayframesaredisplayedoverfaces
detectedlater,inPlaybackmode.
Theportionoftheimageintheorange
frameismagnied.
2 Switchframes.
Movethezoomlevertoward<k>once.
Thescreenatleftisdisplayed.
Toswitchtoadifferentframewhenthere
aremultipleframes,pressthe<m>
button.
3 Zoominorout,orviewother
imageareas.
Asyouexaminethefocus,usethe
zoomlevertozoominorout.Pressthe
<o><p><q><r>buttonstoadjustthe
displayposition.
Pressthe<n>buttontorestorethe
originaldisplayinstep1.
COPY
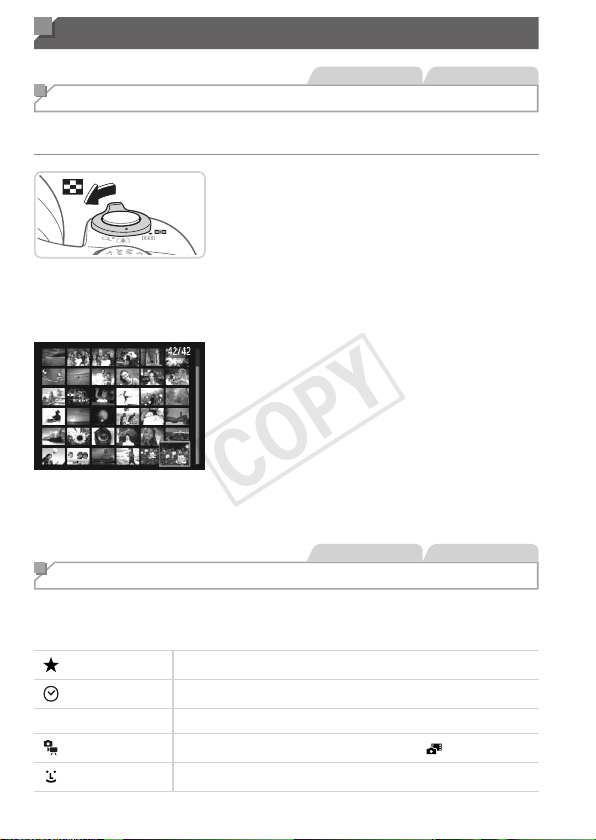
166
Browsing and Filtering Images
StillImages Movies
Navigating Through Images in an Index
Bydisplayingmultipleimagesinanindex,youcanquicklyndtheimages
youarelookingfor.
1 Displayimagesinanindex.
Movethezoomlevertoward<g>to
displayimagesinanindex.Movingthe
leveragainwillincreasethenumberof
imagesshown.
Todisplayfewerimages,movethezoom
levertoward<k>.Fewerimagesare
showneachtimeyoumovethelever.
2 Chooseanimage.
Turnthe<5>dialtoscrollthroughthe
images.
Pressthe<o><p><q><r>buttonsto
chooseanimage.
Anorangeframeisdisplayedaroundthe
selectedimage.
Pressthe<m>buttontoviewthe
selectedimageinsingle-imagedisplay.
StillImages Movies
Finding Images Matching Specied Conditions
Finddesiredimagesquicklyonamemorycardfullofimagesbylteringimage
displayorjumpingbetweenimagesaccordingtoyourspeciedconditions.You
canalsoprotect(
=
175)ordelete(
=
179)theseimagesallatonce.
Favorites
Displaysimagestaggedasfavorites(=
184).
ShotDate Displaystheimagesshotonaspecicdate.
;
MyCategory
Displaystheimagesofaspeciccategory(=
185).
Stillimage/Movie
Displaysstillimages,movies,ormoviesshotin[ ]mode(
=
86).
Name
Displaysimagesofaregisteredperson(=
63).
COPY
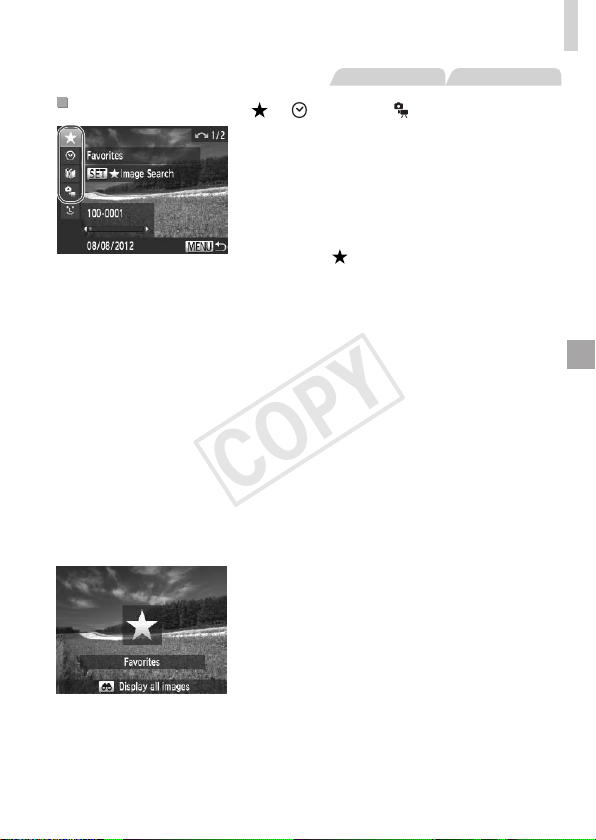
167
BrowsingandFilteringImages
StillImages Movies
FilteringDisplayby[ ],[ ],[
;
],or[ ]
1 Choosetherstconditionfor
imagedisplayornavigation.
Insingle-imagedisplay(exceptdetailed
informationdisplay),pressthe<o>
button,andthenpressthe<o><p>
buttonstochooseadisplaylter.
When[ ]isselected,youcanview
onlyimagesmatchingthisconditionby
pressingthe<q><r>buttons.Toperform
anactionforalloftheseimagestogether,
pressthe<m>buttonandgotostep3.
2 Choosethesecondcondition
andchecktheimagesfound.
Pressthe<q><r>buttonstochoose
anothercondition.Onceyouturnthe
<5>dial,youcanviewtheimages
narroweddownbyyourconditions.
Tocanceldisplayltering,pressthe
<n>button.
Toswitchtolteredimagedisplay,press
the<m>buttonandgotostep3.
3 Viewthelteredimages.
Imagesmatchingyourconditionsare
displayedinyellowframes.Toview
onlytheseimages,pressthe<q><r>
buttons,orturnthe<5>dial.
Toexitlteredimagedisplay,pressthe
<o>button,andafter[Imagesearch
canceled]isdisplayed,pressthe<m>
button.
COPY
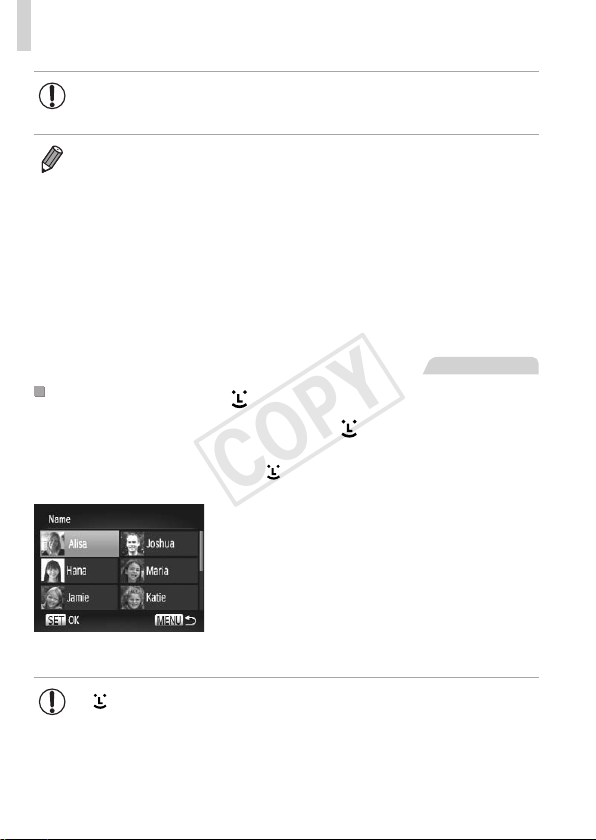
168
BrowsingandFilteringImages
• Whenthecamerahasfoundnocorrespondingimagesforsome
conditions,thoseconditionswillnotbeavailable.
• Toshoworhideinformation,pressthe<l>buttoninstep2.
• Optionsforviewingtheimagesfound(instep3)include“Navigating
ThroughImagesinanIndex”(=
166),“ViewingSlideshows”(=
173),
and“MagnifyingImages”(=
172).Youcanprotect,erase,orprintall
imagesfoundoraddthemtoaphotobookbychoosing[SelectAllImages
inSearch]in“ProtectingImages”(=
175),“ErasingAllImages”(=
179),
“AddingImagestothePrintList(DPOF)”(=
238),or“AddingImagestoa
Photobook”(=
243).
• However,ifyourecategorizeimages(=
185)oreditthemandsavethem
asnewimages(=
188–193),amessageisdisplayedandlteredimage
displayends.
StillImages
FilteringDisplayby[ ]
1 Choose[ ].
Followingsteps1–2on=
167,choose
[
]andpressthe<m>button.
2 Chooseaperson.
Pressthe<o><p><q><r>buttonsor
turnthe<5>dialtochooseaperson,
andthenpressthe<m>button.
3 Viewthelteredimages.
Followstep3on=
167toviewthe
images.
• [ ]isnotavailableunlesspeopleareregistered(=
63).
COPY

169
BrowsingandFilteringImages
Movies
Viewing Movie Digest Movies
Moviescreatedin[ ]mode(=
86)canbeviewedbydate.
1 Chooseamovie.
Pressthe<n>button,choose
[MovieDigestPlayback]onthe[1]tab,
andthenchoosethedate.
2 Playthemovie.
Pressthe<m>buttontostartplayback.
COPY
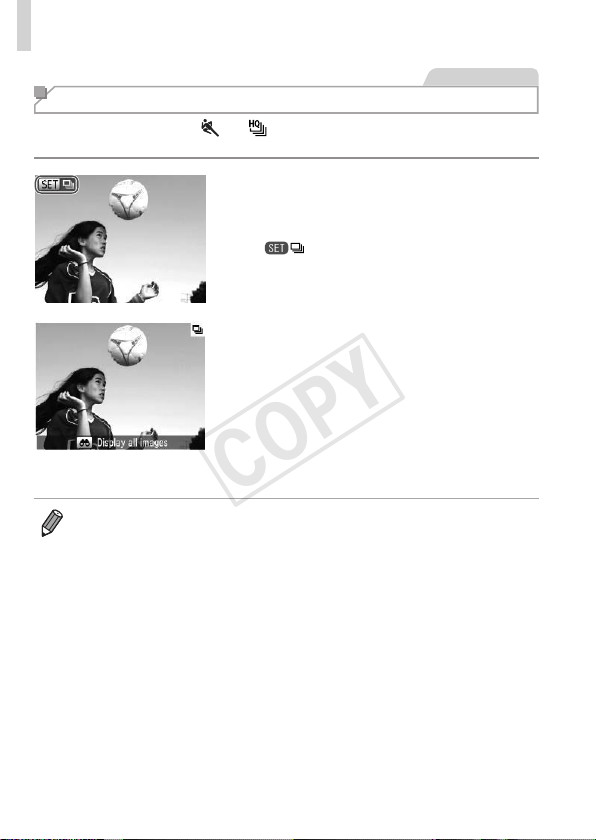
170
BrowsingandFilteringImages
StillImages
Viewing Individual Images in a Group
Groupedimagesshotin[ ]or[ ]mode(=
87,106)aregenerally
displayedtogether,buttheycanalsobeviewedindividually.
1 Chooseanimagegroup.
Pressthe<q><r>buttonsorturnthe
<5>dialtochooseanimagelabeled
[
],andthenpressthe<m>button.
2 Viewindividualimagesinthe
group.
Pressingthe<q><r>buttonsorturning
the<5>dialwilldisplayonlyimagesin
thegroup.
Pressingthe<o>buttonwilldisplay
[Displayallimages].Press<m>to
cancelgroupplayback.
• Duringgroupplayback(step2),youcanbrowsethroughimagesquickly
“NavigatingThroughImagesinanIndex”(=
166)andmagnifythem
“MagnifyingImages”(=
172).Youcanprotect,erase,orprintallimages
inagroupatonceoraddthemtoaphotobookbychoosing[AllImagesin
Group]in“ProtectingImages”(=
175),“ErasingAllImages”(=
179),
“AddingImagestothePrintList(DPOF)”(=
238),or“AddingImagestoa
Photobook”(=
243).
• Toungroupimagessothatyoucanviewthemindividually,pressthe
<n>button,choose[GroupImages]onthe[1]tab,andthenchoose
[Off](=
42).However,groupedimagescannotbeungroupedduring
individualplayback.
COPY

171
Editing Face ID Information
Ifyounoticethatanameisincorrectduringplayback,youcanchangeitor
eraseit.
However,youcannotaddnamesforpeoplewhoarenotdetectedbyFace
ID(namesarenotdisplayed),andforpeoplewhosenameshavebeen
erased.
ChangingNames
1 Accessthesettingscreen.
Pressthe<n>buttonandchoose
[FaceIDInfo]onthe[1]tab(=
42).
Pressthe<o><p>buttonsorturnthe
<5>dialtochoose[EditIDInfo],and
thenpressthe<m>button.
2 Chooseanimage.
Followingtheprocedureon=
160,
chooseanimageandpressthe<m>
button.
Anorangeframeisdisplayedaroundthe
selectedface.Whenmultiplenamesare
displayedinanimage,pressthe<q><r>
buttonsorturnthe<5>dialtochoose
thenametochange,andthenpressthe
<m>button.
3 Choosetheitemtoedit.
Pressthe<o><p><q><r>buttonsor
turnthe<5>dialtochoose[Overwrite],
andthenpressthe<m>button.
4 Choosethenameoftheperson
tooverwrite.
Followstep2on=
69tochoose
thenameofthepersonyouwantto
overwrite.
COPY
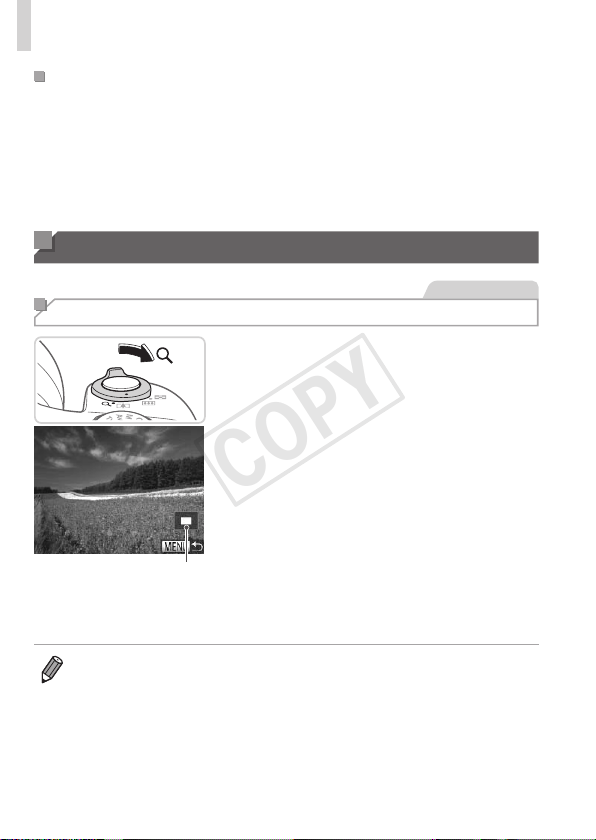
172
ImageViewingOptions
ErasingNames
Followingstep3above,choose[Erase]
andpressthe<m>button.
After[Erase?]isdisplayed,pressthe
<q><r>buttonsorturnthe<5>dialto
choose[OK],andthenpressthe<m>
button.
Image Viewing Options
StillImages
Magnifying Images
ApproximatePosition
ofDisplayedArea
1 Magnifyanimage.
Movingthezoomlevertoward<k>will
zoominandmagnifytheimage.You
canmagnifyimagesuptoabout10xby
continuingtoholdthezoomlever.
Tozoomout,movethezoomlever
toward<g>.Youcanreturntosingle-
imagedisplaybycontinuingtoholdit.
2 Movethedisplaypositionand
switchimagesasneeded.
Tomovethedisplayposition,pressthe
<o><p><q><r>buttons.
Toswitchtootherimageswhilezoomed,
turnthe<5>dial.
• Youcanreturntosingle-imagedisplayfrommagnieddisplaybypressing
the<n>button.
COPY
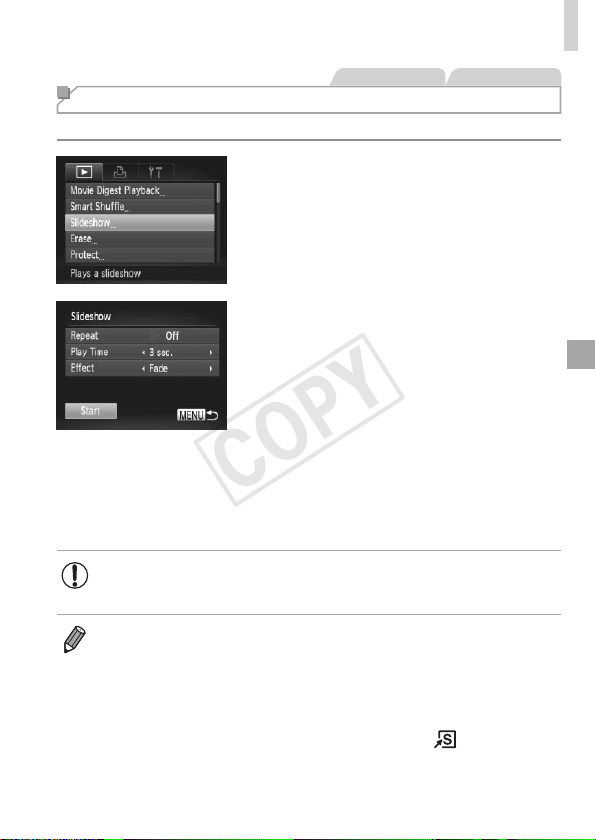
173
ImageViewingOptions
StillImages Movies
Viewing Slideshows
Automaticallyplaybackimagesfromamemorycardasfollows.
1 Accessthesettingscreen.
Pressthe<n>button,andthen
choose[Slideshow]onthe[1]tab
(=
42).
2 Congurethesetting.
Chooseamenuitemtocongure,and
thenchoosethedesiredoption(=
42).
3 Startautomaticplayback.
Pressthe<o><p>buttonsorturnthe
<5>dialtochoose[Start],andthen
pressthe<m>button.
Theslideshowwillstartafewseconds
after[Loadingimage...]isdisplayed.
Pressthe<n>buttontostopthe
slideshow.
• Thecamera’spower-savingfunctions(=
38)aredeactivated
duringslideshows.
• Topauseorresumeslideshows,pressthe<m>button.
• Youcanswitchtootherimagesduringplaybackbypressingthe<q><r>
buttonsorturningthe<5>dial.Forfast-forwardorfast-rewind,holdthe
<q><r>buttonsdown.
• [PlayTime]cannotbemodiedwhen[Bubble]ischosenin[Effect].
• Youcanalsostartslideshowsfromsingle-imagedisplaybypressingand
holdingthe<m>buttonandimmediatelypressingthe<
>button.
COPY
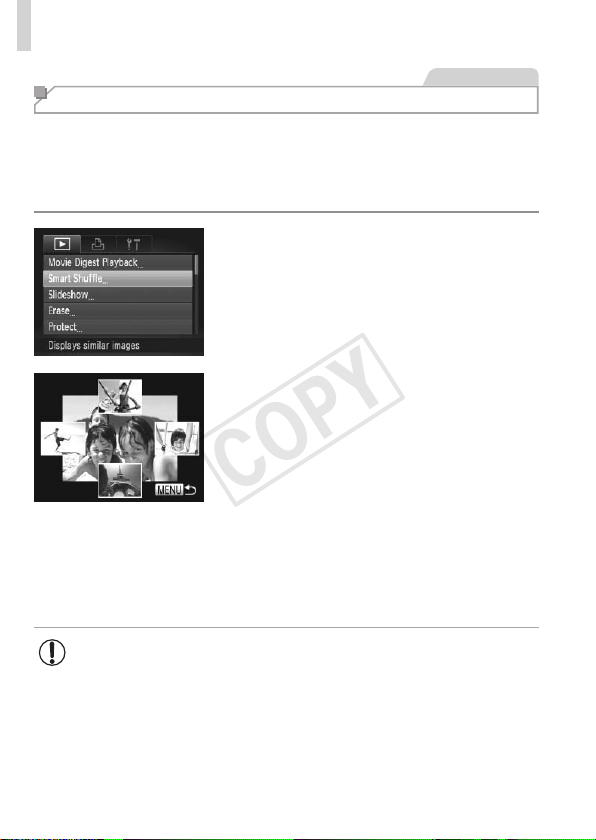
174
ImageViewingOptions
StillImages
Auto Playback of Similar Images (Smart Shufe)
Basedonthecurrentimage,thecameraoffersfourimagessimilartoit
thatyoumaywishtoview.Afteryouchoosetoviewoneofthoseimages,
thecameraoffersfourmoreimages.Thisisanenjoyablewaytoplayback
imagesinanunexpectedorder.Trythisfeatureafteryouhavetakenmany
shots,inmanykindsofscenes.
1 ChooseSmartShufe.
Pressthe<n>button,choose
[SmartShufe]onthe[1]tab,andthen
pressthe<m>button(=
42).
Fourcandidateimagesaredisplayed.
2 Chooseanimage.
Pressthe<o><p><q><r>buttonsto
choosetheimageyouwanttoviewnext.
Yourchosenimageisdisplayedinthe
center,surroundedbythenextfour
candidateimages.
Forfull-screendisplayofthecenter
image,pressthe<m>button.Torestore
theoriginaldisplay,pressthe<m>
buttonagain.
Pressthe<n>buttontorestore
single-imagedisplay.
• Onlystillimagesshotwiththiscameraareplayedbackusing
SmartShufe.
• SmartShufeisnotavailableinthefollowingcases:
-Therearelessthan50shotstakenwiththiscamera
-Anunsupportedimageiscurrentlydisplayed
-Imagesareshowninltereddisplay(=
166)
-Duringgroupplayback(=
170)
COPY
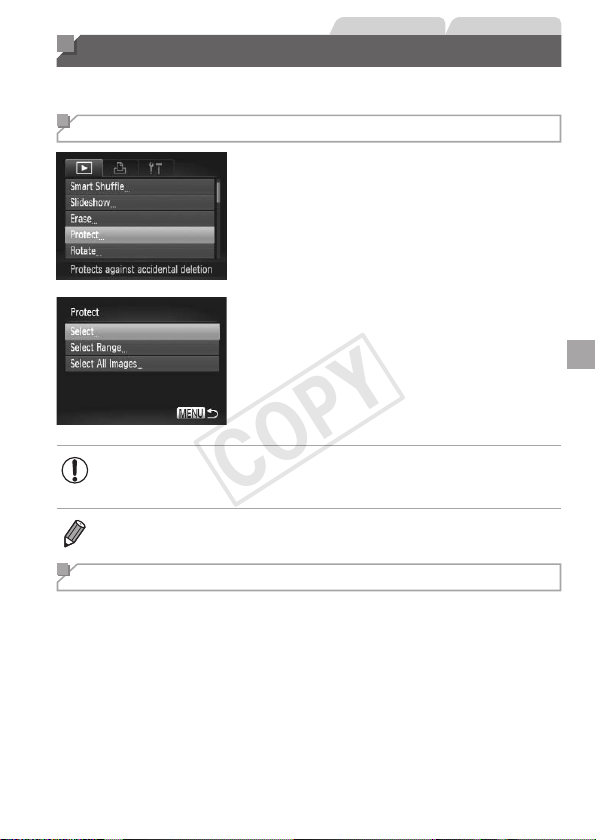
175
StillImages Movies
Protecting Images
Protectimportantimagestopreventaccidentalerasurebythecamera
(=
179).
Choosing a Selection Method
1 Accessthesettingscreen.
Pressthe<n>buttonandchoose
[Protect]onthe[1]tab(=
42).
2 Chooseaselectionmethod.
Chooseamenuitemandasettingas
desired(=
42).
Toreturntothemenuscreen,pressthe
<n>button.
• Protectedimagesonamemorycardwillbeerasedifyouformat
thecard(=
203,204).
• Protectedimagescannotbeerasedusingthecamera’serasurefunction.To
erasethemthisway,rstcancelprotection.
Choosing Images Individually
1 Choose[Select].
Followingstep2above,choose[Select]
andpressthe<m>button.
COPY
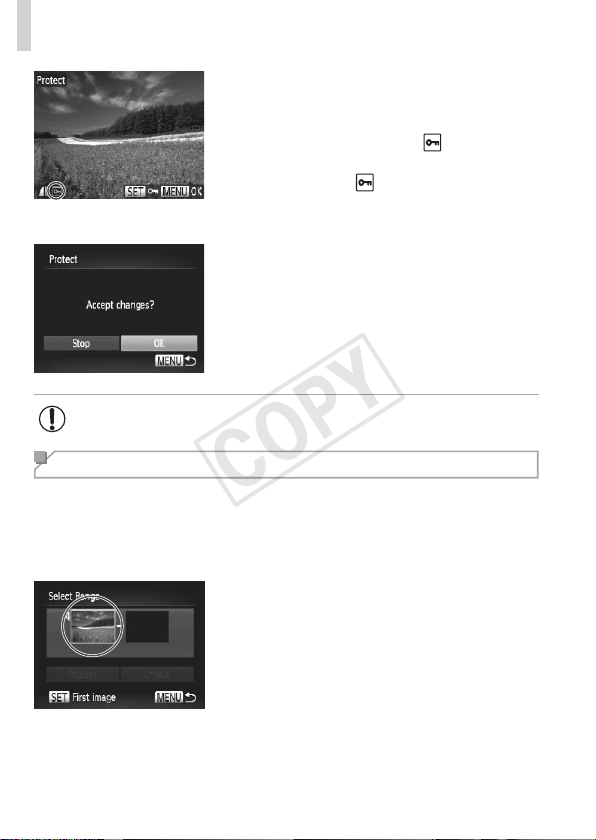
176
ProtectingImages
2 Chooseanimage.
Pressthe<q><r>buttonsorturnthe
<5>dialtochooseanimage,andthen
pressthe<m>button.[
]isdisplayed.
Tocancelselection,pressthe<m>
buttonagain.[
]isnolongerdisplayed.
Repeatthisprocesstospecifyother
images.
3 Protecttheimage.
Pressthe<n>button.A
conrmationmessageisdisplayed.
Pressthe<q><r>buttonsorturnthe
<5>dialtochoose[OK],andthenpress
the<m>button.
• ImageswillnotbeprotectedifyouswitchtoShootingmodeorturn
thecameraoffbeforenishingthesetupprocessinstep3.
Selecting a Range
1 Choose[SelectRange].
Followingstep2on=
175,choose
[SelectRange]andpressthe<m>
button.
2 Chooseastartingimage.
Pressthe<m>button.
COPY
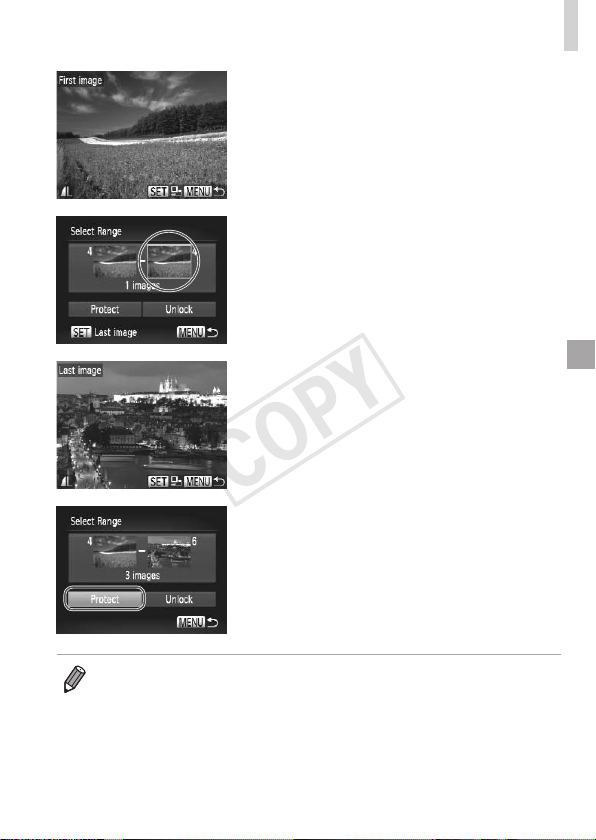
177
ProtectingImages
Pressthe<q><r>buttonsorturnthe
<5>dialtochooseanimage,andthen
pressthe<m>button.
3 Chooseanendingimage.
Pressthe<r>buttontochoose[Last
image],andthenpressthe<m>button.
Pressthe<q><r>buttonsorturnthe
<5>dialtochooseanimage,andthen
pressthe<m>button.
Imagesbeforetherstimagecannotbe
selectedasthelastimage.
4 Protecttheimages.
Pressthe<p>buttontochoose
[Protect],andthenpressthe<m>
button.
• Youcanalsochoosetherstorlastimagebyturningthe<5>dialwhenthe
topscreeninsteps2and3isdisplayed.
COPY
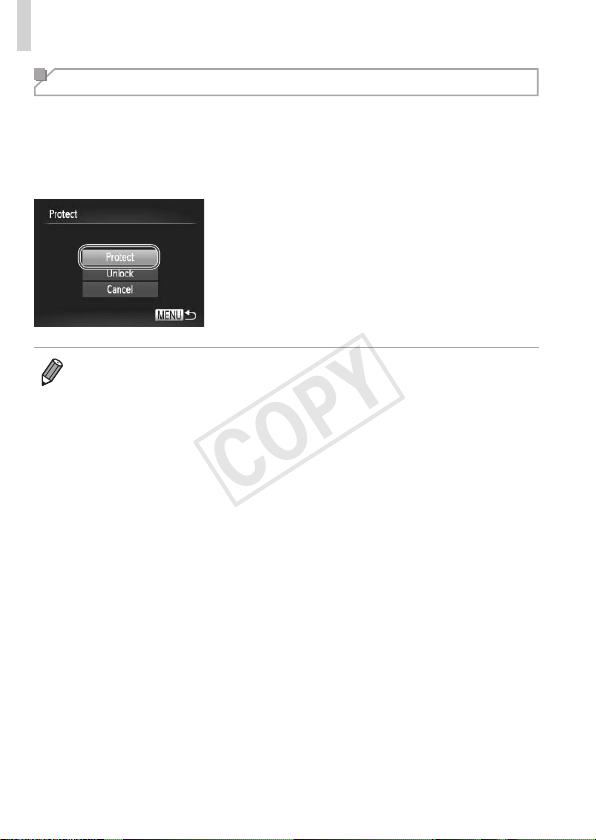
178
ProtectingImages
Specifying All Images at Once
1 Choose[SelectAllImages].
Followingstep2on=
175,choose
[SelectAllImages]andpressthe<m>
button.
2 Protecttheimages.
Pressthe<o><p>buttonsorturnthe
<5>dialtochoose[Protect],andthen
pressthe<m>button.
• Tocancelprotectionforgroupsofimages,choose[Unlock]instep4of
“SelectingaRange”orinstep2of“SpecifyingAllImagesatOnce”.
COPY
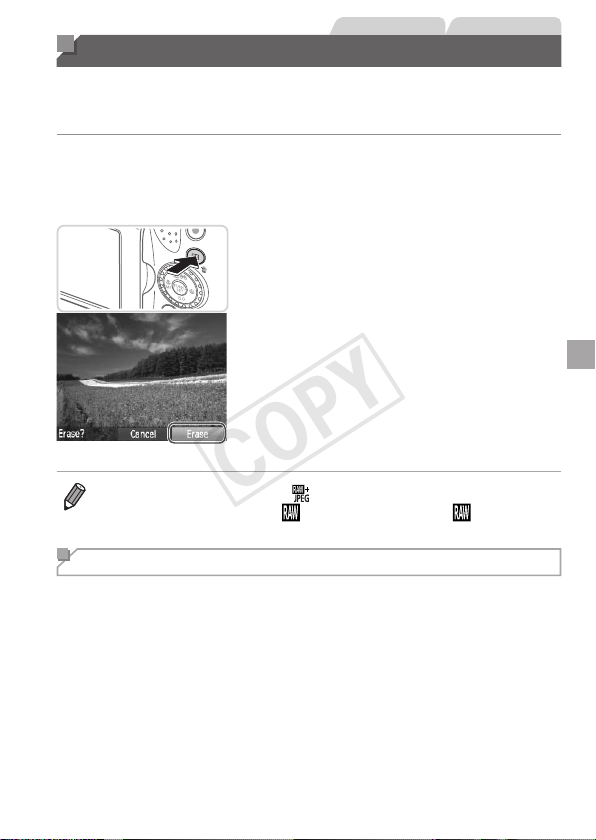
179
StillImages Movies
Erasing Images
Youcanchooseanderaseunneededimagesonebyone.Becarefulwhen
erasingimages,becausetheycannotberecovered.However,protected
images(=
175)cannotbeerased.
1 Chooseanimagetoerase.
Pressthe<q><r>buttonsorturnthe
<5>dialtochooseanimage.
2 Erasetheimage.
Pressthe<a>button.
After[Erase?]isdisplayed,pressthe
<q><r>buttonsorturnthe<5>dialto
choose[Erase],andthenpressthe<m>
button.
Thecurrentimageisnowerased.
Tocancelerasure,pressthe<q><r>
buttonsorturnthe<5>dialtochoose
[Cancel],andthenpressthe<m>
button.
• Pressingthe<a>buttonwhile[ ]imagesaredisplayedwillgiveyou
theoptionofchoosing[Erase
],[EraseJPEG],or[Erase +JPEG]for
deletion.
Erasing All Images
Youcaneraseallimagesatonce.Becarefulwhenerasingimages,
becausetheycannotberecovered.However,protectedimages(=
175)
cannotbeerased.
COPY

180
ErasingImages
ChoosingaSelectionMethod
1 Accessthesettingscreen.
Pressthe<n>button,andthen
choose[Erase]onthe[1]tab(=
42).
2 Chooseaselectionmethod.
Pressthe<o><p>buttonstochoose
aselectionmethod,andthenpressthe
<m>button.
Toreturntothemenuscreen,pressthe
<n>button.
ChoosingImagesIndividually
1 Choose[Select].
Followingstep2above,choose[Select]
andpressthe<m>button.
2 Chooseanimage.
Onceyoufollowstep2on=
176to
chooseanimage,[
]isdisplayed.
Tocancelselection,pressthe<m>
buttonagain.[
]isnolongerdisplayed.
Repeatthisprocesstospecifyother
images.
3 Erasetheimage.
Pressthe<n>button.A
conrmationmessageisdisplayed.
Pressthe<q><r>buttonsorturnthe
<5>dialtochoose[OK],andthenpress
the<m>button.
COPY
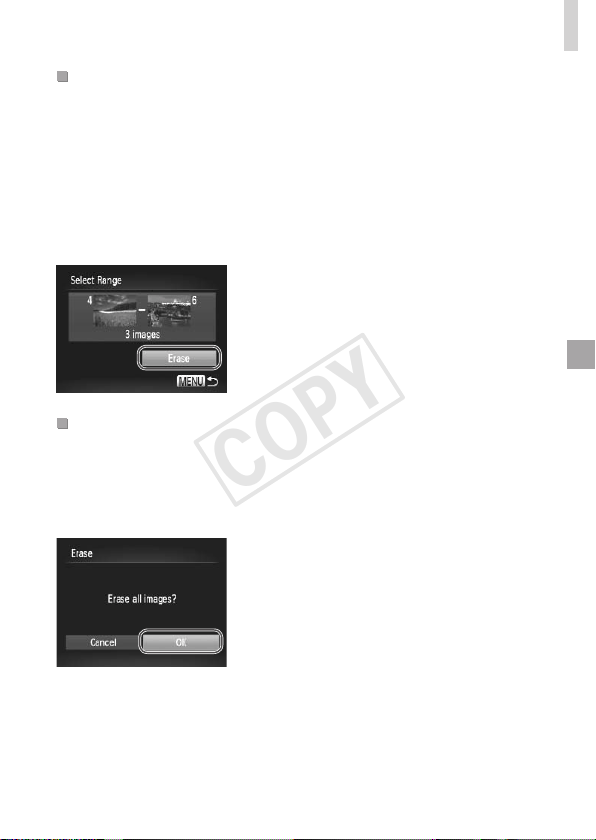
181
ErasingImages
SelectingaRange
1 Choose[SelectRange].
Followingstep2on=
185,choose
[SelectRange]andpressthe<m>
button.
2 Chooseimages.
Followsteps2–3on=
176tospecify
images.
3 Erasetheimages.
Pressthe<p>buttontochoose[Erase],
andthenpressthe<m>button.
SpecifyingAllImagesatOnce
1 Choose[SelectAllImages].
Followingstep2on=
185,choose
[SelectAllImages]andpressthe<m>
button.
2 Erasetheimages.
Pressthe<q><r>buttonsorturnthe
<5>dialtochoose[OK],andthenpress
the<m>button.
COPY
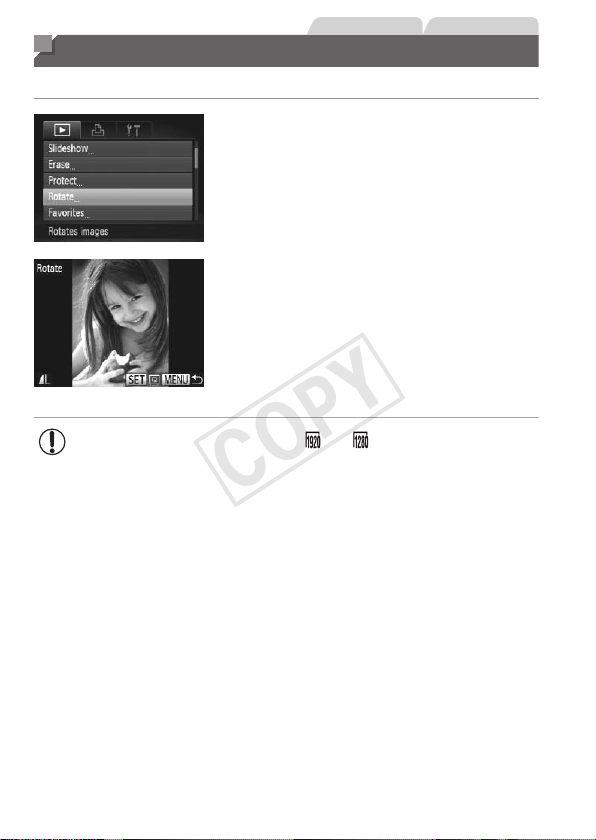
182
StillImages Movies
Rotating Images
Changetheorientationofimagesandsavethemasfollows.
1 Choose[Rotate].
Pressthe<n>buttonandchoose
[Rotate]onthe[1]tab(=
42).
2 Rotatetheimage.
Pressthe<q><r>buttonsorturnthe
<5>dialtochooseanimage.
Theimageisrotated90°eachtimeyou
pressthe<m>button.
Toreturntothemenuscreen,pressthe
<n>button.
• Movieswithanimagequalityof[ ]or[ ]cannotberotated.
• Rotationisnotpossiblewhen[AutoRotate]issetto[Off]
(=
183).
COPY

183
RotatingImages
Deactivating Auto Rotation
Followthesestepstodeactivateautomaticrotationbythecamera,which
rotatesimagesshotinverticalorientationsotheyaredisplayedverticallyon
thecamera.
Pressthe<n>button,choose[Auto
Rotate]onthe[1]tab,andthenchoose
[Off](=
42).
• Imagescannotberotated(=
182)whenyouset[AutoRotate]to
[Off].Additionally,imagesalreadyrotatedwillbedisplayedinthe
originalorientation.
• InSmartShufe(=
174)mode,evenif[AutoRotate]issetto
[Off],imagesshotverticallywillbedisplayedvertically,androtated
imageswillbedisplayedintherotatedorientation.
COPY

184
Image Categories
YoucantagimagesasfavoritesorassignthemtoMyCategory(=
185)
groups.Bychoosingacategoryinlteredplayback,youcanrestrictthe
followingoperationstoallofthoseimages.
• Viewing(=
160),ViewingSlideshows(=
173),ProtectingImages
(=
175),ErasingImages(=
179),AddingImagestothePrintList
(DPOF)(=
238),AddingImagestoaPhotobook(=
243)
StillImages Movies
Tagging Images as Favorites
1 Choose[Favorites].
Pressthe<n>buttonandchoose
[Favorites]onthe[1]tab(=
42).
2 Chooseanimage.
Pressthe<q><r>buttonsorturnthe
<5>dialtochooseanimage,andthen
pressthe<m>button.[
]isdisplayed.
Tountagtheimage,pressthe<m>
buttonagain.[
]isnolongerdisplayed.
Repeatthisprocesstochooseadditional
images.
3 Finishthesetupprocess.
Pressthe<n>button.A
conrmationmessageisdisplayed.
Pressthe<q><r>buttonsorturnthe
<5>dialtochoose[OK],andthenpress
the<m>button.
• ImageswillnotbetaggedasfavoritesifyouswitchtoShooting
modeorturnthecameraoffbeforenishingthesetupprocessin
step3.
COPY
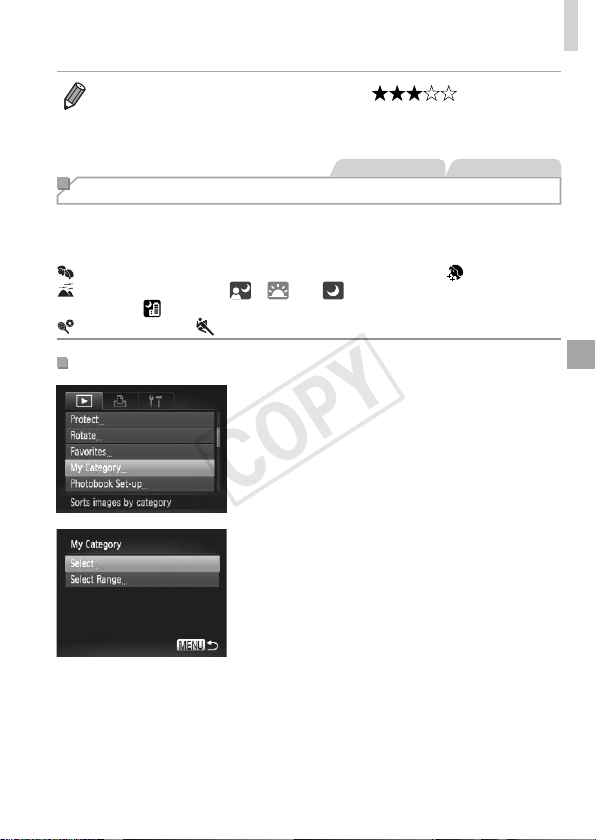
185
ImageCategories
• Favoriteimageswillhaveathree-starrating( )when
transferredtocomputersrunningWindows7orWindowsVista.(Doesnot
applytomoviesorRAWimages.)
StillImages Movies
Organizing Images by Category (My Category)
Youcanorganizeimagesintocategories.Notethatimagesare
automaticallycategorizedatthetimeofshooting,accordingtoshooting
conditions.
: Imageswithdetectedfaces,orimagesshotin[I]or[ ]mode.
: Imagesdetectedas[ ],[ ],or[ ]in<A>mode,orimages
shotin[ ]mode.
: Imagesshotin[ ],[P]or[t]mode.
ChoosingaSelectionMethod
1 Accessthesettingscreen.
Pressthe<n>button,andthen
choose[MyCategory]onthe[1]tab
(=
42).
2 Chooseaselectionmethod.
Chooseamenuitemandasettingas
desired(=
42).
Toreturntothemenuscreen,pressthe
<n>button.
COPY
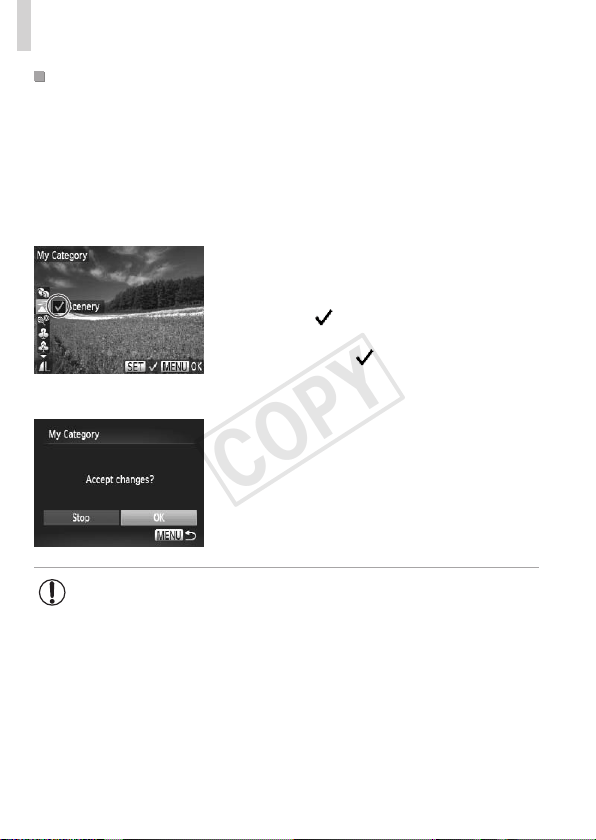
186
ImageCategories
ChoosingImagesIndividually
1 Choose[Select].
Followingstep2on=
185,choose
[Select]andpressthe<m>button.
2 Chooseanimage.
Pressthe<q><r>buttonsorturnthe
<5>dialtochooseanimage.
3 Chooseacategory.
Pressthe<o><p>buttonstochoose
acategoryandthenpressthe<m>
button.[
]isdisplayed.
Tocancelselection,pressthe<m>
buttonagain.[
]isnolongerdisplayed.
Repeatthisprocesstochooseadditional
images.
4 Finishthesetupprocess.
Pressthe<n>button.A
conrmationmessageisdisplayed.Press
the<q><r>buttonsorturnthe<5>
dialtochoose[OK],andthenpressthe
<m>button.
• ImageswillnotbeassignedtoacategoryifyouswitchtoShooting
modeorturnthecameraoffbeforenishingthesetupprocessin
step4.
COPY

187
ImageCategories
SelectingaRange
1 Choose[SelectRange].
Followingstep2on=
185,choose
[SelectRange]andpressthe<m>
button.
2 Chooseimages.
Followsteps2–3on=
176tospecify
images.
3 Chooseacategory.
Pressthe<p>buttontochoosethetype
ofimage,andthenpressthe<q><r>
buttonsorturnthe<5>dialtochoose
acategory.
4 Finishthesetupprocess.
Pressthe<p>buttontochoose[Select],
andthenpressthe<m>button.
• Youcancleartheselectionofallimagesinthe[SelectRange]categoryby
choosing[Deselect]instep4.
COPY
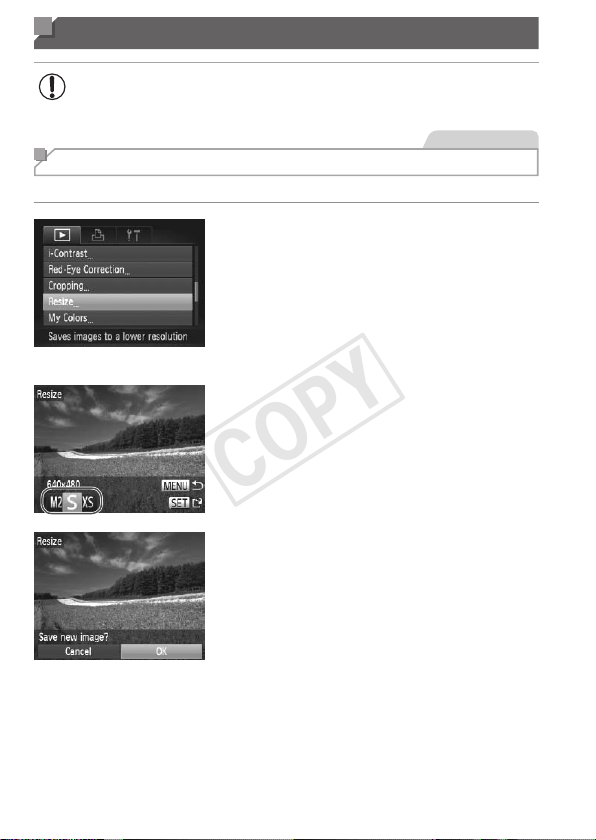
188
Editing Still Images
• Imageediting(=
188–193)isonlyavailablewhenthememory
cardhassufcientfreespace.
StillImages
Resizing Images
Saveacopyofimagesatalowerresolution.
1 Choose[Resize].
Pressthe<n>buttonandchoose
[Resize]onthe[1]tab(=
42).
2 Chooseanimage.
Pressthe<q><r>buttonsorturnthe
<5>dialtochooseanimage,andthen
pressthe<m>button.
3 Chooseanimagesize.
Pressthe<q><r>buttonsorturnthe
<5>dialtochoosethesize,andthen
pressthe<m>button.
[Savenewimage?]isdisplayed.
4 Savethenewimage.
Pressthe<q><r>buttonsorturnthe
<5>dialtochoose[OK],andthenpress
the<m>button.
Theimageisnowsavedasanewle.
COPY
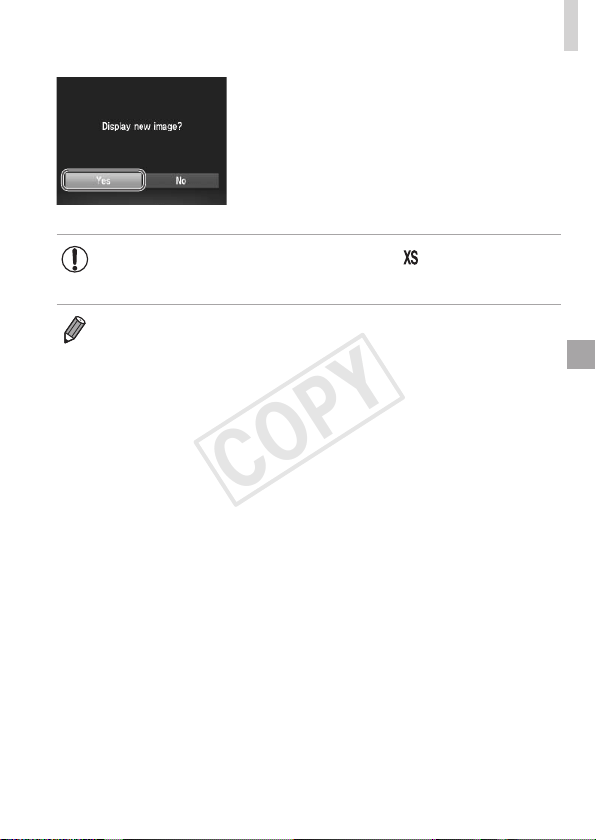
189
EditingStillImages
5 Reviewthenewimage.
Pressthe<n>button.[Displaynew
image?]isdisplayed.
Pressthe<q><r>buttonsorturnthe
<5>dialtochoose[Yes],andthen
pressthe<m>button.
Thesavedimageisnowdisplayed.
• Editingisnotpossibleforimagessavedas[ ]instep3.
• RAWimagescannotbeedited.
• Imagescannotberesizedtoahigherresolution.
COPY
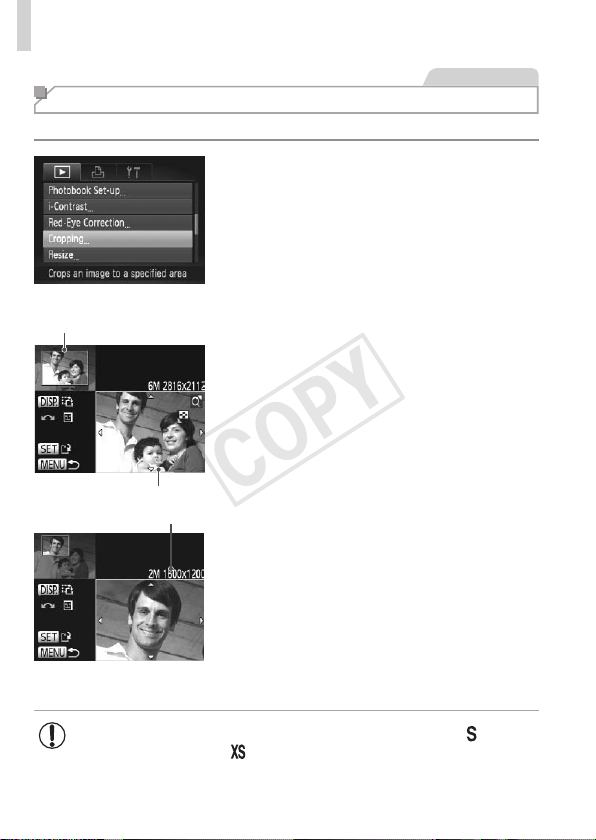
190
EditingStillImages
StillImages
Cropping
Youcanspecifyaportionofanimagetosaveasaseparateimagele.
1 Choose[Cropping].
Pressthe<
n
>button,andthenchoose
[Cropping]onthe[
1
]tab(
=
42).
2 Chooseanimage.
Pressthe<q><r>buttonsorturnthe
<5>dialtochooseanimage,andthen
pressthe<m>button.
PreviewofImageAfterCropping
CroppingArea
ResolutionAfterCropping
3 Adjustthecroppingarea.
Aframeisdisplayedaroundtheportionof
theimagetobecropped.
Theoriginalimageisshownintheupper
left,andapreviewoftheimageas
croppedisshowninthelowerright.
Toresizetheframe,movethezoomlever.
Tomovetheframe,pressthe
<o><p><q><r>buttons.
Tochangetheframeorientation,press
the<l>button.
Facesdetectedintheimageare
enclosedingrayframesintheupper-left
image.Tocroptheimagebasedonthis
frame,turnthe<5>dialtoswitchtothe
otherframe.
Pressthe<m>button.
4
Saveasanewimageandreview.
Followsteps4–5on=
188.
• Editingisnotpossibleforimagesshotataresolutionof[ ]
(=
74)orresizedto[ ](=
188).
• RAWimagescannotbeedited.
COPY
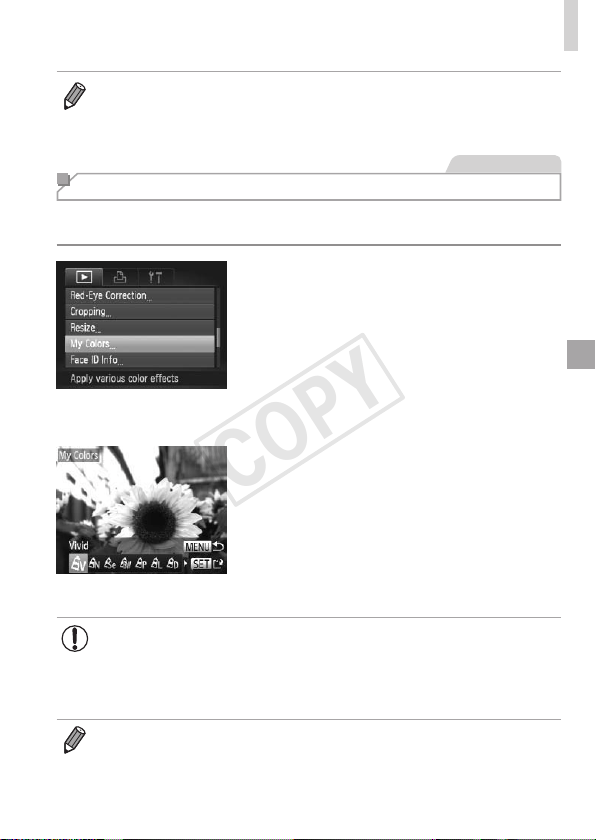
191
EditingStillImages
• Imagessupportedforcroppingwillhavethesameaspectratioafter
cropping.
• Croppedimageswillhaveasmallerresolutionthanuncroppedimages.
StillImages
Changing Image Color Tones (My Colors)
Youcanadjustimagecolorsandthensavetheeditedimageasaseparate
le.Fordetailsoneachoption,see=
125.
1 Choose[MyColors].
Pressthe<n>button,andthen
choose[MyColors]onthe[1]tab
(=
42).
2 Chooseanimage.
Pressthe<q><r>buttonsorturnthe
<5>dialtochooseanimage,andthen
pressthe<m>button.
3 Chooseanoption.
Pressthe<q><r>buttonsorturnthe
<5>dialtochooseanoption,andthen
pressthe<m>button.
4 Saveasanewimageand
review.
Followsteps4–5on=
188.
• Imagequalityofpicturesyourepeatedlyeditthiswaywillbealittle
lowereachtime,andyoumaynotbeabletoobtainthedesired
color.
• ColorsofRAWimagescannotbeedited.
• Thecolorofimageseditedusingthisfunctionmayvaryslightlyfromthe
colorofimagesshotusingMyColors(=
125).
COPY
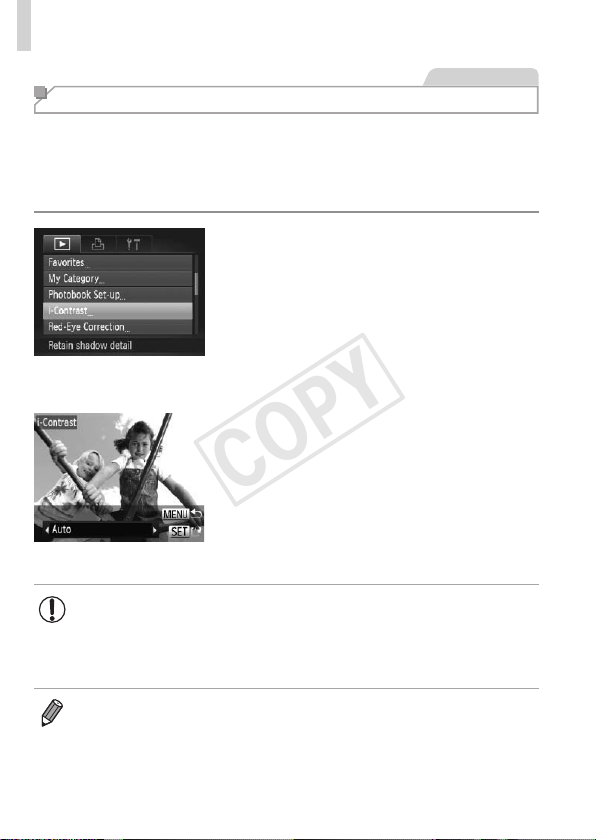
192
EditingStillImages
StillImages
Correcting Image Brightness (i-Contrast)
Excessivelydarkimageareas(suchasfacesorbackgrounds)canbe
detectedandautomaticallyadjustedtotheoptimalbrightness.Insufcient
overallimagecontrastisalsoautomaticallycorrected,tomakesubjects
standoutbetter.Choosefromfourcorrectionlevels,andthensavethe
imageasaseparatele.
1 Choose[i-Contrast].
Pressthe<n>button,andthen
choose[i-Contrast]onthe[1]tab
(=
42).
2 Chooseanimage.
Pressthe<q><r>buttonsorturnthe
<5>dialtochooseanimage,andthen
pressthe<m>button.
3 Chooseanoption.
Pressthe<q><r>buttonsorturnthe
<5>dialtochooseanoption,andthen
pressthe<m>button.
4 Saveasanewimageand
review.
Followsteps4–5on=
188.
• Forsomeimages,correctionmaybeinaccurateormaycause
imagestoappeargrainy.
• Imagesmaylookgrainyafterrepeatededitingusingthisfunction.
• RAWimagescannotbeeditedthisway.
• If[Auto]doesnotproducetheexpectedresults,trycorrectingimagesusing
[Low],[Medium],or[High].
COPY
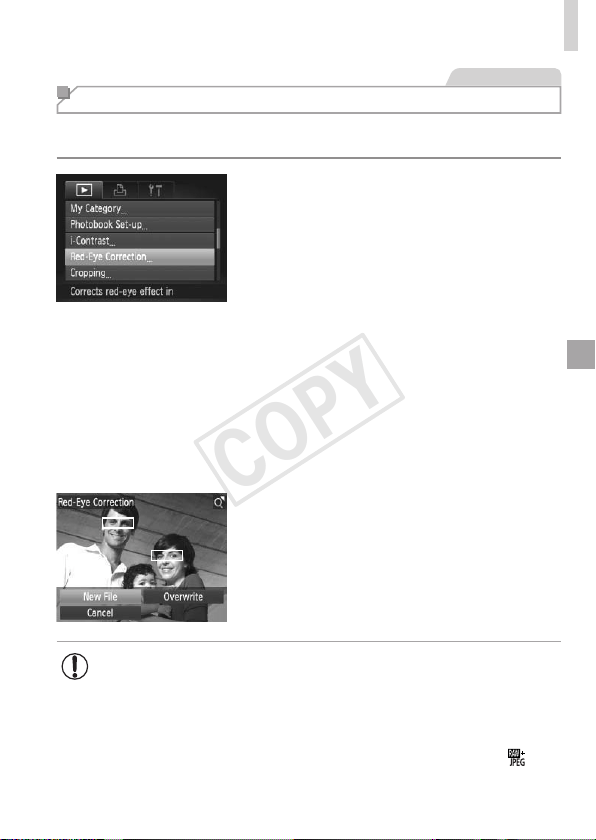
193
EditingStillImages
StillImages
Correcting Red-Eye
Automaticallycorrectsimagesaffectedbyred-eye.Youcansavethe
correctedimageasaseparatele.
1 Choose[Red-EyeCorrection].
Pressthe<n>button,andthen
choose[Red-EyeCorrection]onthe[1]
tab(=
42).
2 Chooseanimage.
Pressthe<q><r>buttonsorturnthe
<5>dialtochooseanimage.
3 Correcttheimage.
Pressthe<m>button.
Red-eyedetectedbythecameraisnow
corrected,andframesaredisplayed
aroundcorrectedimageareas.
Enlargeorreduceimagesasneeded.
Followthestepsin=
172.
4
Saveasanewimageandreview.
Pressthe<o><p><q><r>buttonsor
turnthe<5>dialtochoose[NewFile],
andthenpressthe<m>button.
Theimageisnowsavedasanewle.
Followstep5on=
189.
• Someimagesmaynotbecorrectedaccurately.
• Tooverwritetheoriginalimagewiththecorrectedimage,choose
[Overwrite]instep4.Inthiscase,theoriginalimagewillbeerased.
• Protectedimagescannotbeoverwritten.
• RAWimagescannotbeeditedthisway.
• Red-eyecorrectioncanbeappliedtoJPEGimagesshotin[
],
buttheoriginalimagecannotbeoverwritten.
COPY
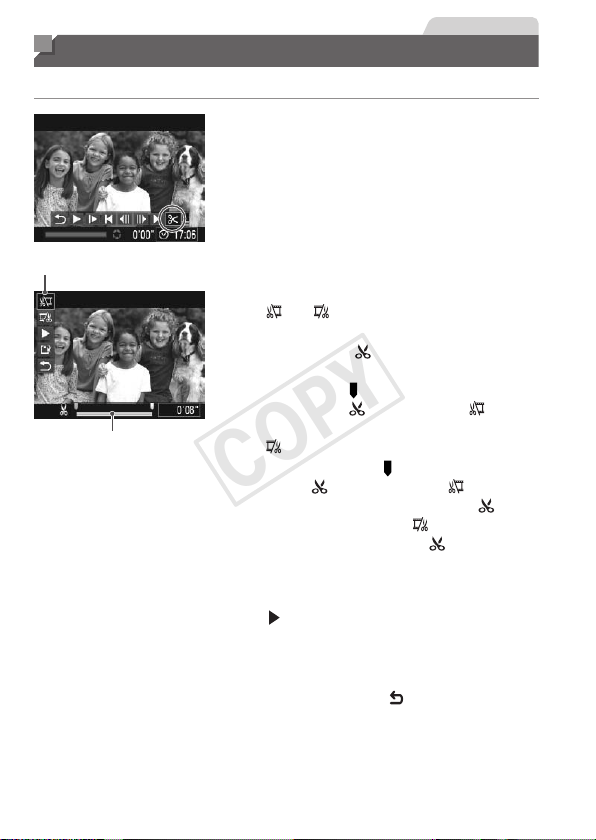
194
Movies
Editing Movies
Youcancutmoviestoremoveunneededportionsatthebeginningorend.
1 Choose[*].
Followingsteps1–3on=
160–161,
choose[*]andpressthe<m>button.
Themovieeditingpanelandeditingbar
arenowdisplayed.
MovieEditingPanel
MovieEditingBar
2 Specifyportionstocut.
Pressthe<o><p>buttonstochoose
[
]or[ ].
Toviewtheportionsyoucancut
(identiedby[
]onthescreen),press
the<q><r>buttonsorturnthe<5>
dialtomove[
].Cutthebeginningofthe
movie(from[
])bychoosing[ ],and
cuttheendofthemoviebychoosing
[
].
Evenifyoumove[ ]toapositionother
thana[
]mark,choosing[ ]willonly
cuttheportionfromthenearest[
]to
theleft,andchoosing[
]willcutthe
portionfromthenearest[
]totheright.
3 Reviewtheeditedmovie.
Pressthe<o><p>buttonstochoose
[
],andthenpressthe<m>button.
Theeditedmovieisnowplayed.
Toeditthemovieagain,repeatstep2.
Tocancelediting,pressthe<o><p>
buttonstochoose[
].Pressthe<m>
button,choose[OK](eitherpressthe
<q><r>buttonsorturnthe<5>dial),
andthenpressthe<m>buttonagain.
COPY

195
EditingMovies
4 Savetheeditedmovie.
Pressthe<o><p>buttonstochoose
[
],andthenpressthe<m>button.
Pressthe<o><p><q><r>buttonsor
turnthe<5>dialtochoose[NewFile],
andthenpressthe<m>button.
Themovieisnowsavedasanewle.
• Tooverwritetheoriginalmoviewiththecutone,choose
[Overwrite]instep4.Inthiscase,theoriginalmoviewillbeerased.
• [Overwrite]isonlyavailablewhenmemorycardslacksufcient
freespace.
• Moviesmaynotbesavedifthebatteryrunsoutwhilesavingisin
progress.
• Wheneditingmovies,youshoulduseafullychargedbatteryoran
ACadapterkit(soldseparately,=
215).
COPY
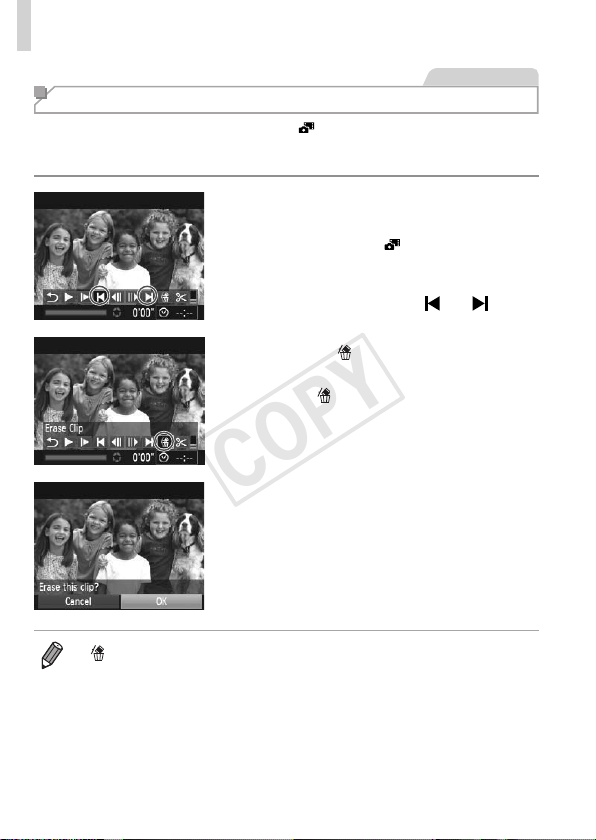
196
EditingMovies
Movies
Editing Movie Digest Clips
Individualchapters(=
86)recordedin[ ]modecanbeerased,as
needed.Becarefulwhenerasingchapters,becausetheycannotbe
recovered.
1 Selectthechaptertoerase.
Followsteps1–2on=
160tochoose
acliprecordedin[
]mode.
Choosethechaptertoerasebypressing
the<q><r>buttonsorturningthe<5>
dial,andthenchoosing[
]or[ ].
2 Choose[ ].
Followingsteps1–3on=
160–161,
choose[
]andpressthe<m>button.
Theselectedchapterisplayedback
repeatedly.
3 Conrmerasure.
Pressthe<q><r>buttonsorturnthe
<5>dialtochoose[OK],andthenpress
the<m>button.
Thechapteriserased,andtheclipis
overwritten.
• [ ]isnotdisplayedifyouselectachapterwhenthecameraisconnected
toaprinter.
COPY

197
Setting Menu
Customizeoradjustbasiccamerafunctionsforgreater
convenience
7
COPY
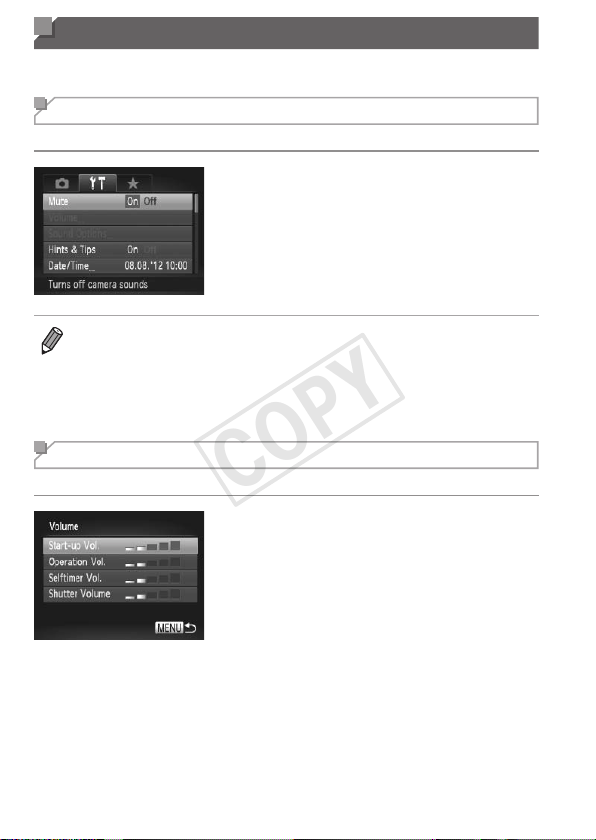
198
Adjusting Basic Camera Functions
Functionscanbeconguredonthe[3]tab.Customizecommonlyused
functionsasdesired,forgreaterconvenience(=
42).
Silencing Camera Operations
Silencecamerasoundsandmoviesasfollows.
Choose[Mute],andthenchoose[On].
• Operationcanalsobesilencedbyholdingdownthe<l>buttonasyou
turnthecameraon.
• Soundisnotplayedduringmoviesifyoumutecamerasounds(=
160).To
restoresoundduringmovies,pressthe<o>button.Adjustvolumewiththe
<o><p>buttons,asneeded.
Adjusting the Volume
Adjustthevolumeofindividualcamerasoundsasfollows.
Choose[Volume],andthenpressthe
<m>button.
Chooseanitem,andthenpressthe
<q><r>buttonstoadjustthevolume.
COPY
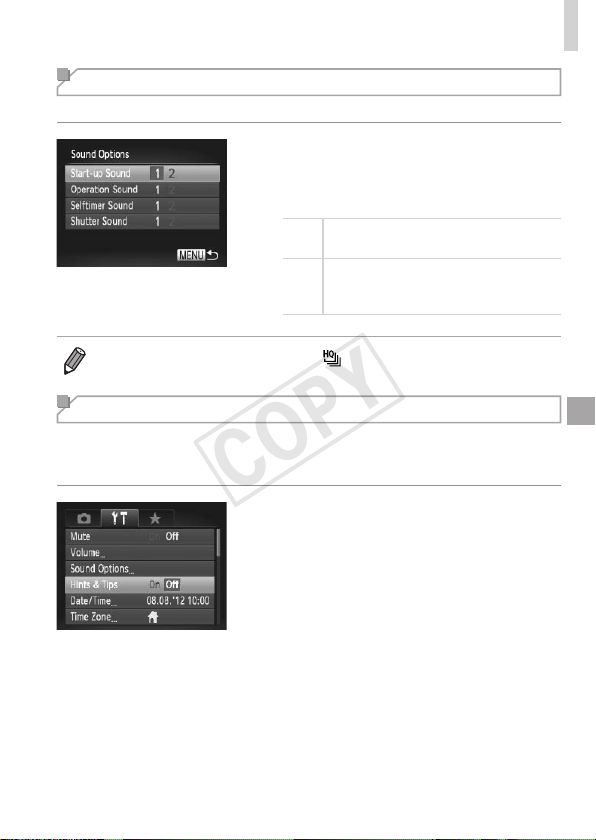
199
AdjustingBasicCameraFunctions
Customizing Sounds
Customizecameraoperatingsoundsasfollows.
Choose[SoundOptions],andthenpress
the<m>button.
Chooseanitem,andthenpressthe
<q><r>buttonstochooseanoption.
1
Presetsounds
(cannotbemodied)
2
Presetsounds
Canbechangedbyusingtheincluded
software.
• Thedefaultshuttersoundisusedin[ ]mode(=
106),regardlessofany
changesto[ShutterSound].
Hiding Hints and Tips
HintsandtipsarenormallyshownwhenyouchooseFUNC.menu
(=
41)orMenu(=
42)items.Ifyouprefer,youcandeactivatethis
information.
Choose[Hints&Tips],andthenchoose
[Off].
COPY
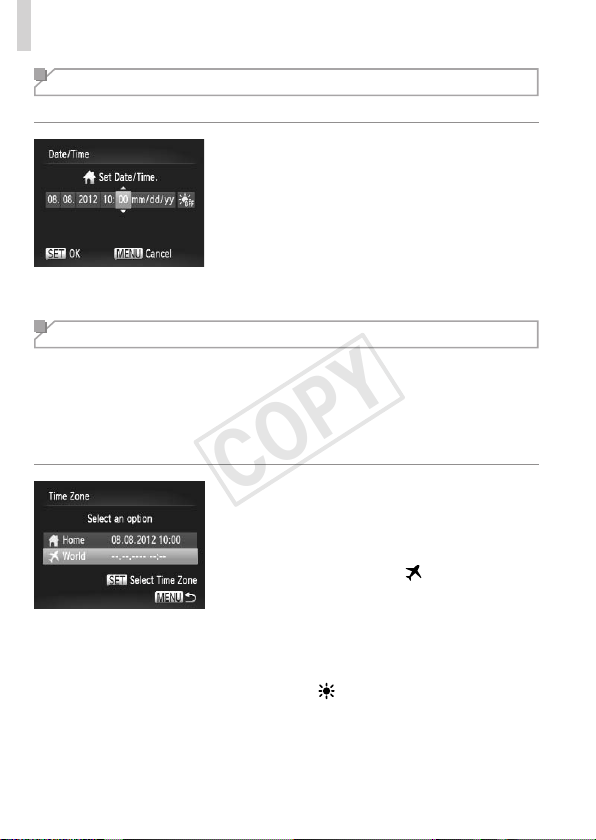
200
AdjustingBasicCameraFunctions
Date and Time
Adjustthedateandtimeasfollows.
1 Accessthe[Date/Time]screen.
Choose[Date/Time],andthenpressthe
<m>button.
2 Congurethesetting.
Pressthe<q><r>buttonstochoosean
option,andthenadjustthesetting,either
bypressingthe<o><p>buttonsor
turningthe<5>dial.
World Clock
Toensurethatyourshotswillhavethecorrectlocaldateandtimewhenyou
travelabroad,simplyregisterthedestinationinadvanceandswitchtothat
timezone.ThisconvenientfeatureeliminatestheneedtochangetheDate/
Timesettingmanually.
Beforeusingtheworldclock,besuretosetthedateandtimeandyour
hometimezone(“SettingtheDateandTime”(=
19)).
1 Specifyyourdestination.
Choose[TimeZone],andthenpressthe
<m>button.
Pressthe<o><p>buttonsorturnthe
<5>dialtochoose[
World],andthen
pressthe<m>button.
Pressthe<q><r>buttonsorturnthe
<5>dialtochoosethedestination.
Tosetdaylightsavingtime(1hour
ahead),pressthe<o><p>buttonsto
choose[
].
Pressthe<m>button.
COPY
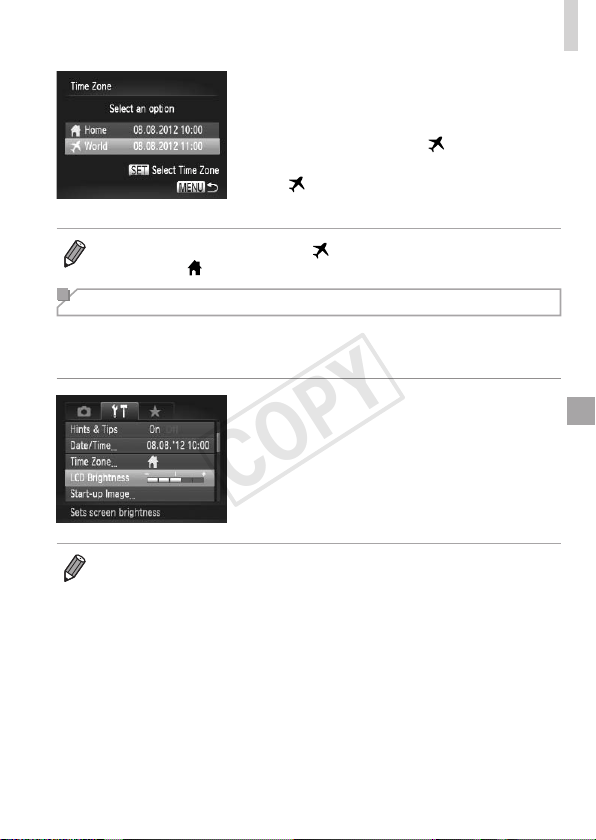
201
AdjustingBasicCameraFunctions
2 Switchtothedestinationtime
zone.
Pressthe<o><p>buttonsorturnthe
<5>dialtochoose[
World],andthen
pressthe<n>button.
[ ]isnowshownontheshootingscreen
(“On-ScreenInformation”(=
255)).
• Adjustingthedateortimewhilein[ ]mode(=
19)willautomatically
updateyour[
Home]timeanddate.
Screen Brightness
Adjustscreenbrightnessasfollows.
Screenandviewnderbrightnesscanbesetseparately.Activatethe
desireddisplayinadvancebypressingthe<l>button.
Choose[LCDBrightness],andthen
pressthe<q><r>buttonstoadjustthe
brightness.
• Formaximumbrightness,pressandholdthe<l>buttonforatleast
onesecondwhentheshootingscreenisdisplayedorwheninsingle-image
display.(Thiswilloverridethe[LCDBrightness]settingonthe[3]tab.)To
restoretheoriginalbrightness,pressandholdthe<l>buttonagainfor
atleastonesecondorrestartthecamera.
COPY
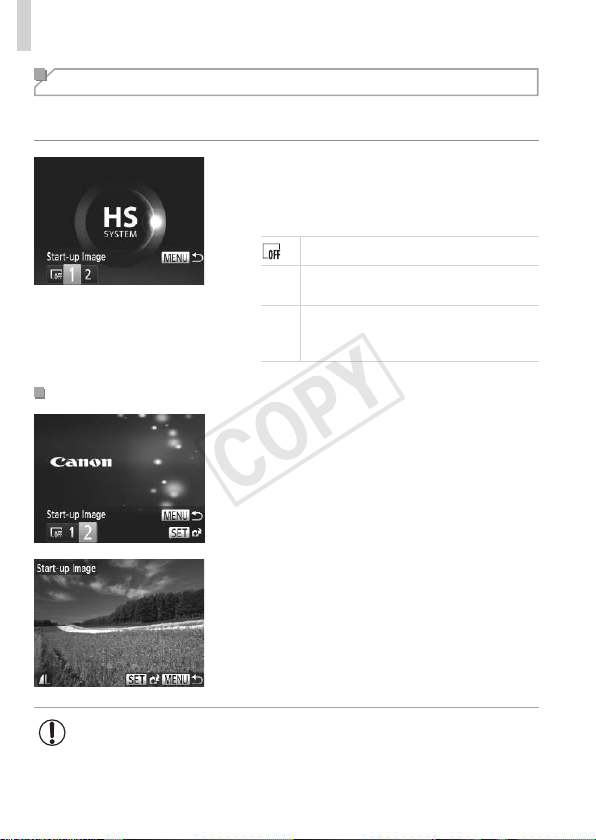
202
AdjustingBasicCameraFunctions
Start-up Screen
Customizethestart-upscreenshownafteryouturnthecameraonas
follows.
Choose[Start-upImage],andthenpress
the<m>button.
Pressthe<q><r>buttonsorturnthe
<5>dialtochooseanoption.
Nostart-upimage
1
Presetimage
(cannotbemodied)
2
Presetimage
Assignadesiredshot,orusethe
includedsoftwaretochangetheimage.
CustomizingtheStart-upScreen
1 Accessthe[Start-upImage]
screeninPlaybackmode.
Pressthe<1>button.
Followingthepreviousprocedure,choose
[2]andpressthe<m>button.
2 Chooseoneofyourshots.
Chooseanimageandpressthe<m>
button.After[Register?]isdisplayed,
choose[OK](eitherpressthe<q><r>
buttonsorturnthe<5>dial),andthen
pressthe<m>button.
• Thepreviousstart-upsettingisoverwrittenwhenyouassignanew
start-upimage.
COPY
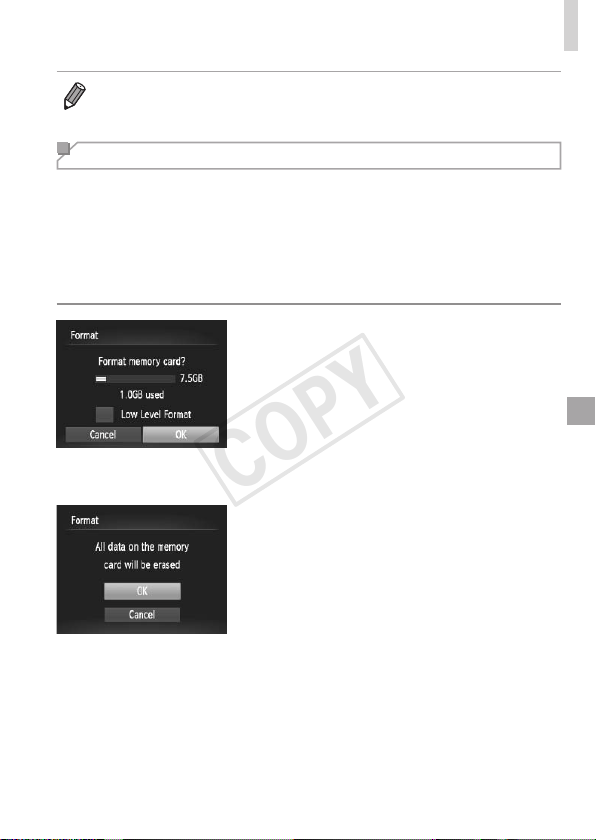
203
AdjustingBasicCameraFunctions
• Youcanassigntheoperatingsoundsandstart-upimageforyourcamera
fromtheincludedsoftware.Fordetails,refertotheSoftware Guide
(=
28).
Formatting Memory Cards
Beforeusinganewmemorycardoracardformattedinanotherdevice,you
shouldformatthecardwiththiscamera.
Formattingerasesalldataonamemorycard.Beforeformatting,copy
imagesonthememorycardtoacomputer,ortakeotherstepstobackthem
up.
AnEye-Ficard(=
245)containssoftwareonthecarditself.Before
formattinganEye-Ficard,installthesoftwareonacomputer.
1 Accessthe[Format]screen.
Choose[Format],andthenpressthe
<m>button.
2 Choose[OK].
Pressthe<o><p>buttonstochoose
[Cancel],choose[OK](eitherpressthe
<q><r>buttonsorturnthe<5>dial),
andthenpressthe<m>button.
3 Formatthememorycard.
Tobegintheformattingprocess,press
the<o><p>buttonsorturnthe<5>
dialtochoose[OK],andthenpressthe
<m>button.
Whenformattingisnished,[Memory
cardformattingcomplete]isdisplayed.
Pressthe<m>button.
COPY

204
AdjustingBasicCameraFunctions
• Formattingorerasingdataonamemorycardonlychangesle
managementinformationonthecardanddoesnoterasethedata
completely.Whentransferringordisposingofmemorycards,take
stepstoprotectpersonalinformationifnecessary,asbyphysically
destroyingcards.
• Thetotalcardcapacityindicatedontheformattingscreenmaybelessthan
theadvertisedcapacity.
Low-LevelFormatting
Performlow-levelformattinginthesecases:[Memorycarderror]is
displayed,thecameraisnotworkingcorrectly,cardimagereading/writingis
slower,continuousshootingisslower,ormovierecordingsuddenlystops.
Low-levelformattingerasesalldataonamemorycard.Beforelow-level
formatting,copyimagesonthememorycardtoacomputer,ortakeother
stepstobackthemup.
Performlow-levelformatting.
Onthescreeninstep2on=
203,
pressthe<o><p>buttonsorturnthe
<5>dialtochoose[LowLevelFormat],
andthenselectthisoption(markwitha
[
])bypressingthe<q><r>buttons.
Followsteps2–3on=
203tocontinue
withtheformattingprocess.
• Low-levelformattingtakeslongerthan“FormattingMemoryCards”
(=
203),becausedataiserasedfromallstorageregionsofthememory
card.
• Youcancancellow-levelformattinginprogressbychoosing[Stop].Inthis
case,alldatawillbeerased,butthememorycardcanbeusednormally.
COPY
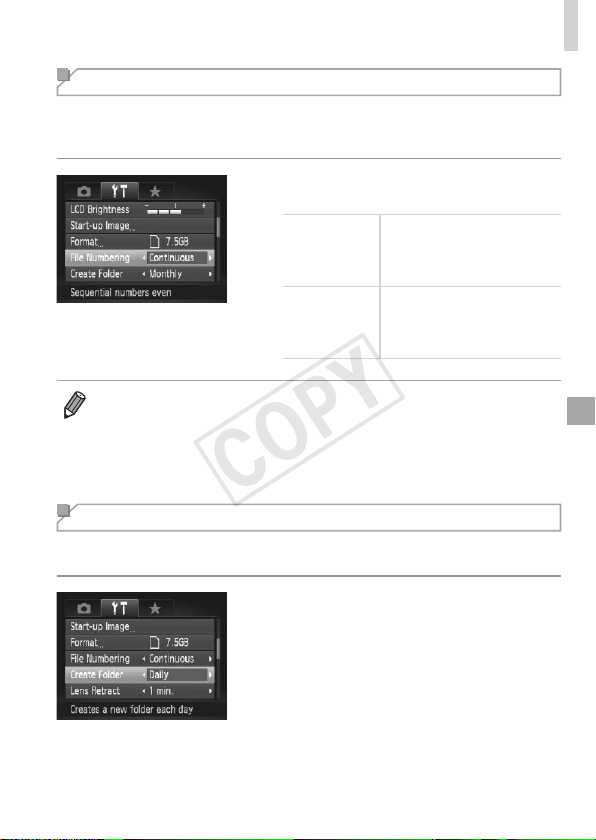
205
AdjustingBasicCameraFunctions
File Numbering
Yourshotsareautomaticallynumberedinsequentialorder(0001–9999)
andsavedinfoldersthatstoreupto2,000imageseach.Youcanchange
howthecameraassignslenumbers.
Choose[FileNumbering],andthen
chooseanoption.
Continuous
Imagesarenumbered
consecutively(untilthe9999th
shotistaken/saved)evenif
youswitchmemorycards.
AutoReset
Imagenumberingisresetto
0001ifyouswitchmemory
cards,orwhenanewfolderis
created.
• Regardlessoftheoptionselectedinthissetting,shotsmaybenumbered
consecutivelyafterthelastnumberofexistingimagesonnewlyinserted
memorycards.Tostartsavingshotsfrom0001,useanempty(orformatted
(=
203))memorycard.
• RefertotheSoftware Guide(=
28)forinformationonthecardfolder
structureandimageformats.
Date-Based Image Storage
Insteadofsavingimagesinfolderscreatedeachmonth,youcanhavethe
cameracreatefolderseachdayyoushoottostoreshotstakenthatday.
Choose[CreateFolder],andthenchoose
[Daily].
Imageswillnowbesavedinfolders
createdontheshootingdate.
COPY
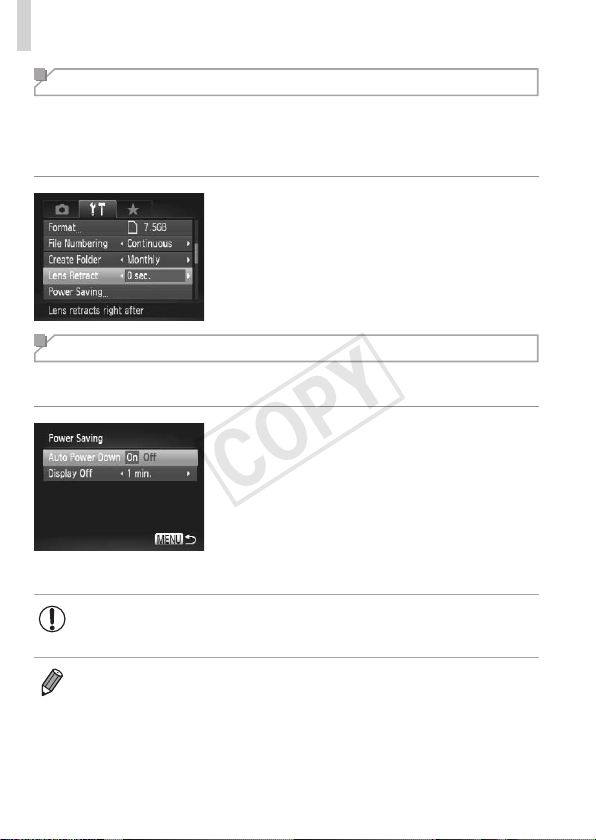
206
AdjustingBasicCameraFunctions
Lens Retraction Timing
Thelensisnormallyretractedforsafetyaboutoneminuteafteryoupress
the<1>buttoninShootingmode(=
38).Tohavethelensretracted
immediatelyafteryoupressthe<1>button,settheretractiontimingto
[0sec.].
Choose[LensRetract],andthenchoose
[0sec.].
Power-Saving Adjustment
Adjustthetimingofautomaticcameraandscreendeactivation(AutoPower
DownandDisplayOff,respectively)asneeded(=
38).
1 Accessthe[PowerSaving]
screen.
Choose[PowerSaving],andthenpress
the<m>button.
2 Congurethesettings.
Afterchoosinganitem,pressthe
<q><r>buttonstoadjustitasneeded.
• Toconservebatterypower,youshouldnormallychoose[On]for
[AutoPowerDown]and[1min.]orlessfor[DisplayOff].
• The[DisplayOff]settingisappliedevenifyouset[AutoPowerDown]to
[Off].
COPY
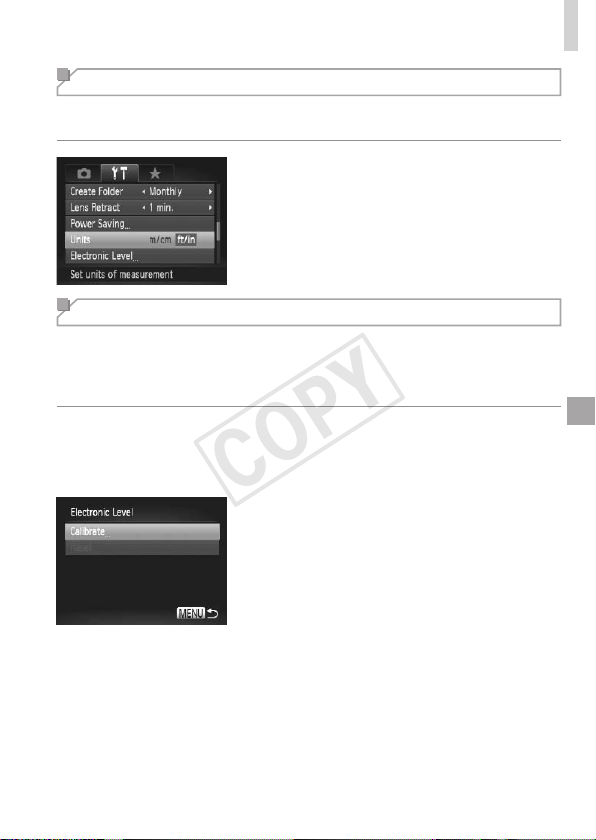
207
AdjustingBasicCameraFunctions
Metric/Non-Metric Display
ChangetheunitofmeasurementshownintheMFindicator(=
130)and
zoombar(=
46)fromm/cmtoft/inasneeded.
Choose[Units],andthenchoose[ft/in].
Electronic Level Calibration
Calibratetheelectroniclevelifitseemsineffectiveinhelpingyoulevelthe
camera.
Forgreatercalibrationaccuracy,displaygridlines(=
154)tohelpyou
levelthecamerainadvance.
1 Levelthecamera.
Placethecameraonaatsurface,such
asatable.
2 Accessthe[ElectronicLevel]
screen.
Choose[ElectronicLevel],andthenpress
the<m>button.
3 Calibratetheelectroniclevel.
Choose[Calibrate]andpressthe<m>
button.Aconrmationmessageis
displayed.
Choose[OK],andthenpressthe<m>
button.
COPY
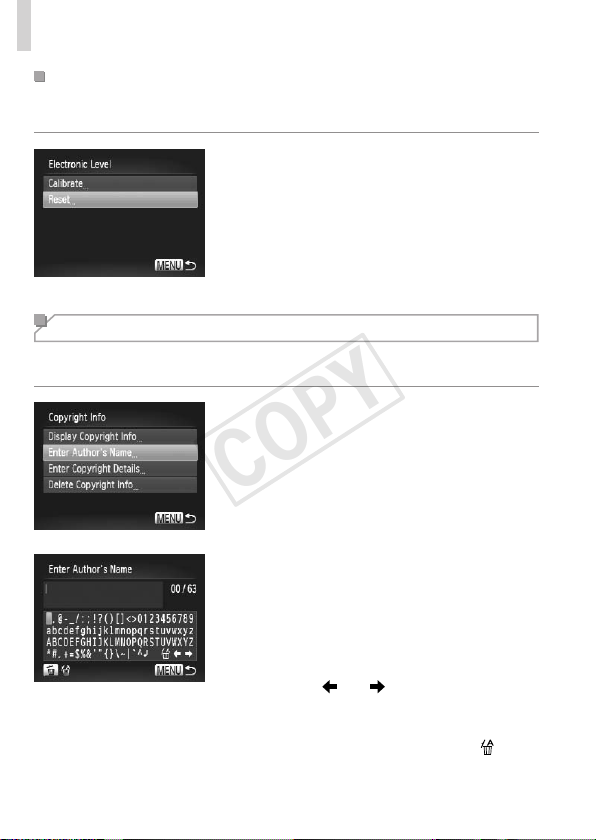
208
AdjustingBasicCameraFunctions
ResettingtheElectronicLevel
Restoretheelectronicleveltoitsoriginalstateasfollows.Notethatthisis
notpossibleunlessyouhavecalibratedtheelectroniclevel.
Choose[ElectronicLevel],andthenpress
the<m>button.
Choose[Reset],andthenpressthe
<m>button.
Choose[OK],andthenpressthe<m>
button.
Oncetheelectroniclevelhasbeenreset,
themenuscreenisdisplayedagain.
Setting Copyright Information to Record in Images
Torecordtheauthor’snameandcopyrightdetailsinimages,setthis
informationbeforehandasfollows.
1 Accessthesettingscreen.
Choose[CopyrightInfo],andthenpress
the<m>button.
Pressthe<o><p>buttonsorturnthe
<5>dialtochoose[EnterAuthor’s
Name]or[EnterCopyrightDetails],and
thenpressthe<m>button.
2 Enteraname.
Pressthe<o><p><q><r>buttonsor
turnthe<5>dialtochooseacharacter,
andthenpressthe<m>buttontoenter
it.
Upto63characterscanbeused.
Choose[ ]or[ ]andpressthe<m>
buttontomovethecursor.
Todeletethepreviouscharacter,either
pressthe<a>buttonorchoose[
]and
pressthe<m>button.
COPY
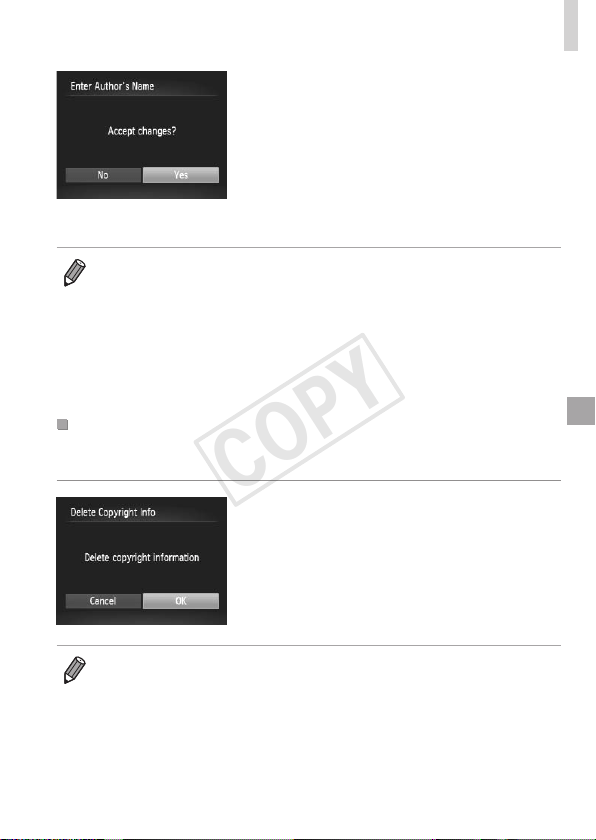
209
AdjustingBasicCameraFunctions
3 Savethesettings.
Pressthe<n>button.[Accept
changes?]isdisplayed.
Pressthe<q><r>buttonsorturnthe
<5>dialtochoose[Yes],andthen
pressthe<m>button.
Theinformationsetherewillnowbe
recordedinimages.
• Tochecktheinformationentered,choose[DisplayCopyrightInfo]onthe
screeninstep1,andthenpressthe<m>button.
• Youcanalsousetheincludedsoftware(=
28)toenter,change,and
deletecopyrightinformation.Somecharactersenteredwiththeincluded
softwaremaynotdisplayonthecamera,butwillbecorrectlyrecordedin
images.
• Youcanview,change,anddeletecopyrightinformationrecordedinimages
byusingtheincludedsoftwaretosaveimagestoacomputer.
DeletingAllCopyrightInformation
Youcandeleteboththeauthor’snameandcopyrightdetailsatthesame
timeasfollows.
Followstep1on=
208andchoose
[DeleteCopyrightInfo].
Pressthe<q><r>buttonsorturnthe
<5>dialtochoose[OK],andthenpress
the<m>button.
• Thecopyrightinfoalreadyrecordedinimageswillnotbedeleted.
COPY
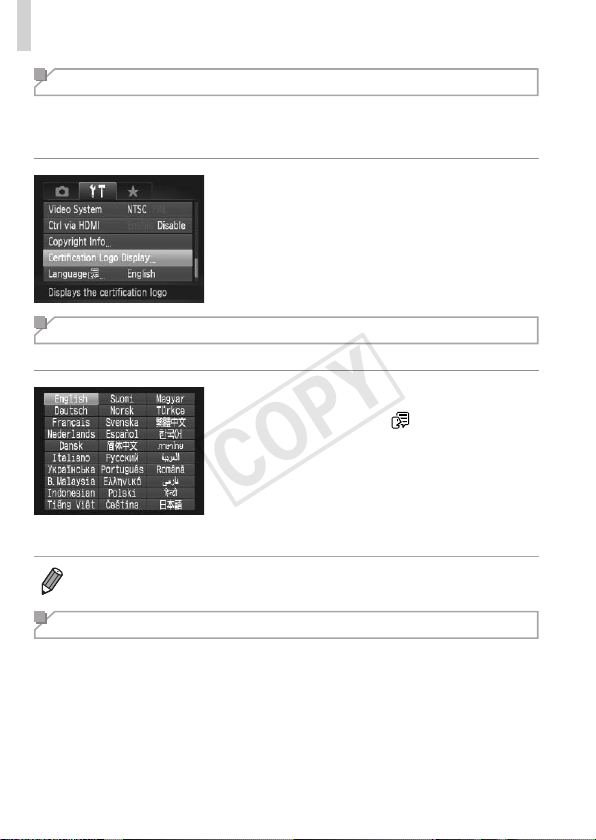
210
AdjustingBasicCameraFunctions
Checking Certication Logos
Somelogosforcerticationrequirementsmetbythecameracanbeviewed
onthescreen.Othercerticationlogosareprintedinthisguide,onthe
camerapackaging,oronthecamerabody.
Choose[CerticationLogoDisplay],and
thenpressthe<m>button.
Display Language
Changethedisplaylanguageasneeded.
1 Accessthe[Language]screen.
Choose[Language ],andthenpress
the<m>button.
2 Congurethesetting.
Pressthe<o><p><q><r>buttonsor
turnthe<5>dialtochoosealanguage,
andthenpressthe<m>button.
• Youcanalsoaccessthe[Language]screeninPlaybackmodebypressing
andholdingthe<m>buttonandimmediatelypressingthe<n>button.
Adjusting Other Settings
Thefollowingsettingscanalsobeadjustedonthe[3]tab.
• [VideoSystem](=
222)
• [CtrlviaHDMI](=
220)
• [Eye-FiSettings](=
245)
COPY
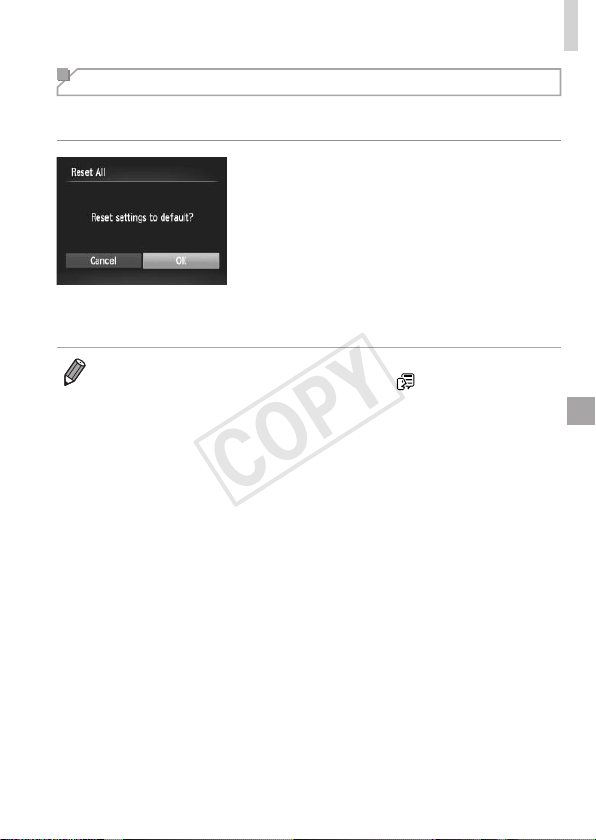
211
AdjustingBasicCameraFunctions
Restoring Defaults
Ifyouaccidentallychangeasetting,youcanrestoredefaultcamera
settings.
1 Accessthe[ResetAll]screen.
Choose[ResetAll],andthenpressthe
<m>button.
2 Restoredefaultsettings.
Pressthe<q><r>buttonsorturnthe
<5>dialtochoose[OK],andthenpress
the<m>button.
Defaultsettingsarenowrestored.
• Thefollowingfunctionsarenotrestoredtodefaultsettings.
-[3]tabsettings[Date/Time](=
19),[Language ](=
21),[Time
Zone](=
200),theimageassignedto[Start-upImage](=
202),and
[VideoSystem](=
222)
-Customwhitebalancedatayouhaverecorded(=
123)
-ColorschoseninColorAccent(=
98)orColorSwap(=
100)
-Theshootingmode(=
89)
-InformationregisteredusingFaceID(=
63)
-Calibratedvaluefortheelectroniclevel(=
207)
-Copyrightinformation(=
208)
COPY

212
COPY

213
Accessories
Useincludedaccessorieseffectivelyandenjoythe
camerainmorewayswithoptionalCanonaccessories
andothercompatibleaccessoriessoldseparately
8
COPY

214
Tips on Using Included Accessories
Effective Battery and Charger Use
• Chargethebatteryon(orimmediatelybefore)the
dayofuse
Chargedbatteriesgraduallylosetheircharge,evenwhen
theyarenotused.
Youcaneasilycheckthechargestateofthebatteryby
attachingthecoversothat▲isvisibleonacharged
battery,andattachingitsothat▲isnotvisibleonan
unchargedbattery.
• Long-termbatterystorage
Afterusingupallremainingbatterypower,removethebatteryfromthecamera.Store
thebatterywiththecoverattached.Storingapartiallychargedbatteryoverextended
periods(aboutayear)mayshortenitslifeoraffectperformance.
• Usingthebatterychargerabroad
Thechargercanbeusedinareaswith100–240VACpower(50/60Hz).Forpower
outletsinadifferentformat,useacommerciallyavailableadapterfortheplug.Never
useanelectricaltransformerdesignedfortraveling,whichmaydamagethebattery.
COPY
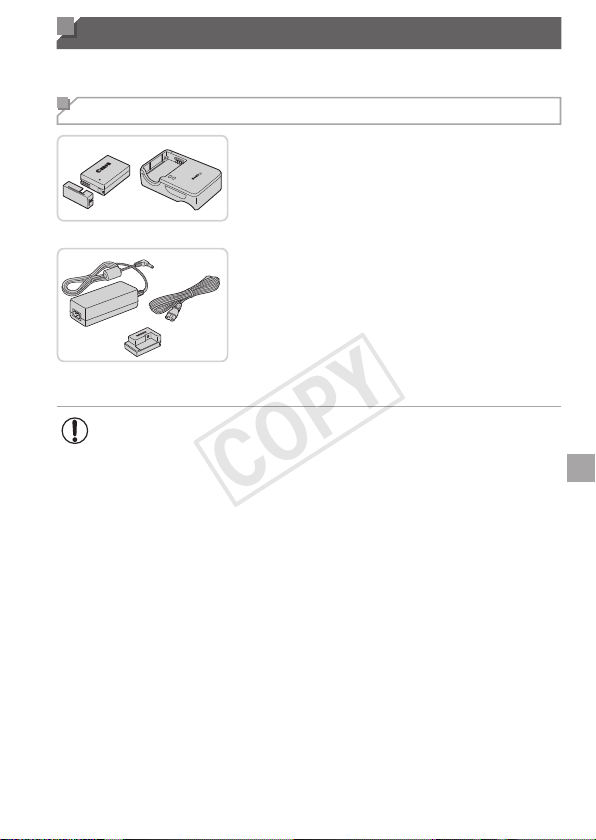
215
Optional Accessories
Thefollowingcameraaccessoriesaresoldseparately.Notethatavailability
variesbyarea,andsomeaccessoriesmaynolongerbeavailable.
Power Supplies
BatteryPackNB-10L
Rechargeablelithium-ionbattery
BatteryChargerCB-2LC/CB-2LCE
ChargerforBatteryPackNB-10L
ACAdapterKitACK-DC80
Forpoweringthecamerausing
householdpower.Recommendedwhen
usingthecameraoverextendedperiods,
orwhenconnectingthecameratoa
printerorcomputer.Cannotbeusedto
chargethecamerabattery.
• ThebatterychargerandACadapterkitcanbeusedinareaswith
100–240VACpower(50/60Hz).
• Forpoweroutletsinadifferentformat,useacommercially
availableadapterfortheplug.Neveruseanelectricaltransformer
designedfortraveling,whichmaydamagethebattery.
COPY
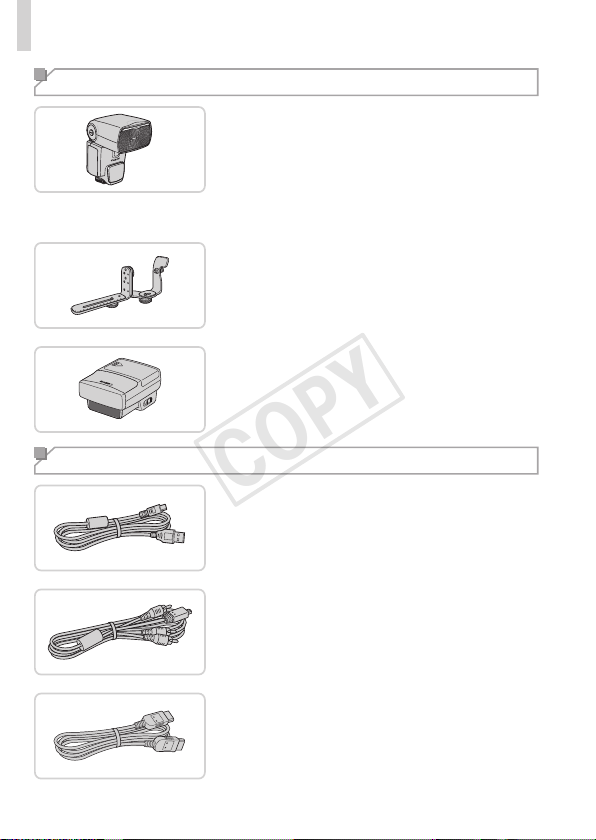
216
OptionalAccessories
Flash Units
Speedlite600EX-RT/600EX/580EXII/
430EXII/320EX/270EXII
Shoe-mountedashunitthatenables
manystylesofashphotography.
Speedlite580EX,430EX,270EX,and
220EXarealsosupported.
SpeedliteBracketSB-E2
Preventsunnaturalshadowsnextto
subjectsduringverticalshooting.Includes
Off-CameraShoeCordOC-E3.
SpeedliteTransmitterST-E2
Enableswirelesscontrolofslave
Speedliteashunits(exceptSpeedlite
270EX/220EX).
Other Accessories
InterfaceCableIFC-400PCU
Forconnectingthecameratoacomputer
orprinter.
StereoAVCableAVC-DC400ST
ConnectthecameratoaTVtoenjoy
playbackonthelargerTVscreen.
HDMICableHTC-100
ForconnectingthecameratoanHDMI
inputofahigh-denitionTV.
COPY

217
OptionalAccessories
RemoteSwitchRS-60E3
Enablesremoteshutterbuttonoperation
(pressingthebuttonhalfwayorallthe
waydown).
LensHoodLH-DC60
Preventsextraneouslightoutsidethe
angleofviewfromenteringthelensand
causingaresorghosting,whichreduce
imagequality.
FilterAdapterFA-DC67A
Adapterrequiredwhenmountinga67
mmlter.
CanonLensFilter(67mmdia.)
Protectsthelensandenablesavarietyof
shootingeffects.
• Alenshoodandlteradaptercannotbeattachedtothecameraatthesame
time.
Printers
CanonPictBridge-Compatible
Printers
Printingimageswithoutacomputeris
possiblebyconnectingthecameratoa
CanonPictBridge-compatibleprinter.For
details,visityournearestCanondealer.
COPY
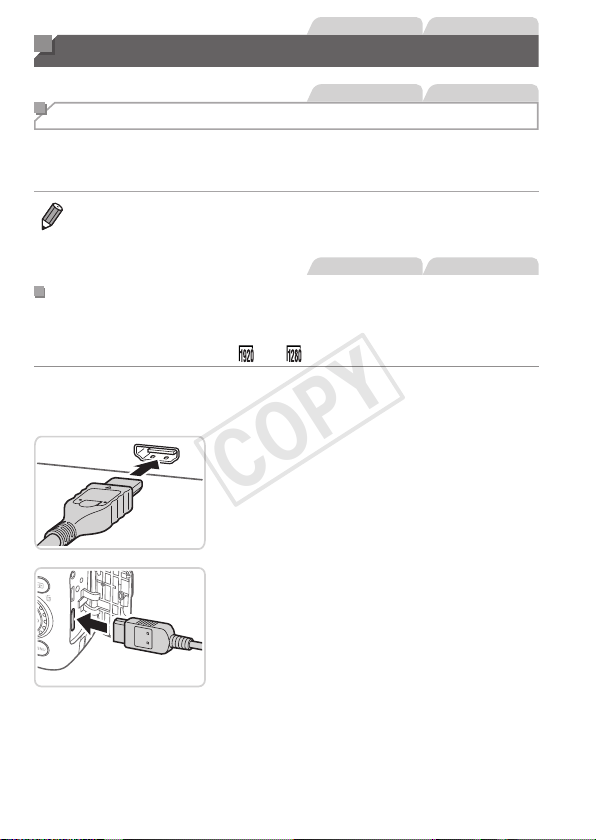
218
StillImages Movies
Using Optional Accessories
StillImages Movies
Playback on a TV
ByconnectingthecameratoaTV,youcanviewyourshotsonthelarger
screenoftheTV.
Fordetailsonconnectionorhowtoswitchinputs,refertotheTVmanual.
• SomeinformationmaynotbedisplayedontheTV(=
257).
StillImages Movies
PlaybackonaHigh-DenitionTV
ConnectingthecameratoanHDTVwiththeHDMICableHTC-100(sold
separately)enablesyoutoviewyourshotsonthelargerscreenoftheTV.
Moviesshotataresolutionof[ ]or[ ]canbeviewedinhigh-denition.
1 MakesurethecameraandTV
areoff.
2 ConnectthecameratotheTV.
OntheTV,insertthecableplugfullyinto
theHDMIinputasshown.
Onthecamera,opentheterminalcover
andinsertthecableplugfullyintothe
cameraterminal.
3 TurntheTVonandswitchto
videoinput.
SwitchtheTVinputtothevideoinputyou
connectedthecabletoinstep2.
COPY

219
UsingOptionalAccessories
4 Turnthecameraon.
Pressthe<1>buttontoturnthecamera
on.
Imagesfromthecameraarenow
displayedontheTV.(Nothingis
displayedonthecamerascreen.)
Whennished,turnoffthecameraand
TVbeforedisconnectingthecable.
• Cameraoperatingsoundsarenotplayedwhilethecameraisconnectedto
anHDTV.
COPY

220
UsingOptionalAccessories
StillImages Movies
ControllingtheCamerawithaTVRemote
ConnectingthecameratoanHDMICEC-compatibleTVenablesplayback
(includingslideshowplayback)usingtheTVremotecontrol.
Inthiscase,youwillneedtoadjustsomeTVsettings.Fordetails,referto
theTVusermanual.
1 Congurethesetting.
Pressthe<n>button,choose
[CtrlviaHDMI]onthe[3]tab,andthen
choose[Enable](=
42).
2 ConnectthecameratotheTV.
Followsteps1–2on=
218toconnect
thecameratotheTV.
3 Displayimages.
TurnontheTV.Onthecamera,pressthe
<1>button.
Imagesfromthecameraarenow
displayedontheTV.(Nothingis
displayedonthecamerascreen.)
4 ControlthecamerawiththeTV
remote.
Pressthe<q><r>buttonsontheremote
tobrowseimages.
Todisplaythecameracontrolpanel,
presstheOK/Selectbutton.Select
controlpanelitemsbypressingthe
<q><r>buttonstochooseanitem,and
thenpressingtheOK/Selectbuttonagain.
COPY

221
UsingOptionalAccessories
CameraControlPanelOptionsShownontheTV
Return Closesthemenu.
GroupPlayback
Displayssetsofimagesshotin[
](=
87)or[ ]
(=
106)mode.(Onlydisplayedwhenagroupedimage
isselected.)
PlayMovie
Startsmovieplayback.(Onlydisplayedwhenamovie
isselected.)
.
Slideshow
Startsslideshowplayback.Toswitchimagesduring
playback,pressthe<q><r>buttonsontheremote
control.
IndexPlayback Displaysmultipleimagesinanindex.
l
ChangeDisplay
Switchesdisplaymodes(=
43).
• Pressingthe<n>buttononthecamerawillswitchcontroltothe
cameraitself,whichwillpreventremotecontroluntilyoureturntosingle-
imagedisplay.
• Thecameramaynotalwaysrespondcorrectlyeveniftheremoteisforan
HDMICEC-compatibleTV.
COPY
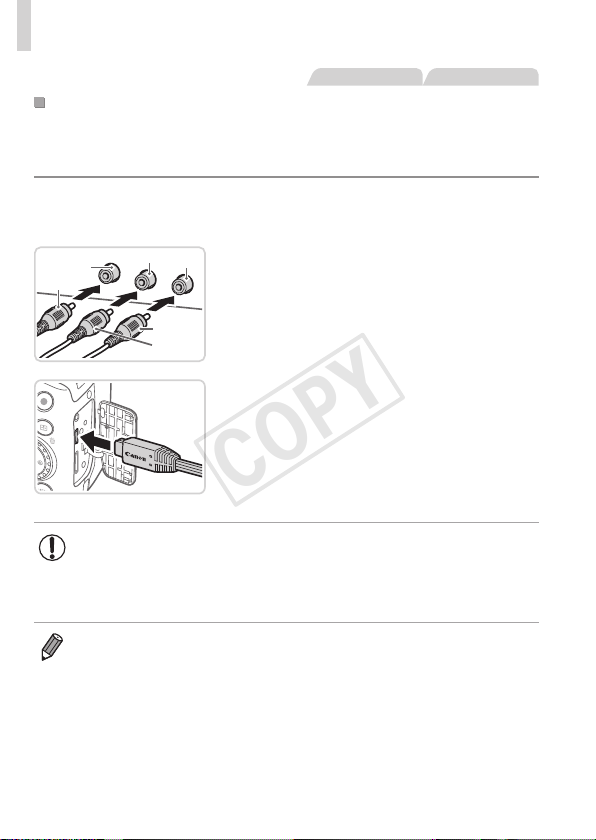
222
UsingOptionalAccessories
StillImages Movies
PlaybackonaStandard-DenitionTV
ConnectingthecameratoaTVwiththeStereoAVCableAVC-DC400ST
(soldseparately)enablesyoutoviewyourshotsonthelargerscreenofthe
TVasyoucontrolthecamera.
1 MakesurethecameraandTV
areoff.
Red
Red
White
Yellow
Yellow
White
2 ConnectthecameratotheTV.
OntheTV,insertthecableplugsfullyinto
thevideoinputsasshown.
Onthecamera,opentheterminalcover
andinsertthecableplugfullyintothe
cameraterminal.
3 Displayimages.
Followsteps3–4on=
218todisplay
images.
• Correctdisplayisnotpossibleunlessthecameravideooutput
format(NTSCorPAL)matchestheTVformat.Tochangethe
videooutputformat,pressthe<n>buttonandchoose[Video
System]onthe[3]tab.
• WhenthecameraandTVareconnected,youcanalsoshootwhile
previewingshotsonthelargerscreenoftheTV.Toshoot,followthesame
stepsaswhenusingthecamerascreen.However,AF-PointZoom(=
80),
MF-PointZoom(=
130)andStitchAssist(=
107)arenotavailable.
COPY
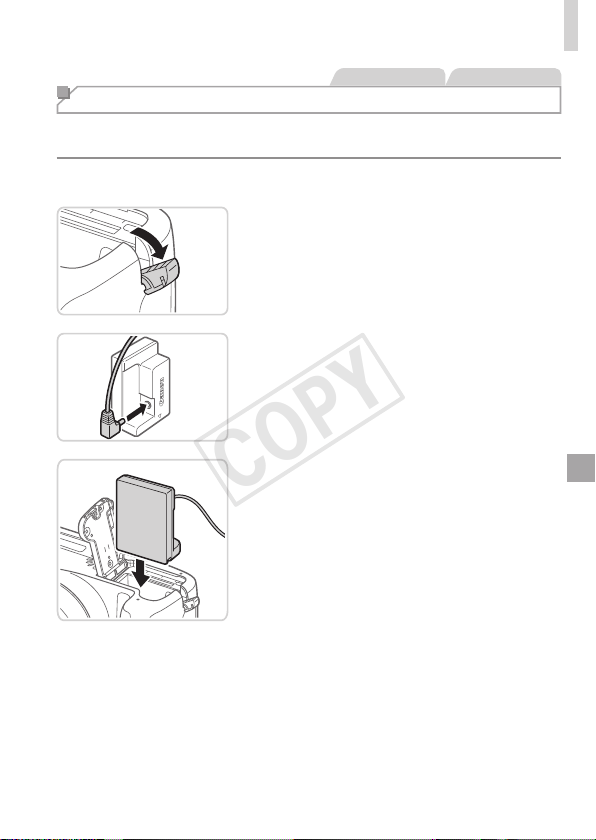
223
UsingOptionalAccessories
StillImages Movies
Powering the Camera with Household Power
PoweringthecamerawithACAdapterKitACK-DC80(soldseparately)
eliminatestheneedtomonitortheremainingbatterylevel.
1 Makesurethecameraisoff.
2 Openthecover.
Followstep2on=
16toopenthe
memorycard/batterycover,andthen
openthecouplercableportcoveras
shown.
3 Connecttheadaptertothe
coupler.
Inserttheadapterplugfullyintothe
coupler.
4 Insertthecoupler.
Insertthecouplerasshownuntilitlocks
intoplace.
COPY

224
UsingOptionalAccessories
CouplerCablePort
Lowerthecover( ),keepingthecoupler
cableinthecouplercableport(
).
5 Connectthepowercord.
Insertoneendofthepowercordintothe
compactpoweradapter,andthenplug
theotherendintoapoweroutlet.
Turnthecameraonanduseitasdesired.
Whennished,turnthecameraoffand
unplugthepowercordfromtheoutlet.
• Donotdisconnecttheadapterorunplugthepowercordwhile
thecameraisstillon.Thismayeraseyourshotsordamagethe
camera.
• Donotattachtheadapteroradaptercordtootherobjects.Doing
socouldresultinmalfunctionordamagetotheproduct.
COPY
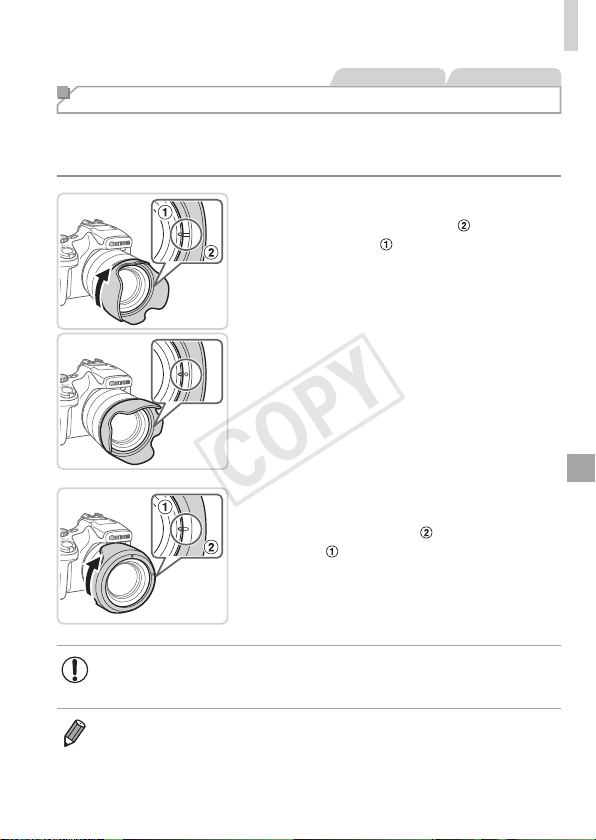
225
UsingOptionalAccessories
StillImages Movies
Using a Lens Hood (Sold Separately)
Forwide-angleshotsofbacklitsubjectswithoutusingtheash,attach
optionalLensHoodLH-DC60topreventlightoutsidetheangleofviewfrom
enteringthelens.
Attachthehood.
Alignthelenshoodmark( )withthe
cameramark(
),andturnthelenshood
inthedirectionofthearrowuntilitlocks
inplace.
Toremovethelenshood,turnitthe
oppositedirection.
Toattachthelenshoodinverted(as
shown)whenthehoodisnotused,align
thelenshoodmark(
)withthecamera
mark(
),andturnthelenshoodinthe
directionofthearrowuntilitlocksin
place.
• Vignettingmayoccurifyouusethebuilt-inashwhenthelens
hoodisattached.
• Alenshoodandlteradaptercannotbeattachedtothecameraatthesame
time.
COPY
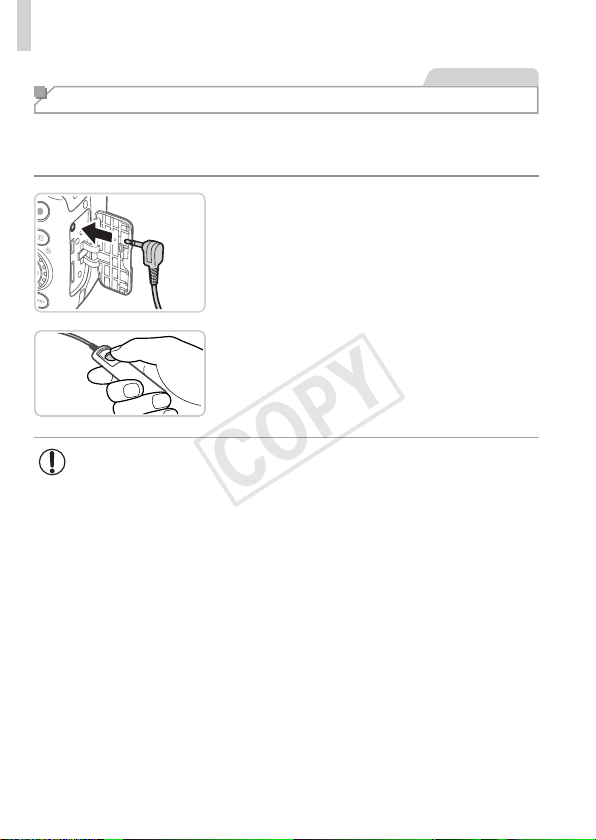
226
UsingOptionalAccessories
StillImages
Using a Remote Switch (Sold Separately)
AnoptionalRemoteSwitchRS-60E3canbeusedtoavoidcamerashake
thatmayotherwiseoccurwhenpressingtheshutterbuttondirectly.This
optionalaccessoryisconvenientwhenshootingatslowshutterspeeds.
1 Connecttheremoteswitch.
Makesurethecameraisoff.
Opentheterminalcoverandinsertthe
remoteswitchplug.
2 Shoot.
Toshoot,pressthereleasebuttononthe
remoteswitch.
• Bulbphotography(longexposures)isnotsupported.
COPY
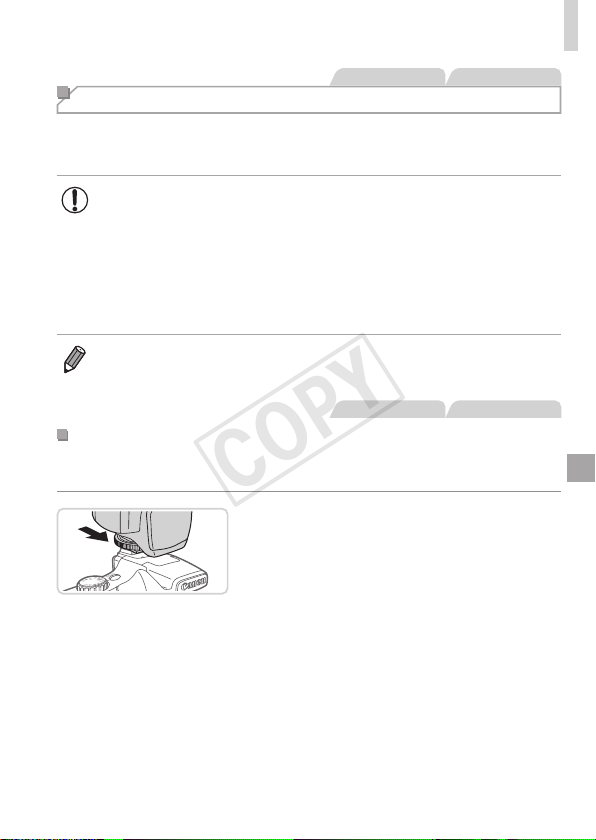
227
UsingOptionalAccessories
StillImages Movies
Using an External Flash (Sold Separately)
MoresophisticatedashphotographyispossiblewithanoptionalSpeedlite
EXseriesash.FormovieshootingusinganLEDlight,theoptional
Speedlite320EXashisavailable.
• ThiscameradoesnotsupportsomeSpeedliteEXseriesfunctions.
• WirelessoperationoftheSpeedlite600EX-RTisnotsupported.
• Non-EXseriesCanonashunitsmaynotrecorrectlyormaynot
reatall,insomecases.
• Useofnon-Canonashunits(especiallyhigh-voltageashunits)
orashaccessoriesmaypreventnormalcameraoperationand
maydamagethecamera.
• AlsorefertotheSpeedliteEXseriesmanualforadditionalinformation.
StillImages Movies
SpeedliteEXSeries
Theseoptionalashunitscanprovidebrightlightingandmeetavarietyof
ashphotographyneeds.
1 Attachtheashunittothehot
shoe.
2 Turntheashon,andthenturn
thecameraon.
Ared[h]iconisnowdisplayed.
Theashpilotlampwilllightupwhenthe
ashisready.
COPY
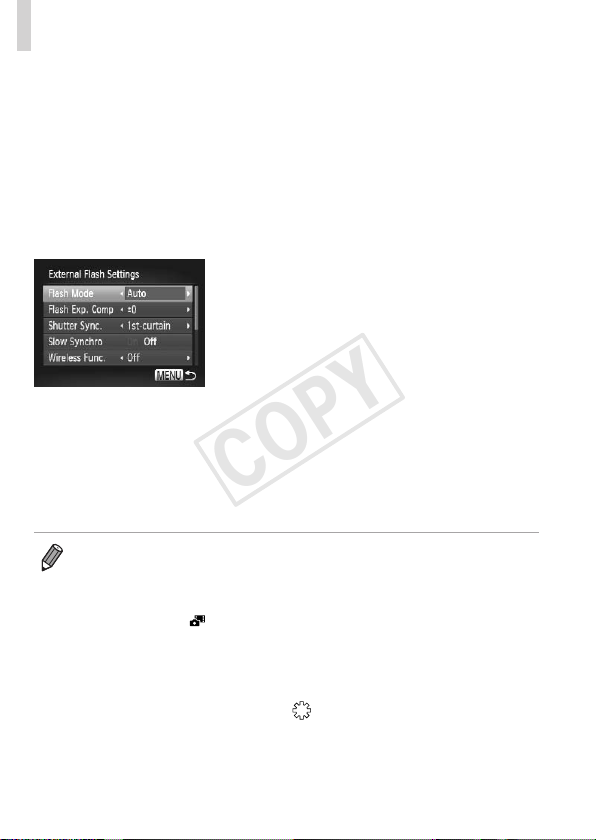
228
UsingOptionalAccessories
3 Chooseshootingmode<G>,
<M>,<B>,or<D>.
Flashsettingscanonlybeconguredin
thesemodes.Inothermodes,theash
isadjustedandredautomatically,as
needed.
4 Setthewhitebalanceto[h]
(=
122).
5 Conguretheexternalash.
Pressthe<n>button,choose[Flash
Control]onthe[4]tab,andthenpress
the<m>button.
Optionsalreadysetontheashitselfare
displayed.
Pressthe<o><p>buttonsorturn
the<5>dialtochooseanitem,and
thenadjustthesettingbypressingthe
<q><r>buttons.
Availablesettingsvarydependingonthe
shootingmodeandtheashattached
(=
229).
• Settingsforthebuilt-inashcannotbeconguredwhileaSpeedliteEX
seriesashisattached,becausethatsettingscreenisnolongeraccessible.
• Youcanalsoaccessthesettingscreenbypressingthe<h>buttonforat
leastonesecond.
• Flashsettingsin[
]shootingmodecanbeconguredjustastheyarein
<G>mode.
• 580EXIIonly:[FlashControl]isnotavailableiftheexternalashhasbeen
setupforstroboscopicash.
• 320EXonly:AutoLEDlightingisonlyavailableinlow-lightmovierecording
orinMoviemode.Inthiscase,the[
]iconisshown.
COPY

229
UsingOptionalAccessories
StillImages Movies
UsingSpeedliteBracketSB-E2(SoldSeparately)
UsingtheoptionalSpeedliteBracketSB-
E2canhelppreventunnaturalshadows
nexttosubjectsduringverticalshooting.
TokeeptheLCDscreenoutoftheway
ofthebracket,usethescreenclosedand
facingoutward.
StillImages
CameraSettingsAvailablewithanExternalFlash(Sold
Separately)
Thefollowingsettingsareavailablein<G>,<M>,<B>,or<D>mode.
Inothershootingmodes,only[Red-EyeCorr.]and[Red-EyeLamp]can
becongured.(Withautoashcontrol,theashalwaysres.)However,
externalashunitsdonotreinmodesthatthebuilt-inashdoesnotre
(=
260).
Item Options
ShootingMode
G M B D
FlashMode
Auto*
1
O O O
–
Manual*
2
O O O O
FlashExp.Comp*
3
–3to+3
O O O
–
FlashOutput*
4
1/128*
5
to1/1(in1/3-stopincrements)
O O O O
ShutterSync. 1st-curtain/2nd-curtain/Hi-speed
O O O O
SlowSynchro
On
O O O O
Off
O
–
O
–
WirelessFunc.*
6
On/Off
O O O O
Red-EyeCorr. On/Off
O O O O
Red-EyeLamp On/Off
O O O O
SafetyFE*
7
On
O O O
–
Off
O O O O
ClearFlashSettings*
8
O O O O
COPY

230
UsingOptionalAccessories
*1E-TTLmodeisusedfortheash.
*2Mmodeisusedfortheash.In[D]shootingmode,E-TTLmodeisalsoavailablefor
theash.Inthiscase,whentheashres,ashexposurecompensationsetonthe
ashisappliedtotheashoutputlevelsetonthecamera.
*3Canbeconguredonlywhen[FlashMode]is[Auto]andashexposure
compensationsetontheashis[+0].Whenyouadjustashexposurecompensation
on600EX-RT,600EX,580EXII,or430EXIISpeedlites,thecameradisplaywillbe
updatedaccordingly.
*4Canbeconguredwhen[FlashMode]is[Manual].Linkedtosettingsontheash
unit.
*51/64forSpeedlite430EXII/430EX/320EX/270EXII/270EX.
*6ForoptionsotherthanOn/Off,congurethesettingontheashunititself.Not
availablewithSpeedlite430EXII/320EX/270EXII/270EX.Whenthissettingissetto
[On],[ShutterSync.]cannotbesetto[2nd-curtain].(If[ShutterSync.]issetto[2nd-
curtain],itwillbechangedto[1st-curtain].)
*7Canonlybeconguredwhen[FlashMode]is[Auto].
*8Restoresalldefaultsettings.Youcanalsorestoredefaultsfor[SlowSynchro],[Safety
FE],[Red-EyeCorr.],and[Red-EyeLamp]byusing[ResetAll]inthe[3]menuon
thecamera(=
211).
• Flashsettingsin[ ]shootingmodecanbeconguredjustastheyarein
<G>mode.
• In<A>shootingmode,iconsrepresentingSmiling,Sleeping,Babies
(Smiling),Babies(Sleeping),andChildrenshootingscenesdeterminedby
thecameraarenotdisplayed,andthecameradoesnotshootcontinuously
(=
52).
COPY
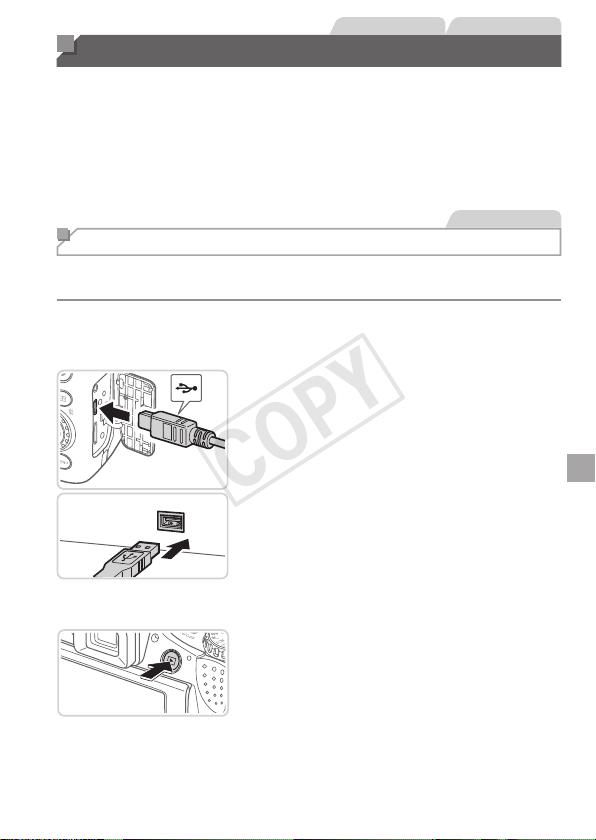
231
StillImages Movies
Printing Images
Yourshotscaneasilybeprintedbyconnectingthecameratoaprinter.On
thecamera,youcanspecifyimagestosetupbatchprinting,prepareorders
forphotodevelopmentservices,andprepareordersorprintimagesfor
photobooks.
ACanonSELPHYCPseriescompactphotoprinterisusedhereforthe
sakeofillustration.Screensdisplayedandavailablefunctionsvaryby
printer.Alsorefertotheprintermanualforadditionalinformation.
StillImages
Easy Print
EasilyprintyourshotsbyconnectingthecameratoaPictBridge-compatible
printer(soldseparately)withtheUSBcable.
1 Makesurethecameraand
printerareoff.
2 Connectthecameratothe
printer.
Openthecover.Holdingthesmaller
cableplugintheorientationshown,insert
theplugfullyintothecameraterminal.
Connectthelargercableplugtothe
printer.Forotherconnectiondetails,refer
totheprintermanual.
3 Turntheprinteron.
4 Turnthecameraon.
Pressthe<1>buttontoturnthecamera
on.
COPY
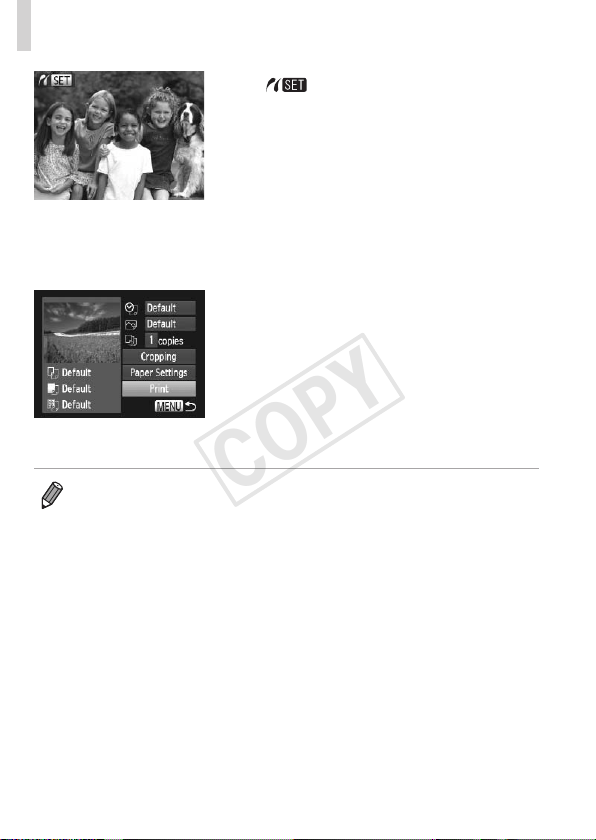
232
PrintingImages
[ ]isdisplayed.
5 Chooseanimage.
Pressthe<q><r>buttonsorturnthe
<5>dialtochooseanimage.
6 Printtheimage.
Pressthe<c>button.
Printingnowbegins.
Toprintotherimages,repeatsteps5–6
afterprintingisnished.
Whenyouarenishedprinting,turnthe
cameraandprinteroffanddisconnectthe
interfacecable.
• ForCanonPictBridge-compatibleprinters(soldseparately),see=
217.
• RAWimagescannotbeprinted.
COPY
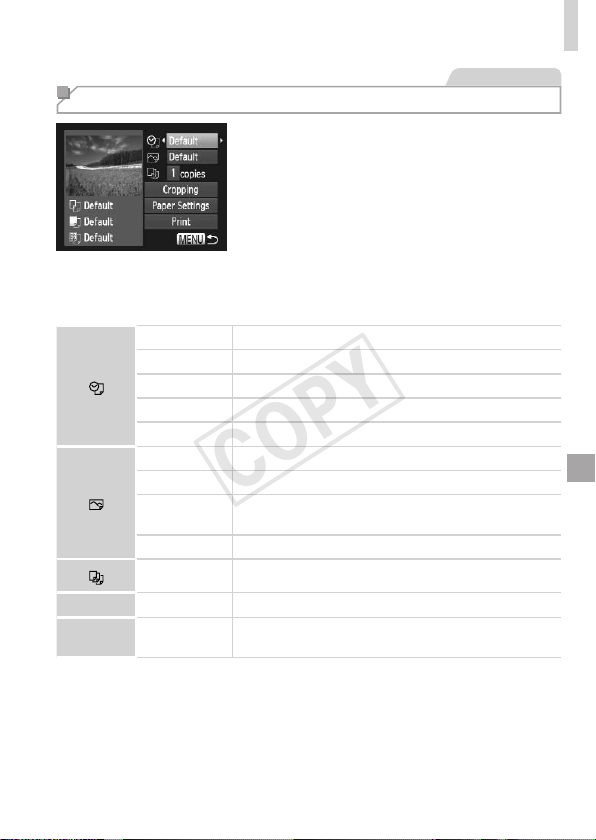
233
PrintingImages
StillImages
Conguring Print Settings
1 Accesstheprintingscreen.
Afterfollowingsteps1–5on=
231
–232tochooseanimage,pressthe
<m>buttontoaccessthescreenatleft.
2 Congurethesettings.
Pressthe<o><p>buttonsorturn
the<5>dialtochooseanitem,and
thenchooseanoptionbypressingthe
<q><r>buttons.
Default Matchescurrentprintersettings.
Date Printsimageswiththedateadded.
FileNo. Printsimageswiththelenumberadded.
Both Printsimageswithboththedateandlenumberadded.
Off
–
Default Matchescurrentprintersettings.
Off
–
On
Usesinformationfromthetimeofshootingtoprintunder
optimalsettings.
Red-Eye1 Correctsred-eye.
No.ofCopies Choosethenumberofcopiestoprint.
Cropping
–
Specifyadesiredimageareatoprint(=
234).
Paper
Settings
–
Specifythepapersize,layout,andotherdetails
(=
235).
COPY
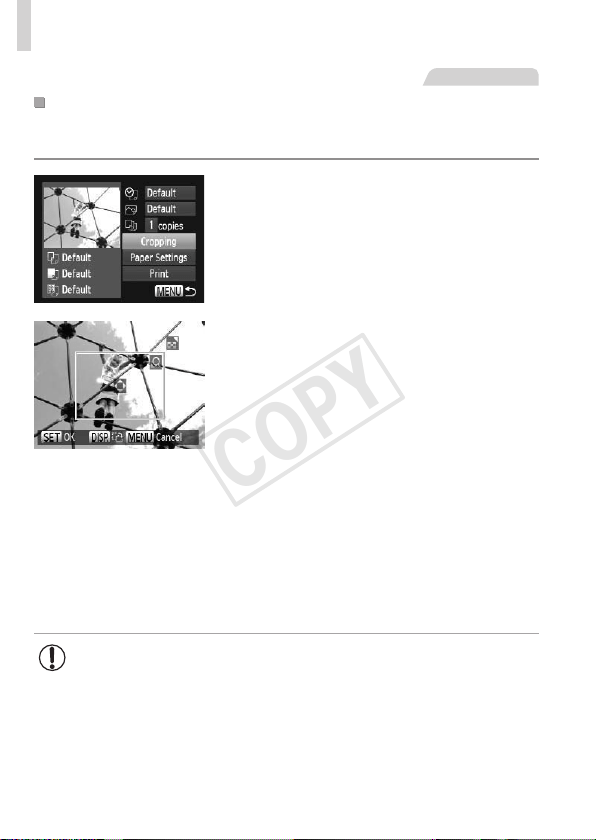
234
PrintingImages
StillImages
CroppingImagesBeforePrinting(Cropping)
Bycroppingimagesbeforeprinting,youcanprintadesiredimagearea
insteadoftheentireimage.
1 Choose[Cropping].
Afterfollowingstep1on=
233to
accesstheprintingscreen,choose
[Cropping]andpressthe<m>button.
Acroppingframeisnowdisplayed,
indicatingtheimageareatoprint.
2 Adjustthecroppingframeas
needed.
Toresizetheframe,movethezoomlever
orturnthe<5>dial.
Tomovetheframe,pressthe
<o><p><q><r>buttons.
Torotatetheframe,pressthe<l>
button.
Whennished,pressthe<m>button.
3 Printtheimage.
Onthescreeninstep1,pressthe
<o><p>buttonsorturnthe<5>dial
tochoose[Print],andthenpressthe
<m>button.
• Croppingmaynotbepossibleatsmallimagesizes,oratsome
aspectratios.
• Datesmaynotbeprintedcorrectlyifyoucropimagesshotwith
[DateStamp]selected.
COPY
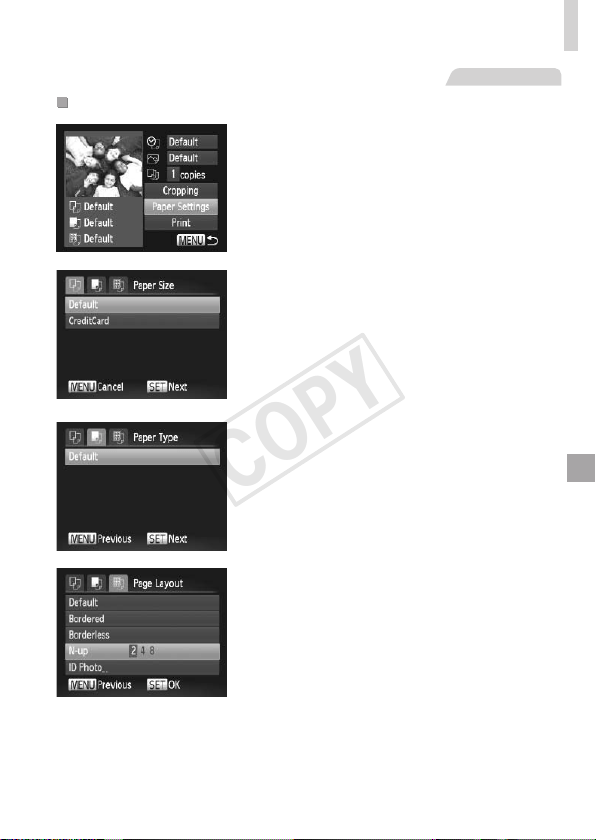
235
PrintingImages
StillImages
ChoosingPaperSizeandLayoutBeforePrinting
1 Choose[PaperSettings].
Afterfollowingstep1on=
233to
accesstheprintingscreen,choose
[PaperSettings]andpressthe<m>
button.
2 Chooseapapersize.
Pressthe<o><p>buttonsorturnthe
<5>dialtochooseanoption,andthen
pressthe<m>button.
3 Chooseatypeofpaper.
Pressthe<o><p>buttonsorturnthe
<5>dialtochooseanoption,andthen
pressthe<m>button.
4 Choosealayout.
Pressthe<o><p>buttonsorturnthe
<5>dialtochooseanoption.
Whenchoosing[N-up],pressthe
<q><r>buttonstospecifythenumberof
imagespersheet.
Pressthe<m>button.
5 Printtheimage.
COPY

236
PrintingImages
AvailableLayoutOptions
Default Matchescurrentprintersettings.
Bordered Printswithblankspacearoundtheimage.
Borderless Borderless,edge-to-edgeprinting.
N-up Choosehowmanyimagestoprintpersheet.
IDPhoto
Printsimagesforidenticationpurposes.
OnlyavailableforimageswitharesolutionofLandanaspectratioof
4:3.
FixedSize
Choosetheprintsize.
Choosefrom3.5x5in.,postcard,orwide-formatprints.
StillImages
PrintingIDPhotos
1 Choose[IDPhoto].
Followingsteps1–4on=
235,choose
[IDPhoto]andpressthe<m>button.
2 Choosethelongandshortside
length.
Pressthe<o><p>buttonsorturnthe
<5>dialtochooseanitem.Choosethe
lengthbypressingthe<q><r>buttons,
andthenpressthe<m>button.
3 Choosetheprintingarea.
Followstep2on=
234tochoosethe
printingarea.
4 Printtheimage.
COPY
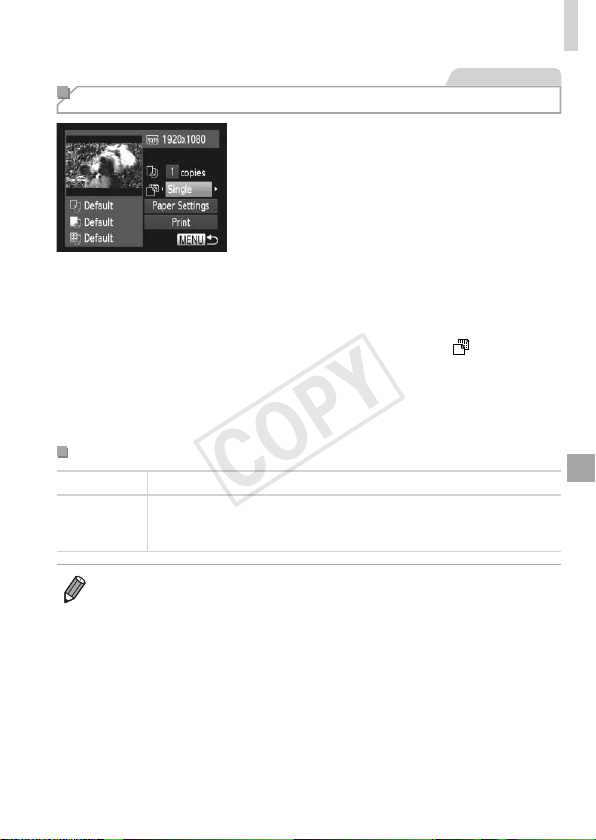
237
PrintingImages
Movies
Printing Movie Scenes
1 Accesstheprintingscreen.
Followsteps1–5on=
231–232
tochooseamovie,andthenpressthe
<m>button.
Pressthe<q><r>buttonsorturnthe
<5>dialtochoose[c],andthenpress
the<m>button.Thescreenatleftis
displayed.
2 Chooseaprintingmethod.
Pressthe<o><p>buttonsorturn
the<5>dialtochoose[
],andthen
pressthe<q><r>buttonstochoosethe
printingmethod.
3 Printtheimage.
MoviePrintingOptions
Single Printsthecurrentsceneasastillimage.
Sequence
Printsaseriesofscenes,acertainintervalapart,onasinglesheetof
paper.Youcanalsoprintthefoldernumber,lenumber,andelapsed
timefortheframebysetting[Caption]to[On].
• Tocancelprintinginprogress,pressthe<m>button.
• [IDPhoto]and[Sequence]cannotbechosenonCanonPictBridge-
compatibleprintersfromCP720/CP730andearliermodels.
COPY
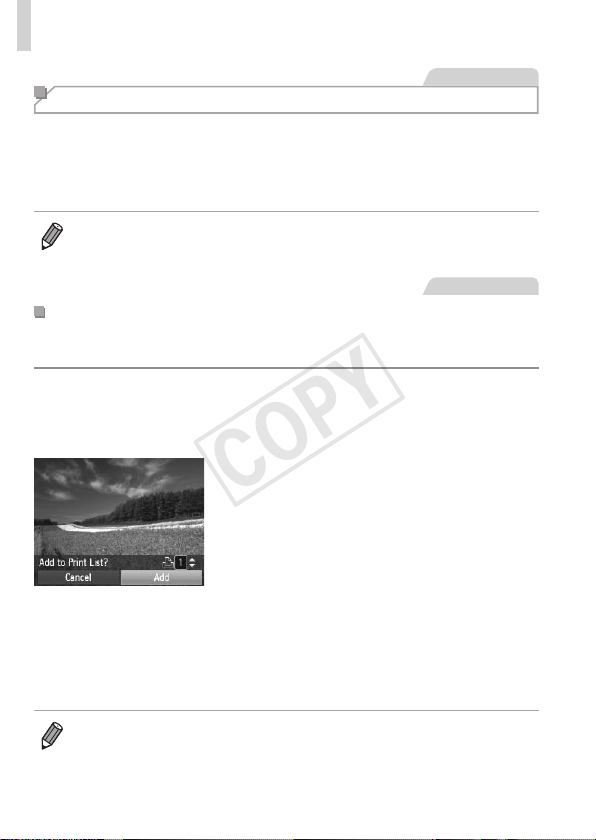
238
PrintingImages
StillImages
Adding Images to the Print List (DPOF)
Batchprinting(=
242)andorderingprintsfromaphotodevelopment
servicecanbesetuponthecamera.Chooseupto998imagesona
memorycardandcongurerelevantsettings,suchasthenumberofcopies,
asfollows.Theprintinginformationyoupreparethiswaywillconformto
DPOF(DigitalPrintOrderFormat)standards.
• RAWimagescannotbeincludedinprintlist.
StillImages
AddingImagestothePrintListviathe<c>Button
Youcanaddimagestotheprintlist(DPOF)afteryourshotorlaterduring
playbacksimplybypressingthe<c>button.
1 Chooseanimage.
Pressthe<q><r>buttonsorturnthe
<5>dialtochooseanimage.
2 Addtheimagetotheprintlist.
Pressthe<c>button.
Pressthe<o><p>buttonstospecify
thenumberofprints.Choose[Add]by
pressingthe<q><r>buttonsorturning
the<5>dial,andthenpressthe<m>
button.
Toremovetheimagefromtheprintlist,
repeatsteps1–2butchoose[Remove]
bypressingthe<q><r>buttonsor
turningthe<5>dial,andthenpressthe
<m>button.
• Printlistcannotbesetupwhilethecameraisconnectedtoaprinter.
COPY
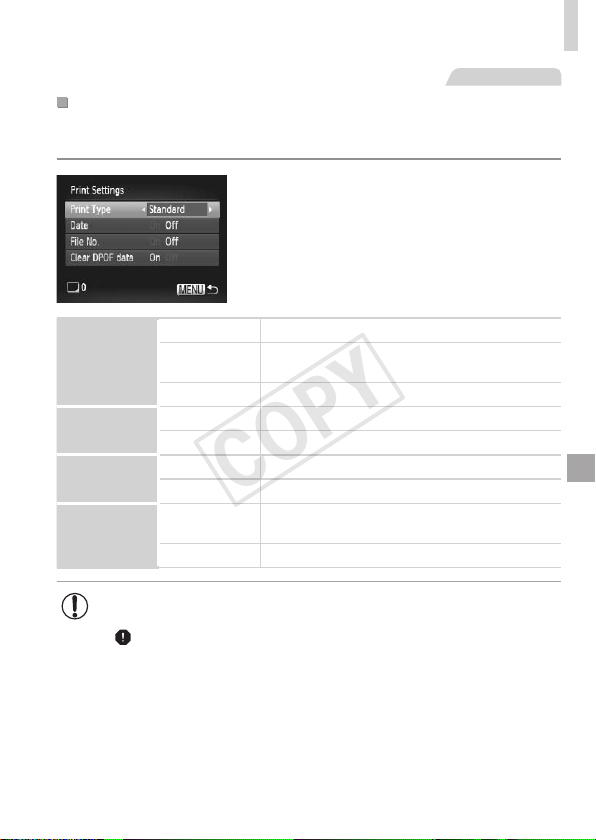
239
PrintingImages
StillImages
ConguringPrintSettings
Specifytheprintingformat,whethertoaddthedateorlenumber,and
othersettingsasfollows.Thesesettingsapplytoallimagesintheprintlist.
Pressthe<n>button,andthen
choose[PrintSettings]onthe[2]tab.
Chooseandconguresettingsasdesired
(=
42).
PrintType
Standard Oneimageisprintedpersheet.
Index
Smallerversionsofmultipleimagesareprinted
persheet.
Both Bothstandardandindexformatsareprinted.
Date
On Imagesareprintedwiththeshootingdate.
Off
–
FileNo.
On Imagesareprintedwiththelenumber.
Off
–
ClearDPOF
data
On
Allimageprintlistsettingsareclearedafter
printing.
Off
–
• NotallofyourDPOFsettingsmaybeappliedinprintingbythe
printerorphotodevelopmentservice,insomecases.
• [
]maybedisplayedonthecameratowarnyouthatthememory
cardhasprintsettingsthatwereconguredonanothercamera.
Changingtheprintsettingsusingthiscameramayoverwriteall
previoussettings.
• Setting[Date]to[On]maycausesomeprinterstoprintthedate
twice.
COPY
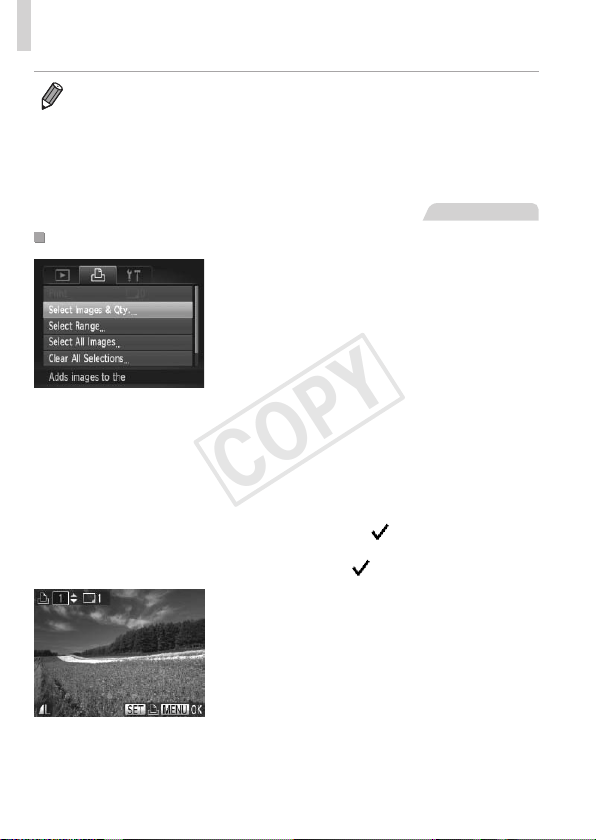
240
PrintingImages
• Specifying[Index]willpreventyoufromchoosing[On]forboth[Date]and
[FileNo.]atthesametime.
• IndexprintingisnotavailableonsomeCanonPictBridge-compatibleprinters
(soldseparately).
• Thedateisprintedinaformatmatchingsettingdetailsin[Date/Time]onthe
[3]tab(=
19).
StillImages
SettingUpPrintingforIndividualImages
1 Choose[SelectImages&Qty.].
Pressthe<n>button,choose
[SelectImages&Qty.]onthe[2]tab,
andthenpressthe<m>button.
2 Chooseanimage.
Pressthe<q><r>buttonsorturnthe
<5>dialtochooseanimage,andthen
pressthe<m>button.
Youcannowspecifythenumberofcopies.
Ifyouspecifyindexprintingfortheimage,it
islabeledwitha[ ]icon.Tocancelindex
printingfortheimage,pressthe<
m
>
buttonagain.[ ]isnolongerdisplayed.
3 Specifythenumberofprints.
Pressthe<o><p>buttonsorturnthe
<5>dialtospecifythenumberofprints
(upto99).
Tosetupprintingforotherimagesandspecify
thenumberofprints,repeatsteps2–3.
Printingquantitycannotbespeciedfor
indexprints.Youcanonlychoosewhich
imagestoprint,byfollowingstep2.
Whennished,pressthe<n>button
toreturntothemenuscreen.
COPY
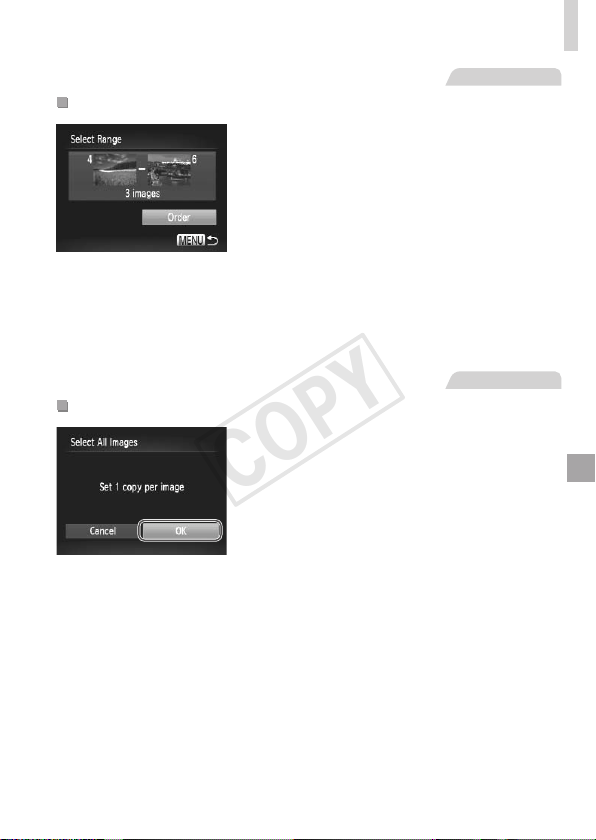
241
PrintingImages
StillImages
SettingUpPrintingforaRangeofImages
1 Choose[SelectRange].
Followingstep1on=
240,choose
[SelectRange]andpressthe<m>
button.
2 Chooseimages.
Followsteps2–3on=
176tospecify
images.
3 Conguretheprintsettings.
Pressthe<o><p>buttonstochoose
[Order],andthenpressthe<m>button.
StillImages
SettingUpPrintingforAllImages
1 Choose[SelectAllImages].
Followingstep1on=
240,choose
[SelectAllImages]andpressthe<m>
button.
2 Conguretheprintsettings.
Pressthe<q><r>buttonsorturnthe
<5>dialtochoose[OK],andthenpress
the<m>button.
COPY

242
PrintingImages
StillImages
ClearingAllImagesfromthePrintList
1 Choose[ClearAllSelections].
Followingstep1on=
240,choose
[ClearAllSelections]andpressthe<m>
button.
2 Conrmclearingtheprintlist.
Pressthe<q><r>buttonsorturnthe
<5>dialtochoose[OK],andthenpress
the<m>button.
StillImages
PrintingImagesAddedtothePrintList(DPOF)
Whenimageshavebeenaddedtothe
printlist(=
238–241),thescreen
atleftisdisplayedafteryouconnect
thecameratoaPictBridge-compatible
printer.Pressthe<o><p>buttonsto
choose[Printnow],andthensimplypress
the<m>buttontoprinttheimagesinthe
printlist.
AnyDPOFprintjobthatyoutemporarily
stopwillberesumedfromthenextimage.
COPY
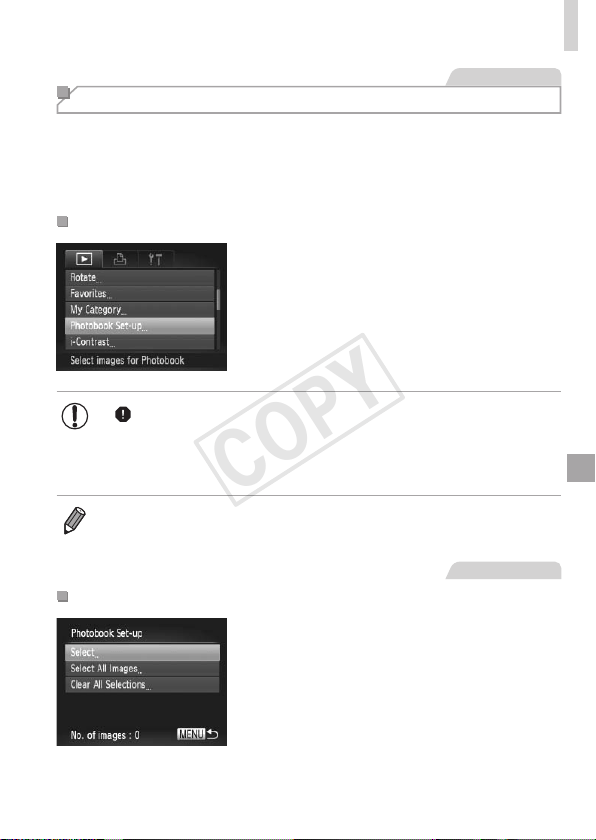
243
PrintingImages
StillImages
Adding Images to a Photobook
Photobookscanbesetuponthecamerabychoosingupto998images
onamemorycardandimportingthemintotheincludedsoftwareonyour
computer,wheretheyarestoredintheirownfolder.Thisisconvenient
whenorderingprintedphotobooksonlineorprintingphotobookswithyour
ownprinter.
ChoosingaSelectionMethod
Pressthe<n>button,choose
[PhotobookSet-up]onthe[1]tab,and
thenchoosehowyouwillselectimages.
• [ ]maybedisplayedonthecameratowarnyouthatthememory
cardhasprintsettingsthatwereconguredonanothercamera.
Changingtheprintsettingsusingthiscameramayoverwriteall
previoussettings.
• Afterimportingimagestoyourcomputer,alsorefertotheSoftware Guide
(=
28)andtheprintermanualforfurtherinformation.
StillImages
AddingImagesIndividually
1 Choose[Select].
Followingthepreviousprocedure,choose
[Select]andpressthe<m>button.
COPY
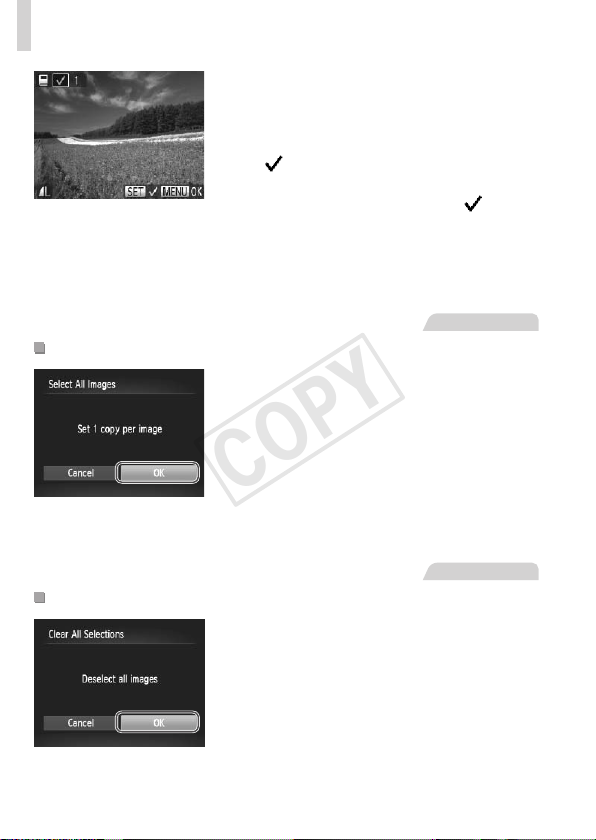
244
PrintingImages
2 Chooseanimage.
Pressthe<q><r>buttonsorturnthe
<5>dialtochooseanimage,andthen
pressthe<m>button.
[ ]isdisplayed.
Toremovetheimagefromthephotobook,
pressthe<m>buttonagain.[
]isno
longerdisplayed.
Repeatthisprocesstospecifyotherimages.
Whennished,pressthe<n>button
toreturntothemenuscreen.
StillImages
AddingAllImagestoaPhotobook
1 Choose[SelectAllImages].
Followingtheprocedureon=
243,
choose[SelectAllImages]andpressthe
<m>button.
2 Conguretheprintsettings.
Pressthe<q><r>buttonsorturnthe
<5>dialtochoose[OK],andthenpress
the<m>button.
StillImages
RemovingAllImagesfromaPhotobook
1 Choose[ClearAllSelections].
Followingtheprocedureon=
243,
choose[ClearAllSelections]andpress
the<m>button.
2 Conrmclearingthephotobook.
Pressthe<q><r>buttonsorturnthe
<5>dialtochoose[OK],andthenpress
the<m>button.
COPY
245
StillImages Movies
Using an Eye-Fi Card
BeforeusinganEye-Ficard,alwaysconrmthatlocaluseispermitted
(=
2).
InsertingapreparedEye-Ficardenablesautomaticwirelesstransferof
imagestoacomputeroruploadingtoaphoto-sharingwebsite.
ImagesaretransferredbytheEye-Ficard.Refertothecard’susermanual
orcontactthemanufacturerforinstructionsonpreparingandusingcardsor
resolvingtransferproblems.
• WhenusinganEye-Ficard,keepthefollowingpointsinmind.
-Cardsmaycontinuetotransmitradiowavesevenwhen[Eye-
Fitrans.]issetto[Disable](=
246).RemovetheEye-Fi
cardbeforeenteringhospitals,aircraft,orotherareaswhere
transmissionisprohibited.
-Whentroubleshootingimagetransferissues,checkthecardand
computersettings.Fordetails,refertothecard’susermanual.
-PoorEye-Ficonnectionsmaycauseimagetransfertotakealong
time,andtransfermaybeinterruptedinsomecases.
-Eye-Ficardsmaybecomehot,duetotheirtransferfunctions.
-Batterypowerwillbeconsumedfasterthaninnormaluse.
-Cameraoperationmaybecomesluggish.Toresolvethis,try
setting[Eye-Fitrans.]to[Disable].
ConnectionstatusofEye-Ficardsinthecameracanbecheckedonthe
shootingscreen(inregularinformationdisplaymode)orplaybackscreen(in
simpleinformationdisplaymode).
(Gray) Notconnected Interrupted
(Blinkingwhite) Connecting Notcommunicating
(White) Connected
ErroracquiringEye-Ficard
information*
2
Animated
Transferin
progress*
1
*1Powersaving(=
38)onthecameraistemporarilydisabledduringimagetransfer.
*2Restartthecamera.Repeateddisplayofthisiconmayindicateaproblemwiththe
card.
Imageslabeledwitha[ ]iconhavebeentransferred.
COPY
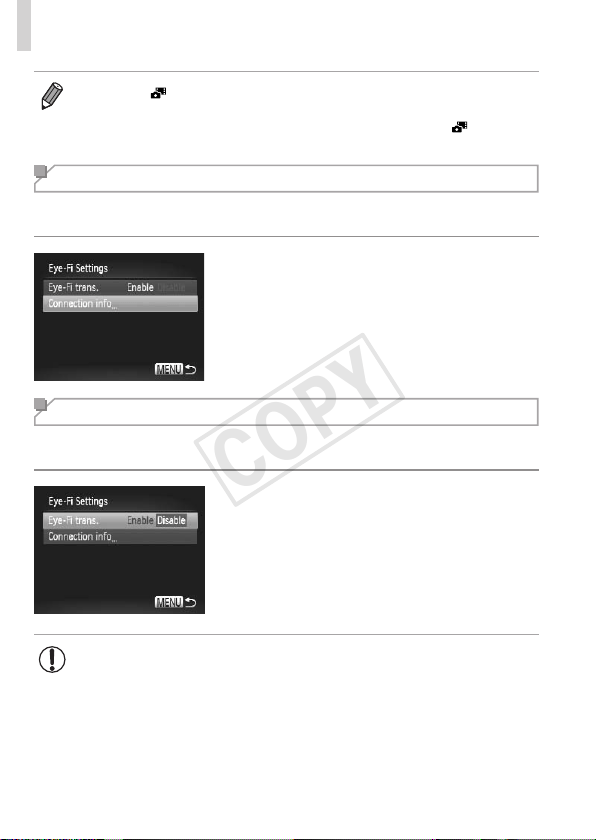
246
UsinganEye-FiCard
• Choosing[ ]modewillinterrupttheEye-Ficonnection.AlthoughtheEye-Fi
connectionwillberestoredafteryouchooseanothershootingmodeorenter
Playbackmode,thecameramaytransferanymoviesmadein[
]mode
again.
Checking Connection Information
ChecktheaccesspointSSIDusedbytheEye-Ficardortheconnection
status,asneeded.
Pressthe<n>button,choose
[Eye-FiSettings]onthe[3]tab,andthen
pressthe<m>button.
Choose[Connectioninfo],andthenpress
the<m>button.
Theconnectioninformationscreenis
displayed.
Disabling Eye-Fi Transfer
CongurethesettingasfollowstodisableEye-Fitransferbythecard,if
necessary.
Choose[Disable]in[Eye-Fitrans.].
Pressthe<n>button,choose
[Eye-FiSettings]onthe[3]tab,andthen
pressthe<m>button.
Choose[Eye-Fitrans.],andthenchoose
[Disable].
• [Eye-FiSettings]isnotshownunlessanEye-Ficardisinthe
camerawithitswrite-protecttabintheunlockedposition.Forthis
reason,youcannotchangesettingsforaninsertedEye-Ficardif
thewrite-protecttabisinthelockedposition.
COPY

247
Appendix
Helpfulinformationwhenusingthecamera
9
COPY

248
Troubleshooting
Ifyouthinkthereisaproblemwiththecamera,rstcheckthefollowing.Iftheitems
belowdonotsolveyourproblem,contactaCanonCustomerSupportHelpDesk.
Power
Nothinghappenswhenthepowerbuttonispressed.
• Conrmthatthebatteryischarged(=
15).
• Conrmthatthebatteryisinsertedfacingthecorrectway(=
16).
• Conrmthatthememorycard/batterycoverisfullyclosed(=
17).
• Dirtybatteryterminalsreducebatteryperformance.Trycleaningtheterminalswitha
cottonswabandreinsertingthebatteryafewtimes.
Thebatteryisdepletedquickly.
• Batteryperformancedecreasesatlowtemperatures.Trywarmingthebatteryalittle
byputtingitinyourpocket,forexample,withtheterminalcoveron.
• Ifthesemeasuresdonothelpandthebatteryisstilldepletedsoonaftercharging,it
hasreachedtheendofitslife.Purchaseanewbattery.
Thelensisnotretracted.
• Donotopenthememorycard/batterycoverwhilethecameraison.Closethecover,
turnthecameraon,andthenturnitoffagain(=
17).
Thebatteryisswollen.
• Batteryswellingisnormalanddoesnotposeanysafetyconcerns.However,ifbattery
swellingpreventsthebatteryfromttinginthecamera,contactaCanonCustomer
SupportHelpDesk.
Display on a TV
CameraimageslookdistortedornotdisplayedonaTV(=
222).
Shooting
Cannotshoot.
• InPlaybackmode(=
21),presstheshutterbuttonhalfway(=
39).
Nothingisdisplayed(=
49).
Strangedisplayonthescreenunderlowlight(=
43).
Strangedisplayonthescreenwhenshooting.
Notethatthefollowingdisplayproblemsarenotrecordedinstillimagesbutare
recordedinmovies.
• ThescreenmayickerandhorizontalbandingmayappearunderuorescentorLEDlighting.
Nodatestampisaddedtoimages.
• Congurethe[DateStamp]setting(
=
61).Notethatdatestampsarenotaddedtoimages
automatically,merelybecauseyouhaveconguredthe[Date/Time]setting(
=
19).
COPY

249
Troubleshooting
• Datestampsarenotaddedinshootingmodes(=
270–271)inwhichthissetting
cannotbecongured(=
61).
[h]ashesonthescreenwhentheshutterbuttonispressed,and
shootingisnotpossible(=
49).
[
]isdisplayedwhentheshutterbuttonispressedhalfway.
• Set[ISMode]to[Continuous](=
147).
• Raisetheashandsettheashmodeto[h](=
142).
• IncreasetheISOspeed(=
117).
• Mountthecameraonatripodortakeothermeasurestokeepitstill.Inthiscase,you
shouldset[ISMode]to[Off](=
147).
Shotsareoutoffocus.
• Presstheshutterbuttonhalfwaytofocusonsubjectsbeforepressingitalltheway
downtoshoot(=
39).
• Makesuresubjectsarewithinfocusingrange(=
276).
• Set[AF-assistBeam]to[On](=
82).
• Conrmthatunneededfunctionssuchasmacroaredeactivated.
• TryshootingwithfocuslockorAFlock(=
134,140).
NoAFframesaredisplayedandthecameradoesnotfocuswhenthe
shutterbuttonispressedhalfway.
• TohaveAFframesdisplayedandthecamerafocuscorrectly,trycomposingthe
shotwithhigher-contrastsubjectareascenteredbeforeyoupresstheshutterbutton
halfway.Otherwise,trypressingtheshutterbuttonhalfwayrepeatedly.
Subjectsinshotslooktoodark.
• Raisetheashandsettheashmodeto[h](=
142).
• Adjustbrightnessbyusingexposurecompensation(=
115).
• Adjustcontrastbyusingi-Contrast(=
120,192).
• UseAElockorspotmetering(=
115,116).
Subjectslooktoobright,highlightsarewashed-out.
• Lowertheashandsettheashmodeto[!](=
47).
• Adjustbrightnessbyusingexposurecompensation(=
115).
• UseAElockorspotmetering(=
115,116).
• Reducethelightingonsubjects.
Shotslooktoodarkdespitetheashring(=
49).
• Shootwithinashrange(=
276).
• Adjustbrightnessbyusingashexposurecompensationorchangingtheashoutput
level(=
144,145).
• IncreasetheISOspeed(=
117).
COPY

250
Troubleshooting
Subjectsinashshotslooktoobright,highlightsarewashed-out.
• Shootwithinashrange(=
276).
• Lowertheashandsettheashmodeto[!](=
47).
• Adjustbrightnessbyusingashexposurecompensationorchangingtheashoutput
level(=
144,153).
Whitedotsorsimilarimageartifactsappearinashshots.
• Thisiscausedbylightfromtheashreectingoffdustorairborneparticles.
Shotslookgrainy.
• LowertheISOspeed(=
117).
• HighISOspeedsinsomeshootingmodesmaycausegrainyimages(=
90).
Subjectsareaffectedbyred-eye(=
75).
• Set[Red-EyeLamp]to[On](=
82)toactivatethered-eyereductionlamp
(=
4)inashshots.Forbestresults,havesubjectslookatthered-eyereduction
lamp.Alsotryincreasingthelightinginindoorscenesandshootingatcloserrange.
• Editimagesusingred-eyecorrection(=
193).
Recordingtothememorycardtakestoolong,orcontinuousshootingisslower.
• Usethecameratoperformlow-levelformattingofthememorycard(=
204).
ShootingsettingsorFUNC.menusettingsarenotavailable.
• Availablesettingitemsvarybyshootingmode.Referto“FunctionsAvailableinEach
ShootingMode”,“FUNC.Menu”,and“ShootingMenu”(=
260–266).
TheBabiesorChildrenicondoesnotdisplay.
• TheBabiesandChildreniconswillnotdisplayifthebirthdayisnotsetinface
information(=
63).Iftheiconsstilldonotdisplayevenwhenyousetthebirthday,
re-registerfaceinformation(=
69),ormakesurethatthedate/timeareset
correctly(=
200).
Shooting Movies
Theelapsedtimeshownisincorrect,orrecordingisinterrupted.
• Usethecameratoformatthememorycard,orswitchtoacardthatsupportshigh-speed
recording.Notethateveniftheelapsedtimedisplayisincorrect,thelengthofmovieson
thememorycardcorrespondstotheactualrecordingtime(
=
203,275).
A“fullbuffer”warning(=
256)isdisplayedandshootingstops
automatically.
Thecamera’sinternalmemorybufferlledupasthecameracouldnotrecordtothe
memorycardquicklyenough.Tryoneofthefollowingmeasures.
• Usethecameratoperformlow-levelformattingofthememorycard(=
204).
• Lowertheimagequality(=
77).
• Switchtoamemorycardthatsupportshigh-speedrecording(=
275).
COPY

251
Troubleshooting
Zoomingisnotpossible.
• Zoomingisnotpossiblewhenshootingmoviesin[ ](=
95)and[ ](=
111)
modes.
Subjectslookdistorted.
• Subjectsthatpassinfrontofthecameraquicklymaylookdistorted.Thisisnota
malfunction.
Playback
Playbackisnotpossible.
• Imageormovieplaybackmaynotbepossibleifacomputerisusedtorenamelesor
alterthefolderstructure.RefertotheSoftware Guide(=
28)fordetailsonfolder
structureandlenames.
Playbackstops,oraudioskips.
• Switchtoamemorycardthatyouhaveperformedlow-levelformattingonwiththe
camera(=
204).
• Theremaybebriefinterruptionswhenplayingmoviescopiedtomemorycardsthat
haveslowreadspeeds.
• Whenmoviesareplayedonacomputer,framesmaybedroppedandaudiomayskip
ifcomputerperformanceisinadequate.
Soundisnotplayedduringmovies.
• Adjustthevolume(=
26,161)ifyouhaveactivated[Mute](=
198)orthe
soundinthemovieisfaint.
• Nosoundisplayedformoviesshotin[
](=
95)or[ ](=
111)mode
becauseaudioisnotrecordedinthesemodes.
Computer
Cannottransferimagestoacomputer.
Whenattemptingtotransferimagestothecomputerviaacable,tryreducingthe
transferspeedasfollows.
• Pressthe<1>buttontoenterPlaybackmode.Holdthe<n>buttondownas
youpressthe<o>and<m>buttonsatthesametime.Onthenextscreen,press
the<q><r>buttonstochoose[B],andthenpressthe<m>button.
Eye-Fi Cards
Cannottransferimages(=
245).
COPY

252
On-Screen Messages
Ifanerrormessageisdisplayed,respondasfollows.
Nomemorycard
• Thememorycardmaybeinsertedfacingthewrongway.Reinsertthememorycard
facingthecorrectway(=
17).
Memorycardlocked
• Thewrite-protecttabofthememorycardissettothelockedposition.Switchthe
write-protecttabtotheunlockedposition(=
16).
Cannotrecord!
• Shootingwasattemptedwithoutamemorycardinthecamera.Toshoot,inserta
memorycardfacingthecorrectway(=
17).
Memorycarderror(=
204)
• Ifthesameerrormessageisdisplayedevenwhenyouhaveinsertedaformattedmemory
cardfacingthecorrectway,contactaCanonCustomerSupportHelpDesk(
=
17).
Insufcientspaceoncard
• Thereisnotenoughfreespaceonthememorycardtoshoot(=
45,85,113,
149)oreditimages(=
188–193).Eithereraseunneededimages(=
179)or
insertamemorycardwithenoughfreespace(=
16).
Chargethebattery(=
15)
NoImage.
• Thememorycarddoesnotcontainanyimagesthatcanbedisplayed.
Protected!(=
175)
UnidentiedImage/IncompatibleJPEG/Imagetoolarge./Cannotplay
backAVI/RAW
• Unsupportedorcorruptimagescannotbedisplayed.
• Itmaynotbepossibletodisplayimagesthatwereeditedorrenamedonacomputer,
orimagesshotwithanothercamera.
Cannotmagnify!/CannotplaybackthiscontentinSmartShufe/
Cannotrotate/Cannotmodifyimage/Cannotregisterthisimage!/
Cannotmodify/Cannotassigntocategory/Unselectableimage./No
identicationinformation
• Thefollowingfunctionsmaybeunavailableforimagesthatwererenamedoralready
editedonacomputer,orimagesshotwithanothercamera.Notethatstarred(*)
functionsarenotavailableformovies.Magnify*(=
172),SmartShufe*(=
174),
Categorize(=
185),Rotate(=
182),Edit*(=
188–193),AssignasStart-up
Image*(=
202),PrintList*(=
238),PhotobookSet-up*(=
243),andEditID
Info*(=
171–172).
• Groupedimagescannotbeprocessed(=
88).
COPY

253
On-ScreenMessages
Invalidselectionrange
• Whenspecifyingarangeforimageselection(=
176,181,187,241),you
attemptedtochooseaninitialimagethatwasafterthenalimage,orvice-versa.
Exceededselectionlimit
• Morethan998imageswereselectedforPrintList(=
238).Choose998imagesor
less.
• Morethan998imageswereselectedforPrintList(=
238)orPhotobookSet-up
(=
243).Choose998imagesorless.
• PrintList(=
238)orPhotobookSet-up(=
243)settingscouldnotbesaved
correctly.Reducethenumberofselectedimagesandtryagain.
• Youattemptedtochoosemorethan500imagesinProtect(=
175),Erase
(=
179),Favorites(=
184),MyCategory(=
185),PrintList(=
238),or
PhotobookSet-up(=
243).
Communicationerror
• Anexcessiveamountofimages(approx.1,000)onthememorycardprevented
printingorimagetransfertoacomputer.Totransfertheimages,useacommercially
availableUSBcardreader.Toprint,insertthememorycarddirectlyintotheprinter
cardslot.
Namingerror!
• Thefoldercouldnotbecreatedorimagescouldnotberecorded,becausethehighest
supportedfoldernumber(999)forstoringimagesonthecardhasbeenreachedand
thehighestsupportedimagenumber(9999)forimagesinfoldershasbeenreached.
Inthe[3]menu,change[FileNumbering]to[AutoReset](=
205),orformatthe
memorycard(=
203).
LensError
• Thiserrormayoccurifthelensisheldwhileitismoving,orwhenthecameraisused
industyorsandylocations.
• Frequentdisplayofthiserrormessagemayindicatecameradamage.Inthiscase,
contactaCanonCustomerSupportHelpDesk.
Acameraerrorwasdetected(error number)
• Ifthiserrormessageisdisplayedimmediatelyafterashot,theimagemaynothave
beensaved.SwitchtoPlaybackmodetocheckfortheimage.
• Frequentdisplayofthiserrormessagemayindicatecameradamage.Inthiscase,
writedowntheerrornumber(Exx)andcontactaCanonCustomerSupportHelp
Desk.
FileError
• Correctprinting(=
231)maynotbepossibleforphotosfromothercamerasor
imagesthathavebeenalteredusingcomputersoftware,evenifthecamerais
connectedtotheprinter.
COPY

254
On-ScreenMessages
Printerror
• Checkthepapersizesetting(=
235).Ifthiserrormessageisdisplayedwhenthe
settingiscorrect,restarttheprinterandcompletethesettingonthecameraagain.
Inkabsorberfull
• ContactaCanonCustomerSupportHelpDesktorequestassistancewithink
absorberreplacement.
COPY
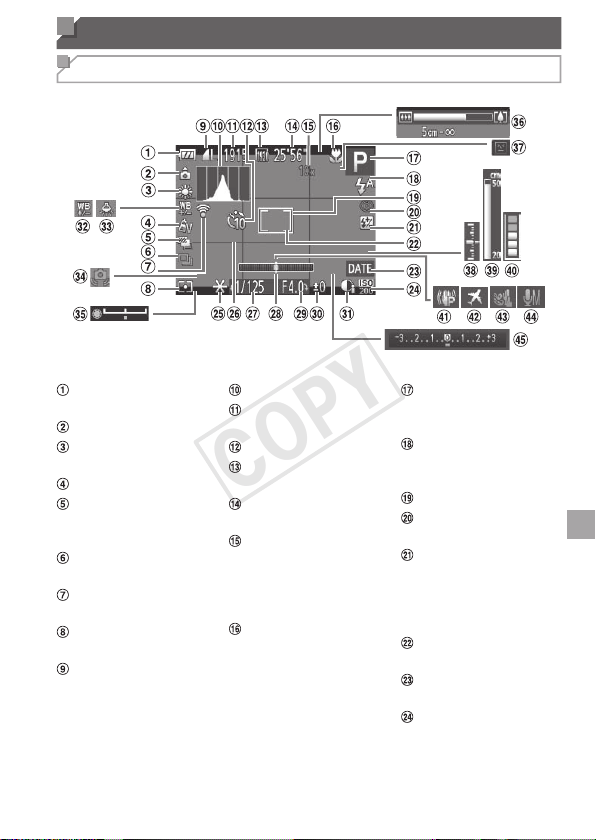
255
On-Screen Information
Shooting (Information Display)
Thesameinformationisshownontheviewnder.
Batterylevel
(=
256)
Cameraorientation*
Whitebalance
(=
122)
MyColors(=
125)
AEBshooting
(=
119)/Focus
bracketing(=
141)
Drivemode
(=
127)
Eye-Ficonnection
status(=
245)
Meteringmethod
(=
116)
Stillimage
compression
(=
147),
Resolution(=
74)
Histogram(=
162)
Recordableshots
(=
275)
Self-timer(=
58)
Moviequality
(=
77)
Remainingtime
(=
275)
Digitalzoom
magnication
(=
55),Digital
tele-converter
(=
132)
Focusingrange
(=
129,130),AF
lock(=
140),IS
modeicon(=
53)
Shootingmode
(=
260),Scene
icon(=
51)
Flashmode
(=
142,143),
LEDlight(=
228)
AFframe(=
133)
Red-eyecorrection
(=
75)
Flashexposure
compensation
(=
144)/Flash
outputlevel
(=
153)
SpotAEpointframe
(=
116)
Datestamp
(=
61)
ISOspeed(=
117)
COPY
256
On-ScreenInformation
AElock(=
115),
FElock(=
144)
Gridlines(=
154)
Shutterspeed
(=
150,152)
Electroniclevel
(=
79)
Aperturevalue
(=
151,152)
Exposure
compensationlevel
(=
115)
i-Contrast(=
120)
Whitebalance
correction(=
124)
Mercurylamp
correction(=
76)
Camerashake
warning(=
49)
Exposureshiftbar
(=
110)
Zoombar(=
46)
Blinkdetection
(=
81)
Exposurelevel
(=
152)
MFindicator
(=
130)
Bufferwarning
(=
250)
Imagestabilization
(=
147)
Timezone(=
200)
Windlter(=
78)
Microphonelevel
(=
78)
Exposure
compensationbar
(=
115)
* :Regularorientation, :Heldvertically
Thecameradetectstheshootingorientationandadjustssettingsforoptimalshots.
Orientationisalsodetectedduringplayback,andineitherorientation,thecamera
automaticallyrotatesimagesasneeded.
However,theorientationmaynotbedetectedcorrectlywhenthecameraispointed
straightupordown.
BatteryLevel
Anon-screeniconormessageindicatesthebatterychargelevel.
Display Details
Sufcientcharge
Slightlydepleted,butsufcient
(Blinkingred)
Nearlydepleted—chargethebatterysoon
[Chargethebattery] Depleted—chargethebatteryimmediately
COPY
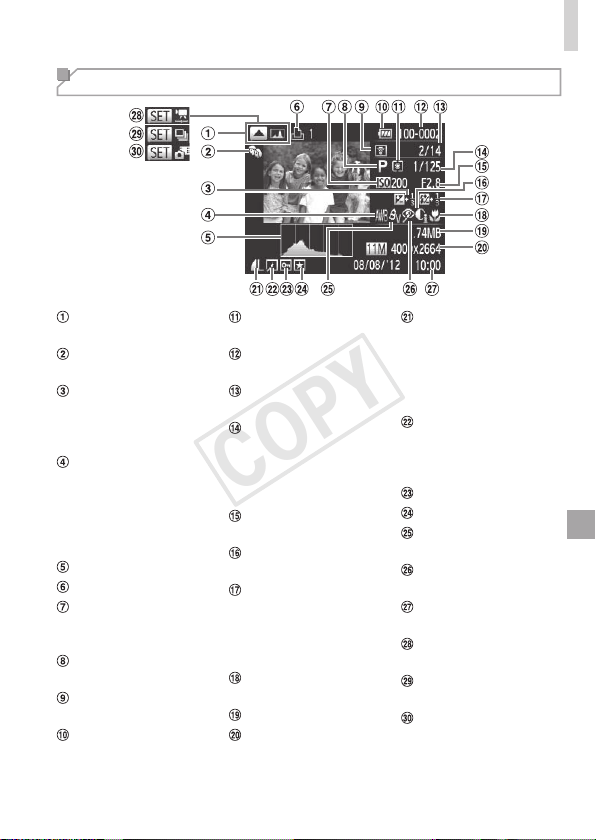
257
On-ScreenInformation
Playback (Detailed Information Display)
Switchdisplay(RGB
histogram)(=
163)
MyCategory
(=
185)
Exposure
compensationlevel
(=
115),Exposure
shiftlevel(=
110)
Whitebalance
(=
122),White
balancecorrection
(=
124),Mercury
lampcorrection
(=
76)
Histogram(=
162)
Printlist(=
238)
ISOspeed(=
117),
Playbackspeed
(=
96,111)
Shootingmode
(=
260)
TransferredviaEye-
Fi(=
245)
Batterylevel
(=
256)
Meteringmethod
(=
116)
Foldernumber-File
number(=
205)
Currentimageno./
Totalno.ofimages
Shutterspeed(still
images)(=
150),
Imagequality/
Framerate(movies)
(=
77)
Aperturevalue
(=
151)
i-Contrast(=
120,
192)
Flashexposure
compensation
(=
144),Flash
outputlevel
(=
153)
Focusingrange
(=
129,130)
Filesize
Stillimages:
Resolution(=
275)
Movies:Playback
time
Compression(image
quality)(=
147)/
Resolution
(=
74),RAW
(=
146),MOV
(movies)
Groupedimage
(=
88,106),
Imageediting
(=
188–193)
Protection(=
175)
Favorites(=
184)
MyColors(=
125,
191)
Red-eyecorrection
(=
75,193)
Shootingdate/time
(=
19)
Movies(=
46,
160)
Groupplayback
(=
170)
PlayClip(=
164)
COPY
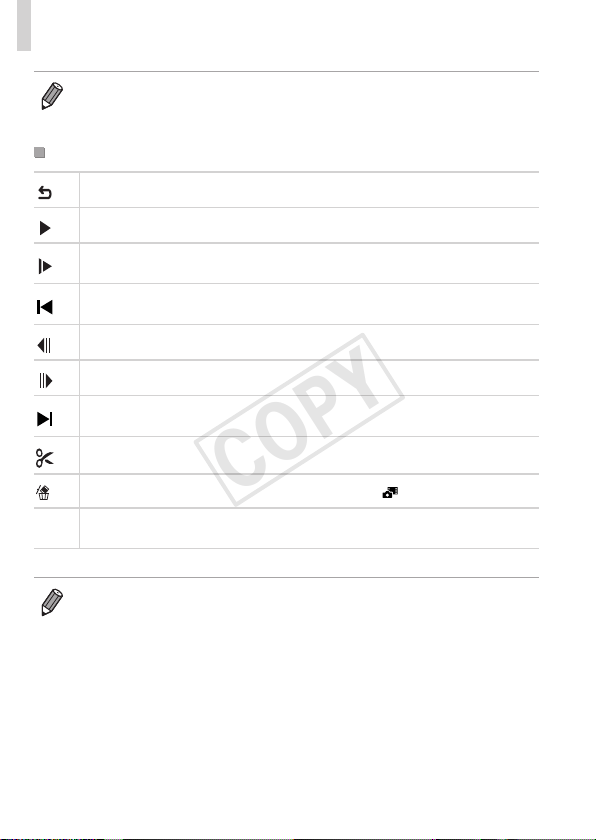
258
On-ScreenInformation
• SomeinformationmaynotbedisplayedwhenviewingimagesonaTV
(
=
218).
SummaryofMovieControlPanelin“Viewing”(=
160)
Exit
Play
SlowMotion(Toadjusttheplaybackspeed,pressthe<q><r>buttonsorturn
the<5>dial.Nosoundisplayed.)
SkipBackward*orPreviousClip(=
86)(Tocontinueskippingbackward,
keepholdingdownthe<m>button.)
PreviousFrame(Forfast-rewind,keepholdingdownthe<m>button.)
NextFrame(Forfast-forward,keepholdingdownthe<m>button.)
SkipForward*orNextClip(=
86)(Tocontinueskippingforward,keep
holdingdownthe<m>button.)
Edit(=
194)
Shownwhenyouhaveselectedamoviecreatedin[ ]mode(=
196).
c
ShownwhenthecameraisconnectedtoaPictBridge-compatibleprinter
(=
231).
*Displaystheframeapprox.4sec.beforeorafterthecurrentframe.
• Duringmovieplayback,youcanskipbackorforward(ortothepreviousor
nextchapter)bypressingthe<q><r>buttons.
COPY

259
Handling Precautions
• Thecameraisahigh-precisionelectronicdevice.Avoiddroppingitor
subjectingittostrongimpact.
• Neverbringthecameranearmagnets,motors,orotherdevicesthat
generatestrongelectromagneticelds,whichmaycausemalfunctionor
eraseimagedata.
• Ifwaterdropletsordirtadherestothecameraorscreen,wipewithadry
softcloth,suchasaneyeglasscloth.Donotrubhardorapplyforce.
• Neverusecleanerscontainingorganicsolventstocleanthecameraor
screen.
• Useablowerbrushtoremovedustfromthelens.Ifcleaningisdifcult,
contactaCanonCustomerSupportHelpDesk.
• Topreventcondensationfromformingonthecameraaftersudden
temperaturechanges(whenthecameraistransferredfromcoldtowarm
environments),putthecamerainanairtight,resealableplasticbagand
letitgraduallyadjusttothetemperaturebeforeremovingitfromthebag.
• Ifcondensationdoesformonthecamera,stopusingitimmediately.
Continuingtousethecamerainthisstatemaydamageit.Removethe
batteryandmemorycard,andwaituntilthemoisturehasevaporated
beforeresuminguse.
COPY

260
Functions and Menu Tables
Functions Available in Each Shooting Mode
ShootingMode
Function
D B M G A
K E
I
P t
x
v
T
Y
E
ExposureCompensation(=
115)
*1 *1
–
O O O
–
O O O O O O O O O O O O
–
O O O O O O
– – – – –
ISOSpeed(=
117)
*1 *1
–
O O O O O O O O O O O O O O O O O O O O O O O O O O O O
*1 *1
O O O O
–
O
– – – – – – – – – – – – – – – – – – – – – – –
Self-Timer(=
58)
*1 *1
O O O O O O O O O O O O O O O O O O O O O O O O O O O O O
][$
*1 *1
O O O O O O
–
O O
– – – –
O O O O O O O O O O O O O O O O
Self-TimerSettings(=
59)
Delay*
2
*1 *1
O O O O O O
–
O O
– – – –
O O O O O O O O O O O O O O O O
Shots*
3
*1 *1
O O O O O
– –
O O
– – – –
O O O
–
O O O O O O O O O
– – –
Flash(=
142,143)*
4
*1 *1
– – –
O O O
–
O O O O O
–
O O
– – –
O O O O O O O O
– – –
h
*1 *1
O O O O
–
O
–
O O O O O
–
O O
–
O
–
O O O O O O O O
– – –
Z
*1 *1
–
O
–
O
*5
O
– – – – – – –
*5
– –
O
– – – – – – – – – – – –
!
– – – – – – – –
O
– – – – –
O
– –
O
–
O
– – – – – – – –
O O O
ApertureValue(=
151)
*1 *1
O O
– – – – – – – – – – – – – – – – – – – – – – – – – – –
ShutterSpeed(=
150)
*1 *1
O
–
O
– – – – – – – – – – – – – – – – – – – – – – – – – –
ProgramShift(=
115)
O O
–
O O O
–
O
– – – – – – – – – – – – – – – – – – – – – – –
AELock/FELock(=
115,144)*
6
O O
–
O O O
–
O
– – – – – – – – – – – – – – – – – – – –
O O O
AELock(Movie)/ExposureShift(=
110)
– – – – – – – – –
– – – – – – – – – – – – – – – – – – –
O O
–
AFLock(whenassignedtothe button(
=
155))
O O O O O O
–
O
–
O O
– – –
O O O
–
O O O O O O O O O O O O O
FocusingRange(=
129,130)
*1 *1
O O O O O O O O O O O O O O O O O O O O O O O O O O O O O
e
*1 *1
O O O O
–
O
–
O O
– – –
O O O
–
O O O O O O O O O O O O O
(=
130)/AFLock(=
140)
*1 *1
O O O O
–
O
–
O O
– – –
O O O
– –
O O O O O O O O O O O O
MoveAFFrame(=
135)
*1 *1
O O O O
– – – – – – – – – – – – – – – – – – – – – – – – –
ResizeAFFrame(=
135)
*1 *1
O O O O
–
O
–
O
– – – –
O
–
O
– – – – –
O O O O O O O O O
FaceSelect(=
139)
O O O O O O O O
–
O O O O O O
–
O
– –
O
– –
O O O O O O O O O
TrackingAF(=
62,136)
O O O O O O O
–
O O
– – – –
O
–
O
– – – – – – –
O O O O
– – –
(=
56)/ (=
57)
O O O O O O O O O O O O O O O O O O
–
O O O O O O O O O O O O
ShootStillImagesDuringMovies(=
108)
O O O O O O O O O O O O O O O O O O O O O
–
O O O O O O O O
–
ScreenDisplay(=
43)
*1 *1
O O O O O O O O
– – – –
O O O O O
– – – – – –
O O
–
O O O
O
Availableorsetautomatically.
–
Notavailable.
*1Optionsvarydependingontheassignedshootingmode.*2Cannotbesetto0
secondsinmodeswithoutselectionofthenumberofshots.*3Oneshot(cannotbe
modied)inmodeswithoutselectionofthenumberofshots.
COPY

261
FunctionsandMenuTables
ShootingMode
Function
D B M G A
K E
I
P t
x
v
T
Y
E
ExposureCompensation(=
115)
*1 *1
–
O O O
–
O O O O O O O O O O O O
–
O O O O O O
– – – – –
ISOSpeed(=
117)
*1 *1
–
O O O O O O O O O O O O O O O O O O O O O O O O O O O O
*1 *1
O O O O
–
O
– – – – – – – – – – – – – – – – – – – – – – –
Self-Timer(=
58)
*1 *1
O O O O O O O O O O O O O O O O O O O O O O O O O O O O O
][$
*1 *1
O O O O O O
–
O O
– – – –
O O O O O O O O O O O O O O O O
Self-TimerSettings(=
59)
Delay*
2
*1 *1
O O O O O O
–
O O
– – – –
O O O O O O O O O O O O O O O O
Shots*
3
*1 *1
O O O O O
– –
O O
– – – –
O O O
–
O O O O O O O O O
– – –
Flash(=
142,143)*
4
*1 *1
– – –
O O O
–
O O O O O
–
O O
– – –
O O O O O O O O
– – –
h
*1 *1
O O O O
–
O
–
O O O O O
–
O O
–
O
–
O O O O O O O O
– – –
Z
*1 *1
–
O
–
O
*5
O
– – – – – – –
*5
– –
O
– – – – – – – – – – – –
!
– – – – – – – –
O
– – – – –
O
– –
O
–
O
– – – – – – – –
O O O
ApertureValue(=
151)
*1 *1
O O
– – – – – – – – – – – – – – – – – – – – – – – – – – –
ShutterSpeed(=
150)
*1 *1
O
–
O
– – – – – – – – – – – – – – – – – – – – – – – – – –
ProgramShift(=
115)
O O
–
O O O
–
O
– – – – – – – – – – – – – – – – – – – – – – –
AELock/FELock(=
115,144)*
6
O O
–
O O O
–
O
– – – – – – – – – – – – – – – – – – – –
O O O
AELock(Movie)/ExposureShift(=
110)
– – – – – – – – –
– – – – – – – – – – – – – – – – – – –
O O
–
AFLock(whenassignedtothe button(
=
155))
O O O O O O
–
O
–
O O
– – –
O O O
–
O O O O O O O O O O O O O
FocusingRange(=
129,130)
*1 *1
O O O O O O O O O O O O O O O O O O O O O O O O O O O O O
e
*1 *1
O O O O
–
O
–
O O
– – –
O O O
–
O O O O O O O O O O O O O
(=
130)/AFLock(=
140)
*1 *1
O O O O
–
O
–
O O
– – –
O O O
– –
O O O O O O O O O O O O
MoveAFFrame(=
135)
*1 *1
O O O O
– – – – – – – – – – – – – – – – – – – – – – – – –
ResizeAFFrame(=
135)
*1 *1
O O O O
–
O
–
O
– – – –
O
–
O
– – – – –
O O O O O O O O O
FaceSelect(=
139)
O O O O O O O O
–
O O O O O O
–
O
– –
O
– –
O O O O O O O O O
TrackingAF(=
62,136)
O O O O O O O
–
O O
– – – –
O
–
O
– – – – – – –
O O O O
– – –
(=
56)/ (=
57)
O O O O O O O O O O O O O O O O O O
–
O O O O O O O O O O O O
ShootStillImagesDuringMovies(=
108)
O O O O O O O O O O O O O O O O O O O O O
–
O O O O O O O O
–
ScreenDisplay(=
43)
*1 *1
O O O O O O O O
– – – –
O O O O O
– – – – – –
O O
–
O O O
O
Availableorsetautomatically.
–
Notavailable.
*4
Setto[
!
]whentheashisdown,butotherwiseselectionispossiblewhentheashisup.
*5Notavailable,butswitchesto[Z]insomecases.*6FElocknotavailablein[!]
ashmode.
COPY
262
FunctionsandMenuTables
FUNC. Menu
ShootingMode
Function
D B M G A
K E
I
P t
x
v
T
Y
E
DRCorrection(=
120)
*1 *1
O O O O
–
O O O O O O O O O O O O O O O O O O O O O
– – –
*1 *1
–
O O O O
– – – – – – – – – – – – – – – – – – – – – – – –
*1 *1
O O O O
– – – – – – – – – – – – – – – – – – – – – – – – –
ShadowCorrect(=
121)
*1 *1
O O O O
–
O O O O O O O O O O O O O O O O O O O O O
– – –
*1 *1
O O O O O O
– – – – – – – – – – – – – – – – – – – – – – –
WhiteBalance(=
122)
*1 *1
O O O O O O O O O O O O O O O O O O O O O O O O O O O O O
*1 *1
O O O O
–
O
– – –
O O O
– – – –
O
– – – – – – – – –
O O
–
h
*1 *1
O O O O
–
O
– – –
O O O
– – – –
O
– – – – – – – – – – – –
*2
*2
*1 *1
O O O O
–
O
– – –
O O O
– – – –
O
– – – – – – – – –
O O
–
WhiteBalanceCorrection(=
124)
*1 *1
O O O O
– – – – – – – – – – – – – – – – – – – – – – – – –
MyColors(=
125)
*1 *1
O O O O O O O O O O O O O O O O O O O O O O O O O O O O O
*3
*3
*4
*1 *1
O O O O
–
O
– – –
O O O
– – – –
O
– – – – – – – – –
O O
–
Bracketing(=
141)
*1 *1
O O O O O O O O O O O O O O O O O O O O O O O O O O O O O
*1 *1
–
O O O
– – – – – – – – – – – – – – – – – – – – – – – – –
*1 *1
O O O O
– – – – – – – – – – – – – – – – – – – – – – – – –
DriveMode(=
127)
*1 *1
O O O O O O O O O O O O
–
O O O O O O O O O O O O O O O O
– – – – – –
O
– – – – – – – – – – – – – – – – – – – – – – – –
*1 *1
O O O O
– – –
O O
– – –
O
–
O O
– –
O O O O O O O O
– – –
*
5
*1 *1
O O O O
– –
O
– – – – –
O
–
O O
– –
O O O O O O O O
– – –
O
Availableorsetautomatically.
–
Notavailable.
*1Optionsvarydependingontheassignedshootingmode.
*2Notavailablein[x]or[v].
*3Whitebalanceisnotavailable.
*4Setinarangeof1–5:contrast,sharpness,colorsaturation,red,green,blue,and
skintone.
*5[
]issetwith[ ],AFlock,or[t].
COPY

263
FunctionsandMenuTables
ShootingMode
Function
D B M G A
K E
I
P t
x
v
T
Y
E
DRCorrection(=
120)
*1 *1
O O O O
–
O O O O O O O O O O O O O O O O O O O O O
– – –
*1 *1
–
O O O O
– – – – – – – – – – – – – – – – – – – – – – – –
*1 *1
O O O O
– – – – – – – – – – – – – – – – – – – – – – – – –
ShadowCorrect(=
121)
*1 *1
O O O O
–
O O O O O O O O O O O O O O O O O O O O O
– – –
*1 *1
O O O O O O
– – – – – – – – – – – – – – – – – – – – – – –
WhiteBalance(=
122)
*1 *1
O O O O O O O O O O O O O O O O O O O O O O O O O O O O O
*1 *1
O O O O
–
O
– – –
O O O
– – – –
O
– – – – – – – – –
O O
–
h
*1 *1
O O O O
–
O
– – –
O O O
– – – –
O
– – – – – – – – – – – –
*2
*2
*1 *1
O O O O
–
O
– – –
O O O
– – – –
O
– – – – – – – – –
O O
–
WhiteBalanceCorrection(=
124)
*1 *1
O O O O
– – – – – – – – – – – – – – – – – – – – – – – – –
MyColors(=
125)
*1 *1
O O O O O O O O O O O O O O O O O O O O O O O O O O O O O
*3
*3
*4
*1 *1
O O O O
–
O
– – –
O O O
– – – –
O
– – – – – – – – –
O O
–
Bracketing(=
141)
*1 *1
O O O O O O O O O O O O O O O O O O O O O O O O O O O O O
*1 *1
–
O O O
– – – – – – – – – – – – – – – – – – – – – – – – –
*1 *1
O O O O
– – – – – – – – – – – – – – – – – – – – – – – – –
DriveMode(=
127)
*1 *1
O O O O O O O O O O O O
–
O O O O O O O O O O O O O O O O
– – – – – –
O
– – – – – – – – – – – – – – – – – – – – – – – –
*1 *1
O O O O
– – –
O O
– – –
O
–
O O
– –
O O O O O O O O
– – –
*
5
*1 *1
O O O O
– –
O
– – – – –
O
–
O O
– –
O O O O O O O O
– – –
O
Availableorsetautomatically.
–
Notavailable.
COPY
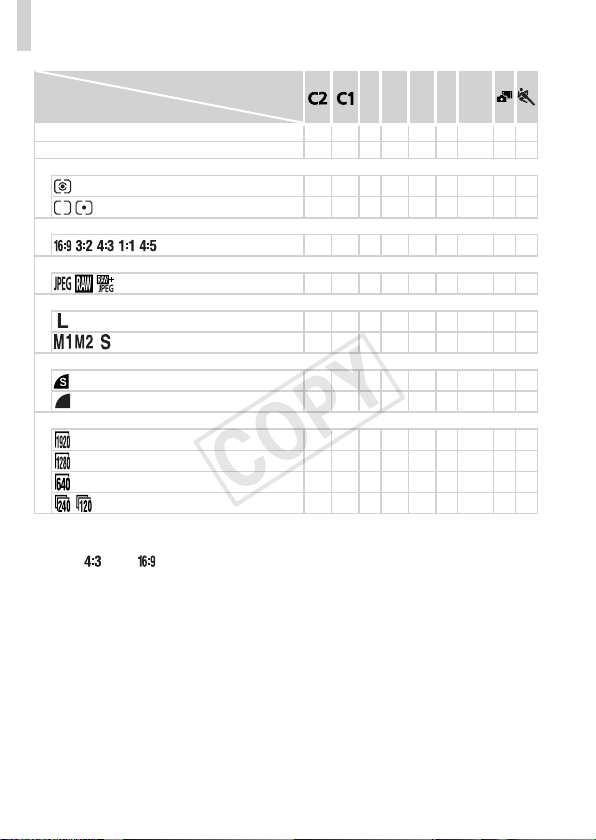
264
FunctionsandMenuTables
ShootingMode
Function
D B M G A
K E
I
P t
x
v
T
Y
E
FlashExposureCompensation(=
144)
*1 *1
–
O O O
–
O
– – – – – – – – – – – – – – – – – – – – – – –
FlashOutputLevel(=
153)
*1 *1
O O O
– – – – – – – – – – – – – – – – – – – – – – – – – –
MeteringMethod(=
116)
*1 *1
O O O O O O O O O O O O O O O O O O O O O O O O O O O O O
*1 *1
O O O O
–
O
– – – – – – – – – – – – – – – – – – – – – – –
StillImageAspectRatio(=
73)
*1 *1
O O O O O
–
O O
–
O O O
– –
O O
–
O
–
*2
– –
O O O O
– – –
ImageType(=
146)
*1 *1
O O O O
– – – – – – – – – – – – – – – – – – – – – – – – –
Resolution(=
74)
*1 *1
O O O O O O O O O O O O O O O O O O O O O O O O O O O O O
*1 *1
O O O O O O O O
–
O O O
– –
O O O
– – – – – – – – –
O O O
Compression(=
147)
*1 *1
O O O O
– – – – – – – – – – – – – – – – – – – – – – – – –
*1 *1
O O O O O O O O O O O O O O O O O O O O O O O O O O O O O
MovieQuality(=
77)
*1 *1
O O O O O O O O O O O O O O O O O O O
–
O O O O O O O
– –
*1 *1
O O O O O O O O O O O O O O O O O O O
*3
O O O O O O O O
–
*1 *1
O O O O O O O O O O O O O O O O O O O
*3
O O O O O O O
– –
– – – – – – – – – – – – – – – – – – – – – – – – – – – – – –
O
O
Availableorsetautomatically.
–
Notavailable.
*1Optionsvarydependingontheassignedshootingmode.
*2Only[
]and[ ]areavailable.
*3Synchronizeswiththeaspectratiosettingandisautomaticallyset(=
96).
COPY
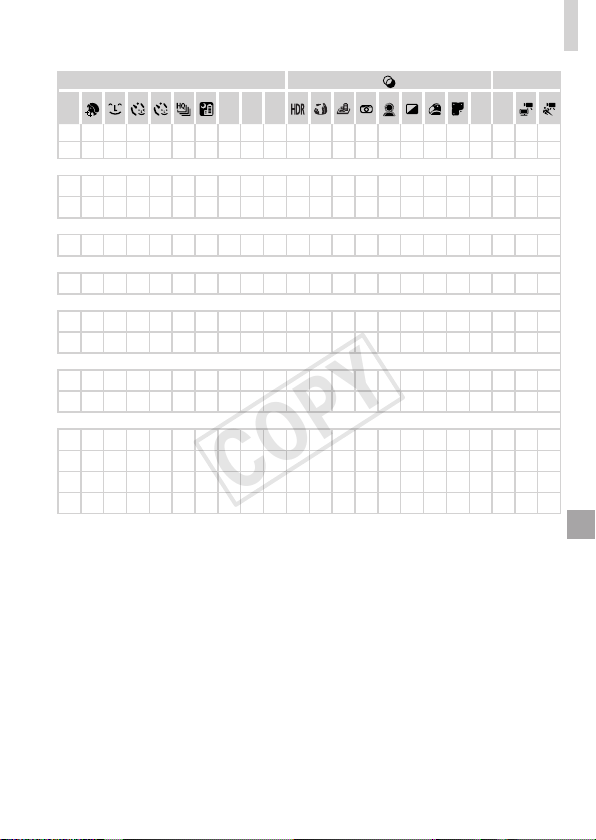
265
FunctionsandMenuTables
ShootingMode
Function
D B M G A
K E
I
P t
x
v
T
Y
E
FlashExposureCompensation(=
144)
*1 *1
–
O O O
–
O
– – – – – – – – – – – – – – – – – – – – – – –
FlashOutputLevel(=
153)
*1 *1
O O O
– – – – – – – – – – – – – – – – – – – – – – – – – –
MeteringMethod(=
116)
*1 *1
O O O O O O O O O O O O O O O O O O O O O O O O O O O O O
*1 *1
O O O O
–
O
– – – – – – – – – – – – – – – – – – – – – – –
StillImageAspectRatio(=
73)
*1 *1
O O O O O
–
O O
–
O O O
– –
O O
–
O
–
*2
– –
O O O O
– – –
ImageType(=
146)
*1 *1
O O O O
– – – – – – – – – – – – – – – – – – – – – – – – –
Resolution(=
74)
*1 *1
O O O O O O O O O O O O O O O O O O O O O O O O O O O O O
*1 *1
O O O O O O O O
–
O O O
– –
O O O
– – – – – – – – –
O O O
Compression(=
147)
*1 *1
O O O O
– – – – – – – – – – – – – – – – – – – – – – – – –
*1 *1
O O O O O O O O O O O O O O O O O O O O O O O O O O O O O
MovieQuality(=
77)
*1 *1
O O O O O O O O O O O O O O O O O O O
–
O O O O O O O
– –
*1 *1
O O O O O O O O O O O O O O O O O O O
*3
O O O O O O O O
–
*1 *1
O O O O O O O O O O O O O O O O O O O
*3
O O O O O O O
– –
– – – – – – – – – – – – – – – – – – – – – – – – – – – – – –
O
O
Availableorsetautomatically.
–
Notavailable.
*1Optionsvarydependingontheassignedshootingmode.
*2Only[
]and[ ]areavailable.
*3Synchronizeswiththeaspectratiosettingandisautomaticallyset(=
96).
COPY

266
FunctionsandMenuTables
4 Shooting Menu
ShootingMode
Function
D B M G A
K E
I
P t
x
v
T
Y
E
AFFrame(=
133)
FaceDetect*
1
*2 *2
O O O O O O
–
O O O O O O O O
– –
O
– –
O O O O O O O O O
TrackingAF
*2 *2
O O O O
*3
–
O O
– – – –
O
–
O
– – – – – – –
O O O O
– – –
FlexiZone/Center*
4
*2 *2
O O O O
–
O O O
– – – –
O
–
O O O
–
O
–
O O O O O O O O O
DigitalZoom(=
55)
Standard
*2 *2
O O O O O
–
O O
–
O O O
– –
O O
– – – – – – – – – –
O O
–
Off
*2 *2
O O O O O O O O O O O O O O O O O O O O O O O O O O O O O
DigitalTele-converter(1.5x/2.0x)
*2 *2
O O O O
– – – – – – – – – – – – – – – – – – – – – – – – –
AF-PointZoom(=
80)
On
*2 *2
O O O O O
– –
O
–
O O O O
–
O
– –
O
– – – –
O O O O
– – –
Off
*2 *2
O O O O O O O O O O O O O O O O O O O O O O O O O O O O O
ServoAF(=
137)
On
*2 *2
O O O O
– –
O O
– – – – – –
O
– – – – – – –
O O O O
– – –
Off*
5
*2 *2
O O O O O O
–
O O O O O O O O O O O O O O O O O O O O O O
ContinuousAF(=
138)
On
*2 *2
O O O O O O O O O O O O O O O
–
O O O O O O O O O O O O O
Off
*2 *2
O O O O
– – –
O O
– – – –
O O O O O O O O O O O O O
– – –
AF-assistBeam(=
82)
On
*2 *2
O O O O O O
–
O O O O O O O O
–
O O O O O O O O O O O O O
Off
*2 *2
O O O O O O O O O
–
O O O O O O O O O O O O O O O O O O O
MF-PointZoom(=
130)
On
*2 *2
O O O O
– – –
O
– – – –
O
–
O
– –
O
– – – –
O O O O
– – –
Off
*2 *2
O O O O O O O O O O O O O O O O O O O O O O O O O O O O O
SafetyMF(=
130)
On
*2 *2
O O O O
–
O
–
O
– – – –
O O O
– –
O O O O O O O O O O O O
Off
*2 *2
O O O O O O O O O O O O O O O O O O O O O O O O O O O O O
O
Availableorsetautomatically.
–
Notavailable.
*1Operationwhennofacesaredetectedvariesbyshootingmode.
*2Optionsvarydependingontheassignedshootingmode.
*3Onlyavailablebypressingthe<o>button(=
62).
*4[FlexiZone]inG,M,B,andDmodes,otherwise[Center].
*5[On]whensubjectmovementisdetectedin<A>mode.
COPY

267
FunctionsandMenuTables
ShootingMode
Function
D B M G A
K E
I
P t
x
v
T
Y
E
AFFrame(=
133)
FaceDetect*
1
*2 *2
O O O O O O
–
O O O O O O O O
– –
O
– –
O O O O O O O O O
TrackingAF
*2 *2
O O O O
*3
–
O O
– – – –
O
–
O
– – – – – – –
O O O O
– – –
FlexiZone/Center*
4
*2 *2
O O O O
–
O O O
– – – –
O
–
O O O
–
O
–
O O O O O O O O O
DigitalZoom(=
55)
Standard
*2 *2
O O O O O
–
O O
–
O O O
– –
O O
– – – – – – – – – –
O O
–
Off
*2 *2
O O O O O O O O O O O O O O O O O O O O O O O O O O O O O
DigitalTele-converter(1.5x/2.0x)
*2 *2
O O O O
– – – – – – – – – – – – – – – – – – – – – – – – –
AF-PointZoom(=
80)
On
*2 *2
O O O O O
– –
O
–
O O O O
–
O
– –
O
– – – –
O O O O
– – –
Off
*2 *2
O O O O O O O O O O O O O O O O O O O O O O O O O O O O O
ServoAF(=
137)
On
*2 *2
O O O O
– –
O O
– – – – – –
O
– – – – – – –
O O O O
– – –
Off*
5
*2 *2
O O O O O O
–
O O O O O O O O O O O O O O O O O O O O O O
ContinuousAF(=
138)
On
*2 *2
O O O O O O O O O O O O O O O
–
O O O O O O O O O O O O O
Off
*2 *2
O O O O
– – –
O O
– – – –
O O O O O O O O O O O O O
– – –
AF-assistBeam(=
82)
On
*2 *2
O O O O O O
–
O O O O O O O O
–
O O O O O O O O O O O O O
Off
*2 *2
O O O O O O O O O
–
O O O O O O O O O O O O O O O O O O O
MF-PointZoom(=
130)
On
*2 *2
O O O O
– – –
O
– – – –
O
–
O
– –
O
– – – –
O O O O
– – –
Off
*2 *2
O O O O O O O O O O O O O O O O O O O O O O O O O O O O O
SafetyMF(=
130)
On
*2 *2
O O O O
–
O
–
O
– – – –
O O O
– –
O O O O O O O O O O O O
Off
*2 *2
O O O O O O O O O O O O O O O O O O O O O O O O O O O O O
O
Availableorsetautomatically.
–
Notavailable.
COPY

268
FunctionsandMenuTables
ShootingMode
Function
D B M G A
K E
I
P t
x
v
T
Y
E
FlashControl(=
75,82,144,145,153)
FlashMode
Auto
*1 *1
–
O O O O O
–
O O O O O
–
O O
–
O
–
O O O O O O O O
– – –
Manual
*1 *1
O O O
– – – – – – – – – – – – – – – – – – – – – – – – – –
FlashExp.Comp
*1 *1
–
O O O
–
O
– – – – – – – – – – – – – – – – – – – – – – –
FlashOutput
*1 *1
O O O
– – – – – – – – – – – – – – – – – – – – – – – – – –
ShutterSync.
1st-curtain
*1 *1
O O O O O O
–
O O O O O
–
O O
–
O
–
O O O O O O O O
– – –
2nd-curtain
*1 *1
O O O O
–
O
– – – – – – – – – – – – – – – – – – – – – – –
Red-EyeCorr.
On
*1 *1
O O O O O O
–
O
–
O O O
–
O O
– – – – – – – – – – – – – –
Off
*1 *1
O O O O O O
–
O O O O O
–
O O
–
O
–
O O O O O O O O
– – –
Red-EyeLamp
On
*1 *1
O O O O O O
–
O O O O O
–
O O
–
O
–
O O O O O O O O
– – –
Off
*1 *1
O O O O O O
–
O O O O O
–
O O
–
O
–
O O O O O O O O
– – –
SafetyFE
On
*1 *1
–
O O O O O
–
O O O O O
–
O O
–
O
–
O O O O O O O O
– – –
Off
*1 *1
O O O O
–
O
– – – – – – – – – – – – – – – – – – – – – – –
ISOAutoSettings(=
118)
MaxISOSpeed
*1 *1
–
O O O
–
O
– – – – – – – – – – – – – – – – – – – – – – –
RateofChange
*1 *1
–
O
–
O
–
O
– – – – – – – – – – – – – – – – – – – – – – –
HighISONR(=
118)
Standard/High/Low
*1 *1
O O O O
– – – – – – – – – – – – – – – – – – – – – – – – –
HgLampCorr.(=
76)
On/Off
– – – – – –
O
– – – – – – – – – – – – – – – – – – – – – – – –
SpotAEPoint(=
116)
Center
*1 *1
O O O O
–
O
– – – – – – – – – – – – – – – – – – – – – – –
AFPoint
*1 *1
O O O O
– – – – – – – – – – – – – – – – – – – – – – – – –
SafetyShift(=
151)
On
*1 *1
–
O O
– – – – – – – – – – – – – – – – – – – – – – – – – –
Off
*1 *1
O O O O O O O O O O O O O O O O O O O O O O O O O O O O O
MovieAudio(=
78)
MicLevel
*1 *1
O O O O O O O O O O O O O O O O O O O
–
O O O O O O O O
–
Level
*1 *1
O O O O O O O O O O O O O O O O O O O
–
O O O O O O O O
–
WindFilter
*1 *1
O O O O O O O O O O O O O O O O O O O
–
O O O O O O O O
–
O
Availableorsetautomatically.
–
Notavailable.
*1Optionsvarydependingontheassignedshootingmode.
COPY

269
FunctionsandMenuTables
ShootingMode
Function
D B M G A
K E
I
P t
x
v
T
Y
E
FlashControl(=
75,82,144,145,153)
FlashMode
Auto
*1 *1
–
O O O O O
–
O O O O O
–
O O
–
O
–
O O O O O O O O
– – –
Manual
*1 *1
O O O
– – – – – – – – – – – – – – – – – – – – – – – – – –
FlashExp.Comp
*1 *1
–
O O O
–
O
– – – – – – – – – – – – – – – – – – – – – – –
FlashOutput
*1 *1
O O O
– – – – – – – – – – – – – – – – – – – – – – – – – –
ShutterSync.
1st-curtain
*1 *1
O O O O O O
–
O O O O O
–
O O
–
O
–
O O O O O O O O
– – –
2nd-curtain
*1 *1
O O O O
–
O
– – – – – – – – – – – – – – – – – – – – – – –
Red-EyeCorr.
On
*1 *1
O O O O O O
–
O
–
O O O
–
O O
– – – – – – – – – – – – – –
Off
*1 *1
O O O O O O
–
O O O O O
–
O O
–
O
–
O O O O O O O O
– – –
Red-EyeLamp
On
*1 *1
O O O O O O
–
O O O O O
–
O O
–
O
–
O O O O O O O O
– – –
Off
*1 *1
O O O O O O
–
O O O O O
–
O O
–
O
–
O O O O O O O O
– – –
SafetyFE
On
*1 *1
–
O O O O O
–
O O O O O
–
O O
–
O
–
O O O O O O O O
– – –
Off
*1 *1
O O O O
–
O
– – – – – – – – – – – – – – – – – – – – – – –
ISOAutoSettings(=
118)
MaxISOSpeed
*1 *1
–
O O O
–
O
– – – – – – – – – – – – – – – – – – – – – – –
RateofChange
*1 *1
–
O
–
O
–
O
– – – – – – – – – – – – – – – – – – – – – – –
HighISONR(=
118)
Standard/High/Low
*1 *1
O O O O
– – – – – – – – – – – – – – – – – – – – – – – – –
HgLampCorr.(=
76)
On/Off
– – – – – –
O
– – – – – – – – – – – – – – – – – – – – – – – –
SpotAEPoint(=
116)
Center
*1 *1
O O O O
–
O
– – – – – – – – – – – – – – – – – – – – – – –
AFPoint
*1 *1
O O O O
– – – – – – – – – – – – – – – – – – – – – – – – –
SafetyShift(=
151)
On
*1 *1
–
O O
– – – – – – – – – – – – – – – – – – – – – – – – – –
Off
*1 *1
O O O O O O O O O O O O O O O O O O O O O O O O O O O O O
MovieAudio(=
78)
MicLevel
*1 *1
O O O O O O O O O O O O O O O O O O O
–
O O O O O O O O
–
Level
*1 *1
O O O O O O O O O O O O O O O O O O O
–
O O O O O O O O
–
WindFilter
*1 *1
O O O O O O O O O O O O O O O O O O O
–
O O O O O O O O
–
O
Availableorsetautomatically.
–
Notavailable.
COPY
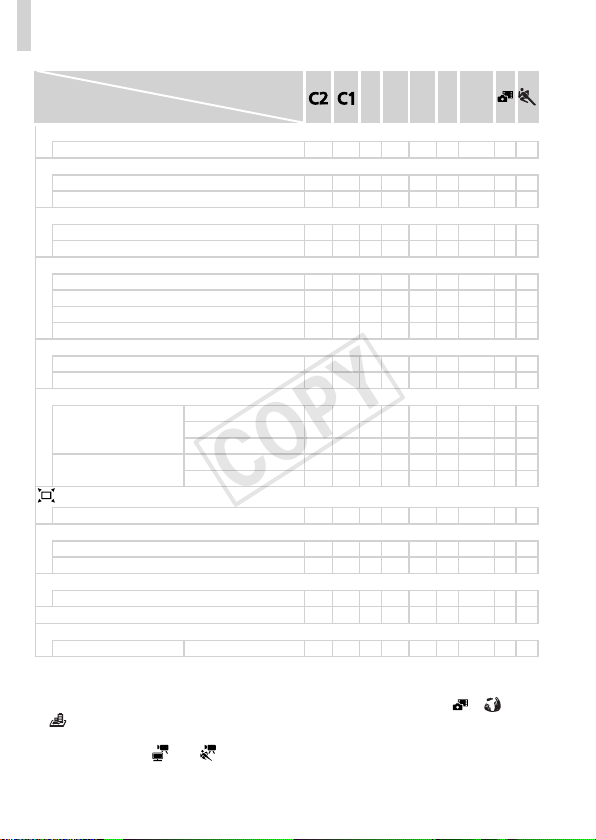
270
FunctionsandMenuTables
ShootingMode
Function
D B M G A
K E
I
P t
x
v
T
Y
E
Review(=
83)
Off/Quick/2–10sec./Hold
*1 *1
O O O O O O O O O O O O O O O O O O O O O O O O O O
– – –
ReviewInfo(=
84)
Off
*1 *1
O O O O O O O O O O O O O O O O O O O O O O O O O O
– – –
Detailed/FocusCheck
*1 *1
O O O O O O O O O O O O O O O O
–
O O O O O O O O O
– – –
BlinkDetection(=
81)
On
*1 *1
O O O O O O
–
O O O O O
– –
O
– – – – – – – –
O O O
– – –
Off
*1 *1
O O O O O O O O O O O O O O O O O O O O O O O O O O O O O
CustomDisplay(=
154)
ShootingInfo
*1 *1
O O O O O O O O O O O O O O O O O O O O O O O O O O O O O
GridLines
*1 *1
O O O O O O O O O O O O O O O O O O O O O O O O O O O O O
ElectronicLevel
*1 *1
O O O O O O O O O O O O O O O O O O O O O O O O O O O O O
Histogram
*1 *1
O O O O O O O O O O O O O O O O O O O O O O O O O O O O O
ReverseDisp.(=
18)
On
*1 *1
O O O O O O O O O O O O O O O O
–
O O O O O O O O O O O O
Off
*1 *1
O O O O O O O O O O O O O O O O O O O O O O O O O O O O O
ISSettings(=
147)
ISMode
Off
*1 *1
O O O O O O O O O O O O O
–
O O O O O O O O O O O O O O O
Continuous
*1 *1
O O O O O O O O O O O O O O O O O O O O O O O O O O O O O
ShootOnly
*1 *1
O O O O
– –
O O O O O O O
–
O O O O O O O O O O O O
– – –
DynamicIS
1
*1 *1
O O O O O O O O O O O O O O O O O O
–
O O O O O O O O O
–
2
*1 *1
O O O O O O O O O O O O O
–
O O O O O
–
O O O O O O O O O
DisplayArea(=
57)
Large/Medium/Small
*1 *1
O O O O O O O O O O O O O O O O
–
O O O O O O O O O O O O
DateStamp(=
61)
Off
*1 *1
O O O O O O O O O O O O O O O O O O O O O O O O O O O O O
Date/Date&Time
*1 *1
O O O O O O O O
–
O O O
– –
O O
– – – – – – – – – – – – –
FaceIDSettings(=
63)
On/Off
*1 *1
O O O O O O O O O O O O O O O O O O O O O O O O O O O O O
SetShortcutbutton(=
155)
*1 *1
O O O O O O O O O O O O O O O O O O O O O O O O O O O O O
SaveSettings(=
156)
Destination C1/C2
O O O O O O
– – – – – – – – – – – – – – – – – – – – – – – – –
O
Availableorsetautomatically.
–
Notavailable.
*1Optionsvarydependingontheassignedshootingmode.
–Whenusing[FaceID](=
63)toshoot,nameswillnotbedisplayedin[ ],[ ],or
[
],buttheywillberecordedinstillimages.
–Settingavailable,butwhenusing[FaceID](=
63)toshoot,nameswillnotbe
displayedin[E],[
],or[ ],andtheywillnotberecordedinmovies.
COPY

271
FunctionsandMenuTables
ShootingMode
Function
D B M G A
K E
I
P t
x
v
T
Y
E
Review(=
83)
Off/Quick/2–10sec./Hold
*1 *1
O O O O O O O O O O O O O O O O O O O O O O O O O O
– – –
ReviewInfo(=
84)
Off
*1 *1
O O O O O O O O O O O O O O O O O O O O O O O O O O
– – –
Detailed/FocusCheck
*1 *1
O O O O O O O O O O O O O O O O
–
O O O O O O O O O
– – –
BlinkDetection(=
81)
On
*1 *1
O O O O O O
–
O O O O O
– –
O
– – – – – – – –
O O O
– – –
Off
*1 *1
O O O O O O O O O O O O O O O O O O O O O O O O O O O O O
CustomDisplay(=
154)
ShootingInfo
*1 *1
O O O O O O O O O O O O O O O O O O O O O O O O O O O O O
GridLines
*1 *1
O O O O O O O O O O O O O O O O O O O O O O O O O O O O O
ElectronicLevel
*1 *1
O O O O O O O O O O O O O O O O O O O O O O O O O O O O O
Histogram
*1 *1
O O O O O O O O O O O O O O O O O O O O O O O O O O O O O
ReverseDisp.(=
18)
On
*1 *1
O O O O O O O O O O O O O O O O
–
O O O O O O O O O O O O
Off
*1 *1
O O O O O O O O O O O O O O O O O O O O O O O O O O O O O
ISSettings(=
147)
ISMode
Off
*1 *1
O O O O O O O O O O O O O
–
O O O O O O O O O O O O O O O
Continuous
*1 *1
O O O O O O O O O O O O O O O O O O O O O O O O O O O O O
ShootOnly
*1 *1
O O O O
– –
O O O O O O O
–
O O O O O O O O O O O O
– – –
DynamicIS
1
*1 *1
O O O O O O O O O O O O O O O O O O
–
O O O O O O O O O
–
2
*1 *1
O O O O O O O O O O O O O
–
O O O O O
–
O O O O O O O O O
DisplayArea(=
57)
Large/Medium/Small
*1 *1
O O O O O O O O O O O O O O O O
–
O O O O O O O O O O O O
DateStamp(=
61)
Off
*1 *1
O O O O O O O O O O O O O O O O O O O O O O O O O O O O O
Date/Date&Time
*1 *1
O O O O O O O O
–
O O O
– –
O O
– – – – – – – – – – – – –
FaceIDSettings(=
63)
On/Off
*1 *1
O O O O O O O O O O O O O O O O O O O O O O O O O O O O O
SetShortcutbutton(=
155)
*1 *1
O O O O O O O O O O O O O O O O O O O O O O O O O O O O O
SaveSettings(=
156)
Destination C1/C2
O O O O O O
– – – – – – – – – – – – – – – – – – – – – – – – –
O
Availableorsetautomatically.
–
Notavailable.
*1Optionsvarydependingontheassignedshootingmode.
–Whenusing[FaceID](=
63)toshoot,nameswillnotbedisplayedin[ ],[ ],or
[
],buttheywillberecordedinstillimages.
–Settingavailable,butwhenusing[FaceID](=
63)toshoot,nameswillnotbe
displayedin[E],[
],or[ ],andtheywillnotberecordedinmovies.
COPY
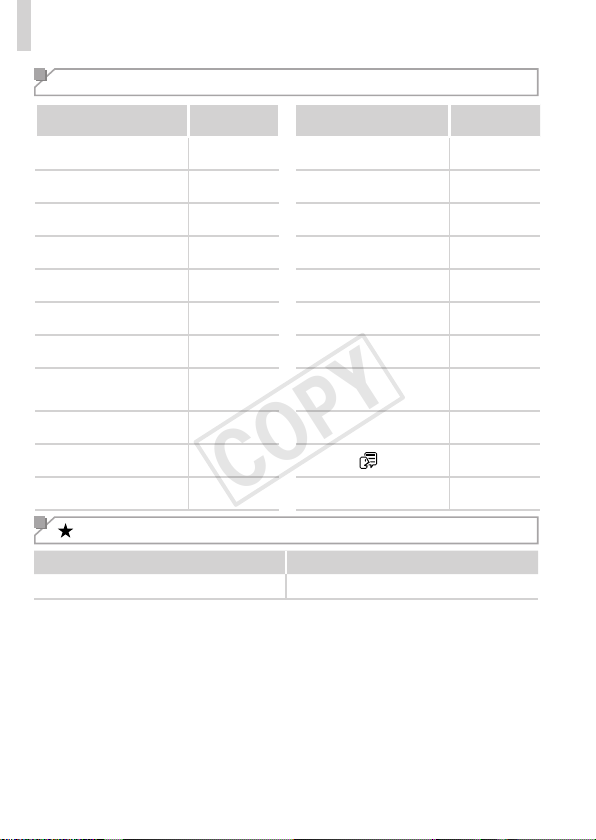
272
FunctionsandMenuTables
3 Set up Menu
Item Ref.Page
Item Ref.Page
Mute
=
198
LensRetract
=
206
Volume
=
198
PowerSaving
=
38,206
SoundOptions
=
199
Units
=
207
Hints&Tips
=
199
ElectronicLevel
=
7 9
Date/Time
=
1 9
VideoSystem
=
222
TimeZone
=
200
CtrlviaHDMI
=
220
LCDBrightness
=
201
Eye-FiSettings
=
245
Start-upImage
=
202
CopyrightInfo
=
208
Format
=
203,204
CerticationLogoDisplay
=
210
FileNumbering
=
205
Language
=
2 1
CreateFolder
=
205
ResetAll
=
2 1 1
My Menu Menu
Item Ref.Page
MyMenusettings
=
157
COPY

273
FunctionsandMenuTables
1 Playback Menu
Item Ref.Page Item Ref.Page
MovieDigestPlayback
=
169
Red-EyeCorrection
=
193
SmartShufe
=
174
Cropping
=
190
Slideshow
=
173
Resize
=
188
Erase
=
179
MyColors
=
191
Protect
=
175
FaceIDInfo
=
163
Rotate
=
182
ScrollDisplay
=
161
Favorites
=
184
GroupImages
=
170
MyCategory
=
185
AutoRotate
=
183
PhotobookSet-up
=
243
Resume
=
161
i-Contrast
=
192
Transition
=
161
2 Print Menu
Item Ref.Page Item Ref.Page
Print
–
SelectAllImages
=
241
SelectImages&Qty.
=
240
ClearAllSelections
=
242
SelectRange
=
241
PrintSettings
=
239
COPY

274
Specications
CameraEffective
Pixels(Max.)
Approx.12.1megapixels
LensFocalLength
50xzoom:4.3(W)–215.0(T)mm
(35mmlmequivalent:24(W)–1200(T)mm)
Viewnder
LCDViewnder
EffectivePixels:Approx.202,000dots(67,000x3)
DioptricAdjustmentRange:–5.0to+4.0m
-1
(dpt)
LCDMonitor
2.8typecolorTFTLCD
EffectivePixels:Approx.461,000dots
FileFormat
DesignruleforCameraFilesystem,DPOF(version1.1)
compliant
DataType
StillImages:Exif2.3(JPEG),RAW(CR2(CanonOriginal))
Movies:MOV(Imagedata:H.264;Audiodata:LinearPCM
(stereo))
Interface
Hi-speedUSB
HDMIoutput
Analogaudiooutput(monaural)
Analogvideooutput(NTSC/PAL)
PowerSource
BatteryPackNB-10L
ACAdapterKitACK-DC80
Dimensions(Based
onCIPAGuidelines)
122.5x87.3x105.5mm(4.82x3.44x4.15in.)
Weight(Basedon
CIPAGuidelines)
Approx.595g(approx.21.0oz.;includingthebatteryand
memorycard)
Approx.551g(approx.19.4oz.;camerabodyonly)
NumberofShots/RecordingTime,PlaybackTime
NumberofShots ScreenOn Approx.315
ViewnderOn Approx.335
MovieRecording
Time*
1
ScreenOn Approx.1hour,15minutes
ViewnderOn Approx.1hour,20minutes
Continuous
Shooting*
2
ScreenOn Approx.2hours,25minutes
ViewnderOn Approx.2hours,30minutes
PlaybackTime Approx.7hours
*1Timeunderdefaultcamerasettings,whennormaloperationsareperformed,suchas
shooting,pausing,turningthecameraonandoff,andzooming.
*2Timeavailablewhenshootingthemaximummovielength(untilrecordingstops
automatically)repeatedly.
•Thenumberofshotsthatcanbetakenisbasedonmeasurementguidelinesofthe
Camera&ImagingProductsAssociation(CIPA).
•Undersomeshootingconditions,thenumberofshotsandrecordingtimemaybeless
thanmentionedabove.
•Numberofshots/timewithafullychargedbattery.
COPY
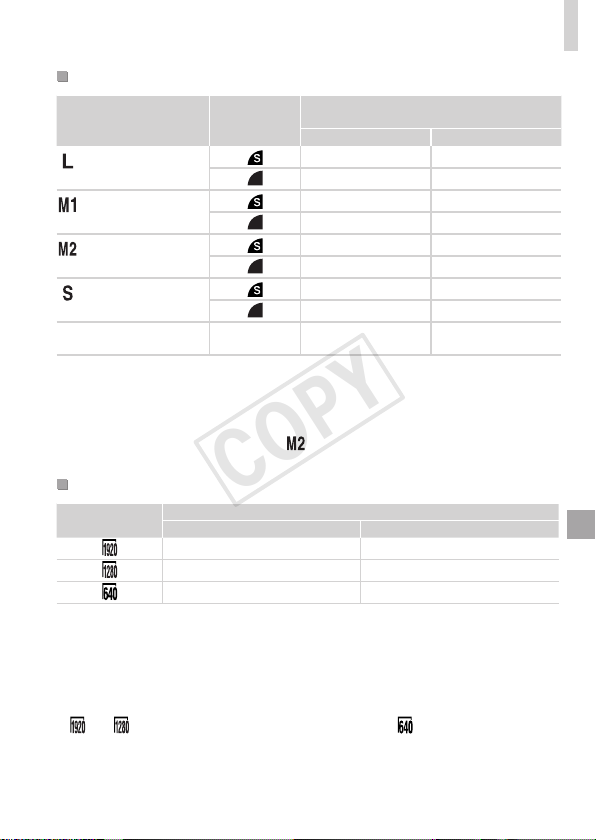
275
Specications
Numberof4:3ShotsperMemoryCard
RecordingPixels
Compression
Ratio
NumberofShotsperMemoryCard
(Approx.shots)
8GB 32GB
(Large)
12M/4000x3000
1379 5568
2192 8850
(Medium1)
6M/2816x2112
2431 9814
3721 15020
(Medium2)
2M/1600x1200
7442 30040
12927 52176
(Small)
0.3M/640x480
27291 110150
40937 165225
RAWImages
12M/4000x3000
— 446 1804
•ThevaluesinthetablearemeasuredaccordingtoCanonstandardsandmaychange
dependingonthesubject,memorycardandcamerasettings.
•Thevaluesinthetablearebasedon4:3aspectratio.Iftheaspectratioischanged
(=
73),moreimagescanbeshotbecausethedatasizeperimagewillbesmaller
thanwith4:3images.However,since[
]16:9imageshaveasettingof1920x1080
pixels,theirdatasizewillbelargerthan4:3images.
RecordingTimeperMemoryCard
ImageQuality
RecordingTimeperMemoryCard
8GB 32GB
29min.39sec. 1hr.59min.43sec.
42min.11sec.*
1
2hr.50min.19sec.*
2
1hr.28min.59sec. 5hr.59min.10sec.
*127min.39sec.foriFramemovies(=
110).
*21hr.51min.37sec.foriFramemovies(=
110).
•ThevaluesinthetablearemeasuredaccordingtoCanonstandardsandmaychange
dependingonthesubject,memorycardandcamerasettings.
•Recordingwillautomaticallystopwhenthecliplesizereaches4GB,orwhenthe
recordingtimereachesapproximately29minutesand59secondswhenshootingin
[
]or[ ],andapproximately1hourwhenshootingin[ ].
•Recordingmaystopevenifthemaximumcliplengthhasnotbeenreachedonsome
memorycards.SDSpeedClass6orhighermemorycardsarerecommended.
COPY
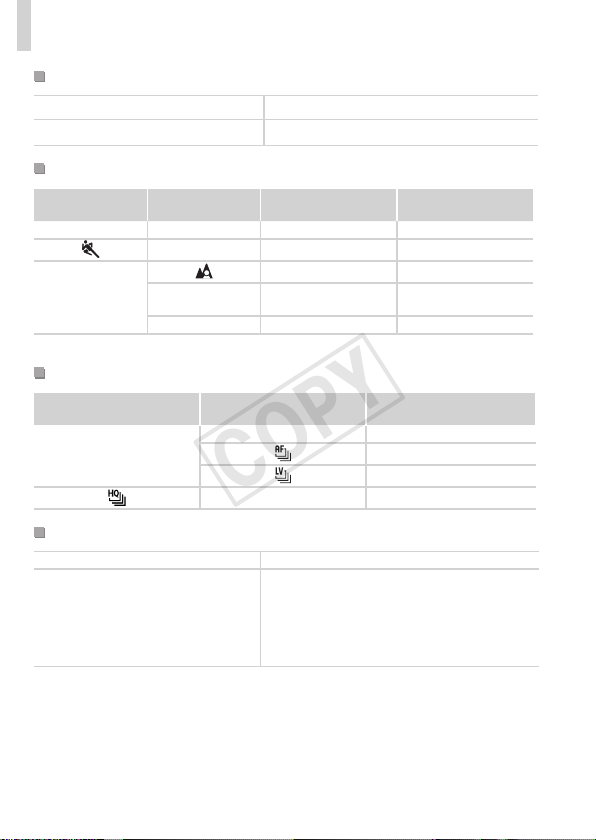
276
Specications
FlashRange
Maximumwideangle(j)
50cm–5.5m(1.6ft.–18ft.)
Maximumtelephoto(i)
1.4m–3.0m(4.6ft.–9.8ft.)
ShootingRange
ShootingMode FocusingRange
MaximumWide
Angle(j)
MaximumTelephoto
(i)
A
–
0cm(0in.)–innity 1.3m(4.3ft.)–innity
–
1m(3.3ft.)–innity 13m(43ft.)–innity
Othermodes
5cm(2.0in.)–innity 1.3m(4.3ft.)–innity
e
*
0cm(0in.)–
50cm(1.6ft.)
–
f
*
0cm(0in.)–innity 1.3m(4.3ft.)–innity
*Notavailableinsomeshootingmodes.
ContinuousShootingSpeed
ShootingMode
ContinuousShooting
Mode
Speed
G
W
Approx.2.2shots/sec.
Approx.0.8shots/sec.
Approx.0.9shots/sec.
W
Approx.13shots/sec.
ShutterSpeed
<A>mode,automaticallysetrange
1–1/2000sec.
<M>modeavailablevalues(sec.)
15,13,10,8,6,5,4,3.2,2.5,2,1.6,1.3,1,
0.8,0.6,0.5,0.4,0.3,1/4,1/5,1/6,1/8,1/10,
1/13,1/15,1/20,1/25,1/30,1/40,1/50,1/60,
1/80,1/100,1/125,1/160,1/200,1/250,1/320,
1/400,1/500,1/640,1/800,1/1000,1/1250,
1/1600,1/2000
COPY

277
Specications
Aperture
f/number f/3.4–f/8.0(W),f/6.5–f/8.0(T)
<B>modeavailablevalues*
f/3.4,f/4.0,f/4.5,f/5.0,f/5.6,f/6.3,f/6.5,f/7.1,
f/8.0
*Dependingonthezoomposition,someaperturevaluesmaynotbeavailable.
BatteryPackNB-10L
Type: Rechargeablelithium-ionbattery
RatedVoltage: 7.4VDC
RatedCapacity: 920mAh
ChargingCycles: Approx.300times
OperatingTemperature: 0–40°C(32–104°F)
Dimensions: 32.5x45.4x15.1mm(1.28x1.79x0.59in.)
Weight: Approx.41g(approx.1.45oz.)
BatteryChargerCB-2LC/CB-2LCE
RatedInput: 100–240VAC(50/60Hz)16VA(100V)–22VA(240V),
0.18A(100V)–0.12A(240V)
RatedOutput: 8.4VDC,0.7A
ChargingTime: Approx.1hour50min.(whenusingNB-10L)
ChargeIndicator: Charging:orange/Fullycharged:green
OperatingTemperature: 5–40°C(41–104°F)
Dimensions: 92.8x63.0x27.0mm(3.65x2.48x1.06in.)
Weight: CB-2LC:Approx.80g(approx.2.82oz.)
CB-2LCE:Approx.74g(approx.2.61oz.)(excludingpower
cord)
LensHoodLH-DC60(SoldSeparately)
CameraMount: Bayonet
Max.DiameterxLength:ϕ69.6x27.0mm(ϕ2.74x1.06in.)
Weight: Approx.10g(approx.0.35oz.)
• AlldataisbasedontestsbyCanon.
• Cameraspecicationsorappearancearesubjecttochangewithout
notice.
COPY

278
Index
A
ACadapterkit.................................... 223
Accessories....................................... 215
AEBmode..........................................119
AElock...............................................115
AFframes.................................. 133,135
AFlock............................................... 140
Aspectratio.......................................... 73
AUTOmode(shootingmode). . 22,40,46
AVcable............................................ 218
Av(shootingmode)........................... 151
B
BatteriesDate/timebattery
Battery
Charging........................................ 15
Level............................................ 256
Powersaving................................. 38
Batterycharger...................................... 2
Blackandwhiteimages............... 94,125
Blinkdetection..................................... 81
C
C1/C2(shootingmode)..................... 156
Camera
Resetall.......................................211
Camerashake................................... 147
Clock.................................................... 44
ColorAccent(shootingmode)............. 98
ColorSwap(shootingmode)............. 100
Color(whitebalance)......................... 122
Compressionratio(imagequality)..... 147
Continuousshooting.......................... 127
High-speedburstHQ
(shootingmode).......................... 106
Creativelters(shootingmode)........... 92
Cropping............................................ 190
Customwhitebalance....................... 123
D
Date/time
Addingdatestamps...................... 61
Changing....................................... 20
Date/timebattery........................... 20
Setting........................................... 19
Worldclock.................................. 200
DefaultsResetall
DIGITALCAMERASolutionDisk........... 2
Digitaltele-converter.......................... 132
Digitalzoom......................................... 55
Displaylanguage................................. 21
DPOF................................................. 238
Drivemode........................................ 127
DynamicRangeCorrection............... 120
E
Editing
Cropping...................................... 190
i-Contrast..................................... 192
MyColors.................................... 191
Red-eyecorrection...................... 193
Resizingimages.......................... 188
Erasing.............................................. 179
Errormessages................................. 252
Exposure
AElock.........................................115
Compensation..............................115
FElock........................................ 144
Eye-Ficards.................................. 2,245
F
Facedetect(AFframemode)............ 133
FaceID................................................ 63
Faceselect........................................ 139
Faceself-timer(shootingmode)........ 104
Favorites............................................ 184
COPY

279
Index
FElock............................................... 144
Filenumbering................................... 205
Fireworks(shootingmode).................. 90
Fish-eyeeffect(shootingmode).......... 94
Flash
Flashexposurecompensation.... 144
On............................................... 142
Slowsynchro............................... 143
FlexiZone(AFframemode)............... 134
Focusbracketing............................... 141
Focuscheck...................................... 165
Focusing
AFframes.................................... 133
AFlock........................................ 140
AF-pointzoom............................... 80
Faceselect.................................. 139
ServoAF..................................... 137
Focusingrange
Macro.......................................... 129
Manualfocus............................... 130
Focuslock......................................... 134
FUNC.menu
Basicoperations............................ 41
Table............................................ 262
G
Gridlines........................................... 154
H
Handheldnightscene
(shootingmode)................................... 89
Highdynamicrange(shootingmode).. 93
High-speedburstHQ
(shootingmode)................................. 106
Householdpower............................... 223
I
i-Contrast................................... 120,192
iFramemovies(moviemode).............110
Imagequality
Compressionratio(imagequality)
Images
Displayperiod............................... 83
Erasing........................................ 179
PlaybackViewing
Protecting.................................... 175
Indicator............................................... 44
ISOspeed...........................................117
L
Lamp.................................................... 82
M
Macro(focusmode)........................... 129
Magnieddisplay............................... 172
Manualfocus(focusmode)............... 130
Memorycards........................................ 2
Recordingtime............................ 275
Menu
Basicoperations............................ 42
Table............................................ 260
Mercurylampcorrection...................... 76
Meteringmethod.................................116
Miniatureeffect(shootingmode)......... 95
Monochrome(shootingmode)............. 98
MovieDigest(shootingmode)............. 86
Movies
Editing......................................... 194
Imagequality
(resolution/framerate)................... 77
Recordingtime............................ 275
M(shootingmode)............................. 152
Multi-areaWhiteBalance.................... 76
MyCategory...................................... 185
MyColors.................................. 125,191
N
NeckstrapStrap
COPY

280
Index
P
Packagecontents.................................. 2
Photobookset-up.............................. 243
PictBridge.................................. 217,231
PlaybackViewing
Portrait(shootingmode)...................... 89
Postereffect(shootingmode)............. 92
PowerACadapterkit
Battery
Compactpoweradapter
Powersaving....................................... 38
Printing.............................................. 231
ProgramAE........................................114
Protecting.......................................... 175
P(shootingmode)..............................114
R
RAW.................................................. 146
Red-eyecorrection...................... 75,193
Resetall..............................................211
Resizingimages................................ 188
Resolution(imagesize)....................... 74
Rotating............................................. 182
S
Screen
Displaylanguage........................... 21
Icons.................................... 255,257
MenuFUNC.menu,Menu
SD/SDHC/SDXCmemorycards
Memorycards
Searching.......................................... 166
Self-timer............................................. 58
2-secondself-timer........................ 59
Customizingtheself-timer............. 59
Faceself-timer
(shootingmode).......................... 104
Winkself-timer
(shootingmode).......................... 103
Sepiatoneimages....................... 94,125
ServoAF............................................ 137
ShadowCorrect................................. 121
Shooting
Shootingdate/timeDate/time
Shootinginformation........... 154,255
Slideshow.......................................... 173
SmartShufe..................................... 174
SmartShutter(shootingmode)......... 102
Smile(shootingmode)....................... 102
Snow(shootingmode)......................... 90
Softfocus(shootingmode).................. 97
Software
DIGITALCAMERASolutionDisk.... 2
Installation..................................... 30
Savingimagestoacomputer........ 32
Sounds.............................................. 198
StereoAVcable................................. 218
StitchAssist(shootingmode)............ 107
Strap................................................ 2,14
Superslowmotionmovie
(moviemode)...................................... 111
Supervivid(shootingmode)................ 92
T
Terminal..................... 218,222,223,231
Toycameraeffect(shootingmode)..... 96
TrackingAF................................. 62,136
Travelingwiththecamera......... 200,214
Troubleshooting................................. 248
TVdisplay.......................................... 218
Tv(shootingmode)............................ 150
V
Viewing................................................ 25
Imagesearch.............................. 166
Indexdisplay............................... 166
Magnieddisplay........................ 172
Single-imagedisplay..................... 25
COPY

281
Index
Slideshow.................................... 173
SmartShufe.............................. 174
TVdisplay................................... 218
W
Whitebalance(color)......................... 122
Widescreen(resolution)....................... 74
Winkself-timer(shootingmode)........ 103
Worldclock........................................ 200
Z
Zoom....................................... 22,46,55
Zoomframingassist............................ 56
COPY

282
CAUTION
RISKOFEXPLOSIONIFBATTERYISREPLACEDBYANINCORRECTTYPE.
DISPOSEOFUSEDBATTERIESACCORDINGTOLOCALREGULATION.
BatteryChargerCB-2LC
IMPORTANTSAFETYINSTRUCTIONS-
SAVETHESEINSTRUCTIONS.
DANGER-TOREDUCETHERISKOF
FIREORELECTRICSHOCK,CAREFULLY
FOLLOWTHESEINSTRUCTIONS.
ForconnectiontoasupplynotintheU.S.A.,useanattachmentplugadapterofthe
propercongurationforthepoweroutlet,ifneeded.
BatteryChargerCB-2LCE
Theadaptercanbeusedwithapowersupplybetween100and240VAC.
ContactyourCanondealerforinformationaboutplugadapterforoverseasuse.
ForU.S.A.customersonly:Forareaswhere120VACpowerisnotused,youwill
needaspecialplugadapter.
ForonlyUnitedStates
UseaULlisted,1.8-3m(6-10ft),TypeSPT-2orNTSPT-2,AWGno.18powersupply
cord,ratedfor125V7A,withanon-polarizedNEMA1-15Pplugratedfor125V15A.
USAandCanadaonly:
TheLithiumion/polymerbatterythatpowerstheproductisrecyclable.
Pleasecall1-800-8-BATTERYforinformationonhowtorecyclethis
battery.
COPY

283
FCCNotice
(DigitalCamera,ModelPC1817systems)
ThisdevicecomplieswithPart15oftheFCCRules.Operationissubjecttothe
followingtwoconditions;
(1)thisdevicemaynotcauseharmfulinterference,and
(2)thisdevicemustacceptanyinterferencereceived,includinginterferencethatmay
causeundesiredoperation.
Note:ThisequipmenthasbeentestedandfoundtocomplywiththelimitsforClass
Bdigitaldevices,pursuanttoPart15oftheFCCrules.Theselimitsaredesigned
toprovidereasonableprotectionagainstharmfulinterferenceinaresidential
installation.
Thisequipmentgenerates,usesandcanradiateradiofrequencyenergyand,if
notinstalledandusedinaccordancewiththeinstructions,maycauseharmful
interferencetoradiocommunications.However,thereisnoguaranteethat
interferencewillnotoccurinaparticularinstallation.Ifthisequipmentdoescause
harmfulinterferencetoradioortelevisionreception,whichcanbedetermined
byturningtheequipmentoffandon,theuserisencouragedtotrytocorrectthe
interferencebyoneormoreofthefollowingmeasures:
•Reorientorrelocatethereceivingantenna.
•Increasetheseparationbetweentheequipmentandreceiver.
•Connecttheequipmentintoanoutletonacircuitdifferentfromthattowhichthe
receiverisconnected.
•Consultthedealeroranexperiencedradio/TVtechnicianforhelp.
Thecablewiththeferritecoreprovidedwiththedigitalcameramustbeusedwiththis
equipmentinordertocomplywithClassBlimitsinSubpartBofPart15oftheFCC
rules.
Donotmakeanychangesormodicationstotheequipmentunlessotherwise
speciedinthemanual.Ifsuchchangesormodicationsshouldbemade,youcould
berequiredtostopoperationoftheequipment.
CanonU.S.A.,Inc.
OneCanonPlaza,LakeSuccess,NY11042,U.S.A.
TelNo.(516)328-5600
CanadianRadioInterferenceRegulations
ThisClassBdigitalapparatuscomplieswithCanadianICES-003.
Toensureproperoperationofthisproduct,useofgenuineCanon
accessoriesisrecommended.
ForCA,USAonly
IncludedlithiumbatterycontainsPerchlorateMaterial-specialhandlingmayapply.
Seewww.dtsc.ca.gov/hazardouswaste/perchlorate/fordetails.
COPY

284
TrademarkAcknowledgments
• TheSDXClogoisatrademarkofSD-3C,LLC.
• ThisdeviceincorporatesexFATtechnologylicensedfromMicrosoft.
• HDMI,theHDMIlogoandHigh-DenitionMultimediaInterfaceare
trademarksorregisteredtrademarksofHDMILicensingLLC.
• TheiFramelogoandtheiFramesymbolaretrademarksofAppleInc.
AboutMPEG-4Licensing
ThisproductislicensedunderAT&TpatentsfortheMPEG-4standard
andmaybeusedforencodingMPEG-4compliantvideoand/ordecoding
MPEG-4compliantvideothatwasencodedonly(1)forapersonaland
non-commercialpurposeor(2)byavideoproviderlicensedundertheAT&T
patentstoprovideMPEG-4compliantvideo.
NolicenseisgrantedorimpliedforanyotheruseforMPEG-4standard.
*NoticedisplayedinEnglishasrequired.
Disclaimer
• Reprinting,transmitting,orstoringinaretrievalsystemanypartofthis
guidewithoutthepermissionofCanonisprohibited.
• Canonreservestherighttochangethecontentsofthisguideatanytime
withoutpriornotice.
• Illustrationsandscreenshotsinthisguidemaydifferslightlyfromthe
actualequipment.
• Theaboveitemsnotwithstanding,Canonacceptsnoliabilityfordamages
duetomistakenoperationoftheproducts.
COPY

285
COPY

CDD-E492-010 ©CANONINC.2012
COPY