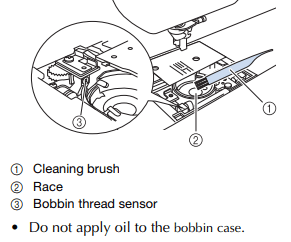
In order to prevent damaging this machine, it must not be oiled by the user.
This machine was manufactured with the necessary amount of oil applied to ensure correct operation, making periodic oiling unnecessary.
If problems occur, such as difficulty turning the handwheel or an unusual noise, immediately stop using the machine, and contact your authorized Brother dealer or the nearest Brother authorized service center.
Precautions on storing the machine
Do not store the machine in any of the locations described below, otherwise damage to the machine may result, for example, rust caused by condensation.
Exposed to extremely high temperatures
Exposed to extremely low temperatures
Exposed to extreme temperature changes
Exposed to high humidity or steam
Near a flame, heater or air conditioner
Outdoors or exposed to direct sunlight
Exposed to extremely dusty or oily environments
Note
• In order to extend the life of this machine, periodically turn it on and use it.
Storing this machine for an extended period of time without using it may reduce its efficiency.
Cleaning the LCD Screen
If the screen is dirty, gently wipe it with a soft, dry cloth. Do not use organic solvents or detergents.
Note
• Do not wipe the LCD screen with a damp cloth.
Memo
• Occasionally, condensation may form on the LCD screen or it may become fogged up; however, this is not a malfunction. After a while, the cloudiness will disappear.
Cleaning the machine surface
If the surface of the machine is dirty, lightly soak a cloth in neutral detergent, squeeze it out firmly, and then wipe the surface of the machine. After cleaning it once with a damp cloth, wipe it again with a dry cloth.
CAUTION • Unplug the power cord before cleaning the machine, otherwise injuries or an electric shock may occur.
Cleaning the race
Sewing performance will suffer if lint and dust collects in the bobbin case, therefore, it should be cleaned regularly.
Press (Needle position button) to raise the needle.
Turn off the machine.
Unplug the power cord from the power supply jack on the right side of the machine.
CAUTION • Unplug the power cord before cleaning the machine, otherwise injuries or an electric shock may occur.
4. Raise the presser foot to remove the needle, presser foot and presser foot holder.
• For details, refer to “Replacing the needle” and “Replacing the presser foot” in the “Basic operations” section.
5. Remove the flat bed attachment or the embroidery unit if either is attached.
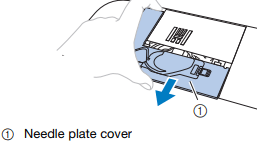
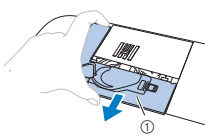
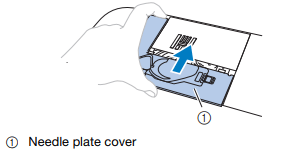
6. Remove the needle plate cover.
■ If there is a screw in the needle plate cover
1. Use the disc-shaped screwdriver to remove the screw in the needle plate cover.
2. Grasp both sides of the needle plate cover, and then slide it toward you.
■ If there is no screw in the needle plate cover
Grasp both sides of the needle plate cover, and then slide it toward you.
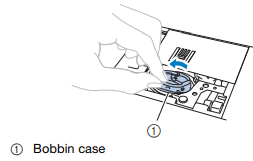
7. Remove the bobbin case.
Grasp the bobbin case, and then pull it out.
8. Use the cleaning brush or a vacuum cleaner to remove any lint and dust from the race and bobbin thread sensor and the surrounding area.
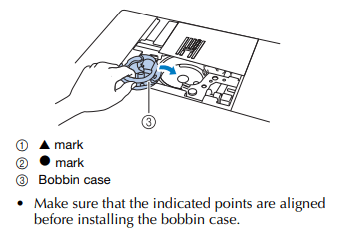
9. Insert the bobbin case so that the mark on the bobbin case aligns with the mark on the machine.
10. Insert the tabs on the needle plate cover into the needle plate, and the slide the cover back on.
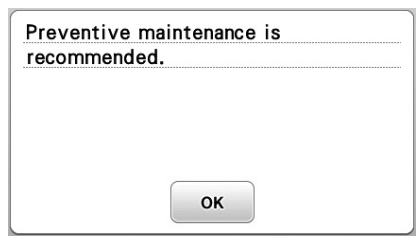
Maintenance message
Once this message appears, it is recommended to take your machine to authorized delaer for a regular check. Though this message will disappear and the machine will continue to function once press OK, the message will display several more times until the appropriate maintenance is performed.
Maintenance will help to ensure you received continued, uninterrupted hours of machine operation in the future.
Touch panel is malfunctioning
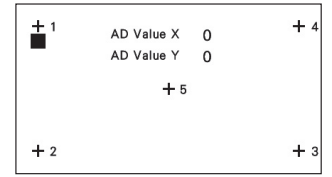
If the screen does not respond correctly when you touch a key (the machine does not perform the operation or a different operation) follow steps below for proper adjustments.
1. Holding your finger on the screen, turn the main power switch to OFF and back to ON.
→ The touch panel adjustment screen is displayed.
2. Light touch the center of each +, in order from 1 to 5.
3. Turn the main power to OFF, then turn it back to ON.
Operation beep
Each time a key is pressed you will hear one beep. If an incorrect operation is performed you will hear two or four beeps.
■ If a key is pressed (correct operation) One beep sounds.
If an incorrect operation is performed Two or four beeps sound.
■ If the machine locks up, for example, because the thread is tangled
The machine beeps for four seconds and the machine automatically stops.
Be sure to check for the cause of the error and correct it before continuing to sew.
■ Canceling the operation beep
Press to display the settings screen.
Display page 6.
Set “Buzzer” to “OFF.”
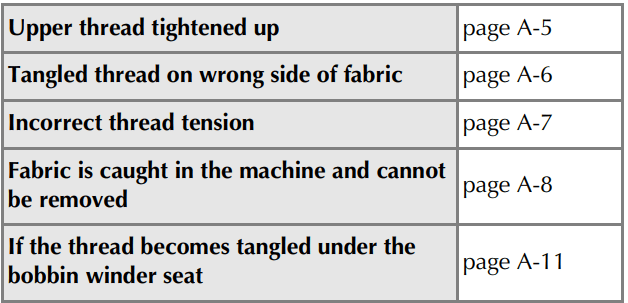
Frequent troubleshooting topics
Detailted causes and remedies for common troubleshooting topics are described below. Be sure to refer to this before contacting us.
Upper thread tightened up
■ Symptom
The upper thread appears as a single continuous line.
The lower thread is visible from the upper side of the fabric.
The upper thread has tightened up, and comes out when pulled.
The upper thread has tightened up, and wrinkes appear in the fabric.
The upper thread tension is tight, and the results do not change even after the thread tension is adjusted.
■ Cause
Incorrect bobbin threading
If the bobbin thread is incorrectly threaded, instead of the appropriate tension being applied to the bobbin thread, it is pulled through the fabric when the upper thread is pulled up. For this reason, the thread is visible from the right side of the fabric.
■ Remedy/check details
Correctly install the bobbin thread.
Press and raise the presser foot lever.
Remove the bobbin from the bobbin case.
Place the bobbin in the bobbin case so that the thread unwinds in the correct direction.
• Hold the bobbin with your right hand with the thread unwinding to the left, and hold the end of the thread with your left hand.
Then, with your right hand, place the bobbin in the bobbin case. A
If the bobbin is inserted with the thread unwinding in the wrong direction, sewing will be done with an incorrect thread tension.
d While holding the bobbin in place with your finger, pass the thread through the slit in the needle plate cover.
• Hold down the bobbin with your right hand, and then pull the end of the thread around the tab with
Tab
Hold down the bobbin with your right hand.
■ Remedy/check details
Remove the tangled thread, and then correct the upper threading. a Remove the tangled thread. If it cannot be removed, cut the thread with scissors.
For details, refer to “Cleaning the race” on page A-2.b Remove the upper thread from the machine.
If the bobbin was removed from the bobbin case, refer to “Installing the bobbin” in the “Basic operations” section and “Remedy/check details” in the section “Upper thread tightened up” on page A-5 to correctly install the bobbin.
c Refer to the following steps to correct the upper threading. Raise the presser foot using the presser foot lever.
1 Presser foot lever
→ The upper thread shutter opens so the machine can be threaded.
• If the presser foot is not raised, the machine cannot be threaded correctly. d Press (Needle position button) once or twice to raise the needle.
→ The needle is correctly raised when the mark on the handwheel is at the top, as shown below. Check the handwheel and, if this mark is not at this position,
1 Mark on handwheel e While holding the thread lightly with your right hand, pull the thread with your left hand, and then pass the thread behind the thread guide cover and to the front.
1 Thread guide cover
While holding the thread lightly with your right hand, pass the thread under the thread guide plate, and then pull it up.
Pass the thread through the thread channel in the order shown below.
Needle bar thread guide
1 Shutter h Press . i Slide the thread behind the needle bar thread guide.
The thread can easily be passed behind the needle bar thread guide by holding the thread in your left hand, then feeding the thread with your right hand, as shown. Make sure that the thread is passed through to the left of the tab of the needle bar thread guide.
Tab
j Next, use the needle threader to thread the needle. Continue with the procedure in “Threading the needle” in the “Basic operations” section.
■ Symptoms
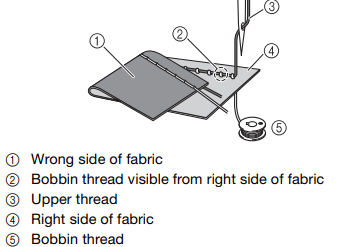
Symptom 1: The bobbin thread is visible from the right side of the fabric. (Refer to illustration below)
Symptom 2: The upper thread appears as a straight line on the right side of the fabric.
Symptom 3: The upper thread is visible from the wrong side of the fabric. (Refer to illustration below)
Symptom 4: The bobbin thread appears as a straight line on the wrong side of the fabric.
Symptom 5: The stitching on the wrong side of the fabric is loose or has slack.
Symptom 1
Symptom 3 A
Wrong side of fabric
Bobbin thread visible from right side of fabric
Upper thread
Right side of fabric
Bobbin thread
Upper thread visible from wrong side of fabric
■ Cause/remedy/check details
Cause 1
The machine is not correctly threaded. <With symptoms 1 and 2 described above> The bobbin threading is incorrect.
Return the upper thread tension to the standard setting, and then refer to “Upper thread tightened up” on page A-5 to correct the threading.
<With symptoms 3 and 5 described above> The upper threading is incorrect.
Return the upper thread tension to the standard setting, and then refer to “Tangled thread on wrong side of fabric” on page A-6 to correct the upper threading.
Note
• If the upper threading and bobbin threading are incorrect, the thread tension cannot be adjusted correctly. Check the upper threading and bobbin threading first, and then adjust the thread tension.
Cause 2
A needle and thread appropriate for the fabric are not being used.
The machine needle that should be used depends on the type of fabric sewn and the thread thickness. If a needle and thread appropriate for the fabric are not being used, the thread tension will not be adjusted correctly, causing wrinkles in the fabric or skipped stitches.
• Refer to “Fabric/Thread/Needle Combinations” in the “Basic operations” section to check that a needle and thread appropriate for the fabric are being used.
Cause 3
An appropriate upper tension is not selected. The setting selected for the upper thread tension is not appropriate.
Refer to “Setting the thread tension” in the “Basic operations” section to select an appropriate thread tension.
The appropriate thread tension differs depending on the type of fabric and thread being used.
* Adjust the thread tension while test sewing on a piece of scrap fabric that is the same as that used in your project.
If the fabric could be removed.
Continue with step p.
If the fabric could not be removed.
Continue with step j.
Note
• Compressed can air is not recommended to be used.
h Remove the bobbin case.k Slightly lift up the needle plate, cut any tangled threads, and then remove the needle plate.
If threads remain in the bobbin case, remove them.
Remove the fabric and threads from the needle plate.
If the fabric cannot be removed, even after completing these steps, contact your nearest Brother authorized i Use the cleaning brush or a vacuum cleaner mini attachment to remove any lint or dust from the race service center. and its surrounding area.l Remove any threads in the race and around the feed dogs. m Turn the handwheel to raise the feed dogs.
n Align the two screw holes in the needle plate with the two holes at the needle plate mounting base, and then fit the needle plate onto the machine.
Note
• Be careful not to drop the removed screws in the machine.
Note
• Be careful not to drop the removed screws in the machine.
o Lightly finger-tighten the screw on the right side of the
1 Cleaning brushneedle plate. Then, use the disc-shaped screwdriver to 2 Racefirmly tighten the screw on the left side. Finally, firmly
tighten the screw on the right side. A
Turn the handwheel to check that the feed dogs move smoothly and do not contact the edges of the slots in the needle plate.
j Use the included disc-shaped screwdriver to loosen the two screws on the needle plate.
Correct position of feed dogs
Incorrect position of feed dogs
Note
• Make sure that the thread passes under the pretension disk of the bobbin-winding thread guide correctly.
Hold the thread end with your left hand, and wind off the thread clockwise with your right hand as shown below.
Wind the bobbin again.
■ Getting ready
Symptom
Probable Cause
Remedy
Reference
Cannot thread the needle.
Needle is not in the correct position.
Press the “Needle position” button to raise the needle.
B-4
Needle is installed incorrectly.
Reinstall the needle correctly.
B-31
Needle is turned, bent or the point is dull.
Replace the needle.
B-31
Upper threading is incorrect.
Check the steps for threading the machine and rethread the machine.
B-23
The needle threader hook is bent and does not pass through the eye of the needle.
Contact your authorized Brother dealer or the nearest Brother authorized service center.
–
The needle threader lever cannot be moved or returned to its original position.
Contact your authorized Brother dealer or the nearest Brother authorized service center.
–
A size 65/9 needle is being used.
The needle is incompatible with the needle threader. Manually pass the thread through the eye of the needle.
B-26
Bobbin thread does not wind neatly on the bobbin.
The thread is not passed through the bobbin winding thread guide correctly.
Correctly pass the thread through the bobbin winding thread guide.
B-17
Bobbin spins slowly.
Move the sewing speed controller to the right so that the speed will be increased.
B-17
The thread that was pulled out was not wound onto the bobbin correctly.
Wind the thread that was pulled off around the bobbin 5 or 6 times clockwise.
B-17
The empty bobbin was not set on the pin properly.
Set the empty bobbin on the pin and slowly turn the bobbin until you hear it click in place.
B-17
While winding the bobbin, the bobbin thread was wound below the bobbin winder seat.
You have not wound the bobbin thread properly. While initially winding thread on the bobbin the bobbin thread is not properly inserted into the guides.
After removing the thread wound below the bobbin winder seat, wind the bobbin correctly. Follow the drawn images on the top of the machine for guidance when threading the machine for bobbin winding.
B-17, A-11
The bobbin thread cannot be pulled up.
Needle is turned, bent or the point is dull.
Replace the needle.
B-31
Bobbin is set incorrectly.
Reset the bobbin correctly.
B-20
Nothing appears in the LCD.
Main power switch is not turned on.
Turn the main power to ON.
B-10
The plug of the power cord is not inserted into an electrical outlet.
Insert the plug of the power cord into an electrical outlet.
B-10
The LCD screen is fogged up.
Condensation has formed on the LCD screen.
After a while, the cloudiness will disappear.
–
The operation keys do not respond.
A glove is worn when the keys are pressed.
The keys are pressed with a fingernail.
A non-electrostatic touch pen is being used.
Directly touch the operation keys with your finger.
When using a commercially available touch pen, make sure that it is compatible with capacitive sensing.
B-5
The operation keys do not respond, or the sensitivity is too strong.
The sensitivity of the operation keys is not set for the user.
Adjust the sensitivity of the operation keys.
B-15
The sewing light does not come on.
The sewing light is damaged.
Contact your authorized Brother dealer or the nearest Brother authorized service center.
–
“Light” is set to “OFF” in the settings screen.
Change the setting to “ON”.
B-14
A
Symptom
Probable Cause
Remedy
Reference
Embroidery unit does not operate.
Embroidery unit is not attached correctly.
Reattach the embroidery unit correctly.
B-54
Embroidery frame was attached before the unit was initialized.
Remove the embroidery frame, and then perform the initialization process correctly.
B-55
■ While sewing
Symptom
Probable Cause
Remedy
Reference
Machine does not operate.
“Start/Stop” button was not pressed.
Press the “Start/Stop” button.
B-36
The bobbin winder shaft is pushed to the right.
Move the bobbin winder shaft to the left.
B-17
There is no pattern selected.
Select a pattern.
B-36
Presser foot is not lowered.
Lower the presser foot.
B-2
“Start/Stop” button was pressed with the foot controller attached.
Remove the foot controller, or use the foot controller to operate the machine.
B-38
The “Start/Stop” button was pressed while the machine is set for the sewing speed controller to control the zigzag stitch width.
Use the foot controller instead of the “Start/ Stop” button to operate the machine, or set the
“Width Control” to “OFF” in the settings screen.
B-13, B-38
Symptom
Probable Cause
Remedy
Reference
Needle breaks.
Needle is installed incorrectly.
Reinstall the needle correctly.
B-31
Needle clamp screw is not tightened.
Tighten the needle clamp screw.
B-31
Needle is turned or bent.
Replace the needle.
B-31
Using improper needle or thread for the selected fabric.
Check the “Fabric/Thread/Needle Combinations”chart.
B-30
Wrong presser foot was used.
Use the recommended presser foot.
B-34
Upper thread tension is too tight.
Adjust the thread tension.
B-42
Fabric is pulled during sewing.
Do not pull the fabric during sewing.
–
Spool cap is set incorrectly.
Check the method for attaching the spool cap, then reattach the spool cap.
B-17
There are scratches around the opening in the needle plate.
* There is a notch on the left side of the opening in the needle plate. This is not a scratch.
a
1 Notch
Replace the needle plate, or consult your authorized Brother dealer.
A-8
There are scratches around the opening in the presser foot.
Replace the presser foot, or consult your authorized Brother dealer.
B-33
There are scratches on the bobbin case.
Replace the bobbin case, or consult your authorized Brother dealer.
A-2
Needle is defective.
Replace the needle.
B-31
A bobbin designed specifically for this machine is not used.
Incorrect bobbins will not work properly. Only use a bobbin designed specifically for this machine.
B-17
Upper threading is incorrect.
Check the steps for threading the machine and rethread the machine.
B-23
Bobbin is set incorrectly.
Reset the bobbin correctly.
B-20
Presser foot is attached incorrectly.
Attach the presser foot correctly.
B-33
Screw of the presser foot holder is loose.
Securely tighten the screw of the presser foot.
B-34
Needle breaks.
Fabric is too thick.
Use fabric that the needle can pierce when the handwheel is turned.
B-30, S-4
Fabric is fed forcefully when sewing thick fabric or thick seams.
Allow the fabric to be fed without being forcefully pushed.
S-4
Stitch length is too short.
Adjust the stitch length.
B-41
Stabilizer is not attached to fabric being embroidered.
Attach stabilizer.
B-58
Bobbin thread is incorrectly wound.
Use a correctly wound bobbin.
B-57
A
Symptom
Probable Cause
Remedy
Reference
Upper thread breaks.
Machine is not threaded correctly (used the wrong spool cap, spool cap is loose, the thread did not catch the needle bar threader, etc.).
Rethread the machine correctly.
B-23
Knotted or tangled thread is being used.
Remove any knots or tangles.
–
The selected needle is not appropriate for the thread being used.
Select a needle that is appropriate for the type of thread being used.
B-30
Upper thread tension is too tight.
Adjust the thread tension.
B-42
Thread is tangled.
Use scissors, etc., to cut the tangled thread and remove it from the race, etc.
A-6
Needle is turned, bent or the point is dull.
Replace the needle.
B-31
Needle is installed incorrectly.
Reinstall the needle correctly.
B-31
There are scratches around the opening of the needle plate.
* There is a notch on the left side of the opening in the needle plate. This is not a scratch.
a
1 Notch
Replace the needle plate, or consult your authorized Brother dealer.
A-8
There are scratches around the opening in the presser foot.
Replace the presser foot, or consult your authorized Brother dealer.
B-33
There are scratches on the bobbin case.
Replace the bobbin case, or consult your authorized Brother dealer.
A-2
Using improper needle or thread for the selected fabric.
Check the “Fabric/Thread/Needle Combinations” chart.
B-30
While sewing, the thread became knotted or tangled.
Rethread upper and lower thread.
B-20, B-23
A bobbin designed specifically for this machine is not used.
Incorrect bobbins will not work properly. Only use a bobbin designed specifically for this machine.
B-17
The thread is tangled on the wrong side of the fabric.
Upper threading is incorrect.
Check the steps for threading the machine and rethread the machine. Be sure that the presser foot is in the raised position when threading the machine so that the upper thread sets properly in the upper tension.
B-23, A-6
Using improper needle or thread for the selected fabric.
Check the “Fabric/Thread/Needle Combinations” chart.
B-30
The upper thread is too tight.
The bobbin thread is incorrectly installed.
Correctly install the bobbin thread.
B-20, A-5
Bobbin thread breaks.
Bobbin is set incorrectly.
Reset the bobbin correctly.
B-20
Bobbin thread is incorrectly wound.
Use a correctly wound bobbin.
B-17
There are scratches on the bobbin or it doesn’t rotate properly.
Replace the bobbin.
B-20
Thread is tangled.
Use scissors, etc. to cut the tangled thread and remove it from the race, etc.
A-8
A bobbin designed specifically for this machine is not used.
Incorrect bobbins will not work properly. Only use a bobbin designed specifically for this machine.
B-17
Symptom
Probable Cause
Remedy
Reference
Fabric puckers.
There is a mistake in the upper or bobbin threading.
Check the steps for threading the machine and rethread it correctly.
B-23
Spool cap is set incorrectly.
Check the method for attaching the spool cap, then reattach the spool cap.
B-23
Using improper needle or thread for the selected fabric.
Check the “Fabric/Thread/Needle Combinations” chart.
B-30
Needle is turned, bent or the point is dull.
Replace the needle.
B-31
Stitches are too long when sewing thin fabrics.
Shorten the stitch length.
B-41
Thread tension is set incorrectly.
Adjust the thread tension.
B-42
Wrong presser foot.
Use the correct presser foot.
B-34
The stitch is not sewn correctly.
The presser foot that is used is not appropriate for the type of stitch that you wish to sew.
Attach the presser foot that is appropriate for the type of stitch that you wish to sew.
B-34
The thread tension is incorrect.
Adjust the tension of the upper thread.
B-42, A-7
The thread is tangled, for example, in the bobbin case.
Remove the tangle thread. If the thread is tangled in the bobbin case, clean the race.
A-8
Feed dogs are set in the down position.
Slide the feed dog position switch to the right
().
B-2
Skipped stitches
Machine is threaded incorrectly.
Check the steps for threading the machine and rethread it correctly.
B-23
Using improper needle or thread for the selected fabric.
Check the “Fabric/Thread/Needle Combinations” chart.
B-30
Needle is turned, bent or the point is dull.
Replace the needle.
B-31
Needle is installed incorrectly.
Reinstall the needle correctly.
B-31
Needle is defective.
Replace the needle.
B-31
Dust or lint has collected under the needle plate.
Remove the dust or lint with the brush.
A-2
Thin or stretch fabrics are being sewn.
Sew with one sheet of thin paper under the fabric.
S-5, D-4
No stitching
Needle is turned, bent or the point is dull.
Replace the needle.
B-31
Bobbin is set incorrectly.
Reset the bobbin correctly.
B-20
Upper threading is incorrect.
Check the steps for threading the machine and rethread the machine.
B-23
High-pitched sound while sewing
Dust or lint is caught in the feed dogs.
Remove the dust or lint.
A-2
Pieces of thread are caught in the race.
Clean the race.
A-2
Upper threading is incorrect.
Check the steps for threading the machine and rethread the machine.
B-23
A bobbin designed specifically for this machine is not used.
Incorrect bobbins will not work properly. Only use a bobbin designed specifically for this machine.
B-17
There are needle holes or friction scratches in the bobbin case.
Replace the bobbin case, or consult your authorized Brother dealer.
A-2
Fabric does not feed through the machine.
Feed dogs are set in the down position.
Slide the feed dog position switch to the right
().
B-2
Stitches are too close together.
Lengthen the stitch length setting.
B-41
Wrong presser foot was used.
Use the correct presser foot.
B-34
Needle is turned, bent or the point is dull.
Replace the needle.
B-31
A
Symptom
Probable Cause
Remedy
Reference
Fabric does not feed through the machine.
Thread is entangled.
Cut the entangled thread and remove it from the race.
A-8
Zigzag foot “J” is slanted on a thick seam at the beginning of stitching.
Use the presser foot locking pin (black button on the left side) on zigzag foot “J” to keep the presser foot level while sewing.
S-4
Presser foot pressure is set incorrectly for fabric.
Adjust presser foot pressure within the settings screen.
B-45
The fabric feeds in the opposite direction.
The feed mechanism is damaged.
Contact your authorized Brother dealer or the nearest Brother authorized service center.
–
The needle contacts the needle plate.
The needle clamp screw is loose.
Firmly tighten the needle clamp screw. If the needle is bent or blunt, replace it with a new one.
B-31
Needle is turned, bent or the point is dull.
Replace the needle.
B-31
Fabric being sewn with the machine cannot be removed.
Thread is tangled below the needle plate.
Lift up the fabric and cut the threads below it, and clean the race.
A-8
A broken needle has fallen into the machine.
-
Turn off the machine, and remove the needle plate. If the needle that fell into the machine can be seen, use tweezers to remove it. After removing the needle, return the needle plate to its original position and insert a new needle. Before turning on the machine, slowly turn the handwheel toward you to check that it turns smoothly and that the new needle enters through the center of the needle plate opening. If the handwheel does not turn smoothly or the needle that fell into the machine cannot be removed, consult your authorized Brother dealer or the nearest Brother authorized service center.
A-8
The handwheel feels sluggish when it is turned.
Thread is tangled in the bobbin case.
Remove the tangled thread from the bobbin case. Re-install the bobbin case so it is correctly positioned.
A-6, A-8
Symptom
Probable Cause
Remedy
Reference
Thread tension is incorrect.
Upper threading is incorrect.
Check the steps for threading the machine and rethread the machine.
B-23
Bobbin is set incorrectly.
Reset the bobbin. (If needle plate was removed, reinstall needle plate and tighten screws prior to installing bobbin case. Check to make sure needle enter through the center of needle plate opening.)
B-20, A-2
Using improper needle or thread for the selected fabric.
Check the “Fabric/Thread/Needle Combinations” chart.
B-30
Presser foot holder is not attached correctly.
Reattach the presser foot holder correctly.
B-33
Thread tension is set incorrectly.
Adjust the thread tension.
B-42
Bobbin thread is incorrectly wound.
Use a correctly wound bobbin.
B-20
Needle is turned, bent or the point is dull.
Replace the needle.
B-31
A bobbin designed specifically for this machine is not used.
Incorrect bobbins will not work properly. Only use a bobbin designed specifically for this machine.
B-17
Symptom
Probable Cause
Remedy
Reference
Character or decorative patterns are misaligned.
Pattern adjustment settings were set incorrectly.
Revise the pattern adjustment settings.
D-5
Pattern does not turn out.
Wrong presser foot was used.
Attach the correct presser foot.
B-34
Did not use a stabilizer material on thin fabrics or stretch fabrics.
Attach a stabilizer material.
D-4
Thread tension is set incorrectly.
Adjust the thread tension.
B-42
Fabric was pulled, pushed or fed at an angle while it was being sewn.
Sew while guiding the fabric with your hands so that the fabric is fed in a straight line.
B-36
The thread is tangled, for example, in the bobbin case.
Remove the tangle thread. If the thread is tangled in the bobbin case, clean the race.
A-2
Embroidery pattern does not sew out correctly.
Thread is twisted.
Use scissors, etc., to cut the twisted thread and remove it from the bobbin case, etc.
A-8
Thread tension is set incorrectly.
Adjust the thread tension.
B-42
Fabric was not inserted into the frame correctly (fabric was loose, etc.).
If the fabric is not taut in the frame, the pattern may turn out poorly or there may be shrinkage of the pattern. Set the fabric into the frame correctly.
B-58
Stabilizing material was not attached.
Always use stabilizing material, especially with stretch fabrics, lightweight fabrics, fabrics with a coarse weave, or fabrics that often cause pattern shrinkage. See your authorized Brother dealer for the proper stabilizer.
B-58
There was an object placed near the machine, and the carriage or embroidery frame hit the object during sewing.
If the frame bumps something during sewing, the pattern will turn out poorly. Do not place anything in the area where the frame may bump it during sewing.
B-57
Fabric outside the frame edges interferes with the sewing arm, so the embroidery unit cannot move.
Reinsert the fabric in the embroidery frame so that the excess fabric is away from the sewing arm, and rotate the pattern 180 degrees.
B-58
Fabric is too heavy, so the embroidery unit cannot move freely.
Place a large thick book or similar object under the arm head to lightly lift the heavy side and keep it level.
–
Embroidery pattern does not sew out correctly.
Fabric is hanging off the table.
If the fabric is hanging off the table during embroidery, the embroidery unit will not move freely. Place the fabric so that it does not hang off the table or hold the fabric to keep it from dragging.
B-57
Fabric is snagged or caught on something.
Stop the machine and place the fabric so that it does not get caught or snagged.
–
Embroidery frame was removed during sewing (for example, to reset the bobbin). The presser foot was bumped or moved while removing or attaching the embroidery frame, or the embroidery unit was moved.
If the presser foot is bumped or the embroidery unit is moved during sewing, the pattern will not turn out. Be careful when removing or reattaching the embroidery frame during sewing.
B-62
Stabilizer is incorrectly attached, for example, it is smaller than the embroidery frame.
Attach the stabilizer correctly.
B-58
Loops appear on the surface of the fabric when embroidering.
The thread tension is incorrectly set.
Adjust the thread tension.
E-26
The combination of the bobbin case and bobbin thread is incorrect.
Change the bobbin case or bobbin thread so that the correct combination is used.
B-57
■ After sewing A
When erroneous operations are performed messages and advice on operation will be displayed on the LCD. Follow what is displayed. If you press or do the operation correctly while the error message is displayed, the message disappears.
Error messages
Cause/solution
1
A malfunction occurred. Turn the machine off, then on again.
This message is displayed if some malfunction occurs.
Turn the machine off, then back on again.
If this message continues to appear, the machine may be malfunctioning. Please contact your authorized Brother dealer or the nearest Brother authorized service center.
2
Cannot change the configuration of the characters.
This message is displayed when there are too many characters and the curved character configuration is impossible.
3
Cannot change the font since some letters are not included to the selected font.
This message appears when the font of the embroidery character pattern is changed to one that does not include characters used in the pattern.
4
Cannot recognize the data for the selected pattern. The data may be corrupted. Please turn off the power and turn on again.
This message appears when you try to retrieve pattern data that is invalid.
Since any of the following may be the cause, check the pattern data.
The pattern data is damaged.
The data that you tried to retrieve was created using another manufacturer’s data design system.
Turn the machine off, then on again to return it to its normal condition.
5
Check and rethread the upper thread.
This message is displayed when the upper thread is broken or not threaded correctly, and the “Start/Stop” button, etc. is pressed.
6
Data volume is too large for this pattern.
This message is displayed when the patterns you are editing take up too much memory, or if you are editing too many patterns for the memory.
7
Lower the buttonhole lever.
This message is displayed when the buttonhole lever is up, a buttonhole stitch is selected, and the “Start/Stop” button, etc. is pressed.
8
Lower the presser foot lever.
This message is displayed when a button, such as the “Start/Stop” button, was pressed while the presser foot was raised.
9
No more patterns can be added to this combination.
This message is displayed when you tried to combine more than 70 decorative stitches.
10
Not enough available memory to save.
This message is displayed when the memory is full and the stitch or pattern cannot be saved.
11
Not enough available memory to save the pattern. Delete another pattern?
This message is displayed when the memory is full and the stitch or pattern cannot be saved.
12
OK to recall and resume previous memory?
This message appears if the machine is turned off while embroidering, then turned on again.
Press to return the machine to the condition (pattern position and number of stitches) when it was turned off. Follow the procedure described in “If the thread breaks during sewing” on page E-24 to align the needle position and embroider the remainder of the pattern.
13
Pattern extends to the outside of embroidery frame.
This message is displayed when the combined character pattern is too large for the embroidery frame. You can rotate the pattern 90 degrees and continue combining characters.
14
Pattern extends to the outside of embroidery frame. Add no additional characters.
This message is displayed when the character pattern combination is too large to fit in the embroidery frame. Change the character pattern size or layout the patterns to fit the embroidery frame. If “Embroidery Frame
Identification View” is set to “ON”, setting to “OFF” or selecting larger frame may help.
15
Pattern extends to the outside of embroidery frame. This function cannot be used at this time.
This message appears when the embroidery character pattern is resized or switched between written vertically/horizontally so that it is too large for the embroidery frame.
16
Preventive maintenance is recommended.
This message is displayed when the machine needs to be maintained. (page
A-3)
17
Raise the buttonhole lever.
This message is displayed when the buttonhole lever is down, a stitch other than a buttonhole is selected, and the “Start/Stop” button, etc. is pressed.
Error messages
Cause/solution
18
Selected pattern field extends to the outside of the embroidery frame.
This message appears when the selected embroidery pattern is larger than the large embroidery frame. Reduce the pattern size, or select a different pattern.
This message appears when the selected embroidery pattern is larger than the embroidery frame selected when “Embroidery Frame Identification View” is set to “ON”.
19
The bobbin thread is almost empty.
This message is displayed when the bobbin thread is running out. Follow the procedure described in “If the bobbin runs out of thread” on page E-23.
20
The bobbin winder safety device has activated. Is the thread tangled?
This message is displayed when the bobbin is being wound, and the motor locks because the thread is tangled, etc.
21
The carriage of the embroidery unit will move. Keep your hands etc. away from the carriage.
This message appears before embroidery unit moves.
22
The pockets are full. Delete a pattern.
This message is displayed when the memory is full and a pattern must be deleted.
23
The safety device has been activated. Is the thread tangled? Is the needle bent?
This message is displayed when the motor locks due to tangled thread or for other reasons related to thread delivery.
24
The "Start/Stop" button does not operate with the foot controller attached. Remove the foot controller.
This message is displayed when the “Start/Stop” button is pressed to sew Utility stitches or Character/Decorative stitches while the foot controller is connected.
25
There is a pattern included that cannot be saved to USB media. Save the pattern in the machine's memory.
Depending on the pattern, it may not be possible to save it to a USB flash drive.
26
This pattern cannot be used.
This message appears when you try to retrieve a pattern that cannot be used with this machine.
27
This USB media cannot be used.
This message is displayed when you try to use incompatible media.
28
Turn off the power and replace the needle plate.
This message is displayed when you try to sew with a stitch other than a straight stitch (middle needle position) while the straight stitch needle plate is installed.
This message is also displayed when the needle plate is removed while the machine is still turned on.
29
USB media error
This message is displayed when an error occurs with the USB flash drive.
30
USB media is not loaded. Load USB media.
This message is displayed when you try to recall or save a pattern while no USB flash drive is loaded.
31
When the speed controller is set to control the zigzag stitch width, the "Start/Stop" button does not operate.
This message is displayed when the speed control lever is set to control the zigzag stitch width, and the “Start/Stop” button is pressed. Set “Width Control” to “OFF” in the settings screen (page B-13), or use the foot controller to operate the machine.
32
F**
If error message “F**” appears in the LCD while the sewing machine is being used, the machine may be malfunctioning. Contact your authorized Brother dealer or the nearest Brother authorized service center.
 (Needle position button) to raise the needle.
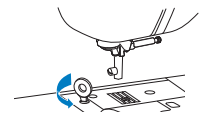
 mark on the bobbin case aligns with the
  mark on the machine.
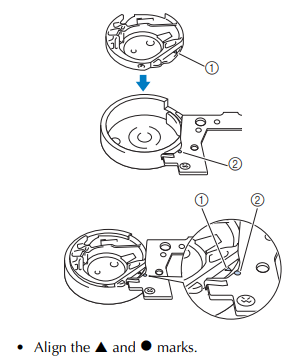


 to display the settings screen.
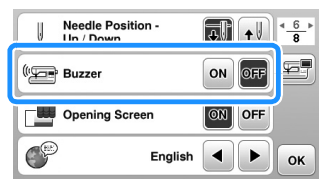
 and raise the presser foot lever.
  ■ Remedy/check details
 Cause 2


 If the fabric cannot be removed, even after completing these steps, contact your nearest Brother authorized

 or do the operation correctly while the error message is displayed, the message disappears.
 to return the machine to the condition (pattern position and number of stitches) when it was turned off. Follow the procedure described in “If the thread breaks during sewing” on page E-24 to align the needle position and embroider the remainder of the pattern.
 The carriage of the embroidery unit will move. Keep your hands etc. away from the carriage.
 Turn off the power and replace the needle plate.