Documents: Go to download!
User Manual
- User Manual - (English)
- Specification - (English)
- USING THE MONITOR
- TROUBLESHOOTING
- PRODUCT SPECIFICATION
Table of contents
User Manual
USING THE MONITOR
Press the joystick button, go to Settings → Input, and then select the input option.
Connecting to a PC
- This monitor supports the *Plug and Play feature.
*Plug and Play: A feature that allows you to add a device to your computer without having to reconfigure anything or install any manual drivers.
HDMI Connection
Transmits digital video and audio signals from your PC to the monitor.
DisplayPort Connection
Transmits digital video and audio signals from your PC to the monitor.
Connecting AV Devices
HDMI Connection
HDMI transmits digital video and audio signals from your AV device to the monitor.
Connecting Peripherals
Connecting Headphones
Connect peripherals to the monitor via the headphones port
NOTE
- Peripheral devices are sold separately.
- If you use angled earphones, it may cause a problem with connecting another external device to the monitor. Therefore, it is recommended to use straight earphones.
- Depending on the audio settings of the PC and external device, headphones and speaker functions may be limited.
USER SETTINGS
Activating the Main Menu
- Press the joystick button on the bottom of the monitor.
- Move the joystick up/down () and left/right ( ) to set the options.
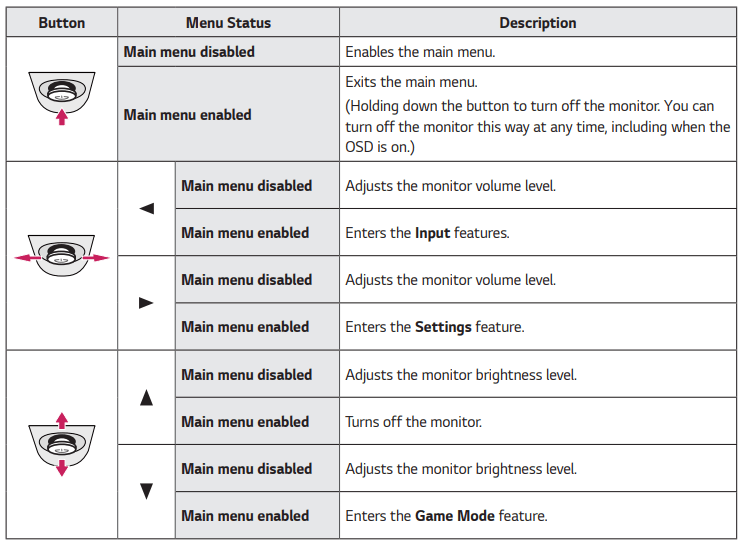
- Press the joystick button once more to exit the main menu.
Main Menu Features
User Settings
Menu Settings
- To view the OSD menu, press the joystick button at the bottom of the monitor and then enter the Settings.
- Configure the options by moving the joystick up/down/left/right.
- To return to the upper menu or set other menu items, move the joystick to or pressing ( ) it.
- If you want to exit the OSD menu, move the joystick to until you exit
Settings | Description | |
Game Mode | Changes the game mode to the one optimized for a given feature. | |
Game Adjust | Adjusts the Adaptive-Sync,Black StabilizerResponse Time,Cross Hair and Game Reset. | |
Picture Adjust | Adjusts theBrightness,ContrastlSharpnesslGammalColor TempR/G/B,Black Level,DFC and Picture Reset. | |
\nput | Input List | Selects the input mode. |
Aspect Ratio | Adjusts the aspect ratio of the screen. | |
General | Sets Language,SMART ENERGY SAVINGRower LED,Automatic Standby,HDM\ Compatibility Mode,DisplayPort 1.4,OSD Lockjnformation and Reset. |
Game Mode on SDR(Non-HDR)signal.
Settings > Game Mode | Description | |
Game Mode | Gamer 1 | In this mode, users can customize elements including game-related options. Gamer 1 and Gamer 2 picture modes alow you to save two sets of customized display settings, including game-related setup options. |
Gamer 2 | ||
FPS | This mode is optimized for FPS games. | |
RTS | This mode is optimized for RTS Game. | |
Vivid | Heightens contrast, brightness and sharpness to display vivid images. | |
Reader | Optimizes the screen for viewing documents. You can brighten the screen in the OSD menu. | |
HDR Effect | Optimizes the screen for high dynamic range. | |
sRGB | A standard RGB color space for the monitor and printer; |
Game Mode on HDR signal
Settings > HDR Game Mode | Description | |
HDR Game Mode | Gamer 1 | In this mode, users can customize elements including game-related options. Gamer 1 and Gamer 2 picture modes allow you to save two sets of customized display settings, including game-related setup options. |
Gamer 2 | ||
FPS | This mode is optimized for FPS games.It is suitable for very dark FPS games. | |
RTS | This mode is optimized for RTS Game. | |
Vivid | Optimized the screen for vivid colors. | |
Standard | Optimized the screen for HDR standard. | |
NOTE
|
Settings > Game Adjust | Description | ||
|
| Provides seamless and natural images by synchronizing the vertical frequency of the input signal With that of the output signal. | |
Game Adjust | Adaptive-Sync | CAUTION
| |
|
| On | Adaptive-Sync function on. |
|
| Off | Adaptive-Sync function off. |
| Black Stabilizer | You can control the black contrast to have better visibility \n dark scenes. You can easily distinguish objects on dark game screens. |
Game Adjust |
| Sets a response time for displayed pictures based on the speed of the screen. For a normal environment, it is recommended that you use Fast. For a fast-moving picture, it is recommended that you use Faster. Once Faster Mode is selected, Motion Blur may occur depending on the content. | |
Response Time | Faster | Sets the response time to Faster. | |
| Fast | Sets the response time to Fast. | |
| Normal | Sets the response time to Normal. | |
| Off | Does not use the response time improvement feature. | |
Cross Hair | Cross ha\r provides a mark on the center of the screen for First Person Shooter (FPS) games. Users can select the cross hair that fits their gaming environment among four different cross hairs. • When the monitor \s off or enters energy saving mode, the cross ha\r feature \s automatically turned off. | ||
Game Reset | Returns game to the default settings. |
Settings > Picture Adjust | Description | ||
| Brightness | Adjusts the brightness of the screen. | |
| Contrast | Adjusts the contrast of the screen. | |
| Sharpness | Adjusts the sharpness of the screen. | |
| Gamma | Mode 1, Mode 2, Mode 3 | The higher the gamma value, the darker the image becomes. Likewise, the lower the gamma value, the lighter the image becomes. |
|
| Mode 4 | If you do not need to adjust the gamma settings, select Mode 4. |
|
| Custom | The user can adjust it to red, green, or blue by customization. |
|
| Warm | Sets the screen color to a reddish tone. |
Picture Adjust | Color Temp | Medium | Sets the screen color to between a red and blue tone. |
| Cool | Sets the screen color to a bluish tone. | |
|
| Manual | Adjusts the color temperature in 500K increments. (Note that 9300K is supported instead of 9500K.). |
| R/G/B | You can customize the picture color using Red, Green, and Blue colors. | |
| Black Level | Sets the offset level (for HDMI only).
| |
| High | Keeps the current contrast ratio of the screen. | |
|
| Low | Lowers the black levels and raises the white levels from the current contrast ratio of the screen. |
| DFC | On | Adjusts the brightness automatically according to the screen. |
| Off | Disables the DFC feature. | |
| Picture Reset | Returns picture and color to the default settings. |
Settings > Input | Description | ||
Input | Input List | Selects the input mode. | |
Aspect Ratio | Adjusts the aspect ratio of the screen. | ||
Ful Wide | Displays the video in widescreen, regardless of the video signal input. | ||
Original | Displays video according to the aspect ratio of the video signal input. | ||
Just Scan | The aspect ratio is not adjusted from the original. | ||
NOTE
|
Settings > General | Description | ||
| Language | Sets the menu screen to the desired language. | |
| SMART ENERGY SAVING | High | Saves energy using the high-efficiency SMART ENERGY SAVING feature. |
| Low | Saves energy using the low-efficiency SMART ENERGY SAVING feature. | |
| Off | Disables the SMART ENERGY SAVING feature. | |
|
| Turns the power LED on the bottom of the monitor on or off. | |
General | Power LED | On | The power LED turns on automatically. |
| Off | The power LED turns off. | |
Automatic Standby | Feature that automatically turns off the monitor when there is no movement on the screen for a period of time. You can set a timer for the auto-off function. (8H, 6H, 4H and Off) | ||
| HDMI Compatibility Mode feature can recognize the legacy equipment that does not support HDMI 2.0. | ||
| On | Enables HDMI Compatibility Mode. | |
HDMI Compatibilit Mode | Off | Disables HDMI Compatibility Mode. | |
NOTE
| |||
|
| ||
| Enables or disables DisplayPort 1.4. NOTE
| ||
DisplayPort 1.4 | |||
|
| OSD Lock | This feature disables the configuration and adjustment of menus. | |
On | Enables OSD Lock. | ||
Off | Disables OSD Lock. | ||
NOTE
| |||
Information | The display information will be shown the Serial Number Total Power On Time, Resolution. | ||
Reset | Restores the default settings. |
TROUBLESHOOTING
Nothing is displayed on the screen. |
|
---|---|
Is the monitor's power cord plugged in? | Check if the power cord is correctly plugged into the power outlet. |
Is the power LED on? | Check the power cable connection and press the power button. |
Is the power on and the power LED displaying whitel | Check that the connected Input is enabled (Settings > Input). |
Is the power LED blinking? |
|
Is the The screen is not currently set to the recommended resolution. If you have no video or the screen flickers, see the troubleshooting guide in the product owner's manual. message being displayed? | This occurs when signals transferred from the PC (graphics card) are out of the recommended horizontal or vertical frequency range of the monitor. Please see the Product Specification section of this manual to set the appropriate frequency. |
Is the No Signal message being displayed? | This is displayed when the signal cable between the PC and the monitor is missing or disconnected. Check the cable and reconnect it. |
Have you installed the display driver? |
|
Some features are disabled. |
|
---|---|
Are some functions not available when you press the Menu button? | The OSD is locked. Go to Settings > General and set OSD Lock to Off. |
The screen retains an image. | |
---|---|
Does image sticking occur even when the monitor is turned off? |
|
Screen display is unstable and shaky. / Images displayed on the monitor leave shadow trails. | |
---|---|
Did you select the appropriate resolution? | If the selected resolution is HDMI 1080i 60/50 Hz (interlaced), the screen may be flickering. Change the resolution to 1080p or the recommended resolution. |
NOTE
- Vertical Frequency: m order to display an image, the screen must be refreshed dozens of times per second, Ike a fluorescent lamp. The number of times the screen is refreshed per second is called vertical frequency, or refresh rate, and is represented by Hz.
- Horizontal Frequency: The time it takes to display one horizontal line is called the horizontal cycle. if 1 is divided by the horizontal interval, the result is the number of horizontal lines displayed per second. This is called horizontal frequency and is represented by kHz.
- Check if the graphics card's resolution or frequency is within the range allowed by the monitor and set it to the recommended (optimal) resolution Control Panel > Display > Settings in Windows. (The settings may differ depending on the operating system (OS) you use.)
- Not setting the graphics card to the recommended (optimal) resolution may result in blurred text, a dimmed screen, a truncated display area or misalignment of the display.
- The setting methods may be different depending on the computer or operating system, and some resolutions may not be available depending on the performance of the graphics card. \f this is the case, contact the manufacturer of the computer or graphics card for assistance.
- Some graphics cards may not support 2560 x 1440 resolution. \f the resolution cannot be displayed, contact the manufacturer of your graphics card.
The display color is abnormal. | |
---|---|
Does the display appear discolored (16 colors)? | Set the color to 24 bit (true color) or higher; in Windows, go to Control Panel > Display > Settings > Color Quality. (The settings may differ depending on the operating system (OS) you use.) |
Does the display color appear unstable or monochrome? | Check if the signal cable is connected properly. Reconnect the cable or reinsert the PC's graphics card. |
Are there spots on the screen? | When using the monitor pixilated spots (red, green, blue, white, or black) may appear on the screen. This is normal for an LCD screen. It is not an error nor is it related to the monitor's performance. |
No sound from the headphone port. | |
---|---|
Are images displayed using DP (DisplayPort) or HDMI input without sound? |
|
PRODUCT SPECIFICATION
See other models: 49UK6200PLA LSC5683WW VS501 LS675 BD370