Documents: Go to download!
- Owner's manual - (English)
- USING THE MONITOR
- USER SETTINGS
- TROUBLESHOOTING
Table of contents
Monitor Manual
USING THE MONITOR
- Illustrations in this manual may differ from the actual product.
Press the joystick button, go to Settings→ Input, and then select the input option.
CAUTION
- Do not press the screen for a prolonged time. This may cause image distortion.
- Do not display a still image on the screen for a prolonged time. This may cause image retention. Use a PC screensaver if possible.
- When connecting the power cord to the outlet, use a grounded (3-hole) power strip or a grounded power outlet.
- The monitor may flicker when turned on in an area where the temperature is low. This is normal.
- Sometimes red, green, or blue spots may appear on the screen. This is normal.
Connecting to a PC
- This monitor supports the *Plug and Play feature.
* Plug and Play: A feature that allows you to add a device to your computer without having to reconfigure anything or install any manual drivers.
HDMI Connection
Transmits digital video and audio signals from your PC to the monitor.
CAUTION
- Using a DVI to HDMI / DP (DisplayPort) to HDMI cable may cause compatibility issues.
- Use a certified cable with the HDMI logo attached. If you do not use a certified HDMI cable, the screen may not display or a connection error may occur.
- Recommended HDMI cable types
- High-Speed HDMI®/™ cable
- High-Speed HDMI®/™ cable with Ethernet
DisplayPort Connection
Transmits digital video and audio signals from your PC to the monitor.
Note
- There may be no video or audio output depending on the DP (DisplayPort) version of the PC.
- If you are using a Mini DisplayPort output graphics card, use a Mini DP to DP (Mini DisplayPort to DisplayPort) cable or gender that supports DisplayPort 1.4. (Sold separately)
Connecting AV Devices
HDMI Connection
HDMI transmits digital video and audio signals from your AV device to the monitor.
Note
- Using a DVI to HDMI / DP (DisplayPort) to HDMI cable may cause compatibility issues.
- Use a certified cable with the HDMI logo attached. If you do not use a certified HDMI cable, the screen may not display or a connection error may occur.
- Recommended HDMI cable types
- High-Speed HDMI®/™cable
- High-Speed HDMI®/™cable with Ethernet
Connecting Peripherals
Headphones Connection
Connect peripherals to the monitor via the headphones port.
Note
- Peripheral devices are sold separately.
- Depending on the audio settings of the PC and external device, headphones and speaker functions may be limited.
- If you use angled earphones, it may cause a problem with connecting another external device to the monitor.
Therefore, it is recommended to use straight earphones.
 |  |
Angled | Straight (Recommend) |
USER SETTINGS
Note • Your monitor’s OSD (On Screen Display) may differ slightly from that shown in this manual
Activating the Main Menu
 |
|

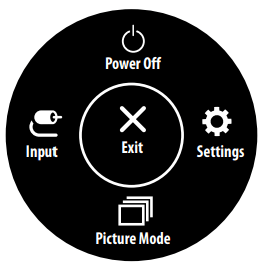
Main Menu Features

| Main Menu | Description |
|---|---|
| Input | Sets input mode. |
| Power Off | Turns off the monitor. |
| Settings | Configures the screen settings. |
| Picture Mode | Sets the picture mode. |
| Exit | Exits the main menu. |
Menu Settings
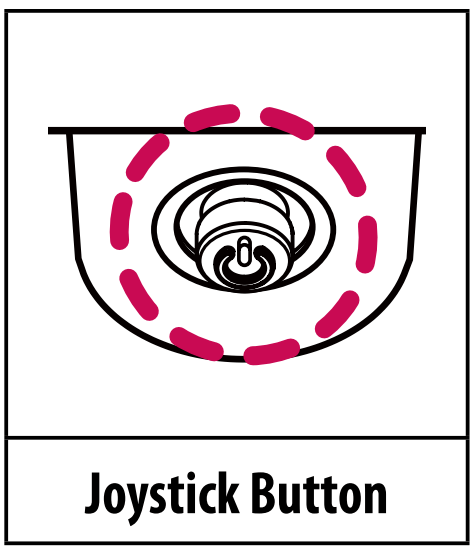
- To view the OSD menu, press the joystick button at the bottom of the monitor and then enter the Settings.
- Move the joystick up/down and left/right to set the options.
- To return to the upper menu or set other menu items, move the joystick to
 or pressing (
 ) it.
) it. - If you want to exit the OSD menu, move the joystick to
 until you exit.

Quick Settings
Settings > Quick Settings | Description | |
| Brightness |
Adjusts the contrast and brightness of the screen. | |
| Contrast | ||
Volume | Adjusts the volume. | |
NOTE •You can adjust Mute / Unmute by moving the joystick button to in | ||
| Color Temp | Custom | The user can adjust it to red, green, or blue by customization. |
Warm | Sets the screen color to a reddish tone. | |
Medium | Sets the screen color between a red and blue tone. | |
Cool | Sets the screen color to a bluish tone. | |
Manual | The user can fine-tune the color temperature. | |
Input
| Settings > Input | Description | |
| Input List | Selects the input mode. | |
Aspect Ratio | Adjusts the aspect ratio of the screen. | |
| Full Wide | Displays the video in widescreen, regardless of the video signal input. | |
| Original | Displays video according to the aspect ratio of the video signal input. | |
| Just Scan | The aspect ratio is not adjusted from the original. | |
NOTE •The display may look the same for Full Wide , Original, and Just Scan options at the recommended resolution (2560 x 1440). •There is no Just Scan menu on FreeSync Mode. ( Go to Picture → Game Adjust → FreeSync, to set from On to Off) | ||
Picture
NOTE •If the Picture Mode is changed, the screen may flicker or the resolution of your PC screen may be affected.
| Settings > Picture | Description | |
| Picture Mode | Custom | Allows the user to adjust each element. |
| Vivid | Heightens contrast, brightness and sharpness to display vivid images. | |
| HDR Effect | Optimizes the screen for high dynamic range. | |
| Reader | Optimizes the screen for viewing documents. You can brighten the screen in the OSD menu. | |
| Cinema | Optimizes the screen for video. | |
| FPS | This mode is optimized for FPS games. | |
| RTS | This mode is optimized for RTS Game. | |
| Color Weakness | This mode is for users who cannot distinguish between red and green. It enables users with color weakness to easily distinguish between the two colors. | |
[Picture Mode on HDR signal]
| Settings > Picture | Description | |
Picture Mode | Custom | Allows the user to adjust each element. |
| Vivid | Optimized the screen for HDR vivid colors. | |
| Cinema | Optimized the screen for HDR video. | |
| FPS | This mode is optimized for FPS games.It is suitable for very dark FPS games. | |
| RTS | This mode is optimized for RTS Game. | |
NOTE •HDR content may not display correctly depending on Window10 OS settings, please check HDR On/Off settings in Windows. •When the HDR function is turned on, the characters or picture quality may be poor according to Graphic card performance. •While the HDR function is on, screen flickering or cracking may occur when changing the monitor input or power on/off according to Graphic card performance. | ||
| Settings > Picture | Description | ||
| Picture Adjust | Brightness |
Adjusts the contrast and brightness of the screen. | |
| Contrast | |||
| Sharpness | Adjusts the sharpness of the screen. | ||
SUPER RESOLUTION+ | High | Optimizes the screen for crystal clear images. Best for high-definition video or games. | |
| Middle | Optimizes the screen for comfortable viewing, with images at the middle level between the low and high modes. Best for UCC or SD videos. | ||
| Low | Optimizes the screen for smooth and natural images. Best for still images or images with less movement. | ||
| Off | Displays in the most common setting. Disables SUPER RESOLUTION+. | ||
NOTE •Because this is a function to increase the sharpness of low resolution pictures, it is not recommended to use the function for normal text or for desktop icons. Doing so may result in unnecessarily high sharpness. | |||
Black Level | Sets the offset level (for HDMI only). •Offset: as a reference for a video signal, this is the darkest color the monitor can display. | ||
High | Keeps the current contrast ratio of the screen. | ||
Low | Lowers the black levels and raises the white levels from the current contrast ratio of the screen. | ||
DFC | On | Adjusts the brightness automatically according to the screen. | |
Off | Disables the DFC feature. | ||
| Settings > Picture | Description | ||
| Game Adjust | Response Time | Sets a response time for displayed pictures based on the movement of the picture on the screen. For a normal environment, it is recommended that you use Fast. When there is a lot of motion, it is recommended that you use Faster. Setting to Faster may cause image sticking. | |
| Faster | Sets the response time to faster. | ||
| Fast | Sets the response time to fast. | ||
| Normal | Sets the response time to normal. | ||
| Off | Does not use the response time improvement feature. | ||
FreeSync | Provides seamless and natural images by synchronizing the vertical frequency of the input signal with that of the output signal. CAUTION •Supported Interface: DisplayPort, HDMI •Supported Graphic Card: A graphic card that supports AMD’s FreeSync is necessary. •Supported Version: Make sure to update the graphic card to the latest driver. | ||
| On | FreeSync function on. | ||
| Off | FreeSync function off. | ||
Black Stabilizer | You can control the black contrast to have better visibility in dark scenes. Increasing the Black Stabilizer value brightens the low gray level area on the screen. (You can easily distinguish objects on dark game screens.) Reducing the Black Stabilizer value darkens the low gray level area and increases the dynamic contrast on the screen. | ||
| Settings > Picture | Description | ||
| Color Adjust |
Gamma | Mode 1, Mode 2, Mode 3 | The higher the gamma value, the darker the image becomes. Likewise, the lower the gamma value, the lighter the image becomes. |
| Mode 4 | If you do not need to adjust the gamma settings, select Mode 4. | ||
Color Temp | Set your own color temperature. | ||
| Custom | The user can adjust it to red, green, or blue by customization. | ||
| Warm | Sets the screen color to a reddish tone. | ||
| Medium | Sets the screen color to between a red and blue tone. | ||
| Cool | Sets the screen color to a bluish tone. | ||
| Manual | The user can fine-tune the color temperature. | ||
| Red/Green/Blue | You can customize the picture color using red, green, and blue colors. | ||
| Six Color | Meets the user requirements for colors by adjusting the hue and saturation of the six colors (red, green, blue, cyan, magenta, and yellow) and then saving the settings. | ||
| Hue | Adjusts the tone of the screen colors. | ||
| Saturation | Adjusts the saturation of the screen colors. The lower the value, the less saturated and brighter the colors become. The higher the value, the more saturated and darker the colors become. | ||
| Picture Reset | Do you want to reset your picture settings? | Yes | Returns to the default settings. |
| No | Cancel the select. | ||
General
| Settings > General | Description | |
| Language | Sets the menu screen to the desired language. | |
| SMART ENERGY SAVING | Conserve energy by using luminance compensation algorithm. | |
| High | Saves energy using the high-efficiency SMART ENERGY SAVING feature. | |
| Low | Saves energy using the low-efficiency SMART ENERGY SAVING feature. | |
| Off | Disables the feature. | |
NOTE •The value of energy saving data may differ depending on panel and panel suppliers. •If you select the option of SMART ENERGY SAVING is High or Low, monitor luminance become lower or higher depend on source. | ||
| Power LED | Turns the power LED on the bottom of the monitor on or off. | |
| On | The power LED turns on automatically. | |
| Off | The power LED turns off. | |
NOTE •When the Power LED function is turned on, it operates as follows: -On Mode: White -Sleep Mode: White Blinking -Off Mode: Off | ||
| Automatic Standby | Feature that automatically turns off the monitor when there is no movement on the screen for a period of time. You can set a timer for the auto-off function. (Off, 4 H, 6 H, and 8 H) | |
| DisplayPort Version | Set DisplayPort Version to the same version as the connected external device. (1.4, 1.2, and 1.1) To use the HDR function, set to 1.4. | |
| Settings > General | Description | |
| OSD Lock | This feature disables the configuration and adjustment of menus. | |
| On | Enables OSD Lock. | |
| Off | Disables OSD Lock. | |
NOTE •The menus except the menus below are disabled. -Brightness -Contrast -Volume -Input List -Aspect Ratio -OSD Lock -Information | ||
| Information | The following display information will be shown; Total Power On Time, Resolution. | |
| Reset to Initial Settings | Do you want to reset your settings? | |
| Yes | Returns to the default settings. | |
| No | Cancel the reset. | |
TROUBLESHOOTING
Nothing is displayed on the screen. | |
Is the monitor's power cord plugged in? | • Check if the power cord is correctly plugged into the power outlet. |
Is the power LED on? | • Check the power cable connection and press the power button. |
Is the power on and the power LED displaying white? | • Check that the connected input is enabled (Settings > Input). |
Is the No Signal message being displayed? | • This is displayed when the signal cable between the PC and the monitor is missing or disconnected. Check the cable and reconnect it. |
Is the out of Range message being displayed? | • This occurs when signals transferred from the PC (graphics card) are out of the horizontal or vertical frequency range of the monitor. Please see the Product specification section of this manual to set the appropriate frequency. |
Screen display is unstable and shaky. / Images displayed on the monitor leave shadow trails. | |
Did you select the appropriate resolution? | • If the selected resolution is HDMI 1080i 60/50 Hz (interlaced), the screen may be flickering. Change the resolution to 1080p or the recommended resolution. • Not setting the graphics card to the recommended (optimal) resolution may result in blurred text, a dimmed screen, a truncated display area or misalignment of the display. • The setting methods may be different depending on the computer or operating system, and some resolutions may not be available depending on the performance of the graphics card. If this is the case, contact the manufacturer of the computer or graphics card for assistance. |
Does image sticking occur even when the monitor is turned off? | • Displaying a still image for a prolonged time may cause damage to the screen, resulting in the retention of the image. • To extend the lifetime of the monitor, use a screensaver. |
Are there spots on the screen? | • when using the monitor, pixilated spots (red, green, blue, white, or black) may appear on the screen. This is normal for an LCD screen. It is not an error, nor is it related to the monitor's performance. |
Some features are disabled. | |
are some functions not available when you press the Menu button? | • The OsD is locked. Disable oSD Lock in General. |
| Do you see an "Unrecognized monitor, Plug and Play (VESA DDC) monitor found" message? | |
| Have you installed the display driver? | • Make sure to check if the graphics card supports Plug and Play function. |
| No sound from the headphone port. | |
| Are images displayed without sound? | • Make sure that the headphone port connections are made properly. • Try increasing the volume with the joystick. • Set the audio output of the PC to the monitor you are using. (The settings may differ depending on the operating system (OS) you use.) |
Note • LED can be lighted with Set OSD Menu. Settings – General – Power LED – On
See other models: GBB530PZCFB RC8015A GSL545WBYV BD660C NB3540
 the Volume menu.
