Operating Instructions
Countertop Coffee Machine
To prevent accidents and machine damage, you absolutely must read
these instructions before installation or use.
en – US, CA M.-Nr. 10 685 710
Packaging material / Disposal of old machine
2
Packaging material
The packing materials protect the appli-
ance during shipping.
The original box and polystyrene pieces
can be saved to transport the appliance
in the future.
The original packaging should also be
kept in case the appliance ever needs
to be returned to Miele for servicing.
Disposal of your old appliance
Electrical and electronic appliances
contain valuable materials. They also
contain certain substances, compounds
and components which were essential
for the proper functioning and safe use
of the equipment. Handling these mate-
rials improperly by disposing of them in
your household waste can be harmful to
your health and the environment. There-
fore, please do not dispose of your old
appliance with regular household waste
and follow local regulations on proper
disposal.
Consult with local authorities, dealers or
Miele in order to dispose of and recycle
electrical and electronic appliances.
Miele assumes no responsibility for
deleting any personal data left on the
appliance being disposed. Please en-
sure that your old appliance is kept
away from children until removal. Ob-
serve safety requirements for appli-
ances that may tip over or pose an en-
trapment hazard.

Contents
3
Packaging material / Disposal of old machine .................................................. 2
IMPORTANT SAFETY INSTRUCTIONS ................................................................ 6
Guide to the appliance ....................................................................................... 16
Controls and display ........................................................................................... 17
Accessories ......................................................................................................... 18
Before using for the first time ............................................................................ 19
Before using for the first time................................................................................ 19
Turning on for the first time ................................................................................... 19
Water hardness ..................................................................................................... 20
Operation.............................................................................................................. 22
Filling the water tank........................................................................................... 23
Filling the coffee bean container ....................................................................... 24
Turning the machine On and Off ........................................................................ 25
Cup heating.......................................................................................................... 26
Adjusting the coffee dispensers to the cup height .......................................... 27
Preparing beverages ........................................................................................... 28
Making a coffee drink............................................................................................ 28
Canceling preparation ........................................................................................... 29
Double portion....................................................................................................... 29
Coffee pot: Making several cups of coffee one after the other............................. 30
Making coffee drinks from ground coffee ............................................................. 30
Preparing the hot water (CM 6350) ....................................................................... 31
Preparing user profile drinks ................................................................................. 32
Making coffee with milk...................................................................................... 33
Milk flask ............................................................................................................... 33
Using milk cartons or bottles ................................................................................ 34
Preparing drinks with milk ..................................................................................... 34
Grinder setting..................................................................................................... 35
Amount of coffee, brew temperature and pre-brewing................................... 36
Amount of coffee................................................................................................... 36
Brewing temperature ............................................................................................. 36
Pre-brewing ground coffee.................................................................................... 37

Contents
4
Portion size .......................................................................................................... 38
User profiles......................................................................................................... 40
Accessing a user profile ........................................................................................ 40
Creating a user profile ........................................................................................... 40
Selecting a user profile.......................................................................................... 41
Changing the name ............................................................................................... 41
Deleting a user profile............................................................................................ 41
Changing a user profile ......................................................................................... 41
Settings ................................................................................................................ 42
Accessing the "Settings" menu............................................................................. 42
Changing and saving settings ............................................................................... 42
Setting options ...................................................................................................... 43
Language............................................................................................................... 45
Time of day............................................................................................................ 45
Timer ..................................................................................................................... 45
Eco mode .............................................................................................................. 46
Lighting.................................................................................................................. 46
Info (displaying information) .................................................................................. 47
Locking the coffee system (System lock) ......................................................... 47
Water hardness ..................................................................................................... 47
Display brightness................................................................................................. 47
Volume................................................................................................................... 47
Cup heating........................................................................................................... 47
Factory default setting........................................................................................... 48
Showroom program (Demo mode)........................................................................ 48
Cleaning and care ............................................................................................... 49
Overview................................................................................................................ 49
Clean by hand or in dishwasher............................................................................ 50
Drip tray and grounds container............................................................................ 52
Drip tray cover....................................................................................................... 53
Water container ..................................................................................................... 53
Stainless steel water intake valve filter.................................................................. 54
Main dispenser with cappuccinatore .................................................................... 54
Stainless steel milk flask ....................................................................................... 56
Milk pipework ........................................................................................................ 56
Bean container and ground coffee chute.............................................................. 57
Housing ................................................................................................................. 57
Care programs....................................................................................................... 58
Accessing the "Maintenance" menu ................................................................ 58
Rinsing the coffee system ..................................................................................... 58
Rinsing the milk pipework ..................................................................................... 59

Contents
5
Degreasing the brew unit and cleaning inside ...................................................... 60
Descaling the machine ....................................................................................... 64
Frequently Asked Questions .............................................................................. 66
Messages in the display........................................................................................ 66
Unusual performance of the coffee system .......................................................... 69
Unsatisfactory results............................................................................................ 76
Transport .............................................................................................................. 78
Evaporating the coffee system.............................................................................. 78
Packaging.............................................................................................................. 78
Technical Service................................................................................................. 79
Saving energy ...................................................................................................... 80
Electrical connection .......................................................................................... 81
Installation............................................................................................................ 82
Appliance dimensions......................................................................................... 83
Technical data...................................................................................................... 85
IMPORTANT SAFETY INSTRUCTIONS
6
Please read these instructions carefully to prevent accidents and
appliance damage.
This appliance complies with current safety requirements. Im-
proper use of the appliance can cause personal injury and material
damage. Read this safety information carefully before operating
the appliance.
They contain important information on the safe installation, opera-
tion, and care of your coffee system. To avoid the risk of personal
injury or damage to the coffee system, it is important that you
carefully read the instructions. Miele cannot be held liable for dam-
age caused by non-compliance with these IMPORTANT SAFETY
INSTRUCTIONS.
Keep these instructions in a safe place and pass them on to any
future user.

IMPORTANT SAFETY INSTRUCTIONS
7
Intended use
Use this coffee system only in standard household environments
for making coffee beverages such as espresso, cappuccino, latte
macchiato, etc. Any other type of use is not permitted.
The coffee system is not suitable for outdoor use.
The machine is intended only for the preparation of coffee-based
drinks such as espresso, cappuccino, latte macchiato etc. Any other
usage is not supported.
Persons which lack physical, sensory or mental abilities or experi-
ence with the machine should not use it without supervision or in-
struction by a responsible person.
IMPORTANT SAFETY INSTRUCTIONS
8
Safety with children
Caution! Danger of burning and scalding on the dispensing
dispensers.
Children's skin is far more sensitive to high temperatures than that
of adults.
Ensure children do not touch hot surfaces of the coffee system or
place parts of their body under the dispensing dispensers.
Keep the coffee system out of reach of children.
Keep children away from the appliance, the power cord and out-
let.
Children should be supervised when they are near the coffee sys-
tem. Do not allow them to play with it or to use the controls.
Remember that coffee and espresso are not suitable drinks for
children.
Danger of suffocation!
Keep children away from any packing material.

IMPORTANT SAFETY INSTRUCTIONS
9
Technical safety
Before installing the coffee system, check for externally visible
damage. If the coffee system is damaged, it may pose a safety haz-
ard and must not be used under any circumstances.
Before connecting the coffee system, check the voltage and fre-
quency indicated on the data plate against the voltage and fre-
quency of the household electrical supply.
This data must correspond in order to prevent damage to the coffee
system. If in doubt, consult a qualified electrician.
Be certain your appliance is properly installed and grounded by a
qualified technician. To guarantee the electrical safety of this appli-
ance, continuity must exist between the appliance and an effective
grounding system. It is imperative that this basic safety requirement
be met. If there is any doubt, have the electrical system of the house
checked by a qualified electrician.
Reliable and safe operation of the coffee system can only be guar-
anteed if it is connected to the electrical supply.
Do not connect the machine to the electrical supply using an ex-
tension cord or power bar.
The coffee system may not be used in mobile installations such as
ships.
Unplug the appliance from the power supply immediately if you
notice any damage or smell.
Do not operate any appliance with a damaged cord or plug or af-
ter the appliance malfunctions, or has been damaged in any manner.
Return appliance to the nearest authorized service facility for exami-
nation, repair or adjustment.
Ensure that the power cord will not be pinched or damaged by
any sharp edges.

IMPORTANT SAFETY INSTRUCTIONS
10
The power cord should not hang down. Someone could trip over
it with the risk of injury and the appliance could be damaged.
Do not let cord hang over edge of table or counter, or touch hot
surfaces.
Do not place on or near a hot gas or electric burner, or in a heated
oven.
Only use the coffee system in rooms where the ambient tempera-
ture is between +50°F (10°C) and +100°F (38°C).
Danger of overheating! Ensure that there is sufficient ventilation
around the coffee system. Do not cover it with tea towels etc. while it
is in use.
If the coffee system is installed behind a cabinet door, it may only
be used with the door open. This will prevent the formation of heat
and humidity and subsequent damage to the appliance and/or hous-
ing unit. Do not close the cabinet door while the coffee system is in
use. Ensure the coffee system has cooled down completely before
closing the door.
Protect the coffee system from water and water spray. Do not im-
merse the appliance in water.
Repairs and other work by unqualified persons to the appliance
and the power cord could be dangerous. The manufacturer cannot
be held liable for unauthorized work. Repairs may only be carried out
by a Miele-authorized service technician.
Repairs must only be performed by a trained technician in accor-
dance with national and local safety regulations. Repairs and other
work by unauthorized persons could be dangerous and may void the
warranty.
Defective components should be replaced by Miele original parts
only. Only with original Miele parts can the manufacturer guarantee
the safety of the appliance.

IMPORTANT SAFETY INSTRUCTIONS
11
For repairs, the coffee system must be disconnected from the
electrical power supply.
The coffee system is only disconnected from the power supply if
– The power cord has been unplugged.
Unplug the cord by pulling on the plug, not on the cord.
– The fuses to the household power supply are turned off.
– Any screw-in fuses in the household supply are fully unscrewed.
Never open the outer casing of the machine. Tampering with elec-
trical connections or components and mechanical parts is highly
dangerous to the user and can cause operational faults or electric
shock.
To protect against fire, electric shock and injury to persons do not
immerse cord, plugs, or coffee machine in water or other liquid.
To disconnect, turn main switch to "0", then remove plug from
wall outlet.
Use only genuine original Miele parts. If parts or accessories from
other manufacturers are used, the warranty may become void.
The use of accessory attachements not recommended by Miele may
result in fire, electric shock or injury to persons.
IMPORTANT SAFETY INSTRUCTIONS
12
Proper use
Danger of burning and scalding from the dispensers.
The liquids and steam dispensed are very hot.
Please note:
– Keep away from the area underneath the dispensers when hot liq-
uids and steam are being dispensed.
– Do not touch hot components.
– Hot liquid or steam could spatter from the dispensers. Ensure that
the main dispenser is clean and fitted correctly.
– Water in the drip tray can also be very hot. Take care when emp-
tying it.
CM 6350: Danger of injury to the eyes!
Never look directly at the lighting or use optical instruments (e.g.
magnifying glass) to look at it.
Please note the following regarding water:
– Fill the water tank only with fresh, cold tap water. Hot or warm
water or other liquids could damage the coffee system.
– Change the water every day to prevent a build-up of bacteria.
– Do not use mineral water. Mineral water will cause lime scale de-
posits to build up in your machine and damage it.
– Do not use water from a reverse osmosis unit in this machine.
This would damage it.
Only fill the bean container with roasted espresso or coffee beans.
Do not fill the bean container with coffee beans that have been
treated with additives or with ground coffee.
Do not pour liquids into the bean container.
IMPORTANT SAFETY INSTRUCTIONS
13
Do not use green (unroasted) coffee beans or mixtures of coffee
beans which contain green coffee beans. Green coffee beans are
very hard and still contain a certain amount of residual moisture.
These can damage the coffee system grinder as soon as grinding
begins.
Do not use oily beans or beans that have been treated with
caramel, sugar, or other substances. Sugar and oil will damage the
coffee system.
Only add ground coffee or cleaning tablets to the ground coffee
chute.
Do not use any caramelized ground coffee. The sugar in the cof-
fee will stick to and block the brew unit of the coffee system. The
cleaning tablets for degreasing the brew unit will not remove this
type of deposit.
Only use plain milk. Most sugary additives can clog the milk lines.
and damage the machine.
If using dairy milk make sure that it has been pasteurized.
Do not place any alcohol mixtures which are alight underneath the
main dispenser. The flames could ignite plastic components and
cause them to melt.
Do not place any open flame, e.g. a candle, on or near the coffee
system. The coffee system could catch fire.
Do not use the coffee system to clean objects.

IMPORTANT SAFETY INSTRUCTIONS
14
Cleaning and care
The coffee system must be disconnected from the electrical sup-
ply before cleaning or maintenance.
Clean the coffee machine and the milk flask (supplied as standard,
depending on model) daily, particularly before using for the first time
(see "Cleaning and care").
All parts of the milk system need to be cleaned thoroughly and
regularly.
Do not use a steam cleaner to clean this machine. Steam could
reach electrical components and cause a short circuit.
Descale the coffee system regularly depending on the water hard-
ness level in your area. Descale the machine more frequently in areas
with very hard water. Miele cannot be held liable for damage arising
from insufficient descaling, the use of incorrect descaling agent or
the use of descaling agent that is not of the appropriate concentra-
tion.
Degrease the brew unit regularly with Miele cleaning tablets. De-
pending on the natural oil content of the coffee used, the brew unit
can become blocked quite quickly.
Rinsing coffee grounds down the drain can cause the sink to clog.
Instead, dispose of your coffee grounds appropriately as biodegrad-
able waste (where facilities exist) or by composting.

IMPORTANT SAFETY INSTRUCTIONS
15
For machines with stainless steel surfaces:
Do not use sticky notes, transparent adhesive tape, masking tape
or other types of adhesive on stainless steel surfaces. These dam-
age the surface, causing it to lose its dirt repellent protective coating.
The finish on stainless steel surfaces is susceptible to scratching.
Even magnets can cause scratching.
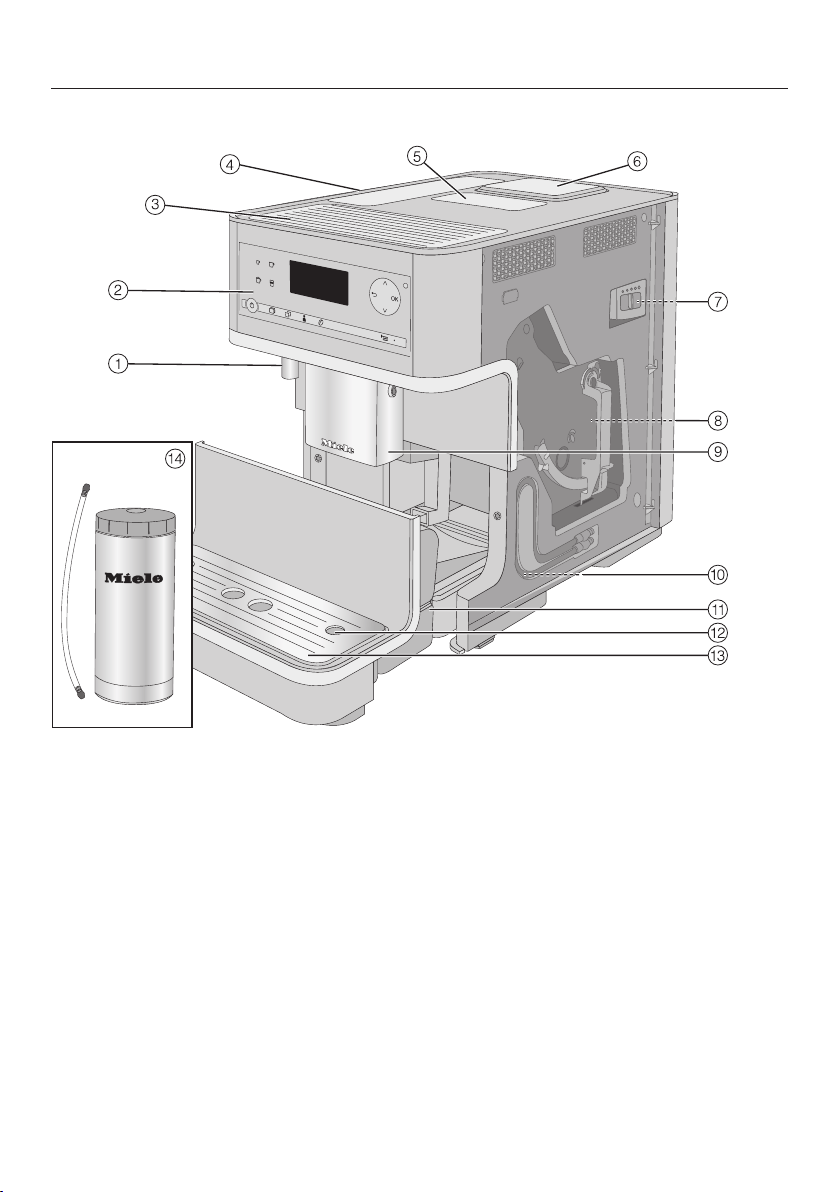
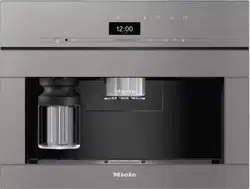
Guide to the appliance
16
a
Hot water spout*
b
Controls and display
c
Cup heating*
d
Water container
e
Ground coffee chute
f
Bean container
g
Grinder setting
(behind the service panel)
h
Brew unit (behind the service panel)
i
Main dispenser with cappuccinatore
j
Park position for milk pipework
(behind the service panel)
k
Drip tray with lid and grounds con-
tainer
l
Milk tube opening
m
Lower panel with drip tray cover
n
Stainless steel milk flask*
*CM 6350
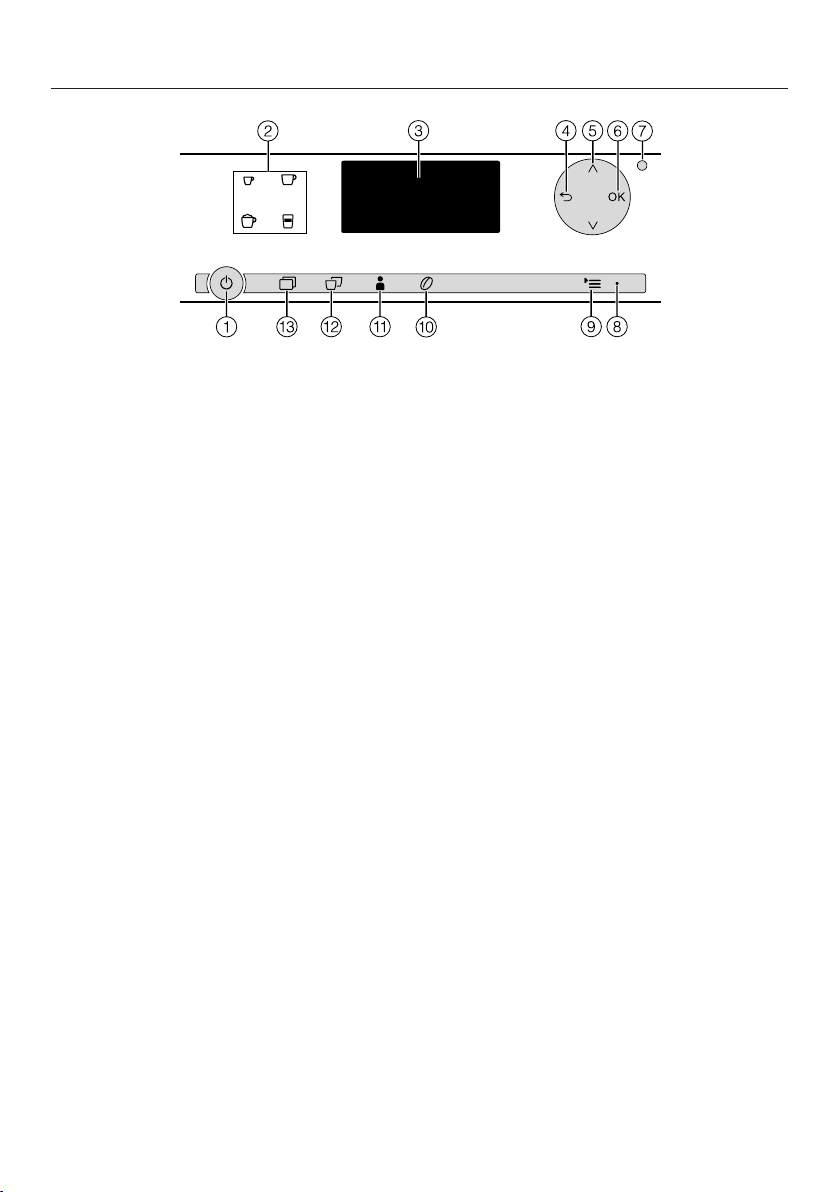
Controls and display
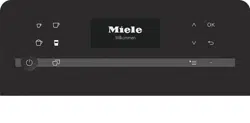
17
a
On / Off button
For turning the appliance On and Off
b
Drink buttons
For making Espresso,
Coffee,
Cappuccino or
Latte macchiato
c
Display
For showing information on current
activity or status
d
Back
For returning to the previous menu,
canceling unwanted actions
e
Arrow buttons
For showing more selection options
in the display and highlighting a se-
lection
f
OK
For confirming display messages and
saving settings
g
Optical interface
(for Miele Technical Service only)
h
LED
Flashes when the appliance is turned
on and the display is black
i
Settings
For displaying the "Settings" menu
and changing settings
j
Parameters
For displaying and changing drink
settings
k
User profiles
For creating and managing profiles
l
Double portion
For preparing two portions of a drink
m
Additional programs
other drinks: Ristretto, lungo coffee,
caffè latte, hot milk, milk froth, hot
water *
Maintenance programs
* CM 6350

Accessories
18
These products and other useful acces-
sories can be ordered via the Miele
Webstore, from Miele Service or from
your Miele dealer.
Included accessories
– Measuring scoop
For ground coffee
– Stainless steel milk flask MB-CM
For keeping milk cool longer
(capacity approx. 2 cups / 0.5 l)
The stainless steel milk flask is not
supplied with the CM 6150.
– Miele appliance care starter set
Different cleaning products, e.g.
Miele descaling tablets, are supplied
depending on model.
– Cleaning brush
For cleaning the milk pipework
Optional accessories
Miele also offers a range of optional ac-
cessories, as well as cleaning and con-
ditioning products for your coffee sys-
tem.
– Cleaning agent for milk pipework
for cleaning the milk system
– Cleaning tablets
for degreasing the brew unit
– Descaling tablets
for descaling the water pipework
– Stainless steel milk flask MB-CM
For keeping milk cool longer
(capacity approx. 2 cups / 0.5 l)
Before using for the first time
19
Before using for the first time
Remove any protective coverings and
notices from the machine.
Insert the drip tray into the lower
panel.
Place the coffee machine on a flat
surface that is not sensitive to water
(see "Installation").
Clean the appliance thoroughly be-
fore filling it with water and coffee
beans (see "Cleaning and care").
Plug in the coffee machine (see
"Electrical connection").
Remove the water container and fill it
up to the "max." mark with fresh cold
water. Replace the water container
(see "Filling the water container").
Remove the bean container lid, fill it
with roasted coffee beans and re-
place the lid (see "Filling the bean
container").
Turning on for the first time
When the coffee machine is turned on
for the first time, after the welcome
screen has appeared you will be asked
to set the following settings:
– Language and country
– Time of day
Tap the On / Off button.
Miele - Willkommen appears briefly on the
display.
Selecting a language
Use the arrow keys to highlight
the desired language.
Then tap OK.
Use the arrow keys to highlight
the desired country.
Then tap OK.
The setting is now saved.
Setting the time of day
Use the arrow keys until the time
of day appears.
Then tap OK.
The setting is now saved.
The coffee machine is now successfully
set up for use. The coffee machine will
heat up and rinse the pipework. Rinse
water flows out of the main dispenser.
Rinse the milk pipework (see "Rinsing
the milk pipework") before making a
drink with milk for the first time.
Please note that the coffee aroma and
the characteristic crema only develops
after the first few coffees have been
made.

Before using for the first time
20
Turn the appliance off with the On /
Off button. Do not unplug the
power cord to switch off the coffee
machine. If you unplug the coffee
machine while using it for the first
time, you will have to set it up for use
again.
A larger quantity of coffee beans is
ground for the first coffee drinks and
powder from the coffee grounds may
adhere to the cover of the drip tray.
Water hardness
The water hardness level indicates how
much calcium is dissolved in the water.
The higher the calcium content, the
harder the water, and the harder the
water, the more often the coffee ma-
chine will need to be descaled.
The coffee machine measures the
amount of water used and steam made.
Depending on the level of water hard-
ness set, more or fewer drinks can be
dispensed before the appliance needs
to be descaled.
Program the coffee machine to the wa-
ter hardness level of your area so that it
functions correctly and does not get
damaged. At the correct time a prompt
will then appear in the display to
descale the appliance.
Your local water authority will be able to
tell you the hardness of water in your
area.
The water hardness level is set to 3 at
the factory.
You can program four hardness levels
on the machine:
°dH gr/gal Setting
0-8.4 0–8.7 Soft 1
8.4–14 8.7-14.6 Medium 2
14–21 14.6-21.9 Hard 3
>21 > 21.9 Very hard 4
* The water hardness settings in the display
may differ from the water hardness level in
your area. To set the correct water hardness
level for your area always refer to the values
in the chart.

Before using for the first time
21
Setting the water hardness level
Tap.
Use the arrow buttons to select
Water hardness and tap OK.
Use the arrow keys to select the
required water hardness. Then tap
OK.
The setting is now saved.
Operation
22
To operate the coffee machine, tap the
sensor buttons with your finger.
CM 6350: An audible signal is gener-
ated each time a button is touched.
You can adjust the volume of the sig-
nal tones or switch the tones off (see
"Settings – Volume").
When the following appears on the dis-
play, you are in the drinks menu:
Miele
Select drink
To make a coffee drink, tap one of the
drink buttons.
You can find more drinks in the Addi-
tional programs menu.
Selecting a menu and navigat-
ing within a menu
To select a menu, tap the relevant but-
ton. You will then be able to start an ac-
tion or change settings in the menu.
Settings
Time
Timer
Language
A scroll bar at the right of the display
shows that additional options or text
are available. Use the arrow keys to
display them.
The setting which is currently selected
will have a checkmark beside it.
To select a setting use the arrow keys
until the setting you want is high-
lighted.
To confirm the selection, tap OK.
Leaving the menu or canceling
an action
To exit the current menu, tap Back.
Filling the water tank
23
Change the water every day to
prevent a build-up of bacteria.
Only use cold, fresh tap water to fill
the water tank.
Hot or warm water or other liquids
can damage the coffee system.
Do not use mineral water. Mineral
water will cause serious limescale
deposits to build up in your machine
and damage it.
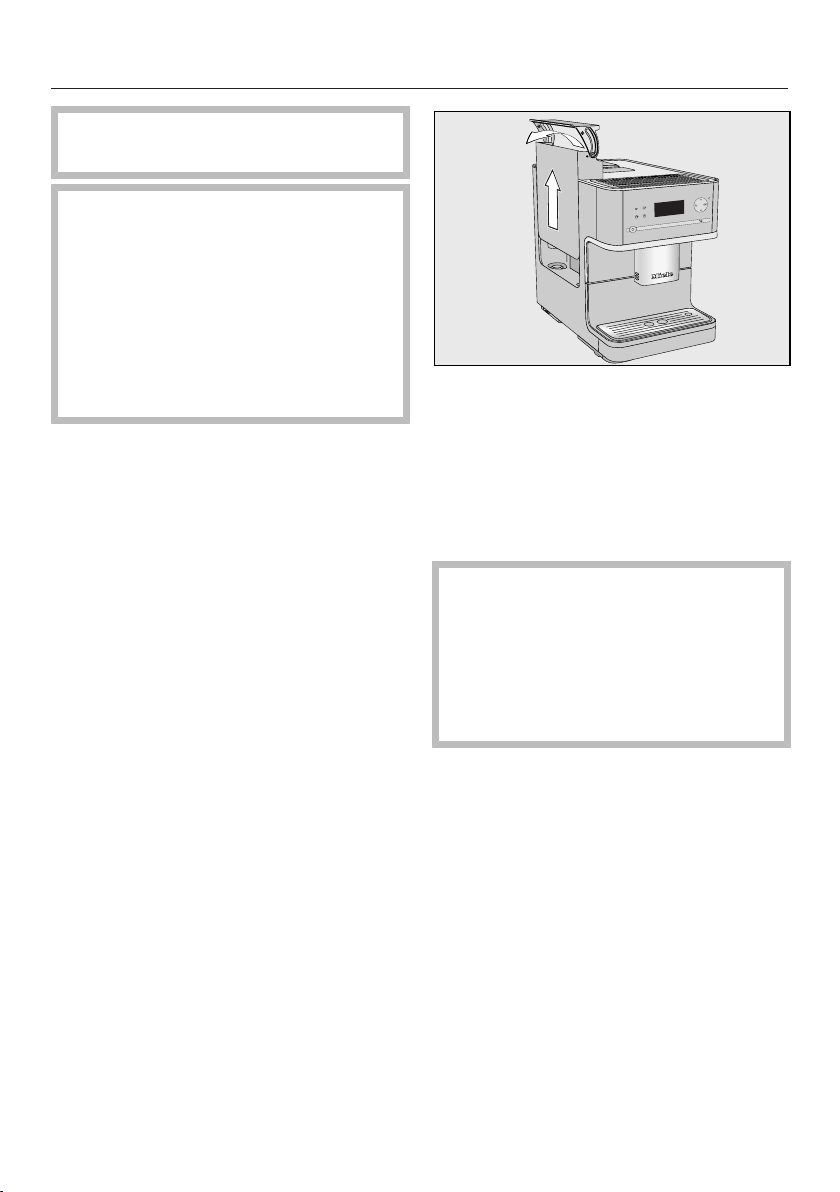
Press the lid on the right-hand side.
Pull the water reservoir up by the lid
to remove it.
Fill the water reservoir with fresh, cold
tap water up to the "max." marker.
Replace the water reservoir.
If the water reservoir is a little high or
at a slant, check whether the surface
that the water reservoir sits on is
dirty. If the water reservoir is not sit-
ting correctly, the drain valve will not
be sealed.
Clean the surface if necessary.
Filling the coffee bean container
24
Fill the coffee bean container with
roasted coffee or espresso beans if you
want to use freshly ground coffee beans
for each cup of espresso or coffee.
Alternatively, you can make coffee or
espresso with ground coffee (see "Mak-
ing coffee drinks from ground coffee").
Important! Risk of damage to the
grinder.
Only put roasted coffee or espresso
beans in the container. Anything
else, including ground coffee, will
damage the grinder.
Do not pour liquids in the bean con-
tainer.
Important! Sugar damages the coffee
system.
Do not use coffee beans that have
been treated with sugar, caramel, or
other substances containing sugar in
the coffee bean container.
Do not use green (unroasted) coffee
beans or mixtures of coffee beans
which contain green coffee beans.
Green coffee beans are very hard
and still contain a certain amount of
residual moisture. These can dam-
age the coffee system grinder as
soon as grinding begins.
Tip: You can use a nut or seed grinder
to grind green coffee beans. These
types of grinder generally have a rotat-
ing stainless steel blade. You can then
add the ground green coffee portion by
portion to the ground coffee chute and
make the desired coffee drink (see
"Making coffee drinks from ground cof-
fee").
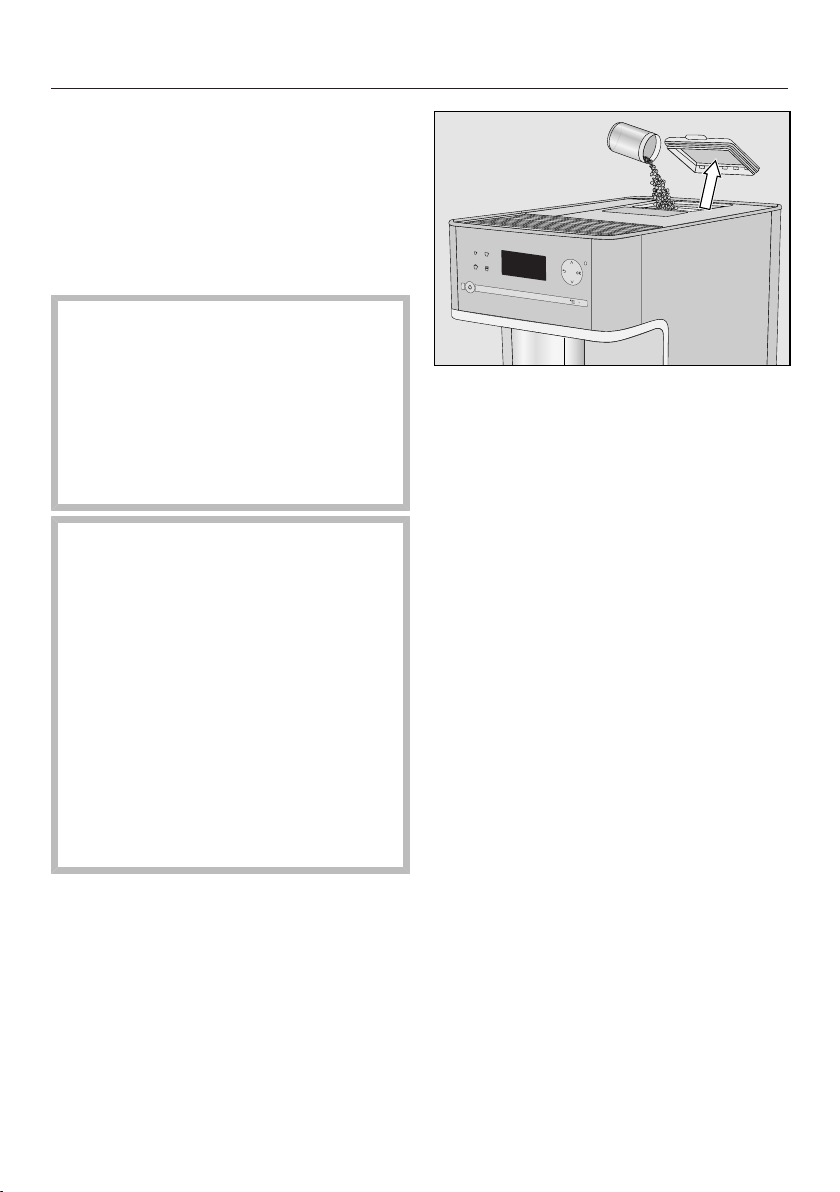
Take the lid off the coffee bean con-
tainer.
Fill the container with roasted coffee
beans.
Replace the lid.
Tip: Only add enough beans to last for
a few days as contact with air causes
coffee beans to lose their aroma.
Turning the machine On and Off
25
Turning the appliance on
Tap the On / Off button.
The appliance heats up and rinses the
lines. Hot water will run out of the main
dispenser.
When Select drink appears on the dis-
play, you can make drinks.
If the operating temperature exceeds
140°F (60°C) when you switch the ma-
chine on, the rinsing process will not
take place.
If no buttons are touched or mainte-
nance programs carried out, the display
will turn off after approx. 7minutes to
save energy.
The LED on the right flashes as long as
the machine is switched on.
Tap any one of the buttons to wake
the appliance up again to make a
drink.
Turning the appliance off
Tap the On / Off button .
After a coffee drink has been dis-
pensed, the pipework will be rinsed be-
fore the appliance turns off.
If you have made a drink using milk,
Place milk pipe in drip tray will appear in
the display.
Insert the end of the milk pipe into the
aperture in the drip tray, and then tap
OK.
If the milk system is not rinsed out be-
fore turning off, it will have to be
rinsed the next time the appliance is
turned on.
Turning off for longer periods
of time
If the coffee machine is not going to be
used for a longer period of time, e.g. if
you are going on vacation:
Empty the drip tray, the waste unit
and the water reservoir.
Clean all parts thoroughly, including
the brew unit.
Switch off the machine and unplug
the power cord to disconnect it.
The time of day will not be saved. It
will have to be reset next time the ap-
pliance is turned on.
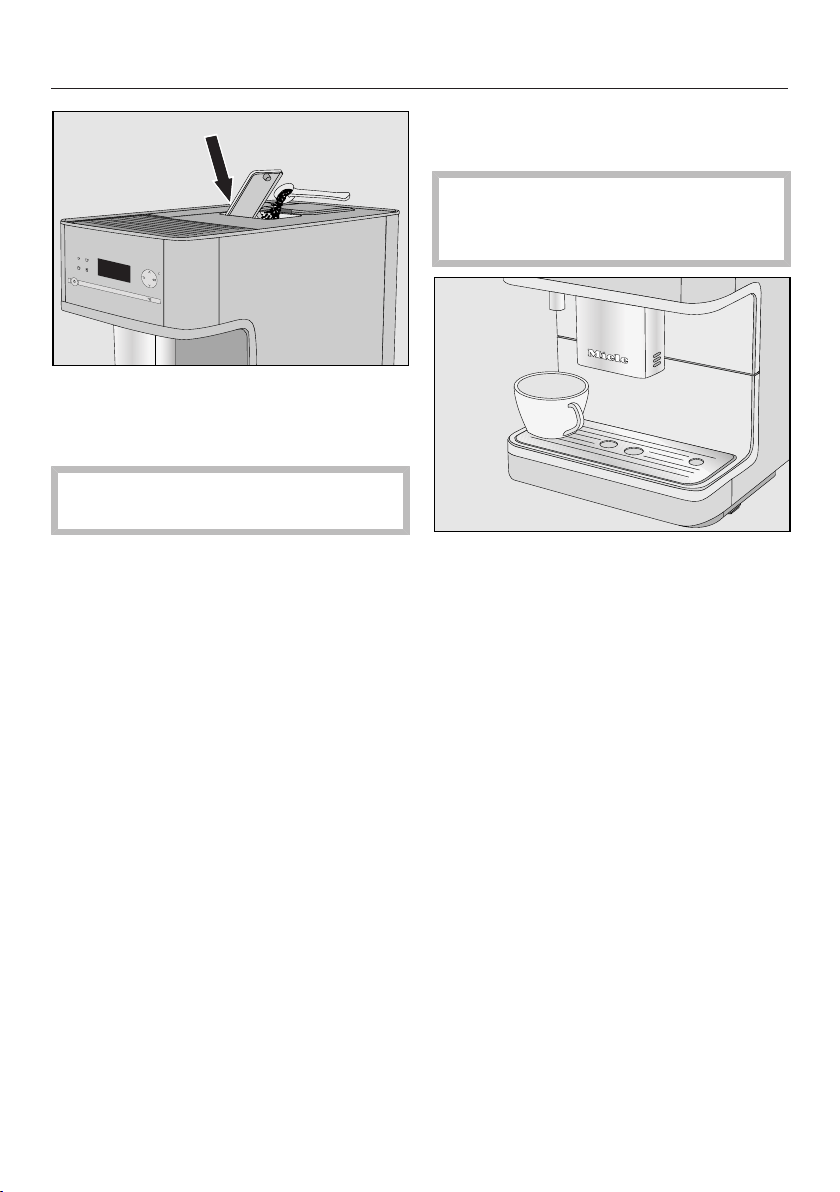
Cup heating
26
(CM 6350)
Cups should always be pre-heated to
allow the flavor of the coffee to develop
and be retained.
The smaller the volume of the coffee/
espresso and the thicker the cup, the
more important it is to pre-heat the cup.
You can pre-heat cups or glasses on
the cup heating surface on the top of
the coffee machine.
The cup heating function must first be
switched on.
The cup heating surface will be heated
continually until the coffee system is
turned off.
To turn cup heating on or off
Tap .
Select Cup heating and tap OK.
Select the required option and tap
OK.
The setting is now saved.
Pre-heating cups
Arrange the cups or glasses on the
cup heating surface on the top of the
coffee system.
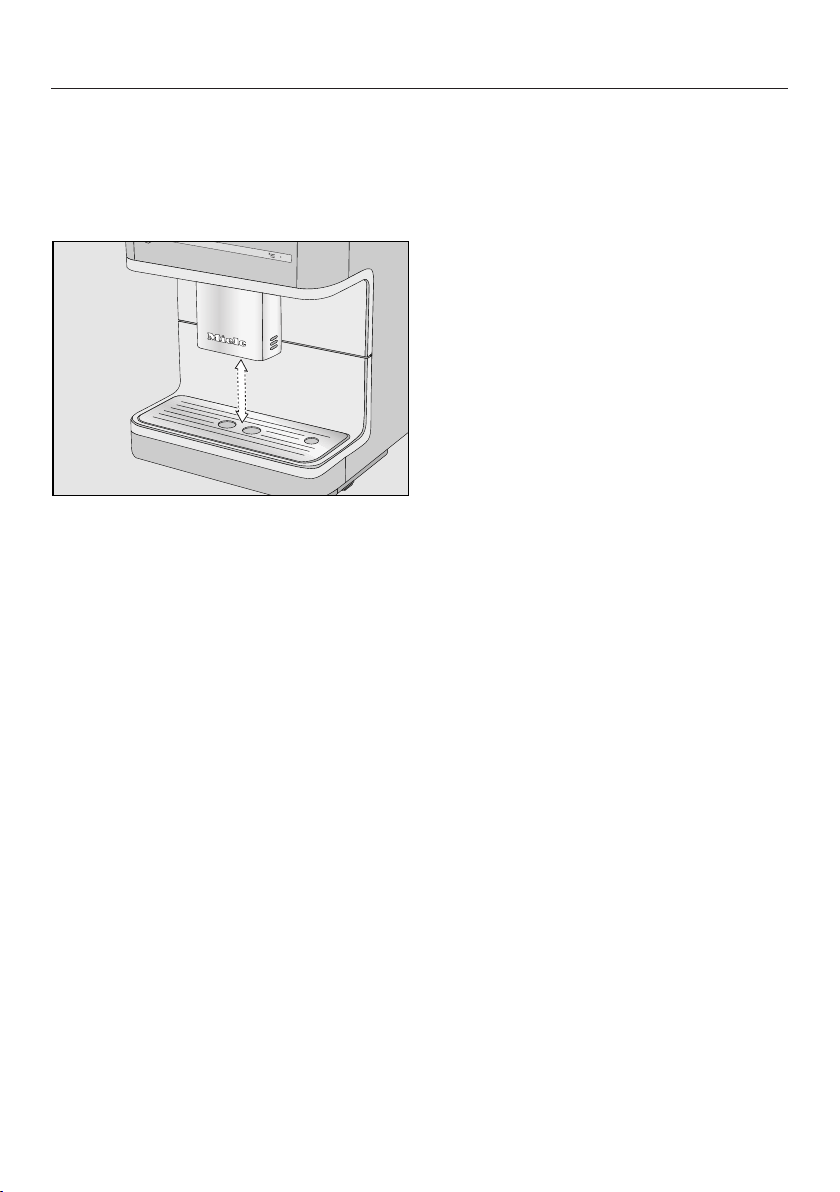
Adjusting the coffee dispensers to the cup height
27
You can adjust the main dispenser to
suit the height of the cup you are using
so that the coffee or espresso will not
cool down as quickly and the crema will
have a better consistency.
Pull the main dispenser down until it
is at the same level as the rim of the
cup.
Alternatively, push the main dis-
penser up until there is enough room
to fit a larger cup or mug underneath.
Preparing beverages
28
You can choose from a variety of spe-
cialty coffees:
– Ristretto is a concentrated, strong
espresso. The same quantity of cof-
fee powder as for an espresso is pre-
pared with very little water.
– Espresso is a strong, aromatic
coffee with a thick hazelnut-brown
cream layer – the crema – on top.
Use espresso-roasted coffee beans
for preparing espresso.
– Coffee differs from espresso by
the increased amount of water and
the roast of the beans.
Use coffee beans of the correct roast
to make coffee.
– Lungo coffee is a coffee with sig-
nificantly more water.
Danger of burning and scalding
from the dispensers.
The liquids and steam dispensed are
very hot.
Keep away from the area underneath
the dispensers when hot liquids and
steam are being dispensed.
Do not touch hot components.
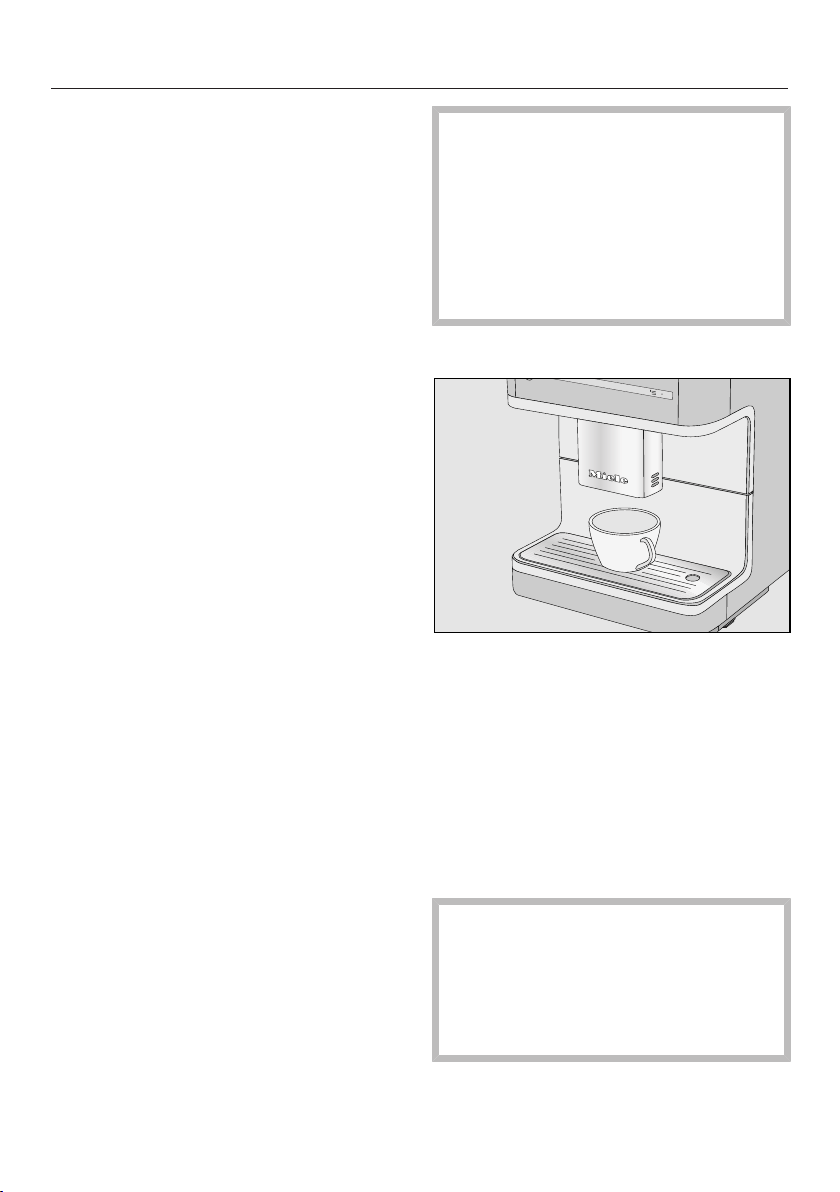
Making a coffee drink
Place a cup under the main dis-
penser.
Select a drink.
– Espresso
– Coffee
– in Additional programs:
Ristretto, Long Coffee
Dispensing will start.
To ensure that any residues from the
factory testing process are removed
from the brewing system, please dis-
card the first two cups of coffee
when using the appliance for the first
time.
Preparing beverages
29
Canceling preparation
To cancel preparation:
Tap the drinks button or for drinks
from Additional programs again.
Drink preparation will be canceled.
Tip: You can cancel making a drink by
tapping OK as soon as Stop appears in
the display.
When making coffee with milk or two
portions of a drink you can cancel
each stage individually.
TapOK.
Drink preparation will be canceled.
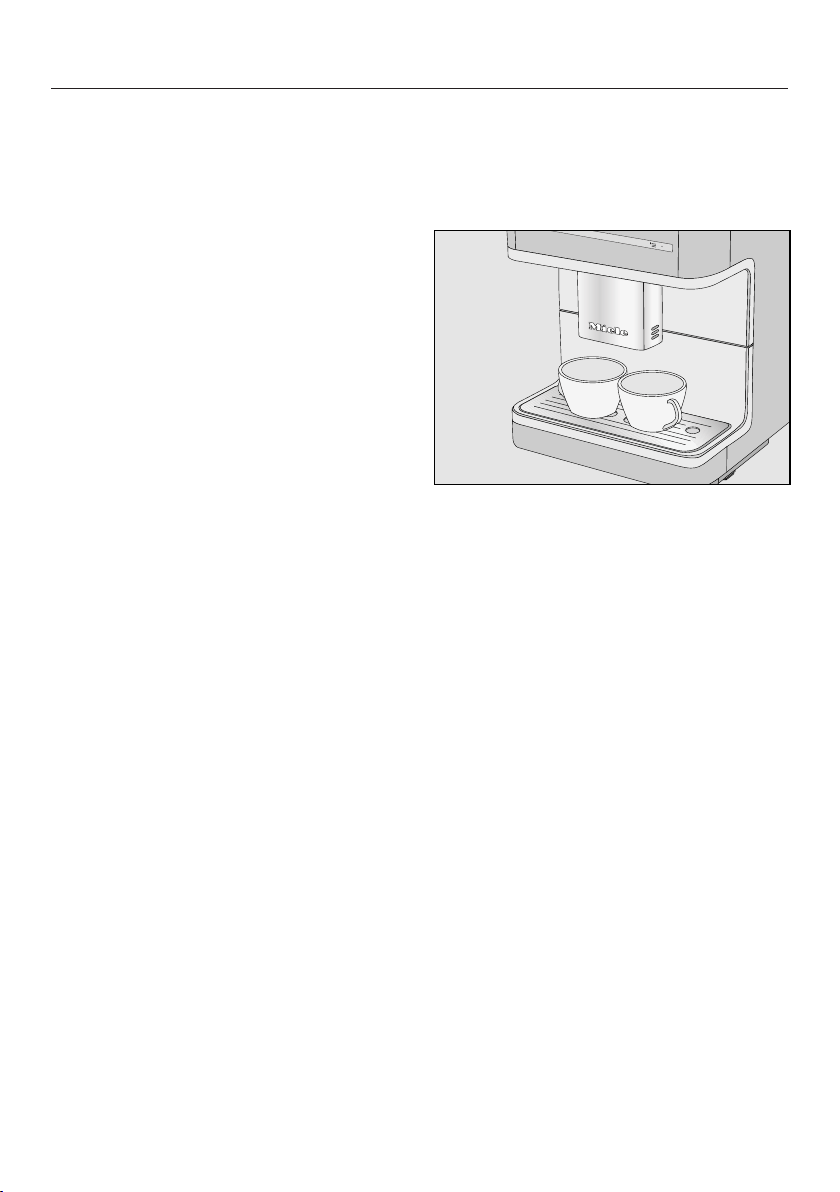
Double portion
You can dispense two portions into one
cup or dispense two portions into two
cups at the same time.
To fill two cups at the same time,
place a cup under each coffee spout.
Tap .
Select a drink.
Two portions of the desired drink will be
dispensed from the main dispenser.
Tip: Tip: If, after a while, you have not
tapped one of the drink buttons, the
"Double portion" option will revert
back to single portions.

Preparing beverages
30
Coffee pot: Making several
cups of coffee one after the
other
With the Coffee potfunction you can
make several cups of coffee one after
the other automatically - up to max.
1quart (1 liter) - to fill a coffee pot, for
example. In this way, up to eight cups
of coffee can be made.
Place a sufficiently large container
under the main dispenser.
Tap.
Use the arrow keys to highlight
Coffee pot.
Tap OK.
Use the arrow keys to highlight
the desired number of cups (3 to 8).
Then tap OK.
Follow the instructions given.
Each portion of coffee will be brewed
and dispensed individually. The display
will inform you about the progress.
Canceling preparation
TouchOK when Stop appears on the
display.
Dispensing will stop.
Canceling Coffee pot
Tap.
Coffee pot dispensing will stop.
Making coffee drinks from
ground coffee
To make drinks using ready-ground cof-
fee, add a portion of ground coffee to
the ground coffee chute.
This allows you to make a decaffeinated
coffee, if the bean container is already
filled with regular coffee beans for ex-
ample.
The coffee system will automatically
recognize that ground coffee has been
placed in the chute.
Only one portion of coffee or espresso
can be prepared at a time when using
ground coffee.
Add a maximum of two level spoons
of coffee to the ground coffee chute.
If too much is added, the brew unit
will not be able to process the cof-
fee.
Adding ground coffee
The coffee system will use all the
ground coffee that has been added to
the chute to make the next coffee.
Use the scoop supplied with the appli-
ance to ensure that the correct amount
of ground coffee is used.
Preparing beverages
31
Open the ground coffee chute.
Use the measuring spoon to add
ready ground coffee to the chute.
Add a maximum of two level spoons
of coffee to the ground coffee chute.
Close the coffee chute.
Use ground coffee appears on the dis-
play.
Making coffee with ground coffee
If you want to make a drink with pre-
ground coffee:
select Yes and tap OK.
You can now choose which coffee drink
to make with ground coffee.
Place a cup under the main dis-
penser.
Select a drink.
The coffee machine will now prepare
the desired drink.
If you selectNo and confirm withOK,
the ground coffee is emptied unused
into the waste container. The appliance
will rinse itself.
Preparing the hot water (CM
6350)
Caution! Danger of burning and
scalding. The water dispensed is
very hot.
Place a suitable container under the
hot water spout.
Tap.
Select Hot water and tap OK.
Hot water will run into the container un-
der the hot water spout.
To cancel preparation
tapOK.
Drink preparation will be canceled.

Preparing beverages
32
Preparing user profile drinks
You can enter individual profiles to cater
for different tastes and preferences.
If you have already created your own
profile (see "User Profiles"), you can se-
lect this to make a drink according to
your own taste.
Tap.
Select the profile with the arrow but-
tons and tap OK.
The name of the selected user profile
will appear in the top of the display.
You can now make your drink.
Making coffee with milk
33
Caution! Danger of burning and
scalding from the main dispenser.
Liquids and steam dispensed will be
very hot.
Only use plain milk. Most sugary ad-
ditives can clog the milk lines. and
damage the appliance.
As soon as you select a drink contain-
ing milk the appliance will start to heat
up. The milk will be drawn up into the
central spout where it is heated by
steam and also frothed for drinks re-
quiring milk froth.
If you have not made any milk drinks
for a while, rinse the milk system
thoroughly before making the first
drink to ensure any bacteria is
flushed out.
The following drinks with milk can be
made:
– Cappuccino consists of approx.
2/3 milk froth and 1/3 espresso.
– Latte macchiato consists of 1/3
each of hot milk, milk froth and
espresso.
– Caffè latte consists of hot milk
and espresso.
Hot milk and milk froth can also be
made.
Tip: Using cold milk (<50°F/10°C) will
produce the perfect milk froth.
You can select milk with a fat content
according to preference. With whole
milk (at least 3.5% fat), the milk froth
will be slightly creamier.
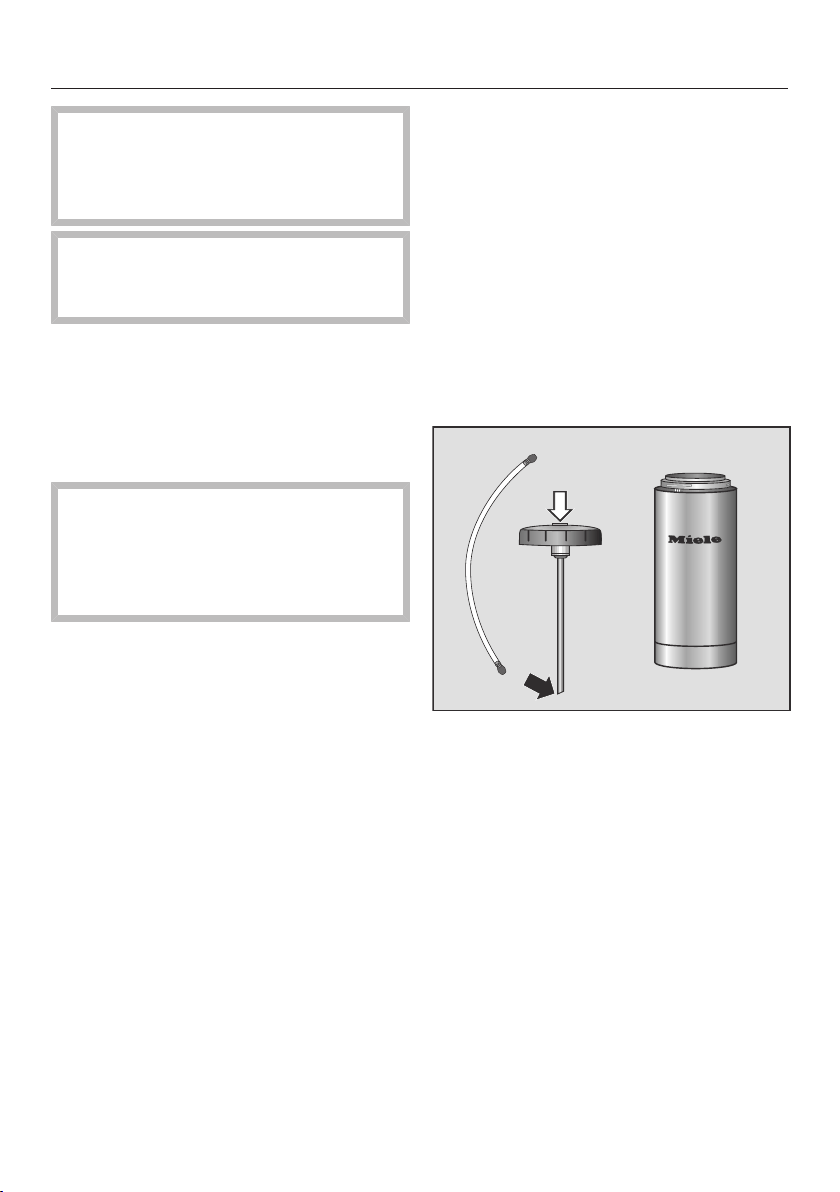
Milk flask
(Supplied with CM 6350)
The stainless steel flask keeps milk cool
for longer. Good milk froth can be made
with cold milk (<50°F/10°C).
Connect the stainless steel suction
tube to the inside of the lid. Make
sure that the slanted end is pointing
downwards as shown.
Fill the milk flask up to max. 3/4" (2
cm) below the rim with milk. Seal the
milk flask with the lid.
Connect the milk tube to the top of
the lid. Make sure that the connecting
piece clicks into position.
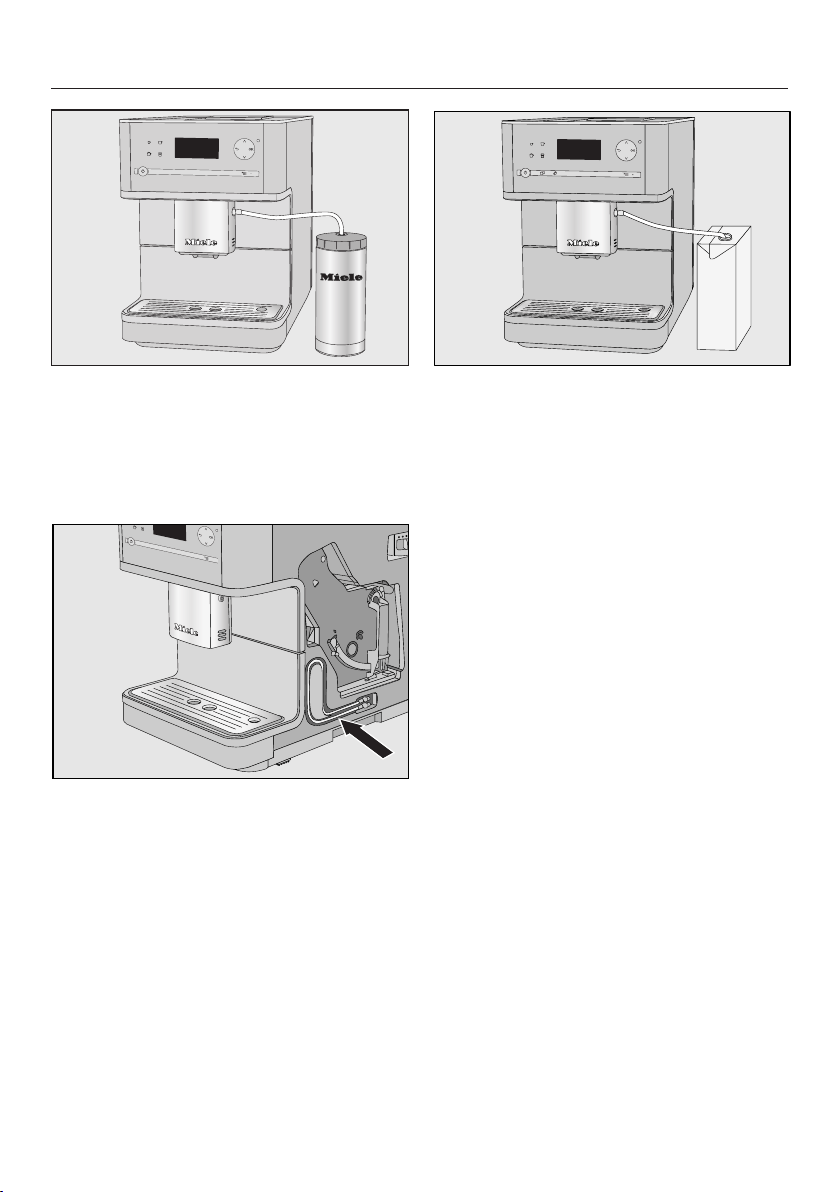
Making coffee with milk
34
Place the milk flask on the right-hand
side of the coffee system. Connect
the other end of the milk tube to the
main dispenser.
Using milk cartons or bottles
The milk tube for cartons and other
suitable containers is located behind
the appliance front.
Connect the milk pipe to the aperture
in the main dispenser.
Place a container with sufficient milk
beside the coffee machine.
Place the end of the milk tube in the
container making sure that it is suffi-
ciently immersed in the milk.
Preparing drinks with milk
Place a suitable container under the
main dispenser.
Select a drink.
– Cappuccino
– Latte macchiato
– in Additional programs: Caffè Latte, Hot
Milk, Milk Froth
The drink will now be made.
Grinder setting
35
When the beans are ground correctly,
the coffee or espresso will flow evenly
into the cup with a good crema.
The crema should have an even nut-
brown colour.
The grinder setting you select will be
used for all coffee drinks.
There are various ways to tell whether
the coffee grinder is set correctly.
The coffee is ground too coarse, if
– espresso or coffee flows into the cup
too quickly.
– the crema is very pale and uneven.
Set a finer grinder setting.
The coffee is ground too fine, if
– espresso or coffee flows into the cup
very slowly.
– the crema is dark brown.
Set a coarser grinder setting.
To avoid damaging the grinder,
please note the following:
Only adjust the grinder one setting at
a time.
Grind the coffee beans again if you
want to adjust the grinder to the next
setting.
Open the appliance door.
Push the slide control one setting to
the left (for finer grinding) or one set-
ting to the right (for coarser grinding).
Close the appliance door.
Opening the appliance resets the in-
ternal counter for emptying the drip
tray and the grounds container.
Empty the drip tray and grounds con-
tainer.
Prepare a coffee drink.
After that, you can adjust the grinder
setting again.
The altered grinder setting will not be
used until after the second coffee has
been dispensed.

Amount of coffee, brew temperature and pre-brewing
36
You can adjust the amount of coffee,
the brew temperature and pre-brewing
individually for each coffee drink. To do
this, first select the drink from the Pa-
rameters menu and then adjust the
drink parameters.
Tap .
Select the drink you want and tap
OK.
The current settings for the amount of
coffee, brewing temperature and pre-
brewing will be displayed for this drink.
Select Amount of coffee, Brew tempera-
ture or Pre-brewing.
Select the setting you want and
tapOK.
The setting is now saved.
Amount of coffee
The coffee system can grind and brew
6-14 g of coffee beans per cup. The
greater the quantity, the stronger the
coffee.
There are various ways to tell whether
the amount of coffee is set correctly.
The amount of coffee is too low, if
– espresso or coffee flows into the cup
too quickly.
– the crema is very pale and uneven.
– the espresso or coffee lacks body.
Increase the amount of coffee so that
more ground coffee is brewed.
The amount of coffee is too high, if
– espresso or coffee flows into the cup
very slowly.
– the crema is dark brown.
– the espresso or coffee tastes bitter.
Decrease the amount of coffee so that
less ground coffee is brewed.
Tip: If the coffee is too strong for you or
it tastes bitter, try a different type of
bean.
Brewing temperature
The ideal brewing temperature will de-
pend on:
– the type of coffee,
– whether an espresso or a coffee is
being prepared, and
– the altitude of the region.
If the coffee system is located at more
than 6562 ft. (2000 meters) above sea
level, the brewing temperature needs to
be set lower due to the change in pres-
sure. This is because the boiling point
for water at a high altitude above sea
level is lower than the boiling point for
water at sea level.
Tip: Not all types of coffee can with-
stand high temperatures. Certain types
are too delicate - the crema on top
would not be as good and the taste
would be impaired.

Amount of coffee, brew temperature and pre-brewing
37
Pre-brewing ground coffee
When the pre-brewing function is
turned on, the freshly ground coffee is
first moistened with a little hot water.
Then the remaining water is forced
through the moistened coffee at high
pressure. This helps release the flavor
of the coffee.
You can set pre-brewing for a normal
length of time or an extra long length of
time. Alternatively, you can turn off the
"Pre-brewing" function.
The machine is supplied with the "Pre-
brewing" function turned off.

Portion size
38
The flavor of the coffee produced de-
pends not just on the type of coffee
used, but also on the amount of water
used.
You can program the amount of water
to suit the size of your cups and the
type of coffee you are using.
For coffee drinks that use milk you can
also set the amount of milk or milk froth
to be dispensed with these drinks. Ad-
ditionally, you can set the portion sizes
for hot milk and milk froth alone.
Each type of drink has a maximum por-
tion size that can be programmed into
the appliance. The coffee machine halts
preparation of the coffee once this por-
tion size has been reached. The maxi-
mum possible portion size for this type
of drink is then saved in the appliance.
If the water container becomes empty
while making a drink, the appliance
will stop programming the portion
size. The portion size will not be
saved.
There are two ways of initiating the pro-
gramming of the portion size:
– By tapping the drink button when you
are preparing a coffee; or
– by selecting Portion size in the Param-
eters menu.
The changed portion size is always
saved in the current User profile. The
name of the current profile appears in
the top left-hand side of the display.
Canceling quantity programming
Touch the drinks sensor again or the
sensor for drinks from Additional
programs again.
Changing the portion size dur-
ing drink preparation
You can adapt the portion size for
espresso, coffee , cappuccino,
and latte macchiato directly during
preparation and save it.
Place a cup under the main dis-
penser.
Tap the sensor button for the desired
drink until Change appears in the dis-
play.
The desired drink is prepared and Save
appears in the display.
When the cup is filled to the desired
level, tap OK.
If you want to change the the drink
amount for coffee specialties with milk,
the ingredients are the drink are saved
one after the other during preparation.
When the quantity for each ingredient
reaches the desired level, tap OK.
The programmed mix of ingredients and
portion sizes will now be dispensed ev-
ery time that particular drink is selected.

Portion size
39
Changing the portion size in
the Parameters menu
You can adapt the portion sizes for
lungo coffee, caffè latte, hot milk,
and milk froth using using the "Pa-
rameters" menu.
Place a suitable container under the
main dispenser.
Tap .
Select the desired drink.
Select Portion size and tap OK.
From this point onwards the procedure
is identical to programming the portion
size during drink preparation.
Changing the portion size for
different user profiles
You can set the portion size for individ-
ual drinks for each user profile.
Tap.
Select the user profile.
The name of the current user profile is
shown at the top left of the display.
Now you can adjust the portion sizes as
described above.
User profiles
40
If the coffee system is used by several
people with different coffee prefer-
ences, you can create individual user
profiles in addition to the Miele profile.
In each user profile, you can make set-
tings for individual drinks (portion size,
amount of ground coffee, brewing tem-
perature and pre-brewing).
The name of the current user profile is
shown at the top left of the display.
Accessing a user profile
Tap .
You can now create a user profile.
If you have allocated a profile in addi-
tion to the Miele standard user profile,
you have the following options:
– Select profile from the user profiles
that have already been allocated.
– Change name if the name of a user
profile needs to be changed.
– Delete profile if you want to delete a
user profile.
– Change profile to set whether the
coffee system automatically always
reverts to the Miele standard user
profile or retains the last selected
user profile.
Tip: Tap or "Profile" to return to
the main menu.
Creating a user profile
Use the arrow buttons to select
Create profile and tap OK.
Letters will appear in the display that
you can select with the arrow buttons.
You can use the arrow buttons to select
from numbers, upper case and lower
case letters.
Tap arrow buttons to select the
character and then tap OK.
The character will then appear in the
line above.
Repeat the process until the desired
name appears in the display line
above.
Tip: You can delete the last character
entered by tapping .
When you have finished entering a
name and want to save it,
use the arrow keys to highlight
the check and tap OK.
If you do not want to save what you
have entered,
tap and hold until all characters
have been deleted and the coffee
system jumps back to the previous
menu.
The last created profile is selected as
the current profile.

User profiles
41
Selecting a user profile
This selection is only possible if a pro-
file has been allocated in addition to
the Miele standard user profile.
Use the arrow buttons to select
Select profile and tap OK.
Select the profile with the arrow but-
tons and tap OK.
The name of the current user profile is
shown at the top left of the display.
Changing the name
This selection is only possible if a pro-
file has been allocated in addition to
the Miele standard user profile.
Use the arrow buttons to select
Change name and tap OK.
Proceed the same as with "Create
profile":
– Select to delete a character.
– To enter new characters, highlight the
relevant character and confirm with
OK,
– Save the new name by selecting in
the display and tapping OK.
Deleting a user profile
This selection is only possible if a pro-
file has been allocated in addition to
the Miele standard user profile.
Use the arrow buttons to select
Delete profile and tap OK.
Select the profile you wish to delete.
TapOK.
A check will appear after the name
and the user profile will be deleted after
a short time.
Changing a user profile
You can program the coffee system so
that it changes back to the Miele stan-
dard profile automatically after each
drink is dispensed, so that the Miele
profile is always active when the appli-
ance is switched on or so that it retains
the most recently selected profile.
Select Change profile and tap OK.
You now have the following options:
– Manually: The selected user profile re-
mains active until you select another
user profile.
– After each use: The appliance will
change back to the Miele standard
user profile automatically after a drink
is dispensed.
– When turned on: Each time the appli-
ance is switched on it will automati-
cally select the Miele standard user
profile regardless of which user pro-
file was set before the appliance was
last switched off.
Select the required option and tap
OK.

Settings
42
Accessing the "Settings" menu
Tap.
Now you can check or change any set-
tings.
The check next to the individual entry
shows you which setting is currently ac-
tive.
Tap if you want to access the previ-
ous menu.
Tap to return to Select drink.
Changing and saving settings
Tap.
Select the setting you wish to change
with the arrow keys and tap OK.
Use the arrow keys to highlight
the required option. Then tap OK.
The setting is now saved.
Settings
43
Setting options
The factory default for each option is indicated by *.
Menu item Available settings
Language German*, English and other languages
Country
Time Clock format
– 12 h / 24 h*
Set
Timer Set :
Turn on at / Turn off after (12:30)* / Turn off at
Activate :
Turn on at (Yes / No*) / Turn off at (Yes / No*)
Eco mode On* / Off
Lighting Set the brightness
Info Number of drinks
– Total no. of uses / Espresso / Coffee / Coffee Americano /
Cappuccino / Latte macchiato / Caffè latte / Milk froth / Hot
milk / Hot water
No. of uses until appliance needs descaling:
No.of uses until brew unit needs degreasing:
System lock On / Off*
Water hardness Soft
Medium
Hard*
Very hard
Settings
44
Menu item Available settings
Display brightness Set the brightness
Volume Buzzer tones
Keypad tone
Cup heating On / Off*
Showroom program Demo mode (On / Off*)
Factory default Do not reset
Reset
The lighting, cup heating and volume functions are only available on the CM
6350.
Settings
45
Language
You can select the language (and coun-
try variant of that language) for all dis-
play text.
Tip: If you select the wrong language
by mistake, you can find the "Lan-
guage" option by following the flag
symbol .
Time of day
You can set the clock display and the
time of day.
Clock Format
Available options are:
– 24-hour display (24 h)
– 12-hour display (12 h)
Setting
Use the arrow keys to set the hours
and minutes.
Timer
The timer offers the following options:
The coffee system:
– switches on at a particular time, e.g.
in the morning for breakfast (Turn on
at).
– switches off at a particular time (Turn
off at),
– switches off after a particular length
of time if no buttons have been
pressed (Turn off after).
For Turn on at and Turn off at to be set,
the timer must be activated.
Turn on at:
Please note that the coffee system will
not turn on at the time specified if you
have activated the system lock.
Use the arrow keys to set the hours
and minutes.
If the coffee system has turned itself on
three times via the Turn on at timer
function and no drinks have been dis-
pensed, the machine will not switch it-
self on again automatically. This pre-
vents the coffee system from switching
itself on unnecessarily, for example,
while you are away on vacation.
The programmed times will, however,
remain in memory and will be reacti-
vated after manually switching the ma-
chine on again.

Settings
46
Turn off at
Use the arrow keys to set the hours
and minutes.
In the event of a longer absence the
programmed times will remain in mem-
ory and will be reactivated after manu-
ally switching the machine on again
(see "Turn on at").
Turn off after
If none of the keys have been pressed
or no drink has been prepared, the cof-
fee system will turn itself off after 30
minutes to save energy.
You can change this pre-setting using
the arrow buttons to a time be-
tween 15 minutes and 9 hours.
Activating and deactivating the timer
When the system lock is activated, the
Turn on at option for the timer cannot
be selected.
Select the timer function you want to
use.
The selected option will have a next
to it.
Tap the arrow button repeatedly
until Accept is highlighted. Then tap
OK.
Eco mode
Eco mode is an energy-saving mode.
If Eco mode is switched on, the coffee
machine will heat up anew every time a
drink is made, so that making a drink
takes longer.
If Eco mode is turned off, significantly
more energy is used. The coffee ma-
chine heats up for the first drink prepa-
ration after being switched on. After
that the appliance remains heated up
and drinks can be prepared without
having to wait very long.
The coffee machine will indicate that
the energy consumption has been al-
tered.
Lighting
(CM 6350)
Change the brightness using the arrow
buttons .
If no keys are touched or maintenance
programs carried out, the lighting will
turn off after approximately 7 minutes
to save energy.
Tip: To switch off the lights, touch the
arrow buttons until no more seg-
ments are filled in and Turned off ap-
pears.
Settings
47
Info (displaying information)
Under the Info menu option, you can
choose to display the number of por-
tions made for each type of drink.
You can also see whether there are
more than 50 portions before the next
descaling or degreasing of the brew unit
(No. of uses until).
Tip: To return to the previous display,
tapOK.
Locking the coffee system
(System lock)
You can lock the coffee system to pre-
vent it being used without your knowl-
edge, by children, for example.
Activating and deactivating the sys-
tem lock
When the system lock is activated, the
timer settings for Turn on at are deacti-
vated. The coffee system will not
switch on at the time set.
Temporarily overriding the system
lock
While the message Press and hold the OK
button for 6 seconds to unlock is in the
display,
tap OK for 6 seconds.
As soon as the coffee system is
turned off, the system is locked again.
Water hardness
See "Before using for the first time" for
information about water hardness.
Display brightness
Change the display brightness using
the arrow keys .
Volume
(CM 6350)
The volume of the alarm and the sensor
buttons can be set using the arrow but-
tons.
Tip: To switch off the tones, touch the
arrow buttons until no more seg-
ments are filled in and Turned off ap-
pears.
Cup heating
(CM 6350)
See "Cup heating" for more informa-
tion.
Settings
48
Factory default setting
You can reset the settings back to the
ones which were set when the coffee
system was delivered - the factory de-
fault settings.
The number of drinks and the appliance
status (No. of drinks until ...) cannot be
reset.
Please refer to the "Setting options"
chart for the factory settings that are
shown in bold.
The following settings will not be re-
set:
– Language
– Time of day
Showroom program (Demo
mode)
Do not activate this setting for domes-
tic use.
The coffee system can be presented in
Miele Showrooms of retail stores with
the Showroom program function. The
lighting will come on, but drinks cannot
be dispensed and other actions cannot
be carried out.
If you activate the Demo mode, you
cannot turn the appliance off with the
On / Off button .
Cleaning and care
49
The coffee system must be cleaned regularly to prevent a build-up of bacte-
ria.
Overview
Recommended frequency What do I have to clean / maintain?
Daily
(at the end of the day)
Water container
Grounds container
Drip tray and drip tray cover
Stainless steel milk flask
Once a week
(more often if heavily soiled)
Main dispenser with cappuccinatore
Brew unit
Area underneath the brew unit
Housing (particularly important immediately after descaling
the appliance)
Once a month Bean container and ground coffee chute
When prompted Milk pipework
Brew unit (degrease with the cleaning tablets)
Descaling the appliance

Cleaning and care
50
Clean by hand or in dish-
washer
The following must be cleaned by hand
only:
– Stainless steel central spout cover
– Brew unit
– water reservoir lid
– Bean container lid
– Stainless steel milk flask
– Lower panel
Some components of the coffee sys-
tem are dishwasher-safe. However,
cleaning these in the dishwasher fre-
quently can cause them to become
discolored due to regular contact
with food residues (e.g. tomatoes) in
the dishwasher. The surface of these
components can also become dam-
aged.
The following parts are dishwasher-
safe:
– Drip tray and lid
– Drip tray cover
– Waste unit
– Water container
– Central spout (without stainless steel
cover)
Danger of burning and scalding
on hot components or by hot liquids!
Always allow the coffee machine to
cool down before cleaning it.
Caution: Water in the drip tray can be
very hot.
Do not use a steam cleaner to
clean this machine. Steam could
cause a short circuit.
It is important to clean the machine reg-
ularly as used coffee grounds go
mouldy quickly. Milk residue can spoil
and clog the milk pipework.

Cleaning and care
51
All external surfaces are susceptible
to scratching. Scratches on glass
surfaces could even cause a break-
age. Contact with unsuitable clean-
ing agents can discolor the external
surfaces. Wipe up any spillages or
splashes of descaling agent immedi-
ately.
To better maintain your appliance
avoid the following:
– Cleaning products containing soda,
ammonia, acid, or chloride
– Cleaners containing solvents
– Lime removers
– Stainless steel cleaners
– dishwasher detergent,
– Oven cleaners
– Abrasive cleaning agents, e.g. pow-
der cleaners and cream cleaners
– Scouring pads, such as pot scrub-
bers and brushes, or used sponges
that still contain abrasive cleanser
residue
– Eraser sponges
– Metal scrapers
Glass cleaners may be used to clean
the exterior. However do not allow
them to sit or "puddle", this can cause
damage to the surface.
Remove the cleaner promptly.
Cleaning and care
52
Drip tray and grounds con-
tainer
Clean the drip tray and grounds con-
tainer every day every day to avoid
unpleasant smells and mildew.
The grounds container is located in the
drip tray. Water from rinsing also col-
lects in the grounds container.
A prompt will appear in the coffee sys-
tem display when the drip tray and/or
the grounds container is full and needs
to be emptied. Empty the drip tray and
the grounds container.
Danger of burns.
If the rinsing process has just fin-
ished, wait a while before removing
the drip tray as the water used for
rinsing will run out of the coffee
spouts.
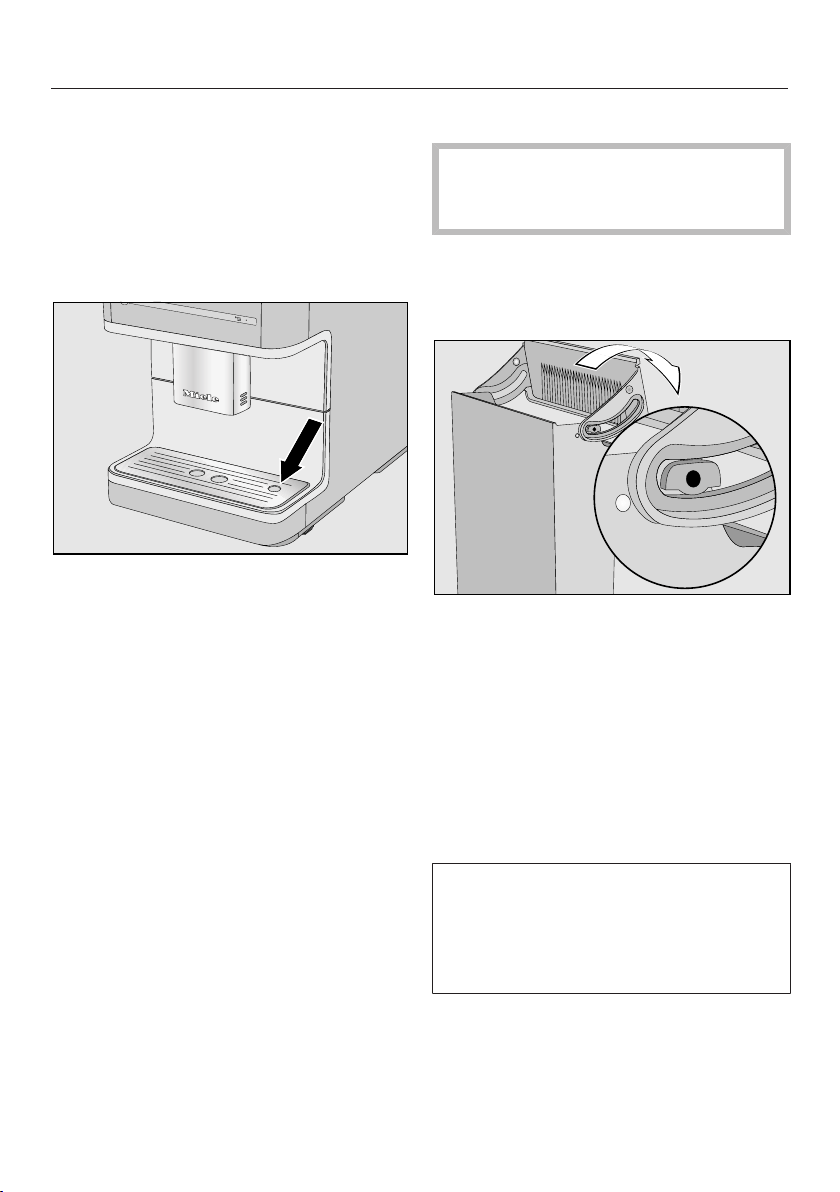
Push the main dispenser up as far as
it will go.
a
b
c
Then pull the drip tray carefully out of
the appliance. Take the lid off.
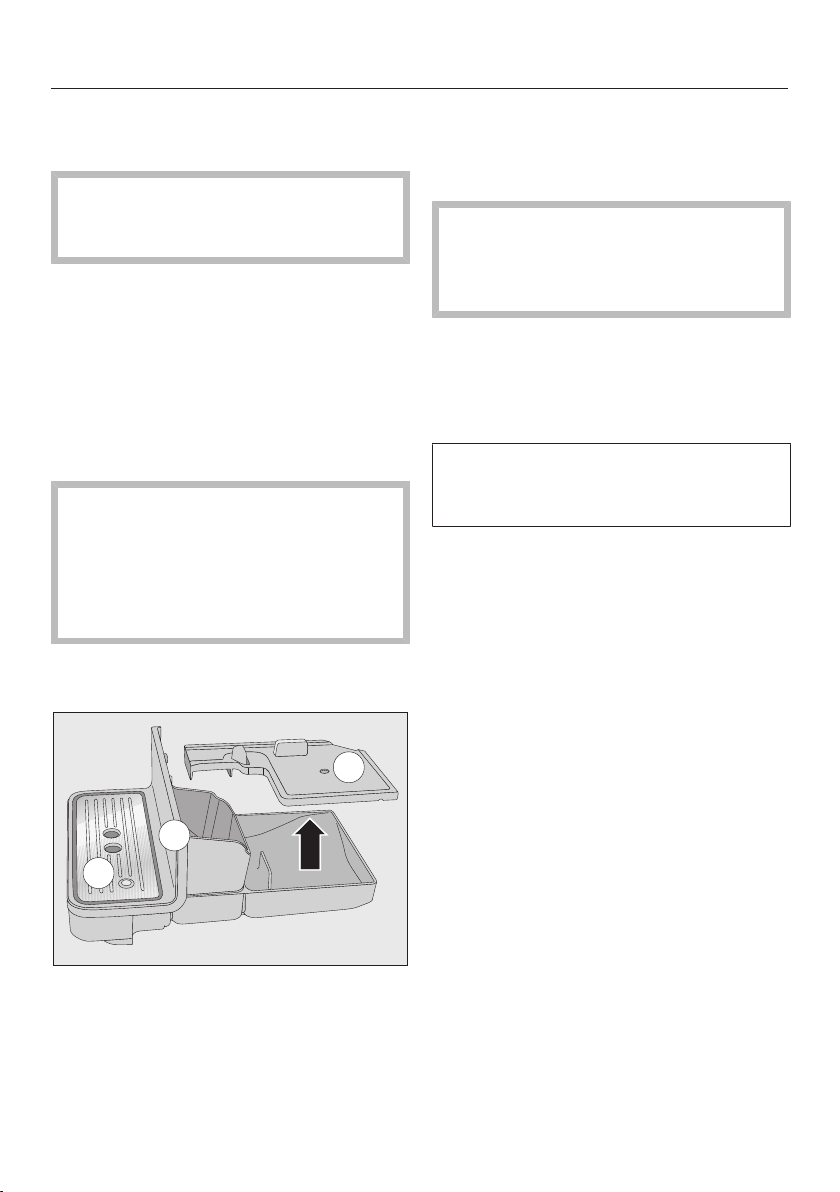
Empty the drip tray and grounds con-
tainer.
Remove the drip tray cover and
the lower panel.
Clean all parts thoroughly.
Clean the lower panel by hand only
using warm water and a little wash-
ing-up liquid.
All other parts are dishwasher safe.
Clean the inside of the appliance un-
derneath the drip tray.
Reassemble all parts and place the
drip tray back in the coffee system.
Make sure the drip tray has been
pushed into its niche as far as it will
go.
Cleaning and care
53
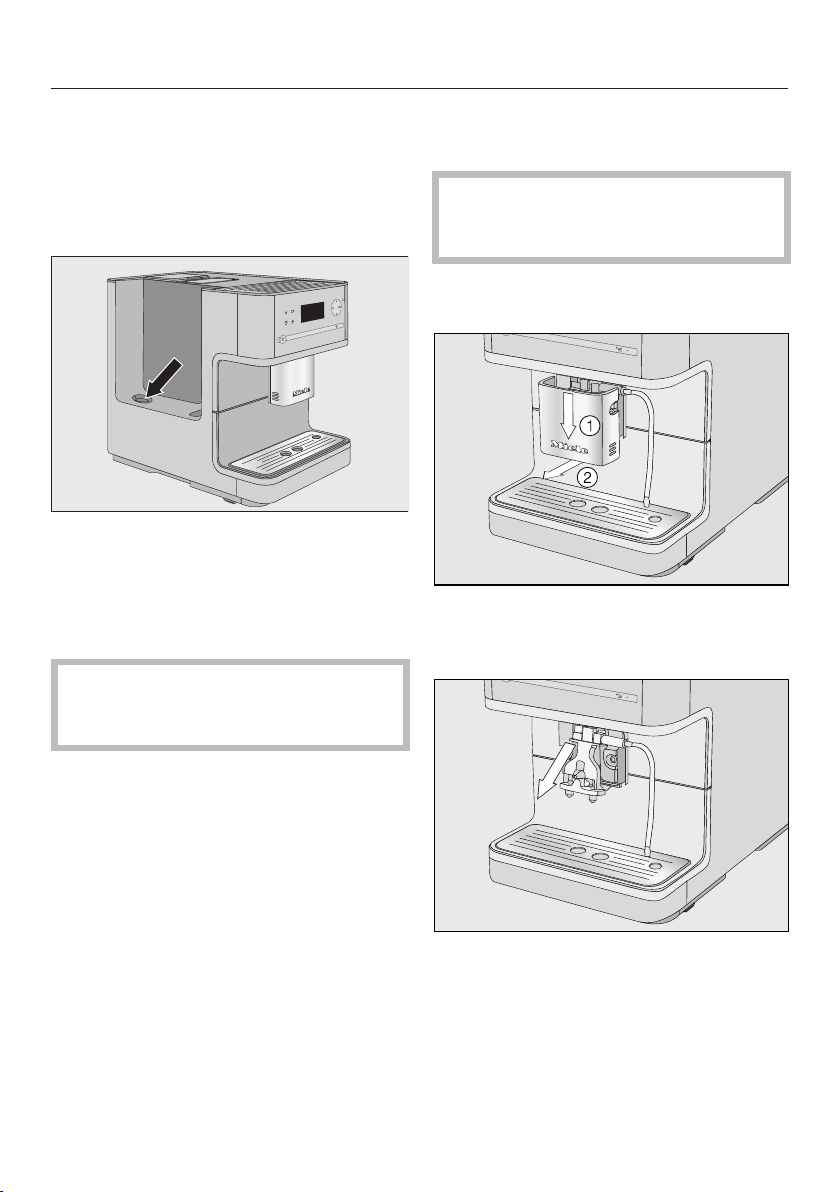
Drip tray cover
Remove the drip tray cover.
The drip tray cover can be cleaned in
the dishwasher or by hand using
warm water and dishwashing liquid.
Dry the drip tray cover thoroughly.
Refit the drip tray cover making sure
that it is correctly fitted (see illustra-
tion).
Water container
Clean the water reservoir lid by hand
only using warm water and dish-
washing liquid.
Press the lid on the right-hand side.
Pull the water reservoir up by the lid
to remove it.
Take the lid off the container and
wash it by hand.
The water reservoir can be cleaned in
the dishwasher, or by hand using
warm water and dishwashing liquid.
After cleaning, dry the water reservoir.
Carefully clean the surface the water
reservoir sits on, particularly the slots.
Fit the lid back on the container.
Make sure that the valve, the under-
side of the water reservoir and the sur-
face the water reservoir sits on are
clean. Otherwise the water reservoir
will not sit correctly.
Cleaning and care
54
Stainless steel water intake
valve filter
The stainless steel water intake valve fil-
ter is located in the recess for the water
container.
Particles in the water can collect on the
fine mesh in the filter. Therefore the
stainless steel filter should be checked
monthly for soiling.
Remove the water container.
Clean the stainless steel filter with
water only without detergent in order
to avoid possible unpleasant flavors.
Check the stainless steel filter for
soiling and clean it if necessary, e.g.
with a damp cotton swab.
Replace the water container.
Main dispenser with cappucci-
natore
Clean the main dispenser cover by
hand only using warm water and
dishwashing liquid.
All other components are dishwasher
safe.
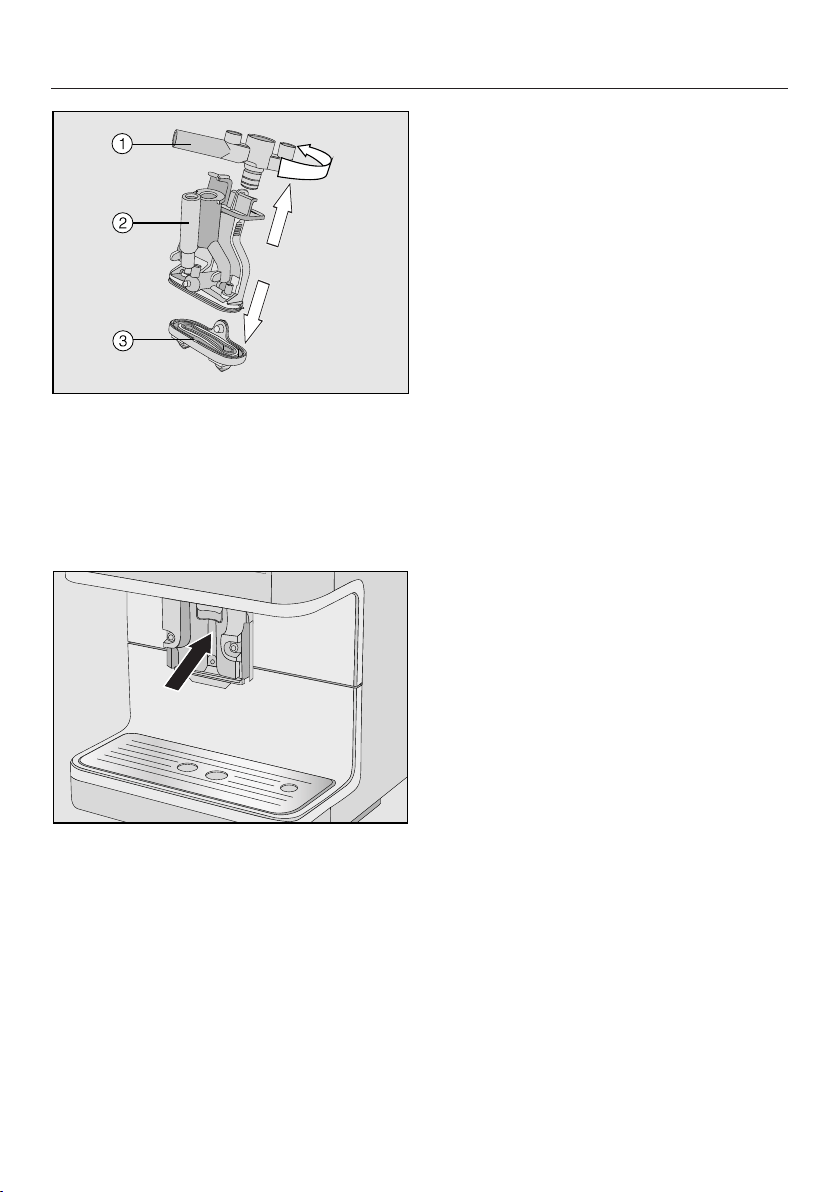
Push the main dispenser right down
and remove the stainless steel cover
by pulling it off towards you.
Pull the dispensing unit off towards
you.
Cleaning and care
55
Twist the upper section with the
holder for the milk pipework and pull
it off. Then pull the Y-shaped piece
off. Remove the dispensing spouts
.
Clean all parts thoroughly.
Clean the surfaces of the main dis-
penser with a damp cloth.
If the milk pipe is blocked, clean it un-
der running water with the brush sup-
plied:
Insert the brush in the tube and move
it back and forth as far as it will go
until all milk residue has been re-
moved.
Fit the dispensing unit back together.
Push the dispensing unit back onto
the main dispenser. Press firmly to
ensure the spouts at the bottom con-
nect correctly with the edge of the
dispenser.
Replace the stainless steel cover and
connect the milk pipe if applicable.

Cleaning and care
56
Stainless steel milk flask
(CM 6350)
The milk flask should be taken apart
and cleaned every day.
Clean all parts by hand only using
warm water and dishwashing liquid.
Use the cleaning brush supplied to
remove milk residue from the milk
pipework if necessary.
Rinse all parts carefully under running
water.
Residual dishwashing liquid can affect
the taste of milk from the appliance
and the quality of the milk froth.
Dry all parts thoroughly.
Reassemble the milk flask.
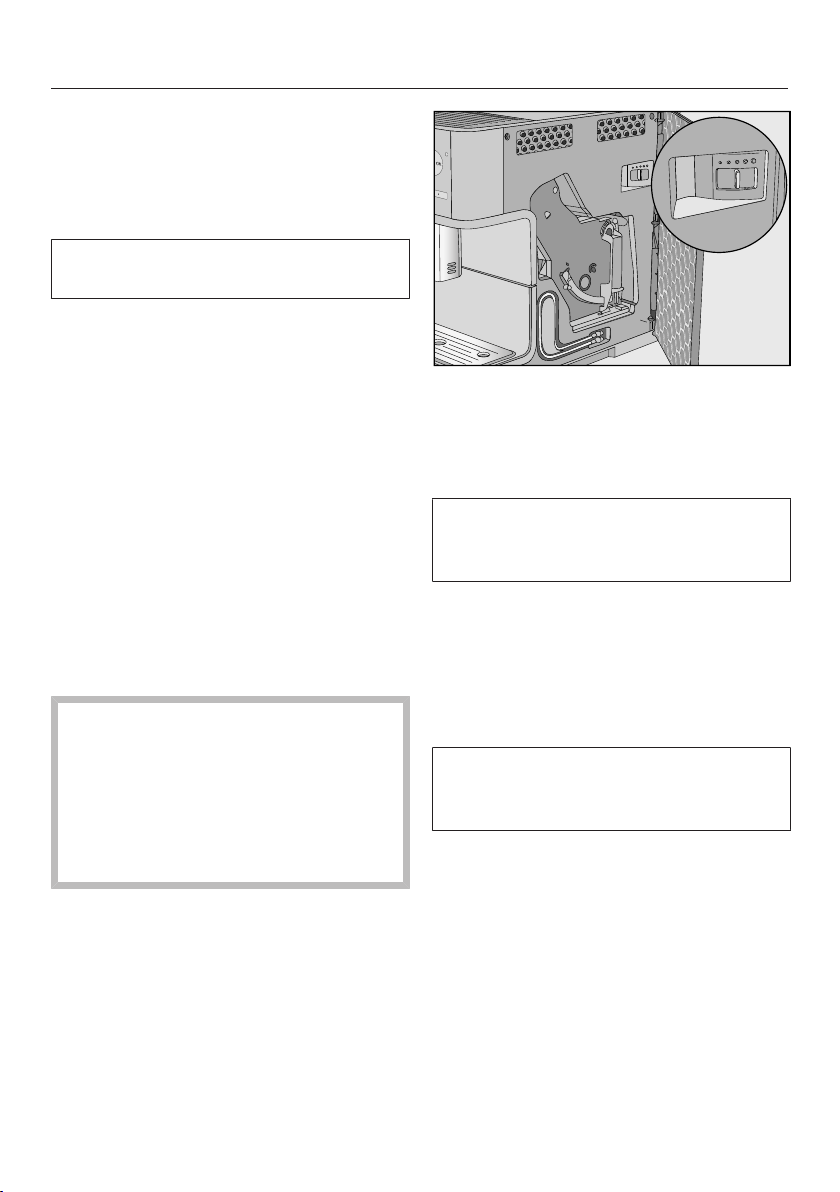
Milk pipework
Make sure that the milk pipework
is cleaned regularly and thoroughly.
Milk contains natural bacteria that
will multiply if the pipework is not
sufficiently clean. Contamination in
the coffee machine can be a health
hazard.
The milk pipework must be cleaned at
least once a week. A message in the
display will prompt you when this needs
to be done.
Confirm the message with OK.
When you confirm the message Clean
milk pipework withOK, the internal
counter for the cleaning interval will be
reset. You will not be reminded again.
There are two options for cleaning the
milk pipework:
– You can remove and dismantle the
central spout with its integrated cap-
puccinatore and either wash it in the
dishwasher or by hand with hot water
and a little washing-up liquid (see
"Central spout with integrated cap-
puccinatore").
– Or you can clean the milk pipework
using the Clean milk pipework mainte-
nance program together with the
Miele cleaning agent for milk
pipework (see "Maintenance program
- Cleaning the milk pipework").

Cleaning and care
57
Bean container and ground
coffee chute
Danger of injury from the grinder!
Switch off the machine and unplug
the power cord to disconnect the
machine before cleaning the bean
container.
Coffee beans contain oils which can
deposit on the walls of the bean con-
tainer and hinder the flow of the beans.
Therefore, clean the bean container reg-
ularly with a soft cloth.
Tip: Use a vacuum cleaner to remove
any coffee residues from the bean con-
tainer and the ground coffee chute.
Open the bean container.
Remove any coffee beans.
Clean the bean container with a dry,
soft cloth.
The coffee bean container can now be
refilled.
If necessary, clean the ground coffee
chute:
Open the ground coffee chute and re-
move any ground coffee residue.
Housing
If soiling is not removed promptly, it
could cause the surface of the appli-
ance to alter or discolor. Remove any
soiling immediately.
Make sure that water cannot get be-
hind the display.
The surfaces are susceptible to
scratching. Contact with unsuitable
cleaning agents can alter or discolor
the surfaces.
Ensure that any splashes of descal-
ing solution are wiped up immedi-
ately.
Turn the coffee system off.
Clean the front of the appliance with
a clean sponge and a solution of
warm water and dishwashing liquid.
Dry using a soft cloth.

Cleaning and care
58
Care programs
The following maintenance programs
are available:
– Rinsing the coffee system
– Rinsing the milk pipework
– Cleaning the milk pipework
– Degreasing the brew unit
– Descaling the machine
Perform the respective maintenance
program when prompted to do so in the
display. You will find more information in
the following pages.
Accessing the "Maintenance" menu
Tap .
With the arrow key , select Mainte-
nance. Then tap OK.
Now you can select a maintenance pro-
gram.
Rinsing the coffee system
You can rinse the water and coffee
pipework of the coffee machine manu-
ally.
After a coffee has been dispensed, the
appliance is rinsed before it turns off.
This removes any residual coffee
grounds.
Tap .
Select Maintenance and tap OK.
Select Rinse appliance and tap OK.
The piping will now be rinsed through.
You may also be prompted to insert the
end of the milk pipe into the drip tray.
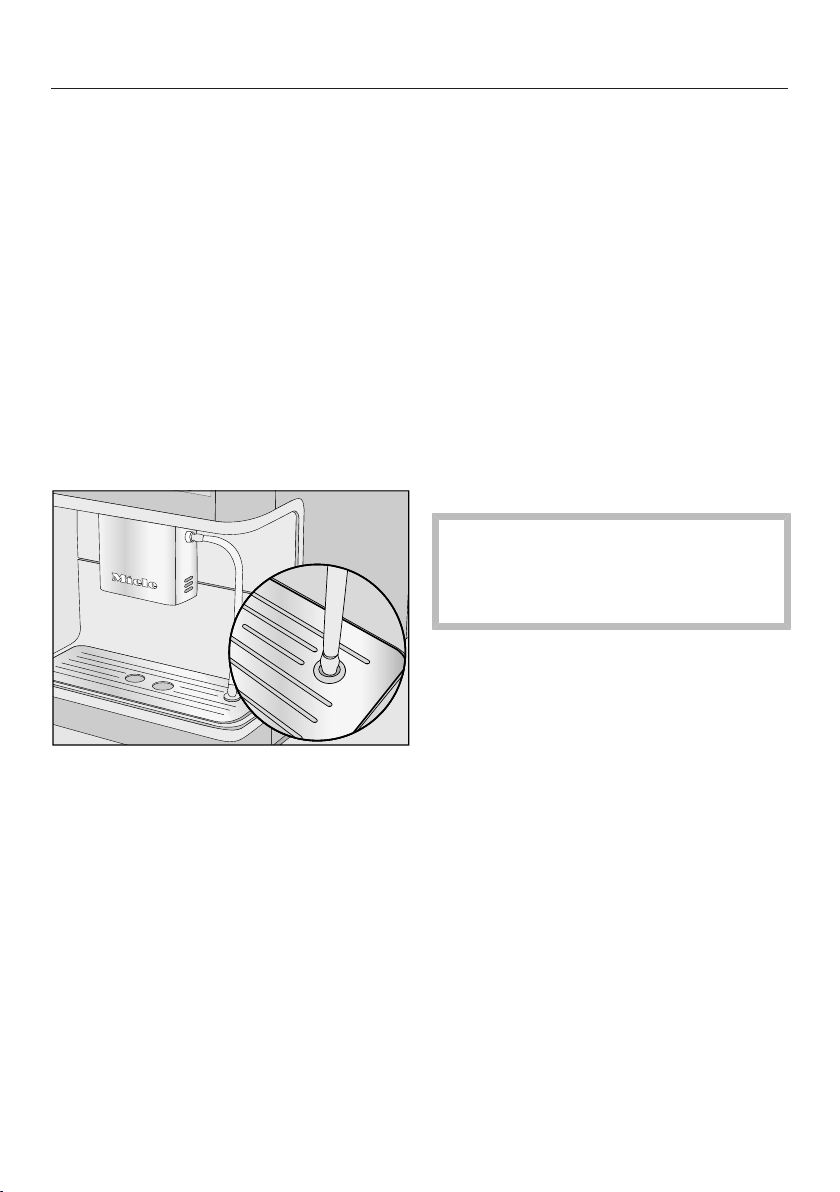
Cleaning and care
59
Rinsing the milk pipework
Milk residue can clog up the milk pipes
and so the milk pipework should be
rinsed regularly. If a drink has been
made using milk, the prompt to insert
the end of the milk tube into the drip
tray will appear at the latest when you
switch the appliance off.
You can also rinse the milk pipework
manually.
Tap .
Select Maintenance and tap OK.
Select Rinse milk pipework and tap OK.
When prompted, place the end of the
milk tube into the right-hand aperture
in the drip tray.
TapOK.
The milk pipework will now be rinsed.
Cleaning the milk pipework
with the maintenance program
We recommend using the Miele milk
pipework cleaning agent for cleaning
the milk pipework. This has been spe-
cially developed for use with Miele cof-
fee machines and prevents subsequent
damage.
It is available from Miele dealers, Miele
Service or www.miele-store.com
The maintenance program Clean milk
pipework lasts about 15minutes.
Tap.
Select Maintenance and tap OK.
The cleaning process cannot be can-
celled once it has started. The
process has to be completed
through to the end.
Select Clean milk pipework and tap OK.
The process will start.
Follow the instructions in the display.
Place milk pipe in cleaning agent appears
on the display.
Making a cleaning solution:
Dissolve the powder in a container
with approx. 1 cup (200 ml) of luke-
warm water. Stir the solution with a
spoon until it has fully dissolved.

Cleaning and care
60
Carrying out the cleaning process:
Place the container next to the appli-
ance and hang the milk pipe in the
solution. Make sure it is placed far
enough into the cleaning solution.
TapOK.
Follow the further instructions given
in the display.
The cleaning process is complete when
rinsing has finished.
Degreasing the brew unit and
cleaning inside
Depending on the natural oil content of
the coffee used, the brew unit can be-
come blocked quite quickly. It must be
degreased regularly in order to ensure
aromatic coffee and trouble-free opera-
tion of the coffee machine.
For optimum cleaning we recommend
Miele cleaning tablets. These cleaning
tablets are specially designed for Miele
built-in coffee machines and will protect
your machine from subsequent dam-
age.
They are available from the Miele Web-
store, Miele Technical Service or from
your Miele dealer.
The "Degrease brew unit" maintenance
program lasts about 15minutes.
After 200 portions have been dis-
pensed, Degrease the brew unit and clean
inside of the machine will appear in the
display.
Confirm the message with OK.
This notification appears at regular in-
tervals. Once the maximum possible
number of beverage preparations has
been reached, the coffee machine is
locked.
You can turn off the coffee machine if
you do not want to carry out the clean-
ing program at this time. However, you
will be not be able to make any more
drinks until the brew unit has been de-
greased.
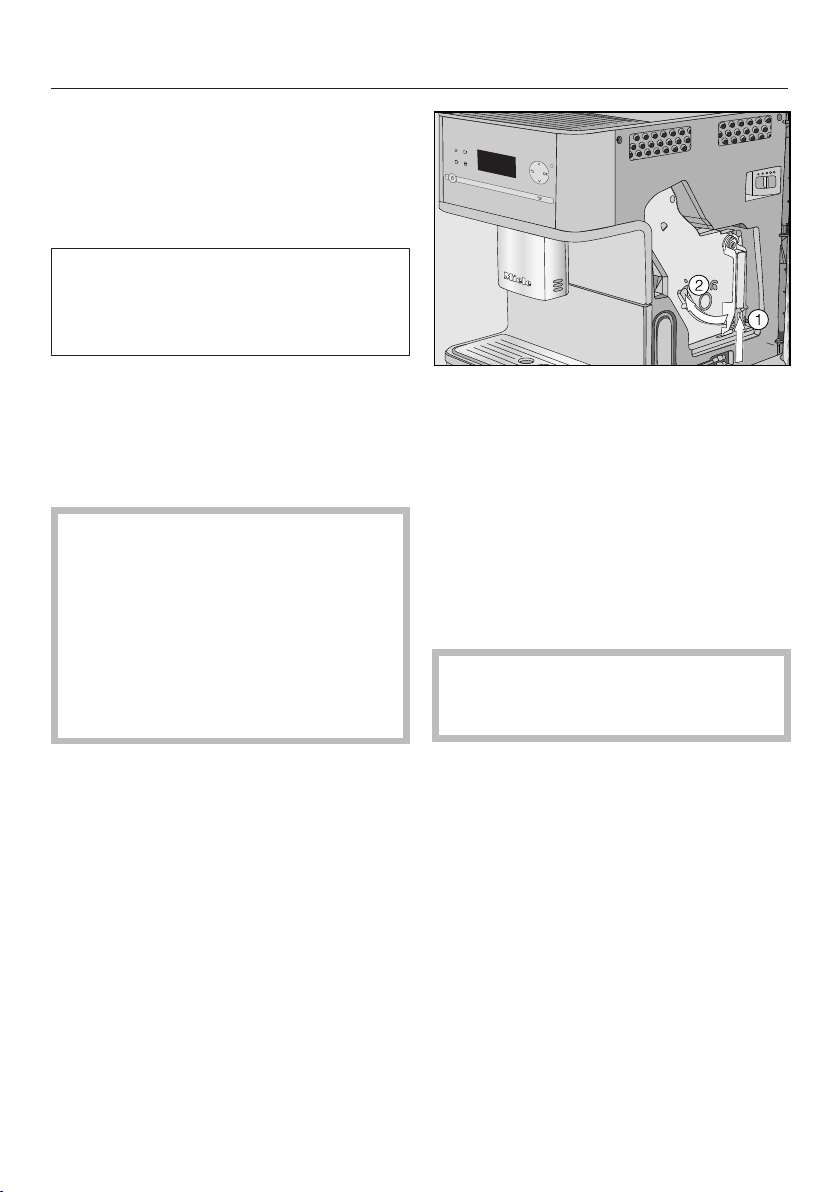
Cleaning and care
61
Start "Degrease brew unit"
Tap.
Select Maintenance and tap OK.
Select Degrease the brew unit.
The cleaning process cannot be can-
celled once it has started. The process
has to be completed through to the
end.
TapOK.
The process will start.
Follow the instructions in the display.
Cleaning the brew unit and inside it
Clean the brew unit by hand only
using warm water. Do not use liquid
dish soap. The moving parts of the
brew unit are lubricated. Liquid dish
soap will damage the brew unit.
For good tasting coffee and to pre-
vent germs from forming, remove
and clean the brew unit under run-
ning water once a week.
Rinse the brew unit by hand and clean inside
the machine appears on the display.
Open the appliance door.
Press the button on the end of the
handle of the brew unit and while
doing so turn the handle counter-
clockwise .
Carefully pull the brew unit out of the
coffee machine.
If you cannot remove the brew unit or
can only do so with difficulty, the brew
unit is not in the correct position (See
"Frequently asked questions").
When you have removed the brew
unit, do not change the position of
the handle on the brew unit.
Clean the brew unit by hand under
hot running water without using de-
tergent or liquid dish soap.
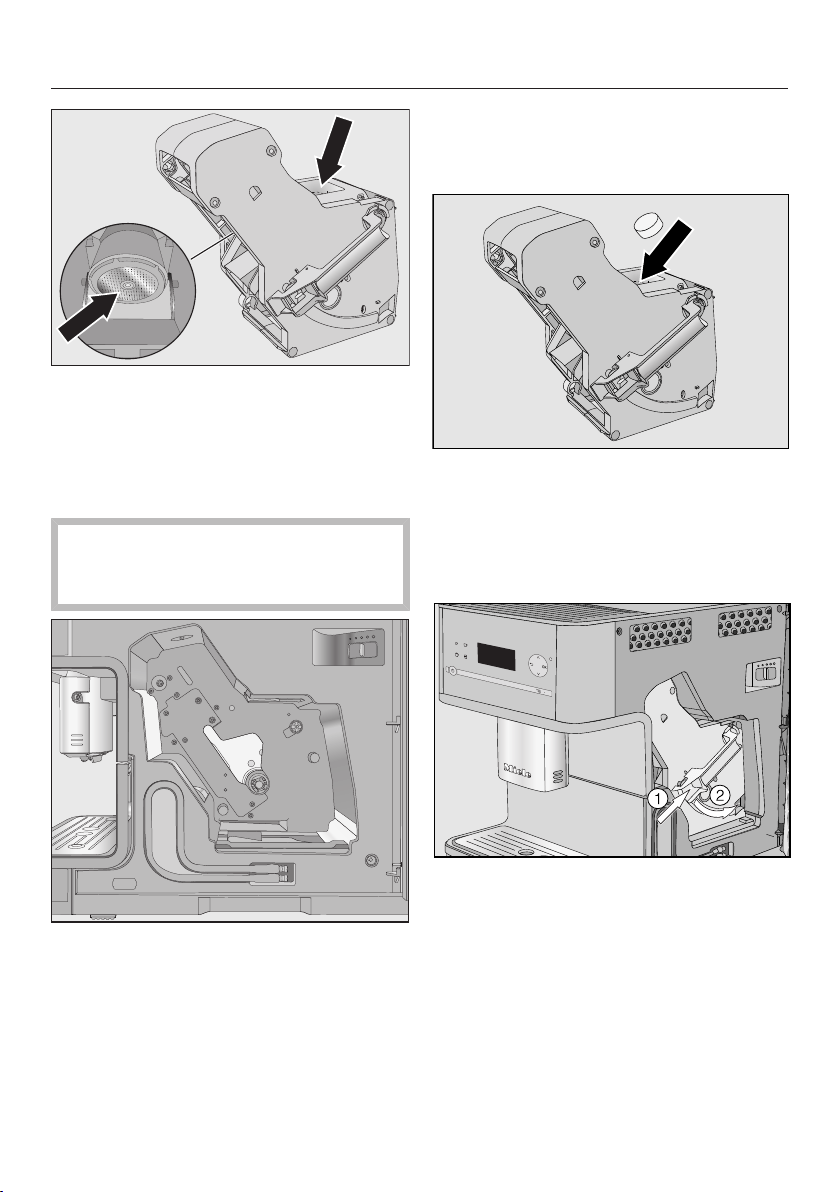
Cleaning and care
62
Wipe any remaining coffee off the two
filters (see arrows).
Dry the funnel to prevent ground cof-
fee sticking to it the next time a cof-
fee is prepared.
Make sure to remove moist ground
coffee remnants regularly to prevent
bacteria from forming.
Clean the inside of the coffee ma-
chine. Make sure that the areas high-
lighted in the illustration are cleaned
extremely carefully.
Tip: Use your vacuum cleaner to re-
move dry coffee grounds.
Place a cleaning tablet in the brew unit,
place it in the machine and close the ma-
chine door. appears on the display.
Drop a cleaning tablet into the top of
the brew unit (arrow).
Push the brew unit with cleaning
tablet back into the coffee machine,
making sure it is straight.
Press the button on the end of the
handle of the brew unit and while
doing so turn the handle clockwise
.
Close the appliance door.
Follow the further instructions given
in the display.
The cleaning process is complete when
rinsing has finished.

Cleaning and care
63
Degrease the brew unit following dis-
play reminder
No drinks can be made and Degrease
the brew unit appears in the display.
The maintenance program cannot be
cancelled. The process has to be car-
ried through to the end.
TapOK.
The maintenance program will then
start.
Descaling the machine
64
Important! When descaling the appli-
ance, cover delicate surfaces and
natural flooring to prevent damage
from splashes of descaling solution.
Ensure that any splashes of descal-
ing solution are wiped up immedi-
ately.
Lime scale builds up in the coffee sys-
tem through use. How often the appli-
ance needs to be descaled will depend
on the water hardness level in your
area. It should be descaled regularly to
ensure that it functions correctly.
The appliance will guide you through
the descaling process. Various mes-
sages will appear in the display, e.g.
you will be prompted to empty the drip
tray or fill the water reservoir.
The descaling process is required and
takes approx.12minutes.
The coffee machine prompts you when
it needs to be descaled. "No. of por-
tions until appliance needs descaling:
No. of uses until appliance needs descaling:
50 appears in the display. Each time a
drink is made the coffee machine dis-
plays the number of portions remaining
until descaling must be carried out.
Confirm the message with OK.
When the number of remaining portions
reaches0, the system will lock.
You can turn off the coffee machine if
you do not want to descale it at this
time. However, you will be not be able
to make any more drinks until descaling
has been carried out.
Descaling following display re-
minder
Descale the appliance appears in the dis-
play.
The descaling process cannot be can-
celled once you have tapped "OK."
The process has to be completed
through to the end.
TapOK.
The process will start.
Follow the instructions in the display.
When Fill the water container with descaling
agent and lukewarm water up to the descal-
ing symbol and place in appliance ap-
pears in the display, proceed as fol-
lows.
Preparing the descaling solution
We recommend using Miele descaling
tablets for optimum results.
These have been specially developed
for use with Miele coffee machines and
prevent subsequent damage.
Other descaling agents, which con-
tain other acids besides citric acid
and/or other undesirable substances,
such as chlorides for example, could
damage the coffee machine. More-
over, the descaling effect required
may not be guaranteed if the descal-
ing solution is not of the appropriate
concentration.
Miele descaling tablets are available to
order via the Miele Webstore, from
Miele Service or from your Miele dealer.
You will need 1 descaling tablet to
descale the appliance.
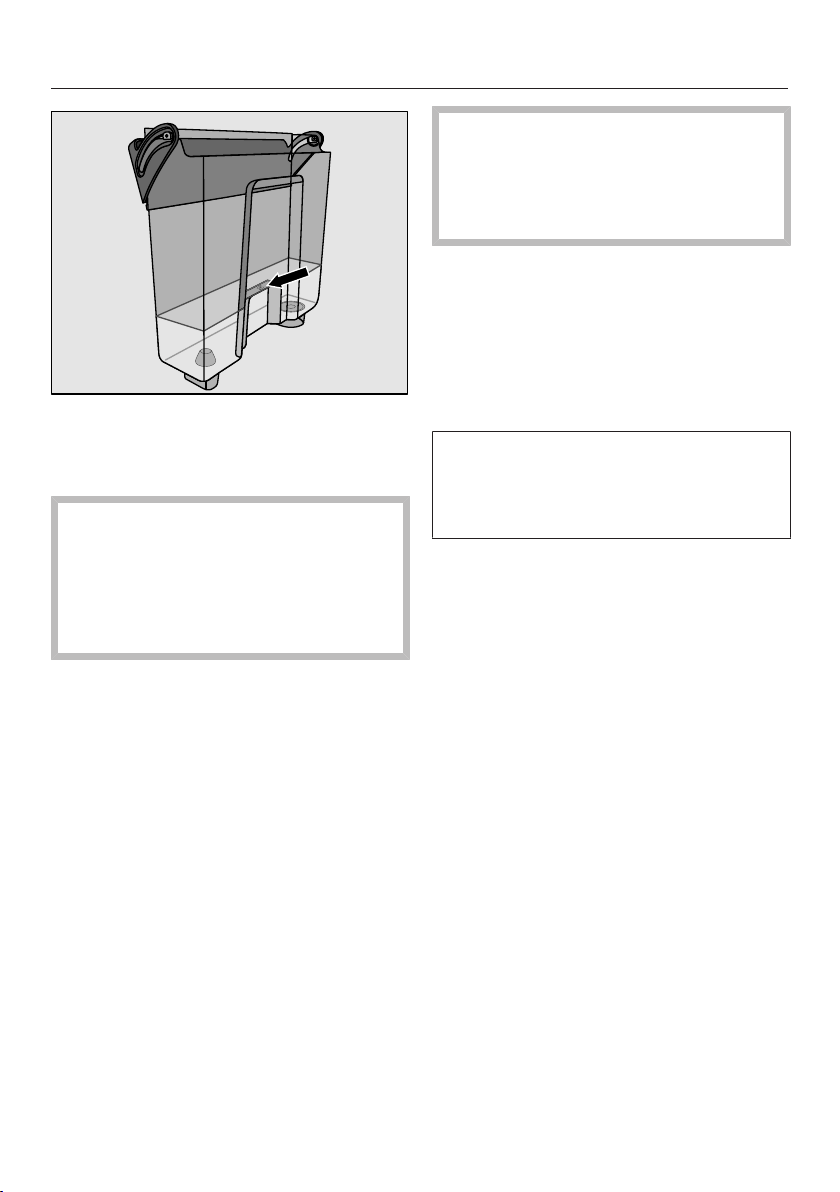
Descaling the machine
65
Fill the water reservoir to the mark
with lukewarm water.
Place 1 descaling tablet in the water.
Follow the instructions for the mixing
ratio carefully. It is important that you
do not fill the water reservoir with too
much or too little water. Otherwise
the descaling process will be can-
celled prematurely.
Performing a descale
Replace the water reservoir.
Follow the instructions given in the
display.
When Rinse the water container and fill with
fresh tap water up to the descaling symbol
appears in the display:
Carefully rinse the water reservoir
with clean water. Ensure that no
descaling solution residue remains in
the water reservoir. Fill the water
reservoir to the mark with fresh tap
water.
The descaling program is finished at the
end of the rinsing cycle and drinks can
be made again.
To protect the appliance and sur-
rounding surfaces from damage,
make sure you wipe up any spills or
splashes of descaling agent immedi-
ately.
Descaling when not prompted
by a message
Tap .
Select Maintenance and tap OK.
Select Descale the appliance.
The descaling process cannot be can-
celled once you have tapped "OK."
The process has to be completed
through to the end.
TapOK.
The descaling process will begin.
Frequently Asked Questions
66
Most problems that occur during daily use can be easily corrected. With the help
of the following guide, you will be able to find the causes of problems and rectify
them. However, please note:
Important! Never open the casing of the appliance.
Repairs and other work by unqualified persons could be dangerous. The manu-
facturer cannot be held responsible for unauthorized work.
Repairs to electrical appliances should only be carried out by a suitably quali-
fied person in accordance with local and national safety regulations.
If you cannot remedy the problem yourself, please contact Miele.
Messages in the display
Fault messages must be confirmed with OK, otherwise the message can reap-
pear in the display even though the problem has been remedied.
To address the fault, follow the instructions on the display.
If the fault message appears in the display again, contact Miele.
Message Possible cause and solution
F1, F2,
F80, F82
There is an internal fault.
Switch the coffee machine off with the On/Off but-
ton. Wait for approx.onehour before switching
it back on again.
F41, F42, F74, F77, F235,
F236
There is an internal fault.
Turn the appliance off with the On / Off button .
Wait for 2 minutes before turning it back on again.
F10, F17 No water or very little water is being drawn in.
Remove the water container, fill it with fresh tap
water and replace it.
Check the stainless steel water intake valve filter
and clean if necessary (see "Stainless steel water
intake valve filter").
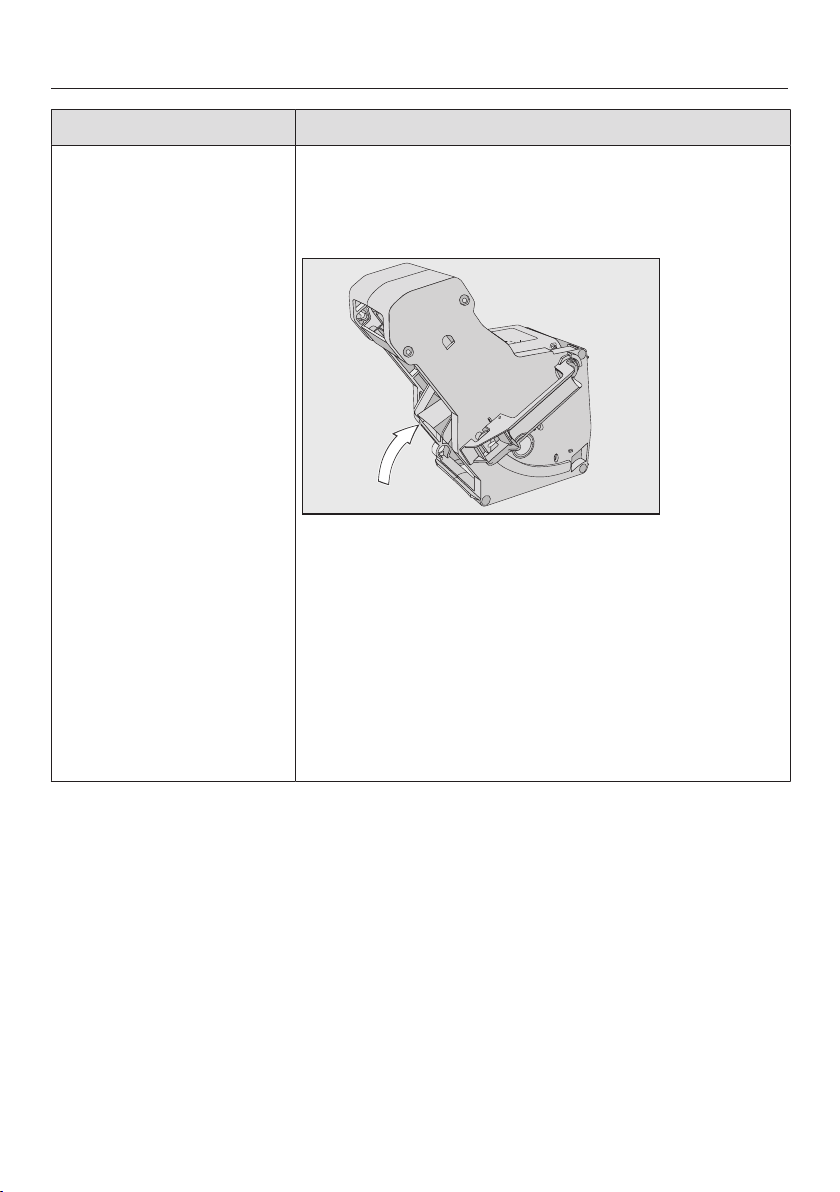
Frequently Asked Questions
67
Message Possible cause and solution
F73 or
Check the brew unit
The brew unit cannot be positioned correctly.
Turn the appliance off with the On / Off button.
Remove and clean the brew unit (see "Removing
the brew unit and cleaning it by hand").
Push the coffee ejector of the brew unit into the
correct position (see diagram).
Do not insert the brew unit. Close the appliance
door and turn the appliance on with the On/Off
button .
This will initialize the brew unit motor and put in back
into the start position.
When Insert the brew unit appears in the display,
open the appliance door and put the brew unit
back in the appliance. Then close the door.
Frequently Asked Questions
68
Message Possible cause and solution
Too much ground coffee There is too much ground coffee in the coffee chute.
If more than two level scoops of ground coffee is
added to the coffee chute, the brew unit cannot
process the coffee. The ground coffee will be directed
into the waste unit and the fault message will appear
in the display.
Turn the appliance off with the On / Off button.
Remove and clean the brew unit (see "Removing
the brew unit and cleaning it by hand").
Remove the ground coffee inside the coffee sys-
tem, e.g. with a vacuum cleaner.
Use the coffee scoop supplied to add ground cof-
fee to the ground coffee chute. Add only a maxi-
mum of two portions of ground coffee to the
chute.

Frequently Asked Questions
69
Unusual performance of the coffee system
Problem Possible cause and solution
The display remains
dark when the coffee
system is turned on us-
ing the On / Off but-
ton.
The On / Off button was not touched for long
enough.
Touch the On / Off button and keep it pressed
for at least three seconds.
The plug is not properly plugged into the electrical
outlet.
Insert the plug into the electrical outlet.
The fuse has tripped because the coffee system, volt-
age or another appliance is defective.
Unplug the power cord from the electrical outlet.
Contact a qualified electrician or Miele Technical
Service for assistance.
CM 6350:
The lighting remains off
after the coffee ma-
chine has been turned
on.
The lighting has been turned off.
Turn the lighting on (see "Settings - Lighting").
The lamp is defective.
Contact Miele Technical Service.
The coffee system turns
off suddenly.
The switch-off time programmed using the timer has
been reached.
If required, you can select a new switch-off time
(see "Settings - Timer").
The plug is not properly plugged into the electrical
outlet.
Insert the plug into the electrical outlet.
CM 6350:
The coffee machine is
switched on. The light-
ing switches off sud-
denly.
This is not a fault. The lighting turns off approximately
7 minutes after the coffee machine was last used.
The sensor buttons do
not respond.
The machine can no
longer be operated.
There is an internal fault.
Disconnect power by unplugging the power cord
from the electrical outlet and or switching off the
circuit breaker.
Frequently Asked Questions
70
Problem Possible cause and solution
The coffee system does
not switch itself on, al-
though the timer setting
Turn on at has been acti-
vated.
The system lock feature has been activated.
You need to deactivate the system lock (see "Set-
tings - System lock").
The appliance was not used after being switched on
automatically three times in succession.
Switch the appliance on and dispense a drink.
The display is hard to
see or not legible.
The display brightness has been set too low.
Change this setting (see "Settings").
Fill and replace the water
container appears in the
display even though the
water container is full
and is in the appliance.
The water container is not sitting properly in the appli-
ance.
Remove the water container and replace it.
Check the stainless steel water intake valve filter
and clean if necessary (see "Stainless steel water
intake valve filter").
The water container was not correctly filled up and in-
serted during descaling.
Fill the water container to the descaling mark°
and restart the descaling program.
Fill and replace the water
container appears after
switching on even
though the container is
filled and fitted in the
appliance. The appli-
ance does not rinse.
The coffee system needs to be descaled.
Turn the coffee system off with the On / Off button
. Wait approx. 1 hour.
Then switch the appliance on again. As soon as
PreHeating appears in the display, tap and se-
lect Descale the appliance.
Descale the coffee system.
After switching on the
appliance the message
Empty the drip tray and the
waste container appears
even though they are
both empty.
This is not a fault.
The drip tray and grounds container was probably not
emptied after making the last coffee, or the internal
counter was not reset.
Remove the drip tray and grounds container from
the appliance and empty them.
Neither milk nor milk
froth comes out of the
central spout.
The milk pipework is blocked.
Clean the main dispenser, taking particular care to
clean the cappuccinatore and milk pipes carefully
with the cleaning brush.
Frequently Asked Questions
71
Problem Possible cause and solution
Empty the drip tray and the
waste container appears
in the display, even
though the drip tray is
empty.
The drip tray is not positioned correctly in the appli-
ance.
Push the drip tray in as far as it will go.
Make sure that the lower panel is sitting on the
drip tray correctly.
Insert the drip tray and the
waste container appears
in the display even
though both are fitted.
The drip tray is not correctly fitted and is therefore not
detected.
Empty the drip tray and the grounds container. Re-
assemble all parts and place the drip tray and the
grounds container back in the coffee system.
The service is open.
Close the service door.
If necessary, empty the drip tray and the grounds
container. Reassemble all parts and place the drip
tray and the grounds container back in the coffee
system.
The drip tray or the
grounds container is
too full or runs over al-
though the drip tray and
the grounds container
were emptied after
each message on the
display.
This is not a fault.
The drip tray and grounds container were probably re-
moved or the appliance was opened without the drip
tray and grounds container being emptied. When the
drip tray is removed or the appliance opened, the in-
ternal counter for emptying the drip tray and grounds
container is automatically reset.
Remove the drip tray and grounds container from
the appliance and empty them.
Fill the bean containerap-
pears in the display
even though the bean
container has just been
filled.
This is not a fault.
Confirm the message with OK.
The coffee system does
not rinse itself when
turned on.
This is not a fault.
If the coffee system still has an operating tempera-
ture higher than 140°F (60°C), rinsing will not take
place.

Frequently Asked Questions
72
Problem Possible cause and solution
Coffee dispensing is re-
peatedly interrupted
and the message Fill the
bean container appears in
the display.
This is not a fault.
The brew unit does not sense the ground coffee.With
particular types of coffee, it can happen that too little
coffee is ground or the ground coffee is too fine. Usu-
ally the grinding – fine and the ground coffee quantity
– are set too low.
Confirm the message with OK.
Tip: If the coffee is too strong for you or it tastes bit-
ter, try another type of bean.
If the message appears during the preparation of all
coffee specialties:
Set the grinder to a coarser setting (see "Grinder
setting").
Check the settings for the amount of coffee for all
coffee specialties (see "Amount of coffee"). If nec-
essary, select a larger amount of coffee.
Also consider any changed drinks in "User profiles"
.
If the message only appears during the preparation of
selected coffee specialties:
Check the settings for the amount of coffee for this
coffee specialty (see "Amount of coffee"). Select a
amount of coffee.
You may also need to set a slightly coarser grinder
setting.
The descaling program
was started uninten-
tionally.
The descaling program cannot be stopped once the
OK button has been tapped.
Descaling must be continued through to completion.
This is a safety precaution to make sure the machine
is descaled correctly. This is important for the
longevity and functional efficiency of your coffee sys-
tem.
Descale the coffee system (see "Descaling").
Frequently Asked Questions
73
Problem Possible cause and solution
Coffee is not flowing
out of the central spout,
or is only being dis-
pensed via one spout.
The main dispenser has a blockage.
Clean the coffee pipework (see "Cleaning and care
- Rinsing the machine").
If there is still no coffee coming out, or coffee is only
coming out of one side
Dismantle the main dispenser and clean all parts
carefully (see "Cleaning and care - Main dispenser
with integrated cappuccinatore").
Make sure all parts are reassembled correctly.
Milk is dripping out of
the cappuccinatore
even though no milk is
being dispensed.
The level of milk in the milk flask is higher than the
cappuccinatore.
Push the main dispenser up as far as it will go.
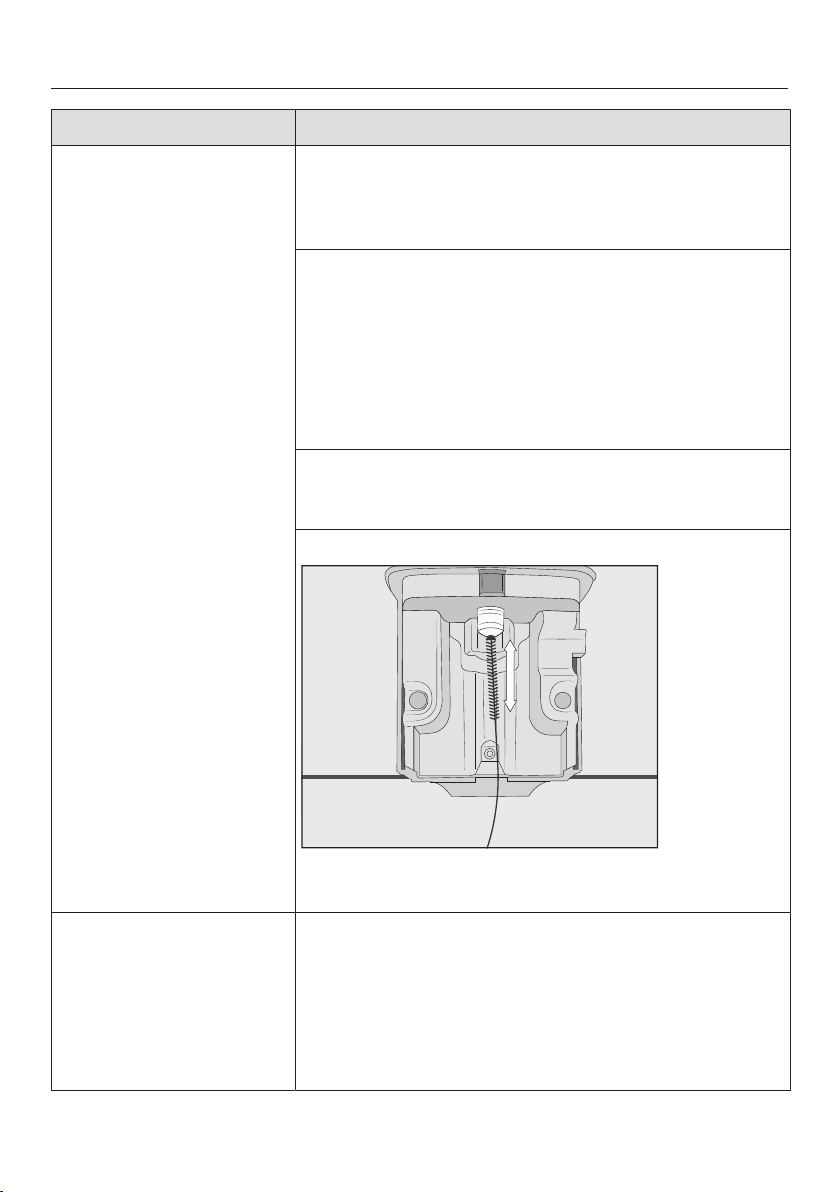
Frequently Asked Questions
74
Problem Possible cause and solution
The milk sputters when
it is dispensed. Hissing
noises can be heard
when milk is being
heated up or frothed.
Although the milk
should be frothed, only
hot milk is comes out of
the main dispenser.
The milk temperature is too high. Good milk froth can
only be achieved when cold milk (below 50°F/10°C) is
used.
Check the temperature of the milk.
The main dispenser with integrated cappucinatore is
not correctly fitted and is taking in air. Or the spouts
are blocked.
Check whether the main dispenser is correctly as-
sembled. Make sure that all parts are tightly con-
nected to one another.
If necessary, clean the main dispenser. Rub the
spout under running water to remove any dirt.
The milk pipework, connections or the intake tube on
the milk flask are blocked.
Clean all parts carefully with the cleaning brush.
The steam jet on the main dispenser has a blockage.
Clean the steam jet with the cleaning brush (see il-
lustration).
Coffee grounds have
settled on the lid of the
drip tray and in the inte-
rior around the brew
unit.
This does not indicate a fault.
The movement of the brew unit during the brewing
process can cause some ground coffee to fall around
it. The type of beans used, the fineness of the ground
coffee and the amount of coffee ground also affect
the amount. Important! Clean the inside of the brew
unit regularly to prevent mold and the like.

Frequently Asked Questions
75
Problem Possible cause and solution
The display lights up
but the coffee machine
does not heat up and no
drinks are made.
The coffee machine
cannot be turned off
with the On/Offbutton
.
The Demo mode of the coffee system has been acti-
vated.
Deactivate the Demo mode (see "Settings - Demo
mode").

Frequently Asked Questions
76
Unsatisfactory results
Problem Possible cause and solution
The coffee is not hot
enough.
The cup has not been pre-heated.
The smaller the cup and the thicker its walls, the more
important it is to pre-heat it.
Pre-heat the cups, e.g. using the cup heating (ac-
cording to model).
The brewing temperature is set too low.
Set a higher brewing temperature (see "Brewing
temperature").
The brew unit filters are blocked.
Remove and clean the brew unit by hand (see "Re-
moving the brew unit and cleaning it by hand").
Degrease the brew unit (see "Brew unit").
Heating-up is taking
longer. The amount of
water is no longer cor-
rect and the coffee ma-
chine is not performing
properly. Coffee flows
into the cup very slowly.
The coffee machine needs to be descaled.
Descale the coffee machine.
The amount of coffee or
espresso dispensed has
changed.
This is not a fault.
You probably changed the drink size by pressing the
sensor longer. Touching the drink buttons for longer
starts quantity programming for the respective drink
("Portion size"). If you do not save a portion size, the
maximum possible amount is saved for this drink.
The consistency of the
milk froth is unsatisfac-
tory.
The milk temperature is too high. Good milk froth can
be achieved when cold milk (< 50°F/10°C) is used.
Check the temperature of the milk in the milk flask.
The milk pipework is blocked.
Clean the central spout with integrated cappucci-
natore and the milk pipework with the cleaning
brush supplied.
Frequently Asked Questions
77
Problem Possible cause and solution
The coffee grinder
makes a louder noise
than usual.
The coffee bean container has become empty during
the grinding process.
Fill the coffee bean container with fresh beans.
There may be stones in among the coffee beans.
Turn the coffee system off immediately. Contact
Miele.
The coffee flows too
quickly into the cup.
The grind level is too coarse.
Set the grinder to a finer setting (see "Setting the
coffee grinder").
The coffee trickles too
slowly into the cup.
The grind level is too fine.
Set the grinder to a coarser setting (see "Grinder
setting").
The crema on the cof-
fee or espresso is "not
right".
The grinder setting is not correct.
Set the grinder to a finer or coarser setting (see
"Grinder setting").
The brew temperature is too high for the type of cof-
fee being used.
Set a lower brewing temperature (see "Brewing
temperature").
The coffee beans are no longer fresh.
Add fresh beans to the coffee bean container.

Transport
78
If the coffee system will not be used for
an extended period of time, e.g. vaca-
tion, or will be transported over a long
distance, the appliance should be pre-
pared as follows.
– Empty and clean the coffee bean
container
– Empty and clean the water reservoir
– Evaporating the coffee system
– Clean the drip tray and grounds con-
tainer
– Pack the appliance securely
Evaporating the coffee system
The coffee system should be evapo-
rated before it is stored for a long pe-
riod of time or transported any distance
- particularly at temperatures below
freezing.
Evaporating means removing all water
from the system. This prevents water
and frost damage in the unit.
Turn the coffee system off with the
On / Off button .
Tap.
Tap twice.
Empty the system? appears on the dis-
play.
Select Yes and tap OK.
Follow the instructions on the display.
Caution! Danger of burning and
scalding at the dispensers. Hot
steam is discharged.
The evaporation process is finished
when Program finished appears on the
display and the display then goes out.
Switch off the machine and unplug
the power cord from the electrical
outlet to disconnect it.
Clean the drip tray and grounds con-
tainer.
The coffee system is now ready to be
packed.
Packaging
The coffee system should only be
packed when it is clean and dry.
Residues of coffee grounds can cause
scratches on surfaces. Coffee and milk
residues or water can cause a build-up
of bacteria.
Use the original packaging including
Styrofoam to pack the coffee system.
Also pack the operating instructions so
that they are available when the coffee
system is next used.
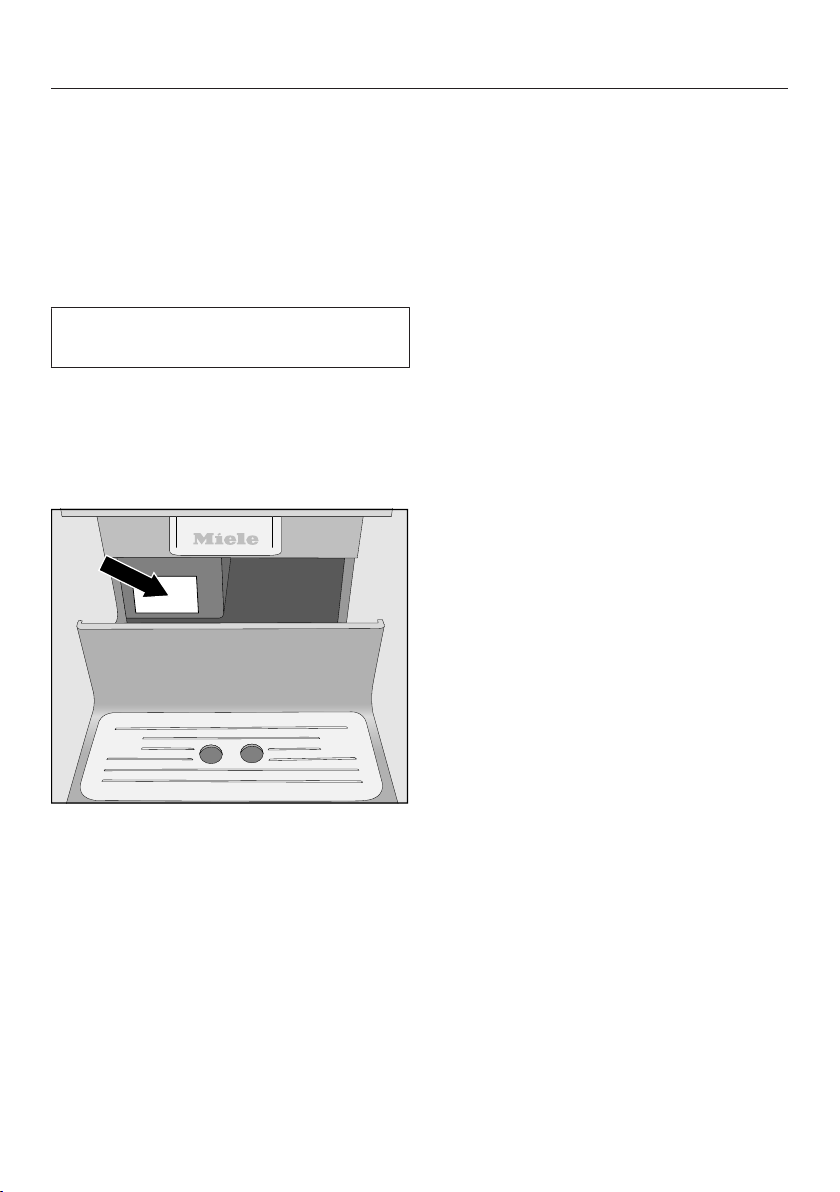
Technical Service
79
After sales service
In the event of a fault that you cannot
correct yourself, please contact
– Your Miele dealer
or
– Miele Technical Service
The telephone number for Miele is
listed at the back of these instructions.
Miele Technical Service requires the
model and serial number of your cof-
fee machine.
This information can be found on the
data plate:
Warranty
For more information, please refer to the
included warranty.
MieleCare (USA only)
MieleCare, our Extended Service Con-
tract program, gives you the assurance
of knowing that your appliance invest-
ment is covered by 5 years of worry free
ownership.
MieleCare is the only Extended Service
Contract in the industry that guarantees
repairs by a Miele Authorized Service
Provider using genuine Miele parts.
Only genuine Miele parts installed by
factory trained professionals can guar-
antee the safety, reliability, and
longevity of your Miele appliance.
Please note that unless expressly ap-
proved in writing by Miele’s Service de-
partment, Extended Service Contracts
offered by other providers for Miele
products will not be recognized by
Miele. Our goal is to prevent unautho-
rized (and untrained) service personnel
from working on your Miele products,
possibly doing further damage to them,
you and/or your home.
To learn more about MieleCare Ex-
tended Service Contracts, please con-
tact your appliance dealer or visit us
online at:
http://mieleusa.com

Saving energy
80
The following tips can help you save
energy and money as well as help the
environment:
– Operate the coffee machine in "Eco
mode" (pre-set).
– Energy consumption may increase if
you change the settings for the
"timers".
This setting uses more energy appears
on the display.
– Switch the coffee machine off with
the On/Off button when it is not in
use.
– Change the setting for the "Switch off
after" timer to 15 minutes. Then the
coffee machine will switch off 15min-
utes after the last drink has been
made or a sensor button has been
touched.
– If you only want to pre-heat your
cups occasionally, you can switch
cup heating off (CM 6350). You can
then use hot water to pre-heat the
cups.

Electrical connection
81
All electrical work should be per-
formed by a qualified electrician in
strict accordance with national and
local safety regulations. Installation,
repairs and other work by unqualified
persons could be dangerous.
Verify that the voltage, load and circuit
rating information found on the data
plate match the household electrical
supply. This data must match to pre-
vent damage to the coffee system. If in
doubt, consult a licensed electrician.
The data plate can be found behind the
drip tray inside the coffee system.
The appliance is supplied with a power
cable ready for connection to an AC
120 V 60 Hz supply.
Connect the coffee system only to a
properly installed outlet with grounding
contact.
Fuse rating must be at least 15 A.
The socket should be next to the appli-
ance and easily accessible.
To reduce the risk of injury, do not
drape cord over the counter top or table
top where it can be pulled on by chil-
dren or tripped over unintentionally.
Do not connect the appliance to a
power inverter or directly to power pro-
duced outside of the normal electrical
grid (i.e. direct solar or wind power
source).
Direct connection to such power
sources can cause power surges and
tripped breakers when the appliance is
turned on, and could damage the appli-
ance.
Do not connect the appliance to energy
saving plugs or outlets. The reduction
of power to the appliance caused by
these devices will cause the appliance
to run hot and may damage it and/or
shorten its usable life.
Do not operate any appliance with a
damaged cord or plug. Contact Miele
Technical Service.
If there is any question concerning
the electrical connection of this ap-
pliance to your power supply, please
consult a licensed electrician or con-
tact Miele’s Technical Service De-
partment.
WARNING: THIS APPLIANCE MUST
BE GROUNDED
Installation
82
Danger of overheating!
Please ensure that there is adequate
ventilation around the appliance.
Do not cover the appliance with dish
towels or similar objects while it is in
use.
Danger of overheating
If the coffee machine is installed be-
hind a kitchen furniture door, it may
only be used with the furniture door
open.
Do not close the furniture door while
the coffee machine is in use.
Please observe the following installation
instructions:
– The location of the appliance must be
dry and well ventilated.
– The ambient temperature of the room
in which the appliance is used must
be between +50°F and +100°F
(+10°C and +38°C).
– The coffee system must be set up on
a level surface. The surface must be
water resistant.
If the coffee system is installed in a
niche, the niche must provide the fol-
lowing minimum dimensions:
Height 20" 508mm
Width 17 11/16" 450mm
Depth 21 7/8" 555mm
When setting up the appliance: make
sure that the front of the appliance
can be fully opened so that the brew
unit can be removed with ease when
required.
The appliance must be set up in the
niche such that it sits flush with the
front edge of the niche.
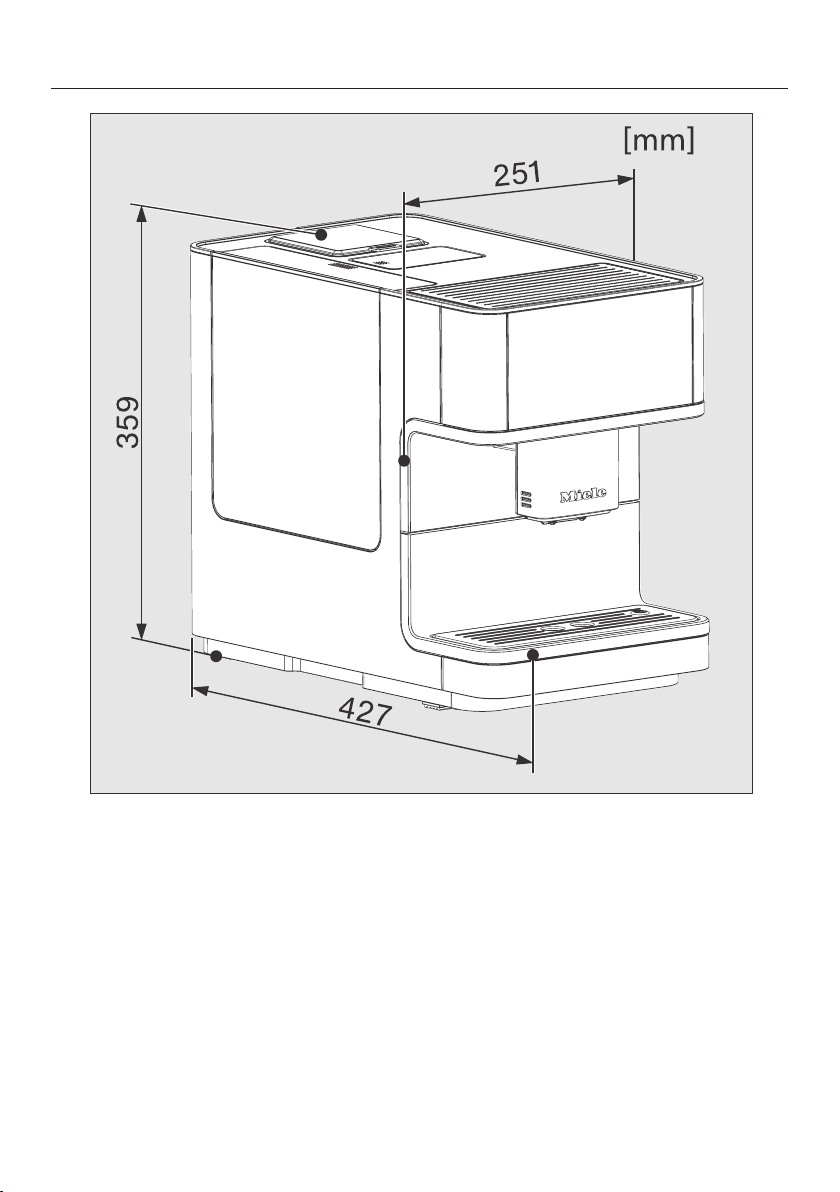
Appliance dimensions
83
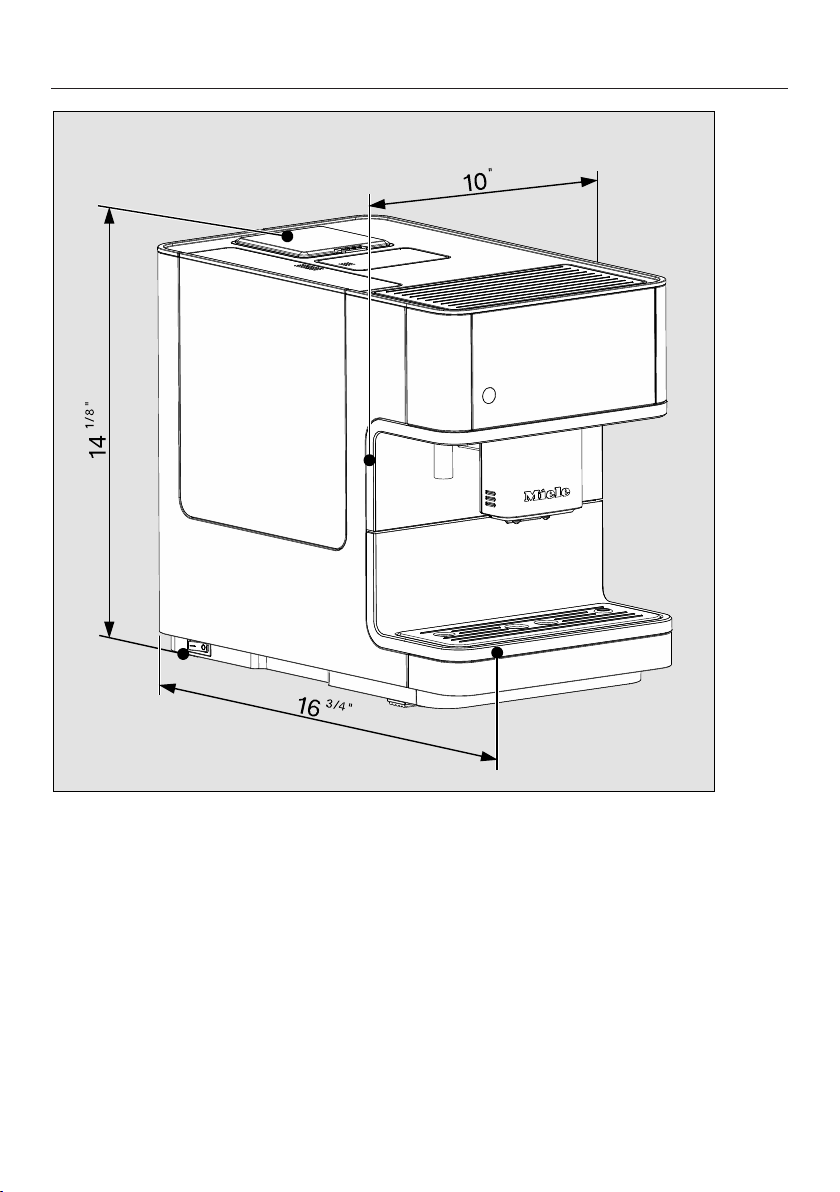
Appliance dimensions
84

Technical data
85
Current draw in standby mode
(default setting):
<0.5 watt
Pump pressure: max. 217 psi (15bar)
Through-flow heater: 1 stainless steel thermo block
Dimensions (W x H x D): 10" x 14 1/8" x 16 3/4" (251 x 359 x
427mm)
Net weight: 22 lbs (9.9 kg)
Power cord length: 4' 7" (140cm)
Water reservoir
capacity:
approx. 7 1/2 cups (1.8l)
Bean container
capacity:
approx. 0.6 lbs (300g)
Stainless steel milk flask
capacity*:
approx. 2 1/2 cups (0.5l)
Grounds container
capacity:
max. 10 portions of coffee grounds
Main dispenser: Height adjustable from 3 1/8"-5 1/2"
(80-140 mm)
Grinder: Stainless steel mill
Grinder setting: Adjustable in 5settings
Ground coffee amount: max.approx. 0.4 ounces (12g)


9 Independence Way
Princeton, NJ 08540
Phone:
Fax:
www.mieleusa.com
U.S.A.
Miele, Inc.
National Headquarters
Please have the model and serial number
of your appliance available when
contacting Technical Service.
Canada
Importer
Miele Limited
Headquarters and Miele Centre
800-843-7231
609-419-4298
Technical Service & Support
Phone:
Fax:
161 Four Valley Drive
Vaughan, ON L4K 4V8
www.miele.ca
800-999-1360
888-586-8056
Customer Care Centre
Phone:
800-565-6435
905-532-2272
International Headquarters
Miele & Cie. KG
Carl-Miele-Straße 29
33332 Gütersloh
Germany

M.-Nr. 10 685 710 / 00en – US, CA
CM6150, CM6350