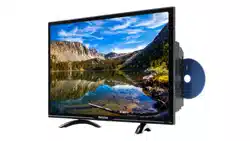
USER MANUAL Westinghouse Dvd Combo TVREMOTE CONTROL
Remote control instructions in TV mode
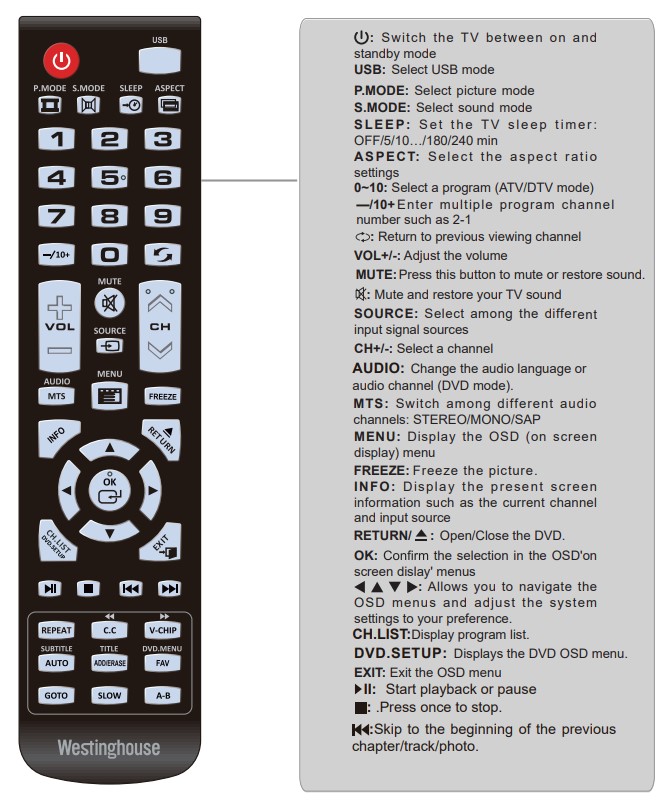
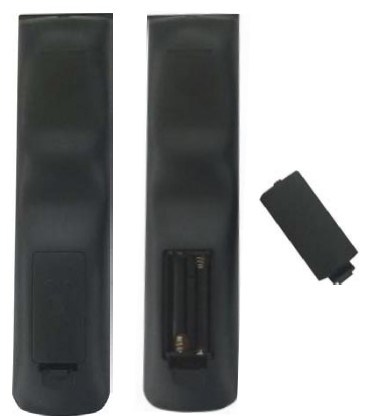
Remote control setup
- Open the cover
- Uses AAA size batteries. When inserting the batteries. make sure correct polarities “+”and “-” marks on the batteries line up correctly with compartment markings.
- Replace the battery cover.
To prevent battery leakage which may result in bodily injury or damage to the remote:
- Install all batteries correctly. and as marked on the remote control.
- Do not mix batteries:(OLD and NEW or CARBON and ALKALINE. etc)
Remove batteries when the remote is not used for a long period of time.
MENU OPERATION
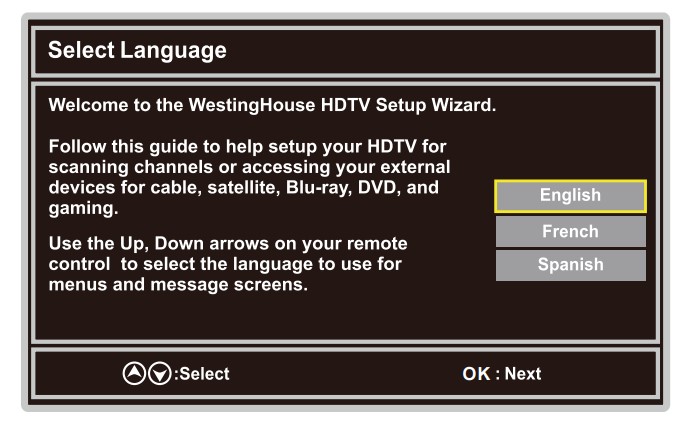
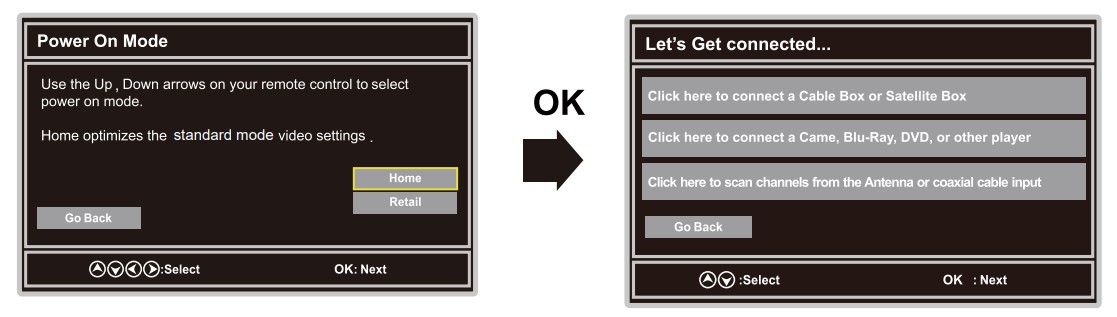
Setup Wizard
Select Language
Power On Mode
The SLEEP-MODE Power should be less than 0.5W
Channel Scan
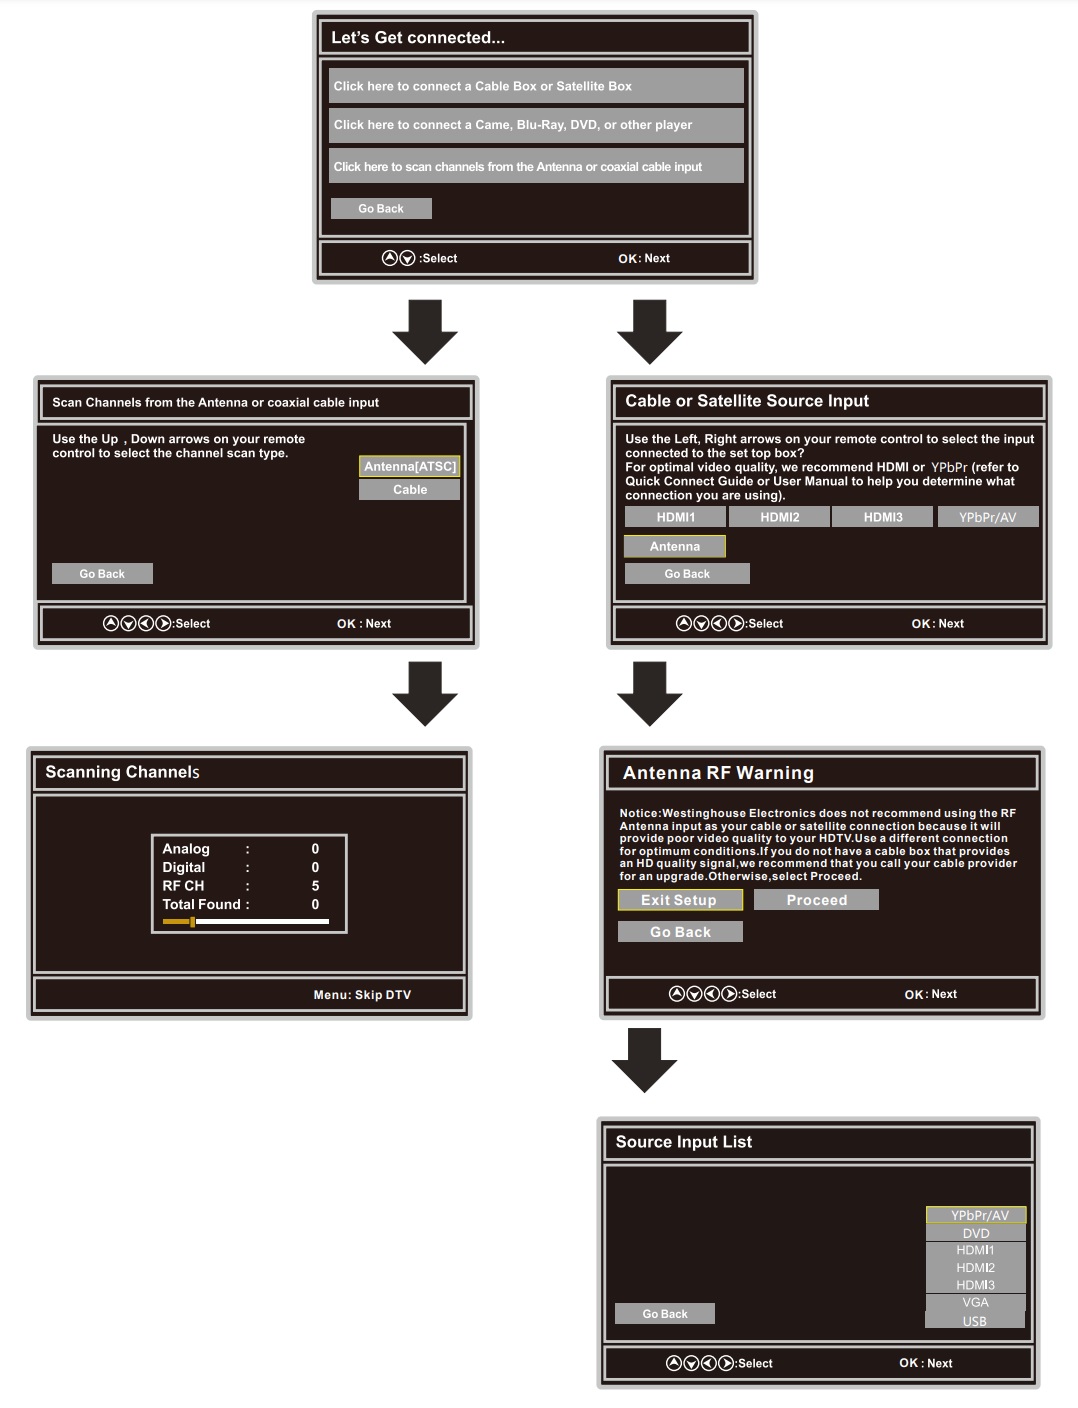
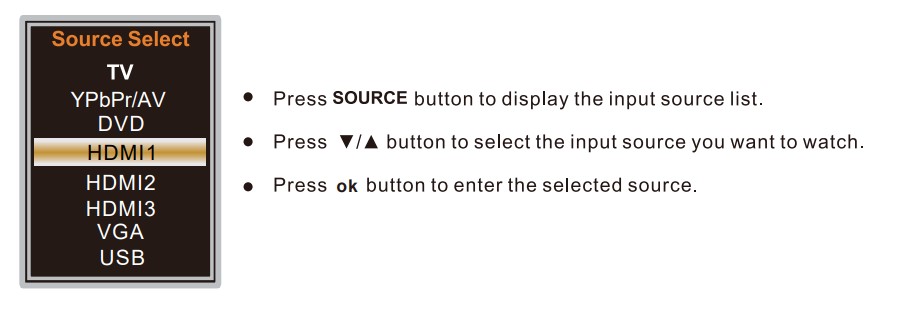
Select Input Source
Basic Operation
- Press MENU button to display the MAINOSD MENU.
- Press
 button to select the MENU you want.
 - Press
 button to enter the sub menu.
 - Press
 button to select the option and then press to adjust the value in the sub menu.
 - You can press MENU button to go back to the upper menu or EXIT button to close the OSD.
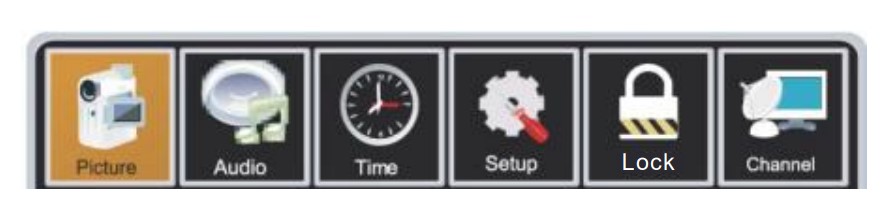
For TV Mode
Picture Menu
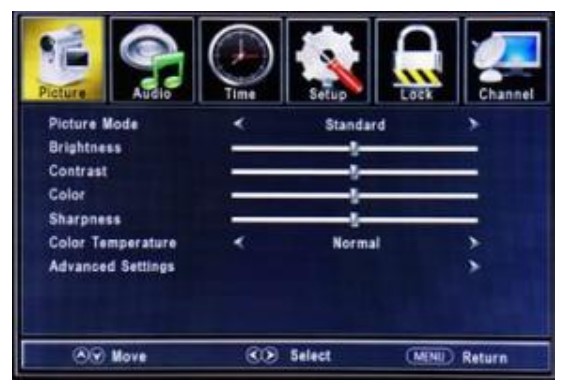
- Press
- Press W/ button to select the option that you want to adjust in the Picture menu.
- Press button to desired level.
- When you have changed the settings. you can exit from the menu by pressing MENU.
Picture Mode
Press button to select Picture Mode. then press button to adjust.
Available picture mode: Standard. Retail. Movie. User.
Brightness
Press button to select Brightness. then press button to adjust.
Contrast
Press button to select Contrast. then press button to adjust.
Color
Press button to select Color. then press button to adjust.
Tint
Press button to select Tint. then press button to adjust.
Sharpness
Press button to select Sharpness. then press button to adjust.
Color Temperature
Press button to select Color Temperature. then press to adjust.
Advanced Settings
Press button to select Advanced Settings. then press ok button to enter.
Adjust advanced video features to fine tune the picture.
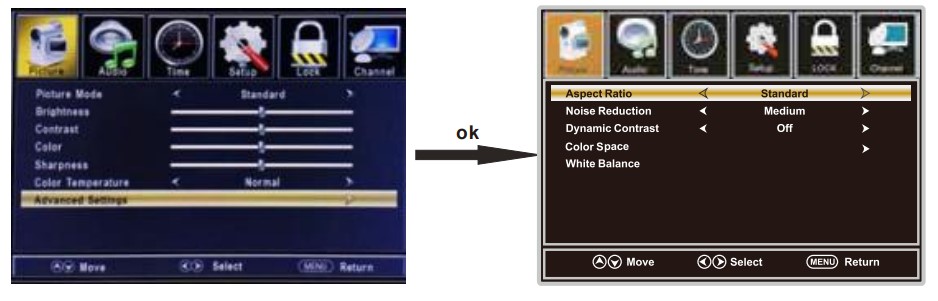
Aspect Ratio
Press button to select Aspect Ratio. then press button to adjust. Available Aspect Ratio:
Standard. Fill. Over Scan.
Noise Reduction
Press button to select the item Noise Reduction. then press button to adjust.
Available Noise Reduction: Off. Weak. edium. trong.
Dynamic Contrast
Press button to select Dynamic Contrast. then press button to adjust On or Off. It can adjust the contrast corresponding to the input signal in order to improve the picture quality displayed.
Color Space
Press button to select Color Space. then press ok button to enter.
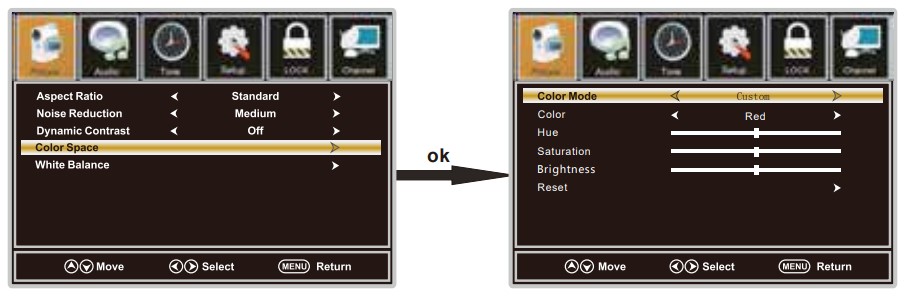
Color Mode
Press button to select Color Mode. then press button to adjust. Available Color
Mode: Auto. Native. Custom.
Color
Press button to select Color. then press button to adjust. Available Color Mode: Red.
Green. Blue. Yellow. Cyan. Magenta.(It is available in Custom mode.)
Hue
Press button to select Hue. then press button to adjust.(It is available in Custom mode.)
Saturation
Press button to select Saturation. then press to adjust.(It is available in Custom mode.)
Brightness
Press button to select Brightness. then press button to adjust.(It is available in Custom mode.)
Reset
Press button to select Reset. Press ok to enter. then press button to select No or Yes.
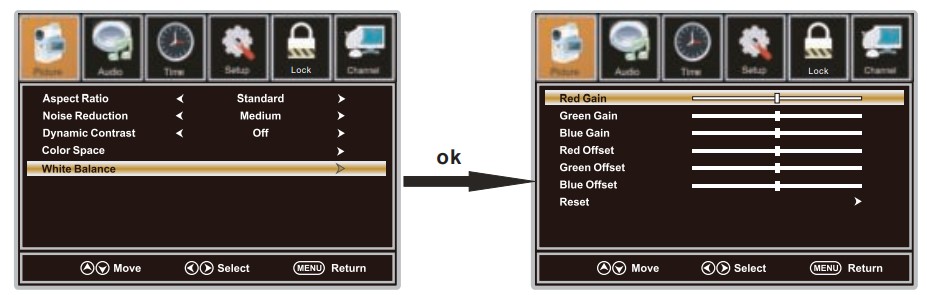
White Balance
Press button to select White Balance. then press ok button to enter.
Press button to select the option you want. hen press button to adjust.
Audiomenu
- Press button to select Audio in the main menu.
- Press button to select the option that you want to adjust in the Audio menu
- Press button to desired level.
- When you have changed the settings. you can exit from the menu by pressing MENU.
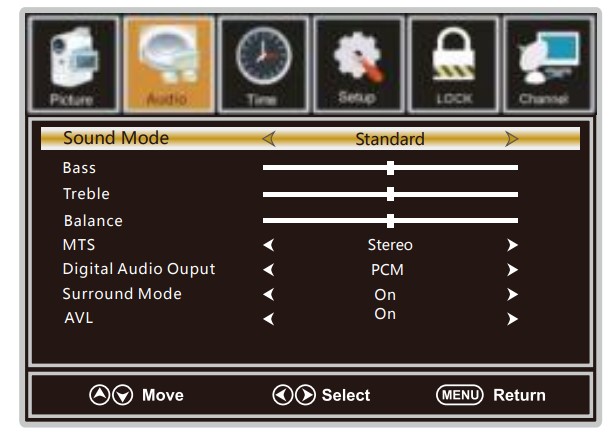
Sound Mode
Press button to select the item Sound Mode. then press button to select the desired mode.
Available Sound Mode: Sports. User. Standard. Music. Movie. Select a sound mode to achieve ideal sound.
Bass
Press button to select Bass. then press button to adjust.
Treble
Press button to select Treble. then press button to adjust.
Balance
Press button to select Balance. then press button to adjust.
MTS
Press button to select MTS. then press button to adjust.
Digital Audio Output
Press button to select the item Digital Audio Output. then press button to select the desired digital audio output. Available digital audio output: PCM. Raw and Off .
Surround Mode
Press button to select the item Surround Mode. then press button to select On or Off.
AVL
Press button to select the item AVL. then press to select On or Off.
Volume Level can set the volume automatically adjust corresponding to the input audio.
Time menu

- Press button to select Time in the main menu.
- Press button to select the option that you want to adjust in the Time menu.
- .Press to desired level
- When you have changed the settings. you can exit from the menu by pressing MENU.
Sleep Time
Press button to select Sleep Timer. then press button to set.
Available Sleep Timer: Off. 5Min. 10Min. 15Min. 30Min. 60Min. 90Min. 120Min. 180Min. 240Min.
Time Zone
Select a Timezone among: Pacific/Alaska/Hawaii/Eastern/Central/Moutain/Atlantic or Newfoundland.
Daylight Saving Time
Select to turn On/Off daylight saving time.
Setup Menu
- Press button to select Setup in the main menu.
- Press button to select the option that you want to adjust in the Setup menu.
- Press button to desired level.
- When you have changed the settings. you can exit from the menu by pressing MENU.
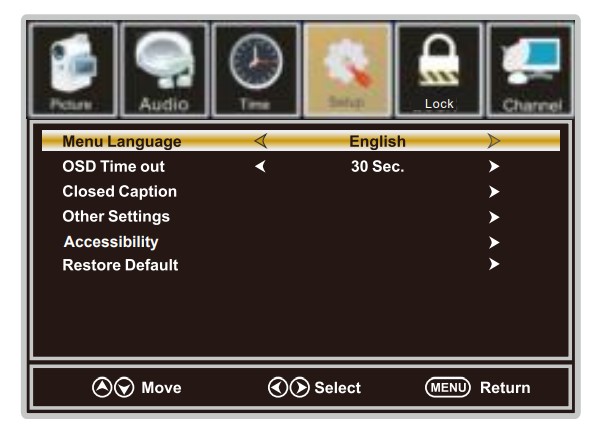
Menu Language
Press button to select the item Menu Language. then press button to adjust.
Available Language: English. French. Spanish.
OSD Timeout
Press button to select OSD Timeout. then press button to set.
Available OSD Timeout: 5Sec. 15Sec. 30Sec. 45Sec. 60Sec..
Closed Caption
Press button to select Closed Caption. then press OK button to enter.
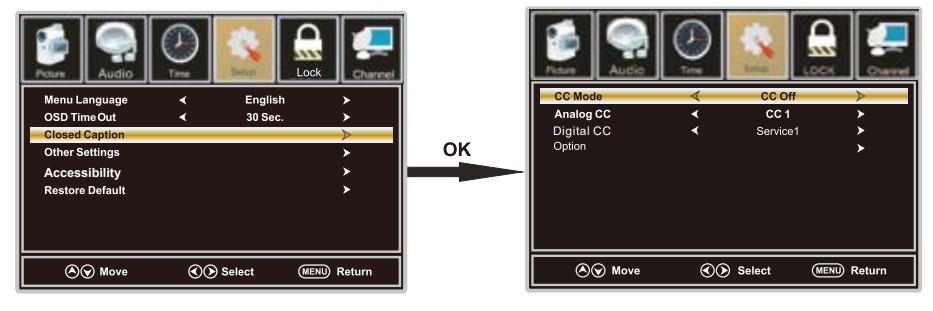
CC mode
Press button to select CC mode,then press button to select CC off, CC on, CCon Mute
Analog CC
Press button to select Analog CC. then press button to select.
Available Analog CC: CC1. CC2. CC3. CC4. Text1. Text2. Text3. Text4.
Digital CC
Press button to select Digital CC. hen press Service3. Service4. Service5. Services6.
Option
Press button to select Option. hen press  button enter submenu.
Other Settings
Press button to select Other Settings. then press OK button to enter.
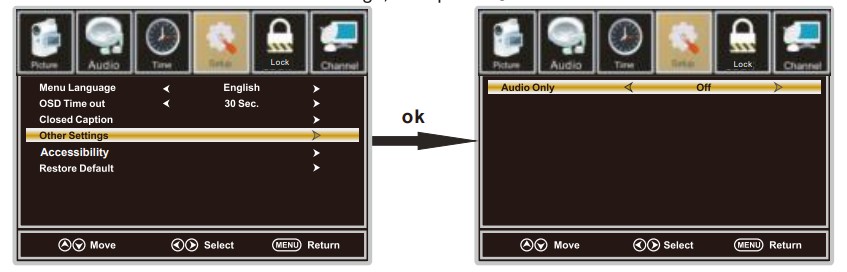
Audio Only
Press button to select Audio Only. then press button to set On or Off.
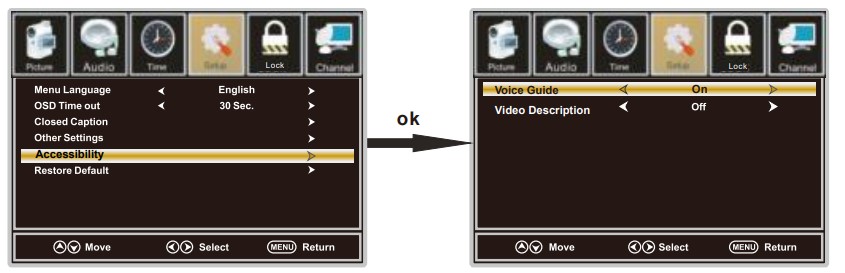
Accessibility
Press button to select Accessibility. then press button to set On or Off.
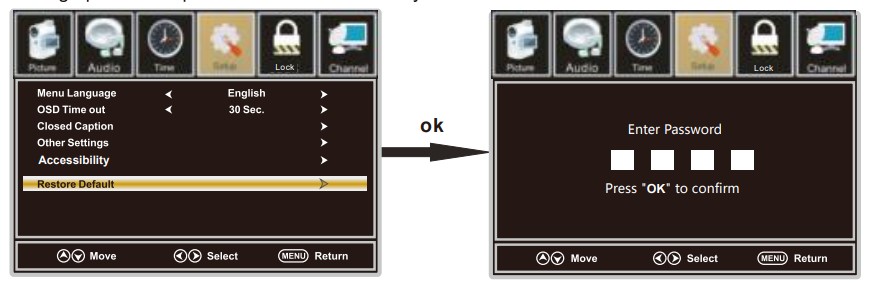
Restore Default
Press button to select Restore Default. then press ok button to select No or Yes.
Change power on options or reset TV to factory default. (0000)
Lock menu
- Press button to select Lock in the main menu.
- Press button to select the option that you want to adjust in the Lock menu.
- Press button to desired level.
- When you have changed the settings. ou can exit from the menu by pressing MENU.
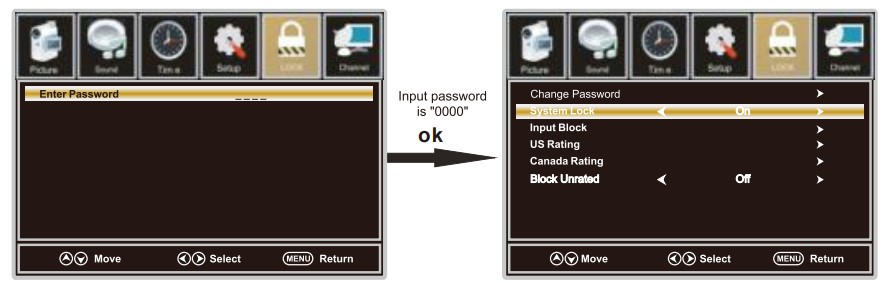
Input password to enter. efault password is “0000".
Change Password
Press & button to select Change Password. then press ok button to adjust the value. a sub menu will appear as below. If the password is changed. all of the passwords in the menu will be changed at the same time.
Note: If you forget your password. you can use “8899” to enter any menu locked.

System Lock
Press button to select System Lock. then press button to set On or Off
Only available when “System Lock’is “On”.
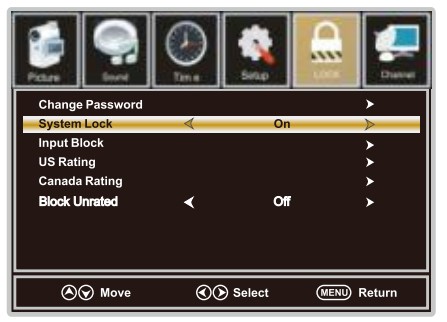
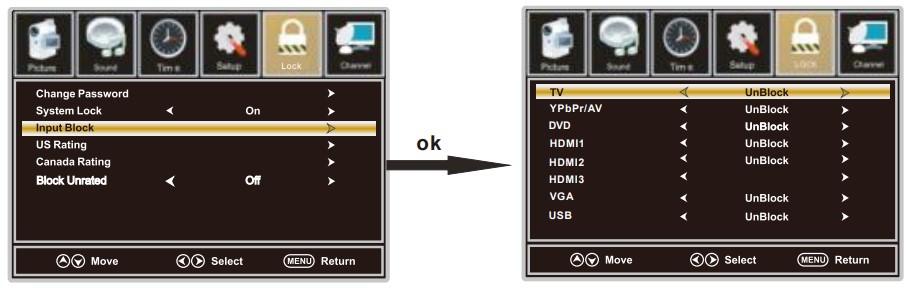
Input Block
Press button to select Input Block. then press button to enter.
Press button to select Unblock or Block the input sources.
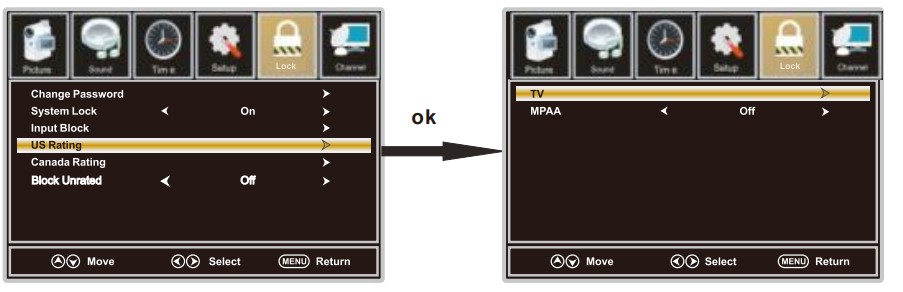
US Rating
Press button to select US Rating. then press button to enter. A sub menu will appear as below.
The TV rating composes of two aspects: age-based and content -based.
This system defines the rating control which comes from MPAA rules.
Canada Rating
Press button to select Canada Rating. then press button to select.
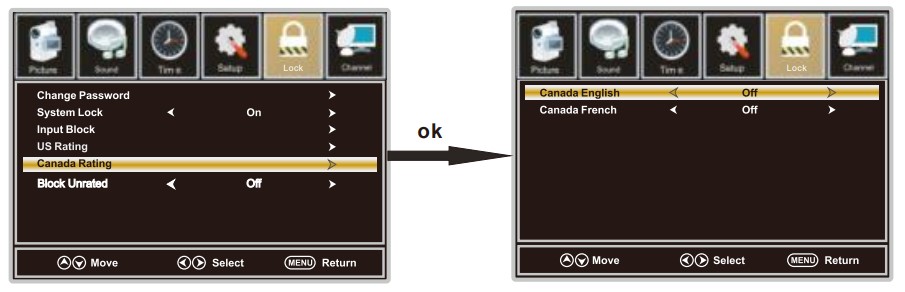
Canada English
Press button to select Canada English. then press buttonto set.
Available Canada English: Off. C. C8+.. PG. 14+. 8+.
Canada French
Press button to select Canada French. then press button to set.
Available Canada French: Off. G. 8ans+. 13ans+. 16ans+. 18ans+.
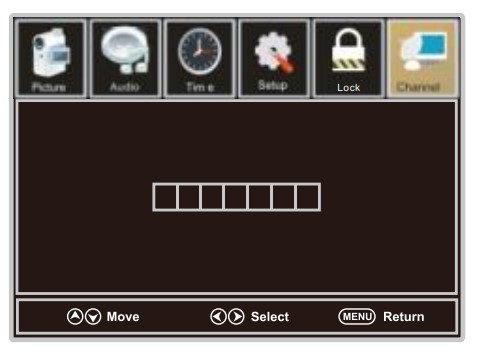
Channel Menu
Note:This menu is only shown when the input source is TV.
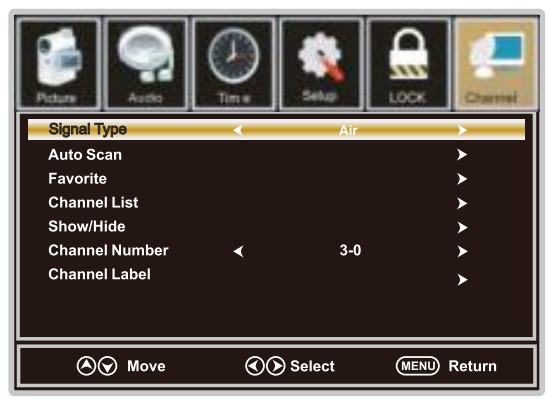
- Press button to select Channel in the main menu.
- Press button to select the option that you want to adjust in the Channel menu
- Press button to desired level.
- When you have changed the settings. you can exit from the menu by pressing MENU.
Signal Type
Press button to select Signal Type. then press button to set. Available Signal Type:Air. Cable.
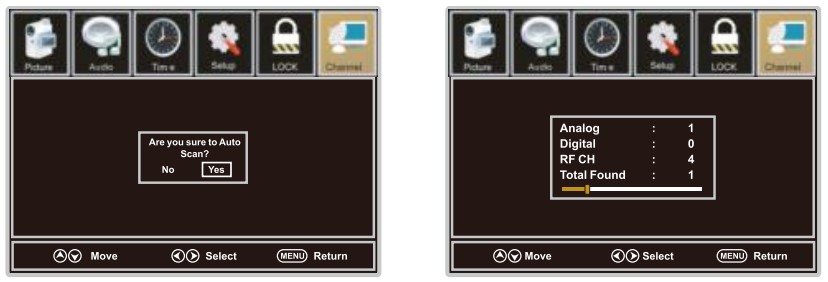
Auto Scan
Press button to select Auto Scan. then press ok button to search channel.
AChannel Search Menu will appear as below.
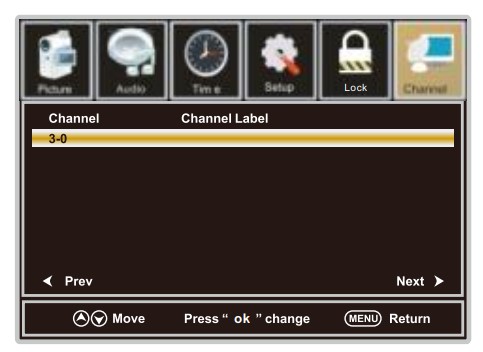
Favorite
Press button to select Favorite. then press ok button to scan the Favorite channel list.
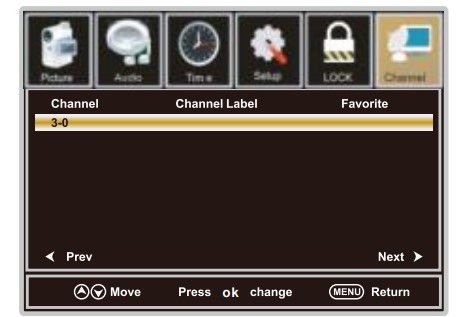
Channel List
Press button to select Channel List. then press ok button to scan the Channel List.
Show/Hide
Press button to select Show. then press ok button to enter .
Show or hide the channels in your program list.
Channel Number
Press button to select Channel Number. then press button to adjust.
Channel Label
Press button to select Channel Label. then press ok button to enter.
Create labels for channels. up to 7 characters.
Setup Menu
For VGA Mode:
- Press button to select Setupin the main menu
- Press button to select VGA Settings. then press ok button to enter.
Asub menu will appear as below.
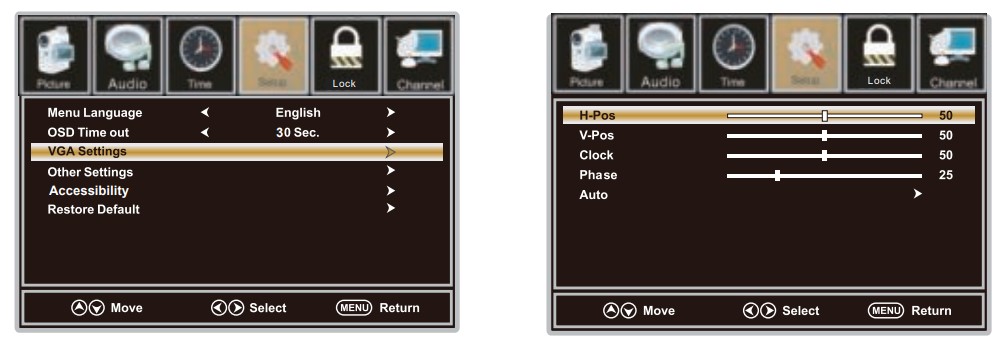
H-Pos
Press button to select H-Pos. then press button to adjust.
V-Pos
Press button to select V-Pos. then press button to adjust.
Clock
Press button to select Clock. then press button to adjust.
Phase
Press button to select Phase. then press to adjust
Auto
Press button to select Auto. then press ok button to enter.
Adjust to the PC signal timing automatically.
Note: The operation and description of the hot key are programmable on your remote control.
USB menu
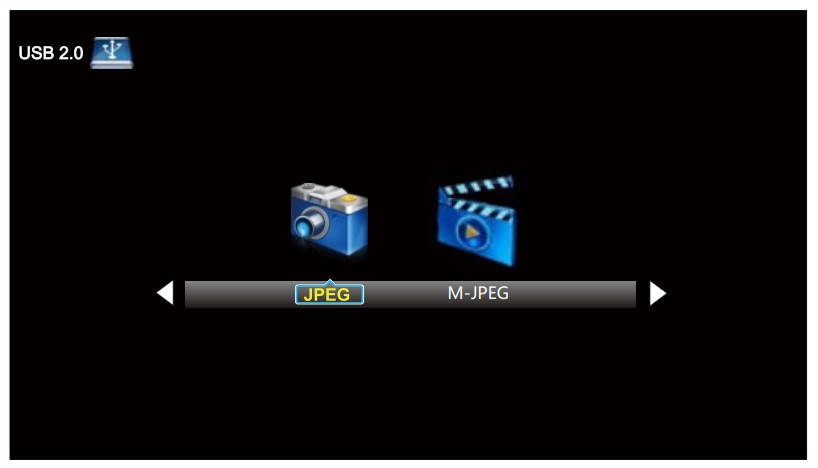
Note:Before operating Media menu. lu in USB device. hen press SOURCE button to set the Input Source to USB.
Press button to select USB in the Source menu. then press OK button to enter.
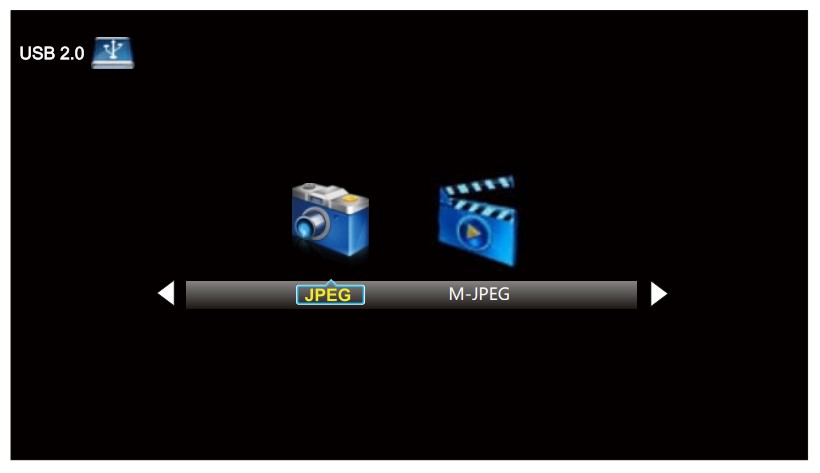
Press button to select the option you want to adjust in the main Media menu. then press
OK button to enter.the
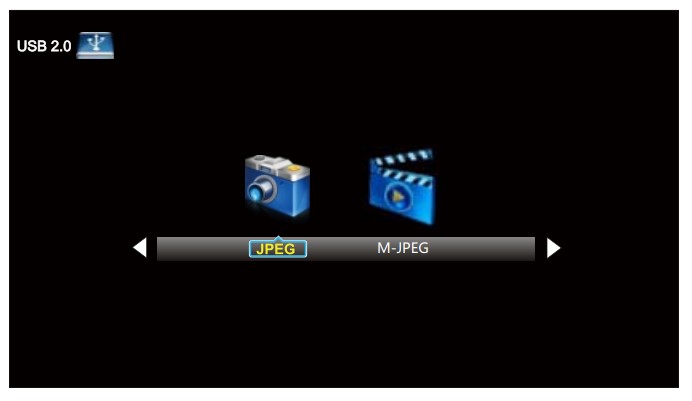
Press button to select JPEG in the main menu. hen press OK button to enter.
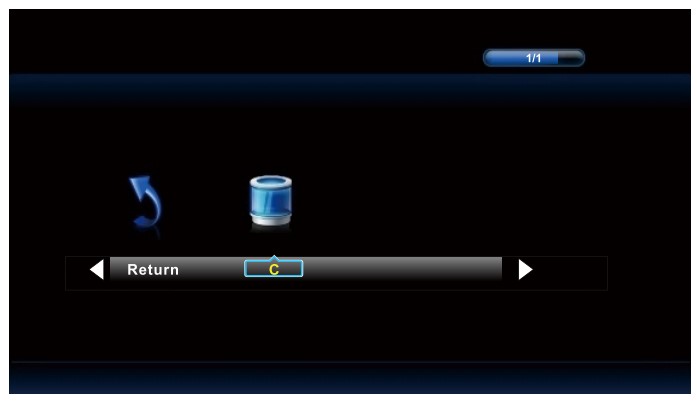
Press Exit button to return back to the previous menu.
Press button to select drive disk you want to watch. then press OK button to enter.
Press button to select Return option to go back to the previous menu.
Press button to select the file you want to watch in the file selecting menu. then press OK button to display picture.
When highlighting the option you select. the file information will appear on the right and picture will be previewed in the center.
Press button to select M-JPEG in the main menu. then press OK button to enter.
Press Exit button to return back to the previous menu.
Press button to select drive disk you want to watch. then press OK button to enter.
Press button to select Return option to go back to the previous menu.
When highlighting the option you select. the file information will appear on the right and Movie will be previewed in the center.
Press OK button to play the selected movie.
Press display button to show select menu in the bottom.
Press button to select menu in the bottom you want to run. then press OK button to operate.
DVD OPERATION
Preparation before playing disc
- The display language is set to English. Please refer to setup operation
- Most functions are operated by the remote control or use the buttons on the front panel.
Preparatio
- Turn the TV on and select DVD as the TV input.
- Turn on any related system power if the player has been connected to amplifier equipment. etc.
PLAY
- Turn on the power. the display shows “LOADING”. (Note: the disc information appears after several seconds if a disc has been inserted. Otherwise NO DISC appears.)
- To insert a disc. place the disc with the printed label side facing the back. into the DVD slot. The disc will automatically be loaded into the player.
- To remove the disc. press the OPEN/CLOSE button and the disc will eject.
- Press PLAY on playback disc. You may also start playback according to the MENU screen once the MENU displays. Press ENTER button to start playback. Some discs may play automatically once loaded.
Press STOP button to stop playing. When playback is stopped the unit keeps in memory the point where STOP was pressed (resume function). Press PLAY again. and play will resume again at this point. Press the STOP button twice. the resume function will be cancelled. The resume function is suitable for discs showing playing time during playback.
- PRESS

Press PREV button or NEXT button on the remote control when playing a disc. a chapter (DVD) or a track (CD) to skip backward or forward correspondingly each time the button is pressed.
Note: When skipping backward. playback starts at the beginning of the previous track. NOT the beginning of the current track.
Press the FB/FF button on the remote control during playback. the disc will be played forward or backward correspondingly. The forward or reverse speed is relatively slow at first. When pressed again. the speed becomes faster. The more times the buttons are pressed. the faster the Fast Forward or
Reverse speed will be. There are five levels of speed: X2. X4. X8. X16 and X32. To return to normal play. press the PLAY button on the player or the remote control.
Press the SETUP button during play. the player will enter into still picture mode. If the button is pressed again the disc is advanced by one frame (step). When the button is continually pressed. there will be consecutive frame advance. To return to normal play. press the PLAY button on the player or the remote control.
Press the pause button to stop playing. Restore play by pressing the PLAY button again.
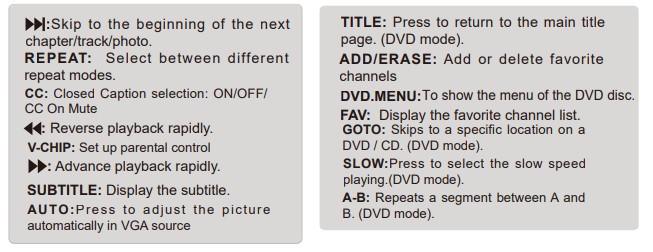
- NUMBER (0-9. 10+) Buttons
Press the number (0-9) buttons. to go directly to the desired track or chapters while a disc is being played. For a track or chapter over 10. press 10+ first and then the 0-9 button.
Press the MUTE button during play. the player shows mute and there is no audio output (silence).
Press again to cancel MUTE.
the VOL+/VOL- button to change the volume for audio output.
Press the A-B button during playback at the point where repeat play is to commence (A). then press again at the point where repeat play is to be concluded (B). Repeat playback between point (A) and point (B) starts. Press A-B button once more where TV screen appears REP OFF to return to normal play.
Press the repeat button to choose to repeat play chapter or title (DVD) and play single audio or full disc (VCD. CD. MP3). Note: Some VCDs do not have repeat function with PBC ON state.
When playing SVCD. VCD. DVD discs. press SLOW to select slow speed playing. Press PLAY/PAUSE to resume to normal play.
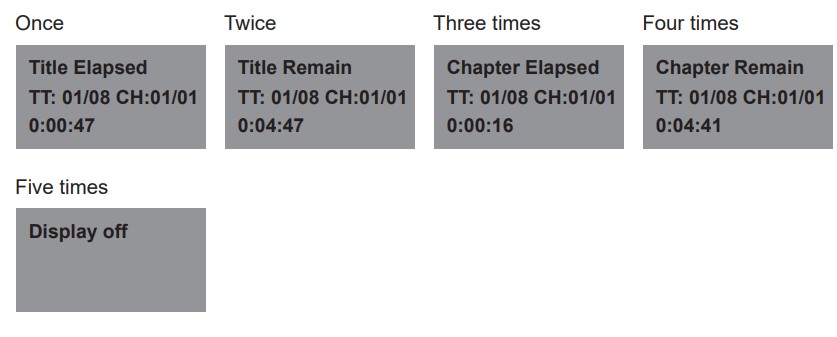
During play. press the GO TO button on the remote control. You can search the disc based on its title/ chapter/track. Press the GO TO button and a search menu will be displayed. Use the < or > button to select the search item/time/title/chapter. The selection will be shown as highlighted. Use the number button to select the search item time/title/chapter. and press the ENTER button to play.
For example:
- Time search (press “GO TO” button twice while playing a DVD): To search 16 min 50 seconds. input 1. 6. 5 and 0. To search 1 hour 14 minutes: input 1. 1. 4. 0. 0. Title/chapter search: To search title 1. chapter 2. input 1 in the highlight title column. move the cursor right to the highlighted area and input 2.
Notes
- For some DVD discs which cannot be searched. “invalid” will appear on the TV screen.
- Input the time. title and chapter of the disc to be searched.
- For VCDs with the PBC mode ON. it can only search for a time.
- AUDIO
Press AUDIO button to switch the audio output among L/L. R/R and L/R.
Press MENU button to show the setup information of DVD disc source.
Press OPEN/CLOSE when power is on and insert disc with label towards the back.
Press OPEN/CLOSE to close.
When playing the DVD. press TITLE to return to the main title page.
- SUBTITLE (FOR DVD AND SUPER VCD DISCS)
To change the subtitle language. refer to Language Setup (page 28).
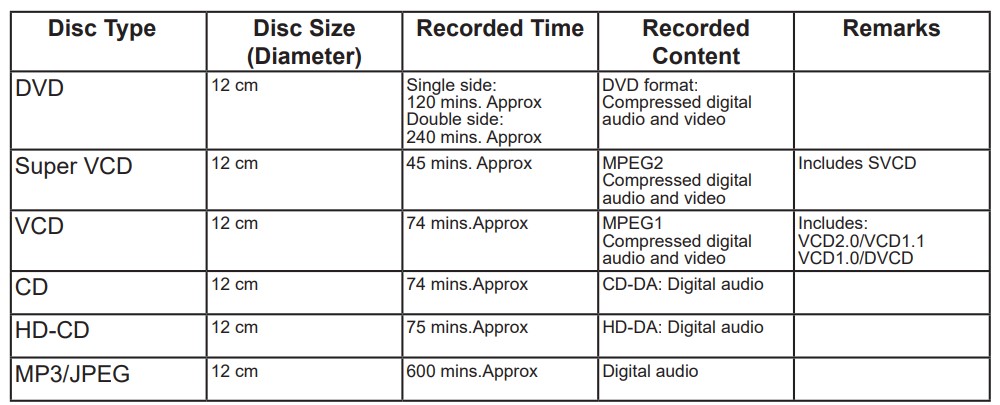
Supporting DVD Format
For DVD discs with 5 pages, press INFO button :
MP3 / JPEG Playback
After loading the MP3/JPEG disc, it will start to scan for the stored MP3/JPEG folders. The folder will display the MP3 contents automatically and start to play the (highlighted Screen will show as below:
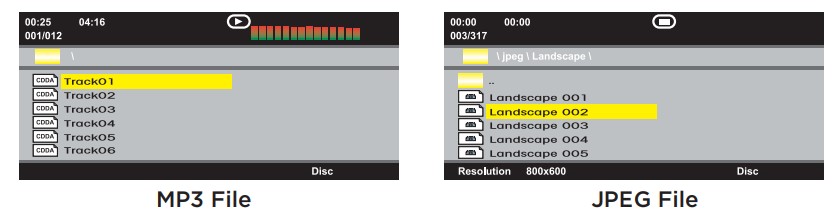
Use the navigation buttons to check for your favourite folder and playback the or move to your favourite NOTE: Press the buttons to move the highlight to folders, documents or mode selection. Press the numeric buttons to select the contents directly. For numbers over 10, press the - button (eg. for number 15, press - and 5). When playing MP3 there is no picture display, only audio output.
DVD Function General Set Up
Press DVD setup button to activate the DVD player’s OSD menu. Press the buttons to move and highlight between different submenus. Press the OK button to enter the highlighted sub-menu. Press DVD SETUP button to exit the OSD menu. Note: In Setup mode, the disc playback functions will be cancelled or paused.
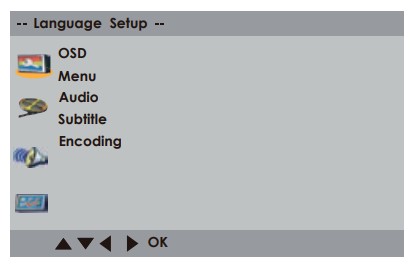
Language Set Up
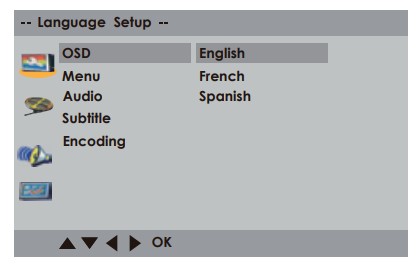
OSD
Menu Audio Press DVD setup button to activate the DVD player’s OSD menu. Press the  buttons to move and highlight between different submenus. Press the OK button to enter the highlighted sub-menu. Press DVD SETUP button to exit the OSD menu. Note: In Setup mode, the disc playback functions will be cancellcanceledsed. Use the navigation buttons to select the OSD setup, there are six languages for your selection. Press the / / buttons to toggle between the different languages: English, French ,Spanish and Press the OK button to confirm.
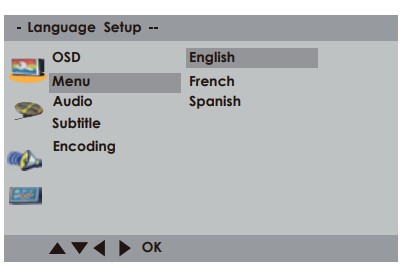
Menu
Use the navigation buttons to select the Menu setup, there are seven languages for your selection. Press the buttons to toggle between the different languages: English, French, Spanish, Portuguese, German, Italian, Dutch, and Polish. Press the OK button to confirm.
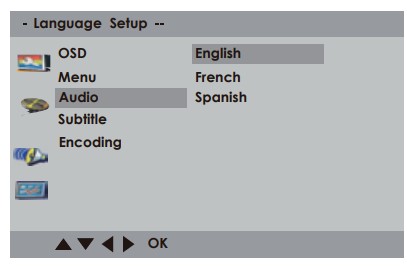
Audio
Use the navigation buttons to select the Audio setup, there are seven languages for your selection. Press the buttons to toggle between the different languages: English, French, Spanish, Portuguese, German, Italian, Dutch, and Polish. Press the OK button to confirm.
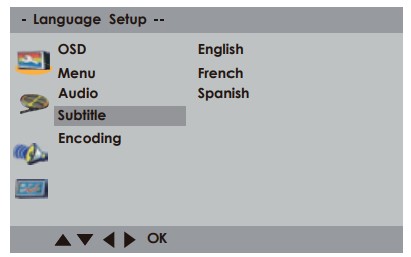
Subtitle
Use the navigation buttons to select the Subtitle setup, there are seven languages for your selection. Press the buttons to toggle between the different languages: English, French, Spanish, Portuguese, German, Italian, Dutch, Polish, and Off. Press the OK button to confirm.

Encoding
Use the navigation buttons to select the Encoding setup. Press thebuttons to select Central European or Western European. Press the OK button to confirm. Note: This function only applies to discs with subtitles using Western or Central European character sets.
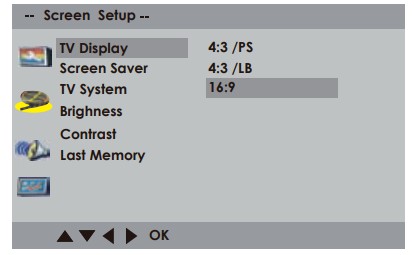
TV Display
Use the navigation buttons to select the TV Type setup. Press the buttons to select 4:3 PS, 4:3 LB or 16:9. Press the OK button to confirm. Select the most appropriate aspect ratio for the DVD being viewed.

4:3 PS (Normal)
Normal Pan and Scan is used for most normal television broadcasts and it is the default setting. It has an aspect ratio of 4:3. If you select this setting when viewing a DVD, the picture will the screen, but you will not see the left and right edges of the picture.
4:3 LB (Normal)
Normal Letter Box will show the DVD in its original aspect ratio, so depending on the size of your television screen, you may see black borders above and below the picture.
16:9 (Wide)
hoose this setting if you have a widescreen television.
NOTE: Playback screen size may vary according to the discs contents. For discs with 4:3 contents, using any mode would display a 4:3 screen. Screen ratio selection should be chosen according to the connected TV/Display aspect ratio.
Screen Saver
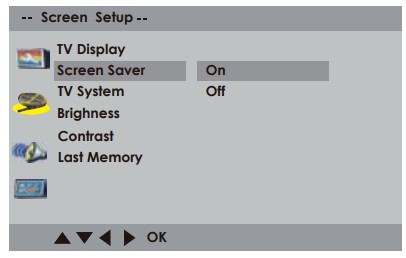
Use the navigation buttons to select the Screen Saver setup. Press the buttons to select On or Off. Press the OK button to confirm.
TV System
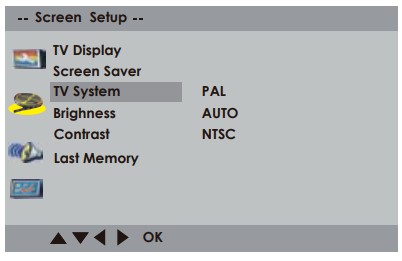
Use the navigation buttons to select the TV System setup. Press the buttons to select NTSC, PAL or Auto. Press the OK button to con rm. Note: NTSC format is generally used for TVs in Canada. Check your TV user guide for supported formats. If PAL is selected with a noncompatible television, you may experience interference or picture scrolling.
Brightness
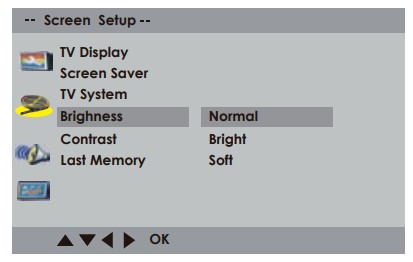
Use the navigation buttons to select the Brightness setup. Press thebuttons to select Normal, Bright or Soft. Press the OK button to con rm.
Contrast
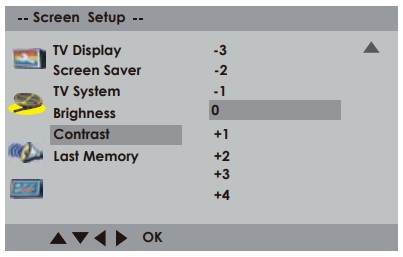
Use the navigation buttons to select the Contrast setup. Press the / / buttons to select 0 to +/-4. Press the OK button to con rm.
Last Memory
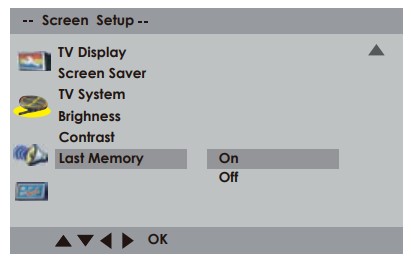
Use the navigation buttons to select the Last Memory setup. Press the buttons to select On or Off . Press the OK button to con rm.
Audio Set Up

Downmix
Use the navigation buttons to select the Downmix setup. Press the buttons to select Lt/Rt or Lo/Ro . Press the OK button to con rm.
Custom Set Up
Parental Control
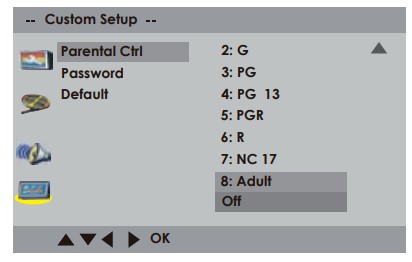
Use the navigation buttons to select the Parental Control setup. Press the button or OK to enter password, then select the V-chip grade or Off.
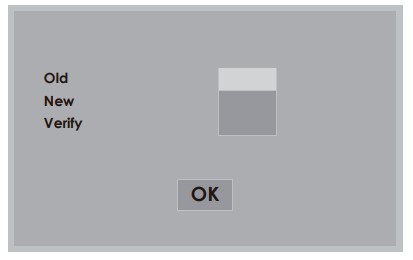
Password
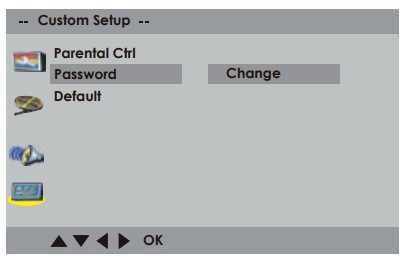
Use the navigation buttons to select the Password setup. Press the or OK button to change the password, then select the V-chip grade or Off.
The default setting is 8899.
Default
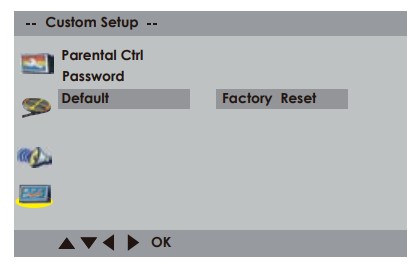
Use the navigation buttons to select the Default setup. Press the button to select Reset. Press the OK button to return to the factory setup.
Troubleshooting
Please check if you can solve problems by troubleshooting yourself.
- No signal
- Please check that all cables are correctly plugged in.
- No color shades
- Adjust the contrast. the color and the brightness.
- Stain on the screen
- May be the result from a lighting signal from car. motor. neon light and other electrical devices or appliances.
- Double or multiple display image
- May be the result of an electrical wave disturb from other TV. Computer and Game machine or Radio
- Snow on the screen
- The cables of the antenna are not correctly plugged in.
- The remote control does not work
- Please check the batteries order and alignment. Check that the IR of the remote control is not hidden by something.
- "Zip" made noise on TV cover
- Even if the display image is correct. the noise may come from an unsteady fixation of the panel.
- No sound
- Make sure that you have not press the MUTE button of the remote control.