Documents: Go to download!
User Manual
- User Manual - (English, French)
- Dimension Guide - (English)
- Tech Sheet - (English)
- Feature Sheet - (English)
- Spec Sheet (web) - (English)
- Installation Instructions - (English)
- Energy Guide - (English)
Owner Manual Dishwasher
KEY USAGE TIPS
Filtration system
Your dishwasher has latest technology in dishwasher filtration. This filtration system minimizes sound and optimizes water and energy conservation while providing superior cleaning. The filter system consists of two parts, an upper filter assembly and lower filter.

IMPORTANT: To avoid damage to dishwasher, do not operate your dishwasher without filters properly installed. Be sure lower filter is securely in place and upper filter assembly is locked into place. If upper assembly turns freely, it is not locked into place.
Drying – Rinse aid is essential.
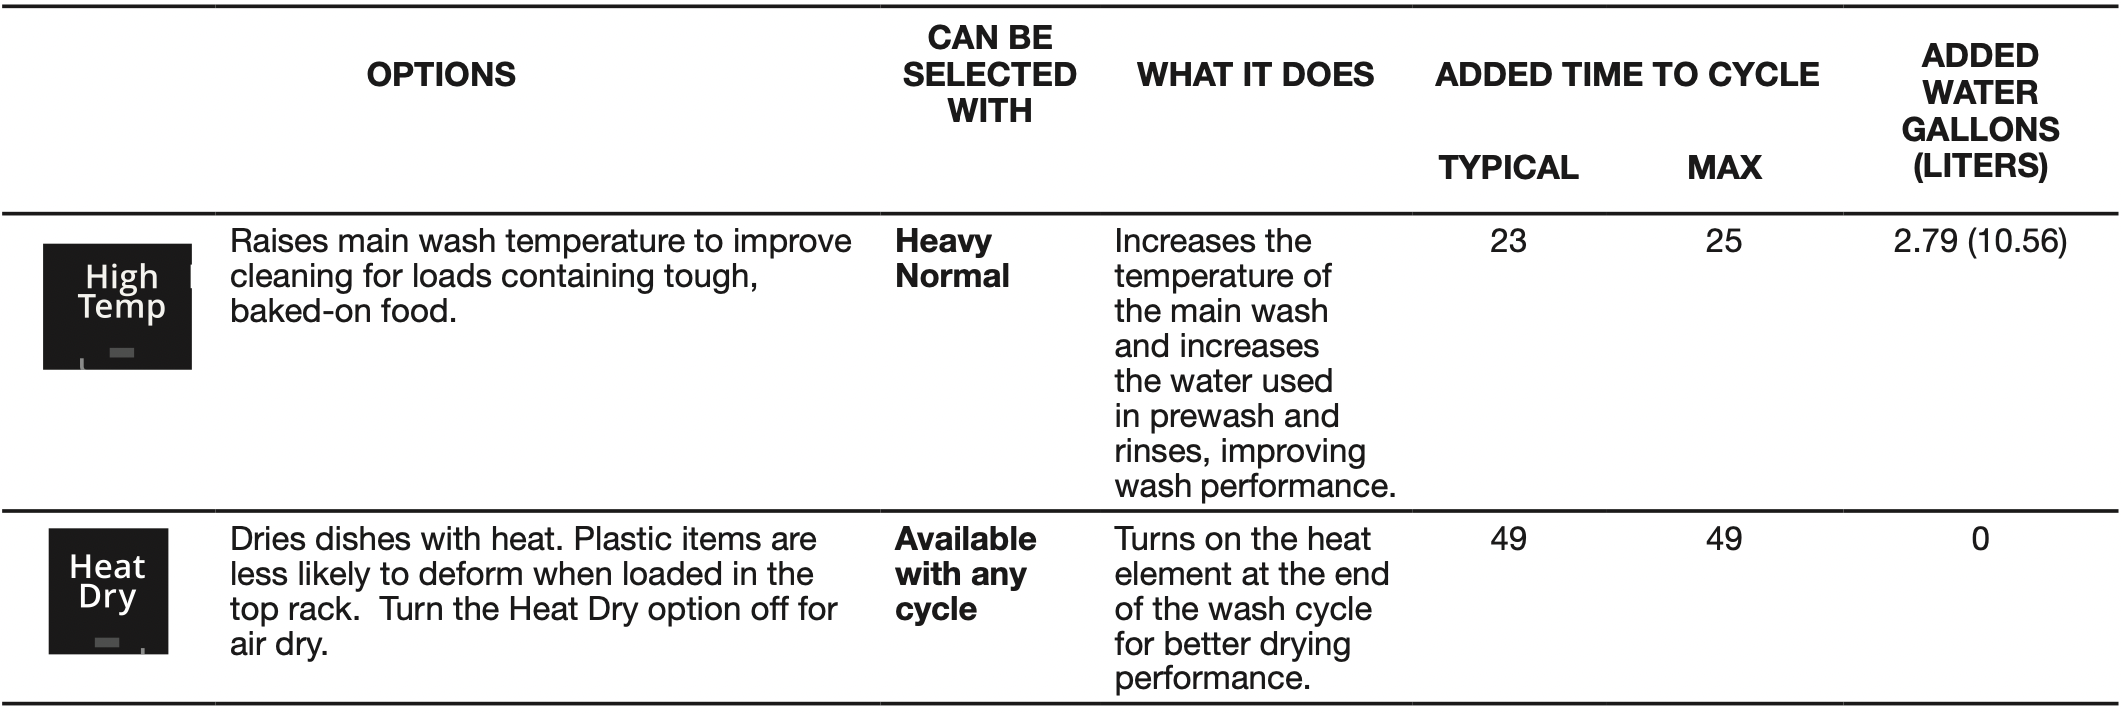
You must use a drying agent such as a rinse aid for good drying performance. Rinse aid along with the Heat Dry option will provide best drying and avoid excessive moisture in dishwasher interior.


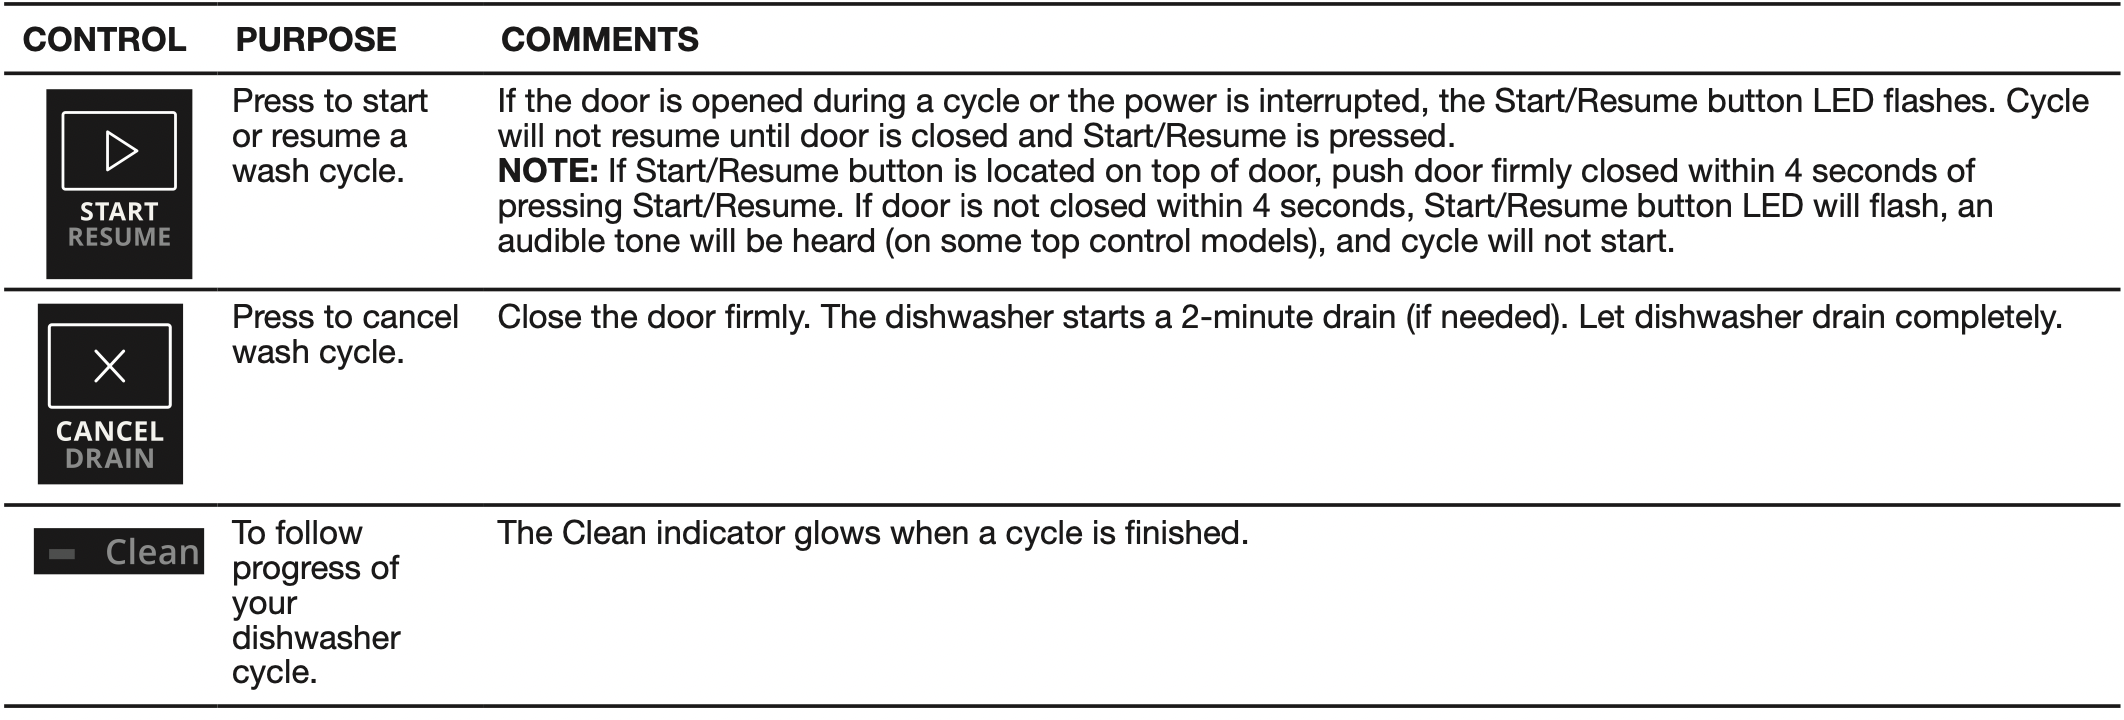
Press Start/Resume every time you add a dish.
IMPORTANT: If anyone opens the door (such as, for adding a dish, even during the Delay Hours option), Start/Resume must be pressed each time.
If Start/Resume is located on top of door: Push door firmly closed within 4 seconds of pressing Start/Resume. If door is not closed within 4 seconds, the Start/Resume button LED will flash, an audible tone will be heard, and cycle will not start.

Recommended detergent
The United States and Canada have passed a restriction limiting the amount of phosphorus (phosphates) in household dishwasher detergents. Major manufacturers have reformulated their dishwasher detergent for this change in detergents as another step in eco-conscious awareness. With these recent changes it is recommended to use tablets and packs for convenience and improved performance.

OPERATING YOUR DISHWASHER
Prepare and Load the Dishwasher
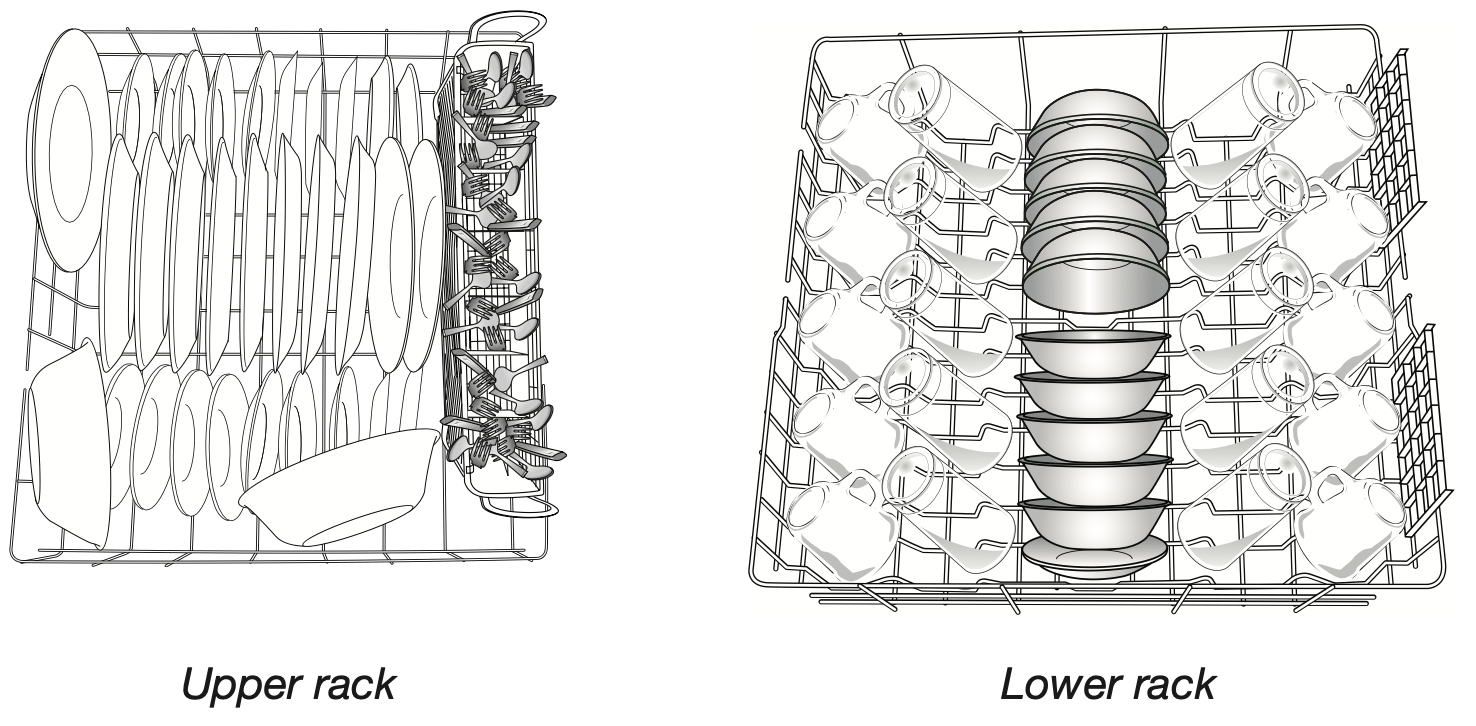
IMPORTANT: Remove leftover food, bones, toothpicks, and other hard items from dishes. Remove labels from containers before washing.
- Make sure when dishwasher door is closed no items are blocking detergent dispenser.
- Items should be loaded with soiled surfaces facing down and inward to the spray as shown in the graphics above. This will improve cleaning and drying results. Angle dirtiest dish surface downward, allowing space for water to flow up through rack and between dishes.
- Avoid overlapping items like bowls or plates that may trap food.
- Place plastics, small plates, and glasses in upper rack.
- Wash only items marked “dishwasher safe.”
- To avoid thumping/clattering noises during operation: Load dishes so they do not touch one another. Make sure lightweight load items are secured in racks.
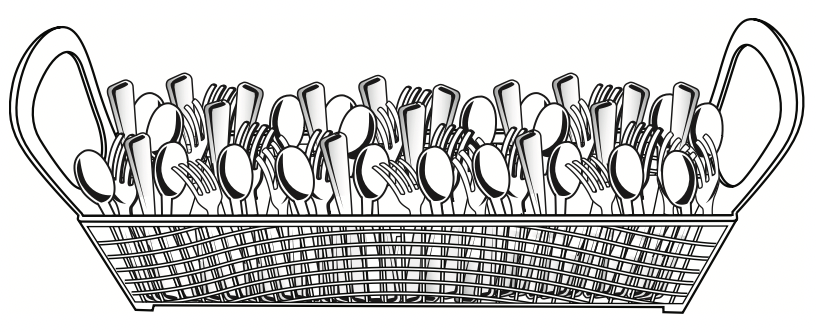
- When loading silverware, always place sharp items pointing down and avoid “nesting” as shown. If your silverware does not fit into the designated slots, flip covers up and mix silverware types to keep them separated.

- Use slots in the covers (if provided) and suggested loading patterns to keep your silverware separated for optimum wash.
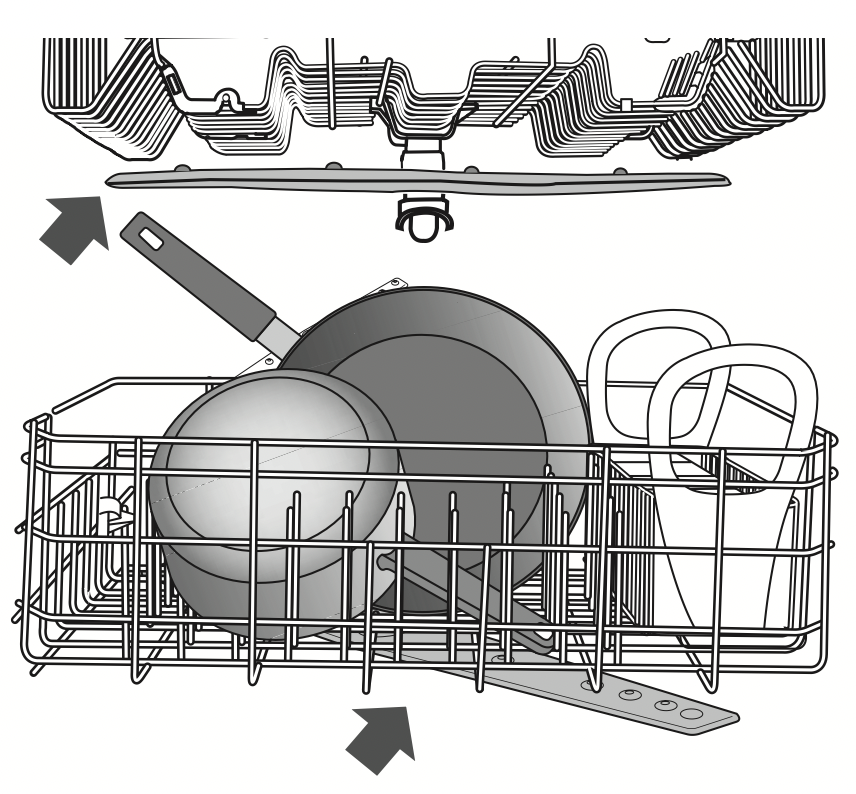
Check That All Arms Spin Freely
Add Detergent
- Use automatic dishwasher detergent only. Add powder, liquid, or tablet detergent just before starting a cycle.
- Fresh automatic dishwasher detergent results in better cleaning. Store tightly closed detergent container in a cool, dry place.

Premeasured Detergents
Many detergents now come in premeasured forms (gel packs, tablets, or powder packs).
These forms are suitable for all hardness and soil levels. Always place premeasured detergents in main compartment and close lid.
Using dishwasher detergent tablets and packs have been proven better than powder, liquid, or gel detergents at reducing filming on dishes. Using tablets and packs over time will start to reduce or eliminate white film. Also, by using a rinse aid you can minimize repeat buildup of white film.
Powder and Gels
- The amount of detergent to use depends on:
How much soil remains on the items - Heavily soiled loads require more detergent.
The hardness of the water - If you use too little detergent in hard water, dishes won't be clean. If you use too much in soft water, glassware will etch.- Soft to Medium Water (0-6 grains per U.S. gallon) [typical water softener water and some city water] Medium to Hard Water (7-12 grains per U.S. gallon) [well water and some city water]
- Depending on your water hardness, fill the Main Wash section of the dispenser as shown. Fill the Prewash section to the level shown, if needed.
NOTE: Follow instructions on the package when using other dishwasher detergent types.
Add Rinse Aid
- Your dishwasher is designed to use rinse aid for good drying performance. Without rinse aid, your dishes and dishwasher interior will have excessive moisture. The Heat Dry option will not perform as well without rinse aid.
- Rinse aid keeps water from forming droplets that can dry as spots or streaks. It also improves drying by allowing water to drain off of dishes after final rinse.
See other models: WML55011HB WVU57UC6FS WCG55US6HW WMH31017HZ30 WVU37UC0FB

- To add rinse aid, turn the dispenser cap 1/4 turn to the left and lift off. Pour rinse aid into the opening until indicator level is at “Full.” Replace dispenser cap and turn to “Lock.” Make sure cap is fully locked.

NOTE: For most water conditions, the factory setting will give good results.
- Check water hardness level to ensure no rings or spots on your dishware before adding rinse aid or adjusting the factory setting.
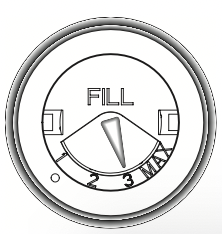
- If you are experiencing poor drying performance, you may want to try a higher setting.
Turn the arrow adjuster inside the dispenser to change rinse aid setting.
Select a Cycle (cycles vary by model)
Efficient dishwashers run longer to save water and energy, just as driving a car slower saves on gas. Typical cycle time is approximately 2¹⁄ 2 hours, but can take less or more time to complete depending on selections.
Select Options (options vary by model)
You can customize your cycles by pressing the options desired. If you change your mind, press the option again to turn off the option. Not all options are available for every cycle. If an invalid option is selected for a given cycle, the lights will flash.
Start or Resume a Cycle
NOTE: Run hot water at the sink nearest your dishwasher until the water is hot. Turn off water.
- If the Start/Resume button is located on top of door, push the door firmly closed within 4 seconds of pressing Start/Resume. If door is not closed within 4 seconds, the Start/Resume button LED will flash, an audible tone will be heard, and cycle will not start.
IMPORTANT: If anyone opens the door (such as, for adding a dish, even during the Delay Hours option), the Start/Resume button must be pressed each time.
- If your Start/Resume button is located on front of door, push door firmly closed. The door latches automatically. Select the wash cycle, options and press START/RESUME or press START/RESUME to repeat the same cycle and options as in previous wash cycle.
CYCLE GUIDE
This information covers several different models. Your dishwasher may not have all of the cycles and options described.
CYCLES

OPTIONS
CONTROLS
DISHWASHER CARE
Cleaning the Exterior
Clean the exterior of dishwasher with a soft, damp cloth and mild detergent. If your dishwasher has a stainless steel exterior, a stainless steel cleaner, such as affresh® Stainless Steel Cleaner is recommended. Avoid using abrasive cleaning products on the exterior of the dishwasher.
Cleaning and Maintaining the Interior
Many detergents may leave white spots or a white residue on dishware and on the interior of the dishwasher. Over time this residue can become unsightly and could affect dishwasher performance. Use of a dishwasher cleaning product such as affresh® Dishwasher Cleaner can help to remove the residue. Monthly use of affresh® Dishwasher Cleaner is recommended to help maintain the dishwasher. Follow package directions.
NOTE: Whirlpool recommends the use of high-quality, premeasured detergent tablets or packs and the use of rinse aid for dishwasher cleaning and daily care.
If you have a drain air gap, check and clean it if the dishwasher isn't draining well.

To Reduce Risk of Property Damage During Vacation or Extended Time Without Use:
- When you will not be using the dishwasher during the summer months, turn off the water and power supply to the dishwasher.
- Make sure the water supply lines are protected against freezing conditions. Ice formations in the supply lines can increase water pressure and cause damage to your dishwasher or home. Damage from freezing is not covered by the warranty.
- When storing your dishwasher in the winter, avoid water damage by having your dishwasher winterized by authorized service personnel.
Cleaning the Filters
It is very easy to remove and maintain the filters. The chart below shows the recommended cleaning frequency.

*Manufacturer's recommendation: This practice will conserve the water and energy that you would have used to prepare your dishes. This will also save you time and effort.
Very Hard Water
If you have hard water (above 15 grains), clean your filter at least once per month. Building up of white residue on your dishwasher indicates hard water. For tips on removing spots and stains, see the “Troubleshooting” section in the full User Instructions.
Filter Removal Instructions
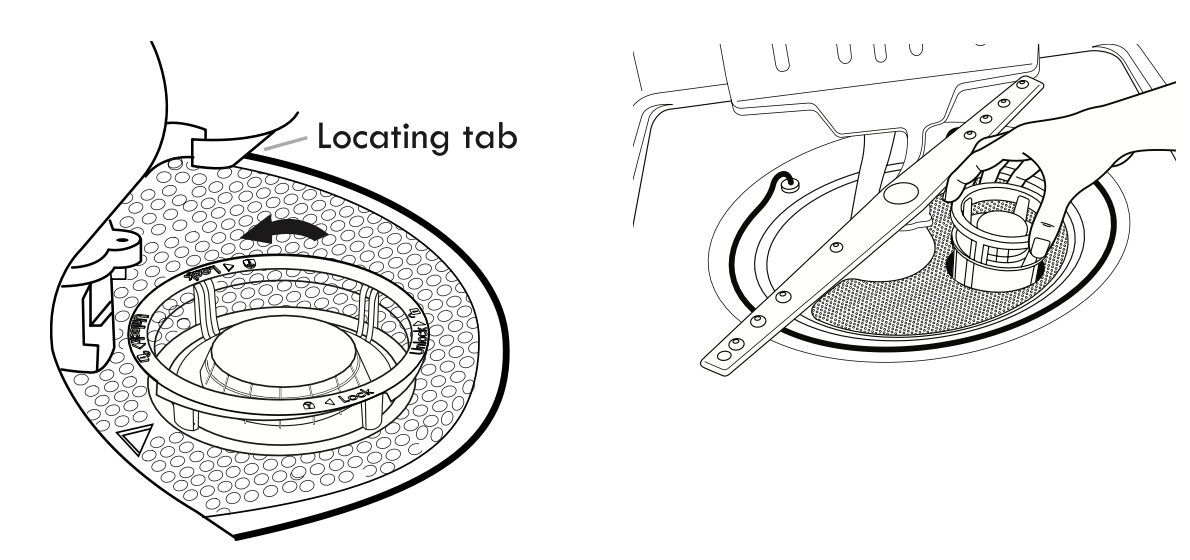
- Turn the upper filter assembly 1/4 turn counterclockwise and lift out.
- Separate the upper filter assembly by gently pulling apart.
- Clean the filters as shown.
Cleaning Instructions
IMPORTANT: Do not use wire brush, scouring pad, etc., as they may damage the filters.
Rinse filter under running water until most soils are removed. If you have hard-to-remove soils or calcium deposits from hard water, a soft brush may be required.

Filter Reinstallation Instructions
- Noting the previous illustrations, place the lower filter under the locating tabs in the bottom of the dishwasher so the round opening for the upper filter assembly lines up with the round opening in the bottom of the tub.
- Insert the upper filter assembly into the circular opening in the lower filter.
- Slowly rotate the filter clockwise until it drops into place. Continue to rotate until the filter is locked into place. If the filter is not fully seated (still turns freely), continue to turn the filter clockwise until it drops and locks into place.
NOTE: The upper filter assembly arrow does not have to align with the arrow in the lower filter as long as the filter is locked.
IMPORTANT: To avoid damage to dishwasher, do not operate your dishwasher without the filters properly installed. Be sure the lower filter is securely in place and the upper filter assembly is locked into place. If the upper filter assembly turns freely, it is not locked into place.
TROUBLESHOOTING
|
If you experience |
Recommended Solutions |
|
Dishwasher does not run or stops during a cycle |
It is normal for certain cycles to repeatedly pause for several seconds during the main wash. Is the door closed tightly and latched? Is the right cycle selected? Is there power to the dishwasher? Has a household fuse blown, or has a circuit breaker tripped? Replace the fuse or reset the circuit breaker. If the problem continues, call an electrician. Has the motor stopped due to an overload? The motor automatically resets itself within a few minutes. If it does not restart, call for service. Is the water shutoff valve (if installed) turned on? |
|
The Clean light is flashing |
Check the following:
|
|
Dishes do not dry completely |
NOTE: Plastic and items with nonstick surfaces are difficult to dry because they have a porous surface which tends to collect water droplets. Towel drying may be necessary. Use of rinse aid along with Heat Dry option is needed for proper drying. Proper loading of items can affect drying. Glasses and cups with concave bottoms hold water. This water may spill onto other items when unloading.
|
|
Noise |
NOTES:
Be sure the filters are properly installed. A thumping sound may be heard if items extend beyond the racks and interfere with the wash arms. Readjust the dishware and resume the cycle |
|
Spotting/Filming |
NOTES:
Confirm that the cloudiness is removable by soaking the item in white vinegar for 5 minutes. If the cloudiness disappears, it is due to hard water. Adjust the amount of detergent. If it does not come clear, it is due to etching. Be sure the incoming water temperature is set at 120°F (49°C). To remove spotting, run a vinegar rinse through the dishwasher.
|
|
Dishwasher does not clean completely |
Be sure the dishwasher is loaded correctly. Improper loading can greatly decrease the washing performance. See the “Operating Your Dishwasher” section. Check the filter to ensure it is properly installed. Clean it if needed. See the “Dishwasher Care” section. Select the proper cycle for the type of soils. The Heavy Wash cycle can be used for tougher loads. Be sure the incoming water temperature is at least 120°F (49°C). Use the proper amount of fresh detergent. More detergent is needed for heavier-soiled loads and hard water conditions. Scrape food from dishes prior to loading (do not prerinse). If foam or suds are detected by the dishwasher sensing system, the dishwasher may not operate properly or may not fill with water. Suds can come from:
|
|
Dishwasher does not drain |
Be sure the cycle has been completed (the Clean light is on). If it has not, you will need to resume the cycle by closing the door and pressing Start/Resume. If dishwasher is connected to a food waste disposer, be sure the knockout plug has been removed from the disposer inlet. Check for kinks in the drain hose. Check for food obstructions in the drain or disposer. Check your house fuse or circuit breaker. |
