Congratulations on your purchase of a high-quality Sharp product. Your LC-32LB480U represents the state of the art in LED TV design and is designed for reliable and trouble-free performance.
CEC Control
Enjoy the benefit of having HDMI CEC compatible products plug and play! No setup is needed! CEC technology lets different components discover and communicate with each other. (See page 35 for instructions on how to use CEC Control.)
DTS TruSurround™
DTS TruSurround delivers clear, crisp, and natural sound while providing deep enveloping bass.
Game mode
Video games generally require adjustments to the television picture settings to get the maximum experience. By simply pressing a button on your remote control, your television settings will automatically adjust for video games. It couldn't be easier. (See the Game option in “Adjusting the TV picture” on page 40 for instruction on how to select Game mode.)
Installing the stands or wall-mount bracket
Notes
If you plan to wall-mount your TV, do not install the stands.
Store the stands and stand screws in case you decide to use the stands in the future.
Installing the stands
1. Carefully place your TV face-down on a cushioned, clean surface to protect the screen from damages and scratches.
2. Make sure that the arrows on the stands are pointing towards the front of the TV. Align the TV stands with the screw holes on the bottom of the TV, then secure the stands to the TV with the four provided screws.
Installing a wall-mount bracket
Warning
Your TV has four VESA mounting holes on the back. If you attach a wall-mount bracket to the back of your TV, the bracket must be securely attached, using all four holes. If you do not use all four mounting holes, your TV may fall and cause property damage or personal injury. See the documentation that came with your wall mount for complete mounting instructions.
This TV is intended to be supported by a UL Listed wall mount bracket with suitable weight/load. (See “Miscellaneous” on page 67.)
To prevent injury, this apparatus must be securely attached to the floor/wall in accordance with the installation instructions.
1. Carefully place your TV face-down on a cushioned, clean surface to protect the screen from damages and scratches.
2. If the TV stands are attached, remove the four screws that secure the stands to your TV.
Notes
• The length of the wall-mount screws vary depending on the wall-mount bracket you purchased. See the instructions that came with the wall-mount bracket for screw lengths.
• The mounting holes on the back of your TV take type M4 screws
TV components
Package contents
• 32" LED TV • Remote control and batteries (2 AAA) • TV stands (2) and screws (4) • Power cord • Quick Setup Guide • Important Information
Front
Side
Back
Remote control
Connecting a cable or satellite box
Many cable or satellite TV boxes have more than one connection type. To get the best video, you should use the best connection type available. For more information, see “What connection should I use?” on page 12.
HDMI (best)
Make sure that your TV’s power cord is unplugged and all connected equipment is turned off.
Connect the incoming cable from the cable wall jack to the cable-in jack on the cable or satellite box.
Connect an HDMI cable (not provided) to one of the HDMI jacks on the side of your TV and to the HDMI OUT jack on the cable or satellite box.
Plug your TV’s power cord into a power outlet, turn on your TV, then turn on the cable or satellite box.
Press INPUT to open the INPUT SOURCE list.
Press to highlight HDMI 1, HDMI 2, or HDMI 3, then press ENTER.
Note
An HDMI cable carries both audio and video. You do not need to use any audio cables.
AV (good)
Notes Cables are often color-coded to match color-coded jacks
Make sure that your TV’s power cord is unplugged and all connected equipment is turned off.
Connect the incoming cable from the cable wall jack to the cable-in jack on the cable or satellite box.
Connect an AV cable (not provided) to the VIDEO jack and L and R audio jacks on the back of your TV and to the AV and audio out jacks on the cable or satellite box.
Plug your TV’s power cord into a power outlet, turn on your TV, then turn on the cable or satellite box.
Press INPUT to open the INPUT SOURCE list.
Press to select AV, then press ENTER.
Coaxial (good)
Make sure that your TV’s power cord is unplugged and all connected equipment is turned off.
Connect the incoming cable from the cable wall jack to the cable-in jack on the cable or satellite box.
Connect a coaxial cable (not provided) to the ANT / CABLE IN jack on the back of your TV and to the coaxial out jack on the cable or satellite box.
Plug your TV’s power cord into a power outlet, turn on your TV, then turn on the cable or satellite box.
Press INPUT to open the INPUT SOURCE list.
Press to highlight TV, then press ENTER.
If you cannot tune to channels you know exist, scan for channels. See “Automatically scanning for channels” on page 45.
Notes
Use a coaxial cable to eliminate interference and noise from radio waves.
Do not bundle the coaxial cable with the power cord or other cables.
Connecting an antenna or cable TV (no box)
Make sure that your TV’s power cord is unplugged and all connected equipment is turned off.
Connect a coaxial cable (not provided) to the ANT / CABLE IN jack on the back of your TV and to the antenna or cable TV wall jack.
Plug your TV’s power cord into a power outlet, then turn on your TV.
Press INPUT to open the INPUT SOURCE list.
Press to highlight TV, then press ENTER.
If you cannot tune to channels you know exist, scan for channels. See “Automatically scanning for channels” on page 45.
Notes
Use a coaxial cable to eliminate interference and noise from radio waves.
Do not bundle the coaxial cable with the power cord or other cables.
If the antenna is not installed correctly, contact qualified service personnel to correct the problem.
If the signal level for a channel is weak, the picture may be distorted. Adjust the antenna or use a highly directional outdoor or set-top antenna with a built-in amplifier.
If the picture quality is good on some channels and poor on others, the problem may be caused by a poor or weak signal from the broadcaster or cable TV provider.
If you connect to cable or satellite TV without a set-top box and experience poor picture quality, you may need to install a set-top box to improve signal reception and picture quality. Contact your cable or satellite TV provider about upgrading to a set-top box.
Many high-definition (HD) channels upscale standard-definition (SD) content. The picture displayed on your TV is still displayed as SD, thus the picture quality will not be as clear or crisp as it would be if the content was originally recorded in HD.
Connecting a DVD or Blu-ray player
Many DVD or Blu-ray players have more than one connection type. To get the best video, you should use the best connection type available. For more information, see “What connection should I use?” on page 12.
HDMI (best)
Make sure that your TV’s power cord is unplugged and the DVD or Blu-ray player is turned off.
Connect an HDMI cable (not provided) to one of the HDMI jacks on the side of your TV and to the HDMI OUT jack on the DVD or Blu-ray player.
Plug your TV’s power cord into a power outlet, then turn on your TV and the DVD or Blu-ray player.
Press INPUT to open the INPUT SOURCE list.
Press to highlight HDMI 1, HDMI 2, or HDMI 3, then press ENTER.
Note
An HDMI cable carries both audio and video. You do not need to use any audio cables.
AV (good)
Notes Cables are often color-coded to match color-coded jacks.
Make sure that your TV’s power cord is unplugged and the DVD or Blu-ray player is turned off.
Connect an AV cable (not provided) to the VIDEO jack and L and R audio jacks on the back of your TV and to the AV OUT jacks on the DVD or Blu-ray player.
Plug your TV’s power cord into a power outlet, then turn on your TV and the DVD or Blu-ray player.
Press INPUT to open the INPUT SOURCE list.
Press to select AV, then press ENTER.
Connecting a game console
HDMI (best)
Make sure that your TV’s power cord is unplugged and the game console is turned off.
Connect an HDMI cable (not provided) to one of the HDMI jacks on the side of your TV and to the HDMI OUT jack on the game console.
Plug your TV’s power cord into a power outlet, then turn on your TV.
Turn on the game console, then set it to the correct output mode. For more information, see the documentation that came with the console.
Press INPUT to open the INPUT SOURCE list.
Press to highlight HDMI 1, HDMI 2, or HDMI 3, then press ENTER.
Note
An HDMI cable carries both audio and video. You do not need to use any audio cables.
AV (good)
Notes Cables are often color-coded to match color-coded jacks.
Make sure that your TV’s power cord is unplugged and the game console is turned off.
Connect the video and audio connectors on the game console’s AV cable (not provided) to the VIDEO jack and L and R audio jacks on the back of your TV and to the composite jack(s) on the game console.
Plug your TV’s power cord into a power outlet, then turn on your TV.
Turn on the game console, then set it to the correct output mode. For more information, see the documentation that came with the console.
Press INPUT to open the INPUT SOURCE list.
Press to select AV, then press ENTER.
Setting parental controls
Parental controls let you prevent your children from watching inappropriate material on TV. When set, parental controls read the rating of the program (with some exceptions, such as news and sports) and deny access to programs that exceed the ratings level you select. To watch programs that exceed the selected rating, you must enter a password.
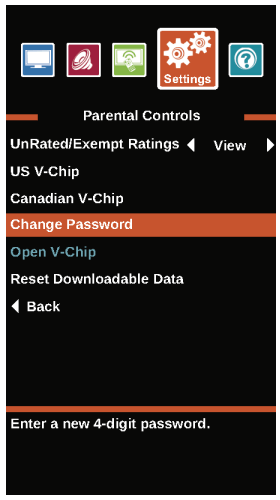
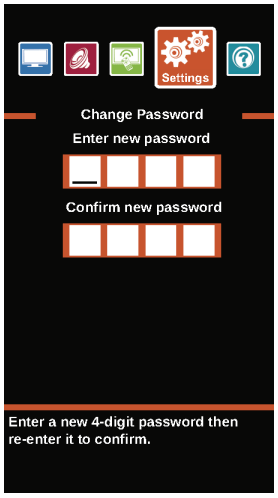
Setting or changing the password
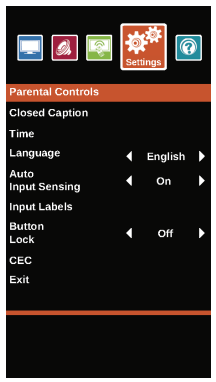
1 Press MENU.
2 Press to highlight Settings, then press ENTER.
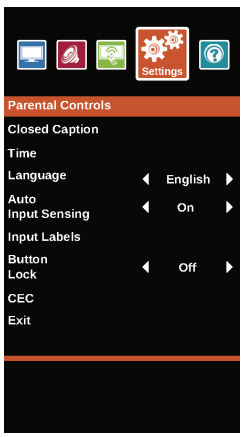
3 Press to highlight Parental Controls, then press ENTER.
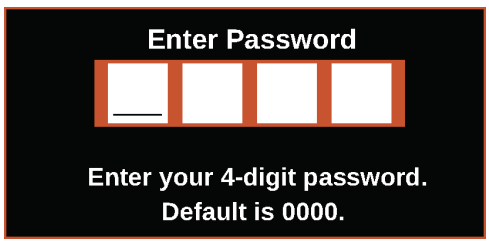
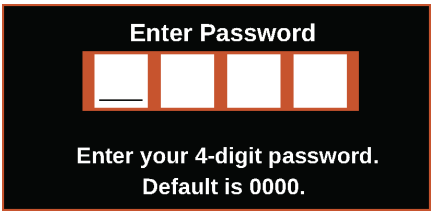
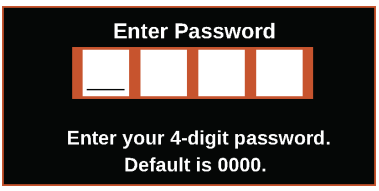
4 Press the number buttons to enter the four-digit password. The default password is 0000. You should change the password to a number you can remember.
5 Press to highlight Change Password, then press ENTER.
6 Press the number buttons to enter a password, then enter the password again. A message tells you that the password has been changed.
Note If you forget your password, enter 9999.
7 Press MENU to return to the previous menu, or press EXIT to close the menu.
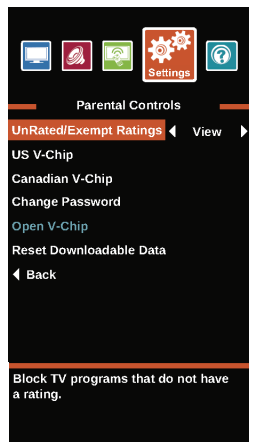
Blocking unrated TV
Some TV programs, such as news and sports shows are not rated. When you set UnRated/Exempt Ratings to Block, TV programs that do not have ratings are blocked. When you try to watch a blocked program, you are prompted to enter the parental controls password.
1 Press MENU.
2 Press to highlight Settings, then press ENTER
3 Press to highlight Parental Controls, then press ENTER.
4 Press the number buttons to enter the four-digit password.
5 Press to highlight UnRated/Exempt Ratings, then press ENTER or to access the option.
6 Press to select Block (to block unrated TV) or View (to unblock unrated TV).
7 Press MENU to return to the previous menu, or press EXIT to close the menu.
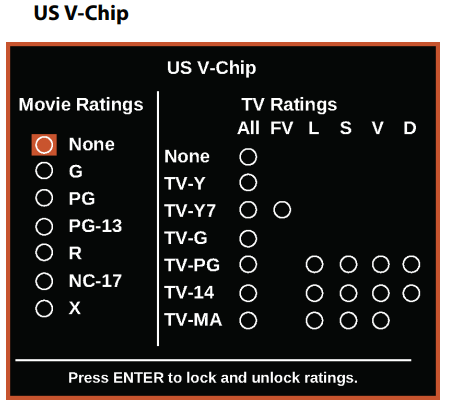
Setting parental control levels
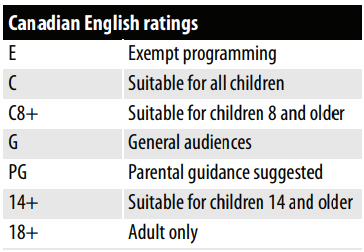
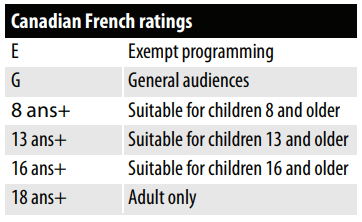
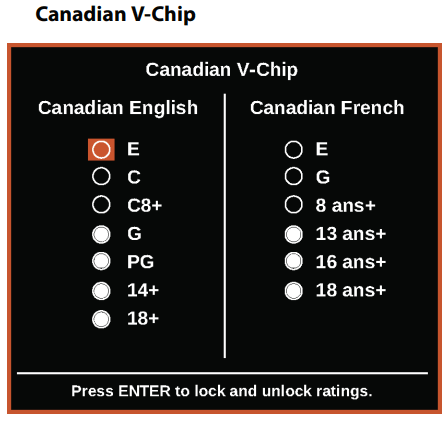
You can set parental controls for the U.S. and Canada.
U.S. rating levels
Canadian rating levels
1 Press MENU.
2 Press to highlight Settings, then press ENTER.
3 Press to highlight Parental Controls, then press ENTER.
4 Press the number buttons to enter the four-digit password.
5 Press to highlight US V-Chip, then press ENTER. (To set Canadian ratings, select Canadian V-Chip.)
6 Press to highlight:
• Movie Ratings or TV Ratings for USA ratings.
• Canadian English or Canadian French for Canadian ratings.
7 Press to select the rating. If a rating has sub-ratings, press to highlight a sub-rating.
Note When you block a rating, that rating and all higher ratings are blocked
8 Press ENTER to confirm. A filled circle appears when a rating is blocked. An empty circles appears when a rating is not blocked.
9 Press MENU to return to the previous menu, or press EXIT to close the menu.
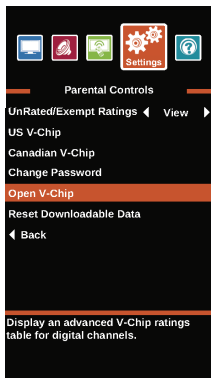
Downloading rating information
If the program you are viewing has downloadable rating information, you can download the information to use when setting parental controls
1 Press MENU.
2 Press to highlight Settings, then press ENTER.
3 Press to highlight Parental Controls, then press ENTER.
4 Press the number buttons to enter the four-digit password.
5 Press to highlight Open V-CHIP, then press ENTER. The screen that you see may vary depending on the broadcaster.
6 Press to select the program and content types you want to block, then press ENTER.
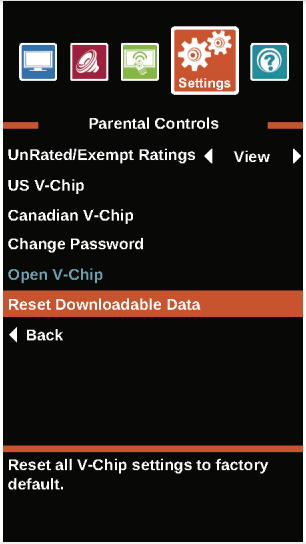
7 To reset the V-Chip information to the factory default, press to highlight Reset Downloadable Data, then press ENTER. A box opens.
8 Press to highlight OK or Cancel, then press ENTER.
9 Press MENU to return to the previous menu, or press EXIT to close the menu.
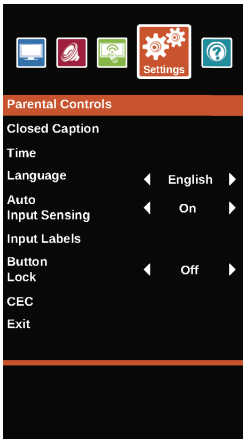
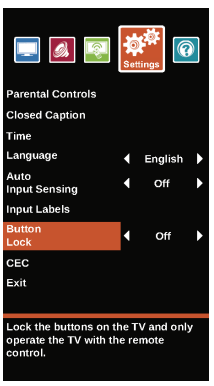
Locking the power button
When the button lock is turned On, the power button on the side of your TV is locked, and you can only operate your TV using the remote control.
1 Press MENU.
2 Press to highlight Settings, then press T or ENTER.
3 Press to highlight Button Lock, then press ENTER or to access the option.
4 Press to select On (locks the button) or Off (unlocks the button).
5 Press MENU to return to the previous menu, or press EXIT to close the menu.
Maintenance
Do not use your TV in areas that are too hot or too cold, because the cabinet may warp or the screen may malfunction. Your TV works best in temperatures that are comfortable to you.
Storage temperatures are 32° to 122°F (0° to 50°C).
Working temperatures are 41° to 104°F (5° to 40°C).
Do not place your TV in direct sunlight or near a heat source.
Cleaning the TV cabinet
Clean the cabinet with a soft, lint-free cloth. If the cabinet is especially dirty, moisten a soft, lint-free cloth in a weak detergent solution, squeeze the excess moisture from the cloth, then wipe the cabinet with the cloth. Use a clean cloth to dry the cabinet.
Cleaning the TV screen
Clean the screen with a soft, lint-free cloth.
Troubleshooting
Warning Do not try to repair your TV yourself. Contact authorized service personnel.
Viewing system information
You may need to view system information during troubleshooting.
1. Press MENU.
2. Press to highlight HELP, then press ENTER.
3. Press to highlight System Info, then press ENTER. Information about the TV software version is displayed.
4. If your TV uses open source software, press ENTER to view the Open Source Software Notice.
5. Press MENU to return to the previous menu, or press EXIT to close the menu.
Learning more
You can learn more about remote control codes and connecting a sound bar.
1. Press MENU.
2. Press to highlight HELP, then press ENTER.
3. Press to highlight Learn More, then press ENTER.
4. Press to highlight a topic, then press ENTER. Your TV displays information about the topic you selected.
5. Press MENU to return to the previous menu, or press EXIT to close the menu.
Updating the TV firmware
If your TV is behaving oddly and you have tried all the solutions in the troubleshooting pages, you may need to update the TV firmware.
Cautions
Make sure that you have tried all other solutions before you upgrade the firmware.
While the firmware is updating, do not turn off your TV.
Note
To update the TV firmware, you need a:
Computer with an available USB port
High-speed Internet connection
USB flash drive
On the Help menu, select System Info, then write down your model, revision, and firmware information. See “Viewing system information” on page 59.
Go to https://www.sharptvusa.com/support
Under Search by Model Number, enter LC-32LB480U, then press ENTER.
Click FIRMWARE. If available, the most current firmware version is listed.
Download the firmware update and copy it to a USB flash drive.
Plug the USB flash drive into the USB port on the side of your TV. A message asks if you want to update the firmware.
Highlight Yes, then press ENTER.
Follow the on-screen instructions to install the update. Do not turn off your TV until the update is complete.
When the update is complete, unplug the USB flash drive, then press ENTER. Your TV turns off then on to complete the update.
If the channel list has been deleted, you need to scan for channels. For more information, see “Automatically scanning for channels” on page 45.
Note
If you see a message that says the firmware file is incorrect, make sure that you have downloaded the correct file for your model.
If you see a message that says the update failed or the TV screen is blank and the power LED is blinking red then blue, turn off your TV, turn it back on, then run the upgrade again.
Restoring settings to the defaults
When you restore default settings, all the settings you have customized (except parental controls) are reset.
1. Press MENU.
2. Press to highlight HELP, then press ENTER.
3. Press to highlight Reset to Default. A message asks if you want to reset all TV settings to the default settings.
4. Press to select OK (to reset) or Cancel (to not reset), then press ENTER. If you select OK, your TV restarts and the Easy Setup wizard opens.
5. Go through the Easy Setup wizard. For more information, see “Turning on your TV for the first time” on page 30.
Video and audio
Problem
Solution
Picture does not fill the screen. There are black bars around the picture.
• Change the aspect ratio. An increasing amount of digital TV and movies are presented in wide screen (16:9). See the View Mode option in “Adjusting the TV picture” on page 40 .
No picture (screen is not lit) and no sound.
• Press on the TV or the remote control.
• Make sure that the Audio Only option is set to Off. See “Playing TV audio only” on page 44 .
• Make sure that the video cables are connected securely to your TV.
• Adjust the contrast and brightness. See “Adjusting the TV picture” on page 40 .
• Make sure that the power cord is plugged in.
• Make sure that the correct video input source is selected. See “Selecting the video input source” on page 32 .
• Try another channel. The station may be experiencing problems.
• Make sure that the incoming signal is compatible.
• Make sure that the antenna or cable TV is connected correctly and securely. See “Connecting a cable or satellite box” on page 13 or “Connecting an antenna or cable TV (no box)” on page 16 .
• Check the closed caption settings. Some TEXT modes can block the screen.
Dark, poor, or no picture (screen is lit), but sound is good.
• Try another channel. The station may be experiencing problems.
• Make sure that the antenna or cable TV is connected correctly and securely. See “Connecting a cable or satellite box” on page 13 or “Connecting an antenna or cable TV (no box)” on page 16 .
• Adjust the brightness. See “Adjusting the TV picture” on page 40 .
• Make sure that the correct picture mode is selected. See “Adjusting the TV picture” on page 40 .
• If you are using an antenna, the digital channel signal may be low. To check the digital channel signal strength, see “Checking the digital signal strength” on page 48 .
• If you are using an antenna and the signal strength is low, adjust the antenna or use a highly directional outdoor antenna or set-top antenna with a built-in amplifier.
• Make sure that the video cables are connected securely to your TV.
• The video cable(s) you are using may be bad. Try a new set.
• Try another channel. The station may be experiencing problems.
No color, dark picture, or color is not correct.
• Try another channel. The station may be experiencing problems.
• Adjust the color settings. See “Adjusting the TV picture” on page 40 .
• Make sure that the video cables are connected correctly and securely to your TV.
• Make sure that the antenna or cable TV is connected correctly and securely. See “Connecting a cable or satellite box” on page 13 or “Connecting an antenna or cable TV (no box)” on page 16 .
• If you are using an antenna, the digital channel signal may be low. To check the digital channel signal strength, see “Checking the digital signal strength” on page 48 .
• If you are using an antenna and the signal strength is low, adjust the antenna or use a highly directional outdoor antenna or set-top antenna with a built-in amplifier.
Only snow (noise) appears on the screen.
• Try another channel. The station may be experiencing problems.
• Make sure that the antenna or cable TV is connected correctly and securely. See “Connecting a cable or satellite box” on page 13 or “Connecting an antenna or cable TV (no box)” on page 16.
• If you are using an antenna, the digital channel signal may be low. To check the digital channel signal strength, see “Checking the digital signal strength” on page 48.
• If you are using an antenna and the signal strength is low, adjust the antenna or use a highly directional outdoor antenna or set-top antenna with a built-in amplifier.
Picture quality is good on some channels and poor on others. Sound is good.
• The problem may be caused by a poor or weak signal from the broadcaster or cable TV provider.
• If you connect to cable or satellite TV without a set-top box and experience poor picture quality, you may need to install a set-top box to improve signal reception and picture quality. Contact your cable or satellite TV provider about upgrading to a set-top box.
Dotted lines or stripes appear on the screen.
• Make sure that the antenna or cable TV is connected correctly and securely. See “Connecting a cable or satellite box” on page 13 or “Connecting an antenna or cable TV (no box)” on page 16.
• If you are using an antenna, the digital channel signal may be low. To check the digital channel signal strength, see “Checking the digital signal strength” on page 48.
• If you are using an antenna and the signal strength is low, adjust the antenna or use a highly directional outdoor antenna or set-top antenna with a built-in amplifier.
• Make sure that the video cables are connected securely to your TV.
• The video cable(s) you are using may be bad. Try a new set.
• Other devices (for example, a surround sound receiver, external speakers, fans, or hair dryers) may be interfering with your TV. Try turning off one device at a time to determine which device is causing interference. After you have determined which device is causing interference, move it further from the TV to eliminate the interference.
Double images.
• Use a highly directional outdoor antenna, cable TV, or satellite TV.
The picture has a few bright or dark spots.
• A few bright or dark spots on an LCD screen is normal. It does not affect the operation of your TV.
Good picture, but no sound.
• Increase the volume.
• Make sure that the sound is not muted.
• Make sure that you do not have headphones connected. When headphones are connected, no sound comes from the TV speakers.
• Make sure that the correct audio mode is selected.
• Make sure that the audio cables are connected correctly and securely to your TV.
• Make sure that the antenna or cable TV is connected correctly and securely. See “Connecting a cable or satellite box” on page 13 or “Connecting an antenna or cable TV (no box)” on page 16.
• If you are using an antenna, the digital channel signal may be low. To check the digital channel signal strength, see “Checking the digital signal strength” on page 48.
• The audio cable(s) you are using may be bad. Try a new set.
Poor picture.
• Make sure that the room is not too bright. Light reflecting off the screen can make the picture difficult to see.
• If an S-VHS camera or a camcorder is connected while another connected device is turned on, the picture may be poor. Turn off one or more devices.
Good sound, but poor color.
• Adjust the contrast, color, and brightness settings. See “Adjusting the TV picture” on page 40.
Audio noise.
• Other devices (for example, a surround sound receiver, external speakers, fans, or hair dryers) may be interfering with your TV. Try turning off one device at a time to determine which device is causing interference. After you have determined which device is causing interference, move it further from the TV to eliminate the interference.
No output from one of the speakers.
• Adjust the audio balance. See “Adjusting sound settings” on page 43.
• Make sure that the audio cables are connected correctly and securely to your TV.
After images appear.
• Do not display a still image, such as a logo, game, or computer image, for an extended period of time. This can cause a permanent after-image to be burned into the screen. This type of damage is not covered by your warranty
Remote control
Problem
Solution
Remote control does not work.
• Make sure that the power cord is correctly connected to your TV and a power outlet.
• Make sure that there are no obstructions between the remote control and the remote control sensor on the front of the TV.
• Point the remote control directly at the remote control sensor on your TV. For the location of the remote control sensor, see “Front” on page 8.
• The supplied batteries are wrapped tightly in clear plastic. Make sure that you have removed this plastic from the batteries.
• Make sure that the batteries are installed correctly. See “Installing remote control batteries” on page 28.
• Replace dead batteries with new batteries. See “Installing remote control batteries” on page 28.
General
Problem
Solution
No power.
• Make sure that the power cord is correctly connected to your TV and a power outlet.
• Unplug the power cord, wait 60 seconds, then plug the cord back in and turn on your TV.
• Other devices (for example, a surround sound receiver, external speakers, fans, or hair dryers) may be interfering with your TV. Try turning off one device at a time to determine which device is causing interference. After you have determined which device is causing interference, move it further from the TV to eliminate the interference.
“No signal” error message is displayed.
• Press INPUT and make sure that you have selected the correct input for the device or service you are trying to use.
• If you are using a cable or satellite box, make sure that it is plugged in and turned on.
• If you are using a cable or satellite box, use the remote that came with that box to change channels.
• Make sure that you have the correct input selected to view channels from the cable or satellite box.
After Auto Channel Search, there are no channels.
• Reception can vary by channel depending on the broadcast power level of a given station. Contact your cable or satellite TV provider.
• Make sure that the antenna or cable/satellite TV is connected securely to your TV.
• Try replacing the cable between the antenna/cable or cable/satellite box and your TV.
One or more channels do not display
• Make sure that the channels are not blocked. See “Setting parental control levels” on page 50.
• Make sure that the channels are not hidden. The channel may have been deleted from the channel list. You can tune to the channel by pressing the number buttons or you can add the channel back to the channel list. See “Hiding channels” on page 46.
• If you are using a cable or satellite box, use the remote that came with that box to change channels.
• Make sure that you have the correct input selected to view channels from the cable or satellite box.
• If you are using an antenna, the digital channel signal may be low. To check the digital channel signal strength, see “Checking the digital signal strength” on page 48.
Password is lost
. • Enter 9999 to access parental controls, then set a new password. See “Setting or changing the password” on page 49.
Some settings cannot be accessed.
• If a setting is grayed, the setting is not available in the current video input mode.
TV cabinet creaks.
• When the TV is in use, the temperature rises naturally and may cause the cabinet to expand or contract which can cause a creaking noise. This is not a malfunction.
Control buttons do not work.
• Make sure that the Button Lock option is set to Off. See “Locking the power button” on page 53.
• Unplug the power cord, wait a few seconds, then plug the cord back in and turn on your TV.
TV keeps turning off.
• Make sure that the sleep timer is not turned on. See “Setting the sleep timer” on page 57.
A retail banner is displayed.
• You selected “Store” mode when you ran the EASY SETUP wizard. Reset your TV to the factory defaults, then select Home on the What is your viewing environment screen. See “Restoring settings to the defaults” on page 60.
CEC-compatible device
Problem
Solution
My TV is not displaying the video from the connected CEC device.
• Make sure that the HDMI cable is connected securely to your TV and the device.
• Make sure that the device is connected to your TV with an HDMI cable.
• Make sure that the device is a CEC-compatible device. See the documentation that came with the device for more information.
• Make sure that the correct video input source is selected. See “Selecting the video input source” on page 32.
• Make sure that the CEC Control feature is turned on. See “Turning CEC Control on or off” on page 35.
• Try adjusting the TV picture. See “Adjusting the TV picture” on page 40.
• If the device is not a Sharp device, it may not be compatible with your TV.
My TV is not playing the audio from the connected CEC device.
• Make sure that the HDMI cable is connected securely to your TV and the device.
• Make sure that the device is connected to your TV with an HDMI cable.
• Make sure that the device is a CEC-compatible device. See the documentation that came with the device.
• Make sure that the TV volume is turned up and not muted.
• Try adjusting the TV sound. See “Adjusting sound settings” on page 43.
• Make sure that the TV speakers are turned on and not muted. See “Adjusting sound settings” on page 43.
• Make sure that the CEC control feature is turned on. See “Turning CEC Control on or off” on page 35.
• If you have connected an HDMI CEC audio receiver, adjust the volume on the receiver. When your TV detects an audio receiver, the TV speakers turn off and sound plays through receiver speakers only.
My TV’s remote control does not control the device.
• Make sure that there are no obstructions between the remote control and the remote control sensors on your TV and the device.
• If the device is not a Sharp device, all the buttons may not work.
• Make sure that the CEC Control feature is turned on. See “Turning CEC Control on or off” on page 35.
• If you are trying to control the volume on an HDMI CEC audio receiver using your TV remote control, make sure that the Audio Return Channel option on the CEC menu is set to On. See “Turning Audio Return Channel on or off” on page 36.
• The device may not support this feature. See the documentation that came with the device for more information.
The device does not show up in the CEC Device list.
• Make sure that the device is turned on
. • Make sure that the HDMI cable is connected securely to your TV and the device.
• Make sure that the device is connected to your TV with an HDMI cable.
• Make sure that the CEC Control feature is turned on. See “Turning CEC Control on or off” on page 35.
• Make sure that the device is a CEC-compatible device. See the documentation that came with the device.
• If the device is not a Sharp device, it may not be compatible with your TV.
My device does not turn off when I turn off my TV.
• Make sure that the CEC Control feature is turned on. See “Turning CEC Control on or off” on page 35.
• Make sure that Device Auto Power Off is set to On on the CEC menu. See “Turning Device Auto Power Off on or off” on page 35.
• The device may not support this feature. See the documentation that came with the device for more information.
My TV does not turn on when I turn on my device.
• Make sure that the CEC Control feature is turned on. See “Turning CEC Control on or off” on page 35.
• Make sure that TV Auto Power On is set to On on the CEC menu. See “Turning TV Auto Power On on or off” on page 36.
• The device may not support this feature. See the documentation that came with the device for more information.
The Audio Return Channel setting on the CEC menu keeps turning back on after it is turned off.
• When Audio Return Channel is set to Off and CEC Control is set to On and you adjust the volume on the audio receiver, Audio Return Channel is automatically set to On. To prevent this from happening, turn off the CEC Control feature. See “Turning CEC Control on or off” on page 35.
I cannot select the Root Menu option on the CEC menu. OR The device’s root menu does not open when I select Root Menu on the CEC menu.
• The device may not support this feature. See the documentation that came with the device for more information.
Note If the problem is not solved by using these troubleshooting instructions, turn off your TV, then turn it on again.

-557633.png)
-118129.png)
-599869.png)
-388148.png)
-755848.png)
-87777.png)
-61841.png)
-396476.png)
-868231.png)
-327817.png)
-850446.png)
-986090.png)
-401437.png)
-205273.png)
-874593.png)
-82714.png)
-856306.png)
-137119.png) to highlight HDMI 1, HDMI 2, or HDMI 3, then press ENTER.
to highlight HDMI 1, HDMI 2, or HDMI 3, then press ENTER.-64258.png)
-551040.png)
-807661.png)
-62600.png)
-47803.png)
-691029.png)
-409627.png)
 to highlight Settings, then press ENTER.
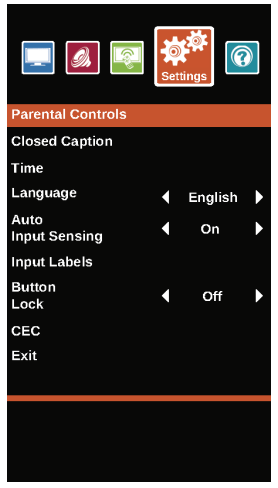

 to access the option.
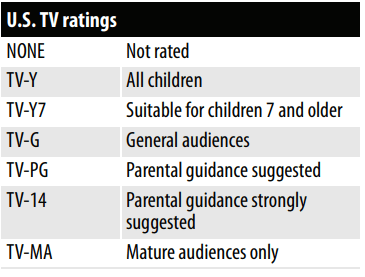


-745300.png) to highlight HELP, then press ENTER.
to highlight HELP, then press ENTER.-114432.png)
-588355.png)
-721252.png)
-41929.png)
-257606.png) on the TV or the remote control.
on the TV or the remote control.