You have several options for connecting your TV to different devices. The method in which you connect will be based upon the type of cables you have and the available outputs on your device.
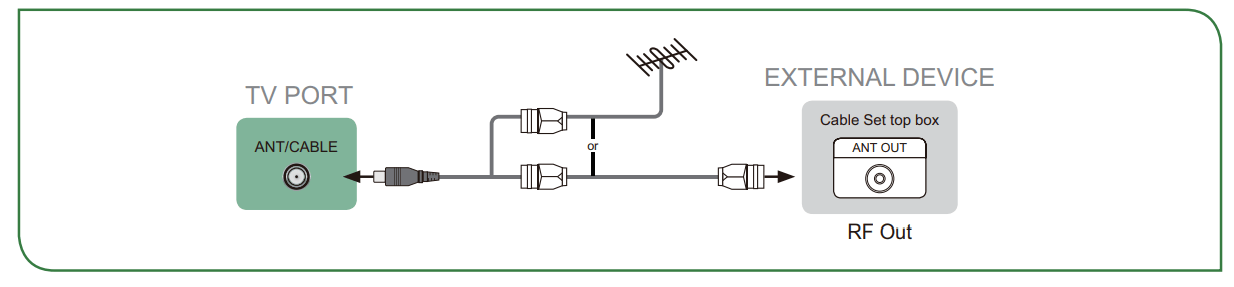
Connecting an antenna, cable set-top box or satellite receiver
To connect an antenna,cable set-top box or satellite receiver:
1. Connect one end of a coaxial cable (not included) to the RF OUT port on the antenna, cable or satellite box. If you are using an antenna with twin-lead cable, you may need a 300-75 Ohm adapter (not provided) to connect it to the back of your TV. Likewise, if you are using several antennas, you may need a combiner (not provided).
2. Connect the other end of the cable to the ANT/CABLE port on the side of TV.
3. Using your remote, press the [INPUT] button and select ANT/CABLE as the input source
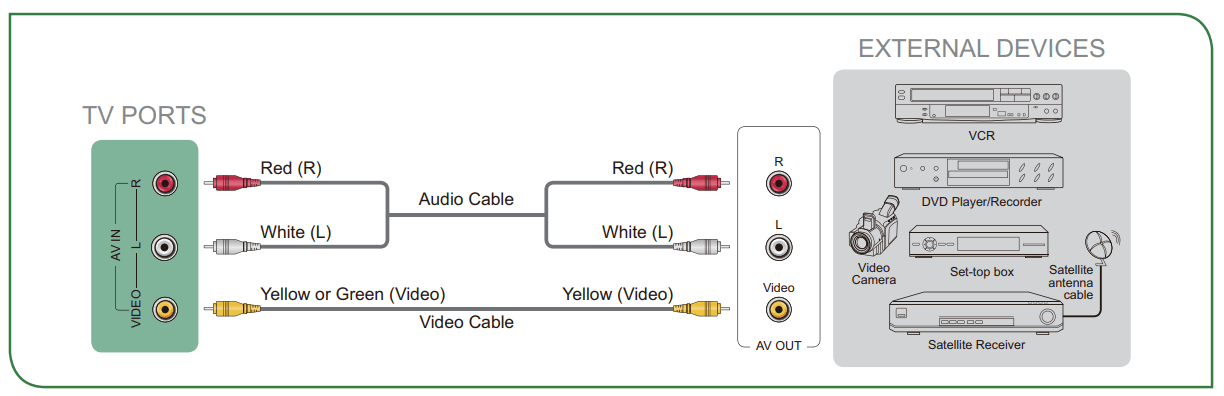
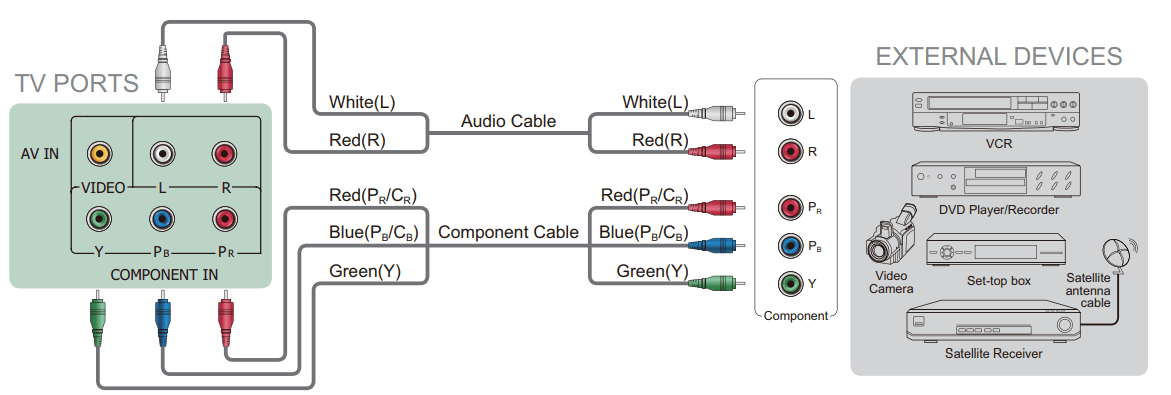
Connecting a satellite receiver, DVD player or other audio visual (AV) device with a composite video cable (yellow/red/white)
To connect an AV device with a composite video cable (not provided):
1. Use the audio and video cables to connect the composite video/audio ports of the external AV device to the AV IN ports of the TV. (Video = yellow, Audio Left = white, and Audio Right = red)
2. Plug the connected devices into the AV connectors on the TV before switching it on.
3. Using your remote, press the [INPUT] button and select AV as the input source.
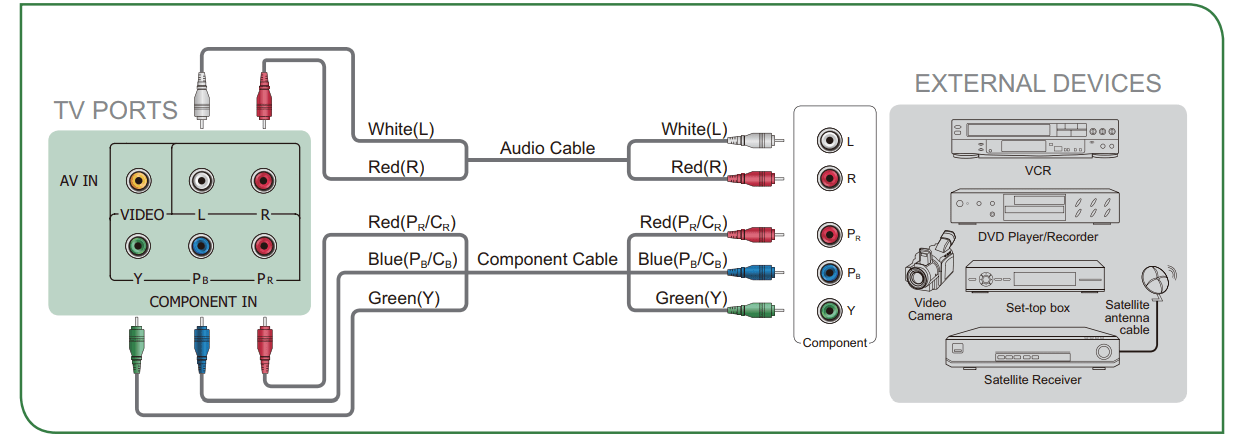
Connecting an AV device with a component video cable (red/blue/green)
To connect an AV device with a component cable (not provided):
1. Use a component video cable to connect the component output ports of the external device to the YPBPR ports for the TV. (Y = green, PB = blue, and PR = red). Use an audio cable to connect the component audio ports of the external device to the TV AUDIO (L/R) ports.
2. Plug the connected devices into the YPBPR and L/R ports on the TV before switching it on.
3. Using your remote, press the [INPUT] button and select COMPONENT as the input source.
NOTE:
• One AV device can be connected to the TV using a component video or composite video cable.(Only available for some models)
• YPBPR ports vary by model.
• Images throughout this document are for illustrative purposes only and may differ from the actual product.
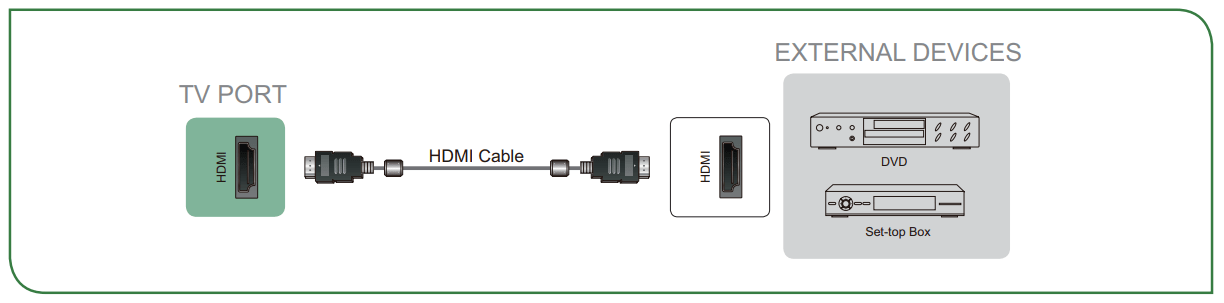
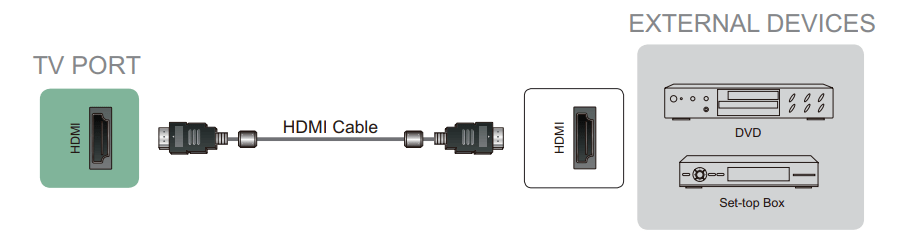
Connecting an AV device with an HDMI cable
This 4K TV has three high-powered HDMI version 2.0 inputs that enable you to connect 4K Ultra-HD external devices. For example,if you have an X-box or Blu-ray player that supports the 2.0 standard,more details will be transmitted to the TV screen to maximize your entertainment experience. Please refer to the User Manual that came with your device for step-by-step instructions. To connect an AV device with an HDMI cable (not provided):
1. Use an HDMI cable to connect the HDMI output port of the AV device to the HDMI port of the TV.
2. Plug the connected devices into the HDMI port on the TV before switching it on.
3. Using your remote, press the [INPUT] button and select the corresponding HDMI input.
NOTE:
• Because the HDMI connector provides video and audio signals, it is not necessary to connect an audio cable.
• We strongly recommend to use HDMI Cable with 2 cores as shown in the figure.
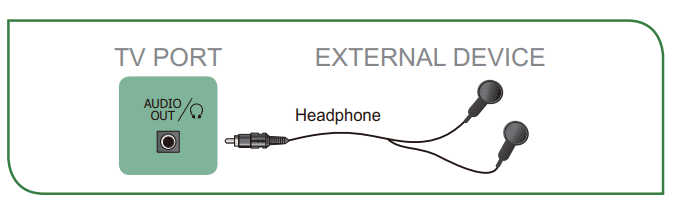
Connecting a headphone
You can connect headphone (not provided) to the AUDIO OUT port on your TV. While the headphone is connected, the sound from the built-in speakers will be disabled.
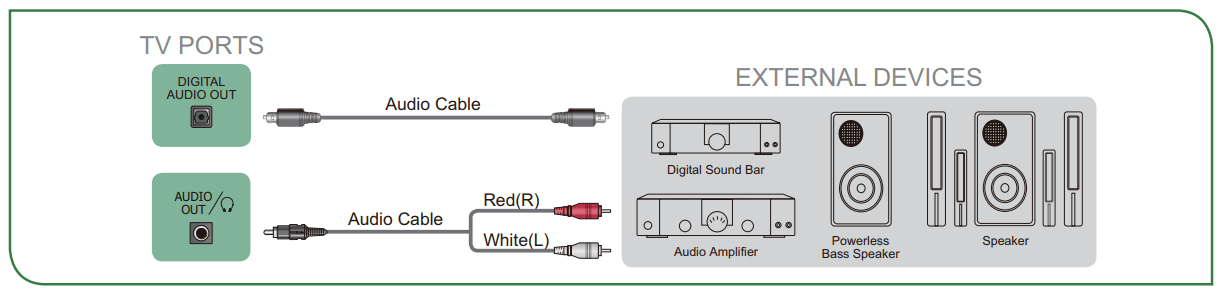
Connecting speakers or other audio receivers
To connect speakers or other audio receivers with an audio cable (not provided):
1. Use an audio cable to connect the digital audio in port of the audio receiver device to the DIGITAL AUDIO OUT port of the TV. Another option is to use an RCA Y-cable (1/8”-stereo mini to L/R phono) to connect an analog sound system to the AUDIO OUT port of the TV.
2. Plug the connected devices into the main power socket before switching on the TV.
• TIP: If you prefer to use Audio Return Channel, then see Connecting a digital sound bar to use Audio Return Channel (ARC)
NOTE:
• When a digital audio system is connected to the DIGITAL AUDIO OUT port, decrease the TV and system volume.
• 5.1 CH (channel) audio is available when the TV is connected to an external device that supports a 5.1 channel surround sound.
• You can receive 5.1 channel audio in one of two ways. The first way is to connect the DIGITAL AUDIO OUT port from the device to the Amplifier. The second way is to connect the DIGITAL AUDIO OUT port on the back of the TV to the Optical port on the Amplifier. After you’ve completed one of the two methods then be sure to go into the Advanced Audio Settings of the TV and select RAW to receive the 5.1 channel audio. You will need to also go into the sound or audio settings of your device to ensure it is set to 5.1 Channel output. It may read ‘Bitstream’, ‘RAW’ or ‘Digital’.
Connecting a digital sound bar to use Audio Return Channel (ARC)
If you’d like to use the Audio Return Channel (ARC) feature to have sound sent from the TV back down an HDMI cable to a digital sound bar, then you will need to connect the cable to the HDMI / ARC port. By using this feature, you will also be able to control the sound bar with your TV remote instead of having to use multiple remotes for each device.
To connect a digital sound bar with an HDMI cable (not provided):
1. Connect the cable that’s attached to the sound bar to the HDMI / ARC port on the TV.
2. Turn on the sound bar by pressing the Power button.
3. Press the [ ] button on your remote and press the [ ˅ ] button of your remote to select Settings and then press OK to enter the Settings menu, go to System > HDMI-CEC. 4. Turn on the HDMI-CEC setting
NOTE:
• Only digital sound bars that require a wired connection are compatible with the TV.
• If the device has an Input Selector feature then make sure to change it to TV.
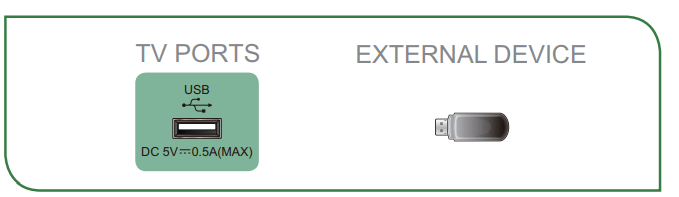
Connecting a USB device
You can connect the USB devices such as hard drives, USB sticks and digital cameras for browsing photos, listening music and watching recorded movies
1. Connect a USB device into the USB port.
2. Select the Media type on the Media screen or Home screen. For more information, see Media
NOTE:
• When connecting a hard disk or a USB hub, always connect the mains adapter of the connected device to the power supply. Exceeding a total current consumption may result in damage. The USB1.1 and USB2.0 devices maximum current consumption are 500mA. The USB3.0 device maximum current consumption is 1A.
• For individual non-standard high-capacity mobile hard disk, if it’s impulse current is greater than or equal 1A, it may cause TV-rebooting or self-locking. So the TV does not support it.
• The USB port supports a voltage of 5V.
Connecting Your TV to a Wireless or Wired Network
You have the option to connect your TV to a wireless or wired network to access the Internet. For more information about the network settings on TV
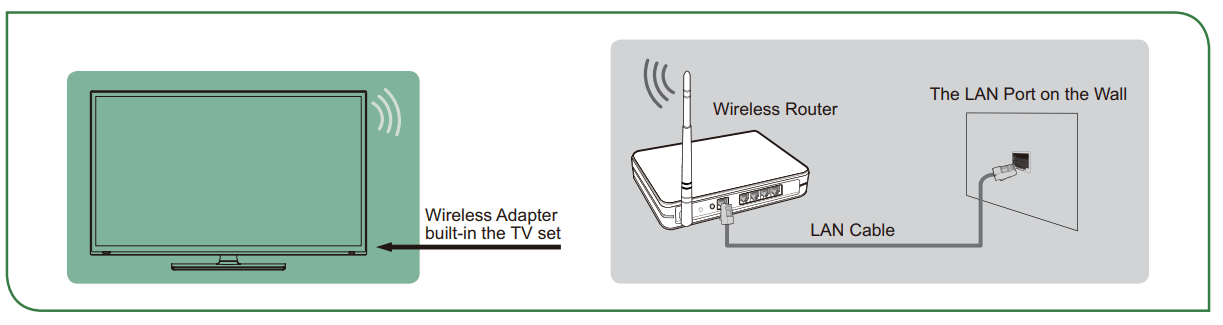
Connecting to a wireless network
Our built-in wireless LAN adapter supports the IEEE 802.11 ac/b/g/n communication protocols and we recommend that you use an IEEE 802.11n or IEEE 802.11ac router. When you play a video over an IEEE 802.11 b/g connection, the video may not play smoothly.
NOTE:
• You must use the built-in Wireless LAN Adapter to use a wireless network because the set does not support an external USB network adapter.
• To use a wireless network, your TV must be connected to a wireless IP sharer. If the wireless IP sharer supports Dynamic Host Configuration Protocol (DHCP), your TV can use a DHCP or static IP address to connect to the wireless network.
• Select a channel for the wireless IP sharer that is not currently being used. If the channel set for the wireless IP sharer is currently being used by another device nearby, this will result in interference and communication failure.
• If you apply a security system other than the systems listed below, it will not work with the TV.
• If Pure High-throughput (Greenfield) 802.11N mode is selected and the Encryption type is set to WEP, TKIP or TKIP-AES (WPS2 Mixed) for your Access Point (AP), then the TV will not support a connection in compliance with these Wi-Fi certification specifications.
• If your access point (AP) supports Wi-Fi Protected Setup (WPS), you can connect to the network via Push Button Configuration (PBC) or PIN (Personal Identification Number). WPS will automatically configure the SSID and WPA key in either mode.
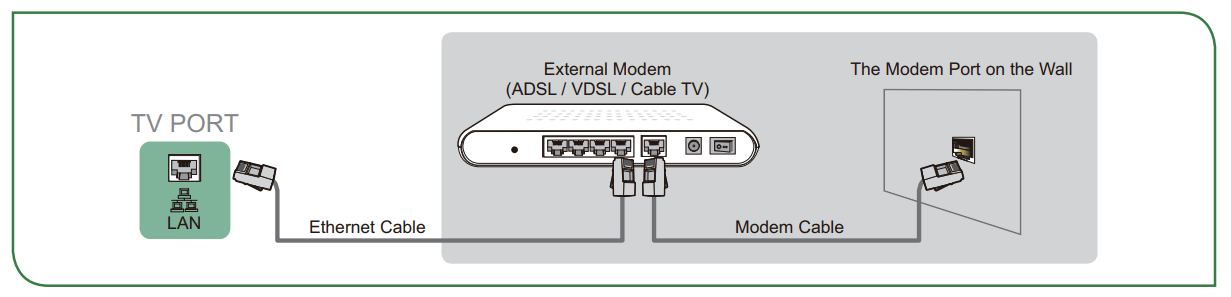
Connecting to a wired (Ethernet) network
You can attach your TV to your LAN in one of the three following ways:
Option 1
You can attach your TV to your LAN by connecting the LAN port on the back of your TV to an external modem using a Cat 5 LAN cable. See the illustration below.
Option 2
You can attach your TV to your LAN by connecting the LAN port on the back of your TV to an IP Sharer which is connected to an external modem. Use an Ethernet cable for the connection. See the illustration below
Option 3
Depending on how your network is configured, you may be able to attach your TV to your LAN by connecting the LAN port on the back of your TV directly to a network wall outlet with an Ethernet cable. See the diagram below.
If you have a Dynamic Network, you should use an ADSL modem or router that supports Dynamic Host Configuration Protocol (DHCP). Modems and routers that support DHCP automatically provide the IP address, subnet mask, gateway, and DNS, so you don’t have to enter them manually. Most home networks are Dynamic Networks.
Some networks require a Static IP address. If your network requires a Static IP address, you must enter the IP address, subnet mask, gateway, and DNS values manually on your TV’s Cable Setup Screen when you set up the network connection. To get the IP address, subnet mask, gateway and DNS values, contact your Internet Service Provider (ISP)
NOTE:
• You can use ADSL modems that support DHCP if your network requires a static IP address. ADSL modems that support DHCP also let you use static IP addresses.
Completing the First-Time Setup Menu
Press the [ ]] button on the remote to turn on the TV.
After the splash screen that displays the logo appears, begin the first-time setup menu
Screen
Task
Language and Location
Using the D-pad arrows of your remote, choose your Language, Region and Time Zone
End User License Agreement
Choose Decline or Agree. If you choose Agree, then select Continue icon and press [OK].
Usage Mode
Select Home Mode(which appears by default).
NOTE:
• Store Mode and Store Mode(Video Demo Only) should only be selected by Retailers who plan to demonstrate the TV.
Network Connection
If your TV does not automatically detect an Ethernet connection, then use a wireless network. Select your network from the list that displays, input the password. Also you can add a hidden network.
Product Registration
Register to stay up-to-date with news and updates about your TV.
Last step of TV setup
You are at the last step of TV setup. If you have not connected network, you can select ‘Set up network’ or ‘Use without network’. If you have connected network,Congratulations! You have completed TV setup. Start to use.
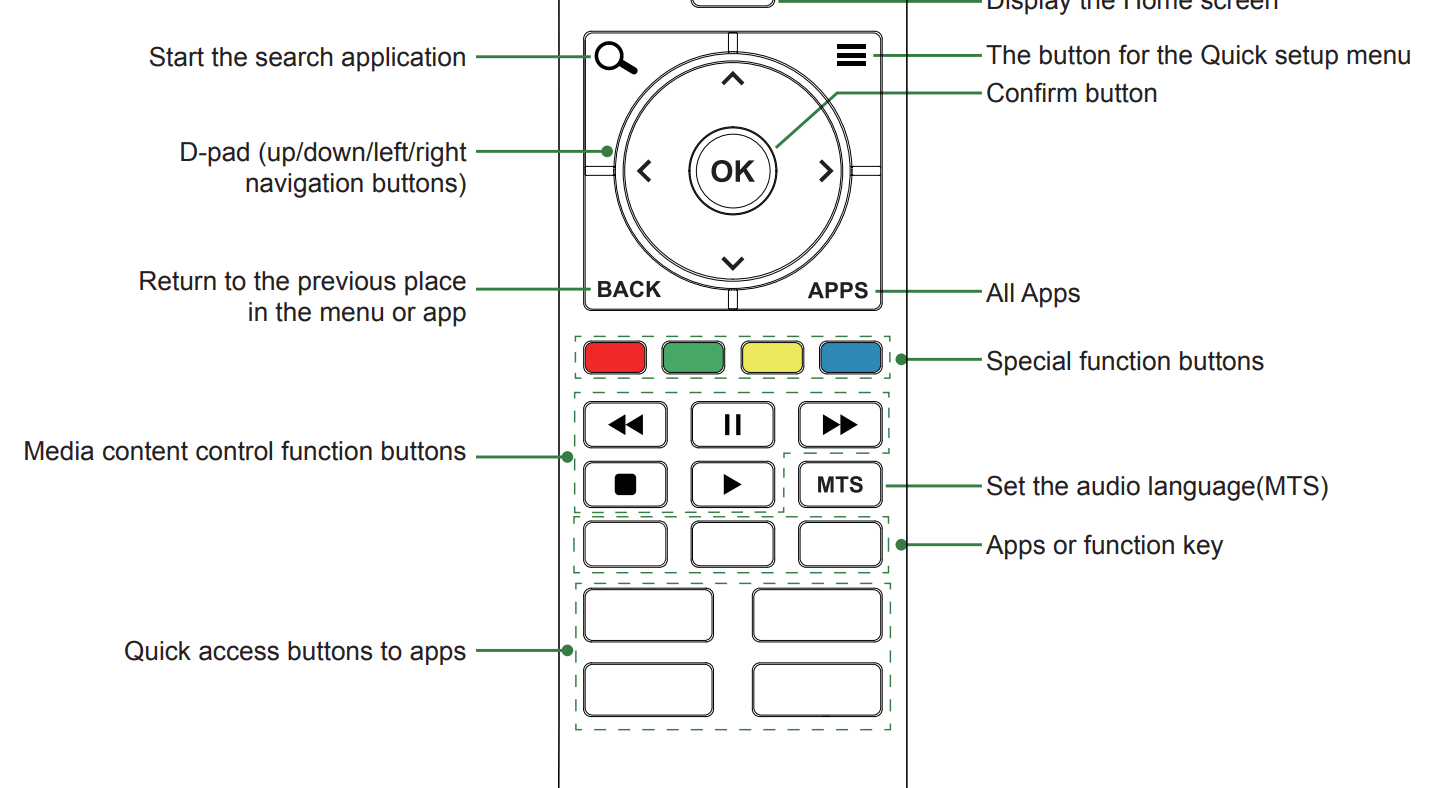
Using Your TV Remote Control
NOTE
Check information according to the actual remote control in the accessory bag.
Remote control range information
The remote control can work at a distance of up to 26 feet in front of the TV set.
It can work at a 30 degree horizontal or vertical angle.
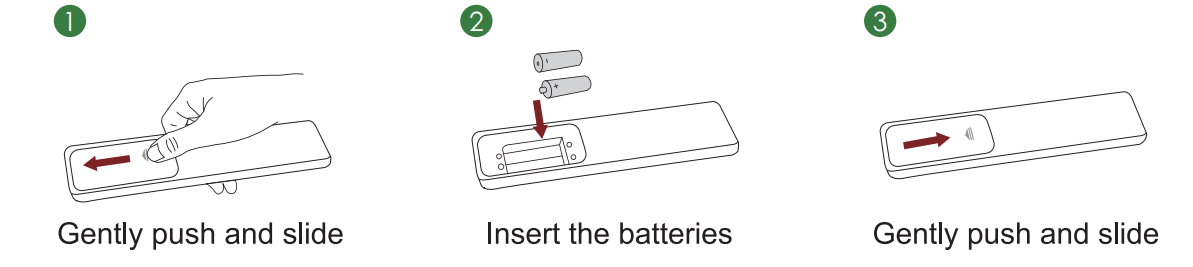
Begin using your remote
Slide the back cover to open the battery compartment of the remote control
2. Insert two AAA size batteries. Make sure to match the (+) and (-) ends of the batteries with the (+) and (-) ends indicated in the battery compartment.
3. Replace the battery compartment cover.
NOTES
Discard batteries in a designated disposal area. Do not throw them into a fire.
Remove old batteries immediately to prevent them from leaking into the battery compartment.
If you do not intend to use the remote control for a long time, remove the batteries.
Battery chemicals can cause a rash. If the batteries leak, clean the battery compartment with a cloth. If chemicals touch your skin then wash it immediately.
Do not mix old and new batteries.
Do not mix alkaline, standard (carbon-zinc) or rechargeable (NiCd, NiMH, etc.) batteries.
Do not continue using the remote if it gets warm or hot.
Call our Support Center immediately on the support website
Program your universal cable or satellite remote control to operate your new television (only for USA)
if you would like to program your other household remote controls to your new television,please refer to the User’s Manual supplied by your Cable or Satellite provider. The Cable or Satellite providers’ User’s Manuals should include instructions on how to program their remote to your television.
A list of codes for the most common Cable and Satellite providers are listed below. Use the code that is associated with your Cable or Satellite provider (if applicable).
If the code associated with your Cable or Satellite provider is not listed, does not work or you cannot locate the instructions to program your remote, call your local Cable or Satellite provider’s customer service center. If your Cable or Satellite provider does not have a code available, please contact us.
Using your cable set-top box or satellite receiver remote as a ‘universal’ remote
If you prefer to use your Cable Set-top Box or Satellite Receiver Remote as a ‘Universal Remote’, then visit the Support page to view a list of the codes.
Connecting Devices to your TV
You have several options for connecting your TV to different devices. The method in which you connect will be based upon the type of cables you have and the available outputs on your device.
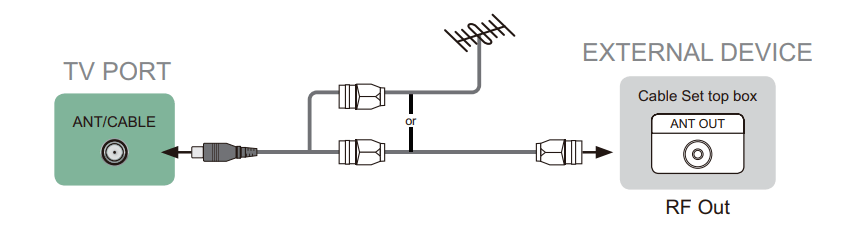
Connecting an antenna, cable set-top box or satellite receiver
To connect an antenna,cable set-top box or satellite receiver:
Connect one end of a coaxial cable (not included) to the RF OUT port on the antenna, cable or satellite box. If you are using an antenna with twin-lead cable, you may need a 300-75 Ohm adapter (not provided) to connect it to the back of your TV. Likewise, if you are using several antennas, you may need a combiner (not provided).
Connect the other end of the cable to the ANT/CABLE port on the side of TV.
Using your remote, press the [INPUT] button and select ANT/CABLE as the input source.
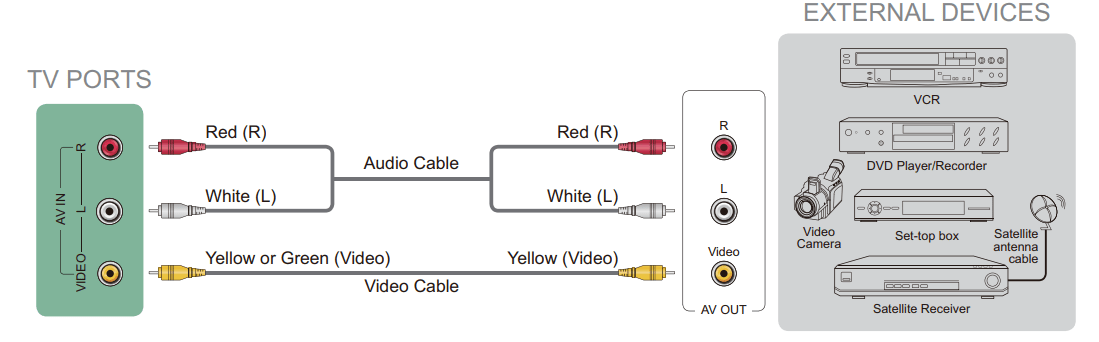
Connecting a satellite receiver, DVD player or other audio visual (AV) device with a composite video cable (yellow/red/white)
To connect an AV device with a composite video cable (not provided):
Use the audio and video cables to connect the composite video/audio ports of the external AV device to the AV IN ports of the TV. (Video = yellow, Audio Left = white, and Audio Right = red)
Plug the connected devices into the AV connectors on the TV before switching it on.
Using your remote, press the [INPUT] button and select AV as the input source.
Connecting an AV device with a component video cable (red/blue/green)
To connect an AV device with a component cable (not provided):
Use a component video cable to connect the component output ports of the external device to the YPBPR ports for the TV. (Y = green, PB = blue, and PR = red). Use an audio cable to connect the component audio ports of the external device to the TV AUDIO (L/R) ports.
Plug the connected devices into the YPBPR and L/R ports on the TV before switching it on.
Using your remote, press the [INPUT] button and select COMPONENT as the input source.
NOTE
One AV device can be connected to the TV using a component video or composite video cable.(Only available for some models)
YPBPR ports vary by model.
Images throughout this document are for illustrative purposes only and may differ from the actual product.
Connecting an AV device with an HDMI cable
This 4K TV has three high-powered HDMI version 2.0 inputs that enable you to connect 4K Ultra-HD external devices. For example,if you have an X-box or Blu-ray player that supports the 2.0 standard,more details will be transmitted to the TV screen to maximize your entertainment experience.
Please refer to the User Manual that came with your device for step-by-step instructions.
To connect an AV device with an HDMI cable (not provided):
. Use an HDMI cable to connect the HDMI output port of the AV device to the HDMI port of the TV.
Plug the connected devices into the HDMI port on the TV before switching it on.
Using your remote, press the [INPUT] button and select the corresponding HDMI input.
Quick Problem-Solving Tips
ISSUES
POSSIBLE SOLUTIONS
No sound or picture
Check if the power cord is plugged into a powered AC outlet.
Press the [ ] button on the remote control to activate the unit from ‘Standby’ mode.
Check to see if the LED light is on or not. If it is, then the TV is receiving power.
I have connected an external source to my TV and I get no picture and/or sound
Check for the correct output connection on the external source and for the correct input connection on the TV.
Make sure you have made the correct selection for the input mode for the incoming signal.
When I turn on my TV, there is a delay for a few seconds before the picture appears. Is this normal?
Yes, this is normal. The TV is initializing and searching for previous setting information.
The picture is normal but there is no sound
Check the volume settings.
Check if ‘Mute’ mode is set to On.
Sound but no picture or black and white picture
If the picture is black and white, unplug the TV from the AC outlet and replug it after 60 seconds.
Check that the Color is set to 50 or higher.
Try different TV channels.
The sound and/or picture is distorted or appears wavy
An electric appliance may be affecting the TV. Turn off any appliances that are nearby and move it farther away from the TV.
Insert the power plug of the TV set into another power outlet
The sound and picture is blurry or cuts out
If using an external antenna, check the direction, position and connection of the antenna.
Adjust the direction of your antenna or reset or fine tune the channel.
A horizontal or vertical stripe appears on the picture and/or the picture is shaking
Check if there is an appliance or electric tool nearby that is causing interference.
The plastic cabinet makes a “clicking” type of sound
The ‘click’ sound can occur when the temperature of the television changes. This change causes the television cabinet to expand or contract, which makes the sound. This is normal and the TV is OK.
The remote control does not work
Confirm that TV still has power and is operational.
Change the batteries in the remote control.
Check if the batteries are correctly installed.
NOTE
For usage in Mexico , operation of this equipment is subject to the following two conditions : 1 ) it is possible that this device doesn’t cause any detrimental interference and 2 ) this device must take any kind of interference, including that which may cause its malfunctioning.
 ] button on your remote and press the [ ˅ ] button of your remote to select Settings and then press OK to enter the Settings menu, go to System > HDMI-CEC. 4. Turn on the HDMI-CEC setting
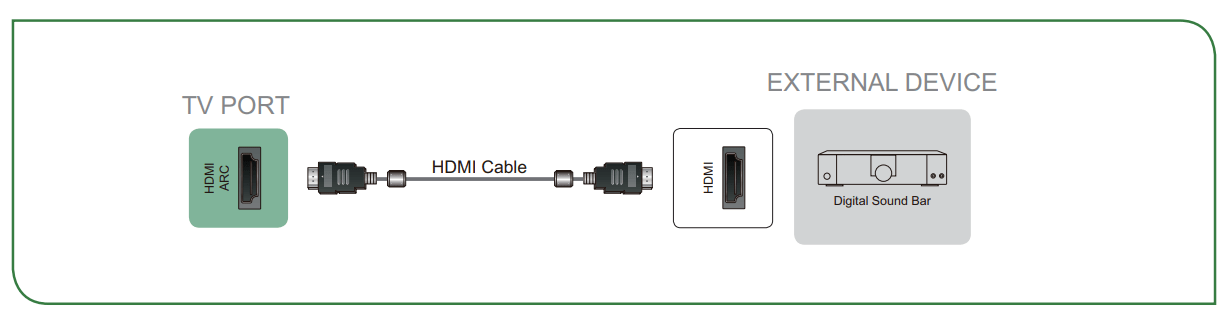


 ]] button on the remote to turn on the TV.
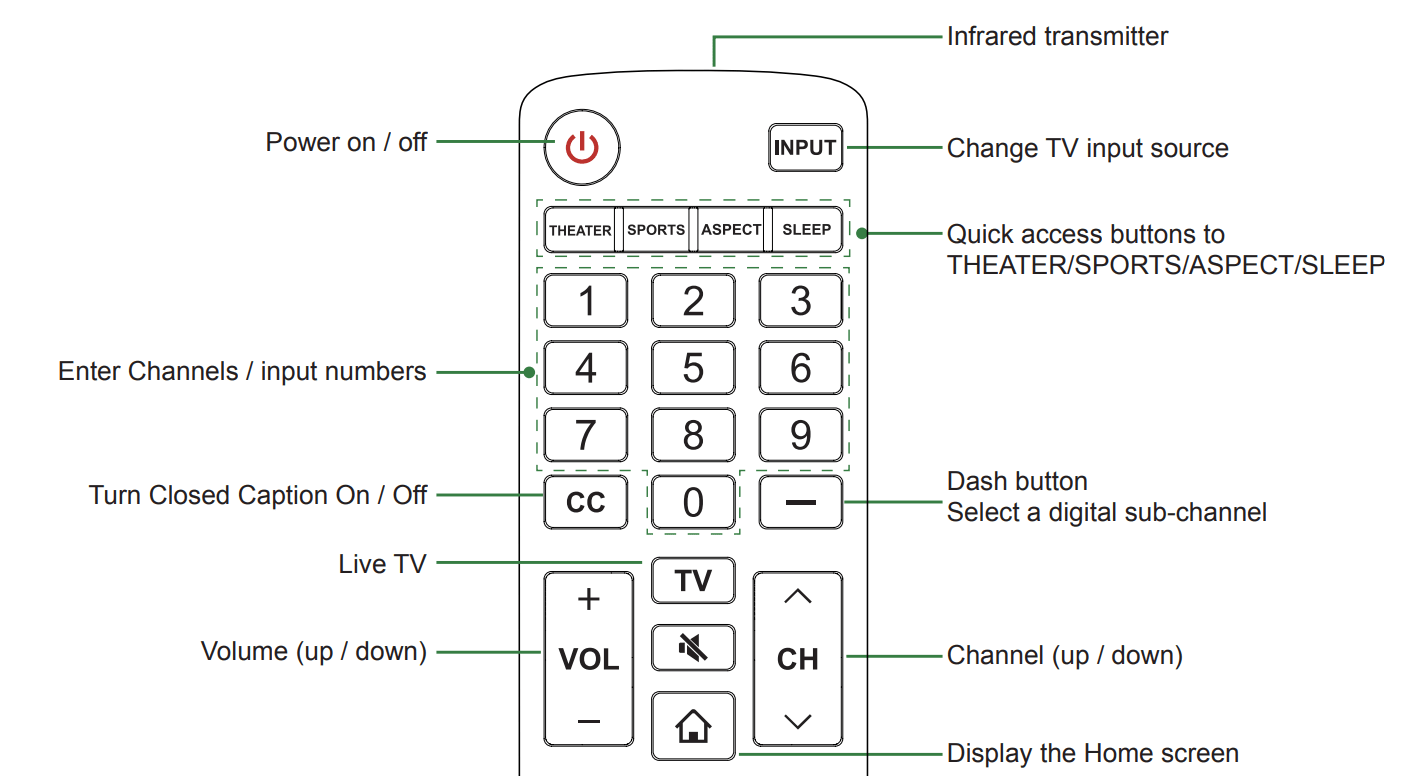
 ] button on the remote control to activate the unit from ‘Standby’ mode.