Do not operate the oven when empty or without the glass tray. It is best to leave a glass of water in the oven when not in use. The water will safely absorb all microwave energy, if the oven is accidentally started.
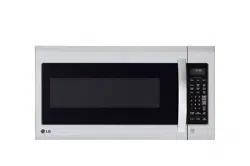
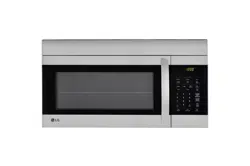
Your microwave oven is designed to make your cooking experience as enjoyable and productive as possible. To get you up and running quickly, the following is a list of the oven’s basic features:
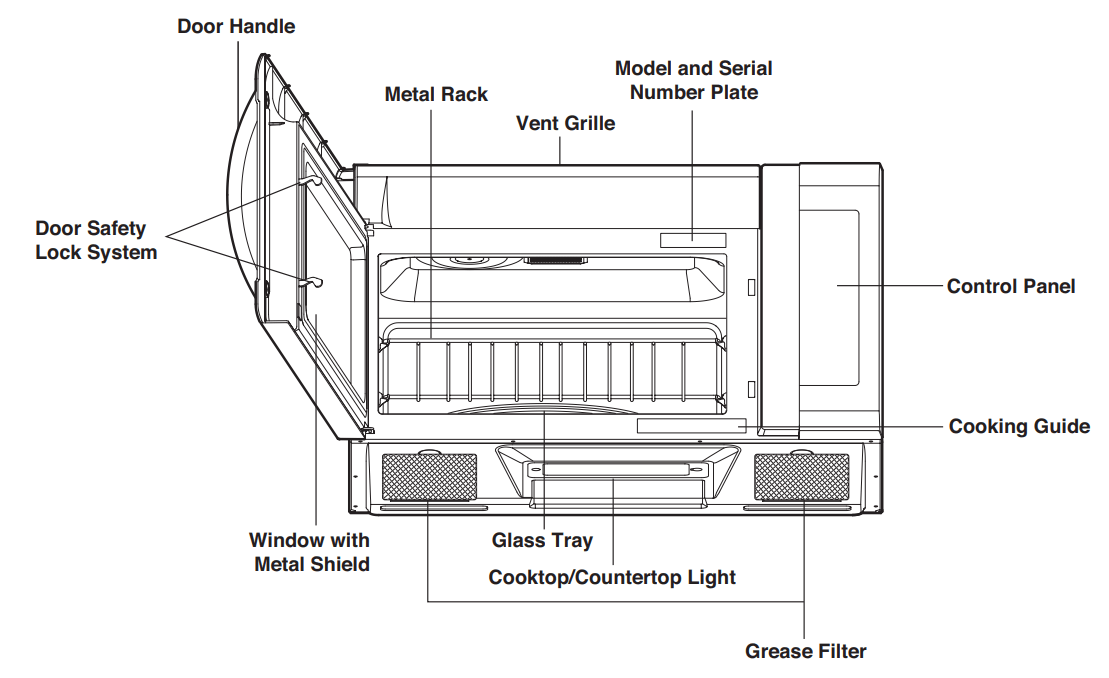
Metal Shielded Window. The shield prevents microwaves from escaping. It is designed as a screen to allow you to view food as it cooks.
Model and Serial Number Plate, Cooking Guide & Service call Label
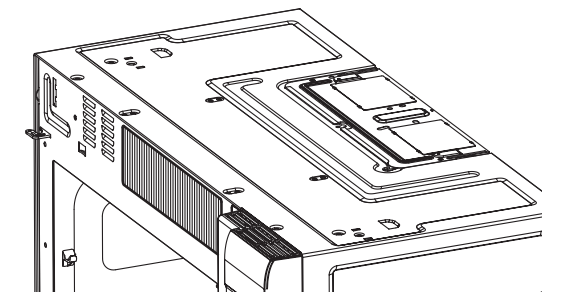
Charcoal Filter (behind Vent Grille)
Vent Grille
Glass Tray. The glass tray moves food as it cooks for more even cooking. It must be in the oven during operation for best cooking results.
Cooktop/Countertop Light
Control Panel. Touch the buttons on this panel to perform all functions.
Metal Rack. Use for extra space when cooking in more than one container at the same time. Remove cooking rack when you are not using it.
Grease Filter
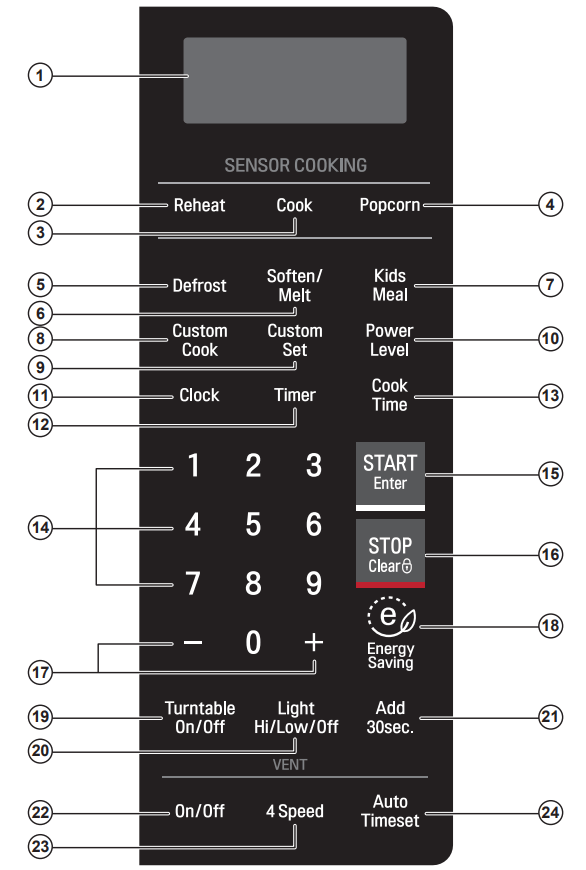
Oven control panel
Your microwave oven control panel lets you select the desired cooking function quickly and easily. All you have to do is touch the necessary Command pad. The following is a list of all the Command and Number pads located on the control panel.
Display. The Display includes a clock and indicators to tell you time of day, cooking time settings and cooking functions selected.
Reheat. Reheat has preset Power Levels for 6 categories including a casserole, dinner plate, and soup/sauce. The oven’s sensor will tell the oven how long to cook depending on the amount of humidity it detects from the food.
Cook. Cook has preset Power Levels for 13 categories including frozen lasagna, casseroles, and rice. The oven’s sensor will tell the oven how long to cook depending on the amount of humidity it detects from the food.
Popcorn. Touch this button when popping popcorn in your microwave oven. The oven’s sensor will tell the oven how long to cook depending on the amount of humidity it detects from the popcorn.
Defrost. Touch this button to defrost frozen food.
Soften/Melt. • Soften: Touch this button to soften butter, ice cream, cream cheese, frozen juice. • Melt: Touch this button to melt butter or margarine, chocolate, cheese, and marshmallows.
Kids Meal. Select type of dish to reheat Mac & Cheese, Hot dog or Chicken nuggets.
Custom Cook. Touch this button to make oven remember Cook time and Power level.
Custom Set. Touch this pad to change the oven’s default setting for sound, clock, display speed, and defrost weight.
Power Level. Touch this button to select a cooking power level.
Clock. Touch this button to enter the time of day.
Timer. Touch this button to start the kitchen timer.
Cook Time. Touch this button to set a cooking time.
Number. Touch number buttons to enter cooking time, power level, quantities or weights.
START/Enter. Touch this button to start a function. If you open the door after the oven begins to cook, touch START/Enter again.
STOP/Clear. Touch this button to stop the oven or clear all entries.
+, -. Touch this button to add or subtract ten seconds of cooking time each time you touch it.
Energy Saving. Touch this button to save energy.
Turntable On/Off. Touch this button to turn on/off the turntable. This option is not available in sensor cook, defrost, soften and melt modes.
Light High/Low/Off. Touch this button to turn the cooktop/countertop light on high/low or off.
Add 30Sec. Touch this button to add 30 seconds of cooking time each time you touch it.
Vent On/Off. Touch button to turn the vent on slow or off.
Vent 4 Speed. Touch button to change vent speed.
Vent Auto Timeset. Touch this button to set ventilation time. (1, 3, 5, 10, and 30 minutes.)
USING YOUR MICROWAVE OVEN
CAUTION
To avoid risk of personal injury or property damage, do not run the oven empty.
To avoid risk of personal injury or property damage, do not use stoneware, large sheets of aluminum foil, metal utensils, or metal trimmed utensils in the oven. Keep aluminum foil at least 1 inch from the oven wall, metal rack and other pieces of foil.
AUDIBLE SIGNALS
Audible signals are available to guide you when setting and using your oven:
A beep will sound each time you touch a button.
4 beeps signals the end of a cooking cycle.
INTERRUPTING COOKING
You can stop the oven during a cycle by opening the door. The oven stops heating and the fan stops, but the light stays on.
To restart cooking, close the door and touch START/Enter.
If you do not want to continue cooking, open the door and touch STOP/Clear.
GLASS TOUCH CONTROLLER
Touch the middle of letter or number to activate.
If you touch the button with a fingernail or fingertip, the controller may not sense it is being touched.
If the controller or your hands are wet it may not sense your touch.
Remove gloves prior to touching the controller.
Use the child lock feature when cleaning the controller to avoid unintended activation.
CLOCK
Example: To set the clock for 8:00 am
Touch Clock.
Enter the time by using the number buttons.
Touch START/Enter (or Clock)
Enter 1 to set "am"
Touch START/Enter.
When the oven is first plugged in or after a power failure, the display will show "PLEASE SET TIME OF DAY". If a time of day is not set, " : " will show on the display with beep
CHILD LOCK
Use this safety feature to lock the control panel when you are cleaning the oven, or so that children cannot use the oven unsupervised.
Example: To set the child lock.
Touch and hold STOP/Clear until you hear 2 beeps and "LOCKED" appears (approximately 4 seconds).
Example: To cancel the child lock
Touch and hold STOP/Clear until "LOCKED" disappears (approximately 4 seconds).
LIGHT HI/LOW/OFF
This button on the controller controls the cooktop light.
Example: To set the Lamp for ON
Touch Light Hi/Low/Off. To turn on, touch once. "Light" will flash in display, then stay on.
Touch Light Hi/Low/Off. To turn off, touch button again. "Light" will disappear from the display.
ENERGY SAVING
The Energy Saving feature saves energy by turning off the display by pressing the Energy Saving button. The display will automatically turn off after 5 minutes of idleness.
Touch Energy Saving to turn the display off.
Touch Energy Saving to turn the display on.
TURNTABLE ON/OFF
For best cooking results, leave the turntable on. It can be turned off for large dishes. Touch Turntable On/Off button to turn the turntable on or off.
NOTES:
This option is not available in sensor cook, defrost, kids meal and soften/melt modes.
Sometimes the turntable can become hot to touch. Be careful when touching the turntable during and after cooking.
Do not run the oven when empty.
VENT ON/OFF
The vent removes steam and other vapors from the surface cooking area.
Touch Vent On/Off. Touch once. "FAN SLOW" will scroll in the display. Fan will work on slow speed.
Touch Vent On/Off. Fan will turn off. "FAN OFF" will scroll in display.
NOTE:
Turn the microwave’s vent fan on whenever you use the oven range cooktop below it.The fan captures smoke, steam, and odors and also prevents the heat from the cooktop from damaging microwave components.
If the microwave is cooking, the vent fan turns on automatically if the sensors detect too much heat from the cooktop. This is normal, and is designed to prevent microwave component damage.
VENT 4 SPEED
When the fan is on, touch this button to toggle the fan speed.Fan speed will change in sequence from slow, low, high, turbo and back to slow.
ADD 30 SEC
A time-saving button, this simplified control lets you quickly set and start microwave cooking without the need to touch START/Enter.
Example: To set ADD 30 SEC for 2 minutes.
Touch Add 30 Sec.4 times.The oven begins cooking and the display shows time counting down.
NOTE: If you continue to touch Add 30 Sec., it will add 30 seconds up to 99 min 59 seconds.
COOKING AT HIGH COOK POWER
Example: To cook food for 8 minutes 30 seconds.
Enter the cook time.
Touch START/Enter. When the cook time is over, you willhear four beeps and "COOK END" will scroll in display.
MICROWAVE POWER LEVELS
This feature lets you program a specific cook time and power. For best results, there are 10 power level settings in addition to HIGH (100%) power.
NOTE: If you do not select a power level, the oven will automatically cook at HIGH (100%) power.
Example: To cook for 5 minutes, 30 seconds at 80% power.
Enter cook time.
Touch Power Level
Enter the power level.
Touch START/Enter. Whenthe cook time is over, four beeps will sound and "COOK END" will display.
CUSTOM SET
You can change the default values for beep sound, clock, display speed, and defrost weight. See following chart for more information.
No.
Fuction
No.
Result
1
Beep ON/OFF control
1
2
Sound ON
Sound OFF
2
Clock display control
1
2
Clock ON
Clock OFF
3
Display
1
2
3
Slow speed
Normal speed
Fast speed
4
Defrost weight mode selected
1
2
Lbs.
Kg.
Example: To change defrost weight mode (from Lbs. to Kg).
Touch Custom Set.
Touch 4.
Touch 2.
MULTI-STAGE COOKING
For best results, some recipes call for different power levels during different stages of a cook cycle. You can program your oven to switch from one power to another for up to 2 stages. 3 stages can be programmed if the first stage is the defrost cycle.
Example: To cook food for 3 minutes at 100% power and then 70% power for 7 minutes 30 seconds.
Enter the first cook time.
Touch Cook Time.
Enter the second cook time.
Touch Power Level.
Enter the power level.
Touch START/Enter.
When the cook time is over, four beeps will sound and "COOK END" will display.
+ / –
By using the More or Less buttons, all of the preprogrammed features like Cook can be adjusted to cook food for a longer or shorter time.
Touching + will add 10 seconds to the cooking time each time you touch it. Touching – will subtract 10 seconds from the cooking time each time you touch it.
CUSTOM COOK
CUSTOM COOK lets you to recall one cooking instruction previously placed in memory and begin cooking quickly.
Example: To memorize for 2 minutes
Touch Custom Cook.
Enter the cook time.
Touch START/Enter.
Example: To recall the memory.
Touch STOP/Clear.
Touch Custom Cook.
Touch START/Enter.
When the cook time is over,you will hear four beeps and END will display.
SENSOR OPERATING INSTRUCTIONS
Used to cook foods without selecting cooking times and power levels. The display will indicate the sensor category during the initial sensing period. The oven automatically determines the required cooking time for each food item.
When the internal sensor detects a certain amount of humidity coming from the food, it will tell the oven how much longer to heat. The display will show the remaining heating time. For best results when cooking by Sensor, follow these recommendations:
Food cooked with the Sensor system should be at normal storage temperature.
The glass tray and the outside of the container should be dry to assure best cooking results.
Foods should always be covered loosely with microwavable plastic wrap, waxed paper, or a lid.
Do not open the door or touch STOP/Clear during the sensing time. When sensing time is over, the oven beeps twice and the remaining cooking time will appear in the display window. At this time you can open the door to stir, turn, or rearrange the food.
SENSOR COOKING GUIDE
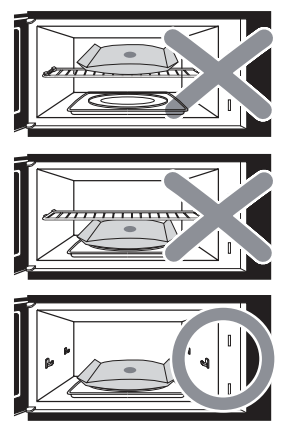
Appropriate containers and coverings help to assure good Sensor cooking results.
Always use microwavable containers and cover them with lids or vented plastic wrap.
Never use tight-sealing plastic covers. They can prevent steam from escaping and cause food to overcook.
Match the amount to the size of the container. Fill containers at least half full for best results.
Be sure the outside of the cooking container and the inside of the microwave oven are dry before placing food in the oven. Beads of moisture turning into steam can mislead the sensor.
If the food is not as hot as you would like after using the sensor cook or reheat function, use Cook Time to continue heating. Do not repeat the sensor options in succession on the same food.
SENSOR POPCORN
Sensor Popcorn lets you pop 2.0, 3.0 and 3.5 ounce bags of commercially packaged microwave popcorn. Pop only one package at a time. If you are using a microwave popcorn popper, follow manufacturer’s instructions.
Example: To pop popcorn.
Touch Popcorn.
Touch START/Enter.
When the cook time is over,four beeps will sound and "COOK END" will display.
Recommended amounts: 2.0 - 3.5 oz.
CAUTION
DO NOT leave the microwave oven unattended while popping corn.
When popping commercially packaged popcorn, remove the rack from the oven. Do not place the bag of microwave popcorn on the rack or under the rack.
SENSOR REHEAT
Reheat lets you heat foods without needing to program times and Power Levels.
Reheat has preset Power Levels for 6 categories. See the details in the cooking guide table.
Example: To reheat a Casserole.
Touch Reheat.
Touch 3 to choose casserole and cooking will start 3~4 second later.
See Cooking Guide for Sensor Reheat table below for info. When the cook time is over, you will hear four beeps and "COOK END" will display.
SENSOR COOK
Using Cook lets you heat common microwave prepared foods without needing to program times and Cook Powers. Sensor Cook has preset Power Levels for 13 food categories. See the details in the cooking guide table.
Example: To cook Rice
Touch Cook.
Touch 6 to choose rice and cooking will start 3~4 second later.
When the cook time is over, you will hear four beeps and "COOK END" will display.
TIMER
You can use your microwave oven as a timer. Use the Timer for timing up to 99 minutes, 99 seconds.
Example: To count 3 minutes.
Touch Timer.
Enter the time by using the number buttons
Touch START/Enter.
When the time is over, the oven will beep 7 times.
NOTE: To turn off the Timer while it is still running, touch the Timer button.
SOFTEN
The oven uses low power to soften foods (butter, ice cream, cream cheese, and frozen juice.) See the following table.
Example: To soften quart of ice cream.
Touch Soften/Melt.
Choose menu.Touch 2 to ice cream.
Touch 2 to choose amount.
Touch START/Enter.
Soften table
Category
Code
Touch button number
1
2
3
Butter
1
1 stick
2 sticks
3 sticks
Ice cream
2
Pint
Quart
Half gallon
Cream Cheese
3
3 oz.
8 oz.
-
Frozen Juice
4
6 oz.
12 oz.
16 oz.
MELT
The oven uses low power to melt foods (butter or margarine, chocolate, marshmallows, or processed cheese food.) See the following table.
Example: To melt 8 oz. chocolate.
Touch Soften/Melt twice.
Choose menu.Touch 2 to chocolate.
Touch 2 to choose amount.
Touch START/Enter.
Melt table
Category
Code
Touch button number
1
2
3
Butter/Margarine
1
1 stick
2 sticks
3 sticks
Chocolate
2
4 oz.
8 oz.
-
Cheese
3
8 oz.
16 oz.
-
Marshmallows
4
5 oz.
10 oz.
-
KIDS MEAL
Using KIDS MEAL lets you heat common microwave-prepared foods without needing to program times and cook power. Mac & Cheese, Hot dog, Chicken Nuggets.
Example: To heat 4 ea Hot dogs.
Touch Kids Meal.
Touch 2 choose Hot dog.
Touch 2.
Touch START/Enter.
NOTE: When the cook time is over, you will hear four beeps and “COOK END” will display.
Kids meal table
Category
Touch button number
1
2
Mac&Cheese
6 oz.
12 oz.
Hot dog
2 ea
4 ea
Chicken Nuggets
4 oz.
8 oz.
DEFROST
Four defrost choices are preset in the oven. The Defrost feature provides you with the best defrosting method for frozen foods, because the oven automatically sets the defrosting times for each food item according to the weight you enter. For added convenience, the Defrost feature includes a built-in tone mechanism that reminds you to check, turn over, separate, or rearrange the food during the defrost cycle. Four different defrosting presets are provided.
Meat
Poultry
Fish
Bread
Touch Defrost and choose menu. Then enter weight. Available weight ranges for Meat, Poultry, and Fish are 0.1 to 6.0 lbs. The available weight range for Bread is 0.1 to 1.0 lb.
Example : To defrost 1.2 lbs. of meat.
Touch Defrost once to choose the Meat category.
Touch 1 to choose meat.
Enter the weight.
Touch START/Enter.
NOTE: After you touch START/Enter, the display counts down the defrost time. The oven will beep once during the defrost cycle. At this time, open the door and turn, separate, or rearrange the food as needed. Remove any portions that have thawed, then return the frozen portions to the oven and touch START/Enter to resume the defrost cycle.
For best results:
Remove fish, shellfish, meat, and poultry from its original closed paper or plastic package (wrapper). Otherwise, the wrap will hold steam and juice close to the foods, which can cause the outer surface of the foods to cook.
Form the meat into the shape of a doughnut before freezing. When defrosting, scrape off thawed meat when the beep sounds and continue defrosting.
Place foods in a shallow glass baking dish or a on a microwave roasting rack to catch drippings.
Foods should still be somewhat icy in the center when removed from the oven.
Defrost table
Category
Food
Meat
0.1to6.0lbs. (45g to2.7kg)
Beef
Ground beef, Round steak, Cubes for stew, Tenderloin steak, Pot roast, Rib roast, Rump roast, Chuck roast, Hamburger patty.
This is a quick defrost feature that allows you to choose a preset 1.0 lbs. defrost cycle.
Example: To defrost for 1.0 lbs
Touch Defrost twice.
Touch START/Enter.
Halfway through the cycle, the oven will beep. Open the door,turn the meat over, Close the door, and touch START/Enter to resume defrosting until the cycle ends.
When the defrost time is over, four beeps will sound and "COOK END" will display.
TIME DEFROST
Time defrost feature allows you to enter time to defrost
Example: defrost 2 minutes
Touch Defrost 3 times.
Enter time to defrost.
Touch START/Enter.
DEFROSTING TIPS
When using Defrost Weight/Time, the weight to be entered is the net weight in pounds and tenths of pounds (the weight of the food minus the container).
Before starting, make sure you have removed any of the metal twist-ties which often come with frozen food bags, and replace them with strings or elastic bands.
Open containers such as cartons before they are placed in the oven.
Always slit or pierce plastic pouches or packaging.
If food is foil wrapped, remove foil and place food in a suitable container.
Slit the skins, if any, of frozen food such as sausage.
Bend plastic pouches of food to ensure even defrosting.
Always underestimate defrosting time. If defrosted food is still icy in the center, return it to the microwave oven for more defrosting.
The length of defrosting time varies according to how solidly the food is frozen.
The shape of the package affects how quickly food will defrost. Shallow packages will defrost more quickly than a deep block.
As food begins to defrost, separate the pieces. Separated pieces defrost more easily.
Use small pieces of aluminum foil to shield parts of food such as chicken wings, leg tips, fish tails, or areas that start to get warm. Make sure the foil does not touch the sides, top, or bottom of the oven. The foil can damage the oven lining.
For better results, let food stand after defrosting. (For more information on standing time, see the “Microwave Cooking Tips” section.)
Turn food over during defrosting or standing time. Break apart and remove food as required.
METAL RACK
CAUTION
To avoid risk of property damage:
Do not use the rack to pop popcorn.
The rack must be on the four plastic supports when used.
Use the rack only when cooking food on the rack position.
Do not cook with the rack on the floor of the oven.
The metal rack gives you extra space when cooking in more than one container at the same time.
To use the rack:
1. Place the rack securely in the four plastic supports.
• The rack MUST NOT touch the metal walls or back of the microwave oven.
2. Place equal amounts of food both ABOVE AND BELOW the rack.
• The amount of food must be approximately the same to balance out the cooking energy.
MAINTENANCE
CARE AND CLEANING
For best performance and safety, keep the oven clean inside and outside. Take special care to keep the inner door panel and the oven front frame free of food or grease build-up.
Never use abrasive powder or pads. Wipe the microwave oven inside and out, including the hood bottom cover, with a soft cloth and a warm (not hot) mild detergent solution. Then rinse and wipe dry.
Use a chrome cleaner and polish on chrome, metal and aluminum surfaces. Wipe spatters immediately with a wet paper towel, especially after cooking chicken or bacon. Clean your oven weekly or more often, if needed.
METAL RACK
Wash the metal rack with a mild soap and a soft or nylon scrub brush.Dry completely. Do not use abrasive scrubbers or cleaners to clean rack.
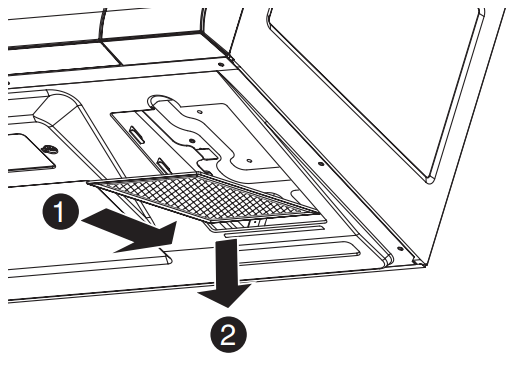
CLEANING THE GREASE FILTERS
The grease filters should be removed and cleaned often, at least once a month.
1.To remove the grease filters, slide each filter to the side, then pull the filters downward. The filters will drop out.
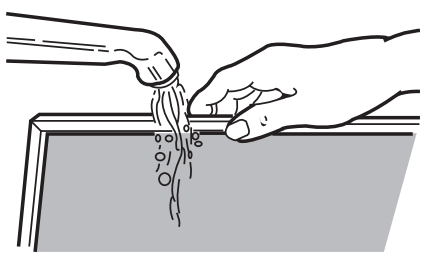
2. Soak grease filters in hot water and a mild detergent. Rinse well and shake to dry. Do not use ammonia or place them in a dishwasher. The aluminum will darken.
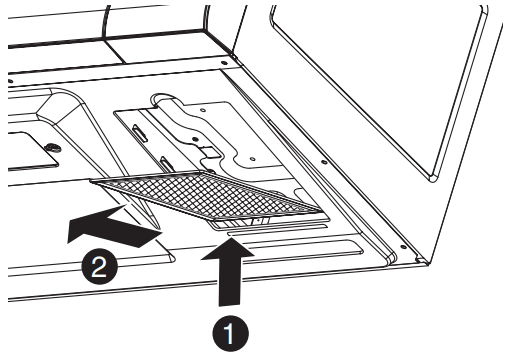
3. To reinstall the filters, slide them into the side slots, then push up and forward to lock.
NOTE: Do not operate the hood without the filters in place.
CHARCOAL FILTER REPLACEMENT
If your oven is vented inside, the charcoal filter should be replaced every 6 to 12 months, and more often if necessary. The charcoal filter cannot be cleaned.
1. Turn the power off at the main power supply and wear gloves
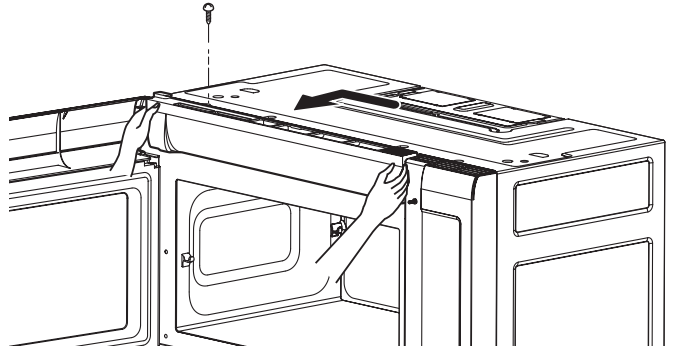
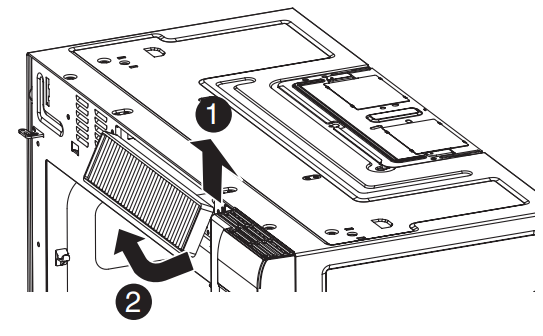
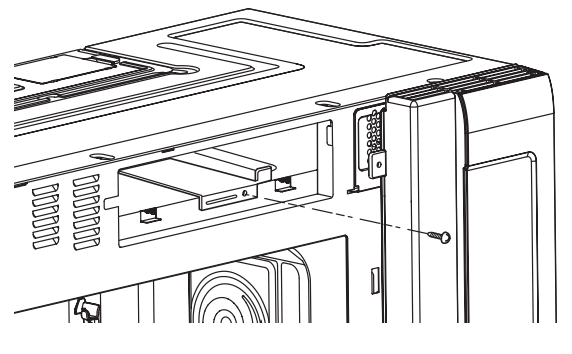
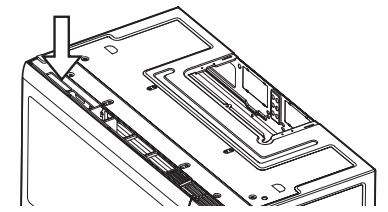
2. Remove the one vent grille mounting screws. (2 outside screws)
3. After open door. Slide vent grille to left and tip it forward.
4. Remove the old filter
5. Slide a new charcoal filter into place.
6. Slide in vent grille and replace the mounting screw. Turn the power back on at the main power supply and set the clock.
COOKTOP/NIGHT LIGHT REPLACEMENT
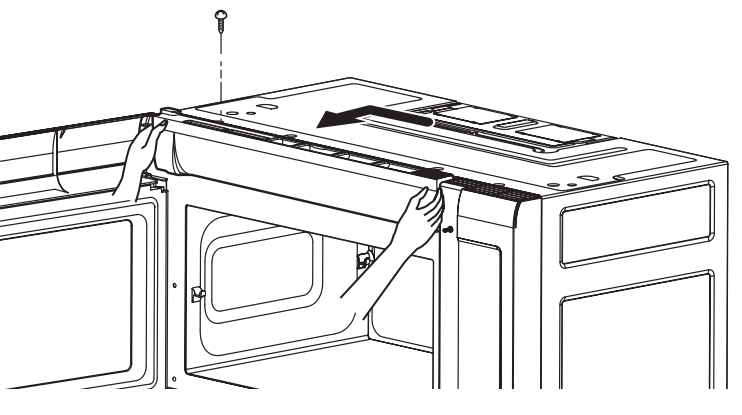
1. Unplug the oven or turn off power at the main power supply.
2. Remove the halogen lamp cover mounting screws.
3. Replace the halogen lamp.
4. Replace the halogen lamp cover and mounting screws.
5. Turn the power back on at the main power supply.
OVEN LIGHT REPLACEMENT
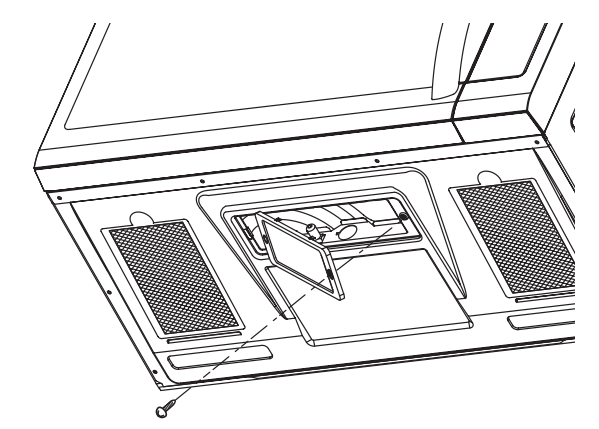
1. Unplug the oven or turn off power at the main power supply and wear gloves.
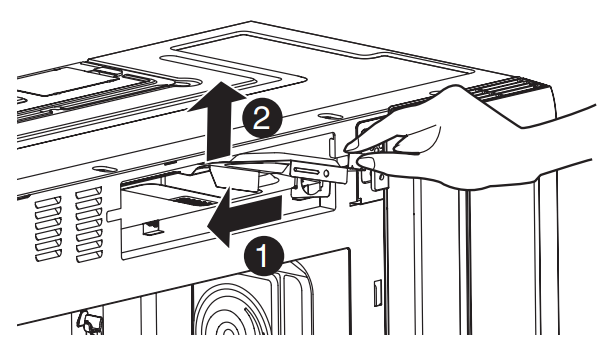
2. Remove the vent cover mounting screw. (1 outside screws)
3. Slide vent grille left, then lift out to remove.
4. Remove the cover screw slide the cover to left and then lift up the bulb holder.
5. Replace the bulb with a 30 watt appliance bulb.
6. Replace the bulb holder and screw.
7. Slide in vent grille and replace the mounting screw. Replace the mounting screws. Turn the power 1 back on at the main power supply.
FAQS - FREQUENTLY ASKED QUESTIONS
Q. Can I use a rack in my microwave oven so that I may reheat or cook on two levels at a time?
A. Only use the rack that is supplied with your rmicrowave oven. Use of any other rack can result in poor cooking performance and/or arcing and may damage your oven.
Q. Can I use either metal or aluminum pans in my microwave oven?
A. Usable metal includes aluminum foil for shielding (use small, flat pieces), and shallow foil trays (if tray is 3/4 inch deep and filled with food to absorb microwave energy). Never allow metal to touch walls or door.
Q. Sometimes the door of my microwave oven appears wavy. Is this normal?
A. This appearance is normal and does not affect the operation of your oven.
Q. What are the humming noises that I hear when my microwave oven is operating?
A. You hear the sound of the transformer when the magnetron tube cycles on and off.
Q. Why does the dish become hot when I microwave food in it? I thought that this should not happen.
A. As the food becomes hot it will conduct the heat to the dish. Use hot pads to remove food after cooking.
Q. What does “standing time” mean?
A. ”Standing time” means that food should be taken out of the oven and covered for additional time after cooking. This process allows the cooking to finish, saves energy and frees the oven for other purposes.
Q. Can I pop popcorn in my microwave oven? How do I get the best results?
A. Yes. Pop packaged microwave popcorn following manufacturer’s guidelines or use the preprogrammed Popcorn button.
Do not use regular paper bags. Use the “listening test” by stopping the oven as soon as the popping slows to a “pop” every one or two seconds. Do not try to repop unpopped kernels. You can also use special microwave poppers. When using a popper, be sure to follow manufacturer’s directions. Do not pop popcorn in glass utensils.
Q. Why does steam come out of the air exhaust vent?
A. Steam is normally produced during cooking. The microwave oven has been designed to vent this steam out the top vent.
Steam exhaust here
TROUBLESHOOTING
BEFORE CALLING FOR SERVICE
Check the following list to be sure a service call is really necessary. A quick review of this manual as well as the additional information in this checklist may prevent an unneeded service call.
If nothing on the oven operates:
check for a blown circuit fuse or a tripped main circuit breaker.
check if oven is properly connected to electric circuit in house.
check that controls are set properly.
If the oven interior light does not work:
the light bulb is loose or defective.
If the oven will not cook:
check that cooking program was entered correctly.
check that door is firmly closed. check that Start button was touched.
check that probe was inserted correctly into receptacle.
check that timer wasn't started instead of a cook function.
If oven takes longer than normal to cook or cooks too rapidly:
be sure the Power Level is programmed properly.
If the time of day clock does not always keep correct time:
check that the power cord is fully inserted into the outlet receptacle.
be sure the oven is the only appliance on the electrical circuit.
If food cooks unevenly:
be sure food is evenly shaped.
be sure food is completely defrosted before cooking.
check placement of aluminum foil strips used to prevent overcooking.
If food is undercooked:
check recipe to be sure all directions (amount, time, power levels) were correctly followed.
be sure microwave oven is on a separate circuit.
be sure food is completely defrosted before cooking.
If food is overcooked:
check recipe to be sure all directions (amount, power level, time, size of dish) were followed.
If arcing (sparks) occur:
be sure microwavable dishes were used.
be sure wire twist ties weren't used
be sure oven wasn’t operated when empty.
make sure metal rack (if used) is properly installed on supports.
If the Display shows a time counting down but the oven is not cooking:
check that door is firmly closed.
check that timer wasn’t started instead of a cooking function.