Sunbeam LC6500 Multi Processor Plus
Product's Documents
Below are documents related to this product, you can read online or download:
- Owner's manual - (English) Read Online | Download pdf
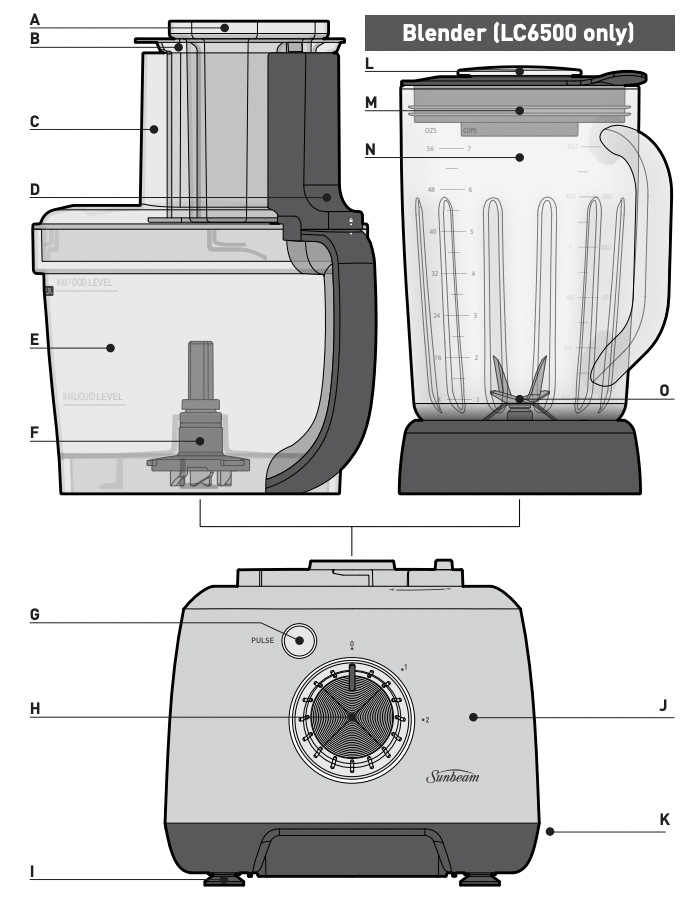
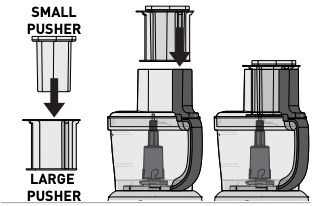
A. Small Food Pusher
The small food pusher is ideal for thin or narrow foods.
B. Two Food Pushers
The two food pushers guide food down evenly into the feed tube and can also be used to close the chute while processing
C. Extra Wide Chute
The wide feed chute makes processing ingredients easy. Use the chute to guide ingredients down into the selected blades. With a wider chute, vegetables do not need to be cut into small pieces to fit in the chute.
D. Processing Bowl Lid
The processing bowl lid activates the automatic safety system. The Multi Processor will not operate unless the lid is correctly positioned on the processing bowl and locked into place.
E. Processing Bowl
The processing bowl is designed to encourage even, efficient processing. It has a capacity of 2 litres for food & 500 mL for liquids. The bowl locks into place on the motor base.
F. Removable Processor Coupling
Can be removed for easy cleaning of the processing bowl.
G. Pulse Button
The pulse provides short bursts of power and allows ingredients to be chopped whilst maintaining the integrity of the food.
H. Two Speed Control Dial
The large speed dial with two speeds, makes it easy to select your desired setting.
I. Non-slip Feet
Non-slip feet keep the food processor secure on the bench top during use.
J. 800W Motor
The base houses a powerful 800W motor, to provide great processing results every time.
K. Cord Storage
Convenient storage of the cord is located at the back of the motor base.
L. Ingredient Cup
Handy 60mL ingredient cup, locks into place on the lid.
M. Flexible lid with pouring hole
The glass jug features a pouring hole in the centre, that allows you to add ingredients during the blending process.
N. 1.5 Litre Glass Jug
The sizeable 1.5 litre glass jug features specially designed internal ribs to cycle ingredients back into the blade system for superior results.
The jug features an easy to pour lip and is marked in both cups and litres (L) for ease of use.
O. Fixed Blade Assembly
Specially designed for extra durability, the heavy-duty, stainless steel blade with a six-blade construction, crushes ice cubes, produces a smooth consistency when pureeing and combines ingredients perfectly for a smoothie.
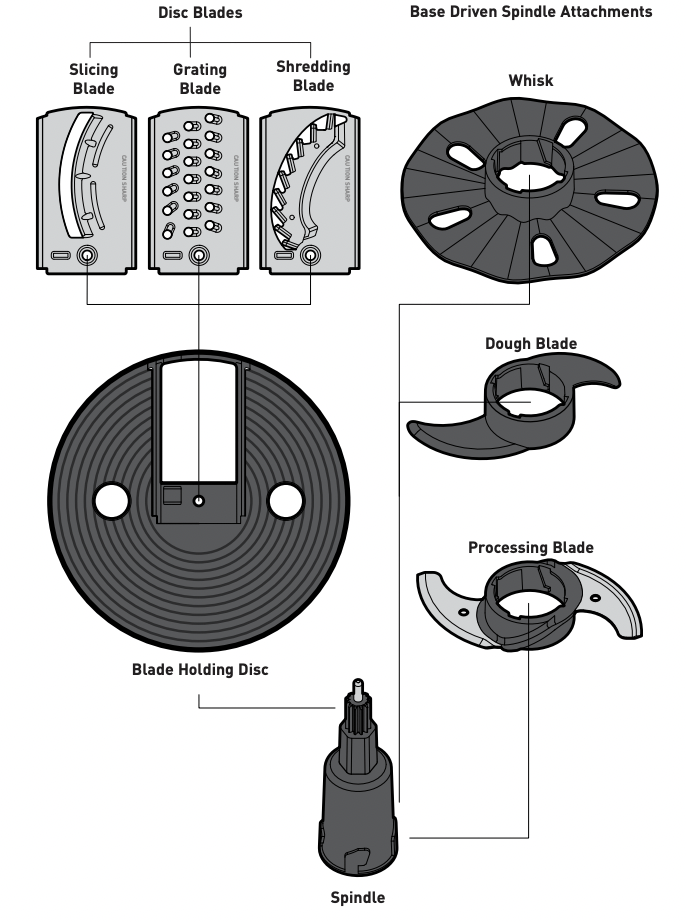
Disc Blades
The stainless steel disc blades are inserted into the blade holding disc for use. The round hole at the end of the disc blades should align with the round hole in the middle of the blade holding disc.
CAUTION: Care must be taken when handling the metal blades as these items are extremely sharp.
Ideal for fruit, vegetables, hard cheeses and deli meats.
Ideal for fruit, vegetables, hard cheeses and chocolate.
Ideal for fruit, vegetables.
Blade Holding Disc
The blade holding disc houses the various processing blade attachments – slicing, grating and shredding.
The blade holding disc is driven by the top of the spindle.
Base Driven Spindle Attachments
The below attachments are driven by the base of the spindle and can only work one at a time.
Whisk
The whisk attachment is ideal for whisking egg whites and creams.
Dough Blade
The dough blade is contoured for fast, efficient processing. It is ideal for mixing doughs, heavy cake mixes and batters.
Processing Blade
The stainless steel processing blade is contoured to fit the shape of the processing bowl to provide the most efficient chopping and/or mixing action.
The processing blade can be used to chop raw meats to mince, chocolate to crumbs and nuts to paste.
Please ensure that the processing blade protective cover is removed before using.
CAUTION: Use extreme caution, as blades are sharp. Always handle the processing blade by the plastic central section.
Spindle
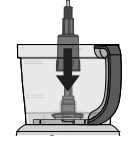
The spindle drives all the food processing attachments. Place attachments on the spindle prior to placing in the processing bowl.
Step 1. Remove Packaging
Ensure all packaging has been removed.
Step 2. Position Machine
Place the motor base facing you on a dry, level surface.
Step 3. Wash Parts
Wash the processing bowl, lid and all attachments in warm water using a mild detergent. Dry each part thoroughly before use.
CAUTION: Care must be taken when handling the metal blades as these items are extremely sharp.
Step 4. Power
Before you assemble the food processor (or blender for LC6500 only), ensure that the power cord is unplugged.
Clean the motor body by wiping with a damp, soft sponge with mild detergent.
Note: Always unplug the Multi Processor before cleaning.
CAUTION: To prevent damage to the appliance do not use alkaline cleaning agents when cleaning the exterior.
Note: Never immerse the motor base in water or any other liquid.
When you have finished processing, unplug your Multi Processor from the power outlet. Wash all accessories, attachments and all surfaces that have come into contact with food in warm soapy water.
• Dishwasher use
All plastic components deteriorate through the prolonged use of a dishwasher for cleaning.
CAUTION: Care must be taken when handling the metal blades as these items are extremely sharp.
• Quick cleaning method
Half fill the blender with warm water and a small amount of detergent. Press the PULSE button for 10-20 seconds. Then remove the jug and rinse it under running water
• For thorough cleaning
Wash the lid, ingredient cup, rubber seal, glass jug with fixed blade assembly in warm soapy water.
Note: Do not clean any part of the blender in the dishwasher.
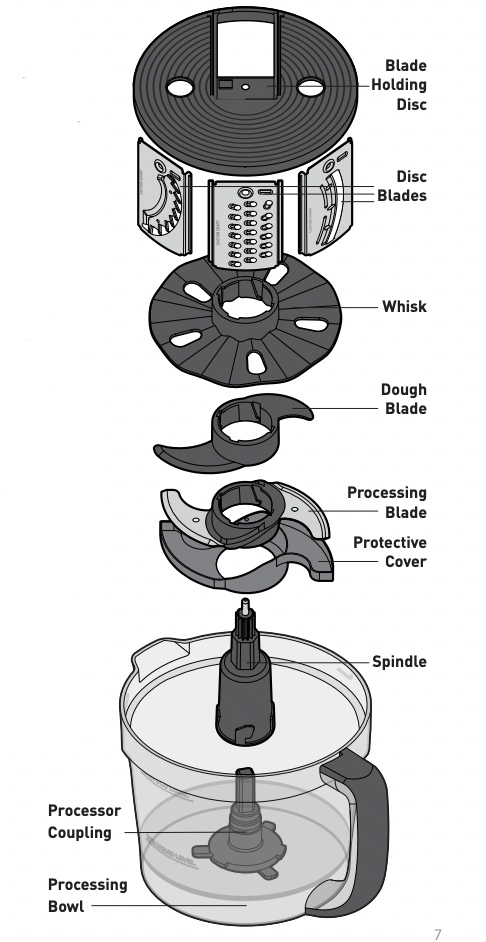
All of the food processor attachments can be conveniently stored within the processing bowl for easy storage.
Note: Wash & dry each attachment thoroughly before storing.
Make sure the removable processor coupling is locked into the processing bowl.
Firstly place the processing blade (with protective cover) over the spindle, making sure the blade is at the lowest position on spindle. Then place in the processing bowl over the processor coupling.
Then place the dough blade on top of the processing blade, it will not lock in, just rest on top.
Then place the whisk over the spindle so it rests on top of the dough blade.
Then the disc blades can now be placed vertically down the sides of the processing bowl.
Lastly place the blade holding disc on top of the spindle.
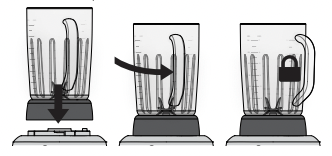
The processing lid with the two food pushers can be positioned & locked into the processing bowl as usual.
The power cord can be stored within the cord storage area at the back of the motor base.
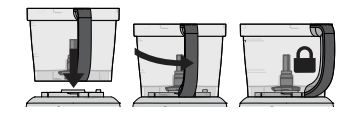
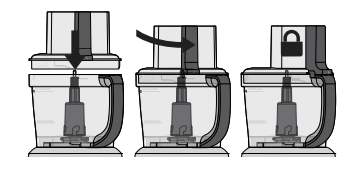
Important: If the processing bowl and lid are not correctly assembled, the Multi Processor will not operate.
Note: The small pusher cannot be used by itself. It must be used with the larger pusher to activate the interlock.
Note: For maximum control when using your food processor, load the feed tube before turning on your food processor. Always use the food pusher for more evenly processed foods and never use your fingers.
Important: When mixing a heavy load i.e 0.5kg dough, do not operate the food processor for more than 38 seconds at a time.
For the best, most consistent results, you should try to process pieces of food that are approximately equal in size. When you break, cut or tear food into uniform pieces before processing, the finished results will be more uniform.
More consistent processing results are achieved if the processing bowl is not overloaded.
Pre-cut meat into cubes approximately 2cm square.
When processing vegetables such as onions, peel and quarter or cut large vegetables into eighths.
The quantities that can be processed within the processing bowl will vary with the density of the mixture.
When various recipes require dry ingredients such as flour, add them directly into the processing bowl before processing. There is no need to sift ingredients when using your Multi Processor. Liquid ingredients may be added while the processor is operating by pouring through the feed tube in the processor lid.
Note: When processing sauces or semiliquid ingredients, stop the food processor and scrape down the bowl sides with a spatula.
The most important factor for successful slicing and shredding is the way in which the food is packed into the feed tube.
Cut all ingredients to a size that fits comfortably into the feed tube. Pack the feed tube and, while holding food steady and upright with the food pusher, press down evenly until all ingredients are sliced or shredded. The more firmly you push, the thicker the slices or shreds. Do not use excessive force or you may damage the food processor.
The feed tube should always be packed firmly to allow each piece of food to support the others. There will always be a small portion of food left unprocessed between the food pusher and the blade.
Note: Never use fingers to push food down the feed tube. Always use the food pusher.
Remember that softer foods such as cheese (cheddar, mozzarella or swiss) should be well chilled before processing. Harder foods such as parmesan or Romano cheese should be at room temperature before processing.
Note: When grating parmesan cheese do not apply a lot of pressure to the food pusher.
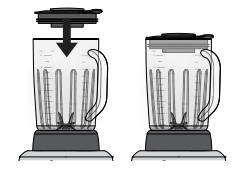
When processing is completed, remove the lid from the processing bowl first and then remove the processing bowl with the processing blade still in place. To remove the processing bowl firstly unlock the processing bowl lid by rotating it in a clockwise direction until the lid is unlocked.
Note: Always wait for the processing blade to stop moving completely before removing the bowl lid.
CAUTION: Use extreme caution, as blades are sharp. Always handle the processing blade by the plastic central section.
Note: Do not exceed the maximum indicated level – 1.5 litres
Note: Do not switch on the Blender without the lid in position.

Note: Although the lid fits firmly to the glass jug, we advise when blending liquid ingredients, to place your hand on the lid as you initially select the blending speed/ function. As the powerful 800 watt motor could cause the liquid to surge up causing leakage. Once you have started blending you can remove your hand.
Note: Do not blend hot ingredients.
Note: Do not operate for more than 2 minutes at a time.
Important: DO NOT process hot/warm liquids in your blender. Allow to cool to room temperature before blending.
Reference file: Sunbeam LC6500 Multi Processor Plus
Additionally, the document applies to other Sunbeam models: LC5500