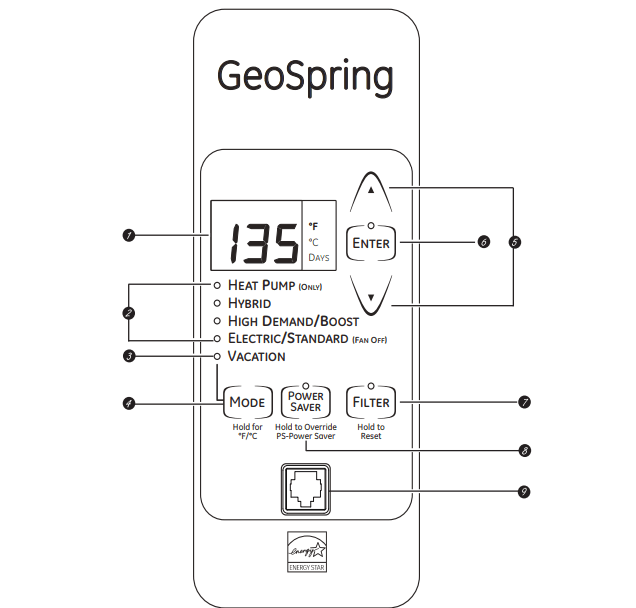
Use this button to alternate between available modes.
5 Arrow Pads
Use these buttons to adjust the temperature setting.
6 Enter Key
7 Filter Reset
The filter is dirty and requires cleaning when the Red light is illuminated. Filter is located on top of the water heater. Press button and hold for 5 seconds to reset filter alarm.
8 Power Saver Override
For use with ACM module. Press and hold to bring unit out of Power Saver mode. Once pressed and Power Saver mode is cancelled, unit will remain out of Power Saver for the next 18 hours.
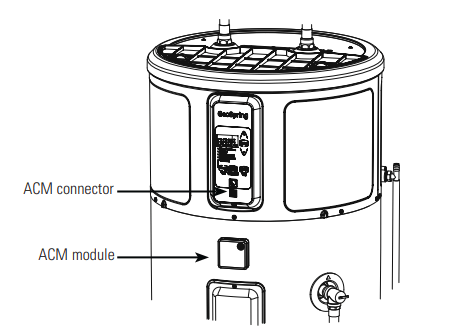
9 Appliance Communication Module Port
For use with optional ACM module (see page 10 for details).
Turning on the water heater.
There is no power button for this unit. Once the water heater is wired and power is supplied, it will be on. The display will show the current water temperature setting. Current operating mode for the water heater is illuminated.
To comply with safety regulations, the controls are factory preset to 120°F (49°C) and Hybrid Mode. It is recommended that the unit be set to Heat Pump (only) mode to maximize energy savings. Operating in Hybrid mode provides a balance of energy savings and hot water use convenience. Reported energy consumption is based on operating the unit in Hybrid mode at a temperature setting of 135°F (57°C), and operation at lower temperature settings or in Heat Pump (only) mode will provide even greater energy savings.
About the water temperature setting
Temperature setpoint:
Safety, energy conservation and hot water capacity are factors to be considered when selecting the water temperature setting of the water heater. To comply with safety regulations, the water temperature setpoint is factory set at 120°F (49°C). This is the recommended starting temperature setting.
NOTE: According to US Dept of Energy, the average residential water heater in the US is set at 135°F (57°C). GE GeoSpring™ Hybrid Water Heater's energy savings claims are based on a 135°F (57°C) temperature setting. The water temperature setpoint can be raised from the factory setting of 120°F to 135°F (49°C to 57°C) without sacrificing the claimed energy savings. If a lower temperature setting than 135°F (57°C) is used, greater savings in energy and operating costs may be achieved.
See "To Adjust the Temperature" section to change the water heater's temperature.
Hot water capacity:
If more hot water capacity is desired, increasing the temperature from 120°F to 135°F (49°C to 57°C) will enable the same tank of hot water to last about 25% longer because more cold water is mixed in at the shower or faucet.
Time/Temperature Relationship in Scalds
Temperature
Time to Produce a Serious Burn
120°F (49°C)
More than 5 minutes
125°F(52°C)
1-1/2 to 2 minutes
130°F(44°C)
About 30 seconds
135°F(57°C)
About 10 seconds
140°F(60°C)
Less than 5 seconds
145°F(63°C)
Less than 3 seconds
150°F(66°C)
About 1-1/2 seconds
155°F(68°C)
About 1 second
Table courtesy of Shriners Burn Institute
Risk of Scalding Reminder:
Water temperatures above 125°F (52°C) can cause severe burns or death from scalding. Be sure to read and follow the warnings outlined in this manual and on the label on the water heater. This label is located on the water heater near the upper element access panel.
See "Time/Temperature Relationship in Scalds" below as a guide in determining the proper water temperature for your home.
Mixing-valves:
Mixing valves for reducing point-of-use water temperature by mixing hot and cold water in branch water lines are available. Contact a licensed plumber or the local plumbing authority for further information.
To Adjust the Temperature
Follow these steps:
Press the UP or DOWN arrow on the control panel key pad to desired temperature.
Press ENTER to accept the new setting.
Note: To change between °F and °C, press and hold MODE.
DANGER: There is a Hot Water scald Potential if the water temperature is set too high. 120°F (49°C) is the recommended starting point for water temperature setting, but it can be adjusted to any temperature between 100°F and 140°F (38°C and 60°C).
Operational Modes.
This water heater defaults to the Hybrid operating mode. Available modes are listed below and can be selected using the MODE button.
Heat Pump (only) Mode-RECOMMENDED FOR MAXIMUM SAVINGS
Heat Pump (only) is the most energy-efficient mode for this water heater. It takes heat from the surrounding air to heat the water. The time it takes to heat the water is longer in this mode, so it may not be sufficient if you have a high-demand situation such as a large household or company.
Hybrid Mode
Hybrid mode combines the energy efficiency of Heat Pump (only) with the recovery speed and power of the Electric (Fan off)/Standard (Fan off) mode in most water usage situations. Hybrid mode will allow the unit to perform like a standard electric water heater while providing significant energy savings.
NOTE: Reported unit performance, energy consumption and savings are based on Hybrid Mode operation at a temperature setting of 135°F (57°C).
High Demand/Boost
This mode may be necessary if your household has a higher-than-average water usage or the unit is undersized for the household water demands. In this mode, the unit will use the electric heating elements only when the water demand rate is high. When using the heating elements, the water temperature will recover at a faster rate but it will use more energy to heat it. Unlike Electric/Standard (Fan off) mode, it will use the heating elements only when needed, and use the heat pump when water demand rates are lower.
NOTE: The difference between Hybrid mode and High Demand/Boost mode is that in High Demand/Boost mode the heating resistive elements are activated sooner than in the Hybrid mode.
Electric (Fan off)/Standard (Fan off) Mode
This mode uses only the upper and lower heating resistance elements to heat the water. The time it takes to heat the water is less in this mode, but it is the LEAST energy-efficient mode.
NOTE: In this mode the green LED light will flash after 48 hours as an indication that the unti is not operating in the most energy efficient mode. The unit will continue to operate in this mode and does not indicate an operating issue.
Vacation
This feature is used when you will be away from the home for an extended period of time and hot water is not needed. In this mode, the unit will drop the water temperature down to 50°F (10°C) and will use the most efficient heating mode to conserve energy while the heater is sitting idle. The unit will automatically resume heating one day before your return, so that hot water will be available.
For example if you will be gone 14 days, follow these steps:
Select VACATION by using the Mode button
Input total days you will be gone (in this example, 14) by pressing the UP arrow button (the default is 7 days)
Press ENTER.
The unit will drop the water temperature down to 50°F (10°C) for one day less than you will be gone (in this example, for 13 days). At the end of the day before you return (in this example, the 13th day), it will automatically return to the previous operating mode and heat the water to the original temperature setting so hot water is available upon your return.
To access any of these modes:
Press the MODE button on the control to the desired operating mode.
The green light will be illuminated on the chosen mode.
Frequently Asked Questions.
Filter:
Q: Why is there a filter?
A: In Hybrid and Heat Pump (only) the unit moves air through the system. The filter protects the unit from dirt. A clean air filter improves efficiency.
Q: How to clean the filter?
A: Leave power on and remove filter from top of unit. Filter can be vacuumed clean or rinsed with warm water. A dirty filter will reduce water heater efficiency!
Modes:
Q: What is Heat Pump (only)?
A: Heat Pump (only) is the most-efficient mode. It takes heat from the air to heat water, thereby cooling the surrounding air. Slower recovery but most-efficient mode.
Q: What is Hybrid?
A: The Hybrid mode combines benefits of Heat Pump (only) with the speed and power of Standard Electric. This provides great performance with less energy.
Q: What is High Demand/Boost?
A: High Demand/Boost can be used when hot water usage is higher than normal. The unit will be less efficient but will heat water faster in response to long water draws. For all normal draws, the unit will still use the efficient Heat Pump the majority of the time.
Q: What is Vacation mode?
A: If you are gone for an extended period, this mode lowers the water temperature to reduce energy used. Unitwill switch to the previous mode one day before you get back.
Q: What is Electric/Standard (Fan off) ?
A: Electric/Standard (Fan off) mode uses only the resistance heaters to heat the water. This gives faster hot water recovery than Hybrid mode, but uses more energy. This mode operates without the fan, stopping the cool air normally discharged during heat pump operation.
Q: Why does the Electric/Standard (Fan off) green LED flash ?
A: In this mode the green LED light will flash after 48 hours as an indication that the unit is not operating in the most energy efficient mode.
Operation:
Q: Why can I hear the unit run?
A: In the most energy-efficient modes, Heat Pump (only), Hybrid, and High Demand/Boost, the method used to heat the water uses a fan that can be heard while running.
Q: The heat pump is not running its normal length of time. What causes this?
A: Under some conditions, the GeoSpring™ Hybrid Water Heater will operate using the electric elements instead of the heat pump to protect your unit and ensure hot water is available to you. These conditions include extreme cold ambient temperature (<45°F), extreme hot ambient temperatures (>120°F), or very low voltage conditions.
The unitwill return to normal operation when conditions permit.
Appliance Communication Module (where installed)
The Hybrid Electric heat pump water heater is compatible with the GE Smart Appliance communication module (ACM) which can be purchased separately. Contact your local utility or visit Smart-Applianceto see if your area is using ACM technology. Applying the ACM allows the unit to respond to utility signals or tojoin a home network.
The following demand response features may be available as part of a pilot test program with the local utility company to help consumers reduce peak electricity usage in the home.
INSTALLATION
The ACM module is equipped with magnets in the base of the module that will enable it to be attached to the painted metal exterior of the heat pump water heater.
Details on how to connect the cables to the module are in the instructions that come with the module.
Once the cable from the ACM module is plugged into the water heater's connection, follow the power-up directions included with the ACM module. As soon as the ACM module is operating, the heat pump water heater is ready to receive the ACM signals.
QUICK GUIDE
If your local utility company is utilizing ACM technology, the ACM module will receive the signals sent from your utility company. One of four signals will be sent:
"Low" (represents lowest energy cost rate is available)
"Medium" (represents increased energy cost rate)
"High" (represents increased energy cost rate)
"Critical"(represents "peak rate” energy cost rate)
A heat pump water heater equipped with a ACM module will automatically recognize what energy cost rate is available and adjust its mode and temperature setting to use less energy when rates are medium, high and critical. When the heat pump water heater responds to these signals, the LED light above the Power Saver button will be on, indicating energy pricing periods are in effect, and the letters PS will be displayed on the LED if the user attempts to change the temperature without first pressing the Power Saver override button.
When the signal is low or when no ACM module is connected, the unit runs as normal. The following steps show how the unit reacts to Medium, High and Critical signal levels.
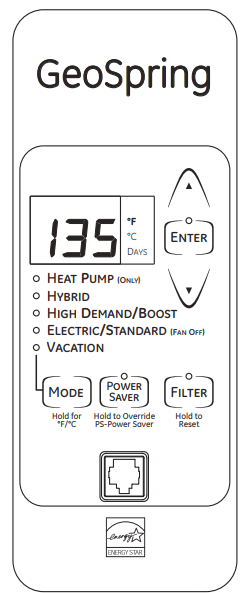
When the ACM signal is Medium, the control will operate in Heat Pump (only) Mode and the water temperature will remain at the current user setting. If the current user temperature setting is 120°F the screen will display:
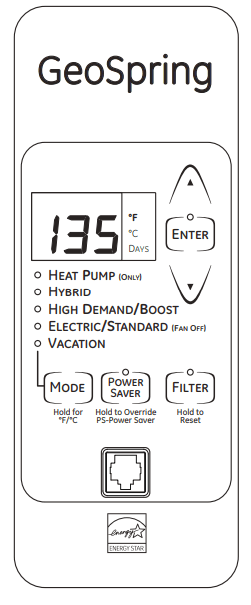
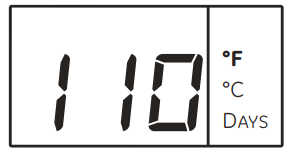
When the ACM signal is High, the control will operate in Heat Pump (only) mode, with a water temperature setting of 110°F, and the screen will display:
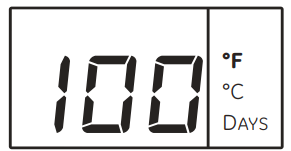
When the ACM signal is Critical, the control will operate in Heat Pump (only) mode, with a water temperature setting of 100°F, and the screen will display:
Notice: Appliance ACM connection carries voltage not compatible to computers or accessories. Do NOT plug laptops, modems, routers, etc into the Appliance RJ45 ACM connector. Use only with designated GE Appliance Accessories. Connection to computers and accessories may result in product damage.
When unit is operating in medium, high or critical, the LCD above the Power Saver button will be lit. If at any time you want to change the temperature setpoint while the unit is in Power Saver mode, press and hold the Power Saver button to override the Power Saver mode, then use the arrow buttons to change to the desired setting. Override will be in place for 18 hours. If you try to change the temperature without overriding the powersaver function, the letters PS will show on the display, indicating it is still in Powersaver mode.
Care and cleaning.
Routine Preventive Maintenance
DANGER: Risk of Scald - Before manually operating the relief valve, make certain no one will be exposed to the danger of coming in contact with the hot water released by the valve. The water may be hot enough to create a scald hazard. The water should be released into a suitable drain to prevent injury or property damage.
NOTE: If the temperature and pressure-relief valve on the hot water heater discharges periodically, this may be due to thermal expansion in a closed water system. Contact the water supplier or your plumbing contractor on how to correct this. Do not plug the relief valve outlet.
Properly maintained, your water heater will provide years of dependable trouble-free service.
It is suggested that a routine preventive maintenance program be established and followed by the user.
Temperature and Pressure-Relief Valve:
At least once a year, lift and release the lever handle on the temperature and pressure-relief valve, located on the front-right side of the water heater, to make certain the valve operates freely. Allow several gallons to flush through the discharge line to an open drain.
Periodic Inspection (once a year):
It is further recommended that a periodic inspection of the operating controls, heating elements and wiring should be made by service personnel qualified in electric appliance repair.
Most electrical appliances, even when new, make some sound when in operation. If the hissing or singing sound level increases excessively, the electric heating element may require cleaning. Contact a qualified installer or plumber for inspection.
Flushing Tank.
A water heater's tank can act as a settling basin for solids suspended in the water. It is therefore not uncommon for hard water deposits to accumulate in the bottom of the tank. To clean the tank of these deposits, follow these steps:
Attach a garden hose to the drain valve located at the bottom of the unit and direct that hose to a drain.
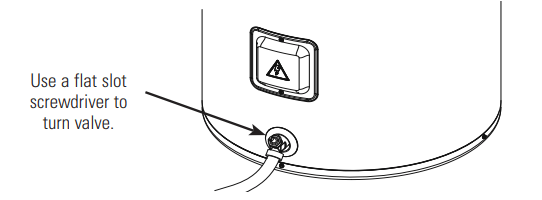
Open the drain valve with a flat screwdriver.
Once a few quarts of water have been drained, close the drain valve.
This should be done with the cold water supply open such that water removed through drain valve is replaced, and water supply flow helps to remove sediment.
Draining the Water Heater
CAUTION: Risk of Shock - Shut off power to the water heater before draining water.
DANGER: Risk of Scald - Before manually operating the relief valve, make certain no one will be exposed to the hot water released by the valve. The water drained from the tank may be hot enough to present a scald hazard and should be directed to a suitable drain to prevent injury or damage.
To drain the water heater, follow these steps:
Attach a garden hose to the drain valve located at the bottom of the unit and direct that hose to a drain.
Turn off the cold water supply.
Admit air to the tank by opening a hot water faucet or lifting the handle on the relief valve
Open the drain valve with a flat screwdriver.
Note: See page 15 for product schematic.
Extended Shutdown Periods or Vacations Exceeding Vacation Mode Options
If the water heater is to remain idle for an extended period of time, the power and water to the appliance should be turned off to conserve energy and prevent a buildup of dangerous hydrogen gas. This unit has no power button, power can only be shut off at the circuit breaker or disconnect switch.
The water heater and piping should be drained if they might be subjected to freezing temperatures.
After a long shutdown period, the water heater's operation and controls should be checked by qualified service personnel. Make certain the water heater is completely filled again before placing it in operation.
NOTE: Refer to the Hydrogen Gas Caution in the Operating Instructions (see page 3).
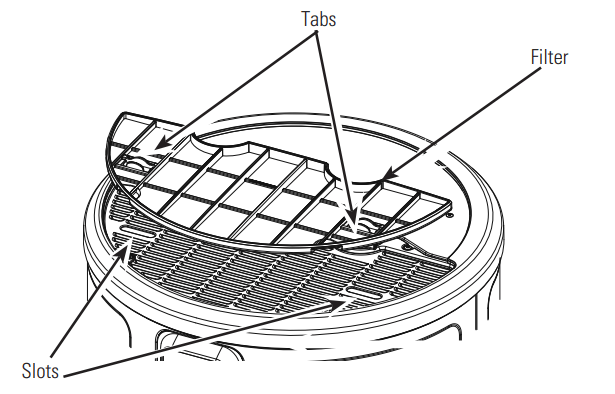
Cleaning the Filter
In the Hybrid, Heat Pump (only) and High Demand/Boost modes, the heater moves air through the system and out the back of the unit. The filter is in place to protect the evaporator from dirt and dust.
A clean air filter is important to get the highest efficiency. Occasionally this filter will need to be cleaned (minimum once per year). When the filter requires cleaning, the Red light above the Filter button will be illuminated and an audible beep will sound.
NOTE: If the filter gets too dirty, the unit will automatically switch to Electric (Fan offl/Standard (Fan off) mode and energy savings will be lost.
Leave the power on. Remove the filter from the top of the unit. Squeeze two tabs and lift to remove the air filter. Once it has been removed, the filter can be vacuumed or wiped clean with a damp cloth or rinsed with warm water.
Once the filter has been cleaned and dried, it can be replaced by aligning it into the slots in the top of the unit and pushing it down into place.
After the clean filter has been reinstalled, press and hold the FILTER button. If a heating cycle is on when the filter fault is reset, it will continue in electric mode to finish the cycle. After that, it will automatically revert to the mode it was in prior to being switched.
IMPORTANT: Filter must be cleaned when the alarm is displayed. A dirty filter will make the system work harder and result in a reduction of efficiency and possible damage to the system. In order to get the best energy efficiency available, make sure your filter is clean.
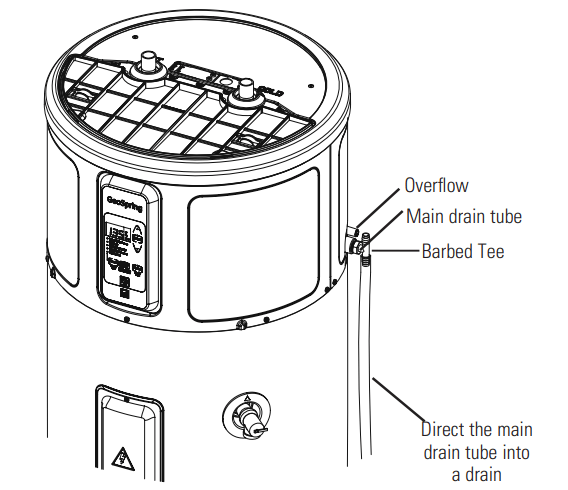
Clearing the Condensation Drain Tube
The main drain is intended to carry all condensate away. If it is clogged, the condensate will exit the overflow drain tube and onto the floor. This is intended as a notification to the user that the primary drain is clogged. Remove the barbed tee and drain tube, clear any debris and reattach.
Periodically inspect the drain lines and clear any debris that may have collected in the lines.
See Installation Instructions for more information.
Exterior Surfaces
Hand wash with warm water only.
Anode Rod
The anode rod should be removed from the water heater's tank and inspected after a maximum of 3 years service, then annually thereafter, and replaced when more than 6" (15.2 cm) of core wire is exposed at either end of the rod.
NOTE: Artificially softened water requires that the anode rod be inspected annually.
Due to shock hazard and to prevent accidental water leaks, this inspection should be done by a qualified servicer or plumber, and requires that the electric power and cold water supply be turned off before servicing the anode rod.
NOTICE: Do not remove the anode rod from the water heater's tank except for inspection and/or replacement, as operation with the anode rod removed will shorten the life of the glass-lined tank and will void warranty coverage.
The anode rod consumption and replacement are not covered by warranty.
Anode Rod Maintenance and Service.
Tools needed:
T20 Torx Screwdriver
Slot Screwdriver
Tape
Socket Wrench
Socket Extention 12" long
1 1/16" Socket
Softset Sealant
Anode Rod, if needed
See page 72 for part ordering instructions
To service the Anode Rod:
Disconnect power, shut off the water supply, and partially drain one or two gallons from the water heater through the lower drain valve.
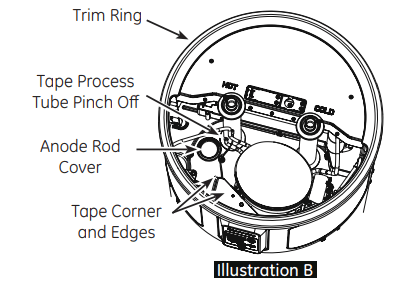
Remove the filter, trim ring, and front top cover as show in Illustration A.
Reinstall the trim ring, place a protective layer of tape on sheet metal edges, and remove the anode rod cover as show in Illustration B.
Using a slot screwdriver and ensuring to avoid damage to exposed wires, remove foam to uncover the anode rod as show in Illustration C.
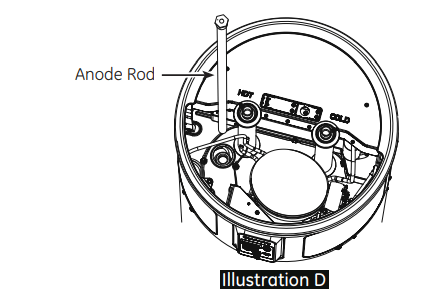
Using a 1 1/16" socket and extension, unscrew the anode rod, then lift out to inspect as show in Illustration D.
To install the anode rod, seal the threads with soft set sealant, thread into the port and using the torque wrench tighten to 50 ± 5 ft-lbs of torque. Reinstall the anode rod cover.
Turn water supply on, open a tap to remove any air in plumbing system, inspect for leaks, then turn the power on and reassemble the unit in reverse order as show in Illustration A.
Troubleshooting…
Problem
Possible Causes
What To Do
Water heater makes sounds
A fan is used to move air through the system.
Some amount of fan sound is normal. If you hear an abnormal sound or the sound level seems unusually loud, then contact service.
Water heater is making the room cooler
Room is not vented properly or is too small.
If the room is smaller than 10' x 10' x 7' (3m x3mx 2.1m), then it must have a louvered door or other means to allow air exchange with surrounding rooms.
Heat is removed from the air to heat the water
This is normal
Water dripping down the outside of the heater.
Condensate drain is clogged.
Clear out any debris in the drain port on the unit.
Hot/Cold water connections are not tightened.
Tighten the inlet and outlet pipe connections.
Not enough or no hot water
Water temperature may be set too low.
See About the Water Temperature Setting section.
Hot water usage pattern exceeds the capability of the water heater in current mode
Change to different mode
Water usage may have exceeded the capacity of the water heater.
Wait for the water heater to recover after an abnormal demand
Ambient temperature is too low
For the water heater to work properly, its location needs to have a temperature of 32° to 150°F for Standard Electric mode and 45° to 120°F for all other modes.
Cold water inlet temperature may be colder during the winter months.
This is normal. The colder inlet water takes longer to heat.
Leaking or open hot water faucets.
Make sure all faucets are closed.
Long runs of exposed pipe, or hot water piping on outside wall.
Insulate piping.
Not enough clearance to allow air to circulate for the heater pump.
Make sure unit is 7" away from the wall.
Room size is not appropriate for water heater.
If room size is less than 10' x 10' x 7' (700 cu. ft.), install louvered door or similar ventilation.
A fuse is blown or a circuit breaker tripped.
Replace fuse or reset circuit breaker.
Electric service to your home may be interrupted.
Contact the local electric utility.
Improper wiring.
See the Installation Instructions section.
Manual reset limit (TCO).
See the Safety Control section, see page 4.
Water connections to unit reversed.
Correct piping connections.
Electric supply may be off.
Make sure electric supply to water heater is correct disconnect switch, if used, are in the ON position.
Water is too hot
Water temperature is set
See About the Water Temperature Setting section. too high.
CAUTION: For your safety, DO NOT attempt repair of electrical wiring, controls, heating elements or other safety devices. Refer repairs to qualified service personnel.
Electronic control has failed.
Call for service.
Rumbling noise
Water conditions in your home caused a buildup of scale or mineral deposits on the heating elements.
Remove and clean the heating elements. This should only be done by a qulified service personnel,
Relief valve producing popping sound or draining
Pressure buildup caused by thermal expansion to a closed system.
This is an unacceptable condition and must be corrected.See Thermal Expansion Information on page 15 Do not plug the relief valve outlet.
Contact a plumbing contractor to correct this.
The heater is beeping and the display says F11
The water heater has not been filled with water beforepowering up. Powering up theheater without water will damage the electric heaters.
The water heater warranty does not cover damage or failure resulting from operation with an empty or partially empty tank.
Fill the tank completely with water. Press ENTER to stop the alarm and then press POWER when the tank has been filled
The filter light is on.
The filter requires cleaning. A clean filter is necessary for effective operation.
Follow the instructions on how to remove and clean the filter on page 12.
The heater is beeping and the screen says "FA-F8"
There is an issue with theheat pump system.
The unit will automatically switch to another available mode to ensure you continue to have hot water. Contactservice immediately and give them the codes listed on the display screen.
The heater is beeping and the screen flashes an error code
There is an issue with the water heater that requires immediate attention.
The heater may switch to another available heating mode, Contact service immediately. To stop the beeping noise (unless error code F2, Fll or bAd linE) press either the UP or down arrow button and the alarm will stop and the display will go back to normal (set temperature).
The water heater is beeping and the screen flashes, "bAd linE"
Unit is not receiving 240VAC as intend. •
Turn off power to water heater (generally at the breaker panel). Then read "Electrical Connections” section ofInstallation Instructions, see page 17. Then, contact the installer to verify electrical input to the water heater.
Hot Water has a rotten egg or sulfur smell
Certain water supplies with •high sulfate content will react with the anode rod that is present in all water heaters for corrosion protection of the tank.
The odor can be reduced or eliminated in most water heaters by replacing the anode rod with less-active material rod. In some cases, an added step of chlorinating the water heater and all hot water lines may be necessary, contact your local water professional or plumber for options and instructions. Call GE at 1.888.4GE.HEWH (1.888.443.4394) to learn how to purchase this replacement anode rod. A qualified servicer or plumber should do this replacement. Use of a non-GE approved anode rod, or operating the water heater without a GE approved anode rod will VOID the warranty.
Unit is not making normal sounds
If unit is using electric resistance elements, it will not make fan or compressor sounds.
For Service, please call 1.888.4GE.HEWH (1.888.443.4394)