User Manual for Refrigerator
Setting up your Refrigerator
Getting ready to install the refrigerator
Congratulations on the purchase of your Samsung Refrigerator.
We hope you will enjoy the many state-ofthe-art features and efficiencies that this new appliance has to offer.
• This refrigerator must be properly installed and located in accordance with the manual before it is used.
• Use this appliance only for its intended purpose as described in this instruction manual.
• We strongly recommend that any servicing be performed by a qualified individual.
• Please dispose of the packaging material for this product in an environmentally friendly manner.
Selecting the best location for the refrigerator
• Select a location without direct exposure to sunlight.
• Select a location with level (or nearly level) flooring.
• Select a location with enough space for the refrigerator doors to open easily.
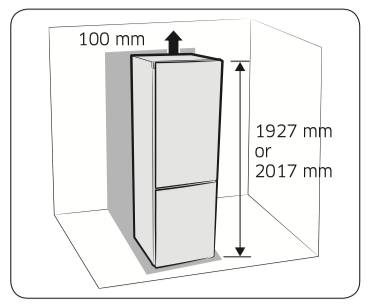
• Allow sufficient space to install the refrigerator on a flat surface.
- If your refrigerator is not level, the internal cooling system may not work correctly.
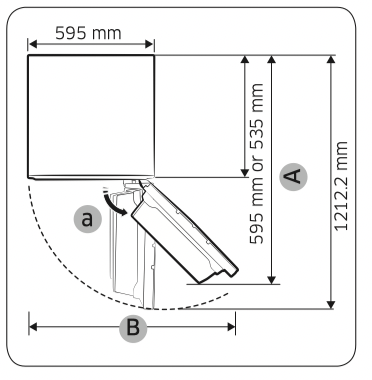
- Overall space required in use. Refer to drawing and dimension as below.
Effective temperature range
The refrigerator is designed to operate normally in the temperature range specified by its class rating.
|
Class
|
Symbol
|
Ambient Temperature range (°C)
|
|
IEC 62552 (ISO 15502)
|
ISO 8561
|
|
Extended Temperate
|
SN
|
+10 to +32
|
+10 to +32
|
|
Temperate
|
N
|
+16 to +32
|
+16 to +32
|
|
Subtropical
|
ST
|
+16 to +38
|
+18 to +38
|
|
Tropical
|
T
|
+16 to +43
|
+18 to +43
|
NOTE
The cooling performance and power consumption of the refrigerator may be affected by the ambient temperature, the door-opening frequency, and the location of the refrigerator. We recommend adjusting the temperature settings as appropriate.
NOTE
• Allow sufficient space to the right, left, back and top for air circulation. This will help reduce power consumption and keep your energy bills lower.
• Do not install the refrigerator where the temperature will go below 10 °C.
• Please ensure that appliance can be moved freely in the event of maintenance & service.
| |
RB41/38
|
RB36/33
|
|
a
|
155˚
|
100˚
|
|
A
|
900 mm
|
1139 mm
|
|
B
|
1330 mm
|
688 mm
|
NOTE
Each measurement based on the design dimension, so it may differ depending on the measuring method.
CAUTION
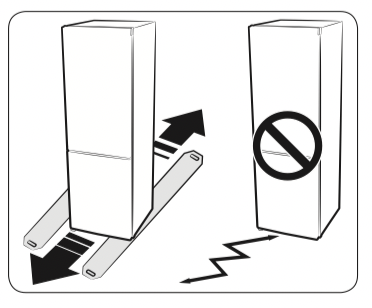
• When installing, servicing, or cleaning behind the refrigerator, be sure to pull the unit straight out and push back in straight after finishing. Also, make sure your floor supports the full-load refrigerator. Otherwise, it may cause floor damage.
• Please tie up the extra length of the power cord at the back of the refrigerator so as not to be touched on the floor preventing the power cord from being crushed by the rollers upon relocation.
NOTE
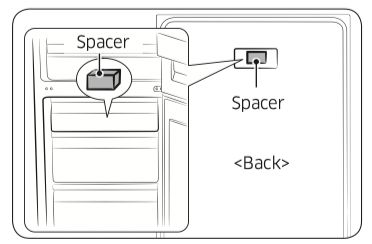
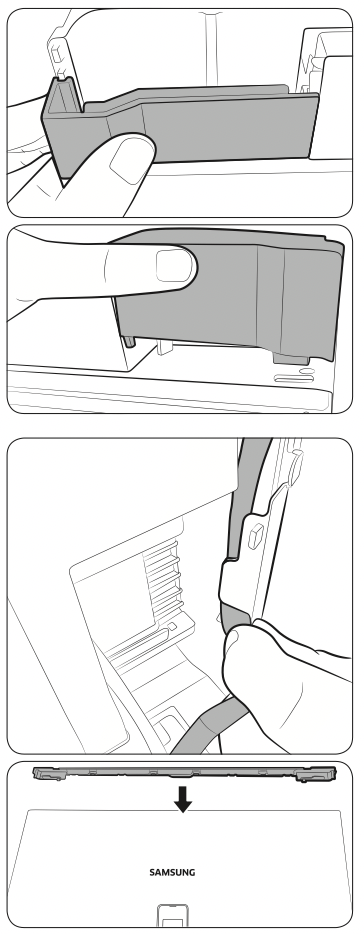
Remove paper on spacer and then attach a spacer (Gray block) on the back side of refrigerator for better performance. Make sure a spacer fix like above image when you install the refrigerator. It is improving the refrigerator performance. If You set the refrigerator in furniture, the spacer should be removed for the door-flushing with furniture.
Flooring
For proper installation, this refrigerator must be placed on a level surface of hard material that has the same height as the rest of the flooring. This surface should be strong enough to support a fully loaded refrigerator. To protect the floor finish, cut a large section of the cardboard carton and place it under the refrigerator where you are working.
NOTE
Pulling or pushing the refrigerator may damage the floor. Moving the refrigerator after installation may damage the floor.
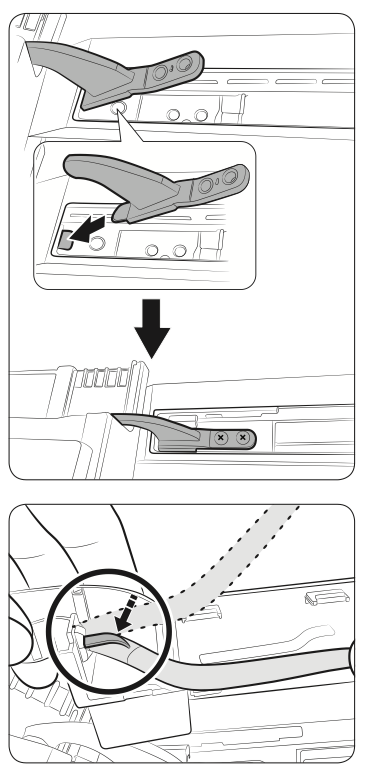
Levelling the refrigerator
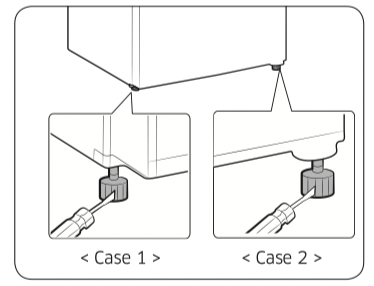
If the front of the appliance is slightly higher than the rear, the door can be opened and closed more easily.
When installing the refrigerator, make sure both legs contact the floor for secure installation.
Case 1) The appliance tilts down to the left. Turn the left adjusting leg in the direction of the arrow until the appliance is level.
Case 2) The appliance tilts down to the right. Turn the right adjusting leg in the direction of the arrow until the appliance is level.
Now that you have your new refrigerator installed and in place, you are ready to set up and enjoy the full features and functions of the appliance.
By completing the following steps, your refrigerator should be fully operational.
If not, first check the power supply and electricity source or try the troubleshooting section at the back of this user guide.
If you have any further questions, contact your Samsung Electronics service center.
1. Place the refrigerator in an appropriate location with reasonable clearance between the wall and the refrigerator. Refer to installation instructions in this manual.
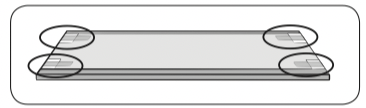
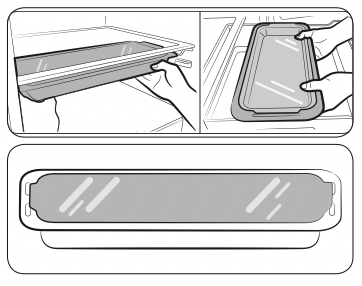
2. Before using the refrigerator please remove the shelf corner covers shown on below figure. (The Foam-PE are used to secure your refrigerator during transportation).
3. Once the refrigerator is plugged in, make sure the interior light comes on when you open the doors.
4. Set the temperature control to the coldest temperature and wait for an hour. The freezer should get slightly chilled and the motor should run smoothly.
5. After powering the refrigerator, it will take a few hours to reach the appropriate temperature.
6. Once the refrigerator temperature is sufficiently cool, you can store food and drink in the refrigerator.
NOTE
After powering the refrigerator, the alarm will sound. Press Freezer or Fridge button.
Operating your Refrigerator
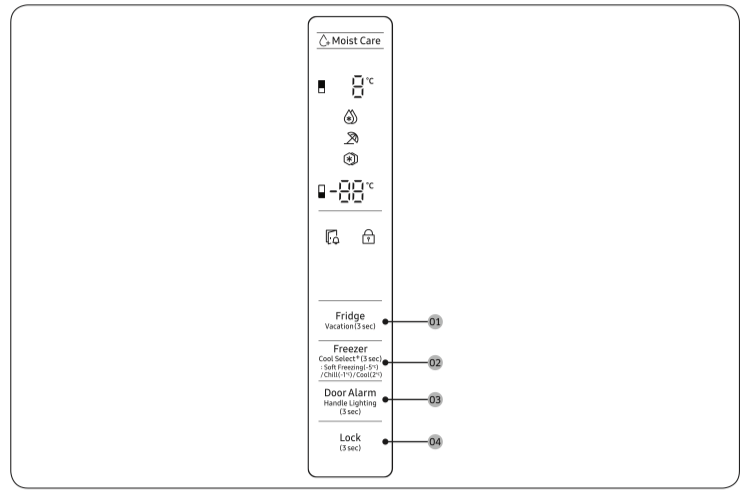
Using the control panel
TYPE A
TYPE B

NOTE
• Each time you press a button on the control panel, you will hear a short beep.
• When you do not press any button, all LEDs on display become turned Off for the minimum energy consumption except Door Alarm. But LEDs of Power Freeze, Power Cool, Lock and Vacation are turned on at the corresponding functions.
01 Fridge / Vacation (3 sec)
| Fridge |
To adjust the fridge temperature, press Fridge to select the corresponding temperature.
You can change the temperature between 1 °C and 7 °C.
Power Cool
Power Cool speeds up the cooling process at maximum fan speed. The fridge keeps running at full speed for two and a half hours and then returns to the previous temperature.
• To activate Power Cool, select temperature 1 °C, and then press Fridge to select Power Cool. The corresponding indicator ( ) lights up, and the refrigerator will speed up the cooling process for you. ) lights up, and the refrigerator will speed up the cooling process for you.
• To deactivate Power Cool, press Fridge again. Then, the temperature of the fridge will be set back to 7 °C.
NOTE
Using Power Cool increases power consumption. Make sure you turn it off and return to the previous temperature if you don’t intend to use it.
|
| Vacation |
If you are going on vacation or a business trip, or if you do not intend to use the fridge for an extended time, use the Vacation mode.
• To activate Vacation mode, press and hold Fridge for 3 seconds. The Vacation On indicator ( ) turns on while the display of the fridge temperatures will turn off. The fridge temperature will be controlled under 17 °C, but the freezer remains active as previously set. ) turns on while the display of the fridge temperatures will turn off. The fridge temperature will be controlled under 17 °C, but the freezer remains active as previously set.
• To deactivate Vacation mode, press and hold Fridge again for 3 seconds. The fridge temperature will return to the previous setting.
NOTE
• Make sure to remove foods in the fridge compartment before using Vacation mode.
• The Vacation mode will be disabled if you adjust the temperature.
|
02 Freezer / Cool Select+ (3 sec)
| Freezer |
The Freezer button can be used to set the freezer temperature. Available temperatures are between -15 °C and -23 °C.
NOTE
You cannot change the temperature in Cool Select mode.
|
| Power Freeze |
Power Freeze uses maximum fan speed to speed up the freezing process. The freezer keeps running at full speed for 50 hours and then returns to the previous temperature.
• To activate Power Freeze, select temperature -23 °C, and then press Freezer to select Power Freeze.
The corresponding indicator (  ) lights up, and the refrigerator will speed up the freezing process for you. ) lights up, and the refrigerator will speed up the freezing process for you.
• When the Power Freeze process is complete, the corresponding indicator turns off and the freezer returns to the previous temperature setting.
• To deactivate Power Freeze, press Freezer again.
The freezer returns to the pervious temperature setting.
• To freeze large amounts of food, activate Power Freeze for at least 20 hours before putting food in the freezer.
NOTE
Using Power Freeze increases power consumption. Make sure you turn it off and return to the previous temperature if you do not intend to use it.
|
| Cool Select+ |
Each time you press and hold Cool Select+ for 3 seconds, the operating mode switches in this sequence:
Freeze  Soft Freezing (-5 °C) Chill (-1 °C) Cool (2 °C) Soft Freezing (-5 °C) Chill (-1 °C) Cool (2 °C)
• Soft Freezing feature helps keep meat and fish fresh longer.
• Cool feature hleps keep water, juice, soft drinks, beer, etc. cold.
CAUTION
• If you switch the mode from Freezer to Cool Select+, the stored food may leak juice or liquid from the food.
• Do not store meat or fishery for an extended time in Cool Select+ mode. The food may freeze or spoil because of inappropriate temperature settings for the food to store.
|
03 Door Alarm / Handle Lighting (3 sec)
|
Door Alarm
|
You can set the alarm for a reminder. If the door is left open for more than 2 minutes, the alarm will sound with the Alarm indicator blinking.
You can toggle to enable and disable the alarm by pressing Door Alarm.
|
|
Handle Lighting
|
Press the Door Alarm button for 3 seconds, then Handle Lighting function will activate.
When the Handle Lighting function activates, the Light under the fridge door will always turn on.
Press the Door Alarm button for 3 seconds again and Handle Lighting function will turn off, The Light is ON when the freezer door is open. (The Light is OFF when the fridge door is open or when the fridge door and freezer door are BOTH open.)
|
04 Lock (3 sec)
| Lock |
Press this button for 3 seconds to activate the Control Lock function. Control Lock indicator( ) will light up and all the buttons are locked and de-activated. (If you press any button while Lock is on, the indicator will blink.) ) will light up and all the buttons are locked and de-activated. (If you press any button while Lock is on, the indicator will blink.)
Press this button for 3 seconds to turn Control Lock off and reactivate the buttons.
|
Temperature Alarm
• When the freezer compartment is too warm because there has been a power failure, the signal of “- -” flashes on the display. When the Freezer or Fridge button is pressed, the “warmest temperature” which has reached in the freezer and fridge compartment is flashed on the display for 5 seconds. Then the actual temperature is indicated. To deactivate the Temperature Alarm function, press the Door Alarm button again.
• This warning may operate;
- When the appliance is turned on.
- The freezer compartment is too warm due to a power failure.
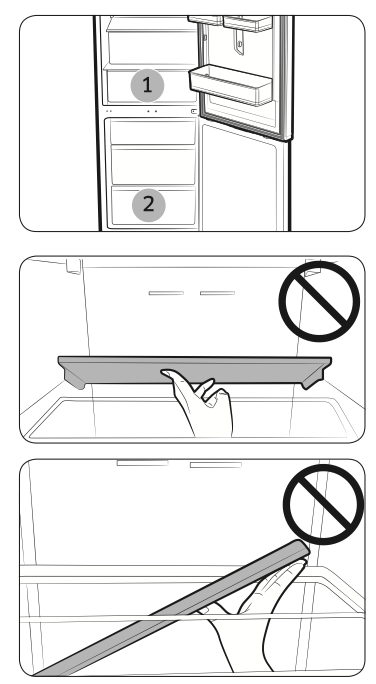
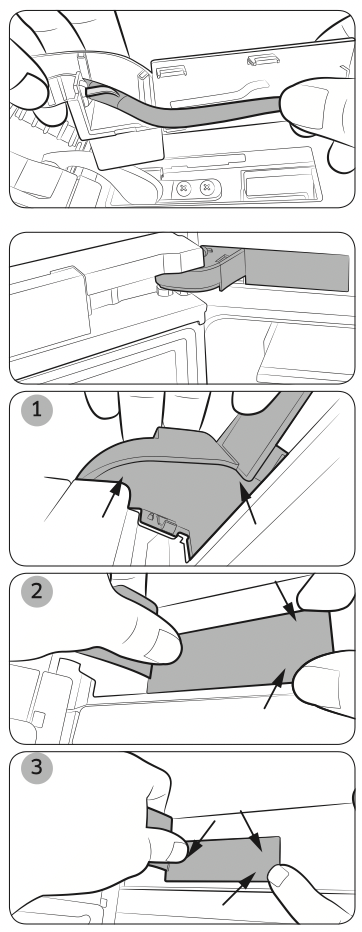
Freezer shelf (Optional)
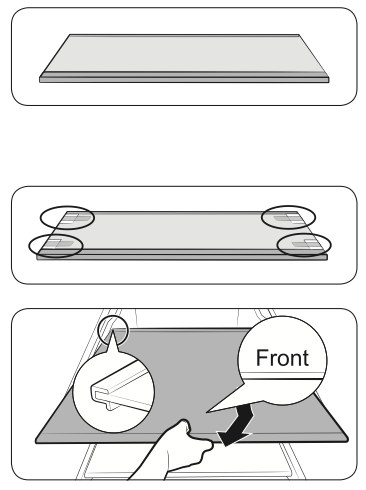
To get more space, you can remove the top and middle drawers and locate the ‘Freezer Shelf’ on the bottom of the freezer, since it does not affect thermal and mechanical characteristics.
A declared storage volume of frozen food storage compartment is calculated with these drawers removed.
1. Remove the attached Tape on the shelf.
2. Take out the top and middle drawer to assemble the shelf.
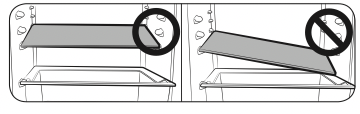
3. Insert the Freezer shelf with the “Front” mark side up. If the “Front” mark is unable to identify, insert the protruding part of the shelf at first as shown in figure.
CAUTION
• Do not insert the shelf upside-down, or in the reverse direction.
• When you don’t use the freezer shelf, keep it safe for later use.
NOTE When storage the glass container on the tempered shelf, the scratch may occur since friction on the shelf.
Parts and features
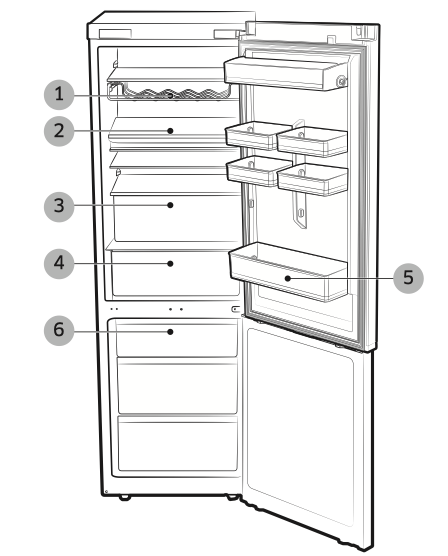
1. Wine Rack (Optional)
2. Foldable Shelf or CHEF PAN Shelf (Optional)
3. FRIDGE DRAWER
4. CHEF BOX (Optional)
5. Door Bin
6. FREEZER DRAWER
NOTE If the door is left open for more than 10 minutes, the LED lamps will turn off.
NOTE
• Some of the feature such as CHEF BOX (1) can be different and may not be available depending on the model.
• The fruits or the vegetables could get frozen in CHEF BOX. (Optional)
• To freeze large quantities of food quickly, use the very bottom drawer (2) where food freezes particularly quickly.
CAUTION
• Be careful not to impact the foldable shelf.
• When you take out the stuff below the foldable shelf, There is a risk of falling the folder shelf.
CAUTION
• The rear of the wine rack may fall out while removing the wine rack to the front.
• Make sure to use both hands when removing the wine rack.
• If the wine rack falls when removed, the stored goods below the wine rack may fall accordingly.
Features of the freezer compartment
Frozen-food mark on the Door panel
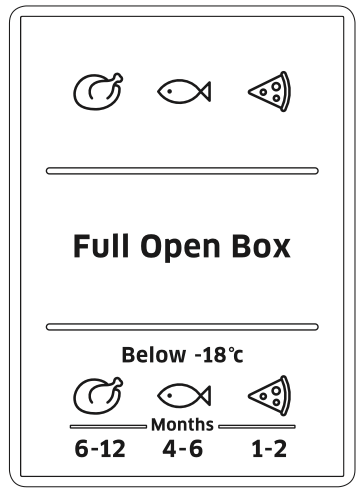
The figures above to the symbols indicate the permitted storage period of the produce in months. When purchasing frozen produce, observe the date of manufacture or sell-by date.
Freezing food
Freeze fresh, undamaged food only. Keep food which is to be frozen away from food which is already frozen. To prevent food from losing its flavour or drying out, place in airtight containers.
Packing food correctly:
1. Place the food in the packaging.
2. Press out all the air.
3. Seal the wrapping.
4. Label the wrapping with the contents and date.
The following products are not suitable for wrapping food:
Wrapping paper, greaseproof paper, cellophane, refuse bags and used shopping bags.
The following products are suitable for wrapping food:
Plastic film, polyethylene blown film, aluminium foil and freezer tins. These products can be purchased from your dealer.
The following products are suitable for sealing the wrapped food:
Rubber bands, plastic clips, string, coldresistant adhesive tape or similar. Bags and polyethylene blown film can be sealed with a film sealer.
Shelf life of frozen food
Storage duration depends on the type of food. At a temperature setting of -18 °C:
• Fresh Poultry (whole chicken), Fresh meat (steaks, Roasts) : up to 12 months
• Fish (Lean fish, Cooked fish), Fresh shrimp, scallops, squid: up to 6 months
• Pizza, Sausage: up to 2 months . Storage duration is refered to FDA web site
CAUTION
If you do not follow this period, you will have food poisoning.
Purchasing and storing deep-frozen food
When purchasing frozen food, observe the following:
• Check that the packaging is not damaged.
• Check the sell-by date.
• The temperature of the supermarket freezer should be below -18 °C or lower. If not, the shelf life of the frozen food is reduced.
• Purchase deep-frozen food last. Wrap food in newspaper or place in a cool bag and take home.
• At home immediately place deepfrozen food in the freezer compartment. Consume the frozen food before the useby date expires.
Thawing frozen food
Depending on the type and application, select one of the following options:
• At room temperature.
• In the refrigerator. In an electric oven, with/without fan assisted hot-air.
• In a microwave oven.
NOTE
• Do not refreeze food which is beginning to thaw or which has already thawed. The food cannot be refrozen until it has been prepared (boiled or fried).
If you do not follow this period, you will have food poisoning.
• Do not store the frozen products longer than the max storage period.
Removing the interior parts
CAUTION
When assembling, put fridge shelves in the correct position and do not put them upside down. It may cause a personal injury or material damage.
NOTE
When you put the shelves back, make sure the side with the label “Front” on it face the front of the refrigerator.
Shelves / Foldable Shelf (Optional)
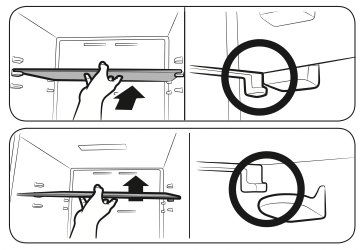
1. To move the shelf, hold it with both hands and lift to release from the rear supports. Then, pull it halfway to the front.
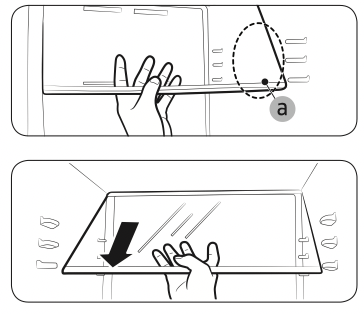
2. In an area (a) between the supports, tilt the shelf on the front side by more than 45 ˚ as shown.
3. Check the target shelf level, and pull up the shelf to the front so that the front hooks locks into the front supports of the target level.
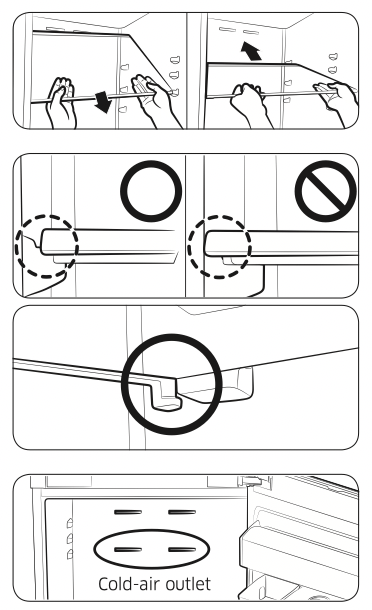
4. While pulling up the front side, insert the rear side to the rear supports.
NOTE
To prevent bumping the door or door bins use caution when removing the shelf.
NOTE
• Make sure the shelf is balanced on every support.
• Make sure every hook of the shelf locks into the correct support.
CAUTION
If the topmost shelf is positioned below the cold-air outlet, food on that shelf may freeze.(RB33/36* models)
Door bins
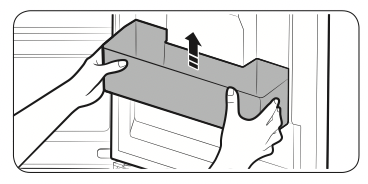
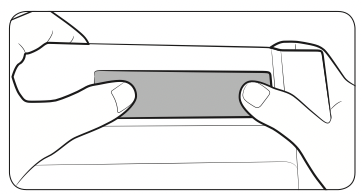
Firmly grab the door bins with both hands and lift it up gently to remove the door bins.
NOTE
• When opening and closing doors, there is a risk of falling if tall things are placed on the bottom of the door bin.
• Do not store vegetable oil that is opened in the fridge door bin. This is because the oil will harden. To prevent hardening, store the oil in a cool place. (Vegetable oils: soybean oil, olive oil, sesame oil, etc)
CHEF BOX (Optional)
Grab the front handle and pull the CHEF BOX.
Grab the side handles, and take out the CHEF BOX.
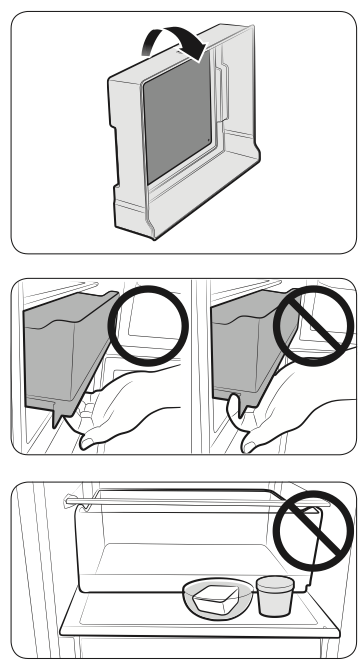
Flip the CHEF BOX, and then remove the cooling plate.
CAUTION
• The cooling plate may not come off easily if there is water on the surface of the cooling plate or the CHEF BOX.
• To prevent injury, do not forcefully pull out the cooling plate.
CAUTION
Do not open the CHEF BOX without using the handle.
NOTE
Do not put any stuff on the CHEF BOX. The door should not be closed.
CHEF Pan (Optional)
It may put under the shelf or into the CHEF BOX, also it can use in the oven as well.
CAUTION
• If the Chef pan put into the CHEF BOX, It may be freezed.
• When using the oven, remove the cover tray.
• Chef pan is not suitable for use in the microwave oven.
• Use caution not to drop the cover tray.
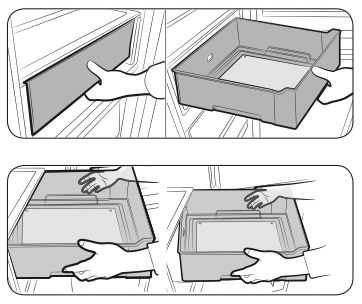
Drawers

Pull the drawers out fully then slightly lift it up to remove the drawers.
• If the drawers get stuck to door, remove drawer by lifting up after remove shelves.
Moving the drawers, please grab the handle of drawer tightly.
CAUTION
If you dropped the drawer during moving it, you will be able to have injury.
Cleaning the refrigerator
WARNING
• Do not use Benzene, Thinner or Clorox™ for cleaning.
• They may damage the surface of the appliance and can create a risk of fire.
CAUTION Do not spray the refrigerator with water while it is plugged in, as it may cause an electric shock. Do not clean the refrigerator with benzene, thinner or car detergent for risk of fire.
1. Unplug the power cord of the refrigerator.
2. Slightly dampen a soft lint-free cloth or paper towel with water.
NOTE Do not use any kind of detergent to clean the refrigerator because that can discolor or damage the refrigerator.
3. Wipe the inside and outside of refrigerator until it is clean and dry.
4. Plug the power cord of the refrigerator.
Removing the interior parts
When the interior or exterior LED lamp has gone out, do not disassemble the lamp cover and LED lamp by yourself.
NOTE Please contact your service agents.
Reversing the door (optional)
Before you reverse the refrigerator door, make sure to unplug the refrigerator. Samsung recommends that reversing of the door opening is only completed by Samsung approved Service providers. This will be on a chargeable basis and at the customers expense.
NOTE Any damage caused while attempting to reverse the door opening is not covered under the appliance manufactures warranty. Any repairs requested due to this circumstance will be completed on a chargeable basis at the customers expense.
1. Before attempting to reverse the refrigerator doors ensure that the refrigerator is disconnected from the main electricity supply and all food stuffs are emptied from inside the appliance.
2. If the customer does not feel confident to follow instruction in the user manual, a Samsung qualified service engineer must be contacted to carry out this change.
3. Do not plug in Refrigerator just after door reverse finished process and wait for at least one hour.
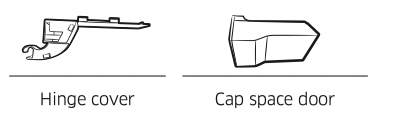
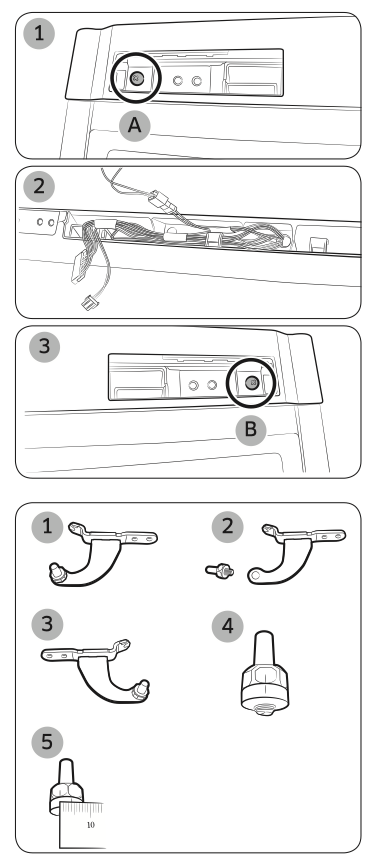
Required Tools (Not provided & Additional part)
The refrigerator offers 3 types of screws for different uses. Be careful to note that the screws are replaced.
Not provided
 Additional part
CAUTION During reversing door, require careful handling about small parts (screw, cap and etc.) for infants.
Reversing the door
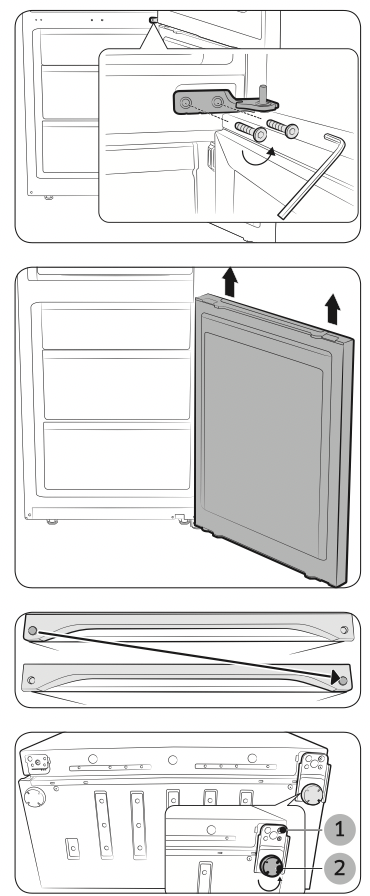
1. Remove the Cover Wire (1) and Cap door L (2).
2. Remove the Cover Hinge to push a hook like below Pictures.
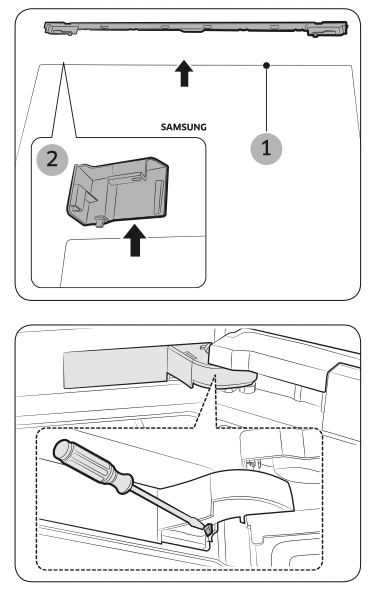
3. Disconnect the housing. And then remove 2 screws on the Upper Hinge.
CAUTION
• The door is heavy, be careful not to injure yourself when removing the door. • Be careful not to damage the wire during operation.
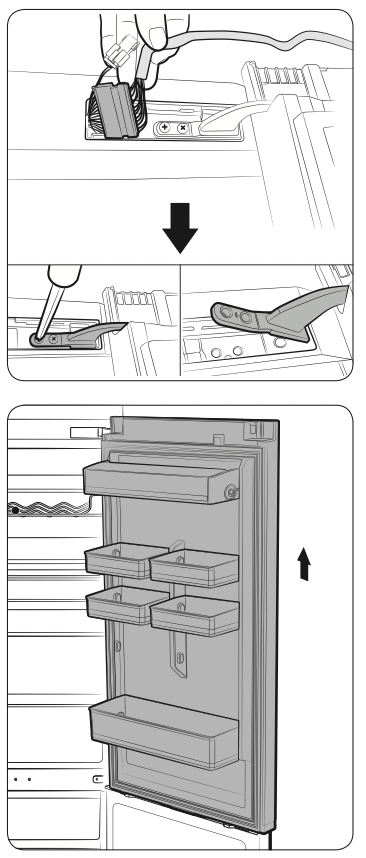
4. Remove the fridge door from the Middle hinge by carefully lifting the door straight up.
CAUTION
The door is heavy, be careful not to injure yourself when removing the door.
5. Disassemble the Middle hinge.
6. Remove the freezer door from the Bottom hinge by carefully lifting the door straight up.
CAUTION
The door is heavy, be careful not to injure yourself when removing the door.
7. Switch the Position of Cap.
CAUTION
Be careful the Scratch, when disassembling the Cap.
8. Lay the refrigerator carefully. Remove the Leg (1) and the Hinge Low (2).
9. FRIDGE door and FREEZER door are changed some part of bottom.
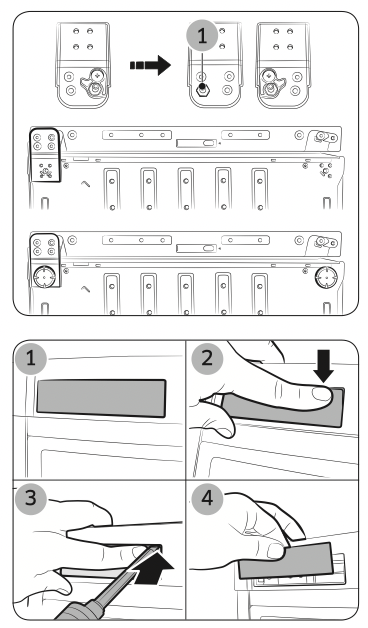
(2) Remove the Auto Closer.
(3) Remove the Stoper.
(4),(5) Change position of the Grommet.
(6) Remove the screw in opposite side.
(7) Assembly the stoper in opposite side.
(8),(9) Change position of the Stoper and assembly.
(10) Install the screw in opposite side.
CAUTION
Be careful not to injure yourself during operation.
10.Switch the Position of Cap screw.
CAUTION
Be careful not to injure yourself during operation.
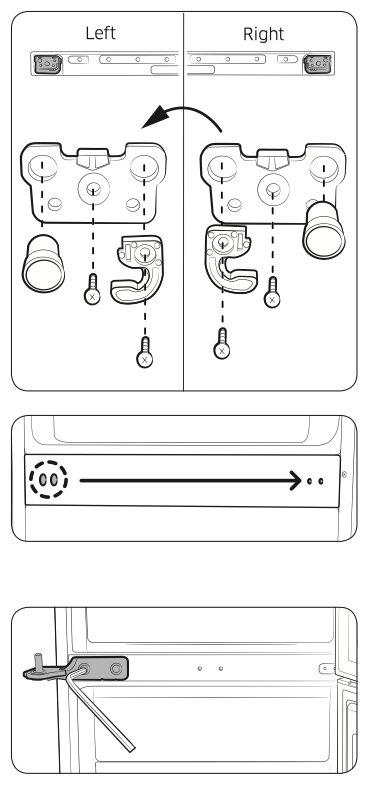
11.Assemble the Middle hinge by the 5 mm Allen wrench. First of all, assemble the Freezer door and Hinge Mid. And then assemble Hinge Low and Fridge Door with Assy Hinge Up. Assembling procedure of the Door.
NOTE
• Hinge Mid > Freezer Door > Hinge Low > Fridge Door with Assy Hinge Up
• Make sure that the screws are screwed tight.
CAUTION
Be careful not to injure yourself during operation.
12.Switch the position of Bottom hinge and Leg (Right > Left). Assembly the Hinge Low after putting the Freezer Door in the middle hinge.
NOTE
• Disassemble the Guide auto close and the Shaft-hinge (1).
• Assemble the Shaft-hinge and the the Guide auto close like this Picture.
• Make sure that the screws are screwed tight.
13.Put the Cap-Control out from the Cover Control like the picture.
14.After removing a Cover control (1), switch the Wire door (2) direction to opposite side on Fridge Door (Display model only).
Assemble the Cover-Control with Screw (A) like a Picture (3).
CAUTION
• Be careful not to injure yourself during operation.
• Be careful not to damage the wire during operation.
15.(1) Not easy to separate the Top hinge shaft , So should disassemble the shaft before removing the top hinge.
(2) Use 11 mm wrench to separate the Top hinge shaft.
(3) Flip the Top hinge and reattach the Top hinge shaft by hands (4) Make a line Top hinge and shaft.
(5) Use a 11 mm wrench to adjust the gap by more than 4 mm between the marking line (4) and the hinge shaft
16.Insert the Top hinge to make the hole a little bigger and then put out the Top hinge to assemble the Fridge door.
NOTE
• Assemble step
- Assemble the Top hinge on the Fridge door.
- Assemble the Middle hinge on the Fridge door.
- Insert the Top Hinge on the Cabinet.
- Assemble the screw.
• Make sure that the screws are screwed tight.
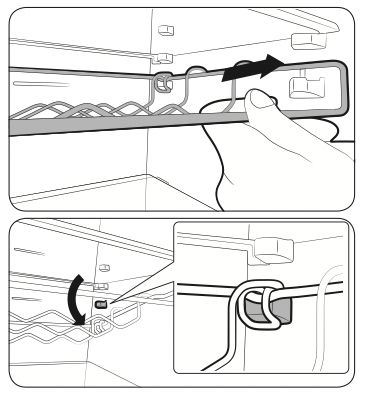
17.Change the Wire door direction to opposite side.
Connect the wire and then insert it into the Cover-Control.
Insert the wire into the Cover Hinge. (Make sure the white band on the wire is secured to the cover hinge hook.) And then fold the fixer not todisassemble as below picture.
CAUTION
Be careful not to damage the wire during operation.
18.Insert the wire between ribs of the Cover Hinge as below picture.
CAUTION
Be careful not to damage the wire during operation.
19.Assemble the Cover Hinge as below picture.
CAUTION
Be careful not to damage the wire during operation.
20.Assemble the Cap Space Door (additional part) on back side.
21.Insert the Cover Wire Door on the top of Fridge door and then push it to assemble completely. Check the wire position that should be located the back side of Cover Wire Door.
CAUTION
Be careful not to damage the wire during operation.
22.Assemble the Cap Control.
Troubleshooting
Before calling for service, review the checkpoints below. Any service calls regarding normal situations (No Defect Cases) will be charged to users.
General
Temperature
|
Symptom
|
Possible causes
|
Solution
|
Fridge/freezer does not operate. Fridge/freezer temperature is warm.
|
• Power cord is not plugged in properly. |
• Properly plug in the power cord. |
| • Temperature control is not set correctly. |
• Set the temperature lower. |
| • Refrigerator is located near a heat source or direct sunlight. |
• Keep the refrigerator away from direct sunlight or a heat source. |
| • Not enough clearance between refrigerator and nearby walls or cabinets. |
• We recommend that the gap between the refrigerator and nearby walls (or cabinets) is more than 50 mm. |
| • The refrigerator is overloaded. Food is blocking the refrigerator vents. |
• Do not overload the refrigerator. Do not allow food to block vents. |
| Fridge/freezer is over-cooling. |
• Temperature control is not set correctly. |
• Set the temperature higher. |
| Interior wall is hot. |
• Refrigerator has heat-proof piping in the interior wall. |
• To prevent condensation from forming, the refrigerator has heat-proof piping in the front corners. If the ambient temperature rises, this equipment may not work effectively. This is not a system failure.

|
Odour
|
Symptom
|
Possible causes
|
Solution
|
|
Refrigerator has odours.
|
• Spoiled food.
|
• Clean the refrigerator and remove any spoiled food.
|
|
• Food with strong odours.
|
• Make sure strong smelling food is wrapped airtight.
|
Frost
|
Symptom
|
Possible causes
|
Solution
|
|
Frost around the vents.
|
• Food is blocking the vents.
|
• Make sure no food blocks the refrigerator vents.
|
|
Frost on interior walls.
|
• Door is not closed properly.
|
• Make sure food does not block the door. Clean the door gasket.
|
Condensation
|
Symptom
|
Possible causes
|
Solution
|
|
Condensation forms on the interior walls.
|
• If door is left open, moisture enters the refrigerator.
|
• Remove the moisture and do not leave a door open for extended periods of time.
|
|
• Food with high moisture content.
|
• Make sure food is wrapped airtight.
|
Do you hear abnormal sounds from the refrigerator?
Before calling for service, review the checkpoints below. Any service calls related to normal sounds will be charged to the user.
These sounds are normal.
• When starting or ending an operation, the refrigerator may make sounds similar to a car engine igniting. As the operation stabilizes, the sounds will decrease.
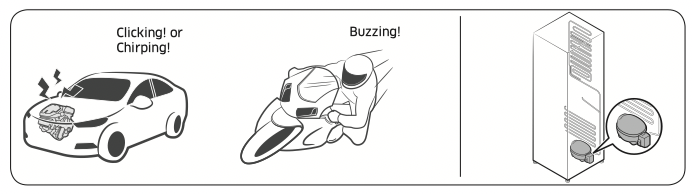
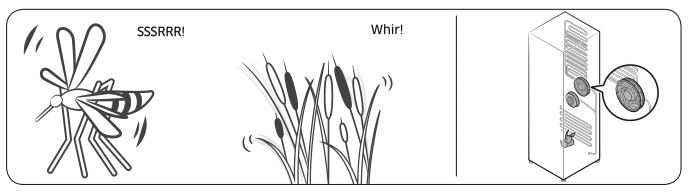
• While the fan is operating, these sounds may occur. When the refrigerator reaches the set temperature, no fan sound will occur.
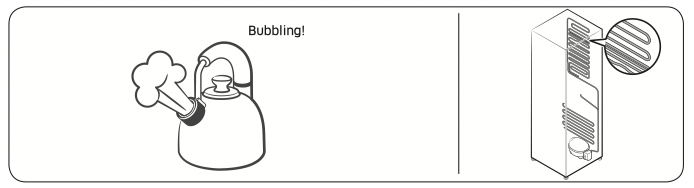
• During a defrost cycle, water may drip on the defrost heater, causing sizzling sounds.
 • As the refrigerator cools or freezes, refrigerant gas moves through sealed pipes, causing bubbling sounds.
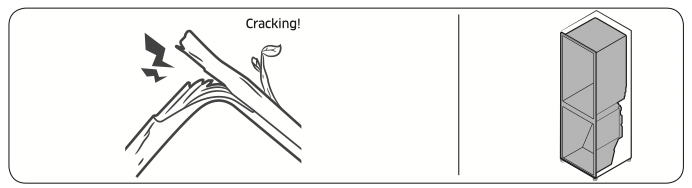
• As the refrigerator temperature increases or decreases, plastic parts contract and expand, creating knocking noises. These noises occur during the defrosting cycle or when electronic parts are working.
• For ice maker models: When the water valve opens to fill the ice maker, buzzing sounds may occur.
• Due to pressure equalizing when opening and closing the refrigerator door, whooshing sounds may occur.