Use & Care of your Freezer
FIRST STEPS
This Use & Care Guide provides general operating instructions for your model. Use the unit only as instructed in this Use & Care Guide. Before starting the unit, follow these important first steps.
Location
Choose a place that is near a grounded electrical outlet.
For the most efficient operation, the appliance should be located where surrounding temperatures will not exceed 110°F (43°C). Temperatures of 32°F (0°C) and below will NOT affect operation. Additional compressor heaters are not recommended.
Allow space around the unit for good air circulation. Leave a 3 inch (75 mm) space on all sides of the unit for adequate circulation.
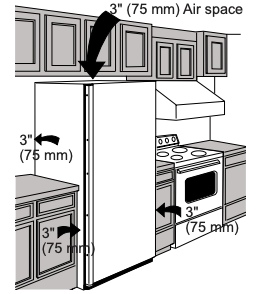
NOTE The exterior walls of the unit may become quite warm as the compressor works to transfer heat from the inside. Temperatures as much as 30° F warmer than room temperature can be expected. For this reason it is particularly important in hotter climates to allow enough space for air circulation around your appliance.
Leveling
The appliance must have all bottom corners resting firmly on a solid floor. The floor must be strong enough to support a fully loaded unit.
NOTE It is VERY IMPORTANT for your appliance to be level in order to function properly. If the unit is not leveled during installation, the lid may be misaligned and not close or seal properly, causing cooling, frost or moisture problems.
CAUTION To allow door to close and seal properly, DO NOT let food packages extend past the front of shelves.
Removing/Reversing Door
Tools required: Phillips screwdriver, flat head screwdriver, hexagonal spanner.
Two people should handle assembling the unit.
- Ensure the unit is unplugged and empty.
- To take the door off, tilt the unit backwards. Rest the unit on something solid so it will not slip during the door reversing process.
- Save all parts to reinstall the door.
- To prevent damaging the coolant system, do not lay the unit flat.
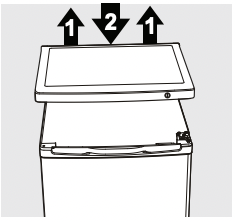
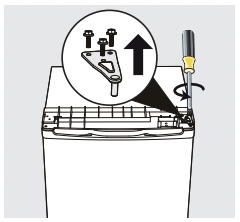
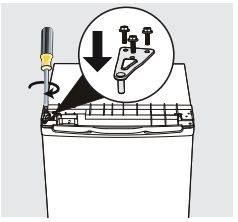
- Remove 2 screws at rear side of top cover
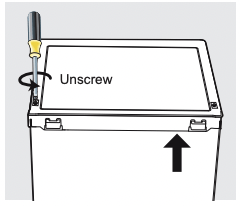
2. Remove top cover and thermostat knob. Place it aside.
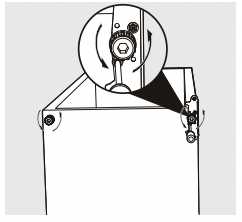
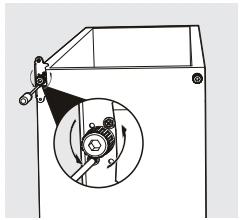
3. Unscrew top hinge. Remove lid and place it on a soft pad to avoid scratching.
4. Unscrew bottom hinge. Remove adjustable feet from both sides.
5. Unscrew and remove bottom hinge pin, turn bracket over, and replace it.
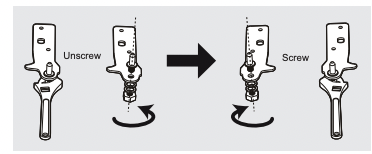
6. Refit the bracket fitting the bottom hinge pin. Replace both adjustable feet.
7. Re-place the door. Ensure the door is aligned horizontally and vertically so the seals are closed on all sides before finally tightening the top hinge.
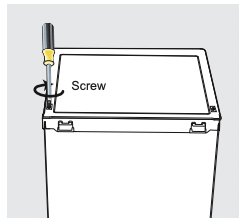
8. Place top cover on the back and fix with 2 screws.
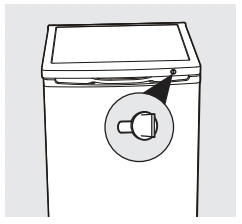
9. Re-place the Temperature Control dial.
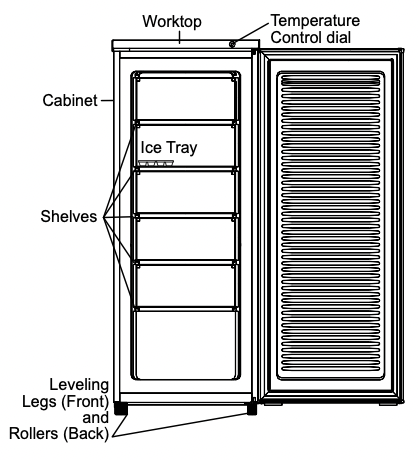
FEATURE DIAGRAM
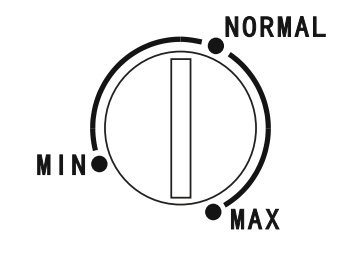
SETTING THE TEMPERATURE CONTROL
Plug in your appliance. The internal temperature is controlled by a thermostat. There are 3 settings: MIN (warmest setting), NORMAL, and MAX (coolest setting).
CARE & CLEANING
Cleaning
Before cleaning remove food from the appliance and store it well covered.
Clean the appliance interior and interior accessories regularly with a cloth and lukewarm water. Do not use abrasive cleaners. After cleaning rinse with fresh water and rub dry.
CAUTION
Appliance must be unplugged (to avoid electrical hazard) from power source when cleaning unit. Never clean the appliance with a steam cleaner. Allow time to dry before using the appliance.
IMPORTANT
Do not use organic solvents, such as lemon juice, juice from an orange peel, butyric acid, or cleaners containing acetic acid.
Between Defrostings
To avoid frequent defrosting, occasionally use a plastic scraper to remove frost. Scrape with a pulling motion. Never use a metal instrument to remove frost.
Defrosting
It is important to defrost and clean the freezer when ¼ to ½ inch of frost has accumulated. Frost may tend to accumulate faster on the upper part of the freezer due to warm, moist air entering the freezer when the door is opened. Remove food and leave the door open when defrosting the freezer.
BEFORE YOU CALL
| PROBLEM |
CAUSE |
CORRECTION |
| APPLIANCE OPERATION |
| Appliance does not run. |
• Appliance may not be plugged in or plug may be loose.
• House fuse blown or tripped circuit breaker.
• Socket is defective.
|
• Ensure plug is tightly pushed into outlet.
• Check/replace fuse with a 15-amp timedelay fuse. Reset circuit breaker.
• Call a qualified electrician.
|
| Interior temperature is too cold. |
• The temperature is set too cold or the appliance is set on MAX setting. |
• Turn control to a warmer setting. |
| Interior temperature is too warm. |
• Temperature Control is set too warm.
• Door is kept open too long or is opened too frequently.
• Large amounts of warm or hot food may have been stored recently.
• Appliance has recently been disconnected for a period of time.
|
• Turn control to a colder setting. Allow several hours for the temperature to stabilize.
• Warm air enters the appliance every time the door is opened. Open the door less often.
• Wait until the appliance has had a chance to reach its selected temperature.
• Appliance requires 24 hours to cool down completely.
|
| SOUND AND NOISE |
| Vibrating or rattling noise. |
• Appliance is not level. It rocks on the floor when it is moved slightly.
• Floor is uneven or weak. Appliance rocks on floor when it is moved slightly.
• Appliance is touching the wall.
|
• Level the unit. Refer to “Leveling” in the First Steps Section.
• Ensure floor can adequately support appliance. Level the appliance by putting wood or metal shims under part of the appliance.
• Re-level the appliance or move appliance slightly. Refer to “Leveling” in First Steps.
|
| WATER/MOISTURE/FROST INSIDE APPLIANCE |
| Moisture forms on inside walls. |
• Weather is hot and humid, which increases internal rate of frost build-up.
• Door may not be seating properly.
• Door is kept open too long, or is opened too frequently
|
• This is normal.
• Carefully warm the leaking sections of the lid seal with a hair dryer set on “cool”. Simultaneously shape the warmed door seal by hand so that it seats correctly.
• Open the door less often.
|
MAJOR APPLIANCE WARRANTY
Your appliance is covered by a one year limited warranty. For one year from your original date of purchase, Electrolux will pay all costs for repairing or replacing any parts of this appliance that prove to be defective in materials or workmanship when such appliance is installed, used and maintained in accordance with the provided instructions.
Exclusions
This warranty does not cover the following:
1. Products with original serial numbers that have been removed, altered or cannot be readily determined.
2. Product that has been transferred from its original owner to another party or removed outside the USA or Canada.
3. Rust on the interior or exterior of the unit.
4. Products purchased “as-is” are not covered by this warranty.
5. Food loss due to any refrigerator or freezer failures.
6. Products used in a commercial setting.
7. Service calls which do not involve malfunction or defects in materials or workmanship, or for appliances not in ordinary household use or used other than in accordance with the provided instructions.
8. Service calls to correct the installation of your appliance or to instruct you how to use your appliance.
9. Expenses for making the appliance accessible for servicing, such as removal of trim, cupboards, shelves, etc., which are not a part of the appliance when it is shipped from the factory.
10. Service calls to repair or replace appliance light bulbs, air filters, water filters, other consumables, or knobs, handles, or other cosmetic parts.
11. Surcharges including, but not limited to, any after hour, weekend, or holiday service calls, tolls, ferry trip charges, or mileage expense for service calls to remote areas, including the state of Alaska.
12. Damages to the finish of appliance or home incurred during installation, including but not limited to floors, cabinets, walls, etc.
13. Damages caused by: services performed by unauthorized service companies; use of parts other than genuine Electrolux parts or parts obtained from persons other than authorized service companies; or external causes such as abuse, misuse, inadequate power supply, accidents, fires, or acts of God.
DISCLAIMER OF IMPLIED WARRANTIES; LIMITATION OF REMEDIES
CUSTOMER’S SOLE AND EXCLUSIVE REMEDY UNDER THIS LIMITED WARRANTY SHALL BE PRODUCT REPAIR OR REPLACEMENT AS PROVIDED HEREIN. CLAIMS BASED ON IMPLIED WARRANTIES, INCLUDING WARRANTIES OF MERCHANTABILITY OR FITNESS FOR A PARTICULAR PURPOSE, ARE LIMITED TO ONE YEAR OR THE SHORTEST PERIOD ALLOWED BY LAW, BUT NOT LESS THAN ONE YEAR. ELECTROLUX SHALL NOT BE LIABLE FOR CONSEQUENTIAL OR INCIDENTAL DAMAGES SUCH AS PROPERTY DAMAGE AND INCIDENTAL EXPENSES RESULTING FROM ANY BREACH OF THIS WRITTEN LIMITED WARRANTY OR ANY IMPLIED WARRANTY. SOME STATES AND PROVINCES DO NOT ALLOW THE EXCLUSION OR LIMITATION OF INCIDENTAL OR CONSEQUENTIAL DAMAGES, OR LIMITATIONS ON THE DURATION OF IMPLIED WARRANTIES, SO THESE LIMITATIONS OR EXCLUSIONS MAY NOT APPLY TO YOU. THIS WRITTEN WARRANTY GIVES YOU SPECIFIC LEGAL RIGHTS. YOU MAY ALSO HAVE OTHER RIGHTS THAT VARY FROM STATE TO STATE.
If You Need Service
Keep your receipt, delivery slip, or some other appropriate payment record to establish the warranty period should service be required. If service is performed, it is in your best interest to obtain and keep all receipts. Service under this warranty must be obtained by contacting Electrolux at the addresses or phone numbers below.
This warranty only applies in the USA and Canada. In the USA, your appliance is warranted by Electrolux Major Appliances North America, a division of Electrolux Home Products, Inc. In Canada, your appliance is warranted by Electrolux Canada Corp. Electrolux authorizes no person to change or add to any obligations under this warranty. Obligations for service and parts under this warranty must be performed by Electrolux or an authorized service company