Owners' Guide Refrigeration
FILTERS AND ACCESSORIES
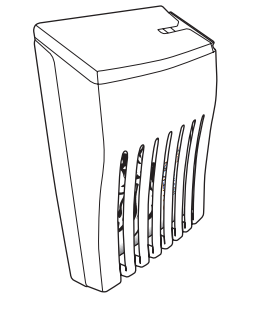
Install Air Filter (on some models)
On some models, your refrigerator's accessory packet includes an air filter, which must be installed prior to use. On some models, the air filter is already installed at the factory.
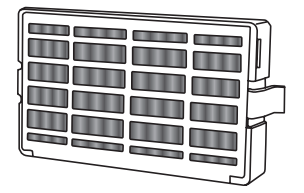
The air filter reduces the buildup of odors. This helps to maintain a cleaner environment inside the refrigerator.
Installing the Air Filter (on some models)
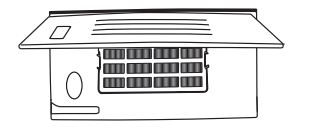
The filter should be installed behind the vented door, which is located (depending on your model) along either the rear or left interior wall near the top of the refrigerator compartment.
- Remove the air filter from its packaging.
- Lift open the vented door.
- Snap the filter into place.
- Close the vented door.
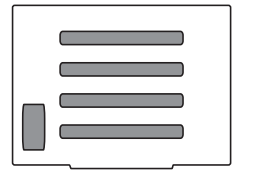
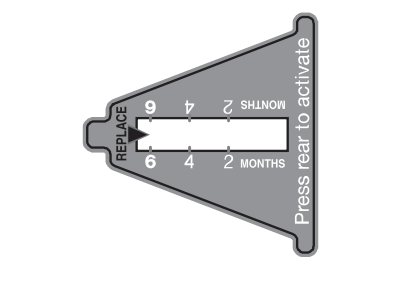
Installing the Filter Status Indicator (on some models)
The filter comes with a status indicator, which should be activated and installed at the same time the air filter is installed.
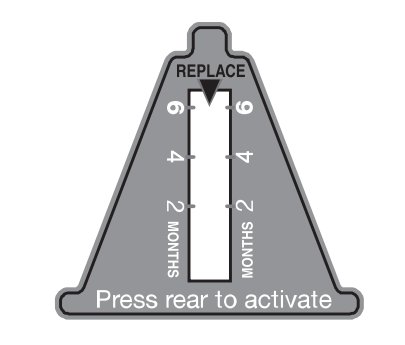
- Place the indicator face-down on a firm, flat surface.
- Apply pressure to the bubble on the back of the indicator, until the bubble pops to activate the indicator.
- Lift open the vented air filter door. On some models, there are notches behind the door.
- On models with notches:
■ Slide the indicator down into the notches, facing outward.
NOTE: The indicator will not easily slide into the notches if the rear bubble has not been popped.
■ Close the air filter door, and check that the indicator is visible through the rectangular hole in the door.
On models without notches:
■ Store the indicator in a visible place you will easily remember - either inside the refrigerator, or elsewhere in your kitchen or home
Replacing the Air Filter
The disposable air filter should be replaced every 6 months, when the status indicator has completely changed from white to red.
To order a replacement air filter, see “Accessories” in the User Instructions or User Guide.
- Remove the old air filter by squeezing in on the side tabs.
- Remove the old status indicator.
- Install the new air filter and status indicator using the instructions in the previous sections.
Install Produce Preserver (on some models)
On some models, your refrigerator's accessory packet includes a Produce Preserver, which should be installed prior to use. On some models, the Produce Preserver is already installed at the factory.
The Produce Preserver absorbs ethylene, allowing the ripening process of many produce items to slow down. As a result, certain produce items will stay fresh longer.
Ethylene production and sensitivity varies depending on the type of fruit or vegetable. To preserve freshness, it is best to separate produce with sensitivity to ethylene from fruits that produce moderate to high amounts of ethylene.

Installing the Produce Preserver (on some models)
CAUTION: IRRITANT
MAY IRRITATE EYES AND SKIN. DANGEROUS FUMES FORM WHEN MIXED WITH OTHER PRODUCTS.
Do not mix with cleaning products containing ammonia, bleach or acids. Do not get in eyes, on skin or clothing. Do not breathe dust. Keep out of reach of children.
FIRST AID TREATMENT: Contains potassium permanganate. If swallowed, call a Poison Control Center or doctor immediately. Do not induce vomiting. If in eyes, rinse with water for 15 minutes. If on skin, rinse with water.
The Produce Preserver pouches should be installed in their housing, which is located along an interior side wall of the crisper or convertible drawer.
NOTE: For best performance, always use two pouches.
- Remove the Produce Preserver pouches from their packaging.
- Lift up on the housing in order to remove it from its mounting tab along the wall.
- Open the housing by pulling up and out on the back of the top of the housing.
- Place both pouches inside the housing, then snap the housing back together.
- Place the housing back on the mounting tab along the wall.
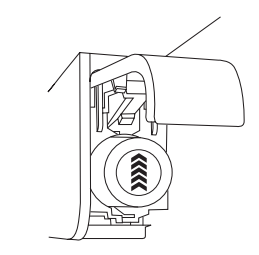
Installing the Status Indicator (on some models)
The Produce Preserver comes with a status indicator, which should be activated and installed at the same time the pouch is installed.
- Place the indicator face-down on a firm, flat surface.
- Apply pressure to the bubble on the back of the indicator, until the bubble pops to activate the indicator.
- Slide open the cap on the Produce Preserver housing.
- Place the indicator in the top of the housing, facing outward.
- Slide the cap closed, and check that the indicator is visible through the rectangular hole in the cap.
NOTE: The cap will not easily close if the indicator’s rear bubble has not been popped.
Replacing the Produce Preserver (on some models)
The disposable pouches should be replaced every 6 months, when the status indicator has completely changed from white to red.
To order replacements, see “Accessories” in the User Instructions or User Guide.
- Remove the old pouches from the Produce Preserver housing.
- Remove the old status indicator.
- Install the new pouches and status indicator using the instructions in the previous sections.
Changing the Water Filter
Do not use with water that is microbiologically unsafe or of unknown quality without adequate disinfection before or after the system. Systems certified for cyst reduction may be used on disinfected waters that may contain filterable cysts.
The water filter status light will help you know when to change your water filter. See “Water Filtration System” in the User Instructions or User Guide.
NOTE: If water flow to your water dispenser or ice maker decreases noticeably, change the filter sooner. The filter should be replaced at least every 6 months, depending on your water quality and usage.
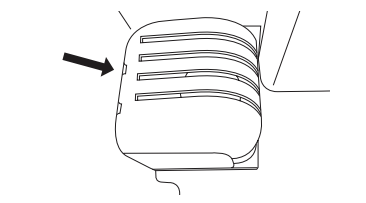
- Locate the water filter in the top-right corner of the refrigerator compartment.
- Lift open the filter cover door. The filter will be released and then be ejected as the door is opened.
- When the door is completely open, pull the filter straight out.
NOTE: There may be some water in the filter. Some spilling may occur. Use a towel to wipe up any spills.
- Take the new filter out of its packaging and remove the cap. Be sure the O-rings are still in place after the cap is removed.
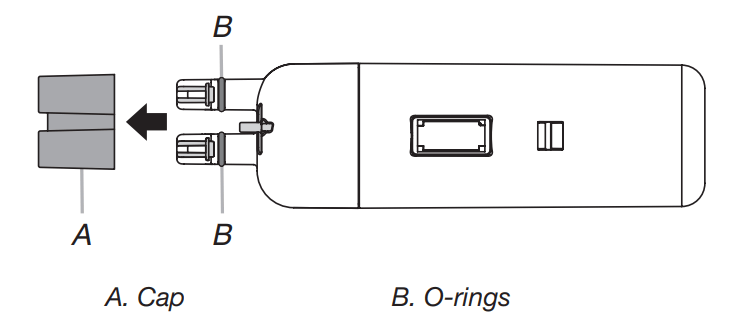
- With the arrow pointing up, align the new filter with the filter housing and slide it into place. The filter cover door will automatically begin to close as the new filter is inserted.
- Close the filter cover door completely in order to snap the filter into place. You may need to press hard.
- After changing the filter, reset the filter status light. See “Water Filtration System” in the User Instructions or User Guide.
- Flush the water system. See “Water and Ice Dispensers” in the User Instructions or User Guide.
REFRIGERATOR CARE
Cleaning
WARNING: Explosion Hazard
Use nonflammable cleaner.
Failure to do so can result in death, explosion, or fire.
Both the refrigerator and freezer sections defrost automatically. However, clean both sections about once a month to avoid buildup of odors. Wipe up spills immediately.
IMPORTANT: Because air circulates between both sections, any odors formed in one section will transfer to the other. You must thoroughly clean both sections to eliminate odors. To avoid odor transfer and drying out of food, wrap or cover foods tightly.
To Clean Your Refrigerator:
NOTE: Do not use abrasive or harsh cleaners such as window sprays, scouring cleansers, flammable fluids, cleaning waxes, concentrated detergents, bleaches or cleansers containing petroleum products on plastic parts, interior and door liners or gaskets. Do not use paper towels, scouring pads, or other harsh cleaning tools.
- Unplug refrigerator or disconnect power.
- Hand wash, rinse, and dry removable parts and interior surfaces thoroughly. Use a clean sponge or soft cloth and a mild detergent in warm water.
- Wash stainless steel and painted metal exteriors with a clean sponge or soft cloth and a mild detergent in warm water
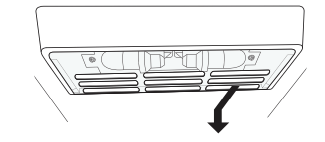
- There is no need for routine condenser cleaning in normal home operating environments. If the environment is particularly greasy or dusty, or there is significant pet traffic in the home, the condenser should be cleaned every 2 to 3 months to ensure maximum efficiency
If you need to clean the condenser:
■ Remove the base grille. See the “Door Removal” instructions, either in the User Instructions or the Installation Instructions and Owner’s Manual, or in the separate instruction sheet provided with your refrigerator.
■ Use a vacuum cleaner with a soft brush to clean the grille, the open areas behind the grille and the front surface area of the condenser.
■ Replace the base grille when finished.
- Plug in refrigerator or reconnect power
Lights
IMPORTANT: The refrigerator and freezer compartments, air tower and dispenser lights are LEDs that cannot be changed by yourself. To order replacement LED lightings, call Whirlpool service. In the U.S.A., call 1-800-253-1301. In Canada, call 1-800-807-6777.
Light Styles:
The dispenser lights are mini LEDs that cannot be changed.
The interior lights vary by model.
- Some models have mini LEDs that cannot be changed.
- Some models have full-size LED bulbs that can be changed. To order replacement LED bulbs, call 1-800- 253-1301 (U.S.A.) or 1-800-807-6777 (Canada).
NOTE: Some LED replacement bulbs are not recommended for wet/damp environments. The refrigerator and freezer compartments are considered to be wet/damp environments. If using a brand of LED bulb other than the recommended Whirlpool LED bulb, read and follow all instructions on the replacement bulb’s packaging before installing it.
- Some models have incandescent 40 watt bulbs that can be changed.
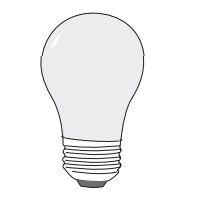
NOTE: Not all replacement bulbs will fit your refrigerator. Do not use an incandescent bulb in excess of 40 watts.
To Change a Light Bulb:
- Unplug refrigerator or disconnect power.
- Remove the light shield as explained in the following sections.
NOTE: To clean the light shield, wash it with warm water and liquid detergent. Before reinstalling, thoroughly rinse and dry the shield.
- Replace the burned-out light bulb, as explained in the following sections.
- Reinstall the light shield, as explained in the following sections.
- Plug in refrigerator or reconnect power.
Refrigerator Compartment - Upper Lights
Light Shield Removal:
- Slide the light shield toward the rear of the refrigerator and remove it from the light housing.
Replacement Bulb:
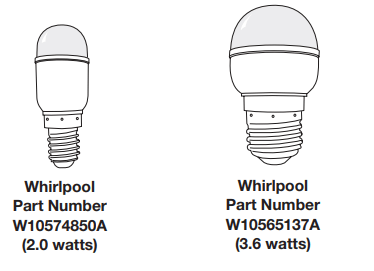
- If the burned-out light is a full-size LED bulb, replace it with Whirlpool part number W10574850A (a 2.0 watt LED bulb).
- If the burned-out light is an incandescent bulb, replace it with an incandescent appliance bulb of the same size, shape and wattage (40 watt maximum).
Light Shield Re-installation:
- Align the light shield in the grooves at the bottom edge of the light housing, then slide it forward until it snaps into place.
Refrigerator Compartment - Lower Lights
Light Shield Removal:
- Slide the light shield to the right to remove the left end from the wall slots; then, pull the right end out of its wall slots.
Replacement Bulb:
- If the burned-out light is a full-size LED bulb, replace it with Whirlpool part number W10565137A (a 3.6 watt LED bulb).
- If the burned-out light is an incandescent bulb, replace it with an incandescent appliance bulb of the same size, shape and wattage (40-watt maximum).
Light Shield Re-installation:
- Place the right end of the light shield into the wall slots, then snap the left end into its wall slots
Freezer Compartment - Upper Light
Light Shield Removal:
- Gently squeeze the front and the bottom-rear edge of the light shield to release the tabs from the wall slots, then pull the light shield forward.
Replacement Bulb:
- If the burned-out light is a full-size LED bulb, replace it with Whirlpool part number W10565137A (a 3.6 watt LED bulb).
- If the burned-out light is an incandescent bulb, replace it with an incandescent appliance bulb of the same size, shape and wattage (40-watt maximum).
Light Shield Re-installation:
- Align the light shield in its proper position, and snap the tabs into the wall slots.
Freezer Compartment - Lower
Light Light Shield Removal:
- Slide the light shield to the left to remove the right end from the wall slots, then pull the left end out of its wall slots.
Replacement Bulb:
- If the burned-out light is a full-size LED bulb, replace it with Whirlpool part number W10565137A (a 3.6 watt LED bulb).
- f the burned-out light is an incandescent bulb, replace it with an incandescent appliance bulb of the same size, shape and wattage (40 watt maximum).
Light Shield Re-installation:
- Place the left end of the light shield into the wall slots, then snap the right end into its wall slots.
Vacation and Moving Care
Vacations
If You Choose to Leave Refrigerator On While You Are Away:
- Use up any perishables and freeze other items.
- If your refrigerator has an automatic ice maker and is connected to the household water supply, turn off the water supply to the refrigerator. Property damage can occur if the water supply is not turned off.
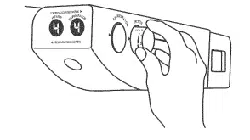
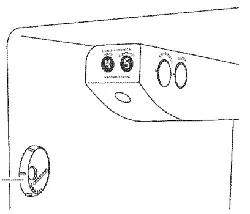
- If you have an automatic ice maker, turn off the ice maker. NOTE: Depending on your model, raise the wire shutoff arm to OFF (up) position or press the switch to OFF (right).
- Empty the ice bin.
If You Choose to Turn Refrigerator Off Before You Leave:
- Remove all food from the refrigerator.
- If your refrigerator has an automatic ice maker:
■ Turn off the water supply to the ice maker at least one day ahead of time.
■ When the last load of ice drops, raise the wire shutoff arm to the OFF (up) position or move the switch to the OFF (right) setting.
- Depending on the model, turn the Refrigerator Control to OFF or turn cooling off. See “Using the Controls” in the User Instructions, User Guide, or Use & Care Guide.
- Clean, wipe, and dry thoroughly.
- Tape rubber or wood blocks to the tops of both doors to prop them open far enough for air to get in. This stops odor and mold from building up.
Moving
When you are moving your refrigerator to a new home, follow these steps to prepare it for the move.
- If your refrigerator has an automatic ice maker:
■ Turn off the water supply to the ice maker at least one day ahead of time.
■ Disconnect the water line from the back of the refrigerator.
■ When the last load of ice drops, raise the wire shutoff arm to the OFF (up) position or move the switch to the OFF (right) setting.
- Remove all food from the refrigerator and pack all frozen food in dry ice.
- Empty the ice bin.
- Depending on the model, turn the Refrigerator Control to OFF or turn cooling off. See “Using the Controls” in the User Instructions, User Guide, or Use & Care Guide.
- Unplug refrigerator.
- Clean, wipe, and dry thoroughly.
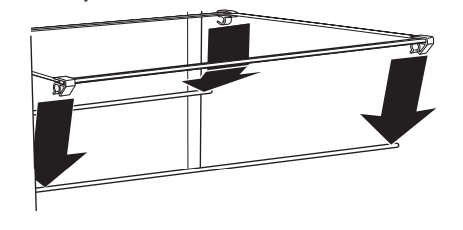
- Take out all removable parts, wrap them well, and tape them together so they don’t shift and rattle during the move.
- Depending on the model, raise the front of the refrigerator so it rolls more easily OR screw in the leveling legs so they don't scrape the floor. See “Adjust the Doors” or “Door Removal, Leveling and Alignment.”
- Tape the doors closed and tape the power cord to the back of the refrigerator.
When you get to your new home, put everything back and refer to the Installation Instructions for preparation instructions. Also, if your refrigerator has an automatic ice maker, remember to reconnect the water supply to the refrigerator.
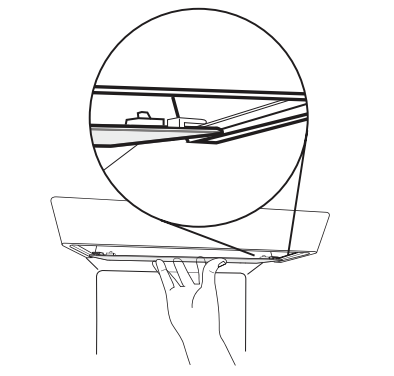
FREEZER SHELF (number of shelves varies by model)
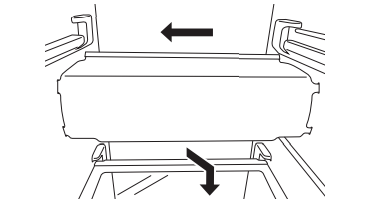
To Remove and Replace the Bottom Shelf:
- Lift up the front and back of the shelf, and remove from the cabinet. Be sure not to remove the retaining rods.
- Replace the shelf aligning the rods with the cabinet ribs. Apply a little pressure on the shelf to attach the rods to the ribs of the cabinet.
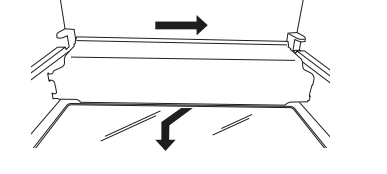
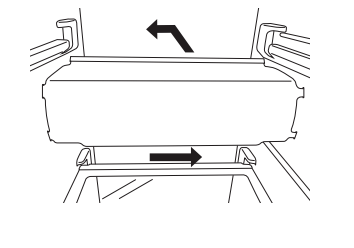
To Remove and Replace the Mid and Top Shelf:
- With your hand, push the shelf from bottom to top until it is released from the holding rod. Pull the shelf until it is released from the rear rod. Remove from the cabinet.
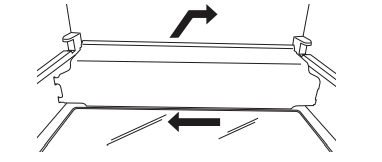
- To replace the shelf:
■ Replace rods into the support holes. Push the rods down so it clicks into the hole.
■ Identify the front and rear trim of the shelf.
■ Place the rear trim on the rear rod and push the shelf so it clicks the rod into the trim rear. (Keep the front raised while pushing).
■ Lower the front of the shelf until the front trim is on the rod and push the shelf down so it clicks the rod into the trim rear.
NOTE: Be sure that both sides of the shelf are positioned evenly in the shelf support holes and the shelf is secure.
PROBLEM SOLVER
First try the solutions suggested here or visit our website to possibly avoid the cost of a service call.
WARNING
Electrical Shock Hazard
Plug into a grounded 3 prong outlet.
Do not remove ground prong.
Do not use an adapter.
Do not use an extension cord.
Failure to follow these instructions can result in death, fire, or electrical shock.
| GENERAL OPERATION |
Possible Causes and/or Recommended Solutions |
| Refrigerator will not operate |
- Not connected to an electrical supply - Plug the power cord into a grounded 3 prong outlet. Do not use an extension cord.
- No power to the electrical outlet - Plug in a lamp to see if the outlet is working.
- Household fuse has blown or circuit breaker has tripped - Replace the fuse or reset the circuit breaker. If the problem continues, contact a licensed electrician.
- Control or cooling is not turned on - Turn on the refrigerator control, or turn cooling on. See “Using the Controls” in the User Instructions or User Guide.
- New installation - Following installation, allow 24 hours for the refrigerator and freezer to cool completely. NOTE: Adjusting the temperature control(s) to the coldest setting will not cool either compartment (refrigerator or freezer) more quickly.
|
| Motor seems to run too much |
- Your new refrigerator has an energy-efficient motor - The refrigerator may run longer than you’re used to, because the compressor and fans operate at lower speeds that are more energyefficient. This is normal. NOTE: Your refrigerator may run even longer if the room is warm, a large load of food is added, the doors are opened often, or if a door has been left open
|
| Refrigerator seems noisy |
The compressor in your new refrigerator regulates temperature more efficiently and uses less energy than older models. During various stages of operation, you may hear normal operating sounds that are unfamiliar.
The following noises are normal:
- Buzzing/Clicking - Heard when the water valve opens and closes to dispense water or fill the ice maker. If the refrigerator is connected to a water line, this is normal. If the refrigerator is not connected to a water line, turn off the ice maker.
- Cracking/Crashing - Heard when ice is ejected from the ice maker mold.
- Popping - Heard when the inside walls contract/expand, especially during initial cooldown.
- Pulsating/Whirring - Heard when the fans/compressor adjust to optimize performance during normal operation.
- Rattling - Heard when water passes through the water line, or due to the flow of refrigerant. Rattling may also come from items placed on top of the refrigerator.
- Water running or gurgling - Heard when ice melts during the defrost cycle and water runs into the drain pan.
- Sizzling - Heard when water drips onto the heater during the defrost cycle
|
| Temperature is too warm |
- New installation - Following installation, allow 24 hours for the refrigerator and freezer to cool completely. NOTE: Adjusting the temperature control(s) to the coldest setting will not cool either compartment (refrigerator or freezer) more quickly.
- Doors are opened often or not closed completely - This allows warm air to enter the refrigerator. Minimize door openings, keep the doors fully closed, and make sure both doors are properly sealed.
- Air vents are blocked - Remove items that are immediately in front of the vents.
- Large amount of warm food recently added - Allow several hours for the refrigerator to return to its normal temperature.
- Controls are not set correctly for the surrounding conditions - Adjust the controls to a colder setting. Check the temperature again in 24 hours.
|
| Temperature is too cold |
- Controls are not set correctly for the surrounding conditions - Adjust the controls to a warmer setting. Check the temperature again in 24 hours.
- Top refrigerator shelf is colder than lower shelves - On some models, air from the freezer enters the refrigerator compartment through vents near the top refrigerator shelf. As a result, the top shelf can be slightly colder than lower shelves.
- Air vents are blocked - Remove items that are immediately in front of the vents
|
| Interior moisture buildup |
NOTE: Some moisture buildup is normal. Clean with a soft dry cloth.
- Room is humid - A humid environment contributes to moisture buildup. Use the refrigerator only in an indoor location, with as little humidity as possible.
- Doors are opened often or not closed completely - This allows humid air to enter the refrigerator. Minimize door openings, keep the doors fully closed, and make sure both doors are properly sealed.
|
| Interior lights do not work |
- Doors have been open for an extended period of time - Close the doors to reset the lights.
- Light bulb is loose in the socket or has burned out - On models with incandescent or full-size LED interior light bulbs, tighten or replace the bulb. See “Lights.”
NOTE: On models with mini LED lights, call for assistance or service if the interior lights do not illuminate when either door is opened. See the Warranty in the User Instructions or User Guide for contact information.
|
| Dispenser lights do not work (on some models) |
- Dispenser light is turned off - On some models, if the dispenser light is set to OFF, the light will turn on only when a dispenser pad/lever is pressed. If you want the dispenser light to stay on continuously, select a different setting. See “Water and Ice Dispensers” in the User Instructions or User Guide.
- Dispenser light is set to AUTO or NIGHT LIGHT - On some models, if the dispenser light is set to AUTO or NIGHT LIGHT, make sure the dispenser light sensor is not blocked. See “Water and Ice Dispensers” in the User Instructions or User Guide.
NOTE: On models with mini LED lights, call for assistance or service if the dispenser lights do not operate correctly. See the Warranty in the User Instructions or User Guide for contact information.
|
WARNING
Explosion Hazard
Use nonflammable cleaner.
Failure to do so can result in death, explosion, or fire.
| DOORS AND LEVELING |
Possible Causes and/or Recommended Solutions |
| Doors are difficult to open |
- Gaskets are dirty or sticky - Clean the gaskets and contact surfaces with mild soap and warm water. Rinse and dry with a soft cloth.
|
| Doors will not close completely |
- Door is blocked open - Move food packages away from the door. Make sure all bins and shelves are in their correct positions. Make sure all packaging materials have been removed.
|
| Doors appear to be uneven |
- Doors need to be aligned, or refrigerator needs to be leveled - See the leveling and door alignment instructions.
|
| Refrigerator rocks and is not stable |
- Refrigerator is not level - To stabilize the refrigerator, remove the base grille and lower the leveling feet until they touch the floor. See the leveling and door alignment instructions.
|
WARNING
Cut Hazard
Use a sturdy glass when dispensing ice.
Failure to do so can result in cuts.
| ICE AND WATER |
Possible Causes and/or Recommended Solutions |
| Ice maker is not producing ice, not producing enough ice, or producing small/ hollow ice |
- Refrigerator is not connected to a water supply, or the water supply shutoff valve is not fully turned on - Connect the refrigerator to a water supply and make sure the water shutoff valve is fully open.
- Kink in the water source line - A kink in the water line can reduce water flow, resulting in decreased ice production, small ice cubes, and/or hollow or irregularly-shaped ice. Straighten the water line.
- Ice maker is not turned on - Turn on the ice maker. See “Ice Maker and Storage Bin” in the User Instructions or User Guide.
- New installation - After connecting the refrigerator to a water source, flush the water system. (See “Water and Ice Dispensers” in the User Instructions or User Guide.) Wait 24 hours for ice production to begin. Wait 72 hours for full ice production. Discard the first three batches of ice produced.
- Large amount of ice was recently removed - Allow sufficient time for the ice maker to produce more ice.
- Ice is jammed in the ice maker ejector arm (on some models) - Remove ice from the ejector arm using a plastic utensil.
- Inadequate water pressure - Verify that the household has adequate water pressure. See “Water Supply Requirements.”
- Water filter is installed incorrectly - Make sure the filter is properly installed. See “Water Filtration System” in the User Instructions or User Guide.
- A reverse osmosis water filtration system is connected to your cold water supply - This can decrease water pressure. See “Water Supply Requirements.”
NOTE: If questions remain regarding water pressure, contact a licensed, qualified plumber.
|
| Ice dispenser will not operate properly |
- Doors not closed completely - Make sure both doors are firmly closed. (On some models, only the freezer door must be closed in order to operate the dispenser.)
- New installation - After connecting the refrigerator to a water source, flush the water system. (See “Water and Ice Dispensers” in the User Instructions or User Guide.) Wait 24 hours for ice production to begin. Wait 72 hours for full ice production. Discard the first three batches of ice produced.
- Ice maker is not turned on, or ice bin is not installed correctly - Turn on the ice maker and make sure the ice storage bin is firmly in position. See “Ice Maker and Storage Bin” in the User Instructions or User Guide.
- Ice is clogged or frozen together in the ice storage bin, or ice is blocking the ice delivery chute - Remove or separate the clogged ice, using a plastic utensil if necessary. Clean the ice delivery chute and the bottom of the ice storage bin using a warm damp cloth; then, dry both thoroughly. To avoid clogging and to maintain a fresh supply of ice, empty the storage bin and clean both the storage bin and the delivery chute every 2 weeks.
- Wrong ice has been added to the storage bin - Use only ice cubes produced by the current ice maker.
- Dispenser is locked - Unlock the dispenser. See “Water and Ice Dispensers” in the User Instructions or User Guide.
- Ice dispenser jams while dispensing crushed ice - For models with the ice storage bin on the door, temporarily switch from crushed ice to cubed ice to clear the jam.
- Dispenser pad/lever has been pressed too long - Ice will automatically stop dispensing. Wait a few minutes for the dispenser to reset, then resume dispensing. Take large amounts of ice directly from the ice bin, not through the dispenser.
- Water pressure to the home is not at or above 30 psi (207 kPa) - The water pressure to the home affects the flow from the dispenser. See “Water Supply Requirements.”
- Water filter is clogged or incorrectly installed - Replace filter or reinstall it correctly. See “Water Filtration System” in the User Instructions or User Guide.
|
| Ice or water has an off-taste, odor, or gray color |
- New plumbing connections - New plumbing connections can result in off-flavored or discolored ice or water. This problem should go away over time.
- Ice has been stored too long - Discard the ice and wash the ice bin. Allow 24 hours for the ice maker to produce new ice.
- Odor has transferred from food - Use airtight moisture-proof packaging to store food.
- Use of non-recommended water supply line - Odors and tastes can transfer from certain materials used in non-recommended water supply lines. Use only a recommended water supply line. See “Water Supply Requirements.”
- There are minerals (such as sulfur) in the water - A water filter may need to be installed in order to remove the minerals.
- Water filter was recently installed or replaced - Gray or dark discoloration in ice or water indicates that the water filtration system needs additional flushing. See “Water and Ice Dispensers” in the User Instructions or User Guide
|
| Water dispenser will not operate properly |
- Doors not closed completely - Make sure both doors are firmly closed. (On some models, only the freezer door must be closed in order to operate the dispenser.)
- Refrigerator is not connected to a water supply, or the water supply shutoff valve is not turned on - Connect the refrigerator to a water supply and make sure the water shutoff valve is fully open.
- Kink in the water source line - A kink in the water line can reduce water flow to the dispenser. Straighten the water line.
- Water pressure to the home is not at or above 30 psi (207 kPa) - The water pressure to the home affects the flow from the dispenser. See “Water Supply Requirements.”
- New installation - After connecting the refrigerator to a water source, flush the water system. See “Water and Ice Dispensers” in the User Instructions or User Guide.
- Dispenser is locked - Unlock the dispenser. See “Water and Ice Dispensers” in the User Instructions or User Guide.
- Water filter is clogged or incorrectly installed - Replace filter or reinstall it correctly. See “Water Filtration System” in the User Instructions or User Guide.
- A reverse osmosis water filtration system is connected to your cold water supply - This can decrease water pressure. See “Water Supply Requirements.”
NOTE: If questions remain regarding water pressure, contact a licensed, qualified plumber.
|
| Water is leaking or dripping from the dispenser |
NOTE: After dispensing, a few additional drops of water are normal.
- Glass was not held under the dispenser long enough - Hold the glass under the dispenser for 2 to 3 seconds after releasing the dispenser pad/lever.
- New installation, or water filter was recently installed or replaced - Air in the water lines causes the water dispenser to drip. Flush the water system to remove the air in the water lines. See “Water and Ice Dispensers” in the User Instructions or User Guide.
- Residual ice in the dispenser chute is melting - Make sure the ice chute is free of ice shavings or pieces.
|
| Water is leaking from the back of the refrigerator |
- Water line connections are not fully tightened - Make sure all connections are firmly tightened. See “Connect Water Supply.”
|
| Water from the dispenser is not cool enough (on some models) |
NOTE: Water from the dispenser is chilled to 50°F (10°C).
- New installation - Allow 24 hours after installation for the water supply to cool completely.
- Recently dispensed a large amount of water - Allow 24 hours for the new water supply to cool completely.
- Water has not been recently dispensed - The first glass of water may not be cool. Discard the first glass of water dispensed.
- Refrigerator is not connected to a cold water pipe - Make sure the refrigerator is connected to a cold water pipe. See “Water Supply Requirements.”
|