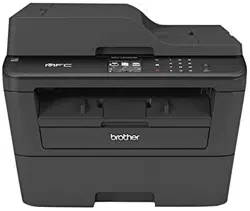
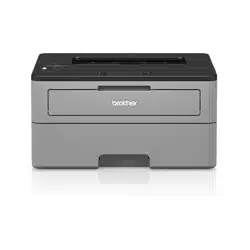
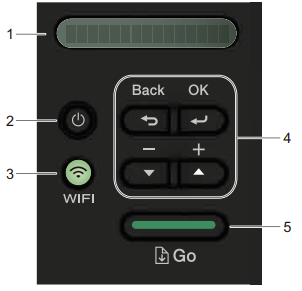
The Control panel will vary depending on your model.
1. LCD ( Liquid Crystal Display)
Display message to help you set up and use your machine.
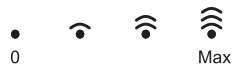
Wireless Models:
A four-level indicator shows the wireless signal strength if you are using a wireless connection.
2. Power On/Off Button
Tum on the machine by pressing ).
Tum othe machine by pressing and holding ). The LCD displays [shutting Down] for a few seconds before going off.
3. Network Buttons
Wired Models:
Network
Press Network to setup wired network settings.
Models with Wireless Function:
Wifi
Press the WiFi button and launch the wireless installer on your computer. Follow the on-screen instructions to set up a wireless connection between your machine and your network.
When the WIFI light is on. your rather machine i connected toa wireless access pon. When the WIFI light blinks. the wireless connection is down. of your machine is in the process of connecting to a wireless access point.
4. Menu Buttons
OK
Press to store your machine settings. After you change a setting. the machine retums tothe previous menu level.
Back
Press to go back one level in the menu.
Press to select the previous digit when setting numbers.
Press to scroll through menus and options.
Press to enter a number or to increase or decrease the number. Press and hold down A or ¥ to scroll faster. When you see the number you want. press OK.
5. Go Button
Press to clear certain error messages. To clear all other errors. follow the control panel instructions.
Press to print any data remaining in the machine's memory.
Press to select the displayed option. After you change a setting. the machine returns to Ready mode.
Press and hold Go for about two seconds to cancel a print job.
Print
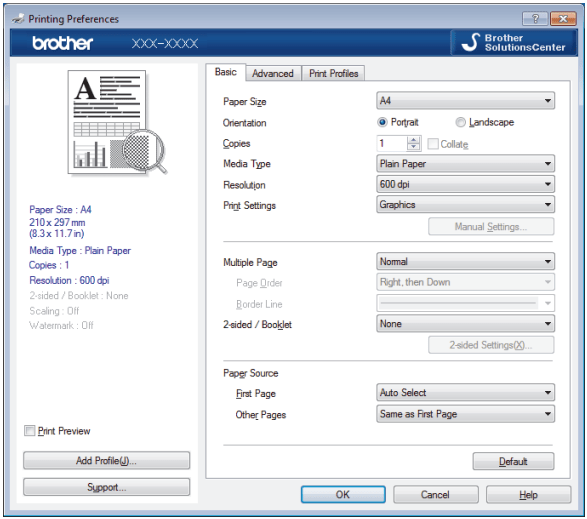
Print a Document (Windows)
Select the print command in your application.
Select Brother XXX-XXXX (where XXXX is the name of your model). and then click the printing properties or preferences button.
The printer driver window appears.
3. Make sure you have loaded the correct size paper in the paper tray.
4. Click the Paper Size drop-down list. and then select your paper size.
5. In the Orientation field. select the Portrait or Landscape option to set the orientation of your printout.
If your application contains a similar setting. we recommend that you set the orientation using the application.
6. Type the number of copies (1-999) you want in the Copies field.
7. Click the Media Type drop-down list. and then select the type of paper you are using.
8. To print multiple pages on a single sheet of paper or print one page of your document on multiple sheets. click the Multiple Page drop-down list. and then select your options.
9. Change other printer settings. if needed.
10. Click OK.
11. Complete your print operation.
Troubleshooting
Use this section to resolve typical problems you may encounter when using your Brother machine. You can correct most problems yourself.
IMPORTANT
For technical help, you must call the country where you bought the machine. Calls must be made from within that country.
Using non-Brother supplies may affect the print quality, hardware performance, and machine reliability.
Error and Maintenance Messages
Home > Troubleshooting > Error and Maintenance Messages
As with any sophisticated office product, errors may occur and supply items may have to be replaced. If this happens, your machine identifies the error or required routine maintenance and shows the appropriate message. The most common error and maintenance messages are shown in the table.
Follow the instructions in the Action column to solve the error and remove the message.
Error Message
Cause
Action
2-sided Disabled
The back cover of the machine is not closed completely.
Close the back cover of the machine until it locks in the closed position.
The 2-sided tray is not installed completely.
Install the 2-sided tray firmly in the machine.
Cartridge Error
The toner cartridge is not installed correctly.
Pull out the drum unit and toner cartridge assembly, take out the toner cartridge, and put it back in the drum unit again. Put the drum unit and toner cartridge assembly back in the machine.
If the problem continues, contact Brother Customer Service or your local Brother dealer.
Cooling Down
The temperature of the inside of the machine is too hot. The machine pauses its current print job and goes into cooling down mode.
Wait until the machine has finished cooling down. Make sure all vents on the machine are clear of obstructions.
When the machine has cooled down, the machine will resume printing.
If the fan is not spinning, disconnect the machine from the power for several minutes, then reconnect it.
Cover is Open.
The front cover is not completely closed.
Open and then firmly close the front cover of the machine.
The fuser cover is not completely closed.
Close the fuser cover located inside the back cover of the machine.
Drum !
The corona wire on the drum unit must be cleaned.
Clean the corona wire on the drum unit.
See Related Information: Clean the Corona Wire.
If the problem continues, replace the drum unit with a new one.
The drum unit or the toner cartridge and drum unit assembly is not installed correctly.
Remove the drum unit, remove the toner cartridge from the drum unit, and put the toner cartridge back into the drum unit. Reinstall the drum unit in the machine.
Drum End Soon
The drum unit is near the end of its life.
Order a new drum unit before the LCD displays Replace Drum.
Jam 2-sided
The paper is jammed in the 2- sided tray or inside the back cover.
Remove the 2-sided tray and open the back cover to pull out all jammed paper.
Jam Inside
The paper is jammed inside the machine.
Open the front cover, remove the toner cartridge and drum unit assembly, and pull out all jammed paper. Close the front cover.
Jam Rear
The paper is jammed in the back of the machine.
Open the fuser cover and remove all jammed paper. Close the fuser cover.
Jam Tray
The paper is jammed in the indicated paper tray.
Pull out the paper tray indicated on the LCD and remove all jammed paper
Manual Feed
Manual was selected as the paper source in the printer driver, but there is no paper in the manual feed slot.
Place paper in the manual feed slot.
Media Mismatch
The media type specified in the printer driver differs from the paper type specified in the machine's menu.
Load the correct type of paper in the tray indicated on the LCD, and then select the correct media type in the Paper Type setting on the machine.
No Drum Unit
The drum unit is not installed correctly.
Reinstall the toner cartridge and drum unit assembly.
No Paper
The machine is out of paper, or paper is not loaded correctly in the paper tray.
• Refill paper in the paper tray. Make sure the paper guides are set to the correct size.
• If paper is in the tray, remove it and load it again. Make sure the paper guides are set to the correct size.
• Do not overfill the paper tray.
No Paper T1
The machine failed to feed paper from the indicated paper tray.
Do one of the following:
• Refill paper in the paper tray indicated on the LCD. Make sure the paper guides are set to the correct size.
• If paper is in the tray, remove it and load it again. Make sure the paper guides are set to the correct size.
• Do not overfill the paper tray.
No Toner
The toner cartridge or the toner cartridge and drum unit assembly is not installed correctly.
Remove the toner cartridge and drum unit assembly. Remove the toner cartridge from the drum unit, and reinstall the toner cartridge back in the drum unit. Reinstall the toner cartridge and drum unit assembly back in the machine. If the problem continues, replace the toner cartridge with a new one.
Out of Memory
The machine's memory is full.
Press and hold Go for about two seconds and reduce the print resolution.
Print Data Full
The machine’s memory is full.
Press and hold Go for about two seconds and delete the previously stored print data.
Print Unable ##
The machine has a mechanical problem.
• Press and hold to turn off the machine, wait a few minutes, and then turn it on again.
• If the problem continues, contact Brother Customer Service. Contact Brother Customer Service at: 1-877-BROTHER (1-877-276-8437) (in USA)
Replace Drum
It is time to replace the drum unit.
Replace the drum unit with a new one.
See Related Information: Replace the Drum Unit.
The drum unit counter was not reset when a new drum was installed.
Reset the drum unit counter.
See the instructions included with the new drum unit.
Replace Toner
The toner cartridge is at the end of its life. The machine stops all print operations.
Replace the toner cartridge with a new one.
Self-Diagnostic
The temperature of the fuser unit does not rise to a specified temperature within the specified time.
• Press and hold to turn off the machine, wait a few seconds, and then turn it on again. Leave the machine idle for 15 minutes with the power on.
The fuser unit is too hot.
Size Error
The paper size defined in the printer driver is not supported by the defined tray.
Choose a paper size supported by the defined tray.
Size Error DX
The paper size specified in the machine's paper size setting is not available for automatic 2-sided printing.
Press and hold Go for about two seconds (if required).
Load the correct size of paper in the tray and set the tray for that paper size.
Choose a paper size supported by 2-sided printing.
Paper sizes available for automatic 2-sided printing are Letter, Legal, Mexico Legal, India Legal and Folio.
The paper in the tray is not the correct size and is not available for automatic 2-sided printing.
Size Mismatch
The paper in the tray is not the correct size.
Load the correct size of paper in the tray indicated on the LCD and set the size of paper for the tray. Press Go.
Toner Ended
It is time to replace the toner cartridge.
Replace the toner cartridge with a new one.
Toner Low
If the LCD displays this message, you can still print. The toner cartridge is near the end of its life.
Order a new toner cartridge now so a replacement toner cartridge is available when the LCD displays Replace Toner.
Paper is Jammed in the Paper Tray
Home > Troubleshooting > Paper Jams > Paper is Jammed in the Paper Tray
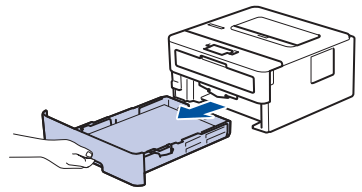
If the machine's control panel or the Status Monitor indicates that there is a jam in the paper tray, follow these steps:
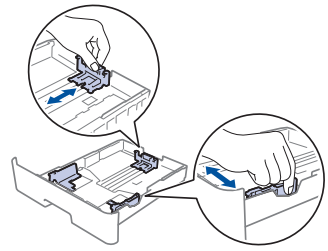
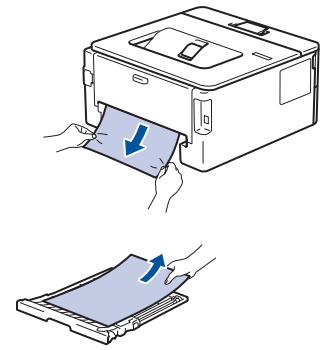
1. Pull the paper tray completely out of the machine.
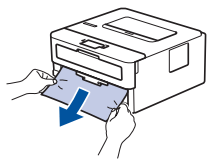
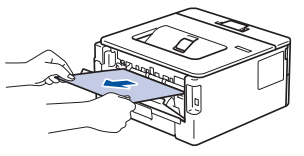
2. Slowly pull out the jammed paper.
Pulling the jammed paper downward using both hands allows you to remove the paper more easily.
3. Fan the stack of paper to prevent further jams, and slide the paper guides to fit the paper size.
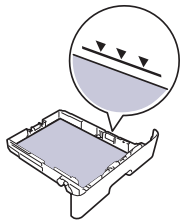
4. Make sure the paper is below the maximum paper mark ().
5. Put the paper tray firmly back in the machine.
Paper is Jammed in the Back of the Machine
Home > Troubleshooting > Paper Jams > Paper is Jammed in the Back of the Machine
If the machine's control panel or the Status Monitor indicates that there is a jam in the back (Rear) of the machine, follow these steps:
1. Leave the machine turned on for 10 minutes for the internal fan to cool the extremely hot parts inside the machine.
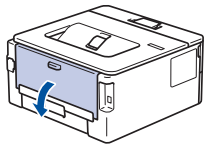
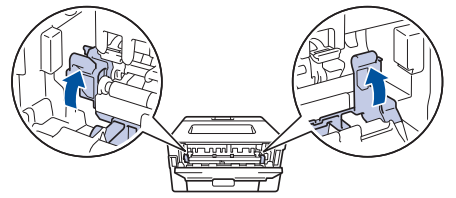
2. Open the back cover.
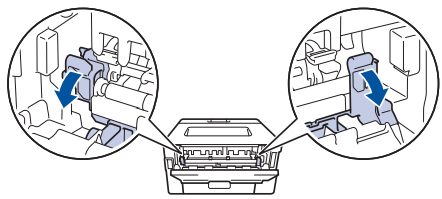
3. Pull the blue tabs at the left and right sides toward you to release the fuser cover.
4. Use both hands to gently pull the jammed paper out of the fuser unit.
5. Close the fuser cover.
If you print on envelopes, pull down the green envelope levers to the envelope position again before closing the back cover.
6. Close the back cover until it locks in the closed position.
Paper is Jammed inside the Machine
Home > Troubleshooting > Paper Jams > Paper is Jammed inside the Machine
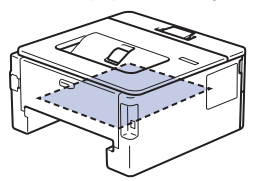
If the machine's control panel or the Status Monitor indicates that there is a jam inside the machine, follow these steps:
1. Leave the machine turned on for 10 minutes for the internal fan to cool the extremely hot parts inside the machine.
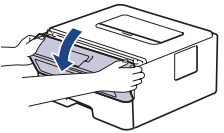
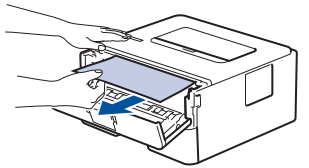
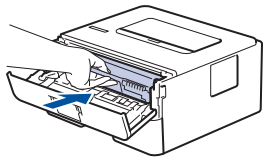
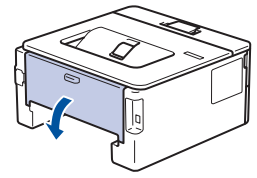
2. Open the front cover.
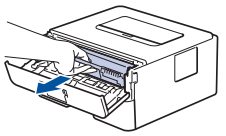
3. Remove the toner cartridge and drum unit assembly.
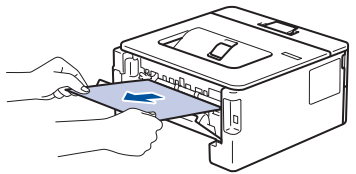
4. Pull out the jammed paper slowly.
5. Install the toner cartridge and drum unit assembly into the machine.
6. Close the front cover.
Paper is Jammed in the 2-sided Tray
If the machine's control panel or the Status Monitor indicates that there is a jam in the 2-sided paper tray, follow these steps:
1. Leave the machine turned on for 10 minutes for the internal fan to cool the extremely hot parts inside the machine.
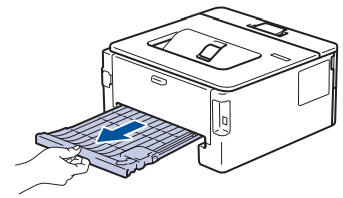
2. Pull the paper tray completely out of the machine.
3. At the back of the machine, pull the 2‑sided tray completely out of the machine.
4. Pull the jammed paper out of the machine or out of the 2‑sided tray.
5. Remove paper that may have jammed under the machine due to static electricity.
6. If paper is not caught inside the 2-sided tray, open the back cover.
7. Use both hands to gently pull the jammed paper out of the back of the machine.
8. Close the back cover until it locks in the closed position.
9. Put the 2-sided tray firmly back in the rear of the machine.
10. Put the paper tray firmly back in the front of the machine.
Printing Problems
Home > Troubleshooting > Printing Problems
Difficulties
Suggestions
No printout
Check the machine is not in Power Off mode.
If the machine is in Power Off mode, press on the control panel, and then send the print data again.
Check that the correct printer driver has been installed and selected.
Check to see if the Status Monitor or the machine's control panel displays an error status.
Check that the machine is online:
• Windows7 and Windows Server 2008 R2
Click (Start) >Devices and Printers . Right-click Brother XXX-XXXX and click See what's printing. Click Printer in the menu bar. Make sure Use Printer Offline is not selected.
• Windows Server 2008
Click (Start) >Control Panel > Hardware and Sound > Printers. Right-click Brother XXX-XXXX. Make sure Use Printer Online is not listed. If it is listed, click this option to set the driver Online.
• Windows 8 and Windows Server 2012
Move your mouse to the lower right corner of your desktop. When the menu bar appears, click Settings > Control Panel. In the Hardware and Sound group, click View devices and printers. Right-click the Brother XXX-XXXX. Click See what's printing. If printer driver options appear, select your printer driver. Click Printer in the menu bar and make sure that Use Printer Offline is not selected.
• Windows 10, Windows Server 2016 and Windows Server 2019
Click > Windows System > Control Panel. In the Hardware and Sound group, click View devices and printers. Right-click the Brother XXX-XXXX. Click See what's printing. If printer driver options appear, select your printer driver. Click Printer in the menu bar and make sure that Use Printer Offline is not selected.
• Windows Server 2012 R2
Click Control Panel on the Start screen. In the Hardware group, click View devices and printers. Right-click the Brother XXX-XXXX. Click See what’s printing. If printer driver options appear, select your printer driver. Click Printer in the menu bar and make sure Use Printer Offline is not selected.
• Mac
Click the System Preferences menu, and then select the Printers & Scanners option. When the machine is offline, delete it using the button, and then add it using the button.
The machine is not printing or has stopped printing.
Cancel the print job and clear it from the machine's memory. The printout may be incomplete. Send the print data again.
See Related Information:Cancel a Print Job.
The headers or footers appear when the document displays on the screen but they do not show up when it is printed.
There is an unprintable area on the top and bottom of the page. Adjust the top and bottom margins in your document to allow for this.
The machine prints unexpectedly or it prints garbage.
Cancel the print job and clear it from the machine's memory. The printout may be incomplete. Send the print data again.
See Related Information:Cancel a Print Job.
Check the settings in your application to make sure they are set up to work with your machine.
Confirm that the Brother printer driver is selected in your application's Print window.
The machine prints the first couple of pages correctly, then some pages have missing text.
Check the settings in your application to make sure they are set up to work with your machine.
Your machine is not receiving all of the data sent from the computer. Make sure you connected the interface cable correctly.
The machine does not print on both sides of the paper even though the printer driver setting is 2-sided and the machine supports automatic 2-sided printing.
Check the paper size setting in the printer driver. You must select Letter, Legal, Folio, or Mexico Legal paper that is 16 to 28 lb (60 to 105 g/m2).
Print speed is too slow.
Try changing the printer driver setting. The highest resolution needs longer data processing, sending and printing time.
If you have enabled the Quiet Mode, disable the Quiet Mode on the printer driver or the machine's menu setting.
The machine does not feed paper.
If there is paper in the paper tray, make sure it is straight. If the paper is curled, straighten it. Sometimes it is helpful to remove the paper, turn the stack over and place it back in the paper tray.
Reduce the amount of paper in the paper tray, and then try again.
(For models with Manual Feed Slot)Make sure Manual is not selected for Paper Source in the printer driver.
Clean the paper pick-up rollers.
The machine does not feed paper from the Manual feed slot.
(For models with Manual Feed Slot)
Use both hands to push one sheet of paper firmly into the manual feed slot until the top edge of the paper presses against the paper feed rollers. Continue pressing the paper against the rollers until the machine grabs the paper and pulls it in further.
Put only one sheet of paper in the manual feed slot.
Make sure Manual is selected as Paper Source in the printer driver.
The machine does not feed envelopes.
(For models with Manual Feed Slot)Load one envelope at a time in the manual feed slot. Your application must be set to print the envelope size you are using. This is usually done in the Page Setup or Document Setup menu of your application.
Improve the Print Quality
Home > Troubleshooting > Improve the Print Quality
If you have a print quality problem, print a test page first. If the printout looks good, the problem is probably not the machine. Check the interface cable connections and try printing a different document. If the printout or test page printed from the machine has a quality problem, check the examples of poor print quality and follow the recommendations in the table.
IMPORTANT
Using non-genuine supplies may affect the print quality, hardware performance, and machine reliability.
1. To get the best print quality, we suggest using recommended print media. Make sure you use paper that meets our specifications.
2. Check that the toner cartridge and drum unit are installed correctly.
Examples of poor print quality
Recommendation
• If the machine indicates Replace Toner status, install a new toner cartridge.
• Check the machine’s environment. Conditions such as humidity, high temperatures, and so on, may cause this print fault.
• If the whole page is too light, Toner Save may be turned on. Turn off Toner Save mode in the machine's menu settings or the printer driver.
• Clean the drum unit.
• Clean the corona wire on the drum unit.
• Replace the toner cartridge with a new toner cartridge.
• Replace the drum unit with a new drum unit.
• Check the machine’s environment. Conditions such as high temperatures and high humidity can increase the amount of background shading.
• Clean the drum unit.
• Replace the toner cartridge with a new toner cartridge.
• Replace the drum unit with a new drum unit.
• Check the machine’s environment. Conditions such as low humidity and low temperatures may cause this print quality problem.
• Select the appropriate media type in the printer driver.
• Select the appropriate media type in the menu setting.
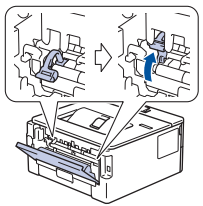
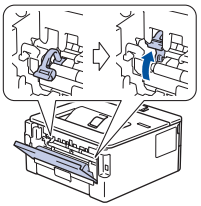
• Make sure the two green levers inside the back cover are in the up position. Pull up the two green levers until they stop.
• Clean the drum unit.
• Replace the drum unit with a new drum unit.
• Replace the toner cartridge with a new toner cartridge.
• The fuser unit may be contaminated.
Contact Brother Customer Service. In USA: 1-877-BROTHER (1-877-276-8437)
• Make sure the media type setting in the driver matches the type of paper you are using.
• Clean the drum unit.
• The toner cartridge may be damaged. Replace the toner cartridge with a new toner cartridge.
• The drum unit may be damaged. Replace the drum unit with a new drum unit.
• The fuser unit may be contaminated. Contact Brother Customer Service. In USA: 1-877-BROTHER (1-877-276-8437)
• Select Thick Paper mode in the printer driver or use thinner paper than you are currently using.
• Select the appropriate media type in the menu setting.
• Check the machine’s environment. Conditions such as high humidity can cause hollow print.
• The drum unit may be damaged. Replace the drum unit with a new drum unit.
• Clean the corona wire inside the drum unit.
• The drum unit may be damaged.
Replace the drum unit with a new drum unit.
• Select the appropriate media type in the printer driver.
• Select the appropriate media type in the menu setting.
• The problem may disappear by itself. Print multiple blank pages to clear this problem, especially if the machine has not been used for a long time.
• Clean the drum unit.
• The drum unit may be damaged.
White lines across the page
Replace the drum unit with a new drum unit.
• Clean the drum unit.
• The drum unit may be damaged. Replace the drum unit with a new drum unit.
• Check the machine's environment. Conditions such as high humidity and high temperatures may cause this print quality problem.
• Clean the drum unit.
• If the problem is not solved after printing a few pages, replace the drum unit with a new drum unit.
White Spots on black text and graphics at 3.7 in. (94 mm) intervals
Black spots at 3.7 in. (94 mm) intervals
• If the problem is not solved after printing a few pages, the drum unit may have foreign material, such as glue from a label, stuck on the drum. Clean the drum unit.
See Related Information:Clean the Drum Unit Using Drum Dot Print.
• The drum unit may be damaged. Replace the drum unit with a new drum unit.
• If you use label sheets for laser printers, the glue from the sheets may sometimes stick to the drum surface. Clean the drum unit. See Related Information: Clean the Drum Unit Using Drum Dot Print.
• If you used paper that has clips or staples, the drum unit may be damaged.
• If the unpacked drum unit is in direct sunlight (or room light for long periods of time), the unit may be damaged.
• Clean the drum unit.
• The toner cartridge may be damaged. Replace the toner cartridge with a new toner cartridge.
• The drum unit may be damaged. Replace the drum unit with a new drum unit.
Black lines down the page
Printed pages have toner stains down the page
• Clean the corona wire inside the drum unit by sliding the green tab. Make sure that the green tab on the drum unit is in the Home position.
• The toner cartridge may be damaged. Replace the toner cartridge with a new toner cartridge.
• The drum unit may be damaged. Replace the drum unit with a new drum unit.
• The fuser unit may be contaminated.
Contact Brother Customer Service. In USA: 1-877-BROTHER (1-877-276-8437)
White lines down the page
• Make sure foreign material such as a torn piece of paper, sticky notes or dust is not inside the machine and around the toner cartridge and drum unit.
• The toner cartridge may be damaged. Replace the toner cartridge with a new toner cartridge.
• The drum unit may be damaged. Replace the drum unit with a new drum unit.
• Make sure the paper or other print media is loaded correctly in the paper tray and the guides are not too tight or too loose against the paper stack.
• Set the paper guides correctly.
• The paper tray may be too full.
• Check the paper type and quality.
• Check for loose objects such as torn paper inside the machine.
• If the problem only occurs during automatic 2-sided printing, check for torn paper in the 2-sided tray. Verify the 2-sided tray is inserted completely and the back cover is closed completely.
• Check the paper type and quality. High temperatures and high humidity will cause paper to curl.
• If you do not use the machine often, the paper may have been in the paper tray too long. Turn over the stack of paper in the paper tray. Also, fan the paper stack, and then rotate the paper 180° in the paper tray.
• Open the back cover (face up output tray) to let the printed paper exit onto the face up output tray.
• Choose Reduce Paper Curl mode in the printer driver when you do not use our recommended print media.
• Make sure paper is loaded correctly.
• Check the paper type and quality.
• Turn over the stack of paper in the tray or rotate the paper 180° in the input tray.
• Make sure the two green levers inside the back cover are in the up position. Pull up the two green levers until they stop.
• Make sure the media type setting in the printer driver matches the type of paper you are using.
• Choose Improve Toner Fixing mode in the printer driver.
If this selection does not provide enough improvement, change the printer driver setting in Media Type to a thick setting. If you are printing an envelope, choose Env. Thick in the media type setting.
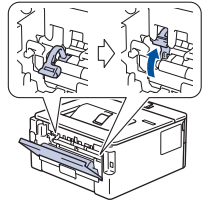
• Make sure the two green levers inside the back cover are pulled down to the envelope position when you print envelopes. After you have finished printing, reset the levers back to their original position. Pull up the levers until they stop.
• Make sure envelopes are printed with the back cover (face up output tray) opened.
• (For models with Manual Feed Slot) Make sure envelopes are fed only from the manual feed slot.
Error Messages
Home > Troubleshooting > Network Problems > Error Messages
Your Brother machine will display an error message if an error occurs. The most common error messages are shown in the table.
Error Messages
Cause
Action
Connection Error
Other devices are trying to connect to the Wi-Fi Direct network at the same time.
Make sure there are no other devices trying to connect to the Wi-Fi Direct network, and then try to configure the Wi-Fi Direct settings again.
Connection Fail
Other devices are trying to connect to the Wi-Fi Direct network at the same time.
• Move the mobile device closer to your Brother machine.
• Move your Brother machine and the mobile device to an obstruction-free area.
• If you are using the PIN Method of WPS, make sure you have entered the correct PIN.
No Device
When configuring the Wi-Fi Direct network, the Brother machine cannot find your mobile device.
• Make sure your machine and mobile device are in the Wi-Fi Direct mode.
• Move the mobile device closer to your Brother machine.
• Move your Brother machine and the mobile device to an obstruction-free area.
• If you are manually configuring the Wi-Fi Direct network, make sure you have entered the correct password.
• If your mobile device has a configuration page for how to obtain an IP address, make sure the IP address of your mobile device has been configured via DHCP
I Cannot Complete the Wireless Network Setup Configuration
Home > Troubleshooting > Network Problems > I Cannot Complete the Wireless Network Setup Configuration
Turn your wireless router off and back on. Then, try to configure the wireless settings again. If you are unable to resolve the problem, follow the instructions below:
Investigate the problem using the WLAN Report.
Cause
Action
Interface
Your security settings (SSID/ Network Key) are not correct.
• Confirm the security settings using the Wireless Setup Helper utility.
• Select and confirm that you are using the correct security settings.
- See the instructions supplied with your wireless LAN access point/router for information on how to find the security settings.
- The manufacturer's name or model number of the wireless LAN access point/router may be used as the default security settings.
- Consult with the access point/router manufacturer, your Internet provider, or network administrator.
Wireless
Your Brother machine's MAC address is not allowed.
Confirm that the Brother machine's MAC Address is allowed in the filter. You can find the MAC Address on your Brother machine's control panel.
Wireless
Your wireless LAN access point/router is in stealth mode (not broadcasting the SSID).
• Enter the correct SSID name or Network Key manually.
• Check the SSID name or the Network Key in the instructions supplied with your wireless LAN access point/router and reconfigure the wireless network setup.
Wireless
Your security settings (SSID/ password) are not correct.
• Confirm the SSID and password.
- When you are configuring the network manually, the SSID and password are displayed on your Brother machine. If your mobile device supports the manual configuration, the SSID and password will be displayed on your mobile device’s screen.
Wi-Fi Direct
You are using Android™ 4.0.
If your mobile device disconnects (approximately six minutes after using Wi-Fi Direct), try the one-push configuration using WPS (recommended) and set the Brother machine as a G/O.
Wi-Fi Direct
Your Brother machine is placed too far from your mobile device.
Move your Brother machine within about 3.3 feet (1 meter) of the mobile device when you configure the Wi-Fi Direct network settings.
Wi-Fi Direct
There are some obstructions (walls or furniture, for example) between your machine and the mobile device.
Move your Brother machine to an obstruction-free area.
Wi-Fi Direct
There is a wireless computer, Bluetooth®- supported device, microwave oven, or digital cordless phone near the Brother machine or the mobile device.
Move other devices away from the Brother machine or the mobile device.
Wi-Fi Direct
If you have checked and tried all of the above, but still cannot complete the Wi-Fi Direct configuration, do the following:
• Turn your Brother machine off and back on. Then, try to configure the Wi-Fi Direct settings again.
• If you are using your Brother machine as a client, confirm how many devices are allowed in the current Wi-Fi Direct network, and then check how many devices are connected.
Wi-Fi Direct
For Windows
If your wireless connection has been interrupted, and you have checked and tried all of the above, we recommend using the Network Connection Repair Tool.
My Brother Machine Cannot Print over the Network
Home > Troubleshooting > Network Problems > My Brother Machine Cannot Print over the Network
Cause
Action
Interface
Your security software blocks your machine's access to the network.
Some security software might block access without showing a security alert dialog box even after successful installation.
To allow access, see the instructions for your security software or ask the software manufacturer.
Wired/Wireless
Your Brother machine was not assigned an available IP address.
• Confirm the IP address and the Subnet Mask.
Verify that both the IP addresses and Subnet Masks of your computer and the Brother machine are correct and located on the same network.
For more information about how to verify the IP address and the Subnet Mask, ask your network administrator.
• Windows
Confirm the IP address and the Subnet Mask using the Network Connection Repair Tool.
Wired/Wireless
The failed print job is still in your computer's print queue.
• If the failed print job is still in your computer's print queue, delete it.
• Otherwise, double-click the printer icon in the following folder and cancel all documents:
- Windows 7
Click (Start) > Devices and Printers > Printers and Faxes.
- Windows 8
Move your mouse to the lower right corner of your desktop. When the menu bar appears, click Settings > Control Panel. In the Hardware and Sound group, click View devices and printers > Printers.
- Windows 10, Windows Server 2016 and Windows Server 2019
Click > Windows System > Control Panel. In the Hardware and Sound group, click View devices and printers > Printers.
- Windows Server 2008
Click Start > Control Panel > Printers.
- Windows Server 2012
Move your mouse to the lower right corner of your desktop. When the menu bar appears, click Settings > Control Panel. In the Hardware group, click View devices and printers > Printers.
- Windows Server 2012 R2
Click Control Panel on the Start screen. In the Hardware group, click View devices and printers.
Your Brother machine is not connected to the wireless network.
Print the WLAN Report to check the error code on the printed report.
Wireless
If you have checked and tried all of the above, but your Brother machine still cannot print, uninstall the printer driver and reinstall it.
I Want to Check that My Network Devices are Working Correctly
Check
Action
Interface
Check that your Brother machine, access point/ router, or network hub is turned on.
Check the following:
• The power cord is connected correctly and the Brother machine is turned on.
• The access point/router or hub is turned on and its link button is blinking.
• All protective packaging has been removed from the machine.
• The toner cartridge and drum unit are installed correctly.
• The front and back covers are fully closed.
• Paper is inserted correctly in the paper tray.
• (For wired networks) A network cable is securely connected to the Brother machine and to the router or hub.
Wired/Wireless
Check the Link Status in the Network Configuration Report or the Printer Settings page.
Print the Network Configuration Report and check that Ethernet Link Status or Wireless Link Status is Link OK.
Wired/Wireless
Check that you can "ping" the Brother machine from your computer.
Ping the Brother machine from your computer using the IP address or the node name in the Windows command prompt or Mac Terminal application:
ping <ipaddress> or <nodename>.
• Successful: Your Brother machine is working correctly and connected to the same network as your computer.
• Unsuccessful: Your Brother machine is not connected to the same network as your computer.
(Windows)
Ask the network administrator and use the Network Connection Repair Tool to fix the IP address and the subnet mask.
(Mac)
Confirm that the IP address and the Subnet Mask are set correctly.
Wired/Wireless
Check that your Brother machine is connected to the wireless network.
Print the WLAN Report to check the error code on the printed report.
Wireless
AirPrint Problems
Home > Troubleshooting > AirPrint Problems
Difficulty
Suggestions
My Brother machine is not displayed in the printer list.
Make sure your Brother machine is turned on.
Confirm the network settings. See Related Information.
Move the mobile device closer to the wireless access point/router, or to your Brother machine.
I cannot print.
Make sure your Brother machine is turned on.
Confirm the network settings. See Related Information.
I am trying to print a multiple-page document from an iOS device, but ONLY the first page is printing.
Make sure you are running the latest OS version.
Other Problems
Home > Troubleshooting > Other Problems
Difficulties
Suggestions
The machine will not turn on.
Adverse conditions on the power connection (such as lightning or a power surge) may have triggered the machine’s internal safety mechanisms. Unplug the power cord. Wait for ten minutes, then plug in the power cord and press to turn on the machine.
If the problem is not solved, press and hold to turn off the machine. If you are using a backup battery or surge suppressor device, disconnect it to make sure it is not the problem. Plug the machine’s power cord directly into a different known working wall outlet and press to turn on the machine.
The Brother software cannot be installed.
(Windows)
If the Security Software warning appears on the computer screen during the installation, change the Security Software settings to permit the Brother product setup program or other program to run.
(Mac)
If you are using a firewall function of anti-spyware or antivirus security software, temporarily disable it and then install the Brother software.
 Power On/Off Button
 If your application contains a similar setting. we recommend that you set the orientation using the application.
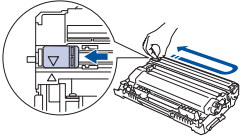
 to turn off the machine, wait a few minutes, and then turn it on again.
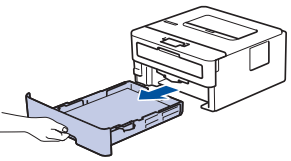
 ).
).
 on the control panel, and then send the print data again.
 (Start) >Devices and Printers . Right-click Brother XXX-XXXX and click See what's printing. Click Printer in the menu bar. Make sure Use Printer Offline is not selected.
 > Windows System > Control Panel. In the Hardware and Sound group, click View devices and printers. Right-click the Brother XXX-XXXX. Click See what's printing. If printer driver options appear, select your printer driver. Click Printer in the menu bar and make sure that Use Printer Offline is not selected.
 button, and then add it using the
  button.