HT-ST5000
4-687-838-63(1)
E:\#Work#\0711\4687838631\4687838631HTST5000SP1\00COV-
HTST5000SP1\010BCO.fm
masterpage: Left
©2017 Sony Corporation Printed in Malaysia 4-687-838-63(1)
The software of this system may be updated in the future. To find out details on any available
updates, please visit the following URL.
http://www.sony-asia.com/section/support
F:\#Work#\0705\4687838631\4687838631HTST5000SP1\00COV-
HTST5000SP1\010COV.fm
masterpage:
Right
HT-ST5000
4-687-838-63(1)
HT-ST5000
Operating Instructions
GB
CT
Sound Bar

2
GB
Do not install the appliance in a
confined space, such as a bookcase or
built-in cabinet.
To reduce the risk of fire, do not cover
the ventilation opening of the appliance
with newspapers, tablecloths, curtains,
etc.
Do not expose the appliance to naked
flame sources (for example, lighted
candles).
To reduce the risk of fire or electric
shock, do not expose this appliance to
dripping or splashing, and do not place
objects filled with liquids, such as vases,
on the appliance.
The unit is not disconnected from the
mains as long as it is connected to the
AC outlet, even if the unit itself has been
turned off.
As the main plug is used to disconnect
the unit from the mains, connect the
unit to an easily accessible AC outlet.
Should you notice an abnormality in the
unit, disconnect the main plug from the
AC outlet immediately.
Do not expose batteries or appliances
with battery-installed to excessive heat,
such as sunshine and fire.
Indoor use only.
Recommended cables
Properly shielded and grounded cables
and connectors must be used for
connection to host computers and/or
peripherals.
WARNING

3
GB
Table of Contents
What’s in the Box ..........................5
What You Can Do with the
System .....................................6
Guide to Parts and Controls ..........8
About the Home Menu ................ 13
Setup
Connecting a 4K TV and 4K
Devices .................................. 15
Connecting a TV or Portable Audio
Device via the ANALOG IN
Jack .........................................17
Connecting to a Wired
Network ................................. 18
Connecting to a Wireless
Network ................................. 19
Mounting the Main Unit on a
Wall .........................................21
Attaching the Grille Frame .......... 23
Listening to the Sound
Listening to the TV ......................24
Listening to the Connected AV
Device ....................................24
Listening to Music on a USB
Device .................................... 25
Selecting the Sound Effect
Setting the Sound Effect that is
Tailored to Sound Sources
(SOUND FIELD) ....................... 27
Enjoying Clear Sound with Low
Volume at Midnight
(NIGHT) ..................................28
Making Dialogues Clearer
(VOICE) ...................................29
Adjusting the Volume of the
Subwoofer .............................29
Adjusting the Delay Between the
Picture and Sound .................30
Listening to Music/Sound
with the BLUETOOTH®
Function
Listening to Music from a Mobile
Device .................................... 31
Listening to Sound of the
Connected TV or Device from
Headphones ..........................34
Listening to Music/Sound
Using the Network Function
Listening to Music on your PC via a
Home Network ......................36
Listening to Music on the Mobile
Device with Sony | Music
Center .................................... 37
Using Chromecast built-in ...........38
Using Spotify ................................39
Using the MUSIC SERVICE
Button ....................................40
Connecting the Wireless Multi
Room-Compatible Device
(Wireless Multi Room) ........... 41
Using the Various Functions/
Settings
Customizing the Speaker Settings
for Surround Sound ...............42
Performing the Wireless Connection
of the Subwoofer
(SECURE LINK) ........................43
Playing Compressed Audio Files or
CDs by Upscaling to Near Hi-
Resolution Sound Quality
(DSEE HX) ...............................44
Enjoying Multiplex Broadcast Sound
(AUDIO) ..................................45
Basic Setup
Startup Guide
(separate
document)
GB

4
GB
Deactivating Buttons on the Main
Unit ........................................ 45
Changing the Brightness of the
Front Panel Display and
BLUETOOTH Indicator
(DIMMER) .............................. 46
Saving Power in Standby
Mode ..................................... 46
Sending the Remote Signal to the
TV via the Main Unit ..............47
Using the Control for HDMI
Function .................................47
Using the “BRAVIA” Sync
Function ................................ 49
Using the Setup Display ............... 51
Options Menu List ....................... 58
Troubleshooting
Troubleshooting .......................... 59
Resetting the System ...................67
Additional Information
Specifications .............................. 68
Power Consumption by the Setting
Value for Each Standby
Mode ..................................... 70
Playable Types of Audio Files ...... 71
Supported Input Audio
Formats ..................................72
Supported HDMI Video
Formats ..................................73
On BLUETOOTH
Communication .....................75
END USER LICENSE
AGREEMENT ...........................76
Precautions ................................. 80
Index ............................................ 84
5
GB
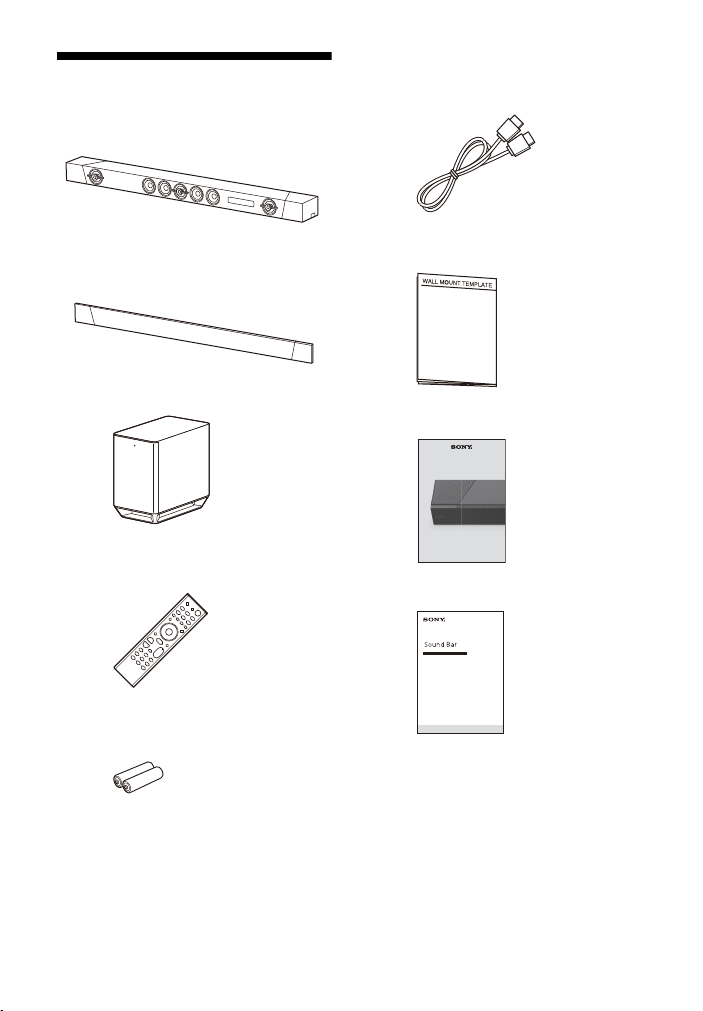
What’s in the Box
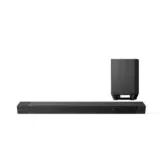
•Bar Speaker (1)
•Grille frame (1)
•Subwoofer (1)
• Remote control (1)
• R03 (size AAA) battery (2)
• HDMI cable (supports the specification
equal to Premium High Speed HDMI
cable with Ethernet) (1)
• WALL MOUNT TEMPLATE (1)
•Startup Guide
• Operating Instructions

6
GB
What You Can Do with the System
“Listening to Music
on a USB Device”
(page 25)
Blu-ray Disc™ player, cable
box, or satellite box, etc.
“Using the Control for HDMI Function”
(page 47)
“Using the “BRAVIA” Sync Function”
(page 49)
“Performing the Wireless
Connection of the Subwoofer
(SECURE LINK)” (page 43)
“Using Spotify” (page 39)*
“Using the MUSIC SERVICE Button”
(page 40)
“Listening to the TV” (page 24)
“Listening to the Connected AV Device” (page 24)
* This service may not be available in some
countries/regions.
* To play on the system, you need the Spotify
Premium account.
Connecting the TV and other devices
(refer to “Startup Guide” (separate
document) or see “Connecting a TV or
Portable Audio Device via the ANALOG
IN Jack” (page 17).)
7
GB
“Listening to Music from a Mobile
Device” (page 31)
“Listening to Music on the Mobile
Device with Sony | Music Center”
(page 37)
“Listening to Sound of the Connected
TV or Device from Headphones”
(page 34)
“Listening to the Same Music in Different
Rooms (Wireless Multi Room)” (page 41)
“Connecting to a Wired
Network” (page 18)
Internet
Router
Modem
Wireless LAN router
“Connecting to a Wireless
Network” (page 19)
“Listening to Music on your PC via a
Home Network” (page 36)
8
GB
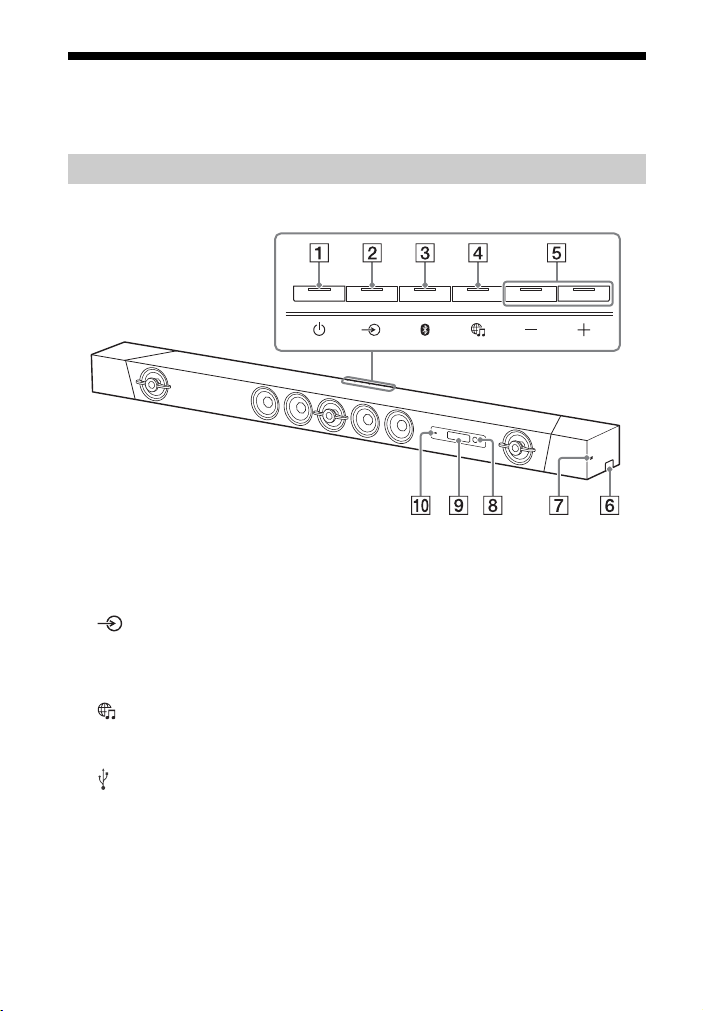
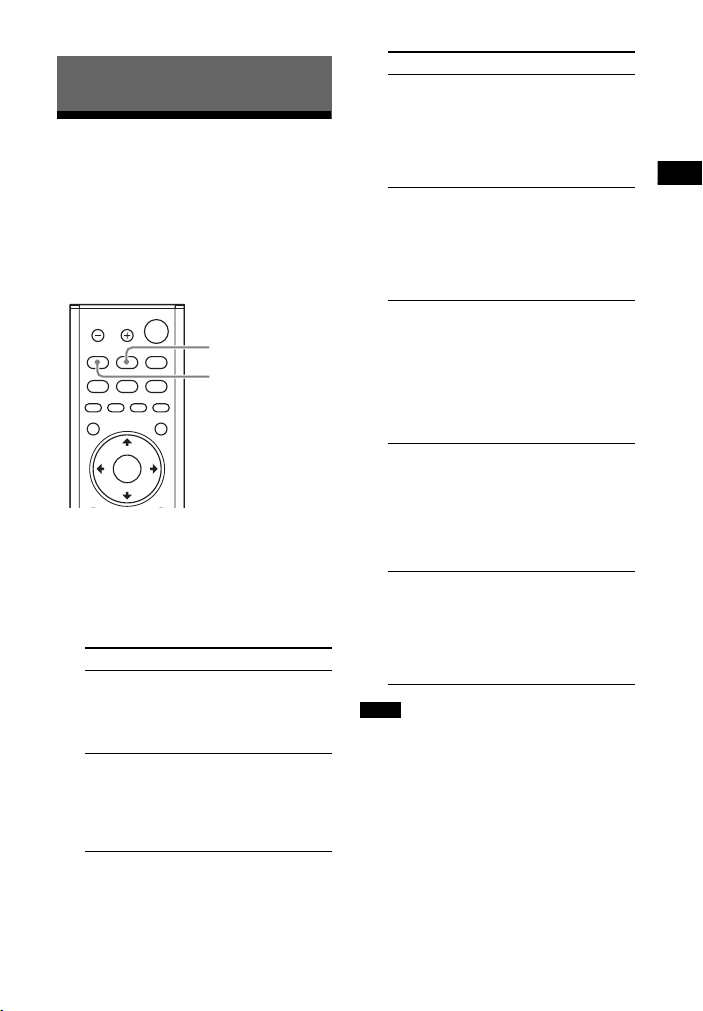
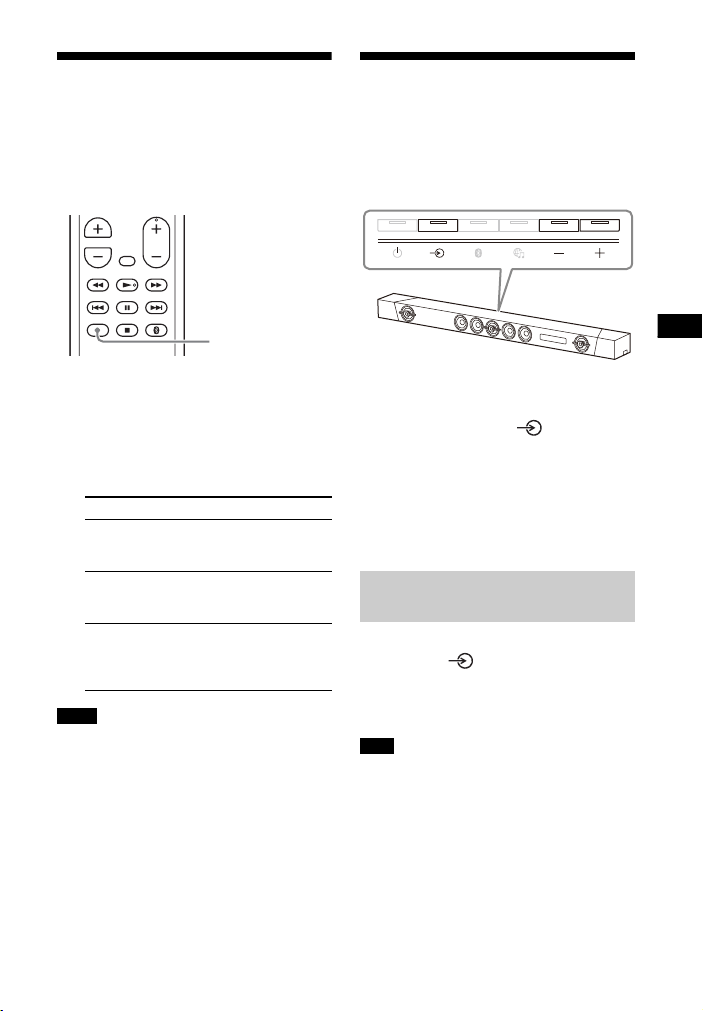
Guide to Parts and Controls
Details are omitted from the illustrations.
Front
(power) button
Turns on the system or sets it to
standby mode.
(input select) button
(page 13, 24)
BLUETOOTH PAIRING button
(page 31)
(MUSIC SERVICE) button
(page 40)
+/– (volume) buttons
(USB) port (page 25)
N-Mark (page 32)
When using the NFC function, touch
your NFC-compatible device to the
mark.
Remote control sensor
Point the remote control at the
remote control sensor to operate
the system.
Front panel display
BLUETOOTH indicator
– Flashes quickly in blue: During
pairing standby status
– Flashes in blue: BLUETOOTH
connection is being attempted
– Lights in blue: BLUETOOTH
connection has been established
Bar Speaker (Main Unit)
9
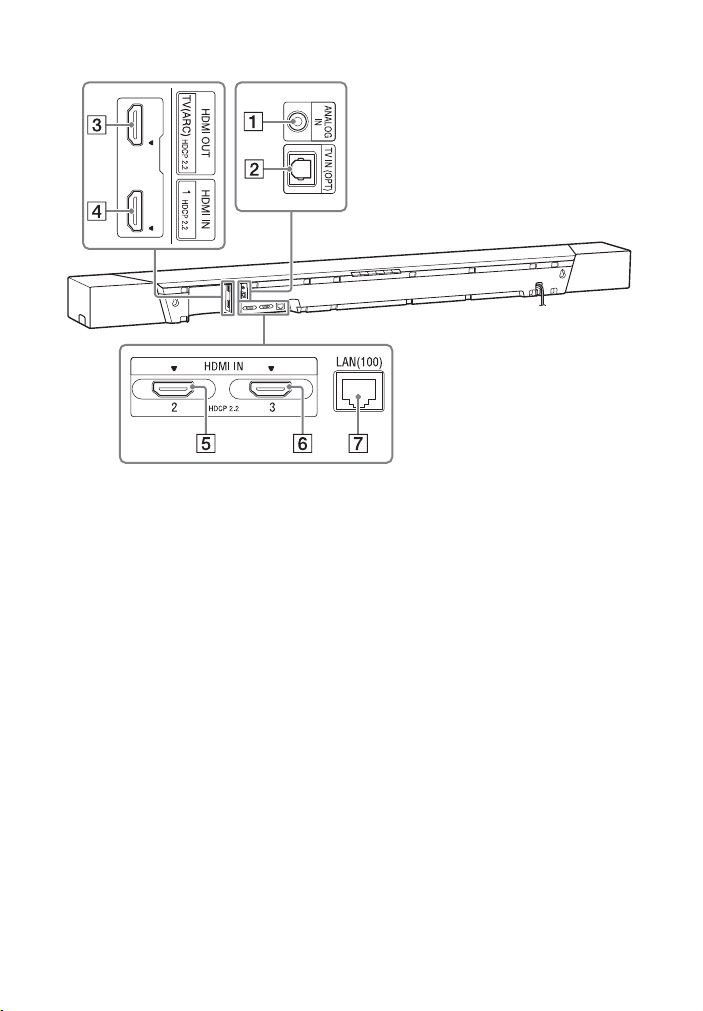
GB
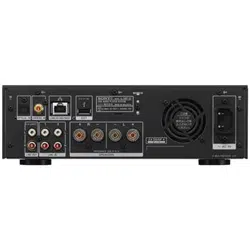
Rear
ANALOG IN jack
TV IN (OPT) jack
HDMI OUT (TV (ARC)) jack
For the specifications and note on
connections, see “Supported
HDMI Video Formats” (page 73).
HDMI IN 1 jack
For the specifications and note on
connections, see “Supported
HDMI Video Formats” (page 73).
HDMI IN 2 jack
For the specifications and note on
connections, see “Supported
HDMI Video Formats” (page 73).
HDMI IN 3 jack
For the specifications and note on
connections, see “Supported
HDMI Video Formats” (page 73).
LAN(100) port
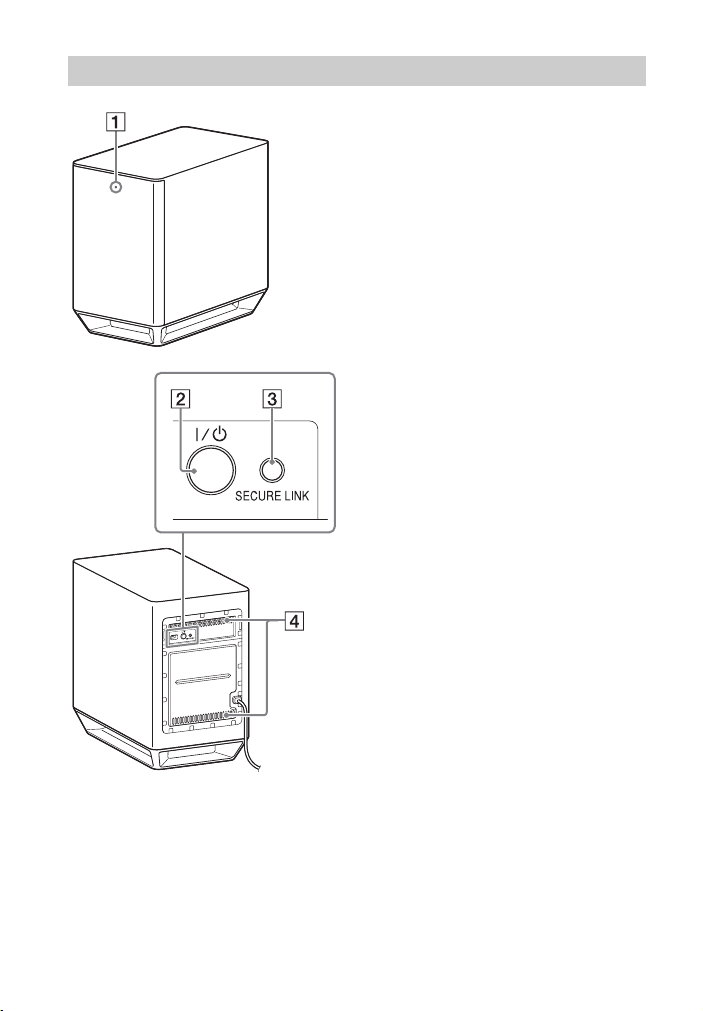
10
GB
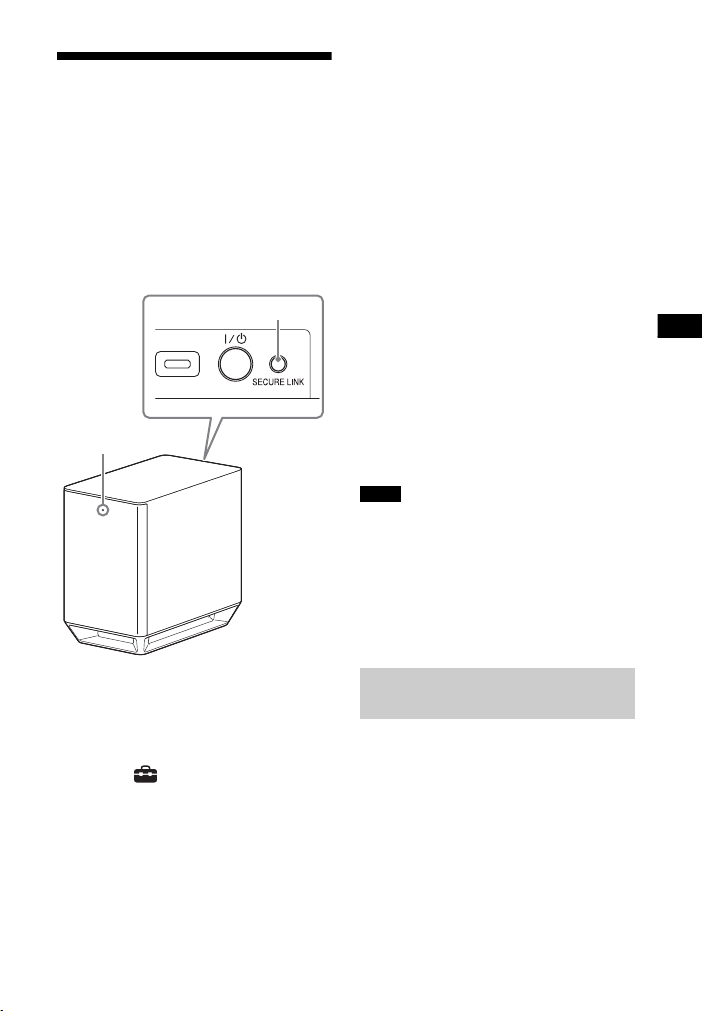
On/standby indicator
– Lights in red: The subwoofer is not
connected to the system
– Lights in green: The subwoofer is
connected to the system
– Lights in orange: The subwoofer is
connected to the system with the
Secure Link function
– Flashes in green: The subwoofer is
attempting to connect to the
system
– Flashes in orange: The subwoofer
is attempting to connect to the
system with the Secure Link
function
– Turns off: The subwoofer is in
standby mode
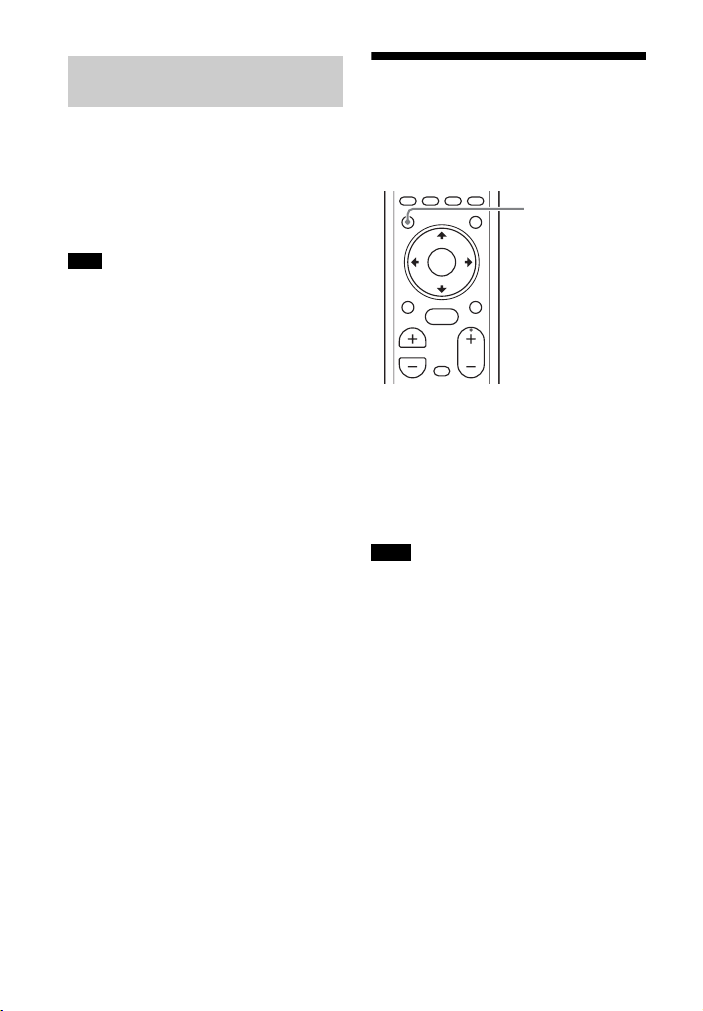
/ (on/standby) button
Turns on the subwoofer or sets it
to standby mode.
SECURE LINK button (page 43)
Ventilation holes
For safety, do not block the
ventilation holes.
Subwoofer

11
GB
INPUT +/– (page 13, 24)
(power)
Turns on the system or sets it to
standby mode.
DISPLAY**
Displays playback information on
the TV screen.
Playback information is not
displayed for TV input.
CLEAR AUDIO+ (page 27)
SOUND FIELD (page 27)
VOICE (page 29)
NIGHT (page 28)
DIMMER (page 46)
Color buttons
Shortcut keys for selecting items
on some menus.
MUSIC SERVICE (page 40)
BLUETOOTH PAIRING (page 31)
OPTIONS** (page 30, 58)
Displays the options menu on the
TV screen.
The options menu is not
displayed for the TV input.
BACK (page 13)
/// (page 13)
(enter) (page 13)
HOME (page 13)
(muting)
Turns off the sound temporarily.
(volume) +*/–
Adjusts the volume.
SW (subwoofer volume) +/–
Adjusts the volume of the
subwoofer.
Remote Control

12
GB
Playback operation buttons
/ (rewind/fast forward)
Searches backward or forward.
/ (previous/next)
Selects the previous/next
chapter, track, or file.
(play)*
Starts or re-starts playback
(resume play).
(pause)
Pauses or re-starts playback.
(stop)
Stops playback.
BLUETOOTH RX/TX (BLUETOOTH
receiver/transmitter) (page 35)
AUDIO* (page 45)
*The AUDIO, , and + buttons have a
tactile dot. Use it as a guide during
operation.
**When watching HDR signal and certain
4K format video, the OPTIONS and
DISPLAY buttons do not work and the
On-Screen Display (OSD) of the system is
not displayed. For details about the 4K
video format, see “Supported HDMI
Video Formats” (page 73).
13
GB
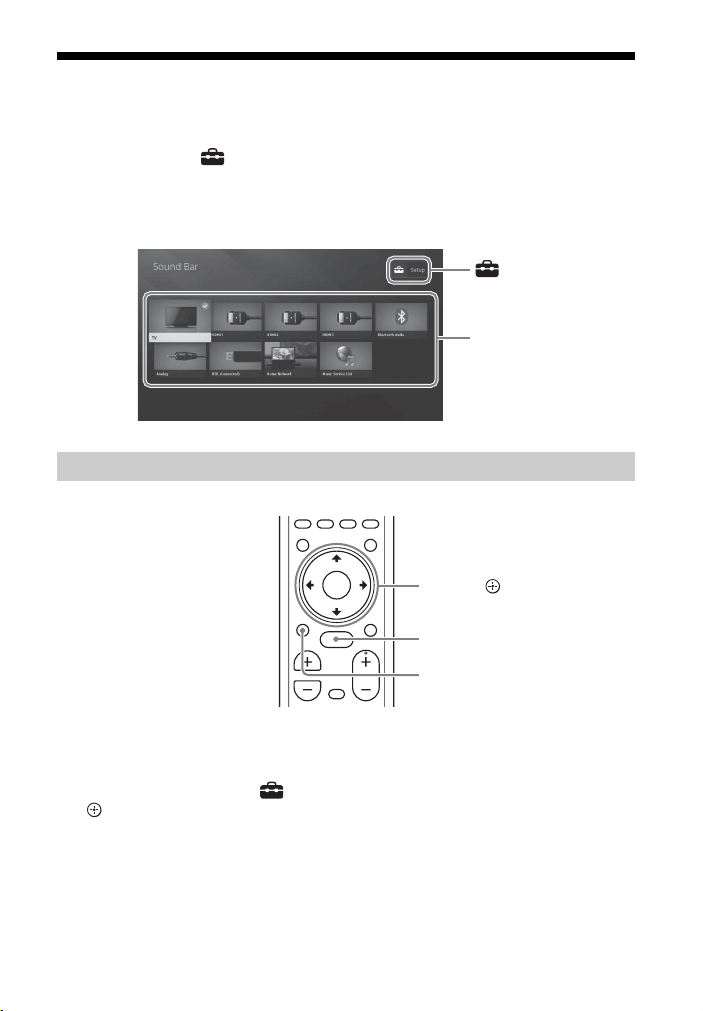
About the Home Menu
You can display the home menu on the TV screen by connecting the system and TV
with the HDMI cable (supplied). From the home menu, you can set the various
settings by selecting [Setup] or select the input or service that you want to watch
from the input list. The home menu is displayed in the language that is selected in
[Easy Setup]. (The following screen is an example when selecting English.)
1 Press HOME.
The home menu appears on the TV screen.
2 Press /// to select [Setup] or an item on the input list, then press
.
The selected input or setup display appears on the TV screen.
To return to the previous screen, press BACK.
Using the Home Menu
[Setup]
Input list
HOME
BACK
///, (enter)
14
GB
Input list
[Setup]
See “Using the Setup Display” (page 51).
Tip
You can also select the input by pressing INPUT +/– repeatedly.
In these Operating Instructions, the operations are described as steps that are
operated on the home menu displayed on the TV screen by using the remote control
while the system and TV are connected with the HDMI cable (supplied).
The operating steps that select items on the TV screen by using /// and are
simplified in the following way.
Example: Select [Setup] from the home menu.
The operation that selects an item by pressing /// and is expressed as
“select.”
Example: Select [Network Settings] - [Internet Settings] - [Wired Setup] on the
home menu.
When repeating the operation that selects an item by pressing /// and , the
selected items are linked with “-.”
Tips
• You can use the buttons on the main unit if they have the same or similar names as those
on the remote control.
• Characters in brackets [ ] appear on the TV screen. Characters in quotes “ ” appear in the
front panel display.
Input name Explanation
[TV] Outputs the TV sound. (page 24)
[HDMI1] Outputs the sound of device that is connected to the HDMI IN 1
jack. (page 24)
[HDMI2] Outputs the sound of device that is connected to the HDMI IN 2
jack. (page 24)
[HDMI3] Outputs the sound of device that is connected to the HDMI IN 3
jack. (page 24)
[Bluetooth Audio] Outputs the sound of device that is connected with the
BLUETOOTH function. (page 31)
[Analog] Outputs the sound of device that is connected to the ANALOG IN
jack. (page 24)
[USB] Outputs music files stored on a connected USB device. (page 25)
[Home Network] Outputs music files on the device that is connected via the
network. (page 36)
[Music Service List] Displays the operation method for music services. (page 40)
About the Steps Description
15
GB
Setup
Basic Setup
Refer to Startup Guide (separate
document).
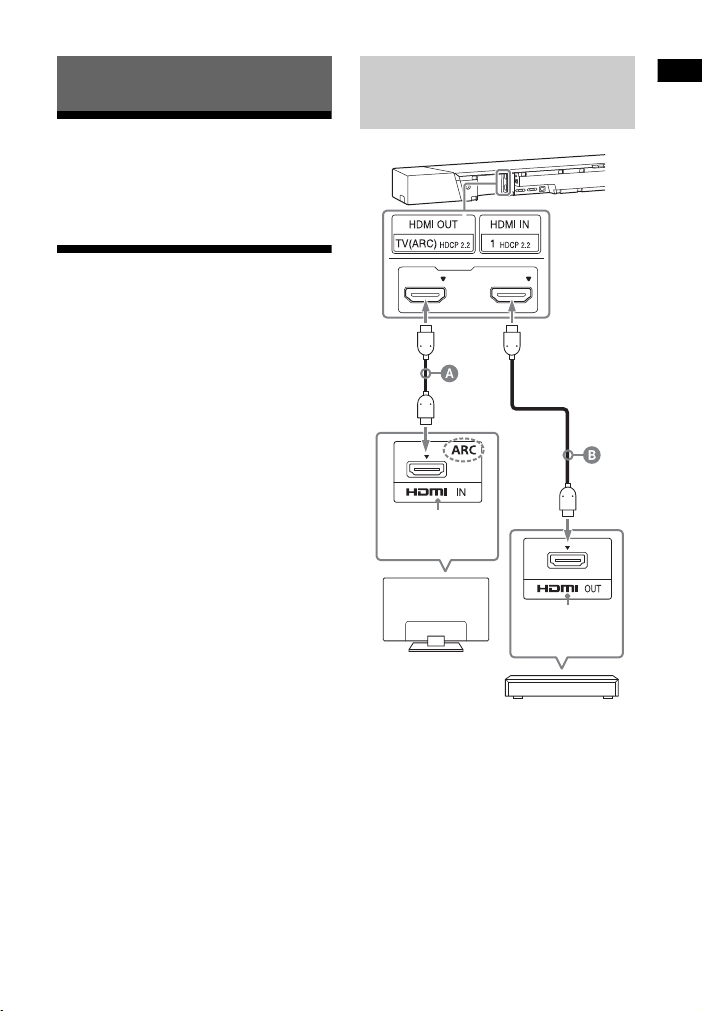
Connecting a 4K TV and
4K Devices
All HDMI jacks on the system support 4K
video format and HDCP2.2 (High-
bandwidth Digital Content Protection
System Revision 2.2).
To watch 4K video content, connect the
4K TV and 4K devices to the system via
an HDCP2.2-compatible HDMI jack on
each device.
You can only view 4K video content
through the HDCP2.2-compatible HDMI
jack connection.
HDMI cable (supplied)
HDMI cable (not supplied)
Use an HDMI cable which supports the 4K
video format that you want to watch. For
details, see “Supported HDMI Video
Formats” (page 73).
Setup
When an HDCP2.2-
Compatible HDMI Jack on
the TV is Labeled with “ARC”
HDCP2.2-
compatible
HDMI jack
Blu-ray Disc player,
cable box, or
satellite box, etc.
HDCP2.2-
compatible
HDMI jack
TV
16
GB
1 Check which HDMI IN jack on your
TV is compatible with HDCP2.2.
Refer to the operating instructions
of the TV.
2 Connect the HDCP2.2-compatible
HDMI IN jack on the TV and HDMI
OUT jack on the main unit with the
HDMI cable (supplied).
TV connection is completed.
3 Connect the HDCP2.2-compatible
HDMI OUT jack of the 4K device
and HDMI IN jack of the main unit
with the HDMI cable (not
supplied).
Refer to the operating instructions
of the 4K device to check that the
HDMI OUT jack of the 4K device is
compatible with HDCP2.2.
4K device connection is completed.
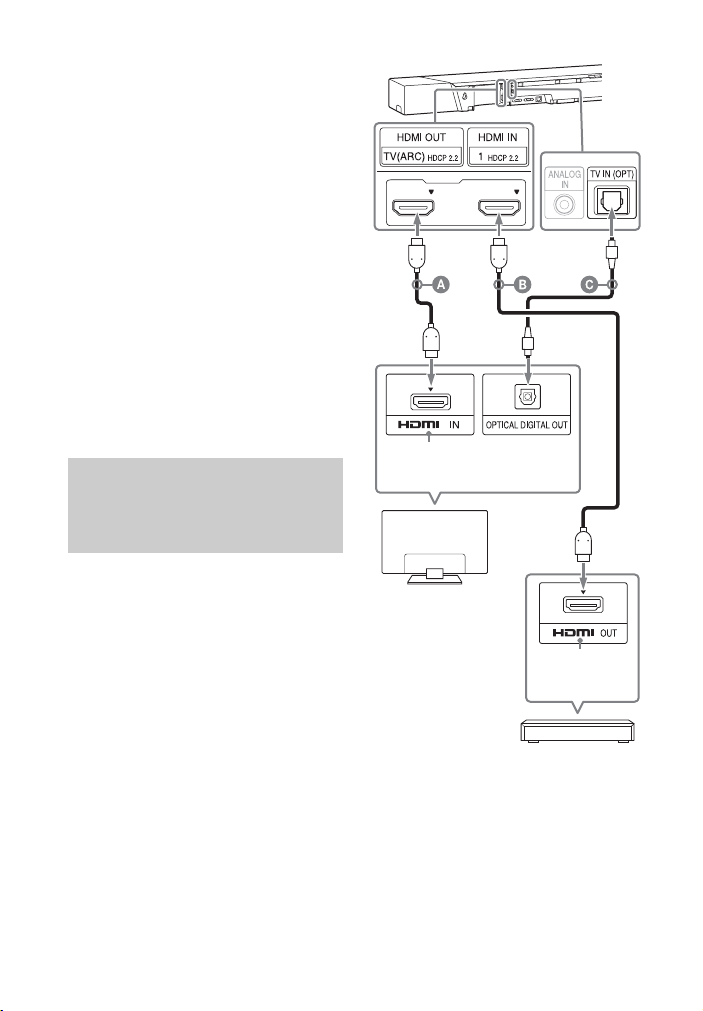
If your TV’s HDCP2.2-compatible HDMI
IN jack is not compatible with ARC
(Audio Return Channel), the TV sound is
not output from the system.
In this case, connect the optical output
jack o f the TV and the TV IN (OPT) jack on
the main unit with the optical digital
cable (not supplied).
HDMI cable (supplied)
HDMI cable (not supplied)
Use an HDMI cable which supports the 4K
video format that you want to watch. For
details, see “Supported HDMI Video
Formats” (page 73).
Optical digital cable (not supplied)
When an HDCP2.2-
Compatible HDMI Jack on
the TV is not Labeled with
“ARC”
HDCP2.2-
compatible
HDMI jack
Blu-ray Disc player,
cable box, or
satellite box, etc.
HDCP2.2-
compatible
HDMI jack
TV
17
GB
Setup
To watch 4K video content, select the
appropriate setting for the connected
4K TV and 4K device.
1 Press HOME.
The home menu appears on the TV
screen.
2 Select [Setup] from the home
menu.
The setup display appears on the TV
screen.
3 Select [System Settings] - [HDMI
Settings] - [HDMI Signal Format].
4 Select the setting you want.
• [Standard format] (default
setting): Select when the
connected TV and devices support
standard bandwidth video
formats.
• [Enhanced format]: Select when
both the connected TV and
devices support high bandwidth
video formats such as 4K 60p
4:4:4 etc.
For the relation of the [HDMI Signal
Format] setting options, supported
video format signals, and HDMI
cables to be used, see “Supported
HDMI Video Formats” (page 73).
• Depending on the TV, the TV setting for
HDMI output may be required. Refer to
the operating instructions of the TV.
• When the picture is not displayed after
[HDMI Signal Format] is set to [Enhanced
format], set it to [Standard format].
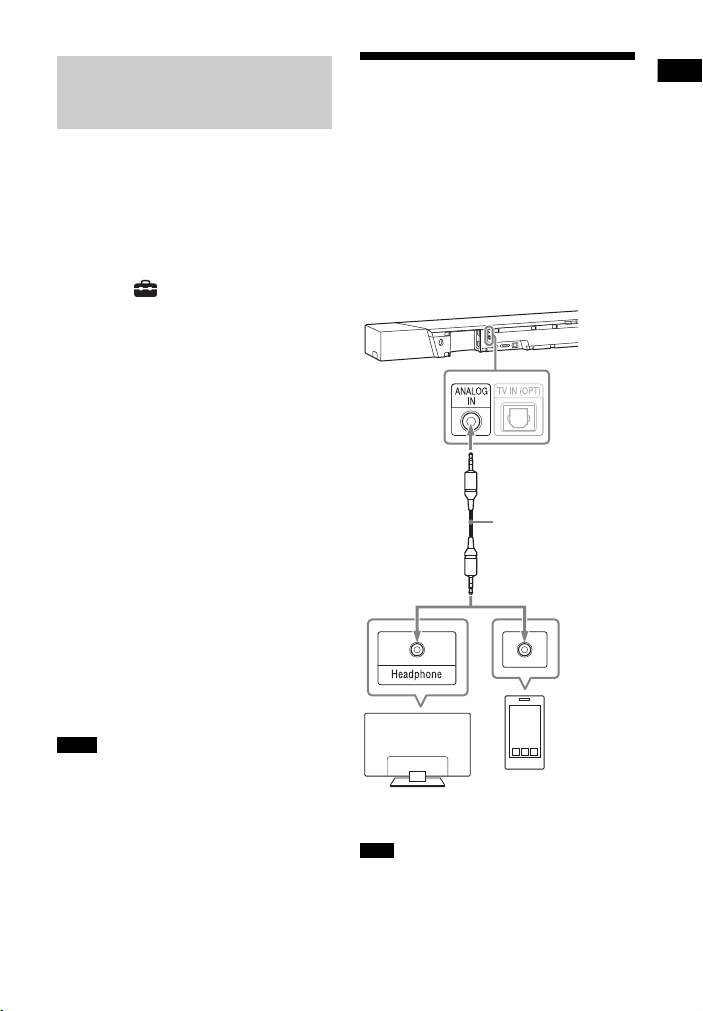
Connecting a TV or
Portable Audio Device
via the ANALOG IN Jack
To connect following devices to the
system, connect them via the ANALOG
IN jack on the system.
– TV that does not have an HDMI jack
and optical digital output jack
– Portable audio device such as a
smartphone, WALKMAN®
If the TV’s headphone jack also serves as
an audio output jack, check the audio
output settings of the TV. For details, refer
to the operating instructions of the TV.
Setting the HDMI Signal
Format to Watch 4K Video
Content
Notes
Note
Smartphone,
WALKMAN®, other
audio devices etc.
TV
Analog
audio out
Analog audio cable
(not supplied)
18
GB
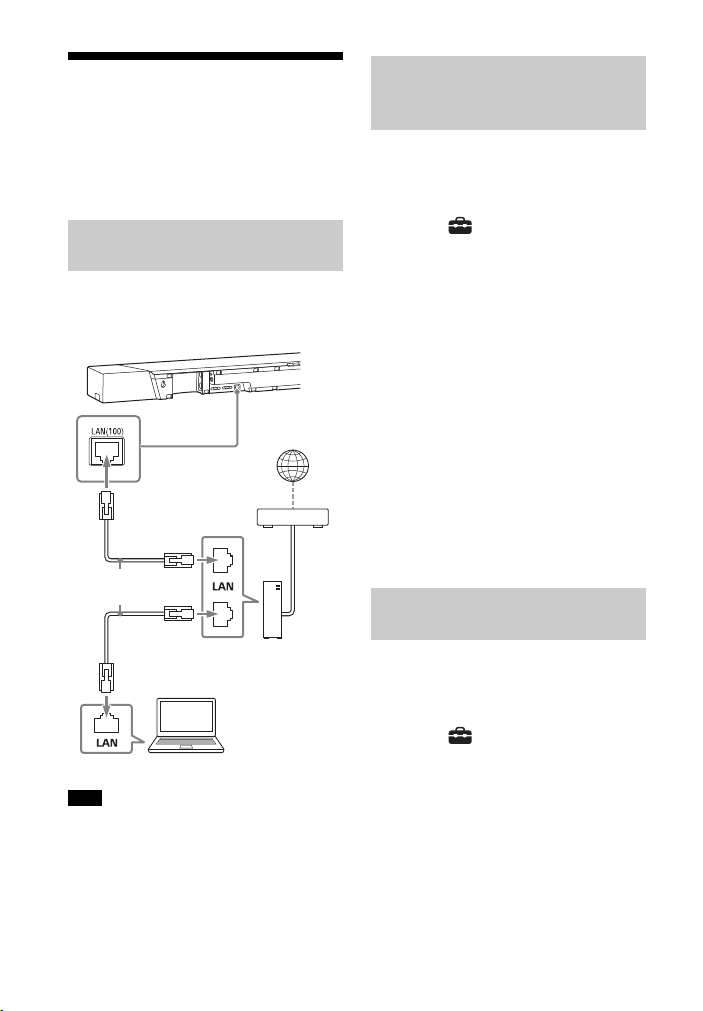
Connecting to a Wired
Network
Prepare the network by connecting the
system and PC to your home network
with a LAN cable.
The following illustration is the example
for connection of the system and PC to
your home network.
The server needs to be connected to the
same network as that of the system.
Tip
We recommend that you use a shielded
straight interface cable (not supplied).
1 Press HOME.
The home menu appears on the TV
screen.
2 Select [Setup] from the home
menu.
The setup display appears on the TV
screen.
3 Select [Network Settings] -
[Internet Settings] - [Wired Setup].
4 Select [Auto].
The system starts network settings
and the network setting status
appears.
Press / to browse information,
and then press .
5 Select [Save & Connect].
The system starts connecting to the
network. For details, refer to the
messages that appear on the TV
screen.
1 Press HOME.
The home menu appears on the TV
screen.
2 Select [Setup] from the home
menu.
The setup display appears on the TV
screen.
3 Select [Network Settings] -
[Internet Settings] - [Wired Setup].
4 Select [Manual].
Connecting to a PC or Router
with a LAN Cable
Note
Internet
LAN cable
(not supplied)
Server
Router
Modem
Connecting by Obtaining
the Network Information
Automatically
Connecting by Using a
Fixed IP Address

19
GB
Setup
5 Perform the setting by following
the on-screen instructions.
The system starts network settings
and the network setting status
appears.
Press / to browse information,
and then press .
6 Select [Save & Connect].
The system starts connecting to the
network. For details, refer to the
messages that appear on the TV
screen.
Connecting to a Wireless
Network
Prepare the network by connecting the
system and PC to your wireless LAN
router.
The server needs to be connected to the
same network as that of the system.
When your wireless LAN router (access
point) is Wi-Fi Protected Setup (WPS)-
compatible, you can easily set the
network settings with the WPS button.
1 Press HOME.
The home menu appears on the TV
screen.
2 Select [Setup] from the home
menu.
The setup display appears on the TV
screen.
3 Select [Network Settings] -
[Internet Settings] - [Wireless
Setup] - [Wi-Fi Protected Setup™
(WPS)].
4 Select [Start].
5 Press the WPS button on the
access point.
The system starts connecting to the
network.
Note
Connecting with the WPS
Button

20
GB
If your wireless LAN router (access point)
is not compatible with Wi-Fi Protected
Setup (WPS), check the following
information in advance.
– The network name (SSID)*
_____________________________________
– The security key (password)**
_____________________________________
* SSID (Service Set Identifier) is a name that
identifies a particular access point.
**This information should be available
from a label on your wireless LAN router/
access point, from the operating
instructions, from the person who set up
your wireless network, or from the
information provided by your Internet
service provider.
1 Press HOME.
The home menu appears on the TV
screen.
2 Select [Setup] from the home
menu.
The setup display appears on the TV
screen.
3 Select [Network Settings] -
[Internet Settings] - [Wireless
Setup].
The list of the network name
appears on the TV screen.
4 Select the desired network name
(SSID).
5 Enter the security key (or
password) using the software
keyboard, and then select [Enter].
The system starts connecting to the
network.
Select [New connection registration] -
[Manual registration] in step 4 of
“Connecting by Selecting the Network
Name (SSID)”and follow the on-screen
instructions.
Select [New connection registration] in
step 4 of “Connecting by Selecting the
Network Name (SSID)” and select [(WPS)
PIN Method].
Sony | Music Center can connect the
system to the same wireless network as
that of the mobile device. For details,
follow the instruction of the app or refer
to the following URL.
http://www.sony.net/smcqa/
Connecting by Selecting the
Network Name (SSID)
Connecting by Using a Fixed
IP Address
Connecting by Using a PIN
Code
Connecting by Sony | Music
Center
21
GB
Setup
Mounting the Main Unit
on a Wall
You can mount the main unit on a wall.
• Prepare screws (not supplied) that are
suitable for the wall material and
strength. As a plasterboard wall is
especially fragile, attach the screws
securely in the wall beam. Install the
speakers horizontally, hung by screws in
studs in a continuous flat section of the
wall.
• Have the installation done by a Sony
dealer or licensed contractor and pay
special attention to safety during the
installation.
• Sony shall not be held responsible for
accidents or damage caused by improper
installation, insufficient wall strength,
improper screw installation or natural
disaster, etc.
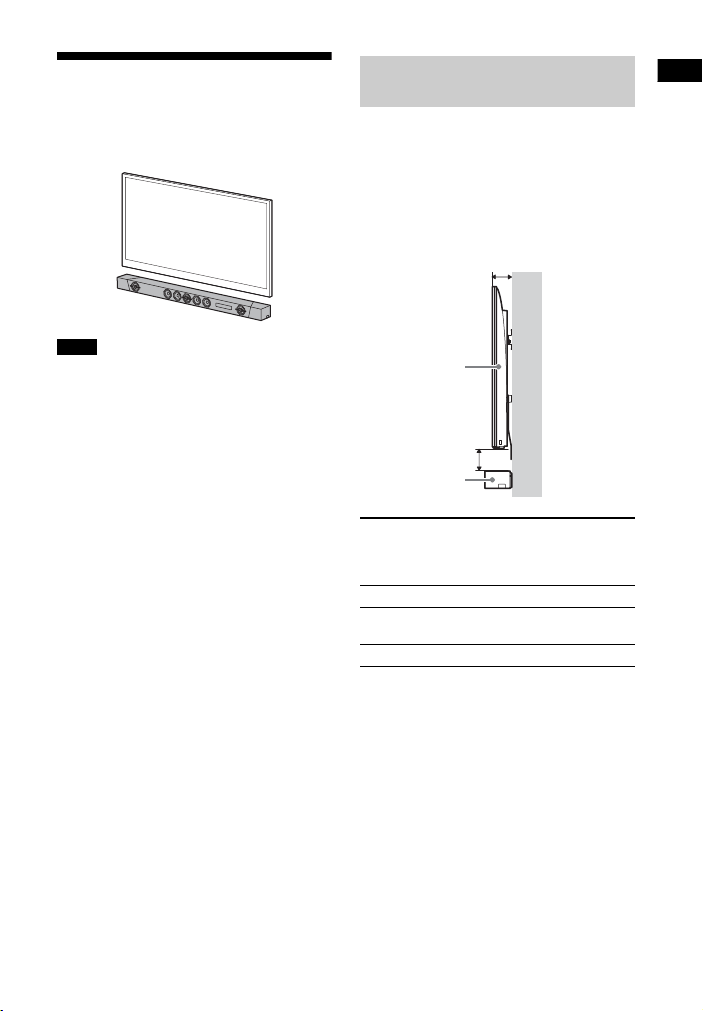
The main unit outputs the surround
sound toward the ceiling.
To ensure that the TV does not interfere
with the output sound from the main
unit, decide on the installation location
of the main unit by referring to the
following estimated values.
Notes
About the Installation
Location of the Main Unit
Depth of the
mounted TV
(A)
Dimensions to the
main unit from the
TV
(B)
Less than 66 mm 50 mm or more
66 mm to less than
100 mm
100 mm or more
100 mm or more 200 mm or more
Main unit
TV
(A)
(B)
22
GB
1 Prepare screws (not supplied) that
are suitable for the wall mount
holes on the rear of the main unit.
2 Stick WALL MOUNT TEMPLATE
(supplied) on a wall.
1 Align TV CENTER LINE () of
WALL MOUNT TEMPLATE with the
center line of your TV.
2 Decide on the height of WALL
MOUNT TEMPLATE by referring to
“About the Installation Location
of the Main Unit” (page 21), then
stick the WALL MOUNT
TEMPLATE on a wall by using a
commercially available adhesive
tape, etc.
3 Mark the screw positions
described as bellow on SCREW
LINE () of WALL MOUNT
TEMPLATE.
Measure the distance described
below with a scale, then mark using
a pencil, etc.
4 Fasten the screws into the mark.
5 Remove WALL MOUNT TEMPLATE.
6 Hang the main unit on the screws.
Align the holes of the rear of the
main unit with the screws, then
hang the main unit on the two
screws.
Mounting the Main Unit on a
Wall
Hole on the rear of the main unit
4mm
More than 30 mm
4.6 mm
10 mm
Center of the TV
WALL MOUNT
TEMPLATE
Adhesive tape,
etc.
Screw position
422 mm
422 mm
11 mm to
12 mm
23
GB
Setup
When sticking WALL MOUNT TEMPLATE,
smooths it out fully.
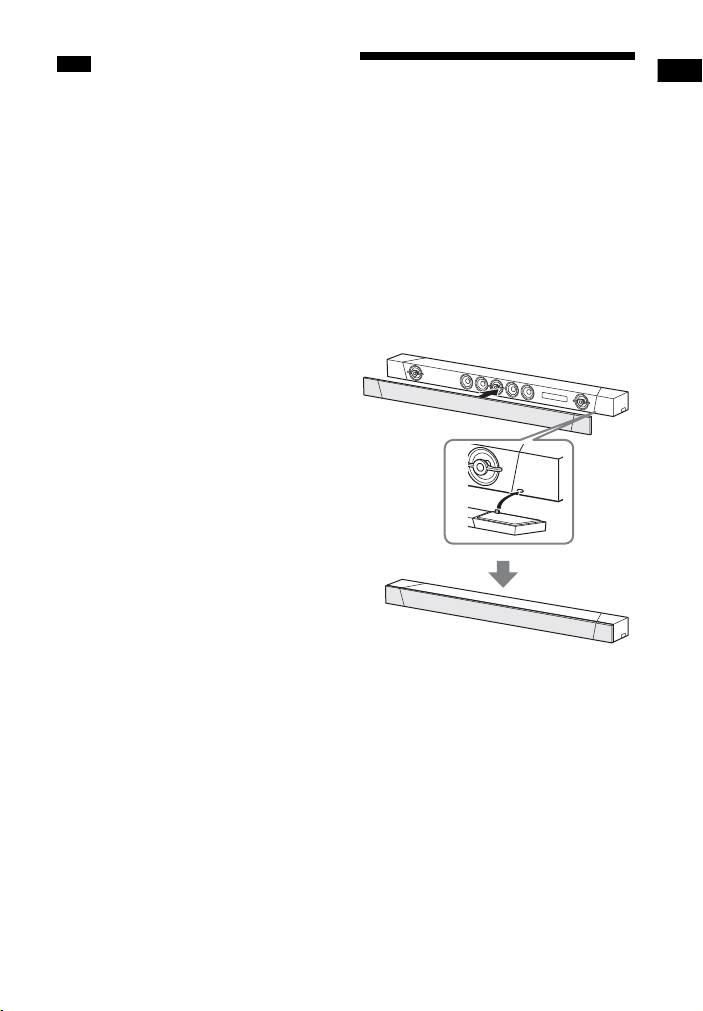
Attaching the Grille
Frame
You can protect the speakers by
attaching the supplied grille frame.
We recommend that you use the main
unit without attaching the grille frame if
you will be listening to High-Resolution
Audio.
Attach the grille frame parallel to
the front panel.
Insert the projections of the grille frame
into the hole on the main unit.
Tip
The grille frame is fixed by a magnet.
Note

24
GB
Listening to the TV
1 Press HOME.
The home menu appears on the TV
screen.
2 Select [TV] on the home menu.
3 Select the program using the TV’s
remote control.
The selected TV program appears
on the TV screen and the TV sound
is output from the system.
4 Adjust the volume.
• Adjust the volume by pressing
+/– on the remote control.
• Adjust the subwoofer volume by
pressing SW +/– on the remote
control (page 29).
Set the speakers setting of the TV (BRAVIA)
to Audio System. Refer to the operating
instructions of your TV regarding how to
set the TV.
Tip
You can select [TV] by pressing INPUT +/–
on the remote control.
Listening to the
Connected AV Device
1 Press HOME.
The home menu appears on the TV
screen.
2 Select the input that the desired
device is connected on the home
menu.
The image of the selected device
appears on the TV screen and the
sound is output from the system.
If you select [Analog], the [Analog]
screen is displayed on the TV
screen.
3 Adjust the volume.
• Adjust the volume by pressing
+/– on the remote control.
• Adjust the subwoofer volume by
pressing SW +/– on the remote
control (page 29).
Tip
You can select the input by pressing INPUT
+/– on the remote control.
You can change the input name of
[HDMI1], [HDMI2], or [HDMI3] that is
displayed on the home menu.
1 Press HOME.
The home menu appears on the TV
screen.
2 Put the cursor on [HDMI1],
[HDMI2], or [HDMI3] on the home
menu, then press OPTIONS.
The options menu appears on the
TV screen.
3 Select [Input Label Setting].
Listening to the Sound
Note
Changing the Input Name
Displayed on the Home
Menu

25
GB
Listening to the Sound
4 Select the input name.
You can select the input name from
the following.
•[BD Player]
•[DVD Player]
•[Cable Box]
• [Satellite]
•[GAME]
•[PC]
5 Press to complete.
Tip
When you change the input name, the
displayed icon is also changed
automatically.
Listening to Music on a
USB Device
You can play music files stored on a
connected USB device.
For playable types of files, see “Playable
Types of Audio Files” (page 71).
1 Connect the USB device to the
(USB) port.
2 Press HOME.
The home menu appears on the TV
screen.
3 Select [USB (Connected)] from
the home menu.
4 Select the folder on which songs
are stored - song.
The selected song is played and
sound is output from the system.
5 Adjust the volume.
• Adjust the volume by pressing
+/– on the remote control.
• Adjust the subwoofer volume by
pressing SW +/– on the remote
control (page 29).

27
GB
Selecting the Sound Effect
Setting the Sound Effect
that is Tailored to Sound
Sources (SOUND FIELD)
You can easily enjoy pre-programmed
sound effects that are tailored to
different kinds of sound sources.
1 Press SOUND FIELD.
The sound field menu appears on
the TV screen.
2 Press the button repeatedly to
select the desired sound field.
• When using the wireless multi room
function or Chromecast built-in, or setting
[Bluetooth Mode] to [Transmitter]
(page 53), the sound field function is not
available.
• The sound field menu does not appear on
the TV screen for TV input.
• When you set [Sound Effect] to [Off], the
sound field function is disabled.
Selecting the Sound Effect
Sound field Explanation
[ClearAudio+]
The appropriate
sound setting is
automatically
selected for the
sound source.
[3D Surround]
Enjoy movies, music,
and more with sound
that flows all around
the room,
surrounding you
from all directions.
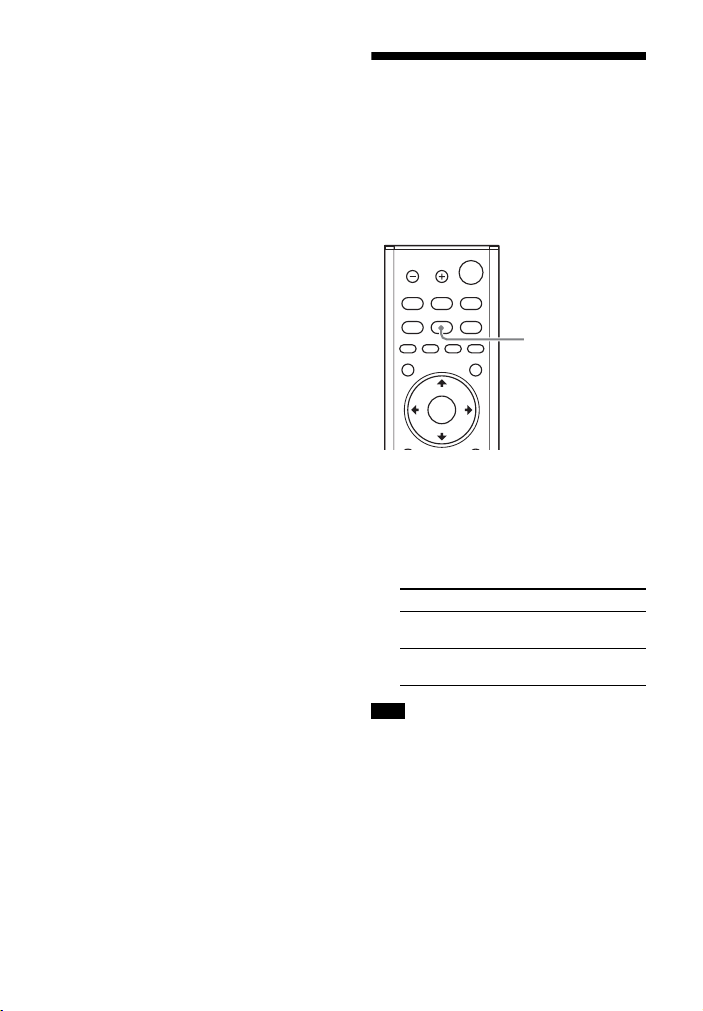
SOUND FIELD
CLEAR AUDIO+
[Movie]
You feel immersed
by the sound that
travels behind you
and surrounds your
entire body. This
mode is suitable for
watching movies.
[Music]
Vividness and
glossiness of the
sound are expressed
in detail. This mode
is suitable for
enjoying music in a
way that moves you.
[Game
Studio]
You can immerse
yourself in your
game by
reproducing the
feeling of movement
and distance of
objects, as well as
clearly hearing the
dialog.
[Sports]
You can experience
an atmosphere as if
you were watching
an event in a
stadium. However,
narrations of
commentators are
reproduced vividly.
[Standard]
The sound of a TV
program can be
heard clearly. This
mode is suitable for
watching news
because voices are
clear.
Notes
Sound field Explanation
28
GB
• The virtual surround is processing when a
sound field other than [Music] is selected,
though this may not work if audio source
is not multi-channel.
Tips
• You can select [ClearAudio+] by pressing
CLEAR AUDIO+ on the remote control.
• You can select the sound field from the
options menu (page 58).
Enjoying Clear Sound
with Low Volume at
Midnight (NIGHT)
Sound is output at low volume with
minimum loss of fidelity and clarity of
dialogue.
1 Press NIGHT.
The night mode appears on the TV
screen.
2 Press the button repeatedly to
select the night mode.
When you turn the system off, this setting
is set to [Off] automatically.
Tip
You can select [Night] from the options
menu (page 58).
Mode Explanation
[On] Activates the night
mode function.
[Off] Deactivates the night
mode function.
Note
NIGHT
29
GB
Selecting the Sound Effect
Making Dialogues
Clearer (VOICE)
1 Press VOICE.
The voice mode appears on the TV
screen.
2 Press the button repeatedly to
select the voice mode.
Tip
You can select [Voice] from the options
menu (page 58).
Adjusting the Volume of
the Subwoofer
The subwoofer is designed for playback
of bass or low frequency sound.
Press SW (subwoofer volume) +/–
to adjust the volume of the
subwoofer.
When the input source does not contain
much bass sound, such as in TV programs,
the bass sound from the subwoofer may
be difficult to hear.
Mode Explanation
[Up Off] Standard
[Up 1] Dialogue is easily
heard by enhancing
dialogue range.
[Up 2] Dialogue range is
enhanced, and
dialogue sound may
be easy to hear for the
elderly.
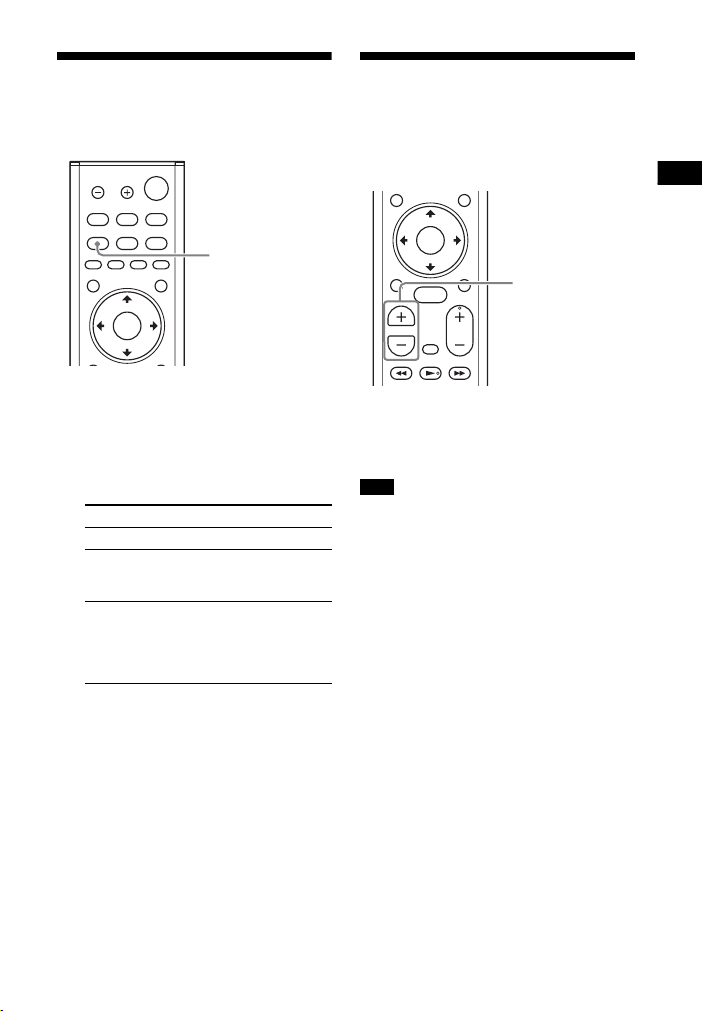
VOICE
Note
SW +/–
30
GB
Adjusting the Delay
Between the Picture and
Sound
When the sound does not match the
pictures on the TV screen, you can
adjust the delay between the picture
and sound.
The setting method differs depending
on the input.
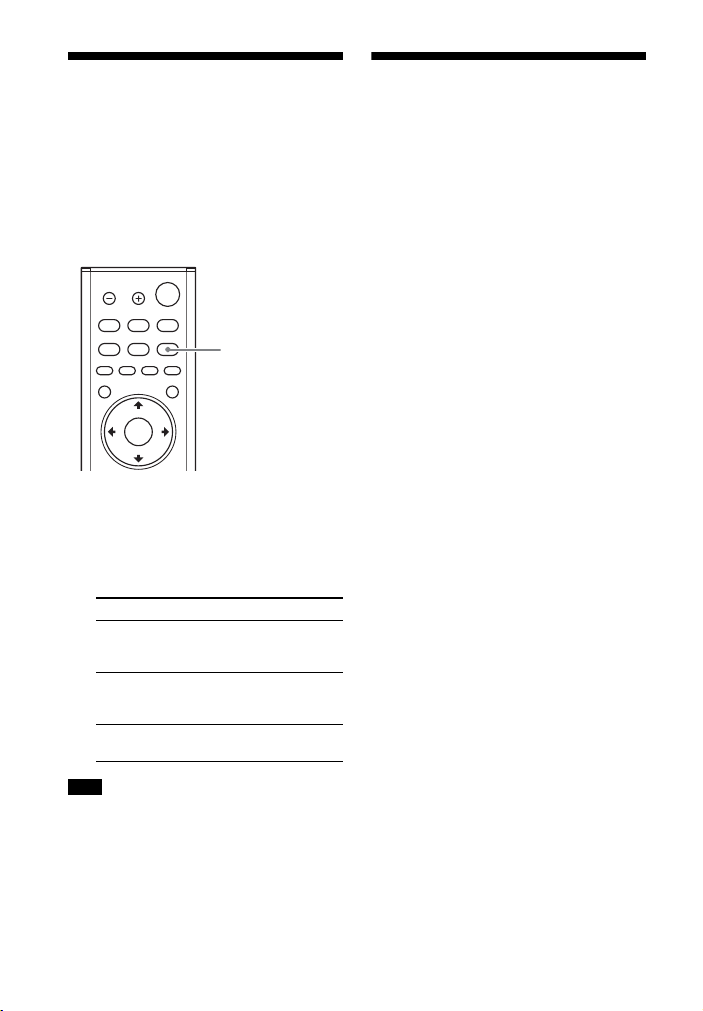
1 Press OPTIONS.
“SYNC” appears in the front panel
display.
2 Press or
The adjusting time appears in the
front panel display.
3 Adjust the delay using /, then
press .
You can adjust from 0 msec to
300 msec in 25 msec increments.
4 Press OPTIONS.
The options menu in the front panel
display turns off.
1 Press OPTIONS.
The options menu appears on the
TV screen.
2 Select [A/V SYNC].
3 Adjust the delay using /, then
press .
You can adjust from 0 msec to
300 msec in 25 msec increments.
When Watching the TV
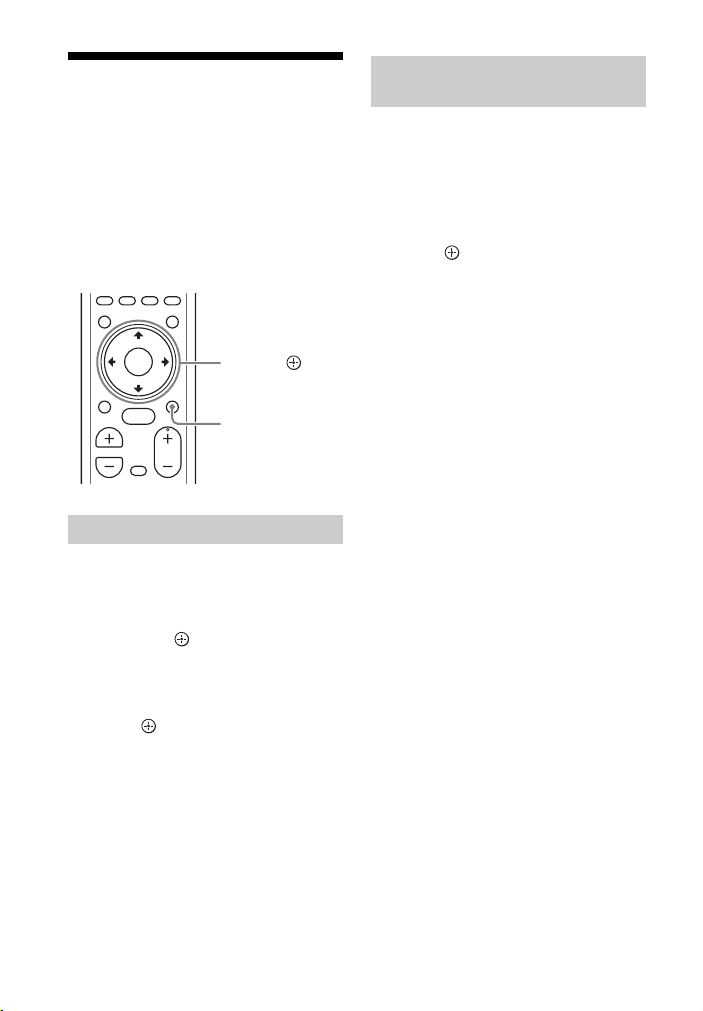
OPTIONS
///,
When Watching Another
Device

31
GB
Listening to Music/Sound with the BLUETOOTH® Function
Listening to Music from
a Mobile Device
You can listen to music stored on a
mobile device such as a smartphone or
tablet via a wireless connection by
connecting the system and the mobile
device with the BLUETOOTH function.
When connecting to the mobile device
with the BLUETOOTH function, you can
operate by simply using the supplied
remote control without turning the TV
on.
1 Press BLUETOOTH PAIRING.
The system enters the pairing
mode, “BT” appears in the front
panel display, and the BLUETOOTH
indicator flashes quickly.
2 Turn on the BLUETOOTH function,
and then select “HT-ST5000” after
searching for it on the mobile
device.
If a Passkey is requested, enter
“0000.”
3 Make sure that the BLUETOOTH
indicator on the main unit lights in
blue.
A connection between the system
and mobile device has been
established.
4 Start audio playback with the
music app on the connected
mobile device.
Sound is output from the main unit.
5 Adjust the volume.
• Adjust the volume by pressing
+/– on the remote control.
• Adjust the subwoofer volume by
pressing SW +/– on the remote
control (page 29).
• You can play or pause the content
by using the playback operation
buttons on the remote control.
Listening to Music/Sound with the
BLUETOOTH® Function
INPUT +/–
BLUETOOTH
PAIRING
SW +/–
HOME
+/–
Playback
operation buttons
BLUETOOTH
RX/TX
Listening to Music by Pairing
with a Mobile Device

32
GB
To check the connection status of
the BLUETOOTH function
Tips
• Once the BLUETOOTH connection is
established, an indication recommending
which application to install will be
displayed according to what device you
have connected.
Following the instructions displayed, an
application called Sony | Music Center,
which will enable you to operate this
system, can be installed.
See “Listening to Music on the Mobile
Device with Sony | Music Center”
(page 37) for details on Sony | Music
Center.
• Perform pairing for the second and
subsequent mobile devices.
1 Turn the BLUETOOTH function of
the mobile device to on.
2 Press INPUT +/– repeatedly to
display “BT” in the front panel
display.
The system automatically
reconnects to the mobile device it
was most recently connected to.
3 Make sure that the BLUETOOTH
indicator lights in blue.
A connection between the system
and mobile device has been
established.
4 Start audio playback with the
music app on the connected
mobile device.
Sound is output from the main unit.
5 Adjust the volume.
• Adjust the volume by pressing
+/– on the remote control.
• Adjust the subwoofer volume by
pressing SW +/– on the remote
control (page 29).
• You can play or pause the content
by using the playback operation
buttons on the remote control.
To disconnect the mobile device
Perform any of the following items.
• Disable the BLUETOOTH function on
the mobile device.
• Press BLUETOOTH PAIRING on the
remote control.
• Turn off the system or mobile device.
If “BT” does not appear in the front panel
display by pressing INPUT +/– in step 2 of
“Listening to Music from the Paired Mobile
Device,” press BLUETOOTH RX/TX on the
remote control once.
Tip
When the connection is not established,
select “HT-ST5000” on the mobile device.
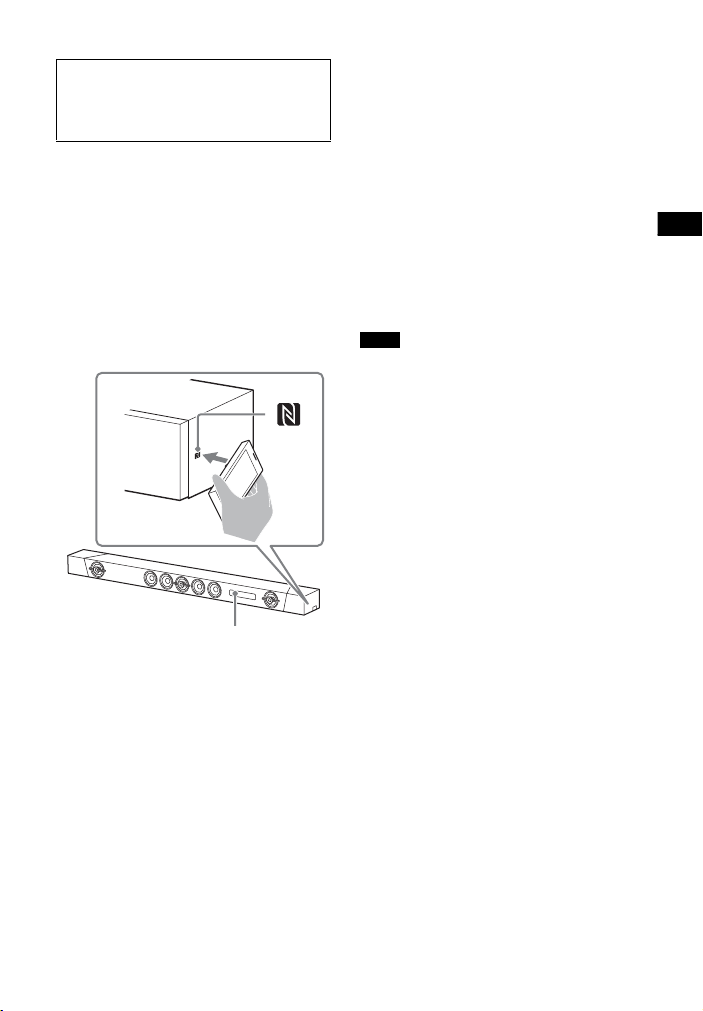
By holding an NFC-compatible mobile
device such as a smartphone or tablet
near the N mark on the main unit, the
system is turned on automatically, then
pairing and BLUETOOTH connection are
performed automatically.
Status BLUETOOTH indicator
During pairing
standby status
Flashes quickly in blue
Connection is
being
attempted
Flashes in blue
Connection has
been
established
Lights in blue
Not connected
Off
Listening to Music from the
Paired Mobile Device
Note
Connecting to a Mobile
Device by One-Touch
Function (NFC)
33
GB
Listening to Music/Sound with the BLUETOOTH® Function
1 Turn on the NFC function of the
mobile device.
2 Touch the N mark on the main unit
with the mobile device.
Keep touching until the mobile
device vibrates and message
appears on the mobile device.
Follow the on-screen instructions to
complete pairing of the main unit
and mobile device.
3 Make sure that the BLUETOOTH
indicator lights in blue.
A connection between the system
and mobile device has been
established.
4 Start audio playback with the
music app on the connected
mobile device.
Sound is output from the system.
5 Adjust the volume.
• Adjust the volume by pressing
+/– on the remote control.
• Adjust the subwoofer volume by
pressing SW +/– on the remote
control (page 29).
• You can play or pause the content
by using the playback operation
buttons on the remote control.
To stop playback by One-touch
function
Touch the N mark on the main unit with
the mobile device again.
• Depending on your device, you may need
to perform the following items on your
mobile device in advance.
– Turn on the NFC function.
– Install the “NFC Easy Connect”
application from Google Play™ and
start the application. (The application
may not be available in some countries/
regions.) For details, refer to the
operating instructions of your device.
• This feature does not work with
BLUETOOTH-compatible headphones. To
listen to sound using a BLUETOOTH-
compatible headphones, see “Listening
to Sound of the Connected TV or Device
from Headphones” (page 34).
• [Bluetooth Mode] is changed to [Receiver]
automatically when making BLUETOOTH
connection with the One-touch function.
Even if the One-touch function is
canceled, the [Bluetooth Mode] setting
remains as [Receiver]. For details about
[Bluetooth Mode], see [Bluetooth
Settings] (page 53).
• If your mobile device is a type that goes
into standby mode in response to
magnetic force, it may not be able to be
connected by NFC. When the One-touch
function does not work, connect it by
using the BLUETOOTH function (page 31).
Compatible devices
Smartphones, tablets, and music players
with the NFC function built-in
(OS: Android™ 2.3.3 or later, excluding
Android 3.x)
BLUETOOTH indicator
Notes

34
GB
Listening to Sound of the
Connected TV or Device
from Headphones
You can listen to sound of the
connected TV or device from
BLUETOOTH-compatible headphones
by connecting it with the BLUETOOTH
function.
1 Set the BLUETOOTH-compatible
headphones to the pairing mode.
Refer to the operating instructions
of the headphones for pairing
method.
2 Press HOME.
The home menu appears on the TV
screen.
3 Select [Setup] from the home
menu.
The setup display appears on the TV
screen.
4 Select [Bluetooth Settings] -
[Bluetooth Mode] - [Transmitter].
The system enters BLUETOOTH
transmission mode.
5 Select the name of the
headphones from the [Device List]
in [Bluetooth Settings].
When the BLUETOOTH connection
is established, [Bluetooth device is
connected.] appears. (The
connected device name also
appears.)
If you cannot find name of your
headphones in [Device List], select
[Scan].
6 Return to the home menu and
select the desired input.
The image of the selected input
appears on the TV screen, “BT TX”
appears in the front panel display,
then the sound is output from the
headphones.
No sound is output from the
system.
For selecting input, see “Using the
Home Menu” (page 13).
7 Adjust the volume.
Adjust the volume level of the
headphones first. The volume level
of the headphones can be
controlled with +/– on the main unit
and +/– on the remote control.
To remove a registered device
from the device list
1 Follow steps 1 to 5 of “Listening to
Sound by Pairing with Headphones.”
2 Select the name of the headphones,
and then press OPTIONS.
3 Select [Remove].
4 Follow the on-screen instructions to
delete the desired headphones from
the device list.
Listening to Sound by Pairing
with Headphones

35
GB
Listening to Music/Sound with the BLUETOOTH® Function
1 Press HOME.
The home menu appears on the TV
screen.
2 Select the desired input.
For selecting input, see “Using the
Home Menu” (page 13).
3 Set the BLUETOOTH function of
the headphones to on.
4 Press BLUETOOTH RX/TX on the
remote control.
[Bluetooth Mode] is set to
[Transmitter] and “BT TX” appears in
the front panel display.
The system automatically
reconnects to the headphones it
was most recently connected to,
then the sound is output from the
headphones.
No sound is output from the
system.
5 Adjust the volume.
Adjust the volume level of the
headphones. You can also adjust
volume level of the headphones
with +/– on the remote control.
To disconnect the headphones
Perform any of the following items.
– Disable the BLUETOOTH function on
the headphones.
– Press BLUETOOTH RX/TX.
– Turn off the system or the
headphones.
– Select the device name of the
connected headphones from
[Setup] - [Bluetooth Settings] -
[Device List]. [Connected] of the
device name disappears.
• You may not be able to adjust the
volume level depending on the
BLUETOOTH-compatible headphones.
• [Bluetooth Audio] is disabled when
[Bluetooth Mode] is set to [Off] or
[Transmitter].
• When input of [Bluetooth Audio] is
selected, you cannot set [Bluetooth
Mode] to [Transmitter]. You cannot
switch it with BLUETOOTH RX/TX on
the remote control neither.
• You can register up to 9 BLUETOOTH
devices. If a 10th BLUETOOTH device is
registered, the oldest connected
BLUETOOTH device will be overwritten
by the new one.
• The system can display up to 15
detected BLUETOOTH device in the
[Device List].
• You cannot change the sound effect
or settings in the options menu while
transmitting sound to the
BLUETOOTH-compatible headphones.
• Some content may not be output due
to content protection.
• Playback of audio/music on the
BLUETOOTH device is delayed
compared to that on the main unit due
to the characteristics of BLUETOOTH
wireless technology.
• You can enable or disable the
reception of AAC or LDAC audio from
the BLUETOOTH device (page 54).
Listening to Sound with
Paired Headphones
About the Connection of the
Headphones
36
GB
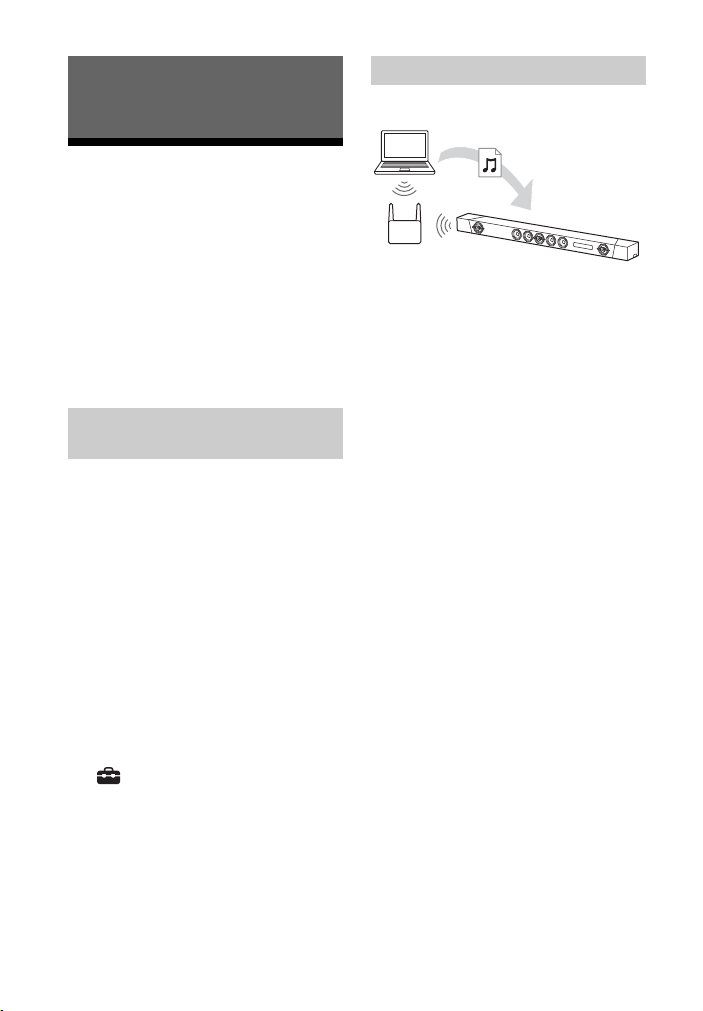
Listening to Music on
your PC via a Home
Network
You can play music files stored on your
PC via your home network.
Music files can be played by operating
on the menu that is displayed on the TV
screen or Sony | Music Center on a
mobile device such as a smartphone or
tablet.
1 Connect the system to a network.
See “Connecting to a Wired
Network” (page 18) and
“Connecting to a Wireless Network”
(page 19).
2 Connect the PC to a network.
For details, refer to the operating
instructions of the PC.
3 Set the PC.
To use the PC on your home
network, you need to set the PC as
the server. For details, refer to the
operating instructions of the PC.
Tip
See [Setup] - [Network Settings] -
[Network Connection Status] when
checking the network connection status.
1 Press HOME.
The home menu appears on the TV
screen.
2 Select [Home Network] from the
home menu.
The device name on your home
network appears on the TV screen.
3 Select the desired device -
folder on which songs are
stored - song.
The selected song is played and
sound is output from the system.
4 Adjust the volume.
• Adjust the volume by pressing
+/– on the remote control.
• Adjust the subwoofer volume by
pressing SW +/– on the remote
control (page 29).
Tip
You can perform various operations from
the options menu (page 58).
Listening to Music/Sound Using
the Network Function
Preparing the Home
Network
Listening to Music on a PC
PC
Wireless LAN router
37
GB
Listening to Music/Sound Using the Network Function
You can play music files stored on the
PC by operating Sony | Music Center
that is installed to a mobile device such
as a smartphone or tablet. For details of
Sony | Music Center, see “What You can
Do with Sony | Music Center” (page 37)
or the following URL.
http://www.sony.net/smcqa/
Listening to Music on the
Mobile Device with
Sony | Music Center
Sony | Music Center is an application for
controlling compatible Sony audio
devices using the mobile device such as
a smartphone or tablet.
For details about Sony | Music Center,
refer to the following URL.
http://www.sony.net/smcqa/
Installing Sony | Music Center onto your
mobile device provides the following.
Sound settings of the system
You can easily customize your sound, or
use the [ClearAudio+] setting
recommended by Sony.
Music service
You can configure the initial settings to
use music services*.
* Depending on the country and region,
music services and their period of
availability may differ.
An update of the device may be required.
When using Chromecast built-in on
music service, see “Using Chromecast
built-in” (page 38).
Enjoying music on your home
network
You can play music stored in your PC or
home network server over your
network.
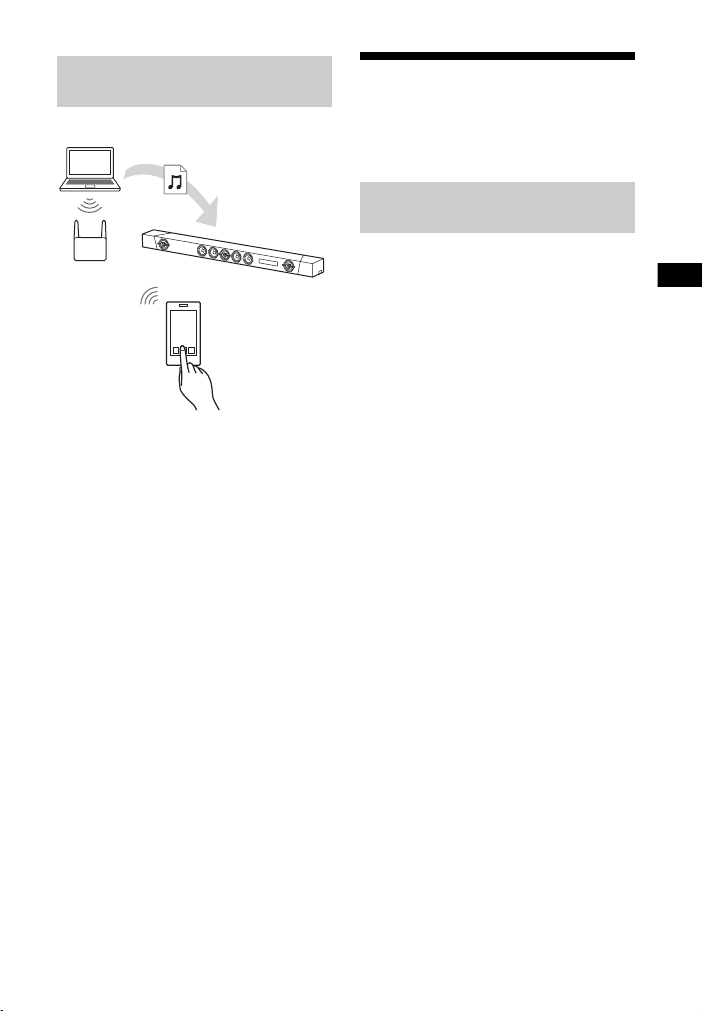
Listening to Music on a PC by
Using Sony | Music Center
PC
Wireless LAN router
Smartphone or
tablet
What You can Do with Sony |
Music Center
38
GB
Enjoying music on the USB device
You can play music on a device
connected to the (USB) port on the
main unit.
What you can control with Sony | Music
Center varies depending on the connected
device. The specification and design of the
application may change without notice.
1 Install the free Sony | Music
Center app to the mobile device.
Search for Sony | Music Center at
Google Play or the App Store and
install it onto your mobile device.
2 Connect the system and mobile
device with the BLUETOOTH
function (page 31) or network
function (page 18).
3 Start Sony | Music Center.
4 Operate by following the Sony |
Music Center screen.
• Before using Sony | Music Center, be sure
to set the [Bluetooth Mode] to [Receiver]
(page 53).
• Use Sony | Music Center of the latest
version.
Tips
• You can connect the system and mobile
device with the NFC function (page 32).
• When connecting with the network
function, connect the mobile device to
the same network as that of the system.
Using Chromecast built-
in
Chromecast built-in allows you to select
music content from the Chromecast-
enabled app and play back on the
system or group that the system is
included.
1 Press HOME.
The home menu appears on the TV
screen.
2 Select [Music Service List] on the
home menu.
The music service list appears on
the TV screen.
3 Select [Chromecast built-in].
Perform the settings to use
Chromecast built-in on the system
by following the on-screen
message.
After performing the settings,
[Quick Start/Network Standby] is set
to [On] automatically and you can
play music quickly even when the
system is in standby mode
(page 55).
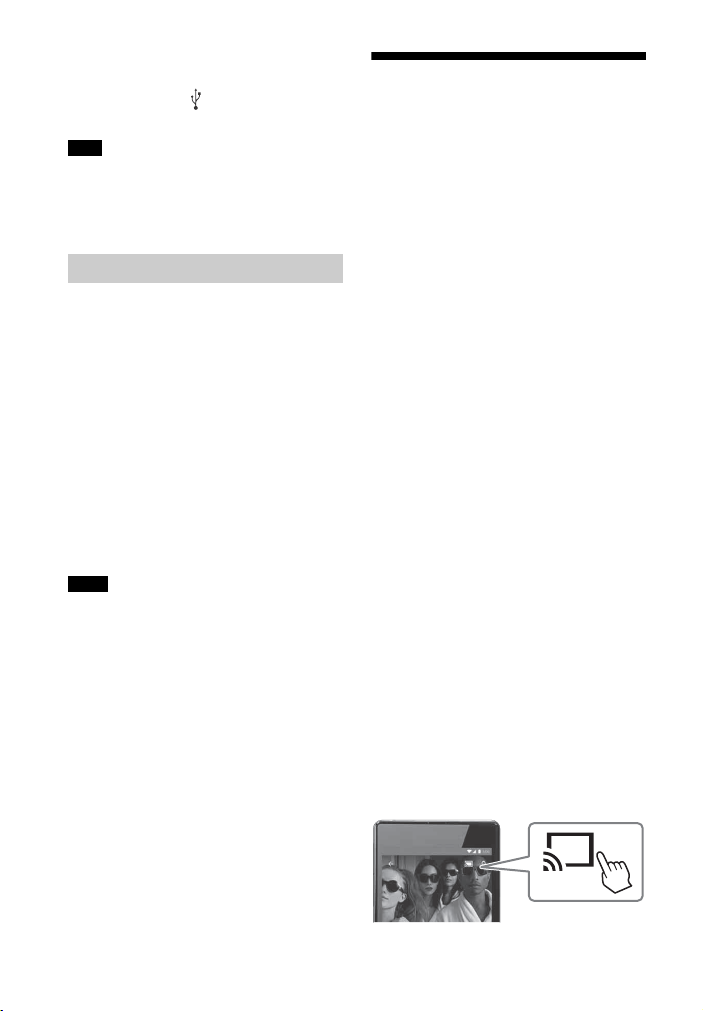
4 Connect the mobile device by Wi-
Fi to the same network as that of
the system.
5 Install the Chromecast-enabled
app to the mobile device.
6 Start the Chromecast-enabled
app, tap the cast button, and
select the system or group that
the system is included.
Note
Using Sony | Music Center
Notes
39
GB
Listening to Music/Sound Using the Network Function
7 Select and play music on the
Chromecast-enabled app.
The music is played on the system.
Depending on the country and region,
Chromecast built-in and the Chromecast-
enabled app may not be provided.
Using Spotify
You can select the music on the Spotify
app and play it on the system. To play
on the system, you need the Spotify
Premium account.
1 Connect the mobile device by Wi-
Fi to the same network as that of
the system.
2 Install the Spotify app to the
mobile device.
3 Start the Spotify app and log in to
the Spotify Premium account.
4 Select and start playing the music
on the Spotify app.
5 Select the Connect icon on the
Spotify app and select the system
as the audio output device.
The music is played on the system.
To play music quickly even when
the system is in standby mode
Set [Quick Start/Network Standby] to
[On] (page 55).
Note
Enabling the “Spotify
Connect” Function
40
GB
1 Press MUSIC SERVICE.
When you have played the music of
Spotify on the system, the music
that was played with Spotify is
resumed. For details, see “Using the
MUSIC SERVICE Button” (page 40).
The Spotify app may not be available in
some countries/regions.
Using the MUSIC SERVICE
Button
To enjoy music services, the system
must be connected to the Internet.
Press MUSIC SERVICE.
The music service list appears on the TV
screen.
When you have played the music of
Spotify on the system, the music that
was played with Spotify is resumed. See
“Using Spotify” (page 39).
• Music services may not be available in
some countries/regions.
• If the resume playback is not available,
the last playlist played on the system
plays.
• To play on the system, you need the
Spotify Premium account.
Tips
• You can update the music service list by
pressing OPTIONS and selecting [Update
Services] on the music service list.
• You can display the music service list by
selecting [Music Service List] on the home
menu or pressing MUSIC SERVICE on the
main unit.
Resuming the Music that has
Played on the Mobile Device
Note
Notes
MUSIC SERVICE
41
GB
Listening to Music/Sound Using the Network Function
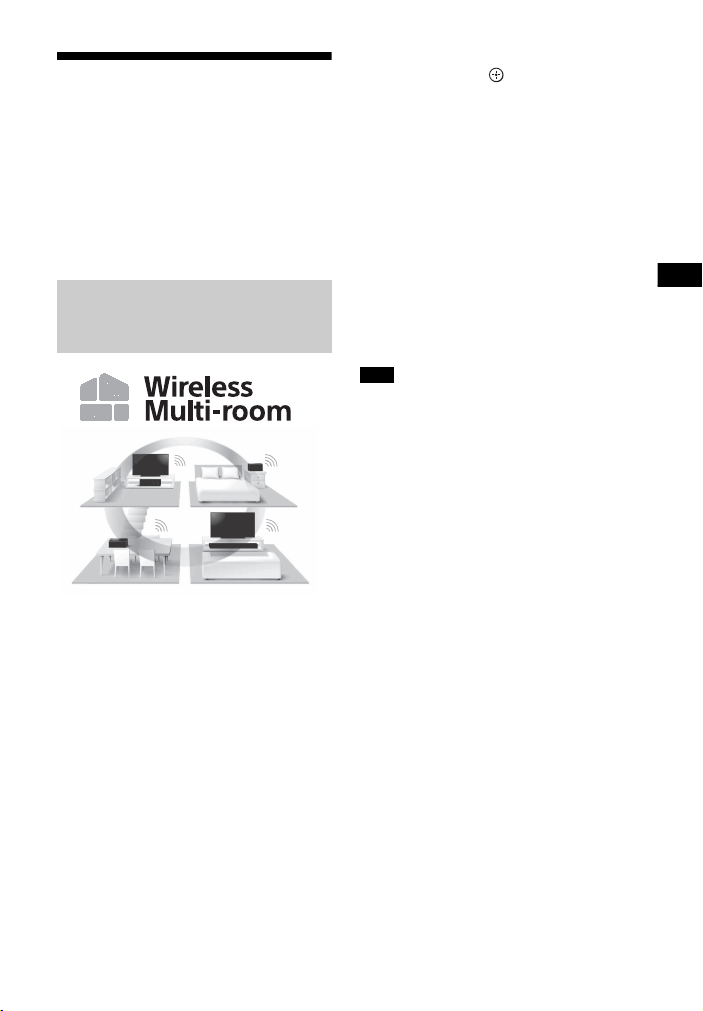
Connecting the Wireless
Multi Room-Compatible
Device (Wireless Multi
Room)
You can enjoy music in any room by
using the system with the wireless multi
room-compatible wireless speaker.
You can enjoy the following music or
sound in different rooms with high
sound quality using your home wireless
network.
•Music on the music service
• Music stored in your PC or smartphone
• Sound of the [TV], [HDMI1], [HDMI2],
[HDMI3], or [Analog] input of the
system*
* You can enjoy the sound of the device
that is connected to the system. The
sound of the system is delayed behind
the picture to synchronize with the sound
of other speakers. If you are bothered by
the time gap between the sound and
picture, press OPTIONS and set [Multi-
room Group Sync] to [Off]. (For the TV
input, press OPTIONS and / until
“M.SYNC” appears on the front panel
display and press (enter) then /
until “OFF” appears on the front panel
display.) The sound of the system is
synchronized with the picture though the
sound output from other speakers is
delayed.
You can operate with Sony | Music
Center that is installed on a mobile
device. To use multiple devices, connect
them to the same wireless LAN.
To perform setting on Sony |
Music Center
Perform the setting by following the
help on Sony | Music Center.
This function is not available for music on
the connected BLUETOOTH device to the
system.
Tip
For details about Sony | Music Center, see
“What You can Do with Sony | Music
Center” (page 37).
Listening to the Same Music
in Different Rooms (Wireless
Multi Room)
Note
42
GB
Customizing the
Speaker Settings for
Surround Sound
To obtain the good surround sound, set
the speakers distance from your
listening position and their output level,
etc.
The default settings are underlined.
1 Press HOME.
The home menu appears on the TV
screen.
2 Select [Setup] from the home
menu.
The setup display appears on the TV
screen.
3 Select [Audio Settings] - [Speaker
Settings].
The [Speaker Settings] screen
appears on the TV screen.
4 Perform the speaker settings.
Select the setting item from the
following items by pressing /
and , then set the value in
accordance with the environment
by pressing / and .
[Distance]
Set the distance from the listening
position to the speakers.
You can set the value from 0 meters to
10 meters (0.1 m step) (0 ft to 33 ft (1/4 ft
step)).
[Front]: Sets the front speaker distance.
[Subwoofer]: Sets the subwoofer
distance.
Tip
You can change measurement units (feet
or meters) by pressing the color button
(RED).
[Level]
Adjust the sound level of the speakers.
For [Front], [Height], and [Subwoofer],
you can set the value from -6.0 dB to 6.0
dB (0.5 dB step).
[Front]: Sets the front speaker level.
[Height]: Sets the height speaker level.
[Subwoofer]: Sets the subwoofer level.
[Test Tone]
The test tone is emitted from the
speakers for checking the available
speakers.
[Off]
: The test tone is not emitted from
the speakers.
[On]: The test tone emitted from each
speaker in order.
[Ceiling Height]
Set the ceiling height of the room where
the system is installed.
You can set the value from 1 meter to 5
meters (0.1 m step) (3.25 ft to 16.5 ft (1/4
ft step)).
Tip
You can change measurement units (feet
or meters) by pressing the color button
(RED).
Using the Various Functions/
Settings
43
GB
Using the Various Functions/Settings
Performing the Wireless
Connection of the
Subwoofer (SECURE LINK)
You can specify the wireless connection
to link the system to the subwoofer
using the Secure Link function. This
function can help prevent interference if
you use multiple wireless products or
your neighbors use wireless products.
1 Press HOME.
The home menu appears on the TV
screen.
2 Select [Setup] from the home
menu.
The setup display appears on the TV
screen.
3 Select [System Settings] -
[Wireless Subwoofer Connection]
- [Secure Link].
The [Secure Link] screen appears on
the TV screen.
4 Select [On].
5 Press SECURE LINK on the rear of
the subwoofer.
The on/standby indicator of the
subwoofer flashes in orange.
Proceed to the next step within 1
minute.
6 Select [Start].
The link setting starts.
To return to the previous display,
select [Cancel].
7 Complete the link setting by
following the on-screen message.
The on/standby indicator of the
subwoofer lights in orange.
• If the message [Cannot set Secure Link.]
appears, follow the on-screen
instructions.
• When [Bluetooth Mode] is set to
[Transmitter] and the BLUETOOTH device
is connected to the system, the wireless
subwoofer connection cannot be
established.
If you use multiple wireless systems,
such as a wireless LAN, the wireless
signals may be unstable. In this case,
the transmission may be improved by
changing the following [RF Channel]
setting.
1 Press HOME.
The home menu appears on the TV
screen.
SECURE LINK
On/standby
indicator
Notes
If Wireless Transmission is
Unstable

44
GB
2 Select [Setup] from the home
menu.
The setup display appears on the TV
screen.
3 Select [System Settings] -
[Wireless Subwoofer Connection]
- [RF Channel].
4 Select the setting you want.
• [Auto] (default setting): Normally
select this. The system
automatically selects the better
channel for transmission.
• [1], [2], [3]: The system transmits
sound by fixing the channel for
transmitting. Select the channel
with the better transmission.
The transmission may be improved by
changing the transmission channel
(frequency) of the other wireless system(s).
For details, refer to the operating
instructions of the other wireless system(s).
Playing Compressed
Audio Files or CDs by
Upscaling to Near Hi-
Resolution Sound Quality
(DSEE HX)
DSEE HX upscales existing sound
sources to near hi-resolution sound
quality, and it makes you feel as if you
are in a recording studio or at a concert.
1 Press HOME.
The home menu appears on the TV
screen.
2 Select [Setup] from the home
menu.
The setup display appears on the TV
screen.
3 Select [Audio Settings] - [DSEE
HX].
4 Select [On].
• This function is only available when
[ClearAudio+] or [Music] is selected as the
sound field (page 27).
• This function is compatible with the
2-channel digital input signals of 44.1 kHz
or 48 kHz sampling frequency.
• The sampling frequency/bit depth after
upscaling is up to 96 kHz/24 bit.
• This function is not compatible with DSD
signals.
• This function does not work for the HDMI,
TV, and analog input.
• This function does not work when using
Chromecast built-in.
Note
Notes
45
GB
Using the Various Functions/Settings
Enjoying Multiplex
Broadcast Sound (AUDIO)
You can enjoy multiplex broadcast
sound when the system receives a
Dolby Digital multiplex broadcast signal.
1 Press AUDIO.
The audio signal appears in the front
panel display.
2 Press the button repeatedly to
select the desired audio signal.
• To receive a Dolby Digital signal, you
need to connect a TV or other devices to
the TV IN (OPT) jack with the optical digital
cable (not supplied).
• If your TV’s HDMI IN jack is compatible
with the Audio Return Channel function
(page 48), you can receive a Dolby Digital
signal via HDMI cable.
Deactivating Buttons on
the Main Unit
You can deactivate buttons on the main
unit for preventing misoperation, such
as child mischief (Child lock function).
Press –, +, and – in order while
pressing and holding on the main
unit.
“LOCK” appears in the front panel
display, and buttons on the main unit do
not work.
You can only operate the system by
using the remote control.
Press –, +, and – in order while pressing
and holding on the main unit.
“UNLCK” appears in the front panel
display, and the child lock function is
canceled.
(power) is not locked with the child lock
function.
Audio signal Explanation
“MAIN” Sound of the main
language will be
output.
“SUB” Sound of the sub
language will be
output.
“MN/SB” Mixed sound of both
the main and sub
languages will be
output.
Notes
AUDIO
Canceling the Child Lock
Function
Note
46
GB
Changing the Brightness
of the Front Panel
Display and BLUETOOTH
Indicator (DIMMER)
You can change the brightness of the
front panel display and BLUETOOTH
indicator.
1 Press DIMMER.
The display mode appears in the
front panel display.
2 Press the button repeatedly to
select the desired display mode.
The front panel display is turned off when
“Off” is selected. It turns on automatically
when you press any button, then turns off
again if you do not operate the system for
about 10 seconds. However, in some cases,
the front panel display may not turn off. In
this case, the brightness of the front panel
display is same as “Dark.”
Saving Power in Standby
Mode
Check that you have made the following
settings:
– [Bluetooth Standby] is set to [Off]
(page 54).
– [Standby Through] is set to [Off]
(page 55).
– [Quick Start/Network Standby] is set
to [Off] (page 55).
– [Remote Start] is set to [Off] (page 56).
Mode Explanation
“Bright” The front panel display
and BLUETOOTH
indicator light brightly.
“Dark” The front panel display
and BLUETOOTH
indicator light darkly.
“Off” The front panel display
is turned off.
Note
DIMMER

47
GB
Using the Various Functions/Settings
Sending the Remote
Signal to the TV via the
Main Unit
When the main unit obstructs the
remote control sensor of the TV, the TV
remote control may not work. In that
case, enable the IR repeater function of
the system.
You can control the TV with the remote
control of the TV by sending the remote
signal from the rear of the main unit.
1 Press HOME.
The home menu appears on the TV
screen.
2 Select [Setup] from the home
menu.
The setup display appears on the TV
screen.
3 Select [System Settings] - [IR-
Repeater].
The [IR-Repeater] screen appears
on the TV screen.
4 Select [On].
• Be sure to check that the remote control
of the TV cannot control the TV, and then
set [IR-Repeater] to [On]. If it is set to [On]
when the remote control can control the
TV, appropriate operation may not be
obtained because of the interference
between the direct command from the
remote control and the command via the
main unit.
• On some TVs, this function may not work
correctly. In this case, place the main unit
slightly further away from the TV.
Using the Control for
HDMI Function
Connecting a device such as a TV or Blu-
ray Disc player compatible with the
Control for HDMI function* by HDMI
cable enables you to easily operate the
device by a TV remote control.
The following functions can be used
with the Control for HDMI function.
• System Power Off function
• System Audio Control function
•Audio Return Channel
• One-Touch Play function
• Menu Operation by TV Remote Control
• HDMI Standby Through power saving
setting
These functions may work with devices
other than those manufactured by Sony,
but operation is not guaranteed.
* Control for HDMI is a standard used by
CEC (Consumer Electronics Control) for
allowing HDMI (High-Definition
Multimedia Interface) devices to control
each other.
Turn [System Settings] - [HDMI Settings]
- [Control for HDMI] on the system to
[On] (page 55). The default setting is
[On].
Enable the Control for HDMI function
settings for the TV and other device
connected to the system.
Tip
If you enable the Control for HDMI
(“BRAVIA” sync) function when using a TV
manufactured by Sony, the Control for
HDMI function of the system is also
enabled automatically. When settings are
Notes
Note
Preparing to Use the Control
for HDMI Function

48
GB
completed, “DONE” appears in the front
panel display.
When you turn off the TV, the system
will turn off automatically.
Set [System Settings] - [HDMI Settings] -
[Standby Linked to TV] on the system to
[On] or [Auto] (page 55). The default
setting is [Auto].
The connected device may not turn off
depending on the status of the device.
If you turn on the system while you are
watching the TV, the TV sound will be
output from the speakers of the system.
The volume of the system can be
adjusted using the TV’s remote control.
If the TV sound was output from the
speakers of the system the previous
time you watched the TV, the system
will be turned on automatically when
you turn on the TV again.
Operations can also be made by the
TV’s menu. For details, refer to the
operating instructions of your TV.
• Sound is only output from the TV if other
than [TV], [HDMI1], [HDMI2] or [HDMI3]
input is selected when using the Twin
Picture function on the TV. When you
disable the Twin Picture function, the
sound is output from the system.
• The number for the system’s volume level
is displayed on the TV screen depending
on the TV. The volume number displayed
on the TV may differ from the number on
the front panel display of the system.
• Depending on the settings of the TV, the
System Audio Control function may not
be available. For details, refer to the
operating instructions of your TV.
If the system is connected to a TV’s
HDMI IN jack compatible with Audio
Return Channel (ARC), you can listen to
TV sound from the speakers of the
system without connecting an optical
digital cable.
On the system, turn [System Settings] -
[HDMI Settings] - [TV Audio Input Mode]
to [Auto] (page 55). The default setting
is [Auto].
If the TV is not compatible with Audio
Return Channel, the optical digital cable
(not supplied) needs to be connected (refer
to the supplied Startup Guide).
When you play content on a device (Blu-
ray Disc player, “PlayStation
®
4,” etc.)
connected to the system, the system
and TV are turned on automatically, the
input of the system is switched to the
input for the device played, and sound is
output from the speakers of the system.
• If [System Settings] - [HDMI Settings] -
[Standby Through] on the system is set to
[On] or [Auto] and the TV sound was
output from the speakers of the TV the
previous time you watched the TV, the
system does not turn on and the sound
and picture are output from the TV even if
device content is played (page 55).
• Depending on the TV, the beginning part
of content being played may not play
correctly.
System Power Off Function
Note
System Audio Control
Function
Notes
Audio Return Channel
Note
One-Touch Play Function
Notes

49
GB
Using the Various Functions/Settings
You can select the system using the
SYNC MENU button on the TV remote
control and operate the system.
This function can be used if the TV
supports the link menu. For details, refer
to the operating instructions of your TV.
• In the TV’s link menu, the system is
recognized by the TV as “Player.”
• Some operations may not be available
with some TVs.
HDMI Standby Through power saving
setting (page 55) is a function that
allows you to enjoy the sound and
picture of a connected device without
turning on the system.
Set [System Settings] - [HDMI Settings] -
[Standby Through] to [Auto] (page 55).
The default setting is [Auto].
If the picture of a device connected to the
system is not displayed on the TV, set
[Standby Through] to [On]. If you connect a
TV other than those manufactured by
Sony, we recommend you to select this
setting.
Using the “BRAVIA” Sync
Function
In addition to the Control for HDMI
function, you can also use the following
functions on devices compatible with
the “BRAVIA” sync function.
•Scene Select function
• Home Theatre Control
• Echo Canceling function
• Language Follow
These functions are proprietary functions
of Sony. This function cannot operate with
products other than those manufactured
by Sony.
The sound field of the system is
automatically switched according to the
TV’s Scene Select function settings. For
details, refer to the operating
instructions of your TV.
Set the sound field to [ClearAudio+]
(page 27).
When using a TV compatible with the
Home Theatre Control function, setting
the system, setting the sound field
settings, input switching, etc. can be
done without switching the TV input.
This function can be us ed when the TV is
connected to the Internet. For details,
refer to the operating instructions of
your TV.
Menu Operation by TV
Remote Control
Notes
HDMI Standby Through
Power Saving Setting
Note
Note
Scene Select Function
Home Theatre Control
Function

50
GB
Echo is reduced when you use Social
Viewing function such as Skype while
watching TV programs. This function
can be used if the TV supports Social
Viewing function. For details, refer to
the operating instructions of your TV.
• If the input of the system is [HDMI1],
[HDMI2] or [HDMI3] when using the Social
Viewing function, the input is
automatically changed to [TV]. Sound of
the Social Viewing and TV program is
output from the speakers of the system.
• Sound is only output from the speaker of
the TV if the input of the system is other
than [TV], [HDMI1], [HDMI2] or [HDMI3]
when using the Social Viewing function.
• This function cannot be used when sound
is output from the TV.
When you change the language for the
on-screen display of the TV, the
system’s on-screen display language is
also changed.
Echo Canceling Function
Notes
Language Follow
51
GB
Using the Various Functions/Settings
Using the Setup Display
You can make various adjustments to items such as picture and sound.
The default settings are underlined.
1 Press HOME.
The home menu appears on the TV screen.
2 Select [Setup] from the home menu.
The setup display appears on the TV screen.
3 Select the setting item.
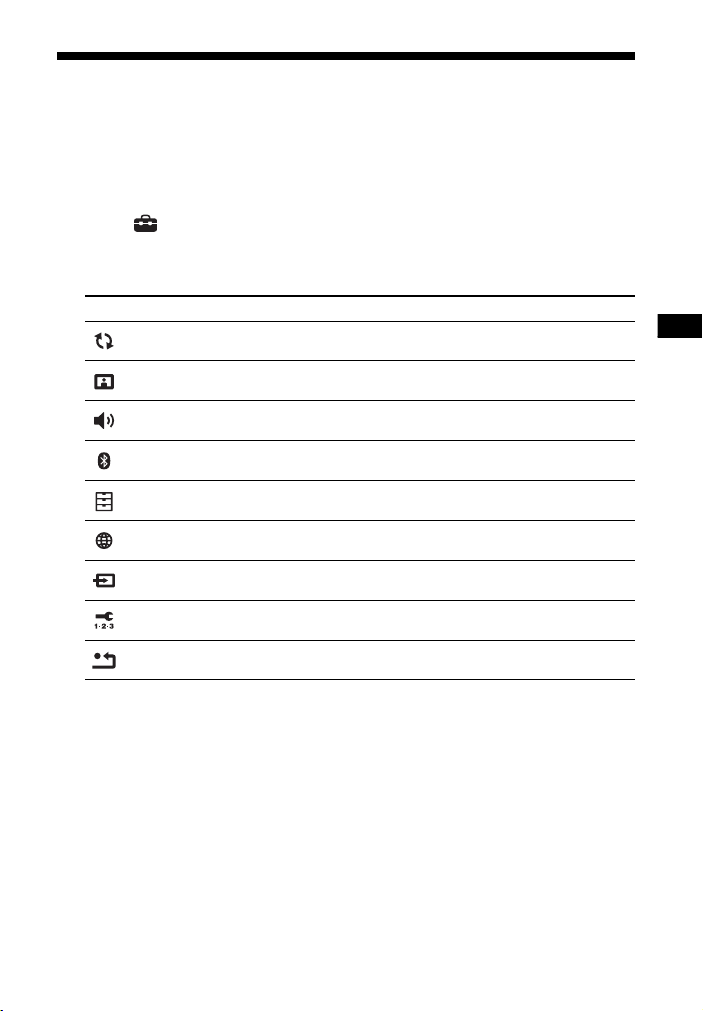
Setting item Explanation
[Software Update] Updates the software of the system. (page 52)
[Screen Settings]
Makes the screen settings according to the type of
TV. (page 52)
[Audio Settings]
Makes the audio settings according to the type of
connection jacks. (page 52)
[Bluetooth Settings]
Makes detailed settings for the BLUETOOTH
function. (page 53)
[System Settings] Makes the system-related settings. (page 54)
[Network Settings]
Makes detailed settings for the Internet and home
network. (page 56)
[Input Skip Setting] Sets the input skip setting for each input. (page 56)
[Easy Setup]
Re-runs the Easy Setup to make the basic settings.
(page 57)
[Resetting]
Resets the system to the factory default settings.
(page 57)
52
GB
By updating your software to the latest
version, you can take advantage of the
newest functions.
For information about update functions,
visit the following website:
http://www.sony-asia.com/section/support
• It may take about 1 hour for the update to
be completed.
• An Internet environment is necessary to
perform updates via Internet.
• During a software update, “UPDT”
appears in the front panel display. After
the update is complete, the system
automatically reboots. While the
updating operation is in progress, do not
turn on or off the system or operate the
system or TV. Wait for the software
update to complete.
• Set [Auto Update] to [On] when you want
to perform software updates
automatically (page 55). Software update
may be performed even if you select [Off]
in [Auto Update] depending on the details
of the updates.
[Update via Internet]
Updates the system’s software using
the available network. Follow the
instructions on the screen. Make sure
network is connected to the Internet.
[Update via USB Memory]
Updates software using USB memory.
Make sure that the software update
folder is correctly named “UPDATE.”
[Output Video Resolution]
[Auto]: Outputs video signal according
to the resolution of the TV or connected
device.
[480p/576p]*: Outputs 480p/576p
video signal.
* If the color system of the playback
content is NTSC, the video signals
resolution can be converted to [480p]
only.
[YCbCr/RGB (HDMI)]
[Auto]: Automatically detects the type
of external device, and then switches to
the matching color setting.
[RGB]: Select this when connecting to a
device with an HDCP compliant DVI jack.
[Video Direct]
You can disable the On-Screen Display
(OSD) of the system when [HDMI1],
[HDMI2] or [HDMI3] input is selected.
This function is useful when playing a
game, you can fully enjoy the game’s
screen.
[On]: Disables the OSD. Information will
not display on the TV screen and the
OPTIONS and DISPLAY buttons will not
work.
[Off]
: Displays information on the TV
screen only when you change the
settings, such as when selecting the
sound field.
[Speaker Settings]
You can perform the speaker settings to
obtain the best possible surround
sound. For details, see “Customizing the
Speaker Settings for Surround Sound”
(page 42).
[DSEE HX]
This function is only available when
[ClearAudio+] or [Music] is selected as
the sound field.
[On]
: Upscales the compressed audio
files or CDs to a High-Resolution sound
quality and reproduces the clear high-
range sound which is often lost
(page 44).
[Off]: Off
[Software Update]
Notes
[Screen Settings]
[Audio Settings]
53
GB
Using the Various Functions/Settings
[Audio DRC]
You can compress the dynamic range of
the sound track.
[Auto]
: Automatically compresses
sound encoded in Dolby TrueHD.
[On]: The system reproduces the dolby
sound track with the kind of dynamic
range that the recording engineer
intended.
[Off]: No compression of dynamic
range.
[Audio Output]
You can select the output method used
for audio signal output.
[Speaker]
: Outputs multi-channel sound
from the system’s speakers only.
[Speaker + HDMI]: The sound is output
from the speaker of the TV and the
system’s speakers. The sound quality of
the playback device depends on the
sound quality of the TV (number of
channels, sampling frequency, etc.). If
the TV has stereo speakers, the sound
output from the system's speaker is in
the same stereo as the TV, even when
playing back multi-channel source.
When [Audio Output] is set to [Speaker +
HDMI] while the [HDMI1], [HDMI2] or
[HDMI3] input is selected, the On-Screen
Display (OSD) of the system is not
displayed and the OPTIONS and DISPLAY
buttons do not work.
[Sound Effect]
You can turn on/off the sound effect
such as the sound field.
[Sound Field On]
: Enables all sound
effects.
[Off]: Disables the sound effects. Select
this when you do not want to set the
upper limit of sampling frequency.
[Audio Upmix]
You can give a priority to one of the
upmixing settings. The upmix
technology increases the number of
channels on the source.
[Dolby Surround]
: The Dolby Surround
upmixer expands the audio contents to
multi channels. It can be played on the
multi-channel speaker including height
speakers.
[Neural:X]: Neural:X is the latest
upmixing technology from DTS that
expands the stereo 5.1 channel and 7.1
channel to multi channels. It can be
played on the multi-channel speaker
including height speakers.
• [Dolby Surround] has priority when the
input format is Dolby. [Neural:X] has
priority when the input format is DTS.
• There may be no sound for height
speakers depending on the sound field.
[Bluetooth Mode]
You can enjoy content from a
BLUETOOTH device by using this system
or listen to sound from this system by
using BLUETOOTH-compatible
headphones.
[Receiver]
: This system is in receiver
mode, which enables it to receive and
output audio from the BLUETOOTH
device.
[Transmitter]: This system is in
transmitter mode, which enables it to
send audio to the BLUETOOTH-
compatible headphones. If you switch
the input of the system, “BT TX” appears
on the front panel display.
[Off]: The BLUETOOTH function is turned
off and you cannot select the [Bluetooth
Audio] input.
You can connect to a BLUETOOTH
device* by using the One-touch function
even if you have set [Bluetooth Mode] to
[Off].
Note
Notes
[Bluetooth Settings]
Note
54
GB
* Only mobile devices such as a
smartphone, tablet, WALKMAN®
[Device List]
Displays a list of paired and detected
BLUETOOTH devices (SNK device) when
[Bluetooth Mode] is set to [Transmitter].
[Bluetooth Standby]
You can set the [Bluetooth Standby] so
that the system can be turned on by a
BLUETOOTH device even when the
system is in standby mode. This
function is only available when you set
[Bluetooth Mode] to [Receiver] or
[Transmitter].
[On]
: The system turns on automatically
when you request a BLUETOOTH
connection from a paired BLUETOOTH
device.
[Off]: Off
[Bluetooth Codec - AAC]
This function is only available when you
set [Bluetooth Mode] to [Receiver] or
[Transmitter].
[On]
: Enable AAC codec.
[Off]: Disable AAC codec.
• You can enjoy high-quality sound if AAC
is enabled and your device supports AAC.
• When connecting BLUETOOTH-
compatible headphones, this setting
cannot be changed.
[Bluetooth Codec - LDAC]
This function is only available when you
set [Bluetooth Mode] to [Receiver] or
[Transmitter].
[On]
: Enable LDAC codec.
[Off]: Disable LDAC codec.
• You can enjoy more high-quality sound if
LDAC is enabled and your device supports
LDAC.
• When connecting BLUETOOTH-
compatible headphones, this setting
cannot be changed.
[Wireless Playback Quality]
You can set the transmission data rate
of LDAC playback. This function is only
available when you set [Bluetooth
Mode] to [Transmitter] and [Bluetooth
Codec - LDAC] to [On].
[Auto]: The data transfer rate is
automatically changed depending on
the environment. If audio playback is
unstable in this mode, use the other
three modes.
[Sound Quality]: The highest bit rate is
used. Sound is sent in a higher quality;
however, audio playback sometimes
may become unstable when the link
quality is not good enough.
[Standard]
: The middle bit rate is used. It
balances both sound quality and
playback stability.
[Connection]: Stability is prioritized.
Sound quality may be reasonable and
connection status will most likely be
stable. If the connection is unstable, this
setting is recommended.
[OSD Language]
You can select the language you want
for the system on-screen display.
[Wireless Subwoofer Connection]
You can perform wireless connection of
the subwoofer again. For details, see
“Performing the Wireless Connection of
the Subwoofer (SECURE LINK)”
(page 43).
[IR-Repeater]
[On]: Remote signals for the TV are sent
from the rear of the main unit (page 47).
[Off]
: Turns off the function.
For details, see “Sending the Remote
Signal to the TV via the Main Unit”
(page 47).
Notes
Notes
[System Settings]

55
GB
Using the Various Functions/Settings
[HDMI Settings]
• [Control for HDMI] (page 47)
[On]
: The Control for HDMI function is
enabled. Devices connected with an
HDMI cable can control each other.
[Off]: Off
• [Standby Linked to TV] (page 48)
This function is available when you set
[Control for HDMI] to [On].
[Auto]: If the input of the system is
[TV], [HDMI1], [HDMI2], or [HDMI3], the
system turns off automatically when
you turn off the TV.
[On]: The system turns off
automatically when you turn off the TV
regardless of the input.
[Off]: The system does not turn off
when you turn off the TV.
•[Standby Through] (page49)
This function is available when you set
[Control for HDMI] to [On].
[Auto]: Signals are output from the
system’s
HDMI OUT (ARC) jack when
the TV is turned on while the system is
not turned on. The system standby
power consumption can be reduced
more than when set to [
On].
[
On]: Signals are always output from
the system’s
HDMI OUT (ARC) jack
when the system is not turned on. If
you connect a TV other than those
manufactured by Sony, we
recommend that you select this
setting.
[
Off]: Signals are not output from the
system’s
HDMI OUT (ARC) jack when
the system is not turned on. Turn on
the system to enjoy on the TV content
of a device connected to the system.
The system standby power
consumption can be reduced more
than when set to [
On].
• [TV Audio Input Mode] (page 48)
Set this function when the system is
connected to a TV’s HDMI IN jack that
is compatible with Audio Return
Channel. The Audio Return Channel
function is available when you set
[Control for HDMI] to [On].
[Auto]
: You can listen to TV sound
from the speakers of the system.
[Optical]: Use this setting when an
optical digital cable is connected.
• [HDMI Signal Format]
You can select the HDMI signal format
for the input signal. For details, see
“Setting the HDMI Signal Format to
Watch 4K Video Content” (page 17).
[Quick Start/Network Standby]
[On]: Shortens the startup time from
standby mode. You can operate the
system quickly after turning it on.
[Off]
: Off
If you agree to use the Chromecast built-in
function, [Quick Start/Network Standby]
automatically switches to [On].
[Auto Standby]
[On]: Turns on the [Auto Standby]
function. When you do not operate the
system for about 20 minutes, the
system enters standby mode
automatically.
[Off]
: Off
[Software Update Notification]
[On]: Sets the system to inform you of
latest software version information
(page 52).
[Off]: Off
[Auto Update Settings]
• [Auto Update]
[On]: Software update is automatically
executed between 2 a.m. and 5 a.m.
local time in the selected [Time Zone]
while this system is not in use. If you
select [Off] in [Quick Start/Network
Standby], software update is
performed after you turn off the
system.
[Off]
: Off
Note
56
GB
• [Time Zone]
Select your country/region.
• Software update may be performed even
if you select [Off] in [Auto Update]
depending on the details of the updates.
• Software update is performed
automatically within 11 days of a new
software release.
[Device Name]
You can change the name of this system
according to your preference so that it is
more recognizable when using the
[Bluetooth Audio] function. The name is
also used with other networks, such as
the home network. Follow on-screen
instructions and use the software
keyboard to enter the name.
[System Information]
You can display the system’s software
version information and the MAC
address.
[Software License Information]
You can display the Software License
Information.
[Internet Settings]
Connect the system to the network
beforehand.
[Wired Setup]: Select this when you
connect to a broadband router using a
LAN cable. When you select this setting,
the wireless LAN function of the system
is disabled automatically.
[Wireless Setup]: Select this when you
use the built-in Wi-Fi function of the
system to connect to a wireless
network.
Tip
For further details, visit the following
website and check the FAQ:
http://www.sony-asia.com/section/support
[Network Connection Status]
Displays the current network
connection status.
[Network Connection Diagnostics]
You can run the network diagnostic to
check if the network connection has
been made properly.
[Connection Server Settings]
Sets whether or not to display the
connected home network server.
[Auto Home Network Access
Permission]
[On]: Allows automatic access from a
newly detected home network
controller.
[Off]: Off
[Home Network Access Control]
Displays a list of home network
controller-compatible products and sets
whether or not to accept commands
from the controllers in the list.
[External Control]
[On]
: Allows the home automation
controller to operate this system.
[Off]: Off
[Remote Start]
[On]: Allows you to turn on the system
by a device linked via a network when
the system is in standby mode.
[Off]
: The system cannot be turned on
by a device linked via a network.
The skip setting is a convenient feature
that allows you to skip unused inputs
when selecting a function by pressing
INPUT +/–.
[Do not skip]: The system does not skip
the selected input.
Notes
[Network Settings]
[Input Skip Setting]
57
GB
Using the Various Functions/Settings
[Skip]: The system skips the selected
input.
When you press INPUT +/– during the
home menu is displayed, input icon
appears dimmed if it has been set to [Skip].
Tip
You can perform [Input Skip Setting] from
the options menu (page 58).
Run [Easy Setup] to make the basic
initial settings and the basic network
settings for the system. Follow the on-
screen instructions.
[Reset to Factory Default Settings]
You can reset the system settings to the
factory default by selecting the group of
settings. All the settings within the
group will be reset.
[Initialise Personal Information]
You can erase your personal
information stored on the system.
If you dispose, transfer or resell this
system, please delete all Personal
Information for security purposes. Please
take appropriate measures such as logging
out after using a network service.
Note
[Easy Setup]
[Resetting]
Note

58
GB
Options Menu List
Various settings and playback operations are available by pressing OPTIONS. The
available items differ depending on the situation.
• The options menu is not displayed for the TV input.
• The OPTIONS button does not work when watching the contents with the HDR signal or
4K video format. For details about the 4K video format, see “Supported HDMI Video
Formats” (page 73).
Item Explanation
[A/V SYNC] Adjusts the time gap between picture and sound. Sound output can be
delayed (page 30).
[Sound Field] Changes the sound field setting (page 27).
[Night] Selects the night mode (page 28).
[Voice] Selects the voice mode (page 29).
[DTS Dialog Control] Adjusts the dialogue volume while streaming the DTS:X contents. You
can listen easily to dialogue since it stands out from the ambient noise.
This function does not work on some audio format.
[Input Skip Setting] Skips unused inputs when selecting a function by pressing INPUT +/–
(page 56).
[Input Label Setting] Changes the input name of [HDMI1]. [HDMI2], or [HDMI3] that is
displayed on the home menu (page 24).
[Repeat Setting] Sets repeat playback.
[Shuffle Setting] Sets shuffle playback.
[Play/Stop] Starts or stops playback.
[Play from start] Plays the item from the beginning.
[Multi-room Group
Sync]
Sets whether the sound of the system is synchronized with the sound
of other speakers or not when using the wireless multi room function
(page 41).
Notes

59
GB
Troubleshooting
Troubleshooting
If you experience any of the following
difficulties while using the system, use
this troubleshooting guide to help
remedy the problem before requesting
repairs. Should any problem persist,
consult your nearest Sony dealer.
Be sure to bring both your main unit and
subwoofer, even if it seems as though
only one has a problem, when you
request to repair.
The system does not power up.
Check that the AC power cord (mains
lead) is connected securely.
Disconnect the AC power cord (mains
lead) from the wall outlet (mains),
and then reconnect after several
minutes.
The system does not turn on even
when the TV is turned on.
Set [System Settings] - [HDMI
Settings] - [Control for HDMI] to [On]
(page 55). The TV must support the
Control for HDMI function (page 47).
For details, refer to the operating
instructions of your TV.
Check the speaker settings of the TV.
The system power syncs with the
speaker settings of the TV. For details,
refer to the operating instructions of
your TV.
If the sound was output from the
speakers of the TV the previous time,
the system does not turn on even
when the TV is turned on.
The system turns off when the TV is
turned off.
Check the setting of [System Settings]
- [HDMI Settings] - [Standby Linked to
TV] (page 55). When [Standby Linked
to TV] is set to [On], the system turns
off automatically when you turn off
the TV regardless of the input.
The system does not turn off even
when the TV is turned off.
Check the setting of [System Settings]
- [HDMI Settings] - [Standby Linked to
TV] (page 55). To turn the system off
automatically regardless of the input
when you turn off the TV, set
[Standby Linked to TV] to [On]. The TV
must support the Control for HDMI
function (page 47). For details, refer
to the operating instructions of your
TV.
There is no picture or the picture is
not output correctly.
Select the appropriate input
(page 13).
When there is no picture while TV
input is selected, select the TV
channel that you want using the TV’s
remote control.
When there is no picture while HDMI
IN 1/2/3 input is selected, press the
playback button of the connected
device.
Disconnect the HDMI cable, then
connect it again. Make sure that the
cable is firmly inserted.
While pressing and holding ,
press +, –, + on the main unit in order
to set the video output resolution
setting to the lowest level.
When there is no picture from the
connected device or the picture from
the connected device is not output
correctly, set [System Settings] -
[HDMI Settings] - [HDMI Signal
Troubleshooting
Power
Picture

60
GB
Format] to [Standard format]
(page 17).
If you connect a device supporting
HDCP 2.2 be sure to connect the
device to the HDMI IN jack and the TV
to the HDMI OUT jack of the system.
The system is connected to an input
device that is not HDCP (High-
bandwidth Digital Content
Protection) compliant. In this case,
check the specifications of the
connected device.
3D content from the HDMI IN 1/2/3
jack do not appear on the TV screen.
Depending on the TV or video device,
3D content may not appear. Check
the supported HDMI video format
(page 73).
4K video content from the HDMI IN
1/2/3 jack do not appear on the TV
screen.
Depending on the TV or the video
device, 4K video content may not
appear. Check the video capability
and settings of your TV and video
device.
The picture may not be displayed
properly if the [HDMI Signal Format]
setting is changed. In this case,
change the setting to [Standard
format] (page 17).
Use a Premium High Speed HDMI
Cable with Ethernet that supports
18Gbps or High Speed HDMI Cable
with Ethernet (page 73).
An image is not displayed on the
entire TV screen.
The aspect ratio on the media is fixed.
Images from the HDMI jack is
distorted.
Video from the device connected to
the HDMI jack may be distorted. If this
happens, set [Video Direct] to [On]
(page 52).
Picture and sound are not output
from the TV when the system is not
turned on.
Set on the system [System Settings] -
[HDMI Settings] - [Control for HDMI]
to [On], and then set [Standby
Through] to [Auto] or [On] (page 55).
Turn on the system, and then switch
the input to that for the device
playing.
If connected to devices other than
those manufactured by Sony that
support the Control for HDMI
function, set [System Settings] -
[HDMI Settings] - [Standby Through]
to [On] (page 55).
HDR Contents cannot show as high-
dynamic range.
Check the settings of the TV and
connected device. For details, refer to
the operating instructions of your TV
and the connected device.
Some devices may convert HDR
contents to SDR if the bandwidth is
not enough. In that case, set [System
Settings] - [HDMI Settings] - [HDMI
Signal Format] to [Enhanced format] if
the TV and the connected device
support a bandwidth of up to 18Gbps
(page 17). When you select [Enhanced
format], be sure to use a Premium
High Speed HDMI Cable with Ethernet
that supports 18Gbps (page 73).
No TV sound is output from the
system.
Check the type and connection of the
HDMI cable, optical digital cable, or
analog audio cable that is connected
to the system and the TV (refer to the
supplied Startup Guide).
Disconnect the cables that are
connected between the TV and the
system, then connect them firmly
again. Disconnect the AC power cords
Sound

61
GB
Troubleshooting
of the TV and the system from the AC
outlets (mains), then connect them
again.
When the system and TV are
connected with a HDMI cable, check
the following.
– The HDMI jack of the connected TV
is labeled with “ARC.”
– The Control for HDMI function of the
TV is set to on.
– On the system, [Control for HDMI] is
set to [On] and [TV Audio Input
Mode] to [Auto] (page 55).
If your TV is not compatible with
Audio Return Channel, connect the
optical digital cable (not supplied)
(refer to the supplied Startup Guide).
If the TV is not compatible with Audio
Return Channel, TV sound will not be
output from the system even if the
system is connected to the TV’s HDMI
IN jack.
Switch the input of the system to [TV].
When you connect the system and TV
with an analog audio cable (not
supplied), switch input of the system
to [Analog] (page 13).
Increase the volume on the system or
cancel muting.
If sound of a cable box/satellite box
connected to the TV is not output,
connect the device to a HDMI IN jack
of the system and switch input of the
system to the input for the connected
device (HDMI IN 1/2/3) (refer to the
supplied Startup Guide).
Depending on the order in which you
connect the TV and the system, the
system may be muted and “Muting”
is displayed on the front panel display
of the system. If this happens, turn on
the TV first, then the system.
Set the speakers setting of the TV
(BRAVIA) to Audio System. Refer to
the operating instructions of your TV
regarding how to set the TV.
Picture and sound are not output
from the TV when the system is not
turned on.
Set on the system [System Settings] -
[HDMI Settings] - [Control for HDMI]
to [On], and then set [Standby
Through] to [Auto] or [On] (page 55).
Turn on the system, and then switch
the input to that for the device
playing.
If connected to devices other than
those manufactured by Sony that
support the Control for HDMI
function, set [System Settings] -
[HDMI Settings] - [Standby Through]
to [On] (page 55).
The sound is output from both the
system and the TV.
Mute the sound of the system or the
TV.
The TV sound from this system lags
behind the image.
Set [A/V SYNC] to 0 msec if it is set to
the range between 25 msec and 300
msec (page 30).
No sound or only very low-level
sound of the device connected to
the system is heard.
Press + on the remote control and
check the volume level (page 11).
Press or + on the remote control
to cancel the muting function
(page 11).
Make sure the input source is
selected correctly. You should try
other input sources by pressing
INPUT +/– on the remote control
several times (page 11).
Check that all the cables and cords of
the system and the connected device
are firmly inserted.
When you play content compatible
with copyright protection technology
(HDCP), it may not be output from the
system.

62
GB
Set [System Settings] - [HDMI
Settings] - [HDMI Signal Format] to
[Standard format] (page 17).
The surround effect cannot be
obtained.
Depending on the input signal and
the sound field setting, surround
sound processing may not work
effectively. The surround effect may
be subtle, depending on the program
or disc.
To play multi-channel audio, check
the digital audio output setting on
the device connected to the system.
For details, refer to the operating
instructions supplied with the
connected device.
When [Audio Output] is set to
[Speaker + HDMI], the sound output
from the system’s speaker is in the
same stereo as the TV, even when
playing back multi-channel source. In
this case, set it to [Speaker] (page 53).
The sound is delayed behind the
picture.
When the sound of the [TV], [HDMI1],
[HDMI2], [HDMI3], or [Analog] input is
played in the wireless multi room
function, the sound of the system is
delayed behind the picture to
synchronize with the sound of other
speakers. If you are bothered by the
time gap between the sound and
picture, press OPTIONS and set
[Multi-room Group Sync] to [Off]. (For
the TV input, press OPTIONS and /
until “M.SYNC” appears on the front
panel display and press (enter)
then / until “OFF” appears on the
front panel display.) The sound of the
system is synchronized with the
picture though the sound output
from other speakers is delayed.
No sound or only very low-level
sound is heard from the subwoofer.
Press SW + on the remote control
to increase the subwoofer volume
(page 29).
Make sure that the on/standby
indicator on the subwoofer is lit in
green or orange.
If the on/standby indicator on the
subwoofer does not light, try the
following.
– Make sure the AC power cord
(mains lead) of the subwoofer is
connected properly.
–Press / (on/standby) of the
subwoofer to turn on the power.
If the on/standby indicator on the
subwoofer flashes slowly in green or
orange, or lights in red, try the
following.
– Move the subwoofer to a location
near the main unit so that the on/
standby indicator on the subwoofer
lights in green or orange.
– Follow the steps in “Performing the
Wireless Connection of the
Subwoofer (SECURE LINK)”
(page 43).
The on/standby indicator on the
subwoofer flashes quickly in green.
– Consult your nearest Sony dealer.
If the on/standby indicator on the
subwoofer flashes in red, press /
(on/standby) of the subwoofer to
turn off the power and check whether
the ventilation holes of the
subwoofer is blocked or not.
The subwoofer is for reproducing
bass sound. In the case of input
sources that contain very little bass
sound components (i.e., a TV
broadcast), the sound from the
subwoofer may be difficult to hear.
Subwoofer

63
GB
Troubleshooting
Set the night mode to [Off]. For
details, see “Enjoying Clear Sound
with Low Volume at Midnight
(NIGHT)” (page 28).
Sound skips or has noise.
If there is a device nearby that
generates electromagnetic waves,
such as a wireless LAN or a
microwave oven in use, locate the
system apart from it.
If there is an obstacle between the
main unit and the subwoofer, move
or remove it.
Locate the main unit and the
subwoofer as close as possible.
Switch the wireless LAN frequency of
any nearby wireless LAN router or PC
to 5 GHz range.
Switch the network connection of the
TV or Blu-ray Disc Player from
wireless to wired.
The USB device is not recognized.
Try the following:
Turn the system off.
Remove and reconnect the USB
device.
Turn the system on.
Make sure that the USB device is
securely connected to the (USB)
port (page 25).
Check to see if the USB device or a
cable is damaged.
Make sure that the USB device is on.
If the USB device is connected via a
USB hub, disconnect it and connect
the USB device directly to the system.
BLUETOOTH connection cannot be
completed.
Make sure that the BLUETOOTH
indicator of the main unit is lit
(page 32).
Make sure the BLUETOOTH device to
be connected with is turned on and
the BLUETOOTH function is enabled.
Bring this system and the
BLUETOOTH device closer together.
Pair this system and the BLUETOOTH
device again. You may need to cancel
the pairing with this system using
your BLUETOOTH device first.
Pairing information may be deleted.
Perform pairing operation again
(page 31).
Pairing cannot be achieved.
Bring this system and the
BLUETOOTH device closer together.
Make sure this system is not receiving
interference from a wireless LAN
device, other 2.4 GHz wireless
devices, or a microwave oven. If a
device that generates
electromagnetic radiation is nearby,
move the device away from this
system.
You cannot use the NFC function.
The NFC function does not work with
BLUETOOTH-compatible
headphones. To listen to sound using
a BLUETOOTH-compatible
headphones, see “Listening to Sound
of the Connected TV or Device from
Headphones” (page 34).
Check that the NFC function for a
BLUETOOTH-compatible device is
enabled.
Sound of the connected
BLUETOOTH mobile device is not
output from the system.
Make sure that the BLUETOOTH
indicator of the main unit is lit
(page 32).
Bring this system and the
BLUETOOTH device closer together.
If a device that generates
electromagnetic radiation, such as a
wireless LAN device, other
BLUETOOTH devices, or a microwave
oven is nearby, move the device away
from this system.
USB Device Connection
Mobile Device Connection

64
GB
Remove any obstacle between this
system and the BLUETOOTH device or
move this system away from the
obstacle.
Reposition the connected
BLUETOOTH device.
Switch the wireless LAN frequency of
any nearby wireless LAN router or PC
to 5 GHz range.
Increase the volume on the
connected BLUETOOTH device.
BLUETOOTH connection cannot be
completed.
Make sure that the BLUETOOTH
indicator of the main unit is lit
(page 8).
Make sure the BLUETOOTH device to
be connected with is turned on and
the BLUETOOTH function is enabled.
Bring this system and the
BLUETOOTH device closer together.
Pair this system and the BLUETOOTH
device again. You may need to cancel
the pairing with this system using
your BLUETOOTH device first.
Pairing information may be deleted.
Perform pairing operation again
(page 34).
Pairing cannot be achieved.
Bring this system and the
BLUETOOTH device closer together.
Make sure this system is not receiving
interference from a wireless LAN
device, other 2.4 GHz wireless
devices, or a microwave oven. If a
device that generates
electromagnetic radiation is nearby,
move the device away from this
system.
You cannot use the NFC function.
The NFC function does not work with
BLUETOOTH-compatible
headphones. To listen to sound using
a BLUETOOTH-compatible
headphones, see “Listening to Sound
of the Connected TV or Device from
Headphones” (page 34).
No sound is output from the
connected BLUETOOTH
headphones.
Make sure that the BLUETOOTH
indicator of the main unit is lit
(page 8).
Bring this system and the
BLUETOOTH device closer together.
If a device that generates
electromagnetic radiation, such as a
wireless LAN device, other
BLUETOOTH devices, or a microwave
oven is nearby, move the device away
from this system.
Remove any obstacle between this
system and the BLUETOOTH device or
move this system away from the
obstacle.
Reposition the connected
BLUETOOTH device.
Switch the wireless LAN frequency of
any nearby wireless LAN router or PC
to 5 GHz range.
Increase the volume on the
connected BLUETOOTH device.
Set [Wireless Playback Quality] to
[Connection] (page 54).
The system cannot connect to the
network.
Check the network connection
(page 18) and the network settings
(page 56).
Headphones Connection via
BLUETOOTH
Wired LAN Connection

65
GB
Troubleshooting
You cannot connect your PC to the
Internet after [Wi-Fi Protected
Setup™ (WPS)] is performed.
The wireless settings of the router may
change automatically if you use the
Wi-Fi Protected Setup function before
adjusting the settings of the router. In
this case, change the wireless settings
of your PC accordingly.
The system cannot connect to the
network or the network connection
is unstable.
Make sure the wireless LAN router is
on.
Check the network connection
(page 19) and the network settings
(page 56).
Depending on the usage
environment (including the wall
material), radio wave reception
conditions, or obstacles between the
system and the wireless LAN router,
the possible communication distance
may be shortened. Move the system
and the wireless LAN router closer to
each other.
Devices that use a 2.4 GHz frequency
band, such as a microwave,
BLUETOOTH, or digital cordless
device, may interrupt
communication. Move the main unit
away from such devices, or turn off
such devices.
The wireless LAN connection may be
unstable depending on the usage
environment, especially while using
the BLUETOOTH function of the
system. In this case, adjust the usage
environment.
The wireless LAN router you want is
not shown in the wireless network
list.
Press BACK to return to the previous
screen, and try [Wireless Setup] again
(page 19). If the wireless LAN router
you want is still not detected, select
[New connection registration] from
the network list, then select [Manual
registration] to input a network name
(SSID) manually.
You cannot connect the system to
the Internet.
Check the wired or wireless LAN
connection.
Restart the router or wireless LAN
router.
The sound is delayed behind the
picture.
When the sound of the [TV], [HDMI1],
[HDMI2], [HDMI3], or [Analog] input is
played in the wireless multi room
function, the sound of the system is
delayed behind the picture to
synchronize with the sound of other
speakers. If you are bothered by the
time gap between the sound and
picture, press OPTIONS and set
[Multi-room Group Sync] to [Off]. (For
the TV input, press OPTIONS and /
until “M.SYNC” appears on the front
panel display and press (enter)
then / until “OFF” appears on the
front panel display.) The sound of the
system is synchronized with the
picture though the sound output
from other speakers is delayed.
The wireless multi room function
cannot be used on Sony | Music
Center.
Connect the mobile device to the
same network as that of the system.
Wireless LAN Connection
Internet Connection
Wireless Multi Room

66
GB
The remote control of this system
does not function.
Point the remote control at the
remote control sensor on the main
unit (page 8).
Remove any obstacles in the path
between the remote control and the
system.
Replace both batteries in the remote
control with new ones, if they are
weak.
Make sure you are pressing the
correct button on the remote control.
TV remote control does not work.
This problem might be solved by
enabling the IR repeater function
(page 54).
The Control for HDMI function does
not work properly.
Check the connection with the
system (refer to the supplied Startup
Guide).
Enable the Control for HDMI function
on the TV. For details, refer to the
operating instructions of your TV.
Wait a while, and then try again. If
you unplug the system, it will take a
while before operations can be made.
Wait for 15 seconds or longer, and
then try again.
Make sure the devices connected to
the system support the Control for
HDMI function.
Enable the Control for HDMI function
on the devices connected to the
system. For details, refer to the
operating instructions of your device.
The type and number of devices that
can be controlled by the Control for
HDMI function is restricted by the
HDMI CEC standard as follows:
–Recording devices (Blu-ray Disc
recorder, DVD recorder, etc.): up to
3 devices
– Playback devices (Blu-ray Disc
player, DVD player, etc.): up to 3
devices (this system uses one of
them)
– Tuner-related devices: up to 4
devices
– Audio system (receiver/
headphone): up to 1 device (used by
this system)
“PRTCT,” “PUSH” and “POWER”
flash alternately in the front panel
display.
Press (power) to turn off the
system. After the indicator
disappears, disconnect the AC power
cord (mains lead) and make sure
nothing is obstructing the ventilation
holes of the system.
“BT TX” appears in the front panel
display.
Press BLUETOOTH RX/TX on the
remote control to switch [Bluetooth
Mode] to [Receiver]. “BT TX” appears
if [Bluetooth Mode] is set to
[Transmitter] (page 53). When you
press BLUETOOTH RX/TX on the
remote control, [Bluetooth Mode] is
switched to [Receiver] and the
selected input appears in the front
panel display.
Remote Control
Others

67
GB
Troubleshooting
Sensors of the TV do not work
properly.
The main unit may block some
sensors (such as the brightness
sensor), the remote control receiver
of your TV or the emitter for 3D
glasses (infrared transmission) of a 3D
TV that supports the infrared 3D glass
system, or wireless communication.
Move the main unit away from the TV
within a range that allow those parts
to operate properly. For the locations
of the sensors and remote control
receiver, refer to the operating
instructions supplied with the TV.
Wireless functions (wireless LAN,
BLUETOOTH, or subwoofer) are
unstable.
Do not place metal objects other than
a TV around the system.
Music that you are not familiar with
is played suddenly.
The pre-installed sample music may
have been played. Press on the
main unit to stop playback.
The system does not work properly.
The system may be in demo mode. To
cancel demo mode, reset the system.
Press and hold (power) and – on
the main unit for more than 5 seconds
(page 67).
Resetting the System
If the system still does not operate
properly, reset the system as follows.
1 Press HOME.
The home menu appears on the TV
screen.
2 Select [Setup] from the home
menu.
The setup display appears on the TV
screen.
3 Select [Resetting] - [Reset to
Factory Default Settings].
4 Select the menu item you want to
reset.
5 Select [Start].
To cancel resetting
Select [Cancel] in step 5.
Press and hold (power) and – on the
main unit for more than 5 seconds.
The settings return to their initial
status.
By resetting, the link with the subwoofer
may be lost. In this case, perform
“Performing the Wireless Connection of
the Subwoofer (SECURE LINK)” (page 43).
If You Cannot Perform
Resetting Using the Home
Menu
Note

68
GB
Specifications
Amplifier section
POWER OUTPUT (rated)
Front L + Front R: 30 W + 30 W
(at 6 ohms, 1 kHz, 1% THD)
POWER OUTPUT (reference)
Front L/Front R speaker blocks: 50 W
(per channel at 6 ohms, 1 kHz)
Front tweeter L/Front tweeter R
speaker blocks: 50 W (per channel at
6 ohms, 10 kHz)
Center speaker block: 50 W (per
channel at 6 ohms, 1 kHz)
Center tweeter speaker block: 50 W
(per channel at 6 ohms, 10 kHz)
Top speaker block: 50 W (per channel
at 6 ohms, 1 kHz)
Inputs
HDMI IN 1/2/3*
ANALOG IN
TV IN (OPT)
Outputs
HDMI OUT (TV (ARC))*
* HDMI IN 1/2/3 and HDMI OUT (TV (ARC))
jacks support HDCP 2.2 protocol. HDCP
2.2 is newly enhanced copyright
protection technology that is used to
protect content such as 4K movies.
HDMI Section
Connector
Type A (19pin)
USB section
(USB) port:
Type A (For connecting USB memory)
LAN section
LAN(100) terminal
100BASE-TX Terminal
Wireless LAN section
Communication system
IEEE 802.11 a/b/g/n
Frequency band
2.4 GHz, 5 GHz
BLUETOOTH section
Communication system
BLUETOOTH Specification version 4.1
Output
BLUETOOTH Specification Power
Class 1
Maximum communication range
Line of sight approx. 30 m
1)
Maximum number of devices to be
registered
9 devices
Frequency band
2.4 GHz band (2.4 GHz - 2.4835 GHz)
Modulation method
FHSS (Freq Hopping Spread Spectrum)
Compatible BLUETOOTH profiles
2)
A2DP 1.2 (Advanced Audio Distribution
Profile)
AVRCP 1.5 (Audio Video Remote
Control Profile)
Supported Codecs
3)
SBC
4)
, AAC
5)
, LDAC
Transmission range (A2DP)
20 Hz - 40,000 Hz (LDAC sampling
frequency 96 kHz with 990 kbps
transmission)
20 Hz - 20,000 Hz (Sampling frequency
44.1 kHz)
1)
The actual range will vary depending on
factors such as obstacles between
devices, magnetic fields around a
microwave oven, static electricity,
cordless phone use, reception
sensitivity, the operating system,
software applications, etc.
2)
BLUETOOTH standard profiles indicate
the purpose of BLUETOOTH
communication between devices.
3)
Codec: Audio signal compression and
conversion format
4)
Abbreviation for Subband Codec
5)
Abbreviation for Advanced Audio
Coding
Additional Information
Bar Speaker (SA-ST5000)

69
GB
Additional Information
Front L/Front R speaker block section
Speaker system
2-way coaxial speaker system,
Acoustic suspension
Speaker
Woofer: 65 mm cone type, Magnetic
fluid speaker
Tweeter: 14 mm soft dome type
Center speaker block section
Speaker system
Center: 2-way coaxial speaker system,
Acoustic suspension
Satellite: Full range speaker system,
Acoustic suspension
Speaker (5 speakers)
Center woofer: 65 mm cone type,
Magnetic fluid speaker
Tweeter: 14 mm soft dome type
Satellite: 65 mm cone type, Magnetic
fluid speaker
Top speaker block section
Speaker system
Full range speaker system, Acoustic
suspension
Speaker
65 mm cone type, Magnetic fluid
speaker
General
Power requirements
Models for Taiwan:
120 V AC, 50 Hz/60 Hz
Models for other countries/regions:
220 V - 240 V AC, 50 Hz/60 Hz
Power consumption
On: 90 W
For details about the power
consumption during standby mode,
see “Power Consumption by the
Setting Value for Each Standby
Mode” (page 70).
Dimensions* (approx.) (w/h/d)
1,180 mm × 80 mm × 142 mm (without
grille frame)
1,180 mm × 80 mm × 145 mm (with
grille frame)
*Not including projection portion
Mass (approx.)
8.3 kg (without grille frame)
8.8 kg (with grille frame)
Compatible iPod/iPhone models
The compatible iPod/iPhone models are as
follows. Update your iPod/iPhone with the
latest software before using with the
system.
BLUETOOTH technology works with:
iPhone 7 Plus/iPhone 7/iPhone SE/iPhone
6s Plus/iPhone 6s/iPhone 6 Plus/
iPhone 6/iPhone 5s/iPhone 5c/iPhone 5/
iPhone 4s
iPod touch (6th generation)/iPod touch
(5th generation)
POWER OUTPUT (reference)
200 W (at 2 ohms, 100 Hz)
Speaker system
Subwoofer speaker system, Passive
radiator type
Speaker
180 mm cone type
200 mm × 300 mm cone type, Passive
radiator
Power requirements
Models for Taiwan:
120 V AC, 50 Hz/60 Hz
Models for other countries/regions:
220 V - 240 V AC, 50 Hz/60 Hz
Power consumption
On: 30 W
Standby mode: 0.5 W or less
Dimensions (approx.) (w/h/d)
248 mm × 403 mm × 426 mm (not
including projection portion)
Mass (approx.)
14.5 kg
Communication system
Wireless Sound Specification version
3.0
Frequency band
5.8 GHz (5.736 GHz - 5.814 GHz)
Modulation method
DSSS
Design and specifications are subject to
change without notice.
Subwoofer (SA-WST5000)
Wireless transmitter/
receiver section

70
GB
Power Consumption by the Setting Value for Each
Standby Mode
1)
Power consumption is the same for [On] or [Off].
2)
All wired network ports connected, all wireless network ports activated.
Standby mode Default setting Setting value
[Bluetooth Standby]
(page 54)
[On] [Off] [On]/[Off]
1)
[On]/[Off]
1)
[Remote Start]
(page 56)
[Off] [Off] [On] [On]/[Off]
1)
[Quick Start/Network
Standby] (page 55)
[Off] [Off] [Off] [On]
Power consumption Less than 2 W Less than 0.5 W Less than 3 W Less than 7 W
2)

71
GB
Additional Information
Playable Types of Audio
Files
1)
The system can play “.mka” files. These
files cannot be played on a home
network server.
2)
The system may not play this file format
on a home network server.
3)
The system does not play this file
format on a home network server.
4)
The system does not play Lossless
coded files.
5)
The system does not play DST encoded
files.
• Some files may not play depending on
the file format, the file encoding, the
recording condition, or the home network
server condition.
• Some files edited on a PC may not play.
• Fast forward or fast reverse may not be
available with some files.
• The system does not play coded files such
as DRM.
• The system can recognize the following
files or folders in USB devices:
– up to folders in the 9th layer (including
the root folder)
– up to 500 files/folders in a single layer
• The system can recognize the following
files or folders stored in the home
network server:
– up to folders in the 19th layer
– up to 999 files/folders in a single layer
• Some USB devices may not work with this
system.
• The system can recognize Mass Storage
Class (MSC) devices (such as flash
memory or an HDD) and 101-key
keyboards.
Codec Extension
MP3 (MPEG-1 Audio
Layer III)
1)
.mp3
AAC/HE-AAC
1),2)
.m4a, .aac
3)
,
.mp4, .3gp
WMA9 Standard
2)
.wma
WMA10 Pro
4)
.wma
LPCM
1)
.wav
FLAC
2)
.flac, .fla
Dolby Digital
1),3)
.ac3
DSF
2)
.dsf
DSDIFF
2),5)
.dff
AIFF
2)
.aiff, .aif
ALAC
2)
.m4a
Vorbis .ogg
Monkey’s Audio .ape
Notes

72
GB
Supported Input Audio Formats
Audio formats supported by this system are as follows.
: Supported format.
–: Unsupported format.
The HDMI IN 1/2/3 jacks do not support audio format that contains copy protections, such
as Super Audio CD or DVD-Audio.
Format Function
“HDMI1”
“HDMI2”
“HDMI3”
“TV”
(ARC)
“TV”
(OPT)
LPCM 2ch
LPCM 5.1ch ––
LPCM 7.1ch ––
Dolby Digital
Dolby TrueHD ––
Dolby Digital Plus –
Dolby Atmos - Dolby TrueHD ––
Dolby Atmos - Dolby Digital Plus –
DTS
DTS-ES Discrete 6.1, DTS-ES Matrix 6.1
DTS 96/24
DTS-HD High Resolution Audio ––
DTS-HD Master Audio ––
DTS-HD LBR ––
DTS:X ––
DTS:X Master Audio ––
Note
73
GB
Additional Information
Supported HDMI Video Formats
Video formats supported by this system are as follows.
: Compatible with 3D signal in Side-by-Side (Half) and Over-Under (Top-and-Bottom)
format
: Compatible with 3D signal in Frame packing, Side-by-Side (Half), and Over-Under (Top-
and-Bottom) format
1)
The OPTIONS and DISPLAY buttons do not work and the On-Screen Display (OSD) of the
system is not displayed.
2)
Use a Premium High Speed HDMI Cable with Ethernet that supports 18Gbps.
3)
Use a Premium High Speed HDMI Cable with Ethernet or Sony High Speed HDMI Cable
with Ethernet with the Cable Type Logo.
• Use an HDMI-authorized cable.
• We do not recommend using an HDMI-DVI conversion cable.
• Audio signals (sampling frequency, bit length, etc.) transmitted from an HDMI jack
may be suppressed by the connected device.
• Sound may be interrupted when the sampling frequency or the number of channels
of audio output signals from the playback device is switched.
• When [TV] input is selected, video signals via one of the HDMI IN 1/2/3 jacks
selected last time are output from the HDMI OUT (ARC) jack.
Resolution
Frame Rate 3D Color Space Color Depth
[HDMI Signal
Format] setting
4K
4096 × 2160p
3840 × 2160p
50/59.94/60 Hz
1)
–
RGB 4:4:4
YCbCr 4:4:4
8 bit
[Enhanced format]
2)
–
YCbCr 4:2:2 8/10/12 bit
–
YCbCr 4:2:0 10/12 bit
23.98/24/25/29.97/30 Hz
1)
–
RGB 4:4:4
YCbCr 4:4:4
10/12 bit
4K
4096 × 2160p
3840 × 2160p
50/59.94/60 Hz
1)
–
YCbCr 4:2:0 8 bit
[Standard format]
3)
23.98/24/25/29.97/30 Hz
–
RGB 4:4:4
YCbCr 4:4:4
8 bit
–
YCbCr 4:2:2 8/10/12 bit
1920 × 1080p
50/59.94/60 Hz
RGB 4:4:4
YCbCr 4:4:4
YCbCr 4:2:2
8/10/12 bit
23.98/24/25/29.97/30 Hz
1920 × 1080i 50/59.94/60 Hz
1280 × 720p
50/59.94/60 Hz
23.98/24/29.97/30 Hz
720 × 480p 59.94/60 Hz
–
720 × 576p 50 Hz
–
640 × 480p 59.94/60 Hz
–
RGB 4:4:4
Notes on HDMI Jack and HDMI Connections

74
GB
• This system supports “TRILUMINOS.”
• All HDMI IN and HDMI OUT jacks support bandwidth up to 18Gbps, HDCP 2.2
1)
,
BT.2020 wide color spaces
2)
, and HDR
(High Dynamic Range)
3)
contents pass-
through.
1)
HDCP 2.2 is newly enhanced copyright protection technology that is used to protect
content such as 4K movies.
2)
BT.2020 color space is new wider color standard that is defined for ultra-high definition
television systems.
3)
HDR is an emerging video format that can display a wider range of brightness levels.
The system is compatible with HDR10, HLG (Hybrid Log Gamma) and Dolby Vision.

75
GB
Additional Information
On BLUETOOTH
Communication
• BLUETOOTH devices should be used
within approximately 10 meters (33 feet)
(unobstructed distance) of each other.
The effective communication range may
become shorter under the following
conditions.
– When a person, metal object, wall or
other obstruction is between the
devices with a BLUETOOTH connection
– Locations where a wireless LAN is
installed
– Around microwave ovens that are in use
– Locations where other electromagnetic
waves occur
• BLUETOOTH devices and wireless LAN
(IEEE 802.11 b/g/n) use the same
frequency band (2.4 GHz). When using
your BLUETOOTH device near a device
with wireless LAN capability,
electromagnetic interference may occur.
This could result in lower data transfer
rates, noise, or inability to connect. If this
happens, try the following remedies:
– Use this system at least 10 meters
(33 feet) away from the wireless LAN
device.
– Turn off the power to the wireless LAN
device when using your BLUETOOTH
device within 10 meters (33 feet).
– Install this system and BLUETOOTH
device as closer to each other as
possible.
• The radio waves broadcast by this system
may interfere with the operation of some
medical devices. Since this interference
may result in malfunction, always turn off
the power on this system and
BLUETOOTH device in the following
locations:
– In hospitals, on trains, in airplanes, at
gas stations, and any place where
flammable gasses may be present
– Near automatic doors or fire alarms
• This system supports security functions
that comply with the BLUETOOTH
specification to ensure secure connection
during communication using BLUETOOTH
technology. However, this security may
be insufficient depending on the setting
content and other factors, so always be
careful when performing communication
using BLUETOOTH technology.
• Sony cannot be held liable in any way for
damages or other loss resulting from
information leaks during communication
using BLUETOOTH technology.
• BLUETOOTH communication is not
necessarily guaranteed with all
BLUETOOTH devices that have the same
profile as this system.
• BLUETOOTH devices connected with this
system must comply with the
BLUETOOTH specification prescribed by
the Bluetooth SIG, Inc., and must be
certified to comply. However, even when
a device complies with the BLUETOOTH
specification, there may be cases where
the characteristics or specifications of the
BLUETOOTH device make it impossible to
connect, or may result in different control
methods, display or operation.
• Noise may occur or the audio may cut off
depending on the BLUETOOTH device
connected with this system, the
communications environment, or
surrounding conditions.
If you have any questions or problems
concerning your system, please consult
your nearest Sony dealer.

76
GB
END USER LICENSE
AGREEMENT
IMPORTANT:
BEFORE USING THE SOFTWARE, PLEASE
READ THIS END USER LICENSE
AGREEMENT (“EULA”) CAREFULLY. BY
USING THE SOFTWARE YOU ARE
ACCEPTING THE TERMS OF THIS EULA. IF
YOU DO NOT ACCEPT THE TERMS OF
THIS EULA, YOU MAY NOT USE THE
SOFTWARE.
This EULA is a legal agreement between
you and Sony Corporation (“SONY”).
This EULA governs your rights and
obligations regarding the SONY
software of SONY and/or its third party
licensors (including SONY’s affiliates)
and their respective affiliates
(collectively, the “THIRD-PARTY
SUPPLIERS”), together with any
updates/upgrades provided by SONY,
any printed, on-line or other electronic
documentation for such software, and
any data files created by operation of
such software (collectively, the
“SOFTWARE”).
Notwithstanding the foregoing, any
software in the SOFTWARE having a
separate end user license agreement
(including, but not limited to, GNU
General Public license and Lesser/
Library General Public License) shall be
covered by such applicable separate
end user license agreement in lieu of
the terms of this EULA to the extent
required by such separate end user
license agreement (“EXCLUDED
SOFTWARE”).
SOFTWARE LICENSE
The SOFTWARE is licensed, not sold. The
SOFTWARE is protected by copyright
and other intellectual property laws and
international treaties.
COPYRIGHT
All right and title in and to the
SOFTWARE (including, but not limited
to, any images, photographs,
animation, video, audio, music, text and
"applets" incorporated into the
SOFTWARE) is owned by SONY or one or
more of the THIRD-PARTY SUPPLIERS.
GRANT OF LICENSE
SONY grants you a limited license to use
the SOFTWARE solely in connection with
your compatible device (“DEVICE”) and
only for your individual, non-
commercial use. SONY and the THIRD-
PARTY SUPPLIERS expressly reserve all
rights, title and interest (including, but
not limited to, all intellectual property
rights) in and to the SOFTWARE that this
EULA does not specifically grant to you.
REQUIREMENTS AND
LIMITATIONS
You may not copy, publish, adapt,
redistribute, attempt to derive source
code, modify, reverse engineer,
decompile, or disassemble any of the
SOFTWARE, whether in whole or in part,
or create any derivative works from or of
the SOFTWARE unless such derivative
works are intentionally facilitated by the
SOFTWARE. You may not modify or
tamper with any digital rights
management functionality of the
SOFTWARE. You may not bypass,
modify, defeat or circumvent any of the
functions or protections of the
SOFTWARE or any mechanisms
operatively linked to the SOFTWARE.
You may not separate any individual
component of the SOFTWARE for use on
more than one DEVICE unless expressly
authorized to do so by SONY. You may
not remove, alter, cover or deface any
trademarks or notices on the

77
GB
Additional Information
SOFTWARE. You may not share,
distribute, rent, lease, sublicense,
assign, transfer or sell the SOFTWARE.
The software, network services or other
products other than SOFTWARE upon
which the SOFTWARE’S performance
depends might be interrupted or
discontinued at the discretion of the
suppliers (software suppliers, service
suppliers, or SONY). SONY and such
suppliers do not warrant that the
SOFTWARE, network services, contents
or other products will continue to be
available, or will operate without
interruption or modification.
USE OF SOFTWARE WITH
COPYRIGHTED MATERIALS
The SOFTWARE may be capable of
being used by you to view, store,
process and/or use content created by
you and/or third parties. Such content
may be protected by copyright, other
intellectual property laws, and/or
agreements. You agree to use the
SOFTWARE only in compliance with all
such laws and agreements that apply to
such content. You acknowledge and
agree that SONY may take appropriate
measures to protect the copyright of
content stored, processed or used by
the SOFTWARE. Such measures include,
but are not limited to, counting the
frequency of your backup and
restoration through certain SOFTWARE
features, refusal to accept your request
to enable restoration of data, and
termination of this EULA in the event of
your illegitimate use of the SOFTWARE.
CONTENT SERVICE
PLEASE ALSO NOTE THAT THE
SOFTWARE MAY BE DESIGNED TO BE
USED WITH CONTENT AVAILABLE
THROUGH ONE OR MORE CONTENT
SERVICES (“CONTENT SERVICE”). USE OF
THE SERVICE AND THAT CONTENT IS
SUBJECT TO THE TERMS OF SERVICE OF
THAT CONTENT SERVICE. IF YOU
DECLINE TO ACCEPT THOSE TERMS,
YOUR USE OF THE SOFTWARE WILL BE
LIMITED. You acknowledge and agree
that certain content and services
available through the SOFTWARE may
be provided by third parties over which
SONY has no control. USE OF THE
CONTENT SERVICE REQUIRES AN
INTERNET CONNECTION. THE CONTENT
SERVICE MAY BE DISCONTINUED AT ANY
TIME.
INTERNET CONNECTIVITY AND
THIRD PARTY SERVICES
You acknowledge and agree that access
to certain SOFTWARE features may
require an Internet connection for which
you are solely responsible. Further, you
are solely responsible for payment of
any third party fees associated with your
Internet connection, including but not
limited to Internet service provider or
airtime charges. Operation of the
SOFTWARE may be limited or restricted
depending on the capabilities,
bandwidth or technical limitations of
your Internet connection and service.
The provision, quality and security of
such Internet connectivity are the sole
responsibility of the third party
providing such service.
EXPORT AND OTHER
REGULATIONS
You agree to comply with all applicable
export and re-export restrictions and
regulations of the area or country in
which you reside, and not to transfer, or
authorize the transfer, of the SOFTWARE
to a prohibited country or otherwise in
violation of any such restrictions or
regulations.
HIGH RISK ACTIVITIES
The SOFTWARE is not fault-tolerant and
is not designed, manufactured or
intended for use or resale as on-line

78
GB
control equipment in hazardous
environments requiring fail-safe
performance, such as in the operation
of nuclear facilities, aircraft navigation
or communication systems, air traffic
control, direct life support machines, or
weapons systems, in which the failure
of the SOFTWARE could lead to death,
personal injury, or severe physical or
environmental damage ("HIGH RISK
ACTIVITIES"). SONY, each of the THIRD-
PARTY SUPPLIERS, and each of their
respective affiliates specifically disclaim
any express or implied warranty, duty or
condition of fitness for HIGH RISK
ACTIVITIES.
EXCLUSION OF WARRANTY ON
SOFTWARE
You acknowledge and agree that use of
the SOFTWARE is at your sole risk and
that you are responsible for use of the
SOFTWARE. The SOFTWARE is provided
"AS IS,” without warranty, duty or
condition of any kind.
SONY AND EACH OF THE THIRD-PARTY
SUPPLIERS (for purposes of this Section,
SONY and each of the THIRD-PARTY
SUPPLIERS shall be collectively referred
to as “SONY”) EXPRESSLY DISCLAIM ALL
WARRANTIES, DUTIES OR CONDITIONS,
EXPRESS OR IMPLIED, INCLUDING, BUT
NOT LIMITED TO, THE IMPLIED
WARRANTIES OF MERCHANTABILITY,
NONINFRINGEMENT AND FITNESS FOR A
PARTICULAR PURPOSE. SONY DOES NOT
WARRANT OR MAKE ANY CONDITIONS
OR REPRESENTATIONS (A) THAT THE
FUNCTIONS CONTAINED IN ANY OF THE
SOFTWARE WILL MEET YOUR
REQUIREMENTS OR THAT THEY WILL BE
UPDATED, (B) THAT THE OPERATION OF
ANY OF THE SOFTWARE WILL BE
CORRECT OR ERROR-FREE OR THAT ANY
DEFECTS WILL BE CORRECTED, (C) THAT
THE SOFTWARE WILL NOT DAMAGE ANY
OTHER SOFTWARE, HARDWARE OR
DATA, (D) THAT ANY SOFTWARE,
NETWORK SERVICES (INCLUDING THE
INTERNET) OR PRODUCTS (OTHER THAN
THE SOFTWARE) UPON WHICH THE
SOFTWARE’S PERFORMANCE DEPENDS
WILL CONTINUE TO BE AVAILABLE,
UNINTERRUPTED OR UNMODIFIED, AND
(E) REGARDING THE USE OR THE
RESULTS OF THE USE OF THE SOFTWARE
IN TERMS OF ITS CORRECTNESS,
ACCURACY, RELIABILITY, OR
OTHERWISE.
NO ORAL OR WRITTEN INFORMATION
OR ADVICE GIVEN BY SONY OR AN
AUTHORIZED REPRESENTATIVE OF
SONY SHALL CREATE A WARRANTY,
DUTY OR CONDITION OR IN ANY WAY
INCREASE THE SCOPE OF THIS
WARRANTY. SHOULD THE SOFTWARE
PROVE DEFECTIVE YOU ASSUME THE
ENTIRE COST OF ALL NECESSARY
SERVICING, REPAIR OR CORRECTION.
SOME JURISDICTIONS DO NOT ALLOW
THE EXCLUSION OF IMPLIED
WARRANTIES, SO THESE EXCLUSIONS
MAY NOT APPLY TO YOU.
LIMITATION OF LIABILITY
SONY AND EACH OF THE THIRD-PARTY
SUPPLIERS (for purposes of this Section,
SONY and each of the THIRD-PARTY
SUPPLIERS shall be collectively referred
to as “SONY”) SHALL NOT BE LIABLE FOR
ANY INCIDENTAL OR CONSEQUENTIAL
DAMAGES FOR BREACH OF ANY
EXPRESS OR IMPLIED WARRANTY,
BREACH OF CONTRACT, NEGLIGENCE,
STRICT LIABILITY OR UNDER ANY OTHER
LEGAL THEORY RELATED TO THE
SOFTWARE, INCLUDING, BUT NOT
LIMITED TO, ANY DAMAGES ARISING
OUT OF LOSS OF PROFITS, LOSS OF
REVENUE, LOSS OF DATA, LOSS OF USE
OF THE SOFTWARE OR ANY ASSOCIATED
HARDWARE, DOWN TIME AND USER’S
TIME, EVEN IF ANY OF THEM HAVE BEEN
ADVISED OF THE POSSIBILITY OF SUCH
DAMAGES. IN ANY CASE, EACH AND ALL

79
GB
Additional Information
OF THEIR AGGREGATE LIABILITY UNDER
ANY PROVISION OF THIS EULA SHALL BE
LIMITED TO THE AMOUNT ACTUALLY
PAID FOR THE PRODUCT. SOME
JURISDICTIONS DO NOT ALLOW THE
EXCLUSION OR LIMITATION OF
INCIDENTAL OR CONSEQUENTIAL
DAMAGES, SO THE ABOVE EXCLUSION
OR LIMITATION MAY NOT APPLY TO
YOU.
AUTOMATIC UPDATE FEATURE
From time to time, SONY or the THIRD-
PARTY SUPPLIERS may automatically
update or otherwise modify the
SOFTWARE, including, but not limited
to, for purposes of enhancement of
security functions, error correction and
improvement of functions, at such time
as you interact with SONY's or third
parties' servers, or otherwise. Such
updates or modifications may delete or
change the nature of features or other
aspects of the SOFTWARE, including,
but not limited to, functions you may
rely upon. You acknowledge and agree
that such activities may occur at SONY's
sole discretion and that SONY may
condition continued use of the
SOFTWARE upon your complete
installation or acceptance of such
update or modifications. Any updates/
modifications shall be deemed to be,
and shall constitute part of, the
SOFTWARE for purposes of this EULA. By
acceptance of this EULA, you consent to
such update/modification.
ENTIRE AGREEMENT, WAIVER,
SEVERABILITY
This EULA and SONY’s privacy policy,
each as amended and modified from
time to time, together constitute the
entire agreement between you and
SONY with respect to the SOFTWARE.
The failure of SONY to exercise or
enforce any right or provision of this
EULA shall not constitute a waiver of
such right or provision. If any part of this
EULA is held invalid, illegal, or
unenforceable, that provision shall be
enforced to the maximum extent
permissible so as to maintain the intent
of this EULA, and the other parts will
remain in full force and effect.
GOVERNING LAW AND
JURISDICTION
The United Nations Convention on
Contracts for the International Sale of
Goods shall not apply to this EULA. This
EULA shall be governed by the laws of
Japan, without regards to conflict of
laws provisions. Any dispute arising out
of this EULA shall be subject to the
exclusive venue of the Tokyo District
Court in Japan, and the parties hereby
consent to the venue and jurisdiction of
such courts.
EQUITABLE REMEDIES
Notwithstanding anything contained in
this EULA to the contrary, you
acknowledge and agree that any
violation of or non-compliance with this
EULA by you will cause irreparable harm
to SONY, for which monetary damages
would be inadequate, and you consent
to SONY obtaining any injunctive or
equitable relief that SONY deems
necessary or appropriate in such
circumstances. SONY may also take any
legal and technical remedies to prevent
violation of and/or to enforce this EULA,
including, but not limited to, immediate
termination of your use of the
SOFTWARE, if SONY believes in its sole
discretion that you are violating or
intend to violate this EULA. These
remedies are in addition to any other
remedies SONY may have at law, in
equity or under contract.
TERMINATION
Without prejudice to any of its other
rights, SONY may terminate this EULA if

80
GB
you fail to comply with any of its terms.
In case of such termination, you must
cease all use, and destroy any copies, of
the SOFTWARE.
AMENDMENT
SONY RESERVES THE RIGHT TO AMEND
ANY OF THE TERMS OF THIS EULA AT ITS
SOLE DISCRETION BY POSTING NOTICE
ON A SONY DESIGNATED WEB SITE, BY
EMAIL NOTIFICATION TO AN EMAIL
ADDRESS PROVIDED BY YOU, BY
PROVIDING NOTICE AS PART OF THE
PROCESS IN WHICH YOU OBTAIN
UPGRADES/UPDATES OR BY ANY OTHER
LEGALLY RECOGNIZABLE FORM OF
NOTICE. If you do not agree to the
amendment, you should promptly
contact SONY for instructions. Your
continued use of the SOFTWARE after
the effective date of any such notice
shall be deemed your agreement to be
bound by such amendment.
THIRD-PARTY BENEFICIARIES
Each THIRD-PARTY SUPPLIER is an
express intended third-party beneficiary
of, and shall have the right to enforce,
each provision of this EULA with respect
to the SOFTWARE of such party.
Should you have any questions
concerning this EULA, you may contact
SONY by writing to SONY at applicable
contact address of each area or country.
Copyright © 2014 Sony Corporation.
Precautions
On safety
• Should any solid object or liquid fall into
the system, unplug the system and have
it checked by qualified personnel before
operating it any further.
• Do not climb on the main unit and
subwoofer, as you may fall down and
injure yourself, or system damage may
result.
On power sources
• Before operating the system, check that
the operating voltage is identical to your
local power supply. The operating voltage
is indicated on the nameplate at the rear
of the main unit.
• If you are not going to use the system for
a long time, be sure to disconnect the
system from the wall outlet (mains). To
disconnect the AC power cord (mains
lead), grasp the plug itself; never pull the
cord.
• One blade of the plug is wider than the
other for the purpose of safety and will fit
into the wall outlet (mains) only one way.
If you are unable to insert the plug fully
into the outlet, contact your dealer.
• AC power cord (mains lead) must be
changed only at a qualified service shop.
On heat buildup
Although the system heats up during
operation, this is not a malfunction. If you
continuously use this system at high
volume, the system temperature at the
rear and bottom rises considerably. To
avoid burning yourself, do not touch the
system.
On placement
• Do not place the system near heat
sources or in a place subject to direct
sunlight, excessive dust, or mechanical
shock.
• Do not place anything at the rear of the
main unit and subwoofer that might block

81
GB
Additional Information
the ventilation holes and cause
malfunctions.
• Do not place metal objects other than a
TV around the system. Wireless functions
may be unstable.
• If the system is being used in combination
with a TV, VCR, or tape deck, noise may
result and picture quality may suffer. In
such a case, place the system away from
the TV, VCR, or tape deck.
• Use caution when placing the system on a
surface that has been specially treated
(with wax, oil, polish, etc.), as staining or
discoloration of the surface may result.
• Take care to avoid any possible injury
from the corners of the main unit and
subwoofer.
• Keep 3 cm or more space under the main
unit when you hang it on a wall.
• The speakers of this system are not of
magnetically shielded type. Do not place
magnetic cards on the system or near it.
On handling the subwoofer
Do not place your hand into the slit of the
subwoofer when lifting it. The speaker
driver may be damaged. When lifting it,
hold the bottom of the subwoofer.
On operation
Before connecting other devices, be sure
to turn off and unplug the system.
If you encounter color irregularity
on a nearby TV screen
Color irregularities may be observed on
certain types of TV sets.
If color irregularity is observed...
Turn off the TV set, then turn it on again
after 15 to 30 minutes.
If color irregularity is observed
again...
Place the system further away from the TV
set.
On cleaning
Clean the system with a soft, dry cloth. Do
not use any type of abrasive pad, scouring
powder, or solvent such as alcohol or
benzine.
If you have any question or problem
concerning your system, please consult
your nearest Sony dealer.
Disclaimer regarding services
offered by third parties
Network services, content and the
(operating system and) software of this
product may be subject to individual terms
and conditions and changed, interrupted
or discontinued at any time and may
require fees, registration and credit card
information.
Notes on updating
This system allows you to update the
software automatically when connected to
the Internet via a wired or wireless
network.
You can add new features and use the
system with more convenience and safety
by updating the system.
If you do not want to update automatically,
you can disable the function by using Sony
| Music Center installed on your
smartphone or tablet. However, the
system may update the software
automatically for reasons such as safety,
even if this function is disabled. You can
also update the software using the settings
menu when this function is disabled. See
“Using the Setup Display” (page 51) for
details.
You may not use the system while the
software is being updated.

82
GB
This system incorporates Dolby* Digital
and the DTS** Digital Surround System.
* Manufactured under license from Dolby
Laboratories. Dolby, Dolby Atmos, Dolby
Vision, and the double-D symbol are
trademarks of Dolby Laboratories.
**For DTS patents, see http://
patents.dts.com. Manufactured under
license from DTS, Inc.
DTS, the Symbol, DTS in combination
with the Symbol, DTS:X, and the DTS:X
logo are registered trademarks or
trademarks of DTS, Inc. in the United
States and/or other countries. © DTS, Inc.
All Rights Reserved.
The BLUETOOTH
®
word mark and logos are
registered trademarks owned by Bluetooth
SIG, Inc. and any use of such marks by Sony
Corporation is under license. Other
trademarks and trade names are those of
their respective owners.
This system incorporates High-Definition
Multimedia Interface (HDMI™) technology.
The terms HDMI and HDMI High-Definition
Multimedia Interface, and the HDMI Logo
are trademarks or registered trademarks of
HDMI Licensing, LLC in the United States
and other countries.
The N Mark is a trademark or registered
trademark of NFC Forum, Inc. in the United
States and in other countries.
Android, Google Play and Chromecast are
trademarks of Google Inc.
Apple, the Apple logo, iPhone, iPod, iPod
touch, and Retina are trademarks of Apple
Inc., registered in the U.S. and other
countries. App Store is a service mark of
Apple Inc.
“Made for iPod,” and “Made for iPhone”
mean that an electronic accessory has
been designed to connect specifically to
iPod or iPhone, respectively, and has been
certified by the developer to meet Apple
performance standards. Apple is not
responsible for the operation of this device
or its compliance with safety and
regulatory standards. Please note that the
use of this accessory with iPod or iPhone
may affect wireless performance.
“BRAVIA” logo is a trademark of Sony
Corporation.
“ClearAudio+” is a trademark of Sony
Corporation.
WALKMAN® and WALKMAN® logo are
registered trademarks of Sony
Corporation.
“PlayStation” is a registered trademark or
trademark of Sony Interactive
Entertainment Inc.
MPEG Layer-3 audio coding technology
and patents licensed from Fraunhofer IIS
and Thomson.
Windows Media is either a registered
trademark or trademark of Microsoft
Corporation in the United States and/or
other countries.
This product is protected by certain
intellectual property rights of Microsoft
Corporation. Use or distribution of such
technology outside of this product is
prohibited without a license from Microsoft
or an authorized Microsoft subsidiary.
Opera® Devices SDK from Opera Software
ASA. Copyright 1995-2016 Opera Software
ASA. All rights reserved.
Wi-Fi®, Wi-Fi Protected Access® and Wi-Fi
Alliance® are registered trademarks of Wi-
Fi Alliance.
Copyrights and Trademarks

83
GB
Additional Information
Wi-Fi CERTIFIED™, WPA™, WPA2™ and Wi-
Fi Protected Setup™ are trademarks of Wi-
Fi Alliance.
LDAC™ and LDAC logo are trademarks of
Sony Corporation.
LDAC is an audio coding technology
developed by Sony that enables the
transmission of High-Resolution (Hi-Res)
Audio content, even over a Bluetooth
connection. Unlike other Bluetooth
compatible coding technologies such as
SBC, it operates without any down-
conversion of the Hi-Res Audio content*,
and allows approximately three times
more data** than those other technologies
to be transmitted over a Bluetooth wireless
network with unprecedented sound
quality, by means of efficient coding and
optimized packetization.
* excluding DSD format contents
**in comparison with SBC (Subband
Coding) when the bitrate of 990 kbps
(96/48 kHz) or 909 kbps (88.2/44.1 kHz) is
selected
This product contains software that is
subject to the GNU General Public License
(“GPL”) or GNU Lesser General Public
License (“LGPL”). These establish that
customers have the right to acquire,
modify, and redistribute the source code of
said software in accordance with the terms
of the GPL or the LGPL.
For details of the GPL, LGPL and other
software licenses, please refer to [Software
License Information] in [System Settings] of
the [Setup] menu on the product.
The source code for the software used in
this product is subject to the GPL and LGPL,
and is available on the Web. To download,
please access the following:
URL:
http://oss.sony.net/Products/Linux
Please note that Sony cannot answer or
respond to any inquiries regarding the
content of this source code.
“DSEE HX” is a trademark of Sony
Corporation.
DLNA™, the DLNA Logo and DLNA
CERTIFIED™ are trademarks, service marks,
or certification marks of the Digital Living
Network Alliance.
“TRILUMINOS” and “TRILUMINOS” logo are
a registered trademark of Sony
Corporation.
This product incorporates Spotify software
which is subject to 3rd party licenses found
here*:
https://developer.spotify.com/esdk-
third-party-licenses/
Spotify and Spotify logos are trademarks of
the Spotify Group.*
* Depending on the country and region,
this function may not be available.
All other trademarks are trademarks of
their respective owners.

84
GB
Index
A
Audio DRC 53
Audio Output
53
Audio Return Channel (ARC)
48, 55
Audio Settings
52
Auto Home Network Access
Permission
56
Auto Standby
55
Auto Update
55
Auto Update Settings
55
B
Bluetooth Codec - AAC 54
Bluetooth Codec - LDAC
54
Bluetooth Mode
53
Bluetooth Settings
53
Bluetooth Standby
46, 54
BT.2020
74
C
Child lock function 45
Connection Server Settings
56
Control for HDMI
47, 55
D
Device List 54
Device Name
56
DSEE HX
52
E
Easy Setup 57
External Control
56
H
HDCP 2.2 74
HDMI Settings
55
HDMI Signal Format
17, 55, 73
HDR
74
Home Network Access Control
56
I
Initialise Personal Information 57
Input Skip Setting
56
Internet Settings
56
IR-Repeater
54
M
Multiplex broadcast sound 45
N
Network 18
Network Connection Diagnostics
56
Network Connection Status
56
Network Settings
56
NFC
32
O
OSD Language 54
Output Video Resolution
52
P
PRTCT 66
Q
Quick Start/Network Standby 46, 55
R
Remote control 11, 47
Remote Start
46, 56
Reset to Factory Default Settings
57,
67
Resetting
57, 67
S
Screen Settings 52
Software License Information
56
Software Update
52
Software Update Notification
55
Sony | Music Center
37
Sound Effect
53
Speaker Settings
52
Standby Through
46, 49, 55
Subwoofer
29, 43, 62
System Information
56
System Settings
54
T
Time Zone 56
TV Audio Input Mode
55

2
CT
切勿將本設備安裝在狹窄的空間內,如書
櫃或壁櫥內。
為了降低發生火災的危險,請勿使用報
紙、桌布、窗簾等物品蓋住設備的通風
孔。
請勿將如點燃的蠟燭等明火源放置於設備
上。
為了降低發生火災或觸電的危險,請勿讓
本設備受到液體潑濺,也不要將如花瓶等
裝滿液體的物體放置於本設備上。
只要本機的電源線仍連接在電源插座上,
即使本機的電源已經關閉,但本機仍然未
與交流電源斷開連接。
由於電源插頭是用來斷開本機與電源插座
的連接,因此請將本機連接至便於插拔的
交流電源插座。一旦發現本機有異常情
況,請立即斷開電源插頭與交流電源插座
的連接。
請勿讓電池或安裝電池的設備暴露在過熱
的環境中,例如:陽光、火等。
限室內使用。
建議的電纜
必須使用妥善包覆及接地的電纜和連接器
來連接主機電腦和/或週邊設備。
僅適用於台灣
鐵氧體磁芯配備主動式重低音揚聲器的交
流電源線,目的是抑制EMC,請勿移除。
經型式認證合格之低功率射頻電機,非經
許可,公司、商號或使用者均不得擅自變
更頻率、加大功率或變更原設計之特性及
功能。
低功率射頻電機之使用不得影響飛航安全
及干擾合法通信;經發現有干擾現象時,
應立即停用,並改善至無干擾時方得繼續
使用。前項合法通信,指依電信法規定作
業之無線電通信。低功率射頻電機須忍受
合法通信或工業、科學及醫療用電波輻射
性電機設備之干擾。
在5.25-5.35GHz 頻帶内操作之無線資訊
傳輸設備,限於室内使用。
製造廠商:SONY CORPORATION
進 口 商:台灣索尼股份有限公司
地 址:台北市長春路145號5樓
洽詢專線:4499111 (台灣本島)
警告
3
CT
設備名稱:主動式揚聲器組合,型號 (型式):HT-ST5000
單元
限用物質及其化學符號
鉛
(Pb)
汞
(Hg)
鎘
(Cd)
六價鉻
(Cr
+6
)
多溴聯苯
(PBB)
多溴二苯醚
(PBDE)
電路板-○○ ○ ○ ○
外殼 -○○ ○ ○ ○
揚聲器-○○ ○ ○ ○
配件 (遙
控器等)
-○○ ○ ○ ○
備考1.“超出0.1 wt %”及“超出0.01 wt %”係指限用物質之百分比含量超出百分比
含量基準值。
備考2.“○”係指該項限用物質之百分比含量未超出百分比含量基準值。
備考3.“-”係指該項限用物質為排除項目。
CT

4
CT
目錄
盒中內容 ...................... 5
系統的功能 .................... 6
部件與控制器的指南 ............ 8
關於主選單 ................... 13
設置
連接4K電視機和4K裝置 ......... 15
透過ANALOG IN插孔連接電視機或可攜
式音訊裝置 ............... 17
連線至有線網路 ............... 18
連線至無線網路 ............... 19
將主機安裝到牆上 ............. 20
安裝網格 ..................... 22
聆聽聲音
聆聽電視 ..................... 23
聆聽連接的AV裝置 ............. 23
聆聽USB裝置上的音樂 .......... 24
選擇音效
設定針對音源的音效(SOUND FIELD)
.......................... 25
深夜時以低音量欣賞清晰的聲音
(NIGHT) ................. 26
讓對話更清楚 (VOICE) ........ 26
調整主動式重低音揚聲器音量 ... 27
調整圖像與聲音之間的延遲 ..... 27
透過BLUETOOTH®功能聆聽音樂/
聲音
聆聽行動裝置中的音樂 ......... 28
從耳機聆聽所連接電視機或裝置的聲
音 ....................... 30
使用網路功能聆聽音樂/聲音
透過家庭網路聆聽 PC 上的音樂
.......................... 32
使用Sony | Music Center聆聽行動裝
置上的音樂 ............... 33
使用Chromecast built-in ...... 34
使用Spotify .................. 34
使用MUSIC SERVICE按鈕 ........ 35
連接無線連接多個房間的相容裝置
(無線連接多個房間) ...... 36
使用各種功能/設定
自訂環繞聲的揚聲器設定 ....... 37
執行主動式重低音揚聲器的無線連接
(SECURE LINK) ........... 38
以提升到接近高解析度的音質播放壓
縮音訊檔案或CD (DSEE HX)
.......................... 39
欣賞多路廣播聲音 (AUDIO) .... 39
停用主機的按鈕 ............... 40
變更前顯示面板與BLUETOOTH指示燈
的亮度 (DIMMER) ......... 40
待機模式中省電 ............... 41
透過主機將遠端訊號傳送到電視機
.......................... 41
使用HDMI控制功能 ............. 42
使用“BRAVIA”同步功能 ....... 43
使用設定顯示 ................. 45
選項選單清單 ................. 51
故障排除
故障排除 ..................... 52
重設系統 ..................... 58
其他資訊
規格 ......................... 59
每個待機模式設定值的耗電量 ... 61
可以播放的音頻檔案類型 ....... 62
支援的輸入音訊格式 ........... 63
支援的HDMI視訊格式 ........... 64
關於BLUETOOTH通訊 ............ 66
最終使用者授權協議 ........... 67
預先注意事項 ................. 70
索引 ......................... 73
基本設置
入⾨指南
(另外的文件)
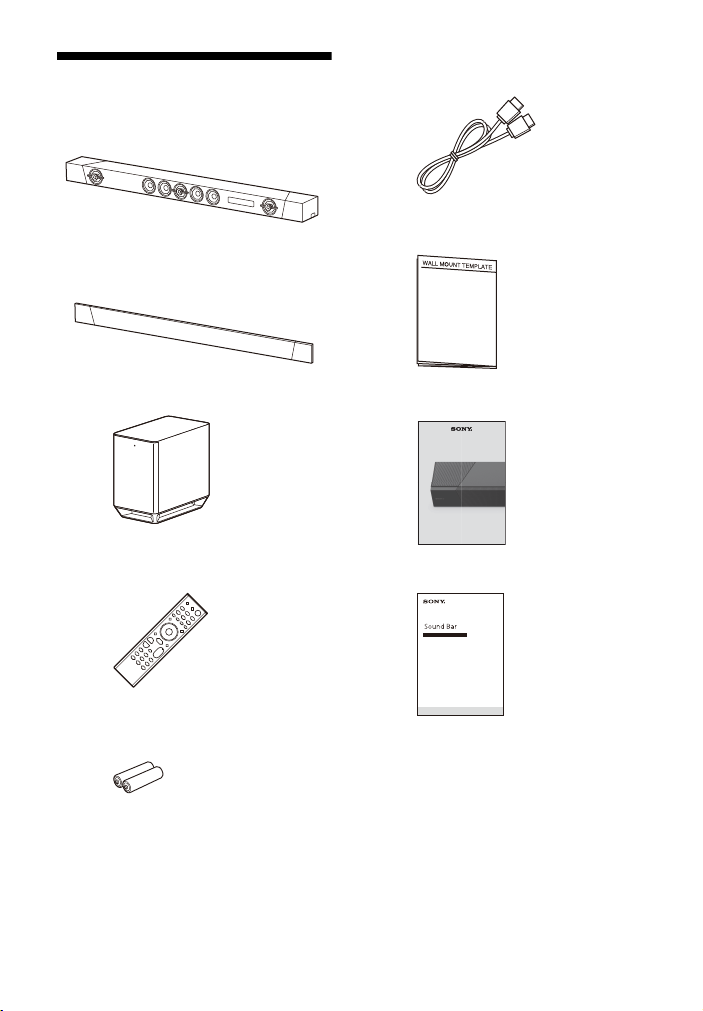
5
CT
盒中內容
• 主動式揚聲器系統 (1)
• 網格 (1)
• 主動式重低音揚聲器 (1)
• 遙控器 (1)
• R03 (AAA大小)電池 (2)
• HDMI連接線 (支援規格等同支援乙太網
路連接的特級高速HDMI傳輸線)(1)
• 壁掛式安裝模板 (1)
• 入⾨指南
• 使用說明書
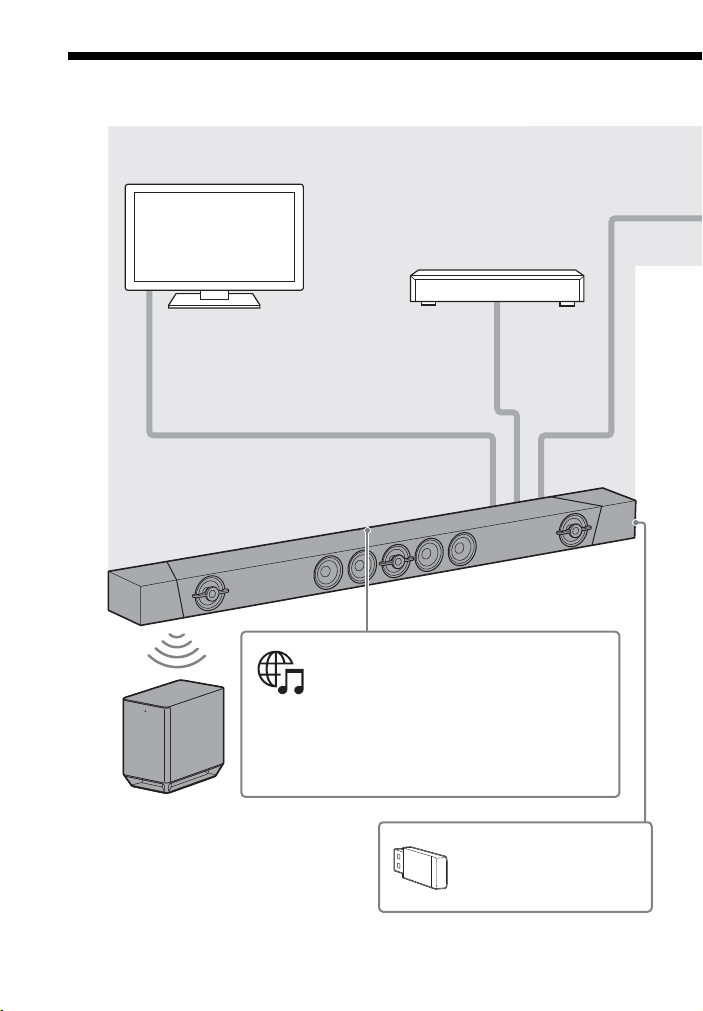
6
CT
系統的功能
“聆聽USB裝置上的音樂”
(第24頁)
Blu-ray Disc™播放器、有線
電視盒或衛星電視盒等
“使用HDMI控制功能” (第42頁)
“使用“BRAVIA”同步功能” (第43頁)
“執行主動式重低音揚聲器的
無線連接 (SECURE LINK)”
(第38頁)
“使用Spotify” (第34頁) *
“使用MUSIC SERVICE按鈕” (第35頁)
“聆聽電視” (第23頁)
“聆聽連接的AV裝置” (第23頁)
* 某些國家/地區可能不提供此服務。
* 若要在系統上播放,您需要Spotify Premium帳
號。
連接電視機和其他裝置
(請參閱“入門指南” (另外的文件)或參
閱“透過ANALOG IN插孔連接電視機或可攜
式音訊裝置” (第17頁)。)


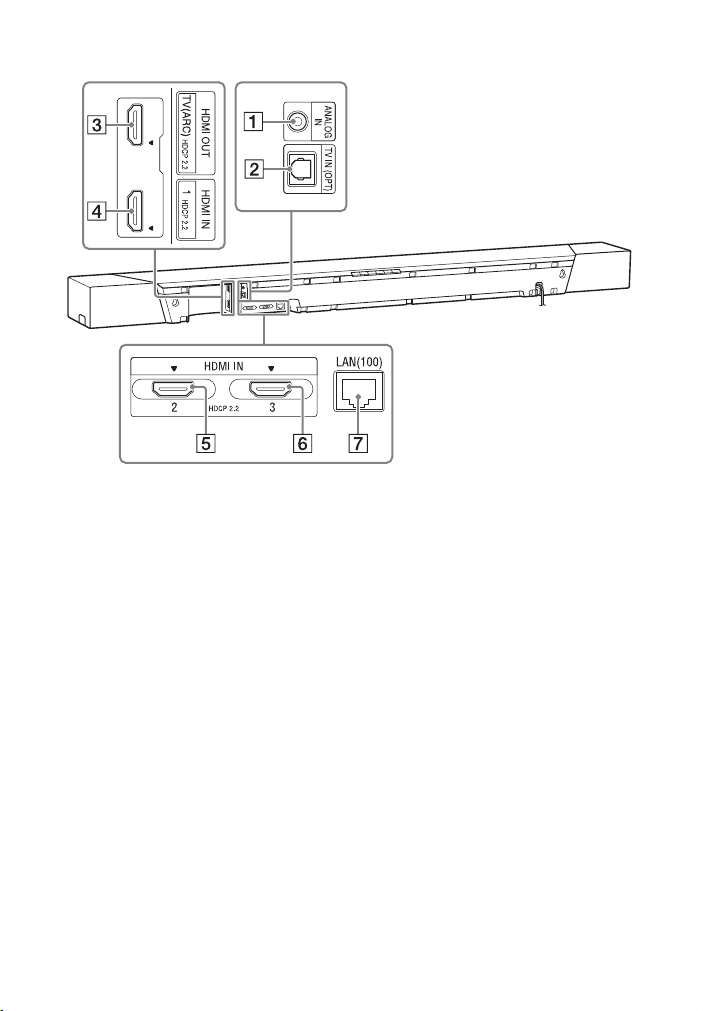
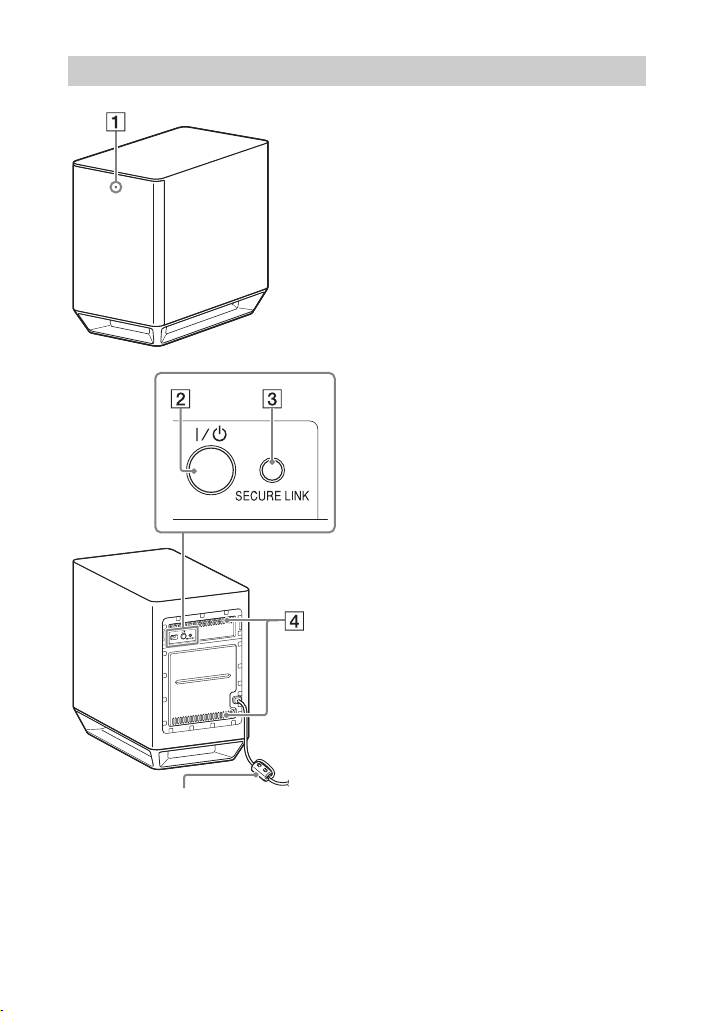
10
CT
開/待機指示燈
– 亮起紅燈:主動式重低音揚聲器沒
有連接系統
– 亮起綠燈:主動式重低音揚聲器連
接系統
– 亮起橘燈:主動式重低音揚聲器已
透過Secure Link功能連接系統
– 閃爍綠燈:主動式重低音揚聲器正
在嘗試連接系統
– 閃爍橘燈:主動式重低音揚聲器正
在嘗試透過Secure Link功能連接系
統
– 熄滅: 主動式重低音揚聲器處於待
機模式
/ (開/待機)按鈕
開啟主動式重低音揚聲器或設至待
機模式。
SECURE LINK按鈕 (第38頁)
通風孔
為了安全起見,請勿堵塞通風孔。
主動式重低音揚聲器
僅適用於台灣
鐵氧體磁芯配備主動式重低音揚聲
器的交流電源線,目的是抑制EMC,
請勿移除。
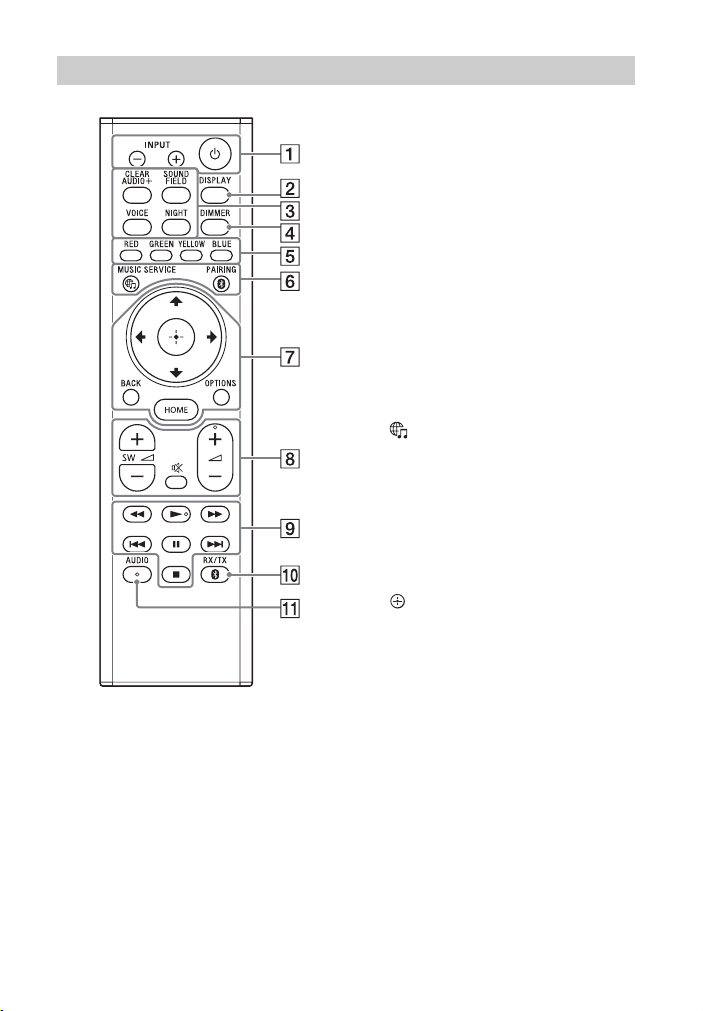
11
CT
INPUT +/- (第13、23頁)
(電源)
開啟系統或設至待機模式。
DISPLAY**
在電視機螢幕上顯示播放資訊。
電視輸入不會顯示播放資訊。
CLEAR AUDIO+ (第25頁)
SOUND FIELD (第25頁)
VOICE (第26頁)
NIGHT (第26頁)
DIMMER (第40頁)
色彩按鈕
用於選取某些選單項目的快速鍵。
MUSIC SERVICE (第35頁)
BLUETOOTH PAIRING (第28頁)
OPTIONS** (第27、51頁)
在電視機螢幕上顯示選項選單。
電視輸入不會顯示選項選單。
BACK (第13頁)
/// (第13頁)
(輸入)(第13頁)
HOME (第13頁)
(靜音)
暫時關閉聲音。
(音量)+*/-
調節音量。
SW (主動式重低音揚聲器音
量)+/-
調整主動式重低音揚聲器音量。
遙控器

12
CT
播放操作按鈕
/ (倒轉/快轉)
向後或向前搜尋。
/ (上一個/下一個)
選擇上一/下一章節、曲目或檔案。
(播放) *
開始或重新開始播放 (繼續播
放)。
(暫停)
暫停或重新開始播放。
(停止)
停止播放。
BLUETOOTH RX/TX (BLUETOOTH接收
器/傳輸器)(第31頁)
AUDIO* (第39頁)
* AUDIO、 和 + 按鈕有觸覺點。操作
時,可將其作為參考點。
**觀賞HDR訊號與某些4K格式的視訊時,
OPTIONS與DISPLAY按鈕沒有作用,而且不
顯示系統的螢幕顯示 (OSD)。 如需關於4K
視訊格式的詳細資訊,請參閱“支援的
HDMI視訊格式” (第64頁)。
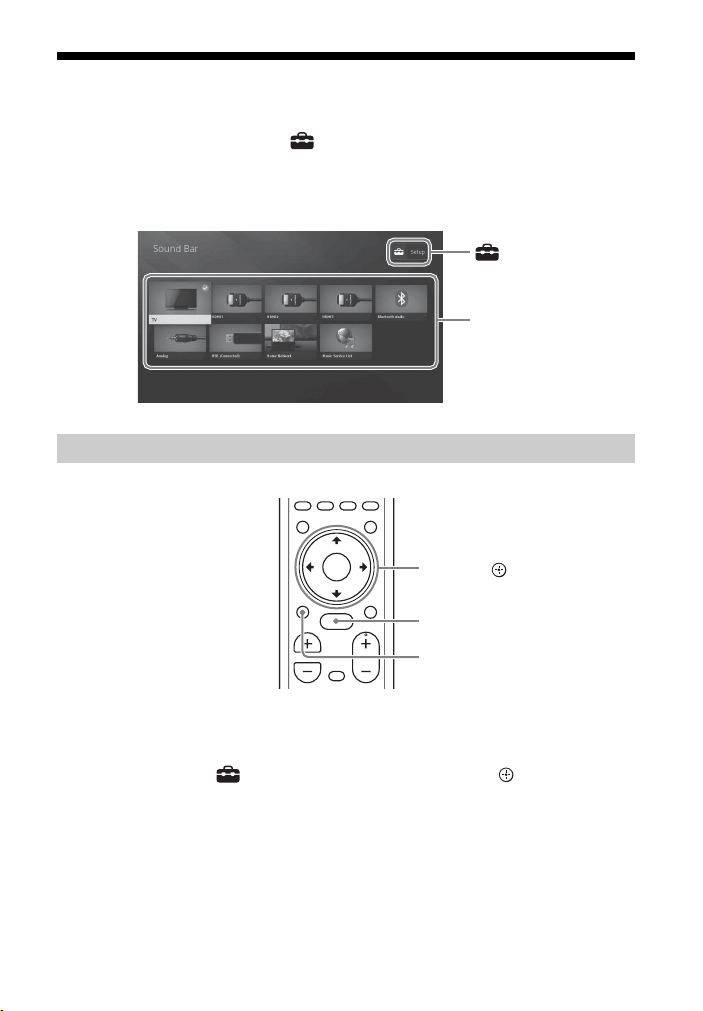
13
CT
關於主選單
您可以使用HDMI連接線 (附帶)連接本系統和電視機,以便在電視機螢幕上顯示主選
單。從主選單中,您可以透過選擇 [設置]設定各種設定,或是從輸入清單中選擇
您要觀看的輸入或服務。主選單以[簡易設置]中選取的語言顯示。(以下畫面為選擇英
文時的範例。)
1 按HOME。
主選單出現在電視機螢幕上。
2 按 /// 選擇 [設置]或輸入清單上的項目,然後按 。
所選輸入或設定顯示出現在電視機螢幕上。
要返回上一個畫面,按BACK。
使用主選單
[設置]
輸入清單
HOME
BACK
///, (輸入)

14
CT
輸入清單
[設置]
請參閱“使用設定顯示” (第45頁)。
提示
您也可以重複按INPUT +/- 選擇輸入。
在本使用說明書中,以透過HDMI連接線 (附帶)連接本系統和電視機時使用遙控器在電
視機螢幕上顯示的主選單上操作的步驟描述操作。
透過以下方式簡化使用 /// 和 選擇電視機螢幕上的項目的操作步驟。
範例:從主選單中選擇 [設置]。
按 /// 和 選擇項目的操作以“選擇”表示。
範例:選擇主選單上的[網路設定] - [網際網路設定] - [有線設置]。
重複按 /// 和 選擇項目的操作時,所選項目以“-”連結。
提示
• 如果主機上的按鈕名稱與遙控器上的相同或類似,您可以使用主機上的按鈕。
• 括號[ ]中的字元出現在電視機螢幕上。引號“ ”中的字元出現在前顯示面板中。
輸入名稱 解說
[TV] 輸出電視機的聲音。(第23頁)
[HDMI1] 輸出連接至HDMI IN 1插孔的裝置的聲音。(第23頁)
[HDMI2] 輸出連接至HDMI IN 2插孔的裝置的聲音。(第23頁)
[HDMI3] 輸出連接至HDMI IN 3插孔的裝置的聲音。(第23頁)
[Bluetooth Audio] 輸出以BLUETOOTH功能連接的裝置的聲音。(第28頁)
[Analog] 輸出連接至ANALOG IN插孔的裝置的聲音。(第23頁)
[USB] 輸出在連接的USB裝置上儲存的音樂檔案。(第24頁)
[Home Network] 輸出透過網路連接的裝置上的音樂檔案。(第32頁)
[Music Service List] 顯示音樂服務的操作方法。(第35頁)
關於步驟說明
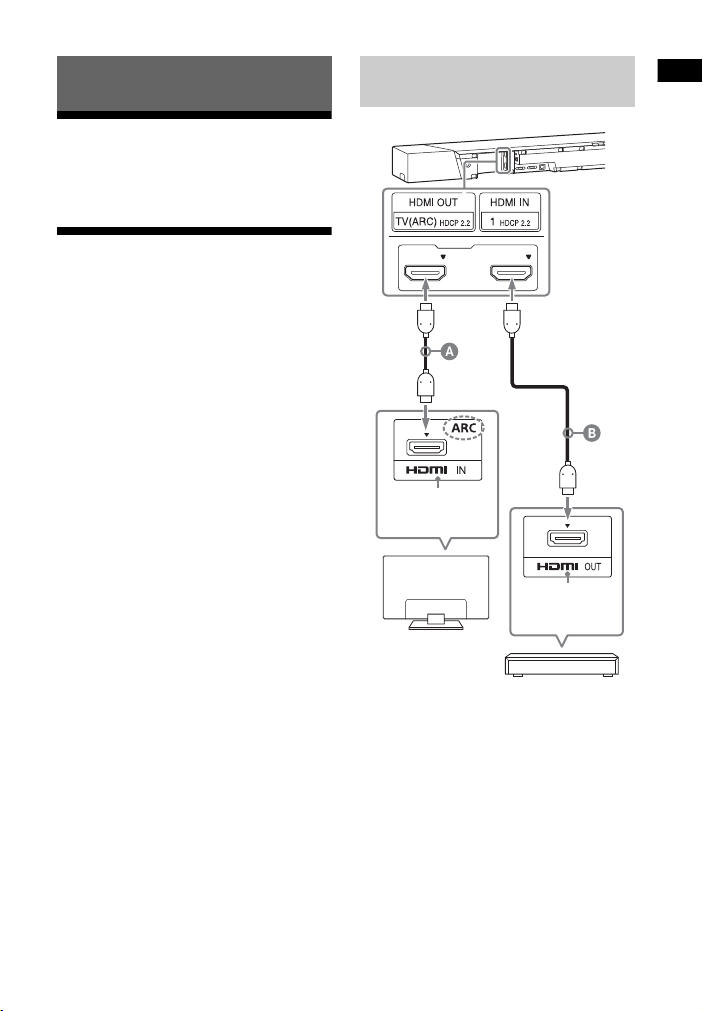
15
CT
設置
基本設置
請參閱入⾨指南 (另外的文件)。
連接4K電視機和4K裝置
系統上的所有HDMI插孔都支援4K視訊格式
和HDCP2.2 (高頻寬數位內容防護系統修
訂版2.2)。
若要觀看4K視訊內容,請透過各裝置上
HDCP2.2相容的HDMI插孔將4K電視機和4K
裝置連接到系統。
您只能透過HDCP2.2相容的HDMI插孔連線
檢視4K視訊內容。
HDMI連接線 (附帶)
HDMI連接線 (無附帶)
使用支援您要觀看的4K視訊格式的HDMI連接
線。詳情請參閱“支援的HDMI視訊格式”
(第64頁)。
1 檢查電視機上的哪一個HDMI IN插孔與
HDCP2.2相容。
請參閱電視機的使用說明書。
設置
當電視機上的HDCP2.2相容HDMI
插孔標示“ARC”時
HDCP2.2相容的
HDMI插孔
Blu-ray Disc播放
器、有線電視盒或
衛星電視盒等
HDCP2.2相容的
HDMI插孔
電視機
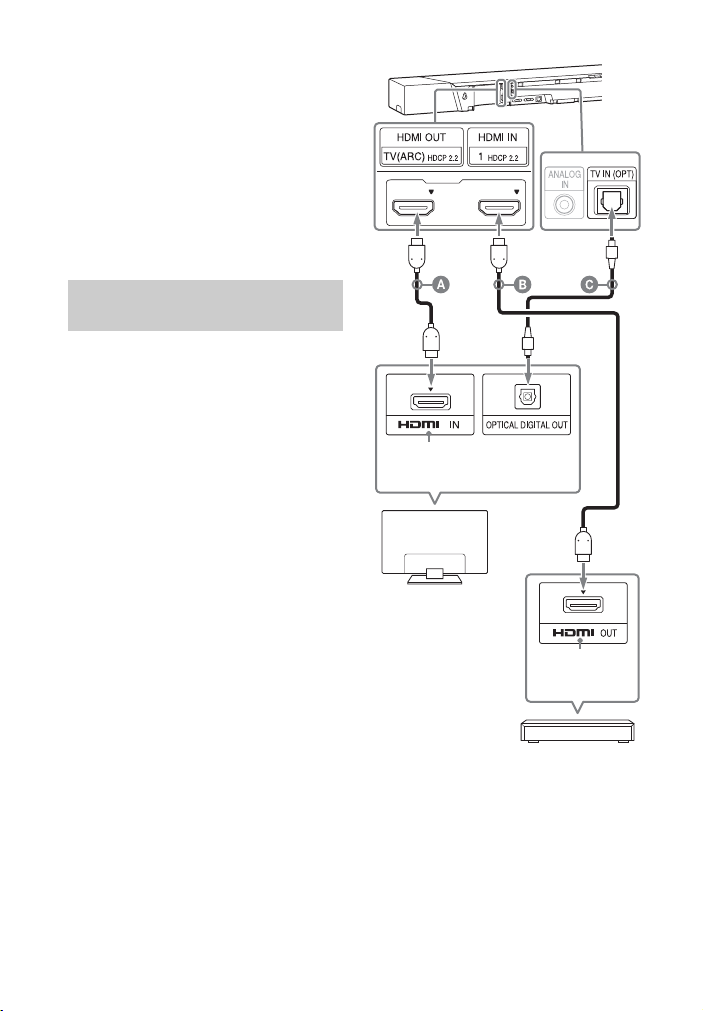
16
CT
2 透過HDMI連接線 (附帶)連接電視機
上的HDCP2.2相容HDMI IN插孔與主機
上的HDMI OUT插孔。
電視機連接完成。
3 透過HDMI連接線 (無附帶)連接4K裝
置的HDCP2.2相容HDMI OUT插孔與主機
的HDMI IN插孔。
請參閱4K裝置的使用說明書,確定4K
裝置的HDMI OUT插孔與HDCP2.2相容。
4K裝置連接完成。
如果電視機的HDCP2.2相容HDMI IN插孔與
ARC (Audio Return Channel)不相容,
系統無法輸出電視機的聲音。
在此情況下,請透過光纖數位線 (無附
帶)連接電視機的光纖輸出插孔與主機上
的TV IN (OPT)插孔。
HDMI連接線 (附帶)
HDMI連接線 (無附帶)
使用支援您要觀看的4K視訊格式的HDMI連接
線。詳情請參閱“支援的HDMI視訊格式”
(第64頁)。
光纖數位線 (無附帶)
當電視機上的HDCP2.2相容HDMI
插孔未標示“ARC”時
HDCP2.2相容的
HDMI插孔
Blu-ray Disc播放
器、有線電視盒或衛
星電視盒等
HDCP2.2相容的
HDMI插孔
電視機
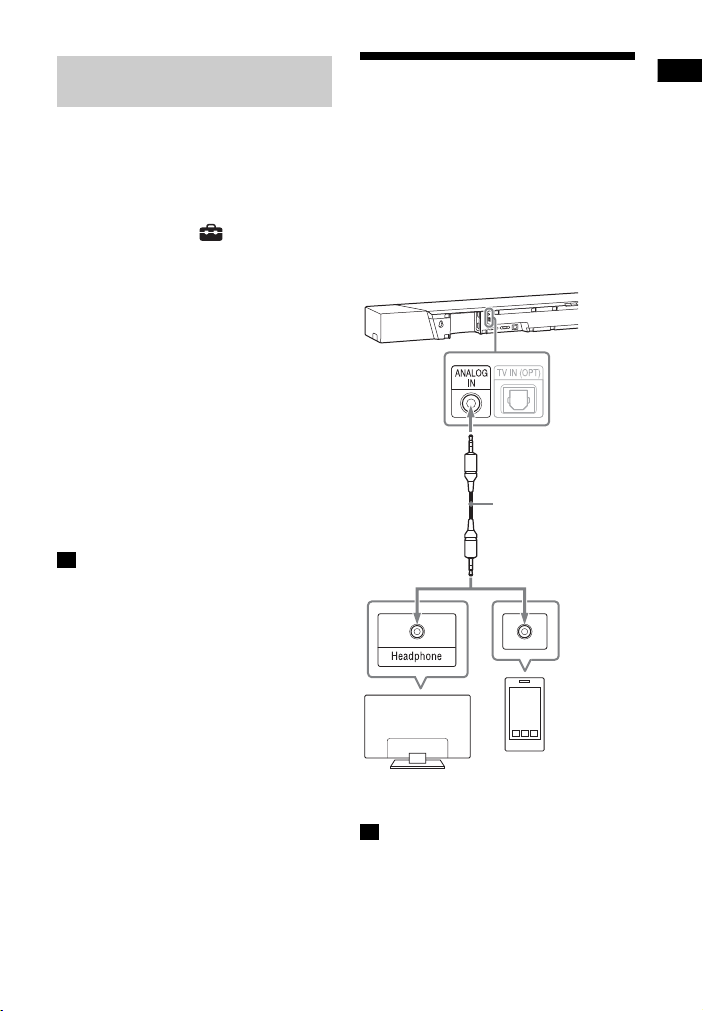
17
CT
設置
若要觀看4K視訊內容,請選擇適合所連接
4K電視機和4K裝置的設定。
1 按HOME。
主選單出現在電視機螢幕上。
2 從主選單中選擇 [設置]。
設定顯示出現在電視機螢幕上。
3 選擇[系統設定] - [HDMI設定] -
[HDMI訊號格式]。
4 選擇您想要的設定。
• [標準格式] (預設設定):連接的
電視機和裝置支援標準頻寬視訊格
式時,選擇此項。
• [增強格式]:連接的電視機和裝置
都支援4K 60p 4:4:4等高頻寬視訊
格式時,選擇此項。
關於[HDMI訊號格式]設定選項、支援
的視訊格式訊號和要使用的HDMI連接
線的關係,請參閱“支援的HDMI視訊
格式” (第64頁)。
• 視電視機而定,可能需要HDMI輸出的電視設
定。請參閱電視機的使用說明書。
• 當[HDMI訊號格式]設定為[增強格式]後,如
果沒有顯示畫面,請設定為[標準格式]。
透過ANALOG IN插孔連
接電視機或可攜式音訊
裝置
若要將以下裝置連接系統,請透過系統上
的ANALOG IN插孔連接。
– 沒有HDMI插孔和光纖數位輸出插孔的電
視機
– 智慧型手機、WALKMAN®等可攜式音訊裝
置
如果電視機的耳機插孔也具備音訊輸出插孔
的作用,請檢查電視機的音訊輸出設定。詳
情請參閱電視機的使用說明書。
設定HDMI訊號格式以觀看4K視
訊內容
註
註
智慧型手機、
WALKMAN®、其他音訊
裝置等
電視機
類比音訊
輸出
類比音訊連接線
(無附帶)
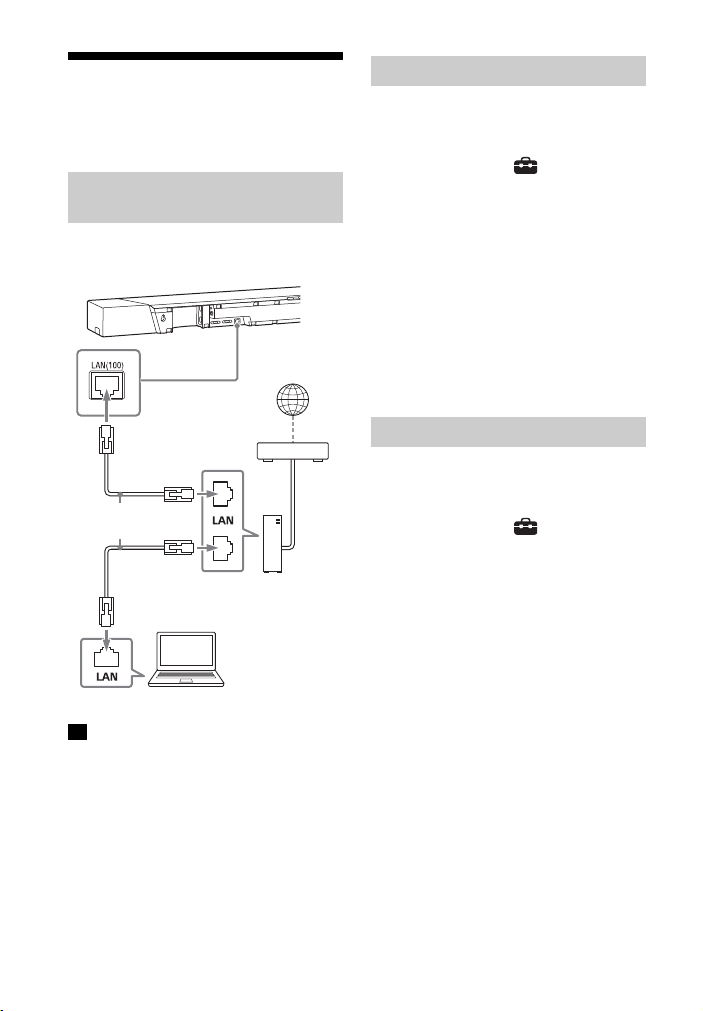
18
CT
連線至有線網路
使用LAN連接線將系統和PC連接至家庭網
路以準備好網路。
下圖說明將系統和PC連接至家庭網路的範
例。
伺服器需連線到與系統相同的網路。
提示
建議您使用屏蔽直連型介面連接線 (無附
帶)。
1 按HOME。
主選單出現在電視機螢幕上。
2 從主選單中選擇 [設置]。
設定顯示出現在電視機螢幕上。
3 選擇[網路設定] - [網際網路設定] -
[有線設置]。
4 選擇[自動]。
系統啟動網路設定,並且出現網路設
定狀態。
按 / 瀏覽資訊,然後按 。
5 選擇[儲存並連線]。
系統開始與網路連線。詳情請參閱電
視機螢幕上顯示的訊息。
1 按HOME。
主選單出現在電視機螢幕上。
2 從主選單中選擇 [設置]。
設定顯示出現在電視機螢幕上。
3 選擇[網路設定] - [網際網路設定] -
[有線設置]。
4 選擇[手動]。
5 按照螢幕上的指示執行設定。
系統啟動網路設定,並且出現網路設
定狀態。
按 / 瀏覽資訊,然後按 。
6 選擇[儲存並連線]。
系統開始與網路連線。詳情請參閱電
視機螢幕上顯示的訊息。
使用LAN連接線連接至PC或路由
器
註
網際網路
LAN連接線
(無附帶)
伺服器
路由器
數據機
透過自動取得網路資訊連接
使用固定的IP位址連接
19
CT
設置
連線至無線網路
將系統和PC連接至無線LAN路由器以準備
好網路。
伺服器需連線到與系統相同的網路。
當您的無線LAN路由器 (存取點)與Wi-Fi
保護設置 (WPS)相容時,您可使用WPS按
鈕輕鬆設定網路設定。
1 按HOME。
主選單出現在電視機螢幕上。
2 從主選單中選擇 [設置]。
設定顯示出現在電視機螢幕上。
3 選擇[網路設定] - [網際網路設定] -
[無線設置] - [Wi-Fi保護設置™
(WPS)]。
4 選擇[開始]。
5 按存取點的WPS按鈕。
系統開始與網路連線。
如果您的無線LAN路由器 (存取點)與
Wi-Fi保護設置 (WPS)不相容,請事先確
認下列資訊。
– 網路名稱 (SSID) *
___________________________________
– 安全性金鑰 (密碼) **
___________________________________
* SSID (服務集標識符)是用來標識特定存
取點的名稱。
**此資訊可從無線LAN路由器/存取點的標籤、
使用說明書中、設定無線網路的人員或您
網際網路服務供應商提供的資訊中取得。
1 按HOME。
主選單出現在電視機螢幕上。
2 從主選單中選擇 [設置]。
設定顯示出現在電視機螢幕上。
3 選擇[網路設定] - [網際網路設定] -
[無線設置]。
網路名稱清單出現在電視機螢幕上。
4 選擇所需的網路名稱 (SSID)。
5 使用軟體鍵盤輸入安全性金鑰 (或密
碼),然後選擇[輸入]。
系統開始與網路連線。
選擇“透過選擇網路名稱 (SSID)連接”
步驟4中的[添加新的無線網路] - [手動登
記],然後依照畫面指示進行。
在“透過選擇網路名稱 (SSID)連接”步
驟4中選擇[添加新的無線網路],然後選
擇[(WPS) PIN方法]。
註
使用WPS按鈕連接
透過選擇網路名稱 (SSID)連
接
使用固定的IP位址連接
使用PIN碼連接

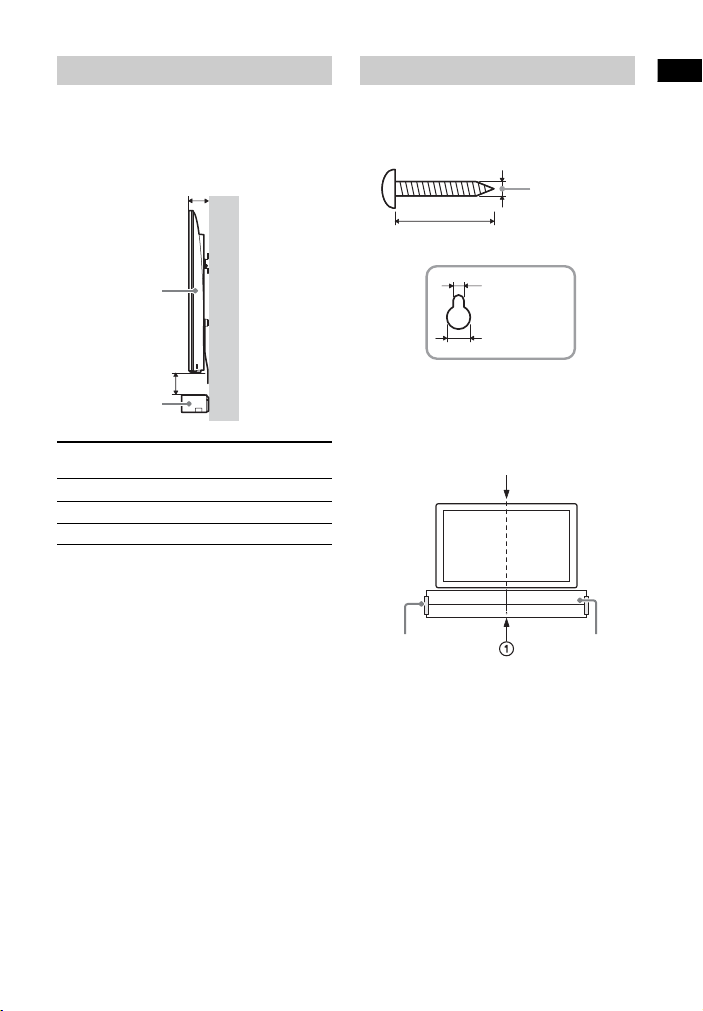
21
CT
設置
主機將環繞音效朝向天花板輸出。
為確保電視機不會干擾主機輸出的音效,
請參考下列估計值,決定主機的安裝位
置。
1 準備適合主機背面壁掛孔的螺絲 (無
附帶)。
2 將壁掛式安裝模板 (附帶)貼在牆
上。
1 將壁掛式安裝模板的電視機中心線
()對齊電視機的中心線。
2 請參閱“關於主機的安裝位置”
(第21頁),決定壁掛式安裝模板
的高度,然後使用市售膠帶等將壁
掛式安裝模板黏貼到牆壁上。
關於主機的安裝位置
已安裝電視機的深度
(A)
電視機與主機的距離
(B)
小於66 mm 50 mm或以上
66 mm至小於100 mm 100 mm或以上
100 mm或以上 200 mm或以上
主機
電視機
(A)
(B)
在牆壁上安裝主機
主機背面的孔
4mm
超過30 mm
4.6 mm
10 mm
電視機中心
壁掛式安裝
模板
膠帶等
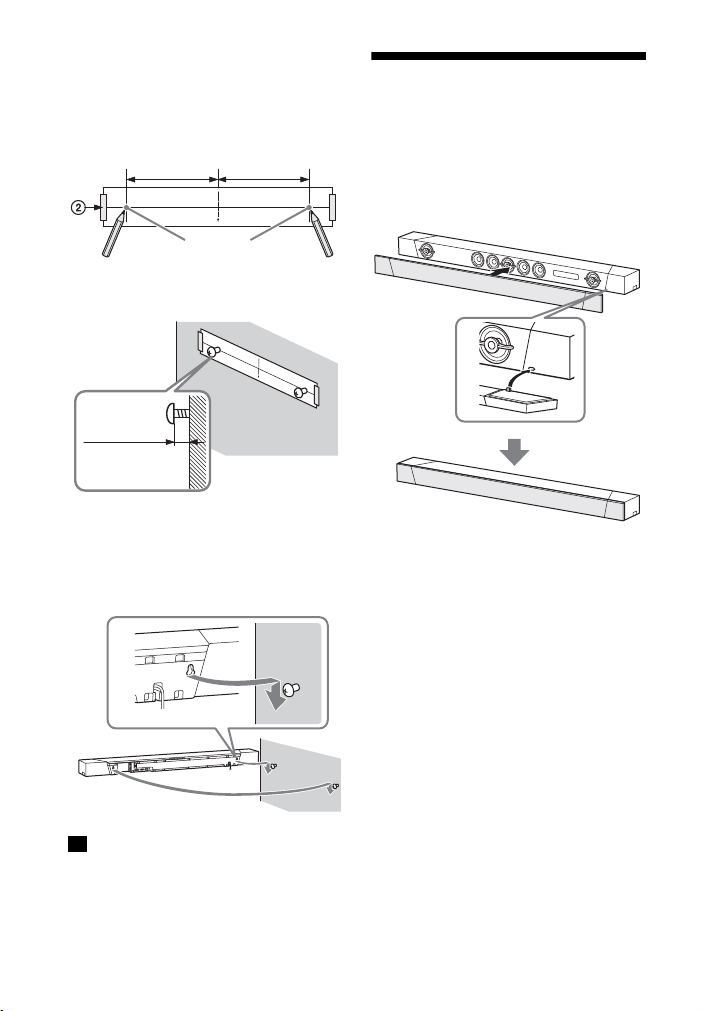
22
CT
3 在壁掛式安裝模板的螺絲線 ()上
標示下述螺絲位置。
用尺測量下述距離,然後用鉛筆等標
示。
4 在標示位置鎖緊螺絲。
5 取下壁掛式安裝模板。
6 將主機掛在螺絲上。
將主機背面孔對齊螺絲,然後將主機
掛在兩個螺絲上。
黏貼壁掛式安裝模板時,將它完全撫平。
安裝網格
您可以透過安裝隨附的網格保護揚聲器。
如果您要聆聽高解析度音訊,建議您使用
主機而不安裝網格。
與前面板平行安裝網格。
將網格的突出部分插入主機上的孔。
提示
網格以磁鐵固定。
註
螺絲位置
422 mm
422 mm
11 mm至
12 mm

23
CT
聆聽聲音
聆聽電視
1 按HOME。
主選單出現在電視機螢幕上。
2 選擇主選單上的[TV]。
3 使用電視機遙控器選擇節目。
所選電視節目出現在電視機螢幕上,
電視聲音從系統輸出。
4 調節音量。
• 按下遙控器上的 +/- 調節音量。
• 按下遙控器上的SW +/- 調節主
動式重低音揚聲器音量 (第27
頁)。
將電視機 (BRAVIA)的揚聲器設定設為音訊
系統。請參閱電視機的使用說明書中有關如
何設定電視機的資訊。
提示
按下遙控器上的INPUT +/- 可以選擇[TV]。
聆聽連接的AV裝置
1 按HOME。
主選單出現在電視機螢幕上。
2 在主選單上選擇連接所需裝置的輸
入。
所選裝置的影像出現在電視機螢幕
上,聲音從系統輸出。
如果選擇[Analog],電視機螢幕上會
顯示[Analog]畫面。
3 調節音量。
• 按下遙控器上的 +/- 調節音量。
• 按下遙控器上的SW +/- 調節主
動式重低音揚聲器音量 (第27
頁)。
提示
按下遙控器上的INPUT +/- 可以選擇輸入。
您可以變更主選單上顯示的[HDMI1]、
[HDMI2]或[HDMI3]的輸入名稱。
1 按HOME。
主選單出現在電視機螢幕上。
2 將游標放在主選單的[HDMI1]、
[HDMI2]或[HDMI3]上,然後按
OPTIONS。
選項選單出現在電視機螢幕上。
3 選擇[輸入標籤設定]。
4 選擇輸入名稱。
您可以從以下項目中選擇輸入名稱。
• [BD Player]
• [DVD Player]
• [Cable Box]
• [Satellite]
• [GAME]
• [PC]
5 按 以完成。
聆聽聲音
註
變更主選單上顯示的輸入名稱
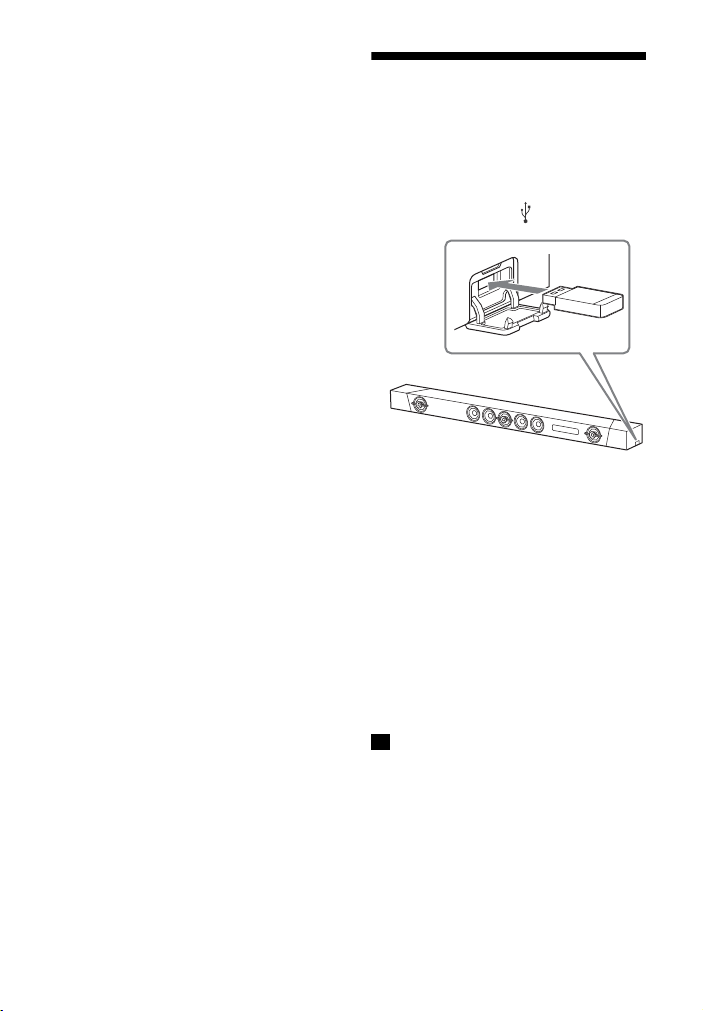
24
CT
提示
變更輸入名稱時,顯示的圖示也會自動改
變。
聆聽USB裝置上的音樂
您可播放在連接的USB裝置上儲存的音樂
檔案。
有關可播放檔案的類型,請參閱“可以播
放的音頻檔案類型” (第62頁)。
1 將USB裝置連接至 (USB)連接埠。
2 按HOME。
主選單出現在電視機螢幕上。
3 從主選單中選擇
[USB (已連接)]。
4 選擇儲存歌曲的資料夾 - 歌曲。
播放所選歌曲,聲音從系統輸出。
5 調節音量。
• 按下遙控器上的 +/- 調節音量。
• 按下遙控器上的SW +/- 調節主
動式重低音揚聲器音量 (第27
頁)。
操作時請勿拔下USB裝置。為了避免破壞數據
或損壞USB裝置,請在連接或拔下USB裝置前
關閉系統。
提示
您也可以從選項選單執行各種操作 (第51
頁)。
註
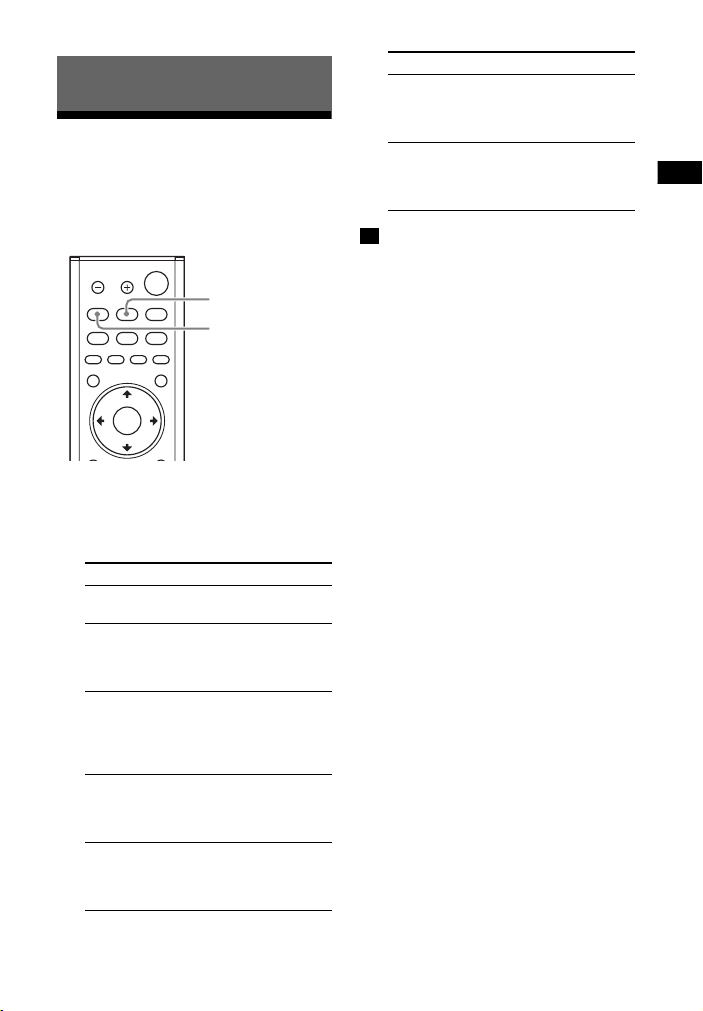
25
CT
選擇音效
設定針對音源的音效
(SOUND FIELD)
您可輕鬆欣賞針對不同的音源而預先編程
的音效。
1 按SOUND FIELD。
音場選單出現在電視機螢幕上。
2 重複按下按鈕選擇所需的音場。
• 使用無線連接多個房間功能或Chromecast
built-in,或是將[Bluetooth模式]設定為
[傳送] (第47頁)時,音場功能不可用。
• 音場選單不會出現在電視輸入的電視機螢幕
上。
• 將[聲音效果]設定為[關]時,音場功能停
用。
• 當選擇[Music]之外的音場時,虛擬環繞功
能正在處理;但是音訊來源不是多聲道時,
這項功能可能沒有作用。
提示
• 按下遙控器上的CLEAR AUDIO+可以選擇
[ClearAudio+]。
• 您可以從選項選單選擇音場 (第51頁)。
選擇音效
音場 解說
[ClearAudio+]
根據音源自動選擇適
合的聲音設定。
[3D Surround]
盡享電影、音樂和更
多節目,徜徉在房間
內四面八方的聲流
中。
[Movie]
您會感覺聲音在您背
後傳出,環繞您的整
個身體,讓您沈醉在
音效當中。 這個模式
適合觀賞影片。
[Music]
細膩呈現生動與華麗
的音效。 這個模式適
合以令人感動的方式
聆聽音樂。
[Game Studio]
重現動作感與物體的
距離感,讓您沈醉在
遊戲當中,並且清楚
聽到對話。
SOUND FIELD
CLEAR AUDIO+
[Sports]
您會體驗到有如在體
育場中觀賞活動的氣
氛。 但是仍然生動呈
現評論者的旁白。
[Standard]
可以清楚聽到電視節
目的聲音。 這個模式
適合觀賞新聞節目,
因為聲音清晰。
註
音場 解說
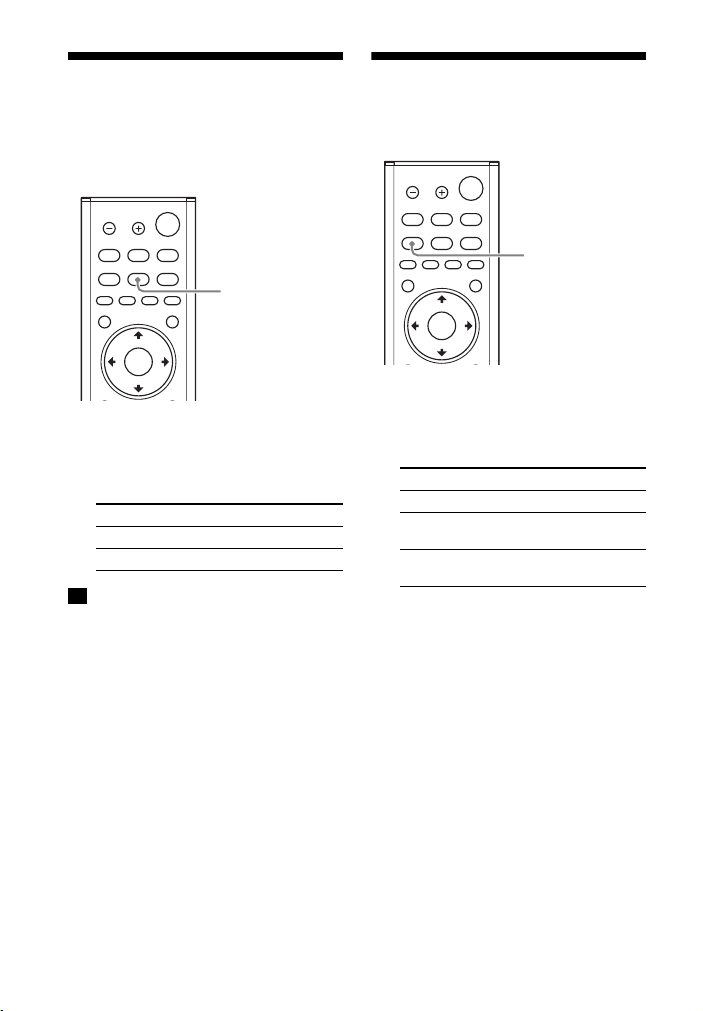
26
CT
深夜時以低音量欣賞清
晰的聲音 (NIGHT)
在失真度最低且對話清晰的狀況下以低音
量輸出聲音。
1 按NIGHT。
夜間模式出現在電視機螢幕上。
2 重複按下按鈕選擇夜間模式。
關閉系統時,此設定會自動設為[關]。
提示
您可以從選項選單中選擇[Night] (第51
頁)。
讓對話更清楚
(VOICE)
1 按VOICE。
語音模式出現在電視機螢幕上。
2 重複按下按鈕選擇語音模式。
提示
您可以從選項選單中選擇[Voice] (第51
頁)。
模式 解說
[開] 啟動夜間模式功能。
[關] 停用夜間模式功能。
註
NIGHT
模式 解說
[Up Off] 標準
[Up 1] 增強對話音域,因此容
易聆聽對話。
[Up 2] 增強對話音域,使老人
容易聽到對話聲音。
VOICE
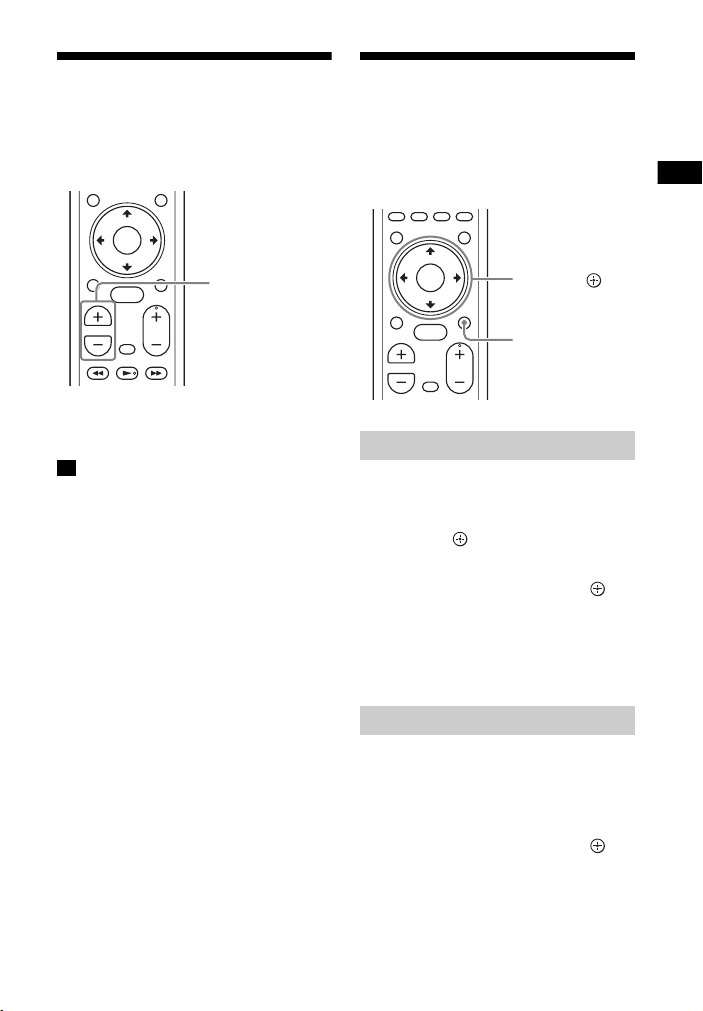
27
CT
選擇音效
調整主動式重低音揚聲
器音量
主動式重低音揚聲器專為播放低音或低頻
聲音而設計。
按SW (主動式重低音揚聲器音量)
+/- 調整主動式重低音揚聲器音量。
當輸入來源未含有太多低音時,例如電視節
目,可能會難以聽見主動式重低音揚聲器的
低音。
調整圖像與聲音之間的
延遲
當聲音對不上電視機螢幕上的圖像時,您
可以調整圖像和聲音之間的延遲時間。
設定方式會視輸入而不同。
1 按OPTIONS。
“SYNC”出現在前顯示面板中。
2 按 或 。
調節時間出現在前顯示面板中。
3 使用 / 調整延遲,然後按 。
您可以使用25毫秒增幅在0毫秒至
300毫秒之間調整。
4 按OPTIONS。
在前顯示面板中的選項選單關閉。
1 按OPTIONS。
選項選單出現在電視機螢幕上。
2 選擇[影音同步]。
3 使用 / 調整延遲,然後按 。
您可以使用25毫秒增幅在0毫秒至
300毫秒之間調整。
註
SW +/-
觀賞電視時
觀賞另一個裝置時
OPTIONS
///、
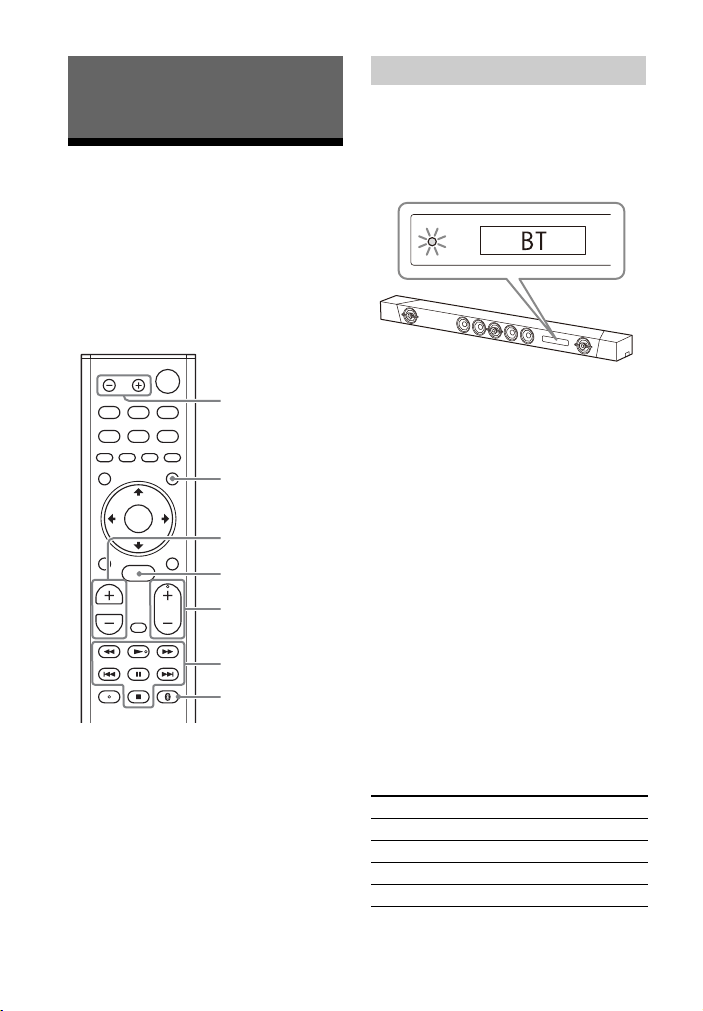
28
CT
聆聽行動裝置中的音
樂
使用BLUETOOTH功能連接系統與行動裝置,
可以透過無線連接聆聽儲存在智慧型手機
或平板電腦等行動裝置上的音樂。
透過BLUETOOTH功能連接行動裝置時,只
要使用附帶的遙控器就能操作,不需開啟
電視。
1 按BLUETOOTH PAIRING。
系統進入配對模式,“BT”出現在前
顯示面板中,且BLUETOOTH指示燈快
速閃爍。
2 開啟BLUETOOTH功能,然後在行動裝
置上搜尋“HT-ST5000”後選擇該型
號。
如需密碼,請輸入“0000”。
3 確定主機上的BLUETOOTH指示燈亮起
藍燈。
系統與行動裝置之間的連線已建立。
4 使用所連線行動裝置上的音樂應用程
式開始播放音訊。
聲音從主機輸出。
5 調節音量。
• 按下遙控器上的 +/- 調節音量。
• 按下遙控器上的SW +/- 調節主
動式重低音揚聲器音量 (第27
頁)。
• 您可以使用遙控器上的播放操作按
鈕播放或暫停內容。
檢查BLUETOOTH功能的連線狀態
透過BLUETOOTH®功能聆聽音樂/
聲音
INPUT +/-
BLUETOOTH PAIRING
SW +/-
HOME
+/-
播放操作按鈕
BLUETOOTH RX/TX
透過與行動裝置配對聆聽音樂
狀態 BLUETOOTH指示燈
配對待機狀態時 快速閃爍藍燈
正在嘗試連線 閃爍藍燈
已建立連線 亮起藍燈
未連線 熄滅
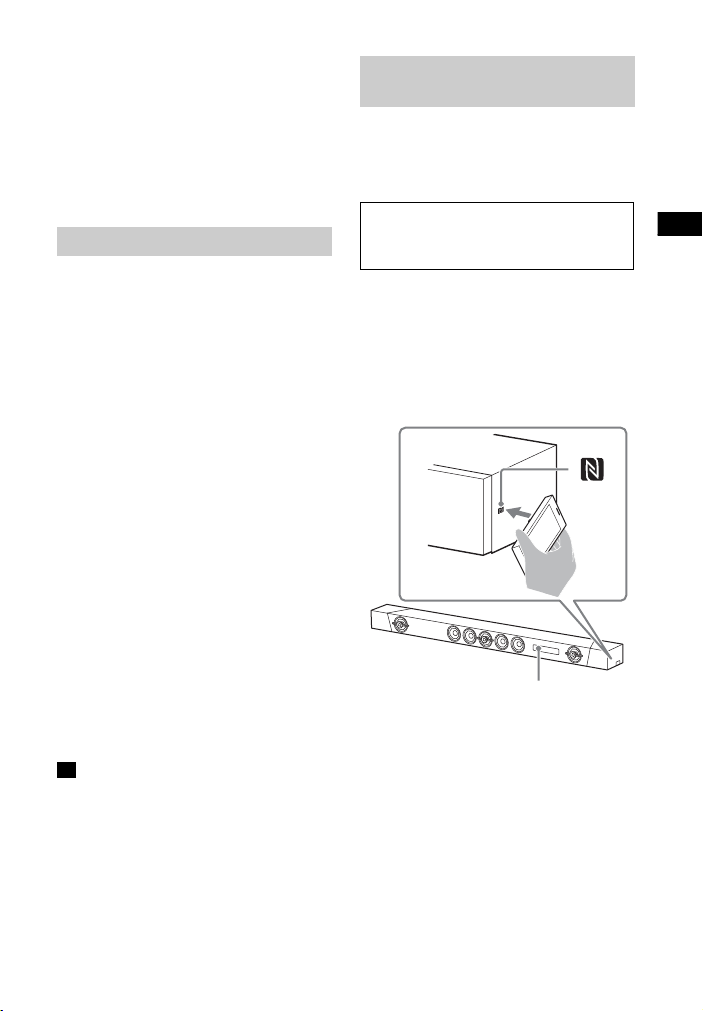
29
CT
透過BLUETOOTH®功能聆聽音樂/聲音
提示
• 建立BLUETOOTH連線後,系統會根據您連線
的裝置顯示可安裝應用程式的建議。
遵照出現的指示可安裝Sony | Music
Center應用程式,以便操作本系統。
有關Sony | Music Center的詳細資料,請
參閱“使用Sony | Music Center聆聽行動
裝置上的音樂” (第33頁)。
• 為第二個和之後的行動裝置執行配對。
1 開啟行動裝置的BLUETOOTH功能。
2 重複按INPUT +/-,使前顯示面板中顯
示“BT”。
系統會自動重新連接最近連線的行動
裝置。
3 確定BLUETOOTH指示燈亮起藍燈。
系統與行動裝置之間的連線已建立。
4 使用所連線行動裝置上的音樂應用程
式開始播放音訊。
聲音從主機輸出。
5 調節音量。
• 按下遙控器上的 +/- 調節音量。
• 按下遙控器上的SW +/- 調節主
動式重低音揚聲器音量 (第27
頁)。
• 您可以使用遙控器上的播放操作按
鈕播放或暫停內容。
斷開行動裝置
執行下列任何項目。
• 停用行動裝置的BLUETOOTH功能。
• 按下遙控器上的BLUETOOTH PAIRING。
• 關閉系統或行動裝置。
在“聆聽已配對行動裝置中的音樂”的步驟2
按下INPUT +/- 時,如果“BT”沒有出現在
前顯示面板中,請按一下遙控器上的
BLUETOOTH RX/TX。
提示
若未建立連線,請選擇行動裝置上的
“HT-ST5000”。
將NFC相容的智慧型手機或平板電腦等行
動裝置拿到主機上的N標記旁,系統會自
動開啟,然後自動執行配對與BLUETOOTH
連線。
1 開啟行動裝置的NFC功能。
2 將行動裝置觸碰主機上的N標記。
持續觸碰,直到行動裝置振動,且行
動裝置上出現訊息。
依照畫面指示完成主機與行動裝置的
配對。
3 確定BLUETOOTH指示燈亮起藍燈。
系統與行動裝置之間的連線已建立。
4 使用所連線行動裝置上的音樂應用程
式開始播放音訊。
聲音從系統輸出。
聆聽已配對行動裝置中的音樂
註
以觸控功能 (NFC)連線至行動
裝置
相容的裝置
內建NFC功能的智慧型手機、平板電腦與音
樂播放器 (作業系統:Android™ 2.3.3或
更新版本,Android 3.x除外)
BLUETOOTH指示燈

30
CT
5 調節音量。
• 按下遙控器上的 +/- 調節音量。
• 按下遙控器上的SW +/- 調節主
動式重低音揚聲器音量 (第27
頁)。
• 您可以使用遙控器上的播放操作按
鈕播放或暫停內容。
以觸控功能停止播放
再次將行動裝置觸碰主機上的N標記。
• 視您的裝置而定,您可能需要預先在您的行
動裝置上執行下列項目。
– 開啓NFC功能。
– 從Google Play™安裝“NFC快速連線”應
用程式,並啟動應用程式。(某些國家/
地區可能不提供此應用程式。)詳情請參
閱您裝置的使用說明書。
• 此功能不適用於BLUETOOTH相容的耳機。若
要使用BLUETOOTH相容的耳機聆聽聲音,請
參閱“從耳機聆聽所連接電視機或裝置的聲
音” (第30頁)。
• 使用觸控功能進行BLUETOOTH連接時,
[Bluetooth模式]會自動變更為[接收]。即
使取消觸控功能,[Bluetooth模式]設定仍
維持為[接收]。有關[Bluetooth模式]的詳
情,請參閱“[Bluetooth設定]” (第47
頁)。
• 如果您的行動裝置屬於會受到磁力影響而進
入待機模式的類型,可能無法透過NFC連
接。當觸控功能無效時,使用BLUETOOTH功
能連接 (第28頁)。
從耳機聆聽所連接電視
機或裝置的聲音
您可以透過BLUETOOTH功能連接電視機或
裝置,從BLUETOOTH相容的耳機聆聽所連
接電視機或裝置的聲音。
1 將BLUETOOTH相容的耳機設定為配對
模式。
請參閱耳機的使用說明書中有關配對
方式的資訊。
2 按HOME。
主選單出現在電視機螢幕上。
3 從主選單中選擇 [設置]。
設定顯示出現在電視機螢幕上。
4 選擇[Bluetooth設定] - [Bluetooth
模式] - [傳送]。
系統進入BLUETOOTH傳輸模式。
5 從[Bluetooth設定]中的[裝置清單],
選擇耳機的名稱。
BLUETOOTH連線建立時,會出現[已連
接Bluetooth裝置。]。(也會出現已
連接的裝置名稱。)
如果在[裝置清單]中找不到您的耳機
的名稱,請選擇[掃描]。
6 返回主選單,並選擇所需的輸入。
所選輸入的影像出現在電視機螢幕
上,“BT TX”出現在前顯示面板中,
然後聲音從耳機輸出。
系統不會輸出聲音。
有關選擇輸入,請參閱
“使用主選單” (第13頁)。
7 調節音量。
先調整耳機的音量。可以使用主機上
的 +/- 和遙控器上的 +/- 控制耳
機的音量。
註
透過與耳機配對聆聽聲音

31
CT
透過BLUETOOTH®功能聆聽音樂/聲音
若要從裝置清單中移除已註冊的裝置
1 依照“透過與耳機配對聆聽聲音”中的
步驟1到5操作。
2 選擇耳機的名稱,然後按OPTIONS。
3 選擇[移除]。
4 依照畫面上的指示將所需的耳機從裝置
清單中刪除。
1 按HOME。
主選單出現在電視機螢幕上。
2 選擇所需的輸入。
有關選擇輸入,請參閱
“使用主選單” (第13頁)。
3 將耳機的BLUETOOTH功能設為開啟。
4 按下遙控器上的BLUETOOTH RX/TX。
[Bluetooth模式]設為[傳送],且
“BT TX”出現在前顯示面板中。
系統自動重新連接至最近連線的耳
機,然後聲音從耳機輸出。
系統不會輸出聲音。
5 調節音量。
調整耳機的音量。使用遙控器上的
+/- 也可以調整耳機的音量。
若要斷開耳機
執行下列任何項目。
– 停用耳機的BLUETOOTH功能。
– 按BLUETOOTH RX/TX。
– 關閉系統或耳機。
– 從 [設置] - [Bluetooth設定] -
[裝置清單]選擇已連接耳機的裝置名
稱。裝置名稱的[已連線]會消失。
• 視BLUETOOTH相容的耳機而定,可能無法
調整音量。
• 將[Bluetooth模式]設定為[關]或[傳送]
時,[Bluetooth Audio]會停用。
• 選擇[Bluetooth Audio]的輸入時,您無
法將[Bluetooth模式]設為[傳送]。您也
無法使用遙控器上的BLUETOOTH RX/TX進
行切換。
• 您最多可以註冊9個BLUETOOTH裝置。如
果註冊第10個BLUETOOTH裝置,新的裝置
將覆寫最早連接的BLUETOOTH裝置。
• 系統在[裝置清單]中最多可顯示15個偵
測到的BLUETOOTH裝置。
• 傳送聲音至BLUETOOTH相容的耳機時,您
無法在選項選單中變更音效或設定。
• 某些內容受到保護,因此可能無法輸
出。
• 由於BLUETOOTH無線技術的特性,在
BLUETOOTH裝置上播放音訊/音樂跟在主
機上播放相比可能會延遲。
• 您可啟用或停用接收來自BLUETOOTH裝置
的AAC或LDAC音訊 (第47頁)。
透過已配對的耳機聆聽聲音
關於耳機的連接
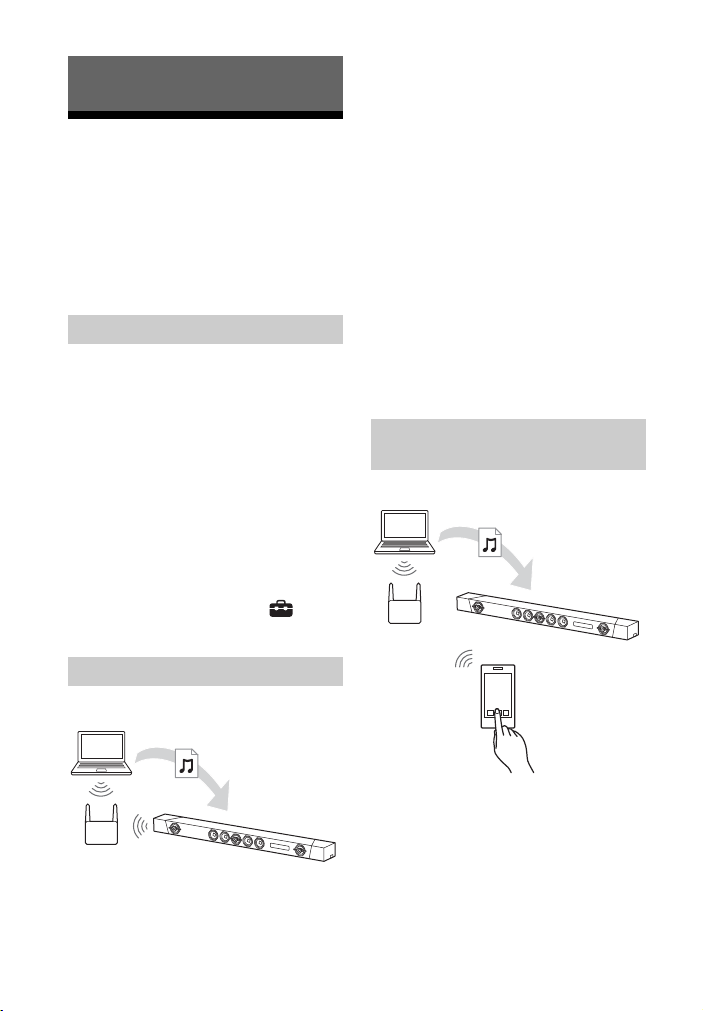
32
CT
透過家庭網路聆聽PC上
的音樂
您可以透過家庭網路播放儲存在PC上的音
樂檔案。
透過操作電視機螢幕上顯示的選單或是智
慧型手機或平板電腦等行動裝置的Sony |
Music Center,可以播放音樂檔案。
1 將系統與網路連接。
請參閱“連線至有線網路” (第18
頁)和“連線至無線網路” (第19
頁)。
2 將PC與網路連接。
詳情請參閱PC的使用說明書。
3 設定PC。
若要在家庭網路上使用PC,您需要將
PC設為伺服器。詳情請參閱PC的使用
說明書。
提示
要檢查網路連線狀態時,請查看 [設置]
- [網路設定] - [網路連線狀態]。
1 按HOME。
主選單出現在電視機螢幕上。
2 從主選單中選擇[Home Network]。
您的家庭網路上的裝置名稱出現在電
視機螢幕上。
3 選擇所需的裝置-儲存歌曲的資料
夾-歌曲。
播放所選歌曲,聲音從系統輸出。
4 調節音量。
• 按下遙控器上的 +/- 調節音量。
• 按下遙控器上的SW +/- 調節主
動式重低音揚聲器音量 (第27
頁)。
提示
您也可以從選項選單執行各種操作 (第51
頁)。
透過操作安裝至智慧型手機或平板電腦等
行動裝置的Sony | Music Center,可以播
放儲存在PC上的音樂檔案。有關Sony |
Music Center的詳情,請參閱“Sony |
Music Center的功能” (第33頁)或以下
URL。
http://www.sony.net/smcqa/
使用網路功能聆聽音樂/聲音
準備Home Network
聆聽PC上的音樂
PC
無線LAN路由器
使用Sony | Music Center聆聽
PC上的音樂
PC
無線LAN路由器
智慧型手機或平板
電腦

33
CT
使用網路功能聆聽音樂/聲音
使用Sony | Music
Center聆聽行動裝置上
的音樂
Sony | Music Center是使用智慧型手機或
平板電腦等行動裝置控制相容Sony音訊裝
置的應用程式。
有關Sony | Music Center的詳情,請參閱
以下URL。
http://www.sony.net/smcqa/
將Sony | Music Center安裝到行動裝置上
可提供以下功能。
系統的聲音設定
您可輕鬆自訂聲音,或是使用Sony建議的
[ClearAudio+]設定。
音樂服務
您可以指定使用音樂服務*的初始設定。
* 視國家和地區而定,音樂服務與其有效期
間可能不同。
可能需要更新裝置。
在音樂服務上使用Chromecast built-in
時,請參閱“使用Chromecast built-in”
(第34頁)。
欣賞家庭網路上的音樂
您可以透過網路播放儲存在PC或家庭網路
伺服器中的音樂。
欣賞USB裝置上的音樂
您可以播放連接至主機 (USB)連接埠的
裝置上的音樂。
Sony | Music Center的功能視連接的裝置而
異。應用程式的規格與設計若有變更,恕不
另行通知。
1 將免費的Sony | Music Center應用程
式安裝到行動裝置。
在Google Play或App Store搜尋Sony
| Music Center並安裝到您的行動裝
置。
2 透過BLUETOOTH功能 (第28頁)或網
路功能 (第18頁),將系統和行動裝
置連接。
3 啟動Sony | Music Center。
4 依照Sony | Music Center畫面操作。
• 使用Sony | Music Center前,務必將
[Bluetooth模式]設為[接收] (第47頁)。
• 使用最新版本的Sony | Music Center。
提示
• 您可以使用NFC功能將系統和行動裝置連接
(第29頁)。
• 透過網路功能連接時,將行動裝置連線到與
系統相同的網路。
Sony | Music Center的功能
註
使用Sony | Music Center
註
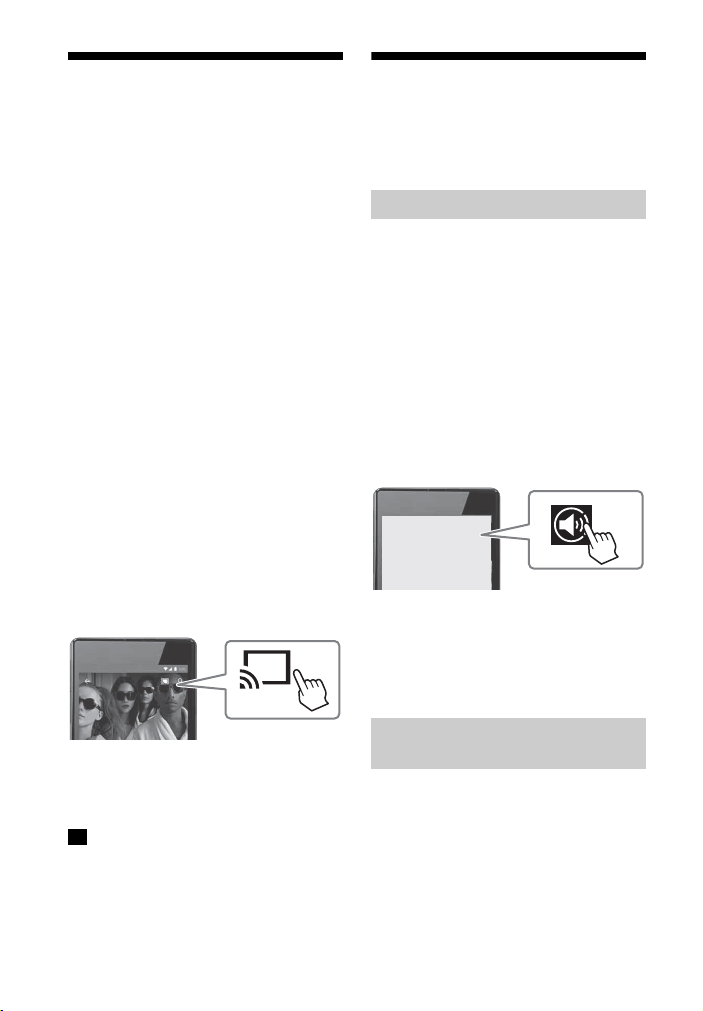
34
CT
使用Chromecast
built-in
Chromecast built-in可讓您從具備
Chromecast功能的應用程式中選擇音樂內
容,並在系統或包含系統的群組上播放。
1 按HOME。
主選單出現在電視機螢幕上。
2 選擇主選單上的[Music Service
List]。
音樂服務清單出現在電視機螢幕上。
3 選擇[Chromecast built-in]。
依照畫面訊息在系統上執行使用
Chromecast built-in的設定。
執行設定後,[快速啟動/網路待機]
會自動設定為[開],如此即使系統處
於待機模式,您也能快速播放音樂
(第48頁)。
4 透過Wi-Fi將行動裝置連線到與系統
相同的網路。
5 將具備Chromecast功能的應用程式安
裝到行動裝置。
6 啟動具備Chromecast功能的應用程
式,點選cast按鈕,並選擇系統或包
含系統的群組。
7 在具備Chromecast功能的應用程式上
選擇並播放音樂。
音樂在系統上播放。
視國家和地區而定,可能無法提供
Chromecast built-in和具備Chromecast功能
的應用程式。
使用Spotify
您可以在Spotify應用程式上選擇音樂,
並在系統上播放。若要在系統上播放,您
需要Spotify Premium帳號。
1 透過Wi-Fi將行動裝置連線到與系統
相同的網路。
2 將Spotify應用程式安裝到行動裝置。
3 啟動Spotify應用程式並登入Spotify
Premium帳號。
4 在Spotify應用程式上選擇並開始播
放音樂。
5 在Spotify應用程式上選擇Connect圖
示,並將系統選擇為音訊輸出裝置。
音樂在系統上播放。
若要在系統處於待機模式時仍然能快
速播放音樂
將[快速啟動/網路待機]設定為[開]
(第48頁)。
1 按MUSIC SERVICE。
當您已在系統上播放Spotify的音樂
時,會繼續播放使用Spotify播放的
音樂。詳情請參閱“使用MUSIC
SERVICE按鈕” (第35頁)。
註
啟用“Spotify Connect”功能
繼續播放已在行動裝置上播放
的音樂
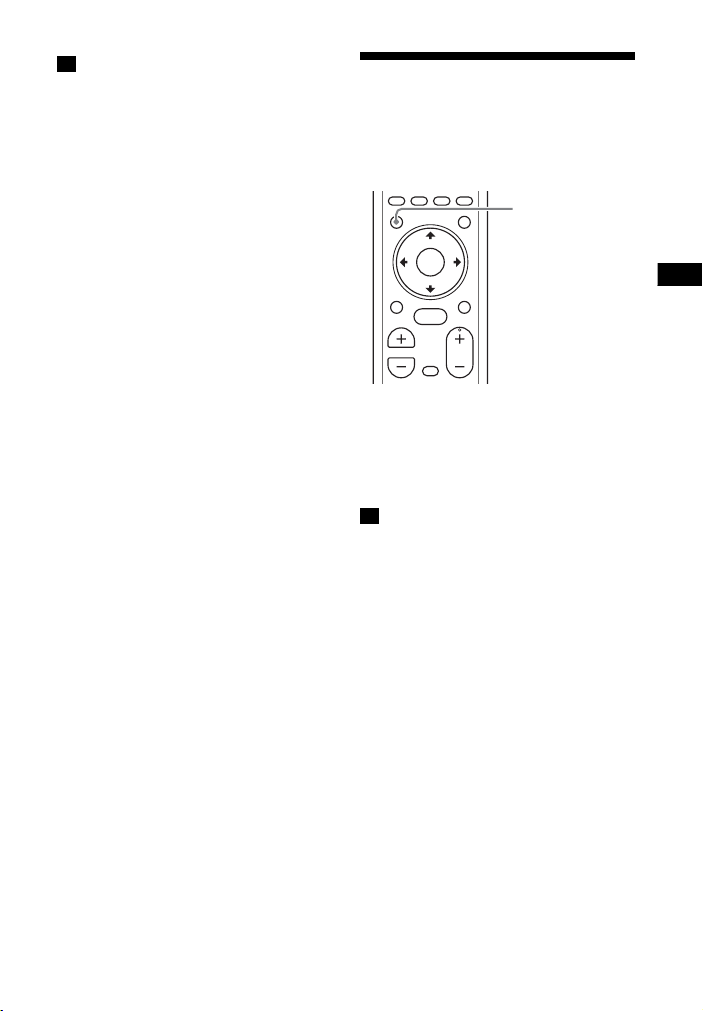
35
CT
使用網路功能聆聽音樂/聲音
某些國家/地區可能不提供Spotify應用程
式。
使用MUSIC SERVICE按
鈕
若要欣賞音樂服務,本系統必須與網際網
路連線。
按MUSIC SERVICE。
音樂服務清單出現在電視機螢幕上。
當您已在系統上播放Spotify的音樂時,
會繼續播放使用Spotify播放的音樂。請
參閱“使用Spotify” (第34頁)。
• 某些國家/地區可能不提供音樂服務。
• 如果無法繼續播放,會播放系統上次播放的
播放清單。
• 若要在系統上播放,您需要Spotify
Premium帳號。
提示
• 按下OPTIONS並在音樂服務清單上選擇[更新
服務],可以更新音樂服務清單。
• 選擇主選單上的[Music Service List]或按
下主機上的MUSIC SERVICE可以顯示音樂服
務清單。
註
註
MUSIC SERVICE
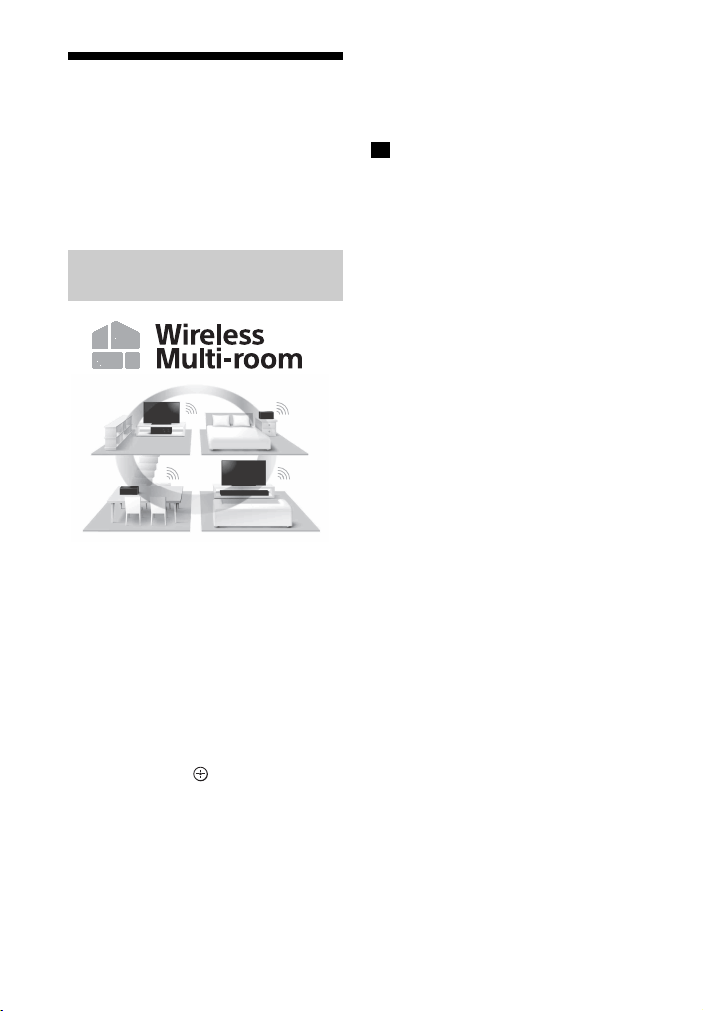
36
CT
連接無線連接多個房間
的相容裝置 (無線連
接多個房間)
將系統與無線連接多個房間的相容無線揚
聲器一起使用,就能在任何房間內聆聽音
樂。
您可以使用家用無線網路在不同的房間內
以高音質欣賞以下音樂或聲音。
• 音樂服務上的音樂
• 儲存在PC或智慧型手機中的音樂
• 系統的[TV]、[HDMI1]、[HDMI2] 、
[HDMI3] 或[Analog]輸入的聲音*
* 您可欣賞系統所連接裝置的聲音。系統的
聲音比畫面慢,因為要與其他揚聲器的聲
音同步。如果聲音與畫面之間的時間差會
困擾您,請按OPTIONS,將[Multi-room群
組同步]設定為[關]。(對於電視輸入,請
按OPTIONS與/直到“M.SYNC”出現於前
顯示面板,接著按 (輸入),然後按
/,直到“OFF”出現在前顯示面板
上。)系統的聲音會與畫面同步,但是其他
揚聲器輸出的聲音會延遲。
您可以使用行動裝置上安裝的Sony |
Music Center操作。若要使用多個裝置,
請將它們連接到相同的無線LAN。
若要在Sony | Music Center上執行設
定
依照Sony | Music Center上的說明執行設
定。
此功能不適用於系統所連接BLUETOOTH裝置上
的音樂。
提示
有關Sony | Music Center的詳情,請參閱
“Sony | Music Center的功能” (第33
頁)。
在不同的房間內聆聽相同的音
樂 (無線連接多個房間)
註
37
CT
使用各種功能/設定
自訂環繞聲的揚聲器
設定
為獲得良好的環繞音效,請設定揚聲器和
您聆聽位置之間的距離,以及它們的輸出
音量等。
預設設定下被劃線。
1 按HOME。
主選單出現在電視機螢幕上。
2 從主選單中選擇 [設置]。
設定顯示出現在電視機螢幕上。
3 選擇[音訊設定] - [揚聲器設定]。
[揚聲器設定]畫面出現在電視機螢幕
上。
4 執行揚聲器設定。
透過按下 / 和 從以下項目選
擇設定項目,然後按下 / 和
根據環境設定值。
[距離]
設定聆聽位置到揚聲器的距離。
值可以設定在0公尺到10公尺 (以0.1 m為
單位)。
[前方]:設定前揚聲器距離。
[重低音]:設定主動式重低音揚聲器距
離。
提示
按色彩按鈕 (RED)可以改變測量單位 (英
尺或公尺)。
[音量]
調整揚聲器的音量。
對於[前方]、[高度]和[重低音],值可以
設定在-6.0 dB到6.0 dB (以0.5 dB為單
位)。
[前方]:設定前揚聲器電平。
[高度]:設定上方揚聲器電平。
[重低音]:設定主動式重低音揚聲器電
平。
[測試音]
揚聲器發出測試音調以便檢查可用的揚聲
器。
[關]
:揚聲器不發出測試音調。
[開]:每個揚聲器按順序發出測試音調。
[天花板高度]
設定安裝系統的房間天花板高度。
值可以設定在1公尺到5公尺 (以0.1 m為
單位)。
提示
按色彩按鈕 (RED)可以改變測量單位 (英
尺或公尺)。
使用各種功能/設定
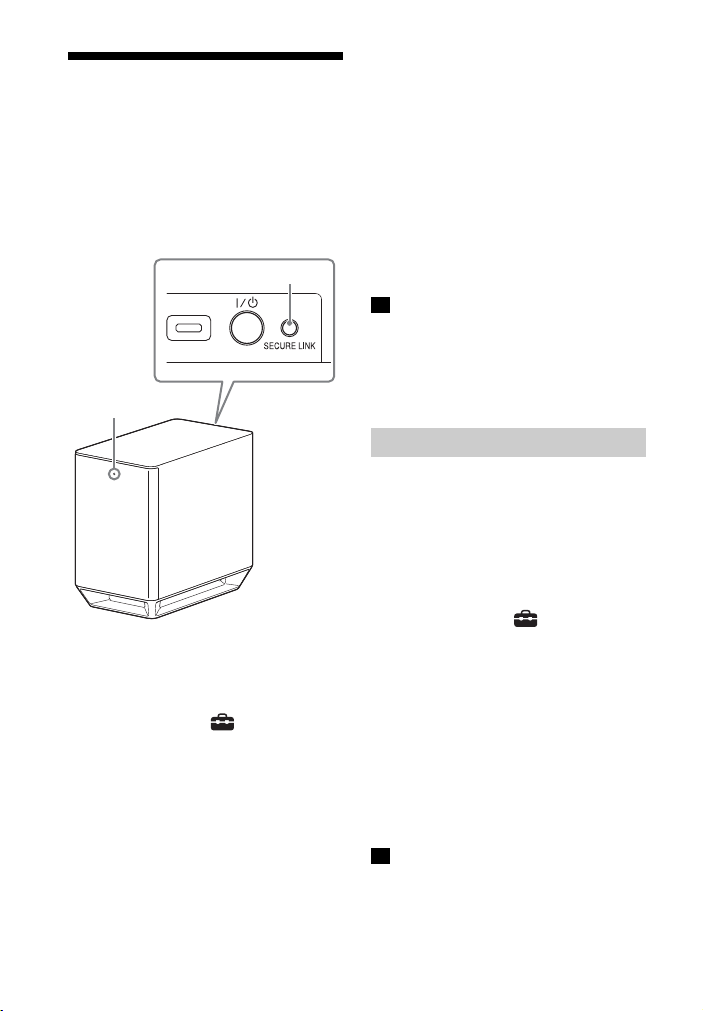
38
CT
執行主動式重低音揚聲
器的無線連接
(SECURE LINK)
您可以使用Secure Link功能指定連結系
統與主動式重低音揚聲器的無線連接。此
功能有助於防止您使用多種無線產品或您
的鄰居使用無線產品時的干擾情況。
1 按HOME。
主選單出現在電視機螢幕上。
2 從主選單中選擇 [設置]。
設定顯示出現在電視機螢幕上。
3 選擇[系統設定] - [無線重低音音箱
連接] - [Secure Link]。
[Secure Link]畫面出現在電視機螢幕
上。
4 選擇[開]。
5 按主動式重低音揚聲器背面的SECURE
LINK。
主動式重低音揚聲器的開/待機指示
燈閃爍橘燈。
在1分鐘內繼續下一步驟。
6 選擇[開始]。
連結設定啟動。
要返回之前的顯示,選擇[取消]。
7 依照畫面訊息完成連結設定。
主動式重低音揚聲器的開/待機指示
燈亮起橘燈。
• 如果出現[無法設定Secure Link。]訊息,
請依照畫面上的指示操作。
• 當[Bluetooth模式]設為[傳送]且BLUETOOTH
裝置連接至系統時,無法建立無線主動式重
低音揚聲器連接。
如果您使用多個無線系統,例如無線LAN,
則無線訊號可能不穩定。在此情況下,更
改下列[射頻頻道]設定或許可以改善傳
送。
1 按HOME。
主選單出現在電視機螢幕上。
2 從主選單中選擇 [設置]。
設定顯示出現在電視機螢幕上。
3 選擇[系統設定] - [無線重低音音箱
連接] - [射頻頻道]。
4 選擇您想要的設定。
• [自動] (預設設定):通常選擇此
選項。系統會自動選擇較佳頻道進
行傳送。
• [1]、[2]、[3]:系統會固定傳送頻
道來傳送聲音。選擇傳送情況較好
的頻道。
更改其他無線系統的傳送頻道 (頻率)或許
可以改善傳送。詳情請參閱其他無線系統的
使用說明書。
SECURE LINK
開/待機指示燈
註
如果無線傳輸不穩定
註
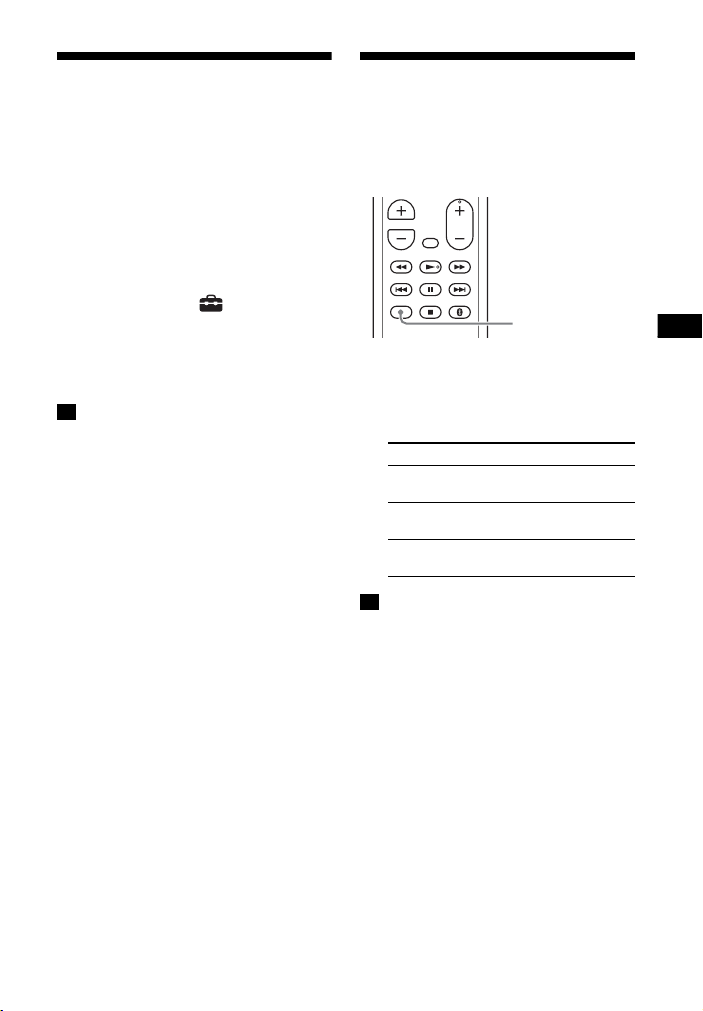
39
CT
使用各種功能/設定
以提升到接近高解析度
的音質播放壓縮音訊檔
案或CD (DSEE HX)
DSEE HX將現有的音源提升到接近高解析
度的音質,使您彷彿身處錄音室或音樂
會。
1 按HOME。
主選單出現在電視機螢幕上。
2 從主選單中選擇 [設置]。
設定顯示出現在電視機螢幕上。
3 選擇[音訊設定] - [DSEE HX]。
4 選擇[開]。
• 只有選擇[ClearAudio+]或[Music]做為音場
(第25頁)時,才能使用本功能。
• 此功能相容於取樣頻率44.1 kHz或48 kHz的
雙聲道數位輸入訊號。
• 提升後的取樣頻率/位元深度高達96 kHz/24
位元。
• 此功能與DSD訊號不相容。
• 此功能不適用於HDMI、電視機和類比輸入。
• 使用Chromecast built-in時,此功能無
效。
欣賞多路廣播聲音
(AUDIO)
當系統接收Dolby Digital多路廣播訊號
時,可以欣賞多路廣播聲音。
1 按AUDIO。
音訊訊號出現在前顯示面板中。
2 重複按下按鈕選擇所需的音訊訊號。
• 若要接收Dolby Digital訊號,您需使用光
纖數位線 (無附帶)將電視機或其他裝置
連接至TV IN (OPT)插孔。
• 如果您的電視機的HDMI IN插孔與Audio
Return Channel功能相容 (第42頁),您可
透過HDMI連接線接收Dolby Digital訊號。
註
音訊訊號 解說
“MAIN” 主要語言的聲音將會被
輸出。
“SUB” 次要語言的聲音將會被
輸出。
“MN/SB” 主要和次要語言的混合
聲音將會被輸出。
註
AUDIO
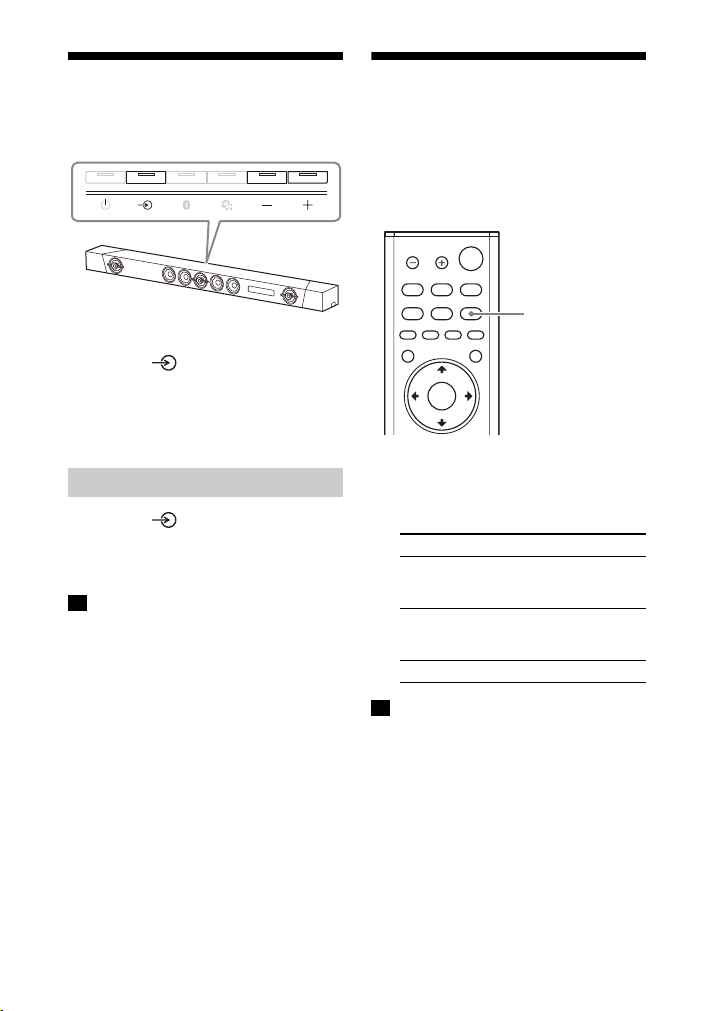
40
CT
停用主機的按鈕
您可以停用主機的按鈕,以避免誤操作,
例如孩童搗蛋 (兒童鎖功能)。
按住主機的 ,並依序按下 -、 +
和-。
“LOCK”出現在前顯示面板中,主機的按
鈕無效。
您只能使用遙控器操作本系統。
按住主機的 ,並依序按下 -、 +
和-。
“UNLCK”出現在前顯示面板中,兒童鎖
功能取消。
兒童鎖功能不會鎖住 (電源)。
變更前顯示面板與
BLUETOOTH指示燈的亮
度 (DIMMER)
您可以變更前顯示面板與BLUETOOTH指示
燈的亮度。
1 按DIMMER。
顯示模式出現在前顯示面板中。
2 重複按下按鈕選擇所需的顯示模式。
選取“Off”時,前顯示面板關閉。當您按下
任何按鈕時會自動開啟,如果約10秒未操作
系統,將再次關閉。但在某些情況下,前顯
示面板可能不會關閉。在此情況下,前顯示
面板的亮度與“Dark”相同。
取消兒童鎖功能
註
模式 解說
“Bright” 前顯示面板和
BLUETOOTH指示燈亮起
強光。
“Dark” 前顯示面板和
BLUETOOTH指示燈亮起
微光。
“Off” 前顯示面板關閉。
註
DIMMER

41
CT
使用各種功能/設定
待機模式中省電
確認您進行了以下設定:
– [Bluetooth待機]設為[關] (第47
頁)。
– [待機直通]設為[關] (第48頁)。
– [快速啟動/網路待機]設為[關] (第48
頁)。
– [遙控啟動]設為[關] (第49頁)。
透過主機將遠端訊號傳
送到電視機
當主機擋到電視機的遙控器感應器時,電
視機遙控器可能會無法使用。在此狀況
下,請啟用系統上的IR Repeater功能。
從主機背面傳送遠端訊號,可以使用電視
機的遙控器控制電視機。
1 按HOME。
主選單出現在電視機螢幕上。
2 從主選單中選擇 [設置]。
設定顯示出現在電視機螢幕上。
3 選擇[系統設定] - [IR-Repeater]。
[IR-Repeater]畫面出現在電視機螢
幕上。
4 選擇[開]。
• 請務必確定電視機的遙控器無法控制電視
機,再將[IR-Repeater]設為[開]。如果該
設定在遙控器可控制電視機時設為[開],則
因為遙控器的直接命令與透過主機發出的命
令之間有干擾,因此無法適當操作。
• 在某些電視機上,此功能可能無法正確運
作。在此情況下,請將主機稍微遠離電視
機。
註

42
CT
使用HDMI控制功能
透過HDMI連接線連接與HDMI控制功能*相
容的電視機或Blu-ray Disc播放器等裝
置,可讓您使用電視機遙控器輕鬆操作裝
置。
以下功能可以與HDMI控制功能一起使用。
• 系統關閉功能
• 系統聲音控制功能
• Audio Return Channel
• 觸控播放功能
• 透過電視機遙控器進行選單操作
• HDMI待機直通省電設定
這些功能可能適用於非Sony製造的裝置,但
不保證能正常運作。
* HDMI控制是CEC (Consumer Electronics
Control)用於讓HDMI (高解析度多媒體介
面)裝置互相控制的標準。
將系統上的[系統設定] - [HDMI設定] -
[HDMI控制]設至[開] (第48頁)。預設
設定為[開]。
為連接至系統的電視機和其他裝置啟用
HDMI控制功能設定。
提示
如果您在使用Sony製造的電視機時啟用HDMI
控制 (“BRAVIA”同步)功能,系統的HDMI
控制功能也會自動啟用。設定完成
時,“DONE”出現在前顯示面板中。
關閉電視機時,也會自動關閉系統。
將系統上的[系統設定] - [HDMI設定] -
[待機與電視連結]設至[開]或[自動]
(第48頁)。預設設定為[自動]。
視連接裝置的狀態而定,裝置可能無法關
閉。
若您在觀賞電視時開啟系統,則電視機的
聲音會從系統的揚聲器輸出。可以使用電
視機遙控器調整系統音量。
若您在上次觀賞電視時,電視機的聲音是
從系統的揚聲器輸出,則重新開啟電視機
時,系統也會自動開啟。
也可以使用電視機選單進行操作。詳情請
參閱電視機的使用說明書。
• 使用電視機的雙重畫面功能時,如果選取的
不是[TV]、[HDMI1]、[HDMI2]或[HDMI3]輸
入,只會從電視機輸出聲音。當您停用雙重
畫面功能時,會從系統輸出聲音。
• 視電視機而定,表示系統音量的數字會顯示
在電視機螢幕上。電視機上顯示的音量數字
可能與系統前顯示面板上的數字不同。
• 視電視機的設定而定,系統聲音控制功能可
能無效。詳情請參閱電視機的使用說明書。
如果系統連接至與Audio Return Channel
(ARC)相容的電視機HDMI IN插孔,您可
以從系統的揚聲器聆聽電視機的聲音,而
不需連接光纖數位線。
在系統上將[系統設定] - [HDMI設定] -
[電視機音訊輸入模式]設至[自動] (第
48頁)。預設設定為[自動]。
如果電視機與Audio Return Channel不相容,
需要連接光纖數位線 (無附帶)(請參閱隨
附的入⾨指南)。
當您在與本系統連接的裝置 (Blu-ray
Disc播放器、“PlayStation
®
4”等)上
播放內容時,本系統與電視機會自動開
啟,系統的輸入會切換到所播放裝置的輸
入,聲音會從系統的揚聲器輸出。
註
準備使用HDMI控制功能
系統關閉功能
註
系統聲音控制功能
註
Audio Return Channel
註
觸控播放功能

43
CT
使用各種功能/設定
• 如果系統上的[系統設定] - [HDMI設定] -
[待機直通]設為[開]或[自動],而且您上次
觀賞電視時電視機的聲音從電視機的揚聲器
輸出,則即使播放裝置內容,系統也不會開
啟,而且聲音和圖像會從電視機輸出 (第
48頁)。
• 視電視機而定,可能無法正確播放所播放內
容的起始處。
您可以使用電視機遙控器上的SYNC MENU
按鈕選擇系統並操作系統。
如果電視機支援連結選單,可以使用此功
能。詳情請參閱電視機的使用說明書。
• 在電視機的連結選單中,電視機會將系統識
別為“播放器”。
• 某些電視機可能無法使用某些操作。
HDMI待機直通省電設定功能 (第48頁)可
讓您欣賞已連接裝置的聲音和圖像,而不
需開啟系統。
將[系統設定] - [HDMI設定] - [待機直通]
設為[自動] (第48頁)。預設設定為[自
動]。
如果系統所連接裝置的圖像沒有顯示在電視
機上,請將[待機直通]設為[開]。如果您連
接非Sony製造的電視機,建議您選擇此設
定。
使用“BRAVIA”同步功
能
除了HDMI控制功能以外,您也可以在與
“BRAVIA”同步功能相容的裝置上使用以
下功能。
• 場景選擇功能
• 家庭劇院控制
• 回音取消功能
• 語言連動
這些功能是Sony的專利功能。此功能無法在
非Sony製造的產品上運作。
系統的音場會根據電視機的場景選擇功能
設定自動切換。詳情請參閱電視機的使用
說明書。
將音場設為[ClearAudio+] (第25頁)。
使用與家庭劇院控制功能相容的電視機
時,不需切換電視輸入就能設定系統、設
定音場設定、切換輸入等。
當電視機連接到網際網路時,可以使用此
功能。詳情請參閱電視機的使用說明書。
您在看電視節目時若使用Skype等社交檢
視功能,會降低回音。如果電視機支援社
交檢視功能,可以使用此功能。詳情請參
閱電視機的使用說明書。
註
透過電視機遙控器進行選單操
作
註
HDMI待機直通省電設定
註
註
場景選擇功能
家庭劇院控制功能
回音取消功能

44
CT
• 使用社交檢視功能時,如果系統的輸入為
[HDMI1]、[HDMI2]或[HDMI3],則輸入會自
動變更為[TV]。社交檢視與電視節目的聲音
會從系統的揚聲器輸出。
• 使用社交檢視功能時,如果系統的輸入非
[TV]、[HDMI1]、[HDMI2]或[HDMI3],聲音
只會從電視機的揚聲器輸出。
• 從電視機輸出聲音時,不能使用此功能。
當您更改電視機畫面顯示語言,系統的畫
面顯示語言也會隨著更改。
註
語言連動

45
CT
使用各種功能/設定
使用設定顯示
您可對例如圖像和聲音等項目進行各種調節。
預設設定下被劃線。
1 按HOME。
主選單出現在電視機螢幕上。
2 從主選單中選擇 [設置]。
設定顯示出現在電視機螢幕上。
3 選擇設定項目。
設定項目 解說
[軟體更新] 更新系統的軟體。(第46頁)
[螢幕設定] 根據電視機的類型進行螢幕設定。(第46頁)
[音訊設定] 根據連接插孔的類型進行音訊設定。(第46頁)
[Bluetooth設定] 為BLUETOOTH功能進行詳細設定。(第47頁)
[系統設定] 進行與系統有關的設定。(第48頁)
[網路設定] 為網際網路與家庭網路進行詳細設定。(第49頁)
[略過輸入設定] 為各個輸入指定輸入跳過設定。(第49頁)
[簡易設置] 重新執行簡易設置,以進行基本設定。(第49頁)
[重設] 將系統重設為原廠預設設定。(第50頁)
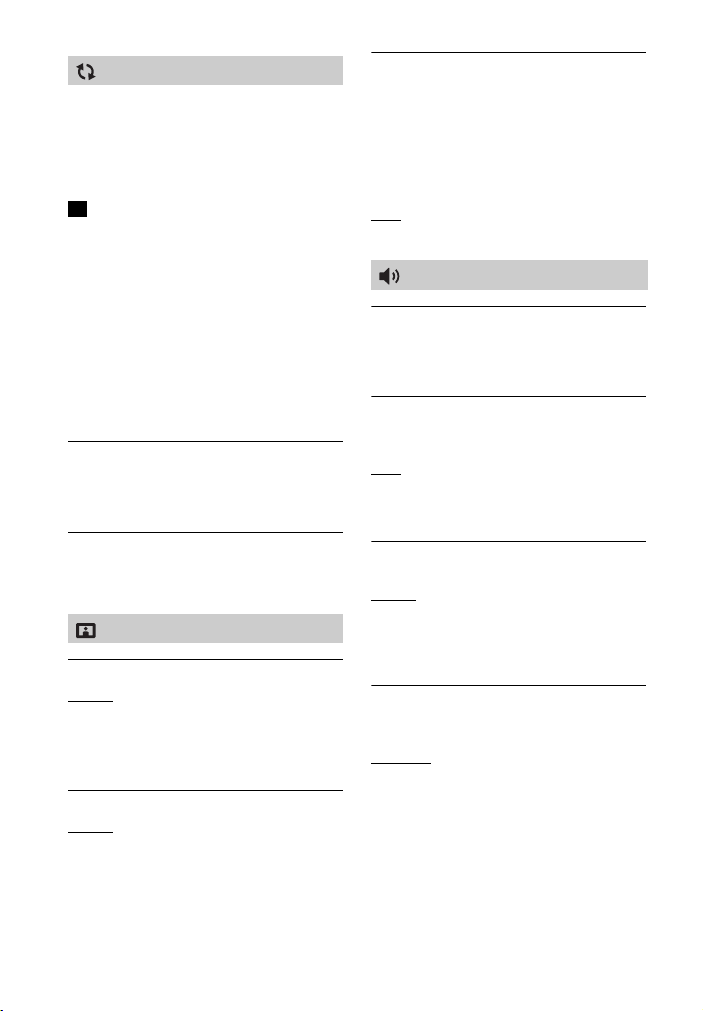
46
CT
將軟體更新至最新的版本,您即可利用最
新的功能。
有關更新功能的資訊,請瀏覽以下網站:
http://www.sony-asia.com/section/
support
• 可能需要約1小時才會完成更新。
• 需要網際網路環境以透過網際網路執行更
新。
• 軟體更新期間,“UPDT”出現在前顯示面板
中。更新完成後,系統會自動重新開機。更
新操作進行中時,不要開啟或關閉本系統,
或操作本系統或電視機。請等待軟體更新完
成。
• 若要自動執行軟體更新,請將[自動更新]設
為[開] (第49頁)。視更新的詳細資訊而
定,即使將[自動更新]選擇為[關],軟體更
新仍可能會執行。
[透過網路更新]
使用可用的網路更新系統的軟體。依照螢
幕上的指示操作。確保網路連接至網際網
路。
[透過USB記憶體更新]
使用USB記憶體更新軟體。確保軟體更新
資料夾正確命名為“UPDATE”。
[輸出視訊解析度]
[自動]:根據電視機或連接裝置的解析度
輸出視訊訊號。
[480p/576p]*:輸出480p/576p視訊訊號。
* 如果播放內容的色彩系統是NTSC,則視訊
訊號的解析度只能轉換為[480p]。
[YCbCr/RGB (HDMI)]
[自動]:自動偵測外部裝置的類型,然後
切換至符合的色彩設定。
[RGB]:當透過符合HDCP標準的DVI插孔連
接裝置時,請選擇此選項。
[視訊直接顯示]
當選取[HDMI1]、[HDMI2]或[HDMI3]輸入
時,您可以停用系統的螢幕顯示 (OSD)。
此功能適用於玩遊戲,您可以盡情享受遊
戲效果。
[開]:停用OSD。資訊不會出現在電視機
螢幕上,OPTIONS與DISPLAY按鈕將沒有作
用。
[
關]:只有當您變更設定時,例如選擇音
場,才會在電視機螢幕上顯示資訊。
[揚聲器設定]
您可以執行揚聲器設定以獲得最佳環繞
聲。詳情請參閱“自訂環繞聲的揚聲器設
定” (第37頁)。
[DSEE HX]
只有選擇[ClearAudio+]或[Music]做為音
場時,才能使用本功能。
[開]
:將壓縮音訊檔案或CD提升到高解析
度音質,並重現通常會遺失的清晰高音域
聲音 (第39頁)。
[關]:關閉
[音訊DRC]
您可壓縮聲帶的動態範圍。
[自動]
:自動壓縮以Dolby TrueHD編碼的
聲音。
[開]:系統複製錄音工程師原意的動態範
圍類型的杜比聲帶。
[關]: 動態範圍不被壓縮。
[音訊輸出]
您可選擇音訊訊號輸出所使用的輸出方
式。
[揚聲器]
:只從系統的揚聲器輸出多聲道
聲音。
[揚聲器+HDMI]:從電視機揚聲器和系統
揚聲器輸出聲音。播放裝置的音質視電視
機的音質而定 (聲道數量、取樣頻率
等)。如果電視機具備立體聲揚聲器,即
使播放多聲道音源,從系統揚聲器輸出的
聲音也會和電視機一樣是立體聲。
[軟體更新]
註
[螢幕設定]
[音訊設定]
47
CT
使用各種功能/設定
當[音訊輸出]設定為[揚聲器+HDMI],而且選
擇[HDMI1]、[HDMI2]或[HDMI3]輸入時,不會
顯示系統的螢幕顯示 (OSD),而且OPTIONS與
DISPLAY按鈕沒有作用。
[聲音效果]
您可以開啟/關閉音場等音效。
[Sound Field開啟]
:啟用所有音效。
[關]:停用音效。不要設定取樣頻率上限
時,選擇此項。
[音訊上混]
您可將優先權賦予上混設定之一。上混技
術能增加音源上的聲道數量。
[杜比環繞聲技術]
:杜比環繞聲技術上混
器會將音訊內容擴展為多聲道。它可在包
含上方揚聲器在內的多聲道揚聲器上播
放。
[Neural:X]:Neural:X是DTS的最新上混
技術,能將立體聲5.1聲道與7.1聲道擴展
為多聲道。它可在包含上方揚聲器在內的
多聲道揚聲器上播放。
• 輸入格式是Dolby時,[杜比環繞聲技術]擁
有優先權。輸入格式是DTS時,[Neural:X]
擁有優先權。
• 視音場而定,上方揚聲器可能沒有聲音。
[Bluetooth模式]
您可以使用本系統欣賞BLUETOOTH裝置的
內容,或使用BLUETOOTH相容的耳機聆聽
本系統的聲音。
[接收]
:本系統處於接收器模式,可從
BLUETOOTH裝置接收並輸出音訊。
[傳送]:本系統處於發送器模式,可將音
訊傳送至BLUETOOTH相容的耳機。如果您
切換系統的輸入,“BT TX”會出現在前
顯示面板上。
[關]:BLUETOOTH功能關閉,且您無法選
擇[Bluetooth Audio]輸入。
即使您已將[Bluetooth模式]設為[關],仍可
使用觸控功能連接BLUETOOTH裝置*。
* 僅智慧型手機、平板電腦、WALKMAN®等行
動裝置
[裝置清單]
當[Bluetooth模式]設為[傳送]時,顯示
已配對且偵測到的BLUETOOTH裝置 (SNK裝
置)清單。
[Bluetooth待機]
您可以設定[Bluetooth待機],讓本系統即
使在待機模式,仍能由BLUETOOTH裝置開
啟。此功能只有在您將[Bluetooth模式]設
為[接收]或[傳送]時才能使用。
[開]
:當您從配對的BLUETOOTH裝置要求
進行BLUETOOTH連線時,本系統會自動開
啟。
[關]:關閉
[Bluetooth Codec - AAC]
此功能只有在您將[Bluetooth模式]設為
[接收]或[傳送]時才能使用。
[開]
:啟用AAC轉碼器。
[關]:停用AAC轉碼器。
• 如果AAC為啟用,且您的裝置支援AAC,您便
能欣賞高品質聲音。
• 連接BLUETOOTH相容的耳機時,此設定無法
更改。
[Bluetooth Codec - LDAC]
此功能只有在您將[Bluetooth模式]設為
[接收]或[傳送]時才能使用。
[開]
:啟用LDAC轉碼器。
[關]:停用LDAC轉碼器。
• 如果LDAC為啟用,且您的裝置支援LDAC,您
便能享受更高品質聲音。
• 連接BLUETOOTH相容的耳機時,此設定無法
更改。
[無線播放品質]
您可以設定LDAC播放的傳送資料速率。此
功能只有在您將[Bluetooth模式]設為[傳
送],且[Bluetooth Codec - LDAC]設為
[開]時才能使用。
註
註
[Bluetooth設定]
註
註
註
48
CT
[自動]:資料傳輸速率會視環境自動改
變。如果音訊播放在此模式中不穩定,請
使用另外三個模式。
[音質]:使用最高位元速率。以較高品質
傳送聲音,但當連結品質不佳時,音訊播
放有時會不穩定。
[標準]
:使用中間位元速率。將聲音品質
與播放穩定性達成平衡。
[連接]:優先考量穩定性。提供合理的聲
音品質,但連線狀態最穩定。如果連線不
穩定,則建議此設定。
[螢幕顯示語言]
您可選擇您要的系統畫面顯示語言。
[無線重低音音箱連接]
您可以再次執行主動式重低音揚聲器的無
線連接。詳情請參閱“執行主動式重低音
揚聲器的無線連接 (SECURE LINK)”
(第38頁)。
[IR-Repeater]
[開]:電視機的遠端訊號從主機背面傳送
(第41頁)。
[關]
:關閉功能。
詳情請參閱“透過主機將遠端訊號傳送到
電視機” (第41頁)。
[HDMI設定]
• [HDMI控制] (第42頁)
[開]
:HDMI控制功能啟用。使用HDMI連
接線連接的裝置可以互相控制。
[關]:關閉
• [待機與電視連結] (第42頁)
此功能在您將[HDMI控制]設為[開]時可
以使用。
[自動]
:如果系統的輸入為[TV]、
[HDMI1]、[HDMI2]或[HDMI3],關閉電視
機時,也會自動關閉系統。
[開]:不論輸入為何,關閉電視機時,
都會自動關閉系統。
[關]:關閉電視機時,系統不會關閉。
• [待機直通] (第43頁)
此功能在您將[HDMI控制]設為[開]時可
以使用。
[自動]
:系統未開啟時若開啟電視機,
從系統的HDMI OUT (ARC)插孔輸出訊號。
系統待機耗電量可比設為[開]時低。
[
開]:系統未開啟時,一律從系統的
HDMI OUT (ARC)插孔輸出訊號。如果您
連接非Sony製造的電視機,建議您選擇
此設定。
[關]:系統未開啟時,不會從系統的
HDMI OUT (ARC)插孔輸出訊號。開啟系
統以在電視上欣賞系統所連接裝置的內
容。系統待機耗電量可比設為[開]時
低。
• [電視機音訊輸入模式] (第42頁)
當系統連接至與Audio Return Channel
相容的電視機HDMI IN插孔時,設定此功
能。Audio Return Channel功能在您將
[HDMI控制]設為[開]時可以使用。
[自動]
:您可以從系統的揚聲器聆聽電
視機的聲音。
[光纖]:連接光纖數位線時,使用此設
定。
• [HDMI訊號格式]
您可以選擇輸入訊號的HDMI訊號格式。
詳情請參閱“設定HDMI訊號格式以觀看
4K視訊內容” (第17頁)。
[快速啟動/網路待機]
[開]:縮短從待機模式啟動的時間。您可
在開啟系統後快速操作系統。
[關]
:關閉
若您同意使用Chromecast built-in功能,
[快速啟動/網路待機]將自動切換為[開]。
[自動待機模式]
[開]:開啟[自動待機模式]功能。當您大
約20分鐘沒有操作系統,系統自動進入待
機模式。
[關]
:關閉
[軟體更新通知]
[開]:設定系統告知您有關最新軟體版本
的資訊 (第46頁)。
[關]:關閉
[系統設定]
註
49
CT
使用各種功能/設定
[自動更新設定]
• [自動更新]
[開]:在所選[時區]中的當地時間上午2
點至上午5點之間且本系統未使用時自動
執行軟體更新。如果選擇[快速啟動/網
路待機]中的[關],則會在您關閉系統後
執行軟體更新。
[關]
:關閉
• [時區]
選擇您的國家/地區。
• 視更新的詳細資訊而定,即使將[自動更新]
選擇為[關],軟體更新仍可能會執行。
• 在發佈新軟體後的11天內會自動執行軟體更
新。
[裝置名稱]
您可根據您的喜好更改本系統的名稱以便
本系統在使用[Bluetooth Audio]功能時
更容易被識別。此名稱也可用於其他網
路,例如家庭網路。依照螢幕指示進行,
使用軟體鍵盤輸入名稱。
[系統資訊]
您可顯示系統的軟體版本資訊和MAC位址。
[軟體授權資訊]
您可顯示軟體授權資訊。
[網際網路設定]
預先將系統連接至網路。
[有線設置]:當您使用LAN連接線連接寬
頻路由器時,選擇此項。當您選擇此設定
時,系統的無線LAN功能會自動停用。
[無線設置]:當您使用系統內建的Wi-Fi
功能與無線網路連線時,選擇此項。
提示
有關進一步詳情,請瀏覽以下網站並查看常
見問題 (FAQ):
http://www.sony-asia.com/section/support
[網路連線狀態]
顯示目前網路連線的狀態。
[網路連線診斷]
您可以進行網路診斷以檢查網路是否正確
連線。
[連線伺服器設定]
設定是否要顯示連接的家庭網路伺服器。
[自動家庭網路存取權限]
[開]:允許從新偵測到的家庭網路控制器
自動存取。
[關]:關閉
[家庭網路存取控制]
顯示與家庭網路控制器相容的產品清單,
並設定是否接受來自清單中控制器的命
令。
[外部控制]
[開]
:允許家用自動化控制器操作本系
統。
[關]:關閉
[遙控啟動]
[開]:當系統處於待機模式時,允許您透
過與網路連結的裝置開啟系統。
[關]
:無法透過與網路連結的裝置開啟系
統。
略過設定是一個很方便的功能,可讓您透
過按INPUT +/- 在選擇功能時略過未使用
的輸入。
[不要略過]
:系統不略過所選的輸入。
[略過]:系統略過所選的輸入。
如果輸入已設為[略過],則當主選單顯示時
若您按INPUT +/-,輸入圖示會呈暗灰色。
提示
您可以從選項選單執行[略過輸入設定] (第
51頁)。
執行[簡易設置]為系統進行基本初始設定
與基本網路設定。依照畫面指示操作。
註
[網路設定]
[略過輸入設定]
註
[簡易設置]

50
CT
[重設為原廠預設的設定]
您可選擇設定群組將系統設定重設為原廠
預設值。在群組中的所有設定將會被重
設。
[初始化個人資訊]
您可以清除存儲在系統中的個人資訊。
如果您廢棄、轉讓或轉售本系統,為了安全
起見請刪除所有個人資訊。請採取適當的措
施,例如在使用網路服務後登出。
[重設]
註
51
CT
使用各種功能/設定
選項選單清單
按OPTIONS即可使用各種設定和播放操作。可用項目視情形而不同。
• 電視輸入不會顯示選項選單。
• 觀賞HDR訊號或4K視訊格式的內容時,OPTIONS按鈕沒有作用。如需關於4K視訊格式的詳細資
訊,請參閱“支援的HDMI視訊格式” (第64頁)。
項目 解說
[影音同步] 調節圖像和聲音之間的時間差距。聲音輸出可延遲 (第27頁)。
[Sound Field] 變更音場設定 (第25頁)。
[Night] 選擇夜間模式 (第26頁)。
[Voice] 選擇語音模式 (第26頁)。
[DTS Dialog Control] 在串流DTS:X內容時調整對話音量。您可輕易聽到對話,因為對話從環境
雜音中凸顯出來。這項功能在某些音訊格式上沒有作用。
[略過輸入設定] 透過按INPUT +/- 在選擇功能時略過未使用的輸入 (第49頁)。
[輸入標籤設定] 您可以變更主選單上顯示的[HDMI1]、[HDMI2]或[HDMI3]的輸入名稱 (第
23頁)。
[重複設定] 設定重複播放。
[隨機設定] 設定隨機播放。
[播放/停止] 開始或停止播放。
[從頭開始播放] 從開頭播放項目。
[Multi-room群組同步] 設定在使用無線連接多個房間功能時,系統的聲音是否與其他揚聲器的聲
音同步 (第36頁)。
註

52
CT
故障排除
若您在使用系統時遇到任何以下問題,請
在尋求維修之前使用此故障檢修指南以幫
助您解決有關問題。若問題持續,請就近
與Sony經銷商聯絡。
在要求進行維修時,請務必同時攜帶您的
主機和主動式重低音揚聲器,即使看起來
只有一個有問題。
系統電源未開啟。
檢查交流電源線已穩固地連接。
將交流電源線從牆壁插座中拔出,數分
鐘後再重新接上。
雖然電視機開啟,但系統沒有開啟。
將[系統設定] - [HDMI設定] - [HDMI控
制]設為[開] (第48頁)。電視機必須
支援HDMI控制功能 (第42頁)。詳情請
參閱電視機的使用說明書。
檢查電視機的揚聲器設定。系統電源與
電視機的揚聲器設定同步。詳情請參閱
電視機的使用說明書。
如果上次聲音從電視機的揚聲器輸出,
即使電視機開啟,系統也不會開啟。
當電視機關閉時,系統也關閉。
檢查[系統設定] - [HDMI設定] - [待機
與電視連結]的設定 (第48頁)。[待機
與電視連結]設為[開]時,不論輸入為
何,關閉電視機時,都會自動關閉系
統。
雖然電視機關閉,但系統沒有關閉。
檢查[系統設定] - [HDMI設定] - [待機
與電視連結]的設定 (第48頁)。如果
不論輸入為何都要在關閉電視機時自動
關閉系統,請將[待機與電視連結]設為
[開]。電視機必須支援HDMI控制功能
(第42頁)。詳情請參閱電視機的使用
說明書。
沒有圖像或圖像輸出不正確。
選擇適當的輸入 (第13頁)。
選擇電視輸入時,如果沒有圖像,請使
用電視機遙控器選擇您要的電視頻道。
選擇HDMI IN 1/2/3輸入時,如果沒有
圖像,請按下所連接裝置的播放按鈕。
斷開HDMI連接線,然後再次連接。確定
連接線已插牢。
按住 不放,然後依序按下主機上
的 +、 -、 +,可將視訊輸出解析度設
定設至最低等級。
如果沒有圖像來自連接的裝置,或是連
接的裝置沒有正確輸出圖像,請將[系
統設定] - [HDMI設定] - [HDMI訊號格
式]設為[標準格式] (第17頁)。
如果您連接支援HDCP 2.2的裝置,請務
必將裝置連接到HDMI IN插孔,將電視
機連接到系統的HDMI OUT插孔。
系統連接到不符合HDCP (高頻寬數位
內容防護)的輸入裝置。在此情況下,
請檢查所連接裝置的規格。
來自HDMI IN 1/2/3插孔的3D內容沒有
出現在電視機螢幕上。
視電視機或視訊裝置而定,3D內容可能
不會出現。檢查支援的HDMI視訊格式
(第64頁)。
來自HDMI IN 1/2/3插孔的4K視訊內容
沒有出現在電視機螢幕上。
視電視機或視訊裝置而定,4K視訊內容
可能不會出現。檢查電視機與視訊裝置
的視訊功能與設定。
如果變更[HDMI訊號格式]設定,可能無
法正確顯示圖像。在此情況下,請將此
設定變更為[標準格式] (第17頁)。
使用支援18Gbps乙太網路連接的特級高
速HDMI傳輸線或支援乙太網路連接的高
速HDMI傳輸線 (第64頁)。
圖像沒有顯示在整個電視螢幕上。
媒體上的高寬比是固定的。
從HDMI插孔傳出的影像失真。
從連接到HDMI插孔的裝置傳出的視訊可
能失真。如果發生此狀況,請將[視訊
直接顯示]設為[開] (第46頁)。
故障排除
電源
圖像

53
CT
故障排除
系統未開啟時,不從電視機輸出圖像和
聲音。
在系統上將[系統設定] - [HDMI設定] -
[HDMI控制]設為[開],然後將[待機直
通]設為[自動]或[開] (第48頁)。
開啟系統,然後將輸入切換至目前播放
的裝置。
如果連接至非Sony製造且支援HDMI控制
功能的裝置,請將[系統設定] - [HDMI
設定] - [待機直通]設為[開] (第48
頁)。
HDR內容無法以高動態範圍顯示。
檢查電視機與連接裝置的設定。詳情請
參閱電視機與連接裝置的使用說明書。
如果頻寬不足,某些裝置可能會將HDR
內容轉換為SDR。在此狀況下,如果電
視機與連接裝置支援頻寬高達18Gbps,
請將[系統設定] - [HDMI設定] - [HDMI
訊號格式]設為[增強格式] (第17
頁)。選擇[增強格式]時,務必使用支
援18Gbps乙太網路連接的特級高速HDMI
傳輸線 (第64頁)。
系統無法輸出電視機的聲音。
檢查連接系統與電視機的HDMI連接線、
光纖數位線或類比音源線的類型和連接
(請參閱隨附的入⾨指南)。
斷開連接在TV和系統之間的連接線,然
後重新牢固地連接。從AC電源插座斷開
TV和系統的AC電源線,然後重新連接。
透過HDMI連接線連接本系統和電視機
時,檢查以下內容。
– 所連接電視機的HDMI插孔標示
“ARC”。
– 電視機的HDMI控制功能設為開啟。
– 在系統上,[HDMI控制]設為[開],
[電視機音訊輸入模式]設為[自動]
(第48頁)。
如果電視機與Audio Return Channel不
相容,請連接光纖數位線 (無附帶)
(請參閱隨附的入⾨指南)。如果電視
機與Audio Return Channel不相容,即
使系統連接至電視機的HDMI IN插孔,
電視機的聲音也不會從系統輸出。
將系統的輸入切換到[TV] 。使用類比
音訊連接線 (無附帶)連接本系統和
電視機時,將系統的輸入切換到
[Analog] (第13頁)。
提高系統音量或取消靜音。
如果連接電視機的有線電視盒/衛星電
視盒沒有輸出聲音,請將裝置連接到系
統的HDMI IN插孔,並將系統的輸入切
換到已連接裝置的輸入 (HDMI IN 1/2/
3)(請參閱隨附的入⾨指南)。
視您連接電視機與系統的順序而定,系
統可能會靜音,而且系統前顯示面板上
會顯示“Muting”。如果發生此狀況,
請先打開電視機,再啟動系統。
將電視機 (BRAVIA)的揚聲器設定設
為音訊系統。請參閱電視機的使用說明
書中有關如何設定電視機的資訊。
系統未開啟時,不從電視機輸出圖像和
聲音。
在系統上將[系統設定] - [HDMI設定] -
[HDMI控制]設為[開],然後將[待機直
通]設為[自動]或[開] (第48頁)。
開啟系統,然後將輸入切換至目前播放
的裝置。
如果連接至非Sony製造且支援HDMI控制
功能的裝置,請將[系統設定] - [HDMI
設定] - [待機直通]設為[開] (第48
頁)。
系統與電視機會同時輸出聲音。
將系統或電視機的聲音靜音。
本系統的電視機聲音延遲,跟不上影
像。
如果[影音同步]設為25毫秒到300毫秒
之間的範圍,請將它設為0毫秒 (第27
頁)。
連接至系統的裝置未發出聲音,或聲音
很小。
按遙控器上的 +,並檢查音量 (第
11頁)。
按遙控器上的 或 + 以取消靜音
功能 (第11頁)。
確認已正確選擇輸入來源。您應該按下
遙控器上的INPUT +/- 數次來嘗試其他
輸入來源 (第11頁)。
檢查系統與連接裝置的所有連接線與導
線是否皆已插牢。
聲音

54
CT
播放相容於版權保護技術 (HDCP)的
內容時,可能無法從系統輸出聲音。
將[系統設定] - [HDMI設定] - [HDMI訊
號格式]設為[標準格式] (第17頁)。
不能產生環繞效果。
視輸入訊號與音場設定而定,環繞聲處
理可能無法有效運作。環繞音效可能不
明顯,視節目或光碟而定。
若要播放多聲道音訊,請檢查連接本系
統的裝置上,數位音訊輸出設定是否正
確。詳情請參閱連接裝置附帶的使用說
明書。
當[音訊輸出]設定為[揚聲器+HDMI],
系統揚聲器輸出的聲音和電視機的聲音
屬於相同立體形態,即使播放多聲道音
源也一樣。 在此狀況下,請將它設定為
[揚聲器] (第46頁)。
聲音比圖像延遲。
以無線連接多個房間功能播放[TV]、
[HDMI1]、[HDMI2]、[HDMI3]或
[Analog]輸入的聲音時,系統的聲音比
畫面慢,因為要與其他揚聲器的聲音同
步。如果聲音與畫面之間的時間差會困
擾您,請按OPTIONS,將[Multi-room群
組同步]設定為[關]。(對於電視輸入,
請按OPTIONS與/直到“M.SYNC”出
現於前顯示面板,接著按 (輸入),
然後按/,直到“OFF”出現在前顯
示面板上。)系統的聲音會與畫面同
步,但是其他揚聲器輸出的聲音會延
遲。
主動式重低音揚聲器沒有聲音或只聽到
極細微的聲音。
按遙控器上的SW + 以調高主動式重
低音揚聲器音量 (第27頁)。
確定主動式重低音揚聲器上的開/待機
指示燈亮起綠燈或橘燈。
如果主動式重低音揚聲器上的開/待機
指示燈沒有亮起,請嘗試以下操作。
– 確保主動式重低音揚聲器的交流電源
線已連接妥當。
– 按主動式重低音揚聲器的 / (開/
待機)以開啟電源。
如果主動式重低音揚聲器上的開/待機
指示燈緩慢閃爍綠燈或橘燈,或是亮起
紅燈,請嘗試以下操作。
– 將主動式重低音揚聲器移動到主機附
近,讓主動式重低音揚聲器上的開/
待機指示燈亮起綠燈或橘燈。
– 請依照“執行主動式重低音揚聲器的
無線連接 (SECURE LINK)” (第38
頁)中的步驟操作。
主動式重低音揚聲器上的開/待機指示
燈快速閃爍綠燈。
– 請就近與Sony經銷商聯絡。
如果主動式重低音揚聲器上的開/待機
指示燈閃爍紅燈,請按主動式重低音揚
聲器的 / (開/待機)以關閉電源,
並檢查主動式重低音揚聲器的通風孔是
否堵塞。
主動式重低音揚聲器可以重現低音。若
輸入來源包含的低音聲音元件很少
(也就是電視機廣播),則可能會難以
聽見主動式重低音揚聲器的聲音。
將夜間模式設為[關]。詳情請參閱“深
夜時以低音量欣賞清晰的聲音
(NIGHT)” (第26頁)。
跳聲或產生雜音。
如果附近有會產生電磁波的裝置,例如
無線LAN或使用中的微波爐,請將系統
放在遠離裝置的位置。
如果在主機和主動式重低音揚聲器間有
障礙物,請移動或移除。
盡可能讓主機靠近主動式重低音揚聲
器。
將任何附近的無線LAN路由器或PC的無
線LAN頻率切換到5 GHz的範圍。
將電視機或Blu
-
ray Disc播放器的網路
連線從無線切換成有線。
USB裝置不被識別。
嘗試以下操作:
關閉系統。
移除USB裝置,然後再次連接。
開啟系統。
確保USB裝置穩固地連接至 (USB)連
接埠 (第24頁)。
檢查USB裝置或連接線是否損壞。
主動式重低音揚聲器
USB裝置連接

55
CT
故障排除
確保USB裝置已開啟。
如果透過USB集線器連接USB裝置,切斷
連接,然後將USB裝置直接連接至系
統。
無法完成BLUETOOTH連線。
確定主機的BLUETOOTH指示燈亮起 (第
28頁)。
確認要連接的BLUETOOTH裝置已開啟,
並已啟用BLUETOOTH功能。
讓本系統與BLUETOOTH裝置互相靠近。
再次配對本系統和BLUETOOTH裝置。您
可能需要先使用BLUETOOTH裝置取消本
系統的配對。
配對資訊可能被刪除。再次進行配對操
作 (第28頁)。
無法完成配對。
讓本系統與BLUETOOTH裝置互相靠近。
確認本系統未接收來自無線LAN裝置、
其他2.4 GHz無線裝置或微波爐的干擾。
如果附近有產生電磁幅射的裝置,請將
該裝置移離本系統。
您無法使用NFC功能。
NFC功能不適用於BLUETOOTH相容的耳
機。若要使用BLUETOOTH相容的耳機聆
聽聲音,請參閱“從耳機聆聽所連接電
視機或裝置的聲音” (第30頁)。
檢查BLUETOOTH相容裝置的NFC功能已啟
用。
系統無法輸出所連接BLUETOOTH行動裝
置的聲音。
確定主機的BLUETOOTH指示燈亮起 (第
28頁)。
讓本系統與BLUETOOTH裝置互相靠近。
如果附近有產生電磁輻射的裝置,如無
線LAN裝置、其他BLUETOOTH裝置或微波
爐,請將該裝置移離本系統。
請將本系統與BLUETOOTH裝置之間的任
何障礙物移開,或將本系統遠離障礙
物。
重新擺放連接的BLUETOOTH裝置。
將任何附近的無線LAN路由器或PC的無
線LAN頻率切換到5 GHz的範圍。
調高連接的BLUETOOTH裝置的音量。
無法完成BLUETOOTH連線。
確定主機的BLUETOOTH指示燈亮起 (第
8頁)。
確認要連接的BLUETOOTH裝置已開啟,
並已啟用BLUETOOTH功能。
讓本系統與BLUETOOTH裝置互相靠近。
再次配對本系統和BLUETOOTH裝置。您
可能需要先使用BLUETOOTH裝置取消本
系統的配對。
配對資訊可能被刪除。再次進行配對操
作 (第30頁)。
無法完成配對。
讓本系統與BLUETOOTH裝置互相靠近。
確認本系統未接收來自無線LAN裝置、
其他2.4 GHz無線裝置或微波爐的干擾。
如果附近有產生電磁幅射的裝置,請將
該裝置移離本系統。
您無法使用NFC功能。
NFC功能不適用於BLUETOOTH相容的耳
機。若要使用BLUETOOTH相容的耳機聆
聽聲音,請參閱“從耳機聆聽所連接電
視機或裝置的聲音” (第30頁)。
連接的BLUETOOTH耳機無法輸出聲音。
確定主機的BLUETOOTH指示燈亮起 (第
8頁)。
讓本系統與BLUETOOTH裝置互相靠近。
如果附近有產生電磁輻射的裝置,如無
線LAN裝置、其他BLUETOOTH裝置或微波
爐,請將該裝置移離本系統。
請將本系統與BLUETOOTH裝置之間的任
何障礙物移開,或將本系統遠離障礙
物。
重新擺放連接的BLUETOOTH裝置。
將任何附近的無線LAN路由器或PC的無
線LAN頻率切換到5 GHz的範圍。
調高連接的BLUETOOTH裝置的音量。
將[無線播放品質]設為[連接] (第47
頁)。
行動裝置連接
透過BLUETOOTH進行耳機連接

56
CT
系統無法連接至網路。
檢查網路連接 (第18頁)和網路設定
(第49頁)。
在執行了[Wi-Fi保護設置™ (WPS)]之
後,您無法將您的PC連接至網際網路。
如果您在調節路由器的設定之前使用
Wi-Fi保護設置功能,路由器的無線設
定可能自動更改。在此情況下,據此更
改您PC的無線設定。
系統無法連接至網路或網路連接不穩
定。
確定無線LAN路由器已開啟。
檢查網路連接 (第19頁)和網路設定
(第49頁)。
視使用環境 (包括牆壁材料)、無線電
波接收狀況或系統和無線LAN路由器之
間的障礙,可通訊距離可能縮短。移動
系統和無線LAN路由器使之間的距離拉
近。
使用2.4 GHz頻率波段的裝置,例如微
波爐、BLUETOOTH或數位無線裝置,可
能會干擾通訊。將主機搬離這類裝置,
或關閉這類裝置。
無線LAN連接視使用環境而可能不穩
定,尤其在使用系統的BLUETOOTH功能
時。在此情況下,調節使用環境。
您要的無線LAN路由器沒有顯示在無線
網路清單中。
按BACK以返回上一個畫面,然後再次嘗
試[無線設置] (第19頁)。如果仍然偵
測不到您要的無線LAN路由器,從網路
清單選擇[添加新的無線網路],然後選
擇[手動登記]以手動輸入網路名稱
(SSID)。
您無法將本系統連接至網際網路。
檢查有線或無線LAN連接。
重新啟動路由器或無線LAN路由器。
聲音比圖像延遲。
以無線連接多個房間功能播放[TV]、
[HDMI1]、[HDMI2]、[HDMI3]或
[Analog]輸入的聲音時,系統的聲音比
畫面慢,因為要與其他揚聲器的聲音同
步。如果聲音與畫面之間的時間差會困
擾您,請按OPTIONS,將[Multi-room群
組同步]設定為[關]。(對於電視輸入,
請按OPTIONS與/直到“M.SYNC”出
現於前顯示面板,接著按 (輸入),
然後按/,直到“OFF”出現在前顯
示面板上。)系統的聲音會與畫面同
步,但是其他揚聲器輸出的聲音會延
遲。
無線連接多個房間功能無法用於Sony |
Music Center。
將行動裝置連接到和系統連接的相同網
路。
本系統的遙控器不能操作。
將遙控器指向主機上的遙控器感應器
(第8頁)。
移除遙控器和系統之間的所有障礙物。
若遙控器的電池電量不足,請更換兩顆
新電池。
確認您在遙控器上按下正確按鈕。
電視機遙控器不能操作。
啟用IR Repeater功能可能可解決此問
題 (第48頁)。
HDMI控制功能不能正常操作。
檢查系統連線 (請參閱隨附的入⾨指
南)。
啟用電視機的HDMI控制功能。詳情請參
閱電視機的使用說明書。
請稍等片刻,然後再試一次。如果拔出
系統的插頭,要稍等一下才能進行操
作。等待15秒以上,然後再試一次。
有線LAN連接
無線LAN連接
網際網路連線
無線連接多個房間
遙控器
其它

57
CT
故障排除
確保連接系統的裝置支援HDMI控制功
能。
在連接系統的裝置上啟用HDMI控制功
能。詳情請參閱您裝置的使用說明書。
HDMI控制功能可控制的裝置類型與數目
受HDMI CEC標準的限制,如下所示:
– 錄製裝置 (Blu-ray Disc錄影機、
DVD錄影機等):最多3個裝置
– 播放裝置 (Blu-ray Disc播放器、
DVD播放器等):最多3個裝置 (本系
統使用其中之一)
– 與調諧器相關的裝置:最多4個裝置
– 音訊系統 (接收器/耳機):最多1個
裝置 (本系統使用)
“PRTCT”、“PUSH”及“POWER”在前
顯示面板中交替閃爍。
按 (電源)關閉系統。指示消失
後,拔出交流電源線,並確定系統的通
風口沒有堵塞。
“BT TX”出現在前顯示面板中。
按遙控器上的BLUETOOTH RX/TX將
[Bluetooth模式]切換到[接收]。如果
[Bluetooth模式]設為[傳送],會出現
“BT TX” (第47頁)。按遙控器上的
BLUETOOTH RX/TX時,[Bluetooth模式]
會切換到[接收],而且所選輸入會出現
在前顯示面板中。
電視機感應器未正確運作。
主機可能會阻礙某些感應器 (例如亮
度感應器)、電視機的遙控器接收器、
支援紅外線3D眼鏡系統之3D電視機的3D
眼鏡發射器 (紅外線傳輸)或無線通
訊。在允許部件正確運作的範圍內,將
主機從電視機處移開。針對感應器和遙
控器接收器的位置,請參閱電視機隨附
的使用說明書。
無線功能 (無線LAN、BLUETOOTH或主
動式重低音揚聲器)不穩定。
請勿將電視機以外的金屬物體放在系統
附近。
突然播放您不熟悉的音樂。
可能已播放預先安裝的音樂範本。按主
機上的 停止播放。
系統沒有正常運作。
系統可能處於示範模式。若要取消示範
模式,請重設系統。按住主機上的
(電源)和-超過5秒 (第58頁)。


59
CT
其他資訊
規格
放大器部分
功率輸出 (額定)
左前+右前:30 W + 30 W
(6歐姆,1 kHz,1% THD)
功率輸出 (參考)
左前置/右前置揚聲器區塊:50 W (每
聲道6歐姆,1 kHz)
左前置高音揚聲器/右前置高音揚聲器區
塊:50 W (每聲道6歐姆,10 kHz)
中置揚聲器區塊:50 W (每聲道6歐姆,
1kHz)
中置高音揚聲器區塊:50 W (每聲道6
歐姆,10 kHz)
頂置揚聲器區塊:50 W (每聲道6歐姆,
1kHz)
輸入
HDMI IN 1/2/3*
ANALOG IN
TV IN (OPT)
輸出
HDMI OUT (TV (ARC))*
* HDMI IN 1/2/3和HDMI OUT (TV (ARC))插
孔支援HDCP 2.2通訊協定。HDCP 2.2是新
增強的版權保護技術,用於保護如4K電影
等內容。
HDMI部分
連接器
類型A (19針)
USB部分
(USB)連接埠:
類型A (用於連接USB記憶體)
LAN部分
LAN(100)端子
100BASE-TX端子
無線LAN部分
通訊系統
IEEE 802.11 a/b/g/n
頻率波段
2.4 GHz、5 GHz
BLUETOOTH部分
通訊系統
BLUETOOTH規格4.1版
輸出
BLUETOOTH規格電源等級1
最遠通訊範圍
視線範圍約30 m
1)
可註冊的裝置數量上限
9個裝置
頻率波段
2.4 GHz波段(2.4 GHz - 2.4835 GHz)
調製方式
FHSS (Freq Hopping Spread Spectrum)
相容的BLUETOOTH模式
2)
A2DP 1.2 (Advanced Audio
Distribution Profile)
AVRCP 1.5 (Audio Video Remote
Control Profile)
支援的轉碼器
3)
SBC
4)
, AAC
5)
, LDAC
傳輸範圍 (A2DP)
20 Hz - 40000 Hz (LDAC取樣頻率
96 kHz,以990 kbps傳輸)
20 Hz - 20000 Hz(取樣頻率44.1 kHz)
1)
實際範圍視裝置之間的障礙物、微波爐附
近的磁場、靜電、無線電話、接收靈敏
度、作業系統、軟體應用程式等因素而
異。
2)
BLUETOOTH標準模式指出裝置之間的
BLUETOOTH通訊目的。
3)
轉碼器:音訊訊號壓縮和轉換格式
4)
次頻帶轉碼器的縮寫
5)
進階音訊編碼的縮寫
左前置/右前置揚聲器區塊部分
揚聲器系統
雙向同軸揚聲器系統、氣墊式
揚聲器
低音揚聲器:65 mm圓錐型、磁流揚聲器
高音揚聲器:14 mm軟半球型
中置揚聲器區塊部分
揚聲器系統
中置揚聲器:雙向同軸揚聲器系統、氣
墊式
衛星:全範圍揚聲器系統、氣墊式
揚聲器 (5個揚聲器)
中置低音揚聲器:65 mm圓錐型、磁流揚
聲器
高音揚聲器:14 mm軟半球型
衛星:65 mm圓錐型、磁流揚聲器
其他資訊
主動式揚聲器系統 (SA-
ST5000)

60
CT
頂置揚聲器區塊部分
揚聲器系統
全範圍揚聲器系統、氣墊式
揚聲器
65 mm圓錐型、磁流揚聲器
一般常規
電源需求
台灣機型:
120 V AC,50 Hz/60 Hz
其他國家/地區的機型:
220 V - 240 V AC,50 Hz/60 Hz
耗電量
開啟:90 W
有關待機模式下耗電量的詳情,請參
閱“每個待機模式設定值的耗電量”
(第61頁)。
尺寸* (約)(寬/高/深)
1180 mm × 80 mm × 142 mm (不含網
格)
1180 mm × 80 mm × 145 mm(含網格)
*不包括突出部分
質量 (約)
8.3 kg (不含網格)
8.8 kg (含網格)
相容的iPod/iPhone機型
相容的iPod/iPhone機型如下所示。使用本系
統前,請將您的iPod/iPhone更新到最新軟
體。
BLUETOOTH技術適用於:
iPhone 7 Plus/iPhone 7/iPhone SE/iPhone
6s Plus/iPhone 6s/iPhone 6 Plus/
iPhone 6/iPhone 5s/iPhone 5c/iPhone 5/
iPhone 4s
iPod touch (第6代)/iPod touch (第5代)
功率輸出 (參考)
200 W (2歐姆,100 Hz)
揚聲器系統
主動式重低音揚聲器系統、被動輻射式
揚聲器
180 mm圓錐型
200 mm × 300 mm圓錐型、被動輻射器
電源需求
台灣機型:
120 V AC,50 Hz/60 Hz
其他國家/地區的機型:
220 V - 240 V AC,50 Hz/60 Hz
耗電量
開啟:30 W
待機模式:0.5 W 或以下
尺寸 (約)(寬/高/深)
248 mm × 403 mm × 426 mm (不包括
突出部分)
質量 (約)
14.5 kg
通訊系統
無線聲音規格3.0版
頻率波段
5.8 GHz波段(5.736 GHz - 5.814 GHz)
調製方式
DSSS
設計及規格如有變更,恕不另行通知。
主動式重低音揚聲器 (SA-
WST5000)
無線傳輸器/接收器部分


62
CT
可以播放的音頻檔案類
型
1)
系統可以播放“.mka”檔案。這些檔案無
法在家庭網路伺服器上播放。
2)
本系統可能無法在家庭網路伺服器上播放
此檔案格式。
3)
本系統無法在家庭網路伺服器上播放此檔
案格式。
4)
本系統無法播放無損編碼檔案。
5)
本系統無法播放以DST編碼的檔案。
• 某些檔案視檔案格式、檔案編碼、錄製狀態
或家庭網路伺服器狀態而可能無法播放。
• 可能無法播放一些在PC編輯過的檔案。
• 快轉或倒轉可能不適用於某些檔案。
• 本系統無法播放DRM等編碼檔案。
• 本系統可識別在USB裝置中的以下檔案或資
料夾:
– 多達第9層中的資料夾 (包括根資料夾)
– 多達單層中的500個檔案/資料夾
• 本系統可識別存放在家庭網路伺服器中的以
下檔案或資料夾:
– 多達第19層中的資料夾
– 多達單層中的999個檔案/資料夾
• 某些USB裝置無法與本系統配合使用。
• 本系統可識別大容量存儲器級別 (MSC)裝
置 (如閃存或HDD)和101鍵的鍵盤。
轉碼器 副檔名
MP3 (MPEG-1 Audio Layer
III)
1)
.mp3
AAC/HE-AAC
1),2)
.m4a、.aac
3)
、
.mp4、.3gp
WMA9標準
2)
.wma
WMA10 Pro
4)
.wma
LPCM
1)
.wav
FLAC
2)
.flac、.fla
Dolby Digital
1),3)
.ac3
DSF
2)
.dsf
DSDIFF
2),5)
.dff
AIFF
2)
.aiff、.aif
ALAC
2)
.m4a
Vorbis .ogg
Monkey’s Audio .ape
註

63
CT
其他資訊
支援的輸入音訊格式
本系統支援的音訊格式如下。
:支援的格式。
-:不支援的格式。
HDMI IN 1/2/3插孔不支援包含複製保護的音訊格式,例如Super Audio CD或DVD-Audio。
格式 功能
“HDMI1”
“HDMI2”
“HDMI3”
“TV”
(ARC)
“TV”
(OPT)
LPCM 2ch
LPCM 5.1ch
--
LPCM 7.1ch
--
Dolby Digital
Dolby TrueHD
--
Dolby Digital Plus
-
Dolby Atmos - Dolby TrueHD
--
Dolby Atmos - Dolby Digital Plus
-
DTS
DTS-ES Discrete 6.1, DTS-ES Matrix 6.1
DTS 96/24
DTS-HD High Resolution Audio
––
DTS-HD Master Audio
––
DTS-HD LBR
––
DTS:X
––
DTS:X Master Audio
––
註
64
CT
支援的HDMI視訊格式
本系統支援的視訊格式如下。
:相容於並排 (半幅)和上下 (頂部和底部)格式的3D訊號
:相容於畫面壓縮、並排 (半幅)和上下 (頂部和底部)格式的3D訊號
1)
OPTIONS與DISPLAY按鈕沒有作用,而且不顯示系統的螢幕顯示 (OSD)。
2)
使用支援18Gbps乙太網路連接的特級高速HDMI傳輸線。
3)
使用支援乙太網路連接的特級高速HDMI傳輸線或有連接線類型標誌的支援乙太網路連接的
Sony高速HDMI傳輸線。
• 使用HDMI授權的連接線。
• 我們不建議使用HDMI-DVI轉換線。
• 連接裝置可能會抑制經由HDMI插孔傳輸的音訊訊號 (取樣頻率、位元長度等)。
• 切換播放裝置音訊輸出訊號的取樣頻率或聲道數時,聲音可能會中斷。
• 選擇[TV]輸入時,透過上次選擇的HDMI IN 1/2/3插孔之一傳輸的視訊訊號,會從HDMI
OUT (ARC)插孔輸出。
• 本系統支援“TRILUMINOS”。
• 所有HDMI IN和HDMI OUT插孔支援頻寬高達18Gbps、HDCP 2.2
1)
、BT.2020廣色域
2)
和HDR
(高動態範圍)
3)
內容傳遞。
解析度
畫面播放速率 3D 色彩空間 色彩深度
[HDMI訊號格式]設定
4K
4096 × 2160p
3840 × 2160p
50/59.94/60 Hz
1)
-
RGB 4:4:4
YCbCr 4:4:4
8位元
[增強格式]
2)
-
YCbCr 4:2:2 8/10/12位元
-
YCbCr 4:2:0 10/12位元
23.98/24/25/29.97/
30 Hz
1)
-
RGB 4:4:4
YCbCr 4:4:4
10/12位元
4K
4096 × 2160p
3840 × 2160p
50/59.94/60 Hz
1)
- YCbCr 4:2:0 8位元
[標準格式]
3)
23.98/24/25/29.97/30 Hz
-
RGB 4:4:4
YCbCr 4:4:4
8位元
- YCbCr 4:2:2 8/10/12位元
1920 × 1080p
50/59.94/60 Hz
RGB 4:4:4
YCbCr 4:4:4
YCbCr 4:2:2
8/10/12位元
23.98/24/25/29.97/30 Hz
1920 × 1080i 50/59.94/60 Hz
1280 × 720p
50/59.94/60 Hz
23.98/24/29.97/30 Hz
720 × 480p 59.94/60 Hz -
720 × 576p 50 Hz -
640 × 480p 59.94/60 Hz - RGB 4:4:4
HDMI插孔和HDMI連接的注意事項

65
CT
其他資訊
1)
HDCP 2.2是新增強的版權保護技術,用於保護如4K電影等內容。
2)
BT.2020色域是新的廣色域標準,為超高解析度電視機系統定義。
3)
HDR是可顯示較大範圍亮度等級的新興視訊格式。系統相容於HDR10、HLG (Hybrid Log
Gamma)與Dolby Vision。

66
CT
關於BLUETOOTH通訊
• BLUETOOTH裝置必須在距離彼此約10公尺
(無障礙)範圍內才能使用。在下列情形,
實際的通訊範圍可能縮短。
– 當透過BLUETOOTH連接的裝置之間有人、
金屬物體、牆壁或其它障礙
– 無線LAN安裝的位置
– 在使用中的微波爐周圍
– 其它電磁波發生的地方
• BLUETOOTH裝置與無線LAN (IEEE 802.11
b/g/n)使用相同的頻率波段 (2.4 GHz)。
在有無線LAN功能的裝置附近使用BLUETOOTH
裝置時,可能會產生電磁干擾。這可能導致
較低的數據傳輸率、噪音或無法連接。如果
發生這種情況,請嘗試以下補救措施:
– 在距離無線LAN裝置至少10公尺遠的位置
使用本系統。
– 在10公尺範圍內使用BLUETOOTH裝置時,
請關閉無線LAN裝置的電源。
– 安裝本系統與BLUETOOTH裝置時儘可能彼
此靠近。
• 本系統的無線電波廣播可能干擾一些醫療裝
置的操作。因為此干擾可能導致故障,在以
下地點請總是關閉本系統和BLUETOOTH裝置
的電源:
– 在醫院、火車上、飛機上、加油站以及任
何可能存在可燃氣體的地方
– 靠近自動⾨或火災報警器
• 本系統支援符合BLUETOOTH規格的安全功能
以確保使用BLUETOOTH技術通訊時的安全連
接。然而,此安全視設定內容和其它因素而
可能不足,因此使用BLUETOOTH技術進行通
訊時總是要小心。
• Sony對於在使用BLUETOOTH技術通訊過程中
蒙受的損害或資訊洩露造成的其它損失概不
負責。
• 無法保證所有與本系統相同模式的
BLUETOOTH裝置之間的BLUETOOTH通訊。
• 與本系統連接的BLUETOOTH裝置必須符合
Bluetooth SIG, Inc.規定的BLUETOOTH規
格,而且必須經過認證符合規格。然而,即
使裝置符合BLUETOOTH規格,還是有
BLUETOOTH裝置基於特性或規格使裝置無法
連接,或導致不同的控制方式、顯示或操
作。
• 視連接至本系統的BLUETOOTH裝置、通訊環
境或周圍情形,可能產生噪音或音訊可能被
切斷。
如果您對本系統有任何疑問或問題,請就近
與Sony經銷商聯絡。

67
CT
其他資訊
最終使用者授權協議
重要:
在使用本軟體前,請先詳細閱讀本最終使
用者授權協議 (以下簡稱 「授權協
議」)。您使用本軟體即表示您接受本授
權協議之條款。如果您不接受本授權協議
之條款,即不得使用本軟體。
本授權協議是您與索尼公司 (以下簡稱
「索尼」)間的法律協議。本授權協議管
轄您以下相關之權利和義務:索尼和
(或)其第三人授權人 (包括索尼之關係
企業)以及其各自之關係企業 (以下合稱
「第三人供應商」)之索尼軟體,連同索
尼提供之任何更新 / 升級、該軟體之任何
印刷、線上或其他電子文件,以及因該軟
體之操作而創造之任何資料檔案 (以下合
稱本 「軟體」)。
儘管有前述約定,本軟體中如任何軟體有
單獨之最終使用者授權協議 (包括但不限
於GNU通用公共授權和較寬 / 圖書館通用
公共授權),且如為該等適用之單獨最終
使用者授權協議所規定時,則相關軟體即
應受該等單獨最終使用者授權協議所管轄
而取代本授權協議之條款 (以下簡稱
「排除軟體」)。
軟體授權
本軟體係授權軟體,並非販售軟體。本軟
體受著作權和其他智慧財產法律與國際條
約保護。
著作權
本軟體 (包括但不限於納入本軟體中之任
何影像、照片、動畫、影片、聲音、音
樂、文字和 「小應用程式」)之一切權利
和所有權均為索尼或某個或數個第三人供
應商所有。
授權
索尼授予您使用本軟體之有限授權,但僅
限與您的相容裝置 (以下簡稱 「裝置」)
相關,且僅供您個人非商業使用。索尼和
第三人供應商均明示保留本授權協議並未
特別授予您之一切本軟體權利、所有權和
利益 (包括但不限於全部智慧財產權)。
規定與限制
您不能複製、公開、調整、再散布、企圖
推衍原始碼、修改、執行逆向工程、解編
譯或拆解任何本軟體 (無論全部或部
分),亦不得自本軟體創作任何衍生作品
或創作本軟體之任何衍生作品,除非該等
衍生作品是本軟體所刻意促成之結果。您
不得修改或破壞本軟體之任何數位權利管
理功能。您不得略過、修改、阻撓或規避
本軟體之任何功能或保護,以及與本軟體
相關而執行之任何機制。您不得將本軟體
之任何個別元件分離開來在超過一部裝置
上使用,除非經索尼明示授權得有此等行
為。您不得移除、改變、遮蔽或掩蓋本軟
體上之任何商標或聲明。您不得分享、散
布、不定期限租賃、定期限租賃、再授
權、轉讓、移轉或銷售本軟體。本軟體性
能有賴其方得發揮之軟體、網路服務或本
軟體以外之其他產品可能會在供應商 (軟
體供應商、服務供應商或索尼)酌情下決
定中斷或中止。索尼和該等供應商不保證
本軟體、網路服務、內容或其他產品將可
持續提供,亦不保證其操作均不會中斷或
修改。
與受著作權保護材料一併使用本軟體
本軟體可由您使用以檢視、儲存、處理和
(或)使用由您和 (或)第三人創造之內
容。該等內容可能受到著作權、其他智慧
財產法律和 (或)協議所保護。您同意使
用本軟體時絕對會遵守適用該等內容之一
切相關法律與協議。您確認並同意,索尼
得採取適當措施以保護本軟體所儲存、處
理或使用之內容之著作權。該等措施包括
但不限於計算您透過本軟體特定功能備份
和復原之頻率、拒絕接受您對啟動資料復
原之要求,以及當您不當使用本軟體時終
止本授權協議。
內容服務
亦請您注意,本軟體得設計與透過一項或
多項內容服務 (以下簡稱 「內容服務」)
而提供之內容一併使用。服務與該內容之
使用應遵守該內容服務之服務條款。如果
您拒絕接受該等條款,則您對本軟體之使
用將受到限制。您確認並同意,透過本軟

68
CT
體而提供之特定內容和服務得由索尼對其
並無控制權之第三人提供。使用內容服務
必須有網際網路連線。內容服務得隨時中
斷。
網路連線和第三人服務
您確認並同意,存取本軟體特定功能可能
需有網路連線,您應自行負責取得網路連
線。此外,您應自行支付與您取得網路連
線相關之任何第三人費用,包括但不限於
網路服務供應商或上網費。本軟體之運作
可能會視您取得的網路連線和服務之性
能、頻寬或技術限制而有上限或受到限
制。此等網路連線之提供、品質與安全性
應由提供相關服務之第三人負全部責任。
出口與其他管制
您同意遵守您居住地區或國家一切適用之
出口與再出口限制與規定,且不會將本軟
體向禁止國家移轉或准許移轉,亦不會以
其他方式違反任何相關限制或規定。
高風險活動
本軟體並非容錯軟體,且其設計、製造或
使用或轉售目的並非能在危險環境中使
用,需有自動故障排除性能之線上控制設
備,例如操作核能設施、航空器導航或通
訊系統、空中交通管制、直接生命維持機
器,或武器系統,而一旦本軟體故障即可
能導致死亡、人員受傷或嚴重的身體或環
境損害 (以下簡稱 「高風險活動」)。 索
尼、每一個第三人供應商,以及其各自之
各個關係企業均明確否認對高風險活動之
任何明示或暗示可適性保證、義務或條
件。
本軟體保證之排除
您確認並同意,本軟體之使用風險完全由
您負擔,且您應對本軟體之使用負責。本
軟體係按 「現狀」提供,無任何類型之保
證、義務或條件。
索尼和各個第三人供應商 (就本條而言,
索尼與各個第三人供應商應合稱為 「索
尼」)明示否認一切明示或暗示之保證、
義務或條件,包括但不限於可銷性、無侵
權或特定目的可適性之暗示保證。索尼不
保證亦無設定任何件或做成任何聲明:
(A)任何本軟體中包含的功能都會符合您
的需求或將會更新; (B)任何本軟體之
操作均為正確或毫無錯誤或任何瑕疵均會
加以修正; (C)本軟體不會損壞任何其
他軟體、硬體或資料; (D)本軟體性能
所賴之任何軟體、網路服務 (包括網際網
路)或產品 (除本軟體外)均會持續提
供、不會中斷或遭到修改;以及 (E)有
關使用本軟體或使用本軟體結果之正確
性、精準度、可靠性或其他特性。
索尼或索尼之授權代表做成之任何口頭或
書面資訊或建議均不應創造任何保證、義
務或條件,亦絕對不會擴大本項保證之範
圍。若本軟體證實有瑕疵,您承擔一切必
要維修、修復或修正之全部費用。部分司
法管轄區禁止排除暗示性保證,因此以上
排除約定可能並不適用於您。
責任限制
索尼和各個第三人供應商 (就本條而言,
索尼與各個第三人供應商應合稱為 「索
尼」)對於有關本軟體而違反任何明示或
暗示保證、違約、過失、無過失責任或基
於任何其他法律理論,均毋須對任何隨附
或衍生性損害賠償負任何責任,包括但不
限於因失去利益、損失所得、遺失資料、
無法使用本軟體或任何相關硬體、故障時
間和使用者時間所引起之任何損失,即使
索尼之任何人已獲悉該等損害之可能性。
於任何情況下,其按本授權協議任何條款
約定之全部責任均應限於實際為產品所支
付金額。部分司法管轄區禁止排除或限制
隨附或衍生性損害賠償,因此以上排除或
限制約定可能並不適用於您。
自動更新功能
索尼或第三人供應商得不時於您與索尼之
伺服器或第三人伺服器互動時或其他時候
自動更新或以其他方式修訂本軟體,包括
但不限於基於增強安全功能、錯誤修正和
改進功能之目的。您確認並同意,該等活
動得由索尼自行酌情決定而進行,且索尼
得以您完成安裝或接受相關更新或修訂為
持續使用本軟體之前提。就本授權協議而
言,任何更新 / 修訂均應視為且應構成本
軟體之部分。您接受本授權協議即表示您
接受該等更新 / 修訂。

69
CT
其他資訊
完整合意、拋棄、可分割性
本授權協議和索尼的隱私政策 (各自均得
不時增補和修訂)共同構成您與索尼間有
關本軟體之完整合意。索尼未行使或強制
執行本授權協議之任何權利或條款均不應
構成拋棄該等權利或條款。若本授權協議
有任何部分經認定為無效、違法或無法執
行,則該條款應於准許之最大範圍內加以
執行,以維持本授權協議之意旨,而其他
部分則均維持完整效力和有效性。
準據法與司法管轄
《聯合國國際貨物買賣合約公約》不應適
用本授權協議。本授權協議應受日本法律
管轄,不適用法律牴觸規定。因本授權協
議所生之任何爭議均應交付日本東京地方
法院之專屬地管轄,且當事人茲同意該等
法院之地點與司法管轄權。
衡平救濟
儘管本授權協議中有任何相反約定,然您
均確認並同意,一旦您有任何違反或不遵
守本授權協議之情事,均會對索尼造成無
法補救之傷害,而金錢損害賠償並不足以
補償該等傷害,且您同意索尼得取得該等
情況下其認為必要或適當之任何禁制救濟
或衡平救濟。索尼亦得採取任何法律和技
術救濟以防止違反本授權協議和 (或)強
制執行本授權協議,包括但不限於立即終
止您對本軟體之使用,只要是索尼自行酌
情認定您已違反或意違反本授權協議即
可。以上救濟均係外加於索尼依法、根據
衡平原則或按合約得有之任何其他救濟。
終止
在不妨礙索尼任何其他權利之前提下,索
尼得於您未遵守本授權協議之任何條款時
終止本授權協議。發生此等終止情況時,
您必須停止對本軟體之一切使用並將其全
數銷毀。
修訂
索尼保留權利得依其自行酌情決定以於索
尼指定網站刊登公告、寄送電郵通知至您
所提供之電郵地址、於您取得升級 / 更新
過程中提供通知,或以其他法律承認之通
知形式等方式,修訂本授權協議之條款。
如果您不同意該等修訂,您應立即與索尼
聯絡取得指示。您於任何該等通知生效日
期後持續使用本軟體即應視為您同意受到
該等修訂之約束。
第三方受益人
與相關當事人之本軟體相關時,各第三人
供應商均係本授權協議各條款之明示預定
第三人受益人且應有權得行使該等條款。
若您有關於本授權協議之任何疑問,請透
過各地區或國家適用之聯絡地址以書面方
式和索尼聯絡。
Copyright © 2014 Sony Corporation.

70
CT
預先注意事項
關於安全
• 如果有任何固體或液體掉入系統,請拔出系
統的插頭,並在繼續操作前讓合格的技術人
員進行檢查。
• 請勿攀爬主機和主動式重低音揚聲器,否則
可能跌落受傷,或是損壞系統。
關於電源
• 操作系統之前,請先確定操作電壓與當地電
源供應相符。操作電壓如主機背面的標示牌
所示。
• 若您將長時間不使用系統,請務必將系統插
頭從牆壁插座拔出。若要切斷交流電源線,
請握住插頭拔出,切勿拉扯電線。
• 為了安全起見,插頭的一個葉片寬過另一
個,並只能以一個方向插入牆壁插座。如果
您不能把插頭完全插入插座,請聯絡您的經
銷商。
• 交流電源線必須在合格服務商店更換。
關於變熱
本系統會在操作時變熱,這不是故障。如果
持續長時間以高音量使用本系統,系統的背
部和底部的溫度會變得相當高。為了避免燙
傷,請勿觸碰系統。
關於放置
• 請勿將系統擺放於靠近熱源的地方,或者會
受到陽光直曬、灰塵過多或機械性撞擊的地
方。
• 請勿在主機和主動式重低音揚聲器後方放置
任何物品,以免堵塞通風孔,造成故障。
• 請勿將電視機以外的金屬物體放在系統附
近。無線功能可能不穩定。
• 若本系統與電視機、錄影機或磁帶卡座搭配
使用,可能會產生雜訊,影響圖像品質。發
生此狀況時,請將系統設置在距離電視機、
錄影機或磁帶卡座較遠處。
• 將本系統置於經特別處理 (打蠟、塗油、
拋光等)的表面上時,請務必小心,否則可
能會造成表面著色或變色。
• 請小心不要撞到主機和主動式重低音揚聲器
的邊角,以免受傷。
• 將主機掛在牆上時在其下方保留3 cm以上的
空間。
• 本系統的揚聲器並非磁屏蔽型。請勿將磁卡
放置在本系統上面或附近。
關於處理主動式重低音揚聲器
抬起主動式重低音揚聲器時,切勿將手放入
主動式重低音揚聲器的狹縫內。揚聲器驅動
器可能會損壞。抬起主動式重低音揚聲器
時,請握持主動式重低音揚聲器底部。
關於操作
連接其他裝置前,請務必關閉系統並拔掉電
源插頭。
如果附近的電視機螢幕上出現色彩不
均勻
某些類型的電視機可能會出現色彩不均勻的
情況。
如果出現色彩不均勻...
請關閉電視機,在15至30分鐘後再次開啟。
如果再次出現色彩不均勻...
將系統設置在距離電視機較遠處。
關於清理
使用柔軟的乾布清潔系統。請勿使用任何類
型的砂紙、拋光粉或溶液,如酒精或汽油。
如果您對本系統有任何疑問或問題,請就近
與Sony經銷商聯絡。
關於第三方提供的服務的免責聲明
本產品的網路服務、內容及 (作業系統和)
軟體可能適用獨立的條款和條件,並可能會
隨時改變、中斷或終止,或是可能會要求支
付相關的費用、進行註冊以及提供信用卡資
訊。
更新的注意事項
本系統透過有線或無線網路連接到網際網路
時,可自動更新軟體。
透過更新本系統,您可以為本系統新增功能
而且更方便安全地使用。
如果不要自動更新,您可以使用智慧型手機
或平板電腦上安裝的Sony | Music Center停
用功能。但是,即使此功能停用,本系統仍
可能由於安全等因素自動更新軟體。此功能
停用時,您也能使用設定選單更新軟體。詳
情請參閱“使用設定顯示” (第45頁)。
正在更新軟體時,您可能無法使用本系統。
71
CT
其他資訊
本系統結合Dolby* Digital與DTS** Digital
Surround System。
* 本產品經過杜比實驗室的許可而製造。
Dolby、Dolby Atmos、Dolby Vision和雙D
符號是杜比實驗室的註冊商標。
**關於DTS專利,請參閱http://
patents.dts.com。依據DTS, Inc.的授權製
造。
DTS、其符號、DTS與其符號的結合、
DTS:X,與DTS:X標誌是DTS, Inc.在美國和/
或其他國家的註冊商標或商標。 © DTS,
Inc.保留所有權利。
BLUETOOTH
®
字型商標和圖形商標均為
Bluetooth SIG, Inc.所有,Sony
Corporation對該商標的各項使用均已經授
權。其他商標和商號是相關擁有者之專利。
本系統包含High-Definition Multimedia
Interface (HDMI™)技術。
HDMI、HDMI 高解析度多媒體介面及 HDMI標
誌為 HDMI Licensing, LLC 在美國及其他國
家的商標或註冊商標。
N字標示為NFC Forum, Inc.在美國和其他國
家的商標或註冊商標。
Android、Google Play和Chromecast是
Google Inc.的商標。
Apple、Apple標誌、iPhone、iPod、iPod
touch和Retina是Apple Inc.在美國以及其他
國家註冊的商標。App Store是Apple Inc. 的
服務標記。
“Made for iPod”與“Made for iPhone”代
表該電子配件專為連接iPod或iPhone設計,
已分別通過開發者認證,符合Apple性能標
準。對於本裝置的操作或其對於安全和監管
標準的遵守情況,Apple恕不負責。請注意,
本配件與iPod或iPhone搭配使用時,可能會
影響無線效能。
“BRAVIA”標誌為Sony Corporation的商標。
“ClearAudio+”是Sony Corporation的商
標。
WALKMAN®和WALKMAN®標誌是Sony
Corporation的註冊商標。
“PlayStation”是Sony Interactive
Entertainment Inc.的註冊商標或商標。
MPEG Layer-3 音頻編碼技術和專利由
Fraunhofer IIS和Thomson授權。
Windows Media是Microsoft Corporation在
美國和/或其它國家的註冊商標或商標。
本產品由Microsoft Corporation的某些知識
產權所保護。在沒有獲得Microsoft或授權
Microsoft子公司許可的情況下,不允許於本
產品之外使用或配銷此技術。
來自Opera Software ASA的Opera® Devices
SDK。版權1995-2016 Opera Software ASA。
版權所有。
Wi-Fi®、Wi-Fi Protected Access®和Wi-Fi
Alliance®是Wi-Fi Alliance的註冊商標。
Wi-Fi CERTIFIED™、WPA™、WPA2™和Wi-Fi
Protected Setup™是Wi-Fi Alliance的商
標。
LDAC™與LDAC標誌是Sony Corporation的商
標。
LDAC是Sony開發的音訊編碼技術,即使透過
Bluetooth連線,仍能傳輸高解析度 (Hi-
Res)音訊內容。不同於其他的Bluetooth相
容編碼技術 (例如SBC),LDAC透過有效率的
編碼技術與最佳化的封包化方式,作業時不
會將高解析度音訊內容向下轉換*,且透過
Bluetooth無線網路的傳輸資料量約為其他技
術的三倍以上**,達到前所未有的絕佳音質。
* 排除DSD格式內容
**當選取的位元速率為990 kbps
(96/48 kHz)或909 kbps
(88.2/44.1 kHz)時,可與SBC (Subband
Coding)比擬
版權與商標

72
CT
本產品包含的軟體受GNU通用公共授權
(“GPL”)或GNU較寬鬆通用公共授權
(“LGPL”)的規範。這些規範讓客戶有權
利遵循GPL或LGPL取得、修改及重新散佈軟體
的原始程式碼。
如需GPL、LGPL及其他軟體授權的詳細資訊,
請參閱產品[設置]選單的[系統設定]中的[軟
體授權資訊]。
此產品中所使用軟體的原始程式碼受GPL與
LGPL規範,並可從網路取得。若要下載,請
存取下列:
URL:
http://oss.sony.net/Products/Linux
請注意,Sony無法回答或回應與此原始程式
碼相關的任何詢問。
“DSEE HX”是Sony Corporation的商標。
DLNA™、DLNA標誌和DLNA CERTIFIED™是
Digital Living Network Alliance的商標、
服務標記或認證符號。
“TRILUMINOS”和“TRILUMINOS”標誌是
Sony Corporation的註冊商標。
本產品採用受第3方授權管轄的Spotify軟
體,詳情請見*:
https://developer.spotify.com/esdk-
third-party-licenses/
Spotify和Spotify標誌是Spotify Group的商
標。 *
* 視國家和地區而定,可能無法使用此功能。
所有其他商標為各自所有者的商標。

73
CT
索引
A
Audio Return Channel (ARC) 42, 48
B
Bluetooth Codec - AAC 47
Bluetooth Codec - LDAC
47
Bluetooth待機
41, 47
Bluetooth模式
47
Bluetooth設定
47
BT.2020
65
C
重設 50, 58
重設為原廠預設的設定
50, 58
初始化個人資訊
50
D
待機直通 41, 43, 48
電視機音訊輸入模式
48
DSEE HX
46
多路廣播聲音
39
E
兒童鎖功能 40
G
更新 46
H
HDCP 2.2 65
HDMI控制
42, 48
HDMI設定
48
HDMI訊號格式
17, 48, 64
HDR
65
I
IR-Repeater 48
J
家庭網路存取控制 49
簡易設置
49
K
快速啟動/網路待機 41, 48
L
連線伺服器設定 49
略過輸入設定
49
N
NFC 29
P
PRTCT 57
R
軟體更新 46
軟體更新通知
48
軟體授權資訊
49
S
聲音效果 47
時區
49
視訊直接顯示
46
輸出視訊解析度
46
Sony | Music Center
33
W
外部控制 49
網際網路設定
49
網路
18
網路連線診斷
49
網路連線狀態
49
網路設定
49
無線播放品質
47
無線重低音音箱連接
48
X
系統設定 48
系統資訊
49
Y
揚聲器設定 46
遙控器
11, 41
遙控啟動
41, 49
YCbCr/RGB (HDMI)
46
音訊DRC
46
音訊設定
46
音訊輸出
46