Check all pockets to make sure that they are empty. Things such as nails, hair clips, matches. pens, coins, and keys can damage both your washer and your clothes.
Mend any torn garments or loose buttons. Tears or holes may become larger during washing.
Remove belts. under wires. etc. to prevent damage to the machine or your clothes.
Pretreat any dirt and stains.
Make sure the clothes are washable in water.
Check the washing instructions.
Remove tissue in pockets.
CAUTION:
Do not wash or spin any item labeled or known to be water prot or water-resistant. even if the product care label on the item permits machine washing. Failure to follow these instructions could Tesult in severe damage to your laundry. your washer and/or property damage as a result of abnormal vibration of the washer.
Examples of water-proof or water-resistant items include certain mattress pads. mattress covers. rain gear. camping gear. skiing apparel. outdoor gear and similar items.
Pretreatment on stains or heavy soil
Use PreWash
Normal cycle for very soiled clothes. In case of heavily soiled clothes. pretreatment may require before the cycle.
Pretreat shirt collars and cuffs with a pre-wash product or liquid Detergent when placing them in the washer. Before washing treat special stains with bar soaps. liquid Detergent or a paste of water and granular Detergent.
Use a pretreat soil and stain remover. Treat stains AS SOON AS POSSIBLE. The longer they are left the harder they are to remove. (For more detail refer to page 13)
Loading
Do not wash fabrics containing flammable materials (waxes. cleaning fluids etc.)
Load Size
The Water Level should just cover the clothes. Adjust the load size accordingly. Loosely load clothes no higher than the top row of holes in the washer tub. To add items after washer has started. press Start button and submerge additional items. Close the lid and press Start button again to restart.
Light and Large-sized clothing
Clothes like downs and woollens are light weight. large and float easily. Use. a nylon net and wash them in a small amount of water If the laundry floats during the wash cycle. it may become damaged. Use dissolved Detergent to prevent the Detergent from clumping.
Long laundry items
Use nylon nets for long. DELICATE items. For laundry with long strings or long length. a net will prevent tangling during washing. Fasten zippers. hook. and strings to make sure that these items a don't snag on other clothes.
*Nylon net is not supplied by LG.
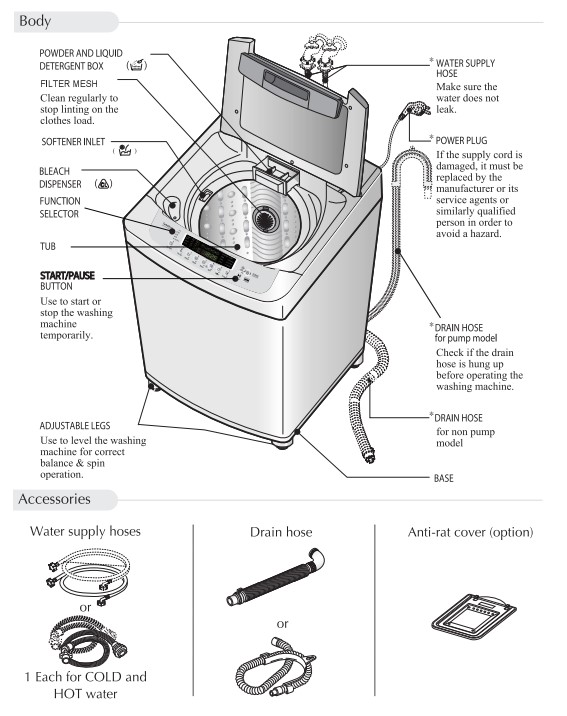
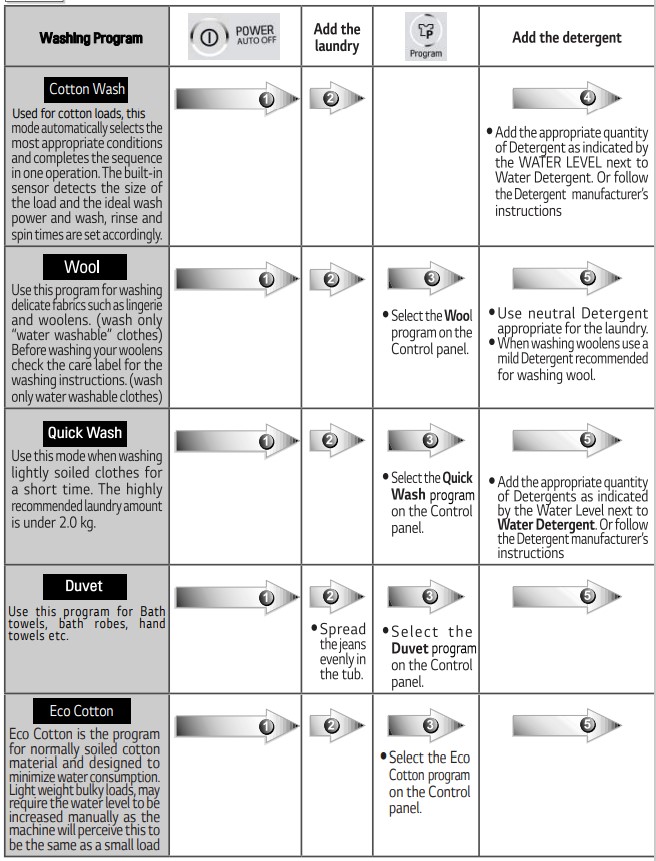
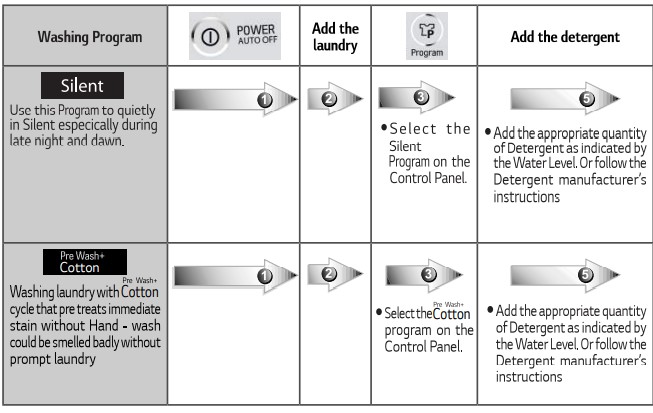
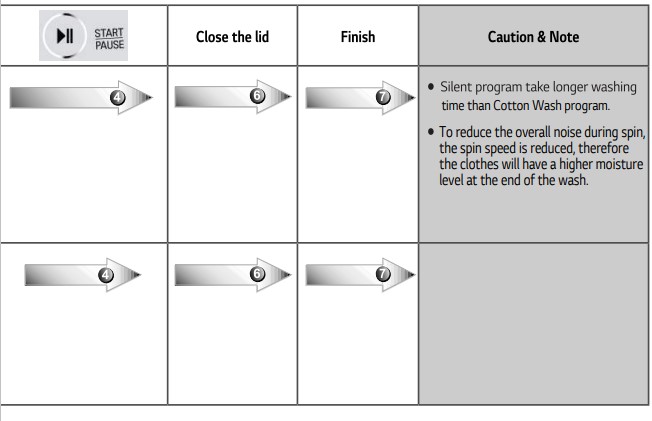
Washing Program
Installation
Placing and Leveling
Please ensure that transit restraint has been removed before operating your machine.
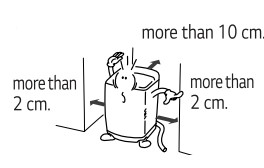
Place the machine on a flat and firm surface which allows proper clearance.
We suggest a minimum clearance of 2 cm to the right side and left sides of the machine for ease of installation. At the rear, a minimum clearance of 10 cm is suggested.
NOTE If the washer is installed on a uneven, weak or tiled floor causing excessive vibration. spin failure or “UE” error can happen to it.
It must be placed on a firm and level floor to prevent spin failure.
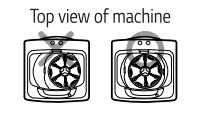
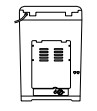
Check that the machine is level Top view of machine Open the lid and look from above to see if it is same as shown.
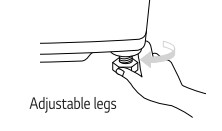
Leveling the machine
Lift the front of the washing machine and twist the Adjustable Leg until washing is placed evenly.
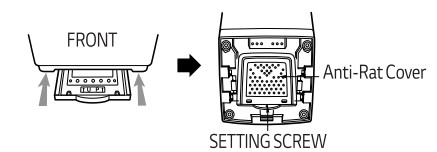
Installing the Anti-Rat Cover (option) Insert the anti-rat cover to be firmly fixed from the back or front of washing machine and screw it.
Caution: If the power is supplied from a cord extension or generator. the cord extension set or electrical portable outlet device should be positioned so that it is not exposed to splashing or ingress of moisture.
Connecting Water Supply hose
Before connecting the Water Supply Hose to the water tap. check the hose type and then choose the correct instruction here under.
Note that the Water Supply Hose supplied may vary from country to country. Make sure to connect the blue inlet hose to the COLD water tap. and the orange inlet hose to the HOT water tap.
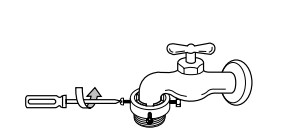
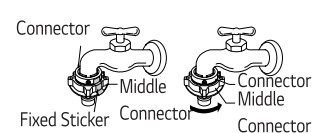
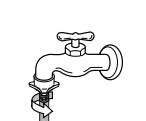
Connecting Water Supply Hose to water tap Normal Type (Normal tap without thread & screw type inlet hose.)
Untighten the screw. Untighten the screw of the connector so that the tap can be placed in the middle.
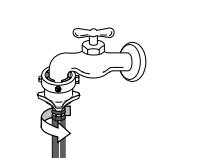
Fixing the connector to the tap. Push the upper connector up till the rubber packing is in tight contact with the tap. Then tighten the 4 screws.
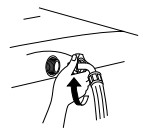
Attach the water supply hose securely to the connector. Push the water supply hose vertically upwards so that the rubber seal within the hose can adhere completely to the tap.
Fixing the connector to the water supply hose. Attach the water supply hose to the connector and then tighten it by screwing it to the right.
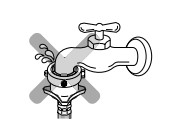
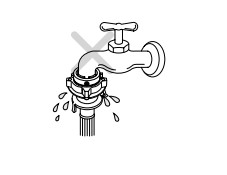
Check the connection of water supply hose and the connector. After connecting the hose. open the tap to check for any water leakage. If the water leaks. close the tap and start again from step 1 NOTE: The washing machine is to be connected to the water mains using new hose-sets and old hose-sets should not be reused.
Connecting Water Supply hose
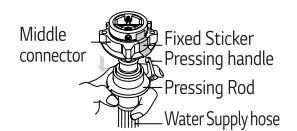
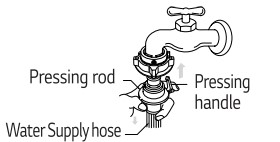
Normal Type (Normal tap without thread & one touch type inlet hose.)
Separate Middle connector from Water Supply Hose. Separate Middle connector from the Water Supply Hose by pulling the Pressing Rod and the Pressing Handle that is attached to the Water supply Hose.
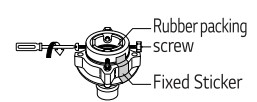
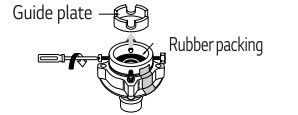
Loosen the fixed nuts to connect the connector to the tap. Untighten the screw of the connector so that the tap can be placed in the middle. NOTE: In case tap is too large. If the tap diameter is too large or is square, untighten the 4 screws and remove the guide plate. Then follow step 1.
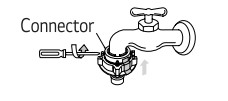
Fixing Connectors to the Tap. Push the upper connector up till the rubber packing is in tight contact with the tap. Then tighten the 4 screws.
Fixing Upper Connector and Middle Connector. Remove the fixed sticker in between the Upper and Middle Connectors. Tighten the connectors by holding one connector and twist middle connector to the right.
Connecting Middle Connector and Water Supply Hose. Press down the pressing rod of the Water Supply Hose which was separated from middle connector (refer Step 1) and then join it to the middle connector.
Check for water leakage. After connecting the hose, open the tap to check for any water leakage. If the connection leaks, close the tap and start again from step 1 If you skip step 1, water leakage may occur.
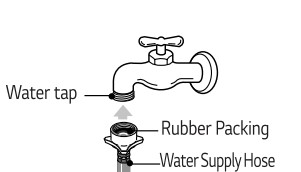
Screw Type
Attach the water supply hose to the tap. Push the water supply hose up so that the rubber packing within the hose can adhere completely to the tap
Connect the water supply hose to tap. Connect the water supply hose to the tap and then tighten it by screwing it to the right.
Check water leakage. After connecting the hose. open the tap to check for any water leakage. ~
Connecting Water Supply Hose to the machine
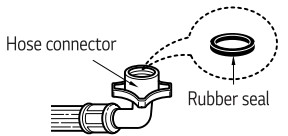
Connect the water supply hose to inlet valve of the washing machine. and then lock it by turning the hose connecting part.
Check to see if there is rubber seal inside the connector.
Connecting Drain Hose Before connecting drain hose. check your Drain Hose model and choose the correct instructions.
Pump Model
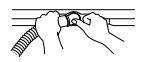
Fit the end of the drain hose to the outlet of the drain pump and tighten the clamp.
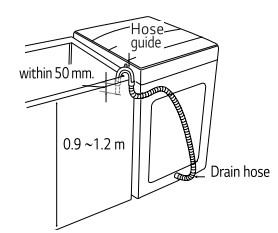
Put the other end of the drain hose over standpipe or wash tub.
NOTE
To Prevent siphoning. the drain hose should not extend more than 50 mm from the end of the hose guide
The discharge height should be approximately 0.9 ~1.2 m from the floor.
The hanging down drain hose might cause poor drainage.
Non-Pump Model
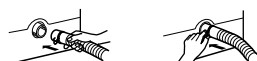
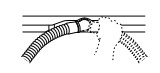
Connect the elbow hose Push the elbow hose toward the body of the washing machine.
Place the Drain Hose To change the direction of the hose. ull out the E elbow hose and change the direction. i Repeat Step 1
Grounding Method
Earth wire should be connected. If the earth wire is not connected. there is possible a danger of electric shock caused by the current leakage
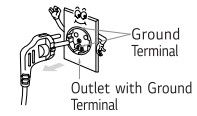
Grounding Method with Ground insert space Terminal
If the AC current outlet has a ground terminal. then separate grounding is not regutes. Note that AC power outlet configurations may differ from country to country.
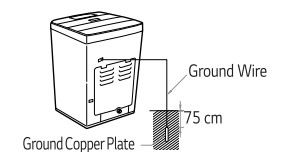
Other Grounding Method
Buying Copper plate Connect the Ground Wire to a Ground Copper plate and bury it more than 75 cm in the ground.
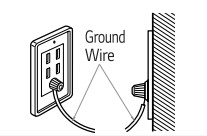
Using Ground Wire Connect the ground Wire to the socket provided exclusively for Grounding
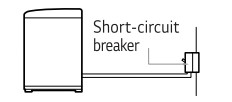
Using a Short Circuit Breaker If grounding methods described above are not possible. a separate circuit breaker should be employed and installed Short-circuit by a qualified electrician.
CAUTION
To prevent a possible explosion. do not connect ground to a gas pipe
Do not connect ground to telephone wires or lighting rods. This may be dangerous during electrical storms.
Connecting ground to plastic has no effect.
Ground wires should be connected when an extension cord is used.
Care and Maintenance
Cold water washing
If you always use Cold water. we recommend that a Warm or Hot wash be used at regular intervals e.g. every Sth wash should be at least a Warm one.
When you have finished
Turn off taps to Prevent the cane of flooding should a hose burst.
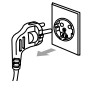
Always unplug the power cord after use.
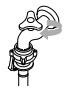
When water supply into the tub is not clean or the filter is clogged with particles (such as sand). clean the filter in the inlet valve occasionally. (The figure of power cord and water tap may vary according to the country)
To Clean the Filter in the Inlet Valve
Close the tap before turning off the power. Hot/Cold (Warm) and = then press the [START/PAUSE] button to briefly start awash in order to completely remove all water pressure from the hoses.
Turn off the power before pulling out cord.
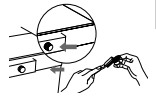
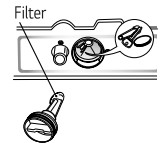
After removing the water supply hose pull out the filter. Then usea brush to clean the filter.
Replace the filter after cleaning it.
NOTE: Before cleaning the fitter. the impurities in the water supply hose should be removed.
To Clean the Filter Mesh
Do NOT rotate this filter as it pivots out along the bottom edge.
NOTE
lf the filter mesh is torn or damaged. purchase a new one from LG service center
To Clean the Pump casting (for pump model)
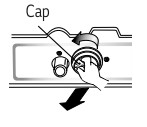
Place a towel on the floor under the drain pump and pull cap. Excess water may it out. flow out.
Turn the cap counter clockwise and pull it out
Remove any foreign objects and fluff inside pump casing and from the filter
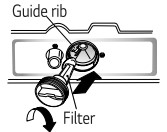
Replace the cap. Insert the filter along the guide ribs inside the pump casing. Filter must face the guide ribs inside pump casing and securely turn the cap clockwise
NOTE: Check if water leaks after reassembling. (The Rubber ring is in the cap)
When there is a fear of freezing
Close the water taps and remove the Water Supply Hose.
Remove the water which remains in the water supply.
Lower the drain hose and drain any remaining water left in by spining
If frozen
Remove the water supply hose. and immerse it in Hot water at approx.. 40°C.
Pour approx. 2 liters of Hot water at approx. 40°C. into the bowl and let it stand for 10 minutes.
Connect the water supply hose to the water tap and confirm that the washing machine performs the supply and drainage of water.
Wash Inner-tub -> Leave the lid open after washing to allow moisture to evaporate. If you want to clean the inner-tub use a clean soft cloth dampened with liquid Detergent. then rinse. (Do not use harsh or gritty cleaners.)
Inlet Hoses Exterior-> Hoses connection washer to faucet should be replace every 5 years. Immediately wipe off any spills. Wipe with damp cloth. Try not to hit surface with sharp objects.
Do not use stain removal sprays or agents on. near or next to the machine. Doing so can damage the machines finish and cause corrosion
Long Vacations-> Be sure water supply is shut off at the tape. Drain all water from hoses if weather will be below freezing.
Cleaning the Inside of your Washer
If you use fabric softener or do regular Cold water washing. it is very important that you occasionally clean the inside of your washer.
Fill your washer with Hot water.
Add about two cups of powerdered detergent that contain phosphate
Let it operate for several minutes.
Stop the washer. open the lid leave it to soak overnight.
After soaking. drain the washer and run it through a normal cycle. Or use Tub Clean Course periodically. We do not recommend that you wash clothes during this procedure.
Products that might damage your washing machine
Concentrated bleaches and diaper sanitizer will cause damage to the paint work and components of your washer.
Hydrocarbon solvents i.e. petrol. paint thinners and lacquer thinners. etc. can dissolve plastic and blister paint (Be careful when washing garments stained with these solvents as they are flammable DO NOT put them in washer or dryer without presoaking and rinsing them first.)
Some pretreatment sprays or liquids can damage your washer's control panel.
Use of dyes in your washer may cause staining of the plastic components. The dye will not damage the machine but we suggest you thoroughly clean your washer afterwards. We do not recommend the use of dye strippers in your washer.
Do not use your washer lid as a work surface.
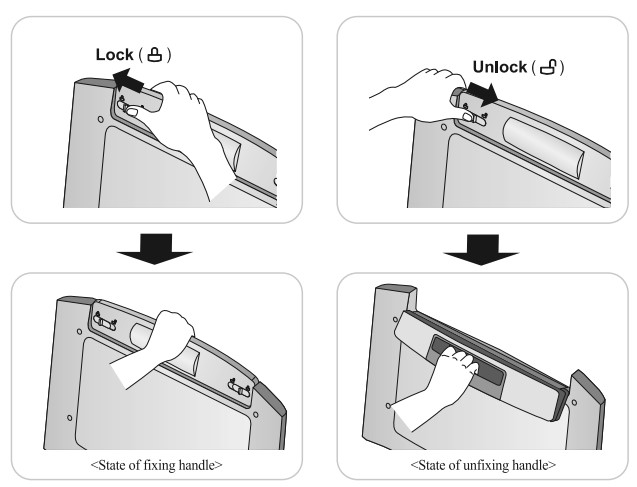
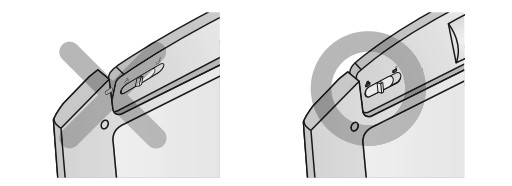
Use of Handle Locker
You can use handle hold function if you like to use. Handle hold function is operated by holder under the handle.
Slide holder to left/right side until you listen to "Click" sound to holding handle.
Do opposite to loose the Handle handing .
NOTE
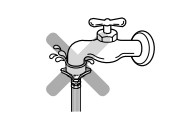
If you operate door like the below picture that. you can hurt so use after check locker was fixing or not.
Common washing problems
Many washing problems involve poor soil & stain removal. residues of lint and scum. and fabric damage. For satisfactory washing results. follow these instructions.
Problems
Possible Causes
Solutions & Preventive Measures
Poor soil Removal
Not enough Detergent
Wash Water temperature too low.
Overloading the washer
Incorrect wash cycle
Incorrect sorting
Donot pretreated stain
Use correct amount of Detergent for load size. amount of soil and water Hardness
Use Warm or Hot water for normal soil Different Water Temperature may be required according to Soil type. (Refer to page 10)
Reduce load size.
Wash with Duvet or PreWash+Normal or Soak & Duvet wash cycle for heavy soiled laundry.
Separate heavily soiled items from lightly soiled ones.
Pretreat stain and heavy soil according to directions shown Page 9
Do not overfill fabric softener dispenser and do not pour liquid fabric softener directly onto fabric. See page 12 for more instructions.
Black or gray
Abuildup caused by the interaction of fabric softener and Detergent can flake off and mark clothes
Not enough Detergent
Keep the recommendations against Scrub (waxy buildup).(refer to scrub page 12.)
Use correct amount of Detergent for load size. amount of soil and water Hardness.
Yellow or brown marks on clothes
lron or inangan in rust stains water supply. water pipes. or waster supply. water heater
To restore discolored load of whites. use rust remover safe for fabric.
Install non precipitating water softener or an iron filter in your water supply system for an ongoing problem.
Before washing. run water for a few minutes to clear lines.
Lint
Incorrect sorting
Tissues left in pocket
Overloading the washer
Wash lint givers eg towels. flannelette. sheets. separately from lint collectors eg synthetic fabrics and remove tissues in pee before wash. See page 9 for sorting and caring before loading.
Do not overload the washer
Residue or Detergent
Overloading the washer
Undissolved Detergent
Use too much Detergent
Do not overload the washer.
Some Detergents need to be per-dissolved. check the Detergent instructions. Try pre-dissolving the Detergent.
Increase Water Temperature using HOT water safe for fabric.
Use proper amount of Detergent.
Holes. tears. Or snags
Incorrect use of chlorine bleach.
Unfastened zippers. hooks. buckles
Ribs. tears and broken threads
Overloading the washer
Degradation of fabric
Never pour chlorine bleach directly on fabric. See page 11 for adding liquid bleach.
Fasten zippers. hooks. and buckles.
Remove objects in pockets. See page 9 for caring before loading.
Do not overload the washer.
Troubleshooting
Before calling for service. check the problem against the list belows.
Symptom
Error Message
Check up
Water Supply Failure
Is the water tap shut off ?
Is the water supply cut off?
Is the tap or water supply hose frozen ?
Is the water pressure low or is the filter of the inlet valve clogged with impurities ?
Is the Hot hose connected to cold ?
Is the Cold hose connected to hot ?
Drainage Failure
Is the drain hose positioned correctly ?
Is the drain hose bent or placed too high?
Is the internal part of the hose or drain pump (only pump model) clogged with impurities ?
Check if electric power has gone off.
Spin Failure
Is the laundry evenly balanced ?
Is the washing machine placed on a flat surface ? Press the "Start/Pause” button to release the UE. now distribute the laundry evenly and then press the "Start/Pause" button again to resume the cycle.
Door(Lid) Open
Is the lid closed ?
Internal sensing failure
Please call nearest LG Electronics service center for help.
Overflow failure
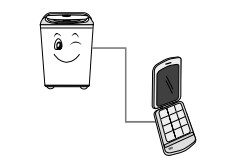
Smart diagnosis
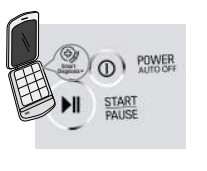
Close the washer door. and press the POWER button. If you manipulated other button or dial before pressing Temp. button. turn off the power and start again from the Fy beginning.
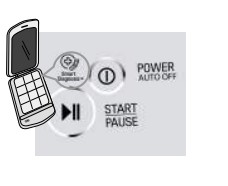
Place the phone to SmartDiagnosis display. Make sure that the speaking side of the phone to face SmartDiagnosis display
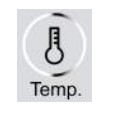
Long press Temp. button to activate smart diagnosis. Place the phone near the & SmartDiagnosis Display. and long press Temp. button until tak tak tak sound Note : Before pressing the Water should turn the power button for reuse if you have made other operations. If under the condition " CL" uninstall it. and reconnect the power
Hold the phone while data is transmitted.
Keep placing phone to SmartDiagnosis display while data for smart diagnosis is being transmitted. The time remaining for data transmission will be displayed on screen.
Transmission sound may be irritating. For proper diagnosis. do not take off the phone. You can press power button to stop diagnosis function and the sound.
After the data transmission is completed. listen to the diagnosis result from the consultant.
When data transmission is completed. the power is automatically turned off with “End” display after a few seconds.
NOTE
Smart Diagnosis is a troubleshooting feature designed to assist. not replace. the traditional method of troubleshooting through service calls. The effectiveness of this feature depends upon various factors. including. but not limited to. the reception of the cellular phone being used for transmission. any external noise that may be present during the transmission. and the acoustics of the room where the machine is located. Accordingly. LG dose not guarantee that smart Diagnosis would accurately troubleshoot any given issue.
#1 Can you cap off the hot water inlet and just use cold water with this machine?
we have been advised that this unit requires to be connected to BOTH hot and cold connections, otherwise you will receive an error and be unable to use the machine.
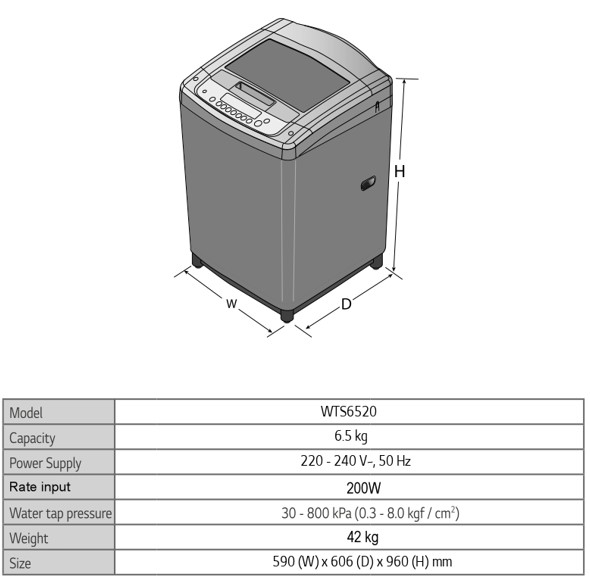
#2 Can tank water be used for washing with LG 6.5kg WTS6520?
I use the tap water for washing machine and i live in a unit, but not sure where the water comes in tap from, may be a underground tank.