
Instructions for use
OVEN
OP8637A / BO6PY4I3-42
OP8637S / BO6PY4I3-42
OP8637A1 / BO6PY4I3-42
OP8637B / BO6PY4I3-42
862798_en_naslovnica_drug_papir.indd 1862798_en_naslovnica_drug_papir.indd 1 29. 09. 2022 12:15:5829. 09. 2022 12:15:58

EN 2
EN User manual EN 3 - EN 31
Pictograms used
Important information
Tip
862798_en_naslovnica_drug_papir.indd 2862798_en_naslovnica_drug_papir.indd 2 29. 09. 2022 12:16:2129. 09. 2022 12:16:21

EN 3
CONTENTS
Your oven
Introduction 4
Description 5
Guide rails/Telescopic guide rails 5
Accessories 6
Door 7
Cooling fan 7
Control panel 8
First use
Before using the appliance for the first time 9
Use
Switching on and settings 10
Oven settings 13
Choosing the settings 17
Selecting additional functions 19
Starting the cooking process 21
Switching off the oven 21
Operation
Culisensor 22
Maintenance
Cleaning the oven 24
Removing and cleaning the guide rails. 24
Removal and installation of the oven door 25
Removing the oven window 26
The Cleaning function (pyrolysis) 27
Replacing the oven lamp 28
Malfunctions
General 29
Environmental aspects
Disposal of the appliance and packaging 31
862798_en_naslovnica_drug_papir.indd EN3862798_en_naslovnica_drug_papir.indd EN3 29. 09. 2022 12:16:2229. 09. 2022 12:16:22

EN 4
YOUR OVEN
Introduction
Congratulations on the purchase of this ASKO oven. This product is designed to offer optimum
user-friendliness. The oven has a wide range of settings enabling you to select the correct
cooking method every time.
This manual shows how you can best use this oven.
In addition to information about operating the oven, you will also find background information
that may be useful when using the appliance.
Please read the separate safety instructions carefully before
using the appliance!
Read this manual before using the appliance and keep it in a safe place for future use.
Installation instructions are supplied separately.
862798_en_naslovnica_drug_papir.indd EN4862798_en_naslovnica_drug_papir.indd EN4 29. 09. 2022 12:16:2229. 09. 2022 12:16:22
EN 5
YOUR OVEN
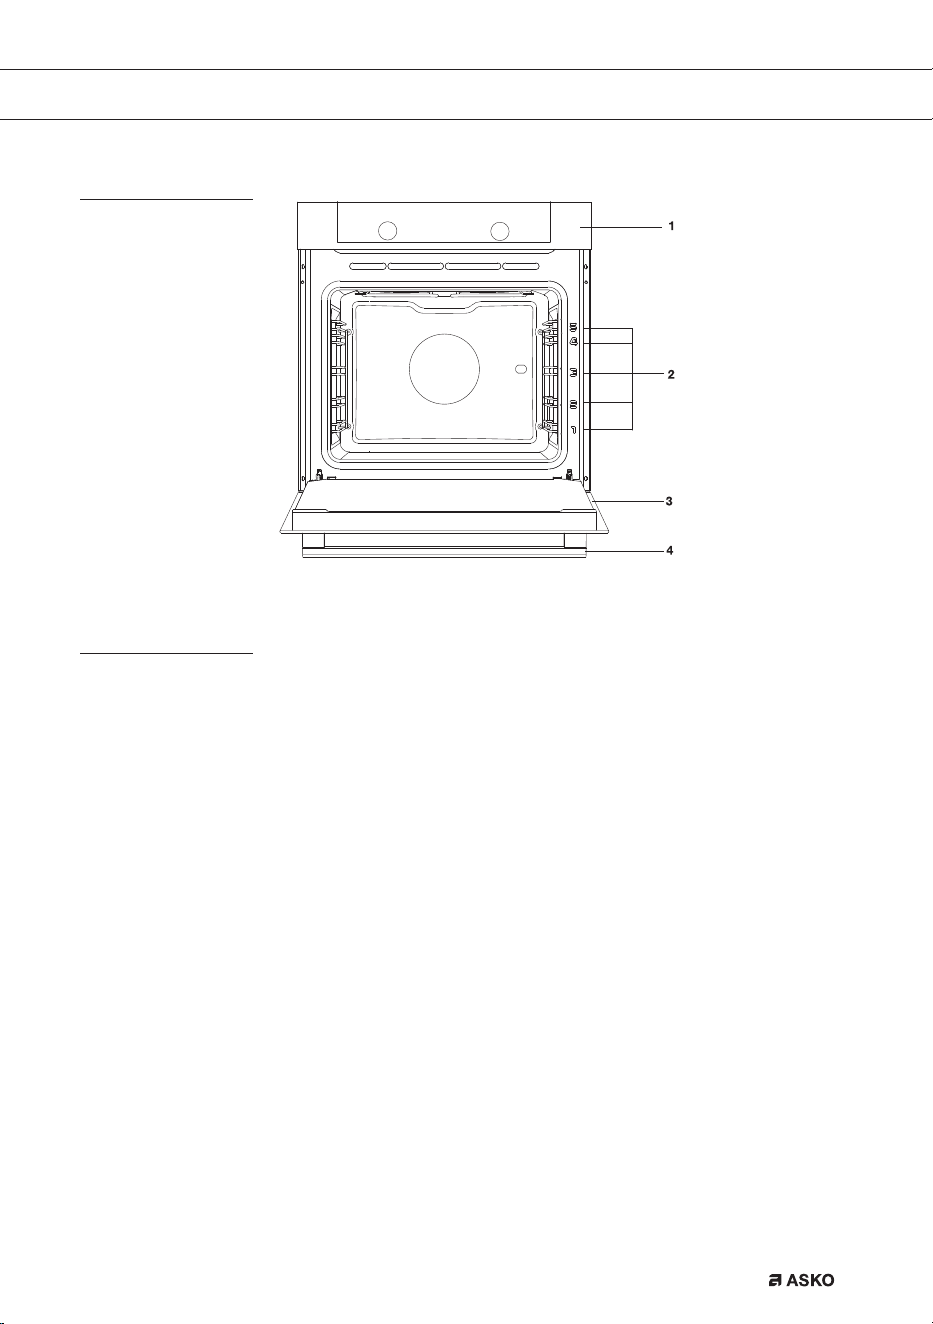
Description
1. Control panel
2. Rack levels
3. Oven door
4. Handle
Guide rails/Telescopic guide rails
• The oven has four or five guide rails (Level 1 to 4/5), depending on the model. Level 1 is
mainly used in combination with bottom heat. The two upper levels are mainly used for the
grill function.
• Place the oven rack, baking tray or steam dish in the gap between the guide rail sliders.
• A number of shelf levels can have fully-retractable telescopic guide rails, depending on the
model.
▷ Pull the telescopic guide rails out of the oven cavity completely and place the oven rack
/ baking tray / steam dish on them. Then slide the oven rack / baking tray / steam dish
on the telescopic guide rails, back into the oven cavity.
▷ Only close the oven door when the telescopic guide rails have been returned completely
back into the oven cavity.
862798_en_naslovnica_drug_papir.indd EN5862798_en_naslovnica_drug_papir.indd EN5 29. 09. 2022 12:16:2229. 09. 2022 12:16:22
EN 6
Accessories
Your appliance is accompanied by a range of accessories, depending on the model. Only use
original accessories; they are specially suited toyour appliance. Be sure that all the accessories
that are being used are able to withstand the temperature settings of the chosen oven function.
Note: not all accessories are suitable/available for every appliance (itmay also differ by country).
When purchasing, always provide the exact identification number of your appliance. Please see
the sales brochures or check online for more details about optional accessories.
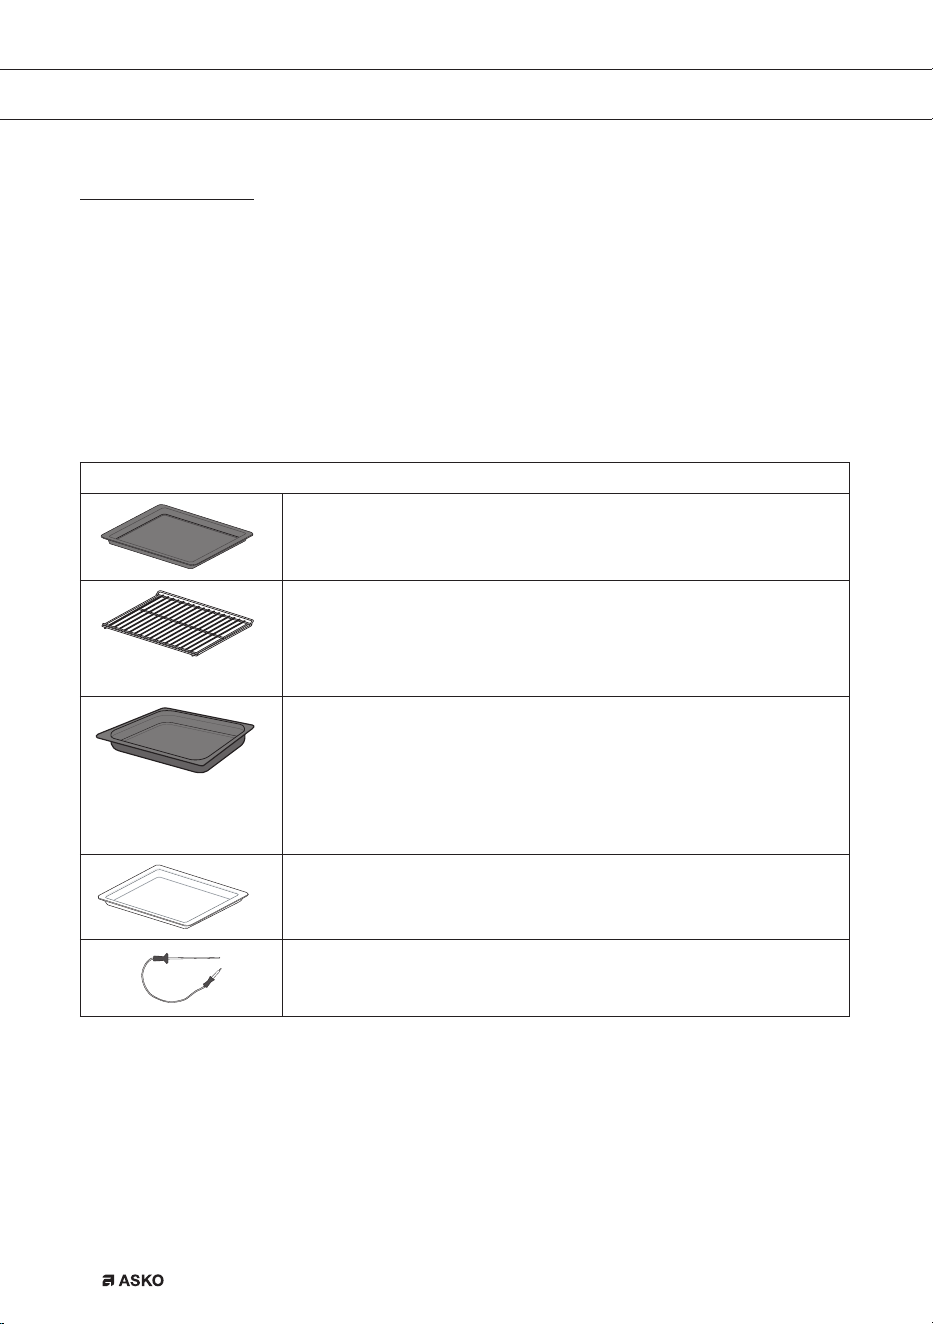
Accessories that can be supplied with your appliance (depending on the model)
Enamelled baking tray; to be used for pastries and cakes.
• Do not use the enamelled baking tray for microwave functions!
• Suitable for pyrolysis cleaning.
Oven rack; mainly used for grilling. A steam dish or pan with food
can also be placed on the oven rack.
• The oven rack is equipped with a safety peg. Lift the rack slightly
at the front to slide it out of the oven.
• Do not use the oven rack for microwave functions!
Deep enamelled baking tray; to be used for roasting meat and
baking moist pastry. It can also be used as a drip tray. Place
the deep baking tray into the first level for use as a drip tray
duringgrilling.
• Do not use the deep enamelled baking tray for microwave
functions!
• Suitable for pyrolysis cleaning.
Glass baking tray; for microwave and oven use.
• NOT suitable for pyrolysis cleaning.
Culisensor; can be used to measure the core temperature of the
dish. When the desired temperature is reached, the cooking process
will be stopped automatically.
YOUR OVEN
862798_en_naslovnica_drug_papir.indd EN6862798_en_naslovnica_drug_papir.indd EN6 29. 09. 2022 12:16:2329. 09. 2022 12:16:23

EN 7
YOUR OVEN
Door
• The door switches interrupt the operation of the oven when the door is openegd during use.
The oven continues operating when the door is closed.
• This oven has a ‘Soft close door system’. When closing the oven door, this system dampens
the movement, from a certain angle, and silently closes the oven door.
Cooling fan
• The appliance is equipped with a cooling fan that cools the casing and control panel.
862798_en_naslovnica_drug_papir.indd EN7862798_en_naslovnica_drug_papir.indd EN7 29. 09. 2022 12:16:2429. 09. 2022 12:16:24

EN 8
YOUR OVEN
Control panel
1. Off
2. Quick preheat
3. Top heat + bottom heat
4. Small grill
5. Large grill
6. Grill with fan
7. Hot air + bottom heat
8. Hot air
9. Bottom heat with fan
10. ECO cooking
11. Defrosting
12. Pyrolysis
13. Display (cooking information and timer)
14. Selection dial
15. Child lock
16. Oven lamp
17. Temperature
18. Timer
19. Start/Stop
Note:
For the best touch response, touch the buttons with the main part of your fingertip. Every
time you press a button during use, a short signal will sound.
10 11
12
1413
15 16 17 18
19
862798_en_naslovnica_drug_papir.indd EN8862798_en_naslovnica_drug_papir.indd EN8 29. 09. 2022 12:16:2429. 09. 2022 12:16:24

EN 9
Before using the appliance for the first time
• Upon receiving the appliance, remove all parts, including any transport equipment, from the
oven.
Clean all accessories and utensils with warm water and regular detergent. Do not use any
abrasive cleaners.
• When the oven heats up for the first time, the characteristic smell of a new appliance will be
emitted. Ventilate the room thoroughly during the first use.
FIRST USE
862798_en_naslovnica_drug_papir.indd EN9862798_en_naslovnica_drug_papir.indd EN9 29. 09. 2022 12:16:2529. 09. 2022 12:16:25
EN 10
USE
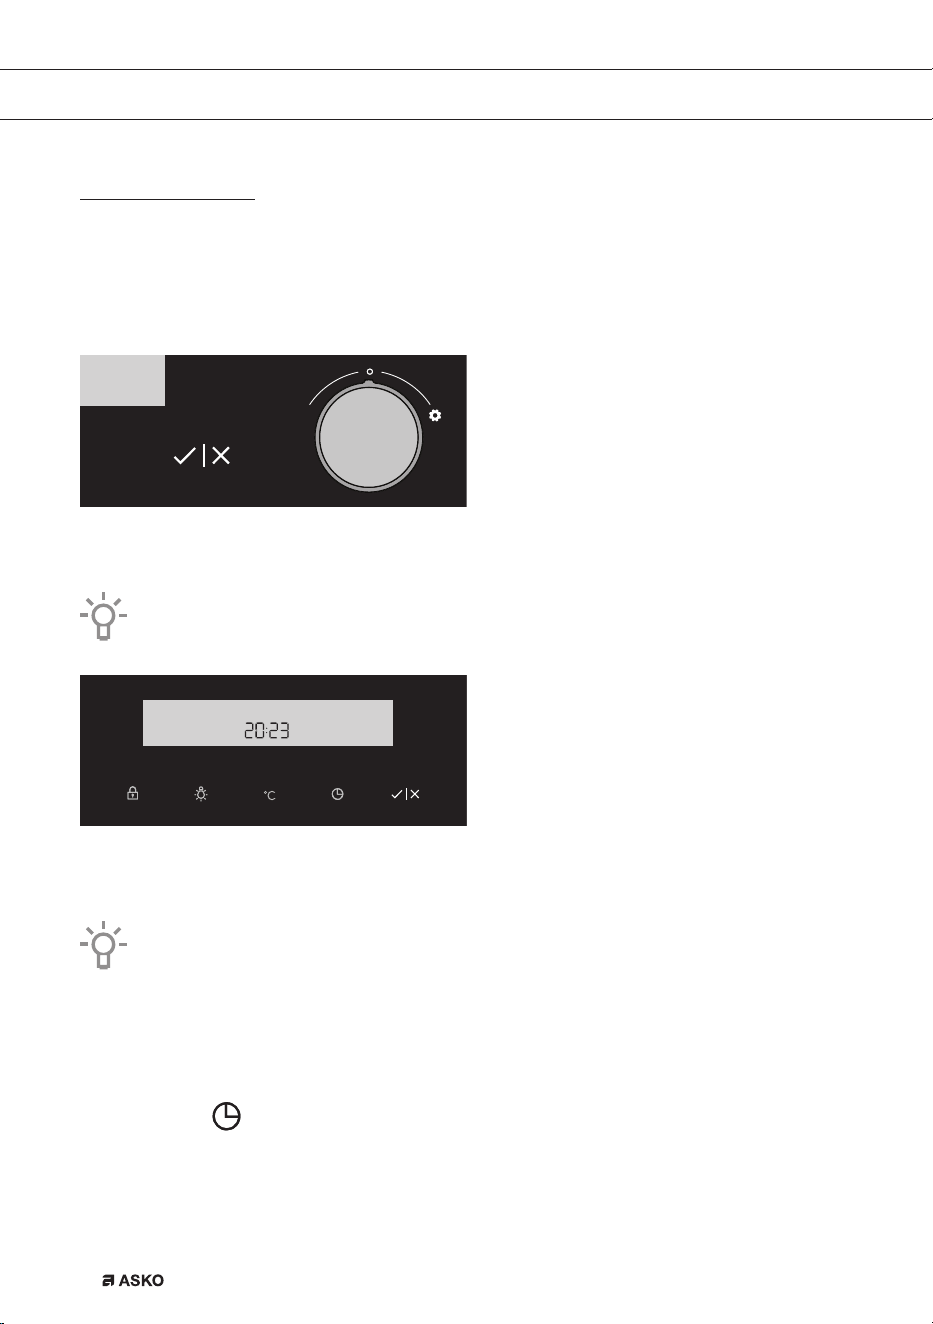
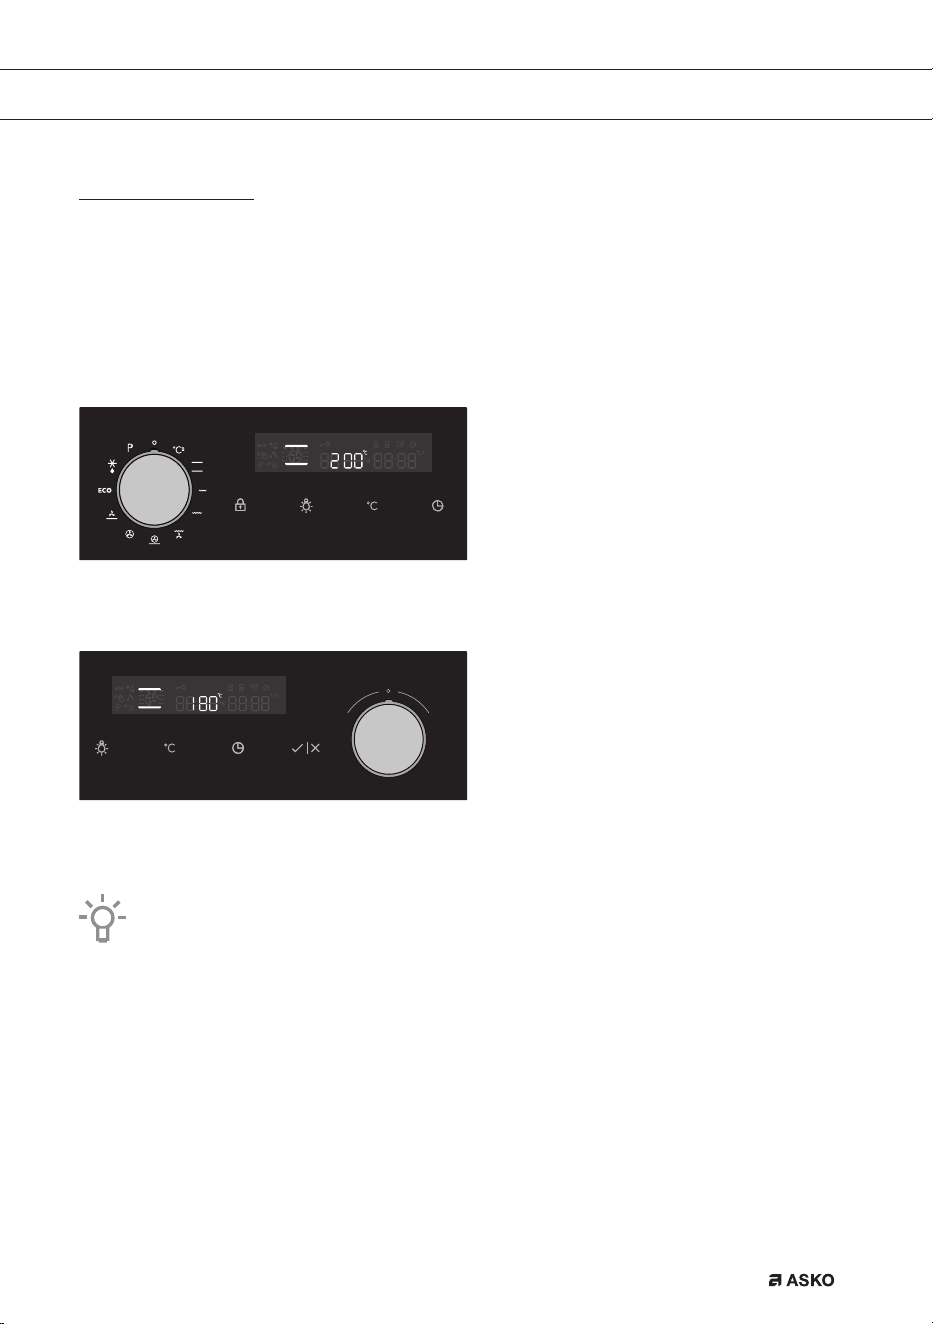
Switching on and settings
After connecting your appliance or after an extended power outage, 12:00 will flash on the display
and the symbol will light up.
Set the time of day.
SETTING THE CLOCK
Rotate the SETTINGS KNOB (-/+) and first set the minutes; then, the cursor will switch to hours.
After three seconds, the settings will be saved.
Turning the knob farther to the right or to the left will change the settings more quickly.
Confirm by pressing START/ STOP. If nothing is pressed within the next three seconds, the setting
will be stored automatically.
The oven will also work if the clock is not set. However, timer functions are not available
in this case (see chapter: SETTING THE TIMER FUNCTIONS).
After a few minutes of idling, the appliance will switch to standby mode.
CHANGING THE CLOCK SETTING
Clock settings may be changed when no timer function is activated.
Press the key to set the current time. Confirm by pressing START/ STOP.
862798_en_naslovnica_drug_papir.indd EN10862798_en_naslovnica_drug_papir.indd EN10 29. 09. 2022 12:16:2529. 09. 2022 12:16:25
EN 11
USE
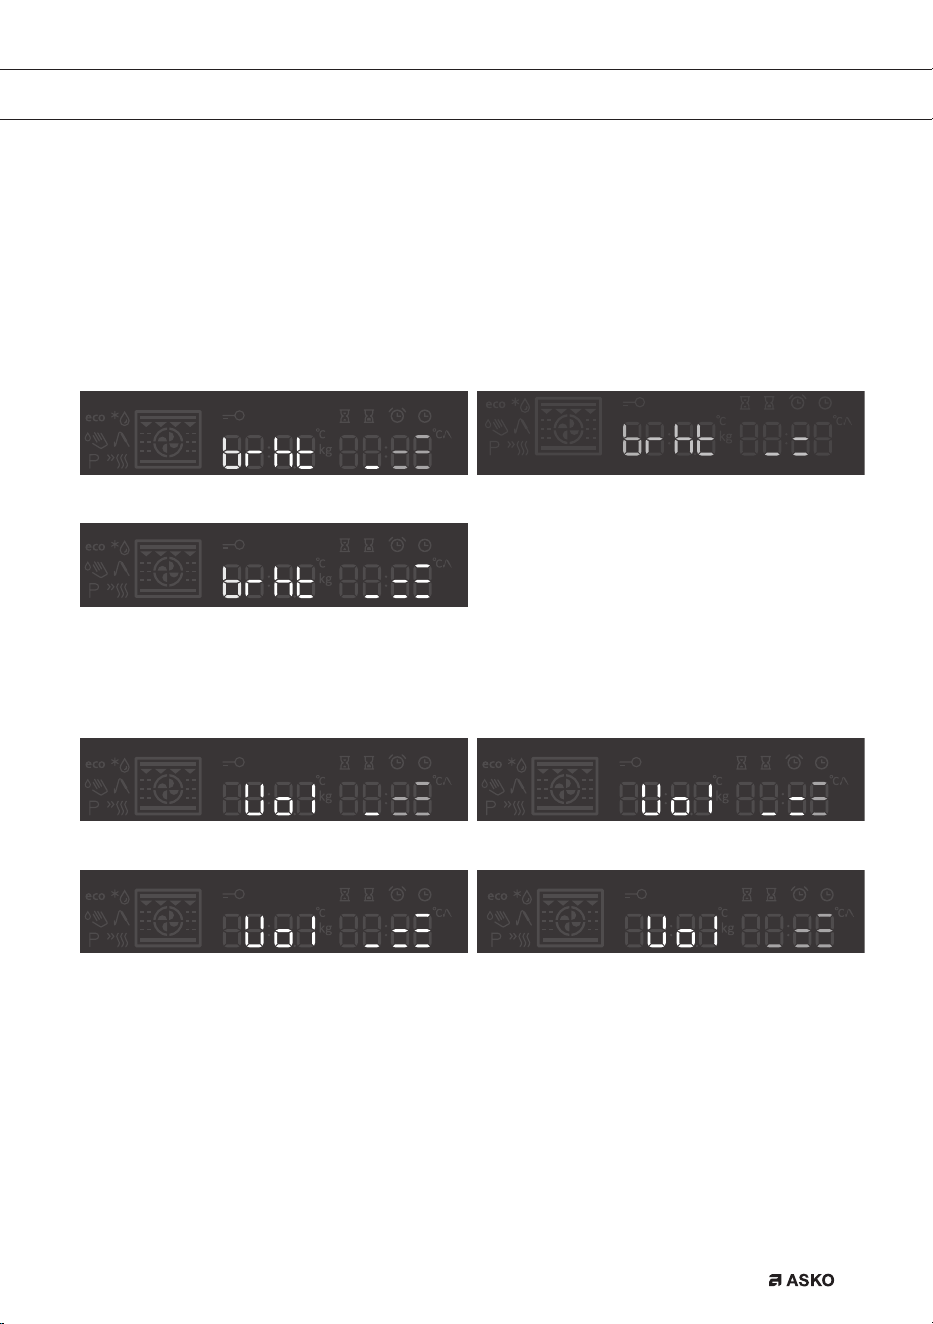
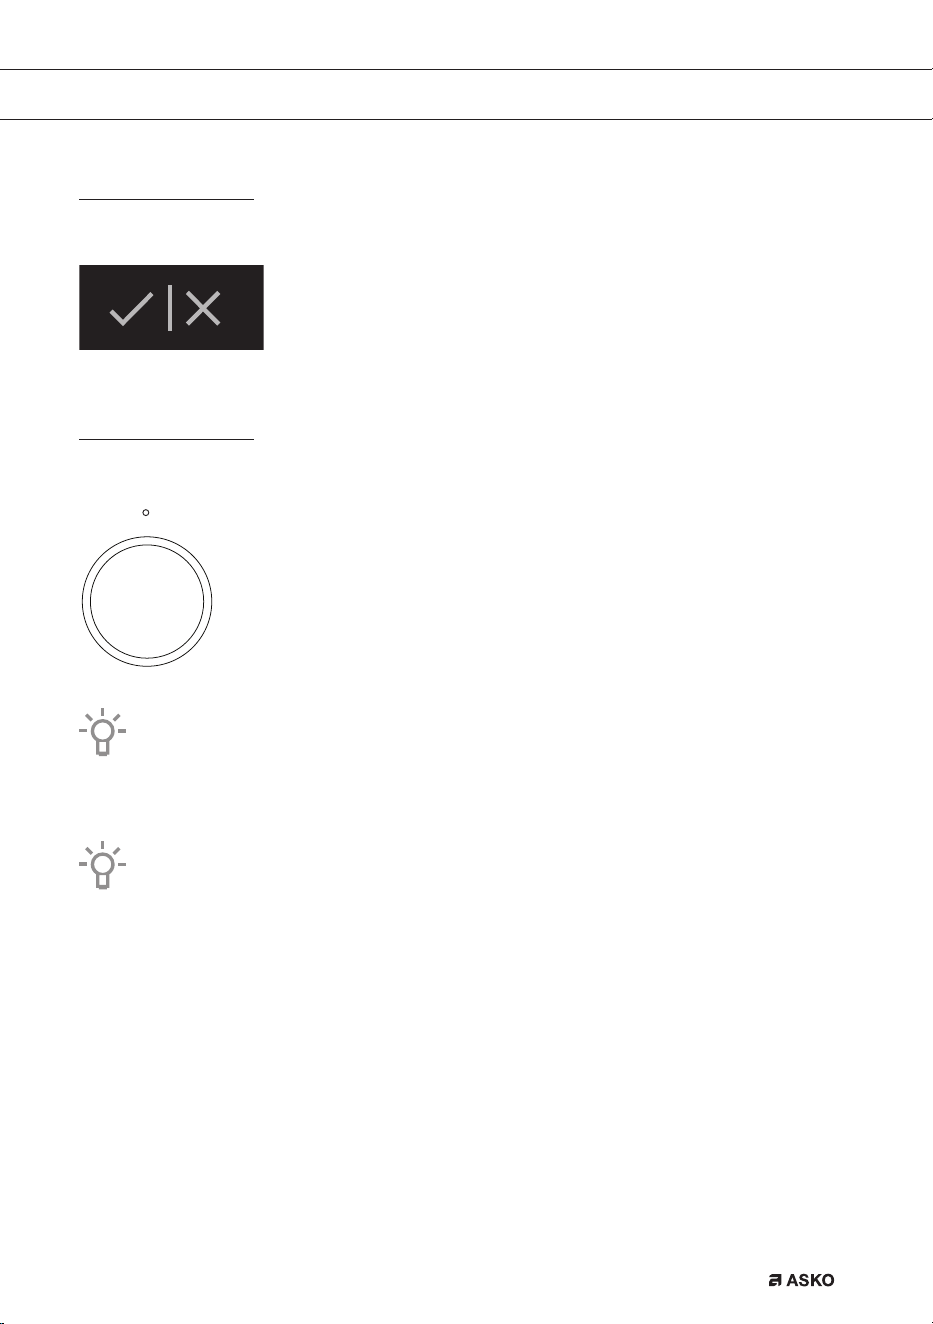
SETTINGS
To change the settings, rotate the setting knob to the right and hold it for three seconds. Press the
start/sop icon to scroll through respective settings or parameters. To change a parameter, rotate
the setting knob to the right or to the left.
BRIGHTNESS LEVEL
Select between three different options of brightness levels. Mid level is pre-set. Levels can be set
by rotate knob.
Brightness level low Brightness level mid
Brightness level max
SOUND LEVEL
Mid level is pre-selected. Sound levels can be set by rotate knob.
Volume level low Pre-set mid sound level
Volume level max Volume level off
862798_en_naslovnica_drug_papir.indd EN11862798_en_naslovnica_drug_papir.indd EN11 29. 09. 2022 12:16:2629. 09. 2022 12:16:26

EN 12
USE
END
By pressing the start/stop icon, user can go out of settings menu back to standby mode. You
can go out of settings manu also if you hold selection knob on the left for 3 sec, or it you turn the
system knob.
To change the settings, rotate the setting knob to the right and hold it for three seconds. Press the
start/sop icon to scroll through respective settings or parameters. To change a parameter, rotate
the setting knob to the right or to the left.
After a power outage or after the appliance is switched off, the additional function
settings will remain stored for no more than a few minutes. Then, all settings,
except for the acoustic signal and child lock will be reset to factory defaults.
862798_en_naslovnica_drug_papir.indd EN12862798_en_naslovnica_drug_papir.indd EN12 29. 09. 2022 12:16:3129. 09. 2022 12:16:31
EN 13
Function/
Recommended
temp. °C
Description
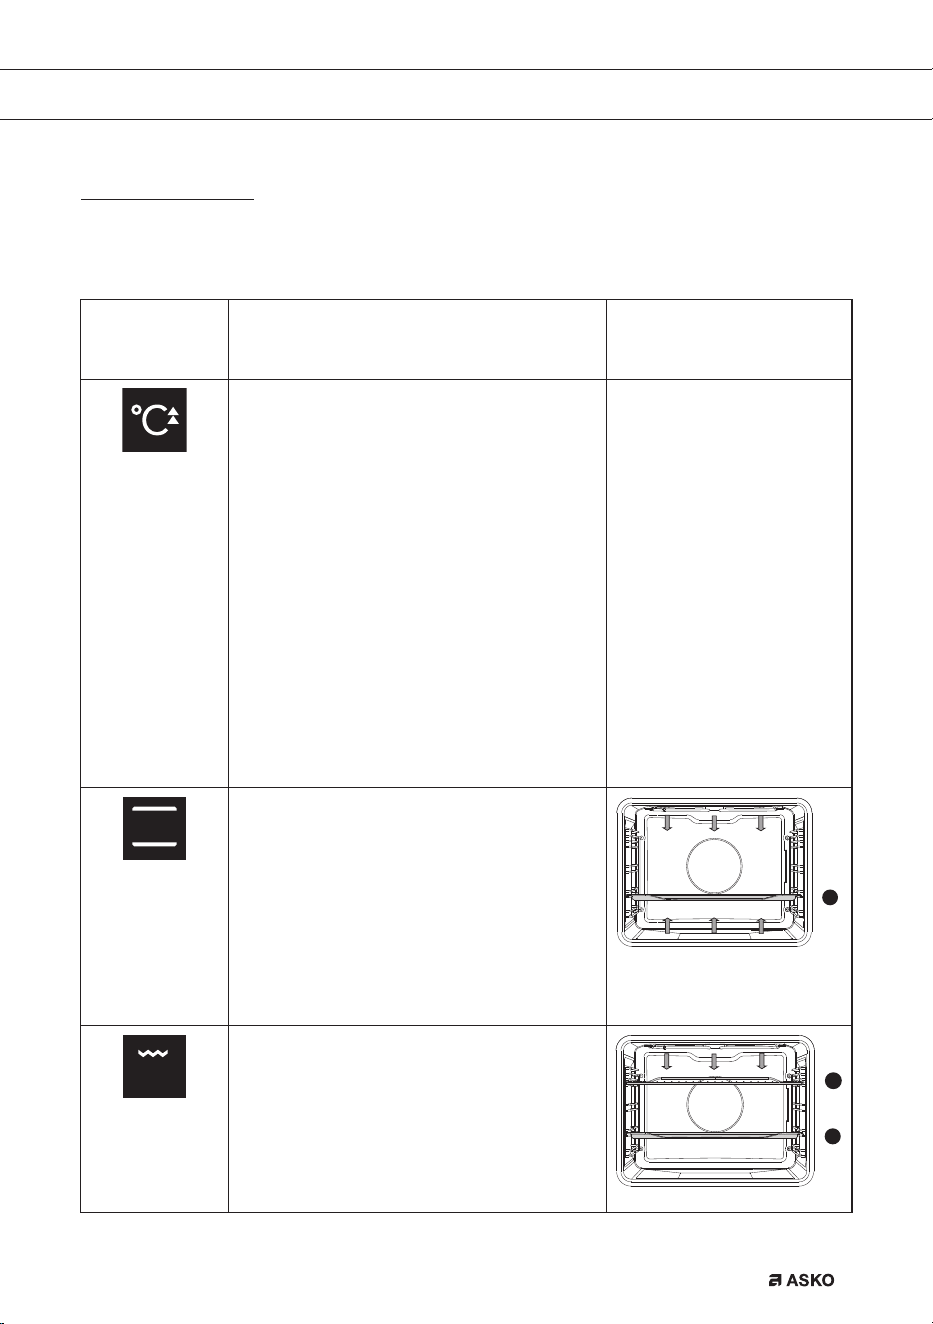
160 °C
Quick preheat
Use this function to heat the oven quickly to
the desired temperature.
This function is not suitable for cooking
food!
• Turn the ‘oven function dial’ to the ‘quick
preheat’ position.
The prior set temperature will be displayed.
You can alter this temperature.
Note:
Preheat will begin after you have started the
oven using the ‘start/stop’ button.
Preheat is complete when the set
temperature is reached and a signal sounds.
200 °C
Top heat + bottom heat
Heat is generated by the heating elements
at the top and bottom of the appliance. This
setting is suitable for traditional baking and
roasting.
• The baking tray or the grill rack is usually
placed at level 2.
• Preheating is recommended.
2
240 °C
Small Grill
Food is heated by the grill element.
• For grilling, the grill rack is usually placed
at level 4 and the baking tray at level 2.
• Keep an eye on the cooking process. At
high temperatures, meat can burn quickly.
• Preheat the oven for 5 minutes.
2
4
USE
Oven settings
Use the table to select the right oven function. Also consult the cooking instructions on the food
packaging.
862798_en_naslovnica_drug_papir.indd EN13862798_en_naslovnica_drug_papir.indd EN13 29. 09. 2022 12:16:3229. 09. 2022 12:16:32
EN 14
Function/
Recommended
temp. °C
Description
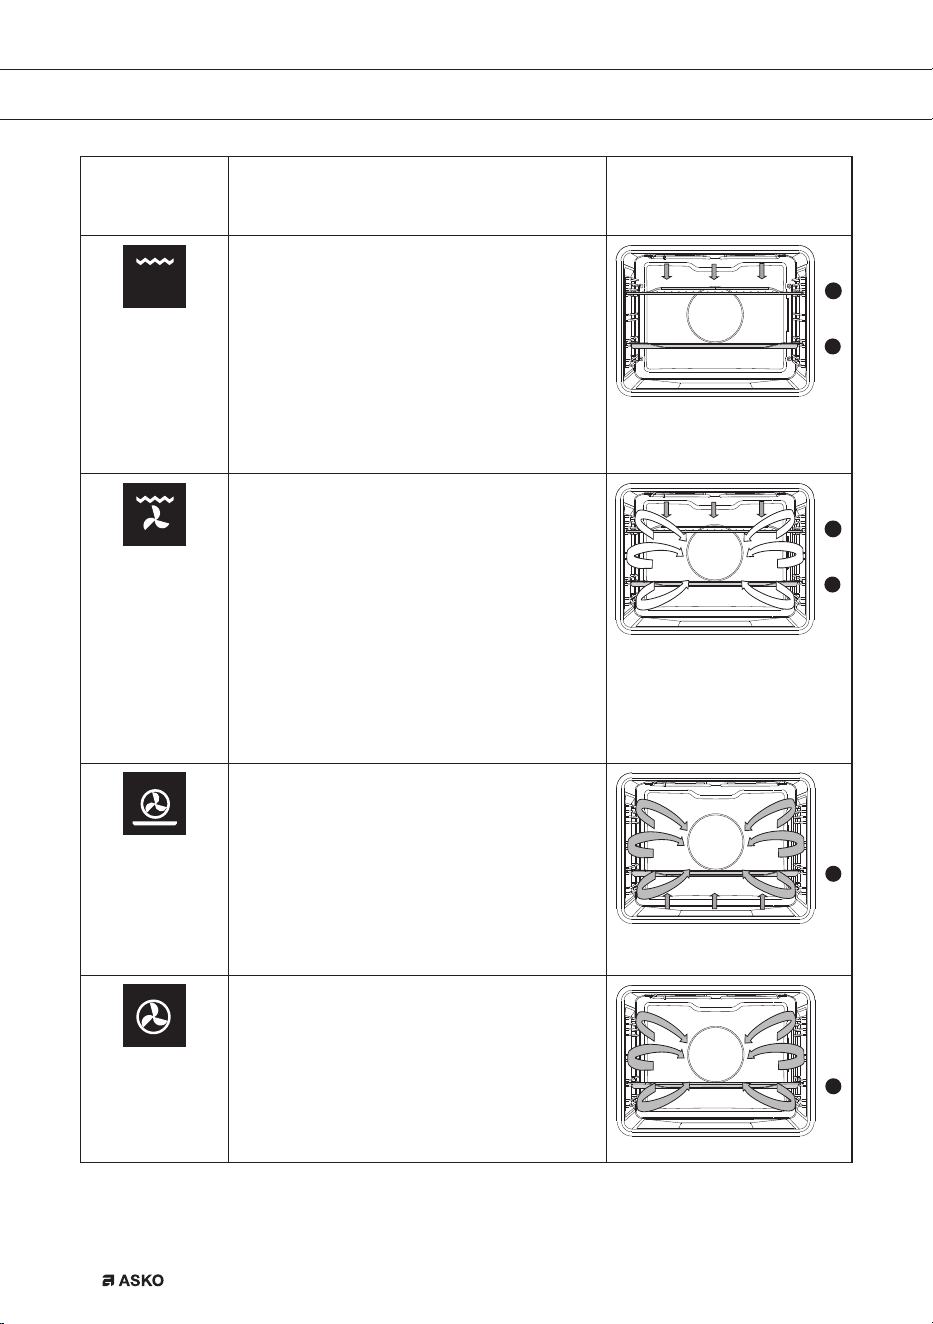
240 °C
Large grill
The heat comes from the top element and
the grill element. This setting is particularly
useful for dishes and baked food that require
a real bottom crust or browning. Use this just
before the end of the baking or roasting time.
• For grilling place the oven rack on the
fourth guide rail level and the baking tray
on the second guide rail level.
2
4
170 °C
Grill + fan
The fan distributes the heat generated from
the top heating element. You can use this
function for grilling meat, fish, poultry and
vegetables. It gives food a crispy texture
without it needing to be turned over.
• For grilling, the grill rack is usually placed
at level 4 and the baking tray at level 2.
• Keep an eye on the cooking process. At
high temperatures, meat can burn quickly.
• Preheat the oven for 5 minutes.
2
4
200 °C
Hot air + bottom heat
Food is heated using a combination of hot air
and bottom heat.
This setting is used for a crispy and browned
result.
• The baking tray or the grill rack is usually
placed at level 2.
• Preheating is recommended.
2
180 °C
Hot air
Food is heated by hot air from a fan and the
heating element at the back of the oven. This
setting uses even heating and is ideal for
baking.
• Place the tray at level 2.
• Preheating is recommended.
2
USE
862798_en_naslovnica_drug_papir.indd EN14862798_en_naslovnica_drug_papir.indd EN14 29. 09. 2022 12:16:3429. 09. 2022 12:16:34
EN 15
Function/
Recommended
temp. °C
Description
180 °C
Bottom heat + fan
The bottom element heats the dish and the
heat is distributed by the fan. This setting
is used for baking yeasted pastry and
preserving fruit and vegetables.
• Place the tray at level 2.
• Preheating is recommended.
2
180 °C
ECO cooking
In this mode, power consumption during the
cooking process is optimized. This mode is
used for roasting meat and baking pastry.
By making use of the residual heat this
setting gives a low energy consumption
(energy class in accordance with EN 60350-
1). On this setting the oven does not display
the actual temperature in the oven.
• Place the tray at level 3.
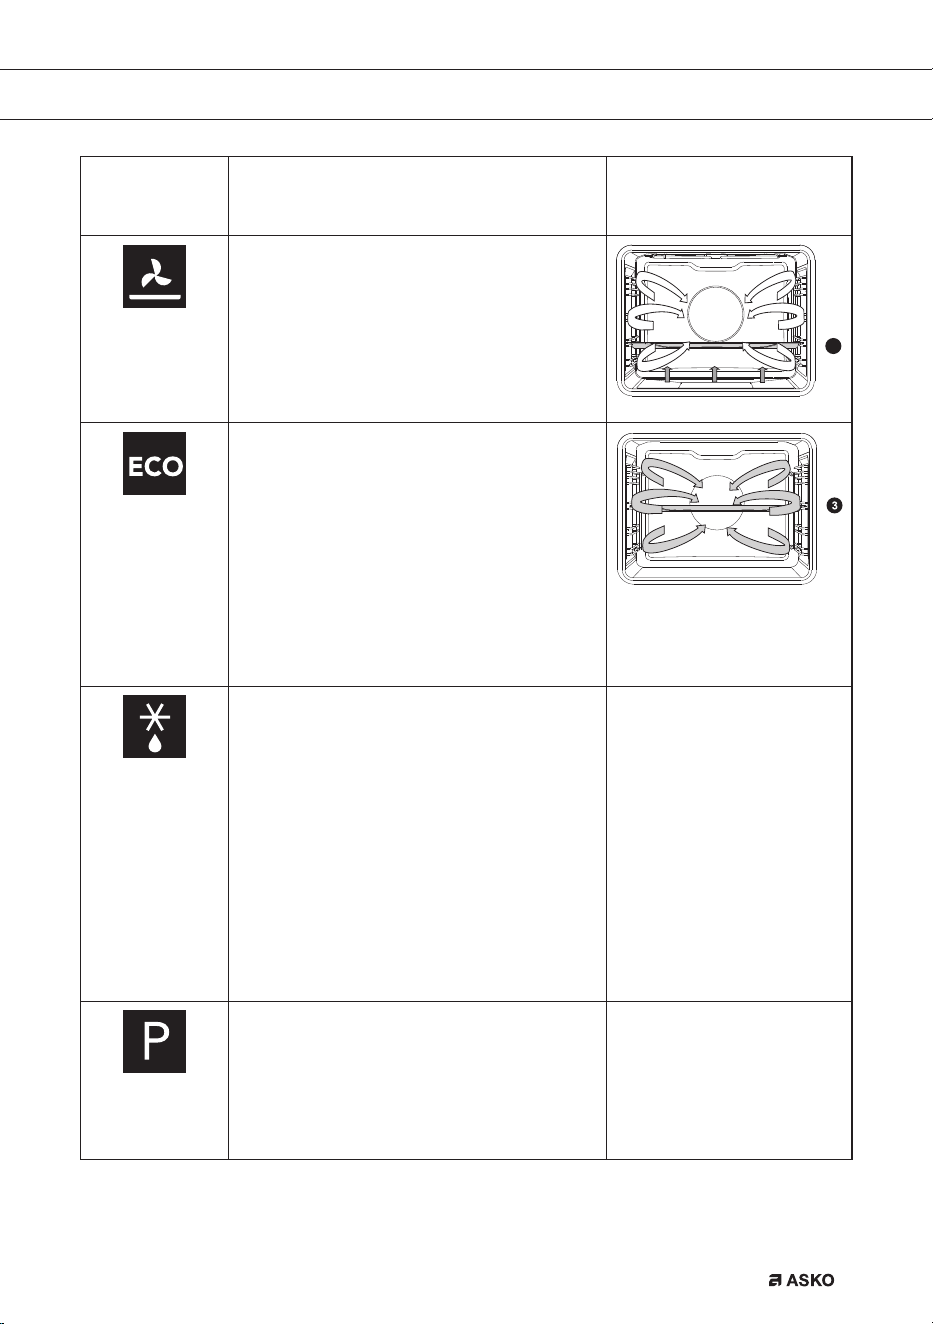
Defrosting
In the defrost function the fan circulates the
air. No heat elements are switched on. Use
this function for slow defrosting of frozen
dishes (cakes, biscuits, cookies, bread,
bread rolls and frozen fruit).
• If desired, set a different defrost time by
pressing the ‘timer button’ and setting the
time using the ‘selection dial’.
• Turn the food over after half the defrosting
time has elapsed; stir the food or break up
large pieces if these are frozen together.
Pyrolysis
This function allows automatic cleaning
of the oven cavity/interior using high
temperature (approx. 460 °C), which
incinerates the fat residues and other
impurities, reducing them to ashes.
USE
862798_en_naslovnica_drug_papir.indd EN15862798_en_naslovnica_drug_papir.indd EN15 29. 09. 2022 12:16:3729. 09. 2022 12:16:37

EN 16
Each oven function has a number of basic or standard settings that you can adjust.
You adjust the settings by pressing the relevant button (before pressing the ‘start/stop’
button). Certain settings are not available for all programmes; if this is the case you will
be alerted by a sound signal.
Adjusting the cooking temperature
• Turn the ‘oven function dial’ to the desired oven function.
• The selected pictogram will appear on the display and the prior set temperature will flash.
• Press the ‘temperature button’. Set the oven to the desired temperature using the ‘selection
dial’.
USE
862798_en_naslovnica_drug_papir.indd EN16862798_en_naslovnica_drug_papir.indd EN16 29. 09. 2022 12:16:4029. 09. 2022 12:16:40
EN 17
Choosing the settings
Each cooking system features basic or default settings which can be adjusted.
Adjust the settings by pressing the relevant key (before pressing the START/STOP key).
Some settings are not available with some programs; an acoustic signal will remind you of such
cases.
CHANGING THE COOKING TEMPERATURE
Select the COOKING SYSTEM. Selected icon will appear on the display and PRESET
TEMPERATURE will flash.
Touch the TEMPERATURE KEY. Rotate the SETTINGS KNOB (-/+) and choose the desired
temperature.
Maximum temperature is limited with some systems.
When the appliance is switched on with the START key, the symbol °C flashes on the display
until the desired value is reached.
USE
862798_en_naslovnica_drug_papir.indd EN17862798_en_naslovnica_drug_papir.indd EN17 29. 09. 2022 12:16:4029. 09. 2022 12:16:40
EN 18
TIMER FUNCTIONS
First rotate the COOKING SYSTEM SELECTOR KNOB; then, set the temperature.
Touch the TIMER key several times to select the symbol.
The icon for the selected timer function will light up and the adjustable cooking start/end
time will flash on the display. Other icons are dimly lit.
Press START to start the cooking process. ELAPSED COOKING TIME will be displayed.
USE
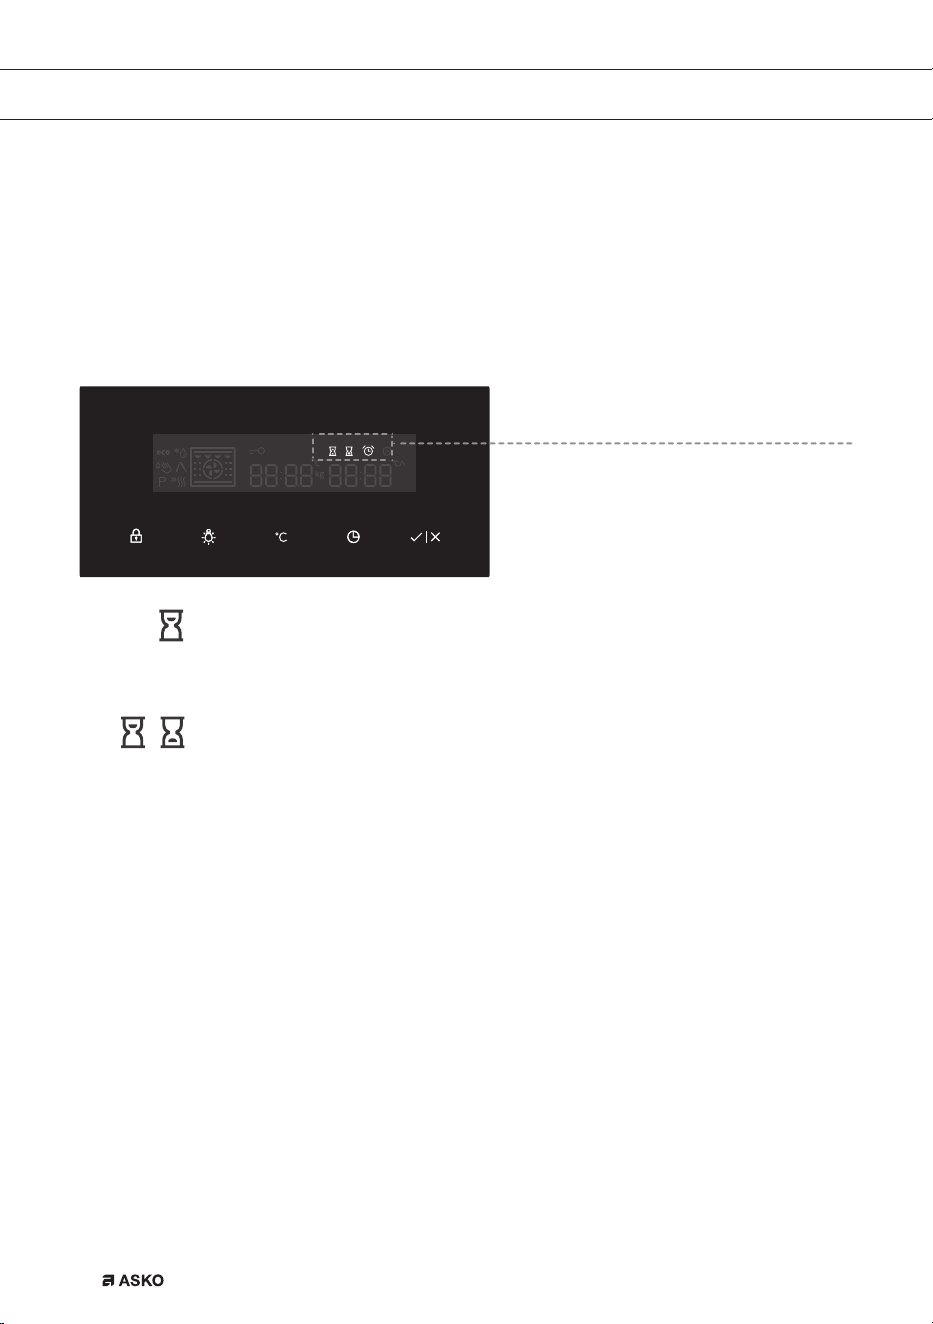
Timer function display
Setting the cooking time
In this mode, you can define the duration of oven operation (cooking time).
Set the desired cooking time. First set the minutes, then the hours. Icon and
cooking time are displayed on the display unit.
Setting the delayed start
In this mode, you may specify the duration of the cooking process (cooking
time) and the time when you wish the cooking process to stop (end time). Make
sure the clock is accurately set to current time.
Example:
Current time: noon
Cooking time: 2 hours
End of cooking: 6 pm
First set the OPERATION DURATION (2 hours). Touch the CLOCK button again and
select END OF OPERATION. The display automatically shows a fl ashing sum of the
time of day and duration of operation of the oven (14:00).
Set the time for the end of baking (18:00)
Press START to start the cooking process. The timer will wait for the time to start the
cooking process and the symbol will be lit up. The oven automatically switches on
(14:00) and stops operating and the selected time (18:00).
862798_en_naslovnica_drug_papir.indd EN18862798_en_naslovnica_drug_papir.indd EN18 29. 09. 2022 12:16:4129. 09. 2022 12:16:41
EN 19
USE
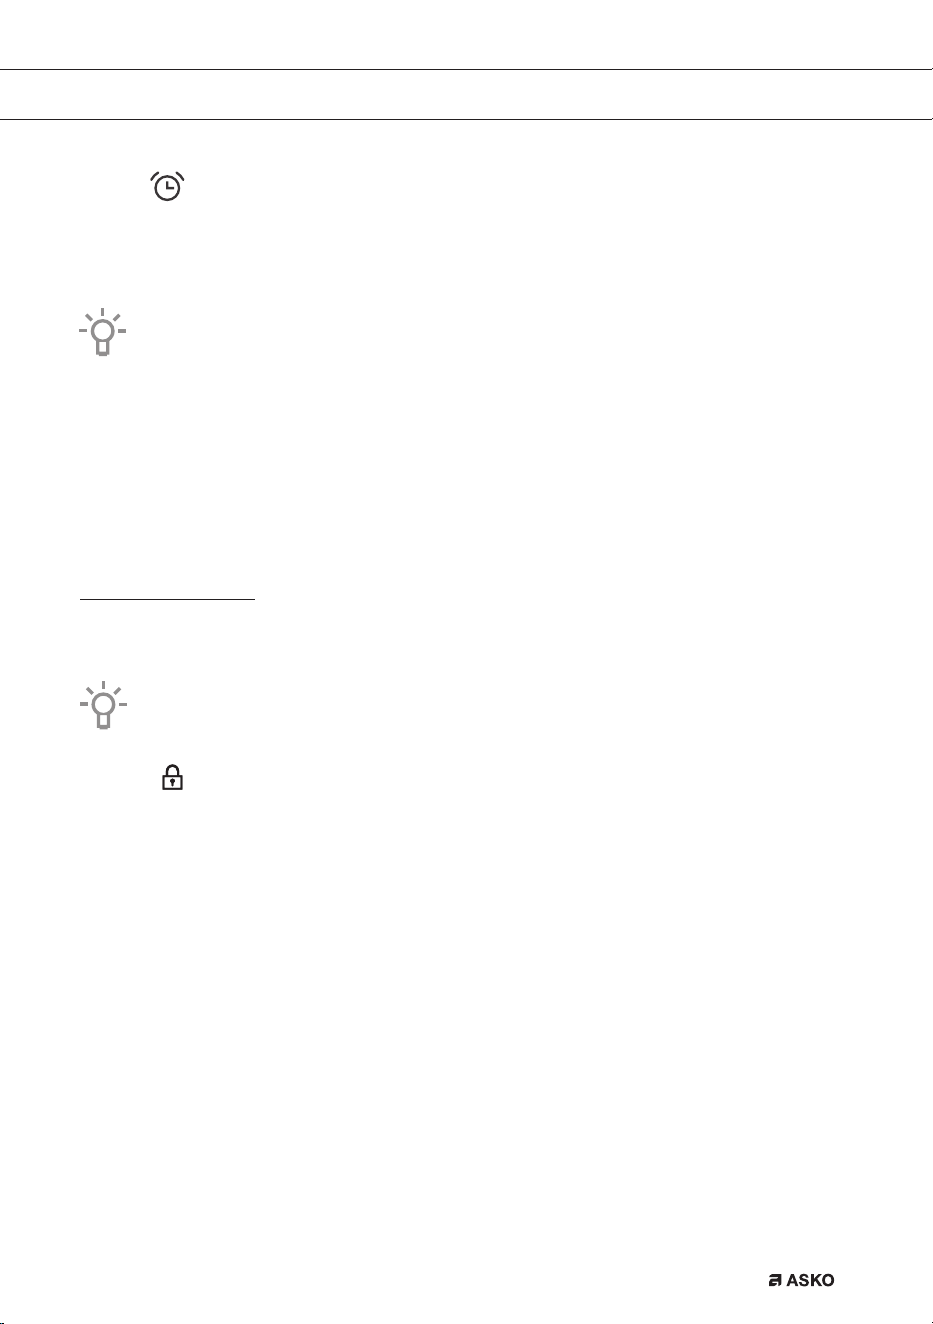
Setting the minute minder
The minute minder can be used independently of the oven operation. The
longest possible setting is 24 hours.
During the last minute, the minute minder is displayed in seconds.
After the set time expires, the oven will automatically stop operating (end of cooking).
An acoustic signal will be heard which you may turn off by touching any key. After one
minute, the acoustic signal will be switched off automatically.
All timer functions can be cancelled by setting the time to »0«.
After a few minutes of idling, the appliance will switch to standby mode.
Selecting additional functions
Activate/deactivate the functions by pressing the desired key or a combination of keys.
Some functions are not available with some systems; an acoustic signal will indicate of
such cases.
Child lock
Activate it by touching the CHILD LOCK key. The »key« icon will light up on
the display. Touch the key again to deactivate the child lock. The icon on the
display will disappear.
If the child lock is activated with no timer function engaged (only clock is
displayed), then the oven will not operate.
If the child lock is activated after a timer function has been set, then the oven
will operate normally; however, it will not be possible to change the settings.
When the child lock is activated, systems (cooking modes) or additional
functions cannot be changed. The only possible change is to end the cooking
process by rotating the selector knob to »0«.
Child lock will remain active after the oven is switched off. To select a new
system, the child lock must first be deactivated.
862798_en_naslovnica_drug_papir.indd EN19862798_en_naslovnica_drug_papir.indd EN19 29. 09. 2022 12:16:4229. 09. 2022 12:16:42
EN 20
USE
Oven lighting
Oven lighting is switched on automatically when the door is opened or when the
oven is switched on.
After the end of the cooking process, the light will remain on for another minute.
The light inside the oven can be switched on or off by pressing the LIGHT key.
Acoustic signal
Loudness of the acoustic signal can be set when no timer function is activated
(only the time of day is displayed). Press the TEMPERATURE/POWER key and
hold it for 5 seconds. Two fully lit bars will appear on the display. Rotate the
SETTINGS KNOB (-/+) to choose one of the three volume levels (one, two, or
three bars). After three seconds, the setting will be automatically stored and the
time of day will appear.
Decreasing the display contrast
The cooking system selector knob should be on the »0« position. Press the
LIGHT key and hold it for 5 seconds. Two fully lit bars will appear on the display.
Rotate the SETTINGS KNOB (-/+) to adjust the display dimmer (one, two, or
three bars). After three seconds, the setting will be automatically saved.
+
Standby
Display lighting can be automatically switched off after 10 minutes if it is not
used.
Press the KEY + TIMER keys to switch off the display. If a timer function has
been activated, then »OFF« and the TIMER icon will appear on the display to
indicate the activated function.
After a power outage or after the appliance is switched off, the additional function
settings will remain stored for no more than a few minutes. Then, all settings, except for
the acoustic signal and child lock will be reset to factory defaults.
5sek
5sek
862798_en_naslovnica_drug_papir.indd EN20862798_en_naslovnica_drug_papir.indd EN20 29. 09. 2022 12:16:4329. 09. 2022 12:16:43
EN 21
USE
Starting the cooking process
Start the cooking process by pressing the START/STOP key and holding it for a while.
Switching off the oven
Turn the COOKING SYSTEM SELECTOR KNOB to position »0«.
After the end of the cooking process and after the oven has been switched off, declining
temperature is displayed down to 50 °C.
All timer settings are also paused and cancelled. Time of day (clock) will be displayed.
After one minute of idling, the appliance will switch to standby mode.
After the use of the oven, some water may be left in the condensate channel (underneath
the door). Wipe the channel with a sponge or a cloth.
862798_en_naslovnica_drug_papir.indd EN21862798_en_naslovnica_drug_papir.indd EN21 29. 09. 2022 12:16:4529. 09. 2022 12:16:45
EN 22
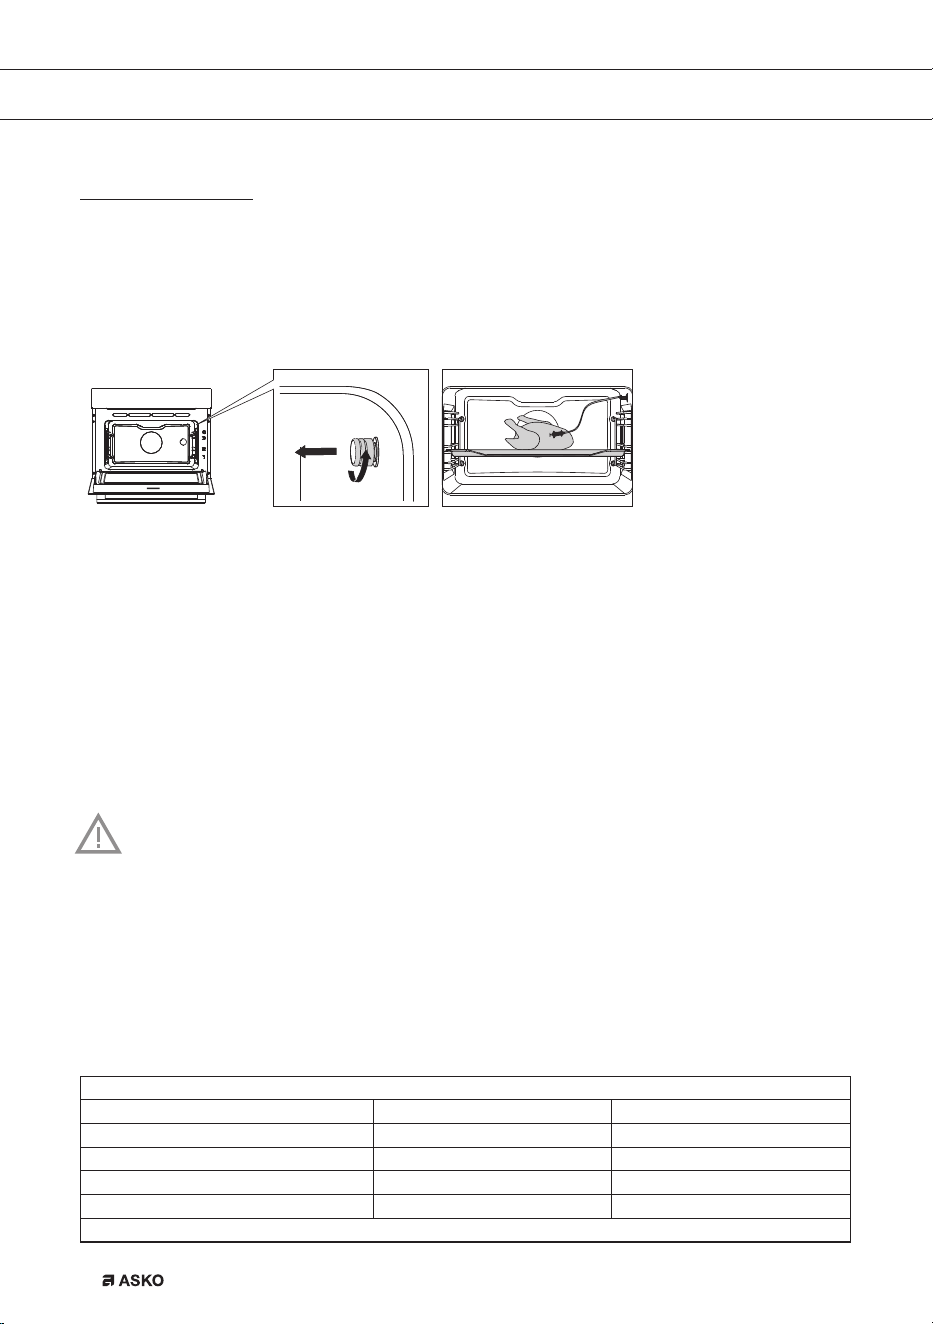
Culisensor
If the culisensor is plugged in, the culisensor screen will be shown and a small culisensor
icon will appear. The oven operates until the food core reaches the set temperature. The core
temperature is measured by means of the temperature probe.
1. Screw the metal cover from the connection point (front top corner of the right side wall).
2. Put the culisensor plug in the connection and insert the culisensor completely into the food.
The display will show the culisensor screen and icon.
3. Set the function and temperature. Instead of the time, you need to set the core temperature
(between 30 -100 °C).
4. Start the progress by pressing the ‘start/stop’ button.
5. During cooking, the rising temperature of the core will be displayed (the desired core
temperature may be adjusted during the cooking process).
6. When the set core temperature is reached, the cooking process will stop. An acoustic signal
will sound, which you may turn off by pressing any button. After one minute, the acoustic
signal will be switched off automatically. The current time appears on the display.
• Always place the culisensor’s entire metal sensor in the dish.
• Please note! After the cooking process always replace the metal cap on the
culisensor’s connection.
• Only use the culisensor in your oven.
• Ensure that the culisensor does not come into contact with the heating element
during cooking.
• The culisensor will be extremely hot after the cooking process. Be careful!
Avoid burns.
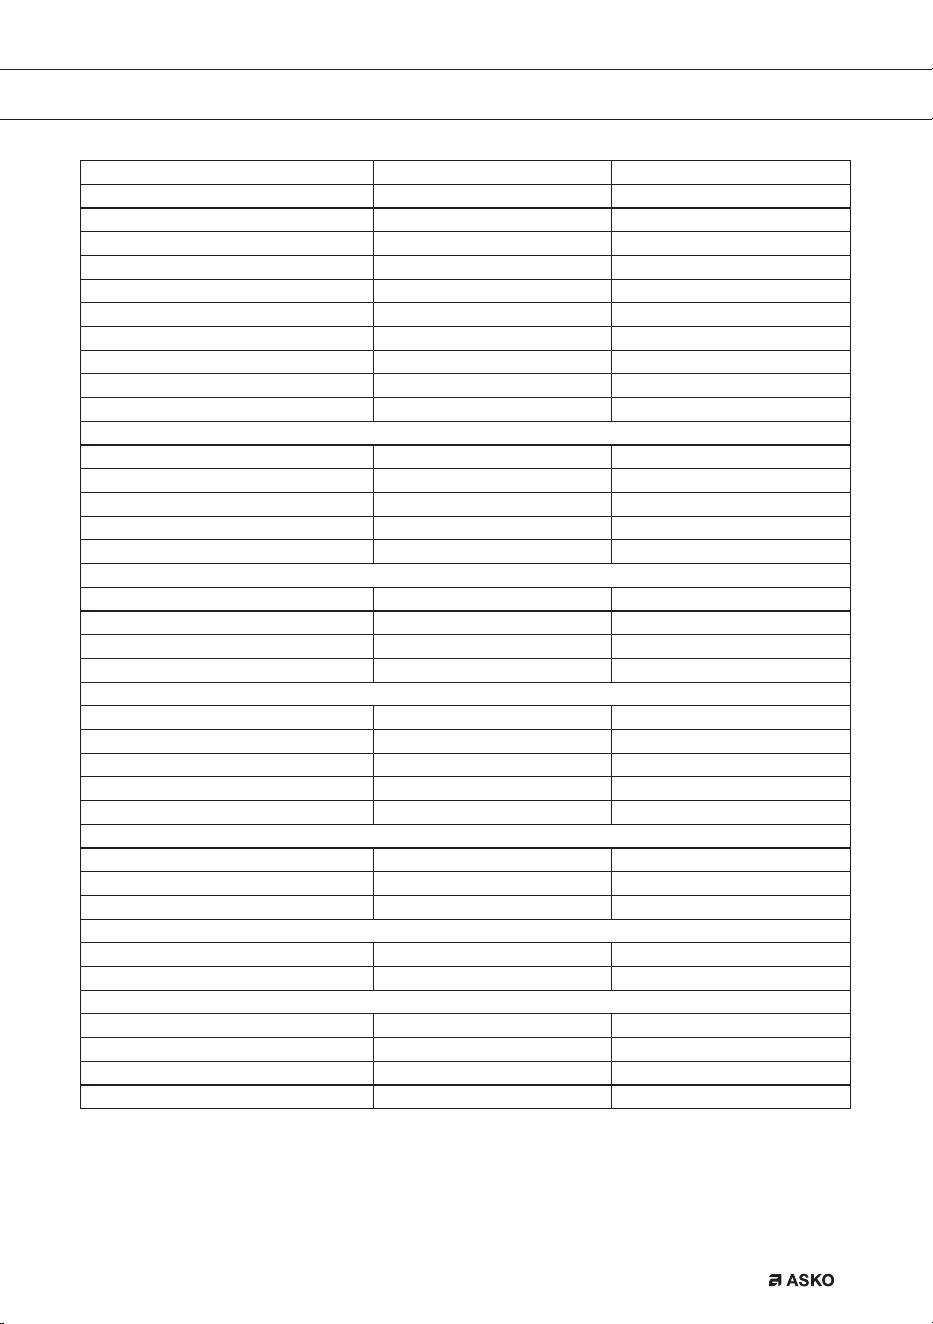
Recommended core temperature values
Beef
Fillet/sirloin medium 55 - 58 ºC
Roast beef medium 55 - 60 ºC
Round steak well-done 85 - 90 ºC
Roast beef well-done 80 - 85 ºC
Stewed beef well-done 90 ºC
Pork
OPERATION
862798_en_naslovnica_drug_papir.indd EN22862798_en_naslovnica_drug_papir.indd EN22 29. 09. 2022 12:16:4529. 09. 2022 12:16:45
EN 23
Hoof/leg well-done 75 ºC
Hoof/leg slightly pink 65 - 68 ºC
Pork loin slightly pink 65 - 70 ºC
Pork shoulder well-done 75 ºC
Pork belly/stu ed well-done 75 - 80 ºC
Pork belly well-done 80 - 85 ºC
Roast pork hoof well-done 80 - 85 ºC
Pork hoof well-done 80 - 85 ºC
Cooked ham very tender 64 - 68 ºC
Kassel ribs well-done 65 ºC
Breaded ham 65 - 68 ºC
Veal
Veal loin slightly pink 58 - 65 ºC
Veal hoof/leg of veal well-done 78 ºC
Fried kidneys well-done 75 - 80 ºC
Roast veal/shoulder well-done 75 - 80 ºC
Leg of veal well-done 75 - 78 ºC
Mutton
Mutton loin pink 65 - 70 ºC
Mutton loin well-done 80 ºC
Mutton hoof pink 70 - 75 ºC
Leg of mutton 82 - 85 ºC
Lamb
Leg of lamb pink 60 - 62 ºC
Leg of lamb well-done 68 - 75 ºC
Lamb loin pink 54 - 58 ºC
Lamb loin well-done 68 - 75 ºC
Lamb shoulder well-done 78 - 85 ºC
Poultry
Chicken well-done 85 ºC
Goose/Duck well-done 90 - 92 ºC
Turkey well-done 80 - 85 ºC
Pastries etc
Pastries 72 - 85 ºC
Terrines 60 - 70 ºC
Fish
Salmon soft 60 ºC
Fish fi llet 62 - 65 ºC
Entire fi sh 65 ºC
Terrine 62 - 65 ºC
OPERATION
862798_en_naslovnica_drug_papir.indd EN23862798_en_naslovnica_drug_papir.indd EN23 29. 09. 2022 12:16:4629. 09. 2022 12:16:46
EN 24
MAINTENANCE
Cleaning the oven
Clean the oven regularly to prevent fat and leftover food from accumulating, especially on interior
and exterior surfaces, the door andseal.
• Clean exterior surfaces with a soft cloth and soapy warm water. Wipe afterwards with a
clean, damp cloth and dry the surfaces.
• Remove splashes and stains on the interior surfaces with a soapy cloth. Wipe afterwards with
a clean, damp cloth and dry the surfaces.
• Clean the interior of the oven
Important
• Take care that NO water enters the vents.
• NEVER use abrasive cleaning materials or chemical solvents.
• ALWAYS ensure that the door seal stays clean.
This prevents accumulation of dirt and allows you to close the door properly.
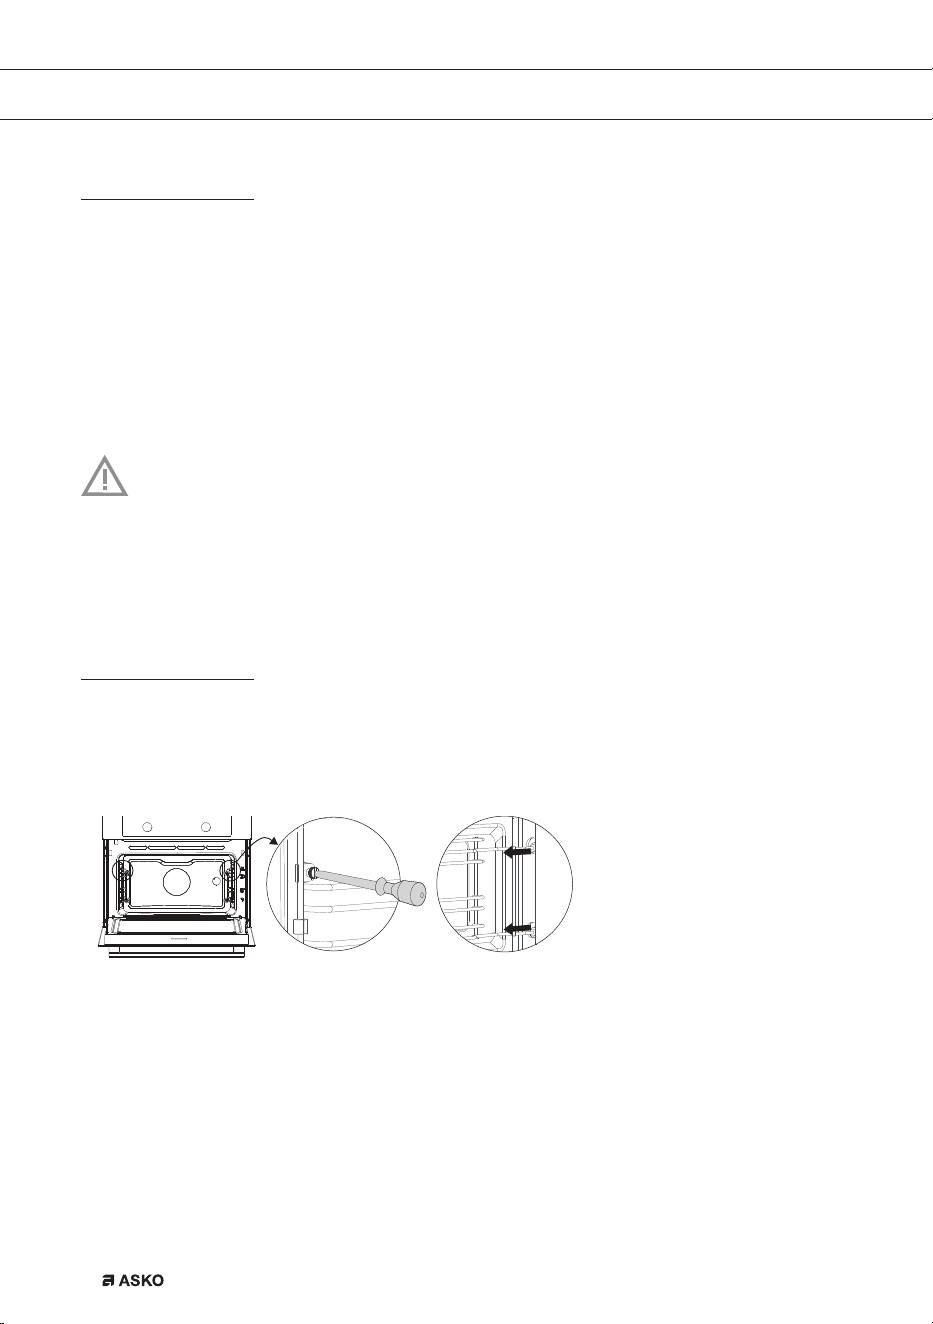
Removing and cleaning the guide rails.
Only use conventional cleaners to clean the guides.
• Remove the screws using a screwdriver.
• Remove the guides from the holes in the back wall.
862798_en_naslovnica_drug_papir.indd EN24862798_en_naslovnica_drug_papir.indd EN24 29. 09. 2022 12:16:4629. 09. 2022 12:16:46
EN 25
MAINTENANCE
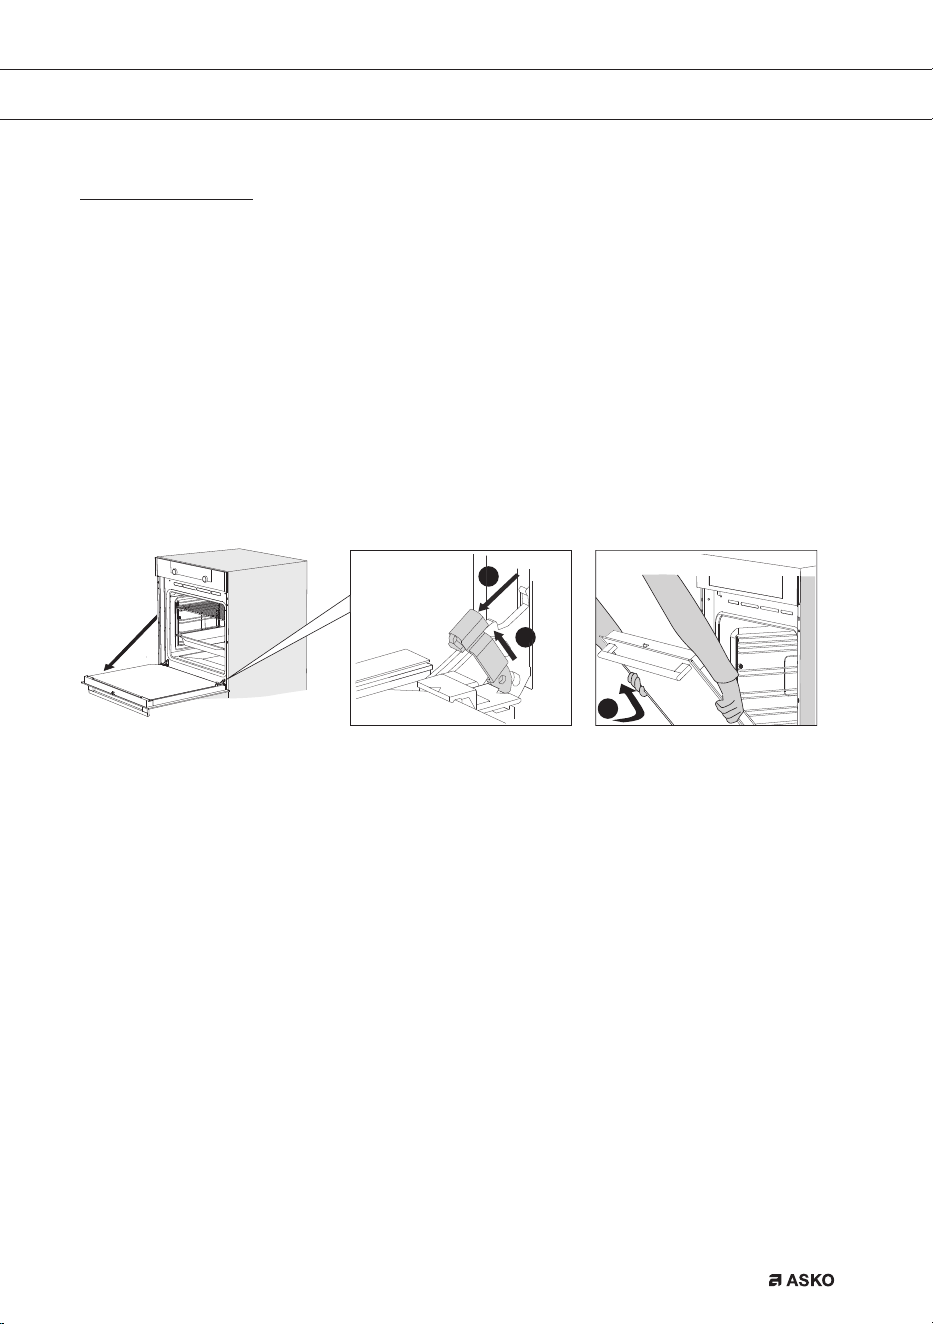
Removal and installation of the oven door
Keep your fingers away from the hinges of the oven door. The hinges are spring loaded and can
cause injury if they spring back.
Make sure that the hinge latches are applied correctly to lock the hinges.
Remove the oven door
1. Open the door to the fully open position.
2. Lift both hinge latches (A) and pull them towards the oven door (B).
The hinges will be locked in the 45° position.
3. Gently close the door until it reaches a 45° angle.
4. Remove the door by lifting and tilting it towards the oven (C).
The hinges need to come out of the slots in the oven.
B
A
C
Install the oven door
5. Hold the door at an angle of approximately 45° in front of the oven.
6. Insert the hinges into the slots and make sure they are both positioned correctly.
7. Open the door to the fully open position.
8. Lift both hinge latches and move them towards the oven.
9. Gently close the oven door and make sure that it closes correctly.
If the door does not open or close correctly, then make sure that the hinges are positioned
correctly in their slots.
862798_en_naslovnica_drug_papir.indd EN25862798_en_naslovnica_drug_papir.indd EN25 29. 09. 2022 12:16:4729. 09. 2022 12:16:47
EN 26
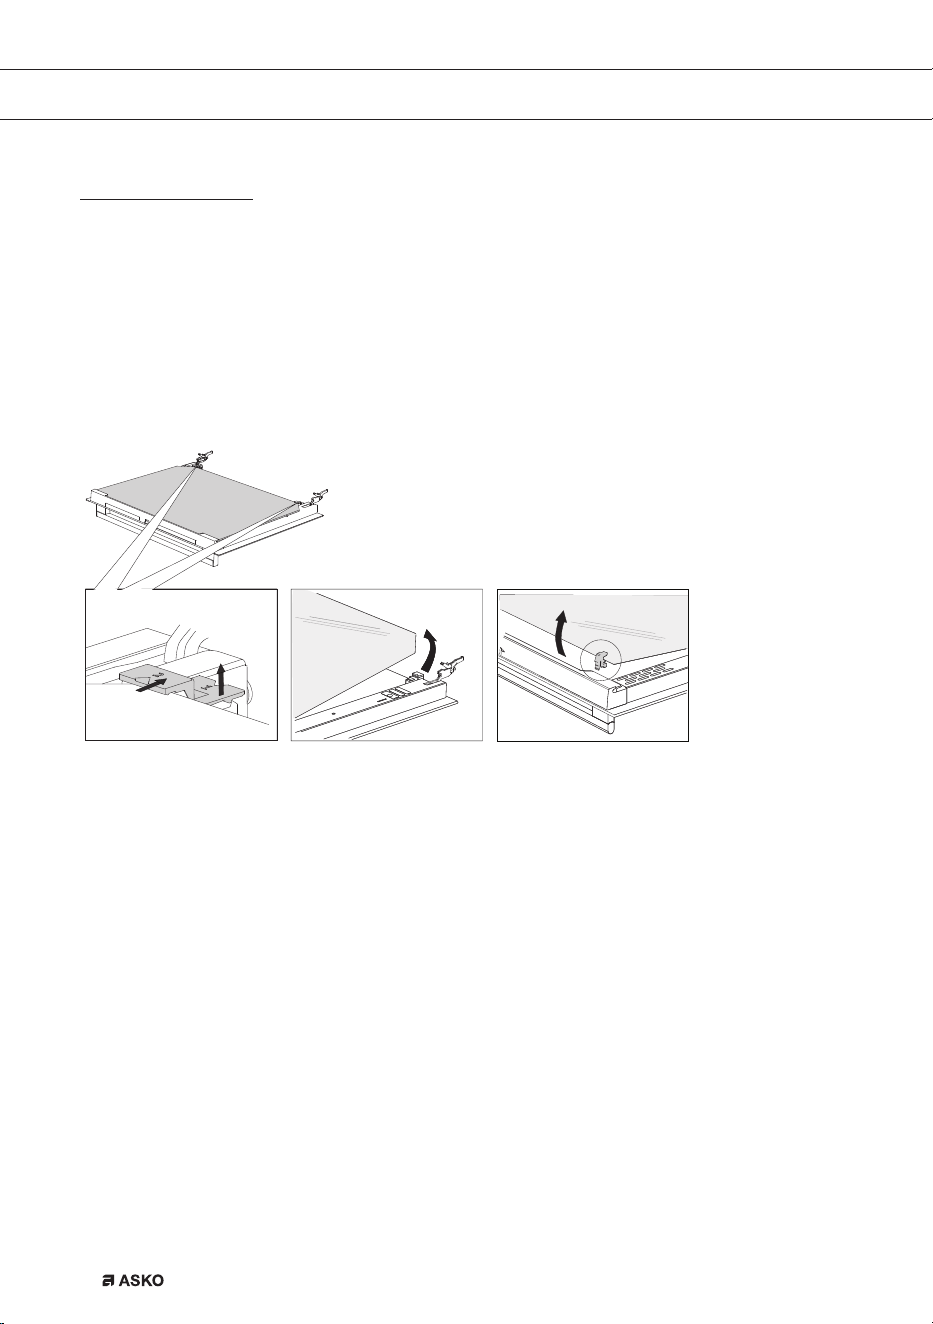
Removing the oven window
The glass in the oven door can be cleaned from the inside, but you do need to remove the glass
from the door to do this. First remove the oven door (see chapter ‘Removing the oven door’).
• Lift the brackets on the left and right side of the door upwards slightly (to marker 1 on the
bracket) and pull this away from the glass slightly (to marker 2 on the bracket).
• Grasp the glass at the bottom and gently lift this upwards to remove it from the support.
• The inner third glass (depending on the model) can be removed by lifting this carefully and
removing it. Also remove the rubber seals around the glass.
To replace the glass pane, observe the reverse order. The markings (semicircle) on the door and
the glass pane should overlap.
MAINTENANCE
862798_en_naslovnica_drug_papir.indd EN26862798_en_naslovnica_drug_papir.indd EN26 29. 09. 2022 12:16:4829. 09. 2022 12:16:48
EN 27
The Cleaning function (pyrolysis)
Instead of cleaning manually, you can clean the oven space or an enamelled baking tray using
the ‘Pyrolysis’ oven feature. During pyrolysis the oven space is heated to a very high temperature.
Contaminants that are present incinerate at this high temperature andonly ash remains.
With average use of the oven, we recommend running the pyrolysis function once per
month.
Caution!
• First, remove all accessories and guide rails / telescopic guide rails from the oven
(see ‘Removing and cleaning the guide rails’).
• Then remove any remaining food from the oven space and wipe the space with a
damp cloth. Chunks of food and fat may ignite during the pyrolysis process. Fire
hazard!
Note! The oven space and an enamelled baking tray cannot be cleaned at the same
time using the pyrolysis function. If you want to clean an enamelled baking tray using
pyrolysis, then do this first (the oven space can become dirty due to the cleaning of the
baking tray). Insert one baking tray at a time. After that, the oven space can be cleaned.
Caution! Do NOT clean the glass baking tray using the ‘Pyrolysis’ ovenfeature.
Starting the Pyrolysis function
1. Make sure the oven space is completely empty and no chunks of food and fat are present!
2. If you want to clean an enamelled baking tray first, place the special pyrolysis guide rails in
position. Wipe the baking tray with a damp cloth and slide the baking tray into the oven on
Level 2.
▷ Remove these special pyrolysis guide rails after the cleaningprocess.
3. Turn the ‘oven function dial’ to ‘Pyrolysis’. The cleaning intensity level and time are
displayed.
4. To choose the desired cleaning intensity level, press the ‘temperature button’ and turn the
‘selection dial’ to select one of three cleaning levels (one, two or three bars lit).
5. After a certain period of time, oven door will be automatically locked for your safety. The key
symbol will appear on the display.
• Unpleasant smell may be emitted from the oven during the cleaning process.
• When the oven has cooled down, wipe it with a damp cloth.
Wipe the oven door and the adjacent surfaces in the gasket area. Do not rub the gasket.
MAINTENANCE
862798_en_naslovnica_drug_papir.indd EN27862798_en_naslovnica_drug_papir.indd EN27 29. 09. 2022 12:16:4929. 09. 2022 12:16:49
EN 28
Please note: Do not attempt to open the oven door while the automatic cleaning
programme is in progress. The programme may be terminated. Risk of burns!
MAINTENANCE
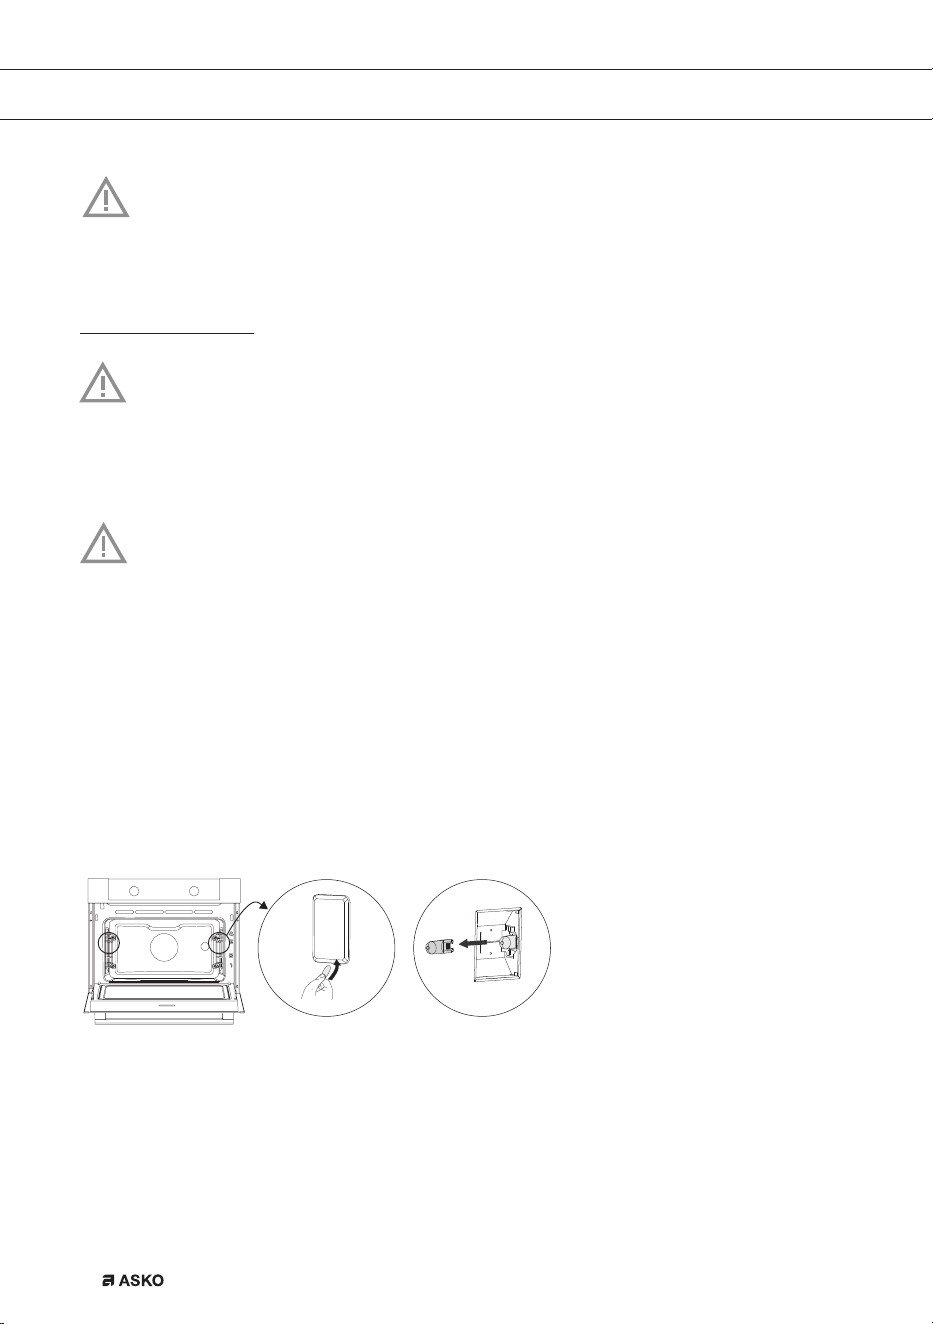
Replacing the oven lamp
The lamp in this household appliance is only suitable for illumination of this appliance.
The lamp is not suitable for household room illumination.
The lamp (E14, 230-240 V, 25 W, 300 °C) is a consumer item and therefore does not fall
under the guarantee. First remove the baking tray, oven rack and guide rails.
Cut the power to the appliance by removing the plug from the socket or switching off the
fuse in the fuse box!
Please note: the lamp can be very hot! Use protection to remove the lamp.
Rear wall lamp
1. Turn the cover to the left to remove it.
2. Turn the bulb out of the fitting.
Side wall lamp
3. Use a flat-blade screwdriver to snap and remove the lamp cover from the holder.
4. Be careful not to damage the enamel.
5. Turn the bulb out of the fitting.
862798_en_naslovnica_drug_papir.indd EN28862798_en_naslovnica_drug_papir.indd EN28 29. 09. 2022 12:16:5029. 09. 2022 12:16:50

EN 29
General
Try the solutions below if you have problems with your oven. You could save yourself the time
and effort of an unnecessary phone call to customer services.
The food is not cooked
• Check whether the timer has been set and you have pressed the ‘start button’.
• Close the door properly.
• Check whether a fuse has blown and whether a circuit breaker has been activated.
Food is overcooked or undercooked
• Check whether the correct cooking time has been set.
• Check whether the temperature has been set.
The display will be reset following power failure
• Remove the plug from the socket and put it back in again.
• Set the time again.
There is condensation on the interior of the oven
• This is normal. Wipe the oven clean after use.
The fan keeps working after the oven is switched off
• This is normal. Once the oven has been switched off, the cooling fan may continue to run
for a little while.
Air flow can be felt at the door and the exterior of the appliance
• This is normal.
Light reflects on the door and the exterior of the appliance
• This is normal.
Steam escapes from the door or the vents
• This is normal.
Clicking sounds can be heard when the oven is working, particularly in the defrost setting
• This is normal.
MALFUNCTIONS
862798_en_naslovnica_drug_papir.indd EN29862798_en_naslovnica_drug_papir.indd EN29 29. 09. 2022 12:16:5029. 09. 2022 12:16:50

EN 30
Storing and repairing the oven
Repairs may only be performed by a qualified service technician.
If maintenance is required, remove the plug from the socket and contact ASKO customer
services.
Have the following information to hand when you call:
• The model number and serial number (stated on the inside of the oven door)
• Guarantee details
• A clear description of the problem
Choose a clean, dry place if you have to store the oven temporarily, as dust and moisture can
damage the appliance.
MALFUNCTIONS
862798_en_naslovnica_drug_papir.indd EN30862798_en_naslovnica_drug_papir.indd EN30 29. 09. 2022 12:16:5029. 09. 2022 12:16:50
EN 31
ENVIRONMENTAL ASPECTS
Disposal of the appliance and packaging
This product is made from sustainable materials. However, the appliance must be disposed of
responsibly at the end of its useful life. The government can provide you with information about this.
The appliance packaging can be recycled. The following materials have been used:
• cardboard;
• polyethylene film (PE);
• CFC-free polystyrene (hard PS foam).
Dispose of these materials responsibly in accordance with legal provisions.
The product has a pictogram of a crossed-out waste container. This
indicates that household appliances must be disposed of separately.
This means that the appliance may not be processed via the regular
waste flow at the end of its useful life. You should take it to a special
municipal waste depot or a sales outlet that offers to do this for you.
Collecting household equipment separately prevents harm to the environment and public health.
The materials used in manufacturing this appliance can be recycled, which provides considerable
savings inenergy and raw materials.
Declaration of Conformity
We hereby declare that our products satisfy the applicable European Directives, Orders
and Regulations, as well as the requirements stated in the referenced standards.
862798_en_naslovnica_drug_papir.indd EN31862798_en_naslovnica_drug_papir.indd EN31 29. 09. 2022 12:16:5129. 09. 2022 12:16:51

862798 / VER 2 / 29-09-2022
The appliance rating label is located on the inside of the appliance.
When contacting the service department,
have the complete type number to hand.
You will find the addresses and phone numbers of the service organisation on the guarantee card.
en (10-22)
862798_en_naslovnica_drug_papir.indd EN32862798_en_naslovnica_drug_papir.indd EN32 29. 09. 2022 12:16:5129. 09. 2022 12:16:51