Owner Manual Cars
Side view
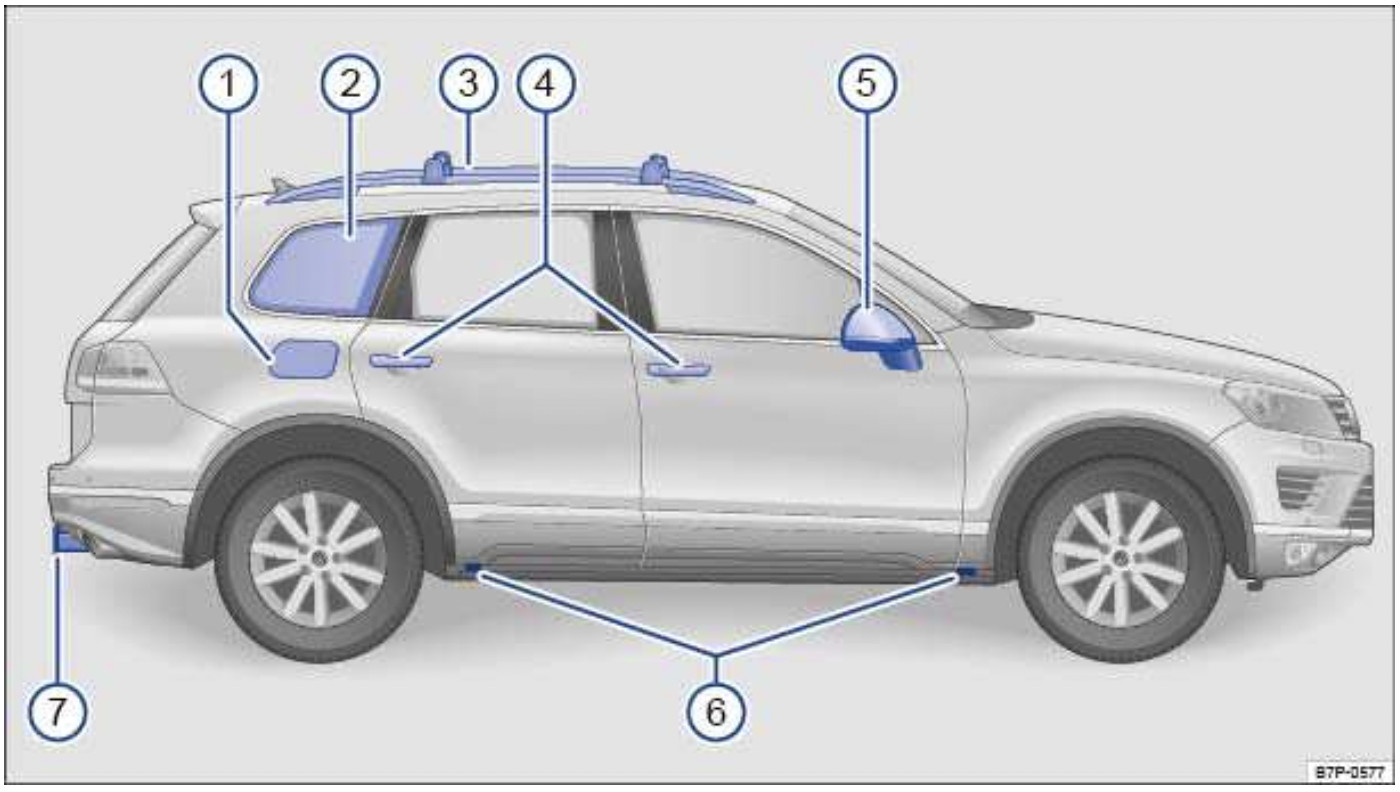
Fig. 1 Vehicle side overview.
Key to fig. 1:
- Fuel filler flap
- Side window with window diversity antenna for:
Radio
Central locking
- Roof rack
- Outside door handles
- Outside mirror:
Additional turn signal light
Area view
- Lift points for the jack
- Trailer hitch/ball mount receiver
Front view
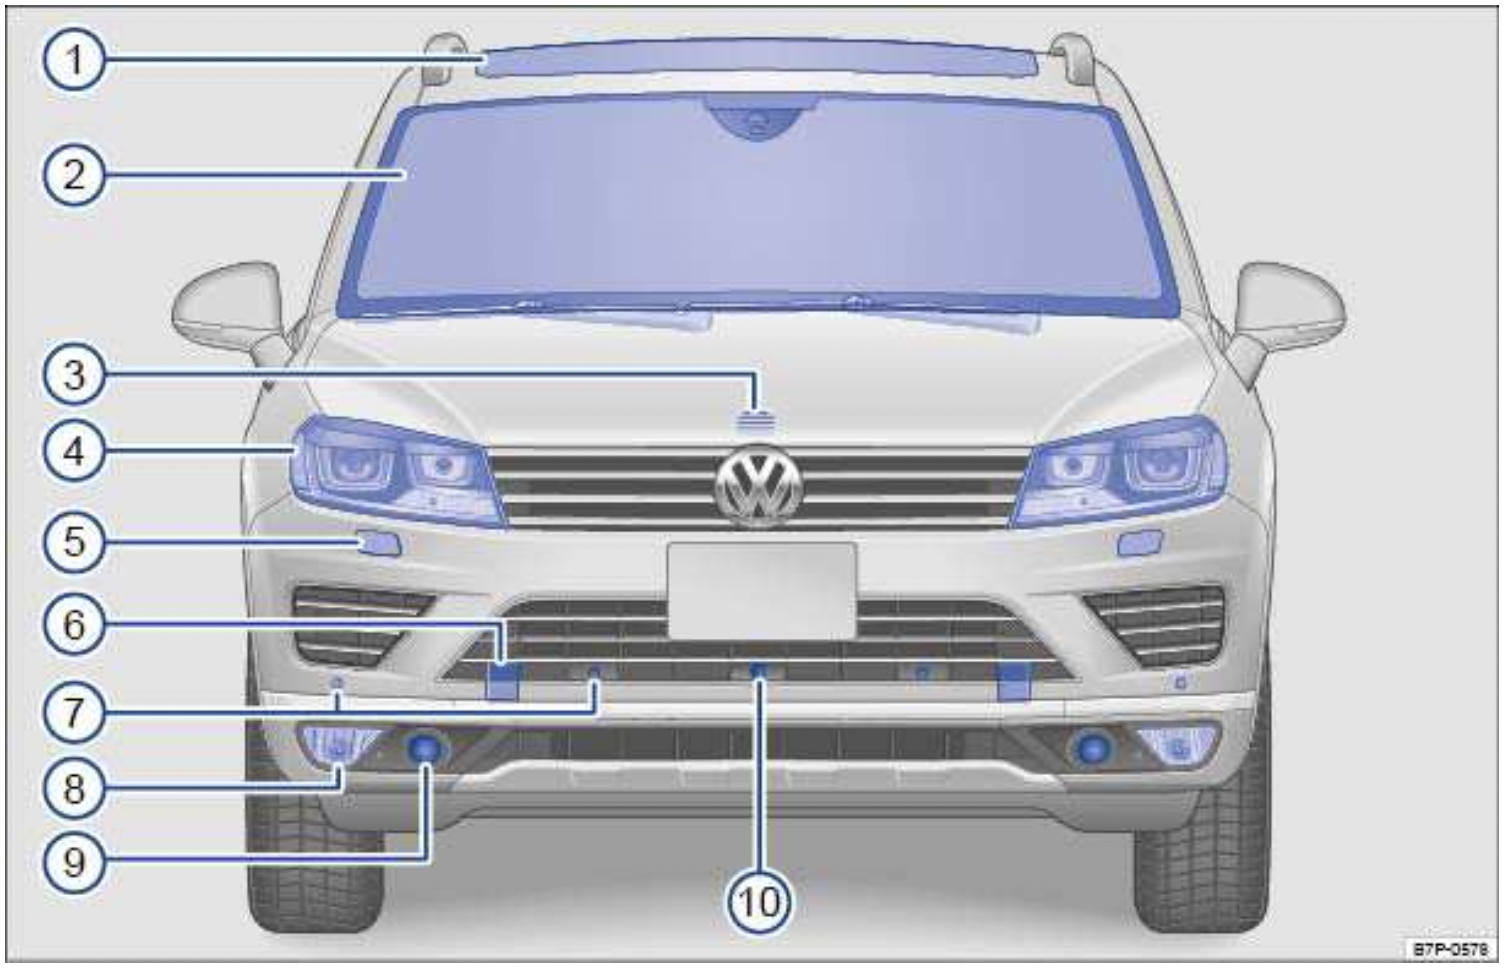
Fig. 2 Vehicle front overview.
Key to fig. 2:
- Power sunroof
- Windshield area with:
Rain sensor on mirror base
Low-light sensor on mirror base
Dynamic high beam control on mirror base
Windshield wipers
- Engine hood release
- Headlights (on both left and right) ,
- Headlight washers (on left and right)
- Threaded hole for the front towing eye (on both left and right) behind covers
- Sensors for front Park Distance Control (on both left and right)
- Fog lights/static cornering lights (on both left and right)
- Radar sensors for the adaptive cruise control (ACC) (on both left and right)
- Camera for Area View
Rear view
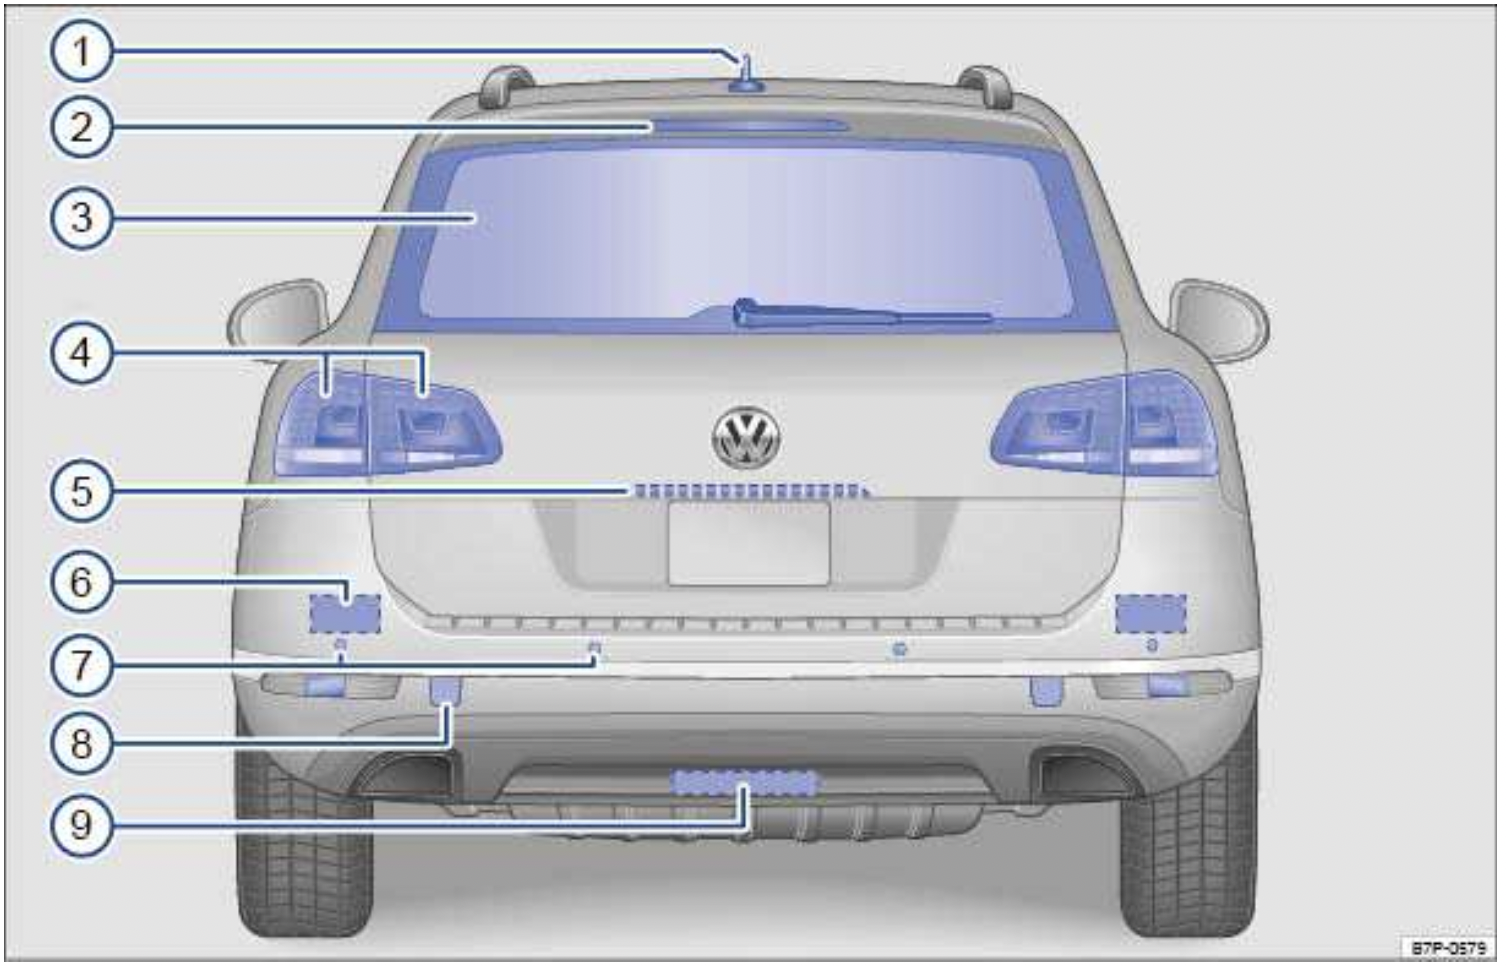
Fig. 3 Vehicle rear overview.
Key to fig. 3:
- Roof antenna for:
Mobile phone
Navigation
- High-mounted brake light
- Rear window with:
Rear window defroster
Rear window wiper
- Taillights (on both left and right)
- Area of:
Button to open the rear hatch
Rear Assist camera and the Area View camera
License plate lighting
- Radar sensors for Side Assist
- Sensors for rear Park Distance Control
- Threaded hole for the rear towing eye (on both left and right) behind covers
- Trailer hitch/ball mount receiver
Driver door overview
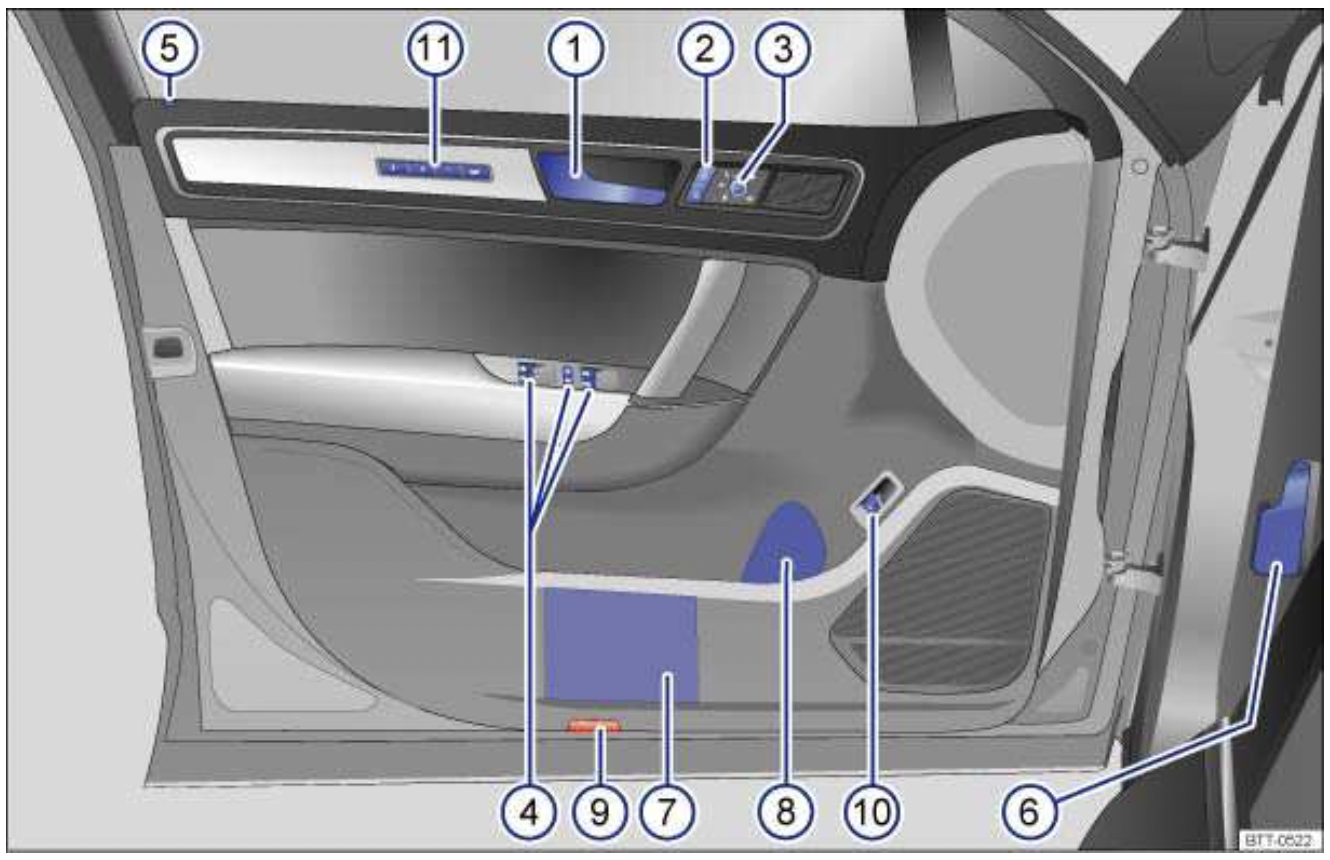
Fig. 4 Overview of controls in the driver door.
Key to fig. 4:
- Door handle
- Power locking switch for locking and unlocking the vehicle

- Switch for adjusting the outside mirror:
Adjusting outside mirrors L - 0 - R
Outside mirror heating 
Folding mirror 
- Buttons for operating the power windows:
Power windows 
Safety switch for rear power windows and electric child safety lock 
- Indicator for power locking system
- Lever for releasing the engine hood
- Storage compartment
- Bottle holder
- Door light
- Switch to unlock the rear hatch

- Memory buttons for storing the driver seat and outside mirror settings

Driver side overview
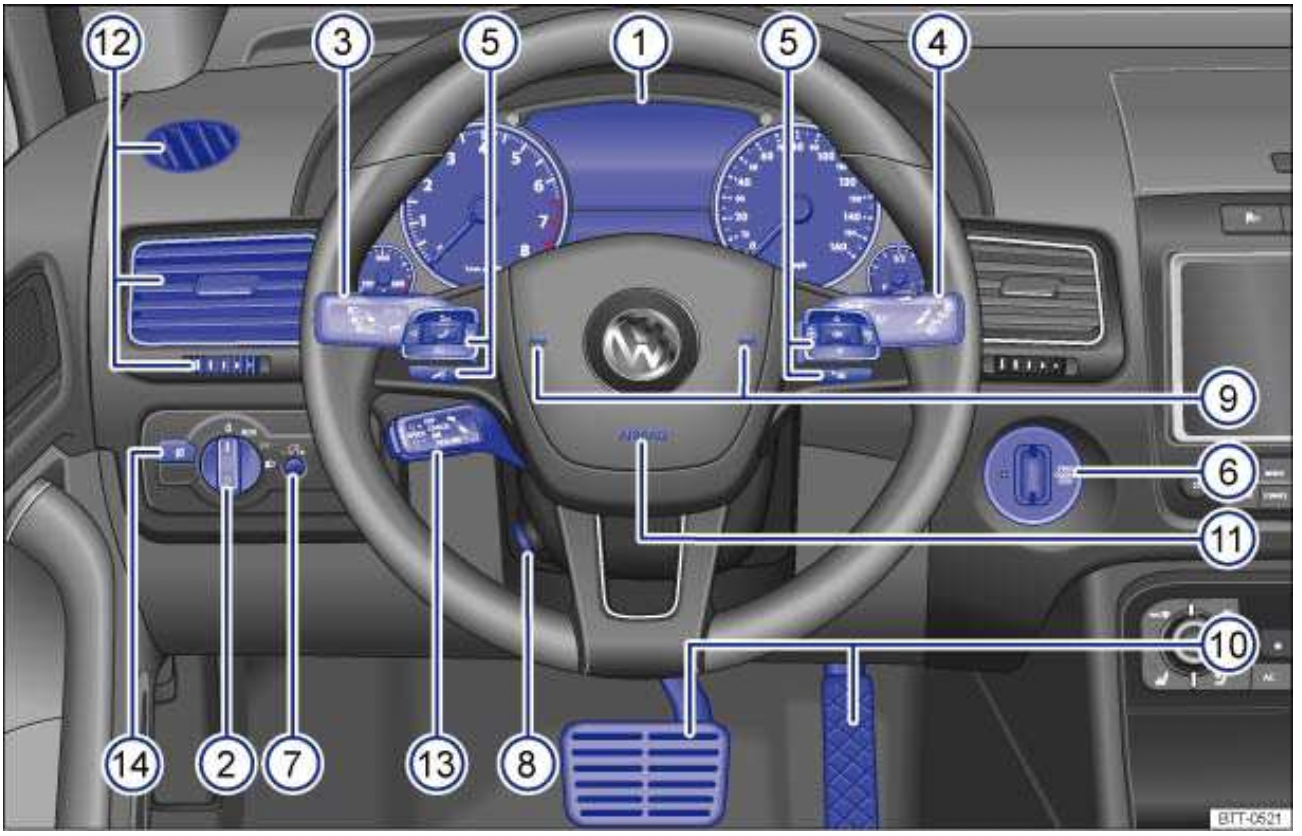
Fig. 5 Driver side overview.
Key to fig. 5:
- Instrument cluster:
Instruments
Display
Warning and indicator lights
- Headlight switch
 :
:
Off position -0-
Automatic headlight activation -AUTO-
Parking lights and low beams 
- Lever for:
High beams 
Headlight flasher 
Turn signals 
- Lever for windshield wiper and washer:
Windshield wiper HIGH - LOW
Intermittent operation for windshield wipers 
“One-tap wiping” 
Windshield wiper 
Automatic wipe/wash for windshield 
Rear window wiper 
Automatic wipe/wash for rear window 
Lever with buttons for the Volkswagen Information System (Basic version) 
- Multi-function steering wheel controls:
Volume setting for radio, navigation system notifications, or telephone calls (if applicable) 
Mute switching for radio or activation of voice control (if applicable) 
Display Phone main menu or accept telephone calls 
Audio, Navigation 
Control switches for the Volkswagen Information System (Premium version) 

- Ignition switch
- Dimmer control for the Instrument cluster and switch illumination

- Switch for adjusting the electric steering column
- Horn (only works when the ignition is switched on)
- Pedals
- Driver front airbag
- Air vents

- Cruise Control System (CCS) lever OFF - CANCEL - ON - RESUME - SPEED - SET
- Fog light button

Upper center console
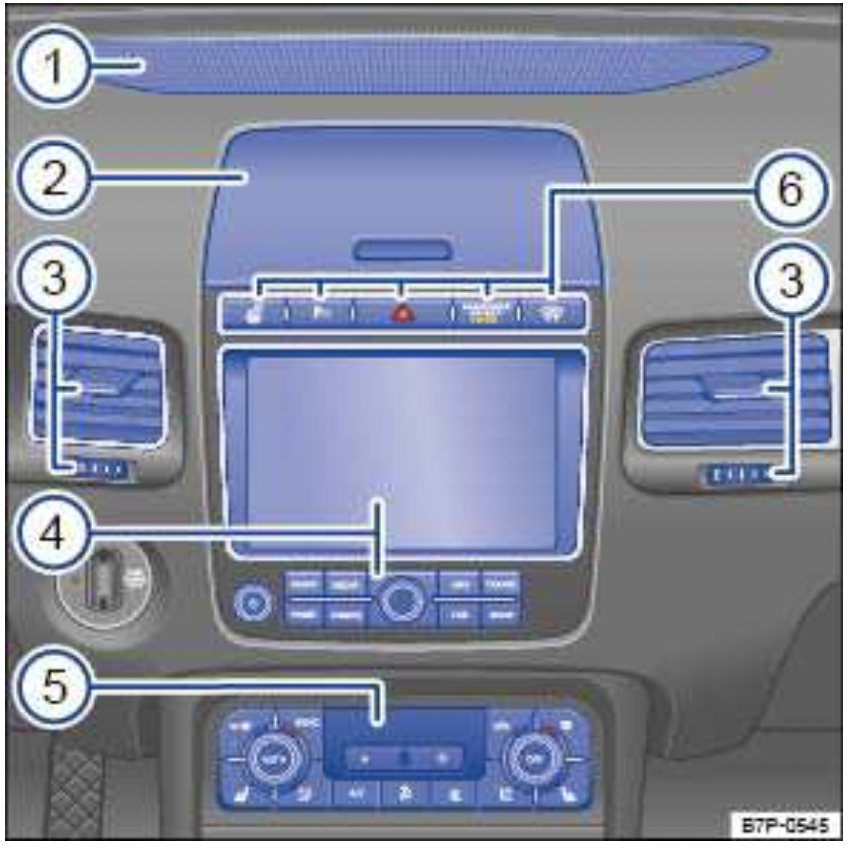
Fig. 7 Overview of upper center console.
Key to fig. 7:
- Air vent for indirect ventilation
- Storage compartment
- Air vents

- Radio or Radio & Navigation system (factory installed)
- Controls for:
Climatronic
Seat heating switch button 
- Located here:
Switch for emergency flashers 
PASSENGER AIR BAG  light (front airbag for front seat passenger)
Park Distance Control system button  or
or 
Rear View camera
Heated steering wheel 
Lower center console
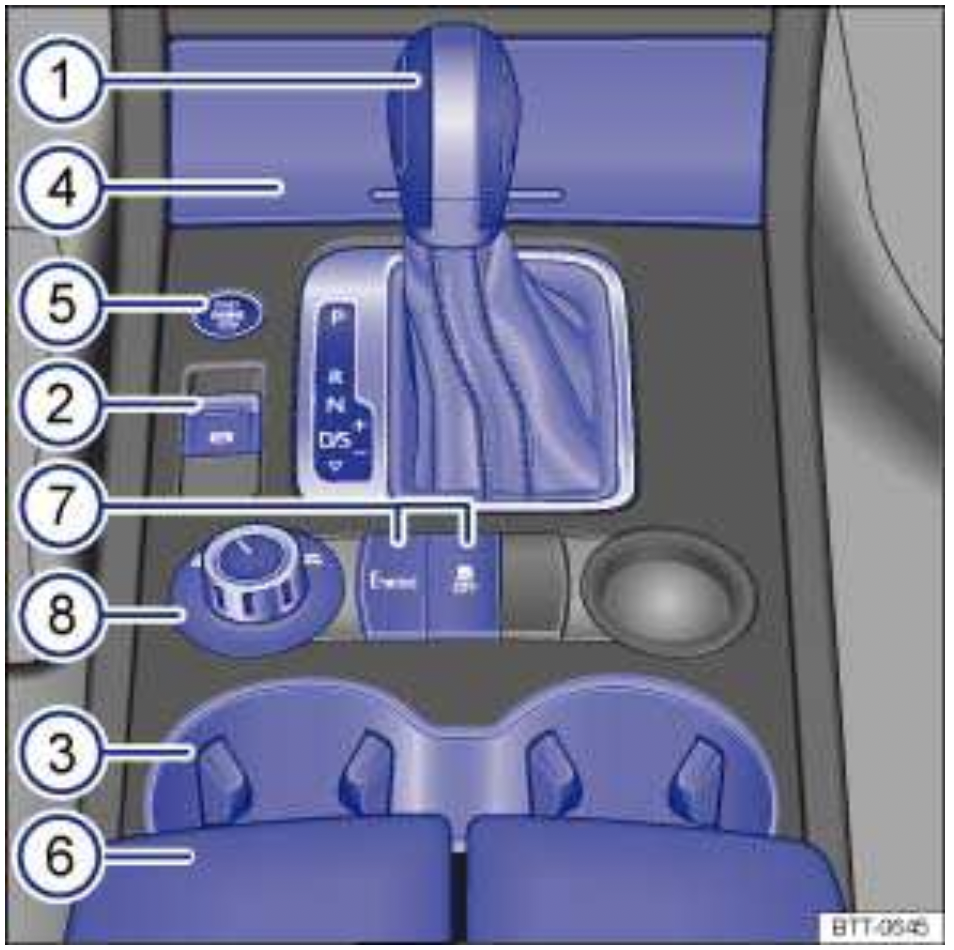
Fig. 8 Overview of lower center console (4MOTION).
Key to fig. 8:
- Automatic transmission selector lever
- Button for:
Electronic parking brake 
- Cup holders
- Storage compartment
with 12 Volt socket
- Starter button for Keyless Access locking and starting system

- Storage compartment in the center armrest
- Button for:
Driving with electric motor 
Anti-slip regulation (ASR) 
- Rotary knob for setting drive mode (On-road / Off-road)
Rear center console

Fig. 10 Overview of rear center console.
Key to fig. 10:
- Cover for:
12 Volt socket
115 Volt outlet
- Air vents

- Controls for:
Seat heating button 
- Storage compartment in the rear center console
Front passenger side overview
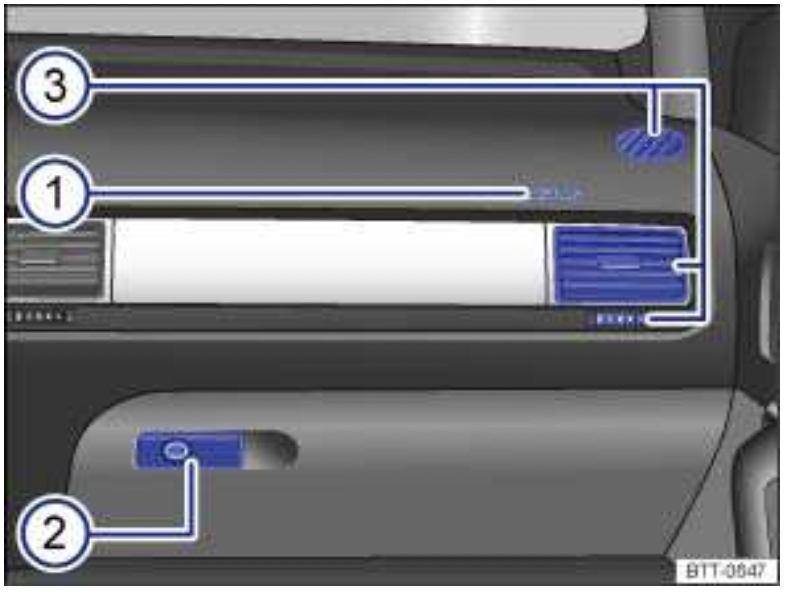
Fig. 11 Overview of the passenger side.
Key to fig. 11:
- Passenger front airbag location in the instrument panel (approximate)
- Opening handle for the lockable glove compartment
- Air vents

Roof console overview
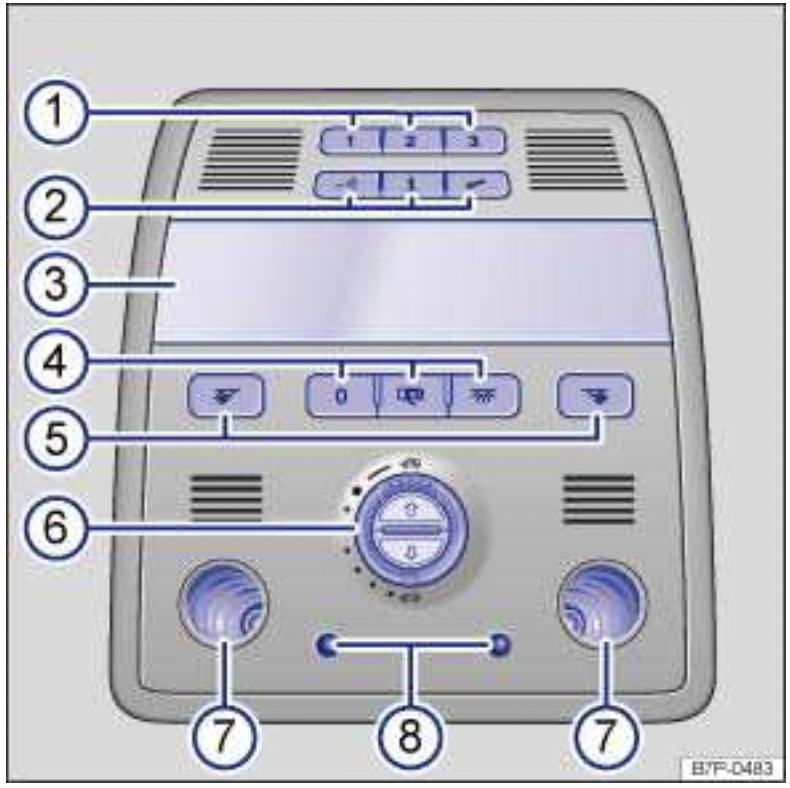
Fig. 12 Overview of the roof console.
Key to fig. 12:
- Buttons for HomeLink ® Universal Transmitter

- 3 button module
Voice operation 
Information 
Assistance 
- Interior and reading lights .
- Buttons for interior lights
Button for Interior lights 
Switch for door contact 
Switch off interior lights 
- Button for reading lights

- Switch for power sunroof
- Reading lights
- Background lighting
Exterior care and cleaning
In this section you’ll find information about:
Washing the vehicle Washing with a power washer Cleaning windows and outside mirrors Cleaning and changing the windshield wiper blades Waxing and polishing vehicle paint Caring for and cleaning chrome and aluminum parts Cleaning wheel rims Care of rubber door and window seals Deicing door lock cylinders Cleaning the power sunroof and the sunshade Undercoating Cleaning the engine compartment
Regular and expert care helps to preserve the value of your vehicle. Such expert care may also be one of the requirements of your New Vehicle Limited Warranty if corrosion repair or repainting is necessary.
Vehicle care products are available from your authorized Volkswagen dealer or Authorized Volkswagen Service Facility.
More information:
- Working in the engine compartment
- Interior care and cleaning
- Parts, accessories, repairs and modifications
WARNING
Vehicle care products can be dangerous. Improper use can cause accidents, burns, poisoning, or other serious personal injuries.
- Always store vehicle care products only in original containers that are securely closed.
- Always read and heed all the instructions and all WARNINGS on the package.
- To reduce the risk of poisoning, never use empty food or beverage containers that might mislead someone into drinking from them.
- Always keep vehicle care products out of the reach of children.
- Always use such products outdoors or in well-ventilated areas, because harmful vapors may be released when these products are used.
- Never use fuel, turpentine, engine oil, nail polish remover or other volatile fluids for vehicle care. They are poisonous and highly flammable.
WARNING
Improper care and cleaning of vehicle components can impact the safety features of the vehicle and cause severe injuries.
- Always clean and maintain vehicle components according to manufacturer's instructions.
- Only use approved or recommended cleaners.
NOTICE
Vehicle care products containing solvents can damage plastics and other vehicle the materials.
- Wash the vehicle only at specifically designated wash locations to prevent water contaminated with oil, grease and fuel from entering the storm drain sewer system. In some areas it is against the law to wash motor vehicles anywhere than other than at specified designated car washing locations.
- When buying vehicle care products, try to choose those that are not harmful to the environment.
- Never throw out vehicle care products with ordinary household waste. Always read and heed all the instructions and all WARNINGS on the package.
Washing the vehicle
Please first read and note the introductory information and heed the WARNINGS 
The longer insect splatter, bird droppings, tree sap, road dirt, industrial deposits, tar, soot, road salt, and other aggressive materials stay on your vehicle, the more damage they do to the paint finish. High temperatures (including strong sunlight) increase the corrosive effects. The vehicle underbody should also be washed regularly and thoroughly.
Car wash
Pay close attention to the information provided by the car wash operator. Before going through a car wash, be sure to take the usual precautions to help prevent damage, such as closing the windows, folding back the outside mirrors, etc. If you have installed additional accessories on the vehicle, such as spoiler, a roof rack, or an antenna, always ask the car wash operator, if this poses a problem ⇒ 
The paint finish is tough enough that the vehicle can normally be washed without problems in an automatic car wash. However, the effect on the paint depends to a large extent on the type of car wash. Volkswagen recommends using brushless car wash facilities.
To remove wax residue from the windows and avoid jerky windshield wiper movement, heed the following tips ⇒ Cleaning windows and outside mirrors.
Washing by hand
When washing by hand, first soften the dirt with plenty of water and then rinse off as much dirt as possible.
Then clean the vehicle with a soft sponge, a washing glove or brush using only light pressure. Start on the roof and work down. Use special shampoo only on hard-to-remove dirt or grime.
Rinse the sponge or glove thoroughly and often.
Clean the wheels and under the door sills last. Use a different sponge or wash mitt.
WARNING
After the vehicle has been washed, the wet brakes or, in winter, brake discs or pads coated with ice, react slower and need longer stopping distances.
- Always dry the brakes and clean off any ice coatings with a few careful applications of the brake. Make sure not to endanger other motorists or cyclists or disobey legal requirements.
CAUTION
Sharp edges under the vehicle can cut exposed skin.
- Always protect your hands and arms from cuts on sharp metal edges when cleaning the underbody, the inside of the wheel housings, etc.
NOTICE
- The water temperature must not be more than +140 °F (+60 °C).
- To help prevent damage to the paint, do not wash the vehicle in direct sunlight.
- Do not use insect sponges, abrasive kitchen sponges or similar things to clean the vehicle. These can damage the paint finish.
- Never clean headlights with a dry cloth or sponge. Always use a wet cloth or sponge. For best results use soapy water.
- When washing or rinsing the vehicle in cold weather, do not let water get into the lock cylinders or point the hose at gaps around the doors, hood or rear hatch. The water could freeze on the locks and seals and make it difficult to open the vehicle!
NOTICE
To help prevent vehicle damage in a car wash:
- Compare the vehicle track width with the dimensions of the guide rails in the car wash to help prevent damage to wheel rims and tires!
- Switch off the rain sensor before driving through a car wash.
- Make sure there is enough clearance for the height and width of the vehicle.
- To help prevent paint damage to the engine hood, place wiper blades against the windshield after they have dried. Do not let them snap back into place.
- Fold the outside mirrors toward the vehicle body. Do not fold power mirrors manually!
- Lock the rear hatch to prevent unintentional opening in the car wash.
Washing with a power washer
Please first read and note the introductory information and heed the WARNINGS
Always follow the instructions for the power washer. This especially applies to the pressure and spraying distance ⇒
Make sure there is enough distance to soft materials such as rubber hoses or insulating material as well as the sensors of the Park Distance Control system. The park distance control system sensors are in the rear and front bumper ⇒
Never use concentrated jet nozzles or so-called dirt blasters ⇒
Never use a power washer to clean the engine compartment ⇒ Cleaning the engine compartment.
WARNING
Improper use of power washers can cause serious invisible permanent damage leading to tire failure and loss of vehicle control. This can cause accidents and severe personal injury.
- Keep sufficient distance between water jet and tires. Never wash tires with a nozzle that sprays the water out in a direct stream regardless of the distance to the tire and even for a very short time.
- Never use “dirt blasters.” to clean tires. Even spraying from a relatively long distance for a very short time can do visible or invisible damage to tires.
WARNING
After the vehicle has been washed, the wet brakes or, in winter, brake discs or pads coated with ice, react slower and need longer stopping distances.
- Always dry the brakes and clean off any ice coatings with a few careful applications of the brake. Make sure not to endanger other motorists or cyclists or disobey legal requirements.
NOTICE
- Water temperature should not be more than 140° F (60° C).
- To help prevent damage to the paint, do not wash the vehicle in direct sunlight.
- In order for Park Distance Control to work correctly, the sensors in the bumpers must be kept clean and clear of snow and ice.
- When using a power washer or steam cleaner, only spray the rear assist sensors directly for a short period of time and always keep the nozzle at least 4 inches (10 cm) from the sensor.
- Do not clean icy or snow-covered windows with a power washer.
- When washing or rinsing the vehicle in cold weather, do not let water get into the lock cylinders or point the hose at gaps around the doors, hood or rear hatch. The water could freeze on the locks and seals and make it difficult to open the vehicle!
Cleaning windows and outside mirrors
Please first read and note the introductory information and heed the WARNINGS
Cleaning windows and outside mirrors
Spray windows and outside mirrors with a commercially available alcohol-based window cleaner.
Dry windows and mirrors with a clean chamois or a lint-free cloth. Do not use a chamois that has been used to wipe painted surfaces because it will have absorbed an oily residue that will smear the glass surfaces.
Use window cleaner or a silicone remover to remove rubber, oil, grease and silicone deposits ⇒
Removing wax residue
Automatic car washes and vehicle care products can leave a wax residue on all glass surfaces. These wax residues can only be removed with special cleaners or cleaning cloths. Wax residue left on the windshield can cause the windshield wipers to grab and squeak instead of gliding smoothly. We recommend that after every car wash you remove any wax residue left on the windshield with a cleaning cloths/chamois G 052 522 A1 or equivalent.
Windshield wiper squeak and grab can be reduced by filling the windshield washer fluid tank with a wiper fluid containing wax-removing agents. Make sure to maintain the proper mixing ratio when refilling the washer fluid tank. Grease-removing cleaning agents cannot remove wax residue ⇒
Special cleaners or cleaning cloths are available from your authorized Volkswagen dealer and authorized Volkswagen Service Facility.
Removing snow
Remove snow from all windows and outside mirrors with an appropriate brush.
Removing ice
The best way to remove ice is with a deicer spray. When using an ice scraper always scrape in one direction, never back and forth. Dirt can scratch the window when moving the scraper backward.
WARNING
Dirty or fogged up windows reduce visibility and increase the risk of accidents and severe injuries.
- Don't drive until you have clear visibility through all windows.
- Remove ice, snow and condensation from all inside and outside window surfaces.
NOTICE
- Never mix recommended cleaning agents with other cleaning agents in the windshield washer reservoir. If you do, this could cause sediments or other by-products that can clog the windshield wiper nozzles.
- Never use warm or hot water to remove snow and ice from windows and mirrors. This could cause the glass to crack!
- The heating elements for the rear defroster are on the inside of the rear window. Do not put stickers over the heating elements on the inside of the rear window and never clean the inside of the windows with corrosive or acidic cleaning agents or other chemicals that could damage the heating elements.
- Antennas installed on the insides of windows can be damaged by abrasive objects or by corrosive or acidic cleaning agents or other chemicals. Do not place any stickers on the windshield-integrated antenna and never clean the antenna with corrosive or acidic cleaning agents or other chemicals.
Cleaning and changing the windshield wiper blades
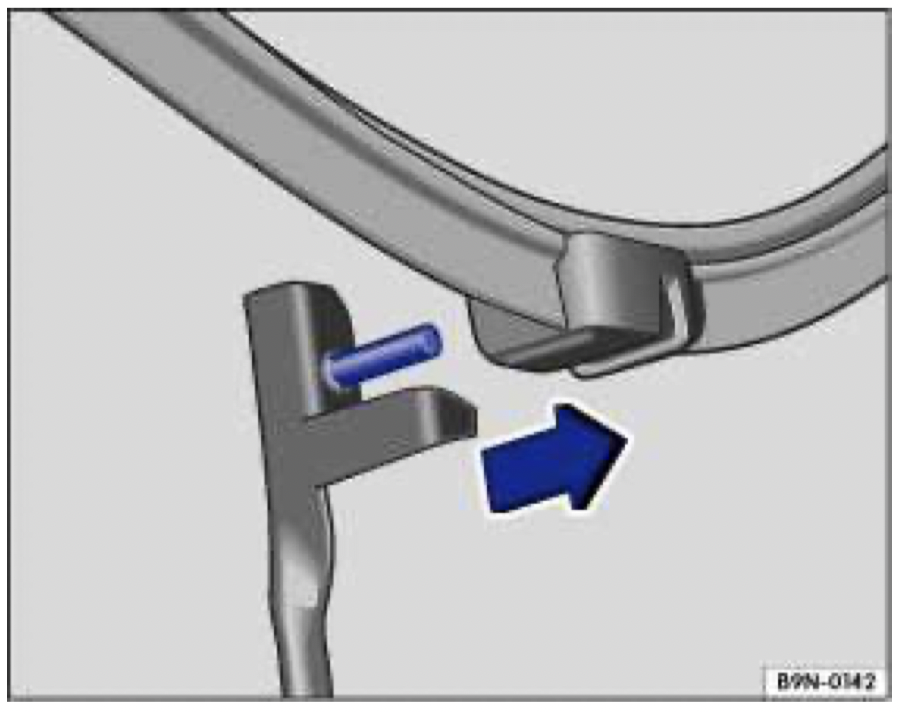
Fig. 321 Changing the windshield wiper blades.
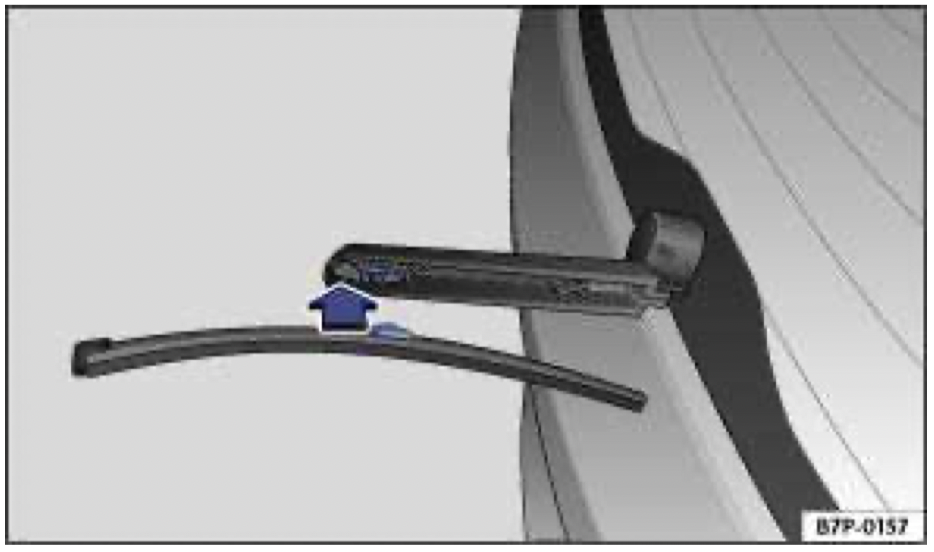
Fig. 322 Changing the rear window wiper blades.
Please first read and note the introductory information and heed the WARNINGS
Factory-installed wiper blades have a graphite coating. The graphite coating lets the wiper blades glide smoothly over the windshield. If this coating is worn or damaged, the wipers may grab or squeak. Check all wiper blades regularly. Wiper blades that grab and squeak must be replaced if worn or damaged and cleaned if dirty ⇒
Replace worn or damaged wiper blades immediately. Replacement blades may be purchased from any authorized Volkswagen dealer or authorized Volkswagen Service Facility.
Lifting and tilting windshield wiper arms
Move the wiper arms into the service position before lifting them away from the windshield ⇒ Windshield wiper and washer.
It is not possible to lift the wiper arms away from the windshield when they are not in the service position.
When lifting or replacing a wiper blade on a window, grip it only by its mounting and not by the blade itself.
Cleaning the wiper blades
- Lift the wiper arm(s) away from the windshield/rear window.
- Using a soft cloth, carefully remove dust and dirt from the wiper blades.
- If the blades are very dirty, carefully clean them with a sponge or cloth ⇒
- Carefully fold the wiper arm back down onto the window.
Changing wiper blades
- Lift the wiper arm(s) away from the windshield.
- Tilt the wiper blade 90 ° clockwise to the wiper arm and pull off the wiper blade ⇒ fig. 321.
- Install a new wiper blade of same length and type onto the wiper arm by pushing in the opposite direction of the arrow until it latches.
- Carefully fold the wiper arm back down onto the windshield.
Changing the rear window wiper blade
- Lift the wiper arm away from the rear window.
- Pull the wiper blade and the retainer out of the holder.
- Install a new wiper blade of same length and type onto the wiper arm by pushing in the opposite direction of the arrow ⇒ fig. 322 until it latches.
- Carefully fold the wiper arm back down onto the rear window.
WARNING
Worn or dirty wiper blades reduce visibility and increase the risk of accidents and severe injuries.
- Always change wiper blades if they are damaged or worn, and if they cannot clean the windows sufficiently.
NOTICE
- Damaged or dirty wiper blades can scratch the windshield and the rear window.
- Solvents, abrasive sponges and sharp-edged objects will damage the graphite coating on the wiper blades.
- Do not clean the windows with gasoline, nail polish remover, paint thinner or similar fluids.
- To help prevent damage to the engine hood and the windshield wiper arms, lift the wiper arms away from the windshield only when they are in the service position.
Waxing and polishing vehicle paint
Please first read and note the introductory information and heed the WARNINGS
Waxing
A good coat of wax helps to protect the vehicle paint. When water no longer forms small drops and runs off when the paint is clean, apply a new coat of good hard wax to protect the vehicle again. Even if a wax solution is used regularly at the car wash, Volkswagen recommends applying a coat of hard wax at least twice a year to protect the paint.
Polishing
Polish your vehicle if the paint has lost its shine and the gloss cannot be brought back with wax.
The vehicle must be waxed after polishing if the polish used does not contain wax compounds to seal the paint.
NOTICE
- To help prevent damage, do not use hard wax or polish on matte-finished parts, plastic parts, headlights or rear lights.
- Do not wax or polish your vehicle if it is dirty, or in a sandy or dusty place.
Caring for and cleaning chrome and aluminum parts
Please first read and note the introductory information and heed the WARNINGS
- Clean the surface using a clean, soft, lint-free cloth dampened with water.
- If the surface is especially dirty, use a special solvent-free cleaning material.
- Then polish chrome and aluminum parts with a soft, dry cloth.
NOTICE
To help prevent damage to chrome and aluminum parts:
- Do not clean or polish in direct sunlight.
- Do not clean or polish in sandy or dusty places.
- Do not use abrasive cleaners or abrasive sponges.
- Do not use cleaning materials that contain solvents.
- Do not polish dirty surfaces.
- Do not use hard wax.
NOTICE: Chrome wheel covers and hubcaps have an extra coating. Do not treat them with chrome care or polishing products. Use regular paint care and polishing products.
Cleaning wheel rims
Please first read and note the introductory information and heed the WARNINGS
Cleaning steel wheels
Stubborn brake dust can be removed with an industrial cleaner. Clean steel wheels regularly with a separate sponge.
Repair any paint damage on steel wheels before rust begins to form.
Cleaning alloy wheels
Every 2 weeks: Wash road salt and brake dust off alloy wheels, and clean the wheels with an acid-free detergent.
Every 3 months: Volkswagen recommends applying a hard wax compound to the wheels.
If road salt and brake dust are not removed regularly, they can corrode the metal.
Use an acid-free detergent specifically designed for light alloy wheels. Do not use car polish or other abrasive products.
If the protective coating is damaged, for example by stone impact, repair the damaged area right away.
Care of rubber door and window seals
Please first read and note the introductory information and heed the WARNINGS
The rubber seals around the doors and windows will stay soft and flexible, seal better and last longer if the seals are treated regularly with a suitable rubber care product.
Before applying the treatment, use a soft cloth to remove dust and dirt from the rubber seals.
Do not apply any rubber care products to the rubber seals on the body in the areas around the windows in the driver's and front passenger's doors. The product could run down onto the windows and smudge them.
Deicing door lock cylinders
Please first read and note the introductory information and heed the WARNINGS
Volkswagen recommends using only genuine Volkswagen deicer spray with lubricating and anticorrosive properties to deice door lock cylinders.
NOTICE: Lock deicers that contain grease solvents can cause the lock cylinder to rust.
Cleaning the power sunroof and the sunshade
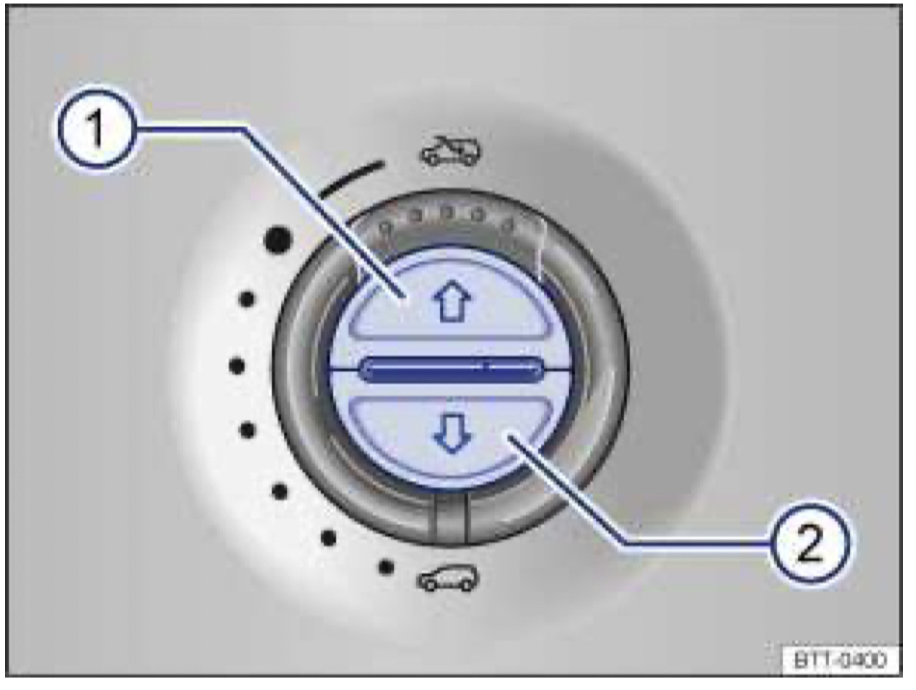
Fig. 323 In the headliner: Buttons for sunshade.
Please first read and note the introductory information and heed the WARNINGS
Dirt and debris can impair the function of the power sunroof.
The power sunroof only works when the ignition is on. You can still open or close the power sunroof for several minutes after you switch off the ignition, as long as the driver or front passenger door has not been opened.
Moving the sunshade to the cleaning position
- Park the vehicle safely.
- Open the power sunroof completely ⇒ page 64.
- Press and hold the button ⇒ fig. 323 (2) for about 5 seconds until the sunshade is completely closed.
- If the sunshade is heavily soiled, carefully clean it with a cloth and warm water.
NOTICE: Close the power sunroof completely before driving off. Driving with the sunshade in the cleaning position can lead to damage to the vehicle.
NOTICE: Do not attempt to clean the drain tubes for the power sunroof. This could result in vehicle damage caused by punctured or damaged drain tubes.
Remove leaves and other objects from the sunroof guide rails regularly either by hand or using a vacuum cleaner.
Undercoating
Please first read and note the introductory information and heed the WARNINGS
The vehicle underbody is coated to help protect it from corrosion and damage. The undercoating could be damaged during normal use. We therefore recommend that you have the protective coatings on the underbody and suspension inspected regularly, and repaired if necessary.
WARNING
Undercoating and rustproofing products can catch fire on the hot exhaust system or any other hot engine component.
- Never apply additional undercoating or rustproofing on or near the exhaust manifold, the exhaust pipes, the catalytic converter, the heat shields, or any other hot vehicle component
Cleaning the engine compartment
Please first read and note the introductory information and heed the WARNINGS
The engine compartment of a vehicle is a dangerous area ⇒ Working in the engine compartment.
If necessary, the engine compartment should be cleaned by an authorized Volkswagen dealer or authorized Volkswagen Service Facility. Incorrect cleaning procedures could remove corrosion protection and damage electrical components, among other things. In addition, water could enter directly into the vehicle interior through the plenum chamber ⇒
Never use a power washer to clean the engine compartment ⇒
If the engine compartment is extremely dirty, have it cleaned professionally by your authorized Volkswagen dealer or authorized Volkswagen Service Facility.
Plenum chamber
The plenum chamber is located in the engine compartment between windshield and engine, under a perforated cover. Outside air is taken into the vehicle interior from the plenum chamber via the climate control system.
Regularly remove leaves and other loose objects from the plenum chamber cover by hand or with a vacuum cleaner.
WARNING
Injuries, scalding, electric shock, accidents and fire hazards can occur while working on the engine or in the engine compartment!
- Before working in the engine compartment, be sure to familiarize yourself with the necessary procedures and generally accepted safety precautions ⇒ page 570, Working in the engine compartment.
- Volkswagen recommends having the work performed by an authorized Volkswagen dealer or authorized Volkswagen Service Facility.
NOTICE: Spraying or pouring water (e.g. with power washer) into the plenum chamber can cause severe damage to the vehicle.
Wash the engine compartment only in special wash bays so that the oily dirt and fuel residue that are washed off the vehicle will not enter the sewage system. In some areas it illegal to wash the engine compartment anywhere other than at such specified locations.
Interior care and cleaning
In this section you’ll find information about:
Caring for upholstery Cleaning upholstery, fabric trim and Alcantara® Care and cleaning of leather upholstery Cleaning leatherette Cleaning storage compartments and cup holders Care and cleaning of plastic components, wood trim and instrument panel Cleaning the safety belts
Modern clothing fabrics such as dark denim may not be completely colorfast. Even with normal use, dye from these and other fabrics can rub off on seat upholstery and leave visible discolorations (especially on light-colored seat upholstery). This is caused by a lack of colorfastness in the clothing fabric, not by any fault in the seat upholstery fabric. To help prevent damage to the seat upholstery, always make sure your clothing is colorfast. Volkswagen recommends having a qualified specialist remove any discolorations from the seat upholstery.
The longer stains, dirt and other deposits remain on the surfaces of vehicle components and upholstery, the more difficult it may be to clean them. If stains, dirt and deposits are left untreated for a long period of time, they may become impossible to remove.
More information:
- Exterior care and cleaning
- Parts, accessories, repairs and modifications
WARNING
Vehicle care products can be dangerous. Improper use can cause accidents, burns, poisoning, or other serious personal injuries.
- Always store vehicle care products only in original containers that are securely closed.
- Always read and heed all the instructions and all WARNINGS on the package.
- To reduce the risk of poisoning, never use empty food or beverage containers that might mislead someone into drinking from them.
- Always keep vehicle care products out of the reach of children.
- Always use such products outdoors or in well-ventilated areas, because harmful vapors may be released when these products are used.
- Never use fuel, turpentine, engine oil, nail polish remover or other volatile fluids for vehicle care. They are poisonous and highly flammable.
WARNING
Improper care and cleaning of vehicle components can compromise the vehicle's safety features and cause severe injuries.
- Always clean and maintain vehicle components according to manufacturer's instructions.
- Only use approved or recommended cleaners.
NOTICE
- Vehicle care products containing solvents can cause irreparable damage to damage plastics and other vehicle the materials.
- Stains, dirt and other deposits that contain aggressive substances or solvents can corrode vehicle materials and cause permanent damage, even after brief contact with the surface.
- Remove stains, dirt, and other deposits as quickly as possible and do not allow them to dry.
- To help prevent damage, have stubborn stains removed by a professional who has the necessary expertise and experience.
Suitable care products are available from authorized Volkswagen dealers and authorized Volkswagen Service Facilities.
Caring for upholstery
Please first read and note the introductory information and heed the WARNINGS
Checklist
Please note the following when it comes to the care and preservation of the upholstery ⇒
- Open Velcro® fasteners can damage upholstery fabric, and trim. Before you get into the vehicle, close all Velcro® fasteners that could come into contact with upholstery fabrics and cloth trim.
- Sharp-edged objects and items on clothing and belts (such as belt clips, mobile phone cases, zippers, rivets, and rhinestones) can damage upholstery material and fabric trim. To help prevent damage, do not let such items come into direct contact with the upholstery and fabric trim.
- Dust and dirt particles in pores, folds, and seams can have a “scouring” effect on material and damage the surface. Remove dust and dirt regularly to help prevent permanent surface damage.
- Check clothing for color-fastness to help prevent upholstery discoloration, especially to light-colored upholstery.
NOTICE
Disregarding the upholstery-related checklist may lead to damage or discoloration of upholstery and fabric trim.
- Please note and follow the points listed in the checklist.
Volkswagen recommends having any discoloration removed by an authorized Volkswagen dealer or authorized Volkswagen Service Facility.
Cleaning upholstery, fabric trim and Alcantara®
Please first read and note the introductory information and heed the WARNINGS
Cleaning upholstery on heated seats and power seats or seats with airbag components
Airbag components and electrical connectors may be installed in the driver seat, the front passenger seat. Damaging, cleaning and handling incorrectly, or wetting or soaking these seat surfaces and backrests can damage the vehicle electrical system and prevent the airbag system from working properly ⇒
Electrical components and connectors that could be damaged by incorrect cleaning or handling are installed in power seats and heated seats ⇒ . This can also result in damage to other parts of the vehicle electrical system.
For this reason, read and follow these cleaning instructions:
- Do not use pressure washers, steam cleaners, or cooling spray.
- Do not use detergent pastes or mild detergent solutions.
- Do not wet the surface completely.
- Only use cleaning products approved by Volkswagen.
- If you have questions or concerns, consult a professional cleaner.
- Before using any cleaning agent, familiarize yourself with instructions and warnings on the packaging.
- Vacuum upholstery, fabric trim, Alcantara ® upholstery, and carpeting regularly with a suitable brush attachment.
- A soft sponge or a commercially available lint-free microfiber cloth may be used for general cleaning ⇒
- Clean Alcantara ® surfaces with a damp cotton or wool cloth or a commercially available lint-free microfiber cloth ⇒
Upholstery and fabric trim with light generalized soiling can be cleaned with a commercially available dry-foam cleaner.
If the upholstery fabric and fabric trim pieces are heavily soiled, see your authorized Volkswagen dealer or authorized Volkswagen Service Facility before you begin cleaning to learn about suitable cleaning options. If necessary, have the cleaning done by a professional.
Cleaning upholstery on non-heated seats, manual seats, or seats without airbag components
- Before using any cleaning agent, familiarize yourself with instructions and warnings on the packaging.
- Vacuum upholstery, fabric trim, Alcantara ® upholstery, and carpeting regularly with a suitable brush attachment.
- Do not use pressure washers, steam cleaners, or cooling spray.
- A soft sponge or a commercially available lint-free microfiber cloth may be used for general cleaning ⇒
- Clean Alcantara ® surfaces with a damp cotton or wool cloth or a commercially available lint-free microfiber cloth ⇒
Upholstery and fabric trim with light generalized soiling can be cleaned with a commercially available dry-foam cleaner.
If the upholstery fabric and fabric trim pieces are heavily soiled, see your authorized Volkswagen dealer or authorized Volkswagen Service Facility before you begin cleaning to learn about suitable cleaning options. If necessary, have the cleaning done by a professional.
Removing stains
When treating stains, it may be necessary to clean the entire surface and not just the stain itself. This is especially true if the entire surface has become dirty from normal use. Otherwise, the area that is treated may become lighter than the untreated area. If you have questions or concerns, consult a professional cleaner.
| Type of stain |
Recommended cleaning for fabric and upholstery
|
| Water-based stains, such as coffee or fruit juice. |
- Moisten a sponge with water and rub the stain gently with a circular motion.
- Wipe dry with an absorbent cloth.
|
| Persistent stains, such as chocolate or make-up. |
- Use only Volkswagen-approved cleaning products.
- If necessary, have the fabric or upholstery professionally cleaned.
|
| Grease-based stains, such as oil, lipstick, etc. |
- Use only Volkswagen-approved cleaning products.
- If necessary, have the fabric or upholstery professionally cleaned.
|
WARNING
If there is a malfunction in the airbag system, the airbag may not deploy correctly or at all, or it may deploy unexpectedly. This could cause fatal injuries.
- Have the airbag system inspected immediately by your authorized Volkswagen dealer or authorized Volkswagen Service Facility.
NOTICE
If the upholstery on power seats, heated seats, or seats with airbag components is wet, electrical components and the vehicle electrical system could be damaged.
- If the seating surface becomes soaked, have it dried and the system components checked immediately by an authorized Volkswagen dealer or authorized Volkswagen Service Facility.
- Do not use steam cleaners because the steam could cause the dirt to penetrate deeper into the fabric and make it impossible to remove.
- Pressure washers and cooling sprays can damage the upholstery.
NOTICE
- Clean only the carpet and floor mats with brushes. Other textile surfaces can be damaged by brushes.
- If detergent pastes or mild detergent solutions are applied with a damp cloth or sponge, the surfactants in the detergent may cause visible lines to form at the edges of the area where the detergent was applied. These lines are generally difficult or impossible to remove.
NOTICE
- Do not soak Alcantara® .
- Do not treat Alcantara ® with leather care products, solvents, floor wax, shoe polish, stain remover or similar products.
- Do not use brushes for damp cleaning, because they can damage upholstery surfaces.
- Do not use a steam cleaner, because dirt will penetrate deeper into the fabric.
Care and cleaning of leather upholstery
Please first read and note the introductory information and heed the WARNINGS
If you have questions regarding the care and cleaning of the leather upholstery in the vehicle, please contact an authorized Volkswagen dealer or authorized Volkswagen Service Facility.
Care and treatment
Natural leather requires special attention and care. Napa leather has a smooth surface. The intensity of the color application determines the leather's appearance and texture. If you can see the leather grain and other natural characteristics, this is an untreated napa leather that will provide very comfortable seating. Delicate veins, closed scars, insect bites, folds, and a slightly clouded color remain visible and represent authentic characteristics of the natural material. Untreated napa leather has no protective coating. It is therefore more susceptible to damage. You should keep this in mind if the leather is going to be exposed to severe wear from children, animals, or other factors. By contrast, leather that has a protective coating is more robust. This has a positive effect on the leather's durability in daily use. The typical natural characteristics are hardly visible or no longer visible at all, but that has no impact on the quality of the leather itself. The typical characteristics of untreated leather are much more distinctive than those of a surface-treated leather.
- After each cleaning, apply cream that waterproofs the leather and protects it against the sun. Such creams also nourish the leather, let it breathe, keep it flexible and moisturized. At the same time it protects the surface.
- Clean leather every 2 to 3 months and remove any new stains.
- Treat leather with a suitable leather-care product twice a year ⇒
- Apply cleaning and conditioning materials sparingly and always with a dry, lint-free cotton or wool cloth. Do not apply cleaning and conditioning materials directly to the leather.
- Remove fresh stains such as ballpoint pen, lipstick, ink, shoe polish, etc. as soon as possible.
- Preserve the leather's color. If necessary, refresh fading spots with a specially-colored leather cream.
- Wipe the leather with a soft cloth.
Cleaning
Volkswagen recommends using a slightly moistened cotton or wool cloth for general cleaning.
It is important not to let water soak through the leather or penetrate into seams.
Before cleaning leather surfaces, read and heed the information ⇒ page 612, Cleaning upholstery on heated seats and power seats or seats with airbag components.
|
Type of stain
|
Cleaning |
| Heavy stains |
- Apply a mild soapy solution with a cloth that has been wrung nearly dry41 .
- Dab dry with an absorbent cloth.
|
| Water-based stains, such as coffee, tea, juice, or blood. |
- Remove fresh stains with an absorbent cloth.
- If the stains are already dry, use an appropriate cleaning agent ⇒
|
| Grease-based stains, such as oil, lipstick, etc. |
- Remove fresh stains with an absorbent cloth.
- Use an appropriate cleaning agent on stains that have not yet penetrated the surface ⇒
|
| Special stains, such as ballpoint pen, marker, nail polish, latex paint, or shoe polish. |
- Dab dry with an absorbent cloth.
- Clean with a special stain remover designed for leather.
|
NOTICE
- Stains that have been left in place too long will penetrate the surface of the leather and cannot be removed.
- Never treat leather with solvents, floor wax, shoe polish, stain remover or similar products. x Wipe up spilled liquids immediately with an absorbent cloth. Liquid can penetrate leather surfaces and seams within a few seconds.
- If the vehicle is left in the sun for a long time, cover the upholstery to protect the leather from direct sunlight and to help prevent fading and discoloration.
Slight discoloration caused by wear and tear is normal.
Cleaning leatherette
Please first read and note the introductory information and heed the WARNINGS
Clean leatherette upholstery only with water and a mild soap solution.
Before cleaning leatherette surfaces, read and heed the information ⇒ page 612, Cleaning upholstery on heated seats and power seats or seats with airbag components.
NOTICE
- Do not clean leatherette with solvents, floor wax, shoe polish, stain remover, or similar products.
- These can cause the material to become brittle and break. Sharp-edged objects and items on clothing and belts (such as belt clips, mobile phone cases, zippers, rivets, and rhinestones) can damage upholstery material and fabric trim.
- If the vehicle is left in the sun for a long time, cover the upholstery to protect the leatherette from direct sunlight and to help prevent fading or discoloration.
Cleaning storage compartments and cup holders
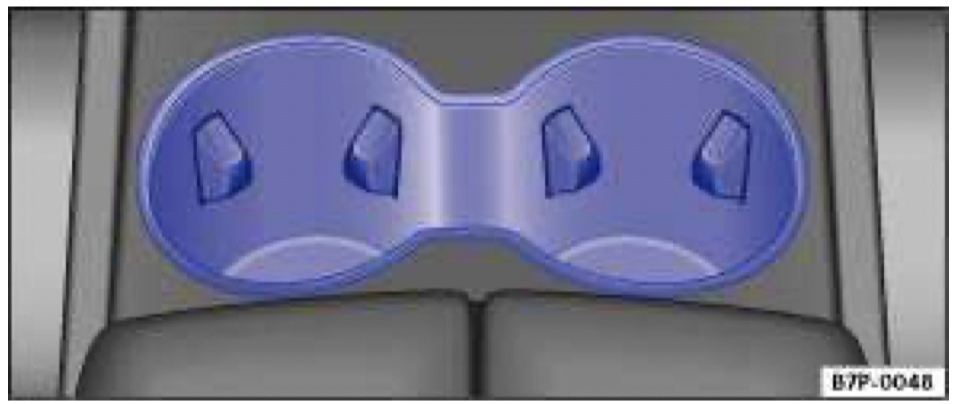
Fig. 324 In the lower front center console: Front cup holders.
Please first read and note the introductory information and heed the WARNINGS
Cleaning storage compartments and cup holders
Some storage compartments and cup holders ⇒ fig. 324 have a removable rubber insert at the bottom.
- Moisten a clean, lint-free cloth with water and clean the parts.
- If this is not sufficient, then use a special solvent-free care and cleaning product designed for plastics.
Care and cleaning of plastic components, wood trim and instrument panel
Please first read and note the introductory information and heed the WARNINGS
- Moisten a clean, lint-free cloth with water and clean the parts.
- Clean plastic components (inside and outside of the vehicle) and the instrument panel only with a solvent-free care and cleaning product that is specifically designed for plastics and approved by Volkswagen ⇒
- Clean wood trim with a mild soap solution.
WARNING
Using solvents or other improper cleaning products on surfaces where airbags are located can change the way airbags deploy in a crash.
- Products containing solvents will change the properties of the plastics and may cause plastic parts to break and fly around when the airbag deploys in a crash, causing injury.
- Never use solvents or cleaners on the steering wheel horn pad or on the instrument panel because they can damage the airbag cover or change the stiffness or strength of the material so that the airbag cannot deploy and protect properly.
- When cleaning the horn pad and instrument panel, use only a soft, dry cloth or a cloth moistened with plain water.
Cleaning the safety belts
Please first read and note the introductory information and heed the WARNINGS
If a safety belt is dirty, this can prevent the belt from working properly. Keep safety belts clean and regularly check all safety belts for damage.
Safety belts must never be taken apart for cleaning.
- Remove coarse dirt with a soft brush ⇒
- Carefully pull the dirty safety belt out of the retractor and keep it out.
- Clean the safety belt with a mild soap solution.
- After cleaning, always give the safety belts time to dry thoroughly before letting them retract. This helps prevent damage to the retractor.
- Do not let the safety belts retract until they are completely dry.
WARNING
Damage to safety belts reduces their overall effectiveness and increases the risk of serious personal injury and death whenever the vehicle is being used.
- Check the condition of all safety belts regularly. If you notice that the safety belt webbing, hardware, retractor, buckle, or any other part of the safety belts is damaged, immediately have an authorized Volkswagen dealer or authorized Volkswagen Service Facility replace the safety belt with the correct replacement belt for your vehicle model and model year.
- Never use chemical cleaning agents, solvents, or any substance that may damage or weaken the safety belt webbing or any other parts of the safety belt. Never let the belts come into contact with corrosive fluids or sharp objects. Otherwise, the safety belt webbing will be significantly weakened.
- After cleaning, always give the safety belts time to dry completely before letting them retract. The moisture can damage the retractor and keep it from working properly.
- Never let foreign objects or liquids get into the safety belt latch. This could prevent the belt buckles and safety belts from working properly.
- Damaged safety belts must be replaced; they cannot be repaired.
- Never try to repair a damaged safety belt yourself. Never remove or modify the safety belts in any way.
- Safety belts that were subject to stress in an accident and stretched must be replaced with a correct, new safety belt, preferably by an authorized Volkswagen dealer or authorized Volkswagen Service Facility.
- Replacement after a crash may be necessary even if a safety belt shows no visible damage. Anchorages that have been loaded must also be inspected.