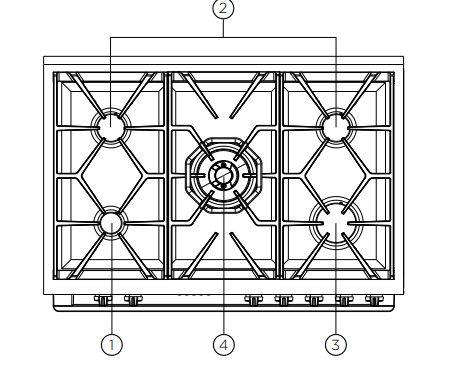
Used for normal cooking and simmering with mid size cookware items.
3. High heat burner (12.1MJ/h)
Used for fast heating with large size cookware items.
4. Intense heat wok burner (14.4MJ/h)
Used for very fast heating with woks and other large size cookware items.
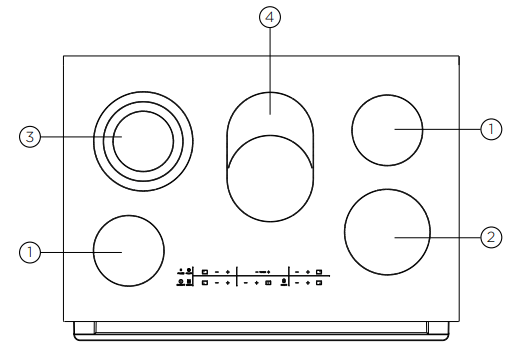
Model WFEP915SC
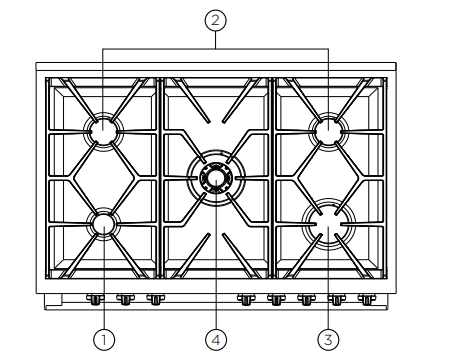
1. Low heat burner (5.1MJ/h)
Used for simmering with small cookware items.
2. Medium heat burner (9.0MJ/h)
Used for normal cooking and simmering with mid size cookware items.
3. High heat burner (12.1MJ/h)
Used for fast heating with large size cookware items.
4. Intense heat wok burner (17.6MJ/h)
Used for very fast heating with woks and other large size cookware items. Use wok trivet provided when cooking with a wok.
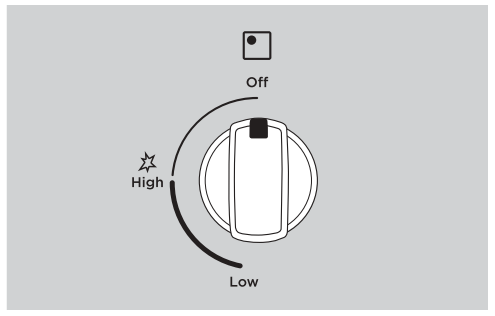
Using your gas hot plates (WFE904SC, WFE914SC, WFEP915SC)
To light a burner with this knob, firstly depress and turn anti-clockwise to the ‘High’ flame position. The knob maybe released once the flame is established and turned further anti-clockwise to reduce the flame height as desired.
Note 1: Gas control has limited movement.
Note 2: If the flame goes out when either knob is released, simply depress the knob again, this time holding it down for approximately 5 seconds.
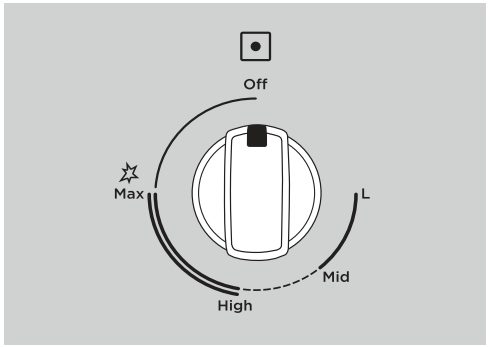
Using your dual flame wok hot plates (WFEP915SC)
To light the wok burner, depress the knob and turn anti-clockwise to ignite the inner and outer burners. The knob may be released when both inside and outside flames are established. Turning the knob further anticlockwise will reduce the height of the outer flame.
Turning the knob to ‘Mid’ and further will distinguish the outer flame and control the height of the inner flame.
Turning the knob back to ‘High’ will reignite the outer flame.
Ceramic hotplates (WFE946SC)
The cooktop is made from ceramic glass, a tough, durable material that withstands heating and cooling without breaking. It is strong enough to hold the heaviest utensils.
However, it must be remembered that as it is GLASS, it may break. Treat it accordingly!
Should you have any questions about the glass in your new appliance, please contact the service centre by dialling 13 13 49.
Single cooking zone small 1200W
Single cooking zone medium 1800W
Triple cooking zone 2300/1600/800W
Multi-purpose double cooking zone 2200/1400W
GETTING TO KNOW YOUR CERAMIC COOKTOP
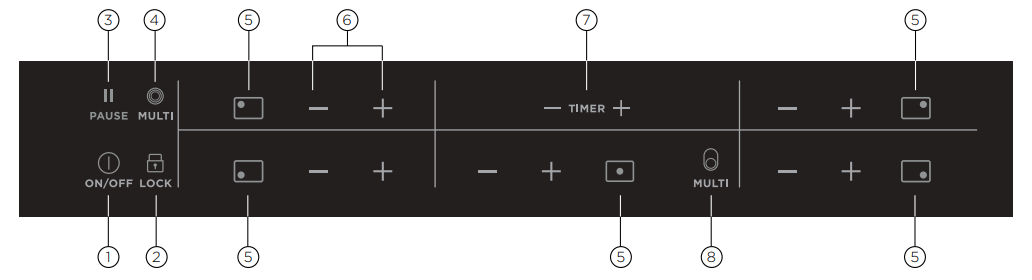
Ceramic cooktop controls
On/Off with power indicator
Lock with pilot light
Pause
Triple ring cooking zone
Zone indicator
Heat setting selection
Timer setting selection
Multipurpose cooking zone
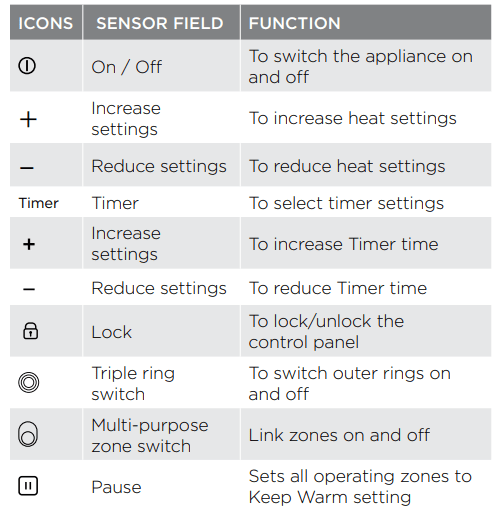
The appliance is operated using Touch Control sensor fields. Functions are controlled by touching sensor fields and confirmed by displays and acoustic signals. Touch the sensor fields from below, without covering other sensor fields.
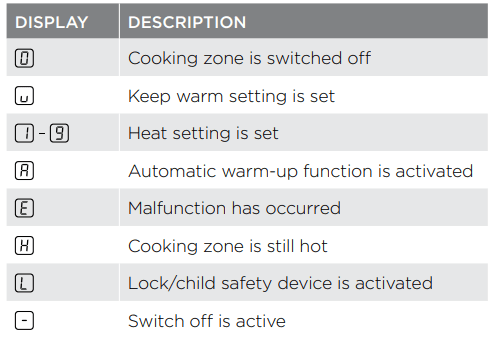
Displays
USING YOUR CERAMIC COOKTOP
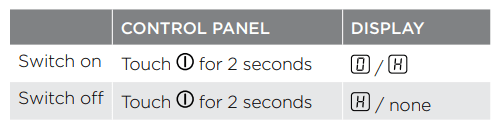
Switching the ceramic cooktop on and off
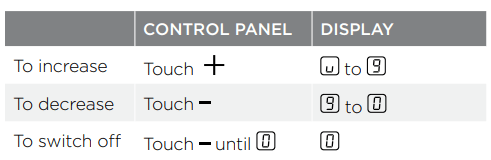
Setting the heat setting
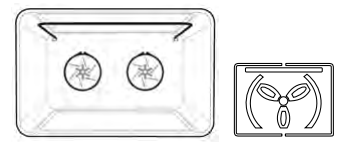
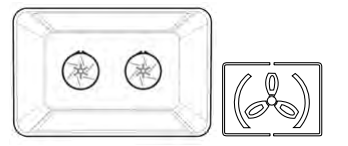
Switching the outside ring on and off
By switching the outside rings on or off, the effective heating surface can be matched to the size of the cookware.
TIPS AND INFORMATION
Before an outside ring can be switched on, the inside ring must be switched on.
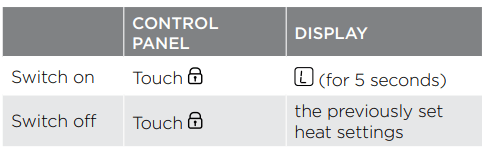
Locking/unlocking the control panel
The control panel, with the exception of the ‘On/Off’ sensor field, can be locked at any time in order to prevent the settings being changed eg. By wiping over the panel with a cloth.
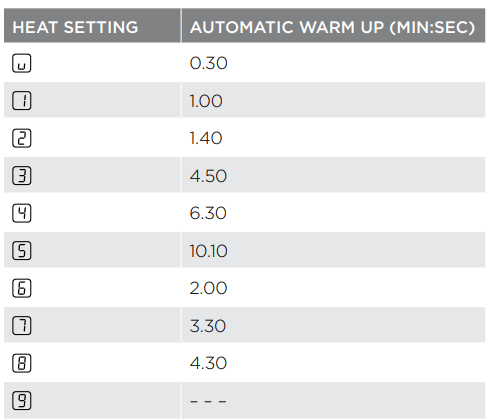
Using the automatic warm-up function
All cooking zones are equipped with an automatic warm up function. When setting a heat setting using , when starting from , the cooking zone switches to full power for a certain amount of time and then automatically switches back to the heat setting set.
The length of time that the automatic warm up function operates depends on the heat setting selected.
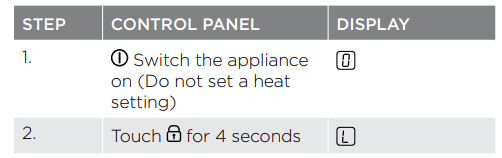
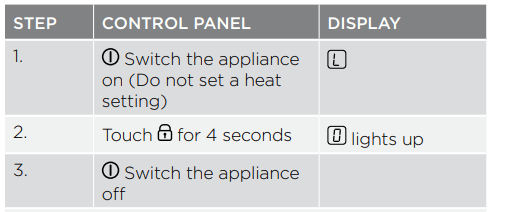
Using the child safety device
The child safety device prevents unintentional use of the appliance.
Switching on the child safety device
The child safety device is switched on
Switching off the child safety device
The child safety device is switched off
The child safety device can only be switched on or off, if no heat setting is set.
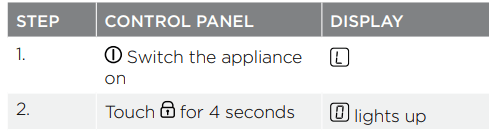
Overriding the child safety device
The child safety device can be switched off in this way for a single cooking session; it remains activated afterwards.
Until the appliance is next switched off, it can be used as normal. After switching off the appliance, the child safety device is active again.
USING YOUR OVEN
Understanding your oven functions
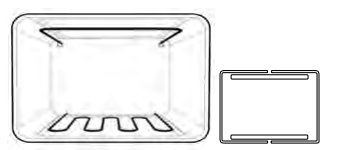
Rapid Heat
Heat comes from the elements surrounding the fans as well as the smaller element above the food. This allows you to preheat your oven 30% quicker than on standard “Bake”. “Rapid Heat” is ideal for cooking frozen precooked foods such as savoury dishes, pastries, pizzas, mini meals (TV dinners), meat pies and fruit pies. Simply place the food in the oven straight from the freezer and heat – ideal for busy people. Cook in the upper half of the oven for best results.
Fan Bake
Heat comes from the elements surrounding the fans. The fans circulate the hot air around the oven cavity so that you can put your food in different places in the oven and still cook them at the same time. You can use the “Fan Bake” function for multi-shelf cooking, reheating cooked foods, pastries and complete oven meals. It will cook at a lower temperature and be faster than baking. Please note that some variation in browning is normal.
Bake/Pizza
Heat comes from two elements, one above and one below the food. The bottom element is a clean heat element and is below the floor of the oven. Both elements are controlled by the thermostat and will turn on and off to maintain the set temperature. You can use the “Bake” function for pizza and single trays of biscuits, scones, muffins, cakes, slices, casseroles, baked puddings, roasts and delicate egg dishes.
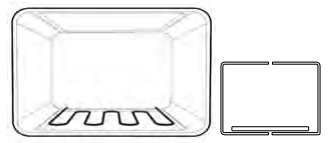
Base Heat
Heat comes from the element below the floor of the oven. The Element is controlled by the thermostat and will turn on and off to maintain the set temperature. The “Base Heat” function can be used to add extra browning to the bases of pizzas, pies and pastries. Cook in the lower half of the oven when you are using only one shelf. For best results, use silver or shiny trays.
Preheating your oven with “Rapid Heat”
To preheat your oven select the “Rapid Heat” function. This function allows your oven to reach the preset temperature quicker than any other cooking function.
Turn the function selector to “Rapid Heat”.
Set the desired preheat temperature, by rotating your oven temperature selector. When the indicator light above the temperature selector goes out, the oven has reached the desired temperature. Select the oven function you require for cooking or baking and place the food in the oven.
Operating the Programmable Controller (WVEP916SB, WVE916SB & WFE946SC)
General features
The oven is equipped with a programmable controller that can be used to turn the oven on and off automatically. The “Cook time” function automatically turns the oven off after a set amount of time. The “End time” function is used to set the time of day you want the cooking cycle to finish. A “Delayed start” is possible by combining the “Cook time” and “End time” features to switch the oven on and off at a specific time during the day
Setting the time of day (after electrical connection)
After the appliance has been electrically connected, the “Set clock” symbol will flash on the display.
To set the time of day, press or symbols while the “Set clock” symbol is flashing.
Press the Clock button and the time of day “Minutes” will flash and can be set in the same manner.
After 5 seconds from the last change, the “Timer arrow” symbol will disappear confirming the time has been set.
NOTE: The clock has a 24-hour display.
Changing the time of day
Switch the appliance “Off” by pressing “On / Off”.
Press “Timer” button repeatedly until the “Set clock” symbol appears flashing with the “Timer arrow” symbol on the display.
To set the time of day, press or symbols while the “Set clock” symbol is flashing.
After 5 seconds from the last change, the “Set clock” symbol and “Timer arrow” symbol will disappear, confirming the time has been set.
Setting the oven function
Switch the appliance “On” by pressing “On / Off”. The oven light will turn on.
Press “Function” button repeatedly until the desired oven function appears. The suggested cooking temperature for that function will appear in the display which can be changed as described below. After 5 seconds from the last change, the oven will begin to heat.
NOTE: If the oven temperature is less than the set temperature, the oven temperature and a rising thermometer icon is displayed. When the oven temperature reaches the set temperature, 4 beeps sound and the set temperature and full thermometer icon are displayed. If the set temperature is less than the oven temperature, the set temperature and a full thermometer icon is displayed.
CLEANING YOUR OVEN
Stainless steel
WARNING
• The oven door trim, the control panel and the storage compartment are decorated with a special stainless steel that resists finger marks and should only be cleaned with warm water and a mild detergent. Do not use stainless steel cleaners, abrasive cleaners or harsh solvents on these parts.
NOTE: Make sure you follow the polish or brushing lines in the stainless steel.
• All grades of stainless steel can stain, discolour or become greasy. You must clean these regularly by following the procedures below if you want your appliance to look its best, perform well and have a long life.
• Care must be taken when wiping exposed stainless steel edges, they can be sharp!
• The stainless steel gas hob can be cleaned with stainless steel cleaners if it becomes soiled or discoloured.
• A suitable cleaner can be purchased from Electrolux Customer Care Centres.
Glass
• Glass surfaces on doors and control panels are best cleaned immediately after soiling.
• A damp cloth may help remove baked on food deposits.
Gas hotplate
• The trivets can be removed for cleaning by carefully lifting them from the hob.
• Clean by washing with warm soapy water.
• The burner caps and crowns are also removable for cleaning.
• If the caps, crowns and cups are heavily soiled, use a non-abrasive cleaning compound.
• Flame port blockages should be removed by using a matchstick or brush.
• Do not clean them with abrasive or caustic type cleaners, or clean them in a dishwasher.
Ceramic hotplate
• Remove all spilt food and fat with the supplied razor blade scraper, while the ceramic glass is still warm but not hot. Wipe clean with dishwashing detergent on a damp cloth.
• If aluminium foil, plastic items or high sugar content foods are allowed to melt on the ceramic glass, clean immediately with the supplied razor blade scraper before the surface has cooled down, otherwise pitting of the surface can occur.
NOTE: Items with high sugar content not only include jam and fruit, but also vegetables such as peas, tomatoes and carrots.
• When the ceramic glass is cool, apply a suitable ceramic glass cleaner.
• It is important to follow the cleaner manufacturer’s instructions. Remove any cleaning residue from the surface as staining of the cooktop may occur.
• Do not use abrasive sponges or scourers, as they may scratch the surface.
• Any pitting, staining, scratches or other surface deterioration is excluded from the warranty.
• Sometimes surface stains appear to be ‘bubble’ marks under the ceramic glass. These can be cleaned off with a razor blade scraper and ceramic cleaner.
Oven
• Always keep your appliance clean. Ensure that fats and oils do not accumulate around elements, burners or fans.
• Always keep the oven dish, baking trays, grill dish and grill dish inserts clean, as any fat deposits may catch fire.
• Always wrap your meats in foil or an oven roasting bag to minimise cleaning. Any polyunsaturated fats can leave a varnish-like residue which is very difficult to remove.
Grill
• Always keep the grill dish and grill dish insert clean, as any fat deposits may catch fire.
CLEANING YOUR OVEN ACCESSORIES
Removing the trays and shelves from your appliance
• Slide the dish and grill tray towards you until they reach the front stop.
• Tilt them up at the front to clear the side supports, taking care not to spill the contents.
• Lift them clear.
• Wash the tray and shelves in hot soapy water.
• Reverse the above steps to put the grill tray and shelves back again.
• Ensure that they are placed between the 2 support wires.
Removing the side racks or shelf supports
• Grasp the shelf support at the front.
• Pull it firmly inwards
Cleaning your oven door
The oven door has been designed to allow the two inner door glasses to be removed for cleaning without removing the door from the product.
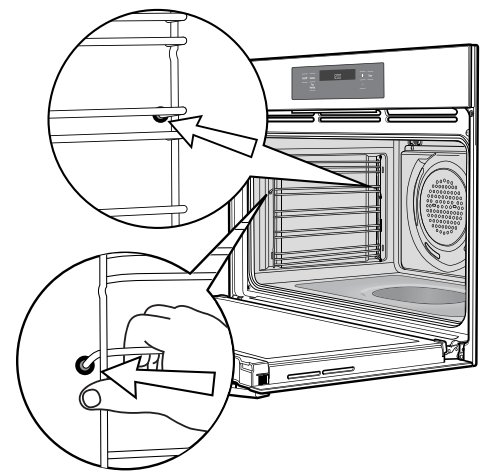
Removing the inner door glass for cleaning:
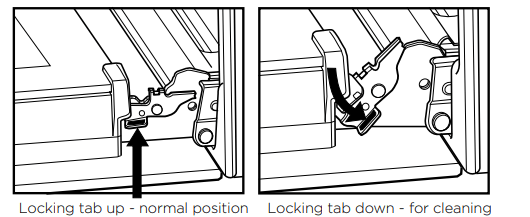
• Open the door fully to gain access to the hinges.
• Push down the hinge locking tab as shown in the diagram on both sides of door.
• Gently close the door until it stops in partially open position on the locking tab (the door will not fully close with the locking tab in the down position).
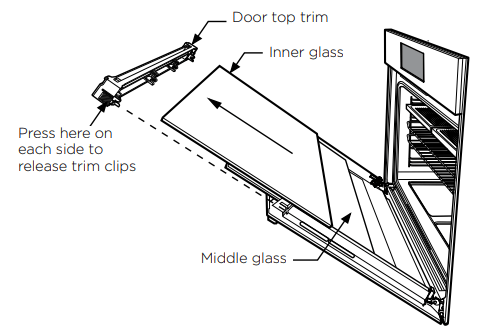
• In this position the top door trim can be removed by pushing each side on the serrated surface to release the clips and lift the trim away from the door.
• To remove the inner glass, tilt top of glass towards the oven and lift out.
• The middle glass is removed in the same way.
• The inner side of outer glass can be cleaned in-situ when inner and middle glass is removed.
• Clean glass using detergent and warm water, wipe clean and dry thoroughly.
Re-assembling the door glass panels:
• Replace the middle glass back to the door. The middle glass is a clear pane and orientation of the glass is not important.
• Replace the inner glass back to the door, ensuring the side with black ceramic paint faces away from the oven cavity when door is closed.
• Fully open the door and return the locking tabs to their normal position and close the door.
Cleaning your oven door
WARNING
• DO NOT use the oven without the inner and middle door glass fitted.
• NEVER spray any caustic cleaners on any surface of the door or damage to the surface coatings will result.
• DO NOT use metal utensils, scrapers, scourers, or abrasive cleaners to clean the glass or any of the door trims. These will damage or scratch the surface coatings and degrade the finish and appearance.
• DO NOT place glass in dishwasher.
• Use only warm water and liquid detergent with a soft cloth to clean the glass or trims.
• Before refitting the glass panes to the door ensure they are dried with a soft cloth.
• The glass edges have been specially ground to remove any sharp edges. However it is glass, and should be handled carefully to avoid injury to your person and damage to the glass.
WARNING
Make sure the appliance power is switched off at the isolating switch before you remove or replace parts, to avoid the possibility of electric shock.
Changing the light globes
• There are 2 light globes located in the top of the oven cavity towards the front. The light globe glass is accessible between the passes of the upper element.
• To remove, turn oven light glass anti-clockwise.
• A special high temperature resistant globe should be used. This can be purchased from the customer care centre.
Storage compartment (selected models)
The storage compartment is accessible through the pivoting door.
Unused oven racks and grill dishes can be stored here.
WARNING
DO NOT store flammable or combustible items in the storage compartments. This is not a compartment for warming food.
CLEANING YOUR PYROLYTIC OVEN
WVEP916SB & WFEP915SC
Pyrolytic cleaning of the oven cavity
The oven has the Pyrolytic self-cleaning function, it cleans by burning off the spatters and accumulated dirt and grease from the oven liner, at high temperature. This process produces ash which can then be wiped out of the oven cavity. It is recommended you clean your oven regularly to keep the oven in its best condition.
• Light clean - this is an energy saving cycle that can be used on a regular basis if the oven is lightly soiled. Possibly after every 2nd or 3rd roast.
• Normal clean - use this as the regular cycle about once every 2-3 months.
Before carrying out the Pyrolytic cleaning function
WARNING
• Clean large deposits, spills or grease from the oven cavity.
• Please keep small children at a safe distance. The appliance becomes very hot.
• Never clean non-stick baking trays and tins in the oven during the pyrolytic cycle. High temperatures damage the non-stick coating and poisonous gas is released.
• Pyrolytic cleaning can release fumes that are not harmful to humans, including infants or persons with medical conditions, however you are strongly advised to provide good ventilation during and after each pyrolytic cleaning process.
• Unlike humans, some birds and reptiles can be extremely sensitive to the potential fumes emitted during the pyrolytic cleaning process. It is strongly advised to remove any pets (especially birds) from the vicinity of the appliance during and after each pyrolytic cleaning process.
• Small pets can also be highly sensitive to the localized temperature changes in the vicinity of all pyrolytic ovens when the pyrolytic self cleaning program is in operation.
CAUTION
• All accessories must be removed from the oven, including shelves, trays and side racks.
• During pyrolytic cleaning the air outlet vent above the door must be kept clear of any obstruction (e.g. tea towels).
• Do not use your oven to clean miscellaneous items (e.g. cookware).
• To prevent damage, do not use acids, sprays or similar cleaning agents.
IMPORTANT
During the pyrolytic cleaning function, it is advisable not to use a cooktop if it is fitted above the oven. This could cause overheating and damage to both appliances.
The cooling fan will operate at an increased speed for Pyrolytic cleaning and will continue to run until the oven has cooled down. It is recommended to use the Pyro clean function regularly to keep the oven in its best condition.
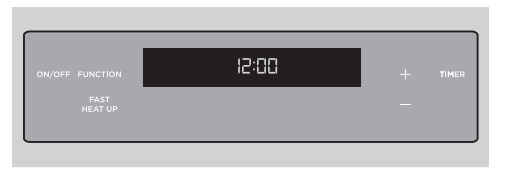
Starting the Pyrolytic cleaning function WFEP915SC
• Make sure all accessories are removed from the oven including shelves, trays and side racks.
• Turn the oven “Function” selector clockwise to select the “Pyro” position.
• Use the “+” or “–” buttons on the electronic clock to select between a pyrolytic cleaning time of 1:30 hours (light clean) or 2:30 hours (normal clean) for the appropriate level of cleaning.
• After 5 seconds from the last change, the oven will begin heating and the “Remaining time” will be displayed.
• The pyrolytic cleaning function can be stopped at any time during the cycle by turning the function selector counter-clockwise to the “OFF” position. NOTE: The “Remaining time” does not include cool-down time for the oven.
• Press the “Function” button repeatedly until “P1” is displayed.
• Press the “–” or “+” symbols to choose between “1hrs 30 min” (light clean or “2hrs 30 min” (normal clean) for the appropriate level of cleaning.
• Press the “Pyro Accept” button to commence the cleaning process.
• The oven will begin heating and the “Remaining Time” will be displayed.
• The pyrolytic cleaning function can be stopped at any time during the cycle by pressing the “On / Off”.
During Pyrolytic cleaning
When the temperature in the oven approaches 300˚C, the door will automatically lock and a padlock symbol will appear on the display
After Pyrolytic cleaning
The door will only unlock when the oven has cooled to a safe temperature. Turning the function off will not unlock the door.
After cool-down, wipe the ash out of the oven with a soft damp cloth and warm water. To restore the enamel shine to more difficult areas, use a damp cloth with vinegar and detergent.
CAUTION
Do not turn off the mains power supply to the oven during the pyrolytic cleaning cycle. This could damage the appliance.
TROUBLESHOOTING
Faults
If there is a problem with the oven and/or grill, please:
• Check the points listed below before calling for service. It may be possible to avoid a call by fixing the problem yourself – and so continue cooking.
NOTE: We may charge for service even in the guarantee period if your problem is due to the causes listed below
Turn grill on high for 30 mins and then the oven on 220°C for 1 hour
Too much condensation building up when baking
Too much water used when cooking
Reduce amount of water
Leave oven door open after cooking
Smells when first using oven
Protective oils being removed
This is normal
Timer flashing
Power failure or interruption
Reset time of day
Burner will not light even though the sparker is working
Knob not held down long enough in ‘High’ position for flame safeguard (where fitted) to engage
Repeat lighting procedure and hold knob down for 5 seconds in ‘High‘ position
Gas supply valve turned off
Turn on gas supply to appliance
Wrong knob turned off
Ensure the knob you are turning corresponds to the burner you wish to light
Port blockage in ignition area
Ensure the ports in the ignition area are clean and dry
Ignition spark plugs wet or dirty
Dry or clean ignition spark plugs
No spark is obtained when control knob is activated
Electricity supply is disconnected or switched off
Switch on electricity or check fuses
Ignition spark plugs wet or dirty
Dry or clean ignition spark plugs
Flames uneven or tending to lift
Flame ports blocked or wet
Clean or dry flame ports
Burner incorrectly fitted
Ensure this component is fitted correctly
NOTE: Only authorised personnel should carry out servicing. If the household fuse continues to blow, call the Customer Care Centre. In the event of a power failure the gas burners may be lit with a hand held igniter and used. Take care to avoid letting unburnt gas flow for more than 5 seconds when attempting to light the burner
PROBLEM
POSSIBLE CAUSE
WHAT TO DO
Flames not staying on when knob released
Knob not held down long enough in ‘High’ position for flame safeguard (where fitted) to engage
Repeat lighting procedure and hold knob down for 5 seconds in ‘High‘ position
Knob not set between ‘High’ and ‘Low’
Knob MUST be set between these positions
Dirt or spillage on flame safeguard sensor (where fitted)
Clean flameguard sensor tip
Low heat, slow cooking
Incorrect cooking pot or pan being used
Refer to cooktop section for correct selection
Benchtop or knobs overheating
Incorrect cooking pot or pan being used
Refer to cooktop section for correct selection
Pot or pan not located on burner properly
Ensure pot or pan is centrally located on burner
Stains appear to be under ceramic glass
These marks are on the surface of the ceramic glass
Clean marks off with a razor blade scraper and ceramic glass cleaner.
Shelf or telescopic runner slides out when door is opened
Oven cavity is not level with the ground.
Perform a check using a level to verify cause (refer to installation section). If not level refer to installer
Oven seal is loose
The oven seal is only attached at each corner. It may seem like a loose fit but when the oven door is closed it will function correctly
No action necessary
Further information
When you need information, service or replacement parts or have a warranty enquiry, please contact the Customer Care Centre:
• Australia - 1300 363 640, 8.00am - 5.00pm EST Monday to Friday
• New Zealand - 09 573 2384, 8.00am - 5.00pm EST Monday to Friday
Please have the following information ready: Model, Model Number & Serial Number. This is shown on the data plate which is visible when the oven door is open.
 TIPS AND INFORMATION
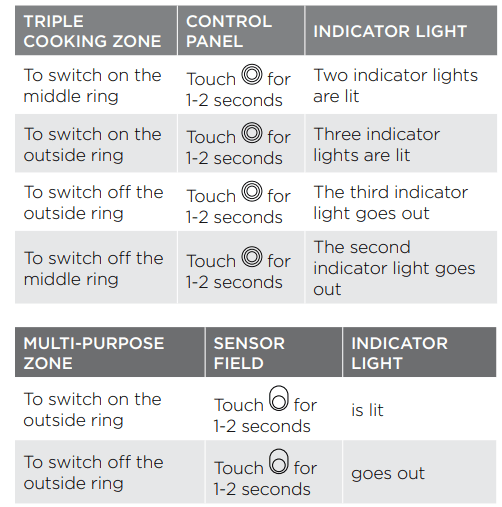
 , when starting from
 , the cooking zone switches to full power for a certain amount of time and then automatically switches back to the heat setting set.
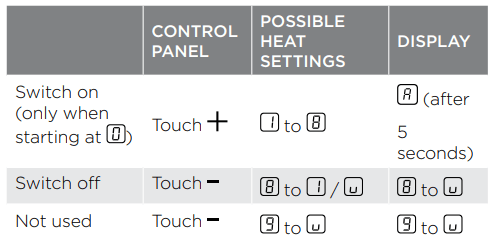
 will flash on the display.
 or
or  symbols while the “Set clock” symbol
  will disappear confirming the time has been set.
 WARNING

 IMPORTANT