User Guide for Refrigerator
Features
- 18 cubic foot capacity
- Electronic control
- Glass spill-safe shelves
- Humidity-controlled crisper drawers
- LED lighting
- Frost free
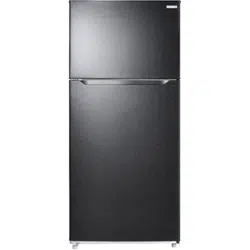
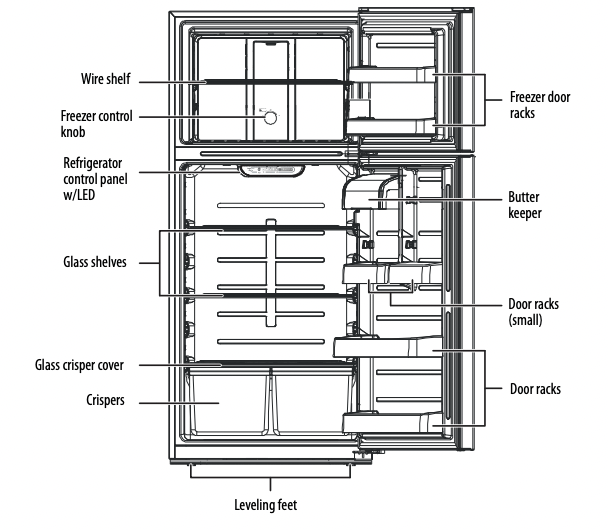
Main components
Setting up your refrigerator
Before using your refrigerator
- Remove the interior packing.
- Let the refrigerator stand upright for approximately four hours before connecting it to power. This reduces the possibility of a malfunction in the cooling system from improper handling during transportation.
- Clean the interior surface with lukewarm water using a soft cloth.
- Wait for approximately 24 hours after the thermostat has been set before placing any food in your refrigerator.
Finding a suitable location
- This refrigerator is designed to be free standing only.
- Place your refrigerator on a floor that is strong enough to support the refrigerator when it is fully loaded.
- Locate the refrigerator in your home or garage away from direct sunlight because it may affect the acrylic coating and heat sources may increase electrical consumption. To ensure optimal performance, install in areas with an ambient temperature between 41°F (5°C) and 109°F (42.8°C).
- Avoid locating the refrigerator in moist areas.
- The refrigerator door must be able to swing fully open.
Leveling your refrigerator
- It is very important for the refrigerator to be level. If the refrigerator is not leveled during installation, the doors may not close or seal properly, causing cooling, frost, or moisture problems.
- To level your refrigerator, rotate the leveling feet clockwise (to raise) the refrigerator or counter-clockwise (to lower).
Note Having someone push against the top of the refrigerator helps to take some weight off the leveling foot, making it easier to adjust.
Providing proper ventilation
Place the refrigerator at least one inch from the wall on each side to ensure proper airflow to the compressor. Do not place the refrigerator near any heat sources, such as a heater or stove, as this may put a strain on the compressor.
Providing a proper power supply
Check your local power source. This refrigerator requires a 110V-120V, 60Hz power supply
Use a receptacle that accepts the grounding prong. The power cord is equipped with a 3-prong (grounding) plug which mates with a standard 3-prong (grounding) wall outlet to minimize the possibility of electric shock hazard from this refrigerator.
|
Using a 3-prong plug and outlet

|
|
Using a grounding adapter

|
Notes
- The refrigerator should always be plugged into its own individual electrical outlet which has a voltage rating that matches the rating plate.
- Never unplug your refrigerator by pulling on the power cord. Always grip the plug firmly and pull it straight out from the outlet.
Using your refrigerator
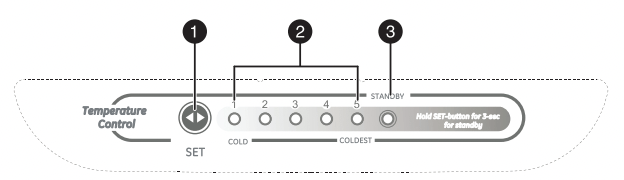
Setting the refrigerator temperature
| # |
Item |
Description |
| 1 |
SET button |
Press to change the refrigerator setting from 1 (cold) to 5 (coldest). |
| 2 |
LED indicators |
Light to show the current refrigerator setting. |
| 3 |
STANDBY LED |
Lights to indicate when the refrigerator is in standby mode (refrigerator and freezer are turned off). |
- The first time you turn the refrigerator on, the control panel LEDs turn on for three seconds, then displays the current setting (default = 3). Your refrigerator runs continuously for several hours until it reaches the preset temperature. After your refrigerator is fully cooled, you can adjust the temperature up or down to your personal preference.
- To temporarily suspend cooling in the refrigerator and freezer, press and hold the SET button for three seconds. The STANDBY LED turns on and cooling is turned off. Press the SET button again to cancel standby mode and resume cooling.
Notes
- If the refrigerator is unplugged or loses power, you must wait three to five minutes before restarting it. If you attempt to restart before this time delay, the refrigerator will not start.
- Large amounts of food will lower the cooling efficiency of the refrigerator.
- If you choose to change the thermostat setting, adjust it by one increment at a time. Allow 24 hours for the temperature to stabilize between adjustments.
Setting the freezer temperature
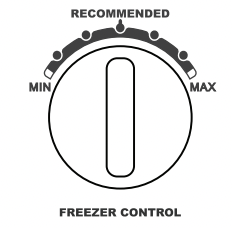
- Turn the controls to adjust the freezer temperature, allow 24 hours for the freezer to adjust and stabilize.
Using the freezer compartment
- Place frozen food into the freezer as quickly as possible after purchase.
- Follow package instructions regarding storage times. The storage life of frozen foods varies and the recommended storage time should not be exceeded.
Reversing the door position
Based on the location where you plan to use your refrigerator, you may find it more convenient to reverse the position of the door.
Caution To avoid injury to yourself or your property, we recommend that someone assist you during the door reversal process.
Preparing to reverse the door position
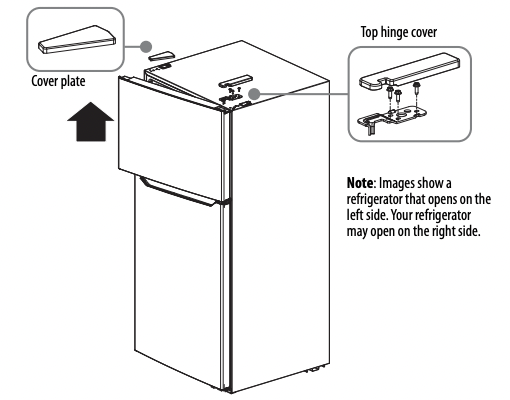
Note Images show a refrigerator that initially opens on the left side. However, your refrigerator may open on the right side.
You will need: A standard (flat head) screwdriver and a Phillips screwdriver.
- Make sure that your refrigerator is unplugged and empty.
- Have someone available to assist you in the process.
- Keep all of the parts you remove to reuse them later.
Reversing the door position
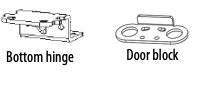
Parts included with the hinge kit:
 OR
OR 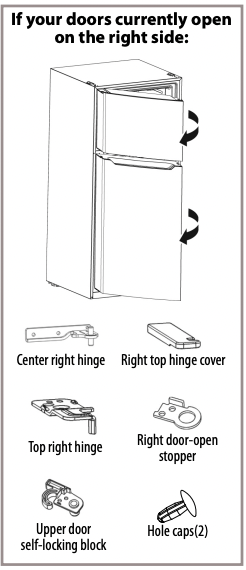
Parts you’ll use that are already mounted on the door (as shipped):
- Unplug your refrigerator and remove all food from the door shelves.
- Remove the cover plate and the top hinge cover, then unscrew and remove the top hinge. Keep the screws to reuse.
3 Lift the freezer door up and away from your refrigerator.
4 Unscrew the three screws holding the center hinge, remove the hinge, then lift the refrigerator door up and away from your refrigerator. Save the screws to reuse and store the hinge in a safe place in case you need to reverse the door position again.

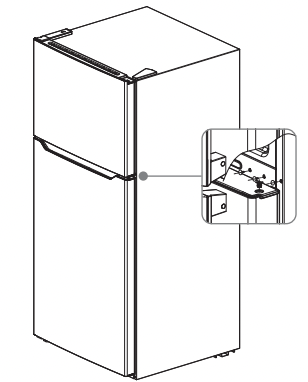
5 Unscrew the two screws holding the bottom hinge, then remove the bottom hinge from the refrigerator.
6 Unscrew the hinge pin from the bottom hinge and reattach it to the other hole in the hinge pin, then secure the bottom hinge to the opposite side of the refrigerator using the screws you removed previously.

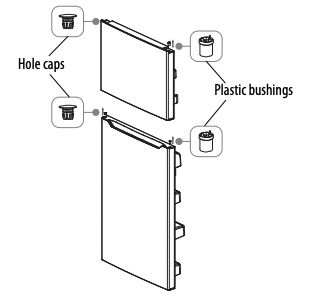
7 Remove the hole caps and plastic bushings from the top of the freezer and refrigerator doors. Save them for the next step
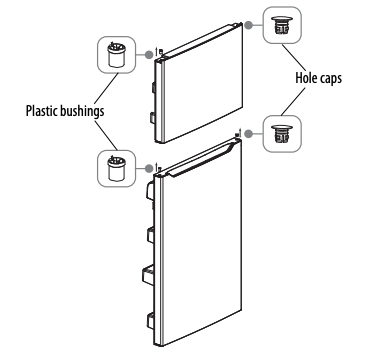
8 Insert the hole caps and plastic bushings into the opposite sides (from where you removed them) of the freezer and refrigerator doors.
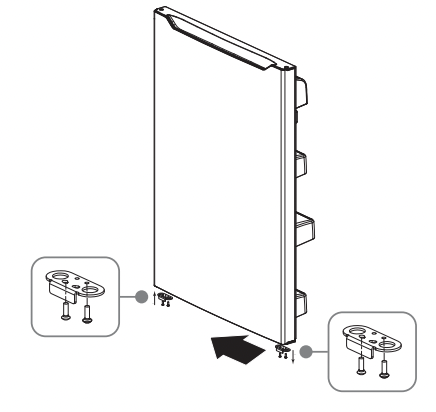
9 Remove the door block from the bottom of the refrigerator door and attach it to the other side.
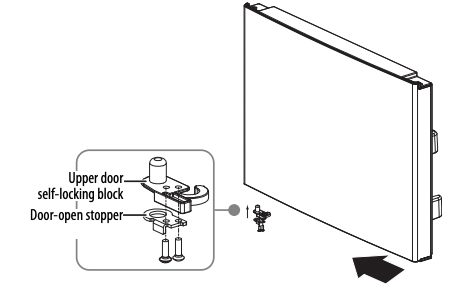
10 Attach the upper door self-locking block and the door-open stopper to the side of the freezer door where the hinge will be. Use the parts from the hinge kit.
11 Remove the old upper door self-locking block and the door-open stopper (do not remove the parts attached in step 10). Store in a safe place in case you need to reverse the door position again.
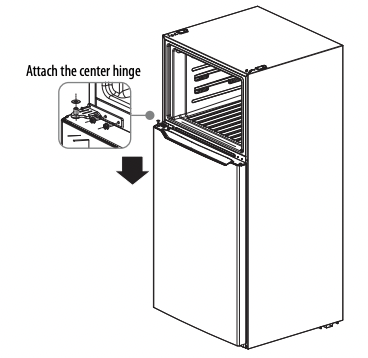
12 Attach the refrigerator door to the bottom hinge, then attach the center hinge to the refrigerator. Use the center hinge from the hinge kit (not the piece removed in step 4).
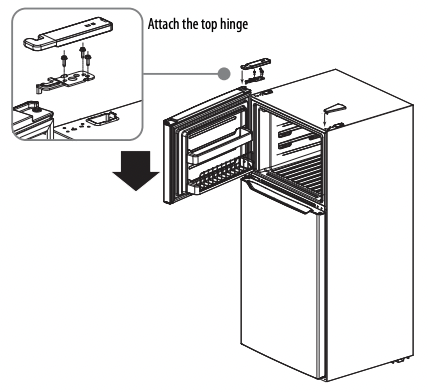
13 Put the freezer door onto the center hinge, then attach the top hinge (from the hinge kit) to the top of refrigerator. Cover the hinge with the top hinge cover (from the hinge kit) and cover the screw holes on the top with the cover plate you previously removed.
14 Add covers to the screw holes and hinge pivot.
Installing an optional ice maker
The refrigerator comes set up for ice maker installation. This refrigerator is compatible with the Insignia NS-IMK20WH7 ice maker.
Maintaining your refrigerator
Your refrigerator is designed for year-round use with only minimal cleaning and maintenance.
When you first receive it, wipe the cabinet with a mild detergent and warm water, then wipe dry with a dry cloth. Do this periodically to keep your refrigerator looking new
Caution
To prevent damage to the finish, do not use:
- Gasoline, benzine, thinner, or other similar solvents.
- Abrasive cleaners.
- Turn off the refrigerator and unplug it from the wall outlet.
- Remove all food.
- Wash the inside with a damp warm cloth soaked in a solution of one quart of lukewarm water to two tablespoons of baking soda solution.
- Be sure to keep the door gasket (seal) clean to keep the refrigerator running efficiently.
- Dry the interior and exterior with a soft cloth.
Defrosting the freezer
This refrigerator is frost free, so you don't need to defrost it. You just need to clean it periodically, following the above instructions.
Changing the interior LED light
- Using a Phillips screwdriver, remove the screw securing the lamp cover, then remove the lamp cover.
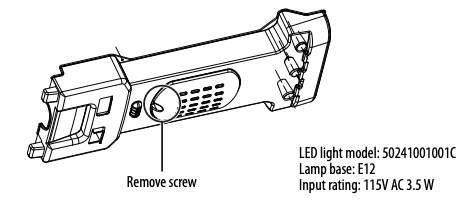
2 Remove the LED lightbulb from the lamp base, then install a new LED lightbulb.
3 Reinstall the lamp cover with the screw you previously removed.
Shutting down your refrigerator - long vacations (several months)
- Turn off the refrigerator and unplug it from the wall outlet.
- Remove all food.
- Clean the refrigerator.
- Leave the door open slightly to avoid possible formation of condensation, mold, or odor.
Caution Use extreme caution with children. The refrigerator should not be accessible to child's play.
Moving your refrigerator
- Turn off the refrigerator and unplug it from the wall outlet.
- Remove all food.
- Securely tape down all loose items inside your refrigerator.
- Tape the doors shut. Be sure the refrigerator stays in the upright position during transportation.
Tips on saving energy
- Locate your refrigerator in the coolest area of the room, away from heat producing appliances or heating ducts and out of the direct sunlight.
- Let hot foods cool before placing them in the refrigerator. Overloading the refrigerator forces the compressor to run longer. Foods that freeze too slowly may lose quality or spoil.
- Wrap foods properly and wipe containers dry before placing them in the refrigerator. This cuts down on frost build-up inside the refrigerator.
- Organize and label food to reduce door openings and extended searches.
Troubleshooting
Caution Do not try to repair your refrigerator yourself. Doing so invalidates the warranty
Error codes
| LED display |
Problem |
| LED 1 and LED 2 lit |
Temperature sensor circuit |
| LED 1 and LED 3 lit |
Freezer defrost sensor |
| LED 1 and LED 4 lit |
Ambient temperature sensor |
| Problem |
Possible cause |
Possible solution |
The refrigerator does not operate
|
The refrigerator is unplugged. |
Make sure that the refrigerator is plugged in and that the plug is pushed completely into the outlet. |
| The thermostat is set to the STANDBY position. |
Press the SET button until LED 3 lights. |
| The fuse on the circuit is blown or the circuit breaker is tripped. |
Check the house fuse/circuit breaker box and replace the fuse or reset the circuit breaker. |
| Power failure. |
If a power failure occurs, the refrigerator turns off. Wait until the power is restored. |
| The compressor turns on and off frequently |
The door has been opened too often or was not closed properly. The door seal may be dirty. |
Make sure that the door is closed properly. Clean the door seal if necessary |
| The room temperature is hotter than normal. |
This is normal, under the circumstances. |
| A large amount of food was recently added to the refrigerator. |
This is normal, under the circumstances. |
| The thermostat is not set correctly. |
Reset the thermostat correctly. |
| The refrigerator does not have the correct clearances. |
The refrigerator should be no closer than five inches from the adjacent walls. |
| The refrigerator has recently been disconnected for a period of time. |
Allow four hours for the refrigerator to cool down completely. |
| Food in the refrigerator compartment is freezing |
The thermostat is set too cold. |
Set the thermostat to a warmer setting. |
Food in the refrigerator compartment is not cold
|
The door has been opened too often or was not closed properly. |
Make sure that the door is closed properly |
| You have just added a large amount of food to the refrigerator or freezer compartments. |
Allow time for the new food to cool, then check again. |
| The thermostat is set too warm. |
Adjust the thermostat to a colder setting. |
| The door gasket does not seal properly. |
Clean the gasket. |
| The refrigerator has recently been disconnected for a period of time. |
Allow four hours for the refrigerator to cool completely. |
The refrigerator makes unusual noises.
|
The refrigerator may not be level on the floor. |
Level the refrigerator with the leveling feet. |
| The body of the refrigerator is touching a wall. |
Move the refrigerator out from the wall. |
Moisture is building up in the interior of the refrigerator
|
The door has been opened too often or was not closed properly. |
Make sure that the door is closed properly. |
| The refrigerator is in a location that is very humid. |
Move the refrigerator to a dryer location. |
| The food in the refrigerator is not packaged properly. |
Repackage the food in the refrigerator to make sure that it is sealed. |
The refrigerator door does not close completely
|
Food packages are interfering with the door. |
Move the food packages or remove some food. |
| The shelves are out of position. |
Adjust the shelves properly. |
| The door gaskets are dirty. |
Clean the door gaskets. |
| The refrigerator is not level. |
Level the refrigerator with the leveling feet. |
| The exterior of the refrigerator is warm |
This is normal. |
|
| There is a popping or crackling sound when the compressor comes on |
This is normal. |
The sound should level off or disappear as the refrigerator continues to run. |
| There is a bubbling or gurgling sound, like water boiling |
This is normal. |
|
Vibrations
|
The refrigerator is not on a level or sturdy surface. |
Make sure that the refrigerator is on a level, sturdy surface. Level the refrigerator with the leveling legs. |
| The refrigerator may be touching a wall. |
Make sure that the refrigerator is not touching a wall. |
| There is moisture forming on the external walls of the refrigerator |
The door may be slightly open. |
Make sure that the door closes completely. |