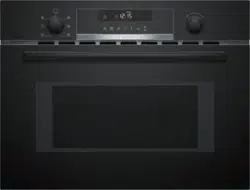
Instruction manual for Microwave Oven
Getting to know your appliance
In this section, we will explain the indicators and controls. You will also find out about the various functions of your appliance.
Note: Depending on the appliance model, individual details and colours may differ.
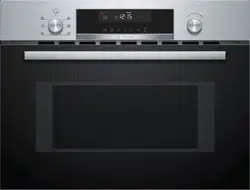
Control panel
Use the function and rotary selector, as well as the touch fields, to set the various functions for your appliance via the control unit. The current settings are shown in the display. The overview shows the control panel when the appliance is switched on with a selected operating mode.
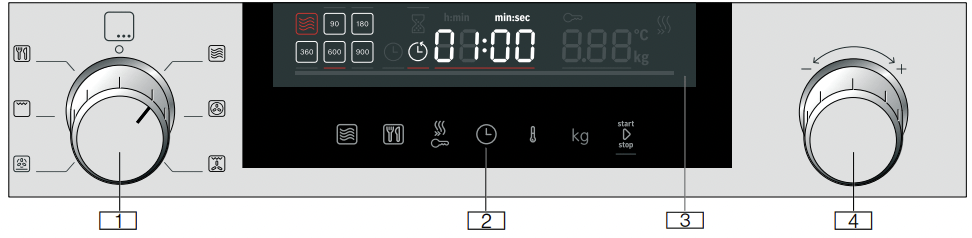
1. Function selector
Use the function selector to set the type of heating or other functions.
You can turn the function selector clockwise or anti-clockwise from the "Off" position.
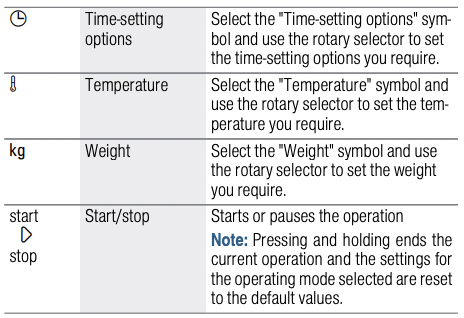
2. Touch fields
There are sensors behind the touch fields. Simply touch a symbol to select the function.
3. Display
The display shows symbols for active functions and the time-setting options.
4. Rotary selector
Use the rotary selector to set the temperature for the heating type or select the setting for other functions.
You can turn the rotary selector clockwise and anti-clockwise.
Notes
- On some appliances, the function or rotary selector can be retracted. To pop the function or rotary selector in or out, push it in in the "Off" position.
- If the function selector is in the "Off" position (energysaving mode) and a function is selected, it will take a few seconds before the function becomes available e.g. the microwave).
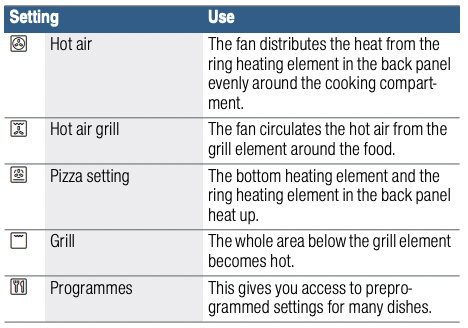
Function selector
Use the function selector to set the types of heating and other functions.
To ensure that you always use the right type of heating to cook your food, we have explained the differences and applications below.

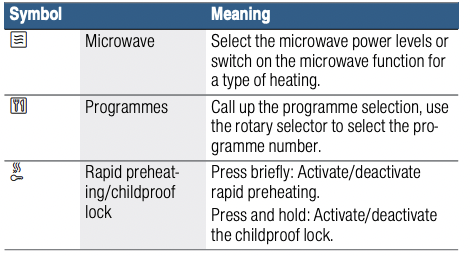
Touch fields and display
You can use the touch fields to set various additional functions for your appliance. You can see the values for these in the display.
Touch fields
Here you can find a short explanation of the various buttons and touch fields.
Display
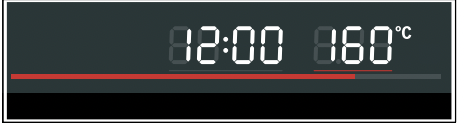
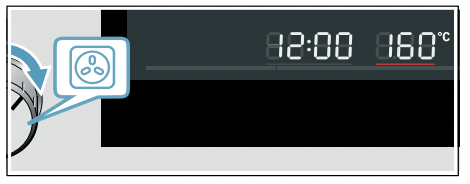
The display is structured so that the information can be read at a glance in any situation.
The value that you can currently set is highlighted. It is highlighted by a red bar displayed under the set value.
The value that is highlighted can be changed directly using the rotary selector.

Display elements
Here you can find a short explanation of the various display elements.
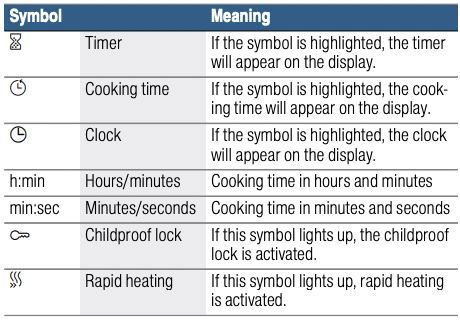
Temperature indicator
The red bar at the bottom of the display shows that the appliance is heating up.
If a heating function is in use, the bar turns red from left to right as the cooking compartment heats up.
If you are using the grill, a full red bar will be displayed immediately.
The bar does not light up when the microwave function is in use.
When you are preheating the appliance, the optimal time to place your food in the cooking compartment is as soon as all five sections of the line have turned red.
Note: Due to thermal inertia, the actual temperature inside the cooking compartment may be slightly different to the temperature that you set.
Night mode
To save energy, the display brightness is automatically reduced to a lower level between 10 p.m. and 5.59 a.m.
Rotary selector
Use the rotary selector to change the adjustment values that are shown in the display and highlighted.
In most selection lists, e.g. programmes, the first selection follows the last. For values, e.g. weight, you have to turn the rotary selector back the other way when you reach the minimum or maximum value.
Operating modes
Your appliance has various operating modes, which make your appliance easier to use.
You can find more detailed descriptions of these in the corresponding sections.
| Operating mode |
Use |
Heating functions  "Operating the appliance" on page 12 "Operating the appliance" on page 12 |
There are various finely tuned heating functions that will allow you to cook your food to perfection. |
| Microwave "Microwave" on page 14 |
You can use the microwave to cook, heat up or defrost your food more quickly. |
| Microwave combined operation |
In addition to a type of heating, you can switch the microwave on for this. |
| Basic settings "Basic settings" on page 21 |
You can change your appliance's basic settings to suit your needs. |
Types of heating
To make sure you always use the right type of heating to cook your food, we have explained the differences and applications below.
The symbols for each type of heating help you to remember them.
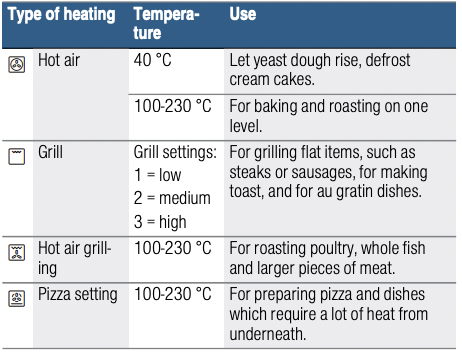
Default values
For each type of heating, the appliance specifies a default temperature or level. You can accept this value or change it in the appropriate area.
Microwave
A variety of microwave power settings that are suitable for different types of food and food preparation are available. The microwave settings do not always correspond exactly to the wattage used by the appliance.
The following microwave settings are available.
You can use the microwave function on its own or in combination with all types of heating.
Exceptions:
 Microwave setting 900 W
 Hot air 40 °C
Find out how to combine the microwave function with all types of heating here:
Cooking compartment
Various functions in the cooking compartment make your appliance easier to use. For example, the cooking compartment is well lit and a cooling fan prevents the appliance from overheating.
Opening the appliance door
If you open the appliance door during an operation, the operation is paused. Close the door and touch the start  stop field to continue the operation.
Interior lighting
The interior lighting lights up while the appliance is operating. Once the oven has finished cooking the food, the lighting goes out.
The interior lighting switches on when the appliance door is opened. This makes it easier to clean your appliance, for example. After approximately 15 minutes, the interior lighting automatically switches itself off.
Cooling fan
Your appliance has a cooling fan. The cooling fan switches on during operation. The hot air escapes above the door.
The cooling fan continues to run for a certain time after operation.
Caution!
Do not cover the ventilation slots. Otherwise, the appliance may overheat.
Notes
- The appliance remains cool during microwave operation. Despite this, the cooling fan will still switch on. The fan may run on even when microwave operation has ended.
- Condensation may form on the door window, interior walls and floor. This is normal and does not adversely affect appliance operation. Wipe away the condensation after cooking.
Before using for the first time
Before you can use your new appliance, you must make some settings. You must also clean the cooking compartment and accessories.
The appliance must be fully installed and connected to the mains.
Fitting the turntable
As shown in the figure, place the turntable with rollers “A” onto the turntable drive coupling “B” in the centre of the cooking compartment floor.
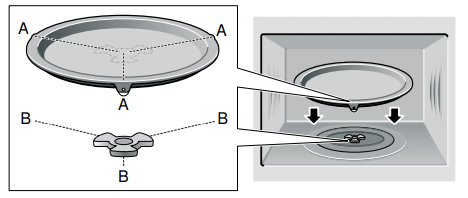
Notes
- Never use the appliance without the turntable
- The turntable must sit straight on the turntable drive coupling.
- The turntable must turn, whichever heating function is being used.
- The maximum load for the turntable is 5 kg.
Initial use
After connecting the electricity supply or after a power cut, the display prompts you to set the time. It may take a few seconds for the instruction to appear.
Setting the time
During initial use, the time display is highlighted.
The value flashes in the display and the
  symbol lights up. Set the time.
- Use the rotary selector to set the time.
- Touch .The time has now been set.
Changing the time on the clock
Note: To change the time on the clock, you will need to switch off the appliance.
- Touch the button twice. The symbol and the clock time will appear on the display.
- Set the clock using the rotary selector.
- Touch the button. The time has now been set.
Notes
- If you do not touch the button after setting the time, the set value is automatically adopted after a few seconds.
- If the function selector has been moved to configure the settings, it must be returned to the "Off" position once you have finished. Only then can the appliance be used.
- In order to reduce the energy consumption of your appliance in standby, you can hide the clock.
Cleaning the cooking compartment and accessories
Before using the appliance to prepare food for the first time, you must clean the cooking compartment and accessories.
Cleaning the cooking compartment
To eliminate the new-appliance smell, heat up the cooking compartment when it is empty and with the oven door closed. One hour with Hot air at 180 °C is ideal for this. Ensure that no packaging remnants have been left in the cooking compartment.
- Use the function selector to set Hot air .
- Use the rotary selector to set to 180 ºC.
- Touch start stop. The appliance begins to heat up.
Switch off the appliance after one hour. To do so, touch start stop and then turn the function selector to the off position.
Cleaning the accessories
Before you use the accessories for the first time, clean them thoroughly with hot soapy water and a soft dish cloth.
Operating the appliance
You have already learnt about the controls and how they work. Now we will explain how to set your appliance. You will learn about what happens when you switch the appliance on and off, and how to select the operating mode.
Switching the appliance on and off
Before you are able to set the appliance, you must switch it on.
Note: The childproof lock can only be set if the appliance is switched off. Some displays also remain visible in the display when the appliance has been switched off.
Switch off your appliance when it is not being used. If no settings are applied for a long time, the appliance switches itself off automatically.
Switching on the appliance
Turn the function selector to switch on the appliance.
A standard value is highlighted in the display. The appliance is ready to use.
You can find out how to select the operating modes in the individual chapters.
Switching off the appliance
Turn the function selector to the off position.
Any functions that may be running are cancelled.
The time appears in the display.
Note: You can set whether the clock should be displayed when the device is switched off in the basic settings.
Selecting an operating mode
After selecting an operating mode, default values are shown in the display. You can start this setting immediately.
The following always applies:
- Use the function selector to select the operating mode.
- If necessary, apply other settings. To do this, touch the appropriate field and use the rotary selector to change the value.
- Touch start stop. The appliance starts the operation. The start stop LED lights up.
Setting the heating function and temperature
Example: Hot air at 200 °C
- Use the function selector to set the Hot air heating function. A default temperature of 160 °C will appear on the display
2. Use the rotary selector to set the temperature to 200 °C.
3. Touch the start stop button.

The appliance will start heating. The start stop LED will be lit. The length of the bar on the temperature indicator gradually increases.
You can change the temperature at any time when the appliance is heating using the rotary selector.
Notes
- Once the appliance has heated up, slight fluctuations in temperature are normal, depending on the heating function.
- When the appliance is heating, the temperature cannot be set to 40 °C.
Setting the cooking time
- Set the type of heating and temperature.
- Touch until the
 symbol is highlighted.
- Use the rotary selector to set the required cooking time.
- Touch start stop.
The appliance begins to heat up. The start stop LED lights up. The cooking time starts counting down.
Pausing the operation
- Touch the start stop field or open the appliance door. The operation is suspended and the start stop LED flashes.
- Close the appliance door.
- Touch the start stop field. The operation is continued and the start stop LED lights up.
Stopping the appliance from heating
Turn the function selector to the "Off" position.
The appliance will stop heating and all the settings will be cleared.
Note: The fan may continue to run after the appliance has been paused or stopped.
Rapid heating
With rapid heating, your appliance reaches the set temperature particularly quickly.
Only use rapid heating when a temperature of over 100 °C has been selected. Rapid heating is available for the following types of heating:
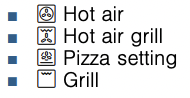
■ Hot air (Exception: Hot air 40 °C)
■  Hot air grill
■  Pizza setting
To ensure an even cooking result, do not place your food in the cooking compartment until rapid heating is complete.
- Set the type of heating and temperature.
- Touch
 . The
. The  symbol lights up on the display.
- Touch start stop. The appliance begins to heat up. The start stop LED lights up.
Rapid heating has finished
An audible signal sounds. The G symbol disappears from the display. Your appliance continues to run with the set type of heating and temperature. Place your food in the cooking compartment.
Cancelling rapid heating
Touch . The symbol disappears from the display. Your appliance continues to run with the set type of heating and temperature.
Note: Rapid heating is automatically deactivated within minutes maximum.
Automatic safety switch-off function
The automatic safety switch-off function is activated if your appliance is operating for a long time with no cooking time having been set. The time at which your appliance switches itself off depends on the set operating mode and temperature.
- Hot air 40 °C: 24 hours
- Hot air 100-230 °C: 5 hours
- Hot air grill and pizza setting: 5 hours
- Grill: 90 minutes
Example: If your appliance is operating with Hot air at 160 °C, it will automatically switch off after approx. 5 hours.
E2 appears in the display. The appliance switches off. To acknowledge, press start stop.
Microwave
You can use the microwave to cook, heat up or defrost food quickly. You can use the microwave on its own or in combination with the grill.
To ensure optimum use of the microwave, please observe the notes on cookware and familiarise yourself with the data in the application tables at the end of the instruction manual.
Cookware
Not all cookware is microwavable. So that your food is heated and the appliance is not damaged, only use microwavable cookware.
Suitable cookware
Heat-resistant cookware made of glass, glass ceramic, porcelain, ceramic or heat-resistant plastic are suitable. These materials allow microwaves to pass through.
You can also use serving dishes. This saves you having to transfer food from one dish to another. You should only use cookware with decorative gold or silver trim if the manufacturer guarantees that they are suitable for use in microwaves.
Unsuitable cookware
Metal cookware is unsuitable. Metal does not allow microwaves to pass through. Food in covered metal containers will remain cold.
Caution!
Creation of sparks: Metal – e.g. a spoon in a glass – must be kept at least 2 cm from the cooking compartment walls and the inside of the door. Sparks can irreparably damage the glass on the inside of the door.
Cookware test
Never switch on the microwave unless there is food inside. The short cookware test is the only exception to this rule.
Perform the following test if you are unsure whether your cookware is suitable for use in the microwave.
- Heat the empty cookware at maximum power for ½ to 1 minute.
- Check the temperature of the cookware during this time.
The cookware should remain cold or warm to the touch.
The cookware is unsuitable if it becomes hot or sparks are generated. In this case, stop the test.
Warning – Risk of burns!
The accessible parts become very hot when in operation. Never touch hot parts. Keep children at a safe distance.
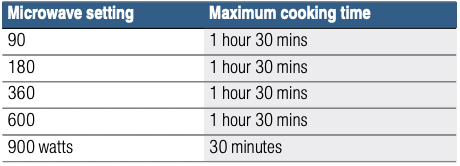
Microwave power settings
The microwave power settings are levels and do not always correspond to the exact wattage that the appliance uses. The following microwave power settings are available
| Microwave setting |
Maximum cooking time |
Use |
| 90 |
1 hour 30 mins |
For defrosting food that deteriorates easily in terms of quality. |
| 180 |
1 hour 30 mins |
For defrosting and continued cooking. |
| 360 |
1 hour 30 mins |
For cooking meat and for heating food that deteriorates easily in terms of quality. |
| 600 |
1 hour 30 mins |
For heating and cooking food. |
| 900 watts |
30 minutes |
For heating liquids. |
Default settings:
The appliance suggests a cooking time for each microwave level. You can accept this value or change it in the relevant area.
The maximum setting is designed for heating liquids only; it is not designed for heating food. After a certain period, the microwave's maximum power is gradually reduced to 600 W to protect the appliance. Full power is made available again after a cooling period.
Time setting intervals
The interval for setting the cooking time changes with the length of the cooking time.
| Cooking time |
Interval |
| 0 - 1 minute |
5 seconds |
| 1 - 3 minutes |
10 seconds |
| 3 - 15 minutes |
30 seconds |
| 15 minutes - 1 hour |
1 minute |
| 1 hour - 1 hour 30 minutes |
5 minutes |
Setting the microwave
Example: Microwave setting 600 W, cooking time minutes.
- Use the function selector to select the microwave function . The appliance is now ready to use. The maximum microwave power output will be displayed as the default value on the display. You can change this at any time.
- Touch the microwave setting field to select the power setting you require.
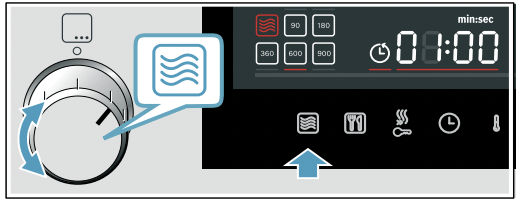
The microwave setting will be highlighted and a default cooking time will be shown on the display.
3. Use the rotary selector to set the required cooking time.
Note: You can also set the cooking time first and then the microwave setting.
4. Touch the start stop button.
The time remaining will count down on the display. The start stop LED will be lit.
The cooking time has elapsed
An audible signal sounds. Open the appliance door or touch any field.
Changing the cooking time
Use the rotary selector to change the cooking time.
After a few seconds, the change is applied.
Changing the microwave power output
Touch until the required level is selected in the display
Notes
■ Touching it several times switches the power levels from the highest to the lowest level.
■ If the microwave function is only added after the start, the appliance pauses. Press start stop to start operation
Pausing the operation
1. Touch the start l stop field or open the appliance door. The operation is suspended and the start l stop LED flashes.
2. Close the appliance door.
3. Touch the start stop field. The operation is continued and the start stop LED lights up.
Stopping the appliance from heating
Turn the function selector to the "Off" position. The appliance will stop heating and all the settings will be cleared.
Note: The fan may continue to run after the appliance has been paused or stopped.
Setting the microwave to combined operation
You can combine the microwave function with all types of heating. The appliance heats up and the microwave is switched on at the same time. As a result, the food is ready in a much shorter time.
Combination options
Exceptions:
Microwave setting 900 W
Hot air 40 °C
Setting combined operation
Example: Hot air 190 ºC with microwave at 360 W, 17 minutes.
1. Use the function selector to set the Hot air function. A default value for the temperature is displayed.
2. Turn the rotary selector to set the desired temperature.
3. Touch the microwave power output field until the required level is selected in the display. A default cooking time appears.
4. Set the cooking time using the rotary selector.
5. Touch start stop. The operation starts and the start stop LED lights up. The cooking time starts counting down.
The cooking time has elapsed
A signal sounds and the start stop symbol stops lighting up. Combination mode has finished. Touch any field to end the acoustic signal.
Changing the microwave power output
Touch until the required level is selected in the display.
Notes
- Touching it several times switches the power levels from the highest to the lowest level.
- If the microwave function is only added after the start, the appliance pauses. Press start stop to start operation
Pausing the operation
- Touch the start stop field or open the appliance door. The operation is suspended and the start stop LED flashes.
- Close the appliance door.
- Touch the start stop field. The operation is continued and the start stop LED lights up.
Stopping the appliance from heating
Turn the function selector to the "Off" position.
The appliance will stop heating and all the settings will be cleared.
Note: The fan may continue to run after the appliance has been paused or stopped.
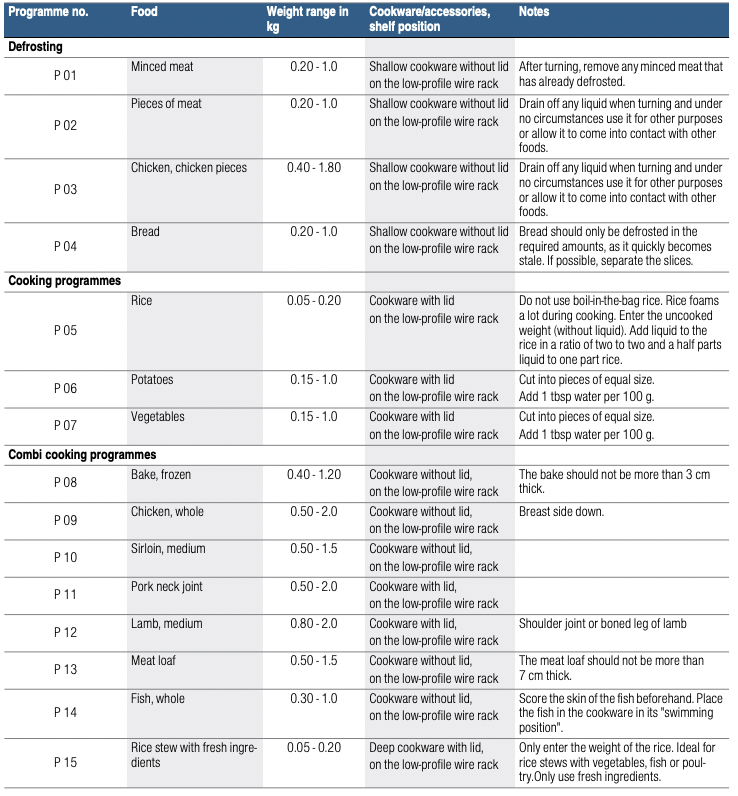
Automatic programmes
You can prepare food really easily using the automatic programmes. You select the programme and enter the weight of your food. The automatic programme then applies the most suitable settings. You can select from 15 programmes.
Notes
- Take the food out of its packaging and weigh it. If it is not possible to enter the exact weight, you should round it up or down.
- Place the food in the cold cooking compartment.
- For the programmes, always use microwaveable, heat-resistant cookware, for example made of glass or ceramic. Observe the accessories tips in the programme table.
- For an optimal cooking result, use food that is in good condition and chilled meat only. For frozen food, use food straight out of the freezer only
Setting a programme
Example in the picture: Programme 3 with a weight of 1 kg.
1. Set the function selector to  automatic programmes. The first programme number and weight suggestion are shown in the display.
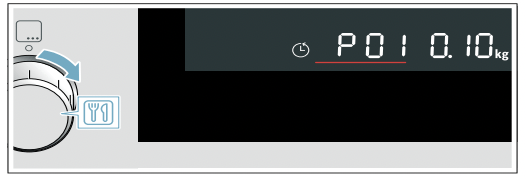
2. Use the rotary selector to select programme number 3.
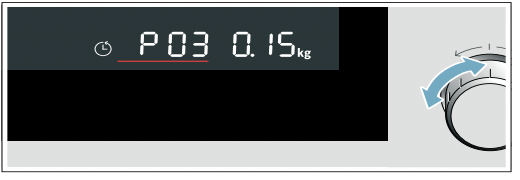
3. Touch kg. The weight setting is highlighted in the display.
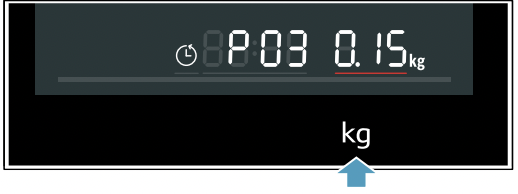
4. Use the rotary selector to set the weight to 1 kg.
The appliance automatically sets the right cooking time for that weight.
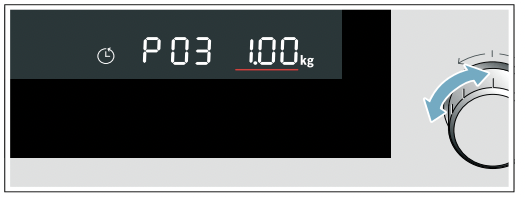
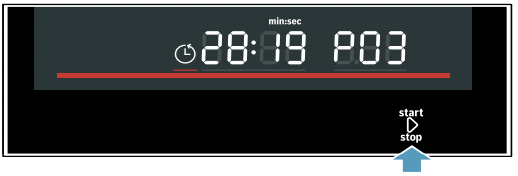
5. Touch start stop. The programme will start. The cooking time visibly counts down and the temperature bar and the start stop LED light up.
Notes
■ Before starting you can use and kg to switch between programmes and weight.
■ Once you have started the programme, the programme number and weight cannot be changed. You can check the set weight by touching kg.
The programme has ended
An audible signal sounds. The programme has finished; the appliance stops heating. Turn the function selector to the off position.
Changing the programme
- Touch the start stop field for approx. four seconds. The programme is reset.
- Select a new programme.
Pausing the operation
- Touch the start stop field or open the appliance door. The operation is suspended and the start l stop LED flashes.
- Close the appliance door.
- Touch the start stop field. The operation is continued and the start stop LED lights up.
Stopping the appliance from heating
Turn the function selector to the "Off" position.
The appliance will stop heating and all the settings will be cleared.
Note: The fan may continue to run after the appliance has been paused or stopped.
Programme table
Setting the time-setting options
Your appliance has various time-setting options. You can use the touch field to call up the menu and switch between the individual functions. The symbols for the available functions light up in the display and the function that you just selected is highlighted.
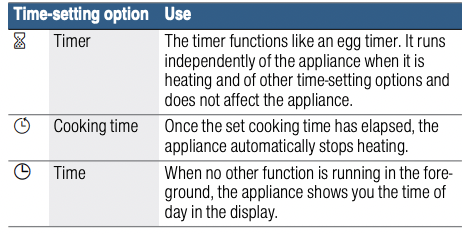
You can only call up the cooking time using the field after setting a type of heating. The timer can be set at any time.
An audible signal sounds once the cooking time or timer duration has elapsed. You can cancel the signal early by touching the field.
Note: You can change how long the audible signal sounds for in the basic settings. "Basic settings" on page 21
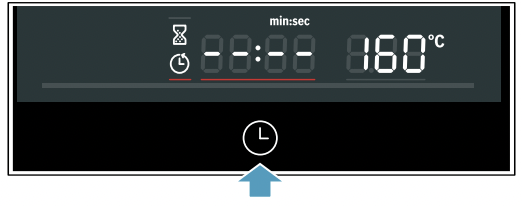
Checking the time settings
If several time-setting options are set, the corresponding symbols light up in the display. The cooking time starts counting down.
To check the timer  , cooking time or time , touch repeatedly until the relevant symbol is highlighted. During operation, only the timer and cooking time are available. In standby, only the timer and time are available. The value for this appears in the display for a few seconds.
Setting the timer
You can use the timer as a kitchen timer. It runs independently of the appliance. The timer has its own audible signal. In this way, you can tell whether it is the timer or a cooking time which has elapsed.
- Touch the field. The symbol and the time symbols light up again.
- Use the rotary selector to set the timer duration. After a few seconds, the time setting is adopted. The timer starts. The symbol lights up in the display and the timer counts down. The other time symbols go out.
The timer duration has elapsed
An audible signal sounds. - - : - - is shown in the display. Touch any field to switch off the timer.
Changing the timer duration
Use the rotary selector to change the timer duration. The change is applied after a few seconds.
Cancelling the timer duration
Use the rotary selector to reset the timer duration to o - - : - - The change is applied after a few seconds. The timer is now switched off.
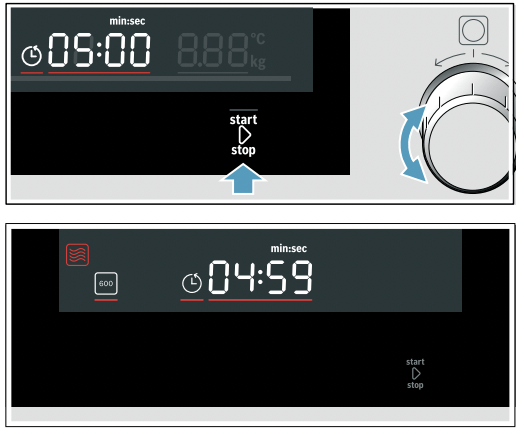
Setting a cooking time
You can set the cooking time for your food on the appliance. Once the cooking time has elapsed, the appliance will automatically switch itself off. The cooking time cannot be accidentally exceeded. Example in the picture: Hot air heating function, cooking time of 45 minutes.
1. Use the function selector to set the heating function. A default value for the temperature is shown on the display.
2. Use the rotary selector to adjust the temperature if necessary.
3. Touch the button twice. - - : - - will be shown on the display and the time symbols will be lit.
4. Use the rotary selector to set a cooking time of 45 minutes.
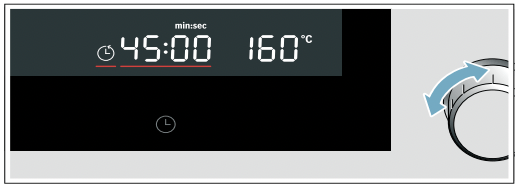
5. Touch the start stop button. The oven will start. The cooking time will count down on the display and the start stop LED will be lit.The other time symbols will go out.
The cooking time has elapsed
An audible signal sounds. The appliance stops heating. - - : - - is shown in the display.
1. Touch the field. The audible signal stops.
2. Turn the function selector to the off position. The appliance is switched off.
Basic settings
There are various settings available to you in order to help use your appliance effectively and simply. You can change these settings as required.
Changing the basic settings
The appliance must be switched off.
1. Touch the button for a few seconds. The first basic setting will appear on the display.
2. Use the rotary selector to change the basic setting.
3. Touch the button. The next basic setting will appear on the display.You can go through all of the basic settings using the button and make changes using the rotary selector.
4. Touch the button for a few seconds. This applies all the settings.
If the appliance is in standby mode, you can change the settings at any time.
Cancelling
If you do not want to save the changes, turn the function selector. The basic settings are ended without being saved.
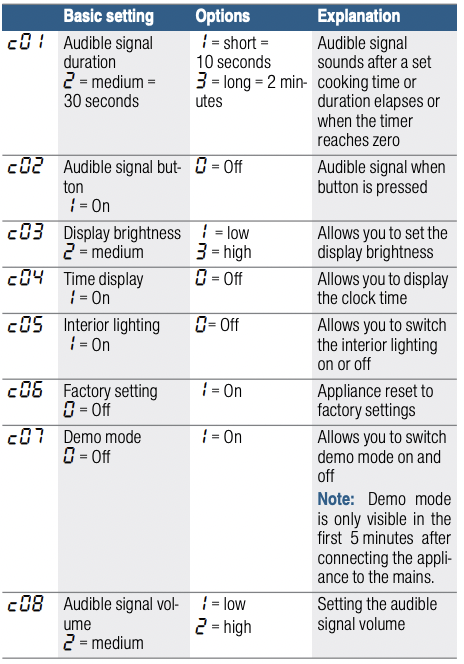
List of basic settings
Depending on the features of your appliance, not all basic settings will be available.
Cleaning
With good care and cleaning, your appliance will retain its appearance and remain fully functioning for a long time to come. We will explain here how you should correctly care for and clean your appliance.
Warning – Risk of burns!
The appliance becomes very hot. Never touch the interior surfaces of the cooking compartment or the heating elements. Always allow the appliance to cool down. Keep children at a safe distance.
Warning – Risk of electric shock!
Do not use any high-pressure cleaners or steam cleaners, which can result in an electric shock.
Warning – Risk of injury!
Scratched glass in the appliance door may develop into a crack. Do not use a glass scraper, sharp or abrasive cleaning aids or detergents.
Note: Unpleasant odours, for example after fish has been prepared, can be removed very easily. Add a few drops of lemon juice to a cup of water. Always place a spoon in the container to prevent delayed boiling. Heat the water for 1 to 2 minutes at maximum microwave output.
Suitable cleaning agents
To ensure that the different surfaces are not damaged by using the wrong cleaning agent, observe the information in the table. Depending on the appliance model, not all of the areas listed may be on/in your appliance.
Caution!
Risk of surface damage
Do not use:
- Harsh or abrasive cleaning agents,
- Cleaning agents with a high alcohol content,
- Hard scouring pads or cleaning sponges,
- High-pressure cleaners or steam cleaners,
- Special cleaners for cleaning the appliance while it is hot.
Wash new sponge cloths thoroughly before use.
Tip: Highly recommended cleaning and care products can be purchased through the after-sales service. Observe the respective manufacturer's instructions.
Microfibre cloth
The microfibre cloth is especially suitable for cleaning easily damaged surfaces, such as glass, glass ceramic, stainless steel or aluminium. It removes liquid and greasy deposits in one go.
Order no. 466 148
Conditioning cloth for stainless steel surfaces
You can treat surfaces with a tested, recommended oilimpregnated conditioning cloth (available from us), which will make the surface more resistant to fingerprints and scratches.
Order no. 311 134
Conditioning oil for modern stainless steel surfaces
This is the same conditioning oil that is used in the cloths, and can be ordered from us in a bottle.
Order no. 311 567
Degreaser
For intensive removal of stubborn grease deposits from surfaces.
Order no. 311 781
Trouble shooting
If a fault occurs, there is often a simple explanation. Before calling the after-sales service, please refer to the fault table and attempt to correct the fault yourself.
Warning – Risk of electric shock! Incorrect repairs are dangerous. Repairs may only be carried out and damaged power cables replaced by one of our trained after-sales technicians. If the appliance is defective, unplug the appliance from the mains or switch off the circuit breaker in the fuse box. Contact the after-sales service.
You can take remedial action yourself for some error messages.
Troubleshooting