
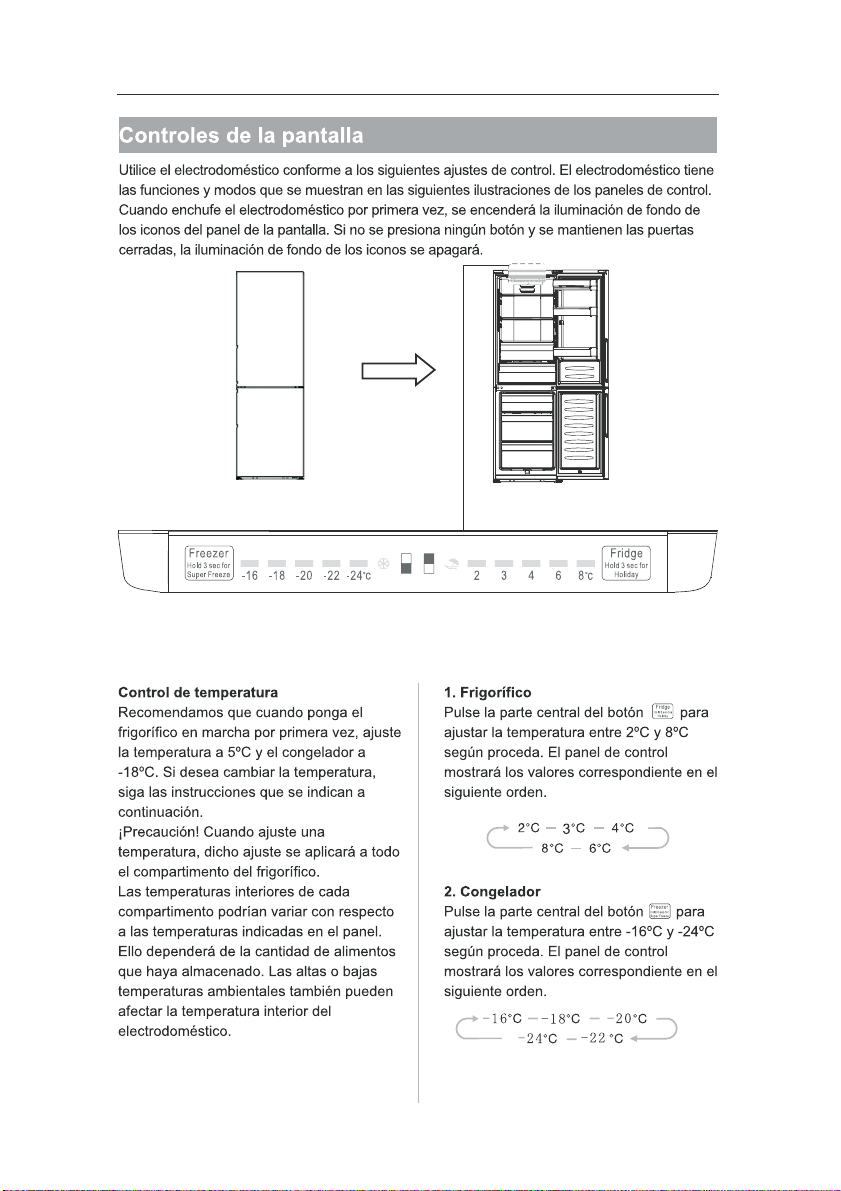
13
14
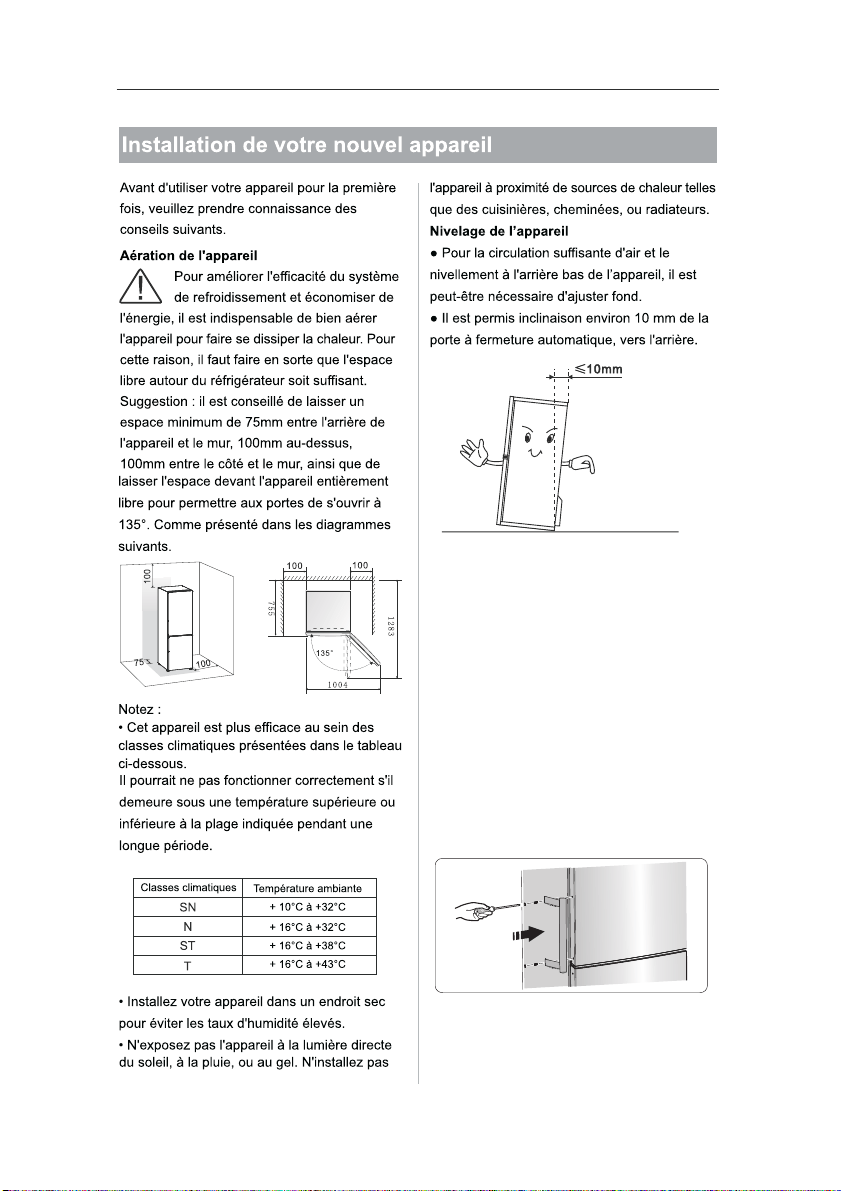
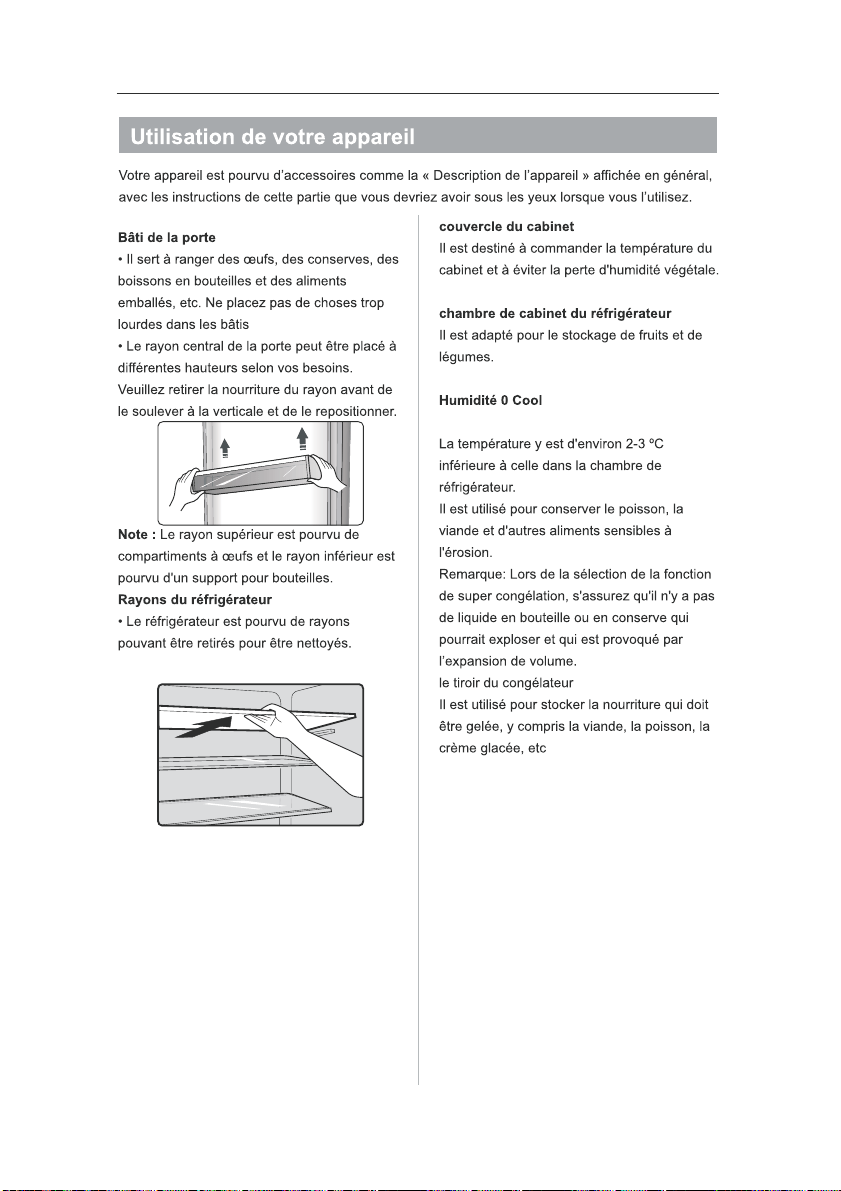
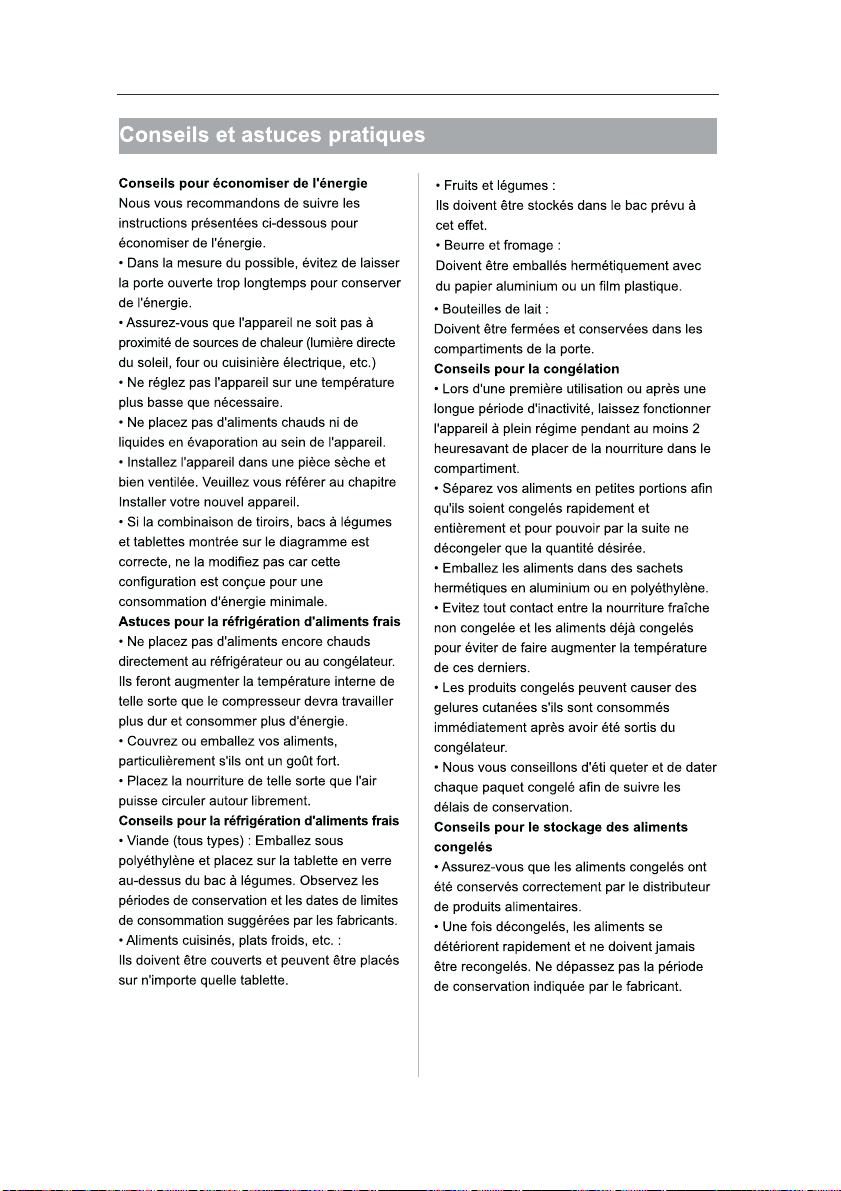
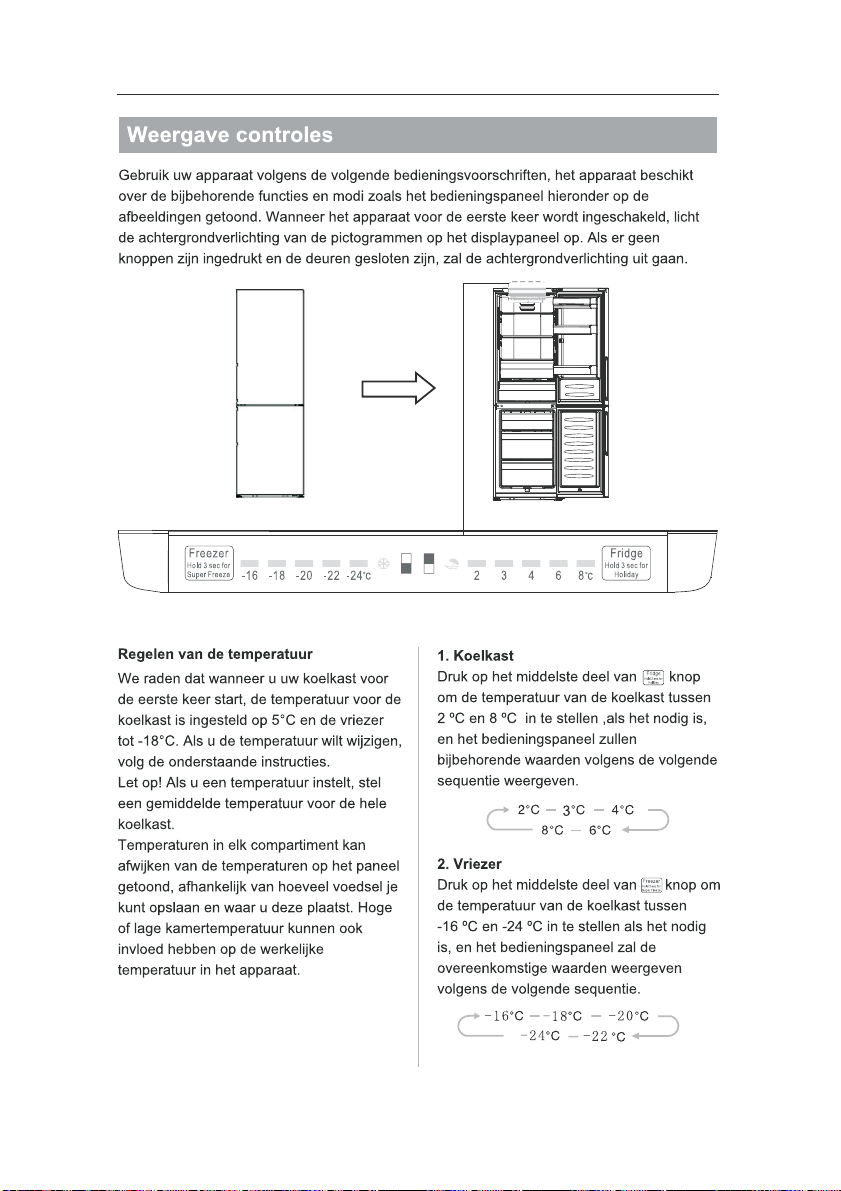
8
2
16
17
18
19
20


9
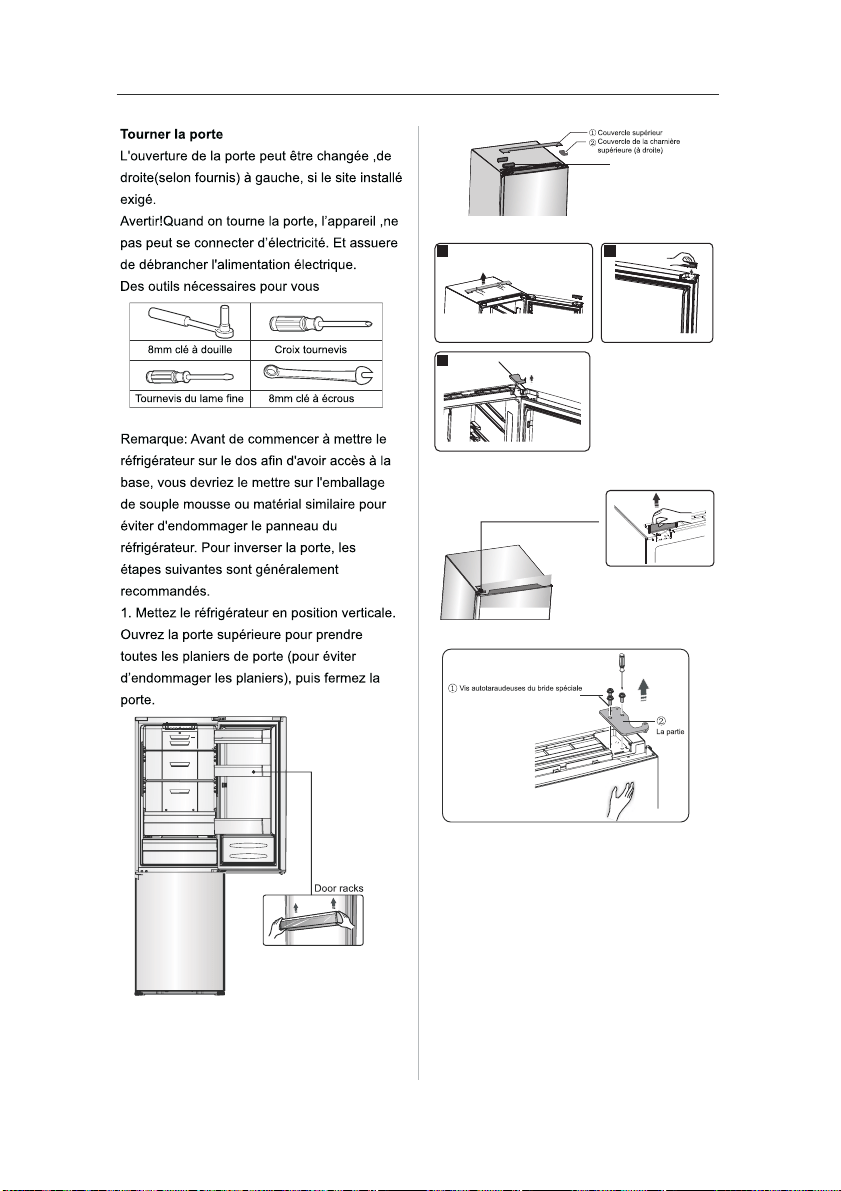
Instalación de las manijas de la
puerta
Las manijas de la puerta están
separadas en una bolsa de plástico
para una transportación cómoda.
Puede instalar las manijas de la
siguiente manera.
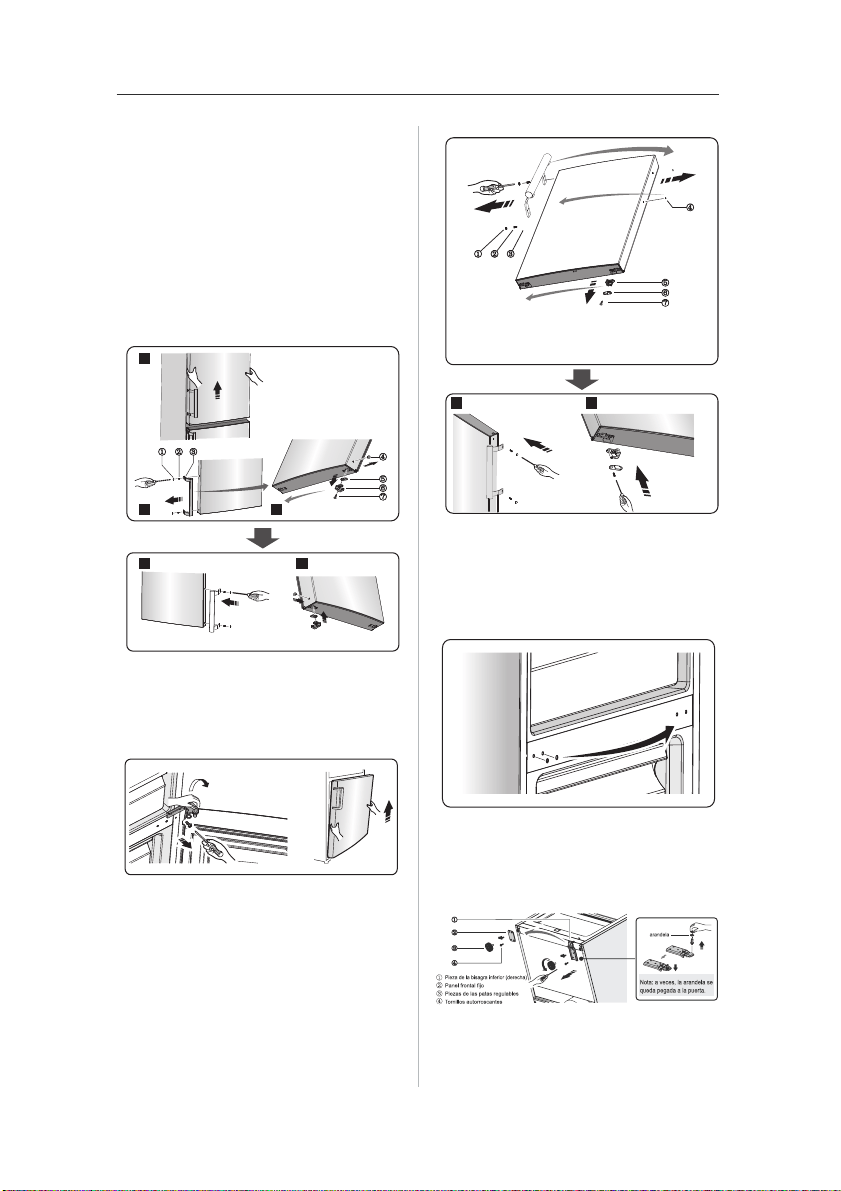
1. Quitar el cobertor de los tornillos
del lado izquierdo de la puerta y luego
colocarlos en la bolsa de plástico.
2. Hacer coincidir la manija en el lado
izquierdo de la puerta, mantener los
ejes de los orificios del tornillo en la
manija y la puerta en línea como se
muestra en la imagen.
1 0
3. Fijar la manija con los tornillos
especiales que vienen en la bolsa de
plástico. Luego, instalar los
cobertores de la manija.
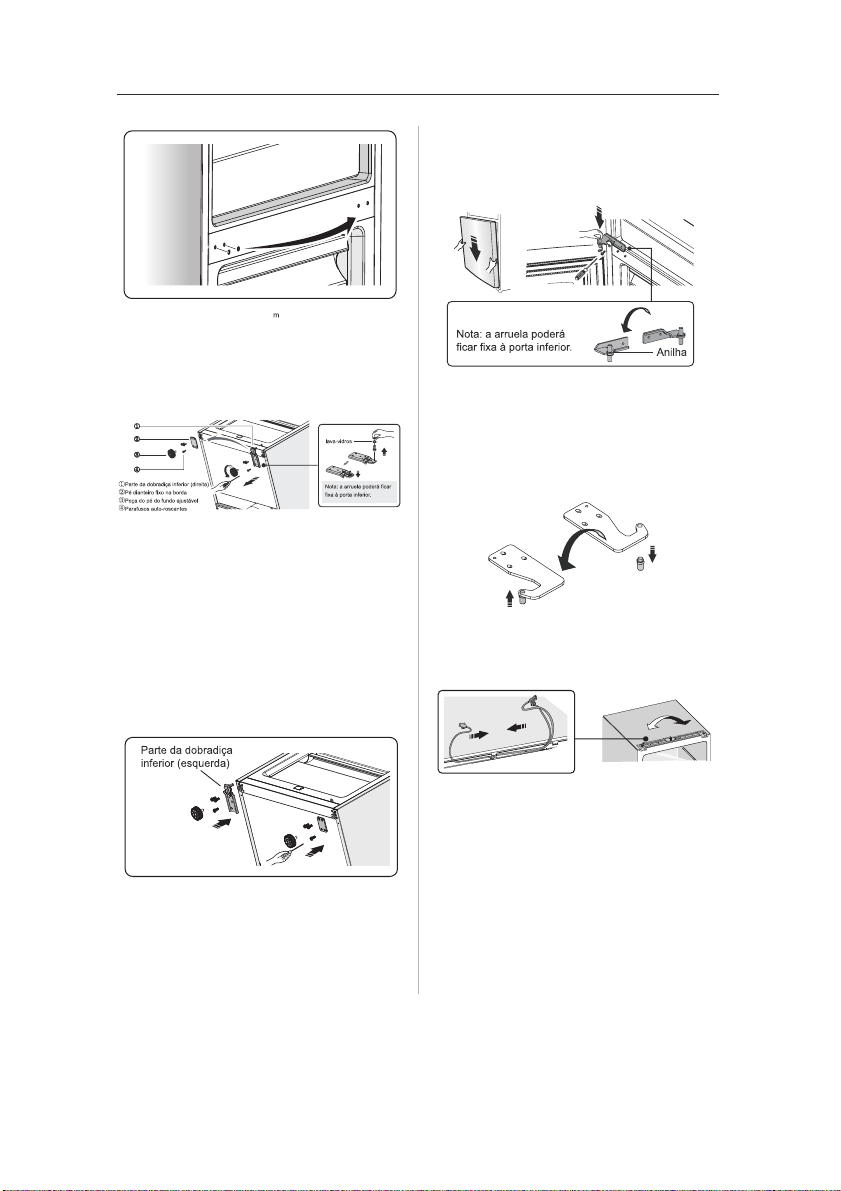
2. Abrir la parte ①
en la parte superior
del refrigerador del lado derecho y
luego retirar la parte ② y ③.
3. Quitar el cobertor de la esquina.
4. Quitar los tornillos ① y quitar la
parte ②
.
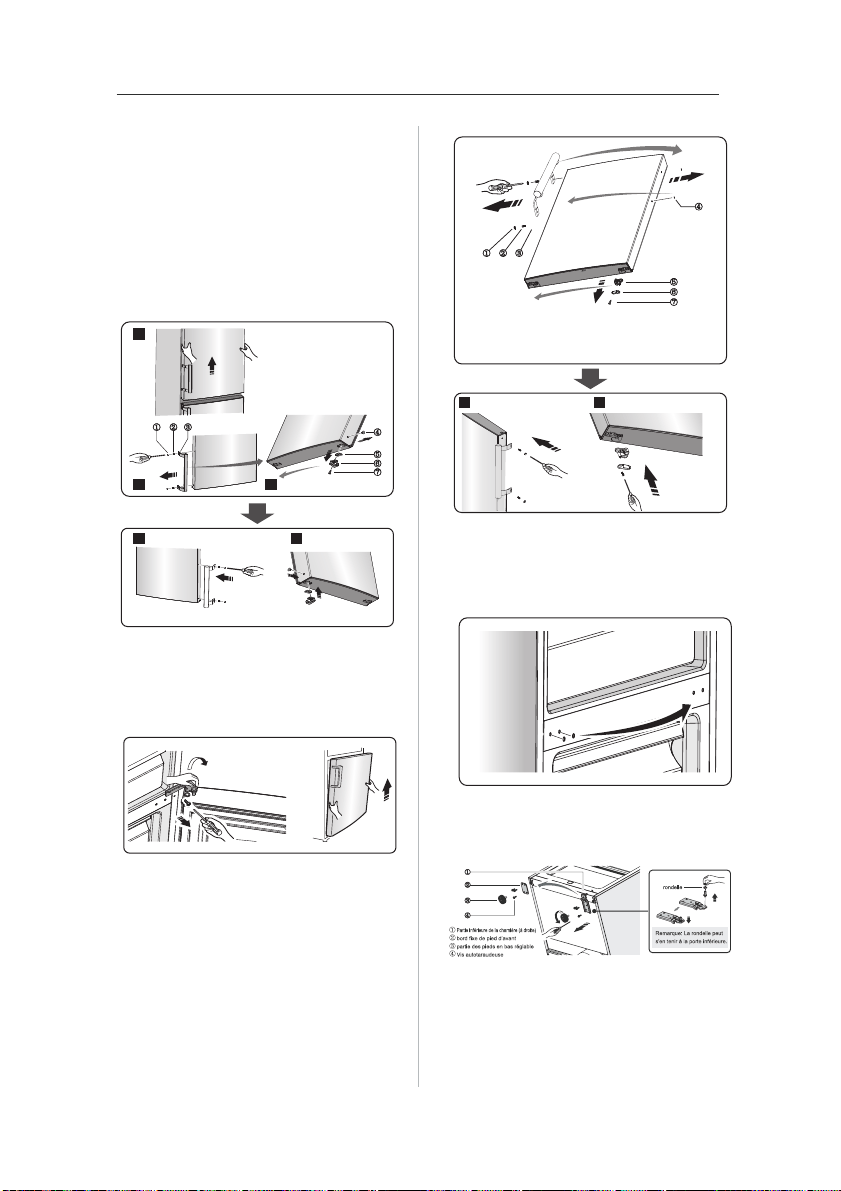
Nota: Sostener la puerta superior con
la mano durante el paso 4 para evitar
que la puerta se caiga.
5. Quitar la puerta superior y colocarla
en una superficie suave con los
paneles hacia arriba. Quitar la parte
① y ④. Luego aflojar los tornillos ②
como se muestra en la imagen.
1 2
3
Caja de conexión magnética
③
1 1
Cambiar la manija ③
al lado derecho.
Luego instalar los tornillos ②, la parte
①
y ④
sucesivamente. Aflojar los
tornillos ⑦, separar la parte ⑥
y ⑤.
Luego instalar la parte ⑤ y la otra
parte ⑥
(en la bolsa de plástico) al
lado izquierdo con los tornillos ⑦.
Colocar la parte ⑥ recién separada
en la bolsa de plástico.
②
Tornillos autorroscantes especiales
③ Manija
① Cubiertas de la manija
④
Cubiertas del orificio del tornillo
⑤ Soporte de la puerta
⑥ Bloque de tope
⑦ Tornillos autorroscantes
1 2
1
2 3
6. Aflojar los tornillos utilizados para
fijar la bisagra del medio y quitar la
bisagra. Luego, quitar la puerta
inferior.
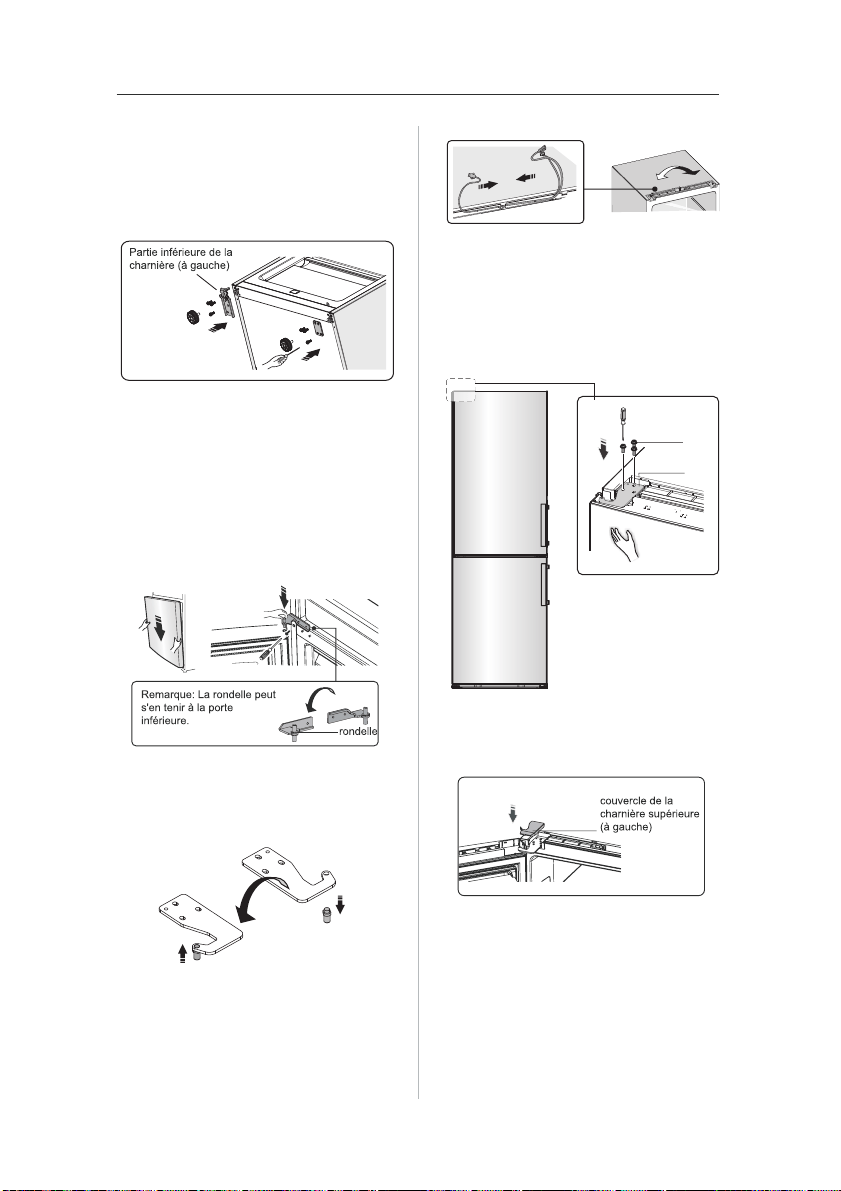
7. Colocar la puerta inferior en una
superficie suave con los paneles
hacia arriba. Cambiar las manijas al
lado derecho según el paso 5. Aflojar
los tornillos ⑦, separar la parte ⑥ y
⑤. Girar la parte ⑤ a 180º y luego
instalar la parte ⑤ y ⑥ a su posición
correspondiente en el lado izquierdo
junto con los tornillos ⑦
.
8. Cambiar el cobertor del orificio del
tornillo en la placa de la cubierta
media desde la izquierda a la
derecha (como se muestra en la
siguiente imagen).
②
Tornillos autorroscantes especiales
③ Manija
① Cubiertas de la manija
④ Cubiertas del orificio del tornillo
⑤ Soporte de la puerta
⑥ Bloque de tope
⑦ Tornillos autorroscantes
1
2
9. Colocar el refrigerador en sentido
plano, quitar la parte ③ y luego
aflojar los tornillos ④. Quitar la parte
② y la parte ①.
10. Desatornillar la bisagra inferior,
cambiar al orificio más cercano y
luego atornillar y colocar la arandela.
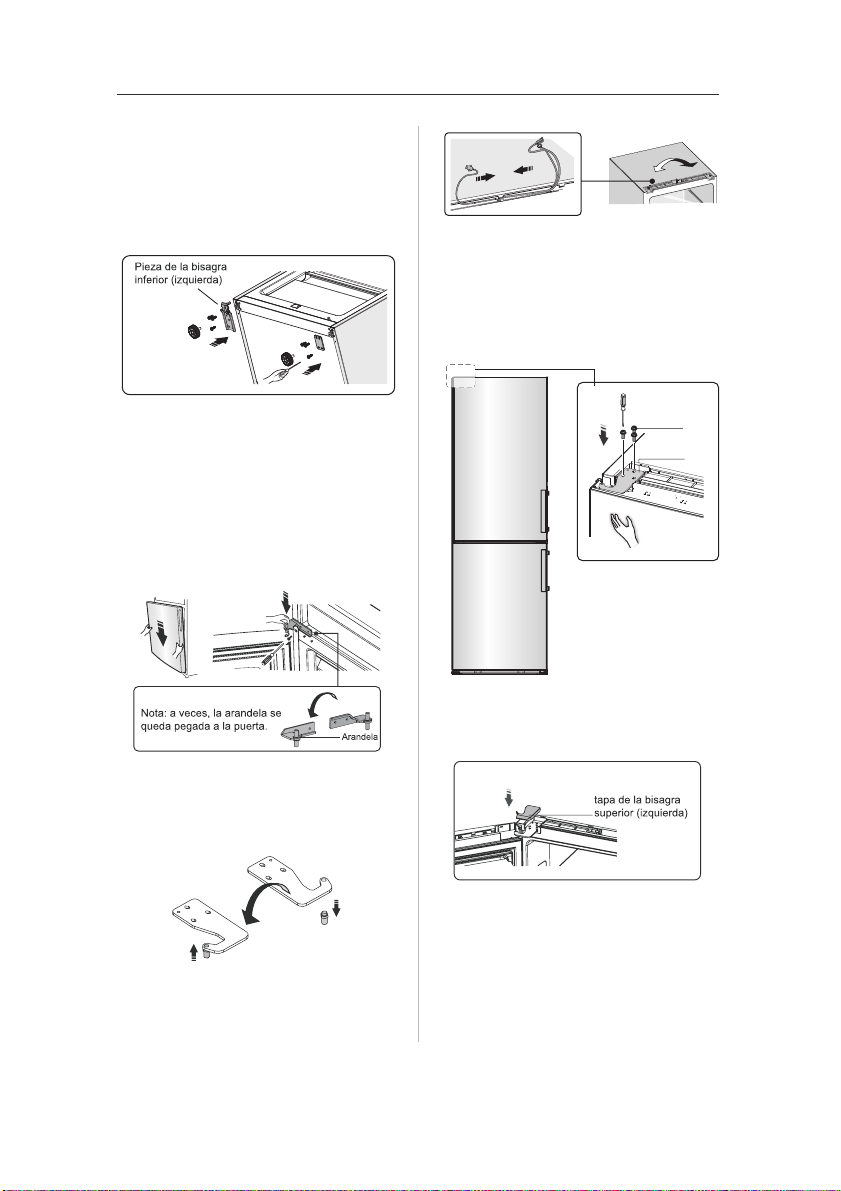
1 2
11. Volver al paso 9, cambiar la
parte ① hacia la izquierda y la parte
② hacia la derecha y luego ajustar
con los tornillos ④. Por último,
instalar la parte ③
.
12. Mover la puerta inferior y
ajustarla en una posición alineada
con el orificio inferior y al eje de la
bisagra superior. Girar la bisagra del
medio a 180º, cambiar la arandela
en el eje del lado superior, ajustar la
bisagra del medio a una posición
adecuada y luego instalarla.
13. Desenroscar el eje de la bisagra
superior, dar vuelta la bisagra
superior y ajustar los ejes. Luego,
colocarlo a un lado para su uso.
14. Cambiar los cables en el lado
izquierdo y derecho de la ranura del
refrigerador.
15. Mover la puerta superior a una
posición adecuada, ajustar la parte
① y la puerta superior. Luego fijar la
parte ① con los tornillos ②
.
(Sostener la puerta con la mano
mientras se instala)
①
②
16. Instalar la parte del cobertor de la
bisagra superior (la cual está en la
bolsa de plástico).
17. Revertir la parte ① e instalarla en
el rincón derecho de la puerta
superior.
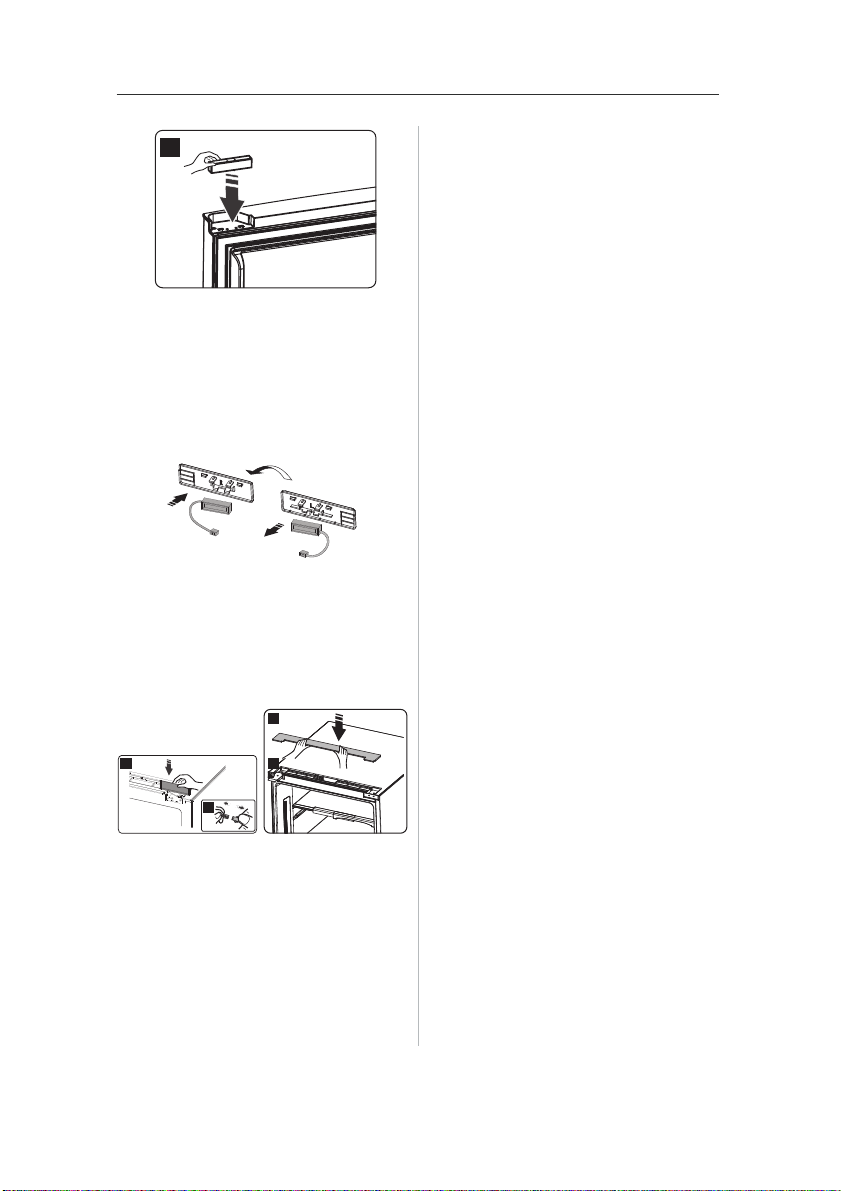
1 3
1
18. Sacar el interruptor de láminas del
bloque (parte ③, 6 en paso 3) y
colocarlo en otro bloque para su uso
(el cual está marcado con una "R" en
la bolsa de plástico). Colocar el bloque
que recién se extrajo en la bolsa de
plástico.
1 1
3
2
Nota:
Asegurar que la cara del interruptor
de láminas encaje bien en el bloque.
19. Instalar la parte ①, conectar el
conector de cables ② y luego instalar
la parte
③.
20. Abrir la puerta superior, colocar
los estantes de la puerta y luego
cerrarla.
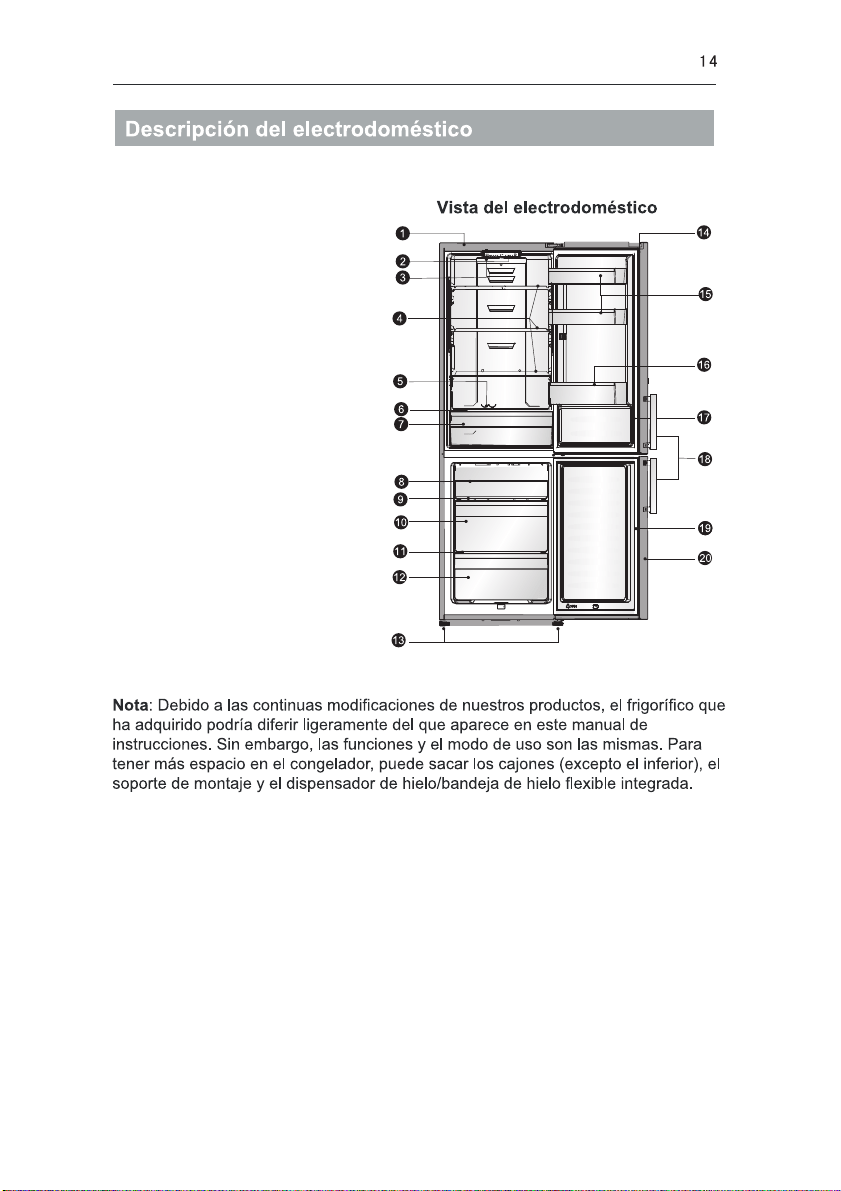
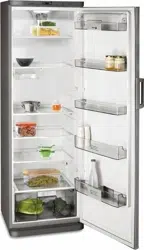
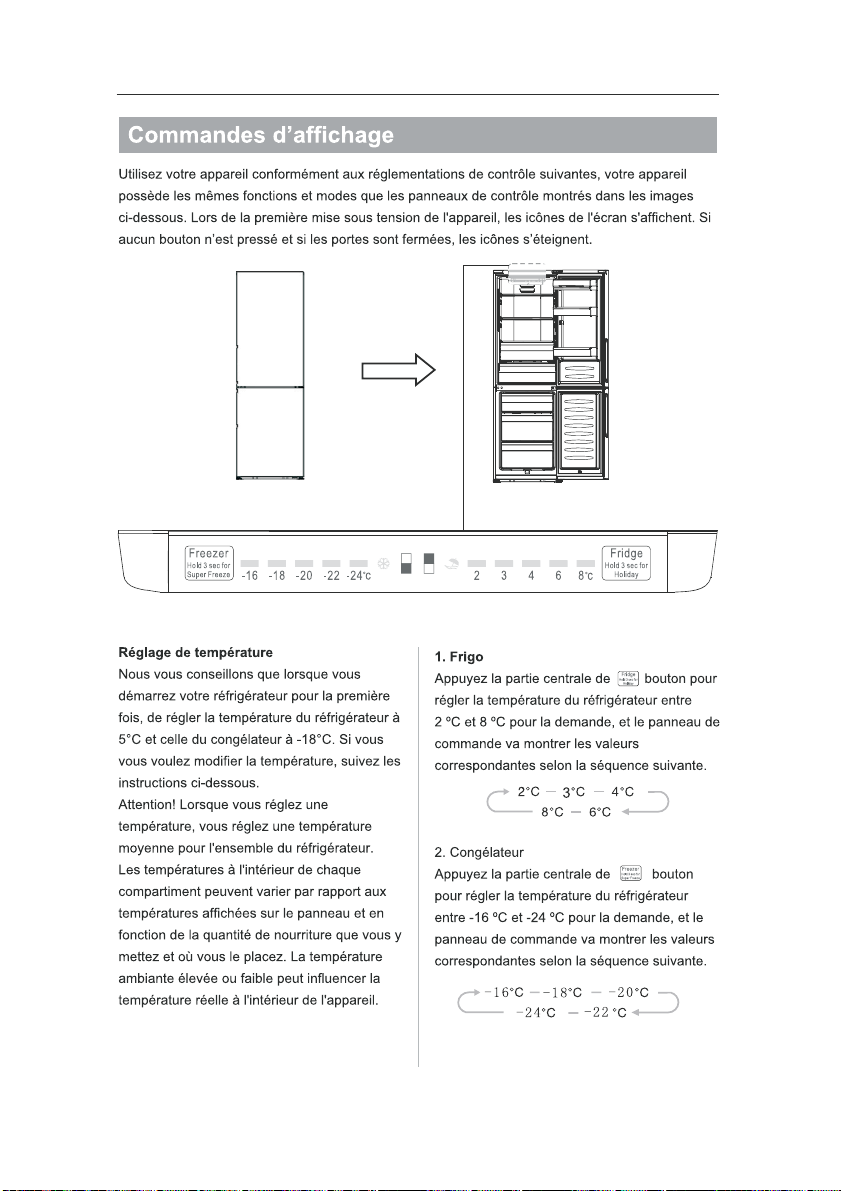
1. Gabinete
2. Parte de la placa de la pantalla
3. Luz LED
4. Estante de vidrio
5. Estante de plástico
6. Cubierta del cajón
7. Cajón de frutas y verduras
8. Cajón superior del congelador
9. Estante de vidrio superior del
congelador
10. Cajón del medio del congelador
(caja grande)
11. Estante medio de vidrio del
congelador
12. Cajón inferior del congelador
13. Patas inferiores ajustables
14. Puerta de la heladera
15. Puerta del estante medio de la
heladera
16. Puerta del estante inferior de la
heladera
17. Sello de la puerta de la heladera
18. Manijas
19. Sello de la puerta del congelador
20. Puerta del congelador
1
5

16
17
18
19
20
21
2
2
1
6
17
1
8
1
9
2
0
13
1
4
8
2
6
7
8
Instalação das maçanetas de porta
Para a conveniência de transporte,
as maçanetas de porta são
fornecidas separadamente num saco
plástico, você pode instalar as
maçanetas de porta como se segue.
1. Coloque as coberturas de
parafuso no lado esquerdo da porta,
e em seguida, coloque-as d para o
saco plástico.
2. Combine a maçaneta no lado
esquerdo da porta, mantendo eixos
dos orifícios de parafusos na
maçaneta e a porta em uma linha,
como mostrada na imagem.
9
3. Fixe a maçaneta com os parafusos
especiais oferecidos no saco plástico.
E em seguida, instale as capas da
maçaneta.
2. Abra a parte ① na parte superior
da geladeira do lado direito e
depois retire a parte ②
e a parte ③.
3. Tire a tampa de canto.
4. Retire os parafusos ① e remova
a parte ②.
Prateleiras
da porta
1 2
3
Caixa de interruptor
magnético
③
Tampa superior
①
1 0
Nota: Por favor, mantenha a porta
superior com a mão durante a etapa 4
para evitar a queda da porta.
5. Retire a porta superior e coloque-a
numa superfície lisa com o seu painel
para cima. Levante a parte ④ e a
parte① e solte os parafusos ② como
mostrado na imagem. Mude a
maçaneta ③
para o lado direito, em
seguida, instale os parafusos ②, a
parte ① e a parte ④ por sua vez. Solte
os parafusos ⑦, retire a parte ⑥ e a
parte ⑤ em seguida, instale a parte ⑤
e a outra parte ⑥ (no saco plástico)
para o lado esquerdo com parafusos
⑦. Coloque a parte ⑥ retirada ao saco
de plástico.
②
Parafusos especiais autoenroscantes
③ Maçaneta
① Tampas de maçaneta
④
Tampas do buraco de parafuso
⑤ Suporte da porta
⑥ Bloco de parada
⑦ Parafuso auto-enroscante
1 2
1
2 3
6. Solte os parafusos usados para fixar a
dobradiça do meio e retire a dobradiça do
meio. Em seguida, retire a porta inferior.
7. Coloque a porta inferior numa superfície
lisa com o seu painel para cima. Altere a
maçaneta para o lado direito de acordo
com o passo 5. Solte os parafusos ⑦
,
retire a parte
⑥
e a parte
⑤
. Vire a parte
⑤ por 180°e, em seguida, instale a parte
⑤ e a parte
⑥para posições
correspondentes no lado esquerdo
juntamente com os parafusos ⑦.
②
Parafusos especiais autoenroscantes
③ Maçaneta
① Tampas de maçaneta
④ Tampas do buraco de parafuso
⑤ Suporte da porta
⑥ Bloco de parada
⑦
Parafuso auto-enroscante
1
2
8. Mude as tampas dos buracos de
parafuso na chapa de cobertura média da
esquerda para a direita (como mostrado
na figura abaixo).
1 1
9. Coloque a geladeira na superfície
plana, retire a parte ③ e depois solte
parafusos④. Retire a parte ② e a
parte
①.
10. Solte parafusos e retire a
dobradiça inferior, altere-a para o local
perto do buraco, e depois monte
parafusos e arruelas.
11. Volte ao passo 9, mude a parte ①
para a esquerda e a parte ② para a
direita e depois fixe-as com parafusos
④
. Finalmente instale a parte ③.
12. Mova a porta inferior e ajuste a sua
posição para alinhar o local do furo
inferior e o eixo da dobradiça superior.
Vire a dobradiça do meio por 180°,
altere a arruela no eixo para o lado
superior, ajuste a dobradiça do meio
para a posição adequada e, em
seguida, instale-a.
13. Solte parafusos e retire o eixo da
dobradiça superior, vire a dobradiça
superior e fixe o eixo nela. Em
seguida, coloque-a ao lado para uso
seguinte.
14. Troque os fios nas ranhuras
esquerda e direita da geladeira.
15. Mova a porta superior para a
posição adequada, ajuste a parte ①
e a porta superior, em seguida, fixe
a parte ①
com parafusos ②. (Por
favor, mantenha a porta superior
com a mão durante a instalação)

1 2
16. Instale a parte da tampa da
dobradiça superior (que está no saco
de plástico).
17. Reverta a parte ① e instale-a no
canto direito da porta superior.
1
1
1
18. Retire o interruptor de lâminas
fora do bloco de resposta (parte ③ 6
no passo 3) e monte-o em outro
bloco para uso (que está com a
marca "R" no saco plástico). Coloque
o bloco de resposta removido de
volta para o saco plástico.
Nota:
Certifique-se de que o lado do
interruptor de lâminas se encaixa
bem no bloco.
19. Instale a parte ①, conecte o
conector de fio②, e, em seguida,
instale a parte ③
.
20. Abra a porta superior, monte as
prateleiras da porta e feche a porta.
1. Armário
2. Parte do painel de visualização
3. Luz LED
4. Prateleira de vidro
5. Prateleira de plástico
6. Cobertura do compartimento refrescante
7.Compartimento refrescante para frutas e
vegetais
8. Gaveta superior do congelador
9. Prateleira de vidro do congelador superior
10. Gaveta do meio do congelador (caixa
grande)
11. Prateleira de vidro do congelador do
meio
12. Gaveta inferior do congelador
13. Pés inferiores reguláveis
14. Porta do frigorífico
15. Prateleira da porta do frigorífico do meio
16. Prateleira da porta do frigorífico inferior
17. Vedação da porta do frigorífico
18. Maçanetas
19. Vedação da porta do congelador
20. Porta do congelador
1
4
15
16
17
18
19
20
2
1
Contents
2
Safety for children and others
who are vulnerable people
For your safety and correct
usage, before installing and
first using the appliance,
read this user manual
carefully, including its hints
and warnings. To avoid
unnecessary mistakes and
accidents, it is important to
make sure that all people
using the appliance are
thoroughly familiar with its
operation and safety
features. Save these
instructions and be sure that
they remain with the
appliance if it is moved or
sold
For the safety of life and
property, keep the
precautions of these user's
,
throughout its life, will be
properly informed on its
usage and safety notices.
so that anyone using it,
This appliance is in accordance with the following EU guidelines:
and 2004/108/EC and 2009/125/EC and EC.643/2009 and 2002/96/EC
2006/95/EC
instructions as the
manufacturer is not
responsible for damages
caused by omission.
This appliance can be used
by children aged from 8
years and above and
persons with reduced
physical, sensory or mental
capabilities or lack of
experience and knowledge
if they have been given
supervision or instruction
concerning use of the
appliance in a safe way and
understand the hazards
involved. Children shall not
play with the appliance.
Cleaning and user
maintenance shall not be
made by children without
supervision.
Keep all packaging away
Safety and warning information_ _ _ _
_ _ _ _ 8
__ _ _ _ 13
_ _ _ _ _ _ _ _ _ _
_ _ _ _ _ _ _ _
2
Installing your new appliance
Description of the appliance
Display controls 14
Using your appliance 16
Helpful hints and tips
Cleaning and care 18
Troubleshooting
Disposal of the appliance
_ _ _ _ _ _ _ _ 17
__ _ _ _ _ _ _ _ _
_ _ _ _ _ _ _ _ _ _ _19
_ _ _ _ _ _20

3
from children as there is
risk of suffocation.
If you are discarding the
appliance, pull the plug out
of the socket, cut the
connection cable (as close
to the appliance as you
can) and remove the door
to prevent children playing
from suffering an electric
shock or from closing
themselves inside it.
If this appliance, featuring a
magnetic door seals, is to
replace an older appliance
having a spring lock (latch)
on the door or lid, be sure
to make the spring lock
unusable before you
discard the old appliance.
This will prevent it from
becoming a death trap for a
child.
General safety
This
appliance is intended
WARNING —
to be used in
and similar applications
such as
household
-staff kitchen areas in
shops, offices and other
working environments;
-farm houses and by
clients in hotels, motels
and other residential type
environments;
-bed and breakfast type
environments;
-catering and similar non-
retail applications
WARNING — Do not
store explosive
substances such as
aerosol cans with a
flammable propellant in
this appliance.
WARNING — If the
supply cord is damaged,
it must be replaced by the
manufacturer, its service
agent or similarly
qualified persons in order
to avoid a hazard.
WARNING — Keep
ventilation openings, in
the appliance enclosure
or in the built-in
structure, clear of
obstruction.
WARNING — Do not use
mechanical devices or
other means to
accelerate the defrosting
process, other than those
recommended by the
manufacturer.
WARNING — Do not
damage the refrigerant
circuit.
WARNING — Do not use
electrical appliances
inside the food storage
compartments of the
appliance, unless they
are of the type
recommended by the
manufacturer.
1.
be lengthened.
2. Make sure that the power
plug is not or
damaged. A or
damaged power plug may
overheat and cause a fire.
3. Make sure that you can
plug of the
appliance.
4. Do not pull the main cable.
5. If the power plug socket is
loose, do not insert the
power plug. There is a risk of
electric shock or fire.
6.You must not operate the
appliance without the interior
lighting lamp cover.
7.The fridge is only applied
with power supply of single
phase alternating current of
220~240V/50Hz. If
fluctuation of voltage in the
district of user is so large that
the voltage exceeds the
above scope, for safety sake,
be sure to apply A.C.
The power cord must not
crushed
crushed
access the main
Electrical safety
specifications or modify
this product in any way.
Any damage to the cord
may cause a shortcircuit,
fire, and/or electric shock.
WARNING — The
refrigerant and insulation
blowing gas are
flammable. When
disposing of the
appliance, do so only at
an authorized waste
disposal centre. Do not
expose to flame.
WARNING — Fill with
potable water only.
The refrigerant isobutene
(R600a) is contained within
the refrigerant circuit of the
appliance, a natural gas
with a high level of
environmental
compatibility, which is
nevertheless flammable.
During transportation and
installation of the
appliance, ensure that
none of the components of
the refrigerant circuit
becomes damaged.
The refrigerant (R600a) is
flammable.
Refrigerant
If the refrigerant circuit
should be damaged:
-Avoid opening flames and
sources of ignition.
-Thoroughly ventilate the
room in which the
appliance is situated.
It is dangerous to alter the
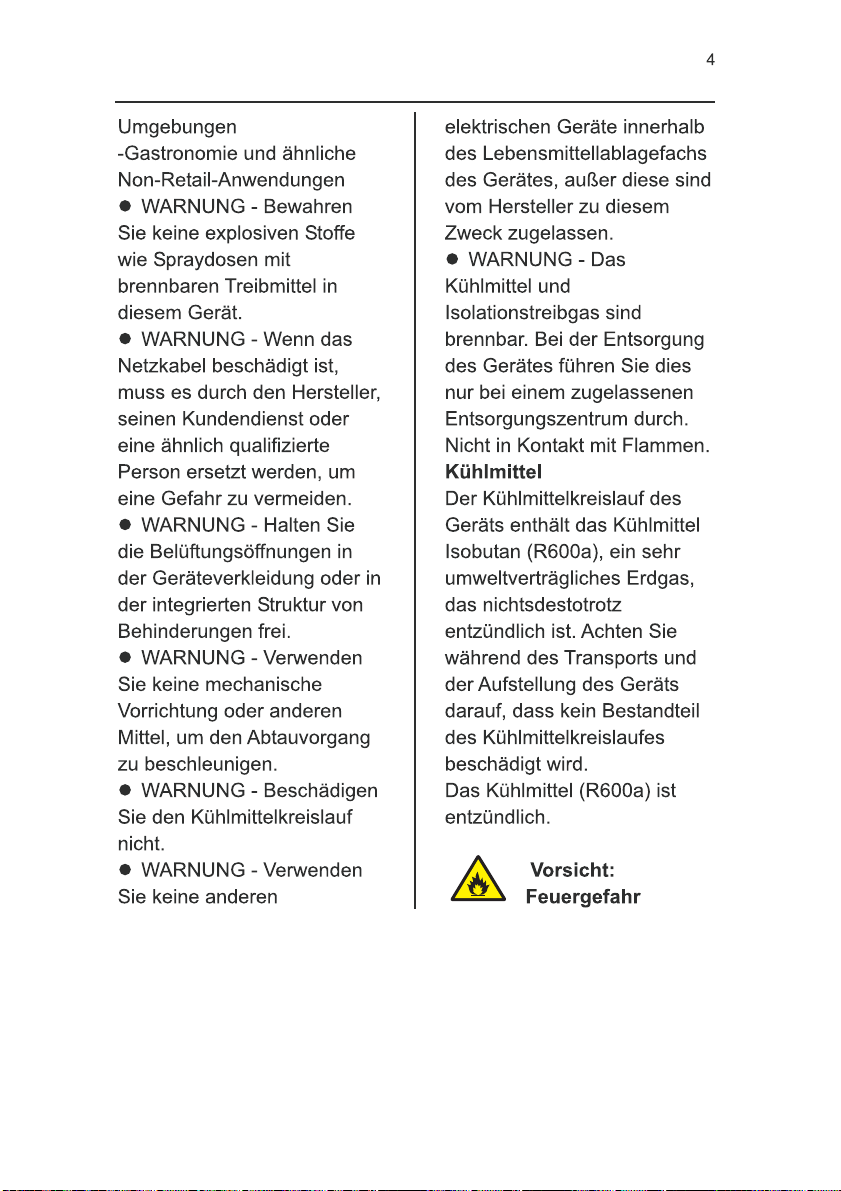
Caution:risk of fire
4

manufactures storage
recommendations should
be strictly adhered
to.Refer to relrelevant
instructions for
Do not place carbonated
e compartment as it
creates pressure on the
container,which may
cause it to
explode,resulting in
damage to the appliance.
Keep buring
candles,lamps and other
items with naked flames
away from the appliance
so that do not set the
appliance on fire.
The appliance is
intended for keeping food
stuff and/or beverages in
normal household as
explained in this
instruction booklet The
appliance is heavy.Care
should be taken when
moving it.
Do not remove nor touch
items from the freezer
compartment if your
hands are damp/wet,as
storage.
or fizzy drinks in the
freez
Frozen food can cause
frost burns if consumed
straight from the freezer
compartment.
Do not place the
appliance in direct
sunlight.
Automatic voltage regulator of
more than 350W to the fridge.
The fridge must employ a
special power socket instead
of common one with other
electric appliances. Its plug
must match the socket with
ground wire.
Do not store flammable
gass or liquids in the
appliance,There is a risk
of an explosion.
Do not operate any
electrical appliances in
the appliance(e.g.electric
ice cream makers,mixers
etc.).
When unplugging always
pull the plug from the
mains socket,do not pull
on the cable.
Do not place hot items
near the plastic
components of this
appliance.
Do not place food
products directly against
the air outlet on the rear
wall.
Store pre-packed frozen
food in accordance with
the frozen food
manufacture’s
instructions.
The appliances
Daily use
5

carefully, follow the
instructions given in this
manual.
Unpack the appliance and
check if there are damages
on it. Do not connect the
appliance if it is damaged.
Report possible damages
immediately to the place
you bought it. In this case
retain packing.
It is advisable to wait at
least four hours before
connecting the appliance to
allow the oil to flow back in
the compressor.
Adequate air circulation
should be around the
appliance, lacking this
leads to overheating. To
achieve sufficient
ventilation, follow the
instructions relevant to
installation.
Wherever possible the back
of the product should not
be too close to a wall to
avoid touching or catching
warm parts (compressor,
condenser) to prevent the
risk of a fire, follow the
instructions relevant to
installation.
The appliance must not be
locate close to radiators or
cookers.
Make sure that the mains
plug is accessible after the
installation of the appliance.
For electrical connection
this could cause skin
abrasions or frost/freezer
burns.
Frozen food must not be
refrozen once it has been
thawed out.
Do not consume ice
popsicles or ice cubes
straight from the freezer
as this can cause freezer
burn to the mouth
and lips.
To avoid items falling and
causing injury or damage
to the appliance, do not
overload the door racks or
put too much food in the
crisper drawers.
Never use the base,
drawers, doors etc. to
stand on or as supports.
Installation Important!
caution!
Care and cleaning
Before maintenance, switch
off the appliance and
disconnect the mains plug
from the mains socket.
Do not clean the appliance
with metal objects, steam
cleaner, ethereal oils,
organic solvents or abrasive
cleansers.
Do not use sharp objects to
remove frost from the
appliance. Use a plastic
scraper.
6

Service
Any electrical work required
This product must be
serviced by an authorized
Service Center, and only
genuine spare parts must be
used.
1)If the appliance is Frost
Free.
2)If the appliance contains
freezer compartment.
to do the servicing of the
appliance should be carried
out by qualified electrician or
competent person.
7
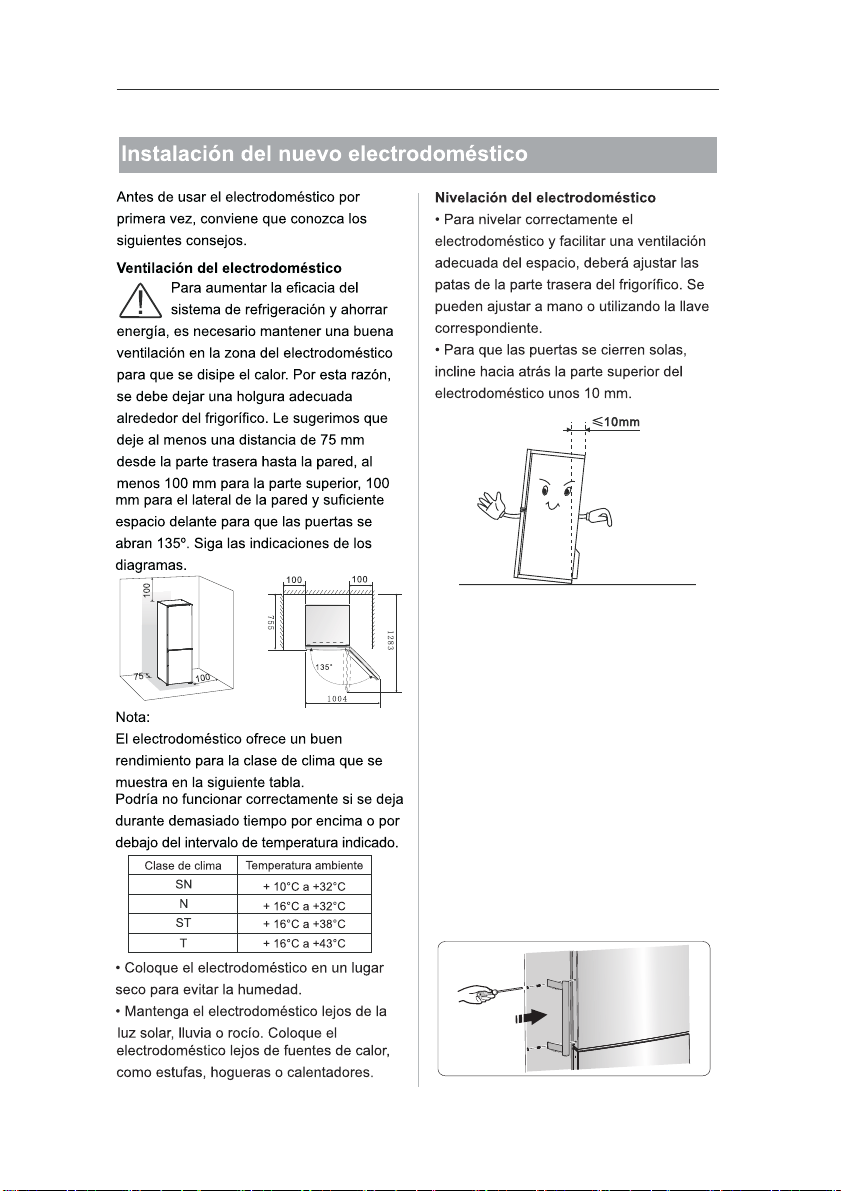
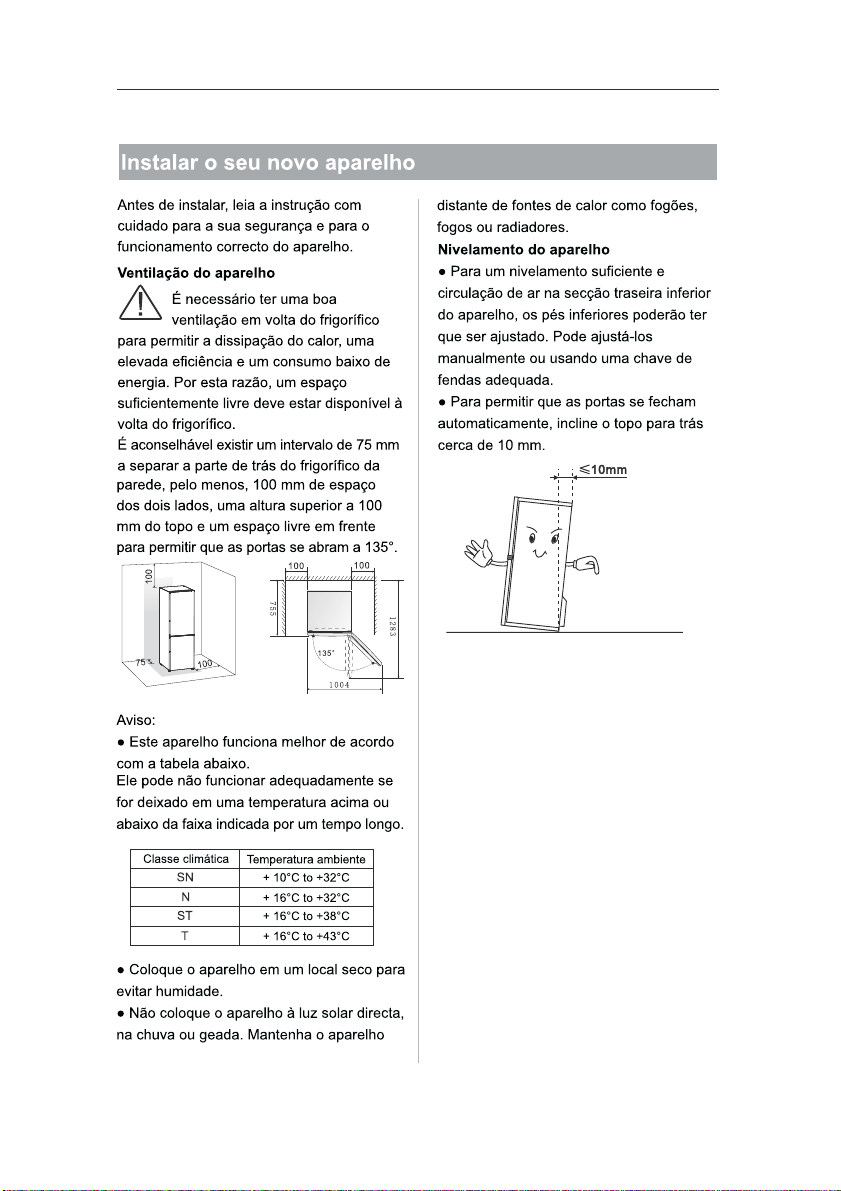
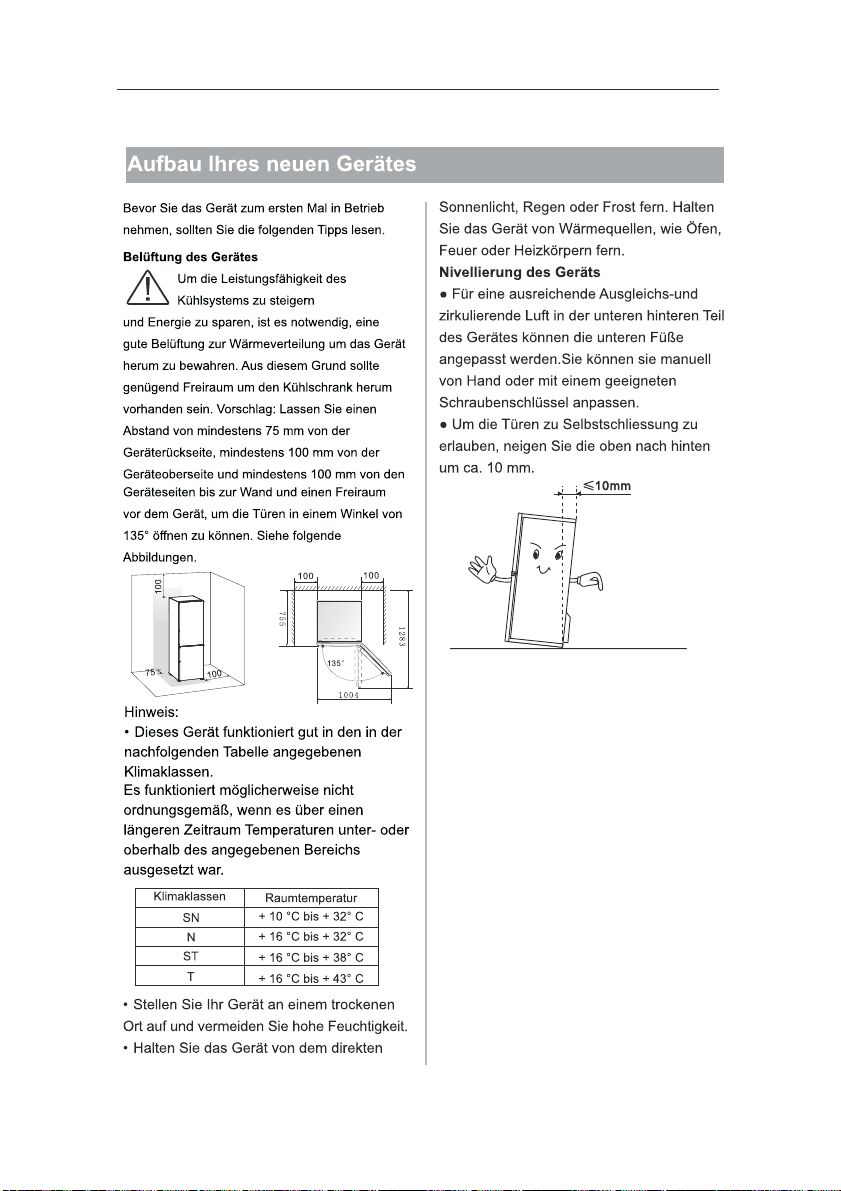
Installing your new appliance
Ventilation of appliance
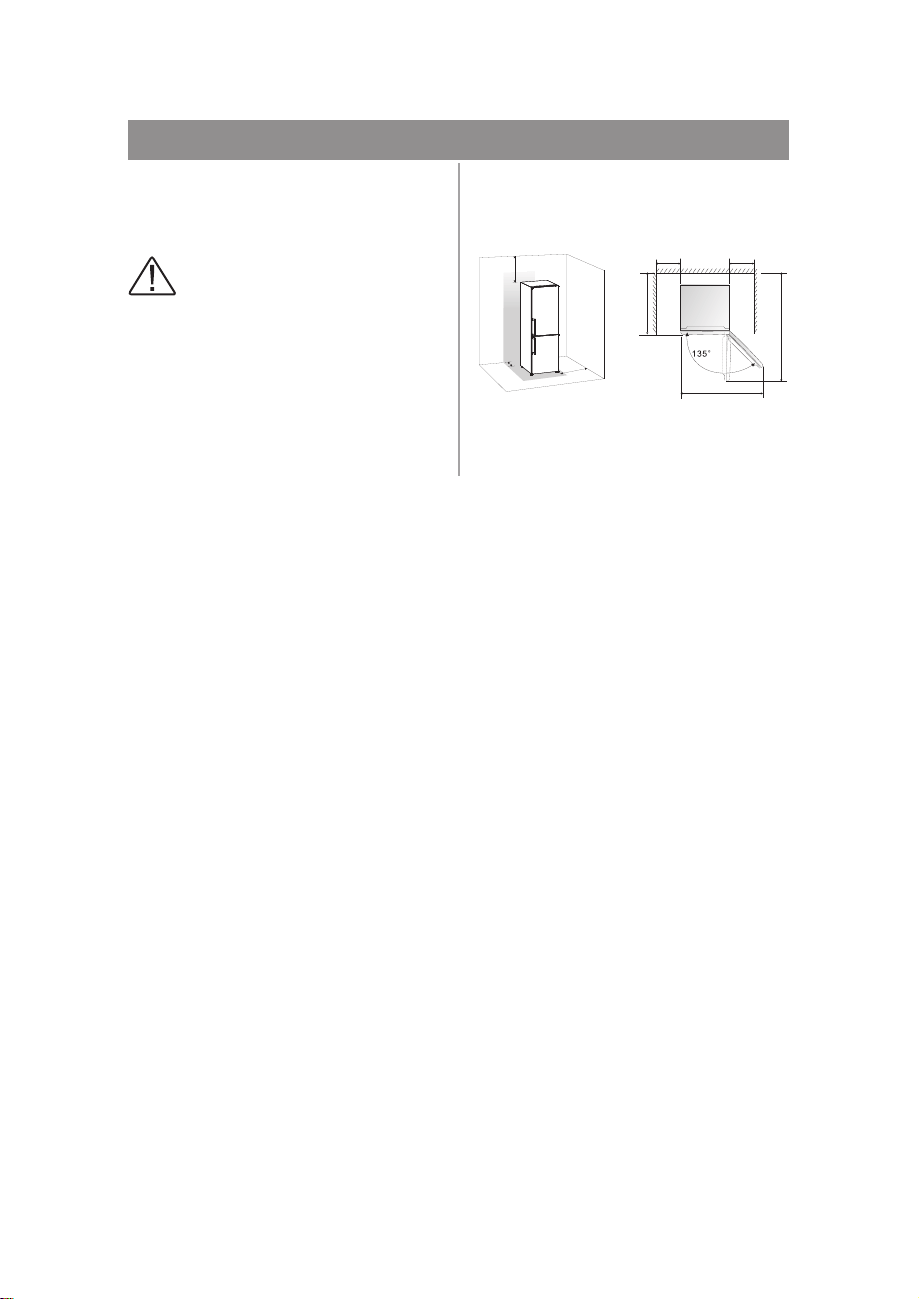
●
Before using the appliance for the first
time, you should be informed of the
following tips.
In order to improve efficiency
of the cooling system and save
energy, it is necessary to maintain
good ventilation around the appliance
for the dissipation of heat. For this
reason, sufficient clear space should
be available around the refrigerator.
Suggest :It is advisable for there to be
at least 75mm of space from the back
to the wall, at least 100mm from its
top,at last 100mm from its side to the
wall and a clear space in front to allow
the doors to open 135°. As shown in
following diagrams.
Note:
This appliance performs well within
the climate class showed in the table
below.
8
100
100
755
1283
1004
75
100
100
9
Climate class
Ambient temperature
SN
N
ST
T
+10°C to +32°C
+16°C to +32°C
+16°C to +38°C
+16°C to +43°C
It may not work properly if being left at
a temperature above or below the
indicated range for a long period.
Stand your appliance in a dry place to
avoid high moisture.
Keep the appliance out of direct
sunlight, rain or frost. Stand the
appliance away from heat sources
such as stoves, fires or heaters.
Leveling of appliance
For sufficient leveling and air
circulating in the lower rear section of
the appliance, the bottom feet may
need to be adjusted. You can adjust
them manually by hand or by using a
suitable spanner.
To allow the doors to self-close, tilt
the top backwards by about 10mm.
●
●
●
●
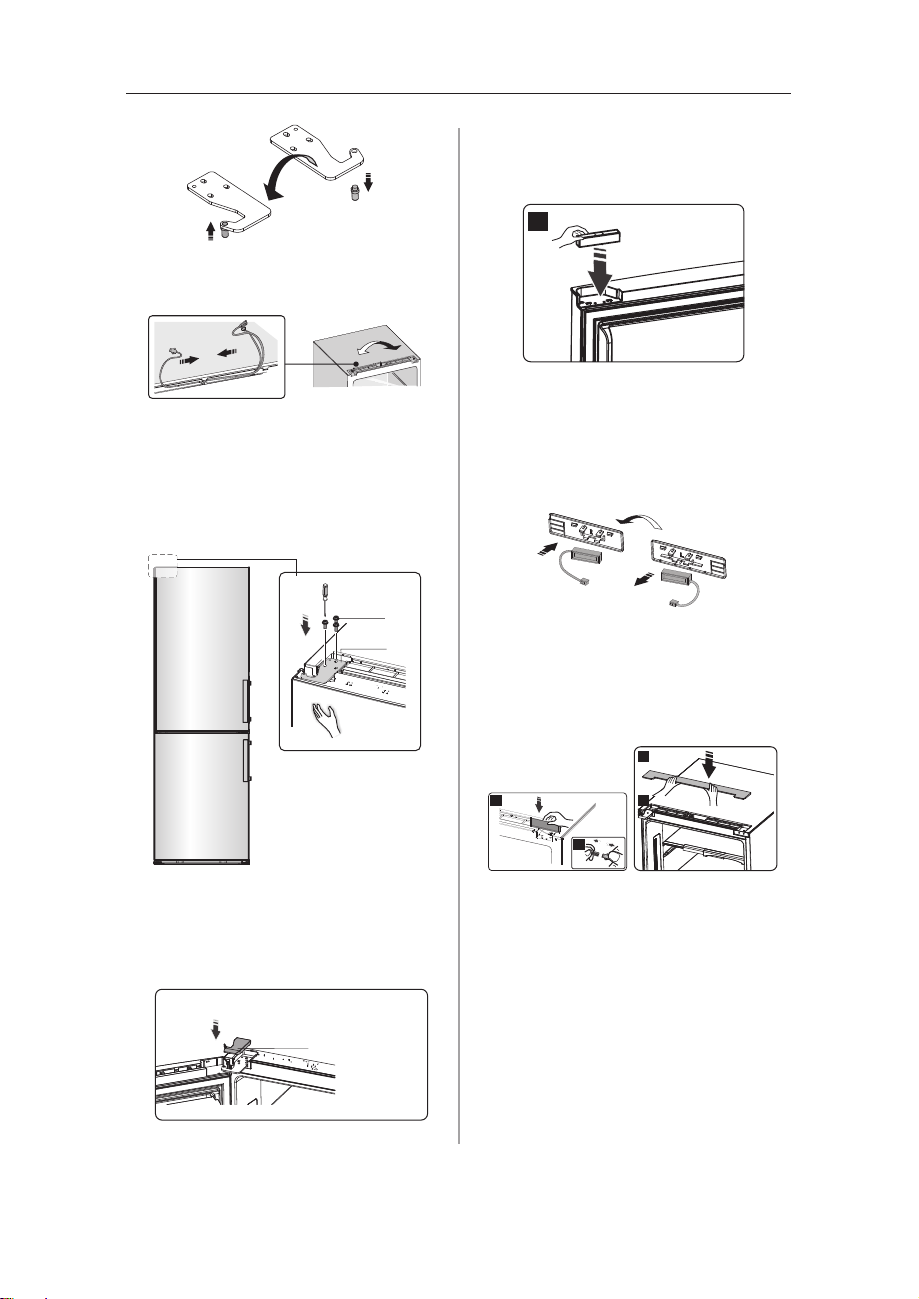
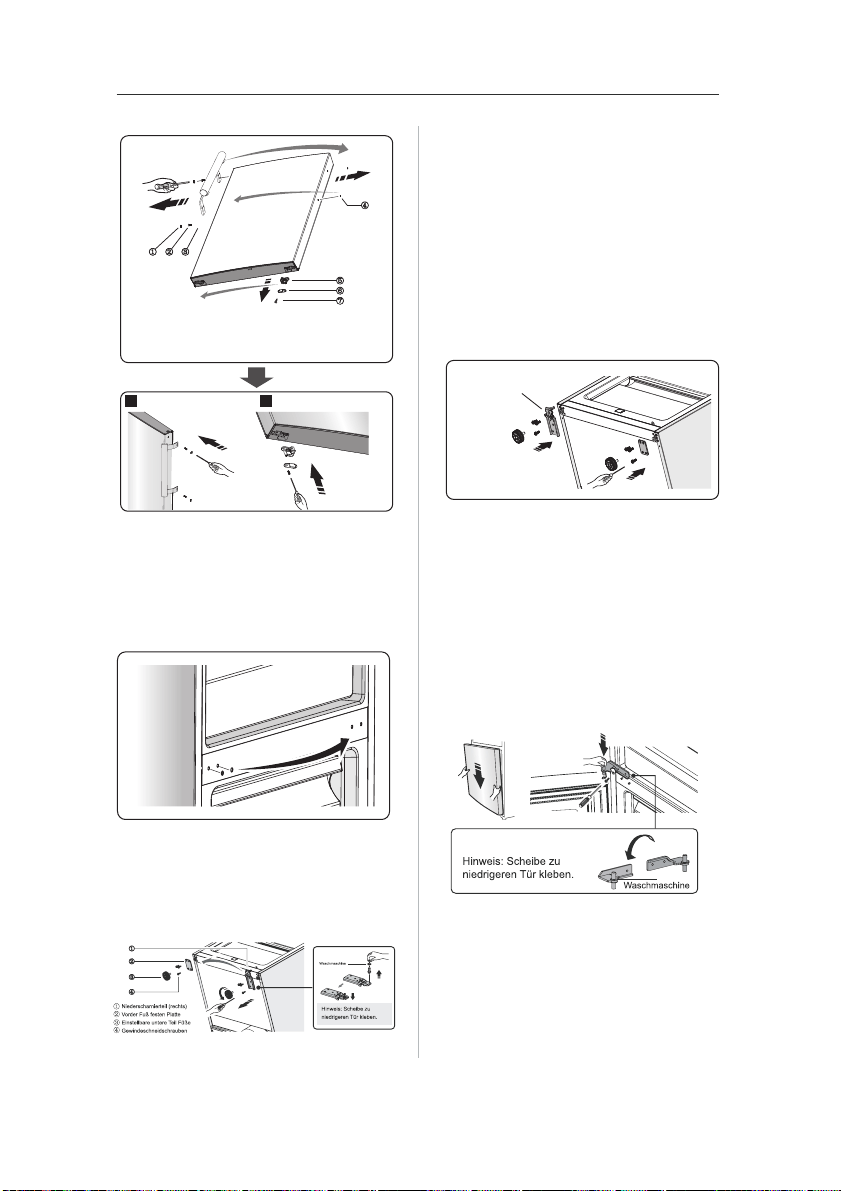
Installing the door handles
For the convenience of transportation,
the door handles are separately
provided in a plastic bag, you can
install the door handles as follows.
1. Lever screw covers on the left side
of the door, and then put them back to
the plastic bag.
2. Match the handle on the left side of
the door, keeping axes of screw holes
in the handle and the door in a line, as
the picture shows.
3. Fix the handle with the special
screws provided in the plastic bag. And
then install the handle covers.
Reversing the door
The side at which the door opens can
be changed, from the right side (as
supplied) to the left side, if the
installation site requires.
Warning! When reversing the door, the
appliance must not be connected to
the mains. Ensure that the plug is
removed from the mains socket..
Tools you will need
8mm socket wrench
Cross-shaped screwdriver
8mm wrench
Thin-blade screwdriver
Note: Before you start lay the
refrigerator on its back in order to
gain access to the base, you should
rest it on soft foam packaging or
similar material to avoid damaging
the backboard of the refrigerator. To
reverse the door, the following steps
are generally recommended.
1. Stand the refrigerator upright.
Open the upper door to take out all
door racks (to avoid racks damaged)
and then close the door.
≤10mm
10
2.
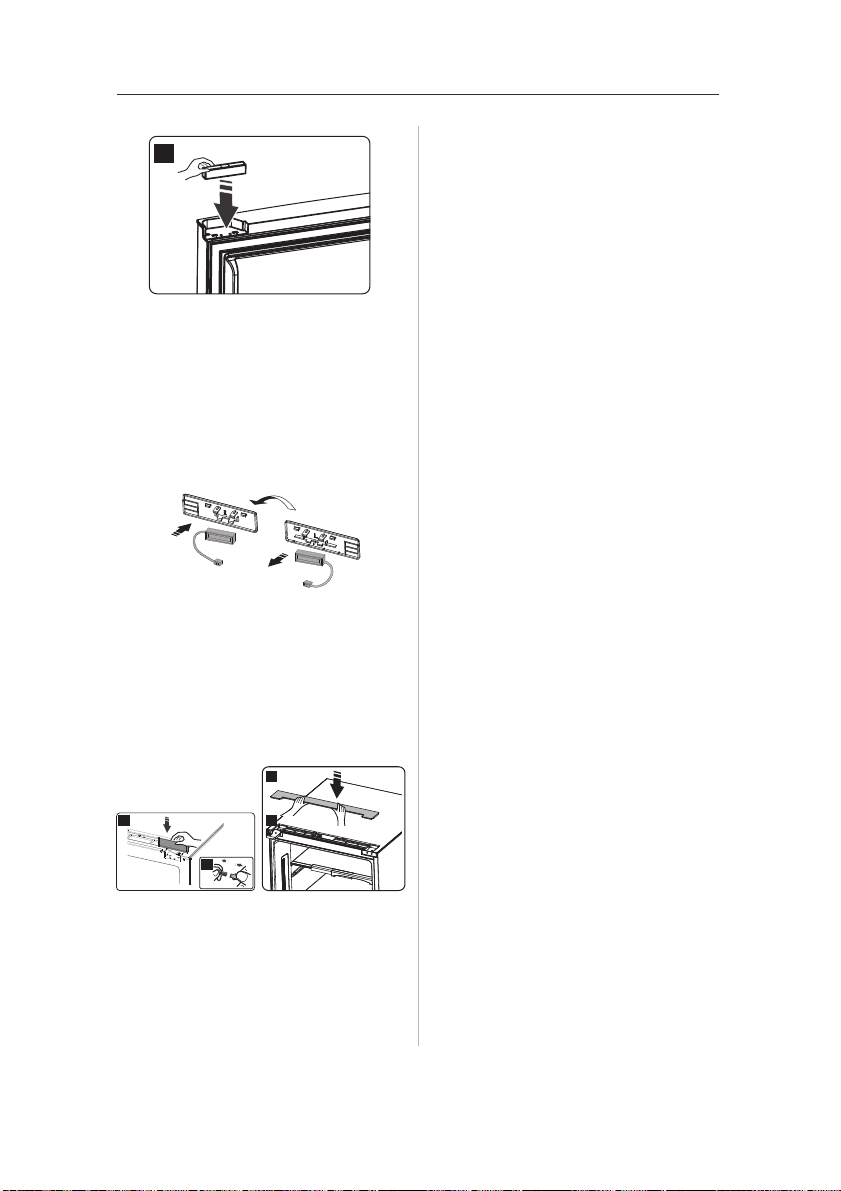
.
Open part ① on top of the
refrigerator body from right side and
then take down part ② and part③
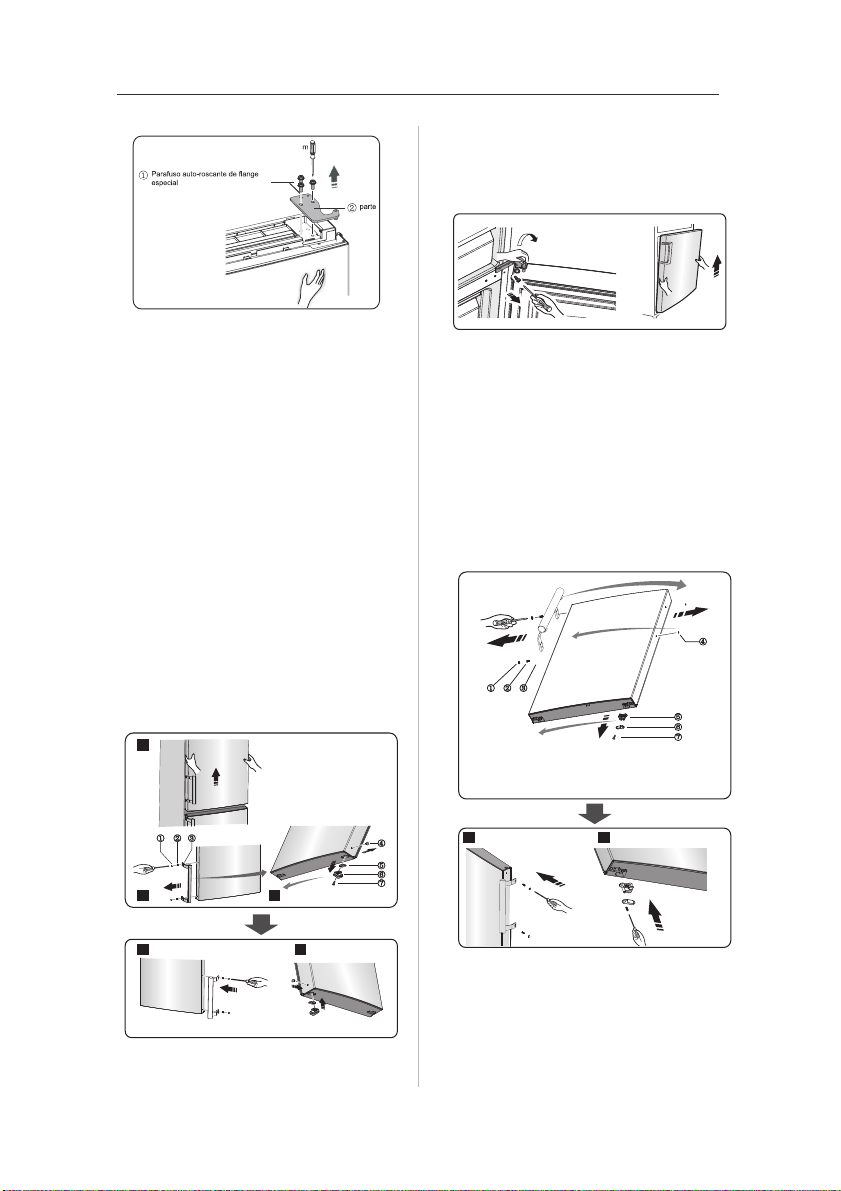
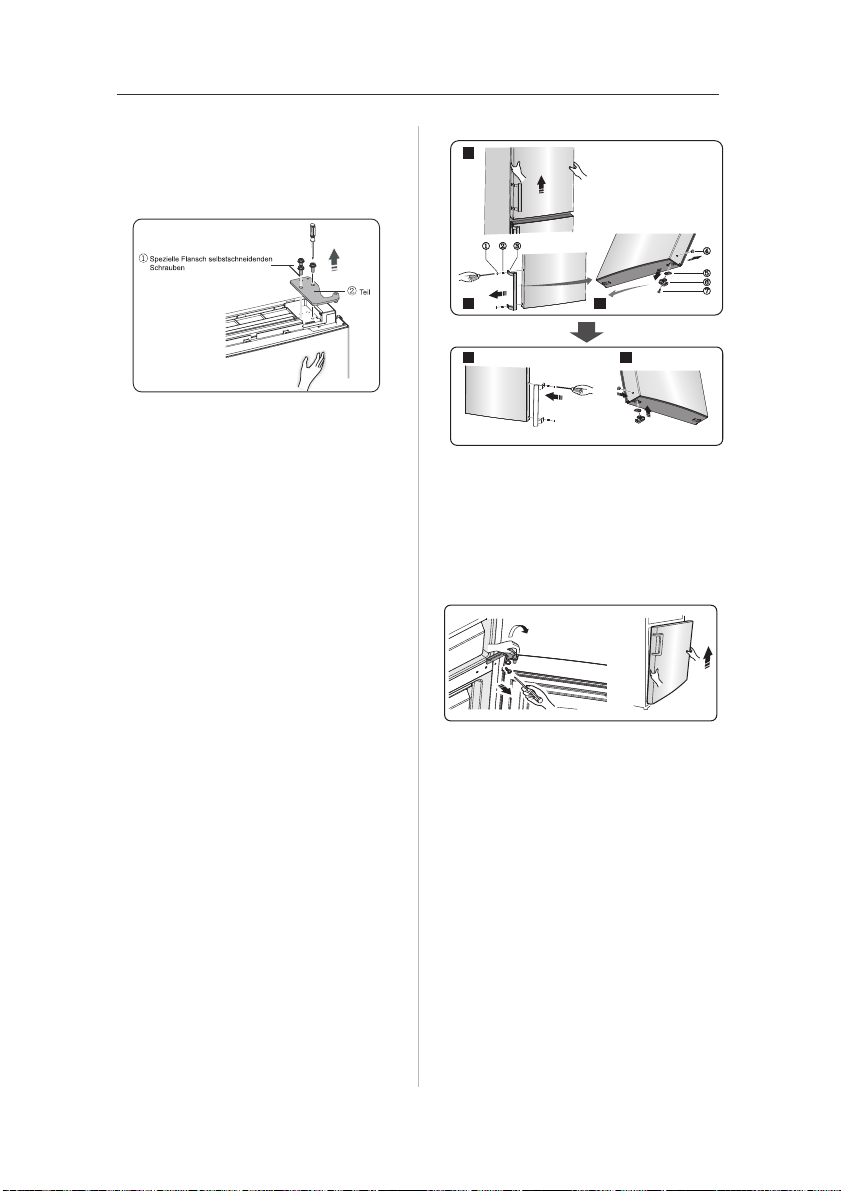
5. Remove the upper door and place it
on a smooth surface with its panel
upwards. Lever part①and part④ then
loose screws② , as shown in the
picture. Change handle③ to the right
side, then install screws②, part① and
part④ in turn. Loose screws⑦, detach
part⑥ and part⑤ then install part⑤
and another part⑥ (in the plastic
bag)to the left side with screws⑦ .Put
part⑥ just detached back to plastic
bag.
,
② Special self-tapping screws
③ Handle
① Handle covers
④ Screw hole covers
⑤ Door holder
⑥ Stop block
⑦ Self-tapping screws
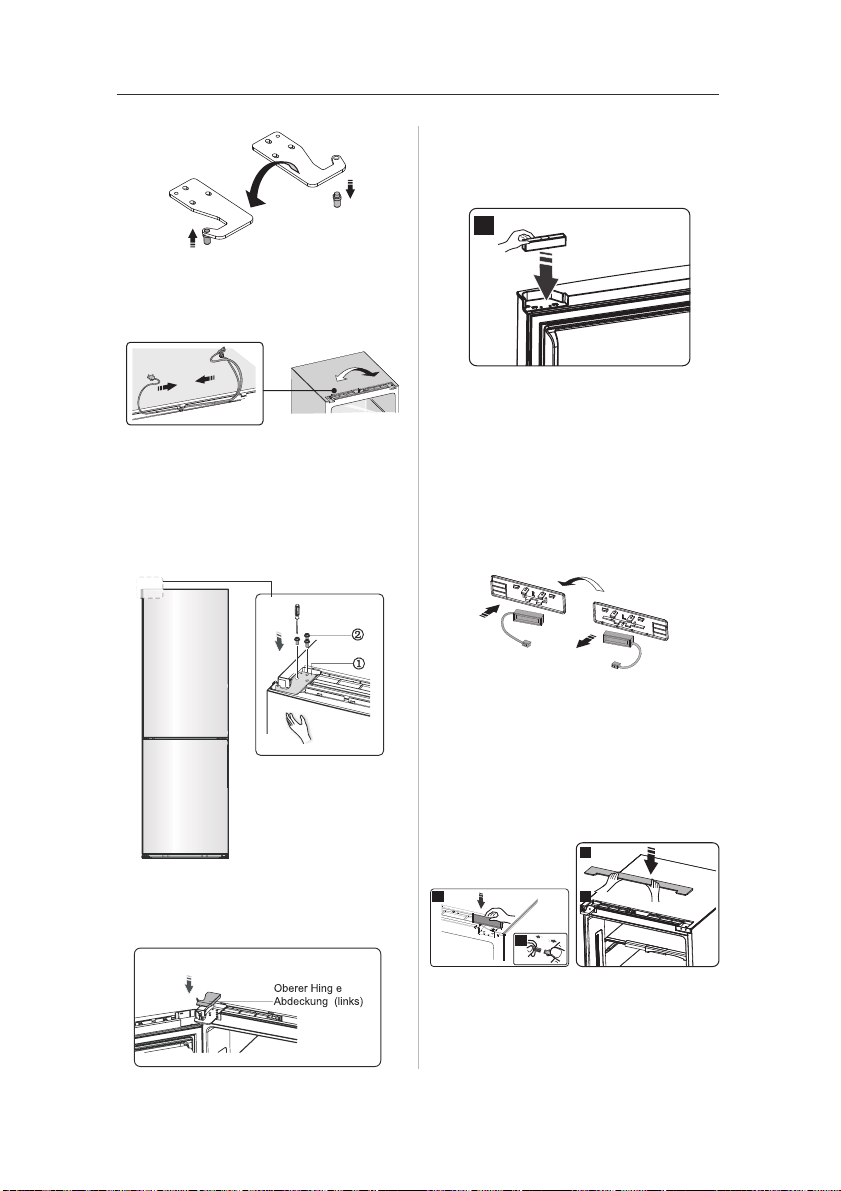
6. Loose screws used to fix the middle
hinge and remove middle hinge. Then
remove the lower door.
1 2
1
2 3
1 2
3
3. Take down the corner cover.
Note: Please hold the upper door by hand
during step 4 to prevent door dropping.
4. Remove the screws ① , and
remove part②.
Special flange self-tapping
screws
①
②
part
magnetic swi tch box
③
Door racks
11
7. Place the lower door on a smooth
surface with its panel upwards.
Change the handle to the right side
according to step 5. Loose screws⑦,
detach part⑥and part⑤.Turn part⑤by
180°and then install part⑤and part⑥to
corresponding position on left side
together with screws⑦.
② Special self-tapping screws
③ Handle
① Handle covers
④ Screw hole covers
⑤ Door holder
⑥ Stop block
⑦ Self-tapping screws
8. Change screw hole covers on
middle cover plate from left to right (as
shown in figure below).
9. Place refrigerator flatwise, remove
part③ and then loose screws④ .
Remove part ② and part①.
10. Screw out lower hinge, change it to
the near hole site, and then screw up
and mount washer.
② Front foot fixed board
④ Self-tapping screws
③ Adjustable bottom feet part
① Lower hinge part(right)
Note: washer may
stick to lower door.
washer
Lower hinge part (left)
Note: washer may
stick to lower door.
Washer
11.Just remount to the step 9,change
part①to left and part②to right and then
fix them with screws④ . Finally install
part③.
12. Move the lower door and adjust its
position to align lower hole site and
upper hinge axis. Turn the middle
hinge by 180, change the washer on
the axis to the upper side, adjust the
middle hinge to the appropriate
position and then install it.
13. Screw out The upper hinge axis,
turn the upper hinge over and fix axis
on it. Then place it at side for use.
1
2
12
14.
15.
Exchange wires both in the left and
right slots of refrigerator body.
Move the upper door to appropriate
position, adjust part① and upper door,
then fix part① by screws② . (Please
hold upper door by hand when
installing)
18. Take the reed switch out of the
coping block(part③ 6 in step 3)and
mount it on another block for use
(which is with mark “R” in the plastic
bag). Put the coping block just
removed back to the plastic bag.
19. Install part ① connect the wire
connector② , and then install part③ .
,
20. Open the upper door, mount door
racks and then close it.
Note:
Be sure character side of reed
switch fits well with coping block.
1 1
3
2
16. Install part the upper hinge
cover(which is in the plastic bag).
upper hing e co ve r( left )
17.Reverse part① and install it onto
the right corner of upper door.
1
①
②

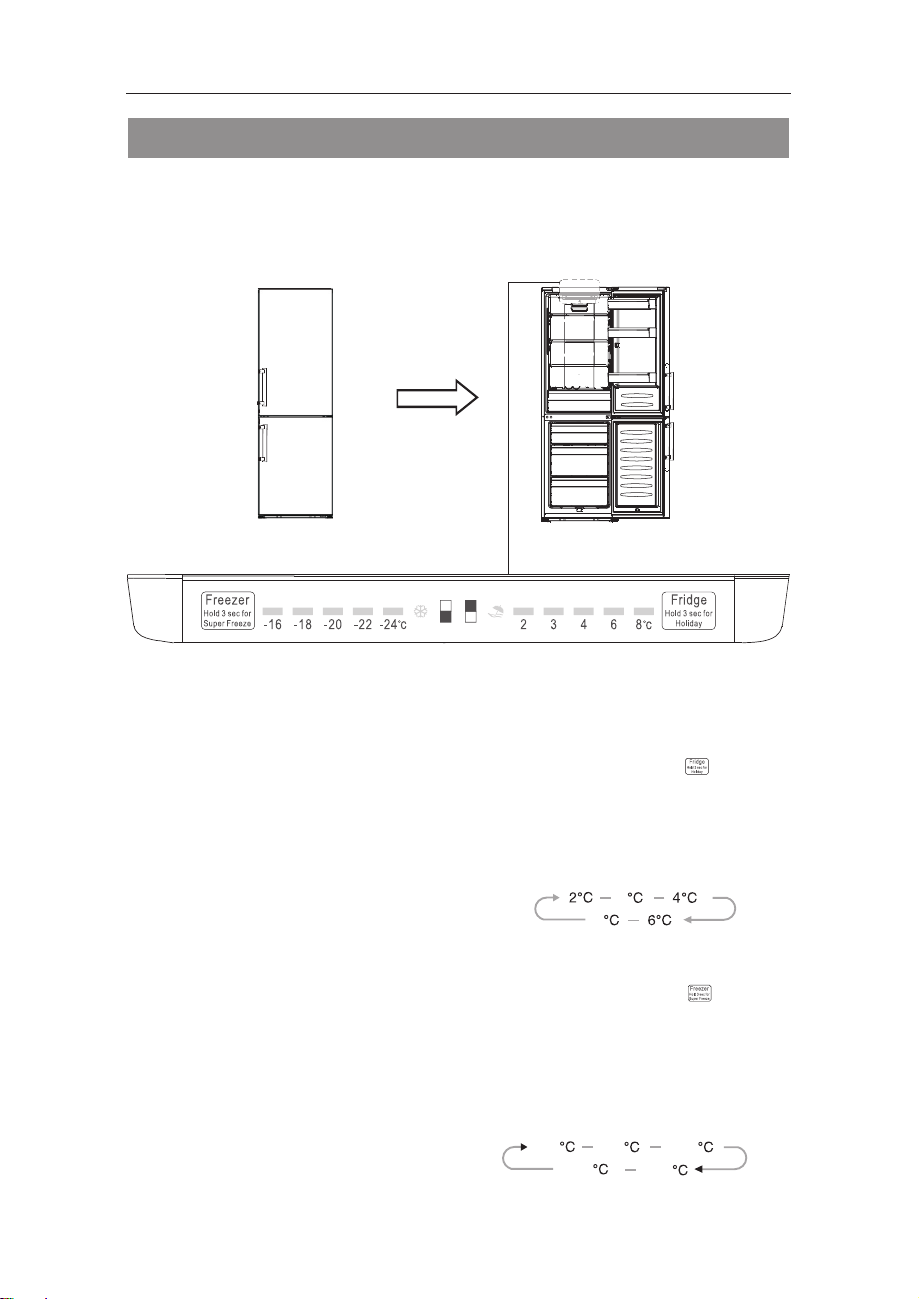
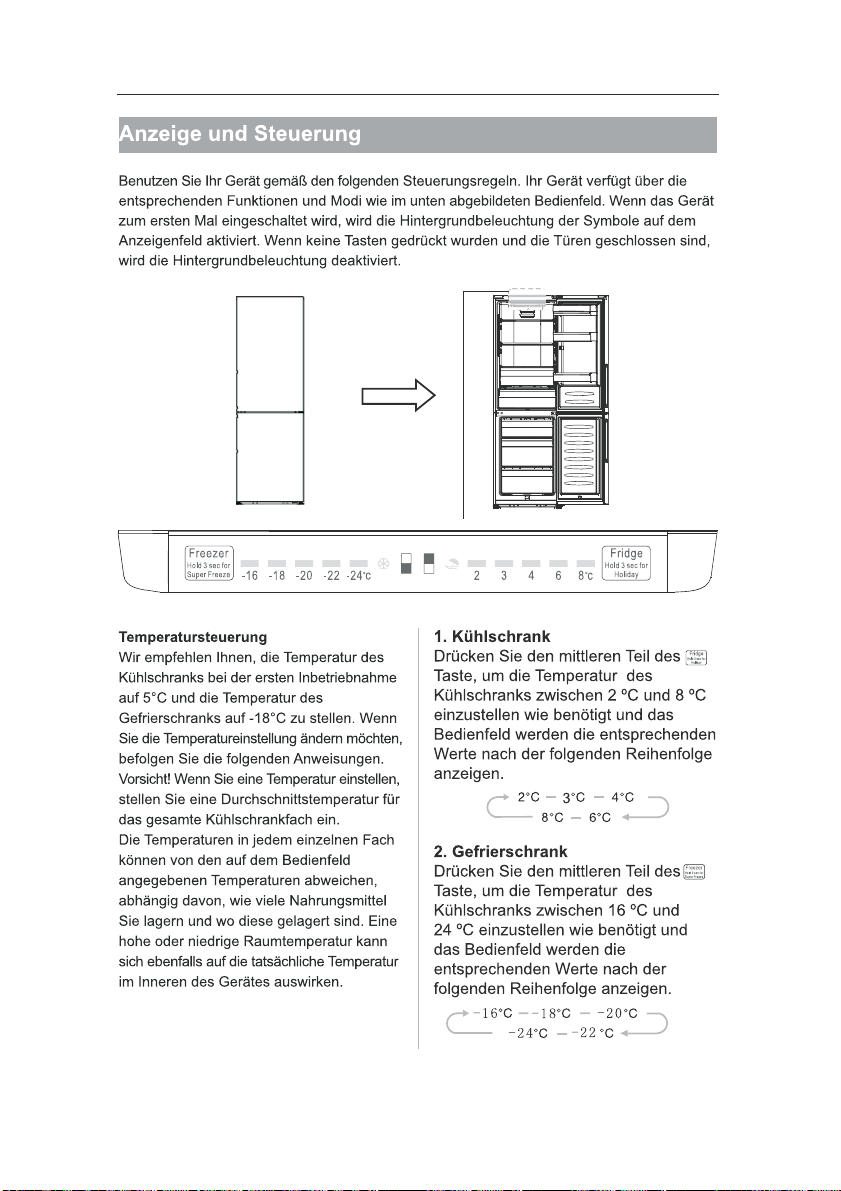
Description of the appliance
13
1.
2.Display board part
3.LED light
4.Glass shelf
5.plastic shelf
6.Crisper cover
7.Fruit and vegetables crisper
8.Upper freezer drawer
9.Upper freezer glass shelf
10.Middle freezer drawer(huge box)
11.Middle freezer glass shelf
12.Lower freezer drawer
13.Adjustable bottom feet
14.Fridge door
15.Middle fridge door shelf
16.Lower fridge door shelf
17.Fridge door seal
18.Handles
19.Freezer door seal
20.Freezer door
Cabinet
View of the appliance
Note: Due to unceasing modification of our products, your refrigerator may be
slightly different from this instruction manual, but its functions and using methods
remain the same. To get more space in the freezer, you can remove drawers
(except lower freezer drawer),installtion bracket and integrative ice maker/twistable
ice tray.
14
Display controls
Controlling the temperature
We recommend that when you start
your refrigerator for the first time, the
temperature for the refrigerator is set
to 4°C and the freezer to -18°C. If you
want to change the temperature, follow
the instructions below.
Caution! When you set a temperature,
you set an average temperature for
the whole refrigerator cabinet.
Te m p e r a t u r e s i n s i d e e a c h
compartment may vary from the
temperature values displayed on the
panel, depending on how much food
you store and where you place them.
Ambient temperature may also affect
the actual temperature inside the
appliance.
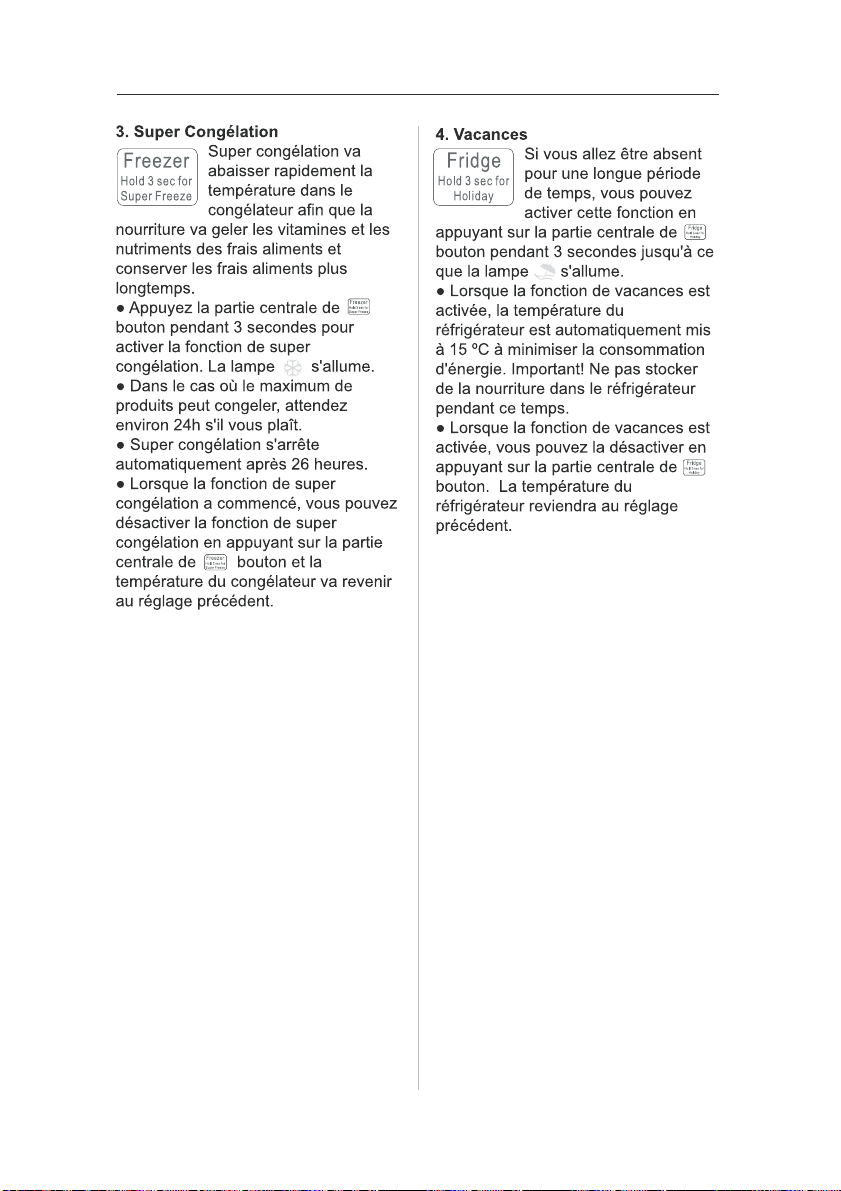
Use your appliance according to the following control regulations, your appliance
has the corresponding functions and modes as the control panels showed in the
pictures below. When the appliance is powered on for the first time, the
backlighting of the icons on display panel starts working. If no buttons have been
pressed and the doors are closed, the backlighting will turn off.
1. Fridge
Press the middle part of button to
set fridge temperature between 2℃
and 8℃ as needed, and control panel
will display corresponding figures
according to the following sequence.
2. Freezer
Press the middle part of button to
set fridge temperature between -16℃
and -24℃ as needed, and control
panel will display corresponding
figures according to the following
sequence.
-1 6
-1 8
-2 0
-2 2
-2 4
8
3
15
●
●
●
●
nutrients of fresh food and keep food
fresh longer.
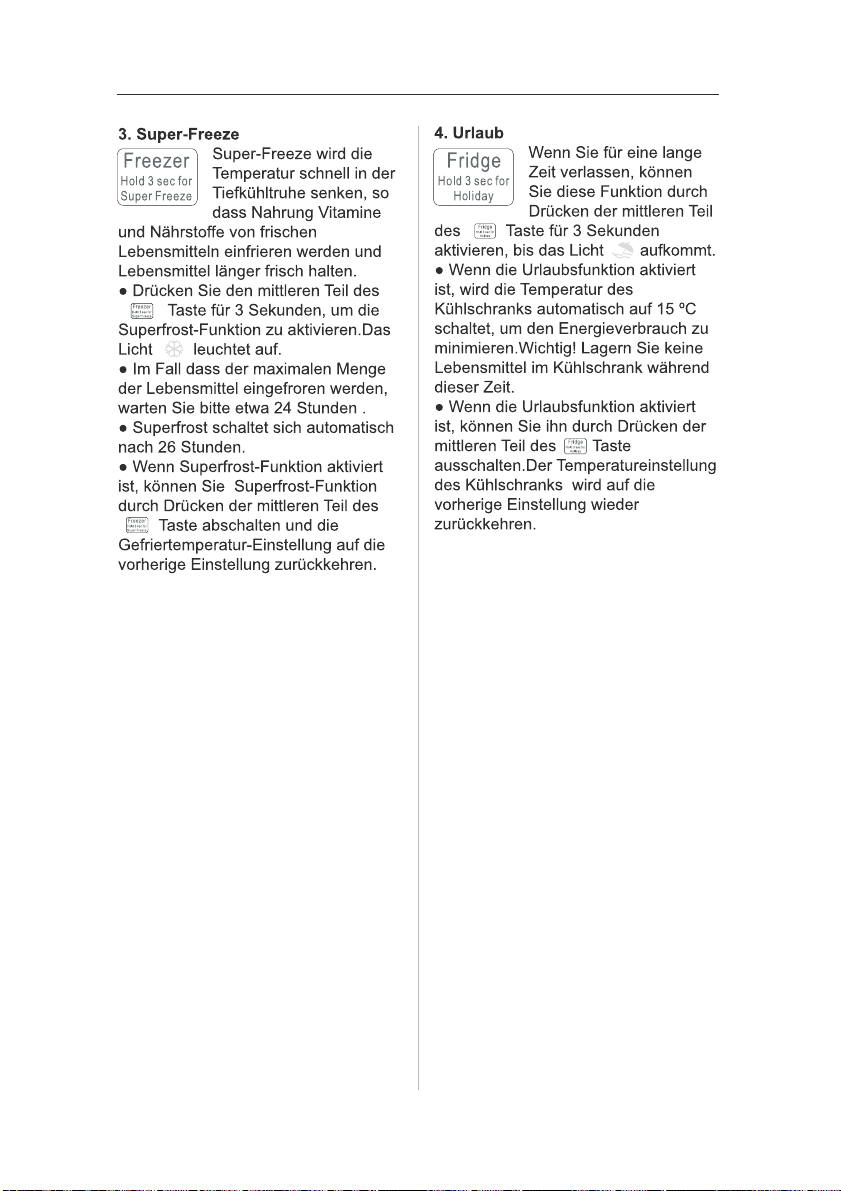
Press the middle part of button for
3 seconds to activate the super freeze
function. The light will come on.
In case of the maximum amount of
food to be frozen, please wait about 24
h.
Super freeze automatically switches
off after 26 hours .
When super freeze function is on you
can switch off super freeze function by
pressing the middle part of button
and the freezer temperature setting will
revert back to the previous setting.
3. Super Freeze
Super Freeze will quickly
lower the temperature
within the freezer so food
will freeze vitamins and
4. Holiday
middle part of button for 3 seconds
until the light comes on.
When the holiday function is
activated, the temperature of the
refrigerator is automatically switched to
15℃ to minimize the energy
consumption.Important! Do not store
any food in the fridge during this time.
When the holiday function is on, you
can switch it off by pressing the middle
part of button. The fridge
temperature setting will revert back to
the previous setting.
●
●
If you are going to be away
for a long period of time,
you can activate this
function by pressing the
Using your appliance
You appliance has the accessories as the "Description of the
appliance”showed in general, with this part instruction you can have the right
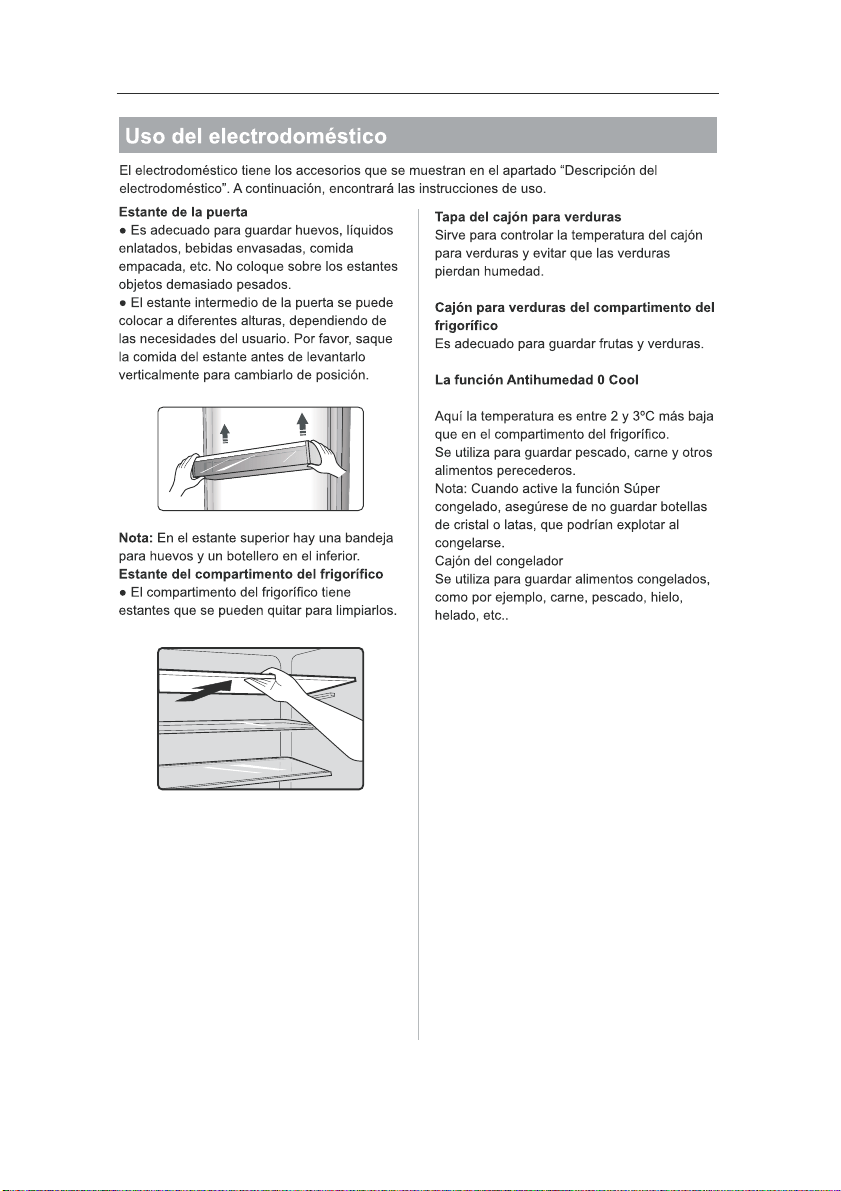
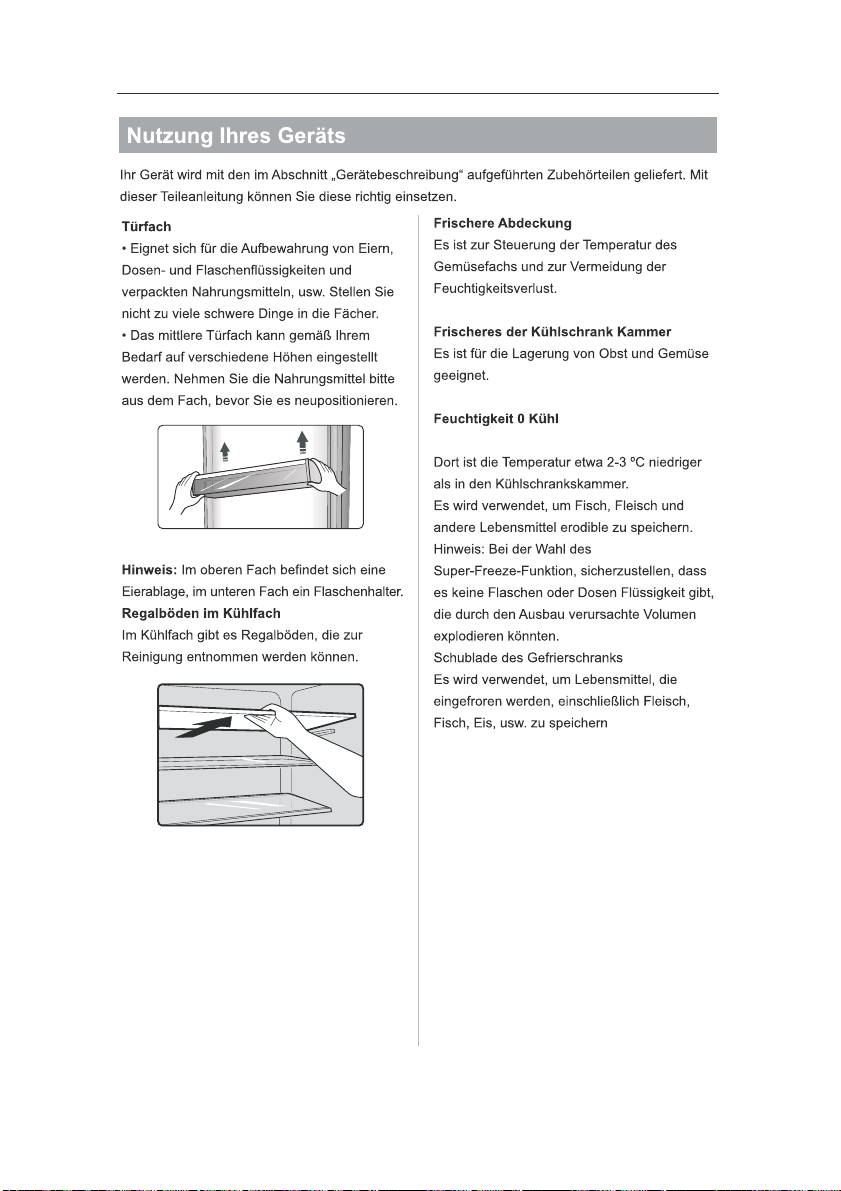
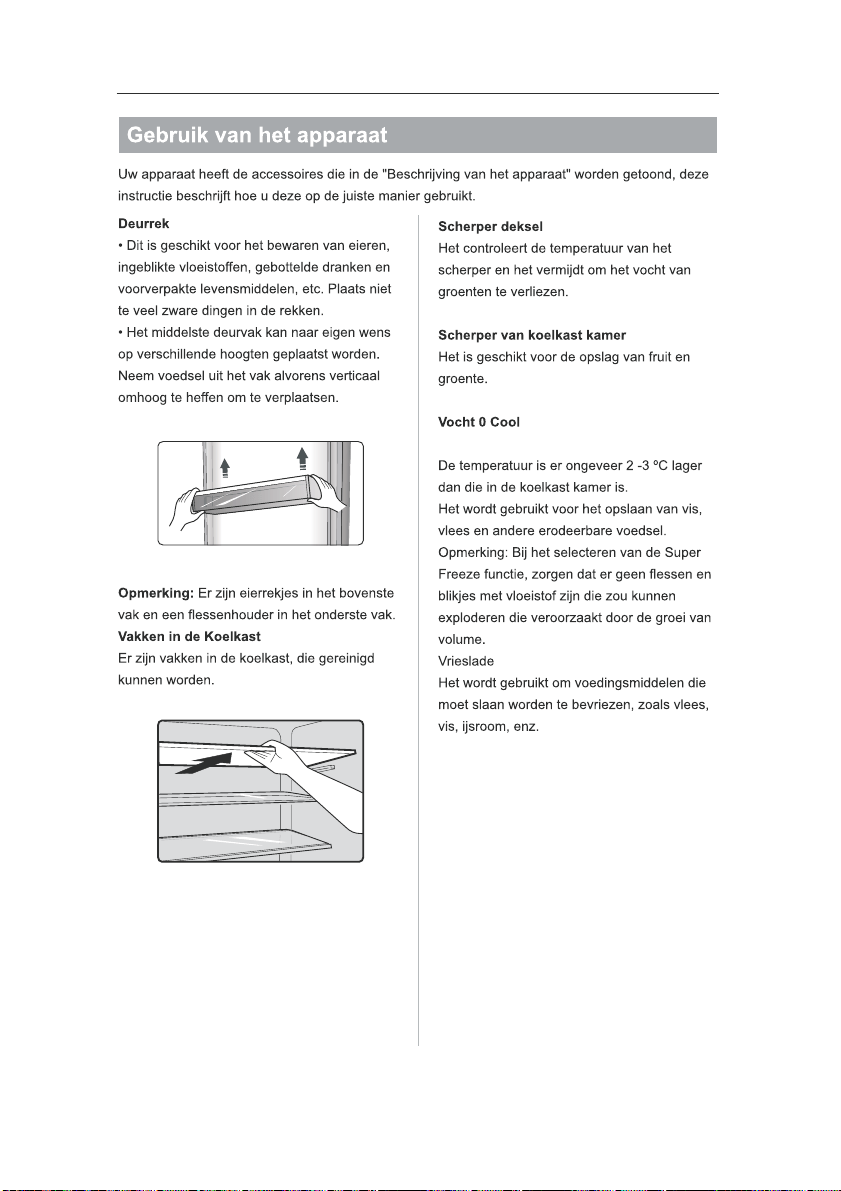
Door rack
It is suitable for the storage of eggs,
canned liquid, bottled drinks and
packed food, etc. Do not place too
many heavy things in the racks
The middle door shelf can be placed
at different heights according to your
requirements. Please take food out of
the shelf before lifting vertically to
reposition.
●
●
Note: There are egg trays in the upper
shelf and bottle holder in the lower
shelf.
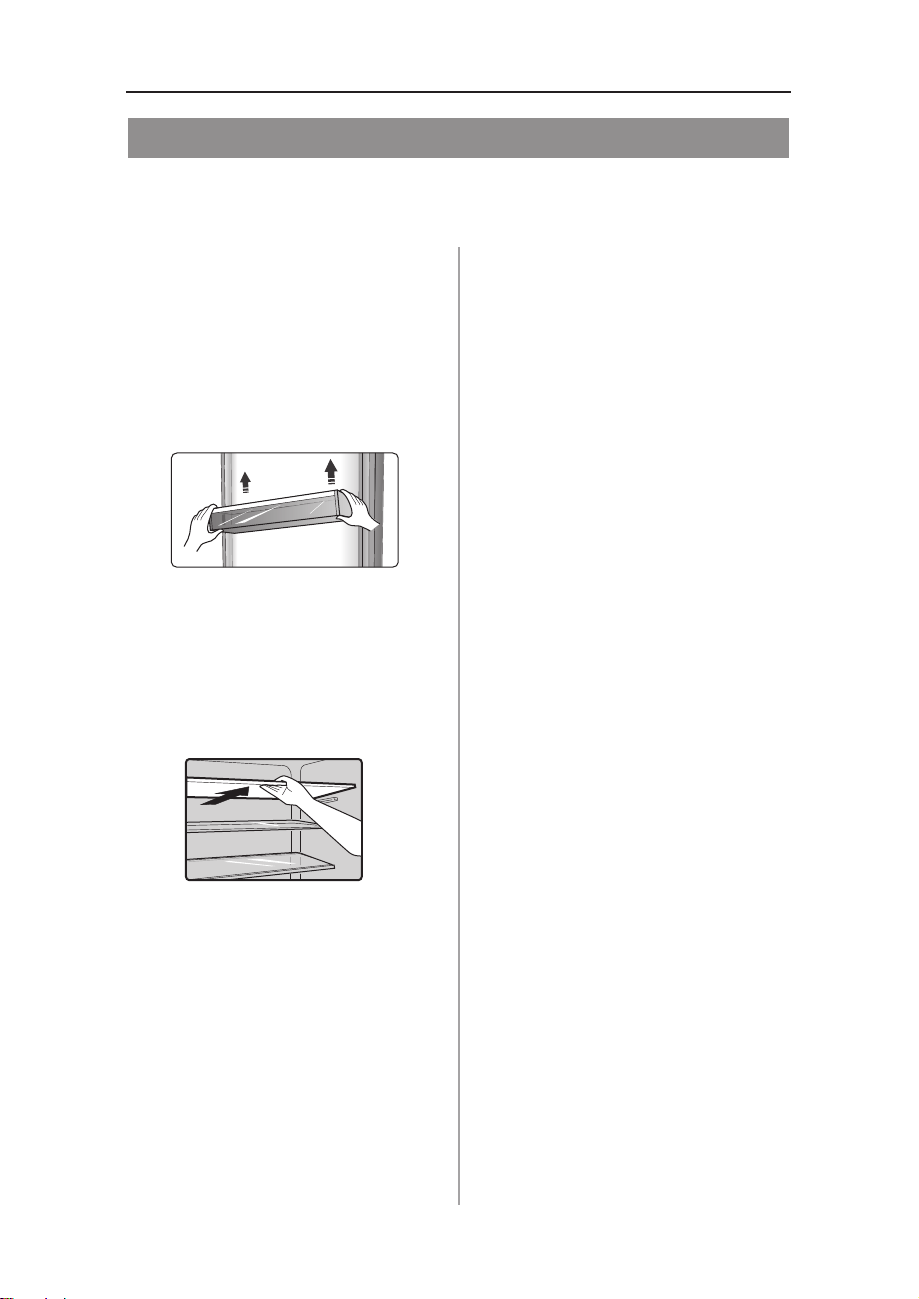
Shelf in Refrigerator chamber
There are shelves in refrigerator
chamber, and they can be taken out to
be cleaned.
●
Crisper of refrigerator chamber
It is suitable for the storage of fruits
and vegetable.
Moisture 0 Cool
The temperature there is about 2-3℃
lower than that in the refrigerator
chamber.
It is used to store fish, meat and
other erodible food.
Note: When selecting the Super
Crisper cover
It is for controlling the temperature of
the crisper and avoiding the vegetable
losing moisture.
●
●
●
●
Freeze function, ensure there is no
bottled or canned liquid which could
explode caused by volume expanding.
16

Helpful hints and tips
●
●
●
refrigerator or freezer, the internal
temperature will increase resulting in
the compressor having to work harder
and will consume more energy.
Do cover or wrap the food,
particularly if it has a strong flavor.
Place food properly so that air can
circulate freely around it.
Hints for refrigeration
Meat (All Types) Wrap in polythene
food: wrap and place on the glass shelf
above the vegetable drawer. Always
follow food storage times and use by
dates suggested by manufacturers.
Cooked food, cold dishes, etc.:
They should be covered and may be
placed on any shelf.
Fruit and vegetables:
They should be stored in the special
drawer provided.
Butter and cheese:
Should be wrapped in airtight foil or
plastic film wrap.
●
●
●
Energy saving tips
We recommend that you follow the tips
below to save energy.
Try to avoid keeping the door open
for long periods in order to conserve
energy.
Ensure the appliance is away from
any sources of heat (Direct sunlight,
electric oven or cooker etc)
Don't set the temperature colder than
necessary.
Don't store warm food or evaporating
liquid in the appliance.
Place the appliance in a well
ventilated, humidity free, room. Please
refer to Installing your new appliance
chapter.
If the diagram shows the correct
combination for the drawers, crisper
and shelves, do not adjust the
combination as this is designed to be
the most energy efficient configuration.
Hints for fresh food refrigeration
Do not place hot food directly into the
●
●
●
●
●
●
●
Milk bottles:
Should have a lid and be stored in the
door racks.
Hints for freezing
When first starting-up or after a period
out of use, let the appliance run at
least 2 hours on the higher settings
b e f o r e p u t t i n g f o o d i n t h e
compartment.
Prepare food in small portions to
enable it to be rapidly and completely
frozen and to make it possible to
subsequently thaw only the quantity
required.
Wrap up the food in aluminum foil or
polyethylene food wraps which are
airtight,
Do not allow fresh,unfrozen food to
touch the food which is already frozen
to avoid temperature rise of the latter.
Iced products, if consumed
immediately after removal from the
freezer compartment, will probably
●
●
●
●
●
●
cause frost burns to the skin.
It is recommended to label and date
each frozen package in order to keep
track of the storage time.
Hints for the storage of frozen food
Ensure that frozen food has been
stored correctly by the food retailer
Once defrosted, food will deteriorate
rapidly and should not be re-frozen. Do
not exceed the storage period indicated
by the food manufacturer.
Switching off your appliance
If the appliance needs to be switched
off for an extended period, the following
steps should be taken prevent mould
on the appliance.
1. Remove all food.
2. Remove the power plug from the
mains socket.
3. Clean and dry the interior thoroughly.
4. Ensure that all the doors are wedged
open slightly to allow air to circulate.
●
●
●
17

For hygienic reasons the appliance
(including exterior and interi or
accessories) should be cleaned
regularly at least every two months.
Caution! The appliance must not be
connected to the mains during
cleaning. Danger of electrical shock!
Before cleaning switch the appliance
off and remove the plug from the
mains socket.
Exterior cleaning
To maintain good appearance of your
appliance, you should clean it
regularly.
-Wipe the digital panel and display
panel with a clean, soft cloth.
-Spray water onto the cleaning cloth
instead of spraying directly on the
surface of the appliance. This helps
ensure an even distribution of moisture
to the surface.
-Clean the doors, handles and cabinet
Cleaning and care
surfaces with a mild detergent and then
wiped dry with a soft cloth.
Caution!
-Don't use sharp objects as they are
likely to scratch the surface.
-Don't use Thinner, Car detergent,
Clorox, ethereal oil, abrasive cleansers
or organic solvent such as Benzene for
cleaning. They may damage the
surface of the appliance and may
cause fire.
Interior cleaning
You should clean the appliance interior
regularly. It will be easier to clean when
food stocks are low. Wipe the inside of
the fridge freezer with a weak solution
of bicarbonate of soda, and then rinse
with warm water using a wrung-out
sponge or cloth. Wipe completely dry
before replacing the shelves and
baskets. Thoroughly dry all surfaces
and removable parts.Although this
appliance automatically defrosts, a
layer of frost may occur on
the freezer compartment's interior
walls if the freezer door is opened
frequently or kept open too long. If the
frost is too thick, choose a time when
the supply of food stocks are low and
proceed as follows:
1 . R e m o v e e x i s t i n g f o o d a n d
accessories baskets, unplug the
appliance from the mains power and
leave the doors open. Ventilate the
room thoroughly to accelerate the
thawing process.
2. When defrosting is completed, clean
your freezer as described above.
Caution! Don't use sharp objects to
remove frost from the freezer
compartment. Only after the interior is
completely dry should the appliance be
switched back on and plugged back
into the mains socket.
Door seals cleaning
Take care to keep door seals clean.
Sticky food and drinks can cause seals
to stick to the cabinet and tear when
you open the door. Wash seal with a
mild detergent and warm water. Rinse
and dry it thoroughly after cleaning.
Caution! Only after the door seals are
completely dry should the appliance be
powered on.
Replacing the LED light:
Warning: The LED light must not be
replaced by the user! If the LED light is
damaged, contact the customer
helpline for assistance. To replace the
LED light, the below steps can be
followed:
1. Unplug your appliance.
2. Remove light cover by pushing up
and out.
3. Hold the LED cover with one hand
and pull it with the other hand while
pressing the connector latch.
4. Replace LED light and snap it
correctly in place.
18
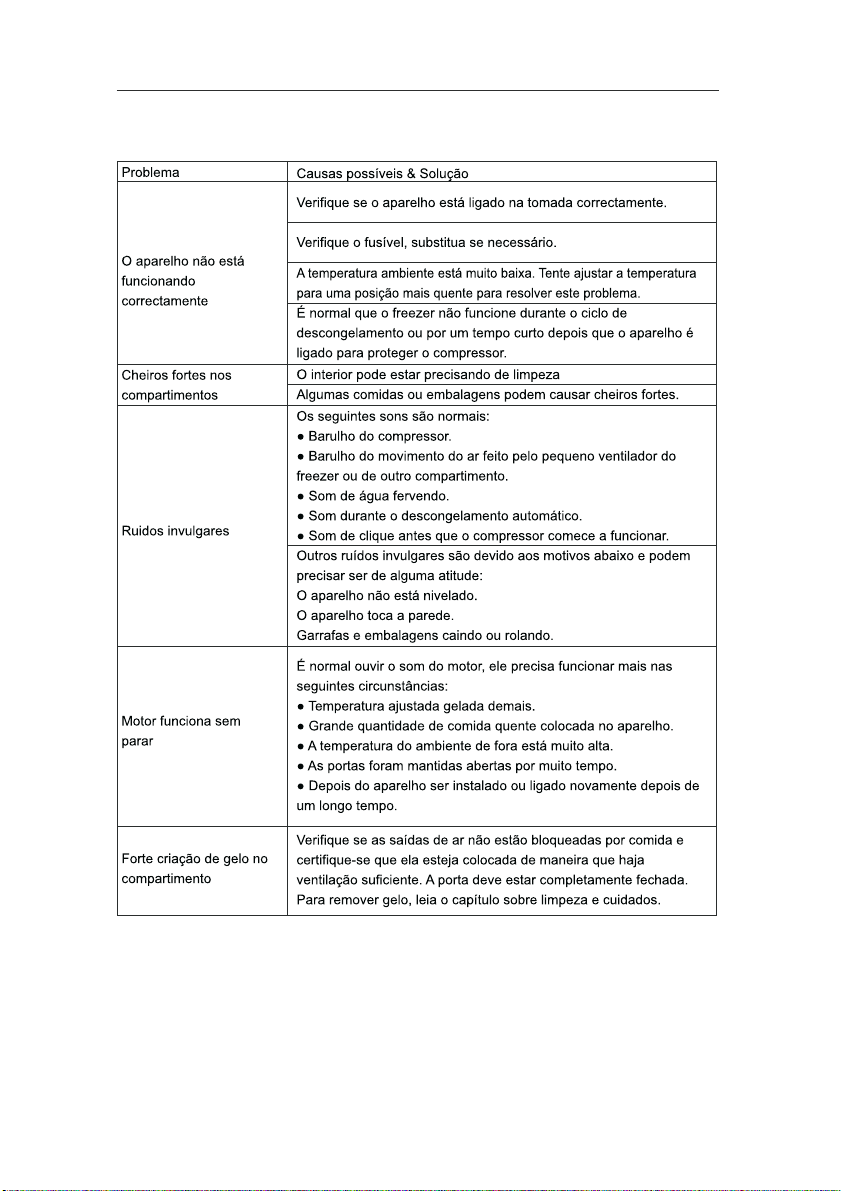
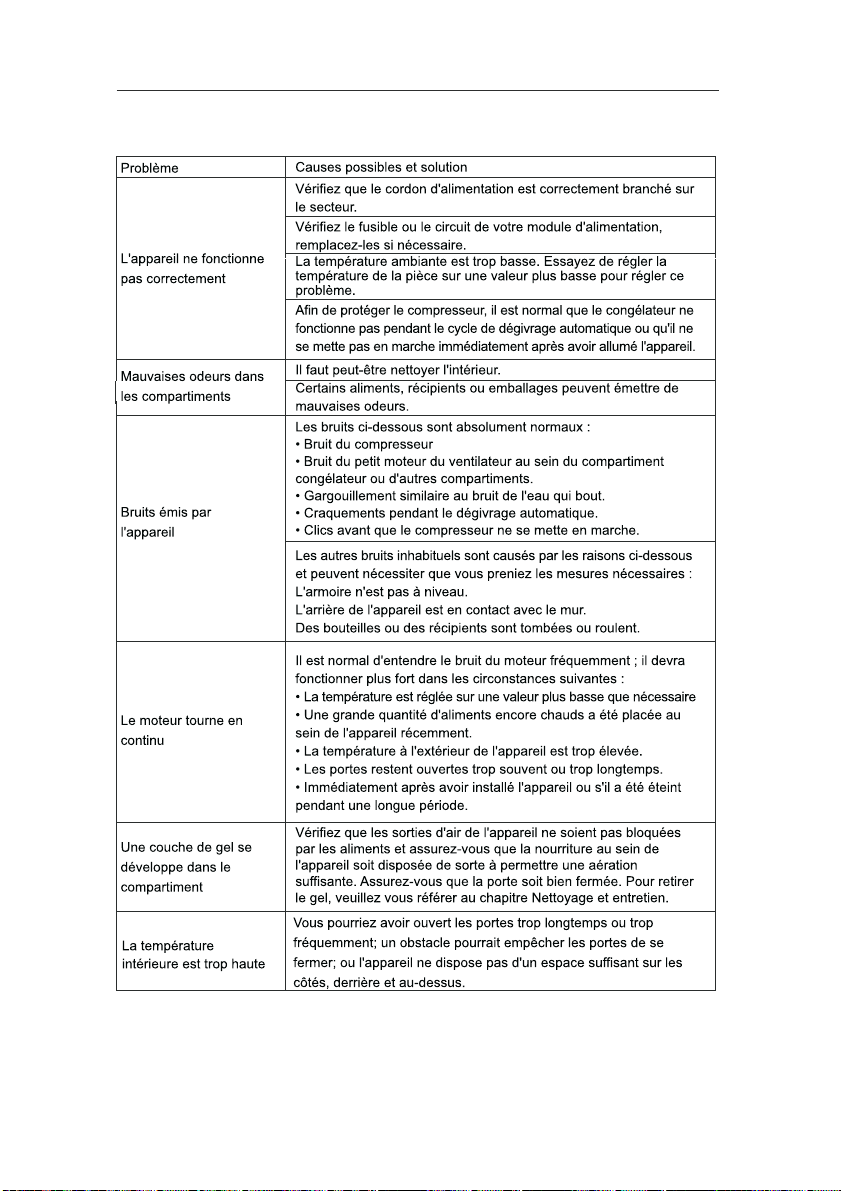
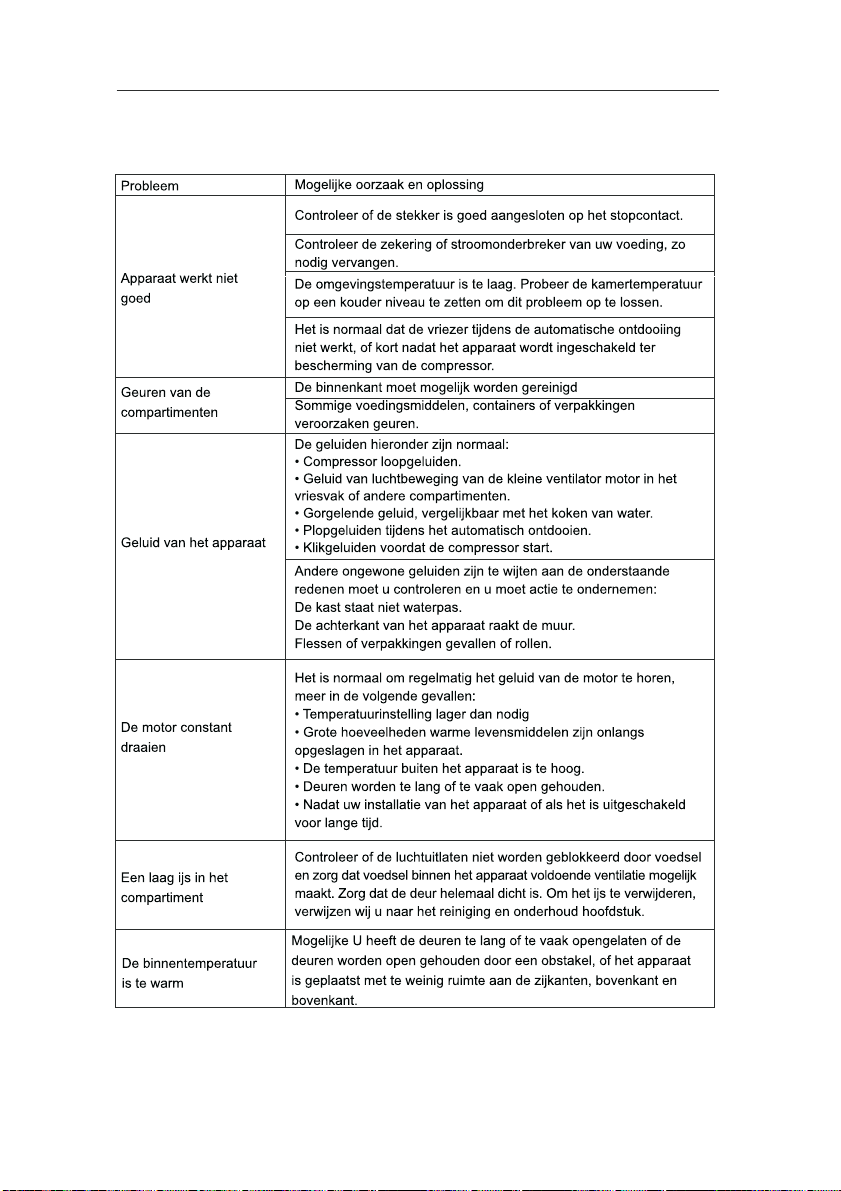
Troubleshooting
If you experience a problem with your appliance or are concerned that the
appliance is not functioning correctly, you can carry out some easy checks before
calling for service, please see below. You can carry out some easy checks
according to this section before calling for service.
Problem
Check whether the power cord is plugged into the power outlet
properly.
Check the fuse or circuit of your power supply, replace if
necessary.
The ambient temperature is too low. Try setting the chamber
temperature to a colder level to solve this problem.
It is normal that the freezer is not operating during the
automatic defrost cycle, or for a short time after the appliance
is switched on to protect the compressor.
The interior may need to be cleaned
Some food, containers or wrapping cause odours.
The sounds below are quite normal:
Compressor running noises.
Air movement noise from the small fan motor in the freezer
compartment or other compartments.
Gurgling sound similar to water boiling.
Popping noise during automatic defrosting.
Clicking noise before the compressor starts.
Noise from the
appliance
Other unusual noises are due
to the reasons below and may
need you to check and take action:
The cabinet is not level.
The back of appliance touches the wall.
Bottles or containers fallen or rolling.
The motor runs
continuously
It is normal to frequently hear the sound of the motor, it will
need to run more when in following circumstances:
Temperature setting is set colder than necessary
Large quantity of warm food has recently been stored within
the appliance.
The temperature outside the appliance is too high.
Doors are kept open too long or too often.
After your installing the appliance or it has been switched off
for a long time.
A layer of frost occurs in
the compartment
Check that the air outlets are not blocked by food and ensure
food is placed within the appliance to allow sufficient
ventilation. Ensure that door is fully closed. To remove the
frost, please refer to cleaning and care chapter.
Temperature inside is
too warm
You may have left the doors open too long or too frequently; or
the doors are kept open by some obstacle; or the appliance is
located with insufficient clearance at the sides, back and top
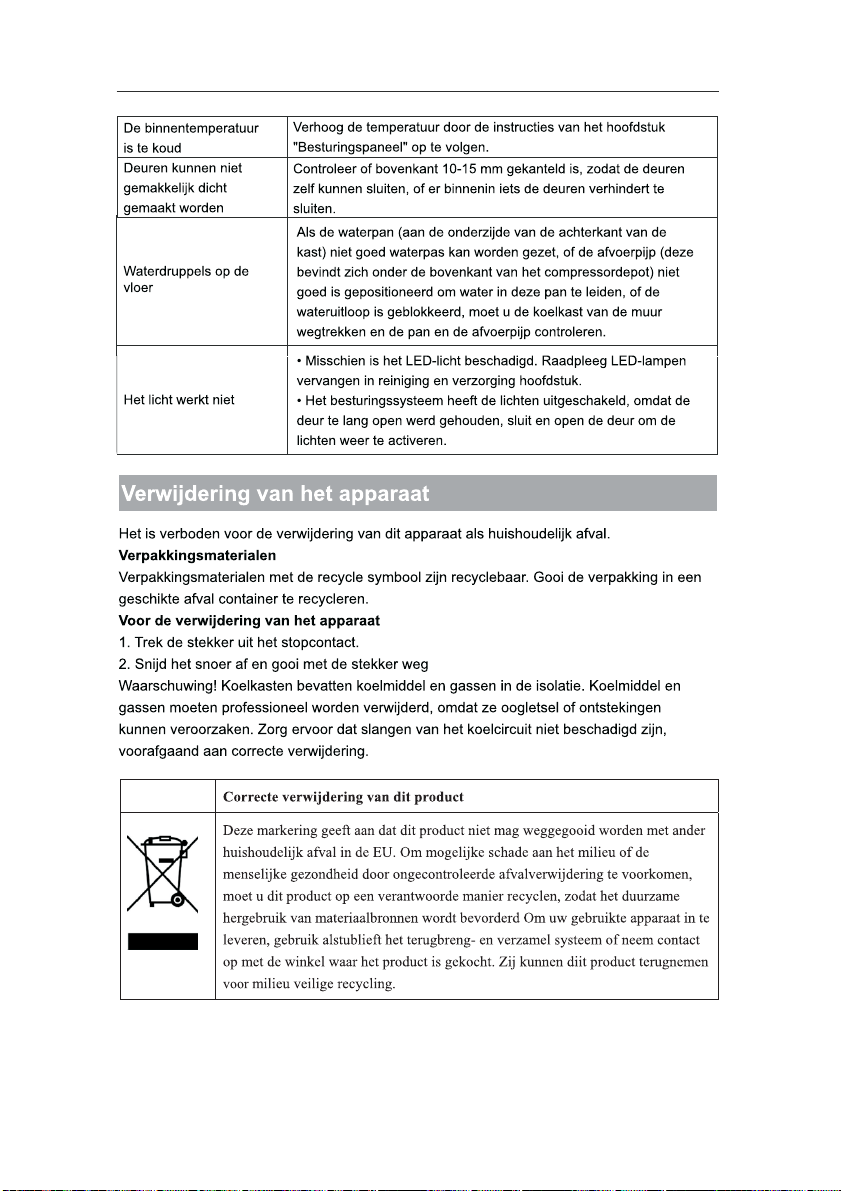
Temperature inside is
too cold
Increase the temperature by following the "Display controls”
chapter.
Possible cause & Solution
●
●
●
●
●
●
●
●
●
●
Appliance is not working
correctly
Odours from the
compartments
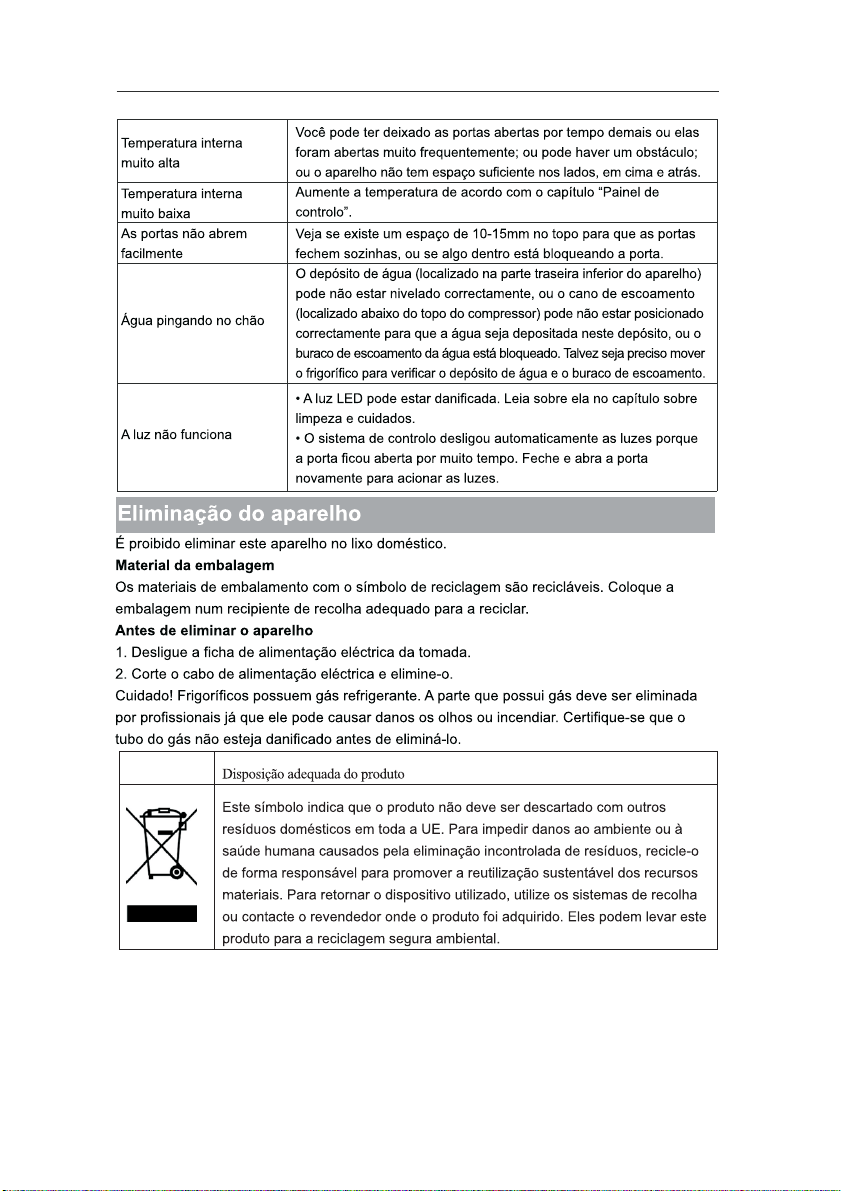
19
is preventing the doors from closing.
Water drips on the floor
The water pan (located at the rear bottom of the cabinet) may
not be properly leveled, or the draining spout ( located
underneath the top of the compressor depot
)
may not be
properly positioned to direct water into this pan, or the water
spout is blocked. You may need to pull the refrigerator away
from the wall to check the pan and spout.
The light is not working
The LED light may be damaged. Refer to replace LED lights
in cleaning and care chapter.
The control system has disabled the lights due to the door
being kept open too long, close and reopens the door to
reactivate the lights.
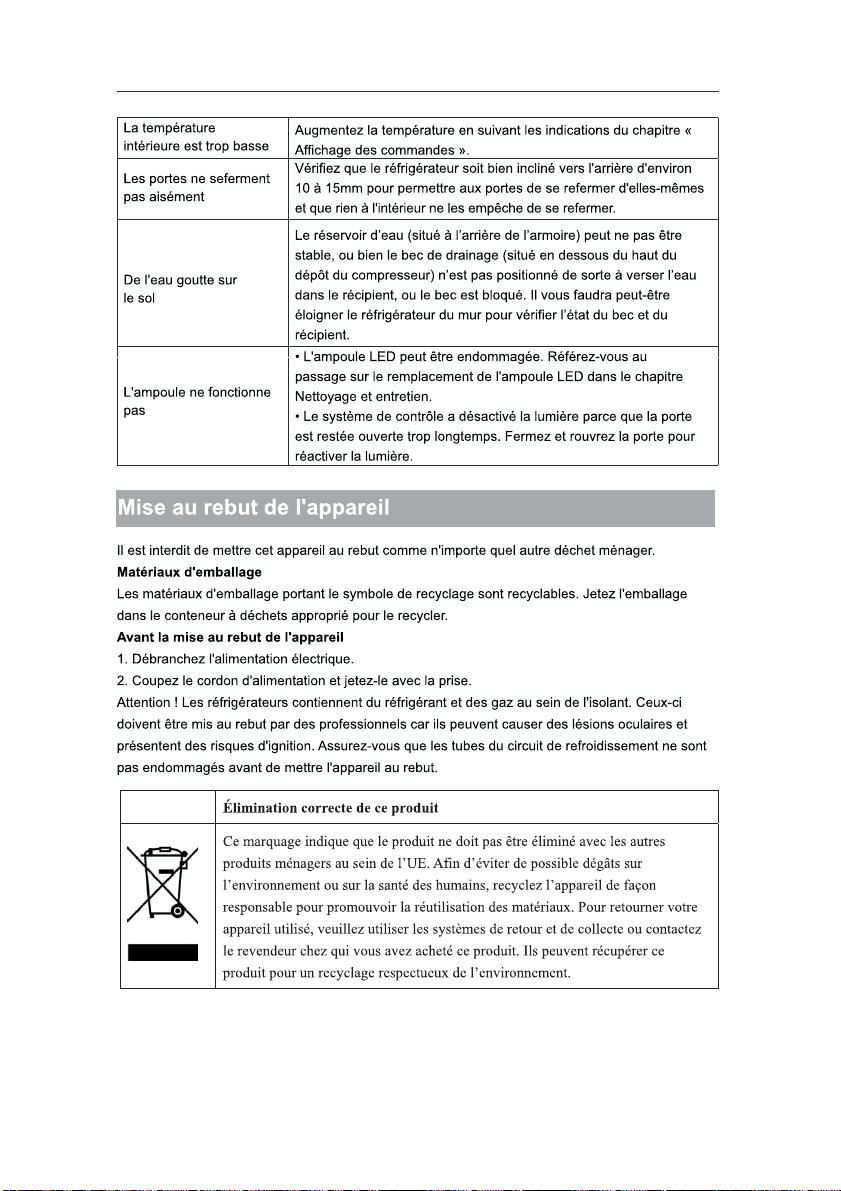
Disposal of the appliance
It is prohibited to dispose of this appliance as household waste.
Packaging materials
Packaging materials with the recycle symbol ar
e recyclable. Dispose of the packaging into
a suitable waste collection container to recycle it.
Before disposal of the appliance
1. Pull out the mains plug from the mains socket.
2. Cut off the power cord and discard with the mains plug
Warning! Refrigerators contain refrigerant a
nd gases in the insulation. Refrigerant and
gases must be disposed of professionally as
they may cause eye injuries or ignition.
Ensure that tubing of the refrigerant circuit is not damage prior to proper disposal.
●
●
Doors cant be closed
easily
Check whether the top of the refrigerator is tilted back by
20
13
14
16
17
18
19
20
8
2

9
Installation des poignées de porte
Pour faciliter la transportation du
réfrigérateur, les poignées de porte
sont fournies séparément dans un sac
en plastique. Vous pouvez les installer
en suivant la procédure suivante.
1. Retirez le capuchon des vis sur le
côté gauche de la porte, puis remettez-
les dans le sac en plastique.
2. Placez la poignée sur le côté
gauche de la porte, en vous assurant
que les trous de vis sur la poignée et la
porte sont sur le même axe, comme le
montre la photo.
3. Fixez la poignée avec les vis
spéciales fournies dans le sac en
plastique puis installez les capots de
poignée.
1
0
2. Ouvrez la pièce (1) sur le dessus du
cabinet du réfrigérateur du côté droite
puis démontez les pièces (2) et (3).
3. Démontez le capuchon de coin.
4. Retirez les vis (1) et la pièce (2)
Remarque: Vous êtes prié de tenir la
porte supérieure à la main pendant la
4ème étape pour qu’elle ne chute
pas.
5. Retirez la porte supérieure et
placez-le sur une surface lisse avec
son panneau vers le haut. Retirez la
pièce (1) et (4), puis desserrez les vis
(2), comme indiqué dans l'image.
Changez l’emplacement de la
poignée (3) vers le côté droit, puis
1 2
3
Boîte de commutateur
magnétique
③
1
1
installez les vis (2), la pièce (1) et la
pièce (4). Desserrez les vis (7),
détachez la pièce (6) et la pièce (5) puis
installez la pièce (5) et une autre pièce
(6) (dans le sac en plastique) sur le côté
gauche avec les vis (7). Mettez la pièce
(6) que vous venez de détacher dans le
sac en plastique.
②
Vis auto-taraudeuses spéciales
③ Poignée
① Capots de poignée
④ Capuchons des trous de vis
⑤ Arrêt de porte
⑥ Bloc d'arrêt
⑦ Vis auto-taraudeuses
1 2
1
2 3
6. Desserrez les vis utilisées pour fixer
la charnière centrale et enlevez la
charnière centrale. Ensuite, retirez la
porte inférieure.
7. Placez la porte inférieure sur une
surface lisse avec son panneau vers le
haut. Changez la poignée sur le côté
droit comme prévu par l'étape 5.
Desserrez les vis ⑦ détachez les pièces
⑥ et ⑤. Tournez la pièce ⑤ de 180°
puis installez les pièces ⑤ et ⑥ en
position au côté gauche correspondant
avec les vis
⑦.
② Vis auto-taraudeuses spéciales
③ Poignée
① Capots de poignée
④ Capuchons des trous de vis
⑤ Arrêt de porte
⑥ Bloc d'arrêt
⑦ Vis auto-taraudeuses
1 2
8. Changez les capuchons des trous
de vis sur la plaque centrale de gauche
à droite (comme le montre l’image ci-
dessous).
9. Placez le réfrigérateur à plat, retirez
la pièce ③ et desserrez les vis ④.
Retirez les pièces ② et ①.
10. Dévissez la charnière inférieure,
Repositionnez-le dans le trou le plus
près, puis serrez les vis et montez la
rondelle.
1
2
11. Il suffit de remonter à l'étape 9,
déplacez la pièce ① à gauche et la
pièce ② à droite, puis fixez-les avec les
vis ④. Installez la pièce
③ en dernier.
12. Déplacez la porte inférieure et
ajustez sa position pour aligner l’axe des
trous inférieurs et de la charnière
supérieure. Tournez la charnière
centrale de 180°, changez la rondelle de
l'axe vers le côté supérieur, ajustez la
charnière centrale en position, puis
installez-le.
13. Dévissez l’axe supérieur de la
charnière, tournez la charnière
supérieure et fixez l'axe sur elle. Puis
posez-le à côté pour utilisation future.
14. Changez la position des fils dans
les encoches gauche et droite du
réfrigérateur.
15. Déplacez la porte supérieure à la
position désirée, ajustez la pièce ① et
la porte supérieure, puis fixez la pièce
① avec les vis ②
. (S’il vous plaît,
supportez la porte supérieure à la
main lors de l'installation)
①
②
16. Installez le couvercle de la
charnière supérieure (qui est dans le
sac en plastique).
17. Inversez la pièce ①
et installez-le
sur le coin droit de la porte supérieure.
1
3
1
18. Retirez le commutateur à lames
sur hors du bloc d'adaptation (pièce ③
6 à l'étape 3) et montez-le sur un autre
bloc pour utilisation (La pièce porte
une marque « R » parmi ceux dans le
sac en plastique). Mettez le bloc
d'adaptation que vous venez juste
d’enlever dans le sac en plastique.
Remarque:
Rassurez-vous que le commutateur à
lames est bien placé sur le bloc
d’adaptation.
19. Installez la pièce ①
, connectez le
connecteur de fils ②, puis installez la
pièce ③.
1 1
3
2
20. Ouvrez la porte supérieure,
montez les balconnets et fermez-le.
1. Cabinet
2. Panneau d'affichage
3. Indicateur DEL
4. Étagère en verre
5. Étagère en plastique
6. Couverture du bac
7. Bac à légumes et fruits
8. Tiroir supérieure du congélateur
9.
Étagère en verre supérieure du
congélateur
10. Tiroir intermédiaire du
congélateur (grosse boite)
11. Étagère en verre intermédiaire
12. Tiroir inférieure du congélateur
13. Pieds réglables en bas
14. Porte du réfrigérateur
15. Balconnet intermédiaire
16. Balconnet inférieure
17. Joint de porte du réfrigérateur
18. Poignées
19. Joint de porte du congélateur
20. Porte du congélateur
15
16
17
18
19
20
21
22
13
14
16
17
18
19
20
8
C
C
C
C
C
Ihres
9
Installation der Türgriffe
Für die Bequemlichkeit der Transport
sind die Türgriffe separat in einer
Plastiktüte mitgeliefert, können Sie die
Türgriffe wie folgt installieren.
1. Hebeln Sie die
Schraubenabdeckungen auf der
linken Seite der Tür, und dann setzen
Sie sie wieder in die Plastiktüte.
2. Passen Sie den Griff auf die linken
Seite der Tür und stellen Sie sicher,
dass die Achsen der Schraubenlöcher
in dem Griff und die Tür in einer Linie
liegen, wie das Bild zeigt.
10
3. Befestigen Sie den Griff mit den in
der Plastiktüte mitgelieferten
Schrauben. Und dann installieren Sie
die Griffabdeckungen.
2. Öffnen Sie das Teil ① auf der
Oberseite des Kühlschrankgehäuses
von der rechten Seite und dann
entnehmen Sie das Teil ② und das
Teil ③.
3. Entnehmen Sie die Eckabdeckung.
Türfächer
1 2
3
Magnetschalterkasten
③
11
4. Entfernen Sie die Schrauben ①,
und dann entfernen Sie das Teil ②.
Hinweis: Bitte halten Sie bei Schritt 4
die obere Tür mit der Hand fest, um
Türfallenlassen zu verhindern.
5. Entfernen Sie die obere Tür und
legen Sie sie auf eine glatte
Oberfläche mit seiner Verkleidung
nach oben. Hebeln Sie das Teil ①
und das Teil ④, und dann lösen Sie
die Schrauben②, wie im Bild gezeigt.
Ändern Sie den Griff ③ auf die rechte
Seite, und dann installieren Sie die
Schrauben ②, das Teil ① und das
Teil ④ nacheinander. Lösen Sie die
Schrauben ⑦
, und nehmen Sie das
Teil⑥ und das Teil⑤ ab und dann
installieren Sie das Teil⑤ und ein
anderes Teil⑥ (in der Plastiktüte) auf
der linken Seite mit Schrauben⑦.
Legen Sie das gerade abgenomme
Teil ⑥zurück in die Plastiktüte.
1 2
1
2
3
6.Lösen Sie die Schrauben, die für
das Befestigen des mittleren
Scharniers verwendet werden, und
entfernen Sie das mittlere Scharnier,
und dann entfernen Sie die untere
Tür.
7. Legen Sie die untere Tür auf einer
glatten Oberfläche mit seiner
Verkleidung nach oben. Ändern Sie
den Griff auf die rechte Seite gemäß
Schritt 5. Lösen Sie die
Schrauben⑦, nehmen Sie das Teil⑥
und das Teil⑤ ab. Drehen Sie das
Teil ⑤ um 180 ° und dann
installieren Sie das Teil⑤ und das
Teil⑥ auf die entsprechende
Position auf der linken Seite
zusammen mit Schrauben ⑦.
Handgriff-Abdeckungen
Spezielle
Schneidschraube
Griff
Schraubenloch-Abdeckungen
Türhalter
Anschlagblock
Schneidschraube
②
③
①
④
⑤
⑥
⑦
12
1
2
8. Änderm Sie die
Schraubenlochabdeckungen auf der
mittleren Deckplatte von links nach
rechts (wie in der Abbildung unten
gezeigt).
9. Platzieren Sie den Kühlschrank
flachweise und entnehmen Sie das Teil
③ und dann lösen Sie die Schrauben
④. Entfernen Sie das Teil ② und das
Teil ①.
10. Schrauben Sie die untere
Scharnierachse aus, und ändern Sie
sie in der Nähe von Lochstelle und
dann schrauben Sie sie an und
befestigen Sie die Scheibe.
11. Montieren zu dem Schritt 9 wieder,
ändern Sie das Teil ① nach links und
das Teil② nach rechts, und dann
befestigen Sie sie mit Schrauben④.
Zuletzt installieren Sie das Teil ③.
Der untere Scharnierteil (links)
12. Bewegen Sie die untere Tür und
adjustieren Sie ihre Position , um sie
auf die untere Lochstelle und die
obere Scharnierachse auszurichten.
Drehen Sie das mittlere Scharnier um
180 und ändern Sie die Scheibe auf
der Achse auf die obere Seite, passen
Sie das mittlere Scharnier an die
entsprechende Position an und dann
installieren Sie es.
13. Schrauben Sie die obere
Scharnierachse heraus, und dehren
Sie das obere Scharnier herum und
befestigen Sie die Achse darauf. Dann
legen Sie sie an der Seite für den
Einsatz.
②
Spezielle Schneidschraube
③
Griff
①
Handgriff-Abdeckungen
④
Schraubenloch-Abdeckungen
⑤
Türhalter
⑥
Anschlagblock
⑦
Schneidschraube
13
14.Wechseln Sie die Kabel in der
linken und rechten Nuten des
Kühlschrankgehäuses.
15. Bewegen Sie die obere Tür auf
eine geeignete Position, passen Sie
das Teil ① und die obere Tür an, dann
befestigen Sie das Teil ① durch
Schrauben ②. (Bitte halten Sie die
obere Tür von Hand bei der Installation)
16. Installieren Sie die obere
Scharnierabdeckung (die ist in der
Plastiktüte).
17. Kehren Sie das Teil ① um und
installieren Sie ihn auf der rechten
Ecke der oberen Tür.
1
18. Entnehmen Sie den Reedschalter
aus der Abdeckungssperre (Teil ③ 6
in Schritt 3) und montieren Sie ihn
auf die andere Sperre für den Einsatz
(mit „R“ gekennzeichnet in der
Plastiktüte). Legen Sie die gerade
entfernte Abdeckungssperre zurück
in die Plastiktüte.
1 1
3
2
Hinweis:
Achten Sie darauf, dass die
Zeichenseite des Reedschalters mit
der Abdeckungssperre übereinstimmt.
19. Installieren Sie das Teil ①,
schließen Sie den Kabelverbinder ②
an, und installieren Sie dann das Teil
③.
20. Öffnen Sie die obere Tür,
montieren Sie die Türfächer und dann
schließen Sie sie.
1.Gehäuse
2.Anzeigetafel-Teil
3.LED-Anzeigenleuchte
4.Glasregal
5.Plastikregal
6.Gemüsefachabdeckung
7.Obst- und Gemüsefach
8.Oberes Gefrierfach
9Oberes Gefrierfach-Glasregal
10.Mittleres Gefrierfach (große Box)
11.Mittleres Gefrierfach-Glasregal
12.Unteres Gefrierfach
13.Einstellbare Fußteile
14.Kühlschranktür
15.Mittleres Kühlschrank-Türregal
16.Unteres Kühlschrank-Türregal
17.Kühlschrank-Türdichtung
18.Griffe
19.Gefrierschrank-Türdichtung
20.Gefrierschranktür
15
16
17
18
19
20
21
22
13
14
8
2
16
17
18
19
20
9
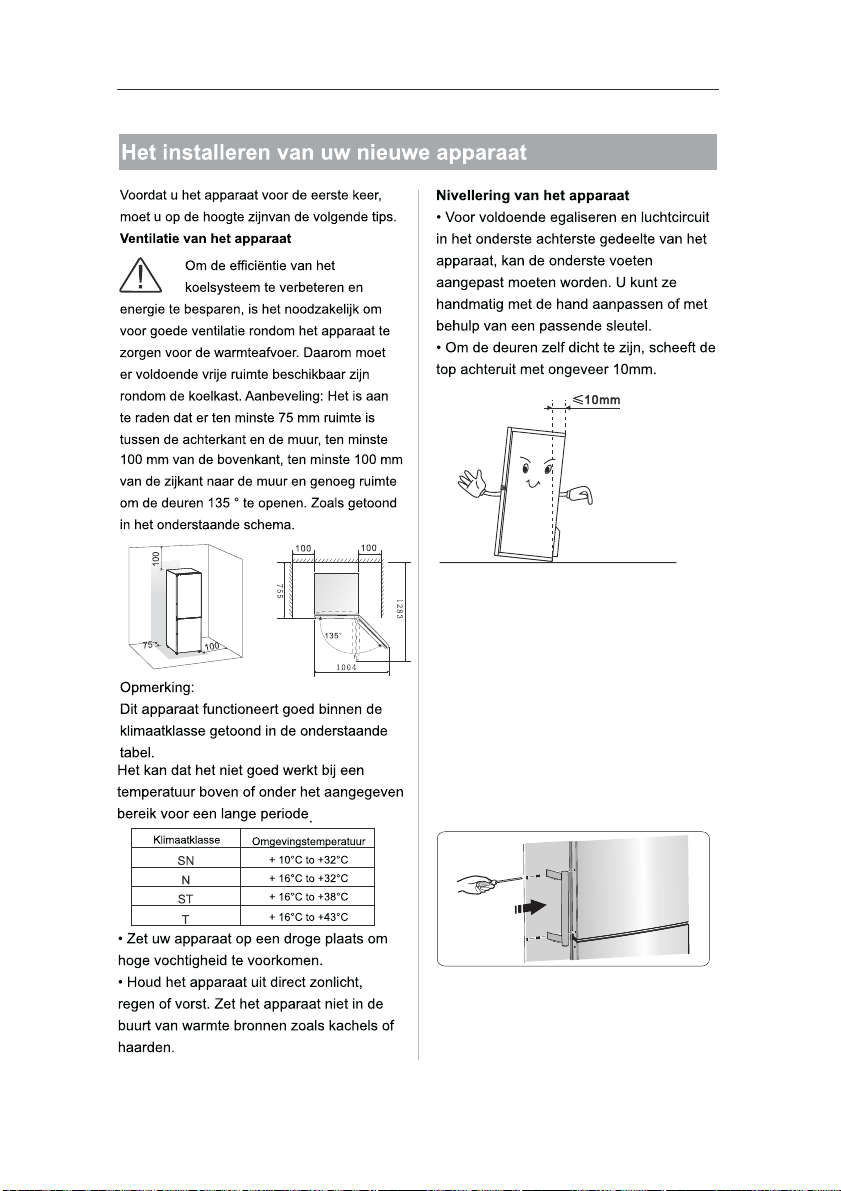
Installeren van de deurgrepen
Voor het gemak tijdens het transport
worden de deurgrepen apart geleverd
in een plastic zakje en u kunt de
deurgrepen als volgt installeren.
1. Verwijder de schroefdoppen aan de
linkerkant van de deur en leg deze
terug in het plastic zakje.
2. Vergelijk de greep op de linkerkant
van de deur, waarbij u de assen van
de schroefgaten in het handvat in lijn
houdt met de deur zoals getoond in de
afbeelding.
3. Bevestig de greep met de speciale
schroeven die zich in het bijgeleverde
plastic zakje bevinden. Vervolgens
installeert u de deurgrepen.
1 0
2. Open deel ① vanaf de bovenkant
van de koelkast chassis aan de
rechterkant en vervolgens neem deel
② en deel ③ uit.
3. Verwijder de hoekafdekking.
4. Verwijder de schroeven ① , en
verwijder deel ②.
Opmerking: Houdt de bovenste
deur vast met de hand gedurende
stap 4 om vallen te voorkomen.
5. Verwijder de bovenste deur en
plaats het op een glad oppervlak met
het paneel naar boven gericht. Til deel
① en deel ④ op , en vervolgens de
schroeven losmaken ② , zoals
getoond in de afbeelding. Breng de
greep ③ naar de rechterkant,
vervolgens installeer de schroeven
②,deel ① en deelt ④
achtereenvolgens. Draai de schroeven
los ⑦, verwijder deel ⑥ en deel ⑤ en
1 2
3
Magnetische draaibox
③
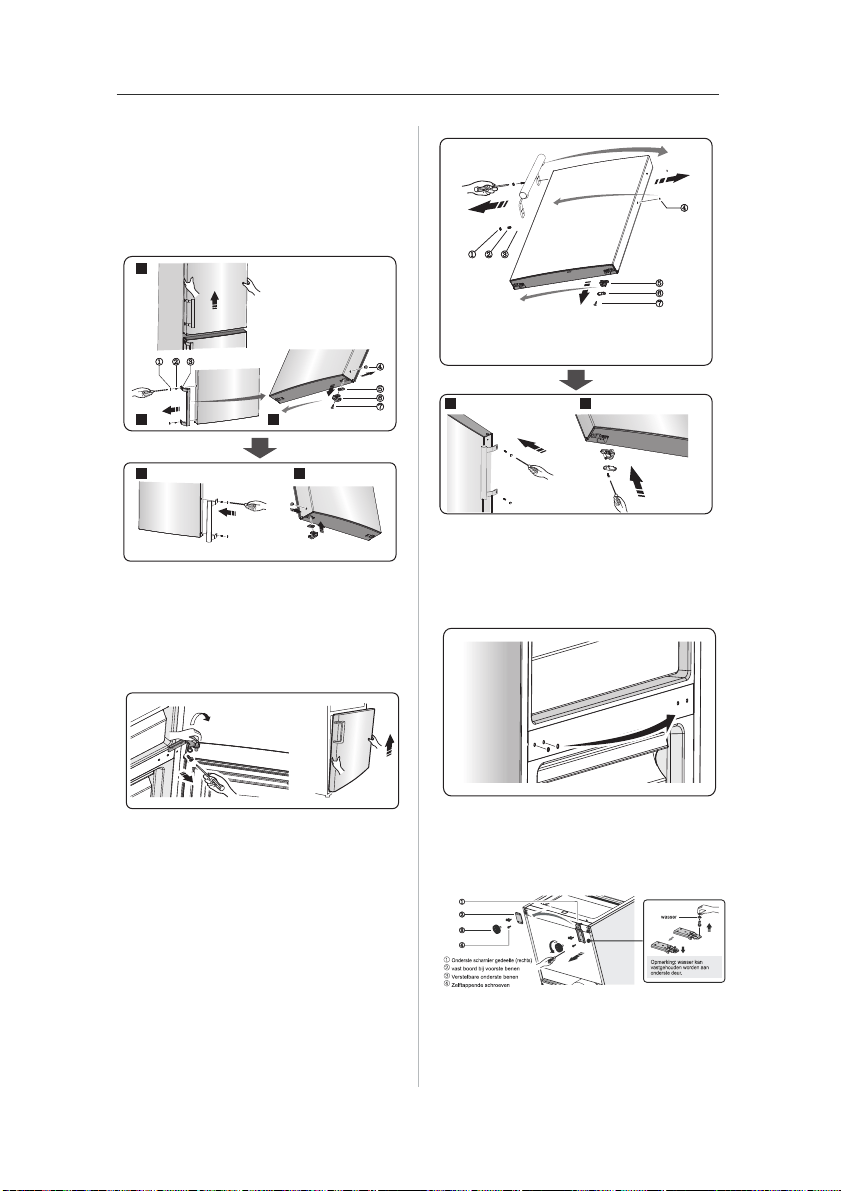
1 1
vervolgens installeer deel ⑤ en het
andere deel ⑥ (in het plastic zakje)
naar de linkerkant met de schroeven
⑦. Plaats het zojuist verwijderde deel
⑥ in het plastic zakje.
②
Speciale zelftappende schroeven
③
Greep
①
Deurgrepen
④
Schoefgat afdekking
⑤
Deurhouder
⑥
Stop blok
⑦
Zelftappende schroeven
1 2
1
2 3
6. Draai schroeven los die gebruikt
zijn om de middelste scharnier vast te
maken en verwijder de middelste
scharnier. Vervolgens verwijder de
onderste deur.
7. Plaats de onderste deur om een
glad oppervlak met het paneel naar
boven gericht. Verander de greep
naar de rechterzijde overeenkomstig
stap 5. Draai de schroeven los ⑦,
verwijder deel ⑥ en deel ⑤. Draai
deel ⑤ met180°en vervolgens
installeer deel ⑤ en deel ⑥ naar de
overeenkomstige positie aan de
linkerkant met de schroeven ⑦
.
②
Speciale zelftappende schroeven
③
Greep
①
Deurgrepen
④
Schoefgat afdekking
⑤
Deurhouder
⑥ Stop block
⑦
Zelftappende schroeven
1
2
8. Verander de schroefgaten van de
middelste afdekplaat van links naar
rechts(zoals getoond in de afbeelding
hier beneden).
9. Plaat de koelkast liggend, verwijder
deel ③ en draai vervolgens de
schroeven los④ . Verwijder deel ② en
deel ①.
10. Draai de onderste scharnier los,
verander het naar het dichtsbijzijnde
schroefgat, en schroef het vervolgens
vast en bevestig de sluitring.
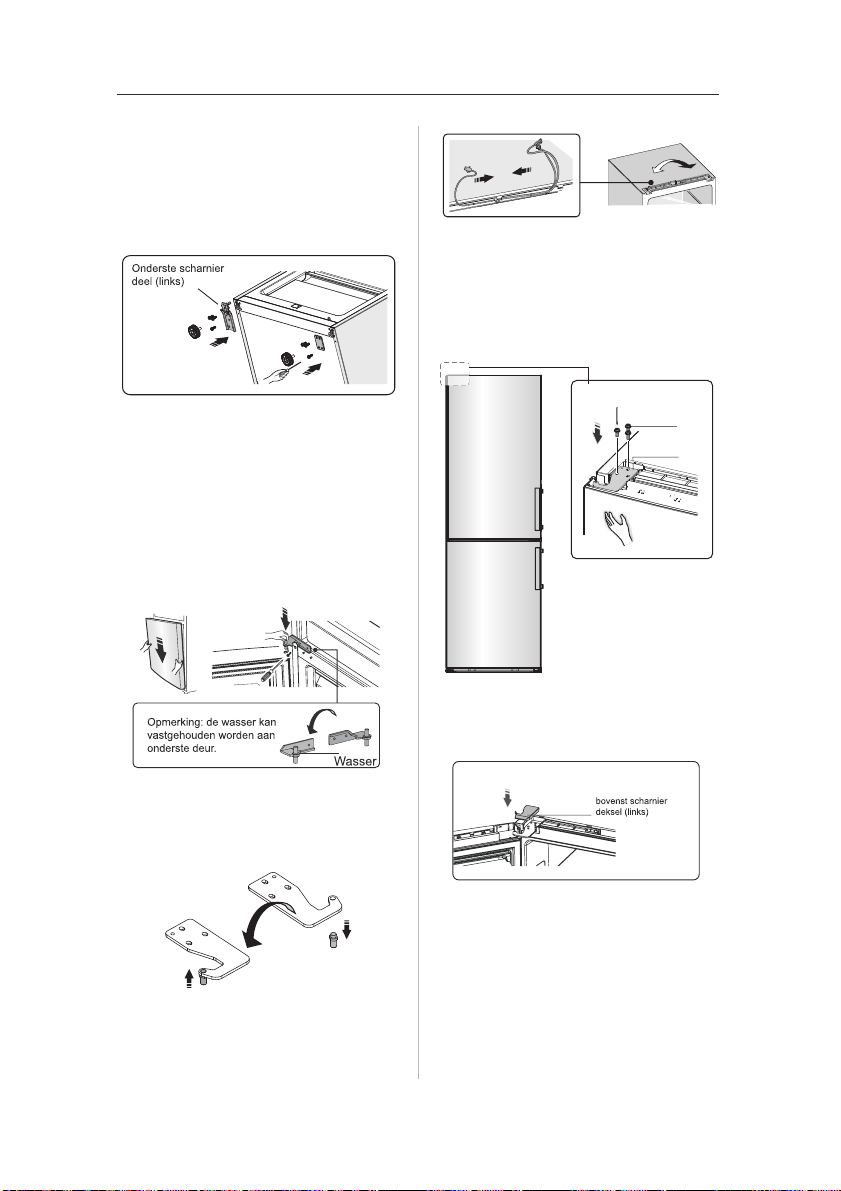
1 2
11. Begin met het monteren vanaf stap
9, verander deel ① naar de linkerkant
en deel ② naar rechts en bevestig
deze met de schroeven ④. Als laatste
installeer deel ③
.
12. Verplaats de onderste deur en stel
de positie bij om het onderste
schroefgat en de bovenste scharnieras
uit te lijnen. Draai de middelste
scharnier met 180, verander de
sluitring op de as naar de bovenkant,
stel de middelste scharnier bij naar de
gewenste positie en vervolgens
installeren.
13. Schoef de bovenste scharnieras
los, draai de bovenste scharnier en
bevestig de as op deze. Plaats het
vervolgens voor gebruik.
14. Wissel de draden van zowel de
linker en rechter sleuven van het
koelkast chassis.
15. Verplaats de bovenste deur naar
de gewenste positie, stel deel ① bij en
de bovenste deur, en vervolgens
bevestig deel ① met de schroeven ②.
(Houdt de bovenste deur vast met de
hand tijdens de installatie)
①
②
16. Installeer de bovenste
scharnierdeksel ( deze bevindt zich in
het plastic zakje).
17. Deel ① omkeren en installeer het
aan de rechterhoek op de bovenste
deur.
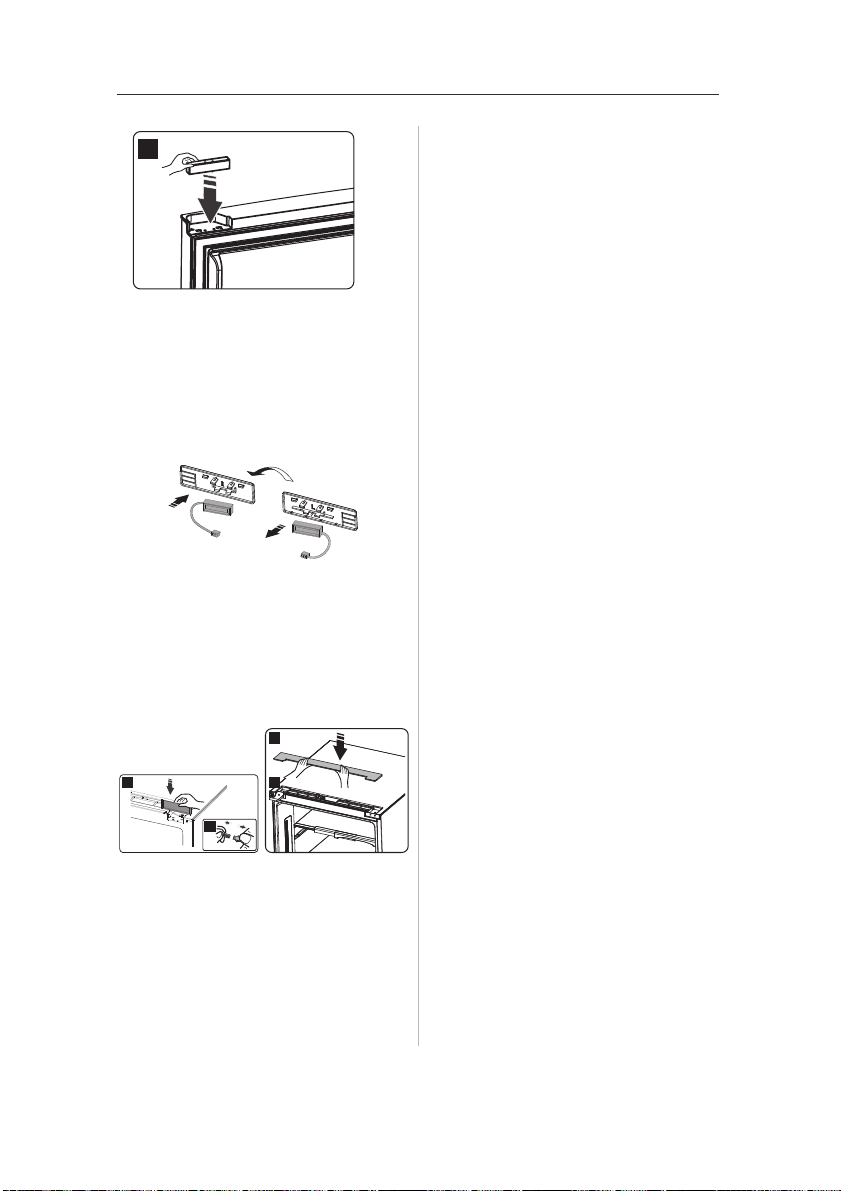
1 3
1
18. Neem de reed-schakelaar uit de
houder(deel ③ 6 in stap 3) en
monteer het op eeen ander houder
voor gebruik (welk is aangeven met
een “R” in het plastic zakje). Plaats de
zojuist verwijderde houder in het
plastic zakje.
1 1
3
2
Opmerking:
Wees er zeker van dat de teken kant
van reed-schakelaar goed bij de
houder past.
19. Installeer deel ①
, verbindt de
draadverbinder ②, en installeer
vervolgens deel ③.
20. Open de bovenste deur, monteer
de deurschappen en sluit het
vervolgens.
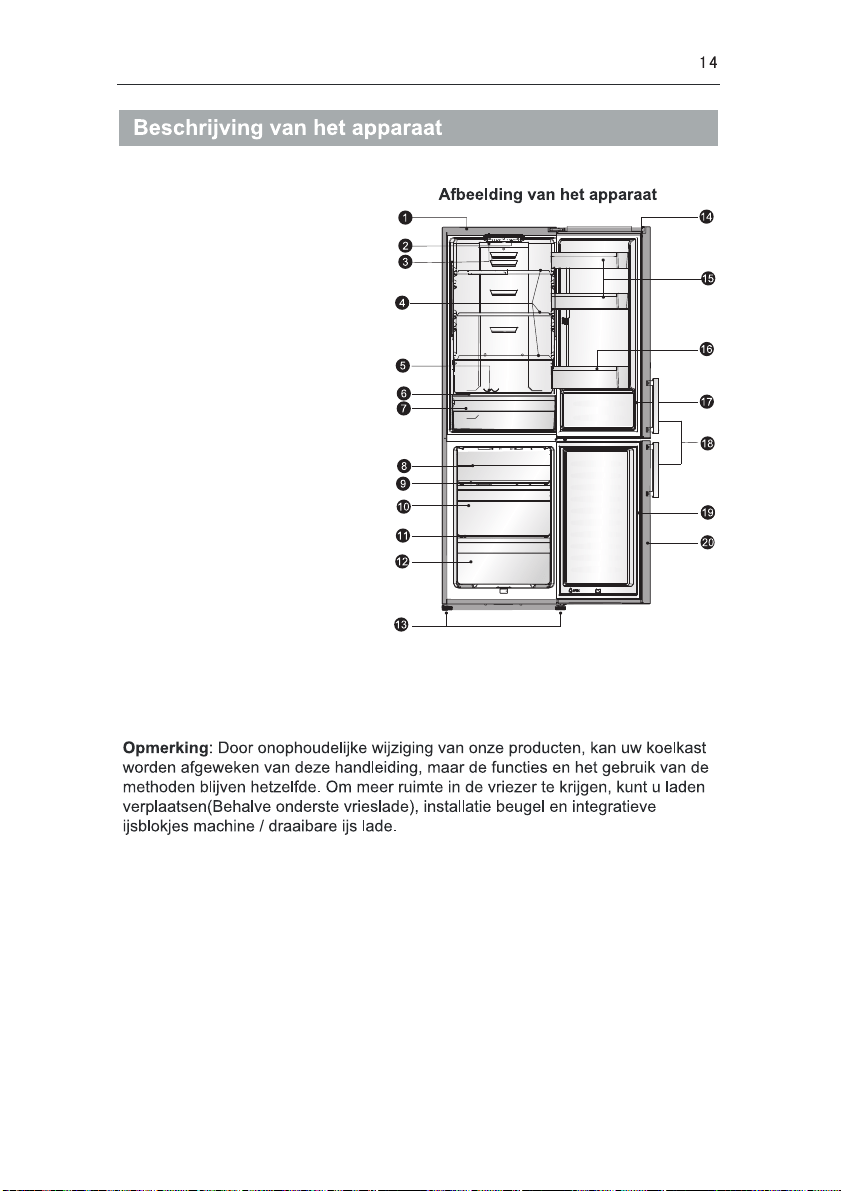
1. Koelkast chassis
2. Display gedeelte
3. LED lampje
4. Glazen plaat
5. Plastic plaat
6. Verslade afdekking
7. Fruit en verslade
8. Bovenste vriesvak
9. Bovenste vriesvak plaat
10. Middelste vrieslade (grote kast)
11. Middelste vrieslade plaat
12. Onderste vrieslade
13. Verstelbare bodemvoeten
14. Koelkastdeur
15. Middelste koelkast deurschap
16. Onderste koelkast deurschap
17. Afdichtingsrubber deur koelkast
18. Grepen
19. Afdichtingsrubber deur vriezer
20. Vriezer deur
15
16
17
18
19
20
21
2
2