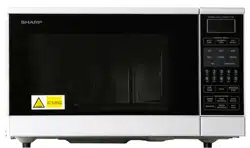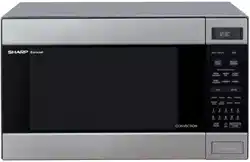
Info Display
OPERATION MANUAL
J
MODELS
®
CONVECTION MICROWAVE OVEN
TM
CONTENTS Page
Warranty 1
Introduction 2
Warning 3
Special Notes and Warning 4
Installation Instructions 5
Oven Diagram 5
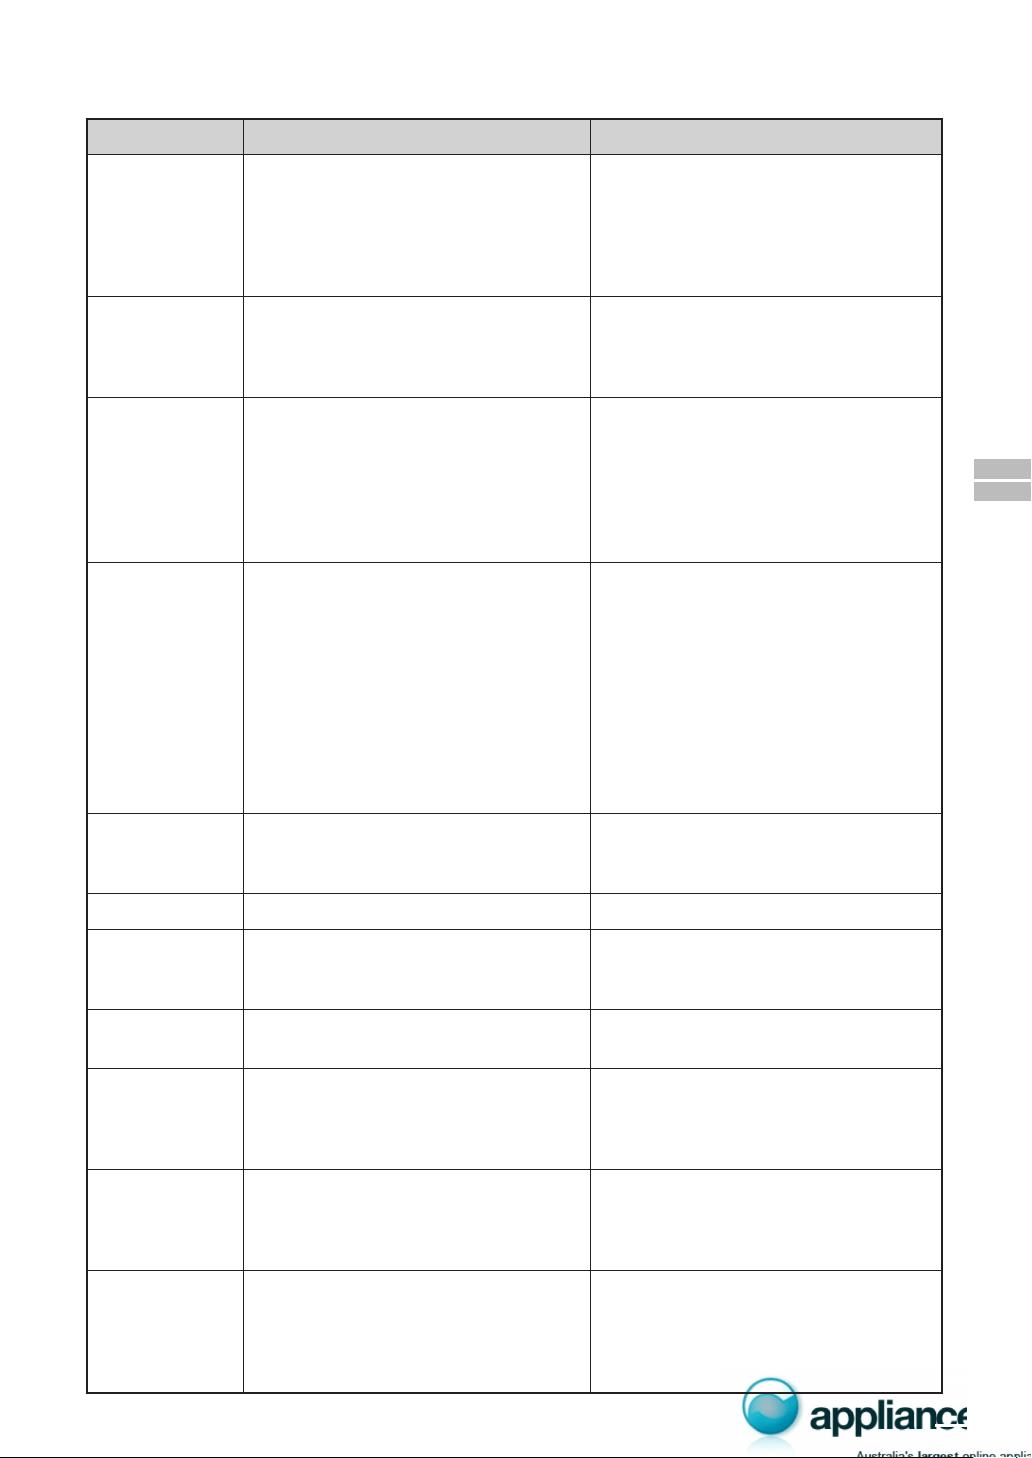
Operation of Touch Control Panel 6
Control Panel Display 6
Touch Control Panel Layout 6
Before Operating 7
Getting Started 7
Clock Setting 7
Stop/Clear 7
To Cancel Program 7
Microwave Cooking 8
Microwave Time Cooking 8
Sequence Cooking 9
Instant Cook 9
Heating without Food 10
Convection Cooking 10
To Cook by Convection 10
To Preheat and Cook by Convection 11
Mix Cooking 12
To Use Automatic Mix Settings 12
To Preheat and Cook
with Automatic Mix Settings 13
Convection and Microwave Cooking 14
Grilling 15
Preheating 16
Automatic Operations 17
Notes for Automatic Operations 17
Sensor Instant Action 17
Reheat Sensor 18
Multi Cook 19
Easy Defrost 20
Other Convenient Features 21
Help Feature 21
Less/More Setting 24
Increasing/Decreasing Time 24
Memory 25
Alarm 25
Care and Cleaning 26
Service Call Check 26
Specifications 26
Cooking Guides 1 –
13
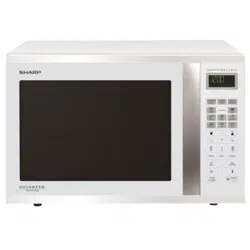
R-980J
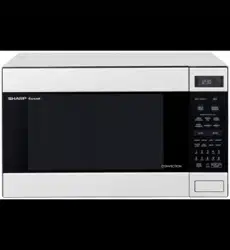
R-990J(S)
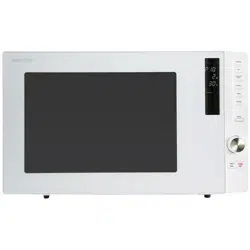
R-990K(S)/(W)
Congratulations on Your Purchase!
This Sharp product is warranted against faults in material and manufacture for the
period as stated in the table below.
If service is required during the warranty period, please contact your nearest Sharp
Approved Service Centre. These repairs would be carried out at no charge to the
owner, subject to the conditions specified herein.
This warranty does not extend to defects or injuries caused by or resulting from causes
not attributable to faulty parts or the manufacture of the product, including but not
limited to, defect or injury caused by or resulting from misuse, abuse, neglect, lack of
maintenance, accidental damage, improper voltage, liquid spillage, vermin infestation,
software, or any alterations made to the product which are not authorised by Sharp.
Please retain your sales documentation, as this should be produced to validate a
warranty claim. This warranty is in addition to and in no way limits, varies or excludes
any implied rights and remedies under any relevant legislation in the country of sale.
WARRANTY PERIODS
Home Theatre Projector 12 months
Audio/Home Theatre 12 months
Microwave / Steam Oven 12 months
Slow Juicer 12 months
Refrigerator 24 months
DVD/Blu-ray 12 months
Washing Machine 24 months
Portable Air Conditioner 12 months
LCD Television 12 months
Air Purifier 12 months
Vacuum Cleaner 24 months
IMPORTANT NOTICE: This warranty applies only to products sold in Australia & New Zealand
S
H
A
RP C
ORP
O
RA
T
I
O
N
OF
A
US
T
RALIA PTY. LI
M
ITE
D
ABN
4
0
0
0
3
03
9
4
0
5
1
Huntingwo
o
d
D
rive
Hu
nt
i
n
g
w
o
o
d NSW
21
4
8
SHARP CORP
O
RATI
O
N OF
NEW Z
EALAND LIMITED
59 Hugo Johnston
Drive
Penr
o
se,
Au
c
k
la
n
d
WARRANTY
Consumer Electronic Products
SPform 040 (SEPT 2013)
Australian customers: Our goods come with guarantees that cannot be excluded
under the Australian Consumer Law. You are entitled to a replacement or refund
for a major failure and for compensation for any other reasonably foreseeable
loss or damage. You are also entitled to have the goods repaired or replaced
if the goods fail to be of acceptable quality and the failure does not amount
to a major failure. The criteria of a major failure is defined in the Australian
Consumer Law. Should you require any assistance with a major failure please
contact Sharp Customer Care.
This warranty does not cover transportation to and from the Sharp Approved Service
Centre. Goods presented for repair may be replaced by refurbished goods of the same
type rather than being repaired. Refurbished parts may be used to repair the goods.
The repair of your goods may result in the loss of user generated data, please ensure
that you have saved this data elsewhere prior to repair.
(excluding lamps and air filters)
FOR LOCATION ENQUIRIES WITHIN
AUSTRALIA
REGARDING YOUR LOCAL
SHARP APPROVED SERVICE CENTRE
VISIT OUR WEBSITE AT
www.sharp.net.au
OR CALL SHARP CUSTOMER CARE
1300 135 022
SHARP CORPORATION OF AUSTRALIA PTY LTD
(LOCAL CALL COSTS APPLY WITHIN AUSTRALIA)
FOR LOCATION ENQUIRIES WITHIN
NEW ZEALAND
REGARDING YOUR LOCAL
SHARP CORPORATION OF NEW ZEALAND LIMITED
VISIT OUR WEBSITE AT
SHARP CUSTOMER SERVICES
TELEPHONE: 09 573 0111
FACSIMILE: 09 573 0113
SHARP APPROVED SERVICE CENTRE
www.sharp.net.nz
CONTACT YOUR SELLING DEALER/RETAILER
OR CALL
SPform019(JUNE 2004)

2
®
INTRODUCTION
The manual is divided into two sections:
1. OPERATION (P3~P26)
This section describes your oven and teaches you how to use all the features.
2. COOKING GUIDE
This section is at the back of the manual, it contains the more commonly used information such as how to
prepare food, which cooking utensil to use, standing time.
It also contains recipes for automatic cooking.
Please take some time to read your operation manual carefully, the automatic cooking menus programmed into
your new oven have been carefully developed to give optimum results when the step-by-step instructions are
followed.
When selecting another home appliance, please again consider our full range of Sharp products.
INFO DISPLAY COOKING SYSTEM
Thank you for buying a Sharp Microwave Oven.
Your new oven has an "Information Display System" which offers you step-by-step instructions to easily
guide you through each feature.
Your oven also has a HELP key for instructions on using Auto Start, Information Guide On / Off,
Demonstration Mode, Child Lock, Info on pads and Help.
After gaining experience and confidence using your oven, the information display can be turned off.
We strongly recommend however that you read this operation manual thoroughly before operating your
oven, paying particular attention to the safety warnings and special notes.
3
WARNING
IMPORTANT SAFETY INSTRUCTIONS : READ CAREFULLY AND KEEP FOR FUTURE REFERENCE.
Do not put things on top of the oven or cover the outer cabinet.
To reduce the risk of fire in the oven cavity:
a. Do not overcook food.
b. Remove wire twist-ties from paper or plastic bags before placing bag in the oven.
c. Do not heat oil or fat for deep frying. The temperature of the oil cannot be controlled.
d. Look at the oven from time to time when food is heated in disposable containers made of plastic, paper
or other combustible materials for signs of smoke or burning.
e. If materials inside the oven should ignite, or smoke is observed, keep oven door closed, turn oven
off, and disconnect the power plug, or shut off power at the fuse or circuit breaker panel.
To reduce the risk of an explosion or delayed eruptive boiling when handling the container.
Your microwave oven is capable of heating food and beverages very quickly therefore, it is very important
that you select the appropriate cooking time and power level for the type and quantity of food to be heated.
If you are unsure of the cooking time and power level required, begin with low cooking times and power levels
until the food is sufficiently heated evenly throughout.
Additionally:
a. Do not place sealed containers in the oven. Babies bottles fitted with a screw cap or teat are
considered to be sealed containers.
b. Do not use excessive amount of time.
c. When boiling liquids in the oven, use a wide-mouthed container.
d. Stand at least for 20 seconds at the end of cooking to avoid delayed eruptive boiling of liquids.
e. Stir the liquid before and during cooking. Use extreme care when handling the container or inserting
a spoon or other utensil into the container.
This oven is for home food preparation only and should only be used for heating, cooking and defrosting food
and beverage.
It is not suitable for commercial, laboratory use, or heating therapeutic devices eg. Wheat bags.
Never operate the oven whilst any object is caught or jammed between the door and the oven.
Do not try to adjust or repair the oven yourself.
It is hazardous for anyone other than a qualified service technician trained by SHARP to carry out any service
or repair operation. Especially those which involve the removal of a cover which gives protection against
exposure to microwave energy are very hazardous.
Do not operate the oven if it is not working correctly or damaged until it has been repaired by a qualified service
technician trained by SHARP. It is particularly important that the oven door closes properly and that there
is no damage to:
(1) Door (warped), (2) Hinges and Latches (broken or loosened), (3) Door Seals, Sealing Surfaces and oven
cavity (buckled or deformed), (4) Burn marks on the door seal faces.
Do not bump, or catch utensils, loose clothes and your accessories on the door safety latches when removing
food from the oven.
Never poke an object, particularly a metal object, through a grille or between the door and the oven while the
oven is operating.
Never tamper with or deactivate the door safety latches.
Always use oven gloves to prevent burns when handling utensils that are in contact with hot food. Enough
heat from the food can transfer through utensils to cause skin burns.
Should the power supply cord become damaged, it must be replaced with a special cord supplied by a
SERVICE CENTRE APPROVED BY SHARP. And it must be replaced by a qualified service technician
trained by SHARP in order to avoid a hazard.
If the oven lamp fails please consult your dealer or a qualified service technician trained by SHARP.
Avoid steam burns by directing steam away from the face and hands.
Slowly lift the furthest edge of a dish's cover including microwave plastic wrap etc., and carefully open
popcorn and oven cooking bags away from the face.
Make sure that the power supply cord is undamaged, and that it does not run under the oven or over any hot
surfaces or sharp edges.
Do not store food or any other items inside the oven.
Make sure the utensil does not touch the interior walls during cooking.
Accessible parts (e.g. oven door, oven cavity, dishes and accessories) may become hot during use. To avoid burns
young children should be kept away. Always use thick oven gloves to prevent yourself from getting burnt.
Only allow children to use the oven without supervision when adequate instructions have been given so that
the child is able to use the oven in a safe way and understands the hazards of improper use.
This appliance is not intended for use by young children or infirm persons without supervision.
Young children should be supervised to ensure that they do not play with the appliance.
When the appliance is operated in the combination mode (Mix Cooking), Convection Cooking, Grilling or Automatic
Operations, children should only use the oven under adult supervision due to the temperature generated.
4
* Cook eggs in shells. This prevents
"explosion", which may damage the
oven or injure yourself.
* Cook hard/soft boiled eggs.
* Overcook oysters.
* Dry nuts or seeds in shells.
* Pop popcorn in regular brown bags or
glass bowls.
* Exceed maximum time on popcorn
package.
* Heat disposable bottles.
* Overheat baby bottles.
Only heat until warm.
* Heat bottles with nipples on.
* Heat baby food in original jars.
* Heat or cook in closed glass jars or air
tight containers.
* Deep fat fry.
* Heat or dry wood, herbs, wet papers,
clothes or flowers.
* Operate the oven without a load (i.e. an
absorbing material such as food or water)
in the oven cavity except when condition-
ing or cleaning the heater elements as
described in the operation manual.
* Heat for longer than recommended
time. See REHEATING-FOOD CHART
in the attached cookbook.
* Heat or cook food while in cans.
* Overcook as they may catch fire.
* Place meat directly on the turntable for
cooking.
* Use metal utensils for MICROWAVE
cooking. Metal reflects microwave
energy and may cause an electrical
discharge known as arcing.
* Use too much.
* Shield food close to cavity walls.
Sparking can damage the cavity.
* Exceed the preheating time recom-
mended by the manufacturer. Exces-
sive preheating can cause the glass
turntable to shatter and/or damage
internal parts of the oven.
* Puncture egg yolks and whites and
oysters before cooking to prevent
"explosion".
* Pierce skins of potatoes, apples,
squash, hot dogs, sausages and
oysters so that steam escapes.
* Use specially bagged popcorn for the
microwave oven.
* Listen while popping corn for the
popping to slow to 1-2 seconds.
* Transfer baby food to small dish and
heat carefully, stirring often. Check for
suitable temperature to prevent burns.
* Remove the screw cap and teat
before warming baby bottles. After
warming shake thoroughly. Check for
suitable temperature.
* Food with filling should be cut after
heating, to release steam and avoid
burns.
* Use a deep bowl when cooking liquids
or cereals to prevent boiling over.
* For boiling or cooking liquids see
WARNING on page 2 to prevent
explosion and delayed eruptive boiling.
* Remove food from can.
* Cook for the recommended time.
(These foods have high sugar and / or
fat contents.)
* Use a microwave proof roasting rack
to collect drained juices.
* Check the utensils are suitable for
MICROWAVE cooking before you use
them.
* Use to shield food to prevent over
cooking.
* Watch for sparking. Reduce foil or
keep clear of cavity walls.
* Place a suitable insulator such as a
microwave and heat proof dinner plate
between the turntable and the
browning dish.
Eggs, fruits,
nuts, seeds,
vegetables,
sausages and
oysters
Popcorn
Baby food
General
Liquids
(Beverages)
Canned foods
Sausage rolls,
Pies, Christmas
pudding
Meats
Utensils
Aluminium foil
Browning dish
SPECIAL NOTES AND WARNING
DO DON’T
5
INSTALLATION INSTRUCTIONS
1.
Remove all packing materials from the oven cavity, (do not remove the waveguide cover), and the feature sticker
from the outside of the door, if there is one. Check the unit for any damage, such as a misaligned door, damaged door
seals around the door or dents inside the oven cavity or on the door. If there is any damage, please do not operate
the oven until it has been checked by a SERVICE CENTRE APPROVED BY SHARP and repaired, if necessary.
2. Accessories provided
1) Turntable tray
2) Roller stay
3) Low rack
3. Since the door may become hot during cooking, you should place or mount the oven so that the bottom of
the oven is 80 cm or more above floor. You should also keep children away from the door to prevent them
burning themselves.
4. Locate the roller stay in the centre of the oven, then fit the turntable on the roller stay.
Make sure the turntable and roller stay are centrally located and locked together.
NEVER operate the oven without the roller stay and turntable.
5. The oven should not be installed in any area where heat and steam are generated, for example, next to a
conventional oven unit. The oven should be installed so as not to block ventilation openings. When the oven
is mounted on a kitchen benchtop, allow space of at least 40 cm on the top, 5 cm on both sides and at the rear
of the oven for adequate air circulation.
WARNING: The electrical outlet must be readily accessible so that the unit can be unplugged easily in an emergency.
6. Neither the manufacturer nor the distributors can accept any liability for damage to the machine or personal
injury for failure to observe the correct electrical connecting procedure.
The A.C. voltage must be single phase • 230V-240V, 50Hz
7. This appliance must be earthed.
8. Operate the oven from a general purpose domestic outlet.
If a generator is used, do not operate the oven with non-sinusoidal outputs.
9.
To build the oven into a wall or kitchen cabinet, use an appropriate built-in kit. Sharp built-in kit model number
RK-J90W for R-980J/R-990K(W) and RK-J90S for R-990J(S)/R-990K(S) are available which enable the
microwave oven to be integrated within a kitchen, the kit is available from your retailer. This built-in kit has
been tested according to Australian Standards. Sharp does not recommend the use of any other built-in kit.
If the oven is to be positioned near a conventional oven, ensure that adequate space is allowed, and a suitable
heat shield is incorporated between the two to prevent damage to the oven and the built-in kit caused by heat.
10. Before using CONVECTION HEATER ELEMENTS for the first time, operate the oven without food for 20
minutes at 250°C. This will allow the oil that is used for rust protection to be burned off.
4) High rack
5) Cook book
6) Operation manual
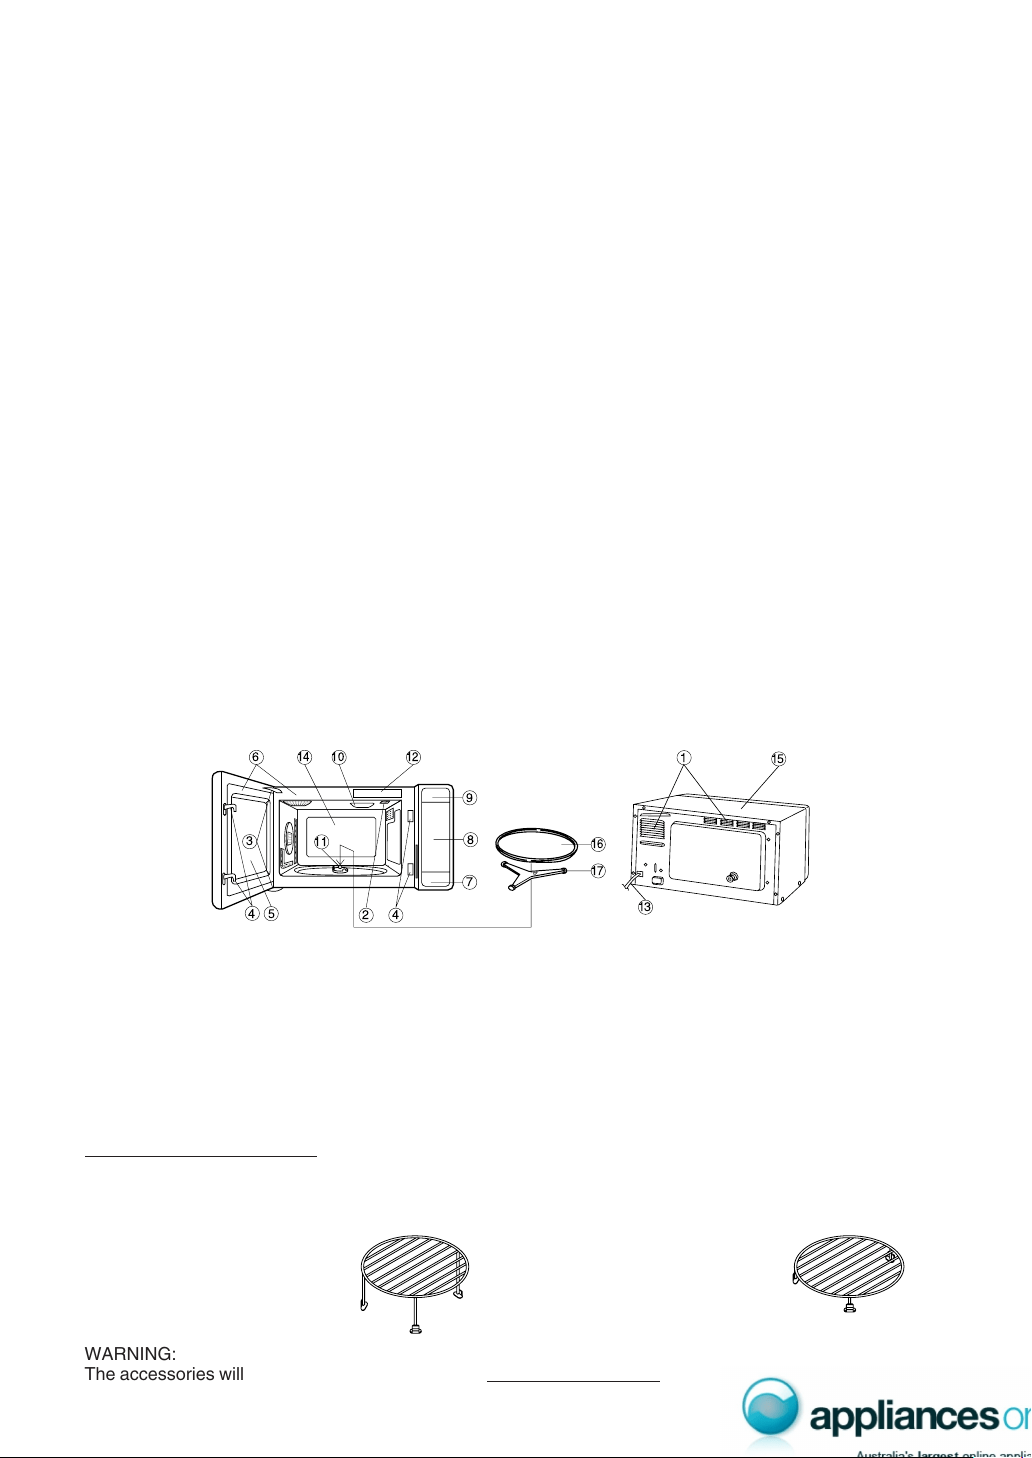
OVEN DIAGRAM
1. Ventilation openings
2. Oven lamp
3. Door hinges
4. Door safety latches
5. See through door
6. Door seals and sealing surfaces
High Rack
-This rack is used for two level
cooking in Convection, such as
layer cakes, muffins, biscuits, etc.,
or for Grill cooking.
Low Rack
-This rack is recommended for
roasting and baking in Convec-
tion or Mix mode and can be used
for reheating and cooking foods
by microwave.
Metal racks——High and low
The racks are for Convection, Mix and Grilling. When cooking on Convection or Mix, do not substitute similar
types of racks for these specially designed ones.
WARNING:
The accessories will become very hot when in use. Use thick oven gloves when inserting/removing the food or
turntable from the oven to PREVENT BURNS.
7. Door open button
8. Touch control panel
9. Digital readout
10. Waveguide cover (Do not remove)
11. Coupling
12. Menu label
13. Power supply cord
14. Oven cavity
15. Outer cabinet
16. Turntable
17. Roller stay
NOTE:
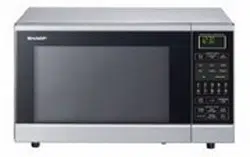
The front-side design is slightly different due to the model you purchased.
6
MIX CONV
DEFROST
SENSOR
COOK KG HELP
OPERATION OF TOUCH CONTROL PANEL
The operation of the oven is controlled by pressing the appropriate pads arranged on the surface of the control
panel.
An entry signal tone should be heard each time you press the control panel to make a correct entry.
In addition an audible signal will sound for approximately 2 seconds at the end of the cooking cycle, or 4 times
when cooking procedure is required.
Indicator
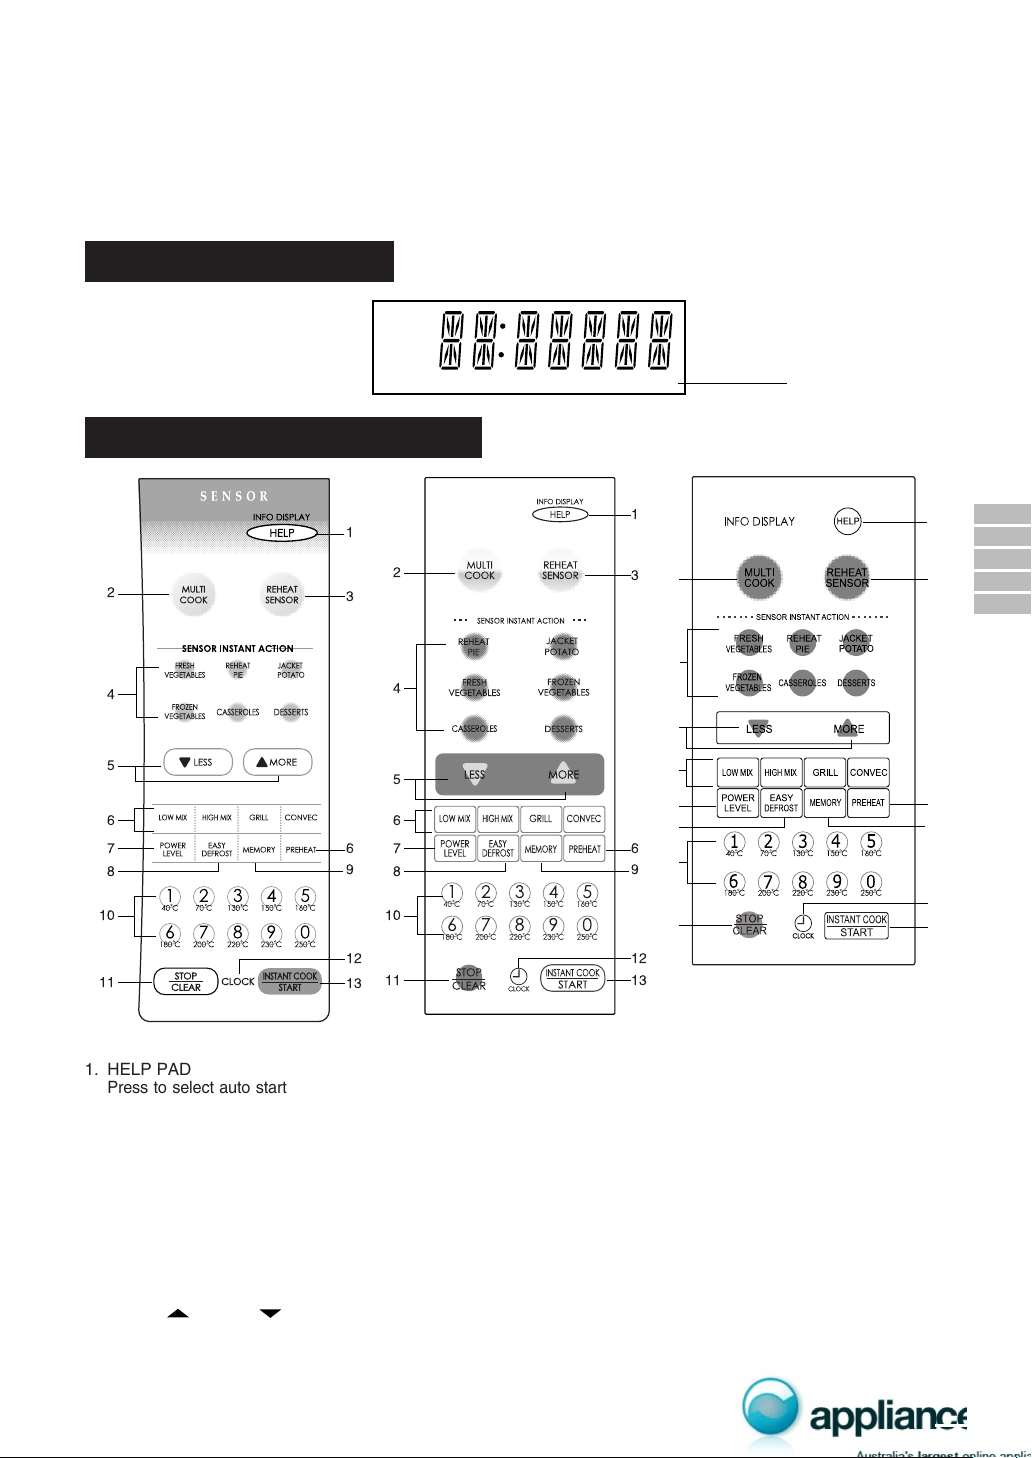
Control Panel Display
Touch Control Panel Layout
1. HELP PAD
Press to select auto start, information
guide on/off, child lock, demonstration
modes or info on pads. Press to obtain
cooking information.
2. MULTI COOK PAD
Press to select Multi Cook mode.
3. REHEAT SENSOR PAD
Press to select 3 popular Reheat
menus.
4.
SENSOR INSTANT ACTION PADS
Press once to cook or reheat 6 pop-
ular menus.
5. MORE( ), LESS( ) PADS
Press to increase/decrease the time
in one minute increments during cook-
ing or to alter the cooking result for the
Sensor Instant Action, Reheat Sen-
sor, Multi Cook or Easy Defrost modes.
6. CONVECTION COOKING
FUNCTION PADS
Press to cook with either func-
tion.
7. POWER LEVEL PAD
Press to select microwave
power setting. If not pressed,
HIGH is automatically select-
ed.
8. EASY DEFROST PAD
Press to defrost meat by enter-
ing weight.
9. MEMORY PAD
Press to enter the frequently
used cooking programme.
Press to recall the memorised
programme.
10. NUMBER AND TEMPERATURE
PADS
Press to enter cooking times, clock
time, convection temperature or to
select the Multi Cook menus.
11. STOP/CLEAR PAD
Press to clear during programming.
Press once to stop operation of oven
during cooking; press twice to cancel
cooking programme.
12. CLOCK PAD
Press to set clock time.
13. INSTANT COOK/START PAD
Press once to cook for 1 minute on
HIGH or increase by 1 minute mul-
tiples each time this pad is pressed
during Microwave, Convection, Grill
or Mix cooking. Press to start oven
after setting programmes.
R-980J
R-990J(S)
6
13
9
3
1
12
2
4
5
6
10
7
11
8
R-990K(S)/(W)
7
* This oven is preset with the INFORMATION GUIDE ON.
To assist you in programming your oven, the information guide will appear in the display.
In this manual, the display of information guide is abbreviated.
* When you become familiar with your oven, the information guide can be turned off. Check page 22.
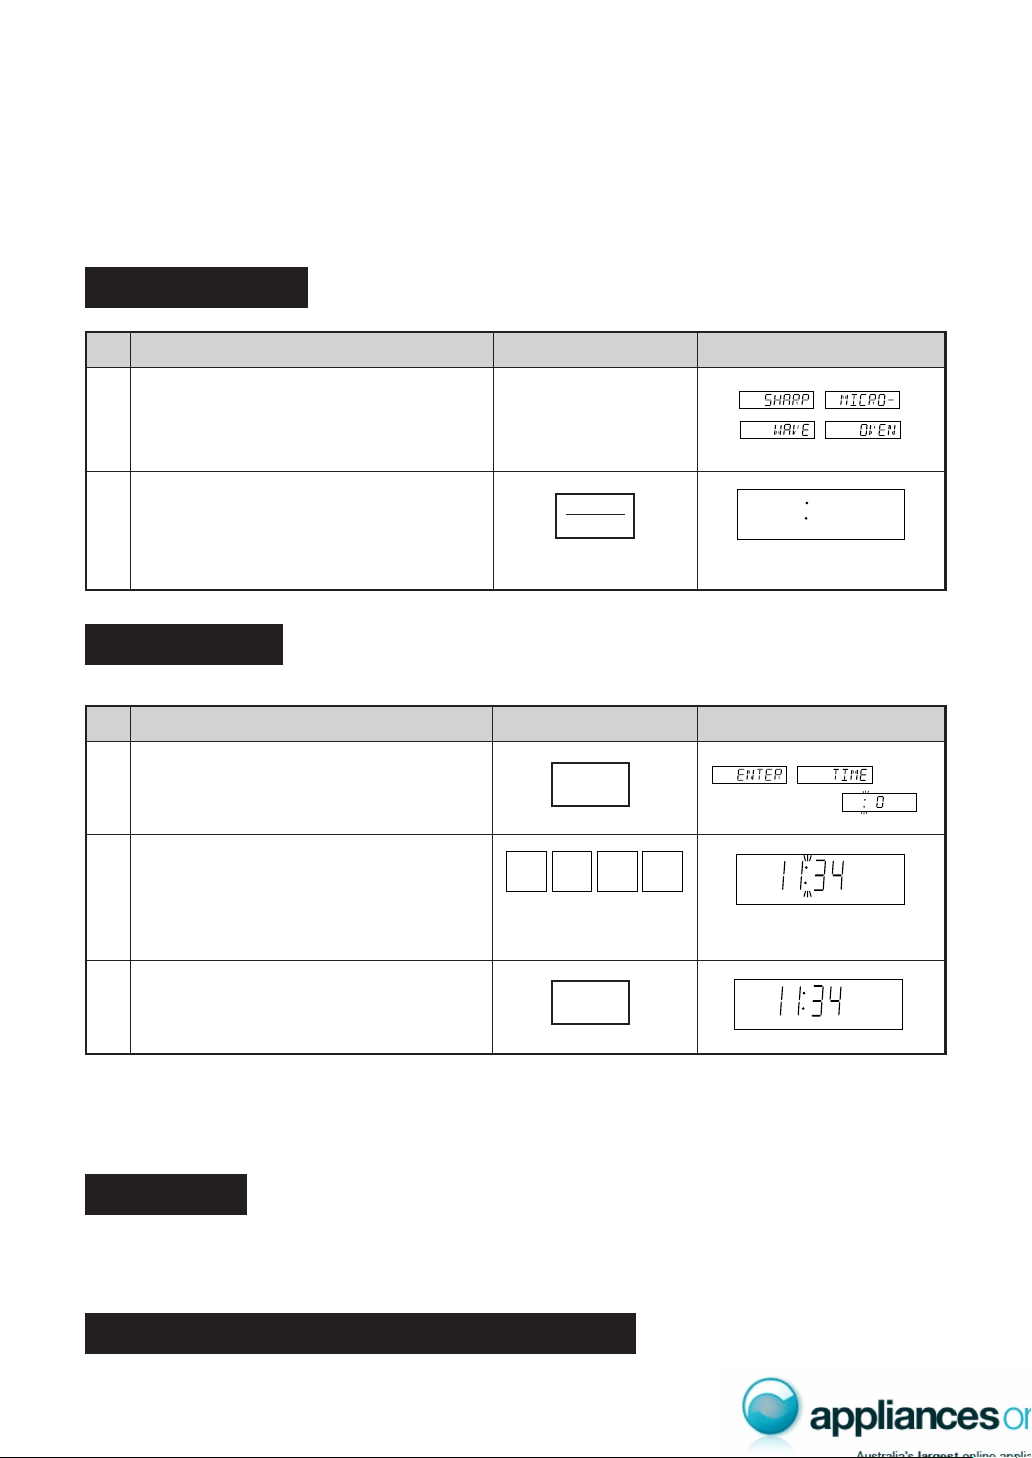
Step
Procedure Pad Order Display
Plug the oven into a power point and switch
on the power.
Ensure the oven door is closed.
Press the STOP/CLEAR pad so that the
oven beeps.
1
BEFORE OPERATING
Getting Started
2
Only the dots will remain.
11 43
Step
Procedure
Press the CLOCK pad.
Enter the correct time of day by pressing the
numbers in sequence.
* To enter the present time of day 11:34 (AM or PM).
(operation guide off:
)
The dots (:) will flash on and
off.
Press the CLOCK pad again.
2
1
3
Clock Setting
Pad Order Display
This is a 12 hour clock. If you attempt to enter an incorrect clock time (eg. 13:45) ERROR will appear in the
display. Press the STOP/CLEAR pad and re-enter the time of day (eg. 1:45).
If you wish to know the time of day during the cooking, auto start or timer mode, press the CLOCK pad. As long
as your finger is pressing the CLOCK pad, the time of day will be displayed.
Press the STOP/CLEAR pad twice.
Stop/Clear
Use the STOP/CLEAR pad to:
1. Stop the oven temporarily during cooking.
2. Clear if you make a mistake during programming.
To Cancel a Programme During Cooking
CLOCK
CLOCK
STOP
CLEAR
8
–
–
–
–
–
–
–
–
Microwave Time Cooking
LOW HIGHMEDIUM
M•LOW M•HIGH
Power level
10% 30% 50% 70% 100%
Defrost
Softening
butter
Fruit
Vegetables
Rice/Pasta
Approximate percentage of
microwave power
Examples of foods typical-
ly cooked on microwave
oven power level
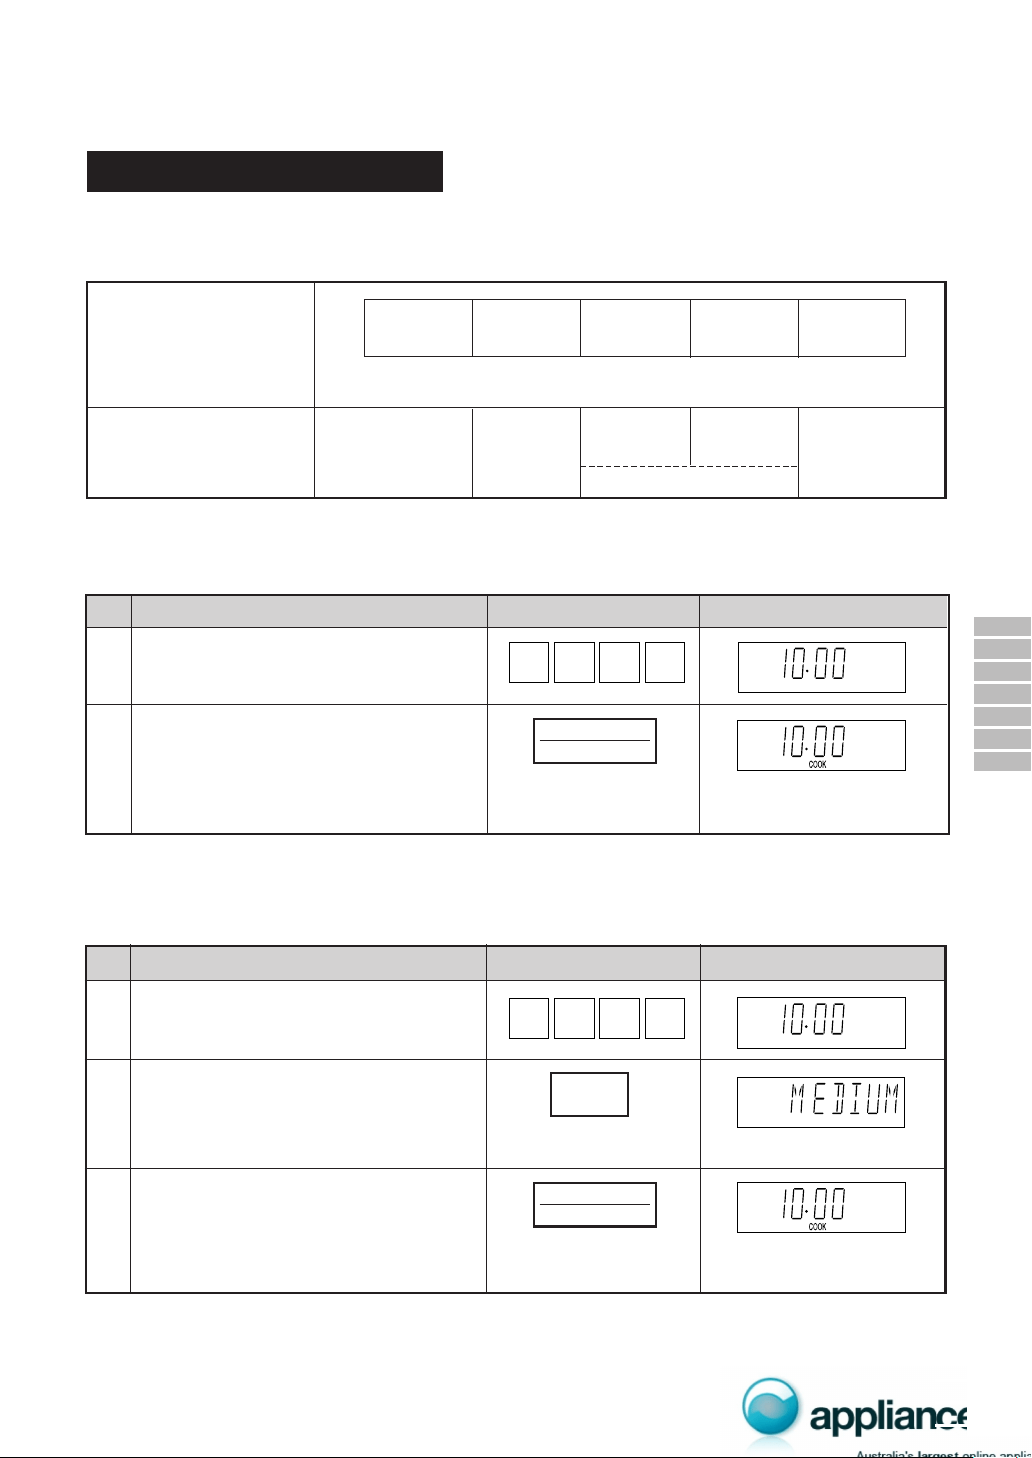
This is a manual cooking feature. First enter the cooking time then the power level.
You can programme up to 99 minutes, 99 seconds.
There are five different power levels.
MICROWAVE COOKING
–
–
–
–
–
–
–
–
–
–
–
–
–
–
–
–
–
–
–
–
–
–
–
–
–
–
–
–
–
–
Keeping food
warm
–
–
–
–
–
–
–
–
Casseroles
–
–
–
–
–
–
–
–
–
–
–
–
–
–
–
–
–
–
Cakes
Muffins
Slices
Seafood
This variable cooking control allows you to select the rate of microwave cooking.
If a power level is not selected, then HIGH power is automatically used.
* Suppose you want to time cook for 10 minutes on HIGH power.
Display
The timer begins to count
down.
Step
Procedure
Enter desired cooking time.
Press the INSTANT COOK/START pad.
Pad Order
1
2
To lower the power press the POWER LEVEL pad once. Note the display will indicate “HIGH”. To lower to
“M•HIGH” press the POWER LEVEL pad again. Repeat as necessary to select “MEDIUM”, “M•LOW” or “LOW”
power levels.
* Suppose you want to cook Fish Fillets for 10 minutes on MEDIUM power.
Procedure Display
Step
Pad Order
Press the INSTANT COOK/START pad.
3
The timer begins to count
down.
If the door is opened during cooking process, the cooking time in the display automatically stops. The cooking
time starts to count down again when the door is closed and the INSTANT COOK/START pad is pressed.
If you want to check the power level during the cooking, press the POWER LEVEL pad.
As long as your finger is pressing the POWER LEVEL pad, the power level will be displayed.
1
Enter desired cooking time.
Select microwave cooking and power level
by pressing the POWER LEVEL pad as
required (for MEDIUM press three times).
2
x 3
01 00
01 00
POWER
LEVEL
INSTANT COOK
START
INSTANT COOK
START
9
Sequence Cooking
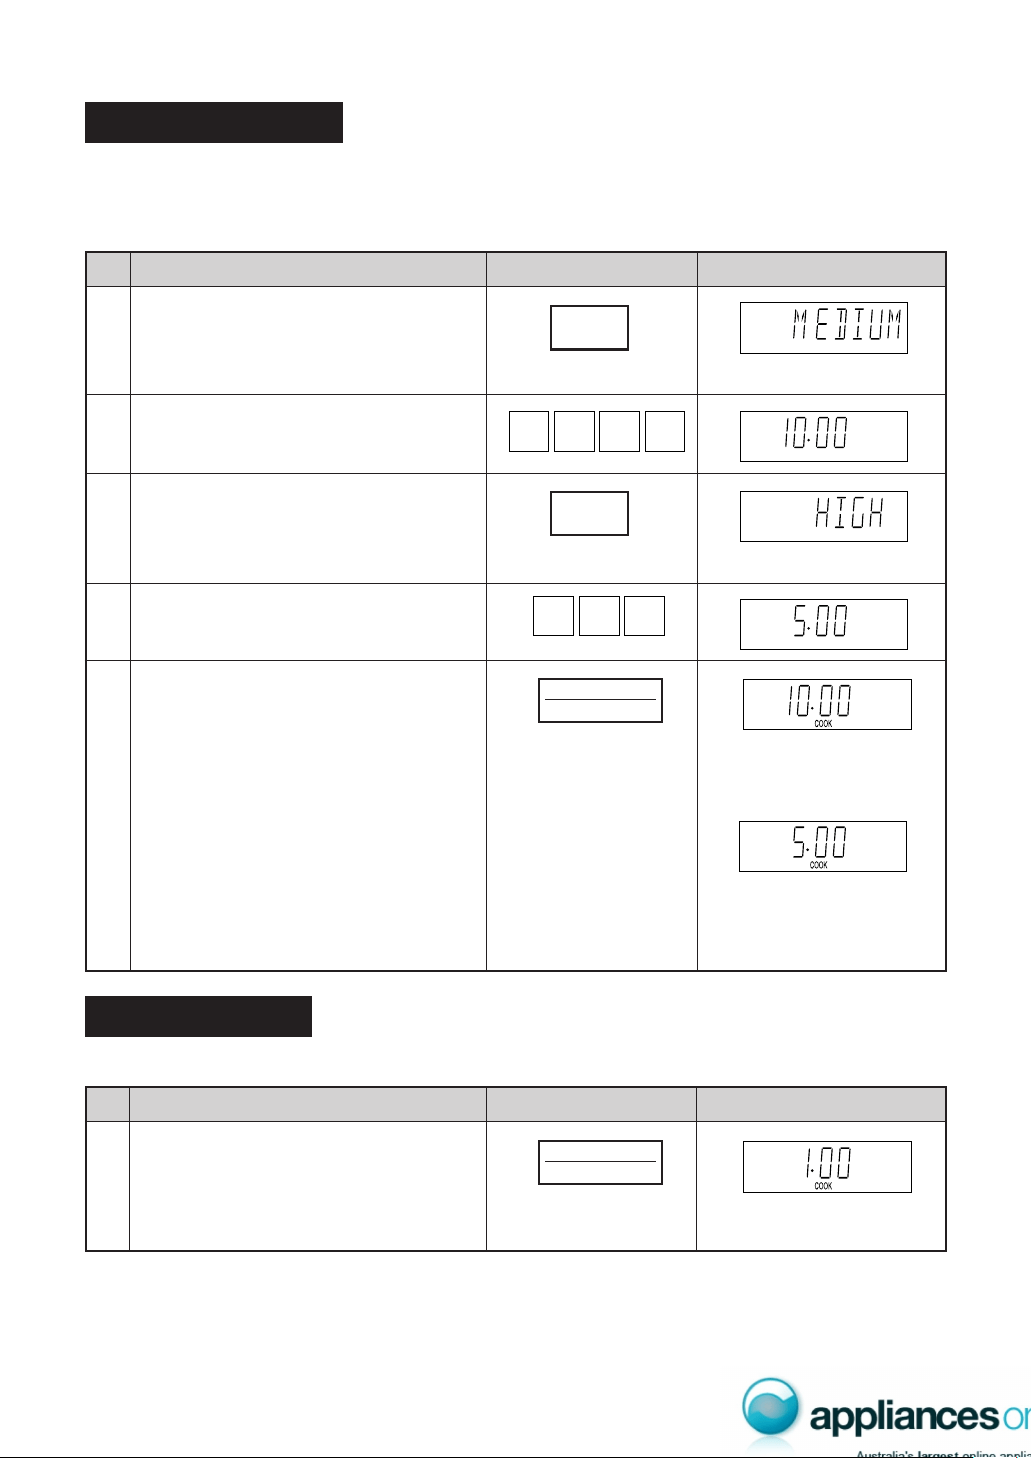
Your oven can be programmed with up to 4 automatic cooking sequences, automatically switching from one
variable power setting to the next.
Note that POWER LEVEL must be entered first when programming sequence cooking.
* Suppose you want to cook for 10 minutes on MEDIUM followed by 5 minutes on HIGH.
Step
Procedure Display
Select microwave cooking and desired power
level by pressing the POWER LEVEL pad (for
MEDIUM press three times).
Enter desired cooking time.
For second sequence, select microwave
cooking and power level (for HIGH press
the POWER LEVEL pad once)
Enter desired cooking time for the second
sequence.
Instant Cook™
Step
Procedure Display
For your convenience Sharp’s Instant Cook allows you to easily cook for one minute on HIGH power.
Press the INSTANT COOK/START pad.
Within one minute of closing the door.
The timer begins to count
down.
Pad Order
Pad Order
The timer begins to count
down to zero. When it reach-
es zero,
the second sequence will ap-
pear and the timer will begin
counting down to zero again.
Press the INSTANT COOK/ START pad until desired time is displayed.
Each time the pad is pressed, the cooking time is increased by 1 minute.
Press the INSTANT COOK/START pad.
1
2
3
4
5
1
x 3
POWER
LEVEL
01 00
005
POWER
LEVEL
INSTANT COOK
START
INSTANT COOK
START

10
CONV CONV
0 002
0 002
CONV
Step
Pad Order
Procedure
Place turntable in the oven.
Press the CONVEC pad.
(Operation guide off : )
CONV
Enter desired temperature.
CONV
COOK
CONV
Press the INSTANT COOK/
START pad.
Enter desired cooking time.
The timer begins to count down to zero.
When timer reaches zero, all indicators will
go out and the oven will "beep".
will appear on the display. The cooling fan
will remain on until the oven cavity has cooled.
1
2
3
4
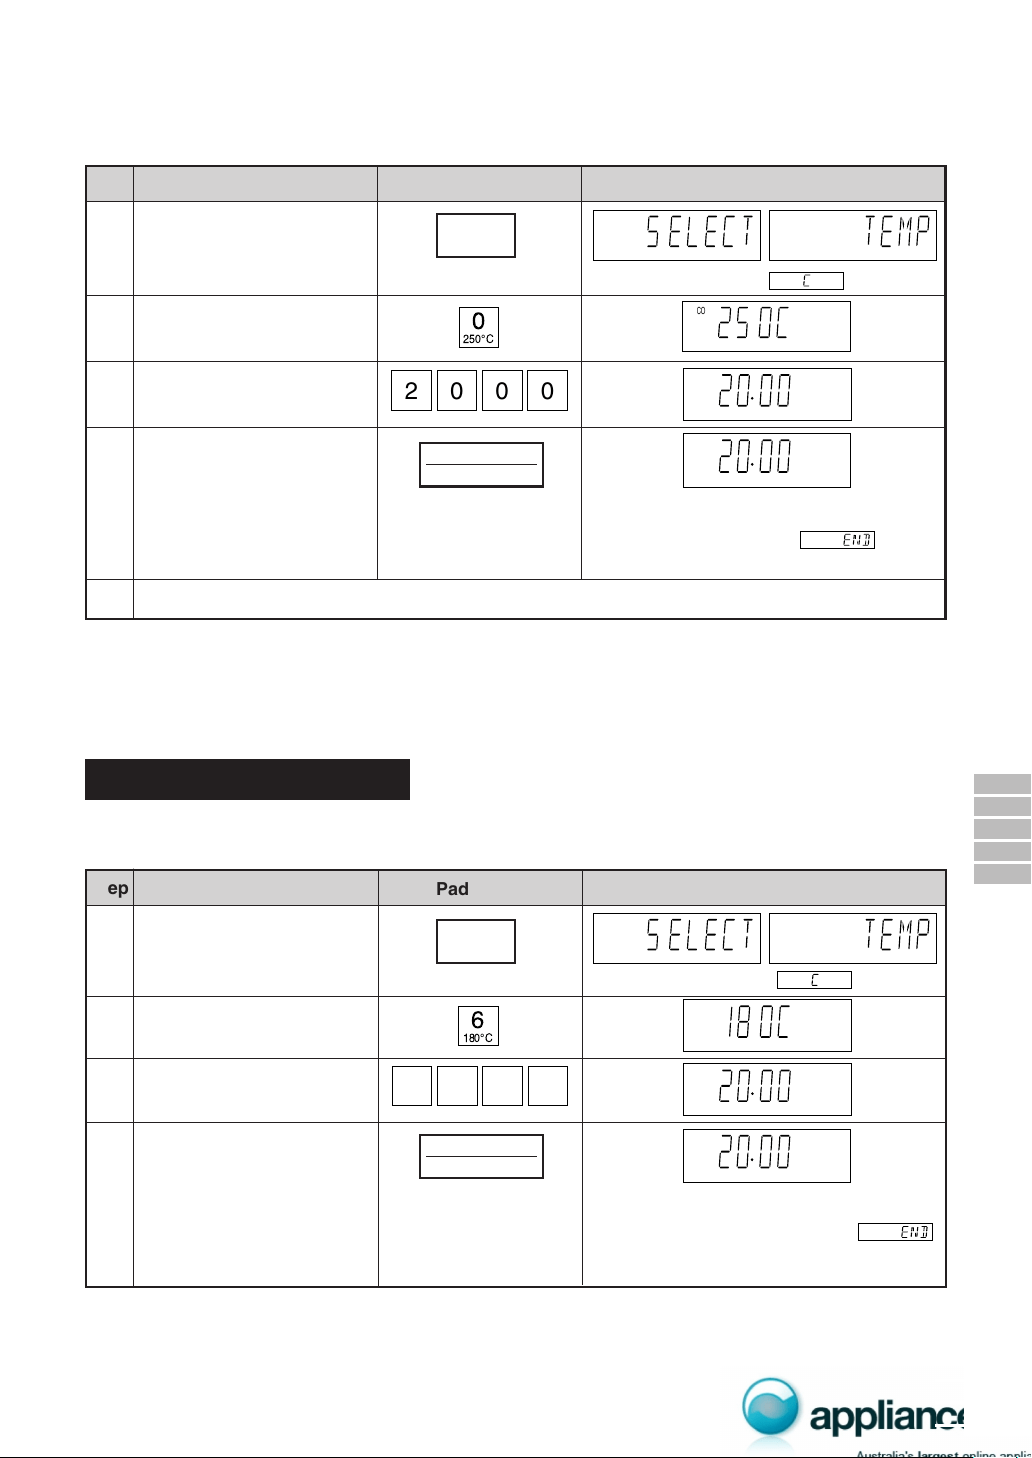
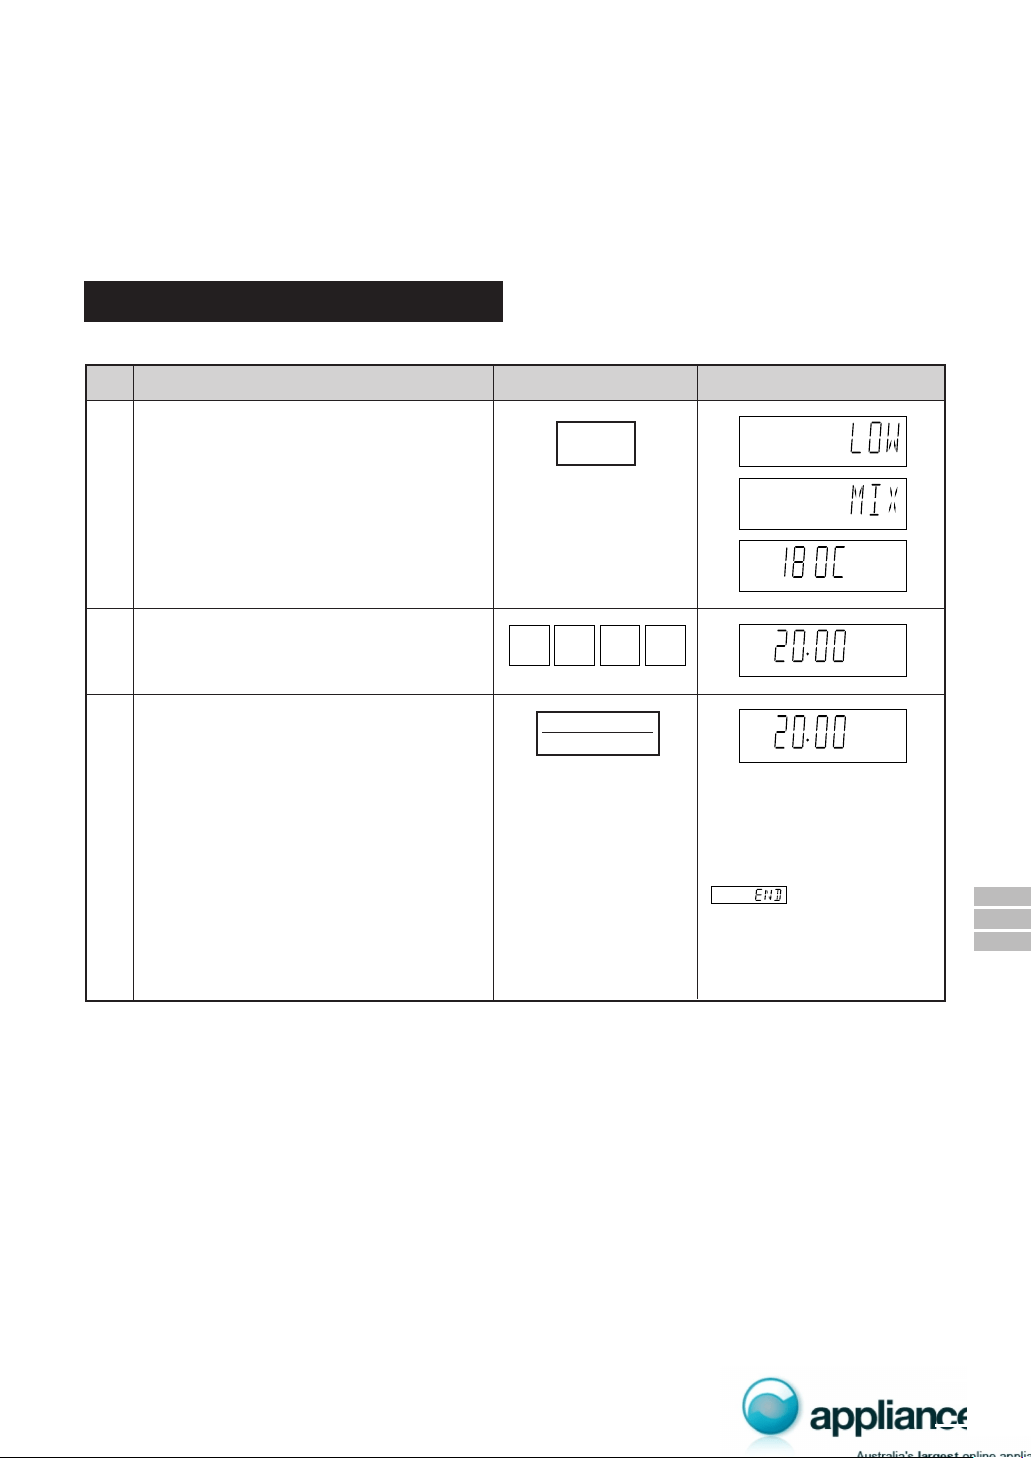
Your Convection Microwave Oven can be programmed for ten different convection cooking temperatures up
to 99 minutes, 99 seconds.
* Suppose you want to cook for 20 minutes at 180°C.
Step
Pad Order
Procedure
Ensure that no food is in the
oven.
Press the CONVEC pad.
Enter the temperature (250°C).
Enter the heating time (20
min.).
CONV
Press the INSTANT COOK/
START pad.
IMPORTANT: During this oper-
ation, some smoke and odour
will occur. Therefore open the
windows or run the ventilation
fan in the room
COOK
CONV
Open the door to cool the oven cavity. The cooling fan will remain on until the oven cavity has cooled.
5
4
3
2
1
The timer begins to count down to zero. When
timer reaches zero, all indicators will go out
and the oven will "beep". will ap-
pear on the display.
(Operation guide off : )
Before the first use and after cleaning the convection heater must be conditioned. The procedure involves
heating for a period of 20 minutes. You may notice some smoke and odour during this process, the oven is not
out of order. Follow the procedure below.
HEATING WITHOUT FOOD
Display
Display
Please consult your Convection Microwave Cookbook for more specific cooking instructions and procedures.
CONVECTION COOKING
To Cook by Convection
INSTANT COOK
START
INSTANT COOK
START
CONVEC
CONVEC
CONV CONV
HELPFUL HINT:
If you are cooking and wish to check the temperature you have programmed, simply press the CONVEC pad.
The programmed temperature will be displayed as long as CONVEC pad is pressed.
WARNING:
Accessible parts (e.g. oven door, oven cavity, dishes and accessories) will become hot when in use. To prevent
burns, always use thick oven gloves.
WARNING:
Accessible parts (e.g. oven door, oven cavity, dishes and accessories) will become hot when in use. To prevent
burns, always use thick oven gloves.
11
0 002
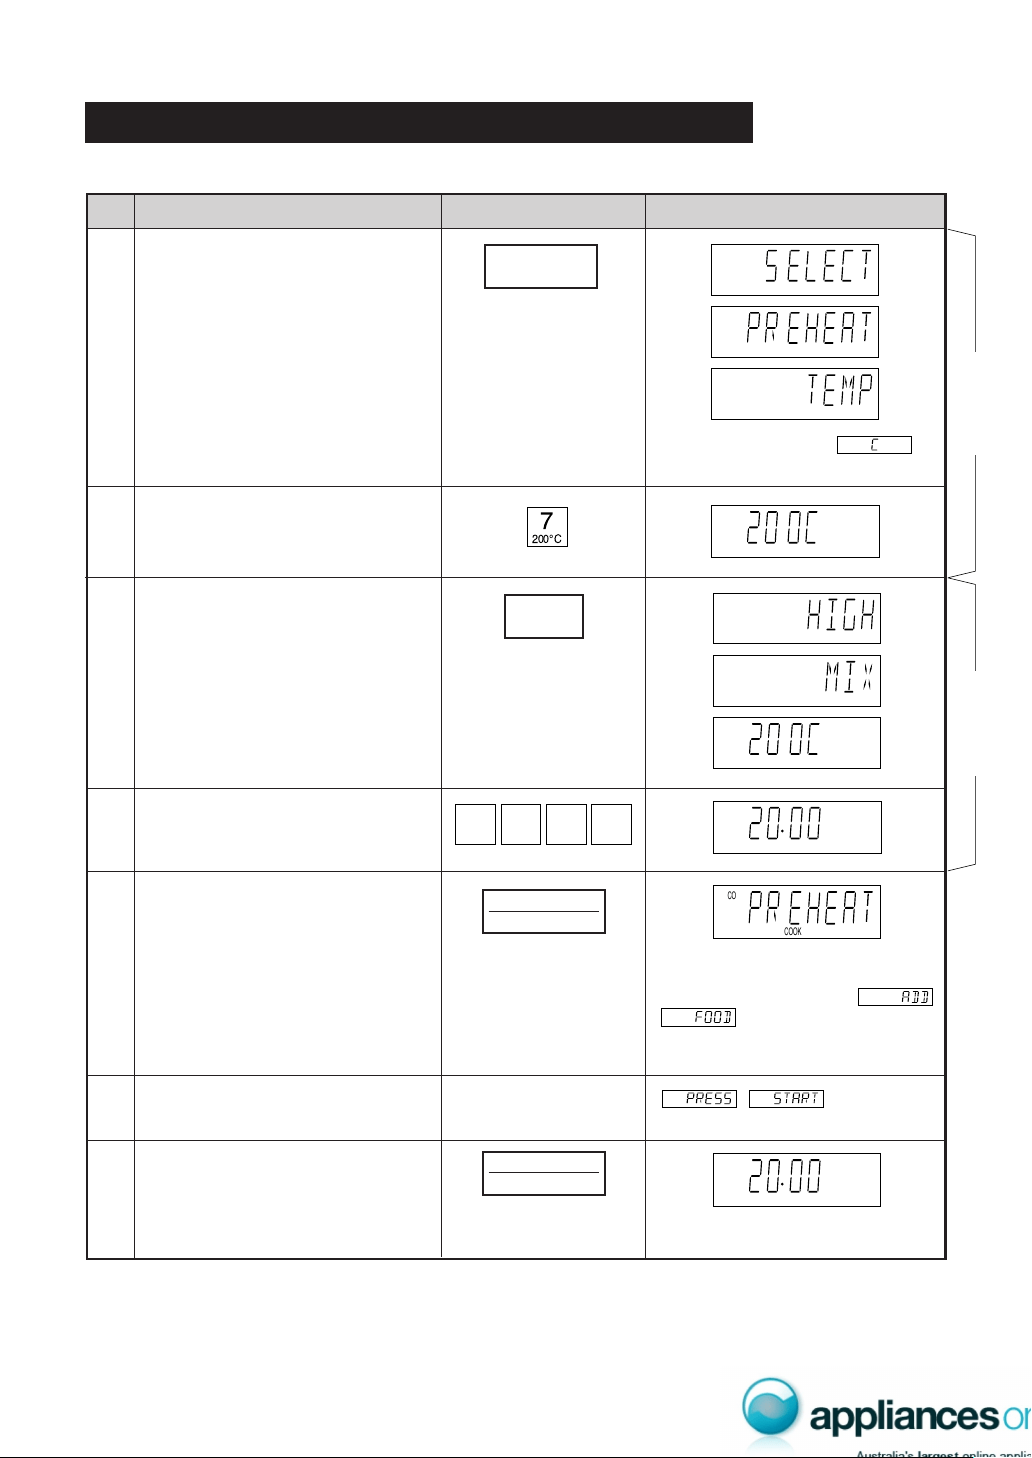
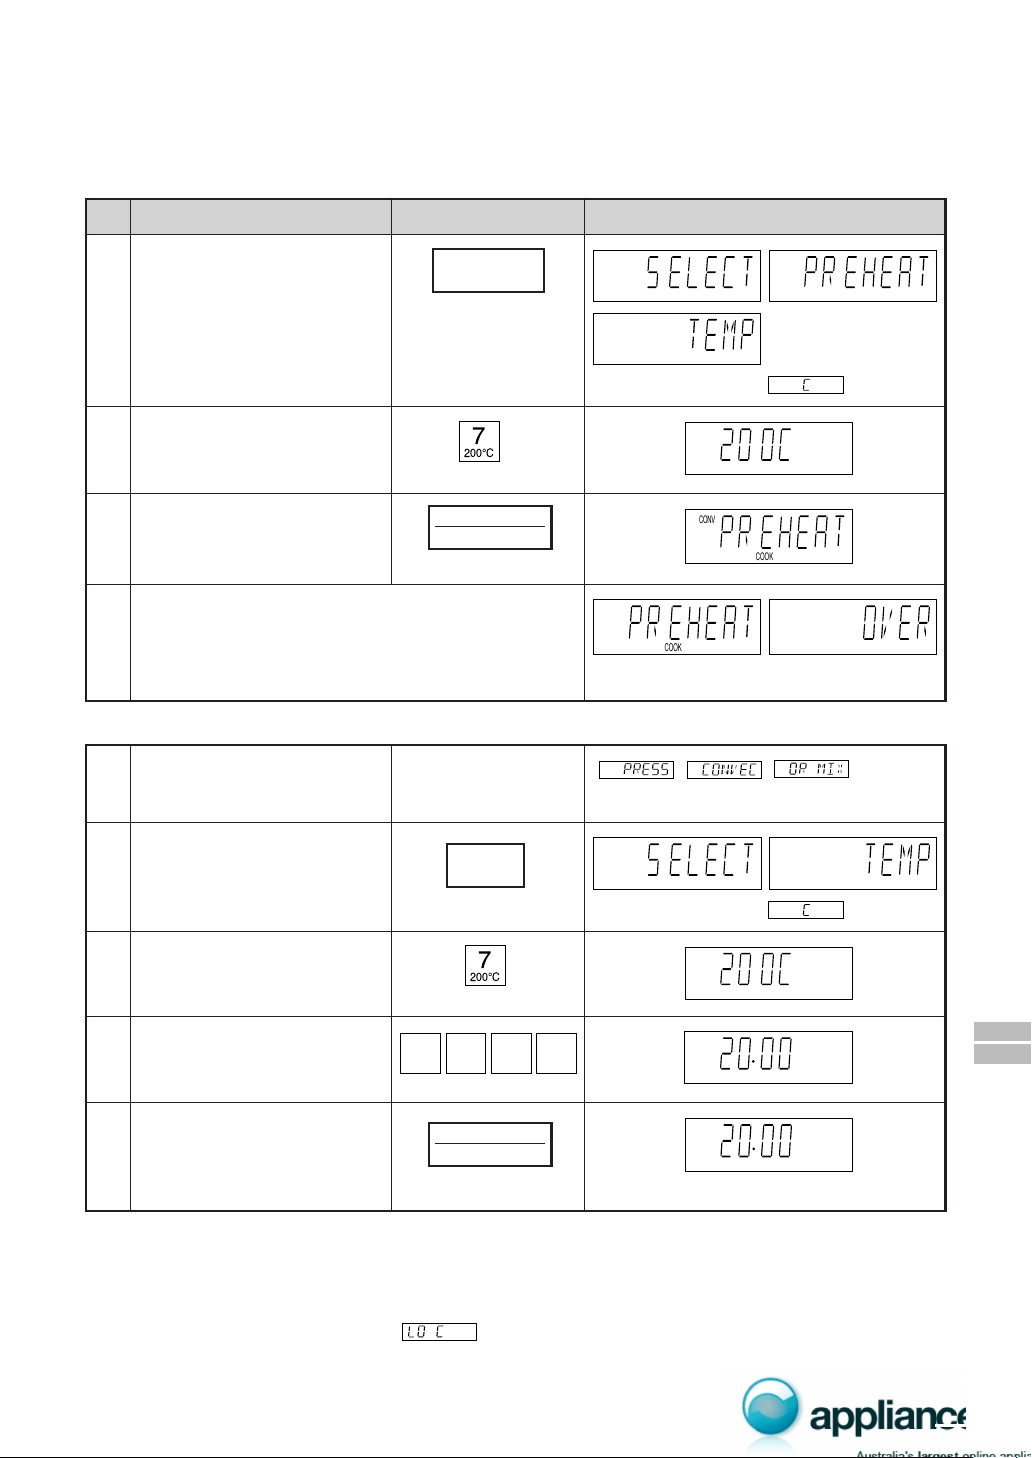
* Suppose you want to preheat the oven to 200°C then cook for 20 minutes at 200°C.
COOK
CONV
To Preheat and Cook by Convection
Step
Procedure Display
CONV
CONV
CONV
(Operation guide off : )
Press the PREHEAT pad.
Press desired preheat temperature
pad.
CONV
Press the CONVEC pad.
CONV
CONV
(Operation guide off : )
Press desired cooking temperature
pad.
Enter desired cooking time.
CONV
CONV
Press the INSTANT COOK/START
pad.
When "ADD FOOD" is displayed, the
oven is preheated. If the oven door is
not opened, the oven will automati-
cally hold at the preheat temperature
for 30 minutes.
will be displayed repeatedly.
When preheat is over, the oven will
"beep" 4 times and
will be displayed.
will be
displayed.
Open the door. Place food in oven.
Close the door.
COOK
CONV
The timer begins to count down to
zero.
Press the INSTANT COOK/START
pad.
Pad Order
2
1
3
4
5
6
7
8
PREHEAT COOKING
HELPFUL HINT:
If you are cooking and wish to check the temperature you have programmed, simply press the CONVEC pad.
The programmed temperature will be displayed as long as CONVEC pad is pressed.
WARNING:
Accessible parts (e.g. oven door, oven cavity, dishes and accessories) will become hot when in use. To prevent
burns, always use thick oven gloves.
PREHEAT
CONVEC
INSTANT COOK
START
INSTANT COOK
START
12
0 002
MIX COOKING
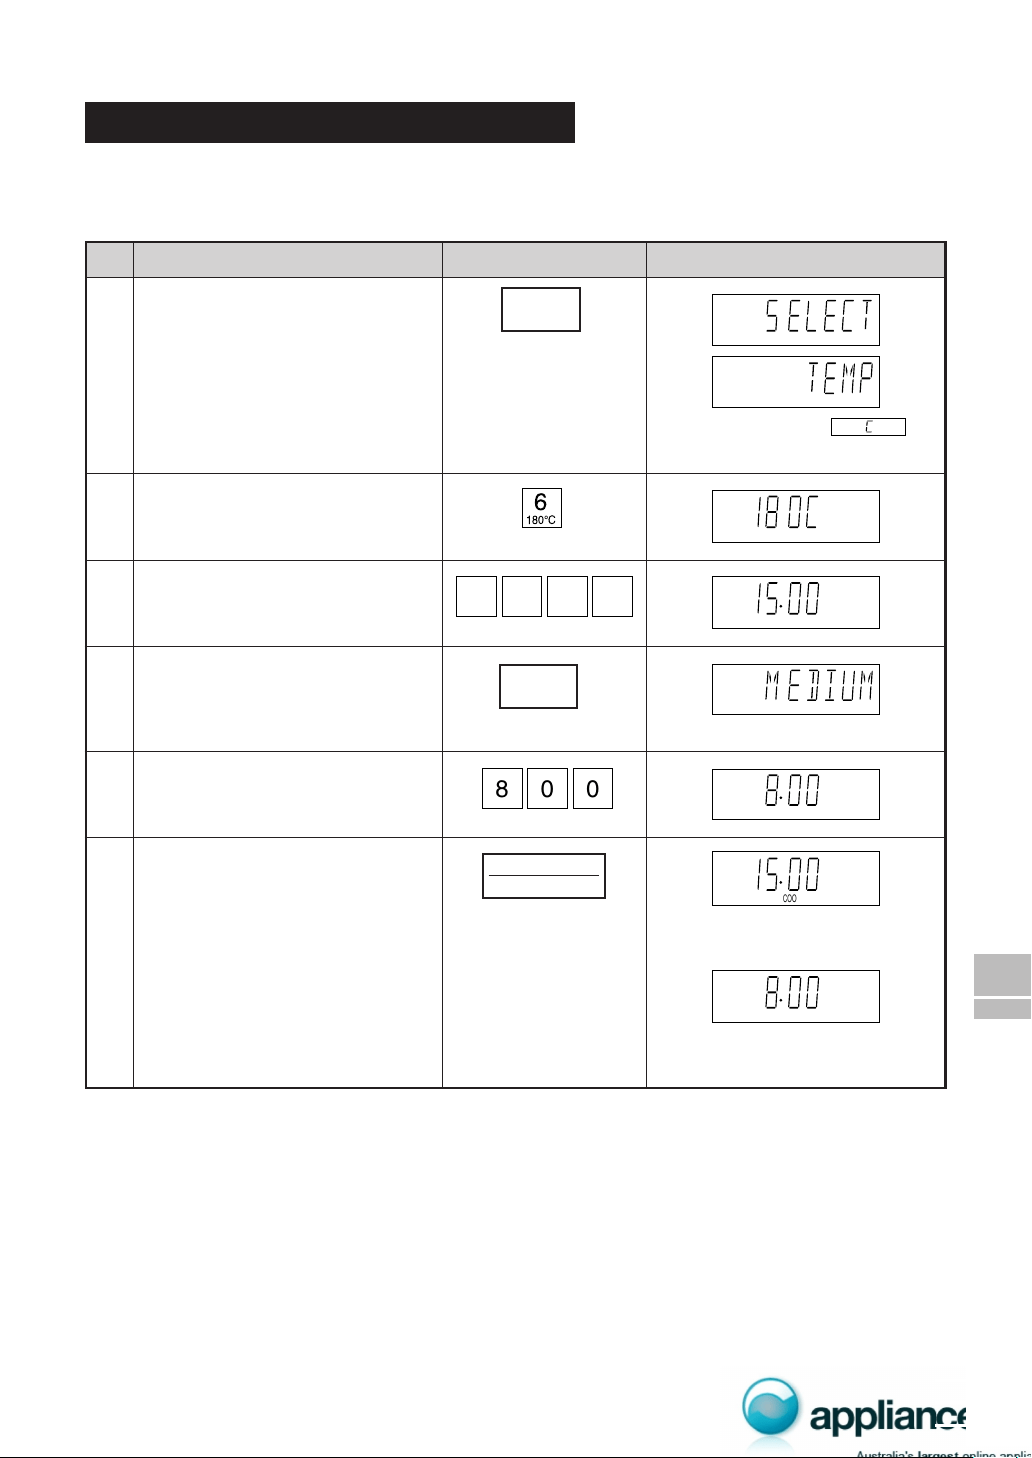
Your Convection Microwave Oven has two preprogrammed settings that make it easy to cook with both
convection heat and microwaves automatically.
The LOW MIX pad is preprogrammed for 180°C with 10% microwave power, while the HIGH MIX pad is
preprogrammed for 200°C with 30% microwave power.
To Use Automatic Mix Settings
* Suppose you want to bake a cake for 20 minutes on LOW MIX.
Step
Procedure Pad Order Display
Press the LOW MIX pad.
MIX
MIX
MIX
Enter desired cooking time.
MIX
Press the INSTANT COOK/START pad.
COOK
MIX
The timer begins to count
down to zero.
When timer reaches zero, all
indicators will go out and the
oven will "beep".
will appear on the
display.
The cooling fan will remain on
until the oven cavity has
cooled.
NOTE
1. To cook on HIGH MIX setting, use the above procedure, pressing the HIGH MIX pad in Step 1.
2. If you want to change convection temperature of Automatic Mix Settings, using the above procedure, press
the desired Mix setting pad again after step 1 and then press the desired temperature pad. And continue
Step 2.
1
2
3
HELPFUL HINT:
If you are cooking and wish to check the temperature you have programmed, simply press the CONVEC pad.
The programmed temperature will be displayed as long as CONVEC pad is pressed.
WARNING:
Accessible parts (e.g. oven door, oven cavity, dishes and accessories) will become hot when in use. To prevent
burns, always use thick oven gloves.
LOW MIX
INSTANT COOK
START
13
0 002
COOK
CONV
COOK
MIX
MIX
To Preheat and Cook with Automatic Mix Settings
* Suppose you want to preheat the oven to 200°C and roast a chicken for 20 minutes on HIGH MIX.
Step
Procedure Pad Order Display
CONV
CONV
CONV
(Operation guide off : )
Press the PREHEAT pad.
Press desired preheat temperature
pad.
CONV
Press the HIGH MIX pad.
MIX
MIX
MIX
Enter desired cooking time.
Press the INSTANT COOK/START
pad.
When "ADD FOOD" is displayed, the
oven is preheated. If the oven door is
not opened, the oven will automati-
cally hold at the preheat temperature
for 30 minutes.
will be displayed repeatedly.
When preheat is over, the oven will
"beep" 4 times and
will be displayed.
Open the door. Place food in oven.
Close the door.
will be
displayed.
If you wish to change convection temperature of Automatic Mix settings, using the above procedure, press the
desired Mix setting pad again after Step 3 and then press the desired temperature pad. And continue Step 4.
The timer begins to count down to
zero.
Press the INSTANT COOK/START
pad.
1
2
3
4
5
6
7
PREHEAT COOKING
WARNING:
Accessible parts (e.g. oven door, oven cavity, dishes and accessories) will become hot when in use. To prevent
burns, always use thick oven gloves.
INSTANT COOK
START
INSTANT COOK
START
HIGH MIX
PREHEAT
14
8 00
COOK
CONV
CONV
CONV
CONV
CONV
Step
Procedure Pad Order Display
Press the CONVEC pad.
(Operation guide off: )
Enter desired convection tempera-
ture.
Enter desired convection cooking
time.
Select microwave cooking and
power level by pressing the
POWER LEVEL pad as required
(for MEDIUM press three times.)
Enter desired microwave cooking
time.
Press the INSTANT COOK/START
pad.
The timer begins to count down to
zero. When it reaches zero,
1
2
3
4
5
Your Convection Microwave Oven can be programmed to combine convection and microwave cooking
operations.
* Suppose you want to roast chicken pieces for 15 minutes at 180°C and then cook at 8 minutes on MEDIUM.
COOK
The timer begins to count down to
zero.
Do not use plastic (non-heat proof) cookware if combining Convection and Microwave mode.
6
Convection and Microwave Cooking
51 00
x 3
WARNING:
Accessible parts (e.g. oven door, oven cavity, dishes and accessories) will become hot when in use. To prevent
burns, always use thick oven gloves.
CONVEC
INSTANT COOK
START
POWER
LEVEL
15
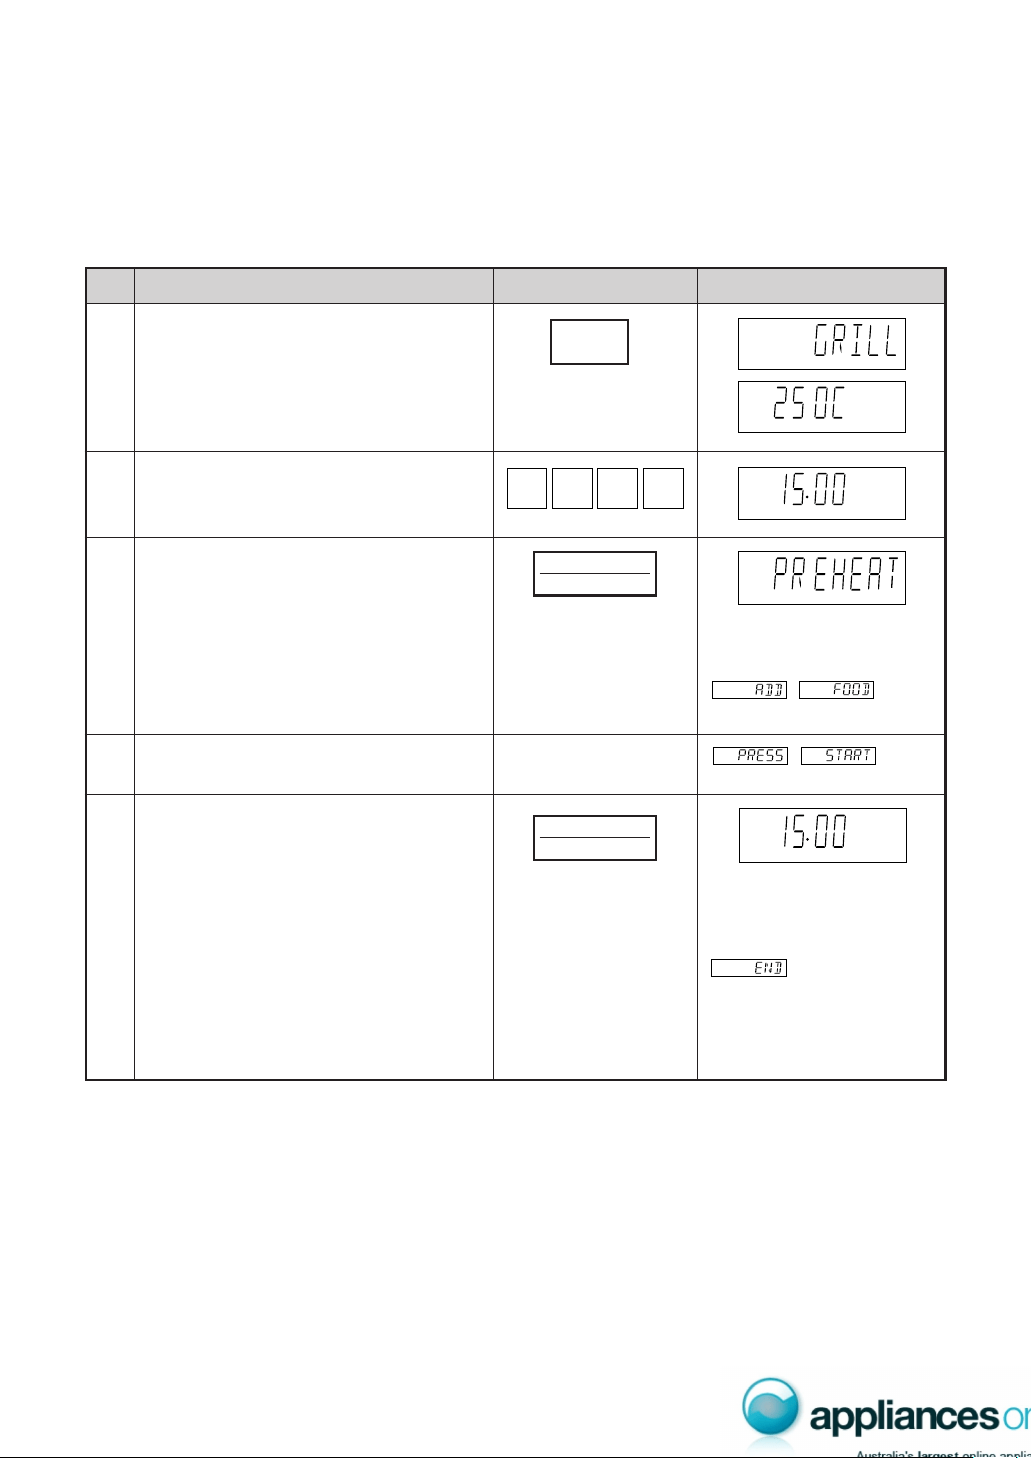
The grill effect is achieved using fan forced heat at a temperature of 250°C.
Preheating is automatic when the GRILL setting is used. Only actual cooking time is entered; the oven signals
when it is preheated to 250°C. Use Grill setting for steaks, chops, chicken pieces and many other foods.
The turntable should remain in oven when preheating.
* Suppose you want to grill a steak for 15 minutes.
GRILLING
COOK
CONV
CONV
DisplayProcedure
Step
CONV
CONV
2
will be displayed repeatedly.
When preheat is over, the oven
will "beep" 4 times and
will be
displayed.
Pad Order
Press the INSTANT COOK/START pad.
1
Place turntable in the oven.
Press the GRILL pad.
Enter desired grilling time.
Open the door and place food in oven.
Close the door.
will be
displayed.
4
The timer begins to count
down to zero. When it reach-
es zero, all indicators will go
off and the oven will "beep".
will appear on the
display. The cooling fan will
remain on until the oven cav-
ity has cooled.
Press the INSTANT COOK/START pad.
3
* Oven will maintain 250°C for 30 minutes after preheat is completed. If the oven door is not opened (food
placed in the oven) within 30 minutes, the oven will automatically turn off.
5
COOK
CONV
51 00
INSTANT COOK
START
INSTANT COOK
START
GRILL
HELPFUL HINT:
If you are cooking and wish to check the temperature you have programmed, simply press the CONVEC pad.
The programmed temperature will be displayed as long as CONVEC pad is pressed.
WARNING:
Accessible parts (e.g. oven door, oven cavity, dishes and accessories) will become hot when in use. To prevent
burns, always use thick oven gloves.
16
0 002
COOK
CONV
COOK
CONV
COOK
CONV
PREHEATING
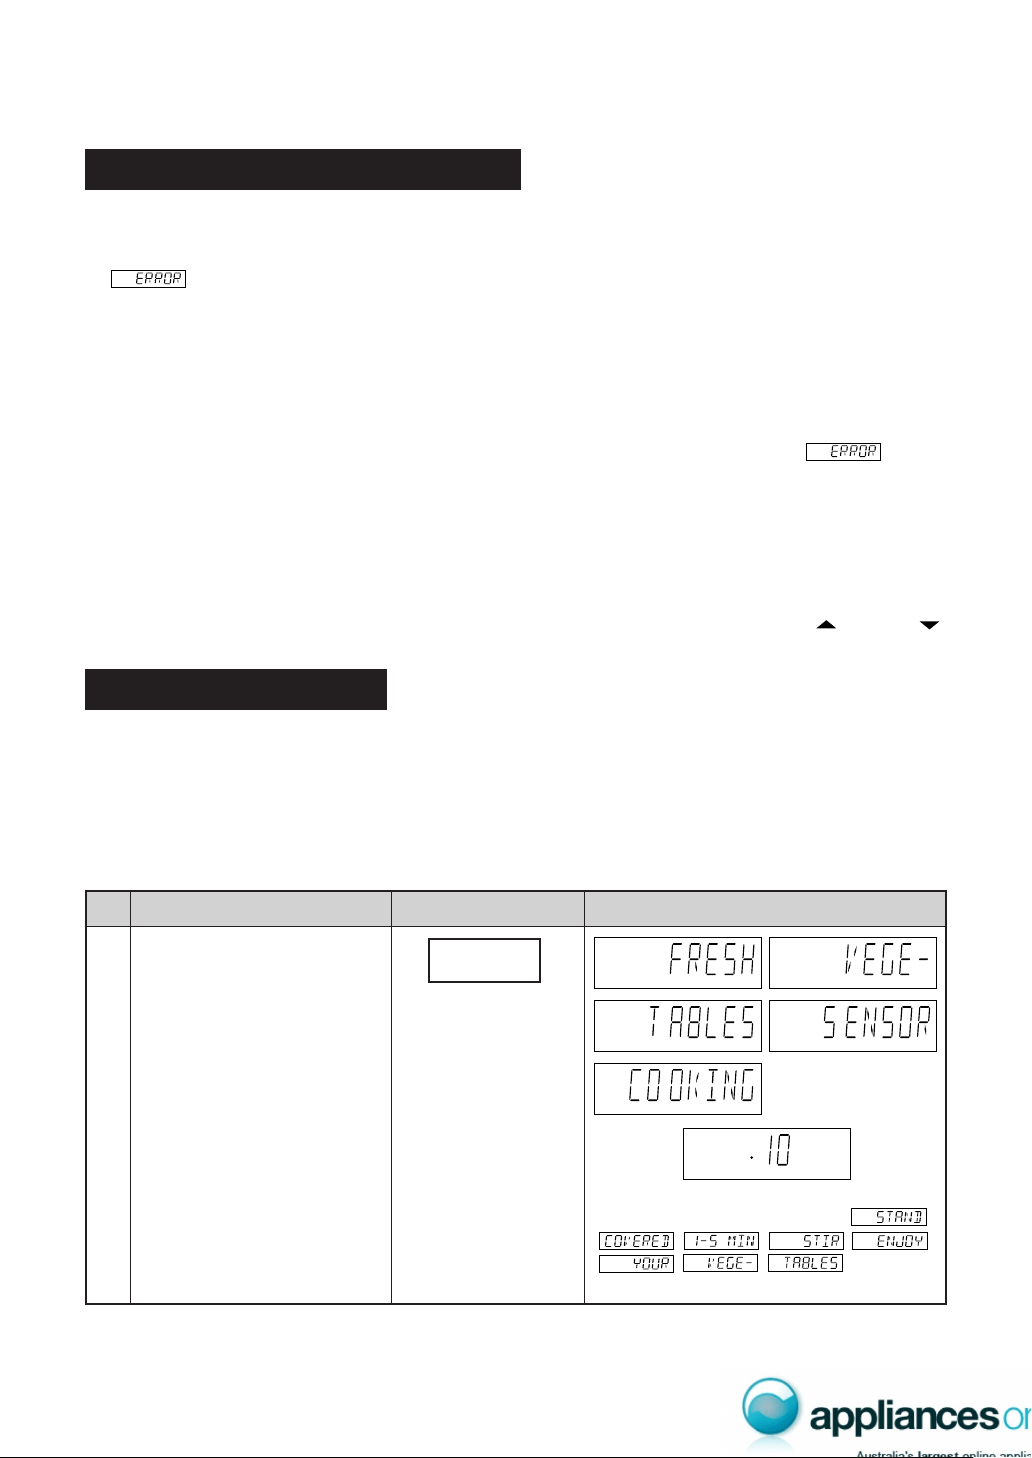
For best results, preheat to the required temperature with the turntable in the oven. Add food after preheating.
* To preheat the oven to 200°C
CONV
CONV
CONV
Step
Procedure Display
Pad Order
(Operation guide off: )
3
2
1
Press the PREHEAT pad.
Select preheating temperature.
Press the INSTANT COOK/
START pad.
Preheat is over. If the oven door is not opened, the oven
will automatically hold at the preheat temperature for 30
minutes.
After preheating, Suppose you want to cook profiteroles for 20 minutes on convection 200°C.
Open the door and place food.
Close the door.
CONV CONV
(Operation guide off: )
The timer begins to count down.
6
7
8
9
Press the CONVEC pad.
Enter desired temperature.
Enter desired cooking time.
Press the INSTANT COOK/
START pad.
After preheating, suppose you want to cook with automatic Mix settings. Press the HIGH MIX or LOW MIX pad
instead of the CONVEC pad in Step 6 , then continue with Step 8.
If you are in the process of preheating and wish to check the actual oven temperature, simply press the CONVEC
pad. The actual oven temperature will be displayed as long as the CONVEC pad is pressed. If the oven
temperature is below 40°C at this time, will be displayed.
4
5
CONV
COOK
CONV
CONV
CONV
INSTANT COOK
START
INSTANT COOK
START
PREHEAT
CONVEC
WARNING:
Accessible parts (e.g. oven door, oven cavity, dishes and accessories) will become hot when in use. To prevent
burns, always use thick oven gloves.
17
AUTOMATIC OPERATIONS
1. Wipe off any moisture from the outside of cooking containers and the interior of the oven with a dry cloth or
paper towel prior to cooking on SENSOR INSTANT ACTION or REHEAT SENSOR.
2. After oven is plugged in, wait 2 minutes before using SENSOR INSTANT ACTION or REHEAT SENSOR.
3. will be displayed if:
(a) more or less than the quantity or weight of foods suggested in the MULTI COOK or EASY DEFROST
MENU GUIDE are programmed when the START pad is pressed.
To clear, press the STOP/CLEAR pad and reprogramme.
(b) the door is opened or the STOP/CLEAR pad is pressed until the cooking time is displayed. To clear, press
the STOP/CLEAR pad and cook manually. See cookbook.
4. When using the automatic features (SENSOR INSTANT ACTION, REHEAT SENSOR, MULTI COOK, EASY
DEFROST), carefully follow the details provided in each MENU GUIDE to achieve the best result.
If the details are not followed carefully, the food may be overcooked or undercooked or may be
displayed.
5. When cooking small quantities of food on SENSOR INSTANT ACTION or REHEAT SENSOR, the food may
be cooked without displaying any remaining cooking time.
6. Food weighing more or less than the quantity or weight listed in each MENU GUIDE, cook manually. See
cookbook.
7. When entering the weight of the food, round off the weight to the nearest 0.1kg(100g). For example, 1.65kg
would become 1.7kg.
8. To change the final cooking or defrosting result from the standard setting, press the MORE( ) or LESS( )
pad prior to pressing the each automatic operation pad.
Step
Display
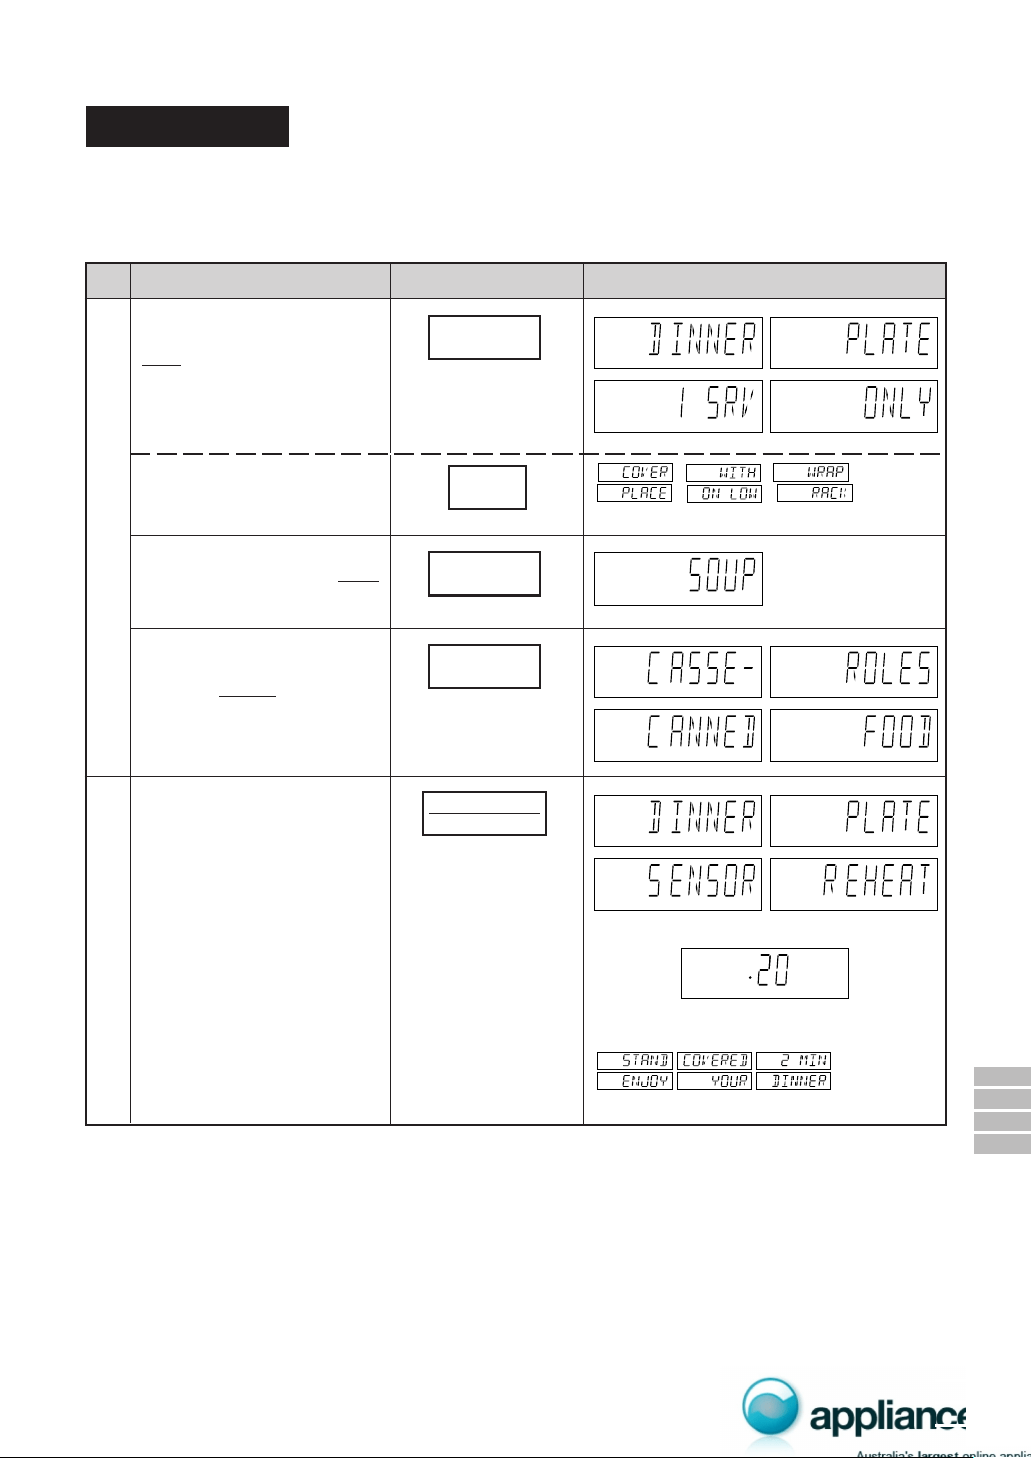
Press the SENSOR INSTANT
ACTION pad for Fresh Vegeta-
bles (within 1 minute of closing
the door).
*When the sensor detects the
vapour from the food, the re-
maining cooking time will ap-
pear.
(eg. remaining cooking time
is approximately. 10 sec.)
1
Pad OrderProcedure
SENSOR
COOK
SENSOR
COOK
SENSOR
COOK
SENSOR
COOK
SENSOR
COOK
SENSOR
COOK
The timer begins to count down. When the
cooking time reaches zero,
will be dis-
played.
* Suppose you want to cook 1.0 kg Fresh Vegetables.
Press once to cook 6 popular menus. Follow the instructions provided in SENSOR
INSTANT ACTION MENU GUIDE or SENSOR INSTANT ACTION RECIPES on
pages 6 - 8 of the cooking guides.
NOTE: You can get a cooking hint by pressing the HELP pad before pressing the desired SENSOR INSTANT
ACTION pad. See page 23.
Notes for Automatic Operations
Sensor Instant Action
FRESH
VEGETABLES
WARNING:
Accessible parts (e.g. oven door, oven cavity, dishes and accessories) will become hot when in use. To prevent
burns, always use thick oven gloves.
-
Fresh Vegetables
-
Reheat Pie
-
Jacket Potato
-
Frozen Vegetables
-
Casseroles
-
Desserts
18
Reheat Sensor
Press to select 3 popular reheat menus.
Follow the instructions provided in REHEAT SENSOR MENU GUIDE on
page 9 of the cooking guides.
SENSOR
HELP
SENSOR
HELP
SENSOR
HELP
SENSOR
HELP
SENSOR
HELP
Step
Procedure Display
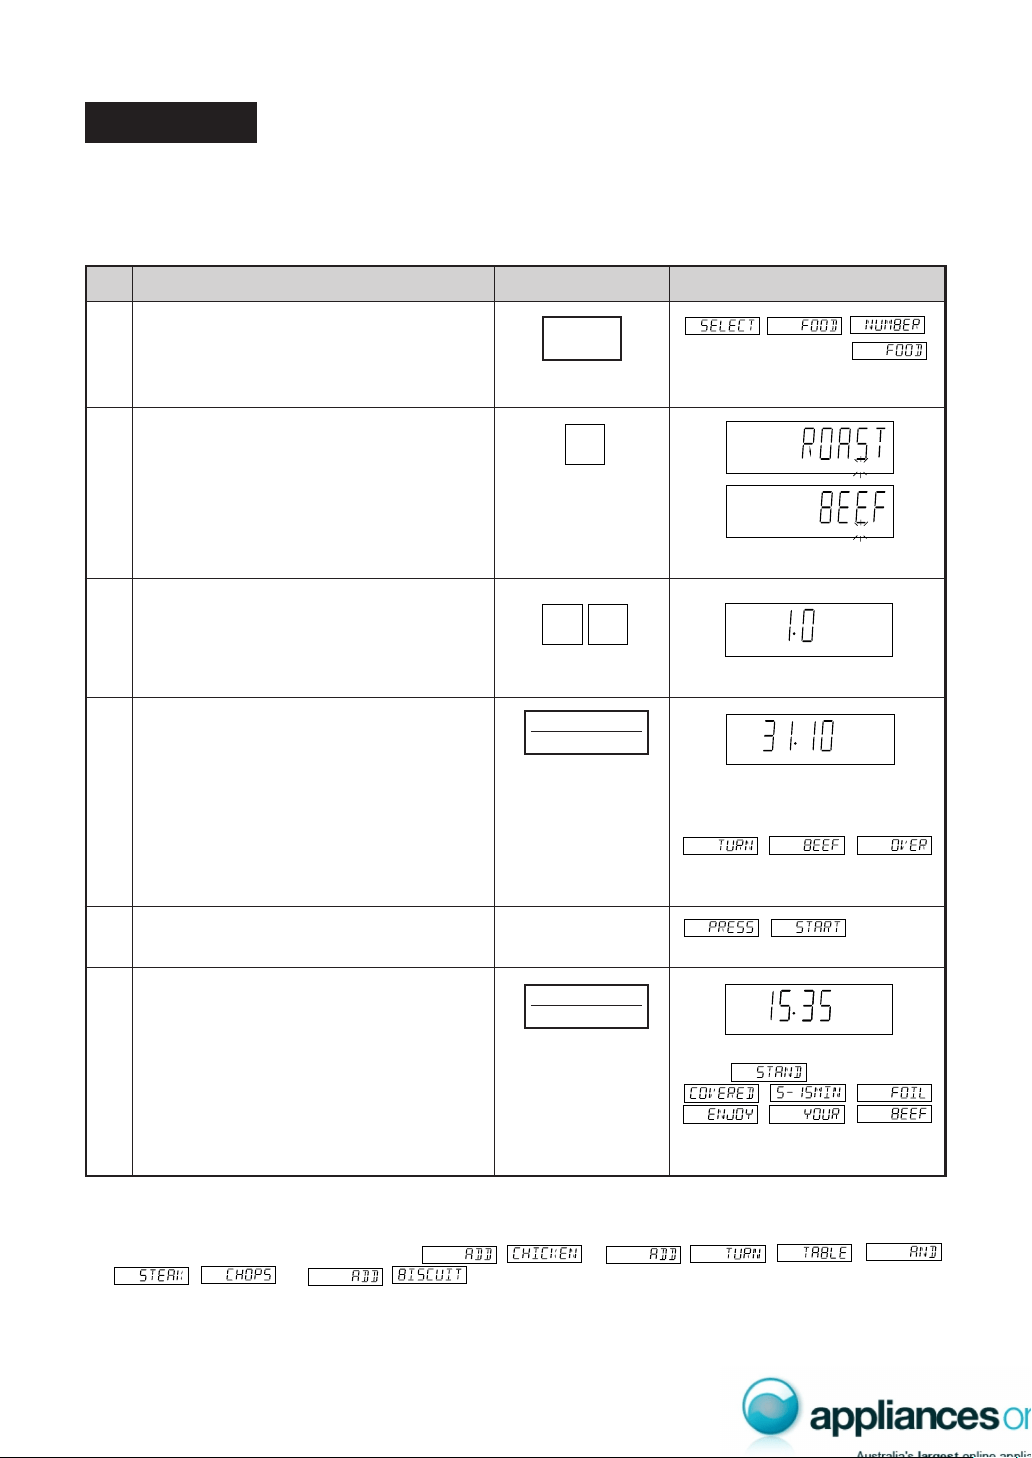
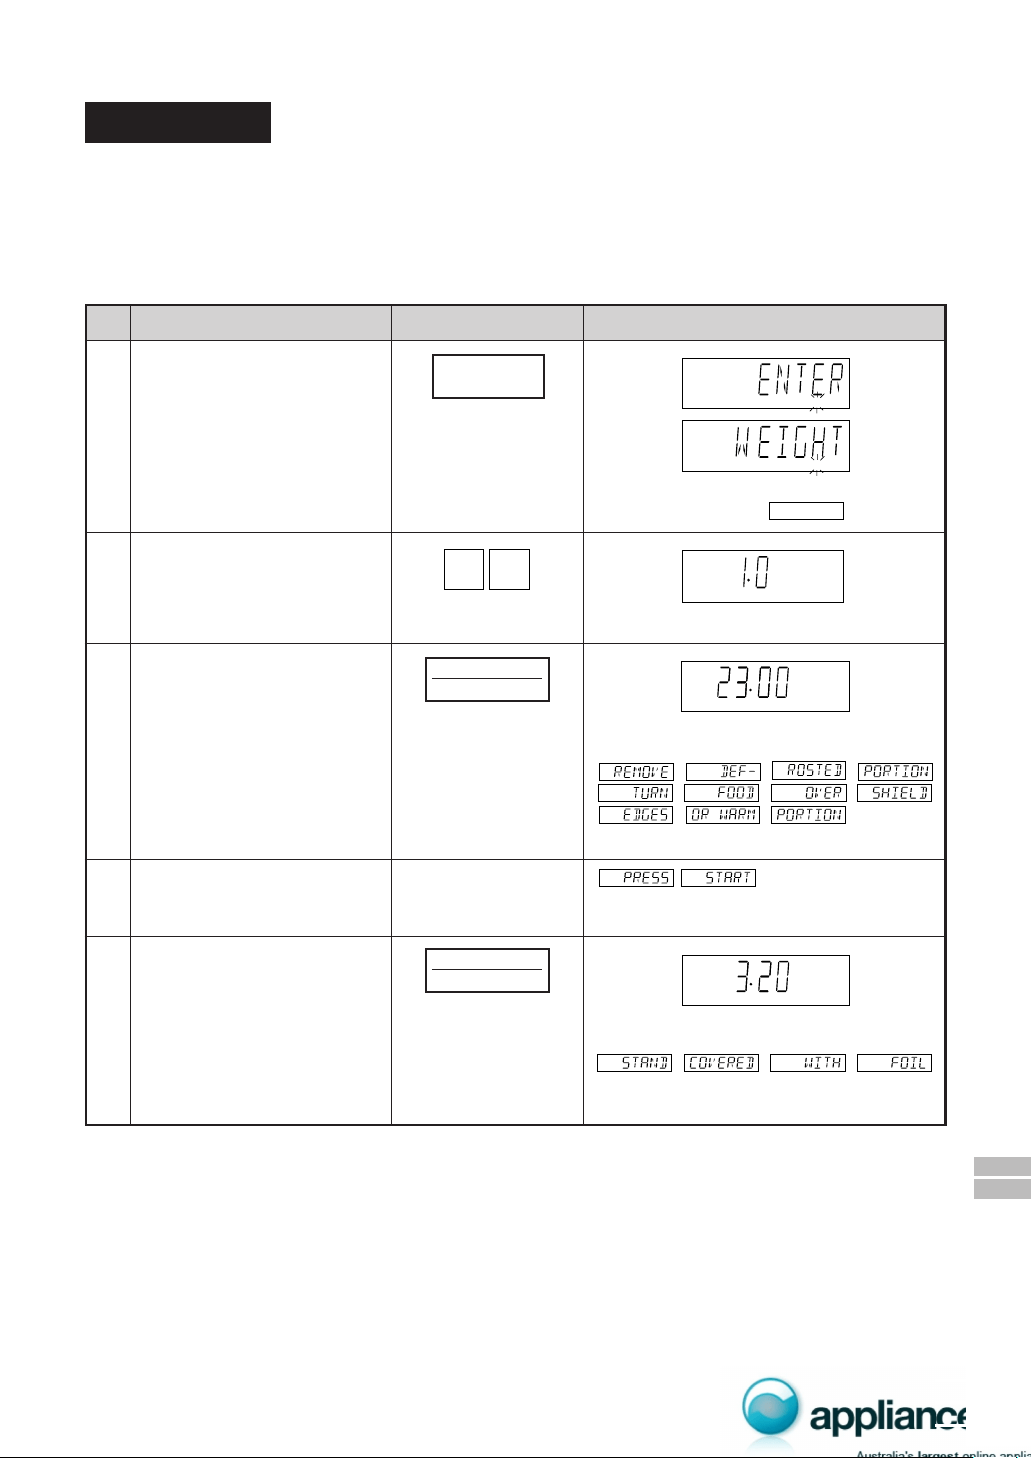
To reheat a Dinner Plate, press
the REHEAT SENSOR pad
once.
Pad Order
If you require a cooking hint,
press the HELP pad.
(See NOTE below)
To reheat Soup, press the
REHEAT SENSOR pad twice
within 3 seconds.
COOK
SENSOR
COOK HELP
SENSOR
COOK HELP
COOK
SENSOR
HELP
SENSOR
HELP
To reheat Casseroles/Canned
Food, press the REHEAT SEN-
SOR pad 3 times within 3 sec-
onds.
SENSOR
HELP
SENSOR
HELP
SENSOR
HELP
SENSOR
HELP
Suppose you want to reheat a
dinner plate.
Press the INSTANT COOK/
START pad.
SENSOR
COOK HELP
The timer begins to count down.
When the cooking time reaches zero,
will be displayed .
The oven starts.
* When the sensor detects the
vapour from the food, the
remaining cooking time will
appear.
(eg. remaining cooking time
is approximately. 20 sec.)
NOTE: You can get a cooking hint whenever HELP is lit in the display. See page 23.
1
2
x 1
x 2
x 3
REHEAT
SENSOR
REHEAT
SENSOR
REHEAT
SENSOR
HELP
INSTANT COOK
START
1. Dinner Plate
2. Soup
3. Casseroles/Canned Food
19
COOK HELP
MIX
COOK HELP
MIX
01
1
HELP
MIX
KG
KG HELP
MIX
6
5
3
1
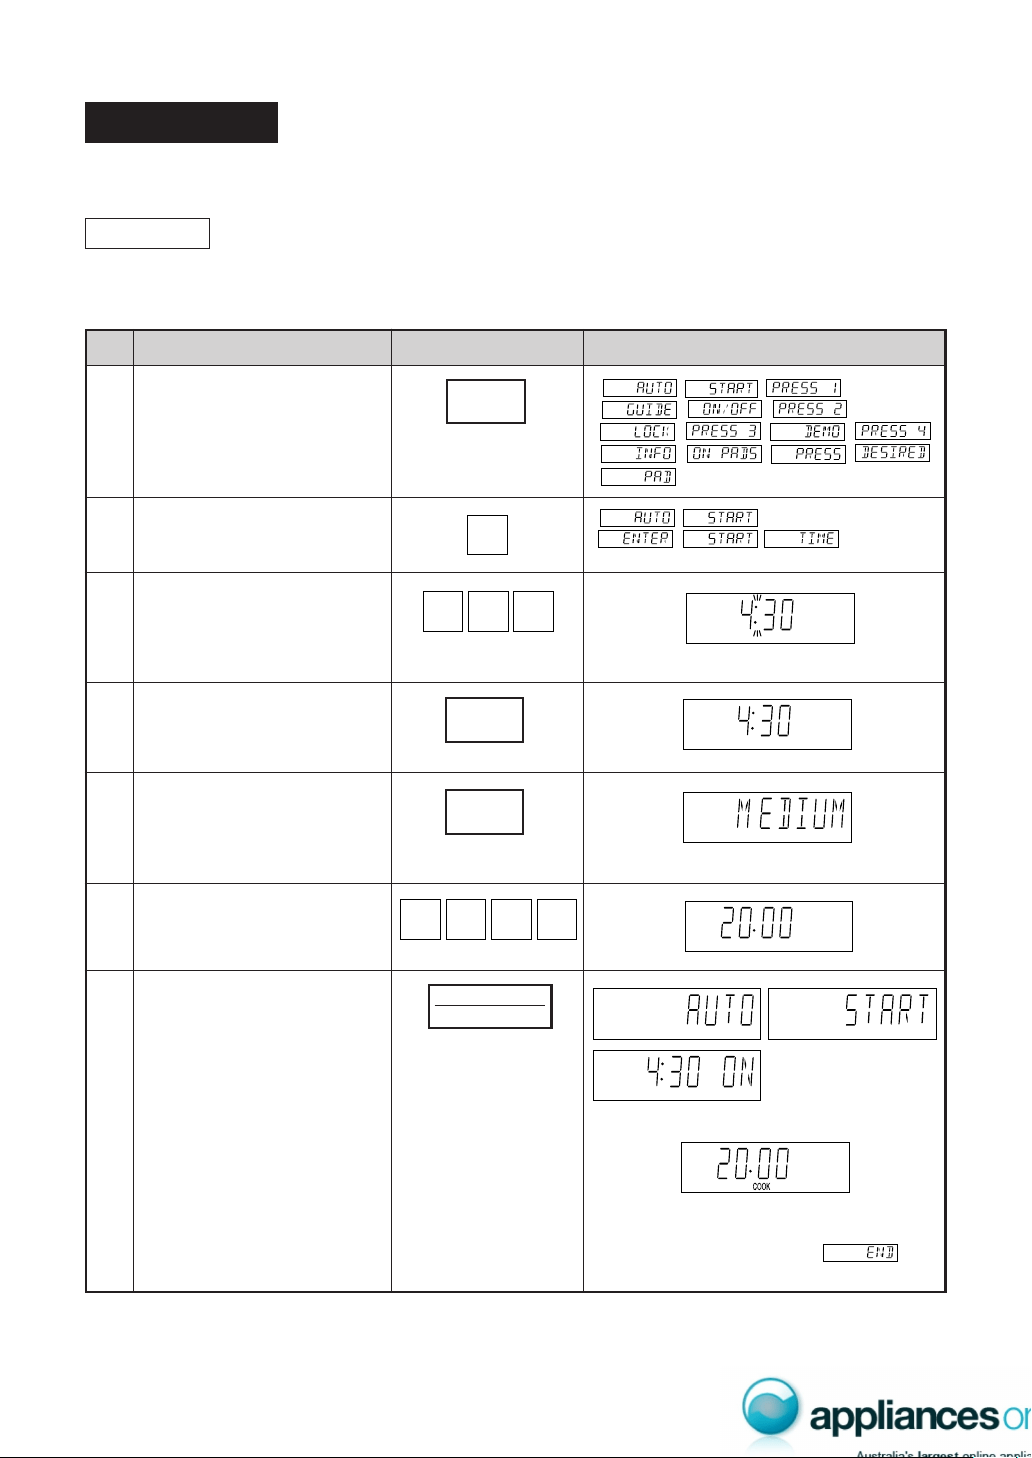
* Suppose you want to cook 1.0 kg Roast Beef (Medium).
Step
Procedure Pad Order Display
Press the MULTI COOK pad.
Select food category for Multi Cook.
Press 1 to cook Roast Beef.
KG will flash on and off.
Enter the weight.
KG HELP
MIX
KG stops flashing.
Press the INSTANT COOK/START pad.
The timer begins to count down.
The oven will "beep" 4 times and
will stop.
will be displayed repeatedly.
Open the door. Turn over the meat. Close
the door.
will be
displayed repeatedly.
Press the INSTANT COOK/START pad.
When the cooking time reaches
zero,
will be displayed repeatedly.
2
4
NOTE:
1. You can get a cooking hint whenever HELP is lit in the display. See page 23.
2. For menus 3, 5 and 6: After Step 3, press the INSTANT COOK/START pad and preheat will start
automatically. When the display shows ,
or open the door and enter the food. Then continue with Step 4.
(Operation guide off: )
1. Roast Beef
2. Roast Lamb
3. Roast Chicken
4. Roast Dinner
5. Grilled Steak/Chops
6. Biscuits
Press to select 6 popular convection and mix cooking menus.
Follow the instructions provided in MULTI COOK
MENU GUIDE
or MULTI COOK RECIPES on pages
=
-
B
of the cooking guides.
Multi Cook
INSTANT COOK
START
INSTANT COOK
START
WARNING:
Accessible parts (e.g. oven door, oven cavity, dishes and accessories) will become hot when in use. To prevent
burns, always use thick oven gloves.
MULTI
COOK
20
DEFROST
COOK HELP
DEFROST
COOK HELP
01
Step
Procedure Display
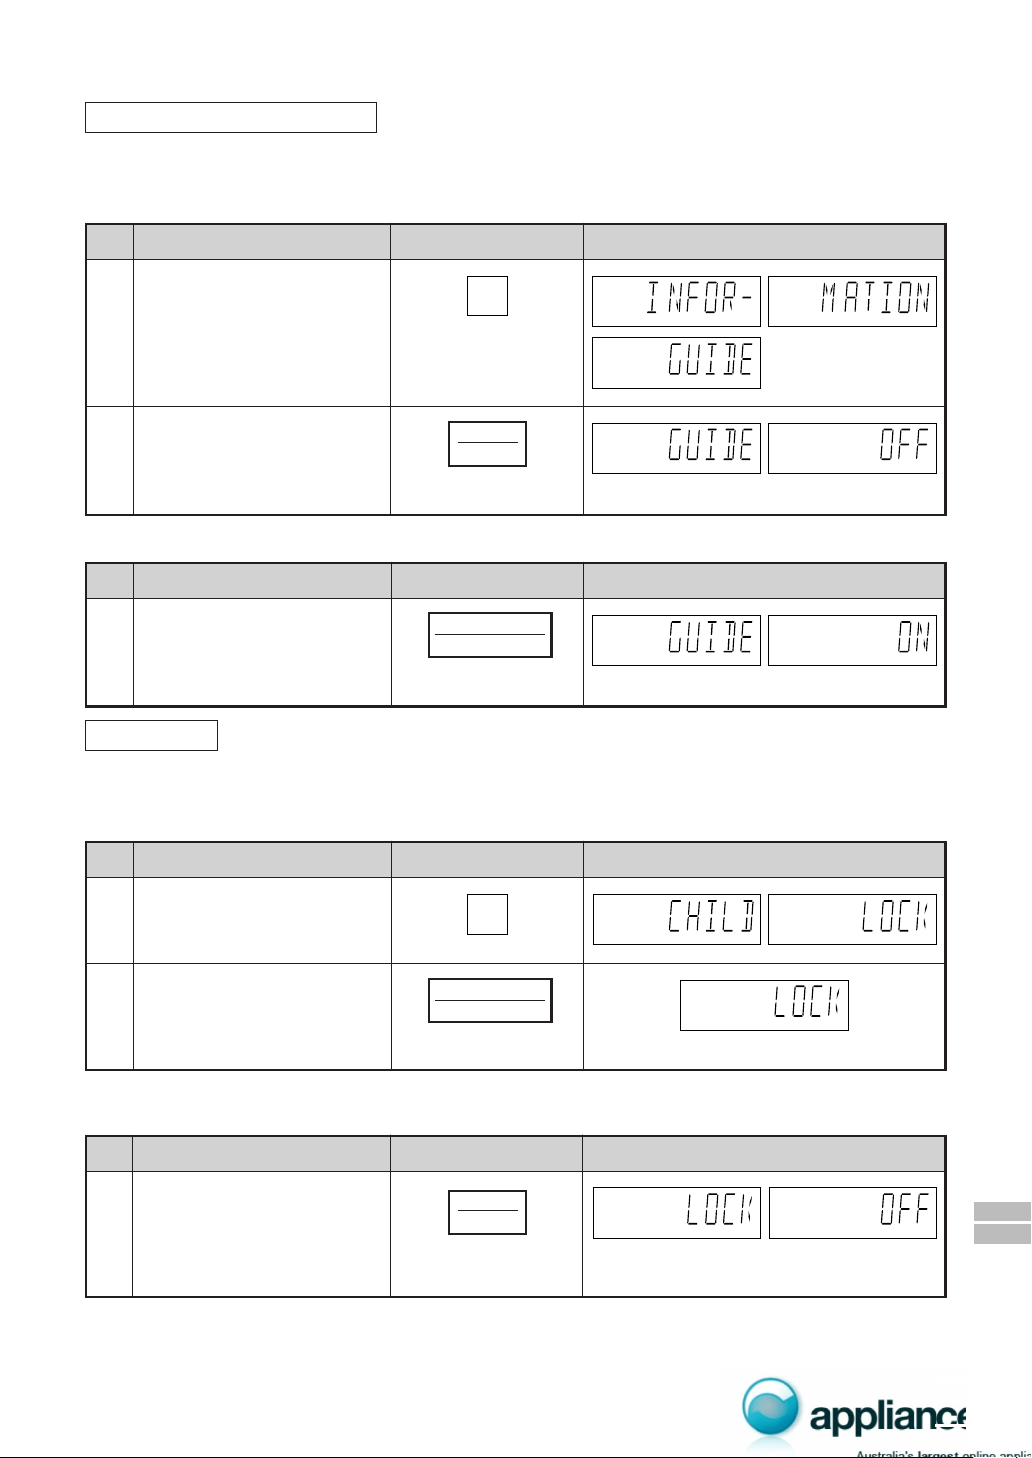
* Suppose you want to defrost 1.0 kg of Chicken Pieces.
The Easy Defrost feature allows you to defrost meats by entering weight.
Follow the instructions provided in EASY DEFROST MENU GUIDE on page C of the
cooking guides.
KG will flash on and off.
(Operation guide off: )
Pad Order
DEFROST
HELP
DEFROST
HELPKG
KG
Enter the weight.
DEFROST
KG HELP
KG stops flashing.
Press the INSTANT COOK/
START pad.
The timer begins to count down. The oven
will “beep” 4 times and will stop.
will be dis-
played repeatedly.
Press the EASY DEFROST
pad.
Open the door. Turn over the
chicken pieces.
Close the door.
will be displayed re-
peatedly.
The timer begins to count down, when it
reaches zero, the oven will “beep”.
will be displayed repeatedly.
4
Press the INSTANT COOK/
START pad.
1
2
3
5
NOTE: You can get a cooking hint whenever HELP is lit in the display. See page 23.
Easy Defrost
INSTANT COOK
START
INSTANT COOK
START
EASY
DEFROST
-
Minced Meat
-
Steak/Chops
-
Chicken Pieces
-
Poultry
-
Roast Meat
21
Help Feature
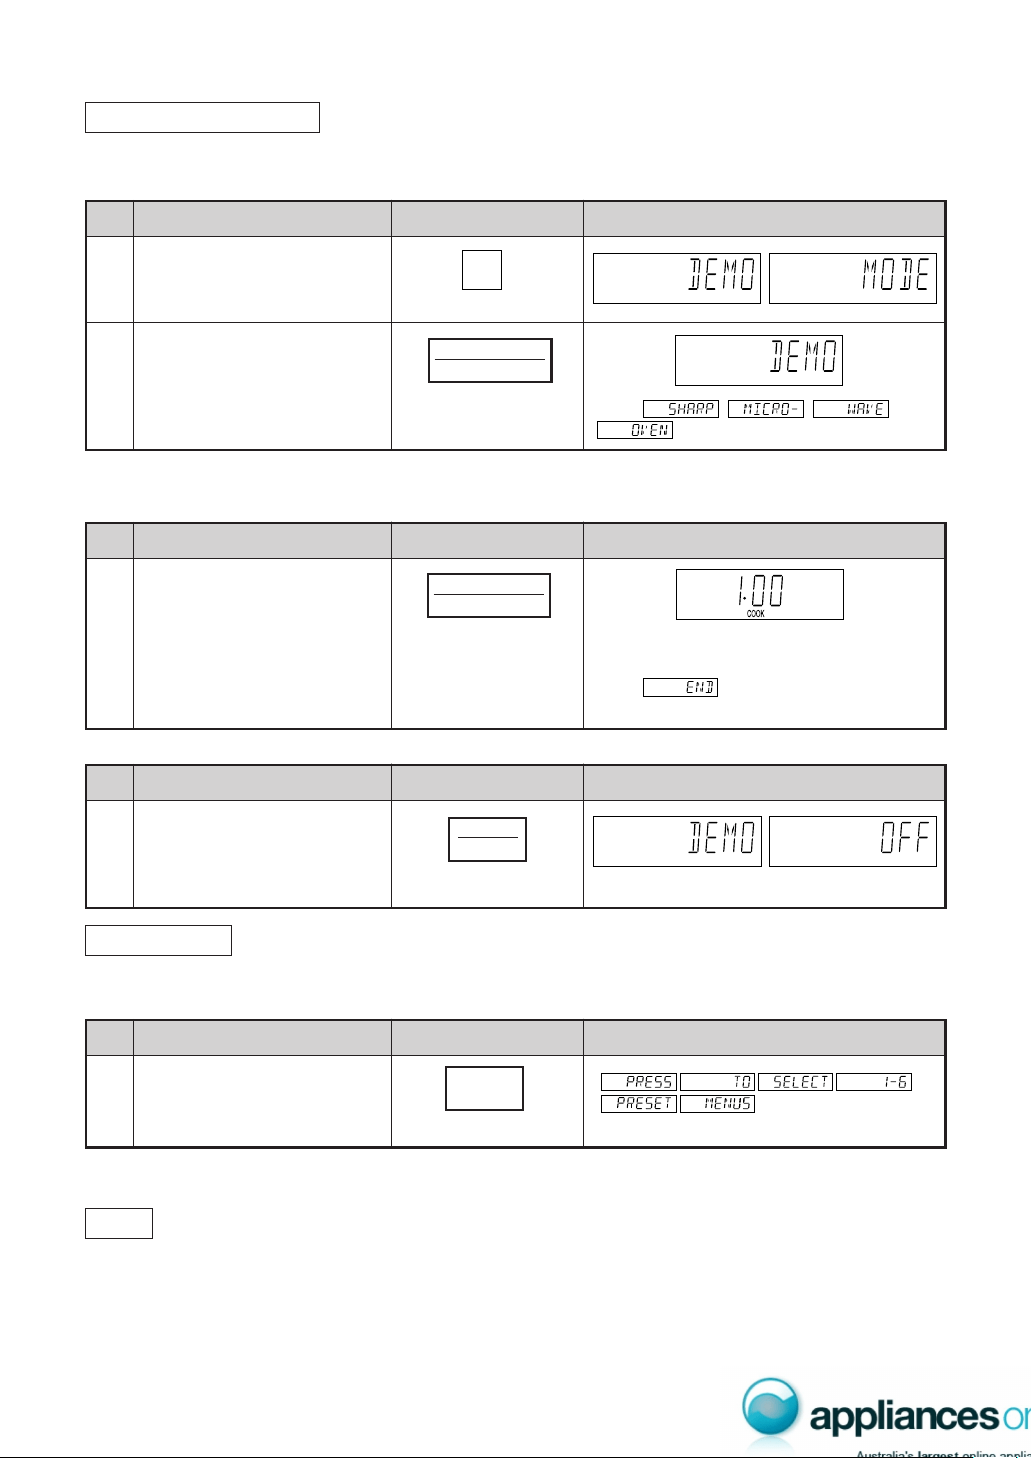
Auto Start
The Auto Start feature allows you to set your oven to start automatically.
* Suppose you want to start cooking a casserole for 20 minutes on MEDIUM at 4:30 in the afternoon.
(Check that the correct time of day is displayed.)
The HELP feature has 6 different programmes.
OTHER CONVENIENT FEATURES
0 002
4 03
1
Display
Press the HELP pad.
Step
Procedure
Pad Order
Press the number 1 pad.
Enter the desired start time.
The dots (:) will flash on and off.
Press the CLOCK pad.
Set the desired cooking mode.
(for microwave cooking on
MEDIUM, press the POWER
LEVEL pad 3 times)
Enter the desired cooking time.
The oven will start cooking at 4:30 P.M.
The timer begins to count down. When the
timer reaches zero, all indicators will go off
and the oven will "beep". will
appear in the display.
3
4
5
6
7
To check the current time, simply press the CLOCK pad, the time will be displayed.
If the door is opened after step 7, close the door and press the START pad to continue with Auto Start.
Press the STOP/CLEAR pad to cancel Auto Start.
The correct time of day must be set before using Auto Start, see clock setting on page 7.
1
Press the INSTANT COOK/
START pad.
2
x 3
HELP
CLOCK
POWER
LEVEL
INSTANT COOK
START
22
3
2
Information Guide On/Off
This oven is preset with the Information Guide On.
As you get more familiar with your oven, the Information Guide can be turned off.
* To turn off the Information Guide. After step 1 for Auto Start.
Display
Step
Procedure Pad Order
Press the number 2 pad.
Press the STOP/CLEAR pad.
The time of day will appear in the display.
2
3
* To restore the Information Guide. After step 2 above.
Display
Step
Procedure Pad Order
Press the INSTANT COOK/
START pad.
The time of day will appear in the display.
Display
Step
Procedure Pad Order
Press the number 3 pad.
3
Press the INSTANT COOK/
START pad.
The time of day will appear in the display.
2
3
The control panel is now locked, each time a pad is pressed, the display will show "LOCK".
* To unlock the control panel. After step 2 above.
If the oven is accidentally started with no food or liquid in the cavity, the life of the oven may be reduced.
To prevent accidents like this, your oven has a "Child Lock" feature that you can set when the oven is not in use.
* To set the Child Lock. After step 1 for Auto Start.
Child Lock
Display
Step
Procedure Pad Order
Press the STOP/CLEAR pad.
The time of day will appear in the display.
The oven is ready to use.
3
STOP
CLEAR
STOP
CLEAR
INSTANT COOK
START
INSTANT COOK
START
23
Display
Step
Procedure Pad Order
Press the number 4 pad.
Press the INSTANT COOK/
START pad.
Then
will appear repeatedly.
Cooking operations can now be demonstrated with no power in the oven.
* Suppose you demonstrate Instant Cook.
2
3
Display
Step
Procedure Pad Order
Press the INSTANT COOK/
START pad.
(Within one minute of closing
the door.)
The timer begins to count down to zero at ten
times the speed. When the timer reaches
zero, will appear in the display.
1
Display
Step
Procedure Pad Order
Press the STOP/CLEAR pad.
The time of day will appear in the display.
* To cancel the Demonstration Mode. After step 2 above.
3
Display
Step
Procedure Pad Order
Press the MULTI COOK pad.
2
The guide message will be repeated twice, and then the display will show the time of day.
If you want to cancel the guide, press the STOP/CLEAR pad.
NOTE: For SENSOR INSTANT ACTION, HELP is not lit in the display, so press the HELP pad before pressing
the desired SENSOR INSTANT ACTION pad.
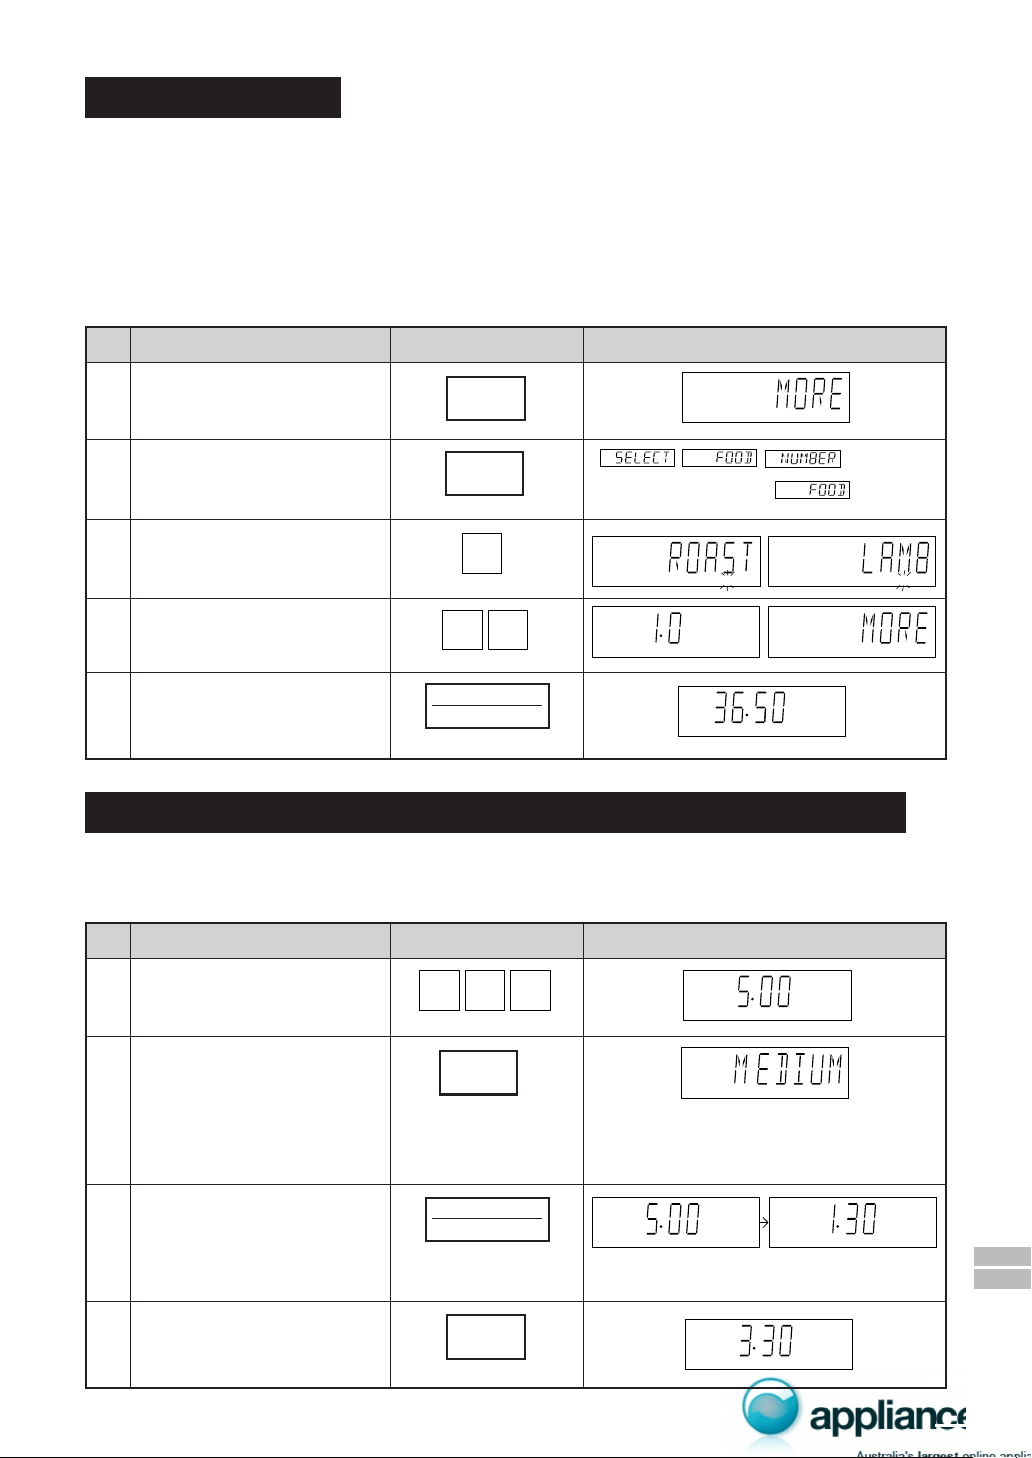
Demonstration Mode
This feature is mainly for use by retail outlets, and also allows you to practice key operations.
* To demonstrate. After step 1 for Auto Start.
Each pad carries useful guide.
* To get the guide for MULTI COOK pad. After step 1 for Auto Start.
Info on Pads
Each setting of Automatic Operations has a cooking hint.
If you wish to check, press the HELP pad whenever HELP is lit in the display.
Help
4
MULTI
COOK
STOP
CLEAR
INSTANT COOK
START
INSTANT COOK
START
24
COOK
KG HELP
MIX
HELP
MIX
COOK HELP
MIX
COOK
COOK
KG HELP
MIX
KG HELP
MIX
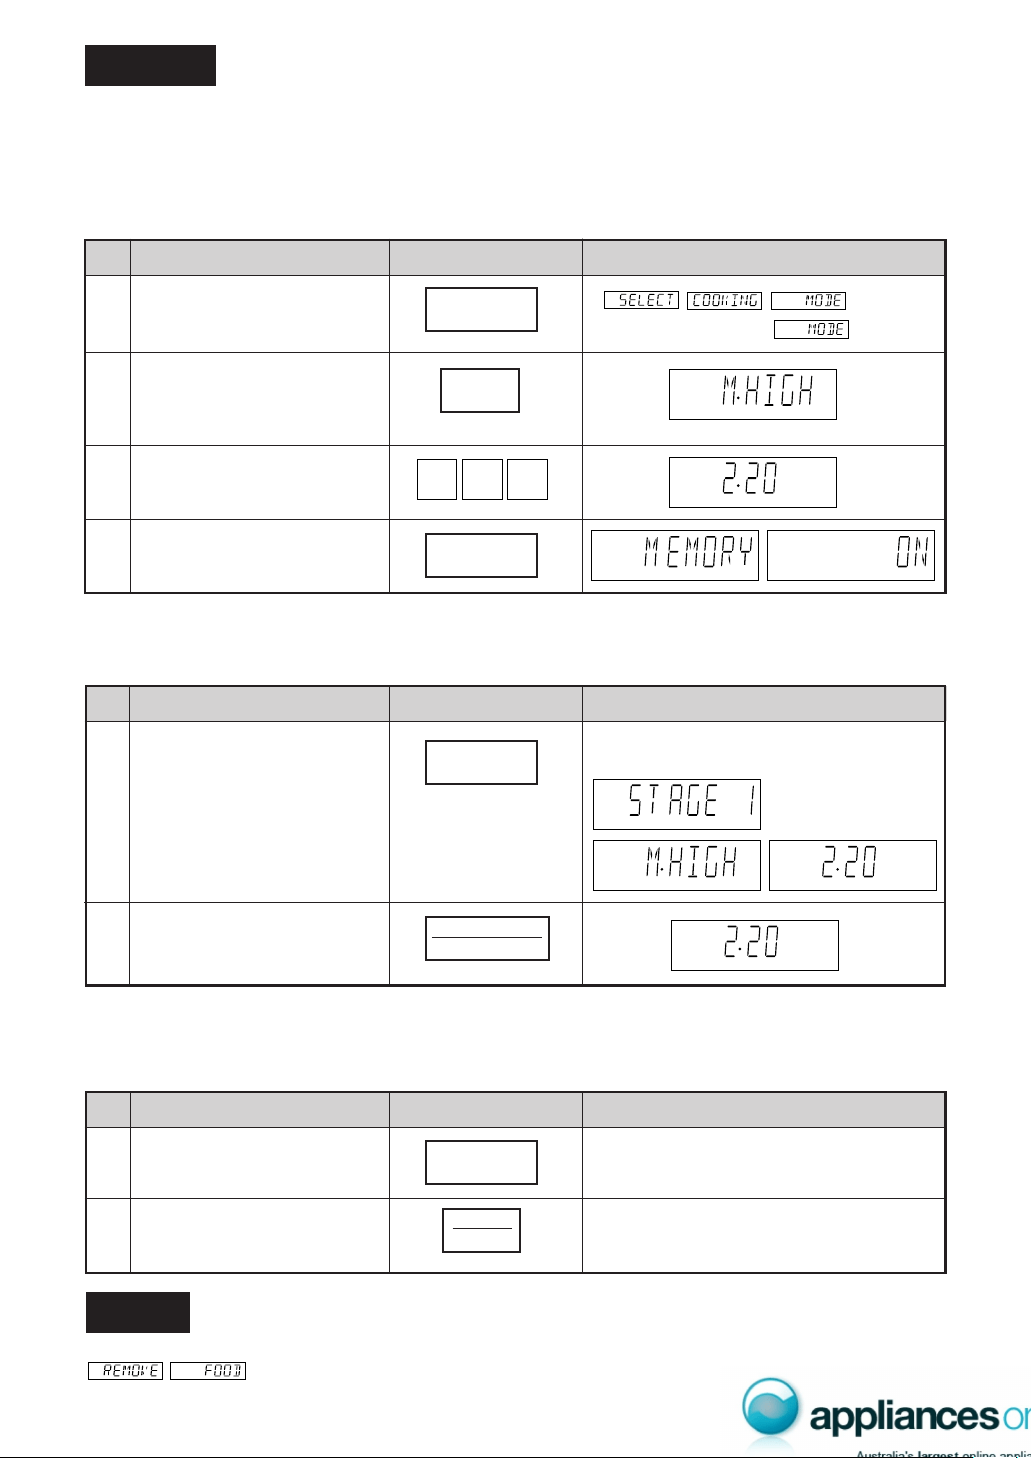
Multi Cook
The cooking times programmed into the automatic menus are tailored to the most popular tastes. To adjust the
cooking time to your individual preference –use the “more” or “less” feature to either add (more) or reduce (less)
cooking time.
The LESS/MORE pads can be used to adjust the cooking time of the following features
– SENSOR INSTANT ACTION – MULTI COOK
– REHEAT SENSOR – EASY DEFROST
To adjust cooking time, press the LESS or MORE pad at the beginning of the procedure.
* Suppose you want to cook 1.0 kg Roast Lamb (Well Done) with MULTI COOK.
Step
Procedure DisplayPad Order
Press the MORE pad.
1
Press the MULTI COOK pad.
(Operation guide off : )
2
Select food category for Multi
Cook.
Press 2 to cook Roast Lamb.
3
Enter the weight.
4
Press the INSTANT/COOK
START pad.
5
Microwave, Convection, Mix or Grilling time can be added or decreased during a cooking programme using the
“MORE” or “LESS” pads.
* Suppose you want to increase cooking time by 2 minutes during 5 minutes on MEDIUM cooking.
Step
Procedure DisplayPad Order
Press the INSTANT COOK/
START pad.
Press the MORE pad twice to
increase time by two minutes.
x 2
The timer begins
to count down.
Less/More Setting
Increasing or Decreasing Time During A Cooking Programme
Enter desired cooking time.
Select microwave cooking and
power level by pressing the
POWER LEVEL pad as re-
quired.
(for MEDIUM press three
times)
x 3
1
2
3
4
MORE
MORE
INSTANT COOK
START
INSTANT COOK
START
POWER
LEVEL
005
2
01
MULTI
COOK
25
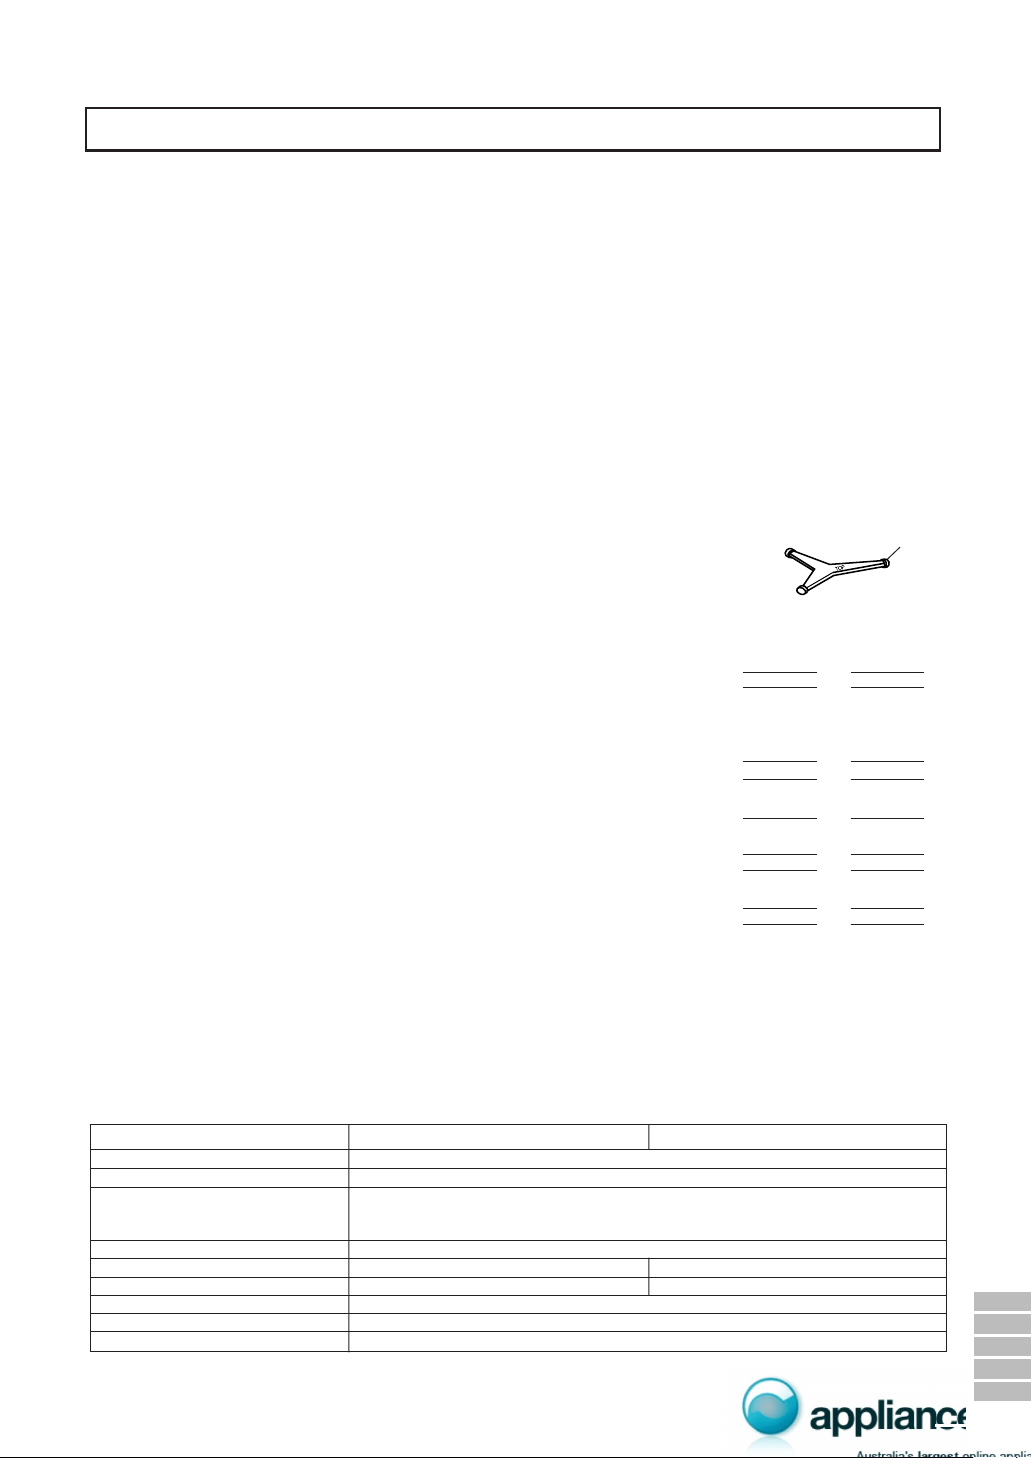
MEMORY ENTRY/REPROGRAMME
(Up to four stages can be memorised.)
*Suppose you want to enter 2 minutes 20 seconds on M•HIGH into the memory.
Press the MEMORY pad
twice.
Step
Procedure DisplayPad Order
(Operation guide off: )
x 2
1
4
Press the MEMORY pad.
NOTE : If you wish to enter more than two stages cooking, repeat step 2 and 3 after step 3.
COOKING BY MEMORY
*Suppose you want to use the memorised cooking programme with memory.
Step
Procedure DisplayPad Order
The memorised cooking programme will
appear.
Press the MEMORY pad.
1
TO CHECK MEMORY
You may forget exactly what information is stored in the memory or simply want to check if the oven has been
programmed correctly:
*Suppose you want to check the cooking programme of memory.
The memorized cooking programme will
appear.
Press the MEMORY pad.
1
Step
Procedure DisplayPad Order
Press the STOP/CLEAR pad.
Time of day will appear.
2
2
Press the INSTANT COOK /
START pad.
Your oven has an alarm function. If you leave food in the oven after cooking, the oven will "beep" 3 times and
will be appeared in the display after 2 minutes.
If you do not remove the food at that time, the oven will "beep" 3 times after 4 minutes and 6 minutes.
Your oven has a memory to allow you to preset a frequently used cooking programme. The oven "memorises" the
instruction and can recall this information when the time of day is displayed. This feature can be used for frequently
prepared foods such as scrambled eggs, or special recipes you like to cook.
Enter desired cooking time.
3
Select microwave cooking and
power level by pressing the
POWER LEVEL pad (for
M•HIGH press twice).
2
x 2
Memory
Alarm
MEMORY
MEMORY
MEMORY
MEMORY
POWER
LEVEL
STOP
CLEAR
INSTANT COOK
START
2 02
COOK
26
AC Line Voltage Single phase 230-240V, 50Hz
AC Power Required 1.6 kW (Microwave) / 1.6 kW (Convection)
Output Power
Microwave 900 W* (IEC test procedure)
Convection Heater 1500 W
Microwave Frequency 2450 MHz**(Class B/Group 2)
Outside Dimensions (WxHxD) 627mm x 378mm x 492mm 627mm x 378mm x 487mm
Depth with the door open 942mm 949mm
Turntable Diameter 390mm
Cooking Uniformity Turntable system
Weight Approx. 29 kg
SERVICE CALL CHECK
Please check the following before calling service:
1. Does the display light up? Yes No
2. When the door is opened, does the oven lamp come on? Yes No
3. Place one cup of water (approx. 250 ml) in a glass measuring cup in the oven and close the door securely.
Oven lamp should go off if door is closed properly.
Press the INSTANT COOK/START pad once.
A. Does the oven lamp come on? Yes No
B. Does the cooling fan work? Yes No
(Put your hand over the rear ventilation openings.)
C. Does the turntable rotate? Yes No
(The turntable can rotate clockwise or counterclockwise. This is quite normal.)
D. Does the COOK indicator light up? Yes No
E. After 1 minutes, is the water hot? Yes No
4. Remove water from the oven and programme the oven for 5 minutes at convection 180°C.
A. Does the CONV and COOK indicators light up? Yes No
B. After 5 minutes, is the inside of the oven hot? Yes No
If "NO" is the answer to any of the above questions, please check your wall socket and the fuse in your meter box.
If both the wall socket and the fuse are functioning properly, CONTACT YOUR NEAREST SERVICE
CENTRE APPROVED BY SHARP.
NOTE:
1. If time in the display is counting down rapidly, check Demonstration Mode. (See P. 23 for detail.)
2.
After manual or automatic cooking using the Grill, Mix or Convection modes, the cooling fan will switch on to cool the oven cavity.
To clear it, press the STOP/CLEAR key and the display will return to the time of day, if set. During these modes, the cooling fan
will carry on working after you have pressed the STOP/ CLEAR key. You may feel hot air blowing out of the ventilation openings.
SPECIFICATIONS
CARE AND CLEANING
Disconnect the power supply cord before cleaning or leave the door open to inactivate the oven.
Before cleaning ensure oven cavity is cool.
CLEAN THE OVEN AT REGULAR INTERVALS -
Keep the oven clean and remove any food deposits, or it could lead to
deterioration of the surface. This could adversely affect the life of the appliance and possibly result in a hazardous situation.
Exterior:
The outside may be cleaned with mild soap and warm water, wipe clean with a damp cloth. Avoid the use of harsh
abrasive cleaners. Keep the ventilation openings free of dust.
Door: Wipe the door and window on both sides, the door seals and adjacent parts frequently with a damp cloth to
remove any spills or spatters. Do not use abrasive cleaner.
Touch Control Panel: Wipe the panel with a cloth dampened slightly with water only. Do not scrub or use any sort
of chemical cleaners. Avoid the use of excess water.
Interior walls:
Wipe spatters and spills with a little dish washing liquid on a soft damp cloth. For heavier stains inside the oven cavity
only, use a mild stainless steel cleaner applied with a soft damp cloth. Do not apply to the inside of the door. Wipe clean ensuring all
cleaner is removed.
After use wipe the waveguide cover in the oven with a soft damp cloth to remove any food splashes. Built-up splashes may
overheat and begin to smoke or catch fire. Do not remove the waveguide cover.
DO NOT USE CAUSTIC CLEANERS, ABRASIVE OR HARSH CLEANSERS OR SCOURING PADS ON YOUR OVEN.
NEVER SPRAY OVEN CLEANERS DIRECTLY ONTO ANY PART OF YOUR OVEN.
DO NOT USE A STEAM CLEANER. Avoid using excess water. After cleaning the oven, ensure any water is remove with a soft cloth.
Note: At regular intervals, heat the oven referring to "Heating without Food" on page 10. Because, the splashed dirt
or food oil remained around oven walls may cause the smoke and odour.
Turntable/Turntable Support/Racks: Wash with mild soapy water and dry thoroughly.
Note: Keep the waveguide cover and accessories clean at all times. If you leave grease or fat in the cavity or
accessories, it may overheat, cause arching, smoke or even catch fire when next using the oven.
SPECIAL NOTE for TURNTABLE SUPPORT:
After cooking, always clean the turntable support, especially around the rollers. These must be free
from food splashes and grease. Built-up splashes or grease may overheat and cause arcing, which
may produce smoke or catch fire.
* When tested in accordance with AS/NZS 2895.1.2004
** This is the classification of ISM (Industrial, Scientific and Medical) equipment described in the International
Standard CISPR11.
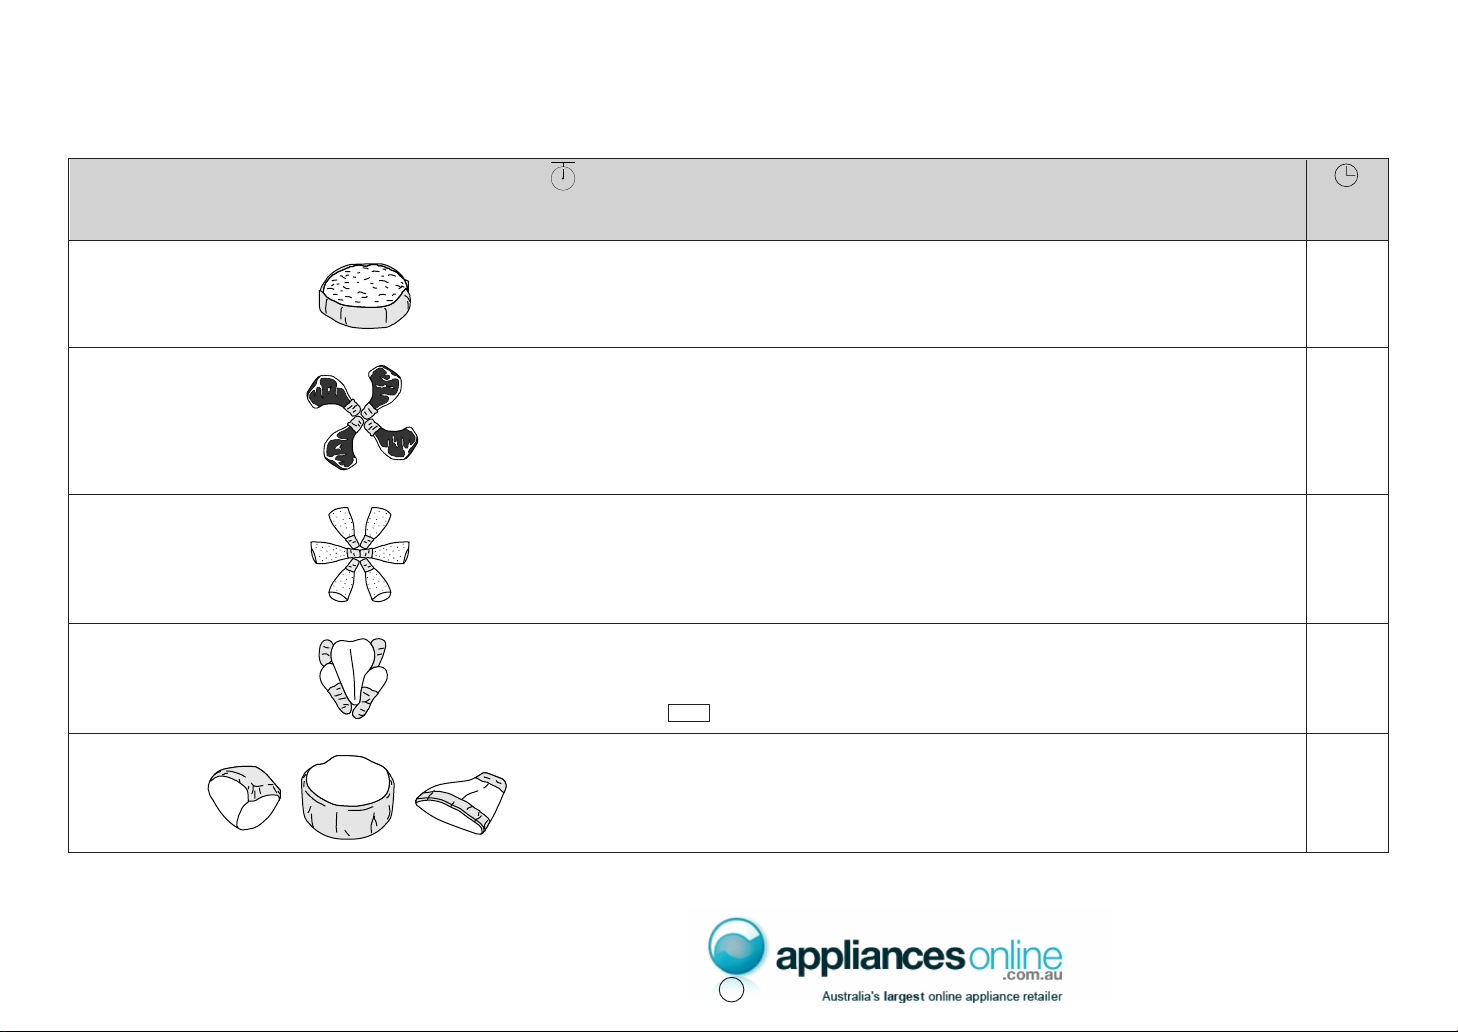
Model Name R-980J R-990J(S)/R-990K(S)/R-990K(W)
roller