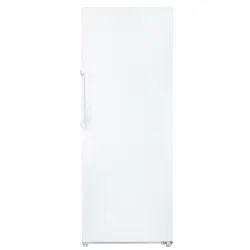
Documents: Go to download!
- Owner's manual - (English, Spanish)
Use & Care Guide Refrigerator
Appliance Setup
This Use & Care Guide provides specific operating instructions for your model. Use the unit only as instructed in this Use & Care Guide. Before starting the appliance, follow these important setup steps.
Installation
- Choose a place that is near a grounded electrical outlet. Do Not use an extension cord or an adapter plug.
- For the most efficient operation, the freezer should be located where surrounding temperatures will not exceed 110°F (43°C). Temperatures of 32°F (0°C) and below will NOT affect freezer operation. Additional compressor heaters are not recommended.
- Allow space around the unit for good air circulation. Leave a 1-inch (25.4 mm) space at the back and on top and a 3/8-inch (9.5 mm) space on the sides of the appliance for adequate circulation
Leveling
- The freezer must have all bottom corners resting firmly on a solid floor that is strong enough to support a fully loaded freezer.
It is Very Important for the appliance to be level in order to function properly. If not level, the door may be misaligned and not close or seal properly, causing cooling, frost, or moisture problems.
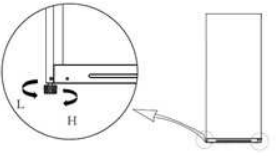
- The appliance is equipped with adjustable front leveling feet. Turn the foot clockwise to raise the side of the unit. Turn counterclockwise to lower the side. Adjust each side as needed until front of unit is level. Also adjust so that front of the unit is 1/4˝ higher than back, so that door stays closed.
Door Handle Installation
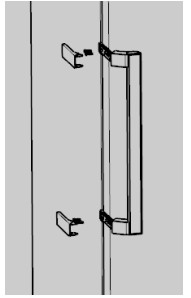
- Locate and remove the handle brace caps and four handle attachment flathead screws from the accessory bag.
- Remove the four roundhead screws from the left edge of the appliance door.
- Use the four flathead screws to attach the handle braces to the door edge.
- Insert the two tabs on the narrow end of the cap into the slots on the brace, and then snap the wide end down into place.
Cleaning
- Wash any removable parts, the freezer interior, and exterior with mild detergent and warm water. Wipe dry. Do not use harsh cleaners on these surfaces.
- Do not use razor blades or other sharp instruments, which can scratch the appliance surface when removing adhesive labels. Any glue left from the tape can be removed with a mixture of warm water and mild detergent, or touch the residue with the sticky side of tape already removed. Do not remove the serial plate
Energy Saving Ideas for Freezer Mode

- The freezer should be located in the coolest area of the room, away from heat producing appliances or heating ducts, and out of direct sunlight.
- Let hot foods cool to room temperature before placing in freezer. Overloading the freezer forces the compressor to run longer. Foods that freeze too slowly may lose quality or spoil.
- Be sure to wrap foods properly, and wipe containers dry before placing them in the freezer. This cuts down on frost build-up inside the freezer.
- Do not line freezer shelves and bins with aluminum foil, wax paper, or paper toweling. Liners interfere with cold air circulatin, reducing freezer efficiency.
- Organize and label food to reduce lid openings and extended searches.
- Remove as many items as needed at one time, and close door as soon as possible.
Appliance Use
Key Components
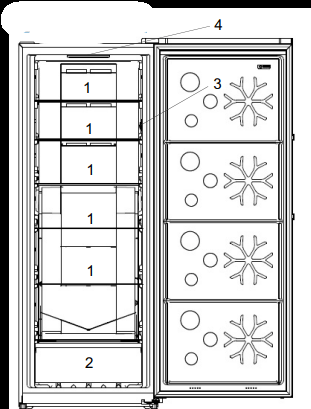
- Glass shelf
- Drawer Bin
- Temperature Control
- LED Lighting
- The interior temperature of this appliance can be set so that the entire unit can be used as either a Freezer or a Refrigerator.
- To turn the appliance on, plug the power cord into a properly grounded 3 prong electrical outlet. The green Power On light located on the temperature control will illuminate.
- For safe food storage, after plugging in allow two hours if used as a refrigerator and four hours if used as a freezer for the appliance to cool down completely to the set temperature. The compressor will run continuously for the first several hours.
- Foods that are already frozen may be placed in the freezer after the first few hours of operation. Unfrozen foods should NOT be loaded into the freezer until the freezer has operated for four hours.
- When loading the freezer, freeze only three pounds of fresh food per cubic foot of freezer space at one time. Distribute packages to be frozen evenly throughout the freezer.
Temperature Control
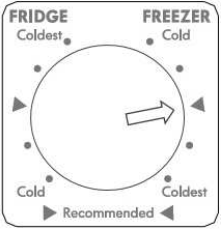
The temperature control is located midway down on the right inner cabinet wall. Turn the arrow dial into the FREEZER zone to use unit as a freezer. Turn dial into FRIDGE zone to use unit as a refrigerator.
You will encounter some resistance at the top center when turning the dial into one zone or the other. Push past the resistance area to move the arrow into the new zone.
Once in a zone, turn the dial so that the arrow points to the temperature setting of your choice.
In each zone a triangle figure indicates the recommended temperature setting for most situations of use.
After making an adjustment, allow several hours for the internal temperature to stabilize at the new setting.
Automatic Defrost
- The appliance is equipped with automatic defrost capability so that you do not have to manually defrost. The cooling element of the unit is regularly heated to melt the frost that forms on it. The resulting water drains through a duct at the back of the unit and into a concealed pan at the base of the unit where it evaporates. Should any frost form on the unit interior walls, remove food and store it elsewhere. Then unplug the unit, wait long enough for the frost to melt, and wipe up the moisture with a dry towel.
Rear Wheels
- The appliance is equipped with rear wheels to help you roll it into or out of a location. CAUTION: Obtain the aid of an assistant if the appliance feels too heavy for you to safely move it.
Interior LED Lighting
- The appliance features interior LED lighting, which is more effective and longer lasting than incandescent bulbs. However, in the unlikely event that the LED fails to light, call 1-844-553-6667 to schedule repair service to replace it.
Easy Open Door Handle
- The appliance is equipped with a door handle that decreases the amount of force needed to to open the door. Grasp the handle and pull to the side and then straight back to easily open the door
Care & Cleaning
CAUTION: Damp objects stick to cold metal surfaces. Do not touch inferior metal surfaces with wet or damp hands.
Cleaning the Inside
- Wash inside surfaces of the appliance with a solution of two tablespoons of baking soda in one quart (1.1 liters) warm water. Rinse and dry. Wring excess water out of the sponge or cloth when cleaning in the area of the controls, or any electrical parts
- Wash the removable parts and baskets with the baking soda solution mentioned above, or mild detergent and warm water.
- Never use metallic scouring pads, brushes, abrasive cleaners, or alkaline solutions on any interior surface. Do not wash removable parts in a dishwasher.
Cleaning the Outside
- Wash the cabinet with warm water and mild liquid detergent. Rinse well and wipe dry with a clean soft cloth. Never use metallic scouring pads, brushes, abrasive cleaners, or alkaline solutions on any exterior surface.
Vacation and Moving Tips
WARNING: If leaving the appliance door open while on vacation, make certain that children cannot get into the freezer and become entrapped.
Short Vacations: Leave the appliance operating during vacations of less than three weeks. Long Vacations: If the appliance will not be used for several months:
- Remove all food and unplug the power cord.
- Clean and dry the interior thoroughly.
- Leave the appliance door open slightly, blocking it open if necessary, to prevent odor and mold growth.
Moving: When moving the appliance, follow these guidelines to prevent damage:
- Disconnect the power cord plug from the wall outlet.
- Remove foods and clean the appliance interior.
- Secure all loose items such as bins and shelves by taping them securely in place to prevent damage.
- In a moving vehicle, secure freezer in an upright position to prevent movement. Also protect outside of freezer with a blanket, or similar item.
NOTE: If unit is turned off or unplugged for several hours, do not open appliance door unnecessarily. This will maintain the coldest temperature inside and reduce the recovery time to desired temperature once the unit is turned back on.
Power or Appliance Failure
- If a power failure occurs, frozen foods will stay frozen for at least 24 hours if the appliance door is kept closed. If the power failure continues, pack seven or eight pounds of dry ice into the appliance every 24 hours. Look in the Yellow Pages under Dry Ice, Dairies, or Ice Cream manufacturers for local dry ice suppliers. Always wear gloves and use caution when handling dry ice.
- If the appliance has stopped operating, see Appliance does not run in the Troubleshooting Guide. If you cannot solve the problem, call an authorized servicer immediately. If the appliance remains off for several hours, follow the directions above for the use of dry ice during a power failure. If necessary, take the food to a local locker plant until the appliance is ready to operate. Look in the Yellow Pages under Frozen Food Locker Plants.
Door Reversal
The appliance is shipped with the hinge on the right so that the door swings open from left to right. Perform the following procedure to reverse the door swing.
NOTE: A left side top hinge cover, top hinge, lower hinge and door closer are shipped with the appliance for use in this procedure.
WARNING: Unplug the refrigerator before performing the door reversal procedure. Failure to unplug may result in serious injury or death from electrical shock.
CAUTION: To avoid personal injury or property damage, obtain assistance from another person to perform the door reversal procedure.
CAUTION: Obtain a securely balanced stool or platform to stand on when performing steps of the procedure that have to do with the top of the appliance cabinet.
1. Remove the two screws securing the right hinge cover to the top of the cabinet. Depress the tab on the cover side of the wire harness and pull the two sections of the harness apart. Push the cabinet section of the harness into the hole on the top of the cabinet.
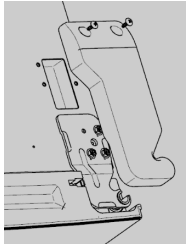
2. Obtain the aid of an assistant to steady the door. Once the hinge is removed the door may swing free of the cabinet. Unscrew the 3 bolts on the upper hinge and remove the right hinge by lifting up. Retain the bolts for left hinge attachment.
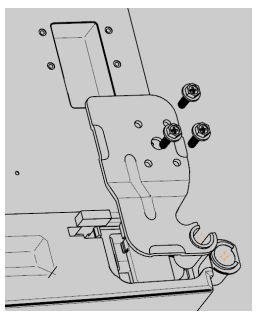
3. Slightly open the door on the handle side for ease of removal. With the aid of an assistant raise the door up from the bottom hinge. Set door aside.
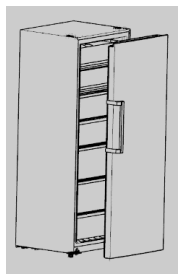
4. Remove the 3 screws from the cover plate on the cabinet left front corner. Remove cover plate and use the screws to reattach it to the cabinet right corner.
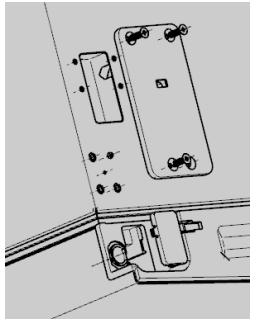
5. With the aid of an assistant, lay the appliance flat on its back. Remove the leveling foot from each side of the bottom. Remove the 5 screws attaching the right bottom hinge to the cabinet. Remove the hinge and retain the 5 screws for left bottom hinge attachment.
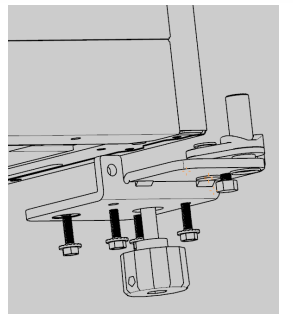
6. Remove the plug from the front bottom left of cabinet and insert it into the hole on the front bottom right. Remove the screw (if present) from the underside of the front bottom edge. Use the 5 screws from step 6 to attach the left lower hinge to the left side of the appliance bottom. Reinsert the leveling footon both sides of the cabinet.
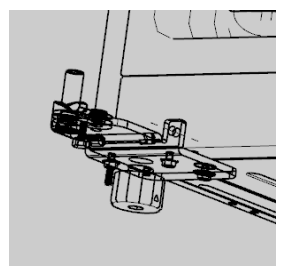
7. Remove the metal door stopper and plastic door closer from the lower right corner of the door. Use the removed screw to attach the door stopper and left door closer to lower left corner of door.
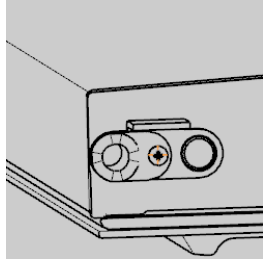
8. With the aid of an assistant, carefully raise the appliance back to upright position. NOTE: Once the appliance is raised back up to vertical position, it must remain upright for 6 hours before plugging in to avoid damage to internal components.
9. With aid of assistant, mount the door onto the lower left hinge. Insert the hinge pin into the door, and use the 3 bolts removed in step 2 to attach the left top hinge to left top corner of cabinet.
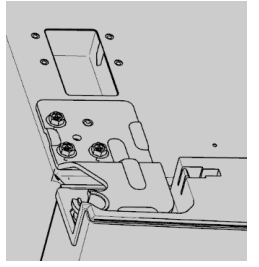
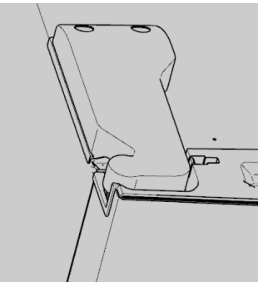
10. Use a flat blade screwdriver to carefully pry the wire harness base out of its clip in the right hinge cover. Carefully insert harness base into clip in left hinge cover. Pull cabinet wire harness section up from recess in left top corner of cabinet. Connect the two harness sections together. Use the 2 screws removed in step 1 to attach the left hinge cover to the left corner of cabinet.
11. Carefully remove the plastic caps that cover the two door handle braces. Remove the flat head screws from the braces and remove handle. Remove the 4 round head screws from door right edge. Reattach the 4 round head screws to the left door edge into the holes exposed from removing the brace screws.
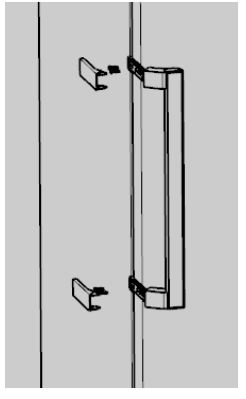
12. Use the removed brace flat head screws to attach the handle to the right edge of door into the holes exposed from removing the 4 round head screws. Insert the two tabs on the narrow end of the cap into the slots on the brace, and then snap the wide end down into place.
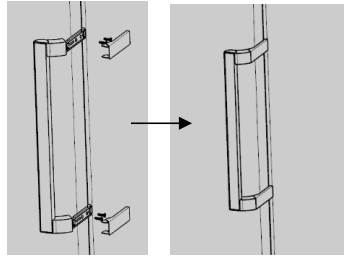
13. Once the handle is installed on the right side of the cabinet, the door reversal procedure is complete. Open and close the door to check that it swings freely and closes securely NOTE: Set the leveling legs so that the front of the cabinet is ¼˝ higher than the back to prevent the door from accidental opening.
TROUBLESHOOTING
TROUBLESHOOTING GUIDE | Before calling for service, review this list. It may save you time and expense. This list includes common occurrences that are not the result of defective workmanship or materials in this appliance. | |
CONCERN | POTENTIAL CAUSE | COMMON SOLUTION |
Appliance does not run. |
|
|
Appliance runs too much or too long. |
weather is hot.
|
|
Interior temperature is too cold. | Temperature Control is set too cold. | Adjust the control to a warmer setting. Allow several hours for the temperature to stabilize. |
Interior temperature is too warm. |
|
|
Appliance exterior surface temperature is warm. | The appliance exterior walls can be as much as 30°F warmer than room temperature. | This is normal while the compressor works to transfer heat from inside the appliance cabinet. |
Louder sound levels whenever appliance is on. | Modern cooling appliances have increased storage capacity and more stable temperatures. They require a high efficiency compressor. | This is normal. When the surrounding noise level is low, you might hear the compressor running while it cools the interior. |
Longer sound periods when compressor comes on. | Appliance operates at higher pressures during the start of the ON cycle. | This is normal. Sound will level off or disappear as appliance continues to run. |
Popping or cracking sound when compressor comes on. | Metal parts undergo expansion and contraction, as in hot water pipes. | This is normal. Sound will level off or disappear as appliance continues to run. |
Bubbling or gurgling sound, like water boiling. | Refrigerant (used for cooling) is circulating throughout the system. | This is normal. |
Vibrating or rattling noise. |
|
|
Moisture forms on inside appliance walls. |
|
|
Moisture forms on outside of freezer. | Door may not be seat- ing properly, causing the cold air from inside the freezer to meet warm moist air from outside. | See Door Will Not Close in this Before You Call section.
|
Odors in appliance. |
|
|
Door will not close. |
|
|
See other models: 79319 60502 41179 99053 60619
