
B07FHBYWPY
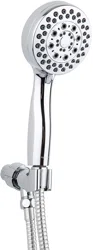
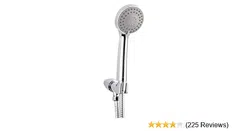
3 Function Hand Shower Set
Ensemble Douchette À 3 Fonctions
Conjunto de Ducha de Mano con 3 funciones
Plumber’s tape
Cinta para roscas
de fontanería
Rags
Trapos
Chiffons
Blanket or Tarp
Manta o Lona
EN
Warranty Information
To obtain a copy of the warranty for this product:
amazon.com/AmazonBasics/Warranty
+1-866-216-1072
Feedback and Help
Love it? Hate it? Let us know with a customer review.
amazon.com/review/review-your-purchases#
amazon.com/gp/help/customer/contact-us
Información Sobre La Garantía
Para obtener una copia de la garantía de este producto:
amazon.es/basics-garantia
+52 (0) 442-348-9587
Comentarios y Ayuda
¿Le encanta? ¿No le gusta nada? Escriba una opinión como cliente.
amazon.com.mx/review/review-your-purchases#
amazon.com.mx/gp/help/customer/contact-us
ES
•
Cleaning and Maintenance: Avoid using abrasive chemicals when cleaning,
read the cleaner product label prior to use.
Caution
This product contains small items that could be a choking hazard if swallowed.
Keep these items away from young children.
Make Sure these instructions are read and completely understood before
attempting installation. If you are unsure of any part of this installation,
please contact a professional installer for assistance.
Step 1: Turn off the water.
Step 2: Remove old shower head.
Apply about 2-3 turns of plumber’s tape to the threads of the
shower arm prior to attaching.
Make sure the water hose inlet is pointing down when tight.
Verify that there is a black o-ring in the end of the sprayer hose
that attaches to the holder. Screw the shower hose (hex nut) onto
the holder by turning it clockwise.
Step 4: Verify that there is a black o-ring in the end of the sprayer hose (knurled
nut) that attaches to the shower head. Screw the shower hose onto the
shower head by turning it clockwise. Wrap a cloth around the shower
hose, use the adjustable wrench to clamp onto the cloth, wrap a cloth
around the fitting of the shower head and use the adjustable wrench to
tighten the sprayer hose.
Paso 4: Confirme que haya una junta tórica negra en el extremo de la manguera
del rociador (tuerca moleteada) que conecta el cabezal de la ducha.
Atornille la manguera de la ducha en el cabezal de la ducha girándola
hacia la derecha. Envuelva un trapo alrededor de la manguera de la ducha,
use la llave inglesa para sujetar el trapo, luego envuelva un trapo alrededor
del accesorio de la regadera y use la llave inglesa para ajustar la manguera
del rociador.
Step 5: Turn the water back on and turn on the shower and check for leaks. If you
find any leaks, try tightening the shower head a little more (Step 3) and
check again for leaks. If you still see a leak, remove the shower head
(Step 2) and remove and reapply any old plumber’s tape and follow Step 3.
Make sure the black washer is inside the coupler prior to attaching.
Step 3: Clean the threads of the shower arm. Attach shower hose to shower arm
and tighten.
NOTICE
NOTICE
NOTICE
•
Limpieza y Mantenimiento: Evite Evite usar productos químicos abrasivos cuando
limpie; lea la etiqueta del producto de limpieza antes
de usarlo.
Atención
Este producto contiene objetos pequeños que podrían ser un riesgo de asfixia en
caso de tragarse. Mantenga estos objetos alejados de niños pequeños.
Asegúrese de leer y comprender completamente estas instrucciones antes
de intentar la instalación del producto. Si no está seguro sobre alguna pieza
o sobre la instalación, contacte a un instalador profesional para obtener ayuda.
Paso 1: Corte el suministro de agua.
Paso 2: Saque el cabezal de ducha viejo.
Aplique 2-3 vueltas de cinta para roscas de fontanería a las roscas
del brazo de la ducha antes de instalar.
Asegúrese de que la entrada de la manguera de agua quede
apuntando hacia abajo cuando esté apretada. Confirme que haya
una junta tórica negra en el extremo de la manguera del rociador
que conecta con el soporte. Atornille la manguera de la
ducha (tuerca hexagonal) en el soporte girándola hacia la derecha.
Paso 5: Vuelva a abrir la llave de paso del agua y abra la llave de agua de la ducha
para ver si hay fugas. Si hay alguna fuga, apriete un poco más el cabezal
de la ducha (Paso 3) y vuelva a revisar si aún hay fugas. Si sigue habiendo
fugas, saque el cabezal de ducha (paso 2) y quite la cinta de fontanería vieja
para reaplicar nueva; luego, pase al paso 3.
Asegúrese de que la arandela negra esté dentro de la unión antes
de instalar.
Paso 3: Limpie las roscas del brazo de la ducha. Fije la manguera de la ducha al
brazo y apriete.
AVISO
AVISO
AVISO
Couverture
ou Bâche
Ruban
d'étanchéité
pour filetage
HECHO EN CHINA
FABRIQUÉ EN CHINE
MADE IN CHINA
Informations Sur La Garantie
Pour obtenir une copie de la garantie portant sur ce produit :
amazon.ca/AmazonBasics/Warranty
+1-877-586-3230
Vos Avis et Aide
amazon.com/review/review-your-purchases#
amazon.ca/gp/help/customer/contact-us
Étape 4 : Vérifiez la présence d’un joint torique noir à l'extrémité du flexible de
pulvérisation (écrou moleté) qui se fixe sur la pomme de douche.
Vissez le flexible de douche sur la pomme de douche en le tournant
dans le sens des aiguilles d’une montre. Enroulez un chiffon autour du
flexible de douche, enserrez le chiffon à l’aide de la clé à molette, puis
enroulez un chiffon autour du raccord de la pomme de douche. Ensuite,
serrez le flexible de pulvérisation à l’aide de la clé à molette.
•
Nettoyage et entretien : Évitez d’utiliser des produits chimiques abrasifs lors du
nettoyage. Lisez l’étiquette du produit relative au
nettoyage avant utilisation.
Attention
Ce produit contient de petits composants susceptibles de présenter un risque
d'étouffement en cas d'ingestion. Conservez ces composants hors de la
portée des enfants en bas âge.
Veillez à bien lire et assimiler l’intégralité des présentes instructions avant
de tenter de procéder à l'installation. En cas de doute concernant toute
étape de cette installation, veuillez contacter un installateur professionnel
afin d'obtenir de l'aide.
Étape 1 : Fermez le robinet.
Étape 2 : Retirez l’ancienne pomme de douche.
Appliquez environ 2 à 3 tours de ruban d’étanchéité pour filetage
sur le filetage du bras de douche avant de procéder à la fixation.
Assurez-vous que l’orifice d’entrée du flexible d'eau est dirigée
vers le bas lorsqu'il est serré. Vérifiez la présence d’un joint
torique noir à l'extrémité du flexible de pulvérisation qui se fixe
au support. Vissez le flexible de douche (écrou hexagonal) sur
le support en le tournant dans le sens des aiguilles d’une montre.
Étape 5 : Rétablissez l'eau, puis ouvrez le robinet de la douche. Ensuite, vérifiez
l’installation afin de détecter des fuites éventuelles. En cas de constat
de fuites, essayez de resserrer un peu plus la pomme de douche
(Étape 3), puis vérifiez à nouveau l’installation afin de détecter des
fuites éventuelles. Si vous détecter toujours une fuite, retirez la pomme
de douche (Étape 2). Ensuite, retirez et appliquez à nouveau tout ruban
d’étanchéité pour filetage, puis suivez l’Étape 3.
Veillez à ce que la rondelle noire soit logée à l’intérieur du raccord
préalablement à toute fixation.
Étape 3 : Nettoyez le filetage du bras de douche. Fixez le flexible de douche sur
le bras de douche, puis serrez.
REMARQUE
REMARQUE
REMARQUE
FR