Documents: Go to download!
User Manual
- User Manual - (English, Spanish)
- Spec Sheet - (English)
- Dimensions Guide - (English)
- WINE COOLER BOTTLE CAPACITY
- Installing your new appliance
- Description of the appliance
- Display Controls
- Using your appliance
- Cleaning and Care
- Troubleshooting
Table of contents
Use & Care Guide Wine Cooler
WINE COOLER BOTTLE CAPACITY
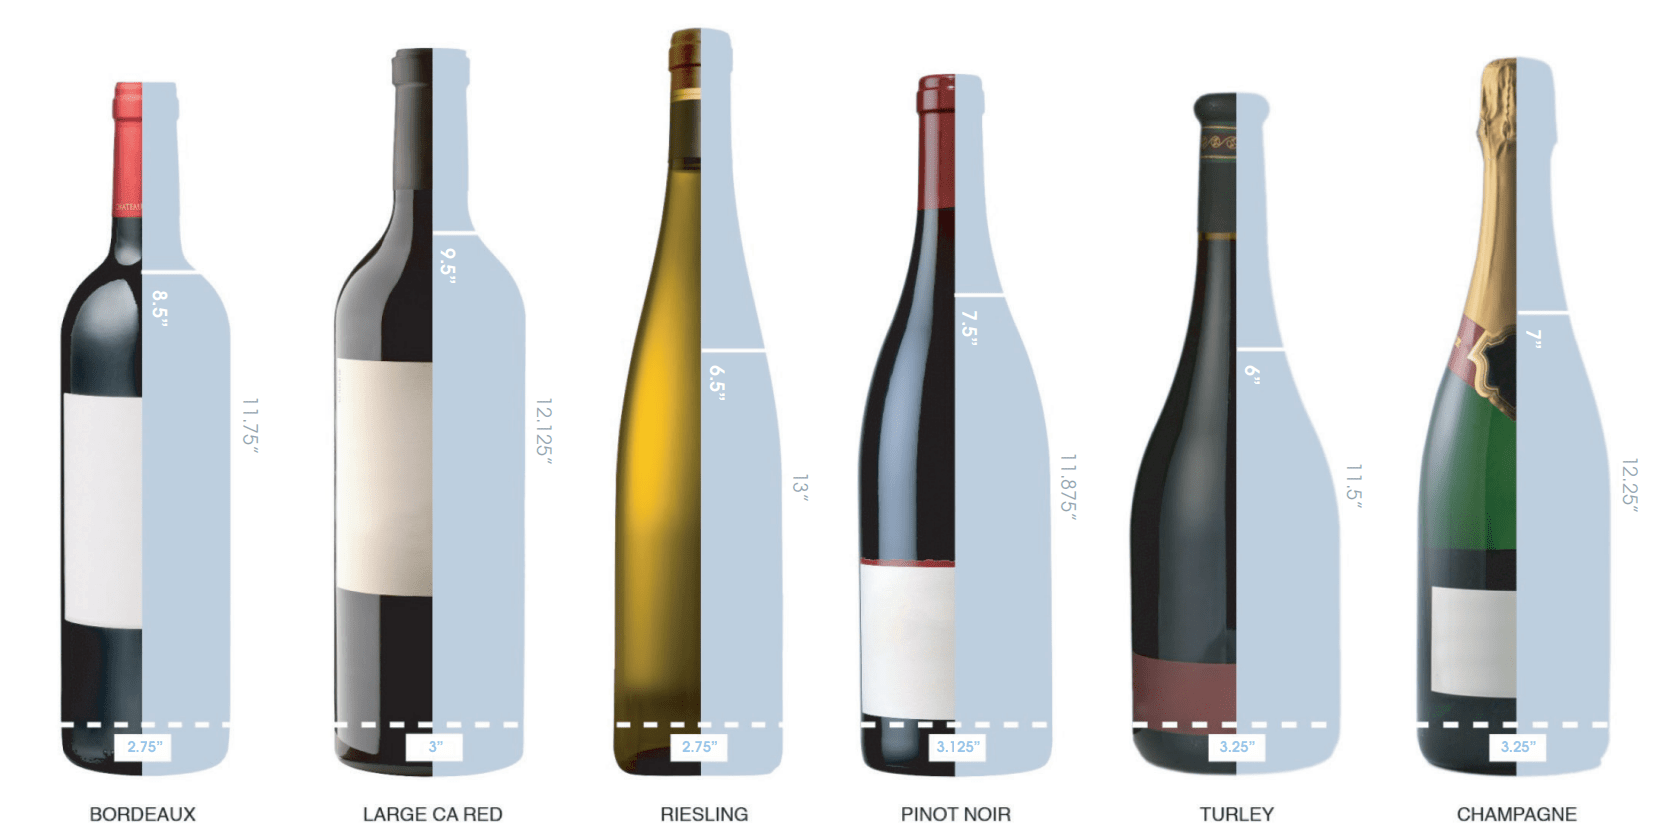
- This chart is provided as a general guide to bottle size. Everyone's collection is different and there are many different bottle size and shapes on the market. The bottle capacity listed for wine coolers is for standard Bordeaux 750ml bottles (including champagne and sparkling wine bottles) will decrease the number of bottles you are able to store in your wine coole
Installing your new appliance
- Before using the appliance for the first time, you should be informed of the following tips
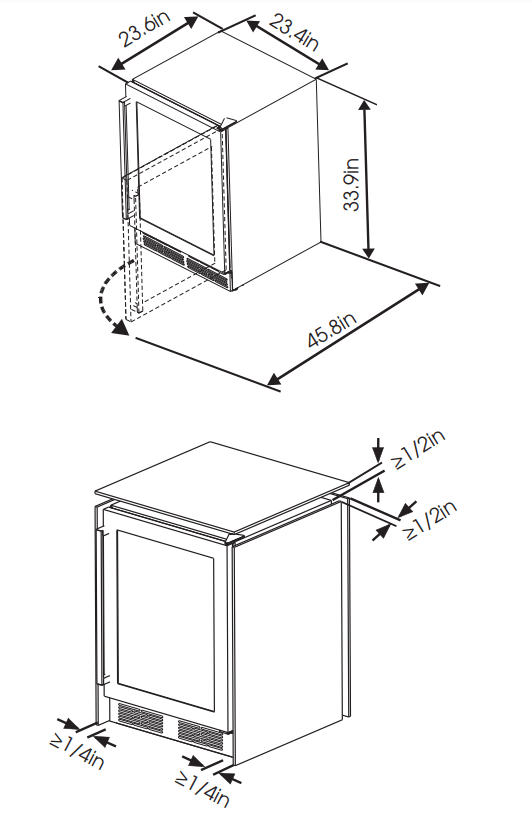
- VENTILATION OF APPLIANCE: In order to improve efficiency of the cooling system and save energy, it is necessary to maintain good ventilation around the appliance for the dissipation of heat.
- For this reason, sufficient clear space should be available around the product.
- Suggest: It is advisable for there to be at least l/2 inch of space from the back to the wall, at least l/2 inch from its top, and at least l/4 inch from its side to the wall. As shown in the following diagrams.
- Note:
- Avoid locating the appliance in damp areas .Too much moisture in the air will cause frost to form quickly on the evaporator.
- Keep the appliance out of direct sunlight, rain or frost. Position the product away from heat sources such as stoves, fires or heaters.
- Position your appliance in a dry place to avoid high moisture.
Leveling Of Appliance
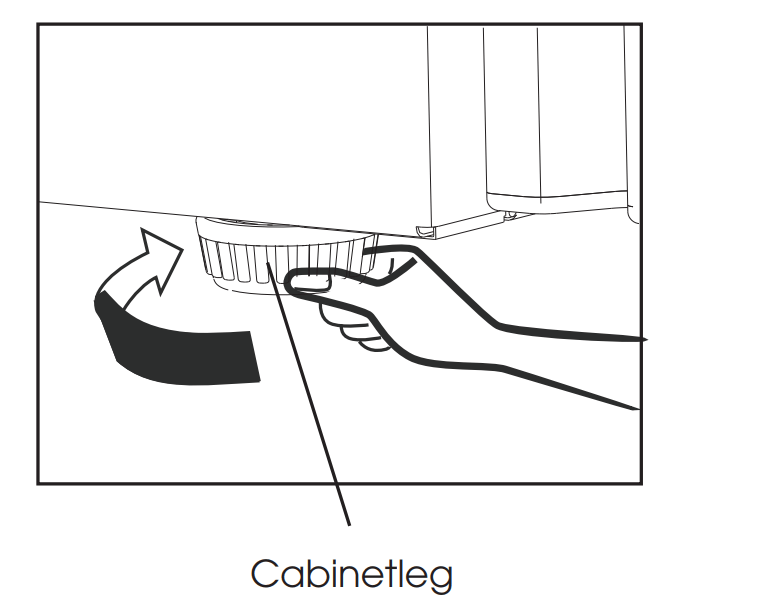
The appliance should be level in order to eliminate vibration. We recommend that you level the appliance by the following steps.
- Put the refrigerator into the right place.
- Turn the adjustable feet (with your fingers or a suitable screw driver) until they touch the floor.
- Tilt back the top backwards for about 10-15mm or 1 ° by turn the adjustable feet. This will allow the doors to self-close providing a consistent closed seal.
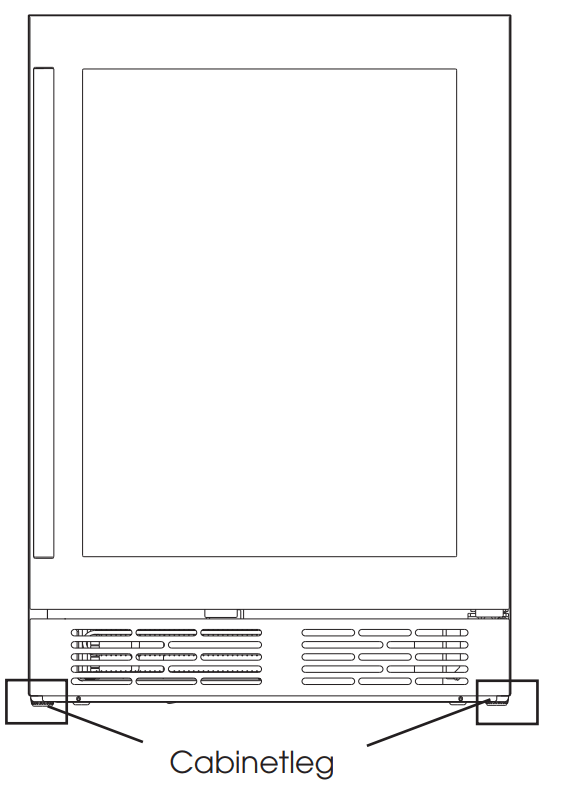
Electrical Connection
- Caution! Any electrical work required to install this appliance should be carried out by a qualified person or authorized service technician.
- WARNING: This appliance must be grounded. The manufacturer declines any liability should these safety measures not be observed.
Description of the appliance
Description of the appliance Equipped with metal shelves
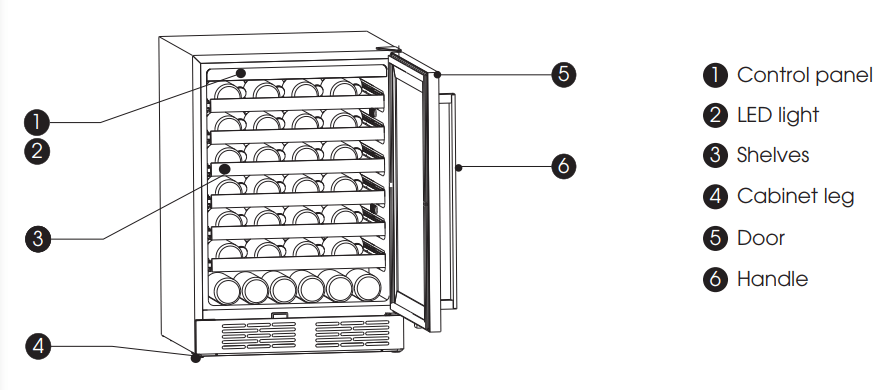
Note:
- The appliance can keep 54 bottles of wine at the same time, please place the wine bottles as shown above.
- Bottle capacities, mentioned in this manual are based on standard BORDEAUX 750ml bottles and standard shelving.
Display Controls

Display
The control panel, shown above, is at the top of the Refrigerator Chamber.
- Each time the power turns on, the display panel will light everything for 3 seconds, beep for 1 second, and then enter the normal display status.
- Icons are always lit (until the screen activates).
- The display will activate the screen saver if no button and no action is taken to open or close the door for 60 seconds with the display on.
- Any button press or open door action will exit the screen saver.
- Press the key in the screen saver state. Activate the screen saver only. Do not change the settings.
- Each valid button press emits a short sound.
- The corresponding temperature setting is reflected in the display, and the setting takes effect and is stored after 10 seconds of operation without pressing the key.
Standby Mode
When you do not plan to use this appliance for a period of time, you can save energy by entering the standby state.
- To enter standby mode, press and hold the standby key for more than 3 seconds. The buzzer will beep and the display board will show "OF".
- To exit standby mode, press and hold the standby key for more than 3 seconds. The buzzer rings will beep.
NOTE: In standby mode, cooling will stop. If you do not to use the appliance for a long time, take out the wine, and unplug the unit.
"Light On/Off key"
- You can turn the interior light on or off by pressing this button. After closing the door for 10 seconds, the light will turn off automatically, so wine is not exposed to light for too long.
Temperature Measure Change (°F / °C)
- You can change the temperature display setting from Fahrenheit to Celsius degrees by pressing the marked ,and vice versa.
Temperature regulation
ou can set the temperature you desire by pressing the buttons "  " or "
 ". When you press the button for the first time, the LED readout will show the previously set temperature. The temperature will increase 1°C or 1°F each time you press the UP button and will decrease 1°C or 1°F each time you press the DOWN button.
NOTE:
- The appliance doesn’t work properly if the set temperature is higher than the ambient temperature.
- The temperature range is from 5°C(41°F ) to 20°C ( 68°F).
- The temperature preset at the factory is12°C.
- When you set a temperature, you set an average temperature for the whole cabinet. There may be a 2°C to 3°C variance between the top and bottom shelves of the appliance.
Over Temperature Alarm
- In order to avoid a the temperature problem that could affect the quality of the wine, the appliance has an overtemperature alarm function. When an over temperature alarm occurs, cancel the alarm by pressing the Cancel Alarm Key and take out the wine, and contact customer service.
- NOTE: In the over temperature alarm state, press the Cancel Alarm Key to exit the over temperature alarm, the alarm tone stops, and the light ” ” will change from blinking to constant, once the appliance cools to the required temperature.
- WARNING: If the LED light is broken, please DO NOT CHANGE IT YOURSELF! Changing the light yourself may cause injury or serious malfunctioning. It must be replaced by a qualified service technician in order to avoid a hazard. Contact your local Service Center for help. Before changing the LED light, switch off the appliance and unplug it, or pull the fuse or the circuit breaker.
Door Alarm
- The door alarm will sound once the fridge door is open over 2 minutes. In case of door alarm, the buzzer will sound 3 times per minute and will stop automatically 8 minutes later. Closing the door will also clear the door alarm.
- To save energy, don’t keep the door open for a long time when using refrigerator.
Using your appliance
This section tells you how to use most of the useful features. We recommend that you read through them carefully before using the appliance.
Installation The Handle
The tools you will need:

The parts you will need:

Before using the device, install the handle as follows:
1. First open the door and take the door gasket out on one side of the nonhinged side.
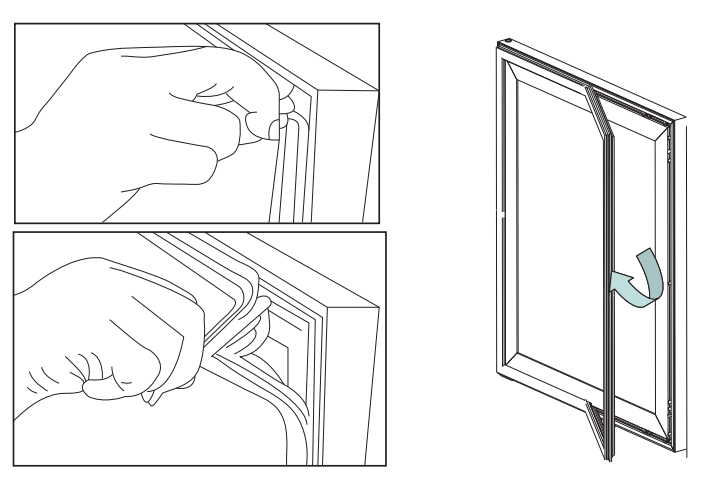
2. Find the handle and screws in the accessory pack.
3. Attach the screw with a magnetic screwdriver so that it passes through the screw hole in the door body until the bottom. Keep a certain amount of pressure and don’ t let go.
4. One hand holds the handle so that the handle hole is aligned with the screw, and the other hand turns the screwdriver
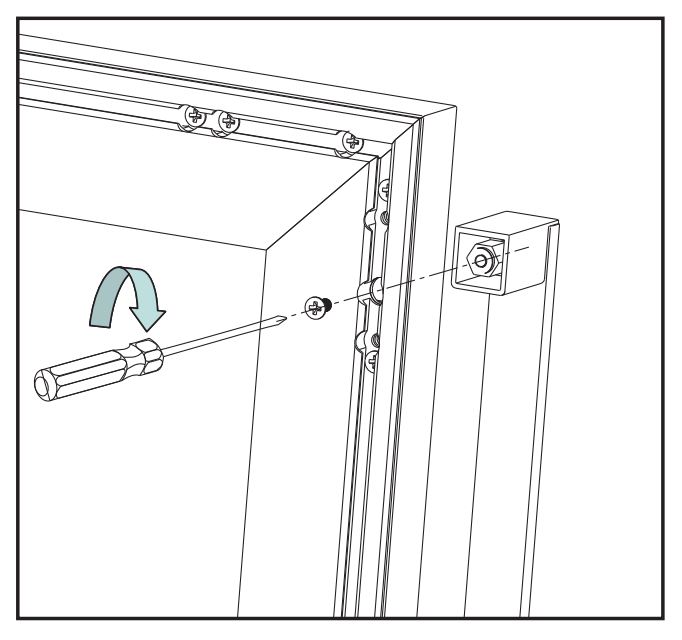
5. Install another screw in the same way.
Placement Of Bottles
- The appliance is equipped with 6 shelves with 8 slots each. The bottles should be placed on the shelves as shown below.
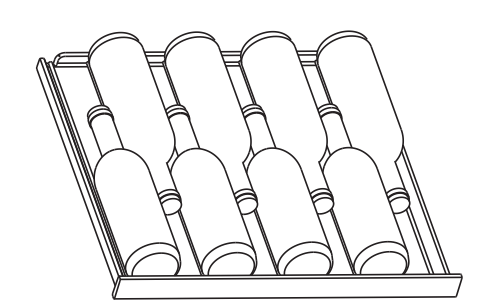
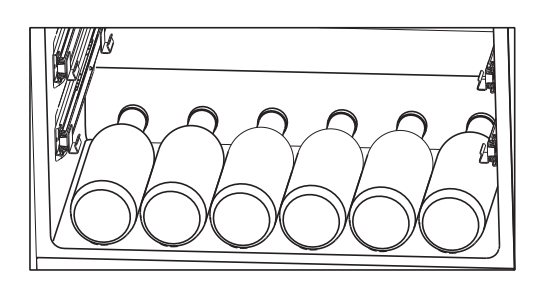
- You can also place bottles in the six slots which are located at the bottom of the refrigerator.
WARNING
- To prevent the bottles from rolling down and being broken, there should not be more than 6 bottles placed at the bottom of the refrigerate room as showed above.
- The maximum loading of each type of shelf is 33lb.
Tips For Keeping The Wine
- Keep the wine in the dark .The door is in anti - UV darkened double glass to protect the wine from the light in case the refrigerator is located in well - lit place.
- Lay the bottles down in such a way that the corks do not dry.
- Avoid switching the appliance light on too often or for too long. Wine keeps better in dark.
- To avoid agitating the wine, handle the bottles with care.
- Follow the recommendations and advice at the time of purchase or given in the technical documentation regarding the quality, duration and optimum storage temperature of the wine.
- The proper storage of wine depends on its age, type of grapes, alcoholic content and level of fructose and tannin contained in it. At the time of purchase, check if the wine is already aged or if it will improve over time.
Reversing The Door
- The side at which the door opens can be changed, from the right side (as supplied) to the left side, if required.
- WARNING: When reversing the door, the appliance must not be connected to power. Ensure that the plug is removed from the power socket.
The tools you will need (Not provided):
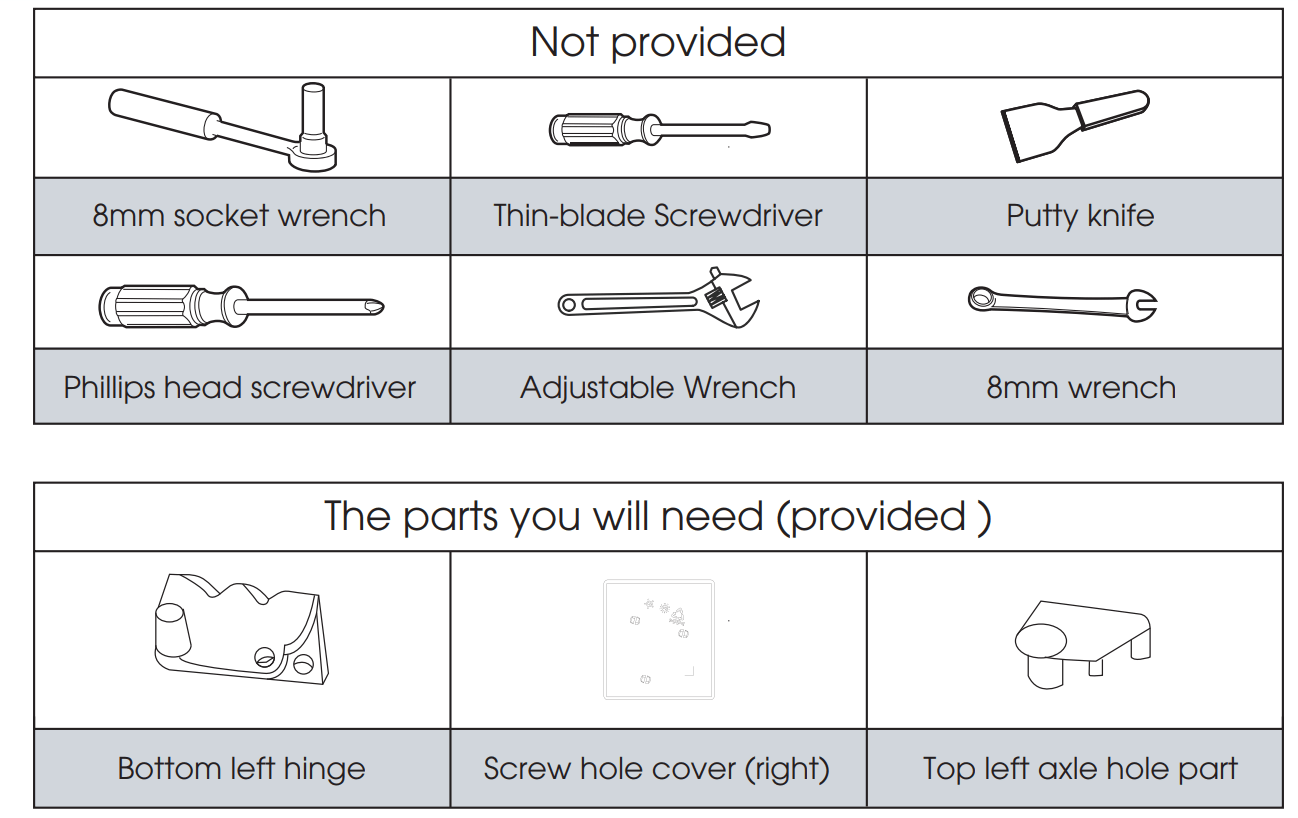
Note: If required you may lay the refrigerator on its back in order to gain access to the base, you should rest it on soft foam packaging or similar material to avoid damaging the backboard of the refrigerator. To reverse the door, the following steps are generally recommended.
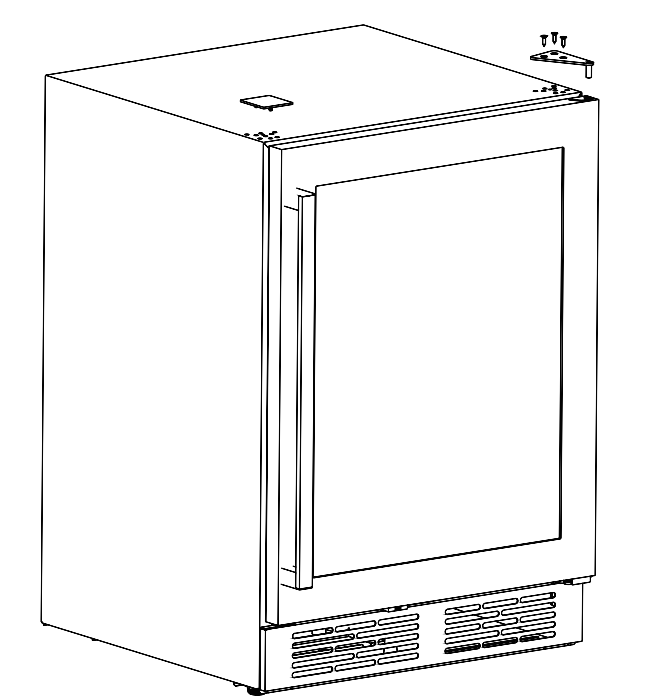
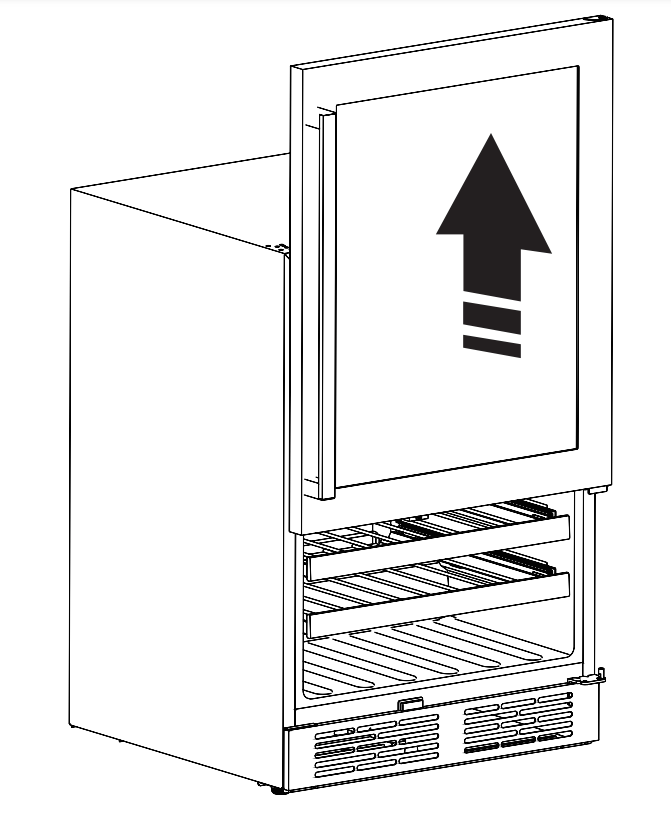
1. Stand the wine cooler upright, close the door, use a putty knife or thin-blade screwdriver to pry off the screw hole cover which is at the top left corner of the cooler, and unscrew the special flange screws which are used for fixing the right upper hinge part by a 8mm socket driver or a spanner (please support the upper door with your hand when doing it)
2. Move the door from the hinge by carefully lifting the door straight up.
Note: When removing the door, watch for washer(s) between the hinge and the bottom of the upper door that may stick to the door. Do not lose these washers.
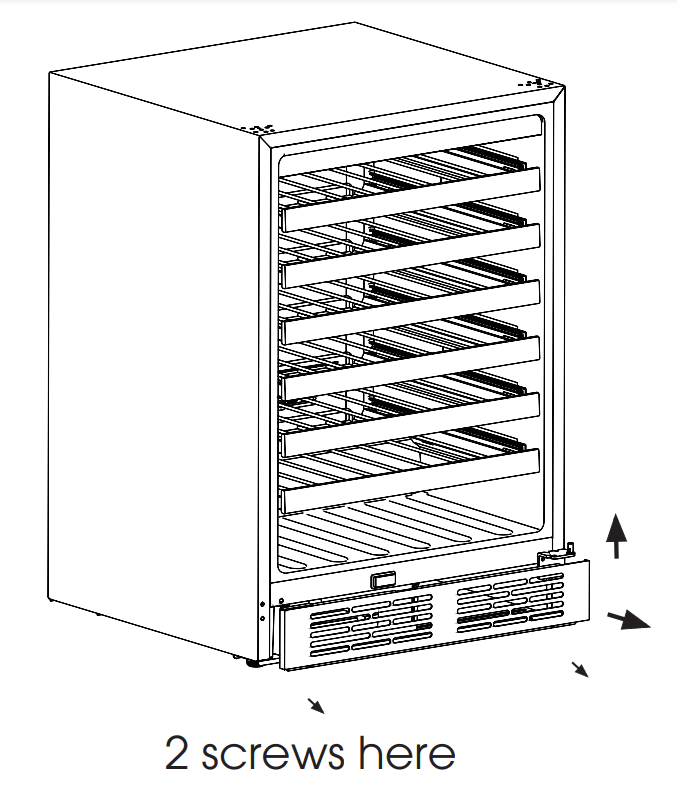
3. Unscrew the grille cover fixing screws then lifting up and pulling backwards, take the grille cover offthe cabinet.
Note: Take care of the screws. Record the screw’s place of ues and quantity
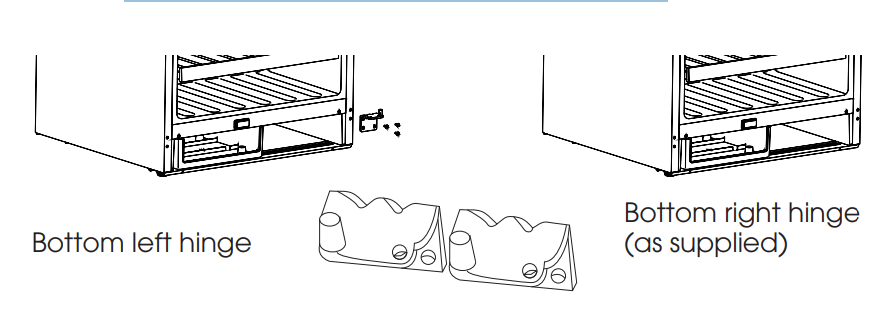
4. Unscrew the bottom right hinge screws then the bottom left hinge screws.
Note: Keep the hinge for the future use.
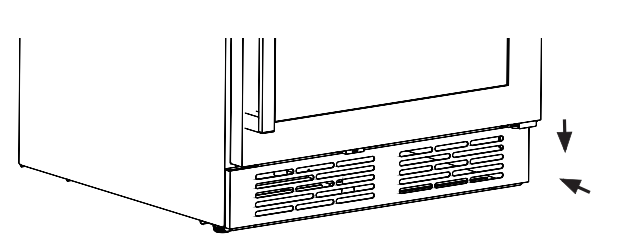
5. Flip the grille cover from left to right as following:
- Pull it out from the left side slot.
- Turn it 180 degree.
- Put it into the right side slot.
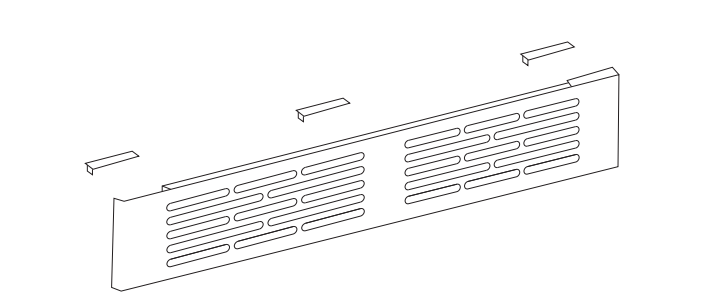
6. Reattach the grille cover to the wine cabinet as shown below.
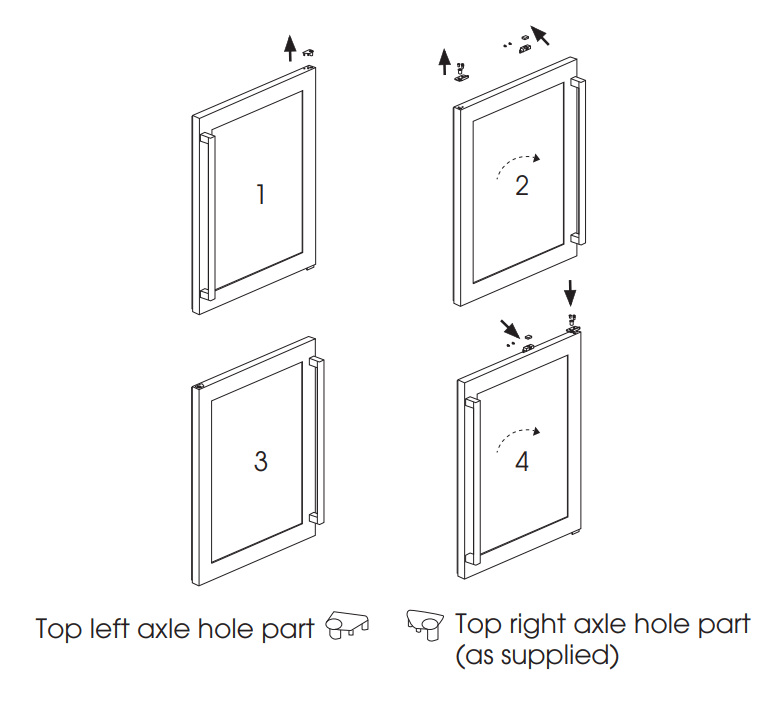
7. Change the axle hole parts of as follows:
- Pull out top right axle hole part by knife or thin blade screwdriver.
- Turn the door 180 degrees, face to the bottom of the door and remove the reinforcement part and magnet supporter with the screwdriver.
- Put the top left axle hole part into the door hole.
- Turn the door 180 degrees, Reattach the reinforcement part and magnet supporter using the same screws.
Note: Handle the door carefully. It is fragile.
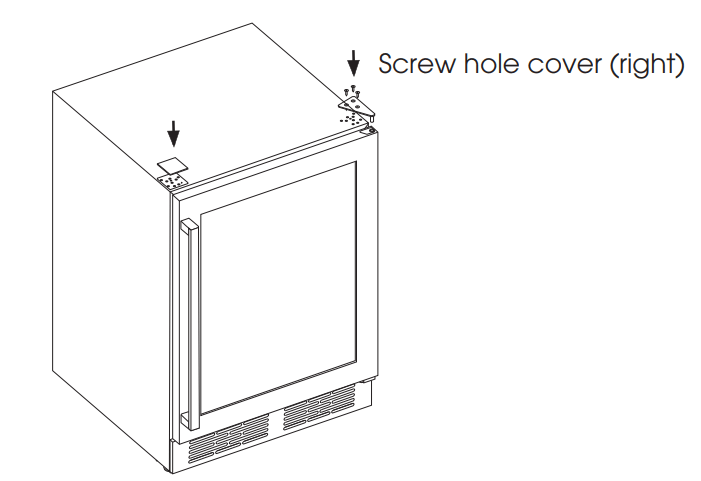
8. Turn the door 180 degrees, put the door on the cabinet using the hinge and screws, on the top left side. Use screw hole cover (right) to hide the holes on the top right side of the wine cabinet.

Wine Serving Temperature Chart
- All wines mature at the same temperature, which is a constant temperature set between 12 ° C(53.6 ° F) to 14°C(57.2 °F). The below chart is an indicative temperature chart to indicate the best temperature for drinking purposes.
| Types of wine | Recommended temperature |
| Champagne NV, Sparkling, Spumante | 6°C (42.8 °F) |
| Dry White Semillon, Sauving Blanc | 8°C (46.4 °F) |
|
Champagne Vintage Dry White Chardonnay Dry White Gewurztraminer Riesling, Pinot grigio Sweet White Sauternes, Barsac Ice Wine,Late Harvest |
10°C (50 °F) |
| Beaujolais | 13°C (55.4 °F) |
|
Sweet White Vintage:Sauternes... White Vintage Chardonnay |
14°C (57.2 °F) |
| Red Pinot Noir Red Grenache.Syrah | 16°C (60.8 °F) |
| Red vintage Pinot Noir | 18°C (64.4 °F) |
| Cabernet & Merlot: French, Australian, New Zealand, Chilean, ltalian, Spanish, Californian, Argentinean... | 20°C (68 °F) |
WARNING: When disposing of your appliance, use an approved disposal site. Remove the plug and ensure that any locks or catches are removed, to prevent young children being trapped inside.
Cleaning and Care
- For hygienic reasons the appliance (including exterior and interior accessories) should be cleaned regularly.
- WARNING: Before cleaning, the appliance must be powered off and unplugged. Danger of electrical shock!
Exterior Cleaning
To maintain good appearance of your appliance, you should clean it regularly.
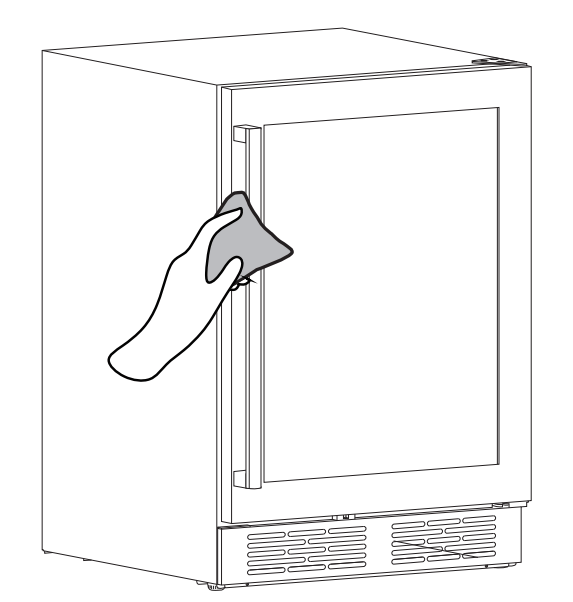
- Spray water onto the cleaning cloth instead of spraying directly on the surface of the appliance. This helps ensure an even distribution of moisture to the surface.
- Clean the door with a mild detergent and then wipe it dry with a soft cloth.
CAUTION
- Don’ t use sharp objects as they are likely to scratch the surface.
- Don’ t use Thinner, Car detergent, Clorox, oils, abrasive cleansers or organic solvents such as Benzene for cleaning. They may damage the surface of the appliance and may cause fire.
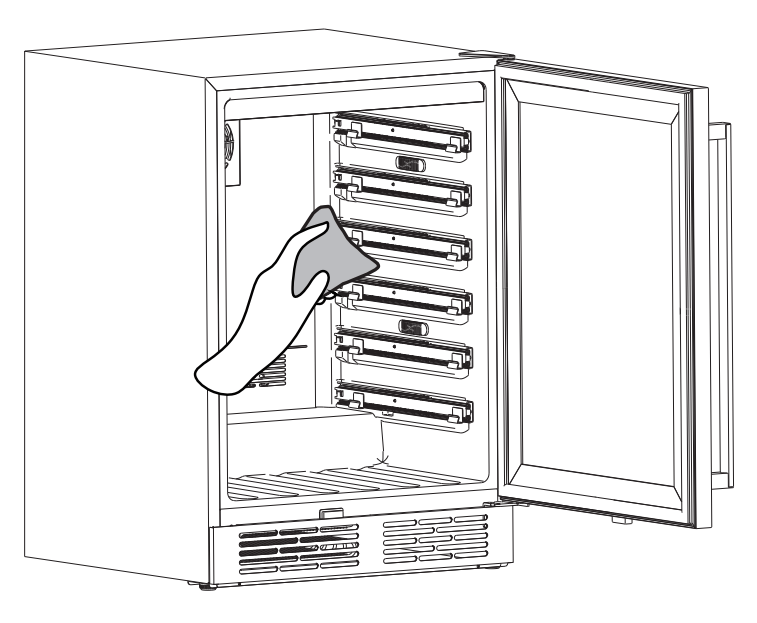
Cleaning The Wine Refrigerator
To clean the wine refrigerator, you should follow these steps:
- Unplug the appliance and remove the bottles.
- Wash the inside with a warm water and baking soda solution.The solution should be about 2 tablespoons of baking soda to 4 cups of water.
- Wash the shelves with a mild detergent solution.
- It may also be necessary to periodically wipe the bottom part of the storage are ,as the wine refrigerator is designed to retain humidity, and condensation may collect there.
Troubleshooting
If you experience a problem with your appliance or are concerned that the appliance is not functioning correctly, you can carry out some easy checks before calling for service, please see below.
WARNING: Don’ t try to repair the appliance yourself. If the problem persists after you have made the checks mentioned below, contact a qualified electrician, authorized service technician or the store where you purchased the product.
| Malfunction | Possible Cause | Remedy |
| The wine is too warm | Temperature is not properly adjusted. | Please look in the "Display controls" section. |
| Door was open for an extended period. | Open the door only as long as necessary. | |
| The appliance is near a heat source | Please refer to the "Installing your new appliance" section | |
| Heavy build up of frost, possibly also on the door seal. | Door seal is not air tight (possibly after changing over the hinges). | Carefully warm the leaking sections of the door seal with a hair dryer (not hotter than approx. 50 ° C) . At the same time shape the warmed door seal by hand such that it sits correctly. |
| Unusual noises | Appliance is not level. | Readjust the feet |
| The appliance is touching the wall or other objects. | Move the appliance slightly | |
| A component, e.g. a pipe, on rear of the appliance is touching another part of the appliance or the wall | If necessary, bend the component out of the way arefully. | |
| The compressor does not start immediately after changing the temperature etting. | This is normal, no error has occurred. | The compressor starts after a period of time. |
| The setting temperature is higher than the ambient temperature. | Set the temperature lower than the ambient temperature as you want. | |
| Water on the floor. | Water drain hole is blocked. | Please refer to the "Cleaning and care" section. |
See other models: 55H9G RS723N4WC1 WFGA9014V RB412N4AI1 RUL173D4AW1
