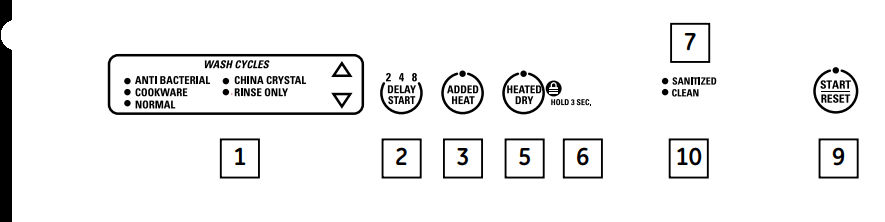
Use the arrow pads to scroll through the wash cycles. The light above or next to the selected pad will be ON to indicate which WASH CYCLE has been selected.
NOTE: This dishwasher is equipped with an ExtraClean™ Sensor with automatic temperature control; therefore, cycle time and total water consumption may vary depending on soil (heavy, medium, light) and temperature conditions.
ANTI BACTERIAL
Heavy 9.1 gallons, 95 minutes
Medium 7.8 gallons, 95 minutes
Light 6.5 gallons, 90 minutes
This cycle raises the water temperature in the final rinse to sanitize your dishware. The cycle length will vary depending on the temperature of your inlet water. NOTE: The Anti-Bacterial cycle is monitored for sanitization requirements. If the cycle is interrupted during or after the main wash portion or if the incoming water temperature is so low that adequate water heating cannot be achieved, the sanitizing conditions may not be met. In these cases, the sanitized light will not illuminate at the end of the cycle.
COOKWARE
Heavy 10.4 gallons, 80 minutes
Medium 9.1 gallons, 90 minutes
Light 7.8 gallons, 100 minutes
This cycle is meant for heavily soiled dishes or cookware with dried-on or baked-on soils. This cycle may not remove burned-on foods. Everyday dishes are safe to be used in this cycle.
NORMAL
Heavy 8.75 gallons, 70 minutes
Medium 6.25 gallons, 60 minutes
Light 5 gallons, 55 minutes
This cycle is for medium/heavily soiled dishes and glassware.
SPEED CYCLE (on some models)
7.8 gallons, 37 minutes
This cycle is for everyday dishes and glassware.
CHINA CRYSTAL
7.8 gallons, 50 minutes
This cycle is for lightly soiled china and crystal.
GLASSES (on some models)
Heavy 7.8 gallons, 50 minutes
This cycle is specifically designed for glasses.
PLASTICS CYCLE (on some models)
Heavy 7.8 gallons, 70 minutes
Medium 6.5 gallons, 60 minutes
Light 5.2 gallons, 55 minutes
This cycle is specifically designed to reduce the risk of melting plastic items and improve plastic drying for dishwasher safe plastic items.
RINSE ONLY
Heavy 2.6 gallons, 10 minutes
Light 1.3 gallons, 5 minutes
For rinsing partial loads that will be washed later. Do not use detergent with this cycle.
2. DELAY START-
This option will allow you to delay the start time of any wash cycle for up to 8 or 24 hours (depending on model).
• Select the delay start time you want by pressing the DELAY START pad. Multiple or continuous pressing will increment the delay hours. Select the number of hours you want to delay the start of the cycle. Then press START/RESET.
• After closing the door, the machine will count down and automatically start at the correct time.
NOTE: To cancel the DELAY START selection before the cycle begins, press the DELAY START pad until the display is blank. Pressing START/RESET will not cancel delay hours.
3. ADDED HEAT-
When selected, the cycle will run longer with the heating element on to improve both wash and dry performance.
NOTE: Cannot be selected with RINSE ONLY cycle.
4. PRE WASH- (on some models)
For use with heavily soiled and/or dried-on, baked-on soils. This option MUST be selected PRIOR to starting the cycle. This option adds 16 minutes to the cycle time.
NOTE: Cannot be selected with RINSE ONLY cycle.
5. HEATED-DRY
When selected, turns the drying heater and fan on for fast drying. This option will extend the cycle time by 30 minutes for the ANTI-BACTERIAL cycle, 38 minutes for the NORMAL cycle and COOKWARE cycle, 8 minutes for the SPEED cycle, 15 minutes for the PLASTICS cycle and 30 minutes for all other cycles. When this is NOT selected, the fan will turn on for 4 hours to dry your dishes without added heat—and energy is saved.
NOTE: Cannot be selected with RINSE ONLY cycle.
6. LOCK -
You can lock the controls to prevent any selections from being made. Or you can lock the controls after you have started a cycle.
Children cannot accidentally start the dishwasher by touching pads with this option selected.
To lock the dishwasher controls, press and hold the HEATED DRY pad for 3 seconds. The LOCK light will turn on. To unlock the dishwasher controls, press and hold the HEATED DRY pad for 3 seconds. The LOCK light will turn off.
7. Status Indicator Lights (indicators vary by model)
The Status display tells you what is happening while the dishwasher is in operation.
The lights will come ON, indicating the sequence of the dishwasher operation.
SENSING
Displayed while the ExtraClean™ Sensor is measuring the amount of soil and temperature of water. The dishwasher will adjust the selected cycle to achieve optimal performance.
ADD-A-DISH
Displayed during prewash, indicating that dishes added now will still be cleaned.
WASHING
Displayed during prewash, main wash and rinse periods.
DRYING
Displayed during HEATED DRY.
SANITIZED
Displayed when cycle has met sanitization conditions.
CLEAN
Displayed when a wash cycle and enhancements are complete.
8. Time Remaining Display (on some models)
During operation, the display shows the minutes remaining until the cycle is complete. The display may adjust the remaining time while the Sensing light is on. The time displayed at the start of each cycle may change from the factory setting as the unit customizes itself to actual home usage. During a delay start, the display will show hours of time remaining until the cycle starts.
9. START/RESET
START—
After selecting the cycle and desired enhancements, press the START/RESET pad one time to ready the dishwasher to begin the cycle. Close the door to start the cycle or begin the DELAY START countdown. When the cycle starts, the water fill begins and approximately 60 seconds later the wash action begins.
The dishwasher will always display your last selection and enhancements. If you don’t want to change the settings, simply press the START/RESET pad one time to ready the dishwasher and close the door to begin the cycle.
NOTE: If the START/RESET light is flashing, the cycle has been interrupted. Light will stop flashing after the dishwasher automatically pumps out the water. Close the door to allow the water to pump out (this takes approximately 70 seconds). When the light stops flashing, the dishwasher can be reprogrammed and restarted.
Also, if a power failure occurs, NORMAL and HEATED DRY will automatically be programmed. Make any new selections and press the START/RESET pad to begin the new cycle.
RESET—
Open the door slowly to prevent splash-out. Press the START/RESET pad to cancel the cycle. Close the door. The dishwasher will pump out and turn off after 70 seconds.
10. Clean—
The CLEAN light is illuminated and a double beep will sound when the selected cycle and enhancements are complete. You may remove the dishes at any time. Note the high-efficiency fan will run quietly for 30 minutes to 4 hours (depending on selected cycle) after the CLEAN light is illuminated to continue drying the dishes. This can be stopped by opening the door and pressing any keypad.
NOTE: To turn off the double beep indicator (or re-activate it if it was previously disengaged), press the HEATED DRY pad 5 times within 3 seconds. A triple beep will sound to indicate the end-of-cycle beep option has been toggled.
Using the dishwasher
Lighting Features (on some models)
Interior Lights (on some models)
The interior Xenon lights provide better visibility for loading and unloading. They turn on when the door is opened and turn off when the door is latched. The lights will turn off after 15 minutes if the door remains unlatched. To turn the lights back on, latch and open the door.
Do not attempt to replace the bulbs. If light bulb replacement is necessary, please contact the GE Answer Center for service by calling 1.800.626.2000.
End-of-Cycle Indicator Light (on some models)
The end-of-cycle indicator light is located on the right side of the dishwasher, above the handle. This light comes on when the selected cycle is complete. The light will stay on until the door is opened. The dishes may be removed at any time.
Note that the high-efficiency fan will run quietly for 30 minutes to 4 hours (depending on the selected cycle) after the end-of-cycle indicator light is illuminated to continue drying the dishes. Opening the door and pressing any keypad will stop the fan.
Water Temperature
The entering water must be at least 120°F (49°C) and not more than 150°F (66°C), for effective cleaning and to prevent dish damage
Check the water temperature with a candy or meat thermometer. Turn on the hot water faucet nearest the dishwasher, place the thermometer in a glass and let the water run continuously into the glass until the temperature stops rising.
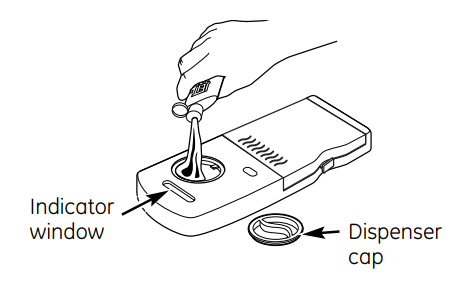
Use a Rinse Agent
A rinse agent improves dry performance, reduces spots and prevents new film buildup on your dishes, glasses, flatware, cookware and plastic. Jet-Dry® and Cascade Crystal Clear® are recommended rinse agents for Monogram Dishwashers.
The rinse agent dispenser holds 3.5 oz. of rinse agent. Under normal conditions, this will last approximately one month. Try to keep it full, but do not overfill.
To fill the rinse agent dispenser, make sure the dishwasher door is fully open.
Rotate the dispenser cap counterclockwise and lift it out. Add rinse agent until the indicator window shows full.
Clean up any spilled rinse agent with a damp cloth. Replace the dispenser cap.
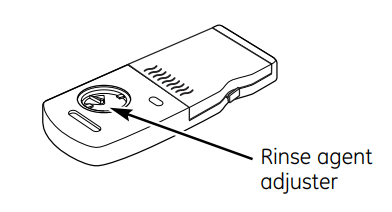
The amount of rinse agent released into the final wash can be adjusted. The factory setting is at the midpoint. If there are rings of calcium (hard water) spots on dishes, try a higher setting. If there is foaming, use a lower setting.
To adjust the setting, remove the dispenser cap; then turn the adjuster counterclockwise to increase the amount of rinse agent or clockwise to decrease the amount of rinse agent dispensed.
Dish Preparation Prior to Loading
• No prerinsing of normal food soil is required.
• Scrape off hard soils, bones, toothpicks, skins and seeds.
• Remove large quantities of any remaining food.
• Remove leafy vegetables, meat trimmings and excessive amounts of grease or oil.
Forget to Add a Dish?
A forgotten dish can be added any time before the main wash.
Open the door slightly.
Wait until the water spray action stops. Steam may rise out of the dishwasher.
Add forgotten dishes.
Close the door.
Care and Cleaning
Exterior
To clean the control panel, use a lightly dampened cloth, then dry thoroughly. To clean the exterior painted panels, use a good appliance polish wax. See the note below about wax on stainless steel panels.
Never use sharp objects, scouring pads or harsh cleaners on any part of the dishwasher.
The stainless steel panels can be cleaned with CERAMA BRYTE® Stainless Steel Appliance Cleaner or a similar product using a clean, soft cloth. You can order CERAMA BRYTE® Stainless Steel Appliance Cleaner through GE Parts by calling 800.626.2002 (for U.S. only). In Canada, call 1.888.880.3030.
NOTE: Avoid streaks on stainless steel panels. Do not use wax on stainless steel panels.
Interior
The stainless steel used to make the dishwasher tub and inner door provides the highest reliability available in a GE dishwasher. If the dishwasher tub or inner door should be scratched or dented during normal use, they will not rust or corrode. These surface blemishes will not affect their function or durability.
Protect Against Freezing
If your dishwasher is left in an unheated place during the winter, ask a service technician to:
Turn off electrical power to the dishwasher. Remove fuses or trip circuit breaker.
Turn off the water supply and disconnect the water inlet line from the water valve.
Drain water from the water inlet line and water valve (use a pan to catch the water).
Reconnect the water inlet line to the water valve.
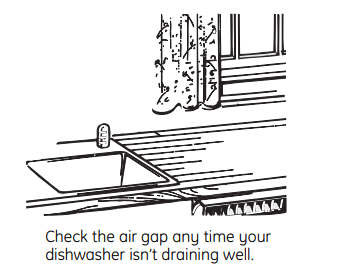
The Air Gap
An air gap protects your dishwasher against water backing up into it if a drain clogs. The air gap is not a part of the dishwasher. It is not covered by your warranty. Not all plumbing codes require air gaps, so you may not have one.
A plugged or dirty air gap will prevent the dishwasher from draining properly. Clean it out if the dishwasher is not draining properly.
The air gap is easy to clean.
Turn off the dishwasher and lift off the chrome cover.
Unscrew or unsnap the plastic cap (depending on model) and clean with a toothpick.
Before You Call For Service
PROBLEM
POSSIBLE CAUSE
WHAT TO DO
Control panel lights go off when you're setting controls
Time too long between touching of selected pads
• Each pad must be touched within 30 seconds of the others. To relight, touch any
pad again, or unlatch and relatch door.
Noise
Detergent cup opening
The motor stopping during the drying period
Water draining out of the tub immediately after you touch the START/RESET pad
Drying fan running for 2-4 hours after CLEAN light is illuminated (Top Control Panel models only)
• This is normal.
Utensils are not secure in the rack or something small has dropped into the rack
• Make sure everything is secured in dishwasher.
Motor hums
• Dishwasher has not been used on a regular basis. If you do not use your dishwasher often, run a RINSE ONLY cycle once every week. This will help keep the seal moist.
Detergent left in dispenser cups
Dishes are blocking the detergent cups
• Reposition the dishes.
Water standing in the bottom of the tub
This is normal
• A small amount of clean water around theoutlet on the tub bottom at the back of the tub keeps the water seal lubricated.
Water won't pump out of the tub
Drain is clogged
• If you have an air gap, clean it.
• Check to see if your kitchen sink is draining well. If not, you may need a plumber.
• If the dishwasher drains into a disposer, run disposer clear.
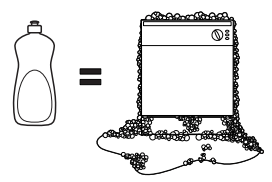
Suds
Correct detergent wasn't used
• Use only automatic dishwasher detergents to avoid sudsing. Cascade®, Cascade Complete® and Electrasol® dishwasher detergents have been approved for use in all Monogram dishwashers.
• To remove suds from the tub, open the dishwasher and let suds dissipate. Touch START. Let run for 30 seconds. Touch START again. Dishwasher will pump out in 70 seconds. Repeat if necessary.
Rinse agent was spilled
• Always wipe up rinse agent spills
immediately.
Stained dishwasher parts
Some tomato-based foods can cause pink or orange stains
• Use of the RINSE ONLY cycle after adding the dish to the load can decrease the level of staining.
• GE also recommends Cascade® Plastic Booster™ to help remove these types of stains.
Dishes and flatware not clean
Low inlet water temperature
• Make sure inlet water temperature is at least 120°F (49°C) (see Using the Dishwasher section).
• Run water at the nearest faucet prior to starting the dishwasher to insure optimal water temperature.
Water pressure is temporarily low
• Turn on a faucet. Is water coming out more slowly than usual? If so, wait until pressure is normal before using your dishwasher.
Air gap is clogged
• Clean air gap.
Improper rack loading
• Make sure large dishware does not block the detergent dispenser or the wash arms.
• Glasses and dishes must face the spray arms.
Spots and filming on glasses and flatware
Extremely hard water
Low inlet water temperature
Overloading the dishwasher
Improper loading
Old or damp powder detergent
Rinse agent dispenser empty Too little detergent
• Use Jet Dry® or Cascade Crystal Clear® rinse agents to remove spots and prevent new film buildup.
• Make sure water temperature is at least 120°F.
• Load dishwasher as shown in the Loading Place Settings section.
• Make sure detergent is fresh.
• If water is extremely hard, a softener may be required.
Cloudiness on glassware
Combination of soft water and too much detergent
• This is called etching and is permanent. To prevent this from happening, use less detergent if you have soft water. Wash glassware in the shortest cycle that will get it clean. See page 10.
Water temperature entering the dishwasher exceeds 150°F (66°C)
• Lower the water heater temperature.
Black or gray marks on dishes
Aluminum utensils have rubbed against dishes
• Remove marks with a mild, abrasive cleaner
Yellow or brown film on inside surfaces
Tea or coffee stains
• Remove the stain by hand, using a solution of 1/2 cup bleach and 3 cups warm water
An overall yellow or brown film can be caused by iron deposits in water
• A special filter in the water supply line is the only way to correct this problem. Contact your GE dealer or a water softener company
White film on inside surfaces
Hard water minerals
• GE recommends Jet-Dry® or Cascade Crystal Clear® to help prevent hard water mineral deposits from forming.
Run dishwasher with citric acid to remove mineral deposits. Citric acid (Part number: WD35X151) can be ordered through GE Parts. See the Consumer Services page for ordering information.
Dishes don’t dry
Low inlet water temperature
• Select HEATED DRY.
• Make sure inlet water temperature is at least 120°F (49°C) (see Using the Dishwasher section).
• Select ADDED HEAT.
• Use a longer cycle, such as Antibacterial.
Dishwasher won't run
Door not latched
• Make sure door is fully closed and latched
Wall switch( some installations) is in the “off” position
• Check for a wall switch that the dishwasher might be connected to. A wall switch is required by electrical codes in some localities. Turn the switch “on” if it is “off.”
Fuse is blown, or the circuit breaker tripped
• Replace fuse or reset circuit breaker. Remove any other appliances from the circuit.
Dishwasher control is inoperative
• Turn off power at the circuit breaker for 30 seconds, then reset power.
Steam
This is normal
• Warm moisture comes through the vent on the bottom of the door during drying and when water is being pumped out.
Sanitized light does not illuminate at the end of the cycle (Anti-Bacteria cycle only)
The door was opened and the cycle was interrupted during or after the main wash portion
• Do not interrupt the cycle any time during or after main wash.
Low inlet water temperature
• Raise the water heater temperature to at least 120°F (49°C).
Interior lights not working
Door was open for more than 15 minutes
• Latch the door and reopen.
Bulbs are burned out
• Call for service to replace bulbs.
End-of-cycle indicator light does not illuminate
Dishwasher has not completed cycle
• Open the door and check the status indicator lights on control panel to determine if cycle is complete.
Beeps every 30 seconds
Door was opened during the cycle
• Close the door to complete the cycle.
START/RESET light blinks
START/RESET pad was pressed during the cycle
• Dishwasher will pump out for approximately 70 seconds and blinking light will turn off.
Power failure during the cycle
• Dishwasher will pump out for approximately 70 seconds and blinking light will turn off. Dishwasher will automatically restart using NORMAL WASH and HEATED DRY.

 to scroll through the wash cycles. The light above or next to the selected pad will be ON to indicate which WASH CYCLE has been selected.
 -
-