1. Clean the inside of the freezer with a mild solution of baking soda and water (see Care and Cleaning).
2. Connect cord to power outlet.
3. Make sure the temperature control is set at 4.
4. Allow freezer to operate for at least 4 hours before placing food inside.
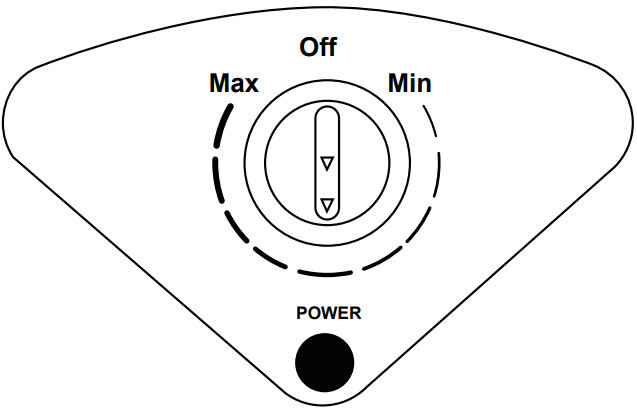
Temperature Control
Freezing temperature selection is made by setting the control from "Min" to "Max" (coldest) to.
If you want colder or warmer temperatures, adjust the control one step at a time.
Allow several hours after each one-step adjustment for the freezer temperature to stabilize.
Turning the control to the OFF position stops the cooling process but does not shut off power to the freezer.
Power-On Light (on some models)
The Power-On Light indicates that the freezer is properly connected to the electrical power.
The light glows even when the temperature control is turned off.
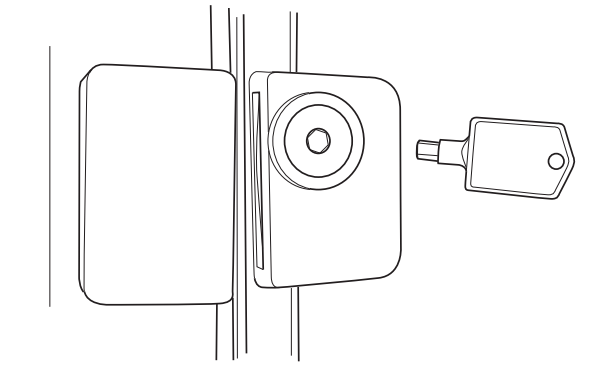
Key-Ejecting Lock (on some models)
The lock is spring loaded so the key cannot be left in the lock. To lock or unlock, press the key in while turning. If the key is lost, contact your dealer for a replacement or go to the page. Always give the model and serial number of the freezer when requesting a replacement key.
Defrosting Instructions
In most climates, defrosting will be necessary only about twice a year.
To have your freezer operate most efficiently, do not permit more than 1/2" (13 mm) of frost to accumulate.
For Complete Defrosting
1. Turn the temperature control to OFF setting and unplug the freezer.
2. Remove all food and place it in corrugated boxes, insulated bags, picnic coolers, etc. Use towels and newspapers for insulation as needed.
3. With the door/lid open, use pans of hot water to speed loosening of frost. Remove large pieces before they melt.
Chest models have a defrost water drain at the front. Remove the defrost drain cap from the outside and the drain plug inside the cabinet.
NOTE: Water may drip from the back flange of the lid cover during defrosting. This is normal. Ice builds up in the lid insulation when the lid is open for adding or removing food, and melts during the defrosting operation.
4. Sponge excess water from the bottom of the freezer as it collects to prevent overflowing.
5. After defrosting, clean the inside of the freezer (see Care and Cleaning).
6. Replace the drain plug inside the cabinet and the cap
on the defrost drain. Fold over and dry the gasket on the hinge side of the lid.
7. Plug in the freezer. Return the temperature control to its previous position and return food to the freezer.
CARE AND CLEANING
Cleaning Your Freezer
■ Outside. Protect the paint finish. The finish on the outside of the freezer is a high quality, baked-on paint finish. With proper care, it will stay new-looking and rust-free for years. Apply a coat of appliance polish wax when the freezer is new and then at least twice a year. Appliance polish wax also works well to remove tape residue from freezer surfaces.
Keep the finish clean. Wipe with a clean cloth lightly dampened with appliance polish wax or mild
liquid dishwashing detergent. Dry and polish with a clean, soft cloth. Do not wipe the freezer with a soiled dishwashing cloth or wet towel. Do not use scouring pads, powdered cleaners, bleach, or cleaners containing bleach.
NOTICE: Care should be taken in moving the freezer away from the wall. All types of floor coverings can be damaged, particularly cushioned coverings and those with embossed surfaces.
■ Inside. Clean the inside of your freezer at least once a year. We recommend that the freezer be unplugged before cleaning. If this is not practical, wring excess moisture out of sponge or cloth when cleaning in the vicinity of switches, lights or controls.
Use warm water and baking soda solution-about a tablespoon of baking soda to a quart of water. Rinse thoroughly with water and wipe dry. Do not use cleaning powders or other abrasive cleaners. DO NOT wash removable parts in a dishwasher.
An open box of baking soda in the freezer will absorb stale freezer odors. Change the box every three months.
In Case of Extended Power Failure
■ Keep freezer lid closed. Your freezer will keep food frozen for 24 hours provided warm air is not admitted.
■ If freezer is out of operation for 24 hours or more, add dry ice. Leave ice in large pieces. Add more ice as required.
■ If dry ice is not available, move food to a frozen food locker temporarily—until power is restored.
Preparing to Move
Disconnect the power cord plug from the wall outlet. Remove foods, defrost and clean the freezer.
Secure all loose items such as baskets by taping them securely in place to prevent damage.
Be sure freezer stays in upright position during actual moving and during transportation. The freezer must be secured during transportation to prevent movement. Protect outside of freezer with blanket.
Preparing for Vacation
To maintain freezer in operation during vacations, be sure your house power is not turned off. For sure protection of freezer contents, you may want to ask a neighbor to check the power supply and freezer operation every 48 hours.
For extended vacations or absences, you may prefer to move your frozen foods to a storage locker temporarily. If your freezer is to be left empty, disconnect power cord plug from wall outlet. To prevent formation of odors, place open box of baking soda in freezer and leave freezer door/lid open.
INSTALLATION
Preparing to Install the Freezer
Freezer Location
Your freezer should be conveniently located for day-to-day use in a dry, well-ventilated room.
Do not install the freezer where the temperature will go below 0°F (-18°C) or above 110°F (43°C), because it will not maintain proper temperatures.
Be sure to install your freezer on a floor strong enough to support it when it is fully loaded.
Do not install the freezer in a location exposed to rain water or direct sunlight.
The freezer must be solidly positioned on the floor if it is to function at its best. Your freezer has adjustable leveling legs that can be turned to be solidly positioned wherever the floor is too uneven. If the place selected for the freezer is damp or moist, place 2 x 4’s (51 mm x 102 mm) under its entire length to assure adequate support.
Clearances
On all models, allow 3" (76 mm) on top, back and sides for proper air circulation. Allow sufficient space on top for lid to open.
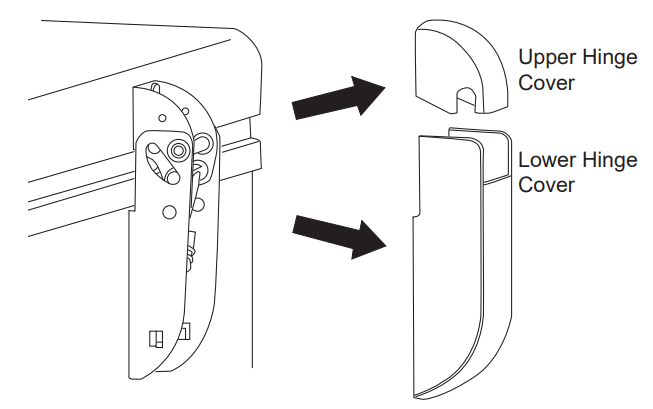
Lid Removal
If it is necessary to remove the lid, follow these steps:
1. Remove each upper hinge cover by grasping on the sides and pulling upwards. Remove each lower hinge cover by grasping on the sides and pulling down
2. Open the lid to the maximum position. (The hinges are loosest at this position.)
3. Loosen, do not remove, the 4 screws from the lower part of the hinge that are mounted to the cabinet.
4. Raise/lift the lid until the screws align with the larger slotted openings in the bottom of the hinge. Each hinge is still attached to the lid with 4 screws.
5. To reinstall lid follow steps in reverse. Tighten all hinge screws but avoid over-tightening to prevent stripping. Reinstall hinge covers.
TROUBLESHOOTING TIPS
Problem
Possible Causes
What To Do
Freezer does not operate or Power-On Light is not on
Temperature control set to OFF position.
Move the control to a temperature setting.
Freezer is unplugged.
Push the plug completely into the outlet.
The fuse is blown/circuit breaker is tripped.
Replace fuse or reset the breaker.
Freezer starts/stops too frequently
Door/lid left open.
Check to see if package is holding door/lid open.
Too frequent or too long lid openings.
Open the lid less often.
Temperature control set too cold.
See Using the Freezer
Freezer operates too long
Door/lid left open.
Check to see if package is holding door/lid open.
Too frequent or too long lid openings.
Open the lid less often.
Temperature control set too cold.
See Using the Freezer
Inadequate air circulation space around cabinet.
See Preparing to install the freezer
Noisy operation or cabinet vibrates
Floor may be weak, causing freezer to vibrate when compressor is on.
Placing 2 X 4’s (51 mm X 102 mm) under the length of the freezer will help support it and may reduce vibration.
Cabinet is not positioned solidly on floor.
See Preparing to install the freezer. Or use shims for uneven floor. uneven floor.