1
En
Thank you for buying this Pioneer product.
Please read through these operating instructions before using your
speaker system to optimize performance.
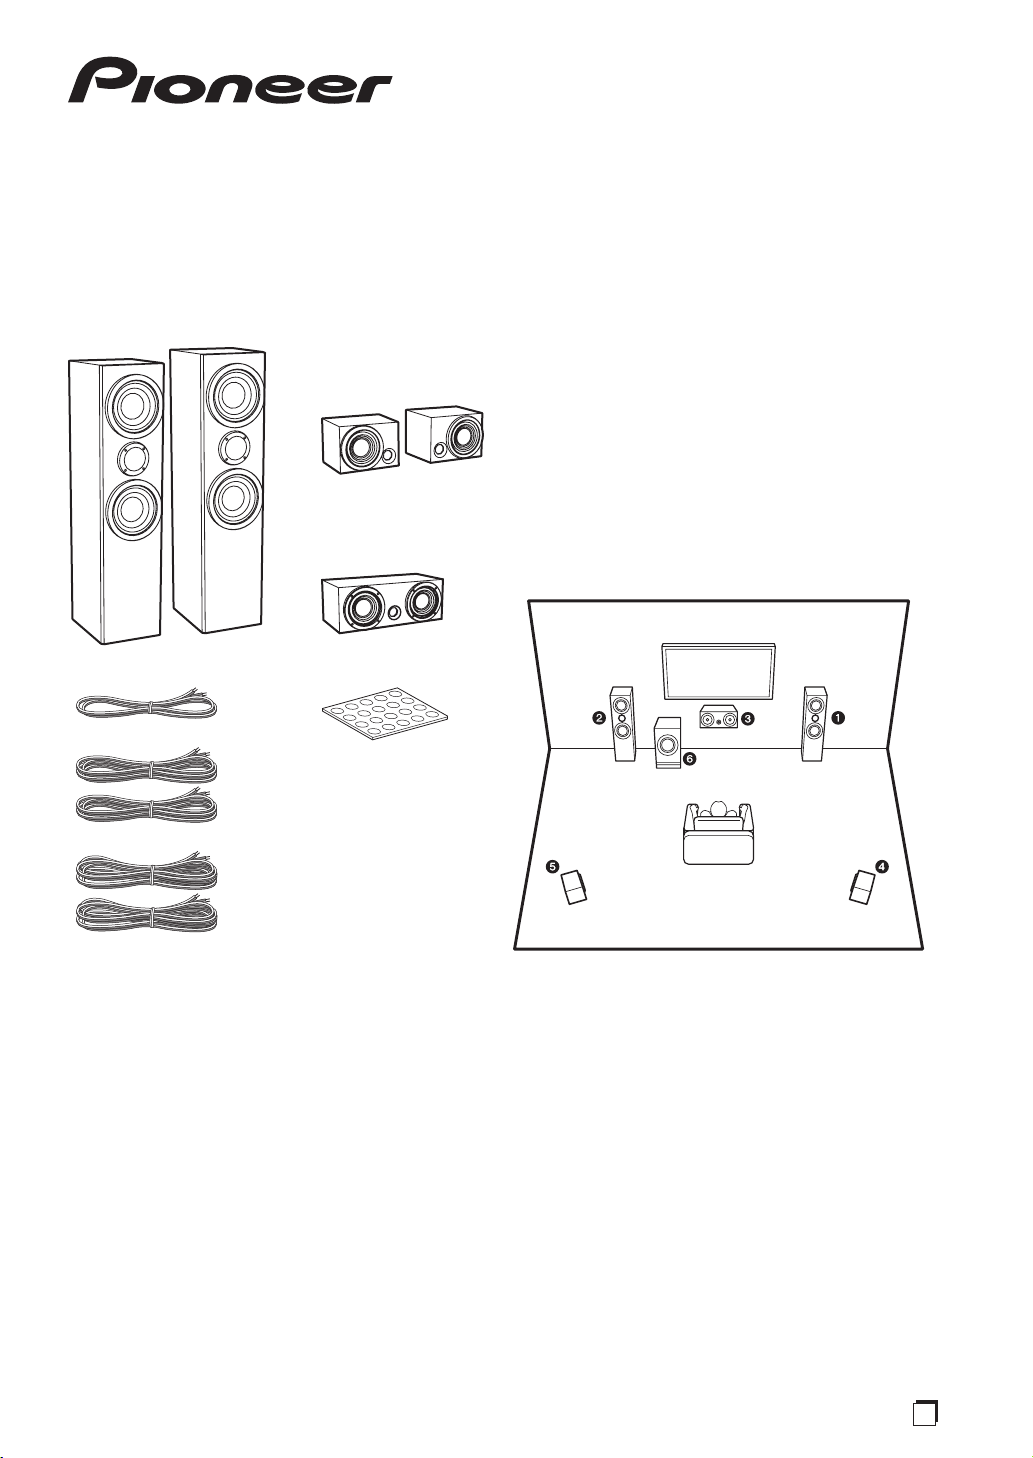
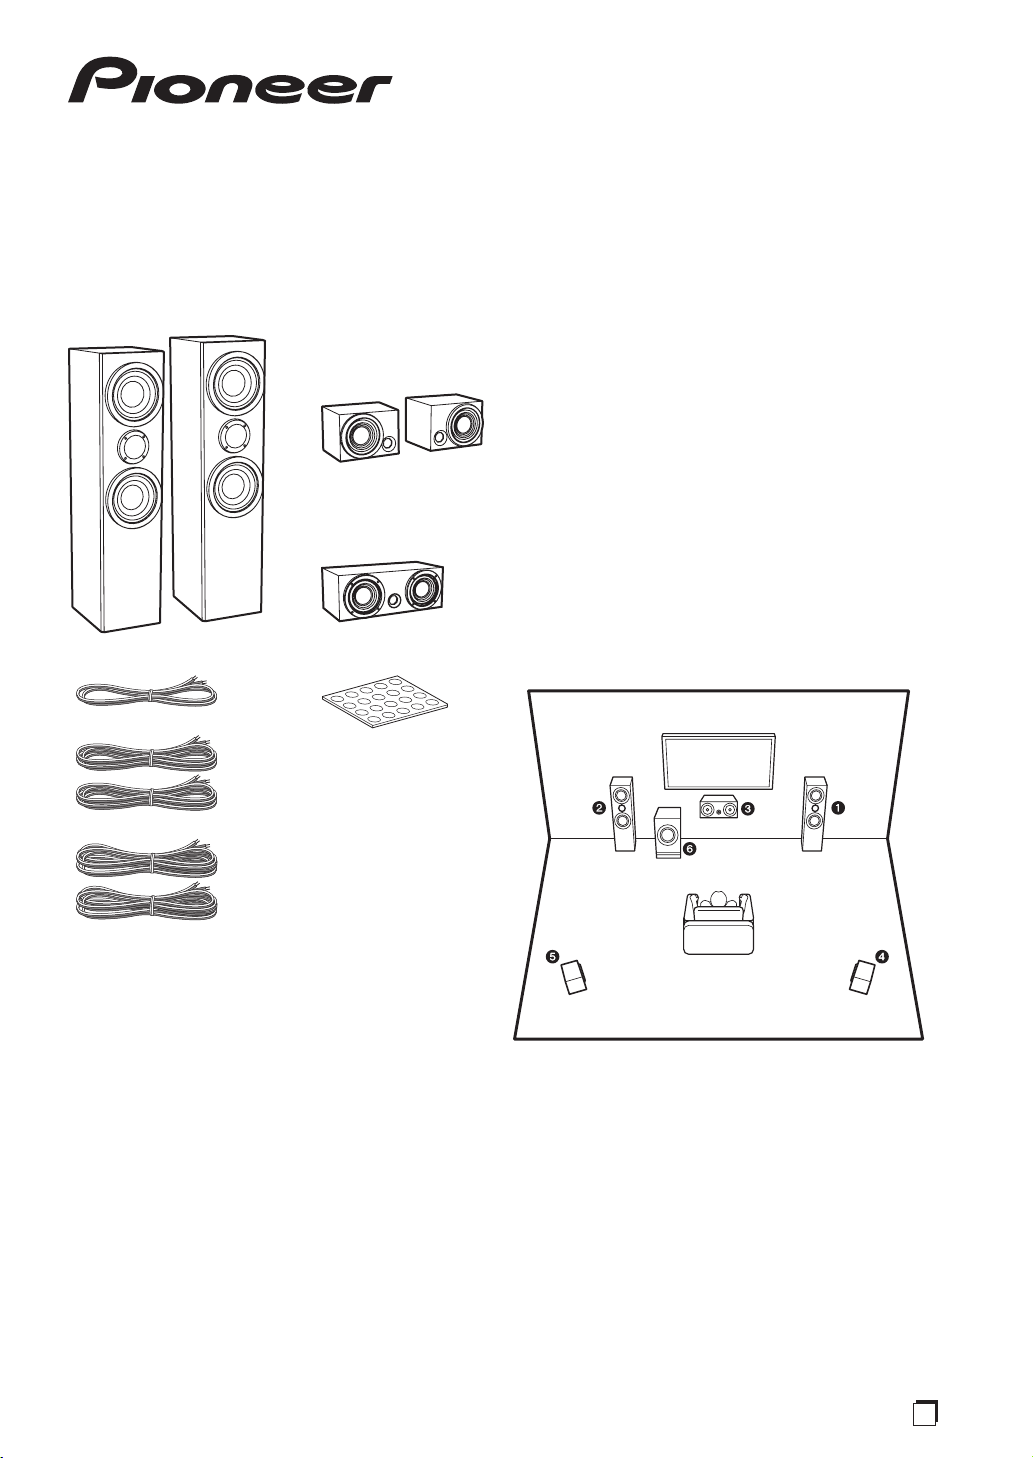
WHAT'S IN THE BOX
1
3
2
54
1. Front speakers (2)
2. Surround speakers (2)
3. Center speaker (1)
4. Speaker cables
Center speaker (1) (2 m, Tie color: Red)
Front speakers (2) (3 m, Tie color: Black)
Surround speakers (2) (10 m, Tie color: Blue)
5. Non-skid pads (1) (20 pcs)
• Operating Instructions (This manual)
BEFORE USE
• These speakers have a rated impedance of 8 Ω. Use an
amplifier that supports speakers with an impedance of 8 Ω.
• In order to prevent damage to the speaker system resulting
from input overload, please observe the following precautions:
– Do not input above the permissible input.
– When connecting this unit and other AV devices to an
amplifier, turn the amplifier off first.
– When amplifying the treble with a graphic equalizer, do not
increase the volume too much.
– Do not output loud volumes through a low output amplifier.
(The harmonic distortion of the amplifier will increase, and
there is a possibility of damage to the speakers.)
• Do not use the speaker to output distorted sound for long
periods of time. This can result in a fire hazard.
• Do not install these units near a stove or other heating
appliance, or put them in a place exposed to the sun. Such
locations may cause the cabinet to change color and the
speaker system to break down.
• Do not attach the front and center speakers to the wall or
ceiling. It may fall off and cause injury.
• These speakers are not equipped with magnetic shielding.
Do not put items easily affected by magnetism (cards with
magnetic tape, etc.) near this unit.
• Some color irregularity or distortion may occur on a cathode
ray tube television (CRT television) if you use one near this
unit. Separate these speakers further from the television if this
occurs.
PLACEMENT AND FINE TUNING
STANDARD SURROUND SETUP
This is a standard multichannel surround sound speaker setup for
optimal 5.1 channel home theater sound.
1, 2. Front Speakers
3. Center Speaker
4, 5. Surround Speakers
6. Subwoofer
Front Speakers
For best results the speakers should be separated a distance
approximately equal to the listening distance. Angling the speakers
inward towards the listener will improve the image stability for
non-central listeners. Close proximity to a side or rear wall will
enhance the midbass performance, although too close (particularly
a corner location) and the bass may be unnaturally high and image
performance may be degraded.
Center Speaker
The speaker should be positioned below the TV. For best results
align the front of the speaker with the front of the TV. If the speaker
is placed under the TV and very close to the floor, then tilting
upwards may be beneficial.
Do not place the center speaker on top of TV, the speaker may
fall from the TV due to external shocks such as earthquakes,
endangering those nearby or damaging the speaker.
Operating Instructions
Speaker System
S-RS55TB
S-RS55TB_EnEs.indb 1 2017/08/24 13:39:08
2
En
Surround Speakers
For best results the speakers should be positioned at or above ear
level. Depending upon your room layout and preferences, the left
and right rear speakers should be positioned on the side walls just
the rear of the listening position, or on the walls.
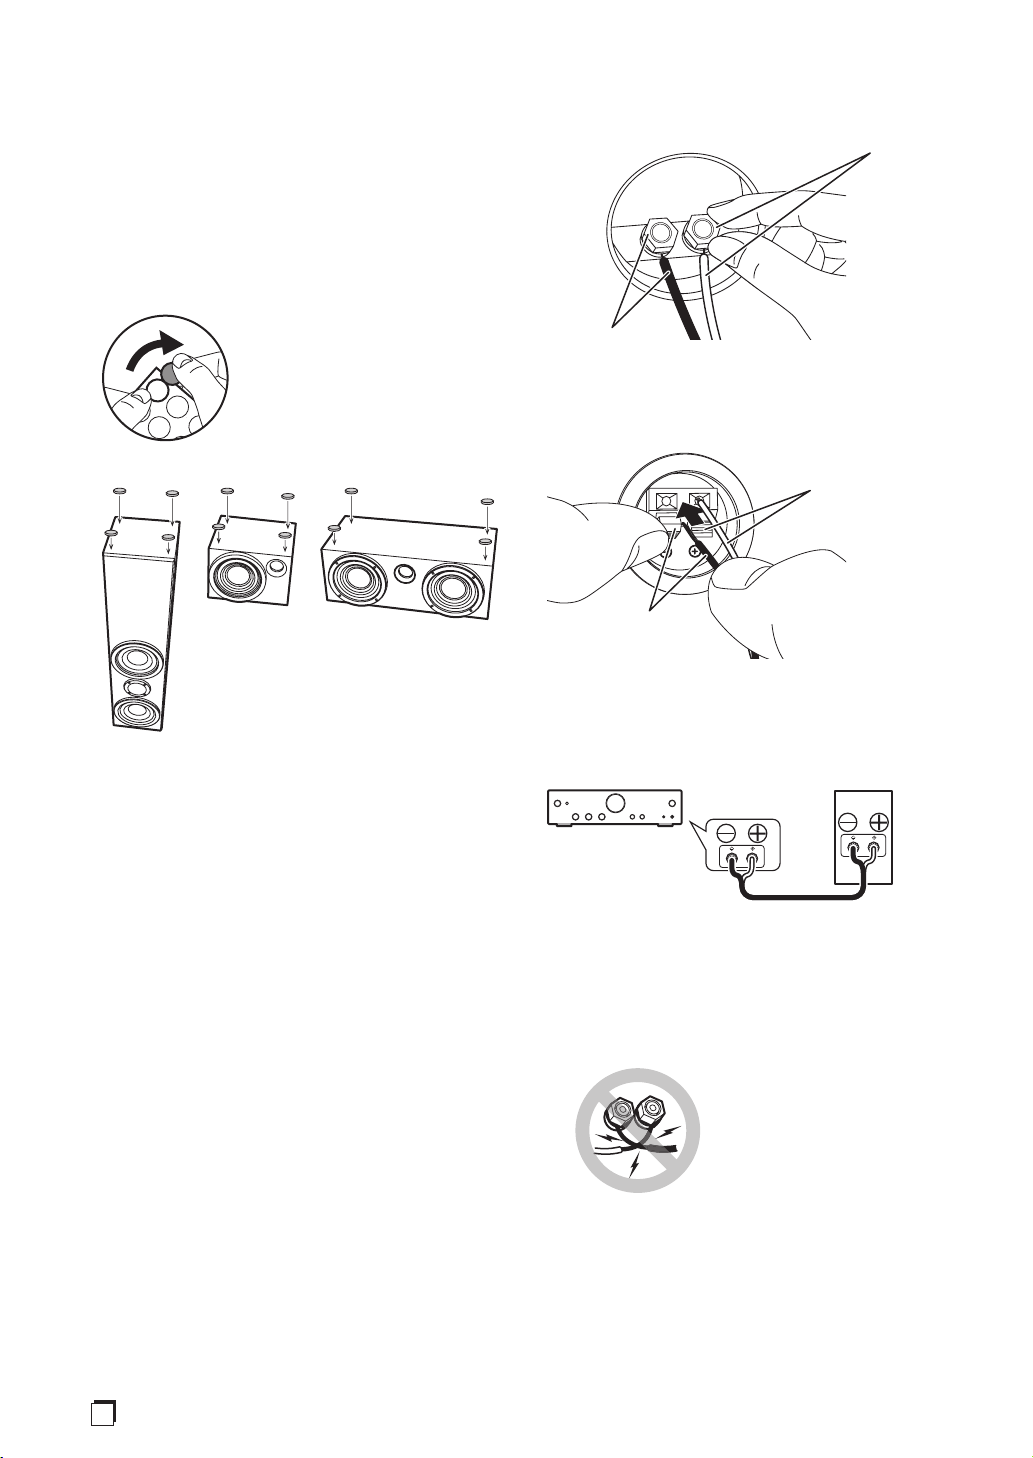
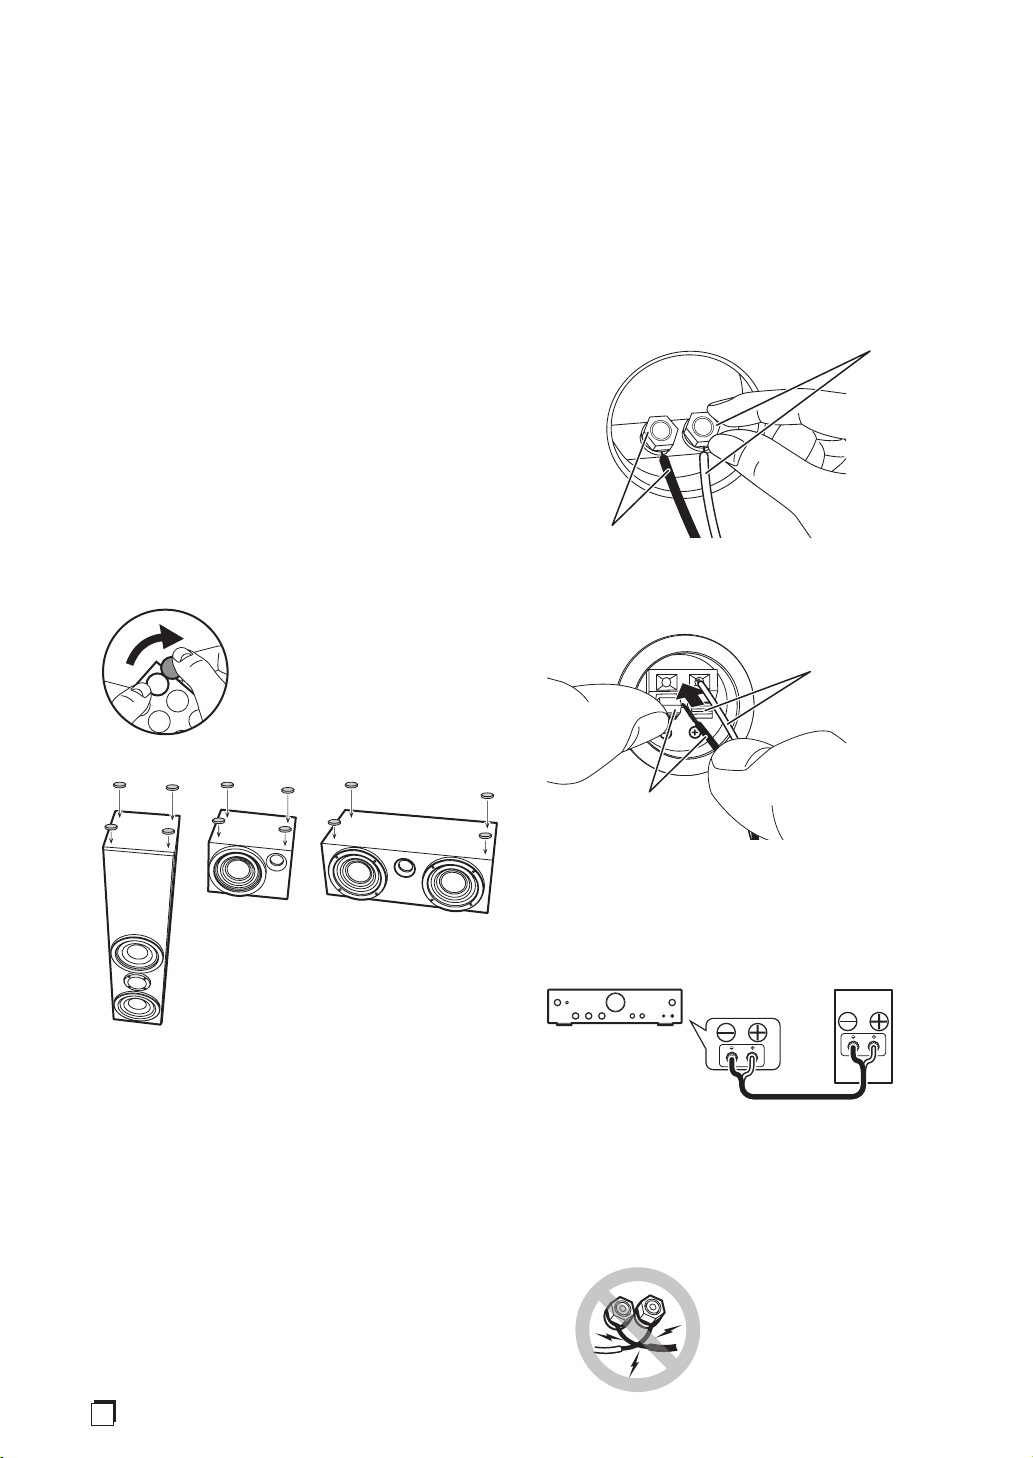
NON-SKID PADS
Use the supplied non-skip pads as necessary according to the
location chosen for installation. Stick the non-skid pads on the four
corners of the surface of the speaker on which it will be installed.
There will be locations, however, where there will be little benefit
from using the non-skid pads, so avoid putting in slippery places.
Put the units on a soft cloth when performing this task.
1
23
1. Front Speakers
2. Surround Speakers
3. Center Speaker
MAKING AMPLIFIER SETTINGS
Before connecting the speakers, please read the operating
instructions supplied with your amplifier to select the speaker
setting of amplifier:
• Front speakers: Large
• Center / surround speakers: Small
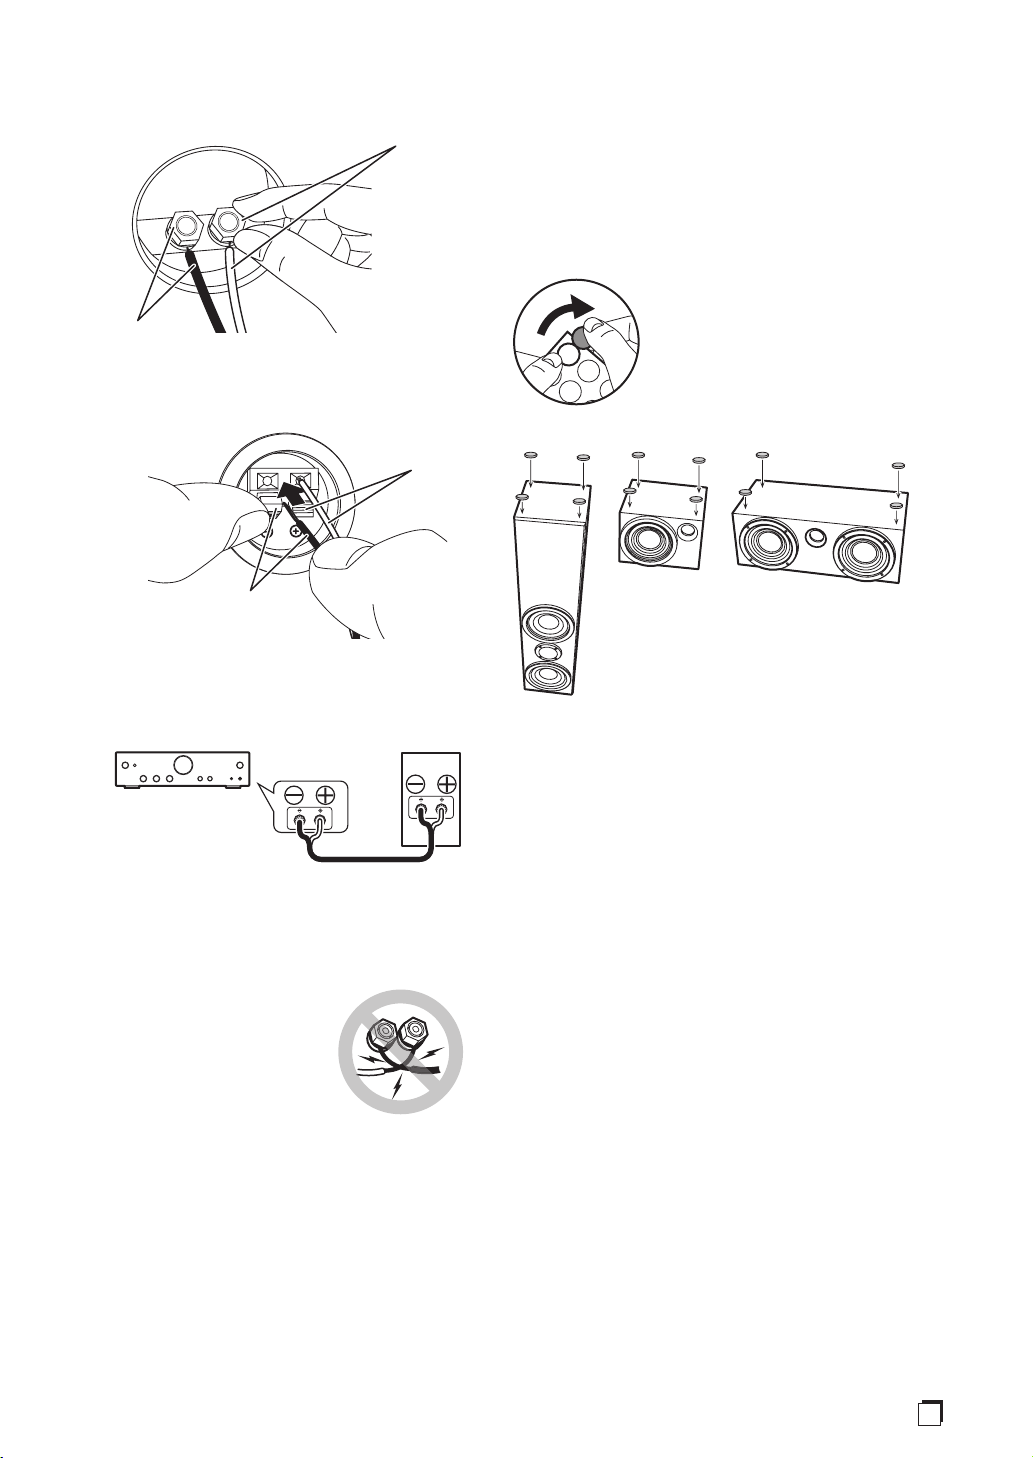
CONNECTING YOUR SYSTEM
• Make sure all equipment is turned off before making any
connections.
• You will not get the proper surround effects from the speakers if
you connect the poles (+ and –) incorrectly.
• These speaker terminals carry HAZARDOUS LIVE voltage.
To prevent the risk of electric shock when connecting or
disconnecting the speaker cables, disconnect the power cord
before touching any uninsulated parts.
Connect to the speaker terminals on the rear of the speakers
Connect the speaker cables to the speaker terminals on the rear of
the speakers. The poles of the input terminals are red for positive
(+) and black for negative (–). Match the colors of the speaker
terminals and speaker cables when connecting.
Front speakers:
After loosening the speaker terminals, push the wires into the
terminals, then tighten firmly.
Red
Black
Center and surround speakers:
While pushing the tabs of the speaker terminals, push the wires
into the terminals.
Red
Black
Connect to the speaker terminals on the rear of the amplifier
Connect the speaker cables to the speaker output terminals on the
rear of the amplifier. (For details, refer to the amplifier's instruction
manual.)
Speakers
Amplifier
• After connecting the cord to the terminal, pull the cord gently
to make sure the end of the cord is firmly connected to the
terminal. Incomplete connection may result in the sound
jumping or noise being output.
• To prevent damage to the circuits, ensure that the + and – wires
of the speaker cables and the left and right wires do not touch
each other. Also take care that the bare wires do not touch the
rear panel of the amplifier.
S-RS55TB_EnEs.indb 2 2017/08/24 13:39:09
3
En
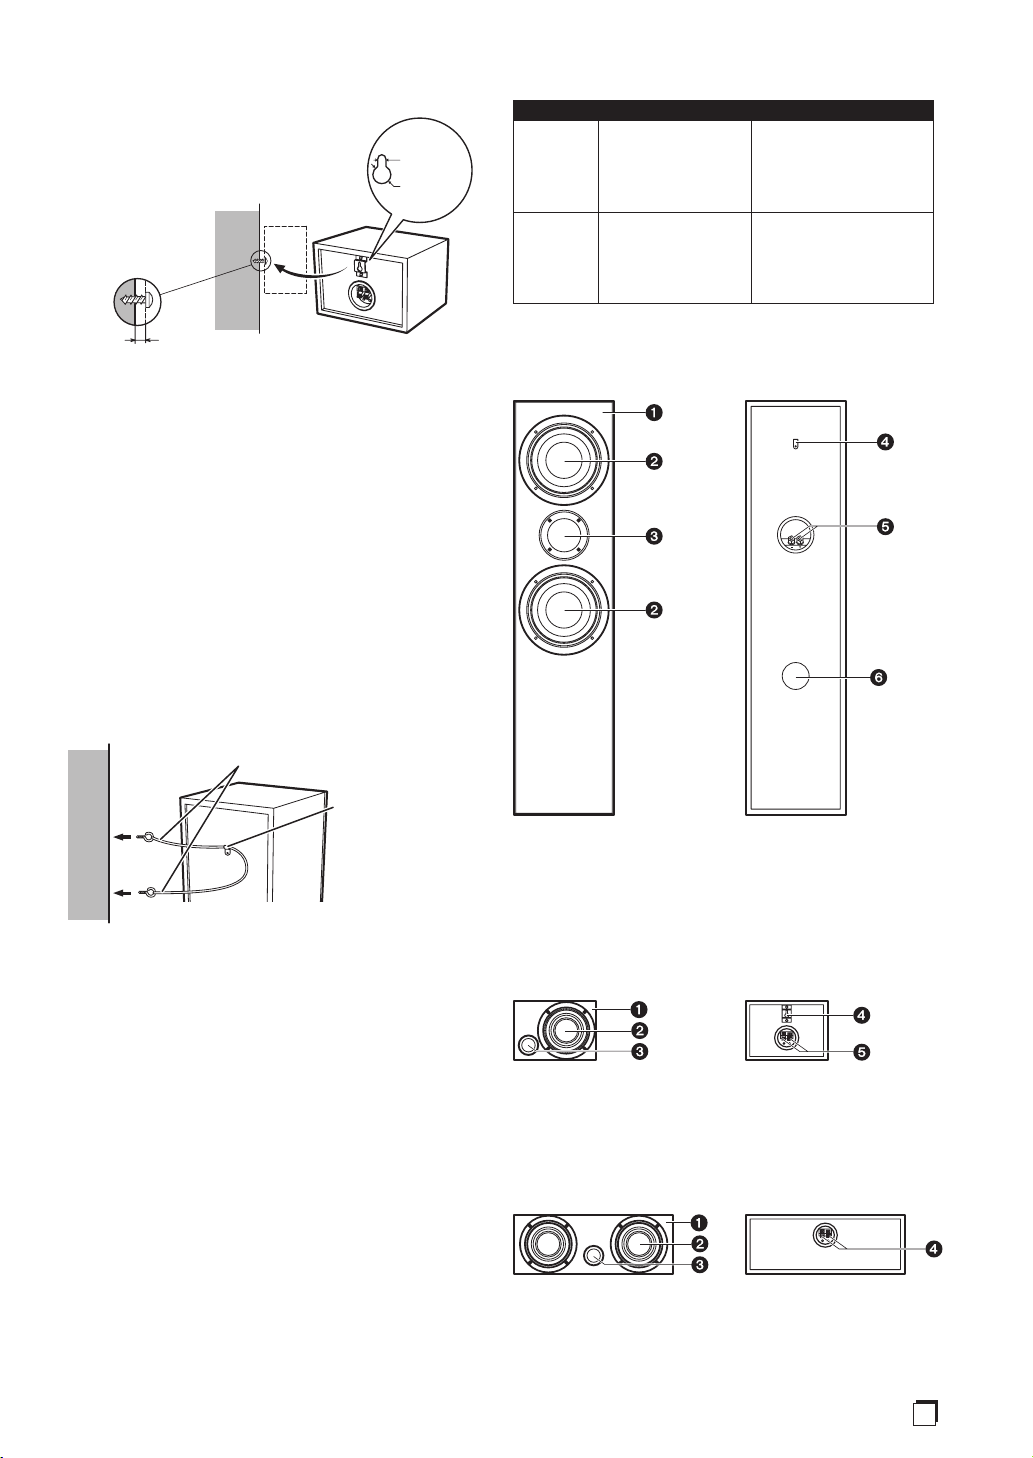
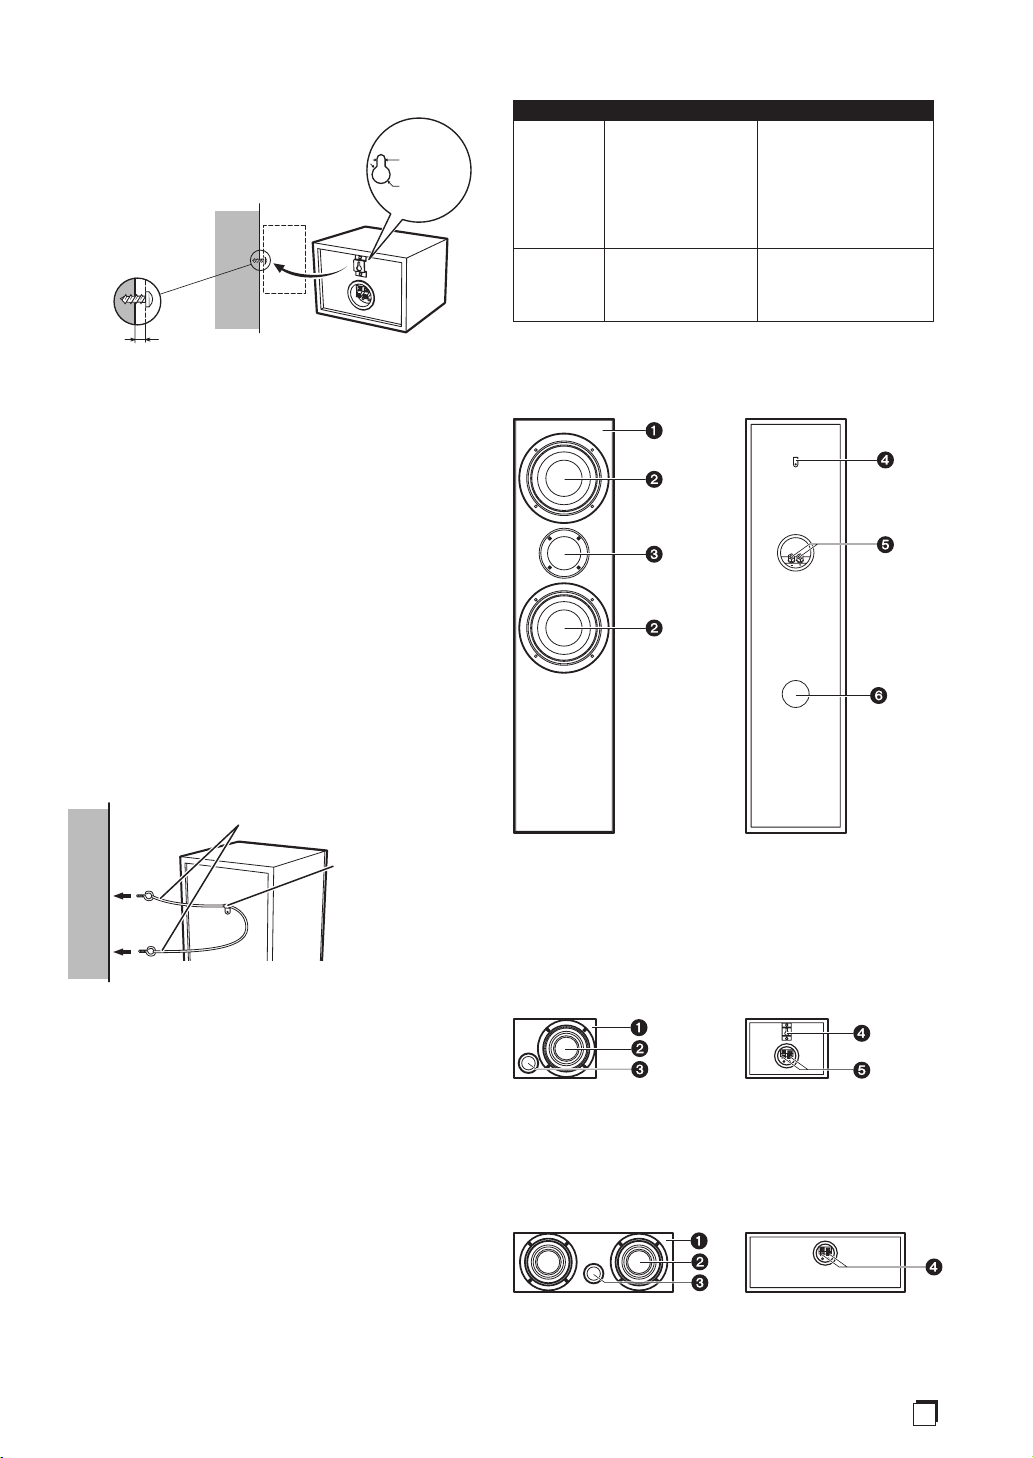
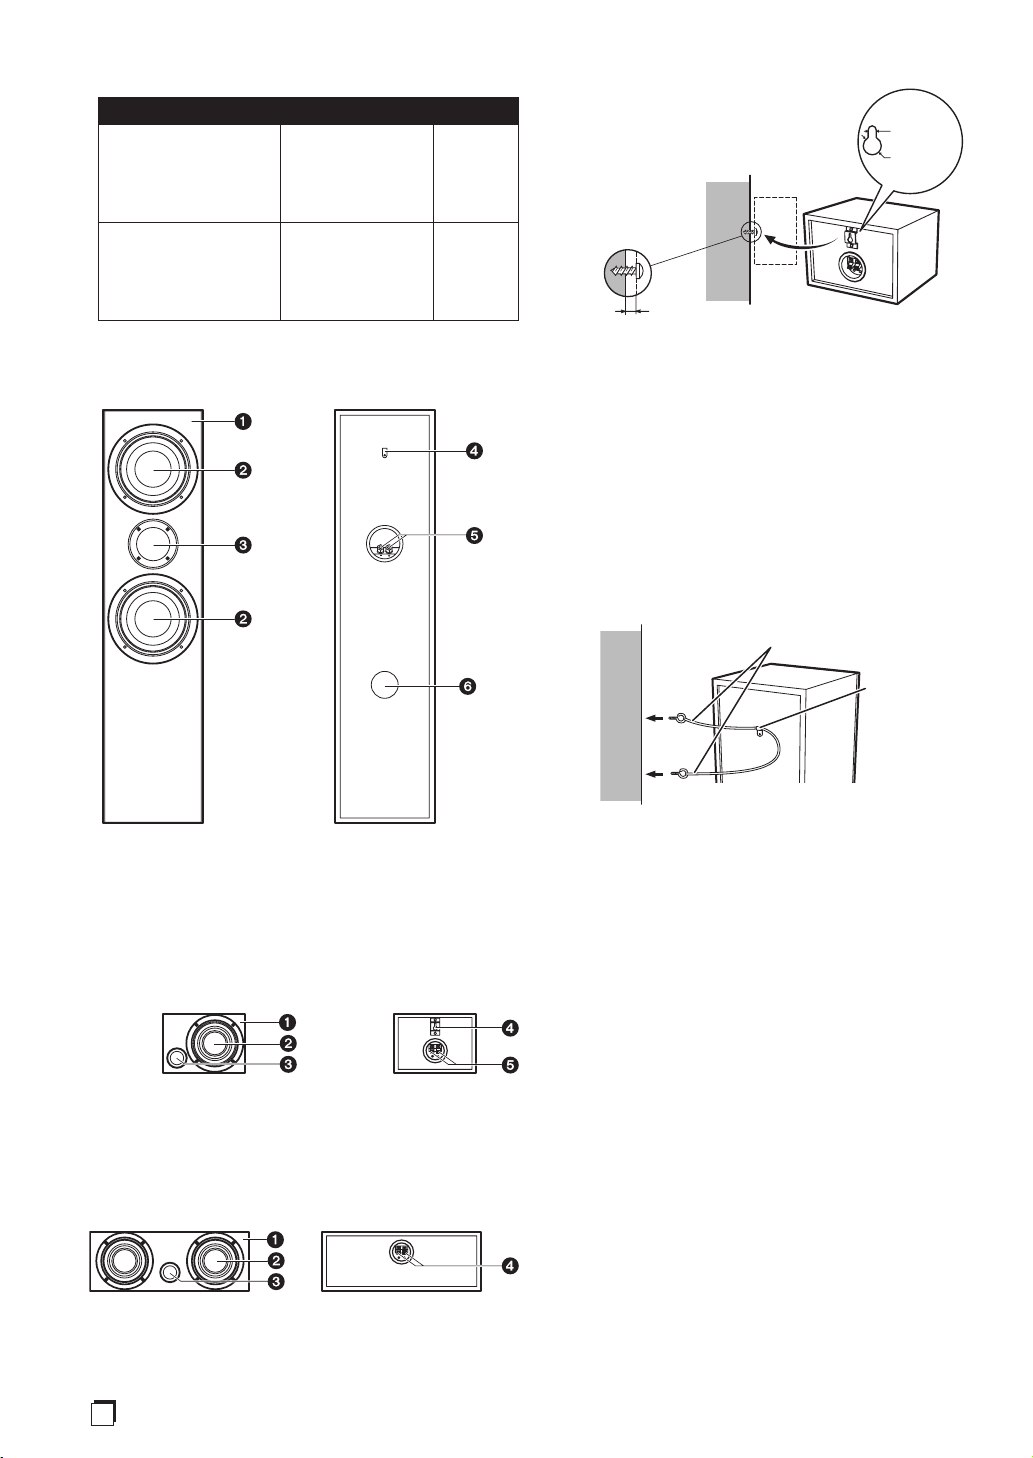
WALL-MOUNTING THE SURROUND
SPEAKERS
Mounting screw
(not supplied)
5 mm to 7 mm
3.7 mm
9.3 mm
• The mounting screws are not supplied. Use screws that suit the
wall material and that can sufficiently support the weight of the
speakers.
• When you intend to attach to the wall, first ensure that the
wall is strong enough to sufficiently support the weight of the
speakers.
• After attaching, check that the fitting is secure. Continue to
check that the fitting is secure at regular intervals thereafter.
• If you are unsure of the quality and strength of the walls,
consult a professional for advice.
• We are not responsible for any accidents or damage that result
from improper installation.
SECURING THE FRONT SPEAKERS
Pass a commercially-available reinforced string through the plastic
catch to securely support the speaker to the wall. Also ensure
that the wall you are fixing the speaker to is strong enough to
sufficiently support the weight of the speaker.
Reinforced strings
(not supplied)
Plastic catches
Backside of front speaker
• Do not attach the plastic catches directly to the wall.
• After attaching, check that the fitting is secure. Continue to
check that the fitting is secure at regular intervals thereafter.
• If you are unsure of the quality and strength of the walls,
consult a professional for advice.
• We are not responsible for any accidents or damage that result
from improper installation.
CABINET MAINTENANCE
Use a polishing cloth or dry cloth to wipe off dust and dirt.
When the cabinet is very dirty, clean with a soft cloth dipped in
some neutral cleanser diluted five or six times with water, and
then wipe again with a dry cloth. Do not use furniture wax or
cleaners. Never use thinners, benzine, insecticide sprays and other
chemicals on or near the cabinets, since these will corrode the
surfaces.
TROUBLESHOOTING
Symptom Possible cause Remedy
No sound. • Bad speaker cable
or connection.
• Amplifier is off.
• Volume control is at
zero.
• Connect correctly or
replace cable.
• Turn on amplifier.
• Slowly turn up volume.
Sound is
distorted.
• Extreme signal
condition.
• Turn down the
amplifier's output level
(volume, bass control,
bass boost) to lower the
level.
Names of the parts
Front speakers
1. Cabinet
2. Woofer
3. Tweeter
4. Plastic catches
5. Speaker terminals
6. Bass ref duct
Surround speakers
1. Cabinet
2. Speaker
3. Bass ref duct
4. Wall attachment fitting
5. Speaker terminals
Center speaker
1. Cabinet
2. Speaker
3. Bass ref duct
4. Speaker terminals
S-RS55TB_EnEs.indb 3 2017/08/24 13:39:10
4
En
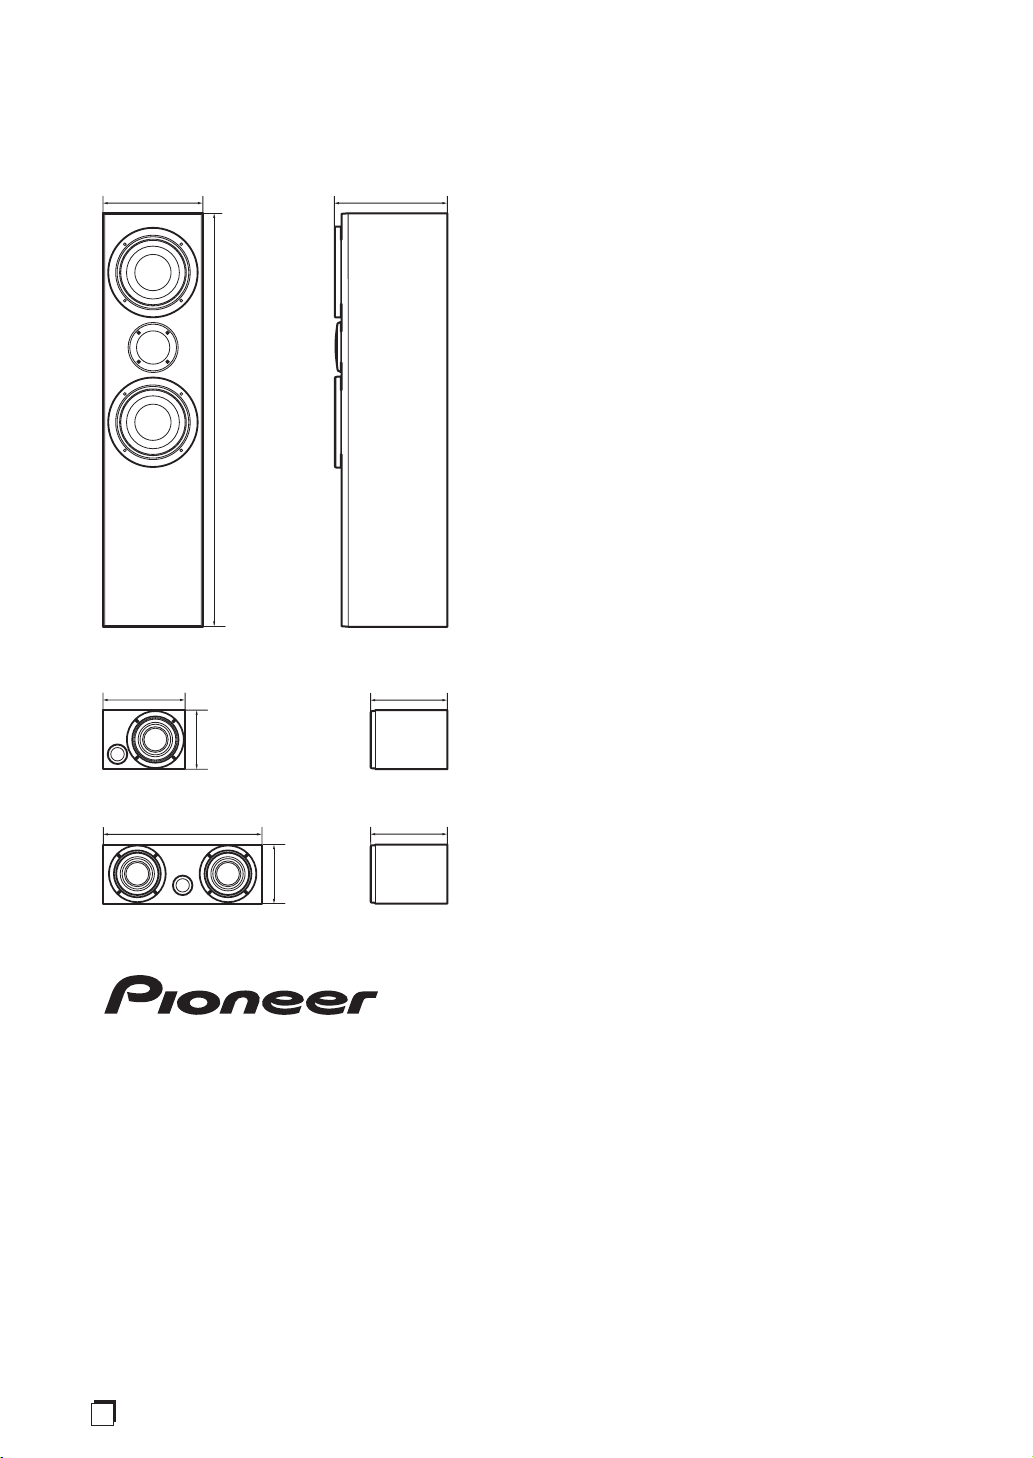
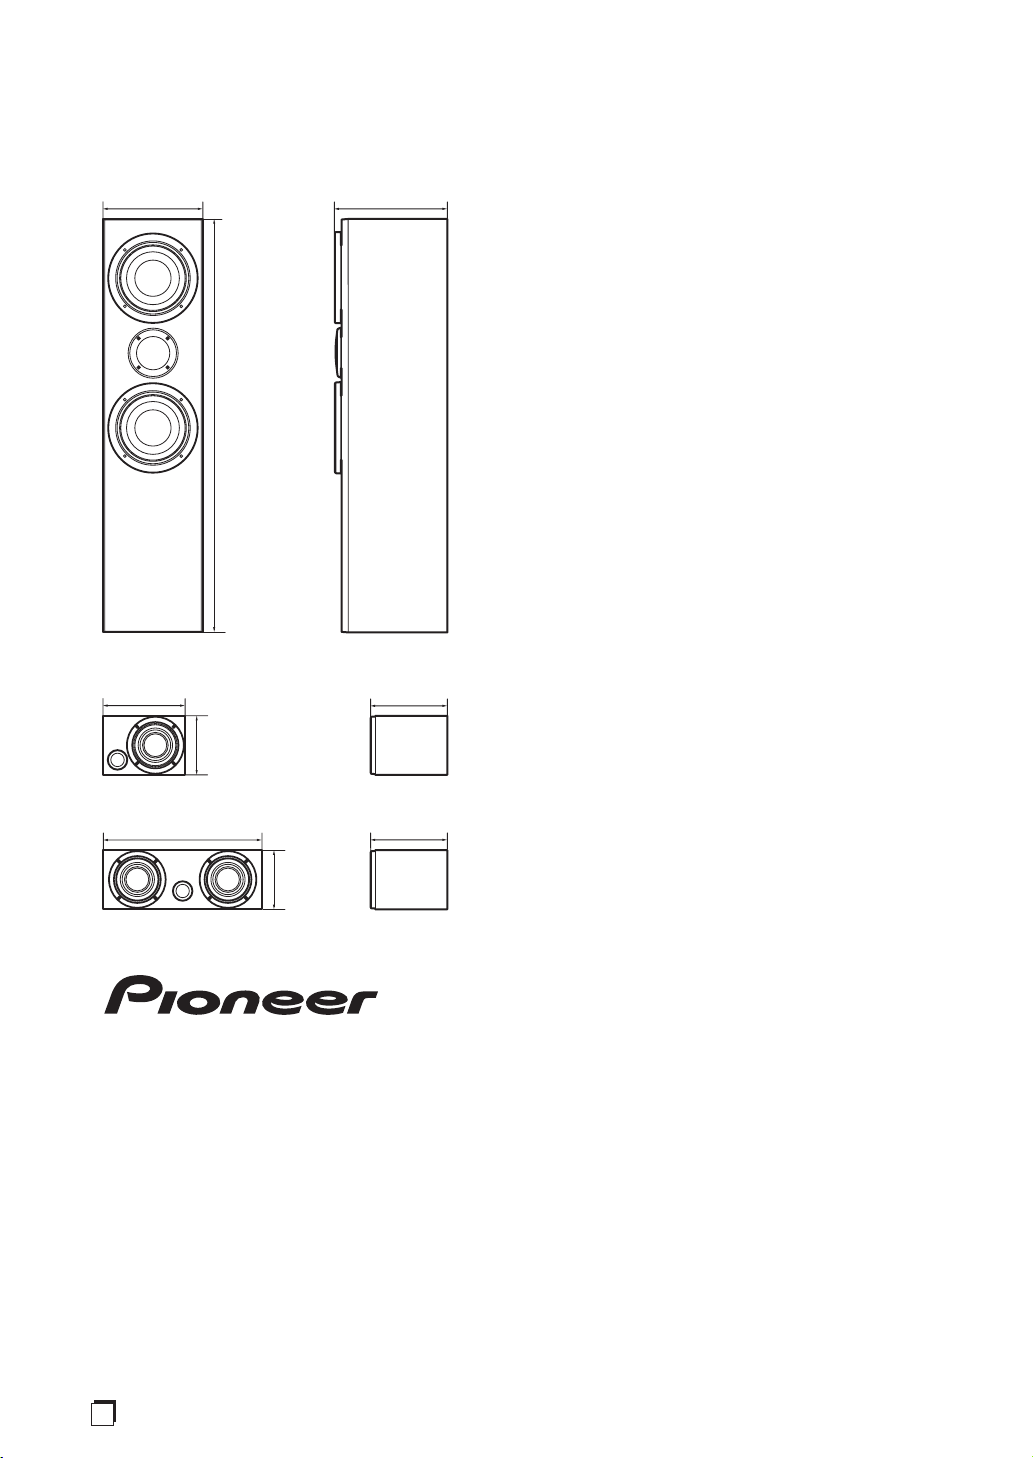
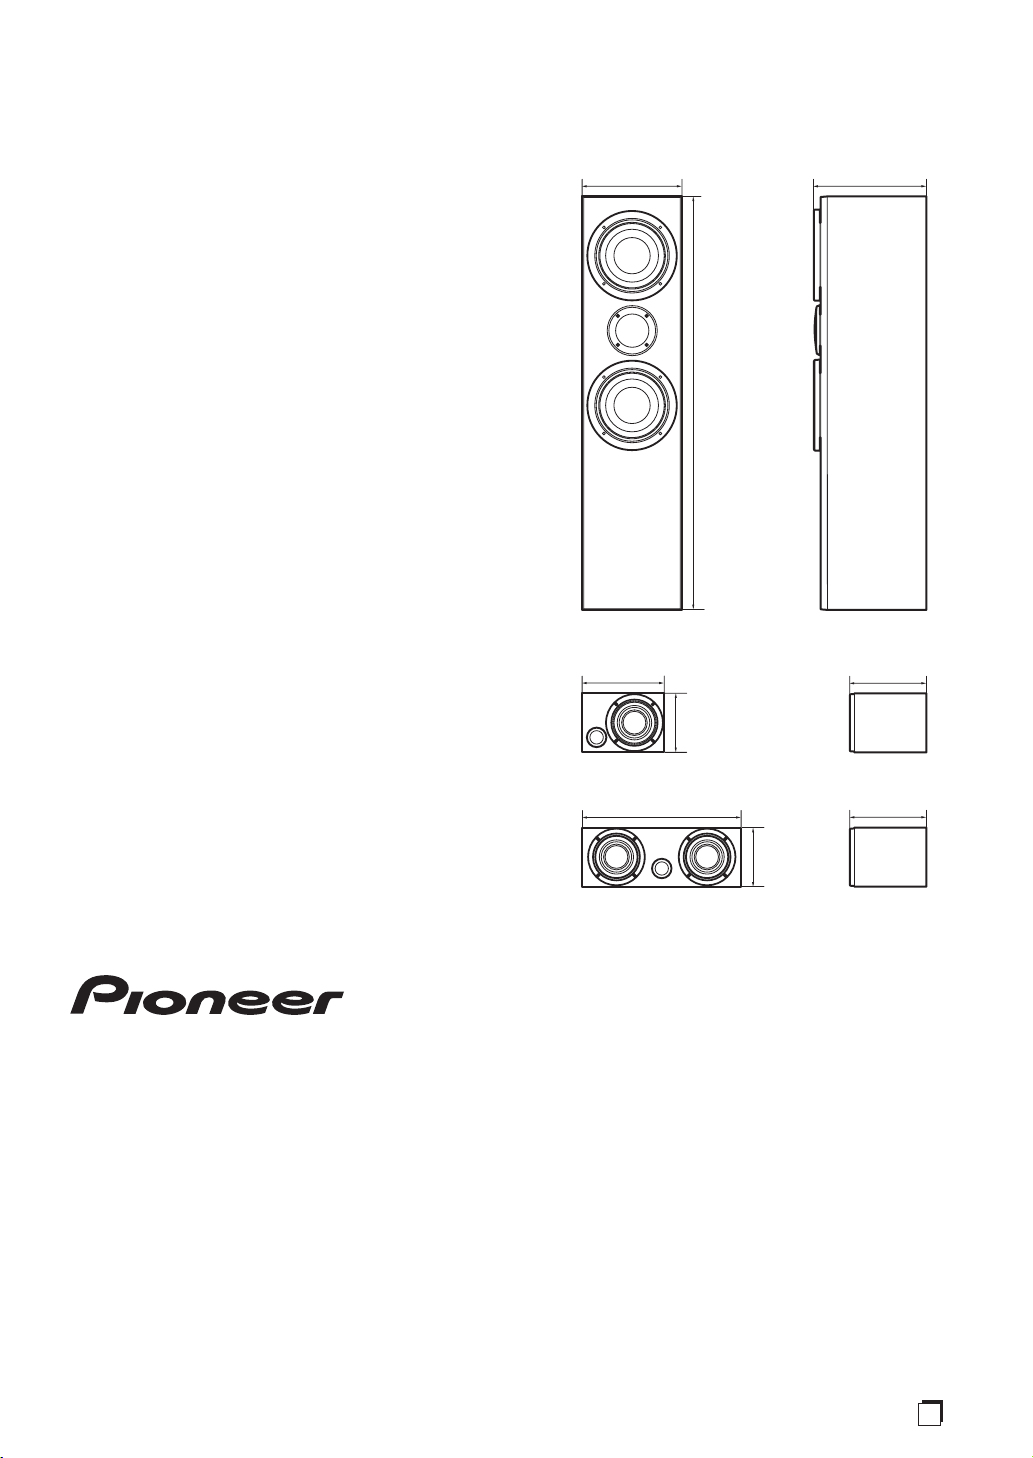
Dimensions diagram
Units: mm
(There may be some small difference between the dimensions
shown here and the actual product.)
169
169
248220
910
130
130
350
180
180
Front Speakers
Surround Speakers
Center Speaker
Front Side
(Including terminal projections)
SPECIFICATIONS
Front Speakers
Enclosure........................................... Bass-reflex floorstanding type
Configuration ........................................................................... 2-way
Woofer .......................................................................16 cm cone ×2
Tweeter ........................................................................5 cm cone ×1
Impedance ...................................................................................8 Ω
Frequency response ................................................ 25 Hz to 40 kHz
Sensitivity (1 m, 1 W) ............................................................ 88.0 dB
Maximum input power ............................................................ 150 W
Exterior dimensions .........(W) 220 mm × (H) 910 mm × (D) 248 mm
Weight ...................................................................................10.5 kg
Surround Speakers
Enclosure................................................ Bass-reflex bookshelf type
Configuration ................................................................ 10 cm 1-way
Speakers ...................................................................10 cm cone ×1
Impedance ...................................................................................8 Ω
Frequency response ................................................ 50 Hz to 30 kHz
Sensitivity (1 m, 1 W) ............................................................ 82.0 dB
Maximum input power ............................................................ 120 W
Exterior dimensions .........(W) 180 mm × (H) 130 mm × (D) 169 mm
Weight .....................................................................................1.4 kg
Center Speaker
Enclosure................................................ Bass-reflex bookshelf type
Configuration ................................................................ 10 cm 1-way
Speakers ...................................................................10 cm cone ×2
Impedance ...................................................................................8 Ω
Frequency response ................................................ 50 Hz to 25 kHz
Sensitivity (1 m, 1 W) ............................................................ 86.0 dB
Maximum input power ............................................................ 120 W
Exterior dimensions .........(W) 350 mm × (H) 130 mm × (D) 169 mm
Weight .....................................................................................2.5 kg
Specifications and design subject to possible modification without
notice due to improvements.
“Pioneer” is a trademark of Pioneer Corporation, and is used under license.
Printed in China / Imprimé en Chine
© 2017 Onky
o & Pioneer Corporation. All rights reserved.
<Germany>
Hanns-Martin-Schleyer-Straße 35, 47877 Willich, Germany
Tel: +49(0)8142 4208 188 (Product Support)
<UK>
Anteros Building, Odyssey Business Park, West End Road, South Ruislip,
Middlesex, HA4 6QQ United Kingdom
Tel: +44(0)208 836 3612
Корпорация О энд Пи
2-3-12, Яэсу, Чуо-ку, г. Токио, 104-0028, ЯПОНИЯ
<France>
6, Avenue de Marais F - 95816 Argenteuil Cedex
FRANCE
Tel: +33(0)969 368 050
2-3-12 Yaesu, Chuo-ku, Tokyo 104-0028 JAPAN
<U.S.A.>
18 PARK WAY, UPPER SADDLE RIVER, NEW JERSEY 07458, U.S.A.
Tel: 1-201-785-2600 Te l: 1-844-679-5350
S-RS55TB_EnEs.indb 4 2017/08/24 13:39:10
1
Es
Muchas gracias por la adquisición de este producto Pioneer.
Lea todo este manual de instrucciones para aprender a operar
correctamente su modelo.
CONTENIDO DE LA CAJA
1
3
2
54
1. Altavoces delanteros (2)
2. Altavoces surround (2)
3. Altavoz central (1)
4. Cable de altavoz
Altavoz central (1) (2 m, color de abrazadera: Rojo)
Altavoces delanteros (2) (3 m, color de abrazadera: Negro)
Altavoces surround (2) (10 m, color de abrazadera: Azul)
5. Almohadillas antideslizantes (1) (20 piezas)
• Manual de instrucciones (Este manual)
ANTES DE USAR
• Estos altavoces poseen una impedancia nominal de 8 Ω. Utilice
un amplificador compatible con altavoces con una impedancia
de 8 Ω.
• Para evitar daños en el sistema de altavoces debido a una
sobrecarga de entrada, tenga presente las precauciones
siguientes:
– No utilice una entrada por encima de la entrada permisible.
– Cuando conecte esta unidad y otros dispositivos AV a un
amplificador, primero apague el amplificador.
– Cuando amplifique los agudos con un ecualizador gráfico,
no suba demasiado el volumen.
– No emita volúmenes altos a través de un amplificador
de salida baja. (La distorsión armónica del amplificador
aumentará y existe la posibilidad de que se dañen los
altavoces.)
• No emplee el altavoz para emitir sonido distorsionado durante
largos períodos de tiempo. Correría el peligro de incendios.
• Ni instale estas unidades cerca de una estufa o cualquier otro
aparato de calefacción, ni las exponga a la luz del sol. Si lo
hace, las cajas de los altavoces se podrían decolorar y las
propias unidades se podría deteriorar.
• No monte los altavoces delanteros y central en la pared ni en el
techo. Podría caerse y ocasionar heridas.
• Estos altavoces no están equipados con blindaje magnético.
No coloque objetos a los que afecte el magnetismo fácilmente
(tarjetas con banda magnética, etc.) cerca de esta unidad.
• Si se usa un televisor de tubo de rayos catódicos (televisor
CRT) cerca del aparato, pueden producirse irregularidades de
color o distorsión en el mismo. Si esto ocurre, separe estos
altavoces más del televisor.
UBICACIÓN Y AJUSTES FINOS
CONFIGURACIÓN ENVOLVENTE ESTÁNDAR
Esta es una configuración de altavoces de sonido envolvente
multicanal estándar para un sonido óptimo de cine en casa de 5.1
canales.
1, 2. Altavoces delanteros
3. Altavoz central
4, 5. Altavoces surround
6. Subwoofer
Altavoces delanteros
Para obtener mejores resultados, los altavoces se deben separar
una distancia aproximadamente equivalente a la distancia de
escucha. Gire los altavoces hacia adentro, en la dirección del
oyente, para mejorar la estabilidad de imagen de los oyentes que
no están situados en el centro. La proximidad de los altavoces a
una pared lateral o trasera mejorará el rendimiento de los graves
medios, aunque si los acerca demasiado (especialmente en una
esquina) los graves pueden sonar poco naturales y el rendimiento
de la imagen se puede degradar.
Manual de instrucciones
Sistema de altavoces
S-RS55TB
S-RS55TB_EnEs.indb 1 2017/08/24 13:39:10
2
Es
Altavoz central
El altavoz se debe situar debajo del televisor. Para obtener los
mejores resultados, alinee la parte frontal del altavoz con la
parte frontal del televisor. Si el altavoz se va a colocar debajo del
televisor y demasiado cerca del suelo, sería conveniente inclinarlo
un poco hacia arriba.
No ponga el altavoz central encima del televisor, porque el altavoz
podría caerse del televisor debido a movimientos bruscos, como
los terremotos, y poner en peligro a quienes se encontrasen cerca,
o dañar el propio altavoz.
Altavoces surround
Para obtener los mejores resultados, los altavoces se deben
colocar a la altura del oído o algo más arriba. Según la disposición
de la habitación y sus preferencias, los altavoces traseros
izquierdo y derecho se deben situar en las paredes laterales, justo
detrás de la posición de escucha, o en las paredes.
ALMOHADILLAS
ANTIDESLIZANTES
Utilice las almohadillas antideslizantes suministradas según sea
necesario de acuerdo con la ubicación elegida para la instalación.
Pegue las almohadillas antideslizantes en las cuatro esquinas
de la superficie del altavoz en el que se instalará. Sin embargo,
habrá ubicaciones en las que no servirá de mucho utilizar las
almohadillas antideslizantes, así que evite ubicarlo en lugares
resbaladizos.
Coloque las unidades sobre un paño suave cuando lleve a cabo
esta tarea.
1
23
1. Altavoces delanteros
2. Altavoces surround
3. Altavoz central
PARA LLEVAR A CABO LOS
AJUSTES DEL AMPLIFICADOR
Antes de conectar los altavoces, lea el manual de instrucciones
suministro con el amplificador para seleccionar el ajuste de los
altavoces en el amplificador.
• Altavoces delanteros: Large
• Altavoces central / surround: Small
CONEXIÓN DEL SISTEMA
• Antes de realizar ninguna conexión, asegúrese de que el
equipo está apagado.
• No conseguirá que los altavoces produzcan los efectos
envolventes adecuados si conecta los polos (+ y –)
incorrectamente.
• Por estos terminales de altavoz circula tensión ACTIVA que es
PELIGROSA. Para evitar el peligro de descargas eléctricas al
conectar o desconectar los cables de altavoz, desenchufe el
cable de alimentación antes de tocar las partes de los cables
que no están aisladas.
Conéctelos a los terminales de altavoz de la parte trasera de
los altavoces
Conecte los cables de los altavoces a los terminales de altavoz de la parte
trasera de los altavoces. Los polos positivos (+) de los terminales de entrada
son rojos y los negativos (–) son negros. Haga coincidir los colores de los
terminales de los altavoces y los cables de los altavoces al realizar la conexión.
Altavoces delanteros:
Después de aflojar los terminales de los altavoces, empuje los
cables dentro de los terminales y apriételos firmemente.
Rojo
Negro
Altavoces central / surround:
Mientras empuja las pestañas de los terminales de los altavoces,
empuje los cables dentro de los terminales.
Rojo
Negro
Conéctelos a los terminales de altavoz de la parte trasera del
amplificador
Conecte los cables de los altavoces a los terminales de salida del
altavoz en la parte trasera de los altavoces. (Para más detalles,
consulte el manual de instrucciones del amplificador.)
Altavoces
Amplificador
• Después de conectar el cable al terminal, tire suavemente
del cable para asegurarse de que el extremo del mismo está
firmemente conectado al terminal. Una conexión incompleta
podría provocar que el sonido saltase o se emitiese ruido.
• Para evitar daños en los circuitos, asegúrese de que los cables
+ y – de los cables de altavoz y los cables izquierdo y derecho
no se tocan entre sí. También tenga cuidado de que los cables
pelados no toquen el panel trasero del amplificador.
S-RS55TB_EnEs.indb 2 2017/08/24 13:39:11
3
Es
MONTAJE EN LA PARED DE LOS
ALTAVOCES SURROUND
Tornilo de montaje
(no suministrado)
5 mm a 7 mm
3,7 mm
9,3 mm
• No se suministran los tornillos de montaje. Utilice tornillos
adecuados para el material de la pared que puedan soportar
suficientemente el peso de los altavoces.
• Cuando pretenda colocarlos en la pared, primero asegúrese de
que la pared es lo suficientemente fuerte como para soportar el
peso de los altavoces.
• Después de colocarlos, compruebe que la colocación es
segura. A partir de entonces, siga comprobando que la
colocación es segura a intervalos regulares.
• Si tiene dudas acerca de las características de la pared,
consulte a un profesional.
• No nos hacemos responsables de ningún accidente o daño
causado como resultado de una instalación inadecuada.
FIJACIÓN SEGURA DE LOS
ALTAVOCES DELANTEROS
Pase una cuerda reforzada, de venta en los establecimientos
del ramo, por el fijador de plástico para sostener con seguridad
el altavoz en la pared. También asegúrese de que la pared en la
que está fijando el altavoz es lo suficientemente fuerte como para
soportar el peso del altavoz.
Cuerdas reforzadas
(no suministrado)
Fijadores de plástico
Parte trasera del altavoz delantero
• No fije el fijador de plástico directamente a la pared.
• Después de colocarlos, compruebe que la colocación es
segura. A partir de entonces, siga comprobando que la
colocación es segura a intervalos regulares.
• Si tiene dudas acerca de las características de la pared,
consulte a un profesional.
• No nos hacemos responsables de ningún accidente o daño
causado como resultado de una instalación inadecuada.
MANTENIMIENTO DE LAS CAJAS
Use una gamuza o un paño secos para limpiar el polvo y la suciedad.
Si las cajas están muy sucias, limpie con un paño suave mojado
en una solución neutra diluida cinco o seis veces en agua y
estrujado, y pase luego un paño seco. No utilice cera para
muebles ni productos de limpieza. No utilice nunca disolventes,
bencina ni insecticida en spray u otros químicos sobre las cajas o
cerca de ellas, ya que se puede corroer la superficie.
SOLUCIÓN DE PROBLEMAS
Síntoma Causa probable Solución
No se oye
nada.
•
Cable de altavoz en
malas condiciones o
conexión defectuosa.
• El amplificador está
apagado.
• El control del
volumen está en 0.
• Corrija la conexión o
sustituya el cable.
• Encienda el
amplificador.
• Suba lentamente el
volumen.
El sonido
se oye
distorsionado.
• Condición de señal
extrema.
•
Baje el nivel de salida del
amplificador (volumen,
control de bajos, refuerzo de
bajos) para reducir el nivel.
Nombres de los componentes
Altavoces delanteros
1. Caja
2. Altavoz de graves
3. Altavoz de agudos
4. Agarradores de plástico
5. Terminales de los altavoces
6. Conducto reflector de graves
Altavoces surround
1. Caja
2. Altavoz
3. Conducto reflector de graves
4. Accesorio para colocación en la pared
5. Terminales de los altavoces
Altavoces central
1. Caja
2. Altavoz
3. Conducto reflector de graves
4. Terminales de los altavoces
S-RS55TB_EnEs.indb 3 2017/08/24 13:39:11
4
Es
Diagrama de dimensiones
Unidades: mm
(Puede que haya algunas pequeñas diferencias entre las
dimensiones aquí mostradas y el producto real.)
169
169
248220
910
130
130
350
180
180
Altavoces delanteros
Altavoces surround
Altavoz central
Delantero
Lateral
(Incluidos los salientes de los terminales)
ESPECIFICACIONES
Altavoces delanteros
Tipo ................................. Tipo sobre el piso con reflexión de graves
Sistema..................................................... Sistema de 2 direcciones
Altavoz de graves ................................................ Cono de 16 cm ×2
Altavoz de agudos ................................................. Cono de 5 cm ×1
Impedancia .................................................................................. 8 Ω
Respuesta en frecuencia .......................................... 25 Hz a 40 kHz
Sensibilidad (1 m, 1 W) ........................................................ 88,0 dB
Potencia de entrada máxima .................................................. 150 W
Dimensiones exteriores
..................................... (An) 220 mm × (Al) 910 mm × (Prf) 248 mm
Peso ......................................................................................10,5 kg
Altavoces surround
Tipo ..........................................Tipo estante con reflexión de graves
Sistema.................................................. Sistema 10 cm de una sola
Altavoces ............................................................. Cono de 10 cm ×1
Impedancia .................................................................................. 8 Ω
Respuesta en frecuencia .......................................... 50 Hz a 30 kHz
Sensibilidad (1 m, 1 W) ........................................................ 82,0 dB
Potencia de entrada máxima .................................................. 120 W
Dimensiones exteriores
..................................... (An) 180 mm × (Al) 130 mm × (Prf) 169 mm
Peso ........................................................................................1,4 kg
Altavoz central
Tipo ..........................................Tipo estante con reflexión de graves
Sistema.................................................. Sistema 10 cm de una sola
Altavoces ............................................................. Cono de 10 cm ×2
Impedancia .................................................................................. 8 Ω
Respuesta en frecuencia .......................................... 50 Hz a 25 kHz
Sensibilidad (1 m, 1 W) ........................................................ 86,0 dB
Potencia de entrada máxima .................................................. 120 W
Dimensiones exteriores
..................................... (An) 350 mm × (Al) 130 mm × (Prf) 169 mm
Peso ........................................................................................2,5 kg
Especificaciones y diseño sujetos a posibles cambios sin previo
aviso debido a mejoras del producto.
“Pioneer” is a trademark of Pioneer Corporation, and is used under license.
Printed in China / Imprimé en Chine
© 2017 Onky
o & Pioneer Corporation. All rights reserved.
<Germany>
Hanns-Martin-Schleyer-Straße 35, 47877 Willich, Germany
Tel: +49(0)8142 4208 188 (Product Support)
<UK>
Anteros Building, Odyssey Business Park, West End Road, South Ruislip,
Middlesex, HA4 6QQ United Kingdom
Tel: +44(0)208 836 3612
Корпорация О энд Пи
2-3-12, Яэсу, Чуо-ку, г. Токио, 104-0028, ЯПОНИЯ
<France>
6, Avenue de Marais F - 95816 Argenteuil Cedex
FRANCE
Tel: +33(0)969 368 050
2-3-12 Yaesu, Chuo-ku, Tokyo 104-0028 JAPAN
<U.S.A.>
18 PARK WAY, UPPER SADDLE RIVER, NEW JERSEY 07458, U.S.A.
Tel: 1-201-785-2600 Te l: 1-844-679-5350
S-RS55TB_EnEs.indb 4 2017/08/24 13:39:12
4
Ar
169
169
248220
910
130
130
350
180
180
.................................
.....................................................................................
216 .........................
15 .....................................................
8 ..........................................................................................
4025 ....................................................
88.0 ...............................................................11
150 ...........................................................................
248
910220 ...............
10.5 ......................................................................................
.............
10 ..........................................................................
110 ..............................................................
8 ..........................................................................................
3050 ....................................................
82.0 ...............................................................11
120 ...........................................................................
169
130180 ...............
1.4 ........................................................................................
.............
10 ..........................................................................
210 ..............................................................
8 ..........................................................................................
2550 ....................................................
86.0 ...............................................................11
120 ...........................................................................
169
130350 ...............
2.5 ........................................................................................
.
“Pioneer” is a trademark of Pioneer Corporation, and is used under license.
Printed in China / Imprimé en Chine
© 2017 Onky
o & Pioneer Corporation. All rights reserved.
<Germany>
Hanns-Martin-Schleyer-Straße 35, 47877 Willich, Germany
Tel: +49(0)8142 4208 188 (Product Support)
<UK>
Anteros Building, Odyssey Business Park, West End Road, South Ruislip,
Middlesex, HA4 6QQ United Kingdom
Tel: +44(0)208 836 3612
Корпорация О энд Пи
2-3-12, Яэсу, Чуо-ку, г. Токио, 104-0028, ЯПОНИЯ
<France>
6, Avenue de Marais F - 95816 Argenteuil Cedex
FRANCE
Tel: +33(0)969 368 050
2-3-12 Yaesu, Chuo-ku, Tokyo 104-0028 JAPA
N
<U.S.A.>
18 PARK WAY, UPPER SADDLE RIVER, NEW JERSEY 07458, U.S.A.
Tel: 1-201-785-2600 Te l: 1-844-679-5350
3
Ar
75
3.7 mm
9.3 mm
•
•
•
•
•
•
•
•
•
•
•
•
•
•
•
• •
1 .
2 .
3 .
4 .
5 .
6 .
1 .
2 .
3 .
4 .
5 .
1 .
2 .
3 .
4 .
2
Ar
1
23
1 .
2 .
3 .
•
•
•
•
•
•
•

1
Ar
.Pioneer
1
3
2
5
4
1 .)2
2 .)2
3 .)1
4 .
2( )1
3( )2
10( )2
5 .20( )1
•
•8
8
•
–
–AV
–
–
•
•
•
•
•
CRT
.5.1
21
3
54
6
S-RS55TB
*29403272*
F1708-0
SN 29403272