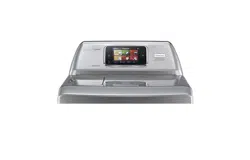
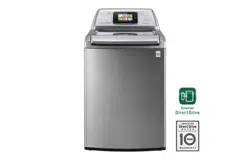
The inverter motor, which is directly connected to the tub, minimizes energy loss and produces little noise and vibration.
Smart ThinQ
SMART DIAGNOSIS™ - Should you experience technical difficulty, your appliance has the capability of transmitting data by phone to the Customer Information Center to diagnosis the problem.
Smart Access - Monitor your cycle operation so you know how much time is left in the cycle. You can even shut the machine off if you need to.
Smart Adapt - Download new and special cycles that are not included with the machine.
Smart Grid - Smart appliances can communicate with local utility companies that are equipped with Smart Grid equipment. Smart Message - When the cycle is complete or the appliance has problems, you have the option of receiving push notifications on your smart phone. (Refer to the modem manual for detailed information on Smart ThinQ.)
TUB CLEAN
Regular cleaning of the tub on a monthly basis using TUB CLEAN will keep the tub clean and fresh.
CHILD LOCK
Use this option to disable the controls during a wash cycle. This option can prevent children from changing cycles or operating the machine.
SMARTRINSE™ WITH JET SPRAY
This washer is designed to save rinse water by using the SMARTRINSE™ with jet spray in COTTON/NORMAL and HEAVY DUTY cycles.
FULL STAINLESS STEEL DRUM
The Full stainless steel drum offers extreme durability.
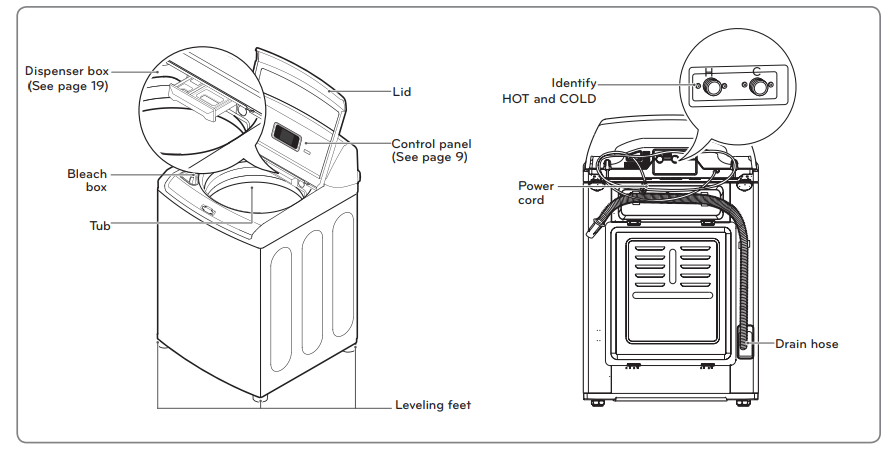
INTRODUCING YOUR WASHING MACHINE
Parts and Accessories
Parts
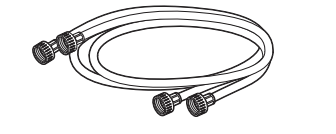
Accessories
NOTE Accessories shown below are included in thismodel.
Hot and Cold Water Hoses (with 2 seals per hose, 1 at each end)
Cable tie (forsecuring drain hose)
USB, Wi-Fi, for Smart Functions
NOTE
Contact LG Customer Service at 1-800-243-0000 (1-888-542-2623 in Canada) if any accessories are missing or to purchase accessories.
Always purchase good quality hoses. Leaking caused by poor quality hoses or by improper installation is not covered by the manufacturer’s warranty.
The images in this guide may be different from the actual components and accessories, and are subject to change by the manufacturer without prior notice for product improvement purposes.
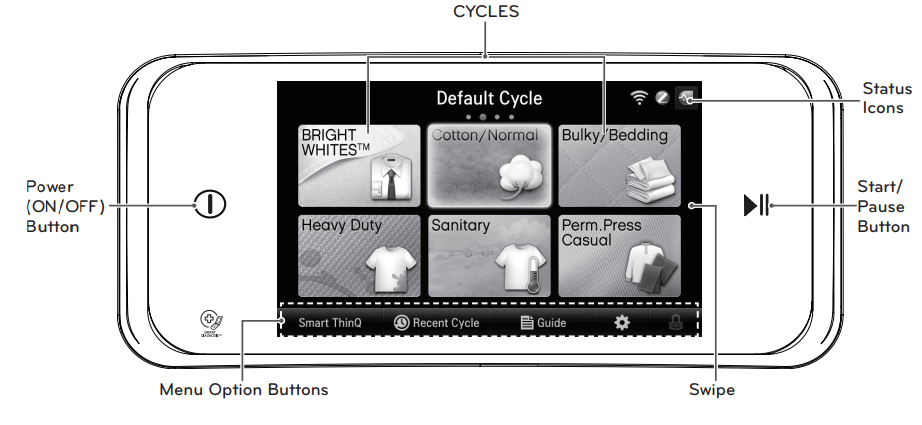
Control panel features
Operation
Button
Description
POWER (ON/OFF) BUTTON
- Touch to turn the washer ON or OFF. Touching the POWER button during a cycle will cancel that cycle and any wash settings will be lost. The lid will unlock after a brief pause.
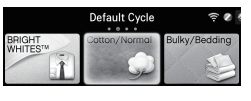
CYCLES
- The CYCLE screens display cycle names and icons; the default cycle is Cotton/Normal. Touch the left or right arrows to scroll through the cycle screens. There are four screens that will display up to six cycles at a time.
Saved custom cycles will display on the Custom Cycle screen. The opening screen can be changed from the standard cycles to the Custom Cycles screen using the Default Cycle button in the setup screen.
START/PAUSE BUTTON
- Touch this button to start the selected cycle. If the washer is running, use this button to pause the cycle without losing the current settings. Cotton/Normal is the default cycle. Touching the Start/ Pause button without selecting a cycle will cause this cycle to run immediately.
MENU OPTION BUTTONS
- These buttons will take you to special feature and settings screens.
SWIPE
- You can swipe the screen to navigate though the cycle screens.
STATUS ICONS
- Displays the status of various systems and features.
Display
Back
Button
Description
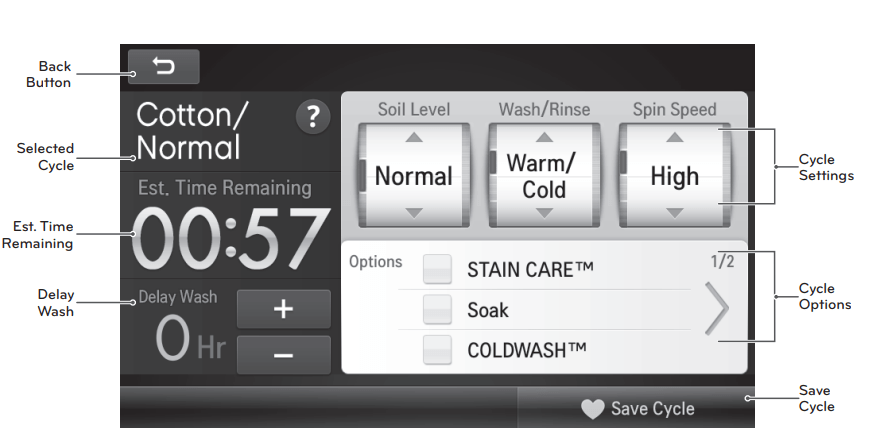
SELECTED CYCLE
- The icon and name of the selected cycle.
EST. TIME REMAINING
- Displays the estimated time remaining in the cycle, including any Delay Wash time. This time will change if settings are modified or if options are added
DELAY WASH
- Touch the plus (+) or minus (-) buttons to either add or decrease time from the Delay Wash feature.
SAVE CYCLE
- After modifying a cycle settings, you have the option of saving it as a custom cycle and adding it to the cycle screens..
CYCLE OPTIONS
- Add available options to the cycle. Not all options are available with every cycle. The options that are not available will be dimmed.
CYCLE SETTINGS
- Use the arrow keys to adjust the default Soil Level, Wash/Rinse temperature or Spin Speed of the cycle. The bar to the left of each indicator shows the number of adjustments available.
BACK BUTTON
- Touch this button to return to the previous screen.
PREPARATION
Sorting wash loads
Precautions for fabric care before wash cycle Read and observe the following to prevent shrinkage or damage to clothes.
CAUTION
Do not wash or spin any item labeled or known to be water-proof or water-resistant, even if the product care label on the item permits machine washing. Failure to follow these instructions could result in bodily injury, severe damage to your laundry, your washer and/or property damage as a result of abnormal vibration of the washer.
- Examples of water-proof or water-resistant items include certain mattress pads, mattress covers, rain gear, camping gear, skiing apparel, outdoor gear and similar items.
Check all pockets to make sure that they are empty.
Items such as clips, matches, pens, coins, and keys can damage both your washer and your clothes.
Close zippers, hooks, and drawstrings to prevent these items from snagging or tangling on other clothes.
Pretreat heavily stained areas before washing.
Doing so will produce clean, stain-free results.
Combine large and small items in a load. Load large items first.
Large items should not be more than half of the total washload.
The washer can be fully loaded, but the drum should not be tightly packed with items.
Do not wash single items, except for bulky items such as blankets. Make sure to wash laundry in similar types of loads.
Washing a single small item may result in the tub becoming unbalanced, vibrating and making a noise.
Brush heavy soil, dust, or hair off fabrics before washing.
Laundry may not wash clean if there is dirt or sand on the fabrics, or they may damage due to particles rubbing against sheer fabrics.
Wash blankets individually.
Washing more than one blanket together may produce unclean results due to tangling or an unbalanced load.
Always separate fabrics according to their colors and wash them separately to prevent colors from running.
Fabrics may damage or become stained due to fabric dyes running, or due to foreign objects transferring from one fabric to another.
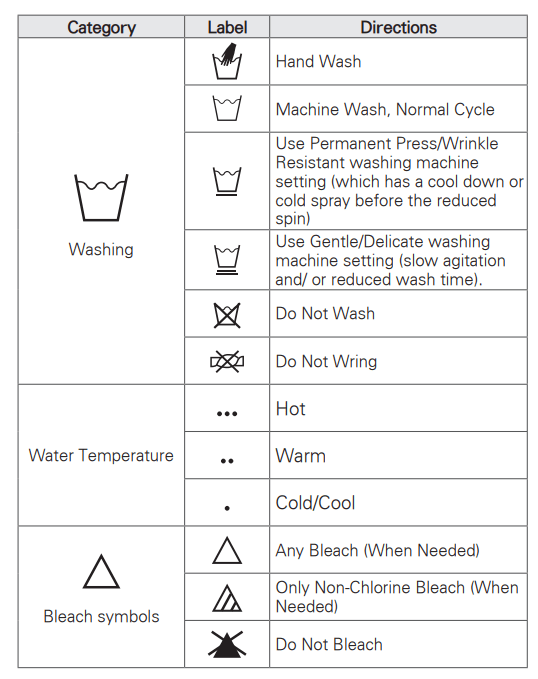
Fabric care labels
Most articles of clothing feature fabric care labels that include instructions for proper care.
Sorting laundry
It is recommended that you sort laundry into similar loads that are washable in the same cycle.
Refer to the following chart for sorting clothes
Colors
Whites / Lights / Darks
Soil
Heavy / Normal / Light
Fabric
Delicates / Easy Care / Sturdy Cottons
Lint
Lint Producers / Lint Collectors
Using detergent/fabric softener
Recommended detergent
Make sure to use HE (High-Efficiency) detergent for Top loading washing machines. HE detergents dissolve more efficiently and produce fewer suds to ensure efficient washing and rinsing. Use the correct amount of detergent as indicated on the label of the detergent packaging.
Designed specially to use only HE (High-Efficiency) detergent
NOTE
Only use HE detergents, since using a regular detergent may produce excessive suds.
HE detergents produce fewer suds, dissolve more efficiently to improve washing and rinsing performance, and help to keep the interior of your washer clean. Use less detergent for soft water.
Wipe up any spills immediately, as liquids could damage the finish and the control panel of the washing machine.
Using too much detergent can cause a build-up in the tub resulting in unsatisfactory performance and machine malfunction.
If you use a detergent that does not dissolve easily or a detergent with high viscosity, it will leave a residue on the tub, which may not rinse properly.
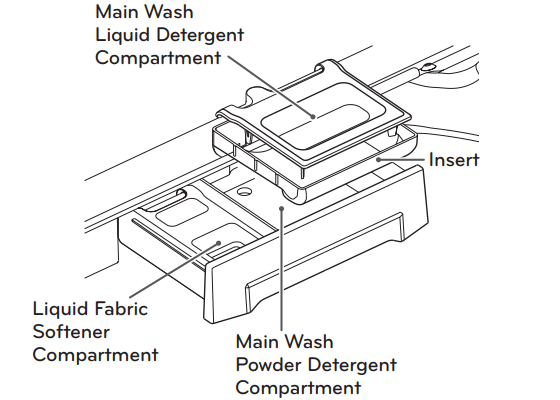
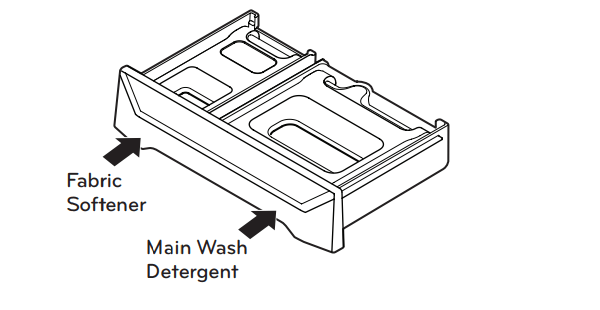
Loading the dispenser
The detergent dispenser drawer of the washing machine has a dispenser compartment for each detergent type. Add the appropriate detergents into its respective compartments.
Pull out the detergent dispenser drawer.
Add the appropriate detergent to its allocated compartment.
If you use a liquid detergent, check if the liquid detergent cup is in place.
If you use a powdered detergent, remove the liquid detergent cup and put the powder in the main wash detergent compartment.
Close the detergent dispenser drawer slowly.
- Slamming the detergent dispenser drawer may result in the detergent overflowing into another compartment or pouring into the tub earlier than programmed.
NOTE It is normal for a small amount of water to remain in the dispenser compartments at the end of the cycle.
Main Wash Detergent Compartment
This compartment holds laundry detergent for the main wash cycle, which is added to the load at the beginning of the cycle. Always use HE (High-Efficiency) detergent with your washing machine.
Never exceed the manufacturer’s recommendations when adding detergent. Using too much detergent can result in detergent buildup in clothing and the washer. Either powdered or liquid detergent may be used.
NOTE
Liquid or powdered color-safe bleach may be added to the main wash compartment with detergent of the same type.
When using liquid detergent, make sure the liquid detergent cup and insert are in place. Do not exceed the maximum fill line.
When using powdered detergent, remove the insert and liquid detergent cup from the compartment. Powdered detergent will not dispense with the liquid detergent cup and insert in place.
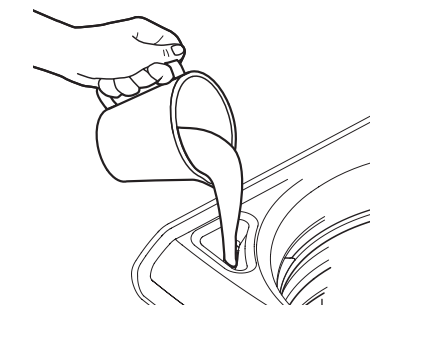
Fabric Softener Compartment
This compartment holds liquid fabric softener, which will be automatically dispensed during the final rinse cycle.
NOTE
Always follow the manufacturer’s recommendations when adding fabric softener. Do not exceed the maximum fill line. Using too much fabric softener may result in stained clothes.
Dilute concentrated fabric softeners with warm water. Do not exceed the maximum fill line.
Never pour fabric softener directly onto the load or into the drum.
Liquid Bleach Compartment
This compartment holds liquid chlorine bleach, which will be dispensed automatically at the proper time during the wash cycle. Avoid overfilling or splashing when adding bleach to the dispenser. The maximum capacity of the bleach dispenser is one cup of bleach per wash cycle. Overfilling could result in premature dispensing of bleach, which will result in fabric damage.
NOTE
Do not add powdered or liquid color-safe bleach to this compartment.
Always follow the manufacturer’s recommendations when adding bleach. Do not exceed the maximum fill line. Using too much bleach can damage fabrics.
Never pour undiluted liquid chlorine bleach directly onto the load or into the drum. Fabric damage can occur.
USING YOUR WASHING MACHINE
Basic operation
SORT LAUNDRY AND LOAD WASHER
Sort laundry by fabric type, soil level, color and load size, as needed. Open the lid and load selected items into the washer.
CLEANING PRODUCT
Add High-Efficiency (HE) detergent to the detergent dispenser.
TURN ON THE WASHER
Touch the POWER button to turn ON the washer. The LG startup screen will display, followed by the cycle screen.
NOTE: Approximately one minute after the power is shut off, the control enters standby mode. It takes approximately four seconds for the control to power on from standby mode. NOTE: If the washer remains idle for four minutes after turning the washer off, any water left in the tub will automatically be drained. You may restart the washer at this time. However, once the washer initiates draining, all functions will be suspended and cycle settings lost.
SELECT A CYCLE
Scroll through the cycle screens, by either touching the arrow buttons or swiping the screen, and select your desired cycle. Touch a cycle button to view its preset water temperature, spin speed, soil level, and option settings.
ADJUST CYCLE SETTINGS AND SELECT OPTIONS
Default settings for the selected cycle can now be changed, if desired, using the cycle settings and option buttons.
NOTE: Not all modifiers and options are available on all cycles.
BEGIN CYCLE
Touch the START/PAUSE button to begin the cycle. The lid will lock, and the washer will agitate briefly without water to measure the weight of the load.
NOTE: If the washer is paused during a cycle and not restarted, an alarm will sound and a warning popup will display. If the cycle is not restarted, it will shut off and all settings will be lost. If water remains in the tub, it will drain four minutes after the cycle has canceled.
ADD A GARMENT LIGHT
ADD A GARMENT will appear in the Time & Status display near the beginning of the wash cycle to indicate when it is safe to add items to the load. Touch the START/PAUSE button to pause the cycle and add garments to the load.
END OF CYCLE
When the cycle is finished, the chime will sound. Immediately remove your clothing from the washer to reduce wrinkling.
WARNING To reduce the risk of fire, electric shock, or injury to persons, read the IMPORTANT SAFETY INSTRUCTIONS before operating this appliance.
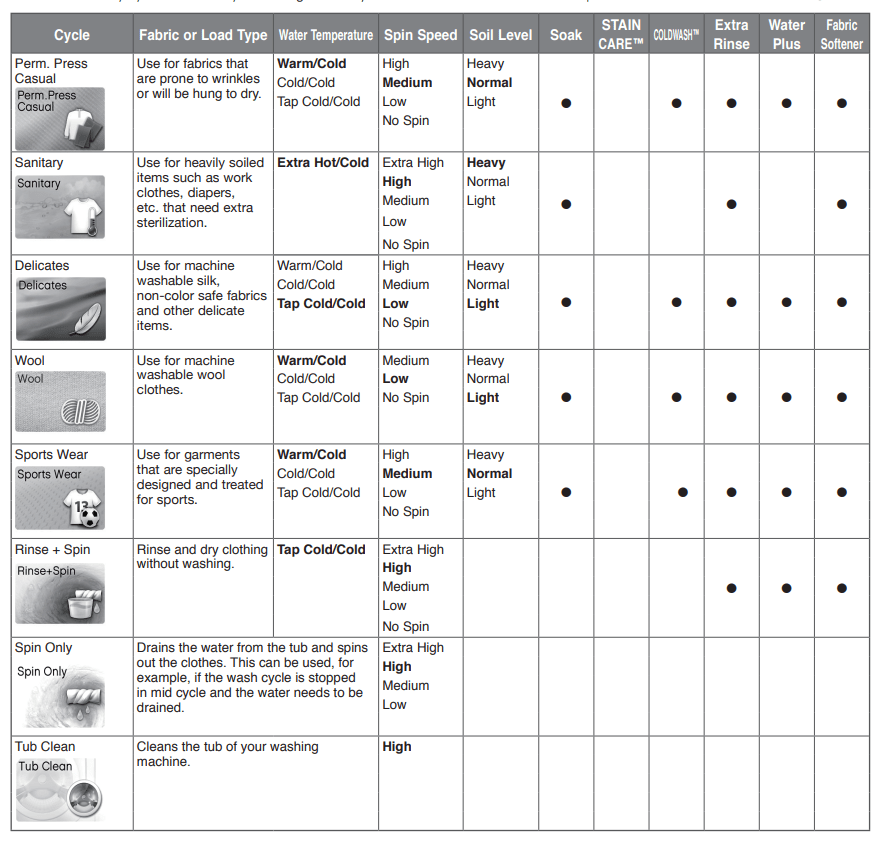
Cycle guide
The Cycle Guide below shows the default settings, available changes and options, and the recommended fabric types for each cycle. To protect your garments, not all settings or options are available for every cycle. Custom Cycle settings can only be selected from these available options.
⬤ Available Settings = Available Option Default Setting (Bold)
NOTE:
To protect your garments, not every water temperature, spin speed, soil level, or option is available with every cycle. A chime will sound if the selection is not allowed.
*When a cycle is selected, the default time for that cycle is displayed. This time will change as modifiers or options are selected. Once the START button is touched, the washer will measure the size of the load. The estimated time may change once the load size has been measured.
The washer automatically adjusts the wash time for the amount of laundry, water pressure, water temperature and other operating conditions.
These cycles use various wash motions to enhance cleaning and fabric care performance. The wash motions may sound different at different stages of the wash cycle. This is normal.
Cycle guideEN
G
The Cycle Guide below shows the default settings, available changes and options, and the recommended fabric types for each cycle. To protect your garments, not all settings or options are available for every cycle. Custom Cycle settings can only be selected from these available options.
⬤ Available Settings = Available Option Default Setting (Bold)
Main cycle
You can wash laundry items more thoroughly by selecting the wash cycle that best suits the type of items to be washed. Select the desired cycle. When you select a wash cycle, the light for the corresponding wash cycle will turn on. See page 21, Basic operation, for more details on operating methods.
Normal items, COTTON/NORMAL
Use this cycle to wash all normal items, except delicate fabrics such as wool or silk.
Wrinkle free items, PERM.PRESS/CASUAL
This cycle is for washing items such as wrinkle-free clothes or tablecloths to minimize wrinkles.
Heavy soiled items, HEAVY DUTY
This cycle is for washing heavily soiled laundry though more powerful tub rotation.
Blankets or bulky items, BULKY/BEDDING
This cycle is for washing blankets or bulky items.
For white fabrics, BRIGHT WHITES™
This cycle is for washing white items only.
Clean tub, TUB CLEAN
Use this cycle to clean the tub of your washing machine.
Reduce laundry bacteria, SANITARY
This wash cycle reduces 99.9% bacteria on laundry through high temperature.
Small items , BABY WEAR
Use this cycle to wash small , lightly soiled loads.
Mixed items, TOWELS
Use this cycle for washing towels , shirts , jeans and mixed loads.
Sports or exercise items, SPORTS WEAR
Use this cycle for garments that are specially designed and treated for sport.
Lightly soiled items, PURE COLOR™
Use this cycle for a light wash load of brightly colored clothes.
Quick wash, SPEED WASH
Use the Speed Wash cycle to quickly wash lightly soiled clothing and small load. For high wash and rinse efficiency, it is recommended to wash small loads of 2-3 lightly soiled garments.
NOTE Use a little detergent in this cycle. If you want more rinsing, you can add extra rinse by using the Extra Rinse button.
Items labeled wool or hand-washable, WOOL
This cycle is for washing shrinkable woolen or hand-washable items requiring delicate care. Only wash woolen items that are labeled machine washable or hand-washable.
NOTE
Laundry weight should be less than 8 pound (3.6 kg) to prevent damage to the fabric.
Use only natural or wool-safe detergent harmless to fabrics and load 1/2 of the normal amount of detergent.
The WOOL cycle uses a gentle tumble rotation angle and low speed spin for the ultimate fabric care.
Sheer items, DELICATES
This cycle is for washing lingerie or sheer and lacy clothes which can easily be damaged.
Rinse+Spin
Rinse and dry clothing without washing
Spin Only
Drains the water from the tub and spins out the clothes. This can be used, for example, if the wash cycle is stopped in mid cycle and the water needs to be drained
CYCLE SETTING BUTTONSEN
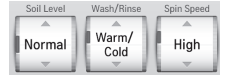
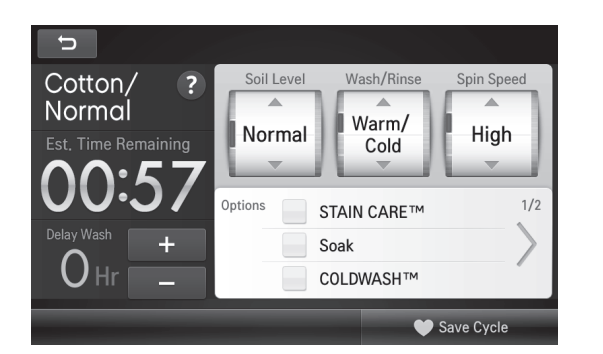
When a cycle is selected, the default settings and available options for that cycle are displayed. Adjust the settings or add options as desired for your particular needs. Use the up and down arrows to adjust the setting to the desired selection. The washer automatically adjusts the water level for the type and size of wash load for best results and maximum efficiency. Due to the high efficiency nature of this product, water levels may be much lower than expected. This is normal and cleaning/rinsing performance will not be compromised.
NOTE To protect your garments, not every water temperature, spin speed, soil level, or option is available with every cycle. The option will be dimmed or will not display on the screen if it is not available with the selected cycle.
SOIL LEVEL
Adjusting the soil level setting will modify the cycle times and/or wash actions. For example, to maximize cleaning performance of heavily soiled items, increase the soil level to Heavy.
WASH RINSE
Wash/Rinse adjusts the wash and rinse temperature combination for the selected cycle.
Select the water temperature suitable for the type of load you are washing. Follow the garment fabric care labels for best results.
The actual cold rinse temperature depends on the temperature of the cold water at the faucet.
SPIN SPEED Higher spin speeds extract more water from clothes, reducing drying time and saving energy. Lower spin speeds will tend to reduce wrinkling but may increase dry times and energy consumption.
Use the Spin Speed up and down arrows to adjust the setting to the desired selection. Some fabrics, such as delicates, require a slower spin speed. To protect your clothing, not all spin speeds are available for all cycles.
SAVE CYCLE
After modifying a cycle setting, you have the option of saving it as a custom cycle and adding it to the Custom Cycle screen. Touch the Save Cycle button more than once, will save the cycle multiple times.
OPTIONS
Your washing machine features several additional cycle options that customize cycles to meet your individual needs.
SOAK
This option provides a 15-180 minute presoak prior to the start of the selected cycle. Touch the Soak button to select the desired soak time from the popup menu. Use the Soak option to presoak garments to help remove difficult spots or stains on fabrics. At the end of the presoak time, the selected cycle will begin with the same water used for the soak.
STAIN CARE™
Use this option for heavily soiled loads that need improved stain treatment. When STAIN CARE is selected, the wash cycle will begin with warm water to help prevent the setting of certain types of stains. Then, as the cycle progresses, hot water will be added to gradually increase the water temperature to help remove stains that require treatment at higher temperatures.
NOTE Best results are obtained with small loads (less than 6 lbs.)
COLD WASH™
This option saves energy by using cooler water while increasing the wash and rinse times to maintain wash performance. Cold Wash is not available in Sanitary, Bright White, Tub Clean, and Rinse & Spin.
NOTE Cold Wash is not available with Stain Care.
EXTRA RINSE
This option will add one or two extra rinses to the selected cycle.
Touch the Extra Rinse button to select the desired number of additional rinses from the popup menu. Use this option to help ensure the removal of detergent or bleach residue from fabrics. Liquid fabric softener, if used, is always dispensed in the final rinse.
NOTE You cannot add extra rinses to the Drain & Spin cycle.
WATER PLUS
Select this option to add extra water to the wash and rinse cycles. This option is especially useful for extra large or bulky items. Once the washer has stopped filling, touch the Pause button to pause the cycle. Touch the Change Settings button, then select Water Plus. Touch the Start button to resume the cycle.
NOTE
If the machine reaches its maximum water level, Water Plus will have no effect.
You cannot select the Water Plus option in the Sanitary, Bulky/Bedding and Tub Clean cycles.
To use the Water Plus function:
1. Pause the washer during the wash or rinse cycle once the washer has stopped filling. (Water Plus is not available during the spin cycle.)
2. Touch the Change Settings button.
3. Select Water Plus from the Cycle Settings screen.
4. Touch the Start button to resume the cycle.
FABRIC SOFTENER
Fabric softener is dispensed in the final rinse. This washer is designed to save rinse water by using a jet spray rinse system (Smart Rinse™) in COTTON/NORMAL and HEAVY DUTY cycles. If you want to use fabric softener with either of these cycles, touch the Fabric Softener button to change the final rinse to a regular rinse. Although the softener will still be dispensed without selecting FABRIC SOFTENER during a spray rinse, failure to select either option will result in poor fabric softener performance.
CUSTOM CYCLE
CUSTOM CYCLE allows you to store a cycle that you have customized for your specific needs. This allows you to save your favorite temperature, spin speed, soil level, and other options for a cycle, and then recall them at the touch of a button. A maximum of five custom cycles can be saved and can be selected from the Custom Cycles screen.
To save a Custom Cycle:
1. Touch the POWER button to turn on the washer.
2. Select the desired cycle that you would like to customize.
3. Use the CYCLE MODIFIERS and OPTIONS to customize the cycle .
4. Touch the Save Cycle button to save your custom cycle.
To use a Custom Cycle:
1. Touch the POWER button to turn on the washer.
2. Navigate to the custom cycles screen. (The Custom Cycle screen can be set as the home screen. Refer to the Settings Screen section).
3. Select the desired cycle from the custom cycle screen.
4. Touch the START/PAUSE button to start the cycle.
NOTE A Custom Cycle can be adjusted the same as any other cycle.
DELAY WASH
Once you have selected the cycle, touch this button to delay the start of the wash cycle. Each touch of the button increases the delay time by one hour, for up to 19 hours. Once the desired delay time is set, touch the START/PAUSE button to start the delay time.
NOTE If the START/PAUSE button is not touched to begin the delay time, the washer will automatically shut off after four minutes.
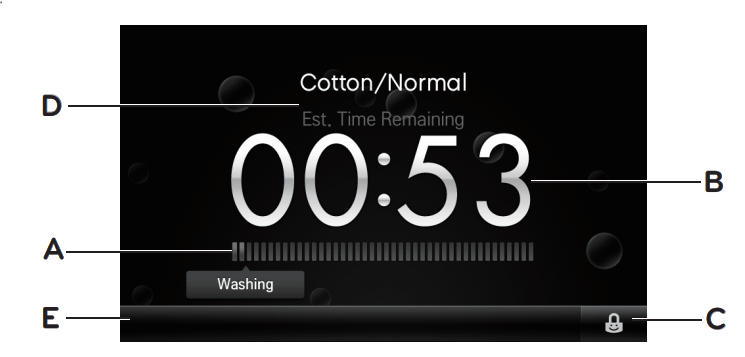
TIME & STATUS SCREEN
The TIME & STATUS screen is displayed any time the washer is running a cycle. This screen displays the selected cycle name, icon and the estimated time remaining in the cycle. The stage of the cycle is displayed below the time, and each stage has a unique on-screen animation. Cycle progress is also indicated by the illuminated ring around the central graphic.
NOTE
To protect your garments, not every water temperature, spin speed, soil level, or option is available with every cycle. The option will be dimmed or will not display on the screen if it is not available with the selected cycle.
A CYCLE STATUS/ADD A GARMENT Displays the wash cycle status.
ADD A GARMENT will display during the early stage of the wash cycle to indicate that it is safe to pause the cycle to add more items.
Once ADD A GARMENT disappears from the display, additional laundry should not be added to the load. Doing so may result in unsatisfactory performance because the washer will not compensate for the additional garments.
1. Touch the START/PAUSE button to pause the washer.
2. Open the lid after it unlocks.
3. Add your additional items.
4. Close the lid.
5. Touch the START/PAUSE button. The cycle will resume after the lid locks and the washer remeasures the load.
B ESTIMATED TIME REMAINING After the cycle has started, the washer will display the estimated time remaining and the stage of the wash cycle. Each stage is shown with its own screen animation.
C CHILD LOCK
Use this option to disable the controls. The washer can only be locked during a cycle. This feature can prevent children from changing cycles or operating the machine. Once the control lock is set, it must be deactivated before any controls, except the power button, can be used. When the washer is turned on, the controls will still be locked. Touch and hold the Child Lock button for three seconds to lock or unlock the controls.
D OPERATING CYCLE/CHANGE SETTINGS Displays the icon of the running cycle. After the running cycle has been paused, Change Settings will appear next to the cycle icon. Touch the Change Settings button to modify the cycle settings during the wash cycle.
E CANCEL
Touch this button to cancel the wash cycle after the cycle has been paused. The cancel button will appear when the cycle is paused and then the cycle can be cancelled.
MENU OPTIONS BUTTONS & SCREENS
These buttons are used for setup, connectivity and on-screen guides.
SETTINGS SCREEN
NOTE Pressing the arrow keys or swiping will allow you to access the second screen with the Installation, Factory Reset and ZigBee buttons.
SIGNAL (Volume)
The volume of the tones and signals can be adjusted using either the volume graphic in the center of the volume screen, or by touching the 1, 2 or off buttons.
BRIGHTNESS
The brightness of the screen can be adjusted using either the brightness graphic in the center of the brightness screen, or by touching the + or - buttons.
LANGUAGE
Touch the Language button to select the desired on screen language: English, Spanish or French.
DISPLAY OPTION
Select the Display Options button to change the Home Screen. This selection determines which screen is displayed when the power is turned on or a cycle is canceled.
Wi-Fi
Wi-Fi connectivity allows you to use the many connectivity features of this appliance. The washer must be connected to a Wi-Fi network before connectivity features can be used. Touch the Wi- Fi button to set up Wi-Fi or to turn it On/Off. Refer to the Smart Appliance Connectivity section.
PRODUCT REGISTRATIONE
To use the connectivity features of your appliance, you must first create a user ID and password at the LG Smart ThinQ website. Once that is completed, use the Product Registration screen to register your appliance to your online account for automatic updates and to access special cycles that can be downloaded. Registering your product allows the system to identify your appliance in order to give you the right cycles. Refer to the Smart Appliance Connectivity section.
INSTALLATION
The INSTALLATION screen provides you with basic step-by step installation instructions. Always refer to the Installation Instructions in the owner’s manual for complete safety and installation instructions.
FACTORY RESET
Select the Factory Reset button to clear all settings and return the appliance control to the original settings. Using this feature will erase all Custom Cycles, Wi-Fi settings, Recent cycles, etc.
ZIGBEE
If your utility company has equipped your home with a smart meter, you will need to contact the utility company for information regarding the set up of the ZigBee modem and the Smart Grid features. Your utility company can provide you with information regarding the features and capabilities of the meter and the utility. You will need to work with your utility for initial setup.
STAND–BY MODE
Stand-By Mode allows the appliance to turn on quicker, but increases energy usage.
Turning Stand-By Mode off will result in a longer turn on time, but saves energy.
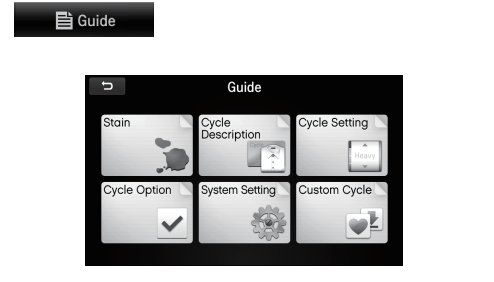
GUIDE SCREEN
STAIN
Use the STAIN GUIDE to find out detailed stain treatment for 26 common stains. Scroll through the stains at the bottom of the screen by touching the left and right arrow buttons. Touch the stain that you would like a description for.
CYCLE DESCRIPTION (CYCLE GUIDE) Use the cycle guide to find out detailed information on each of the LG cycles. Scroll through the cycles at the bottom of the screen by touching the left and right arrow buttons. Touch the cycle that you would like a description for.
CYCLE SETTING
Use the CYCLE SETTING screen to find out detailed information on each of the cycle modifiers: Water Temperatures, Soil Levels and Spin Speeds. Scroll through the cycle modifiers at the bottom of the screen by touching the left and right arrow buttons. Touch the cycle modifier that you would like a description for.
CYCLE OPTION
Use the CYCLE OPTION screen to find out detailed information on each of the cycle options. Scroll through the cycle options at the bottom of the screen by touching the left and right arrow buttons. Touch the cycle option that you would like a description for.
SYSTEM SETTING
Use the SYSTEM SETTING screen to find out detailed information on each of the settings. Scroll through the system settings at the bottom of the screen by touching the left and right arrow buttons. Touch the system setting that you would like a description for.
CUSTOM CYCLE
Use the CUSTOM CYCLE screen to find out detailed information on each of the custom cycles. Scroll through the custom cycles at the bottom of the screen by touching the left and right arrow buttons. Touch the custom cycle that you would like a description for.
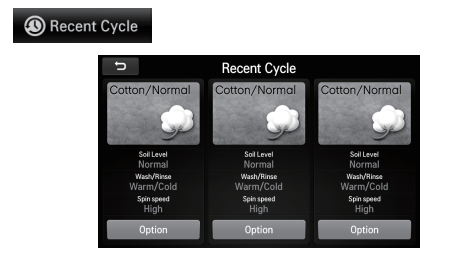
RECENT CYCLE SCREEN
The RECENT CYCLE screen displays the three most recently used wash cycles, including custom cycles. To use a recent cycle, touch the cycle icon and adjust and run the cycle in the usual manner.
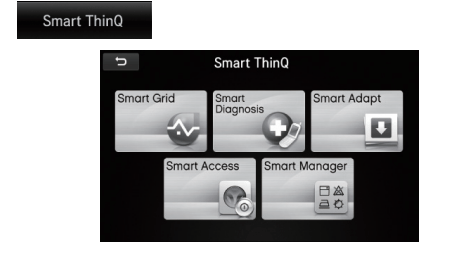
SMART THINQ SCREEN
Smart Grid
Smart appliances can communicate with local utility companies that are equipped with Smart Grid equipment. These utility companies can then adjust the operating times for enabled smart appliances during peak electricity demands. Turning this feature on can help reduce your electricity consumption by allowing the utility company to delay some of the functions of your machine during peak electric demand. Select ON or OFF to turn the Smart Grid feature on or off. The status of the Smart Grid is shown on the home screen.
Contact your utility company to find out more about its system’s capabilities and for help in setting up your machine.
SMART DIAGNOSIS™
Should you experience any problems with your washing machine, it has the capability of transmitting data via your telephone to an LG Specialist, or from your machine directly to your Smart Phone using the LG Smart Laundry Application. Refer to the SMART DIAGNOSIS™ section for detailed information.
Smart Adapt
The Smart Adapt features of this appliance allow you to download new and special cycles that are not included with the machine. If new software becomes available, a popup will give you the option to download that software to update your machine.
Smart Manager
Smart Manager provides useful information on how to care for your laundry and appliance. This feature may be available by searching for the “LG Smart Laundry&DW” Application(app)on your smart phone. This application is not available for all smart phones.
Smart Access
Smart Access allows you to monitor the operation of the washer and dryer using your smart phone. The machine can also be turned off using this feature. This feature may be available by searching for the “LG Smart Laundry&DW” Application(app)on your smart phone. This application is not available for all smart phones.
SMART APPLIANCE CONNECTIVITY
Smart ThinQ OPERATION
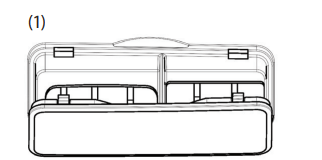
Connecting this appliance to a Wi-Fi network allows you to use its many connectivity features. The ZigBee modem is used for Smart Grid connectivity, where available.
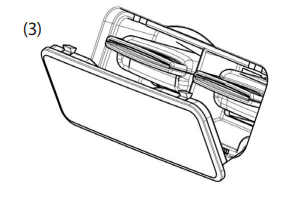
Open the cover by pulling it open at the top (1).
The left port is larger and is only for the ZigBee modem. The right port is for the Wi-Fi modem or USB drive.
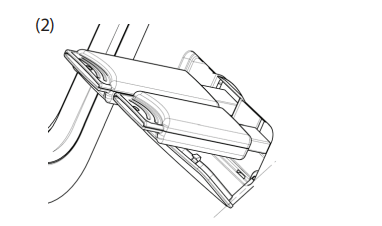
Insert the modem into the appropriate port (2).
Close the cover. When the modems are fully seated, the cover will close completely (3).
NOTE
LG Electronics is not responsible for any network connection problems or any faults, malfunctions, or errors caused by network connection.
Network connection may not work properly depending odn Internet service provider.
Wireless network can experience interference from other devices with 2.4 GHz frequency(wireless phone, Bluetooth device, or microwave oven). Interference may also be caused by devices with 5 GHz frequency, the same as any other Wi-Fi devices.
The surrounding wireless environment can make wireless network service run slowly.
Failure to turn off all local home networks may cause excessive traffic on some devices.
Invalid settings of network devices (wired/wireless line sharer, hub) can cause the appliance to operate slowly or not operate properly. Install the devices correctly according to the appropriate manual and set network.
Certain connected features (such as Program Update) will operate slowly if the Wi-Fi connection strength is not strong. To improve the Wi-Fi signal strength, it is recommendedto purchase a Wi-Fi repeater.
CONNECTIVITY OVERVIEW
Website home screen may change.
Your appliance now does more than just laundry. Once it is connected to the internet through your home Wi-Fi network, it can check for and download software updates for its operating system, or provide you with a list of extra cycles available for download. You can even check the progress of a cycle with the LG Smart Laundry application for your smart phone. This same smart phone application lets you troubleshoot problems by recording and analyzing data from the appliance. The appliance is also ready for the Smart Grid when your utility installs Smart Grid equipment; it can adjust its operating times based on when electricity prices are lower or delay operation when the demand for electricity is high.
PROFILE SETUP (ID and PASSWORD setup)
In order to use the connectivity features of your appliance, you must first create a user ID and password at the LG SMARTTHINQ website (http://us.smartthinq.com). From your home computer, or other computer with internet access, open the SMARTTHINQ website and follow the instructions below for creating your ID and password.
1. Click “Sign In” in the upper right corner of the web page.
2. On the login page, below the ID and password boxes, click the Membership “Sign up” button.
3. On the next page, you must agree to the terms of use and the privacy statement. Click “Confirm.”
4. Next, in the ID box, enter your email address. This will be your user ID. You will receive a confirmation email for activating the account at that email address. This ID will be entered on the ID and password screen on your appliance when registering the appliance.
5. Enter a password. Passwords are case sensitive, and you will need to enter this password on your appliance when you register the appliance. The password should be 6-12 characters, and you should make note of it for later use.
6. Enter the security characters into the box to the right.
7. Click the “Confirm” button. The system will send you an email containing a link to confirm your identity for the account.
8. Click the link in the confirmation email, and the website will display a confirmation page. Your account is now setup. SMART APPLIANCE CONNECTIVITY Website home screen may change.
CONNECTIVITY SETUPN
Wi-Fi SETUP
Connecting this appliance to a Wi-Fi network allows you to use its many connectivity features.
Touch the Settings button on the lower part of the Screen.
Touch the wi-fi button on the settings screen
Select your home network. If your network requires a key, touch the password field and enter the password using the popup keyboard.
PRODUCT REGISTRATION
Once you have successfully created a User ID and Password at http://us.smartthinq.com, and your machine is connected to your home network, you are ready to register your product.
Touch the Product Registration button
Touch the ID/Password field on the screen. A keyboard will pop up and allow you to enter your SmartThinq ID and Password. Touch the Enter key
Your product registration and Wi-Fi setup is complete. Touch OK.
ZIGBEE
If your utility company has equipped your home with a smart meter, you will need to contact the utility company for information regarding the set up of the ZigBee modem and the Smart Grid features. Your utility company can provide you with information regarding the features and capabilities of the meter and the utility. You will need to work with your utility for initial setup.
Smart Grid
If your utility company has equipped your home with Smart Grid technology, you will need to contact the utility company for information regarding the set up of the ZigBee modem and the Smart Grid features. Your utility company can provide you with information regarding the features and capabilities of the system.
NOTE The LGE Smart Grid system is only available if your home is equipped with a Smart Meter, ZIGBEE modem, and an LG appliance with a Smart Grid system. The Smart Grid system functions when your utility company is able to provide you with information regarding the features and capabilities of the system. ZIGBEE modems will be for sale when the Smart Grid system is available. Please visit http://us.smartthinq. com for more details. The usage and features relating to Smart Meter will be in accordance with your utility company.
Smart ThinQ
Smart Adapt
The Smart Adapt features of this appliance allow you to download new and special cycles that are not included in the basic cycles on the appliance. In addition, if there are any upgrades to the operating software for your appliance, the system can be upgraded using the Smart Adapt technology.
To use the Smart Adapt features of this appliance, the appliance must first be registered (refer to the previous sections). This allows the system to identify you and your appliance so that you can take advantage of the Smart Adapt features. Each time you turn on the appliance it will check for software updates . Available cycles can be checked by touching the Smart Adapt button on the THINQ screen.
CYCLE DOWNLOAD USING WI-FI OR USB
Appliances that have been successfully registered can download a variety of specialty cycles specific to the appliance. Only one cycle can be stored on the appliance at a time. It can be selected from the Custom Cycle screen until it is overwritten by a new cycle. Each cycle can be downloaded as often as needed.
Touch the Smart Adapt button. If using a USB drive, follow the instructions below, in the Uploading a Cycle to the USB Drive section, to upload the cycle to the USB drive before continuing .
Touch the Cycle Download button. The machine will search the online database for cycles.
*(Wi-Fi only) Scroll through the available cycles and select the cycle that best fits your laundry needs. Touch OK to begin the download. *If you are downloading cycles using the USB drive, the cycle will automatically download to the machine.
Downloading cycle. NOTE: Only one new cycle can be stored on the appliance at a time.
When you close the screen, your main cycle screen will display. Your new cycle can be found on the Custom Cycle screen in the upper left corner. Touch the View button to view details of the downloaded cycle. Touch the Close button to return to the previous screen; this screen will appear during the next status update.
UPLOADING A CYCLE TO THE USB DRIVE
In order to download a cycle to the machine via USB, the cycle must first be uploaded to the USB drive. This is done with your computer from the website (http://us.smartthinq.com).
1. Plug the LG USB drive into an available USB port on your computer. The USB drive must have a folder in the root directory named “LG_Washer.”
2. Open the website and sign in. Click “MYPAGE.”
3. Click “Download” on the left sidebar, and then select the “Download Laundry Cycle” tab.
4. Select your washer from the list to see all the cycles that are available for download.
5. Select the desired cycle for download, and follow the instructions to save it to the LG USB drive on your computer in the LG_Washer folder. Only one cycle can be in the folder at a time.
6. Safely remove the USB drive from the computer and insert it into the Smart Link™ Wi-Fi modem port on the console in place of the Wi-Fi modem (right hand port).
SOFTWARE UPDATE
When improvements to the operating software are available, they will be made available to you so you can update your appliance to the latest version of software. Each time you turn on the washer when it is properly connected and registered, it will search the database for software upgrades. A message will pop up to alert you to the availability of an upgrade, if one is available.
Touch the Smart Adapt button from the THINQ screen.
Touch the Program Upgrade button. The machine will search the online database for cycles.
Touch the Yes button to begin the update process. Touching the No button will return you to the previous screen; the Program Update screen will display again the next time you turn on the machine.
Depending on your Wi-Fi connection speed, the update process could take several minutes. Do not interrupt the power during the download process.
Touch the View button to see information relating to the software version that was just downloaded. When you close the popup, the appliance will automatically restart to finalize the software installation.
LG SMART APPLIANCE APPLICATION FOR SMART PHONES
NOTE The LG SMART APPLIANCE application is not available for all smart phones. Available smart phone minimum specifications: Android 2.2, iOS 4.0 (Recommended).
The LG SMART APPLIANCE application allows you to monitor, modify and diagnose your smart appliance from anywhere. Use the Laundry Guide to find out how to treat a wide variety of stains or check out the laundry care icons on garments.
SMART DIAGNOSIS™
Use your phone to record the SMART DIAGNOSIS™ signal if you have problems with your appliance. The application can analyze the signal and help you solve the problem without waiting for a technician.
Smart Access
Monitor your cycle operation so you know how much time is left in the cycle. You can even shut the machine off if you need to.
Smart Adapt
This feature allows you to find and download special cycles to fit your particular laundry needs.
Smart Manager (LAUNDRY GUIDE)
The laundry guide is full of helpful information to help you get the most out of your machine. The stain care guides provide instructions for proper treatment and removal of a large number of common stains. Fabric care symbols are shown to make sure that you give your garments the proper care.
MAINTENANCE
Care
Cleaning the Water Inlet Filters
If the washer detects that water is not entering the dispenser, an error message will show on the display. If you live in an area with hard water, this may be caused by clogged inlet filters.
NOTE Use extreme care when removing and cleaning the filters. If the filters cannot be cleaned or are damaged, do NOT operate the washer without the inlet filters. Contact LG Customer Service or a qualified LG servicer.
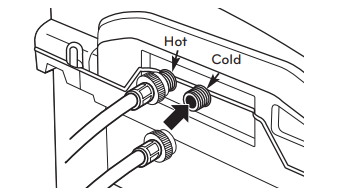
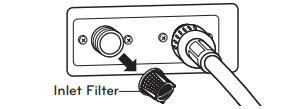
Turn off both water taps completely. Unscrew the hot and cold water lines from the back of the washer.
Carefully remove the filters from the water inlets, and soak them in white vinegar or a lime scale remover. Rinse thoroughly before reinstalling. Press the filters back into place and reattach the water lines. Do NOT operate the washer without the inlet filters.
WARNING
Unplug the power cord and turn off the faucets before cleaning. Failure to do so may cause electric shock.
Do not use the washing machine without the inlet filters. If you use the washing machine without the inlet filters it will cause leaks and malfunction.
If you use the washing machine in an area with hard water, the inlet filter may clog due to lime buildup. Contact your nearest LG customer service center if the inlet filter is not clean or is missing.
NOTE message will blink on the display when the water pressure is weak or an inlet filter is clogged with dirt. Clean the inlet filter.
Care in cold climates
When the Water Line is frozen
1 Turn off the faucets connected with the water lines.
2 Pour hot water on the frozen faucets to thaw the water lines and pull them out.
3 Immerse the water lines in hot water to thaw them.
4 Connect the water lines with the water inlets of the washing machine and faucets.
5 Turn on the faucets.
6 Touch the power button.
7 Select the Rinse & Spin cycle.
8 Make sure that the water fills properly.
When the Drain Line is Frozen
1 Pour hot water in the washer tub and close the door. Leave it for 10 minutes.
2 Touch the Power button after 10 minutes.
3 Select the Spin Only cycle.
4 Make sure that the water drains.
Caring for the LCD Display
To remove dust or light dirt, wipe the surface with a dry, clean, soft cloth. To remove major dirt, wipe the surface with a soft cloth dampened in clean water or diluted mild detergent. Then wipe immediately with a dry cloth.
CAUTION
Do not push, rub or hit the surface with your fingernail or a sharp object. This may result in scratches on the screen and image distortions.
Do not use any chemicals, such as waxes, benzene, alcohol, thinners, insecticides, air fresheners or lubricants. They may damage the screen’s finish and cause discoloration.
Cleaning
Periodically clean the washing machine to maintain its performance and to prevent malfunction.
Clean the drum, TUB CLEAN
Using the washing machine in a humid space for a long period of time may lead to a buildup of black mold and germs in the air inside the washer tub and affect your health. If you clean the washer tub regularly on a monthly basis using TUB CLEAN it will keep the washer tub clean for hygienic use.
1 Add tub cleaner or lime scale remover into the detergent dispenser drawer.
- Do not exceed the maximum detergent limit line when you add it. Detergent may remain in the washer tub after cleaning.
- When you use liquid chlorine bleach, load it into the liquid chlorine bleach compartment.
- When you use a powdered cleaner, pull out the liquid detergent cup and add it into the main wash detergent compartment.
- When you use cleaning tablets, place them directly into the washer tub. (Do not add tablet cleaner to the drawer.)
2 Touch .
3 Select the Tub Clean cycle
4 Touch .
NOTE
Never load laundry while using TUB CLEAN. The laundry may damage or become contaminated. Make sure to clean the washer tub when it is empty.
It is recommended to leave the door open after finishing the laundry to keep the tub clean.
It is recommended that TUB CLEAN should be repeated monthly.
If mildew or musty smell already exists, run TUB CLEAN for 3 consecutive weeks.
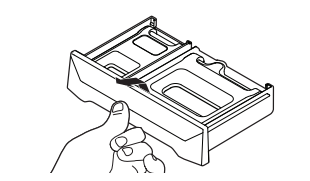
Cleaning the detergent box
Leaving detergent in the detergent for an extended period of time or using the washing machine for a long period of time may cause the build-up of scales in the detergent. Pull out and clean the detergent once a week.
1 Remove the drawer by pulling it straight out until it stops. Lift up on the front of the drawer and pull it out.
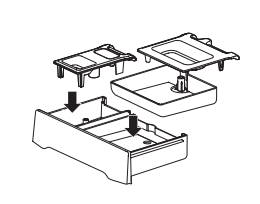
2 Remove the inserts from the 2 compartments; rinse the inserts and the drawer with warm water to remove traces of accumulated laundry products.
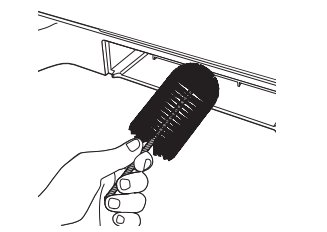
3 To clean the drawer opening, use a small, non-metal brush to clean the recess. Remove all residues from the upper and lower parts of the recess.
4 Return the inserts to the proper compartments and replace the drawer.
WARNING Do not spray water inside the washing machine. Doing so may cause fire or electric shock.
NOTE Use water only when you clean the detergent box. Make sure to use RINSE+SPIN to rinse the washer tub before the wash cycle when you use a cleaning detergent to clean the washer tub.
TROUBLESHOOTING
Checking error messages
If the following message appears on the display, check the following and take the appropriate corrective action.
Message
Possible Causes
Solutions
Water in the washer drains slowly or not at all, or the display shows:
NOT DRAINING
ERROR (OE)
Drain hose is bent, pinched, or clogged.
Make sure the drain hose is free of clogs, kinks, etc., and is not pinched behind or under the washer.
Washer fills with water slowly or not at all, or the display shows:
NO FILL ERROR (IE)
Water supply taps are not open fully. Water line hoses are kinked, pinched, or bent.
Water inlet filters are clogged.
Water pressure to tap or house is too low.
Make sure that the water taps are open fully. Make sure the hoses are not kinked or pinched. Be careful when moving the washer.
Clean the inlet filters. See the Care and Cleaning section.
Check another faucet in the house to make sure that household water pressure is adequate.
Washer will not turn on
Power cord is not properly plugged in.
House fuse is blown, circuit breaker has tripped, or power outage has occurred.
Make sure that the plug is plugged securely into a grounded, 3-prong, 120-VAC, 60-Hz. outlet.
Reset circuit breaker or replace fuse. Do not increase fuse capacity. If the problem is a circuit overload, have it corrected by a qualified electrician.
The display shows:
LID OPEN ERROR (dE)
The lid is not closed properly.
Make sure that the lid is closed properly and press the START/PAUSE button. After starting a cycle, it may take a few moments before the drum begins to turn or spin. The washer will not spin unless the lid is locked (LID LOCK light will turn on).
If the lid is closed and locked and the open lid error message is displayed, call for service.
If you press the START button while the lid is open, dE error message will be displayed.
The display shows:
LID LOCK ERROR (dL)
Lid lock switch error
Make sure that the lid is closed properly and press the START/PAUSE button. The washer will not spin unless the lid is locked (LID LOCK light will turn on).
If the lid is closed and the lid lock error message is displayed, call for service.
The display shows:
OVERFILL ERROR (FE)
Water level is too high due to a faulty water valve.
Close the water taps, unplug the washer, and call for service.
The display shows:
CLUTCH ERROR (E6)
Clutch error
Unplug the washer, and call for service.
The display shows: The washer is adding water to redistribute the load for optimal performance. No action is required.
The washer has detected an out of balance load.
If the washer detects a load that is too far out of balance to spin, it will display this code while it is attempting to rebalance the load. The washer will add water and try to redistribute the load automatically. This display is for your information only, and no action is required.
The display shows:
OUT OF BALANCE LOAD (UE)
If the uE rebalance (see above) is not successful, this error will be displayed. The load is too small.
Heavy articles are mixed with lighter items. The load is out of balance.
The automatic attempt to rebalance the load was not successful. The cycle has been paused to allow the load to be manually adjusted.
Small loads may need additional items to be added to allow the washer to balance the loads.
The load may have heavy items loaded with lighter items. Always try to wash articles of somewhat similar weight to allow the washer to evenly distribute the weight of the load for spinning.
Manually redistribute the load if articles have become tangled preventing the automatic distribution from working properly.
The display shows:
TEMPERATURE SENSOR ERROR (tE)
Thermistor error
Unplug the washer and call for service.
The display shows:
WATER SENSOR ERROR (PE)
The water level sensor is not working correctly.
Close the water taps, unplug the washer, and call for service.
The display shows:
DRIVE MOTOR ERROR (LE)
Thermal overload protection circuit in the motor has been tripped.
Allow the washer to stand for 30 minutes to allow the motor to cool; then restart the cycle. If the LE error code still appears, unplug the washer and call for service.
Normal sounds you may hear
The following sounds may be heard while the washer is operating. They are normal.
Clicking:
Lid lock relay when the lid locks and unlocks.
The washer will make a series of clicking noises as it changes the cleaning mode.
High pitched noise:
The wash basket spins faster to remove moisture from the load.
Spraying or hissing:
Water spraying or circulating during the cycle.
Humming or gurgling:
Drain pump pumping water from the washer at the end of a cycle.
Water sloshing sound:
A liquid in the balance ring around the wash basket helps the basket spin smoothly.
(Washer is turned off and tub is rotated.)
Sound of water being added after the washer has already been operating:
The washer adapts to the load size and type to add more water to the cycle as needed.
The wash load may be unbalanced. If the washer senses that the load is unbalanced, it will stop and refill to redistribute the load.
The washer may be diluting laundry additives to add to the wash load.
Before calling for service
Your washing machine is equipped with an automatic error-monitoring system to detect and diagnose problems at an early stage. If your washer does not function properly or does not function at all, check the following before you call for service.
Problem
Possible Causes
Solutions
Rattling and clanking noise
Foreign objects, such as keys, coins, or safety pins, may be in drum or pump.
Stop washer and check drum for foreign objects. If noise continues after the washer is restarted, call for service.
Thumping sound
Heavy wash loads may produce a thumping sound.
Washer load may be out of balance.
This is normal. If sound continues, the washer is probably out of balance. Stop and redistribute the wash load.
Stop and redistribute the wash load.
Vibrating noise
Wash load may be unevenly distributed in the drum.
Not all leveling feet are resting firmly on the floor.
Floor not rigid enough.
Stop washer and rearrange the wash load.
Adjust the leveling feet. Make sure all four feet are in firm contact with the floor while the washer is in the spin cycle with a load.
Make sure that the floor is solid and does not flex. Refer to Flooring in the Installation section.
Water leaking around washer
Fill hose connection is loose at tap or washer.
House drain pipes are clogged.
Large items such as pillow and blanket over the tub.
Check hoses. Check and tighten hose connections.
Unclog drain pipe. Contact a plumber if necessary. Check the cycle. If you wash large items, use BULKY/ BEDDING cycle.
Stop washer and check the load position. Lay bulky items into the tub.
Excessive sudsing
Too much detergent or incorrect detergent.
Reduce detergent amount or use low-sudsing detergent.
Only use detergent with the HE (High-Efficiency) logo.
Washer won’t
operate
Control panel is asleep
This is normal. Press POWER.
Washer is unplugged
Make sure cord is plugged securely into a working outlet.
Water supply is turned off
Turn both hot and cold faucets fully on.
Controls are not set properly
Make sure the cycle was set correctly, close the lid and press START.
Lid is open-safety feature
Prevents the washer from filling and operation when lid is up
Close lid and reset cycle, to the beginning if necessary.
Circuit breaker/fuse is tripped/ blown
Check house circuit breakers/fuses. Replace fuses or reset breaker. The washer should have a dedicated circuit.
Electronics need to be reset
Press the POWER button.
START was not pressed after a cycle was set
Press START.
Extremely low water pressure
Check another faucet in the house to make sure that household water pressure is adequate.
Washer is too cold
If the washer has been exposed to temperatures below freezing for an extended period of time, allow it to warm up before pressing POWER. Otherwise, the display will not come on.
Washer not filling
property
Filter clogged or fill hoses may be kinked
Make sure that filters (blue and orange screens must be free of solids) on the unit are not clogged. Turn off water and check filter by disconnecting hose at machine. Check that fill hoses are not kinked or clogged.
Energy efficiency
This is an energy-efficient washer. As a result the temperature settings for this washer may be different than non-energy-efficient washers.
Insufficient water supply
Make sure that the water supply is turned on. Make sure that the water faucets are turned to their completely open positions.
The washer lid is open
The washer lid must be closed for all washer cycle operations. If the lid is opened during washer operation, all functions will stop, including water filling.
Incorrect fill hose connection
Make sure that the fill hoses connect the hot water supply to the hot inlet on the washer, and the cold water supply to the cold inlet on the washer (hot to hot, cold to cold).
Water fill optimization
Water may not cover the top level of the clothes. This is normal for this high-efficiency washer. The water fill is optimized by the system for best wash performance.
Washer will not
drain water
Kinked drain hose or drain located higher than 8’ above floor
Ensure that the drain hose is not kinked. Per the recommended installation instructions, the drain outlet cannot be over 8’ above the floor.
Water leaks every load
Hoses not installed correctly
Check all fill and drain hose connections to ensure that they are tight and secure.
Water leaks
Oversudsing of detergent
Oversudsing may create leaks, and may be caused by the type and amount of detergent used. High-efficiency detergent is recommended. Make sure that detergent and any additives are put into the correct dispenser compartments. Follow the detergent manufacture’s recommendations for the amount of detergent, but try using less detergent, especially if home water conditioning or water softening units are used.
Wash cycle time is longer than usual
The washer automatically adjusts the wash time for the amount of laundry, water pressure, water temperature, and other operating conditions.
This is normal. The washer adjusts cycle time automatically to provide optimal results for the selected cycle.
If you press the START button while the lid is open, dE error message will be displayed.
Incomplete or no dispensing of detergent
Detergent compartments clogged from incorrect filling
Make sure that detergent and additives are put in to the correct dispenser compartments. If liquid detergent is used, make sure that the liquid detergent cup and insert are in the detergent compartment. If powdered detergent is used, make sure that the liquid detergent cup and insert are not used. For all detergent types, always make sure that the dispenser drawer is fully closed before the start of the cycle.
Too much detergent use
Make sure that the suggested amount of detergent is used per the manufacture’s recommendations. You may also dilute the detergent with water to the maximum fill line on the compartment to avoid clogging. Use only HE (High-Efficiency) detergent.
Insufficient water supply
Make sure that the water supply is turned on. Make sure that the water faucets are turned to their completely open positions.
Normal residue
Normal operation. Residual may remain in the dispenser of the compartments. The dispenser box may be removed for occasional cleaning with warm water and a scrub brush.
Premature
dispensing of bleach
Bleach dispenser filled for future load
You cannot store bleach in the dispenser for future use. The bleach dispenser will be dispensed every load for optimal safety of the washer.
Overfilling the bleach dispenser
Overfilling the dispenser with bleach may lead to premature dispensing. There is a maximum fill line indicated on the bleach dispenser to help avoid overfilling.
Clogging of bleach
Bleach dispenser is not seated
Make sure that the bleach cover is properly seated and snapped into place before the start of the cycle.
Insufficient cleaning
You may remove and clean the bleach cover with warm water and a scrub brush to clear clogging.
Poor stain removal
Presoak not selected
We recommend that you select presoak when defining your wash cycle. Always make sure that any additives, such as your high efficiency liquid detergent, are added to the pretreat dispenser bin before starting the cycle. Always refer to your clothes care label before treating stains.
Staining
Add laundry products to the washer drum.
Washer not unloaded promptly. Does not properly sort the clothes.
Load the laundry products into the dispenser. Always remove items from the washer as soon as the cycle is completed.
Always wash dark colors separately from light colors and whites to prevent discoloration. If possible, do not wash heavily soiled items with lightly soiled ones.
Wrinkling
Washer not unloaded promptly. Washer overloaded.
Hot and cold water inlet hoses are reversed.
Always remove items from the washer as soon as the cycle is completed.
The washer can be fully loaded, but the drum should not be tightly packed with items. The lid of the washer should close easily.
Hot water rinse can set wrinkles in garments. Check the inlet hose connections.
Certain Wi-Fi features are operations lowly
Wi-Fi connection strength is not stong
To improve the Wi-Fi signal strength. It is recommended to purchase a Wi-Fi repeater.
SPECIFICATIONS
Model WT6001H*
Description
Top-Loading Washer
Electrical requirements
120 VAC @ 60 Hz.
Max. water pressure
14.5~ 116 PSI (100~800 kPa)
Dimensions
68.6 cm (W) X 72.1 cm (D) X 115.3 cm (H), 141.7 cm (H with lid open)
27”(W) X 283/8”(D) X 453/8”(H), 553/4”(H with lid open)


 Designed specially to use only HE (High-Efficiency) detergent
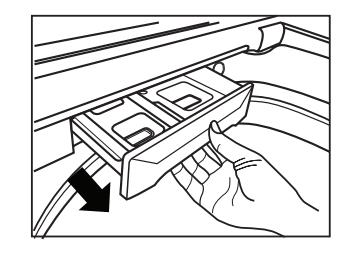
 SORT LAUNDRY AND LOAD WASHER
 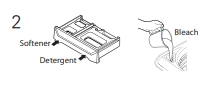 CLEANING PRODUCT
 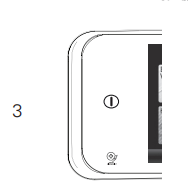 TURN ON THE WASHER
 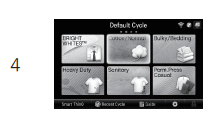 SELECT A CYCLE
 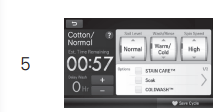 ADJUST CYCLE SETTINGS AND SELECT OPTIONS
  BEGIN CYCLE
  ADD A GARMENT LIGHT
  END OF CYCLE
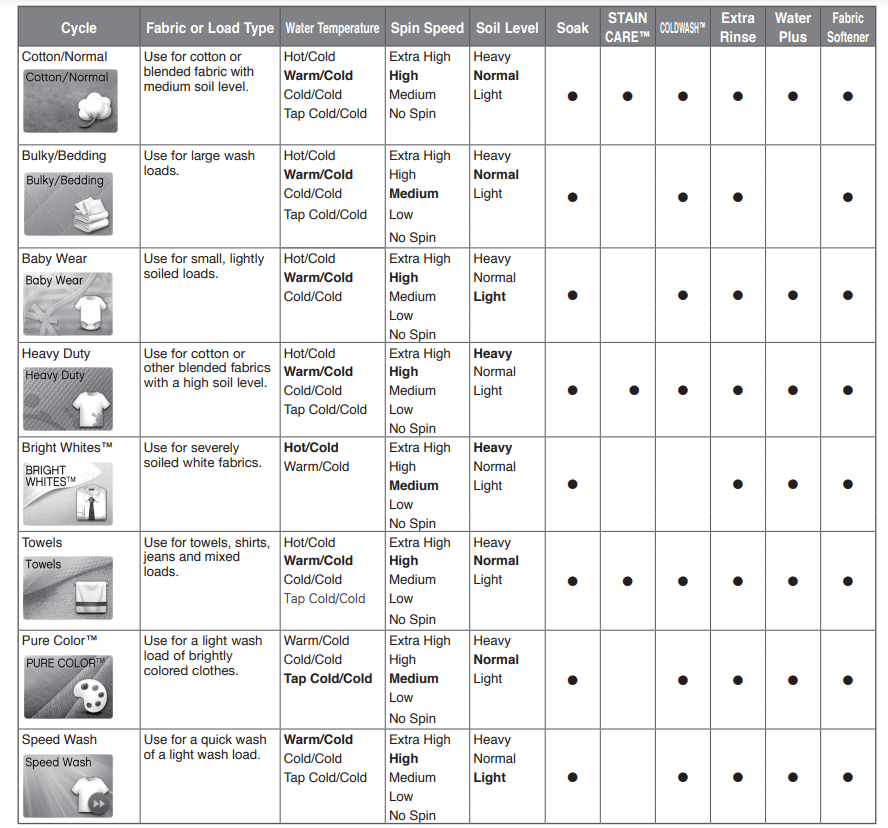


 key
key 


 message will blink on the display when the water pressure is weak or an inlet filter is clogged with dirt. Clean the inlet filter.
  .
.  .
. 
 NOT DRAINING
  Only use detergent with the HE (High-Efficiency) logo.