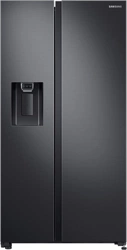
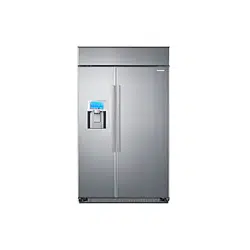
User Manual Refrigerator
Installation
Refrigerator at a glance
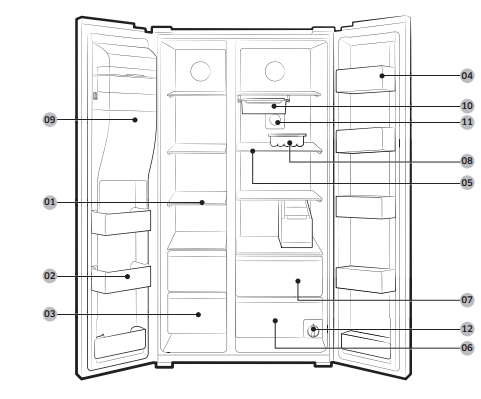
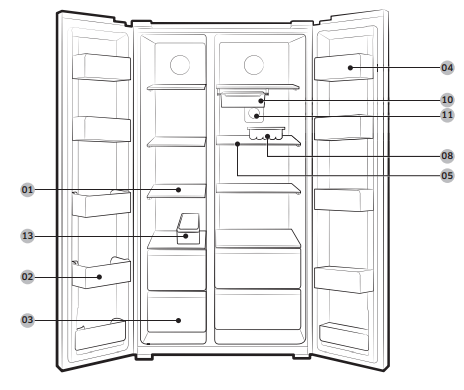
01 Freezer shelves
02 Multipurpose freezer guard
03 Dried food and meat storage bin
04 Refrigerator guard
05 Refrigerator shelves
06 Vegetable bin
07 Multipurpose bin
08 Egg container
09 Ice maker bucket **
10 Moving tray *
11 Anti-bacteria filter *
12 Water filter **
13 Ice tray
* Applicable models only
** Dispenser models only
Step-by-step installation
STEP 1 Select a site
Site requirements:
• Solid, level surface without carpeting or flooring that may obstruct ventilation
• Away from direct sunlight
• Adequate room for opening and closing the door
• Away from a heat source
• Room for maintenance and servicing
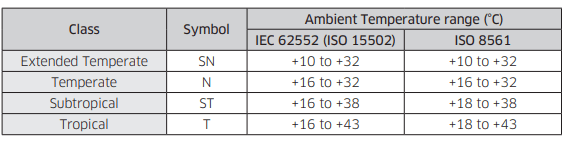
• Temperature range: between 5 °C and 43 °C
Effective temperature range
The refrigerator is designed to operate normally in the temperature range specified by its class rating.
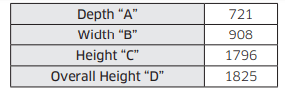
Clearance
See the pictures and table below for space requirements for installation.
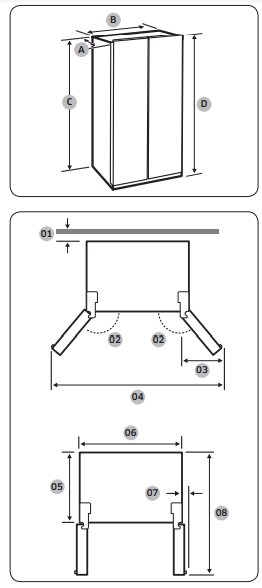
01 50 mm
02 165°
03 519 mm
04 1742 mm
05 610 mm
06 908 mm
07 31 mm
08 1345 mm
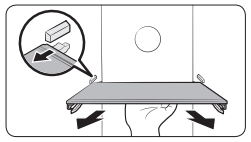
STEP 2 Flooring
- The surface to install the refrigerator must support a fully loaded refrigerator.
- To protect the floor, put a large piece of cardboard on each leg of the refrigerator.
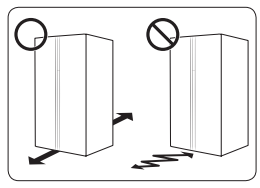
- Once the refrigerator is in its final position, do not move it unless necessary to protect the floor. If you have to, use a thick paper or cloth such as old carpets along the movement path.
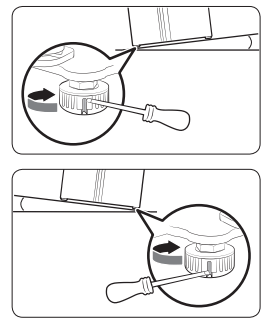
STEP 3 Adjust the levelling feet
- To adjust the height of the freezer side: Insert a flat-head screwdriver into the leveller of the freezer-side front leg. Turn the leveller clockwise to raise, or turn it counter clockwise to lower.
- To adjust the height of the fridge side: Insert a flat-head screwdriver into the leveller of the fridge-side front leg. Turn the leveller clockwise to raise, or turn it counter clockwise to lower.
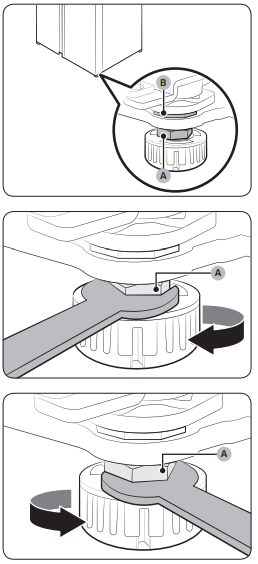
STEP 4 Adjust the door height as well as the door gap
To adjust the height of a door
The height of a door can be adjusted using the clamp nut and the height nut on the front bottom of each door.
1. Open the door to adjust, and locate the two nuts (A) and (B) on the front bottom of the door.
2. With the provided spanner, turn the clamp nut (A) clockwise to loosen. Then, open the door, and do the following inside the door.
- To raise the door, turn the height nut (B) counter clockwise.
- To lower the door, turn the height nut (B) clockwise. A
3. When complete, tighten the clamp nut (A) by turning it counter clockwise.
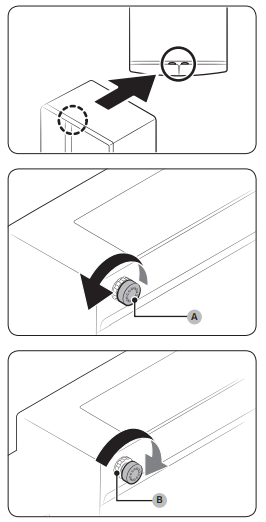
To correct the gap between a door and the refrigerator unit The gap can be adjusted manually using the gap bolt on the top rear side of each door.
1. To adjust the gap, do the following:
- To widen the gap, turn the gap bolt (A) clockwise.
- To narrow the gap, turn the gap bolt (A) counter clockwise. B
2. When the gap is corrected, tighten the locking nut (B) by turning it clockwise.
STEP 5 Connect to a water source
To connect the cold water pipe to the water filtering hose
1. Shut off the water supply by closing the main water valve.
2. Locate the cold, potable water pipe (1).
3. Follow the Water Line Installation to connect to the water pipe.
4. When connection is complete, open the main water valve and dispense about 3 liters of water. This is to remove impurities inside the pipe
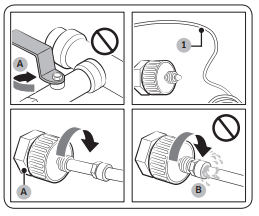
A. Close Main Water pipe
B. No gap
To connect the water filtering hose to the water line
1. Loosen and remove the compression nut (a) from the water line of the refrigerator, and insert it to the water filtering hose.
2. Tighten up the compression nut (a) to connect the water filtering hose and the water line.
3. Open the main water valve and check for any leaks.
4. If there are no leaks, dispense about a 3 liters of water before actually using the refrigerator to remove impurities inside the water filtering system.
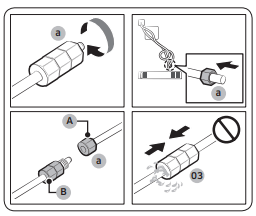
A. Water Line from unit
B. Water Line from Kit
STEP 6 Initial settings
By completing the following steps, the refrigerator should be fully functioning.
1. Plug the power cord into the wall socket to turn the refrigerator on.
2. Open the door, and check if the interior light lights up.
3. Set the temperature to the coldest, and wait for about an hour. Then, the freezer will be slightly chilled, and the motor will run smoothly.
4. Wait until the refrigerator reaches the set temperature. Now the refrigerator is ready for use.
STEP 7 Final check
When installation is complete, confirm that:
• The refrigerator is plugged into an electrical outlet and grounded properly.
• The refrigerator is installed on a flat, level surface with a reasonable clearance from the wall or the cabinet.
• The refrigerator is level and is sitting firmly on the floor.
• The door opens and closes freely, and the interior light turns on automatically when you open the door.
Door removal for entrance
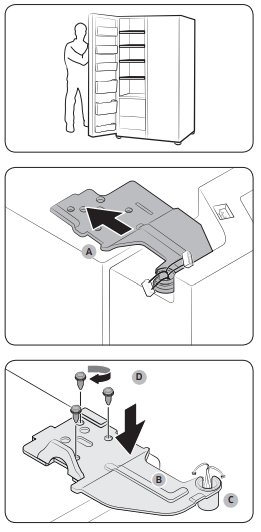
If the refrigerator cannot pass through the entrance due to its size, follow these instructions:
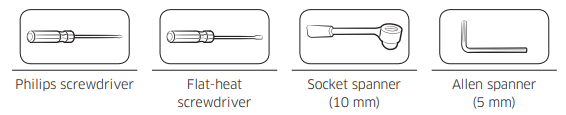
Tools required (not provided)
These tools are used for removing the doors.
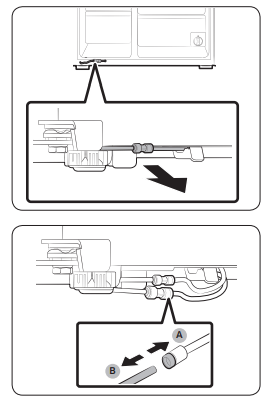
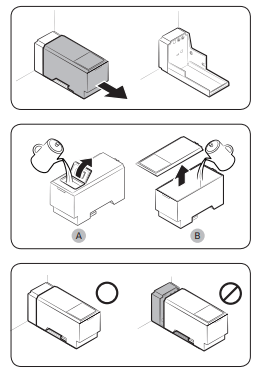
Disconnect the water line
1. From the bottom rear side of the refrigerator, pull out the water line to the front.
2. To disconnect the hoses, press and hold the transparent coupler (A) and detach the water hose (B).
Detach the doors
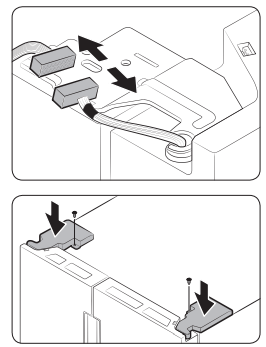
1. Use a Philips screwdriver to unscrew the hinge covers (A) on the top of each door.
2. Open the doors to loosen the hinges and remove the hinge covers. Once the covers are removed, close the doors.
3. Disconnect the electrical harness. B C
4. Unscrew the hinge screws (B) counter clockwise, and remove the upper hinge (C). Be careful as the door can fall on you, causing physical injury.
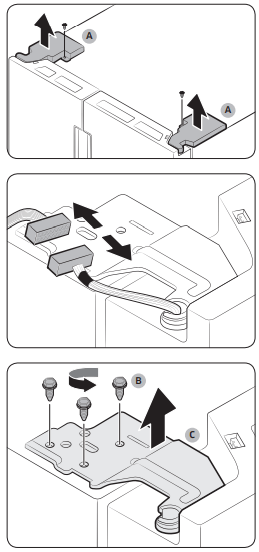
5. Remove the hinges (C) on both sides.
6. Gently lift up the doors one by one to remove. Use caution as the door may fall off or over.
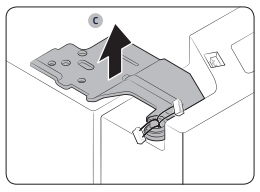
Reconnect the water hoses
Once the refrigerator has passed through the entrance, reconnect the water hoses and insert the provided clips (x2) to tighten the coupler.
A. Center of transparent coupler
B. Clip A (1/4”) (6.35 mm)
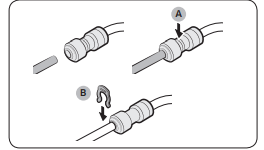
Reattach the doors
1. Hold the freezer door and hook to the hinge at the bottom of the refrigerator.
2. On the top side, insert the hinge (A) into the hinge slot.
3. Insert the upper hinge shaft (B) into the hinge hole (C). Make sure the hinge shaft is straight so that all screw holes are fully revealed. Then, tighten the hinge screws (D) clockwise.
4. Connect the electrical harness
5. Insert the hinge covers with the front sides first, and then tighten the screws. Use a Philips screwdriver for this step.
Operations
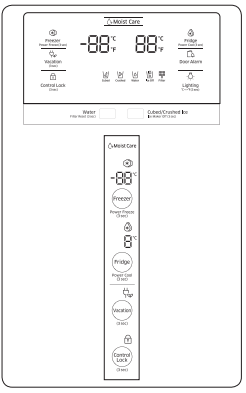
Feature panel
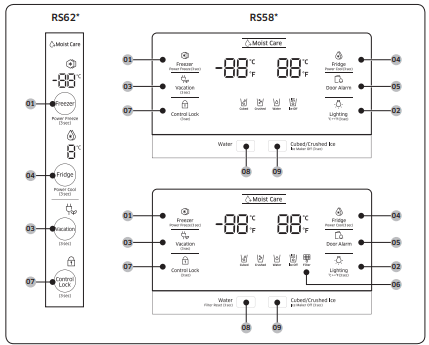
01 Freezer / Power Freezer
02 Lighting / °C ⇔ °F
03 Vacation
04 Fridge / Power Cool
05 Door Alarm
06 Filter *
07 Control Lock
08 Water / Filter Reset*
09 Cube/Crushed Ice / Ice Maker Off
*Applicable models only
01 Freezer / Power Freeze (3 sec)
- Freezer :The Freezer button can be used to set the freezer temperature, or to activate Power Freeze. Available temperatures are between -15 °C (5 °F) and -23 °C (-8 °F).
- Power Freeze : Power Freeze speeds up the freezing process at maximum fan speed. The freezer keeps running at full speed for several hours and then returns to the previous temperature.
- To activate Power Freeze, press and hold Freezer for 3 seconds. The corresponding indicator
 lights up, and the refrigerator will speed up the freezing process for you.
- To deactivate, press and hold Freezer for 3 seconds again. The freezer returns to the previous temperature setting.
- To freeze large amounts of food, activate Power Freeze for at least 24 hours before putting food in the freezer.
02 Lighting / °C ⇔ °F (3 sec) : The Lighting button can be used to switch the temperature scale between Celsius and Fahrenheit. To switch the temperature scale, press and hold Lighting for 3 seconds to change the current temperature scale.
03 Vacation
- Vacation: The Vacation button can be used to activate/deactivate Vacation mode. If you are going on vacation or a business trip, or if you do not intend to use the refrigerator for an extended time, use the Vacation feature. Press and hold Vacation for 3 seconds to turn off the fridge operation with the Vacation indicator
 on.
on.
04 Fridge / Power Cool (3 sec)
The Fridge button can be used to set the fridge temperature, or to activate/deactivate Power Cool.
- Fridge : You can manually adjust the cooling temperature for the fridge. Keep pressing Fridge to cycle through the temperature bar, and select a desired temperature between 1 °C (34 °F) and 7 °C (44 °F).
- Power Cool : Power Cool speeds up the cooling process at maximum fan speed. This is useful to quickly cool food that spoils quickly, or after the door is left open for some time. The fridge keeps running at full speed for several hours and then returns to the previous temperature. Press and hold Power Cool for 3 seconds.
05 Door Alarm
- Door Alarm: You can set the alarm for a reminder. If the door is left open for more than 2 minutes, the alarm will sound with the alarm indicator
 blinking. The alarm is enabled by factory default. To disable the alarm, press Door Alarm. To enable, press Door Alarm again.
06 Filter : The filter lifecycle will be reset and the filter indicator turns off. The icon will blink red for several seconds when you open or close the door
07 Control Lock (3 sec)
- Control Lock : To activate the Control Lock, press and hold Control Lock for 3 seconds. The controls on the display are disabled, and the dispenser does not operate even if you push the lever. To deactivate, press and hold again for 3 seconds.
08 Water / Filter Reset (3 sec): The Water button can be used to dispense water, or to reset the water filter.
- Dispensing: Press Water to dispense water. In this mode, no ice will be dispensed.
- Filter Reset : After about 6 months (approximately 300 gallons) of using the original water filter, the Filter indicator turns red to remind you that the filter needs to be replaced. If this happens, replace the filter, and press and hold Filter Reset for 3 seconds.
09 Cubed/Crushed Ice / Ice Maker Off (3 sec)
- Cubed/Crushed Ice : You can select an ice type. Press the button to toggle between the cubed and crushed ice types. The corresponding indicator turns on.
- Ice Maker Off : To disable ice making, press and hold for 3 seconds. In this mode, ice making is disabled even if you press Cubed/Crushed Ice.
Temperature settings
To ensure optimal performance, we recommend setting the temperature to -19 °C (-2 °F) for the freezer, and 3 °C (37 °F) for the fridge.
Freezer
The freezer temperature can be adjusted between -23 °C (-9 °F) and -15 °C (5 °F). To change the temperature, keep pressing Freezer until a desired temperature is selected. The temperature changes by 1 scale unit.
• Recommended: -19 °C (-2 °F)
Fridge
The fridge temperature can be adjusted between 1 °C (34 °F) and 7 °C (44 °F). To change the temperature, keep pressing Fridge until a desired temperature is selected. The temperature changes by 1 scale unit.
• Recommended: 3 °C (37 °F)
The temperature of the freezer or fridge may rise if you open the door frequently, or a large amount of food is put in the refrigerator. If this happens, the temperature display blinks until the refrigerator returns to the specified temperature settings.
Special features
The refrigerator features user-oriented devices that you can use to benefit from.
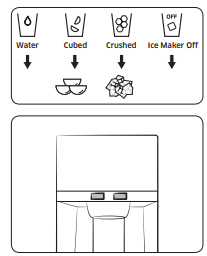
Water dispenser (applicable models only)
With the water dispenser, you can dispense water without opening the fridge door.
Basically, the water dispenser offers 3 options: chilled water, cubed ice, and crushed ice. If you do not want to dispense ice, press Ice Maker Off.
With the Ice Maker enabled,
1. Press to select the ice type.
2. Put a water glass on the dispenser lever and push it. Ice will be dispensed from the dispenser.
3. Press to select the water.
4. Then, put the glass on the dispenser lever and push it. Water will be dispensed from the dispenser.
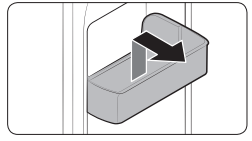
To fill the water tank
For first-time use, clean the inner side of the water tank and dry well.
1. Hold both handgrips on the front of the tank, and slide out as shown. A B
2. Open the front lid (A) of the cover or the entire cover (B) and fill the tank with a max of 5 liters water.
3. Reinsert the water tank and fit into the dispenser mechanism. Make sure the front side (with the front lid) of the tank faces to the front.
For first-time use
• Push the dispenser lever for 10 seconds to emit air from the hoses of the water supply system.
• Discard the first six glasses of water to remove impurities in the water supply system.
To dispense water
Put a glass under the water outlet, and gently push against the dispenser lever with the glass
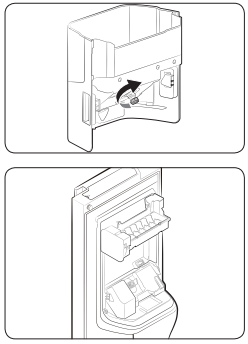
Ice making (applicable models only)
The refrigerator has a built-in ice maker that automatically dispenses ice so that you can enjoy filtered water with cubed or crushed ice to your preference.
If ice does not dispense, first check the ice maker if it makes ice properly. To check the ice maker
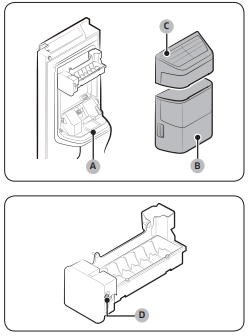
1. Gently hold the icemaker bucket (B) with both hands and remove it from the ice chute (A).
2. Check the icemaker bucket if it contains ice as appropriate.
3. Then, hold the icemaker cover (C) and slightly lift up to remove. D
4. Press Test (D) on the side of the ice maker. You will hear a chime (dingdong) at the press of the button.
5. You will hear another chime if the ice maker operates properly.
To secure more storage space (applicable models only)
If you do not use the ice maker and need more storage space, remove the icemaker bucket (A) and the snack bin. Then, insert the freezer guide (B) into the icemaker bucket’s place. To secure more room, remove the freezer’s upper drawer (C).
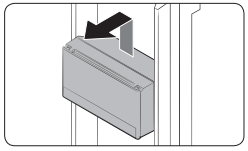
Icemaker bucket
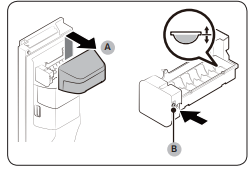
If you do not dispense ice for an extended period, ice may form clumps inside the bucket. If this happens, remove and empty the icemaker bucket.
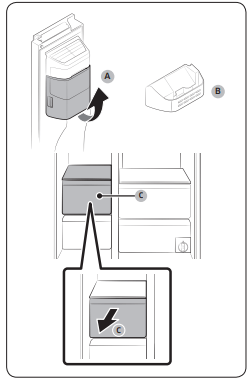
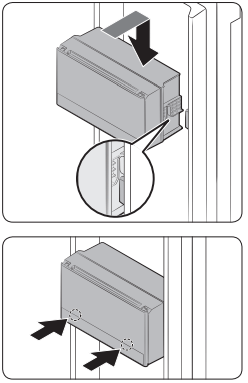
1. To remove the icemaker bucket, gently lift it up and pull out slowly while holding the handgrips with both hands.
2. Remove and empty the icemaker bucket.
3. When done, turn the gear handle on the rear of the bucket by 90°, and then put the bucket back into position. Make sure the bucket is inserted properly until you hear a clicking sound.
4. Press and hold Ice Maker Off for 3 seconds to reset the icemaker.
Water pressure
If you want to check how much water flows into the ice tray, follow these steps.
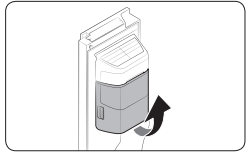
1. Gently lift up the icemaker cover (A) to remove.
2. Press Test (B) on the side of the icemaker. Normally, the ice cube container fills with water in a few minutes.
3. If the water level is lower than expected, check the water pressure of the water supply line from the water source. This is not a system failure.
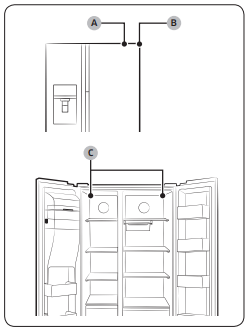
Smart Eco (applicable models only)
The Smart Eco system intelligently controls the refrigerator according to the operating environment in order to keep food fresh using 4 sensors that are located on both the inner and outer sides of the refrigerator. This smart system also monitors usage patterns and the operating status to save power consumption.
A. External temperature sensor
B. External humidity sensor
C. Internal temperature sensors
Maintenance
Handle and care
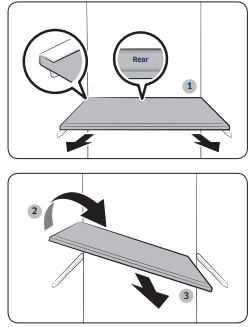
Shelves (fridge/freezer)
- To remove a shelf, fully open the corresponding door. Hold the front of the shelf and gently lift up and slide out.
- If the door cannot fully open, slide out the shelf half way to the front and turn it over to remove.
Moving tray shelf (fridge/freezer)
- To remove the shelf, hold the bottom side of the shelf and gently lift up and pull out.
Door guard
To remove a door guard, hold the front sides of the bin and gently lift up to remove.
Drawers
Gently lift up the front of the drawer and slide out.
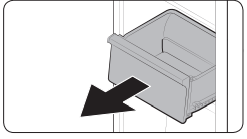
Vegetable bin / Dry bins
To remove the vegetable bin from the fridge or the dry bin from the freezer.
1. First, remove surrounding multipurpose bins if necessary. A
2. If your refrigerator is provided with a cover (A) for the vegetable/dry bin, remove the cover. For this, slide out the cover while holding down the clips on either side of the cover.
3. Gently pull out the vegetable/dry bin.
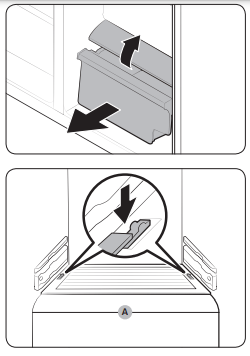
Sealing guard (applicable models only)
To remove the sealing guard
Gently lift up the guard, and then pull it to the front while holding the bottom side.
To reinsert the sealing guard
1. Put the guard on the front of the housing. And then, insert the guard by lowering it.
2. Press both hooks on the guard to lock the guard. When the guard is locked properly, you will hear a clicking sound.
Icemaker bucket
To remove the icemaker bucket, see the Diagnosis section on page 50.
Cleaning
Interior and exterior
Regularly use a dry cloth to remove all foreign substances such as dust or water from the power plug terminals and contact points.
1. Unplug the power cord.
2. Use a moistened, soft, lint-free cloth or paper towel to clean the refrigerator’s interior and exterior.
3. When done, use a dry cloth or paper towel to dry well.
4. Plug in the power cord.
Replacement
Water filter (applicable models only)
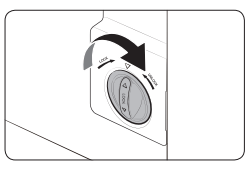
1. Turn the knob of the filter cartridge counter clockwise by 90 degrees. The filter cartridge will be unlocked.
2. Pull out the cartridge.
3. Insert a new filter cartridge. Use only Samsung-provided or -approved filters
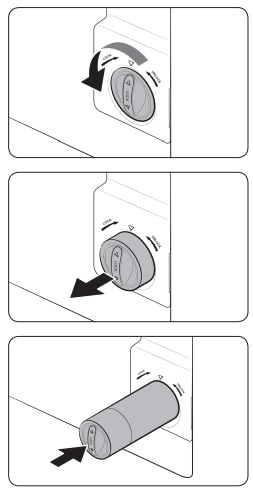
4. Turn the cartridge knob clockwise to lock into place.
5. Press and hold Filter Reset on the feature panel for 3 seconds to reset the filter lifecycle. The filter indicator  turns off.
6. When replacing is complete, flush 4 liters of water to remove impurities from the water line. See the Flushing section for more information.
Reverse osmosis water filtration system
The water pressure of the water supply system to a reverse osmosis water filtration system must be between 35 psi and 120 psi (241 kPa and 827 kPa). The water pressure of the reverse osmosis water filtration system to the refrigerator’s cold water line must be at least 40 psi (276 kPa). If the water pressure is below the specified:
• Check to see whether the sediment filter in the reverse osmosis system is blocked. Replace the filter if necessary.
• Refill the water tank in the reverse osmosis system with water.
• If your refrigerator has a water filter, it may further reduce the water pressure when used in conjunction with a reverse osmosis system. Remove the water filter.
For more information or servicing, contact a licensed plumbing professional.
Ordering a new filter
To purchase a new water filter, contact a local Samsung service centre.
Lamps and anti-bacteria filter
Neither lamps nor the anti-bacteria filter are user-serviceable. Do not attempt to replace them yourself. To replace them, contact a local Samsung service center.
Troubleshooting
General
| Symptom |
Action |
| Does not operate or cool. |
- Make sure the power cord is connected properly.
- Make sure the temperature control is set correctly. Try setting to a lower temperature.
- Make sure to keep the refrigerator away from direct sunlight or a heat source. Failing to do so may affect the cooling performance.
- Make sure the refrigerator has enough room from the rear and side walls or the cabinet. Failing to do so may affect the cooling performance.
- Too much food may block the ventilation of the refrigerator. To keep the refrigerator in normal operation, do not put too much food inside.
|
| Food in the fridge freezes. |
- Check if the temperature control is set to the lowest temperature. If so, change to a higher or the optimal temperature.
- This happens if the ambient temperature is too low. Set the temperature higher.
- Check if food containing a high portion of water is put in the coldest area of the fridge or near the cooling vent. If this happens, move the food to other shelves in the fridge.
|
| Emits noises |
- Make sure the refrigerator is installed on a stable, flat surface.
- Make sure the refrigerator has enough room from the rear and side walls or the cabinet.
- Make sure to keep the refrigerator from impurities or foreign objects inside or underneath.
- The refrigerator may produce a ticking sound from inside, which occurs when the various accessories contract or expand. This is not a system failure.
|
| The front corners and sides become warm and form condensation. |
- To prevent condensation from forming, the refrigerator has heat-proof piping in the front corners. If the ambient temperature rises, this equipment may not work effectively. This is not a system failure.
- Make sure the door is closed properly. Condensation may form if you leave the door open for some time.
- Condensation may form on the exterior surface of the refrigerator if humid air comes into contact with the cool surface of the refrigerator
|
| The ice maker does not make ice. |
- You must wait for 12 hours until the refrigerator makes ice.
- Make sure the ice maker is not stopped while making ice.
- Make sure the water tank is filled with water.
- Check if the icemaker bucket contains ice clumps. In this case, empty the icemaker bucket and try again.
|
| The water dispenser is not functioning. |
- Check if the water tank is frozen. If so, select a higher fridge temperature.
- Make sure the water tank is filled with water.
- Make sure the water tank is installed properly.
- Make sure the water filter is installed properly.
|
| Produces a bubbling sound. |
- The refrigerator makes this sound during the cooling process, which is normal.
|
| A bad smell comes from inside the refrigerator. |
- Check for any spoiled food. We recommend cleaning the refrigerator on a regular basis and remove any spoiled or suspect food items.
- Make sure strong smelling food is wrapped up airtight.
|
| Frost forms on the interior walls. |
- Make sure no food blocks the vents of the refrigerator. It is also important to arrange food items evenly for ventilation.
- Make sure the door is closed properly.
|
| Condensation forms on the interior walls or around vegetables. |
- This happens when food containing a high portion of water is stored uncovered, or the door has been left open for a while.
- Make sure food is covered or put in sealed containers.
|
| Ice maker does not supply Ice cubes. |
Check the following:
- Push the water dispenser lever to check the water supply.
- Push the ice dispenser lever to check the operation of the auger motor in the ice maker assembly.
- Check if there are any objects that obstruct the auger motor from running. If found, remove the objects and clear the motor area.
- If the ice maker has not been used for an extended time, the icemaker bucket may contain ice chunk that obstructs the auger motor from running properly. In this case, remove and empty the icemaker bucket, and try dispensing ice
|