
ODW717WB,ODW717XB
14 place settings
half-load function

Witheachwashcycle.
Compartment
For pro grammes with pre-wash only.
(Follow the !)User Manual
Electric indic ator on control panel (if pro vided).
Check the rinse aid level
Load the baskets
Select a programme
Turn on the water tap and press the . The machine will start working
after about 10 seconds.
Start/Pause Button
Running the dishwasher
Switch off the appliance
Turn off the water tap,
unload the baskets
Fill the detergent dispenser
Warning: wait a few minutes (about 15 min utes) before unloading the dishwasher to avoid handling
the dishes and utensils while they are still hot and more susce ptible to break.
They will also dry better.Unload the appliance, starting fro m the lower b asket.
Changing t he programme
Add forgotten dishes in the
dishwasher.
Scrape off any large amount of leftover food. Soften remnants of burnt food in pans,
then l oad the baskets. Refer to the dishwashe r loadin g inst ructions.
Close the door,press the Programme Button until the selected programme lights up.
( See the section entitled Operation instruction )“”
When the working cy cle has finished, the buzzer of the
dishwasher will sound 8 times, then stop.
Turn off the appliance using the Power Button.
If the appliance is switched
off during a wash cycle.
Op en t he do or car ef ull y.
Hot s team m ay esc ape
when the door is opened!
If the appliance is switched off during a wash cycle, when switched
on agai n, plea se re-select the washing cycle and operate the dishwasher
according to the original Power-on state.
Switch on the appliance Press the Power bu tton to switch on the appliance, Open the door.
For detailed operating method read the co rresponding content on the instruction man ual.
1. A running cycle can o nly be modified if it has been running for a short time. O therwise the deterg ent
m ay have already be en released and the water already drained. If this is the case, the detergent
dispenser must be refil led.
2.
Press the St art/Pause button, press the program button for more than three seconds,t he
machine will be in standby state, then you can change the program to the desired cycle setting
1.Press the Sta rt/Paus e But ton to stop the washing.
2.Open the door a little .
3.After the spra y arms stop working, you c an open the door
c ompletely.
4.Add forgotten dishes.
5.Close the door.
6.Press the St a rt/Pau s e Button, the dishwa s her will r un
after 10 seconds.

To re vie w the sec tion o n t ro ublesho oti ng Ti ps
will help you to solve some common problems
by yourse lf .
Dear Cu s tom e r,
Please carefully read this manu al before using the
dishwasher, it will help you t o us e and maintain the
dishwasher properly.
Pass it on to any subsequen t owner of the app liance.
This manual contains sections on safety Instructions,
Operating Instructions, Installat ion I nstructions and
Trou bl es hoo tin g Tip s, et c.
The man ufactu rer, fol lowing a p olicy of c onstant
develo pment a nd u pdat ing of t he pr oduc t, may
make m odifications wit hout givi ng pr ior not ic e.
K eep it as a r e f er in the later da ys .
If yo u can not solv e the pro blem s by yo urself ,
please ask f or t he help of profe ssi onal te chnician s.
Th is appli ance is in tended t o b e used in h ou sehol d
and similar applications such as:
-s taff kitch en a reas in s hop s, off ice s and othe r
w orkin g en viro nme nts;
-farm hous es;
-b y cli ent s in h otel s, m otels and ot he r r esident ia l
t ype env iro nme nt s;
-bed and breakfast type environments.
Dishwasher Features........ .......................... .. ...2
AttentionbeforeorafterloadingtheDishwasher
Baskets..........................................................6
Filtering System.... ........................ ..... ............11
Caring f or t he Dishwasher..................... .........12.
A F ill the Rinse Aid Dispenser............. .. ..3、 ..... .. .
B Function o f Detergent ........................ .4、 ........
... ... ...... ..7
Th e M et hod Load ing No rmal D ish ware
Wash Cycle Table....... ....................................9
Turni ng on t h e App lian ce ... ... ... ... ... .... .. ... ....... .9
Change the Programme............. . ................10....
At the end of the Wa sh Cy cle..... ......... ......... ....10
Positioning the Applianc e................... ..........13..
Wate r Co nnec t i on.... .. . .... ... .. .... ... .. . ..... ... .. .... .14.
About Power Connection........................ .......13.
Start of dishwasher..... .......................... . ......15..
Be fo re c al lin g f o r ser vic e. . ... .. .. ... . ... . ... .. ... .. . ....1 6.
Error codes.................................... . .............17.
Tech nical info rmation............................ .. .....18..
Co ntr ol Pa ne l.. . .... . ...... ... .. ... . ... ...... .. ... . ... ....... . ..2
This appliance must be grounded. In the event of a
malfunction or breakdown, grounding will reduce
the risk of an electric shock by providing a path of
least resist ance of electric current. This appliance
is equipped wi th a cord having an equipment-
grounding conductor and a grounding plug.
The plug must be plugged into an appropriate outlet
that is installed and grounded in accordance with
all local codes and ordinances.
Keep children away from detergent and rinse aid, keep
child away from the open door of the dishwasher,
there could still be some detergent left inside.
ren
Donotabuse,siton,orstandonthedoorordish
rack of the dishwasher.
Do n ot touch the heating element during or
immediatel y after use.
(This instruction is only applicable to machines
with a visual heating element.)
Do not wash plastic items unless they are marked
dishwasher safe or the equivalent. For plastic items
n
ot so marked, check the manufacturer's
recommendations.
Use o nly deterge nt and rin se additives
desi gn ed for an a utom atic dis hwa sher.
Never us e so ap, laun dry de te rg ent , or h an d
washi ng detergen t in you r dis hwasher. Ke ep
t h ese pr odu cts out of th e r each of c hi ldr en.
Dur in g i nstallation, th e power supply must not
be ex ce ssive ly or dangero usly be nt or flatt en ed.
Do not tamper with controls.
Do not place any heavy objects the
door wh en it is open. The appliance could tip
forward.
on or stand on
When l oading ite ms to be w ashed :
1) Locat e shar p it em s so t hat th ey a re not li kely
to damage t he door seal ;
2 Warni ng: Kni ves and ot her u te nsils with
shar p poin ts must be loade d in the bask et
with their points do wn or place d in a
horizontal position.
)
W he n usi ng y our dishwasher, you s houl d
p rev ent pl a stic item s f r o m c oming i n to c onta c t
w ith t he h eating e lement.(T his instru cti on is on ly
appli cable to m ac hines wi th a visual he atin g
el ement. )
If thes upply cord is damaged, it must be replaced
bythemanufactureroritsserviceagentora
simi la rly q uali fi ed pers on i n or der to av oid a
ha zard.
Please dispose of packing materials properly.
Use the dishwasher only for its intended function.
Remove the door to the washing compartment when
removing an old dishw asher from service or discarding it.
Dishwash er de ter gents are stro ngl y alkal ine, they
can be ext remely da nger ous if swall owed. Avoi d
conta ct wit h ski n a nd eyes and kee p ch il dre n away
fro m the dishwas her when the door is ope n.
C heck th at the det erg ent com parm ent is e mpt y
aft er com pletion o f the wash c ycl e.
Th e a ppliance is to be con nect ed to the water
mains using new hose sets and that old hose-sets
s hould no t be reused.
T he max im um numb er of p lace set t i ngs to b e
washed is 14.
T he max im um perm i ss ible i nl et water pressur e is
1Mpa.
T he mini mum p erm is sible i nlet water pr es su r e is
0.04Mpa.
Children should be supervised to ensure that they do
not play with the appliance.
This appliance is not intended for use by persons
(including children with reduced physical, sensory or
mental capabilities, or lack of experience and
knowledge ,unless they have been g iven supervision
or instruction concerning use of the appliance by a
person responsible for their safety.
)
When usin g your dishw asher, fo ll ow the pr ecaut ions li s t ed bel ow:
The d oor sh ou ld not be left o pe n,
since this coul d increa se the ris k of trippi ng.
Improper connection of the equipment-grounding
conductor can result in the risk of an electric shock.
Check with a qualified electrician or service
representative if you are in doubt whether the
appliance is properly grounded. Do not modify the
plug provided w ith the appliance; If it does not fit
the outlet. Have a proper outlet installed by a
qualified electrician.
Do not operate your dishwasher unless all
enclosure panels are properly in place. Open
the door very carefully if the dishwasher is
operating, there is a risk of water squirting out.
The dishwasher must always be connected to
the water system using new hose sets.
If t he ap pliance is in stal led o n a carp e t fl oor,
tak e c a re t h at t h e o p eni ngs in its bas e a r e no t ob stru ct ed .

before using it for the first time.
To g etthe best perform ance from your dishwasher, read all operating instructions
10
11
Ba ck View
1
2
3
4
5
6
7
8
9
Fron t vi ew
Lower basket
Dispenser
Cup shelf
Sp ray a rm s
Fil ter as sem bly
Inlet pipe connector
Drain pipe
Upper basket
Cutlery rack
Top s pray arm
1
I nner pip e
5
6
7
8
9
11
10
3
2
4
3
1
3
1
6.Start /Paus e butt on: To st art t he s elected
washin g prog ra m o r pause the wa shing prog ram
when t he m achine i s w orking.
5.Power B utton: To turn on/off the pow er sup ply.
8.Child lo ck bu tton: p ress the two buttons
sim ultaneously to lock the p rogr am.
4 .Delay Butt on : Pr ess t he button t o de lay.
3.Program B ut ton : To P res s the b utton t o selec t
ap propriate Program.
1. Pr ogra m indicators: to sho w which
program you have chosen;
2.D isplay scr een: t o s how t he r emindi ng time
and the state( runn ing s tate, d elay time etc )
7.I f y ou h av e o nl y about or les s than h al f of fu ll load
dishes of the dishw asher, you can sel ect the half lo ad
functio n and your d esired progr am ac cording to th e
dishes conta minat e d deg ree (T he quic k and s oak pr ogra ms
can’t s elect t his fun ction).
A pro gr am se lect th e half load f unction, it ca n save time,
energ y, and water compare to th e program h asn’t select
the ha lf load functi on.
After t he hal f load f unction i s se lecte d, al l the spray arms
are runn ing , yo u c an l oad al l t he basket s.

Bef or e using you r dishwas her f or the fir st ti me:
A. Fill the rinse aid dispenser
B. F i ll in deterge nt
Therinse aid is released during the final rinse to prevent water from forming dropletson your dishes, which can
leave spots and streaks. It also improves drying by allowing water to roll off the dishes. Your dishwasher is
designed to use liquid rinse aids. The rinseaid dispenser is located inside the door next to the detergent dispenser.
To fil l t he dispense r, o pen the c ap and pour t he rin se ai d int o t he di spenser unti l th e level indi cator tur ns com pletel y
black. The volume of the rinse aid container is about 110ml.
Rinse Aid D ispenser
Function of Rinse Aid
Rin se aid is autom ati cal ly a dde d du ring the l ast r inse, e ns uring th oro ugh r in sing, an d s po t and st rea k f re e dryi ng.
Attention!
Only use branded rinse aid for dishwasher. Never fill the rinse aid dispenser with any other substances
(e. g. Dis hwasher c leaning a gent , l iqui d deter gen t). Thi s w oul d d amage t he ap pl ia nce.
As the rin se aid dim ini shes, the size of the bl ac k dot
on the rinse ai d lev el indica tor c ha nges, as il lustrated be low.
Fu ll
3/4full
1/2full
1/4full-Shouldrefilltoeliminatespotting
Empty
If t here is n o ri nse-aid w arning l ig ht in the c ontrol p ane l, y ou can j udge th e amo un t o f r inse-aid by t he color o f the
opti cal level indica tor "C " loc ate d nex t to t he ca p. Wh en the rins e-a id c ontaine r i s ful l, the whol e i ndica to r w ill be
dark .As t he rinse- aid dim inishes, t he size of th e d ark d ot d ecreases . You sh ould neve r l et t he r inse ai d get b elow
1/4full.
When to Refill the Rinse Aid Disp ense r
RINSE AID DISPENSER
To o pe n t he di spens er, turn the cap to th e "o pen" (lef t) ar row a nd lift it ou t.
Po ur th e ri nse ai d in to t he di sp ense r, bei ng car eful no t to o verf ill.
Replace the cap by inserting it aligned with "open" arrow and turning it tothe closed (right) arrow.
Be car eful no t t o over fill th e disp enser, b ecause t his c ould cau se over suds in g. Wi pe aw ay an y sp il ls
with a damp cloth. Don't forget to replace the c ap before you close the dishwasher do or.
Attenti on!
Clean up a ny ri nse ai d spilt dur ing filling w ith an ab sorb ent clo th to a void exc ess f oaming
during the ne xt w ash.
1
2
3
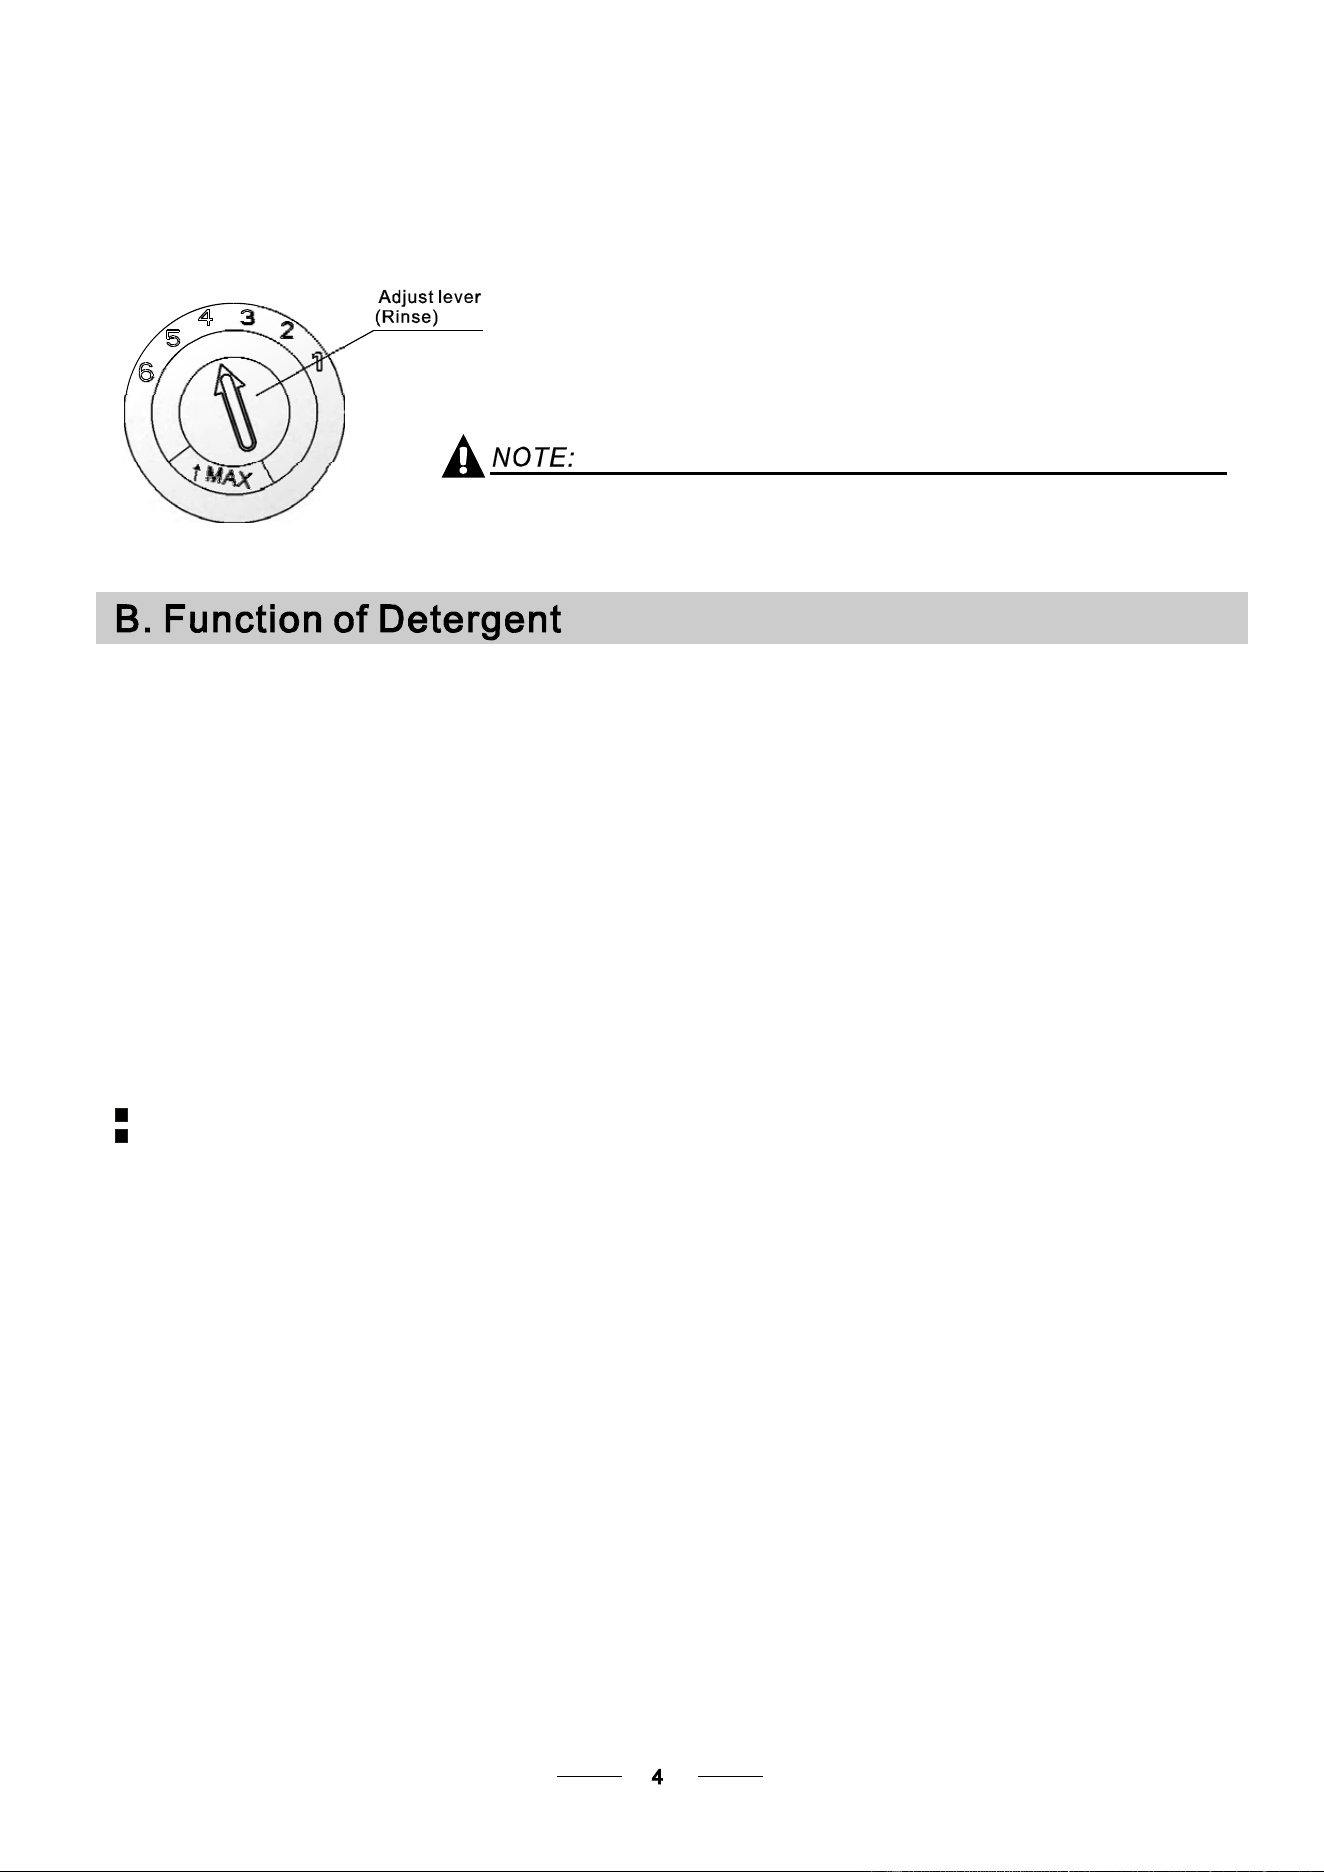
Adjusting Rinse Aid Dispenser
The r inse a id di spen ser h as s ix or four s ettin gs.Always st art with t he dispens er
set o n "4 ". I f s pots and poor dr ying a re a pro ble m, i ncrea se th e am ount of rinse
aid dispensed by removing the dispenser lid and rotating the dial to "5". If the
d is he s still are not dry ing p rop erly o r ar e showing s pots, adjust the d ial t o the next
h ighe r le ver u ntil you r d is hes are sp ot-fr ee . T he recom mended se tting is "4 ".
(Factory val ue is "4".)
Incr ease th e dose if ther e are d rop s of w ate r o r li me sp ots on the dish es a fter washing .
Reduce i t i f th ere ar e sticky whitis h sta ins on your dish es o r a bl uish f ilm on g lassw are o r
knife blades.
Dete rge nt s wi th it s c hemical i ngredients a re ne cessary t o r emove dirt , c rush d irt an d trans port it ou t of the di sh washer.
Most o f th e co mme rcial qu ali ty deterge nts a re sui table f or t his p ur pose.
Detergents
Ther e are 3 sorts of det ergents
1.W ith phos pha te and wi th c hlori ne
2.With phos phat e and wi thout c hlorine
3.W ithout p hosphat e and without chl orine
Based on their chemical composition, detergents can be split in two basic types:
The use of normal washing programs in combination with concentrated detergents
reduces pollution and is good for your dishes; these wash programs are specificallymatched
to the dirt- diss olvi ng pr ope rti es of the e nzymes of th e co nce ntrated d ete rgent . Fo r th is rea son
norm al was h pro grams i n wh ich conc entrated de terge nts ar e used can ac hieve t he sam e
res ult s that c an o th erwi se only b e ac hieved using i nten si ve progr ams .
“”
“”
“”
De terg ent t abl ets o f di ffere nt brand s disso lve at diffe rent spe eds. For this reason some
det erge nt t ablets ca nnot d is solve an d de velop th eir f ul l c leaning power du ring sho rt
pro gra ms. The refore please use lon g progra ms when usi ng d etergent tabl ets, to
ensure the completeremoval of detergent residuals.
The dispenser mus t be refill ed before the start o f each wash cycle following the instructions
pro vided in the was h cy cle t able . Your dishwash er u ses less detergent an d ri nse a id t han
Co nven tional d ishwasher. Gene ral ly, on ly o ne ta ble spoon of detergent is need ed for
a normal wash load. More h eavily soiled items need more detergent.Always add the
det erge nt j ust b efor e st artin g th e d is hwashe r, other wise it coul d g et d amp and w ill not
dis sol ve pr oper ly.
Concentrated Detergent
Detergent Tablets
Detergent Dispenser
conv ent ional , al kaline de terg ents with caustic compon en ts
l ow a lkal ine c oncentr ated det erge nts with natu ra l enzymes
N ormally new pulveris ed d eter gen t is w ithout p hosph at e. T hus the w ater sof tene r fun ctio n of
phosp hate is not g iven. In this case we r ecomm end t o fi ll salt in t he s alt c ontaine r even w hen
the hardness of water is only6 dH. If detergents without phosphate are used in the case ofhard water
of ten whit e sp ots appe ar o n di shes and gla sses. In this case please add m or e detergent t o re ach
bet ter r es ults. Det erge nts with out chlor ine do o nly b leac h a lit tl e. Str ong a nd coloured sp ots w ill not
be rem ov ed c omplete ly. In this c ase ple ase choo se a progra m wi th a hig her te mp erature.
°

Amount of Detergent to Use
ProperUse of Detergent
Use o nly deterge nt spe cifically m ade f or the us e in d ishwashers . Ke ep your d et ergent fr esh and dry.
Don't put powder ed d etergent i nto the di spenser u ntil you'r e re ady to wash dishes.
Dishwasher detergent is corrosive! Take care to keep it out of reach of children.
Al w ays add the d ete rgent j ust b efore start ing ea ch w ash c ycle.
Only us e br anded de ter gen t aid f or d ishwash er.
If t he lid i s cl os ed: pr es s r e lease bu tton . The l id w ill s pri n g open.
Detergent tablet
Det e rg ent po wd e r
Fi ll the detergen t di spen ser with detergent.
The marking indicates the dosing levels , as
illustrated onthe right:
The p lace for main wash cy cle det ergent.
The pla ce for p re -wash cycle de te rg ent.
Pl ease obs erve th e man ufa cture rs d osin g an d st orag e
Recomme nda t ion s as st at ed on the d eter gent p ac k agi n g .
Close t he li d an d pr ess until it lo cks i n pl ace.
If the dishes are heavily soiled, place an additional
deterge nt d ose in the pr e-w ash dete rgen t ch amb er. T his dete rge nt w ill ta ke e ffect duri ng th e pr e-w ash phas e.
A
B
Fill in Detergent
You find infor ma tion abou t the a mount of d etergen t fo r the sing le pr ogramm e on t he las t pag e.
Pl ea se b e aw are, t ha t accord ing t o the lev el soiling and the spe cif ic har dn ess of w ater d ifferences a re possibl e.
Pl ease o bserve the m anufact urer 's re commen dati ons on the dete rg ent pac kagi ng.

Cutlery with wooden, horn china or
mother -of-pearl handle s
Plast ic i te ms that ar e n ot h eat resis tant
Older cutl ery wit h glued par ts t hat a re not
temperature resistant
Bonded c utlery i te m s or dishes
Pewter or coop er i tems
Crystal gla ss
Steel items su bject t o rusti ng
Wooden p latte rs
Items made from synthetic fibres
So me t ypes of g lasses c an becom e
dull after a l arge n u mb e r of wash e s
Silv er an d a lumi num pa rts ha ve a
tendency to discolour during washing
Glazed patterns may fade if machine
washed frequent ly
Are not suitable
Are of limited suitability
Dishes and items of cutlery must not lie inside one another, or cover each other.
To av oid d amage to gla sse s, th ey m ust not touc h.
Lo ad large i te ms w hic h ar e mo st difficul t to c lea n in to th e l ower bask et.
The u pper bas ket i s de signed to ho ld m ore d eli cate and lighter d ishware such as gl as ses , coffee
and tea cups
Lo ng bladed k nives sto red i n an uprigh t po sition are a p otential haza rd !
Lo ng and/or s harp item s o f cut lery such as carving kniv es must be p ositi one d
h orizon tally in t he upp er b aske t.
P lease do not ove rl oa d yo ur dishw asher. T his is i mportant for g ood resu lts a nd f or
r easonab le consu mption o f en ergy.
Load h oll ow i tems suc h as cups, gl asse s, p ans etc. With the opening facing downward s s o that
w a t er c ann o t c o ll ec t i n the c ont a i n er or a de ep ba se.
Consider buying utensils which are identified as dishwasher-proof.
Use a mild detergent that is described as 'kind to dishes'. If necessary, seek further
information from the detergent manufacturers.
For particular items, select a program with as low a temperature as possible.
To pr even t da mage, do n ot t ake gla ss a nd cutle ry out of the di shw ashe r imm ediat el y
aft er t he p r ogram me h a s e nde d.
(For b est perf ormance of the di shw asher, f ollow the se load ing gu ide li nes.
Featu res and ap pearance of baske ts and cutl ery ba skets m ay var y from your m odel.)
Scrape off any larg e amo unts o f le ftover fo od. S often remnan ts of b urnt f ood i n pa ns.
It i s not necess ary to ri nse t he d ish es u nder running water.
Pl ace objects in the dishwa sher i n the f ollowing way:
1.Item s su ch a s cups, gla sses, pots /pans, e tc. a re f aced downwa rds.
2.Curv ed i tems, or ones wit h reces ses, sh ould b e loade d asla nt s o th at w ater can run off.
3.All u tensils are st acked secu rely and can not ti p o ver.
4.All u tensils a re placed in t he way t hat t he s pray arms can rotat e freel y d urin g w ashin g.
Very sm all items s houl d n ot b e w ashed i n the dish was he r as they c ould eas il y fall out of the basket .
To pre ven t wa ter dr ip ping fr om t he uppe r basket into t he lower basket, we rec om me nd tha t you
empty the lower ba sk et f irst an d the n t he upp er ba sk et.

Th e u pper bas ket is de si gned t o hol d m ore del icate
and li ghte r d ishware s uch as g lasses, coffe e an d
tea cups and saucers, as well as plates, small bowls
and shallow pans (as long as they are not too dirty).
Positi on the dishe s an d co okw are so that they w ill
not get moved by the spray of water.
We sug ges t tha t y ou pl a ce l arge item s a nd t he m ost
difficult to clean items are to be placed intothe lower
basket : su ch a s p ots, p ans , lids, se rvin g d ishes and
bowls, as sh own in t h e f igure bel ow. I t is pr ef er abl e to
pla c e s er vi n g d i shes a nd lids o n t he s i de of th e r a cks
in orde r to a vo id bl ocki ng t he ro tatio n of the t op spray
arm.
Pots,servingbowls,etc,mustalwaysbeplacedtopdown.
Dee p pots sho uld be sl anted to allo w water to f low o ut.
Pl ease be r emi nded that :
T he B ottom B as k et f eatur e s fo ldin g sp ikes so t hat l arge r or mor e po t s an d p ans c an be l oade d.
Foldin g Spikes of Lower Basket
Fo r better stacki ng of pots and pans ,
the spi kes c an b e fol ded do wn as
sho w in the p ict ure righ t.
Folding back the c up shelives
Fo r bet ter s tacking of po ts a nd pans ,
th e sp ikes can be f olded dow n as
show in the p ict u re ri gh t.
The h eig ht of t he upper ba sket c an be ad justed in o rd er t o
creat e mo re sp ace for la rg e uten sils b oth for t he upp er
/lower basket . The hei ght o f the upp er ba sket ca n b e
adjusted by l ift up t he bask et fo r t he upper posi tion, and up
press t he hand le to lowe r the upper baske t, s ee the pictur e
be low:
Adjusting the Upper Bask et
Lift the basket
for upper postion
Up press the handle
to lower the basket
Adjust handle

Max. Dishes
Max. Dishes
Top baske t
Bottom bask et
Lower Position max.Φ
Up p er P o si t io n ma x.Φ
19cm
25cm
14cm
30cm
Cutl ery sh ould b e pl a c ed i n t he cut l er y r ack sepa ratel y
fro m ea ch o the r in the a ppropria te p osit ions, and do
make su r e th e ut ensi l s do no t n est t oge ther, t hi s m ay
cause bad performance.

* : This program is the test cycle. The information for comparability test
in ac co rd anc e wi t h , a s follows :
AS/NZS 2007.1
AS/NZS 2007.1
Capacity: 14 setting
Posi t ion U p p er bas ke t: upper w heel s on r ai ls
Rinse aid setting: 6
O pen the door sl ightl y 50 mm to a ssi s t i n dr yin g of t he di shes a ft e r e ve ry wash
Starting a cycle wash
1 Dr aw out the l owe r and up per b asket, load the dish es a nd pu sh the m back.
I t i s to l oad the l owe r b asket first , t hen t he uppe r one ( see the section ent it led
Lo ading the Dishwashe r ).
2 Pour in th e d eterg ent ( see t he sect ion e ntitl ed Det ergent a nd Ri nse Aid ) .
3 I nse rt the plug into the socket. The power s uppl y is 2 20-240 VAC / 50 HZ, th e sp ecificatio n
of the s ocket is 1 0A 250VAC. Make su re that t he wa ter supply is turn ed on to full pres sur e.
4 Clo se the do or, pr ess the power Button , and the displ ay will turn on.
5 Pr ess the pro gram Bu tton , the w ash p rogr am w ill b e changed a s f ollows di rectio n:
“”
“”
I nten sive->H eavy->Nor ma l->60 min- >Quick- >Soak;
I f a pro gram i s se lected , th e respo nse light will li ght. Th en press the Start/Pa use button, th e
dish wash er b egin s to start.
r eco mme nded
Normal
Intensive
Heavy
(OrAll )in 1
5/27.5 g
(OrAll )in 1
5/27 .5g
(OrAll )in1
5/27.5g
For norma lly s oil ed loads,
such as , plates ,glasses
and lightly soi led pans.
standard dai ly c ycle .
pots
For the heaviest soiled
loads, such as pots, p ans,
casser ole dishes and d ishes
that have been sitting with
dri ed food on them for a
wh i le .
A short er wash for l ightly
soiled loads that do not
need drying.
Quick
Pre-w ash( 50 )
Wash (65 )
Rin se
Rin se
Rins e(65 )
Dryin g
℃
℃
℃
Pre-w ash( 45 )
Wash (55 )
Rin se
Rin se (60 )
Dryin g
℃
℃
℃
Pre-w ash
Wash (50 )
Rinse
Rins e(5 0 )
Drying
℃
℃
Wash (40 )
Rinse
Rins e (45 )
℃
℃
165
160
135
40
1. 15
0.9
1.4
0. 5
18
14.5
13.9
10 .5
60 m in
Pre-w ash(50 )
wa sh(6 0 )
Rin se (50 )
Dry i ng
℃
℃
℃
60
10
0.9
5/27.5g
20g
Daily w ash i n only 1 h our.
For li ghtl y an d no rmally
soile d p lates and pan s
for everyday.
Means: need to fill rinse into the Rinse-Aid D ispenser.
()
(*AS/NZS 200 7.1)
For heavi l y s oil e d lo a d s ,
such as pots, plates, glasses
and ligh tly s oi led pans .
Ashorter washfor lightly
soil ed lo a ds th at d o no t
need drying.
Soak
Pre-Wash
80.01
3.8
Wash th e ar ms in s oap y an d war m w ater an d use a s oft b rush to
clean the j ets. R ep lace th em af ter r i nsin g the m th orough ly.
When following this procedure from step1 to step 3, the filter system will be removed;
when following it from Step 3 to Step 1, the filte r syste m will be installed.
It is dangerous to open the door when washing, because the hot water may scald you.
W h en t h e working cy cle h as fini s hed, the b u z zer o f t he di s hw a she r wi ll s ou nd f or 8 secon d s, th en s t op . Turn o ff
the app lia n c e u sing the Pow er s wi tc h bu tton , shut off th e w ate r sup p ly and open t h e do or o f the dish wa s her.
Wait for a f ew mi nutes b ef ore unlo adin g th e di shwash er to a void ha ndlin g th e di shes and ute nsi ls w hile th ey
are still h ot a nd m or e suscept ibl e to br eak age. The y wi ll als o d ry be tter.
Switch Off the Dishwasher
1.S witch off the dishwa sher by p re ssing the button.
2.Turn off the water tap.
Po wer
Open the door carefully.
Hot di shes are sensitive to knocks. The dishes should theref ore be a llowed t o cool down around 15 minut es
before removing from the appliance.
Open t he dish washer do or, le ave it a jar and wait a f ew minutes be fore rem oving the dishe s. In thi s w ay they
will be cooler an d the drying will b e impr oved .
Unloading the dishwasher
It i s normal t hat t he dishw as her is wet inside.
Empty the low er ba sket fir st a nd the n the upper o ne. T his wil l avoi d wat er dr ipp ing f ro m the uppe r Bas ket on to
the dis hes in the l ower one.
If you ope n t he do or , the m ach ine wil l p aus e. T he p rogram l ight will
stop bli n ki ng an d t he b uzzer wil l b e eve ry m in ute u nle ss y o u close t he door . Af t er
y ou c lose the doo r , the ma chin e wi ll ke ep o n w orkin g af ter 1 0 s econds.
during a w ash cycle
beeping
Premis e:
A cycl e th at is under way can on ly be mod ified if it ha s only been r unn ing fo r a s hort time. O therwis e, the
de tergent m ay hav e a lready be en re lea sed, a nd the appli ance m ay have alrea dy dr ain ed the wash water.
If t his i s t he case , the deter gent d ispenser mu st be refil led ( see the sec tio n ent itl ed " Load ing the
Det ergent " ).
Pr ess the S tart /Pau se but ton, the m achine w ill be in st andby stat e, press the program b utton f or mor e than
3 then you can change the program t o the desir ed cycle se tt ing (s ee the s ection ent itled " S tarting a w ash
cycle. . ." ).
1
2
sec onds
A forgotten dish can be added any time before the detergent cup opens.
Add forgotten dishes.
Close the door
After the spray arms stop working,you can open the door
completely.
2
3
Open th e door a little to stop the washing.
1
4
5
6
Press the Start/Pause button
Press the button, the dishwasher will run
after 10 seconds.
Start/Pause
When you press theStart/Pause button to pause during washing, the running indicator will
s top bl inking a nd the d ishwasher w ill eve ry m inu te un less you pr ess t he
button to s tar t.Start/Pause
be beeping

The filter prev ent s lar ger remnant s of food or ot her obj ect s from get ting insi de th e p ump.
The residues may block the filter, in this case they must be removed.
The filter s yst em c onsi sts of a coar se filter,a flat (M ain f il te r)
A n d a mi c rofi lter( F i ne f il ter).
Food and soil particles trapped in this filter are pulverized by a
specia l jet on t he l ower spr ay a rm a nd w ash ed d own t o d rain.
Larg er i tems, s uc h as pie c es of bone s or gl ass, tha t coul d blo ck
the drain To re move
the items
and easily become trapped in the course filter
caught by the filter, gently squeeze the tap on the top of this
filterand lift out.
This filter holds soil and food residues in the sump area and
pr eve nts i t f rom b eing on th e di sh es dur ing w ash c yc le.redeposited
Main filter
1
Coarse filter
2
Fine filter
3
2
3
1
Filter assembly
The filter efficiently
For b est p er formance and re sults, t he f il te r must be cleane d re gularly. t his r eason, i t i s a goo d i de a t o
r emo ve th e l arger food pa rticl es tr app ed in the filte r aft er each was h cyc le b y ri nsing the s em ici rcular filte r an d
c up u nder ru nnin g wa ter. To re move th e fil ter d evice, p ull t he c up ha ndl e in t he upwa rd d irect ion.
re mo ves f ood part icle s from th e wa sh w at er, al lowin g it t o be rec ycle d d ur ing the cycl e.
For
T he dish was her must n e ver be used wi thout t he f il t er s.
Imp ro per repl ac ement of the f ilt er may red uce the perform an ce lev el of the applian ce
and damage dishes and utensils.
St ep 1 Turn the filter in ant i-cl ockwise dir ection,:
Step 2 li ft th e fi lter up:
When following this procedure from step 1 to step 2, the filter system will be remo ved;
when following it from Step 2 to Step 1, the filter system will be installed.
1
2

Th e cont ro l p ane l can be clea ned by using a l ightly dam pened c loth.
Af ter cl eaning, m ake sure t o dr y it t horoug hly.
For the ext e ri or, us e a good appli ance po li s h wax.
Never u se s harp objects, scouring pads o r h arsh c lean ers on a ny part o f t he di shwasher.
Protect Against Freezing
1.Cut off the electrical power to the dishwasher.
2.Turn off th e water suppl y an d disco nnect th e w ater inl et pi pe from the w ate r val ve.
3.Drain the w ater fr om the inlet p ip e an d wat er va lve. (U se a p an to gathe r th e w ater)
4.Reconnect t he wate r inl et pi pe t o the wate r valve.
5.Remove the f ilter at the bottom o f the t ub and use a spong e t o soak up water in the sum p.
pl ease take fros t pr ot ectio n meas ures o n t he dishw asher in winter. Ev ery fter washing c ycle s,
pl ease oper ate as f ollows
time a
:
Cleaning the Filter
Cleaning The Door
To c lean th e c o a rs e f il t er and t he fi n e fi l t e r, us e a cl ean i n g bru sh . Reas se mbl e t he f il t er part s as s ho wn in t h e figur es
on t he p revi ous page an d r eins er t t he e nt ir e a sse mb l y in t he d ishwash er, p os i t i oning i t i n i ts seat and pr essin g d o w n war d s.
When cleaning the filters, don't knock on them. Otherwise, the filters could be
contorted and theperformance ofthe dishwasher couldbe decreased.
To clean the e dge ar ound t he door, you sho uld use o nly a soft wa rm, d am p cl oth.
To avoid penetrat ion o f wa te r i nto the d oor lock and el ectrical com ponen ts, d o not
use a spr ay cle aner of any k ind.
Never u se a spr ay cl ean er t o cl ean t he door panel as it m ay dam age the door loc k
and electrical components.
Ab rasive ag ent s o r som e pa pe r towels s hou ld not b e u sed b ecau se o f th e r isk o f
sc r a t c hi ng o r leaving s pots on the st ainles s stee l sur fa ce.
Cleaning the Spray Arms
I f your dishwa sher cannot w ork beca use of t he ice,
pl ease co ntac t prof essional service pe rson s.
It i s ne cess ar y t o cl e an t h e s p r ay ar ms r eg ul ar ly for h ar d
water chemicalswill clog the spray arm jets a nd bearings.
- Ins pect t he filter s for blo cking a fter e very tim e t he dis hwa sher has be en u sed.
- By uns crew ing the c oar se fi lter, you can remove the filter syst em . Re mov e a ny food r emna nts and
clean the filters under running water.
Remarks:
The entire filter assembly should be cleaned once a week.
To remove thelower spray arm, pull out the spray arm upward.
To r e mo v e th e u pper s p r a y a rm , h o ld t he n ut, rot ate th e a rm
clockwise to remove it.
Wash the arm s in soap y and w arm w ater an d u se a sof t brus h to
clean t he jets . R eplac e them aft er ri nsing t hem thorough ly.
Itis recommend that yourun a washcycle with the
di shwasher e mpt y an d t he n re mov e th e plu g f rom t he
socket, t urn o ff t he wa te r supp ly and l eave the door of
t he appli a n c e sl ight ly op en. Th is wil l help t h e doo r
seals to last longer and prevent odours from forming
within the applian ce .
If the app lian ce m ust be move d, tr y to keep it in the
vertical position. If absolutely necessary, it can be
positi oned on its back .
Oneofthefactorsthatcauseodourstoforminthe
dishwasher i s foo d th at re mai ns tr app ed i n the seals .
Periodic cle aning with a d amp sponge will p rev ent t hi s
f r o m occurr ing.
Ensure the voltage and frequency of the power being used corresponds to
t hose on the ratin g pl ate . Only in ser t the plug into an elec trica l s ocket whi ch i s ear the d
pr op erly. If th e el ectr ical sock et t o whi ch the a ppl ianc e mu st b e c onn ected is not
appropriate for the plug , replace the socket, rather than using a a daptor or the likes as
they could cause overheating and burns.
Plea se look at th e ra ting lab el t o know the rat ing volt age a nd c on nect t he dishwash er to the app ropr iate power s uppl y.
Use the r equ ired fuse 1 0 amp , tim e d ela y f use or circui t bre ak er rec omm ended and prov ide separat e circ uit s ervi ng
only this appl ia nce.
Posi tion the appli ance i n the d esired l ocation. The back sho uld r est ag ainst t he w al l b ehi nd it, and the side s,
along t he adj acen t ca bi nets o r wa lls. T he d is hwasher i s equippe d wi th water supply a nd drain hos es th at can
be pos itioned ei th er to the righ t or the left s ides t o facil it ate p ro per i nstall ati on.
O nce the appl ian ce is pos iti oned f or levell in g, t he hei ght of the di shwashe r
m ay be alter ed v ia adjust ment o f the scre wing level of the fe et. In any case,
th e appl ia nce should not b e incl ined more than 2 .
For personal saf ety:
DO NOT USE AN EXTENSION CORD OR AN ADAPTER PLUG WITH THIS APPLIANCE.
DO NOT, UNDER ANY CIRCUMSTANCES, CUT OR REMOVE THE EARTHING
CONNECTION FROM THE POWER CORD.
Befo re cleani ng or p erformi ng ma int enance, always
remove th e p lug fr om the socket.
To clean the exterior and rubber parts of the dishwasher,
do not use solventsor abrasive cle aning products.
O nly u se a cloth w ith w arm soapy wat e r.
To rem ov e s pots or s t ain s from the sur face of t he
in teri or, u se a clot h damp e ned wit h w a ter and a lit t le
v ineg ar, o r a c lean ing pro duc t mad e s pecifical ly f or
dishwashers.
Remove the Plug
No Solve nts or Ab rasive C leani ng
Mov ing the Ap plia nce
Seals
Aft er ever y wa sh, turn off t he w ater supp ly to the
applia nce and l eave th e doo r s lightly op en so t ha t
m oisture a nd odour s a re n ot t rapped in side.
After Every Wash
When not in Use for a Long Time
This appliance must be earthed. In the event of a malfunction or breakdown, earthing will reduce the risk of
electric shock by providing a path of least resistance for the electric current. This appliance is equipped with a
cord having an equipment-earthing conductor and an earthing plug. The plug must be plugged into an
appropriate outlet that is installed and earthed in accordance with all local standards and requirements.

for pers onal safety:
DO NOT USE AN EXTENSION CORD OR AN ADAPTER PLUG WITH THIS APPLIANCE.
DO NOT, UNDER ANY CIRCUMSTANCES, CUT OR REMOVE THE
FROM THE POWER CORD.
EAR THING
CONNECTION
Improper connection of the equipment earthing conductor can result in the risk of an
electric shock.
Check with a qualified electrician or service representative if you are in doubt whether the
appliance is properly earthed.
Do not modify the plug provided with the appliance. If the plug does not fit properly to the
outlet, please have a qualified electrician to install a proper outlet.
Connec t the cold wa ter s upp ly hose to a t hread ed 3 /4(in ch) conn ect or an d ma ke s ure
that it is fastened tightly in place.
If th e wa ter p ipes are new or have not been use d f or an e xt ended per iod o f ti me, le t the
water run to make sure thatthewater is clear. This precautionis needed to avoid the
risk of t he w ater inlet to b e blocked an d dam ag e the app lian ce.
Please close the hydrant after using.
Ins ert t he drain hos e int o a d ra in pip e wi th a mini mum dia meter o f 40mm, or le t it r un in to th e si nk, m aking s ure t o
av oid bend ing o r cr impi ng it . Th e top of the h ose mus t be less than 10 00m m.
A
Counter
Front
Drain pipe
NOTE
The top of the hose
must be less than
1000mm.
φ 40mm
B
The following things should be checked before starting the dishwasher.
The content of this manual is very he lpful to the u sers.
After installation, please make sure to keep this manual.
1
The dishwasher is level and fixed properly
2
T he i nlet va lv e i s o pen
3
There is a leakage at the connections of the conducts
4
The wires are tightly connected
5
The power is switched on
6
The i nlet an d dr ain hoses are k notte d
7
All packing materials and printings should be taken out from the dishwasher
Extension Hose
If you need a drain hose extension, make sure to use a similar drain hose.
It must b e no longer th an 4 met res ; otherw ise the c leaning effe ct of the di sh was her coul d be reduced .
Wa t e r O u t l e t
Connect the wate r dr ain h os e. The dr ain hose mu st be corr ect ly fit ted t o avoid wate r leaks.
Ensur e that th e w ater dra in h ose i s no t kin ked or s quashed .
I f the sink is 1 000 h igh er f rom t he fl oor, t he ex c ess w a te r i n hoses ca nno t be drai ne d dir ec tl y
into the sink. It will be necessary to drain excess water from hoses into a bowl or suitable
conta ine r tha t is held outsi de and low er th an t he s ink.
How to Drain Excess Water From Hoses
Syphon Connection
Insert t he drain h ose into a dr ain p ipe with a minimum di ameter o f 40mm , or let i t r un into th e sink, making sur e t o
avoid ben ding or crimping it. T he to p of the hose mus t be le ss than 1000m m.

Fuse blown, or the home
circuit breaker has been
triggered.
Replace fuse or reset cir cuit breaker. Remove any other
appliances sharing t he same circuit with the dishwasher
Sp il led rinse-aid
Always wipe up rinse-a id spills immedi ately.
Hard water minerals
The affected items are
not corrosion resistant.
The lid of the softer
is loose
Aspayarmis
knocking against
an item in a basket
r
Items of cro c kery
are loose in the
wash cabinet
This may be caused
by on-site installation
or the cross-section of
the piping.
A programme was not
run after dishwasher
salt was added.
Traces of salt have
gotten into the wash cycle.
To clean the interior, use a damp sponge with
dishwasher detergent and wear rubber gloves.
Nev er use any other cleaner than dishwasher
detergent for the r isk of foaming or suds.
Always run the qu ick wash programme
without any crockery in the dishwasher a nd
without selecting the Tur bo funct ion (if pr esent) ,
after adding dishwasher salt.
Check the lip .Ensure the fix is fine.
Interrupt the programme, and rearrange the items
whic h are obs t ructing the sp ay arm.r
Interrupt the programme,
and rearrange the items of crockery .
This has no influe nce on the dishwasher function.
if in doub t, contact a suitably qualified plumber.
Detergent with
colourant was used
Make sur e that the detergent is the one without
colourant.
Improper detergent
Make sure the dishwasher is turned on and the d oor is
closed secu rely.
Check that the water supply is connected properly and
the water is turned on.
Make sure to close the door properly and latch it.
Make sure the power cord is properly plugged into the
wall socket.
Power supply is not
turned on
Error code:E1;
Water pressure is low
Door of dishwasher
not properly closed.
Kink in drain hose
Filt er clogged
Kitchen sink clogged
Check drain hose.
Check the filter
(see section titled )" Cleaning The Filter "
Check the kitchen sink to make sure it is draining well.
If the problem is the kitchen sink no t draining ,you may
need a plumber rather than a serviceman for dishwashers.
Use only the special dishwasher detergent to avoid suds.
If this occurs, open the dishwasher and let suds evaporate.
Add 1 gallon of cold water to the tub. Close and latch the
dishwasher, then select any cycle. Dishwasher will drain
out the water at the first step.
Repeat if necessary.
Open the door after th e draining
has stopped and check if the suds have disappeared.

The dishes were not
loaded correctly .
See notes in " Loading the Dishwasher Baskets ".
Select a more intensive prog ramme.
See" Wash Cycle Table ."
Use more detergent, or change your detergent.
Rearr ange the items so that the sp ay can rotate freely.r
Clean and/or fi t the filter combination correctly.
Clean the sp ay arm jets. See "Cleaning the Spray
Arms".
r
Use less detergent if you have soft water and select
a shorter cycle to wash the glassware and to get
them clean.
Use a mild abrasive cleaner to eliminate those marks.
Re-loading the dishes properly.
Load the dishwasher as suggested in the directions.
Increase the amount of rinse-a id/refill the rinse-aid
dispenser.
Do not empty your dishwasher immediately after
washing. Open the door slightly so that the steam can
escape. Begin unloading the d ishwasher only once
the dishes are barely warm to the touch. Empty the low
basket first. This prevents water for m dropping off
dishes in the upper basket.
In short program the washing temperature is lower.
This also lowers cleaning performance. Choose
a program with a long washing time.
Water drainage is more d ifficult with these items.
Cutlery or dishes of this type are not suitable for
washing in the dishwasher.
The programme was
not powerful enough.
Not enough dete r gent
was d ispensed.
Items are blocking
the path of sp ay arms.r
The filter combination
inthebaseofwash
cabinet is not clean or
is not correct ly fitted.
This may cause
the sp ay arm jets
to get blocked.
r
Combin ation of soft
water and too much
detergent.
Aluminum utensils
have rubbed against
dishes.
Dishes block
detergent cups.
Improper loading
Too little rinse -aid
Dishes are removed
too soon
Wrong program
has been selected
Use of cutlery with
a low-quality coating
Overflow .
Whe n so me malfunctions come on, the appliance will displ ay error code s to warn you:
Longer inlet time.
F aucets is not opened, or water intake is
restri cted,or water pressure is too low.
Some element of dishwasher leaks .
E1
E4
If overflow occurs, turn off the main water supply before ca lling service.
If there is water in the base pan because of an overfill or small leak,
the water should be removed before restarting the dishwasher .

Height : 845mm
Width : 598mm
Depth : 605mm
(with the door closed)
Water pressure: 0.04-1.0MPa
Power supply: see rating label
Capacity: 14 place settings
If overflow occurs, turn off the main water supply before ca lling service.
If there is water in the base pan because of an overfill or small leak,
the water should be removed before restarting the dishwasher .