ODW717WB,ODW717XB
14 place settings
half-load function
Witheachwashcycle.
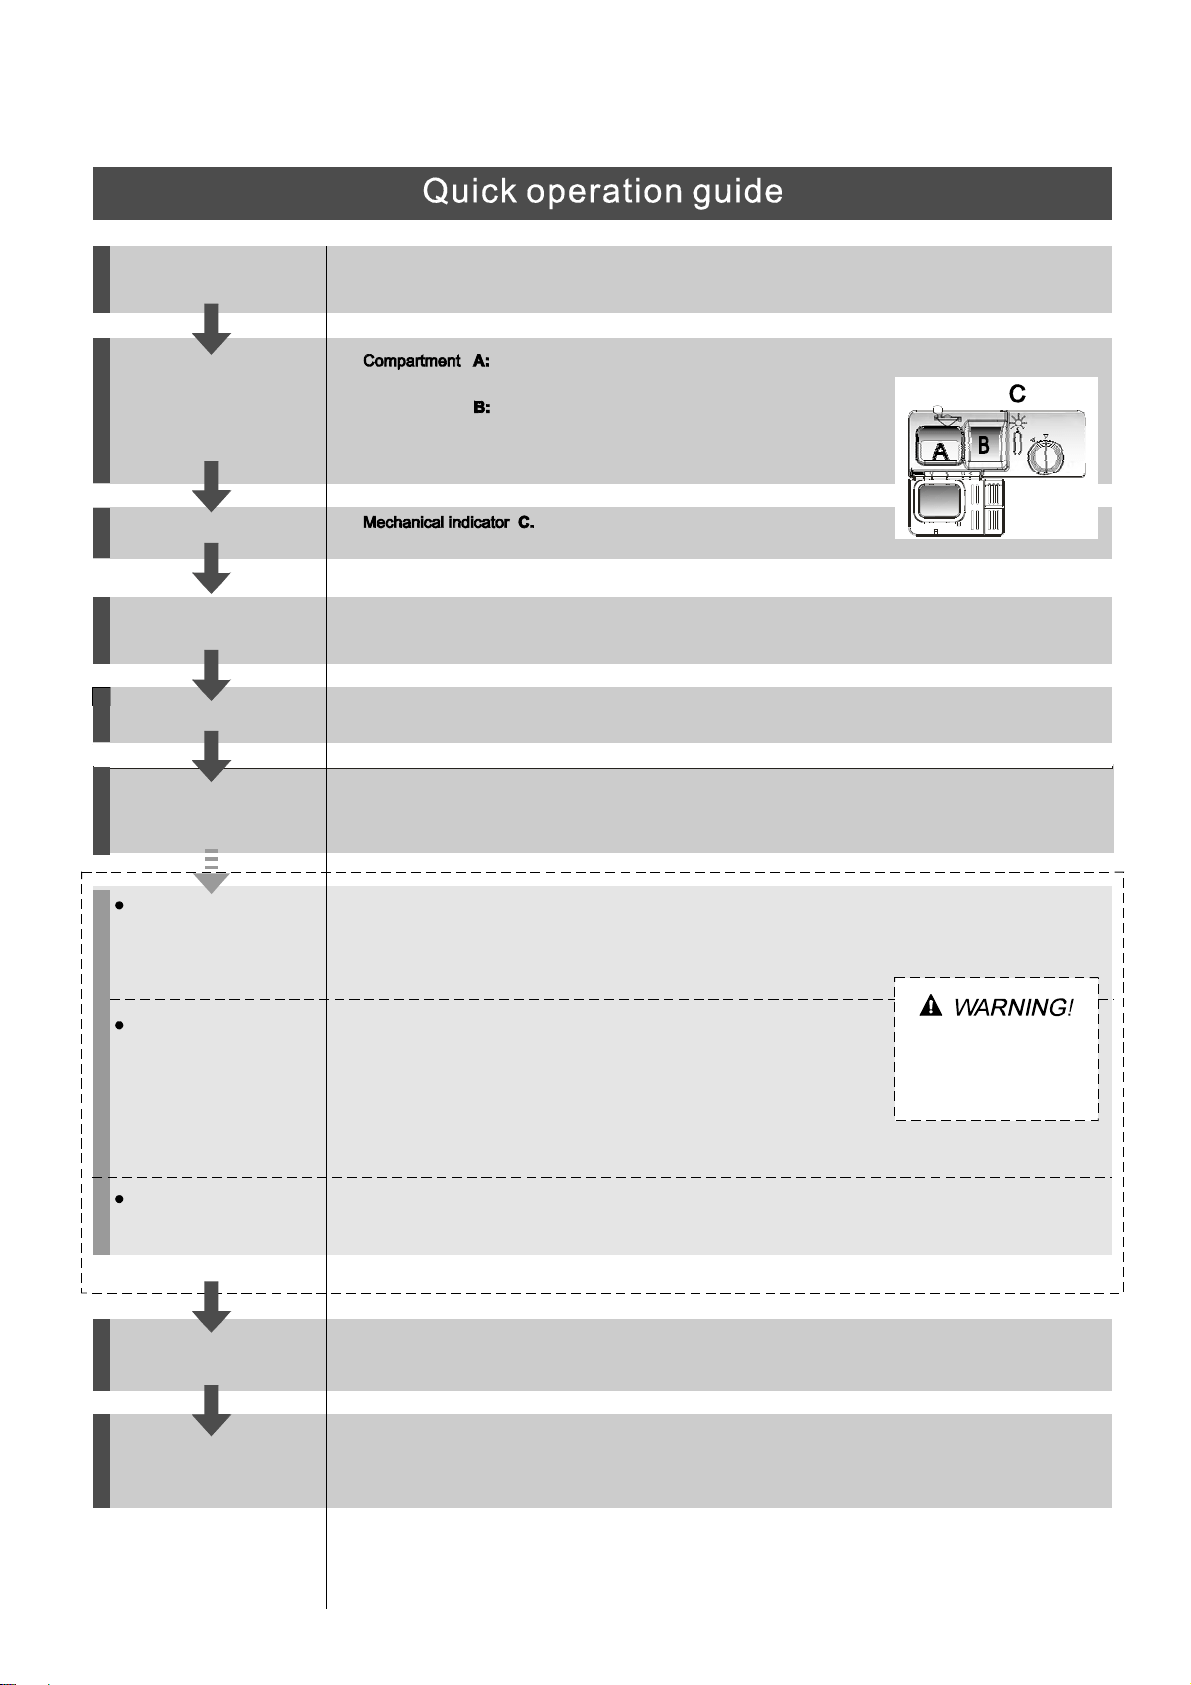
Compartment
For pro grammes with pre-wash only.
(Follow the !)User Manual
Electric indic ator on control panel (if pro vided).
Check the rinse aid level
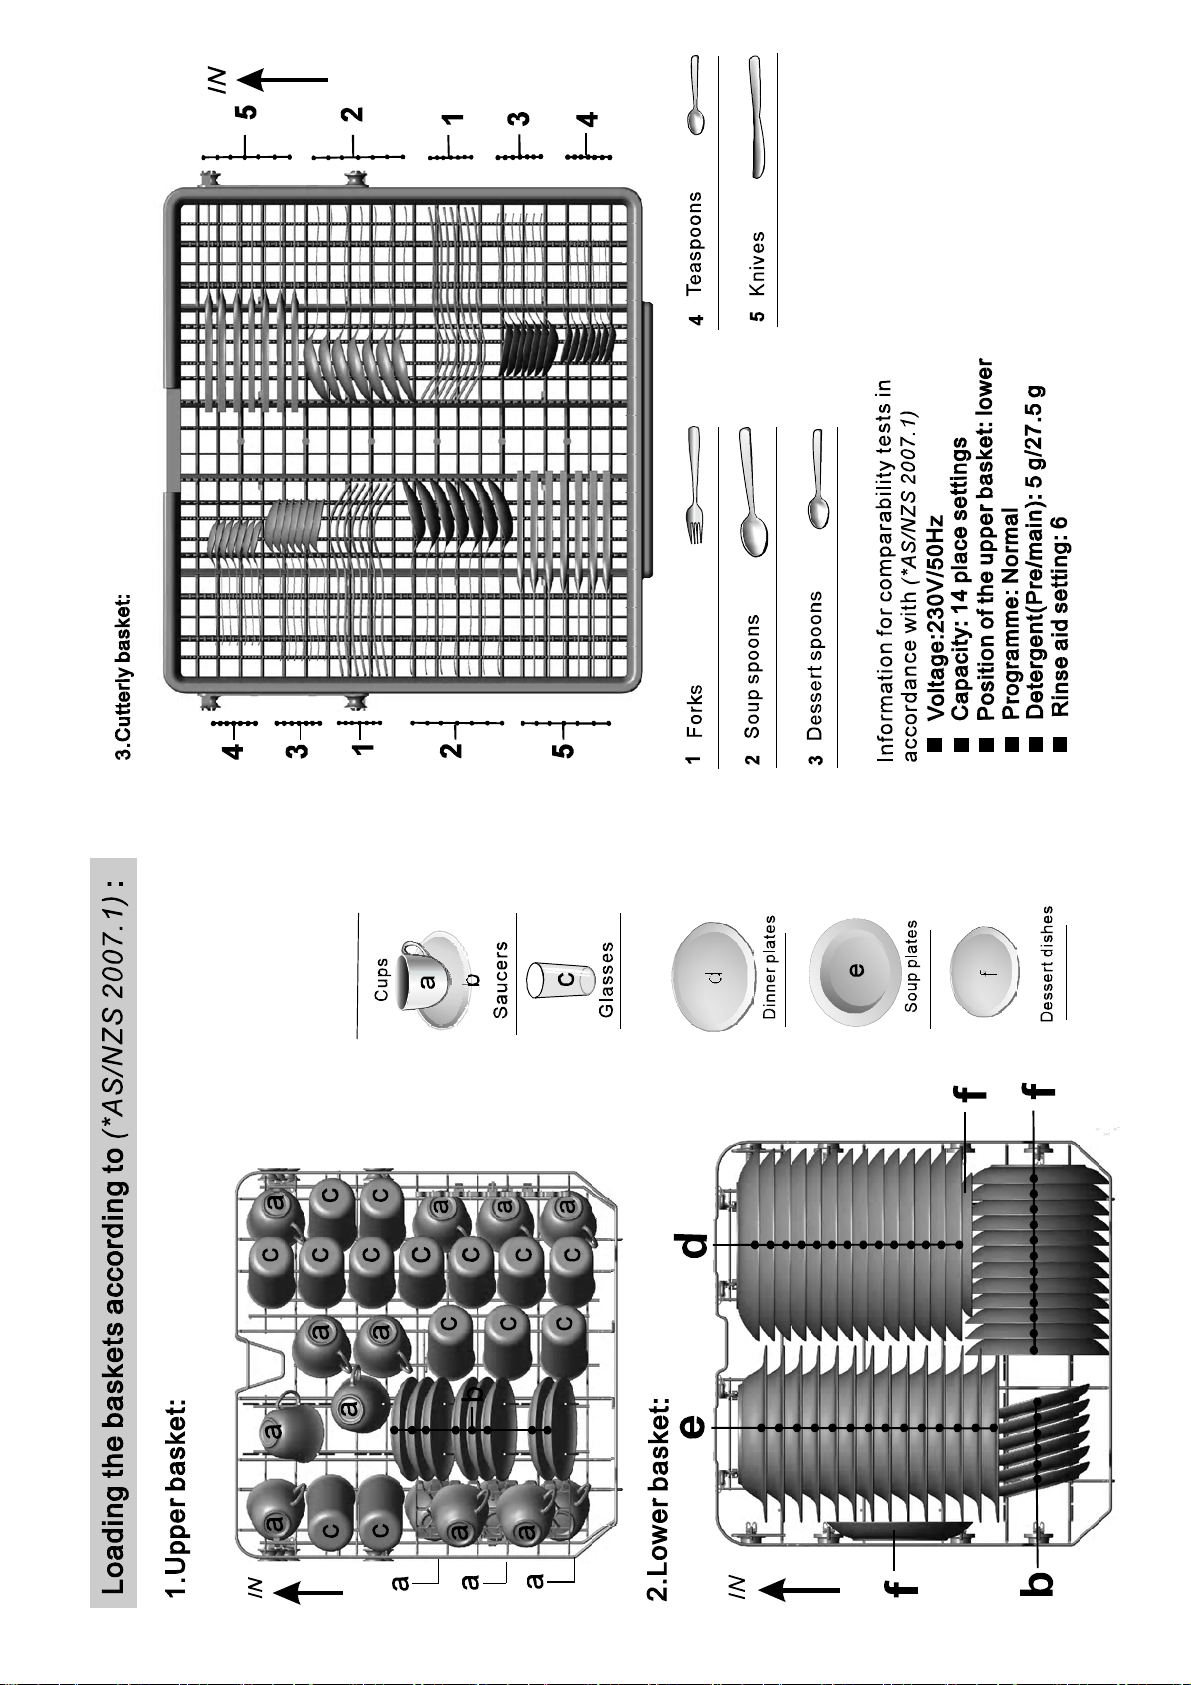
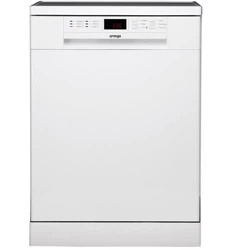
Load the baskets
Select a programme
Turn on the water tap and press the . The machine will start working
after about 10 seconds.
Start/Pause Button
Running the dishwasher
Switch off the appliance
Turn off the water tap,
unload the baskets
Fill the detergent dispenser
Warning: wait a few minutes (about 15 min utes) before unloading the dishwasher to avoid handling
the dishes and utensils while they are still hot and more susce ptible to break.
They will alsodry better.Unload the appliance, starting fro m the lower b asket.
Changing t heprogramme
Add forgotten dishes in the
dishwasher.
Scrape off anylarge amount of leftover food. Soften remnants of burnt food in pans,
then l oad the baskets. Refer to the dishwashe r loadin g inst ructions.
Close the door,press the Programme Button until the selected programme lights up.
( See the section entitled Operation instruction )“”
When the working cy cle has finished, the buzzer of the
dishwasher will sound 8 times, then stop.
Turn off the appliance using the Power Button.
If the appliance is switched
off during a wash cycle.
Op en t he do or car ef ull y.
Hots team m ay esc ape
when thedoorisopened!
If the appliance is switched off during a wash cycle, when switched
on agai n, plea se re-select the washing cycle and operate the dishwasher
according to the original Power-on state.
Switch on the appliance Press the Power bu tton to switch on the appliance, Open the door.
For detailed operating method read the co rresponding contentonthe instructionman ual.
1. A running cycle can o nly be modified ifit has been running for a short time. O therwise the deterg ent
m ay have already be en released and the water already drained. If this is the case, the detergent
dispenser must be refil led.
2.
Press the St art/Pause button, press the program button for more than three seconds,t he
machine will be in standby state, then you can change the program to the desired cycle setting
1.Press the Sta rt/Paus e But ton to stop the washing.
2.Open the door a little .
3.After the spra y arms stop working, you c an open the door
c ompletely.
4.Add forgotten dishes.
5.Close the door.
6.Press the St a rt/Pau s e Button, the dishwa s her will r un
after 10 seconds.
To re vie w the sec tion o nt ro ublesho oti ngTi ps
will helpyoutosolve somecommonproblems
by yourse lf.
Dear Cu s tom e r,
Please carefully read thismanu albeforeusingthe
dishwasher,itwillhelp you t ous eandmaintainthe
dishwasher properly.
Passit on to anysubsequen towner ofthe app liance.
Thismanualcontains sections on safety Instructions,
OperatingInstructions, Installat ionI nstructionsand
Trou bl es hoo tin g Tip s, et c.
The man ufactu rer, fol lowing a p olicy ofc onstant
develo pmenta ndu pdat ing of t he pr oduc t, may
make m odifications wit hout givi ng pr ior not ic e.
K eep it as a r e f er in the later da ys .
Ifyo ucan not solv ethe pro blem sby yo urself ,
please ask f ort he help of profe ssi onal te chnician s.
Th is appli ance isin tended t ob e used in h ou sehol d
andsimilarapplications suchas:
-s taff kitch en a reas in s hop s,off ice s and othe r
w orkin gen viro nme nts;
-farm hous es;
-b ycli ent s in h otel s,m otels and ot he rr esident ia l
t ype env iro nme nt s;
-bed and breakfast type environments.
DishwasherFeatures........ .......................... .. ...2
AttentionbeforeorafterloadingtheDishwasher
Baskets..........................................................6
FilteringSystem.... ........................ ..... ............11
Caring f ort he Dishwasher..................... .........12.
A F illtheRinseAidDispenser............. .. ..3、 ..... .. .
B Function o fDetergent ........................ .4、 ........
... ... ...... ..7
Th eM et hod Load ing No rmal D ish ware
Wash CycleTable....... ....................................9
Turni ng on t h eApp lian ce ... ... ... ... ... .... .. ... ....... .9
Change theProgramme............. . ................10....
At theendof theWa sh Cy cle..... ......... ......... ....10
PositioningtheApplianc e................... ..........13..
Wate r Co nnec t i on.... .. . .... ... .. .... ... .. . ..... ... .. .... .14.
AboutPowerConnection........................ .......13.
Startof dishwasher..... .......................... . ......15..
Be fo re c al lin g f o r ser vic e. . ... .. .. ... . ... . ... .. ... .. . ....1 6.
Errorcodes.................................... . .............17.
Tech nical info rmation............................ .. .....18..
Co ntr ol Pa ne l.. . .... . ...... ... .. ... . ... ...... .. ... . ... ....... . ..2
This appliance must be grounded. In the event of a
malfunction or breakdown, grounding will reduce
the risk of anelectric shock by providing a path of
least resist ance of electric current. This appliance
is equipped wi th a cord having an equipment-
grounding conductor and a grounding plug.
The plug must be plugged into an appropriate outlet
that is installed and grounded in accordance with
all local codes and ordinances.
Keep children away from detergent and rinse aid, keep
child away from the open door of the dishwasher,
there could still be some detergent left inside.
ren
Donotabuse,siton,orstandonthedoorordish
rack of the dishwasher.
Do n ot touch the heating element during or
immediatel y after use.
(This instruction is only applicable to machines
with a visual heating element.)
Do not wash plastic items unless they are marked
dishwasher safe or the equivalent. For plastic items
n
ot so marked, check the manufacturer's
recommendations.
Use o nly deterge nt and rin se additives
desi gn ed for an a utom atic dis hwa sher.
Never us eso ap, laun dryde te rg ent , or h an d
washi ng detergen t in you rdis hwasher. Ke ep
t h ese pr odu cts out of th e r each of c hi ldr en.
Dur in gi nstallation, th epower supply must not
be ex ce ssive lyor dangero usly be ntor flatt en ed.
Do not tamper with controls.
Do not place any heavy objects the
door wh en it is open. The appliance could tip
forward.
on or stand on
When l oading ite ms to be w ashed :
1) Locat e shar p it em s so t hat th eya re not li kely
to damage t he door seal ;
2 Warni ng: Kni ves and ot heru te nsils with
shar p poin ts must be loade din the bask et
with their points do wn or place din a
horizontalposition.
)
W he nusi ngy our dishwasher, yous houl d
p rev ent pl a stic item s f r o m c oming i n to c onta c t
w itht heh eating e lement.(T his instru cti on is on ly
appli cable to m ac hines wi tha visual he atin g
el ement. )
Ifthes upplycordisdamaged, itmustbereplaced
bythemanufactureroritsserviceagentora
simi la rly q uali fi ed pers on i n or der to av oid a
ha zard.
Pleasedispose ofpackingmaterials properly.
Use the dishwasher only for its intended function.
Remove the door to the washing compartment when
removing an old dishw asher from service or discarding it.
Dishwash erde ter gents are stro ngl yalkal ine, they
can be ext remely da nger ousif swall owed.Avoi d
conta ctwit hski na ndeyes and kee pch il dre n away
fro m the dishwas herwhen the door is ope n.
C heck th at the det erg ent com parm ent is e mpt y
aft er com pletion o fthe wash c ycl e.
Th ea ppliance is to be con nect edto the water
mainsusingnewhose sets and thatold hose-sets
s houldno t be reused.
T he max im um numb er of p lace set t i ngs to b e
washedis14.
T he max im um perm i ss ible i nl et water pressur e is
1Mpa.
T he mini mum p erm is sible i nlet water pr es su r e is
0.04Mpa.
Children should be supervised to ensure that they do
not play with the appliance.
This appliance is not intended for use by persons
(including children with reduced physical, sensory or
mental capabilities, or lack of experience and
knowledge ,unless they have been g iven supervision
or instruction concerning use of the appliance by a
person responsible for their safety.
)
When usin g your dishw asher, fo ll ow the pr ecaut ions li s t ed bel ow:
The d oorsh ou ld not be left o pe n,
since this coul d increa sethe ris kof trippi ng.
Improper connection of the equipment-grounding
conductor can result in the risk of an electric shock.
Check with a qualified electrician or service
representative if you are in doubt whether the
appliance is properly grounded. Do not modify the
plug provided w ith the appliance; If it does not fit
the outlet. Have a proper outlet installed by a
qualified electrician.
Do not operate your dishwasher unless all
enclosure panels are properly in place. Open
the door very carefully if the dishwasher is
operating, there is a risk of water squirting out.
The dishwasher must always be connected to
the water system using new hose sets.
If t heap pliance isin stal ledo n a carp e tfl oor,
tak ec a re t h at t h eo p eni ngs in its bas e a r e no t ob stru ct ed .
beforeusingit forthe first time.
To g etthe best perform ance fromyourdishwasher,read all operatinginstructions
10
11
Ba ck View
1
2
3
4
5
6
7
8
9
Fron t vi ew
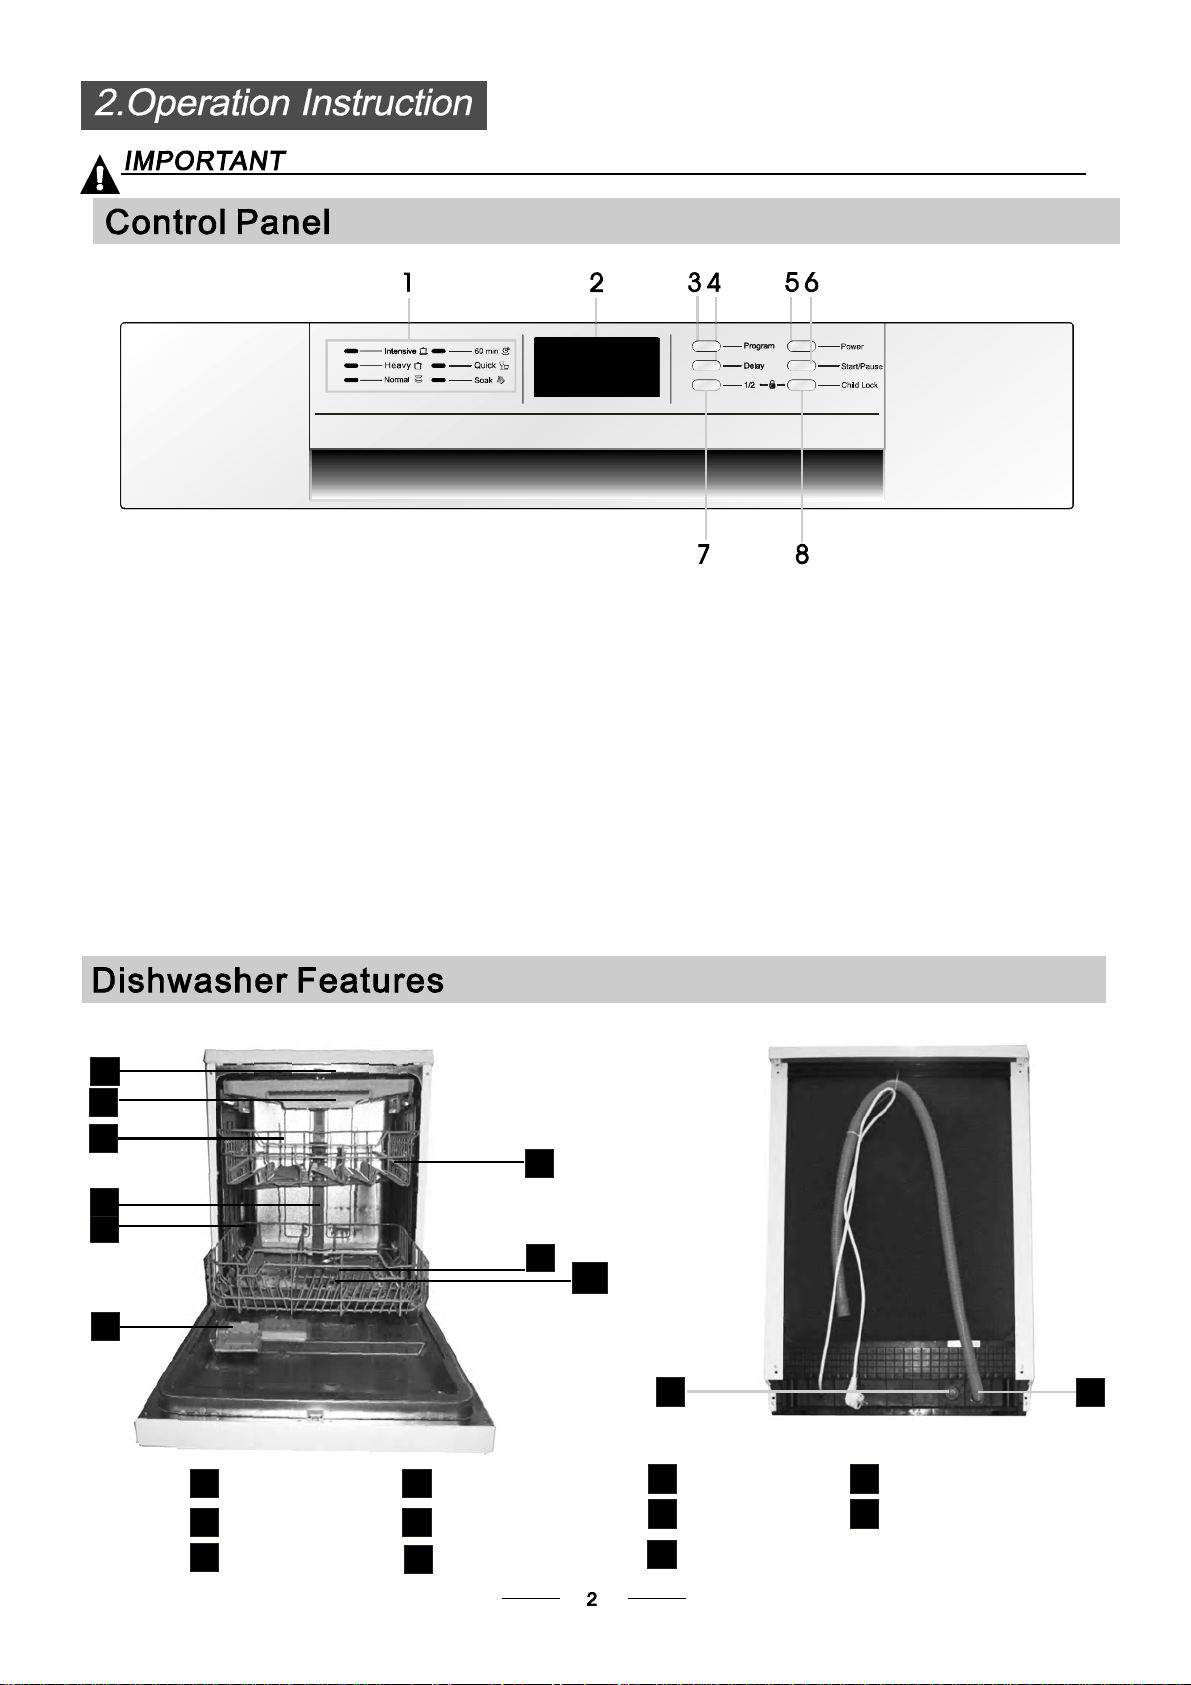
Lower basket
Dispenser
Cupshelf
Sp ray a rm s
Fil ter as sem bly
Inletpipeconnector
Drainpipe
Upper basket
Cutleryrack
Tops pray arm
1
I nner pip e
5
6
7
8
9
11
10
3
2
4
3
1
3
1
6.Start /Paus ebutt on:To st artt he s elected
washin gprog ra mo rpausethe wa shing prog ram
when t he m achine i sw orking.
5.Power B utton:To turn on/off the pow er sup ply.
8.Child lo ckbu tton:p ress the two buttons
sim ultaneously to lock the p rogr am.
4 .Delay Butt on : Pr ess t he button t o de lay.
3.Program B ut ton :To P res s the b uttont o selec t
ap propriateProgram.
1. Pr ogra m indicators: to sho w which
programyouhavechosen;
2.D isplay scr een: t os how t he r emindi ng time
and the state( runn ing s tate, d elay time etc )
7.I f y ou h av e o nl y about or les s than h al f of fu ll load
dishes of the dishw asher, you can sel ect the half lo ad
functio n and your d esired progr amac cording toth e
dishes conta minat e ddeg ree(T he quic kand s oak pr ogra ms
can’t s elect t hisfun ction).
Apro gr amse lectth e half load f unction, it ca n save time,
energ y, and water compare to th e program h asn’t select
the ha lf load functi on.
Aftert he hal f loadf unction i sse lecte d, al lthe spray arms
are runn ing , yo u c an l oad al l t he basket s.
Bef or e using you r dishwas her f or the fir st ti me:
A. Fill therinse aiddispenser
B. F i ll in deterge nt
Therinseaid isreleasedduringthe finalrinseto preventwater from forming dropletsonyour dishes,which can
leave spots andstreaks. Italso improvesdryingby allowing waterto rolloff thedishes.Your dishwasheris
designedto useliquidrinse aids.The rinseaiddispenser islocatedinsidethe door next to thedetergent dispenser.
To fil lt he dispense r,o pen the c apand pour t he rin se ai dint o t hedi spenser unti lth e level indi cator tur ns com pletel y
black.Thevolume ofthe rinseaidcontaineris about 110ml.
RinseAid D ispenser
Function of RinseAid
Rin se aid is autom ati cal ly a dde ddu ring the l ast r inse, e ns uring th oro ughr in sing, an ds po tand st rea k f re e dryi ng.
Attention!
Onlyusebranded rinse aid for dishwasher.Never fill the rinseaiddispenserwithany othersubstances
(e. g. Dis hwasher c leaning a gent ,l iqui d deter gen t). Thi sw oul dd amage t he ap pl ia nce.
As the rin se aid dim ini shes, the size ofthe bl ac k dot
on the rinse ai dlev el indica tor c ha nges, as il lustrated be low.
Fu ll
3/4full
1/2full
1/4full-Shouldrefilltoeliminatespotting
Empty
If t here is n ori nse-aid w arning l ig ht in the c ontrolp ane l,y ou can j udge th e amo un to f r inse-aid by t he color o f the
opti cal level indica tor "C " loc ate d nex tto t heca p. Wh en the rins e-a idc ontaine r i sful l, the whol ei ndica to rw illbe
dark .As t he rinse- aid dim inishes, t he size of th ed arkd ot d ecreases .You sh ould neve rl ett he r inse ai d get b elow
1/4full.
When to Refill the RinseAid Disp ense r
RINSEAIDDISPENSER
Too pe nt hedi spens er, turn the cap to th e "o pen" (lef t)ar rowa nd lift it ou t.
Po ur th e ri nse ai d in to t he di sp ense r, bei ng car eful no t to o verf ill.
Replacethe capby inserting italignedwith "open" arrow andturning ittotheclosed(right) arrow.
Be car eful no t t oover fillth e disp enser,b ecause t hisc ould cau se over suds in g.Wi pe aw ay an ysp il ls
witha damp cloth.Don'tforgettoreplacethec ap beforeyou close thedishwasherdo or.
Attenti on!
Clean up a ny ri nseai d spilt dur ing filling w ith an ab sorb ent clo th toa void exc ess f oaming
during the ne xtw ash.
1
2
3
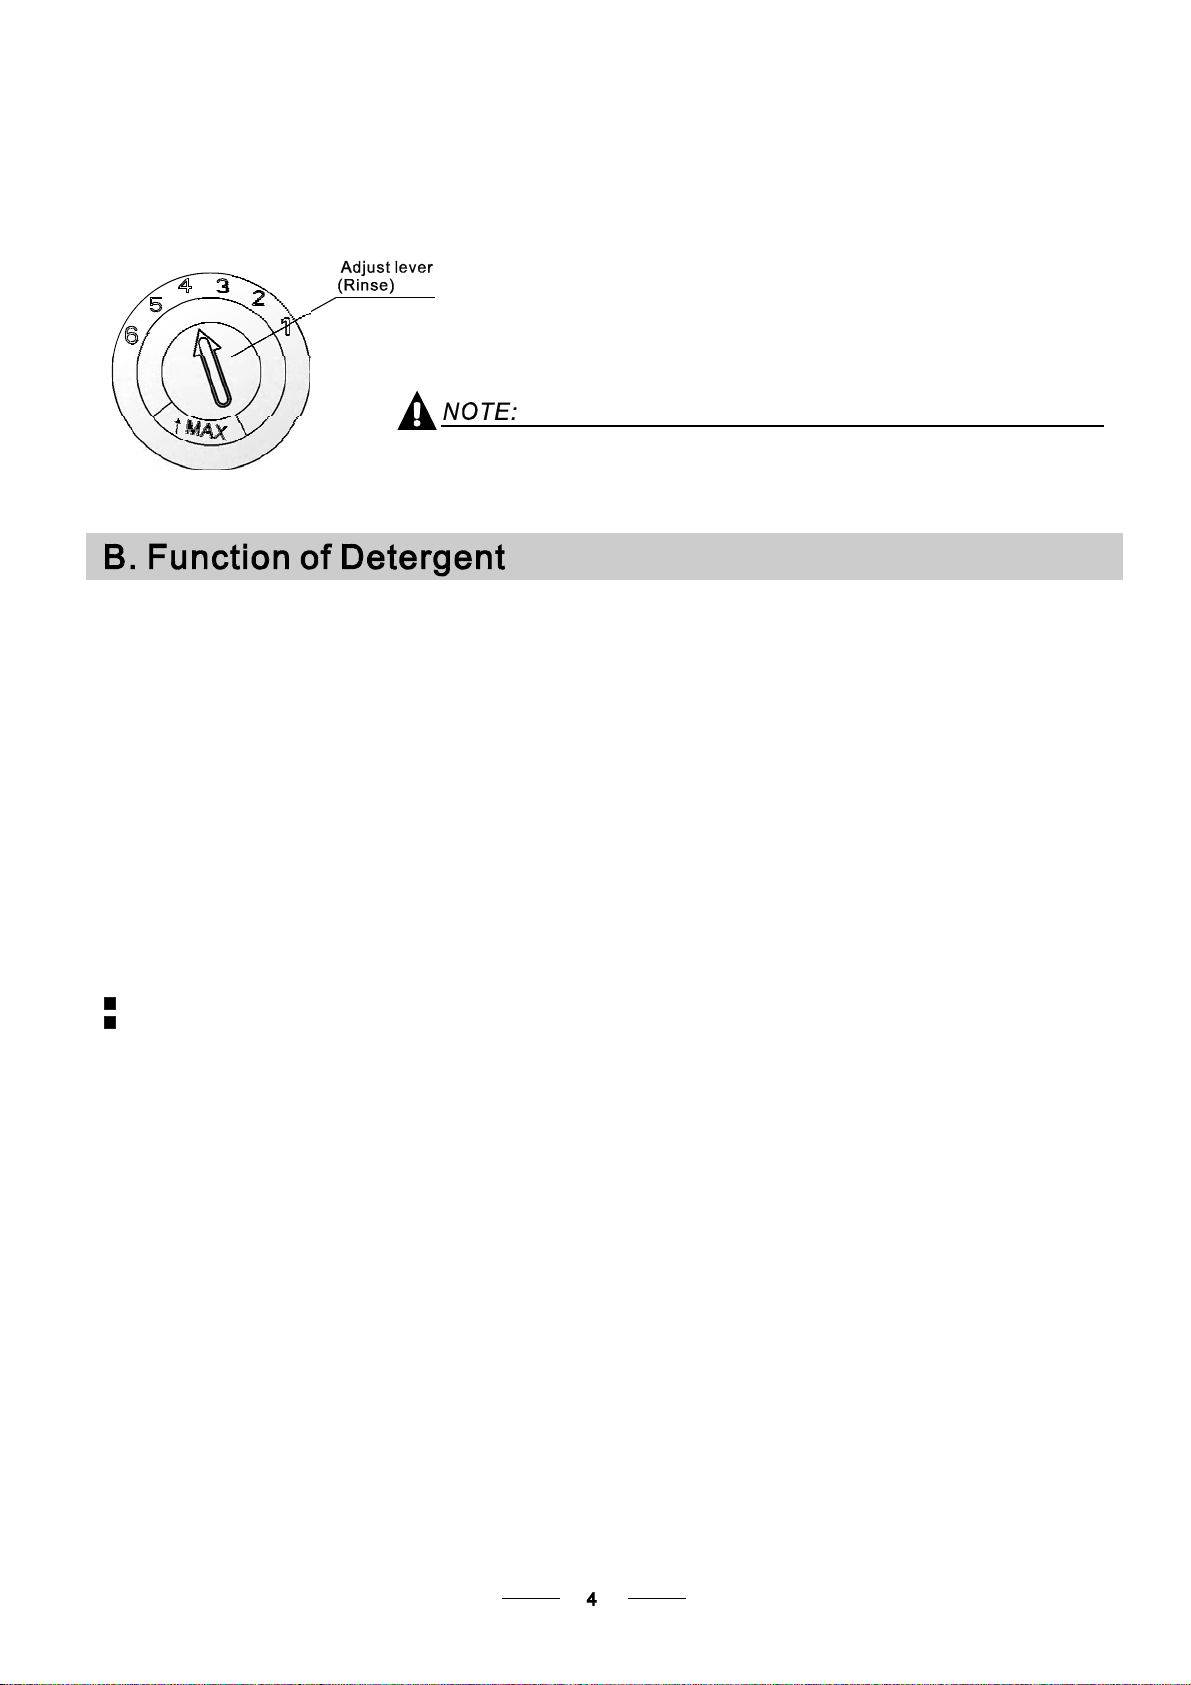
Adjusting RinseAid Dispenser
The r inse a id di spen serh ass ix or four s ettin gs.Always st art with t he dispens er
set o n"4 ". I f s pots and poor dr ying a re a pro ble m,i ncrea seth eam ount of rinse
aiddispensed by removing thedispenserlidandrotatingthedialto"5".Ifthe
d is he s still are not dry ing p rop erlyo r ar e showing s pots, adjust the d ial t othe next
h ighe rle veru ntil you r d is hes are sp ot-fr ee .T he recom mended se tting is "4 ".
(Factory val ue is"4".)
Incr ease th e dose if ther eare d rop s of w ate ro r li mesp ots on the dish es a fter washing .
Reduce i ti fth ere ar e sticky whitis hsta ins on your dish eso r abl uish f ilm on g lassw areo r
knifeblades.
Dete rge nt s wi th it s c hemical i ngredients a re ne cessary t or emove dirt ,c rush d irt an dtrans port it ou tof the di sh washer.
Most o f th eco mme rcial qu ali ty deterge ntsa re sui tablef ort hisp ur pose.
Detergents
Ther eare 3 sorts of det ergents
1.W ith phos pha te and wi thc hlori ne
2.With phos phat eand wi thout c hlorine
3.W ithout p hosphat e and without chl orine
Based on their chemicalcomposition,detergentscan be split in two basic types:
Theuseof normal washingprograms in combination with concentrated detergents
reducespollutionand is goodforyour dishes;these washprogramsarespecificallymatched
to the dirt- diss olvi ng pr ope rti es of the e nzymes of th eco nce ntrated d ete rgent .Fo rth isrea son
norm al was hpro gramsi nwh ich conc entrated de terge nts ar e used can ac hievet hesam e
res ult s that c ano th erwi se only b eac hieved using i nten si ve progr ams .
“”
“”
“”
De terg entt abl ets o fdi ffere ntbrand sdisso lve at diffe rent spe eds. For this reason some
det erge nt t ablets ca nnotd is solve an dde velop th eirf ul lc leaning power du ring sho rt
pro gra ms.The refore please use lon gprogra ms when usi ngd etergent tabl ets, to
ensurethe completeremoval of detergentresiduals.
Thedispenser mus tbe refill ed before thestarto feachwash cycle followingthe instructions
pro vided in the was hcy cle t able .Your dishwash er u ses less detergent an dri nsea id t han
Co nven tional d ishwasher. Gene ral ly,on lyo ne ta ble spoon of detergent is need ed for
a normalwash load.Moreh eavilysoileditemsneedmore detergent.Alwaysaddthe
det erge nt j ust b efor e st artin gth ed is hwashe r, other wise it coul dg etd amp and w ill not
dis sol ve pr oper ly.
Concentrated Detergent
DetergentTablets
DetergentDispenser
conv ent ional ,al kaline de terg ents with caustic compon en ts
l ow a lkal ine c oncentr ated det erge nts with natu ra l enzymes
N ormally new pulveris edd eter gen t is w ithoutp hosph at e.T hus the w ater sof tene r fun ctio n of
phosp hate is not g iven. In this case we r ecomm end t ofi ll salt in t hes alt c ontaine reven w hen
thehardness ofwater isonly6 dH.Ifdetergentswithoutphosphateare used inthecase ofhardwater
of ten whit esp ots appe ar o ndi shes and gla sses. In this case please add m or e detergent t o re ach
bet ter r es ults. Det erge nts with out chlor ine do o nlyb leac ha lit tl e. Str ong a nd coloured sp ots w ill not
be rem ov edc omplete ly.In this c ase ple ase choo se a progra mwi tha hig her te mp erature.
°
Amount ofDetergenttoUse
ProperUseofDetergent
Use o nly deterge nt spe cifically m ade f orthe us ein d ishwashers .Ke epyour d et ergent fr esh and dry.
Don't put powder edd etergent i nto the di spenser u ntilyou'r e re ady to wash dishes.
Dishwasher detergentis corrosive!Take care tokeepitoutofreach of children.
Al w ays add the d ete rgentj ustb efore start ing ea chw ash c ycle.
Only us ebr anded de ter gen t aid f ord ishwash er.
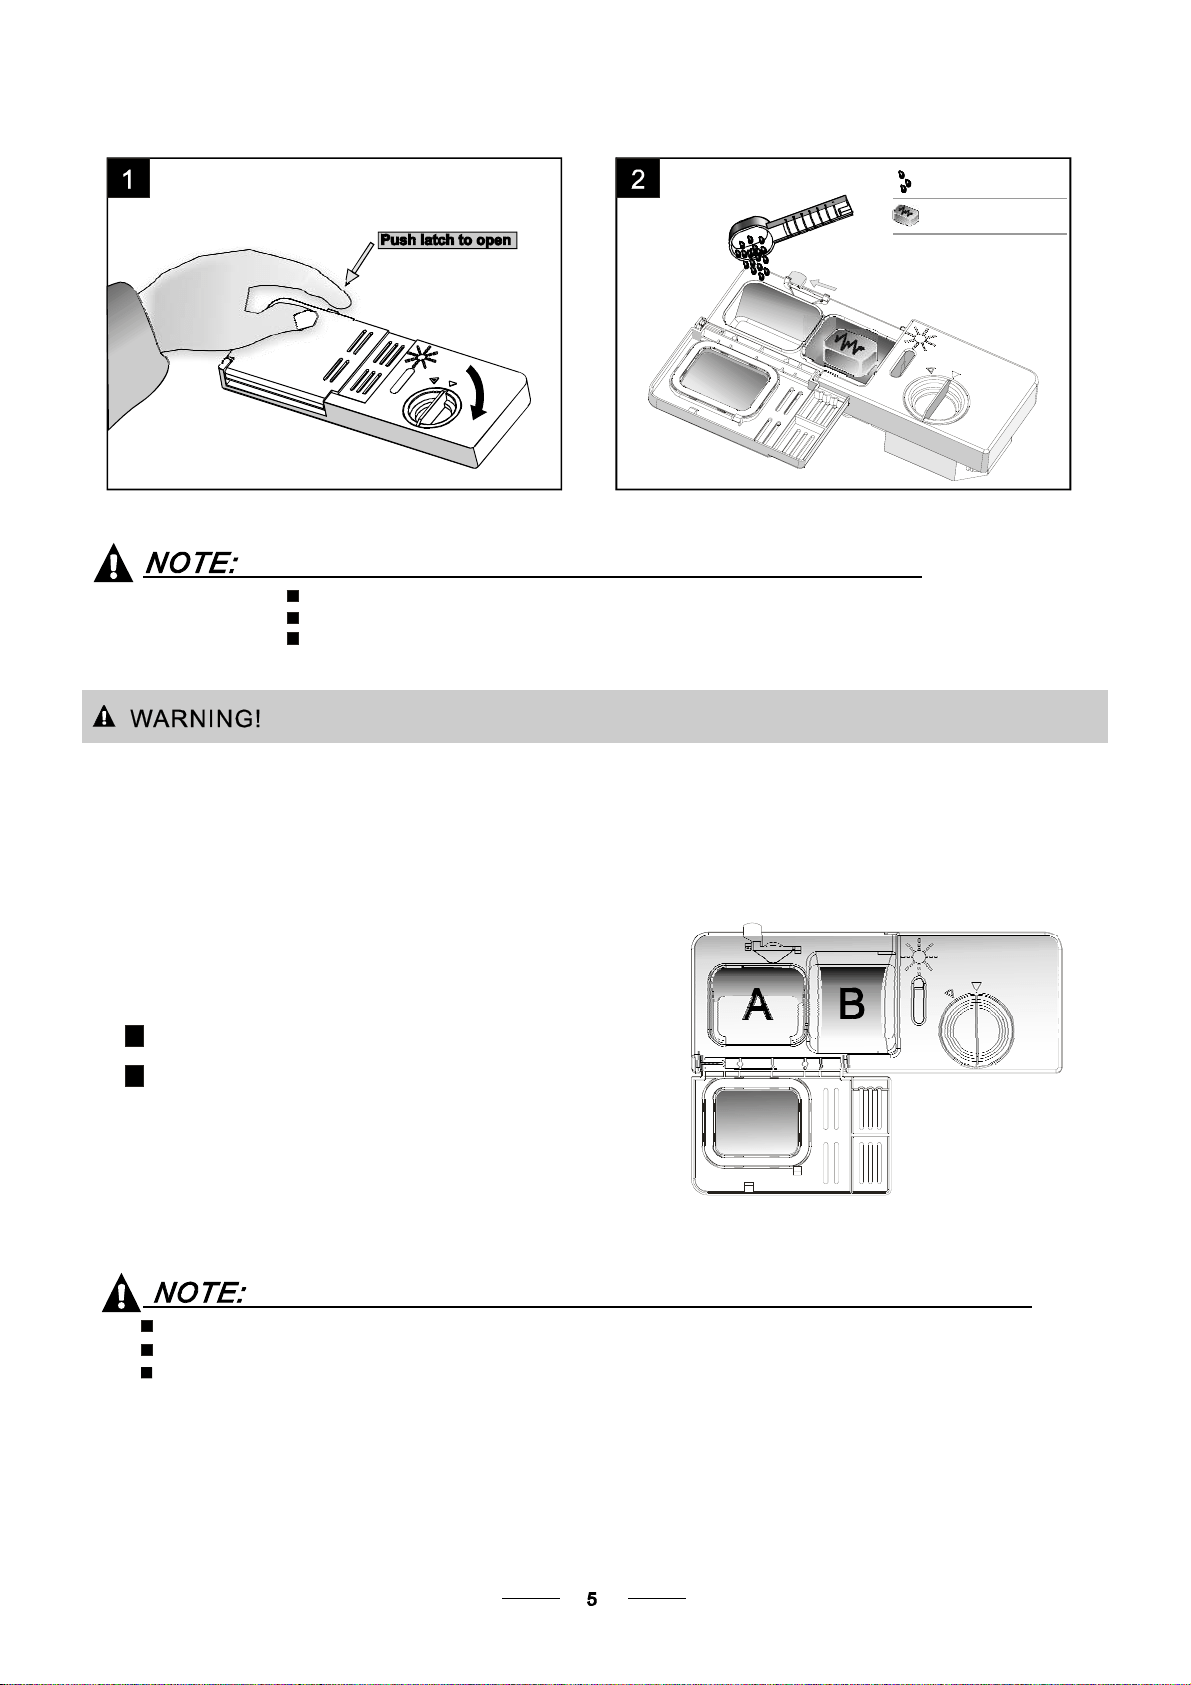
If t he lid i s cl os ed: pr es s r e lease bu tton . The l id w ill s pri n g open.
Detergent tablet
Det e rg ent po wd e r
Fi ll the detergen tdi spen ser with detergent.
Themarkingindicatesthedosinglevels , as
illustratedontheright:
The p lacefor main wash cy cle det ergent.
The pla cefor p re -wash cycle de te rg ent.
Pl ease obs erve th e man ufa cture rs d osin gan dst orag e
Recomme nda t ion s as st at ed on the d eter gent p ac k agi n g .
Close t he li d an d pr ess until it lo cks i n pl ace.
Ifthedishesareheavily soiled, placean additional
deterge nt d ose in the pr e-w ash dete rgen t ch amb er.T his dete rge ntw ill ta kee ffect duri ng th epr e-w ash phas e.
A
B
Fill in Detergent
You find infor ma tion abou tthe a mount of d etergen tfo r the sing lepr ogramm eon t he las tpag e.
Pl ea seb eaw are,t ha taccord ing t othe lev el soiling and the spe cif ic har dn essof w aterd ifferences a re possibl e.
Pl easeo bserve the m anufact urer 'sre commen dati ons on the dete rg ent pac kagi ng.
Cutlerywithwooden,horn chinaor
mother -of-pearl handle s
Plast ici te ms that ar en oth eat resis tant
Older cutl erywit h glued par ts t hat a re not
temperatureresistant
Bonded c utlery i te m sor dishes
Pewter or coop er i tems
Crystal gla ss
Steel items su bject t orusti ng
Wooden p latte rs
Items madefromsyntheticfibres
So me t ypes ofg lasses c anbecom e
dull after a l arge n u mb e r of wash e s
Silv er an da lumi num pa rts ha ve a
tendencytodiscolourduring washing
Glazed patterns mayfadeifmachine
washed frequent ly
Are not suitable
Are oflimited suitability
Dishesand itemsofcutlerymustnot lie insideoneanother,orcover each other.
Toav oidd amage to gla sse s, th eym ust not touc h.
Lo ad large i te msw hic h ar e mo stdifficul tto c lea n in toth e l ower bask et.
The u pper bas ket i sde signed to ho ldm ore d eli cate and lighter d ishware such as gl as ses , coffee
andteacups
Lo ng bladed k nives sto redi nan uprigh tpo sition are a p otential haza rd !
Lo ng and/or s harp item so f cut lery such as carving kniv es must be p ositi one d
h orizon tallyin t he upp erb aske t.
P lease do not ove rl oa d yo urdishw asher. T his is i mportant forg ood resu lts a ndf or
r easonab leconsu mption o f en ergy.
Load h oll ow i tems suc has cups, gl asse s,p ans etc. With the opening facing downward ss o that
w a t er c ann o t c o ll ec t i n the c ont a i n er or a de epba se.
Consider buyingutensilswhichare identifiedasdishwasher-proof.
Usea mild detergentthatisdescribedas'kind todishes'.Ifnecessary, seekfurther
information from thedetergent manufacturers.
For particular items,select aprogramwithaslowatemperature aspossible.
To pr even t da mage, do n ot t ake gla ssa ndcutle ry out of the di shw ashe r imm ediat el y
aft er t he p r ogram meh a se nde d.
(For b estperf ormance of the di shw asher, f ollow the seload inggu ide li nes.
Featu res and ap pearance of baske ts and cutl eryba skets m ay var y from your m odel.)
Scrape off any larg eamo untso f le ftover fo od. S often remnan ts of b urntf ood i npa ns.
It i snot necess ary tori nse t he d ish esu nder running water.
Pl ace objects in the dishwa sheri nthe f ollowing way:
1.Item ssu ch a scups, gla sses, pots /pans, e tc.a re f aced downwa rds.
2.Curv edi tems, or ones wit hreces ses,sh ouldb eloade dasla nts oth at w ater can run off.
3.All u tensils are st acked secu rely and can not ti po ver.
4.All u tensils a re placed in t he way t hat t he s pray arms can rotat efreel y d urin gw ashin g.
Very sm all items s houl dn ot b ew ashedi n the dish was he ras they c ould eas il yfall out of the basket .
To pre ven t wa ter dr ip ping fr om t he uppe rbasket into t he lower basket, we rec om me nd tha tyou
empty the lower ba sk etf irstan dthe nt he upp er ba sk et.
Th eu pper bas ket is de si gned t o hol dm ore del icate
and li ghte rd ishware s uch as g lasses, coffe e an d
teacupsand saucers, aswellasplates,smallbowls
andshallowpans (as long astheyarenot toodirty).
Positi on thedishe san dco okw areso thatthey w ill
notgetmoved bythespray ofwater.
We sug ges t tha t y ou pl a ce l arge item s a nd t he m ost
difficulttocleanitemsaretobeplacedintothelower
basket : su cha sp ots, p ans , lids, se rvin g d ishes and
bowls, as sh own in t h e f igure bel ow. I t is pr ef er abl e to
pla c e s er vi n g d i shes a nd lids o n t he s i de of th e r a cks
in orde rto a vo idbl ocki ngt he ro tatio nof the t op spray
arm.
Pots,servingbowls,etc,mustalwaysbeplacedtopdown.
Dee p pots sho uld be sl anted to allo w water to f low o ut.
Pl ease be r emi nded that :
T heB ottomB as k etf eatur e sfo ldin g sp ikes so t hat l arge r or mor epo t san d p ans c an be l oade d.
Foldin g Spikes of Lower Basket
Fo rbetter stacki ng of pots and pans ,
the spi kesc anb efol ded do wn as
sho w in the p ict ure righ t.
Folding back the c up shelives
Fo r bet ter s tacking ofpo tsa ndpans ,
th e sp ikes can be f olded dow n as
showin the p ict u re ri gh t.
The h eig ht of t he upper ba sket c an be ad justed in o rd er t o
creat emo resp ace for la rg euten sils b oth for t he upp er
/lower basket .The hei ghto f the upp erba sketca nb e
adjusted by l ift up t hebask et fo rt he upper posi tion, and up
press t he hand le to lowe rthe upper baske t,s ee the pictur e
be low:
Adjusting the Upper Bask et
Lift the basket
for upper postion
Up press the handle
to lower the basket
Adjust handle
Max. Dishes
Max. Dishes
Top baske t
Bottom bask et
LowerPositionmax.Φ
Up p er P o si t io nma x.Φ
19cm
25cm
14cm
30cm
Cutl ery sh ould b e pl a c ed i n t he cut l er y r ack sepa ratel y
fro mea ch o the r in thea ppropria tep osit ions, and do
make su r e th e ut ensi l s dono t n est t oge ther, t hi s m ay
causebad performance.
* : This programis the test cycle. Theinformationfor comparabilitytest
in ac co rd anc e wi t h , a s follows :
AS/NZS 2007.1
AS/NZS 2007.1
Capacity: 14setting
Posi t ion U p p er bas ke t: upper w heel s onr ai ls
Rinse aid setting: 6
O pen the door sl ightl y 50 mmto a ssi s t i n dr yin g of t he di shes a ft e r e ve ry wash
Startinga cyclewash
1 Dr aw out the l owe rand up perb asket, load the dish esa nd pu shthe mback.
I ti s to l oad the l owe rb asket first ,t hent he uppe r one ( see the section ent it led
Lo ading the Dishwashe r ).
2 Pour in th ed eterg ent ( see t he sect ione ntitl ed Det ergent a nd Ri nseAid ) .
3 I nse rt the plug into the socket. The power s uppl yis 2 20-240 VAC/ 50 HZ, th esp ecificatio n
of the s ocket is 1 0A 250VAC. Make su re that t hewa ter supply is turn ed on to full pres sur e.
4 Clo se the do or, pr ess the power Button ,and the displ ay will turn on.
5 Pr ess the pro gram Bu tton , the w ash p rogr amw ill b echanged a sf ollows di rectio n:
“”
“”
I nten sive->H eavy->Nor ma l->60 min- >Quick- >Soak;
I f a pro grami sse lected , th erespo nse light will li ght.Th en press the Start/Pa use button, th e
dish wash erb egin sto start.
r eco mme nded
Normal
Intensive
Heavy
(OrAll )in 1
5/27.5 g
(OrAll )in 1
5/27 .5g
(OrAll )in1
5/27.5g
Fornorma llys oil edloads,
suchas , plates ,glasses
andlightly soi ledpans.
standarddai lyc ycle .
pots
For theheaviest soiled
loads, such as pots,p ans,
casser ole dishes and d ishes
thathavebeensittingwith
dri edfood on themfor a
wh i le .
Ashort erwash forl ightly
soiled loadsthat donot
needdrying.
Quick
Pre-w ash( 50 )
Wash(65 )
Rin se
Rin se
Rins e(65 )
Dryin g
℃
℃
℃
Pre-w ash( 45 )
Wash(55 )
Rin se
Rin se (60 )
Dryin g
℃
℃
℃
Pre-w ash
Wash(50 )
Rinse
Rins e(5 0 )
Drying
℃
℃
Wash (40 )
Rinse
Rins e(45 )
℃
℃
165
160
135
40
1. 15
0.9
1.4
0. 5
18
14.5
13.9
10 .5
60 m in
Pre-w ash(50 )
wa sh(6 0 )
Rin se (50 )
Dry i ng
℃
℃
℃
60
10
0.9
5/27.5g
20g
Daily w ashi nonly 1 h our.
For li ghtl yan dno rmally
soile dp lates and pan s
foreveryday.
Means:need to fill rinse into the Rinse-AidD ispenser.
()
(*AS/NZS200 7.1)
Forheavi l y s oil e d lo a d s ,
suchas pots, plates,glasses
and ligh tly s oi led pans .
Ashorterwashforlightly
soil ed lo a ds th at d o no t
need drying.
Soak
Pre-Wash
80.01
3.8
Washth ear ms in s oap yan dwar mw ater an duse a s oftb rush to
clean thej ets. R ep lace th emaf terr i nsin g the mth orough ly.
When following this procedure from step1 to step 3, the filter system will be removed;
when following it from Step 3 to Step 1, the filte r syste m will be installed.
Itis dangerousto open thedoorwhenwashing,becausethe hotwater may scald you.
W h en t h e working cy cle h as fini s hed, the b u z zer o f t he di s hw a she r wi ll s ou nd f or 8 secon d s, th en s t op . Turn o ff
the app lia n c e u sing the Pow er s wi tc h bu tton , shut off th e w ate r sup p ly and open t h e do or o f the dish wa s her.
Wait for af ewmi nutes b ef ore unlo adin gth edi shwash erto a voidha ndlin gth edi shes and ute nsi lsw hile th ey
are still h ot a ndm or e suscept ibl e to br eak age. The ywi llals od ry be tter.
SwitchOfftheDishwasher
1.S witch off the dishwa sher by p re ssing the button.
2.Turnoff thewatertap.
Po wer
Openthedoorcarefully.
Hot di shes are sensitive to knocks. The dishes should theref orebe a llowed t o cool down around 15 minut es
beforeremovingfromtheappliance.
Open t hedish washer do or, le ave it a jar and wait a f ew minutes be fore rem oving the dishe s. In thi sw ay they
will be cooler an dthe drying will b eimpr oved .
Unloadingthe dishwasher
Iti s normal t hatt he dishw as her is wet inside.
Empty the low erba sketfir sta nd the nthe upper o ne. T his wil lavoi d wat er dr ipp ing f ro m the uppe r Bas ket on to
the dis hes in the l ower one.
If you ope nt hedo or , the m ach ine wil lp aus e. T he p rogram l ight will
stop bli n ki ng an d t he b uzzer wil l b e eve ry m in ute u nle ss y o u close t he door . Af t er
y ou c lose the doo r, the ma chin ewi llke epo nw orkin gaf ter 1 0s econds.
duringa w ash cycle
beeping
Premis e:
Acycl e th atis under way can on ly be mod ified if it ha s only been r unn ing fo ra s hort time. O therwis e, the
de tergent m ay hav ea lready be en re lea sed, a nd the appli ance m ay have alrea dy dr ain ed the wash water.
If t his i st he case , the deter gentd ispenser mu st be refil led( see the sec tio nent itl ed "Load ing the
Det ergent " ).
Pr ess the S tart /Pau sebut ton, the m achine w ill be in st andby stat e, press the program b utton f ormor e than
3 then you can change the program t othe desir ed cycle se tt ing (s eethe s ection ent itled " S tarting aw ash
cycle. . .").
1
2
sec onds
Aforgotten dish can be added any time before the detergent cup opens.
Add forgotten dishes.
Close the door
After the spray arms stop working,you can open the door
completely.
2
3
Open th e door a little to stop the washing.
1
4
5
6
Press the Start/Pause button
Press the button, the dishwasher will run
after 10 seconds.
Start/Pause
When you presstheStart/Pausebutton topause during washing,therunningindicator will
s top bl inkinga nd the d ishwasher w ill eve ry m inu teun less you pr ess t he
button to s tar t.Start/Pause
be beeping
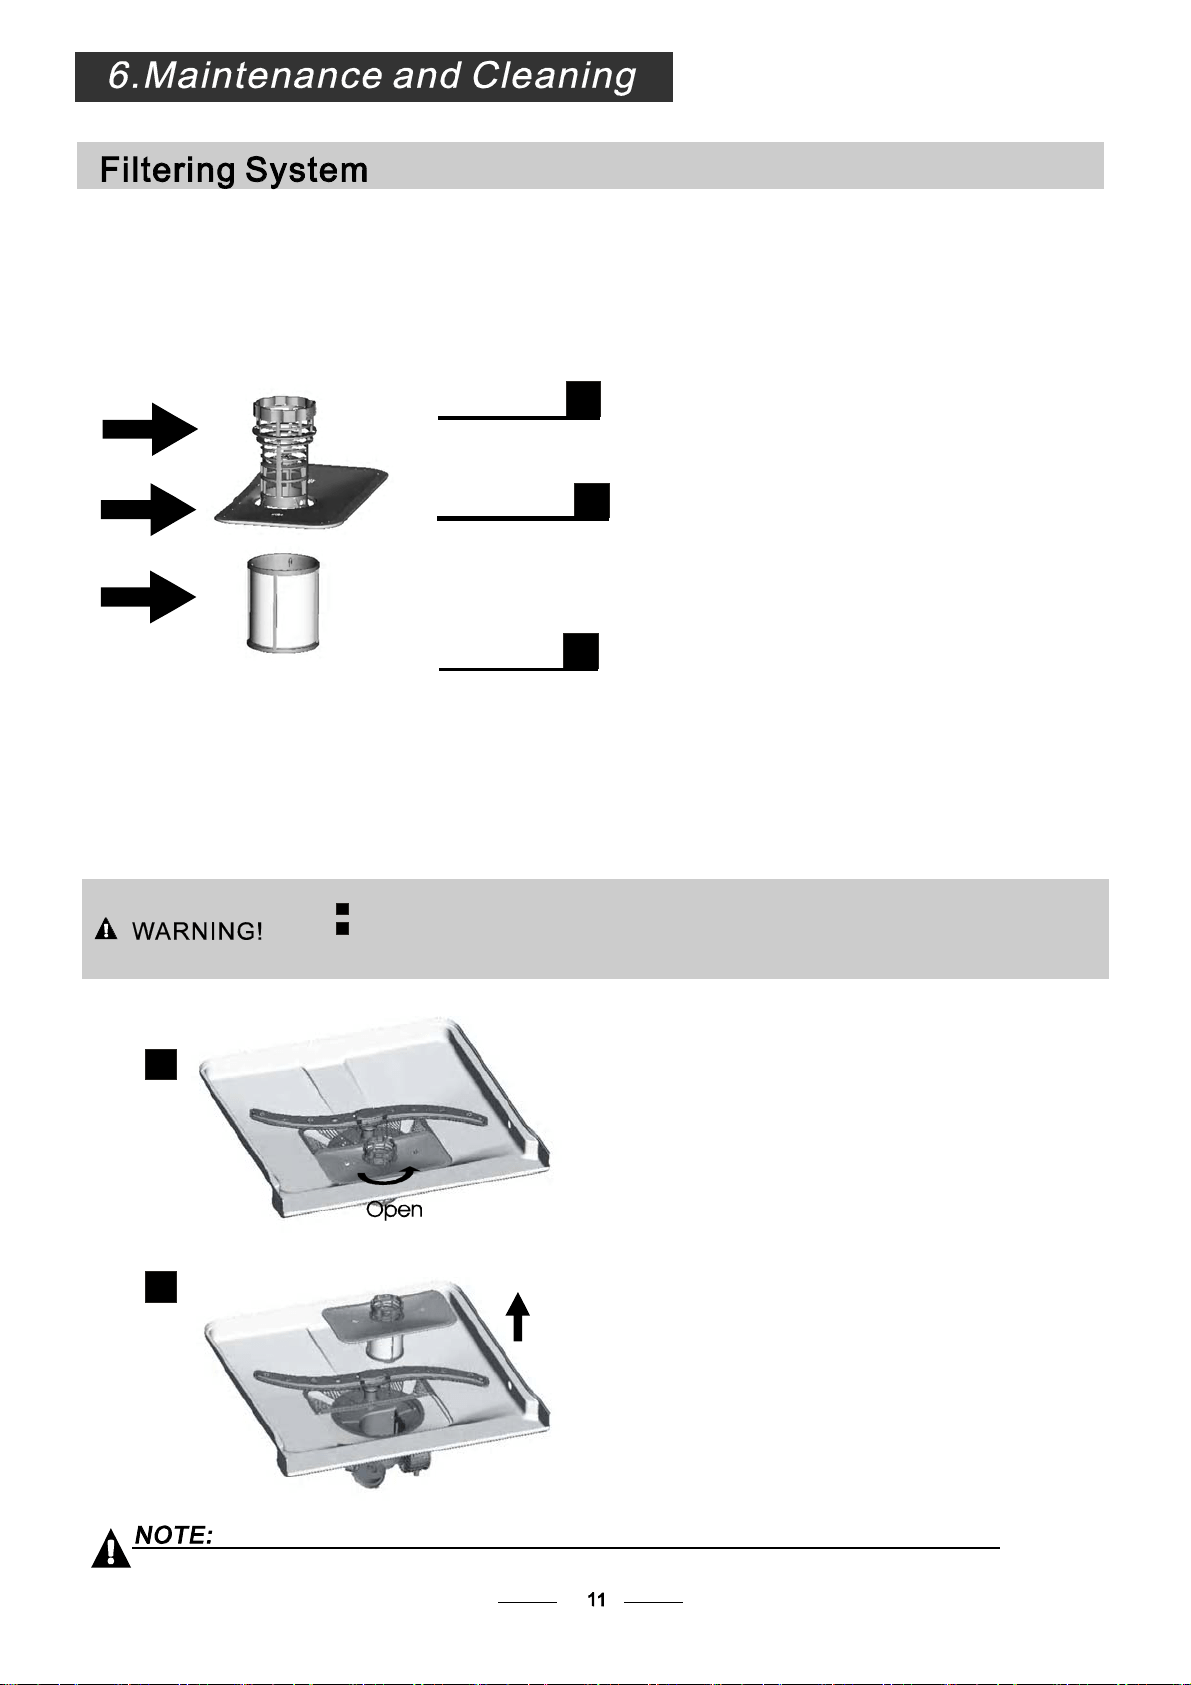
The filter prev ent slar ger remnant sof food or ot her obj ect s from get ting insi deth ep ump.
Theresidues may blockthefilter, inthiscasethey mustbe removed.
The filter s yst emc onsi sts of a coar se filter,a flat (M ain f il te r)
A n da mi c rofi lter( F i ne f il ter).
Food and soil particles trapped inthisfilter arepulverizedbya
specia l jet ont he l ower spr ay a rma ndw ash edd own t od rain.
Larg er i tems, s uc h as pie c es of bone s or gl ass, tha t coul d blo ck
the drain Tore move
the items
andeasilybecometrapped inthecoursefilter
caughtbythe filter,gently squeeze the tap onthetopofthis
filterandliftout.
Thisfilter holds soil and food residuesin the sumpareaand
pr eve nts i tf rom b eing on th e di sh es dur ing w ash c yc le.redeposited
Main filter
1
Coarse filter
2
Fine filter
3
2
3
1
Filterassembly
Thefilter efficiently
For b est p er formance and re sults, t he f il te rmust be cleane dre gularly. t hisr eason,i t i sa goo di de at o
r emo ve th el arger food pa rticl estr app edin the filte raft ereach was hcyc leb yri nsing the s em ici rcular filte ran d
c up u nderru nnin gwa ter. Tore move th efil terd evice, p ull t hec up ha ndl e in t he upwa rdd irect ion.
re mo vesf ood part icle s from th ewa sh w at er,al lowin git t obe rec ycle dd ur ing the cycl e.
For
T he dish was her must n e ver be used wi thout t he f il t er s.
Imp ro per repl ac ementof the f ilt er may red uce the perform an ce lev el of the applian ce
anddamagedishesand utensils.
St ep 1 Turn the filter in ant i-cl ockwise dir ection,:
Step 2 li ft th e fi lter up:
When following this procedure from step 1 to step 2, the filter system will be remo ved;
when following it from Step 2 to Step 1, the filter system will be installed.
1
2
Th e cont ro lp ane lcan be clea ned by using a l ightly dam pened c loth.
Af tercl eaning, m ake sure t o dr yit t horoug hly.
For the ext e ri or, us e a good appli ance po li s h wax.
Neveru ses harp objects, scouring pads o rh arsh c lean ers ona ny part o ft he di shwasher.
ProtectAgainst Freezing
1.Cutoff the electrical power to thedishwasher.
2.Turn off th ewater suppl yan ddisco nnect th ew ater inl etpi pe from the w ate rval ve.
3.Drain the w ater fr omthe inlet p ip ean dwat erva lve. (U se ap an to gathe rth ew ater)
4.Reconnect t he wate rinl etpi pe t othe wate rvalve.
5.Remove the f ilter at the bottom o f the t ub and use a spong et o soak up water in the sum p.
pl ease take fros t pr ot ectio n meas ureso nt he dishw asher in winter.Ev ery fter washing c ycle s,
pl ease oper ateas f ollows
time a
:
Cleaning the Filter
CleaningThe Door
To c lean th e c o a rs e f il t er and t he fi n e fi l t e r, us e a cl ean i n g bru sh . Reas se mbl e t he f il t er part s as s ho wn in t h e figur es
on t he p revi ous page an d r eins er t t he e nt ir e a sse mb l y in t he d ishwash er, p os i t i oning i t i n i ts seat and pr essin g d o w n war d s.
Whencleaning the filters, don't knock on them.Otherwise, thefilterscould be
contorted andtheperformance ofthedishwashercouldbedecreased.
To clean thee dge ar oundt hedoor,you sho uld use o nly a soft wa rm, d am pcl oth.
To avoid penetrat iono f wa te ri nto the d oorlock and el ectrical com ponen ts,d o not
usea spr ay cle aner of any k ind.
Never u sea spr ay cl ean ert ocl ean t he door panel as it m ay dam age the door loc k
andelectricalcomponents.
Ab rasive ag ent so r som e pa pe r towels s hou ldnot b eu sed b ecau seo fth er isko f
sc r a t c hi ng o r leaving s pots on the st ainles s stee l sur fa ce.
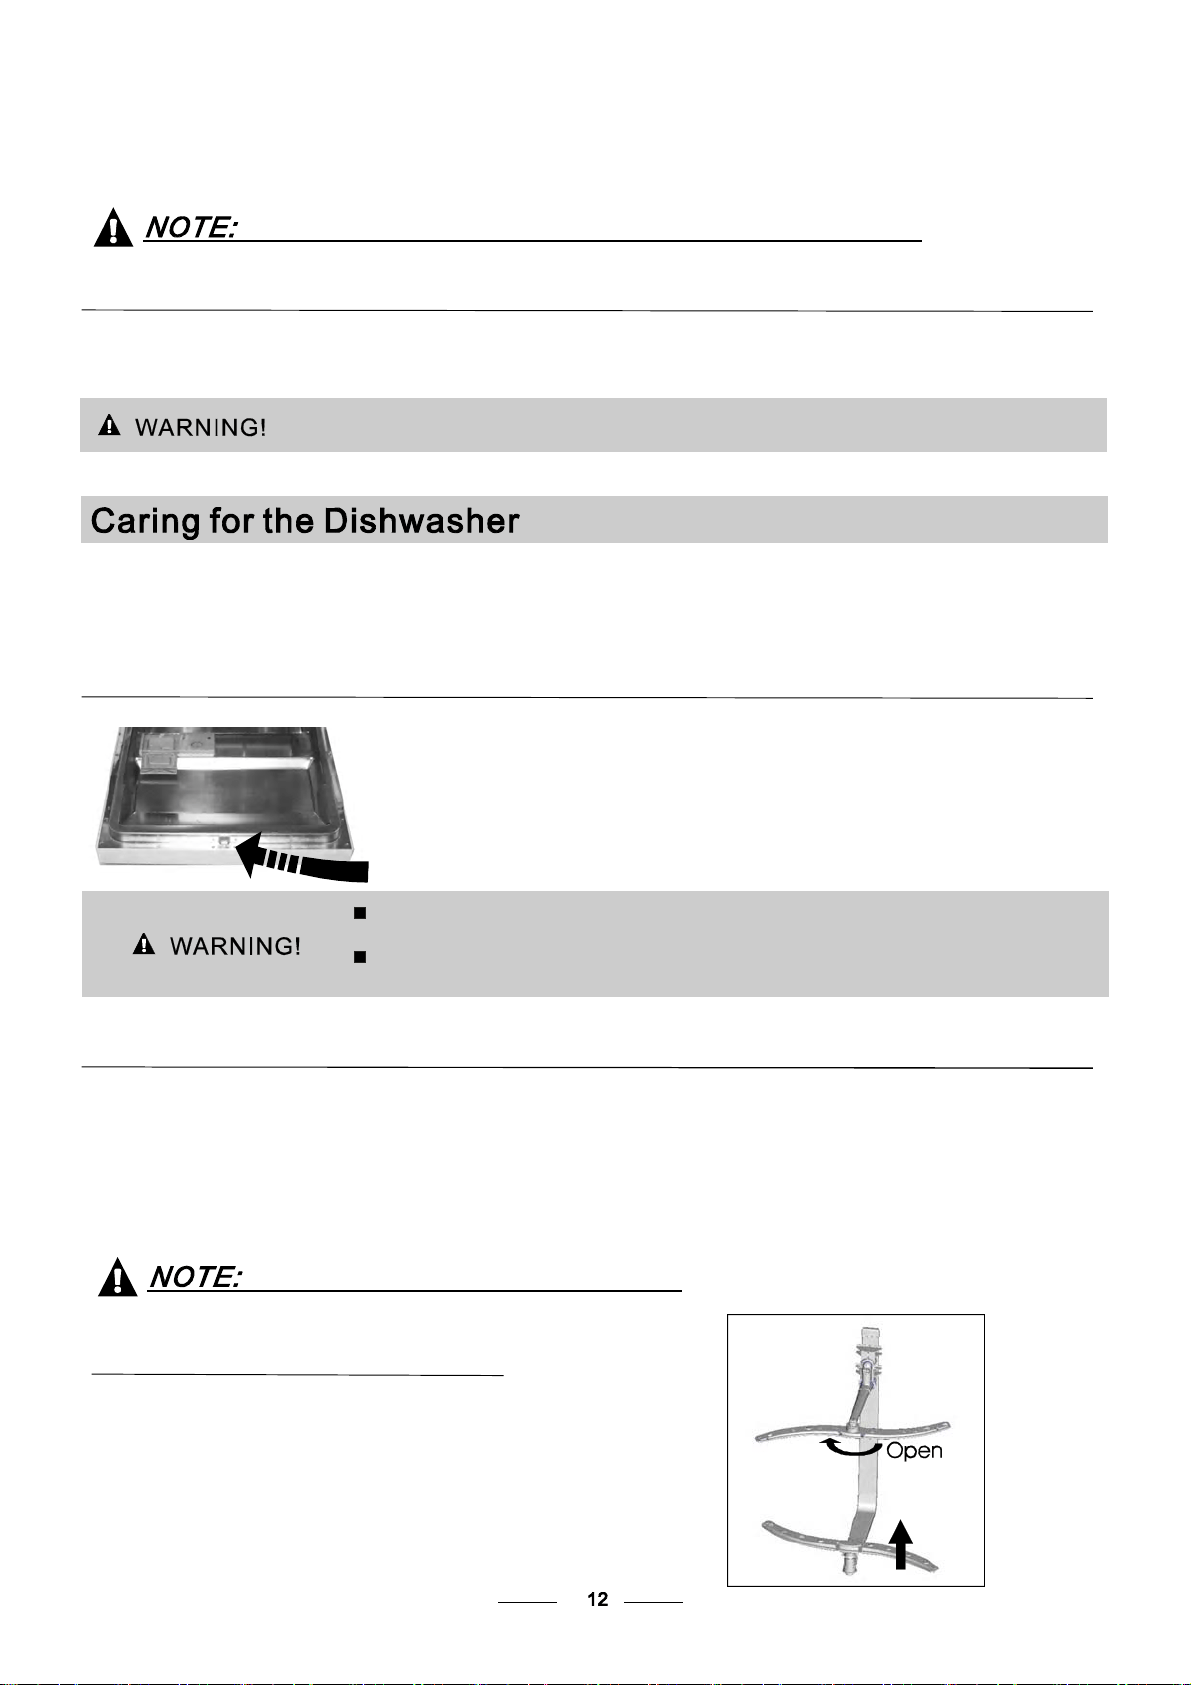
Cleaning the SprayArms
I fyour dishwa shercannot w ork beca use of t he ice,
pl ease co ntac tprof essional service pe rson s.
It i s ne cess ar y t o cl e an t h e s p r ay ar ms r eg ul ar ly for h ar d
waterchemicalswillclogthe sprayarmjetsa ndbearings.
- Ins pect t he filter sfor blo ckinga ftere very tim et he dis hwa sher has be enu sed.
- By uns crew ing the c oar sefi lter, you can remove the filter syst em . Re mov ea nyfoodr emna nts and
cleanthefilters underrunningwater.
Remarks:
Theentire filter assembly shouldbe cleanedoncea week.
Toremovethelowerspray arm,pull out thespray armupward.
To r e mo v e th e u pper s p r a ya rm , h o ld t he n ut, rot ate th e a rm
clockwisetoremoveit.
Washthe arm s in soap yand w armw ater an du sea sof tbrus hto
clean t hejets .R eplac e them aft erri nsingt hem thorough ly.
Itisrecommendthatyourunawashcyclewiththe
di shwasher e mpt yan dt he nre mov eth eplu gf romt he
socket, t urn o ff t he wa te r supp ly and l eave the door of
t he appli a n c e sl ight ly op en. Th is wil l help t h e doo r
sealsto lastlonger andprevent odoursfromforming
withinthe applian ce .
If the app lian ce m ustbe move d, tr yto keep it in the
verticalposition. If absolutelynecessary, itcanbe
positi oned on its back .
Oneofthefactorsthatcauseodourstoforminthe
dishwasher i sfoo dth atre mai nstr app edi n the seals .
Periodic cle aning with ad amp sponge will p rev ent t hi s
f r o m occurr ing.
Ensurethevoltageandfrequencyof the powerbeing usedcorresponds to
t hose on the ratin gpl ate . Only in ser t the plug into an elec trica l s ocket whi ch i sear the d
pr op erly. If th eel ectr ical sock et t owhi ch the a ppl ianc emu st b ec onn ected is not
appropriate fortheplug, replacethe socket, ratherthan usingaa daptor orthelikes as
they couldcause overheatingandburns.
Plea selook at th era ting lab el t o know the rat ing volt age a nd c on nect t he dishwash er to the app ropr iate powers uppl y.
Use the r equ ired fuse 1 0 amp ,tim ed ela yf use or circui tbre ak er rec omm ended and prov ide separat ecirc uit s ervi ng
only this appl ia nce.
Posi tion the appli ancei n the d esired l ocation. The back sho uld r est ag ainst t hew al lb ehi nd it, and the side s,
along t he adj acen t ca bi netso r wa lls.T he d is hwasher i s equippe dwi thwater supply a nd drain hos es th atcan
be pos itioned ei th er to the righ tor the left s ides t o facil it atep ro per i nstall ati on.
O nce the appl ian ceis pos iti onedf or levell in g, t he hei ghtof the di shwashe r
m ay be alter edv ia adjust mento f thescre wing level of the fe et. In any case,
th eappl ia nce should notb eincl ined more than 2 .
For personal saf ety:
DO NOT USE AN EXTENSION CORD OR AN ADAPTER PLUG WITH THIS APPLIANCE.
DO NOT, UNDERANY CIRCUMSTANCES, CUTOR REMOVETHE EARTHING
CONNECTION FROM THE POWER CORD.
Befo re cleani ngor p erformi ng ma int enance, always
remove th ep lugfr omthe socket.
Tocleanthe exteriorandrubberparts ofthe dishwasher,
donot use solventsorabrasivecle aningproducts.
O nly u se a cloth w ith w arm soapy wat e r.
To rem ov e s pots ors t ain s from the sur face of t he
in teri or, u se a clot hdamp e ned wit hw a ter and alit t le
v ineg ar, o r a c lean ing pro duc t mad es pecifical lyf or
dishwashers.
Remove thePlug
No Solve nts orAb rasive C leani ng
Mov ing theAp plia nce
Seals
Aft er ever ywa sh, turn offt hew ater supp ly to the
applia nce and l eave th e doo rs lightly op en sot ha t
m oisturea nd odour sa ren ot t rapped in side.
After EveryWash
When not inUse for aLong Time
This appliance must be earthed. In the event of a malfunction or breakdown, earthing will reduce the risk of
electric shock by providing a path of least resistance for the electric current. This appliance is equipped with a
cord having an equipment-earthing conductor and an earthing plug. The plug mustbe plugged into an
appropriate outlet that is installed and earthed in accordance with all local standards and requirements.

for pers onal safety:
DO NOT USE AN EXTENSION CORD OR AN ADAPTER PLUG WITH THIS APPLIANCE.
DO NOT, UNDER ANY CIRCUMSTANCES, CUT OR REMOVE THE
FROM THE POWER CORD.
EAR THING
CONNECTION
Improper connection of the equipment earthing conductor can result in the risk of an
electric shock.
Check with a qualified electrician or service representative if you are in doubt whether the
appliance is properly earthed.
Do not modify the plug provided with the appliance. If the plug does not fit properly to the
outlet, please have a qualified electrician to install a proper outlet.
Connec t the cold wa ters upp ly hose to at hread ed3 /4(in ch) conn ect or an dma kes ure
that itis fastened tightly in place.
Ifth ewa ter p ipes are new or have not been use df or ane xt ended per iodo f ti me, le t the
waterrunto makesurethatthewater is clear.This precautionis needed toavoidthe
risk of t he w ater inlet tob e blocked an d dam ag e the app lian ce.
Please closethe hydrant after using.
Ins ert t he drain hos eint oa d ra in pip ewi tha mini mum dia metero f 40mm, orle tit r un in to th esi nk, m aking s ure t o
av oid bend ingo r cr impi ngit .Th etop of the h ose mus tbe less than 10 00m m.
A
Counter
Front
Drain pipe
NOTE
The top of the hose
must be less than
1000mm.
φ 40mm
B

Thefollowingthingsshould bechecked beforestartingthe dishwasher.
The contentof this manual is very he lpful to the u sers.
After installation, please make sure to keep this manual.
1
Thedishwasheris level andfixedproperly
2
T he i nlet va lv ei s o pen
3
There is a leakageat the connections of theconducts
4
Thewiresaretightlyconnected
5
The poweris switched on
6
The i nlet an d dr ain hoses are k notte d
7
Allpackingmaterialsand printings should be taken outfrom thedishwasher
ExtensionHose
Ifyouneeda drainhoseextension,makesure touseasimilar drain hose.
It must b eno longer th an 4 met res ; otherw ise the c leaning effe ctof the di sh was her coul d be reduced .
Wa t e r O u t l e t
Connect the wate rdr ain h os e.The dr ain hose mu st be corr ect lyfit tedt o avoid wate r leaks.
Ensur ethat th ew ater dra inh ose i sno t kin ked ors quashed .
I f the sink is 1 000 h igh er f rom t he fl oor, t he ex c ess w a te r i n hoses ca nno t be drai ne d dir ec tl y
into the sink.Itwillbe necessary todrainexcesswaterfromhoses intoabowlor suitable
conta ine r tha tis held outsi de and low erth ant hes ink.
How toDrain ExcessWater FromHoses
Syphon Connection
Insert t he drain h oseinto adr ainp ipe with a minimum di ameter o f40mm ,or let i t r un into th esink, making sur e t o
avoid ben ding or crimping it.T he to pof the hose mus t be le ss than 1000m m.
Fuse blown, or the home
circuit breaker has been
triggered.
Replace fuse or reset cir cuit breaker. Remove any other
appliances sharing t he same circuit with the dishwasher
Sp il led rinse-aid
Always wipe up rinse-a id spills immedi ately.
Hard water minerals
The affected items are
notcorrosion resistant.
The lid of the softer
is loose
Aspayarmis
knocking against
an item in a basket
r
Items of cro c kery
are loose in the
wash cabinet
This may becaused
by on-site installation
or the cross-section of
the piping.
A programme was not
run after dishwasher
salt was added.
Traces of salt have
gotten into the wash cycle.
To clean the interior, use a damp sponge with
dishwasher detergent and wear rubber gloves.
Nev er use any other cleaner than dishwasher
detergent for the r isk of foaming or suds.
Always run the qu ick wash programme
without any crockery in the dishwasher a nd
without selecting the Tur bo funct ion (if pr esent) ,
after adding dishwasher salt.
Check the lip .Ensure the fix is fine.
Interrupt the programme, and rearrange the items
whic h are obs t ructing the sp ay arm.r
Interrupt the programme,
and rearrange the items of crockery .
This has no influe nce on the dishwasher function.
if in doub t, contact a suitably qualified plumber.
Detergent with
colourant was used
Make sur e that the detergent is the one without
colourant.
Improper detergent
Make sure the dishwasher is turned on and the d oor is
closed secu rely.
Check that the water supply is connected properly and
the water is turned on.
Make sure to close the door properly and latch it.
Make sure the power cord is properly plugged into the
wall socket.
Power supply is not
turned on
Error code:E1;
Water pressure is low
Door of dishwasher
not properly closed.
Kink in drain hose
Filt er clogged
Kitchen sink clogged
Check drain hose.
Check the filter
(see section titled )" Cleaning The Filter "
Check the kitchen sink to make sure it is draining well.
If the problem is the kitchen sink no t draining ,you may
need a plumber rather than a serviceman for dishwashers.
Use only the special dishwasher detergent to avoid suds.
If this occurs, open the dishwasher and let suds evaporate.
Add 1 gallon of cold water to the tub. Close and latch the
dishwasher, then select any cycle. Dishwasherwilldrain
outthe water at the first step.
Repeat if necessary.
Open the door after th e draining
has stopped and check if the suds have disappeared.
The dishes were not
loaded correctly .
See notes in " Loading the Dishwasher Baskets ".
Select a more intensive prog ramme.
See" Wash Cycle Table ."
Use more detergent, or change your detergent.
Rearr ange the items so that the sp ay can rotate freely.r
Clean and/or fi t the filter combination correctly.
Clean the sp ay arm jets. See "Cleaning the Spray
Arms".
r
Use less detergent if you have soft water and select
a shorter cycle to wash the glassware and to get
them clean.
Use a mild abrasive cleaner to eliminate those marks.
Re-loading the dishes properly.
Load the dishwasher as suggested in the directions.
Increase the amount of rinse-a id/refill the rinse-aid
dispenser.
Do not empty your dishwasher immediately after
washing. Open the door slightly so that the steam can
escape. Begin unloading the d ishwasher only once
the dishes are barely warm to the touch. Empty the low
basket first. This prevents water for m dropping off
dishes in the upper basket.
In short program the washing temperature is lower.
This also lowers cleaning performance. Choose
a program with a long washing time.
Water drainage is more d ifficult with these items.
Cutlery or dishes of this type are not suitable for
washing in the dishwasher.
The programme was
notpowerful enough.
Not enough dete r gent
was d ispensed.
Items are blocking
the path of sp ay arms.r
The filter combination
inthebaseofwash
cabinet is not clean or
is not correct ly fitted.
This may cause
the sp ay arm jets
to get blocked.
r
Combin ation of soft
water and too much
detergent.
Aluminum utensils
have rubbed against
dishes.
Dishes block
detergent cups.
Improper loading
Too little rinse -aid
Dishes are removed
too soon
Wrong program
has been selected
Use of cutlery with
a low-quality coating
Overflow .
Whe n so me malfunctions come on, the appliance will displ ay error code s to warn you:
Longer inlet time.
F aucets is not opened, or water intake is
restri cted,or water pressure is too low.
Some element of dishwasher leaks .
E1
E4
If overflow occurs, turn off the main water supply before ca lling service.
If there is water in the base pan because of an overfill or small leak,
the water should be removed before restarting the dishwasher .
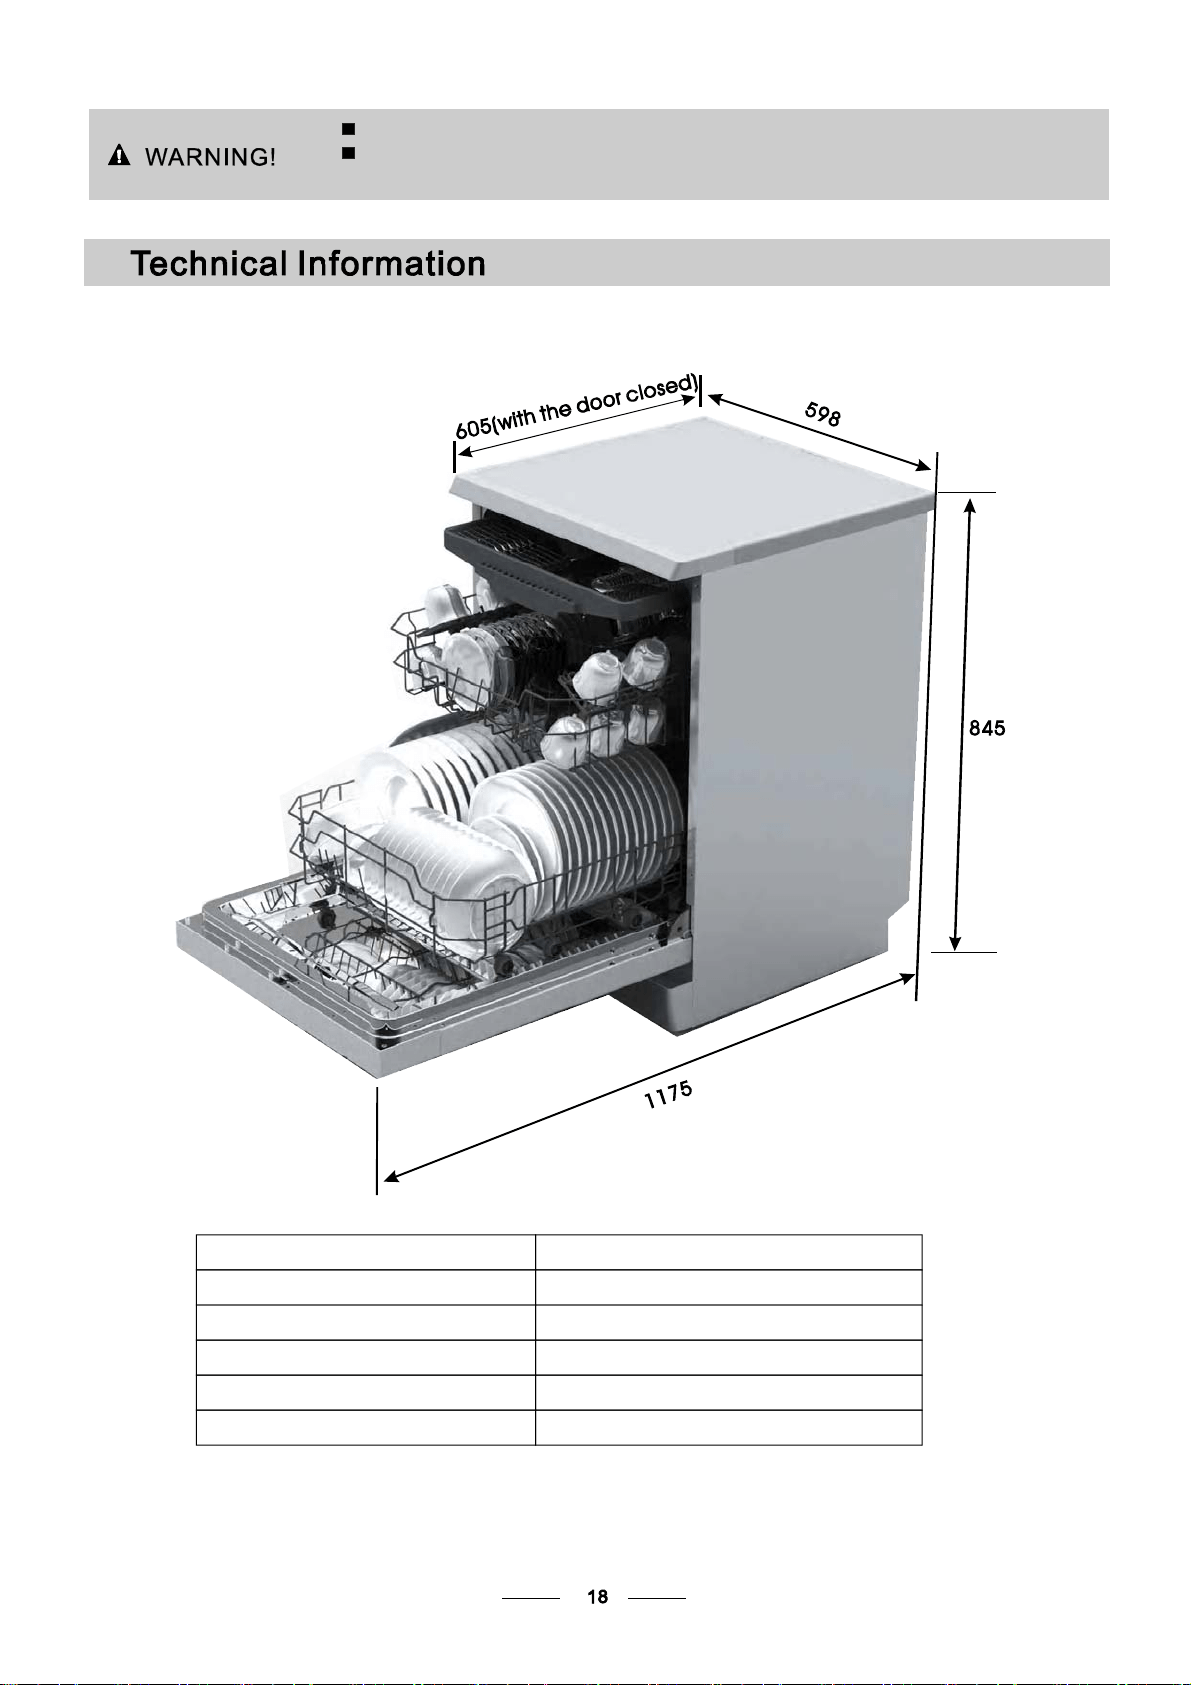
Height: 845mm
Width : 598mm
Depth : 605mm
(with the door closed)
Water pressure: 0.04-1.0MPa
Power supply: see ratinglabel
Capacity: 14place settings
If overflow occurs, turn off the main water supply before ca lling service.
If there is water in the base pan because of an overfill or small leak,
the water should be removed before restarting the dishwasher .