Important Safety Instructions ..........................................................2
How and Why ............................................................................ 2
Energy Saving Ideas ................................................................... 3
Front Installation ............................................................................3-4
Using the Air Conditioner .............................................................5
Air Conditioner Features ............................................................5-6
Careand Cleaning ...................................................................6-7
Routine Maintenance ...................................................................8
Before You Call For Service ........................................................9
Sears Service .............................................................................. I0
Warranty ........................................................................................I 0
Read and Save These instructions
This Useand Care Manual provides specific operating instructions for your model, Usethe air conditioner only asinstructed
inthis manual These instructions arenot meant to coverevery possible condition and situation that mayoccur Common sense
and caution must be practiced when installing, operating, and maintaining any appliance,
Record Your Model and Serial Numbers
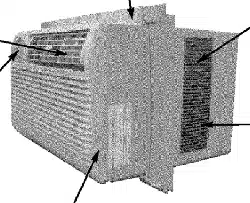
Record in the space provided below the mode! and serial numbers. The seriat plate is located behind the left front louvers,
Reading the numbers may be easier by using a flashtigLhtor by removing the cabinet front as instructed under "Care and
Cleaning*' On some models, the serial plate is !ocated on the outside of the cabinet
Model Number:
Serial Number:
Purchase Date:
_ ............ __ .... _-_,_ '- _____4_ .......:----
P/N 96SR-D02(9510
nmportant Safety
Instructions
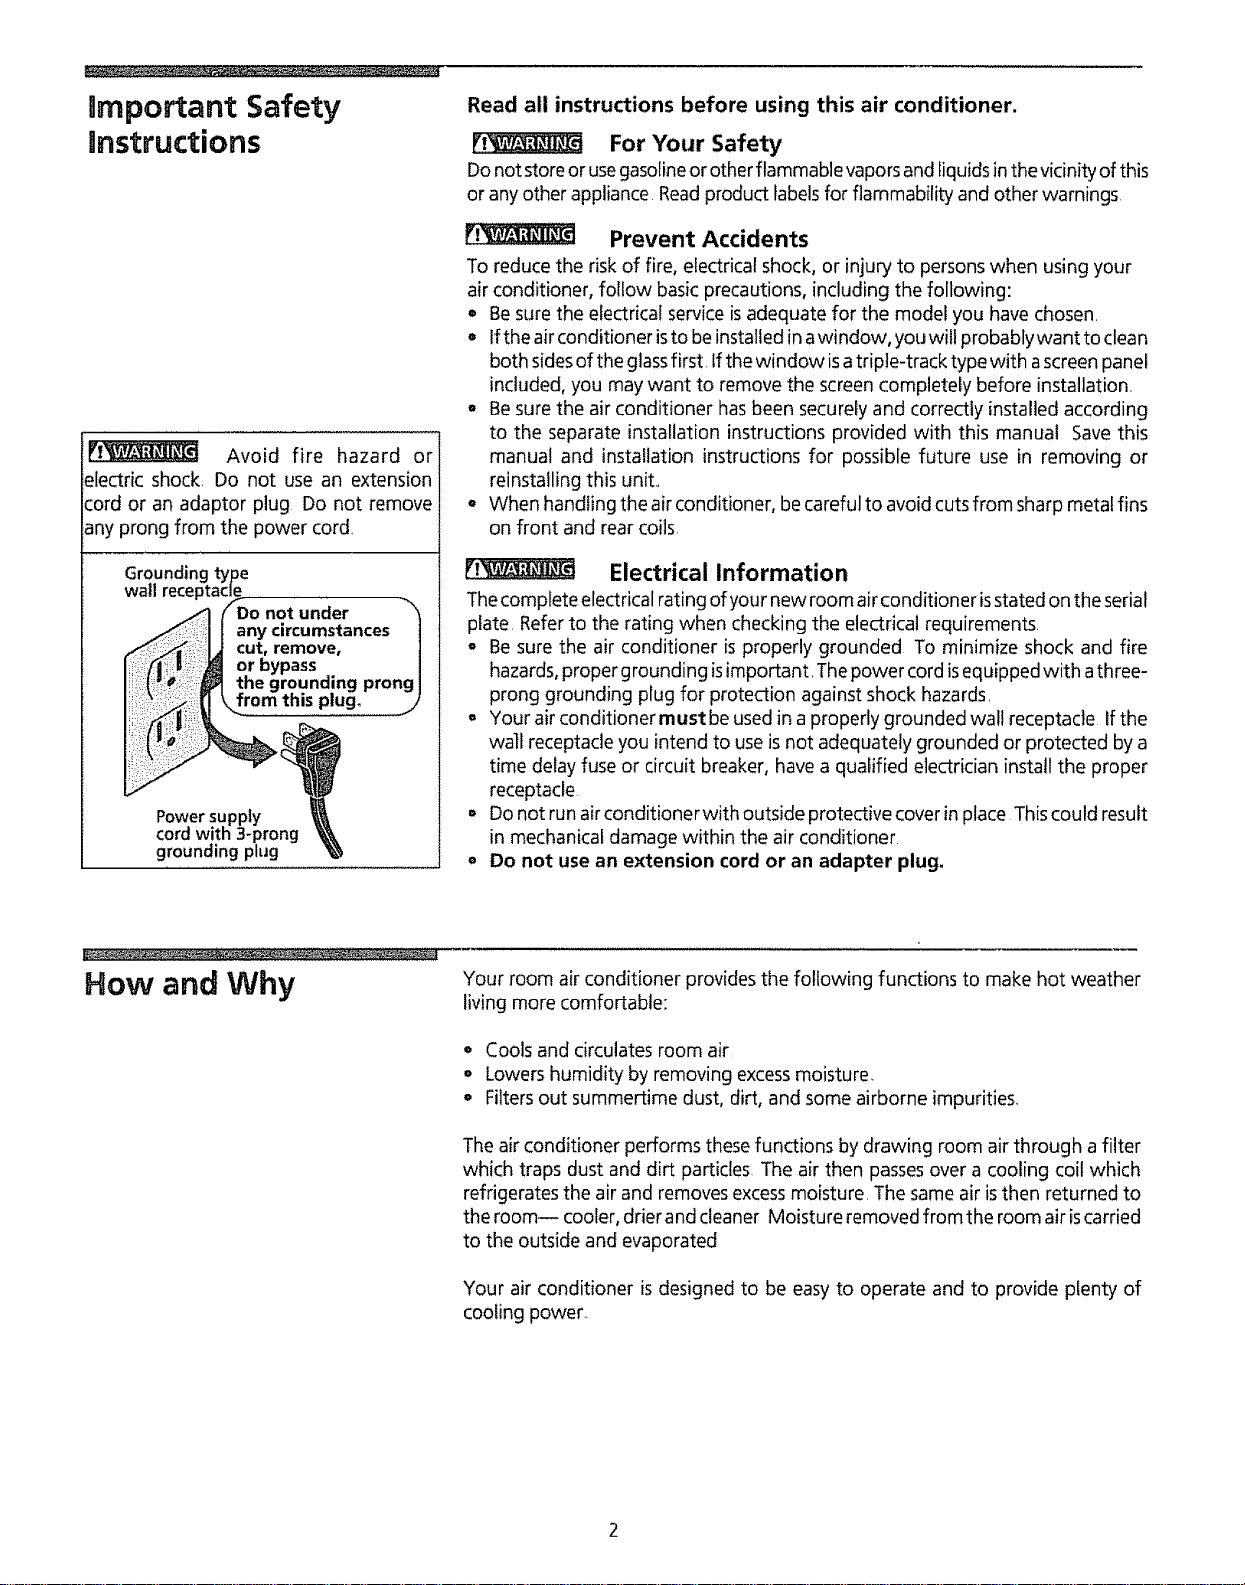
Avoid fire hazard or
electric shock. Do not use an extension
cord or an adaptor plug Do not remove
any prong from the power cord
Groundinc
wall rece
Do not under
anycircumstances|
cut, remove, ]
or bypass |
the grounding prong I
from this p!ug. .j)
Power supply
cord with 3-prong
grounding plug
Read all instructions before using this air conditioner.
For Your Safety
Donot storeor usegasolineor other flammable vapors and Iiquids inthe vicinity of this
or any other appliance Readproduct Iabelsfor flammability and other warnings
Prevent Accidents
To reduce the risk of fire, electrical shock, or injury to persons when using your
air conditioner, follow basic precautions, including the following:
• Besure the electrical service isadequate for the model you have chosen.
• Ifthe air conditioner isto be installed in awindow, youwill probably want to clean
both sides of the glassfirst, tf the window isatriple-track type with ascreen panel
included, you may want to remove the screen completely before installation.
° Besure the air conditioner hasbeen securely and correctly installedaccording
to the separate installation instructions provided with this manual Save this
manual and installation instructionsfor possible future use in removing or
reinstalling this unit..
= When handIing the air conditioner, be careful to avoid cuts from sharp metal fins
on front and rear coils
Electrical Information
Thecomp|ete electrical rating of your new room air conditioner isstated on the serial
plate. Referto the rating when checking the electricalrequirements.
= Be sure the air conditioner is properly grounded To minimize shock and fire
hazards,proper grounding isimportant. Thepower cord isequipped with athree-
prong grounding plug for protection against shock hazards.
= Your air conditioner must be used in a properly grounded wall receptacle If the
wall receptacle you intend to use isnot adequately grounded or protected by a
time delay fuse or circuit breaker, have a qualified electrician install the proper
receptacle
= Donot run airconditionerwith outside protective cover in place This could result
in mechanical damage within the air conditioner
o Do not use an extension cord or an adapter plug,
How and Why
Your room air conditioner provides the following functions to make hot weather
living more comfortable:
• Cools and circulates room air
, Lowershumidity by removing excessmoisture.
o Filters out summertime dust, dirt, and some airborne impurities.
The air conditioner performs these functions by drawing room air through a filter
which traps dust and dirt particles The air then passesover a cooling coil which
refrigerates the air and removes excessmoisture, The same air isthen returned to
the room-- cooler, drier and cleaner Moisture removed from the room air iscarried
to the outside and evaporated
Your air conditioner is designed to be easy to operate and to provide plenty of
cooling power.

Energy Saving Ideas
o The capacity of the room air conditioner must fit the room sizefor efficient and
satisfactory operation
• Install the room air conditioner on the shady side of your home A window that
faces north is best because it isshaded most of the day
° Do not block air flow inside with blinds, curtains or furniture; or outside with
shrubs, enclosures, or other buildings
o Close the fireplace damper, floor and wall registers so cool air does not escape
up the chimney and into the duct work,
, Keep blindsand drapesin other windows closedduring the sunniest partof the day
• Clean the air filter as recommended in the section "Care and Cleaning,"
o Proper insulation andweather stripping in your home will help keep warm air out
and cool air in
o External house shading with trees, plants or awnings will help reduce the air
conditioner's work load
° Operate heat producing appliances such as ranges, washers, dryers and
dishwashers during the coolest part of the day
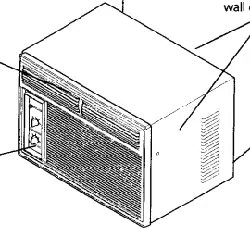
Front Installation
Bottom Rail
Seal
T
InstallingWindow Seal
Vertical
Screw
J.
Unit Cover
Horizontal
Louvers Front Panel
Front installation - Side Air Discharge
(some models)
Installing Bottom Rail Seal (some models)
Some models are shipped in a removable sleevethat must be positioned correctly
for safe and efficient sealing Follow the Installation Instructions supplied with the
model,
Manual Vertical Louver Adjustment (side air discharge)
Complete this adjustment before installing front panel,
1 Adjust the vertical louvers to the straight position by using the handle
2 The dial plate and knobs are packed separately To install them, refer to
Installing the Dial Plate and Front Frame Section following,
Front Installation (some side air discharge models)
Install the front panel with filter asfollows
1 Adjust the horizontal louvers to the straight position Hold the front straight until
the vertical louver handle linesup between the bottom horizontal louver and the
discharge opening
2, Pressthe front straight onto the cabinet until the holes in the flange of the plastic
front line up with the screw holesin the metal cabinet Fastenthe front panel in
place with the two screws provided
installing the Vent Control (some models)
The vent control handle is included in the decorative front kit, To install the vent
handle, refer to illustrations below The handle must be attached before the
decorative front isattached Insert the handle with the tab facing the right
Snapthe slot of the clear actuator strip over the handle tab, PRESSthe strip inplace
from the back of the tab, asshown below, until the tab "clicks" into position, Move
the handle in and out to be surevent operation isworking Ifnot, repeat vent handle
procedure until the vent functions properly
Front Instalaation
(continued)
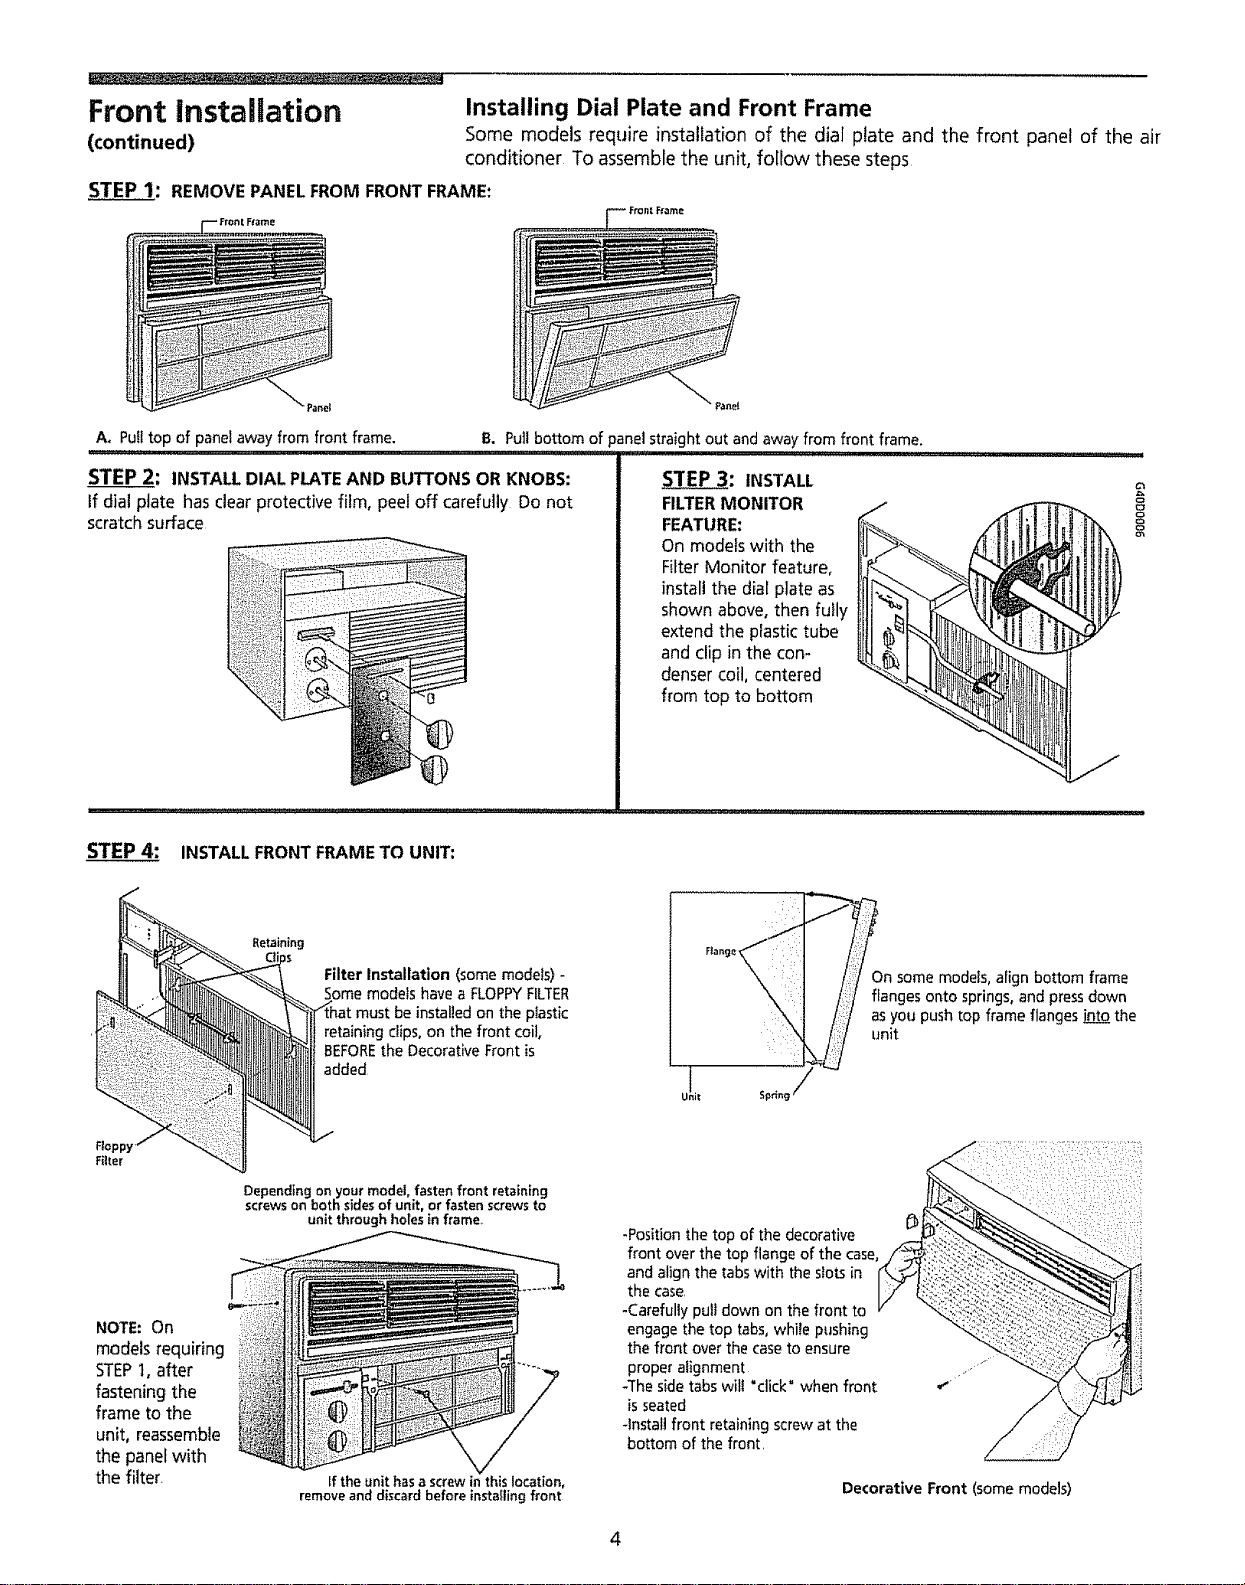
Installing Dial Plate and Front Frame
Some models require installation of the dial plate and the front panel of the air
conditioner To assemble the unit, follow these steps
STEP 1: REMOVE PANEL FROM FRONT FRAME:
=_-- Fro_t Ft,_me
Pane!
A. Pull top of panel away from front frame. B. Pull bottom of panel straight out and away from front frame.
ii ................... !l,!,j,,,i ,,,, ,,,,, iii , i L, i1!111,!,!,!1 ..................................
STEP 2: INSTALL DIAL PLATE AND BUTTONS OR KNOBS:
If dial plate has clear protective film, peel off carefully Do not
scratchsurface
STEP 3: INSTALL
FILTERMONITOR
FEATURE:
On models with the
Filter Monitor feature,
install the dial plate as
shown above, then fully
extend the plastic tube
and clip in the con-
denser coil, centered
from top to bottom
8
STEP 4: INSTALL FRONT FRAME TO UNIT:
Filter Installation (some models) -
Some models have a FLOPPYFILTER
:be installed on the plastic
retaining clips, on the front coil,
BEFOREthe Decorative Front is
added
_On some models, align bottom frame
/ _langes onto springs, and pressdown
as you push top frame flanges "nLQ_tothe
unit
Filter
NOTE: On
models requiring
STEPI, after
fastening the
frame to the
unit, reassemble
the panel with
the filter.
Depending on your model, fasten front retaining
screws on both sidesof unit, or fasten screws to
unit through holes in frame,
If the unit has a screw in this location,
remove and discard before installing front
-Position the top of the decorative
front over the top flange of the case,
and align the tabs with the slots in
the case
-Carefully pull down on the front to
engage the top tabs, while pushing
the front over the case to ensure
proper alignment
-The side tabs wilt 'click" when front
is seated
-Install front retaining screw at the
bottom of the fronL
Decorative Front (some models)
4
..... • ...... .
Using the Air Conditioner
NOTE: If the air conditioner isturned off,
wait 3 minutes before restarting This
allows pressure inside the compressor to
equalize Failure to follow these
instructions may cause inefficient
operation.
To reduce the risk of fire, electric shock, or injury to persons, read the
IMPORTANTSAFETYINSTRUCTIONSbefore operating this appliance
To begin operating the air conditioner, follow these steps:
I, Plugin the air conditioner (Toprevent electrical hazards, do not usean extension
cord or an adapter plug.)
2. Setthe exhaust vent to the CLOSEDposition
3, Setthe TEMP Control to the coolest setting
4 Set the fan control at the highest level,
5 Adjust the louvers for comfortable air flow,
6. Once the room has cooled, set the fan to the POWERSAVERFAN setting and/
or adjust the TEMP Control to the setting you find most comfortable
Review the "Air Conditioner Features" section for other settings,
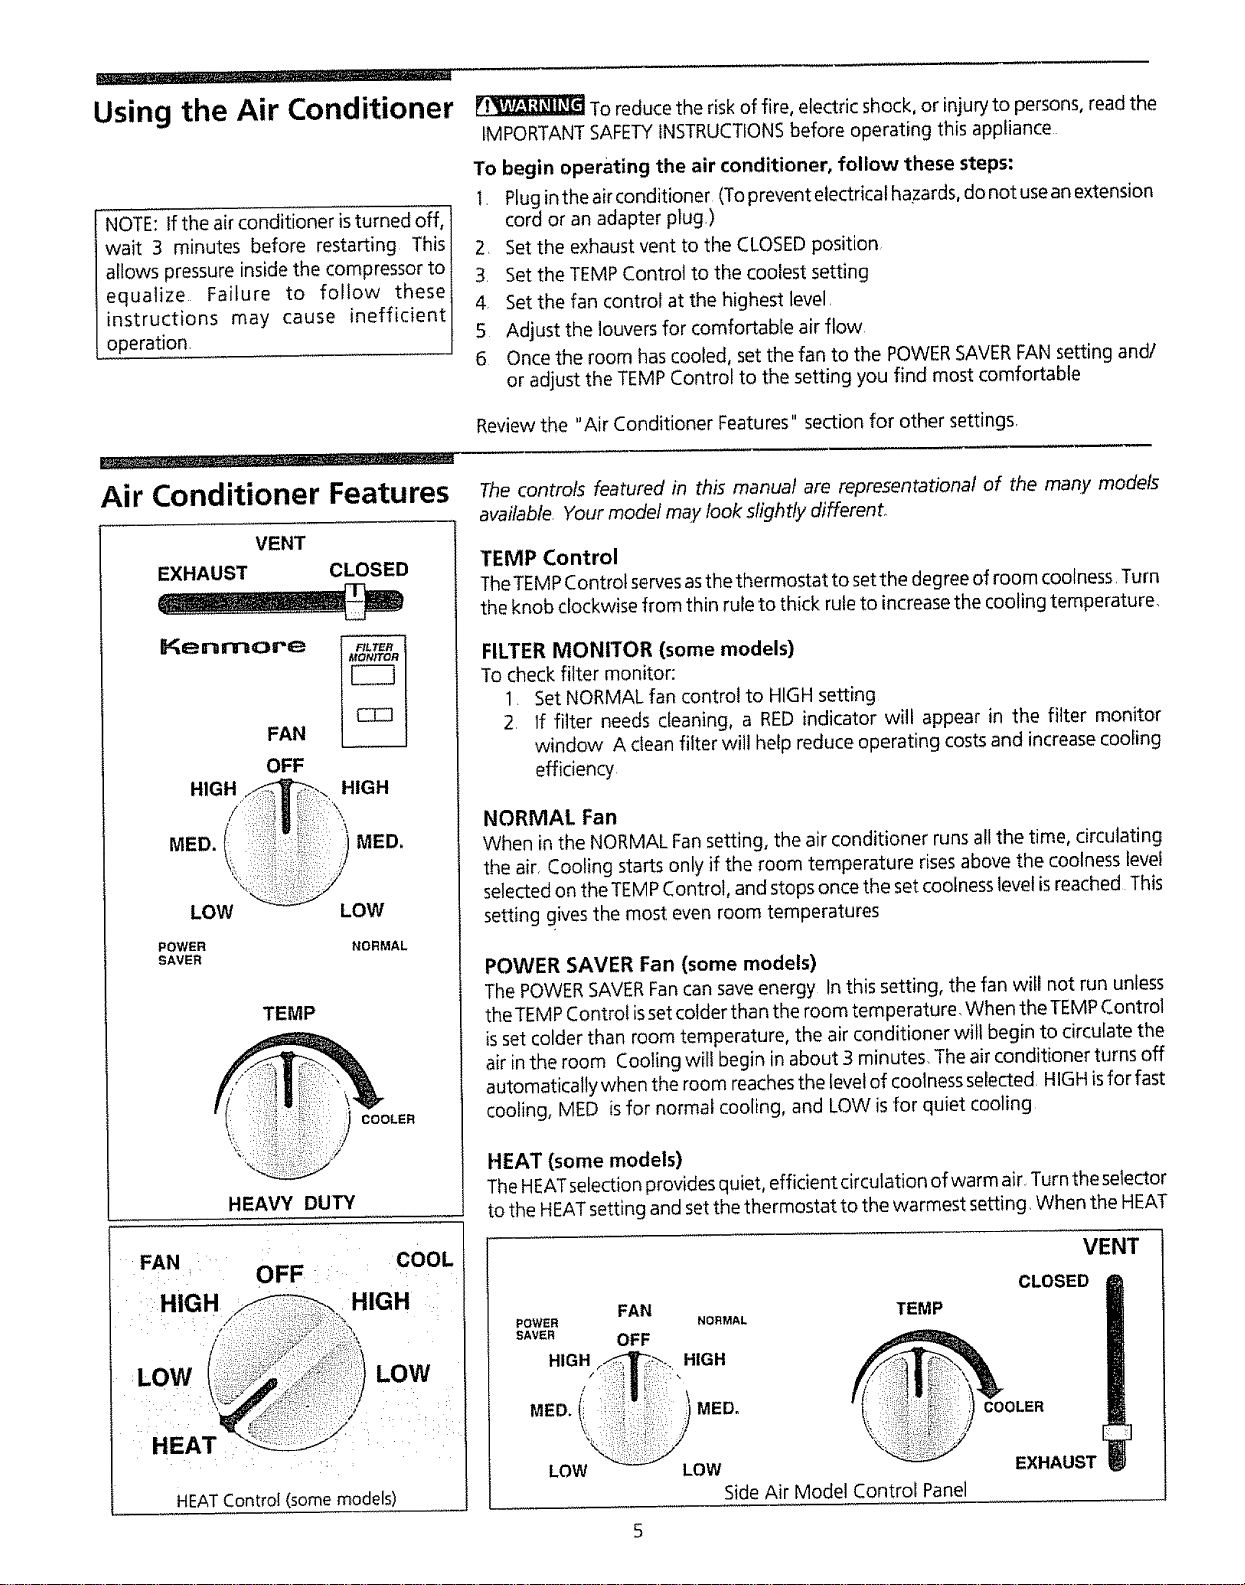
Air Conditioner Features
VENT
EXHAUST CLOSED
Kenmore
FAN
OFF
HIGH
/
MED. (i_
LOW
POWER
SAVER
HIGH
4
MED,
LOW
NORMAL
TEMP
COOLER
HEAVY DUTY
The controls featured in this manual are representational of the many models
available. Your model may took slightly different.
TEMP Control
TheTEMPControl servesasthe thermostat to setthe degree of room coolness, Turn
the knob clockwise from thin rule to thick rule to increase the cooling temperature,
FILTER MONITOR (some models)
Tocheck filter monitor:
1. Set NORMAL fan control to HIGHsetting
2. If fitter needs cleaning, a RED indicator will appear in the filter monitor
window A clean filter will help reduce operating costs and increase cooling
efficiency
NORMAL Fan
When in the NORMAL Fansetting, the air conditioner runs all the time, circulating
the air, Cooling starts only if the room temperature rises above the coolness level
selectedon the TEMPControl, and stops once the set coolnesslevel isreached This
setting gives the most even room temperatures
POWER SAVER Fan (some models)
The POWERSAVERFancan saveenergy In this setting, the fan will not run unless
the TEMPControl issetcolder than the room temperature, When the TEMPControl
isset colder than room temperature, the air conditioner will begin to circulate the
air in the room Cooling will begin in about 3 minutes, The air conditioner turns off
automatically when the room reachesthe levelof coolnessselected, HIGHisfor fast
cooling, MED isfor normal cooling, and LOW is for quiet cooling
HEAT (some models)
TheHEATselection provides quiet, efficient circulation of warm air, Turnthe selector
to the HEATsetting and set the thermostat to the warmest setting, When the HEAT
COOL
OFF " .... :
•HIGH
LOW LOW
HEAT
HEATContro! (somemodels)
FAN TEMP
POWER NORMAL
SAVER OFF
HIGH_.. HIGH
MED.(_ j MED. IQ_ ii!'l,i)i:i::
LOW LOW
Side Air Model Control Panel
VENT
CLOSED
EXHAUST
Air Conditioner Features
(continued)
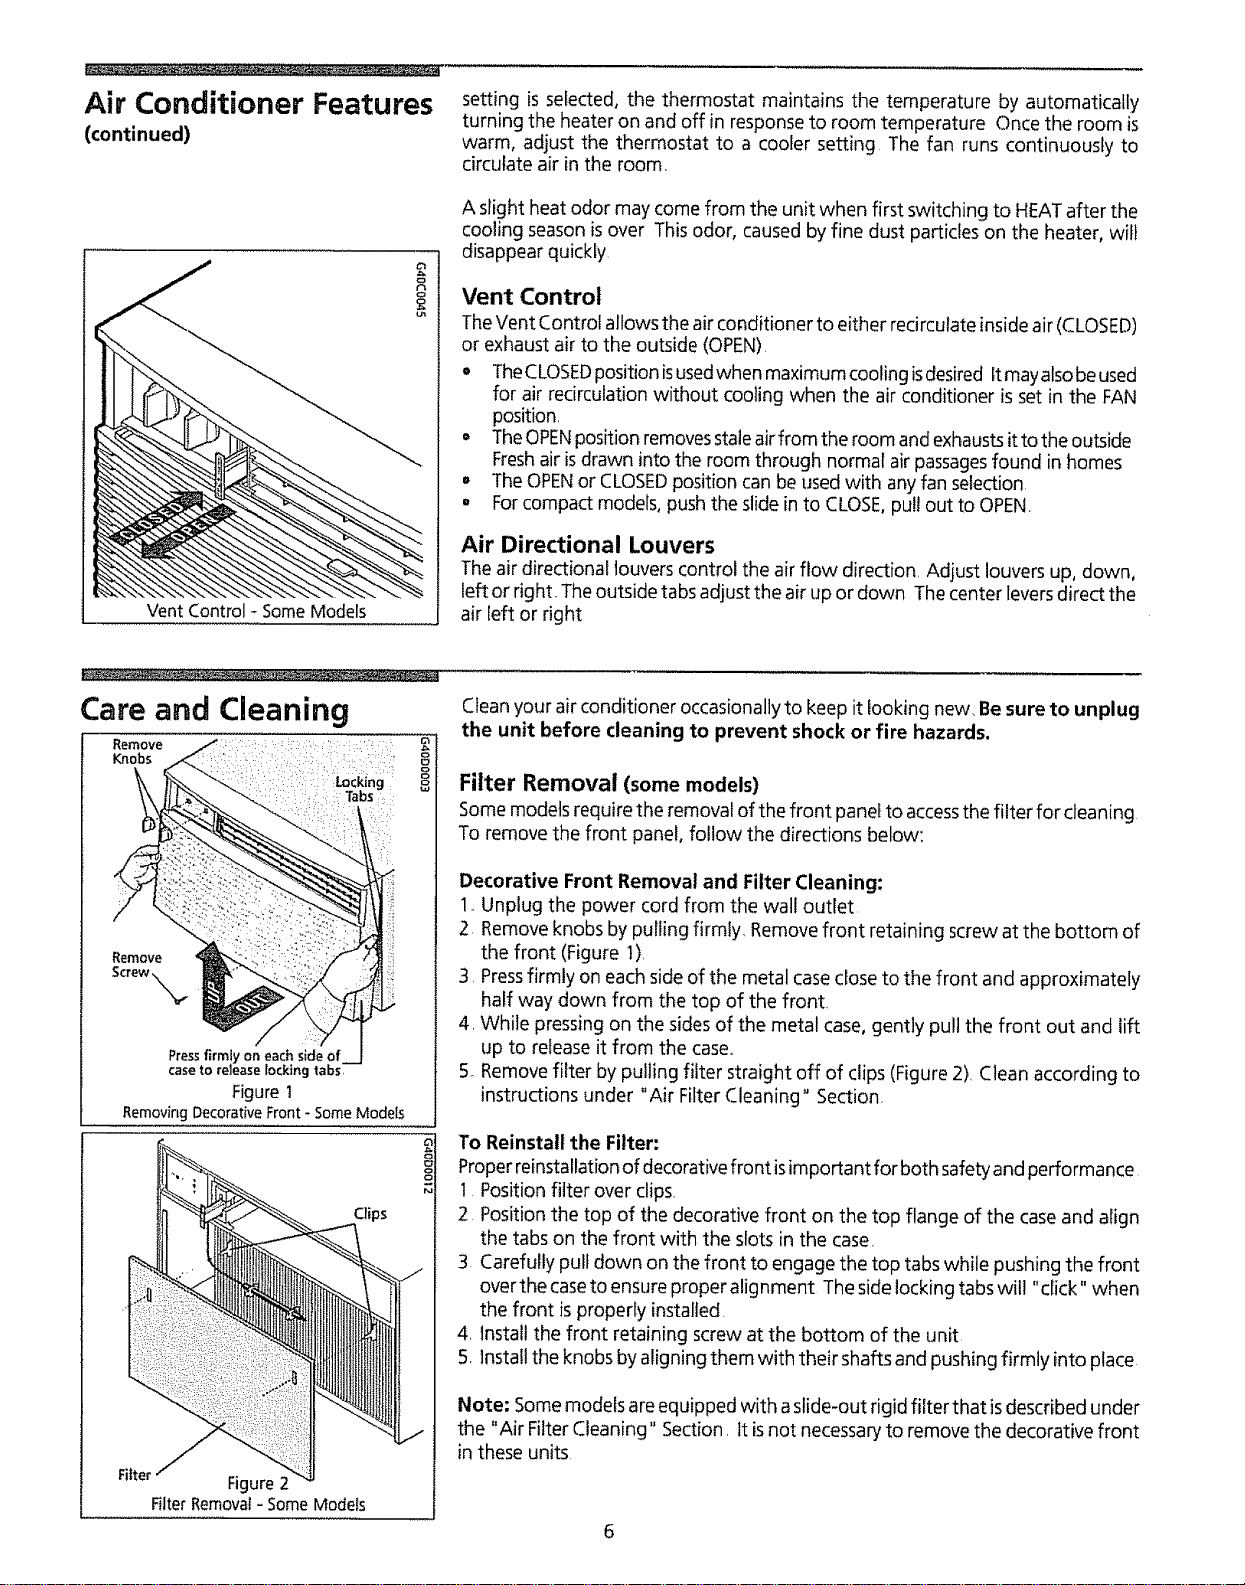
Vent Control - Some Models
setting is selected, the thermostat maintains the temperature by automatically
turning the heater on and off in responseto room temperature Once the room is
warm, adjust the thermostat to a cooler setting The fan runs continuously to
circulate air inthe room
A slight heat odor may come from the unit when first switching to HEATafter the
cooling season isover This odor, caused by fine dust particles on the heater, will
disappear quickly
Vent Control
TheVent Control allows the air conditioner to either redrculate inside air (CLOSED)
or exhaust air to the outside (OPEN)
o TheCLOSEDposition isusedwhen maximum cooling isdesired It mayalsobe used
for air recirculation without cooling when the air conditioner is set in the FAN
position
= TheOPENposition removesstaleairfrom the room and exhaustsit to the outside
Freshair isdrawn into the room through normal air passagesfound in homes
° The OPENor CLOSEDposition can be used with any fan selection
o Forcompact models, push the slidein to CLOSE,pull out to OPEN
Air Directional Louvers
Theair directional louvers control the air flow direction. Adjust louvers up, down,
left or right. Theoutside tabs adjust the air up or down The center leversdirect the
air left or right
Care and Cleaning
Remove .....: ":
Knobs :': : : ::" 8
Remove
Screw,N_
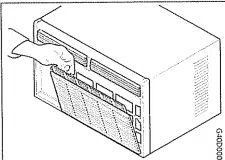
Press firmly on each side of
case to release locking tabs,
Figure1
Removing Decorative Front - Some Models
Filter Figure2
Filter Removal- Some Models
Clean your air conditioner occasionally to keep it looking new Besure to unplug
the unit before cleaning to prevent shock or fire hazards.
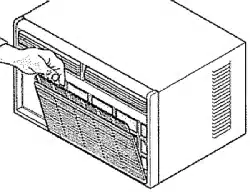
Filter Removal (some models)
Some models require the removal of the front panel to accessthe filter for cleaning
To remove the front panel, follow the directions below:
Decorative Front Removal and Filter Cleaning:
1_Unplug the power cord from the wall outlet
2 Remove knobs by pulling firmly. Removefront retaining screw at the bottom of
the front (Figure 1).
3. Pressfirmly on each side of the metal case close to the front and approximately
half way down from the top of the front.
4_While pressing on the sides of the metal case, gently pull the front out and lift
up to release it from the case.
5 Remove filter by pulling filter straight off of clips (Figure 2) Clean according to
instructions under "Air Filter Cleaning" Section
To Reinstall the Filter:
Properreinstallation of decorative front isimportant for both safety and performance
1 Position filter over clips.
2 Position the top of the decorative front on the top flange of the case and align
the tabs on the front with the slots in the case.
3 Carefully pull down on the front to engage the top tabs while pushing the front
overthe caseto ensure proper alignment Theside locking tabs wit! "click" when
the front is properly installed.
4 Install the front retaining screw at the bottom of the unit
5. Installthe knobs by aligning them with their shafts and pushing firmly into place
Note: Somemodels are equipped with aslide-out rigid filter that isdescribed under
the "Air Filter Cleaning" Section. It isnot necessaryto remove the decorative front
in these units
Care and Cleaning
(continued)
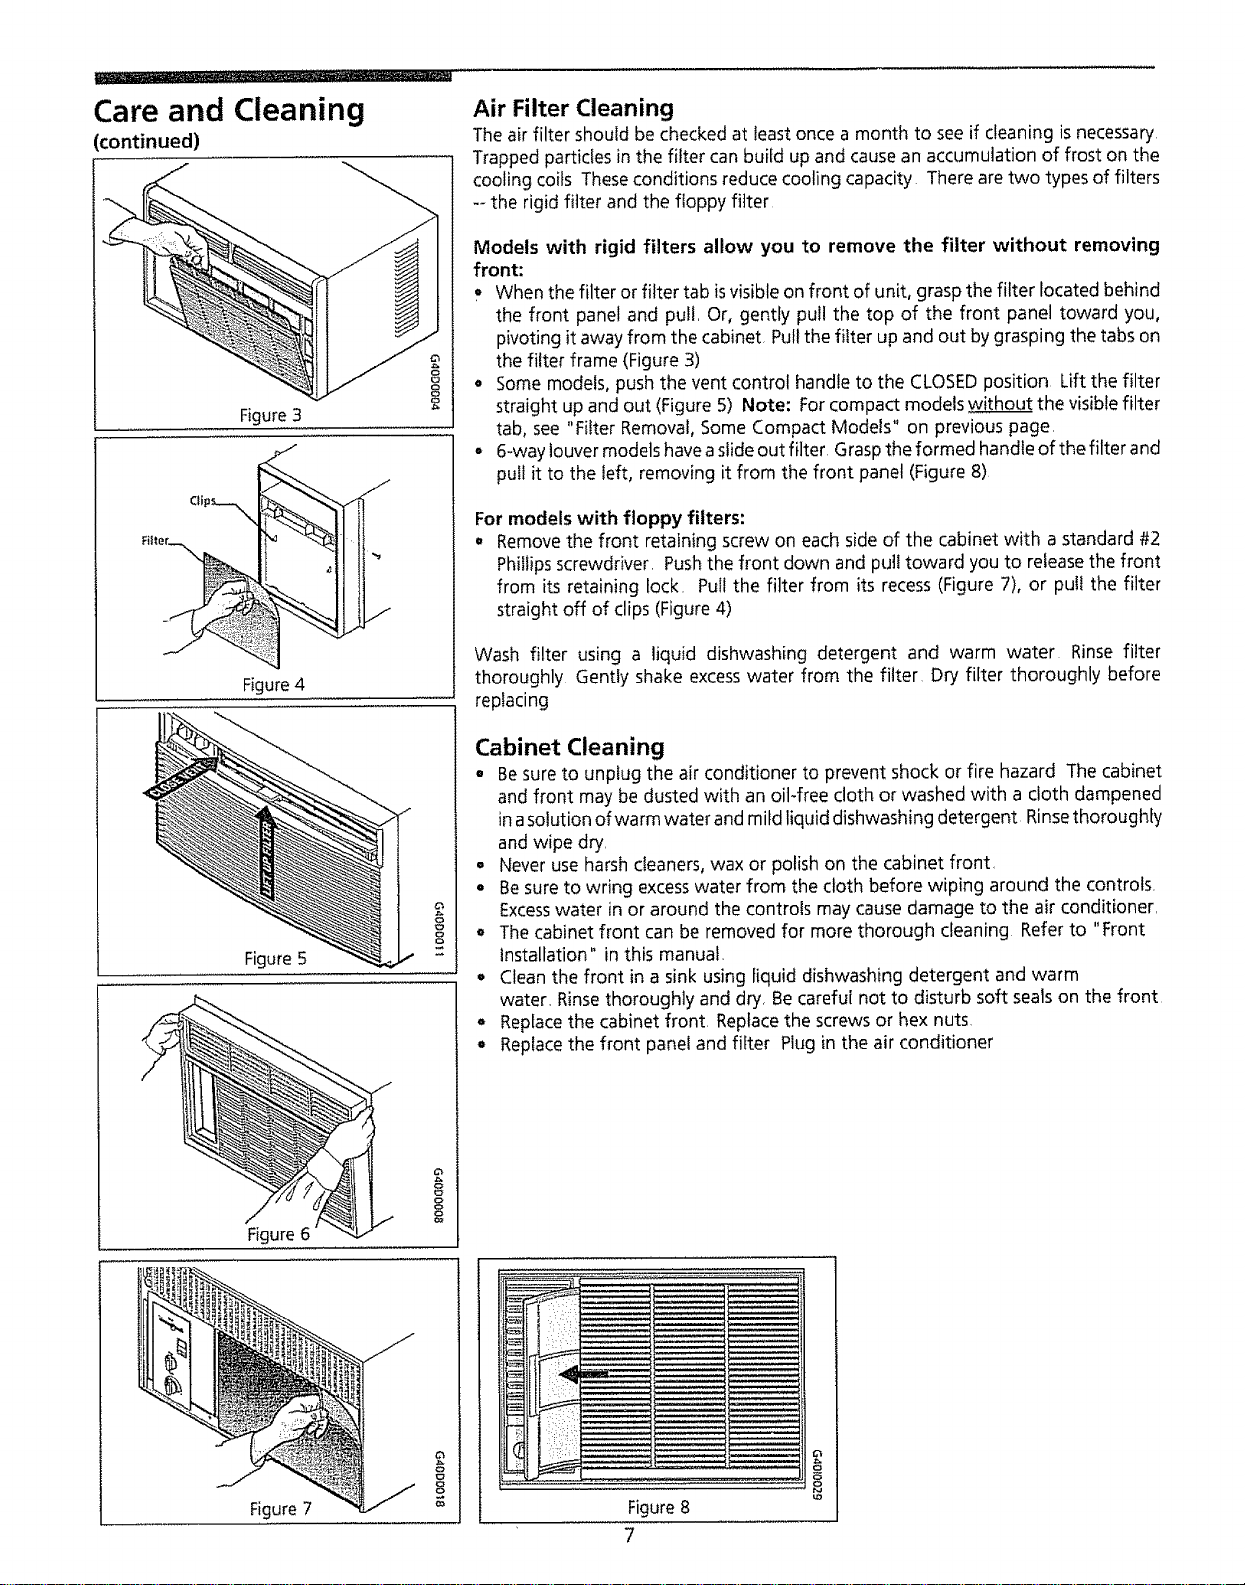
Figure 3
J
Figure 4
Figure 5
f
Figure 6
8
8
P_
Air Filter Cleaning
Theair filter should be checked at leastonce a month to seeif cleaning isnecessary
Trapped particles in the filter can build up and causean accumulation of frost on the
cooling coils Theseconditions reduce cooling capacity Thereare two types of filters
-_the rigid filter and the floppy filter
Models with rigid filters allow you to remove the filter without removing
front:
When the filter orfilter tab isvisible on front of unit, graspthe filter located behind
the front panel and pull, Or, gently pul! the top of the front panel toward you,
pivoting it away from the cabinet, Pullthe filter up and out bygrasping the tabs on
the filter frame (Figure 3)
• Somemodels, push the vent control handle to the CLOSEDposition Lift the filter
straight up and out (Figure 5) Note: Forcompact modelswithout the visiblefilter
tab, see "Filter Removal, Some Compact Models" on previous page,
- 6-way louver modelshaveaslideout filter Graspthe formed handle of the filter and
pull it to the left, removing it from the front panel (Figure 8)
For models with floppy filters:
° Removethe front retaining screw on each side of the cabinet with a standard #2
Phillipsscrewdriver. Pushthe front down and put! toward you to releasethe front
from its retaining lock. Pull the filter from its recess(Figure 7), or puii the filter
straight off of clips (Figure4)
Wash filter using a liquid dishwashing detergent and warm water Rinse filter
thoroughly Gently shake excesswater from the filter Dry filter thoroughly before
replacing
Cabinet Cleaning
• Besureto unplug the air conditioner to prevent shock or fire hazard The cabinet
and front may be dusted with an oit-free cloth or washed with a cloth dampened
inasolution ofwarm water and mild liquid dishwashing detergent Rinsethorough[y
and wipe dry,
. Never use harshcleaners,wax or polish on the cabinet front,
• Besureto wring excesswater from the cloth before wiping around the controls,
Excesswater in or around the controls may cause damage to the air conditioner,
• The cabinet front can be removed for more thorough cleaning Refer to "Front
Installation" in this manual.
° Cleanthe front in a sink using liquid dishwashing detergent and warm
water, Rinsethoroughly and dry, Becareful not to disturb soft sealson the front
• Replacethe cabinet front Replacethe screws or hex nuts,
° Replacethe front panel and filter Plug in the air conditioner
Figure 7
8
Figure8
7
B
o
Routine Maintenance
Winter Storage
If you plan to store the air condittoner during the winter, remove it carefully from
the window according to the installation instructions, Cover it with plastic or return
it to the original carton NOTE: To prevent rust or electrical connections from
being damaged, store air conditioner in an upright position and a dry place.
A winter cover can be purchased from your dealer, The cover wil! protect the air
conditioner when it is left in place through the winter,,
Before performing any service, unplug the power cord from
the electrical outlet.
After servicing, reversethe following procedures to reinstall the air conditioner
Cleaning the Cabinet Front
Removethe front panel Wash with warm, sudsywater Rinse and dry with a soft
cloth. Never usesolvents, cleaning fluids, abrasive cleaners or strong detergents, If
the packaging leavesa gum residue, remove with a cloth dipped in rubbing alcohol
Repairing Paint Damage
Inspect weather-exposed parts (cabinet shell, mounting hardware, if used, etc.)
once or twice a year, especially in areasnear oceans or where rust is a problem. If
needed, touch up with a good grade of exterior paint
Cleaning Inside the Air Conditioner
No Liquid should get into the motor, electrical control box, or
compressor electrical terminals
1, Removefront panel
2 With help and using the proper lifting methods to avoid personal injury,
remove the chassis from cabinet shell.* When removing the air conditioner
from cabinet shellor window, there may be water inside the basethat may spill
on the floor. Be careful to avoid cuts from sharp metal fins on the front and
rear coils.
3. Liquids should not get into electrical parts. Wrap the fan motor, electrical
control box, and electrical terminals in plastic, This will keep water or other
liquid from getting inside where it could damage the insulation and cause
serious trouble
4. Clean and hose out base, coils, and water pans, Clean at least once a year or
more often if the coils and pans collect dirt, sand, leaves, algae, or insects
5.. After cleaning, remove plastic protection. Wait 24 hours before starting the
unit again. This allows time for all areasto dry out.
NOTE; Water from rainfall or from normal use does not harm these
components since the water isnot asforcefully driven into parts asa stream
of water from a garden hose
*HANDLE NOTE: If the air conditioner has a chassis handle, it isNOT intended for lifting
the unit It is for sliding the chassis WITHIN the cabinet shell only (to aid in cleaning,
maintenance, etc )
8
Before You Call for Before calling for service, review this list It may save you time and expense. This list
includes common occurrences that are not the result of defective workmanship or
Service... materials in this appliance
OCCURRENCE SOLUTION
Air conditioner will not operate, Wal! plug disconnected Push plug firmly into wall outlet
House fuse blown or circuit breaker tripped Replacefusewith time delay type or resetcircuit breaker
FAN selector in OFF position Turn FAN selector to the desired FAN setting
Unit turned off by moving TEMP Control to awarmer setting and then immediately turning back
to a colder setting Wait approximately 3 minutes Listen for compressor to start
Unit turned off and then on too quickly Turn unit off and wait 3 minutes before restarting
TEMPControl setwarmer than room temperature Turn TEMP Control clockwise to a colder setting
(thick rule)
Air from unit does not feel cold Turn selector to a higher FAN position
enough° TEMP Control set too warm (thin rule) Turn TEMPControl clockwise to a colder setting (thick rule)
Room temperature below 70"F(21°C) Cooling may not eccu runtil room temperature risesabove
70"F_2_°C).
Temperature sensingtube touching coldcoil,located behind airfilter Straighten tube away from coil
Air conditioner cooling, but room is Outdoor temperature below 70"F(21°C) To defrost the coil, set selector to FAN position Then,
too warm - - ice forming on cooling turn TEMP Control clockwise to a warmer setting (thin rule)
coil behind decorative front,
Air filter may be dirty Clean filter Referto Care and Cleaning section To defrost, set selector
to FAN
TEMP CONTROL set too cold for night-time cooling To defrost the coil, set selector to a FAN
position Then, set TEMP CONTROL to a warmer position
Air conditioner cooling, but room is Dirty air filter--air restricted Clean air filter Refer to Care and Cleaning section
too warm *- NO_ ice forming on
cooling coil behind decorative front, TEMPControl set too warm Turn TEMPControl clockwise to a colder setting (thick rule).
Vent set at OPENposition Set vent at CLOSED position for maximum cooling
Air directional louvres positioned improperly Position Iouvres for better air distribution
Front of unit isblocked bydrapes, blinds, furniture, etc -- restricts air distribution Clear blockage
in front of unit
Doors, windows, registers, etc open --cold air escapes Close doors, windows, registers, etc
Unit recently turned on in hot room Allow additional time to remove "stored heat" from walls,
ceiling, floor and furniture
Dirty air filter-- air restricted Clean air filter
Air conditioner turns on and off Outside temperature extremely hot Set FAN on high speed to bring air past cooling coils more
rapidly frequently
Noise when unit is cooling_ Air movement sound This is normal If too loud, turn selector to lower FAN setting
Sound of fan hitting water.moisture removal system This is normal when humidity ishigh Close
doors, windows and registers
Window vibration--poor installation Refer to installation instructions or check with installer
Water dripping INSIDE when unit is Improper installation Tilt air conditioner slightly to the outside to allow water drainage Refer
cooling° to installation instructions--checkwith installer,
Water dripping OUTSIDE when unit Unit removing large quantity of moisture from humid room This is normal during excessively
is cooling, humid days
9
Sears Service
"We ServiceWhat We Sell" is our assurance you can depend on Searsfor service
•,,and Searsservice isnationwide Your air conditioner has added value when you
consider that Sears has service units nationwide, staffed with professional
technicians specifically trained on Sears appliances and having parts, tools and
equipment to insurethat we meet our pledge to you. "We ServiceWhat We Sell.."
Sears Maintenance Agreement
Maintain the value of your Kenmore® air conditioner with a Sears Maintenance
Agreement. Searsair conditioners are designed, manufactured, and tested foryears
of dependable operation Yet, anymodern appliance may require servicefrom time
to time.
The SearsMaintenance Agreement
o tsyour way to buy tomorrow's service at today's price
o Eliminates repair bills resulting from normal use.
o Allows for as many service calls as required.
° Provides for service by professional Sears4rained technicians
o Offers an annual preventive maintenance check-upat your request
This maintenance agreement does not cover original installation,reinstallation, or
damage resulting fi'om external causessuch asacts of God, abuse, theft, fire, flood,
wind, lightning, freezing, power failure, power reduction, etc. Please ask a
salesperson to seethe agreement for all of the terms and conditions
Warranty
Full One-Year Warranty on Air Conditioner
For one year from date of purchase, when this air conditioner is operated and
maintained for normal room cooling according to instructions in this owner's
manual, Searswill repair this air conditioner, free of charge, if defective in material
or workmanship.
Full Five-Year Warranty on Sealed Refrigeration System
Forfive years from the date of purchase, when this air conditioner isoperated and
maintained for normal room cooling according to instructions in this owner's
manual, Searswill repair the sealed refrigeration system (consisting of refrigerant,
connecting tubing, and compressor), free of charge, if defective in material or
workmanship.
This warranty gives you specific legal rights, and you may have other
rights which vary from state to staten
Warranty service is available by contacting the NEAREST SEARSSERVICECENTER/
DEPARTMENT in the United States or call 1-800-4-REPAIR,
For parts, call 1-800-FON-PART
SEARS, ROEBUCK and CO.
3333 Beverly Road
Hoffman Estates, IL 60719
10
PRINTEDIN US A
lnstrucciones lmportantes para la Seguridad ...................................2
Ideas 0tiles para Ahorrar Energfa ...................................................3
Instalaci6n de la Parte Delantera .......................................................3-4
Uso del Acondicionador de Aire ....................................................5
CaracterBticas del Acondicionador de Aire ...........................5-6
Cuidado y Limpieza .....................................................................6-7
Mantenimiento Rutinario ......................................................................8
Lista de Control de Averias ......................................................................9
Servicio Sears.................................................................................................t0
__ _
Garantfa ...............................................................................................I 0
1011o II11££ 10[ £I£ .,=
Lea y Guarde Estas Instrucciones
EsteManual del Usuadocontieneinstruccionesespecfficassobreelfuncionamiento deestemodelo Sedebe usarelacondicionador
de airede habitaci6n de acuerdo conlasinstruccionescontenidasen esteManual del Usuario Lasinstrucciones quecontieneeste
Manual del Usuario no cubren todas lascondicionesy situacionesposiblesque pudieran ocurrir, Siempresedebe usarel sentido
comun y la percauci6n al instalar, poner en funcionamiento y mantener cualquier aparato dom_stico
Registre el N_mero de Modelo y el N6mero de Serie
Registreel N° de Modelo y el N° de Serie en el espaciodebajo La placa del numero de serieseencuentra detr_Isde las celosias
anterioresizquierdas Seram_sf_icilleer estosnumerossi utiliza una lintema electricao siquita la parte frontal del gabinete como
sedescribe en la secci6n "Cuidado y Limpieza " Enalgunos modelos, la placa seubica en el exterior del gabinete
N° de Modelo:
N° de Serie:
Fecha de Compra:
PIN 96SR-D02(9510)
instrucciones
Irnportantes para la
Seguridad
Lea todas las instrucciones antes de utilizar este aparato de aire
acondicionado.
r_l_ml Para su seguridad
No guarde ni utilice gasolina ni otros vapores y Ifquidos inflamables cerca de este u otto
electrodom_stico Lea las etiquetas de los productos para la inflamabitidad y otras
advertendas
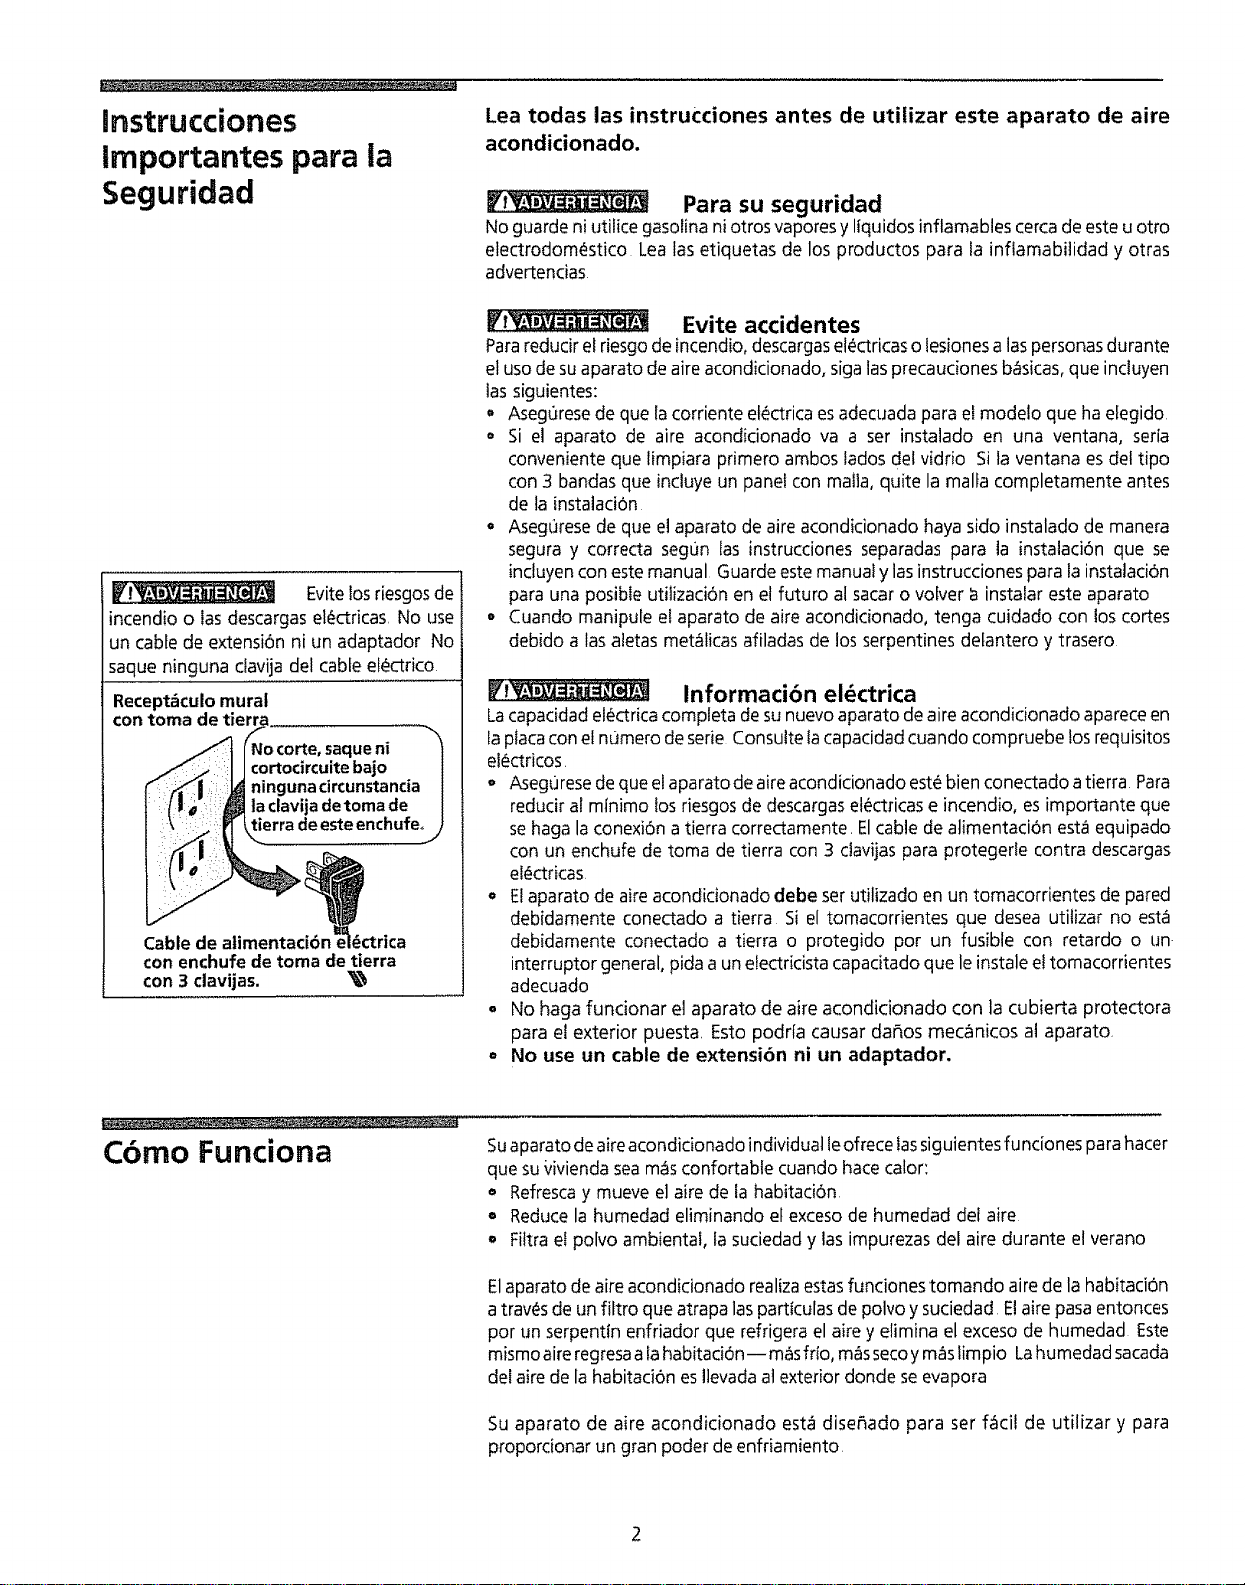
_____ Evitelosriesgosde
incendioo lasdescargasel_actricas,No use
un cable de extensi6nni un adaptador No
saque ninguna davija del cable ef_ctrico.
Recept_culo mural
con toma de tierra
ue ni
Cable de atimentaci6n _ i_ctrica
con enchufe de toma de tierra
con 3 clavijas. _
Evite accidentes
Para redudr el riesgo de incendio, descargas el_ctricas o lesiones alas personas durante
el uso de su aparato de aire acondicionado, siga las precauciones b_sicas, que incluyen
las siguientes:
• Asegurese de que la corriente et_ctrica es adecuada para el modelo que ha eEegido
= Si el aparato de aire acondicionado va a ser instalado en una ventana, seria
conveniente que limpiara primero ambos lados del vidrio Si la ventana es del tipo
con 3 bandas que incluye un pane! con mafia, quite la malfa completamente antes
de la instataci6n
= Asegurese de que el aparato de aire acondicionado haya sido instalado de manera
segura y correcta seg0n Ias instrucciones separadas para la instalad6n que se
incfuyen con este manual Guarde este manual y las instrucciones para la instalaci6n
para una posible utilizaci6n en et futuro al sacar o votver a instalar este aparato
o Cuando manipule et aparato de aire acondicionado, tenga cuidado con los cortes
debido alas aletas met_licas afiladas de los serpentines detantero y trasero
Informacibn el_ctrica
La capacidad el_ctrica completa de su nuevo aparato de aire acondicionado aparece en
la placa con el n0mero de serie Consulte tacapacidad cuando compruebe los requisitos
el_actricos.
o Aseg0rese de que el aparato de aire acondicionado este bien conectado a tierra Para
reducir al minimo los riesgos de descargas electricas e incendio, es importante que
se haga la conexi6n a tierra correctamente, Elcable de alimentaci6n esta equipado
con un enchufe de toma de tierra con 3 clavijas para protegerle contra descargas
el_ctricas
o Etaparato de aire acondicionado debe set utilizado en un tomacorrientes de pared
debidamente conectado a tierra Si el tomacorrientes que desea utilizar no esta
debidamente conectado a tierra o protegido pot un fusible con retardo o un
interruptor general, pida a un electricista capacitado que le instaleel tomacorrientes
adecuado
° No haga funcionar el aparato de aire acondicionado con la cubierta protectora
para el exterior puesta Esto podr[a causar dar_os mec_nicos al aparato,
° No use un cable de extensi6n ni un adaptador,
Cbmo Funciona
Suaparato de aire acondicionado individual leofrece las siguientes fu nciones para hacer
que su _/ivienda sea m_s confortabte cuando hate calor:
• Refresca y mueve el aire de ta habitation
o Reduce la humedad eliminando el exceso de humedad def aire
o Filtra el polvo ambiental, la suciedad y las impurezas del aire durante el verano
E1aparato de aire acondicionado realiza estas funciones tomando aire de la habitaci6n
a tray,s de un fiftro que atrapa las parttculas de polvo y suciedad El aire pasa entonces
pot t_nserpentln enfriador que refrigera el aire y elimina el exceso de humedad Este
mismo aire regresa ala habitaci6n-- mas frto, m_s seco y m_s limpio Lahumedad sacada
clel aire de la habitaci6n esllevada at exterior donde se evapora
Su aparato de aire acondicionado estcfidise_ado para set f_cil de utilizar y para
proporcionar un gran poder de enfriamiento,

Ideas para Ahorrar
Energia
, La capacidad del aparato de aire acondicionado debe ser la adecuada al tamario de
la habitaci6n para obtener un funcionamiento eficiente y satisfactorio
• Instale el aparato de ake acondicionado en el lado sombreado de la casa Una ventana
orientada hacia el norte es la mejor porque estar_ a la sombra durante la mayor parte
del d_a
o No b!oquee el paso de aire en el interior con persianas, cortinas o muebles; o en el
exterior con arbustos, cercamientos u otros edificios
° Cierre el regulador de tiro de la chimenea y las rejillas del piso y las paredes para que
el aire frio no seescape pot la chimenea y hacia las tuberlas
° Mantenga las persianasy cortinas de lasotrasventanas cerradas durante la parte mas
soleada del d{a,
, Limpie el filtro de aire segun se recomienda en la secci6n "Cuidado y limpieza"
° Elaislamiento adecuado y laprotecci6n contra el tiempo en suvivienda mantendra e!
aire catiente en elexterior y el aire frio en el interior
, Lasombra exterior de la casacon ayuda de _rboles, plantas o toldos ayudar_ a reducir
el esfuerzo de trabajo de! aparato de aire acondicionado
o Utilice los electrodom_sticos que producen calor, como estufa, lavadora0 secadora o
lavavajillas, durante la parte mas fresca del dia,
Instalacibn de la Parte
Delantera
t'
InstalaciOn de] burlete enla ventana
Rejillavertical
Manija
Tornillo
l
Tapadelaparato
\, /
%-_Tornillo
Rejillas Panel
horizontales delantero
InstalaciOn de la parte delantera - Descarga
lateral de aire (aglunos modelos)
lnstalacibn de la Junta Hermdtica de Ventana (atgunosmodelos)
El "manguito" o gabinete removible del acondicionador de aire debe quedar en
una posici6n correcta para crear una junta herm_tica segura y eficaz Consulte las
instrucciones de instalaci6n
Ajuste Manual de la Rejilla Vertical
Complete este ajuste antes de instalar el panel delantero
1 Ajuste Ias rejillas verticafes en la posici6n recta usando ta manija
2 La plata de los controles y las perillas vienen en embalajes distintos Para
instalarlos, yea la secci6n de Instalaci6n de la placa de controles y del marco
delantero.
Instalaci6n del Panel Delantero
lnstale asi el panel delantero con e! filtro:
1 Ajuste las rejillas horizontales en la posici6n recta Sujete la parte delantera recta
hasta que Ia manija de las rejillas verticates se alinee entre la rejilla horizontal
inferior y la abertura de descarga
2 Presione ta parte delantera, recta, sobre la caja hasta que los agujeros de ta
pesta_a de la parte delantera de plastico se alineen con los agujeros de los
tornillos de tacaja met_lica Fije el panel delantero en su lugar con los dos tornillos
que se incluyen
instalacibn del Control del Respiradero (algunosmodelos)
La manija para controlar ventifaci6n est.1 incluida con el panel frontal decorativo
Para instalar la manija, consulte la ilustraci6n abajo La manija debe estar instalada
antes de instalar el panel frontal decorativo Introduzca la manija con la parte
saliente hacia fa derecha, Aprete la tira pl_stica transparente en posici6n desde el
fondo de la parte saliente, como se muestra en la figura abajo Mueva ia manija para
ver si el respiradero funciona Si no funciona, repita los pasos arriba hasta que
funcione bien
__ Aprete uqU[
?
manija __
_ali_Parente lira pl6stlC
transparente sobre ia
parte sla[ente en |a manija
3
Instalacibn de la Parte
DeUantera (continuacibn)
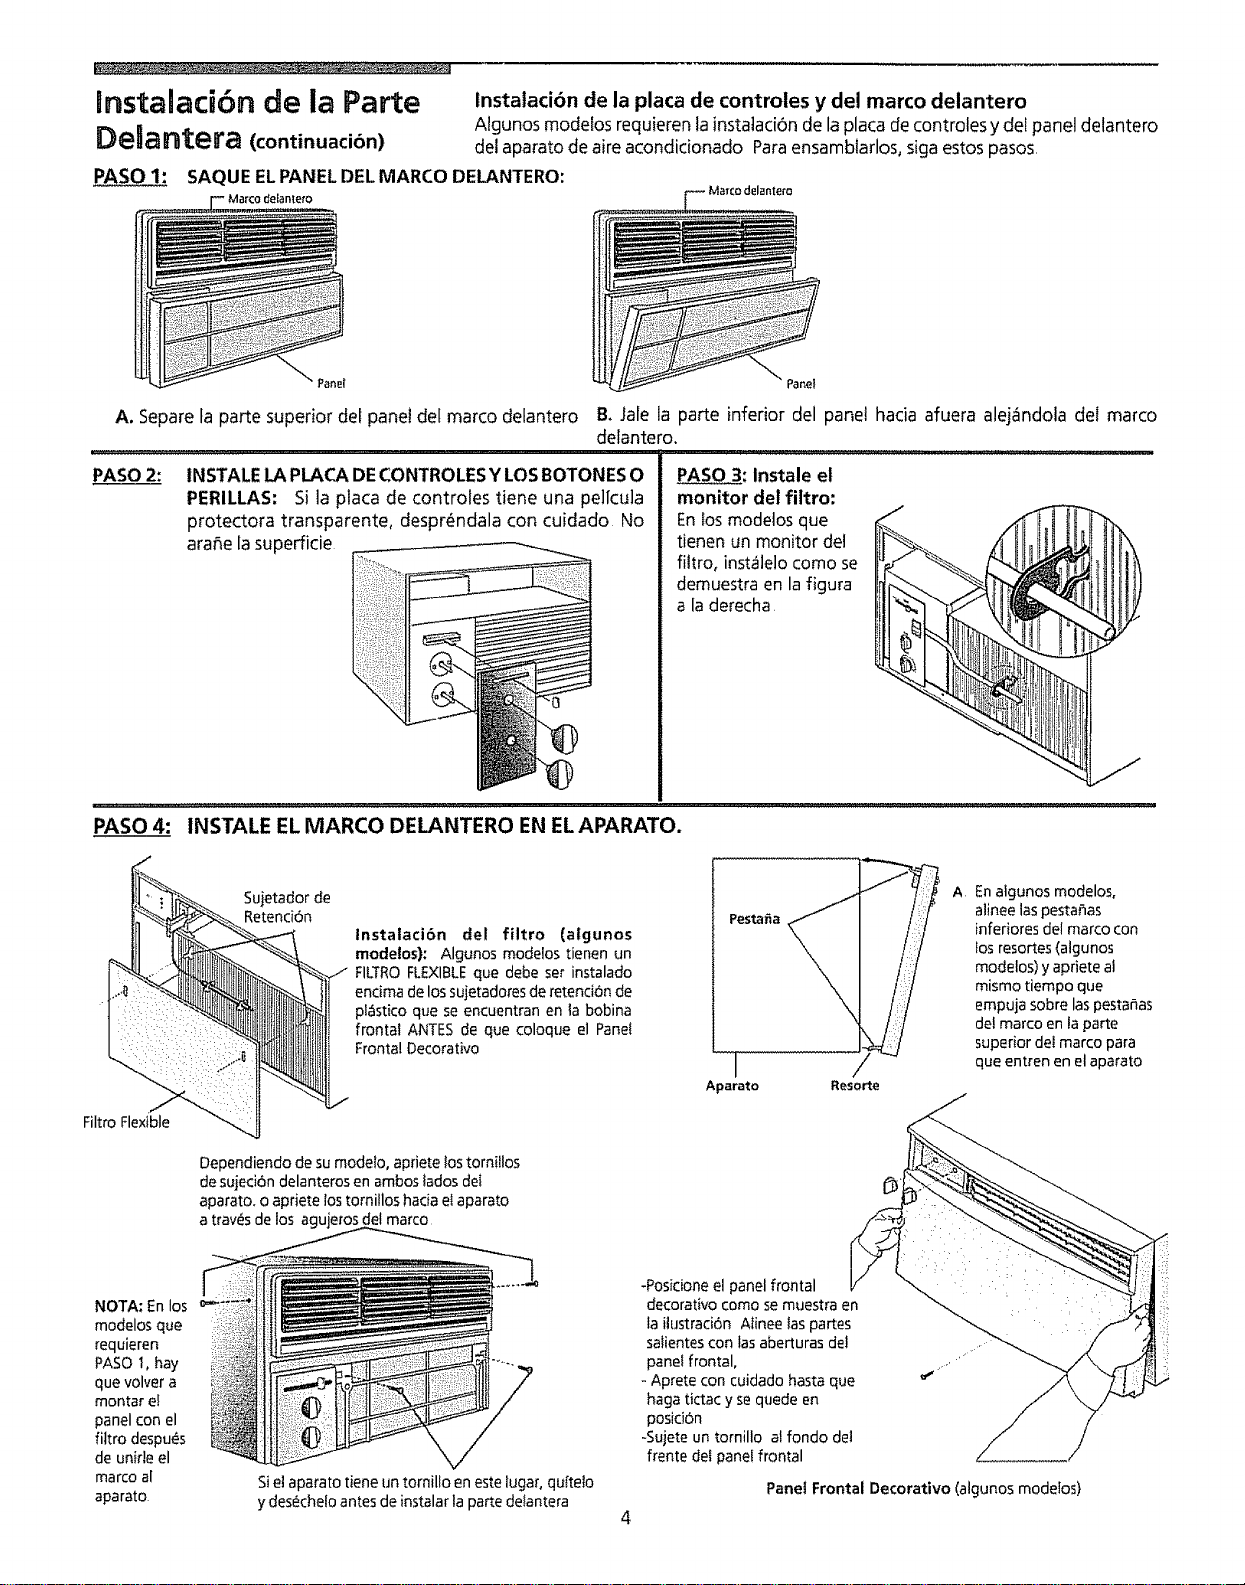
PASO 1: SAQUE ELPANELDELMARCO DELANTERO:
instalaci6n de la placa de controles y del marco delantero
Algunos modefosrequierenla instataci6nde laplacade controlesy dei panel detantero
del aparatode aire acondicionado Paraensamblarlos, sigaestospasos
A. Separe la parte superior del panel del marco delantero
PASO 2: INSTALE LA PLACA DE CONTROLES Y LOS BOTONES O
PERILLAS: Si la placa de controles tiene una pel[cula
protectora transparente, despr_ndala con cuidado No
ara_e la supefficie
F Marco delantem
& Jale la parte inferior del panel hacia afuera alej_ndola del marco
delantero.
PASO____3: Instale el
monitor del filtro:
En _os modelos que
tienen un monitor del
filtro, inst_lelo como se
demuestra en la figura
a la derecha
PASO 4: INSTALE EL MARCO DELANTERO EN ELAPARATO.
Sujetador de
Retenci6n
Instataci6n del filtro (algunos
modelos): Algunos modelos tienen un
FILTROFLEXIBLEque debe ser instalado
encima de los sujetadores de retend6n de
plastico que se encuentran en la bobina
frontal ANTES de que coloque el Panet
Frontal Decorativo
Filtro Flexible
Dependiendo de su modelo, apriete lostornitlos
desujed6n delanteros en ambos tados del
aparato, o apriete lostomillos hacia el aparato
a tray, s de los agujeros del marco
Pestafia
I
Aparato
-!
Resorte
A En algunos modelos,
alinee las pestaSas
inferiores del marco con
los resortes (algunos
modelos) y apriete al
mismo tiempo que
empuja sobre las pestar_as
del marco en la parte
superior deI marco para
que entren en el aparato
NOTA: En los
modelos que
requieren
PASO 1, hay
que volver a
montar e!
panel con el
filtro despu_s
de unide el
marco al
aparato
Siel aparato tiene un tornillo en este lugar, quffe!o
y desechelo antes de instalar la parte delantera
4
-Posicione el panel frontal
decorativo como se muestra en
la ilustraci6n A[inee las partes
salientes con las aberturas deJ
panel frontal,
Aprete con cuidado hasta que
haga tictac y se quede en
posici6n
-Sujete un tornillo al fondo de]
frente del panel frontal
Panel Frontal Decorativo (algunos modelos)
El Uso del
Acondicionador de Aire
NOTA: Siest_ apagado el acondicionador
de aire, espere 3 minutos antes de volver
a encenderlo. Estopermite que lapresi6n
seequilibre adentro det compresor El no
seguir estas instrucciones puede resultar
en un funcionamiento ineficaz
Caracteristicas del
Acondicionador de Aire
Vi_ Para redudr e! riesgo de incendio, choque el_ctrico o dafios a
personas, lea Ias INSTRUCCIONES IMPORTANTES PARA LA SEGURIDAD antes de poner
en funcionamiento este aparato
Para comenzar el funcionamiento del acondicionador de aire, siga estos pasos:
1 Enchufe el acondicionador de aire (Para evitar riesgos asociados con la
etectricidad, no debe usar un cable de extensi6n ni un enchufe de adaptador)
2, Coloque el respiradero de exhaustaci6n en la posici6n de CERRADO
3 Coloque el termostato en el numero rues alto (ajuste que da Io m_s fr[o)
4 Co!oque el control de selector en el ajuste m_s alto para VENTILACI6N o
ENFRIAMIENTO
5 Ajuste las ce!osias para dar una ventilad6n de aire comoda
6 Una vez este enffiada ia habitad6n, coloque el termostato en el ajuste que de
la temperatura que a usted m_s le agrada
Consulte ta secci6n "Caractedsticas del Acondicionador de Aire" para obtener m_s
informaci6n en cuanto a otros ajustes de temperatura
Los controfes que se detaltan en este manual son representativos de los muchos modelos
que son disponibtes El modelo que usted tiene puede tener un aspecto un poco
diferente
VENT
EXHAUST CLOSED
Kenmore
FAN
OFF
HtGH__ HIGH
MED, ! MED,
LOW LOW
POWER NORMAL
SAVER
TEMP
COOLER
HEAVY DUTY
FAN COOL
OFF
HIGH H_IGH
LOW LOW
HEAT
Control dei CALENTADOR (atgunos modelos)
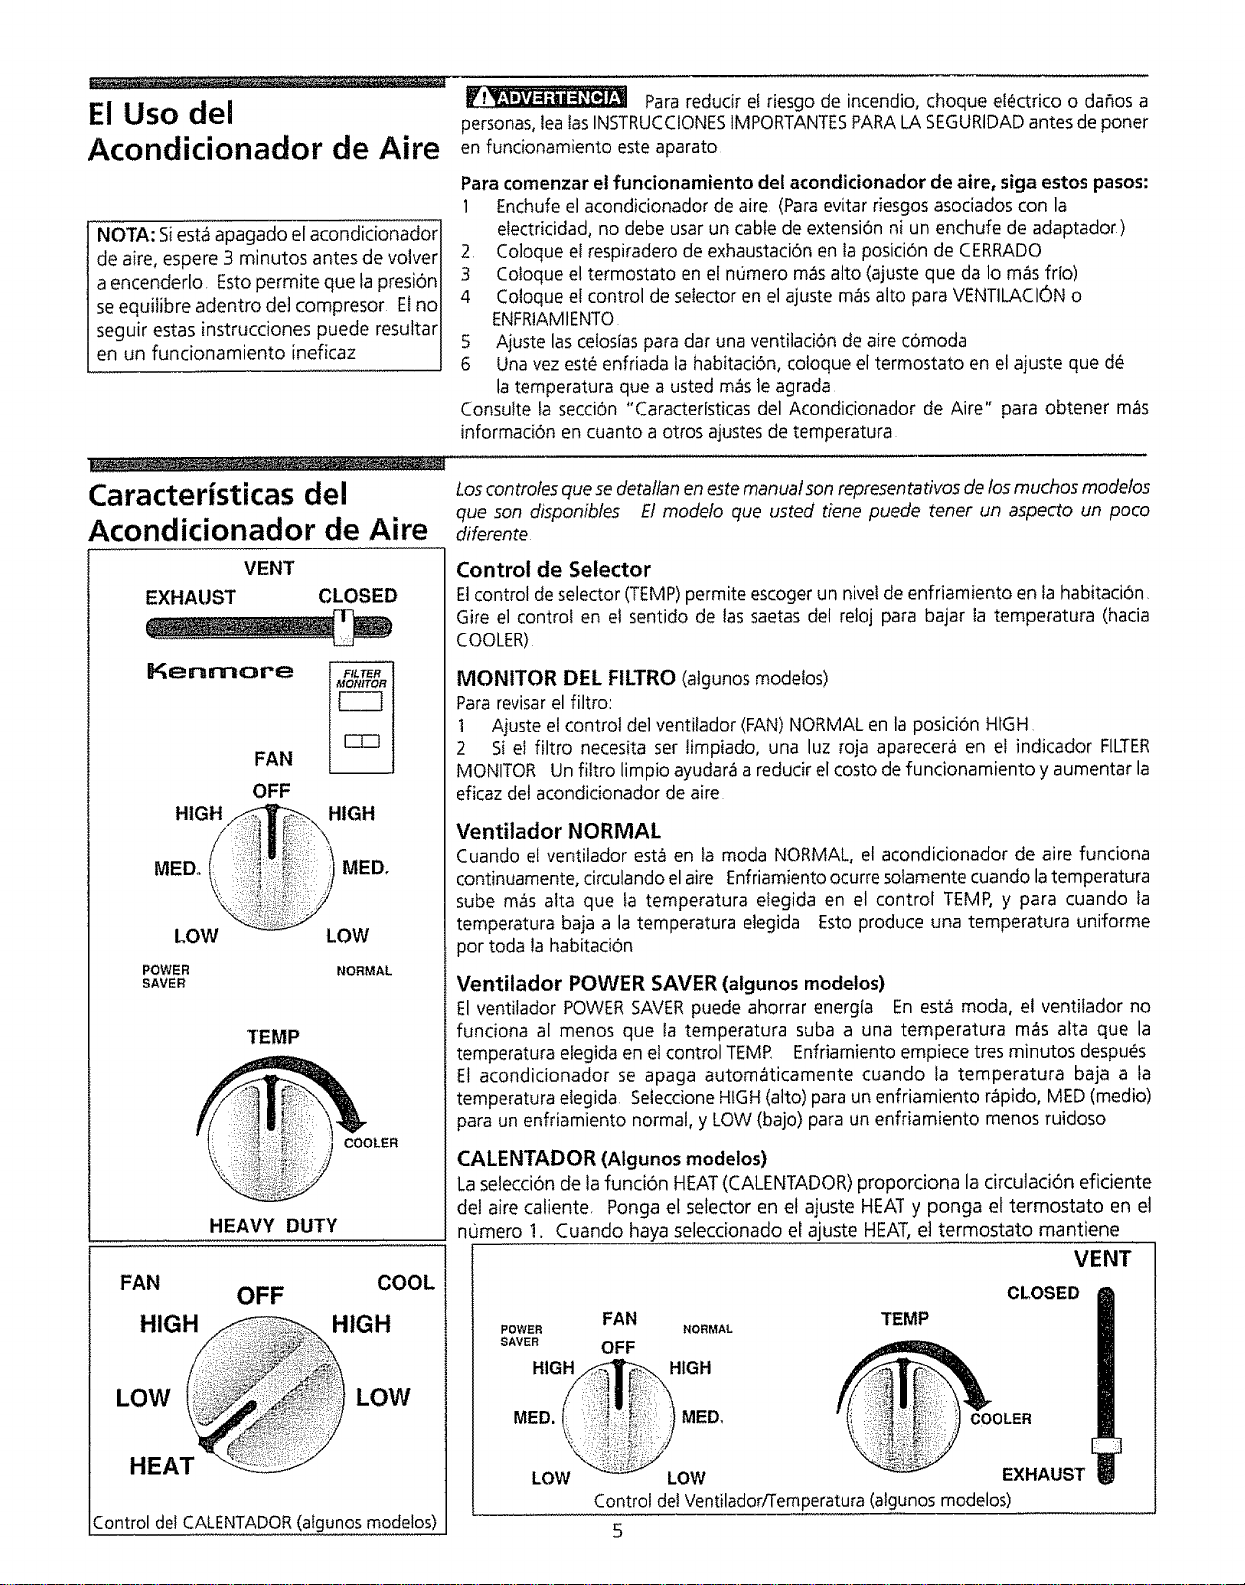
Control de Selector
EJcontrol deselector (TEMP)permite escogerun niveide enfriamiento en fa habitaci6n,
Gire el control en el sentido de las saetasdel reloj para bajar ia temperatura (hacia
COOLER)
MONITOR DEL FILTRO (atgunos modetos)
Para revisar el filtro:
t Ajuste el control del ventifador (FAN) NORMAL en la posid6n HIGH
2 Si el filtro necesita set limpiado, una luz roja aparecera en el indicador FILTER
MONITOR Un filtro limpio ayudar_ a redudr el costo de funcionamiento y aumentar la
eficaz del acondidonador de aire
Ventilador NORMAL
Cuando el ventilador est_ en la moda NORMAL, el acondicionador de aire funciona
continuamente,circulandoelaire Enfriamientoocurresofamente cuando latemperatura
sube m_s atta que ta temperatura etegida en el control TEMP,y para cuando la
temperatura baja a la temperatura elegida Esto produce una temperatura uniforme
por toda la habitaci6n
Ventilador POWER SAVER (algunos modetos)
El ventilador POWERSAVERpuede ahorrar energla En esta moda, el ventilador no
fundona al menos que la temperatura suba a una temperatura mas atta que la
temperatura etegidaen etcontrol TEMP Enfriamiento empiece tres minutos despues
El acondicionador se apaga automaticamente cuando la temperatura baja a la
temperatura elegida SeteccioneHIGH(alto) para un enfriamiento r&pido, MED(medio)
para un enfriamiento normal, y LOW(bajo) para un enfriamiento menos ruidoso
CALENTADOR (Algunos modelos)
La selecci6n de lafunci6n HEAT (CALENTADOR) proporciona la circutaci6n efidente
del aire caliente Ponga el selector en el ajuste HEAT y ponga et termostato en el
numero !. Cuando haya seleccionado el ajuste HEAT, el termostato mantiene
VENT
CLOSED
FAN
POWER NORMAL
SAVER OFF
HIGH HIGH
TEMP
MED. MED, COOLER
LOW LOW EXHAUST
Control del Ventilador/Temperatura (algunos modelos)
Caracteristicas del
Acondicionador de Aire
(continuaci6n)
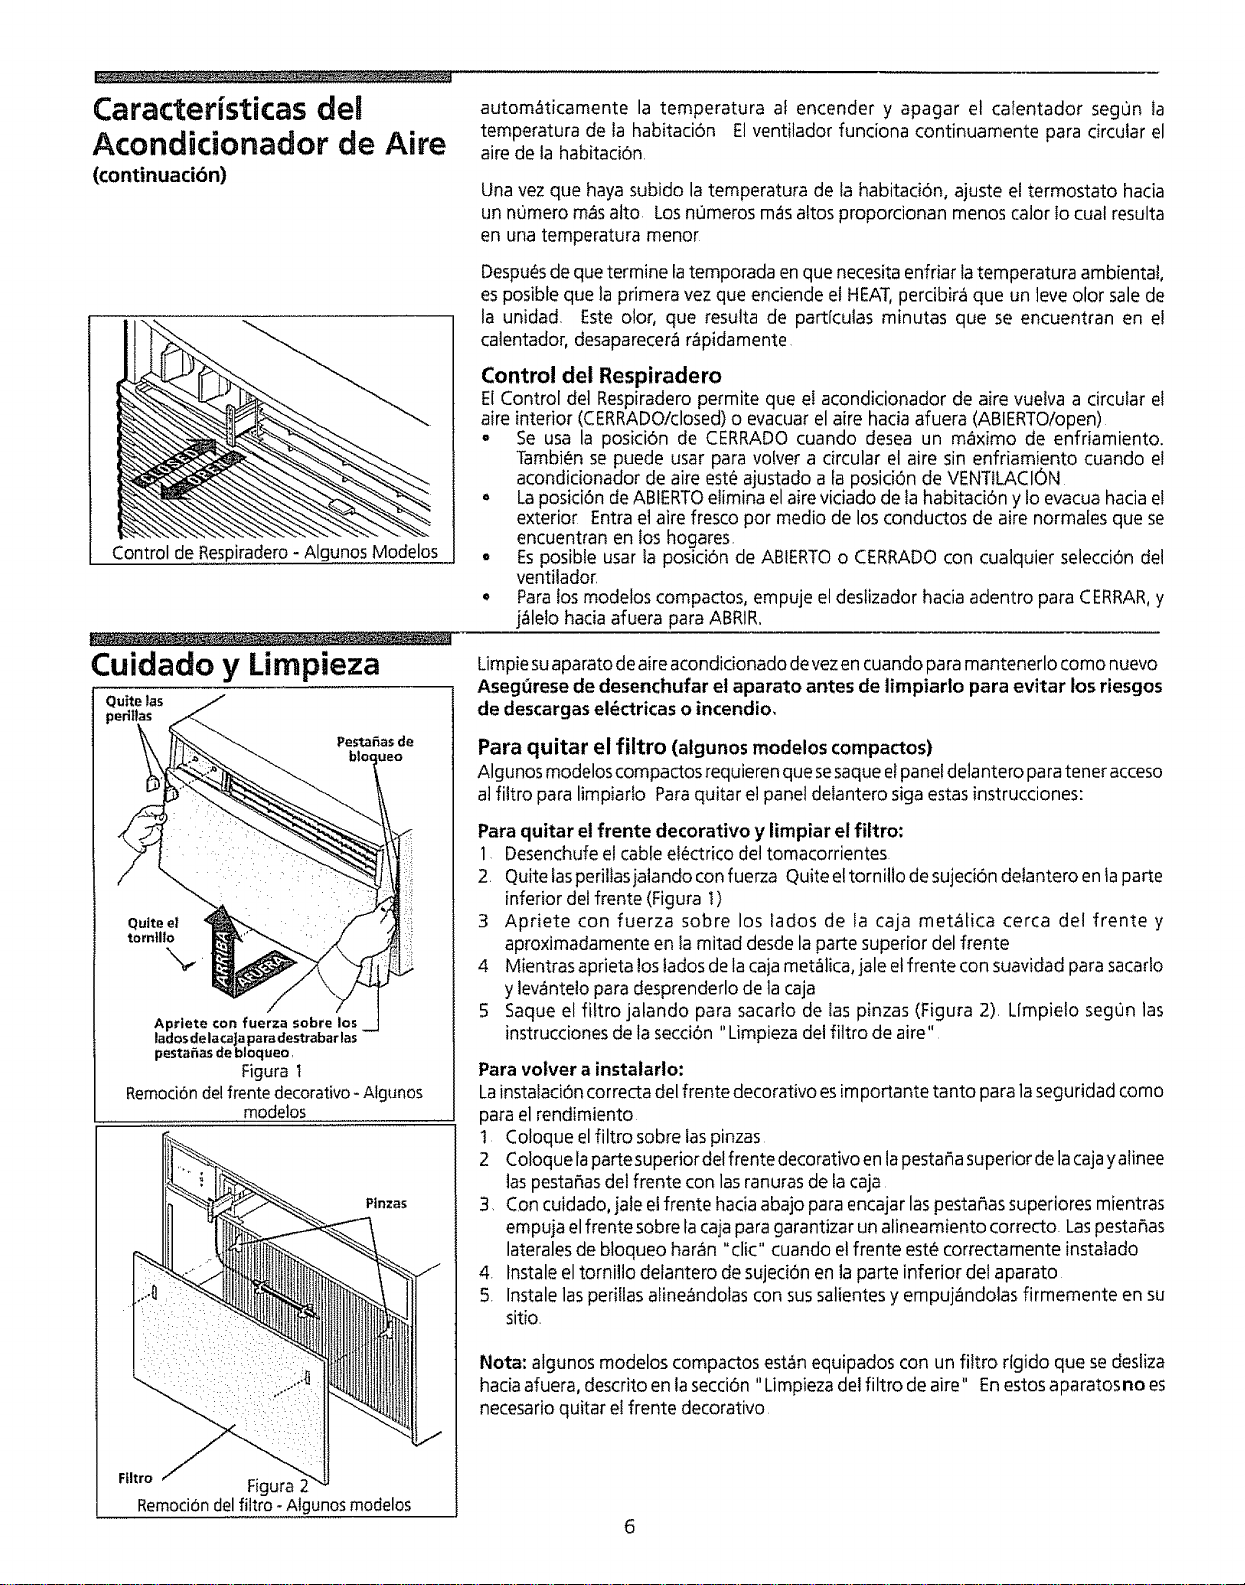
Control de Respiradero - Algunos Modelos
Cuidado y Limpieza
Quite las
p,
Apriete con fuerza sobre los
lados dela caJapara destrabar las
pestahas de bloqueo,
Figura t
Remoci6nde!frente decorativo - Atgunos
modelos
Ptnzas
Ftltro ,I Figura 2
Remoci6ndel filtro -Algunos modelos
autom6ticamente la temperatura af encender y apagar el calentador segon la
temperatura de ta habitaci6n El ventilador funciona continuamente para circular el
aire de la habitaci6n.
Unavez que hayasubido la temperatura de la habitaci6n, ajuste eltermostato hacia
un numero m_salto Losnumeros mas altos proporcionan menos calor Iocual resulta
en una temperatura menor
Despu_asdeque termine tatemporada en que necesitaenfriar latemperatura ambienta!,
esposibleque laprimera vezque enciende el HEAT,percibira que un leveolor salede
la unidad. Este olor, que resulta de partlculas minutas que se encuentran en el
calentador, desaparecerar=ipidamente
Control del Respiradero
El Control det Respiradero permite que el acondicionador de aire vuelva a circular el
aire interior (CERRADO!closed) o evacuar el aire hacia afuera (ABIERTO/open)
,, Se usa la posid6n de CERRADO cuando desea un maximo de enfriamiento.
Tambien se puede usar para volver a circular el aire sin enfriamiento cuando el
acondidonador de aire est_a ajustado a fa posici6n de VENTtLACION
o La posici6n de ABIERTO elimina el aire viciado de fa habitad6n y Io evacua hacia e!
exterior Entra el aire fresco pot medio de los conductos de aire normafes que se
encuentran en los hogares.
• Es posibte usar fa posici6n de ABIERTO o CERRADO con cualquier selecci6n del
ventilador
o Para los modelos compactos, empuje el deslizador hacia adentro para CERRAR, y
j_lelo hacia afuera para ABRIR.
Limpiesuaparatodeaire acondicionadodevezencuandopara mantenerlocomo nuevo
Asegt_resede desenchufar et aparato antes de limpiarlo para evitar los riesgos
de descargaseldctricas o incendio,
Para quitar el filtro (algunos modelos compactos)
Algunos modelos compactos requieren que sesaque el panel delantero para tenet acceso
atfittro para limpiarto Para quitar et panel deiantero siga estas instrucciones:
Para quitar el frente decorativo y limpiar el filtro:
1 Desenchufe el cable el_ctrico del tomacorrientes
2. Quite las periltasjatando con fuerza Quite el tornilto de sujed6n delantero en la parte
inferior del frente (Figura 1)
3 Apriete con fuerza sobre los lados de la caja met_tica cerca del frente y
aproximadamente en la mitad desde la parte superior del frente
4 Mientras aprieta los tados de la caja met_lica, jale et frente con suavidad para sacarlo
y lev_ntelo para desprenderlo de la caja
5 Saque el filtro jalando para sacarlo de las pinzas (Figura 2)= Limpielo segOn las
instrucciones de la secci6n "Limpieza del filtro de aire"
Para volver a instalario:
Lainstafaci6n correcta del frente decorativo es importante tanto para la segu ridad como
para el rendimiento
! Coloque el filtro sobre las pinzas
2 Coloque lapartesuperior del frente decorativo en la pesta_a superior de la cajay alinee
las pesta_as del frente con las ranuras de la caja
3, Con cuidado, jale etfrente hacia abajo para encajar las pesta_as superiores mientras
empuja el frente sobre la caja para garantizar un alineamiento correcto= Las pestafias
laterales de bloqueo har6n "clio" cuando el frente estL_correaa mente instalado
4. fnstale el tomillo defantero de sujeci6n en la parte inferior del aparato
5. lnstale las peri!las aline_ndolas con sus salientes y empuj_ndolas firmemente en su
sitio.
Nota: algunos modelos compactosest&nequipados con un filtro rlgido quesedesliza
haciaafuera, descritoen lasecciOn"Limpieza del filtro de aire" Enestosaparatosno es
necesarioquitar el frente decorativo
Cuidado y limpieza
(continuacibn)
Figura 3
Figura 4
Figura 5 /
Figura 6'
Figura7
J
J
Limpieza dei filtro de aire
Elfiltro de airedeber_serexaminadopor Iomenosunavezal mesparaversiesnecesario
limpiado,Laspartfculasatrapadasenelfiltro puedenacumularseycausarunaacumulaciOn
de hielo sobrelosserpentinesenfriadores Estocausauna reducci6n de iacapacidadde
enfriamiento. Existendostipos defiltros -- el filtro rfgidoy elfiltro flexible°
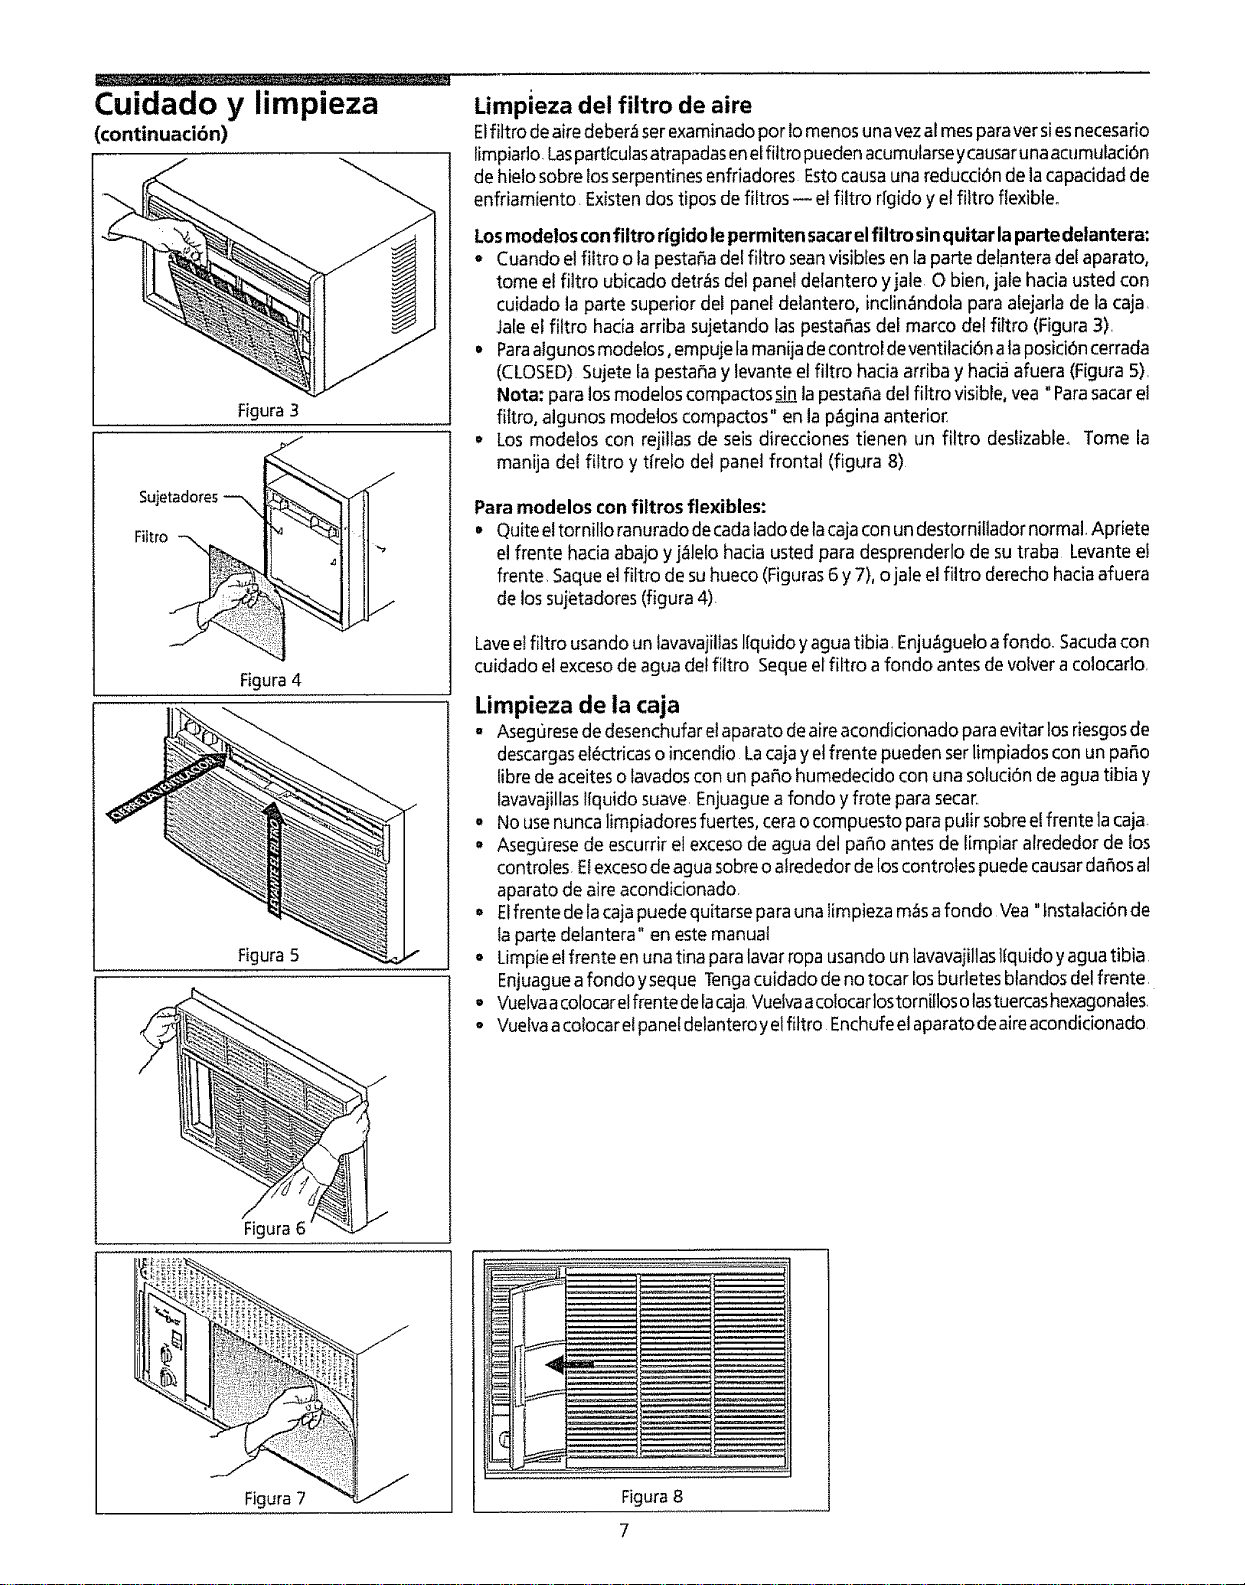
Losmodelosconfiltro rlgidole permiten sacarel filtro sinquitar lapartedelantera:
- Cuandoel filtro o la pesta_adelfiltro seanvisiblesen la parte delanteradelaparato,
tome el filtro ubicado detras del panel delantero yjale O bien, jale haciausted con
cuidado la parte superior del panel delantero, inclin_Indolapara alejarla de la caja,
Jaleel filtro haciaarriba sujetando laspesta5asdel marco del filtro (Figura3),
• Paraalgunosmodelos, empujelamanijadecontrol deventilaci6nalaposiciOncerrada
(CLOSED)Sujetela pesta5ay levanteel filtro haciaarriba y had,4afuera (Figura5),
Nota: para losmodelos compactos_ la pestaSadel filtro visible,vea" Parasacarel
filtro, algunos modeloscompactos" en la p_gina anterior_
• Losmodelos con rejillas de seis direcdones tienen un filtro deslizable, Tome la
manija del filtro y tfrelo del panel frontal (figura 8)
Paramodelos confiltros flexibles:
• Quiteeltornilto ranuradodecadaiadodelacajaconun destornillador normal.Apriete
el frente haciaabajo yj_lelo hacia usted para desprenderlo de sutraba Levanteel
frente Saqueelfiftro de suhueco (Figuras6 y 7),ojale el filtro derechohaciaafuera
de lossujetadores(figura 4)
Laveelfiltro usandoun lavavajillasliquido yaguatibia Enju_gueloa fondo, Sacudacon
cuidadoel excesode agua delfiltro Sequeel filtro afondo antes devolver acolocarlo
Limpieza de la caja
o Aseguresede desenchufarelaparato deaireacondicionado paraevitar losriesgosde
descargasel_ctricaso incendio Lacaiayetfrente puedenserlimpiadoscon un paso
libre deaceiteso favadoscon un paso humedecido con una soluci6nde agua tibia y
tavavajillasliquido suave.Enjuagueafondo yfrote parasecar..
o Nousenuncalimpiadoresfuertes, cerao compuesto para pulir sobree!frente lacaja
, Aseguresede escurrirel excesode agua del paso antes de limpiar alrededor de los
controles Elexcesode aguasobreo alrededorde loscontrotes puedecausarda_osal
aparato de aireacondicionado,
• Elfrente de lacajapuedequitarseparauna limpieza m_safondo Vea"lnstalaci6n de
la parte delantera" en estemanual
• Limpieelfrente en unatina paralavarropa usandounlavavaiillastfquidoyaguatibia
Enjuaguea fondo yseque Tengacuidado deno tocar losburletes btandosdel frente.
° VuelvaacolocarelfrentedetacajaVuelvaacolocarlostornillosotastuercashexagonates,
o Vuefvaacotocarelpanel delanteroyelfittro Enchufeelaparatodeaireacondicionado
Figura 8
Mantenimiento
Rutinario
Almacenamiento para el invierno
Sipiensaalmacenareiaparatodeaireacondicionadoduranteelinvierno,qufteloconcuidado
de [aventanasegonlasinstrucdonespara lainstalaci6n,Cubralocon pt_sticoo col6quelo
enlacajaoriginal NOTA:paraevitar la oxidacibnoquelasconexionesel_ctricassean
da_adas,guarde el aparato deaire acondicionado en posicibnrecta y en un iugar
secooPuedecomprarunacubiertaparaelinviernoensudistribuidor.Lacubiertaprotegeal
aparatodeaire acondicionadocuandosedejaen sulugardurante etinvierno
Antes de hater cualquier acto de servicio o
mantenimiento, desenchufe et acondicionador de aire_
Despu_s de servicio, inverta las instrucciones siguientes para reinstalar el
acondicionador de aire
Para Limpiar el Panel Frontal
Remu_vee!panel frontal, Limpielo con agua tibia y detergente suave. Enju_guelo,
y s_quelocon un patio suave Nunca uselimp!adores potentes, amonia o solventes
Si existeun residuo de goma en e! panel fronta!, remu_velo con un patio y alcohol
Reparacibn de Pinta
Revisefaspartesexteriores (elgabinete, etc )una o dosvecespor afio, especialmente
en !ocaci6nescerca deloceano, donde el mojo pueda serun problema. SiIo necesite,
pinte el exterior del gabinete.
Limpieza del Interior det Acondicionador de Aire
No permita que aqua entra en el motor, la cajael_ctrica, o losterminales el_ctricos
del compresor
t, Remueva el panel frontal
2, Con ayuda, y con cuidado para eviata dafio personal, remueva el chasis del
gabinete, AI remover etacondicionador de aire del gabinete o de la ventana,
pueda existir agua dentro de la base que pueda derramar sobre el piso Tenga
cuidado de no cortarse con las afetas met_[icas afilados de los serpentines
delantero y trasero.
3 No deje que t[quidos entran en laspartes electricas Envuelva el motor, la caja
e!_ctrica y losterminales elect!cos con plastico, Estoprevendr_ que agua haga
dafio a la isolaci6n y cause dafio serio
4, Limpie la base, losserpentines y la bandeja de agua Ltmpielos al menos una
vez por afio, o mas si los serpentines y bandejas se ensucien,
5, Despu_s de limpiarlo, remu_va el pf_stico Espere24 horas antes de poner la
unidad en funcionamiento, Esto propone tiempo suficiente para secamiento
*NOTA SOBRELAMANIJA: Sihay unamanija enetchasis, no usetapara levantar la unidad
Sdlo existe para ayudar en mover el chasisdentro del gabinete (durante ta iimpieza, et
mantenimiento, el servicio)
Lista de Control de
Averias
Antes de efectuar una llamada al servicio de reparaciones, repase esta lista Es
posible que le ahorre tiempo y dinero Esta lista incluye problemas comunes que
no son el resuttado de una mano de obra omateriales defectuosos en este aparato,
PROBLEMA
Acondicionador de aire no funciona
SOLUOON
Elenchufe en el tomacorriente de pared no est_ bien conectado Aseg_rese que el enchufe encaje de manera
adecuada en el tomacorriente
Elfusible de la casa ha explotado o et disyuntor ha fallado Reemptace el fusible con un fusible de tiempo de
demora o vuelva a aiustar el disyuntor,
Selector en posici6n de APAGADO, Ponga el selector en posici0n de ENCEND1DO(aigunos modelos) o en el
aiuste deseado de VENT1LADORo ENFRIAMIENTO.
Unidad apagada porque el termostato se haajustado en un nivel m_s alto y Iuego se ha vuelto a colocar en un
nivet m_s baja Espere aproximadamente 3 minutos Escuche que empiece a-funcionar el compresor
Se ha apagado y encendido la unidad rapidamente Apague la unidad y espere 3 minutos antes de volver a
encenderla
Termostato ajustado en un niveI demasiado bajo Aiuste el termostato a un nivel m_s alto para enfriamien_o
Aire de la unidad no es suficiente frio CoIoque el selector en un nivel m_s alto para el VENTfLADOR o ENFRJAMIENTO
Termostato ajustado para una temperatura demasiado atta Ajuste el termostato para una temperatura mi_s
fria.
Temperatura de ta habitation menos de 70°F (21°C) Esposible que enfriamiento no ocurra hasta que ta
temperatura sea mayor que 70°F (21 ° C)
Tubo sensor de temperatura toca ta bobina frfa ubicada detr_s del filtro de aire Enderezca el tubo de manera
que no toque la bobina
Acondicionador de aire enfria, pero
habitacibn es demasiado calorosa -
hielo se acumula en la bobina de
enfriar detr&s del panel frontal
decorativo
Temperatura exterior a menos de 70_ F(21° C). ParadesheIar la bobina, coloque el selector en la posici6n de
V£NT&ADOR £ntonces, ajus[e el termostato en una temperatura m_s alta
Filtro de aire puede estar sucio Limpie el fiItro Refierese a Ia SecciSn de Cuidado y Limpieza Para deshelar,
ajuste el selector en una de tas posiciones del VENTILADOR
Termostato ajustado en una temperatura demasiado fria para enfriar durante la noche. Para deshetar ia
bobina, ajuste el selector en una de las posiciones del VENTILADOR Entonces. aiuste el termostato en una
posici6n de temperatura m_s alta
Acondicionador de aire enfria, pero
habitaci6n es demasiado calorosa - NO
se acumula hielo en la bobina de
enfriar detr&s del panel frontal
decorativoo
Filtro de aire sucio - aire restringido Limpie el filtro de aire Refierese a la secci6n de Cuidado y Limpieza
Termostato ajustado a una temperatura demasiado calorosa Gire el termostato en sentido de rotacion de _as
manecillas del reloj hada un ajuste que dar& una temperatura m_isfria
Termostato ajustado a un nOmero bajo Ajuste el te{mostato a un nOmero m_s alto
Respiradero ajustado en position de ABIERTO Aiuste el respiradero en position de CERRADO para Iograr un
enfriamien[o m,tximo_
Celosias direccionales de aire en una posici6n inadecuada Posicione lascelosfas para una mejor distribuci6n
de aire
Parte frontal de la unidad est,i bloqueada por cortinas, persianas, muebles, etc - restringe la distribuci0n deI
aire Quite e!estorbo de en frente de la unidad
Puertas, ventanas, registros, etc abiertos - dejan escapaz et aire frio Cierre las puertas, ventanas, registros,
etc
Apenas se enciende fa unidad en una habitaci6n calorosa Permite tiempo adicional para sacar "calor
aImacenado" de paredes, techo, piso y muebles
Filtro de aire 5ucio - aire restdngido Limpie el filtro de aire
Acondicionador se enciende y se Temperatura exterior extremadamente alta Ajuste VENTILADORen veloddad aIta para que traiga el aire por
apaga r,_pidamente, encima de las bobinas de enfriar m=%frecuentemente
Unidad emite ruido al enfriaro Sonido de movimiento de aire Esto es normal Si es demasiado fuerte, ponga el selector en un ajuste de
VENTILADORm_s bajo,
Ventilador suena al pegar ai sistema de extracci6n de agua/humedad Esto es normal cuando fa humedad es
atta Cierre puertas, ventanas y registros
Vibraci6n de ta ventana - instalaci6n deficiente Refierese a las instrucciones de instalacibn o hable con el
instalador
Instalaci6n inadecuada Incline tevemente el acondicionador de aire hacia el exterior para permitir el drenaje
Gotea agua ADENTRO DE LA CASA de agua Refierese alas instrucciones de instalaci6n - hable con el instalador
cuando la unidad enfriao
Gotea agua AFUERA DE LA CASA
cuando la unidad enfria,
Unidad saca grandes cantidades de humedad de la habitaciSn Esto es normal en un dia excesivamente
hOmedo
9
Servicio Sears
"Nosotros Reparamos Io que Vendemos" es nuestra garantfa de que usted puede
depender de Sears para servicio _ y el servicio de Sears Io puede conseguir a tray, s de
todo el pals Su acondicionador de aire tiene mayor valor cuando se considera que Sears
tiene centros de ser¢icio a tray,s de todo el pars, con t_cnicos entrenados por
Sears...t_cnicos espedficamente entrenados en los artefactos Sears y que cuentan con
tas piezas, herramientas y equipo para asegurarle que cumplimos con nuestra
promesa." Nosotros reparamos to que vendemos "
Convenio de Mantenimiento de Sears
Conserve el valor de su acondicionador de aire Kenmore® adquiriendo e! convenio de
Mantenimiento Sears Los acondicionadores de aire Sears estan dise_ados, fabricados
y probados para funcionamiento confiable durante muchos aEos Sin embargo,
cuatquier artefacto modemo puede, de vez en cuando, necesitar servicio
El Convenio de Mantenimiento Sears
o Essu manera de comprar ta reparaci6n del manana al precio de hoy
o Elimina las cuentas de reparaciones resultantes de! uso normal
Permite tantas ftamadas de servicio como sean necesarias
• Proporciona senJicio por t_cnicos profesionales entrenados por Sears
o Ofrece mantenimiento preventivo anual si Io solicita
Este convenio de mantenimiento no cubre la instalaci6n original, la reinstalaci6n o da_o
resuttante de causas extemas tales como casos fortuitos, abuso, robo, incendio,
inundaciones, viento, rayos, congelaci6n, falla de energla, reducci6n de potencia, etc.
Solicite a un vendedor que le explique todos los t_rminos y condiciones del convenio
Garantia
Garantia Completa de un Afio para el Acondicionador de Aire
Dentro de un a_o a partir de lafecha de compra, cuando este acondicionador de aire
sea operado y mantenido para uso normal de enfriamiento de una habitaci6n, de
acuerdo con las instrucciones provistas en el Manual del Usuario, Sears reparar_ este
acondicionador de aire, gratuitamente, sitiene defectos de material o mano de obra.
Garantia Completa de Cinco A_os en el Sistema de Refrigeracibn Sellado
Durante cinco a_os a partir de la fecha de compra, cuando este acondicionador de aire
sea operaclo y mantenido de acuerdo con las instrucciones indicadas en e! Manual del
Usuario, Sears reparara el sistema sellado (que se compone def refrigerante, tuberia de
conexbn y motor del compresor), gratuitamente, si tiene defectos de material o mano
de obra
Esta garantia le otorga derechos legales especificos y usted tarnbi_n
puede tener otros derechos que varian de un estado a otro.
El servicio bajo la garantta est_ disponible poni_ndose en contacto con el
CENTRO/DEPARTAMENTO DE SERVfCIO SEARS MAS CERCANO
en los Estados Unidos o Itamando al !-800-4-REPAfR
Para REPUESTOSflame at 1-800-FON-PART
SEARS, ROEBUCK and CO.
3333 Beverly Road
Hoffman Estates, IL 60179
t0 IMPRESOEN EEUU