Important Safety Instructions ............................................... 2
How and Why .................................................................. 2
Energy Saving Ideas ................................................................ 3
Installation .......................................................................... 3-4
Using the Air Conditioner ...........................................................5
Air Conditioner Features .............................................. 5-6
Care and Cleaning ..................................................................... 6-7
Routine Maintenance ...............................................................8
Before You Call For Service .......................................................9
Sears Service ........................................................................ 10
Warranty ............................................................................ 10
Read and Save These Instructions
ThisUseand CareManual provides specificoperating instructions for your model Usethe air conditioner only asinstructed
in thismanuaf Theseinstructi_nsaren_tmeantt_c_vereveryp_ssibIec_nditi_nandsituati_nthatmay_ccur Common sense
and caution must be practicedwhen installing, operating, and maintaining anyappliance
Record Your Model and Serial Numbers
Record in the space provided below timemodel and serial numbers The serial plate is located behind the left front louvers
Reading the numbers may be easier by using a flashlight or by removing the cabinet front as instructed under "Care and
Cleaning " On compact models, it is located on the outside of the cabinet
Model Number:
Serial Number:
Purchase Date:
PiN 955R-D02 (941t)
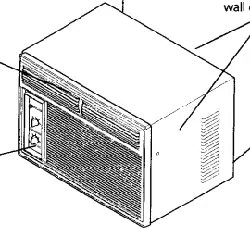
Important Safety
Unstructions
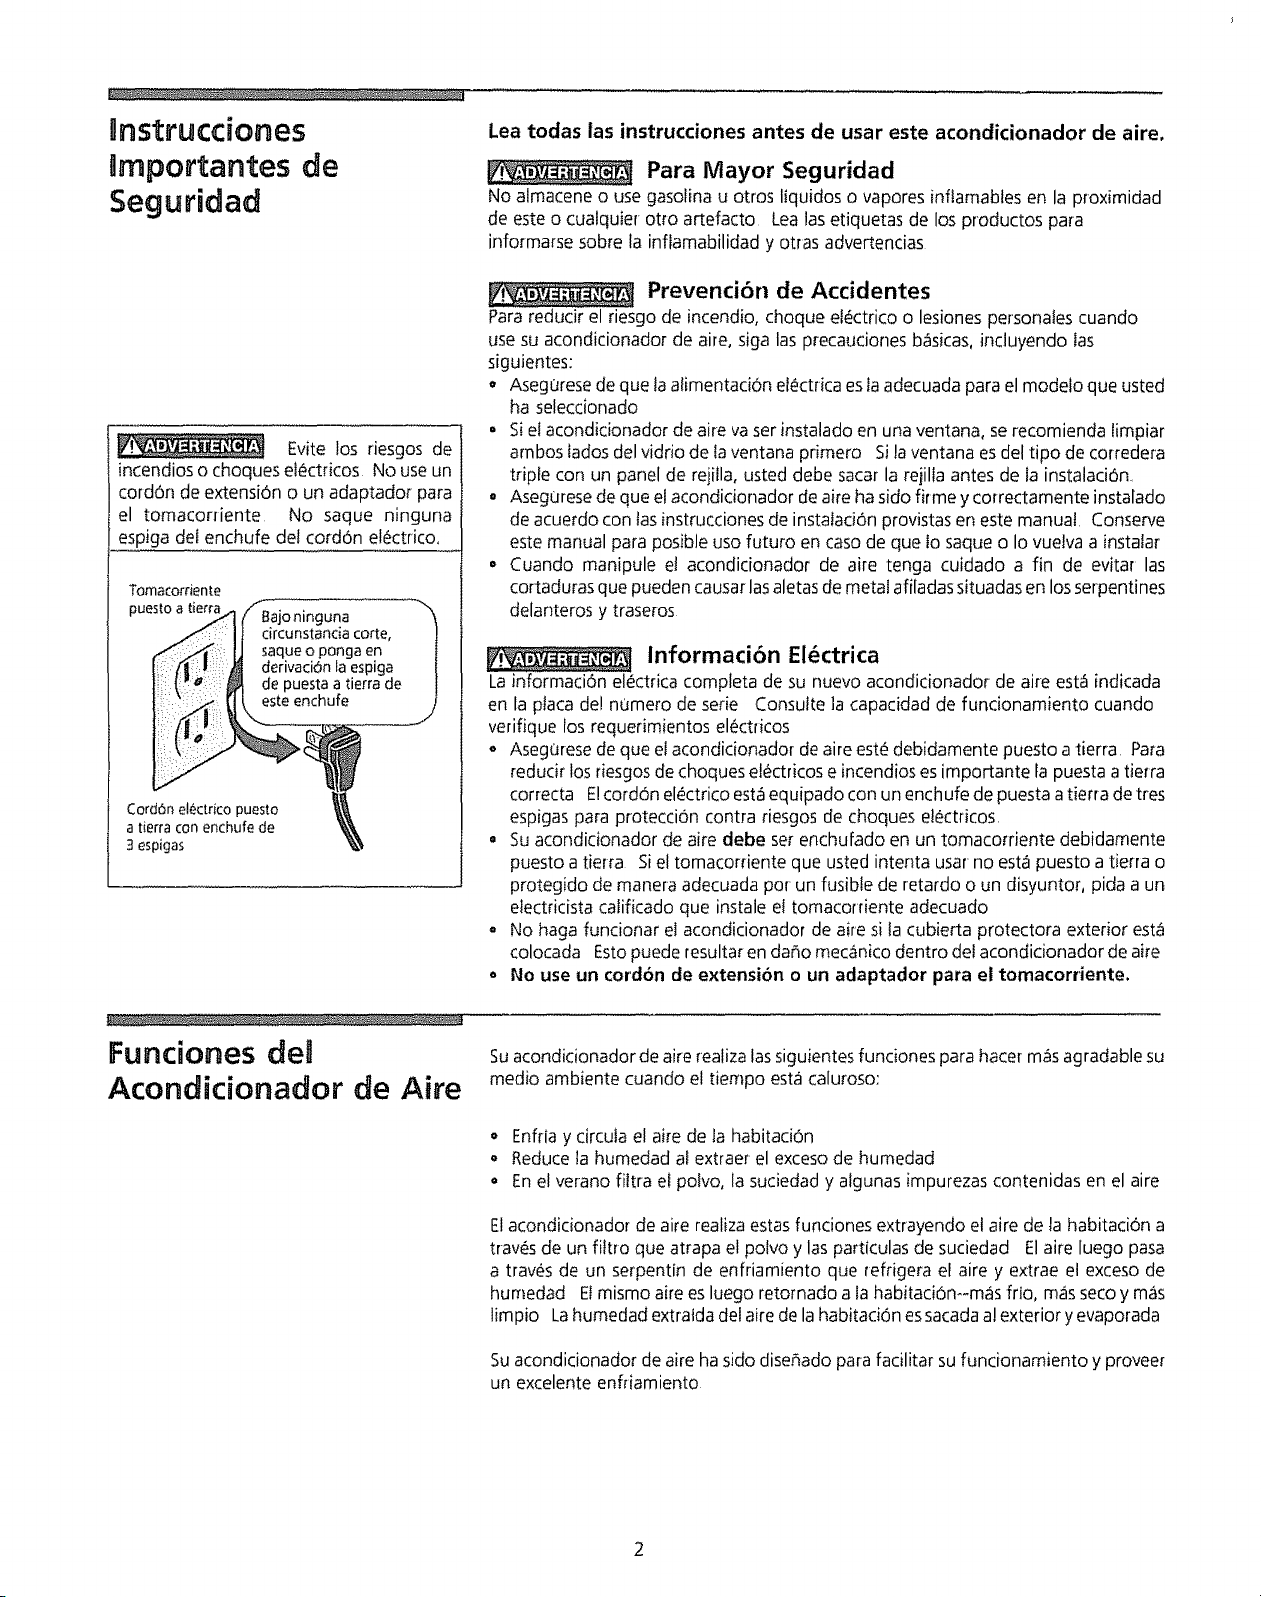
Avoid fire hazard or
electric shock Do not use an extension
cord or an adaptor plug Do not remove
any prong from the power cord
Groundinc )e
wall
bypass
g,+
Power supply
cord with 3-prong
grounding plug
Read all instructions before using this air conditioner.
For Your Safety
Donot store or usegasolineor other flammable vapors and liquidsin the vicinity ofthis
or anyother appliance Readproduct labelsfor flammability and other warnings
[:_ Prevent Accidents
To reduce the risk of fire, electrical shock, or injury to persons when using your
air conditioner', follow basic precautions, including the following:
• Be sure the electrical service isadequate for the model you have chosen
o Ifthe airconditioner isto be installed in awindow, you will probably want to clean
both sidesof the glassfirst, If the window isa triple-track type with ascreen panel
included, you may want to remove the screen completely before installation,,
o Be sure the air conditioner hasbeen securely and correctly installed according
to the separate installation instructions provided with this manual Save this
manual and installation instructions for possible future use in removing or
reinstalling this unit
o When handling the air conditioner, be careful to avoid cutsfrom sharp metal fins
on front and rear coils.
ri_ Electrical Information
Thecomplete electrical rating of your new room air conditioneris stated on the serial
plate Refer to the rating when checking the electrical requirements
+ Be sure the air conditioner is properly grounded To minimize shock and fire
hazards,proper grounding isimportant Thepower cord isequipped with athree-
prong grounding plug for protection against shock hazards
oYour air conditionerrnust be used in a properly grounded wall receptacle if the
wall receptacleyou intend to useis not adequately grounded or protected by a
time delay fuse or circuit breaker, have a qualified electrician installthe proper
receptacle
• Do not run air conditioner with outside protective cover'in place Thiscould result
in mechanical damage within the air conditioner
o Do not use an extension cord or an adapter plug.
How and Why Your room air'conditioner provides the following functions to make hot weather
living more comfortable:
Cools and circulates room air
o Lowers humidity by removing excessmoisture
= Filtersout summertime dust, dirt, and some airborne impurities
The air conditioner performs these functions by drawing room air through a filter
'which traps dust and dirt particles The air then passesover a cooling coil which
refrigerates the air and removesexcessmoisture The same air isthen returned to
the room--cooler, drier and cleaner Moisture removed from the room air iscarried
to the outside and evaporated
Your air conditioner is designed to be easy to operate and to provide plenty of
cooling power
Energy Saving ideas
/
o The capacity of the room air conditioner must fit the room sizefor efficient and
satisfactory operation
• Install timeroom air conditioner on the shady sideof your home, A window that
faces north isbest because it isshaded most of the day,
Do not block air flow inside with blinds, curtains or furniture; or outside with
shrubs, enclosures, or other buildings
o Close the fireplace damper, floor and wall registers socoot air does not escape
up the chimney and into the duct work,
o Keep btindsand drapesin other windows closedduring thesunniest partof the day
• Clean the air filter as recommended in the section "Care and Cleaning "
oProperinsulation and weather stripping inyour home will help keep warm air out
and coot air in
_, External house shading with trees, plants or awnings will help reduce the air
conditioner's work load
oOperate heat producing appliances such as ranges, washers, dryers and
dishwashers during the coolest part of the day
installation
t i' Bottom Rail I it
i sea l if!I
l ....
_"222"22..... 21_iiT2221_""_'T77;-_LLLi,2_?,Z.... r
Installing Window Seal
Vertical Louver _
Screw
Unit Cover
_ _'_-- Screw
Horizontal
Louvers Front Panel
Front Installation - Side Air Discharge
Side Air and Top Air Discharge Models, Including Compacts
Installing Window Seal
The removable "sleeve"or cabinet (compact models) of the air conditioner must be
properly positioned for safeand efficient sealing, To installthe window seal,position
the bottom rail seal on timebottom rai! flush with the front edge of the rail and in
contact with side seals, Compact models are permanently encased in the cabinet,
which is not removable Referto the Installation Instructions
Manual Vertical Louver Adjustment
Complete this adjustment before installing front panel
1 Adjust the vertical louvers to the straight position by using the handle
2 The control panel and knobs are packed separately To install them, refer to
Installing the Dial Plate and Front Frame section
Front Installation
Install the front panel with filter asfollows:
t Adjust the horizontal louvers to the straight position Hold the front straight
until the vertical louver handle linesup between the bottom horizontal louver
and the discharge opening
2 Pressthe front straight onto the cabinet until the holes in the flange of the
plastic front line up with the screw holes in the metal cabinet Fastenthe front
panel in place with the two screws provided
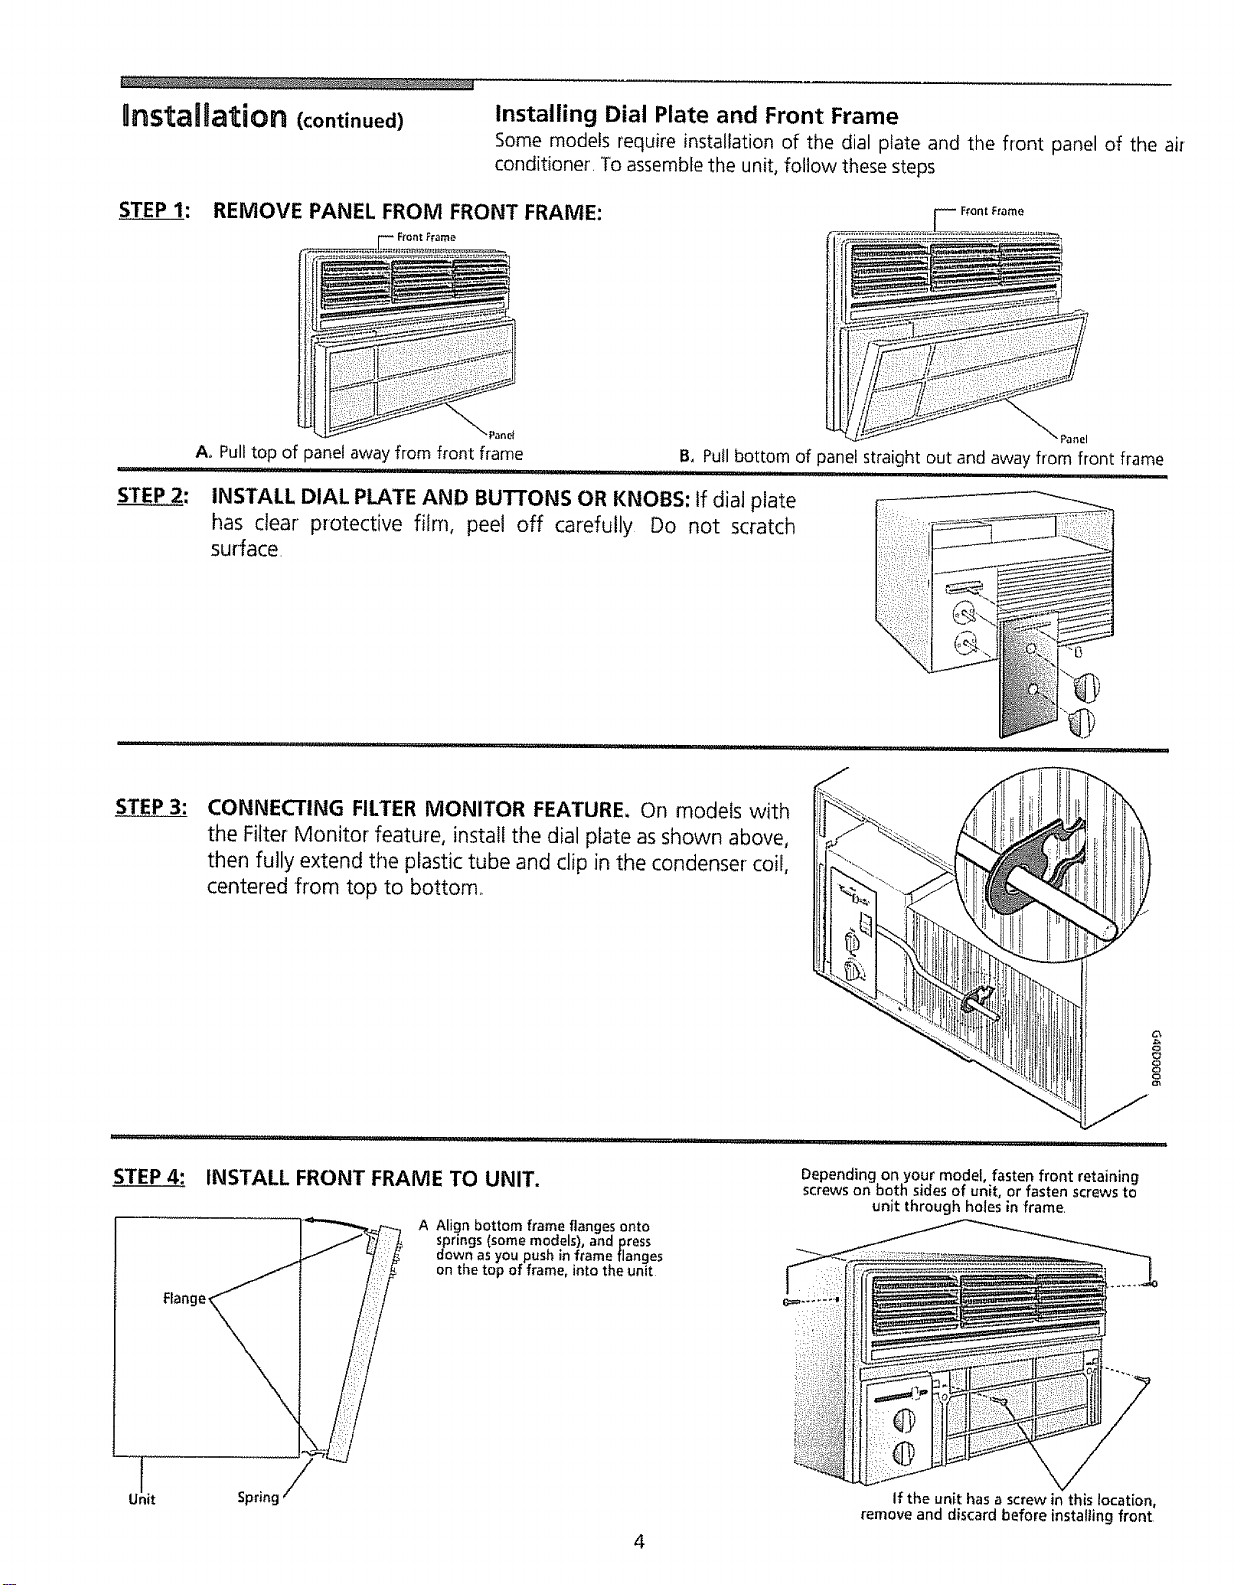
Unstailation (continued) Installing Dial Plate and Front Frame
Some models require installation of the dial plate and the front panel of the air
conditioner, To assemblethe unit, follow these steps
STEP I: REMOVE PANEL FROM FRONT FRAME:
==========================================
Ao Pull top of panel away from front frame Panel
B, Pull bottom of panel straight out and away from front frame
INSTALL DIAL PLATE AND BUTTONS OR KNOBS: If dial plate
has clear protective film, peel off carefully Do not scratch
surface
STEP 3: CONNECTING FILTER MONITOR FEATURE, On models with
the Filter Monitor feature, install the dial plate as shown above,
then fully extend the plastic tube and clip in the condenser coil,
centered from top to bottom_
1
Unit
Flange_
INSTALL FRONT FRAME TO UNIT.
A Align bottom frame flanges onto
springs (some models), and press
down as you push in frame flanges
on the top of frame, into the unit
Sprincj
Depending on your model, fasten front retaining
screws on both sides of unit, or fasten screws to
unit through holes in frame,
If the unit has a screw in this location,
remove and discard before installing front
Using the Air Conditioner
NOTE: If the air conditioner isturned off,
wait 3 minutes before restarting This
allows pressure inside the compressor to
equalize Failure to follow these
instructions may cause inefficient
operation
To reduce the risk of fire, electric shock, or injury to persons, read the
IMPORTANTSAFETYINSTRUCTIONSbefore operating this appliance,
To begin operating the air conditioner, follow these steps:
Plugin the air conditioner (Toprevent electrical hazards, do not useanextension
cord or an adapter plug )
2 Setthe exhaust vent to the CLOSEDposition
3 Setthe TEMPControl to the coolest setting
4 Set the fan control at the highest level
5 Adjust the louvers for comfortable air flow
6 Once the room hascooled, set the fan to the POWERSAVERFAN setting and/
or adjust the TEMP Control to the setting you find most comfortable
Review the "Air Conditioner Features" section for other settings..
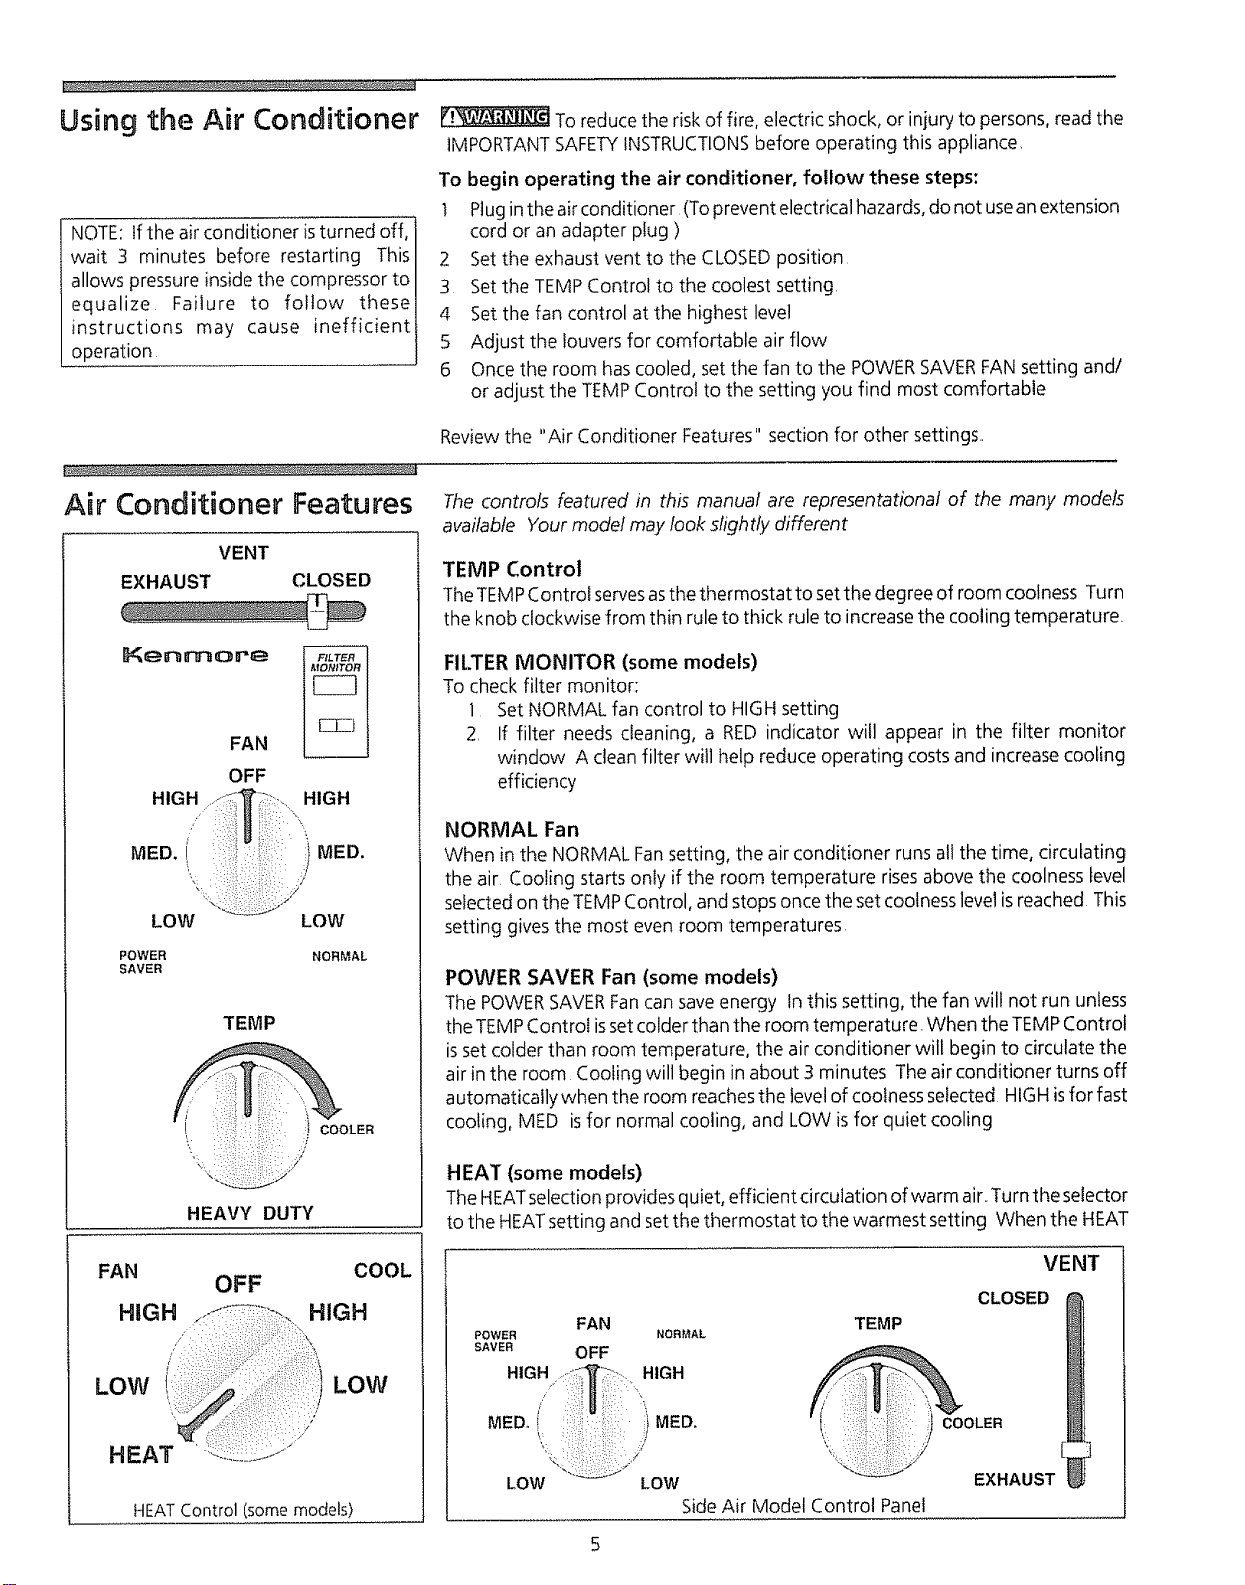
Air Conditioner Features
VENT
EXHAUST CLOSED
KenmoreFAN
OFF
MED i" ') MED
LOW LOW
POWER
SAVER NORMAL
TEMP
COOLER
HEAVY DUTY
The controls featured in this manual are representational of the many models
available Your model may look shght!y different
TEMP Control
TheTEMPControi servesasthe thermostat to set the degree of room coolness Turn
the knob clockwise from thin rule to thick rule to increase the cooling temperature
FILTER MONITOR (some models)
To check filter monitor:
] Set NORMAL fan control to HIGHsetting
2, If filter needs cleaning, a RED indicator will appear in the filter monitor
window A clean filter will help reduce operating costs and increase cooling
efficiency
NORMAL Fan
When in the NORMAL Fansetting, the air conditioner runs all the time, circulating
the air. Cooling starts only if the room temperature rises above the coolness level
selected on the TEMPControl, and stops once the set coolnesslevel isreached This
setting gives the most even room temperatures
POWER SAVER Fan (some models)
The POWERSAVERFancan saveenergy In this setting, the fan will not run unless
theTEMP Control isset colder than the room temperature When the TEMPControl
isset colder than room temperature, the air conditioner will begin to circulatethe
air in the room Cooling will begin in about 3 minutes The air conditioner turns off
automatically when tile room reachesthe level of coolness selected HIGHisfor fast
cooling, MED isfor normal cooling, and LOW isfor quiet cooling
HEAT (some models)
The HEATselection provides quiet, efficient circulation of warm air..Turnthe selector
to the HEATsetting and set the thermostat to the warmest setting When the HEAT
FAN COOL
OFF
HIGH HIGH
' :: :) :i ::::i:;:::':
I
LOW LOW
HEAT Control (some models)
FAN TEMP
POWER NORMAL
SAVER OFF
HIGH HIGH
VENT
CLOSED
/
MED,i }MED. I : COOLE.
LOW LOW EXHAUST
Side Air Model Control Panel
Air Conditioner Features
(continued)
Vent Control - Compact Models
setting is selected, the thermostat maintains the temperature by automatically
turning the heater on and off in response to room temperature Once the room is
warm, adjust the thermostat to a cooler' setting The fan runs continuously to
circulate air in the room
A slight heat odor may come from the unit when first switching to HEATafter the
cooling season isover This odor, caused by fine dust particles on the heater, will
disappear quickly
Vent Control
TheVent Control allows the air conditioner to either recirculateinsideair (CLOSED)
or exhaust air to the outside (OPEN)
o TheCLOSEDposition isusedwhen maximum cooling isdesired,It mayalsobe used
for air recirculation without cooling when the air conditioner is set in the FAN
position
• TheOPENpositionremovesstaleairfrom the room and exhaustsit to the outside
Freshair isdrawn into the room through normal air passagesfound in homes
o The OPENor CLOSEDposition can be usedwith any fan selection
o Forcompact models, push the slide in to CLOSE,pull out to OPEN
Air Directional Louvers
The air directional louvers control the air flow direction. Adjust louvers up, down,
left or right The outside tabs adjust the air up or down Thecenter leversdirect the
air left or right
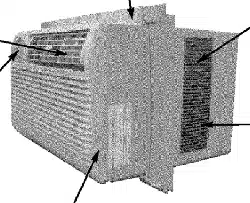
Care and Cmeaning
Remove
Knobs
Locking
Tabs
e
Pressfirmly on eachsideof
case to release locking tabs 8
Figure1
Removing Decorative Front - Some Compact Modets
Clips
Figure 2
Filter Removal- Some Compact Mode_s
Clean your air conditioner occasionally to keep it looking new. Besure to unplug
the unit before cleaning to prevent shock or fire hazards,
Filter Removal, Some Compact Models.
Somecompactmodels requirethe removalof the front panel to accessthe filter for
cleaning. To remove the front panel, follow the directions below:
Note: Some compact models are equipped with a slide-out rigid filter that is
described under the "Air Filter Cleaning" section It isnotnecessary to remove the
decorative front in these units
Decorative Front Removal and Filter Cleaning
1 Unplug the power cord from the wall outlet
2 Removeknobs by pulling firmly Removefront retaining screw at the bottom of
the front (Figure t)
3 Pressfirmly on each sideof the metal case close to the front and approximately
half way down from the top of the front
4 While pressing on the sides of the metal case,gently pull the front out and lift
up to release it from the case
5 Removefilter by pulling filter straight off of clips (Figure 2) Clean according to
instructions under "Air Filter Cleaning" section
To reinstall:
Properreinstallation of decorative front isimportant for both safetyand performance
I Position filter over clips.
2 Position the top of the decorative front on the top flange of the case and align
the tabs on the front with the slots in the case
3 Carefully pull down on the front to engage the top tabs while pushing the front
over the caseto ensure proper alignment. Theside locking tabs will "click" when
the front is properly installed
4 Install the front retaining screw at the bottom of the unit
5 Install the knobs byaligning them with their shafts and pushing firmly into place
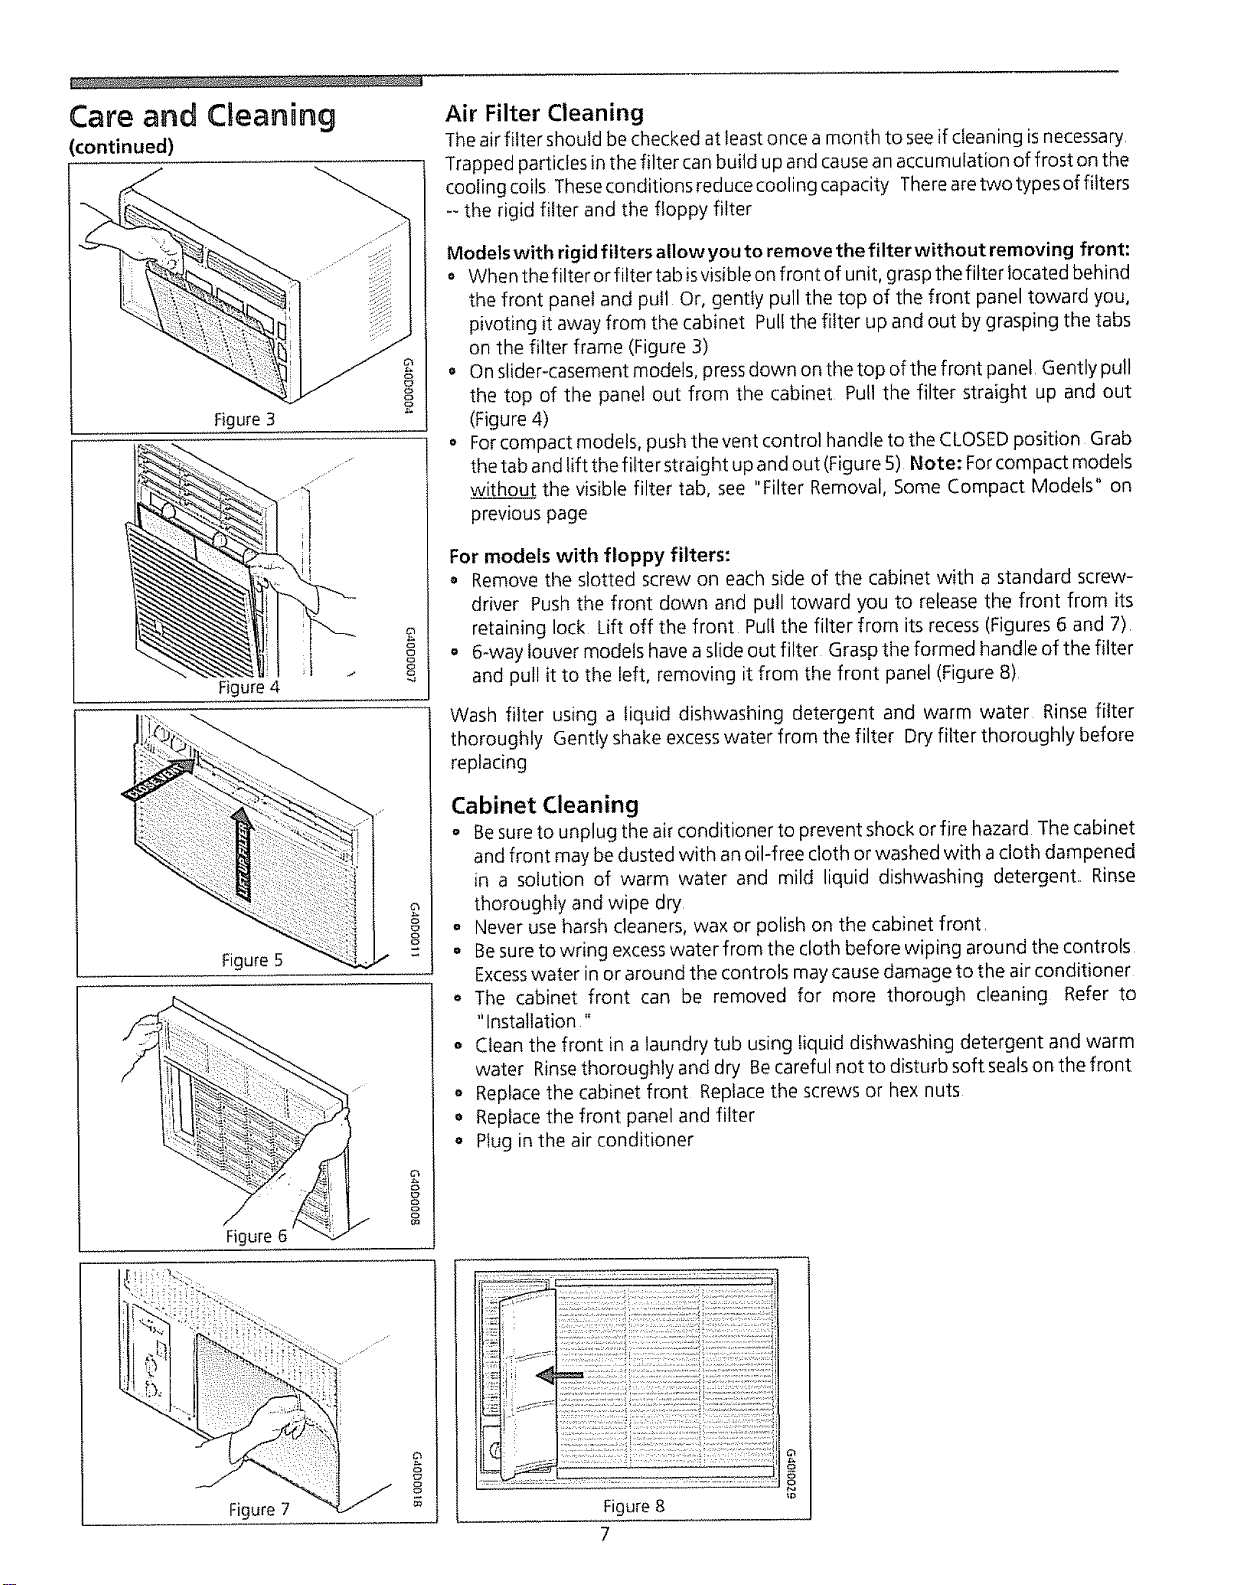
Care and Cleaning
continued)
Figure3
Figure4
o
8
8
Figure 5 g
!
Figure 6 g
Air Filter Cleaning
Theair filter should be checked at least once a month to seeif cleaning isnecessary,
Trapped particles in the filter canbuild up and causean accumulation of frost on the
cooling coils Theseconditions reduce cooling capacity Therearetwo types of filters
-- the rigid filter and the floppy filter
Models with rigid filters allow you to remove the filterwithout removing front:
• When the filter or filter tab isvisibleon front of unit, graspthe fitter located behind
the front pane! and pu!l Or, gently pu!l the top of the front panel toward you,
pivoting it away from the cabinet Pullthe filter up and out by grasping the tabs
on the filter frame (Figure 3)
o On slider-casement models, pressdown on the top of the front panel, Gently pull
the top of the panel out from the cabinet Pull the filter straight up and out
(Figure 4)
o Forcompact models, push the vent control handle to the CLOSEDposition Grab
the tab and lift the filter straight up and out (Figure 5) Note: Forcompact models
without the visible filter tab, see "Filter Removal, Some Compact Models" on
previous page
For models with floppy filters:
o Remove the slotted screw on each side of the cabinet with a standard screw-
driver Push the front down and pull toward you to release the front from its
retaining lock Lift off the front Pull the filter from its recess(Figures 6 and 7),
o 6-way louver models havea slide out filter Graspthe formed handle of the filter
and pull it to the left, removing it from the front panel (Figure 8)
Wash filter using a liquid dishwashing detergent and warm water Rinse filter
thoroughly Gently shake excesswater from the filter Dry filter thoroughly before
replacing
Cabinet Cleaning
o Be sureto unplug the air conditioner to prevent shock or fire hazard The cabinet
and front may be dusted with an oil-free cloth or washed with a cloth dampened
in a solution of warm water and mild liquid dishwashing detergent,, Rinse
thoroughly and wipe dry,
o Never use harsh cleaners, wax or polish on the cabinet front,
Besure to wdng excesswater from the cloth before wiping around the controls
Excesswater in or around the controls may cause damage to the air conditioner
o The cabinet front can be removed for more thorough cleaning Refer to
"Installation"
• Clean the front in a laundry tub using liquid dishwashing detergent and warm
water Rinsethoroughly and dry Becareful not to disturb soft sealson the front
o Replacethe cabinet front Replace the screws or hex nuts
• Replacethe front panel and filter
•Plug in the air conditioner
Figure 7
8
8Figure 8
7
e
o

Routine Maintenance Winter Storage
If you plan to store the air conditioner during the winter, remove it carefully from
the window according to the installation instructions Cover it with plastic or return
it to the original carton NOTE; To prevent rust or electrical connections from
being damaged, store air conditioner in an upright position and a dry place_
A winter cover can be purchased from your dealer The cover will protect the air
conditioner when it isleft in place through the winter
_'i_ Before performing any service, unplug the power cord from
the electrical outlet.
Cleaning the Cabinet Front
Remove the front panel Wash with warm, sudsywater Rinseand dry with a soft
cloth, Never use solvents,cleaning fluids, abrasive cleaners or strong detergents tf
the packaging leavesagum residue, remove with a cloth dipped in rubbing alcohol
Repairing Paint Damage
Inspect weather-exposed parts (cabinet shell, mounting hardware, if used, etc)
once or twice a year, especially in areasnear oceans or where rust isa problem If
needed, touch up with a good grade of exterior paint.
Cleaning Inside the Air Conditioner
No Liquid should get into the motQr, electrical control box, or
compressor electrical terminals
1 Remove front panel
2. With help and using the proper lifting methods to avoid personal injury,
remove the chassis from cabinet shell* When removing the air conditioner
from cabinet shell or window, there may be water inside the basethat may spill
on the floor- Becareful to avoid cuts from sharp metal fins on the front and
rear coils
3 Liquids should not get into electrical parts Wrap the fan motor-, electrical
control box, and electrical terminals in plastic This will keep water or other
liquid from getting inside where it could damage the insulation and cause
serious trouble.
4, Clean and hose out base, coils, and water pans Clean at least once a year or
more often if the coils and pans collect dirt, sand, leaves, algae, or insects
5, After cleaning, remove plastic protection Wait 24 hours before starting the
unit again This allows time for all areas to dry out
Note: Water from rainfall or from normal usedoesnot harm these components
since the water isnot asforcefully driven into parts asa stream of water from
a garden hose
6. While the cabinet isremoved, this is a good time to oil the fan motor (See
instructions below )
*HANDLE NOTE: If the air conditioner has a chassis handle, it is NOT intended for lifting
the unit It is for sliding the chassis WITHIN the cabinet shell only (to aid in cleaning,
maintenance, etc )
Oiling the Fan Motor
To oil fan motor:
i. Removefront panel
2 Slidechassispart-way out of the cabinet shell to expose fan motor oil plugs,
(Be careful not to slide chassis out too far,) If the air conditioner-is not
equipped with a slide-out chassis,remove the cabinet
3 Oil the fan motor per instructions on the motor, To add oil, pull out the oil
plug at each end of the motor, A one-ounce capsule of oil (part number
10943) is available through your nearest SearsService Center Replace oil
hole plugs after oiling,
After servicing, reverse the above procedures to reinstall the air conditioner
8
Before You Call for Before calling for service, review this list, It may save you time and expense This fist
includes common occurrences that are not the result of defective workmanship or
Service ,,,materials in this appliance
OCCURRENCE SOLUTION
Air conditioner will not operate. Wall plug disconnected Push plug firmly into wall outlet
House fuseblown or circuit breaker tripped Replacefuse with time delaytype or resetcircuit breaker
FAN selector in OFFposition Turn FAN selector to the desired FAN setting
Unit turned off bymoving TEMPControl to a warmer setting and then immediately turning back
to a colder setting Wait approximately 3 minutes Listen for compressor to start,
Unit turned off and then on too quickly Turn unit off and wait 3 minutes before restarting
TEMP Control set warmer than room temperature Turn TEMP Control clockwise to a colder setting
(thick rule)
Air from unit does not feel cold Turn selector to a higher FAN position
enough. TEMP Control set too warm (thin rule) Turn TEMPControl clockwise to a colder setting (thick rule)
Roomtemperature below 70°F(21°C) Cooling may not occur until room temperature risesabove
70°F(21°C)
Temperature sensingtube touching cold coil, located behind airfilter Straighten tube away from coil
Air conditioner cooling, but room is Outdoor temperature below 70°F(21°C) To defrost the coil, set selector to FAN position Then,
too warm - - ice forming on cooling turn TEMP Control clockwise to a warmer setting (thin rule)
coil behind decorative front. Air filter may be dirty Clean filter Refer to Care and Cleaning section To defrost, set selector
to FAN
TEMP CONTROL set too cold for night-time cooling To defrost the coil, set selector to a FAN
position Then, set TEMP CONTROLto a warmer position
Air conditioner cooling, but room is Dirty air filter--air restricted Clean air filter Refer to Care and Cleaning section
too warm -_ NO ice forming on
cooling coil behind decorative front. TEMP Control set too warm Turn TEMP Control clockwise to a colder setting (thick rule)
Vent set at OPEN position Set vent at CLOSEDposition for maximum cooling
Air directional louvres positioned improperly Position louvres for better air distribution
Front of unit isblocked by drapes, blinds, furniture, etc -- restricts air distribution Clear blockage
in front of unit
Doors, windows, registers, etc open --cold air escapes Close doors, windows, registers, etc
Unit recently turned on in hot room Allow additional time to remove "stored heat" from walls,
ceiling, floor and furniture
Dirty air filter-- air restricted Clean air filter
Air conditioner turns on and off Outside temperature extremely hot Set FAN on high speed to bring air past cooling coils more
rapidly frequently
Noise when unit is cooling, Air movement sound This is normal If too loud, turn selector to lower FAN setting
Sound of fan hitting water-moisture removal system This is normal when humidity ishigh Close
doors, windows and registers
Window vibration--poor installation Refer to installation instructions or check with installer
Water dripping INSIDE when unit is Improper installation Tilt air conditioner slightly to the outside to allow water drainage Refer
cooling° to installation instructions--check with installer
Water dripping OUTSIDE when unit Unit removing large quantity of moisture from humid room This is normal during excessively
is cooling, humid days
9
Sears Service "We ServiceWhat We Sell" is our assurance you carl depend on Searsfor service
, .and Searsservice is nationwide Your air conditioner hasadded value when you
consider that Sears has service units nationwide, staffed with professional
technicians specifically trained on Sears appliances and having parts, tools and
equipment to insure that we meet our pledge to you "We ServiceWhat We Sell"
Sears Maintenance Agreement
Maintain the value of your Kenmore® air conditioner with a SearsMaintenance
Agreement Searsair conditioners are designed, manufactured, and tested foryears
of dependable operation Yet, anymodern appliance may require servicefrom time
to time
The SearsMaintenance Agreement
Is your way to buy tomorrow's service at today's price
Eliminates repair bills resulting from normal use
oAllows for as many service calls as required,
o Provides for-service by professional Sears-trained technicians
oOffers an annual preventive maintenance check-up at your request,
This maintenance agreement does not cover original installation, reinstatlation, or
damage resulting from external causessuch asactsof God, abuse, theft, fire, flood,
wind, lightning, freezing, power failure, power reduction, etc Please ask a
salesperson to seethe agreement for all of the terms and conditions,
Warranty Full One-Year Warranty on Air Conditioner
For one year from date of purchase, when this air conditioner is operated and
maintained for normal room cooling according to instructions in this owner's
manual, Searswill repair this air conditioner, free of charge, if defective in nqatefial
or workmanship
Ful! Five-Year Warranty on Sealed Refrigeration System
For'five years from the date of purchase, when this air conditioner isoperated and
maintained for normal room cooling according to instructions in this owner's
manual, Searswill repair the sealed refrigeration system (consisting of refrigerant,
connecting tubing, and compressor), free of charge, if defective in material or
workmanship
This warranty gives you specific legal rights, and you may have other
rights which vary from state to state.
Warranty service is available by contacting the NEARESTSEARS SERVICECENTER/
DEPARTMENT in the United States or cal! 1-800-4-REPAIR
For parts, call 1-800-FON-PART
SEARS, ROEBUCK and CO.
3333 Beverly Road
Hoffman Estates, tL 60719
t0
PRINTEDIN US,A,
Caracteristicas del Acondicionador de Aire ..........................5-6
Lea y Conserve Estas nstrucdones
Este Manual del Usuafio le proporciona instrucciones espedficas para su modelo Use el acondicionador de aire solamente
como se indica en este manual Estasinstrucciones no pueden cubrir todas lassituaciones o condiciones posibles que puedan
presentarse Pot 1otanto, sedeben seguir pr_cticas seguras y tener cuidado cuando seinstala, sehace funcionar y seejecuta
mantenimiento en cualquier artefacto,
Anote su N_mero de Modelo y N6mero de Serie
Anote en ei espacio provisto eI numero de modeIo y el numero de serie. La placa del n0mero de serie estc_situada detrEs
de las persianas delanteras dei lado izquierdo Pueda que seam_s f_cif leer los n0meros usando una linterna o sacando et
panel delantero del gabinete como se indica en lasecci6n "Cuidado y Limpieza " En los modelos compactos, est_ ubicado
en el exterior del gabinete
N_mero de Modelo:
N_mero de Serie:
Fecha de Compra,'
P/N95SR-D02(9411)
nnstrucciones
amportantes de
Seguridad
Lea todas ias instrucciones antes de usar este acondicionador de aire0
Para Mayor Seguridad
No almacene o use gasolina u otros liquidos o vapores inftamables en la proximidad
de este o cualquier otto artefacto Lea las etiquetas de los productos pafa
informarse sobre la infiamabilidad y otras advertencias
Evke los riesgos de
incendios o choques etc_ctdcos No use un
cordon de extension o un adaptador para
el tomacorriente No saque ninguna
espiga del enchufe del cordon electrico,
Tomacomente
puest°a tie_ SBajo ninguna
j<_51 ]I circunstandacorte, |
_<.._i;i: IJ saqueopongaen i
I_!'t _t/: _ derivaciOnla espiga |
I_ \It_ depuestaatierra de |
CordOn electdco puesto l_t
atierraconenchufede _,_,
3espigas _.'_
PreventiOn de Accidentes
Para reducir el riesgo de incendio, choque el_ctrico o lesiones personates cuando
use su acondicionador de aire, siga las precauciones b_sicas, incluyendo ias
siguientes:
• Asegurese de que ta alimentaciOn electrica esla adecuada para el modelo que usted
ha seleccionado
•Si el acondicionador de aire va ser instalado en una ventana, se recomienda limpiar
ambos lados del vidfio de la ventana primero Sila ventana es del tipo de corredera
tdple con un panel de rejilla, usted debe sacar la rejilla antes de la instalaci6n,
° AsegUrese de que el acondicionador de aire ha sido firme y correctamente instalado
de acuerdo con tasinstrucciones de instalad0n provistas en este manual Conserve
este manual para posible uso futuro en caso de que to saque o Io vuelva a instalar
,Cuando manipule et acondicionador de aire tenga cuidado a fin de evitar las
cortaduras que pueden causar las aletas de metal afiladas situadas en los serpentines
delanteros y traseros
Informacibn El_ctrica
La informaci0n el_ctrica completa de su nuevo acondicionador de aire est_ indicada
en la ptaca de! n0mero de serie Consuite ]a capacidad de fundonamiento cuando
verifique los requerimientos el_ctricos
o AsegOrese de que el acondicionador de aire este debidamente puesto a tierra Para
reducir los riesgos de choques el_ctricos e incendios es importante la puesta a tierra
correcta E!cordon electrico est.1equipado con un enchufe de puesta a tierra de tres
espigas para protecci0n contra riesgos de choques electricos,
°Su acondicionador de aire debe ser enchufado en un tomacomente debidamente
puesto a tierra Si el tomacorriente que usted intenta usar no est.1 puesto a tierra o
protegido de manera adecuada por un fusible de retardo o un disyuntor, pida a un
electricista calificado que instale el tomacorriente adecuado
- No haga funcionar el acondicionador de aire si ta cubierta protectora exterior est.1
colocada Esto puede resultar en da_o meQ1nico dentro del acondicionador de ake
o No use un cordon de extension oun adaptador para el tomacorriente,
Fundones
Acondicionador de Aire Suacondicionador de aire realiza las siguientes funciones para hater m¢isagradable su
medio ambiente cuando el tiempo est.1 caluroso:
o Enfria y circula el a#e de la habitadOn
°Reduce ta humedad al extraer el exceso de humedad
° En el verano filtra e! polvo, la suciedad y algunas impurezas contenidas en el aire
El acondidonador de aire realiza estas fundones extrayendo et aire de ta habitacion a
traves de un filtro que atrapa el polvo y las particulas de suciedad El aire luego pasa
a trav_s de un serpentin de enfriamiento que refrigera el aire y extrae el exceso de
humedad El mismo aire es luego retornado a la habitaci6n-m_is frio, m_isseco y m¢is
limpio Lahumedad extratda del aire de la habitaciOn es sacada a! exterior y evaporada
Su acondicionador de aire ha sido dise#,ado para facilitar su funcionamiento y provee_
un excelente enfliamiento
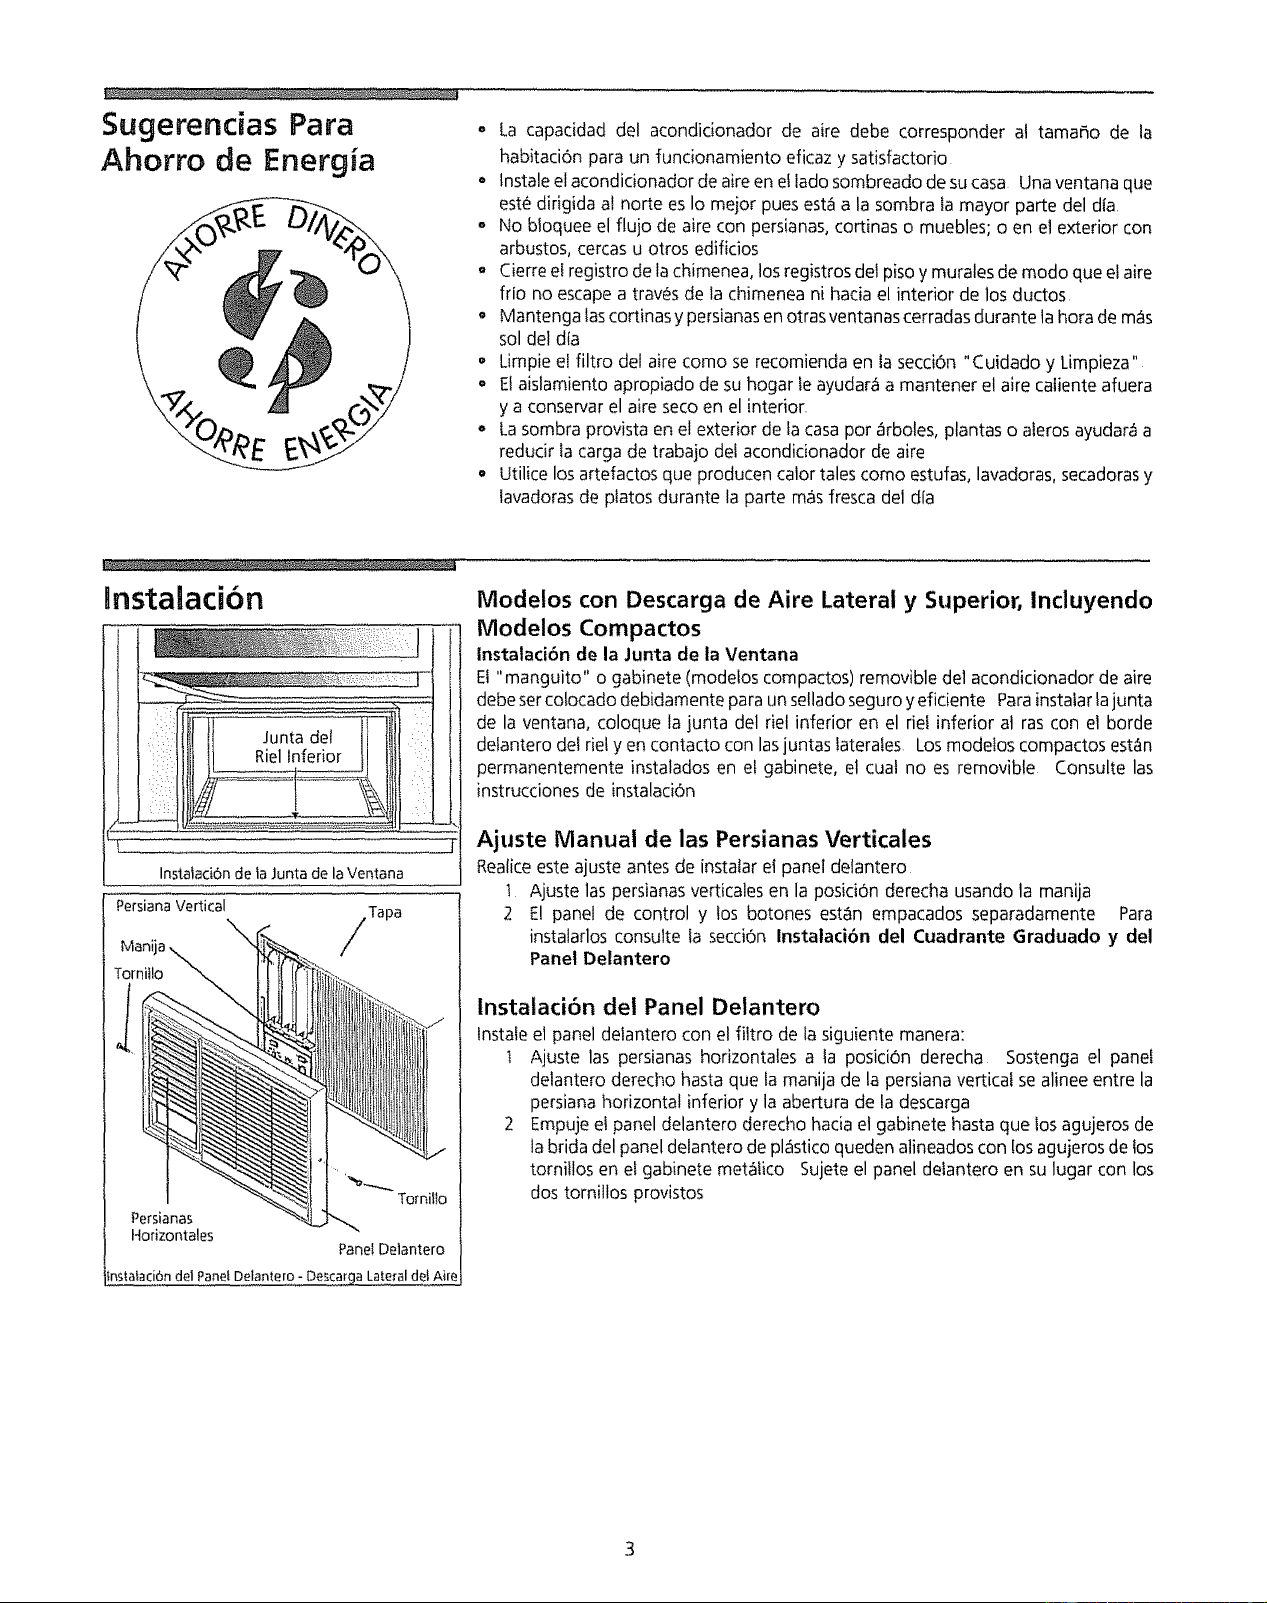
Sugerendas Para
Ahorro de Energia o La capacidad del acondicionador de aire debe corresponder al tama_o de la
habitaci6n para un funcionamiento eficaz y satisfactorio
o lnstale el acondicionador de aire en el iado sombreado de su casa Una ventana que
este dirigida al norte es Io mejor pues est.1a la sombra la mayor parte del dfa
• No bloquee el flujo de aire con persianas, cortinas o muebles; o en et exterior con
arbustos, cercas u otros edificios
o Cierre el registro de la chimenea, los registros de1 piso y murales de modo que el aire
frio no escape a traves de la chimenea ni hacia el interior de los ductos
• Mantenga las cortinas y persianas en otras ventanas cerradas durante la hora de m_ts
sol del dia
• Limpie ef filtro del aire como se recomienda en ta secci6n "Cuidado y Limpieza"
• El aislamiento apropiado de su hogar fe ayudar_t a mantener el aire caliente afuera
y a consepcar el aire seco en el interior.
. La sombra provista en el exterior de la casa pot _irboles, plantas o aleros ayudar_t a
reducir la carga de trabajo del acondicionador de aire
• Utilice los artefactos que producen calor tales como estufas, lavadoras, secadoras y
lavadoras de platos durante la parte m_isfresca del dia
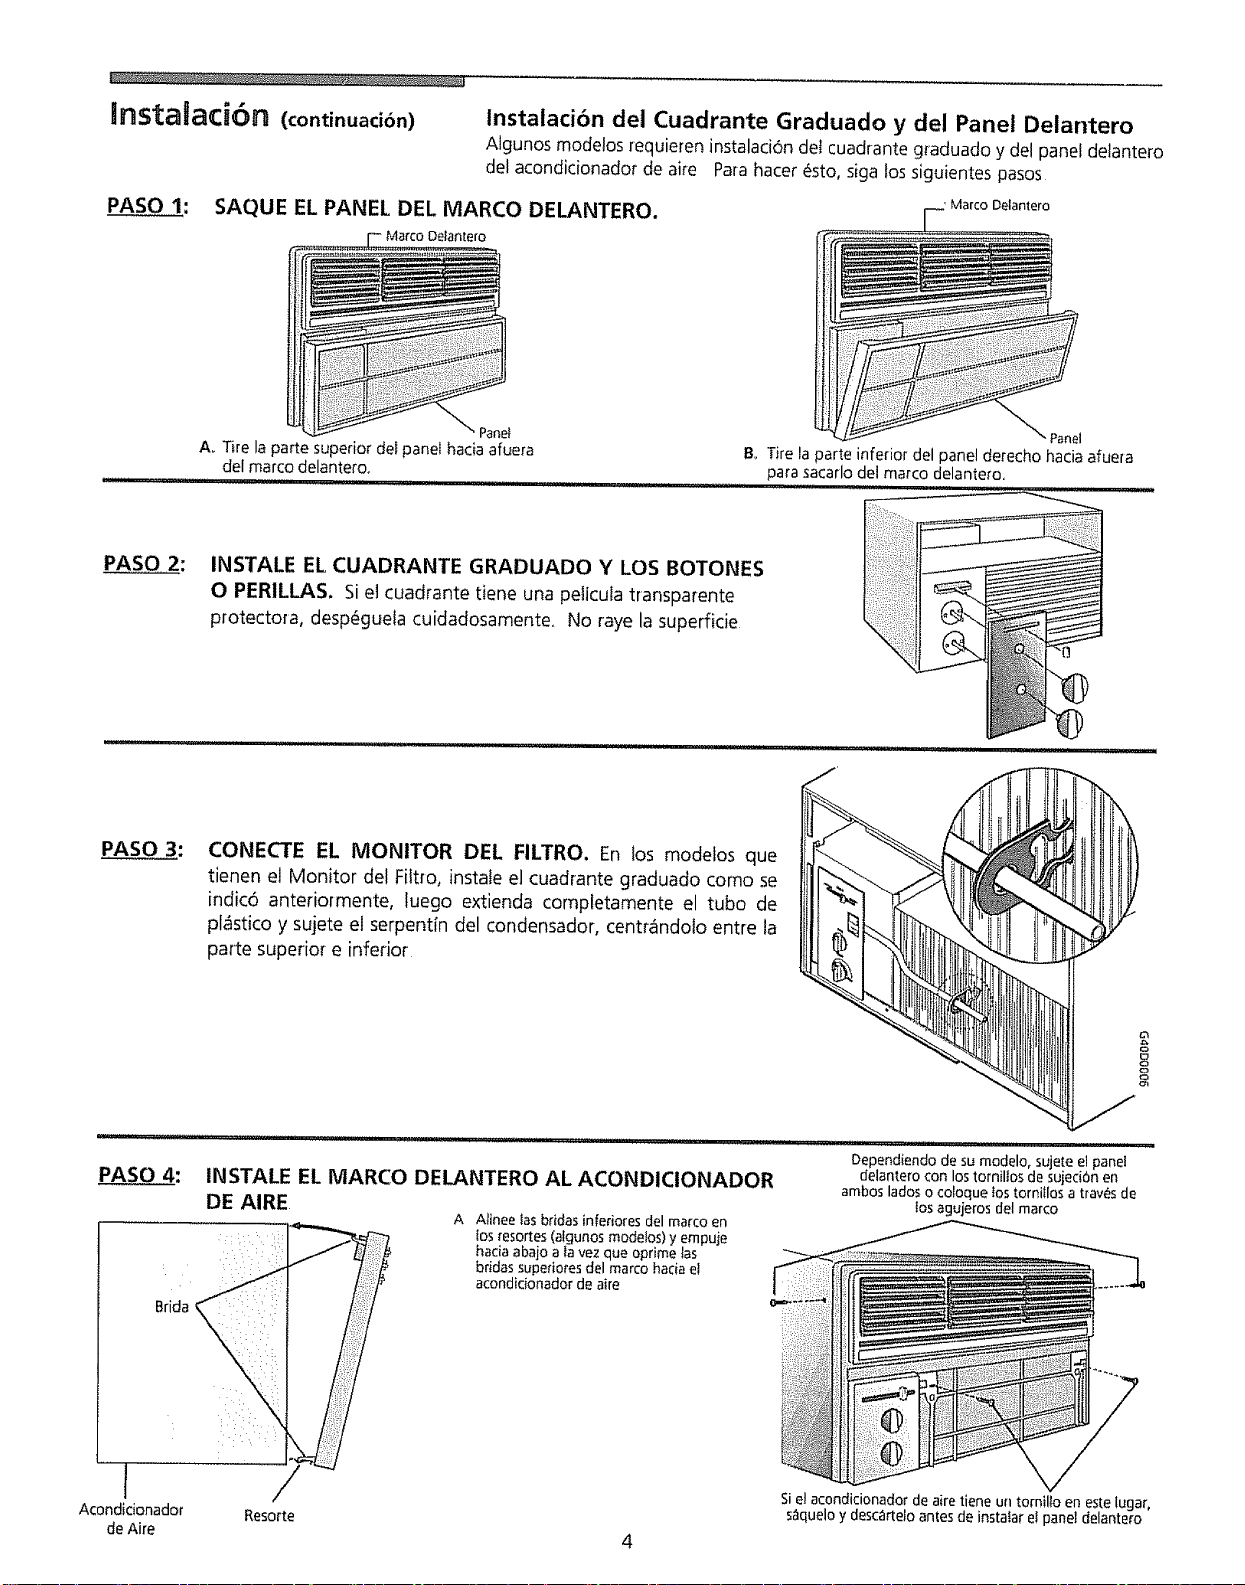
Rnsta aci6n
Junta del ::i
Instatad6ndetaJuntade laVentana
PersianaVertical Tapa
M0oija \ /
Torniilo
Tornillo
Persianas
14ofizontales Panel Delantero
_nstalaciOndei Pane!Detantero- Dfl_cargaLa!eraldefAire
Modelos con Descarga de Aire Lateral ySuperior, Incluyendo
Modelos Compactos
Instalaci6n de la Junta de la Ventana
Et "manguito" o gabinete (modeios compactos) removible del acondicionador de aire
debe ser colocado debidamente para un sellado seguro y eficiente Para instalar la junta
de la ventana, coloque la junta del riel inferior en el riel inferior at ras con el borde
delantero del riel y en contacto con las juntas lateraIes Los modefos compactos estan
permanentemente instalados en e! gabinete, el cuat no es removible Consulte las
instrucciones de instalacibn
Ajuste Manual de las Persianas Verticales
Realice este ajuste antes de instatar el panel delantero
Ajuste las persianas verticales en la posiciOn derecha usando la manija
2 E! panel de control y tos botones estan empacados separadamente Para
instalarlos consulte la secciOn Instalaci6n del Cuadrante Graduado ydel
Panel Delantero
lnstalaci6n dei Panel Delantero
Instale el panel delantero con el filtro de la siguiente manera:
t Ajuste las persianas horizontales a la posiciOn derecha Sostenga el panel
delantero derecho hasta que la manija de la persiana vertical se alinee entre la
persiana horizontal inferior y la abertura de la descarga
2 Empuje el panel delantero derecho hacia el gabinete hasta que los agujeros de
la brida del panel delantero de pkistico queden alineados con los agujeros de los
torniflos en el gabinete met_iiico Sujete el panel defantero en su lugar con los
dos tornillos provistos
3
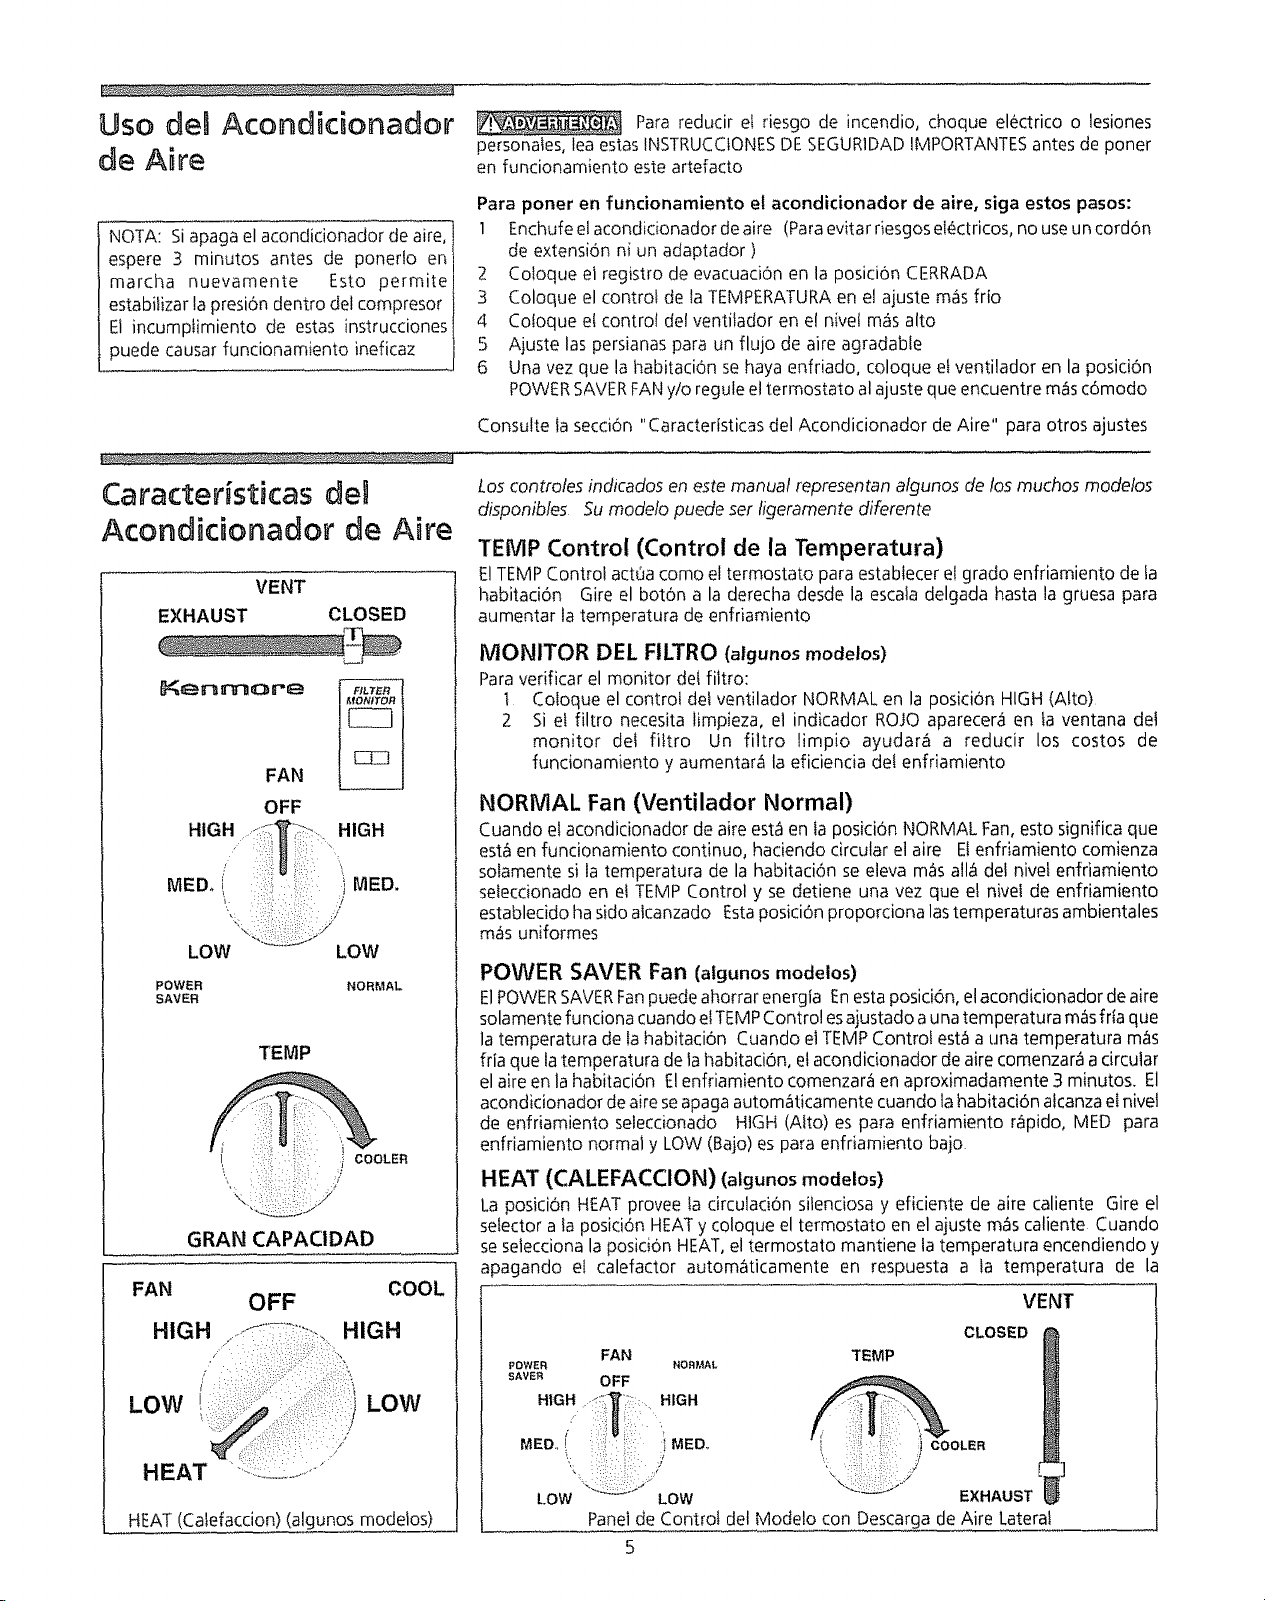
_nsta_ad6rn (continuaci6n) lnstalaci6n del Cuadrante Graduado y del Panel Delantero
Algunos modelos requieren instalaci6n det cuadrante graduado y del panel delantero
del acondicionador de aire Pa[a hater 6sto, siga los siguientes pasos
PASO 1: SAQUE EL PANEL DEL MARCO DELANTERO.
Delanlero
A. Tire la parte superior del panel hacia afuera
del marco delantero.
' Marco Delantero
"Panel
B_ Tire la parte inferior del panel derecho hacia afuera
para sacarlo del marco delantero,
INSTALE EL CUADRANTE GRADUADO Y LOS BOTONES
OPERILLAS, Si el cuadrante tiene una pelicula transparente
protectora, desp_guela cuidadosamente. No raye la supefficie
PASO 3: CONECTE EL MONITOR DEL FILTRO. En los modelos que
tienen el Monitor del Filt_o, instale el cuadrante graduado como se
indic6 anteriormente, luego extienda completamente el tubo de
plcistico y sujete el serpentfn del condensador, centr_indolo entre la
patte superior e inferior
Dependiendo de su modelo, sujeteel panel
PASO 4: INSTALE EL MARCO DELANTERO AL ACONDIClONADOR delantero con lostornillos de sujeciOnen
ambos lados o coloque_ostornillos a trav_s de
DE AIRE losaguierosdel marco
A Alinee lasbridas inferiores del marco en
,: _ i:: los_esortes(algunos modelos)y empuje
haciaabajo a la vez que oprime las
: i bridas superiores del marco hacia e!
acondicionador de aire
I Sie!acondicionador de aire tiene un tornillo en este lugar,
Acondidonador Resorte s_lqueloy desc_rtelo anles de instalar el panel delantero
de Aire 4
Uso Acondidonador
de Aire Para reducir et riesgo de incendio, choque electrico o lesiones
personales, lea estas INSTRUCCtONES DE SEGURIDAD IMPORTANTES antes de poner
en funcionamiento este artefacto
NOTA: Si apaga el acondidonador de aire,
espere 3 minutos antes de ponerlo en
marcha nuevamente Esto permite
estabilizar la presi6n dentro del compresor
El incumplimiento de estas instrucciones
puede causar funcionamiento ineficaz
Para poner en funcionamiento el acondicionador de aire, siga estos pasos:
1 Enchufe el acondicionador de aire (Paraevitar riesgos elOctricos, no useun cordon
de extension ni un adaptador )
2 Cotoque el registro de evacuaciOn en la posicion CERRADA
3 Coloque el control de ta TEMPERATURA en el ajuste m_s frio
4 Cotoque et control del ventilador en e! nivet m_s alto
5 Ajuste las persianas para un flujo de aire agradable
6 Una vez que la habitation se haya enfriado, coloque et ventilador en la posiciOn
POWER SAVERFAN y/o regule el termostato al ajuste que encuentre mas cOmodo
Consulte Ia section "Caracteristicas del Acondicionador de Aire" para otros ajustes
!
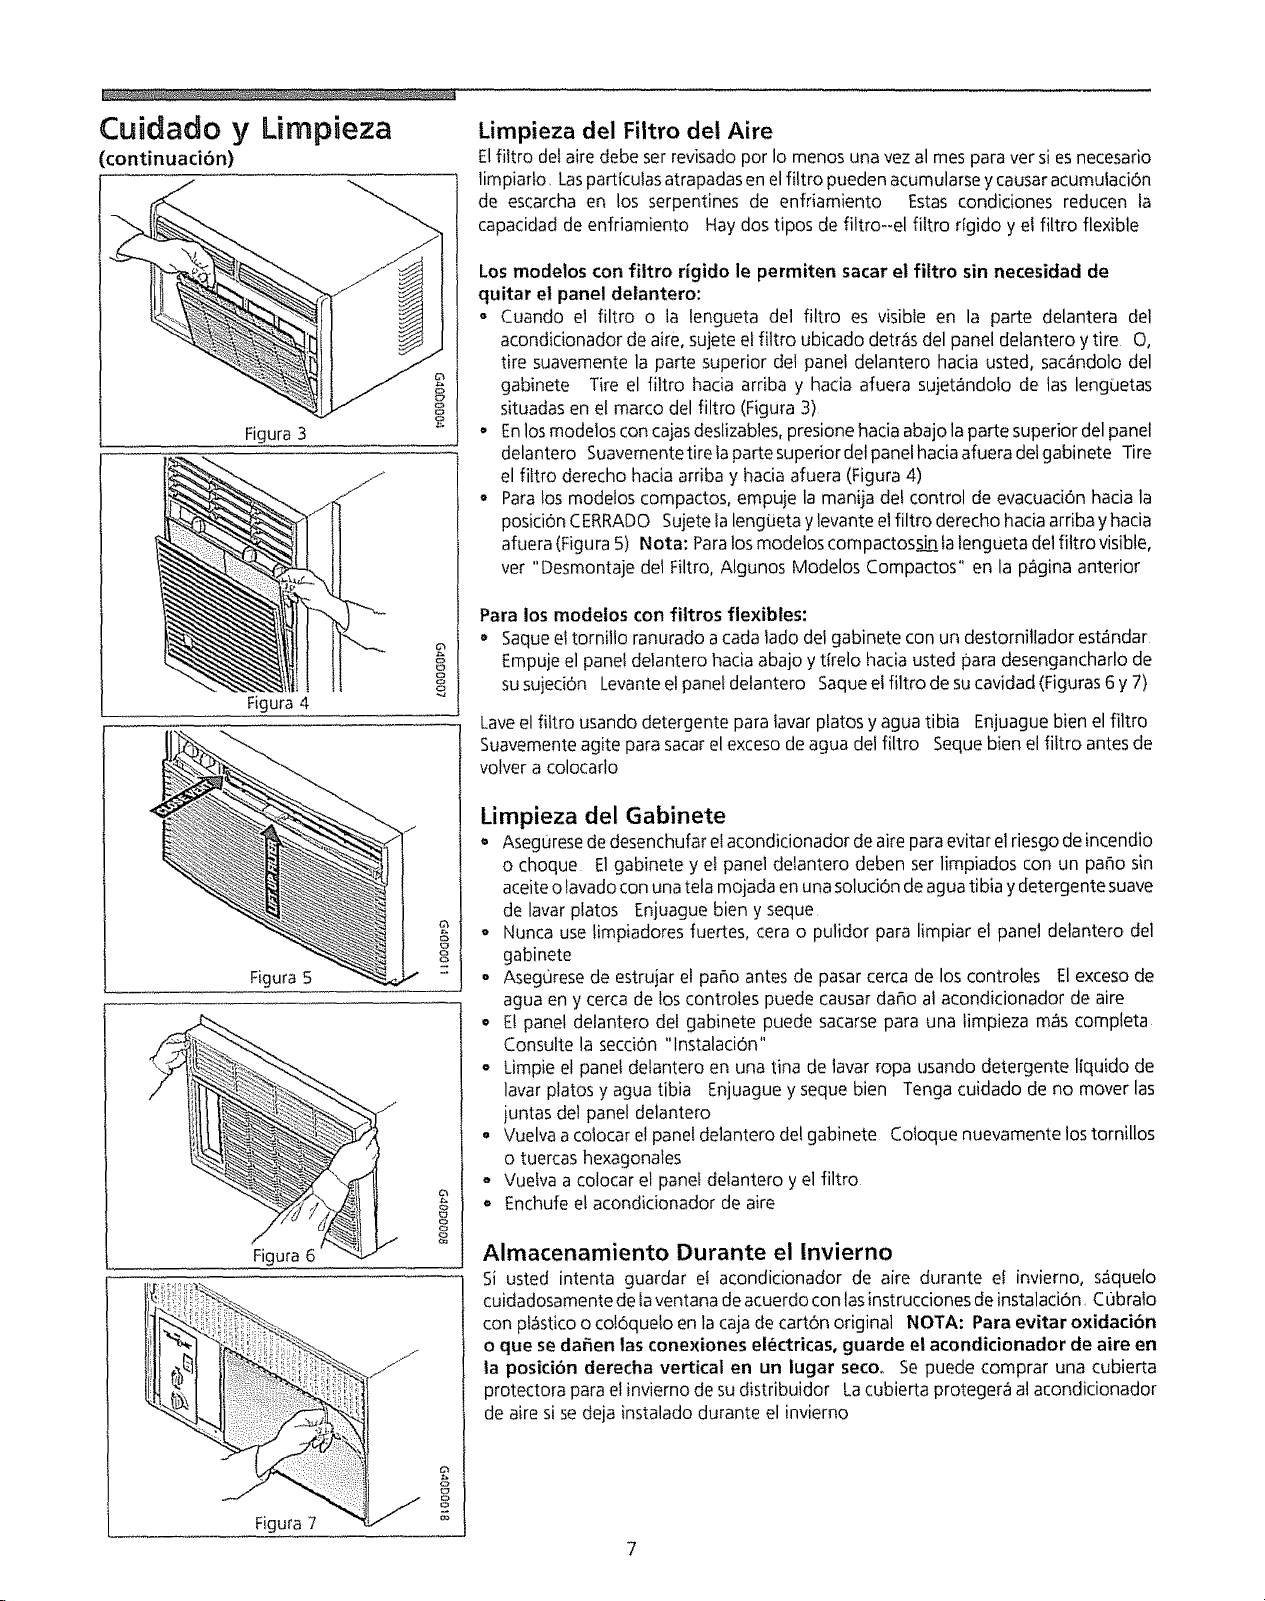
Caracter sticas deD
Acondidonador de Aire
Loscontrotes indicados en este manual representan algunos de losmuchos modelos
disponibles 5u modelo puede set ligeramente diferente
TEMP Control (Control de la Temperatura)
VENT
EXHAUST CLOSED
t}_enmoreFAN
OFF
HIGH-::'_T;_ .... HIGH
MEDo (' :::::;::i::_::::: 'i IVlED.
LOW LOW
POWER
SAVER NORMAL
TEMP
COOLER
\/
GRAN CAPACIDAD
FAN
HIGH OFF COOL
HIGH
/
LOW LOW
HEAT "::::::!L._L.........."
E!TEMP Control act0a como el termostato para establecer e! grado enfriamiento de fa
habitaciOn Gire el boton a la derecha desde la escala delgada hasta la gruesa para
aumentar la temperatura de enfriamiento
MONITOR DEL FILTRO (algunos modelos)
Para verificar el monitor del filtro:
1 Coloque el control del ventilador NORMAL en la posicion HIGH (Alto)
2 Si el filtro necesita limpieza, el indicador ROJO aparecera en la ventana del
monitor del filtro Un filtro limpio ayudara a reducir los costos de
funcionamiento y aumentar_ la eficiencia del enfrJamiento
NORMAL Fan (Ventilador Normal)
Cuando el acondicionador de aire est_ien la posici6n NORMAL Fan, esto significa que
est_ en funcionamiento continuo, haciendo circular el aire Elenfriamiento comienza
solamente si la temperatura de la habitaci0n se eleva m_s atl_ del nivet enfriamiento
selecdonado en et TEMP Control y se detiene una vez que et nivel de enfriamiento
establecido ha sido alcanzado Esta posici6n proporciona las temperaturas ambientales
mas uniformes
HEAT (Catefaccion) (algunos modeios)
POWER SAVER Fan (algunos modelos)
ElPOWER SAVERFan puede ahorrar energia Enesta posici0n, el acondicionador de aire
solamente funciona cuando el TEM PControl es ajustado a una temperatura m_s frla que
la temperatura de la habitaciOn Cuando el TEMP Control est_ a una temperatura m_s
fria que la temperatura de la habitacion, el acondidonador de aire comenzar_ a circular
el aire en la habitaci6n El enfriamiento comenzara en aproximadamente 3 minutos. El
acondicionador de aire se apaga autom_ticamente cuando la habitaci6n alcanza el nivel
de enfriamiento selecdonado HIGH (Alto) es para enfriamiento r_pido, MED para
enfriamiento normal y LOW (Bajo) es para enfriamiento bajo
HEAT (CALEFACCION) (algunos modelos)
La posici6n HEAT provee la circuladOn silenciosa y eficiente de aire caliente Gire el
selector a la posici6n HEAT y coloque el termostato en el ajuste m_s caliente CtJando
se selecciona la posicion HEAT, el termostato mantiene la temperatura encendiendo y
apagando el calefactor autom_ticamente en respuesta a la temperatura de la
VENT
FAN
PowEn NOm,_AL
SAVER OFF
MED., !' :;:: :i MED,.
LOW_:: -. !:: _ ':;;OW
CLOSED
TEMP
_t COOLER
EXHAUST
Panelde Control del Modelo con Descargade Aire Lateral
5

Caracte#sticas del
Acondidonador de Aire
(continuacibn)
Control de Evacuaci6n - Modelos Compactos
habitaci6n Una vez que la habitaci6n est_ calefaccionada, ajuste el termostato a una
posici6n m_s ffla Etventitador funciona continuamente para hater circular el aire de
fa habitaci6n
Puede que satga un olor cuando el acondicionador es colocado pot primera vez en la
posici6n HEAT despues que ha pasado la temporada de enfliamiento Este olor,
causado por las particulas finas de polvo en e! calefactor0 desaparecerE r_pidamente
Control de Evacuaci6n
ElControl de Evacuaci6n (Vent Control) permite que et acondicionador de aire ya sea
recircute el aire interno (CERRADO) o haga salir el aire al exterior (ABtERTO)
= La posici6n CLOSED (CERRADO) se usa cuando se desea enfriamiento m_1ximo
Puede tambi_n ser usada para recircular el aire, sin enfriamiento cuando e!
acondicionador de aire est_ ajustado a la posici6n FAN (VENTILADOR)
° La posici6n OPEN(ABIERTO)extrae el aire viciado de la habitaciOn y Io expulsa hacia
el exterior El aire fresco es aspirado hacia la habitaci6n a trav_s de los pasajes
normales del aire que se encuentran en los hogares
= La posiciOn OPEN o CLOSED (ABIERTO o CERRADO) puede set usada con cualquier
setecciOn del ventilador
Para los modetos compactos, empuje la corredera hacia adentro para CERRADO y
t_rela hacia afuera para ABIERTO
Persianas Direccionales del Aire
La direcci6n del aire puede set ajustada hacia arriba, hacia abajo, a la izquierda o a la
derecha. Laslenguetas exteriores ajustan el aire hacia arriba o hacia abajo Laspalancas
centrales dirigen et aire hacia la izquierda o a la derecha
Cuidado y Limpieza
Sacar las
Perillas
_ _"_\ LengCletas
Sacare_ :!:: :_::
Presione firmemente en cada lado de la caia
para desenganchar las lengOetas de sujeci6n
Figurat
@
Desmontaie del Panel Delantero Decorativo _algunos
Modelos Compactos
Sujetadores
8
Fiitro Figura 2 _8
OesmontaiedelFiltro-algunosModelosCompactos
Limpie suacondicionador de aire periodicamente para mantener su buena apariencia
Aseg_irese de desenchufar el acondicionador de aire antes de limpiarlo para
evitar los riesgos de choque el_ctrico o incendio_
Desmontaje del Filtro, Algunos Modeios Compactos,
En algunos modelos compactos es necesario desmontar el panel delantero para tener
acceso al filtro para su limpieza Para sacar el panel delantero, siga las instrucciones
indicadas a continuaci6n:
Nota: Algunos modeloscompactosesto_nequipadoscon un filtro rigidodestizableque
sedescribeen lasecci6n "Limpieza del Fiitro de Aire" No esnecesariosacarel panel
decorativo delantero en estasunidades
Desmontaje del Panel Decorativo Delantero y Limpieza del Filtro
I Desenchufeel cord6n del tomaco_riente
2, Saque las perillas tir_ndolas firmemente Saque el tornillo que sujeta el panel
delantero situado en la parte inferior del panel delantero (FiguraI)
3, Empujefirmemente en cada lado de la caja de metal cerca del panel delantero y
aproximadamente en la mitad del panel delantero
4 A lavezque presionalosladosde lacajade metal,tire suavementeelpanel delantero
hacia afuera y lev_ntelo para desenganchar}ode la caja
5 Saqueel filtro tir_ndolo fuera de lossujetadores(Figura2) Limpiede acuerdo a las
instrucciones en la seccidn "Limpieza del Filtro de Aire",
Para volver a instalar
Esimportante la reinstalaciOncorrecta del panel delantero tanto por razones de
seguridad como de rendimiento
I Coloque el f!ltro en lossujetadores
2 Coloque la partesuperior del paneldecorativo en la brida superiorde lacajayalinee
laslengOetasen e! panel delantero con laslengoetas de la caja
3, Cuidadosarnentetire hacia abajo el paneldelantero para enganchar lasleng0etas
superiores a la vez que Io empuja sobre la caja para asegurar un alineamiento
adecuado Lasleng0etas de sujeci6n lateralesemitir_n un "chasquido"cuando el
pane!delantero est_ debidamente instalado
4 Instale el tornillo de sujeciOn del panel delantero en la parte inferior del
acondicionador de aire
5 Instalelasperillasaline_ndolasconsusejesyempujando firmemente hadasuposici6n_
6
Cuidado y Lirnpieza
(continuaciOn)
Figura 3
.J
Figura 4
e
8
Figura 5 I
J
Figura 6
Figura 7
J
2
8
o_
Limpieza del Fiitro del Aire
Elfittro del aire debe ser revisado por Io menos una vez al rues para ver si es necesario
limpiarto, Losparticulas atrapadas en el filtro pueden acumularse y causar acumulaci6n
de escarcha en los serpentines de enfriamiento Estas condiciones reducen la
capacidad de enfriamiento Hay dos tipos de filtro--el filtro rfgido y el filtro flexible
Los modelos con filtro rigido le permiten sacar el fittro sin necesidad de
quitar el panel delantero:
- Cuando el filtro o la lengueta del filtro es visible en la porte delantera de1
acondicionador de aire, sujete el fittro ubicado detras del panel delantero y tire O,
tire suavemente la porte superior dei panel delantero hacia usted, sac_ndolo del
gabinete Tire el filtro hacia arriba y hacia afuera sujetandolo de los lenguetas
situadas en el marco del filtro (Figura 3)
o Enlos modetos can cajas deslizables, presione hacia abajo la porte superior del panel
delantero Suavemente tire faporte superior del panel hacia afuera del gabinete -Fire
el filtro derecho hada arriba y hacia afuera (Figura 4)
o Para los modelos compactos0 empuje la manija de! control de evacuaci6n hacia la
posicion CERRADO Sujete la lengueta y levante el filtro derecho hacia arriba y hacia
afuera (Figura 5) Nota: Para los modeios compactossin ta lengueta del fittrovisible,
ver "Desmontaje det Filtro, Algunos Modelos Compactos" en la pagina anterior
Para los modelos con filtros flexibles:
o Saque el tornillo ranurado a cada lado del gabinete con un destornillador est&ndar
Empuje el panel delantero hacia abajo y tirelo lnacia usted para desengancharlo de
susujeci6n Levante el panel delantero Saque el filtro de su cavidad (Figuras 6 y 7)
Laveel filtro usando detergente para lavar platos y agua tibia Enjuague bien el filtro
Suavemente agite para sacar el exceso de agua del filtro Seque bien el filtro antes de
volver a colocarlo
Lirnpieza del Gabinete
, Asegurese de desenchufar el acondicionador de aire para evitar el riesgo de incendio
o choque El gabinete y el panel delantero deben ser limpiados con un paho sin
aceite olavado con una tela mojada en una soluci6n de agua tibia y detergente suave
de lavar platos Enjuague bien y seque
o Nunca use timpiadores fuertes, cera o pulidor para limpiar et panel delantero del
gabinete
• Asegurese de estrujar el patio antes de pasar cerca de los controles El exceso de
agua en y cerca de los controles puede causar da_o al acondicionador de aire
o E! panel delantero del gabinete puede sacarse para una limpieza m_s completa
Consulte la secci6n "lnstalaciOn"
• Limpie el panel delantero en una tina de tavar ropa usando detergente liquido de
lavar platos y agua tibia Enjuague y seque bien Tenga cuidado de no mover las
juntas det panel delantero
o Vuelva acotocar e! panel delantero de! gabinete Coloque nuevamente los tornillos
o tuercas hexagonales
° Vuelva a colocar el panel detantero y el filtro
o Enchufe el acondicionador de aire
Almacenamiento Durante el lnvierno
Si usted intenta guardar el acondicionador de aire durante el inviemo, saquelo
cuidadosamente de la ventana de acuerdo con los instrucciones de instalaci6n, Cubralo
con pI_stico o coI6quelo en la caja de cart6n original NOTA: Para evitar oxidaciOn
o que se da_en tas conexiones el_ctricas, guarde el acondicionador de aire en
la posici6n derecha vertical en un lugar seco. Se puede comprar una cubierta
protectora para el invierno de su distribuidor La cubierta proteger_ al acondicionador
de aire si se deja instalado durante el invierno
Mantenimiento de
Rutina Antes de efectuar cualquier mantenimiento desenchufe el
cord6n el_ctrico del tomacorriente.
Limpieza del Panel Delantero del Gabinete
Saque el panel delantero Lave con agua jabonosa tibia Enjuague y seque con un paso
suave Nunca use solventes, I_quidos de limpieza, limpiadores abrasivos o detergentes
fuertes Si los materiales de empaque dejaron residuos de goma, s&que!os con un paso
humedecido con alcohol para fricciones
Reparaci6n de la Pintura Da_ada
tnspeccione las piezas que est_n expuestas a las inclemencias dei tiempo (et
gabinete, la ferreteda de montaje, si se ha usado, etc ) una o dos veces al argo,
especialmente en lugares cerca del mar o donde la oxidaci6n es un problema Si es
necesario, proteja con una pintura para exterior de buena clase,
Limpieza del Interior del Acondicionador de Aire
No debe entrar liquido al motor, a la caja de control el_ctrica o a los
bornes ei_ctricos del compresor
1 Saque el panel delantero
2 Con ayuda y usando los m_todos adecuados para levantar objetos pesados a fin de
evitar lesi6n personal, saque el chasis del gabinete * Cuando se saca el
acondicionador de aire del gabinete o de la ventana puede que haya agua dentro
de la base la cuaI se puede derramar en el suelo Tenga cuidado para evitar
cortaduras en las aletas de metal afitadas en la parte delantera y en los serpentines
delanteros y traseros
3 Los liquidos no deben penetrar alas piezas el_ctricas Cubra el ventilador, la caja
de control el_ctrica y los bornes el_ctricos con pl6stico Esto evitar_ que el agua y
otros liquidos penetren al interior donde podrian da_ar el aislamiento y causar
probIemas serios
4 Limpie y lave la base con agua, Io serpentines y los colectores de agua Limpie por
Io menos una vez al afio o m_s a menudo si losserpentines y los colectores acumulan
suciedad, arena, hojas, algas o insectos
5 Despu_s de ta limpieza, saque el protector de pl_stico Espere 24 horas antes de
volver a poner en marcha el acondicionador de aire nuevamente Esto le da tiempo
a que se seque Nora: El agua de la Iluvia o del uso normal no dafia estos
componentes pues no penetra forzadamente alas piezas como el chorro de agua
de una manguera de jardfn
6 Cuando se ha sacado el gabinete, esuna buena oportunidad para aceitar el motor
del ventilador (Yea las instrucciones a continuaci6n )
*NOTA SOBRE LA MANUA: El acondicionador de aire tiene una manija, la cual
NO est_ destinada para levantar el artefacto Espara deslizar el chasis hacia
DENTRO det gabinete solamente (para ayudar a la limpieza, mantenimiento, etc )
Lubricaci6n del Motor del Ventilador
Para lubricar el motor del ventilador:
1 Saque el panel delantero
2 Deslice el chasis hasta la mitad fuera de[ gabinete para dejar al descubierto los
tapones de fubficacidn del motor de{ ventiladoT (Tenga cuidado de no deslizar el
chasis hasta muy afuera) Si el acondicionador de aire no est_ equipado con un
chasis deslizable, saque el gabinete
3 Lubrique el motor del ventilador segt3n las instrucdones del motor Para agregar
aceite, saque el tapdn del aceite en cada extremo del motor, Puede adquirir una
c_psula de una onza de aceite (pieza nomero 10943) en su Centro de Servicio Sears
mas cercano Vuetva a colocar los tapones del agujero del aceite despues de la
lubricaci6n
Despu_sdelmantenimiento, invierta losprocedimientos anteriorespara volver instalar
el acondicionador de aire
8

En caso de necesitar
servmcDo,,,
PROBLEMA
El acondictonador de atre no functonao
Antes de Hamar a un tecnico para servicio0 revise esta lista Puede ahorrar tiempo y
dinero Esta lista induye los problemas m_s comunes que no son el resultado de
materiales o mano de obra defectuasa de este artefacto
SOLUCION
Est,_ desenchufado Enchufelo bienen el tomacorfiente
Fusible del hogar quemado o disyuntor disparado Reemplace e! [usible con fusibles de acd6n retardada o vueiva a
reposicionar el disyuntor
El selector FAN esta en ia posici6n OFF Coloque e! selector FAN en el ajuste FAN deseado
El acondicionador de aire se apaga si se mueve el Control TEMP a un ajuste m_s caliente ysi se vuelve inmediatamente
a un ajuste m&s frlo Espere aproximadamente 3minutos Escuche para ver si el compresor se pone en marcha
El aire acondicionado fu_ apagado y puesto en marcha muy r_ipidamente Apague el acondicionador de aire y espere
3 minutos antes de ponedo en marcha nuevamente
Elcontrol TEMPest_ ajustado a una temperatura superior a la temperatura de la habitaci6n Gire el Control TEMPa
la derecha a un ajuste mas fdo (la escala mas gruesa)
Elaire proveniente del acondidonador de
aire no parece Io sufidentemente frio, Gire el selector a la posici6n FAN mas alia
E1control TEMP est,_ ajustado a demasiado ¢aliente (escata de_gada) Gire el Control TEMP a ta derecha a un ajuste
m_s fdo (escala gruesa)
La temperatura de ia habitaci6n es inferior a 21°C (70%) El enfriamiento no se producir_ hasta que la temperatu_'a
de la habitaci6n sobrepase 21°C (70_F)
Eltubo detector dela temperatura est&tocando el serpentin fdo. situado deltas del filtro del aire Aleje el tubo detector
del serpentln
El acondidonador de aire enfria, pero la
habitaciOn est& demasiado caliente -- se
forma hielo en et serpentin de
enfriamiento detr_s del panel decorativo
delanteroo
El acondicionador de aire enfrla pero la
habitaci6n est_ demasiado ca|lento -_ NO
hay formacibn de hielo en el serpentin de
enfriamiento detr&s del panel decorativo
delantero0
La temperatura exterior es inferior a 21°C (70°F) Para deshiela_ el serpentln, coloque el selector en la posiciOn FAN
Luego gire el Control "rEMP hacia la derecha a un ajuste m_s caliente (escala delgada)
El Iiltro del ake puede estar sucio Limpie e! filtro del aire consulte la secci6n "Cuidado y Limpieza" Para deshielar.
coloque el selector en la position FAN
TEMP CONTROL est_ ajustado demasiado frio para enfriamiento nocturno Para deshielar el serpentln_ coloque el
selector en la posiciOn FAN Luego, coloque e! CONTROL rEMP en una posici6n m_s caliente
El filtro del aire est_ sucio--restricci6n del aire Limpie el filtro del aire Consulte la seccion Cuidado y Limpieza
El Control TEMP est_ ajustado a demasiado caliente Gire el Control TEMP a la derecha a un ajuste m&s frio (escala
gruesa)
E! Control de Evacuaci6n esta en ta posici0n OPEN (ABIERTO) Coloque el Control de Evacuaci6n en la posiciOn CLOSED
(CERRADO) para enfdamiento m_ximo
Las persianas direccionales del aire estan real didgidas Coloque las persianas de manera de lograr una mejor
distfibuci6n del aire
Et acondicionador de aire se apaga y se
enciende r_pidamente,
Se produce ruido cuando el
acondicionador de aire est_ enfrlando,,
Goteo INTERIOR del agua cuando el
acondicionador de aire est_ enfriandoo
Goteo de agua HACIA AFUERA cuando el
acondicionador de aire est_ enfriando,,
La parte delantera del acondicionador de aire esta bloqueada por cortinas, persianas, muebles, etc -- se restringe la
distribuci6n del aire Despeje las obstrucciones situadas delante del acondicionador de aire
Pue_tas, ventanas, regis_ros, etc abiertos -- e! aire frlo se escapa Cierre las puertas, ventanas, registros, elc
El acondicionador de aire ha sido reci_n encendido en una habilaci6n que est_ caliente Deje que transcurra un poco
de tiempo para que salga e! calor que esta acumulado en las paredes, en el techo, piso y muebles
Filt_o de ake sucio -- restricci6n del aire Limpie el fil_ro del aire
la temperatura exterior est& demasiado caliente Coloque el FAN (VENTILADOR) en la posici6n m,_s alla para que el
aire pase sobre los serpentines de enfriamiento m_s frecuentemente
Ruido producido por el movimiento del aire Esto es normal Si es demasiado fuerte, gire el selector al ajus_e FAN m_s bajo
Ruido producido por el ventilador al golpear el sistema de extracci6n de agualhumedad Esto es normal cuando la
humedad es demasiado alia Cierre las puertas, ventanas y registros
VibraciOn de la ventana--instalaci6n deficiente Consulte las instrucciones de instalaci6n o con un _nstalador protesionat
Instalaci6n incorrecta Incline el acondicionador de aire ligeramente hacia e! exterior para desaguarlo Consulte _as
inst_ucciones de instalaci6n--consulte con un instalador profesional
El acondicionador esta extrayendo una gran cantidad de humedad de la habitad6n Esto es normal durante dlas
excesivamente h0medos
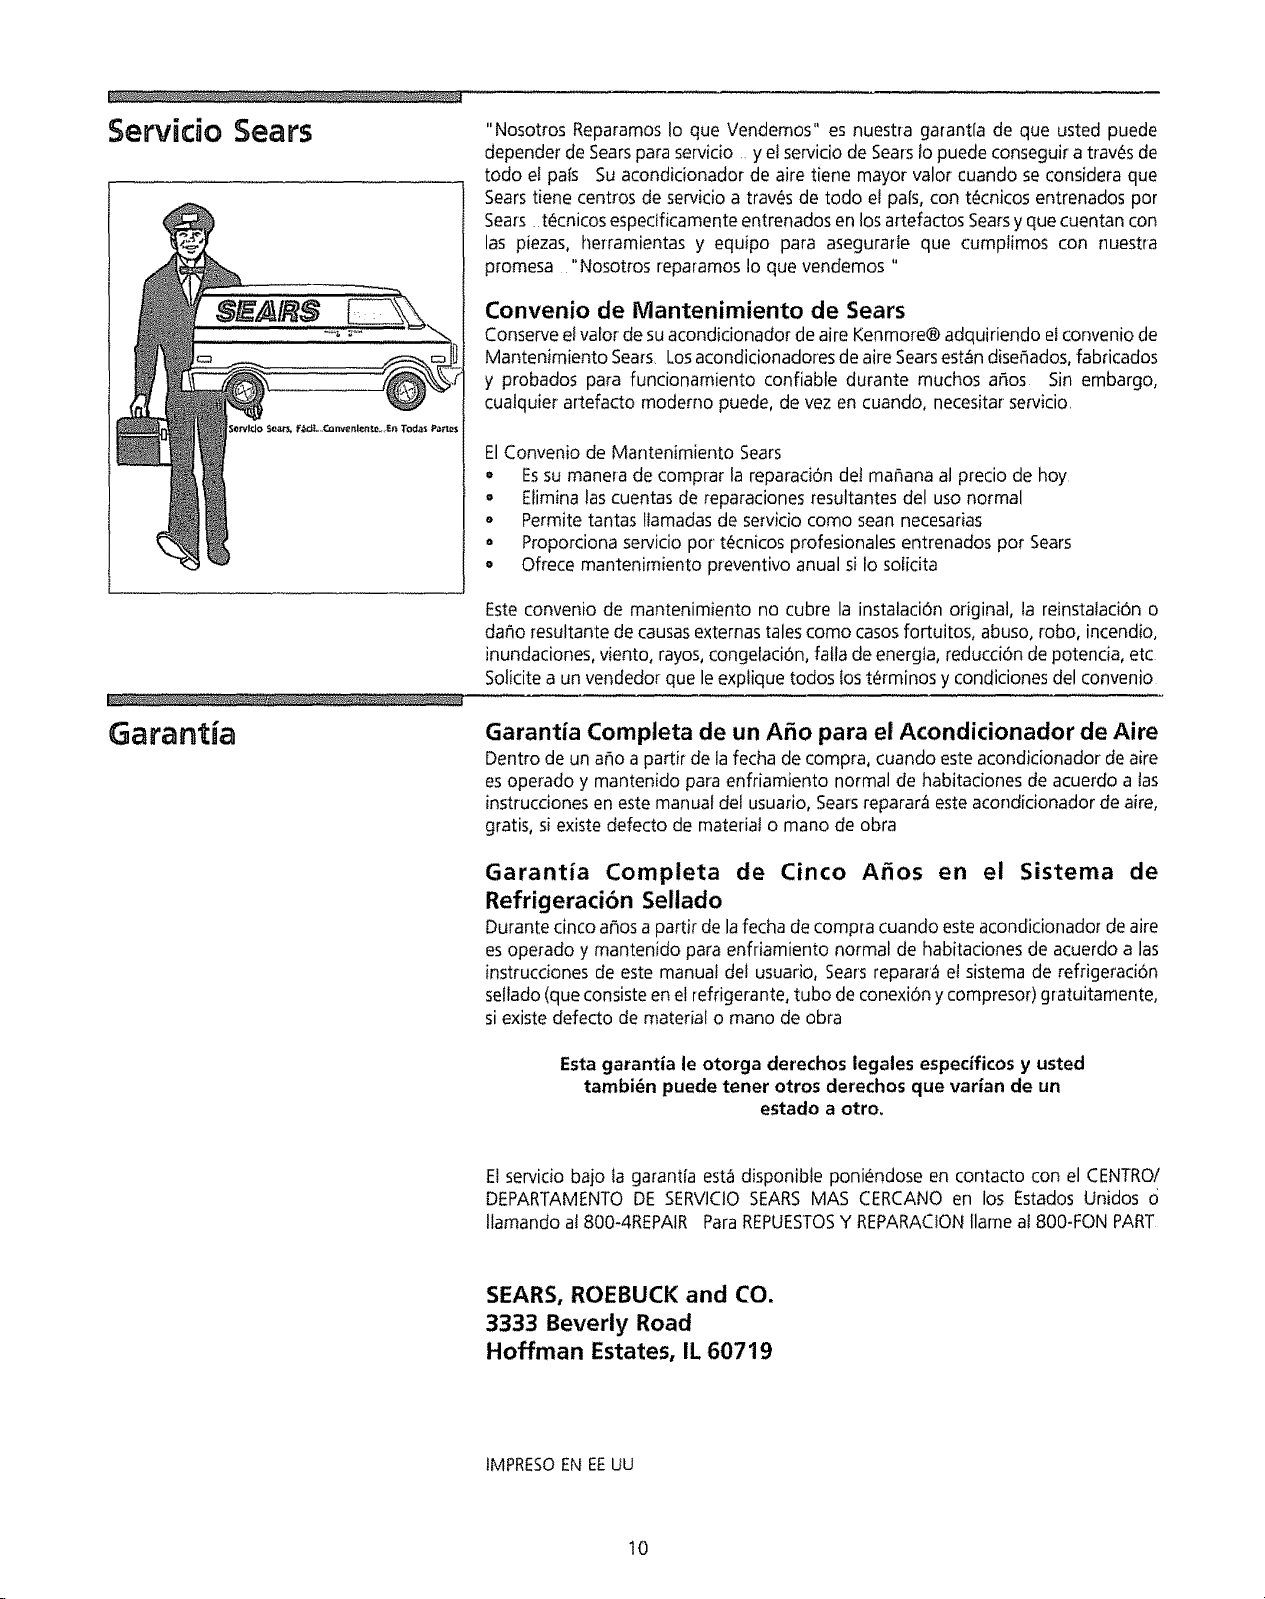
Servicio Sears "Nosotros Reparamos Io que Vendemos" es nuestra garantia de que usted puede
depender de Sears para servicio, y el servicio de Sears lo puede conseguir a tray,s de
todo et pals Su acondicionador de aire tiene mayor valor cuando se considera que
Sears tiene centros de servicio a trawas de todo et pals, con t_cnicos entrenados por
Sears t_cnicos espectficamente entrenados en los artefactos Searsy que cuentan con
las piezas, herramientas y equipo para asegurarle que cumptimos con nuestra
promesa "Nosotros reparamos Io que vendemos "
Convenio de Mantenimiento de Sears
Conserve el valor de su acondicionador de aire Kenmore® adquiriendo el convenio de
Mantenimiento Sea_s Losacondicionadores de aire Sears est_n dise_ados, fabficados
y probados para funcionamiento confiable durante muchos a_os Sin embargo,
cualquier artefacto modemo puede, de vez en cuando, necesitar servicio,
El Convenio de Mantenimiento Sears
= Essu manera de comprar la reparad6n del mar_anaal precio de hoy
o Eliminalascuentas de reparaciones resultantes del uso normal
o Permite tantas llamadasde serviciocomo sean necesarias
. Proporcionaserviciopor tecnicos profesionalesentrenados pot Sears
o Ofrece mantenimiento preventivoanual si Io solicita
Garantia
Esteconvenio de mantenimiento no cubre la instalaciOnoriginal, la reinstalaci6n o
dar_oresultantede causasexternastalescomo casosfortuitos, abuso, robo, incendio,
inundaciones, viento, rayos,congelaci6n,falla deenergla, reducci6n de potencia, etc
Solicitea un vendedor que le expliquetodos lost4_rminosy condicionesdel convenio
Garantia Completa de un Afio para el Acondicionador de Aire
Dentro de un aFloa partir de la fecha de compra, cuando este acondicionador de aire
es operado y mantenido para enfriamiento normal de habitaciones de acuerdo alas
instrucciones en este manual del usuario, Sears reparar_ este acondicionador de aire,
gratis, si existe defecto de material o mano de obra
Garantia Completa de Cinco Afios en el Sistema de
Refrigeraci6n Sellado
Durante cinco argosa partir de la fecha de compra cuando este acondicionador de aire
es operado y mantenido para enfriamiento normal de habitaciones de acuerdo alas
instrucciones de este manual del usuario, Sears reparar'a el sistema de refrigeraci6n
sellado (que consiste en el refrigerante, tubo de conexiOn y compresor) gratuitamente,
si existe defecto de material o mano de obra
Estagarantia le otorga derechos legales especfficosy usted
tambi_n puede tener otros derechos que varian de un
estado a otro,
El servicio bajo la garantia est_ disponible poni@ndose en contacto con el CENTROI
DEPARTAMENTO DE SERVICIO SEARS MAS CERCANO en los Estados Unidos 0
llamando al 800-4REPAIR Para REPUESTOSY REPARACION llame al 800-FON PART
SEARS, ROEBUCK and CO.
3333 Beverly Road
Hoffman Estates, IL 60719
IMPRESOEN EEUU
10