User Manual GE - General Electric GE Built-In Dishwasher with Hidden Controls GLDT696D02SS

GE - General Electric GE Built-In Dishwasher with Hidden Controls GLDT696D02SS - Use Manual - Use Guide PDF.
Documents: Go to download!
  • Owner's manual - (English)


Owner's manual Dishwashers

About the dishwasher control panel.
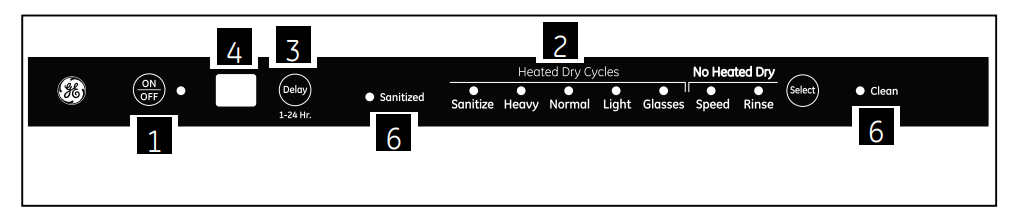
Control Settings

ON/OFF

With door open, press ON/OFF button to turn the unit ON to begin operation and OFF at the end of a wash cycle. The ON/OFF light is displayed when the dishwasher is ON.

Wash Cycle Selections

Press SELECT button to choose wash cycle. The light under the cycle name will display to indicate which cycle has been selected.

SANITIZE 4.8 gallons, 130 minutes

This cycle is meant to sanitize dishes and glasses with added heat. If you select sanitize cycle, at the end of this cycle, the sanitized indicator will turn on .

HEAVY 6.7 gallons, 125 minutes

This cycle is meant for heavily soiled dishes or cookware with dried-on or baked-on soils. This cycle may not remove burned-on foods. Everyday dishes are safe to be used in this cycle.

NORMAL 3.8 gallons, 140 minutes

This cycle is meant for loads of everyday dishes, glasses and cookware with medium soils that have not been pre-rinsed.

LIGHT 4.8 gallons, 78 minutes

This cycle is meant for loads of everyday dishes, glasses and cookware with light soils that have been pre-rinsed. GLASSES 3.9 gallons, 76 minutes

This cycle is meant for lightly soiled glassware. This cycle has less heating during the wash and rinse to protect your glassware. This cycle also has a lower temperature heated dry.

SPEED 5.8 gallons, 78 minutes

This cycle is meant for loads of everyday dishes, glasses and cookware with medium soils that have not been pre-rinsed. This cycle features reduced wash times to allow for faster cycle completion. This cycle also has a reduced time heated dry.

RINSE 1.9 gallons, 26 minutes

For rinsing partial loads that will be washed later. Do not use detergent with this cycle. This cycle does not include heated dry.

Delay Start Option

This option allows you to delay the start of a wash cycle for up to 24 hours.

NOTE:To cancel the DELAY HOURS option before the start of the cycle, repeatedly press the DELAY HOURS button until the display is blank or reads "00.”

2 Digit Display

This display is used for DELAY START and cycle time countdown.

When a cycle is selected, this display is populated with the total number of minutes in the cycle (up to 99 minutes). For cycle times above 99 minutes the display will read "99”.

Starting a Cycle

After selecting the wash cycle (Step 2) and DELAY START (Step 3), if desired, close the door of the dishwasher to start the cycle or begin the DELAY START countdown. When the door is closed, there will be a 5 second delay followed by a 60 second pump out before the water fill begins.

Status Indicators

SANITIZED If the SANITIZE cycle is selected, the sanitized indicator light will be turned on at the end of the cycle. If the NSF requirements for sanitization are not reached, the light will not turn on.

CLEAN The green light will display and a beep will sound to alert you that the wash cycle is complete. If the door is NOT opened, the beep will sound 4 times.

Using the dishwasher.

Check the Water Temperature

The entering water should be at least 120°F and not more than 150°F for effective cleaning and to prevent dish damage. Check the water temperature with a candy or meat thermometer.

Turn on the hot water faucet nearest the dishwasher, place the thermometer in a glass and let the water run continuously into the glass until the temperature stops rising

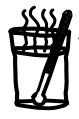
Use Cascade Crystal Clear® Rinse Agent

Cascade Crystal Clear® rinse agent removes spots and prevents new film buildup on your dishes, glasses, flatware, cookware and plastic.

Filling the Dispenser

The rinse agent dispenser holds 3.5 oz. of rinse agent. Under normal conditions, this will last approximately one month. Try to keep it full, but do not overfill.

  1. Make sure the dishwasher door is fully open.
  2. Turn the dispenser cap to the left and lift it out.
  3. Add rinse agent until the indicator window looks full.
  4. Clean up any spilled rinse agent with a damp cloth.
  5. Replace the dispenser cap.

Rinse Aid Setting

The amount of rinse agent released into the final wash can be adjusted. The factory setting is at the midpoint. If there are rings of calcium (hard water) spots on dishes, try a higher setting. If you observe foam in the final rinse, try a lower setting.

To adjust the setting

Remove the dispenser cap; then turn the adjuster counterclockwise to increase the amount of rinse agent or clockwise to reduce the amount of rinse agent dispensed.

Dish Preparation Prior to Loading

  • No prerinsing of normal food soil is required if using Heavy, Normal or Speed wash cycles.
  • Scrape off hard soils, bones, toothpicks, skins and seeds.
  • Remove large quantities of any remaining food.
  • Remove leafy vegetables, meat, trimmings and excessive amounts of grease or oil.
  • Remove acidic food soils that can discolor stainless steel.

Proper Use of Detergent

Use only detergent specifically made for use in dishwashers. Cascade® Automatic Dishwashing Detergent has been approved.

Keep your detergent fresh and dry. Don't put detergent into the dispenser until you're ready to wash dishes.

The amount of detergent to use depends on whether your water is hard or soft. With hard water, you need extra detergent. With soft water, you need less detergent.

Protect your dishes and dishwasher by contacting your water department and asking how hard your water is. Twelve or more grains is extremely hard water. A water softener is recommended. Without it, lime can build up in the water valve, which could stick while open and cause flooding. Too much detergent with soft water can cause a permanent cloudiness of glassware, called etching.

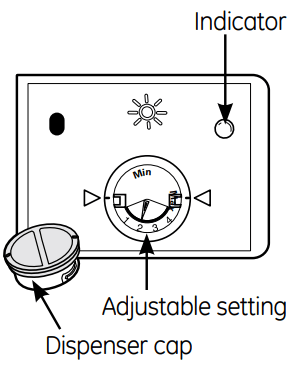
Use the information in the table below as a guideline to determine the amount of automatic dishwasher detergent to place in the dispenser.

When using automatic dishwasher detergent tablets, simply place one tablet in the dispenser and close the cover.

Number of Grains

To open the wash cover, press the button and the cover will flip back.

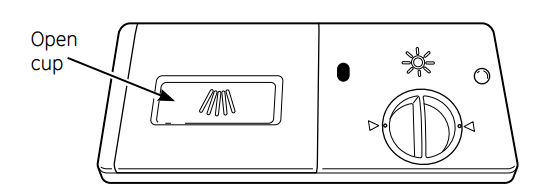
For heavily-soiled loads, use the HEAVY wash cycle and add a little extra detergent.

DO NOT USE HAND DISH DETERGENT

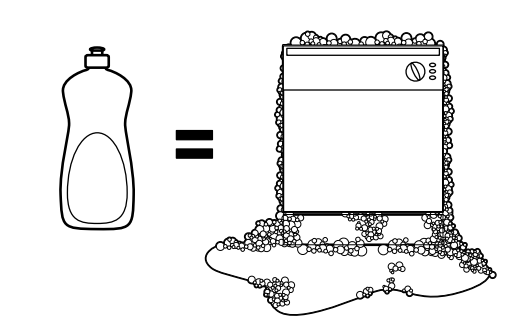
NOTE: Using a detergent that is not specifically designed for dishwashers will cause the dishwasher to fill with suds. During operation, these suds will spill out of the dishwasher vents, covering the kitchen floor and making the floor wet.

Because so many detergent containers look alike, store the dishwasher detergent in a separate space from all other cleaners. Show anyone who may use the dishwasher the correct detergent and where it is stored.

While there will be no lasting damage to the dishwasher, your dishes will not get clean using a dishwashing detergent that is not formulated to work with dishwashers.

Forget to Add a Dish?

A forgotten dish can be added any time before ^ > the main wash.

  1. Unlatch the door to interrupt the cycle. Pull the door handle to release the door.
  2. Do not open the door until the water spray action stops. Steam may rise out of the dishwasher.
  3. Add forgotten dishes.
  4. Close the door and push it in to relatch.

Loading the dishwasher racks.

For best dishwashing results, follow these loading guidelines. Features and appearance of racks and silverware baskets may vary from your model

Upper Rack

The upper rack is for glasses, cups and saucers. This is also a secure place for dishwasher-safe plastics. A cup shelf may be placed in the up or down position to add flexibility. The upper rack is good for all kinds of odd-shaped utensils. Saucepans, mixing bowls and other items should be placed face down.

Secure larger dishwasher-safe plastics over two tines when possible. Make sure small plastic items are secure so they can't fall onto the heater.

Be sure that items do not protrude through the bottom of the rack and block rotation of the middle spray arm. This could result in poor wash performance for items in the upper rack.

Lower Rack

When loading the lower rack, do not load large platters or trays in the front left corner. They may prevent detergent from circulating during the wash cycle.

The lower rack is best used for plates, saucers and cookware. Large items should go along the sides. Load platters, pots and bowls along the sides, in corners or in the back. The soiled side of items should face the center of the rack.

Silverware Basket

The silverware basket may be used without the topper for quick loading. With the topper, flatware is better positioned for the dishwasher to thoroughly wash and dry all pieces by preventing nesting.

Without the topper

Put the flatware in the removable basket with fork and knife handles up to protect your hands. Place spoons in the basket with handles down. Mix knives, forks and spoons so they don't nest together. Distribute evenly. Small plastic items, such as measuring spoons and lids from small containers, should go in the bottom of the silverware basket with silverware on top.

With the topper

Place small plastic items, such as measuring spoons and lids from small containers, in the bottom of the basket and snap the topper in place. Insert spoons and forks, handles first, through the holes in the topper. Place knives, blades first, through the holes in the topper.

Be careful not to let a portion of any item such as a pot or dish handle extend through the bottom rack. This could block the wash arm and cause poor washing results.

Caring for the dishwasher.

To clean the control panel, use a lightly dampened cloth, then dry thoroughly. To clean the exterior, use a good appliance polish wax. Never use sharp objects, scouring pads or harsh cleaners on any part of the dishwasher

Cleaning the Exterior

Cleaning the Door Panel

Before cleaning the front panel, make sure you know what type of panel you have. Refer to the last two letters of your model number. You can locate your model number on the left-hand tub wall just inside the door. If your model number ends with BB or WW, then you have a Painted Door panel. If your model number ends with SS, then you have a Stainless Steel Door panel.

Follow the instructions below for cleaning the door panel for your specific model.

Painted Door Panel (model numbers ending in BB-black or WW-white)

Use a clean, soft, lightly dampened cloth, then dry thoroughly. You may also use a good appliance wax or polish.

Stainless Steel Door Panel (model numbers ending in SS)

The stainless steel panels can be cleaned with Stainless Steel Magic or a similar product using a clean, soft cloth. Do not use appliance wax, polish, bleach or products containing chlorine on Stainless Steel doors.

You can order Stainless Steel Magic #WX10X15 through GE Parts by calling 800.626.2002.

Do not wipe the dishwasher with a soiled dish cloth or wet towel. These may leave a residue. Do not use scouring pads or powdered cleaners because these products can scratch the finish.

Cleaning the Control Panel

To clean the control panel, use a lightly dampened cloth; then dry thoroughly. Do not use sharp objects, scouring pads or harsh cleaners on the control panel.

Stainless Steel Interior Tub and Inner Door

The stainless steel used to make the dishwasher tub and inner door provides the highest reliability available in a GE dishwasher. If the dishwasher tub or inner door is ever scrached or dented during during normal use, they will not rust or corrode. These surface blemishes will not affect their function or durability.

Cleaning the Spray Arms and the Filters

The dishwasher will flush away all normal food soils. However, objects (fruit pits, bones, etc.) may collect in openings and should be removed occasionally to avoid clogging the drain system.

CAUTION Personal injury hazard. Before cleaning the interior, wait at least 20 minutes after a cycle for the heating element to cool down. Failure to do so could result in burn injuries.

Cleaning the Spray Arms

Because hard water chemicals will clog the spray arm jets and bearings, it is necessary to clean the spray arms regularly. Wash the arms in soapy, warm water and use a soft brush to clean the jets. Replace them after rinsing thoroughly.

To remove the upper spray arm, unscrew the nut clockwise.

To remove the lower spray arm, pull upward.

Cleaning the Filters

For best performance and results, the filter assembly must be cleaned once a month. The filter efficiently removes food particles from the wash water, allowing water to be recirculated during the cycle. For this reason, it is a good idea to remove the large food particles trapped in the filter frequently by rinsing the main filter and cup under running water. To remove the filter assembly, follow the 3 steps shown below. To clean the main filter and fine filter, use a cleaning brush. The dishwasher must never be used without the filters. Improper replacement of the filter may reduce the performance level of the appliance and may damage dishes and utensils.

STEP 1: Turn the filter counter-clockwise and lift up.

STEP 2: Lift the main filter up

STEP 3: Lift the fine filter up

General Care Instructions

Protect Against Freezing

If your dishwasher is left in an unheated place during the winter, ask a service technician to:

  1. Cut off electrical power to the dishwasher. Remove fuses or trip circuit breaker.
  2. Turn off the water supply and disconnect the water inlet line from the water valve.
  3. Drain water from the water inlet line and water valve. (Use a pan to catch the water.)
  4. Reconnect the water inlet line to the water valve.

Does Your Dishwasher Have an Air Gap?

Check the air gap any time your dishwasher isn’t draining well.

An air gap protects your dishwasher against water backing up into it if a drain clogs.

The air gap is not a part of the dishwasher.

It is not covered by your warranty. Not all plumbing codes require air gaps, so you may not have one.

The air gap is easy to clean.

  1. Turn off the dishwasher and lift off the chrome cover.
  2. Remove the plastic cap and clean with a toothpick.

Before you call for service…

Troubleshooting Tips - Save time and money! Review the charts on the following pages, or visit GEAppliances. You may not need to call for service.

Problem

  • Use only automatic dishwasher detergents to avoid sudsing. Cascade® Dishwashing Detergent has been approved for use in all GE dishwashers.
  • To remove suds from the tub, open the dishwasher and let I suds evaporate. Add 1 gallon of cold water to the tub. Close 1 and latch the dishwasher. Repeat if necessary.
Rinse agent was spilled
  • Always wipe up rinse agent spills immediately.

Stained dishwasher parts

Detergent with

colorant was used

  • Some detergents contain colorant (pigment or dyes) that will discolor the tub interior with extended use. Check the detergent cup for signs of any discoloration. If cup is discolored, change to detergent without any colorant. Cascade® Dishwashing Detergents has been approved for use in all GE dishwashers.
Some tomato-based foods can stain
  • Use of the RINSE ONLY cycle after adding the dish to the load can decrease the level of staining.
Dishwasher won't runFuse is blown, or the circuit breaker tripped
  • Replace fuse or reset circuit breaker. Remove any other appliances from the circuit.
Power is turned off
  • In some installations, the power to the dishwasher is proved through a wall switch, often located next to the disposer switch. Make sure it is on.
Reboot your control
  • Turn off power to the dishwasher (at circuit breaker or wall switch) for 30 seconds, then turn back on.
SteamThis is normal
  • Steam comes through the vent during washing, drying and when water is being pumped out.
Beeping at the end of the cycleThis is normal
  • The dishwasher will beep 4 times (unless interupted) and the CLEAN light will display at the end of the wash cycle.
Dishes and flatware not cleanLow inlet water temperature
  • Make sure inlet water temperature is correct (see page 6).
Water pressure is temporarily low
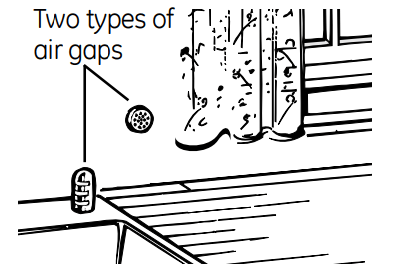
  • Turn on a faucet. Is water coming out more slowly than usual? If so, wait until pressure is normal before using your dishwasher.
Air gap is clogged
  • Clean the air gap.
Improper rack loading
  • Make sure large dishware does not block the detergent dispenser or the wash arms.
No air gap or high drain loop
  • Verify that you have an air gap or a high drain loop. Refer to the Installation Instructions.
Filter needs cleaning
  • The filter assembly must be cleaned regularly to allow the filter to efficiently remove food particles from the wash water. See Cleaning the Filter section on page 1.
Spots and filming on glasses and flatwareExtremely hard water
  • Use Cascade Crystal Clear® rinse agent to remove spots and prevent new film buildup.
Low inlet water temperature
  • Make sure water temperature is at least 120°F.
Overloading the dishwasher / Improper loading
  • Load dishwasher as shown in the Loading the Dishwasher Racks section.
Old or damp powder detergent
  • Make sure detergent is fresh.
Rinse agent dispenser empty Too little detergent
  • If water is extremely hard, a water softener may be required.
Cloudiness on glasswareCombination of soft water and too much detergent
  • This is called etching and is permanent. To prevent this from happening, use less detergent if you have soft water. Wash glassware in the shortest cycle that will get them clean.
Water temperature entering the dishwasher exceeds 150°F
  • Lower the water heater temperature.
Black or gray marks on dishesAluminum utensils have rubbed against dishes
  • Remove marks with a mild, abrasive cleaner.
Yellow or brown film on inside surfacesTea or coffee stains
  • Remove the stain by hand, using a solution of 1/2 cup bleach and 3 cups warm water.

WARNING

Before cleaning interior wait at least 20 minutes after a cycle for the heating element to cool down. Failure to do so can result in burns.

An overall yellow or brown film can be caused by iron deposits in water
  • A special filter in the water supply line is the only way to correct this problem. Contact a water softener company.
White film on inside surfacesHard water minerals
  • To clean the interior, apply dishwasher detergent to a damp sponge. Wear rubber gloves. Do not use any type of cleanser other than dishwasher detergent because it may cause foaming or sudsing. Cascade® Automatic Dishwashing Detergent has been approved for use in all GE dishwashers.
Dishes don't dryLow inlet water temperature
  • Make sure inlet water temperature is correct (see page 6).
Rinse agent dispenser is empty
  • Check the rinse agent dispenser.
Control panel responded to input but dishwasher never filled with waterDoor latch may not be properly seated
  • Make sure the door is firmly closed.
Water vale may be turned off
  • Make sure water valve (usually located under the sink) is turned on.
Dishwasher beeps once every 15 secondsThis is normal
  • Close the door after opening it mid-cycle.
This is a reminder that the door has been left open during operation
  • Press ON/OFF to turn OFF the dishwasher.


See other models: JSP34WW4WW JB680SP2SS AZ25E12D2CM1 PSC23NHSABB PSD3230Z00WW
GE - General Electric GLDT696D02SS | File type: PDF | Filename: gldt690d00bb.pdf | Size: 1.99 MB | Language: English

Download User Manual

Contact us

GE - General Electric in United States

1-800-432-2737 Monday - Friday: 7 a.m. - 10 p.m. ET Saturday - Sunday: 8 a.m. - 6 p.m. E