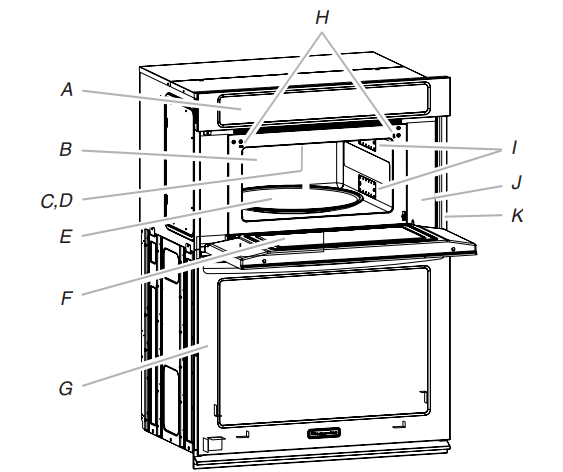
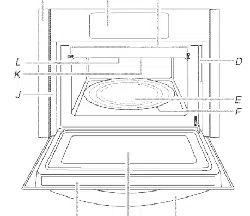
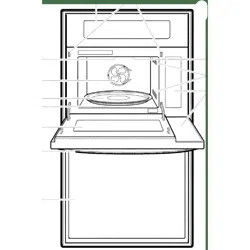
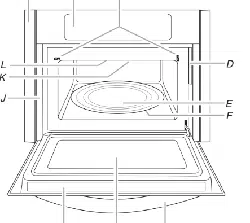
This manual covers different models. The oven you have purchased may have some or all of the items listed. The locations and appearances of the features shown here may not match those of your model.
A. Electronic oven control
B. Convection element and fan (hidden behind back panel)
C. Light (inaccessible, in ceiling)
D. Grill element (can be lowered)
E. Turntable
F. Metal shielded window
G. Lower oven (on combination models, see separate User Guide)
H. Door safety lock system
I. Dual microwave emission
J. Cooking guide label
K. Model/serial/rating (on right mounting rail, single oven models)
Parts and Features not shown
Steamer
Convection grid
Crisper pan and handle
Baking tray
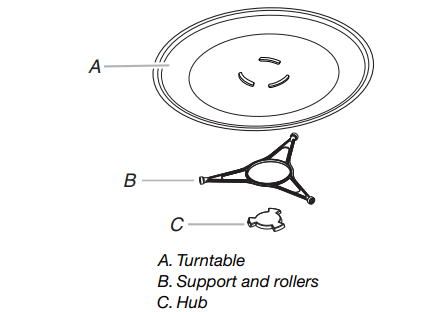
Turntable
NOTE: By touching the Turntable ON/OFF key, it is possible to switch the turntable ON and OFF during some microwave cycles. The turntable can be turned “On” or “Off” during the Manual Cook, Manual Reheat, Manual Defrost, Manual Steam Cook, and all Easy Convect cycles.
The turntable rotates in both directions to help cook food more evenly. Do not operate the microwave oven without having the turntable in place. See “Assistance or Service” to reorder any of the parts.
The raised, curved lines in the center of the turntable bottom fit between the 3 spokes of the hub. The hub turns the turntable during microwave oven use. The rollers on the support should fit inside the turntable bottom ridge.
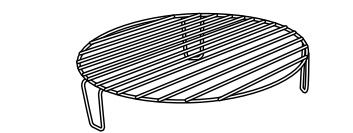
Convection Rack
The convection rack provides optimal heat circulation for convection cooking.
■ The rack will become hot. Always use oven mitts or pot holders when handling.
■ To avoid damage to the microwave oven, do not allow the rack to touch the inside cavity walls, ceiling or floor.
■ Always use the turntable.
■ To avoid damage to the microwave oven, do not store the rack in the microwave oven.
■ Two-level cooking is not recommended.
■ For best results, do not place popcorn bags on the rack.
■ The rack is designed specifically for this microwave oven. For best cooking results, do not attempt to use any other rack in this microwave oven.
■ See “Assistance or Service” section to reorder.
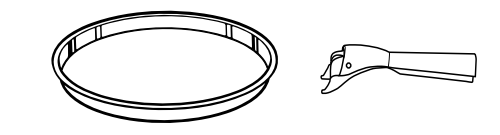
Crisper Pan and Handle
The crisper pan, with its nonstick surface and detachable handle, has been specifically designed for microwave use, and is ideal for pan-frying (pan-browning) foods in the microwave oven.
■ The crisper pan will become hot. Always use the handle and oven mitts or pot holders when handling. Place gripping end on the edge of pan, squeeze handle, and lift pan.
■ To avoid damage to the microwave oven, do not allow the crisper pan or handle to touch the inside cavity walls, ceiling or floor.
■ Do not place crisper pan on the convection grid. Always use the turntable as a support for the crisper pan.
■ To avoid damage to the microwave oven, do not use another metal object with the crisper pan.
■ To avoid damage, do not place hot crisper pan directly on heatsensitive surfaces.
■ The crisper pan is designed specifically for this microwave oven. Do not use it in any other oven.
■ Use only wooden or plastic cooking utensils to help avoid scratches.
■ See “Assistance or Service” section to reorder.
Baking Tray
■ Baking Tray can be used only with convection cooking.
■ To avoid damage to the microwave oven, do not use in combination with microwave cooking.
■ Baking Tray will become hot. Always use oven mitts or pot holders when handling.
■ See “Positioning Baking Tray” section before using.
■ See “Assistance or Service” section to reorder.
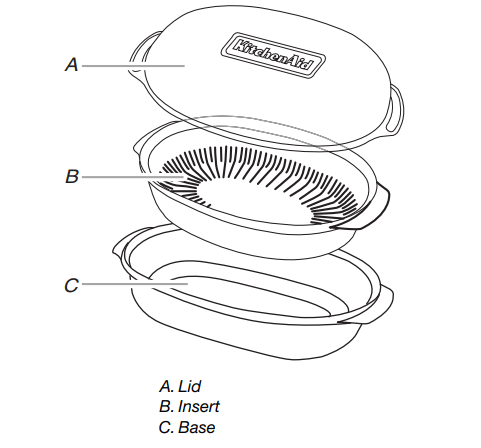
KITCHENAID™ Steamer Vessel
Use the KITCHENAID™ Steamer Vessel with the Steam Cook feature to steam foods.
■ The steamer vessel will become hot. Always use oven mitts or pot holders when handling.
■ Steamer vessel is designed to be used only in the microwave oven. To avoid damaging steamer vessel, do not use in a convectional- or combination-type oven, with any other convection or crisp function, or on electric or gas burners.
■ Do not use plastic wrap or aluminum foil when covering the food.
■ Always place the steamer on the glass turntable. Check that the turntable turns freely before starting the microwave oven.
■ Do not remove lid while the bowl is inside the microwave oven, as the rush of steam will disrupt the sensor settings.
■ To avoid scratching, use plastic utensils.
■ Do not overfill with water. See steam chart in the “Steam Cooking” section for the amount of water recommended.
Lid: Always use the lid when steaming. Place directly over the insert and base or just the base.
Insert: Use when steam cooking to keep foods such as fish and vegetables out of the water. Place insert with food directly over the base. Do not use when simmering.
Base: For steam cooking, place water in base. For simmering foods such as rice, potatoes, pasta and vegetables, place food and water/liquid in base.
See “Assistance or Service” section to order replacements. See “General Cleaning” section for instructions on cleaning.
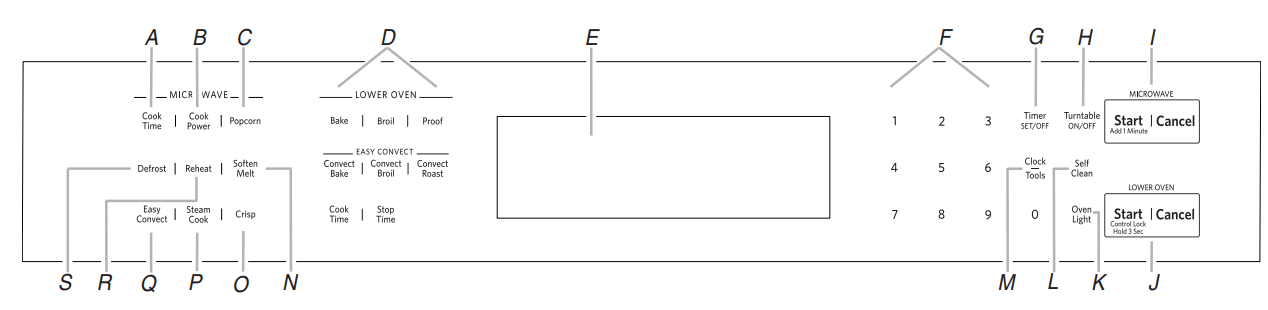
FEATURE GUIDE
A. Cook Time
B. Cook Power
C. Popcorn
D. Lower Oven Controls (see separate Use and Care Guide)
E. Combination Oven Display
F. Number Keypads
G. Timer SET/OFF
H. Turntable ON/OFF
I. Start/Cancel Microwave
J. Start/Cancel Lower Oven
K. Oven Light
L. Self Clean
M. Clock/Tools
N. Soften Melt
O. Crisp
P. Steam Cook
Q. Easy Convect
R. Reheat
S. Defrost
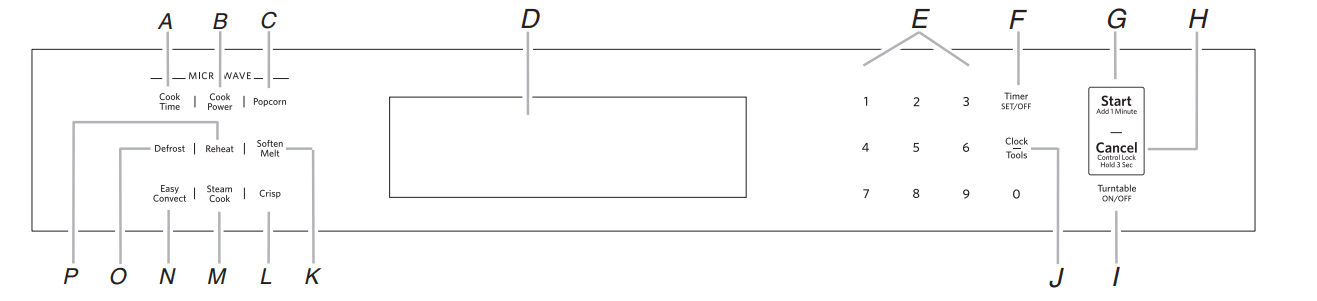
A. Cook Time
B. Cook Power
C. Popcorn
D. Microwave Oven Display
E. Number Keypads
F. Timer Set/Off
G. START/Add 1 Minute
H. Cancel/Control Lock
I. Turntable On/Off
J. Clock/Tools
K. Soft Melt
L. Crisp
M. Steam Cook
N. Easy Convect
O. Defrost
P. Reheat
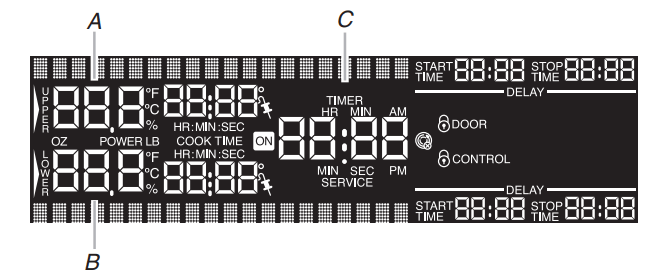
Upper and Lower Oven Display (combination oven models)
A. Microwave Cavity Display
B. Oven Cavity Display
C. Time of Day/Timer Display
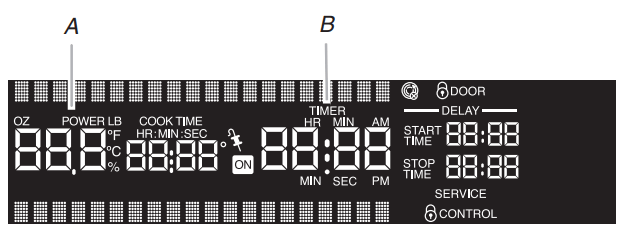
Microwave Oven Display (single oven models)
A. Microwave Cavity Display
B. Time of Day/Timer Display
KEYPAD
FEATURE
INSTRUCTIONS
TIMER (SET/OFF)
Oven Timer
1. Touch TIMER SET/OFF. Touch again to switch between MIN/SEC, HR/MIN and OFF. If no action is taken, the control will continue to wait for a length of time to be entered.
2. Touch the number keypads to set the length of time.
3. Touch TIMER SET/OFF. If the keypad is not touched, the control will continue to wait for TIMER SET/OFF to be touched. When the set time ends, 4 chimes will continuously repeat until the Timer Off keypad is touched.
4. If the Cancel keypad is touched, the oven will turn off; however, the Timer can only be turned off using the Timer Off keypad.
COOK TIME
Crisper Pan Frying
1. Touch COOK TIME and then number keypads to set a length of time to cook.
OR
Touch the number keypads to set a length of time to cook. To use this feature, the display must be in the time of day visualization. NOTE: Doneness function is not active for manual cooking.
2. Touch START. The display will count down the cook time. When the stop time is reached, the oven will shut off automatically and “Cooking Complete” will appear on the oven display. If enabled, end-of-cycle tones will sound, and then reminder tones will sound every minute.
3. Touch CANCEL or open the door to clear the display and/or stop reminder tones.
REHEAT
Reheat
1. Touch REHEAT.
2. Touch number keypad to select food type from the Reheat Chart.
OR
Touch REHEAT repeatedly to scan and select food settings. For example, to select the Casserole setting, REHEAT must be touched twice.
3. Touch number keypads to enter quantity (slices or cups).
To change the doneness setting, touch the COOK POWER keypad before or after the “Start?” prompt is displayed to toggle through and select a doneness of Normal, More or Less.
4. Touch START. When the stop time is reached, the oven will shut off automatically and “reheat complete” will appear on the oven display. If enabled, end-of-cycle tones will sound, and then reminder tones will sound every minute.
5. Touch CANCEL or open the door to clear the display and/or stop reminder tones.
REHEAT
Manual Reheat
1. Touch REHEAT.
2. Touch the number “7” keypad.
OR
Touch REHEAT repeatedly to scan to the Manual setting.
3. Touch the number keypads to set a length of time to reheat. Reheat time can be set up to 99 minutes and 99 seconds.
NOTE: The doneness function is not active during manual reheating.
4. The default power level is 70%. To change the power level, touch COOK POWER and then enter the desired power level. See the Cooking Power Chart.
NOTE: If a cook time has not been entered, after 5 seconds of inactivity the power level will be automatically confirmed. The screen will then prompt to enter cook time.
5. Touch START. The upper oven display will count down the reheat time. When the stop time is reached, the oven will shut off automatically and “Reheat Complete” will appear on the oven display. If enabled, the end-of-cycle tones will sound. Reminder tones will then sound every minute after the cycle has been completed.
6. Touch CANCEL or open the door to clear the display and stop the reminder tones.
REHEAT
Beverage Reheat
1. Touch REHEAT.
2. Touch number keypad “3.”
OR
Touch REHEAT repeatedly to scan and select the Beverage setting.
3. Touch number keypad to enter cups, and then touch start.
4. Touch number keypads 1 through 3 to select Warm, Hot or Very Hot.
OR
Touch REHEAT repeatedly to scan and select temperature setting.
NOTE: Doneness function not active for reheating beverages.
5. Touch START. The upper oven display will count down the reheat time. When the stop time is reached, the oven will shut off automatically and “Reheat Complete” will appear on the oven display. If enabled, end-of-cycle tones will sound, and then reminder tones will sound every minute.
IMPORTANT: Heated liquids can splash out during and after heating. A wooden stir stick placed in the cup or bowl during heating may help avoid this.
6. Touch CANCEL or open the door to clear the display and/or stop reminder tones.
DEFROST
Defrost
1. Touch DEFROST.
2. Touch the number keypad from the Defrost Chart to select food.
OR
Touch DEFROST repeatedly to scroll through foods. For example, to select the Meats setting, DEFROST must be touched twice.
3. Touch number keypads to enter the weight. To change the doneness setting, touch the Cook Power keypad before or after the “Start?” prompt is displayed to toggle through and select a doneness of Normal, More or Less.
4. Touch START.
The upper oven display will count down the defrost time. For better results, a preset standing time is included in the defrosting time. This may make the defrosting time seem longer than expected.
When the stop time is reached, the oven will shut off automatically and “Defrost Complete” will appear in the display. If enabled end-of-cycle tones will sound, and then reminder tones will sound every minute.
5. Touch CANCEL or open the door to clear the display and/or stop reminder tones.
DEFROST
Manual Defrost
1. Touch DEFROST.
2. Touch the number “6” keypad.
OR
Touch DEFROST repeatedly to scan to the Manual setting.
3. Touch the number keypads to set a length of time to defrost. Time can be set up to 99 minutes and 99 seconds.
NOTE: The doneness function is not available for manual defrosting.
4. The default power level is 30%. To change power level, touch COOK POWER and then enter the desired power level. See the Cooking Power Chart.
NOTE: If a cook time has not been entered, after 5 seconds of inactivity the power level will be automatically confirmed. The screen will then prompt to enter cook time.
5. Touch START. The upper oven display will count down the defrost time. When the stop time is reached, the oven will shut off automatically and “Defrost Complete” will appear on the oven display. If enabled, the end-of-cycle tones will sound. Reminder tones will then sound every minute after the cycle has been completed.
6. Touch CANCEL or open the door to clear the display and stop the reminder tones.
STEAM COOK
Steam Cook
1. Touch STEAM COOK.
2. Touch the number keypad to select a food type from the Steam Cooking Chart.
OR
Touch STEAM COOK repeatedly to scan and select food type. For example, to select the Fresh Vegetables setting, Steam Cook must be touched twice. To change the doneness setting, touch the Power keypad before or after the “Start?” prompt is displayed to toggle through and select a doneness of Normal, More or Less.
3. Touch START. The upper oven display will count down the steam time once the sensor identifies the cooking duration. When the steam time has ended, the oven will shut off automatically and “Steam Complete” will appear in the display. If enabled, end-of-cycle tones will sound, and then reminder tones will sound every minute.
4. Touch CANCEL or open the door to clear the display and/or stop reminder tones.
STEAM COOK
Manual Steam Cook
1. Touch STEAM COOK.
2. Touch the number keypad “6.”
OR
Touch STEAM COOK repeatedly to scan and select the Manual steam setting.
3. Touch the number keypads to set a length of time to steam. Time can be set up to 99 minutes and 99 seconds.
NOTE: Doneness function is not active for manual steam cooking.
4. Touch START. Once the boiling point is reached the upper oven display will start to count down the steam time. When the stop time is reached, the oven will shut off automatically and “Steam Complete” will appear in the display. If enabled, end-of-cycle tones will sound, and then reminder tones will sound every minute.
5. Touch CANCEL or open the door to clear the display and/or stop reminder tones.
POPCORN
Popcorn
1. Touch POPCORN.
NOTE: Doneness function is not active for popcorn setting.
2. Touch START. When the stop time is reached, the oven will shut off automatically and “Cooking Complete” will appear in the display. If enabled, end-of-cycle tones will sound, and then reminder tones will sound every minute.
3. Touch CANCEL or open the door to clear the display and/or stop reminder tones.
SOFTEN MELT
Soften
1. Touch SOFTEN MELT.
2. Touch number keypad “2” to select Soften function.
OR
Touch SOFTEN MELT repeatedly to scan and select Soften.
3. Touch number keypad to select food type from the Soften Chart.
OR
Touch SOFTEN MELT repeatedly to scan and select food settings.
4. Touch number keypads to enter quantity (weight or sticks). To change the doneness setting, touch the Power keypad before or after the “Start?” prompt is displayed to toggle through and select a doneness of Normal, More or Less.
5. Touch START. The upper oven display will count down the soften time. When the stop time is reached, the oven will shut off automatically and “Soften Complete” will appear in the display. If enabled, end-of-cycle tones will sound, and then reminder tones will sound every minute.
6. Touch CANCEL or open the door to clear the display and/or stop reminder tones.
SOFTEN MELT
Melt
1. Touch SOFTEN MELT.
2. Touch number keypad “1” to select Melt function.
OR
Touch SOFTEN MELT repeatedly to scan and select Melt.
3. Touch number keypad to select food type from the Melt Chart.
OR
Touch SOFTEN MELT repeatedly to scan and select food settings.
4. Touch number keypads to enter quantity (weight or sticks). To change the doneness setting, touch the Power keypad before or after the “Start?” prompt is displayed to toggle through and select a doneness of Normal, More or Less.
5. Touch START. The upper oven display will count down the melt time. When the stop time is reached, the oven will shut off automatically and “Melt Complete” will appear in the display. If enabled, end-of-cycle tones will sound, and then reminder tones will sound every minute.
6. Touch CANCEL or open the door to clear the display and/or stop reminder tones.
BUILT-IN MICROWAVE OVEN USE
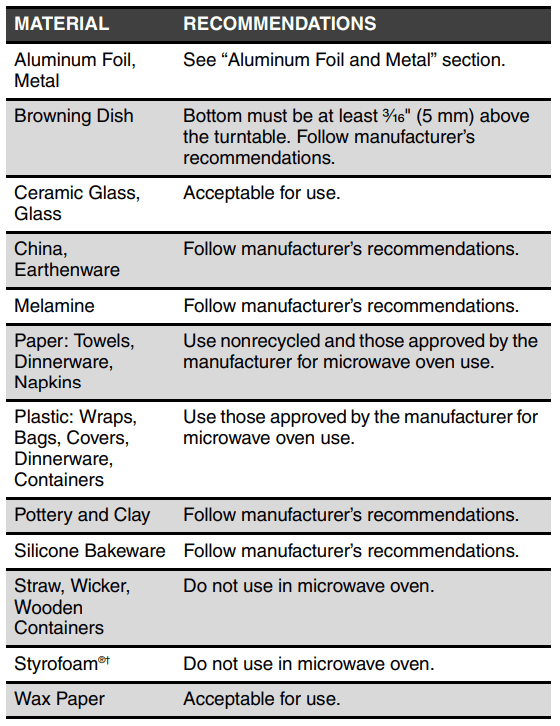
Cookware and Dinnerware
Cookware and dinnerware must fit on the turntable. Always use oven mitts or pot holders when handling because any dish may become hot from heat transferred from the food. Do not use cookware and dinnerware with gold or silver trim. Use the following chart as a guide, then test before using.
To Test Cookware or Dinnerware for Microwave Use:
Place cookware or dinnerware in microwave oven with 1 cup (250 mL) of water beside it.
Cook at 100% cooking power for 1 minute.
Do not use cookware or dinnerware if it becomes hot and the water stays cool.
Aluminum Foil and Metal
Always use oven mitts or pot holders when removing dishes from the microwave oven.
Aluminum foil and some metal can be used in the microwave oven. If not used properly, arcing (a blue flash of light) can occur and cause damage to the microwave oven.
OK for Use
Racks and bakeware supplied with the microwave oven (on some models), aluminum foil for shielding, and approved meat thermometers may be used with the following guidelines:
■ To avoid damage to the microwave oven, do not allow aluminum foil or metal to touch the inside cavity walls, ceiling or floor.
■ Always use the turntable.
■ To avoid damage to the microwave oven, do not allow contact with another metal object during microwave cooking.
Do Not Use
Metal cookware and bakeware, gold, silver, pewter, non-approved meat thermometers, skewers, twist ties, foil liners such as sandwich wrappers, staples and objects with gold or silver trim or a metallic glaze should not be used in the microwave oven.
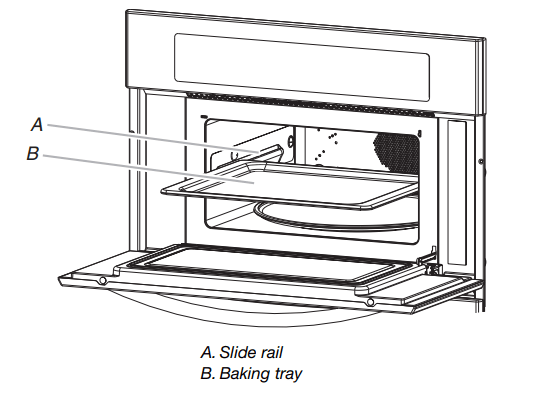
Positioning Baking Tray
Baking tray can only be used with convection cooking and broiling (on some models). To avoid damage to the microwave oven, do not use baking tray in combination with microwave cooking.
Place baking tray on slide rails as shown below. Push in tray to stop position. Check that the baking tray is level.
For best cooking results, use baking tray only in the recommended position.
Manual Cooking
To Use:
1. Touch COOK TIME and then number keypads to set a length of time to cook.
OR
Touch the number keypads to set a length of time to cook. To use this feature, the display must be in the time of day visualization. Time can be set up to 99 minutes and 99 seconds. If using 100% cook power, skip to Step 3.
2. Touch COOK POWER, and then enter the desired power level. See the Microwave Cooking Power Chart in the “Microwave Cooking Power” section.
NOTE: Doneness function is not active for manual cooking.
3. Touch START/ADD 1 MINUTE.
The display will count down the cook time.
Touching Start/Add 1 Minute while the microwave oven is operating will add cook time to the current cycle by 1 minute. Multiple minutes can be added by repeatedly touching Start/Add 1 Minute.
When the stop time is reached, the oven will shut off automatically and “Cooking Complete” will appear on the oven display.
If enabled, end-of-cycle tones will sound, and then reminder tones will sound every minute.
4. Touch CANCEL or open the door to clear the display and/or stop reminder tones.
Keeping Food Warm
To Keep Food Warm:
1. Touch COOK TIME and then number keypads to set a length of time to warm.
OR
Touch the number keypads to set a length of time to warm. To use this feature, the display must be in time of day visualization.
2. Touch COOK POWER.
3. Touch number keypad “1” to set cook power at 10%.
NOTE: Doneness function is not active for manual cooking.
4. Touch START. The display will count down the warming time. When the stop time is reached, the oven will shut off automatically and “Cooking Complete” will appear in the display. If enabled, end-of-cycle tones will sound, and then reminder tones will sound every minute.
5. Touch CANCEL or open the door to clear the display and/or stop the reminder tones.
BUILT-IN MICROWAVE OVEN CARE
General Cleaning
IMPORTANT: Before cleaning, make sure all controls are off and the microwave oven is cool. Always follow label instructions on cleaning products.
Soap, water and a soft cloth or sponge are suggested first, unless otherwise noted.
STAINLESS STEEL (on some models)
NOTE: To avoid damage to stainless steel surfaces, do not use soap-filled scouring pads, abrasive cleaners, Cooktop Polishing Creme, steel-wool pads, gritty washcloths or abrasive paper towels. Damage may occur to stainless steel surfaces, even with one-time or limited use.
Rub in direction of grain to avoid damaging.
Cleaning Method:
■ affresh® Stainless Steel Cleaner Part Number W10355016 (not included): See “Assistance or Service” section to order.
■ Vinegar for hard water spots.
MICROWAVE OVEN DOOR EXTERIOR
Cleaning Method:
■ Glass cleaner and a soft cloth or sponge: Apply glass cleaner to soft cloth or sponge, not directly on panel.
■ affresh® Kitchen Appliance Cleaner Part Number W10355010 (not included): See “Assistance or Service” section to order.
MICROWAVE OVEN CAVITY
To avoid damage to microwave oven cavity, do not use soap-filled scouring pads, abrasive cleaners, steel-wool pads, gritty washcloths or some paper towels.
On stainless steel models, rub in direction of grain to avoid damaging.
The area where the oven door and frame touch when closed should be kept clean.
Cleaning Method:
Average soil
■ Mild, nonabrasive soaps and detergents: Rinse with clean water and dry with soft, lint-free cloth.
Heavy soil
■ Mild, nonabrasive soaps and detergents: Heat 1 cup (250 mL) of water for 2 to 5 minutes in oven. Steam will soften soil. Rinse with clean water and dry with soft, lintfree cloth.
Odors
■ Lemon juice or vinegar:
■ Heat 1 cup (250 mL) of water with 1 tbs (15 mL) of either lemon juice or vinegar for 2 to 5 minutes in oven.
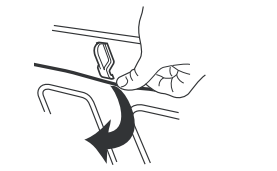
MICROWAVE OVEN CEILING
The broil element does not need cleaning since the intense heat will burn off any food spatters. However, the ceiling above the broil element may need regular cleaning.
Cleaning Method:
■ Warm water, mild detergent and a sponge.
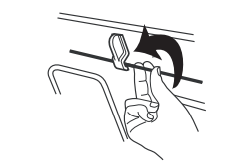
To clean:
1. Push the fastening thread gently towards the back of the ceiling and then lower it to release the broil element.
2. Lower the front of the broil element to access the ceiling for cleaning.
3. Raise broil element back up and return the fastening thread back to its original location.
Always return the broil element to the cooking position after cleaning.
TURNTABLE
Replace turntable immediately after cleaning. Do not operate the microwave oven without the turntable in place.
Cleaning Method:
■ Mild cleanser and scouring pad
■ Dishwasher
RACK
■ Steel-wool pad
■ Dishwasher
CRISPER PAN
To avoid damage to browning pan, do not immerse or rinse with water while the crisper pan is hot. Do not use steel-wool pads.
Cleaning Method:
■ Warm water, mild detergent and a sponge. Heavily soiled areas can be cleaned with a scouring pad and mild cleanser.
■ Dishwasher
BAKING TRAY
■ Dishwasher
STEAMER
■ Dishwasher
TURNTABLE SUPPORT AND ROLLERS, HUB, CRISPER PAN HANDLE
■ Dishwasher
TROUBLESHOOTING
Try the solutions suggested here first in order to avoid the cost of an unnecessary service call.
Nothing will operate
■ Has a household fuse blown, or has the circuit breaker tripped?
Replace the fuse or reset the circuit breaker. If the problem continues, call an electrician.
■ Is the appliance wired properly?
See Installation Instructions.
Microwave oven will not operate
■ Is the door completely closed?
Firmly close door.
■ Is the electronic oven control set correctly?
See “Electronic Oven Control” section.
■ On some models, is the Control Lock set?
See “Control Lock” section.
■ On combination oven models, is the lower oven selfcleaning?
The upper oven will not work during the lower oven SelfCleaning Cycle.
■ Is the magnetron working properly?
Try to heat 1 cup (250 mL) of cold water for 2 minutes at 100% cooking power. If water does not heat, call for service. See “Assistance or Service” section.
Microwave oven makes humming noise
■ This is normal and occurs when the transformer in the magnetron cycles on.
Microwave oven door looks wavy
■ This is normal and will not affect performance.
Turntable will not operate
■ Is the turntable properly in place?
Make sure turntable is correct side up and is sitting securely on the turntable support.
■ Is the turntable support operating properly?
Remove turntable. Remove and clean turntable support and rollers. Replace turntable support. Replace turntable. Place 1 cup (250 mL) of water on the turntable, then restart oven. If it still is not working, call for service. See “Assistance or Service” section. Do not operate the oven without turntable and turntable support working properly
Turntable rotates both directions
■ This is normal and depends on motor rotation at beginning of cycle.
Display shows messages
■ Is the display showing a letter followed by a number?
Clear the display. See “Display(s)” section. If it reappears, call for service. See “Assistance or Service” section.
Display shows time countdown, but is not operating
■ Is the Timer in use?
See “Timer” section.
Tones are not sounding
■ Are tones disabled?
See “Tones” section.
Fan stays on after cooking is completed
■ Depending on the temperature inside the microwave oven after a cooking cycle ends, the cooling fan may continue to run for some time in order to cool the microwave oven. The turntable may also continue to rotate and the light may stay on during this time. This is normal. The door may be opened at any time to add or remove food, and/or to start another cooking cycle.
Smoke is coming from oven vent during crisping
■ Some smoke is normal and occurs just as in conventional crisping.
Sparking during crisping
■ This is normal and occurs as fat burns off from past cooking. Sparking will stop once fat is completely burned off.
Cooking times seem too long
■ Is the cooking power set properly?
See “Microwave Cooking Power” in the “Microwave Oven Use” section.
■ Are large amounts of food being heated?
Larger amounts of food need longer cooking times.
■ Is the incoming voltage less than that specified in the “Electrical Requirements” section?
Have a qualified electrician check the electrical system of the house.
Radio or TV Interference
■ Is the microwave oven plugged into the same outlet?
Try a different outlet.
■ Is the radio or TV receiver near the microwave oven?
Move the receiver away from the microwave oven, or adjust the radio or TV antenna.
■ Are the microwave oven door and sealing surfaces clean?