Safety Instructions
Operating Instructions
Aluminum.Foil 11
Clock.and.Timer 14
Oven
. Baking.and.Roasting 16
. Broiling,.Broiling.Guide 13
. Control.Lockout 22
. Convection
. Lights 10
. Oven.Control 9
. Power.Outage
. Preheating 11
. Probe 16
. Racks 25
. Sabbath.Feature 24
. Self-Cleaning
. Special.Features
. Thermostat.Adjustment 26
. Timed.Baking..
. and.Roasting 15
. Vent 10
Surface.Cooking 6-8
. Griddle 8
Care and Cleaning
Burner.Assembly 29
Burner.Grates
Control.Panel.and.Knobs 33
Cooktop 33
Door.Removal 34
Griddle 31
Oven.Bottom 34
Oven.Light.Replacement 37
Oven.Vents 33
Racks 35
Self-Cleaning
Stainless.Steel.Surfaces 36
Installation
Instructions
40–49
Air.Adjustment 48
Anti-Tip.Device 49
Assemble.Surface.Burners 46
Checking.Burner..
Ignition 47
Connecting.the.Range..
to.Gas. 42–44
Dimensions.and.Clearances 40
Electrical.Connections 45
Leveling.the.Range 48
LP 41
Troubleshooting
Tips
50–53
Accessories 54
Consumer Support
Consumer.Support Back.Cover
Warranty.for.Customers..
in.Canada 57
Warranty.for.Customers..
56
Ranges
183D5580P268 29-5765...07-11 GE
PCGB995
CCGS990
Owner’s Manual
& Installation
Instructions
GEAppliances.com
Self-Cleaning Gas
Write the model and serial
numbers here:
Model # ____________________
Serial # _____________________
You.can.find.them.on. a.label.under.
the.manifold.above.the.upper.oven.
In Canada contact us at:
www.GEAppliances.ca
2
IMPORTANT SAFETY INFORMATION.
READ ALL INSTRUCTIONS BEFORE USING.
SAVE THESE INSTRUCTIONS
.IMPORTANT.SAFETY.NOTICE
The.California.Safe.Drinking.Water.and.Toxic.Enforcement.Act.requires.the.Governor.of.California.to.publish.a.list.of.
substances.known.to.the.state.to.cause.cancer,.birth.defects.or.other.reproductive.harm,.and.requires.businesses.to.
warn.customers.of.potential.exposure.to.such.substances
The.fiberglass.insulation.in.self-clean.ovens.gives.off.a.very.small.amount.of.carbon.monoxide.during.the.cleaning.cycle.
Exposure.can.be.minimized.by.venting.with.an.open.window.or.using.a.ventilation.fan.or.hood
WARNING
-.Do.not.store.or.use.gasoline.or.other.flammable.vapors.and.liquids.in.the.vicinity.of.this.or.any.other.appliance
- WHAT TO DO IF YOU SMELL GAS
■ Do.not.try.to.light.any.appliance
■ Do.not.touch.any.electrical.switch;.do.not.use.any.phone.in.your.building
■ Immediately.call.your.gas.supplier.from.a.neighbor’s.phone.Follow.the.gas.supplier’s.instructions
■ If.you.cannot.reach.your.gas.supplier,.call.the.fire.department
-.Installation.and.service.must.be.performed.by.a.qualified.installer,.service.agency.or.the.gas.supplier
WARNING
If the information in this manual is not followed exactly, a fire or explosion may
result, causing property damage, personal injury or death.
■..All.ranges.can.tip
■
BURNS.or.other.SERIOUS.INJURIES.can.result
■ INSTALL.and.CHECK.the.anti-tip.bracket.following.the.instructions.supplied.with.the.bracket
To.reduce.the.risk.of.tipping.the.range,.the.range.must.be.secured.by.a.properly.installed.anti-tip.
bracket.See.installation.instructions.shipped.with.the.bracket.for.complete.details.before.attempting.
to.install
To.check.if.the.bracket.is.installed.and.engaged.properly,.look.underneath.the.range.to.see.that.the.
rear.leveling.leg.is.engaged.in.the.bracket.On.some.models,.the.storage.drawer.or.kick.panel.can.be.
removed.for.easy.inspection.If.visual.inspection.is.not.possible,.slide.the.range.forward,.confirm.the.
anti-tip.bracket.is.securely.attached.to.the.floor.or.wall,.and.slide.the.range.back.so.the.rear.leveling.leg.is.under.the.
anti-tip.bracket
If.the.range.is.pulled.from.the.wall.for.any.reason,.always.repeat.this.procedure.to.verify.the.range.is.properly.secured.
by.the.anti-tip.bracket.
Never.completely.remove.the.leveling.legs.or.the.range.will.not.be.secured.to.the.anti-tip.device.properly.
If.you.did.not.receive.an.anti-tip.bracket.with.your.purchase,.call.18006268774.to.receive.one.at.no
.cost.(in.Canada,.
call.18005613344).For.installation.instructions.of.the.bracket,.visit.GEAppliancescom.(in.Canada,.GEAppliancesca)
WARNING

3
IMPORTANT SAFETY INFORMATION.
READ ALL INSTRUCTIONS BEFORE USING. GEAppliances.com
SAVE THESE INSTRUCTIONS
WARNING
NEVER use this appliance as a space heater to heat
or warm the room. Doing so may result in carbon
monoxide poisoning and overheating of the oven.
■..Use.this.appliance.for.its.intended.purpose.as.described.
in.this.owner’s.manual
■..Have.your.range.installed.and.properly.grounded.by.
a.qualified.installer.in.accordance.with.the.provided.
installation.instructions.Any.adjustment.and.service.
should.be.performed.only.by.a.qualified.gas.range.
installers.or.service.technicians.Do.not.attempt.to.repair.
or.replace.any.part.of.your.range.unless.it.is.specifically.
recommended.in.this.manual
■..Your.range.is.shipped.from.the.factory.set.for.use.
with.natural.gas.It.can.be.converted.for.use.with.LP.
gas.If.required,.thse.adjustments.must.be.made.by.a.
qualified.technician.in.accordance.with.the.installatoin.
instructions.and.local.codes.The.agency.performing.this.
work.assumes.responsibility.for.the.conversion
■..Have.the.installer.show.you.the.location.of.the.range.
gas.shut-off.valve.and.how.to.turn.it.off.if.necessary
■..Plug.your.range.into.a.120-volt.grounded.outlet.only.Do.
not.remove.the.round.grounding.prong.from.the.plug.
If.in.doubt.about.the.grounding.of.the.home.electrical.
system,.it.is.your.responsibility.and.obligation.to.have.an.
ungrounded.outlet.replaced.with.a.properly.grounded,.
three.prong.outlet.in.accordance.with.the.National.
Electrical.Code.
Do.not.use.on.extension.cord.with.this.
appliance
■..Before.performing.any.service,.unplug.the.range.
or.disconnect.the.power.supply.at.the.household.
distribution.panel.by.removing.the.fuse.or.switching.off.
the.circuit.breaker
■..Be.sure.all.packing.materials.are.removed.from.the.
range.before.operating.to.prevent.ignition.of.these.
materials
■ Avoid.scratching.or.impacting.glass.doors,.cooktops.or.
control.panels.Doing.so.may.lead.to.glass.breakage.Do.
not.cook.on.a.product.with.broken.glass.Shock,.fire.or.
cuts.may.occur
■ Do.not.leave.children.alone.or.unattended.in.an.
area.where.an.appliance.is.in.use.They.should.never.
be.allowed.to.climb,.sit.or.stand.on.any.part.of.the.
appliance
■ Do.not.store.items.of.interest.to.children.above.a.range.
or.on.the.backguard.of.a.range—children.climbing.on.
the.range.to.reach.items.could.be.seriously.injured
■..Do.not.allow.anyone.to.climb,.stand.or.hang.on.the.
oven.door,.drawer.or.cooktop.They.could.damage.the.
range.or.tip.it.over.causing.severe.injury.or.death
■..Never.block.the.vents.(air.openings).of.the.range.They.
provide.the.air.inlets
.and.outlets.that.are.necessary.for.
the.range.to.operate.properly.with.correct.combustion.
Air.openings.are.located.at.the.rear.of.the.cooktop,.
at.the.top.and.bottom.of.the.oven.door,.and.at.the.
bottomof.the.range.under.the.warming.drawer,.lower.
oven.drawer.or.kick.panel
■ Use.only.dry.pot.holders—moist.or.damp.pot.holders.on.
hot.surfaces.may.result.in.burns.from.steam.Do.not.let.
pot.holders.touch.surface.burners,.burner.grate,.or.oven.
heating.element.Do.not.use.a.towel.or.other.bulky.cloth.
in.place.of.pot.holders
■..Be.careful.not.to.touch.hot.surfaces.of.the.range.
Potentially.hot.surfaces.include.burners,.grates,.cooktop,.
backguard,.oven.and.door.interior.and.crevices.around.
the.oven.door
■..Do.not.heat.unopened.food.containers.Pressure.could.
build.up.and.the.container.could.burst,.causing.an.
injury
■..Cook.meat.and.poultry.thoroughly—meat.to.at.least.an.
internal.temperature.of.160°F.and.poultry.to.at.least.
an.internal.temperature.of.180°F.Cooking.to.these.
temperatures.usually.protects.against.foodborne.illness
.GENERAL.SAFETY.INSTRUCTIONS
WARNING
4
IMPORTANT SAFETY INFORMATION.
READ ALL INSTRUCTIONS BEFORE USING.
SAVE THESE INSTRUCTIONS
■..Do.not.use.water.on.grease.fires.Never.pick.up.
a.flaming.pan.Turn.the.controls.off.Smother.a.
flaming.pan.on.a.surface.burner.by.covering.the.pan.
completely.with.a.well-fitting.lid,.cookie.sheet.or.flat.
tray.If.necessary,.use.a.multi-purpose.dry.chemical.or.
foam-type.fire.extinguisher
■..If.there.is.a.fire.in.the.oven.during.baking,.turn.the.oven.
off.and.keep.the.door.closed.until.the.fire.goes.out.If.
necessary,.use.a.multi-purpose.dry.chemical.or.foam.
type.fire.extinguisher
■ If.there.is.a.fire.in.the.oven.during.self-clean,.turn.the.
oven.off.and.wait.for.the.fire.to.go.out.Do.not.force.
the.door.open.Introduction.of.fresh.air.at.self-clean.
temperatures.may.lead.to.a.burst.of.flame.from.the.
oven.Failure.to.follow.this.instruction.may.result.in.
severe.burns.
IN.THE.EVENT.OF.A.FIRE,.TAKE.THE.FOLLOWING.STEPS.
TO.PREVENT.INJURY.AND.FIRE.SPREADING:
■..Never.leave.the.surface.burners.unattended.at.medium.
or.high.heat.settings.Foods,.especially.oily.foods,.may.
ignite.resulting.in.fire.that.could.spread.to.surrounding.
cabinets
■..Never.leave.oil.unattended.while.frying..If.allowed.to.
heat.beyond.its.smoking.point,.oil.may.ignite.resulting.
in.fire.that.may.spread.to.surrounding.cabinets..Use.a.
deep.fat.thermometer.whenever.possible.to.monitor.oil.
temperature.
■ To.avoid.oil.spillover.and.fire,.use.a.minimum.amount.of.
oil.when.shallow.pan-frying.and.avoid.cooking.frozen.
foods.with.excessive.amounts.of.ice.
■ Use.proper.pan.size.and.avoid.pans.that.are.unstable.
or.easily.tipped.Select.cookware.that.is.matched.to.the.
size.of.the.burner.Burner.flames.should.be.adjusted.so.
that.they.do.not.extend.beyond.the.bottom.of.the.pan.
Excessive.flame.may.be.hazardous
■..Always.use.the.LITE.position.when.igniting.the.top.
burners.and.make.sure.the.burners.have.ignited
■ When.using.glass/ceramic.cookware,.make.sure.it.is.
suitable.for.cooktop.service;.others.may.break.because.
of.sudden.change.in.temperature
■..To.minimize.the.possibility.of.burns,.ignition.of.
flammable.materials.and.spillage,.the.handle.of.a.
container.should.be.turned.toward.the.center.of.the.
range.without.extending.over.nearby.burners
■ When.preparing.flaming.foods.under.a.hood,.turn.the.
fan.on
■ Do.not.use.a.wok.with.a.round.metal.support.ring.the.
ring.may.trap.heat.and.block.air.to.the.burner.resulting.
in.a.carbon.monoxide.hazard
■ Do.not.attempt.to.lift.the.cooktop.Doing.so.may.
damage.the.gas.tubing.to.the.surface.burners.resulting.
in.a.gas.leak.and.risk.of.fire
■ When.disabling.Gas/Control.Lockout.(on.some.models),.
make.sure.the.surface.controls.are.set.to.the.OFF.
position.This.will.prevent.unintended.gas.flow.from.the.
burners
■ Do.not.use.aluminum.foil.to.cover.the.grates.or.line.
any.part.of.the.cooktop.Doing.so.may.result.in.carbon.
monoxide.poisoning,.overheating.of.the.cooktop.
surfaces,.or.a.potential.fire.hazard
COOKTOP.SAFETY.INSTRUCTIONS
WARNING
WARNING
■..Do.not.store.or.use.flammable.materials.in.an.oven.or.
near.the.cooktop,.including.paper,.plastic,.pot.holders,.
linens,.wall.coverings,.curtains,.drapes.and.gasoline.or.
other.flammable.vapors.and.liquids
■..
Never.wear.loose-fitting.or.hanging.garments.while.
using.the.appliance.Avoid.storing.commonly.used.items.
in.cabinetes.above.the.range.and.be.careful.when.
reaching.over.the.range.Clothing.in.close.proximity.to.
burners.or.hot.surfaces.may.ignite.causing.severe.burns
■ Do.not.let.cooking.grease.or.other.flammable.materials.
accumulate.in.or.near.the.range.Grease.in.the.oven.or.
on.the.cooktop.may.ignite.
■ Clean.ventilating.hoods.frequently.Grease.should.not.
be.allowed.to.accumulate.on.the.hood.or.filter
.
KEEP.FLAMMABLE.MATERIALS.AWAY.FROM.THE.RANGE
WARNING
IMPORTANT SAFETY INFORMATION.
READ ALL INSTRUCTIONS BEFORE USING. GEAppliances.com
5
SAVE THESE INSTRUCTIONS
WARNING
.
NEVER.cover.any.slots,.holes,.or.
passages.in.the.oven.bottom.or.cover.an.entire.rack.with.
materials.such.as.aluminum.foil.Doing.so.blocks.air.flow.
through.the.oven.and.may.cause.carbon.monixide.
poisoning.Aluminum.foil.linings.may.also.trap.heat,.causing.
a.fire.hazard
■..Stand.away.from.the.range.when.opening.the.oven.
door.Hot.air.or.steam.which.escapes.can.cause.burns.
to.hands,.face.and/or.eyes
■ Keep.the.oven.free.from.grease.buildup.Grease.in.the.
oven.may.ignite.
■ Place.oven.racks.in.desired.location.while.oven.is.cool.
If.rack.must.be.moved.while.oven.is.hot,.be.careful.to.
avoid.touching.hot.surfaces
■..Pull.the.oven.rack.to.the.stop-lock.position.when.
loading.and.unloading.food.from.the.oven.This.helps.
prevent.burns.from.touching.hot.surfaces.of.the.door.
and.oven.walls
■ Do.not.leave.items.such.as.paper,.cooking.utensils.or.
food.in.the.oven.when.not.in.use.Items.stored.in.an.
oven.can.ignite
■..Do.not.leave.items.on.the.cooktop.near.the.oven.vent.
which.is.in.the.center.of.the.backguard.Items.may.
overheat.resulting.in.a.risk.of.fire.or.burns
■..When.using.cooking.or.roasting.bags.in.the.oven,.follow.
the.manufacturer’s.directions
■..Never.broil.with.door.open.Open-door.broiling.is.not.
permitted.due.to.overheating.of.control.knobs
OVEN.SAFETY.INSTRUCTIONS
WARNING
The self-cleaning feature operates the oven at temperatures high enough to burn away food soils in the oven.
Follow these instructions for safe operation.
■..Before.operating.the.self-clean.cycle,.remove.pans,.
shiny.metal.oven.racks.and.other.utensils.from.the.
oven.Only.porcelain-coated.oven.racks.may.be.left.in.
the.oven.Do.not.use.self-clean.to.clean.other.parts,.
such.as.grates
■..Before.operating.the.self-clean.cycle,.wipe.grease.and.
food.soils.from.the.oven.Excessive.amount.of.grease.
may.ignite.leading.to.smoke.damage.to.your.home
■ If.the.self-cleaning.mode.malfunctions,.turn.the.oven.off.
and.disconnect.the.power.supply.Have.it.serviced.by.a.
qualified.technician.
■ Do.not.clean.the.door.gasket.The.door.gasket.is.
essential.for.a.good.seal.Care.should.be.taken.not.to.
rub,.damage.or.move.the.gasket
■ Do.not.use.oven.cleaners.No.commercial.oven.cleaner.
or.oven.liner.protective.coating.of.any.kind.should.be.
used.in.or.around.any.part.of.the.oven
SELF-CLEANING.OVEN.SAFETY.INSTRUCTIONS
WARNING
■..The.purpose.of.the.warming.drawer.is.to.hold.hot.
cooked.foods.at.serving.temperature.Bacteria.will.grow.
in.food.while.it.is.below.140°F.Do.not.put.cold.food.in.
warming.drawer.Do.not.heat.food.for.more.than..
2.hours.Failure.to.follow.these.instructions.may.result.in.
foodborne.illness
■..Do.not.leave.paper.products,.plastics,.canned.food.or.
combustible.materials.in.the.drawer.They.may.ignite
■ Do.not.touch.the.heating.element.or.the.interior.surface.
of.the.drawer.These.surfaces.may.be.hot.enough.to.
cause.burns.
■ Use.care.when.opening.the.drawer.Open.the.drawer.a.
crack.and.let.hot.air.or.steam.escape.before.removing.
or.replacing.food.Hot.air.or.steam.that.escapes.can.
cause.burns.to.hands,.face.and/or.eyes
■ Do.not.use.aluminum.foil.to.line.the.warming.drawer.
Foil.is.an.excellent.heat.insulator.and.will.trap.heat.
beneath.it.This.will.upset.the.performance.of.the.
drawer.and.potentially.cause.a.fire.hazard
.WARMING.DRAWER/LOWER.OVEN.DRAWER.SAFETY.
.INSTRUCTIONS
(Some models)
WARNING
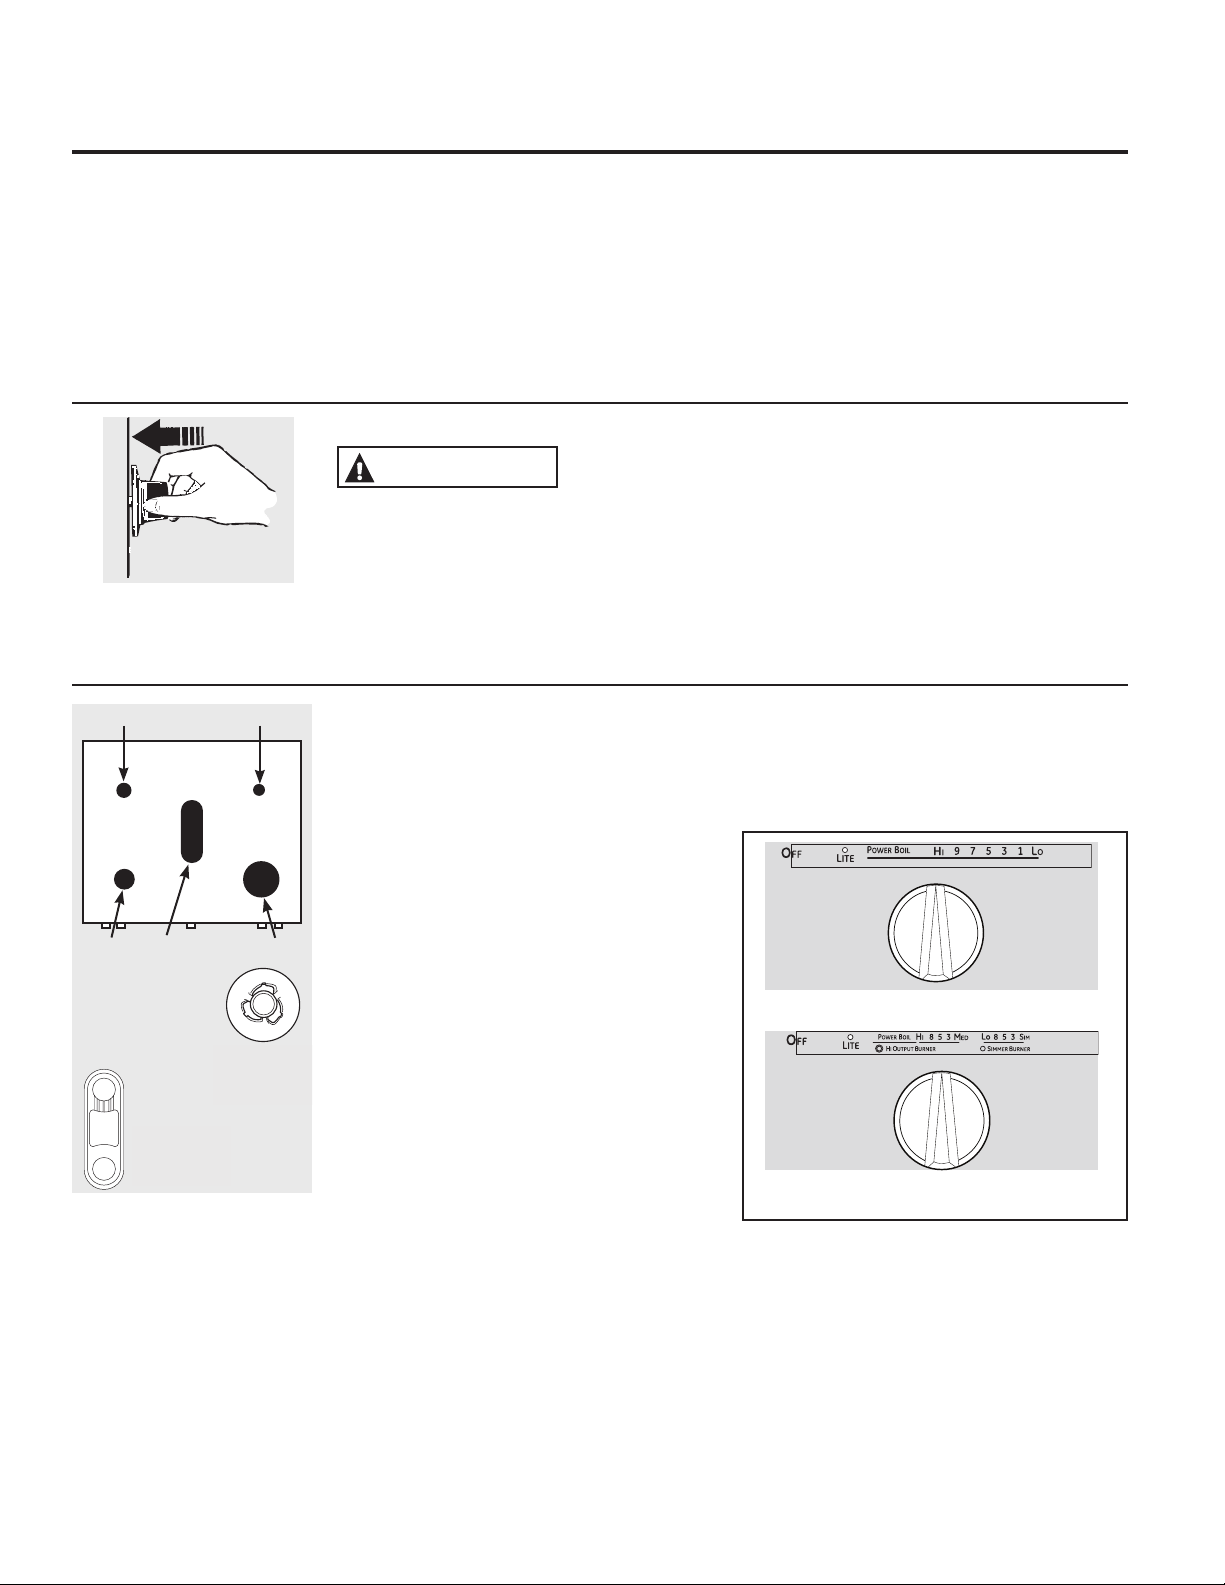
Using the gas surface burners.
Throughout this manual, features and appearance may vary from your model.
How to Light a Gas Surface Burner
.
WARNING
Burner flames that
are not covered by cookware may present a risk
of fire or clothing ignition. The griddle burner
should only be used with the griddle in place.
Failure to do so may result in serious injury.
Make.sure.all.the.surface.burners.are.placed.in.
their.respective.positions
Push.the.control.knob.in.and.turn.it.to.the.LITE.position
You.will.hear.a.little.clicking.noise—the.sound.
of.the.electric.spark.igniting.the.burner
Turn.the.knob.to.adjust.the.flame.size.If.the.
knob.stays.at.LITE,.it.will.continue.to.click
When.one.burner.is.turned.to.LITE,.all.the.
burners.spark.Do.not.attempt.to.disassemble.
or.clean.around.any.burner.while.another.
burner.is.on.An.electric.shock.may.result,.which.
could.cause.you.to.knock.over.hot.cookware
Push the control knob in and turn
it to the LITE position.
Before Lighting a Gas Burner
..Make.sure.all.burners.are.in.place
..Make.sure.all.grates.on.the.range.are.
properly.placed.before.using.any.burner
..If.your.range.has.the.Gas/Control.Lockout.
feature,.make.sure.it.is.disabled.before.
attempting.to.light.the.surface.burners
After Lighting a Gas Burner
..Do.not.operate.the.burner.for.an.extended.
period.of.time.without.cookware.on.the.
grate.The.finish.on.the.grate.may.chip.
without.cookware.to.absorb.the.heat
..Be.sure.the.burners.and.grates.are.cool.
before.you.place.your.hand,.a.pot.holder,.
cleaning.cloths.or.other.materials.on.them
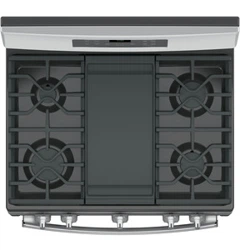
Sealed Gas Burners
Your.gas.range.cooktop.has.sealed.gas.
burners.They.offer.convenience,.cleanability.
and.flexibility.to.be.used.in.a.wide.range.of.
cooking.applications
The.smallest.burner.in.the.right.rear.position.
is.the.simmer.burner.On.some.models,.the.
right.front.position.triple.flame.burner.will.be.
the.simmer.burner.This.burner.can.be.turned.
down.to.SIM.for.a.very.low.simmer.setting.
It.provides.precise.cooking.performance.for.
delicate.foods.such.as.sauces.or.foods.that.
require.low.heat.for.a.long.cooking.time
The.medium.(left.rear).and.the.large.(left.
front).burners.are.the.primary.burners.
for.most.cooking.These.general-purpose.
burners.can.be.turned.down.from.HI.to.LO.to.
suit.a.wide.range.of.cooking.needs
The.extra.large.burner.(right.front,.triple.flame.
burner,.or.left.front.burner.on.some.models).are.
the.maximum.output.burners.Like.the.other.
four.burners,.it.can.be.turned.down.from.HI.to.
SIM.for.a.wide.range.of.cooking.applications.
These.burners.are.designed.to.quickly.bring.
large.amounts.of.liquid.to.a.boil.They.have.
a..special.POWER BOIL
™
.setting.designed.to.
be.used.with.cookware.10.inches.or.larger.in.
diameter.for.the.extra.large.and.11.inches.or.
larger.for.the.triple.flame.burner.
The.center.oval.burner.(on.some.models).is.for.
large.pots/pans.or.for.use.with.the.griddle
Medium
Small
Large
Center (oval)
(on some
models)
Extra Large
Extra
Large
on
some
models
Tri-ring
burner (on
some models)
Bridge burner
(on some
models)
For extra large burners only
For tri-ring burners only
6
GEAppliances.com
How to Select Flame Size
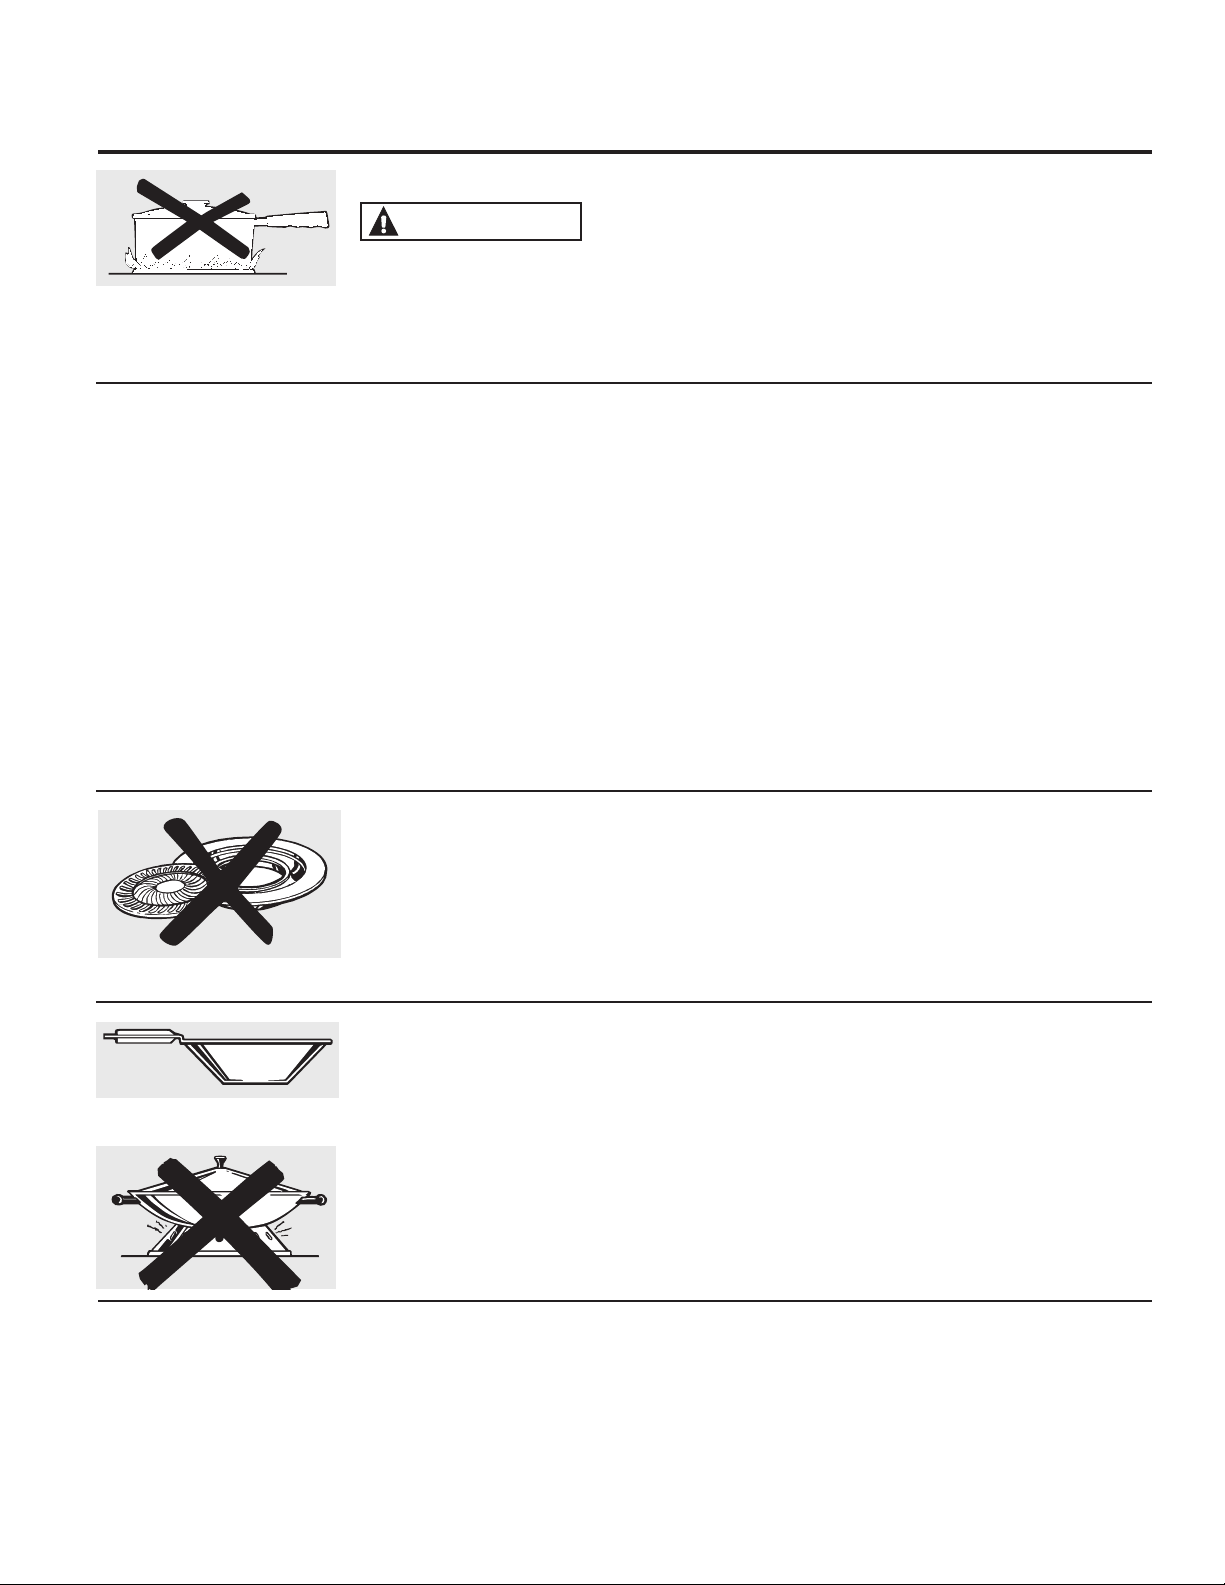
. WARNING
Flames that are
not covered by cookware may present a risk
of burns or clothing igniton. Never let flames
extend beyond the sides of the cookware.
Watch.the.flame,.not.the.knob,.as.you.adjust.
heat.When.fast.heating.is.desired,.the.flame.
size.on.a.gas.burner.should.match.the.
cookware.you.are.using
Flames.larger.than.the.bottom.of.the.cookware.
will.not.result.in.faster.heating.and.may.be.
hazardous
In Case of Power Failure
In.case.of.a.power.failure,.you.can.light.the.
gas.surface.burners.on.your.range.with.a.
match.Hold.a.lit.match.to.the.burner,.then.
push.in.and.turn.the.control.knob.to.the.LITE.
position.Use.extreme.caution.when.lighting.
burners.this.way.
Surface.burners.in.use.when.an.electrical.
power.failure.occurs.will.continue.to.operate.
normally
NOTE: If Gas/Control Lockout is in use at the
time of a power failure, the surface burners
cannot be lit.
Wok This Way
We.recommend.that.you.use.a.14-inch.or.
smaller.flat-bottomed.wok.Make.sure.the.wok.
bottom.sits.flat.on.the.grate.They.are.available.
at.your.local.retail.store
Only.a.flat-bottomed.wok.should.be.used
Do.not.use.a.wok.support.ring.Placing.the.
ring.over.the.burner.or.grate.may.cause.the.
burner.to.work.improperly,.resulting.in.carbon.
monoxide.levels.above.allowable.standards.
This.could.be.dangerous.to.your.health.
Use a flat-bottomed wok
Stove Top Grills
Do.not.use.stove.top.grills.on.your.sealed.gas.
burners.If.you.use.the.stove.top.grill.on.the.
sealed.gas.burner,.it.will.cause.incomplete.
combustion.and.can.result.in.exposure.to.
carbon.monoxide.levels.above.allowable.
current.standards.
This.can.be.hazardous.to.your.health
Top-of-Range Cookware
Aluminum: Medium-weight.cookware.is.
recommended.because.it.heats.quickly.
and.evenly.Most.foods.brown.evenly.in.an.
aluminum.skillet.Use.saucepans.with.tight-
fitting.lids.when.cooking.with.minimum.
amounts.of.water
Cast-Iron:.If.heated.slowly,.most.skillets.will.
give.satisfactory.results
Enamelware:.Under.some.conditions,.the.
enamel.of.some.cookware.may.melt.Follow.
cookware.manufacturer’s.recommendations.
for.cooking.methods
Glass:.There.are.two.types.of.glass.
cookware—those.for.oven.use.only.and.
those.for.top-of-range.cooking.(saucepans,.
coffee.and.teapots).Glass.conducts.heat.
very.slowly
Heatproof Glass Ceramic:.Can.be.used.for.
either.surface.or.oven.cooking.It.conducts.
heat.very.slowly.and.cools.very.slowly.Check.
cookware.manufacturer’s.directions.to.be.
sure.it.can.be.used.on.gas.ranges
Stainless Steel:.This.metal.alone.has.poor.
heating.properties.and.is.usually.combined.
with.copper,.aluminum.or.other.metals.for.
improved.heat.distribution.Combination.
metal.skillets.usually.work.satisfactorily.
if.they.are.used.with.medium.heat.as.the.
manufacturer.recommends
7

8
WARNING Fire Hazard
The Pre-Heat setting (on some models) is provided to
quickly preheat your griddle. Turn control down before
placing food on the griddle. Cooking on the Pre-Heat
setting may result in fire.
Use care when cooking greasy foods. Spilled grease may
result in fire.
Never place or store any items on the griddle, even when
it is not in use. Heat from surrounding burners can heat
the griddle and may result in fire.
Place and remove the griddle only when all grates and
griddle are cool and all surface units are turned OFF.
Most.griddled.foods.require.cooking.on.a.preheated.surface.
Preheat.griddle.according.to.this.guide,.then.switch.to.the.
desired.cook.setting.
..
Do.not.use.oil.on.the.griddle.for.extended.lengths.of.time.
Permanent.staining.and/or.craze.lines.on.the.surface.could.result
..Do not overheat the griddle..Leaving.the.griddle.burner.
on.at.HI.for.an.extended.amount.of.time.without.food.can.
damage.the.nonstick.coating
..Avoid.using.metal.utensils.with.sharp.points.or.rough.sharp.
edges.which.might.damage.the.griddle.surface
..Do.not.cut.foods.on.the.griddle
Your.nonstick.coated.griddle.or.preseasoned.
griddle.(on.some.models).provides.an.
extra-large.cooking.surface.for.meats,.
pancakes.or.other.food.usually.prepared.in.a.
frying.pan.or.skillet
NOTE: Your.griddle.will.discolor.over.time.as.it.
becomes.seasoned.with.use
How to Insert the Griddle
Using the griddle. (on some models)
The.griddle.can.only.be.used.with.the.center.
burner.To.insert.the.griddle,.remove.the.center.
grate.and.replace.with.the.griddle.
NOTE: Do not clean the griddle in the self-
cleaning oven
Using the Griddle
Nonstick Griddle for Models JCGB870
Type of Food Preheat Time Cook Setting
Warming.Tortillas 4.min 6
Pancakes 4.min 7
Hamburgers 4.min 8
Fried.Eggs 2.min 7
Breakfast.Sausage.Links 35.min 8
Hot.Sandwiches.(such.as.
Grilled.Cheese)
3.min 8
Type of Food Preheat Conditions Cook Setting
Warming.Tortillas none 3.(Med-Low)
Pancakes 7.(Med-Hi).
3.min
7.(Med-Hi)
Hamburgers 7.(Med-Hi).
5.min
7.(Med-Hi)
Breakfast.Sausage.Links Hi.
5.min
5.(Med)
Hot.Sandwiches.(such.as.
Grilled.Cheese)
Hi.
4.min
Hi
NOTE: Griddle settings may need to be adjusted if the griddle is
used for an extended time.
NOTE: Griddle settings may need to be adjusted if the griddle is
used for an extended time.
NOTE: Griddle settings may need to be adjusted if the griddle is
used for an extended time.
Preseasoned Griddle for Model PCGB995
Type of Food Preheat
Conditions
Cook Setting
Warming.Tortillas none 3.(Med-Low)
Pancakes 4.(Med-Hi).
10.min
4.(Med)
Hamburgers Hi.
5.min
5.(Med).
Sear.on.Hi.for.1.
minute.on.each.
side
Fried.Eggs Hi.
5.min
4.(Med)
Breakfast.Sausage.Links Hi.
5.min
5.(Med)
Hot.Sandwiches.(such.as.
Grilled.Cheese)
Hi.
4.min
Hi
Nonstick Griddle for Model CCGS990
Using the lower oven.
(Throughout this manual, features and appearance may vary from your model.)
Bake Pad
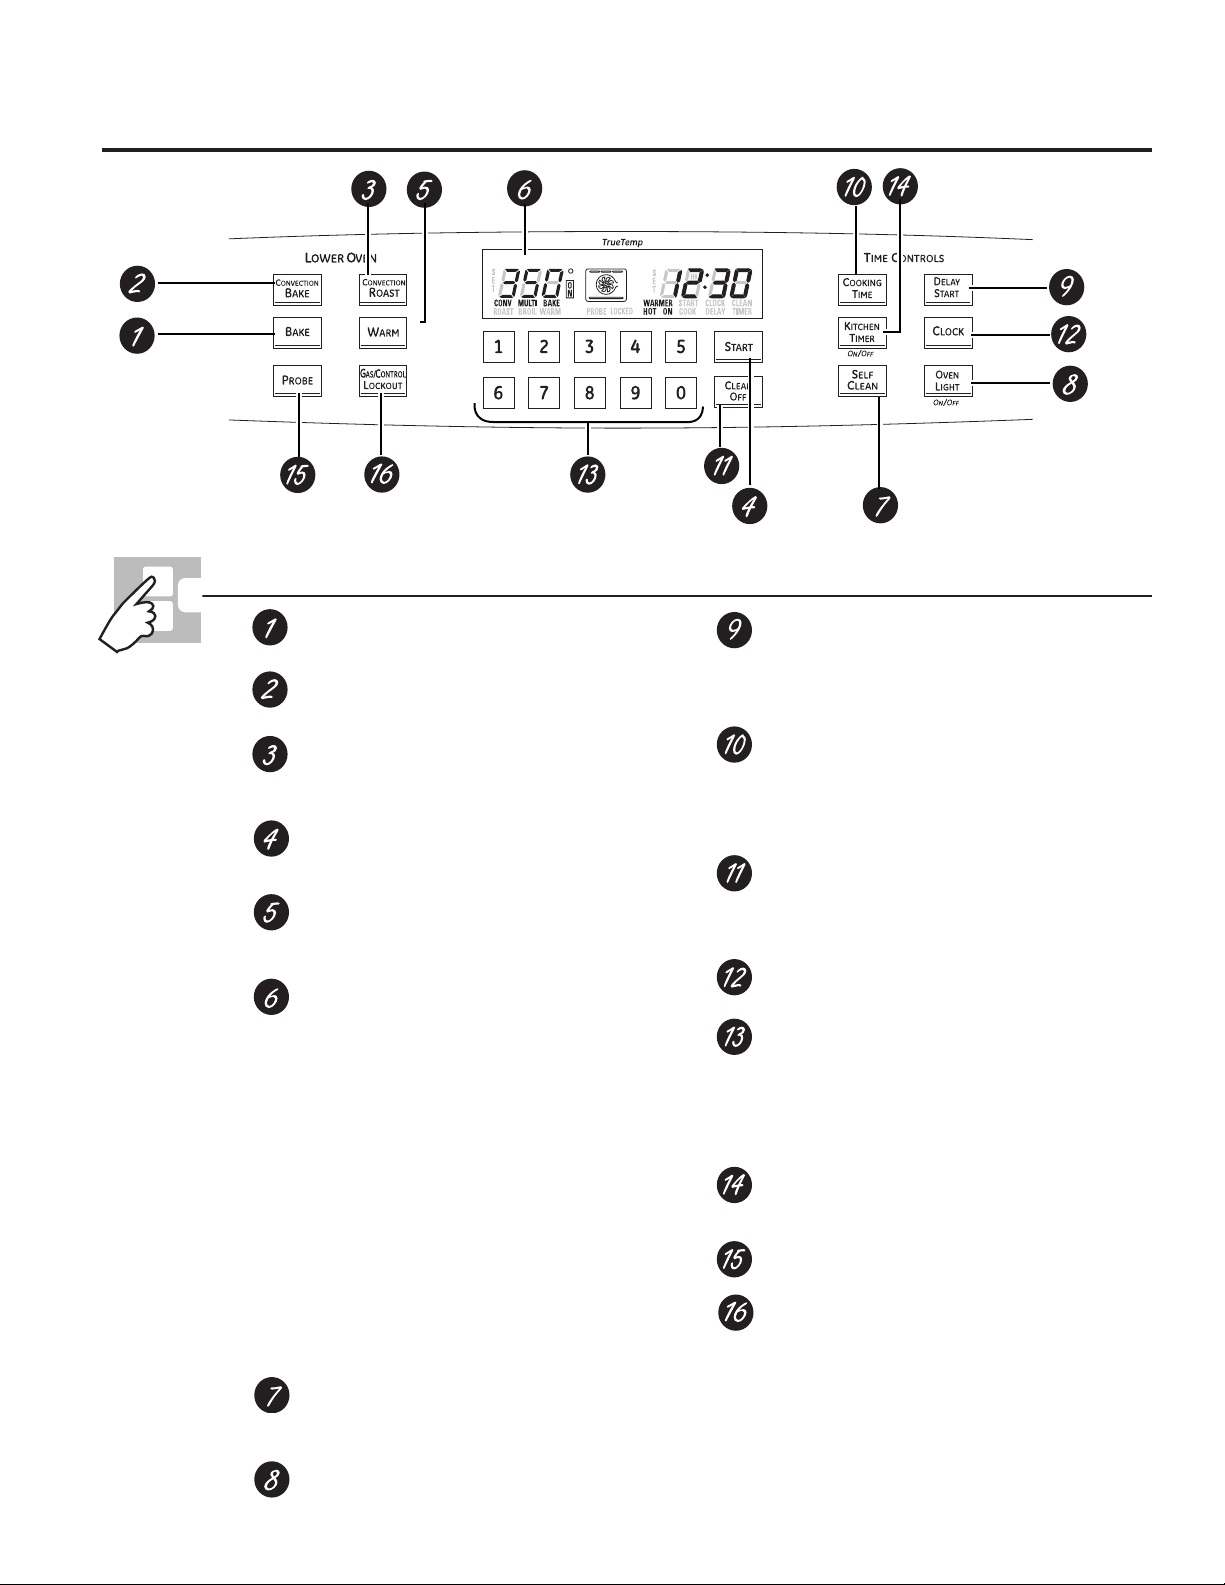
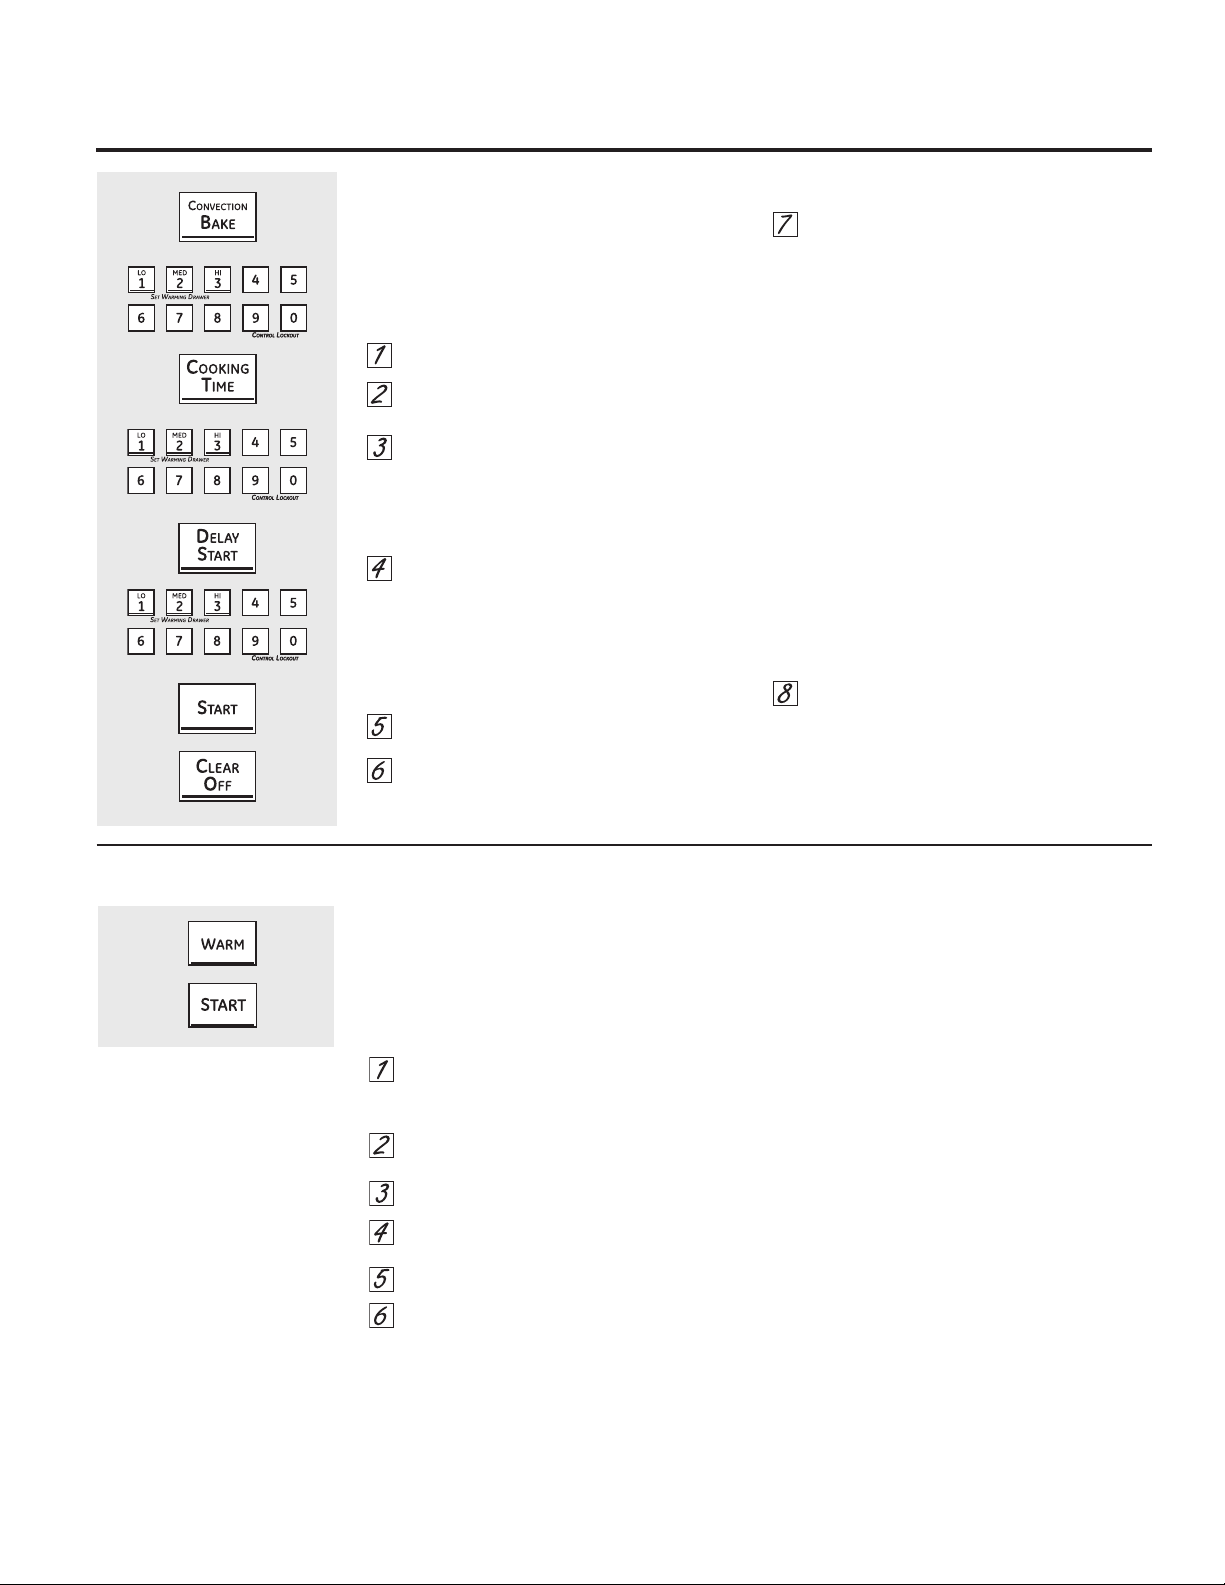
.Touch.to.select.the.bake.function
.Convection Bake Pad (on some models)
.Touch.to.select.baking.with.the.convection.function
.Convection Roast Pad (on some models)
.Touch.to.select.roasting.with.the.convection.
function
Start Pad
.Must.be.touched.to.start.any.cooking.or.cleaning.
function
Warm Pad
Touch.to.keep.cooked.foods.warm.See.the.How to
Set the Oven for Warming.section
Display
.Shows.the.time.of.day,.oven.temperature,.whether.
the.oven.is.in.the.bake,.broil.or.self-cleaning.mode,.
the.times.set.for.the.timer.or.automatic.oven.
operations,.and.if.the.range.is.locked
If “F–” and a number or letter flash in the display
and the oven control signals, this indicates a function
error code. Touch the Clear/Off pad. Allow the oven to
cool for one hour. Put the oven back into operation. If the
function error code repeats, disconnect the power to the
oven and call for service.
If your oven was set for a timed oven operation and a
power outage occurred, the clock and all programmed
functions must be reset.
The time of day will flash in the display when there has
been a power outage.
Self Clean Pad
.Touch.to.select.self-cleaning.function.See.the.
Using the self-cleaning oven.section
. Oven Light On/Off Pad
.Touch.to.turn.the.oven.light.on.or.off
Delay Start Pad
.Use.along.with.Cooking Time.or.Self Clean.pads.
to.set.the.oven.to.start.and.stop.automatically.at.a.
time.you.set
Cooking Time Pad
.Touch.and.then.touch.the.number.pads.to.set.the.
amount.of.time.you.want.your.food.to.cook.The.
oven.will.shut.off.when.the.cooking.time.has.run.
out
Clear/Off Pad
.Touch.to.cancel.ALL.oven.operations.except.the.
clock,.timer.and.Gas/Control.Lockout.or.Control.
Lockout.(depending.on.model)
Clock Pad
Touch.before.setting.the.clock
Number Pads
.Use.to.set.any.function.requiring.numbers,.such.
as.the.time.of.day.on.the.clock,.the.timer,.the.oven.
temperature,.the.internal.food.temperature,.the.
start.time.and.length.of.operation.for.timed.baking.
and.self-cleaning
Kitchen Timer On/Off Pad
Touch.to.select.the.timer.feature
Probe Pad
Touch.when.using.the.probe.to.cook.food
Gas/Control Lockout Pad (on some models)
Touch.and.hold.the.Gas Control Lockout.pad.
for.3.seconds.to.lock/unlock.the.surface.burners,.
oven.burners.and.control.panel.so.they.cannot.be.
activated
Oven Control, Clock, Timer and Features
Features, appearance and pad locations may vary.
HOLD 3 SEC
9
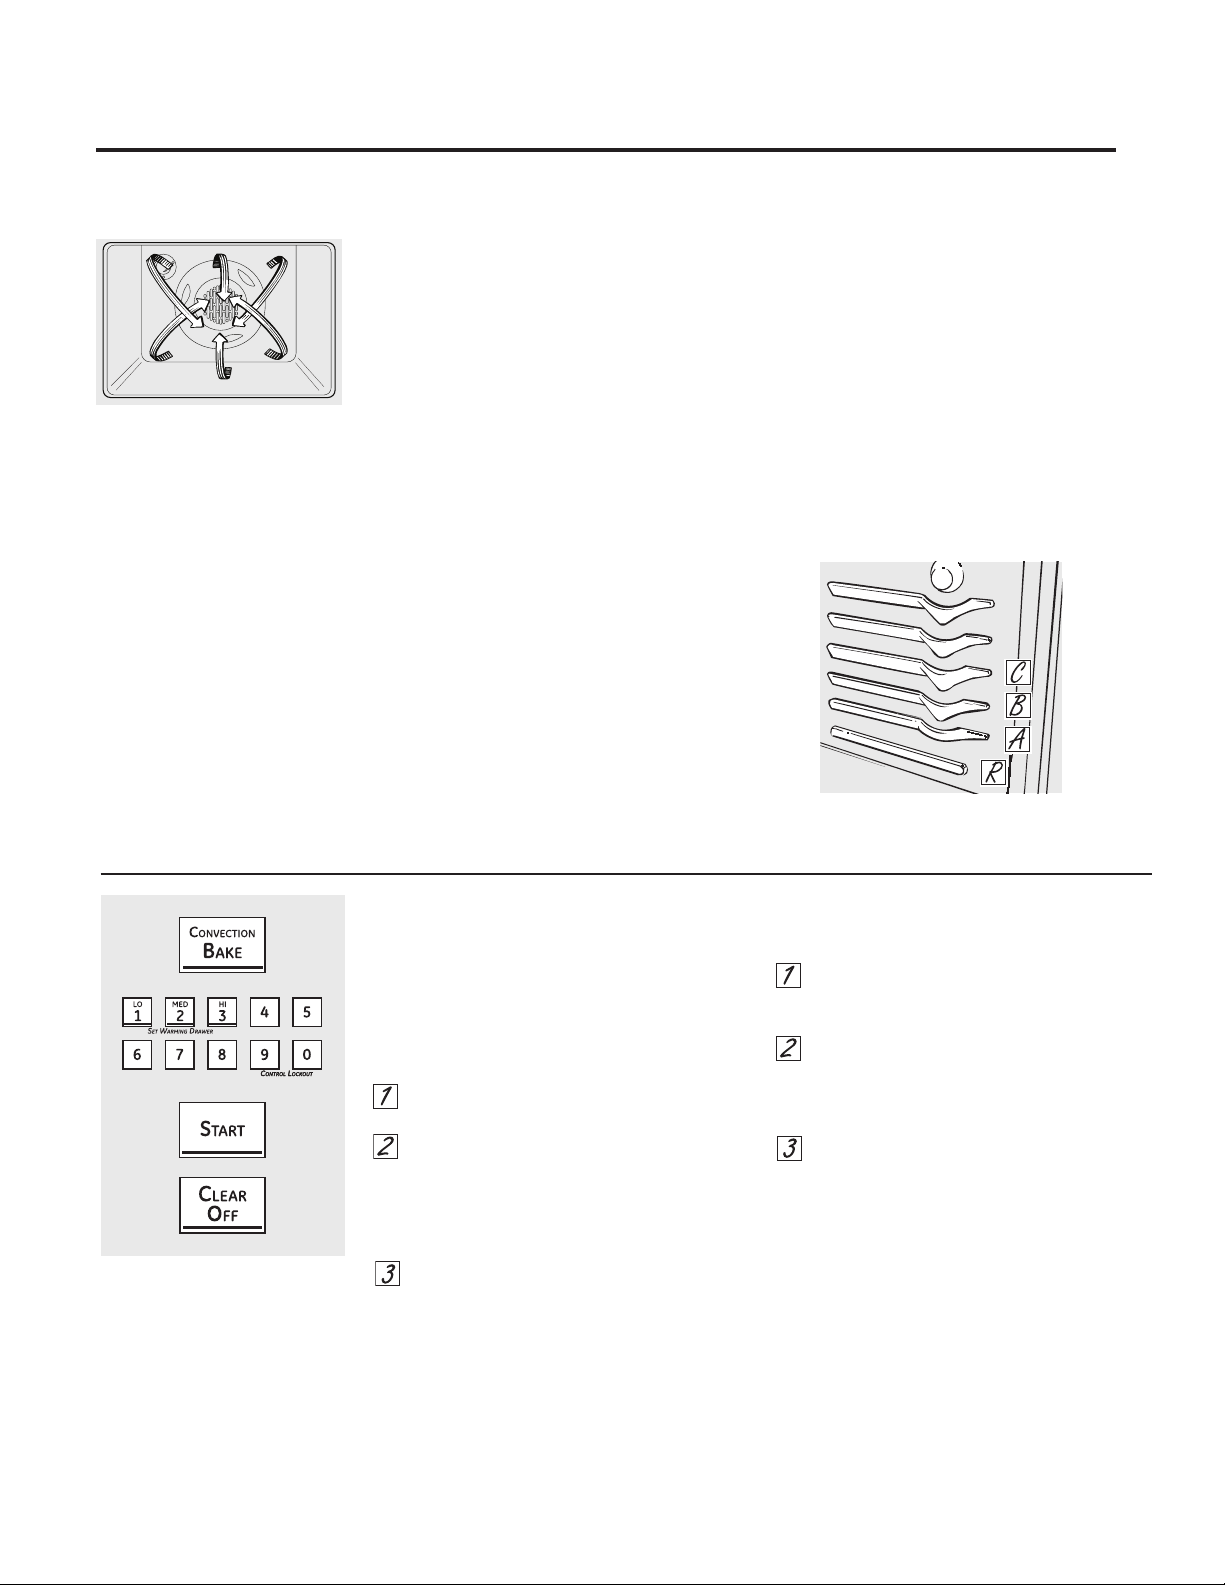
Using the ovens..
To avoid possible burns, place the racks in the desired position before you turn the oven on.
Before you begin…
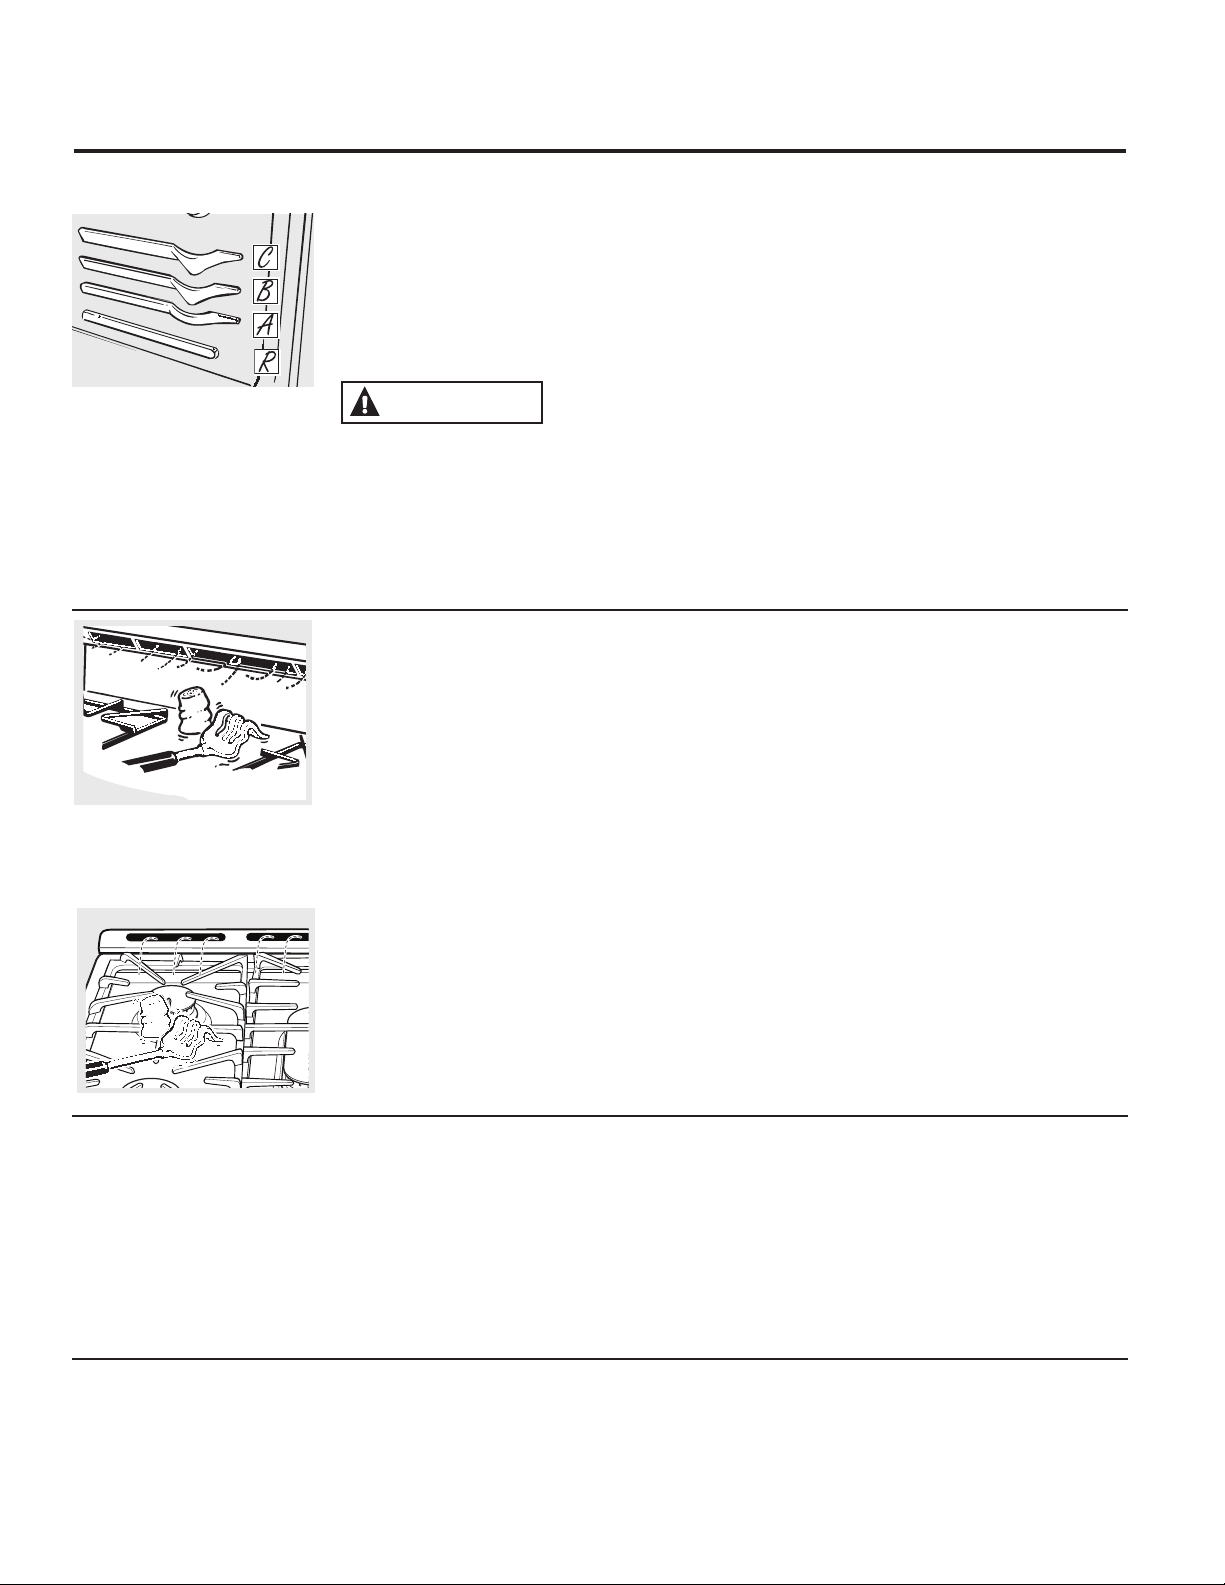
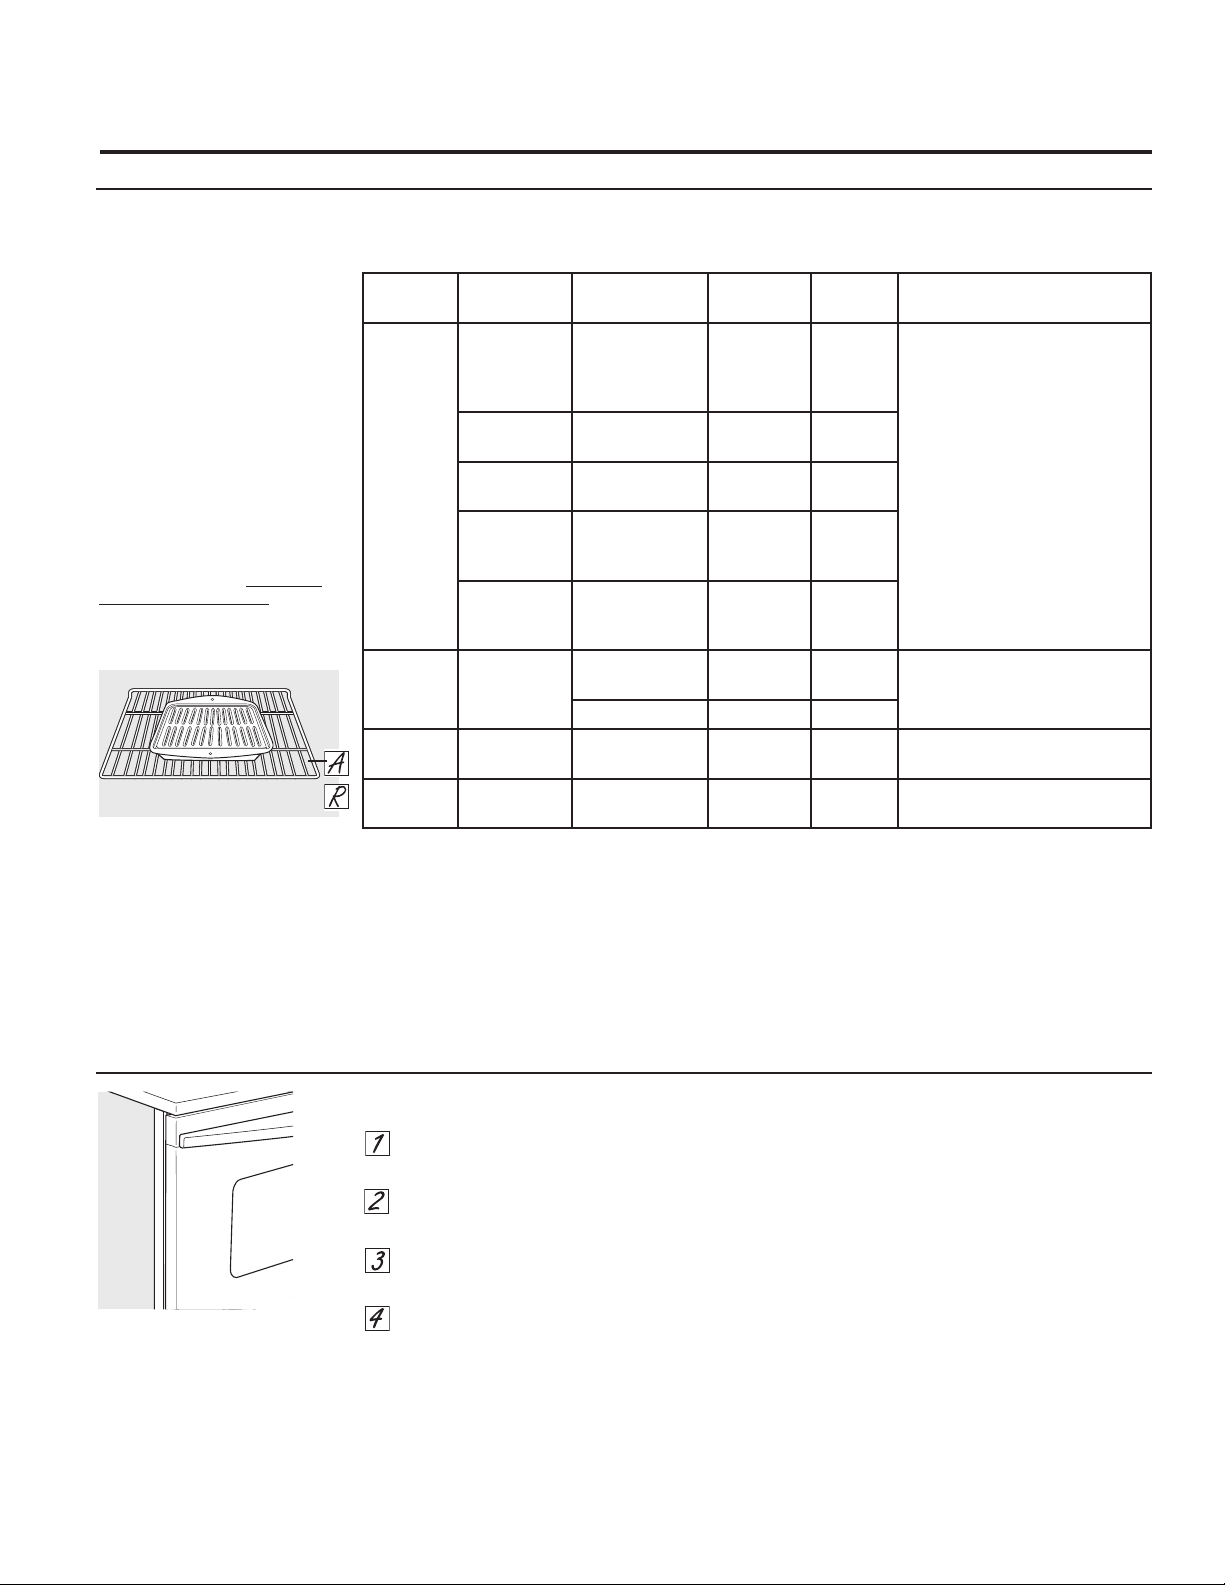
The.racks.have.stop-locks,.so.that.when.placed.
correctly.on.the.rack.supports.(A.through.C),.
they.will.stop.before.coming.completely.out,.
and.will.not.tilt
When.placing.and.removing.cookware,.pull.the.
rack.out.to.the.bump.on.the.rack.support
. CAUTION
When you are using
a rack in the lowest position (R), you will
need to use caution when pulling the rack
out. We recommend that you pull the rack
out several inches and then, using two pot
holders, pull the rack out by holding the
sides of it. The rack is low and you can be
burned if you put your hand in the middle of
the rack and pull all the way out. Be careful
not to burn your hand on the door when
using the rack in the lowest position (R).
To.remove.a.rack,.pull.it.toward.you,.tilt.the.
front.end.up.and.pull.it.out
To.replace,.place.the.end.of.the.rack.(stop-
locks).on.the.support,.tilt.up.the.front.and.push.
the.rack.in
NOTE: The rack is not designed to slide out at
the special low rack (R) position.
10
The oven has 3 shelf positions.
It also has a special low shelf
position (R) for extra large items,
such as a large turkey.
Power Outage
The.oven.or.broiler.cannot.be.lit.during.a.power.
failure.Gas.will.not.flow.unless.the.glow.bar.is.
hot
If.the.oven.is.in.use.when.a.power.failure.
occurs,.the.oven.burner.shuts.off.and.cannot.
be.re-lit.until.power.is.restored.This.is.because.
the.flow.of.gas.is.automatically.stopped.
and.will.not.resume.when.power.is.restored.
until.the.glow.bar.has.reached.operating.
temperature
Upper Oven Light
Touch.the.Oven.Light.pad.on.the.upper.control.
panel.to.turn.the.light.on.or.off
Upper Oven Vent
Your.oven.is.vented.through.ducts.at.the.rear.
of.the.range.Do.not.block.these.ducts.when.
cooking.in.the.oven—it.is.important.that.the.
flow.of.hot.air.from.the.oven.and.fresh.air.
to.the.oven.burner.be.uninterrupted.Avoid.
touching.the.vent.openings.or.nearby.surfaces.
during.oven.or.broiler.operation—they.may.
become.hot
..Handles.of.pots.and.pans.on.the.cooktop.
may.become.hot.if.left.too.close.to.the.vent
..Do.not.leave.plastic.or.flammable.items.on.
the.cooktop—they.may.melt.or.ignite.if.left.
too.close.to.the.vent
..Do.not.leave.closed.containers.on.the.
cooktop.The.pressure.in.closed.containers.
may.increase,.which.may.cause.them..
to.burst
..Metal.items.will.become.very.hot.if.they.are.
left.on.the.cooktop,.and.could.cause.burns
Plastic items on the cooktop may
melt if left too close to the vent.
Vent appearance and location vary.
If your model has a door latch, do not lock the oven door with the latch during baking or roasting. The latch is used for self-
cleaning only.
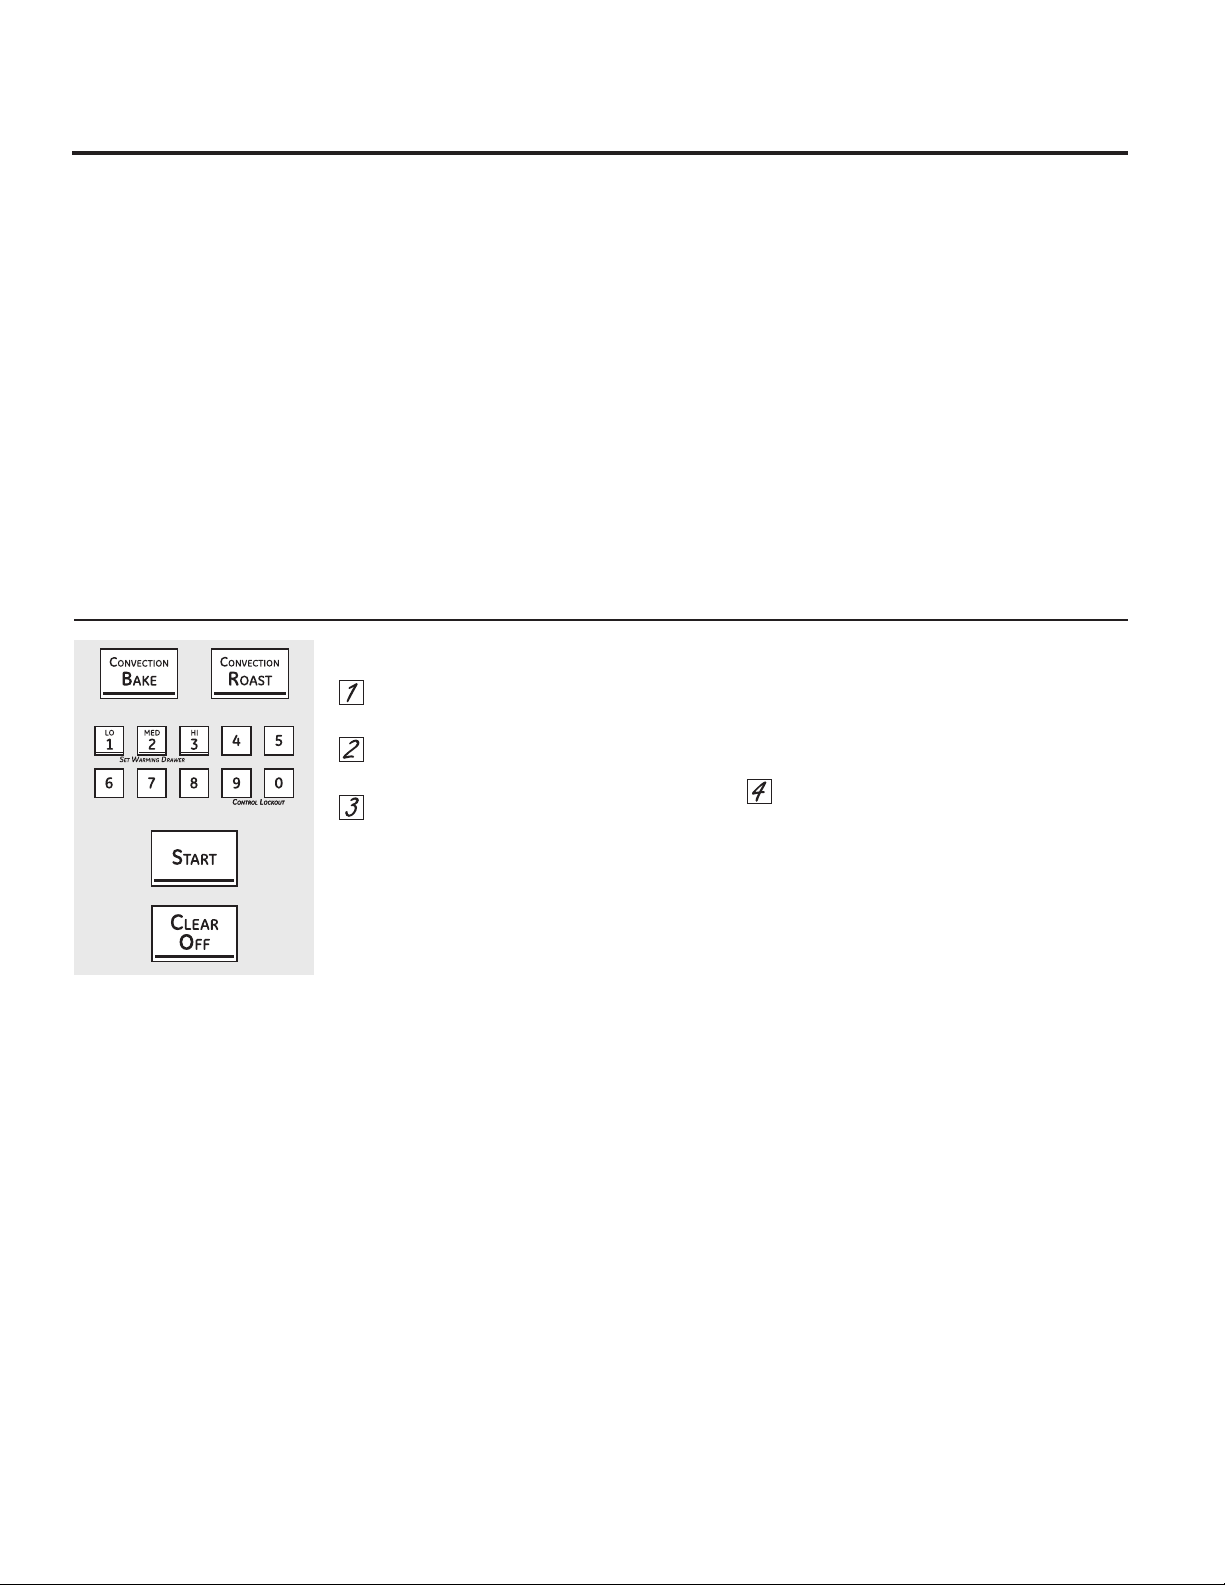
How to Set the Lower Oven for Baking or Roasting
Your.oven.is.not.designed.for.open-door.
cooking
..Touch.the.BAKE.pad
...Touch.the.number.pads.to.set.the.desired.
temperature
...Touch.the.START.pad
The.word.ON.and.100°.will.be.displayed.As.the.
oven.heats.up,.the.display.will.show.the.changing.
temperature.When.the.oven.reaches.the.
temperature.you.set,.a.tone.will.sound
To change the oven temperature during BAKE
cycle, press the BAKE pad and then the number
pads to get the new temperature.
...Check.food.for.doneness.at.minimum.time.
on.recipe.Cook.longer.if.necessary
....Touch.the.CLEAR/OFF.pad.when.cooking.
is.complete
NOTE: A cooling fan may automatically turn on
and off to cool internal parts. This is normal and
the fan may continue to run even after the unit
is turned off.
Preheating and Pan Placement
To avoid possible burns, place the racks in the
desired position before you turn on the oven.
Preheat.the.oven.if.the.recipe.calls.for.it.
To.preheat,.set.the.oven.at.the.correct.
temperature.Preheating.is.necessary.when.
convection.baking.and.for.good.results.when.
baking.cakes,.cookies,.pastry.and.breads.For.
ovens.without.a.preheat.indicator.light.or.tone,.
preheat.10.minutes.
Baking.results.will.be.better.if.baking.pans.are.
centered.in.the.oven.as.much.as.possible.Pans.
should.not.touch.each.other.or.the.walls.of.the.
oven.
If.you.need.to.use.two.shelves,.stager.the.pans.
so.one.is.not.directly.above.another.leaving.
approximately.1-1/2”.between.pans,.from.the.
front,.back.and.sides.of.the.walls
NOTE:.Do.not.bake.or.store.anything.in.either.
oven.during.a.self.clean.cycle
Oven Moisture
As.your.oven.heats.up,.the.temperature.change.
of.the.air.in.the.oven.may.cause.water.droplets.
to.form.on.the.door.glass.These.droplets.
are.harmless.and.will.evaporate.as.the.oven.
continues.to.heat.up
The oven has a special low rack
(R) position just above the oven
bottom. Use it when extra cooking
space is needed, for example,
when cooking a large turkey. The
rack is not designed to slide out at
this position.
Aluminum Foil
Do.not.use.aluminum.foil.to.line.oven.bottoms.
The.foil.will.trap.heat.below.and.upset.the.
performance.of.the.oven...Foil.can.melt.
and.permanently.damage.the.oven.bottom.
Damage.from.improper.use.of.aluminum.foil.is.
not.covered.by.the.product.warranty.
Foil.may.be.used.to.catch.spills.by.placing.a.
sheet.on.a.lower.rack,.several.inches.below.
the.food.Do.not.use.more.foil.than.necessary.
and.never.entirely.cover.an.oven.rack.with.
aluminum.foil.Keep.foil.at.least.1-1/2”.from.
oven.walls.to.prevent.poor.heat.circulation
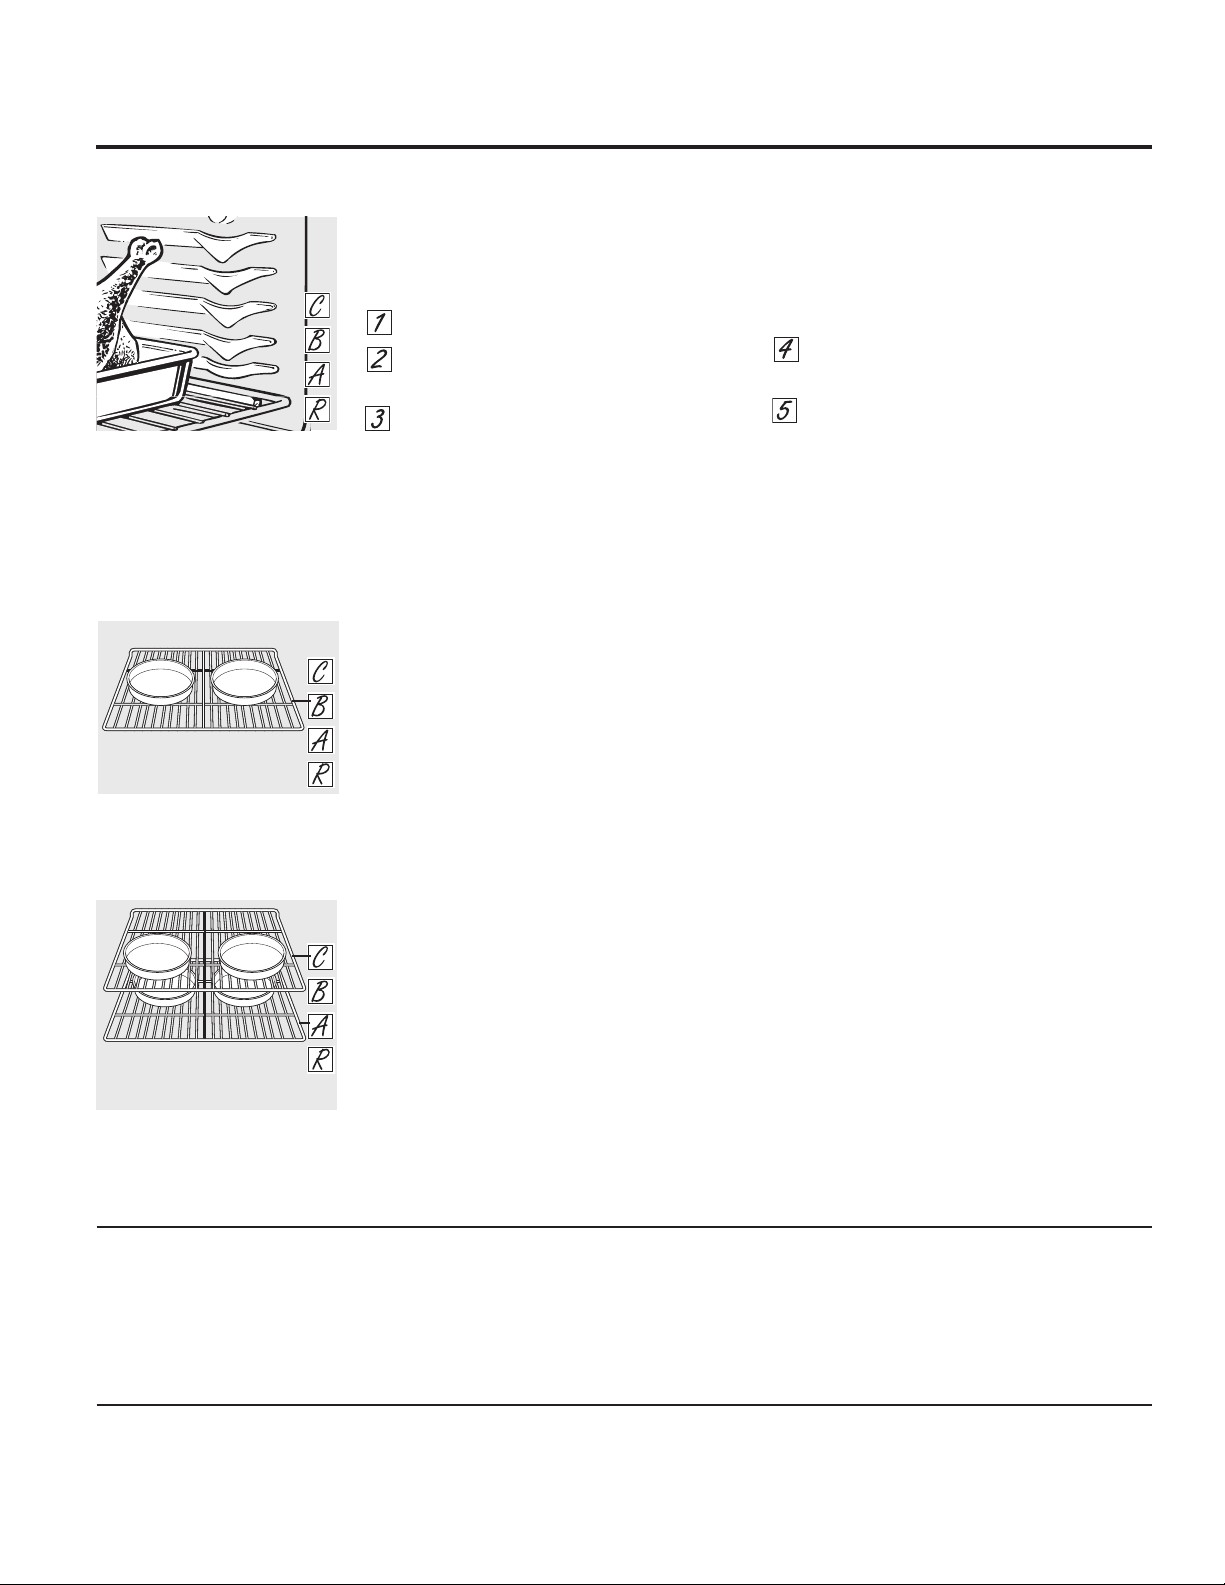
When baking on a single rack, use
the rack position from the chart for
your type of food. Baking results
will be better if baking pans are
centered in the oven as much as
possible.
When baking four cake layers at a
time, use racks A and C. Place the
lower pans at the back of the rack
and the upper pans to the front of
the rack shown so that one pan is
not directly above another.
Using the lower oven.. GEAppliances.com
11
Using the upper oven.
To use the upper oven
...Push.in.and.turn.the.upper.oven.knob.to.
any desired setting
...Allow.the upper.oven.to.preheat
The upper oven signal light is located on the
upper.left.side.of.the.knob.and.glows.when.the.
knob is in the ON position.It remains ON until
the.knob.is.moved.to.the.OFF.position
The "Heating" signal light is located on the
upper.right.side.of.the.knob.and.glows.when.
the heating elements are active.Preheat
is.complete.after.the."Heating".signal.has.
turned off for the first time with each use.
A.tone.will.NOT.sound.when.the.oven.is.
finished preheating
NOTES:
The lower oven cannot be used during a
self-clean cycle of the upper oven.
Do not put food, foil or cookware directly on
the bottom of the upper oven.
If foods require a cover, use only foil or lids
able to wirhstand baking temperatures. Do
not use plastic.
For best baking results, use rack position B. If
your dish is too tall, place on rack position A.
For best results, bake cakes in lower oven.
Push in and turn the upper oven
knob to any desired setting.
12
How to Set the Upper Oven for Broiling
...Place.the.meat.or.fish.on.a.broiler.grid.in.a.
broiler.pan
...Follow.suggested.rack.positions.in.the.
Broiling Guide
...The.oven.door.must.be.closed.during.
broiling
...Push.in.and.turn.the.upper.oven.knob.to.
broil.setting
Serve.the.food.immediately,.and.leave.the.pan.
outside.the.oven.to.cool.during.the.meal.for.
easiest.cleaning
Close the door. Always broil with
the door closed.
13
The.upper.oven.has.2.rack.positions
**.In.general,.higher.rack.positions.
yield.darker.external.searing.and.
lower.positions.yield.more.doneness
For.best.results,.the.broil.pan.should.
be.oriented.parallel.to.the.broiler
. GEAppliances.com
Broiling Guide
Preheat.oven.for.5.minutes
The.size,.weight,.thickness,.
starting temperature and
your.preference.of.doneness.
will affect broiling times.This
guide.is.based.on.meats.at.
refrigerator temperature
†The US.Department of
Agriculture says “Rare beef is
popular, but you should know that
cooking it to only 140°F means
some food poisoning organisms
may survive” (Source: Safe Food
Book, Your Kitchen Guide, USDA
Rev.June 1985)
*Due to the variety of meats and cuts available, you may select alternate rack positions based on personal
preference.of.doneness.and.external.searing.See.illustration.for.description.of.rack.positions
Food Doneness Type or
Thickness
Rack Type Rack
Position*
Comments
Beef Rare -
Medium.
Rare.(140˚-
160˚F)
Steaks-.1".thick Roller/Flat A Steaks.less.than.1".thick.are.
difficult.to.cook.rare.They.may.
cook.through.before.browning
To.avoid.curling,.slash.fat.at.1".
intervals
For.best.results,.broil.no.more.
than.8.ground.beef.patties.at.
one.time
Medium.
(160˚F)
Steaks.-..
3/4".to.1".thick
Roller/Flat A
Well.Done.
(170˚F)
Steaks.-..
3/4".to.1".thick
Roller/Flat A
Medium.
(160˚F)
Ground.Beef.
Patties.-.1/2".to.
3/4".thick
Roller/Flat A
Well.Done.
(170˚F)
Ground.Beef.
Patties.-.1/2".to.
3/4".thick
Roller/Flat A
Chicken Breast,.
boneless
Roller/Flat A Broil.skin.side.down.first
Breast,.bone-in Roller/Flat A
Fish
fillets
1/2".to.1".thick Roller/Flat A Handle.and.turn.very.carefully
Pork
chops
Well.Done.
(170˚F)
3/4".thick Roller/Flat A To.avoid.curling,.slash.fat.at.1".
intervals
Using the clock and timer.
Not all features are on all models.
To Set the Clock
The.clock.must.be.set.to.the.correct.time.of.
day.for.the.automatic.oven..timing.functions.
to.work.properly.The.time.of.day.cannot.be.
changed.during.a.timed.baking.or.self-cleaning.
cycle
...Touch.the.Clock.pad
...Touch.the.number.pads
Touch.the.number.pads.the.same.way.you.
read.them.For.example,.to.set.12:34,.touch.the.
number.pads.1, 2, 3.and.4.in.that.order
If.number.pads.are.not.touched.within.one.
minute.after.you.touch.the.Clock.pad,.the.
display.reverts.to.the.original.setting.If.this.
happens,.touch.the.Clock.pad.and.reenter.the.
time.of.day
...Touch.the.Start.pad.until.the.time.of.day.
shows.in.the.display.This.enters.the.time.
and.starts.the.clock
To.check.the.time.of.day.when.the.display..
is.showing.other.information,.simply.touch.the.
Clock.pad.The.time.of.day.shows.until.another.
pad.is.touched
To Set the Timer (For lower oven only.)
The.timer.does.not.control.oven.operations.
The.maximum.setting.on.the.timer.is.9.hours.
and.59.minutes
...Touch.the.Kitchen Timer On/Off.pad
...Touch.the.number.pads.until.the.amount.
of.time.you.want.shows.in.the.display.The.
maximum.time.that.can.be.entered.in.
minutes.is.59.Times.more.than.59.
minutes.should.be.changed.to.hours.and.
minutes.For.example,.to.enter.90.minutes.
as.1.hour.30.minutes,.touch.1, 3.and.0.in.
that.order
If.you.make.a.mistake,.press.the.Kitchen Timer
On/Off.pad.and.begin.again
...Touch.the.Start.pad.After.pressing.the.
Start.pad,.Set.disappears;.this.tells.you.the.
time.is.counting.down,.although.the.
display.does.not.change.until.one.minute.
has.passed
...When.the.timer.reaches.:00,.the.control.
will.beep.3.times.followed.by.one.beep.
every.6.seconds.until.the Kitchen Timer.
On/Off pad.is.touched
The.6-second.tone.can.be.canceled.by.
following.the.steps.in.the.Special.features.of.
your.oven.control.section.under.Tones.at.the.
End.of.a.Timed.Cycle
Make.sure.the.clock.is.set.to.the.
correct.time.of.day
The.timer.is.a.minute.timer.only.
The.Clear/Off.pad.does.not.affect..
the.timer
Power Outage
If.a.flashing.time.is.in.the.display,.you.have.
experienced.a.power.failure.Reset.the.clock
Touch.the.Clock.pad.once.to.reset.Enter.the.
correct.time.of.day.by.touching.the.appropriate.
number.pads.Touch.the.Start.pad
To Reset the Timer
If.the.display.is.still.showing.the.time.remaining,.
you.may.change.it.by.touching.the.Kitchen.
Timer On/Off.pad.and.then.touching.the.
number.pads.until.the.time.you.want.appears.
in.the.display
If.the.remaining.time.is.not.in.the.display.(clock,.
delay.start.or.cooking.time.are.in.the.display),.
recall.the.remaining.time.by.touching.the.
Kitchen Timer On/Off pad.and.then.touching.
the.number.pads.to.enter.the.new.time.you.
want
To Cancel the Timer
Touch.the.Kitchen Timer On/Off.pad.twice
14
Using the timed baking and roasting features. (lower oven only) GEAppliances.com
NOTE: Foods that spoil easily—such as milk, eggs, fish, stuffings, poultry and pork—should not be allowed to sit for more
than 1 hour before or after cooking. Room temperature promotes the growth of harmful bacteria. Be sure that the oven
light is off because heat from the bulb will speed harmful bacteria growth.
How to Set an Immediate Start and Automatic Stop
The upper oven will turn on immediately and
cook for a selected length of time. At the end
of the cooking time, the oven will turn off
automatically.
...Touch.the.Bake.pad
...Touch.the.number.pads.to.set.the.desired.
oven.temperature
...Touch.the Cooking Time pad
NOTE: If.your.recipe.requires.preheating,.you.
may.need.to.add.additional.time.to.the.length.
of.the.cooking.time
...Touch.the.number.pads.to.set.the.desired.
length.of.cooking.time.The.minimum.
cooking.time.you.can.set.is.1.minute
The.oven.temperature.that.you.set.and.
the.cooking.time.that.you.entered.will.be.
in.the.display
..Touch.the.Start.pad
The.oven.will.turn.ON,.and.the.display.will.
show.the.cooking.time.countdown.and.the.
changing.temperature.starting.at.100°F.(The.
temperature.display.will.start.to.change.once.
the.oven.temperature.reaches.100°F).When.
the.oven.reaches.the.temperature.you.set,.3.
beeps.will.sound
The.oven.will.continue.to.cook.for.the.set.
amount.of.time,.then.turn.off.automatically
After.the.oven.turns.off,.the.end-of-cycle.tone.
will.sound
...Touch.the.Clear/Off.pad.to.clear.the.
display.if.necessary.Remove.the.food.
from.the.oven.Remember,.even.though.
the.oven.turns.off.automatically,.food.left.
in.the.oven.will.continue.cooking.after.the.
oven.turns.off
How to Set a Delayed Start and Automatic Stop
The.upper.oven.will.turn.on.at.the.time.of.day.you.
set,.cook.for.a.specific.length.of.time.and.then.turn.
off.automatically.
Make.sure.the.clock.shows.the.correct.time.of.day.
...Touch.the.Bake.pad
...Touch.the.number.pads.to.set.the.desired.oven.
temperature
...Touch.the.Cooking Time.pad
NOTE: If your recipe requires preheating, you may
need to add additional time to the length of the
cooking time.
...Touch.the.number.pads.to.set.the.desired.
length.of.cooking.time.The.minimum.cooking.
time.you.can.set.is.1.minute
The.oven.temperature.that.you.set.and.the.
cooking.time.that.you.entered.will.be.in.the.
display
...Touch.the.Delay Start.pad
...Touch.the.number.pads.to.set.the.time.of.day.
you.want.the.oven.to.turn.on.and.start.
cooking
...Touch.the.Start.pad
NOTE: An attention tone will sound if you are using
timed baking and do not touch the Start pad.
NOTE: If you would like to check the times you have
set, touch the Delay Start pad to check the start
time you have set or touch the Cooking Time pad to
check the length of cooking time you have set.
When.the.oven.turns.ON.at.the.time.of.day.you.set,.
the.display.will.show.the.cooking.time.countdown.
and.the.changing.temperature.starting.at.100°F.
(The.temperature.display.will.start.to.change.once.
the.oven.temperature.reaches.100°F).When.the.
oven.reaches.the.temperature.you.set,.beeps.will.
sound
The.oven.will.continue.to.cook.for.the.set.amount.of.
time,.then.turn.off.automatically
After.the.oven.turns.off,.the.end-of-cycle.tone.will.
sound
...Touch.the.Clear/Off.pad.to.clear.the.display.if.
necessary.Remove.the.food.from.the.oven.
Remember,.even.though.the.oven.turns.off.
automatically,.food.left.in.the.oven.will.
continue.cooking.after.the.oven.turns.off
15
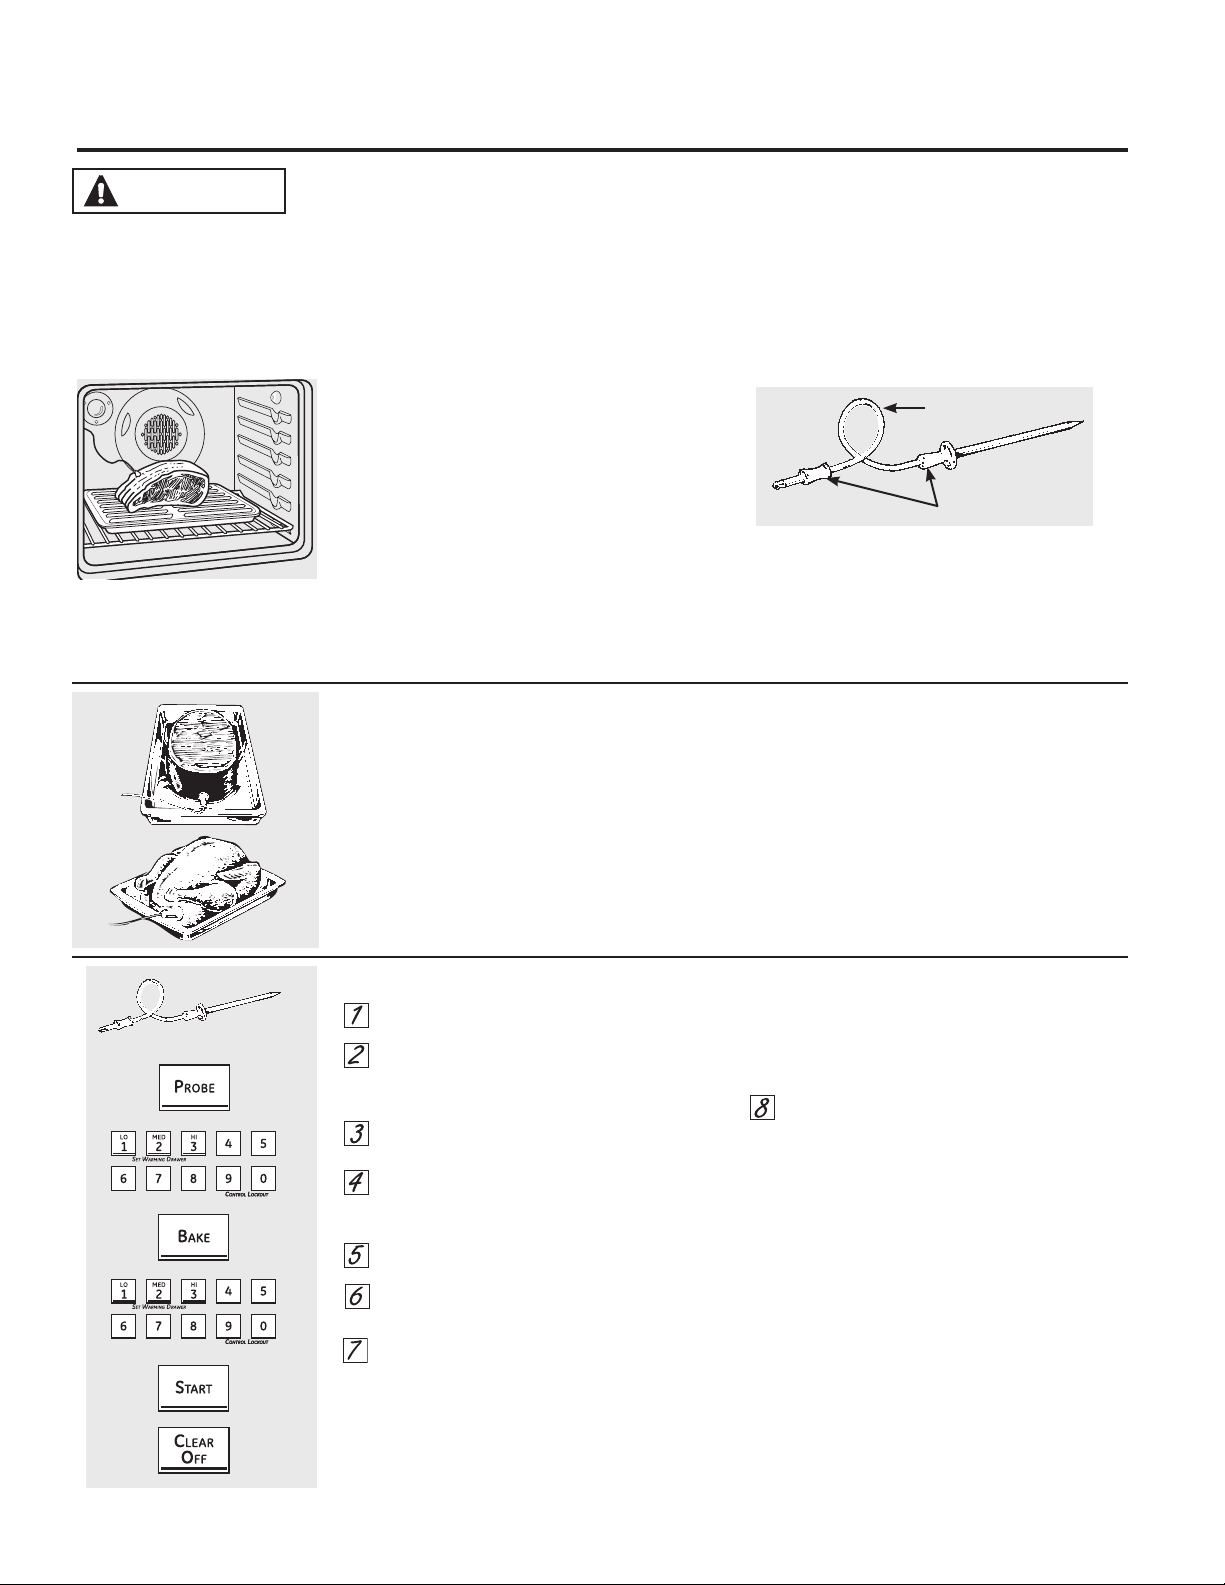
Using the probe. (lower oven only)
After.preparing.the.meat.and.placing.it.on..
a.trivet.or.on.a.broiler.pan.grid,.follow.these.
directions.for.proper.probe.placement
Insert.the.probe.completely.into.the.meat..
It.should.not.touch.the.bone,.fat.or.gristle
For.roasts.with.no.bone,.insert.the.probe.into.
the.meatiest.part.of.the.roast.For.bone-in.ham.
or.lamb,.insert.the.probe.into.the.center.of.the.
lowest.large.muscle
Insert.the.probe.into.the.center.of.dishes.such.
as.meat.loaf.or.casseroles
Insert.the.probe.into.the.meatiest.part.of.the.
inner.thigh.from.below.and.parallel.to.the.leg.of.
a.whole.turkey
How to Set the Lower Oven For Cooking When Using the Probe
...Insert.the.probe.into.the.food
...Plug.the.probe.into.the.outlet.in.the.oven.
Make.sure.it’s.pushed.all.the.way.in.Close.
the.oven.door
...Touch.the.Probe.pad.
...Touch.the.number.pads.to.set.the.desired.
internal.food.or.meat.temperature.
between.100°F.and.200°F
...Touch.the.Bake.pad
...Touch.the.number.pads.to.set.the.desired.
oven.temperature.
...Touch.the.Start.pad
The.display.will.flash.if.the.probe.is.inserted.
into.the.outlet.and.you.have.not.set.a.probe.
temperature.and.touched.the.Start.pad
The.display.will.show.LO.until.the.internal.
temperature.of.the.food.reaches.100°F;.then.
the.changing.internal.temperature.will.be.
shown
...When.the.internal.temperature.of.the.food.
reaches.the.number.you.have.set,.the.
probe.and.the.oven.turn.off.and.the.oven.
control.signals.To.stop.the.signal,.touch.
the.Clear/Off.pad.Use.hot.pads.to.remove.
the.probe.from.the.food.Do.not.use.tongs.
to.pull.on.it—they.might.damage.it
To.change.the.oven.temperature.during..
probe.cooking,.touch.the.Bake.pad.and.then.
the.number.pads.to.set.the.new.temperature
■ If the probe is removed from the food before
the final temperature is reached, a tone will
sound and the display will flash until the
probe is removed from the oven.
■ You can use the timer even though you
cannot use timed oven operations while
using the probe.
16
CAUTION To prevent burns, do not unplug the probe from the oven outlet until the oven has cooled. Do not
store the probe in the oven.
If.your.model.has.a.door.latch,.do.not.lock.the.oven.door.with.the.latch.while.cooking.with.the.probe.The.latch.is.used.
for.self-cleaning.only
For.many.foods,.especially.roasts.and.poultry,.internal.food.temperature.is.the.best.test.for.doneness.The.temperature.
probe.takes.the.guesswork.out.of.cooking.foods.to.the.exact.doneness.you.want.
Use.of.probes.other.than.the.one.provided.with.
this.product.may.result.in.damage.to.the.probe
Use.the.handles.of.the.probe.and.plug.when.
inserting.and.removing.them.from.the.food.and.
outlet.
To.avoid.damaging.your.probe,.do.not.use.
tongs.to.pull.on.the.cable.when.removing.it.
To.avoid.breaking.the.probe,.make.sure.food.
is.completely.defrosted.before.inserting
To.prevent.possible.burns,.do.not.unplug.the.
probe.from.the.outlet.until.the.oven.has.cooled.
Never.leave.your.probe.inside.the.oven.
during.a.self-cleaning.cycle
Do.not.store.the.probe.in.the.oven.
The temperature probe has a
skewer-like probe at one end and
a plug at the other end that goes
into the outlet in the oven.
Cable
Handles
Using the convection lower oven. (on some models) GEAppliances.com
The.convection.oven.fan.shuts.off.when.the.oven.door.is.opened.DO.NOT.leave.the.door.open.for.long.periods.of.time.
while.using.convection.cooking
To.help.you.understand.the.difference.between.
convection.bake.and.roast.and.traditional.bake.
and.roast,.here.are.some.general.guidelines
Convection Bake
■..Preheat.the.oven.See.the.Using.the.oven–.
Preheating.and.Pan.Placement.section
■..Ideal.for.foods.cooked.on.multiple.racks
■..Good.for.large.quantities.of.baked.foods
■..Good.results.with.cookies,.biscuits,.brownies,.
cupcakes,.cream.puffs,.sweet.rolls,.angel.
food.cake.and.bread
The.convection.fan.circulates.the.heated..
air.evenly.over.and.around.the.food.
Convection Roast
■..Good for large tender cuts of meat,
uncovered.
The.convection.fan.circulates.the.heated.air.
evenly.over.and.around.the.food.Meat.and.
poultry.are.browned.on.all.sides.as.if.they.
were.cooked.on.a.rotisserie.Heated.air.will.be.
circulated.over,.under.and.around.the.food.
being.roasted.The.heated.air.seals.in.juices.
quickly.for.a.moist.and.tender.product.while,.
at.the.same.time,.creating.a.rich.golden.brown.
exterior
Roasts or poultry should be cooked on rack
position (A).
When.you.are.convection.roasting,.it.is.
important.that.you.use.a.broiler.pan.and.grid.
for.best.convection.roasting.results.The.pan
.is.
used.to.catch.grease.spills.and.the.grid.is.used.
to.prevent.grease.spatters
■..Place.the.rack.in.rack.position.(A)
In.a.convection.oven,.a.fan.
circulates.hot.air.over,.under.and.
around.the.food.This.circulating.
hot.air.is.evenly.distributed.
throughout.the.oven.cavity.As.a.
result,.foods.are.evenly.cooked.
and.browned—often.in.less.time.
than.with.regular.heat
Auto Recipe
™
Conversion
You.can.use.your.favorite.recipes.in.the.
convection.oven
When using Convection Bake, the oven will
automatically convert the oven temperature
from regular baking to Convection Bake
temperatures.
...Using.the.number.pads,.enter.the.
temperature.recommended.in.the.recipe
...Touch.the.Start.pad
...The.display.will.show.the.temperature.
you.entered.from.your.recipe.The.
oven.will.automatically.convert.it.to.the.
convection.cooking.temperature.
...Touch.the Clear/Off.pad.when.baking.is.
finished
■ Use pan size recommended in the recipe.
■ Some package instructions for frozen
casseroles, main dishes or baked goods
have been developed using commercial
convection ovens. For best results in
this oven, preheat the oven and use the
temperature, for regular baking, on the
package.
To deactivate the feature:
...Touch.the.lower.oven.Warm.and.Bake.
pad.at.the.same.time.until.the.display.
shows.SF
...Touch.the.Convection Bake.pad.The.
display.will.show.Con On.Touch.the.
Convection Bake.pad.again.The.display.
will.show.Con Off
...Touch.the.Start.pad
17
Using the convection lower oven. (on some models)
Cookware for Convection Cooking
Before.using.your.convection.oven,.check..
to.see.if.your.cookware.leaves.room.for.air.
circulation.in.the.oven.If.you.are.baking.with.
several.pans,.leave.space.between.them.Also,.
be.sure.the.pans.do.not.touch.each.other.or.the.
walls.of.the.oven.
Paper and Plastic
Heat-resistant.paper.and.plastic.containers.that.
are.recommended.for.use.in.regular.ovens.can.
be.used.in.convection.ovens.Plastic.cookware.
that.is.heat-resistant.to.temperatures.of.400°F.
can.also.be.used,.when.oven.is.below.400°F
Metal and Glass
Any.type.of.cookware.will.work.in.your.
convection.oven.However,.metal.pans.heat.the.
fastest.and.are.recommended.for.convection.
baking.
■. Darkened or matte-finished pans will bake
faster than shiny pans.
■ Glass or ceramic pans cook more slowly.
When.baking.cookies,.you.will.get.the.best.
results.if.you.use.a.flat.cookie.sheet.instead.of.a.
pan.with.low.sides
For.recipes.like.oven-baked.chicken,.use.a.pan.
with.low.sides.Hot.air.cannot.circulate.well.
around.food.in.a.pan.with.high.sides
or
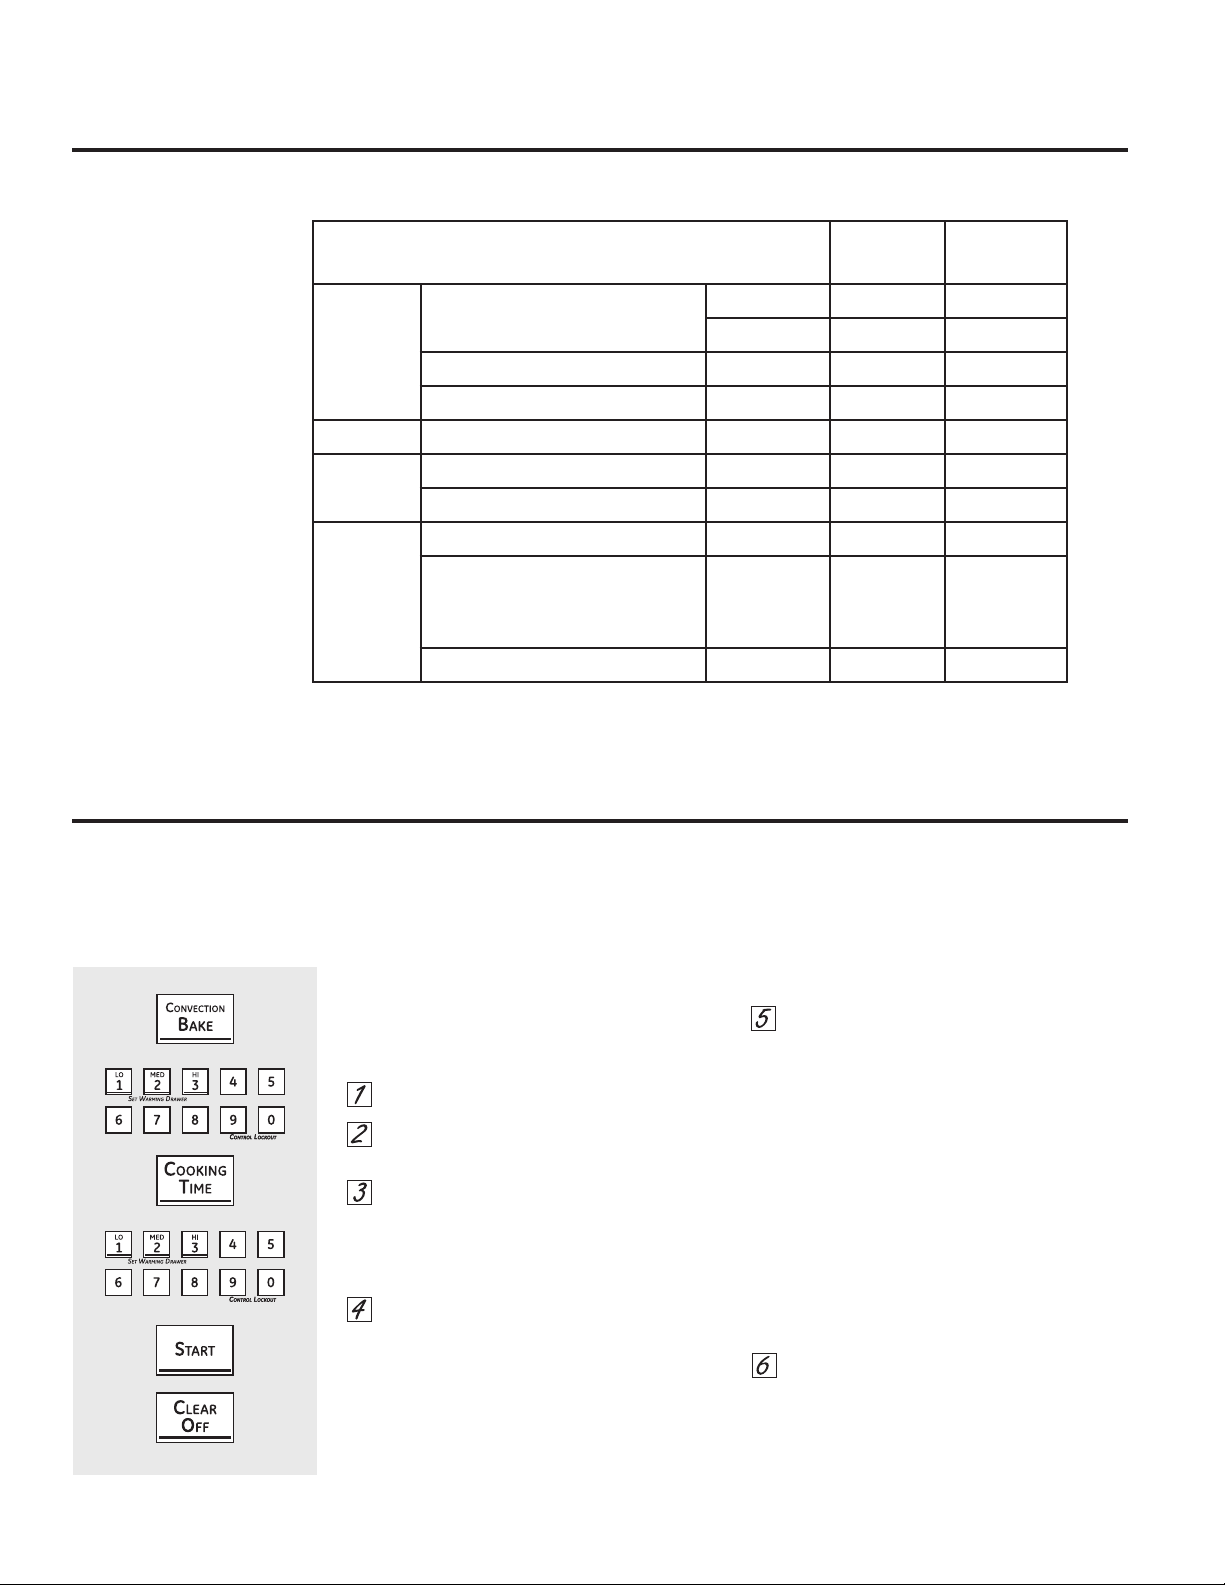
How to Set the Lower Oven for Convection Baking or Roasting
...Touch.the.Convection Bake.or.Convection
Roast pad
...Touch.the.number.pads.to.set.the.desired.
oven.temperature
..Touch.the.Start.pad
To.change.the.oven.temperature,.touch.the.
Convection Bake.or.Convection Roast.pad.
and.then.the.number.pads.to.set.the.new.
temperature
When.the.oven.starts.to.heat,.the.changing.
temperature,.starting.at.100°F,.will.be.displayed.
When.the.oven.reaches.the.temperature.you.
set,.3.beeps.will.sound
...Touch.the.Clear/Off.pad.when.finished
NOTE: You will hear a fan while cooking with
convection. The fan will stop when the door is
opened, but the heat will not turn off.
The fan will not start until the preheat
temperature is reached.
18
19
How to Set the Lower Oven for Convection Roasting When Using the Probe
(on some models)
The.display.will.flash.PROBE.and.the.oven.
control.will.signal.if.the.probe.is.inserted.into.
the.outlet,.and.you.have.not.set.a.probe.
temperature.and.touched.the.Start.pad
....Place.the.rack.in.the.rack.position.(A).
Insert.the.probe.completely.into.the.food
. . ...Plug.the.probe.into.the.outlet.in.the.oven.
Make.sure.it.is.pushed.all.the.way.in.Close.
the.oven.door
....Touch.the.Convection.Roast.pad
....Touch.the.number.pads.to.set.the.desired.
oven.temperature
....Touch.the.Probe. pad
....Touch.the.number.pads.to.set.the.desired.
internal.food.temperature
To.change.the.oven.temperature.during.the.
Convection.Roast.cycle,.touch.the.Convection
Roast.pad.and.then.touch.the.number.pads.to.
set.the.new.desired.temperature
....Touch.the.Start.pad
When.the.oven.starts.to.heat,.the.word.LO.will.
be.in.the.display.
After.the.internal.temperature.of.the.food.
reaches.100°F,.the.changing.internal.
temperature.will.be.shown.in.the.display
. . ...When.the.internal.temperature.of.the.
food.reaches.the.number.you.have.set,.
the.probe.and.the.oven.turn.off.and.the.
oven.control.signals.To.stop.the.signal,.
touch.the.Clear/Off.pad.Use.hot.pads.to.
remove.the.probe.from.the.food.Do.not.
use.tongs.to.pull.on.it—they.might.
damage.it
. CAUTION
To prevent burns, do
not unplug the probe from the oven outlet
until the oven has cooled. Do not store the
probe in the oven.
NOTE:
■..If.the.probe.is.removed.from.the.food.before.
the.final.temperature.is.reached,.a.tone.will.
sound.and.the.display.will.flash.until.the.
probe.is.removed.from.the.oven
■..You.will.hear.a.fan.while.cooking.with.this.
feature.The.fan.will.stop.when.the.door.is.
opened.but.the.heat.will.not.turn.off
■..You.can.use.the.timer.even.though.you.
cannot.use.timed.oven.operations.while.
using.the.probe
For.best.results.when.roasting.
large.turkeys.and.roasts,.we.
recommend.using.the.probe.
included.in.the.convection.oven.
GEAppliances.com
Using the convection lower oven. (on some models)
20
You will hear a fan while cooking with this feature. The fan will stop when the door is opened but the heat will not turn off.
NOTE: Foods that spoil easily—such as milk, eggs, fish, stuffings, poultry and pork—should not be allowed to sit for more
than 1 hour before or after cooking. Room temperature promotes the growth of harmful bacteria. Be sure that the oven
light is off because heat from the bulb will speed harmful bacteria growth.
How to Set an Immediate Start and Automatic Stop
The.lower.oven.will.turn.on.immediately.and.cook.
for.a.selected.length.of.time.At.the.end.of.the.
cooking.time,.the.oven.will.turn.off.automatically
...Touch.the Convection Bake.pad
...Touch.the.number.pads.to.set.the.desired.oven.
temperature
...Touch.the.Cooking Time.pad
NOTE: If your recipe requires preheating, you may
need to add additional time to the length of the
cooking time.
...Touch.the.number.pads.to.set.the.desired.
length.of.cooking.time.The.minimum.cooking.
time.you.can.set.is.1.minute.
The.oven.temperature.that.you.set.and.the.
cooking.time.that.you.entered.will.be.in.the.
display
...Touch.the.Start.pad
The.oven.will.turn.ON,.and.the.display.will.show.
the.cooking.time.countdown.and.the.changing.
temperature.starting.at.100°F.(The.temperature.
display.will.start.to.change.once.the.oven.temperature.
reaches.100°F).When.the.oven.reaches.the.
temperature.you.set,.3.beeps.will.sound
The.oven.will.continue.to.cook.for.the.set.amount.
of.time,.then.turn.off.automatically,.unless.the.Cook
and Hold.feature.was.set.See.the.Special features of
your oven control.section
After.the.oven.turns.off,.the.end-of-cycle.tone.will.
sound
...Touch.the.Clear/Off.pad.to.clear.the.display.if.
necessary.Remove.the.food.from.the.oven.
Remember,.even.though.the.oven.turns.off.
automatically,.food.left.in.the.oven.will.
continue.cooking.after.the.oven.turns.off
Using the lower oven timed convection baking features. (on some models)
*Stuffed birds generally require 30-45 minutes additional roasting time. Shield legs and breast with foil to prevent
overbrowning and drying of skin.
Convection Roasting Guide - Suggested Settings
Meats
Oven
Temp.
Internal
Temp.
Beef Rib.Roast.(4-8.lbs)
Bone-in.and.Boneless
Rare 325˚F 145˚F
Medium 325˚F 160˚F
Beef.Tenderloin.(2-3.lbs) Rare 425˚F 145˚F
Beef.Tenderloin.(4-6.lbs) Rare 425˚F 145˚F
Pork Bone-In,.Boneless.(3-5.lbs) 325˚F 160˚F
Lamb Bone-In.(5-9.lbs) Medium 325˚F 165˚F
Boneless.(4-7.lbs) Medium 375˚F 165˚F
Poultry Whole.Chicken.(5-7.lbs) 350˚F 170˚F
Turkey,.Whole*.
Unstuffed.(10.to.16.lbs).
Unstuffed.(18.to.24.lbs)
.
325˚F.
325˚F
.
170-180˚F.
170-180˚F
Turkey.Breast.(4.to.6.lbs) 325˚F 170˚F
How to Set a Delayed Start and Automatic Stop
The.lower.oven.will.turn.on.at.the.time.of.day.you.
set,.cook.for.a.specific.length.of.time.and.then.turn.
off.automatically
Make.sure.the.clock.shows.the.correct.time..
of.day
...Touch.the.Convection.Bake.pad
...Touch.the.number.pads.to.set.the.desired.oven.
temperature
...Touch.the.Cooking.Time.pad
NOTE: If your recipe requires preheating, you may
need to add additional time to the length of the
cooking time.
...Touch.the.number.pads.to.set.the.desired.
length.of.cooking.time.The.minimum.cooking.
time.you.can.set.is.1.minute
The.oven.temperature.that.you.set.and.the.
cooking.time.that.you.entered.will.be.in.the.
display
...Touch.the Delay Start.pad
...Touch.the.number.pads.to.set.the.time.of.day.
you.want.the.oven.to.turn.on.and.start.cooking
...Touch.the.Start.pad
NOTE: If.you.would.like.to.check.the.times.you.have.
set,.touch.the.Delay Start.pad.to.check.the.start.
time.you.have.set.or.touch.the.Cooking Time.pad.to.
check.the.length.of.cooking.time.you.have.set.
When.the.oven.turns.ON.at.the.time.of.day.you.set,.
the.display.will.show.the.cooking.time.countdown.
and.the.changing.temperature.starting.at.100°F.
(The.temperature.display.will.start.to.change.once.
the.oven.temperature.reaches.100°F).When.the.
oven.reaches.the.temperature.you.set,.3.beeps.will.
sound
The.oven.will.continue.to.cook.for.the.set.amount.
of.time,.then.turn.off.automatically,.unless.the.Cook
and Hold.feature.was.set.See.the.Special.features.of.
your.oven.control.section
After.the.oven.turns.off,.the.end-of-cycle.tone.will.
sound
...Touch.the.Clear/Off pad.to.clear.the.display.if.
necessary.Remove.the.food.from.the.oven.
Remember,.even.though.the.oven.turns.off.
automatically,.food.left.in.the.oven.will.continue.
cooking.after.the.oven.turns.off
Using the lower oven timed
convection baking features. (on some models) GEAppliances.com
How to Set the Oven For Warming
The.WARM.feature.keeps.cooked.foods.hot
This.feature.is.not.designed.to.reheat.cold.food
To.use.the.WARM.feature,.touch.the.WARM.
pad.and.then.the.START.pad
To.use.the.WARM.feature.after.Timed Baking.
or.Roasting,.follow.these.steps:
...Touch.the.mode.of.cooking.that.you.want.
to.use.(BAKE, CONVECTION BAKE or.
CONVECTION ROAST)
...Touch.the.number.pads.to.set.the.oven.
temperature
....Touch.the.COOKING TIME.pad
....Touch.the.number.pads.to.set.the.desired.
length.of.cooking.time
....Touch.the.WARM.pad
....Touch.the.START.pad
To Crisp Stale Items
..Place.food.in.low-sided.dishes.or.pans
..For.best.results,.place.the.food.items.in.a.
single.layer.Do.not.stack
..Leave.them.uncovered
..Check.crispness.after.20–30.minutes.
Add.time.as.needed
IMPORTANT NOTES:
..Food.should.be.kept.hot.in.its.cooking.
container.or.transferred.to.a.heat-safe.
serving.dish
..For.moist.foods,.cover.them.with.an.
oven-safe.lid.or.aluminum.foil
..Fried.or.crisp.foods.do.not.need.to.be.
covered,.but.can.become.too.dry.if.warmed.
for.too.long
..Repeated.opening.of.the.door.allows.the.hot.
air.to.escape.and.the.food.to.cool
..Allow.extra.time.for.the.temperature.inside.
the.oven.to.stabilize.after.adding.items
..With.large.loads.it.may.be.necessary.to.
cover.some.of.the.cooked.food.items
..Remove.serving.spoons,.etc,.before.placing.
containers.in.the.oven
..Do.not.use.plastic.containers,.lids.or.plastic.
wrap
Note:.Plastic.containers,.lids.or.plastic.wrap.will.
melt.if.placed.in.the.oven.Melted.plastic.may.
not.be.removable.and.is.not.covered.under.
your.warranty
21
Special features of your lower oven control.
Your new touch pad control has additional features that you may choose to use. The following are the features and how
you may activate them.
The special feature modes can only be activated while the display is showing the time of day. They remain in the control’s
memory until the steps are repeated.
When the display shows your choice, touch the Start pad. The special features will remain in memory after a power failure.
12 Hour Shut-Off
With this feature, should you forget and leave the
oven on, the control will automatically turn off the
oven after 12 hours during baking functions or
after 3 hours during a broil function.
If.you.wish.to.turn.OFF.this.feature,.follow.the.
steps.below
...Touch.the.Bake.and.Warm.pads.at.the.
same.time.for.3.seconds.until.the.display.
shows.SF
...Touch.the.Delay Start.pad.The.display.
will.show.12.shdn.(12.hour.shut-off).Touch.
the.Delay Start.pad.again.and.the.display.
will.show.no shdn (no shut-off)
...Touch.the.Start.pad.to.activate.the.no.
shut-off.and.leave.the.control.set.in.this.
special.features.mode
At.the.end.of.a.timed.cycle,.3.short.beeps.will.
sound.followed.by.one.beep.every.6.seconds.
until.the.Clear/Off.pad.is.touched.This.continual.
6-second.beep.may.be.canceled
To.cancel.the.6-second.beep:
...Touch.the.Bake.and.Warm.pads.at.the.
same.time.for.3.seconds.until.the.display.
shows.SF
....Touch.the.Kitchen Timer On/Off.pad.The.
display.shows.CON BEEP (continual.beep).
and.BEEP.Touch.the.Kitchen Timer On/
Off pad.again.The.display.shows.BEEP.
(This.cancels.the.one.beep.every.6.
seconds)
...Touch.the.Start.pad
Tones at the End of a Timed Cycle
Gas/Control Lockout (on some models)
Your.control.will.allow.you.to.lock.out.the.
surface.burners,.oven.burners.and.control.
panel.so.they.cannot.be.activated
To.lock/unlock.the.controls:
...Turn.all.surface.burners.off
...Touch.and.hold.the.Gas/Control Lockout.
pad.for 3.seconds.until.the.display.shows.
LOC ON
...To.unlock.the.control,.touch.and.hold.the.
Gas/Control Lockout.pad.for.3.seconds.
until.the.display.shows.LOC OFF
When.this.feature.is.on.and.the.touch.pads.are.
touched,.the.control.will.beep.and.the.display.
will.show.LOC ON
■..The gas/control lockout mode affects all
controls. No controls will work when this
feature is activated.
■ The adjustment will be retained in memory
after a power failure.
HOLD 3 SEC
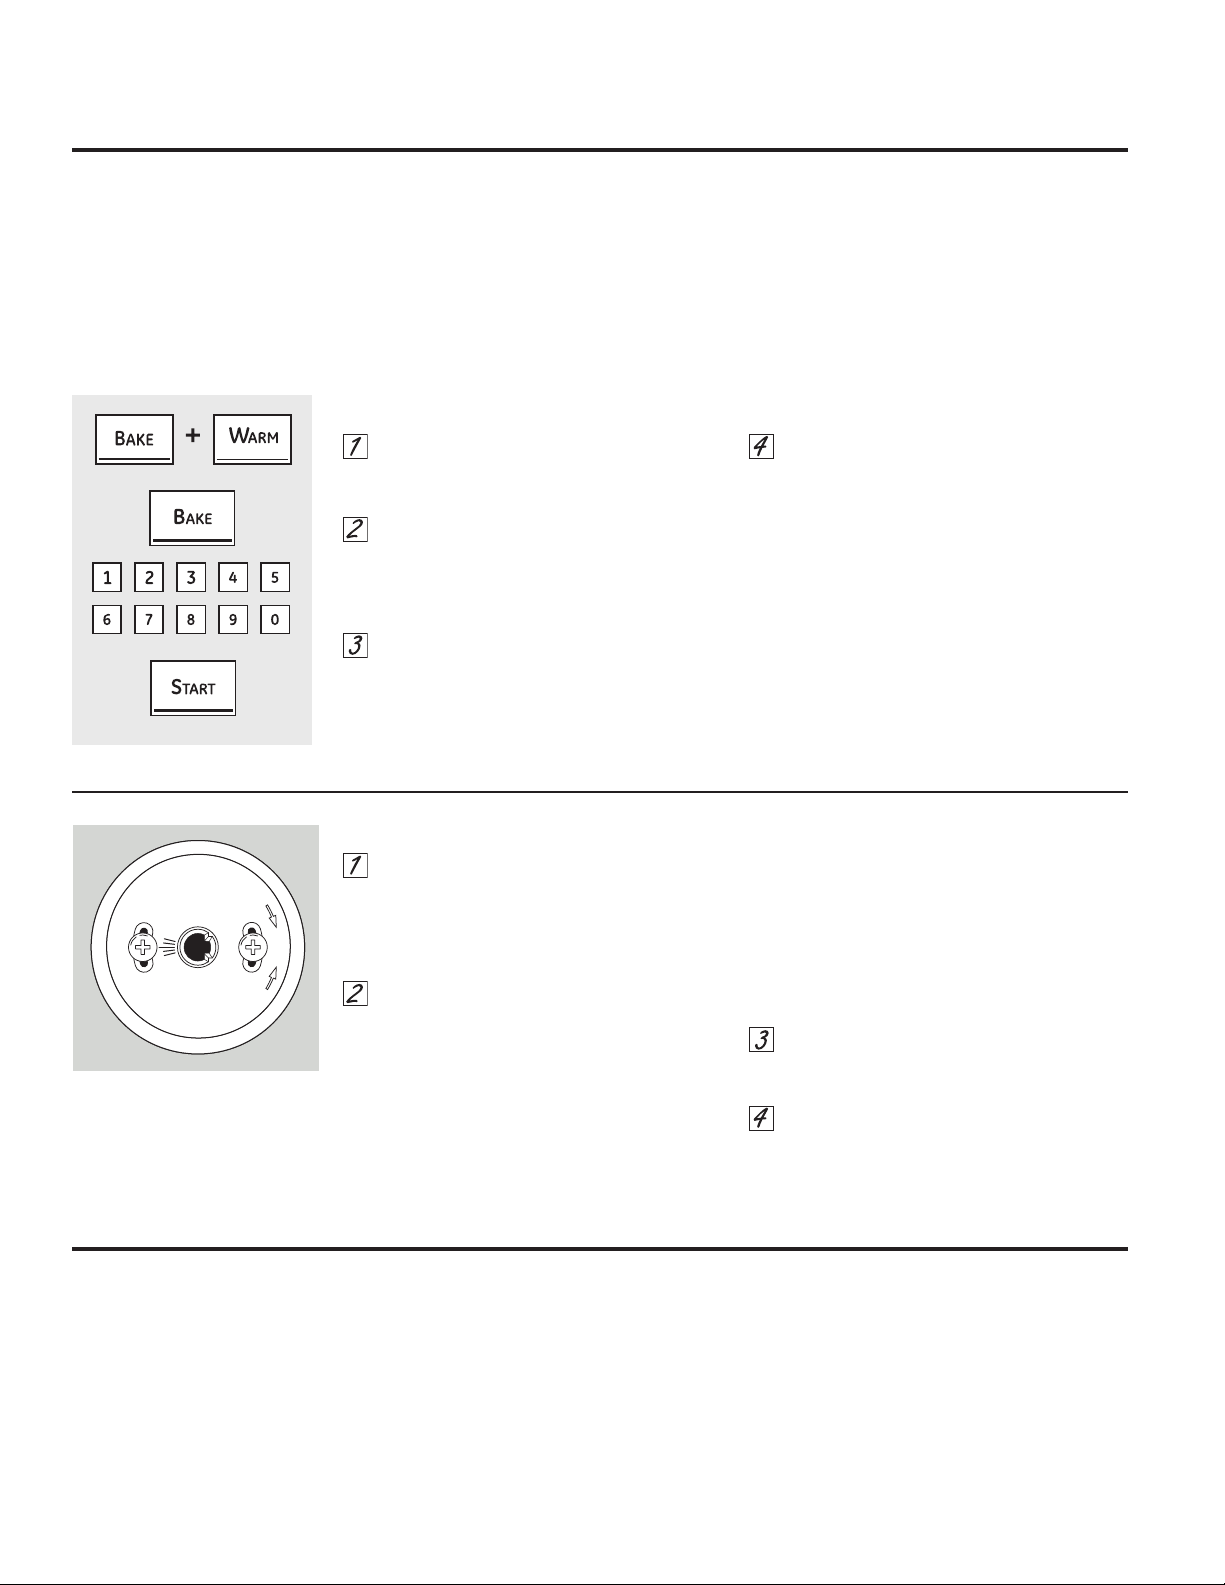
Fahrenheit or Celsius Temperature Selection
Your.oven.control.is.set.to.use.the.Fahrenheit.
temperature.selections,.but.you.may.change.
this.to.use.the.Celsius.selections
...Touch.the.Bake.and.Warm pads.at.the.
same.time.for.3.seconds.until.the.display.
shows.SF
...Touch.the.Warm.and.Cooking Time.pads.
at.the.same.time.The.display.will.show.F.
(Fahrenheit)
...Touch.the.Warm.and.Cooking Time.pads.
again.at.the.same.time.The.display.will.
show.C.(Celsius)
...Touch.the.Start.pad
22
12-Hour, 24-Hour or Clock Blackout
Your.control.is.set.to.use.a.12-hour.clock
If.you.would.prefer.to.have.a.24-hour.military.
time.clock.or.black.out.the.clock.display,.follow.
the.steps.below
...Touch.the.Bake.and.Warm.pads.at.the.
same.time.for.3.seconds.until.the.display.
shows.SF
...Touch.the.Clock.pad.once.The.display.will.
show.12 hr.. If.this.is.the.choice.you.want,.
touch.the.Start.pad
Touch.the.Clock.pad.again.to.change.
to.the.24-hour.military.time.clock.The.display.
will.show 24 hr.. If.this.is.the.choice.you.want,.
touch.the.Start.pad
Touch.the.Clock.pad.again.to.black.out.the.
clock.display.The.display.will.show.OFF. If.this.
is.the.choice.you.want,.touch.the.Start.pad
NOTE: If the clock is in the blackout mode, you
will not be able to use the Delay Start function.
GEAppliances.com
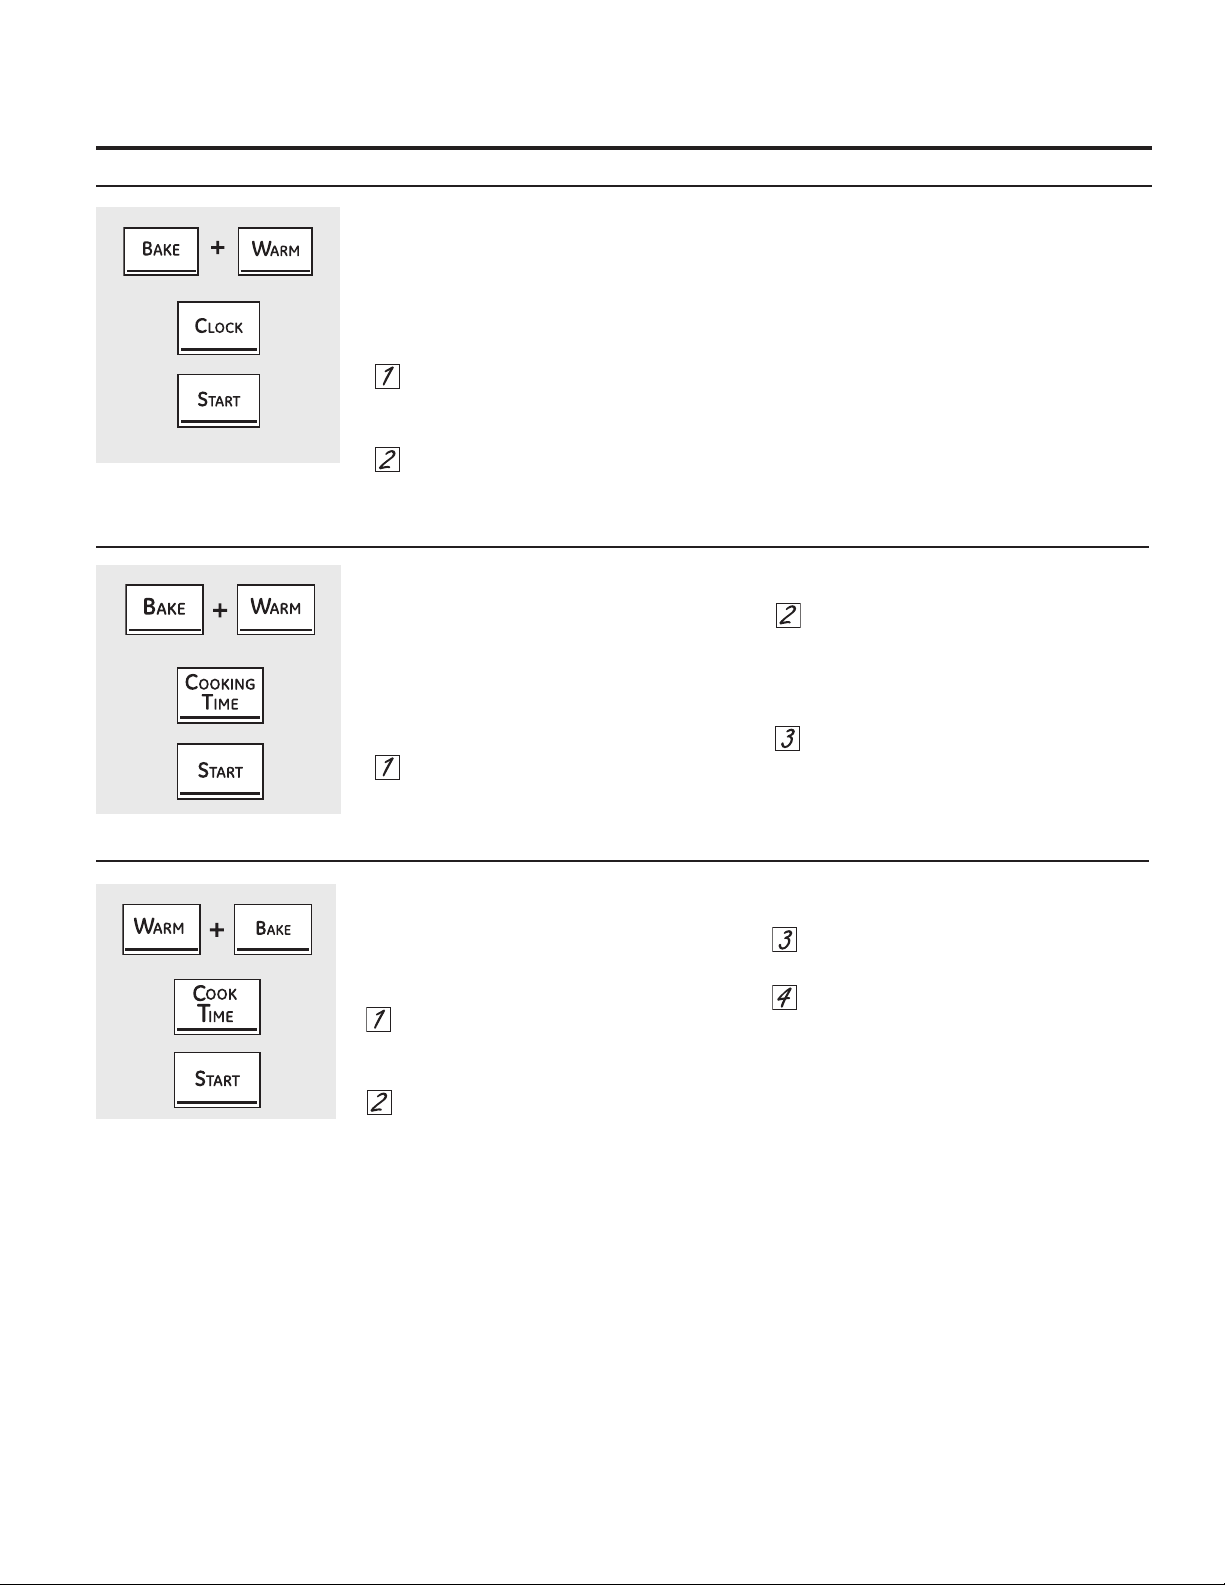
Cook and Hold
Your.new.control.has.a.cook.and.hold.feature.
that.keeps.cooked.foods.warm.for.up.to.3.
hours.after.the.cooking.function.is.finished.
This.feature.can.only.be.used.when.timed.
cooking
To.activate.this.feature,.follow.the.steps.below
...Touch.the.Bake.and Warm.pads.
at.the.same.time.for.3.seconds.until.the.
display.shows.SF
...Touch.the.Cooking Time.pad.The.display.
will.show.Hld OFF.
...Touch.the.Cooking Time.pad.again.to.
activate.the.feature.The.display.will.show.
Hld ON
...Touch.the.Start.pad.to.activate.the.cook.
and.hold.feature.and.leave.the.control.set.
in.this.special.features.mode
23
This feature allows you to adjust the tone
volumes to a more acceptable volume. There
are three possible volume levels.
...Touch.the.upper.oven.Warm.and.Bake.
pads.at.the.same.time.until.the.display.sh.
ows.SF
....Touch.the.Cook Time pad.The.display.
shows.2 Beep.This.is.the.middle.volume.
level
....Touch.the.Cook Time.pad.again.The.
display.will.show.3 Beep.This.is.the.
loudest.volume.level
....Touch.the.Cook Time.pad.again.The.
display.will.show.1 Beep.This.is.the.
quietest.volume.level
...Choose.the.desired.sound.level.(1 Beep, 2
Beep, 3 Beep)
...Touch.the.Start.pad
Tone Volume (on some models)
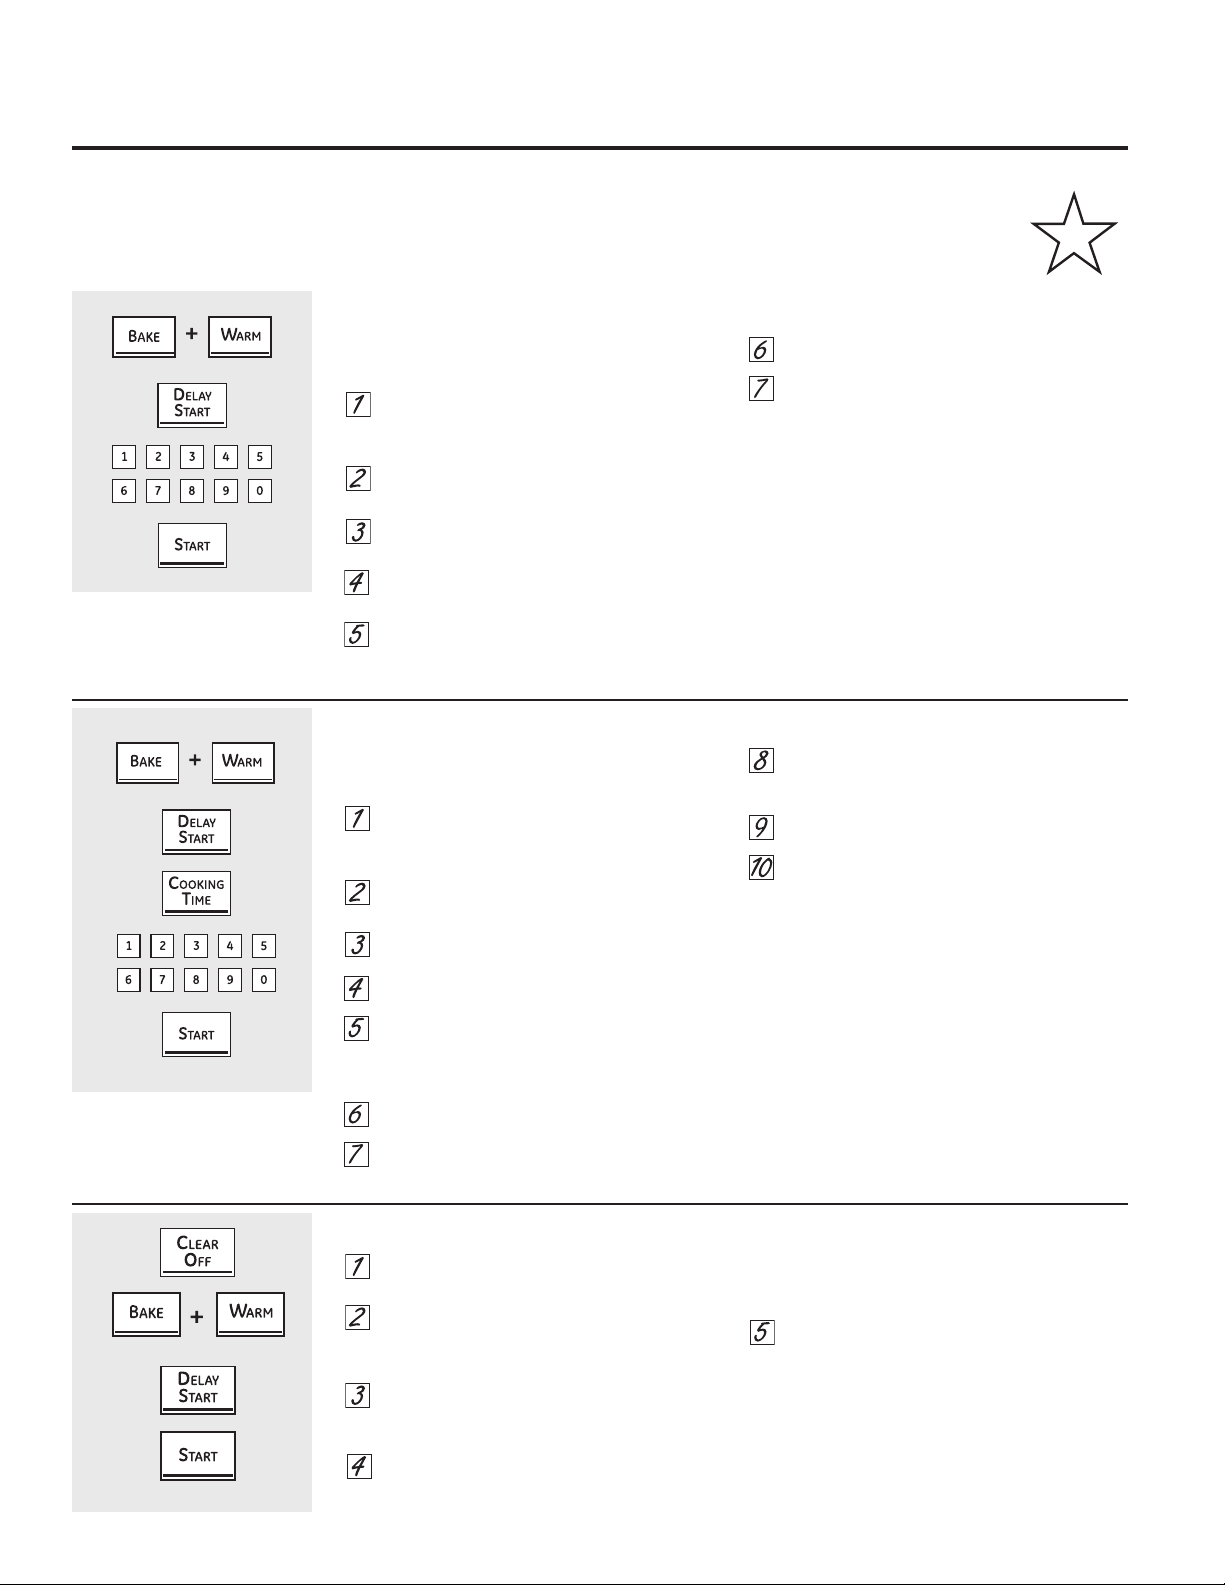
How to Exit the Sabbath Feature
.
..Touch.the.Clear/Off.pad
...If.the.oven.is.cooking,.wait.for.a.random.
delay.period.of.approximately.30.seconds.
to.1.minute,.until.only.⊃ is.in.the.display
...Press.and.hold.both.the.Bake.and.Warm
pads,.at.the.same.time,.until.the.display.
shows.SF
...Tap.the.Delay Start.pad.until.12 shdn.
or.no shdn.appears.in.the.display.12
shdn.indicates.that.the.oven.will.
automatically.turn.off.after.12.hours.no
shdn.indicates.that.the.oven.will.not.
automatically.turn.off
...Touch.the.Start.pad
NOTE: If a power outage occurred while
the oven was in Sabbath, the oven will
automatically turn off and stay off even when
the power returns. The oven control must be
reset.
Using the Sabbath feature. (lower oven only)
(Designed for use on the Jewish Sabbath and Holidays)
The Sabbath feature can be used for baking/roasting in the upper and lower oven or baking drawer (on some models). It
cannot be used for convection, broiling, self-cleaning or delay start cooking.
NOTE: The oven light comes on automatically (on some models) when the door is opened and goes
off when the door is closed. The bulb may be removed. See the Oven Light Replacement section. On
models with a light switch on the control panel, the oven light may be turned on and left on.
How to Set for Regular Baking/Roasting
Make sure the clock shows the correct time of
day and the oven is off.
...Press.and.hold.both.the.Bake.and.Warm.
pads,.at.the.same.time,.until.the.display.
shows.SF
...Tap.the.Delay Start.pad.until.SAb bAtH.
appears.in.the.display
...Touch.the.Start.pad.and.⊃ will.appear.
in.the.display.
...
Touch.the.Bake.pad.No.signal.will.be.
given
...Using.the.number.pads,.enter.the.desired.
temperature.between.170°.and.550°.No.
signal.or.temperature.will.be.given
...Touch.the.Start.pad
...After.a.random.delay.period.of.
approximately.30.seconds.to.1.minute,..
⊃ ⊂ will.appear.in.the.display,.indicating.
that.the.oven.is.baking/roasting.If..
⊃ ⊂ doesn’t.appear.in.the.display,.start.
again.at.Step.4
To.adjust.the.oven.temperature,.touch.the.
Bake.pad,.enter.the.new.temperature.using.the.
number.pads.and.touch.the.Start.pad
NOTE: The.Clear/Off.and.Cooking Time pads.
are.active.during.the.Sabbath.feature
How to Set for Timed Baking/Roasting–Immediate Start and Automatic Stop
Make.sure.the.clock.shows.the.correct.time..
of.day.and.the.oven.is.off
...Press.and.hold.both.the.Bake.and.Warm.
pads,.at.the.same.time,.until.the.display.
shows.SF
...Tap the.Delay Start.pad.until.SAb bAtH.
appears.in.the.display
...Touch.the.Start.pad.and.⊃ will.appear.
in.the.display.
...Touch.the.Cooking Time.pad.
...Touch.the.number.pads.to.set.the.desired.
length.of.cooking.time.between.1.minute.
and.9.hours.and.99.minutes.The.cooking.
time.that.you.entered.will.be.displayed
...Touch.the.Start.pad
...Touch.the.Bake.pad.No.signal.will.be.
given
...Using.the.number.pads,.enter.the.desired.
temperature.No.signal.or.temperature.will.
be.given.
...Touch.the.Start.pad
...After.a.random.delay.period.of.
approximately.30.seconds.to.1.minute,..
⊃ ⊂ will.appear.in.the.display,.indicating.
that.the.oven.is.baking/roasting.If.⊃ ⊂
doesn’t.appear.in.the.display,.start.again.
at.Step.7
To.adjust.the.oven.temperature,.touch.the.
Bake.pad,.enter.the.new.temperature.using.the.
number.pads.and.touch.the.Start.pad
When.cooking.is.finished,.the.display.will.
change.from.⊃ ⊂ to.⊃.and.0:00.will.appear,.
indicating.that.the.oven.has.turned.OFF.but.is.
still.set.in.Sabbath.Remove.the.cooked.food
When.the.display.shows.⊃ the.
oven.is.set.in.Sabbath.When.the.
display.shows.⊃ ⊂.the.oven.is.
baking/roasting
When.the.display.shows.
⊃ the.
oven.is.set.in.Sabbath.When.the.
display.shows.⊃ ⊂.the.oven.is.
baking/roasting
K
Certified
Sabbath
Mode
24

25
Remove and replace full extension racks. (on some models) GEAppliances.com
Extension Rack
When.placing.and.removing.cookware,.always.
pull.the.rack.out.by.its.upper.front.rail.to.its.
fully.open.position
NOTE:.Do.not.extend.the.rack.quickly.Food.
may.slide.off.the.front.of.the.rack
To remove the rack:
...Make.sure.the.rack.is.pushed.all.the.way.into.
the.oven.so.that.the.side.paddles.on.the.rack.
frame.disengages.with.the.oven.support
...Firmly.grasp.the.rack.handle.and.pull.towards.
you..The.rack.will.stop.when.the.curved.end.of.
the.rack.hits.the.oven.bump
..Tilt.the.front.end.up.and.pull.it.out
NOTE:.When.handling.the.extension.rack,.do.
not.allow.the.sliding.portion.to.fall.open.This.
can.damage.the.slides
To replace the rack:
...Firmly.grasp.both.sides.of.the.rack.frame.
and.the.sliding.rack.
...Place.the.curved.end.of.the.rack.onto.the.
desired.rack.position,.tilt.up.the.front.of.the.
rack.and.push.it.in.as.far.as.it.will.go
..When.the.rack.is.properly.installed.and.locked.
into.position,.the.locking.side.paddles.on.the.
rack.frame.will.click-lock.into.place.on.the.oven.
supports.If.the.side.paddles.did.not.click-lock.
into.position,.repeat.the.steps.above.and.make.
sure.the.side.paddles.have.been.correctly.
cleaned.and.lubricated.See.Extension Rack.in.
the.Care and cleaning.section
Upper.
Front.Rail
Fully.Open.Position
Grasp here
CAUTION
To avoid burns, place the racks in the correct position before turning on the oven.
Make sure frame is fully inserted in the oven to lock it in place.
You may find that your new oven cooks differently than the one it replaced. Use your new oven for a few weeks to become
more familiar with it. If you still think your new oven is too hot or too cold, you can adjust the thermostat yourself.
Do not use thermometers, such as those found in grocery stores, to check the temperature setting of your oven.
These thermometers may vary 20–40 degrees.
NOTE: This adjustment will not affect the broiling or the self-cleaning temperatures. The adjustment will be retained in
memory after a power failure.
To Adjust the Lower Thermostat
To Adjust the Upper Thermostat
...Touch.the.Bake.and.Warm.pads.at.the.
same.time.for.3.seconds.until.the.display.
shows.SF
...Touch.the.Bake.pad.A.two-digit.number.
shows.in.the.display.
...Touch.Bake.once.to.decrease.(-).the.oven.
temperature,.or.twice.to.increase.(+)
...The.oven.temperature.can.be.adjusted.up.
as.much.as.35°F.or.down.as.much.as.
35°F.Touch.the.number.pads.the.same.
way.you.read.them.For.example,.to.
change.the.oven.temperature.15°F,.touch.
1.and.5
...When.you.have.made.the.adjustment,.
touch.the.Start.pad.to.go.back.to.the.
time-of-day.display.Use.your.oven.as.you.
would.normally
NOTE: The thermostat adjustment for Baking
will also affect Convection Baking or Convection
Roasting.
...Pull.the.OVEN CONTROL knob.off.the.
range.and.look.at.the.back.side.To.make.
an.adjustment,.loosen.(approximately.one.
turn),.but.do.not.completely.remove,.the.
two.screws.on.the.back.of.the.knob
...With.the.back.of.the.knob.facing.you,.hold.
the.outer.edge.of.the.knob.with.one.hand.
and.turn.the.front.of.the.knob.with.the.
other.hand.To.raise.the.oven.temperature,.
move.the.top.screw.toward.the.right.You’ll.
hear.a.click.for.each.notch.you.move.the.
knob.To.lower.the.temperature,.move.the.
top.screw.toward.the.left
Each.click.will.change.the.oven.
temperature.approximately.10°F.(Range.is.
±30°F.from.the.arrow).We.suggest.that.
you.make.the.adjustment.one.click.from.
the.original.setting.and.check.oven.
performance.before.makingany.additional.
adjustments
...After.the.adjustment.is.made,.retighten.
screws.so.they.are.snug,.but.be.careful.
not.to.overtighten
...Re-install.knob.on.range.and.check.
performance
Adjust the lower and upper oven
thermostats—Do it yourself!.
Most.recipes.for.baking.have.been.developed.using.high-fat.products.such.as.butter.or.margarine.(80%.fat).If.you.
decrease.the.fat,.the.recipe.may.not.give.the.same.results.as.with.a.higher-fat.product
Recipe.failure.can.result.if.cakes,.pies,.pastries,.cookies.or.candies.are.made.with.low-fat.spreads.The.lower.the.fat.
content.of.a.spread.product,.the.more.noticeable.these.differences.become.
Federal.standards.require.products.labeled.“margarine”.to.contain.at.least.80%.fat.by.weight.Low-fat.spreads,.on.the..
other.hand,.contain.less.fat.and.more.water.The.high.moisture.content.of.these.spreads.affects.the.texture.and.flavor..
of.baked.goods.For.best.results.with.your.old.favorite.recipes,.use.margarine,.butter.or.stick.spreads.containing.at.least..
70%.vegetable.oil
The type of margarine will affect baking performance!
T
O
M
A
K
E
O
V
E
N
C
O
O
L
E
R
T
U
R
N
D
I
S
K
A
P
P
R
O
X
.
1
0
˚
F
P
E
R
N
O
T
C
H
T
O
M
A
K
E
O
V
E
N
H
O
T
T
E
R
T
U
R
N
D
I
S
K
T
O
A
D
J
U
S
T
O
V
E
N
T
E
M
P
E
R
A
T
U
R
E
L
O
O
S
E
N
S
C
R
E
W
S
A
N
D
R
O
T
A
T
E
26
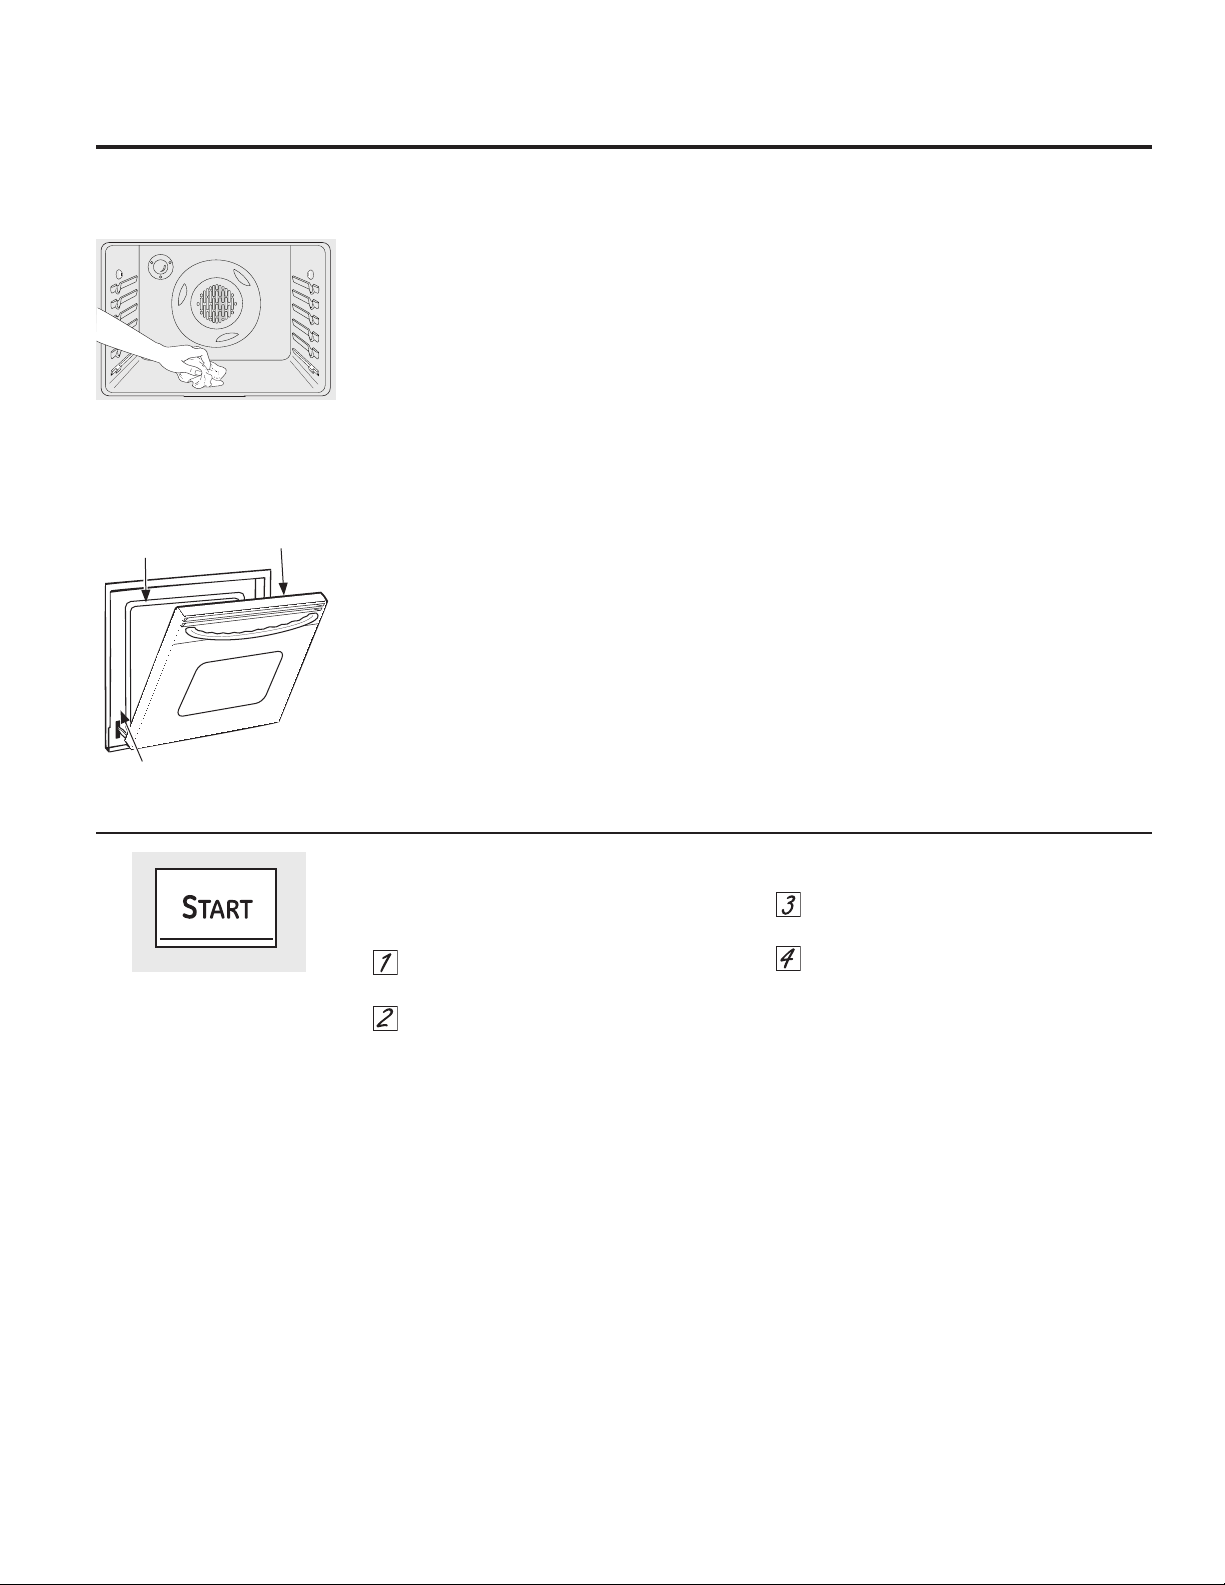
The oven door must be closed and all controls set correctly for the cycle to work properly.
Before a Clean Cycle
For.the.first.self-clean.cycle,.we.recommend.
venting.your.kitchen.with.an.open.window..
or.using.a.ventilation.fan.or.hood
Remove.any.broiler.pan,.broiler.grid,.all.
cookware,.probe.and.any.aluminum.foil..
from.the.oven—they.cannot.withstand.the.high.
cleaning.temperatures
NOTE:
■..If.your.oven.is.equipped.with.nickel.
oven.racks,.remove.them.before.you.begin.
the.self-clean.cycle
■..If.your.oven.is.equipped.with.gray.porcelain-
coated.oven.racks,.they.may.be.left.in.the.
oven.during.the.self-clean.cycle
Soil on the front frame of the range and
outside the gasket on the front frame will
need to be cleaned by hand. Clean these
areas with hot water, soap-filled scouring
pads or cleansers such as Soft Scrub
®
. Rinse
well with clean water and dry. Wipe off
the flat inner door with soapy water and a
sponge.
Do not clean.the.gasket.The.fiberglass.
material.of.the.front.frame.gasket.cannot.
withstand.abrasion.It.is.essential.for.the.gasket.
to.remain.intact.If.you.notice.it.becoming.worn.
or.frayed,.replace.it
Wipe up any heavy spillovers on the oven
bottom.
Make.sure.the.oven.light.bulb.cover.is.in.place.
and.the.oven.light.is.off
IMPORTANT:. The.health.of.some.birds.
is.extremely.sensitive.to.the.fumes.given..
off.during.the.self-cleaning.cycle.of.any.range.
Move.birds.to.another.well-ventilated.room
NOTE: Use caution when opening the upper
and lower oven after the self-clean cycle has
ended. The oven may still be hot.
Wipe up heavy soil on the oven
bottom.
How to Set the Upper Oven for Cleaning
The.oven.door.must.be.closed.and.all.controls.
set.correctly.for.the.cycle.to.work
...Rotate.upper.oven..knob.to.self-clean.
position
...Touch.the.Start.pad
Doors.will.lock.automatically.The.display.will.
show.the.clean.time.remaining.If the upper
door is not locked and remaining clean time
is not displayed, within 1 minute of initiating
the cycle rotate the knob to the Off positioin
and open both doors for 10 minutes. Repeat
step 1..It.will.not.be.possible.to.open.the.oven.
door.until.the.temperature.drops.below.the.
lock.temperature.and.the.LOCKED DOOR.light.
goes.off
The.oven.shuts.off.automatically.when.the.
clean.cycle.is.complete
...When.the LOCKED DOOR light.is.off,.the.
door.will.unlock.automatically
...Rotate.knob.to.the.off.position
■..The.words.LOCK DOOR.will.flash.and.the.
oven.control.will.signal.if.you.set.the.clean.
cycle.and.forget.to.close.the.oven.door
■..To.stop.a.clean.cycle,.touch.the.Clear/Off.
pad.then.turn.the.oven.control.knob.to.the.
OFF.position.After.some.period.of.time,.the.
LOCKED DOOR. light.will.go.off.This.will.
indicate.that.the.oven.has.cooled.below.
the.locking.temperature.and.gas.is.able.to.
flow.to.the.cooktop.The.doors.will.unlock.
automatically
■..After.you.complete.the.first.oven.clean.cycle,.
you.can.start.the.second.oven.clean.cycle
Using the self-cleaning upper and lower ovens. GEAppliances.com
HOLD 3 SEC
NOTES:
■..The.surface.burners.must.
be.turened.off.prior.to.the.
self-clean.start.time
■..Both.ovens.cannot.be.self-
cleaned.at.the.same.time
■..Cooktop.burners.and.the.oven.
not.in.self-clean.mode.will.not.
start.during.self-clean.cycle
27
DO NOT hand
clean gasket.
DO hand clean
inside door frame
and glass.
DO hand clean oven frame.
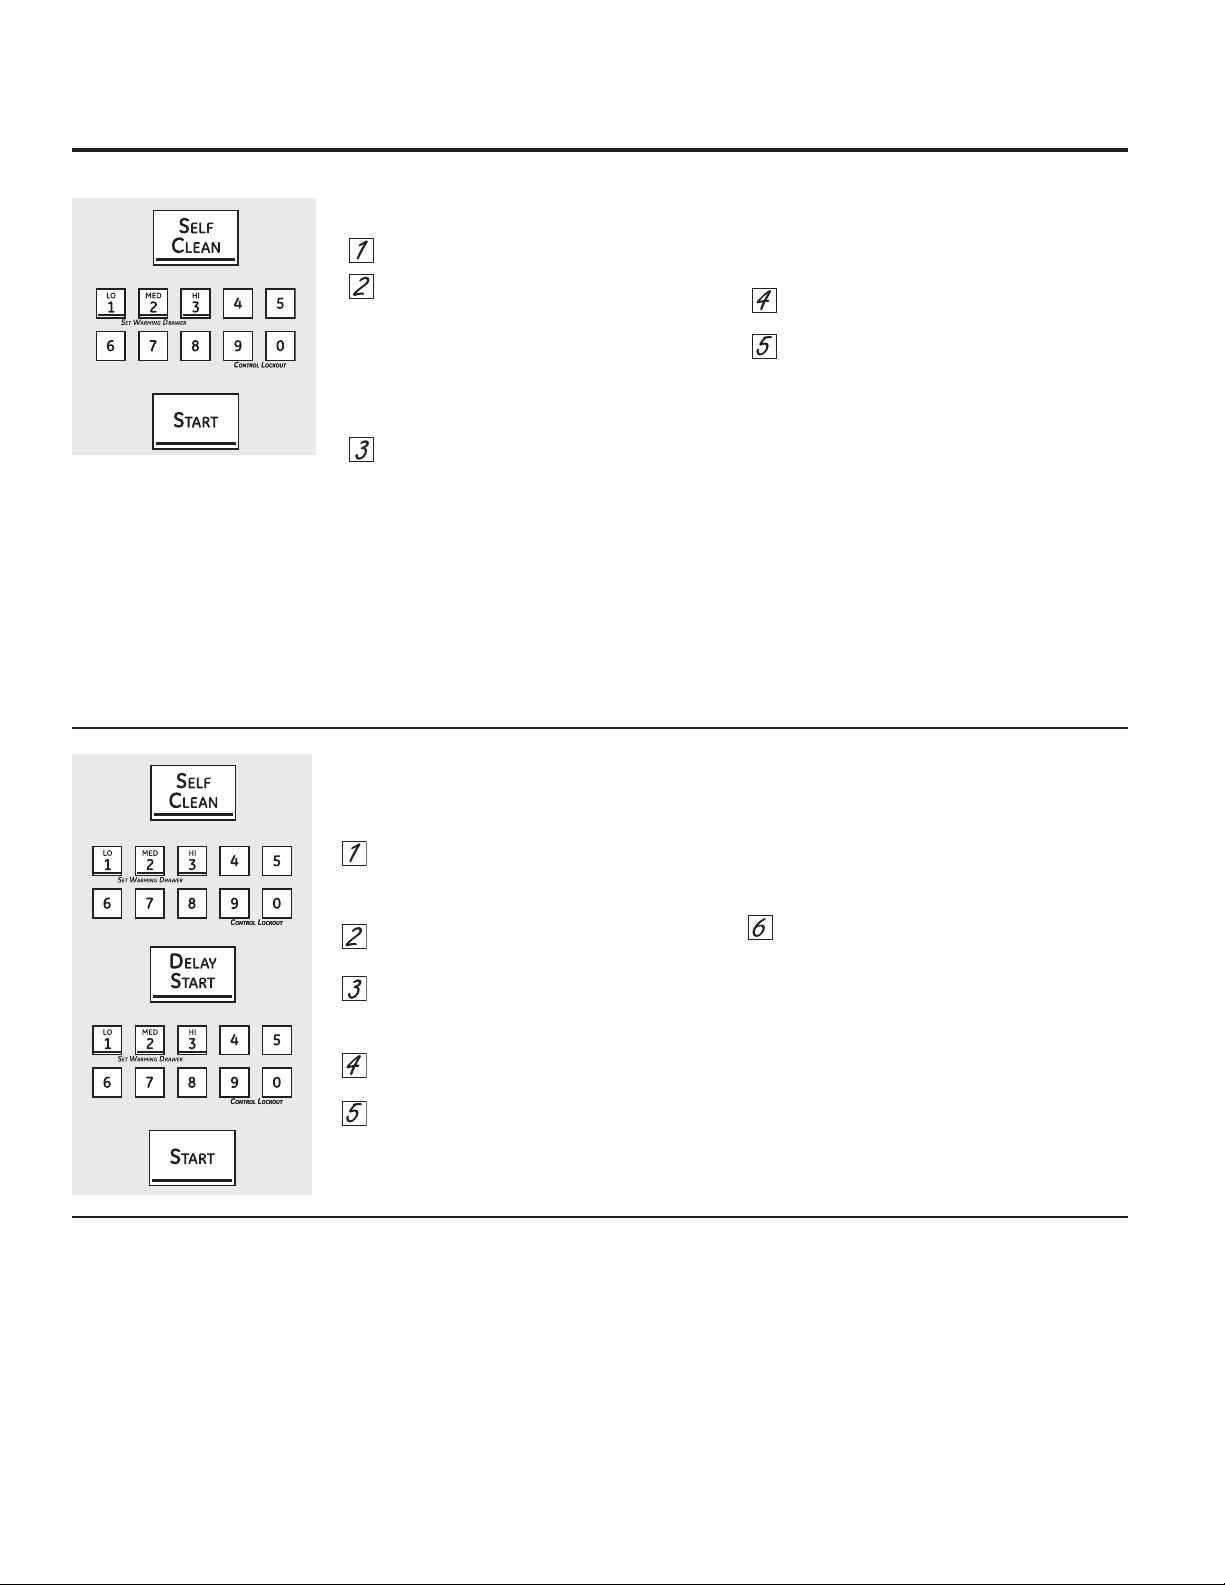
How to Delay the Start of Cleaning (lower oven only)
Make.sure.the.clock.shows.the.correct.time.
of.day
...Touch.the.Self Clean.pad
NOTE: The surface burners will be turned off
automatically when self-clean cycle starts.
...Using.the.number.pads,.enter.the.desired.
clean.time
....Touch.the.Delay Start.pad.The.earliest.
start.time.you.can.set.will.appear.in.the.
display
...Using.the.number.pads,.enter.the.time.of.
day.you.want.the.clean.cycle.to.start
...Touch.the.Start.pad
Doors.will.lock.automatically.The.display.will.
show.the.start.time.It.will.not.be.possible.to.
open.the.oven.door.until.the.temperature.drops.
below.the.lock.temperature.and.the.LOCKED
DOOR.light.goes.off
The.oven.shuts.off.automatically.when.the.
clean.cycle.is.complete
..The.doors.will.unlock.automatically
■.
.
The.words.LOCK DOOR.will.flash.and.the.
oven.control.will.signal.if.you.set.the.clean.
cycle.and.forget.to.close.the.oven.door
■ To.stop.a.clean.cycle,.touch.the.Clear/Off.
pad.After.some.period.of.time,.the.LOCKED
DOOR. light.will.go.off.This.will.indicate.
that.the.oven.has.cooled.below.the.locking.
temperature.and.gas.is.able.to.flow.to.the.
cooktop.The.doors.will.unlock.automatically
After a Clean Cycle
You.may.notice.some.white.ash.in.the.oven.
Wipe.it.up.with.a.damp.cloth.after.the.oven.
cools.
If.white.spots.remain,.remove.them.with.a.
soap-filled.scouring.pad.and.rinse.thoroughly.
with.a.vinegar.and.water.mixture.
These.deposits.are.usually.a.salt.residue.that.
cannot.be.removed.by.the.clean.cycle
If.the.oven.is.not.clean.after.one.clean.cycle,.
repeat.the.cycle.
■.
.
You.cannot.set.the.oven.for.cooking.until.the.
oven.is.cool.enough.for.the.door.to.unlock
■ While.the.oven.is.self-cleaning,.you.can.
touch.the.Clock.pad.to.display.the.time.of.
day.To.return.to.the.clean.countdown,.touch.
the Cooking Time.pad
■..If.the.racks.become.hard.to.slide,.apply.a.
small.amount.of.vegetable.oil.or.cooking.oil.to.
a.paper.towel.and.wipe.the.edges.of.the.oven.
racks.with.the.paper.towel
How to Set the Lower Oven for Cleaning
...Touch.the.Self Clean.pad
...Using.the.number.pads,.enter.the.desired.
clean.time,.if.a.time.other.than.4.hours.is.
needed
Clean.cycle.time.is.normally.4.hours.You.can.
change.the.clean.time.to.any.time.between.
3.hours.and.5.hours,.depending.on.how.dirty.
your.oven.is
...Touch.the.Start.pad
Doors.will.lock.automatically.The.display.will.
show.the.clean.time.remaining.If the upper
door is not locked and remaining clean time
is not displayed, within 1 minute of initiating
the cycle rotate the knob to the Off positioin
and open both doors for 10 minutes. Repeat
step 1. It.will.not.be.possible.to.open.the.oven.
door.until.the.temperature.drops.below.the.
lock.temperature.and.the.LOCKED DOOR.light.
goes.off
The.oven.shuts.off.automatically.when.the.
clean.cycle.is.complete
...When.the LOCKED DOOR light.is.off,.the.
door.will.unlock.automatically
...Rotate.knob.to.the.off.position
■..The.words.LOCK DOOR.will.flash.and.the.
oven.control.will.signal.if.you.set.the.clean.
cycle.and.forget.to.close.the.oven.door
■..To.stop.a.clean.cycle,.touch.the.Clear/Off.
pad.then.turn.the.oven.control.knob.to.the.
OFF.position.After.some.period.of.time,.the.
LOCKED DOOR. light.will.go.off.This.will.
indicate.that.the.oven.has.cooled.below.
the.locking.temperature.and.gas.is.able.to.
flow.to.the.cooktop.The.doors.will.unlock.
automatically
■..After.you.complete.the.first.oven.clean.cycle.
you.can.start.the.second.oven.clean.cycle
The oven door must be closed and all controls set correctly for the cycle to work properly.
Using the self-cleaning upper and lower ovens.
28
NOTES:
■..The.surface.burners.must.
be.turened.off.prior.to.the.
self-clean.start.time
■..Both.ovens.cannot.be.self-
cleaned.at.the.same.time
■..Cooktop.burners.and.the.oven.
not.in.self-clean.mode.will.not.
start.during.self-clean.cycle
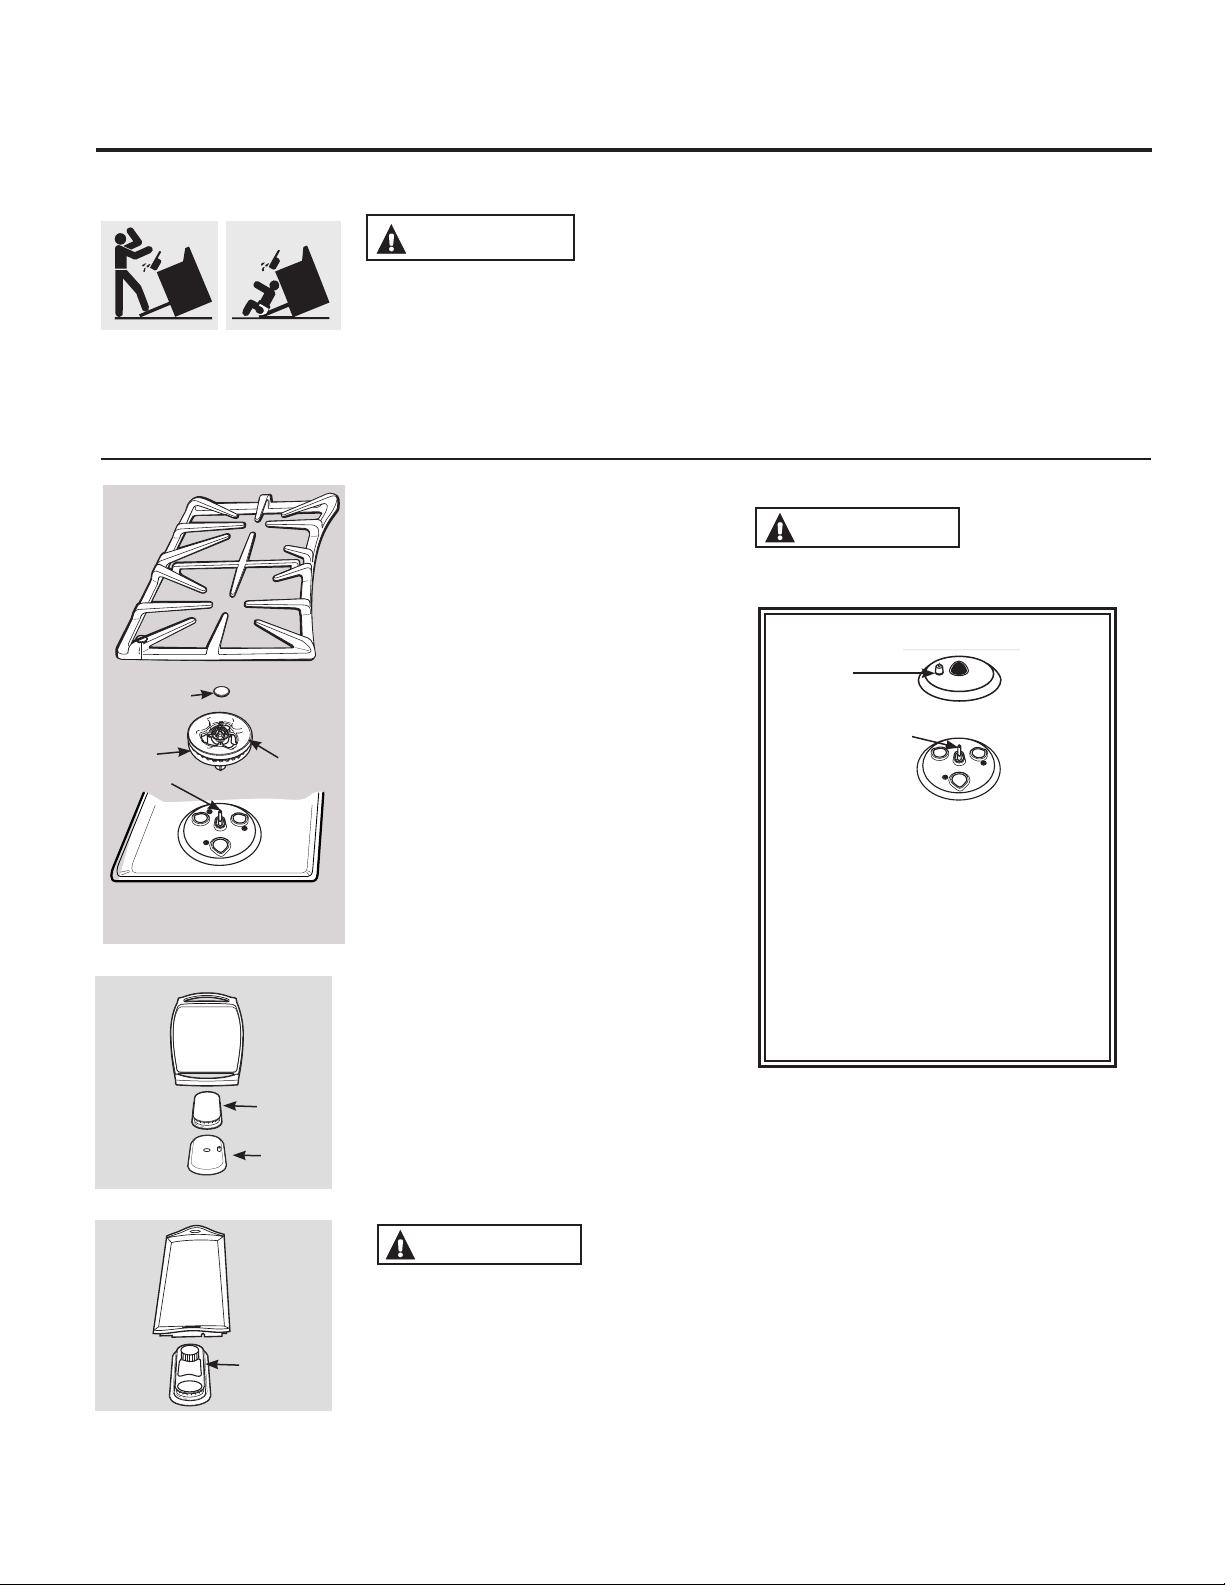
29
GEAppliances.com
Be sure electrical power is off and all surfaces are cool before cleaning any part of the range.
.
WARNING If your range is removed for cleaning, servicing or any reason, be
sure the anti-tip device is reengaged properly when the range is replaced. Failure to take
this precaution could result in tipping of the ra
nge and cause injury.
To check if the bracket is installed and engaged properly, carefully tip the range forward. The
bracket should stop the range within 4 inches. If it does not, the bracket must be reinstalled.
If the range is pulled from the wall for any reason, always repeat this procedure to verify the
range is properly secured by the anti-tip bracket.
If your range has no anti-tip bracket, call 1.800.626.8774 to receive one at no cost.
Sealed Burner Assemblies.(on some models)
Turn.all.controls.OFF. before.removing.the.
burner.parts
The.round.side.burner.caps.and.burner.
heads.can.be.lifted.off,.making.them.easy.to.
clean.The.electrodes.are.not.removable
The.oval.center.burner.head.and.cap.
assembly.can.be.lifted.off,.making.it.easy..
to.clean.The.burner.electrode.is.not.
removable
The.tri-ring.burner.inner.cap.can.be.lifted.
off.for.cleaning.the.outer.cap.and.base.
assembly.can.be.lifted.off.the.cooktop.as.one.
piece.for.cleaning.purpases
. CAUTION
Do not operate the
cooktop without all burner parts and grates
in place.
The.electrode.of.the.spark.igniter.is.
exposed.when.the.burner.head.is.
removed.When.one.burner.is.turned.
to.LITE,. all.the.burners.spark.Do.
not.attempt.to.disassemble.or.clean.
around.any.burner.while.another.
burner.is.on.An.electric.shock.may.
result,.which.could.cause.you.to.knock.
over.hot.cookware
Burner.head.
and.cap.
assembly
Burner.head.
cap.and.
electrode
Center.
griddle
Chef’s
griddle
Electrode
Side.grate
Outer.
burner.
cap
Inner.burner.
cap
Cooktop
Tri-Ring.Burner..
(on.some.models)
Electrode
Burner..
base
or
Electrode
Tri-ring.base..
(on.some.models)
Electrode
. CAUTION
Do not remove
tri-ring or bridge burner cap from head.
The.tri-ring.or.bridge.burner.head.and.cap.
assembly.can.be.lifted.off,.making.it.easy.to.
clean.The.electrode.is.not.removeable
Care and cleaning of the range.
Burner Caps, Bases and Heads
Before.removing.the.burner.caps.and.heads.
(on.some.models),.remember.their.size.and.
location.Replace.them.in.the.same.location.
after.cleaning
NOTE: Do not use steel wool or scouring
powders to clean the burner parts.
Burner caps
Lift.off.when.cool.Wash.burner.caps.in.hot,.
soapy.water.and.rinse.with.clean.water.You.
may.scour.with.a.plastic.scouring.pad.to.
remove.burned-on.food.particles
Tri-ring burner (on some models)
The outer cap on the tri-ring burner is not
removable. Only the center round cap may be
removed for cleaning.
To.clean.the.burner.bases,.use.soapy.water.and.a.
plastic.scouring.pad.Wipe.clean.with.a.damp.cloth
Make.sure.that.no.water.gets.into.the.burner.
bases.Allow.them.to.dry.fully.before.using
Burner Heads (on some models) and Oval
(Center) Burner Head/Cap Assembly
The burner heads and the oval burner head/cap
assembly are removable. Simply lift them off the
range for cleaning.
For.proper.ignition,.make.sure.the.small.hole.in.
the.section.that.fits.over.the.electrode.is.kept.
open.A.sewing.needle.or.wire.twist-tie.works.
well.to.unclog.it
The slits in the burner heads must be kept clean
at all times for an even, unhampered flame.
Clogged.or.dirty.burner.ports.or.electrodes.will.
not.allow.the.burner.to.operate.properly
Any.spill.on.or.around.an.electrode.must.
be.carefully.cleaned.Take.care.to.not.hit.an.
electrode.with.anything.hard.or.it.could.be.
damaged
Clean.the.burner.heads.routinely,.especially.
after.bad.spillovers,.which.could.clog.the.
openings.Lift.off.when.cool
To.remove.burned-on.food,.soak.the.burner.
heads.in.a.solution.of.mild.liquid.detergent.
and.hot.water.for.20–30.minutes.For.more.
stubborn.stains,.use.a.toothbrush
After cleaning
Before.putting.the.burner.caps,.heads.(on.some.
models).and.oval.head/cap.assembly.back,.
shake.out.excess.water.and.then.dry.them.
thoroughly.by.setting.in.a.warm.oven.for.30.
minutes
Replacement Burner Heads.(on some models)
Replace.burner.heads.over.the.electrodes.on.
the.cooktop,.in.the.correct.locations.according.
to.their.size.There.is.one.small,.one.medium,.
one.large.and.one.extra-large.burner.head
.
Make.sure.the.slot.or.hole.(depending.on.model).in.
the.burner.head.is.positioned.over.the.electrode
Oval (Center) Burner Head/Cap Assembly
Replace.the.oval.(center).head/cap.assembly.over.
the.electrode.on.the.cooktop
Caps
Replace.the.matching.size.caps.onto.the.burner.
bases.or.heads
Make.sure.that.the.heads.(on.some.models).and.
caps.are.replaced.in.the.correct.locations
The.oval.burner.head/cap.assembly.is.
removable.Simply.lift.it.off.the.range.for.
cleaning.Use.a.sewing.needle.or.twist-tie.
to.unclog.the.small.hole.in.the.burner.
heads
Burner.cap.is.
properly.seated
Burner.cap.is.
NOT.properly.
seated
Front.of.range
Tri-ring.cap
(on.some.models)
(on.some.models)
Electrode
Slot
Front.of.range
Oval.head.and.cap.
assembly
Make.sure.the.slot.in.the.
burner.head.is.positioned.
over.the.electrode
Hole.in.
burner.
head
Electrode
Burner.head
Burner base
Tri-ring.head.(on.some.models)
Make.sure.the.ring.in.the.burner.head.
is.positioned.over.the.electrode.and.
that.the.burner.head.is.fully.inserted.
inside.the.burner.base.A.small.gap.
between.the.base.and.head.is.normal
Electrode
Stability.chamber
Burner..
base
Front-right.head.(on.some.models),.
front-left.head,.back-right.head.and.
back-left.head
Make.sure.the.slot.in.the.burner.head..
is.positioned.over.the.electrode
Use.a.sewing.
needle.or.twist-tie.
to.unclog.the.
small.hole.in.the.
burner.head
Burner.heads.(on.some.models)
The.burner.heads.(on.some.models).
are.removable.Simply.lift.them.off.
the.range.for.cleaning
Burner.head
Front.of.range
Tri-ring.head
(on.some.models)
(on.some.models)
Slot
Electrode
or
Hole
Electrode
30
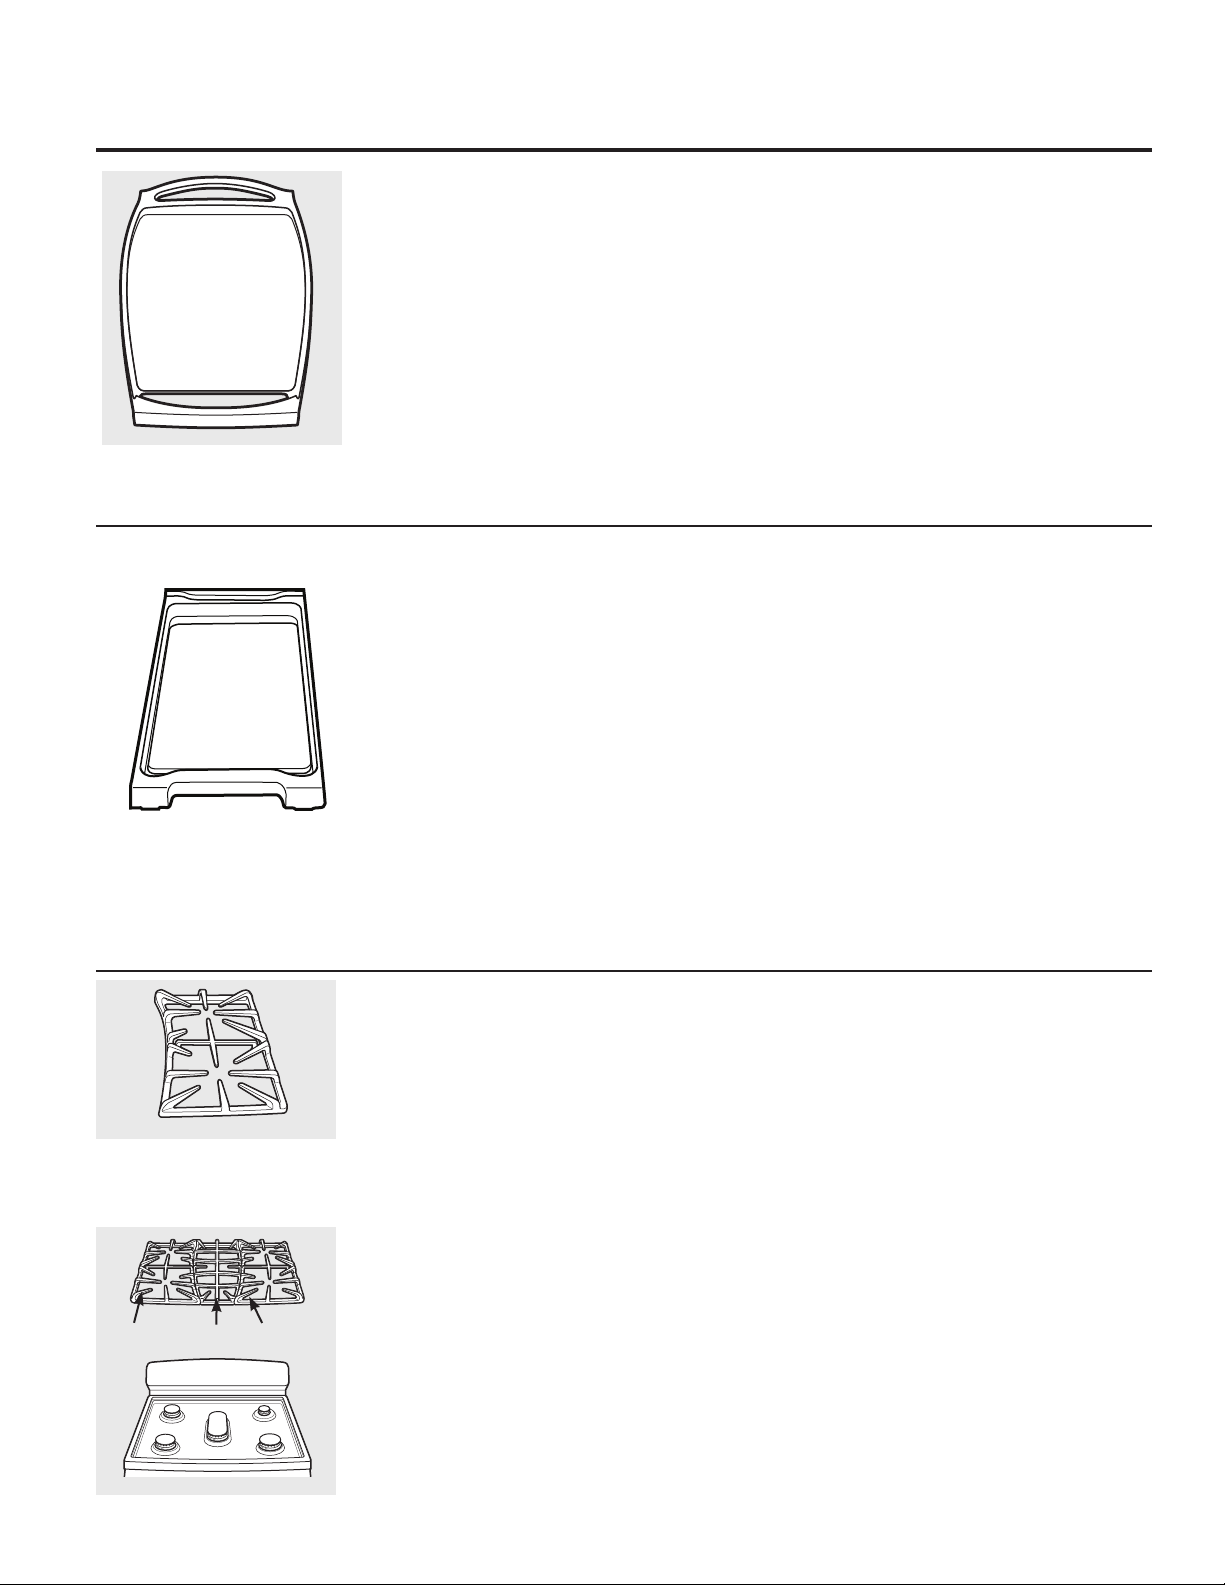
31
Burner Grates
Your.range.has.three.professional-style.double.
grates.These.grates.are.position-specific.For.
maximum.stability,.these.grates.should.only.
be.used.in.their.proper.position;.they.cannot.
be.interchanged.left.to.right.or.front.to.back.
For.convenience,.the.undersides.of.the.left.and.
right.grates.are.marked.“LEFT.FRONT”.and.
“RIGHT.FRONT”.Make.sure.the.front.portion.of.
both.grates.is.in.front.The.middle.grate.has.a.
bow.in.front.Make.sure.the.bowed.portion.is.
toward.the.front.of.the.range.In.addition,.the.
middle.grate.is.supported.by.the.left.and.right.
grates.and.must.be.installed.LAST.for.stability
Cleaning
Lift.out.when.cool.Grates.should.be.washed.
regularly.and,.of.course,.after.spillovers.Wash.
them.in.hot,.soapy.water.and.rinse.with.clean.
water.When.replacing.the.grates,.be.sure.
they.are.positioned.securely.over.the.burners.
Replace.the.grates.so.that.continuous.arcs.are.
formed.with.the.center.ribs.of.all.three.grates
Do.not.operate.a.burner.for.an.extended.period.
of.time.without.cookware.on.the.grate.The.
finish.on.the.grate.may.chip.without.cookware.
to.absorb.the.heat
To.get.rid.of.burned-on.food,.place.the.grates.in.
a.covered.container.Add.1/4.cup.ammonia.and.
let.them.soak.several.hours.or.overnight.Wash,.
rinse.well.and.dry.
Although.they.are.durable,.the.grates.will.
gradually.lose.their.shine,.regardless.of.the.
best.care.you.can.give.them.This.is.due.to.their.
continual.exposure.to.high.temperatures.You.
will.notice.this.sooner.with.lighter.color.grates
NOTE: Do not clean the grates in a self-cleaning
oven.
The.grates.may.be.cleaned.in.a.
dishwasher
Appearance.may.vary
Left.Front
Right.Front
Center
Lodge
®
Reversible Cast-Iron Griddle (on some models)
Nonstick Griddle (on some models)
■ Rinse with hot water (do not use soap), and
dry thoroughly.
■ Before cooking, prepare the surface with
cooking spray or vegetable oil.
■ After cooking, clean the griddle with a stiff
brush and hot water. Using soap is not
recommended, and harsh detergents should
never be used.
■ Towel dry immediately and apply a light coat
of cooking spray or vegetable oil while the
griddle is still warm.
■ Store in a cool, dry place.
■ Do not wash in the dishwasher.
Griddle Precautions:
■ If something has spilled under the griddle, it
should be cleaned up as soon as possible to
prevent “baked on” food soil.
■ Do not allow grease to accumulate under the
griddle as it can be a fire hazard. Clean under
the griddle as soon as it is cool. Clean with hot
soapy water.
■ Do not place your griddle in the microwave.
■ Always turn off all surface burners before
removing the griddle. Use caution when
handling a hot griddle.
NOTES:
■ The.griddle.is.to.be.used.over.the.center.
burner.only
■ Do.not.clean.the.griddle.in.a.self-cleaning.
oven
■ Do.not.clean.the.griddle.in.a.dishwasher
■ Wash.with.hot,.soapy.water.after.each.use.
while.using.a.sponge.or.dishcloth
■ If.oil.or.food.residue.is.left.on.the.griddle,.
further.cooking.will.harden.the.residue.and.
cause.sticking.over.time.In.this.case,.use.a.
non-abrasive.cleanser.such.as.Bon.Ami®.
or.one.of.the.soft.scrub.cleansers.Apply.
with.a.sponge,.Scrunge®.or.other.cleaning.
pad.labeled.safe.for.non-stick.pans
■ Use.only.plastic,.nylon.or.wooden.utensils.
or.SilverStone®.kitchen.tools.to.prevent.
marring.of.the.coating
■ Never.use.knives.or.cut.food.on.the.grid-
dle.Wash.with.hot,.soapy.water.after.each.
use.Store.carefully.to.prevent.scratching
Griddle Precautions:
■ If.something.has.spilled.under.the.griddle,.
it.should.be.cleaned.up.as.soon.as.possible.
to.prevent.“baked.on”.food.soil
■ Do.not.allow.grease.to.accumulate.under.
the.griddle.as.it.can.be.a.fire.hazard.Clean.
under.the.griddle.as.soon.as.it.is.cool.
Clean.with.hot.soapy.water
■ Do.not.place.your.griddle.in.the.
microwave
■ Always.turn.all.surface.burners.before.
removing.the.griddle.Use.caution.when.
handling.a.hot.griddle
GEAppliances.com
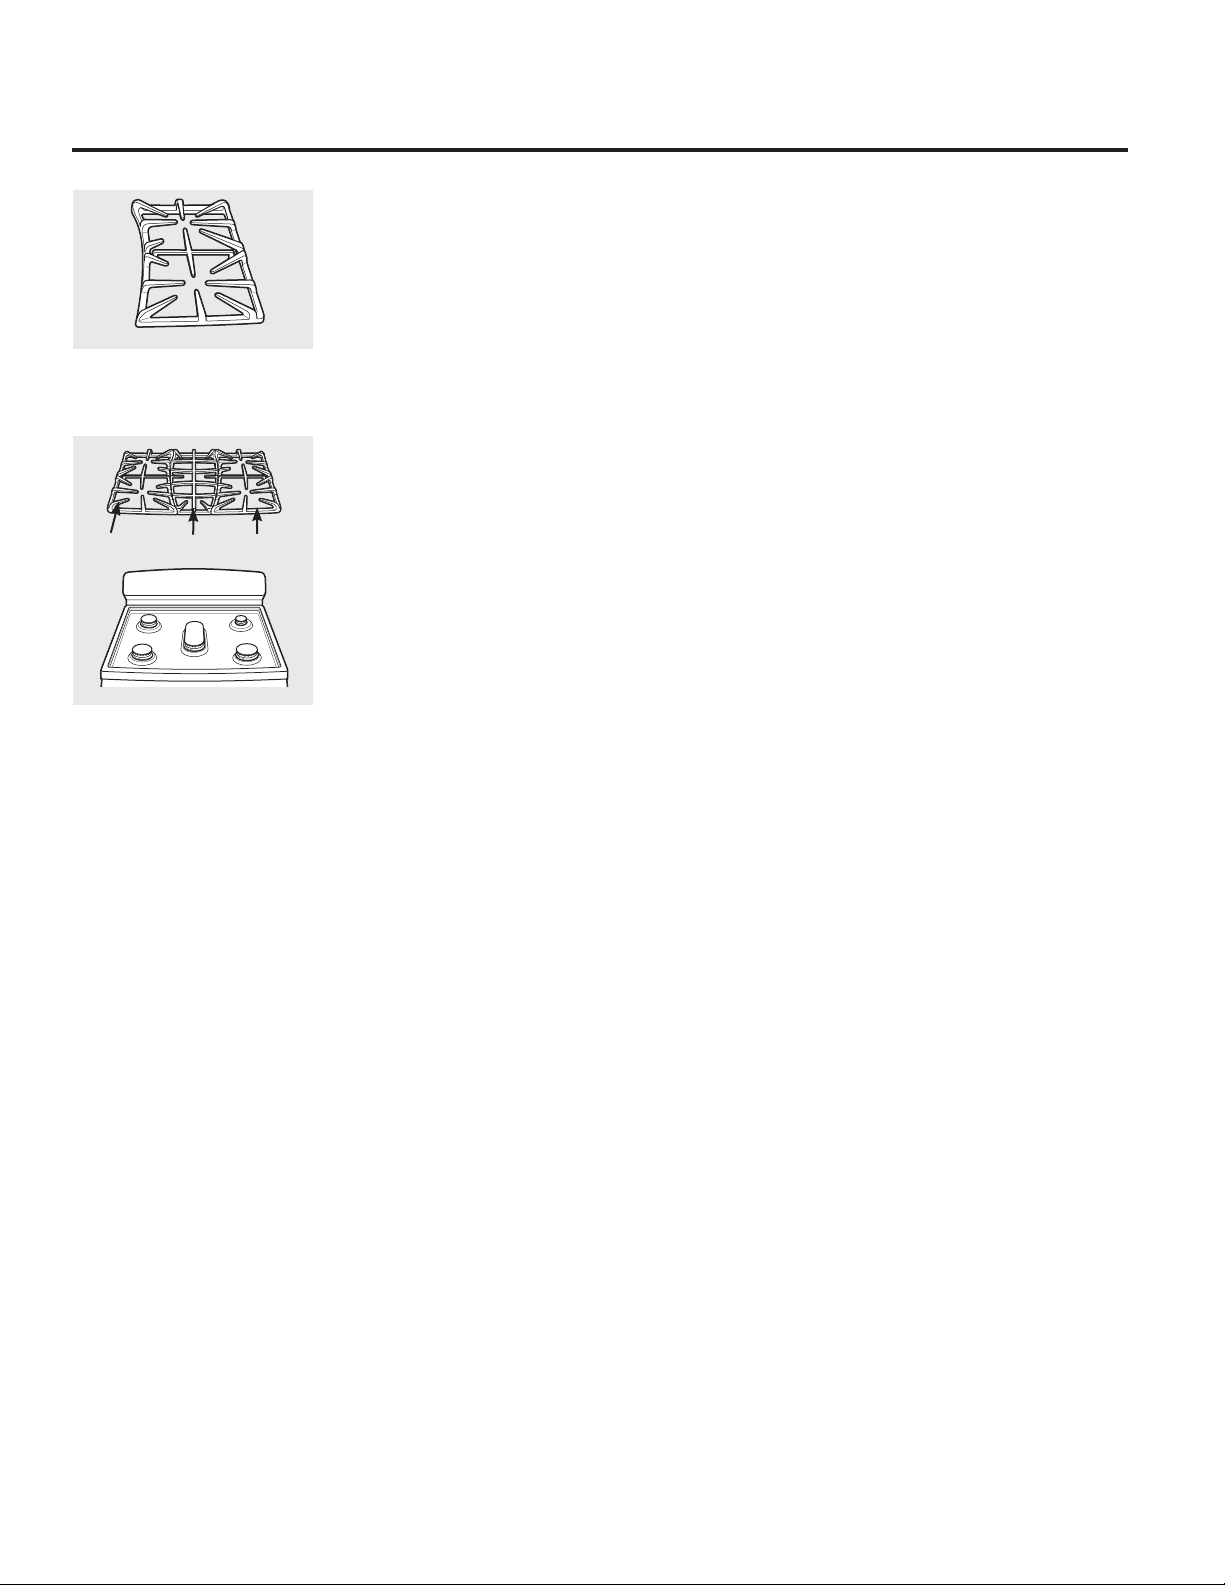
Care and cleaning of the range.
32
Burner Grates for Model CCGS990 Only
Your.range.has.three.professional-style.double.
grates.These.grates.are.position-specific.For.
maximum.stability,.these.grates.should.only.be.
used.in.their.proper.position.For.convenience,.
the.undersides.of.the.side.grates.are.marked.
“OUTSIDE”.Make.sure.the.front.portion.of.
both.grates.is.in.front.The.center.grate.can.be.
interchanged.front.to.back
Cleaning Grates - Soap and Water
Lift.grates.out.when.cool.Grates.should.be.
washed.regularly.and,.of.course,.after.spillovers.
Wash.them.in.hot,.soapy.water.and.rinse.with.
clean.water.When.replacing.the.grates,.be.sure.
they.are.positioned.securely.over.the.burners.
Replace.the.grates.so.that.straight.lines.are.
formed.with.the.center.ribs.of.all.three.grates
Cleaning Grates—Dishwasher
The.grates.may.be.cleaned.in.the.dishwasher.
Remove.any.burnt-on.food.particles.that.
you.can.prior.to.placing.the.grates.in.the.
dishwasher.Place.them.on.the.lowest.rack.
of.the.dishwasher.and.run.on.a.“heavy.duty”.
cycle
Do.not.operate.a.burner.for.an.extended.period.
of.time.without.cookware.on.the.grate.The.
finish.on.the.grate.may.chip.without.cookware.
to.absorb.the.heat
Although.the.grates.are.durable,.they.will.
gradually.lose.their.shine,.regardless.of.the.
best.care.you.can.give.them.This.is.due.to.their.
continual.exposure.to.high.temperatures.and.
abrasion.by.the.cookware
Support Bumpers
If.one.or.more.of.the.circular.silicone.grate.
support.bumpers.in.the.cooktop.are.missing.or.
damaged,.replacement.parts.can.be.obtained.
by.calling.1800GECARES
To.insert.the.new.bumpers,.simply.insert.the.cone.
shaped.end.and.push.down.while.gently.twisting.or.
rocking.the.bumper
The.grates.may.be.cleaned.in.a.
dishwasher
Appearance.may.vary
Outside.
Grate
Center.
Grate
Outside.
Grate
Oven Air Vents
Never.block.the.vents.(air.openings).of.the.
range.They.provide.the.air.inlet.and.outlet.that.
are.necessary.for.the.range.to.operate.properly.
with.correct.combustion
Air.openings.are.located.at.the.rear.of.the.
cooktop,.at.the.top.and.bottom.of.the.oven.
door,.and.at.the.bottom.of.the.range
Upper Control Panel
On models so equipped, lock out the touch pads
before cleaning.
See.the.Gas/Control Lockout information.in.
the.Special features of your oven control.section.
in.this.manual
Clean.up.splatters.with.a.damp.cloth
You.may.also.use.a.glass.cleaner
Remove.heavier.soil.with.warm.soapy.water.
Do.not.use.abrasives.of.any.kind
Unlock the touch pads after cleaning.
Vent.appearance.and.location.vary
Lower Control Panel (Front Manifold Panel) and Knobs
It’s.a.good.idea.to.wipe.the.control.panel.after.
each.use.of.the.oven.Use.a.damp.cloth.to.
clean.or.rinse.For.cleaning,.use.mild.soap.and.
water.or.a.50/50.solution.of.vinegar.and.water.
For.rinsing,.use.clean.water.Polish.dry.with.a.
soft.cloth
Do.not.use.abrasive.cleansers,.strong.liquid.
cleaners,.plastic.scouring.pads.or.oven.cleaners.
on.the.control.panel—they.will.damage.the.
finish
Do.not.try.to.bend.knobs.by.pulling.them.up.
or.down.or.by.hanging.a.towel.or.other.such.
loads.This.can.damage.the.gas.valve.shaft
The.control.knobs.may.be.removed.for.easier.
cleaning
Make.sure.the.knobs.are.in.the.OFF.positions.
and.pull.them.straight.off.the.stems.for.
cleaning
The.knobs.can.be.cleaned.in.a.dishwasher.or.
they.may.also.be.washed.with.soap.and.water.
Make.sure.the.insides.of.the.knobs.are.dry.
before.replacing
Replace.the.knobs.in.the.OFF.position.to.ensure.
proper.placement
Metal.parts.can.be.cleaned.with.soap.and.
water.Do.not.use.steel.wool,.abrasives,.
ammonia,.acids.or.commercial.oven.cleaners.
Dry.with.a.soft.cloth
NOTE: Knobs are not interchaneable. Be sure to
reinstall the knobs to the original location.
Surface.burner.knob
Upper.oven.knob.(on.some.models)
Red.line
Gas/Control
Cooktop Surface
To.avoid.damaging.the.porcelain-enamel.
surface.of.the.cooktop.and.to.prevent.it.from.
becoming.dull,.clean.up.spills.right.away.Foods.
with.a.lot.of.acid.(tomatoes,.sauerkraut,.fruit.
juices,.etc).or.foods.with.high.sugar.content.
could.cause.a.dull.spot.if.allowed.to.set
When.the.surface.has.cooled,.wash.and.rinse.
For.other.spills.such.as.fat.spatterings,.wash.
with.soap.and.water.once.the.surface.has.
cooled.Then.rinse.and.polish.with.a.dry.cloth
NOTE: For stainless steel cooktops, refer to the
Stainless steel surfaces section.
GEAppliances.com
33
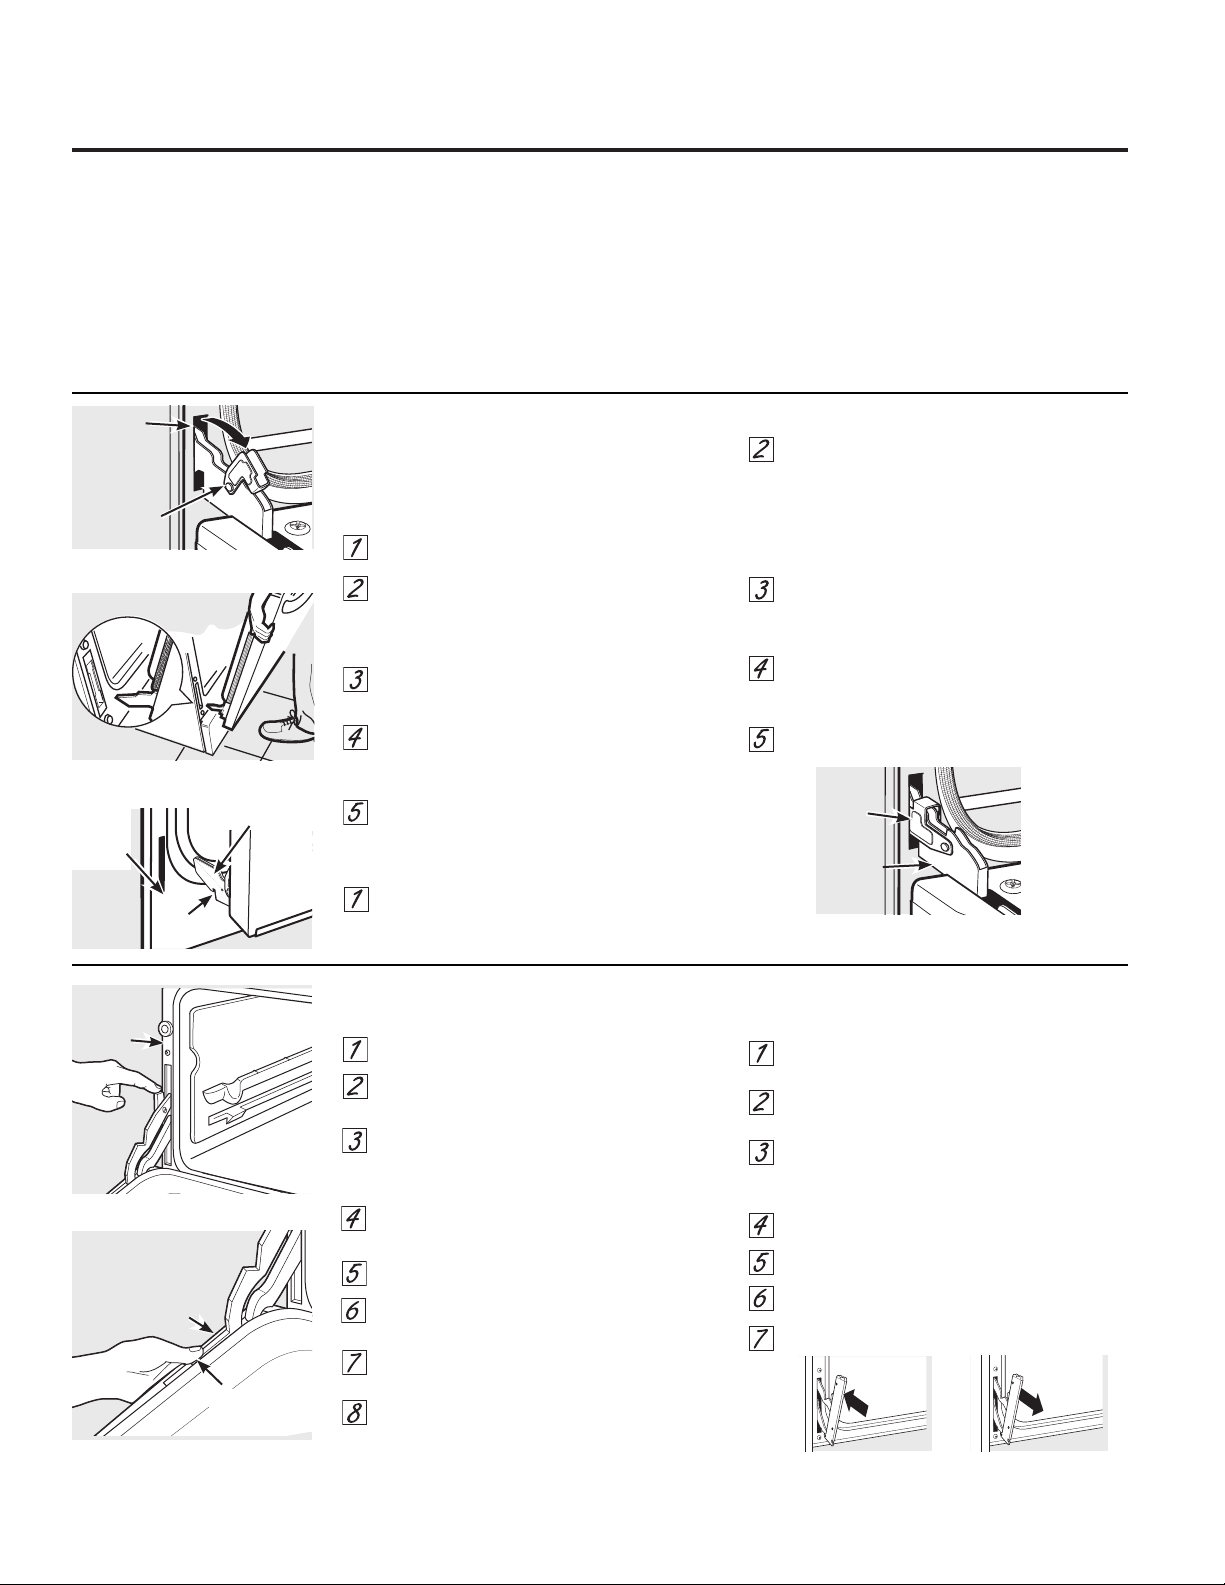
Care and cleaning of the range.
Oven Bottom
The.oven.bottom.has.a.porcelain-enamel.
finish.To.make.cleaning.easier,.protect.the.
oven.bottom.from.excessive.spillovers.by.
placing.a.cookie.sheet.on.the.rack.below.the.
rack.you.are.cooking.on.This.is.particularly.
important.when.baking.a.fruit.pie.or.other.
foods.with.a.high.acid.content.Hot.fruit.
fillings.or.other.foods.that.are.highly.acidic.
(such.as.tomatoes,.sauerkraut.and.sauces.
with.vinegar.or.lemon.juice).may.cause.pitting.
and.damage.to.the.porcelain-enamel.surface.
and.should.be.wiped.up.immediately.
To.clean.up.spillovers,.use.soap.and.water,.an.
abrasive.cleaner.or.soap-filled.scouring.pad.
Rinse.well.to.remove.any.soap.before.self-
cleaning
The door is very heavy. Be careful when
removing and lifting the door.
Do.not.lift.the.door.by.the.handle.
To remove the door:
..Fully.open.the.door
...Pull.the.hinge.locks.down.toward.the.door.
frame,.to.the.unlocked.position.A.tool,.
such.as.a.small.flat-blade.screwdriver,.
may.be.required
...Firmly.grasp.both.sides.of.the.door.at.the.
top
...Close.door.to.the.door.removal.position,.
which.is.halfway.between.the.broil.stop.
position.and.fully.closed
...Lift.door.up.and.out.until.the.hinge.arm.
is.clear.of.the.slot
To replace the door:.
...Firmly.grasp.both.sides.of.the.door.at.the.
top
...With.the.door.at.the.same.angle.
as.the.removal.position,.seat.the.
indentation.of.the.hinge.arm.into.the.
bottom.edge.of.the.hinge.slot.The.notch.
in.the.hinge.arm.must.be.fully.seated.into.
the.bottom.of.the.slot
...Fully.open.the.door.If.the.door.will.not.
fully.open,.the.indentation.is.not.seated.
correctly.in.the.bottom.edge.of.the.slot
...Push.the.hinge.locks.up.against.the.front.
frame.of.the.oven.cavity.to.the.locked.
position
...Close.the.oven.door
Lift-Off Lower Oven Door (on some models)
Hinge.
lock
Removal.position
Hinge..
lock
Push.hinge.locks.up.to.lock
Pull.hinge.locks.down.to.unlock
Indentation
Bottom.
edge.of.
slot
Hinge.arm
Slot
Hinge.
arm
Lift-Off Upper Oven Door (on some models)
To remove the door:
..Fully.open.the.door
...Lift.up.on.the.hinge.lock.toward.the.oven.
frame.until.they.stop
...Close.the.door.to.45.degrees.(you.will.feel.
the.door.stop).The.hinge.lock.will.contact.
the.oven.frame
...On.both.sides.of.the.door,.press.down.on.
the.release.buttons.on.each.hinge
...Lift.door.up.until.it.is.clear.of.the.hinge
...Pull.on.hinge.arms.slightly.to.relieve.
pressure.on.the.locking.tabs
...Push.the.hinge.locks.down.onto.
the.hinge
...Push.the.hinges.in.toward.the.unit.
so.they.are.closed
To replace the door:
...Pull.the.hinges.down.away.from.the.oven.
frame.to.the.fully.open.position
...Lift up.on.the.hinge.locks.toward.the.oven.
frame.until.they.stop
...The.hinges.will.release.to.the.45-degree.
position.The.hinge.locks.will.contact.the.
oven.frame
...Slide.the.door.back.onto.the.hinges.Make.
sure.the.buttons.pop.back.out
...Fully.open.the.door.
...Push.the.hinge.locks.down.onto.the.hinge
...Close.the.oven.door
Oven.
frame
Door.
frame
Release.
buttons
Pull.down
Push.in
34
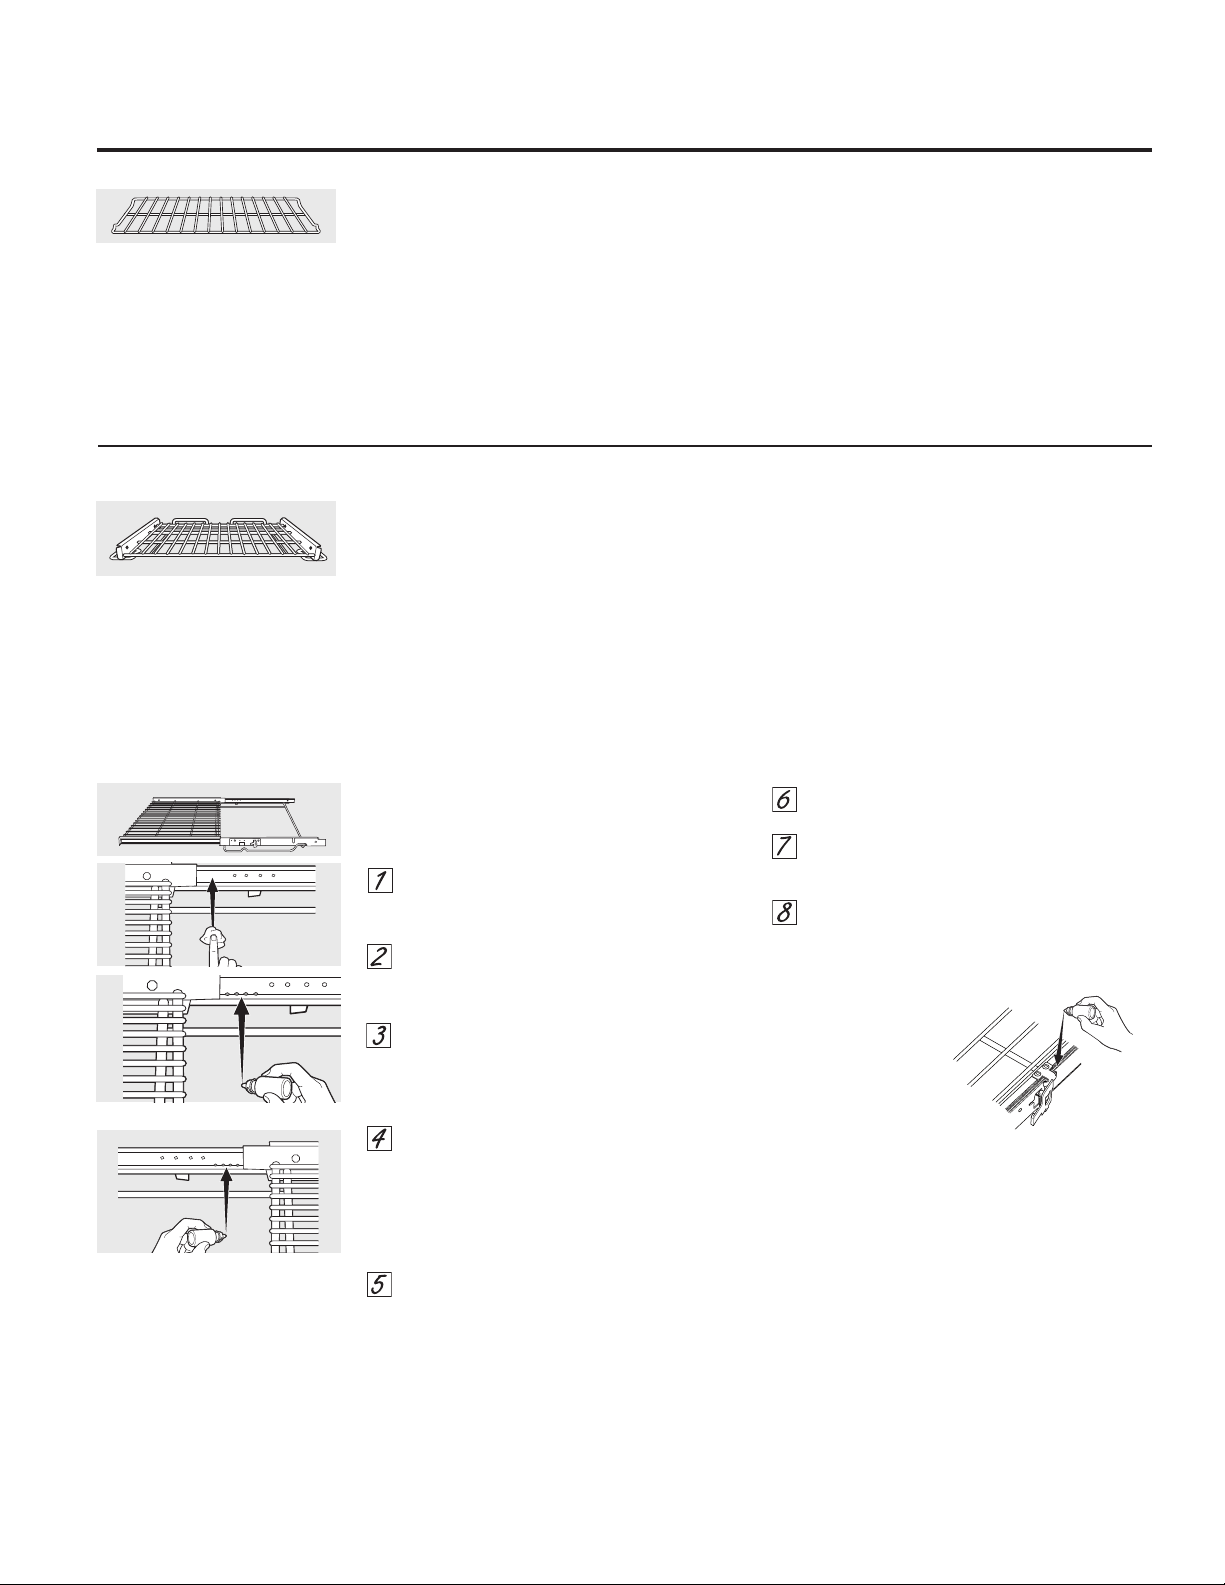
Extension.racks.may.be.cleaned.by.hand.with.
an.abrasive.cleaner.or.steel.wool..During.
cleaning,.be.careful.not.to.allow.water.or.
cleaner.to.enter.the.extension.slides.on.the.
sides.of.the.rack.
NOTE: Do not clean in a dishwasher.
The.rack.may.also.remain.in.the.oven.during.
the.self-cleaning.cycle.without.being.damaged.
(Not.applicable.for.nickel.extension.racks)
If the rack becomes hard to remove or
replace,.wipe.the.oven.rack.supports.with.
cooking.oil Do not wipe cooking oil on the
slides
If.the.rack.becomes.difficult.to.slide.or.if.the.
paddle.is.difficult.to.actuate,.the.rack.may.need.
to.be.lubricated.using.the.Graphite.Lubrication.
shipped.with.your.oven.To.order.additional.
Graphite.Lubrication,.call.our.National.Parts.
Center.at.800.626.2002.and.reference.
WB02T10303
Oven Racks
All.oven.racks.may.be.cleaned.by.hand.with.an.
abrasive.cleaner.or.steel.wool.After.cleaning,.
rinse.the.racks.with.clean.water.and.dry.with.a.
clean.cloth.Gray.porcelain-coated.oven.racks.
may.remain.in.the.oven.during.the.self-cleaning.
cycle.without.being.damaged.The.nickel-plated.
oven.racks.may.remain.in.the.oven.during.the..
self-cleaning.cycle,.but.they.will.lose.their.luster.
and.become.hard.to.slide.It.will.be.necessary.
to.grease.all.oven.rack.side.edges.with.a.light.
coating.of.vegetable.oil.after.cleaning.them.by.
hand.or.in.the.oven.This.will.help.maintain.the.
ease.of.sliding.the.racks.in.and.out.of.the.oven
Extension Rack
To lubricate the slides:
NOTE: Do not spray extension rack with cooking
spray or other lubricant sprays.
...Remove.the.rack.from.the.oven.See.
Extension.Rack.in.the.Using.the.oven.
section
...Fully.extend.the.rack.on.a.table.or.
countertop.Newspaper.may.be.placed.
underneath.the.rack.for.easy.cleanup
....If.there.is.debris.in.the.slide.tracks,.wipe.it.
away.using.a.paper.towel..
NOTE: Any graphite lubricant wiped away
must be replaced - see steps 4 through 7.
...Shake.the.graphite.lubricant.before.
opening.it.Starting.with.the.left.slide.
mechanism.of.the.rack,.place.four.(4).
small.drops.of.lubricant.on.the.two.(2).
bottom.tracks.of.the.slide.close.to.the.
bearing.carriers
...Repeat.for.the.right.slide.mechanism.of.
the.rack
....Open.and.close.the.rack.several.times.to.
distribute.the.lubricant
...Replace.the.cap.on.the.lubricant.and.
shake.it.again.Turn the rack over and
repeat steps 3, 4, 5 and 6
...Close.the.rack,.turn.rack.right-side-up.and.
place.in.the.oven.See.Extension Rack in
the Using the oven.section
To lubricate the paddle:
Shake.lubricant.and.
apply.to.the.moving.
parts.of.the.paddle.
mechanisms.as.shown.
Rack.right-side-up
Right.side
35
GEAppliances.com

Care and cleaning of the range.
36
Cleaning the Door
To clean the inside of the door:
■..Do.not.allow.excess.water.to run.into.any.
holes.or.slots.in.the.door.
■..Wipe.dish.washing.detergent.over.any.baked.
-on.spatters.on.the.glass.Use.a.single.sided.
safety.razor.blade.to.clean.it.off.Then.wipe.
over.the.glass.with.a.soapy.cloth.to.remove.
any.residue.and.dry.off
■..The.area.outside.the.gasket.can.be.cleaned.
with.a.soap-filled.plastic.scouring.pad
To clean the outside of the door:
■..Use.soap.and.water.to.thoroughly.clean.the.
top,.sides.and.front.of.the.oven.door.Rinse.
well.You.may.also.use.a.glass.cleaner.to.
clean.the.glass.on.the.outside..
of.the.door
■..Spillage.of.marinades,.fruit.juices,.tomato.
sauces.and.basting.materials.containing.
acids.may.cause.discoloration.and.should.be.
wiped.up.immediately.When.the.surface.is.
cool,.clean.and.rinse
■..Do.not.use.oven.cleaners,.cleansing.powders.
or.harsh.abrasives.on.the..
outside.of.the.door
The.gasket.is.designed.with.a.gap.
at.the.bottom.to.allow.for.proper.
air.circulation
Do.not.rub.or.clean.the.door.
gasket—it.has.an.extremely.low.
resistance.to.abrasion.
If.you.notice.the.gasket.becoming.
worn,.frayed.or.damaged.in.any.
way.or.if.it.has.become.displaced.
on.the.door,.you.should.have.it.
replaced
Stainless Steel Surfaces
(on some models)
Do not use a steel wool pad; it will scratch the
surface.
IMPORTANT: APPLY A PROTECTIVE COAT
OF CERAMA BRYTE
®
STAINLESS STEEL
BRIGHTENER (Part # WB02T10111) BEFORE
USING..
This.will.help.you.to.maintain.the.brightness.
and.appearance.of.your.stainless.steel.range
■..In.order.to.avoid.any.discolorations.and/or.
grease.stains,.we.recommend.cleaning.and.
removing.any.spills,.spots.and.grease.from.
the.range.after.use
■..It.is.important.to.use.a.soft.cloth.or.paper.
towel.every.time.the.range.is.cleaned.to.
avoid.any.scratches
Read.carefully.the.instructions.on.the.back.of.
the.Brightener.for.better.results
Cleaning Instructions:
1...Remove.grates
2...Wash.using.warm,.soapy.water:
..Wet.soft.cloth.or.paper.towel.(avoid.using.
excessive.water)
..Wipe.the.surface.in.the.direction.of.the.grain.
(following.the.steel.lines)
..Rinse.and.wring.out.a.soft.cloth.or.paper.
towel.and.dry.the.range
3....Apply.a.degreaser.that.does.not.contain.
sodium.hydroxide.or.stainless.steel.cleaner.
(follow.instructions)
4...Apply.Cerama.Bryte
®
.Stainless.Steel.
Brightener.(follow.instructions)
5....Repeat.steps.2–4.as.many.times.as.needed
6....Put.grates.back.in.place
Follow.these.instructions.for.any.stainless.steel.
surface.on.your.range
DO NOT USE for cooktop or stainless steel
parts cleaning:
•..Caustic.lye.(sodium.hydroxide).or.cleaners.
containing.this.chemical
•..Hard.or.steel.wool.pads
•..Abrasive.materials.or.chemicals
To.inquire.about.purchasing.stainless.steel.
appliance.cleaner.or.polish,.or.to.find.the.
location.of.a.dealer.nearest.you,.please.call.our.
toll-free.number:
National Parts Center 800.626.2002 (U.S.)
800.661.1616 (Canada)
GEAppliances.com (U.S.)
www.GEAppliances.ca (Canada)
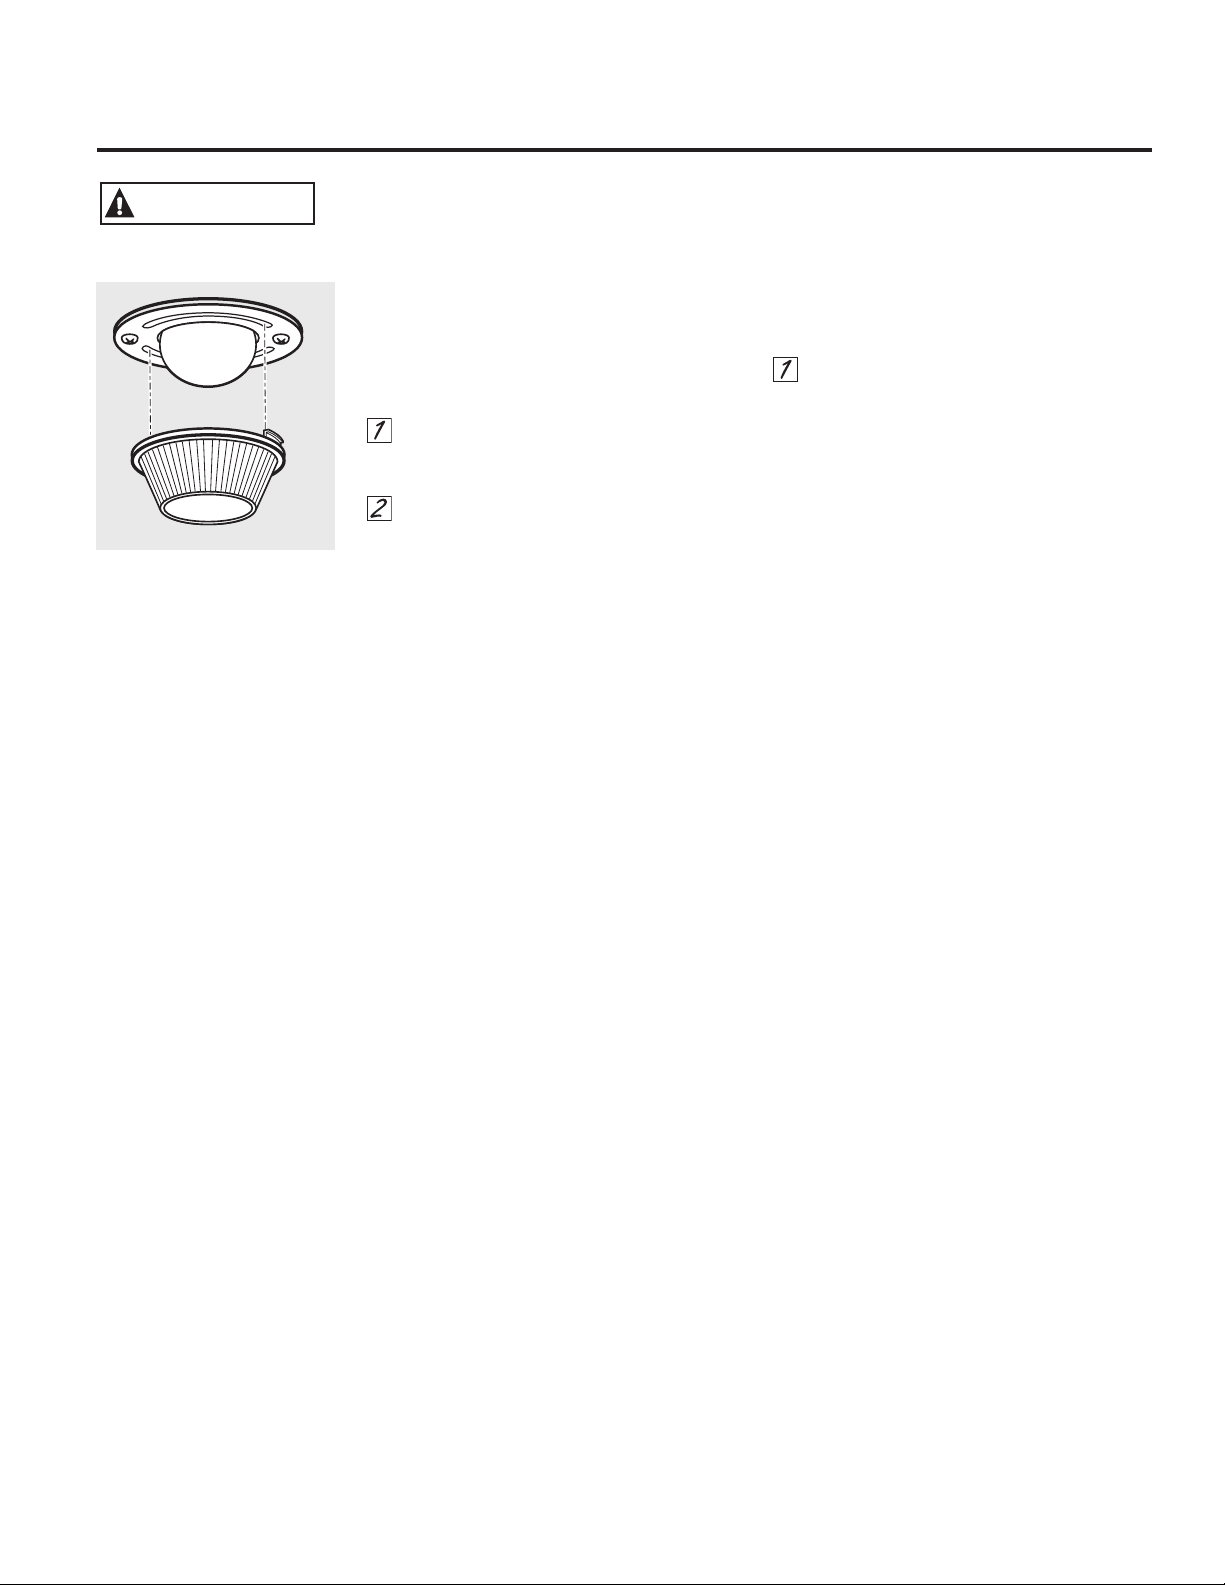
37
GEAppliances.com
Oven Light Replacement (on some models)
Be.sure.to.let.the light.cover.and.bulb.cool.
completely
To remove the cover:
...Twist.lens.counterclockwise.about.a.
quarter.turn.to.remove.
Do not remove any screws to remove the cover.
...Replace.bulb.with.a.40-watt.appliance.
bulb.or.two-prong.halogen.bulb,.as.
appropriate
To replace the cover:
...Line.up.tabs.of.lens.in.front.of.tabs.on.
housing.and.rotate.clockwise.to.engage
WARNING
Shock or Burn Hazard: Before replacing oven light bulb, disconnect the electrical power to the
range at the main fuse or circuit breaker panel. Failure to do so may result in electric shock or burn.
BEFORE YOU BEGIN
Read these instructions completely and carefully.
Installation of this range must conform with local
codes or, in the absence of local codes, with the
National Fuel Gas Code, ANSI Z223.1/NFPA.54, latest
edition. In Canada, installation must conform with
the current Natural Gas Installation Code, CAN/
CGA-B149.1 or the current Propane Installation
Code, CAN/CGA-B149.2, and with local codes where
applicable. This range has been design-certified by
CSA International according to ANSI Z21.1, latest
edition, and Canadian Gas Association according to
CAN/CGA-1.1 latest edition.
As.with.any.appliance.using.gas.and.generating.heat,.
there.are.certain.safety.precautions.you.should.follow.
You.will.find.these.precautions.in.the.Important Safety
Information.section.in.the.front.of.this.manual.Read.
them.carefully
•
IMPORTANT – Save.these.instructions.for.
local.electrical.inspector’s.use
•
IMPORTANT – Observe.all.governing.
codes.and.ordinances
• Note to Installer – Leave.these.instructions.with.
the.appliance.after.installation.is.completed
• Note to Consumer – Keep.this.Owner’s.Manual.
and.Installation.Instructions.for.future.reference
• Note –.This.appliance.must.be.properly.grounded
• Servicer –.The.electrical.diagram.is.in.an.envelope.
attached.to.the.back.of.the.range.
•. Proper.installation.is.the.responsibility.of.the.installer.
•. Product.failure.due.to.improper.installation.is.not.
covered.under.the.Warranty.
Mobile Home - Additional Installation Requirements
The.installation.of.this.range.must.conform.to.the.
Manufactured.Home.Construction.and.Safety.Standard,.
Title.24.CFR,.Part.3280.(formerly.the.Federal.Standard.
for.Mobile.Home.Construction,.use.the.Standard.for.
Manufactured.Home.Installations,.ANSI.A225,.1/NFPA.
501A.or.with.local.codes
Mobile home installations require:
•
..When.this.range.is.installed.in.a.mobile.home,.it.must.
be.secured.to.the.floor.during.transit.Any.method.of.
securing.the.range.is.adequate.as.long.as.it.conforms.
to.the.standards.listed.above
Installation
Range
Instructions
.. .
Do not store or use combustible materials, gasoline or
other flammable vapors and liquids in the vicinity of
this or any other appliance.
If you smell gas:
Open.windows
Don’t.touch.electrical.switches
Extinguish.any.open.flame
Immediately.call.your.gas.supplier
FOR YOUR SAFETY
38
TOOLS YOU WILL NEED
Flat-blade.screwdriver
Pipe.wrenches.(2)
(one.for.backup)
Phillips.screwdriver
Open-end.or..
adjustable.wrench
Pencil.and.ruler
Level
Drill,.awl.or.nail
MATERIALS YOU MAY NEED
•..Gas.line.shut-off.valve
•..Pipe-joint.sealant.or.UL-approved.pipe.thread.tape.with.
Teflon*.that.resists.action.of.natural.and.LP.gases
•..Flexible.metal.appliance.connector.(1/2″.ID).A.5-foot.
length.is.recommended.for.ease.of.installation.but.other.
lengths.are.acceptable.Never.use.an.old.connector.when.
installing.a.new.range
•..Flare.union.adapter.for.connection.to.gas.supply.line.(3/4″.
or.1/2″.NPT.x.1/2″.ID)
•..Flare.union.adapter.for.connection.to.pressure.regulator.on.
range.(1/2″.NPT.x.1/2″.ID)
•..Liquid.leak.detector.or.soapy.water
•..
Lag.bolt.or.1/2″.OD.sleeve.anchor.(for.concrete.floors.only)
*Teflon:.Registered.trademark.of.DuPont
If you have questions, call 1.800.GE.CARES or visit our Website at: GEAppliances.com
In the Commonwealth of Massachusetts
•
..This.product.must.be.installed.by.a.licensed.plumber.or.
gas.fitter
•
..When.using.ball.type.gas.shut-off.valves,.they.shall.be.
the.T-handle.type
•
.
A.flexible.gas.connector,.when.used,.must.not.exceed.3.feet
Installation Instructions
39
WARNING
INSTALLATION SAFETY
INSTRUCTIONS
Read these instructions completely and carefully.
Improper installation, adjustment, alteration, service
or maintenance can cause injury or property damage.
Refer to this manual. For assistance or additional
information, consult a qualified installer, service
agency, manufacturer (dealer) or the gas supplier.
Never.reuse.old.flexible.connectors.The.use.of.old.
flexible.connectors.can.cause.gas.leaks.and.personal.
injury.Always.use.NEW.flexible.connectors.when.
installing.a.gas.appliance
Leak.testing.of.the.appliance.shall.be.conducted.
according.to.the.manufacturer.instructions
IMPORTANT.–.Remove.all.packing.material.
and.literature.from.oven.before.connecting.gas.and.
electrical.supply.to.range
CAUTION.
.
Do.not.attempt.to.operate.
the.oven.of.this.range.during.a.power.failure.(Electric.
Ignition.models.only)
..Have.your.range.installed.by.a.qualified.installer
..Your.range.must.be.electrically.grounded.in.
accordance.with.local.codes.or,.in.the.absence.of.
local.codes,.in.accordance.with.the.National.Electrical.
Code.(ANSI/NFPA.70,.latest.edition).In.Canada,.
electrical.grounding.must.be.in.accordance.with.the.
current.CSA.C221.Canadian.Electrical.Code.Part.1.
and/or.local.codes.See.Electrical Connections. in.this.
section
..Before.installing.your.range.on.linoleum.or.any.other.
synthetic.floor.covering,.make.sure.the.floor.covering.
can.withstand.180°F.without.shrinking,.warping.or.
discoloring.Do.not.install.the.range.over.carpeting.
unless.a.sheet.of.1/4”.thick.plywood.or.similar.
insulator.is.placed.between.the.range.and.carpeting
..Make.sure.the.wall.coverings.around.the.range.can.
withstand.heat.generated.by.the.range.up.to.200°F
..Avoid.placing.cabinets.above.the.range.To.reduce.
the.hazard.caused.by.reaching.over.the.open.flames.
of.operating.burners,.install.a.ventilation.hood.over.
the.range.that.projects.forward.at.least.5”.beyond.
the.front.of.the.cabinets
..The.ventilating.hood.must.be.constructed.
of.sheet.metal.not.less.than.00122”.thick.
Install.above.the.cooktop.with.a.clearance.of.not.
less.than.1/4”.between.the.hood.and.the.underside.
of.the.combustible.material.or.metal.cabinet.The.
hood.must.be.at.least.as.wide.as.the.appliance.and.
centered.over.the.appliance.Clearance.between.the.
cooking.surface.and.the.ventilation.hood.surface.
MUST NEVER BE LESS THAN 24”
EXCEPTION: Installation.of.a.listed.microwave.oven.or.
cooking.appliance.over.the.cooktop.shall.conform.to.
the.installation.instructions.packed.with.that.appliance
..If.cabinets.are.placed.above.the.range,.
allow.a.minimum.clearance.of.30”.between.the.
cooking.surface.and.the.bottom.of.unprotected.
cabinets
..If.a.30”.clearance.between.cooking.surface.and.
overhead.combustible.material.or.metal.cabinets.
cannot.be.maintained,.protect.the.underside.of.the.
cabinets.above.the.cooktop.with.not.less.than.1/4”.
insulating.millboard.covered.with.sheet.metal.not.less.
than.00122”.thick.Clearance.between.the.cooking.
surface.and.protected.cabinets.MUST NEVER BE LESS
THAN 24”.
..The.vertical.distance.from.the.plane.of.the.cooking.
surface.to.the.bottom.of.adjacent.overhead.cabinets.
extending.closer.than.1”.to.the.plane.of.the.range.
sides.must.not.be.less.than.18”.(See.the.Dimensions.
and.Clearances. illustration.in.this.section)
CAUTION - Only the GE Café branded series
of Advantium
®
or microwave over-the-range ovens are
designed to be installed above the GE Café range..Surfaces.
above.a.gas.range.can.become.hot.Installation.of.any.other.
over-the-range.oven.above.a.GE.Café.range.may.result.in.
surface.temperatures.that.can.cause.burns
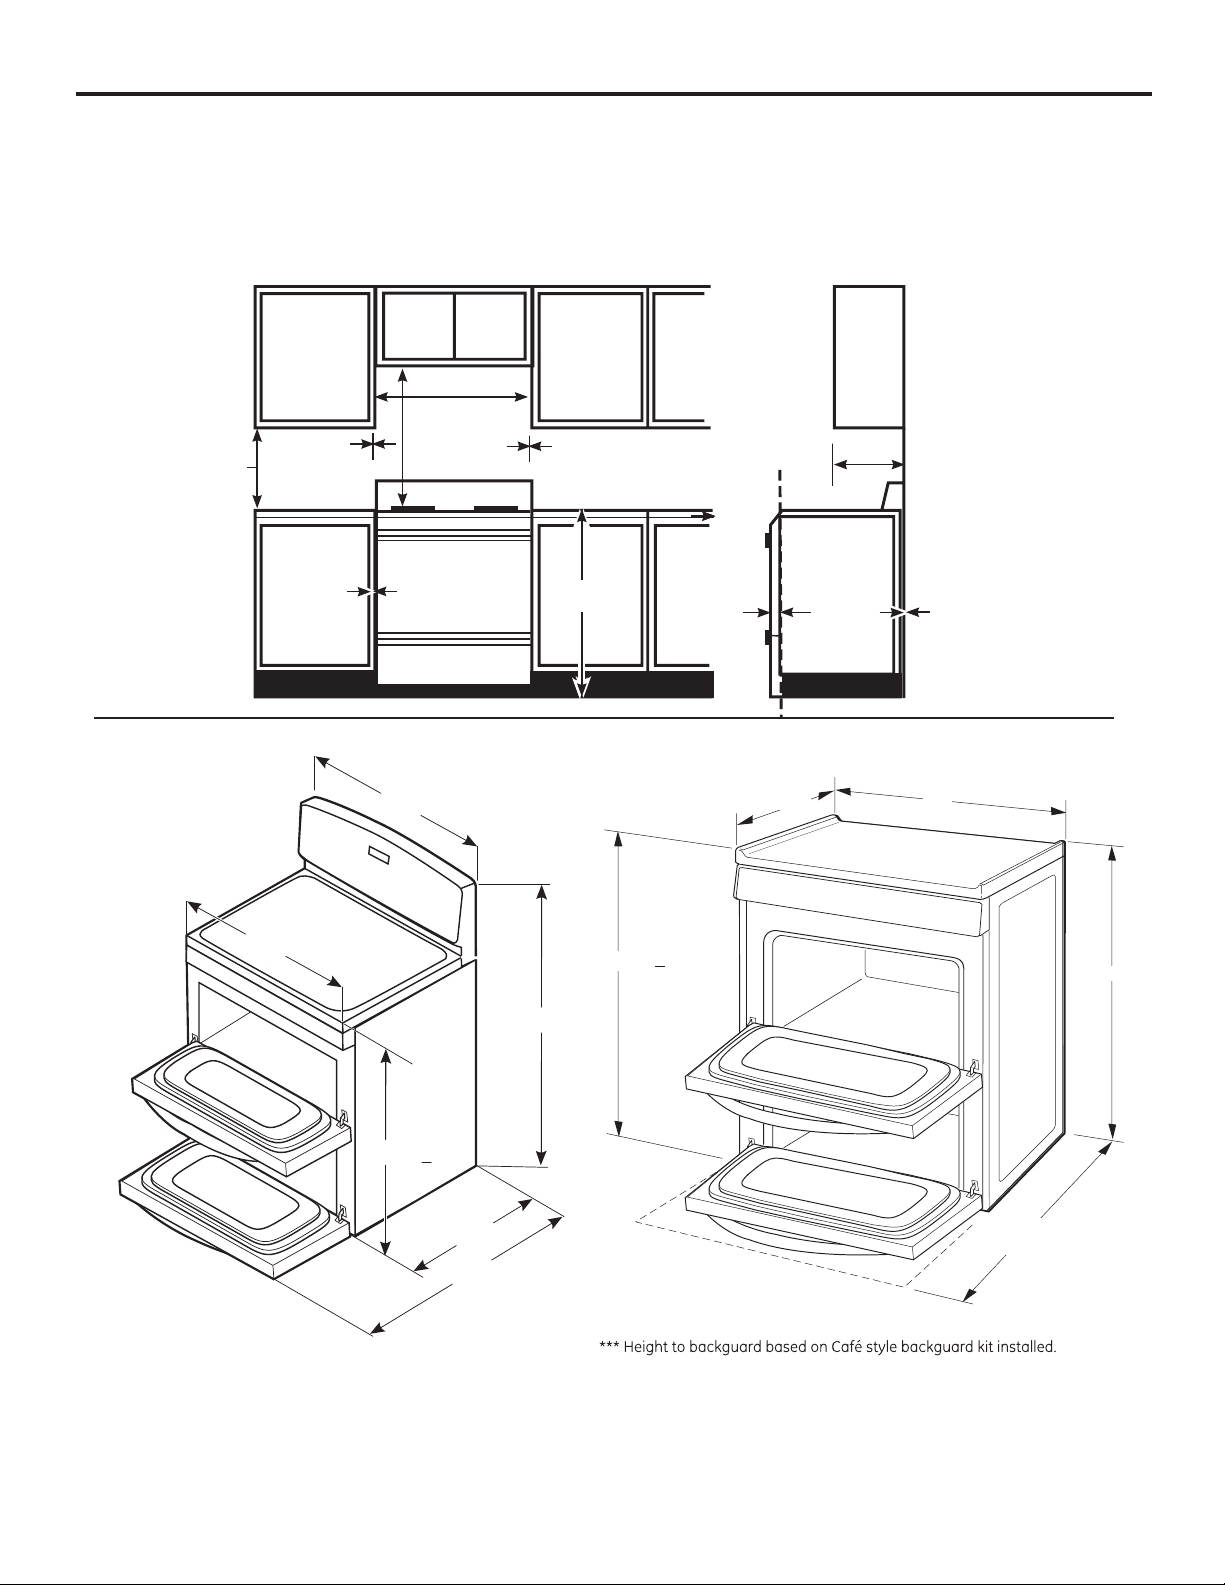
Installation Instructions
Provide adequate clearances between the range and adjacent combustible surfaces. These dimensions must be
met for safe use of your range. The location of the electrical outlet and pipe opening (see Gas Pipe and Electric
Outlet Locations) may be adjusted to meet specific requirements.
The range may be placed with 0″ clearance (flush) at the back wall.
DIMENSIONS AND CLEARANCE
.40
**43-3/4”
48”
*29-3/4”
36-1/4” +1/4”
30”
30 3/4”
* Dimension includes handle with doors closed.
**Dimension are referenced from the point at
the back of the range that will contact the rear wall first.
Max dimension should be considered between the upper
and lower doors.
*29.1/4"
36.1/4".+1/4"
***41.1/2"
**43.3/8"
Depth.with.door.open
30"
To.cabinets.below.
cooktop.and.at.
the.range.back
To.cabinets.
below.
cooktop.and.
at.the.range.
back
30”
30”
6”
Minimum
13”
Minimum.
clearance.to.
right.wall
Maximum.
depth.for.
cabinets.above.
countertops
Front.edge.of.
the.range.side.
panel.forward.
from.cabinet
18”
0”
1/4”
Minimum.to.
cabinets.on.
either.side..
of.the.range
36”
6”
Minimum.
clearance..
to.left.wall*
0”
.41
Installation Instructions
LOCATION
Do not locate the range where it may be subject to
strong drafts. Any openings in the floor or wall behind
the range should be sealed. Make sure the openings
around the base of the range that supply fresh air
for combustion and ventilation are not obstructed
by carpeting or woodwork.
Your.range,.like.many.other.household.items,.is..
heavy.and.can.settle.into.soft.floor.coverings.such.as.
cushioned.vinyl.or.carpeting.Use.care.when.moving..
the.range.on.this.type.of.flooring.It.is.recommended.
that.the.following.simple.and.inexpensive.instructions.
be.followed.to.protect.your.floor
The.range.should.be.installed.on.a.sheet.of.plywood..
(or.similar.material).When.the.floor.covering.ends.at.
the.front.of.the.range,.the.area.that.the.range.will.rest.
on.should.be.built.up.with.plywood.to.the.same.level.or.
higher.than.the.floor.covering.
This.will.allow.the.range.to.be.moved.for.cleaning..
or.servicing.Also,.make.sure.your.floor.covering.will.
withstand.180°F.(See.the.Installation.Safety.Instructions.
section)
Make.sure.the.wall.coverings.around.your.range.can.
withstand.the.heat.generated.(up.to.200°F).by.the.
range.(See.the..Installation Safety Instructions.section)
IMPORTANT!
Remove.all.tape.and.packaging.Make.sure.the.burners.
are.properly.seated.and.level
Take.the.accessory.pack.out.of.the.oven.and/or.drawer
Check.to.be.sure.that.no.range.parts.have.come.loose.
during.shipping
CONVERTING TO LP GAS
(or converting
back to natural gas from LP)
This range leaves the factory set for use with natural
gas. If you want to convert to LP gas, the conversion
must be performed by a qualified LP gas installer.
The.conversion.instructions.and.LP.orifices.can.be.found.
attached.to.the.range.next.to.the.pressure.regulator
Keep.these.instructions.and.the.orifices.in.case.you.want.
to.convert.back.to.natural.gas
.42
Installation Instructions
Your range is designed to operate at a pressure of 5”
of water.column.on.natural.gas.or,.if.designed.for.LP.gas.
(propane.or.butane),.10”.of.water.column
Make.sure.you.are.supplying.your.range.with.the.type..
of.gas.for.which.it.is.designed.
This.range.is.convertible.for.use.on.natural.or..
propane.gas.If.you.decide.to.use.this.range.on.LP.gas,.
conversion.must.be.made.by.a.qualified.LP.installer.
before.attempting.to.operate.the.range.on.that.gas
For.proper.operation,.the.pressure.of.natural.gas.supplied.
to.the.regulator.must.be.between.5”.and.13”.of.water.
column.
For.LP.gas,.the.pressure.supplied.must.be.between.10”.
and.13”.of.water.column.
When.checking.for.proper.operation.of.the.regulator,..
the.inlet.pressure.must.be.at.least.1".greater.than.the.
operating.(manifold).pressure.as.given.above.
The.pressure.regulator.located.at.the.inlet.of.the.range.
manifold.must.remain.in.the.supply.line.regardless.of.
whether.natural.or.LP.gas.is.being.used.
A.flexible.metal.appliance.connector.used.to.connect.the.
range.to.the.gas.supply.line.should.have.an.ID.of.1/2”.
and.be.5.feet.in.length.for.ease.of.installation.In.Canada,.
flexible.connectors.must.be.single.wall.metal.connectors.
no.longer.than.6.feet.in.length
PROVIDE ADEQUATE GAS SUPPLY
1
.CONNECT THE RANGE TO GAS
2
Shut off the main gas supply valve before disconnecting
the old range and leave it off until the new hook-up
has been completed. Don’t forget to relight the pilot on
other gas appliances when you turn the gas back on.
Because.hard.piping.restricts.movement.of.the.range,..
the.use.of.a.CSA.International-certified.flexible.metal.
appliance.connector.is.recommended.unless.local.codes.
require.a.hard-piped.connection.
Never.use.an.old.connector.when.installing.a.new.range.
If.the.hard.piping.method.is.used,.you.must.carefully.align.
the.pipe;.the.range.cannot.be.moved.after.the.connection.
is.made
To.prevent.gas.leaks,.put.pipe.joint.compound.on,.or.wrap.
pipe.thread.tape.with.Teflon*.around,.all.male.(external).
pipe.threads
A...Install.a.manual.gas.line.shut-off.valve.in.the.gas.line.in.
an.easily.accessed.location.outside.of.the.range.Make.
sure.everyone.operating.the.range.knows.where.and.
how.to.shut.off.the.gas.supply.to.the.range
B...Install.male.1/2”.flare.union.adapter.to.the.1/2”.NPT.
internal.thread.at.inlet.of.regulator.Use.a.backup.
wrench.on.the.regulator.fitting.to.avoid.damage
..When.installing.the.range.from.the.front,.remove..
the.90°.elbow.for.easier.installation
C..Install.male.1/2”.or.3/4”.flare.union.adapter.to.the.
NPT.internal.thread.of.the.manual.shut-off.valve,..
taking.care.to.back-up.the.shut-off.valve.to.keep.it.
from.turning
D..Connect.flexible.metal.appliance.connector.to.the.
adapter.on.the.range.Position.range.to.permit.
connection.at.the.shut-off.valve
E..When.all.connections.have.been.made,.make.sure..
all.range.controls.are.in.the.off.position.and.turn.on.the.
main.gas.supply.valve.Use.a.liquid.leak.detector.at.all.
joints.and.connections.to.check.for.leaks.in.the.system
WARNING Fire hazard: Do not use
a flame to check for gas leaks.
When.using.test.pressures.greater.than.1/2.psig.to.
pressure.test.the.gas.supply.system.of.the.residence,.
disconnect.the.range.and.individual.shut-off.valve.from.
the.gas.supply.piping.When.using.test.pressures.of.1/2.
psig.or.less.to.test.the.gas.supply.system,.simply.isolate.
the.range.from.the.gas.supply.system.by.closing.the.
individual.shut-off.valve
*Teflon:.Registered.trademark.of.DuPont
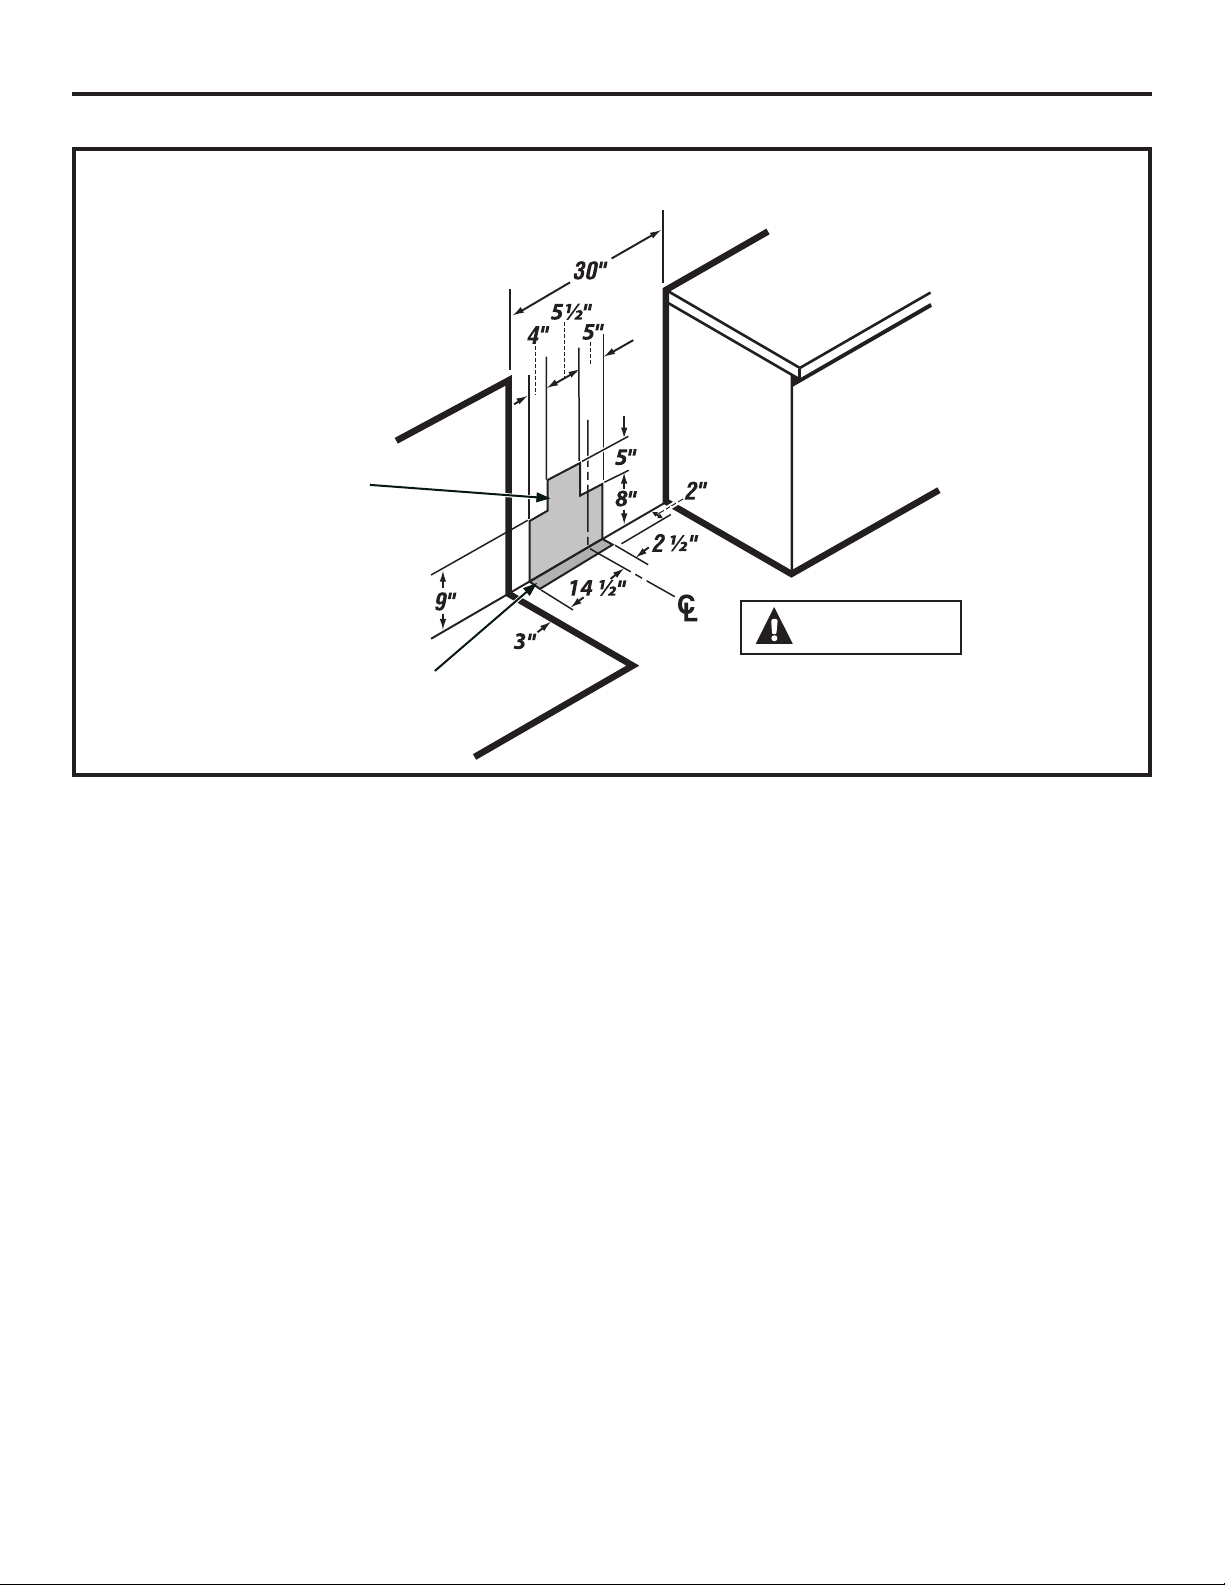
Installation Instructions
.43
GAS PIPE AND ELECTRICAL OUTLET LOCATIONS
Recommended.area.for.120V.
outlet.on.rear.wall.and.area.for.
through-the-wall.connection.of.
pipe.stub.and.shut-off.valve
Recommended.area.
for.through-the-floor.
connection.of.pipe.stub.
and.shut-off.valve
CAUTION To prevent
drafts from affecting burner
operation, seal all openings in floor
and wall.
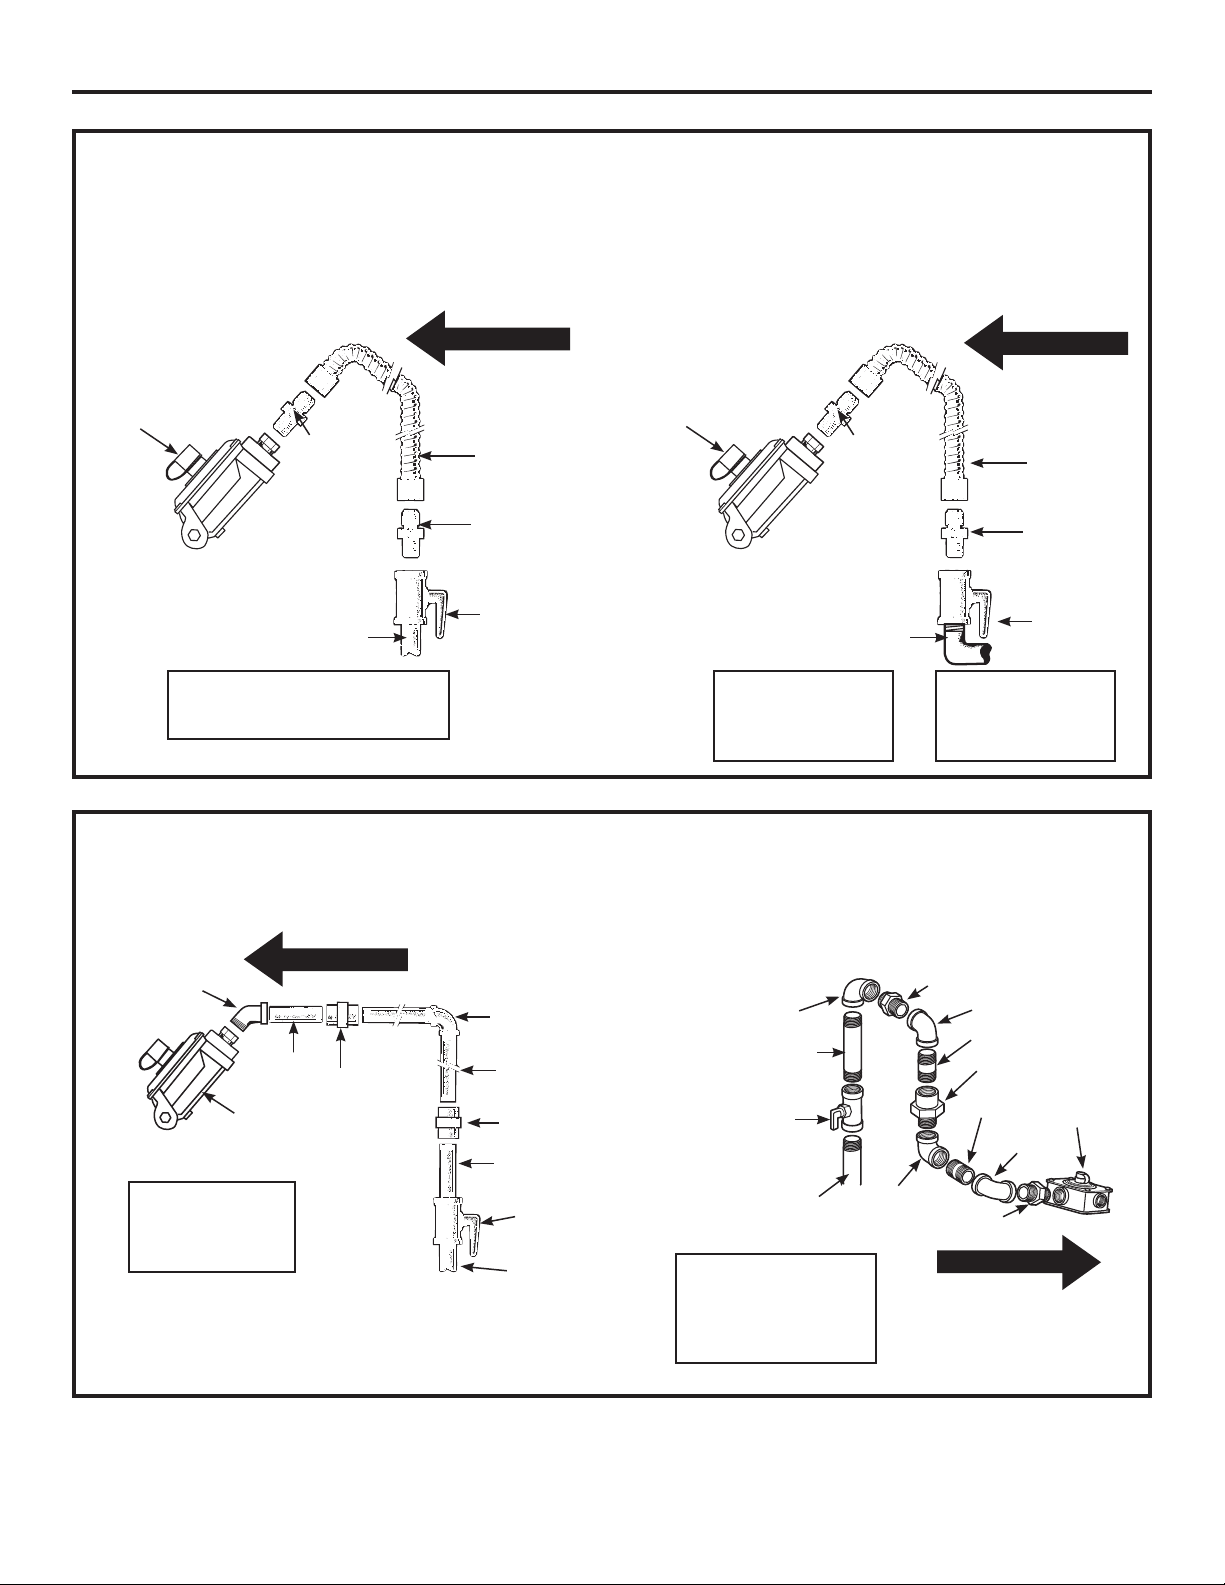
Installation Instructions
Pressure.
regulator
Pressure.
regulator
Gas.Flow.into.Range
Gas.Flow.into.Range
Flex.
connector.
(6.ft.max)
Flex.
connector.
(6.ft.max)
Adapter Adapter
Installer:.Inform.the.consumer.of.
the.location.of.the.gas.shut-off.
valve
Installer:.Inform.the.
consumer.of.the.
location.of.the.gas.
shut-off.valve
Installer:.See.
recommended.
distance.for.through.
the.wall.connection
1/2″.or.3/4″.
Gas.pipe
1/2″.or.3/4″.
Gas.pipe
Adapter
Adapter
Gas..
shut-off..
valve
Gas..
shut-off..
valve
Pressure..
regulator
45°.Elbow
Nipple
Union
90°.Elbow
Black..
iron.pipe
Union
Nipple
Gas..
shut-off..
valve
1/2″.or.3/4″
Gas.pipe
Gas.Flow.into.Range
Installer:.Inform..
the.consumer.of.
the.location.of.the.
gas.shut-off.valve
Gas.Flow.into.Range
Gas..
shut-off..
valve
1/2″.or.3/4″
Gas.pipe
Pressure..
regulator
Nipple
90°.Elbow
90°.Elbow
Adapter
Adapter
90°.Elbow
Quick.connect..
or.union
Installer:.Inform.the.
consumer.of.the.
location..
of.the.gas.shut-off.
valve
Alternate.Hookup
Nipple
Nipple
90°.
Elbow
.44
FLEXIBLE CONNECTOR HOOKUP OPTIONS
RIGID PIPE HOOKUP OPTIONS
Gasline from floor Gasline from wall

.45
Installation Instructions
ELECTRICAL CONNECTIONS
Electrical Requirements
120-volt,.60.Hertz,.properly.grounded.dedicated.circuit.
protected.by.a.15-amp.or.20-amp.circuit.breaker.or.
time-delay.fuse
Note:.Use.of.automatic,.wireless,.or.wired.external.
switches.that.shut.off.power.to.the.appliance.are.not.
recommended.for.this.product
Grounding
WARNING Shock Hazard:
This appliance must be properly grounded. Failure to
do so can result in electric shock.
The.power.cord.of.this.appliance.is.equipped.with.a.
3-prong.(grounding).plug.which.mates.with.a.standard.
3-prong.grounding.wall.receptacle.to.minimize.the.
possibility.of.electric.shock.hazard.from.this.appliance
The.customer.should.have.the.wall.receptacle.and.circuit.
checked.by.a.qualified.electrician.to.make.sure.the.
receptacle.is.properly.grounded
Where.a.standard.2-prong.wall.receptacle.is.
encountered,.it.is.the.personal.responsibility.and.
obligation.of.the.customer.to.have.it.replaced.with.a.
properly.grounded.3-prong.wall.receptacle
DO NOT, UNDER ANY CIRCUMSTANCES, CUT OR REMOVE
THE THIRD (GROUND) PRONG FROM THE POWER CORD.
DO NOT USE AN ADAPTER. DO NOT USE AN EXTENSION
CORD.
A word about GFCIs – GFCIs are not required or
recommended for gas range receptacles.
Ground.Fault.Circuit.Interrupters.(GFCIs).are.devices.that.
sense.leakage.of.current.in.a.circuit.and.automatically.
switch.off.power.when.a.threshold.leakage.level.is.
detected.These.devices.must.be.manually.reset.by.the.
consumer.The.National.Electrical.Code.requires.the.
use.of.GFCIs.in.kitchen.receptacles.installed.to.serve.
countertop.surfaces.Performance.of.the.range.will.not..
be.affected.if.operated.on.a.GFCI-protected.circuit.but.
occasional.nuisance.tripping.of.the.GFCI.breaker.is.
possible
3
Ensure.proper.ground.
exists.before.use
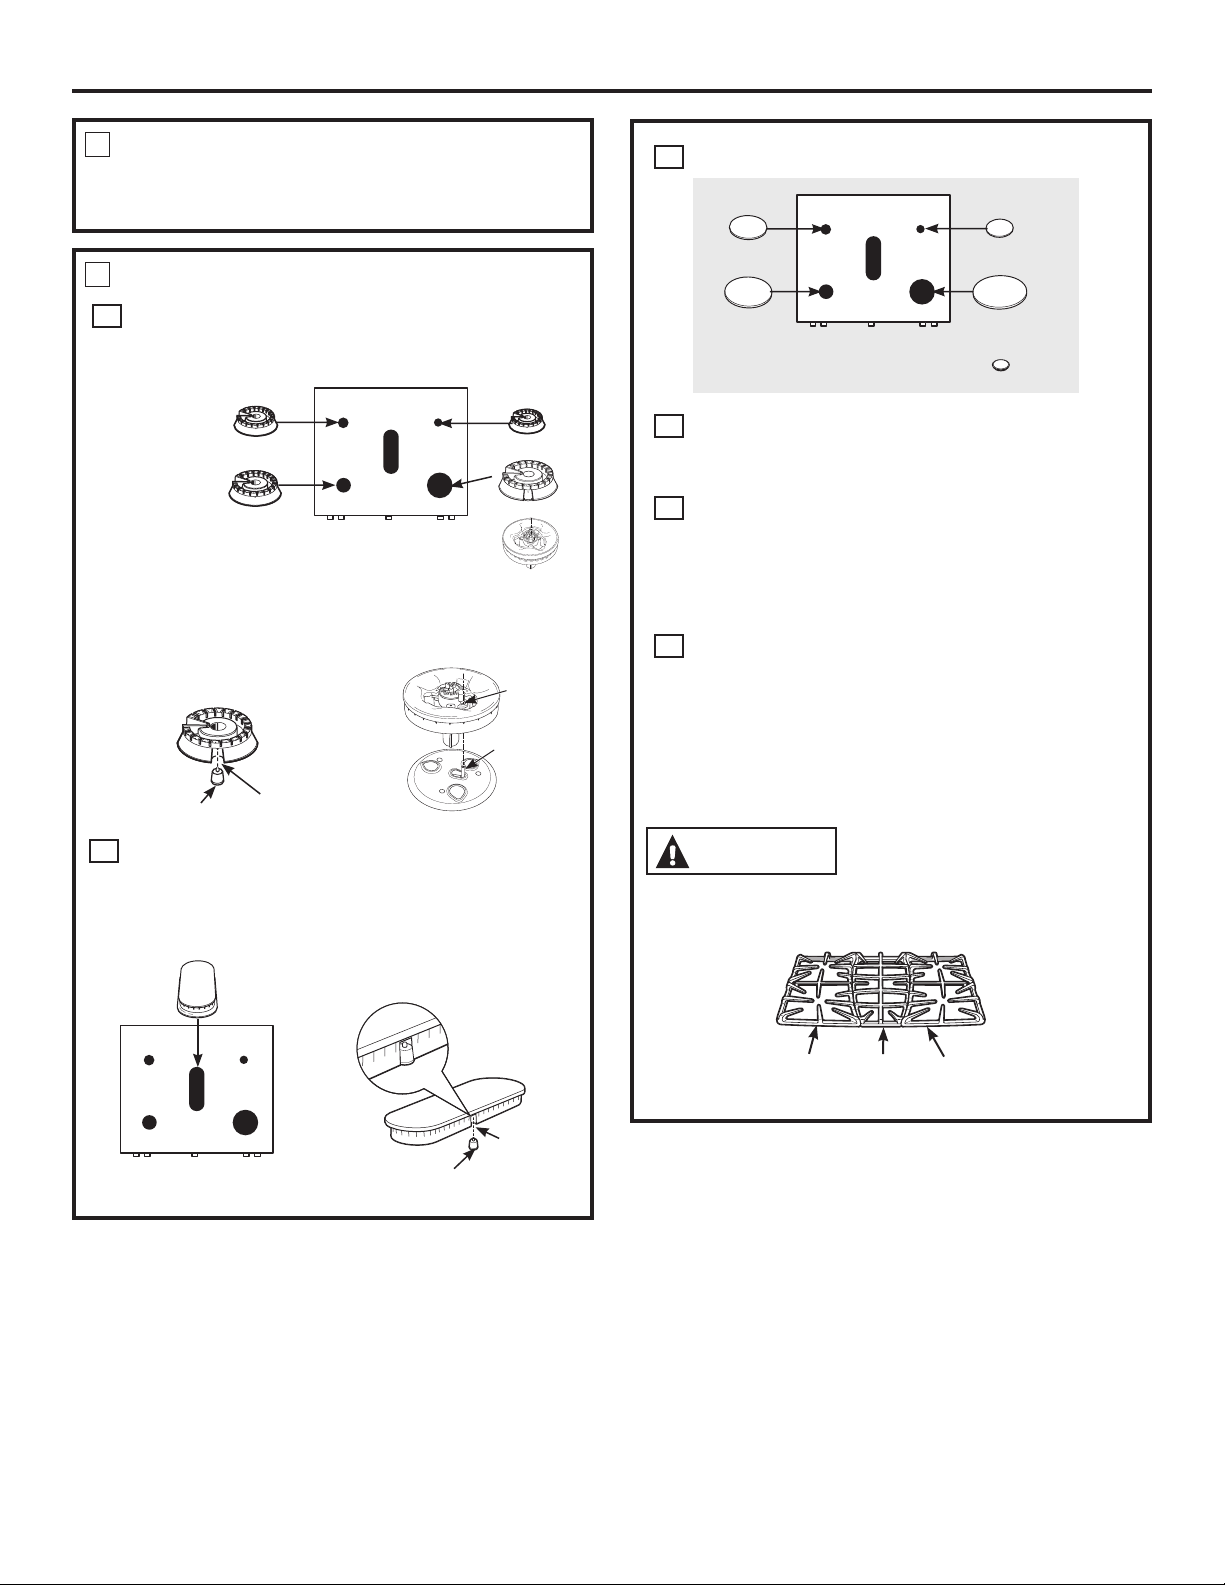
5
ASSEMBLE SURFACE BURNERS
(CONT.)
B
Oval (Center) Burner Head/Cap Assembly
Place.the.oval.(center).head/cap.assembly.over.the.
electrode.on.the.cooktop
C
. Caps
Place.the.matching.size.caps.onto.the.burner.bases..
or.heads
Make.sure.that.the.heads.(on.some.models).and.caps.
are.replaced.in.the.correct.locations
D
. Grates
Place.the.left,.right.and.center.grates.on.the.cooktop.
These.grates.are.position.specific.The.undersides.of.
the.left.and.right.grates.are.marked.“LEFT.FRONT”.
and.“RIGHT.FRONT”.On.some.models.the.underside.
is.labeled."OUTSIDE".Place.the.middle.grate.with.its.
bowed.front.(on.some.models).toward.the.front.of.the.
range
CAUTION
Do not operate the burner
without all burner parts in place.
Installation Instructions
SEAL THE OPENINGS
4
Seal.any.openings.in.the.wall.behind.the.range.and.in.the.
floor.under.the.range.when.hookups.are.completed
ASSEMBLE SURFACE BURNERS
5
A
..Burner.Heads.(on.some.models)
Place.burner.heads.over.the.electrodes.on.the.cooktop,.in.
the.correct.
locations.
according.to.
their.size.There.
is.one.small,.
one.medium,.
one.large.and.
one.extra-large.
burner.head
.46
Electrode
Slot
Front.of.range
Oval.head.and.cap.
assembly
Make.sure.the.slot.in.the.
burner.head.is.positioned.
over.the.electrode
Left-Front
Right-Front
Center
Front.of.range
(on.some.models)
Triple.flame.head
(on.some.models)
Front.of.range
Tri-ring.cap
(on.some.models)
(on.some.models)
B
Oval (Center) Burner Head/Cap Assembly
Place.the.oval.(center).head/cap.assembly.over.the.
electrode.on.the.cooktop
Slot
Electrode
or
Make.sure.the.slot.in.the..
burner.head.is.positioned..
over.the.electrode
Hole
Electrode
Operation.of.all.cooktop.and.oven.burners.should.be.
checked.after.the.range.and.gas.supply.lines.have.been.
carefully.checked.for.leaks
Electric Ignition Models
Select.a.top.burner.knob.and.simultaneously.push.in.
and.turn.to.LITE.position.You.will.hear.a.clicking.sound.
indicating.proper.operation.of.the.spark.module.Once.the.
air.has.been.purged.from.the.supply.lines,.burners.should.
light.within.4.seconds.After.burner.lights,.rotate.knob.out.
of.the.LITE. position.Try.each.burner.in.succession.until.all.
burners.have.been.checked
Quality of Flames
The.combustion.quality.of.burner.flames.needs.to.be.
determined.visually
If burner flames look like (A), call for service. Normal
burner flames should look like (B) or (C), depending on
the type of gas you use.
With.LP.gas,.some.yellow.tipping.on.outer.cones.is.
normal
CHECK IGNITION OF SURFACE
BURNERS
6
CHECK IGNITION OF OVEN BURNER
7
The.oven.is.designed.to.operate.quietly.and.automatically..
To.operate.the.lower.oven,.press.the.Bake.pad.and.then.press.
the.number.pads.until.350°.appears.in.the.display.Touch.the.
Start. pad.After.30–90.seconds,.the.oven.burner.will.ignite.and.
burn.until.the.set.temperature.is.reached.The.oven.burner.will.
continue.to.cycle.on.and.off.as.necessary.to.maintain.the.oven.
at.the.temperature.indicated.by.the.display
To.operate.the.upper.oven,.turn.the.Upper.Oven.Control.Knob.
to.350°
To.check.ignition.of.the.broil.burner,.touch.the.Broil Hi/Lo. pad.
and.then.the.Start.pad.After.30–90.seconds,.the.broil.burner.
will.ignite
Electric ignition models.require.electrical.power.to.operate.
In.case.of.a.power.outage,.the.oven.burners.on.these.models.
cannot.be.lit.manually.with.a.match.Gas.will.not.flow.unless..
the.glow.bar.is.hot
If.the.oven.is.in.use.when.a.power.outage.occurs,.the.burner..
will.shut.off.and.cannot.be.relit.until.power.is.restored
.47
Installation.Instructions
(C) Soft blue
flames—Normal.
for.natural.gas
(B) Yellow tips
on outer cones—
Normal.for.LP.gas
(A) Yellow flames—
Call.for.service
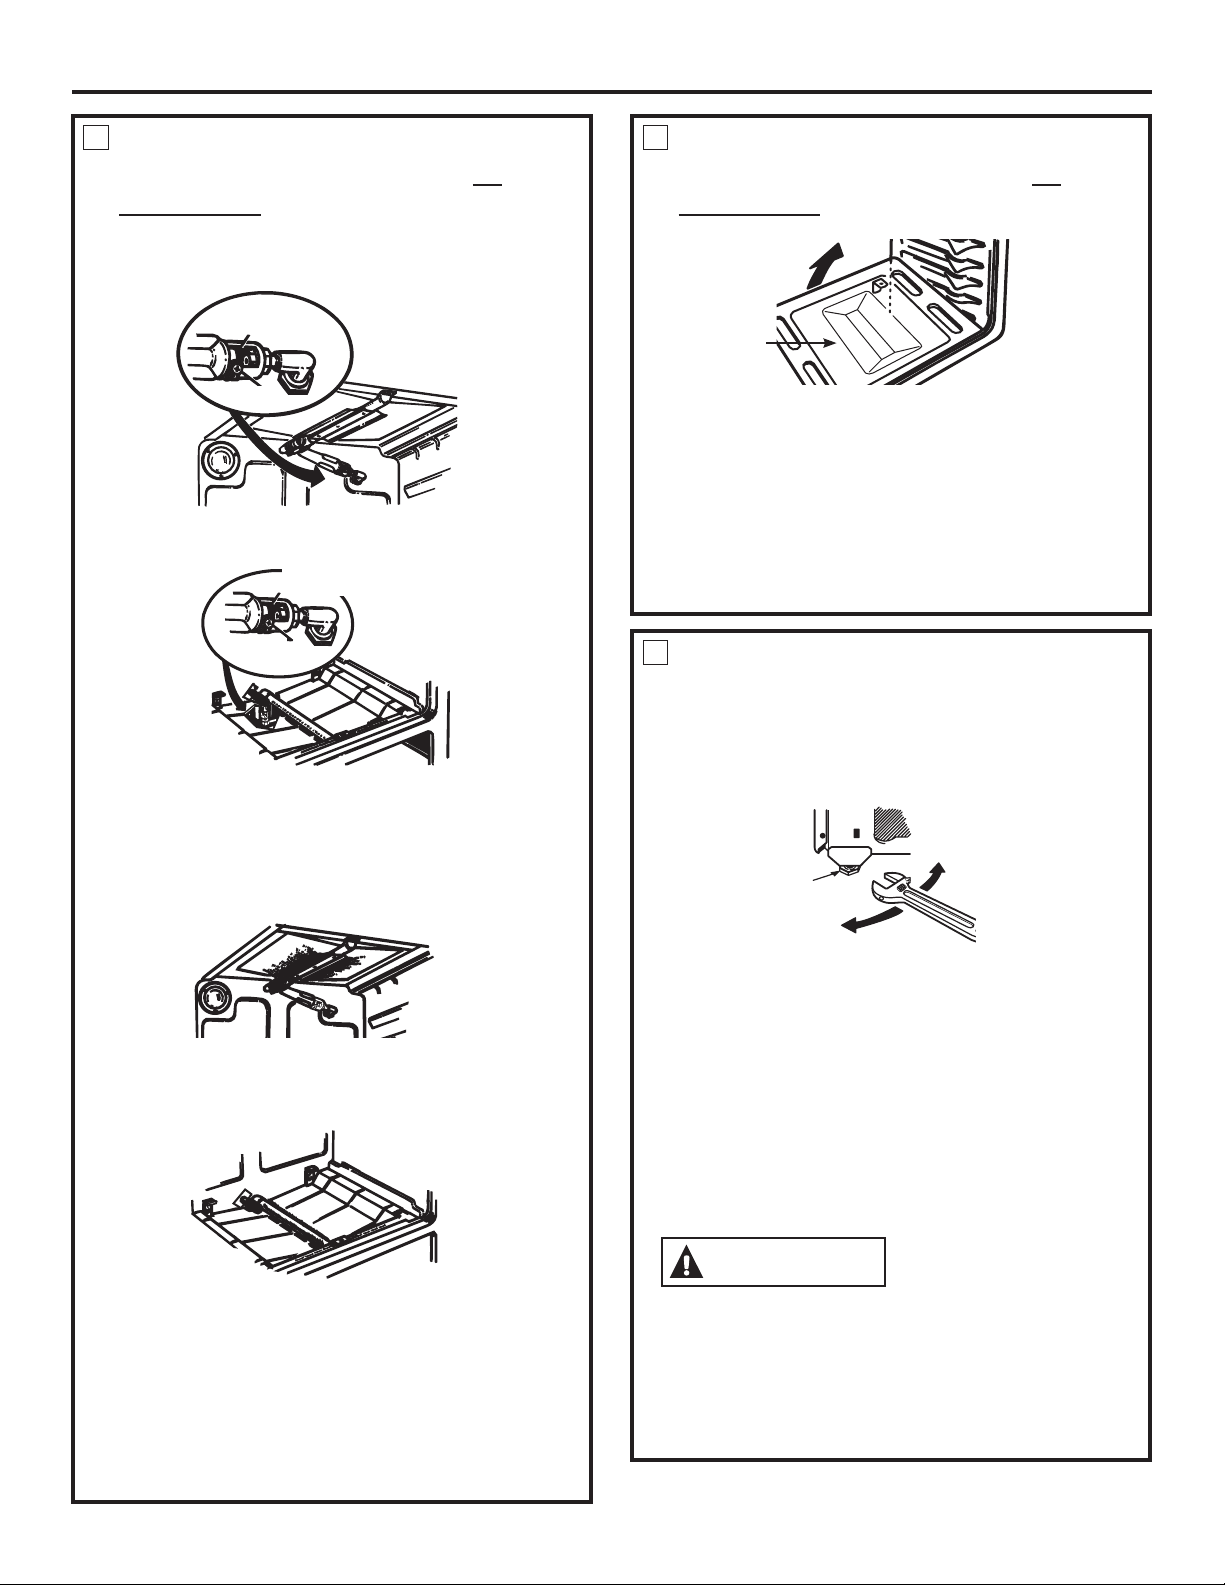
To remove the oven bottom:
A. .Remove.the.screws.holding.down.the.rear.of.the.oven.
bottom
B. .Grasp.the.oven.bottom.at.finger.slots.on.each.side
C...Lift.the.rear.of.the.oven.bottom.enough.to.clear.the.
lip.of.the.range.frame,.push.it.back,.and.then.pull.it.up.
and.out
.48
Installation Instructions
ADJUST BROIL AND OVEN BURNER
AIR ADJUSTMENT SHUTTERS IF
NECESSARY
8
Air.adjustment.shutters.for.the.top.and.bottom.burners.
regulate.the.flow.of.air.to.the.flames
The.air.adjustment.shutter.for.the.top.(broil).burner.is.in.
the.center.of.the.rear.wall.of.the.oven
The.shutter.for.the.bottom.(oven).burner.is.near.the.back.
wall.See.the.Care.and.cleaning.of.the.range. section
To.adjust.the.flow.of.air.to.either.burner,.loosen.the.
Phillips.head.screw.and.rotate.the.shutter.toward.open.or.
closed.position.as.needed
The.flames.for.the.top.(broil).burner.should.be.steady.with.
approximately.1″.blue.cones.and.should.not.extend.out.
over.the.edges.of.the.burner.baffle
To.determine.if.the.bottom.burner.flames.are.burning.
properly,.remove.the.oven.bottom.and.enclosure.over.
burner.shutter.for.lower.oven.Flames.should.have.
approximately.1″.blue.cones.and,.if.range.is.supplied.
with.natural.gas,.should.burn.with.no.yellow.tipping..
(With.most.LP.gas,.small.yellow.tips.at.the.end.of.outer.
cones.are.normal).Flames.should.not.lift.off.burner.ports.
If.lifting.is.observed,.gradually.reduce.air.shutter.opening.
until.flames.are.stabilized
.ADJUST BROIL AND OVEN BURNER
AIR ADJUSTMENT SHUTTERS IF
NECESSARY
(CONT.)
8
.LEVELING THE RANGE
9
A...Install.the.oven.racks.in.the.oven.and.check.for.
levelness.before.positioning.the.range.where.it.will.
be.installed.with.front.access.to.front.leveling.legs.
and.rear.access.to.rear.leveling.legs.All.legs.must.be.
leveled.before.the.product.is.installed
B...Check.for.levelness.by.placing.a.spirit.level.or.a.cup,.
partially.filled.with.water,.on.one.of.the.oven.racks..
If.using.a.spirit.level,.take.two.readings—with.the.level.
placed.diagonally.first.in.one.direction.and.then.the.
other
C...The.front.leveling.legs.can.be.adjusted.from.the.bottom.
through.the.front.of.the.unit.The.rear.legs.can.be.
adjusted.from.the.bottom.through.the.side.of.the.unit
D...Use.an.open-end.or.adjustable.wrench.to.adjust.the.
leveling.legs.until.the.range.is.level
WARNING
.
Never.completely.remove.
the.leveling.leg.as.the.range.will.not.be.secured.to.the.
anti-tip.device.properly
E...After.leveling.the.unit,.slide.it.into.final.position.and.
verify.levelness
F...After.the.range.is.level,.slide.the.range.away.from.the.
wall.so.that.the.Anti-Tip.device.can.be.installed
Leg.leveler
Lower.
range
Raise.
range
(on.some.models)
Air..
adjustment.shutter
Loosen
Air.adjustment.
shutter
Loosen
Oven.bottom
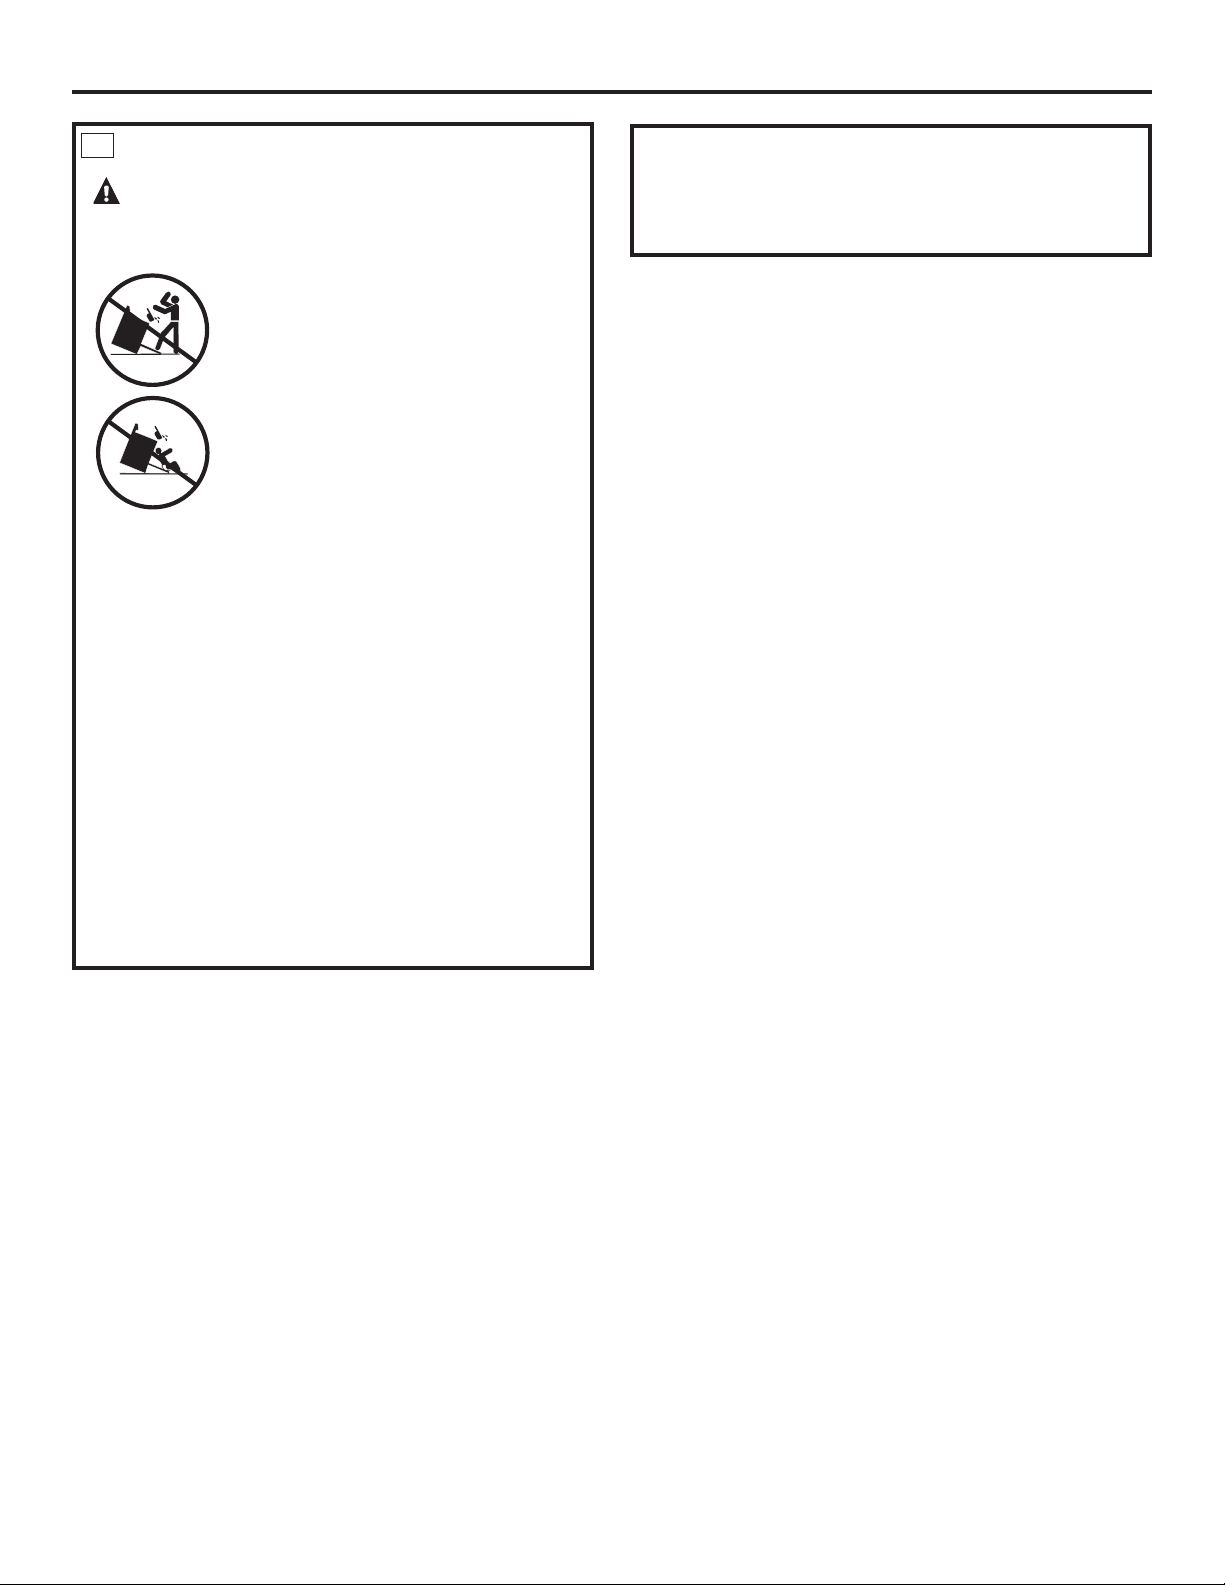
49
Installation Instructions
INSTALLING THE ANTI-TIP DEVICE
10
WHEN ALL HOOKUPS ARE COMPLETED
Make sure all controls are left in the off position. Make
sure the flow of combustion and ventilation air to the
range is unobstructed.
WARNING
ANTI-TIP DEVICE
.
• All ranges can tip.
• BURNS or other SERIOUS INJURIES
can result.
• INSTALL and CHECK the
anti-tip bracket following the
instructions supplied with the bracket.
To.reduce.the.risk.of.tipping.the.range,.the.range.must.
be.secured.by.a.properly.installed.anti-tip.bracket.Follow.
the.instructions.packaged.with.the.bracket
To.check.if.the.bracket.is.installed.and.engaged.
properly,.look.underneath.the.range.to.see.that.the.
rear.leveling.leg.is.engaged.in.the.bracket.On.some.
models,.the.storage.drawer.or.kick.panel.can.be.
removed.for.easy.inspection.If.visual.inspection.is.not.
possible,.slide.the.range.forward,.confirm.the.anti-tip.
bracket.is.securely.attached.to.the.floor.or.wall,.and.
slide.the.range.back.so.the.rear.leveling.leg.is.under.
the.anti-tip.bracket
If.the.range.is.pulled.from.the.wall.for.any.reason,.always.
repeat.this.procedure.to.verify.the.range.is.properly.
secured.by.the.anti-tip.bracket
If.your.range.has.no.anti-tip.bracket,.call.18006268774.
to.receive.one.at.no.cost
Problem Possible Causes What To Do
. Plug on range is not completely. •. Make.sure.electrical.plug.is.plugged.into.a.live,.properly
. inserted in the electrical outlet...grounded.outlet
.
. Burner slits on the side of the. •. Remove.the.burners.and.clean.them.Check.the.
. burner may be clogged...electrode.area.for.burned-on.food.or.grease.See.
. . . the.Care and cleaning of the range.section
. Improper burner assembly.. •. Make.sure.the.burner.parts.are.installed.correctly
. . . See.the.Care and cleaning of the range.section
Burner flames very . Improper air to gas ratio.. •. If.range.is.connected.to.LP.gas,.contact.the.person.
large or yellow.. . who.installed.your.range.or.made.the.conversion
Surface burners light. The oven gas shut-off valve.. •. To.check.the.oven.gas.shut-off.valve,.pull.unit.forward.
but oven does not. may have accidentally been. ..to.have.access.to.range.back.Look.for.the.gas.shut-off
. moved during cleaning or. ..lever.at.the.lower.back.section.of.the.range
. moving
Control signals after. You forgot to enter a bake.. •. Touch.the.Bake.pad.and.desired.temperature.
entering cooking time. temperature or cleaning time...or.the.Self Clean.pad.and.desired.clean.time
or start time
Food does not bake or
.
. Oven controls improperly set.. •. See.the.Using the upper oven.or.Using the lower oven.section
roast properly in the
. Rack position is incorrect. • See.the.Using the upper oven or.Using the lower oven.section
upper or lower oven
Incorrect cookware or cookware • See.the.Using the upper oven.or.Using the lower oven.section
of improper size being used.
. Oven thermostat needs.. •. See.the.Adjust the lower and upper oven thermostat—Do it
. adjustment.. . yourself!.section
. Clock not set correctly.. •. See.the.Using the clock and timer.section
. Aluminum foil used improperly. •. See.the.Care.and.cleaning.of.the.range.section
. in the oven.
. Oven bottom not securely. •. See.the.Installation.of.the.range.section
. seated in position.
Burners do not light. Gas/Control Lockout feature. •. Allow.the.range.to.cool.down.and.touch.and.hold.the.
. is activated.. . Gas/Control.Lockout.pad.(on.some.models).for.3.seconds.
. . . until.the.display.shows.LOC.OFF
. Plug on range is not . •. Make.sure.electrical.plug.is.plugged.into.a.live,.properly
. completely inserted in the..grounded.outlet
. electrical outlet.
. Gas supply not connected . •. See.the.Installation.Instructions.that.came.with.your.
. or turned on.. . range
Troubleshooting Tips
Save time and money! Review the charts on the following
pages first and you may not need to call for service.
Before you call for service…
Top burners do not light
or do not burn evenly.
(The front right burner is
designed to have slightly
smaller flames between
the 6 and 9 o’clock
positions. This is normal.)
Lever.is..
shown.closed.
PULL.TO.OPEN
Sealed burner models
50
51
Problem Possible Causes What To Do
Burners do not light. A fuse in your home may be. •. Replace.the.fuse.or.reset.the.circuit.breaker
(cont.). blown or the circuit breaker
. tripped.
. Burner parts not replaced . •. See.the.Care and cleaning of the range.section
. correctly..
Gas/Control Lockout .. . •.If.LOC.ON.appears.in.the.display,.the.range.control.is.
or Control Lockout .. . locked.Turn.this.feature.off.to.use.the.range.See.the.
feature is activated.. Gas/Control Lockout.or.Control Lockout section
Food does not broil. Oven controls improperly set.. •. Make.sure.you.turn.the.upper.oven.knob.to.the.broil.position.
properly in the upper oven
. Oven door not closed.. •.See.the.Using the upper oven section
. Improper rack position. •.See.the.Broiling Guide
. being used.
. Food being cooked . •.For.best.results,.use.a.pan.designed.for.broiling.
. in a hot pan.. . Make.sure.it.is.cool
. Cookware not suited . •.For.best.results,.use.a.pan.designed.for.broiling
. for broiling.
. Oven bottom not securely. •. See.the Installation of the range.section
. seated in position.
Upper or lower oven . Oven thermostat . •.See.the.Adjust lower and upper oven thermostat—Do it
temperature too hot. needs adjustment.. . yourself!.section.
or too cold
Clock and timer.. Plug on range is not completely . •.Make.sure.electrical.plug.is.plugged.into.a.live,.properly.
do not work. inserted in the electrical outlet...grounded.outlet
. A fuse in your home may be . •. Replace.the.fuse.or.reset.the.circuit.breaker
. blown or the circuit breaker..
. tripped.
. Oven controls improperly set.. •. See.the.Using.the.clock.and.timer.section
Upper or lower oven . Light bulb is loose or defective.. •.Tighten.or.replace.the.bulb
light does not work
. Plug on range is not completely . •.Make.sure.electrical.plug.is.plugged.into.a.live,.properly.
. inserted in the electrical outlet...grounded.outlet
Upper or lower oven will . The oven temperature is too . •.Allow.the.range.to.cool.to.room.temperature.and.
not self-clean. high to set a self-clean operation...reset.the.controls
. Oven controls improperly set.. •. See.the.Using the self-cleaning upper and lower ovens.section
“Crackling” or. This is the sound of the . •. This.is.normal.
“popping” sound. metal heating and cooling
. during both the cooking and
. cleaning functions.
GEAppliances.com
Problem Possible Causes What To Do
Excessive smoking Excessive soil.. •. Touch.the.Clear/Off. pad.or.turn.the.upper.oven.knob.to.the..
. . . OFF.position.and.press.the.Clear/Off.pad.Open.the.windows
. . . to.rid.the.room.of.smoke.Wait.until.the.LOCKED DOOR.
. . . light.goes.off.Wipe.up.the.excess.soil.and.reset.the...
. . . clean.cycle
Oven door will not open Oven too hot.. •. Allow.the.oven.to.cool.below.locking.temperature
after a clean cycle.. . Do.not.lock.the.door.with.the.door.latch.except.when.. .
. . . using.the.self-clean.feature
Oven not clean after a Oven controls not properly set.. •. See.the.Using the self-cleaning upper and lower ovens.section
clean cycle
Oven was heavily soiled.. •. Clean.up.heavy.spillovers.before.starting.the.clean.
. . . cycle.Heavily.soiled.ovens.may.need.to.self-clean..
. . . again.or.for.a.longer.period.of.time
“Door” appears in the Latch handle was moved to the •. Move.the.latch.handle.to.the.right.only.when.setting
display (on models right but a program other than..the.self-cleaning.cycle
with a door latch) self-clean was selected.
“LOCK DOOR” flashes The self-clean cycle has been.. •. Close.the.oven.door.and.on.models.with.a.latch,.move
in the display selected but the door is not ..the.latch.all.the.way.to.the.right
. closed and on models with a latch,.
. the latch was not moved all the
. way to the right.
LOCKED DOOR light . The oven door is locked. •.Touch.the.Clear/Off.pad.Allow.the.oven.to.cool
is on when you want. because the temperature..and.then,.on.models.with.a.door.latch,.unlock.the.door
to cook inside the oven has not ..
. dropped below the
. locking temperature.
“F—” and a number or On models with a door latch, . •. The.latch.may.have.been.moved,.even.if.only.slightly,
letter flash in the display if a function error code appears..from.the.locked.position.Make.sure.the.latch.is.moved
. during the self-cleaning cycle,..to.the.right.as.far.as.it.will.go
. check the oven door latch.
. You have a function error code. . •. Touch.the.Clear/Off.pad.Allow.the.oven.to.cool.for.
. . . one.hour.Put.the.oven.back.into.operation
. If the function code repeats.. •. Disconnect.all.power.to.the.range.for.5.minutes
. . . and.then.reconnect.power.If.the.function.error.
. . . code.repeats,.call.for.service
Oven racks are The nickel racks (if so equipped) . •. Apply.a.small.amount.of.vegetable.oil.to.a.paper.
difficult to slide were cleaned in a self-clean cycle... towel.and.wipe.the.edges.of.the.oven.racks.with.
. The gray porcelain-coated racks..the.paper.towel.Do.not.spray.with.Pam
®
.or.other.
. (if so equipped) were improperly..lubricant.sprays
. cleaned.
“Probe” appears in This is reminding you to enter a. •. Enter.a.probe.temperature
the display (some models) probe temperature after plugging..
. in the probe.
52
Before you call for service…
Troubleshooting Tips

GEAppliances.com
Problem Possible Causes What To Do
LOC shows in the The Gas/Control Lockout feature. •. Be.sure.the.surface.burner.controls.are.turned.OFF.
display is activated.. . Turn.this.feature.off.to.use.the.range.See.the.Gas/Control.
. . . Lockout.section
Display goes blank A fuse in your home may be . •. Replace.the.fuse.or.reset.the.circuit.breaker
. blown or the circuit breaker
. tripped.
. The clock is in the . •. See.the.Special features of your oven control.section
. blackout mode.
Display flashes Power failure. . •. Reset.the.clock
Unable to get the Oven control pads were . •. The.Bake.and.Broil Hi/Lo.pads.must.be.touched.at
display to show “SF” not pressed properly.. . the.same.time.and.held.for.3.seconds
Power outage, Power outage or surge.. •. Reset.the.clock.If.the.oven.was.in.use,.you.must.reset.
clock flashes. . . it.by.touching.the.Clear/Off.pad,.setting.the.clock.
. . . and.resetting.any.cooking.function
“Burning” or “oily” This is normal in a new oven . •. To.speed.the.process,.set.a.self-clean.cycle.for.a
odor emitting from and will disappear in time. ..minimum.of.3.hours.See.the.Using the self-cleaning
the vent. . . oven.section
Strong odor An odor from the insulation . •. This.is.temporary
. around the inside of the oven
is normal for the first few times
the oven is used.
Fan noise (some models) A cooling fan or a convection fan.•. This.is.normal.The.cooling.fan.will.turn.on.to.cool.internal.
. (depending on the function you..parts.It.may.run.up.to.1-1/2.hrs.after.the.oven.is.turned.
.
are using) may automatically turn
..off.The.convection.fan.will.cycle.on.and.off.until.the.
. on.. . function.is.over.or.the.door.is.opened
Convection fan not Preheat temperature . •. Fan.will.start.automatically.once.the.preheat.
working (some models) not reached.. . temperature.is.reached
53
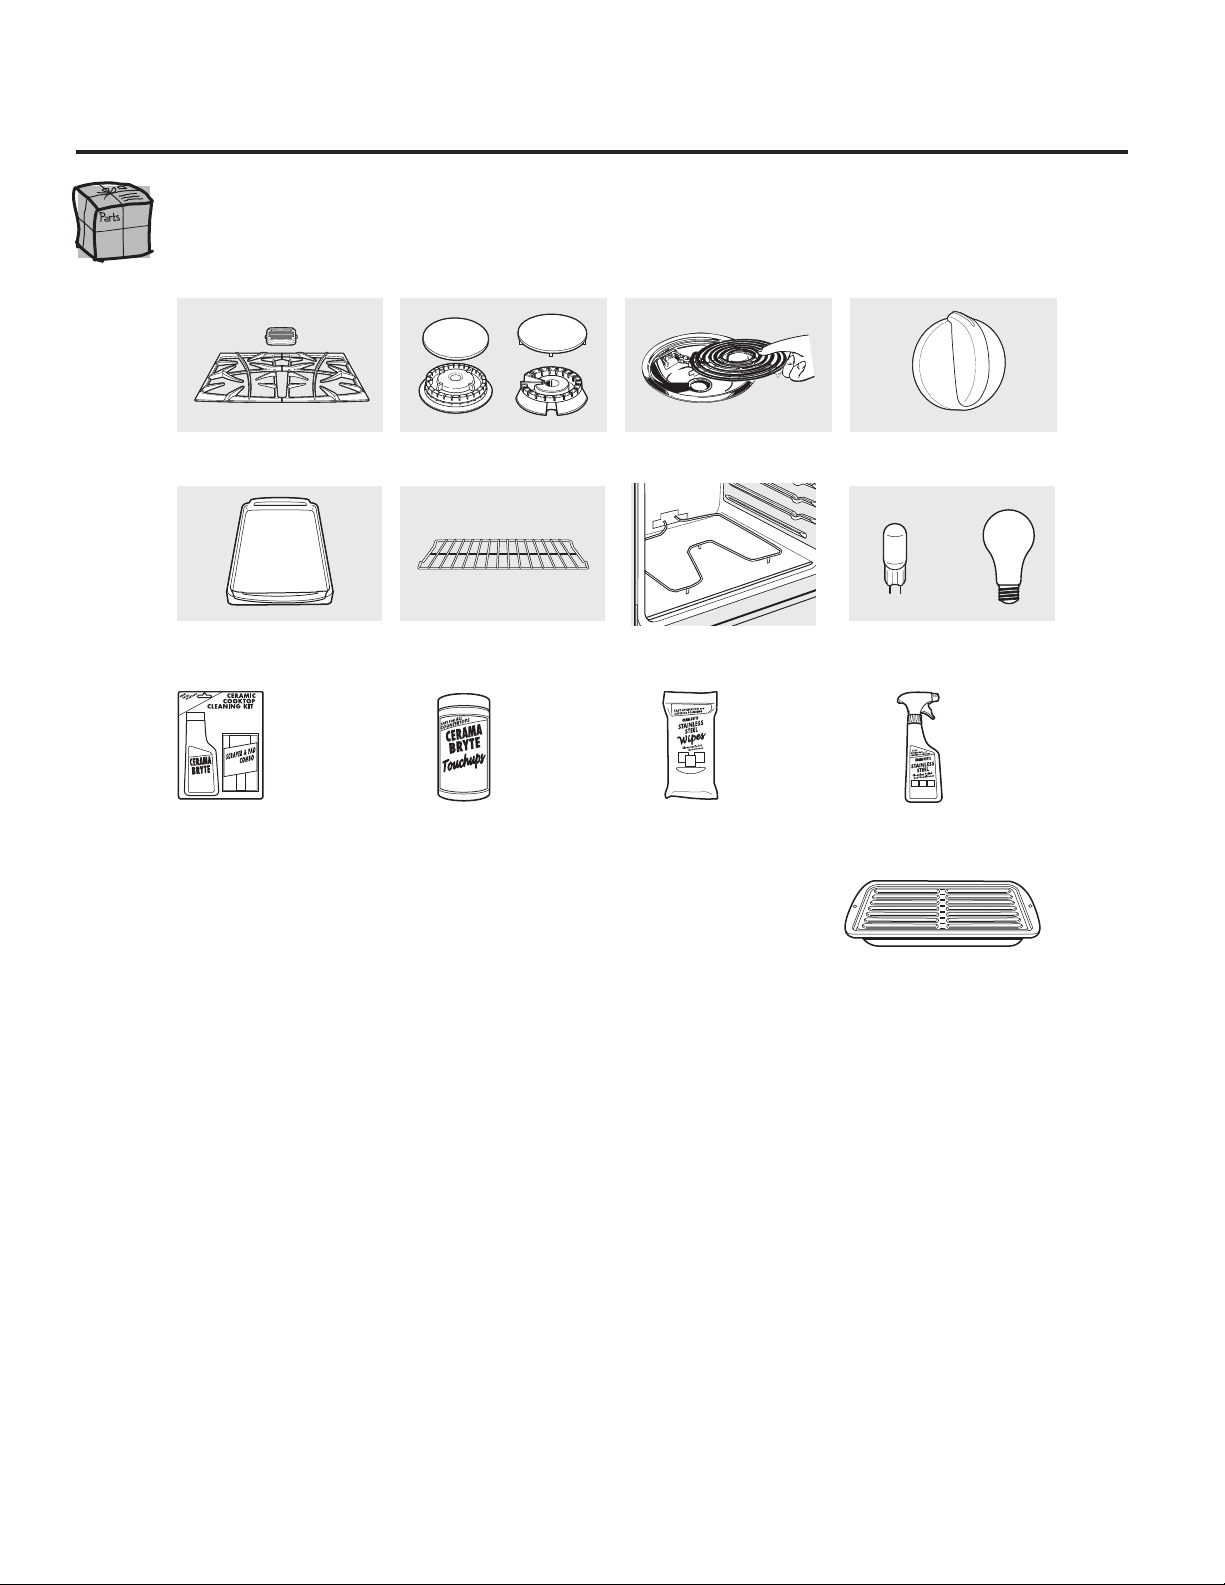
Accessories.
.
Looking For Something More? (Not all accessories are available for all models.)
You.can.find.these.accessories.and.many.more.at.GEAppliances.com.(US).
or.www.GEAppliances.ca.(Canada),.or.call.800.626.2002.(US).or.800.661.1616.(Canada).
(during.normal.business.hours).Have.your.model.number.ready
Experience these other great products to keep your kitchen looking great!
Get the most out of your Broiler Pan! (Not for use with Broiler Drawer models.)
Use.your.pan.and.grid.cover.to.broil.hamburgers,.seafood,.steaks,.vegetables,.bacon,.chops.and.so.much.
more!.The.pan.below.catches.the.excess.fats.and.oils
. •.Genuine.GE.Part
. •.Easy.To.Clean
. •.One-Year.Warranty
Limited Time Offer! Free Shipping!
When.you.order.your.broiler.pan.within 30 days.of.purchasing.your.GE.cooking.product
Small Large* XL**
U.S. Part # WB48X10055 WB48X10056 WB48X10057
Canada Part # 222D2097G001 222D2097G002 N/A
Dimensions 8-3/4” W x 1-1/4” H x 13-1/2” D 12-3/4” W x 1-1/4” H x 16-1/2” D 17” W x 1-1/4” H x 19-1/4” D
* The large (standard) broil pan does not fit in 20”/24” ranges.
** The XL pan does not fit in 24” wall ovens, 27” drop-ins or 20”/24” ranges.
Surface.Elements.and.Drip.
Pans
Grates Surface.Burner.Heads.and.Caps
Oven.Elements Light.Bulbs
Knobs
Oven.Racks
WX10X117GCS
WX10X305
WX10X10001
PM10X311
Ceramic.Cooktop.
Cleaning.Kit:.
Includes.cleaner,.
scraper.and.pad
Ceramic.Cooktop.
Cleaning.Wipes
Stainless.Steel.
Appliance.Polish.
Wipes
Stainless.Steel.
Appliance.
Cleaner
or
Griddle
To place your order, call 800.626.2002 (U.S.), 800.661.1616 (Canada) or mail this form to:
In the U.S.: GE Parts, P.O. Box 221027, Memphis, TN 38122-1027. In Canada: GE Parts, 1 Factory Lane, Moncton, N.B. E1C 9M3
Broiler Pan Order Form
Quantity ____________________ Part Number __________________________________________________
____________________ ______________________________________________________________
____________________ ______________________________________________________________
Model Number ______________ Serial Number __________________ Brand _______________ Date of Purchase __________
First Name ____________________________________________ Last Name ______________________________________________
Address__________________________________________________________________________________________________________
City __________________________________________________ State ___________ Zip Code _____________________________
Phone ________________________________________________ E-Mail __________________________________________________
Check ______ Money Order ______
Call 800.626.2002 in the U.S. or 800.661.6161 in Canada for current pricing. All credit card orders must be called in.
._._._._._._._._._._._._._._._._._._._._._._._._._._._._._._._._._._._._._._._._._._._._._._._._._
54

55
Notes. GEAppliances.com
56
.Service trips to your home to teach you how to use
the product.
.Improper installation, delivery or maintenance.
..Product damage or failure of the product if it is abused,
misused, modified, used for other than the intended
purpose or used commercially
.Replacement of house fuses or resetting of circuit breakers.
.Damage to the product caused by accident, fire, floods
or acts of God.
.Incidental or consequential damage caused by possible
defects with this appliance.
.Damage caused after delivery.
.Product not accessible to provide required service.
.What.GE.Will.Not.Cover:
This warranty is extended to the original purchaser and any succeeding owner for products purchased for home
use within the USA. If the product is located in an area where service by a GE Authorized Servicer is not available,
you may be responsible for a trip charge or you may be required to bring the product to an Authorized GE Service
Location for service. In Alaska, the warranty excludes the cost of shipping or service calls to your home.
Some states do not allow the exclusion or limitation of incidental or consequential damages. This warranty gives
you specific legal rights, and you may also have other rights which vary from state to state. To know what your
legal rights are, consult your local or state consumer affairs office or your state’s Attorney General.
Warrantor: General Electric Company. Louisville, KY 40225
For The Period Of: GE Will Replace:
One Year. Any part.of.the.range.which.fails.due.to.a.defect.in.materials.or.workmanship.During.this
From the date of the. limited one-year warranty,.GE.will.also.provide, free of charge,.all.labor.and.in-home.service.
original purchase. to.replace.the.defective.part
GE Gas Range Warranty..(For customers in the United States)
All warranty service provided by our Factory Service Centers,
or an authorized Customer Care
®
technician. To schedule
service, visit us on-line at GEAppliances.com, or call 800.
GE.CARES (800.432.2737). Please have serial number
and model number availa ble when calling for service.
Staple your receipt here.
Proof of the original purchase
date is needed to obtain service
under the warranty.
EXCLUSION OF IMPLIED WARRANTIES—Your sole and exclusive remedy is product repair as provided in
this Limited Warranty. Any implied warranties, including the implied warranties of merchantability or
fitness for a particular purpose, are limited to one year or the shortest period allowed by law.
57
All.warranty.service.provided.by.our.Factory.Service.Centers..
or.an.authorized.Customer.Care
®
.technician.For.service,.
call.18005613344.Please.have.serial.number.and.model.
number.available.when.calling.for.service
Service trips to your home to teach you how to use the
product.
Improper installation, delivery or maintenance.
Product damage or failure of the product if it is abused,
misused, modified, used for other than the intended
purpose or used commercially.
Replacement of house fuses or resetting of circuit breakers.
Damage to the product caused by accident, fire, floods or
acts of God.
Incidental or consequential damage caused by possible
defects with this appliance.
Damage caused after delivery.
Product not accessible to provide required service.
What.Mabe.Will.Not.Cover:
For The Period Of: Mabe Will Replace:
One Year. Any part of the range which fails due to a defect in materials or workmanship. During this
From the date of the limited one-year warranty, Mabe will also provide, free of charge, all labor and in-home service.
original purchase. to replace the defective part.
.
GE Gas Range Warranty. (For customers in Canada)
Staple.your.receipt.here..
Proof.of.the.original.purchase.
date.is.needed.to.obtain.
service.under.the.warranty
EXCLUSION OF IMPLIED WARRANTIES—Your sole and exclusive remedy is product repair as provided in
this Limited Warranty. Any implied warranties, including the implied warranties of merchantability or
fitness for a particular purpose, are limited to one year or the shortest period allowed by law.
This warranty is extended to the original purchaser and any succeeding owner for products purchased in Canada
for home use within Canada. In-home warranty service will be provided in areas where it is available and deemed
reasonable by Mabe to provide.
Some provinces do not allow the exclusion or limitation of incidental or consequential damages, so the above
exclusion may not apply to you. This warranty gives you specific legal rights, and you may also have other rights
which vary from province to province. To know what your legal rights are in your province, consult
your local provincial consumer affairs office.
Warrantor: Mabe Canada Inc.
Burlington, Ontario

Consumer Support.
GE Appliances Website. In.the.US: GEAppliances.com
Have.a.question.or.need.assistance.with.your.appliance?.Try.the.GE.Appliances.Website.24.hours.a.day,..
any.day.of.the.year!.For.greater.convenience.and.faster.service,.you.can.now.download.Owner’s.Manuals,..
order.parts.or.even.schedule.service.on-line.In Canada: www.GEAppliances.ca
Schedule Service. In.the.US:.GEAppliances.com
Expert.GE.repair.service.is.only.one.step.away.from.your.door.Get.on-line.and.schedule.your.service.at.your.
convenience.any.day.of.the.year!.Or.call.800GECARES.(8004322737).during.normal.business.hours
In.Canada,.call.18005613344
Real Life Design Studio. In.the.US:.GEAppliances.com
GE.supports.the.Universal.Design.concept—products,.services.and.environments.that.can.be.used.by.people.of.
all.ages,.sizes.and.capabilities.We.recognize.the.need.to.design.for.a.wide.range.of.physical.and.mental.abilities.
and.impairments.For.details.of.GE’s.Universal.Design.applications,.including.kitchen.design.ideas.for.people.with.
disabilities,.check.out.our.Website.today.For.the.hearing.impaired,.please.call.800TDDGEAC.(8008334322)
In.Canada,.contact:..Manager,.Consumer.Relations,.Mabe.Canada.Inc..
Suite.310,.1.Factory.Lane.
Moncton,.NB.E1C.9M3
Extended Warranties. In.the.US:.GEAppliances.com
Purchase.a.GE.extended.warranty.and.learn.about.special.discounts.that.are.available.while.your.warranty.is.still..
in.effect.You.can.purchase.it.on-line.anytime,.or.call.8006262224.during.normal.business.hours.GE.Consumer.
Home.Services.will.still.be.there.after.your.warranty.expires.In.Canada,.call.18882612133
Parts and Accessories . In.the.US:.GEAppliances.com
Individuals.qualified.to.service.their.own.appliances.can.have.parts.or.accessories.sent.directly.to.their.homes.(VISA,.
MasterCard.and.Discover.cards.are.accepted).Order.on-line.today,.24.hours.every.day.or.by.phone.at..
8006262002.during.normal.business.hours
Instructions contained in this manual cover procedures to be performed by any user. Other servicing generally
should be referred to qualified service personnel. Caution must be exercised, since improper servicing may
cause unsafe operation.
Customers.in Canada.should.consult.the.yellow.pages.for.the.nearest.Mabe.service.center,.or.call.18006611616
Contact Us.. In.the.US:.GEAppliances.com
If.you.are.not.satisfied.with.the.service.you.receive.from.GE,.contact.us.on.our.Website.with.all.the.details.including.
your.phone.number,.or.write.to:.. .General.Manager,.Customer.Relations.
GE.Appliances,.Appliance.Park.
Louisville,.KY.40225
In Canada: www.GEAppliances.ca,.or.write.to:..Director,.Consumer.Relations,.Mabe.Canada.Inc
Suite.310,.1.Factory.Lane.
Moncton,.NB.E1C.9M3
Register Your Appliance. In.the.US:.GEAppliances.com
Register your new appliance on-line—at your convenience! Timely.product.registration.will.allow.for.enhanced.
communication.and.prompt.service.under.the.terms.of.your.warranty,.should.the.need.arise.You.may.also.mail..
in.the.pre-printed.registration.card.included.in.the.packing.material.In.Canada: www.GEAppliances.ca
Printed in Mexico
This book is printed on recycled paper.