Loading ...
Loading ...
Loading ...
8 9
1-800-798-7398
sharkclean.com
English
English
NOTE: To prolong the life of your Steam
Mop, we recommend using distilled water.
NOTE: Sweep or vacuum your floors prior
to cleaning with your Steam Mop.
1
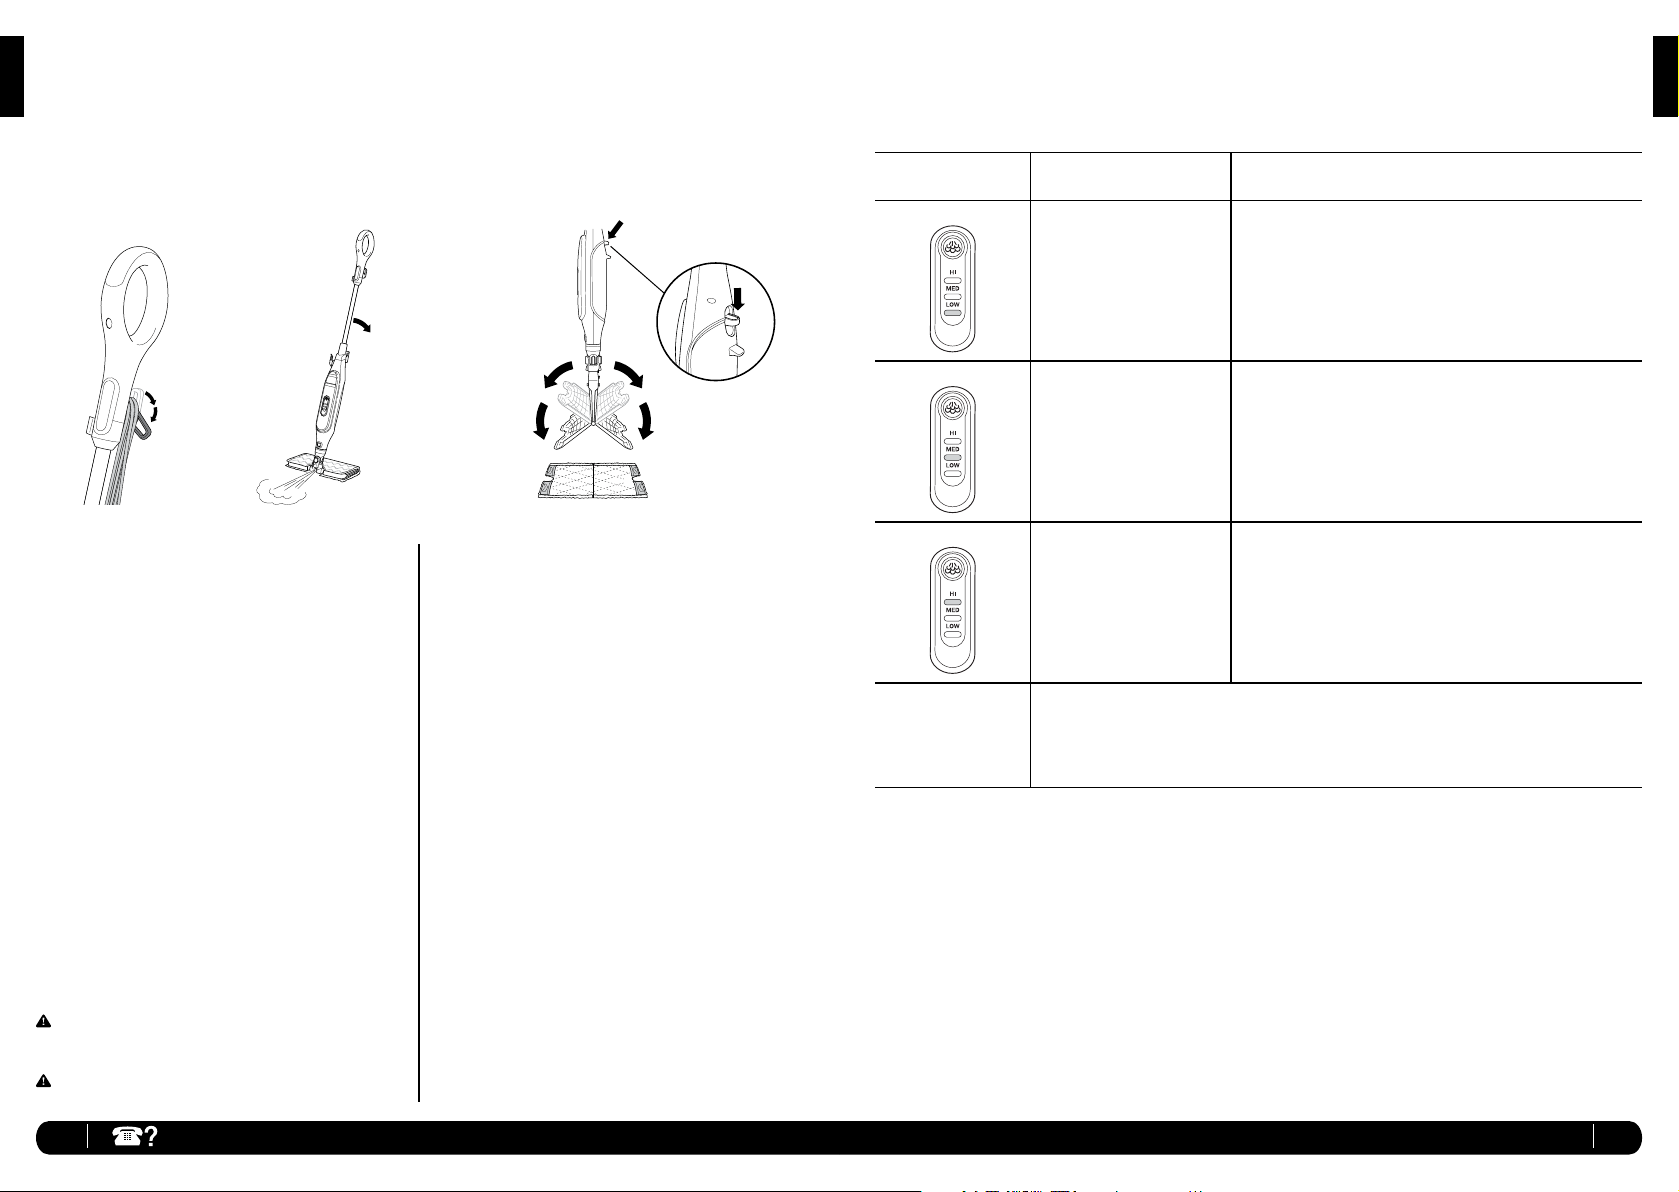
Twist the Quick-Release Cord Holder to unwrap
the power cord completely (fig. 9). Plug into an
electrical outlet.
2 When it's first plugged in, the unit will be
in Standby mode. The 3 lights below the
Steam Control Button will blink to indicate
Standby mode.
3 To select the steam mode, press the Steam
Control Button once for LOW (1 blue light)
twice for MED (2 blue lights) or three times
for HI (3 blue lights).
4
Clean your floors with a forward and
backward motion.
5
When you need an extra burst of steam
to clean a stuck-on stain, you can use
the Steam Blaster
™
feature. Flip the head
over so that it is behind the mop body,
then tilt the mop handle down. This will
cause the Steam Blaster (fig. 10) to emit a
concentrated blast of steam onto the stain.
CAUTION: While in Steam Blaster mode,
DO NOT leave stationary for more than one
minute.
CAUTION: DO NOT scrub any one area for an
extended period of time.
IMPORTANT: Make sure you DO NOT use the Steam Mop without attaching a Dirt Grip
™
pad and
adding water to the water tank first. When you use the Steam Mop for the first time, it might take
longer than the normal 30 seconds to start steaming.
IMPORTANT: DO NOT use on unsealed wood or unglazed ceramic floors. On surfaces that have
been treated with wax and on some no-wax floors, the sheen may be removed by the heat and
steam action. Test an isolated area of the surface to be cleaned before proceeding. Check the use
and care instructions from the floor manufacturer.
Using Your Steam Pocket
®
Mop
Intelligent Steam Control
®
6 To stop the Steam Blaster spray, simply
raise the handle. You can then flip the mop
head back into its original position and
continue cleaning.
7
When finished mopping, press the Steam
Control Button. The blue light will blink,
indicating that the unit is in Standby mode.
Once in Standby mode, unplug the unit.
8 To remove the Dirt Grip pad, simply lift the
mop straight up by the handle until the
Genius
™
Mop Head is hanging straight down.
Press the Release button on the back of the
mop body (fig 11a), and both sides of the
head will drop open, releasing the pad (fig
11b).
9
Once the Dirt Grip pad has been released,
close the Genius Mop Head. To close, gently
press one side of the Genius Mop Head to
the floor until that side clicks into place.
Repeat on the other side.
10 When the water tank is empty, the Steam
Mop will stop producing steam. You can
refill the water tank at any time as long as
the Steam Mop is unplugged. Follow the
water tank filling instructions on page 11.
NOTE: Please wait 2 to 3 minutes for the
Steam Mop to cool o before switching the
mop head. NEVER leave the Steam Mop
with a damp/wet Dirt Grip pad on any floor
for an extended period of time.
The Shark
®
Genius
™
Steam Pocket
®
Mop System has 3 unique Intelligent Steam Control settings
so you can use the right amount of steam for the cleaning task at hand. See below for tips on
when to use each setting.
SETTING IDEAL FOR THESE
SEALED SURFACES
RECOMMENDED USAGE
LOW
Laminate
Hardwood
Marble
Cleaning delicate surfaces
Light cleaning and dusting
Loosening and lifting light dirt
MED
Hardwood
Marble
Tile
Stone
Cleaning sealed surfaces and large areas
Basic, everyday cleaning
Removing spots and smaller messes
Cleaning moderate and heavy trac areas
HI
Tile
Stone
Hardwood
Marble
Reaching hard-to-clean surfaces
Tough cleaning and removing stuck-on messes
nd stains
Deep cleaning heavy trac areas
Cutting through heavy dirt and grime
Sanitizing* floors
Steam Blaster
™
For an extra burst of steam, you can use the Steam Blaster feature in
LOW, MED and HI. Follow the instructions found on the “Using your Steam
Pocket Mop” page.
fig. 9
fig. 10
fig. 11b
fig. 11a
TO SANITIZE* WITH THE STEAM MOP USING THE GENIUS
™
MOP HEAD AND
THE DIRT GRIP
™
PAD:
1 Attach a clean Dirt Grip pad to the Genius Mop Head.
2 Plug in the unit and press the Steam Control Button to select the HI Setting.
3 Wait 30 seconds for the unit to begin producing steam.
4 Start mopping on an appropriate sealed hard floor surface with a forward and backward
motion. After three minutes, your unit is ready to be used to sanitize.
5 Using a forward and backward motion, move the unit slowly and evenly over the area to be
sanitized while applying continuous downward pressure. Slowly repeat at least 3 times.
* Sanitization studies were conducted under controlled test conditions. Household conditions
and results may vary. With Genius Mop Head in HI mode only when used with Steam Mop.
Not in Steam Blaster mode.
Loading ...
Loading ...
Loading ...