User Manual
KODAK
VR CAMERA
PIXPRO
ORBIT360 4K/4KVR360

1
Before You Start
Declaration of Conformity
Responsible Party: JK Imaging Ltd.
Address: JK Imaging Ltd., 17239 So. Main Street, Gardena, CA 90248 USA
JK Imaging Europe, 71 Clarendon Road, Watford, WD17 1DS, UK
Company Website: kodakpixpro.com
About this Manual
Thank you for purchasing this KODAK PIXPRO 360 VR Camera. Please read this manual carefully and keep it in a safe place for future reference.
JK Imaging reserves all rights of this document. No part of this published manual may be reproduced, transmitted, transcribed, stored in a retrieval system or
translated into any language or computer language, in any form, by any means, without the prior written permission of JK Imaging.
All trademarks mentioned in this manual are used for identiication purposes only and are properties of their respective owners.
This manual provides you with instructions on how to use your new KODAK PIXPRO 360 VR CAMERA. Every eort has been made to ensure that the contents
of this manual are accurate; however JK Imaging reserves the right to make changes without notice.
Throughout this manual," " indicates useful information, " page number" indicates an introduction to contents on the speciied page.

2
For Customers in the U.S.A.
Federal Communication Commission Interference Statement
This device complies with Part 15 of the FCC Rules. Operation is subject to the following two conditions: (1) This device may not cause harmful interference and (2)
this device must accept any interference received, including interference that may cause undesired operation.
This equipment has been tested and has been found to comply with the limits for a Class B digital device, pursuant to Part 15 of the FCC Rules. These limits
are designed to provide reasonable protection against harmful interference in a residential installation. This equipment generates, uses and can radiate radio
frequency energy and if not installed and used in accordance with the instructions, may cause harmful interference to radio communications. There is no
guarantee that interference will not occur in a particular installation. If this equipment does cause harmful interference to radio or television reception, which can
be determined by turning the equipment o and on, the user is encouraged to try to correct the interference by one of the following measures:
- Reorient or relocate the receiving antenna
- Increase the area of separation between the equipment and receiver
- Connect the equipment into an outlet on a dierent circuit from that to which the receiver is connected
- Consult an experienced radio/TV technician for advice or help
FCC Caution: Any changes or modiications not expressly approved by the party responsible for compliance could void the user's authority to operate this
equipment.
This transmitter should not be co-located or operated in conjunction with any other antenna or transmitter.
Radiation Exposure Statement:
This product complies with the FCC portable RF exposure limit set forth for an uncontrolled environment and is safe for the intended operation as described in
this manual. Further reduction of RF exposure can be achieved if the product is kept as far away as possible from the user’s body or by setting the device to lower
power output if such functionality is available.
Canadian Industry Statement:
This device complies with ISED’s licence-exempt RSS’s. Operation is subject to the following two conditions: (1) This device may not cause harmful interference
and (2) this device must accept any interference received, including interference that may cause undesired operation.
Radiation Exposure Statement:
This product complies with the Canadian portable RF exposure limit set forth for an uncontrolled environment and is safe for intended operation as described in
this manual. Further reduction of RF exposure of can be achieved if the product is kept as far away as possible from the user’s body or by setting the device to
lower power output if such functionality is available.

3
For Customers in Europe
This symbol [crossed-out wheel bin WEEE Annex IV] indicates the separate collection of electrical waste and electronic equipment in European countries.
Please do not throw the equipment into domestic refuse. Please use the return and collection systems available in your country for proper and safe disposal
of this product.
The “CE” mark indicates that this product complies with European requirements for safety, health, environment and customer protection. “CE” marked
cameras are intended for sales in Europe.
Europe – EU Declaration of Conformity
This device complies with the essential requirements of the RED Directive 2014/53/EU. The following test methods have been applied in order to prove
presumption of conformity with the essential requirements of the RED Directive 2014/53/EU:
- EN609501/A12:2011+A2:2013
Safety of Information Technology Equipment
- EN 62311:2008
Assessment of electronic and electrical equipment related to human exposure restrictions for electromagnetic ields (0 Hz-300 GHz)
- EN 300 3301 V2.1.1:2017
Electromagnetic compatibility and Radio Spectrum Matters (ERM); Short Range Devices (SRD); Radio equipment in the frequency range of 9 KHz to 25
MHz and inductive loop systems in the frequency range 9 KHz to 30 MHz
- EN 300 328 V2.1.1 (201611)
Wideband transmission systems; Data transmission equipment operating in the 2.4 GHz ISM band and using wide band modulation techniques
- EN 301 4891 V1.9.2:2011
Electromagnetic compatibility and Radio Spectrum Matters (ERM); ElectroMagnetic Compatibility (EMC) standard for radio equipment and services; Part 1:
Common technical requirements
- EN 301 4893 V1.6.1:2013
Electromagnetic compatibility and Radio Spectrum Matters (ERM); ElectroMagnetic Compatibility (EMC) standard for radio equipment and services; Part 3:
Speciic conditions for Short-Range Devices (SRD) operating on frequencies between 9 KHz and 246 GHz
- EN 301 48917 V2.2.1:2012
Electromagnetic compatibility and Radio Spectrum Matters (ERM); ElectroMagnetic Compatibility (EMC) standard for radio equipment; Part 17: Speciic
conditions for Broadband Data Transmission Systems
Sintai Optical (Shenzhen) Co., Ltd., declares that this [KODAK PIXPRO 4KVR360 and BLUETOOTH Remote] is in compliance with the essential requirements and
other relevant provisions of Directive 1999/5/EC.
Manufacturer: Sintai Optical (Shenzhen) Co., Ltd.
Address: Qiwei Ind Sec, 1st, 2nd,& 3rd Bldg, Lisonglang Village, Gongming Town, Bao’an District, Shenzhen, Guangdong, China
Packaging: Please follow local regulations for recycling of product packaging.
Batteries: Please dispose of used batteries at designated collection and recycling centers.

4
SAR Statement
A minimum separation distance of zero cm must be maintained between the user’s body and the device, including the antenna during body-worn operation to
comply with the RF exposure requirements in Europe.
To comply with the RF Exposure requirements or limitations in Europe, third-party belt-clips, holsters or similar accessories used with this device should not
contain any metallic components. The use of accessories that do not satisfy these requirements may not comply with RF exposure requirements or limitations
and should be avoided.

5
Safety Notes
Product Notes:
not handle this product improperly. This product may be damaged or permanently broken if dropped, punctured or crushed.
camera lenses for optimal performance.
physical changes. In this case, it is recommended to wait until the product returns to normal room temperature before you turn it on again to operate.
use. Even though the temperature could be relatively high and heat is emitted from the surface of the camera, the camera is capable of shooting continuously
and operating properly. When the camera detects that the temperature of the camera body is within certain limitations it will power o automatically.
normal.
Battery Notes:
down completely.
with clean water and seek immediate medical attention.
leakage.

6
Memory Card Notes:
microSD card, microSDHC card or microSDXC card, class 10 or higher.
Never force the memory card into the card slot.
not taken using the product in these folders, in case the iles cannot be recognized during normal playback.
permanently and iles/folders could be
permanently lost.
Other Notes:
may not power on later.
camera's LCD may have a few dead or bright pixels. This is completely normal and these pixels do not
aect the quality of the photos or videos taken with this camera.
recommended actions immediately as indicated below:
1. If liquid crystal comes in contact with your skin, please wipe your skin with a clean, dry cloth, thoroughly wash with soap and rinse with plenty of clean water.
2. If liquid crystal gets into your eye, lush your eye immediately with plenty of clean water for at least 15 minutes. Please seek immediate medical assistance.
3. If liquid crystal is accidentally swallowed, rinse your mouth immediately with clean water and try to induce vomiting. Please seek immediate medical
assistance.
Waterproof Notes:
splash proof function. Before use, please check whether the waterproof rubber ring is damaged or contaminated with a foreign object before closing the
battery cover door. When there is a foreign object on the waterproof rubber ring and its adjacent surfaces, please use a clean, lint-free, dry cloth to clean it. If
there are any scratches or cracks, contact our service center immediately for maintenance and/or obtain a replacement waterproof rubber ring.
camera's power and thoroughly wipe it with
a clean, dry, lint-free cloth before opening the battery cover door in order to remove the battery and the memory card.
camera body, please
make sure to fully wipe and dry them o.
before rinsing). After rinsing, wipe the camera with a clean, dry, lint-free cloth.

7
Before You Start ......................................................................................................................................1
Safety Notes
............................................................................................................................................5
Contents
..................................................................................................................................................7
Getting Ready..........................................................................................................................................9
Camera Part Names ............................................................................................................................................... 10
Mounting / Removing Lens Covers:
....................................................................................................................... 11
Installing the Battery:
..............................................................................................................................................12
Installing a Memory Card:
.......................................................................................................................................13
Mounting / Removing Battery Cover Door:
............................................................................................................. 13
Charging the Battery:
..............................................................................................................................................14
Main Camera Interface ..........................................................................................................................16
Power On / Off ........................................................................................................................................................17
Start-up for Date and Time
.....................................................................................................................................17
Camera Mode Introduction
.....................................................................................................................................18
Movie Mode
........................................................................................................................................................................................ 18
Snap Shot Photo Mode
..................................................................................................................................................................... 18
Time-Lapse Photo Mode ................................................................................................................................................... 19
Loop Recording Mode
...................................................................................................................................................................... 19
Time-Lapse Video Mode
.................................................................................................................................................................. 19
High-Speed Movie Mode
.................................................................................................................................................................. 20
Contents
8
Burst Mode
......................................................................................................................................................................................... 20
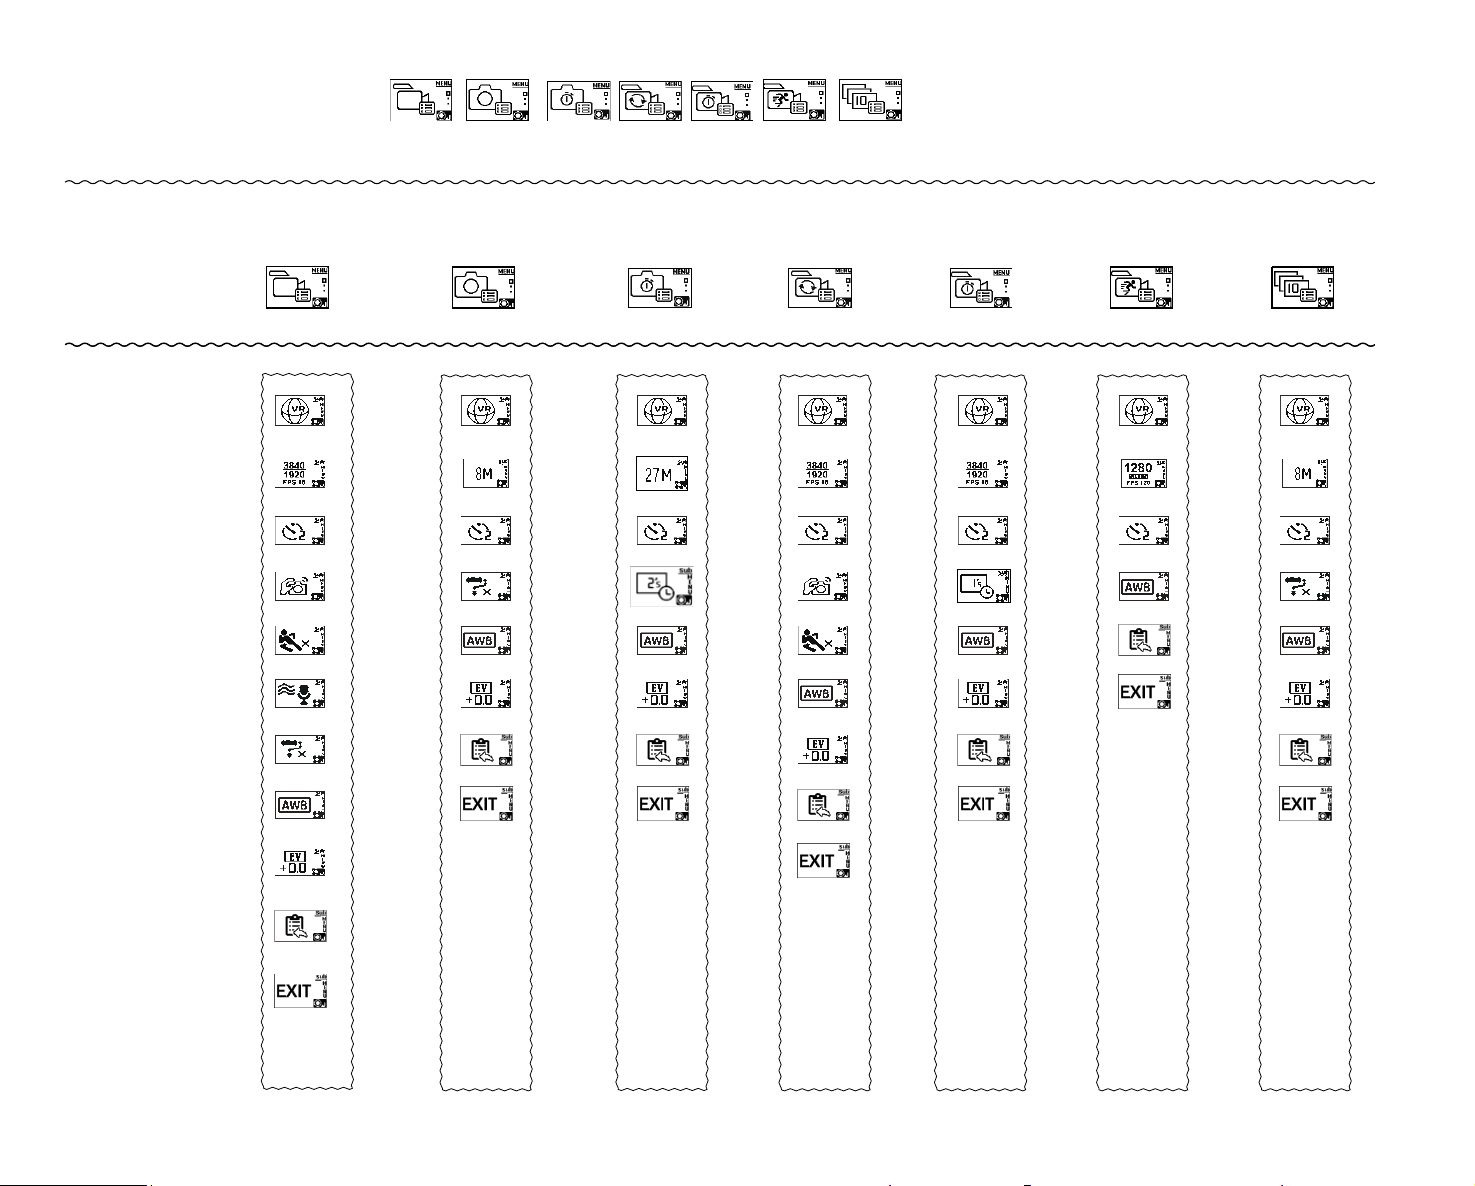
Menu Introduction: .................................................................................................................................................. 21
All Shooting Mode Settings (
/ / / / / /
) ....................................................................... 22
General Settings
................................................................................................................................................................. 30
BLUETOOTH Remote Control-D ............................................................................................................................33
BLUETOOTH Remote Control-C
............................................................................................................................ 40
User Interface ........................................................................................................................................44
Micro USB Interface ...............................................................................................................................................44
Charging Your Camera: ................................................................................................................................................................. 44
Using an External Power Supply
................................................................................................................................................... 44
Data Transmission
......................................................................................................................................................................... 44
Micro HDMI Interface: .............................................................................................................................................46
Wi-Fi Mode .................................................................................................................................48
Appendices
............................................................................................................................................ 52
Prompts and Warning Messages: ...........................................................................................................................55
Trouble Shooting:
...................................................................................................................................................57
Special Accessories...............................................................................................................................58
9
Getting Ready
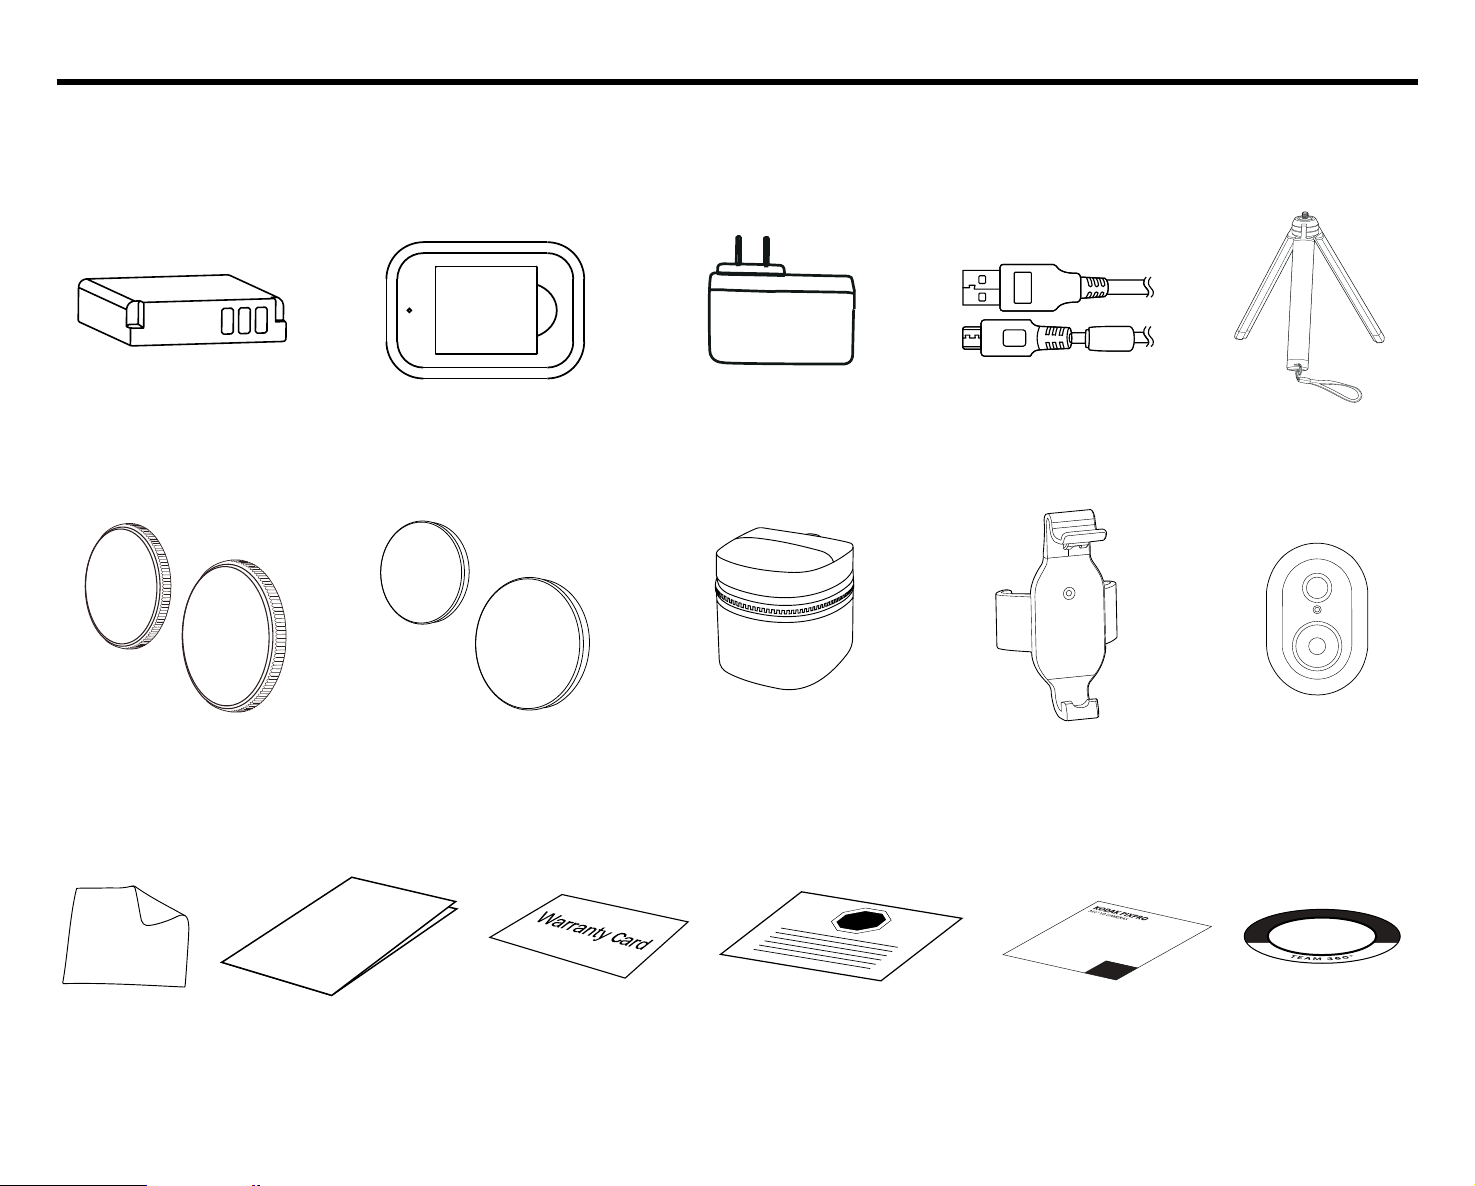
Standard Parts and Accessories Included:
Your product packaging should contain the camera you purchased along with the following standard parts and accessories. If anything is missing or appears
to be damaged, please contact our customer service center. (The AC Adapter style will vary according to the power requirements from dierent countries or
regions. Pictures below are for reference only):
Warranty Card
Quick Start Guide
Quick Start Guide
STOP
Service Card
Lens Covers
(BSmall / CLarge)
Protective Covers
(BSmall / CLarge)
Rechargeable Li-ion Battery
Micro USB CableBattery Charger AC Adapter
Carrying Case
Cleaning Cloth
Small 3Leg Stand-B
Remote Control
Mount-B
Online Company
Store Card
Team 360
Sticker
BLUETOOTH Mini
Remote Control-D
10
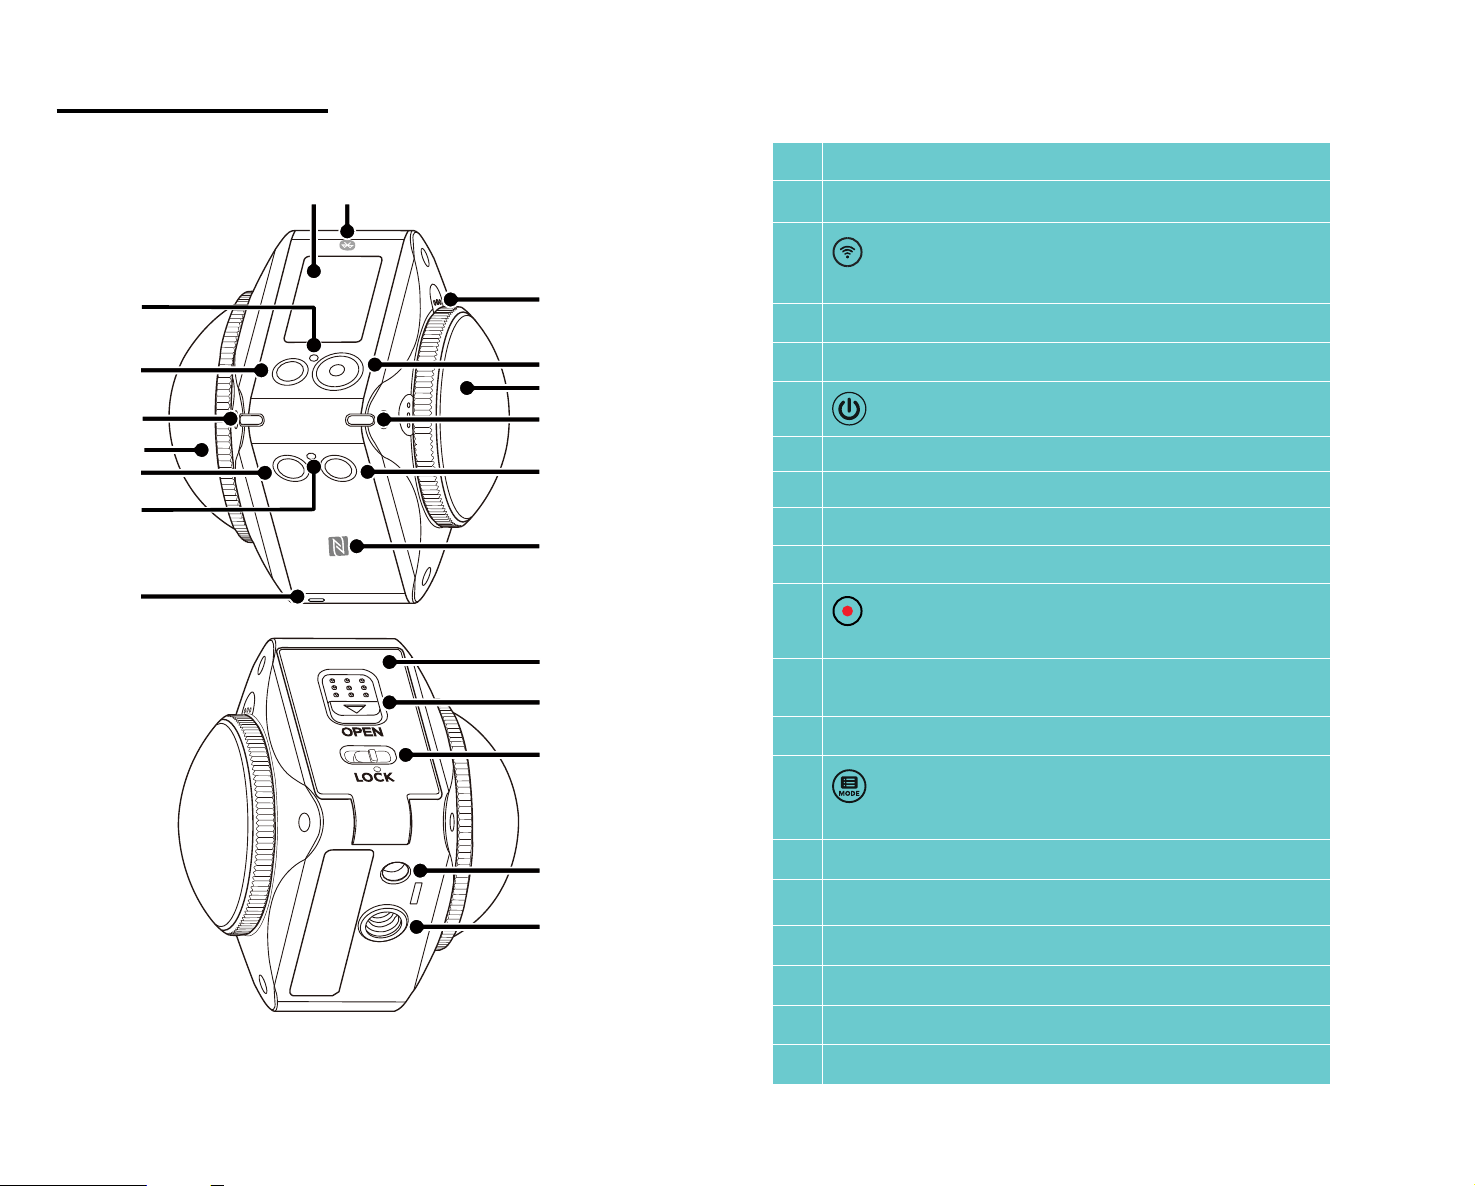
Camera Part Names
1 Speaker
2 Wi-Fi Indicator
3
Wi-Fi Button / Direction Button (down) / Remote
Control Pairing (press and hold)
4 Lens B (235 Degrees)
5 Lens Status Indicator B
6
Power Button
7 Status Indicator
8 LCD
9 BLUETOOTH Logo / Mark
10 Exterior Microphone (Stereo)
11
Video Recording Button / Photo
Shooting Button / OK Button
12
Lens A (155 Degrees-VR Mode [2:1]) (197 Degrees-Front
Mode [16:9])
13 Lens Status Indicator A
14
Menu Button / Direction Button (up) / Mode
Switching (press and hold)
15 NFC Logo / Mark
16 Battery Cover Door
17 Battery Cover Open Toggle Switch
18 Battery Cover Door Lock
19 Positioning Mount Receptor
20 1/4" Screw Socket
5
4
7
6
3
2
1
13
12
10
11
14
15
20
19
18
17
16
8 9

11
Mounting / Removing Lens Covers:
Removing lens covers:
Turn the clear, protective lens cover counter clockwise following the illustrations
below until it separates from the ORBIT360 4K/4KVR360.
Attaching lens covers:
Turn the lens covers clockwise and irmly tighten the lens covers as illustrated
below.
The lens covers protect the camera's glass lenses from being permanently damaged and are dustproof, shockproof and splash proof. Using the lens covers
when taking a photo/shooting a video will not aect the photo image/video quality. Keeping the clear, prootective lens covers on the ORBIT360 4K/4KVR360
is essential to being able to use the internal stitch feature of the camera. If you do not use the clear lens covers, you will not be able to stitch photo/videos
and render iles for sharing.
Before mounting the clear lens covers, make sure the permanent glass lens surfaces are clean and dry. Always use a clean, lint-free, dry cloth to clean the
camera's lenses before shooting or recording so any foreign particles it will not aect the photo or video quality.
When the ORBIT360 4K/4KVR360 is exposed to extreme temperature dierences, condensation may form inside the camera's lens covers. If this happens,
remove the lens covers, clean with a soft, dry, lint-free cloth and reinstall the lens covers.
If the ORBIT360 4K/4KVR360 will not be used for a long period of time or during transportation, always put the black rubber protective covers on (as shown
in the image below):
12
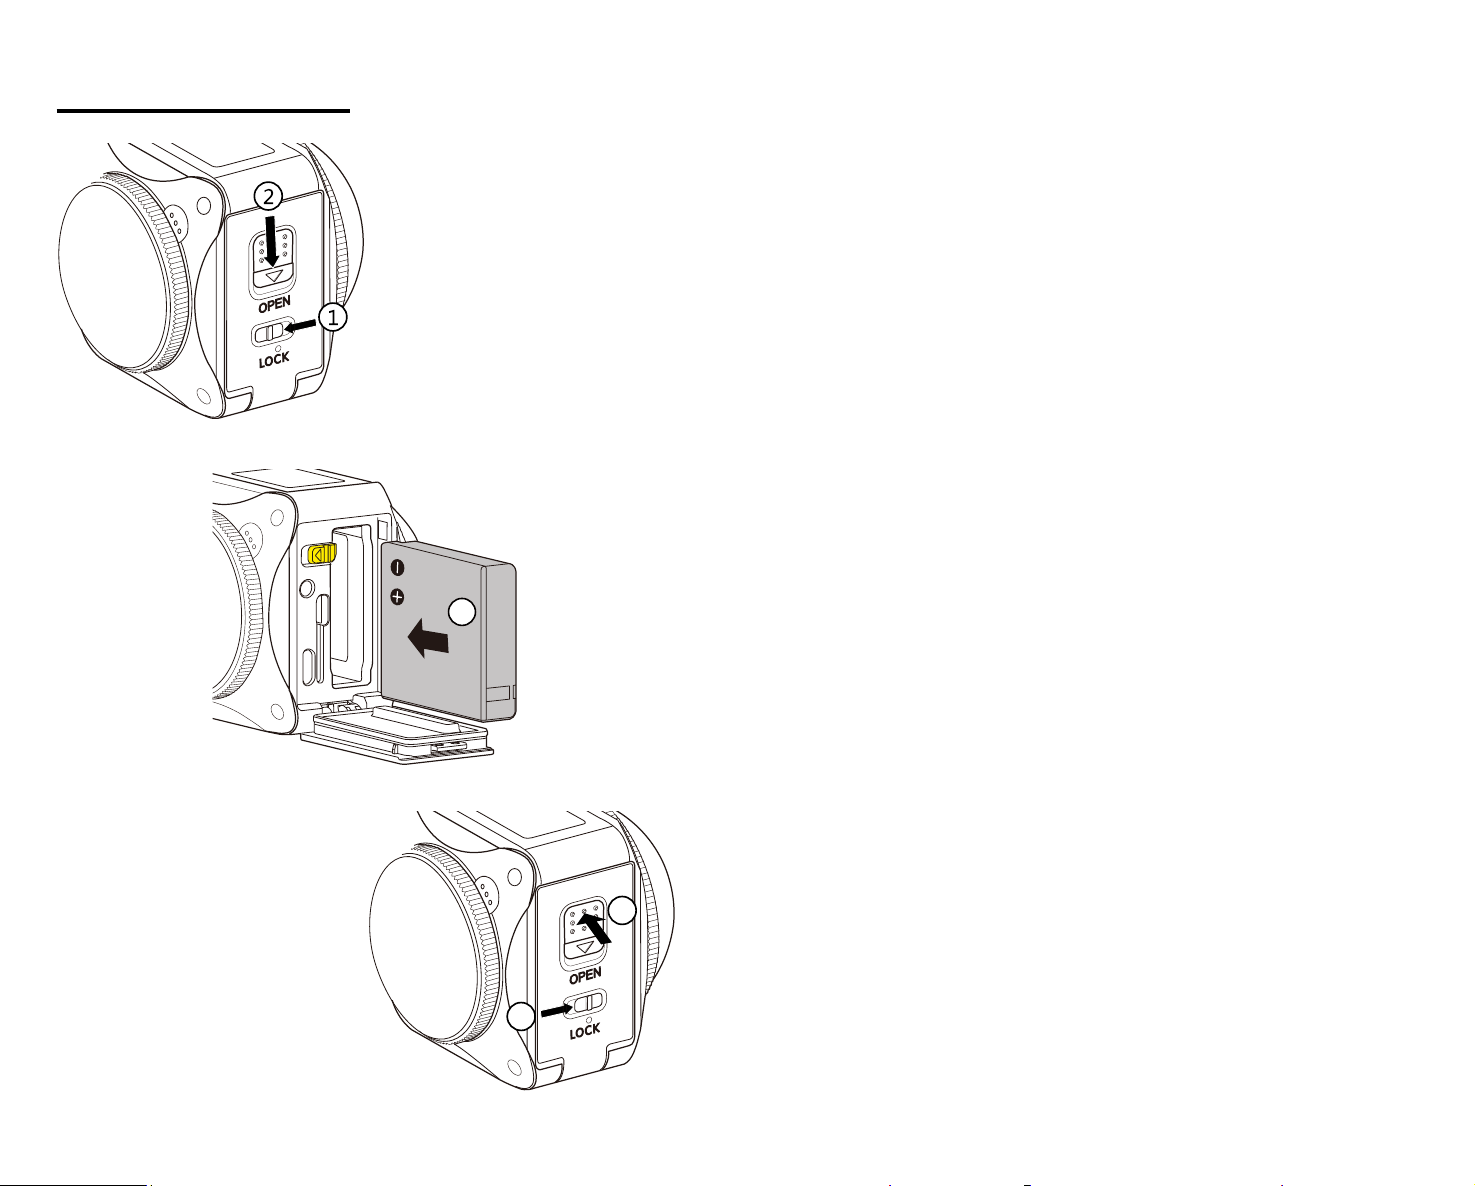
Installing the Battery:
1. Open the Battery Cover Door
Slide the battery cover lock to the left ① , then slide the open switch of the
battery cover door downward ② .
2. Insert the Battery
Insert the Li-ion battery into the battery compartment in the direction of the
arrow ③ (note the location of the + and - symbols).
3. Close the Battery Cover Door
Close the battery cover door until your hear a “click” to indicate the door is
fully and tightly closed ④ . Slide the battery cover lock to the right ⑤ .
3
4
5
13
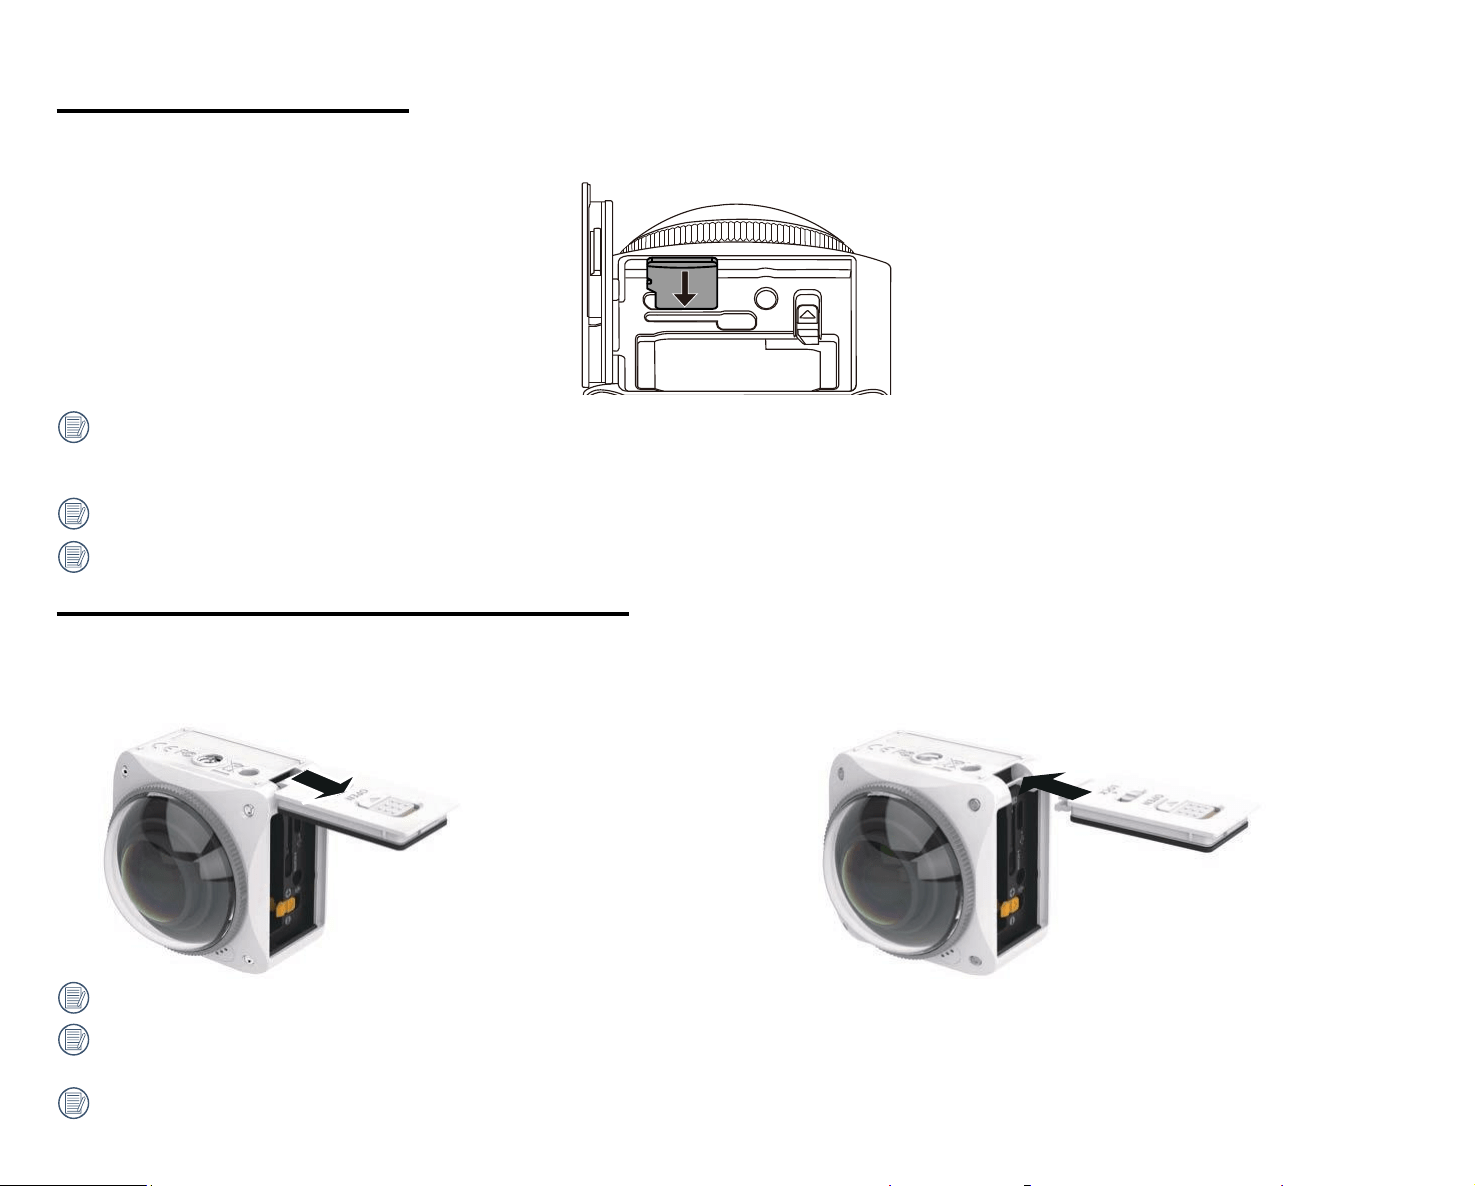
Installing a Memory Card:
Open the battery cover door, then insert the memory card into the card slot as shown in the illustration below (note the direction of the memory card opening).
Push the bottom end of the memory card with your ingertip into the slot completely and close the battery cover door.
A memory card (microSD / microSDHC / microSDXC) is essential to recording and saving 360 photos and videos and is not included in the product
packaging. The memory card needs to be purchased separately. Please use a memory card which is Class 10 or higher and has a capacity of 8GB to 256GB.
When recording with any new memory card Class 10 or higher, it is recommended you format the memory card before using.
To remove the memory card, open the battery cover door, gently press the memory card to eject it and remove it carefully.
The camera will automatically turn o if the memory card is inserted or removed when the product is turned on.
Mounting / Removing Battery Cover Door:
Removing Battery Cover Door:
Pull the battery cover door hinge out carefully (as shown in the
diagram below) until the battery cover door is separated from the
camera body.
Mounting Battery Cover Door:
Snap the battery cover door back on to the camera body at the hinge section
as shown in the diagram below.
With the battery cover removed, user may readily access the USB/HDMI/AV interfaces at their discretion.
File size may increase or decrease depending on the subject, shooting conditions, etc. Disc capacity varies with manufacturer and formatting method. The
exposure time may be used for reference.
The camera is not waterproof or weatherproof if the battery cover door is removed.
14
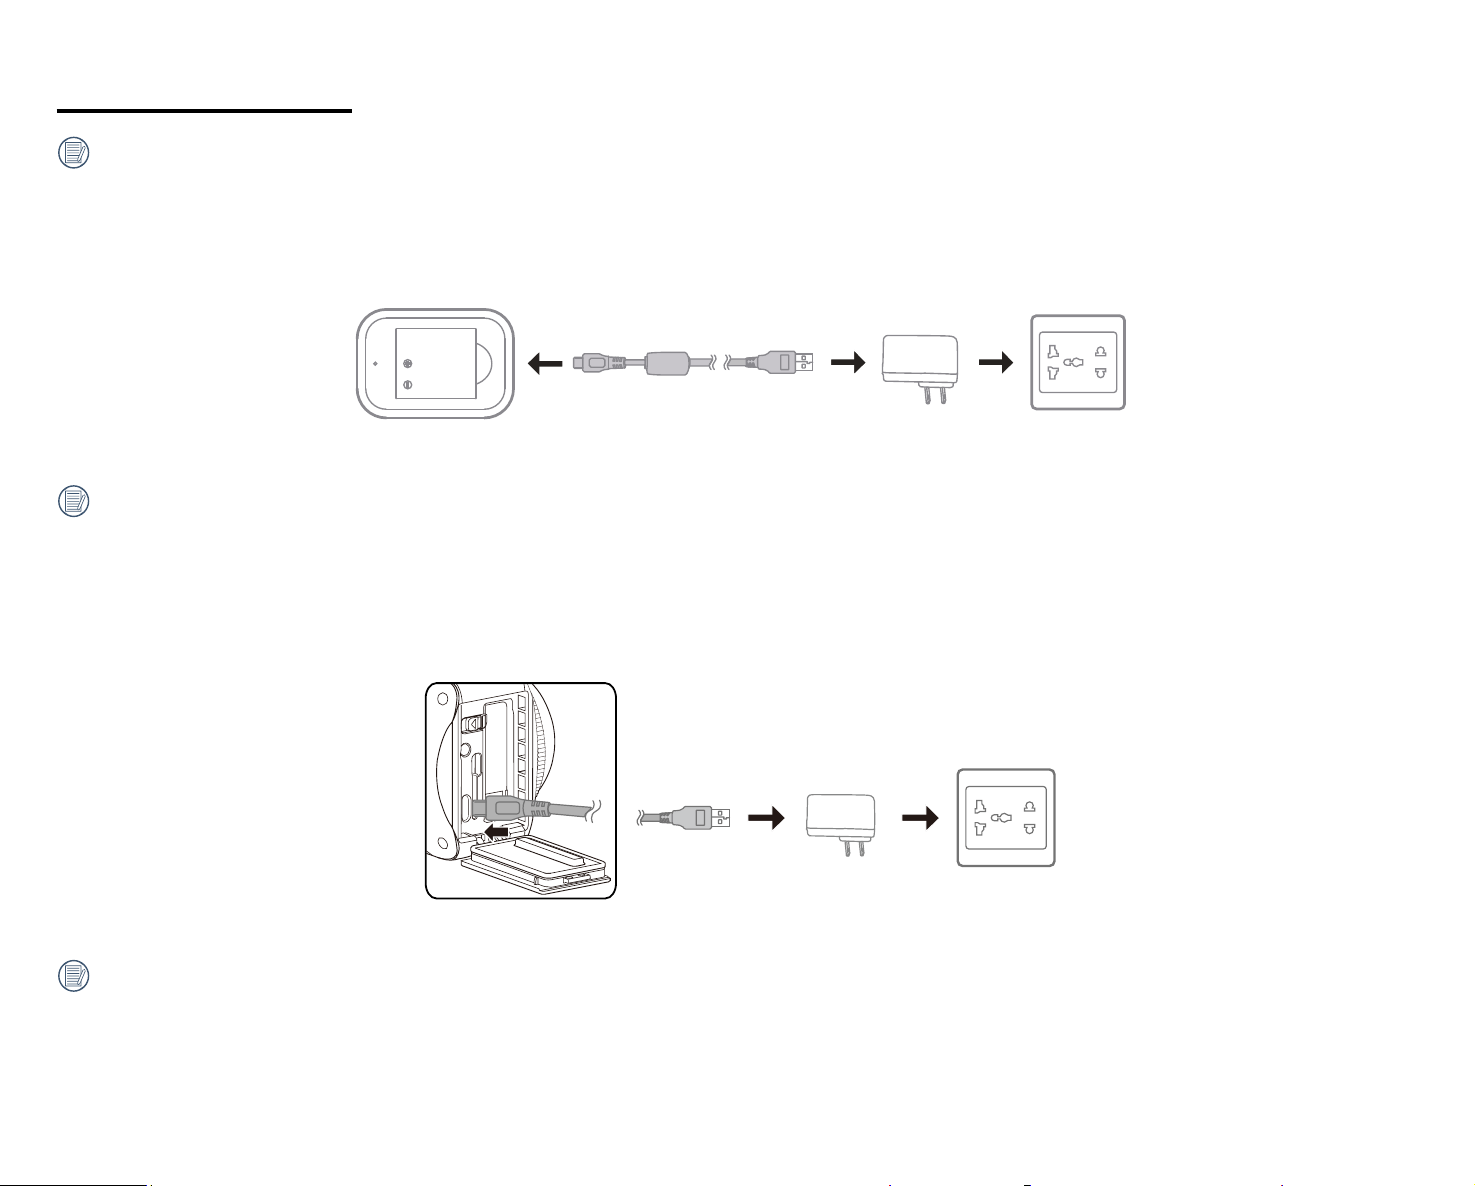
Charging the Battery:
Please use the supplied battery charger and AC adapter to charge the Li-ion battery in an ambient temperature ranging from 50˚F to 95˚F or 10˚C to 35˚C.
Charging the Battery with Induded Battery Charger:
1. Place the battery into the battery charger according to the direction illustrated below. Use the Micro USB cable to connect the battery charger to the AC
adapter then plug the AC adapter into an electrical outlet.
2. The indicator light will turn red when charging. The indicator light will turn green when charging is complete.
When charging the battery for the irst time or after a long period of storage, please make sure that the charging time is a minimum of four hours.
Charging the Camera with an AC Adapter or an External Power Supply (vehicle power supply, portable power supply, etc.):
1. Place the battery into the camera.
2. While in the "off" mode, use the Micro USB cable to connect the camera to the AC adapter irst, then plug the AC adapter into an electrical outlet. Alternatively,
use the Micro USB cable to connect the camera to an external power supply (vehicle power supply, portable power supply, etc.).
3. The indicator light will turn orange while it is charging. The indicator light will go out once charging is completed and the battery is fully charged.
The camera cannot be recharged when its power is on.
15
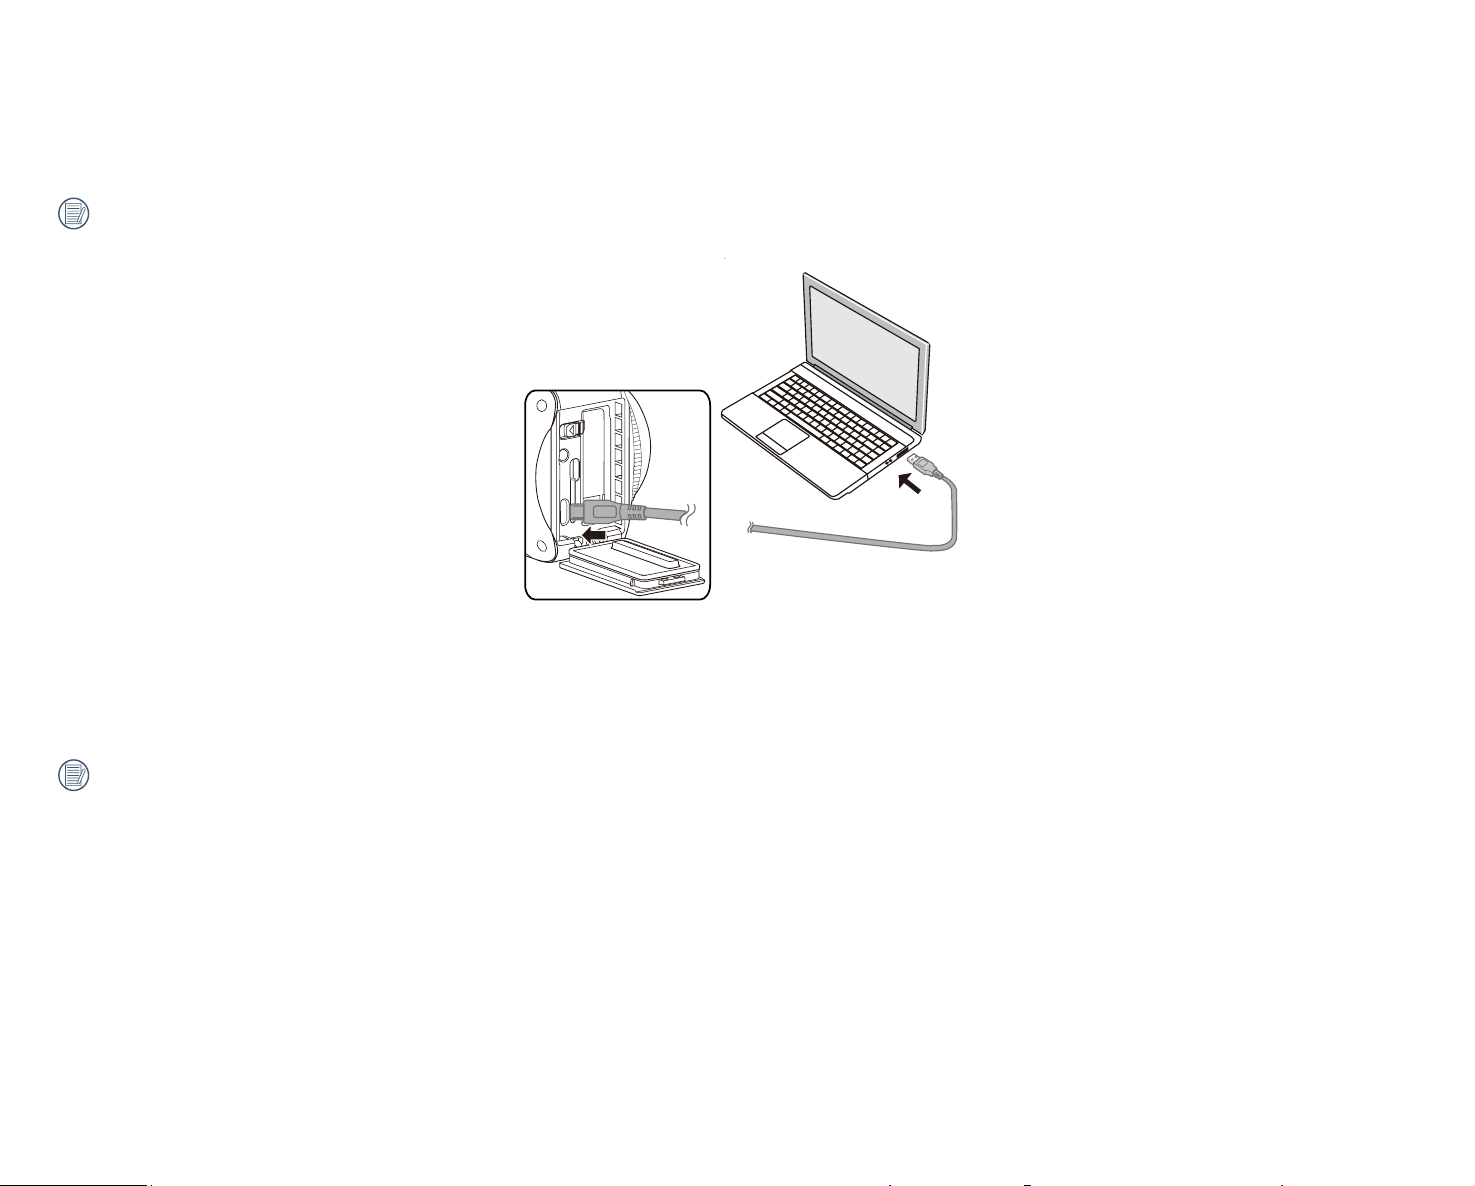
Charging the Camera via a Computer:
1. Place the battery into the camera.
2. Use the Micro USB cable to connect the camera (in the "o" position) to your computer.
3. The indicator light will remain orange while it is charging. The indicator light will go out once charging is completed and the battery is fully charged.
The camera cannot be recharged when its power is on.
Using the Internal Microphone:
Please only use a 2.5mm audio cable for the internal microphone. Optional PIXPRO 2.5mm Audio Cables are available for purchase @ kodakpixpro.com (cable
sold seperately).
16
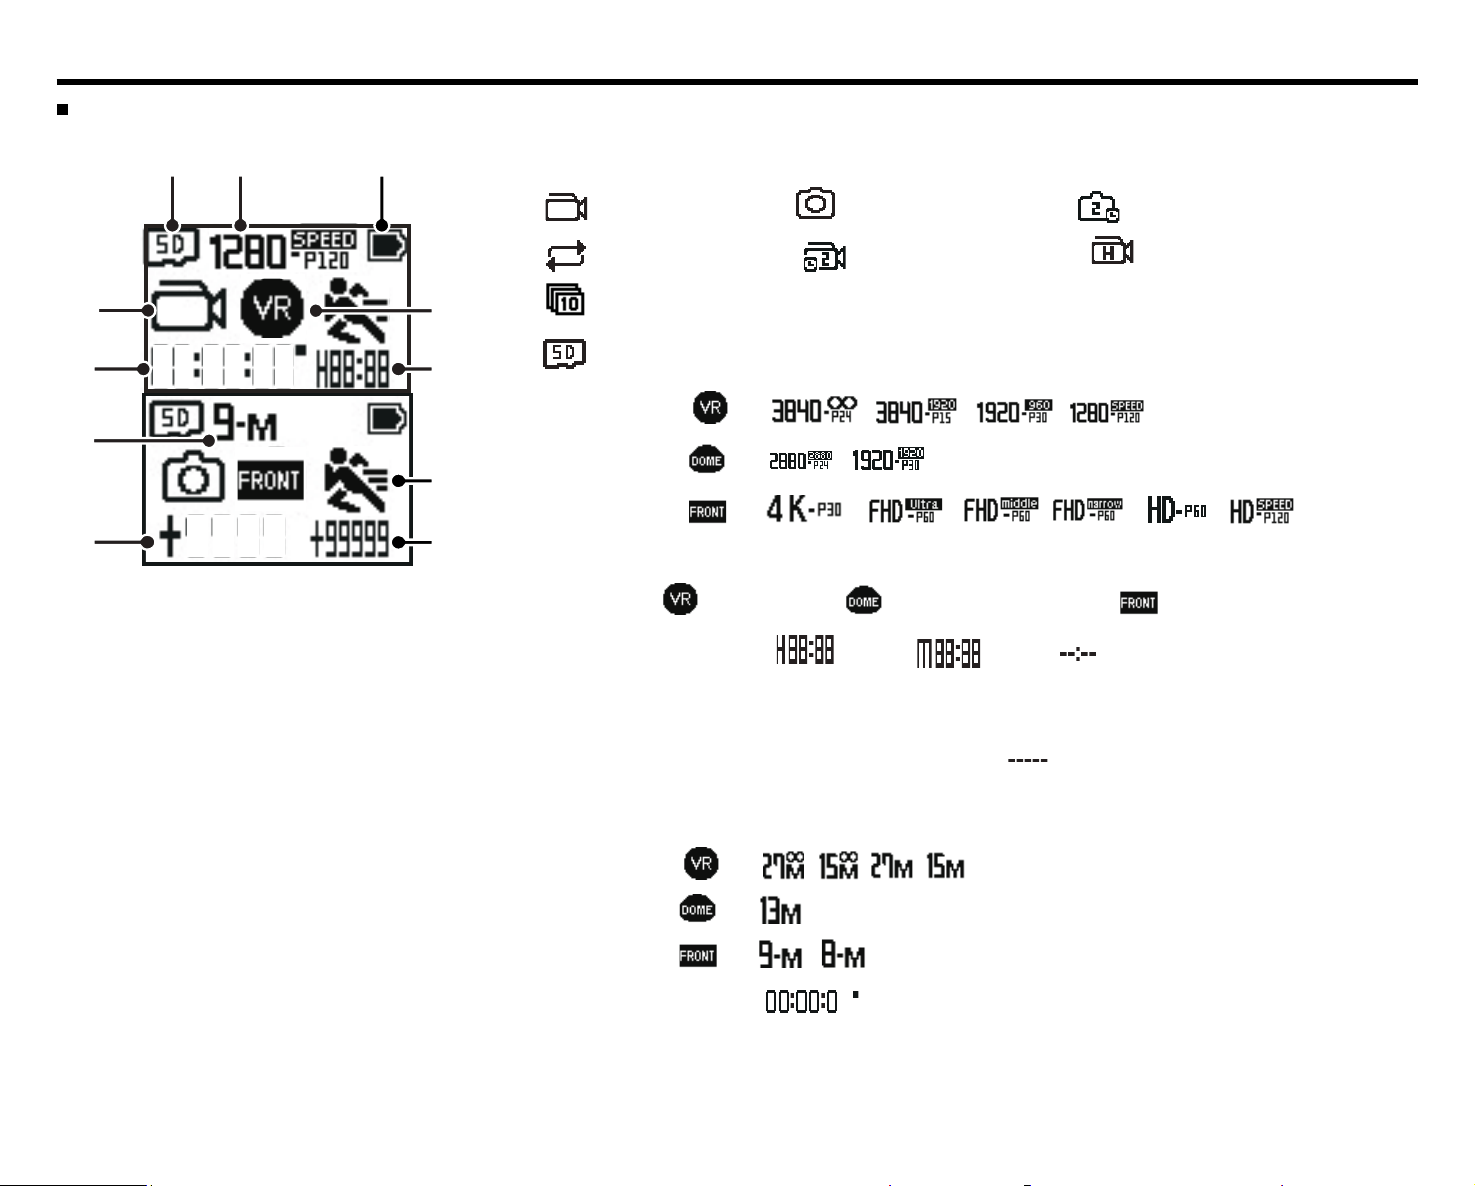
Main Camera Interface
Main Camera Interface Introduction:
2 4
7
8
6
5
1
9
10
11
3
1. Camera Mode
Movie Mode Snap Shot Photo Mode Time-Lapse Photo Mode
Loop Recording Mode Time-Lapse Video Mode High-Speed Movie Mode
Burst Mode
2. Memory Card
3. Movie Size: / / /
/
/ / / / /
4. Battery Status
5. Display Mode: 360 Spherical / 235 Round (Dome) Mode /
6. Remaining Recording Time: HH:MM / MM:SS / none
7. Motion Detection (On)
8. Number of Remaining Shots ("+99999" will be displayed when the SD card exceeds the maximum
available display number) / none
9. Existing Document in the Memory Card ("+9999" will be displayed when the SD card exceeds the
maximum available display number)
10. Photo Size: / / /
/
11. Time Recording the Movie
197 4K UItra Wide
4K [16:9] Full Frame
17
Power On / O
Power On:
When the power is o, press the button for one second or more to turn the camera on.
Power O:
When the power is on, press the button for one second or more to turn o the product.
If the product cannot be powered o normally, you can remove the battery from the camera to force it to power o.
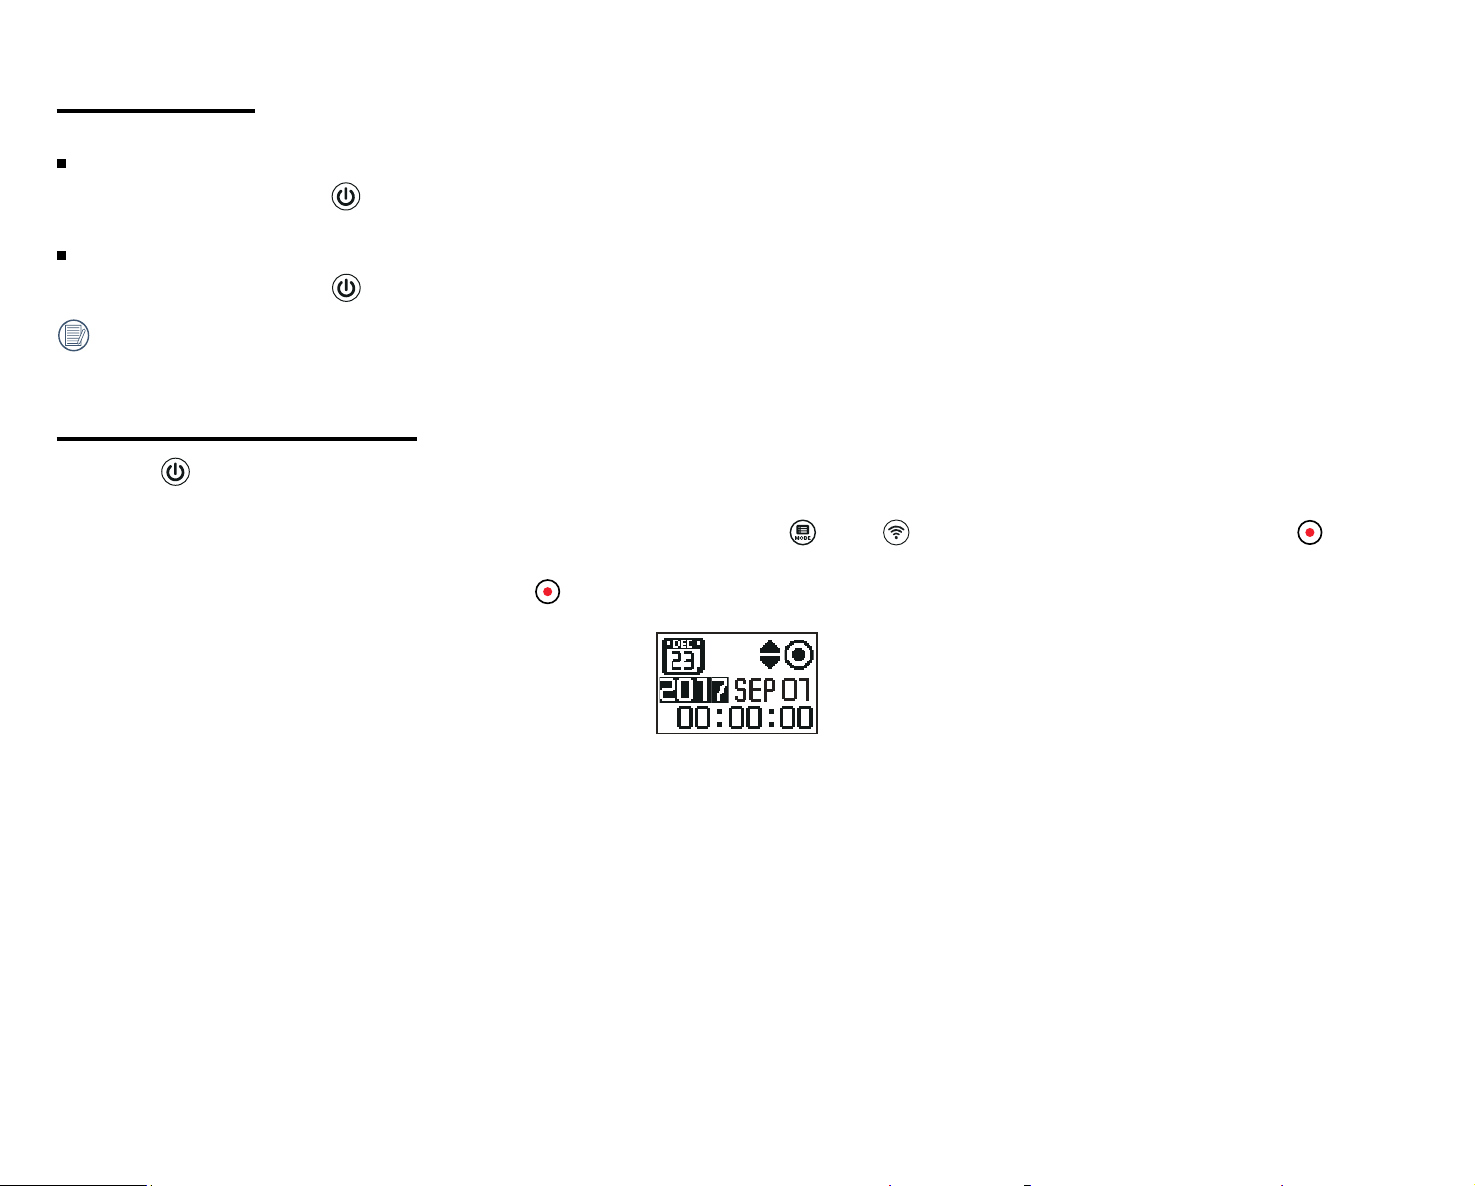
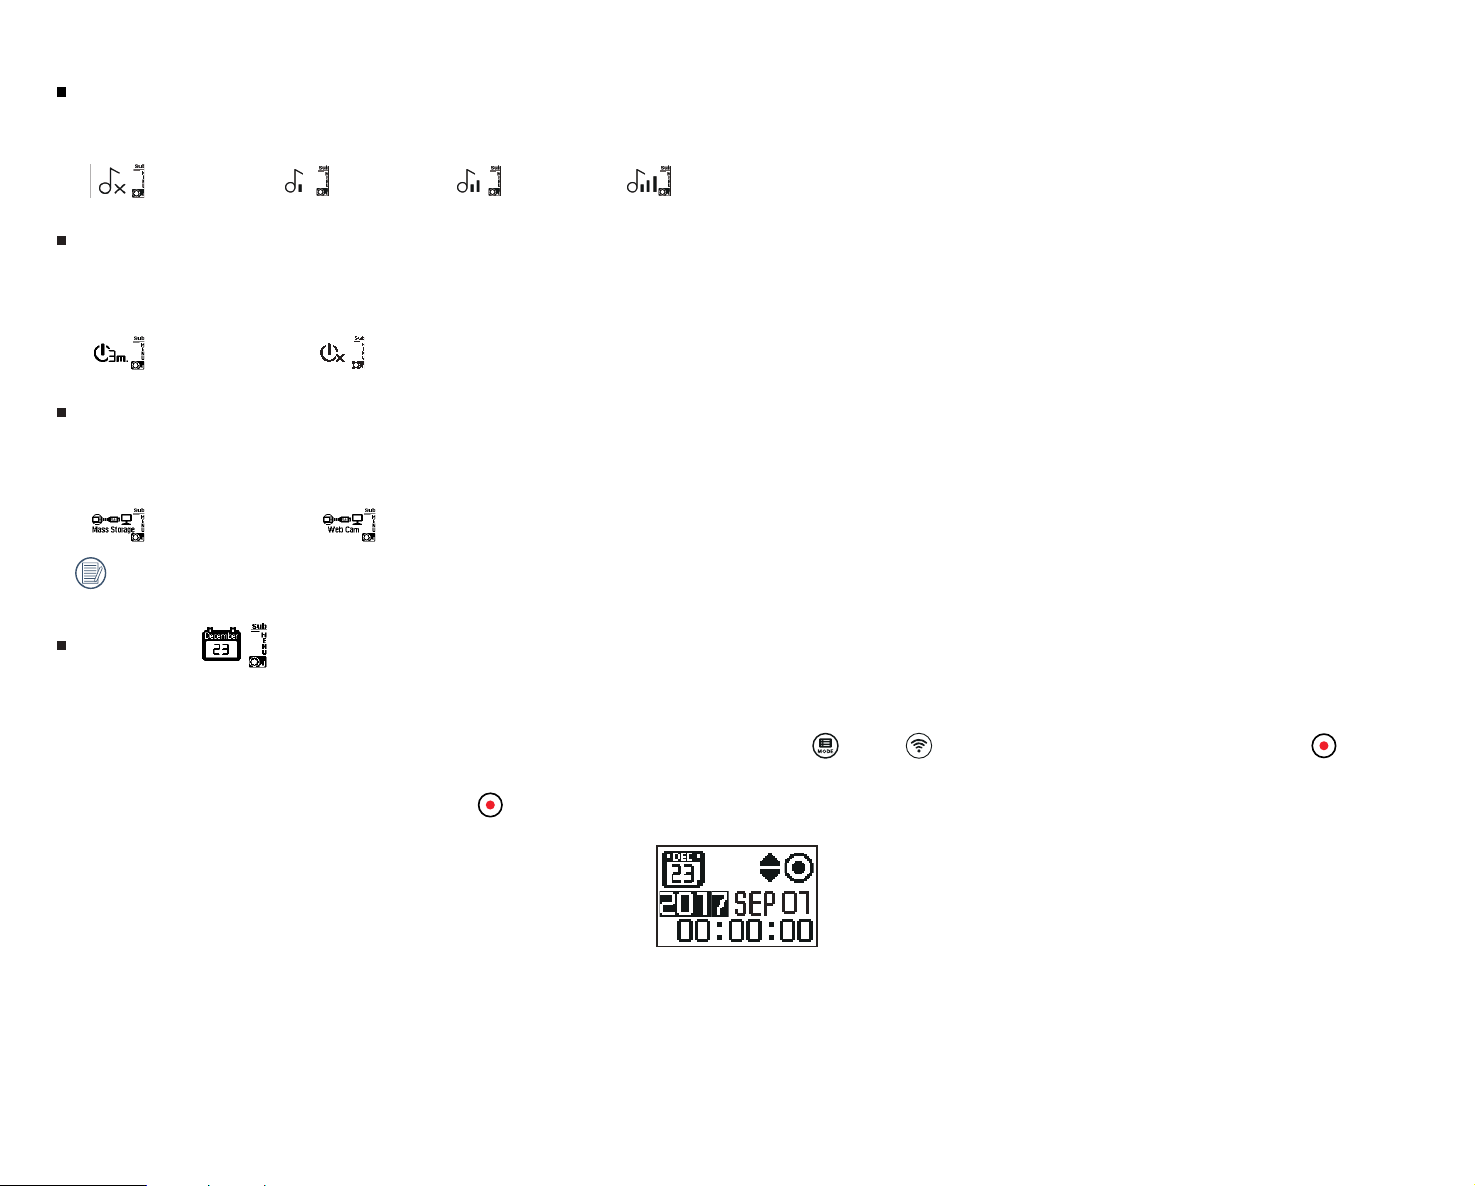
Start-up for Date and Time
1. Press the button to turn the camera on. When starting for the irst time, the display will show the date and time screen setting, "Year/Month/Day/Hour/
Minute/Second".
2. The ield to be adjusted will be highlighted with a black background color. Press the (up) or (down) buttons to adjust the value, press the button to
enter and conirm.
3. After adjusting the "Minute : Second" value, press the button to enter the main camera menu interface.
18
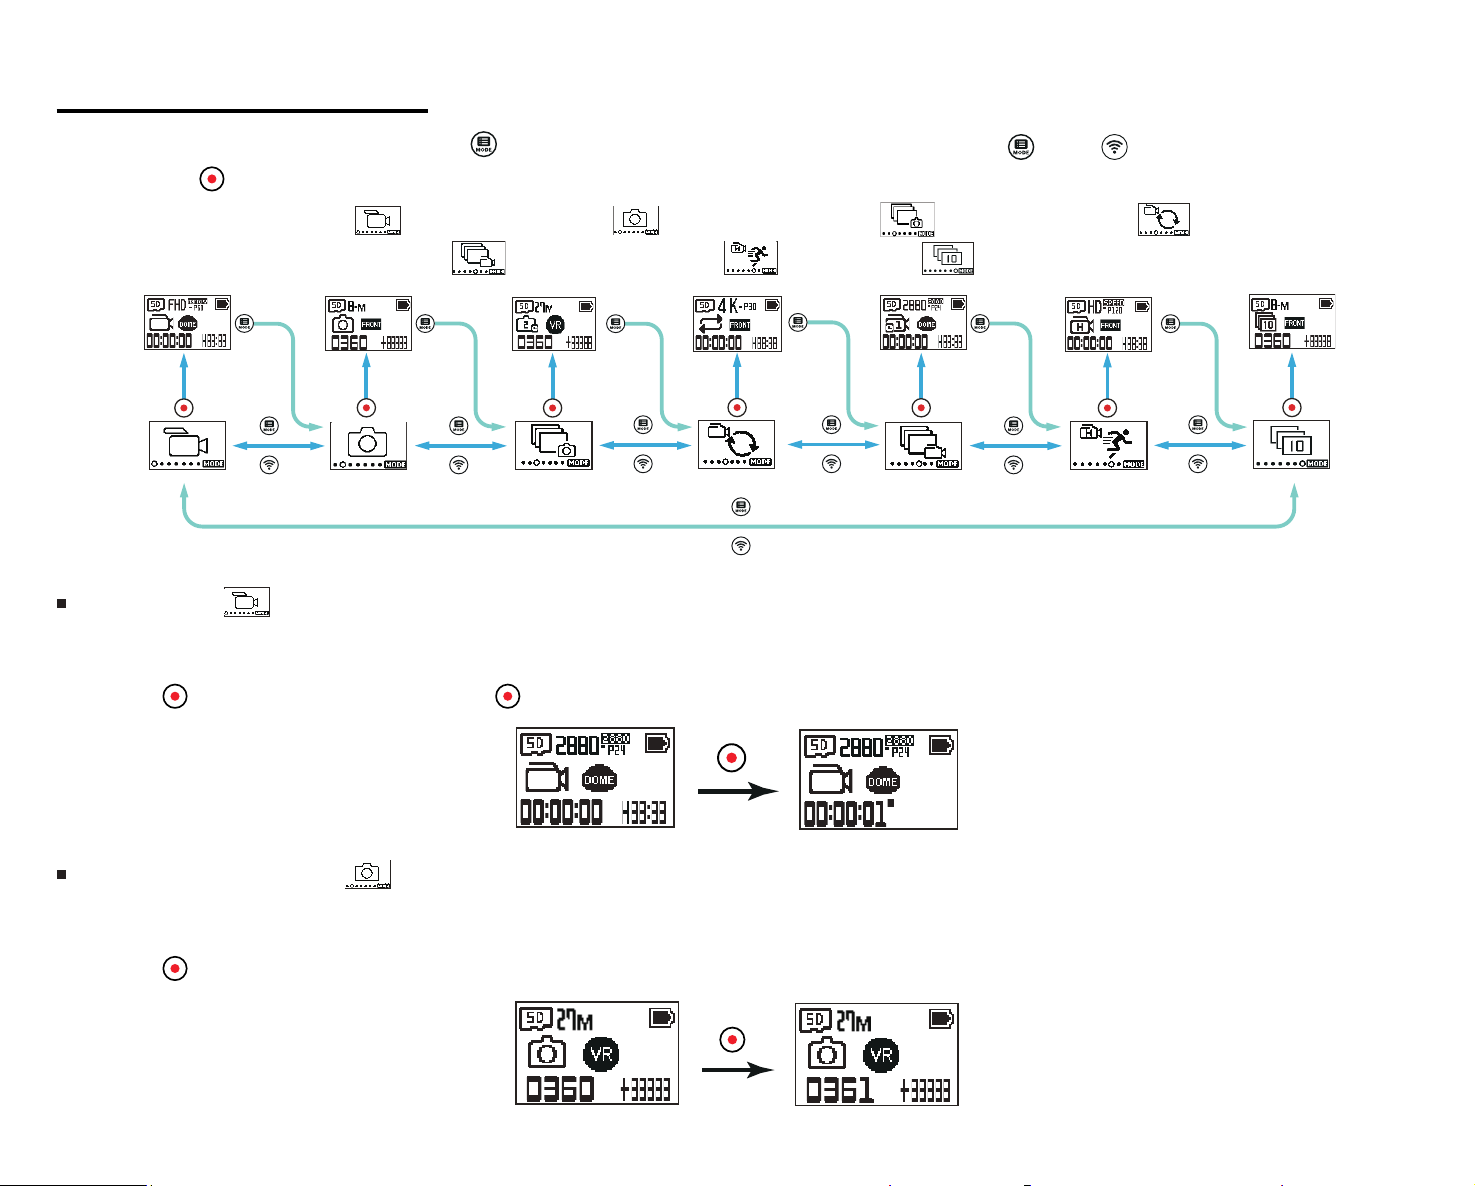
Camera Mode Introduction
In the main camera interface, press and hold the (up) button to enter the mode selection interface. Press the (up) or (down) button to select any one
mode; press the button to enter and conirm the mode of the current interface.
7 modes are available: Movie Mode , Snap Shot Photo Mode , Time-Lapse Photo Mode , Loop Recording Mode ,
Time-Lapse Video Mode
, High-Speed Movie Mode , and Burst Mode .
Movie Mode
Enable video recording. This mode is suitable for recording in most conditions.
Operation Method:
Press the
button to start recording. Press the button again to stop recording.
Snap Shot Photo Mode
Enable photo shooting. This mode is suitable for shooting photos in most conditions.
Operation method:
Press the
button to take a photo.
19
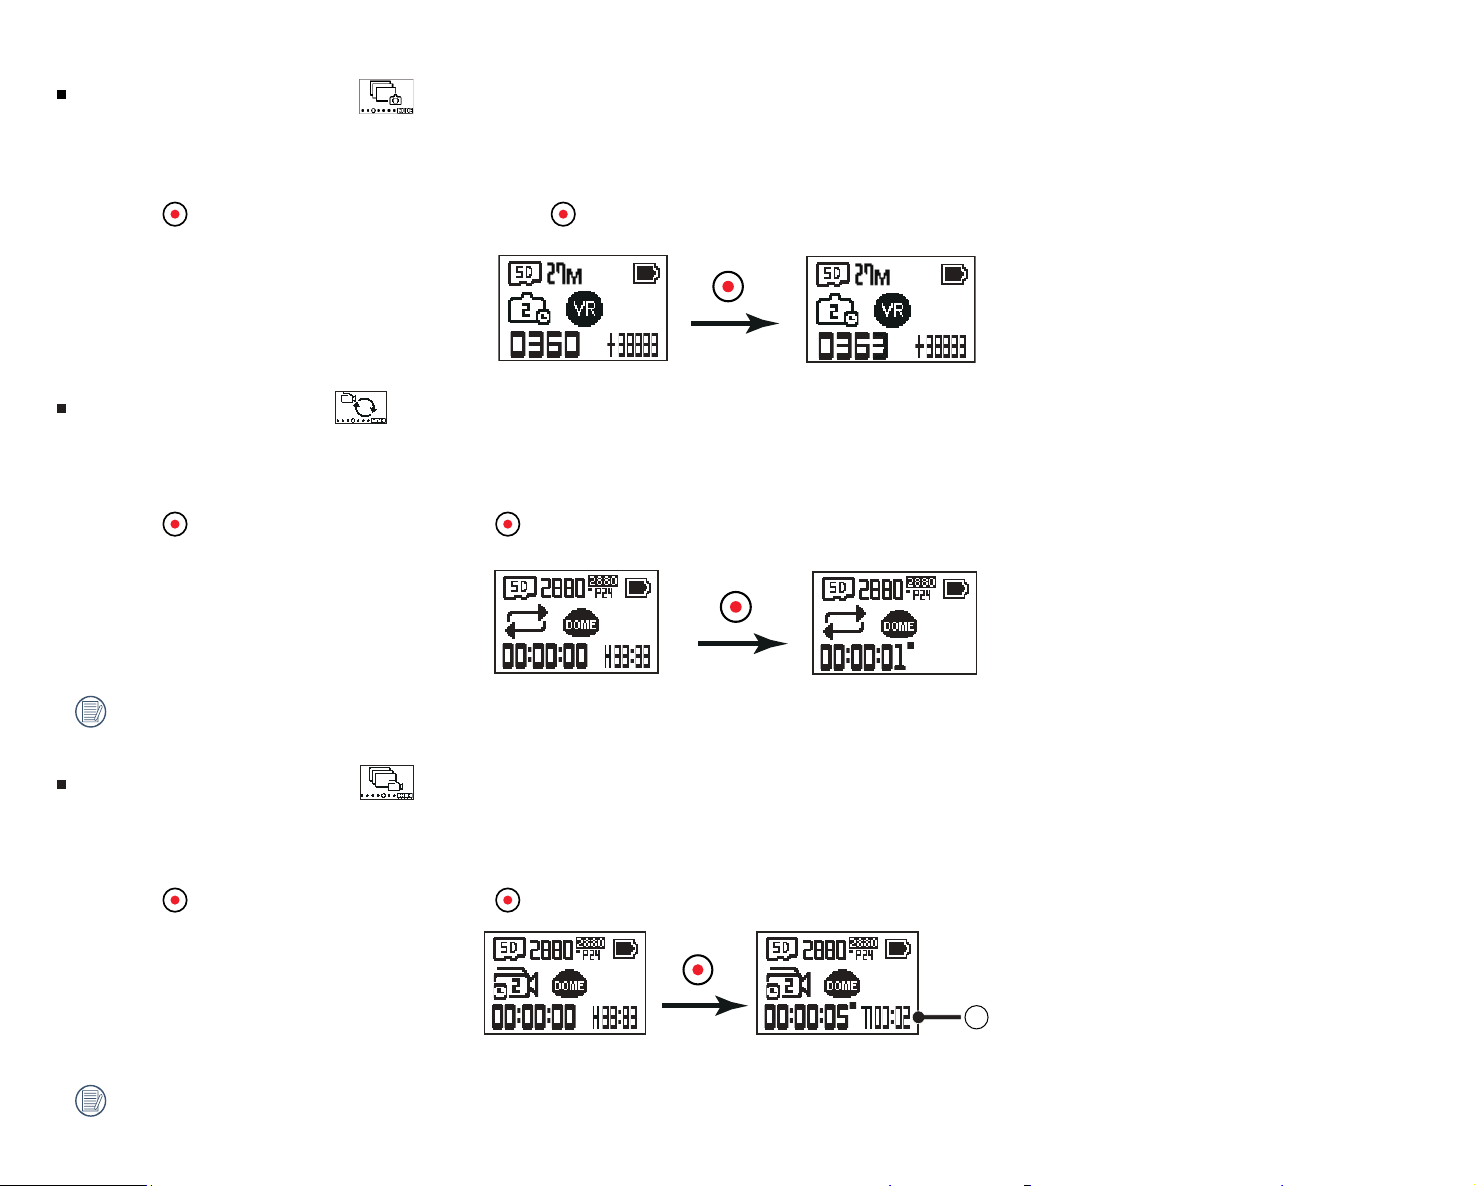
Time-Lapse Photo Mode
Time-Lapse Photo means shooting at a certain time interval and saving the shot photos in the same folder. If the number of iles exceeds the maximum number
of folder (9999), create a new folder.
Operation method:
Press the
button to start shooting photos. Press the button again to stop shooting photos.
Loop Recording Mode
Loop recording refers to recording independent video segments in the unit of 2 minutes. The recording will be automatically stopped if the single recording
time exceeds 24 hours.
Operation method:
Press the
button to start recording. Press the button again to stop recording.
The video recording time varies in accordance with dierent capacities of memory card and movie size. Each time loop recording is executed, a new folder
is generated.
Time-Lapse Video Mode
Time-lapse movie enables the recording of an interval of time, and splices the frames together to present a condensed video, which usually requires a long
period to complete.
Operation method:
Press the
button to start recording. Press the button again to stop recording.
1
①
indicates that the current countdown seconds
Neither sound recording nor electronic image stabilization (EIS) function are supported.
20
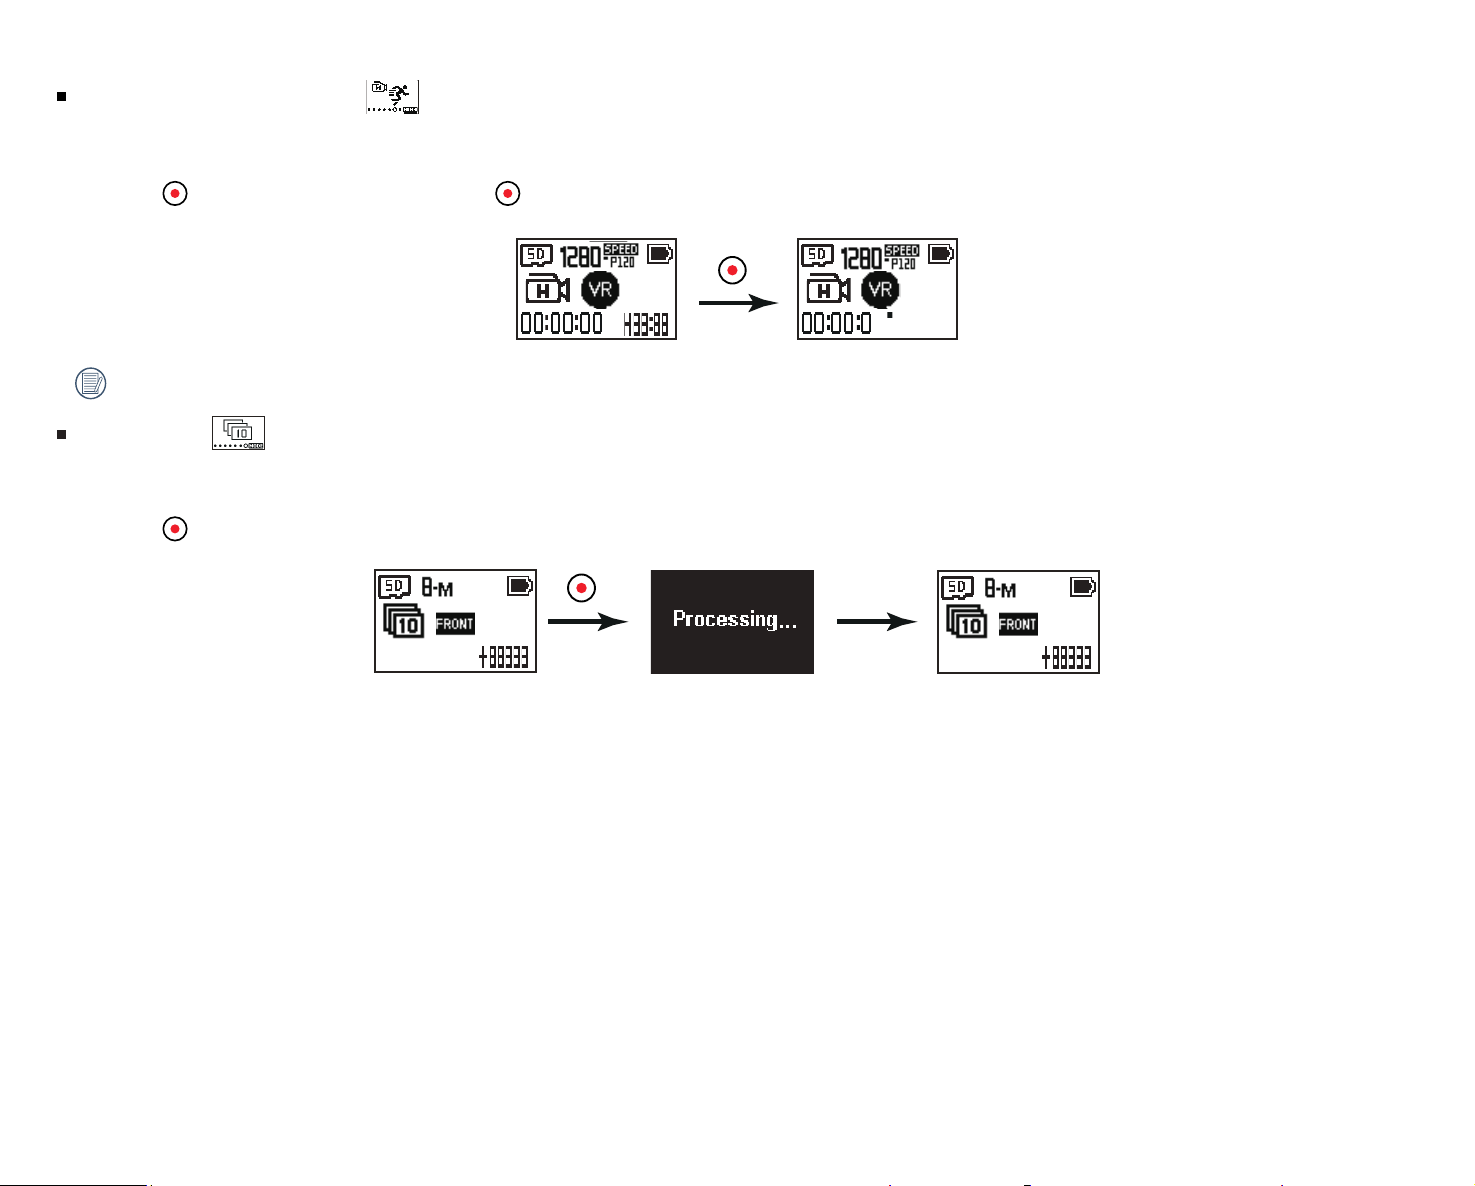
High-Speed Movie Mode
This camera shoots ultra-high speed movies and plays back with normal 30fps speed.
Operation method:
Press the
button to start recording. Press the button again to stop recording.
Audio cannot be recorded in this mode.
Burst Mode
Enables ten successive photos to be captured continuously before automatically pausing.
Operation method:
Press the
button; the camera will pause after 10 photos have been taken.
21
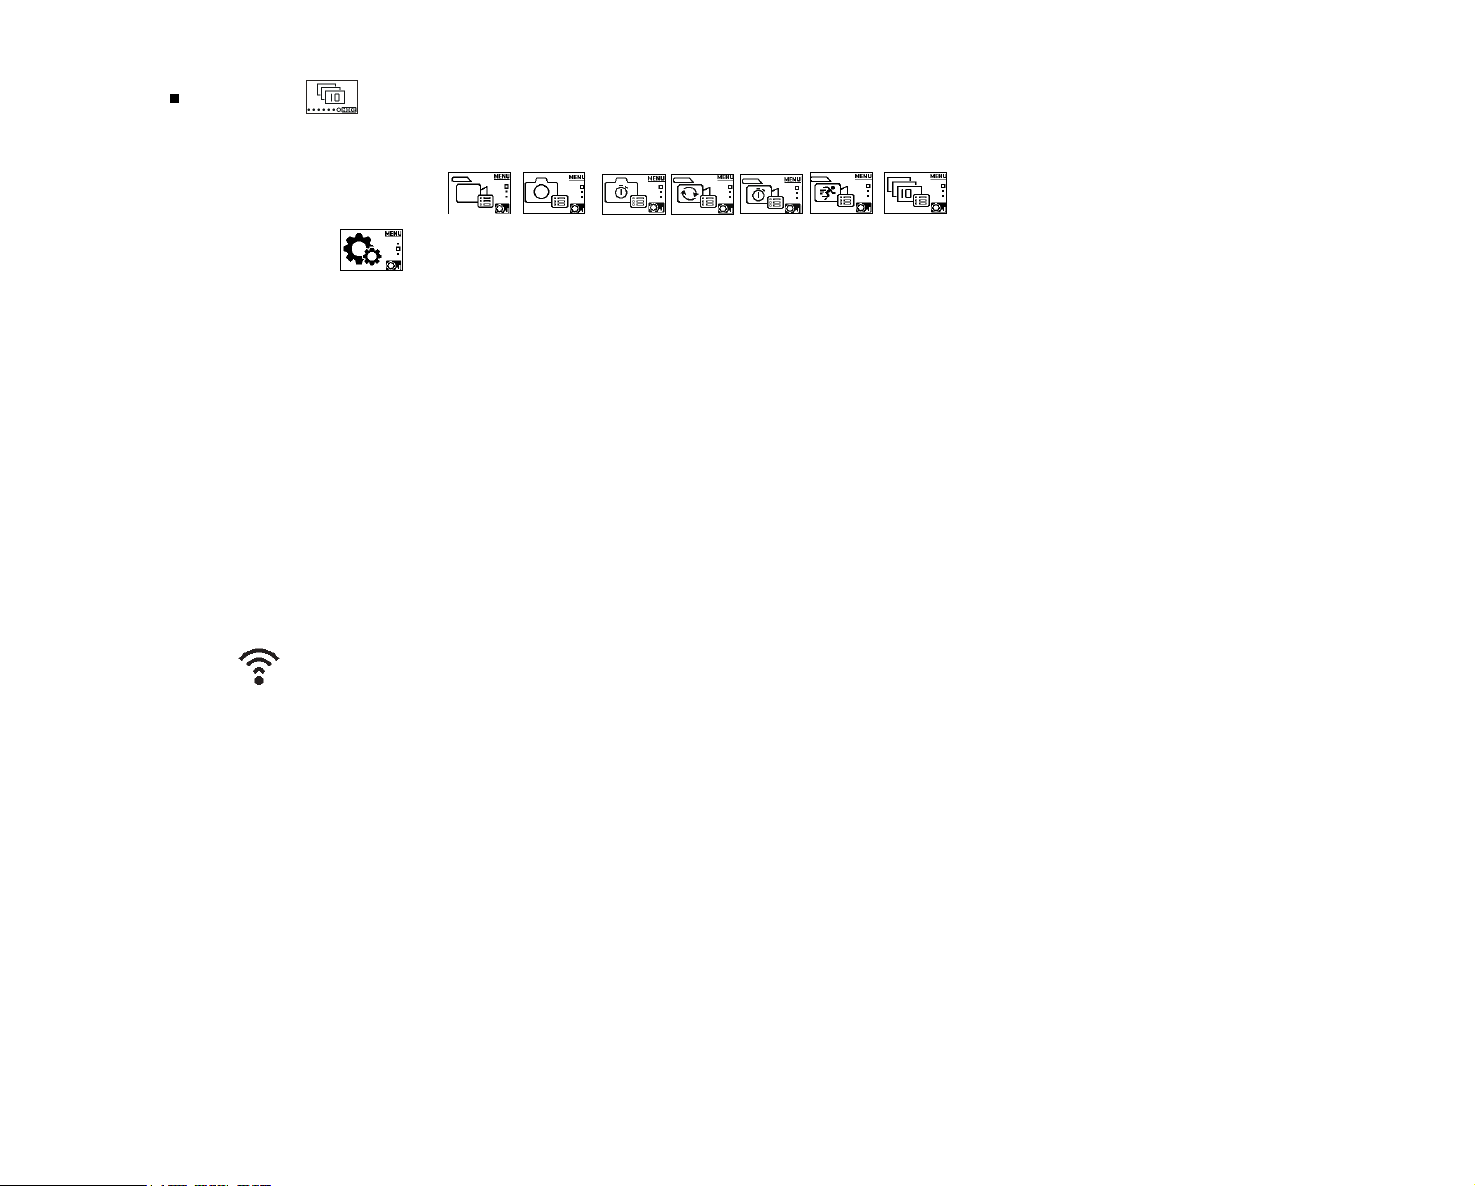
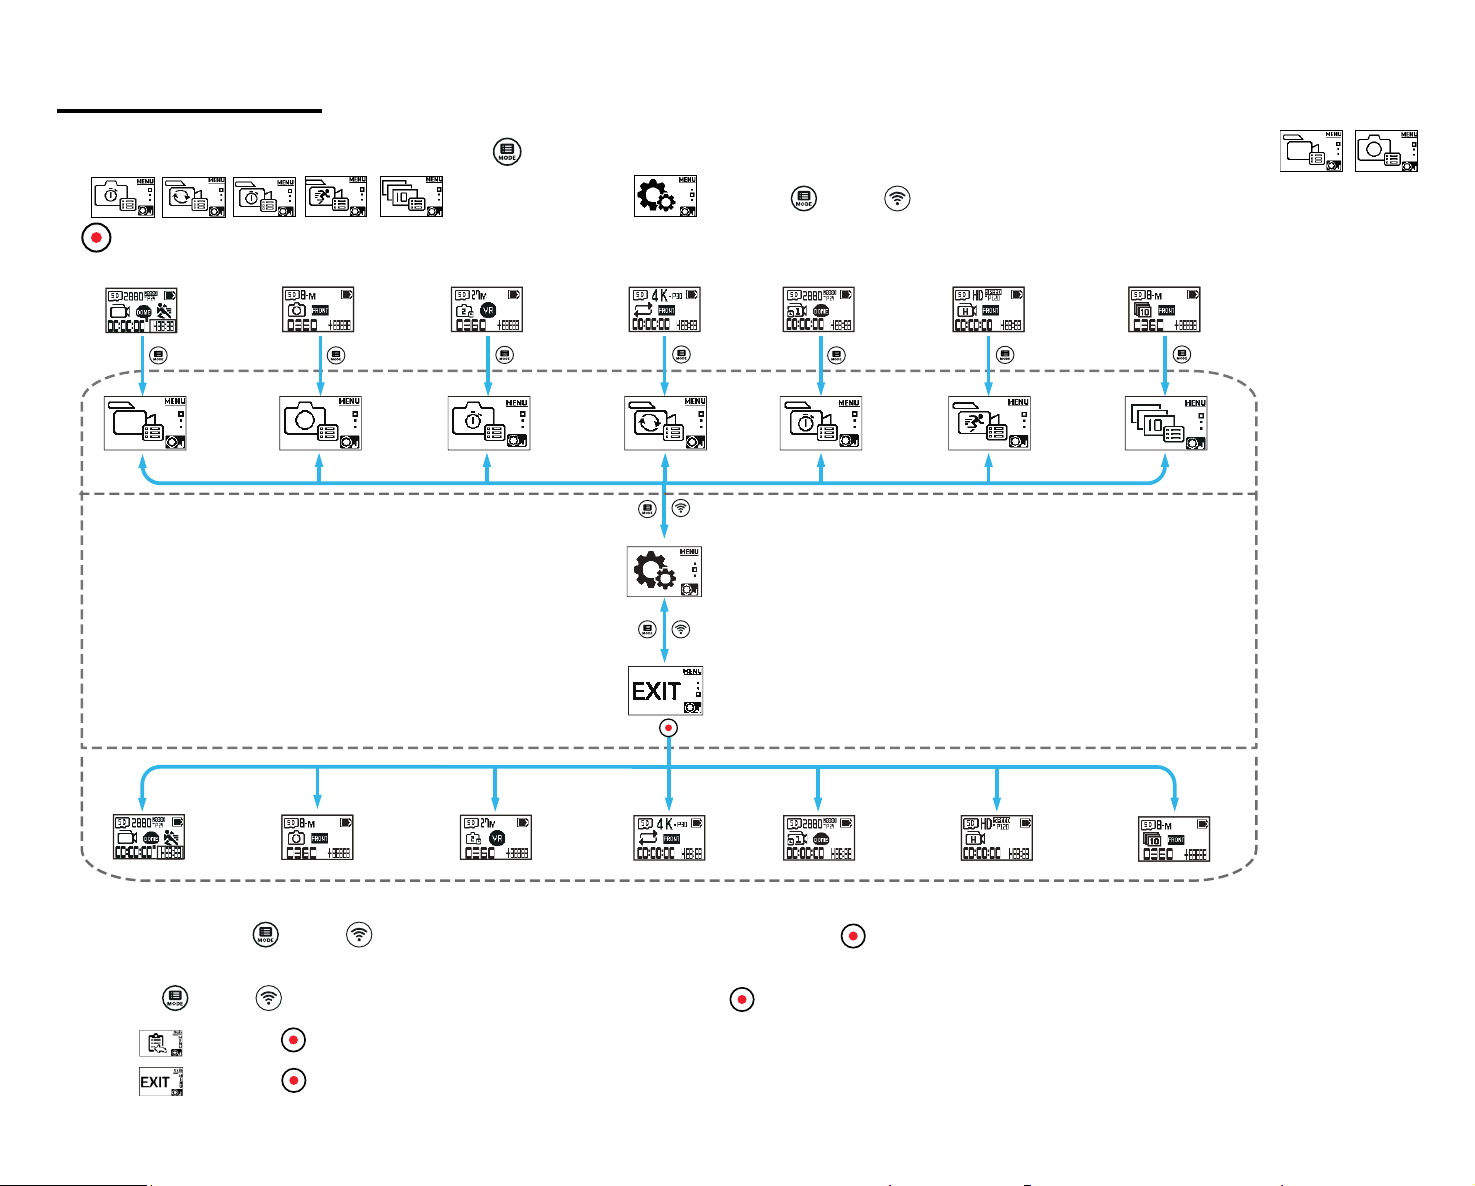
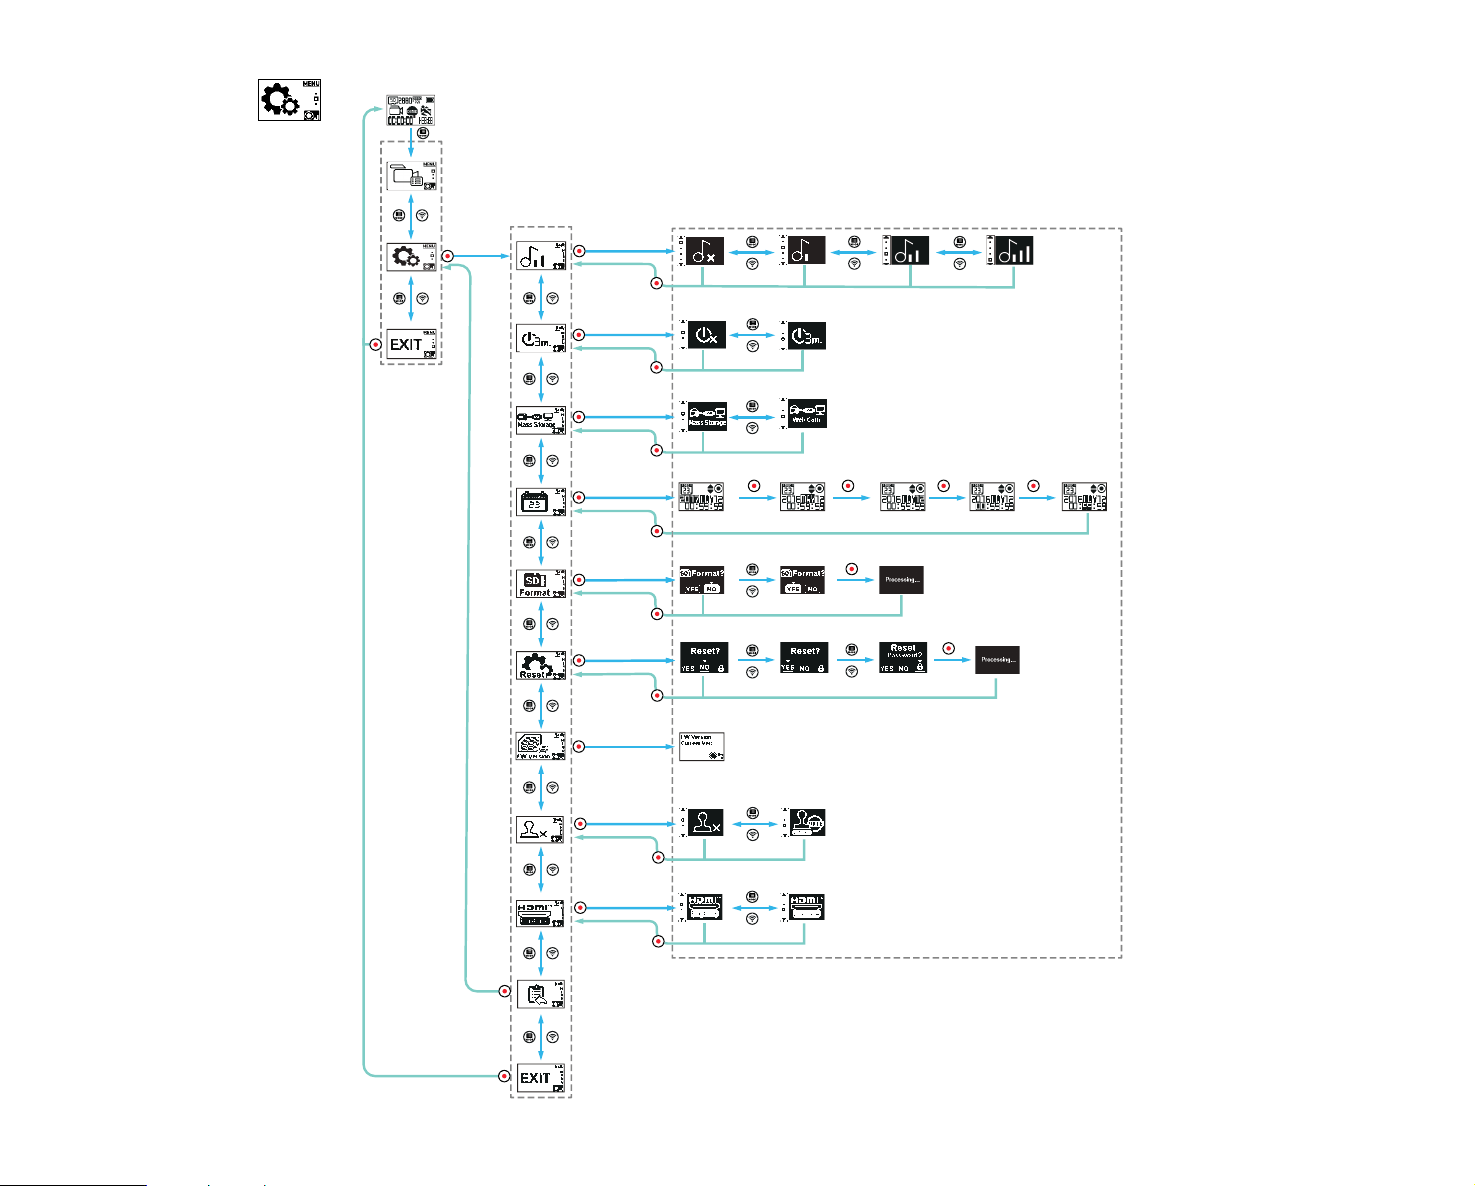
Menu Introduction:
1. In the main camera interface, press and hold the (up) button to enter the interface menu. There are 2 options: All Shooting Mode Settings ( /
/
/ / / / ) and General Settings . Press the (up) or (down) button to select the desired setting and press the
button to enter the corresponding sub-menu interface.
Menu Interface
2. Toggle between the (up) or (down) buttons to select the desired setting; press the button to conirm and to enter the selected menu interface
(highlighted with a black background color).
3. Press the (up) or (down) buttons to select the desired item; press the button to select and conirm and to go back to the sub-menu interface.
4. Select , press the button to return to the menu interface.
5. Select , press the button to return to the main menu interface.
22
All Shooting Mode Settings (
/ / / / / /
)
The Sub Menu for all shooting modes and settings:
Menu Interface
Movie Setting Photo Setting
Time-Lapse
Photo Setting
Loop Recording
Setting
Time-Lapse
Video Setting
High-Speed
Movie Setting
Burst Setting
Sub-Menu
Interface
settings
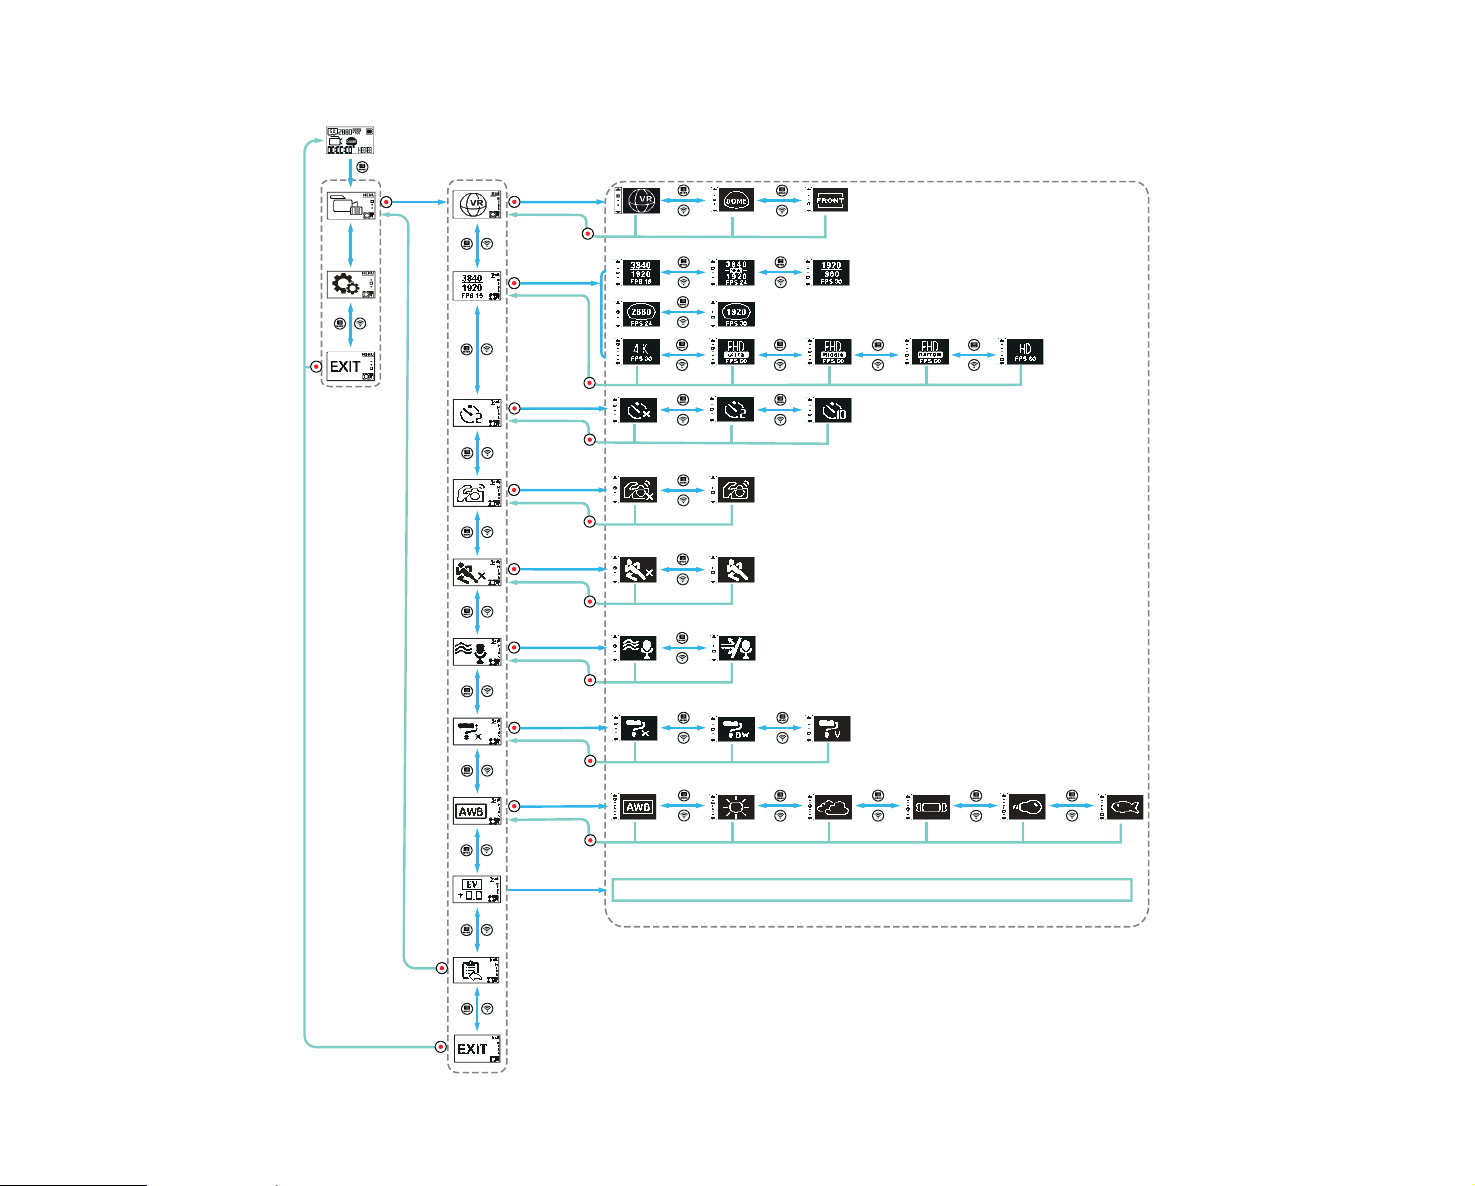
23
Below is an illustration of the recording setting menu for an example. The operating settings of all optional shooting modes have the same menu entry low and
menu access as shown below:
Menu Sub-Menu Selectable Options
-3.0、-2.7、-2.3、-2.0、-1.7、-1.3、-1.0、-0.7、-0.3、+0.0、+0.3、+0.7、+1.0、+1.3、+1.7、+2.0、+2.3、+2.7、+3.0
24
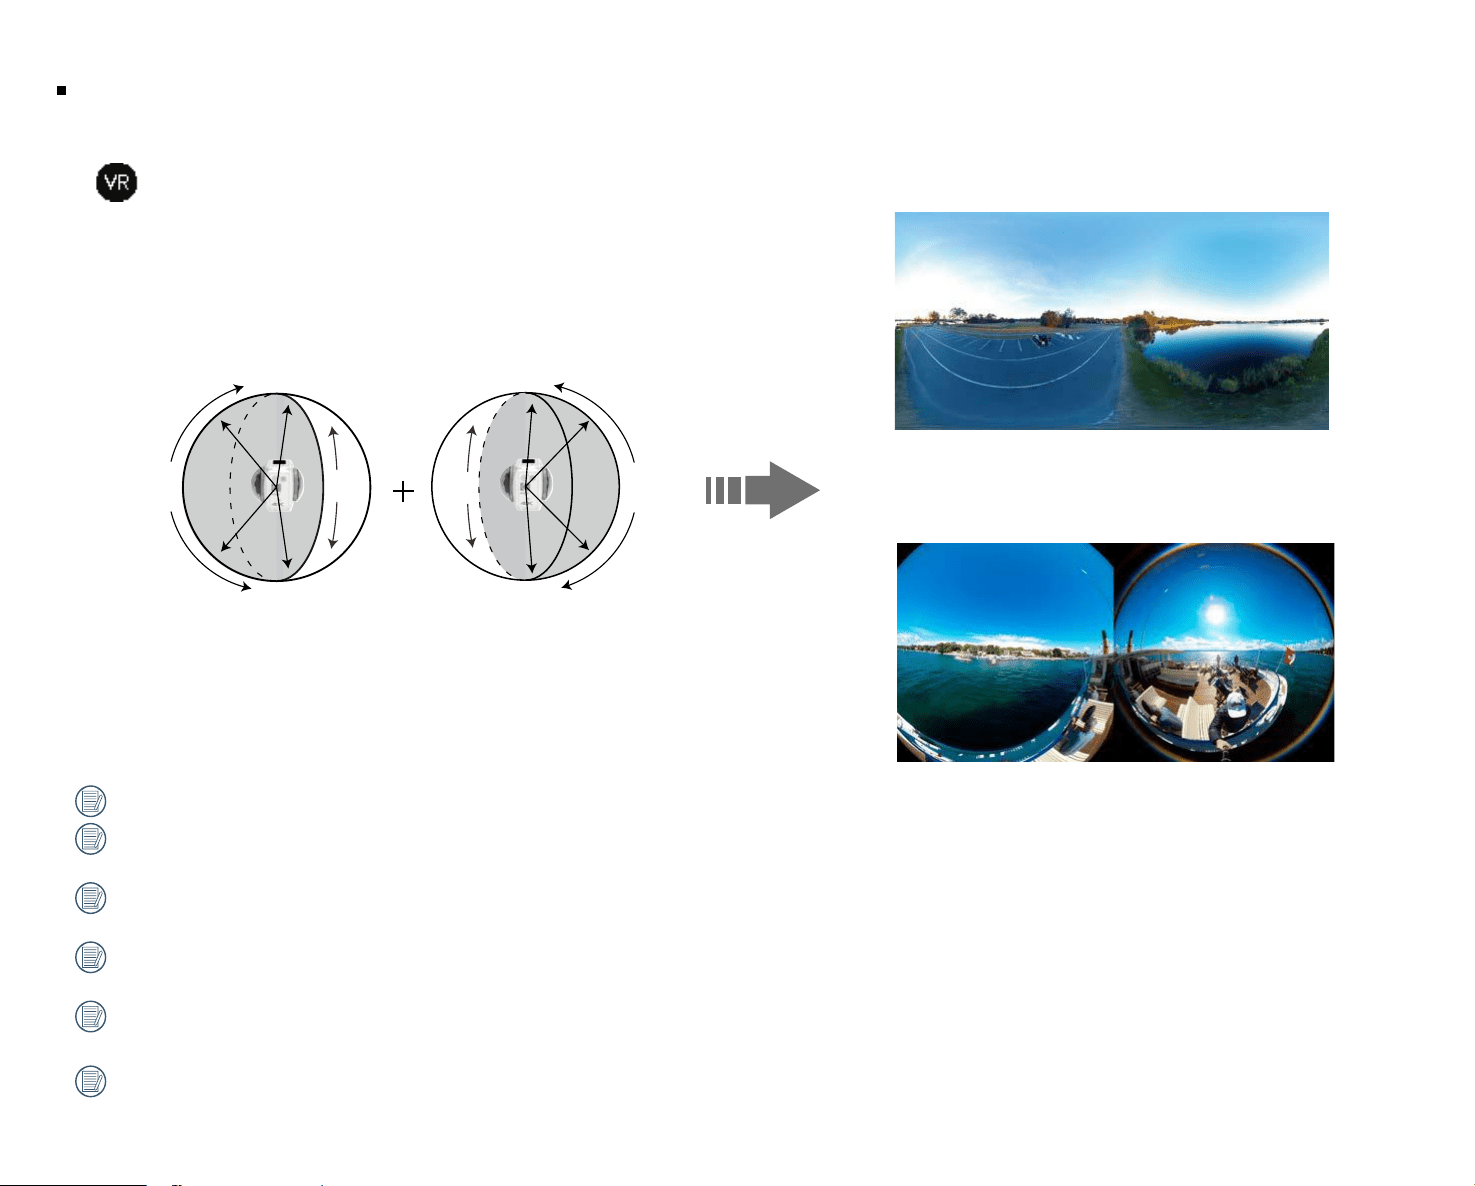
Display Mode
Set image storage format
There are 3 options:
1.
360 Spherical / VR Mode
235°
360° 360°
155°
In-Camera Stitch
Dual Global
We recommend keeping objects a distance of 5 ft away from the stitch line for optimum stitching and output results.
When shooting using the in-camera stitch mode, you cannot manually adjust the ile's stitch position after recording. For optimized stitching shoot with the
protective lens covers on.
To have the ability to manually control your stitch line post capture, switch to the dual global mode and manually adjust and edit your stitch line using the
free “PIXPRO 360 VR Suite” software for increased lexibility when editing ORBIT360 4K / 4KVR360 360° photos or video.
When shooting in a controlled and safe environment using the dual global mode setting, you have the added lexibility of removing the protective lens
covers to reduce unwanted glare and added clarity.
When clear plastic lens covers are removed you cannot use the camera's In-Camera stitch mode and upload 360° photos and videos from the PIXPRO
Remote Viewer APP.
When removing the clear, plastic, protective lens covers, the preferred and recommended method for shooting is 24 fps dual global mode and stitching in
the complimentary PIXPRO 360 VR Suite software provided, to optimize lexibility of manually adjusting the stitch line for added control.

2. 235 Round (Dome) Mode
235°
360°
3.
197 4K UItra Wide Full Frame Mode [16:9]
4K [16:9] Full Frame Mode

26
Movie Size
Video Resolution Settings:
VR 360 Spherical / VR Mode (2:1)
3840×1920 (24fps)
3840×1920 (15fps)
1920×960 (30fps)
1280×640 (120fps)
235 Round (Dome) Mode (1:1)
2880×2880 (24fps)
1920×1920 (30fps)
197 4K UItra Wide Mode
3840×2160 (30fps)
1920×1080 (60fps)
1920×1080 (60fps)
1920×1080 (60fps)
1280×720 (60fps)
1280×720 (120fps)
The selectable video resolution options vary for dierent video shooting modes and are subject to actual user
selections that will determine inal playback and the saved video ile resolution.
When the display mode is set to , the only options available will have the [2:1] aspect ratio and will be
displayed; when the display mode is set to , only the [16:9] options will be displayed; when the display
mode is set to , only the [1:1] aspect ratio options will be displayed.
When selecting during recording, if the lenses face toward a harsh or brighter light, a glow eect
may occur.
The maximum recording times are:
Movie size 4GB 8GB 16GB 32GB 64GB 128GB 256GB
00:07:00 00:16:00 00:31:00 01:05:00 02:10:00 04:21:00 08:42:00
00:07:00 00:16:00 00:31:00 01:05:00 02:10:00 04:21:00 08:42:00
00:28:00 00:57:00 01:52:00 03:51:00 07:43:00 15:28:00 30:58:00
00:18:00 00:37:00 01:13:00 02:31:00 05:03:00 10:07:00 20:15:00
00:07:00 00:16:00 00:31:00 01:05:00 02:10:00 04:21:00 08:42:00
00:14:00 00:29:00 00:56:00 01:57:00 03:55:00 07:50:00 15:42:00
00:07:00 00:16:00 00:31:00 01:05:00 02:10:00 04:21:00 08:42:00
00:18:00 00:37:00 01:12:00 02:30:00 05:00:00 10:01:00 20:04:00
00:18:00 00:37:00 01:12:00 02:30:00 05:00:00 10:01:00 20:04:00
00:18:00 00:37:00 01:12:00 02:30:00 05:00:00 10:01:00 20:04:00
00:30:00 01:00:00 01:58:00 04:05:00 08:11:00 16:24:00 32:51:00
00:21:00 00:43:00 01:25:00 02:56:00 05:52:00 11:46:00 23:34:00
File size may increase or decrease depending on the subject, shooting conditions, etc. Disc capacity varies
with manufacturer and formatting method. The exposure time may be used for reference.

27
Self Timer:
Setting the self-timer function:
There are 3 options:
Self Timer - 10 sec
Electronic Image Stabilization (EIS):
Setting the Electronic Image Stabilization (EIS) function:
There are 2 options:
O
Shooting Modes Number of Recording Pixels EIS Setting
Still
7360x3680 360° 360° -
5520x2760 360° 360° -
7360x3680 360° 360° -
5520x2760 360° 360° -
3680x3680 235° 235° -
3526x2644 197° 197° -
3840x2160 197° 197° -
Movie
3840x1920 15fps 360° 360° -
3840x1920 24fps 360° 360° -
1920x960 30fps 360° 360° -
2880x2880 24fps 235° 235° 207°
1920x1920 30fps 235° 235° 207°
3840x2160 30fps 197° 197° 172°
1920x1080 60fps 197° 197° 172°
1920x1080 60fps 155° 155° 140°
1920x1080 60fps 100° 100° 91°
1280x720 60fps 67° 67° 61°
Hi Speed Movie
1280x640 120fps 360° 360° -
1280x720 120fps 197° 197° -
When the camera is set in VR Mode, the EIS setting is not available.
28
Time-Lapse Photo:
Set interval photo time.
There are 6 options:
60 sec
Time-Lapse Video:
Set interval recording time.
There are 6 options:
60 sec
Motion Detection:
Motion detection means if the camera detects moving objects entering into view, it will automatically start recording. During the recording process, if there is
no moving object detected for 10 continuous seconds, the recording will pause automatically.
There are 2 options:
O
Operation method:
1. Select and return to the main menu interface.
2. The display will show the icon. Press the button to activate. When the product detects moving objects, it will automatically start recording.
3. The product will stop recording when there is no change in the image or lack of movement after 10 seconds. When the image changes or the camera senses
movement again, the camera will start recording again automatically and a new video ile will be generated after each pause and restart.
1 2
①
indicates the total time of recording
② indicates the total time from enabling the Motion Detection setting
4. Press the button to stop recording and detecting.
Wind Reduction:
Wind reduction refers to the camera's ability to reduce the amount of noise caused by wind or high speed recording environments.
There are 2 options:
O
29
Color:
Set Image Color.
There are 3 options:
Vivid
White Balance:
White balance means the user can adjust the color temperature under dierent light sources to help ensure that the colors in photos and videos are
reproduced as accurately as possible.
There are 6 options:
Auto White Balance Underwater
Exposure Compensation:
Adjust picture brightness. The adjustable range of the camera's exposure compensation value is from EV -3.0 to EV +3.0.
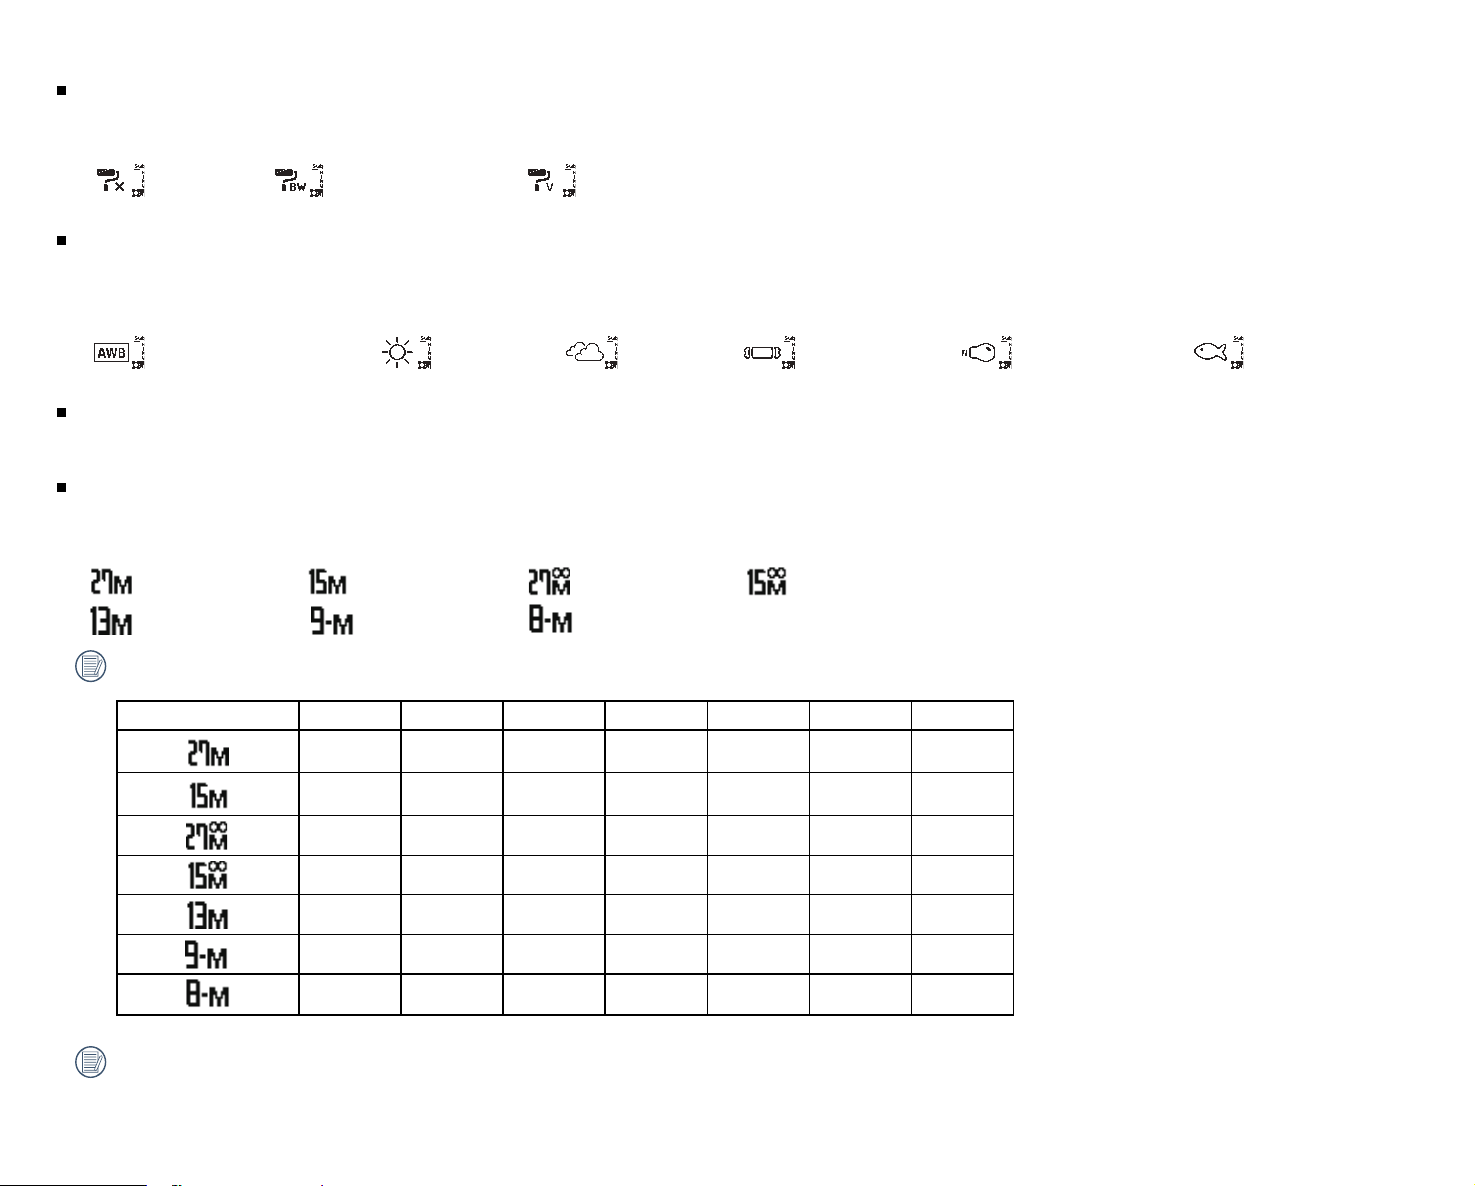
Photo Size:
Set photo resolution.
There are 7 options:
5520×2760(2:1)
3840×2160(16:9)
Number of photos that can be stored:
Photo size 4GB 8GB 16GB 32GB 64GB 128GB 256GB
553 1111 2167 4465 8854 17732 35487
950 1907 3720 7666 15218 30477 60994
553 1111 2167 4465 8854 17732 35487
950 1907 3720 7666 15218 30477 60994
1059 2125 4144 8540 16792 33630 67304
1472 2954 5761 11872 23189 46441 92944
1631 3274 6384 13156 25630 51330 102728
File size may increase or decrease depending on the subject, shooting conditions, etc. Disc capacity varies with manufacturer and formatting method. The
exposure time may be used for reference.
30
General Settings
Menu Sub-Menu Selectable Options
X.XX
31
Audio / Sound
Set the audio / sound levels of the camera.
There are 4 options:
Sound 3
Automatic Power O
When this function is enabled, if there is no action taken within a set time frame (except while recording or connected to Wi-Fi), the camera will automatically
power o.
There are 2 options:
O
USB Connection Mode
The mode of connecting the camera via a Micro USB cable to a computer is available. If there is a need to view, save photos or videos, please select the "Mass
Storage" mode from the menu settings. If there is a need for the camera to serve as a video chat (SKYPE) device, please select the "Webcam" option.
There are 2 options:
Webcam
When the Webcam is being used, the power can only be supplied by the camera's internal Li-ion battery, so a fully charged battery is highly recommended.
Date / Time
Set the date and time in the camera.
1. The display shows the date and time setting screen, "Year, Month, Day, Hour : Minute : Second";
2. The ield to be adjusted will be highlighted with a black background color. Press the (up) or (down) button to adjust the value, press the button
to conirm value.
3. After adjusting the "Minute" value, press the button to enter the Sub-Menu Interface.
32
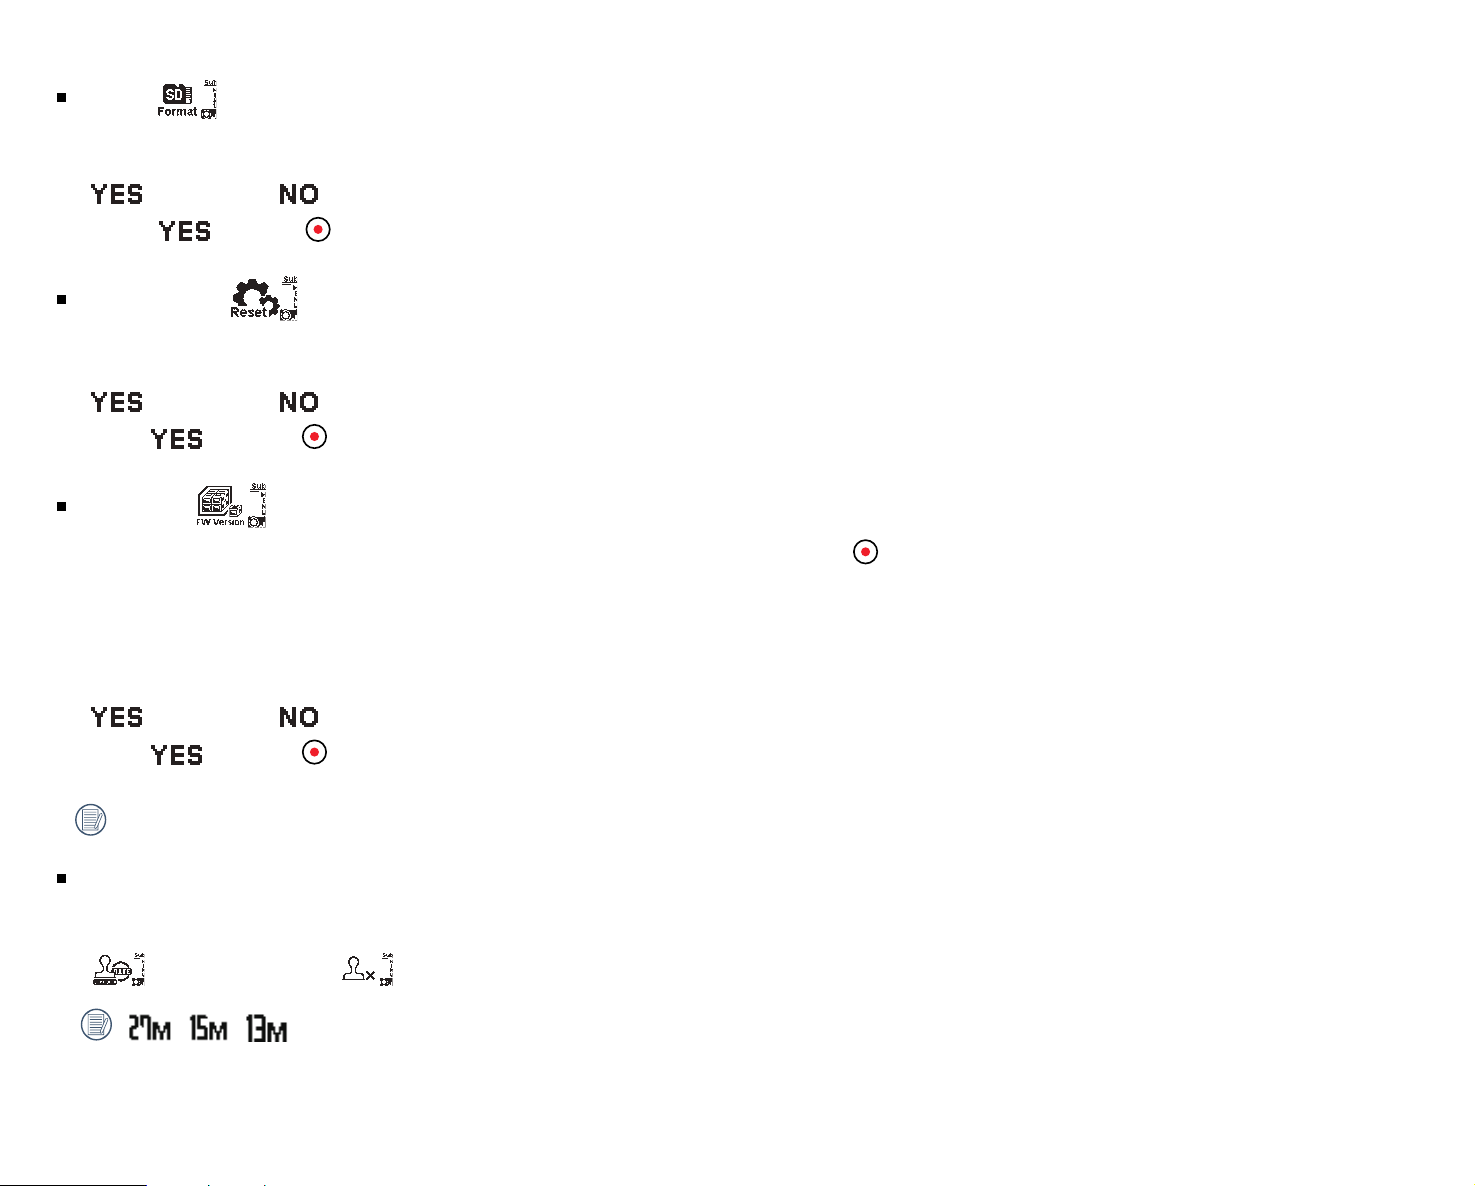
Format
Format will clear all data stored on the memory card and will fully erase all photos and videos stored on the card.
There are 2 options:
Cancel
To select , press the button to start formatting the card and return to the sub-menu interface after completion.
Reset Settings
Reset settings will recover and reinstall all standard product settings to the factory defaults (except for date and time).
There are 3 options:
Reset Password
If select
, press the button to start reset and return to the sub-menu interface after completion.
FW Version
The FW version will display the current irmware version installed on your camera. Press the button to return to the sub-menu interface.
2. Copy the irmware folder to the memory card. (Two iles in the irmware folder)
3. Insert the memory card into the camera. If there is a new version stored in a folder irmware on the memory card, the irmware can be updated by inserting
the memory card and updating the irmware.
There are 2 options:
Cancel
If select , press the button to start updating the new irmware and the camera will automatically power o after completing and installing the
irmware update.
If the low battery warning appears, fully charge the battery before reattempting to update the irmware.
Date Stamp
Include a date stamp on the photo image.
There are 2 options:
/ / will not allow a date stamp on the photo images.
33
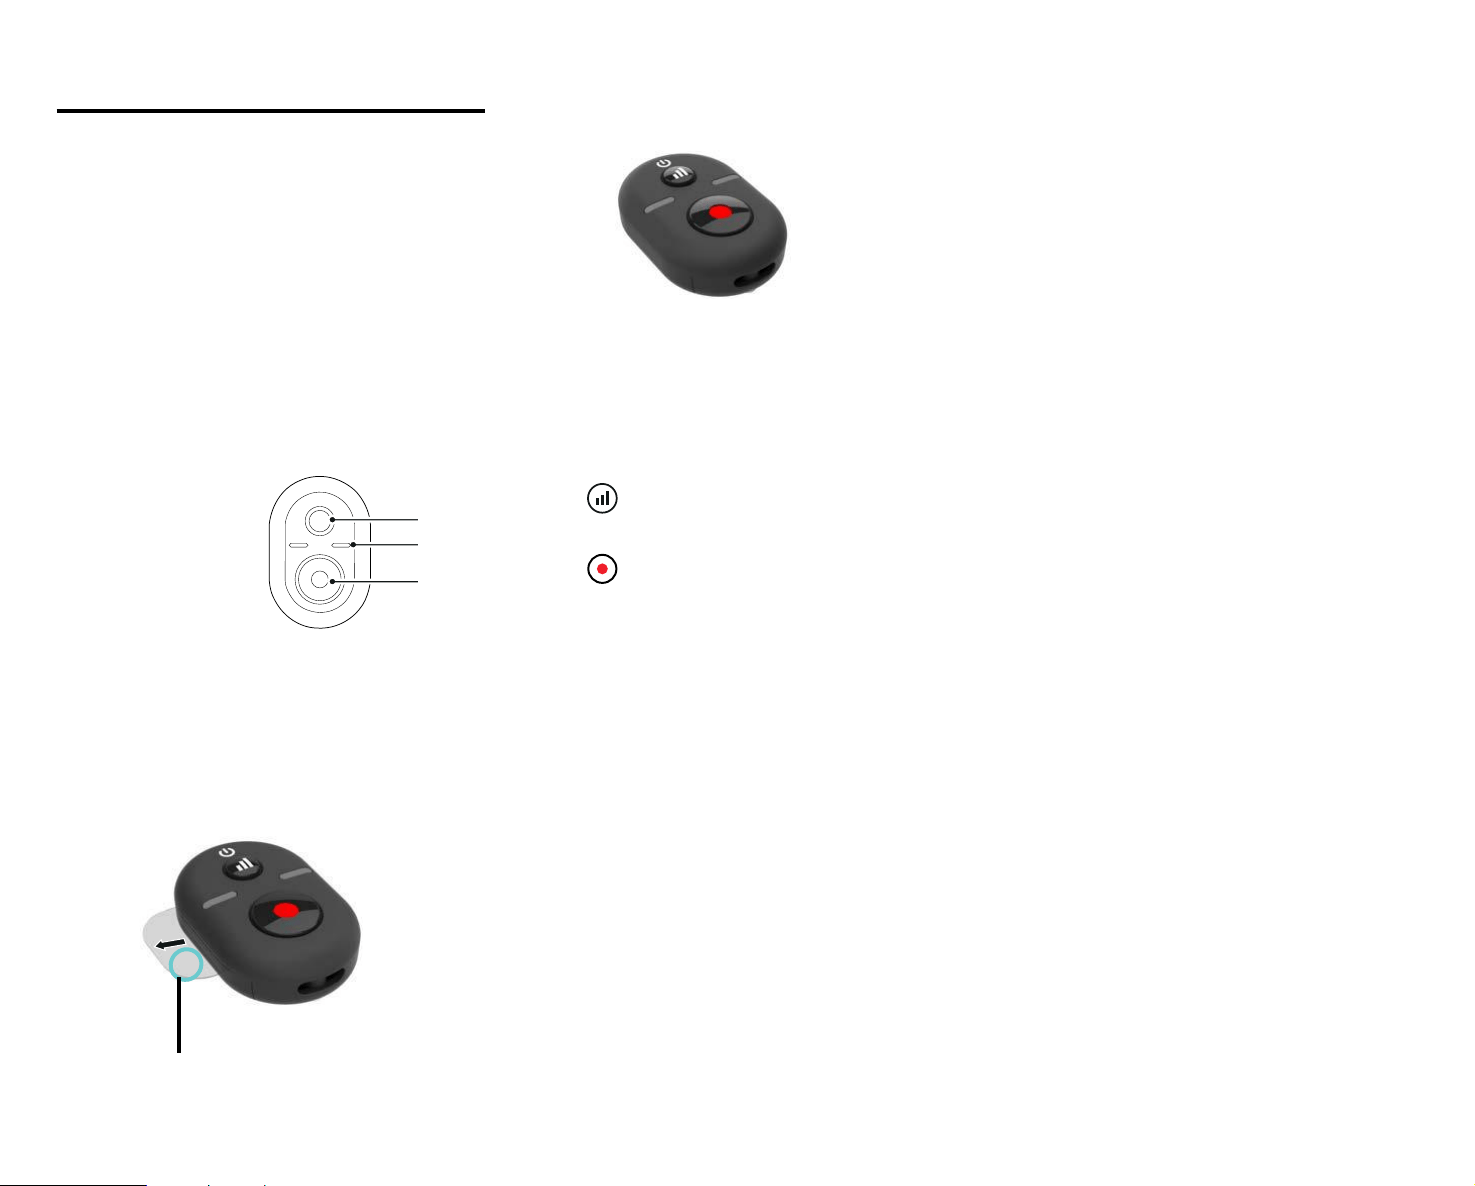
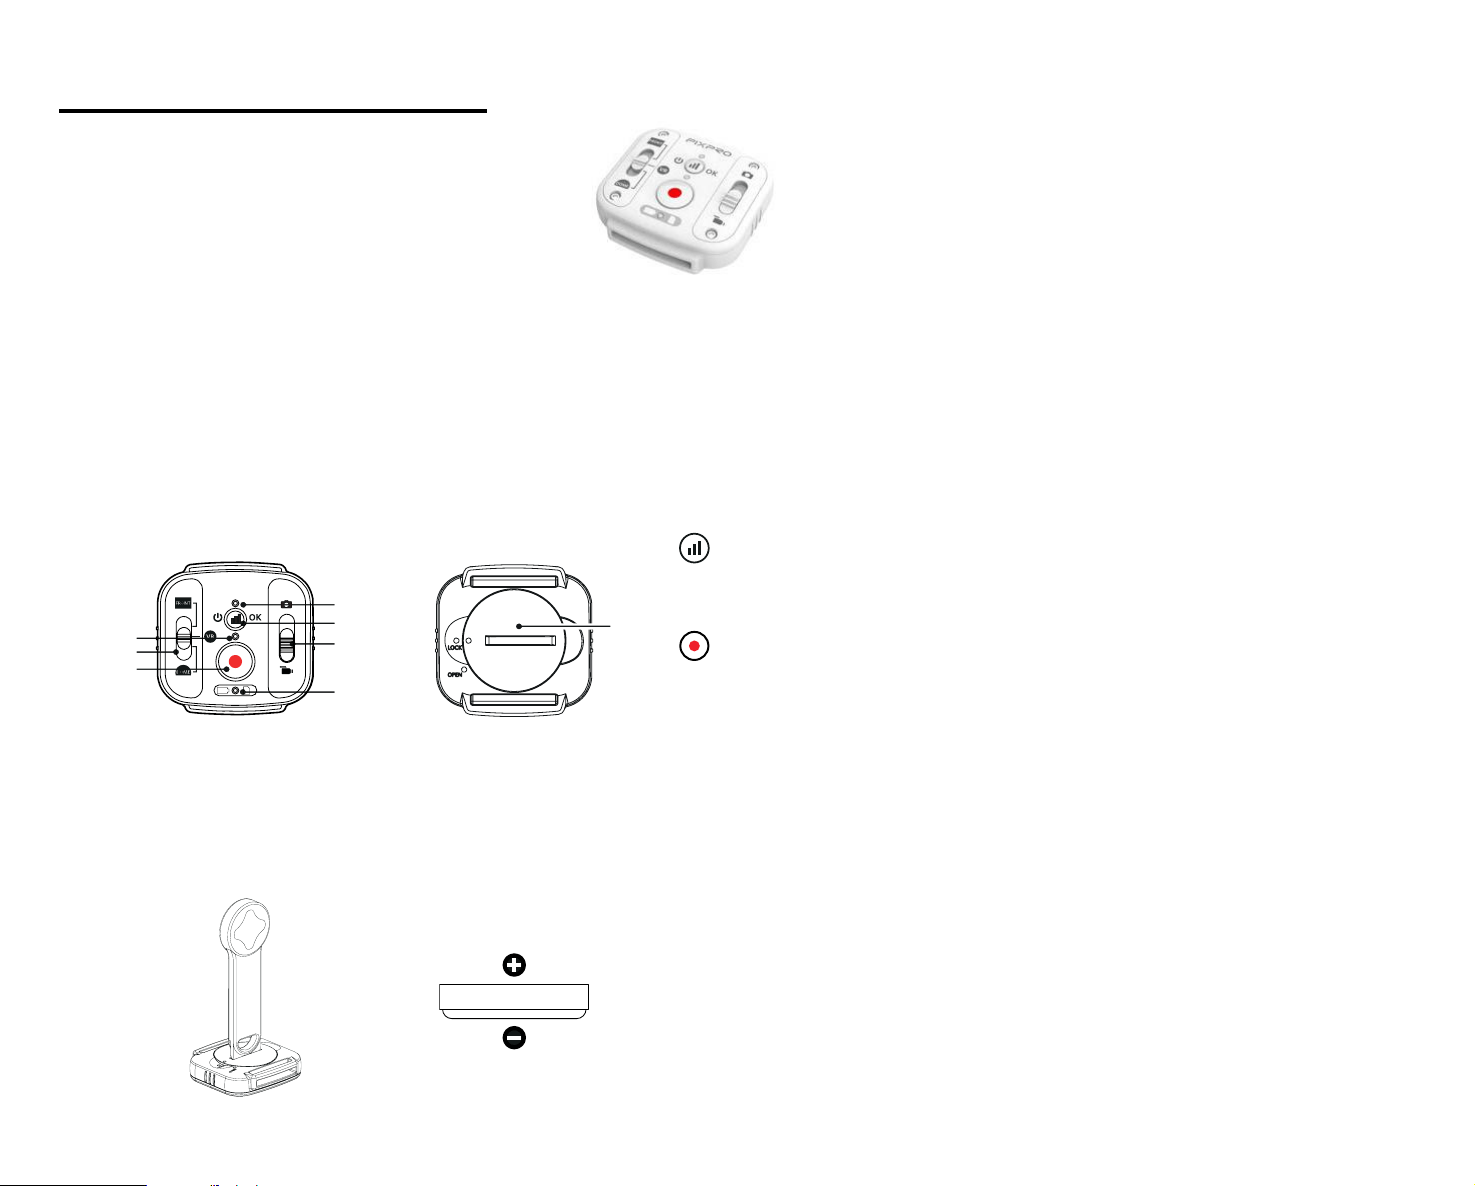
BLUETOOTH Remote Control-D
Speciications
Model: RRBK04
Dimension:30×20×13.7mm
Weight: 27±2g (including battery)
Dust Proof: IP6X
Temperature: -10° to 40°C
Humidity: 0~90%
Battery: Button Cell CR2032
1. BLUETOOTH Signal Test Button
2. Connect / Shooting Indicator
3. Recording / Shooting Button / Mode Switching
Movie<=>Photo (press and hold)
Remote Control View
Before Using:
Pull the insulating strip completely out prior to operating the remote control.
Insulating Strip
1
2
3
34
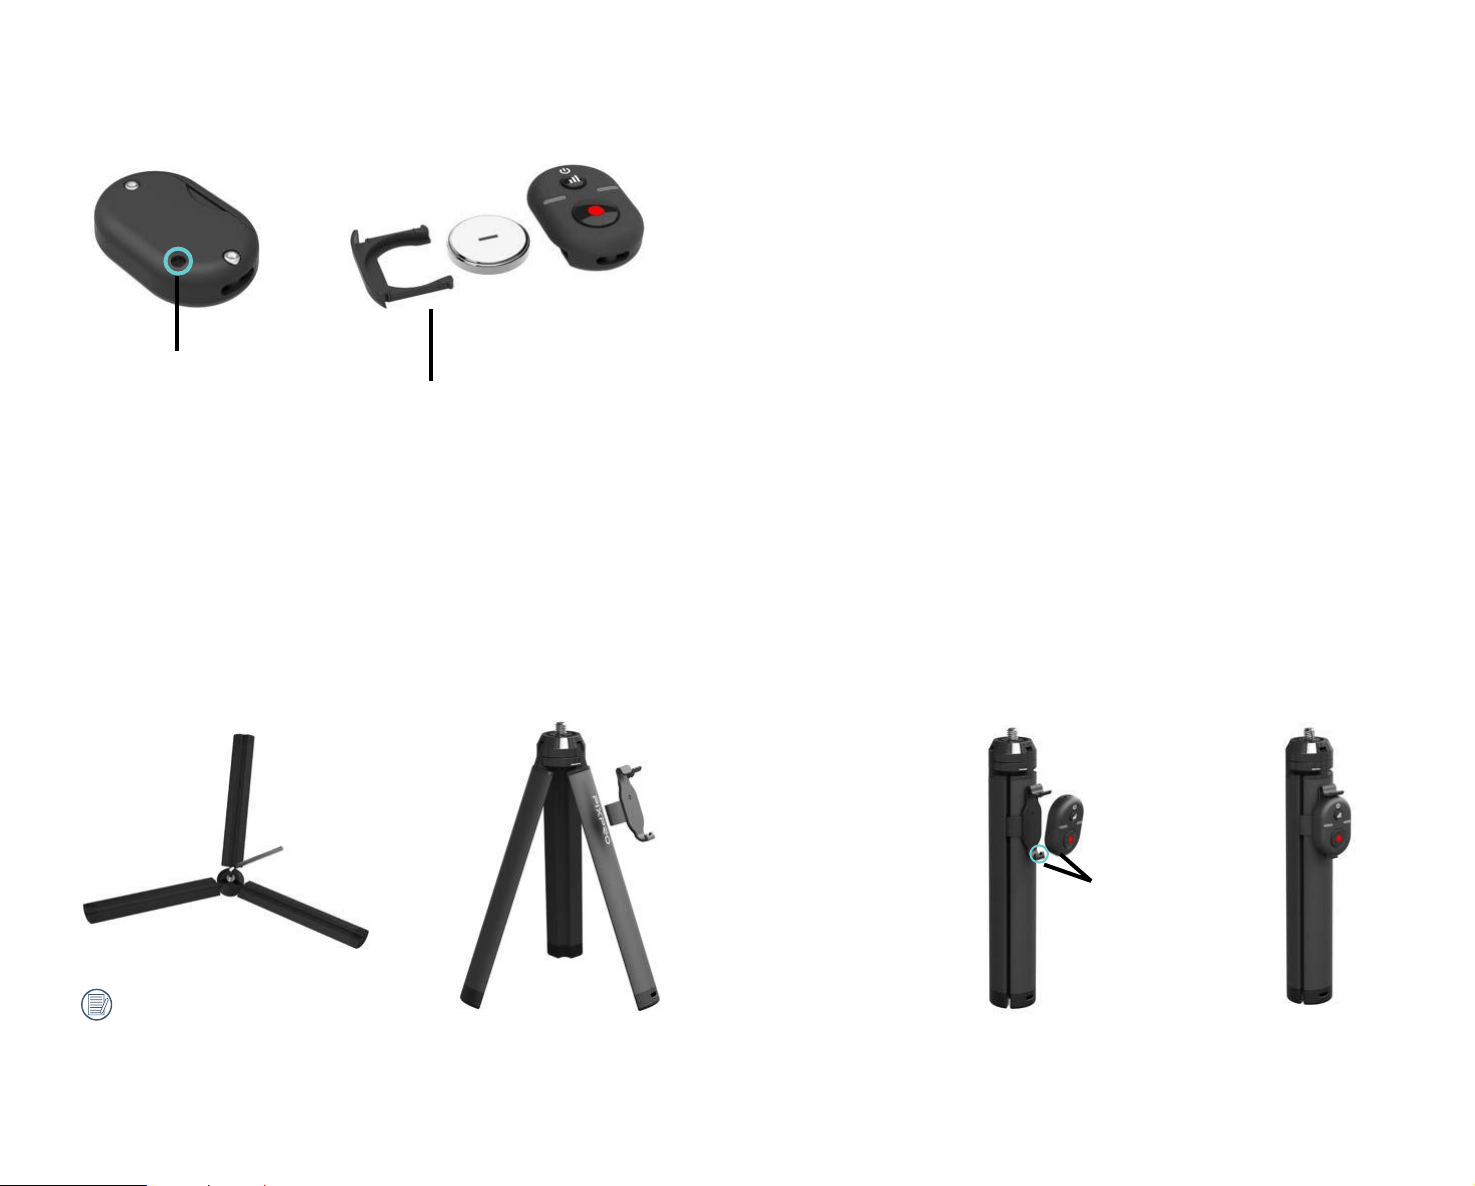
Installation of the Remote Control Mount-B /Mini Remote Control/3Leg Stand:
1. Press the Mini Remote Control mount onto the 3Leg Stand (Fig. 1). Close the tripod (Fig. 2).
2. To mount the Mini Remote Control and align it between the two location holes at the bottom of the mount (Fig. 3), align the remote control with the two
locating points at the top of the mount (Fig. 4), and snap into place.
Locating point
(1)
(2)
(3)
(4)
Installing the Battery:
Use a screwdriver to remove the screw on the backside of the remote control by turning it counterclockwise (Fig. 1). Open the battery cover and insert the
battery (Fig. 2), close the battery cover and rotate the screw in the opposite direction to tighten down.
Screw
Battery Cover
Negative
If the tripod is loose, tighten it
with the supplied Hex Wrench.
35
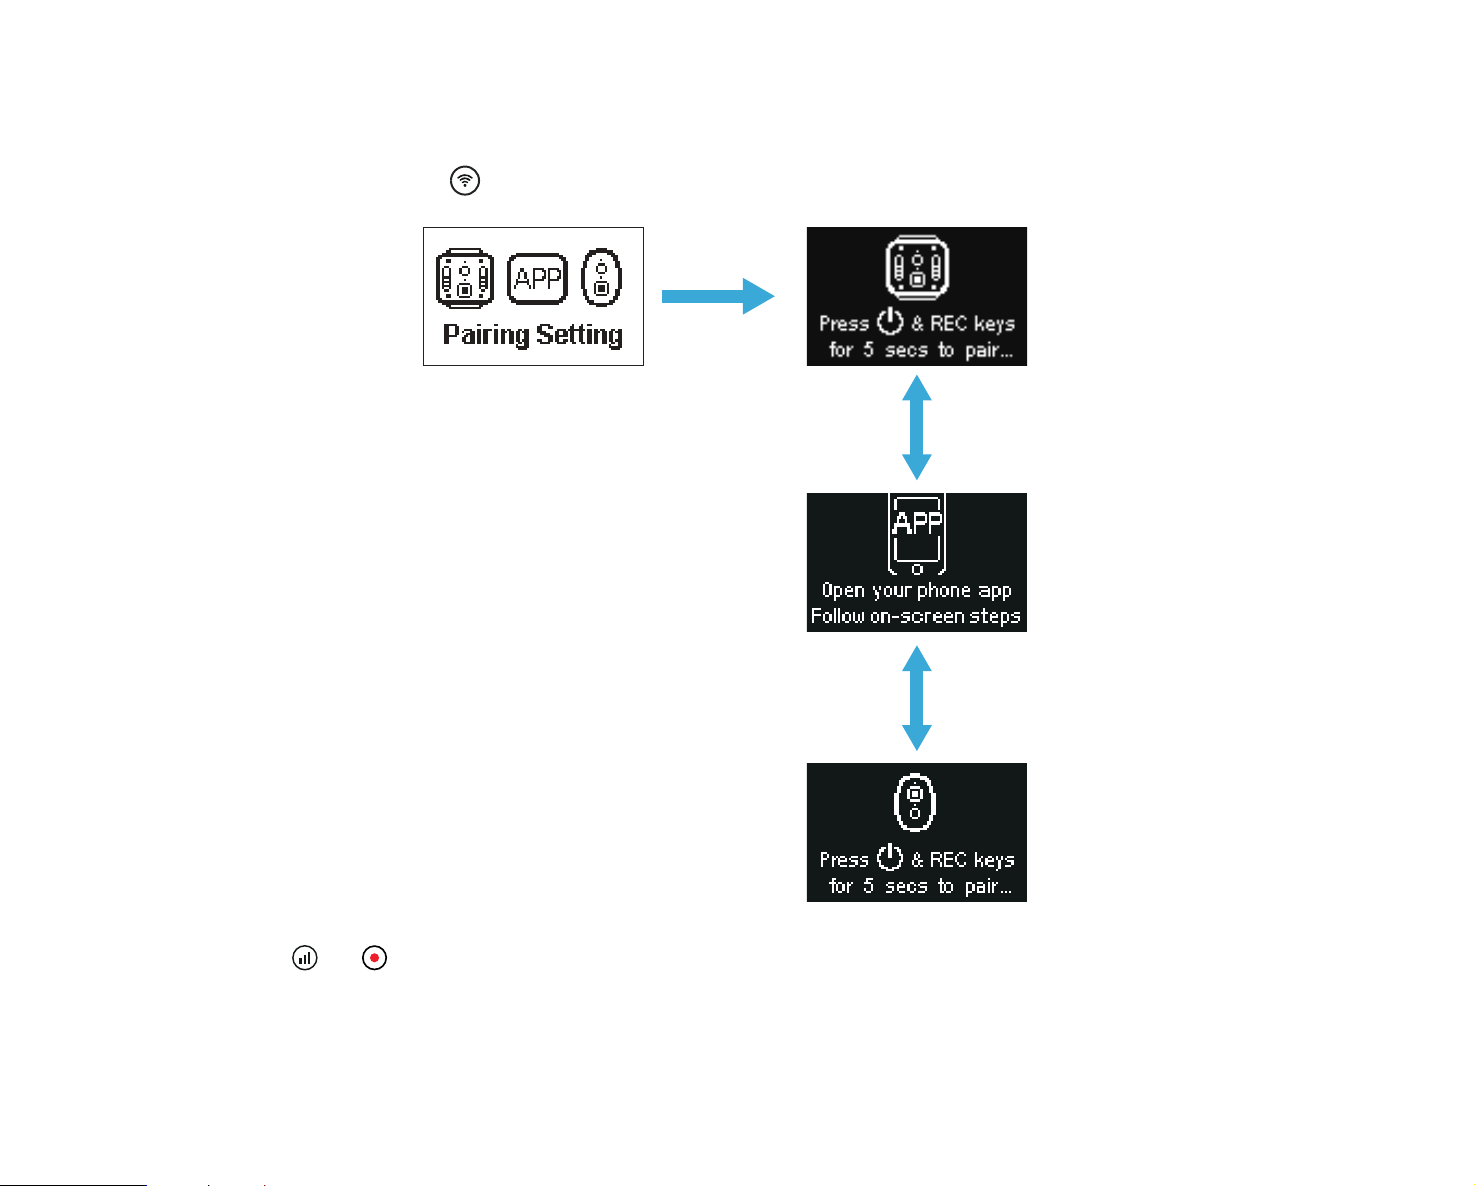
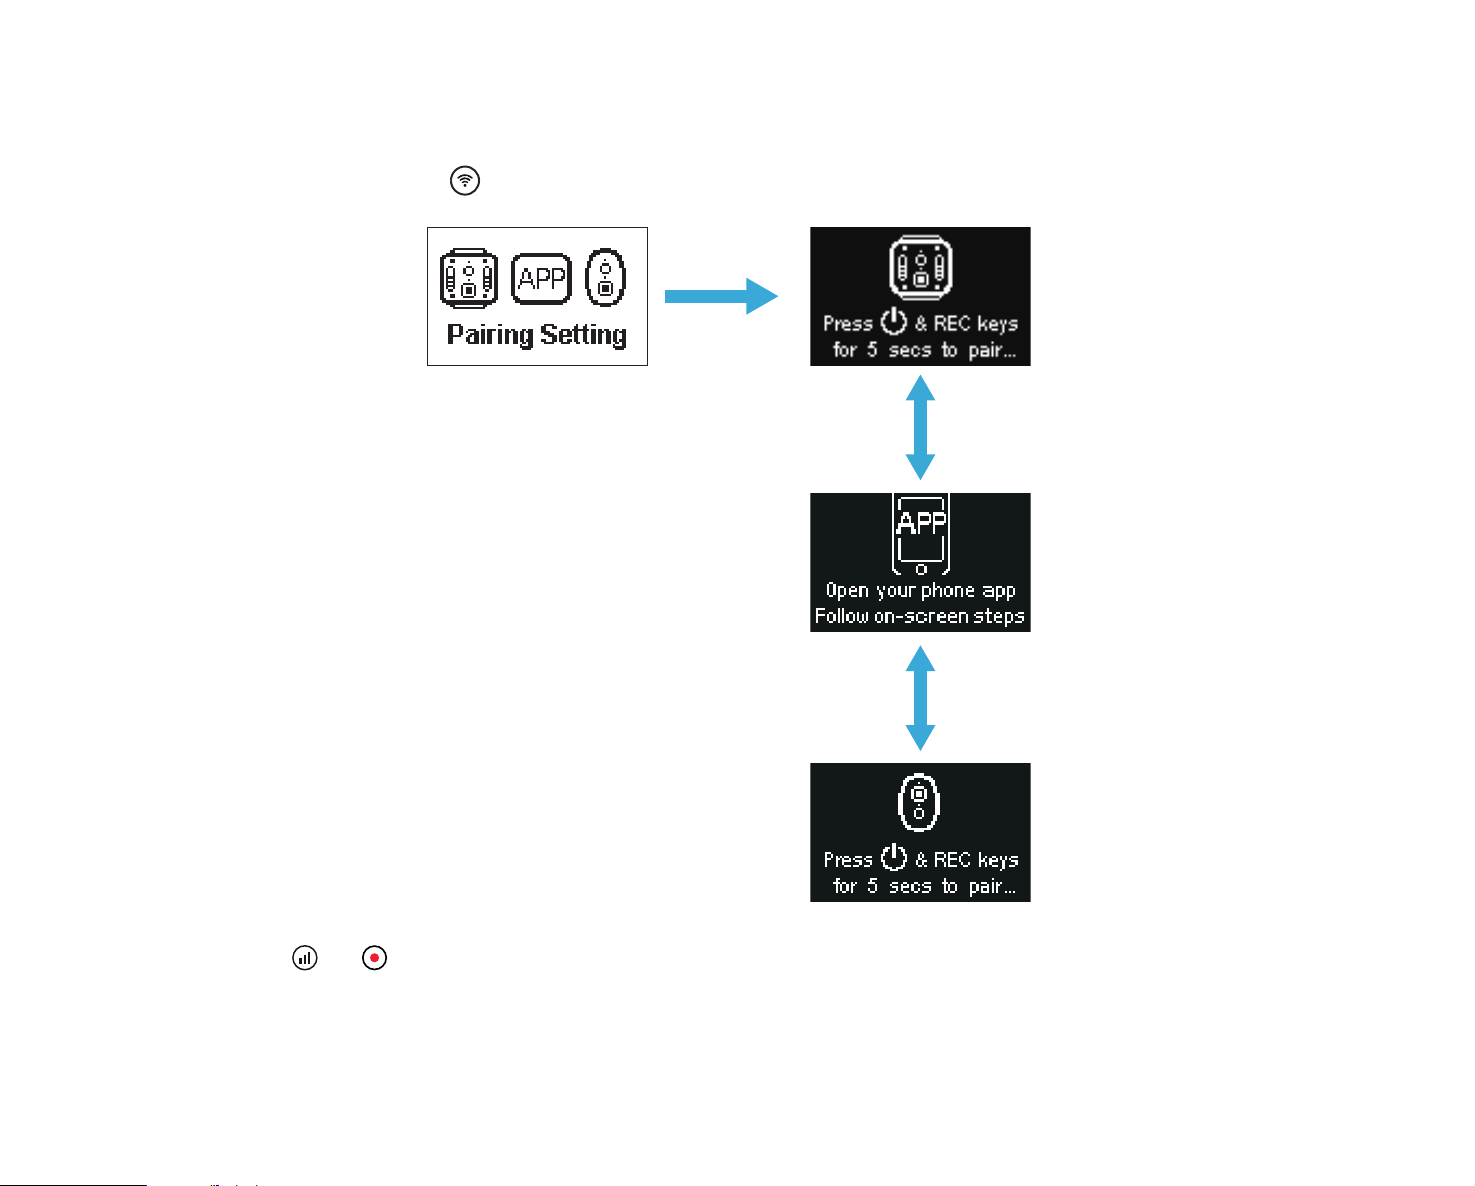
Pairing the Camera Via BLUETOOTH Remote Control:
1. Pair the camera to the remote control
This method is for one remote control to one camera:
With the camera turned on, press the
button for 2 seconds to enter the pairing mode.
Press and hold the and buttons simultaneously on the remote control until pairing is successful.
36
While attempting to pair, the remote control should be held close to the camera.
2. Press the button on the remote control to start shooting or recording and press the button again to stop recording.
Other parameters in the camera will remain the same as initially set.
3. To terminate remote control pairing, press the button.

37
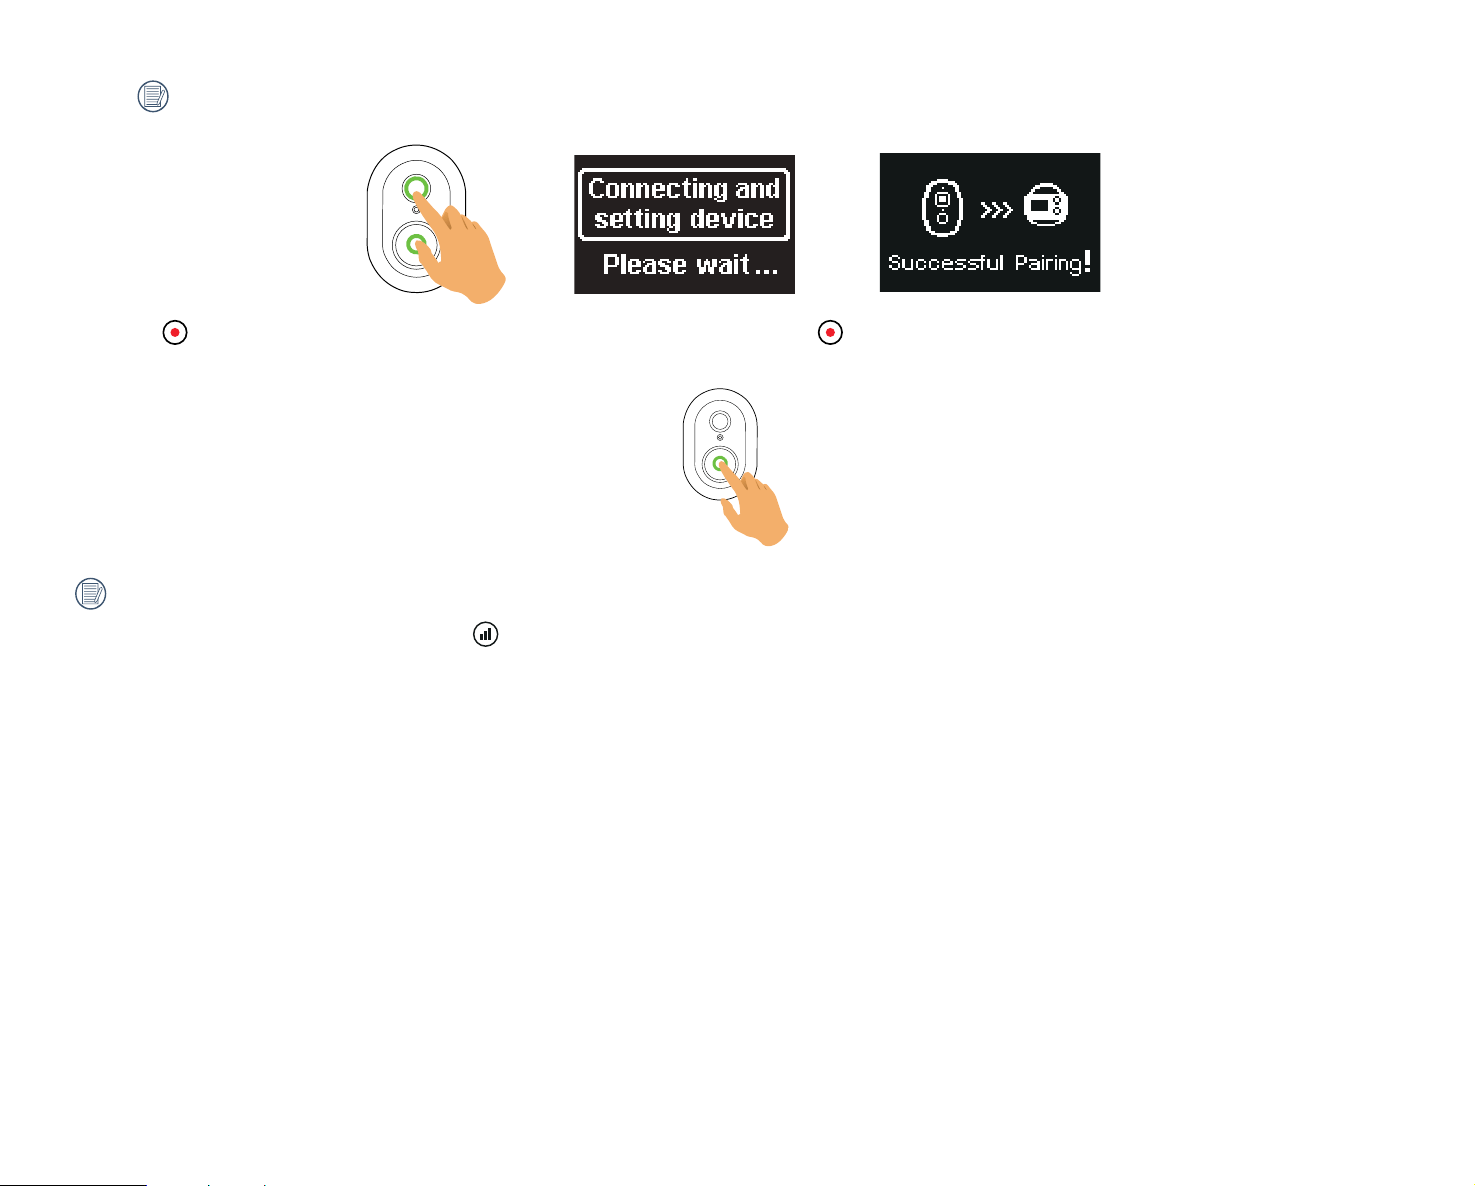
Successful Pairing Between the Camera and the Remote Control:
1. BLUETOOTH signal test press the button. The camera will power off or on by pressing and holding the button for 1.5 seconds or more.
2. Using the mini remote control, all settings or parameters set in the camera's menus for shooting or recording will remain the same as initially set to switch from
movie to photo mode or viceversa by (In standby mode) pressing and holding the button.
Upon successful pairing, both the remote control and camera will remember the BLUETOOTH information.
When camera is activated prior to remote control after pairing with remote control, press and hold the signal button on the remote control to reconnect.
When successfully reconnected, the green LED signal light will flash in green.
If the camera has been powered off for more than 12 hours, it is impossible to power on the camera directly with remote control.
Movie or Photo Switching does not work.
Indicator Lamp Status Description:
1. If pairing is successful, the signal indicator light will turn green.
2. If pairing fails, the signal indicator lamp will turn red.
3. Switch to Movie mode by pressing and holding the button, the signal indicator light will start flashing green.
4. Switch to Photo mode by pressing and holding the button, the signal indicator light will start flashing green.
5. When recording or shooting with the Mini Remote Control, the shooting status indicator lamp will turn red.
6. When the remote control's battery level is less than 20%, the indicator light will turn orange.
Precautions:
1. If the Wi-Fi, NFC or HDMI connection or computer connection with the camera are enabled, the remote control function is not available.
2. The remote control operates at band 2.4GHz. Because microwave ovens, radios and amateur radios also use the same cyclic wave, it is possible to experience
radio interference.
3. Before using the remote control, please make sure there are no other electronic devices or radio stations, etc. around. Please use the camera and remote
control in an environment with better permeability and free from obstructions.
4. Radio interference and other circumstances may cause a malfunction of the remote control. Pay attention to the actual conditions of the camera when using
the remote control.

38
Download and Install BLUETOOTH Remote Control APP
●
APP Download:
Download the APP installation package (APP name: PIXPRO Remote Update Service) to your smart Mobile phone from the path below and install it by
following the instructions on the interface.
For ANDROID Mobile phone, search and download the APP "PIXPRO Remote Update Service" in Google Play and install it by following the instructions on
your smart device's interface.
For iOS Mobile phone, search and download the APP "PIXPRO Remote Update Service" in APP Store and install it by following the instructions on your smart
device's interface.
Please review the following items before your irst time connecting:
1. Do not use in places with high intensity magnetic ields, electrostatic and electric wave interference (for example near a microwave oven), which may or
may not cause failure in receiving proper signals.
2. Do not use the Wi-Fi connection functions on an airplane.
3. To maintain your connection, please keep the BLUETOOTH Remote Control near distance without signal shielding interference.
4. Your smart Mobile phone needs to support BLE.
5. Your smart Mobile phone operating system version needs to be iOS 11.0 or higher on Mac or ANDROID 6.0 or higher.
iOS system:
Hardware requirements: iPhone Mobile Phone
ROM: min. 8GB
RAM: min. 1GB
BLUETOOTH: BLE4.
Android system:
Hardware requirements: Android Mobile Phone
ROM: min. 8GB
RAM: min. 1GB
BLUETOOTH: BLE4.
39
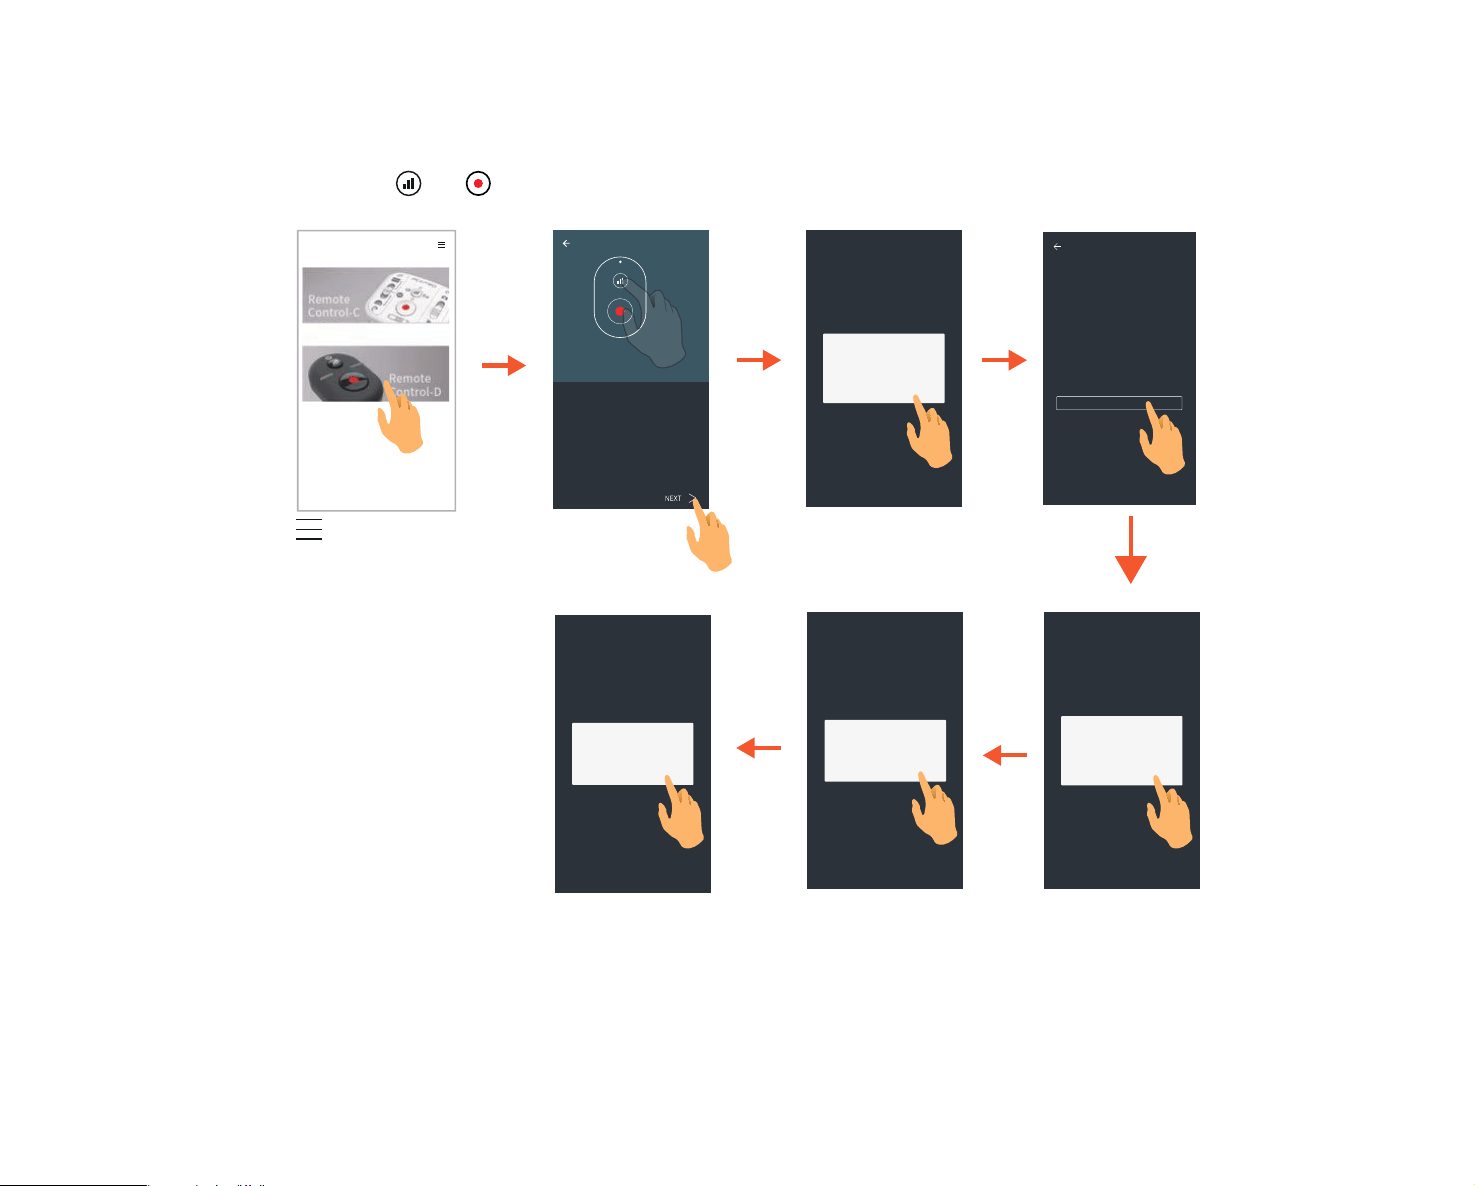
Connecting your Remote Control to Smart Mobile phone with BLUETOOTH
Operation Method:
1. Enable Bluetooth function on your phone.
2. Press and hold remote controller's and keys for more than 5 seconds, wait for the indicator to light up for pairing.
OK
C
AN
CE
L
OK
C
AN
CE
L
Firmware
C
urrent FW version: VX.X.
2
Select Device
YES
L
ATE
R
OK
Step 1:
Step 2:
Enable Bluetooth function on your phone.
Press and hold remote controller's [Power] + [REC]
keys for more than 5 seconds, wait for the indicator
to light up for pairing.
Turn on Bluetooth to allow the App to
connect to accessories.
Check for updates
New version V.X.X.3 is available for
download. Download now?
Download successful! Ready to update?
Update successful !
OK: Turn on the BLUETOOTH
connection
CANCEL: Return to select device
OK: Download new irmware
CANCEL: Return to the
previous interface
YES: Update the irmware
LATER: Enter the
conirmation interface
: Go to the copyright interface
40
This remote control device can be used to remotely control the camera from a distance.
The remote control is optional. If you wish to purchase one, contact your retailer to buy or visit kodakpixpro.com for our online store.
The optional wrist strap is provided to wear the remote control if desired.
Speciications
Model: RRWH03
Dimension: 46.9 × 46.1 × 13.7mm
Weight: 28g (including battery)
Waterproof: 5m (16 feet)
Shockproof: 2m (6.5 feet)
Dustproof: IP6X
Temperature: -10° to 40°C
Humidity: 0~90%
Battery Type: Button Cell CR2450
1
7
6
5
2
3
4
8
1. Signal Indicator Lamp
2. BLUETOOTH Signal Test Button
3. Shooting Mode Switch
4. Battery / Memory Card Indicator Light
5. Recording / Shooting Button
6. VR 360° / Front 197° / Dome Mode 235° Mode
Switch
7. Shooting Status Indicator Lamp
8. Battery Cover Plate
Remote Control View
Installing the Battery:
Open the battery cover plate with the included accessories tool in a counter clockwise direction. Insert the battery with the anode facing upward. Replace cover
CR2450 plate over battery and turn clockwise to lock into place.
CR2450
BLUETOOTH Remote Control-C
Positive
Negative
41
Pairing the Camera Via BLUETOOTH Remote Control:
1. Pair the camera to the remote control
This method is for one remote control to one camera:
With the camera turned on, press the
button for 2 seconds to enter the pairing mode.
Press and hold the and buttons simultaneously on the remote control until pairing is successful.
42
While pairing, the remote control should be held close to the camera.
2. Set the desired shooting mode (movie mode or snap / shot photo mode ) and the display mode (VR , Round (Dome) or Front ).
Other parameters are set the same as the current settings of the camera at the same mode.
3. Press the button on the remote control to start shooting or recording and press the button again to stop recording.
After successful pairing, if you press the button, the remote control and the camera need to be re-paired.

43
Successful Pairing Between the Camera and the Remote Control:
1. To test if the camera's powered on or whether the remote control is paired successfully, press the button. The camera will power off by pressing and
holding the button for more than 1.5 seconds.
2. When the button on the remote control is pressed to start recording or shooting, the camera will work with the current setting of the remote control.
Upon successful pairing, both the remote control and camera will remember the BLUETOOTH information.
When camera is activated prior to remote control after pairing with remote control, press and hold the signal button on the remote control to reconnect.
When successfully reconnected, the green LED signal light will flash in green.
If the camera has been powered off for more than 12 hours, it is not possible to power the camera on directly with remote control.
Indicator Lamp Status Description:
1. If pairing is successful, the signal indicator light will turn green.
2. If pairing fails, the signal indicator lamp will turn red.
3. During remotely controlled recording or shooting, the shooting status indicator lamp will turn orange.
4. When the battery level of the camera is less than 25% or the memory card is full, the battery/memory card indicator lamp will turn red.
Precautions:
1. If the Wi-Fi, NFC or HDMI connection or computer connection with the camera are enabled, the remote control function is not available.
2. The remote control operates at band 2.4GHz. Because microwave ovens, radios and amateur radios also use the same cyclic wave, it is possible to experience
radio interference.
3. Before using the remote control, please make sure there are no other electronic devices or radio frequencies, etc. around. Please use the camera and remote
control in an environment with better permeability and free from obstructions whenever possible.
4. Radio interference and other circumstances may cause a malfunction of the remote control.
44
User Interface
Micro USB Interface
Charging Your Camera:
14
Using an External Power Supply
In the case of low battery power or when a long-term power supply is needed, an external power supply (AC adapter, vehicle power supply, portable power
supply or other power unit) can be used instead of a battery. The camera settings for functions, photography and other operation can be performed normally.
When powered on, use the Micro USB cable to connect the camera to an external power supply. When connected with an external power supply, this icon "
"
will be displayed on the camera's LCD.
When powered o, use the Micro USB cable to connect the camera to the external power supply. Press the
button to power on. When connected to an
external power supply, " " will be displayed on the camera's LCD.
Requirements for the external power supply: output power of 5 V, output current of 1 A.
Insert the battery into the camera before using an external power supply to charge the camera.
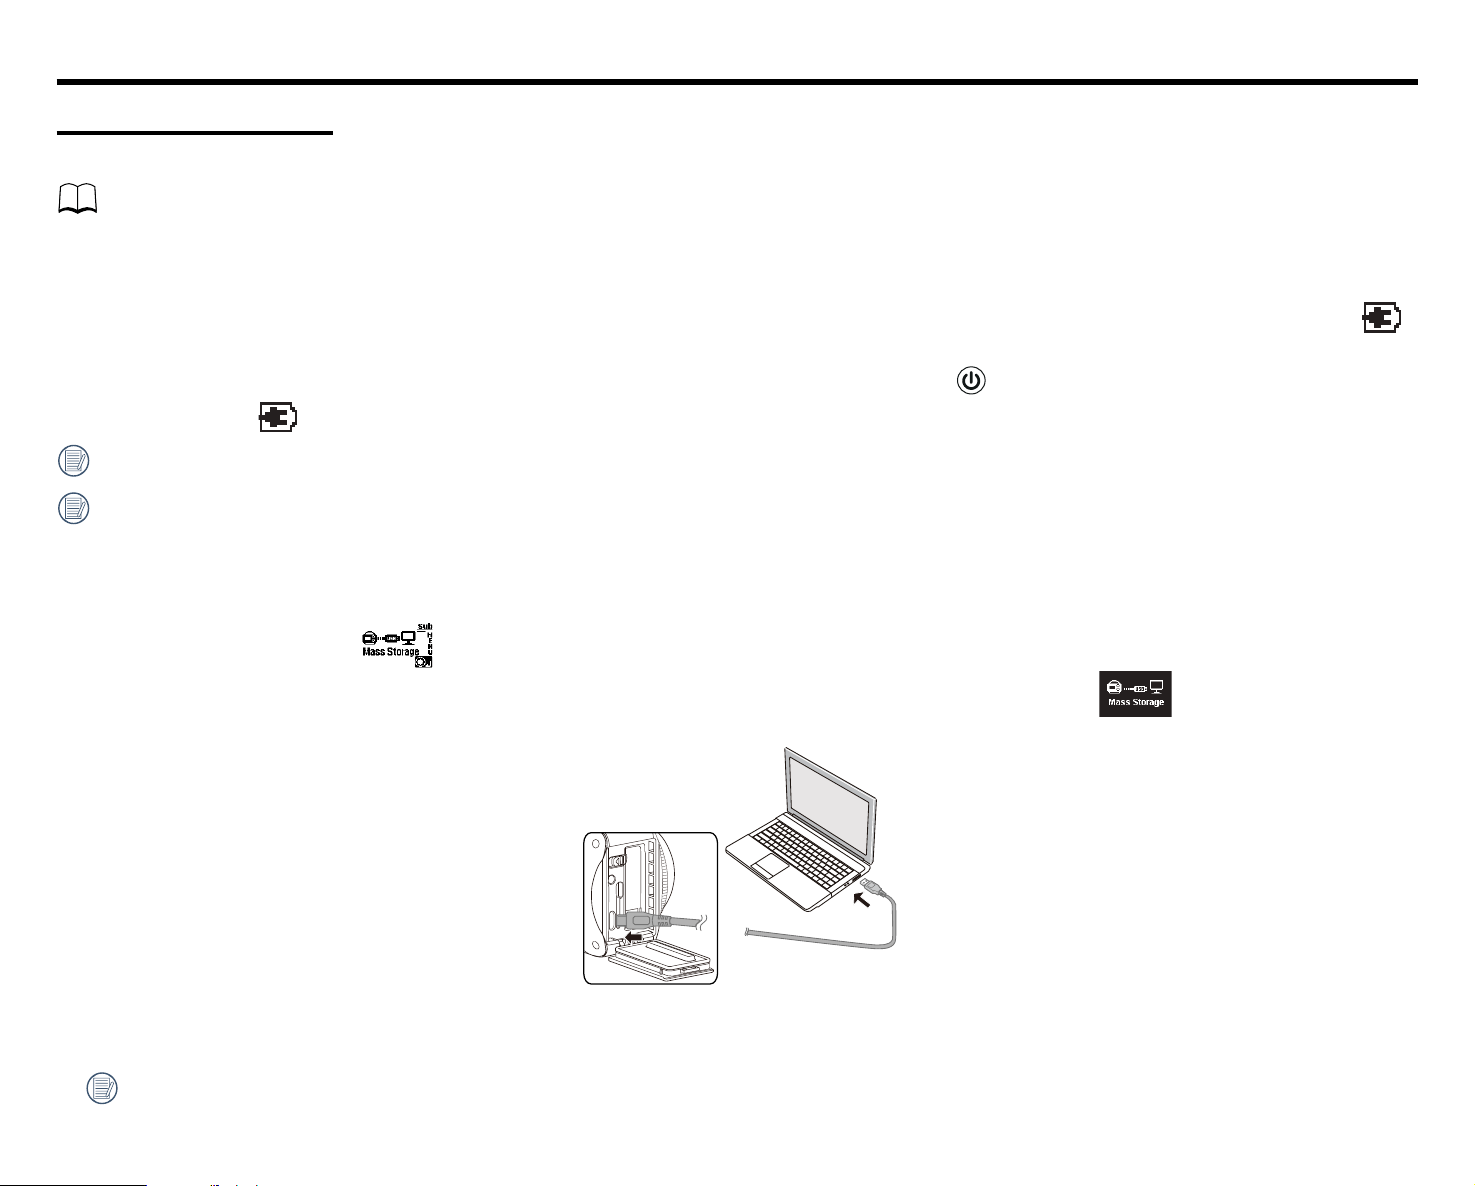
Data Transmission
Use the Micro USB cable to connect the camera to a computer and copy iles from the camera to the computer.
The steps are as follows:
1. Set the USB connection mode to in the camera menu.
2. Use the Micro USB cable to connect a computer (on) to the camera (on). During the connection, the camera will display " " and the computer will
automatically detect the camera.
3. Open the camera folder on the computer to copy your iles to the computer's hard drive. After the transmission is complete, please unplug the USB cable in a
safe manner according to the computer's settings and operation manual.
4. The camera will automatically power o when the Micro USB cable is unplugged.
Your computer operating system version needs to be Mac OS X10.9 and above or Windows 7 and above.

45
The folder structure of a microSD card on which this camera has performed recording is as follows:
●
Folder numbers range from 100 to 999. Four alphabetic characters indicate the camera lens type.
Five or eight alphabetic characters indicate the ile type.
The character shows the camera lens type used in the shot:
VR: 360 Spherical /
Dome: 235 Round (Dome) Mode: R
Front: 197 4K UItra Wide Mode: F
●
VR iles formatted (Each folder stores a maximum of 9999 still pictures)
Still pictures in .jpg format
Movie iles in .mp4 format
●
Loop Recording videos.
Movie iles in .mp4 format
The size of a video ile may not exceed 4GB. If the size is over 4GB, it will be saved as a separate
ile.
To simulate a 360
°
viewing experience while previewing videos recorded by the ORBIT360
4K/4KVR360, use the PIXPRO 360 VR Suite, available for Mac and PC's.
100VR360
DCIM
LOOPREC
ORBIT360 4K/4KVR360

46
Micro HDMI Interface:
To connect your camera to a TV, use a Micro HDMI cable (sold separately).
After the connection is successful, the iles on the memory card of the camera should be displayed on the television, while or
Liveview
is displayed on
the camera's LCD.
Shooting and Playback Functions on the Camera:
1. Press and hold the button to switch between the video playback mode and the shooting modes.
2. Press the (up) or (down) buttons to browse the folders and iles in the playback modes.
3. Press the button to start playing videos and photos and press the button again to stop playing while in the recorded folders and iles.
4. Set the camera parameters according to requirements in the menu irst while in the shooting mode. Then return to the main camera screen, press the
button to shoot or start recording and press the button again to stop recording.
In the live view mode, the frame rate depends on the video settings.

47
Playback Functionality from your TV's and Remote Control:
1. Press the left and right keys to switch between the folders and iles on your camera's Micro SD card.
2. Press the button to return to main menu.
3. Press the button to hide or display the TV screen information.
4. For browsing the video folders and iles, press the TV remote control central key to start playing, press the left arrow to fast reverse, press the right arrow to
fast forward and press the central button again to pause playback.
5. Press the button to delete the current ile and select to conirm deletion.
6. Press the button to stop playing.
Only HDMI televisions having the Consumer Electronics Control (CEC) function can support this function.
48
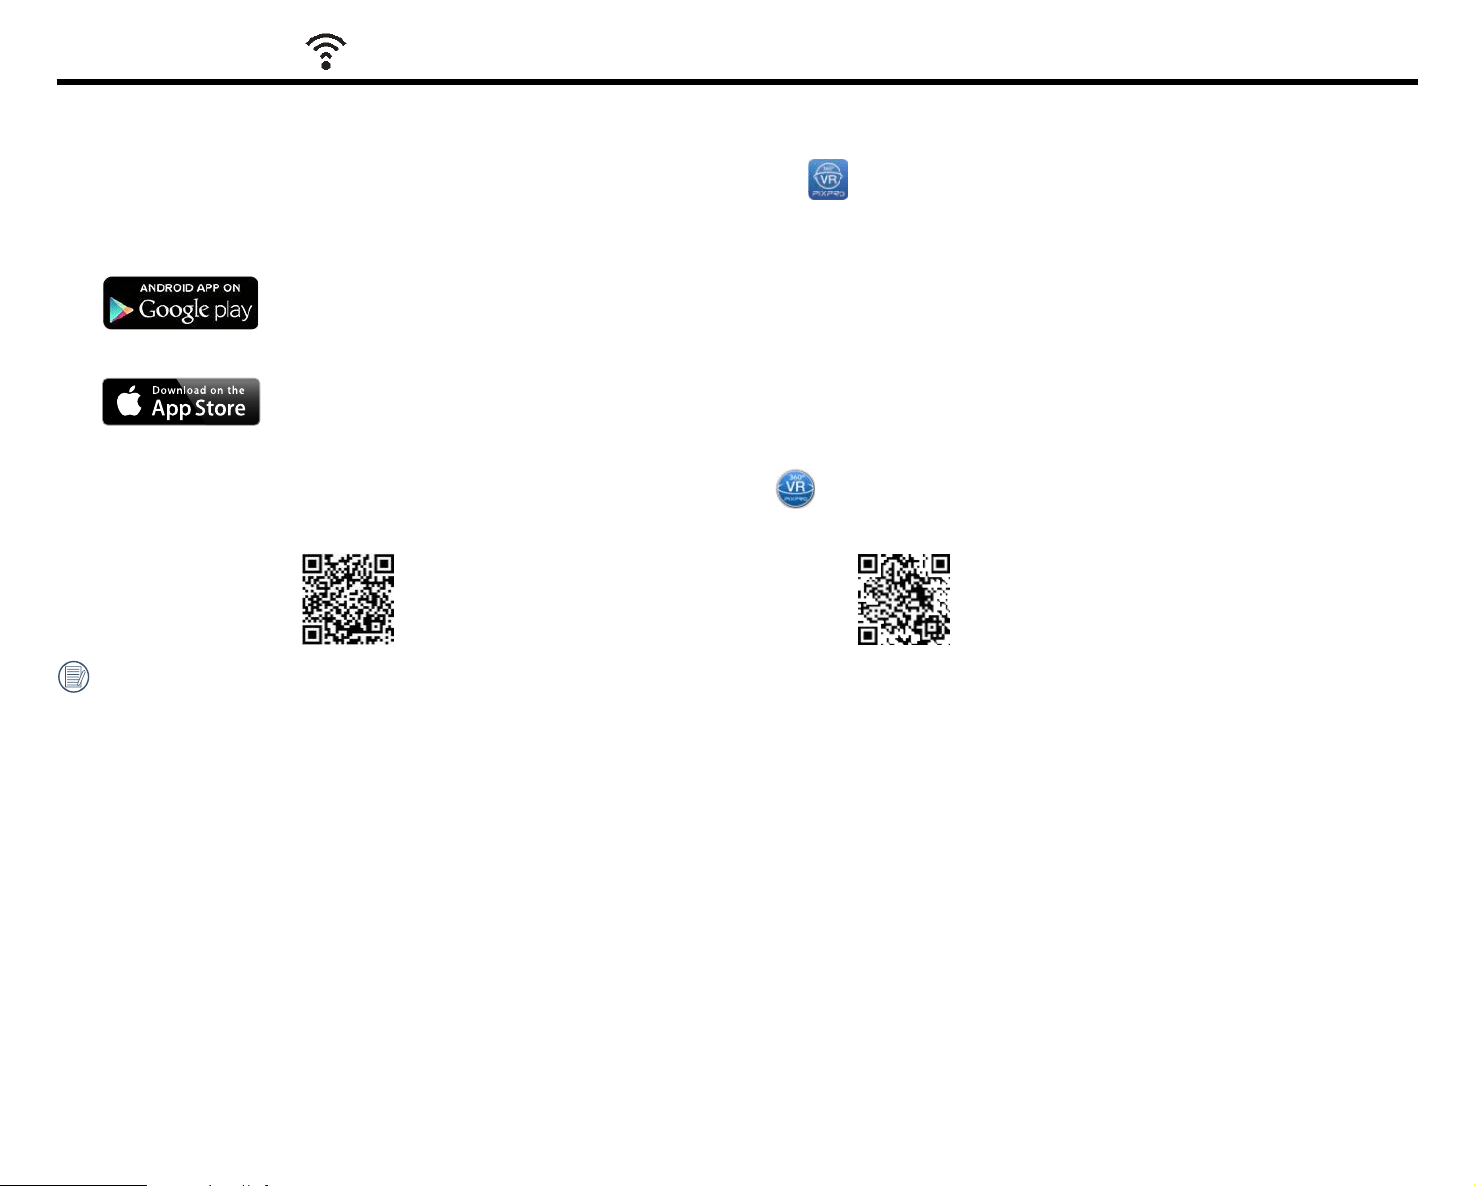
Download and Install APP
●
Smart Devices:
Download the APP installation package (APP name: PIXPRO 360 VR Remote Viewer) to your smart device from the path below and install it by following
the instructions on the interface.
For ANDROID devices, search and download the APP "PIXPRO 360 VR Remote Viewer" in Google Play and install it by following the instructions on your
smart device's interface.
For iOS devices, search and download the APP "PIXPRO 360 VR Remote Viewer" in APP Store and install it by following the instructions on your smart
device's interface.
●
Personal Computers:
Download the "PIXPRO 360 VR Suite" (for Mac or Windows) installation package
by following the prompts on the interface.
Americas
http://kodakpixpro.com/
Americas/support/downloads.php
Europe
http://kodakpixpro.com/Europe/
support/downloads.php
Please review the following items before your irst time connecting:
1. Do not use in places with high intensity magnetic ields, electrostatic and electric wave interference (for example near a microwave oven), which may or
may not cause failure in receiving proper signals.
2. Do not use the Wi-Fi or NFC connection or functions on an airplane.
3. To maintain your connection, please keep the ORBIT360 4K/4KVR360 within 32.8 feet (10 meters) without signal shielding interference.
4. The ORBIT360 4K/4KVR360 and the smart device can only be connected one to one.
5. The ORBIT360 4K/4KVR360 and personal computer can only be connected one to one.
6. Your smart device operating system version needs to be iOS 11.0 or higher on Mac or ANDROID 6.0 or higher. iPad mini1 / iPad 4 / iPad Air 1 / iPhone 5s
and earlier models (any system versions) will not support this APP.
7. Your computer operating system version needs to be OS X10.9 on Mac and Windows 7 and above.
Wi-Fi Mode
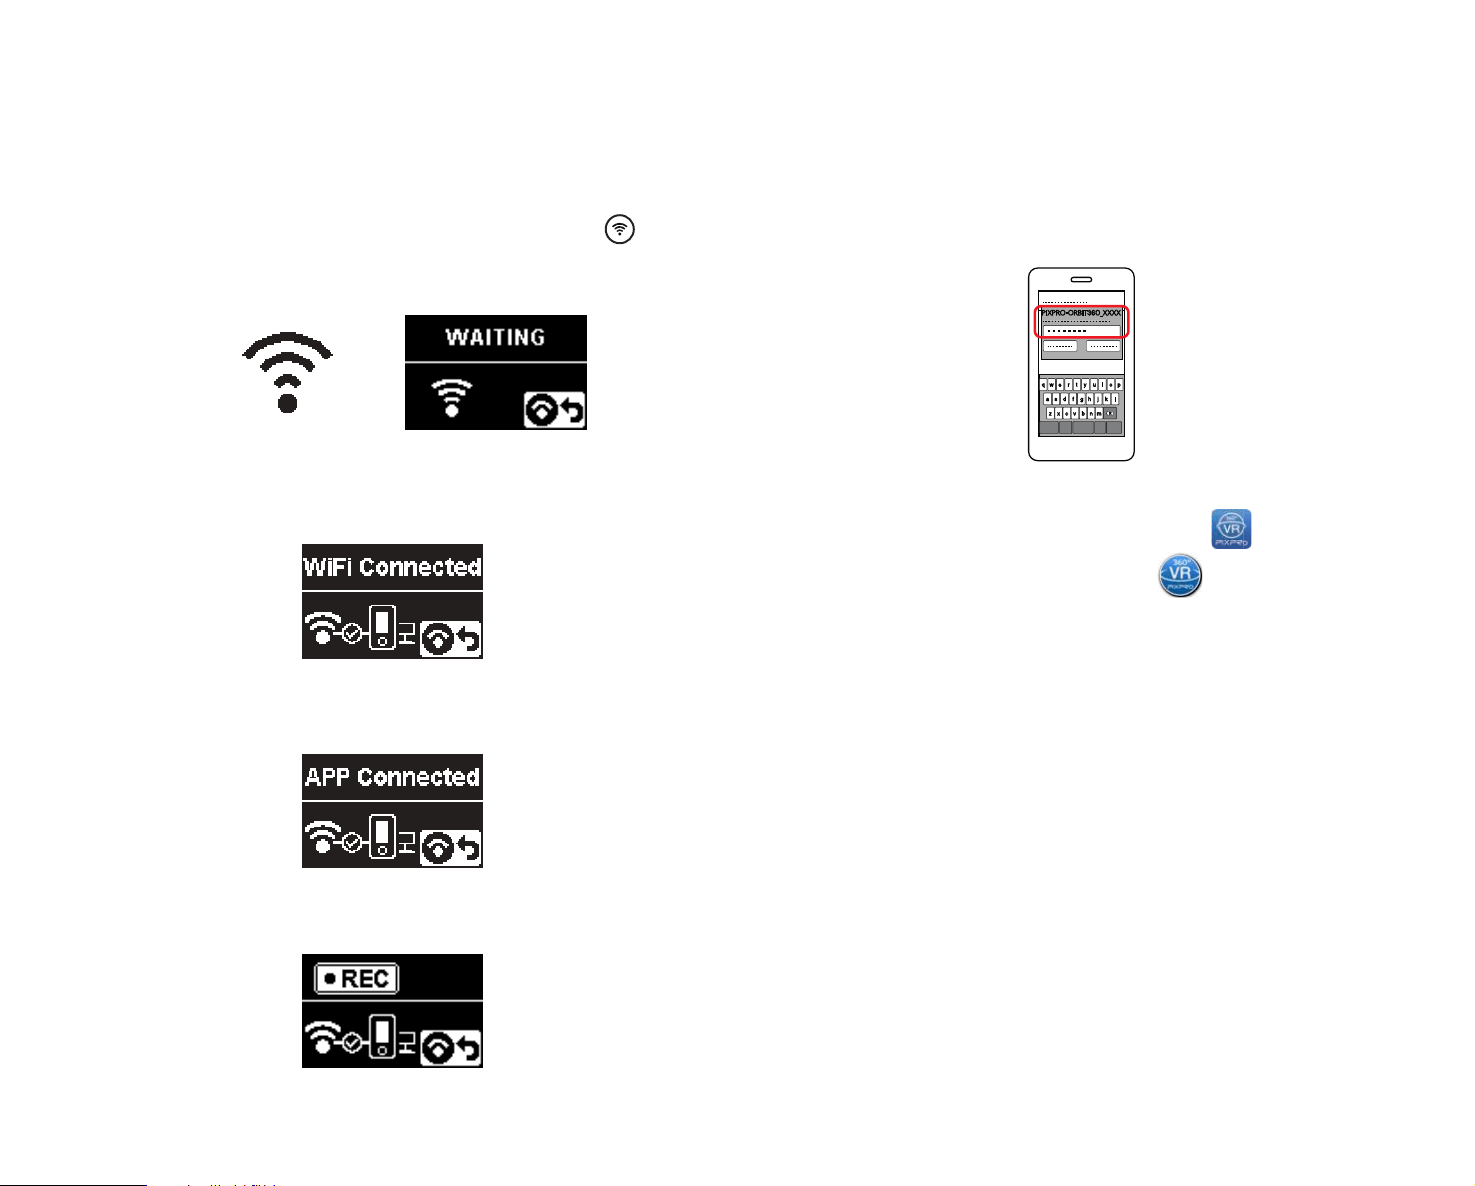
49
1. Camera:
the label in the battery compartment of the camera. Press the button
to enable Wi-Fi mode. The camera will enter the pending connection mode
interface two seconds later:
Connecting your Camera to Smart Device (or Personal Computer) with Wi-Fi:
Operation Method:
2. Smart Device or Personal Computer:
When you enable Wi-Fi mode, the camera will automatically search nearby
Password: 12345678)
PIXPRO-ORBIT360_XXXX
3. Camera:
When the Wi-Fi connection is successful, enter the Wi-Fi connection
interface.
4. Smart Device or Personal Computer:
When connected via Wi-Fi, you can tap the APP icon on the smart
device to start it; or double-click the APP icon on the desktop of your
computer to start it.
5. Camera:
When the APP is connected to the camera, the APP connection interface will
appear.
When recording has started via the APP, the recording interface will appear
on the camera's LCD.
50
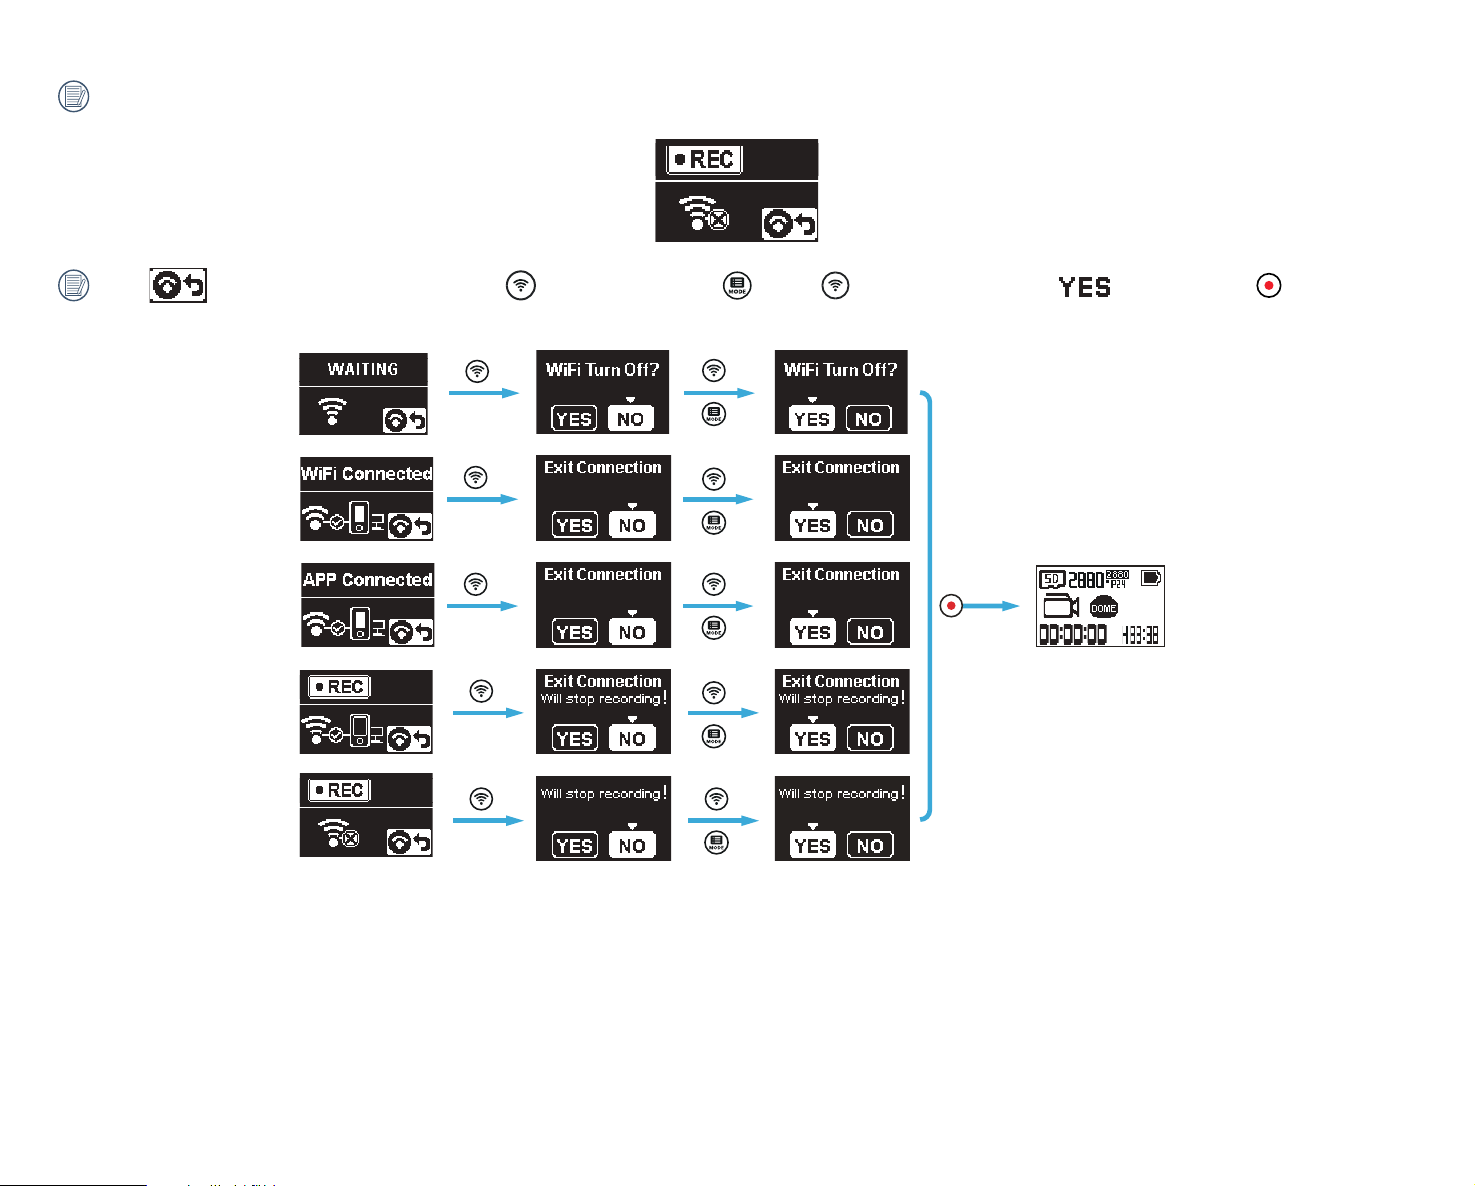
If the Wi-Fi connection is dropped while recording, the camera will continue to record and will enter the connection free recording mode.
When displays in the interface, press the button and press the (up) or (down) button to select . Then press the button to exit
the Wi-Fi connection mode.
51
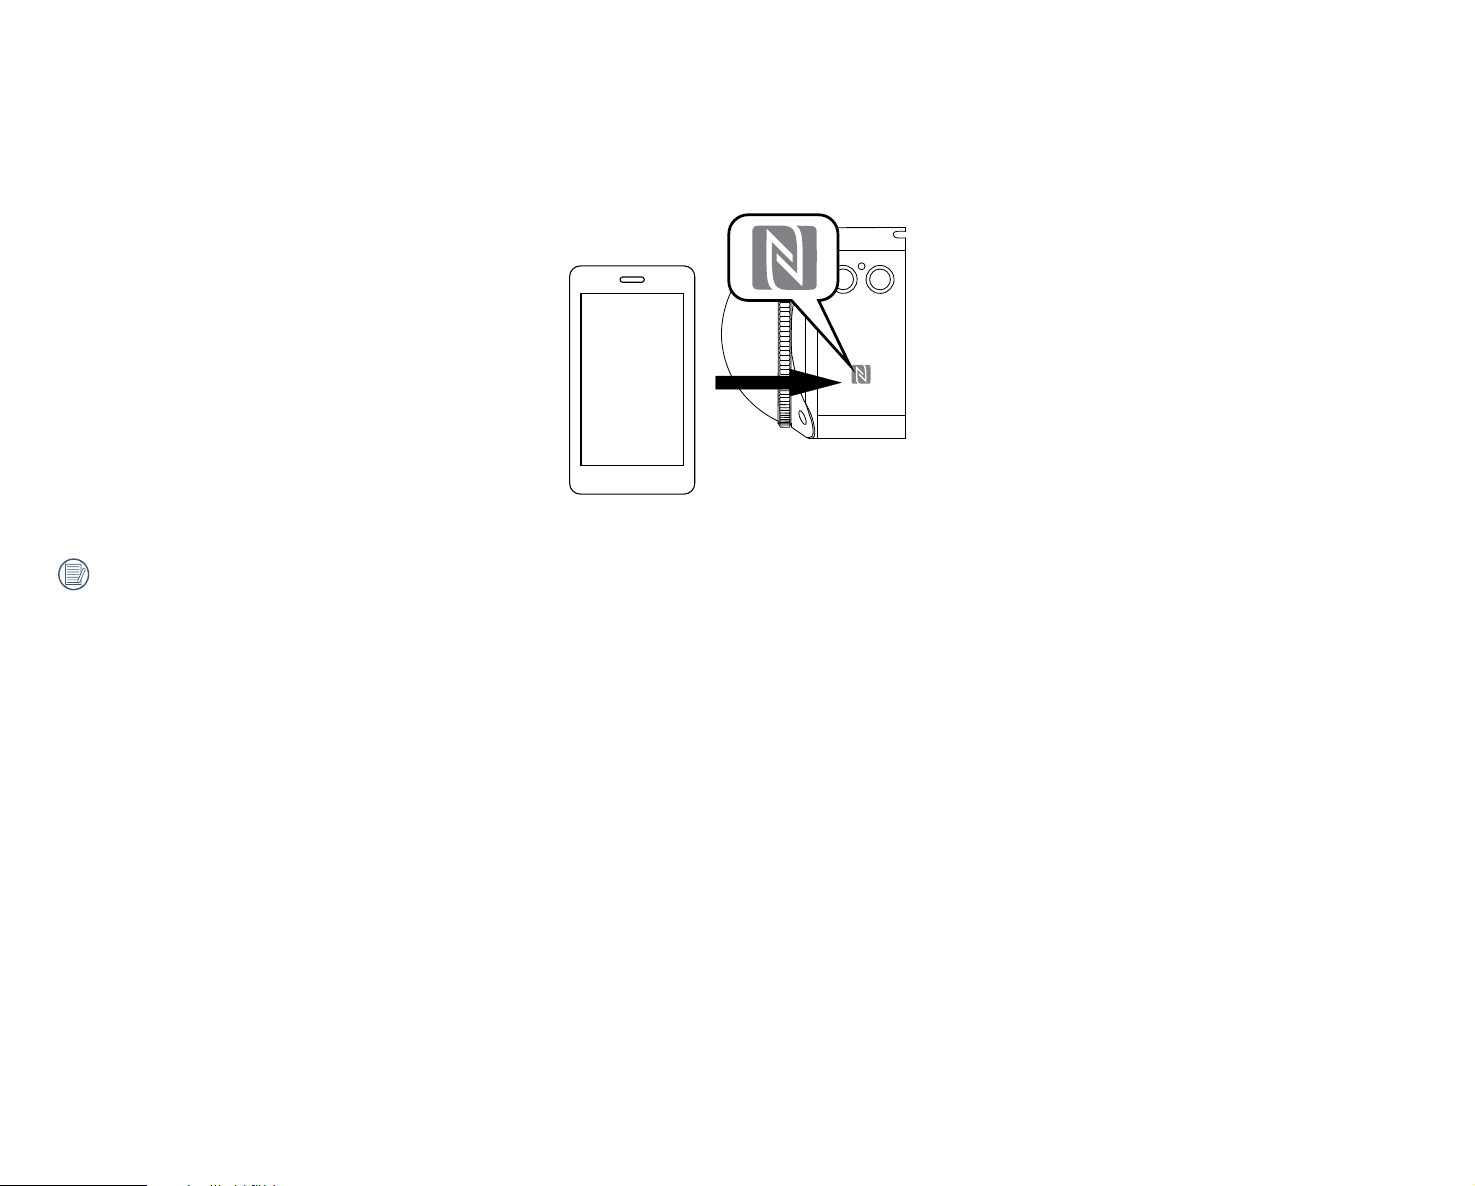
Connecting Camera to Smart Device with NFC
1. These instructions are to enable NFC connection on your smart device.
2. Use your smart device to lightly touch the NFC mark on the ORBIT360 4K/4KVR360 camera. If the smart device has a prompt tone or vibration that means the
connection is successful.
3. The APP will automatically open on your smart device.
The NFC feature is only available when your smart device's screen is unlocked.

52
Appendices
Speciications:
Design and speciications are subject to change without notice.
Image Sensor A
Type 1/2.3" BIS CMOS
Eective Pixels 20.68 Megapixels
Total Pixels 21.14 Megapixels
Lens A
Focal Length 1.633mm
Equivalent to 35mm ilm 9.18mm
F Number F2.4
Lens Construction 7 groups 8 elements
Focus Fix Focus
Field of View
Max. 197 Degrees (For Front Mode [16:9])
Max. 155 Degrees (For VR Mode [2:1])
Focusing Range 30cm~
∞
Image Sensor B
Type 1/2.3" BIS CMOS
Eective Pixels 20.68 Megapixels
Total Pixels 21.14 Megapixels
Lens B
Focal Length 1.257mm
Equivalent to 35mm ilm 7.08mm
F Number F2.4
Lens Construction 7 groups 8 elements
Focus Fix Focus
Field of View Max. 235 Degrees
Focusing Range 30cm~
∞
Anti-Handshake Electronic Image Stabilization (EIS)

53
Number of Recording
Pixels
Still Image
27MP: 7360x3680 (2:1)
Stitched
VR Mode / 360 Spherical
15MP: 5520x2760 (2:1)
27MP: 7360x3680 (2:1)
Global
15MP: 5520x2760 (2:1)
13MP: 3680x3680 (1:1) Round (Dome) Mode / 235 Dome
8MP: 3840x2160 (16:9)
Front Mode / 197 4K Ultra Wide
9MP: 3526x2644 (4:3)
Movie
(2:1)
3840×1920/24fps Global
VR Mode / 360 Spherical
3840×1920/15fps
Stitched
1920×960/30fps
(1:1)
2880x2880/24fps
Round (Dome) Mode / 235 Dome
1920×1920/30fps
(16:9)
3840x2160/30fps
Front Mode / 197 4K Ultra
Wide
1920x1080/60fps Ultra
1920x1080/60fps Middle
1920x1080/60fps Narrow
1280x720/60fps
High-speed Movie :
1280×640/120fps(2:1) VR Mode / 360 Spherical
1280x720/120fps(16:9) Front Mode / 197 4K Ultra Wide
File Format
Still Image Exif 2.3 (JPEG)
Movie MP4 [Image: H.264; Audio: AAC(Stereo)]
Camera Modes VR Mode (Lens A and Lens B), Round (Dome) Mode (Lens B), Front Mode (Lens A)
Shooting Modes Photo, Hi-Speed Movie, Movie, Burst
Splash proof Equivalent to JIS/IEC IPX5 (Body)
Shockproof Up to 2m (with lens cover)
Dustproof Equivalent to JIS/IEC (IP6X)

54
Freeze-prooing -10°C
LCD 1.0 inch TN LCD (With Backlight)
Level Gauge 3 Axis
ISO Sensitivity Auto (100~1600) (Photo) Auto (100~800) (Movie)
Exposure Metering Method Artiicial Intelligence AE (AiAE)
Exposure Control Method Program AE
Burst Supported
White balance Auto White Balance, Daylight, Cloudy, Fluorescent, Incandescent, Underwater
Recording Media
Internal Memory: No
microSD / microSDHC / microSDXC Card (Up to 256GB Support)
Language English
Interface USB 2.0 (Micro 5 pin USB) , HDMI (Type D), Stereo Microphone Input (Diameter of 2.5mm)
Wi-Fi Supported (802.11b/g/n)
NFC Supported
BLUETOOTH Supported (BLE4.1)
BLUETOOTH Remote Control-D Supported
BLUETOOTH Remote Control-C Supported (Option)
Power Rechargeable Li-ion Battery LB080, 3.6V 1250mAh, In-Camera Charging
Shooting Capability (Battery
Performance)
Approx. 150 shots (Based on CIPA Standards) (Wi-Fi on)
Approx. 80 minutes for Video (@3525x2644 /15fps) (Wi-Fi on)
Operation Environment Temperature: -10 ~ 40°C, Humidity: 0 ~ 90%
Dimensions (W×H×D) Approx.55.0×55.0×66.9 mm (without lens cover) (Based on CIPA Standards)
Weight
Approx. 130g (only body)
Approx. 156g (with battery and memory Card)
55
Prompts and Warning Messages:
Message Description Recommended Action
There are too many iles, which may cause a delay in powering on.
When pressing the button for recording, the memory card cannot be accessed
because there are too many folders/iles.
After copying the iles to your computer,
choose to delete or reformat Micro SD
Card.
No memory card is detected in the camera. Insert your memory card.
When turning on the product or pressing the button, the product detects that the
memory card is out of capacity.
After copying the iles to your computer,
choose to delete or reformat Micro SD
Card.
The memory card still cannot be recognized after formatting.
An error occurs when reading the memory card.
An interruption has been encountered during shooting or recording so the camera
cannot shoot or record any further.
Reformat the memory card.
When the writing speed is too slow, recording cannot continue.
Please select a Class 10 memory card or
higher for optimum performance.
It will be displayed while the camera is being processed. No action required.
Connecting to your computer or TV.
The display will disappear after a
successful connection.
56
Message Description Recommended Action
The camera is set to "Mass Storage" device and is connecting to the computer via
USB.
No action required.
The camera is set to "Webcam" and is connecting to the computer via USB. No action required.
Connecting to a HDMI device. No action required.
A warning for low battery before the camera will shut down automatically.
Charge or replace with a new battery.
Updating irmware.
No action required. The camera will
turn o automatically after the update is
complete.
Battery temperature is too high. The product will automatically shut down.
Remove the battery carefully when the
product is shut down. The battery can be
used again after cooling down.

57
Trouble Shooting:
Problem Possible Causes Recommended Action
Camera does not turn on
The battery has been depleted.
The battery is installed incorrectly.
Charge the battery.
Follow the charging instructions in the manual to
properly install the battery.
Blurred Images
There could be smudges or dirt on the camera's
lenses or the lens covers.
Clean carefully with a clean, lint-free, dry cloth.
Failed to Connect to Wi-Fi Wrong password entered.
Re-enter the password. If you have forgotten the
password after changing it from the default factory
password, you can use the reset function to restore
the initial factory default password: 12345678
Slow Wi-Fi Connection
There are too many programs running
simultaneously on your smart device.
Close other unnecessary programs and APPs
connecting or running on your smart device.
Micro USB Connection Failure
The wrong USB connection mode has been
selected.
Conirm the USB connection mode in the camera
menu. If there is a need to read, save videos or
photos, please select "Mass Storage". If there is
a need to serve as a video chat (SKYPE) camera,
please select "Webcam".

58
Special Accessories
There are dierent accessory options available for the ORBIT360 4K/4KVR360 cameras. Accessory bundle packs will vary by retailer and international regions.
To purchase additional optional PIXPRO accessories separately, please contact your local retailer or visit kodakpixpro.com for for a complete list of available
accessories.
Before using your camera (especially in water or rigorous activity), please pay close attention to make sure the camera is tightly secured or housed to
prevent possible damage or loss of the product.
Please ensure that the bonding, adhesive surface is clean and free of debris or unwanted particles before using double-sided adhesive accessories. Dirt,
grease or other foreign matter will reduce the eectiveness of the double-sided adhesive. The double-sided adhesive is not easily removed after adhering.
Please take care to properly position and orient the accessory before sticking it to the desired surface.
After fully assembling and mounting the optional accessories, please make sure any screw or mount is in the proper position and fully secured.
59
Standard Housing-C: For use with other accessories when waterprooing is not required
Installation Method:
1. Hold the bottom of the locking arm and lip up to open it.
2
1
2. Open the locking arm of the standard housing and place the camera inside
housing as shown in diagram below. Press the top cover of the ixed mount
around camera to close it. Press the bottom of the lock as shown in diagram
below until locked into place.
4. Use the included accessories tool to fully tighten the setscrew. Be careful not
to over tighten screw and risk stripping.
Accessories Tool
3. Install the housing mount on the desired accessory and use the
setscrew to tighten.
In order to prevent deformation or damage of the Standard Housing
accessory, please refer to the diagram to the left for your reference and do
not overtighten screws.
Use the protection latch only at the time of transportation and storage.
Keep the latch in such a way that it does not detach when mounting.
Protection
latch

60
Flat Adhesive Mount-A: For sticking onto a skateboard or other lat
objects
Installation Method:
There are two types of adhesive mounts: lat and curved. You should select your desired adhesive mount based on the shape of the object you intend to mount
your camera to.
Both types can be installed in the same way:
1
. Assemble the standard housing ( 59).
2. Fasten the standard housing and install adhesive mounts according to the diagrams below and use the setscrew to tighten.
3. Stick the double-sided adhesive at the bottom of the adhesive mount to the object of your choice.
The double-sided adhesive is disposable. It should always be replaced with a new one after being peeled o.
Curved Adhesive Mount-A: For sticking onto a helmet or other
curved objects
Double-Sided Adhesive
61
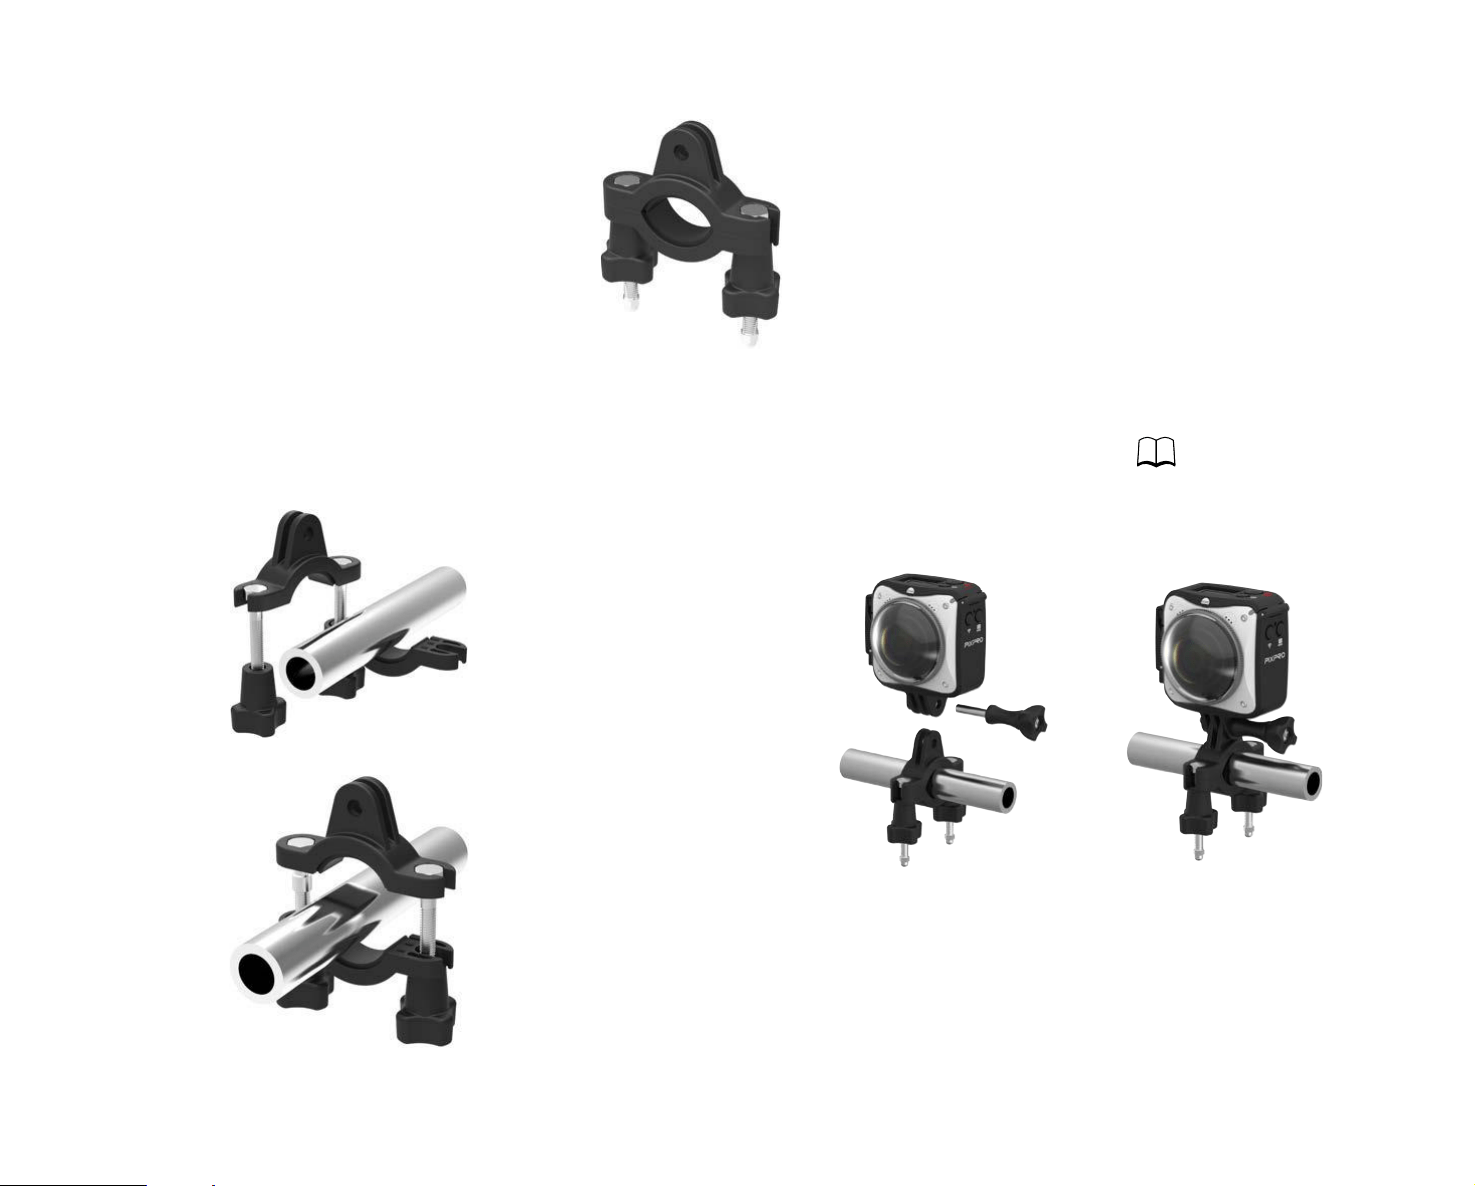
Bar Mount-A: For mounting on bicycle handlebars, posts, rods and other tube-like objects
Installation Method:
1
. Align the bar clamp to the handlebar or tube shaped post and
rotate the screws clockwise to tighten.
2. Assemble and install the standard housing ( 59).
3. Connect and install the standard housing and bar clamp in accordance with
the directions illustrated in the diagram below and use the setscrew to fully
tighten.
62
3. Carefully clean the suction mount bottom and the smooth mounting surface
before attaching the suction cup. Press the handle down to suction to your
desired surface.
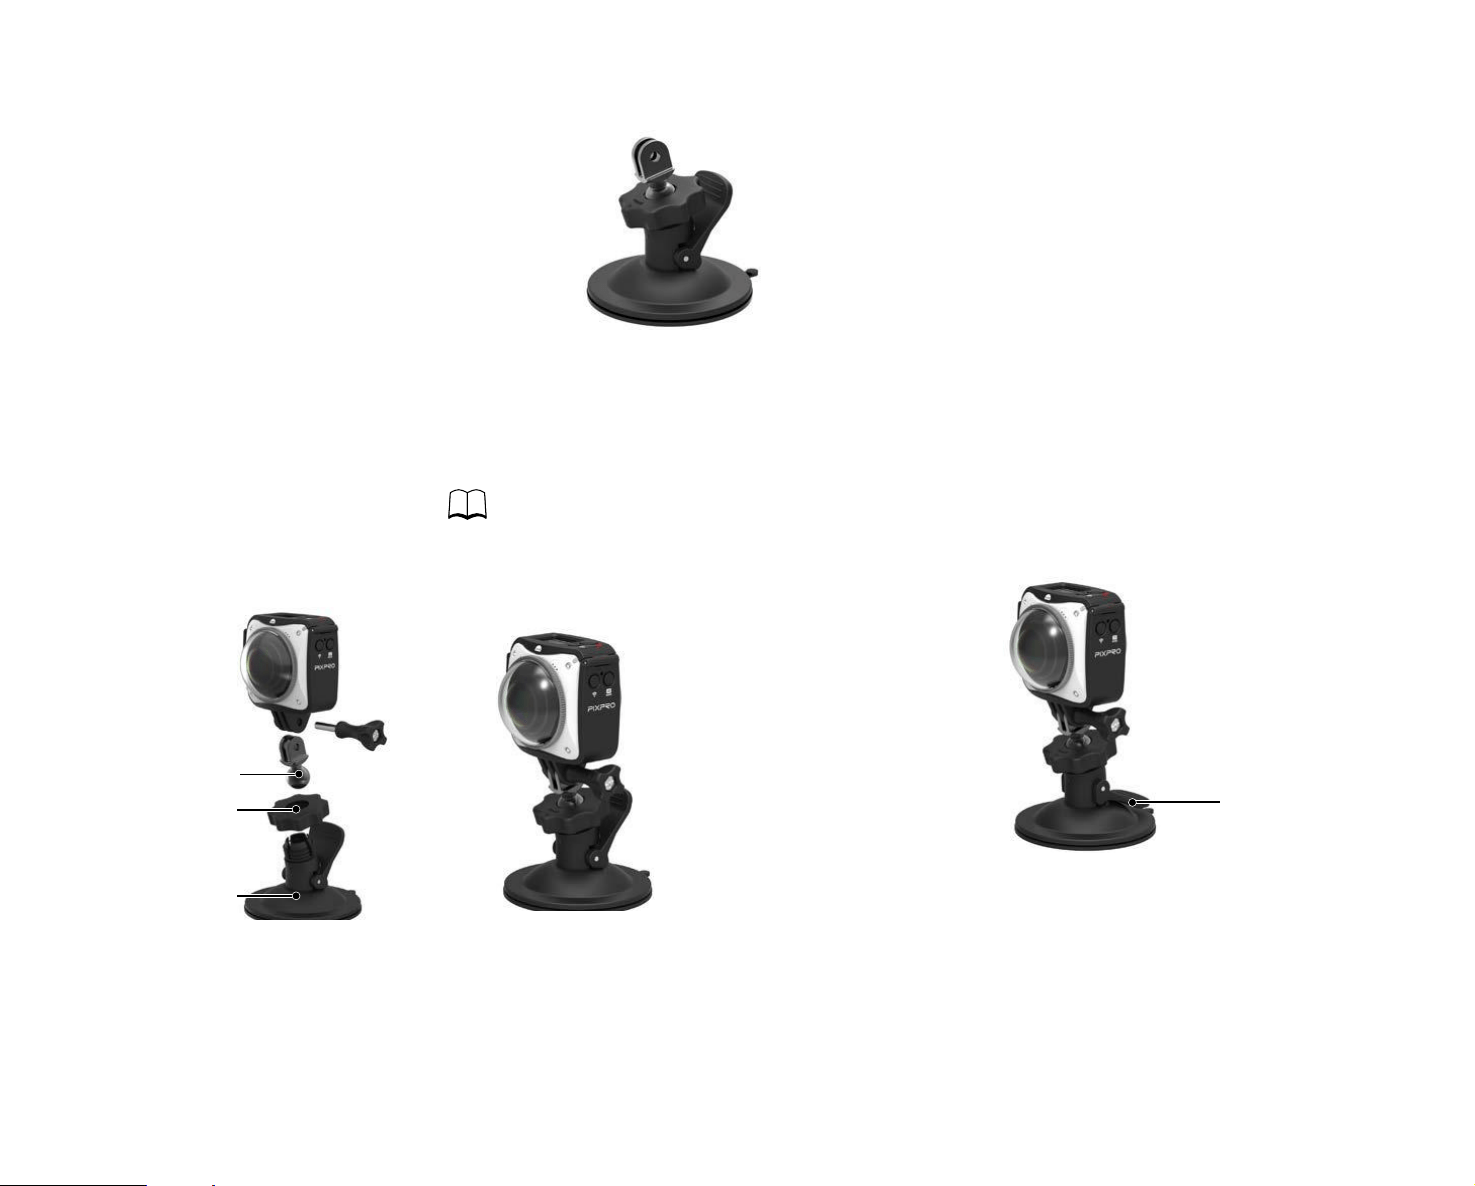
Suction Cup Mount-A: For attachment to smooth surfaces, such as glass
Installation Method:
1. Assemble and install the standard housing ( 59).
2. Attach the standard housing to the adapter, pre-tightening the nut and
suction mount in accordance with the illustration below and fully tighten the
large nut.
Handle
Adapter
Large Nut
Suction Mount
63
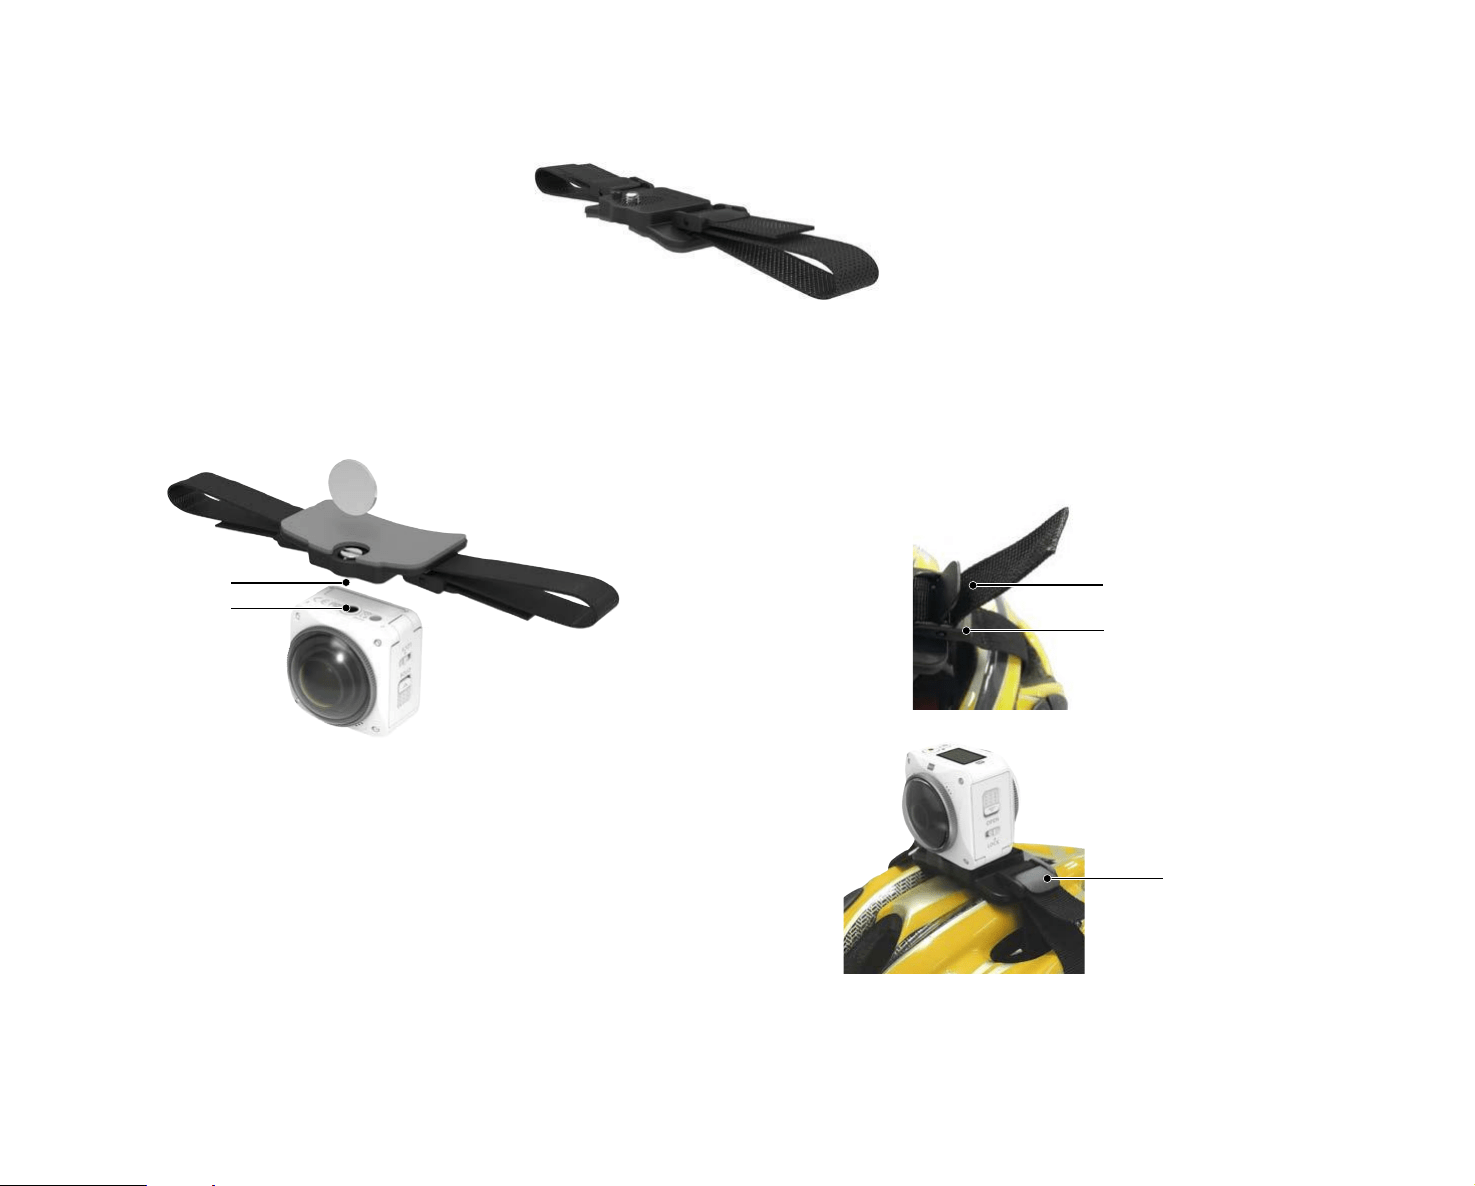
Vented Helmet Strap Mount-A: For mounting on objects like bicycle helmets
Installation Method:
1. Align the locator pole on the mount to the locator hole on the camera and
align the screw on the mount to the camera's screw socket. Turn the screw
clockwise with a coin or similar shaped object to tighten.
Band
Buckle
2. Lay out the strap before threading both ends into the helmet. Thread both
ends of the band into the buckle, then press down on the buckle clamp to
fasten.
Buckle Clamp
Screw Socket
Mounting Screw
64
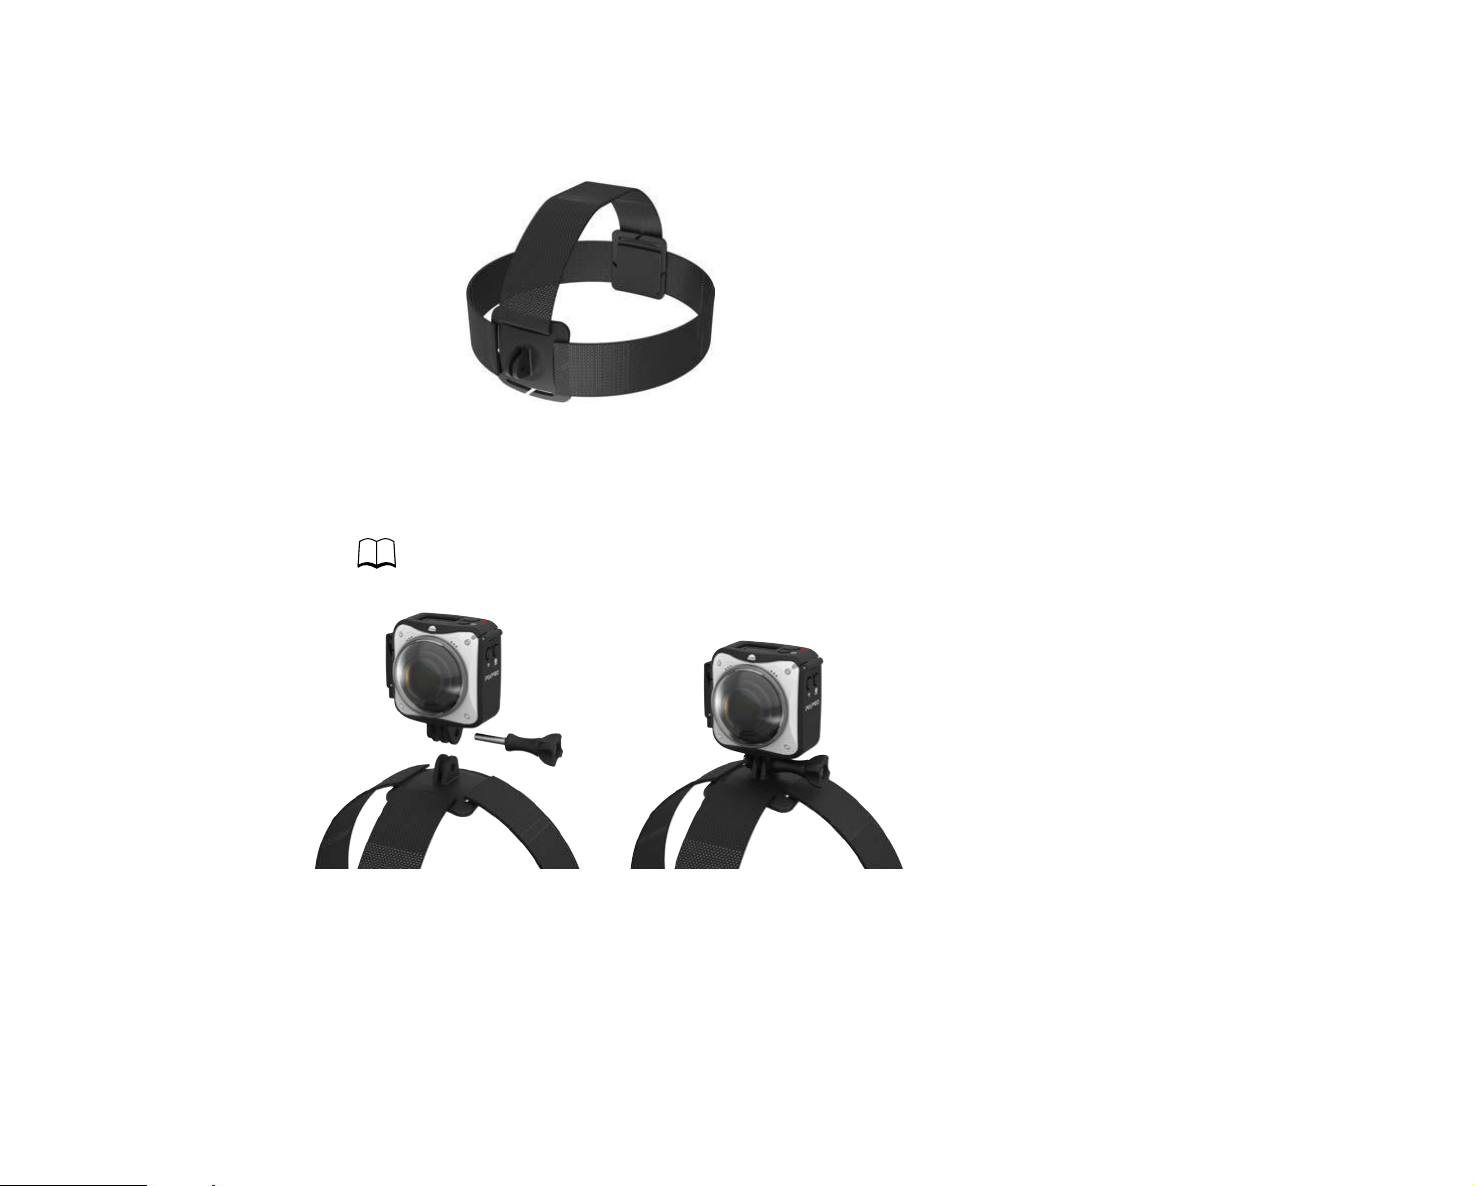
Head Strap Mount: For wearing on one’s head
Installation Method:
1. Assemble the standard housing ( 59).
2. Insert the base of the standard housing to the mount before using the set screw to fully tighten.
3. Place the band around your head and adjust to desired it.
65
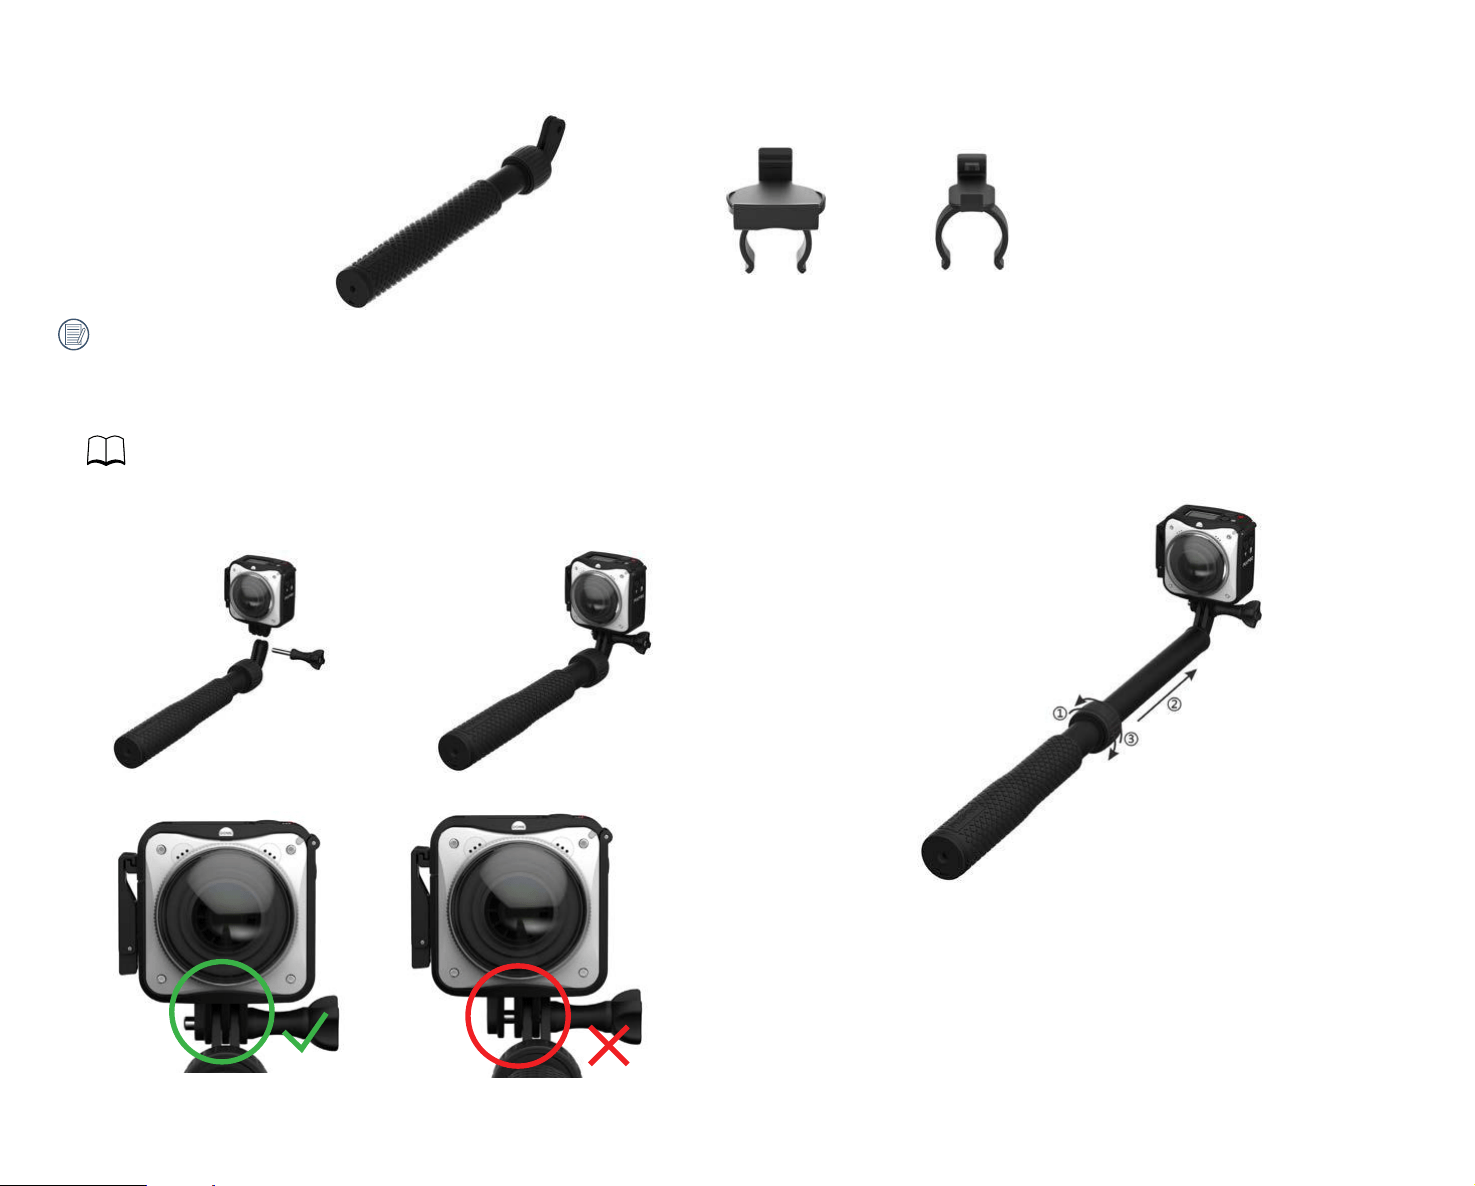
Selie Stick-B and Remote Control Mount: For taking selies or 360° shooting and recording
3. Twist the knob counterclockwise selie stick sections in accordance with
the directions below to extend. Twist clockwise knob to lock in place.
Always use caution when using. Do not use the hand-held selie stick when on a bicycle, motorized vehicle or in other unsafe scenarios.
Installation Method:
1. Assemble and install the standard housing (or the waterproof housing)
( 59/68).
2. Attach the standard housing (or the waterproof housing) to the
selie stick-B in accordance with the diagram below, then tighten the
thumbscrew.
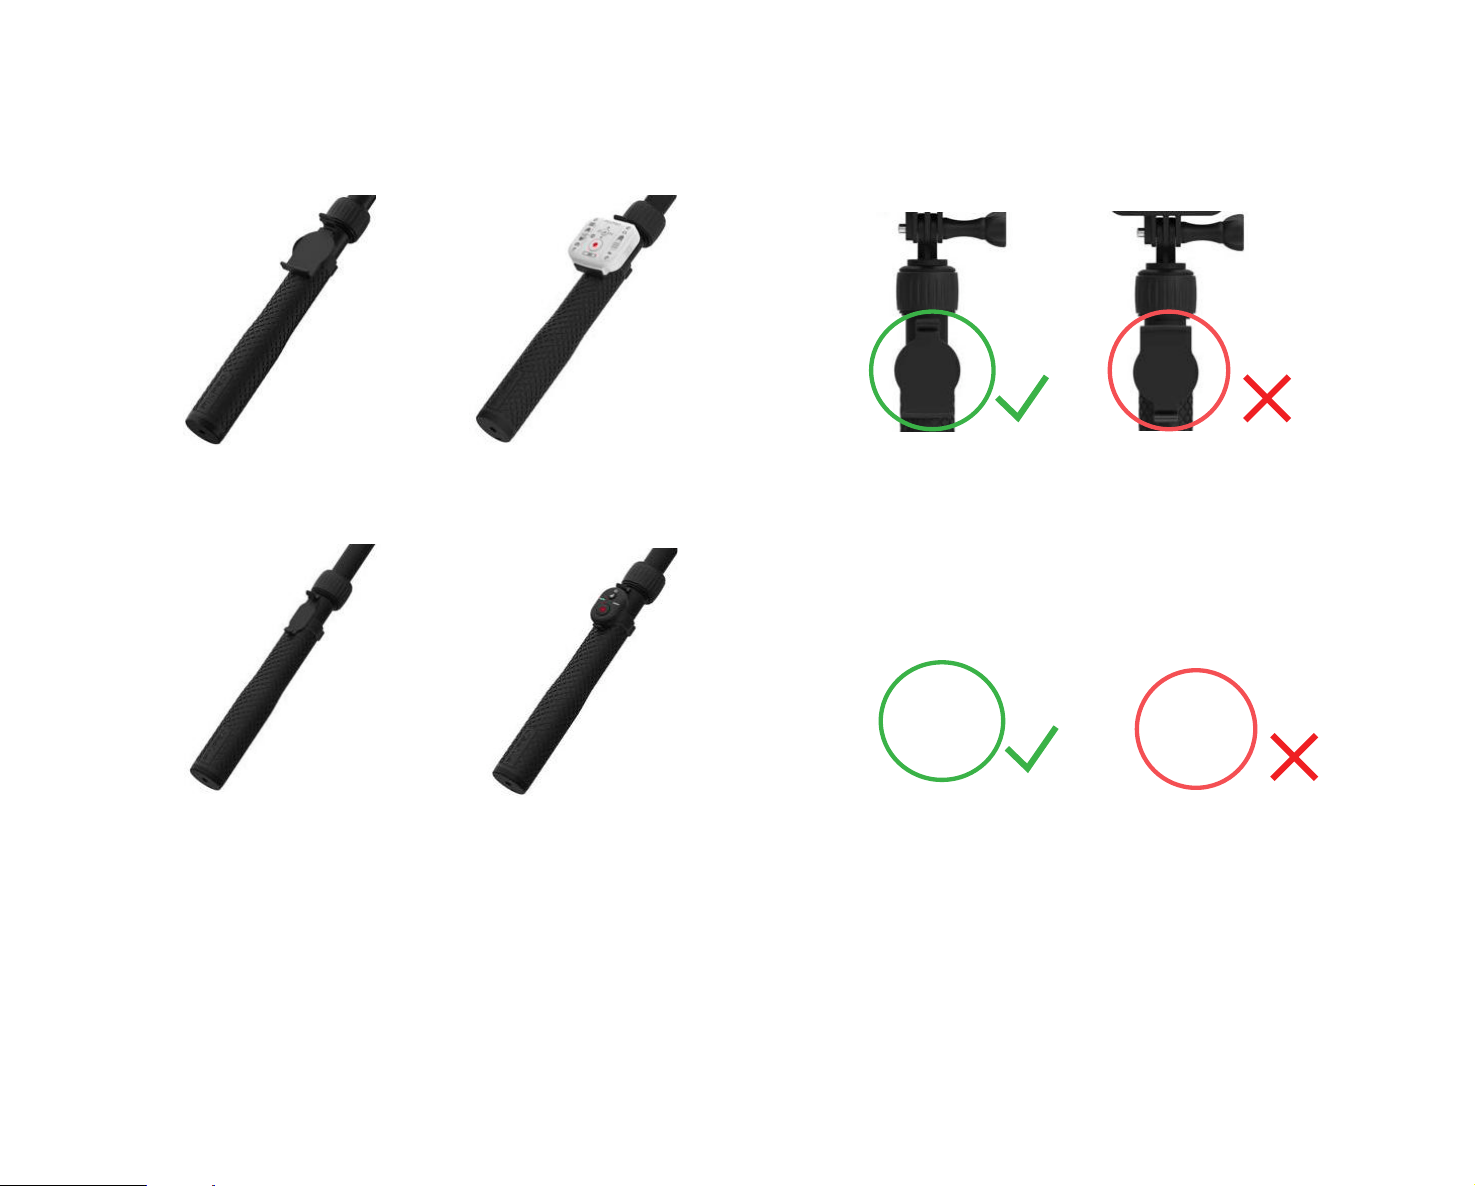
66
4. To install the remote control and clip mount to the handle, snap and lock the remote control in to the clip and attach to the selie stick pole as shown in
diagram below:
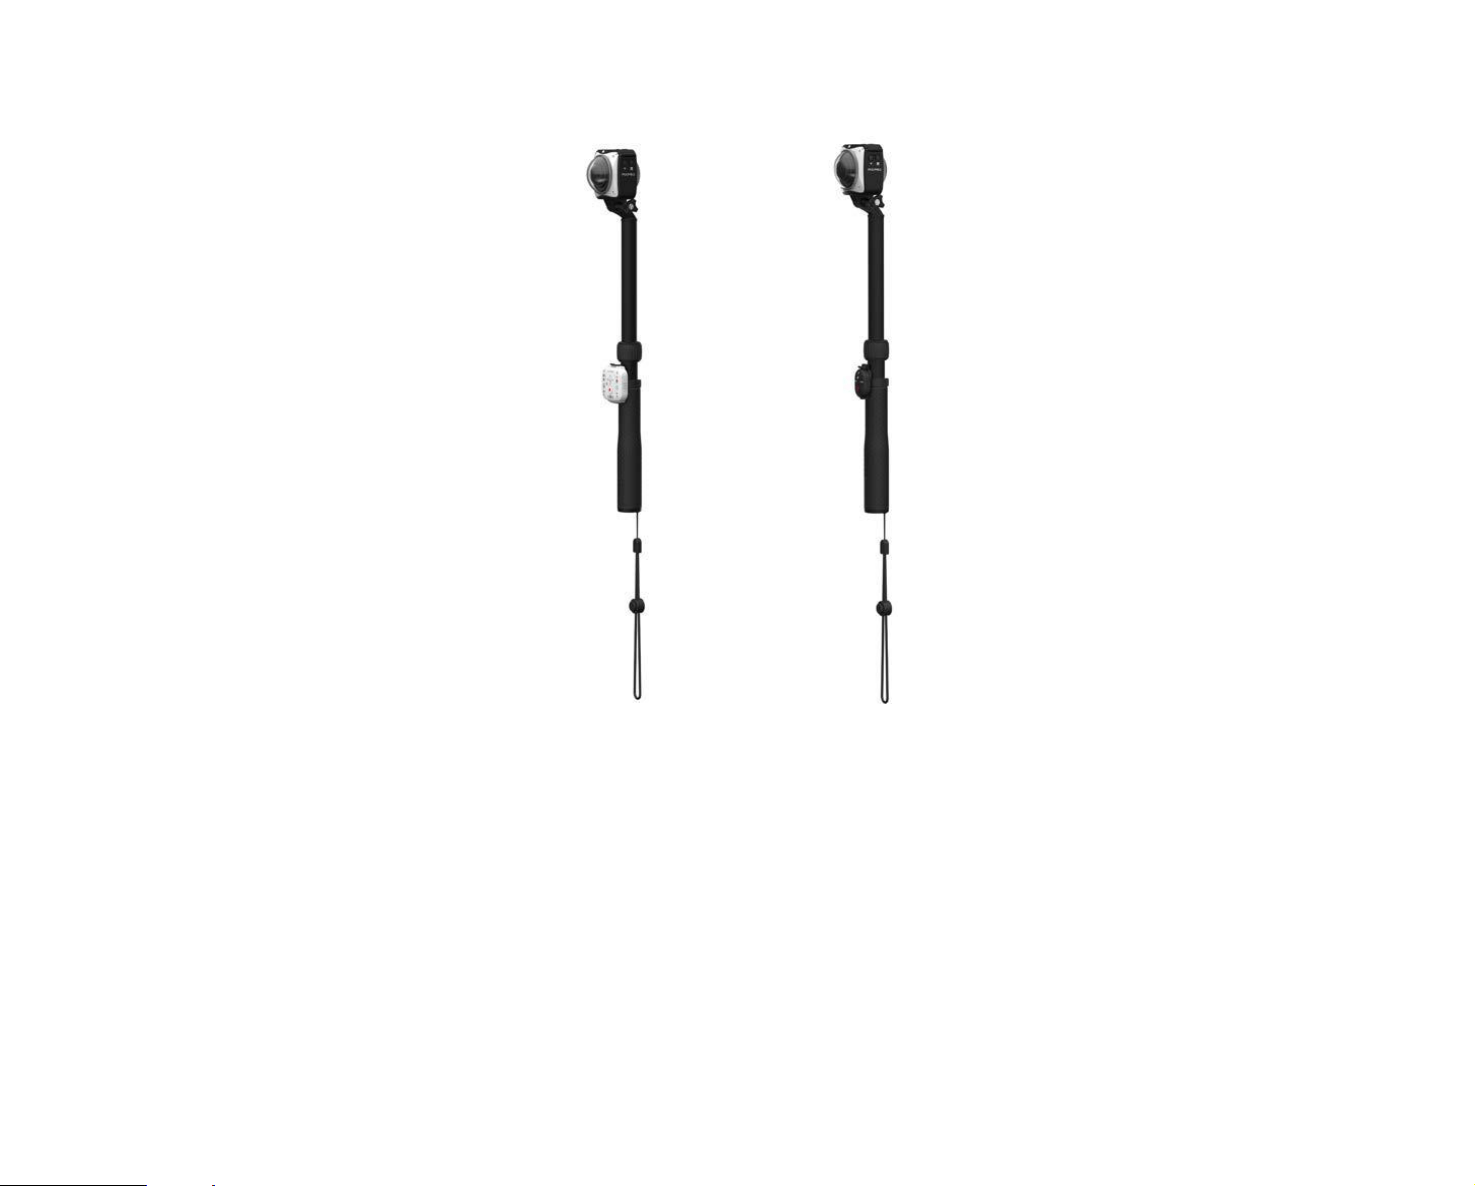
67
5. Attach the included wrist strap to the handle of the selie stick. Wrap wrist strap around your wrist when in use.

68
Waterproof Housing-C: For use with the ORBIT360 4K/4KVR360 underwater, in wet conditions or in other occasions where
waterprooing is recommended or necessary
BLUETOOTH Signal Test Button
Recording / Shooting Button
Installation Method:
1. Place base of the Waterproof Housing over the 1/4" Screw Socket on
the bottom of the camera, align the base screw to the 1/4" Screw Socket on
the camera, then tighten screw.
Waterproof
Housing Base
Positioning Mount Receptor
1/4" Screw Socket
2. Remove the two protective lens caps from the camera and wrap the Anti-
Fog Insert and Anti-Relective Patch around the circumference of the
camera. For more details on the installation and removal of the protective
lens covers, please refer to the ORBIT360 4K/4KVR360 User Manual (
11).
Anti-Fog Insert
Anti-Relective Patch
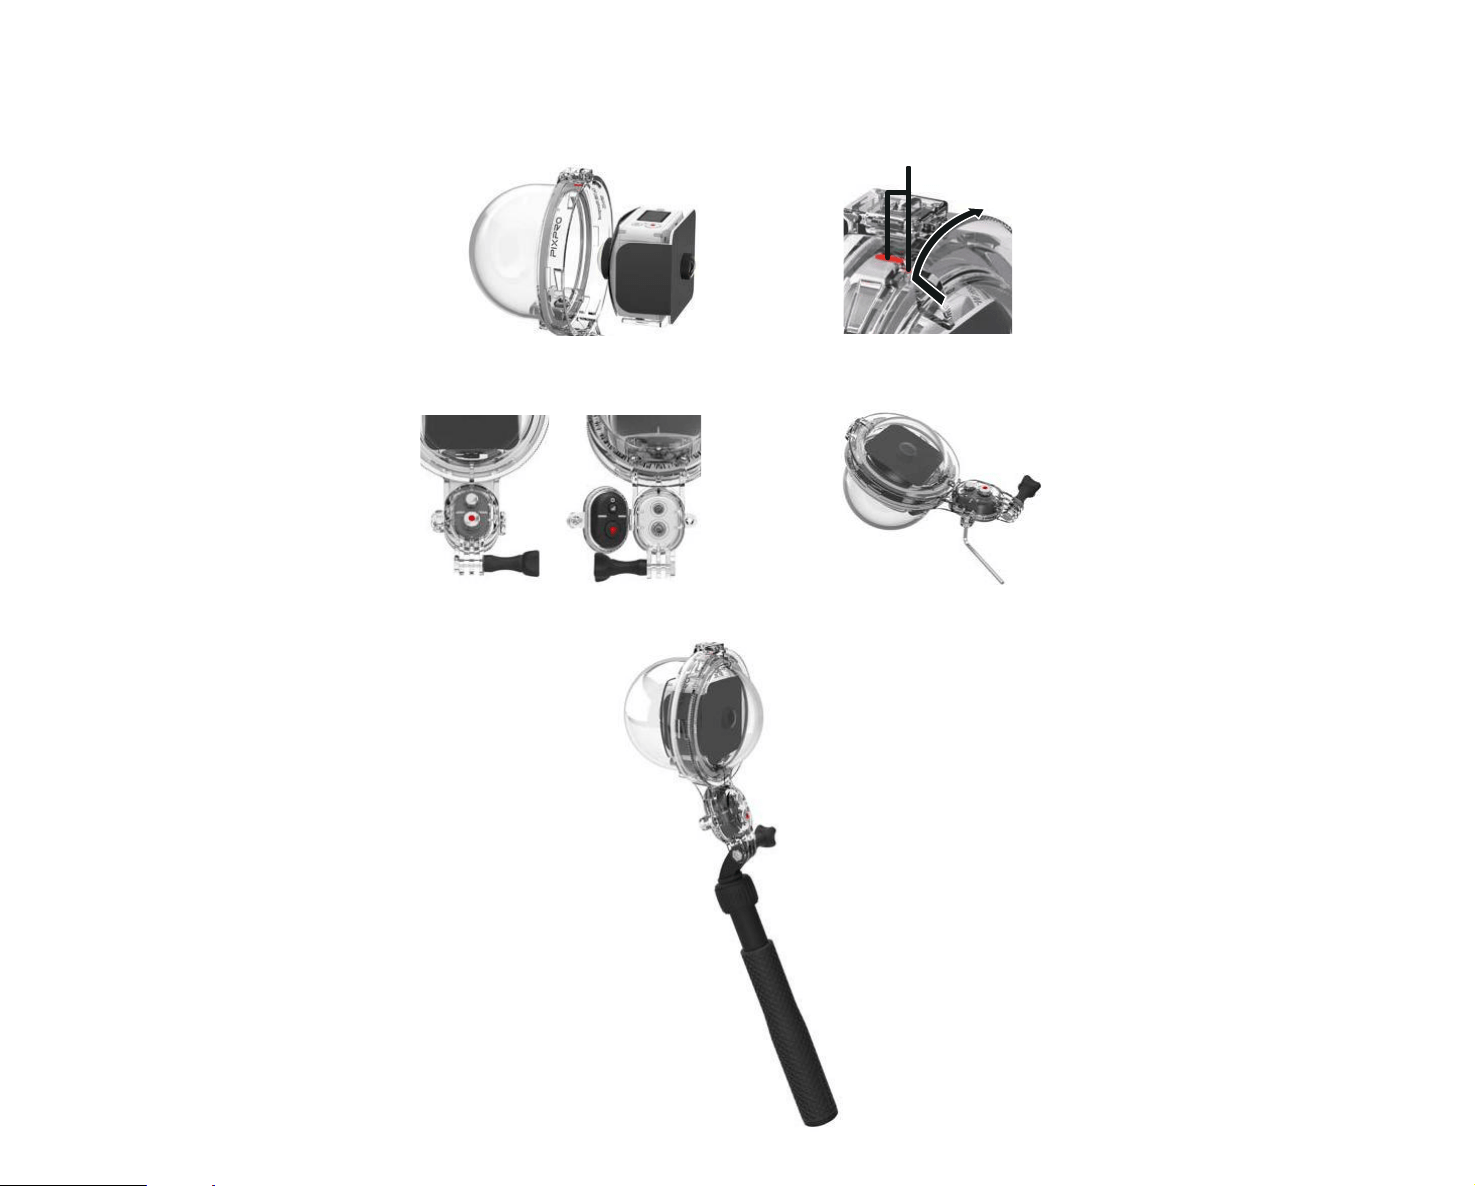
69
3. Place the camera into the stationary and mounted half of the Waterproof Housing. Align the red mount marks on the front half enclosure to the mounted,
ixed half of the Waterproof Housing and turn the front half of the Waterproof Housing enclosure in the direction of the arrow on the housing. When you hear a
"clicking" sound, the front and back covers of the Waterproof Housing have been properly closed and are fully sealed.
Alignment Marks
4. Use the supplied Hex Wrench tool to loosen the clear plastic mini remote control enclosure on the Waterproof Housing. Open the mini remote control
enclosure cover and insert the Mini BLUETOOTH Remote Control inside. Then use the Hex Wrench tool to carefully and fully tighten the screw.
5. To attach the Waterproof Housing Mount with other PIXPRO accessories like the selie stick, use the included accessories tool to fully and carefully tighten the
set screw.

70
Set the camera to VR mode with the resolution ile size of / / , with the selectable option of underwater . Pair the camera and the
Mini BLUETOOTH Remote Control, refer to ( 3537) for detailed instructions. When pairing is successful, insert the camera into the Waterproof
Housing and secure.
In order to prevent deformaties or permanent damage to the Waterproof Housing accessory, please refer to the diagram ( 67) for your reference
and do not overtighten screws.
Before using your camera in or submerging under water, please make sure you irst securely enclose it inside the Waterproof Housing. The Waterproof
Housing can be submerged up to 30 meters (98 feet) with a water temperature between 69.8˚F ± 50˚F ( 21℃ ± 10℃ ). The Waterproof Housing accessory will
maintain its waterproof capabilities for up to 2 hours at a depth of up to 30 meters (98 feet) while fully submerged.
Please install the Anti-Fog ilm in a dry environment, so as not to aect Anti-Fog ilm moisture absorption.
Anti-Fog Inserts are intended to help minimize and absorb unwanted moisture from within the waterproof enclosure. Please make sure the Anti-Fog Inserts
are completely dry before use by heating in a 176˚F (80°C) oven for approximately 5 minutes. Each Anti-Fog Insert can be used between 2 and 3 times.
The Anti-Relective Patch is intended to reduce unwanted glare and relections while used under water.
Please don't use the product in the scene of violent shock, such as motorboat. It may lead to waterproof shell damage and cause water leakage.
To open the Waterproof Housing, twist the front half of the Waterproof Housing's enclosure to the left and counter clockwise lock in the direction indicated
on the Waterproof Housing diagram below.
2
1
Never open the Waterproof Housing when submerged, around water or in wet conditions.
After employing the waterproof box in the water, please use a soft cloth to wipe the residual water droplets dry, and then put it into the holster.

71
Quick Release Clip: Suitable for attaching to a belt or strap
Installation Method:
1. Align the clip's positioning post and screw mount with the camera's positioning mount receptor and 1/4" screw socket.
2. Use the supplied accessory tool to tighten the screw into the mount and secure your camera to the base of the Quick Release Clip.
There are three available positions to mount your model of KODAK PIXPRO VR Camera to the Quick Release Clip:
①
Place the positioning post in the center
ORBIT360 4K/4KVR360 VR Mode
Positioning Post
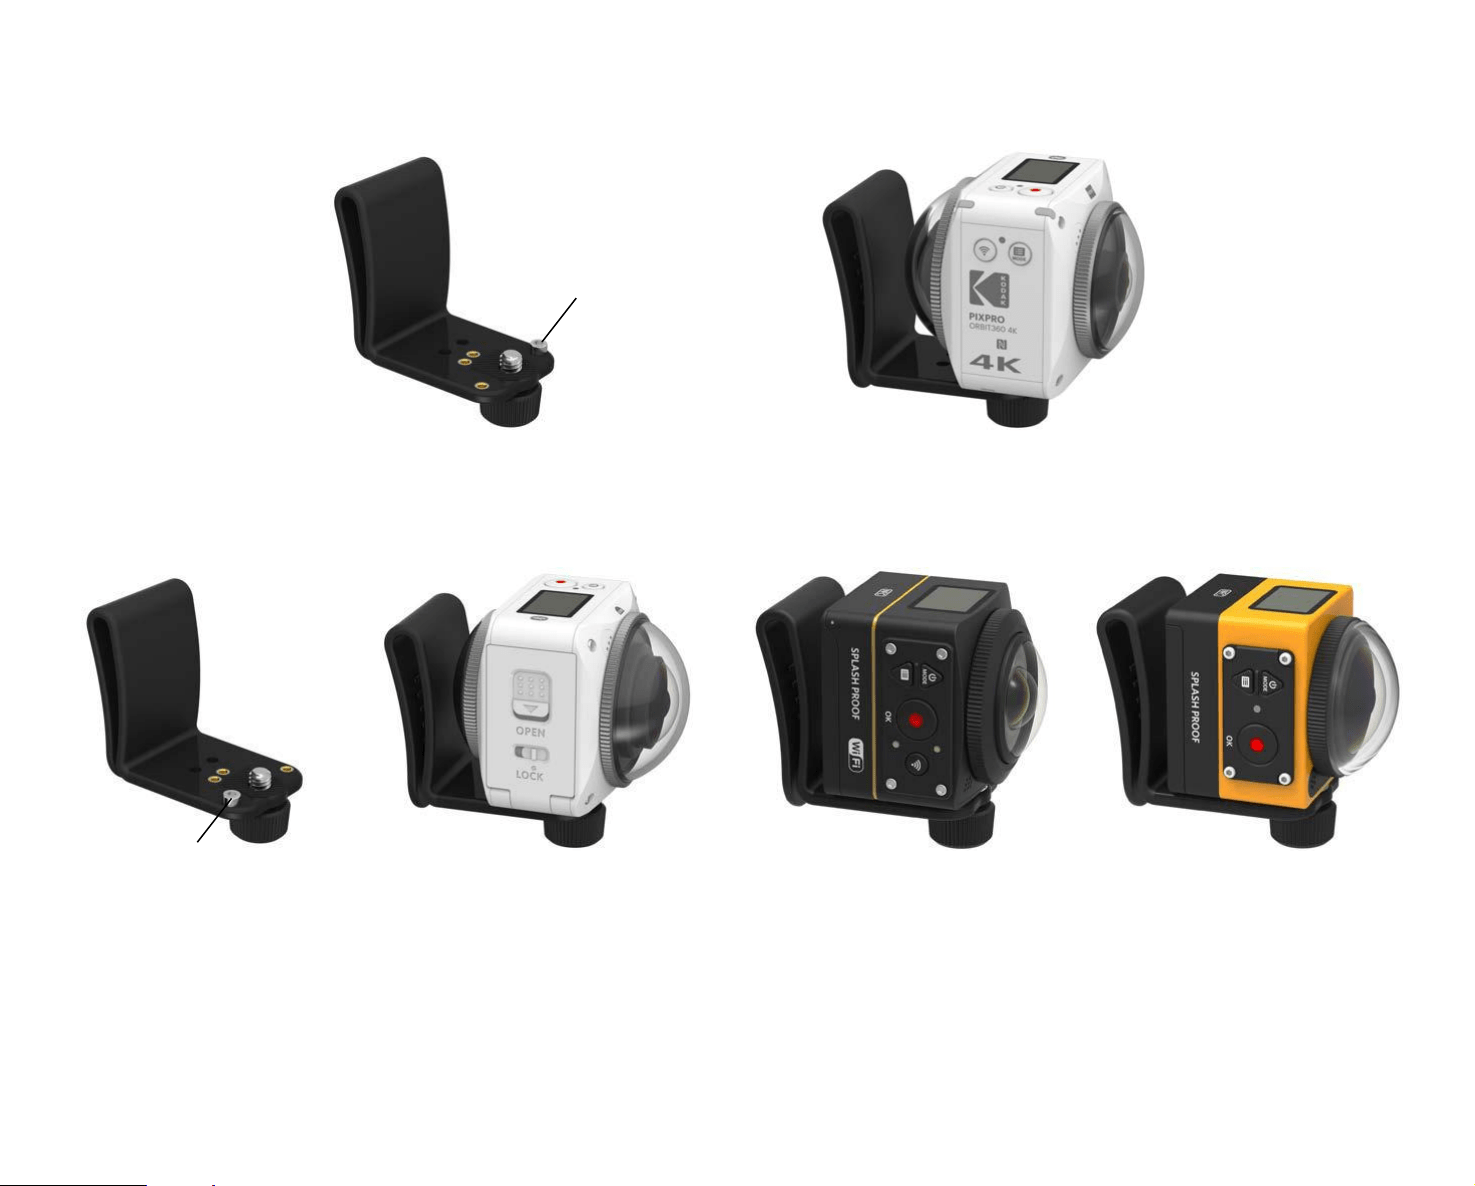
72
②
Place the positioning post to the left
③
Place the positioning post to the right
3. Attach the Quick Release Clip with your mounted camera secured to desired belt, harness, strap or other accessory.
ORBIT360 4K/4KVR360
197˚ Front Mode
ORBIT360 4K/4KVR360 235˚
Round (Dome) Mode
Single SP360 4K Single SP360 1080p
Positioning Post
Positioning Post
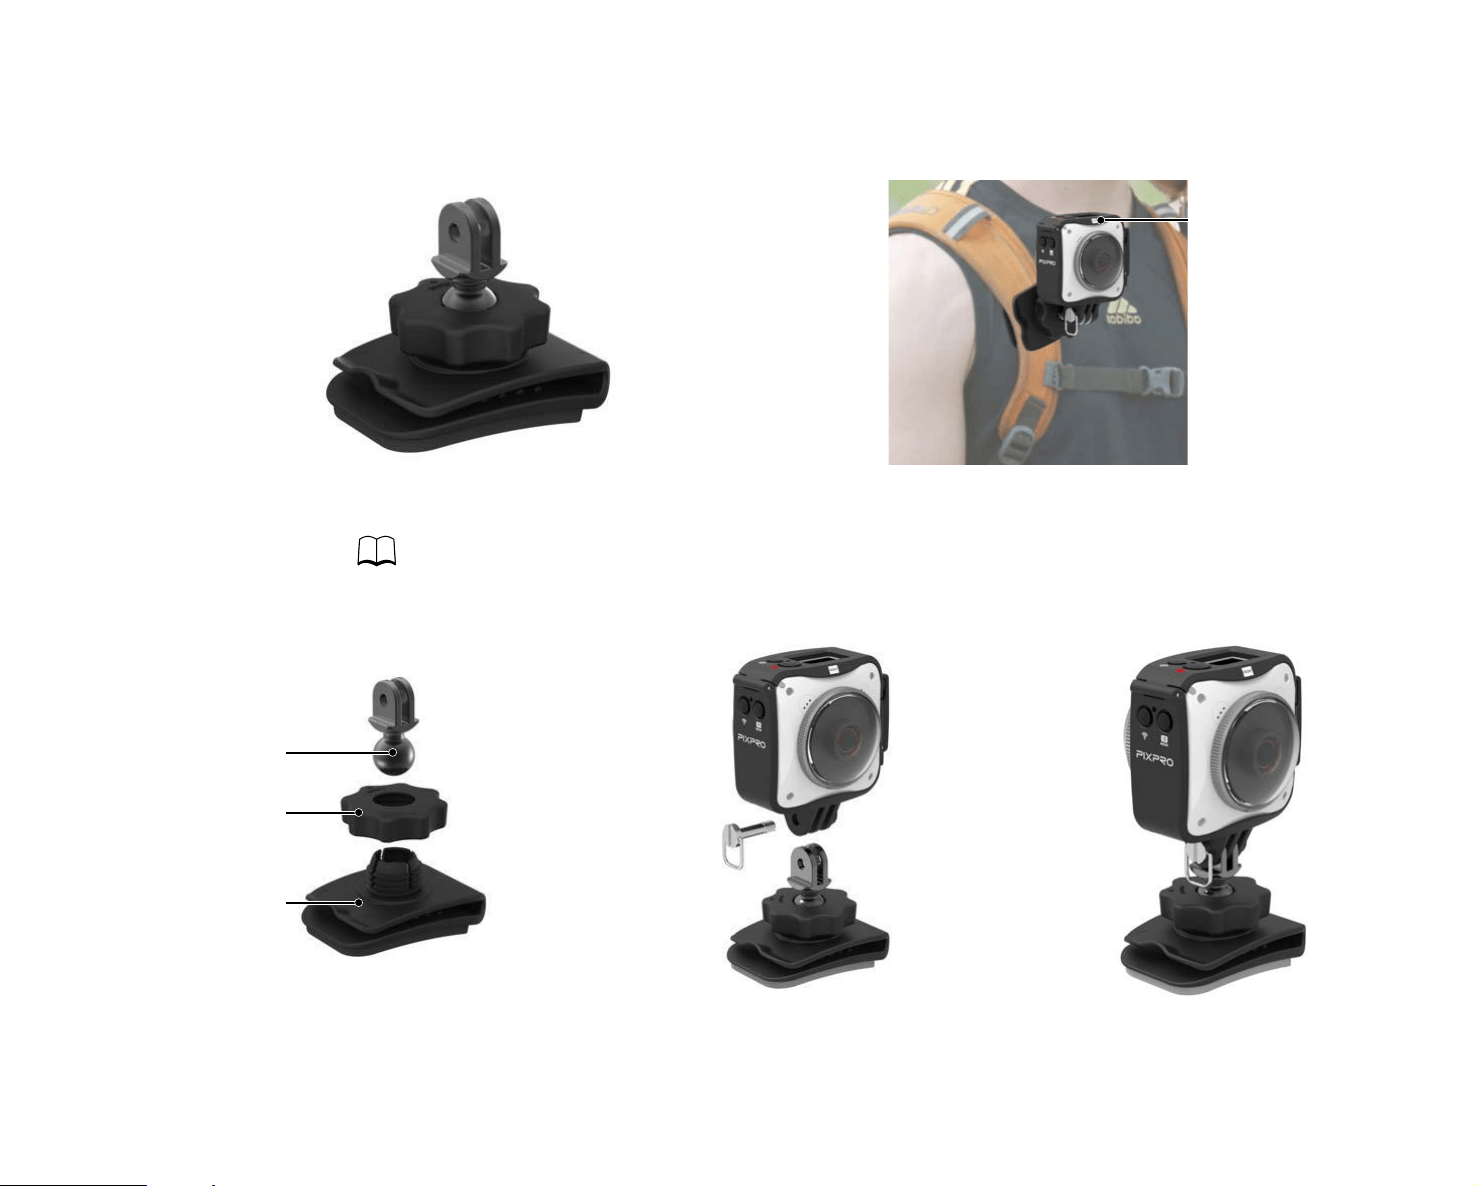
73
Backpack Clip: Suitable for clip on the backpack
Front Mode Forward
Installation Method:
1. Assemble the standard housing ( 59).
2. Attach the standard housing to the adapter, and pre-tightening the large nut and backpack clip in accordance with the illustration below Insert the base of the
standard housing to the mount before using the large nut to fully tighten.
Adapter
Large Nut
Backpack Clip
3. Clip the backpack clip to the backpack and ix the camera's shooting direction.
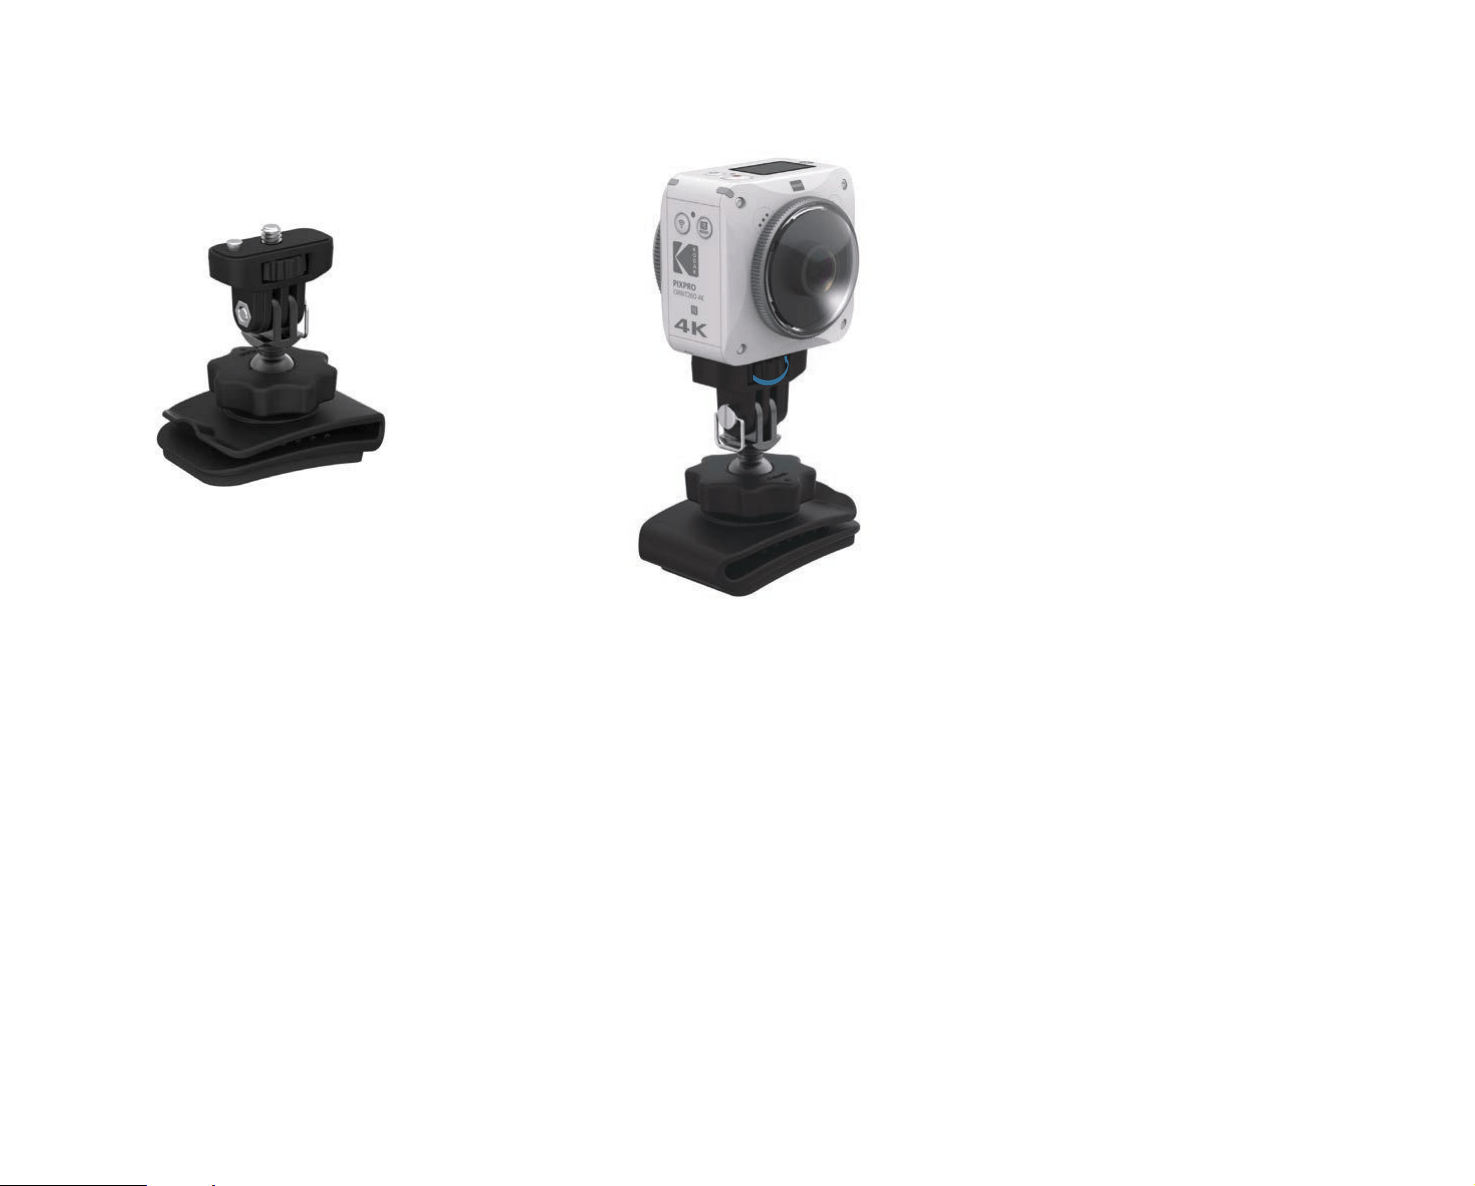
74
4.
To attach the Backpack Clip with other PIXPRO accessories like the Screw Mount-B, use the included accessories tool to fully tighten the set screw.

© 2017 JK Imaging Ltd. All Rights Reserved.
The Kodak trademark, logo and trade dress are used under license from Eastman Kodak Company.
All other logos, products or company names that are referred to in this document are trade names, trademarks or registered
JK Imaging Ltd. 17239 So. Main Street, Gardena, CA 90248 USA
JK Imaging Europe, 71 Clarendon Road, Watford, WD17 1DS, UK
kodakpixpro.com
Made in Myanmar
Ver. 3