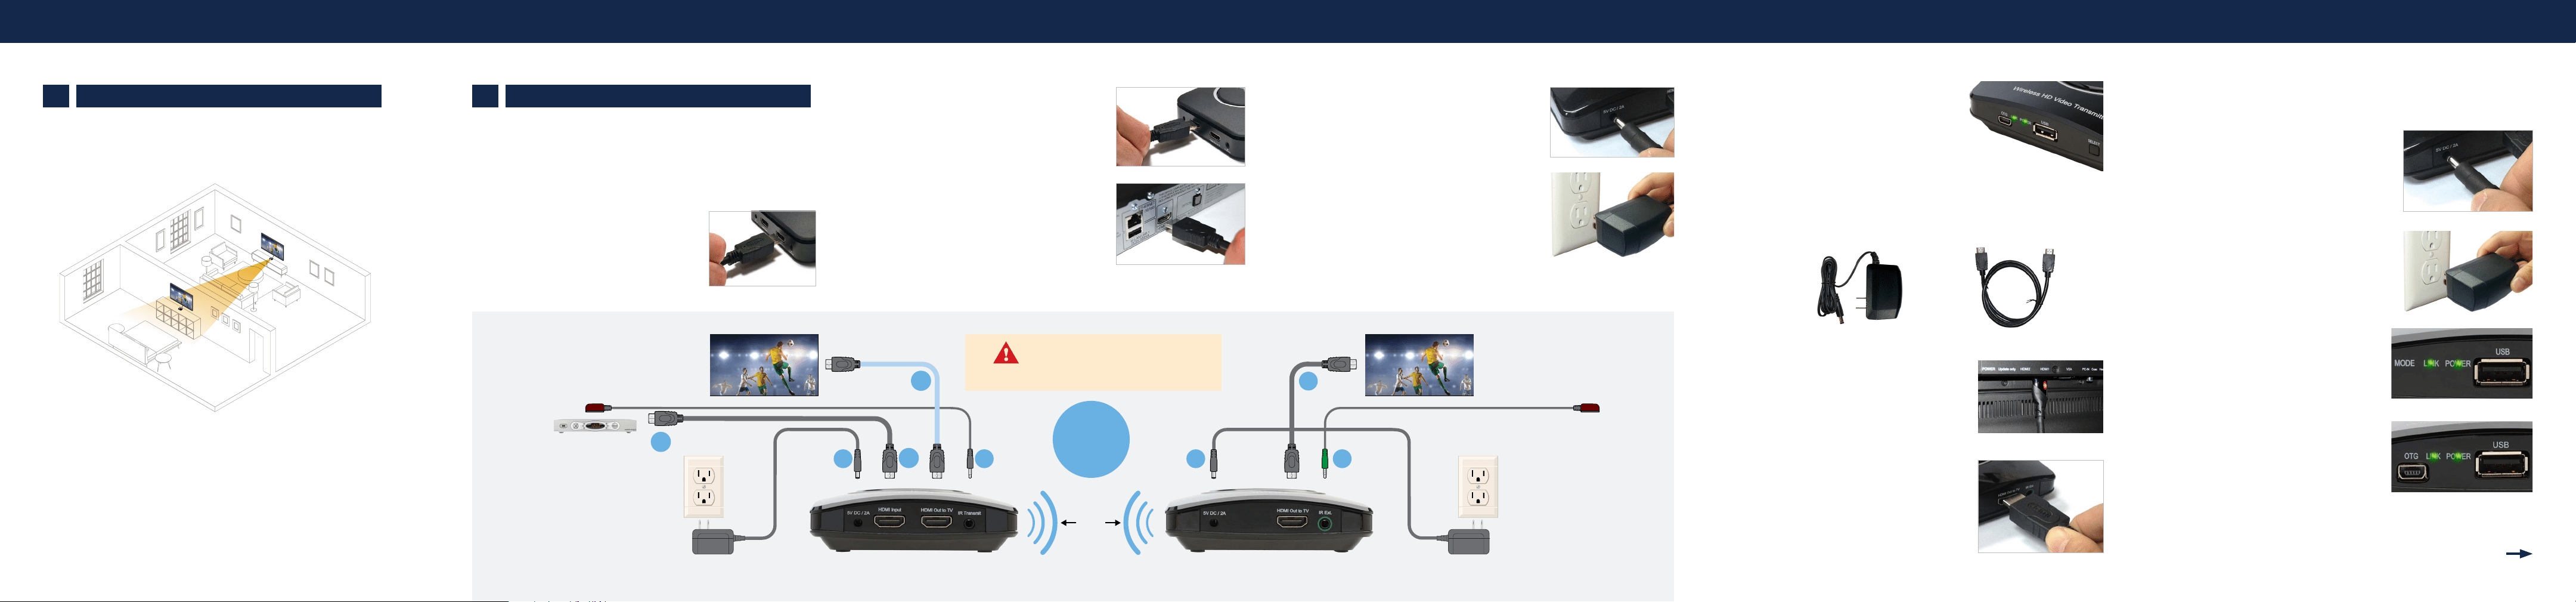
Step 3D Turn on the TV and switch the source to the HDMI input that
the receiver is connected to.
Step 4A Plug the smaller end of the
power supply into the 5VDC port on the
back of the receiver.
Step 4B Plug the larger end of the
power supply into a power outlet.
Step 4C Make sure the power light
on the receiver is solid green.
Step 4D Wait for a bit as the
receiver connects to the transmitter.
The LINK light should be solid green
once they’re connected.
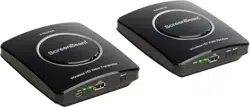
A. How MyWirelessTV Works
MyWirelessTV allows video and audio to be sent from video source to the
TV wirelessly. Therefore, you have the freedom to place the TV virtually
anywhere within the home and enjoy live TV without the wiring mess.
Identify which source device you want to connect to the transmitter. Video
from that source device will then be transmitted to your receiver box(es).
Installation for the MyWirelessTV is easy. Both units come pre-paired
to work with each other. All you need to do is connect the cables
according to the diagram or, if you want, follow the detailed step-by-step
instructions.
Note: Only use power adapter by Actiontec Electronics Inc., model number
WA-10P05FU.
B Setting up Transmitter and Receiver
Step 1A
Select the source device (i.e. a cable/satellite set-top box
or Blu-ray player) you wish to transmit signal to the TV, and power off that
device. Get the wireless HD video transmitter unit from MyWirelessTV 2
Kit and follow the steps below.
Note: If the transmitter and receiver are in the same room,
you may skip to Step 1C.
Step 1B (Optional) If the source device is
previously connected to an HDTV, unplug the
HDMI cable from the back of the source, then plug
the free end of the HDMI cable into the HDMI port
labeled Out-to-TV on the back of the transmitter.
Source
Device
Do NOT place the MyWirelessTV
Transmitter or Receiver on top of
or near a heat-generating source.
CAUTION
Please refer to
this illustration
while connect-
ing cables
Power
Outlet
Power
Outlet
1D
1C
2
TRANSMITTER MWTV2TX RECEIVER MWTV2RX
5
*Range subject to change.
Walls, ceilings and oors may
reduce the wireless range.
(Optional)
HDTV HDTV
3
1B
4
6
Up to
150 ft.
range*
Step 1C Otherwise, get an HDMI
cable from the MyWirelessTV 2 Kit. Plug
one end into the HDMI Input port on the
back of the transmitter.
Step 1D Plug the other end of the
HDMI cable into the HDMI port on the
source device.
Step 2A Get the power supply from the
MyWirelessTV 2 Kit. Plug the smaller end of
the power supply into the 5VDC port on the
back of the transmitter.
Step 2B Plug the larger end of the
power supply into a power outlet.
Step 2C Verify the POWER light on
the transmitter is solid green.
Step 2D Now power on your video
source device.
Note: The LINK light will blink.
Step 3A Get the wireless HD video receiver, HDMI cable and
power supply. Go to the TV you want to connect.
Step 3B Plug one end of this HDMI
cable into an HDMI port on the HDTV.
Step 3C Plug the other end of the
HDMI cable into the HDMI port labeled
Out-to-TV on the back of the receiver.
CONTINUE ON NEXT SIDE
quick start guide ScreenBeam
®
|
MyWirelessTV 2
This Quick Start Guide will walk you through the easy steps to set up the
MyWirelessTV 2 Kit.
A How MyWirelessTV Works
B Setting Up Transmitter and Receiver
C Setting Up IR Control
D Troubleshooting
You will need the following items from your MyWirelessTV 2 kit:
• Wireless HD Transmitter • Wireless HD Receiver
• Two (2) Power Supplies • Two (2) HDMI Cables
• IR Blaster Cable • IR Receiver Extension Cable
©2021 ScreenBeam Inc. MyWirelessTV, MyWirelessTV2, ScreenBeam and the ScreenBeam
logo are trademarks or registered trademarks of ScreenBeam Inc. in the U.S. and/or other
countries. The terms HDMI, HDMI High-Definition Multimedia Interface, and the HDMI Logo
are trademarks or registered trademarks of HDMI Licensing Administrator, Inc. All other
names or marks referenced are the names or marks of their respective owners. Product
photo may differ from actual product, however functionality remains as stated above.
Specifications subject to change without notice.
020921-v8
Telephone Technical Support
1-888-436-0657
Online Technical Support
https://retailsupport.screenbeam.com
C Setting Up IR Control
The IR blaster cable connects to your wireless HD video transmitter.
The IR blaster can receive IR signal from your source device’s remote
control over the MyWirelessTV network, and emits the IR signal to control
the source device. Thus, you can control the source device from wherever
the TV and wireless HD video receiver are located.
The IR receiver extension cable extends the IR receiver of the wireless
HD video receiver. Thus, it allows the receiver to receive an IR signal
from the remote control, if the unit is placed in an area where IR signal is
not in line-of-sight of the source’s remote control.
Note: If the receiver and transmitter are in the same room, setting up IR blaster
cable is not required.
Step 5A Get the IR blaster cable
from MyWirelessTV 2 kit. The IR blaster
cable has a black connector.
Step 5B Plug the IR blaster cable’s
black connector into the Transmit port on
the back of the transmitter.
Step 5C Remove the adhesive tape from the bottom of the
IR blaster head.
Step 5D Locate the infrared (IR)
sensor on your source device box, and
mount the IR blaster head on top of the
box over the sensor of the source device.
Step 6A Get the IR extender
cable (with a green connector) from the
MyWirelessTV 2 kit.
Step 6B Plug the IR extender cable’s
green connector in to the green port on the
back of the receiver.
Step 6C Remove the protective covering of
the double stick tape and attach the flat end of
the IR extender cable to the front corner of the
HDTV bezel or frame.
Your HDTVs and cable/satellite box should now be connected as shown
in the diagram on the other side. You can now start enjoying HDTV
anywhere you want it!
D Troubleshooting
FREQUENTLY ASKED QUESTIONS
Do I have to connect a TV to the Transmitter’s HDMI Out-to-TV port?
No. This step is optional.
I’m not seeing video on the TV that’s connected to the transmitter.
Check the power and connection from the video source to the transmitter,
and the connection from the transmitter to TV.
I’m not seeing video on the TV that’s connected to the receiver.
Check the power and connection from receiver to the TV, and make sure
the correct source input is selected on the TV.
The audio and video on the receiver’s TV seems slower than on the
transmitter’s TV.
This is expected since the receiver receives AV transmission from the
transmitter over the air.
How do I control the video source (e.g. cable/DirecTV box) remotely?
You need to use the same remote control. The control signal is passed
through the air from the MyWirelessTV 2 Receiver to the MyWirelessTV 2
Transmitter, and sent to the video source.
The video quality is poor and sometimes there’s no video display on
the receiver’s TV.
You may need to adjust the orientation of the transmitter and receiver
units, and direct them to be facing each other. You can view the
MyWirelessTV connection strength on the Menu page of the receiver. To
access the Menu page, press the MENU button once on the receiver.
I cannot control the source device with its remote control, via the
MyWirelessTV 2 receiver OR the source device is slow to respond
to the remote control.
Make sure the IR blaster cable is connected to the transmitter’s
IR Transmit port, and the sensor is mounted directly on top of the source
device’s IR sensor window. Also make sure the receiver or the IR receiver
cable sensor is in line of sight of the remote control.
What is the MENU button on the receiver?
The MENU button provides access to the menu screen. You can view
the device firmware version, signal strength, or change the language for
display and video stream mode.
MyWirelessTV 2
Quick Start
Guide
CONTINUE ON NEXT SIDE
PN: 0530-0814-001
Model Numbers:
MWTV2Tx and MWTV2Rx
ScreenBeam
®
|
MyWirelessTV 2quick start guide