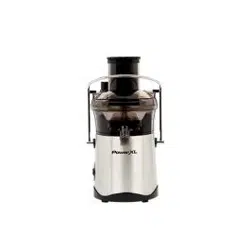
PowerXL SHL96 SelfCleaning Juicer
Product's Documents
Below are documents related to this product, you can read online or download:
- User Manual - (English) Read Online | Download pdf
BEFORE YOU BEGIN: The PowerXL Self-Cleaning Juicer™ will provide you many years of healthy juicing. But before you begin, it’s very important that you read this entire manual, making certain that you are totally familiar with this appliance’s operation and precautions.
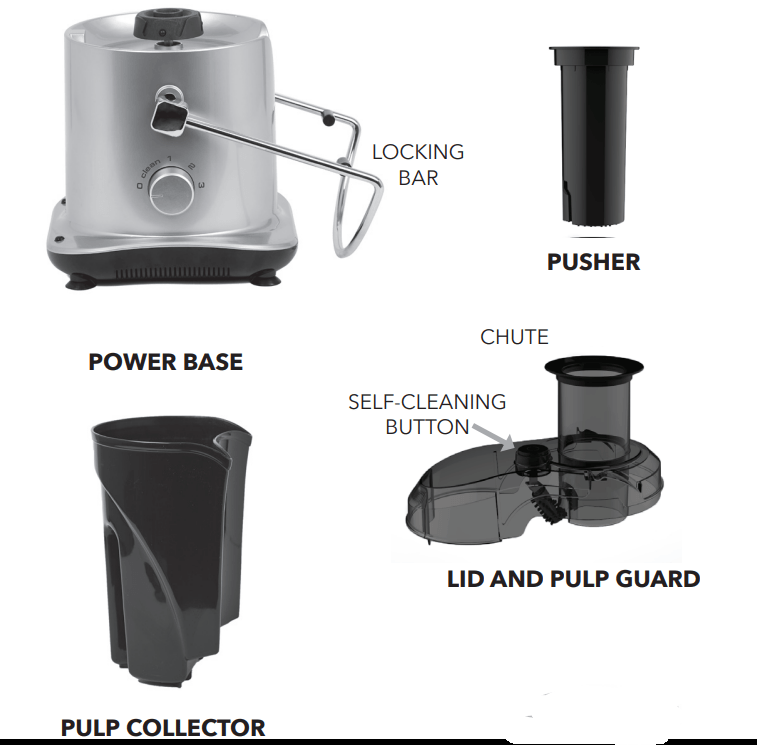
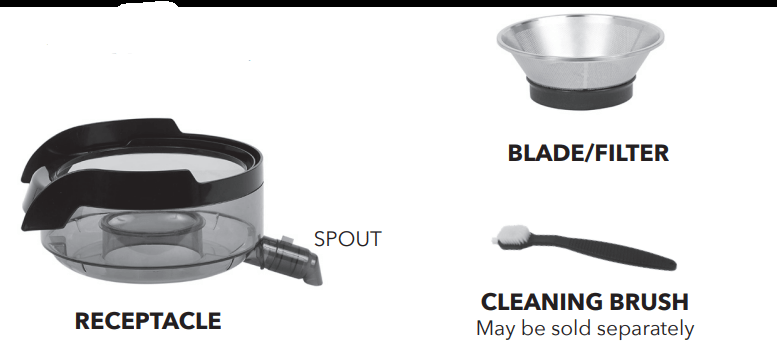
IMPORTANT: Your juicer has been shipped with the components shown below. Check everything carefully before use. If any part is missing or damaged, do not use this product and contact Customer Service using the contact information located on the back of this manual.
Before First Use
Ensure that all packing materials have been removed, including any clear or plastic film. Running the appliance with any of this material still intact may cause serious damage. Disassemble the appliance (see the "Disassembly” section). Clean the appliance (see the "Care & Cleaning” section). Dry all parts thoroughly before use. Assemble the appliance (see the "Assembly” section).
1. Clean and cut ingredients to a size that will fit in the Chute. Ensure that all pits and large stems are removed. Small seeds and skins should not be a problem if you wish to use them.
2. Place the appliance on a stable countertop or table. Plug the power cord into a 110V outlet. Select the speed you wish to use based on the type of food you are juicing and allow the appliance to run for a few seconds.
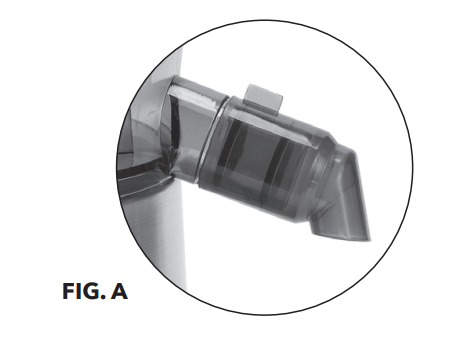
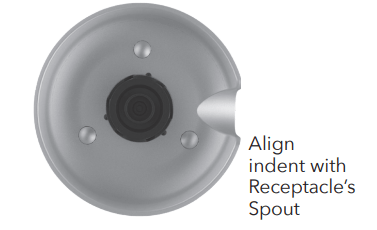
3. Before juicing, ensure the Spout is pointed downward and properly aligned with your glass or container (see Fig. A).
4. Use the Pusher to guide the ingredients into the Chute with a smooth, steady motion. You should see the juice beginning to flow into your glass or container, and the pulp will begin to collect on the Lid and in the Pulp Collector.
5. Immediately after use, clean the appliance (see the "Care & Cleaning” section).
NOTE: Sometimes, you may need to remove excess food or pulp when making large quantities of juice. This appliance's self-cleaning function can be used to clean moderate amounts of food from the appliance (see the "Self-Cleaning” section). If there is a large build-up of food, unplug the appliance, remove the Lid, and clean the Blade/Filter and Pulp Chute.
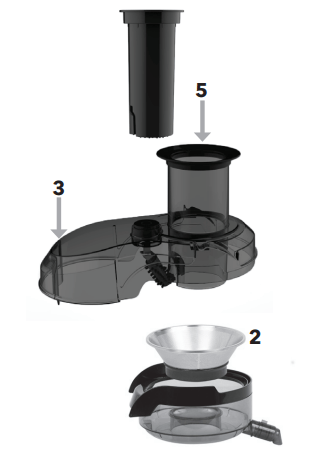
1. Align the Receptacle's Spout with the indent on the Power Base and insert the Receptacle.
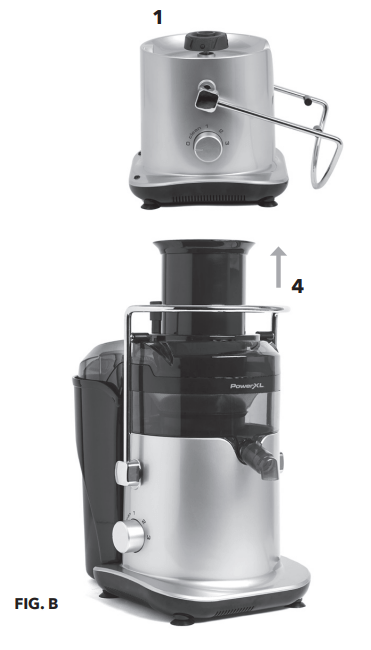
2. Insert the Blade/Filter into the Receptacle and set the Blade/Filter in place with a slow clockwise motion. Now, place the Pulp Collector under the back lip of the Receptacle (see Fig. B).
3. Place the Lid on the Receptacle so that the Lid is stable and unable to rotate.
4.Lift the Locking Bar so that it comes over the top of the Lid and locks, holding the appliance together. If the bar does not lock, the appliance will not turn on.
5. The Pusher must be used to guide fruits and vegetables through the Chute.
IMPORTANT: Before d isassembly, make certain the appliance is shut off and the power cord is unplugged from the power outlet. Ensure the motor is stopped and allow 10 minutes to cool.
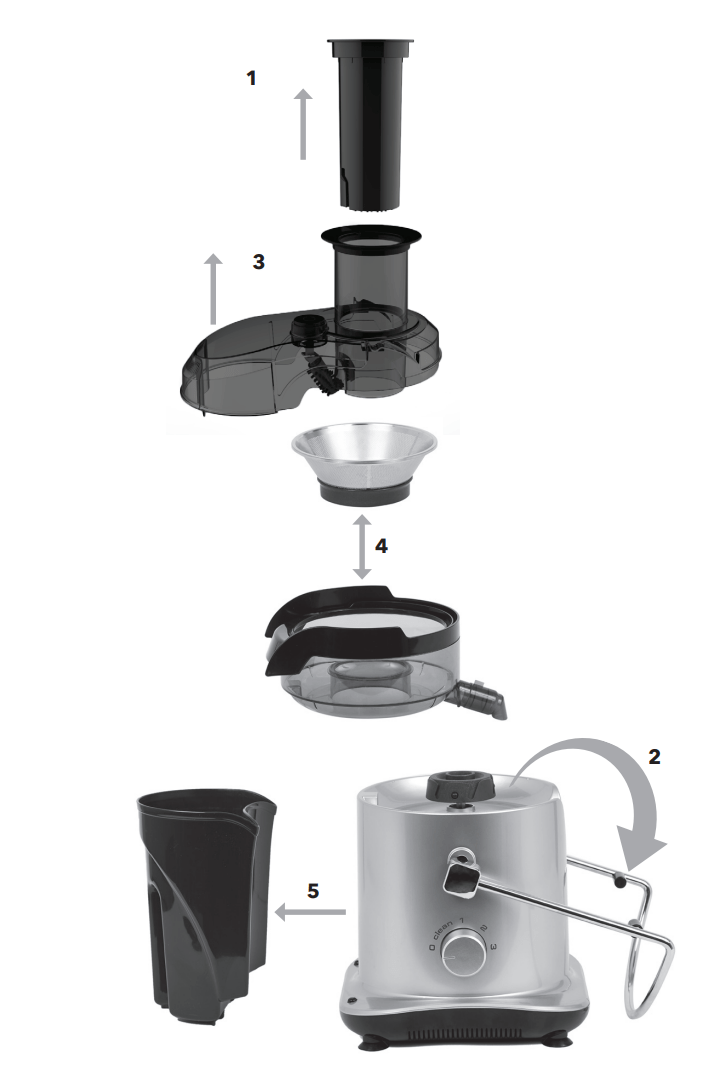
1. Lift and remove the Pusher from the Chute.
2. Grasp the Locking Bar and rotate downward. This will release all components for easy disassembly.
3. Lift and remove the Lid and Pulp Guard.
4. Lift and remove the Receptacle, which contains the Blade/
Filter. At this point, you can separate the Blade/Filter from the Receptacle.
5. NOTE: The Pulp Collector is now free from the appliance.
Self-Cleaning
The self-cleaning function helps remove pulp build-up, which improves the performance of the juicer. Using the self-cleaning function can also make fully cleaning the juicer easier. To use the self-cleaning function:
1. Place an empty cup underneath the Spout.
2. While slowly pouring water into the Chute, lightly press the SelfCleaning Button three times. The cleaning Attachment will scrape off any excess pulp.
3. Stop pouring water and let the water drain.
4. Re move the cup with water.
5. After using the self-cleaning function, you can either continue juicing or shut off the juicer. If you shut off the juicer, the juicer should be fully cleaned (see the "Fully Cleaning the Juicer" section).
Disassembling & Cleaning the Self-Cleaning Attachment
1. Pull down the locking bar.
2. Re move the Lid and Pulp Guard and turn it over.
3. Re move the self-cleaning brush from the Lid by unscrewing the single screw closest to you (see Fig. C).

4. The screw, washer, cleaning brush, washer, and spring will slide off of the self-cleaning rod.
5. Clean or replace the Self-Cleaning attachment. Contact customer service for replacement parts.
Reassembling the Self-Cleaning Attachment
1. Reassemble the cleaning attachment in the following order: spring, washer, cleaning brush, washer, screw.
2. Hand tighten the screw so it is snug and will not fall off when in use. Do not overtighten to strip the screw.
3. For best results, ensure that the screw is screwed in all the way before each use.
The juicer will need to be fully cleaned periodically and when the self-cleaning function does not remove all food from the juicer. With the exception of the Motor Base, all the components can be put in your home dishwasher. We recommend top rack placement.*
1. Turn off the power switch and wait until the motor stops completely.
2. With dry hands, unplug the power cord from electrical outlet.
3. Disassemble the machine (see the "Disassembly” section).
4. Wipe the outside of the Power Base with a warm, moist cloth and mild detergent. Do not submerge the Power Base in water. Do not spray with water or any other liquid. The Power Base is not dishwasher safe. IMPORTANT: Do not use abrasive sponges, cloths, or cleansers as these can damage the finish.
5. Hold the Filter/Blade under warm running water. Use a cleaning brush to loosen the leftover fibers that may be stuck to the Filter/Blade before placing the Filter/Blade in the dishwasher. Never use a wire brush. Rinse the Filter/Blade from the outside under running water. A sink's spray hose attachment is especially effective for loosening fiber from the Filter/Blade.
6. Clean all other parts with a warm, moist cloth and mild detergent. Rinse well and dry thoroughly.
7. Dry the components thoroughly, reassemble the machine (see the "Assembly” section), and turn on the power to spin out any excess water.
8. Ensure the appliance and its parts are completely dry before storing in a cool, dry place.
*CAUTION: Some commercial and foreign-made dishwashers may reach internal temperatures that are higher than machines made for home use by US standards. Do not use these dishwashers with your juicer. The higher temperatures may cause damage to appliance and can void your guarantee. Check with your dishwasher manufacturer before using.
The Benefits of Juicing
Juicing is a quick way to get many of the health benefits you need from fresh food, including antioxidants and nutrients.
We recommend juicing produce items that you would normally consume. Before juicing any produce, it is important to wash it thoroughly to remove all contaminants, including soil and pesticides.
Skins, Stems, and Seeds
Skins: Juicing with the skins on is a personal preference with most produce.
Stems: The only stems that are beneficial to process are grape stems. All others should be removed.
Seeds: Removing seeds is discretionary due to certain health risks associated with certain produce.
Carrots
Due to the irregular size and shape of carrots, care must be taken when juicing. Do not overfill the chute. Allow room for the carrots to move and be pushed into the juicer. Use the Pusher to guide the carrots and prevent them from bouncing out of the chute.
Citrus Fruits
We recommend the removal of the skin from citrus fruits. The skin will provide a tart flavor to the juice. The skin can also be difficult to process. Juicing with or without the skin is a personal preference. If you are going to keep the skin on citrus fruit, cut into smaller pieces.
Mangoes, Apricots, and Peaches
Important: Always remove large pits. Do not put any produce in the juicer with large pits. Pits will damage the blade and possibly seize the motor.
Ginger
Ginger is fibrous. Cut it into small pieces (no bigger than A inch) and juice no more than 1 cup at a time. Juicing large pieces and/or too much ginger could result in ginger getting stuck in the strainer, overwhelming the appliance, and could cause it to break, causing injury. Alternate juicing ginger with other fruits or vegetables.
Pomegranates and Cherries
These wonder fruits can absolutely be juiced. When juicing cherries, remove the pits. When juicing pomegranates, only the seeds may be used. You must remove the outer skin and the inner membrane.
Pineapple and Melons
Although the juicer can process the rind from these items, we recommend removing the rind. Pineapple is stringy in nature and can cause a blockage at the opening of the Spout. Monitor juice flow and juicing progress to avoid blockages, which can cause the Receptacle to overflow.
Berries and Small Fruits
When juicing berries (except cranberries), you need to add other juicier fruits (such as apples or oranges) that produce more juice to push the juice through the juicer. For example, first process the berries (you may not see a lot of juice). Then, add an apple or an orange - something that will increase the volume of juice.
Keep the Pulp Collector Clean
When juicing, be sure to monitor the Pulp Collector and empty it before it is full. If the Pulp Collector fills and pulp backs up into the filter, the motor will shut off. The pulp can be used for recipes or thrown away. You can place a plastic bag in the Pulp Collector to aid with clean-up.
Get the Most from Your Juicer
The PowerXL Self-Cleaning Juicer
is a centrifugal juicer that uses a high-speed motor for optimal juice extraction. Because of the motor's high speed, some vibrations and noises during operation are normal.
Some varieties of produce are more difficult to juice than others. The amount of juice you process depends on which fruits and vegetables you select. Produce such as oranges, apples, melons, and cucumbers tend to yield more juice and should be mixed with those that yield less juice. Use these Juicing Charts to select the best operating speed and help take the guesswork out of juicing.
Speed 1 SOFT FRUIT & VEGETABLES | |
Blackberries Blueberries Cherries (Pitted) Grapefruit Grapes Green Peas Kiwi Kiwi (Very Ripe) Lemon (no peel) Lime (no peel) Mango Mushroom | Nectarines (Very Ripe) Oranges Peaches (Very Ripe) Pears (Very Ripe) Peppers Pineapple (Very Ripe) Raspberries Strawberries Tangerines Tomatoes Watermelon |
Speed 2 | ||||
FIRM FRUIT & VEGETABLES | LEAFY GREENS | HIGH JUICE CONTENT | ||
Apples Apricot Cantaloupe Celery Clementines Cranberries Cucumber Green Beans Guava Honeydew Melon Nectarines | Okra (Skin Removed) Onion Papaya Passion Fruit Peaches (Harder) Pears (Harder) Pineapple Plums Pomegranate Seeds | Basil Collard Greens Dandelion Greens Endive Kale Leeks Lettuces Mint Mustard Greens Parsley Peppermint Radicchio Spinach Swiss Chard Watercress Wheat Grass | Apples Cantaloupe Celery Clementines Cranberries Cucumber Grapefruit Grapes Honeydew Melon | Lemon Lettuces Lime Oranges Peppers Pineapple Tangerines Tomatoes Watermelon |
Speed 3 | |
HARD FRUIT & VEGETABLES | ROOT VEGETABLES |
Asparagus Broccoli Brussels Sprouts Cabbages Cauliflower Fennel Jicama Pumpkin Squashes | Beets* Carrots Garlic Ginger* Horseradish* Parsnip Potatoes Radishes Turnip |
Symptom | Possible Cause/Solution |
| Appliance does not run when switched on | Check to see if the appliance is plugged in. |
Locking bar is not locked in place properly. | |
Check if all parts are assembled. | |
Check if there is any residue left between the blade and the receptacle. | |
Make sure you wait 5-10 minutes to restart if the appliance automatically shuts down. | |
| Motor is unusually loud and vibrating | Check that all parts are assembled properly and in the correct position. |
Juicing fibrous items can create a lot of pulp and clog the Blade/Filter. Turn off the appliance and clean the Blade/Filter. | |
| The motor overheats causing the power to automatically shut off | Applying too much pressure with the Pusher while processing can cause the motor to overheat, which activates the built-in thermal cut-off switch. The motor will stop working for approximately 10 minutes to cool down (see the "Safety Features” section). |
The fruits and vegetables may be soft or overripe. | |
There may be too much pulp in the filter. Turn the appliance off and clean the filter. | |
| No juice is coming out of the Spout | Make sure the Spout is facing downward while juicing. If the Spout is facing upward, juice will not come out of the Spout and may overflow out of the receptacle. |
Some produce, such as berries, may not be juicy enough. Add juicier produce, such as apples and oranges, to the juicer to help push the juice through the juicer. |
Safety Features
The juicer was designed with safety in mind. Two important safety features are:
Built-In Automatic Shut Off System
The juicer is equipped with a special feature that automatically shuts off the motor should the appliance become jammed or overheated during the juicing process. Prior to shut down, you will most likely hear the juicer get louder. This will indicate that something has caused the motor to strain. Should this happen, simply turn the Power Switch off and unplug the appliance.
Follow the Disassembly, Cleaning and Assembly procedures. Then, allow the appliance to cool for 10 minutes. The appliance will reset and you will be able to resume the juicing process.
The Locking Bar
When in the upright and locked position, this feature holds the Juicer Lid/Pulp Guard in place. If the Locking Bar is not in its proper position, the motor will not engage and the blade will not spin.
WARNING
PREVENT INJURIES! CAREFULLY READ ALL INSTRUCTIONS BEFORE USE!
When using electrical appliances, basic safety precautions should always be followed, including:
1. READ all instructions before using the appliance.
2. This appliance is for home use only. If the appliance is used improperly or for professional or semi-professional purposes or
if it is not used according to the instructions in the user manual, the guarantee becomes invalid and the manufacturer will not be held liable for damages.
3. NOT FOR USE BY CHILDREN!
Keep out of the reach of children to avoid injury.
4. The appliance has a polarized plug. To reduce the risk of electric shock, this plug will fit in an outlet only one way. If the plug does not fit fully in the outlet, reverse the plug. If it still does not fit, do not use the appliance and consult an electrician.
5. DO NOT operate this or any appliance with a damaged AC cord or plug.
6. UNPLUG from outlet when not in use.
7. DO NOT operate if appliance malfunctions, has been dropped or appears damaged in any manner. Never attempt home repairs. Only a qualified appliance technician should repair appliance before re-use.
8. DO NOT USE any attachments or utensils that were not recommended or included in the package. The use of attachments not recommended or sold by Tristar Products, Inc. may cause serious hazardous situations including fire, electric shock or personal injury.
9. To protect against risk of electrical shock or injury, NEVER immerse power cord, plug, or main appliance in water or other liquids.
10. DO NOT let Power Cord hang over the edge of table, counter, or come in direct contact with hot surfaces such as stoves.
11. DO NOT use outdoors.
12. MAKE SURE the lid is attached properly and is securely locked before operating the appliance (see the "Assembly” section).
13. MAKE SURE the motor stops completely and the appliance is unplugged from the electrical outlet before disassembling, assembling or cleaning.
14. Should the appliance suddenly stop or develop excessive vibration or unusually loud noise, SHUT OFF AND UNPLUG the appl iance immediately, wait for blade to stop moving, then disassemble, clean thoroughly and reassemble.
15. DO NOT touch moving parts.
16. To avoid risk of personal injury KEEP HANDS AND UTENSILS
out of the juicer and away from its sharp Blade during operation. Use the Pusher, not fingers or utensils, to insert food into the juicer.
17. NEVER disengage the Locking Bar during operation.
18. Cut fibrous food into small pieces and juice no more than 1 cup at a time. Juicing large pieces and/or too much fibrous food could result in the food getting stuck in the filter, overwhelming the appliance and could cause it to break, causing injury.
CAUTION ANYONE WHO HAS NOT FULLY READ AND UNDERSTOOD ALL OPERATING AND SAFETY INSTRUCTIONS CONTAINED IN THIS MANUAL IS NOT QUALIFIED TO OPERATE OR CLEAN THIS APPLIANCE.